


SKR24
MODEL SKR24
1600 Xenium Lane North, Minneapolis, MN 55441-3787
Phone (763) 923-2441
!"$#
1

Thank you for purchasing Silver King food service equipment. Our goal is to provide our customers with the most reliable
mation before operating your new
for possible freight damage following the instructions printed
on the exterior of the container. Report any damages to the carrier responsible for transportation and promptly present a claim for
The stainless steel exterior of the cabinet has been protected by a plastic covering during manufacturing and shipping. This
terior and exterior surfaces using a
warm, mild soapy water solution and a sponge or cloth, rinse with clean water and dry.
in the bottom of
e parts
Inside the unit you will find Shelves and a plastic bag containing Shelf Supports. The Shelf Supports with the “tang” go on the rear
Should the Door ever require straightening, loosen the Screws on the Hinges, square the Door with the cabinet and retighten the
Door is easily reversible on single door units should space or convenience require that you do so. Simply
remove the Screws holding the Hinges, rotate the Door 180 degrees and relocate the Hinges on the side opposite their original
en locating your new refrigerator, convenience and accessibility are important considerations, but the following installation
uld affect the operation of the
For proper ventilation the bottom front of the unit must not be obstructed. The unit must be on legs or casters to raise it off the
TECHNICAL MANUAL
SILVER KING FRONT BREATHING REFRIGERATORS
MODEL SKR24
equipment in the industry today. Please read this manual and the accompanying warranty infor
Silver King unit. Be sure to complete and mail the warranty card within 10 days of purchase to validate your warranty.
INSPECT FOR DAMAGE AND UNCRATE
Upon delivery of your new Silver King unit, uncrate at once to inspect
any evidence of mishandling. Save all packaging materials if a claim is filed.
INSTALLATION
covering can be readily stripped before installation. After removing this covering, wash the in
Legs/Casters
The unit comes with Legs or Casters. To install them, tilt the unit and thread the Legs or Casters into the 4 Rivnuts
the cabinet. Make sure that they are installed tightly to prevent future thread wear.
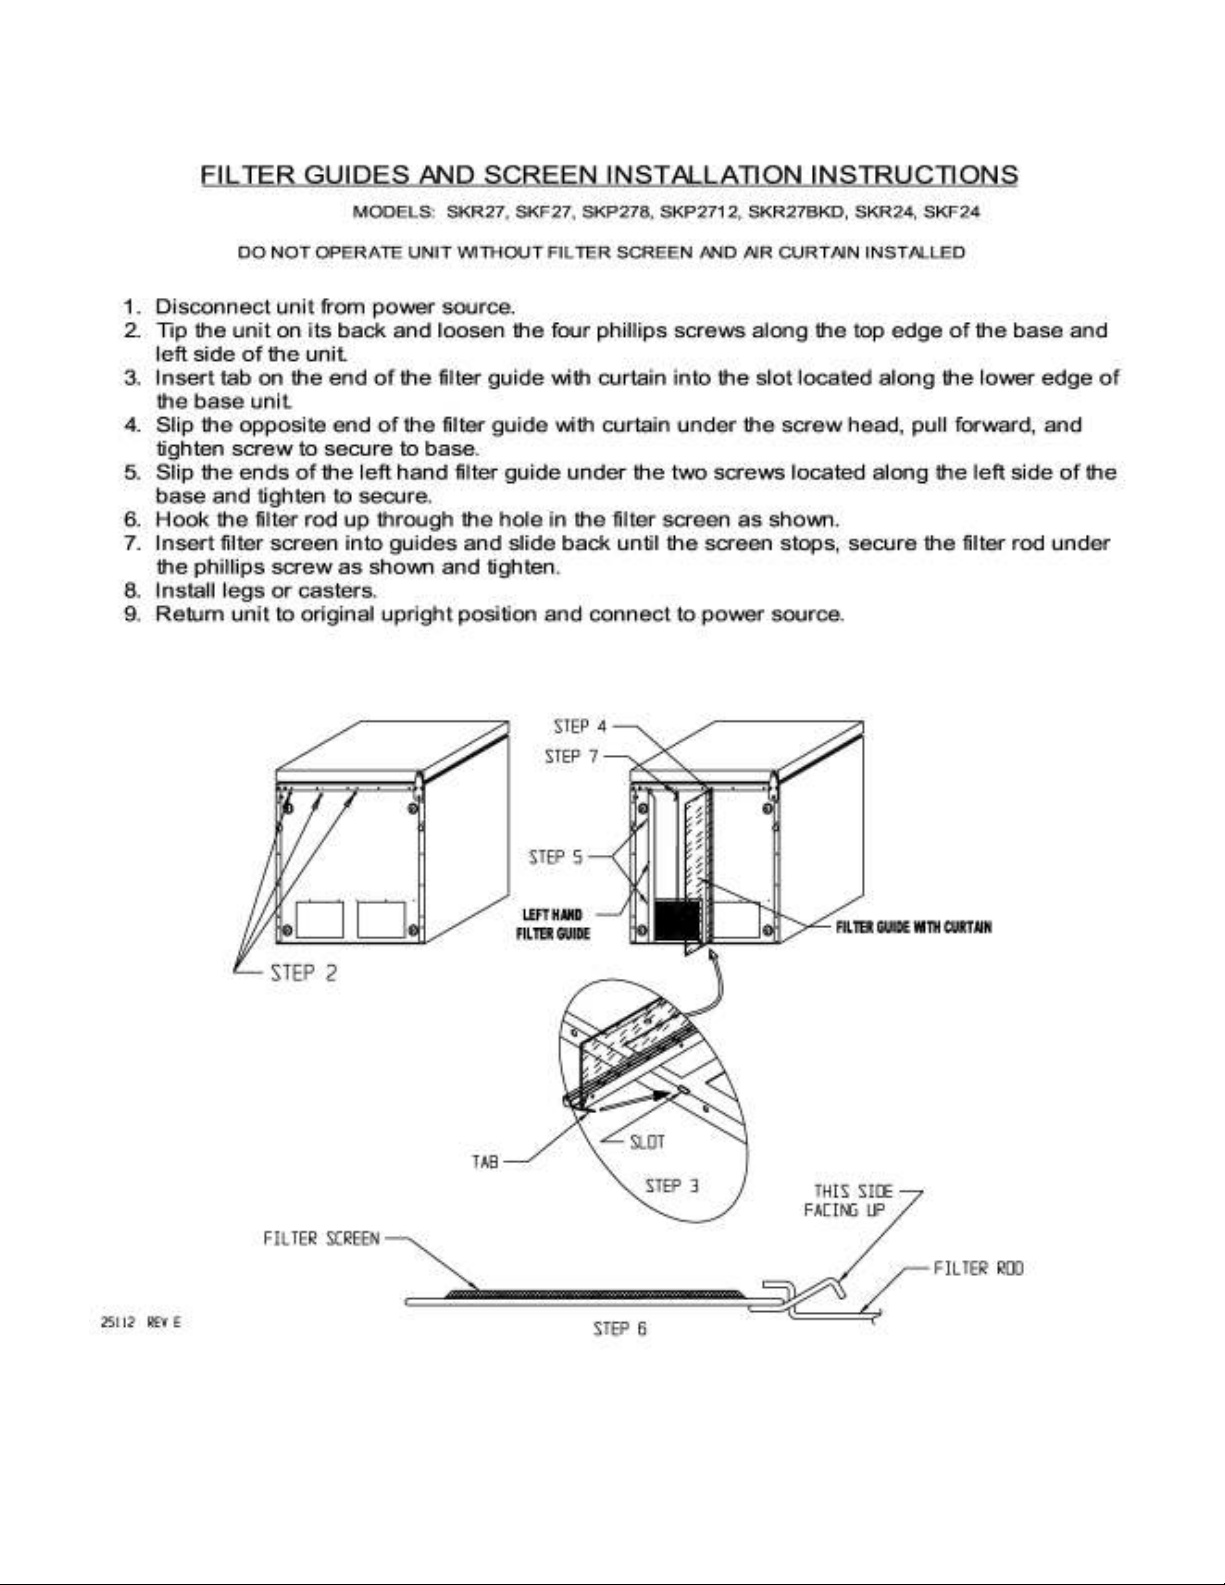
Condenser Filter Screen
The Condenser Filter Screen, Screen Pull and Filter Guides are packaged inside the unit. The instructions for installing thes
are included in this technical manual. Do not operate the unit without the filter screen installed!
Shelves
Pilasters. This shelf system allows for easy adjustment to suit your needs.
Door Adjustment and Swing
Screws.
The mounting of the
location.
Location
Wh
guidelines must be followed;
• Always avoid placing the refrigerator adjacent to an oven, heating element or hot air source that wo
unit.
•
floor. The unit can be installed tight on the sides and back.
• The unit must be level or tilted backwards slightly.
1

Electrical Connections
Be sure to check the data plate, located on the liner of the cabinet, for required voltage prior to connecting the unit to power. The
properly
rposes. Any attempt to cut off the
grounding spike or to connect to an ungrounded adapter plug will void the warranty, terminate the manufacturers responsibility and
e or breaker. The unit must be isolated on a circuit and not plugged into an
cord is
connected to the required power source. If the Compressor does not start when the unit is initially plugged in, check to make sure
th product. When
to maintain an average cabinet
temperature of approximately 36 to 40 Deg F. To obtain colder temperatures turn the Temperature Control stem clockwise and vice
Your Silver King refrigerator is an automatic defrost unit and no additional plumbing is required. Automatic defrosting is
a
pan located in the compressor compartment where it is evaporated into the room air. It is important that the unit be installed level to
are very important to continued operation and maximizing the life of
The cabinet interior is aluminum and stainless steel and the exterior is stainless steel. These surfaces should be cleaned
of warm water and mild soap, rinsed and wiped dry with a soft cloth. A good stainless steel cleaner can
also be used. Should a surface become stained, do not attempt to clean with an abrasive cleanser or scouring pad. Use a soft
e grain of the metal to avoid scratching the surface. Do not use chlorinated cleaners. Always rinse well and
the cabinet. To
clean it simply pull it out the front of the unit using the Filter Screen Pull and rinse it in a stream of water. Dry the screen by tapping
on the bottom of the unit and sliding it all
specifications on the data plate supersede any future discussion.
The standard refrigerator is equipped with an eight (8) foot power cord that requires a 115 Volt, 60 Cycle, 1 Phase
grounded electrical receptacle. The power cord comes with a 3 prong plug for grounding pu
could result in serious injury.
The circuit must be protected with a 15 or 20 ampere fus
extension cord.
OPERATION
Initial start up
After satisfying the installation requirements, the refrigerator is ready to start. The Compressor will start when the power
that the Temperature Control is not in the “off” position. Allow the unit to run for two hours before loading it wi
loading the unit with product, take care not to block the air flow in the cabinet as this would affect the units performance.
Temperature Control
The Temperature Control is located on the back wall of the cabinet liner and is factory set
versa. Allow the unit a minimum of one hour to respond to a control setting adjustment.
Defrost
accomplished when frost buildup on the Evaporator Coil is cleared during Compressor “off” cycles. Defrost water is collected in
allow proper drainage of the defrost water.
MAINTENANCE
Preventative maintenance is minimal although these few steps
the appliance.
Cabinet Surfaces
periodically with a solution
cleanser and rub with th
dry after cleaning.
Condenser
Periodically the Condenser Filter Screen must be cleaned. The Condenser Filter Screen is located on the bottom of
it on a counter or floor. Replace the filter screen by placing it into the filter screen tracks
the way to the rear of the cabinet. Do not operate the unit without the filter sreen installed!
Door Gasket
The Door Gasket will collect dirt and should be wiped clean with a warm, mild soapy water solution to extend its life and assure
maximum cabinet performance and life.
MODEL SERIAL NO. DATE INSTALLED
2
3

Gracias por comprar la maquinaria de servicios de alimentación Silver King. Nuestro objetivo es otorgar a nuestros clientes la
anual y la información acerca de la garantía que lo acompaña antes de
poner en funcionamiento su nueva unidad Silver King. Asegúrese de completar y enviar por correo la tarjeta de garantía dentro de
Cuando reciba su nueva unidad Silver King, desembálela inmediatamente y controle que no haya sufrido daños durante el
envase. Si encuentra daños, infórmelo a la empresa
responsable del transporte y presente inmediatamente un reclamo ante cualquier prueba de maltrato. Si presenta un reclamo,
acero inoxidable ha sido protegido por una cubierta de plástico en la fabricación y envío. Esta cubierta
puede ser retirada antes de la instalación. Una vez retirada la cubierta, lave las superficies internas y externas utilizando una
La unidad trae patas o rueditas. Para instalarlas, incline la unidad y enrosque las Patas o Rueditas en las 4 Tuercas ubicadas en la
La Pantalla de Filtro Condensadora, el Tirador de la Pantalla, y las Guías del Filtro están embaladas dentro de la unidad. Las
o
Dentro de la unidad encontrará Estantes y una bolsa de plástico con los soportes de los mismos. Los Soportes que tienen una
Este sistema de estantes permite ajustar fácilmente los estantes conforme a sus
illos
El engaste de la puerta es fácilmente reversible en las unidades de una sola puerta si usted desea hacerlo por cuestiones de
s y coloque las
Al elegir una ubicación para su nuevo refrigerador, debe tener en cuenta la conveniencia y facilidad de acceso, pero debe seguir
MANUAL TECNICO
REFRIGERADORES DE RESPIRACION FRONTAL SILVER KING
MODELOS SKR24
mejor maquinaria de la industria actual. Sírvase leer este m
los 10 días posteriores a la compra a fin de ratificar su garantía.
INSPECCIONE LA UNIDAD EN BUSCA DE DAÑOS Y DESEMBALE
transporte siguiendo las instrucciones impresas en la parte externa del
conserve todo el material de embalaje.
INSTALACION
El exterior del gabinete de
solución de agua jabonosa y tibia y una esponja o paño, enjuague con agua limpia y seque.
Patas/Rueditas
parte inferior del gabinete. Asegúrese que estén ajustadas para prevenir el futuro desgaste de las roscas.
Pantalla de Filtro Condensadora
instrucciones para instalarlas están incluidas en este manual ¡No ponga la unidad en funcionamiento antes de instalar la pantalla!
Tabla de Cortar
Las Ménsulas para Tabla de Cortar y las instrucciones para su instalación son enviadas con el gabinete. Luego de haber colocad
las Ménsulas para la Tabla de Cortar, colóquela dentro de las mismas.
Estantes
“cola” van colocados en las pilastras traseras.
necesidades.
Ajuste y Vaivén de la Puerta
En caso de necesitar enderezar la puerta, afloje los Tornillos en las Bisagras, alinee la Puerta con el gabinete y ajuste los Torn
nuevamente.
espacio o conveniencia. Simplemente retire los Tornillos que sostienen las Bisagras, rote la puerta 180 grado
Bisagras en el lado opuesto a su ubicación original.
Ubicación
las siguientes pautas de instalación;
*Siempre evite colocar el refrigerador cerca de un horno, elemento calefactor o fuente de aire caliente, que pueda afectar el
funcionamiento de la unidad.
4
 Loading...