

Page 1
IAN 96126
HAAR- UND BARTSCHNEIDER
Bedienungsanleitung
HAIR & BEARD TRIMMER
Operating instructions
HAIR & BEARD TRIMMER SHBS 5 A1
HÅR- OG SKÆGTRIMMER
Betjeningsvejledning
CV_96126_SHBS5A1_LB3.indd 2CV_96126_SHBS5A1_LB3.indd 2 23.01.14 08:1123.01.14 08:11
Page 2
GB / IE Operating instructions Page 1
DK Betjeningsvejledning Side 19
DE / AT / CH Bedienungsanleitung Seite 37
Before reading, unfold the page containing the illustrations and familiarise yourself with all functions of the device.
Før du læser, vend siden med billeder frem og bliv bekendt med alle apparatets funktioner.
Klappen Sie vor dem Lesen die Seite mit den Abbildungen aus und machen Sie sich anschließend mit allen Funktionen des Gerätes vertraut.
CV_96126_SHBS5A1_LB3.indd 3CV_96126_SHBS5A1_LB3.indd 3 23.01.14 08:1123.01.14 08:11
Page 3
D E F
C
A
B
CV_96126_SHBS5A1_LB3.indd 4CV_96126_SHBS5A1_LB3.indd 4 23.01.14 08:1123.01.14 08:11
Page 4
Contents
Introduction . . . . . . . . . . . . . . . . . . . . . 2
Cleaning and care . . . . . . . . . . . . . . . 13
GB
IE
Information concerning these operating
instructions . . . . . . . . . . . . . . . . . . . . . . . . . . . . 2
Copyright . . . . . . . . . . . . . . . . . . . . . . . . . . . . . 2
Limitation of liability . . . . . . . . . . . . . . . . . . . . . 2
Intended use . . . . . . . . . . . . . . . . . . . . . . . . . . 2
Warnings used . . . . . . . . . . . . . . . . . . . . . . . . . 3
Safety. . . . . . . . . . . . . . . . . . . . . . . . . . 4
Basic safety instructions . . . . . . . . . . . . . . . . . . 4
Package contents . . . . . . . . . . . . . . . . 7
Spare Parts . . . . . . . . . . . . . . . . . . . . . . . . . . . 8
Disposal of packaging . . . . . . . . . . . . . . . . . . . 8
Appliance description . . . . . . . . . . . . . 8
Before fi rst use . . . . . . . . . . . . . . . . . . 9
Charging the batteries . . . . . . . . . . . . . . . . . . . 9
Operation with the mains power adapter . . . . 9
Cleaning the shaver attachment . . . . . . . . . . 14
Cleaning the ear/nose hair trimmer
attachment . . . . . . . . . . . . . . . . . . . . . . . . . . . 14
Disposal . . . . . . . . . . . . . . . . . . . . . . . 15
Disposal of the appliance . . . . . . . . . . . . . . . 15
Disposal of batteries . . . . . . . . . . . . . . . . . . . 16
Appendix . . . . . . . . . . . . . . . . . . . . . . 17
Technical details. . . . . . . . . . . . . . . . . . . . . . . 17
Notes on the Declaration of Conformity . . . . 17
Warranty . . . . . . . . . . . . . . . . . . . . . . . . . . . . 17
Service . . . . . . . . . . . . . . . . . . . . . . . . . . . . . . 18
Importer . . . . . . . . . . . . . . . . . . . . . . . . . . . . . 18
Oiling the cutting attachments . . . . . . . . . . . . 10
Handling and use . . . . . . . . . . . . . . . 10
Attaching/changing the cutter attachments . . 10
Attaching/changing the comb attachments . . 10
Hair trimmer attachment . . . . . . . . . . . . . . . . 11
Beard trimmer attachment . . . . . . . . . . . . . . . 12
Precision trimmer attachment . . . . . . . . . . . . . 12
Ear/nose hair trimmer attachment . . . . . . . . . 12
Shaver attachment . . . . . . . . . . . . . . . . . . . . . 12
SHBS 5 A1
IB_96126_SHBS5A1_LB3.indb 1IB_96126_SHBS5A1_LB3.indb 1 21.01.14 15:0621.01.14 15:06
1
Page 5

GB
IE
Introduction
Information concerning these operating instructions
Congratulations on the purchase of your new appliance.
You have selected a high-quality product. The operating instructions are a constituent of this product.
They contain important information about safety, use and disposal. Before using the product,
familiarise yourself with all operating and safety instructions. Use this product only as described
and only for the specifi ed areas of application. Retain these instructions for future reference.
Please also pass these operating instructions on to any future owner(s).
Copyright
This documentation is subject to copyright protection.
Any copying or reproduction, including extracts thereof, and the reproduction of images (even in
a modifi ed state), is only permitted with the written authorisation of the manufacturer.
Limitation of liability
All technical information, data and information for installation, connection and operation contained in these operating instructions corresponds to the latest state at the time of printing and
takes into account our previous experience and our best available knowledge.
Intended use
2
No claims can be derived from the details, illustrations and descriptions in these instructions.
The manufacturer assumes no responsibility for damage caused by failure to observe these
instructions, improper use, incompetent repairs, making unauthorised modifi cations or for using
unapproved replacement parts.
This appliance is intended for use only in private environments, not for commercial purposes.
This appliance is only intended for cutting natural hair. It may only be used with human hair,
not with artifi cial or animal hair.
It is not intended for any other use or for uses extending beyond those stated. Claims of any
kind for damage arising as a result of non-intended use will not be accepted. The user is the
sole bearer of the risk.
SHBS 5 A1
IB_96126_SHBS5A1_LB3.indb 2IB_96126_SHBS5A1_LB3.indb 2 21.01.14 15:0621.01.14 15:06
Page 6
Warnings used
The following warnings are used in these operating instructions:
DANGER
A warning at this risk level indicates an imminently hazardous situation.
If the hazardous situation is not avoided, it could lead to death or serious physical injury.
► Follow the instructions in this warning to avoid a fatality or serious personal injury.
WARNING
A warning of this risk level indicates a potentially hazardous situation.
Failure to avoid this hazardous situation could result in physical injury.
► Follow the instructions in this warning to prevent physical injury.
CAUTION
A warning of this risk level indicates potential damage to property.
Failure to avoid this situation could result in damage to property.
► Follow the instructions in this warning to prevent damage to property.
GB
IE
NOTE
A note indicates additional information that will assist you in handling the appliance.
►
SHBS 5 A1
IB_96126_SHBS5A1_LB3.indb 3IB_96126_SHBS5A1_LB3.indb 3 21.01.14 15:0621.01.14 15:06
3
Page 7

GB
IE
Safety
This section provides you with important safety information regarding
handling of the appliance. The appliance complies with the statutory
safety regulations. Incorrect usage can lead to personal injury and
property damage.
Basic safety instructions
For safe handling of the appliance, follow the safety information below:
■ This appliance may be used by children aged 8 over and by persons
with reduced physical, sensory or mental capabilities or lack of experience and knowledge, provided that they are under supervision or
have been told how to use the appliance safely and are aware of the
potential risks. Children must not play with the appliance. Cleaning and
user maintenance tasks must not be carried out by children unless they
are supervised.
■ Before use, check the appliance for externally visible damage. Never
4
operate an appliance that is damaged. There is a risk of electrocution.
■ The appliance may no longer be used if there is any damage to the cable,
to the mains power adapter, the housing or any other components.
■ All repairs must be carried out by authorised specialist companies or
the Customer Service department. Improper repairs can pose signifi cant
risks to the user. Warranty claims also become void.
■ Do not use the appliance with a defective cutter attachment or defective
comb attachment, since these may have sharp edges. There is a risk of
personal injury!
SHBS 5 A1
IB_96126_SHBS5A1_LB3.indb 4IB_96126_SHBS5A1_LB3.indb 4 21.01.14 15:0621.01.14 15:06
Page 8

■ Defective components must always be replaced with original replacement
parts. Compliance with safety requirements can only be guaranteed if
original replacement parts are used.
■ Never operate the appliance unsupervised, and only in accordance
with the information on the nameplate.
■ Use only the mains power adapter provided when using mains power.
■ Remove the mains power adapter from the wall socket
- if a defect occurs,
- before cleaning the appliance,
- if you do not intend using the appliance for long periods,
- after every use.
When doing so, pull the mains power adapter itself and not the cable.
■ ATTENTION! Keep the appliance dry.
■ Do not use the appliance while taking a bath. Risk of fatal electrical
shocks!
GB
IE
SHBS 5 A1
■ Never submerge the appliance or the cable with mains power adapter
in water or other liquids.
■ If the appliance falls into the water, it is imperative that you pull the
mains power adapter out of the power socket before you reach into
the water.
■ Never touch the mains power adapter with wet hands, especially when
plugging it in or unplugging it. Risk of fatal electrical shocks!
5
IB_96126_SHBS5A1_LB3.indb 5IB_96126_SHBS5A1_LB3.indb 5 21.01.14 15:0621.01.14 15:06
Page 9

GB
IE
■ The installation of a residual current circuit breaker with a rated tripping
current of no more than 30 mA off ers further protection from electric
shocks. Have the installation carried out only by a qualifi ed electrician.
■ Check the mains power adapter and the hair and beard trimmer regu-
larly for any possible mechanical defects.
■ Ensure that the cable does not get jammed in cupboard doors or pulled
over hot surfaces. If this occurs, the cable insulation may be damaged.
■ Only plug the mains power adapter into an easily reachable power
socket so that you can pull the mains power adapter out of the power
socket quickly in an emergency.
■ Do not cover the mains power adapter to avoid impermissible warming.
6
IB_96126_SHBS5A1_LB3.indb 6IB_96126_SHBS5A1_LB3.indb 6 21.01.14 15:0621.01.14 15:06
SHBS 5 A1
Page 10
Package contents
This appliance is supplied with the following components as standard:
▯ Hair and beard trimmer
▯ Charging station
▯ Mains power adapter
▯ Hair trimmer attachment
▯ Beard trimmer attachment
▯ Precision trimmer attachment
▯ Ear/nose hair trimmer attachment
▯ Shaver attachment
▯ Comb attachment for the hair trimmer attachment
▯ Comb attachment for the beard trimmer attachment
▯ Cleaning brush
▯ Scissors
▯ Comb
▯ Blade oil
GB
IE
SHBS 5 A1
▯ Storage pouch
▯ This operating manual
NOTE
Check the delivery for completeness and for signs of visible damage.
►
► If the delivery is incomplete, or is damaged due to defective packaging or through transpor-
tation, contact the Service Hotline (see chapter Service).
♦ Remove all appliance parts from the carton.
♦ Remove all packaging materials from the appliance.
DANGER
► Packaging material must not be used as a plaything. There is a risk of suff ocation.
7
IB_96126_SHBS5A1_LB3.indb 7IB_96126_SHBS5A1_LB3.indb 7 21.01.14 15:0621.01.14 15:06
Page 11
GB
IE
Spare Parts
You can also contact the Service Hotline if you need replacement parts (see chapter
Service).
Disposal of packaging
The packaging protects the appliance from transport damage.
Returning the packaging to the material cycle conserves raw materials and reduces the amount of
waste that is generated. Dispose of packaging material which is no longer needed in accordance
with applicable local regulations.
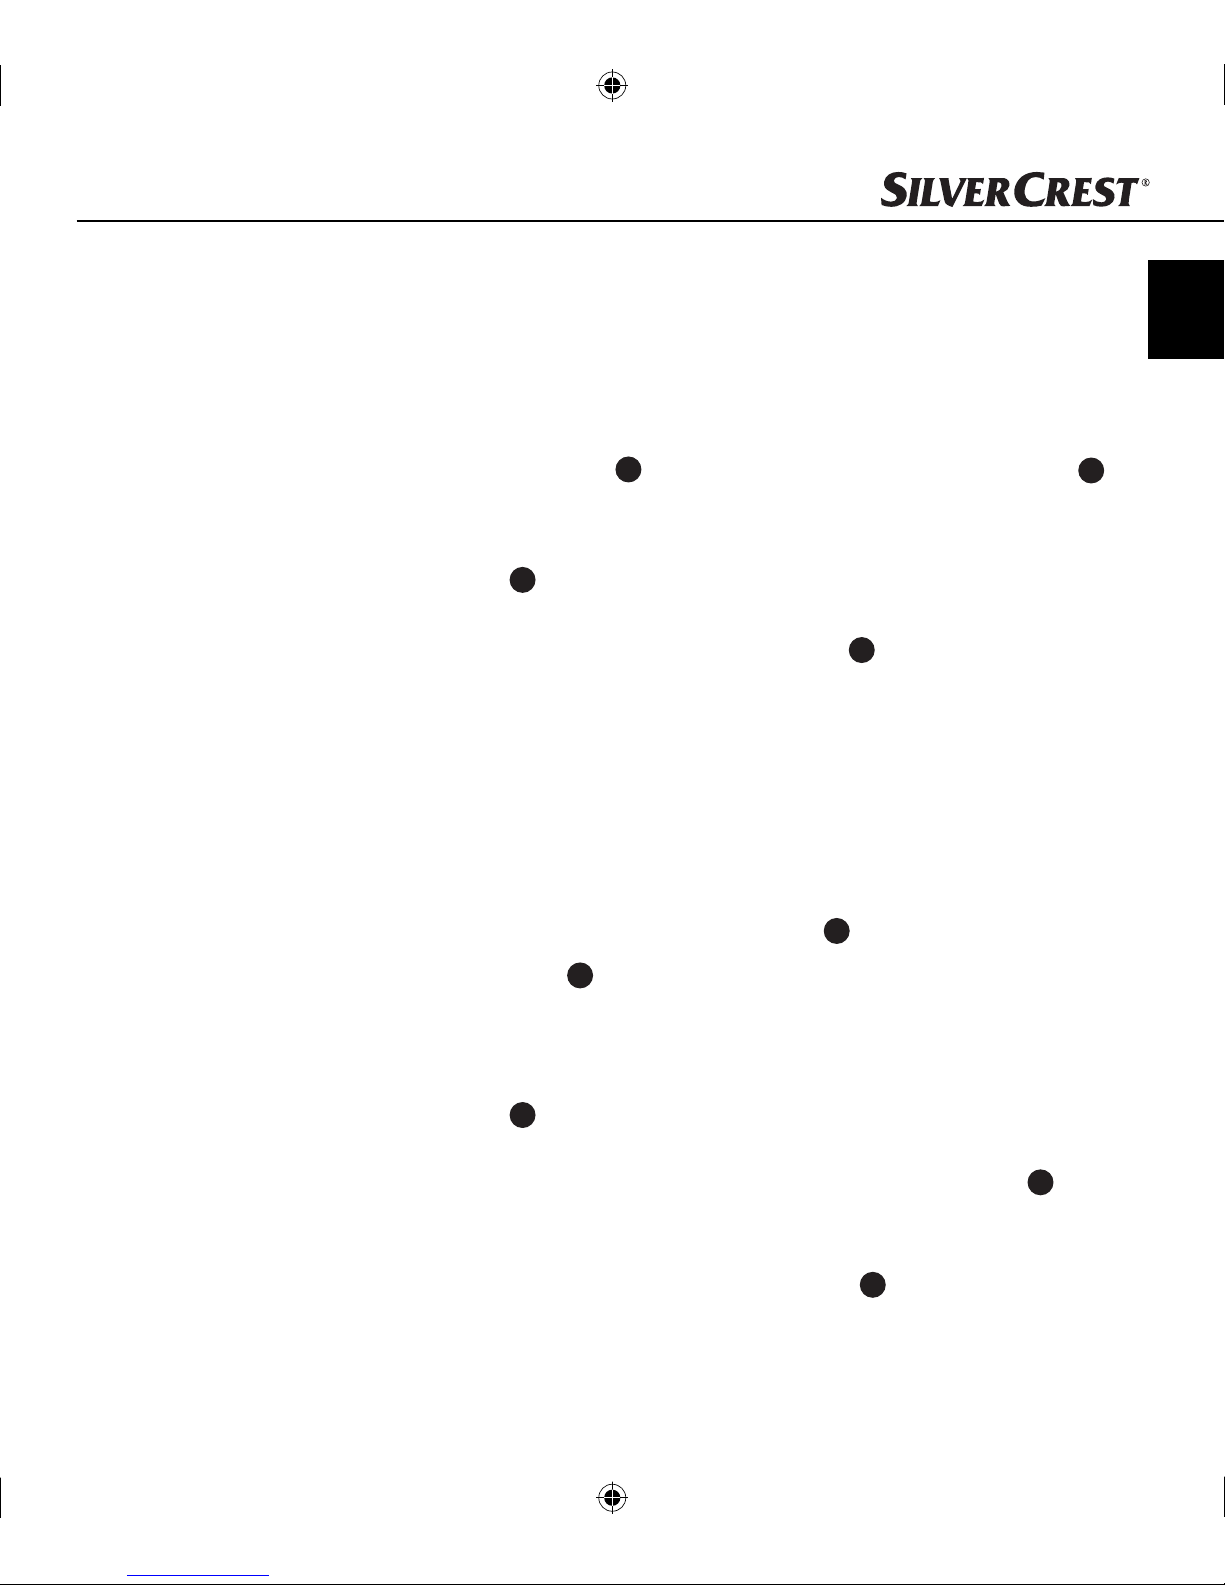
Appliance description
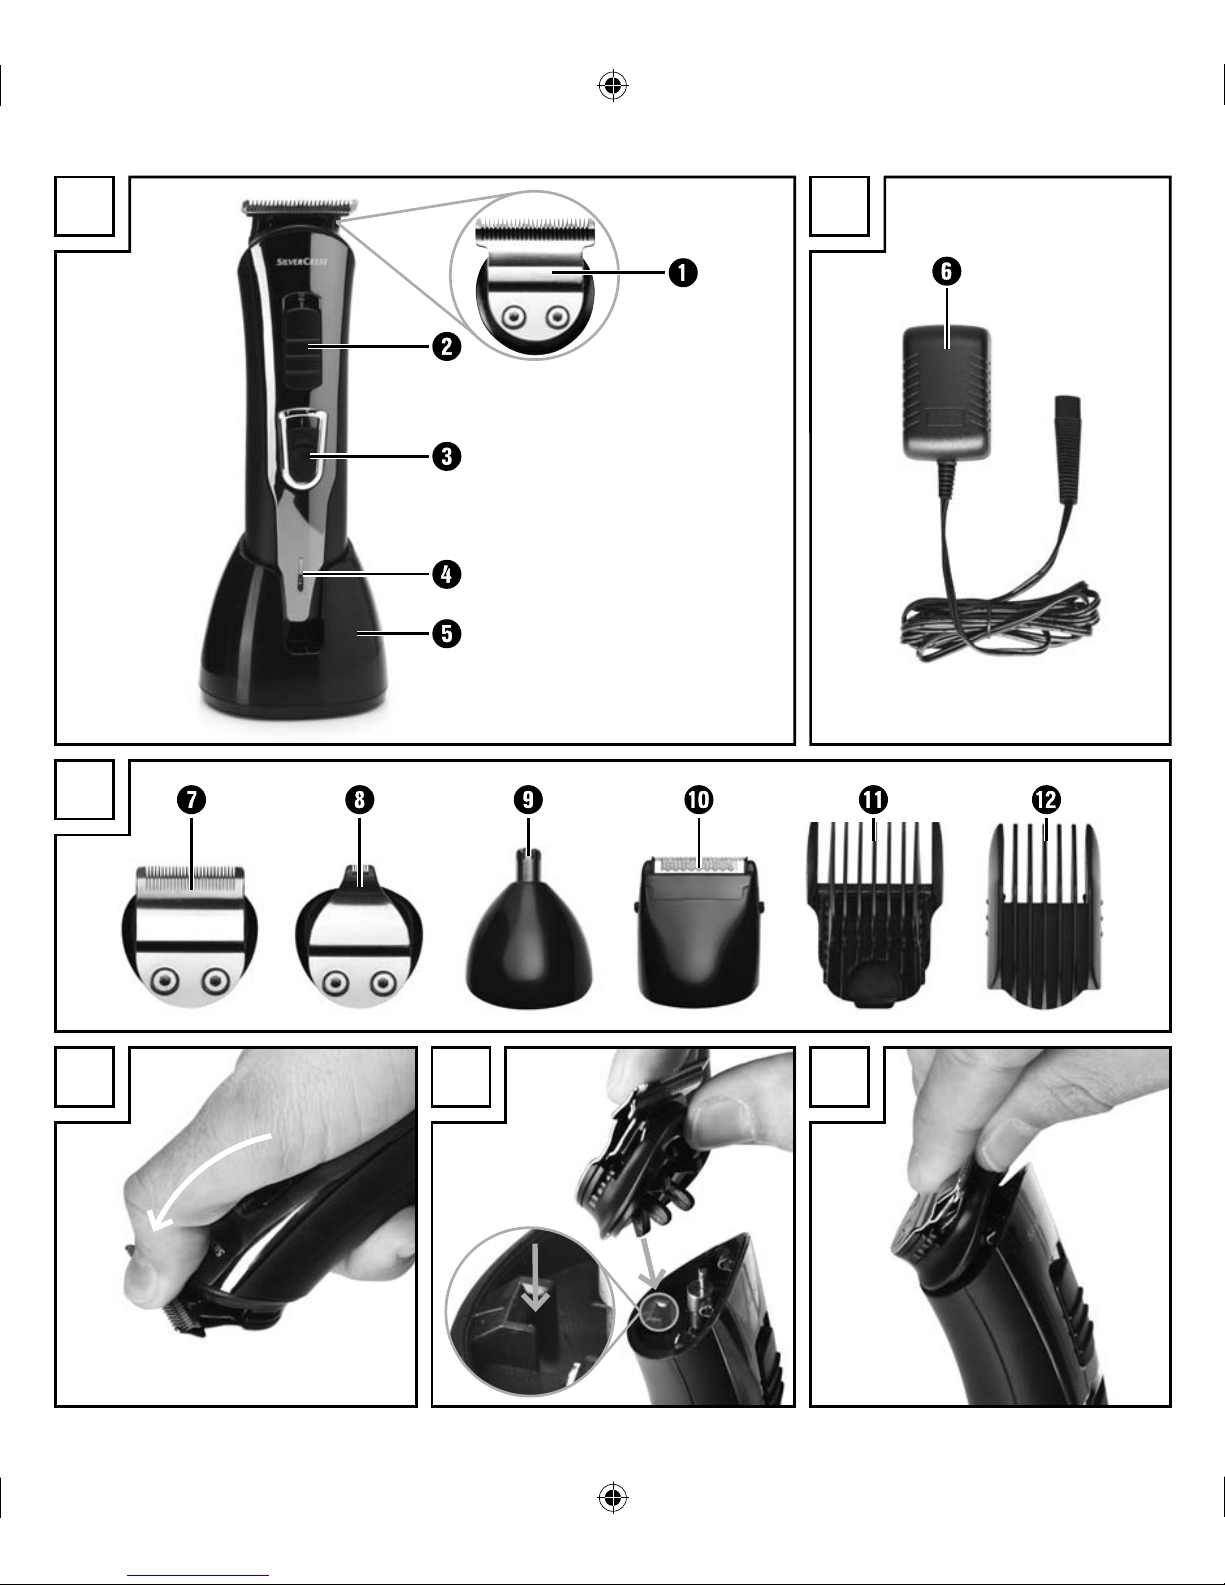
Figure A:
Hair trimmer attachment
2
Slide switch for cut length fi ne adjustment
3
On/off switch
4
Charging indicator lamp
5
Charging station/holder with connecting socket for mains power adapter
8
Figure B:
6
Mains power adapter
Figure C:
7
Beard trimmer attachment
8
Precision trimmer attachment
9
Ear/nose hair trimmer attachment
10
Shaver attachment
11
Comb attachment for the hair trimmer attachment
12
Comb attachment for the beard trimmer attachment
SHBS 5 A1
IB_96126_SHBS5A1_LB3.indb 8IB_96126_SHBS5A1_LB3.indb 8 21.01.14 15:0621.01.14 15:06
Page 12
Before fi rst use
The hair and beard trimmer can be used as a battery-powered or mains-powered appliance.
Charging the batteries
The battery for the hair and beard trimmer should be charged for at least 90 minutes before fi rst use.
♦ Connect the mains power adapter cable 6 to the hair and beard trimmer charging station 5.
♦ Avoid damaging the appliance! Ensure that the appliance is switched off before charging the
battery.
♦ Plug the mains power adapter 6 (wide-range voltage 100–240 V) in a power socket complying
with the appliance specifi cations.
♦ The charging progress is indicated by the charging indicator lamp 4.
– charging indicator lamp fl ashes red: the battery is discharged
– charging indicator lamp illuminates red: battery is being charged
– charging indicator lamp illuminates green: battery is fully charged
♦ Once the battery is fully charged, you can use the appliance for around 60 minutes without
connecting it to the power supply.
Operation with the mains power adapter
GB
IE
SHBS 5 A1
If your hair and beard trimmer stops working during shaving due to a discharged or weak battery,
6
you can continue shaving by plugging in the mains power adapter
♦ Plug the mains power adapter plug 6 into the socket on the underside of the hair and beard
trimmer.
♦ To avoid injuries and damage to the appliance, always switch the appliance off before con-
necting it to the power supply.
♦ Plug the mains power adapter 6 (wide-range voltage 100–240 V) in a power socket complying
with the appliance specifi cations.
♦ After 1–2 seconds, you can switch the appliance on by pressing the ON/OFF switch 3.
If the appliance does not start immediately, switch it off again and wait around 1 minute
before switching it on again.
♦ If you want to charge the battery without using the charging station 5 in this manner you can
only do this when the appliance is switched off .
.
9
IB_96126_SHBS5A1_LB3.indb 9IB_96126_SHBS5A1_LB3.indb 9 21.01.14 15:0621.01.14 15:06
Page 13
GB
IE
Oiling the cutting attachments
We recommend that you oil the hair trimmer , beard trimmer 7 and precision trimmer attachments 8 before fi rst use and after cleaning to ensure full mobility.
♦ To do this, simply apply a couple of drops of blade oil (accessory) between the blades, and
then distribute it evenly.
♦ Wipe off any access oil with a soft cloth. Use only non-corrosive oils such as sewing machine oil.
Handling and use
Attaching/changing the cutter attachments
WARNING
► Switch off the appliance before attaching or changing the cutter attachments.
There is a risk of personal injury!
♦ Press your thumbs forwards against the cutter attachment to release it from its holder
(see Fig. D). Then remove the cutter attachment from the appliance.
♦ To attach the cutter attachment, insert the lower plug-in tab into the opening on the appliance
(see Fig. E).
♦ Then press the upper part of the cutter attachment onto the appliance until it audibly clicks into
place and is fi rmly seated (see Fig. F).
Attaching/changing the comb attachments
Comb attachment for the hair trimmer attachment
The comb attachment 11 has settings for 6 diff erent cut lengths (13 mm/15 mm/17 mm/
19 mm/21 mm/23 mm).
♦ Attach the comb attachment 11 from the front onto the hair trimmer attachment and press
the rear end fi rmly until it clicks into place.
♦ To remove the comb attachment 11, release the lower end and pull it forwards off the appliance.
10
SHBS 5 A1
IB_96126_SHBS5A1_LB3.indb 10IB_96126_SHBS5A1_LB3.indb 10 21.01.14 15:0621.01.14 15:06
Page 14
Comb attachment for the beard trimmer attachment
The comb attachment 12 has settings for 6 diff erent cut lengths (4 mm/6 mm/9 mm/12 mm/
15 mm/18 mm).
♦ Attach the comb attachment 12 from the front onto the beard trimmer attachment 7 and press
it down.
♦ To remove the comb attachment 12 press it forwards off the appliance.
Hair trimmer attachment
NOTE
Any hair to be cut should be clean and dry.
►
► Brush the hair carefully through to remove any knots.
► Place a hairdressing cape or cloth around your neck and throat to avoid cut hair ends
falling inside your collar.
► Start by setting the comb attachment 11 to a longer length and reduce this in stages while
cutting the hair.
► Please note that the corresponding cut length will only be achieved if the slide switch 2
is set to position 3 and the appliance is being held at right angles to the skin surface.
GB
IE
SHBS 5 A1
♦ Switch the hair and beard trimmer on by pressing the ON/OFF switch 3.
♦ Run the hair and beard trimmer slowly through your hair.
♦ Hold the appliance so that the comb attachment 11 is as fl at as possible.
♦ Always cut from your neck towards the top of your head, or from your forehead and temples
upwards towards the middle of your head.
♦ Use the hair trimmer attachment without the comb attachment 11 to cut the hair very short.
♦ You can use the slide switch 2 to fi nely adjust the cut length in three steps.
11
IB_96126_SHBS5A1_LB3.indb 11IB_96126_SHBS5A1_LB3.indb 11 21.01.14 15:0621.01.14 15:06
Page 15

GB
IE
Beard trimmer attachment
NOTE
Comb the beard in the direction of growth to remove any knots.
►
► Start by setting the comb attachment 12 to a longer length and reduce this in stages while
cutting the hair.
► Please note that the corresponding cut length will only be achieved if the slide switch 2 is
set to position 3 and the appliance is being held at right angles to the skin surface.
♦ Cut the beard against the beard growth direction (upwards from chin to ear). Trim fi rst one
side and then other.
♦ Use the beard trimmer attachment 7 without the comb attachment 12 to cut the beard very
short or to add shape or trim a moustache.
♦ You can use the slide switch 2 to fi nely adjust the cut length in three steps.
Precision trimmer attachment
♦ Use the precision trimmer attachment 8 to add shape to a moustache, mutton chops, sideburns
or eyebrows.
♦ Lay the edge of the precision trimmer attachment 8 at the required level of the hair growth
and move the appliance downwards.
Ear/nose hair trimmer attachment
♦ Use the ear/nose hair trimmer 9 if you want to remove ear or nose hair.
♦ Guide the metal end of the ear/nose hair trimmer attachment 9 slowly into the nostril or ear.
♦ Move the appliance slowly in a circular motion to cut the hair.
Shaver attachment
♦ Use the shaver attachment 10 for a dry shave.
♦ Hold the appliance at right angles to the skin surface and move it gently over your face.
♦ Shave in the opposite direction to the beard growth. In complicated areas, such as the chin,
pull the skin tight to achieve a better result.
12
IB_96126_SHBS5A1_LB3.indb 12IB_96126_SHBS5A1_LB3.indb 12 21.01.14 15:0621.01.14 15:06
SHBS 5 A1
Page 16

Cleaning and care
DANGER
Danger to life due to electric shock!
► Pull the mains power adapter 6 out of the power socket before cleaning the appliance.
► Never touch the mains power adapter 6 with wet hands, especially when plugging it in or
unplugging it.
► Always keep the mains power adapter 6 and the cable dry.
CAUTION
Possible damage to the appliance.
► The hair and beard trimmer may never be immersed in water or other liquids for cleaning,
since the appliance is not watertight. If this is done, live parts (batteries) can be damaged.
► Do not use aggressive or abrasive cleaning agents, as these can damage the upper surfaces.
► Clean the housing only with a soft damp cloth and a mild detergent.
♦ Switch the hair and beard trimmer off by pressing the ON/OFF switch 3.
♦ Disconnect the cable from the appliance and pull the mains power adapter 6 out of the
power socket.
GB
IE
SHBS 5 A1
♦ If any comb attachment (11 or 12) is attached, remove this fi rst.
♦ Wash the comb attachment (11 or 12) if required under running water.
♦ Dry the comb attachment (11 or 12) thoroughly afterwards.
♦ Press your thumbs against the cutter attachment to release it from its holder (see Fig. D).
♦ Use the cleaning brush supplied to remove any hair residue from the cutter attachment.
♦ Once you have completed cleaning, plug the cutter attachment plug-in tab back into the
mounting opening on the appliance (see Fig. E).
♦ Push the cutter attachment back onto the appliance by pressing lightly from above (see Fig. F).
NOTE
In order to reduce friction, occasionally apply a couple of drops of blade oil (accessory)
►
between the blades, and then distribute it evenly. You can also use any non-corrosive oil
(e.g. sewing machine oil). Wipe off any access oil with a soft cloth.
13
IB_96126_SHBS5A1_LB3.indb 13IB_96126_SHBS5A1_LB3.indb 13 21.01.14 15:0621.01.14 15:06
Page 17
GB
IE
Cleaning the shaver attachment
CAUTION
Possible damage to the appliance.
► Do not remove the shaving foil from the foil holder and do not clean this with the cleaning brush.
♦ Remove the shaver attachment 10 from the appliance.
♦ Press the buttons at the side of the shaver attachment 10 and pull off the shaving foil holder.
Hold the shaving foil holder only by the sides and do not press on the foil itself.
♦ Clean the cutting blades with the supplied cleaning brush.
♦ Clean the shaving foil in the shaving foil holder by holding it under running water and allow
it to dry off completely before reattaching it to the shaver attachment 10.
♦ Replace the shaving foil holder onto the shaver attachment 10. During replacement ensure that
the fi xing tabs on the shaving foil holder are inserted into the corresponding openings on the
shaver attachment 10, and then press the shaving foil holder gently down until it audibly clicks
into place.
NOTE
Every now and again, apply a couple of drops of blade oil (accessory) between the blades,
►
and then distribute it evenly. Attach the shaver attachment 10 to the appliance and allow the
appliance to run for a few seconds without using it. Wipe off any access oil with a soft cloth.
Cleaning the ear/nose hair trimmer attachment
♦ Remove the ear/nose hair trimmer attachment 9 from the appliance.
♦ Clean the ear/nose hair trimmer attachment 9 under running water and allow it to dry
completely before using it again.
14
IB_96126_SHBS5A1_LB3.indb 14IB_96126_SHBS5A1_LB3.indb 14 21.01.14 15:0621.01.14 15:06
SHBS 5 A1
Page 18
Disposal
Disposal of the appliance
Never dispose of the appliance in the normal domestic waste. This product is
subject to the provisions of European Directive 2012/19/EU (Waste Electrical
and Electronic Equipment).
Dispose of the appliance via an approved disposal company or your municipal waste facility.
Please observe the currently applicable regulations. Please contact your waste disposal centre
if you are in any doubt.
NOTE
Before disposing of the appliance it is essential to fi rst remove the battery.
►
CAUTION
Removal of the battery requires a certain amount of manual dexterity; otherwise there is a
►
risk of injury! If you have no experience in using tools, you should entrust the task to some-
one who is competent to do the job properly.
► Ensure that the battery does not get damaged during removal. There is a risk of fi re!
► The removed battery may not be reused.
► Never short-circuit the battery. The contacts on the removed battery should not be connected
by an metallic objects. The battery can overheat and explode.
► WARNING! Only remove the battery for disposal of the appliance. Removal will destroy the
appliance. Never operate an appliance that has been dismantled.
GB
IE
♦ Disconnect the appliance from the power supply.
♦ Switch on the appliance and let it run until the battery is fully discharged.
♦ Remove the cutter attachment from the appliance (see chapter Attaching/changing the cutter
attachments)
♦ There are three screws on the rear of the appliance. Two of the screws are in the mounting
opening of the appliance.
♦ Loosen both the screws with a Philips screwdriver.
SHBS 5 A1
IB_96126_SHBS5A1_LB3.indb 15IB_96126_SHBS5A1_LB3.indb 15 21.01.14 15:0621.01.14 15:06
15
Page 19

GB
IE
♦ Remove the rear side of the appliance.
♦ Use a diagonal cutter/fl at-head screwdriver to disconnect the battery from the circuit board.
Remove the battery. Take the battery and the appliance separately to appropriate disposal
facilities.
Disposal of batteries
Used batteries may not be disposed of in household waste. All consumers are statutorily required
to dispose of batteries at a collection point provided by their local community or at a retail store.
The purpose of this obligation is to ensure that batteries are disposed of in a non-polluting manner.
Only dispose of batteries when they are fully discharged.
16
IB_96126_SHBS5A1_LB3.indb 16IB_96126_SHBS5A1_LB3.indb 16 21.01.14 15:0621.01.14 15:06
SHBS 5 A1
Page 20

Appendix
Technical details
Mains power adapter PTB-045100EU
Input voltage 100–240 V ∼, 50/60 Hz
Output voltage 4.5 V
Output current 1000 mA
GB
IE
Protection class
Hair and beard trimmer
Input voltage 4.5 V
Input current 1000 mA
Rechargeable battery 3.7 V/700 mAh Li-ion battery
Environmental temperature 5°C up to 35°C
Notes on the Declaration of Conformity
With regard to conformity with essential requirements and other relevant provisions, this appliance complies with the guidelines of the Electromagnetic Compatibility Directive 2004/108/EC and the Low Voltage Directive 2006/95/EC.
The full original Declaration of Conformity is available from the importer.
Warranty
The warranty for this appliance is for 3 years from the date of purchase. The appliance has been
manufactured with care and meticulously examined before delivery.
II /
Please retain your receipt as proof of purchase. In the case of a warranty claim, please make
contact by telephone with our Customer Service Department. Only in this way can a post-free
despatch for your goods be assured.
SHBS 5 A1
IB_96126_SHBS5A1_LB3.indb 17IB_96126_SHBS5A1_LB3.indb 17 21.01.14 15:0621.01.14 15:06
17
Page 21

GB
IE
NOTICE
This product is for domestic use only and is not intended for commercial use. The warranty is void
in the case of abusive and improper handling, use of force and internal tampering not carried out
by our authorised service branch.
Your statutory rights are not restricted in any way by this warranty. The warranty period is not
extended by repairs made under the warranty. This applies also to replaced and repaired parts.
Damages and defects extant at the time of purchase must be reported immediately after unpacking, resp. no later than two days after the date of purchase.
Repairs made after the lapse of the warranty period are subject to charge.
Service
Service Great Britain
Tel.: 0871 5000 720 (£ 0.10/Min.)
E-Mail: kompernass@lidl.co.uk
The warranty covers only claims for material and manufacturing defects, but not for
►
transport damage, wearing parts or for damage to fragile components, e.g. buttons or
batteries.
Importer
18
IAN 96126
Service Ireland
Tel.: 1890 930 034
(0,08 EUR/Min., (peak))
(0,06 EUR/Min., (off peak))
E-Mail: kompernass@lidl.ie
IAN 96126
Hotline availability: Monday to Friday 08:00 - 20:00 (CET)
KOMPERNASS HANDELS GMBH
BURGSTRASSE 21
44867 BOCHUM
GERMANY
www.kompernass.com
SHBS 5 A1
IB_96126_SHBS5A1_LB3.indb 18IB_96126_SHBS5A1_LB3.indb 18 21.01.14 15:0621.01.14 15:06
Page 22

Indholdsfortegnelse
Introduktion . . . . . . . . . . . . . . . . . . . 20
Om denne betjeningsvejledning . . . . . . . . . . 20
Ophavsret . . . . . . . . . . . . . . . . . . . . . . . . . . . 20
Ansvarsbegrænsning . . . . . . . . . . . . . . . . . . . 20
Anvendelsesområde . . . . . . . . . . . . . . . . . . . 20
Anvendte advarsler . . . . . . . . . . . . . . . . . . . . 21
Sikkerhed . . . . . . . . . . . . . . . . . . . . . 22
Grundlæggende sikkerhedsanvisninger. . . . . 22
Pakkens indhold . . . . . . . . . . . . . . . . 24
Reservedele . . . . . . . . . . . . . . . . . . . . . . . . . . 25
Bortskaff else af emballagen . . . . . . . . . . . . . 25
Beskrivelse af produktet . . . . . . . . . 25
Før første brug . . . . . . . . . . . . . . . . . 26
Opladning af batteri . . . . . . . . . . . . . . . . . . . 26
Funktion med strømforsyningen . . . . . . . . . . . 26
Rengøring og vedligeholdelse . . . . . 30
Rengøring af barberkammen . . . . . . . . . . . . . 31
Rengøring af næse-/øretrimmer . . . . . . . . . . . 32
Bortskaff else . . . . . . . . . . . . . . . . . . . 32
Bortskaff else af produktet . . . . . . . . . . . . . . . 32
Bortskaff else af batterier/genopladelige
batterier . . . . . . . . . . . . . . . . . . . . . . . . . . . . . 33
Tillæg . . . . . . . . . . . . . . . . . . . . . . . . . 34
Tekniske data . . . . . . . . . . . . . . . . . . . . . . . . . 34
Oplysninger om
overensstemmelseserklæringen . . . . . . . . . . . 34
Garanti . . . . . . . . . . . . . . . . . . . . . . . . . . . . . 34
Service . . . . . . . . . . . . . . . . . . . . . . . . . . . . . . 35
Importør . . . . . . . . . . . . . . . . . . . . . . . . . . . . . 35
DK
Smøring af klippekammene . . . . . . . . . . . . . . 27
Betjening og funktion . . . . . . . . . . . . 27
Påsætning/skift af klippekamme . . . . . . . . . . 27
Påsætning/skift af kamme . . . . . . . . . . . . . . . 27
Klippekam . . . . . . . . . . . . . . . . . . . . . . . . . . . 28
Skægkam . . . . . . . . . . . . . . . . . . . . . . . . . . . . 29
Præcisionstrimmer . . . . . . . . . . . . . . . . . . . . . 29
Næse-/øretrimmer . . . . . . . . . . . . . . . . . . . . . 29
Barberkam . . . . . . . . . . . . . . . . . . . . . . . . . . . 29
SHBS 5 A1
IB_96126_SHBS5A1_LB3.indb 19IB_96126_SHBS5A1_LB3.indb 19 21.01.14 15:0621.01.14 15:06
19
Page 23

DK
Introduktion
Om denne betjeningsvejledning
Tillykke med købet af dit nye produkt.
Du har dermed valgt et produkt af høj kvalitet. Betjeningsvejledningen er en del af dette produkt.
Den indeholder vigtige informationer om sikkerhed, anvendelse og bortskaff else. Du bedes sætte
dig ind i alle produktets betjenings- og sikkerhedsanvisninger før brug. Brug kun produktet som
beskrevet og kun til de angivne anvendelsesområder. Opbevar denne betjeningsvejledning, så du
altid kan fi nde den igen. Lad vejledningen følge med produktet, hvis du giver det videre til andre.
Ophavsret
Denne dokumentation er ophavsretligt beskyttet.
Enhver kopiering eller eftertryk – også i uddrag – samt videregivelse af billeder – også i ændret
form – er kun tilladt efter skriftligt samtykke fra producenten.
Ansvarsbegrænsning
Alle tekniske informationer, data og anvisninger til tilslutning og betjening i denne betjeningsvejledning svarer til den nyeste viden på trykketidspunktet og gives efter bedste overbevisning i
henhold til vores hidtidige erfaringer og viden.
Der kan ikke stilles nogen form for krav baseret på informationerne, billederne og beskrivelserne
i denne vejledning.
Producenten påtager sig intet ansvar for skader på grund af manglende overholdelse af betjeningsvejledningen, anvendelse, som ikke hører ind under anvendelsesområdet, forkerte reparationer,
ændringer, som er foretaget uden tilladelse samt anvendelse af ikke-tilladte reservedele.
Anvendelsesområde
Dette produkt er kun beregnet til privat brug og ikke til erhvervsmæssige formål. Produktet er kun
beregnet til klipning af naturhår. Det må kun anvendes til menneskehår, men ikke til kunstigt hår
eller dyrehår.
Al anden anvendelse betragtes som værende uden for anvendelsesområdet. Der kan ikke stilles
krav i forbindelse med skader forårsaget af anvendelse til formål uden for anvendelsesområdet.
Brugeren bærer alene risikoen.
20
SHBS 5 A1
IB_96126_SHBS5A1_LB3.indb 20IB_96126_SHBS5A1_LB3.indb 20 21.01.14 15:0621.01.14 15:06
Page 24

Anvendte advarsler
I denne betjeningsvejledning anvendes følgende advarsler:
FARE
En advarsel på dette faretrin markerer en truende farlig situation.
Hvis den farlige situation ikke undgås, kan det medføre livsfarlige eller alvorlige personskader.
► Følg anvisningerne i denne advarsel, så livsfarlige og alvorlige personskader undgås.
ADVARSEL
En advarsel på dette faretrin angiver en mulig farlig situation.
Hvis den farlige situation ikke undgås, kan det føre til personskader.
► Følg anvisningerne i denne advarsel for at undgå, at personer kommer til skade.
OBS
En advarsel på dette faretrin angiver en mulig materiel skade.
Hvis den farlige situation ikke undgås, kan det føre til materielle skader.
► Følg anvisningerne i denne advarsel for at undgå materielle skader.
BEMÆRK
Et 'bemærk' henviser til yderligere oplysninger, som gør det nemmere at bruge produktet.
►
DK
SHBS 5 A1
IB_96126_SHBS5A1_LB3.indb 21IB_96126_SHBS5A1_LB3.indb 21 21.01.14 15:0621.01.14 15:06
21
Page 25

Sikkerhed
Dette kapitel indeholder vigtige sikkerhedsanvisninger til brug af produktet.
Dette produkt overholder de foreskrevne sikkerhedsbestemmelser. Forkert
DK
anvendelse kan føre til personskader og materielle skader.
Grundlæggende sikkerhedsanvisninger
Overhold følgende sikkerhedsanvisninger for sikker brug af produktet:
■ Dette produkt må bruges af børn fra 8 år og derover og af personer med
nedsatte fysiske, psykiske, motoriske eller mentale evner eller manglende
erfaring og/eller viden, hvis de er under opsyn eller undervises i sikker
brug af produktet og de farer, der kan være forbundet med det. Børn
må ikke lege med produktet. Rengøring og brugervedligeholdelse må
ikke udføres af børn uden opsyn.
■ Kontrollér produktet for udvendige, synlige skader før brug. Tag aldrig
et beskadiget produkt i anvendelse. Der er risiko for elektrisk stød.
■ Hvis kablet, strømforsyningen, kabinettet eller andre dele er beskadigede,
må produktet ikke anvendes længere.
■ Lad kun autoriserede specialforretninger eller kundeservice reparere
produktet. Ukorrekte reparationer kan medføre betydelige farer for
brugeren. Desuden bortfalder alle garantikrav.
■ Brug ikke produktet med defekt skærekam eller kam, da de kan have
meget skarpe kanter. Der er fare for personskader!
■ Defekte komponenter må kun udskiftes med originale reservedele.
Overholdelse af sikkerhedskravene kan kun garanteres, hvis der
an-vendes originale dele.
■ Lad aldrig produktet være uden opsyn, og brug det kun i henhold til
dataene på typeskiltet.
22
IB_96126_SHBS5A1_LB3.indb 22IB_96126_SHBS5A1_LB3.indb 22 21.01.14 15:0621.01.14 15:06
SHBS 5 A1
Page 26

■ Brug kun den medfølgende strømforsyning til netdrift.
■ Tag strømforsyningen ud af stikkontakten
- hvis der opstår en fejl,
- før du rengør produktet,
- hvis produktet ikke skal bruges i længere tid,
- hver gang, du har brugt produktet.
Træk i selve strømforsyningen og ikke i kablet.
■ OBS! Hold produktet tørt.
■ Brug ikke produktet, når du er i bad. Der er fare for elektrisk stød!
■ Læg aldrig kablet med strømforsyningen ned i vand eller andre væsker.
■ Hvis produktet falder ned i vand, skal strømforsyningen altid først tages
ud af stikkontakten, før du stikker fi ngrene ned i vandet.
■ Hold aldrig på strømforsyningen med våde hænder og særligt ikke,
når du sætter den i stikkontakten eller tager den ud.
Der er fare for elektrisk stød!
■ Installation af et fejlstrømsrelæ med en dimensioneringsstrøm på maks.
30 mA giver endnu bedre beskyttelse mod elektriske stød.
DK
Installationen må kun udføres af en autoriseret elektriker.
■ Kontrollér regelmæssigt strømforsyningen og hår- og skægklipperen
for eventuelle mekaniske defekter.
■ Sørg for, at kablet ikke kommer i klemme i skabsdøre eller trækkes
hen over varme overfl ader. Derved kan kablets isolering beskadiges.
■ Slut strømforsyningen til en stikkontakt, som er nem at få adgang til,
så strømforsyningen hurtigt kan trækkes ud i tilfælde af en fejl.
■ Dæk ikke strømforsyningen til, da den ellers opvarmes for meget.
SHBS 5 A1
IB_96126_SHBS5A1_LB3.indb 23IB_96126_SHBS5A1_LB3.indb 23 21.01.14 15:0621.01.14 15:06
23
Page 27

Pakkens indhold
Produktet leveres som standard med følgende dele:
▯ Hår- og skægklipper
DK
▯ Oplader
▯ Strømforsyning
▯ Klippekam
▯ Skægkam
▯ Præcisionstrimmer
▯ Næse-/ørekam
▯ Barberkam
▯ Kam til klippekam
▯ Kam til skægkam
▯ Rengøringsbørste
▯ Skær
▯ Kam
▯ Klingeolie
▯ Opbevaringspose
▯ Denne betjeningsvejledning
BEMÆRK
Kontrollér, at alle dele er leveret med, og at de ikke har synlige skader.
►
► Hvis der mangler dele, eller hvis nogle af delene er defekte på grund af mangelfuld
emballage eller på grund af transporten, bedes du henvende dig til service-hotline
(se kapitlet Service).
♦ Tag alle delene og betjeningsvejledningen ud af kassen.
♦ Fjern alle emballeringsmaterialer fra produktet.
FARE
► Emballagematerialer må ikke bruges til leg. Der er fare for kvælning.
24
IB_96126_SHBS5A1_LB3.indb 24IB_96126_SHBS5A1_LB3.indb 24 21.01.14 15:0621.01.14 15:06
SHBS 5 A1
Page 28

Reservedele
Henvend dig til service-hotline, hvis du mangler reservedele (se kapitlet Service).
Bortskaff else af emballagen
Emballagen beskytter produktet mod transportskader.
Afl evering af emballagen til genbrug sparer råstoff er og reducerer aff aldsmængden.
Bortskaf emballagematerialer, du ikke skal bruge mere, efter de lokalt gældende forskrifter.
Beskrivelse af produktet
Figur A:
Klippekam
2
Skydekontakt til fi njustering af klippelængden
3
Tænd-/slukkontakt
4
Opladeindikator
5
Oplader / holder med tilslutningsindgang til strømforsyning
Figur B:
6
Strømforsyning
Figur C:
7
Skægkam
DK
8
Præcisionstrimmer
9
Næse-/ørekam
10
Barberkam
11
Kam til påsætning på klippekammen
12
Kam til påsætning på skægkammen
SHBS 5 A1
IB_96126_SHBS5A1_LB3.indb 25IB_96126_SHBS5A1_LB3.indb 25 21.01.14 15:0621.01.14 15:06
25
Page 29

DK
Før første brug
Hår- og skægklipperen kan bruges med batteri eller sluttes til strømnettet.
Opladning af batteri
Før produktet bruges første gang, skal batteriet til hår- og skægklipperen oplades i mindst
90 minutter.
♦ Slut strømforsyningens kabel til hår- og skægklipperens 6 oplader 5.
♦ Undgå at beskadige produktet! Sørg for, at produktet er slukket, før du oplader batteriet.
♦ Sæt strømforsyningen 6 (bredt spændingsområde 100 - 240 V) i en stikkontakt, der passer til
forskrifterne for produktet.
♦ Opladningen vises med opladeindikatoren 4:
- Opladeindikatoren blinker rødt: Batteriet er afl adet
- Opladeindikatoren lyser rødt: Batteriet oplades
- Opladeindikatoren lyser grønt: Batteriet er opladet.
♦ Når batteriet er ladet helt op, kan produktet anvendes i ca. 60 minutter uden tilslutning til
strømnettet.
Funktion med strømforsyningen
26
Hvis hår- og skægklipperen standser midt i klipningen, fordi batteriet er afl adet eller svagt, kan
6
du fortsætte klipningen ved at slutte strømforsyningen
♦ Sæt strømforsyningens kabelstik 6 ind i indgangen på undersiden af hår- og skægklipperen.
♦ For at undgå skader på produktet skal det altid slukkes, før det sluttes til strømnettet.
♦ Sæt strømforsyningen 6 (bredt spændingsområde 100 - 240 V) i en stikkontakt, der passer til
forskrifterne for produktet.
♦ Efter 1- 2 sekunder kan du tænde for produktet med TÆND- / SLUK-kontakten 3. Hvis produktet
ikke straks starter op, skal du slukke for det igen og vente ca. 1 minut, før du tænder for det igen.
♦ Hvis du vil oplade batteriet på denne måde uden at bruge opladeren 5, må det kun gøres,
når produktet er slukket.
til.
SHBS 5 A1
IB_96126_SHBS5A1_LB3.indb 26IB_96126_SHBS5A1_LB3.indb 26 21.01.14 15:0621.01.14 15:06
Page 30

Smøring af klippekammene
Vi anbefaler at smøre hår- , skæg- 7 og præcisionstrimmeren 8 med olie før første brug og
efter rengøring, så de bevarer deres bevægelighed.
♦ Smør med en til to dråber klingeolie (tilbehør) mellem klingerne, og fordel olien.
♦ Tør den overfl ødige olie af med en blød klud. Brug kun syrefri olie som f.eks. symaskineolie.
Betjening og funktion
Påsætning/skift af klippekamme
ADVARSEL
► Sluk for produktet, før du sætter klippekammene på eller skifter dem.
Der er fare for personskader!
♦ Tryk foran med tommelfi ngeren på klippekammen for at løsne den fra holderen (se fi g. D).
Tag klippekammen af produktet.
♦ For at sætte klippekammen på skal du sætte den nederste indstiksfl ig ind i åbningen på produktet
(se fi g. E).
DK
♦ Sæt derefter den øverste del af klippekammen på produktet, til den klikker på plads, så det
kan høres og sidder fast (se fi g. F).
Påsætning/skift af kamme
Kam til påsætning på klippekam
Kammen 11 har indstillinger til 6 forskellige klippelængder (13 mm / 15 mm / 17 mm / 19 mm /
21 mm / 23 mm).
♦ Sæt kammen 11 på klippekammen forfra, og tryk den fast på den bageste ende, til den
klikker på plads.
♦ For at fjerne kammen 11 skal du løsne den på den nederste ende og tage den af produktet forfra.
SHBS 5 A1
27
IB_96126_SHBS5A1_LB3.indb 27IB_96126_SHBS5A1_LB3.indb 27 21.01.14 15:0621.01.14 15:06
Page 31

DK
Kam til påsætning på skægkam
Kammen 12 har indstillinger til 6 forskellige klippelængder (4 mm / 6 mm / 9 mm / 12 mm /
15 mm / 18 mm).
♦ Sæt kammen 12 på skægkammen 7 forfra, og skub den ned.
♦ For at tage kammen 12 af skal du skubbe den frem og tage den af.
Klippekam
BEMÆRK
Håret, der skal klippes, skal være rent og tørt.
►
► Red håret omhyggeligt igennem, så sammenfi ltret hår redes ud.
► Læg et frisørslag eller et håndklæde om halsen og nakken, så hårresterne ikke falder ned i
kraven.
► Start først med kammen 11 med en længere klippelængde, og indstil kortere klippelængder
trinvist i løbet af klipningen.
► Bemærk, at du kun får den rigtige længde, hvis skydekontakten 2 står på position 3,
og produktet holdes vinkelret på huden.
♦ Tænd for hår- og skægklipperen med TÆND- / SLUK-kontakten 3.
28
♦ Bevæg hår- og skægklipperen langsomt gennem håret.
♦ Hold produktet, så kammen 11 sidder så fl adt på som muligt.
♦ Klip altid fra nakken og op mod toppen af hovedet eller fra panden og tindingerne op til
midten af hovedet.
♦ Brug klippekammen uden kam 11, hvis håret skal klippes meget kort.
♦ Med skydekontakten 2 kan du indstille den ønskede længde i 3 trin.
SHBS 5 A1
IB_96126_SHBS5A1_LB3.indb 28IB_96126_SHBS5A1_LB3.indb 28 21.01.14 15:0621.01.14 15:06
Page 32

Skægkam
BEMÆRK
Red skægget igennem i vokseretningen, så sammenfi ltret hår redes ud.
►
► Start først med kammen 12 med en længere klippelængde, og indstil kortere klippelængder
trinvist i løbet af klipningen.
► Bemærk, at du kun får den rigtige længde, hvis skydekontakten 2 står på position 3, og
produktet holdes vinkelret på huden.
♦ Klip skægget imod skæggets vokseretning (fra kinden og op til øret). Trim først den ene og
derefter den anden side.
♦ Brug skægkammen 7 uden påsat kam 12, hvis skægget skal klippes meget kort.
♦ Med skydekontakten 2 kan du indstille den ønskede længde i 3 trin.
Præcisionstrimmer
♦ Brug præcisionstrimmeren 8 til formning af overskæg, kindskæg, bakkenbarter eller øjenbryn.
♦ Sæt præcisionstrimmerens 8 kant på den højde, du ønsker hårkanten skal have, og bevæg
produktet nedad
DK
Næse-/øretrimmer
♦ Brug næse-/øretrimmeren 9, hvis du vil fjerne næse- eller ørehår.
♦ Sæt langsomt metalspidsen på næse-/øretrimmeren 9 ind i næseboret eller øret.
♦ Bevæg maskinen i cirkler for at klippe hårene.
Barberkam
♦ Brug barberkammen 10 til tør barbering.
♦ Hold produktet vinkelret på huden, og bevæg det forsigtigt hen over ansigtet.
♦ Barbér imod skæggets vokseretning. Stram huden ud på vanskelige stedersom f.eks. kinden
for at få et bedre resultat.
SHBS 5 A1
29
IB_96126_SHBS5A1_LB3.indb 29IB_96126_SHBS5A1_LB3.indb 29 21.01.14 15:0621.01.14 15:06
Page 33

DK
Rengøring og vedligeholdelse
FARE
Livsfare på grund af elektrisk stød!
► Tag strømforsyningen 6 ud af stikkontakten, før du rengør maskinen.
► Hold aldrig på strømforsyningen 6 med våde hænder, når du sætter den i stikkontakten
eller tager den ud.
► Hold altid strømforsyningen 6 og kablet tørt.
OBS
Produktet kan blive beskadiget.
► Hår- og skægklipperen må ikke lægges ned i vand eller andre væsker ved rengøring, da
den ikke er vandtæt. Strømførende dele ( batterier) kan beskadiges.
► Brug ikke stærke eller skurende rengøringsmidler, da de kan angribe produktets overfl ade.
► Rengør udelukkende kabinettet med en let fugtet klud og et mildt opvaskemiddel.
♦ Sluk for hår- og skægklipperen med TÆND- / SLUK-kontakten 3.
♦ Tag ledningen ud af maskinen, og tag strømforsyningen 6 ud af stikkontakten.
30
♦ Hvis der sidder en kam på maskinen, skal den tages af (11 eller 12).
♦ Vask kammen (11 eller 12) med rindende vand ved behov.
♦ Tør derefter kammen (11 eller 12) omhyggeligt af.
♦ Tryk foran med tommelfi ngeren på klippekammen for at løsne den fra holderen (se fi g. D).
♦ Fjern hårresterne fra klippekammen med den vedlagte rengøringsbørste.
♦ Sæt klippekammens indstiksfl ig ind i produktets åbning igen efter rengøringen (se fi g. E).
♦ Lad klippekammen klikke på plads igen med et let tryk oppefra (se fi g. F).
SHBS 5 A1
IB_96126_SHBS5A1_LB3.indb 30IB_96126_SHBS5A1_LB3.indb 30 21.01.14 15:0621.01.14 15:06
Page 34

BEMÆRK
For at undgå friktion skal der smøres mellem klingerne med en til to dråber klingeolie (tilbe-
►
hør), hvorefter olien skal fordeles. Du kan også bruge alle former for syrefri olie (som f.eks.
symaskineolie). Tør den overfl ødige olie af med en blød klud.
Rengøring af barberkammen
OBS
Produktet kan blive beskadiget.
► Skærefolien må ikke tages ud af skærefolierammen og heller ikke rengøres med rengørings-
børsten.
♦ Tag barberkammen 10 af produktet.
♦ Tryk på knapperne på siden af barberkammen 10, og tag skærefolierammen af. Hold kun på
siden af skærefolierammen, og tryk ikke på skærefolien.
♦ Rengør kniven med den medfølgende rengøringsbørste.
♦ Rengør skærefolien i skærefolierammen under rindende vand, og lad den tørre helt, inden du
sætter den på barberkammen 10 igen.
DK
SHBS 5 A1
♦ Sæt skærefolierammen på barberkammen 10 igen. Sørg for, at fastgøringsfl igene på skære-
folierammen sidder i de rigtige udskæringer på barberkammen 10, og tryk skærefolierammen
lidt ned, til den klikker hørbart på plads.
BEMÆRK
Smør af og til kniven med en til to dråber klingeolie (tilbehør), og fordel olien. Sæt barber-
►
kammen 10 på produktet, og lad det køre nogle sekunder uden at bruge det. Tør den overfl ødige olie af med en blød klud.
31
IB_96126_SHBS5A1_LB3.indb 31IB_96126_SHBS5A1_LB3.indb 31 21.01.14 15:0621.01.14 15:06
Page 35

Rengøring af næse-/øretrimmer
♦ Tag næse-/øretrimmeren 9 af maskinen.
♦ Rengør næse-/øretrimmeren 9 under rindende vand, og lad den tørre helt, inden den bruges igen.
DK
Bortskaff else
Bortskaff else af produktet
Bortskaf ikke produktet sammen med det almindelige husholdningsaff ald.
Dette produkt er underlagt EU-direktivet 2012/19/EU WEEE (Waste Electrical
and Electronic Equipment).
Bortskaf produktet via en godkendt bortskaff elsesvirksomhed eller den kommunale genbrugsplads.
Følg de aktuelt gældende regler. Henvend dig i tvivlstilfælde til den lokale genbrugsplads.
BEMÆRK
Før produktet bortskaff es, skal det genopladelige batteri tages ud.
►
OBS
Udtagning af det genopladelige batteri kræver lidt praktisk håndelag, da der ellers er fare
►
for at komme til skade! Hvis du ikke har erfaring i brug af værktøj, bør du lade en person,
som kan fjerne det genopladelige batteri korrekt, udføre dette arbejde.
► Pas på, at det genopladelige batteri ikke beskadiges. Der er fare for brand!
► Når det genopladelige batteri tages ud, må det ikke anvendes igen.
► Kortslut aldrig det genopladelige batteri. Kontakterne på det udtagne genopladelige batteri
må ikke være forbundet med hinanden via metalgenstande. Det genopladelige batteri kan
overophedes og eksplodere.
► OBS! Tag kun det genopladelige batteri ud, hvis produktet skal bortskaff es. Når det
genopladelige batteri tages ud, ødelægges produktet. Brug aldrig produktet, hvis det er
beskadiget.
32
IB_96126_SHBS5A1_LB3.indb 32IB_96126_SHBS5A1_LB3.indb 32 21.01.14 15:0621.01.14 15:06
SHBS 5 A1
Page 36

♦ Afbryd produktet fra strømnettet.
♦ Tænd for produktet, og lad det køre, til det genopladelige batteri er tomt.
♦ Tag skærekammen af produktet (se kapitlet Påsætning/skift af klippekammene.
♦ På bagsiden af produktet er der tre skruer. To af skruerne er i produktets åbning.
♦ Løsn skruerne med en stjerneskruetrækker.
♦ Tag produktets bagside af.
♦ Løsn forbindelsen mellem det genopladelige batteri og platinen med en skævbider /
kærvskruetrækker. Tag det genopladelige batteri ud. Afl evér det genopladelige batteri
og produktet hver for sig til korrekt destruktion.
Bortskaff else af batterier/genopladelige batterier
Batterier/genopladelige batterier må ikke smides ud med husholdningsaff aldet. I henhold til
loven er alle forbrugere forpligtede til at afl evere almindelige batterier/genopladelige batterier
på et indsamlingssted i kommunen eller hos en forhandler. Denne forpligtelse hjælper med til, at
batterier/genopladelige batterier kan afl everes til miljøskånsom destruktion. Levér kun batterier/
genopladelige batterier tilbage i afl adet tilstand.
DK
SHBS 5 A1
IB_96126_SHBS5A1_LB3.indb 33IB_96126_SHBS5A1_LB3.indb 33 21.01.14 15:0621.01.14 15:06
33
Page 37

Tillæg
Tekniske data
DK
Strømforsyning PTB-045100EU
Indgangsspænding 100 - 240 V ∼, 50 / 60 Hz
Udgangsspænding 4,5 V
Udgangsstrøm 1000 mA
Beskyttelsesklasse
Hår- og skægklipper
Indgangsspænding 4,5 V
Indgangsstrøm 1000 mA
Genopladeligt batteri Genopladeligt li-ion-batteri 3,7 V, 700 mAh
Omgivelsestemperatur 5°C til 35°C
Oplysninger om overensstemmelseserklæringen
Dette produkt er i overensstemmelse med de grundlæggende krav og øvrige
relevante forskrifter i det europæiske direktiv for elektromagnetisk kompatibilitet
2004/108/EC samt lavspændingsdirektivet 2006/95/EC.
II /
Den komplette, originale overensstemmelseserklæring kan rekvireres hos
importøren.
Garanti
Du får 3 års garanti fra købsdatoen på dette produkt. Produkten er produceret omhyggeligt og
inden levering afprøvet samvittighedsfuldt.
Opbevar kassebonen som bevis for købet. I garantitilfælde bedes du kontakte dit servicested
telefonisk. På denne måde kan der garanteres gratis indsendelse af din vare.
34
IB_96126_SHBS5A1_LB3.indb 34IB_96126_SHBS5A1_LB3.indb 34 21.01.14 15:0621.01.14 15:06
SHBS 5 A1
Page 38

BEMÆRK
Garantien gælder kun for materiale- eller fabrikationsfejl, men ikke for transportskader, slidte
►
dele eller defekter på skrøbelige dele som f.eks. kontakten eller batterier.
Produktet er kun beregnet til privat og ikke til erhvervsmæssigt brug. Ved misbrug og uhensigtsmæssig behandling, anvendelse af vold og ved indgreb, som ikke er foretaget af vores autoriserede service-afdeling, ophører garantien.
Dine juridiske rettigheder indskrænkes ikke ved denne garanti. Garantiperioden forlænges ikke,
hvis der gøres brug af garantien. Det gælder også for udskiftede og reparerede dele.
Skader og mangler, der evt. allerede fandtes ved køb, skal anmeldes lige efter udpakning og
senest to dage efter købsdatoen.
Når garantiperioden er udløbet, skal evt. reparationer betales.
Service
Service Danmark
Tel.: 32 710005
E-Mail: kompernass@lidl.dk
IAN 96126
Åbningstid for hotline: Mandag til fredag fra kl. 8:00 – 20:00 (MET)
Importør
KOMPERNASS HANDELS GMBH
DK
BURGSTRASSE 21
44867 BOCHUM
GERMANY
www.kompernass.com
SHBS 5 A1
IB_96126_SHBS5A1_LB3.indb 35IB_96126_SHBS5A1_LB3.indb 35 21.01.14 15:0621.01.14 15:06
35
Page 39

36
IB_96126_SHBS5A1_LB3.indb 36IB_96126_SHBS5A1_LB3.indb 36 21.01.14 15:0621.01.14 15:06
SHBS 5 A1
Page 40

Inhaltsverzeichnis
Einführung . . . . . . . . . . . . . . . . . . . . . 38
Informationen zu dieser Bedienungsanleitung 38
Urheberrecht . . . . . . . . . . . . . . . . . . . . . . . . . 38
Haftungsbeschränkung . . . . . . . . . . . . . . . . . 38
Bestimmungsgemäße Verwendung . . . . . . . . 38
Verwendete Warnhinweise . . . . . . . . . . . . . . 39
Sicherheit . . . . . . . . . . . . . . . . . . . . . . 40
Grundlegende Sicherheitshinweise . . . . . . . . 40
Lieferumfang . . . . . . . . . . . . . . . . . . . 43
Ersatzteile . . . . . . . . . . . . . . . . . . . . . . . . . . . . 44
Entsorgung der Verpackung . . . . . . . . . . . . . 44
Gerätebeschreibung . . . . . . . . . . . . . 44
Vor der Inbetriebnahme . . . . . . . . . . 45
Aufl aden der Akkus . . . . . . . . . . . . . . . . . . . . 45
Betrieb mit dem Steckernetzteil . . . . . . . . . . . 45
Reinigung und Pfl ege . . . . . . . . . . . . 49
Rasieraufsatz reinigen . . . . . . . . . . . . . . . . . . 50
Nasen-/Ohrhaartrimmeraufsatz reinigen . . . 51
Entsorgung. . . . . . . . . . . . . . . . . . . . . 51
Gerät entsorgen . . . . . . . . . . . . . . . . . . . . . . . 51
Batterien/Akkus entsorgen . . . . . . . . . . . . . . . 52
Anhang . . . . . . . . . . . . . . . . . . . . . . . 53
Technische Daten . . . . . . . . . . . . . . . . . . . . . . 53
Hinweise zur Konformitätserklärung . . . . . . . 53
Garantie . . . . . . . . . . . . . . . . . . . . . . . . . . . . 53
Service . . . . . . . . . . . . . . . . . . . . . . . . . . . . . . 54
Importeur . . . . . . . . . . . . . . . . . . . . . . . . . . . . 54
DE
AT
CH
Schneidaufsätze ölen . . . . . . . . . . . . . . . . . . . 46
Bedienung und Betrieb . . . . . . . . . . . 46
Aufstecken/Wechseln der Schneidaufsätze . 46
Aufstecken/Wechseln der Kammaufsätze . . . 46
Haarschneideaufsatz . . . . . . . . . . . . . . . . . . . 47
Bartschneideaufsatz. . . . . . . . . . . . . . . . . . . . 48
Präzisionstrimmeraufsatz . . . . . . . . . . . . . . . . 48
Nasen-/Ohrhaartrimmeraufsatz . . . . . . . . . . 48
Rasieraufsatz . . . . . . . . . . . . . . . . . . . . . . . . . 48
SHBS 5 A1
IB_96126_SHBS5A1_LB3.indb 37IB_96126_SHBS5A1_LB3.indb 37 21.01.14 15:0621.01.14 15:06
37
Page 41

DE
AT
CH
Einführung
Informationen zu dieser Bedienungsanleitung
Herzlichen Glückwunsch zum Kauf Ihres neuen Gerätes.
Sie haben sich damit für ein hochwertiges Produkt entschieden. Die Bedienungsanleitung ist
Bestandteil dieses Produkts. Sie enthält wichtige Hinweise für Sicherheit, Gebrauch und Entsorgung.
Machen Sie sich vor der Benutzung des Produkts mit allen Bedien- und Sicherheitshinweisen
vertraut. Benutzen Sie das Produkt nur wie beschrieben und für die angegebenen Einsatzbereiche.
Bewahren Sie diese Bedienungsanleitung gut auf. Händigen Sie alle Unterlagen bei Weitergabe
des Produkts an Dritte mit aus.
Urheberrecht
Diese Dokumentation ist urheberrechtlich geschützt.
Jede Vervielfältigung, bzw. jeder Nachdruck, auch auszugsweise, sowie die Wiedergabe der
Abbildungen, auch im veränderten Zustand, ist nur mit schriftlicher Zustimmung des Herstellers
gestattet.
Haftungsbeschränkung
Alle in dieser Bedienungsanleitung enthaltenen technischen Informationen, Daten und Hinweise
für den Anschluss und die Bedienung entsprechen dem letzten Stand bei Drucklegung und erfolgen unter Berücksichtigung unserer bisherigen Erfahrungen und Erkenntnisse nach bestem Wissen.
Aus den Angaben, Abbildungen und Beschreibungen in dieser Anleitung können keine Ansprüche
hergeleitet werden.
Der Hersteller übernimmt keine Haftung für Schäden aufgrund von Nichtbeachtung der Bedienungsanleitung, nicht bestimmungsgemäßer Verwendung, unsachgemäßen Reparaturen, unerlaubt
vorgenommenen Veränderungen oder Verwendung nicht zugelassener Ersatzteile.
Bestimmungsgemäße Verwendung
Dieses Gerät ist nur für private Nutzung und nicht für gewerbliche Zwecke zugelassen. Das Gerät
ist nur zum Schneiden von Naturhaar vorgesehen. Es darf nur bei menschlichem Haar – nicht bei
Kunst- oder Tierhaar – angewendet werden.
Eine andere oder darüber hinausgehende Benutzung gilt als nicht bestimmungsgemäß. Ansprüche
jeglicher Art wegen Schäden aus nicht bestimmungsgemäßer Verwendung sind ausgeschlossen.
Das Risiko trägt allein der Benutzer.
38
SHBS 5 A1
IB_96126_SHBS5A1_LB3.indb 38IB_96126_SHBS5A1_LB3.indb 38 21.01.14 15:0621.01.14 15:06
Page 42

Verwendete Warnhinweise
In der vorliegenden Bedienungsanleitung werden folgende Warnhinweise verwendet:
GEFAHR
Ein Warnhinweis dieser Gefahrenstufe kennzeichnet eine drohende
gefährliche Situation.
Falls die gefährliche Situation nicht vermieden wird, kann dies zum Tod oder zu schweren
Verletzungen führen.
► Die Anweisungen in diesem Warnhinweis befolgen, um die Gefahr des Todes oder schwerer
Verletzungen von Personen zu vermeiden.
WARNUNG
Ein Warnhinweis dieser Gefahrenstufe kennzeichnet eine mögliche
gefährliche Situation.
Falls die gefährliche Situation nicht vermieden wird, kann dies zu Verletzungen führen.
► Die Anweisungen in diesem Warnhinweis befolgen, um Verletzungen von Personen zu
vermeiden.
DE
AT
CH
SHBS 5 A1
ACHTUNG
Ein Warnhinweis dieser Gefahrenstufe kennzeichnet einen möglichen
Sachschaden.
Falls die Situation nicht vermieden wird, kann dies zu Sachschäden führen.
► Die Anweisungen in diesem Warnhinweis befolgen, um Sachschäden zu vermeiden.
HINWEIS
Ein Hinweis kennzeichnet zusätzliche Informationen, die den Umgang mit dem Gerät
►
erleichtern.
39
IB_96126_SHBS5A1_LB3.indb 39IB_96126_SHBS5A1_LB3.indb 39 21.01.14 15:0621.01.14 15:06
Page 43

Sicherheit
In diesem Kapitel erhalten Sie wichtige Sicherheitshinweise im Umgang mit
dem Gerät. Dieses Gerät entspricht den vorgeschriebenen Sicherheitsbestimmungen. Ein unsachgemäßer Gebrauch kann zu Personen- und
Sachschäden führen.
DE
AT
CH
Grundlegende Sicherheitshinweise
Beachten Sie für einen sicheren Umgang mit dem Gerät die folgenden
Sicherheitshinweise:
■ Dieses Gerät kann von Kindern ab 8 Jahren und darüber sowie von
Personen mit verringerten physischen, sensorischen oder mentalen Fähigkeiten oder Mangel an Erfahrung und Wissen benutzt werden, wenn sie
beaufsichtigt oder bezüglich des sicheren Gebrauchs des Gerätes unterwiesen wurden und die daraus resultierenden Gefahren verstehen. Kinder
dürfen nicht mit dem Gerät spielen. Reinigung und Benutzer-Wartung
dürfen nicht von Kindern ohne Beaufsichtigung durchgeführt werden.
■ Kontrollieren Sie das Gerät vor der Verwendung auf äußere sichtbare
Schäden. Nehmen Sie ein beschädigtes Gerät nicht in Betrieb. Es besteht
Stromschlaggefahr.
■ Sollte ein Schaden am Kabel, am Steckernetzteil, am Gehäuse oder an
anderen Teilen festgestellt werden, darf das Gerät nicht weiter benutzt
werden.
■ Lassen Sie Reparaturen am Gerät nur von autorisierten Fachbetrieben
oder dem Kundenservice durchführen. Durch unsachgemäße Reparaturen
können erhebliche Gefahren für den Benutzer entstehen. Zudem erlischt
der Garantieanspruch.
40
IB_96126_SHBS5A1_LB3.indb 40IB_96126_SHBS5A1_LB3.indb 40 21.01.14 15:0621.01.14 15:06
SHBS 5 A1
Page 44

■ Benutzen Sie das Gerät nicht mit defektem Schneidaufsatz oder defektem
Kammaufsatz, da diese scharfe Kanten haben können. Es besteht Verletzungsgefahr!
■ Defekte Bauteile dürfen nur gegen Original-Ersatzteile ausgetauscht
werden. Nur bei diesen Teilen ist gewährleistet, dass sie die Sicherheitsanforderungen erfüllen werden.
■ Betreiben Sie das Gerät nie unbeaufsichtigt und nur gemäß den Anga-
ben auf dem Typenschild.
■ Verwenden Sie für den Netzbetrieb nur das mitgelieferte Steckernetzteil.
■ Ziehen Sie das Steckernetzteil aus der Steckdose
- wenn eine Störung auftritt,
- bevor Sie das Gerät reinigen,
- wenn Sie das Gerät längere Zeit nicht benutzen,
- nach jedem Gebrauch.
Ziehen Sie dabei am Steckernetzteil direkt und nicht am Kabel.
■ ACHTUNG! Das Gerät trocken halten.
■ Das Gerät nicht während des Badens benutzen. Es besteht Strom-
schlaggefahr!
■ Tauchen Sie das Gerät sowie das Kabel mit Steckernetzteil niemals in
DE
AT
CH
Wasser oder eine andere Flüssigkeit.
■ Falls das Gerät ins Wasser gefallen ist, ziehen Sie unbedingt zuerst das
Steckernetzteil aus der Steckdose, bevor Sie ins Wasser greifen.
■ Fassen Sie das Steckernetzteil niemals mit nassen Händen an, besonders
wenn Sie es in die Steckdose stecken bzw. aus dieser herausziehen.
Es besteht Stromschlaggefahr!
SHBS 5 A1
IB_96126_SHBS5A1_LB3.indb 41IB_96126_SHBS5A1_LB3.indb 41 21.01.14 15:0621.01.14 15:06
41
Page 45

■ Der Einbau einer Fehlerstromschutzeinrichtung mit einem Bemessungs-
auslösestrom von nicht mehr als 30 mA bietet weiteren Schutz vor einem
elektrischen Schlag. Lassen Sie den Einbau ausschließlich von einer
Elektro-Fachkraft durchführen.
■ Prüfen Sie das Steckernetzteil und den Haar- und Bartschneider regelmäßig
DE
AT
CH
auf eventuelle mechanische Defekte.
■ Achten Sie darauf, dass das Kabel nicht in Schranktüren eingeklemmt
oder über heiße Flächen gezogen wird. Es könnte sonst die Isolierung des
Kabels beschädigt werden.
■ Schließen Sie das Steckernetzteil nur an eine gut erreichbare Steckdose
an, damit im Störungsfall das Steckernetzteil schnell aus der Steckdose
gezogen werden kann.
■ Decken Sie das Steckernetzteil nicht ab, um eine unzulässige Erwär-
mung zu vermeiden.
42
IB_96126_SHBS5A1_LB3.indb 42IB_96126_SHBS5A1_LB3.indb 42 21.01.14 15:0621.01.14 15:06
SHBS 5 A1
Page 46

Lieferumfang
Das Gerät wird standardmäßig mit folgenden Komponenten geliefert:
▯ Haar- und Bartschneider
▯ Ladestation
▯ Steckernetzteil
▯ Haarschneideaufsatz
▯ Bartschneideaufsatz
▯ Präzisionstrimmeraufsatz
▯ Nasen-/Ohrhaartrimmeraufsatz
▯ Rasieraufsatz
▯ Kammaufsatz für den Haarschneideaufsatz
▯ Kammaufsatz für den Bartschneideaufsatz
▯ Reinigungsbürste
▯ Schere
▯ Kamm
▯ Klingenöl
▯ Aufbewahrungsbeutel
▯ Diese Bedienungsanleitung
HINWEIS
Prüfen Sie die Lieferung auf Vollständigkeit und auf sichtbare Schäden.
►
► Bei einer unvollständigen Lieferung oder Schäden infolge mangelhafter Verpackung oder
durch Transport wenden Sie sich an die Service-Hotline (siehe Kapitel Service).
DE
AT
CH
♦ Entnehmen Sie alle Teile des Gerätes aus dem Karton.
♦ Entfernen Sie sämtliches Verpackungsmaterial vom Gerät.
GEFAHR
► Verpackungsmaterialien dürfen nicht zum Spielen verwendet werden.
Es besteht Erstickungsgefahr.
SHBS 5 A1
IB_96126_SHBS5A1_LB3.indb 43IB_96126_SHBS5A1_LB3.indb 43 21.01.14 15:0621.01.14 15:06
43
Page 47

DE
AT
CH
Ersatzteile
Wenden Sie sich bei Ersatzteilbedarf an die Service-Hotline (siehe Kapitel Service).
Entsorgung der Verpackung
Die Verpackung schützt das Gerät vor Transportschäden.
Die Rückführung der Verpackung in den Materialkreislauf spart Rohstoff e und verringert das
Abfallaufkommen. Entsorgen Sie nicht mehr benötigte Verpackungsmaterialien gemäß den örtlich
geltenden Vorschriften.
Gerätebeschreibung
Abbildung A:
Haarschneideaufsatz
2
Schiebeschalter für Schnittlängen-Feinjustierung
3
Ein- / Aus-Schalter
4
Ladekontrollanzeige
5
Ladestation / Halter mit Anschlussbuchse für Steckernetzteil
44
Abbildung B:
6
Steckernetzteil
Abbildung C:
7
Bartschneideaufsatz
8
Präzisionstrimmeraufsatz
9
Nasen-/Ohrhaartrimmeraufsatz
10
Rasieraufsatz
11
Kammaufsatz für den Haarschneideaufsatz
12
Kammaufsatz für den Bartschneideaufsatz
SHBS 5 A1
IB_96126_SHBS5A1_LB3.indb 44IB_96126_SHBS5A1_LB3.indb 44 21.01.14 15:0621.01.14 15:06
Page 48

Vor der Inbetriebnahme
Der Haar- und Bartschneider kann als Akku- oder Netzgerät betrieben werden.
Aufl aden der Akkus
Vor der ersten Anwendung sollte der Akku des Haar- und Bartschneiders mindestens 90 Minuten
aufgeladen werden.
♦ Verbinden Sie das Kabel des Steckernetzteils 6 mit der Ladestation 5 des Haar- und Bartschneiders.
♦ Vermeiden Sie Beschädigungen des Geräts! Stellen Sie sicher, dass das Gerät ausgeschaltet
ist, bevor Sie den Akku aufl aden.
♦ Stecken Sie das Steckernetzteil 6 (Weitspannungsbereich 100 - 240 V) in eine zu den Gerä-
tevorgaben passende Steckdose.
♦ Der Ladevorgang wird durch die Ladekontrollanzeige 4 dargestellt:
- Ladekontrollanzeige blinkt rot: Akku ist entladen
- Ladekontrollanzeige leuchtet rot: Akku wird geladen
- Ladekontrollanzeige leuchtet grün: Akku ist geladen.
♦ Mit voll geladenem Akku können Sie das Gerät bis zu ca. 60 Minuten ohne Anschluss an das
Stromnetz betreiben.
DE
AT
CH
Betrieb mit dem Steckernetzteil
Kommt Ihr Haar- und Bartschneider wegen entladenem oder leistungsschwachem Akku während
der Rasur zum Stillstand, so können Sie bei angeschlossenem Steckernetzteil 6 die Rasur fortsetzen.
♦ Stecken Sie den Kabelstecker des Steckernetzteils 6 in die Buchse auf der Unterseite des
Haar- und Bartschneiders.
♦ Um Verletzungen und Schäden am Gerät zu vermeiden, schalten Sie das Gerät immer aus,
bevor Sie es mit dem Stromnetz verbinden.
♦ Stecken Sie das Steckernetzteil 6 (Weitspannungsbereich 100 - 240 V) in eine zu den Gerä-
tevorgaben passende Steckdose.
♦ Nach 1 - 2 Sekunden können Sie das Gerät mit dem EIN- / AUS-Schalter 3 einschalten. Sollte
das Gerät nicht sofort anlaufen, schalten Sie es nochmals aus und warten Sie ca. 1 Minute,
bevor Sie es erneut einschalten.
♦ Wollen Sie den Akku ohne Nutzung der Ladestation 5 auf diese Weise aufl aden, dann nur bei
ausgeschaltetem Gerät.
SHBS 5 A1
45
IB_96126_SHBS5A1_LB3.indb 45IB_96126_SHBS5A1_LB3.indb 45 21.01.14 15:0621.01.14 15:06
Page 49

Schneidaufsätze ölen
Wir empfehlen den Haarschneide- , Bartschneide- 7 und Präzisionstrimmeraufsatz 8 vor der
ersten Verwendung und nach der Reinigung zu ölen, um ihre Beweglichkeit zu erhalten.
♦ Geben Sie hierzu ein bis zwei Tropfen Klingenöl (Zubehör) zwischen die Klingen und verteilen
Sie es gleichmäßig.
DE
AT
CH
♦ Wischen Sie ggf. überschüssiges Öl mit einem weichen Tuch ab. Verwenden Sie nur säurefreies
Öl, wie z.B. Nähmaschinenöl.
Bedienung und Betrieb
Aufstecken/Wechseln der Schneidaufsätze
WARNUNG
► Schalten Sie das Gerät aus, bevor Sie die Schneidaufsätze aufstecken oder wechseln.
Es besteht Verletzungsgefahr!
♦ Drücken Sie von vorne mit dem Daumen gegen den Schneidaufsatz, um ihn aus der Halterung
zu lösen (siehe Abb. D). Nehmen Sie den Schneidaufsatz vom Gerät ab.
♦ Zum Aufsetzen des Schneidaufsatzes führen Sie die untere Stecklasche in die Aufnahmeöff nung
des Gerätes (siehe Abb. E).
♦ Drücken Sie anschließend den oberen Teil des Schneidaufsatzes auf das Gerät, bis er hörbar
einrastet und fest sitzt (siehe Abb. F).
Aufstecken/Wechseln der Kammaufsätze
Kammaufsatz für den Haarschneideaufsatz
Der Kammaufsatz 11 bietet Einstellungen für 6 verschiedene Schnittlängen
(13 mm/15 mm/17 mm/19 mm/21 mm/23 mm).
♦ Stecken Sie den Kammaufsatz 11 von vorne auf den Haarschneideaufsatz und drücken das
hintere Ende fest, bis er einrastet.
♦ Zum Abnehmen des Kammaufsatzes 11 lösen Sie ihn an seinem unteren Ende und ziehen ihn
nach vorne vom Gerät ab.
46
IB_96126_SHBS5A1_LB3.indb 46IB_96126_SHBS5A1_LB3.indb 46 21.01.14 15:0621.01.14 15:06
SHBS 5 A1
Page 50

Kammaufsatz für den Bartschneideaufsatz
Der Kammaufsatz 12 bietet Einstellungen für 6 verschiedene Schnittlängen
(4 mm/6 mm/9 mm/12 mm/15 mm/18 mm).
♦ Stecken Sie den Kammaufsatz 12 von vorne auf den Bartschneideaufsatz 7 und schieben Sie
ihn runter.
♦ Zum Abnehmen des Kammaufsatzes 12 schieben Sie ihn nach vorne vom Gerät ab.
Haarschneideaufsatz
HINWEIS
Das zu schneidende Haar sollte sauber und trocken sein.
►
► Kämmen Sie das Haar sorgfältig durch, um eventuelle Knoten zu entfernen.
► Legen Sie einen Frisierumhang oder ein Tuch um Hals und Nacken, um zu vermeiden, dass
Haarreste in den Kragen fallen.
► Beginnen Sie zuerst mit Kammaufsatz 11 mit einer längeren Schnittlänge und stellen Sie im
Verlauf des Schneidens stufenweise kürzere Schnittlängen ein.
► Bitte beachten Sie, dass die entsprechende Schnittlänge nur dann zustande kommt, wenn
der Schiebeschalter 2 sich in der Position 3 befi ndet und das Gerät im rechten Winkel zur
Hautoberfl äche gehalten wird.
DE
AT
CH
SHBS 5 A1
♦ Schalten Sie den Haar- und Bartschneider mit dem EIN- / AUS-Schalters 3 ein.
♦ Führen Sie den Haar- und Bartschneider langsam durch das Haar.
♦ Halten Sie das Gerät dabei so, dass der Kammaufsatz 11 möglichst fl ach aufl iegt.
♦ Schneiden Sie immer vom Nacken in Richtung Oberkopf bzw. von Stirn und Schläfen nach
oben zur Kopfmitte hin.
♦ Verwenden Sie den Haarschneideaufsatz ohne Kammaufsatz 11, um die Haare sehr kurz
zu schneiden.
♦ Über den Schiebeschalter
variieren.
2
können Sie die gewünschte Schnittlänge in 3 Stufen gering
47
IB_96126_SHBS5A1_LB3.indb 47IB_96126_SHBS5A1_LB3.indb 47 21.01.14 15:0621.01.14 15:06
Page 51

DE
AT
CH
Bartschneideaufsatz
HINWEIS
Kämmen Sie den Bart in Wuchsrichtung durch, um eventuelle Knoten zu entfernen.
►
► Beginnen Sie zuerst mit Kammaufsatz 12 mit einer längeren Schnittlänge und stellen Sie im
Verlauf des Schneidens stufenweise kürzere Schnittlängen ein.
► Bitte beachten Sie, dass die entsprechende Schnittlänge nur dann zustande kommt, wenn
der Schiebeschalter
Hautoberfl äche gehalten wird.
♦ Schneiden Sie den Bart gegen die Bartwuchsrichtung (vom Kinn zum Ohr nach oben hin).
Trimmen Sie zuerst die eine, dann die andere Seite.
♦ Verwenden Sie den Bartschneideaufsatz 7 ohne Kammaufsatz 12, um den Bart sehr kurz
oder Schnurbart und Konturen zu schneiden.
2
sich in der Position 3 befi ndet und das Gerät im rechten Winkel zur
♦ Über den Schiebeschalter
2
können Sie die gewünschte Schnittlänge in 3 Stufen gering variieren.
Präzisionstrimmeraufsatz
♦ Benutzen Sie den Präzisionstrimmeraufsatz 8, um Schnurrbart, Backenbärte, Koteletten oder
Augenbrauen zu formen.
♦ Legen Sie die Kante des Präzisionstrimmeraufsatzes 8 an der gewünschten Höhe des Haaran-
satzes an und bewegen Sie das Gerät nach unten.
Nasen-/Ohrhaartrimmeraufsatz
♦ Benutzen Sie den Nasen-/Ohrhaartrimmer 9, wenn Sie Nasen- oder Ohrhaare entfernen
möchten.
♦ Führen Sie nur die Metallspitze des Nasen-/Ohrhaartrimmeraufsatzes 9 langsam in ein Nasen-
loch oder ein Ohr ein.
♦ Bewegen Sie das Gerät langsam kreisförmig, um die Haare zu schneiden.
Rasieraufsatz
♦ Benutzen Sie den Rasieraufsatz 10 für eine Trockenrasur.
♦ Halten Sie das Gerät im rechten Winkel zur Hautoberfl äche und führen Sie es sanft über Ihr Gesicht.
♦ Rasieren Sie gegen die Bartwuchsrichtung. An komplizierten Stellen, wie z.B. am Kinn straff en
Sie die Haut, um ein besseres Ergebnis zu erhalten.
48
IB_96126_SHBS5A1_LB3.indb 48IB_96126_SHBS5A1_LB3.indb 48 21.01.14 15:0621.01.14 15:06
SHBS 5 A1
Page 52

Reinigung und Pfl ege
GEFAHR
Lebensgefahr durch elektrischen Schlag!
► Ziehen Sie das Steckernetzteil 6 aus der Steckdose, bevor Sie das Gerät reinigen.
► Fassen Sie das Steckernetzteil 6 niemals mit nassen Händen an, wenn Sie es in die Steck-
dose stecken bzw. aus dieser herausziehen.
► Halten Sie das Steckernetzteil 6 und das Kabel immer trocken.
ACHTUNG
Mögliche Beschädigung des Gerätes.
► Der Haar- und Bartschneider darf zur Reinigung nicht in Wasser oder andere Flüssigkeiten
getaucht werden, da das Gerät nicht wasserdicht ist. Dadurch könnten stromführende Teile
(Akkus) beschädigt werden.
► Verwenden Sie keine aggressiven oder scheuernden Reinigungsmittel, da diese die Gehäu-
seoberfl äche angreifen können.
► Reinigen Sie das Gehäuse ausschließlich mit einem leicht feuchten Tuch und einem milden
Spülmittel.
DE
AT
CH
SHBS 5 A1
♦ Schalten Sie den Haar- und Bartschneider mit dem EIN- / AUS-Schalter 3 aus.
♦ Trennen Sie das Kabel vom Gerät und ziehen Sie das Steckernetzteil 6 aus der Steckdose.
♦ Nehmen Sie ggf. einen aufgesetzten Kammaufsatz (11 oder 12) vom Gerät.
♦ Waschen Sie den Kammaufsatz (11 oder 12) falls erforderlich mit fl ießendem Wasser ab.
♦ Trocknen Sie den Kammaufsatz (11 oder 12) anschließend gut ab.
♦ Drücken Sie von vorne mit dem Daumen gegen den Schneidaufsatz, um ihn aus der Halterung
zu lösen (siehe Abb. D).
♦ Entfernen Sie mit beiliegender Reinigungsbürste verbliebene Haarreste vom Schneidaufsatz.
♦ Stecken Sie die Stecklasche des Schneidaufsatzes nach erfolgter Reinigung in die Aufnahmeöff -
nung des Gerätes zurück (siehe Abb. E).
♦ Lassen Sie den Schneidaufsatz durch leichten Druck von oben wieder einrasten (siehe Abb. F).
49
IB_96126_SHBS5A1_LB3.indb 49IB_96126_SHBS5A1_LB3.indb 49 21.01.14 15:0621.01.14 15:06
Page 53

HINWEIS
Um die Reibung zu reduzieren, geben Sie ein bis zwei Tropfen Klingenöl (Zubehör)
►
zwischen die Klingen und verteilen Sie es gleichmäßig. Sie können auch jedes säurefreie
Öl (wie z.B. Nähmaschinenöl) verwenden. Wischen Sie ggf. überschüssiges Öl mit einem
weichen Tuch ab.
DE
AT
CH
Rasieraufsatz reinigen
ACHTUNG
Mögliche Beschädigung des Gerätes.
► Bauen Sie die Scherfolie nicht aus dem Scherfolienrahmen aus und reinigen Sie diese nicht
mit der Reinigungsbürste.
♦ Nehmen Sie den Rasieraufsatz 10 vom Gerät ab.
♦ Drücken Sie die seitlich angebrachten Knöpfe des Rasieraufsatzes 10 und ziehen Sie den
Scherfolienrahmen ab. Halten Sie den Scherfolienrahmen dabei nur seitlich und drücken Sie
nicht auf die Scherfolie.
♦ Reinigen Sie das Schermesser mit der mitgelieferten Reinigungsbürste.
♦ Reinigen Sie die Scherfolie im Scherfolienrahmen unter fl ießendem Wasser und lassen Sie diese
vollständig trocknen, bevor Sie sie wieder auf den Rasieraufsatz 10 setzen.
♦ Setzen Sie den Scherfolienrahmen wieder auf den Rasieraufsatz 10. Achten Sie beim Aufsetzen
darauf, dass die Befestigungslaschen am Scherfolienrahmen in die entsprechenden Aussparungen
am Rasieraufsatz 10 passen und drücken Sie den Scherfolienrahmen leicht herunter, bis er
hörbar einrastet.
HINWEIS
Geben Sie von Zeit zu Zeit ein bis zwei Tropfen Klingenöl (Zubehör) auf das Schermesser
►
und verteilen Sie es gleichmäßig. Setzen Sie den Rasieraufsatz 10 auf das Gerät und lassen
das Gerät einige Sekunden laufen ohne es zu benutzen. Wischen Sie ggf. überschüssiges Öl
mit einem weichen Tuch ab.
50
IB_96126_SHBS5A1_LB3.indb 50IB_96126_SHBS5A1_LB3.indb 50 21.01.14 15:0621.01.14 15:06
SHBS 5 A1
Page 54

Nasen-/Ohrhaartrimmeraufsatz reinigen
♦ Nehmen Sie den Nasen-/Ohrhaartrimmeraufsatz 9 vom Gerät ab.
♦ Reinigen Sie den Nasen-/Ohrhaartrimmeraufsatz 9 unter fl ießendem Wasser und lassen Sie
ihn vollständig trocknen, bevor Sie ihn wieder verwenden.
Entsorgung
Gerät entsorgen
Werfen Sie das Gerät keinesfalls in den normalen Hausmüll. Dieses Produkt
unterliegt der europäischen Richtlinie 2012/19/EU (Waste Electrical and Electronic Equipment).
Entsorgen Sie das Gerät über einen zugelassenen Entsorgungsbetrieb oder über Ihre kommunale
Entsorgungseinrichtung. Beachten Sie die aktuell geltenden Vorschriften. Setzen Sie sich im Zweifelsfall mit Ihrer Entsorgungseinrichtung in Verbindung.
HINWEIS
Vor der Entsorgung des Gerätes muss unbedingt der Akku entfernt werden.
►
ACHTUNG
Für das Ausbauen des Akkus benötigen Sie etwas handwerkliches Geschick, ansonsten
►
besteht Verletzungsgefahr! Sollten Sie keine Erfahrungen im Umgang mit Werkzeug haben,
sollten Sie den Akku-Ausbau einer Person überlassen, die diesen fachgerecht ausführen
kann.
► Achten Sie beim Ausbau darauf, dass der Akku nicht beschädigt wird. Es besteht Brandge-
fahr!
► Der ausgebaute Akku darf nicht wieder verwendet werden.
► Schließen Sie den Akku niemals kurz. Die Kontakte an dem ausgebauten Akku dürfen nicht
durch metallische Gegenstände verbunden werden. Der Akku kann überhitzen und explodie-
ren.
► ACHTUNG! Bauen Sie den Akku nur für die Entsorgung des Gerätes aus. Durch den
Ausbau des Akkus wird das Gerät zerstört. Nehmen Sie ein zerlegtes Gerät nicht wieder in
Betrieb.
DE
AT
CH
SHBS 5 A1
IB_96126_SHBS5A1_LB3.indb 51IB_96126_SHBS5A1_LB3.indb 51 21.01.14 15:0621.01.14 15:06
51
Page 55

DE
AT
CH
♦ Trennen Sie das Gerät vom Netz.
♦ Schalten Sie das Gerät ein und lassen Sie es so lange laufen, bis der Akku leer ist.
♦ Nehmen Sie den Schneidaufsatz vom Gerät ab (siehe Kapitel Aufstecken/Wechseln der
Schneidaufsätze).
♦ Auf der Geräterückseite befi nden sich drei Schrauben. Zwei der Schrauben sind in der Aufnahme-
öff nung des Gerätes.
♦ Lösen Sie die Schrauben mit einem Kreuzschlitzschraubendreher.
♦ Nehmen Sie die Geräterückseite ab.
♦ Lösen Sie mit einem Seitenschneider / Schlitzschraubendreher die Verbindung vom Akku zu der
Platine. Entnehmen Sie den Akku. Geben Sie den Akku und das Gerät getrennt voneinander
zur geeigneten Entsorgung.
Batterien/Akkus entsorgen
Batterien/Akkus dürfen nicht im Hausmüll entsorgt werden. Jeder Verbraucher ist gesetzlich
verpfl ichtet, Batterien/Akkus bei einer Sammelstelle seiner Gemeinde/seines Stadtteils oder im
Handel abzugeben. Diese Verpfl ichtung dient dazu, dass Batterien/Akkus einer umweltschonenden
Entsorgung zugeführt werden können. Geben Sie Batterien/Akkus nur im entladenen Zustand zurück.
52
IB_96126_SHBS5A1_LB3.indb 52IB_96126_SHBS5A1_LB3.indb 52 21.01.14 15:0621.01.14 15:06
SHBS 5 A1
Page 56

Anhang
Technische Daten
Steckernetzteil PTB-045100EU
Eingangsspannung 100 - 240 V ∼, 50 / 60 Hz
Ausgangsspannung 4,5 V
Ausgangsstrom 1000 mA
Schutzklasse
Haar- und Bartschneider
Eingangsspannung 4,5 V
Eingangsstrom 1000 mA
Akku Li-Ion Akku 3,7 V, 700 mAh
Umgebungstemperatur 5°C bis 35°C
Hinweise zur Konformitätserklärung
Dieses Gerät entspricht hinsichtlich Übereinstimmung mit den grundlegenden
Anforderungen und den anderen relevanten Vorschriften der europäischen
Richtlinie für elektromagnetische Verträglichkeit 2004/108/EC sowie der
Niederspannungsrichtlinie 2006/95/EC.
DE
AT
CH
II /
Die vollständige Original-Konformitätserklärung ist beim Importeur erhältlich.
Garantie
Sie erhalten auf dieses Gerät 3 Jahre Garantie ab Kaufdatum. Das Gerät wurde sorgfältig produziert und vor Anlieferung gewissenhaft geprüft.
Bitte bewahren Sie den Kassenbon als Nachweis für den Kauf auf. Bitte setzen Sie sich im Garantiefall mit Ihrer Servicestelle telefonisch in Verbindung. Nur so kann eine kostenlose Einsendung
Ihrer Ware gewährleistet werden.
SHBS 5 A1
IB_96126_SHBS5A1_LB3.indb 53IB_96126_SHBS5A1_LB3.indb 53 21.01.14 15:0621.01.14 15:06
53
Page 57

DE
AT
CH
HINWEIS
Das Produkt ist lediglich für den privaten und nicht für den gewerblichen Gebrauch bestimmt.
Bei missbräuchlicher und unsachgemäßer Behandlung, Gewaltanwendung und bei Eingriff en,
die nicht von unserer autorisierten Service-Niederlassung vorgenommen wurden, erlischt die Garantie.
Ihre gesetzlichen Rechte werden durch diese Garantie nicht eingeschränkt. Die Garantiezeit wird
durch die Gewährleistung nicht verlängert. Dies gilt auch für ersetzte und reparierte Teile.
Eventuell schon beim Kauf vorhandene Schäden und Mängel müssen sofort nach dem Auspacken
gemeldet werden, spätestens aber zwei Tage nach Kaufdatum.Nach Ablauf der Garantiezeit
anfallende Reparaturen sind kostenpfl ichtig.
Service
Service Deutschland
Tel.: 0800 5435 111
E-Mail: kompernass@lidl.de
IAN 96126
Die Garantieleistung gilt nur für Material- oder Fabrikationsfehler, nicht aber für Transport-
►
schäden, Verschleißteile oder für Beschädigungen an zerbrechlichen Teilen, z. B. Schalter
oder Akkus.
Importeur
54
Service Österreich
Tel.: 0820 201 222 (0,15 EUR/Min.)
E-Mail: kompernass@lidl.at
IAN 96126
Service Schweiz
Tel.: 0842 665566 (0,08 CHF/Min., Mobilfunk max. 0,40 CHF/Min.)
E-Mail: kompernass@lidl.ch
IAN 96126
Erreichbarkeit Hotline: Montag bis Freitag von 8:00 Uhr – 20:00 Uhr (MEZ)
KOMPERNASS HANDELS GMBH
BURGSTRASSE 21
44867 BOCHUM
DEUTSCHLAND
www.kompernass.com
SHBS 5 A1
IB_96126_SHBS5A1_LB3.indb 54IB_96126_SHBS5A1_LB3.indb 54 21.01.14 15:0621.01.14 15:06
Page 58

IAN 96126
KOMPERNASS HANDELS GMBH
BURGSTRASSE 21
44867 BOCHUM
DEUTSCHLAND / GERMANY
www.kompernass.com
Last Information Update · Tilstand af information
Stand der Informationen: 01 / 2014 · Ident.-No.: SHBS5A1-012014-1
CV_96126_SHBS5A1_LB3.indd 1CV_96126_SHBS5A1_LB3.indd 1 23.01.14 08:1123.01.14 08:11
 Loading...