

Page 1
IAN 93556
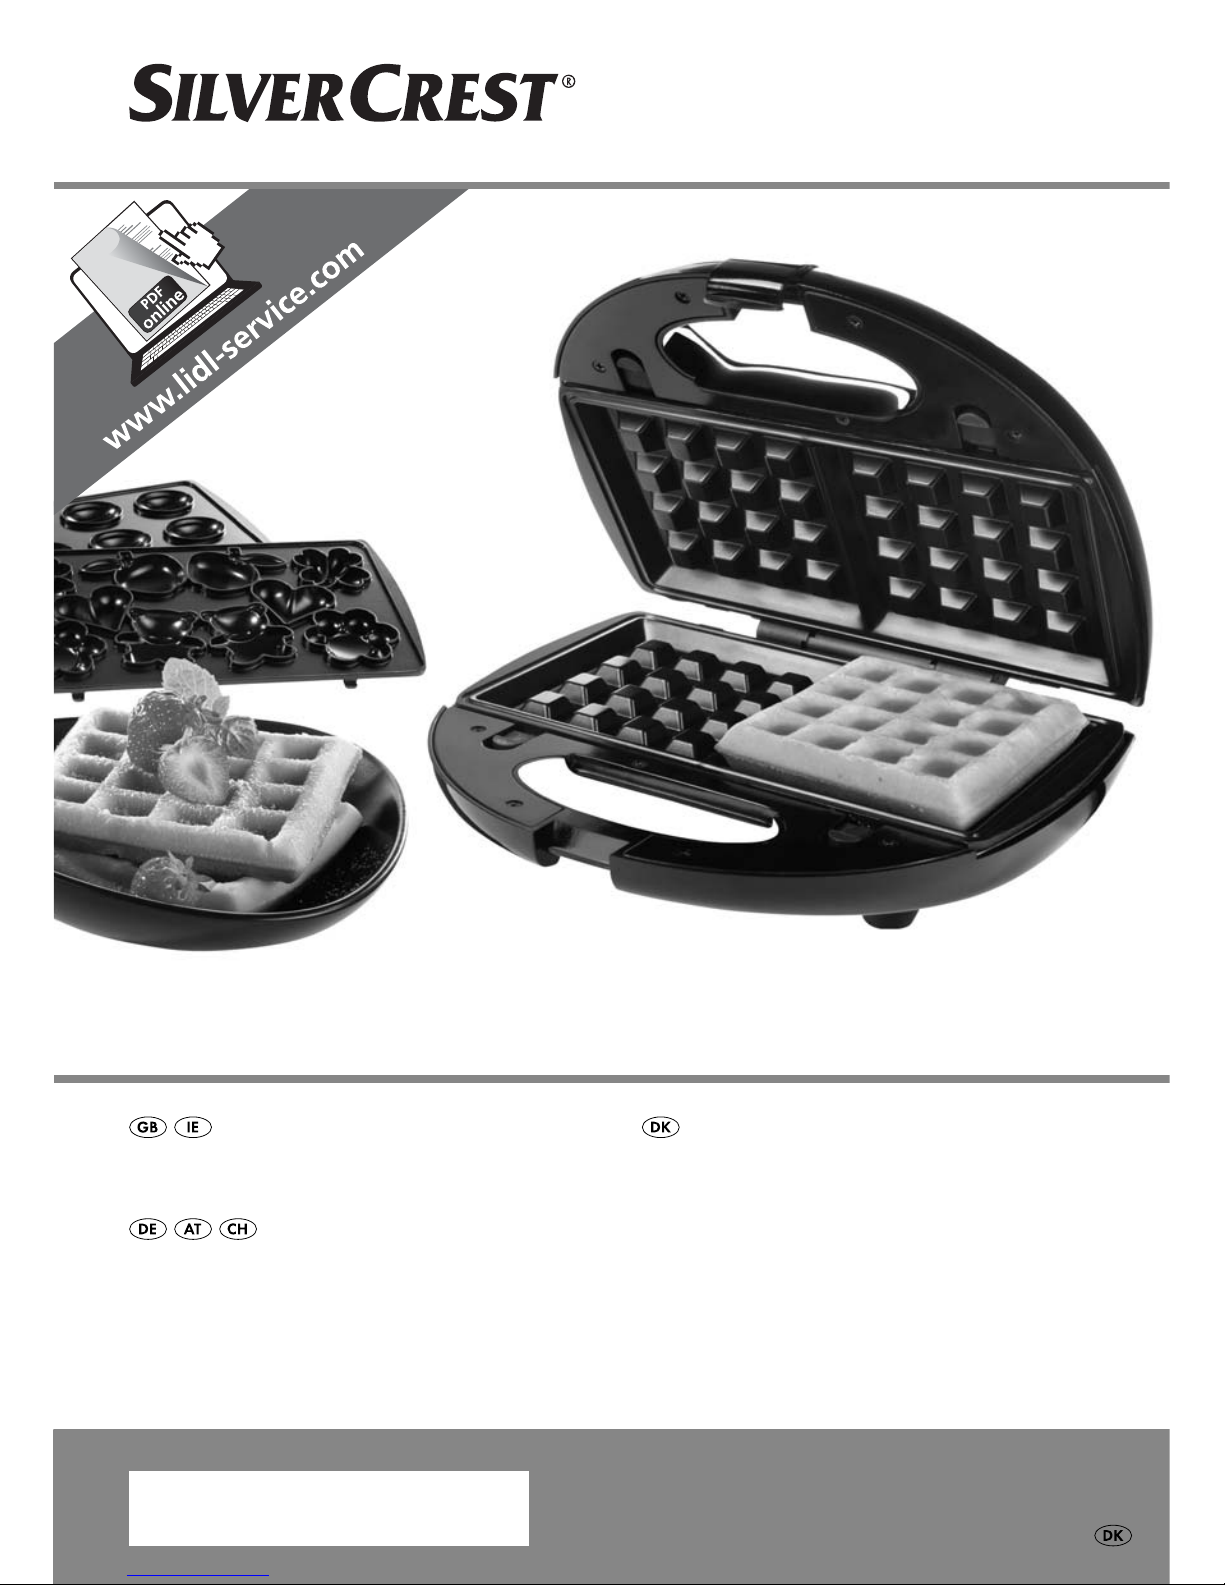
WAFFLE MAKER SWEW 750 A1
WAFFLE MAKER
Operating instructions
VAFFELJERN
Betjeningsvejledning
WAFFELEISEN
Bedienungsanleitung
Page 2
GB / IE Operating instructions Page 1
DK Betjeningsvejledning Side 17
DE / AT / CH Bedienungsanleitung Seite 33
Before reading, unfold the page containing the illustrations and familiarise yourself with all functions of
the device.
Før du læser, vend siden med billeder frem og bliv bekendt med alle apparatets funktioner.
Klappen Sie vor dem Lesen die Seite mit den Abbildungen aus und machen Sie sich anschließend mit allen
Funktionen des Gerätes vertraut.
Page 3
A
E
B
C
D
Page 4

Index
Introduction . . . . . . . . . . . . . . . . . . . . . . . . . . . . . . . . . . . . . . . . . . . . . . . . . . . 2
Copyright . . . . . . . . . . . . . . . . . . . . . . . . . . . . . . . . . . . . . . . . . . . . . . . . . . . . . . . . . . . . . . . 2
Limited liability . . . . . . . . . . . . . . . . . . . . . . . . . . . . . . . . . . . . . . . . . . . . . . . . . . . . . . . . . . . 2
Intended use . . . . . . . . . . . . . . . . . . . . . . . . . . . . . . . . . . . . . . . . . . . . . . . . . . . . . . . . . . . . 2
Items supplied . . . . . . . . . . . . . . . . . . . . . . . . . . . . . . . . . . . . . . . . . . . . . . . . . 3
Disposal of the packaging . . . . . . . . . . . . . . . . . . . . . . . . . . . . . . . . . . . . . . . . . . . . . . . . . . 3
Appliance description . . . . . . . . . . . . . . . . . . . . . . . . . . . . . . . . . . . . . . . . . . . 4
Technical data . . . . . . . . . . . . . . . . . . . . . . . . . . . . . . . . . . . . . . . . . . . . . . . . . 4
Safety instructions . . . . . . . . . . . . . . . . . . . . . . . . . . . . . . . . . . . . . . . . . . . . . 5
Exchanging the removable plates . . . . . . . . . . . . . . . . . . . . . . . . . . . . . . . . . 7
Placement of the removable plates . . . . . . . . . . . . . . . . . . . . . . . . . . . . . . . . . . . . . . . . . . . 7
Extracting the removable plate . . . . . . . . . . . . . . . . . . . . . . . . . . . . . . . . . . . . . . . . . . . . . . 8
Commissioning . . . . . . . . . . . . . . . . . . . . . . . . . . . . . . . . . . . . . . . . . . . . . . . . 8
GB
IE
Operation . . . . . . . . . . . . . . . . . . . . . . . . . . . . . . . . . . . . . . . . . . . . . . . . . . . . 9
Making nut waffl es/patterned waffl es . . . . . . . . . . . . . . . . . . . . . . . . . . . . . 9
Making waffl es . . . . . . . . . . . . . . . . . . . . . . . . . . . . . . . . . . . . . . . . . . . . . . . . . . . . . . . . . 10
Cleaning . . . . . . . . . . . . . . . . . . . . . . . . . . . . . . . . . . . . . . . . . . . . . . . . . . . . . 11
Storage . . . . . . . . . . . . . . . . . . . . . . . . . . . . . . . . . . . . . . . . . . . . . . . . . . . . . 11
Troubleshooting . . . . . . . . . . . . . . . . . . . . . . . . . . . . . . . . . . . . . . . . . . . . . . 12
Recipes . . . . . . . . . . . . . . . . . . . . . . . . . . . . . . . . . . . . . . . . . . . . . . . . . . . . . . 12
Waffl es . . . . . . . . . . . . . . . . . . . . . . . . . . . . . . . . . . . . . . . . . . . . . . . . . . . . . . . . . . . . . . . 12
Chocolate waffl es . . . . . . . . . . . . . . . . . . . . . . . . . . . . . . . . . . . . . . . . . . . . . . . . . . . . . . . 13
Basic batter for nut waffl es/patterned waffl es . . . . . . . . . . . . . . . . . . . . . . . . . . . . . . . . . . 13
Sweet batter for nut waffl es/patterned waffl es . . . . . . . . . . . . . . . . . . . . . . . . . . . . . . . . . 14
Savoury batter for nut waffl es/patterned waffl es . . . . . . . . . . . . . . . . . . . . . . . . . . . . . . . 15
Disposal . . . . . . . . . . . . . . . . . . . . . . . . . . . . . . . . . . . . . . . . . . . . . . . . . . . . . 15
Warranty and Service . . . . . . . . . . . . . . . . . . . . . . . . . . . . . . . . . . . . . . . . . 16
Importer . . . . . . . . . . . . . . . . . . . . . . . . . . . . . . . . . . . . . . . . . . . . . . . . . . . . . 16
SWEW 750 A1
1
Page 5

GB
IE
Introduction
Congratulations on the purchase of your new appliance!
You have clearly decided in favour of a modern, high quality product. These
operating instructions are a component of this product. They contain important
information in regard to safety, use and disposal. Before using the product,
familiarise yourself with all of these operating and safety instructions. Use this
appliance only as described and only for the purposes indicated. In addition,
pass these documents on, together with the product, to any future owner.
Copyright
This documentation is copyright protected.
Any copying or reproduction of it, including as extracts, as well as the reproduction
of images, also in an altered state, is only permitted with the written authorisation
of the manufacturer.
Limited liability
All technical information, data and instructions for the installation, connection
and operation contained in these operating instructions correspond to the latest
available at the time of printing and, to the best of our knowledge, take into
account our previous experience and know-how.
No claims can be derived from the details, illustrations and descriptions in these
instructions.
The manufacturer assumes no responsibility for damage caused by failure to observe these instructions, improper use, incompetent repairs, making unauthorised
modifi cations or for using unapproved replacement parts.
Intended use
This appliance is exclusively intended for making waffl es, nut waffl es and
patterned waffl es.
This appliance is intended exclusively for use in domestic households. Do not use
the appliance for commercial applications!
2
SWEW 750 A1
Page 6
Items supplied
The appliance is delivered with the following components as standard:
▯ Waffl e
▯ 2 Removable plates “Waffl es”
▯ 2 Removable plates “Nut waffl es”
▯ 2 Removable plates “Patterned waffl es”
▯ Operating instructions
1)
Remove the appliance, the removable plates and the operating instructions
from the carton.
2) Remove all packing material.
NOTICE
► Check the contents to ensure everything is present and for visible damage.
► If the delivery is not complete or has been damaged due to defective
pack
Warranty and Service).
Maker
aging or transportation, contact the Service Hotline (see section
GB
IE
Disposal of the packaging
The packaging protects the appliance from transport damage. The packaging
materials are selected from the point of view of their environmental friendliness
and disposal technology and are therefore recyclable.
The recirculation of packaging into the material circuit saves on raw material and
reduces the amount of waste generated. Dispose of packaging material that is
no longer needed as per the regionally established regulations.
NOTICE
► If possible preserve the appliance's original packaging during the warranty
period so that, in the e
ance ideally for its return.
vent of a warranty claim, you can pack the appli-
SWEW 750 A1
3
Page 7

GB
IE
Appliance description
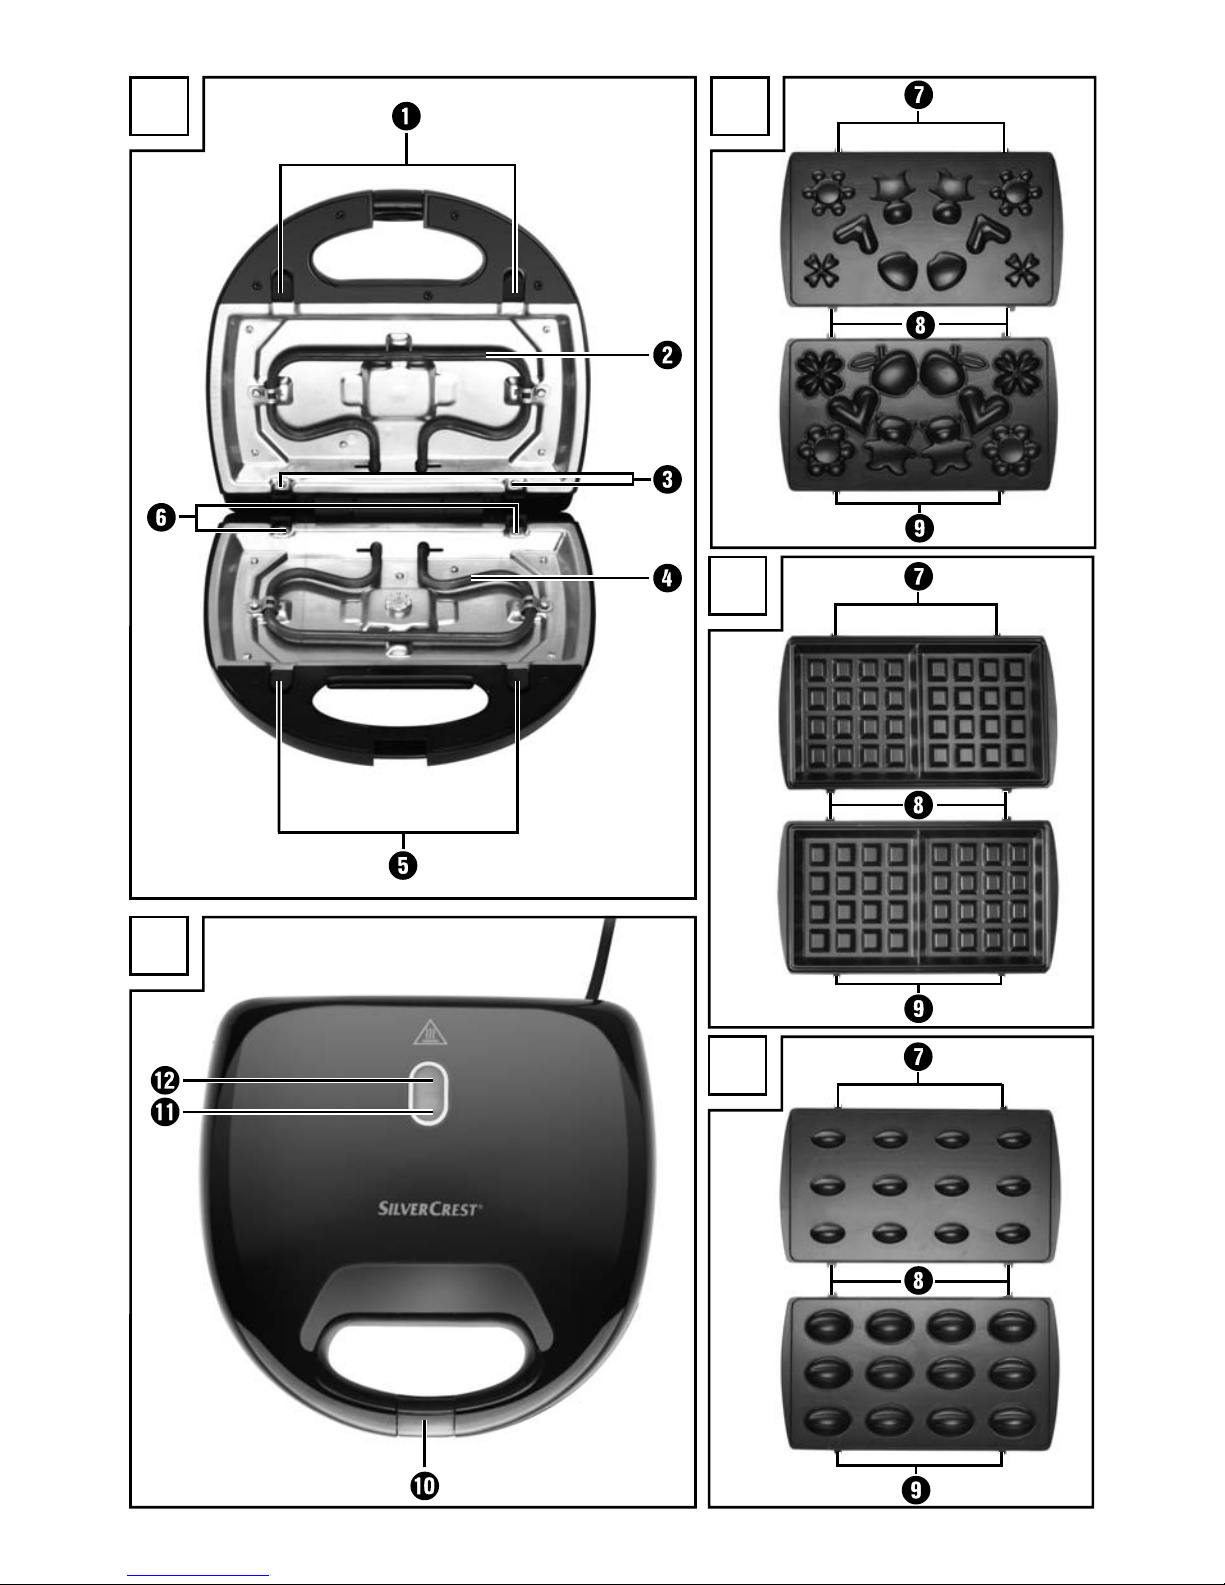
Illustration A:
1 Locking device
2 Heating coil
3 Lower mountings
4 Heating coil
5 Locking devices
6 Rear mountings
Illustration B (Nut waffl es):
7 Upper latches
8 Lower and rear latches
9 Front latches
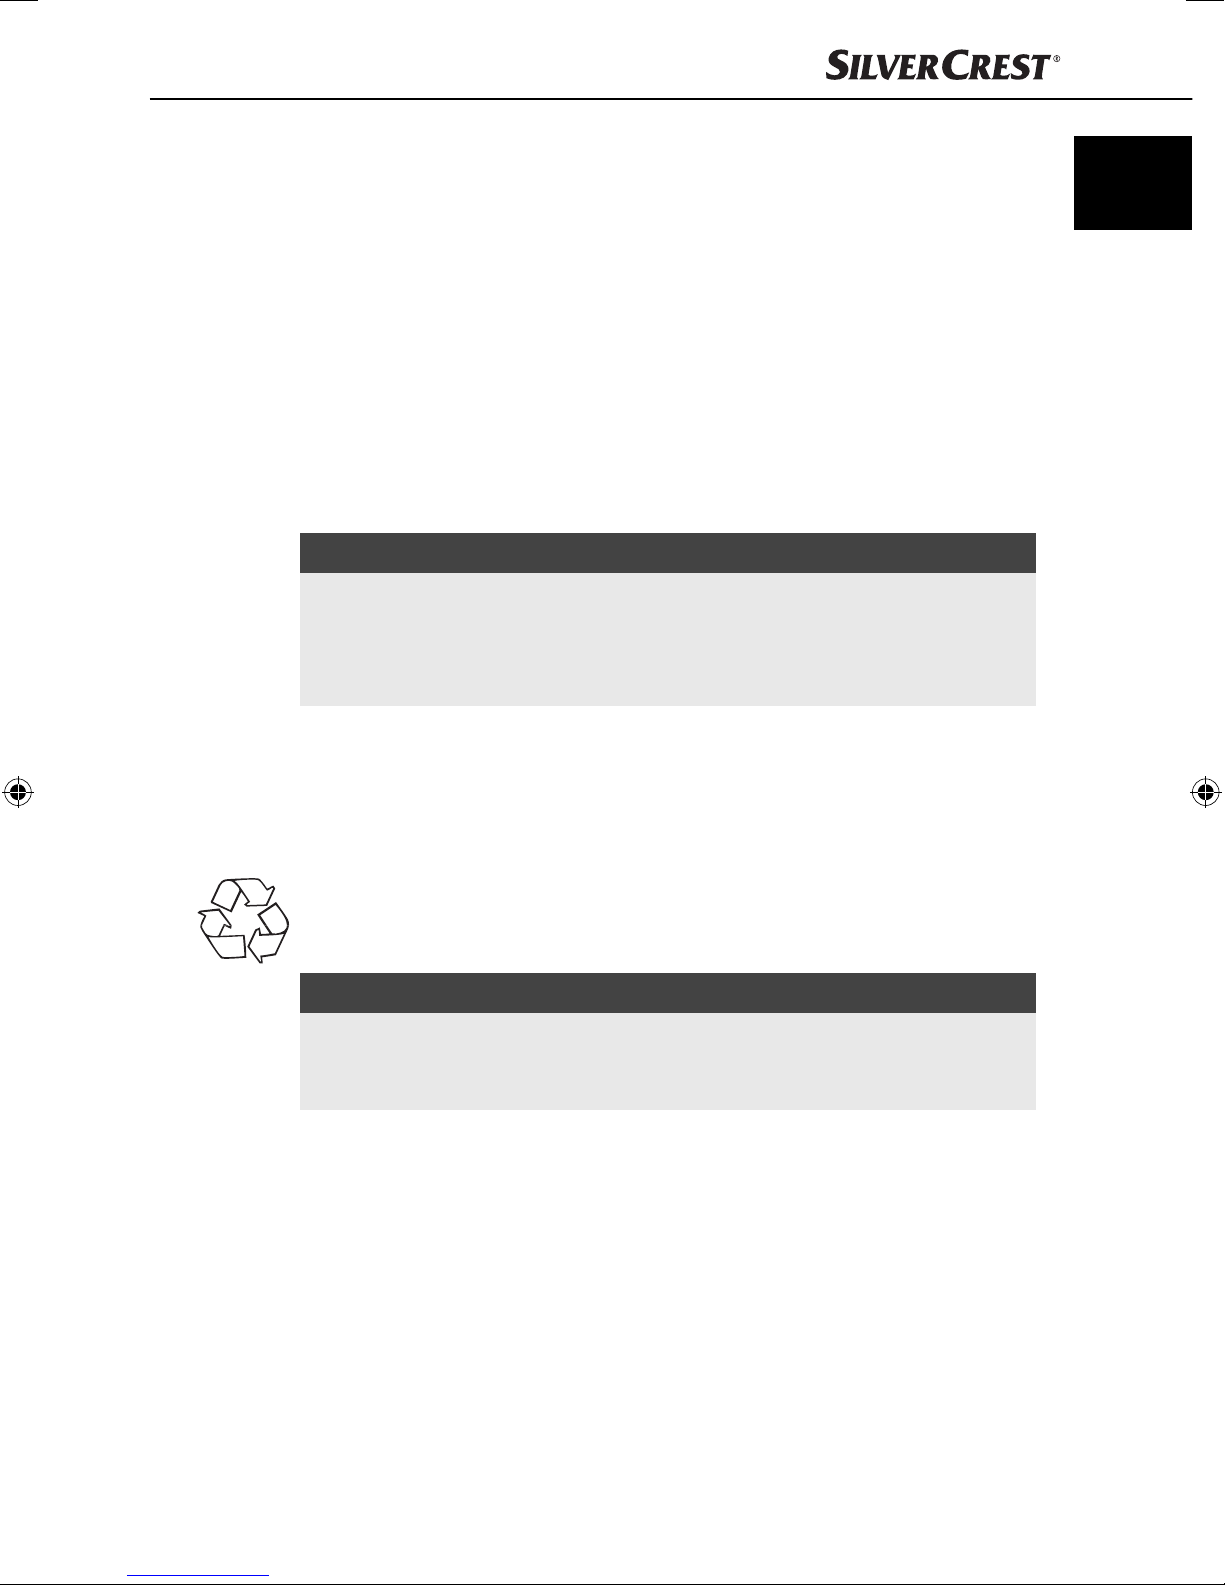
Illustration C (Waffl es):
7 Upper latches
8 Lower and rear latches
9 Front latches
Illustration D (Patterned waffl es):
7 Upper latches
8 Lower and rear latches
9 Front latches
Illustration E:
0 Lid locking device
q Control lamp “Power”
w Control lamp “Ready”
Technical data
Voltage 220 - 240 V ∼, 50 Hz
Power consumption 750 W
4
SWEW 750 A1
Page 8

Safety instructions
WARNING! RISK OF ELECTRIC SHOCK!
► Arrange for damaged power cables and/or plugs to be replaced as
soon as possible by a qualifi ed specialist or by Customer Services.
► Use the appliance only in dry indoor areas, not outdoors.
NEVER submerse the appliance in water or other liquids!
If you do, then you could receive a potentially fatal electric shock.
► When cleaning, ensure that water cannot permeate into the appli-
ance. NEVER clean the appliance under running water.
► Ensure that the appliance can never come into contact with water.
NEVER use the appliance adjacent to water or close to vessels
containing liquids.
► Ensure that the power cable never gets wet or moist when the
GB
IE
appliance is in use. Lay the cable such that it cannot be clamped
or otherwise damaged.
► After use, disconnect the power cable from the mains power
socket to turn off the unit.
► NEVER open the housing of the appliance.
WARNING! RISK OF INJURY!
► This appliance may be used by children of at least 8 years of age
and persons with reduced physical, sensory or mental capabilities
or lack of experience and/or knowledge if they are supervised
by a person responsible for their safety or receive from this person instruction in how the appliance is to be used, and they have
understood the potential risks.
► Children should not play with the appliance.
SWEW 750 A1
5
Page 9

GB
IE
WARNING! RISK OF INJURY!
► Cleaning and user maintenance should not be performed by
children, unless they are older than 8 years of age and are supervised. Children younger than 8 years of age are to be kept away
from the appliance and the power cable.
► The appliance can become hot when it is in use. Therefore, only
touch the handles.
► Let the appliance cool down completely before cleaning it, ex-
changing the removable plates or putting it into storage.
► Be careful when taking out the prepared food. Both the appliance
and the food will be extremely hot.
► Use the appliance only on a stable, non-slippery and level surface.
► Do not use an external timing switch or a separate remote control
system to operate the appliance.
Attention! Hot surfaces!
CAUTION - RISK OF FIRE!
► This appliance may not be used in close vicinity to fl ammable material.
► Do not leave the appliance unattended at any time when it is in use.
► Operate the appliance only on heat resistant surface.
► Do not operate the appliance unsupervised.
CAUTION - PROPERTY DAMAGE!
► To avoid damaging the non-stick coating of the Sandwich Maker,
remove your cooked foods only with a plastic or wooden spatula
or some other suitable, non-metallic implement.
► Do not use abrasive cleansers or sharp objects for cleaning.
6
SWEW 750 A1
Page 10
Exchanging the removable plates
You can choose between 3 diff erent removable plates:
GB
IE
– “Nut waffl
which can then be fi lled and fi tted together.
– “Waffl
– “Patterned waffl
waffl e halves which can then be fi lled and fi tted together.
WARNING! RISK OF ELECTRIC SHOCK
► Disconnect the plug from the mains power socket before exchanging the
emovable plates.
r
WARNING! RISK OF INJURY!
► Let the appliance cool down before exchanging the removable plates!
Risk of Burns!
NOTE
► When using the "nut waffl
please always ensure that the top removable plate is installed in the top
section of the appliance, and that the bottom removable plate is installed
in the bottom section of the appliance. Use the illustrations in the fold-out
page for orientation.
es” removable plates: for preparing hollow nut waffl e halves,
es” removable plates: for making waffl es.
es” removable plates: for preparing hollow patterned
es" and "patterned waffl es" removable plates,
Placement of the removable plates
1) Open the waffl e iron by releasing the lid locking device 0 and lifting the lid.
2) Upper removable plate: First slide the lower latches 8 into the lower mountings 3.
3) Now press the upper latches 7 onto the locking devices 1, so that the
upper latches 7 spring under the locking devices 1 and the removable
plate is fi rmly seated.
4) Lower removable plate: First slide the rear latches 8 into the rear mountings 6.
5) Now press the front latches 9 onto the locking devices 5 so that the
latches 9 spring under the locking devices 5 and the removable plate is
fi rmly seated.
6) Press fi rmly once in the centre of the lower removable plate to ensure that it
is securely inserted.
SWEW 750 A1
7
Page 11
GB
IE
Extracting the removable plate
1) Upper removable plate: Slide the locking devices 1 upwards and simul-
taneously tilt the removable plate forward so that you can lift it out from
underneath the lower mountings 3.
2) Lower removable plate: Pull the locking devices 5 forward and lift the
removable plate so that you can pull it out from the rear mountings 6.
Commissioning
Carry out the following procedure with each of the 3 pairs of removable plates.
■ Smear the non-stick coating on the removable plates with oil suitable for
cooking.
WARNING! RISK OF INJURY!
► Let the appliance cool down before exchanging the removable plates!
Risk of Bur
■ Install a pair of removable plates into the appliance.
■ Insert the plug into a mains power socket.
ns!
■ Close the appliance and lock it with the lid locking device 0.
■ Let the appliance heat up for about 10 minutes.
NOTICE
► With the fi rst usage a slight smell can arise (minimal smoke development is
also possible). This is nor
suffi cient ventilation. For example, open a window.
■ Disconnect the plug and allow the appliance to cool down.
■ Clean the removable plates and the appliance as described in the chapter
“Cleaning”.
The appliance is no
w ready for use.
mal and dissipates after a short time. Provide for
8
SWEW 750 A1
Page 12

Operation
Making nut waffl es/patterned waffl es
1) Select the “nut waffl es” or “patterned waffl es” removable plates and insert
them. Always ensure that you insert the top removable plate in the top half
of the appliance and the bottom removable plate in the bottom half.
CAUTION – PROPERTY DAMAGE!
► Never use two diff erent removable plates at the same time.
Close the lid and lock it with the lid locking device 0.
2)
3) Insert the plug into a mains power socket. The orange “Power” indicator
lamp q illuminates.
4) As soon as the appliance has heated up, the green “Ready” indicator
lamp w illuminates.
5) Undo the lid locking device 0, open the lid and put approximately 1/2 tsp.
of batter (see “Recipes” chapter for recipes for nut waffl es and patterned
waffl es) into each of the moulds/patterns in the bottom removable plates.
GB
IE
NOTE
► When using patterned waffl
across all parts of the pattern. Otherwise, parts of the pattern may subsequently be missing.
6) Close the lid and lock it with the lid locking device 0.
CAUTION – PROPERTY DAMAGE!
► To avoid damaging the non-stick coating of the nut waffl es/patterned
always remove your waffl es with a plastic or wooden spoon or some other
suitable, non-metallic implement.
7) The nut waffl es/patterned waffl es are ready after about 3 - 4 minutes.
Undo the lid locking device 0, open the cover and remove the nut waffl es/
patterned waffl es.
8) If you have fi nished preparing your nut waffl es/patterned waffl es, please
disconnect the mains plug from the mains socket.
9) Allow the nut waffl es/patterned waffl es to cool down a little and trim any
excess from the edge of the nut waffl es/patterned waffl es with a knife.
10) Fill the nut waffl es/patterned waffl es with the required fi lling. Spread a little
of the fi lling towards the edge of the nut waffl es/patterned waffl es and place
the matching counterpart on top so that both halves stick together, creating
a hollow form.
es, ensure that the batter has been distributed
waffl es,
SWEW 750 A1
9
Page 13

GB
IE
Making waffl es
1) Select the “waffl es” removable plates and install them.
CAUTION – PROPERTY DAMAGE!
► Never use two diff erent removable plates at the same time.
Close the lid and lock it with the lid locking device 0.
2)
3) Insert the plug into a mains power socket. The orange “Power” indicator
lamp q illuminates.
4) As soon as the appliance has heated up, the green “Ready” indicator
lamp w illuminates.
5) Open the lid and place about 2 - 3 large tablespoons of batter into the centre
of each of the two waffl e baking surfaces on the lower removable plate.
6) Close the lid and lock it with the lid locking device 0.
CAUTION – PROPERTY DAMAGE!
► To avoid damaging the non-stick coating of the appliance, always remove
our waffl es with a plastic or wooden spatula or some other suitable, non-
y
metallic implement.
7) The waffl es are ready after about 3 - 4 minutes. This time may vary depending
on the type of batter used and personal preferences. Undo the lid locking
device 0, open the cover and remove the nut waffl es/patterned waffl es.
8) If you have fi nished preparing your waffl es, disconnect the plug from the
mains power socket.
10
SWEW 750 A1
Page 14
Cleaning
WARNING! RISK OF ELECTRIC SHOCK
► Disconnect the plug from the mains power socket before cleaning the
appliance.
GB
IE
NEVER submer
do, then you could receive a potentially fatal electric shock .
WARNING! RISK OF INJURY!
► Let the appliance cool down before cleaning it. Risk of Burns!
CAUTION - PROPERTY DAMAGE!
► Do not use aggressive or abrasive cleaning agents. These can damage the
upper sur
► Under no circumstances should you clean the removable grill plates or the
appliance in the dishw
NOTICE
► Do not wait too long to start with the cleaning. Wait until the appliance
has cooled do
burnt. Then the food particles can be removed more easily.
■ Clean the appliance housing only with a dry or lightly moistened cloth.
■ Detach the removable plates and clean them in warm water with a little
deter
faces of the appliance.
gent added.
se the appliance in water or other liquids! If you
asher!
wn suffi ciently that you can touch it without the risk of being
■ If fats or food should be under the removable plates and in the space in
which the heating coils 2 4 ar
– Dab the fats or other liquids with a piece of kitchen paper.
– Remove stuck-on burnt residues with a wooden spatula or small wooden
sk
ewers.
■ Dry all parts well before re-use.
Storage
■ Store the appliance in a dry location.
■ Clean the appliance as described in the chapter “Cleaning”.
SWEW 750 A1
e located, proceed as follows:
11
Page 15

GB
IE
Troubleshooting
Problem Cause Remedy
Recipes
Waffl es
Ingredients:
The plug is not inserted into
The appliance
does not function.
The nut waffl es/
patterned waffl es /
waffl es are too
dark.
♦ 250 g margarine or butter
♦ approx. 200 g sugar
♦ 2 packets of vanilla sugar
♦ 5 eggs
a mains power socket.
The appliance is defective.
The nut waffl es/patterned
waffl es/waffl es were in the
appliance for too long.
Connect the power cable
into a mains power socket.
In this case, contact
Customer Services.
Remove the nut waffl es/
patterned waffl es/waffl es
sooner.
♦ 500 g fl our
♦ 2 tsp of baking powder
♦ 350 - 400 ml milk
1)
Whisk the eggs until foamy.
2) Add the sugar and vanilla sugar, then mix everything together.
3) Then add the melted butter or margarine.
4) Blend in the baking powder.
5) Under constant stirring, gradually add the milk and fl our alternately.
6) Whisk everything at maximum speed with a hand blender until a smooth
batter mixture is produced.
12
SWEW 750 A1
Page 16

Chocolate waffl es
Ingredients:
♦ 150 g soft butter
♦ 3 eggs
♦ 150 g sugar
♦ 100 g grated white chocolate
♦ 250 g fl our
♦ 1 tsp cinnamon
♦ 50 ml milk
1)
Whisk the eggs until foamy.
2) Add the sugar and cinnamon, then mix everything together.
3) Then add the melted butter or margarine.
4) Under constant stirring, gradually add the milk and fl our alternately.
5) Now fold in the grated chocolate.
GB
IE
6) Whisk everything at maximum speed with a hand blender until a smooth
batter mixture is produced.
Basic batter for nut waffl es/patterned waffl es
Ingredients:
♦ 400 g fl our
♦ 100 g sugar
♦ 100 g soft butter
♦ 2 eggs
♦ 100 ml milk
♦ ¼ tsp baking powder
1)
Whisk the butter, the sugar and the eggs.
2) Mix the fl our and baking powder together and add to the mixture.
3) Now add the milk.
4) Whisk everything at maximum speed with a hand blender.
SWEW 750 A1
13
Page 17

GB
IE
NOTE
► The nut waffl es/patterned
diff erent ingredients, such as jam, icing, nut-nougat spreads, custard,
yoghurt, apple purée, caramel, cream or, for savoury fi llings, cream
cheese, herb curd cheese, aioli, tzatziki, melted Gouda cheese etc.
waffl es can be fi lled with a wide variety of
► You can also cover the nut waffl es/patterned
glaze or icing, or sprinkle icing sugar on them.
waffl es with chocolate
Sweet batter for nut waffl es/patterned waffl es
Ingredients:
♦ 500 g fl our
♦ 200 g sugar
♦ 200 g Butter or margarine
♦ 200 g sour cream
♦ 3 eggs
♦ 1 tsp of baking powder
♦ 1 packets of vanilla sugar
1)
Separate the white and the yolk of two eggs. The yolk is not required.
2) Now whisk the butter/margarine, the sugar, the vanilla sugar, the 2 egg
whites and one whole egg (yolk and white).
3) Stir in the sour cream.
4) Mix the fl our and baking powder together and add to the mixture.
5) Whisk everything at maximum speed with a hand blender.
NOTE
► The sweet nut waffl e/patterned
of diff erent ingredients, such as jam, icing, nut-nougat spread, custard,
yoghurt, apple purée, caramel or cream.
► You can also cover the nut waffl es/patterned
glaze or icing, or sprinkle icing sugar on them.
waffl es can be fi lled with a wide variety
waffl es with chocolate
14
SWEW 750 A1
Page 18

Savoury batter for nut waffl es/patterned waffl es
Ingredients:
♦ 200 g fl our
♦ 125 g margarine
♦ 1 egg
♦ ¼ tsp baking powder
♦ 1 pinch sugar
♦ 1 pinch of salt
1)
Whisk the margarine, the sugar, the egg and the salt.
2) Mix the fl our and baking powder together and add this.
3) Whisk everything at maximum speed with a hand blender.
NOTE
GB
IE
Disposal
Do not dispose of this appliance in your normal domestic waste.
This product is subject to the provisions of European Directive
2012/19/EU. (Waste Electrical and Electronic Equipment).
Dispose of the appliance through an approved disposal centre or at your community waste facility. Observe the currently applicable regulations. In case of
doubt, please contact your waste disposal centre.
► The savoury nut waffl e/patterned
of diff erent ingredients, such as cream cheese, herb curd cheese, aioli,
tzatziki, melted Gouda cheese etc.
waffl es can be fi lled with a wide variety
SWEW 750 A1
15
Page 19

GB
IE
Warranty and Service
The warranty for this appliance is for 3 years from the date of purchase. The appliance has been manufactured with care and meticulously examined before delivery.
Please retain your receipt as proof of purchase. In the case of a warranty claim,
please make contact by telephone with our Customer Service Department. Only
in this way can a post-free despatch for your goods be assured.
NOTICE
► The warranty covers only claims for material and manufacturing defects,
but not for tr
components, e.g. buttons or batteries.
This product is for domestic use only and is not intended for commercial use. The
warranty is void in the case of abusive and improper handling, use of force and
internal tampering not carried out by our authorised service branch.
Your statutory rights are not restricted in any way by this warranty. The warranty
period is not extended by repairs made under the warranty. This applies also to
replaced and repaired parts.
Damages and defects extant at the time of purchase must be reported immediately after unpacking, resp. no later than two days after the date of purchase.
ansport damage, wearing parts or for damage to fragile
Repairs made after the lapse of the warranty period are subject to charge.
Service Great Britain
Tel.: 0871 5000 720 (£ 0.10/Min.)
E-Mail: kompernass@lidl.co.uk
IAN 93556
Service Ireland
Tel.: 1890 930 034
(0,08 EUR/Min., (peak))
(0,06 EUR/Min., (off peak))
E-Mail: kompernass@lidl.ie
IAN 93556
Hotline availability: Monday to Friday 08:00 - 20:00 (CET))
Importer
KOMPERNASS HANDELS GMBH
BURGSTRASSE 21
44867 BOCHUM
GERMANY
www.kompernass.com
16
SWEW 750 A1
Page 20

Indholdsfortegnelse
Introduktion . . . . . . . . . . . . . . . . . . . . . . . . . . . . . . . . . . . . . . . . . . . . . . . . . 18
Ophavsret . . . . . . . . . . . . . . . . . . . . . . . . . . . . . . . . . . . . . . . . . . . . . . . . . . . . . . . . . . . . . 18
Ansvarsbegrænsning . . . . . . . . . . . . . . . . . . . . . . . . . . . . . . . . . . . . . . . . . . . . . . . . . . . . . 18
Anvendelsesområde . . . . . . . . . . . . . . . . . . . . . . . . . . . . . . . . . . . . . . . . . . . . . . . . . . . . . 18
Medfølger ved køb . . . . . . . . . . . . . . . . . . . . . . . . . . . . . . . . . . . . . . . . . . . . 19
Bortskaff else af emballagen . . . . . . . . . . . . . . . . . . . . . . . . . . . . . . . . . . . . . . . . . . . . . . . 19
Beskrivelse af sandwichmakeren . . . . . . . . . . . . . . . . . . . . . . . . . . . . . . . . 20
Tekniske data . . . . . . . . . . . . . . . . . . . . . . . . . . . . . . . . . . . . . . . . . . . . . . . . 20
Sikkerhedsanvisninger . . . . . . . . . . . . . . . . . . . . . . . . . . . . . . . . . . . . . . . . . 21
Udskiftning af skiftepladerne . . . . . . . . . . . . . . . . . . . . . . . . . . . . . . . . . . . 23
Indsætning af skiftepladerne . . . . . . . . . . . . . . . . . . . . . . . . . . . . . . . . . . . . . . . . . . . . . . 23
Udtagning af skiftepladerne . . . . . . . . . . . . . . . . . . . . . . . . . . . . . . . . . . . . . . . . . . . . . . . 24
Første opstart . . . . . . . . . . . . . . . . . . . . . . . . . . . . . . . . . . . . . . . . . . . . . . . . 24
Betjening . . . . . . . . . . . . . . . . . . . . . . . . . . . . . . . . . . . . . . . . . . . . . . . . . . . . 25
Bagning af vaff elæg/vaff elfi gurer . . . . . . . . . . . . . . . . . . . . . . . . . . . . . . . 25
DK
Bagning af vafl er . . . . . . . . . . . . . . . . . . . . . . . . . . . . . . . . . . . . . . . . . . . . . . . . . . . . . . . . 26
Rengøring . . . . . . . . . . . . . . . . . . . . . . . . . . . . . . . . . . . . . . . . . . . . . . . . . . . 27
Opbevaring . . . . . . . . . . . . . . . . . . . . . . . . . . . . . . . . . . . . . . . . . . . . . . . . . . 27
Afhjælpning af fejl . . . . . . . . . . . . . . . . . . . . . . . . . . . . . . . . . . . . . . . . . . . . 28
Opskrifter . . . . . . . . . . . . . . . . . . . . . . . . . . . . . . . . . . . . . . . . . . . . . . . . . . . 28
Vafl er . . . . . . . . . . . . . . . . . . . . . . . . . . . . . . . . . . . . . . . . . . . . . . . . . . . . . . . . . . . . . . . . . 28
Chokoladevafl er . . . . . . . . . . . . . . . . . . . . . . . . . . . . . . . . . . . . . . . . . . . . . . . . . . . . . . . . 29
Basisdej til vaff elæg/vaff elfi gurer . . . . . . . . . . . . . . . . . . . . . . . . . . . . . . . . . . . . . . . . . . . 29
Sød dej til vaff eljern/vaff elfi gurer . . . . . . . . . . . . . . . . . . . . . . . . . . . . . . . . . . . . . . . . . . . 30
Saltet dej til vaff elæg/vaff elfi gurer . . . . . . . . . . . . . . . . . . . . . . . . . . . . . . . . . . . . . . . . . . 31
Bortskaff else . . . . . . . . . . . . . . . . . . . . . . . . . . . . . . . . . . . . . . . . . . . . . . . . . 31
Garanti og service . . . . . . . . . . . . . . . . . . . . . . . . . . . . . . . . . . . . . . . . . . . . 32
Importør . . . . . . . . . . . . . . . . . . . . . . . . . . . . . . . . . . . . . . . . . . . . . . . . . . . . 32
SWEW 750 A1
17
Page 21

Introduktion
Til lykke med købet af din nye elartikel!
DK
Dermed har du valgt et moderne produkt af høj kvalitet. Betjeningsvejledningen
er del af dette produkt. Den indeholder vigtige informationer om sikkerhed,
anvendelse og bortskaff else. Du bedes sætte dig ind i alle produktets betjeningsog sikkerhedsanvisninger før brug. Brug kun produktet som beskrevet og kun til
de angivne anvendelsesområder. Lad vejledningen følge med produktet, hvis du
giver det videre til andre.
Ophavsret
Denne dokumentation er ophavsretligt beskyttet.
Enhver kopiering eller eftertryk - også i uddrag - samt videregivelse af billeder -
også i ændret form - er kun tilladt efter skriftligt samtykke med producenten.
Ansvarsbegrænsning
Alle tekniske informationer, data og anvisninger til tilslutning og betjening i denne
betjeningsvejledning svarer til den nyeste viden på trykningstidspunktet og gives
efter bedste overbevisning i henhold til vores hidtidige erfaringer og viden.
Der kan ikke stilles nogen form for krav baseret på informationerne, billederne og
beskrivelserne i denne vejledning.
Producenten påtager sig intet ansvar for skader på grund af manglende overholdelse af vejledningen, anvendelse, som ikke hører ind under anvendelsesområdet,
forkerte reparationer, ændringer, som er foretaget uden tilladelse samt anvendelse
af ikke-tilladte reservedele.
Anvendelsesområde
Dette produkt er udelukkende beregnet til bagning af vafl er, vaff elæg og vaffelfi gurer.
Denne sandwichmaker er kun beregnet til anvendelse i private husholdninger.
Brug ikke sandwichmakeren til erhvervsmæssige formål!
18
SWEW 750 A1
Page 22

Medfølger ved køb
Sandwichmakeren leveres standardmæssigt med følgende komponenter:
▯ Vaff eljern
▯ 2 skifteplader ”Vafl er”
▯ 2 skifteplader ”Vaff elæg”
▯ 2 skifteplader ”Figurer”
▯ Betjeningsvejledning
1)
Tag sandwichmakeren, skiftepladerne og betjeningsvejledningen ud af kassen.
2) Fjern alt emballeringsmaterialet.
BEMÆRK
► Kontrollér, at alle dele er leveret med, og at de ikke har synlige skader.
► Hvis der mangler nogle dele, eller hvis nogle af delene er defekte på
grund af mangelfuld emballage eller på grund af tr
henvende dig til service-hotline (se kapitel Garanti og service).
Bortskaff else af emballagen
Emballagen beskytter sandwichmakeren mod transportskader. Emballeringsmaterialerne er valgt ud fra kriterier som miljøforligelighed og bortskaff elsesteknik og
kan derfor genbruges.
DK
ansporten, bedes du
Afl evering af emballagen til materialerecirkulation sparer råstoff er og reducerer
aff aldsmængden. Bortskaf emballeringsmaterialerne, som ikke skal bruges mere,
i henhold til de gældende lokale forskrifter.
BEMÆRK
► Opbevar den originale emballage i løbet af sandwichmakerens garanti-
periode, h
ind, hvis du skal gøre brug af garantien.
vis det er muligt, så du kan pakke sandwichmakeren ordentligt
SWEW 750 A1
19
Page 23

Beskrivelse af sandwichmakeren
Figur A:
1 Låseanordninger
DK
2 Varmeslange
3 Nederste holdere
4 Varmeslange
5 Låseanordninger
6 Bageste holdere
Figur B (Vaff elæg):
7 Uden tapper
8 Nederste og bageste tapper
9 Forreste tapper
Figur C (vaff elplader):
7 Uden tapper
8 Nederste og bageste tapper
9 Forreste tapper
Figur D (Vaff elfi gurer):
7 Uden tapper
8 Nederste og bageste tapper
9 Forreste tapper
Figur E:
0 Lås til låget
q Kontrollampe "Power"
w Kontrollampe "Driftsklar"
Tekniske data
Spænding 220 - 240 V ~, 50 Hz
Strømforbrug 750 W
20
SWEW 750 A1
Page 24

Sikkerhedsanvisninger
ADVARSEL! FARE FOR STRØMSTØD!
► Lad straks beskadigede ledninger eller stik udskifte af en autoriseret
reparatør, så farlige situationer undgås
► Brug kun sandwichmakeren i tørre rum - ikke udendørs.
Læg aldrig motorblokken ned i vand eller andre væsker!
Ellers er der livsfare på grund af elektrisk stød.
► Sørg for, at der ikke kommer vand ind i sandwichmakeren under
rengøring. Rengør aldrig sandwichmakeren under rindende vand.
► Sørg for, at sandwichmakeren aldrig kan komme i kontakt med
vand. Brug aldrig sandwichmakeren i nærheden af vand eller ved
siden af beholdere, som indeholder vand.
► Sørg for, at ledningen aldrig bliver vådt eller fugtigt under brug.
Læg ledningen, så den ikke klemmes eller på anden måde beskadiges.
DK
► Træk stikket ud af stikkontakten efter brug for at slukke for sand-
wichmakeren.
► Åbn aldrig sandwichmakerens kabinet.
ADVARSEL! FARE FOR PERSONSKADER!
► Denne sandwichmaker kan anvendes af børn fra 8 år samt af
personer med nedsatte psykiske, sensoriske eller mentale evner
eller manglende erfaring og/eller viden, hvis de er under opsyn
eller er oplært i, hvordan apparatet bruges sikkert samt har forstået
de farer, som kan opstå i forbindelse med sandwichmakeren.
► Børn må ikke lege med sandwichmakeren.
SWEW 750 A1
21
Page 25

DK
ADVARSEL! FARE FOR PERSONSKADER!
► Rengøring og brugervedligeholdelse må ikke udføres af børn,
medmindre de er over 8 år gamle og under opsyn.
Børn under 8 år skal holdes borte fra sandwichmakeren og tilslutningsledningen.
► Sandwichmakerens dele kan blive meget varme under brug. Hold
derfor kun på håndtagene.
► Lad sandwichmakeren køle helt af, før du rengør den, udskifter
skiftepladerne eller stiller det til side.
► Vær forsigtig, når de færdige vafl er tages ud. Vaff eljernet og
vafl erne er meget varme.
► Brug kun sandwichmakeren på en stabil, skridsikker og plan
overfl ade.
► Brug aldrig en ekstern timer eller et separat fjernbetjeningssystem
til betjening af sandwichmakeren.
Obs! Varm overfl ade!
OBS - BRANDFARE!
► Sandwichmakeren må ikke anvendes i nærheden af brændbare
materialer.
► Dæk ikke sandwichmakeren til, mens den er i brug.
► Brug kun sandwichmakeren på et varmeresistent underlag.
► Lad aldrig sandwichmakeren være i gang uden opsyn.
OBS - MATERIELLE SKADER!
► Tag kun fødevarerne op med en plast- eller træ-
spartel eller en anden egnet genstand, der ikke er lavet af metal,
så du ikke ødelægger sandwichmakerens slip-let-belægning.
► Brug ikke slibende pudsemidler og spidse genstande til rengøring.
22
SWEW 750 A1
Page 26

Udskiftning af skiftepladerne
Du kan vælge mellem to forskelige skifteplader:
– Skifteplader „Vaff elæg“: til tilberedning af hule vaff elæg-halvdele, som
an fylde med forskelligt fyld og lægge sammen.
man k
– Skiftepladene „Vafl er“: til bagning af vafl er.
– Skiftepladerne „Vaff elfi gurer“: til tilberedning af hule vaff elfi gurer, som
an fylde med forskelligt fyld og lægge sammen.
man k
ADVARSEL! FARE FOR STRØMSTØD!
► Træk stikket ud af stikkontakten, før du udskifter skiftepladerne.
ADVARSEL! FARE FOR PERSONSKADER!
► Lad sandwichmakeren køle helt af, før skiftepladerne udskiftes! Forbræn-
dingsfar
BEMÆRK
► Vær altid opmærksom på ved skiftepladerne „Vaff elæg“ og „Vaff elfi gurer“,
at de skif
jernet, placeres her, og omvendt, at de skifteplader, der er beregnet til at
være i den nederste del af vaff eljernet, placeres her. Se illustrationerne på
udklapsiden.
e!
teplader, der er beregnet til at være i den øverste del af vaff el-
DK
Indsætning af skiftepladerne
1) Åbn vaff eljernet ved at løsne lågets lås 0 og løft låget op.
2) Øverste skifteplade: Skub først de nederste tapper 8 ind i de nederste
holdere 3.
3) Tryk nu på de øverste tapper 7 på låseanordningerne 1, så tapperne 7
springer ind under låseanordningerne 1, og skiftepladen sidder fast.
4) Nederste skifteplade: Skub først de bageste tapper 8 ind i de bageste
holdere 6.
5) Tryk nu på de forreste tapper 9 på låseanordningerne 5, så tapperne 9
springer ind under låseanordningerne 5, og skiftepladen sidder fast.
6) Tryk igen midt på den nederste skifteplade for at sikre, at den sidder rigtigt fast.
SWEW 750 A1
23
Page 27

Udtagning af skiftepladerne
1) Øverste skifteplade: Stil låseanordningerne 1 op, og vip samtidig skiftepladen
frem, så den kan løftes ud af de nederste holdere 3.
DK
2) Nederste skifteplade: Træk låseanordningerne 5 frem, og løft skiftepladen,
så den kan trækkes ud af de bageste holdere 6.
Første opstart
Udfør den følgende procedure med hver af de 3 skiftepladepar.
■ Gnid skiftepladernes slip-let-belægning én gang ind i olie, der er velegnet til
madlavning.
ADVARSEL! FARE FOR PERSONSKADER!
► Lad sandwichmakeren køle helt af, før skiftepladerne skiftes! Forbrændingsfare!
■ Sæt et par skifteplader ind i sandwichmakeren.
■ Sæt stikket i en stikkontakt.
■ Luk sandwichmakeren, og lås den med lågets lås 0.
■ Lad sandwichmakeren varme op i 10 minutter.
BEMÆRK
► Ved første anvendelse kan det lugte en smule (en smule røgudvikling er
også mulig). Det er normalt og for
lig udluftning. Åbn for eksempel vinduet.
svinder efter kort tid. Sørg for tilstrække-
■ Træk stikket ud, og lad sandwichmakeren køle af.
■ Rengør sandwichmakeren som beskrevet i kapitlet "Rengøring".
Nu er sandwichmak
eren klar til brug.
24
SWEW 750 A1
Page 28

Betjening
Bagning af vaff elæg/vaff elfi gurer
1) Vælg skiftepladerne „Vaff elæg“ eller „Vaff elfi gurer“ og sæt disse i. Vær her
opmærksom på, at den skifteplade, der er beregnet til at sidde øverst i vaff eljernet placeres øverst og omvendt, at den skifteplade, der er beregnet til at
sidde i den nederste del, placeres nederst.
OBS – MATERIELLE SKADER!
► Brug aldrig to forskellige skifteplader samtidigt.
Luk låget og lås det med låsen 0.
2)
3) Sæt stikket i en stikkontakt. Den orange kontrollampe „Power“ q lyser.
4) Så snart vaff eljernet er varmet op, lyser den grønne kontrollampe „Driftsklar“ w.
5) Løsn låsen til låget 0, åbn låget og hæld ca. 1/2 teske dej (opskrifter til
vaff elæg og vaff elfi gurer, se kapitlet „Opskrifter“) i hver af formene/fi gurerne i den nederste skifteplade.
BEMÆRK
► Sørg for, at fi gurerne fyldes helt ud med dej. Ellers kan det ske, at dele af
guren ikke udfyldes.
fi
6) Luk låget og lås det med låsen 0.
DK
OBS – MATERIELLE SKADER!
► Tag kun vaff elæggene/vaff elfi gurerne op med en plast- eller træspartel
eller en anden egne
lægger vaff eljernets slip-let-belægning.
7) Efter ca. 3 - 4 minutter er vaff elæggene/vaff elfi gurerne færdige. Løsn låsen 0,
åbn låget og tag vaff elæggene/vaff elfi gurerne ud.
8) Hvis du ikke vil lave fl ere vaff elæg/vaff elfi gurer, skal du trække stikket ud af
stikkontakten.
9) Lad vaff elæggene/vaff elfi gurerne køle lidt af og skær den overfl ødige dej
af kanterne på vaff elæggene/vaff elfi gurerne med en kniv.
10) Fyld vaff elæggene/vaff elfi gurerne med det ønskede fyld. Fordel en smule af
fyldet på kanterne af vaff elæggene/vaff elfi gurerne og læg de tilhørende modstykker ovenpå, så begge halvdele klæber sammen og danner en hul fi gur.
t genstand, der ikke er lavet af metal, så du ikke øde-
SWEW 750 A1
25
Page 29

DK
Bagning af vafl er
1) Vælg skiftepladerne ”Vafl er”, og sæt dem ind.
OBS – MATERIELLE SKADER!
► Brug aldrig to forskellige skifteplader samtidigt.
Luk låget og lås det med låsen 0.
2)
3) Sæt stikket i en stikkontakt. Den orange kontrollampe „Power“ q lyser.
4) Så snart vaff eljernet er varmet op, lyser den grønne kontrollampe „Driftsklar“ w.
5) Åbn låget, og fyld 2 - 3 store spsk. vaff eldej i hver af vaff elpladerne på den
nederste skifteplade.
6) Luk låget og lås det med låsen 0.
OBS – MATERIELLE SKADER!
► Tag kun vafl erne op med en plast- eller træspartel eller en anden egnet
genstand, der ikk
slip-let-belægning.
7) Efter ca. 3 - 4 minutter er vafl erne færdige. Denne tid kan variere afhængigt
af den anvendte vaff eldej og den personlige smag. Løsn låsen til låget 0,
åbn låget og tag vafl erne op.
e er lavet af metal, så du ikke ødelægger vaff eljernets
8) Hvis du ikke vil tilberede fl ere vafl er, skal du trække stikket ud af stikkontakten.
26
SWEW 750 A1
Page 30

Rengøring
ADVARSEL! FARE FOR STRØMSTØD
► Træk stikket ud af stikkontakten, før du rengør sandwichmakeren.
ADVARSEL! FARE FOR PERSONSKADER!
► Lad sandwichmakeren afkøle før rengøringen. Forbrændingsfare!
OBS - MATERIELLE SKADER!
► Brug ikke stærke eller skurende rengøringsmidler. De kan angribe sand-
wichmak
► Rengør aldrig skiftepladerne eller produktet i opvaskemaskinen!
BEMÆRK
► Vent ikke alt for længe med rengøringen. Vent, til sandwichmakeren er
kølet så meget af, at der ikk
Så kan madresterne lettere fjernes.
Læg aldrig sandwichmak
Ellers kan det være livsfarligt på grund af elektrisk stød.
eren overfl ade.
eren ned i vand eller andre væsker!
e er fare for at brænde sig ved berøring.
DK
■ Rengør kabinettet med en tør klud eller en let fugtet klud.
■ Tag skiftepladerne ud, og rengør dem i varmt vand, og tilsæt lidt opvaske-
middel.
■ Hvis der er løbet fedt eller madrester ind under skiftepladerne i rummet,
h
vor varmeslangerne 2 4 befi nder sig, skal du gøre følgende:
– Fjern fedtet eller væsken med et stykke køkkenrulle.
– Fjern fastbrændte rester med en træspartel eller et lille træspyd.
■ Tør alle dele godt af før næste brug.
Opbevaring
■ Opbevar vaff eljernet på et tørt sted.
■ Rengør sandwichmakeren som beskrevet i kapitlet "Rengøring".
SWEW 750 A1
27
Page 31

Afhjælpning af fejl
Fejl Årsag Afhjælpning
DK
Sandwichmakeren
fungerer ikke.
Vaff elæggene/
vaff elfi gurerne/
vafl erne bliver
for mørke.
Opskrifter
Vafl er
Ingredienser:
♦ 250 g margarine eller smør
♦ ca. 200 g sukker
♦ 2 breve vaniljesukker
♦ 5 æg
Stikket sidder ikke
i stikkontakten.
Sandwichmakeren er
defekt.
Vaff elæggene/vaff elfi gurerne/vafl erne var
for længe i vaff eljernet.
Sæt stikket i stikkontakten.
Henvend dig til
kundeservice.
Tag vaff elæggene/
vaff elfi gurerne/
vafl erne ud lidt før.
♦ 500 g mel
♦ 2 tsk. bagepulver
♦ 350 - 400 ml mælk
1)
Rør æggene til skum.
2) Tilsæt sukkeret og vaniljesukkeret, og rør det hele sammen.
3) Tilsæt det smeltede smør eller margarine.
4) Rør bagepulveret i.
5) Tilsæt mælken og melet skiftevist, mens du fortsætter med at røre.
6) Bland det hele på det højeste trin med håndmixeren, indtil dejen er glat.
28
SWEW 750 A1
Page 32

Chokoladevafl er
Ingredienser:
♦ 150 g blødt smør
♦ 3 æg
♦ 150 g sukker
♦ 100 g revet hvid chokolade
♦ 250 g mel
♦ 1 tsk. kanel
♦ 50 ml mælk
1)
Rør æggene til skum.
2) Tilsæt sukker og kanel, og rør det hele sammen.
3) Tilsæt det smeltede smør eller margarine.
4) Tilsæt mælken og melet skiftevist, mens du fortsætter med at røre.
5) Til sidst tilsættes den revne chokolade.
6) Bland det hele på det højeste trin med håndmixeren, indtil dejen er glat.
Basisdej til vaff elæg/vaff elfi gurer
Ingredienser:
DK
♦ 400 g mel
♦ 100 g sukker
♦ 100 g blødt smør
♦ 2 æg
♦ 100 ml mælk
♦ ¼ tsk. bagepulver
1)
Bland smør, sukker og æg.
2) Bland mel og bagepulver og tilsæt dette.
3) Tilsæt derefter mælken.
4) Bland det hele på højeste trin med håndmixeren.
SWEW 750 A1
29
Page 33

DK
BEMÆRK
► Vaff elæggene/vaff elfi gurerne kan du fylde med forskelligt fyld:
or eksempel marmelade, glasur, nødde-nougat-creme, budding, yoghurt,
F
æblemos, karamel, fl ødeskum eller spændende fyld som fl ødeost, krydderkvark, aioli, tzatziki, smeltet gouda osv.
► Du kan også overtrække vaff elæggene/vaff elfi gurerne med chokoladeglasur
ller glasur eller strø fl ormelis på.
e
Sød dej til vaff eljern/vaff elfi gurer
Ingredienser:
♦ 500 g mel
♦ 200 g sukker
♦ 200 g smør eller margarine
♦ 200 g creme-fraiche
♦ 3 æg
♦ 1 tsk. bagepulver
♦ 1 brev vaniljesukker
1)
Skil æggeblommerne fra æggehviderne ved to af æggene. Æggeblommerne
skal ikke bruges.
2) Bland smør/magarine, sukker, vaniljesukker, de to æggehvider og det hele
æg (æggeblomme og æggehvide).
3) Rør creme-fraichen i.
4) Bland mel og bagepulver og tilsæt dette.
5) Bland det hele på højeste trin med håndmixeren.
BEMÆRK
► De søde vaff elæg/vaff elmotiver kan fyldes med forskelligt fyld:
or eksempel marmelade, glasur, nødde-nougat-creme, budding, yoghurt,
F
æblemos, karamel eller fl ødeskum
► Du kan også overtrække vaff elæggene/vaff elfi gurerne med chokoladeglasur
eller glasur eller str
ø fl ormelis på.
30
SWEW 750 A1
Page 34

Saltet dej til vaff elæg/vaff elfi gurer
Ingredienser:
♦ 200 g mel
♦ 125 g margarine
♦ 1 æg
♦ ¼ tsk. bagepulver
♦ 1 knsp. sukker
♦ 1 knsp. salt
1)
Bland magarine, sukker, æg og salt.
2) Bland mel og bagepulver, og tilsæt det.
3) Bland det hele på højeste trin med håndmixeren.
BEMÆRK
► De salte vaff elæg/vaff elfi gurer kan fyldes med forskelligt fyld:
or eksempel fl ødeost, krydderkvark, aioli, tzatziki, smeltet gouda osv.
F
Bortskaff else
Smid aldrig sandwichmakeren ud sammen med det normale
husholdningsaff ald.
Dette produkt er underlagt det europæiske direktiv 2012/19/EU.
(Waste Electrical and Electronic Equipment).
DK
Bortskaf sandwichmakeren via en godkendt bortskaff elsesvirksomhed eller den
kommunale genbrugsstation. Følg de aktuelt gældende regler. Henvend dig i
tvivlstilfælde til det lokale bortskaff elsessted.
SWEW 750 A1
31
Page 35

Garanti og service
Du får 3 års garanti fra købsdatoen på dette produkt. Produkten er produceret
omhyggeligt og inden levering afprøvet samvittighedsfuldt.
DK
Opbevar kassebonen som bevis for købet. I garantitilfælde bedes du kontakte dit
servicested telefonisk. På denne måde kan der garanteres gratis indsendelse af
din vare.
BEMÆRK
► Garantien gælder kun for materiale- eller fabrikationsfejl, men ikke for
ansportskader, slidte dele eller defekter på skrøbelige dele som f.eks.
tr
kontakten eller batterier.
Produktet er kun beregnet til privat og ikke til erhvervsmæssigt brug. Ved misbrug
og uhensigtsmæssig behandling, anvendelse af vold og ved indgreb, som ikke er
foretaget af vores autoriserede service-afdeling, ophører garantien.
Dine juridiske rettigheder indskrænkes ikke ved denne garanti. Garantiperioden
forlænges ikke, hvis der gøres brug af garantien. Det gælder også for udskiftede
og reparerede dele.
Skader og mangler, der evt. allerede fandtes ved køb, skal anmeldes lige efter
udpakning og senest to dage efter købsdatoen.
Når garantiperioden er udløbet, skal evt. reparationer betales.
Service Danmark
Tel.: 32 710005
E-Mail: kompernass@lidl.dk
IAN 93556
Åbningstid for hotline: Mandag til fredag fra kl. 8:00 – 20:00 (MET)
Importør
KOMPERNASS HANDELS GMBH
BURGSTRASSE 21
44867 BOCHUM
GERMANY
www.kompernass.com
32
SWEW 750 A1
Page 36

Inhaltsverzeichnis
Einführung . . . . . . . . . . . . . . . . . . . . . . . . . . . . . . . . . . . . . . . . . . . . . . . . . . . 34
Urheberrecht . . . . . . . . . . . . . . . . . . . . . . . . . . . . . . . . . . . . . . . . . . . . . . . . . . . . . . . . . . . 34
Haftungsbeschränkung . . . . . . . . . . . . . . . . . . . . . . . . . . . . . . . . . . . . . . . . . . . . . . . . . . . 34
Bestimmungsgemäße Verwendung . . . . . . . . . . . . . . . . . . . . . . . . . . . . . . . . . . . . . . . . . . 34
Lieferumfang . . . . . . . . . . . . . . . . . . . . . . . . . . . . . . . . . . . . . . . . . . . . . . . . . 35
Entsorgung der Verpackung . . . . . . . . . . . . . . . . . . . . . . . . . . . . . . . . . . . . . . . . . . . . . . . 35
Gerätebeschreibung . . . . . . . . . . . . . . . . . . . . . . . . . . . . . . . . . . . . . . . . . . . 36
Technische Daten . . . . . . . . . . . . . . . . . . . . . . . . . . . . . . . . . . . . . . . . . . . . . . 36
Sicherheitshinweise . . . . . . . . . . . . . . . . . . . . . . . . . . . . . . . . . . . . . . . . . . . 37
Austauschen der Wechselplatten . . . . . . . . . . . . . . . . . . . . . . . . . . . . . . . . 39
Einsetzen der Wechselplatten . . . . . . . . . . . . . . . . . . . . . . . . . . . . . . . . . . . . . . . . . . . . . . 39
Herausnehmen der Wechselplatten . . . . . . . . . . . . . . . . . . . . . . . . . . . . . . . . . . . . . . . . . . 40
Erste Inbetriebnahme . . . . . . . . . . . . . . . . . . . . . . . . . . . . . . . . . . . . . . . . . . 40
DE
AT
CH
Bedienen . . . . . . . . . . . . . . . . . . . . . . . . . . . . . . . . . . . . . . . . . . . . . . . . . . . . 41
Waff elnüsse/Motiv-Waff eln backen . . . . . . . . . . . . . . . . . . . . . . . . . . . . . . 41
Waff eln backen . . . . . . . . . . . . . . . . . . . . . . . . . . . . . . . . . . . . . . . . . . . . . . . . . . . . . . . . . 42
Reinigen . . . . . . . . . . . . . . . . . . . . . . . . . . . . . . . . . . . . . . . . . . . . . . . . . . . . . 43
Aufbewahren . . . . . . . . . . . . . . . . . . . . . . . . . . . . . . . . . . . . . . . . . . . . . . . . 43
Fehlerbehebung . . . . . . . . . . . . . . . . . . . . . . . . . . . . . . . . . . . . . . . . . . . . . . 44
Rezepte . . . . . . . . . . . . . . . . . . . . . . . . . . . . . . . . . . . . . . . . . . . . . . . . . . . . . 44
Waff eln . . . . . . . . . . . . . . . . . . . . . . . . . . . . . . . . . . . . . . . . . . . . . . . . . . . . . . . . . . . . . . . 44
Schokoladenwaff eln . . . . . . . . . . . . . . . . . . . . . . . . . . . . . . . . . . . . . . . . . . . . . . . . . . . . . 45
Basisteig für Waff elnüsse/Motiv-Waff eln . . . . . . . . . . . . . . . . . . . . . . . . . . . . . . . . . . . . . 45
Süßer Teig für Waff elnüsse/Motiv-Waff eln . . . . . . . . . . . . . . . . . . . . . . . . . . . . . . . . . . . . 46
Salziger Teig für Waff elnüsse/Motiv-Waff eln . . . . . . . . . . . . . . . . . . . . . . . . . . . . . . . . . . 47
Entsorgung. . . . . . . . . . . . . . . . . . . . . . . . . . . . . . . . . . . . . . . . . . . . . . . . . . . 47
Garantie und Service . . . . . . . . . . . . . . . . . . . . . . . . . . . . . . . . . . . . . . . . . . 48
Importeur . . . . . . . . . . . . . . . . . . . . . . . . . . . . . . . . . . . . . . . . . . . . . . . . . . . 49
SWEW 750 A1
33
Page 37

DE
AT
CH
Einführung
Herzlichen Glückwunsch zum Kauf Ihres neuen Gerätes!
Sie haben sich damit für ein modernes und hochwertiges Produkt entschieden.
Die Bedienungsanleitung ist Bestandteil dieses Produktes. Sie enthält wichtige
Hinweise für Sicherheit, Gebrauch und Entsorgung. Machen Sie sich vor der
Benutzung des Produkts mit allen Bedien- und Sicherheitshinweisen vertraut.
Benutzen Sie dieses Produkt nur wie beschrieben und für die angegebenen
Einsatzbereiche. Händigen Sie alle Unterlagen bei Weitergabe des Produkts an
Dritte mit aus.
Urheberrecht
Diese Dokumentation ist urheberrechtlich geschützt.
Jede Vervielfältigung, bzw. jeder Nachdruck, auch auszugsweise, sowie die
Wiedergabe der Abbildungen, auch im veränderten Zustand, ist nur mit
schriftlicher Zustimmung des Herstellers gestattet.
Haftungsbeschränkung
Alle in dieser Bedienungsanleitung enthaltenen technischen Informationen, Daten
und Hinweise für den Anschluss und die Bedienung entsprechen dem letzten
Stand bei Drucklegung und erfolgen unter Berücksichtigung unserer bisherigen
Erfahrungen und Erkenntnisse nach bestem Wissen.
Aus den Angaben, Abbildungen und Beschreibungen in dieser Bedienungsanleitung können keine Ansprüche hergeleitet werden.
Der Hersteller übernimmt keine Haftung für Schäden aufgrund von Nichtbeachtung der Bedienungsanleitung, nicht bestimmungsgemäßer Verwendung,
unsachgemäßen Reparaturen, unerlaubt vorgenommenen Veränderungen oder
Verwendung nicht zugelassener Ersatzteile.
Bestimmungsgemäße Verwendung
Dieses Gerät ist ausschließlich vorgesehen für das Backen von Waff eln, Waff elnüssen und Motiv-Waff eln.
Dieses Gerät ist ausschließlich für die Benutzung in privaten Haushalten bestimmt. Benutzen Sie das Gerät nicht gewerblich!
34
SWEW 750 A1
Page 38

Lieferumfang
Das Gerät wird standardmäßig mit folgenden Komponenten geliefert:
▯ Waff eleisen
▯ 2 Wechselplatten „Waff eln“
▯ 2 Wechselplatten „Waff elnuss“
▯ 2 Wechselplatten „Motive“
▯ Bedienungsanleitung
1)
Entnehmen Sie das Gerät, die Wechselplatten und die Bedienungsanleitung
aus dem Karton.
2) Entfernen Sie sämtliches Verpackungsmaterial.
HINWEIS
► Prüfen Sie die Lieferung auf Vollständigkeit und auf sichtbare Schäden.
► Bei einer unvollständigen Lieferung oder Schäden infolge mangelhafter
erpackung oder durch Transport wenden Sie sich an die Service-Hotline
V
(siehe Kapitel Garantie und Service).
DE
AT
CH
Entsorgung der Verpackung
Die Verpackung schützt das Gerät vor Transportschäden. Die Verpackungsmaterialien sind nach umweltverträglichen und entsorgungstechnischen Gesichtspunkten ausgewählt und deshalb recyclebar.
Die Rückführung der Verpackung in den Materialkreislauf spart Rohstoff e und
verringert das Abfallaufkommen. Entsorgen Sie nicht mehr benötigte Verpackungsmaterialien gemäß den örtlich geltenden Vorschriften.
HINWEIS
► Heben Sie wenn möglich die Originalverpackung während der Garan-
eit des Gerätes auf, um das Gerät im Garantiefall ordnungsgemäß
tiez
verpacken zu können.
SWEW 750 A1
35
Page 39

Gerätebeschreibung
Abbildung A:
1 Arretierungen
2 Heizschlange
3 untere Halterungen
DE
AT
CH
4 Heizschlange
5 Arretierungen
6 hintere Halterungen
Abbildung B (Waff elnüsse):
7 obere Rastnasen
8 untere und hintere Rastnasen
9 vordere Rastnasen
Abbildung C (Waff elplatten):
7 obere Rastnasen
8 untere und hintere Rastnasen
9 vordere Rastnasen
Abbildung D (Motiv-Waff eln):
7 obere Rastnasen
8 untere und hintere Rastnasen
9 vordere Rastnasen
Abbildung E:
0 Deckelverriegelung
q Kontrollleuchte „Power“
w Kontrollleuchte „Betriebsbereit“
Technische Daten
Spannung 220 - 240 V ∼, 50 Hz
Leistungsaufnahme 750 W
36
SWEW 750 A1
Page 40

Sicherheitshinweise
WARNUNG! STROMSCHLAGGEFAHR!
► Lassen Sie beschädigte Netzkabel oder Netzstecker sofort von
autorisiertem Fachpersonal ersetzen, um Gefährdungen zu vermeiden.
► Verwenden Sie das Gerät nur in trockenen Räumen, nicht im Freien.
Tauchen Sie das Gerät niemals in Wasser oder andere
Flüssigkeiten! Andernfalls besteht Lebensgefahr durch
elektrischen Schlag.
► Achten Sie beim Reinigen darauf, dass kein Wasser in das Innere
des Gerätes gelangt. Reinigen Sie das Gerät nie unter fl ießendem
Wasser.
► Stellen Sie sicher, dass das Gerät niemals mit Wasser in Berüh-
rung kommen kann. Betreiben Sie das Gerät niemals in der Nähe
von Wasser oder neben Gefäßen, die Flüssigkeit enthalten.
► Achten Sie darauf, dass im Betrieb das Netzkabel niemals nass
oder feucht wird. Führen Sie es so, dass es nicht eingeklemmt
oder anderweitig beschädigt werden kann.
DE
AT
CH
► Ziehen Sie nach jedem Gebrauch den Netzstecker aus der Netz-
steckdose, um das Gerät auszuschalten.
► Öff nen Sie nie das Gehäuse des Gerätes.
WARNUNG! VERLETZUNGSGEFAHR!
► Dieses Gerät kann von Kindern ab 8 Jahren sowie von Personen
mit reduzierten physischen, sensorischen oder mentalen Fähigkeiten oder Mangel an Erfahrung und/oder Wissen benutzt werden,
wenn sie beaufsichtigt oder bezüglich des sicheren Gebrauchs
des Gerätes unterwiesen wurden und die daraus resultierenden
Gefahren verstanden haben.
► Kinder dürfen nicht mit dem Gerät spielen.
SWEW 750 A1
37
Page 41

WARNUNG! VERLETZUNGSGEFAHR!
► Reinigung und Benutzer-Wartung dürfen nicht durch Kinder
durchgeführt werden, es sei denn, sie sind älter als 8 Jahre und
beaufsichtigt. Kinder jünger als 8 Jahre sind vom Gerät und der
DE
AT
CH
Anschlussleitung fernzuhalten.
► Die Geräteteile können im Betrieb heiß werden. Fassen Sie daher
nur den Griff an.
► Lassen Sie das Gerät erst vollständig abkühlen, bevor Sie es reini-
gen, die Wechselplatten austauschen oder es verstauen.
► Seien Sie vorsichtig beim Herausnehmen der fertigen Speisen.
Das Gerät, sowie die Speisen sind sehr heiß.
► Betreiben Sie das Gerät nur auf einer stabilen, rutschfesten und
ebenen Stellfl äche.
► Benutzen Sie keine externe Zeitschaltuhr oder ein separates Fern-
wirksystem, um das Gerät zu betreiben.
Achtung! Heiße Oberfl äche!
ACHTUNG - BRANDGEFAHR!
► Das Gerät darf nicht in der Nähe von brennbaren Materialien
verwendet werden.
► Decken Sie das Gerät nicht ab, solange es in Betrieb ist.
► Betreiben Sie das Gerät nur auf einer hitzebeständigen Unterlage.
► Betreiben Sie das Gerät niemals unbeaufsichtigt.
ACHTUNG - SACHSCHADEN!
► Entnehmen Sie die Speisen nur mit einem Kunststoff - oder Holzspatel
oder einem anderen geeigneten, nichtmetallischen Gegenstand,
um die Antihaftbeschichtung des Waff eleisens nicht zu zerstören.
► Benutzen Sie zur Reinigung keine scharfen Putzmittel und spitze
Gegenstände.
38
SWEW 750 A1
Page 42

Austauschen der Wechselplatten
Sie können zwischen 3 verschiedenen Wechselplatten wählen:
– Wechselplatten „Waff elnüsse“: zur Zubereitung von hohlen Waff elnuss-
ten, die man dann füllen und zusammenfügen kann.
Hälf
– Wechselplatten „Waff eln“: zum Backen von Waff eln.
– Wechselplatten „Motiv-Waff eln“: zur Zubereitung von hohlen Waff elmo-
-Hälften, die man dann füllen und zusammenfügen kann.
tiv
WARNUNG! STROMSCHLAGGEFAHR
► Ziehen Sie erst den Netzstecker aus der Netzsteckdose, bevor Sie die
echselplatten austauschen.
W
WARNUNG! VERLETZUNGSGEFAHR!
► Lassen Sie das Gerät vor dem Austauschen der Wechselplatten abkühlen!
erbrennungsgefahr!
V
HINWEIS
► Achten Sie bei den Wechselplatten „Waff elnüsse“ und „Motiv-Waff eln“
immer dar
rätes zu installieren und die jeweils untere Wechselplatte in den unteren Teil
des Gerätes. Orientieren Sie sich an den Abbildungen der Ausklappseite.
auf, die jeweils obere Wechselplatte in den oberen Teil des Ge-
Einsetzen der Wechselplatten
DE
AT
CH
1) Öff nen Sie das Gerät, indem Sie die Deckelverriegelung 0 lösen und den
Deckel aufklappen.
2) Obere Wechselplatte: Schieben Sie zuerst die unteren Rastnasen 8 in die
unteren Halterungen 3.
3) Drücken Sie nun die oberen Rastnasen 7 auf die Arretierungen 1, so dass
die Rastnasen 7 unter die Arretierungen 1 springen und die Wechselplatte
fest sitzt.
4) Untere Wechselplatte: Schieben Sie zuerst die hinteren Rastnasen 8 in die
hinteren Halterungen 6.
5) Drücken Sie nun die vorderen Rastnasen 9 auf die Arretierungen 5, so
dass die Rastnasen 9 unter die Arretierungen 5 springen und die Wechselplatte fest sitzt.
6) Drücken Sie einmal kräftig auf die Mitte der unteren Wechselplatte, um
sicherzustellen, dass diese sicher eingesetzt ist.
SWEW 750 A1
39
Page 43

DE
AT
CH
Herausnehmen der Wechselplatten
1) Obere Wechselplatte: Schieben Sie die Arretierungen 1 nach oben und
kippen Sie gleichzeitig die Wechselplatte nach vorne, so dass Sie diese aus
den unteren Halterungen 3 herausheben können.
2) Untere Wechselplatte: Ziehen Sie die Arretierungen 5 nach vorne und heben Sie die Wechselplatte an, so dass Sie diese aus den hinteren Halterungen 6 herausziehen können.
Erste Inbetriebnahme
Führen Sie die folgende Prozedur mit jedem der 3 Wechselplattenpaare durch.
■ Reiben Sie einmalig die Antihaftbeschichtung der Wechselplatten mit zum
ochen geeignetem Öl ein.
K
WARNUNG! VERLETZUNGSGEFAHR!
► Lassen Sie das Gerät vor dem Wechseln der Wechselplatten abkühlen!
erbrennungsgefahr!
V
■ Setzen Sie ein Paar der Wechselplatten in das Gerät ein.
■ Stecken Sie den Netzstecker in eine Netzsteckdose.
■ Schließen Sie das Gerät und verriegeln Sie es mit der Deckelverriegelung 0.
■ Lassen Sie das Gerät ca. 10 Minuten aufheizen.
HINWEIS
► Beim ersten Gebrauch kann ein leichter Geruch entstehen (auch geringe
auchentwicklung möglich). Dieser ist normal und verliert sich nach kurzer
R
Zeit. Sorgen Sie bitte für ausreichende Entlüftung. Öff nen Sie zum Beispiel
ein Fenster.
■ Ziehen Sie den Netzstecker und lassen Sie das Gerät abkühlen.
■ Reinigen Sie die Wechselplatten und das Gerät wie im Kapitel „Reinigen“
beschrieben.
Das Ger
ät ist nun betriebsbereit.
40
SWEW 750 A1
Page 44

Bedienen
Waff elnüsse/Motiv-Waff eln backen
1) Wählen Sie die Wechselplatten „Waff elnüsse“ oder „Motiv-Waff eln“ und
setzen Sie diese ein. Achten Sie dabei darauf die obere Wechselplatte in
der oberen Hälfte des Gerätes zu montieren und die untere Wechselplatte in
der unteren Hälfte.
ACHTUNG - SACHSCHADEN!
► Benutzen Sie niemals zwei verschiedene Wechselplatten gleichzeitig.
Schließen Sie den Deckel und verriegeln Sie ihn mit der Deckelverriegelung 0.
2)
3) Stecken Sie den Netzstecker in eine Netzsteckdose. Die orangene Kontrollleuchte „Power“ q leuchtet.
4) Sobald das Gerät aufgeheizt ist, leuchtet die grüne Kontrollleuchte „Betriebsbereit“ w auf.
5) Lösen Sie die Deckelverriegelung 0, öff nen Sie den Deckel und geben Sie
ca, 1/2 TL Teig (Rezepte für Waff elnüsse und Motiv-Waff eln siehe Kapitel
„Rezepte“) in jede der Formen/Motive der unteren Wechselplatten.
DE
AT
CH
HINWEIS
► Achten Sie bei den Motiv-Waff eln darauf, dass Sie den Teig über alle Teile
des Motiv
nicht ausgefüllt werden.
6) Schließen Sie den Deckel und verriegeln Sie ihn mit der Deckelverriegelung 0.
ACHTUNG - SACHSCHADEN!
► Entnehmen Sie die Waff elnüsse/Motiv-Waff eln nur mit einem Kunststoff -
oder Holzlöff
stand, um die Antihaftbeschichtung des Gerätes nicht zu zerstören.
7) Nach ca. 3 - 4 Minuten sind die Waff elnüsse/Motiv-Waff eln fertig. Lösen
Sie die Deckelverriegelung 0, öff nen Sie den Deckel und entnehmen Sie die
Waff elnüsse/Motiv-Waff eln.
8) Wenn Sie keine weiteren Waff elnüsse/Motiv-Waff eln mehr zubereiten wollen, ziehen Sie den Netzstecker aus der Netzsteckdose.
9) Lassen Sie die Waff elnüsse/Motiv-Waff eln etwas abkühlen und schneiden
Sie überschüssigen Teig vom Rand der Waff elnüsse/Motiv-Waff eln mit einem
Messer ab (entgraten).
s verteilen. Ansonsten kann es passieren, dass Teile des Motivs
el oder einem anderen geeigneten, nichtmetallischen Gegen-
SWEW 750 A1
41
Page 45

10) Füllen Sie die Waff elnüsse/Motiv-Waff eln mit der gewünschten Füllung.
Verteilen Sie ein wenig der Füllung auch auf dem Rand der Waff elnüsse/
Motiv-Waff eln und legen Sie das passende Gegenstück darauf, so dass die
beiden Hälften zusammen kleben und eine Hohlkörperfi gur entsteht.
Waff eln backen
DE
AT
CH
1) Wählen Sie die Wechselplatten „Waff eln“ und setzen Sie diese ein.
ACHTUNG - SACHSCHADEN!
► Benutzen Sie niemals zwei verschiedene Wechselplatten gleichzeitig.
Schließen Sie den Deckel und verriegeln Sie ihn mit der Deckelverriegelung 0.
2)
3) Stecken Sie den Netzstecker in eine Netzsteckdose. Die orangene Kontrollleuchte „Power“ q leuchtet.
4) Sobald das Gerät aufgeheizt ist, leuchtet die grüne Kontrollleuchte „Betriebsbereit“ w auf.
5) Öff nen Sie den Deckel und füllen Sie etwa 2 - 3 große EL Waff elteig mittig in
jede der beiden Waff elbackfl ächen der unteren Wechselplatte.
6) Schließen Sie den Deckel und verriegeln Sie ihn mit der Deckelverriegelung 0.
ACHTUNG - SACHSCHADEN!
► Entnehmen Sie die Waff eln nur mit einem Kunststoff - oder Holzspatel oder
einem ander
beschichtung des Gerätes nicht zu zerstören.
7) Nach ca. 3 - 4 Minuten sind die Waff eln fertig. Diese Zeitangabe kann,
je nach verwendetem Waff elteig und persönlichem Geschmack, variieren.
Lösen Sie die Deckelverriegelung 0, öff nen Sie den Deckel und entnehmen
Sie die Waff eln.
en geeigneten, nichtmetallischen Gegenstand, um die Antihaft-
8) Wenn Sie keine weiteren Waff eln mehr backen wollen, ziehen Sie den Netzstecker aus der Netzsteckdose.
42
SWEW 750 A1
Page 46

Reinigen
ACHTUNG - SACHSCHADEN!
HINWEIS
WARNUNG! STROMSCHLAGGEFAHR
► Ziehen Sie erst den Netzstecker aus der Netzsteckdose, bevor Sie das
ät reinigen.
Ger
Tauchen Sie das Gerät niemals in Wasser oder andere Flüssigkeiten!
Andernfalls besteht Lebensgefahr durch elektrischen Schlag.
WARNUNG! VERLETZUNGSGEFAHR!
► Lassen Sie das Gerät vor der Reinigung abkühlen. Verbrennungsgefahr!
► Keine scharfen oder scheuernden Reinigungsmittel verwenden. Das greift
die Oberfl
► Reinigen Sie die Wechselplatten oder das Gerät keinesfalls in der
Spülmaschine!
äche des Gerätes an.
DE
AT
CH
► Warten Sie mit der Reinigung nicht zu lange. Warten Sie, bis sich das Ge-
ät soweit abgekühlt hat, dass Sie es ohne Verbrennungsgefahr anfassen
r
können. Dann lassen sich die Lebensmittelreste besser entfernen.
■ Das Gehäuse reinigen Sie mit einem trockenen Tuch oder einem leicht ange-
feuchteten Lappen.
■ Nehmen Sie die Wechselplatten ab und reinigen Sie die Wechselplatten in
w
armem Wasser und geben Sie etwas Spülmittel hinzu.
■ Sollten Fett oder Lebensmittel unter die Wechselplatten in den Raum, in
w
elchem sich die Heizschlangen 2 4 befi nden, gelaufen sein, gehen Sie
folgendermaßen vor:
– Tupfen Sie Fett oder andere Flüssigkeiten mit einem Stück Küchenpapier ab.
– Entfernen Sie festgebrannte Rückstände mit einem Holzspatel oder
kleinem Holzspieß.
■ Trocknen Sie alle Teile vor dem erneuten Gebrauch gut ab.
Aufbewahren
■ Bewahren Sie den Gerät an einem trockenen Ort auf.
■ Reinigen Sie das Gerät wie im Kapitel „Reinigen“ beschrieben.
SWEW 750 A1
43
Page 47

Fehlerbehebung
Störung Ursache Abhilfe
DE
AT
CH
Das Gerät funktioniert nicht.
Die Waff elnüsse/
Motiv-Waff eln/
Waff eln werden
zu dunkel.
Rezepte
Waff eln
Zutaten:
Der Netzstecker steckt nicht
in der Netzsteckdose.
Das Gerät ist defekt.
Die Waff elnüsse/MotivWaff eln/Waff eln waren zu
lange im Gerät.
♦ 250 g Margarine oder Butter
♦ ca. 200 g Zucker
♦ 2 Päckchen Vanillezucker
♦ 5 Eier
Verbinden Sie den Netzstecker mit dem Stromnetz.
Wenden Sie sich an den
Kundendienst.
Nehmen Sie die Waff elnüsse/Motiv-Waff eln/
Waff eln eher heraus.
♦ 500 g Mehl
♦ 2 TL Backpulver
♦ 350 - 400 ml Milch
1)
Rühren Sie die Eier schaumig.
2) Geben Sie den Zucker und den Vanillezucker hinzu und verrühren Sie alles.
3) Geben Sie die zerlassene Butter oder Margarine hinzu.
4) Rühren Sie das Backpulver unter.
5) Geben Sie unter ständigem Rühren die Milch und das Mehl abwechselnd
nach und nach hinzu.
6) Vermengen Sie alles auf höchster Stufe mit dem Handmixer, bis ein glatter
Teig entsteht.
44
SWEW 750 A1
Page 48

Schokoladenwaff eln
Zutaten:
♦ 150 g weiche Butter
♦ 3 Eier
♦ 150 g Zucker
♦ 100 g geriebene weiße Schokolade
♦ 250 g Mehl
♦ 1 TL Zimt
♦ 50 ml Milch
1)
Rühren Sie die Eier schaumig.
2) Geben Sie den Zucker und den Zimt hinzu und verrühren Sie alles.
3) Geben Sie die zerlassene Butter oder Margarine hinzu.
4) Geben Sie unter ständigem Rühren die Milch und das Mehl abwechselnd
nach und nach hinzu.
DE
AT
CH
5) Als letztes heben Sie die geriebene Schokolade unter.
6) Vermengen Sie alles auf höchster Stufe mit dem Handmixer, bis ein glatter
Teig entsteht.
Basisteig für Waff elnüsse/Motiv-Waff eln
Zutaten:
♦ 400 g Mehl
♦ 100 g Zucker
♦ 100 g weiche Butter
♦ 2 Eier
♦ 100 ml Milch
♦ ¼ TL Backpulver
1)
Vermengen Sie die Butter, den Zucker und die Eier.
2) Vermischen Sie das Mehl und das Backpulver und geben Sie es hinzu.
3) Geben Sie die Milch hinzu.
4) Vermengen Sie alles auf höchster Stufe mit dem Handmixer.
SWEW 750 A1
45
Page 49

DE
AT
CH
HINWEIS
► Die Waff elnüsse/Motiv-Waff eln können Sie mit verschiedensten Zutaten
füllen:
Zum Beispiel mit Mar
Joghurt, Apfelmus, Karamell, Sahne oder für herzhafte Füllungen Frischkäse, Kräuterquark, Aioli, Tzatziki, geschmolzener Gouda usw.
► Sie können die Waff elnüsse/Motiv-Waff eln auch mit Schokoladenglasur
oder Zuck
erguss überziehen oder Puderzucker darüber streuen.
melade, Zuckerguss, Nuss-Nougat-Creme, Pudding,
Süßer Teig für Waff elnüsse/Motiv-Waff eln
Zutaten:
♦ 500 g Mehl
♦ 200 g Zucker
♦ 200 g Butter oder Margarine
♦ 200 g Schmand
♦ 3 Eier
♦ 1 TL Backpulver
♦ 1 Päckchen Vanillezucker
1)
Trennen Sie von zwei Eiern das Eigelb und das Eiweiß. Das Eigelb wird nicht
benötigt.
2) Vermengen Sie die Butter/Margarine, den Zucker, den Vanillezucker, die 2
Eiweiße und das ganze Ei (Eigelb und Eiweiß).
3) Rühren Sie den Schmand unter.
4) Vermischen Sie das Mehl und das Backpulver und geben Sie es hinzu.
5) Vermengen Sie alles auf höchster Stufe mit dem Handmixer.
HINWEIS
► Die süßen Waff elnüsse/Motiv-Waff eln können Sie mit verschiedensten
Zutaten füllen:
Zum Beispiel mit Mar
Joghurt, Apfelmus, Karamell oder Sahne.
► Sie können die Waff elnüsse/Motiv-Waff eln auch mit Schokoladenglasur
oder Zuck
erguss überziehen oder Puderzucker darüber streuen.
melade, Zuckerguss, Nuss-Nougat-Creme, Pudding,
46
SWEW 750 A1
Page 50

Salziger Teig für Waff elnüsse/Motiv-Waff eln
Zutaten:
♦ 200 g Mehl
♦ 125 g Margarine
♦ 1 Ei
♦ ¼ TL Backpulver
♦ 1 Prise Zucker
♦ 1 Messerspitze Salz
1)
Vermengen Sie die Margarine, den Zucker, das Ei und das Salz.
2) Vermischen Sie das Mehl und das Backpulver und geben Sie es hinzu.
3) Vermengen Sie alles auf höchster Stufe mit dem Handmixer.
HINWEIS
► Die salzigen Waff elnüsse/Motiv-Waff eln können Sie mit verschiedensten
Zutaten füllen:
Zum Beispiel mit F
Gouda usw..
rischkäse, Kräuterquark, Aioli, Tzatziki, geschmolzenem
DE
AT
CH
Entsorgung
Werfen Sie das Gerät keinesfalls in den normalen Hausmüll.
Dieses Produkt unterliegt der europäischen Richtlinie 2012/19/EU.
(Waste Electrical and Electronic Equipment).
Entsorgen Sie das Gerät über einen zugelassenen Entsorgungsbetrieb oder über
Ihre kommunale Entsorgungseinrichtung. Beachten Sie die aktuell geltenden
Vorschriften. Setzen Sie sich im Zweifelsfall mit Ihrer Entsorgungseinrichtung in
Verbindung.
SWEW 750 A1
47
Page 51

Garantie und Service
Sie erhalten auf dieses Gerät 3 Jahre Garantie ab Kaufdatum. Das Gerät wurde
sorgfältig produziert und vor Anlieferung gewissenhaft geprüft.
Bitte bewahren Sie den Kassenbon als Nachweis für den Kauf auf. Bitte setzen
Sie sich im Garantiefall mit Ihrer Servicestelle telefonisch in Verbindung. Nur so
kann eine kostenlose Einsendung Ihrer Ware gewährleistet werden.
DE
AT
CH
HINWEIS
► Die Garantieleistung gilt nur für Material- oder Fabrikationsfehler, nicht
aber für T
zerbrechlichen Teilen, z. B. Schalter oder Akkus.
Das Produkt ist lediglich für den privaten und nicht für den gewerblichen
Gebrauch bestimmt. Bei missbräuchlicher und unsachgemäßer Behandlung,
Gewaltanwendung und bei Eingriff en, die nicht von unserer autorisierten ServiceNiederlassung vorgenommen wurden, erlischt die Garantie.
Ihre gesetzlichen Rechte werden durch diese Garantie nicht eingeschränkt. Die
Garantiezeit wird durch die Gewährleistung nicht verlängert. Dies gilt auch für
ersetzte und reparierte Teile.
Eventuell schon beim Kauf vorhandene Schäden und Mängel müssen sofort nach
dem Auspacken gemeldet werden, spätestens aber zwei Tage nach Kaufdatum.
Nach Ablauf der Garantiezeit anfallende Reparaturen sind kostenpfl ichtig.
Die Garantiezeit wird durch die Gewährleistung nicht verlängert. Dies gilt auch
für ersetzte und reparierte Teile.
Service Deutschland
Tel.: 0800 5435 111
E-Mail: kompernass@lidl.de
ransportschäden, Verschleißteile oder für Beschädigungen an
IAN 93556
Service Österreich
Tel.: 0820 201 222 (0,15 EUR/Min.)
E-Mail: kompernass@lidl.at
IAN 93556
Service Schweiz
Tel.: 0842 665566 (0,08 CHF/Min., Mobilfunk max. 0,40 CHF/Min.)
E-Mail: kompernass@lidl.ch
IAN 93556
Erreichbarkeit Hotline: Montag bis Freitag von 8:00 Uhr – 20:00 Uhr (MEZ)
48
SWEW 750 A1
Page 52

Importeur
KOMPERNASS HANDELS GMBH
BURGSTRASSE 21
44867 BOCHUM
GERMANY
www.kompernass.com
DE
AT
CH
SWEW 750 A1
49
Page 53

IAN 93556
KOMPERNASS HANDELS GMBH
BURGSTRASSE 21
44867 BOCHUM
DEUTSCHLAND / GERMANY
www.kompernass.com
Last Information Update · Tilstand af information
Stand der Informationen:
10 / 2013 · Ident.-No.: SWEW750A1-092013-2
 Loading...