

Page 1
MINCER SFW 350 C1
MINCER
Operating instructions
KØDHAKKER
Betjeningsvejledning
KÖTTKVARN
Bruksanvisning
FLEISCHWOLF
Bedienungsanleitung
IAN 270744
VLEESMOLEN
Gebruiksaanwijzing
HACHOIR À VIANDE
Mode d’emploi
Page 2

GB / IE Operating instructions Page 1
SE Bruksanvisning Sidan 19
DK Betjeningsvejledning Side 37
FR / BE Mode d’emploi Page 55
NL / BE Gebruiksaanwijzing Pagina 73
DE / AT / CH Bedienungsanleitung Seite 91
Before reading, unfold the page containing the illustrations and familiarise yourself with all functions of
the device.
Vik ut bildsidan och ha den till hands när du läser igenom anvisningarna och gör dig bekant med
apparatens / maskinens funktioner.
Før du læser, vend siden med billeder frem og bliv bekendt med alle apparatets funktioner.
Avant de lire le mode d’emploi, ouvrez la page contenant les illustrations et familiarisez-vous ensuite avec
toutes les fonctions de l’appareil.
Vouw vóór het lezen de pagina met de afbeeldingen open en maak u vertrouwd met alle functies van het
apparaat.
Klappen Sie vor dem Lesen die Seite mit den Abbildungen aus und machen Sie sich anschließend mit allen
Funktionen des Gerätes vertraut.
Page 3
A
B
0
9
7
65
8
w
q
e
1
4
2
3
C
t
u
z
r
Page 4

GB│IE
│
1 ■
SFW 350 C1
Index
Introduction ...................................................2
Copyright .............................................................. 2
Limited liability ........................................................... 2
Intended use ..................................................2
Items supplied / Component description ............................3
Technical data .................................................3
Safety instructions .............................................4
Assembly / Disassembly .........................................6
Assembling the meat grinder ................................................ 6
Assembling the sausage stuffer attachment .................................... 7
Assembling the kubbe attachment ............................................ 8
Assembling the biscuit attachments ........................................... 8
Operation ....................................................9
Operating the appliance ................................................... 9
Processing meat ......................................................... 10
Processing sausage meat .................................................. 10
Using the kubbe attachment ...............................................11
Making biscuits .........................................................11
Non-functionality .............................................12
Cleaning .....................................................12
Cleaning the motor block .................................................12
Cleaning the accessories ..................................................13
Storage .....................................................13
Disposal .....................................................14
Warranty and Service .........................................14
Importer .....................................................15
Recipes ......................................................15
Kubbe ................................................................ 15
Fresh Grill Sausages .....................................................16
Biscuits ................................................................ 17
Page 5

■ 2 │ GB
│
IE
SFW 350 C1
Introduction
Congratulations on the purchase of your new appliance.
You have clearly decided in favour of a quality product. These operating instructions
are a part of this product. They contain important information in regard to safety,
use and disposal. Before using the product, familiarise yourself with all of these
operating and safety instructions. Use the product only as described and only for
the specified areas of application. Retain these instructions for future reference. In
addition, pass these documents on, together with the product, to any future owner.
Copyright
This documentation is copyright protected.
Any copying or reproduction of it, including as extracts, as well as the reproduction
of images, also in an altered state, is only permitted with the written authorisation
of the manufacturer.
Limited liability
All technical information, data and instructions for the installation, connection
and operation contained in these operating instructions correspond to the latest
available at the time of printing and, to the best of our knowledge, take into
account our previous experience and know-how.
No claims can be derived from the details, illustrations and descriptions in these
instructions.
The manufacturer assumes no responsibility for damage caused by failure to observe these instructions, improper use, incompetent repairs, making unauthorised
modifications or for using unapproved replacement parts.
Intended use
This appliance is intended only for the preparation of food in quantities expected
in domestic households:
▯ Mincing fresh meat,
▯ Making sausages with natural or artificial sausage skin,
▯ Making biscuits
This appliance is not intended for the processing of frozen foods or other hard
foodstuffs, e.g. bones or nuts, or for use in commercial or industrial environments.
Page 6

GB│IE
│
3 ■
SFW 350 C1
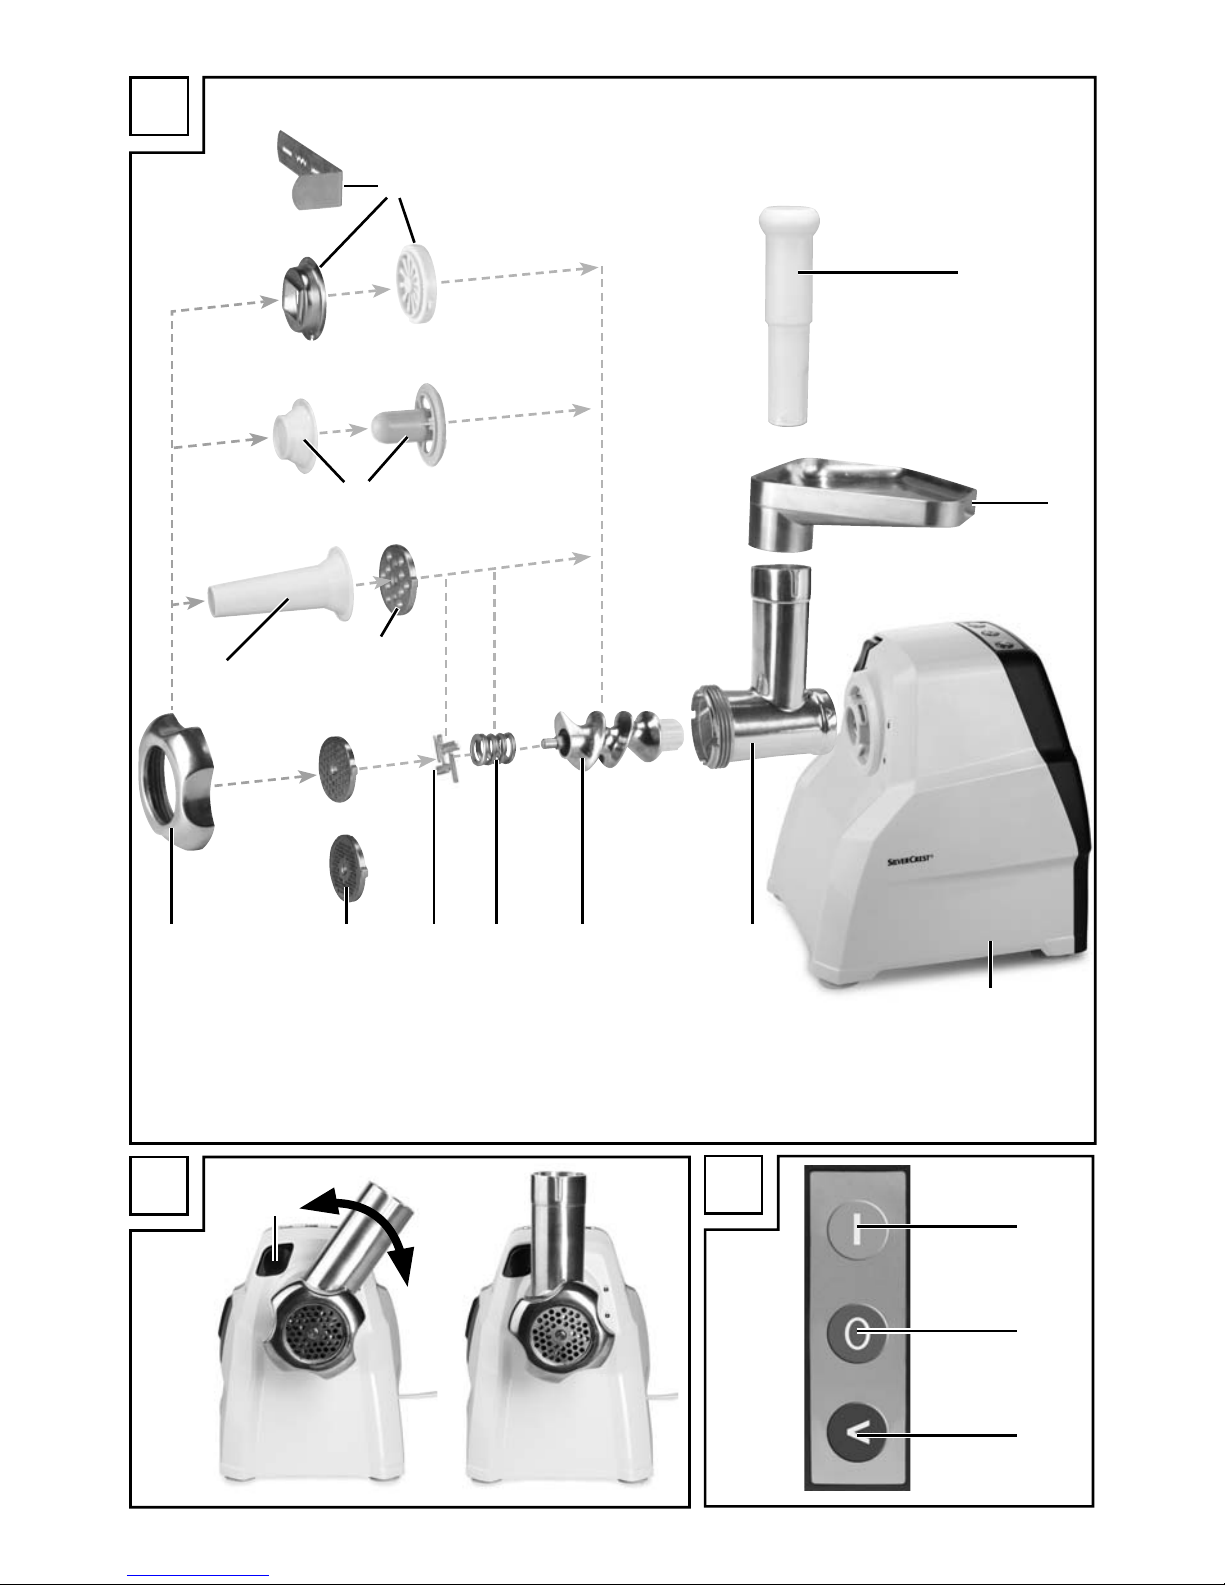
Items supplied / Component description
Figure A:
Biscuit attachment with pattern strips
Stodger
Feeding tray
Motor unit
Meat grinder casing made of metal
Transport screw
Spring
Cross blade
Cutting discs for coarse and fine mincing
Ring clamp
- Sausage stuffer attachment
3 Sausage disc
! Kubbe attachment
Figure B:
. Locking button
Figure C:
0 “I” button
6 “0” button
1 “<” button
Technical data
Voltage 220 - 240 V ∼, 50 Hz
Power consumption 250 - 350 W
Protection class
II /
C.O. Time 15 minutes
C.O. Time
The C.O. Time (Continuous Operation) details how long an appliance may be
used without the motor overheating and being damaged. After the appliance has
run for this period it must be switched off until the motor has cooled itself down.
Page 7

■ 4 │ GB
│
IE
SFW 350 C1
Safety instructions
RISK OF ELECTRIC SHOCK
► Ensure that the power cable does not become damaged. Pro-
tect the cable from heat and ensure that it cannot be trapped
or clamped.
► Arrange for damaged power cables and/or plugs to be
replaced as soon as possible by a qualified specialist or by
Customer Services.
► Use the appliance only in dry indoor areas, not outdoors.
Never immerse the motor block in water or any other
liquid! If you do, then you could receive a potentially
fatal electric shock.
WARNING!
► Never use the appliance for purposes other than those listed
here. There will be a major risk of serious accidents should
you try to neutralise the safety fitments on the appliance!
WARNING! RISK OF INJURY!
► Never put your hand into the openings of the appliance. Do
not insert any objects of any kind into the openings – except
for the appropriate stodger and the foodstuff to be processed.
If you do, there will be a serious risk of accidents!
► Unplug the appliance from the power source before attaching
or removing accessories.
► Do not leave the appliance unsupervised when it is ready
for use. To avoid it being switched on accidentally, always
unplug the appliance after use or during breaks.
► Only use the original accessory parts for this appliance.
Other accessories may not meet the safety requirements.
Page 8

GB│IE
│
5 ■
SFW 350 C1
WARNING! RISK OF INJURY!
► Never operate the appliance in a no-load condition. This
could irreparably damage the appliance.
► Before changing accessories or additional parts that are in
motion during operation, the appliance must be switched off
and disconnected from mains power.
► Never use the appliance for purposes other than those
described in these instructions.
► Warning – the cross blade is very sharp! Always take care
when handling and cleaning the appliance.
► The appliance should always be disconnected from the
mains when unattended and before assembly, disassembly
or cleaning.
► This appliance may not be used by children.
► The appliance and its connecting cable must be kept away
from children.
► This appliance may be used by persons with limited physical,
sensory or mental capabilities or lack of experience and
knowledge, provided that they are under supervision or
have been told how to use the appliance safely and are
aware of the potential risks.
► The appliance must not be used as a plaything by children.
Page 9

■ 6 │ GB
│
IE
SFW 350 C1
Assembly / Disassembly
CAUTION - PROPERTY DAMAGE!
► All accessories are coated with a thin film of oil to protect them from corrosion.
Therefore, carefully clean all of the parts before using the appliance for the
first time, as described in detail in the chapter "Cleaning". After subsequent
usage, always apply a light coating of cooking oil to the metallic components.
Assembling the meat grinder
Unfold the fold-out side. There you will find the step-by-step illustrations for assembling the appliance.
1) Place the transport screw in the meat grinder casing .
2) Place the spring onto the transport screw .
3) Then fit the cross blade on so that the sharp side points away from the
spring . Ensure that the square opening in the cross blade is placed
correctly on the square axle.
WARNING! RISK OF INJURY!
► The cross blade is very sharp! Risk of injury!
CAUTION - PROPERTY DAMAGE!
► The appliance will be damaged if the cross blade is inserted the other
way around!
4) Select the appropriate cutting disc /sausage disc 3.
Page 10

GB│IE
│
7 ■
SFW 350 C1
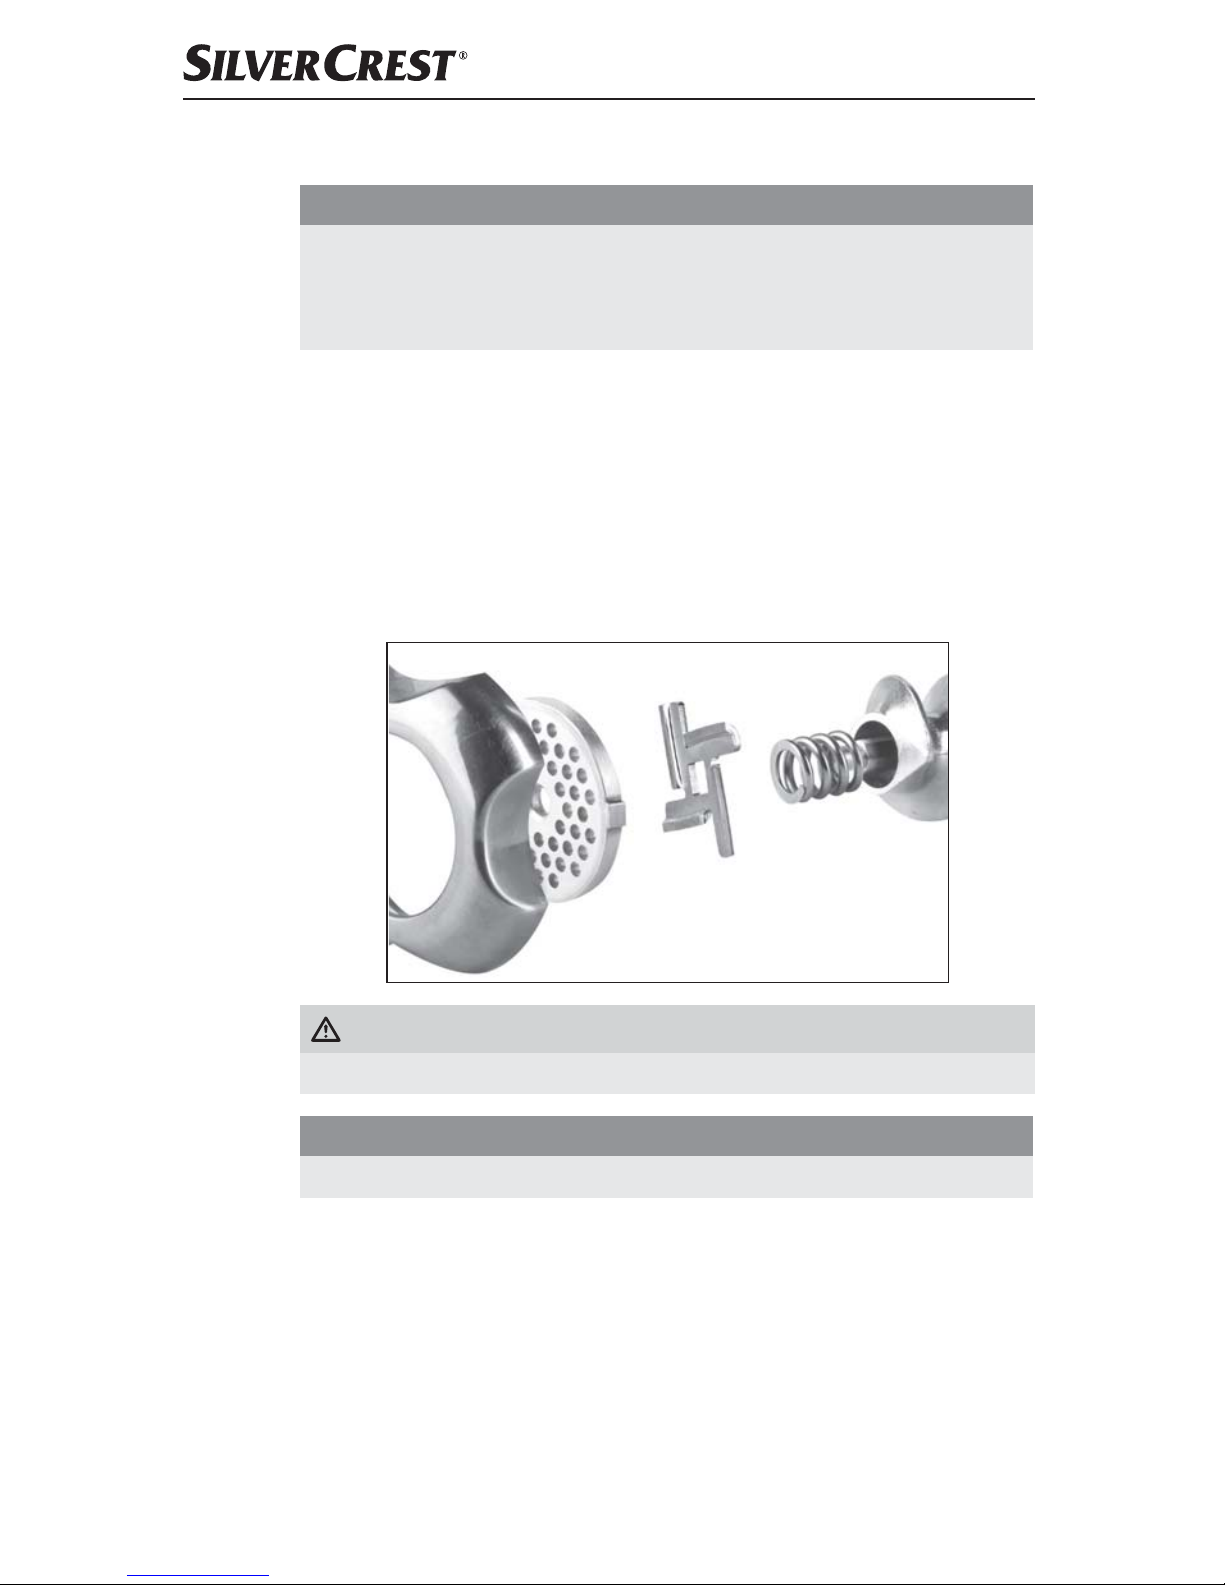
5) Place your selected cutting disc into the meat grinder casing so that
the fixings on the cutting disc are located in the openings in the meat
grinder casing .
6) After everything has been correctly assembled, screw the ring clamp
back on hand-tight.
7) The ready-assembled meat grinder casing is connected by a bayonet
connector to the motor block :
– Insert the meat grinder casing into the motor block such that the
arrow on the meat grinder casing lies against the symbol
on the
motor unit . The locking button .presses itself in (Fig. B).
– Lightly press the meat grinder casing in and at the same time turn
the feeding shaft on the meat grinder casing into the middle position
(Fig. B) so that the arrow on the feeding shaft points to the symbol
.
When the meat grinder casing engages, the locking button .
springs out.
– Finally, place the feeding tray on top of the feeding funnel.
– To dismantle it, press the locking button .and turn the feeding funnel
to the right (Fig. B)
. You can now pull the meat grinder casing out.
Assembling the sausage stuffer attachment
Unfold the fold-out side - there you will find the step-by-step illustrations for assembling the appliance.
1) Remove the meat grinder casing as described under “Assembling the
meat grinder”.
2) Dismantle all parts which are fitted to/in the meat grinder casing and
clean them.
3) Coat all metal parts with cooking oil.
4) Put the transport screw , the spring and the cross blade back into
the meat grinder casing .
5) Insert the sausage disc 3 so that the fixings on the sausage disc 3 are
located in the openings in the meat grinder casing .
6) Then place the sausage stuffer attachment - before the sausage disc 3.
7) Screw the ring clamp on hand-tight.
8) Assemble the meat grinder casing as described under “Assembling the
meat grinder”.
Page 11

■ 8 │ GB
│
IE
SFW 350 C1
Assembling the kubbe attachment
Unfold the fold-out side. There you will find the step-by-step illustrations for assembling the appliance.
1) Remove the meat grinder casing as described under “Assembling the
meat grinder”.
2) Disassemble any attachments that might be fitted and clean the meat grinder
casing .
NOTICE
► For the kubbe attachment !, the cross blade with the spring is not
required! If need be, remove them both from the meat grinder casing .
3) Coat all metal parts with cooking oil.
4) Insert the two plastic parts of the kubbe attachment ! so that the fixings on
the bottom kubbe attachment ! ring are located in the openings in the meat
grinder casing .
5) When everything has been attached correctly, screw the ring clamp back
on hand-tight.
6) Assemble the meat grinder casing as described under “Assembling the
meat grinder”.
Assembling the biscuit attachments
Unfold the fold-out side. There you will find the step-by-step illustrations for assembling the appliance.
1) Remove the meat grinder casing as described under “Assembling the
meat grinder”.
2) Disassemble any attachments that might be fitted and clean the meat grinder
casing .
NOTICE
► For the biscuit attachment , the cross blade with the spring is not
required! If need be, remove them both from the meat grinder casing .
3) Coat all metal parts with cooking oil.
4) Pull the pattern strips away from the front of the biscuit attachment .
5) First place the plastic disc and then the metal disc of the biscuit attachment
into the meat grinder casing (see fold-out side). Insert the biscuit attachment . so that the fixings on the biscuit attachment . are located in the
openings in the meat grinder casing .
6) After everything has been correctly assembled, screw the ring clamp
back on hand-tight.
Page 12

GB│IE
│
9 ■
SFW 350 C1
7) Replace the pattern strips back in to the front of the biscuit attachment .
Ensure that the grip on the pattern strips points away from the appliance.
If it does not, you will not be able to adjust the pattern, which is located
directly on the grip.
8) Assemble the meat grinder casing as described under “Assembling the
meat grinder”.
9) To dismantle it, you must first remove the pattern strips before you can
screw the ring clamp open and take the biscuit attachment back out.
Operation
RISK OF ELECTRIC SHOCK
► NEVER open the housing of the motor block – it does not contain any
user-serviceable elements. If the housing is opened, the warranty becomes
void. If the housing is opened, there is a risk of receiving a potentially fatal
electric shock.
CAUTION - PROPERTY DAMAGE!
► Do not use the appliance for longer than 15 minutes continuously. To avoid
an overheating of the appliance, after such a period switch it off and allow
it to cool down for ca. 30 minutes.
► NEVER activate the buttons "I" 0 or "<" 1, during a change of rotation
direction, if the appliance motor has not come to a complete stop. This
could damage the motor.
Operating the appliance
Once the appropriate attachments have been fixed:
1) Place the appliance where it will at all times be absolutely stable and under
no circumstances could it fall off of the work surface or in any way come into
contact with water (due to vibrations or becoming snagged in the power
cable). Vibration is unavoidable when it is working.
RISK OF ELECTRIC SHOCK
► Never touch an appliance, which is plugged in or is operational when it
happens, that falls or lands in water – or in the case of other emergencies!
First disconnect the appliance from the mains power source in all emergency
situations! Otherwise you run the risk of serious injury or loss of life!
2) Put the food which is to be processed in the feeding tray and place a
catchment container at the front under the exit opening.
Page 13

■ 10 │ GB
│
IE
SFW 350 C1
3) First press the button “0” 6to check that the appliance is still switched off.
Otherwise there is a risk that the appliance could unintentionally start
when the plug is inserted into the power socket.
4) Then insert the plug into a mains power socket.
5) Press the button “I” 0 to start the appliance.
WARNING! RISK OF INJURY!
► Push the foodstuff into the feeding shaft ONLY with the round stodger –
NEVER with one’s fingers, forks, spoons or similar objects. That could lead
to physical injury and also damage the appliance.
CAUTION - PROPERTY DAMAGE!
► Do not ever press so hard that the motor gets audibly slower. This could
overburden the machine and damage it.
Processing meat
1) Use pieces of meat that fit easily into the feeding funnel. If necessary, cut the
meat to size beforehand. Check that the meat does not have any bones and
or tendons.
WARNING!
► Minced meat is very prone to bacterial contamination. Therefore take care
to maintain good hygiene when processing meat. If you do not, it may
cause serious health problems.
2) When you have read and understood all of the instructions on the topic
”Meat“, you can now use the appliance as described in the chapter
“Operating the appliance”.
Processing sausage meat
1) Pass meat through the meat grinder twice before using it as sausage stuffing.
2) To make sausage stuffing, add some chopped onions, spices and other
ingredients to the minced meat, as per your recipe, and knead the mixture
well. Refrigerate this for 30 minutes before processing it further.
3) Pull one end of the sausage skin (natural or artificial sausage skin) onto the
sausage stuffer attachment - and tie a knot in the other end. For 1 kg of the
filling, you will need approximately 1.60 m of sausage skin.
Page 14

GB│IE
│
11 ■
SFW 350 C1
TIP!
Soak the natural sausage skin in lukewarm water for about 3 hours before
using it and wring it out before attaching it. This will make the natural sausage skin more elastic. Natural sausage skins are available from butcher
suppliers close to slaughter houses or from your family butcher.
4) The sausage mixture will be pressed into the sausage skin by the sausage
stuffer attachment -. When it is long enough switch the appliance off, press
the sausage together at the ends and rotate it a couple of times along its
longitudinal axis.
TIP!
Sausage meat tends to expand when cooked or frozen. Therefore, to
prevent it from bursting it is best not to overstuff the sausage.
5) When you have read and understood all of the instructions on the topic
”Sausage”, you can now use the appliance as described in the chapter
“Operating the appliance”.
Using the kubbe attachment
With the kubbe attachment ! foodstuffs can be processed to form hollow rolls
of meat or vegetables, which can then be stuffed as desired.
1) First put the meat through the meat grinder twice before pressing it through
the kubbe attachment !.
2) When you have read and understood all of the instructions on the topic
“Kubbe-Attachment”, you can now use the appliance as described in the
chapter “Operating the appliance”.
Making biscuits
After you have made the biscuit pastry according to your recipe, and after having
fixed the biscuit attachment :
1) Line a small baking tray with greaseproof paper and place or hold it directly
under the exit opening at the front of the appliance.
2) Press pastry evenly into the meat grinder casing – the transport screw
then pushes it through the selected design on the design motif strip of the
biscuit attachment .
3) When the biscuit is the required length, stop the appliance and break the
pastry off at the exit opening. Lay the biscuits on the baking tray.
4) When you have read and understood all of the instructions on the topic
“Biscuits”, you can now use the appliance as described in the chapter
“Operating the appliance”.
Page 15

■ 12 │ GB
│
IE
SFW 350 C1
Non-functionality
If the drive is blocked by accumulated food:
■ Press the button “0” 6to stop the meat grinder.
■ Press and hold the button “<” 1. The appliance will now run in the reverse
direction. This enables you to transport the food which has become stuck a
short way backwards, and the motor to run freely again.
■ When the drive runs smoothly again, release the “<” 1button.
■ Press the button “I” 0to re-start the meat grinder.
■ If you do not succeed in getting the drive free with this, clean the appliance
as described in the chapter “Cleaning”.
Should the motor suddenly stop, it could be due to automatic
activation of the internal overload fuse. This is intended to
protect the motor.
■ Switch the appliance off and allow it cool down for approximately 30 minutes
before continuing to use it.
■ Should this not work, wait for a further 15 minutes.
■ If it still does not function at the end of this period, this indicates a technical
problem. In this case, contact the Customer Service Centre.
If the power cable is damaged or the accessories are
visibly damaged:
■ Immediately switch the appliance off by pressing the “0” 6 button!
■ If this is not possible without risk to personal safety, disconnect the plug from
the mains power socket.
■ Arrange for the defective parts to be repaired by Customer Services before
re-using the appliance.
Cleaning
RISK OF ELECTRIC SHOCK
► Disconnect the plug from the mains power socket before cleaning the appli-
ance. In this way accidents caused by the inadvertent switching on of the
appliance and electric shocks can be avoided.
Cleaning the motor block
■ Clean the exterior surfaces and the power cable with a slightly damp cloth.
Dry the appliance well before re-using it.
Page 16

GB│IE
│
13 ■
SFW 350 C1
RISK OF ELECTRIC SHOCK
► Never immerse the motor block in water or any other liquid! Should this
occur, you are at risk of a potentially fatal electric shock if permeating
moisture makes contact with the electrical wiring.
CAUTION - PROPERTY DAMAGE!
► Never use detergents, abrasive cleaners or solvents. These could damage
the appliance and leave residues on the foodstuffs.
Cleaning the accessories
NOTICE
► Do not clean the accessories in a dishwasher! This could cause damage to
them!
■ Clean the accessories that could come in contact with foodstuffs, ...
– by hand only, the accessories are not dishwasher safe.
– with hot water and a household detergent suitable for use with foods.
WARNING! RISK OF INJURY!
► The cross blade is very sharp! Risk of injury!
■ Dry all parts thoroughly, before re-using the appliance.
NOTICE
► Apply a light coating of cooking oil to all metallic components after each
cleaning Otherwise, metal parts can discolour!
Storage
■ Push the power cable (but not the plug) into the cable storage shaft under
the appliance base. There it is protected from damage.
■ Store the appliance at a dry location.
■ After drying the metal attachments coat them lightly with a little cooking oil –
if you are not going to use the appliance immediately. This will protect them
from corrosion.
■ Store the appliance where it will be out of reach of children and people
requiring supervision. They are not always able to correctly assess the
potential risks involved with using electrical appliances.
Page 17

■ 14 │ GB
│
IE
SFW 350 C1
Disposal
Do not dispose of the appliance in your normal domestic waste.
This product is subject to the provisions of European Directive
2012/19/EU (Waste Electrical and Electronic Equipment).
Dispose of the appliance through an approved disposal centre or at your com-
munity waste facility. Observe the currently applicable regulations. In case of
doubt, please contact your waste disposal centre.
Dispose of all packaging materials in an environmentally friendly manner.
Warranty and Service
The warranty for this appliance is for 3 years from the date of purchase. This appliance has been manufactured with care and meticulously examined before delivery.
Please retain your receipt as proof of purchase. In the case of a warranty claim,
please make contact by telephone with our service department. Only in this way
can a post-free despatch for your goods be assured.
NOTICE
► The warranty covers only claims for material and manufacturing defects, not
for transport damages, worn parts or for damage to fragile components,
e.g. buttons or batteries.
The appliance is intended for domestic use only, NOT for commercial purposes.
If this product has been subjected to improper or inappropriate handling, abuse,
or modifications not carried out by one of our authorised sales and service
outlets, the warranty will be considered void.
Your statutory rights are not restricted in any way by this warranty. The warranty
period is not extended by repairs effected under warranty. This applies also to
replaced and repaired parts.
Damages or defects discovered after purchase are to be reported directly after
unpacking, at the latest two days after the purchase date.
Repairs carried out after lapse of the warranty period are subject to charge.
The warranty period is not extended by repairs effected under warranty.
This applies also to replaced and repaired parts.
Damages or defects discovered after purchase are to be reported directly after
unpacking, at the latest two days after the purchase date.
Repairs carried out after lapse of the warranty period are subject to charge.
Page 18

GB│IE
│
15 ■
SFW 350 C1
Service Great Britain
Tel.: 0871 5000 720 (£ 0.10/Min.)
E-Mail: kompernass@lidl.co.uk
IAN 270744
Service Ireland
Tel.: 1890 930 034
(0,08 EUR/Min., (peak))
(0,06 EUR/Min., (off peak))
E-Mail: kompernass@lidl.ie
IAN 270744
Hotline availability: Monday to Friday 08:00 - 20:00 (CET)
Importer
KOMPERNASS HANDELS GMBH
BURGSTRASSE 21
44867 BOCHUM
GERMANY
www.kompernass.com
Recipes
Kubbe
Ingredients for the wrapping
450 g of lean Lamb, Veal or Beef
150 g Flour
1 Tsp Pimento (type of pepper)
1 Tsp Nutmeg
1 Pinch Chili powder
1 Pinch Pepper
Ingredients for the meat filling
700 g Mutton
1 1/2 Tbsp. Olive oil
1 1/2 Tbsp Onions, finely chopped
1/2 Tsp Pimento (type of pepper)
1/2 Tsp. Salt
1 1/2 Tbsp Flour
Page 19

■ 16 │ GB
│
IE
SFW 350 C1
Pass the meat for the wrapping through the meat grinder twice (first with the
coarse and then with the fine cutting discs ) and then combine it with the
ingredients. Then pass this mixture through the meat grinder twice. Exchange
the cutting disc for the Kubbe attachment ! (see chapter “ Assembling the
kubbe attachment”).
Shape the Kubbe wrappers with the Kubbe attachment ! and then freeze them.
Filling:
Pass the meat through the meat grinder twice (first with the coarse and then with
the fine cutting discs ). Saute the onions and then mix them well with the meat
and other ingredients. Fill the Kubbe wrappers and fry until done.
Alternative Fillings:
250 g steamed Broccoli
or 250 g steamed Zucchini
or 250 g cooked Rice
Fresh Grill Sausages
Ingredients:
300 g lean Beef
500 g lean Pork
200 g Shoulder bacon
20 g Salt
1/2 Tsp ground white Pepper
1 Tsp Caraway
1/2 Tsp Nutmeg
Pass the beef, pork and bacon through the meat grinder twice.
Add the mixed spices and salt and thoroughly knead for 5 minutes.
Place the sausage filling in the refrigerator for ca. 30 minutes. Fill the skins with
sausage meat as detailed (see chapter “Preparing sausage”) and make sausages
of ca. 25 cm in length.
Grill the sausages well and eat them on the same day.
Page 20

GB│IE
│
17 ■
SFW 350 C1
Biscuits
Ingredients:
500 g butter
500 g sugar
2 - 3 packets of vanilla sugar
1 packet of vanilla custard
1/4 tsp salt
1 egg
4 egg yolks
800 g plain flour
2 tbsp baking powder
200 g ground (blanched) almonds
Zest of a lemon
Beat the butter until fluffy. Add the remaining ingredients one after another and
knead well into the dough. Cover the finished dough and allow to stand for around
12 hours in the fridge (e.g. overnight). Then pass it through the meat grinder with
the biscuit attachment . Place the biscuits on a baking tray lined with baking
paper. Bake the biscuits in a pre-heated oven at 180°C for approx. 10 - 15 minutes
until golden brown.
Page 21

18
SFW 350 C1
Page 22

SE
│
19 ■
SFW 350 C1
Innehållsförteckning
Inledning ....................................................20
Upphovsrätt ............................................................ 20
Ansvarsbegränsning .....................................................20
Föreskriven användning .......................................20
Leveransens innehåll / Beskrivning av delar .......................21
Tekniska data ................................................21
Säkerhetsanvisningar .........................................22
Montering/Demontering .......................................24
Montera ihop köttkvarnen .................................................24
Montera korvstoppare .................................................... 25
Montera rulltillbehör ..................................................... 26
Montera kaksprits ....................................................... 26
Användning ..................................................27
Använda produkten ...................................................... 27
Mala kött .............................................................. 28
Göra korv ............................................................. 28
Arbeta med rulltillbehöret ................................................. 29
Baka spritskakor ......................................................... 29
Åtgärda fel ..................................................30
Rengöring ...................................................30
Rengöra motorblock ..................................................... 30
Rengöra tillbehör ........................................................ 31
Förvaring ....................................................31
Kassering ....................................................32
Garanti och service ............................................32
Importör ....................................................33
Recept ......................................................33
Kubberullar ............................................................33
Hemlagad bratwurst .....................................................34
Spritskakor ............................................................. 35
Page 23

■ 20 │ SE
SFW 350 C1
Inledning
Ett stort grattis till din nyinköpta produkt.
Du har valt en produkt med hög kvalitet. Bruksanvisningen ingår som en del i leve-
ransen. Den innehåller viktiga anvisningar för säkerhet, användning och kasering.
Läs noga igenom alla användar- och säkerhetsanvisningar innan du tar produkten i
bruk. Använd endast produkten enligt beskrivningarna och i de syften som anges här.
Ta väl vara på den här bruksanvisningen. Lämna över all dokumentation tillsammans
med produkten om du överlåter den till någon annan person.
Upphovsrätt
Det här dokumentet skyddas av upphovsrätt.
All form av mångfaldigande eller eftertryck, även delvis, samt återgivning av
bilderna, även i förändrat tillstånd, är endast tillåten med tillverkarens skriftliga
godkännande.
Ansvarsbegränsning
All teknisk information, alla data och anvisningar som gäller anslutning och
användning motsvarar senaste standard då dokumentet trycks och har utformats
efter bästa förmåga med hänsyn till vår tidigare erfarenhet och kunskap.
Det finns inga som helst möjligheter att ställa krav på ersättning som baseras på
angivelserna, bilderna och beskrivningarna i den här bruksanvisningen.
Tillverkaren ansvarar inte för skador som är ett resultat av att anvisningarna inte
följts, användningssätt som strider mot föreskrifterna, felaktigt utförda reparationer,
otillåtna ändringar eller för att reservdelar som inte är godkända använts.
Föreskriven användning
Den här produkten är endast avsedd för att bearbeta livsmedel i privata hushåll i
de mängder som normalt förekommer i hemmet:
▯ Mala färskt kött,
▯ Göra korv i naturtarm eller konstgjort korvskinn,
▯ Baka spritskakor
Köttkvarnen är inte avsedd för bearbetning av frusna eller naturligt hårda
livsmedel, t ex ben eller nötter, och inte heller för yrkesmässig eller industriell
användning.
Page 24

SE
│
21 ■
SFW 350 C1
Leveransens innehåll / Beskrivning av delar
Bild A:
Kaksprits med mönsterremsa
Påmatare
Påfyllningsskål
Motorblock
Köttkvarn av metall
Transportsnäcka
Fjäder
Kniv
Grov och fin hålskiva
Låsring
- Korvstoppare
3 Korvplatta
! Rulltillbehör
Bild B:
. Låsknapp
Bild C:
0 Knapp I
6 Knapp 0
1 Knapp <
Tekniska data
Spänning 220 - 240 V ∼, 50 Hz
Effektförbrukning 250 - 350 W
Skyddsklass
II /
Kontinuerlig drifttid 15 minuter
Kontinuerlig drifttid
Den kontinuerliga drifttiden anger hur länge produkten kan användas i sträck
utan att motorn överhettas och skadas. När den tiden har gått måste produkten
stängas av och får inte sättas på igen förrän motorn kallnat.
Page 25

■ 22 │ SE
SFW 350 C1
Säkerhetsanvisningar
RISK FÖR ELCHOCK
► Akta så att strömkabeln inte skadas. Håll den på avstånd
från heta ytor och lägg den så att den inte kan klämmas.
► Låt genast auktoriserad fackpersonal byta ut skadade kablar
och kontakter för att undvika olyckor.
► Använd endast produkten i torra utrymmen inomhus, aldrig
ute i det fria.
Doppa aldrig ner motorblocket i vatten eller andra vätskor!
Annars finns risk för elchocker.
VARNING!
► Använd aldrig produkten till andra ändamål än de som
beskrivs här. Det finns en betydande risk för skador om
skyddsanordningarna sätts ur funktion för att du använder
köttkvarnen på fel sätt!
VARNING! RISK FÖR PERSONSKADOR!
► Stick aldrig in fingrarna i produktens öppningar. Stick inte
heller in några föremål i öppningarna – med undantag
från den påmatare som används och de livsmedel som ska
bearbetas. Annars finns stor risk för skador!
► Dra alltid ut kontakten ur uttaget innan du sätter på eller tar
av några tillbehör.
► Lämna aldrig produkten utan uppsikt när den är klar för drift.
Dra ut kontakten när du är färdig eller avbryter arbetet så att
produkten inte kan sättas på av misstag.
► Använd bara originaltillbehör till den här produkten. Delar
från andra tillverkare kanske inte uppfyller säkerhetskraven.
Page 26

SE
│
23 ■
SFW 350 C1
VARNING! RISK FÖR PERSONSKADOR!
► Använd aldrig produkten utan livsmedel. Då kan den total-
förstöras.
► Innan tillbehör eller delar som rör sig under driften byts ut
måste produkten stängas av och kontakten dras ur.
► Missbruka inte produkten genom att använda den i andra
syften än de som anges i den här anvisningen.
► Var försiktig: Kniven är mycket vass! Var alltid mycket försiktig
när du rengör produkten.
► Bryt alltid strömförbindelsen till produkten när den inte hålls
under uppsikt, när den tas isär eller sätts ihop eller när den
rengörs.
► Produkten får inte användas av barn.
► Produkten och dess anslutningsledning ska hållas på avstånd
från barn.
► Den här produkten får användas av personer med begränsad
fysisk, sensorisk eller mental förmåga eller bristande erfarenhet
och/eller kunskap om de hålls under uppsikt eller instruerats
i hur produkten används på ett säkert sätt och inser vilka
risker det innebär.
► Barn får inte leka med produkten.
Page 27
■ 24 │ SE
SFW 350 C1
Montering/Demontering
AKTA - RISK FÖR MATERIALSKADOR!
► Samtliga tillbehör är försedda med en oljefilm som ska skydda mot korrosion.
Rengör därför alla delar noga så som beskrivs detaljerat i kapitel Rengöring
innan du använder dem första gången. Gnid sedan in alla metalldelar med
lite matolja.
Montera ihop köttkvarnen
Fäll upp sidan med bilder - där hittar du en bild som visar i vilken ordning delarna
ska monteras.
1) Sätt transportsnäckan i köttkvarnen .
2) Sätt fjädern på transportsnäckan .
3) Sätt sedan in kniven med den vassa sidan vänd från fjädern . Se till att
den fyrkantiga öppningen på kniven ligger rätt på den fyrkantiga axeln
VARNING! RISK FÖR PERSONSKADOR!
► Kniven är mycket vass! Risk för personskador!
AKTA - RISK FÖR MATERIALSKADOR!
► Produkten skadas om kniven sätts in på fel håll!
4) Välj en hålskiva /korvplatta 3.
Page 28

SE
│
25 ■
SFW 350 C1
5) Lägg in den hålskiva du ska använda i köttkvarnen så att fixeringarna
på hålskivan hamnar i öppningarna på köttkvarnen .
6) När allt sitter som det ska skruvar du åt låsringen för hand.
7) Den färdigmonterade köttkvarnen ansluts till motorblocket med
bajonettlås:
– Sätt köttkvarnen på motorblocket så att pilen på köttkvarnen
ligger mot symbolen
på motorblocket . Lås-knappen . trycks in
(Bild B).
– Tryck försiktigt in köttkvarnen och vrid samtidigt köttkvarnens påfyll-
ningsrör till läget i mitten (Bild B) så att pilen pekar mot symbolen
. När
köttkvarnen snäpper fast åker Lås-knappen . ut igen.
– Sätt till sist påfyllningsskålen ovanpå påfyllningsöppningen.
– För att ta av påfyllningsröret trycker du in Lås-knappen . och vrider
det åt höger (Bild B)
. Sedan kan du dra ut köttkvarnen .
Montera korvstoppare
Fäll upp sidan med bilder - där hittar du en bild som visar i vilken ordning delarna
ska monteras.
1) Ta av köttkvarnen så som beskrivs under Montera ihop köttkvarnen.
2) Ta isär alla delar som monterats på/i köttkvarnen och rengör dem.
3) Gnid in alla metalldelar med matolja.
4) Sätt in transportsnäckan , fjädern och kniven i köttkvarnen igen.
5) Stoppa in korvplattan 3 så att fixeringarna på korvplattan 3hamnar i
öppningarna på köttkvarnen .
6) Sätt sedan korvstopparen - framför korvplattan 3.
7) Skruva fast låsringen för hand.
8) Montera köttkvarnen så som beskrivs under Montera ihop köttkvarnen.
Page 29

■ 26 │ SE
SFW 350 C1
Montera rulltillbehör
Fäll upp sidan med bilder - där hittar du en bild som visar i vilken ordning delarna
ska monteras.
1) Ta av köttkvarnen så som beskrivs under Montera ihop köttkvarnen.
2) Ta av ev. andra tillbehör och rengör köttkvarnen .
OBSERVERA
► När man använder rulltillbehöret ! behövs varken kniv eller fjäder !
Ta ut båda delarna ur köttkvarnen om du ska använda rulltillbehöret.
3) Gnid in alla metalldelar med matolja.
4) Lägg in rulltillbehörets ! båda plasthalvor så att fixeringarna på rulltillbehörets !undre ring hamnar i öppningarna på köttkvarnen .
5) När allt sitter på plats skruvar du fast låsringen igen för hand.
6) Montera köttkvarnen så som beskrivs under Montera ihop köttkvarnen.
Montera kaksprits
Fäll upp sidan med bilder - där hittar du en bild som visar i vilken ordning delarna
ska monteras.
1) Ta av köttkvarnen så som beskrivs under Montera ihop köttkvarnen.
2) Ta av ev. andra tillbehör och rengör sedan köttkvarnen .
OBSERVERA
► När man använder kakspritsen behövs varken kniv eller fjäder !
Ta ut båda delarna ur köttkvarnen om du ska använda kakspritsen.
3) Gnid in alla metalldelar med matolja.
4) Dra av mönsterremsan framtill på kakspritsen .
5) Sätt först in plastskivan och sedan kakspritsens metallskiva i köttkvarnen
(se uppfällbar sida). Lägg in kakspritsen så att fixeringarna på kakspritsen
hamnar i öppningarna på köttkvarnen .
6) När allt sitter som det ska skruvar du åt låsringen för hand.
Page 30

SE
│
27 ■
SFW 350 C1
7) Sätt tillbaka mönsterremsan framtill på kakspritsen . Kontrollera att
handtaget på remsan pekar bort från produkten. Annars går det inte att
använda det mönster som sitter precis vid handtaget.
8) Montera köttkvarnen så som beskrivs under Montera ihop köttkvarnen.
9) Dra först av mönsterremsan innan du skruvar loss låsringen och tar ut
kakspritsen .
Användning
RISK FÖR ELCHOCK
► Öppna aldrig motorblockets hölje – det finns inga komponenter som
ska servas inuti. Om höljet öppnas upphör garantin att gälla. När höljet är
öppet finns risk för livsfarliga elchocker.
AKTA - RISK FÖR MATERIALSKADOR!
► Använd inte produkten längre än 15 minuter i sträck. Låt den sedan vara
avstängd i ungefär 30 minuter så att den inte överhettas.
► Tryck aldrig på någon av knapparna „I“ 0 eller „<“ 1 när du ska byta rota-
tionsriktning så länge motorn inte står helt stilla. Annars kan motorn skadas.
Använda produkten
När du monterat de tillbehör du vill ha:
1) Ställ produkten så att den står absolut stabilt och under inga omständigheter
kan falla ner från bordet eller hamna i närheten av vatten ( t ex av vibrationerna eller för att någon råkar dra ner produkten i strömkabeln). Vibrationer
är oundvikliga när köttkvarnen arbetar.
RISK FÖR ELCHOCK
► Försök aldrig fatta tag i köttkvarnen om den fallit ner, hamnat i vatten eller
vid liknande nödsituationer om den fortfarande är ansluten och i värsta fall
fortfarande är igång! I nödsituationer ska du genast dra ut kontakten!
Annars finns akut risk för livsfarliga och allvarliga personskador!.
2) Lägg de livsmedel som ska bearbetas i skålen och ställ ett uppsamlingskärl
under utmatningsöppningen på framsidan.
Page 31

■ 28 │ SE
SFW 350 C1
3) Tryck först på 0-knappen 6 för att försäkra dig om att produkten verkligen
är avstängd. Annars finns risk för att den startar av misstag när man sätter
kontakten i ett eluttag.
4) Sätt sedan kontakten i ett eluttag.
5) Tryck på I-knappen 0för att sätta på produkten.
VARNING! RISK FÖR PERSONSKADOR!
► Använd endast den runda påmataren för att trycka ner livsmedel i
påfyllningsöppningen – använd aldrig fingrarna, gafflar, skedskaft eller
liknande. Då finns stor risk för att du själv och produkten skadas.
AKTA - RISK FÖR MATERIALSKADOR!
► Tryck aldrig så hårt att motorn hörbart saktar ner. Annars kan produkten
överbelastas och skadas.
Mala kött
1) Försök bara mala köttbitar som går in genom påfyllningsöppningen utan problem. Skär upp köttet i lagom stora bitar om det behövs. Se till så att det inte
finns ben eller senor i köttet.
VARNING!
► Köttfärs är mycket känsligt för bakterier. Se till att hålla god hygien när du
mal kött. Annars kan du bli sjuk.
2) När du läst igenom all information på temat kött kan du börja använda
produkten så som beskrivs i kapitel Använda produkten.
Göra korv
1) Låt köttet först gå två gånger genom köttkvarnen innan du börjar göra korv.
2) Tillsätt hackad lök, kryddor och andra ingredienser efter ditt recept i köttfärsen och knåda smeten noga. Låt den sedan stå i kylskåpet i 30 minuter
innan du fortsätter.
3) Kräng ett korvskinn (naturtarm eller konstgjort skinn) över korvstopparen och gör en knut i den andra änden. För varje kilo korvsmet går det åt ungefär
1,60 m korvskinn.
Page 32

SE
│
29 ■
SFW 350 C1
TIPS
Naturtarmar ska först ligga tre timmar i ljummet vatten och sedan vridas
ur innan de krängs över korvhornet. Då blir de elastiska igen. Naturtarmar
kan köpas hos en charkuterist i närheten av ett slakteri eller hos någon
annan kötthandlare.
4) Korvsmeten pressas igenom korvstopparen - och in i korvskinnet. När
korven har önskad längd stänger du av maskinen, trycker ihop korvänden
och snurrar korven ett par varv så att den snörps av i änden.
TIPS
Korven expanderar när den kokas och fryses. Fyll därför inte på för
mycket smet, då kan korven spricka.
5) När du läst igenom all information på temat korv kan du sätta igång så som
beskrivs i kapitel Använda produkten.
Arbeta med rulltillbehöret
Med rulltillbehöret ! kan du forma ihåliga rullar av kött eller grönsaker och fylla
dem med något gott.
1) Låt köttet först gå två gånger genom köttkvarnen innan du pressar det genom
rulltillbehöret !.
2) När du läst igenom all information på temat rulltillbehör kan du sätta igång
så som beskrivs i kapitel Använda produkten.
Baka spritskakor
När du gjort en kakdeg efter eget recept och monterat kakspritsen :
1) Lägg bakpapper på en liten bakplåt och ställ plåten under utmatningsöppningen på produktens framsida.
2) Tryck in en jämn ström av deg genom köttkvarnen – sedan pressas den
vidare av transportsnäckan genom det motiv som valts på kakspritsens
mönsterremsa.
3) När degbiten är lagom lång stänger du av produkten och kniper av degen
vid öppningen. Lägg kakan på bakplåten.
4) När du läst all information på temat spritskakor kan du sätta igång så som
beskrivs i kapitel Använda produkten.
Page 33

■ 30 │ SE
SFW 350 C1
Åtgärda fel
Om drivanordningen blockeras av livsmedel som fastnat:
■ Tryck på 0-knappen 6för att stoppa köttkvarnen.
■ Håll <-knappen 1intryckt. Då backas drivmekanismen. På så sätt flyttas det
som har fastnat bakåt och drivmekanismen fungerar igen.
■ Släpp <-knappen 1 igen när problemet åtgärdats.
■ Tryck på I-knappen 0 för att starta köttkvarnen.
■ Om det fortfarande är stopp i drivmekanismen ska du rengöra produkten så
som beskrivs i kapitel Rengöring.
Om motorn stannar plötsligt kan det bero på att den inbyggda överbelastningssäkringen har utlöst. Den är till för
att skydda motorn
■ Stäng av produkten och låt den svalna i ca 30 min. innan du använder den
igen.
■ Om det inte hjälper väntar du i ytterligare 15 min.
■ Om inte det heller har någon effekt tyder det på att något är fel. Vänd dig i
så fall till kundtjänst.
Om strömkabeln skadas eller om du märker att andra
delar är trasiga :
■ Stäng genast av produkten med 0-knappen 6!
■ Om det inte är helt ofarligt ska du istället dra ut kontakten.
■ Låt kundtjänst reparera skadorna innan du använder produkten igen.
Rengöring
RISK FÖR ELCHOCK
► Dra ut kontakten innan du rengör köttkvarnen. Då kan den inte sättas på av
misstag och orsaka skador och det finns ingen risk för elchocker.
Rengöra motorblock
■ Rengör utsidan och strömkabeln med en något fuktig trasa. Torka av produkten
noga innan du använder den igen.
Page 34

SE
│
31 ■
SFW 350 C1
RISK FÖR ELCHOCK
► Doppa aldrig ner motorblocket i vatten eller andra vätskor! Det finns risk
för livsfarliga elchocker om det kommer in vätska till elektriska ledare.
AKTA - RISK FÖR MATERIALSKADOR!
► Använd inte rengöringsmedel, slipande medel eller lösningsmedel. De kan
skada produkten och rester av medlet kan hamna i livsmedlen.
Rengöra tillbehör
OBSERVERA
► Diska inte tillbehören i diskmaskinen! Då kommer de att skadas!
■ Rengör alla tillbehör som kan komma i kontakt med livsmedel ...
– för hand, de tål inte maskindisk.
– med hett vatten och vanligt diskmedel
VARNING! RISK FÖR PERSONSKADOR!
► Kniven är mycket vass! Risk för personskador!
■ Torka av alla delar noga innan du använder produkten igen.
OBSERVERA
► Gnid alltid in alla metalldelar med lite matolja när du rengjort dem! Annars
kan metalldelarna missfärgas!
Förvaring
■ För in strömkabeln (utan kontakt) i facket på produktens undersida. Då skyd-
das den från skador.
■ Förvara produkten i ett torrt utrymme.
■ Gnid in alla tillbehör av metall med ett tunt lager matolja när de torkat – om
du inte genast ska använda produkten igen. Det ger ett gott skydd mot korrosion.
■ Förvara produkten oåtkomligt för barn och otillräkneliga personer. De inser
inte alltid riskerna när man handskas med elektriska apparater.
Page 35

■ 32 │ SE
SFW 350 C1
Kassering
Produkten får absolut inte kastas bland hushållssoporna.
Den här produkten faller under det europeiska direktivet
2012/19/EU (Waste Electrical and Electronic Equipment).
Lämna in den till ett godkänt återvinningsföretag eller till din kommunala av-
fallsanläggning. Följ gällande föreskrifter. Om du är tveksam ska du fråga den
lokala avfallshanteringsmyndigheten.
Lämna in allt förpackningsmaterial till miljövänlig återvinning.
Garanti och service
För den här produkten lämnar vi tre års garanti från och med inköpsdatum. Den
här produkten har tillverkats med omsorg och genomgått en noggrann kontroll
innan leveransen.
Var god bevara kassakvittot som köpbevis. Vi ber dig kontakta vår kundtjänst per
telefon vid garantifall. Bara då kan du skicka in produkten utan kostnad.
OBSERVERA
► Garantin gäller endast för material- eller fabrikationsfel, den täcker inte
transportskador, förslitningsdelar eller skador på ömtåliga delar som t ex
knappar och batterier.
Produkten är endast avsedd för privat bruk och får inte användas yrkesmässigt.
Vid missbruk och felaktig behandling, användande av våld och vid ingrepp som
inte gjorts av vår auktoriserade servicefilial upphör garantin att gälla.
Den lagstadgade garantin begränsas inte av denna garanti. Garantitiden
förlängs inte för att man utnyttjar garantiförmånerna. Det gäller även för utbytta
eller reparerade delar.
Eventuella skador och brister som upptäcks redan vid köpet måste anmälas direkt
efter uppackningen, dock senast två dagar efter inköpsdatum.
När garantitiden är slut måste man betala för eventuella reparationer.
Garantitiden förlängs inte för att man utnyttjar garantiförmånerna. Det gäller
även för utbytta eller reparerade delar.
Eventuella skador och brister som upptäcks redan vid köpet måste anmälas direkt
efter uppackningen, dock senast två dagar efter inköpsdatum.
När garantitiden är slut måste man betala för eventuella reparationer.
Page 36

SE
│
33 ■
SFW 350 C1
Service Sverige
Tel.: 0770 930739
E-Mail: kompernass@lidl.se
IAN 270744
Service Suomi
Tel.: 010309 3582
E-Mail: kompernass@lidl.fi
IAN 270744
Tillgänglighet Hotline: Måndag till fredag kl. 08.00 – 20.00 (CET)
Importör
KOMPERNASS HANDELS GMBH
BURGSTRASSE 21
44867 BOCHUM
GERMANY
www.kompernass.com
Recept
Kubberullar
Ingredienser till skalet
450 g magert får-, kalv- eller nötkött
150 g mjöl
1 tsk kryddpeppar
1 tsk muskotnöt
1 nypa chilipulver
1 nypa peppar
Ingredienser till köttfyllningen
700 g lammkött
1 1/2 msk olivolja
1 1/2 msk finhackad lök
1/2 tsk kryddpeppar
1/2 tsk salt
1 1/2 msk mjöl
Page 37

■ 34 │ SE
SFW 350 C1
Låt köttet till rullarna gå två gånger i följd genom köttkvarnen (först genom den
grova och sedan genom den fina hålskivan ) och blanda sedan i de övriga
ingredienserna. Låt även denna smet gå igenom köttkvarnen två gånger.
Byt hålskivan mot rulltillbehöret ! (se kapitel Montera rulltillbehör).
Forma rullar med rulltillbehöret ! och bryn dem.
Fyllning:
Låt köttet gå två gånger igenom köttkvarnen (först med den grova och sedan
med den fina hålskivan ). Bryn löken och blanda ordentligt med köttet och
resten av ingredienserna. Fyll rullarna med massan och låt dem genomstekas.
Alternativa fyllningar:
250 g ångkokt broccoli
eller 250 g ångkokt zucchini
eller 250 g kokt ris
Hemlagad bratwurst
Ingredienser:
300 g magert nötkött
500 g magert griskött
200 g bogfläsk
20 g salt
1/2 matsked malen vitpeppar
1 tesked kummin
1/2 tesked muskotnöt
Låt nötkött, griskött och fläsk gå två gånger genom köttkvarnen.
Blanda i kryddor och salt och knåda massan i 5 minuter.
Låt korvsmeten stå i kylskåpet i ca 30 minuter. Fyll på korvsmet enligt anvisningarna
(se kapitel Göra korv) och stoppa 25 cm långa korvar.
Stek den färdiga bratwursten ordentligt och ät upp den samma dag.
Page 38

SE
│
35 ■
SFW 350 C1
Spritskakor
Ingredienser:
500 g smör
500 g socker
2 - 3 kuvert vaniljsocker
1 kuvert vaniljpudding
1/4 tsk salt
1 ägg
4 äggulor
800 g vetemjöl (typ 405)
2 tsk bakpulver
200 g malen mandel (skållad)
det rivna skalet av en citron
Rör smöret pösigt. Tillsätt övriga ingredienser lite i taget och knåda degen väl.
Låt den färdiga delen vila övertäckt ca 12 timmar (t.ex. över natten) i kylskåp.
Kör sedan degen i köttkvarnen genom kakspritsen . Lägg spritskakorna på
en bakplåt med bakpapper. Grädda spritskakorna i ugnen i 180°C ca 10 - 15
minuter tills de blivit guldgula.
Page 39

36
SFW 350 C1
Page 40

DK
│
37 ■
SFW 350 C1
Indholdsfortegnelse
Indledning ...................................................38
Ophavsret .............................................................38
Ansvarsbegrænsning ..................................................... 38
Anvendelsesområde ...........................................38
Medfølger ved køb / Beskrivelse af delene ........................39
Tekniske data ................................................39
Sikkerhedsanvisninger .........................................40
Sådan samles kødhakkeren / og sådan skilles den ad ..............42
Samling af kødhakkeren .................................................. 42
Montering af pølsehorn ..................................................43
Montering af kubbe-del .................................................. 44
Montering af dejsprøjte .................................................. 44
Betjening ....................................................45
Betjening af maskinen ....................................................45
Tilberedning af kød ...................................................... 46
Tilberedning af pølser .................................................... 46
Sådan arbejder du med kubbe-delen ........................................47
Fremstilling af sprøjtede kager .............................................47
I tilfælde af fejl ...............................................48
Rengøring ...................................................48
Rengøring af motorblokken ...............................................48
Rengøring af tilbehørsdele ................................................49
Opbevaring ..................................................49
Bortskaffelse .................................................50
Garanti og service ............................................50
Importør ....................................................51
Opskrifter ...................................................51
Kubbe ................................................................ 51
Frisk Rostbratwurst (tysk medister) ...........................................52
Sprøjtede kager ......................................................... 53
Page 41

■ 38 │ DK
SFW 350 C1
Indledning
Til lykke med købet af din nye elartikel.
Dermed har du valgt et produkt af høj kvalitet. Betjeningsvejledningen er del af
dette produkt. Den indeholder vigtige informationer om sikkerhed, anvendelse og
bortskaffelse. Du bedes sætte dig ind i alle produktets betjenings- og sikkerhedsanvisninger før brug. Brug kun produktet som beskrevet og kun til de angivne
anvendelsesområder. Opbevar denne vejledning, så du altid kan finde den igen.
Lad også vejledningen følge med produktet, hvis du giver det videre til andre.
Ophavsret
Denne dokumentation er ophavsretligt beskyttet.
Enhver kopiering eller eftertryk - også i uddrag - samt videregivelse af billeder -
også i ændret form - er kun tilladt efter skriftligt samtykke med producenten.
Ansvarsbegrænsning
Alle tekniske informationer, data og anvisninger til tilslutning og betjening i denne
betjeningsvejledning svarer til den nyeste viden på trykningstidspunktet og gives
efter bedste overbevisning i henhold til vores hidtidige erfaringer og viden.
Der kan ikke stilles nogen form for krav baseret på informationerne, billederne
og beskrivelserne i denne vejledning.
Producenten påtager sig intet ansvar for skader på grund af manglende overholdelse af vejledningen, anvendelse, som ikke hører ind under anvendelsesområdet,
forkerte reparationer, ændringer, som er foretaget uden tilladelse samt anvendelse
af ikke-tilladte reservedele.
Anvendelsesområde
Denne maskine er udelukkende beregnet til tilberedning af fødevarer i private
husholdninger i mængder, der er normale for en almindelig husholdning:
▯ Hakning af ferskt kød
▯ Tilberedning af pølser i naturtarm eller kunstig tarm
▯ Tilberedning af sprøjtede kager
Maskinen er ikke beregnet til forarbejdning af frosne eller på anden måde hårde
fødevarer, f.eks. knogler eller nødder, og ikke til erhvervsmæssige eller industrielle
områder.
Page 42

DK
│
39 ■
SFW 350 C1
Medfølger ved køb / Beskrivelse af delene
Figur A:
Dejsprøjte-del med mønsterstriber
Stopper
Påfyldningsskål
Motordel
Kødhakkedel af metal
Transportsnegl
Fjeder
Krydskniv
Grov og fin hulskive
Låsering
- Pølsehorn
3 Pølseskive
! Kubbe-del
Figur B:
. Låseknap
Figur C:
0 Knapp „I“
6 Knapp „0“
1 Knapp „<“
Tekniske data
Spænding 220 - 240 V ∼, 50 Hz
Strømforbrug 250 - 350 W
Beskyttelsesklasse
II/
Korttidsdrift 15 minutter
Korttidsdrift
Korttidsdriften angiver, hvor længe man kan bruge maskinen, uden at motoren
bliver for varm og tager skade. Efter den angivne korttidsdrift skal der slukkes for
maskinen, indtil motoren er kølet af.
Page 43

■ 40 │ DK
SFW 350 C1
Sikkerhedsanvisninger
FARE FOR STRØMSTØD
► Sørg for, at strømledningen ikke beskadiges. Hold den borte
fra varme steder og dele, og læg den, så den ikke kan klemmes fast.
► Hvis strømledningen eller strømstikket er beskadiget, skal
den/det straks udskiftes af en autoriseret reparatør, så farlige situationer undgås.
► Brug kun maskinen i tørre rum, ikke udendørs.
Læg aldrig motorblokken ned i vand eller andre væsker!
Ellers er der livsfare på grund af elektrisk stød.
ADVARSEL!
► Brug kun maskinen til de formål, der er beskrevet her. Der er
alvorlig fare for uheld, hvis du sætter beskyttelsesanordningerne på maskinen ud af funktion, fordi du bruger den forkert!
ADVARSEL! FARE FOR PERSONSKADER!
► Stik aldrig fingrene ind i åbningerne på maskinen. Stik heller
ikke genstande ind i maskinens åbninger. Den eneste undtagelse er stopperen, der hører til tilbehøret samt fødevarerne,
der skal tilberedes. I modsat fald er der alvorlig fare for uheld!
► Træk først stikket ud af stikkontakten, før tilbehørsdelene sæt-
tes på eller tages af.
► Sørg for, at maskinen altid er under opsyn, når den er klar
til brug. Træk altid stikket ud af stikkontakten efter brug, eller
hvis du afbryder arbejdet, så maskinen ikke starter ved en
fejltagelse.
► Brug kun de originale tilbehørsdele til denne maskine. Andre
dele er muligvis ikke tilstrækkeligt sikre.
Page 44

DK
│
41 ■
SFW 350 C1
ADVARSEL! FARE FOR PERSONSKADER!
► Sæt aldrig maskinen i gang, hvis den er tom. Den kan gå i
stykker, så den ikke længere kan repareres.
► Før udskiftning af tilbehør eller dele, som bevæger sig under
drift, skal produktet slukkes og kobles fra lysnettet.
► Produktet må ikke bruges til andre formål end dem, der er
beskrevet i denne vejledning.
► Forsigtig: Krydskniven er meget skarp! Vær altid forsigtig ved
håndtering og rengøring af produktet.
► Produktet skal altid afbrydes fra strømforsyningen, hvis det
ikke er under opsyn samt inden montering, afmontering eller
rengøring.
► Produktet må ikke bruges af børn.
► Produktet og dets tilslutningsledning skal holdes uden for
børns rækkevidde.
► Dette produkt kan bruges af personer med reducerede fysiske,
sensoriske eller mentale evner eller manglende erfaring og/
eller viden, hvis de er under opsyn eller er blevet oplært i
brugen af produktet og de farer, som kan være forbundet
med det.
► Børn må ikke lege med produktet.
Page 45

■ 42 │ DK
SFW 350 C1
Sådan samles kødhakkeren /
og sådan skilles den ad
OBS - MATERIELLE SKADER!
►
Alle tilbehørsdele er forsynet med en tynd oliefilm for at beskytte dem mod
korrosion. Rengør derfor alle dele omhyggeligt, før du bruger dem første
gang, som beskrevet i kapitlet "Rengøring". Gnid derefter alle metaldele
ind med spiseolie.
Samling af kødhakkeren
Klap udklapssiden ud - her kan du på billederne se rækkefølgen for, hvordan
maskinen skal samles.
1) Sæt transportsneglen ind i kødhakkerdelen .
2) Sæt fjederen på transportsneglen .
3) Sæt krydskniven ind, så siden med knivene vender væk fra fjederen .
Sørg for, at den firkantede kærv på krydskniven sidder korrekt på den
firkantede akse.
ADVARSEL! FARE FOR PERSONSKADER!
► Krydskniven er meget skarp! Fare for personskader!
OBS - MATERIELLE SKADER!
► Maskinen går i stykker, hvis krydskniven sættes omvendt ind!
4) Vælg en hulskive /pølseskive 3.
Page 46

DK
│
43 ■
SFW 350 C1
5) Sæt den valgte hulskive ind i kødhakkedelen , så fikseringerne på hulskiven sidder i kærvene på kødhakkedelen .
6) Når alt er sat rigtigt ind, skrues låseringen på med hånden.
7) Den færdigt monterede kødhakkerdel samles med motorblokken ved
hjælp af en bajonetfatning:
– Sæt kødhakkerdelen ind i motorblokken , så pilen på kødhakker-
delen er ud for symbolet
på motorblokken . Låseknappen .
trykkes ind. (Fig. B).
– Tryk kødhakkerdelen en smule ind, og drej samtidigt skakten ved
kødhakkerdelen til midterpositionen (Fig. B), så pilen på skakten
peger mod symbolet
. Når kødhakkerdelen går i hak, hopper
låseknappen .ud.
– Sæt til sidst påfyldningsskålen på øverst på påfyldningsskakten.
– Hvis du vil tage den af, skal du trykke på låseknappen .og dreje skak-
ten til højre igen (Fig. B)
. Derefter kan kødhakkerdelen tages ud.
Montering af pølsehorn
Klap udklapssiden ud - på billederne kan du se rækkefølgen for, hvordan maskinen
skal samles.
1) Tag kødhakkerdelen af som beskrevet under "Samling af kødhakkeren".
2) Skil alle dele ad, som er monteret på/i kødehakkedelen , og rengør dem.
3) Gnid alle metaldele ind i spiseolie.
4) Sæt transportsneglen , fjederen og krydskniven ind i kødhakkede-
len igen.
5) Sæt pølseskiven 3 ind, så fikseringerne på pølseskiven 3 sidder i kærvene
på kødhakkedelen .
6) Sæt derefter pølsehornet - foran pølseskiven 3.
7) Skru låseringen på med hånden.
8) Montér kødhakkerdelen som beskrevet under "Samling af kødhakkeren".
Page 47

■ 44 │ DK
SFW 350 C1
Montering af kubbe-del
Klap udklapssiden ud - på billederne kan du se rækkefølgen for, hvordan maskinen
skal samles.
1) Tag kødhakkerdelen af som beskrevet under "Samling af kødhakkeren".
2) Tag eventuelt tilbehør af, og rengør kødhakkerdelen .
BEMÆRK
► Til kubbe-delen ! skal krydskniven med fjederen ikke bruges!
Tag derfor begge dele ud af kødhakkerdelen .
3) Gnid alle metaldele ind i spiseolie.
4) Sæt kubbe-delens to plastikdele ! ind, så fikseringerne på kubbe-delens
nederste ring ! sidder i kærvene på kødhakkedelen .
5) Når det hele er sat rigtigt ind, skrues låseringen fast igen med hånden.
6) Montér kødhakkerdelen som beskrevet under "Samling af kødhakkeren".
Montering af dejsprøjte
Klap udklapssiden ud - på billederne kan du se rækkefølgen for, hvordan maskinen
skal samles.
1) Tag kødhakkerdelen af som beskrevet under "Samling af kødhakkeren".
2) Tag eventuelt tilbehør af, og rengør kødhakkerdelen .
BEMÆRK
► Til dejsprøjtedelen skal krydskniven med fjederen ikke bruges!
Tag derfor begge dele ud af kødhakkerdelen .
3) Gnid alle metaldele ind i spiseolie.
4) Tag mønsterstrimlen foran på dejsprøjtedelen af.
5) Sæt først plastskiven og derefter metalskiven til dejsprøjten ind i kødhak-
kerdelen (se udklapssiden). Sæt dejsprøjte-delen ind, så fikseringerne på
dejsprøjte-delen sidder i kærvene på kødhakkedelen .
6) Når alt er sat rigtigt ind, skrues låseringen på med hånden.
Page 48

DK
│
45 ■
SFW 350 C1
7) Sæt mønsterstrimlen ind igen foran på dejsprøjtedelen . Sørg for, at
grebet på mønsterstrimlen peger væk fra maskinen. Ellers kan mønsteret,
som er lige ved grebet, ikke indstilles.
8) Montér kødhakkerdelen som beskrevet under "Samling af kødhakkeren".
9) Når du vil afmontere dejsprøjten, skal du trække mønsterstrimlen af, før
du skruer låseringen af og tage dejsprøjtedelen ud igen.
Betjening
FARE FOR STRØMSTØD
► Åbn aldrig huset omkring motorblokken – der er ingen betjeningsdele
i huset.Hvis huset åbnes, bortfalder garantien. Når huset er åbent, er der
livsfare på grund af elektrisk stød.
OBS - MATERIELLE SKADER!
► Brug ikke maskinen længere end 15 minutter i vedvarende drift. Lad derefter
maskinen være slukket i ca. 30 minutter for at undgå overophedning.
► Tryk aldrig på knapperne "I" 0 eller "<" 1 ved skift af omdrejningsretning,
medmindre maskinens motor står helt stille. Motoren kan gå i stykker.
Betjening af maskinen
Når du har monteret det ønskede tilbehør:
1) Stil maskinen, så den står helt stabilt og ikke kan falde ned fra bordet (f.eks.
på grund af vibrationer, eller hvis der rives i strømledningen) eller komme
i nærheden af rindende vand. Vibrationer er uundgåelige, når maskinen
arbejder.
FARE FOR STRØMSTØD
► Lad være med at gribe ud efter maskinen, mens den er i gang, hvis den
falder ned eller kommer ned i vand – eller i andre nødstilfælde! Træk i
nødstilfælde straks strømstikket ud! Ellers er der akut fare for kvæstelser og
livsfare!
2) Læg fødevarerne, der skal tilberedes, ned i påfyldningsskålen , og stil en
opsamlingsbeholder under udløbsåbningen.
Page 49

■ 46 │ DK
SFW 350 C1
3) Tryk først på knappen "0" 6 for at sikre, at maskinen stadig er slukket. Ellers
kan maskinen starte ved en fejltagelse, hvis stikket sættes i stikkontakten.
4) Sæt derefter stikket i stikkontakten.
5) Tryk på knappen "I" 0 for at tænde for maskinen.
ADVARSEL! FARE FOR PERSONSKADER!
► Pres kun fødevarerne ned i skakten med den runde stopper – aldrig
med fingrene, gafler, skafter på skeer eller lignende. Der er alvorlig fare for
personskader, og maskinen kan ødelægges.
OBS - MATERIELLE SKADER!
► Tryk aldrig så hårdt, at det kan høres, at motoren arbejder langsommere.
Ellers kan maskinen overbelastes og beskadiges.
Tilberedning af kød
1) Brug kødstykker, som nemt kan komme ned i påfyldningsskakten. Skær
eventuelt kødet til, så det passer. Sørg for, at kødet ikke indeholder knogler
eller sener.
ADVARSEL!
► Hakket kød er meget udsat for bakterier. Sørg derfor for en god hygiejne,
når du tilbereder kød. Ellers kan der være fare for sygdomme.
2) Når du har læst alle informationer om emnet "kød", kan du anvende maskinen
som beskrevet i kapitlet "Betjening af maskinen".
Tilberedning af pølser
1) Kør kødet to gange gennem kødhakkeren, før du forarbejder det til pølser.
2) Tilsæt finthakkede løg, krydderier og andre ingredienser til det hakkede kød
som angivet i opskriften for pølsefyldet, og ælt massen godt igennem. Stil
pølsefyldet i køleskabet i ca. 30 min., før du fortsætter tilberedningen.
3) Sæt pølsetarmen (natur- eller kunsttarm) over pølse-stoppedelen -, og luk
den anden ende med en knude. Til 1 kg pølsefyld skal du regne med ca.
1,60 m pølsetarm.
Page 50

DK
│
47 ■
SFW 350 C1
TIP
Læg først naturtarmen i lunkent vand i ca. 3 timer, og vrid tarmen, før du
sætter den på. Derved bliver naturtarmen elastisk igen. Naturtarme kan
du få hos specialslagtere i nærheden af slagterier eller hos din slagter.
4) Pølsefyldet presses ind i pølsetarmen gennem pølse-stoppedelen -. Når den
ønskede længde er nået, skal du slukke maskinen, trykke pølsen sammen i
enden, og dreje den et par gange rundt om sin egen længdeakse.
TIP
Pølser udvider sig ved kogning og frysning. Overfyld derfor ikke pølserne,
da de ellers kan gå i stykker.
5) Når du har læst alle informationer om emnet "pølser", kan du anvende
maskinen som beskrevet i kapitlet "Betjening af maskinen".
Sådan arbejder du med kubbe-delen
Med kubbe-delen ! kan du forme hule ruller af kød eller grøntsager af de
anvendte fødevarer og derefter fylde dem efter ønske.
1) Kør kødet to gange gennem kødhakkeren, før du presser det gennem kubbedelen !.
2) Når du har læst alle informationer om emnet "kubbe-del", kan du anvende
maskinen som beskrevet i kapitlet "Betjening af maskinen".
Fremstilling af sprøjtede kager
Når du har tilberedt en dej til sprøjtede kager efter en opskrift og har monteret
delen til sprøjtede kager :
1) Læg bagepapir på en lille bageplade, og stil den under åbningen foran på
maskinen.
2) Pres dejen ensartet ned i kødhakkerdelen – transportsneglen trykker
derefter dejen gennem det valgte motiv på motivstrimlen på dejsprøjten .
3) Når dejen har nået den ønskede længde, skal du stoppe maskinen og skære
dejen af ved udgangsåbningen. Læg dejen på bagepladen.
4) Når du har læst alle informationer om emnet ”sprøjtede kager”, kan du
anvende maskinen som beskrevet i kapitlet ”Betjening af maskinen”.
Page 51

■ 48 │ DK
SFW 350 C1
I tilfælde af fejl
Hvis motoren er blokeret på gund af ophobede fødevarer:
■ Tryk på knappen "0" 6for at standse kødhakkeren.
■ Bliv ved med at trykke på knappen "<" 1. Motoren kører nu baglæns. Der-
ved kan du transportere fødevarerne et stykke tilbage for at frigøre motoren.
■ Når motoren ikke længere er blokeret, slipper du knappen "<" 1.
■ Tryk på knappen "I" 0for at starte kødhakkeren.
■ Hvis motoren ikke kommer fri, skal maskinen rengøres som beskrevet i kapitlet
"Rengøring".
Hvis motoren pludselig standser, kan det være, at den
interne overbelastningssikring er blevet udløst. Den skal
beskytte motoren.
■ Sluk for maskinen, og lad den køle af i ca. 30 min., før du bruger den igen.
■ Hvis det ikke hjælper, skal du vente 15 min. mere.
■ Hvis det heller ikke hjælper, tyder alt på en defekt. Henvend dig i så fald til
kundeservice.
Hvis strømledningen er beskadiget, eller der kan ses skader
på maskinens dele:
■ Sluk straks for maskinen ved at trykke på knappen "0" 6!
■ Træk strømstikket ud, hvis det ikke kan gøres uden risiko.
■ Få disse skader repareret af kundeservice, før maskinen anvendes igen.
Rengøring
FARE FOR STRØMSTØD
► Træk stikket ud af stikkontakten, før du rengør maskinen. Dermed forhindrer
du faren for uheld på grund af uventet, uønsket start og elektrisk stød.
Rengøring af motorblokken
■ Rengør alle udvendige dele og strømledningen med en fugtig klud. Tør
maskinen godt af, inden du bruger den igen.
Page 52

DK
│
49 ■
SFW 350 C1
FARE FOR STRØMSTØD
► Læg aldrig motorblokken ned i vand eller andre væsker! Det er livsfarligt
på grund af elektrisk stød, hvis der kommer fugt ind i elektriske ledere.
OBS - MATERIELLE SKADER!
► Brug ikke rengørings-, skure- eller opløsningsmidler. Disse midler kan beska-
dige maskinen og efterlade rester på fødevarerne.
Rengøring af tilbehørsdele
BEMÆRK
► Rengør ikke tilbehørsdelene i opvaskemaskinen! Det medfører, at delene
ødelægges!
■ Rengør tilbehørsdelene, som kan komme i kontakt med fødevarer, ...
– med hånden, tilbehørsdelene må ikke vaskes i opvaskemaskine.
– med varmt opvaskevand og opvaskemiddel, der egner sig til genstande,
som kommer i kontakt med fødevarer.
ADVARSEL! FARE FOR PERSONSKADER!
► Krydskniven er meget skarp! Fare for personskader!
■ Tør alle dele omhyggeligt, før du bruger maskinen igen.
BEMÆRK
► Gnid metaldelene ind i spiseolie igen efter rengøring! Ellers kan metalde-
lene misfarves!
Opbevaring
■ Sæt strømledningen (uden strømstik) ind i kabelskakten under maskinens
bund. Så beskyttes den mod skader.
■ Opbevar maskinen et tørt sted.
■ Gnid metaldelene med et tyndt lag spiseolie efter aftørring, hvis du ikke bruger
maskinen med det samme igen. Derved er metaltilbehøret godt beskyttet mod
korrosion.
■ Opbevar maskinen, så børn og personer, som har behov for opsyn, ikke
kan få fat i den. Disse personer kan ikke altid bedømme mulige farer ved
omgang med elektriske apparater.
Page 53

■ 50 │ DK
SFW 350 C1
Bortskaffelse
Smid aldrig kødhakkeren ud sammen med det normale hushold-
ningsaffald.
Dette produkt er underlagt det europæiske direktiv 2012/19/EU
(Waste Electrical and Electronic Equipment).
Bortskaf kødhakkeren hos et godkendt affaldsfirma eller på din kommunale
genbrugsplads. Følg de aktuelt gældende regler. Kontakt genbrugspladsen,
hvis du er i tvivl.
Aflever alle emballagematerialer på et affaldsdepot, så miljøet skånes.
Garanti og service
På denne maskine får du 3 års garanti fra købsdatoen. Maskinen er produceret
omhyggeligt og er inden levering afprøvet samvittighedsfuldt.
Opbevar kassebonen som bevis for købet. Kontakt venligst din serviceafdeling
telefonisk, hvis du ønsker at gøre brug af garantien. På denne måde garanteres
det, at tilsendelsen af varen er gratis.
BEMÆRK
► Garantien gælder kun for materiale- eller fabrikationsfejl, men ikke for
transportskader, sliddele eller skrøbelige dele som f.eks. kontakten eller
akkumulatorer.
Produktet er kun beregnet til privat og ikke til erhvervsmæssigt brug. Ved misbrug
og uhensigtsmæssig behandling, anvendelse af vold og ved indgreb, som ikke er
foretaget af vores autoriserede service-afdeling, ophører garantien.
Dine juridiske rettigheder indskrænkes ikke ved denne garanti. Garantiperioden
forlænges ikke, hvis der gøres brug af garantien. Det gælder også for udskiftede
og reparerede dele.
Skader og mangler, der eventuelt allerede fandtes før køb, skal straks anmeldes
efter udpakningen og senest to dage efter købsdatoen.
Når garantiperioden er udløbet, er reparationer betalingspligtige.
Garantiperioden forlænges ikke, hvis der gøres brug af garantien. Det gælder
også for udskiftede og reparerede dele.
Skader og mangler, der eventuelt allerede fandtes før køb, skal straks anmeldes
efter udpakningen og senest to dage efter købsdatoen.
Når garantiperioden er udløbet, er reparationer betalingspligtige.
Service Danmark
Tel.: 32 710005
E-Mail: kompernass@lidl.dk
IAN 270744
Åbningstid for hotline: Mandag til fredag fra kl. 8:00 – 20:00 (MET)
Page 54

DK
│
51 ■
SFW 350 C1
Importør
KOMPERNASS HANDELS GMBH
BURGSTRASSE 21
44867 BOCHUM
GERMANY
www.kompernass.com
Opskrifter
Kubbe
Ingredienser til omslaget
450 g magert lamme-, kalve- eller oksekød
150 g mel
1 tsk. allehånde
1 tsk. muskatnød
1 knivspids chilipulver
1 knivspids peber
Ingredienser til kødfyldet
700 g fåre-/lammekød
1 1/2 spsk. olivenolie
1 1/2 spsk. finthakket løg
1/2 tsk. allehånde
1/2 tsk. salt
1 1/2 spsk. mel
Page 55

■ 52 │ DK
SFW 350 C1
Hak kødet til omslaget to gange efter hinanden i kødhakkeren (først med den grove
og derefter med den fine hulskive ), og bland det sammen med ingredienserne.
Hak også denne masse to gange i kødhakkeren. Skift hulskiven ud med
kubbe-delen ! (se kapitlet "Montering af kubbe-del").
Form kubbe-omslagene med kubbe-delen !, og frys dem.
Fyld:
Hak kødet to gange med kødhakkeren (først med den grove og derefter med
den fine hulskive ).
Svits løgene, og bland dem godt sammen med kødet og de øvrige ingredienser.
Fyld kubbe-omslagene med blandingen, og sprødsteg dem.
Alternativt fyld:
250 g dampet broccoli
eller 250 g dampet squash
eller 250 g kogt ris
Frisk Rostbratwurst (tysk medister)
Ingredienser:
300 g magert oksekød
500 g magert svinekød
200 g spæk
20 g salt
1/2 spsk. hvidt, stødt peber
1 tsk. kommen
1/2 teske muskatnød
Kør oksekødet, svinekødet og spækket to gange gennem kødhakkeren.
Tilsæt de blandede krydderier samt salt, og ælt i 5 minutter.
Stil pølsefyldet i køleskabet i ca. 30 minutter. Fyld pølsefyldet i som beskrevet i
vejledningen (se kapitlet "Tilberedning af pølser"), og sno pølser på ca. 25 cm
længde.
Spis den færdige godt gennemstegte Rostbratwurst samme dag.
Page 56

DK
│
53 ■
SFW 350 C1
Sprøjtede kager
Ingredienser:
500 g smør
500 g sukker
2 - 3 breve vaniljesukker
1 brev vaniljebudding
1/4 teske salt
1 æg
4 æggeblommer
800 g mel (type 405)
2 tsk. bagepulver
200 g malede mandler (blancherede)
Revet skal af en citron
Pisk smørret, til det skummer. Tilsæt resten af ingredienserne lidt efter lidt, og ælt
dejen godt igennem. Lad den færdige dej hvile ca. 12 timer (f.eks. natten over)
tildækket i køleskabet. Kør den så gennem kødhakkeren med dejsprøjte-delen .
Læg de sprøjtede kager på en bageplade med bagepapir. Bag kagerne gyldne
i en forvarmet bageovn ved 180°C i ca.10-15 minutter.
Page 57

54
SFW 350 C1
Page 58

FR│BE
│
55 ■
SFW 350 C1
Sommaire
Introduction ..................................................56
Droits d’auteur .......................................................... 56
Limitation de responsabilité ................................................56
Utilisation conforme ...........................................56
Accessoires fournis / Description des pièces ........................57
Caractéristiques techniques .....................................57
Consignes de sécurité ..........................................58
Assemblage / désassemblage ...................................60
Assemblage du hachoir à viande ........................................... 60
Monter le poussoir à saucisse ..............................................61
Monter l’accessoire à boulettes ............................................. 62
Monter l’accessoire pour biscuits sablés ......................................62
Opération ...................................................63
Fonctionnement de l’appareil ..............................................63
Travailler de la viande ....................................................64
Confectionner des saucisses ............................................... 64
Travailler avec l’accessoire à boulettes ....................................... 65
Confectionner des biscuits sablés ........................................... 65
En cas de panne ...............................................66
Nettoyage ...................................................66
Nettoyage du bloc-moteur .................................................66
Nettoyage des accessoires ................................................67
Rangement ..................................................67
Mise au rebut ................................................68
Garantie et service après-vente .................................68
Importateur ..................................................69
Recettes .....................................................69
Boulettes ..............................................................69
Saucisse à griller fraîche .................................................. 70
Biscuits sablés .......................................................... 71
Page 59

■ 56 │ FR
│
BE
SFW 350 C1
Introduction
Toutes nos félicitations pour l’achat de votre nouvel appareil.
Vous avez choisi un produit de grande qualité. Le mode d’emploi fait partie de ce
produit. Il contient des remarques importantes concernant la sécurité, l’utilisation et
la mise au rebut. Veuillez vous familiariser avec l’ensemble des consignes d’opération
et de sécurité avant l’usage du produit. N’utilisez le produit que conformément aux
consignes et pour les domaines d’utilisation prévus. Conservez soigneusement ces
instructions. En cas de transfert du produit à un tiers, remettez-lui également tous les
documents.
Droits d’auteur
Cette documentation est protégée par les droits d’auteur.
Toute reproduction ou réimpression, même partielle, y compris la reproduction des
illustrations, même modifiées, n’est autorisée qu’avec l’accord écrit du fabricant.
Limitation de responsabilité
L’ensemble des informations, données et remarques techniques se rapportant
au raccordement et à l’opération contenues dans le présent mode d’emploi sont
conformes au dernier état lors du passage en presse en tenant compte de nos
expériences passées et de nos connaissances en toute bonne foi.
Aucune prétention ne peut être dérivée des indications, photos et descriptions
contenues dans le présent mode d’emploi.
Le fabricant n’assume aucune responsabilité pour les dommages résultant d’un
non-respect du mode d’emploi, d’un usage non conforme, de réparations non
conformes, de modifications effectuées sans autorisation ou de l’usage de pièces
de rechange non agréées.
Utilisation conforme
Cet appareil est prévu pour le travail exclusif avec des denrées alimentaires dans
des quantités usuelles ménagères dans le cadre privé :
▯ Hachage de viande fraîche,
▯ Confection de saucisses dans des boyaux naturels ou synthétiques,
▯ Confection de biscuits sablés
L’appareil n’est pas prévu pour le travail de denrées alimentaires congelées
ou dures, par exemple des os ou des noix, et son utilisation est exclue dans le
secteur commercial ou industriel.
Page 60

FR│BE
│
57 ■
SFW 350 C1
Accessoires fournis / Description des pièces
Figure A :
Accessoire pour biscuits sablés avec plaquette des modèles
Bouchon
Plateau de remplissage
Bloc-moteur
Adaptateur du hachoir en métal
Vis transporteuse
Ressort
Lame cruciforme
Grille fine et grossière
Anneau de fermeture
- Embout à saucisses
3 Grille à saucisses
! Accessoire à boulettes
Figure B :
. Bouton de verrouillage
Figure C :
0 Touche «I»
6 Touche «0»
1 Touche «<»
Caractéristiques techniques
Tension 220 - 240 V ∼, 50 Hz
Puissance absorbée 250 - 350 W
Classe de protection
II /
Temps d'opération par
intermittence
15 minutes
Temps d’opération par intermittence
Le temps d’opération par intermittence indique pendant combien de temps
l’appareil peut être opéré, sans que le moteur ne surchauffe ou subisse de
dommages. Après le temps d’opération par intermittence indiqué, l’appareil
doit être éteint jusqu’à ce que le moteur se soit refroidi.
Page 61

■ 58 │ FR
│
BE
SFW 350 C1
Consignes de sécurité
RISQUE D'ÉLECTROCUTION
► Veillez à ce que le cordon d'alimentation ne soit pas
endommagé. Maintenez-le à distance de zones chaudes
et acheminez-le de telle manière qu'il ne puisse pas être
coincé.
► Faites remplacer aussitôt un cordon d'alimentation ou une
fiche secteur endommagée par des techniciens spécialisés
agréés, afin d'éviter tous dangers.
► Utiliser l'appareil exclusivement dans des locaux secs, surtout
pas en extérieur.
N'immergez jamais le bloc-moteur dans l'eau ou d'autres
liquides ! Sinon, il y a danger de mort par électrocution.
AVERTISSEMENT !
► N'utilisez jamais l'appareil à d'autres fins que celles décrites ici.
Risque important d'accident si vous mettez les dispositifs de
protection hors service en cas d'utilisation non appropriée
de l'appareil !
AVERTISSEMENT ! RISQUE D'ACCIDENT !
► Ne passez jamais vos mains dans les ouvertures de l'appareil.
N'introduisez jamais un quelconque objet dans les ouvertures –
exception faite du bouchon correspondant à la grille et des
denrées alimentaires que vous transformez. Risque très élevé
d'accident !
► Débranchez tout d'abord la fiche de la prise secteur, avant
d'installer ou de retirer les pièces accessoires.
► Ne laissez jamais l'appareil sans surveillance lorsqu'il est prêt à
l'emploi. Lorsque vous avez terminé ou en cas d'interruption
du travail, débranchez toujours la fiche de la prise secteur
afin d'éviter une mise en marche accidentelle.
Page 62

FR│BE
│
59 ■
SFW 350 C1
AVERTISSEMENT ! RISQUE D'ACCIDENT !
► Utilisez exclusivement les accessoires d’origine constructeur
prévus pour cet appareil. L’utilisation de pièces différentes
peut ne pas être suffisamment sûr.
► N'opérez jamais l'appareil lorsqu'il est vide. Ceci peut en
effet entraîner des dommages irréparables.
► Avant de changer les accessoires ou les pièces supplémen-
taires mobiles lors de l’utilisation, l’appareil doit être mis à
l’arrêt et débranché du secteur.
► N’utilisez pas l’appareil à d’autres fins que celles décrites
dans cette notice.
► Attention : la lame cruciforme est extrêmement tranchante !
Faites toujours très attention en manipulant et en nettoyant
l’appareil.
► En cas d’absence de surveillance et avant l’assemblage, le
désassemblage ou le nettoyage, l’appareil doit toujours être
débranché du secteur.
► L’appareil ne doit pas être utilisé par des enfants.
► Tenir l’appareil et son cordon de raccordement hors de
portée des enfants.
► Cet appareil peut être utilisé par des personnes ayant des
capacités physiques, sensorielles ou mentales réduites ou
un manque d’expérience et de connaissances à condition
qu’elles aient reçu une supervision ou des instructions
concernant l’utilisation de l’appareil en toute sécurité et
qu’elles comprennent les dangers encourus.
► Ne pas laisser les enfants jouer avec l’appareil.
Page 63

■ 60 │ FR
│
BE
SFW 350 C1
Assemblage / désassemblage
ATTENTION - RISQUE DE DÉGÂTS MATÉRIELS !
► Toutes les pièces d'accessoires sont revêtues d'un fin film huileux afin de les
protéger de la corrosion. Avant la première utilisation, nettoyez pour cette
raison soigneusement toutes les pièces comme décrit en détails au chapitre
«Nettoyage». Badigeonnez ensuite toutes les pièces métalliques d'un peu
d'huile alimentaire.
Assemblage du hachoir à viande
Ouvrez la partie rabattable - vous y trouverez l’ordre d’assemblage sous forme
d’une représentation graphique.
1) Placez la vis transporteuse dans l’adaptateur du hachoir à viande .
2) Insérez le ressort sur la vis transporteuse .
3) Insérez la lame cruciforme de telle manière que la face tranchante ne
soit pas orientée vers le ressort . Veillez à ce que l’encoche angulaire de
la lame cruciforme repose correctement dans l’axe angulaire.
AVERTISSEMENT ! RISQUE D'ACCIDENT !
► La lame cruciforme est extrêmement tranchante ! Risque de blessures !
ATTENTION - RISQUE DE DÉGÂTS MATÉRIELS !
► L'appareil sera endommagé si la lame cruciforme est insérée dans le
sens contraire !
4) Sélectionnez la grille souhaitée /grille à saucisses 3.
Page 64

FR│BE
│
61 ■
SFW 350 C1
5) Insérez la grille sélectionnée de telle manière dans l’adaptateur du
hachoir , que les fixations sur la grille se trouvent dans les encoches de
l’adaptateur du hachoir à viande .
6) Lorsque tout est correctement inséré, vissez l’anneau de fermeture fermement
à la main.
7) L’adaptateur du hachoir à viande monté est relié au bloc-moteur par
un joint à baïonnette :
– Insérez l’adaptateur du hachoir à viande dans le bloc-moteur ,
afin que la flèche au niveau de la gaine de remplissage repose sur le
symbole
du bloc-moteur . Le bouton de verrouillage . s’enfonce
(Fig. B).
– Appuyez légèrement sur l’adaptateur du hachoir à viande et ce faisant,
tournez la gaine de remplissage de l’adaptateur du hachoir à viande
dans la position du milieu (Fig. B), afin que la flèche au niveau de la gaine
de remplissage indique le symbole
. Lorsque l’adaptateur du hachoir à
viande s’enclenche, le bouton de verrouillage .ressort.
– Pour finir, placez le plateau de remplissage en haut sur la gaine de
remplissage.
– Pour le retirer, appuyez sur le bouton de verrouillage .et tournez à
nouveau la gaine de remplissage vers la droite (Fig. B)
. Ensuite, vous
pouvez retirer l’adaptateur du hachoir à viande .
Monter le poussoir à saucisse
Ouvrez la partie rabattable - vous y trouverez l’ordre d’assemblage sous forme
d’une représentation graphique.
1) Retirez l’adaptateur du hachoir à viande , conformément à la description
sous «Assemblage du hachoir à viande».
2) Démontez toutes les pièces qui sont montées dans/sur l’adaptateur du hachoir
en métal et nettoyez-les.
3) Badigeonnez toutes les parties métalliques avec de l’huile alimentaire.
4) Insérez la vis transporteuse , le ressort et la lame cruciforme dans
l’adaptateur du hachoir en métal .
5) Insérez la grille à saucisses 3 de telle manière que les fixations de la grille à sau-
cisses 3 se trouvent dans les encoches de l’adaptateur du hachoir à viande .
6) Placez ensuite le poussoir à saucisse - devant la grille à saucisse 3.
7) Vissez l’anneau de fermeture fermement à la main.
8) Montez l’adaptateur du hachoir à viande conformément à la description
sous «Assemblage du hachoir à viande».
Page 65

■ 62 │ FR
│
BE
SFW 350 C1
Monter l’accessoire à boulettes
Ouvrez la partie rabattable - vous y trouverez l’ordre d’assemblage sous forme
d’une représentation graphique.
1) Retirez l’adaptateur du hachoir à viande , conformément à la description
sous «Assemblage du hachoir à viande».
2) Retirez toutes les appliques éventuelles et nettoyez l’adaptateur du hachoir
à viande .
REMARQUE
► Pour l'accessoire à boulettes !, la lame cruciforme avec le ressort
n'est pas nécessaire ! Le cas échéant, ressortez les deux éléments de
l'adaptateur du hachoir à viande .
3) Badigeonnez toutes les parties métalliques avec de l’huile alimentaire.
4) Insérez les deux pièces en plastique de l’accessoire à boulettes ! de telle
manière que les fixations sur l’accessoire à boulettes ! se trouvent dans les
encoches de l’adaptateur du hachoir à viande .
5) Si toutes les pièces sont correctement positionnées, vissez de nouveau fermement l’anneau de fermeture à la main.
6) Montez l’adaptateur du hachoir à viande conformément à la description
sous «Assemblage du hachoir à viande».
Monter l’accessoire pour biscuits sablés
Ouvrez la partie rabattable - vous y trouverez l’ordre d’assemblage sous forme
d’une représentation graphique.
1) Retirez l’adaptateur du hachoir à viande , conformément à la description
sous «Assemblage du hachoir à viande».
2) Retirez toutes les appliques éventuelles et nettoyez l’adaptateur du hachoir
à viande .
REMARQUE
► Pour l'accessoire pour biscuits sablés , la lame cruciforme avec le res-
sort n'est pas nécessaire ! Le cas échéant, ressortez les deux éléments
de l'adaptateur du hachoir à viande .
3) Badigeonnez toutes les parties métalliques avec de l’huile alimentaire.
4) Retirez la plaquette des modèles à l’avant de l’accessoire pour biscuits sablés
.
5) Insérez tout d’abord le disque en plastique, puis le disque en métal de
l’accessoire pour biscuits sablés dans l’adaptateur du hachoir à viande
(voir face dépliable). Insérez l’accessoire pour biscuits sablés de telle
manière que les fixations de l’accessoire pour biscuits sablés se trouve
dans les encoches de l’adaptateur du hachoir à viande .
6) Lorsque tout est correctement inséré, vissez l’anneau de fermeture à la main.
Page 66

FR│BE
│
63 ■
SFW 350 C1
7) Insérez la plaquette de modèles à nouveau à l’avant dans l’accessoire
pour biscuits sablés . Veillez à ce que la poignée au niveau de la plaquette des modèles ne soit pas dirigée vers l’appareil. Sinon, vous ne
pourrez pas régler le modèle qui se trouve directement sur la poignée.
8) Montez l’adaptateur du hachoir à viande conformément à la description
sous «Assemblage du hachoir à viande».
9) Pour le retirer, il faut à nouveau enlever la plaquette des modèles , avant
d’enlever l’anneau de fermeture et de pouvoir à nouveau enlever l’acces-
soire pour biscuits sablés .
Opération
RISQUE D'ÉLECTROCUTION
► N'ouvrez jamais le boîtier du bloc-moteur – car il ne s'y trouve aucun
élément d'opération. Toute ouverture du boîtier met fin à la prétention à la
garantie. Si le boîtier est ouvert, danger de mort par électrocution.
ATTENTION - RISQUE DE DÉGÂTS MATÉRIELS !
► N'utilisez pas l'appareil plus de 15 minutes en opération permanente.
Laissez ensuite l'appareil éteint pendant environ 30 minutes pour éviter une
surchauffe.
► N'appuyez jamais sur les touches «I» 0 ou «<» 1 en cas de changement
de la direction de marche, aussi longtemps que le moteur de l'appareil
n'est pas entièrement immobilisé. Le moteur peut être endommagé.
Fonctionnement de l’appareil
Si vous avez monté les grilles souhaitées :
1) Installez l’appareil afin qu’il soit absolument stable et qu’il ne puisse pas tomber de la table (par exemple suite à des vibrations ou à un accrochage dans
le cordon d’alimentation), ou être à proximité d’une source d’eau ouverte.
Des secousses sont inévitables en cours d’opération.
RISQUE D'ÉLECTROCUTION
► Ne saisissez jamais l'appareil s'il tombe sur le sol ou dans l'eau - ou en cas
de tout autre cas d'urgence - et qu'il est encore raccordé au secteur ou en
fonctionnement ! En cas d'urgence, débranchez immédiatement le cordon
d'alimentation ! Danger de mort et risque important de blessures !
2) Placez les denrées alimentaires à travailler dans le plateau de remplissage
et placez un récipient collecteur à l’avant sous l’ouverture de sortie.
Page 67

■ 64 │ FR
│
BE
SFW 350 C1
3) Appuyez tout d’abord sur la touche «0» 6, afin de vous assurer que l’appareil est encore éteint. Sinon, il y a le risque d’un démarrage accidentel de
l’appareil, lorsque la fiche secteur est branchée dans la prise secteur.
4) Insérez la fiche secteur dans la prise.
5) Appuyez sur la touche «I» 0pour allumer l’appareil.
AVERTISSEMENT ! RISQUE D'ACCIDENT !
► Poussez les aliments dans la gaine de remplissage uniquement à l'aide du
bouchon rond – ne prenez jamais vos doigts, des fourchettes ou des
manches de cuiller ou objets similaires. Risque important de blessure et
d'endommagement de l'appareil.
ATTENTION - RISQUE DE DÉGÂTS MATÉRIELS !
► N'appuyez jamais avec une force telle que l'on entende le moteur ralentir.
Vous risquez sinon de surcharger et d'endommager l'appareil.
Travailler de la viande
1) Choisissez des morceaux de viande qui entrent sans problèmes dans la
gaine de remplissage. Le cas échéant, prédécoupez la viande. Veillez à ce
que la viande ne contienne pas d’os ou de tendons.
AVERTISSEMENT !
► La viande hachée s'avarie rapidement. Pour cette raison, veillez à une bonne
hygiène lorsque vous travaillez la viande. Sinon, vous risquez des problèmes
de santé.
2) Lorsque vous avez lu toutes les consignes se rapportant au sujet «Viande»,
vous pouvez maintenant utiliser l’appareil comme décrit au paragraphe
«Opérer l’appareil».
Confectionner des saucisses
1) Faites passer la viande deux fois par le hachoir à viande, avant de la transformer en saucisses.
2) Pour la farce des saucisses, ajoutez des oignons finement coupés, des
épices et autres ingrédients à la farce selon votre recette et pétrissez bien la
masse. Placez cette dernière pendant 30 minutes au réfrigérateur avant de
poursuivre la fabrication.
3) Enfilez le boyau (naturel ou synthétique) sur l’embout à saucisses - et faites
un nœud à l’autre extrémité. Vous pouvez calculer environ 1,60 m de boyau
à saucisses pour environ 1 kg de farce.
Page 68

FR│BE
│
65 ■
SFW 350 C1
CONSEIL
Laissez auparavant tremper le boyau naturel pendant environ 3 heures dans
l'eau tiède et essorez-le avant de l'enfiler sur l'embout. Le boyau naturel
redevient ainsi plus élastique. Vous trouverez des boyaux naturels dans les
magasins spécialisés en accessoires pour bouchers à proximité d'abattoirs
ou auprès de votre boucher.
4) La farce à saucisses est ensuite pressée par l’embout à saucisses - dans le
boyau. Lorsque la longueur souhaitée est atteinte, éteignez l’appareil, pincez
la saucisse à son extrémité et tournez-la plusieurs fois sur son axe longitudinal.
CONSEIL
Lors de la cuisson et de la congélation, la saucisse se dilate. Ne la remplissez
donc pas trop, car sinon, elle pourrait éclater.
5) Lorsque vous avez lu toutes les consignes se rapportant au sujet «Saucisse»,
vous pouvez maintenant utiliser l’appareil comme décrit au chapitre «Opérer
l’appareil».
Travailler avec l’accessoire à boulettes
Avec l’accessoire à boulettes !, vous pouvez former des rouleaux creux à partir
de viande ou de légumes avec les denrées alimentaires introduites dans l’appareil, que vous pouvez ensuite remplir comme souhaité.
1) Faites tout d’abord passer deux fois la viande dans le hachoir à viande
avant de la presser à travers l’accessoire à boulettes !.
2) Lorsque vous avez lu toutes les consignes se rapportant au sujet «Accessoire
à boulettes», vous pouvez maintenant utiliser l’appareil comme décrit au
chapitre «Opérer l’appareil».
Confectionner des biscuits sablés
Une fois que vous avez préparé une pâte pour fabriquer une pâtisserie selon
votre recette et que vous avez monté l’accessoire pour biscuits sablés :
1) Etalez du papier sulfurisé dans un petit lèchefrite et placez-le à l’avant de
l’appareil sous l’ouverture de sortie.
2) Pressez de manière homogène la pâte dans l’adaptateur du hachoir à
viande – la vis transporteuse la presse alors à travers le motif sélectionné au niveau de la plaquette de modèles de l’accessoire pour biscuits
sablés .
3) Lorsque les biscuits ont atteint la longueur souhaitée, arrêtez l’appareil et
sectionnez la pâte au niveau de l’ouverture de sortie. Posez les biscuits sur
sur le lèchefrite.
4) Lorsque vous avez lu toutes les consignes se rapportant au sujet «Biscuits
sablés», vous pouvez utiliser l’appareil, comme décrit au chapitre «Opérer
l’appareil».
Page 69

■ 66 │ FR
│
BE
SFW 350 C1
En cas de panne
Si l’entraînement est bloqué par des denrées alimentaires :
■ Appuyez sur la touche «0» 6, pour arrêter le hachoir.
■ Maintenez la touche «<» 1enfoncée. L’entraînement tourne maintenant en
sens inverse. De cette manière, vous pouvez transporter les denrées alimentaires un peu en marche arrière afin de débloquer l’entraînement.
■ Dès que l’entraînement est débloqué, relâchez la touche «<» 1.
■ Appuyez sur la touche «I» 0, pour faire démarrer le hachoir.
■ Si vous ne parvenez pas à débloquer l’entraînement de cette manière, net-
toyez l’appareil, conformément à ce qui est décrit sous le point «Nettoyage».
Si le moteur s’éteint subitement, il est possible que le
fusible de surcharge interne ait été déclenché. Celui-ci est
destiné à protéger le moteur.
■ Éteignez le moteur et laissez-le refroidir pendant environ 30 min. avant de
réutiliser l’appareil.
■ Si cette solution n’apporte aucun résultat, attendez encore 15 minutes
supplémentaires.
■ Si ce délai s’est écoulé également sans résultat, cela indique une défectuo-
sité. Adressez-vous dans ce cas au service après-vente.
Si le cordon d’alimentation est endommagé ou si des détériorations sont reconnaissables au niveau des pièces de
l’appareil :
■ Éteignez immédiatement l’appareil en appuyant sur la touche «0» 6!
■ S’il n’est pas possible d’éteindre l’appareil sans prendre de risques supplé-
mentaires, débranchez le cordon d’alimentation.
■ Laissez tout d’abord intervenir le service après-vente pour la réparation
avant de continuer à utiliser l’appareil.
Nettoyage
RISQUE D'ÉLECTROCUTION
► Débranchez tout d'abord la fiche de la prise secteur avant de nettoyer
l'appareil. Vous évitez ainsi les risques d'accident par un démarrage accidentel de l'appareil et par électrocution.
Nettoyage du bloc-moteur
■ Nettoyez toutes les surfaces extérieures ainsi que le cordon d’alimentation
à l’aide d’un chiffon légèrement humide. Séchez soigneusement l’appareil
avant de le réutiliser.
Page 70

FR│BE
│
67 ■
SFW 350 C1
RISQUE D'ÉLECTROCUTION
► N'immergez jamais le bloc-moteur dans l'eau ou d'autres liquides ! Danger
de mort par électrocution si de l'humidité ayant pénétré dans l'appareil
atteint les conducteurs électriques.
ATTENTION - RISQUE DE DÉGÂTS MATÉRIELS !
► N'utilisez pas de produit nettoyant, abrasif ou solvant. Ils peuvent endom-
mager l'appareil et laisser des résidus sur les aliments.
Nettoyage des accessoires
REMARQUE
► Ne nettoyez pas les accessoires dans le lave-vaisselle. Ceci peut provo-
quer des dommages sur ces pièces !
■ Nettoyez tous les accessoires qui entrent en contact avec les denrées ali-
mentaires, ...
– uniquement à la main, les pièces accessoires ne sont pas adaptées pour
un lavage en lave-vaisselle.
– à l’eau chaude et avec un produit pour la vaisselle adéquat au lavage
des produits en contact avec des denrées alimentaires.
AVERTISSEMENT ! RISQUE D'ACCIDENT !
► La lame cruciforme est extrêmement tranchante ! Risque de blessures
■ Séchez bien toutes les pièces avant de continuer à utiliser l’appareil.
REMARQUE
► Après chaque nettoyage, badigeonnez à nouveau les pièces métalliques
d’huile alimentaire. Sinon, les pièces métalliques risquent de décolorer !
Rangement
■ Glissez le cordon d’alimentation (sans fiche secteur) dans la gaine du câble
sous le dessous de l’appareil. Il est ainsi protégé des détériorations.
■ Rangez l’appareil dans un endroit sec.
■ Après le séchage, badigeonnez les pièces métalliques avec une fine couche
d’huile alimentaire – si vous ne prévoyez pas d’utiliser immédiatement
l’appareil. Vous obtenez ainsi une bonne protection contre la corrosion.
■ Conservez l’appareil hors de portée des enfants et des personnes néces-
sitant une surveillance. Ceux-ci peuvent ne pas toujours bien évaluer les
risques lors de la manipulation d’appareils électriques.
Page 71

■ 68 │ FR
│
BE
SFW 350 C1
Mise au rebut
L’appareil ne doit jamais être jeté dans la poubelle domestique
normale. Ce produit est assujetti à la directive européenne
2012/19/EU (Waste Electrical and Electronic Equipment).
Remettez l’appareil destiné au recyclage à une entreprise spécialisée ou au
centre de recyclage de votre commune. Respectez la réglementation en vigueur.
En cas de doutes, contactez votre organisation de recyclage.
Eliminez l’ensemble des matériaux d’emballage d’une manière respectueuse de
l’environnement.
Garantie et service après-vente
Cet appareil bénéficie de 3 ans de garantie à compter de la date d’achat.
L’appareil a été fabriqué avec soin et consciencieusement contrôlé avant sa
distribution.
Veuillez conserver le ticket de caisse en guise de preuve d’achat. Dans le cas
où la garantie s’applique, veuillez appeler le service après-vente concerné.
Cette condition doit être respectée pour assurer l’expédition gratuite de votre
marchandise.
REMARQUE
► La prestation de garantie s'applique uniquement aux vices de matériau ou
de fabrication, pas aux dégâts de transport, aux pièces d'usure ou aux
dégâts subis par des pièces fragiles, par ex. commutateurs ou batteries.
Le produit est exclusivement destiné à un usage privé et non commercial. La garantie
prend fin en cas de manipulation abusive et non conforme, de recours à la force
et d’interventions qui n’ont pas été réalisées par notre succursale de service
après-vente agréée.
Cette garantie ne constitue pas une restriction de vos droits légaux. La durée de
la garantie n’est pas prolongée par l’exercice de la garantie. Ceci vaut également
pour les pièces remplacées et réparées.
Tous dommages et défauts présents dès l’achat doivent être notifiés dès que le
produit est déballé, et au plus tard deux jours après la date d’achat.
Toutes réparations survenant après la période sous garantie seront payantes.
La durée de la garantie n’est pas prolongée par l’exercice de la garantie. Ceci
vaut également pour les pièces remplacées et réparées.
Tous dommages et défauts présents dès l’achat doivent être notifiés dès que le
produit est déballé, et au plus tard deux jours après la date d’achat.
Toutes réparations survenant après la période sous garantie seront payantes.
Page 72

FR│BE
│
69 ■
SFW 350 C1
Service France
Tel.: 0800 919270
E-Mail: kompernass@lidl.fr
IAN 270744
Service Belgique
Tel.: 070 270 171 (0,15 EUR/Min.)
E-Mail: kompernass@lidl.be
IAN 270744
Heures de service de notre hotline : du lundi au vendredi de 8 h à 20 h (HEC)
Importateur
KOMPERNASS HANDELS GMBH
BURGSTRASSE 21
44867 BOCHUM
GERMANY
www.kompernass.com
Recettes
Boulettes
Ingrédients du manteau
450 g de viande d’agneau, de veau ou de bœuf maigre
150 g de farine
1 cuillère à café de piment (quatre-épices)
1 cuillère à café de noix de muscade
1 pincée de piment fort
1 pincée de poivre
Ingrédients de la farce à la viande
700 g de viande d’agneau
1 1/2 cuillère à soupe d’huile d’olive
1 1/2 cuillère à soupe d’oignons finement hachés
1/2 cuillère à café de piment (quatre-épices)
1/2 cuillère à café de sel
1 1/2 cuillère à soupe de farine
Page 73

■ 70 │ FR
│
BE
SFW 350 C1
Hacher la viande pour le manteau deux fois l’une après l’autre dans le hachoir
(tout d’abord avec la grille grossière, puis la grille fine ) et la mélanger avec les
ingrédients. Hacher également cette masse deux fois avec le hachoir. Remplacer
la grille par l’accessoire à boulettes ! voir le chapitre «Monter l’accessoire
à boulettes»).
Formez les manteaux des boulettes avec l’accessoire à boulettes ! et les mettre
au congélateur.
Garniture :
Hacher la viande deux fois avec le hachoir (dans un premier temps avec la grille
grossière, puis avec la grille fine ). Faire suer les oignons et bien les mélanger
avec la viande et le reste des ingrédients. Remplir les manteaux des boulettes et
les faire rôtir.
Garnitures alternatives :
250 g de brocolis cuits à la vapeur
ou 250 g de courgettes cuites à la vapeur
ou 250 g de riz cuit
Saucisse à griller fraîche
Ingrédients :
300 g de viande de bœuf maigre
500 g de viande de porc maigre
200 g de lard d’épaule
20 g de sel
1/2 de cuillère à soupe de poivre blanc moulu
1 cuillère à café de cumin
1/2 cuillère à café de noix de muscade
Faire passer la viande de bœuf, la viande de porc et le lard deux fois par le
hachoir.
Ajouter le mélange d’épices ainsi que le sel et pétrir pendant 5 minutes.
Mettre la farce à saucisses au réfrigérateur pendant env. 30 minutes. Remplir la
farce à saucisses conformément aux instructions (voir le chapitre «Confectionner
des saucisses») et fabriquer des saucisses d’une longueur de 25 cm.
Consommer la saucisse à griller le même jour, bien cuite.
Page 74

FR│BE
│
71 ■
SFW 350 C1
Biscuits sablés
Ingrédients :
500 g de beurre
500 g de sucre
2 - 3 paquets de sucre vanillé
1 paquet de flan à la vanille
1/4 cuillère à café de sel
1 œuf
4 jaunes d’œuf
800 g de farine (type 405)
2 cuillères à café de levure chimique
200 g d’amandes en poudre (blanchies)
Zeste râpé d’un citron
Battre le beurre en mousse. Ajouter les autres ingrédients les uns après les autres
et bien malaxer la pâte. Laisser reposer la pâte en la couvrant environ 12 heures
(par ex. une nuit) au réfrigérateur. Puis la faire passer par le hachoir pourvu
de l’accessoire pour biscuits sablés . Poser les biscuits sablés sur une plaque
revêtue de papier sulfurisé. Faire cuire les biscuits sablés dans le four préchauffé
à 180°C pendant 10-15 minutes jusqu’à obtenir une belle couleur dorée.
Page 75

72
SFW 350 C1
Page 76

NL│BE
│
73 ■
SFW 350 C1
Inhoud
Inleiding .....................................................74
Auteursrecht ............................................................ 74
Beperking van aansprakelijkheid ............................................ 74
Gebruik in overeenstemming met bestemming .....................74
Inhoud van het pakket / Beschrijving van onderdelen ...............75
Technische gegevens ..........................................75
Veiligheidsvoorschriften ........................................76
Monteren/demonteren ........................................78
Vleesmolen monteren ..................................................... 78
Worst-stop-opzetstuk monteren .............................................79
Kubbe-opzetstuk monteren .................................................80
Sprits-opzetstuk monteren .................................................80
Bediening ....................................................81
Het apparaat gebruiken .................................................. 81
Vlees verwerken ......................................................... 82
Worst verwerken ........................................................ 82
Werken met het Kubbe-opzetstuk ...........................................83
Spritsgebak maken ...................................................... 83
In geval van storingen .........................................84
Reinigen .....................................................84
Motorblok reinigen ......................................................84
Accessoires reinigen ..................................................... 85
Opbergen ...................................................85
Milieurichtlijnen ...............................................86
Garantie en service ............................................86
Importeur ...................................................87
Recepten ....................................................87
Kubbe ................................................................ 87
Verse gegrilde braadworst ................................................88
Spritskoekjes ........................................................... 89
Page 77

■ 74 │ NL
│
BE
SFW 350 C1
Inleiding
Gefeliciteerd met de aankoop van uw nieuwe apparaat.
U hebt hiermee gekozen voor een hoogwaardig product. De bedieningshandlei-
ding maakt deel uit van dit product. Deze bevat belangrijke aanwijzingen voor
veiligheid, gebruik en afvoeren. Maak uzelf voorafgaand aan het gebruik van
het product vertrouwd met alle bedienings- en veiligheidsvoorschriften. Gebruik
het product uitsluitend op de voorgeschreven wijze en voor de aangegeven
doeleinden. Berg deze gebruiksaanwijzing zorgvuldig op. Geef alle documenten
mee als u het product doorgeeft aan een derde.
Auteursrecht
Deze documentatie is auteursrechtelijk beschermd.
Iedere reproductie, resp. herdruk, ook gedeeltelijk, evenals de weergave van de
afbeeldingen, ook in veranderde toestand is alleen toegestaan met schriftelijke
toestemming van de producent.
Beperking van aansprakelijkheid
Alle technische informatie, gegevens en aanwijzingen voor de inbouw en
aansluiting en de bediening in deze gebruiksaanwijzing voldoen aan de laatste
stand bij het in druk bezorgen en resulteren naar beste weten uit afweging van
onze ervaringen en inzichten tot dusverre.
Men kan op basis van de gegevens, afbeeldingen en beschrijvingen in deze
gebruiksaanwijzing geen aanspraken doen gelden.
De fabrikant is niet aansprakelijk voor schade als gevolg van het niet in acht
nemen van de gebruiksaanwijzing, gebruik dat niet volgens de bestemming is,
ondeskundige reparaties, ongeoorloofd uitgevoerde veranderingen of gebruik
van ongeoorloofde onderdelen.
Gebruik in overeenstemming met bestemming
Dit apparaat is uitsluitend bedoeld voor het thuis verwerken van levensmiddelen
waarvan de hoeveelheid past binnen het huishoudelijk gebruik:
▯ Doordraaien van vers vlees,
▯ Worst maken in een natuur- of kunstdarm
▯ Spritsgebak maken
Het apparaat is niet bedoeld voor het verwerken van harde of bevroren levensmiddelen, bijv. botten of noten, en niet voor bedrijfsmatig of industrieel gebruik.
Page 78

NL│BE
│
75 ■
SFW 350 C1
Inhoud van het pakket /
Beschrijving van onderdelen
Afbeelding A:
Opzetstuk voor spritskoekjes met streepmotief
Stopper
Vulschaal
Motor
Vleesmolen-voorzetstuk van metaal
Transportschroef
Veer
Kruismes
Grove en fijne gatenschijf
Afsluitring
- Worst-stop-opzetstuk
3 Worstschijf
! Kubbe-opzetstuk
Afbeelding B:
. Vergrendelendeknop
Afbeelding C:
0 Toets „I“
6 Toets „0“
1 Toets „<“
Technische gegevens
Spanning 220 - 240 V ∼, 50 Hz
Vermogen 250 - 350 W
Beschermingsklasse
II /
KB-tijd 15 minuten
KB-tijd
De KB-tijd (kort bedrijf) geeft aan hoe lang een apparaat kan worden bediend,
zonder dat de motor oververhit raakt en schade hieraan ontstaat. Na de aangegeven KB-tijd moet het apparaat uitgeschakeld blijven tot de motor is afgekoeld.
Page 79

■ 76 │ NL
│
BE
SFW 350 C1
Veiligheidsvoorschriften
GEVAAR VOOR ELEKTRISCHE SCHOK
► Let erop, dat het netsnoer niet wordt beschadigd. Zorg ervoor
dat het niet te warm wordt en geleid het zo, dat het niet kan
worden ingeklemd.
► Laat beschadigde netstekkers of netsnoeren onmiddellijk
door geautoriseerde vakmensen vervangen om gevaarlijke
situaties te vermijden.
► Gebruik het apparaat alleen in droge ruimtes en niet in de
openlucht.
Dompel het motorblok nooit in water of andere vloeistoffen!
Anders bestaat er levensgevaar voor elektrische schok.
WAARSCHUWING!
► Gebruik het apparaat nooit voor andere doeleinden dan hier
zijn beschreven. Er bestaat groot gevaar van ongelukken, als
u door onjuist gebruik de beschermende voorzieningen op
het apparaat buiten gebruik zet!
WAARSCHUWING! LETSELGEVAAR!
► Grijp nooit in de openingen van het apparaat. Druk er nooit
één of ander voorwerp in – met uitzondering van de telkens bij
het stuk behorende stopper en de te verwerken levensmiddelen.
Anders is het gevaar van ongelukken groot!
► Haal eerst de stekker uit het stopcontact, alvorens accessoires
op te zetten of af te nemen.
► Laat het apparaat nooit zonder toezicht, wanneer het klaar
voor gebruik is. Trek na het gebruik of bij werkonderbrekingen steeds de stekker uit het stopcontact, om te vermijden
dat het per ongeluk gaat draaien.
► Gebruik uitsluitend de originele accessoires voor dit apparaat.
Andere onderdelen zijn daarvoor mogelijk niet veilig genoeg.
Page 80

NL│BE
│
77 ■
SFW 350 C1
WAARSCHUWING! LETSELGEVAAR!
► Gebruik het apparaat nooit in lege toestand. Daardoor kan
het apparaat onherstelbaar beschadigd raken.
► U dient het apparaat uit te schakelen en de stekker uit het
stopcontact te trekken voordat u accessoires of hulpstukken
verwisselt, die bij gebruik in beweging zijn.
► Gebruik het apparaat nooit voor andere doeleinden dan in
deze gebruiksaanwijzing zijn beschreven.
► Voorzichtig: het kruismes is zeer scherp! Ga steeds voor-
zichtig te werk in de omgang met het apparaat en bij het
reinigen.
► Het apparaat moet altijd van de stroom worden losgekoppeld
indien er geen toezicht is, en voor montage, demontage of
reiniging.
► Het apparaat mag niet door kinderen worden gebruikt.
► Houd het apparaat en het bijbehorende snoer buiten bereik
van kinderen.
► Dit apparaat mag worden gebruikt door personen met
beperkte fysieke, zintuiglijke of geestelijke vermogens of
gebrek aan ervaring en/of kennis, mits ze onder toezicht
staan of over het veilige gebruik van het apparaat zijn
geïnstrueerd en de daaruit resulterende gevaren hebben
begrepen.
► Kinderen mogen niet met het apparaat spelen.
Page 81

■ 78 │ NL
│
BE
SFW 350 C1
Monteren/demonteren
LET OP - MATERIËLE SCHADE!
► Alle accessoires zijn van een dunne oliefilm voorzien, om deze tegen
corrosie te beschermen. Reinig daarom alle onderdelen vóór het eerste
gebruik zorgvuldig, zoals uitgebreid beschreven onder „Reinigen“.
Wrijf alle metaaldelen in met een beetje plantaardige olie.
Vleesmolen monteren
Vouw de uitvouwbare pagina naar buiten - u vindt daar een afbeelding van de
volgorde van de montage.
1) Zet de transportschroef in het vleesmolen-voorzetstuk .
2) Steek de veer op de transportschroef .
3) Zet dan het kruismes er zodanig in, dat de scherpe kant van de veer
weg wijst. Let erop dat de hoekige inkeping van het kruismes correct op
de hoekige as ligt.
WAARSCHUWING! LETSELGEVAAR!
► Het kruismes is erg scherp! Letselgevaar!
LET OP - MATERIËLE SCHADE!
► Het apparaat wordt beschadigd, als het kruismes er andersom wordt
ingezet!
4) Kies de gewenste gatenschijf /worstschijf 3.
Page 82

NL│BE
│
79 ■
SFW 350 C1
5) Leg de gekozen gatenschijf zodanig in het vleesmolen-voorzetstuk ,
dat de fixering op de gatenschijf in de inkeping in het vleesmolen-voorzet-
stuk ligt.
6) Als alles er goed is ingezet, draait u de sluitring er stevig op.
7) Het gemonteerde vleesmolen-voorzetstuk wordt d.m.v. een bajonetsluiting
met het motorblok verbonden:
– Steek het vleesmolen-voorzetstuk in het motorblok , zodat de pijl
op het vleesmolen-voorzetstuk tegen het symbool
op het motor-
blok ligt. De vergrendelende knop .wordt erin gedrukt (Afb. B).
– Druk het vleesmolen-voorzetstuk licht naar binnen en draai daarbij
de vulschacht op het vleesmolen-voorzetstuk in de middelste stand
(Afb. B), zodat de pijl op de vulschacht naar het symbool
wijst.
Als het voorzetstuk van de vleesmolen vastklikt, springt de vergrende-
lende knop .eruit.
– Plaats tot slot de vulschaal boven op de vulopening.
– Om eraf te nemen, drukt u op de vergrendelende knop .en draait
u de vulschacht weer naar rechts (Afb. B)
. Daarna kunt u het
vleesmolen-voorzetstuk eruit trekken.
Worst-stop-opzetstuk monteren
Vouw de uitvouwbare pagina naar buiten - u vindt daar een afbeelding van de
volgorde van de montage.
1) Haal het vleesmolen-voorzetstuk eraf, zoals beschreven onder „Vleesmolen
monteren“.
2) Neem alle onderdelen die op/in het vleesmolen-voorzetstuk zijn gemonteerd, uit elkaar en reinig ze.
3) Wrijf alle delen van metaal in met spijsolie.
4) Plaats de transportschroef , de veer en het kruismes terug in het
vleesmolen-voorzetstuk .
5) De worstschijf 3 zodanig inleggen, dat de fixeringen op de worstschijf 3 in
de inkepingen in het vleesmolen-voorzetstuk liggen.
6) Zet dan het worst-stop-opzetstuk - voor de worstschijf 3.
7) Draai de afsluitring er stevig op.
8) Monteer het vleesmolen-voorzetstuk zoals beschreven onder „Vleesmolen
monteren“.
Page 83

■ 80 │ NL
│
BE
SFW 350 C1
Kubbe-opzetstuk monteren
Vouw de uitvouwbare pagina naar buiten - u vindt daar een afbeelding van de
volgorde van de montage.
1) Haal het vleesmolen-voorzetstuk eraf, zoals beschreven onder „Vleesmolen
monteren“.
2) Haal alle eventuele opzetstukken eraf en reinig het voorzetstuk voor de
vleesmolen .
OPMERKING
► Voor het kubbe-opzetstuk ! wordt het kruismes met de veer niet ge-
bruikt! Neem beide in voorkomend geval uit het vleesmolen-opzetstuk .
3) Wrijf alle delen van metaal licht met spijsolie in.
4) Beide delen van het kubbe-opzetstuk ! zodanig inleggen, dat de fixeringen op de onderste ring van het kubbe-opzetstuk ! in de inkepingen in het
vleesmolen-voorzetstuk liggen.
5) Als alles correct ingezet is, draait u de afsluitring er weer stevig op.
6) Monteer het vleesmolen-voorzetstuk zoals beschreven onder „Vleesmolen
monteren“.
Sprits-opzetstuk monteren
Vouw de uitvouwbare pagina naar buiten - u vindt daar een afbeelding van de
volgorde van de montage.
1) Haal het vleesmolen-voorzetstuk eraf, zoals beschreven onder „Vleesmolen
monteren“.
2) Haal alle eventuele opzetstukken eraf en reinig het voorzetstuk voor de
vleesmolen .
OPMERKING
► Voor het sprits-opzetstuk wordt het kruismes met de veer niet ge-
bruikt! Neem beide in voorkomend geval uit het vleesmolen-opzetstuk .
3) Wrijf alle delen van metaal licht met spijsolie in.
4) Trek de patroonstrook van de voorkant van het sprits-opzetstuk af.
5) Zet eerst de plastic schijf en dan de metalen schijf van het opzetstuk voor
spritsgebak in het voorzetstuk voor de vleesmolen (zi uitvouwpagina).
Het spritskoekjes-opzetstuk zodanig inleggen, dat de fixeringen op het
spritskoekjes-opzetstuk in de inkepingen in het vleesmolen-voorzetstuk
liggen.
6) Als alles er goed is ingezet, draait u de sluitring er stevig op.
Page 84

NL│BE
│
81 ■
SFW 350 C1
7) Steek de patroonstrook weer voor op het spritsgebak-opzetstuk . Let
erop, dat de handgreep op de patroonstrook van het apparaat weg
wijst. Anders kunt u het motief, dat direct op de greep zit, niet instellen.
8) Monteer het vleesmolen-voorzetstuk zoals beschreven onder „Vleesmolen
monteren“.
9) Alvorens eraf te halen moet u eerst de patroonstrook eraf trekken, voordat
u de sluitring eraf draait en het spritsgebak-opzetstuk er weer uit kunt
halen.
Bediening
GEVAAR VOOR ELEKTRISCHE SCHOK
► Nooit de behuizing van het motorblok openen – daarin zitten geen
bedieningselementen. Indien de behuizing geopend wordt, vervalt de
aanspraak op garantie. Bij geopende behuizing bestaat er levensgevaar
door een elektrische schok.
LET OP - MATERIËLE SCHADE!
► Gebruik het apparaat niet langer dan 15 minuten in continu bedrijf. Laat
het apparaat vervolgens ongeveer 30 minuten lang uitgeschakeld om
oververhitting te voorkomen.
► Nooit op de toetsen „I“ 0 of „<“ 1 bij wisseling van de looprichting
drukken, zo lang de motor van het apparaat niet volledig stilstaat. De
motor kan beschadigd raken.
Het apparaat gebruiken
Als u de noodzakelijke stukken heeft gemonteerd:
1) Stel het apparaat zo op, dat het absoluut stabiel staat en het in geen geval
(bijv. door trillingen of het verstrikt raken in het netsnoer) van de tafel kan
vallen of in de buurt van open water kan komen. Trillingen zijn gedurende
het lopen onvermijdelijk.
GEVAAR VOOR ELEKTRISCHE SCHOK
► Grijp nooit naar een aangesloten of zelfs lopend apparaat, wanneer het gaat
vallen of in het water komt - of bij andere noodsituaties! Trek gedurende
een noodsituatie direct de stekker uit het stopcontact! Anders bestaat er
acuut levens- en letselgevaar!.
2) Leg de te verwerken levensmiddelen in de vulschaal en zet een opvang-
schaal voor onder de uitvoeropening.
Page 85

■ 82 │ NL
│
BE
SFW 350 C1
3) Druk eerst op de toets „0“ 6, om te controleren, of het apparaat nog uitge-
schakeld is. Anders bestaat het risico dat het apparaat onbedoeld start, als
de stekker in het stopcontact wordt gestoken.
4) Steek vervolgens de netstekker in het stopcontact.
5) Druk op de toets „I“ 0, om het apparaat aan te zetten.
WAARSCHUWING! LETSELGEVAAR!
► Druk de levensmiddelen uitsluitend met de ronde stopper in de vulope-
ning - nooit met de vingers, vorken, stelen van lepels o.i.d. Er bestaat groot
gevaar voor verwondingen en het apparaat zou beschadigd kunnen raken.
LET OP - MATERIËLE SCHADE!
► druk nooit zo vast, dat de motor hoorbaar langzamer loopt. Anders kan
het apparaat overbelast raken en beschadigd worden.
Vlees verwerken
1) Gebruik stukken vlees die moeiteloos in de vulopening passen. Snij het vlees
desnoods eerst in stukken. Let erop, dat het vlees geen bot of pezen bevat.
WAARSCHUWING!
► Gehakt is erg gevoelig voor ziektekiemen. Let op een goede hygiëne, als u
vlees verwerkt. Anders kunnen er problemen optreden met de gezondheid.
2) Als u alle aanwijzingen heeft gelezen over het thema „vlees“ kunt u het
apparaat nu gebruiken zoals beschreven in het hoofdstuk „Het apparaat
gebruiken“.
Worst verwerken
1) Draai het vlees eerst twee keer door de vleeswolf, voor u dit tot worst
verwerkt.
2) Voor de worstvulling voegt u aan het gehakt kleine gesneden uitjes, kruiden en
andere ingrediënten volgens uw recept toe en daarna kneed u de massa goed
door. Zet die 30 min. lang in de koelkast voordat u die verder verwerkt.
3) Druk de worstdarm (natuur- of kunstdarm) over het worst-stop-stuk - en
knoop het andere einde dicht. Voor 1 kg vulmassa heeft u ongeveer 1,60 m
worstdarm nodig.
Page 86

NL│BE
│
83 ■
SFW 350 C1
TIP
Leg de natuurdarm van te voren ongeveer 3 uur in lauwwarm water en
wring deze uit voor het erop trekken. Natuurdarm wordt zo weer elastisch.
Natuurdarmen kunt u bij de toeleverancier voor slagerijen nabij slachthuizen
krijgen of bij uw slager.
4) De worstvulling wordt door het worst-stop-stuk - in de worstdarm geperst.
Wanneer de gewenste lengte is bereikt, schakelt u het apparaat uit, drukt u de
worst aan het einde samen en draait u die een paar maal om de lengteas.
TIP
Worst gaat uitzetten bij het koken en bij het invriezen. Doe er daarom niet
te veel vulling in, anders kan de worst knappen.
5) Als u alle aanwijzingen heeft gelezen over het thema „worst“ kunt u het
apparaat nu gebruiken zoals beschreven in het hoofdstuk „Het apparaat
gebruiken“.
Werken met het Kubbe-opzetstuk
Met het kubbe-opzetstuk ! kunt u van de erin gelegde levensmiddelen holle
rolletjes van vlees of groente vormen, die u naar wens kunt vullen.
1) Draai het vlees eerst twee maal door de vleeswolf, voor u het door het
kubbe-opzetstuk ! perst.
2) Als u alle aanwijzingen heeft gelezen over het thema „kubbe-opzetstuk“
kunt u het apparaat nu gebruiken zoals beschreven in het hoofdstuk „Het
apparaat gebruiken“.
Spritsgebak maken
Wanneer u deeg voor spritsgebak volgens uw recept maakt en het spritsgebakopzetstuk heeft gemonteerd:
1) Leg bakpapier op een klein bakblik en houd dat dicht onder de uitvoeropening
aan de voorzijde van het apparaat.
2) Druk gelijkmatig deeg in het vleesmolen-voorzetstuk – de transportschroef drukt dit dan door het gekozen motief heen op het spritsgebak-
opzetstuk .
3) Als het gebak de gewenste lengte heeft bereikt, stopt u het apparaat en
breekt u het deeg af bij de uitvoeropening. Leg het gebak op het bakblik.
4) Als u alle aanwijzingen heeft gelezen over het thema „spritsgebak“ kunt u
het apparaat nu gebruiken zoals beschreven in het hoofdstuk „Het apparaat
gebruiken.
Page 87

■ 84 │ NL
│
BE
SFW 350 C1
In geval van storingen
Als de aandrijving geblokkeerd is door het opeenhopen
van levensmiddelen:
■ Druk op de toets „0“ 6, om de vleesmolen te stoppen.
■ Houd de toets „<“ 1ingedrukt. De aandrijving loopt nu achterwaarts.
Zodoende kunt u de levensmiddelen een stuk terug transporteren om de
aandrijving weer vrij te krijgen.
■ Is de aandrijving vrij, laat u de toets „<“ 1los.
■ Druk op de toets „I“ 0, om de vleesmoelen te starten.
■ Indien u de aandrijving zodoende niet vrij heeft gekregen, reinig dan het
apparaat zoals beschreven onder „Reinigen“.
Als de motor plotseling stil gaat staan, is het mogelijk, dat
de interne overbelastingszekering ingeschakeld is. Deze
moet de motor beveiligen.
■ Zet het apparaat uit en laat het ca. 30 min. lang afkoelen, alvorens het
apparaat weer te gebruiken.
■ Mocht dat niet helpen, dan wacht u nog eens 15 min.
■ Wanneer het ook gedurende deze periode niet gelukt is, dan moet er wel
een defect zijn. Neem in dit geval contact op met de klantenservice.
Als het netsnoer is beschadigd of schade aan de onderdelen
van de apparatuur evident is:
■ Zet het apparaat onmiddellijk uit, door op de toets „0“ 6 te drukken!
■ Wanneer dit niet zonder gevaar mogelijk is, trekt u de netstekker eruit.
■ Laat de schade eerst door de klantenservice herstellen, voordat u het
apparaat opnieuw gebruikt.
Reinigen
GEVAAR VOOR ELEKTRISCHE SCHOK
► Haal de stekker uit het stopcontact voordat u het apparaat schoonmaakt.
Daarmee voorkomt u het gevaar van ongevallen door onverwacht en
onbedoeld starten en een elektrische schok.
Motorblok reinigen
■ Reinig alle vlakken aan de buitenkant en het netsnoer met een enigszins
vochtige doek. Droog het apparaat goed af voordat u het opnieuw gebruikt.
Page 88

NL│BE
│
85 ■
SFW 350 C1
GEVAAR VOOR ELEKTRISCHE SCHOK
► Dompel het motorblok nooit in water of andere vloeistoffen! Anders kan
zich een levensgevaarlijke situatie voordoen door een elektrische schok,
als binnengedrongen vocht bij de elektrische leidingen komt.
LET OP - MATERIËLE SCHADE!
► Gebruik geen schoonmaak-, schuur- of oplosmiddelen. Deze kunnen het
apparaat beschadigen en restanten achterlaten op de levensmiddelen.
Accessoires reinigen
OPMERKING
► Reinig de accessoires niet in de vaatwasmachine! Dat leidt tot beschadiging
aan de accessoires!
■ Reinig de accessoires die in contact kunnen komen met levensmiddelen,....
– alleen met de hand, de accessoires zijn niet vaatwasmachinebestendig
– met heet afwaswater en een huishoudelijk afwasmiddel dat levensmiddel-
vriendelijk is.
WAARSCHUWING! LETSELGEVAAR!
► Het kruismes is erg scherp! Letselgevaar!
■ Droog alles goed af, voordat u het apparaat verder gebruikt.
OPMERKING
► Wrijf na elke schoonmaakbeurt de metaaldelen weer met spijsolie in! Anders
kunnen de metaaldelen verkleuren!
Opbergen
■ Schuif het netsnoer ( zonder netstekker ) in de kabelschacht onder op de
bodem van het apparaat. Zo beschadigt het niet.
■ Bewaar het apparaat op een droge plaats.
■ Vet de metalen opzetstukken na het afdrogen heel dun met wat spijsolie in -
wanneer u het apparaat niet onmiddellijk weer gebruikt. . Daarmee zorgt
u voor een goede bescherming tegen corrosie.
■ Berg het apparaat zo op, dat kinderen en minder valide personen er niet
bij kunnen. Deze kunnen mogelijke gevaren in de omgang met elektrische
apparaten niet altijd juist inschatten.
Page 89

■ 86 │ NL
│
BE
SFW 350 C1
Milieurichtlijnen
Deponeer het toestel in geen geval bij het normale huisvuil.
Dit product is onderworpen aan de Europese richtlijn 2012/19/EU
(Waste Electrical and Electronic Equipment).
Voer het toestel af via een erkend afvalverwerkingsbedrijf of via uw gemeentereiniging. Neem de bestaande voorschriften in acht. Neem in geval van twijfel
contact op met uw gemeentereinigingsdienst.
Voer alle verpakkingsmateriaal op een milieuvriendelijke manier af.
Garantie en service
U heeft op dit apparaat 3 jaar garantie vanaf de aankoopdatum. Het apparaat
is met de grootst mogelijke zorg vervaardigd en voorafgaand aan de levering
nauwkeurig gecontroleerd.
Bewaar a.u.b. de kassabon als aankoopbewijs. Mocht u aanspraak willen
maken op de garantie, neem dan telefonisch contact op met uw serviceadres.
Alleen dan kan het gratis inzenden van uw product worden gewaarborgd.
OPMERKING
► De garantie geldt uitsluitend voor materiaal- of fabricagefouten, echter niet
voor transportschade, aan slijtage onderhevige delen of voor beschadigingen van breekbare delen, bijv. schakelaars of accu's.
Het product is uitsluitend bestemd voor privé-gebruik en niet voor bedrijfsmatige
doeleinden. Bij verkeerd gebruik en ondeskundige behandeling, bij gebruik
van geweld en bij reparaties die niet door ons geautoriseerd servicefiliaal zijn
uitgevoerd, vervalt de garantie.
Uw wettelijke rechten worden door deze garantie niet beperkt. De garantieperiode
wordt niet verlengd door de aansprakelijkheid. Dit geldt eveneens voor vervangen
en gerepareerde onderdelen.
Schade en gebreken die mogelijk reeds bij de aankoop aanwezig zijn, moeten
direct na het uitpakken worden gemeld, uiterlijk echter twee dagen na de dag
van aankoop.
Na verstrijken van de garantieperiode moeten alle voorkomende reparaties
vergoed worden.
De garantieperiode wordt niet verlengd door de aansprakelijkheid. Dit geldt
eveneens voor vervangen en gerepareerde onderdelen.
Schade en gebreken die mogelijk reeds bij de aankoop aanwezig zijn, moeten
direct na het uitpakken worden gemeld, uiterlijk echter twee dagen na de dag
van aankoop.
Na verstrijken van de garantieperiode moeten alle voorkomende reparaties
vergoed worden.
Page 90

NL│BE
│
87 ■
SFW 350 C1
Service Nederland
Tel.: 0900 0400223 (0,10 EUR/Min.)
E-Mail: kompernass@lidl.nl
IAN 270744
Service België
Tel.: 070 270 171 (0,15 EUR/Min.)
E-Mail: kompernass@lidl.be
IAN 270744
Bereikbaarheid hotline: Maandag t/m vrijdag van 8:00 tot 20:00 uur (CET)
Importeur
KOMPERNASS HANDELS GMBH
BURGSTRASSE 21
44867 BOCHUM
GERMANY
www.kompernass.com
Recepten
Kubbe
Ingrediënten voor het omhulsel
450 g mager schapen-, kalfs- of rundvlees
150 g meel
1 TL piment (jamaicapeper)
1 TL nootmuskaat
1 snufje chilipoeder
1 snufje peper
Ingrediënten voor de vleesvulling
700 g lamsvlees
1 1/2 EL olijfolie
1 1/2 EL fijngehakte uien
1/2 TL piment (jamaicapeper)
1/2 TL zout
1 1/2 EL meel
Page 91

■ 88 │ NL
│
BE
SFW 350 C1
Het vlees voor het omhulsel twee keer na elkaar in de vleesmolen fijnmalen
(eerst met de grove en dan met de fijne gatenschijf ) en vermengen met de
ingrediënten. Deze massa eveneens twee keer met de vleesmolen fijnmalen.
Gatenschijf vervangen voor kubbe-opzetstuk ! (zie hoofdstuk „kubbe-opzetstuk
monteren“).
Kubbe-omhulsels met het kubbe-opzetstuk ! vormen en licht bevriezen.
Vulling:
vlees twee keer met de vleesmolen fijnmalen (eerst met de grove en vervolgens
met de fijne gatenschijf ). Uien fruiten en met het vlees en de overige ingredienten goed vermengen. Kubbe-omhulsels ermee vullen en braden.
Alternatieve vullingen:
250 g gestoomde broccoli
of 250 g gestoomde courgette
of 250 g gekookt rijst
Verse gegrilde braadworst
Ingrediënten:
300 g mager rundvlees
500 g mager varkensvlees
200 g schouderspek
20 g zout
1/2 eetlepel gemalen witte peper
1 theelepel karwijzaad
1/2 theelepel nootmuskaat
Rundvlees, varkensvlees en spek twee keer door de vleesmolen draaien.
Vermengde kruiden en het zout toevoegen en 5 minuten door elkaar kneden.
Worstvulling ongeveer 30 minuten lang in de koelkast zetten. Worstvulling volgens
gebruiksaanwijzing vullen (zie hoofdstuk “Worst verwerken“) en worstjes van
25 cm lengte draaien.
De braadworst die gereed is dezelfde dag nog goed doorgebraden en nuttigen.
Page 92

NL│BE
│
89 ■
SFW 350 C1
Spritskoekjes
Ingrediënten:
500 g boter
500 g suiker
2 - 3 pakjes vanillesuiker
1 pakje vanillepudding
1/4 theelepel zout
1 ei
4 dooiers
800 g meel (type 405)
2 theelepels bakpoeder
200 g gemalen amandelen (geblancheerd)
Geraspte schil van een citroen
De boter schuimig roeren. De overige ingrediënten beetje bij beetje toevoegen
en het deeg goed kneden. Het deeg als het klaar is ca. 12 uur (bijv. ‘s nachts)
in de koelkast afgedekt laten rusten. Dan door de vleesmolen draaien met het
spritskoekjes-opzetstuk . De spritskoekjes op een met bakpapier bekleed
bakblik leggen. De spritskoekjes in een voorverwarmde oven op 180°C in ca.
10-15 minuten goudgeel bakken.
Page 93

90
SFW 350 C1
Page 94

DE│AT│CH
│
91 ■
SRK 400 A2
Inhaltsverzeichnis
Einleitung ....................................................92
Urheberrecht ........................................................... 92
Haftungsbeschränkung ................................................... 92
Bestimmungsgemäße Verwendung ..............................92
Lieferumfang / Teilebeschreibung ................................93
Technische Daten ..............................................93
Sicherheitshinweise ...........................................94
Zusammenbauen / Zerlegen ....................................96
Fleischwolf zusammenbauen ............................................... 96
Wurst-Stopf-Aufsatz montieren ..............................................97
Kubbe-Aufsatz montieren ..................................................98
Spritzgebäck-Aufsatz montieren ............................................ 98
Bedienen ....................................................99
Das Gerät bedienen ..................................................... 99
Fleisch verarbeiten ......................................................100
Wurst verarbeiten ......................................................100
Arbeiten mit dem Kubbe-Aufsatz ...........................................101
Spritzgebäck herstellen ..................................................101
Im Fehlerfall ................................................102
Reinigen ....................................................102
Motorblock reinigen ....................................................102
Zubehörteile reinigen ....................................................103
Aufbewahren ...............................................103
Entsorgung. . . . . . . . . . . . . . . . . . . . . . . . . . . . . . . . . . . . . . . . . . . . . . . . . . 104
Garantie und Service .........................................104
Importeur ..................................................105
Rezepte ....................................................105
Kubbe ...............................................................105
Frische Rostbratwurst ....................................................106
Spritzgebäck ..........................................................107
Page 95

■ 92 │ DE
│AT│
CH
SRK 400 A2
Einleitung
Herzlichen Glückwunsch zum Kauf Ihres neuen Gerätes.
Sie haben sich damit für ein hochwertiges Produkt entschieden. Die Bedie-
nungsanleitung ist Bestandteil dieses Produkts. Sie enthält wichtige Hinweise für
Sicherheit, Gebrauch und Entsorgung. Machen Sie sich vor der Benutzung des
Produkts mit allen Bedien- und Sicherheitshinweisen vertraut. Benutzen Sie das
Produkt nur wie beschrieben und für die angegebenen Einsatzbereiche. Händigen Sie alle Unterlagen bei Weitergabe des Produkts an Dritte mit aus.
Urheberrecht
Diese Dokumentation ist urheberrechtlich geschützt.
Jede Vervielfältigung, bzw. jeder Nachdruck, auch auszugsweise, sowie die
Wiedergabe der Abbildungen, auch im veränderten Zustand, ist nur mit schriftlicher Zustimmung des Herstellers gestattet.
Haftungsbeschränkung
Alle in dieser Bedienungsanleitung enthaltenen technischen Informationen, Daten
und Hinweise für den Anschluss und die Bedienung entsprechen dem letzten
Stand bei Drucklegung und erfolgen unter Berücksichtigung unserer bisherigen
Erfahrungen und Erkenntnisse nach bestem Wissen.
Aus den Angaben, Abbildungen und Beschreibungen in dieser Anleitung können
keine Ansprüche hergeleitet werden.
Der Hersteller übernimmt keine Haftung für Schäden aufgrund von Nichtbeachtung der Anleitung, nicht bestimmungsgemäßer Verwendung, unsachgemäßen
Reparaturen, unerlaubt vorgenommenen Veränderungen oder Verwendung nicht
zugelassener Ersatzteile.
Bestimmungsgemäße Verwendung
Dieses Gerät ist ausschließlich vorgesehen für das Verarbeiten von ausschließlich
Lebensmitteln in haushaltsüblichen Mengen im privaten Haushalt:
▯ Durchdrehen von frischem Fleisch,
▯ Herstellen von Wurst in Natur- oder Kunstdarm,
▯ Herstellung von Spritzgebäck
Das Gerät ist nicht vorgesehen für das Verarbeiten von gefrorenen oder anderweitig harten Lebensmitteln, z.B. Knochen oder Nüsse und nicht in gewerblichen
oder industriellen Bereichen.
Page 96

DE│AT│CH
│
93 ■
SRK 400 A2
Lieferumfang / Teilebeschreibung
Abbildung A:
Spritzgebäck-Aufsatz mit Musterstreifen
Stopfer
Einfüllschale
Motorblock
Fleischwolfvorsatz aus Metall
Transportschnecke
Feder
Kreuzmesser
grobe und feine Lochscheibe
Verschlussring
- Wurst-Stopf-Aufsatz
3 Wurstscheibe
! Kubbe-Aufsatz
Abbildung B:
. Verriegelungsknopf
Abbildung C:
0 Taste „I“
6 Taste „0“
1 Taste „<“
Technische Daten
Spannung 220 - 240 V ∼, 50 Hz
Leistungsaufnahme 250 - 350 W
Schutzklasse
II /
KB-Zeit 15 Minuten
KB-Zeit
Die KB-Zeit (Kurzzeitbetrieb) gibt an, wie lange man ein Gerät betreiben kann,
ohne dass der Motor überhitzt und Schaden nimmt. Nach der angegebenen
KB-Zeit muss das Gerät solange ausgeschaltet werden, bis sich der Motor abgekühlt hat.
Page 97

■ 94 │ DE
│AT│
CH
SRK 400 A2
Sicherheitshinweise
STROMSCHLAGGEFAHR
► Achten Sie darauf, dass das Netzkabel nicht beschädigt
wird. Halten Sie es von heißen Bereichen fern und führen
Sie es so, dass es nicht eingeklemmt werden kann.
► Lassen Sie beschädigte Netzkabel oder Netzstecker sofort
von autorisiertem Fachpersonal ersetzen, um Gefährdungen
zu vermeiden.
► Verwenden Sie das Gerät nur in trockenen Räumen, nicht im
Freien.
Tauchen Sie den Motorblock niemals in Wasser oder
andere Flüssigkeiten! Andernfalls besteht Lebensgefahr
durch elektrischen Schlag.
WARNUNG!
► Verwenden Sie das Gerät niemals für andere Zwecke, als
hier beschrieben. Es besteht erhebliche Unfallgefahr, wenn
Sie durch Fehlverwendung die Schutzvorrichtungen am Gerät
außer Funktion setzen!
WARNUNG! VERLETZUNGSGEFAHR!
► Fassen Sie niemals in Öffnungen am Gerät. Führen Sie niemals
irgendwelche Gegenstände dort hinein – mit Ausnahme der
jeweils zum Aufsatz gehörenden Stopfer und den zu verarbeitenden Lebensmitteln. Andernfalls kann erhebliche Unfallgefahr
bestehen!
► Ziehen Sie erst den Stecker aus der Steckdose, bevor Sie
Zubehörteile aufstecken oder abnehmen.
► Lassen Sie das Gerät niemals unbeaufsichtigt, wenn es be-
triebsbereit ist. Ziehen Sie nach Gebrauch oder bei Arbeitsunterbrechungen stets den Stecker aus der Steckdose, um
versehentliches Anlaufen zu vermeiden.
Page 98

DE│AT│CH
│
95 ■
SRK 400 A2
WARNUNG! VERLETZUNGSGEFAHR!
► Verwenden Sie nur die Original- Zubehörteile zu diesem
Gerät. Andere Teile sind dafür möglicherweise nicht ausreichend sicher.
► Betreiben Sie das Gerät nie im Leerzustand. Das kann das
Gerät irreparabel beschädigen.
► Vor dem Auswechseln von Zubehör oder Zusatzteilen, die im
Betrieb bewegt werden, muss das Gerät ausgeschaltet und
vom Netz getrennt sein.
► Missbrauchen Sie das Gerät nicht für andere Zwecke, als in
dieser Anleitung beschrieben.
► Vorsicht: das Kreuzmesser ist sehr scharf! Gehen Sie beim
Umgang und Reinigen des Gerätes stets vorsichtig vor.
► Das Gerät ist bei nicht vorhandener Aufsicht und vor dem
Zusammenbau, dem Auseinandernehmen oder Reinigen
stets vom Netz zu trennen.
► Das Gerät darf nicht von Kindern benutzt werden.
► Das Gerät und seine Anschlussleitung sind von Kindern fernzu-
halten.
► Dieses Gerät kann von Personen mit reduzierten physischen,
sensorischen oder mentalen Fähigkeiten oder Mangel an
Erfahrung und/oder Wissen benutzt werden, wenn sie
beaufsichtigt oder bezüglich des sicheren Gebrauchs des
Gerätes unterwiesen wurden und die daraus resultierenden
Gefahren verstanden haben.
► Kinder dürfen nicht mit dem Gerät spielen.
Page 99

■ 96 │ DE
│AT│
CH
SRK 400 A2
Zusammenbauen / Zerlegen
ACHTUNG - SACHSCHADEN!
► Sämtliche Zubehörteile sind mit einem dünnen Ölfilm versehen, um diese
vor Korrosion zu schützen. Reinigen Sie vor dem ersten Gebrauch daher
sämtliche Teile sorgfältig, wie im Kapitel „Reinigen“ ausführlich beschrieben. Reiben Sie danach alle Metallteile mit etwas Speiseöl ein.
Fleischwolf zusammenbauen
Klappen Sie die Ausklappseite aus - Sie finden dort die Zusammenbau-Reihenfolge bildlich dargestellt.
1) Setzen Sie die Transportschnecke in den Fleischwolfvorsatz .
2) Stecken Sie die Feder auf die Transportschnecke .
3) Setzen Sie dann das Kreuzmesser so ein, dass die Seite mit den Messern
von der Feder weg zeigt. Achten Sie darauf, dass die eckige Aussparung
des Kreuzmessers korrekt auf der eckigen Achse liegt.
WARNUNG! VERLETZUNGSGEFAHR!
► Das Kreuzmesser ist sehr scharf! Verletzungsgefahr!
ACHTUNG - SACHSCHADEN!
► Das Gerät wird beschädigt, wenn das Kreuzmesser anders herum
eingesetzt wird!
4) Wählen Sie die gewünschte Lochscheibe /Wurstscheibe 3.
Page 100

DE│AT│CH
│
97 ■
SRK 400 A2
5) Legen Sie die ausgewählte Lochscheibe so in den Fleischwolfvorsatz
ein, dass die Fixierungen an der Lochscheibe in den Aussparungen am
Fleischwolfvorsatz liegen.
6) Wenn alles richtig eingesetzt ist, schrauben Sie den Verschlussring
handfest auf.
7) Der fertig montierte Fleischwolfvorsatz wird über einen Bajonett-
Verschluss mit dem Motorblock verbunden:
– Stecken Sie den Fleischwolfvorsatz in den Motorblock , so dass
der Pfeil am Fleischwolfvorsatz am Symbol
am Motorblock
liegt. Der Verriegelungsknopf . drückt sich hinein (Abb. B).
– Drücken Sie den Fleischwolfvorsatz leicht hinein und drehen Sie
dabei den Einfüllschacht am Fleischwolfvorsatz in die Mittelposition
(Abb. B), so dass der Pfeil am Einfüllschacht auf das Symbol
zeigt.
Wenn der Fleischwolfvorsatz einrastet, springt der Verriegelungsknopf . heraus.
– Setzen Sie zum Schluss die Einfüllschale oben auf den Einfüllschacht.
– Zum Abnehmen drücken Sie den Verriegelungsknopf . und drehen den
Einfüllschacht wieder nach rechts (Abb. B)
. Danach können Sie den
Fleischwolfvorsatz heraus ziehen.
Wurst-Stopf-Aufsatz montieren
Klappen Sie die Ausklappseite aus - Sie finden dort die Zusammenbau-Reihenfolge bildlich dargestellt.
1) Nehmen Sie den Fleischwolfvorsatz , wie unter „Fleischwolf zusammenbauen“ beschrieben, ab.
2) Nehmen Sie alle Teile, die am/im Fleischwolfvorsatz montiert sind, auseinan-
der und reinigen Sie diese.
3) Reiben Sie alle Metallteile mit Speiseöl ab.
4) Setzen Sie die Transportschnecke , die Feder und das Kreuzmesser
wieder in den Fleischwolfvorsatz ein.
5) Legen Sie die Wurstscheibe 3 so ein, dass die Fixierungen an der Wurst-
scheibe 3 in den Aussparungen am Fleischwolfvorsatz liegen.
6) Setzen Sie dann den Wurst-Stopf-Aufsatz - vor die Wurstscheibe 3.
7) Schrauben Sie den Verschlussring handfest auf.
8) Montieren Sie den Fleischwolfvorsatz wie unter „Fleischwolf zusammenbauen“ beschrieben.
 Loading...