

Page 1
2.
iTunes will automatically start when the iPod is recognized.
If you have configured iTunes to not automatically start when connected
to an iPod, click Start - Programs - iTunes - iTunes.
Enter the wireless configuration information you wrote down in the Before
configuring this product section.
3.
<<< Windows environment >>>
4.
5.
6.
7.
8.
9.
10.
11.
12.
13.
14.
15.
16.
17.
19.
20.
21.
22.
Perform setup
2
18.
Please refer to the back of this document when configuring this
product from a Macintosh.
Connect your iPod to a PC using the
USB cable bundled with the iPod.
(Do not use this product yet.)
Connect the AC adapter to this product,
and plug the AC plug to the electrical
outlet.The configuration information
will be uploaded from your iPod. When
the transfer completes, the operation
LED (White) in the front will turn off.
The white operation LE D of this
product will change from ON, to OFF, to
ON, and then st arts fla shing. T he
configuration is co mpleted when the
LED starts flashing.
1.
Disconnect iPod from PC.
When your iPod displays a "Do not disconnect." message on its LCD, please
correctly remove your iPod according to the iPod manual. If you do not follow the
correct procedure for removing the iPod, the data may become corrupted.
Feb, 2007
To use this product over the wireless network, you need to configure the information appropriate for your network. This information needs to be
identical to the wireless devices on your network such as the access point. Please collect the following information before the setup.
Wirelessly connect iPod with PC or Mac
Users c an synchr onize wit h a Windows or Macin tosh comp uter
running iTunes over an 802.1 1g wirele ss networ k so the re is
no need to move t he iPod ba ck to the computer every ti me
you want to trans fer new s ongs or v ideos.
Supports S-video port, line port, and Apple Remote
You can s hare you r iPod w ith your family and fri ends on audio
and video devices by connecting to the S-video port and the line
out audio port. It also suppor ts the Apple Rem ote (sold
separately by Apple Computer, Inc.), so you can sit back, relax and
enjoy. You do not have to st and up to sk ip to the next track.
Charge your iPod
You can ch arge your iPod bat tery by c onnectin g your iPo d to
this pr oduct. (Plea se note th at power ne eds to be a pplied for
this pro duct to ch arge your iPod.)
Easy configuration
The "Wireless Dock Setup" software included includes a software
wizard allowing you to easily set it up using either a 10/100 network
or using the iPod.. You can easily configure this product by
answering the questions on the screen.
Features
Before configuring this product...
1
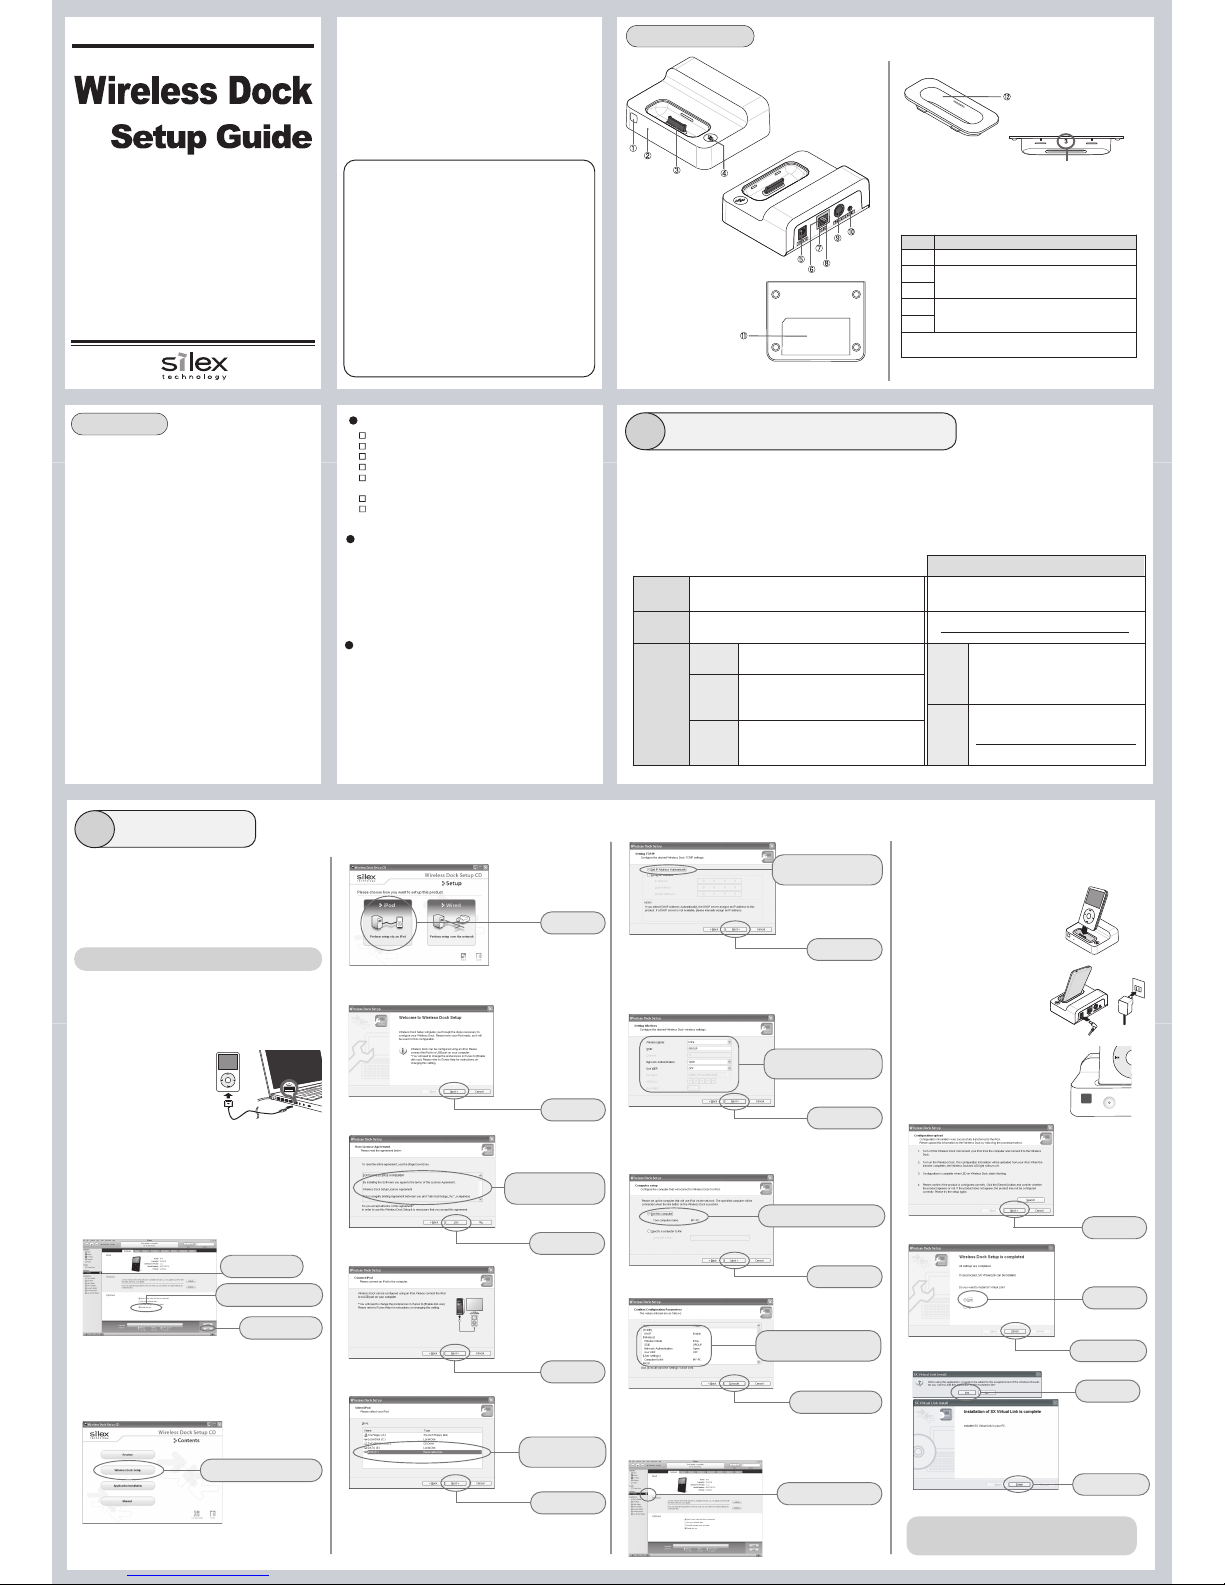
(1) Infrared (IR) Receiver
(2) Operation LED (White)
(3) iPod Connector
(4) Link Button
(5) AC Connector
(6) Network Port
(7) LED (Green)
(8) LED (Orange)
(9) S-video Out Port
(10) Line Out Port
(11) Ethernet Address
Numbers from 3 to 7 are indicated on the
adapter.
There are 5 adapters bundled to this product to support each
iPod. Choose the adapter that fits your iPod
(12) Dock Adapter
7
6
iPod with color display
4
iPod
3
5
iPod mini
Dock adapters for iPod nano and fifth generation iPod are bundled
with each iPod.
Number
iPod type
Thank you for purchasing the Wireless Dock for i Pod (this
product).
This setup gu ide, "Wireless Dock Setup Guide", provides
information on how to configure and use this product in a
wireless netw ork environment using a Win dows XP or
Macintosh computer.
Before setup, please read carefully the "Safety instructions" in
the online ma nual incl uded in the CD-ROM to proper ly
configure this product.
English
Windows XP, Windows 2000
Mac OS X 10.2.7 to 10.4.x (PPC version)
Mac OS X 10.4.3 or later (Intel version)
Supported Operating Systems
Wireless mode
This name is used to identify devices to be connected to the wireless
network. It is also known as ESSID or Network Name.
There is Ad hoc and Infrastructure mode. Select Infrastructure mode to
communicate via access point.
SSID
Encryption
method
No encryption
Communication data is encrypted based on the
encryption key (WEP key).
WEP key size (64bit / 128bit) and WEP key must be the
same as other wireless devices on your network.
Communication data is not encrypted.
(No information needs to be confirmed when
encryption is not used.)
WEP
Communication data is encrypted based on the
encryption key (Pre-Shared Key).
Pre-Shared Key and encryption mode (TKIP / AES) must
be the same as other wireless devices on your network.
WPA / WPA2
Ad hoc (ch. ) / Infrastructure
WEP key
WEP
(Open / Shared)
Encryption
method
/ WPA / WPA2
Write down your network configuration
or
Pre-Shared
Key
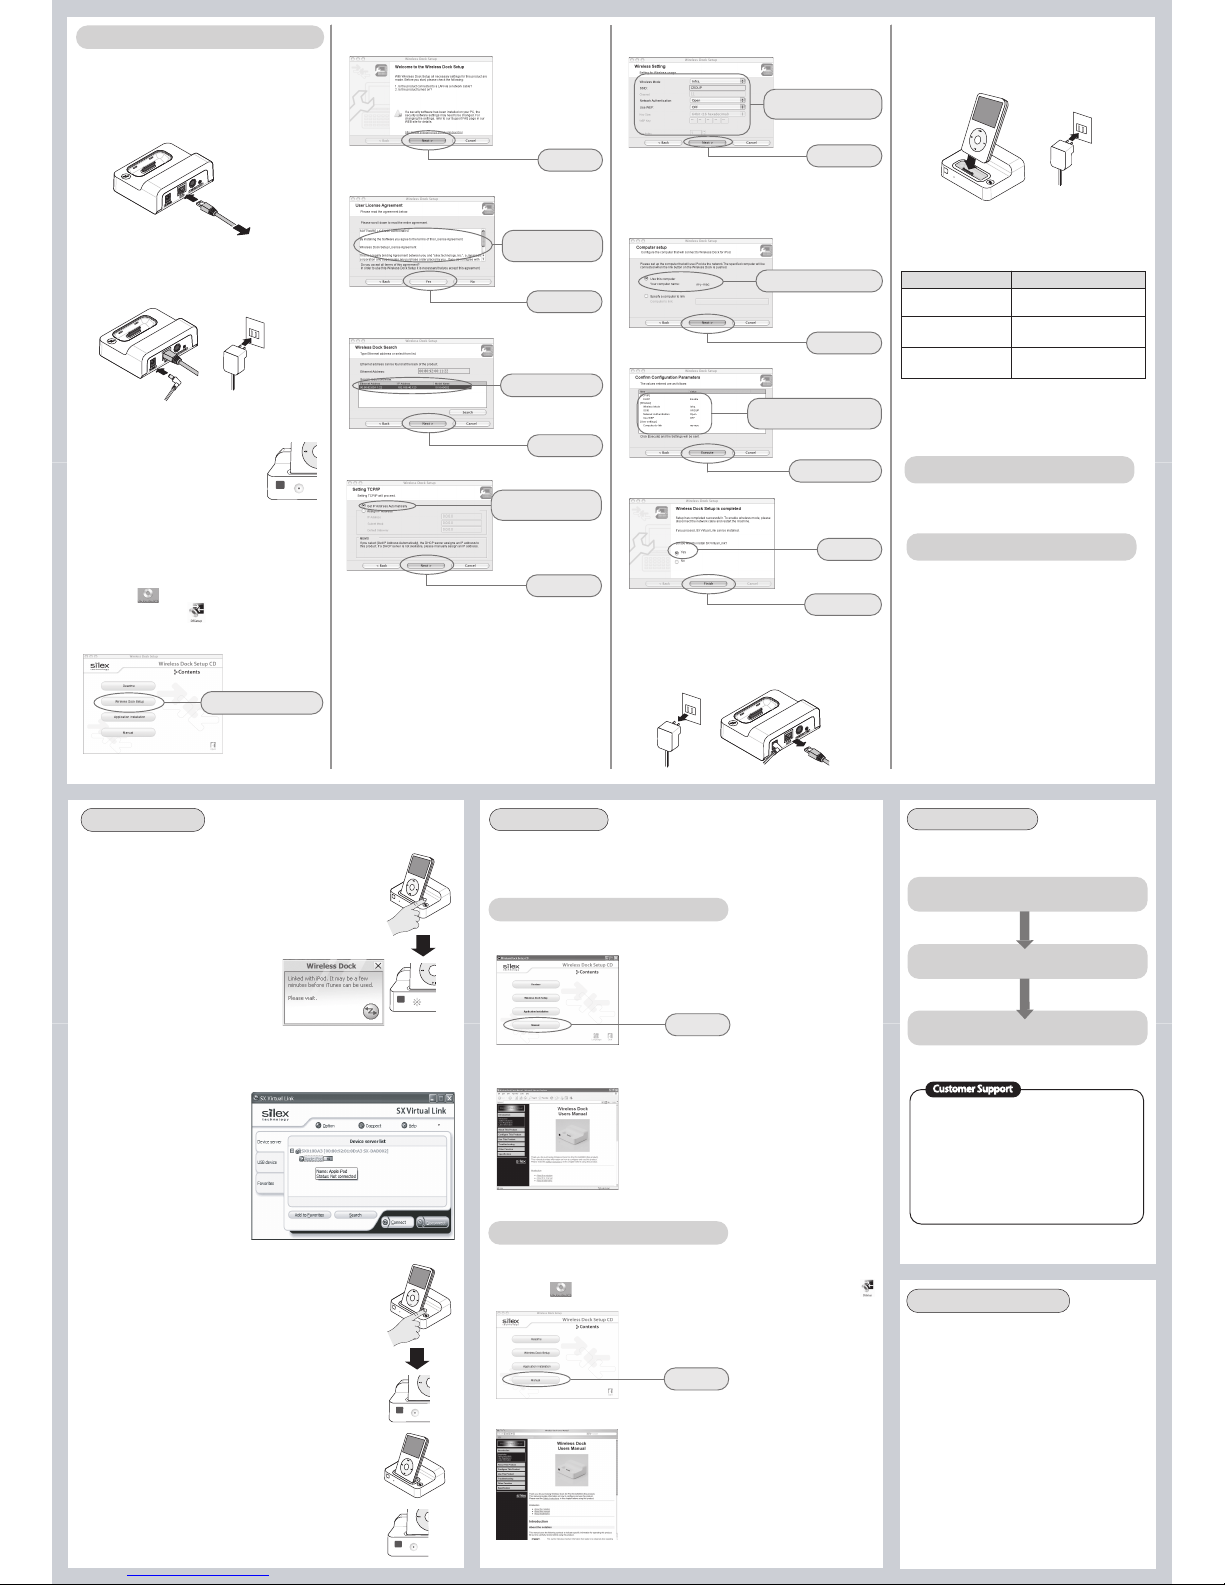
This step explains how to configure the IP address using the
configuration utility in the Wireless Dock Setup CD.
Configuration can be done on either a Windows or Macintosh
environment.
Please insert the Wireless Dock Setup CD into your PC.
* If the screen does not appear au tomatically, open M y Computer, select t he
CD-ROM drive and execute Autorun.exe.
When Get I P Address Au tomatically is selecte d, the IP addres s is
automatica lly obtaine d from the n etwork. If you want to man ually assig n an
IP Address, sel ect Assign IP Address a nd enter th e IP address (mandator y),
subnet mas k, and default gateway.
Click Wireless Dock Setup
Click iPod.
Click remove button
Name of Parts
- Do not use this product near medical devices such as a heart
pacemaker. The radio wave generated by this product may
interfere with the operation of these devices and may threaten
one's life.
- Do not use this product near microwave ovens. The radio wave
used by microwave ovens may cause interference to this
product.
Please note the following instructions:
Safety instructions regarding the radio waves
Please refer to the back of this document
for operation instructions.
Configuration of this product is complete.
(2) Click Next.
(1) Select iPod set to
PC from the list.
Click Next.
(2) Click Yes.
(1) Read the agreement
below.
Click Next.
(1) Click Get IP Address
Automatically.
(2) Click Next.
(2) Click Next.
(1) Enter wireless
configuration information
(2) Click Next.
(1) Click Use this computer.
(2) Click Execute.
(1) Confirm the configuration
parameters.
Click Next.
(1) Click Yes.
(2) Click Finish.
* Please visit our website for the compatibility status of the latest
version of each operating system (OS).
(2) Click Enable disk use
(3) Click Apply
Contents
Wireless Dock for iPod
Power Supply
iPod Dock Adapters (5)
Audio Cable
Wireless Dock Setup CD
(Configuration utility, online manual)
Setup Guide (this document)
Warranty Booklet
* The iPod will only show up in this list after you ENABLE DISK USE in iTunes as
shown in step 4. It will show up in this list as a similar name for your iPod under
DEVICES in iTunes as a Removable Disk.
Go back to your iTunes Window and click the Eject icon to the right
of the name of the iPod under iTunes DEVICES.
Select the iPod icon in the iTunes DEVICES list on the menu on the
left, and check the Enable disk use option.
(1) Select iPod
Click Start - Control Panel. Open the Security Center click
Windows Firewall. Click the Exceptions tab. Check the File and
Printer Sharing checkbox. Click OK.
With the AC adapter unplugged, Place the
iPod in this product.
23.
(1) Click Yes.
(2) Click Finish.
Important: Before using this product, please make sure you have read the documentation and have
installed iTunes and the iPod hardware and software on your computer. Please refer to the iTunes
and iPod documentation for directions on how to use them.
24.
Laden Sie d ie deutsche In stallationsanleitung von unserer
Webseite herunter. Die Adresse finden Sie auf der Rückseite
dieses Dokuments unter "Troubleshooting".
Veuillez télécharger le guide d'installation en français à partir
de notre site Web. Reportez-vous à la section "Troubleshooting"
située au dos de ce document.
Scaricare la guida all'installazione in italiano dal nostro sito
web. Consultare la sezione "Troubleshooting" sul retro di questo
documento per conoscere l'indirizzo della home page.
Descargue la guía de configuración en español desde nuestro
sitio Web. Consulte la sección "Troubleshooting" en la contraportada
de este documento para obtener la dirección del sitio Web.
O guia de configuração em português está disponível para
download de nosso site na web. Consulte na "Troubleshooting"
no verso deste folheto o endereço do site na web.
(De)
(Fr)
(It)
(Es)
(Pt)
Page 2
WA03370XA
2.
3.
4.
5.
7.
8.
9.
10.
11.
12.
13.
14.
16.
17.
18.
6.
Click Apple Menu - System Preferences - Sharing. - Services tab.
Check the Windows Sharing check box.
1.
1.
2.
3.
1.
2.
4.
3.
<<Access to manual from Windows>>
<<Access to manual from Macintosh>>
Use this product
Check that the iPod is connected properly with this product and that it is in
Play Mode.
1.
Press the link button on this product to switch to Link Mode.
2.
iTunes automatically starts when this product run in Link Mode.
3.
You can download music and video to the iPod using iTunes as if the iPod is
directly connected to the PC.
4.
<< Connect from iPod >>
<< Remove iPod from this product >>
Remove the iPod by following the procedure below when the music or movie has
been downloaded to the iPod.
Under the iTunes Devices list, either click the Eject iPod button to the right of
your iPod (Device), or in the lower right corner of iTunes.
1.
Press the link button to switch to Play Mode.
2.
Operation LED flashes while in Play Mode.
The operation LED turns ON when this product is in Link Mode.
<< Charge iPod >>
The following is the procedure on how to charge your iPod using this product.
Check that the iPod is connected properly with this product and is in Play Mode.
The iPod is automatically charged when it is connected to this product.
1.
When removing iPod from this product, check that this product is in Play Mode.
Operation LED flashes at Play Mode.
The window below is displayed when this product
connects to a PC. It may take a while to start
iTunes if you are using large capacity iPod. Please
wait until iTunes starts. This window will
automatically close when iTunes starts.
Remove the iPod from this product.
3.
<<< Macintosh environment >>>
Connect an Ethernet cable to this product and the other end of the
Ethernet cable to an Ethernet hub or a computer.
Connect an AC adapter to this product and a power plug to an outlet.
Check the LED of this product has changed from
ON, OFF, to ON, and starts flashing.
Please insert the Wireless Dock Setup CD into your computer.
CD-ROM icon ( ) is displayed on your desktop. Open the CD-ROM
icon and double-click DSSetup ( ).
Click Wireless Dock Setup
(2) Click Next.
(1) Click Use this computer.
(2) Click Execute.
(1) Confirm the configuration
parameters.
Check for successful configuration by looking at the LED
(Green/Orange) on the back of this product.
Place the iPod in this product and plug the AC plug to the
electrical outlet.
When connecting iPod, please use Dock adapter that fits your iPod.
Configuration of this product is complete.
The CD-ROM contains the online manual of this product. Detailed information on the configuration,
use of this product and Q&A for tips are described in the onl ine manual. The following is the
procedure on how to refer to the online manual.
Please insert the Wireless Dock Setup CD into your PC.
Please insert the Wireless Dock Setup CD into your computer.
CD-ROM icon ( ) is displayed on your desktop. Open the CD-ROM icon and double-click DSSetup ( ).
Click Manual
Online manual will be displayed.
Click Manual
Online manual will be displayed.
Refer to manual
Troubleshooting
Please refer to the following procedure if you have any
problems regarding the setup.
1 Refer to the Q&A in the online manual
(see above).
2 Refer to the SILEX support web site.
3 Contact our customer support center.
USA: SILEX TECHNOLOGY America, Inc.
E-mail : support@silexamerica.com
URL : http://www.silexamerica.com
Phone : 1-866-765-8761
Europe: SILEX TECHNOLOGY Europe GmbH
E-mail : support@silexeurope.com
URL : http://www.silexeurope.com
Phone : +49(0)2159-6750-0
Customer Support
http://www.silex.jp/register
Make sure to fill out the User Registration via our web page
after completing setup. User Registration is recommended in
order to provide you better product support and service.
For User Registration
(2) Click Next.
(1) Enter wireless
configuration information
If the screen does not appear automatically, open My Computer, select the CD-ROM drive and execute Autorun.exe.
Please refer to "Troubleshooting" below if you encounter
any problems during the configuration.
(2) Click Yes.
(1) Read the agreement
below.
Click Next.
<< Charge iPod >>
(1) Select your product.
(2) Click Next.
(1) Click Get IP Address
Automatically.
(2) Click Next.
15.
(1) Click Yes.
(2) Click Finish.
Unplug the power and the network cable of this product.
Please do not unplug the network cable if you use this product through a wired LAN.
To Ethernet HUB
Status
LED
Communicating with a wired
LAN.
Connecting with AP and communicating
in infrastructure mode.
Communicating in Ad hoc mode.
Green : ON
Orange : Blinks during data transmission
Green : Blink
Orange : ON
Green and Orange blinks
alternatively
Enter the wireless configuration information you wrote down in the Before
configuring this product section.
When Get I P Address Au tomatically is selecte d, the IP addres s is
automatica lly obtaine d from the n etwork. If you want to man ually assig n an
IP Address, sel ect Assign IP Address a nd enter th e IP address (mandator y),
subnet mas k, and default gateway.
Please see below for operation instructions.
There are two ways to connect this product to your computer. You can press the link
button on this product to connect from th e iPod, or you can connect from your
computer using the SX Virtual Link software
<< Connect from computer >>
You can connect from your computer by using
the SX VIrtual Link software.
From Windows, click the Sta rt menu, All
Programs, SX Virtual Link , t hen SX Virtual
Link.
From Macintosh systems, you can open up SX
Virtual Link from Applications.
When S X Virtual Link has started, cli ck the
WIreless Dock, then select the iPod, and click
Connect.
 Loading...