

Silex technology SD-300,SD-310AN Setup Manual
Thank you for purchasing the Serial Device Server, SD-300/SD-310AN.
This Setup Guide provides information on how to set up and use SD-300/
SD-310AN.
Jun, 2015
Package Contents
Setup Procedure
Link to Serial Device
Step3
The following is the procedure to setup SD-300/SD-310AN.
Prepare the items and information that will be
necessary to setup SD-300/SD-310AN.
Link to your serial device.
Before You Begin
Step1
The following items are included in SD-300/SD-310AN package.
Setup
Step2
Before You Begin
Step1
1-1. Necessary Items
The following items are required in order to use SD-300/SD-310AN.
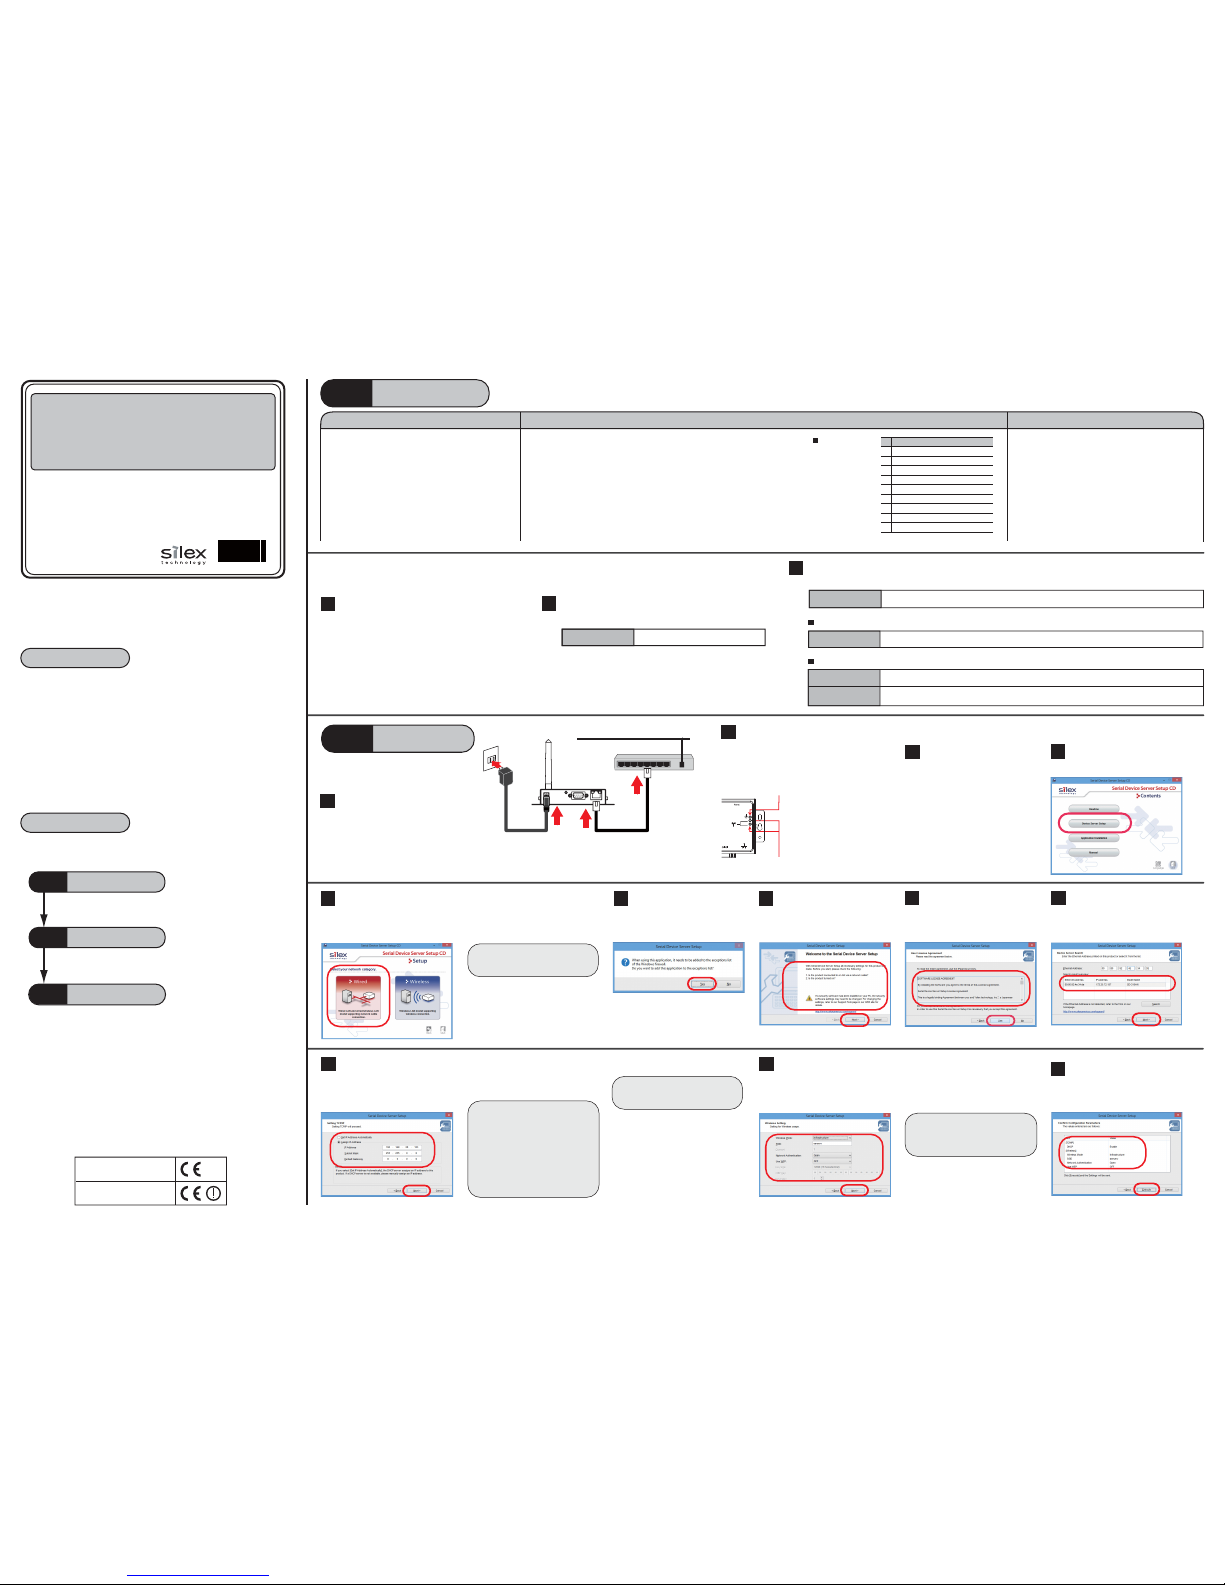
Connect SD-300/SD-310AN to a wired LAN. Connect SD-300/SD-310AN and your serial device.
The serial port PIN assignment is shown on the right.
PIN Assignment
Collect the information such as SSID, encryption mode,
encryption key, etc. of your wireless network.
* If you will use SD-310AN in a wired network after
nishing the setup, you do not have to collect these
information.
Wireless LAN Settings
(only for SD-310AN)
Network Cable
Serial Cable
Yellow and Green LED : OFF
Orange LED : ON
Setup
Step2
1 DCD(Data Carrier Direct) Input
2 RxD(Receive Data) Input
3 TxD(Transmit Data) Output
4 DTR(Data Terminal Ready) Output
5 GND(Ground) Input
6 DSR(Data Set Ready) Input
7 RTS(Request To Send) Output
8 CTS(Clear To Send) Input
9
RI(Ring Indicate) Input or +5 VDC Power Input
Pin Details
English
□SD-300/SD-310AN
□AC adaptor
□Setup Guide (this document)
□GPL license notice
□Warranty Booklet
□Rubber foot (4pcs)
* In a 100BASE-TX network, a network cable supporting
100BASE-TX (category 5 or above) is required.
* Even if you wish to use SD-300/SD-310AN on a wireless
network, we recommend that you setup
SD-300/SD-310AN using a wired network, since
conguration based on a wired network is much easier.
WA102480XA
Download the utilities and user's manual below and extract them on your computer.
Access the URL below from the computer you are
using to congure the SD-300/SD-310AN.
This section explains how to download the necessary utilities and user's manual from our website.
1
2
USA : silex technology america, Inc.
URL : http://www.silexamerica.com/
Europe : silex technology europe GmbH
URL : http://www.silexeurope.com/
3
Go to the Support page and select the product model.
Product Model
SD-300 or SD-310AN
1-2. Downloading the necessary items
1
2
Network cable
AC adaptor
Network
Ethernet Hub
SD-310AN
②
①
③
④
Connect a network cable to
SD-300/SD-310AN and the other
end to an Ethernet Hub.
Connect an AC adaptor to
SD-300/SD-310AN and power plug
to an outlet.
Check the LEDs on SD-300/SD-310AN.
- Orange LED turns ON
- Green/Yellow LEDs turn OFF
Serial Device Server
SD-300 / SD-310AN
Setup Guide
Install SD-300/SD-310AN to your network and
congure the network settings.
5
4
3
6
8
9
* The conguration will not be
necessary if you plan to use
SD-310AN on a wired LAN
network. Click Next then.
2-1.Before Setup
2-2. Configure Network Settings
1
Open the folder “Serial Device Server
Setup” you have downloaded and
double-click Sdsetup.exe.
2
Click Device Server Setup.
Click Wired.
* If the User Account Control screen is
displayed, click Yes or Continue.
Click Yes .
7
* When there is a DHCP server on
your network and you wish to
obtain an IP address automatically
from it, select Get IP Address
Automatically and click Next.
* When the window without the
option, "Get IP Address
Automatically" is displayed, please
enter the IP address (mandatory),
subnet mask and default gateway.
Select Assign IP Address and enter the designated IP address and click Next.
Congure the settings to use a wireless LAN and click Next.
Read the SOFTWARE LICENSE
AGREEMENT and click Yes .
The Serial Device Server Setup screen
is displayed. Click Next.
Select SD-300/SD-310AN and click
Next.
Utility
Serial Device Server Setup
SX Virtual Link for Serial Device Server
Installation Guide
User's Manual
SD-300/SD-310AN User's Manual
Utility
SX Virtual Link for Serial Device Server
Installation
The below is used on the computer where you congure SD-300/SD-310AN.
The below is used on the computer where you use SD-300/SD-310AN.
10
Check the settings and click Execute.
* This connection image uses SD-310AN as an example.
*
When you are using SD-300 (a wired
model), go on to 10.
Use the serial cable that came with your serial device (the one you may have
been using to connect the PC and serial device directly) or that is recommended
in the operating manual of your serial device.
SD-300 (wired model)
SD-310AN (wireless model)
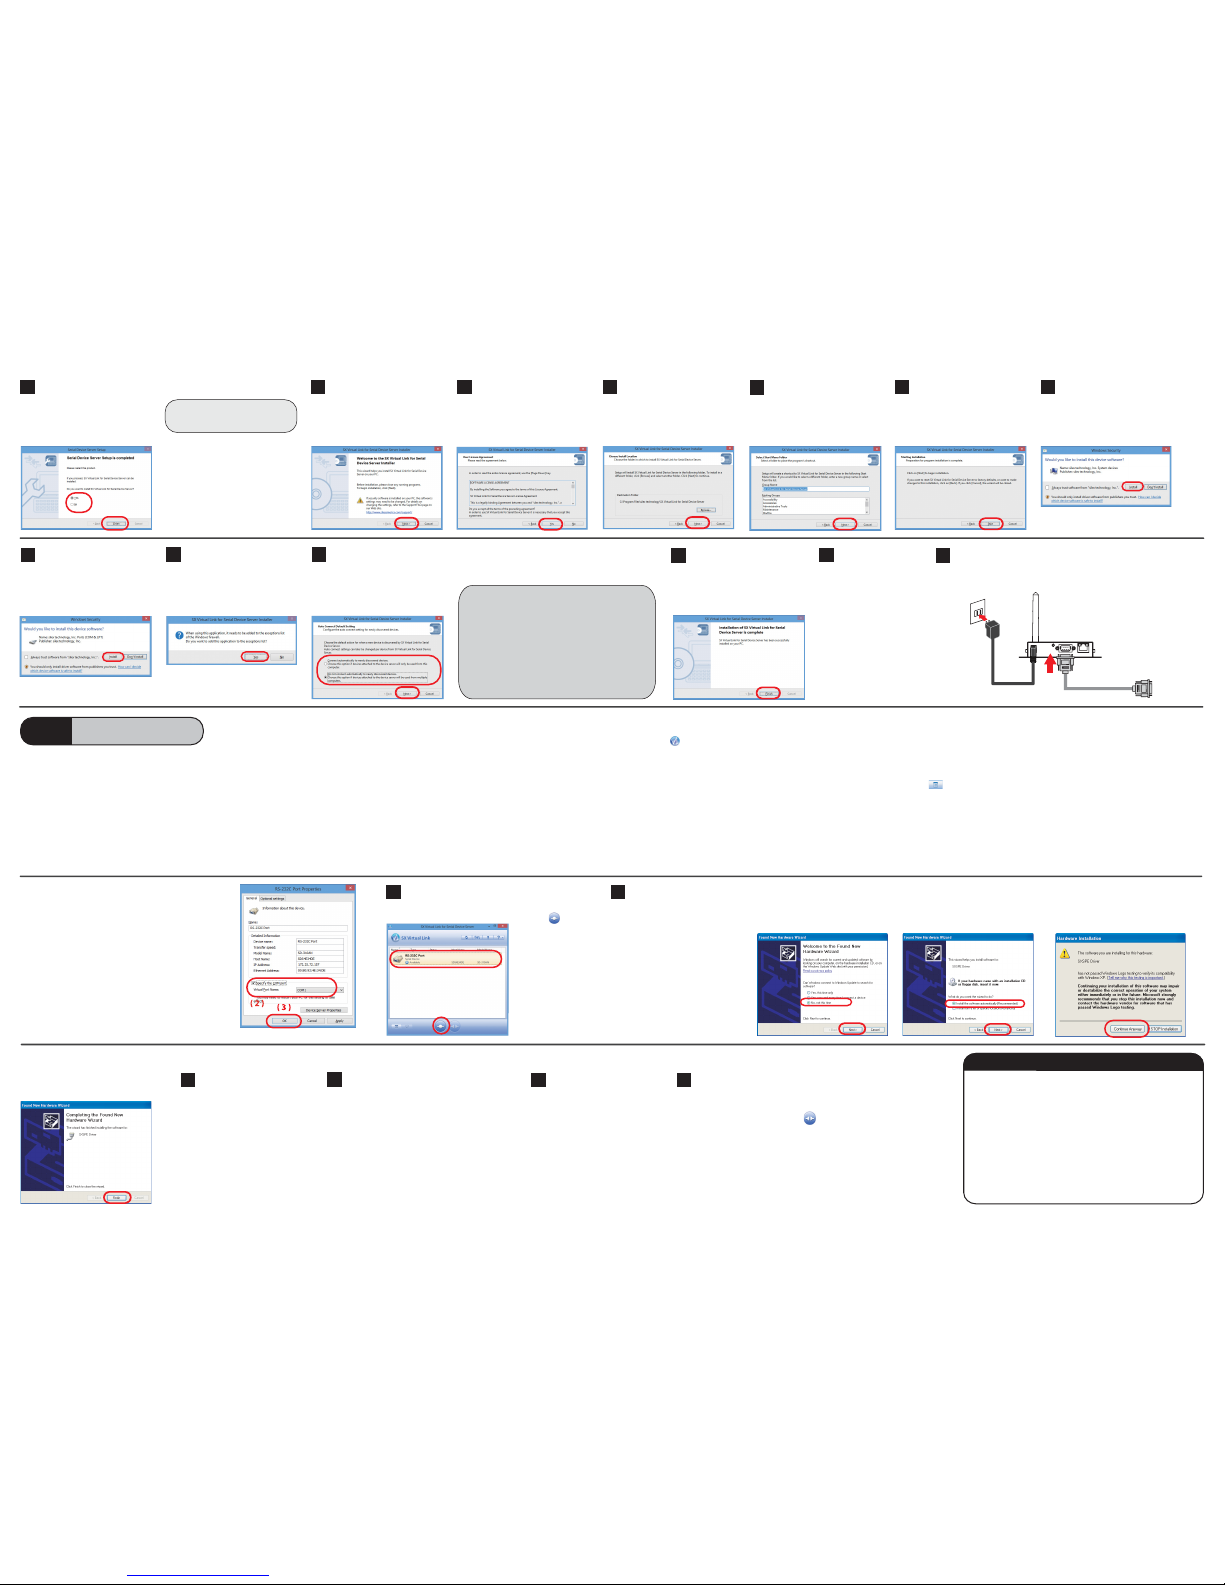
SX Virtual Link for Serial Device Server
Installer wizard is displayed.
Click Next.
Read the SOFTWARE LICENSE
AGREEMENT and click Yes .
Select the folder to install into and
click Next.
Enter the Group Name to be displayed
in the Start Menu.
Click Next.
Click Install.
When the message below is displayed,
click Yes .
Select the appropriate action that you
wish to take when a new serial device
is discovered and click Next.
The completion screen is displayed.
Click Finish.
Link to Serial Device
Step3
3-1. Start SX Virtual Link for Serial Device Server
Click the icon in the task tray or click Start - All Programs - SX Virtual
Link for Serial Device Server - SX Virtual Link for Serial Device Server.
3-2. Link to a serial device
* To specify the COM port manually, please complete the following steps before you
link to the serial device.
(1) Select the serial device that you wish to link and click the Properties button
.
(2) In the General tab, check Specify
the COM port check box and
select the COM port that you wish
to use from Virtual Port Name.
(Please do not select one that is
already used on your system.)
(3) Click OK.
Select SD-300/SD-310AN in SX Virtual Link for Serial Device
Server's main window and click Connect button .
Once you successfully link to the serial
device, the status icon is changed to
“Connected” in the SX Virtual Link for
Serial Device Server's main window.
The COM port that you have selected
is displayed in the status column.
* If Found New Hardware Wizard is
displayed, install software for the device
according to the followings:
3-3. Start a serial communication software
Start a serial communication software
such as a terminal software, etc.
On the serial communication software, select
the COM port that is displayed in the status
column of the SX Virtual Link for Serial Device
Server's main window.
* Also, congure the serial port settings such as a baud rate,
stop bit, etc. on serial communication software.
Once the communication settings are complete,
you can communicate with the serial device
connected to SD-300/SD-310AN.
Select SD-300/SD-310AN in the SX Virtual
Link for Serial Device Server's main
window and click Disconnect button .
3-4. Unlink from a serial device
Close the serial communication
software.
USA : silex technology america, Inc.
E-mail : support@silexamerica.com
URL : http://www.silexamerica.com/
Phone : +1-866-765-8761
Europe : silex technology europe GmbH
E-mail : support@silexeurope.com
URL : http://www.silexeurope.com/
Phone : +49(0)2151-65009-0
(1) Select No, not this time and click
Next.
(2) Select Install the software
automatically (Recommended)
and click Next.
15
14
13
12
21
20
1
2
1
2
1
2
Unplug the AC adapter from
the outlet for these settings
to take eect.
If you will use SD-310AN over
a wireless LAN, unplug the
network cable.
22
23
AC adaptor
SD-310AN
②
①
Serial Cable
To Serial Device
③
Connect the serial device that you wish to share over the network to SD-300/SD-310AN
using a serial cable and insert the power plug of SD-300/SD-310AN into the outlet.
11
Click Start to begin the installation.
16
18
19
If Connect automatically to newly discovered
devices is selected, SX Virtual Link for Serial Device
Server will automatically connect the new devices
when they are detected. Select this when you are
sure that you will be the only user of the serial device.
If Do not connect automatically to newly
discovered devices is selected, you will manually
connect the new devices by selecting it on SX Virtual
Link for Serial Device Server. Select this when you
want to share the serial device with other users.
Windows Security message is displayed.
Click Install.
17
Select Yes and click Fi nish.
Customer Support
Customer Support
(4) Click Finish.
In this Setup Guide, how to link the serial device using SX Virtual Link for
Serial Device is described (this method is called as ”Serial Port Emulation
Mode”).
For other communication methods, see the SD-300/SD-310AN User's
Manual that you have downloaded at Step1 Before You Begin.
Install the SX Virtual Link for Serial Device if it is not yet installed to the PC
where you use SD-300/SD-310AN.
For how to download it, see Step1 Before You Begin.
For how to install it, see SX Virtual Link for Serial Device Server Installation
guide that you have downloaded.
Install the necessary application to a PC
(3) Click Continue Anyway.
The following explains how to install
SX Virtual Link for Serial Device
Server. Follow the instructions on
the screen to install it.
* If you do not want to install SX Virtual
Link for Serial Device Server, select
No and go on to 22.
 Loading...