


RUNNING COMPUTER
RC 14.11
RUNNING COMPUTER
SPEED – DISTANCE – LAP COUNT
PT NL ES IT FR US/GB DE
www.sigmasport.com

CONTENTS
1 |
Foreword |
52 |
2 |
Packaging contents |
52 |
3 |
Safety guidelines |
53 |
4 |
Overview |
54 |
4.1 |
Activating the running computer |
54 |
4.2 |
Attaching the R3 transmitter |
54 |
4.2.1 |
Attaching the chest belt |
54 |
4.2.2 |
Attaching the HipClip |
55 |
4.3 |
Before training |
56 |
4.4 |
Pressing and holding down buttons |
57 |
4.5 |
Overview of modes and functions |
58 |
4.5.1 |
Sleep mode |
59 |
4.5.2 |
Training mode |
59 |
4.5.3 |
Lap view |
60 |
4.5.4 |
Setting mode |
61 |
5 |
Setting mode |
62 |
5.1 |
Activating the setting mode |
62 |
5.2 |
Display setup |
62 |
5.3 |
Button assignment in the setting mode |
62 |
5.4 |
Brief guide to device settings |
63 |
5.5 |
Establishing device settings |
63 |
5.5.1 |
Setting the language |
63 |
5.5.2 |
Setting the measuring unit |
63 |
5.5.3 |
Calibration |
63 |
5.5.4 |
Correction factor |
63 |
5.5.5 |
Setting the date |
64 |
5.5.6 |
Setting the time |
65 |
5.5.7 |
Setting the gender |
66 |
5.5.8 |
Setting the date of birth |
66 |
5.5.9 |
Setting the weight |
66 |
5.5.10 |
Setting the max. HR |
66 |
5.5.11 |
Setting the training zone |
67 |
5.5.12 |
Training with training zones |
68 |
5.5.13 |
Setting up an individual training zone |
68 |
5.5.14 |
Setting the total distance |
70 |
5.5.15 |
Setting the total running time |
71 |
5.5.16 |
Setting the total calories |
71 |
5.5.17 |
Setting the contrast |
71 |
5.5.18 |
Log interval |
72 |
5.5.19 |
Logbook |
73 |
|
|
|
50 |
www.sigmasport.com |

CONTENTS
5.5.20 |
Setting the button tones |
73 |
5.5.21 |
Turning the zone alarm on and off |
73 |
6 |
Calibration and correction factor |
74 |
6.1 |
Why calibrate? |
74 |
6.2 |
Calibration function |
74 |
6.3 |
Activating calibration |
75 |
6.4 |
Calibrating |
76 |
6.4.1 |
Preparing for calibration |
77 |
6.4.2 |
Carrying out calibration runs |
78 |
6.5 |
Correction factor |
79 |
7 |
Training mode |
80 |
7.1 |
Activating the training mode |
80 |
7.2 |
Display setup |
80 |
7.3 |
Button assignment in the training mode |
81 |
7.4 |
Functions while training |
82 |
7.5 |
Radio link with the R3 transmitter |
82 |
7.6 |
Starting a training session |
83 |
7.7 |
Interrupting a training session |
84 |
7.8 |
Ending a training session |
84 |
7.9 |
Training values after training |
85 |
7.10 |
Resetting and saving the training values |
85 |
8 |
Training with laps |
86 |
8.1 |
Using lap training |
86 |
8.2 |
Summary of the last lap |
87 |
8.3 |
Lap view |
87 |
8.3.1 |
Activating the lap view mode |
88 |
8.3.2 |
Display setup |
88 |
8.3.3 |
Button assignment for the lap view |
89 |
8.3.4 |
Displaying values for individual laps |
90 |
9 |
Data transfer |
90 |
9.1 |
Connecting the RC 14.11 to the docking station watch |
91 |
10 |
Maintenance and cleaning |
92 |
10.1 |
Changing the battery |
92 |
10.2 |
Washing the Comfortex+ textile chest belt |
93 |
10.3 |
Disposal |
94 |
11 |
Technical data |
94 |
12 |
Warranty |
97 |
|
|
|
US/GB
51

1 FOREWORD
Thank you for purchasing the SIGMA SPORT® RC 14.11 running computer. Your new running computer will be a faithful training partner for many years to come. You can use your running computer for many different activities, including:
Kk Running
Kk Walking and Nordic Walking
Kk Hiking
Kk Swimming (HR measurement only)
The RC 14.11 running computer is a technically advanced instrument that measures not only your heart rate but also your distance and speed.
Please read these instructions carefully to familiarize yourself with the many functions of your new running computer and prepare for their use.
SIGMA SPORT® wishes you the best of fun with your running computer.
2 PACKAGING CONTENTS
RC 14.11 running computer incl. battery
Battery compartment tool
For activating the battery and battery changes. Tip: If you lose this tool, the battery compartment can also be opened with the aid of a ballpoint pen.
Comfortex+ chest belt
For heart rate measurement and attaching the R3 transmitter
52 |
www.sigmasport.com |

2 PACKAGING CONTENTS
R3 transmitter incl. battery
For measuring your speed and heart rate.
The R3 transmitter sends coded digital signals to your RC 14.11.
HipClip for R3 transmitter
To train without heart rate measurement but with speed.
Data Center 2
Software for analyzing your training data.
Docking station with USB connection
For reading the RC 14.11 training data in
the Data Center 2 software on the computer.
Please install the Data Center 2 software before connecting the docking station!
3 SAFETY GUIDELINES
Kk Consult your doctor before starting training in order to avoid health risks. This particularly applies if you suffer from any cardiovascular diseases or have not done any sport for a long time.
Kk Please do not use the running computer for diving; it is only suitable for swimming.
Kk Do not press any buttons while under water.
US/GB
53

4 OVERVIEW
4.1 Activating the running computer
Before you can train with your new RC 14.11, you need to activate it. To do this, use the appropriate tool to set the battery compartment to ON.
Your RC 14.11 will automatically change to setting mode. Use the PULSE (-) and SPEED (+) buttons to scroll through the basic settings. Press the SET
button to confirm your entry. Set the basic settings such as the language, measuring unit, date and time. Press and hold the SET button to exit the
setting mode.
For further information, please see section 5 “Setting mode”.
4.2 Attaching the R3 transmitter
You can wear the R3 transmitter either on the chest belt or the HipClip.
Kk Worn on chest belt
It measures the heart rate, speed and distance.
Kk Worn on HipClip
It measures the speed and distance, but not the heart rate.
4.2.1 Attaching the chest belt
Press the R3 transmitter into the snaps of the chest belt.
Important: Detach the R3 transmitter from the belt after training in order to save the battery. The transmitter is always active if a current is flowing between the two contacts. This is the case when the chest belt is worn on the skin, or, for instance, if the chest strap and/or the R3 transmitter lies on a wet towel. When the LED flashes, the R3 transmitter is on.
54 |
www.sigmasport.com |

4OVERVIEW
4.2.1Attaching the chest belt
Adjust the length of the belt.
Important: The belt should fit snug, but not too tight.
Place the belt below the chest muscle or breasts.
Important: The R3 transmitter faces forward.
Wet the surface of the laminated electrodes, which rest on the skin
Important: The heart rate measurement is only reliable if the laminated electrodes are moist.
4.2.2 Attaching the HipClip
Snap the R3 transmitter into the HipClip.
Important: Detach the R3 transmitter from the HipClip after training in order to save the battery. The transmitter becomes active when it is clipped on the HipClip or if current can flow between the contacts (press buttons). When the LED flashes, the R3 transmitter is on.
Note: The R3 transmitter can only be used in one direction.
Attach the HipClip to the center of your pants.
Important: Speed and distance are only measured correctly if you wear the HipClip on the front center.
US/GB
55

4 OVERVIEW
4.3 Before training
Before you can start training, you need to prepare the running computer in the following manner:
1 Put on the chest belt or HipClip and the RC 14.11.
2 Activate the RC 14.11 by pressing and holding down any button.
3 The running computer automatically switches to training mode. Wait until your heart rate is displayed before you start training.
4 Start training.
Press the START/STOP button to start training.
56 |
www.sigmasport.com |

4 OVERVIEW
4.3 Before training
5 To finish training, simply press the START/STOP button. The stopwatch stops. To reset the values to zero, press and hold the START/STOP button. To exit the training mode, press and hold the PULSE (-) button.
4.4 Pressing and holding down buttons
The buttons on the running computer perform different actions depending on how long you press them:
Kk Press button briefly
Activate or scroll through functions.
Kk Press and hold
Switch to another mode, reset training values,
or synchronize the R3 transmitter and the RC 14.11.
Example: You have finished training and want to activate the sleep mode.
Hold down the PULSE (-) button.
Keep the PULSE (-) button held down. The display will flash twice, indicating that the training mode is deactivated.
US/GB
57
4 OVERVIEW
4.4 Pressing and holding down buttons
The sleep mode will be displayed.
Release the PULSE (-) button.
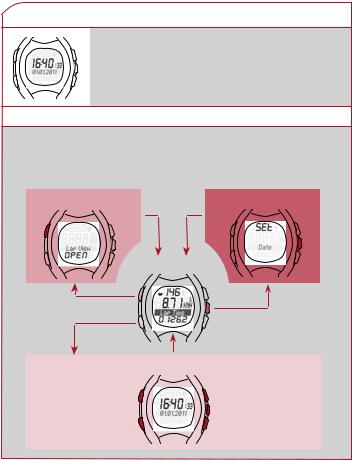
4.5 Overview of modes and functions
The heart rate monitor has three main modes (training mode, setting mode and sleep mode). You can switch between these modes by pressing and holding a button.
Lap view |
Setting mode |
Training mode
Sleep mode
58 |
www.sigmasport.com |
4OVERVIEW
4.5.1Sleep mode
In sleep mode, only the time and date are displayed. To switch from sleep mode to training mode,
press and hold down any button.
4.5.2 Training mode
You will train in this mode.
LAP |
START/STOP |
||||
Kk |
Laps/ |
Kk |
Stopwatch |
||
|
intervals |
|
|
||
|
|
|
|
SET |
|
|
|
|
|
Kk |
Distance (in km) |
|
|
|
|
Kk |
Speed |
|
|
|
|
|
(in km/h or min/km) |
|
|
|
|
Kk |
Running time |
PULSE |
|
|
SPEED |
||
|
|||||
|
|||||
Kk |
Average heart rate |
Kk |
Lap time |
||
Kk |
Maximum heart rate |
Kk |
Lap distance |
||
Kk |
Calories |
Kk |
Average speed |
||
Kk |
Remaining log time |
Kk |
Maximum speed |
||
Kk |
Total Kcal* |
Kk |
Time |
||
|
|
|
|
Kk |
Total distance* |
|
|
|
|
Kk |
Total running time* |
*Note: To provide you with a clearer overview while training, the total values are only displayed if the stopwatch is not running.
US/GB
59
4 OVERVIEW
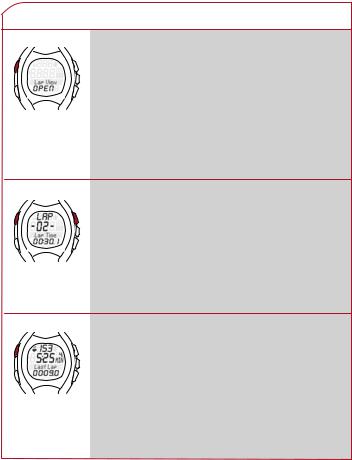
4.5.3 Lap view
The RC 14.11 can be used for lap training.
The values for the individual laps or legs are saved in the running computer. You can view the values in the lap view after and during your training.
You can only activate the lap view from the
training mode. To do this, hold down the LAP button.
In lap view mode:
Use the LAP and START/STOP buttons to navigate and scroll through the previous laps. Press the PULSE (-) and SPEED (+) buttons to view the
heart rate and distance values for each lap.
While training, the running computer briefly shows you a summary of the last lap for each completed lap (briefly press the LAP button). This enables you to directly determine whether you are close to values you are striving to achieve (pace table, target time).
60 |
www.sigmasport.com |

4 OVERVIEW
4.5.4 Setting mode
This mode enables you to adjust the device settings. Kk Use the SPEED (+) button to scroll forward
from the language to the zone alarm.
Kk Use the PULSE (-) button to scroll backward from the zone alarm to the language.
|
|
|
|
|
Zone alarm |
Language |
|||
(On, Off) |
(ES, FR, IT, GB, DE) |
|||
Button tones |
Measuring unit |
|||
(On, Off) |
(km/h, mph, min/km, min/mile) |
|||
Logbook |
Calibration |
|||
(Cancel, Delete) |
||||
(Run/Walk) |
||||
|
|
|
||
Log interval |
Correction factor |
|||
(5, 10, 20 or 30 sec.) |
||||
(Enter) |
||||
|
|
|
||
Contrast |
Date |
|||
(5 levels) |
||||
(Enter, Format) |
||||
Total Kcal |
||||
Time |
||||
(Enter) |
||||
Total running time |
(Enter, 12h, 24h) |
|||
Gender |
||||
(Enter) |
||||
Total distance |
(Male, Female) |
|||
Year of birth |
||||
(Enter) |
||||
Training zone |
(Enter) |
|||
Weight |
||||
(Fat Burn, Fit Zone, |
||||
Individual) |
Max. heart rate |
(Enter) |
|
||
|
|
|
|
(Calculated from gender, |
|
|
age and weight. |
|
|
Correction possible) |
|
US/GB
61

5 SETTING MODE
5.1 Activating the setting mode
Prerequisite: Your running computer must be in training mode (see section 4.5 “Overview of modes and functions”).
Hold down the SET button. The display will flash twice to indicate that the setting mode is now active.
5.2 Display setup
|
|
1st line |
SET indicates that the setting mode |
|
|||
|
|
|
is active. |
|
|
|
|
|
|
3rd line/ |
Submenu or the setting to be |
|
|
||
|
|
4th line |
changed. |
|
|
|
|
5.3 Button assignment in the setting mode
PULSE 
Press:
Scroll backward
Press and hold:
Scroll continuously
LIGHT 


Press:
Light on
START/STOP
Press: In calibration mode, start and stop the measurement
SET
Press: Select function Save value
Press and hold: Exit setting mode (in calibration mode, cancel calibration)
SPEED 
Press: Scroll forward
Press and hold: Scroll continuously
62 |
www.sigmasport.com |

5 SETTING MODE
5.4 Brief guide to device settings
Device settings such as language, measuring unit, correction factor, gender, date of birth, weight, max. HR, contrast, log interval, logbook, button tones and zone alarm are all set in the same manner: Select the device setting, change the value and save the modified setting.
Prerequisite: Your running computer must be in setting mode (section 5.1).
1Press the PULSE (-) or SPEED (+) button
repeatedly until you reach the desired device setting.
2Press the SET button. The device setting value flashes.
3Press the PULSE (-) or SPEED (+) button repeatedly until the desired value is displayed.
4Press the SET button. The new device setting is saved. You can now scroll to a different device setting.
5.5 Establishing device settings
5.5.1 Setting the language
Follow the steps described in section 5.4 “Brief guide to device settings”.
5.5.2 Setting the measuring unit
Follow the steps described in section 5.4 “Brief guide to device settings”.
5.5.3 Calibration
The calibration is described in a separate section.
See section 6 “Calibration and correction factor”.
5.5.4 Correction factor
The correction factor is described in a separate section.
See section 6 “Calibration and correction factor”.
US/GB
63
 Loading...