

Page 1

SQM-160
Sigma
instruments
Rate/Thickness Monitor
User’s Guide
Version 2.0
© Copyright Sigma Instruments, Inc. 2000
ΣΣ
Page 2
Safety Information
Read this manual before installing, operating, or servicing this equipment. Do not install
substitute parts, or perform any unauthorized modification of the product. Return the
product to Sigma Instruments for service and repair to ensure that safety features are
maintained.
Safety Symbols
WARNING: Calls attention to a procedure, practice, or condition, that could possibly
cause bodily injury or death.
CAUTION: Calls attention to a procedure, practice, or condition, that could possibly cause
damage to equipment or permanent loss of data.
Refer to manual for specific Warning or Caution information to avoid personal
injury or equipment damage.
Hazardous voltages may be present.
Earth ground symbol.
Chassis ground symbol.
Page 3

Warranty Information
This Sigma Instruments product is warranted against defects in material and
workmanship for a period of 1 year from the date of shipment, when used in accordance
with the instructions in this manual. During the warranty period, Sigma Instruments will,
at its option, either repair or replace products that prove to be defective.
Limitation of Warranty
Defects from, or repairs necessitated by, misuse or alteration of the product, or any
cause other than defective materials or workmanship are not covered by this warranty.
NO OTHER WARRANTIES ARE EXPRESSED OR IMPLIED, INCLUDING BUT NOT
LIMITED TO THE IMPLIED WARRANTIES OF MERCHANTABILITY AND FITNESS
FOR A PARTICULAR PURPOSE. UNDER NO CIRCUMSTANCES SHALL SIGMA
INSTRUMENTS BE LIABLE FOR CONSEQUENTIAL OR OTHER DAMAGES
RESULTING FROM A BREACH OF THIS LIMITED WARRANTY, OR OTHERWISE.
Return Policy
The purchaser may return this product in like new condition within 30 days after
shipment for any reason. In case of return, purchaser is liable and responsible for all
freight charges in both directions.
Page 4

Table of Contents
Chapter 1 Quick Start
1.0 Introduction ..................................................................................................................1-1
1.1 Installation.....................................................................................................................1-4
1.2 Front Panel...................................................................................................................1-1
1.3 Rear Panel....................................................................................................................1-2
1.4 System Connections ...................................................................................................1-3
1.5 Film Setup.....................................................................................................................1-5
1.6 Depositing a Film.........................................................................................................1-6
Chapter 2 Operation
2.0 Introduction...................................................................................................................2-1
2.1 Menu Selection............................................................................................................2-1
2.2 Film Parameters Setup...............................................................................................2-2
2.3 System Parameters Setup.........................................................................................2-4
2.4 Sensor Selection.........................................................................................................2-7
2.5 Sensor Min/Max Frequency.......................................................................................2-8
2.6 Sensor Tooling.............................................................................................................2-9
2.7 Rate/Thickness or Frequency Display ......................................................................2-10
2.8 Crystal Life Display......................................................................................................2-10
2.9 Zero Thickness.............................................................................................................2-11
2.10 Shutter Operation......................................................................................................
2.11 Simulate Mode...........................................................................................................
Chapter 3 Options
3.0 Introduction...................................................................................................................
3.1 Option Card Installation..............................................................................................
3.2 Four Sensor Card........................................................................................................
3.3 Analog Output Card.....................................................................................................
Chapter 4 MonComm Software
4.0 Introduction...................................................................................................................4-1
4.1 Installation.....................................................................................................................4-1
4.2 Run MonComm............................................................................................................4-1
4.3 Add and Delete Films..................................................................................................4-2
4.4 Download Films............................................................................................................4-3
4.5 Graph Data ...................................................................................................................4-4
4.6 Save Data .....................................................................................................................4-5
4.7 Edit System Parameters.............................................................................................4-6
4.8 Load Defaults...............................................................................................................4-6
Page 5

Chapter 5 Maintenance
5.0 Introduction...................................................................................................................5-1
5.1 Fuse Replacement......................................................................................................5-1
Appendix
A. Material Parameters
B. Specifications
C. I/O Connections
D. Declaration of Conformity
Page 6

Chapter 1 Quick Start
1.0 Introduction
Congratulations on your purchase of the SQM-160 Deposition Rate/Thickness Monitor.
The SQM-160 is an easy-to-use instrument for measuring many types of thin film
coatings. This chapter will help to get you up and running quickly. Please review the
entire manual for detailed operational, programming, and safety information.
1.1 Installation
Refer to Sections 1.3 and 1.4 for detailed system hookup information.
Rack
Installation
Power
Connection
Sensor
Connections
Digital I/O
Connections
Computer
Connection
The SQM-160 occupies a 3.5” high, half-rack space. An
optional kit (900-008) is available to adapt to a full rack. Install
the unit in a 19” rack with the supplied hardware.
WARNING: The SQM-160 is shipped with a ½ A Fuse for use
with 90–120 VAC. If your line voltage is 180–240 VAC, replace
the fuse with the ¼A fuse included with your SQM-160.
WARNING: Verify that the Voltage Selector Switch located next
to the power switch matches your line voltage.
Plug the SQM-160 into your power source with the included
power cord.
Connect the BNC cables and oscillator from your vacuum
chamber feedthrough to the desired SQM-160 Sensor Input(s).
Refer to Appendix C for details on wiring digital I/O to the
SQM-160 Relay I/O connector.
If you would like to use the supplied Windows software to
collect data or program the SQM-160, attach a 9 pin straightthru cable from the SQM-160 RS-232 connector to your
computer’s serial port.
Option
Connections
Move the rear panel power switch to the On (|) position. The SQM-160 will briefly
display its software version, then go to normal operating mode.
If you purchased the Analog Output Option (502-021), connect
a BNC cable form the Rate or Thickness connector to your
chart recorder.
1-1
Page 7

Chapter 1 Quick Start
1.2 Front Panel
Display1 Display2 Crystal Status LEDs
Control Knob
Rate A/s Thickness kA
Zero
Xtal Life
Open
Closed
Shutter
Control Configuration
Σ
Control Section
Time
Sigma
instruments
SQM-160
Rate/Thickness Monitor
Time SP
Thk SP
Final Thk
1
2
3
4
5
Crystal Status
6
Next Prev Clear Program
Clear
Configuration SectionSetpoint LEDs
Front Panel Controls
Display 1 Displays rate and thickness in normal operation.
Displays setup parameter name in program mode.
Display 2 Displays deposition time in normal operation.
Displays setup parameter value in program mode.
Control
Section
Zero thickness reading. Toggle Display 1 between Crystal Life
and Rate/Thickness readings. Toggle shutter relay on/off.
Configuration
Section
Program enters setup mode. Next/Prev moves thru menus.
Clear cancels change and returns value to its original setting.
Setpoint LEDs Illuminate when the indicated setpoint is reached.
Crystal Status
LEDs
Illuminate when a crystal is active and operating.
Flashes when an active crystal fails.
Control Knob Used to adjust values or scroll though menu selections.
Pushing the control knob stores the current setting.
1-2
Page 8

Chapter 1 Quick Start
1.3 Rear Panel
Option A Card
3 4 5 6
Sensor 1 Sensor 2
Manufactured By
Sigma
Σ
instruments
Rate Thick
RS-232
Model No. SQM-160
Ser No. 80901
Option B Card
Relay I/O
Ground
110
Line Fuse
Fuse 1/2 A SB at 120VAC
Fuse 1/4 A SB at 240VAC
220
10
Rear Panel Connections
Sensor 1 & 2 Connection to quartz crystal sensor remote oscillator. See
Section 1.4 for detailed hookup.
RS-232 Connection to computer serial port for programming and data
acquisition.
Relay I/O Connects 4 relays and 4 digital inputs to external equipment for
process control. See Appendix C for connections.
Option A Card Provides an additional four sensor measurement channels.
Option B Card Provides two 0-5V analog outputs for rate and thickness
readings.
Ground Terminal
Measurement ground terminal.
Voltage Selector WARNING: Select 115V for 90-120VAC, 230V for 180-240VAC.
Line Fuse WARNING: Replace line fuse only with a fuse of the specified
type and rating.
Power Connector WARNING: Use removable power cords only of the specified
type and rating.
1-3
Page 9
Chapter 1 Quick Start
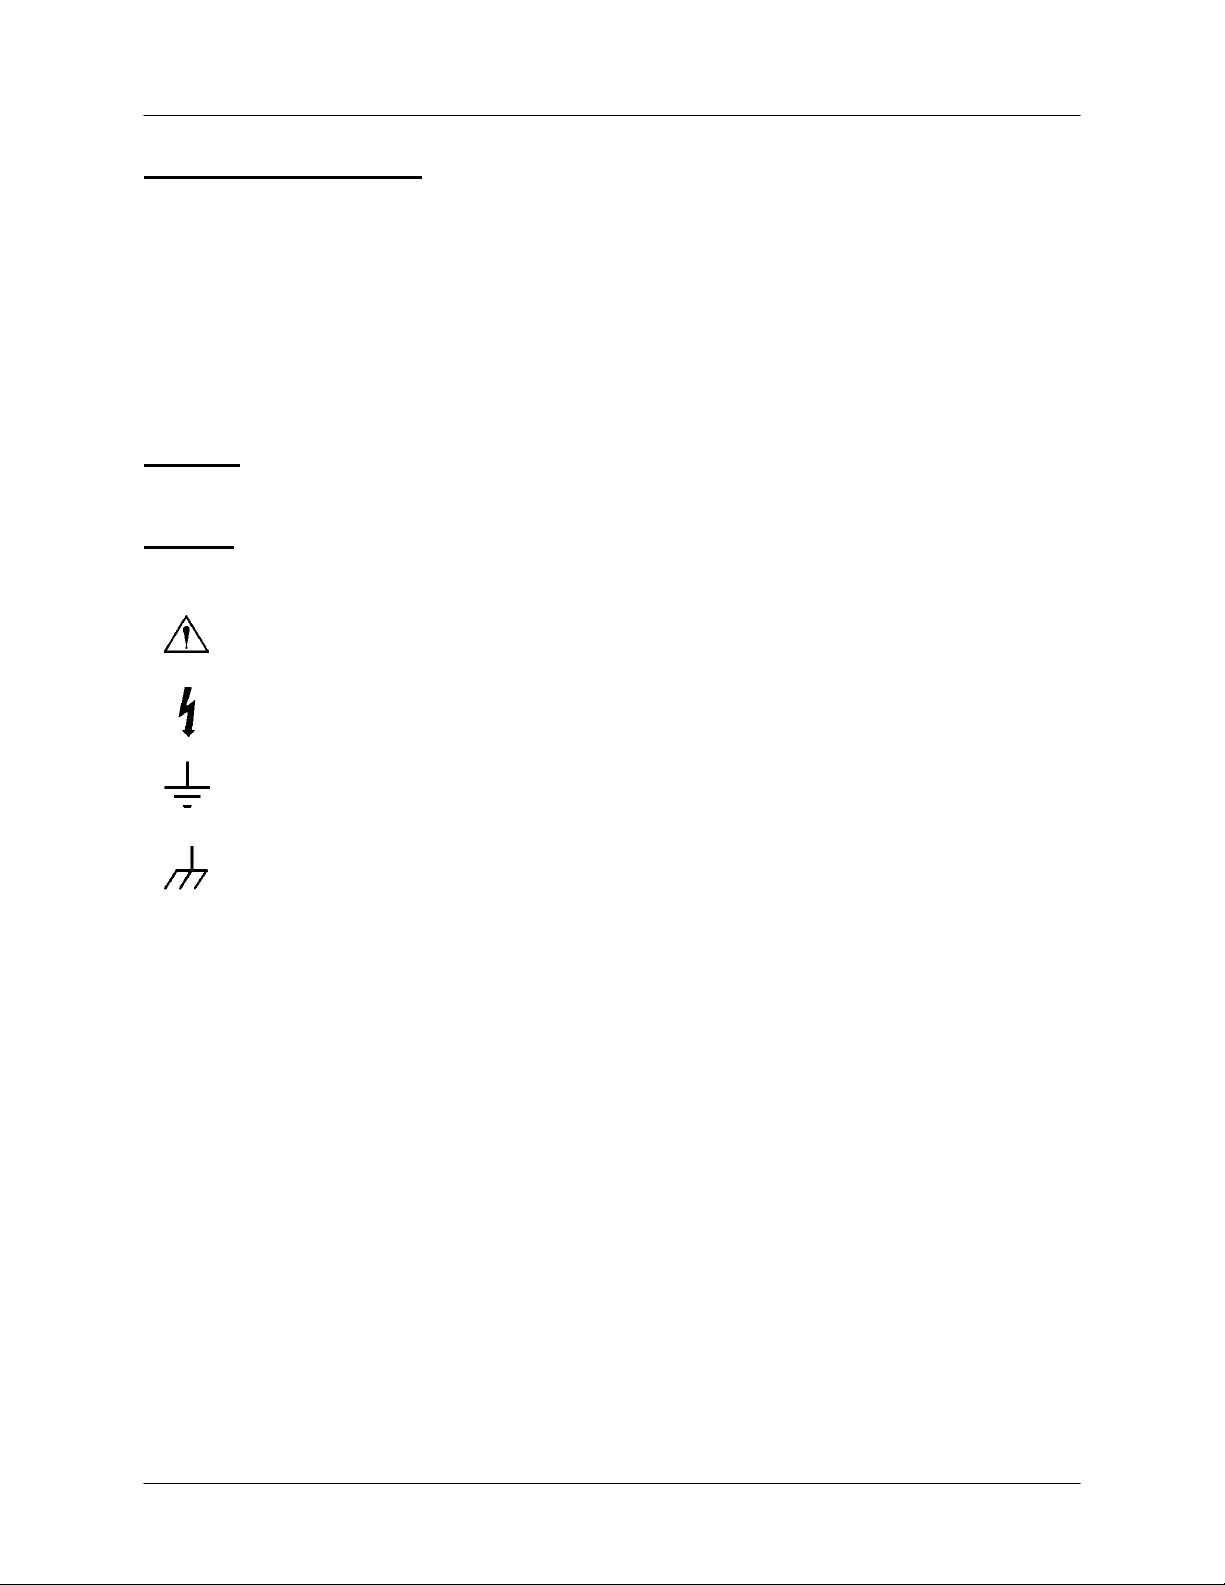
1.4 System Connections
The diagram and table below identifies typical vacuum system components and their
function.
Sensor
In-Vac
Cable
Feedthrough
6" BNC Cable
Oscillator
Source
Shutter
10' BNC Cable
Ground Wire
Option A Card
Sensor 1 Sensor 2
Manufactured By
Sigma
Σ
instruments
RS-232
Model No. SQM-160
Ser No. 80901
Option B Card
Relay I/O
Ground
Line Fuse
Fuse 1/2 A SB at 120VAC
Fuse 1/4 A SB at 240VAC
220
110
System Components
Sensor Holds the quartz crystal used to measure rate and thickness.
Crystals must be replaced occasionally.
In-Vac Cable A coax cable, typically 30” long, that connects the sensor to the
feedthrough.
10
Feedthrough Provides isolation between vacuum and atmosphere for
electrical and cooling lines.
6” BNC Cable Provides a flexible connection from the feedthrough to the
oscillator. Keep this cable as short as possible.
Oscillator Contains the electronics to operate the quartz crystal. Total
cable length to the crystal should be under 40”.
10’ BNC Cable Connects the oscillator to the SQM-160. Lengths up to 100’
are acceptable.
Ground Wire A wire, typically braided, that connects the vacuum system to
the SQM160 ground terminal.
1-4
Page 10

Chapter 1 Quick Start
1.5 Film Setup
This section will help you setup the SQM-160 to measure a film. Refer to Chapter 2 for
detailed film programming instructions.
Note: User actions with front panel controls are indicated by a Box. Results shown on
displays, are indicated by a Dashed Box.
Enter Program
Mode
Select a Film Turn the Control Knob to select one of the nine possible films,
Set Film
Parameters
Set System
Parameters
If the Crystal Life display is shown, press Xtal Life to return to
Rate/Thickness mode. Press Program to enter the film setup
menu. Pressing the program switch while in program mode
returns the SQM-160 to normal mode.
then press the Control Knob to enter the film parameters
menu.
Turn the Control Knob to set the first film parameter (density).
The parameter value is shown in Display 2. Press the Control
Knob to save the value and move to the next film parameter. If
you press Clear, the film parameter returns to its original value.
Continue to set each parameter. When the last film parameter
is entered, the SQM-160 returns to normal mode. See Chapter
2 for detailed instructions on setting Film Parameters.
To Enter the system menu, press Program, then Prev. Set
system parameters by turning, then pushing, the Control Knob
as described above. See Chapter 2 for detailed instructions on
setting System Parameters.
If the sensor(s) you selected during film setup are connected to the SQM-160, the
Crystal Status LEDs should be lit. If not, return to the Film Parameters menu and set
the Sensor Average parameter to the desired sensor(s).
If the Crystal Status LED is flashing, it is most likely that sensor is not properly
connected. Sigma supplies a small test crystal with each oscillator module that can be
used to test sensor connections external to the vacuum chamber. Referring to Section
1.4, disconnect the oscillator from its 6” BNC cable. Attach the test crystal to the
oscillator’s feedthrough connector. The Crystal Status LED will remain lit if the external
sensor connections are correct.
Refer to the Sensor Selection, Frequency Display and Sensor Min/Max sections of
Chapter 2 for information that can assist in troubleshooting sensor problems.
1-5
Page 11

Chapter 1 Quick Start
1.6 Depositing a Film
If you have followed this Quick Start chapter, you are ready to deposit a film. Follow the
procedure below to begin deposition.
Verify Sensor
Operation
Display
Rate/Thickness
Zero
Thickness
Start
Deposition
The Rate and Thickness displays should begin to move from zero. Please take time to
review the remainder of this manual for detailed operational, programming, and safety
information.
Verify that the Crystal Status LED for the measuring sensor is
lit, and not flashing.
Display 1 should be displaying Rate on the left and Thickness
on the right. If the Crystal Life display mode is active, press
the Xtal Life switch to return to Rate/Thickness mode. If the
Program Mode is active, press Program to return to normal
mode.
If needed, press the Zero switch to zero the thickness reading.
Apply power to your source evaporation supply. If the SQM160 shutter relay is connected, press the Shutter switch to
begin deposition.
If the displays remain at zero, check your system setup to assure that you are actually
evaporating. Also check that the deposited material is reaching the sensor.
If the display is erratic or noisy, first check your sensor connections. Refer to the
Timebase, Rate Filter and Rate Resolution sections of Chapter 2 for information that
can help in troubleshooting noisy reading problems.
If the rate and thickness readings do not match your expectations, refer to the Film
Parameter (Density, Z-Factor, Tooling) and Sensor Tooling sections of Chapter 2.
1-6
Page 12

Chapter 2 Operation
Control
Configuration
instruments
Σ
Zero
Next
Clear
Program
Clear
5
6
PROGRAM
2.0 Introduction
This section details the operation of the SQM-160 menus and front panel controls. It is
arranged by common user tasks.
Note: User actions with front panel controls are indicated by a Box. Results shown on
displays, are indicated by a Dashed Box.
2.1 Menu Selection
Two menus provide control of the SQM-160 programming. The Film Parameters Menu
allows you to customize each of the nine stored films. The System Parameters Menu
sets values that remain constant for all films.
Note: If Crystal Life is shown on the SQM-160 displays, press the Xtal Life switch to
return the displays to rate/thickness or frequency display.
The Configuration Section of the SQM-160 front panel contains four switches used to
access the program menus. Within the program menus, the Control Knob is also used
to adjust values and select menu choices. In program mode, Display 1 shows the
parameter to be changed. Display 2 shows the selected parameter’s value.
To enter the Film Parameters Menu, press the Program switch. The SQM-160 displays
the currently active film. Turn the control knob to select a different film, then press Next
to display the first parameter for the selected film.
To enter the System Parameters Menu, press the Program switch. Then press Prev to
display the first system parameter.
Rate A/s Thickness kA
Xtal Life
Open
Closed
Shutter
Time
Sigma
SQM-160
Rate/Thickness Monitor
Time SP
Thk SP
Final Thk
1
3
Crystal Status
2
4
Prev
Press NEXT to
move thru the
Film menu
Press PREV then
NEXT to move
thru the
System menu
Press
to access
menus
2-1
Page 13

Chapter 2 Operation
2.2 Film Parameters Setup
The Film Parameters Menu programs the SQM-160 for the materials that will be
deposited as thin films. Nine films can be stored, but only one film is active at any time.
To program film parameters:
1. Press P rogram to enter program mode.
2. Use the Control Knob to scroll to the desired Film # (1-9).
3. Depress the Control Knob or Next to enter the film parameters menu for the
selected film.
4. Use Next and P rev to move through the film parameters, shown in Display 1.
5. Use the Control Knob to adjust the parameter value, shown in Display2, to the
desired setting.
6. Press Clear to abandon the change and return to the original setting.
7. Depress the Control Knob to save the displayed value, or press Next to exit without
saving the value. (Pressing either one will take you to the next material parameter.)
8. Press P rogram to exit the Film Parameters Menu and return to normal mode.
Notes:
1. Refer to the section on Sensor Selection for instructions on setting SENS AVG.
2. A setting of zero for FINL THK, THK SET or TIME SET will disable that function.
2-2
Page 14

Chapter 2 Operation
The diagram and table below detail the parameters available in the Film Parameters
Menu:
Program
Film Selection Film Parameters Menu
Film1
.
.
.
.
.
.
Film9
- DENSITY
- TOOLING
- Z-FACTOR
- FINL THK
- THK SET
- TIME SET
- SENS AVG
Sub-Menu
- 1
- 2
Sensors 3 to 6
- 3
show only if the
.
four sensor
.
option card is
iinstalled.
- 6
Display Description Range Default Units
DENSITY
Density of the material being
0.5 – 99.99 1.00 gm/cc
deposited.
TOOLING
Overall tooling Factor for this film.
10 – 399 100 %
See the Sensor Tooling section of
this chapter for information on
setting tooling values.
Z-FACTOR
FINL THK
THK SET
TIME SET
SENS AVG
Z-Factor of the material being
deposited.
Desired Final Thickness of
deposited material. Lights Final Thk
LED. Zero is disabled.
Thickness value that closes the
Thickness Setpoint relay and lights
Thk SP LED. Zero is disabled.
Elapsed time that closes the Timer
Setpoint relay and lights Time SP
LED. Zero is disabled.
Enable/disable crystals for this film.
See the Sensor Selection section of
this chapter for more information.
0.10 – 10.00 1.0
0.000 – 99.99 0.500 KÅ
0.000 – 99.99 0 KÅ
0:00 – 99:59 0 Sec
Enabled/
Disabled
Ch1
Enabled
2-3
Page 15

Chapter 2 Operation
2.3 System Parameters Setup
The System Parameters Menu sets values that pertain to the overall functioning of the
SQM-160, and to your vacuum system’s setup. System parameters are constant for all
films.
1. Press P rogram to enter program mode.
2. Press P rev to enter the System Parameters Menu
3. Use Next and P rev to move through the system parameters.
4. Use the Control Knob to adjust the parameter value shown in Display2 to the
desired setting.
5. Press Clear to abandon the change and return to the original setting.
6. Depress the Control Knob to save the displayed value, or press Next to exit without
saving the value. (Pressing either one will take you to the next material parameter.)
7. Press P rogram to exit the System Parameters Menu and return to normal mode.
Notes:
1. Refer to the section on Sensor Tooling for instructions on setting xTOOLING .
2. Refer to the section on Sensor Min/Max for instructions on setting FMIN/FMAX .
3. Refer to the Options Chapter for instructions on setting R/T BNDS for the Analog
Output Card
2-4
Page 16

Chapter 2 Operation
Program
System Parameters Menu
- TIMEBASE
- SIM MODE
- FRQ DISP
Prev
- RATE RES
- RATEFILT
- BAUDRATE
- ETCH
- xTOOLING
- FMIN/MAX
- R/T BNDS
Sub-Menu
- xTLTOOL1
- xTLTOOL2
- xTLTOOL3
.
.
- xTLTOOL6
- FREQ MIN
- FREQ MAX
- RATE MIN
- RATE MAX
- THICKMIN
Display Description Range Default Units
TIMEBASE
Time required to take a single
0.15 – 2.00 0.25 sec
measurement
SIM MODE
FRQ DISP
Simulates sensors. On/Off Off
Toggles between Rate/Thickness
On/Off Off
and Frequency Displays
RATE RES
RATEFILT
Display resolution of Rate Hi/Low Low
Number of readings averaged for
1 – 20 8
rate calculations
BAUDRATE
ETCH
Serial Baud Rate to PC 2.4 – 19.2 19.2 kbps
Sets mode to negative rate for
On/Off Off
etching applications
2-5
Page 17

Chapter 2 Operation
Display Description Range Default Units
xTOOLING
FMIN/MAX
FREQ MIN
FREQ MAX
The following System Parameters apply only if the optional Analog Output card is
installed. See the Options chapter for more information on setting the Analog Output
Card parameters.
Display Description Range Default Units
Tooling value assigned to each
sensor. See the Sensor Tooling
section of this chapter for
information on setting tooling
values.
Sub-Menu to select Crystal
Frequency Limits
Minimum Crystal Frequency 4.00 – 6.00 5.00 MHz
Maximum Crystal Frequency 4.10 – 6.10 6.10 MHz
10 – 399 100 %
R/T BNDS
RATE MIN
RATE MAX
THICKMIN
THICKMAX
Rate and Thickness Bounds SubMenu
Deposition Rate for Zero Output
(Zero Volts)
Deposition Rate for Full Scale
Output (+5 Volts)
Thickness for Zero Output (Zero
Volts)
Thickness for Full Scale Output
(+5 Volts)
0 – 999 0 Å/s
9.9 – 999 100 Å/s
0 – 99.99 0.00 kÅ
0 – 99.99 1.00 kÅ
2-6
Page 18

Chapter 2 Operation
2.4 Sensor Selection
The SQM-160 comes standard with two sensor inputs. Four additional sensors are
available by adding a Sensor Option Card. The sensors can each be assigned to a
different film, or multiple sensors can be averaged for a single film. The averaging
option provides more uniform coverage of the deposition area, and provides a backup
sensor capability. If one of multiple sensors assigned to a film fails, the sensor is
automatically removed from rate/thickness calculations.
To assign a sensor, or sensors, to a film:
1. Press P rogram to enter program mode.
2. Use the Control Knob to scroll to the desired Film # (1-9).
3. Depress the Control Knob or Next to enter the film parameters menu for the
selected film.
4. Press Next until SENS AVG is shown.
5. Use the Control Knob to scroll through the sensors in Display2.
6. Depress the Control Knob to toggle the sensor on/off.
Sensor status can be seen by observing the Crystal Status LEDs:
If the LED is not illuminated, the crystal is disabled.
If the LED is illuminated,the crystal is enabled and receiving valid readings.
If the LED is flashing, the crystal is enabled, but is not receiving valid readings.
7. Continue selecting sensors until the Crystal Status LEDs indicate the desired setup.
8. Press P rogram to exit the Film Parameters Menu and return to normal mode.
2-7
Page 19

Chapter 2 Operation
2.5 Sensor Min/Max Frequency
The Sensor Min/Max frequencies establish the operating range for the sensing quartz
crystals. Both values are used to determine the % life that is displayed in Xtal Life
mode.
When the sensor frequency drops below the minimum, the SQM-160 indicates a sensor
failure by blinking the Crystal Status display. Likewise, a sensor whose initial value
exceeds the maximum will cause a blinking Crystal Status.
To set sensor minimum and maximum frequencies:
1. Press P rogram to enter program mode.
2. Press P rev to enter the System Parameters Menu
3. Press Next until FMIN/FMAX is shown.
4. Depress the Control Knob to display FREQ MIN.
5. Adjust the Control Knob to the desired minimum operating frequency on Display2.
6. Depress the Control Knob to accept the minimum value and display FREQ MAX.
7. Adjust the Control Knob to the desired maximum operating frequency on Display2.
8. Depress the Control Knob to accept the maximum value.
9. Press P rogram to exit the System Parameters Menu and return to normal mode.
2-8
Page 20
Chapter 2 Operation
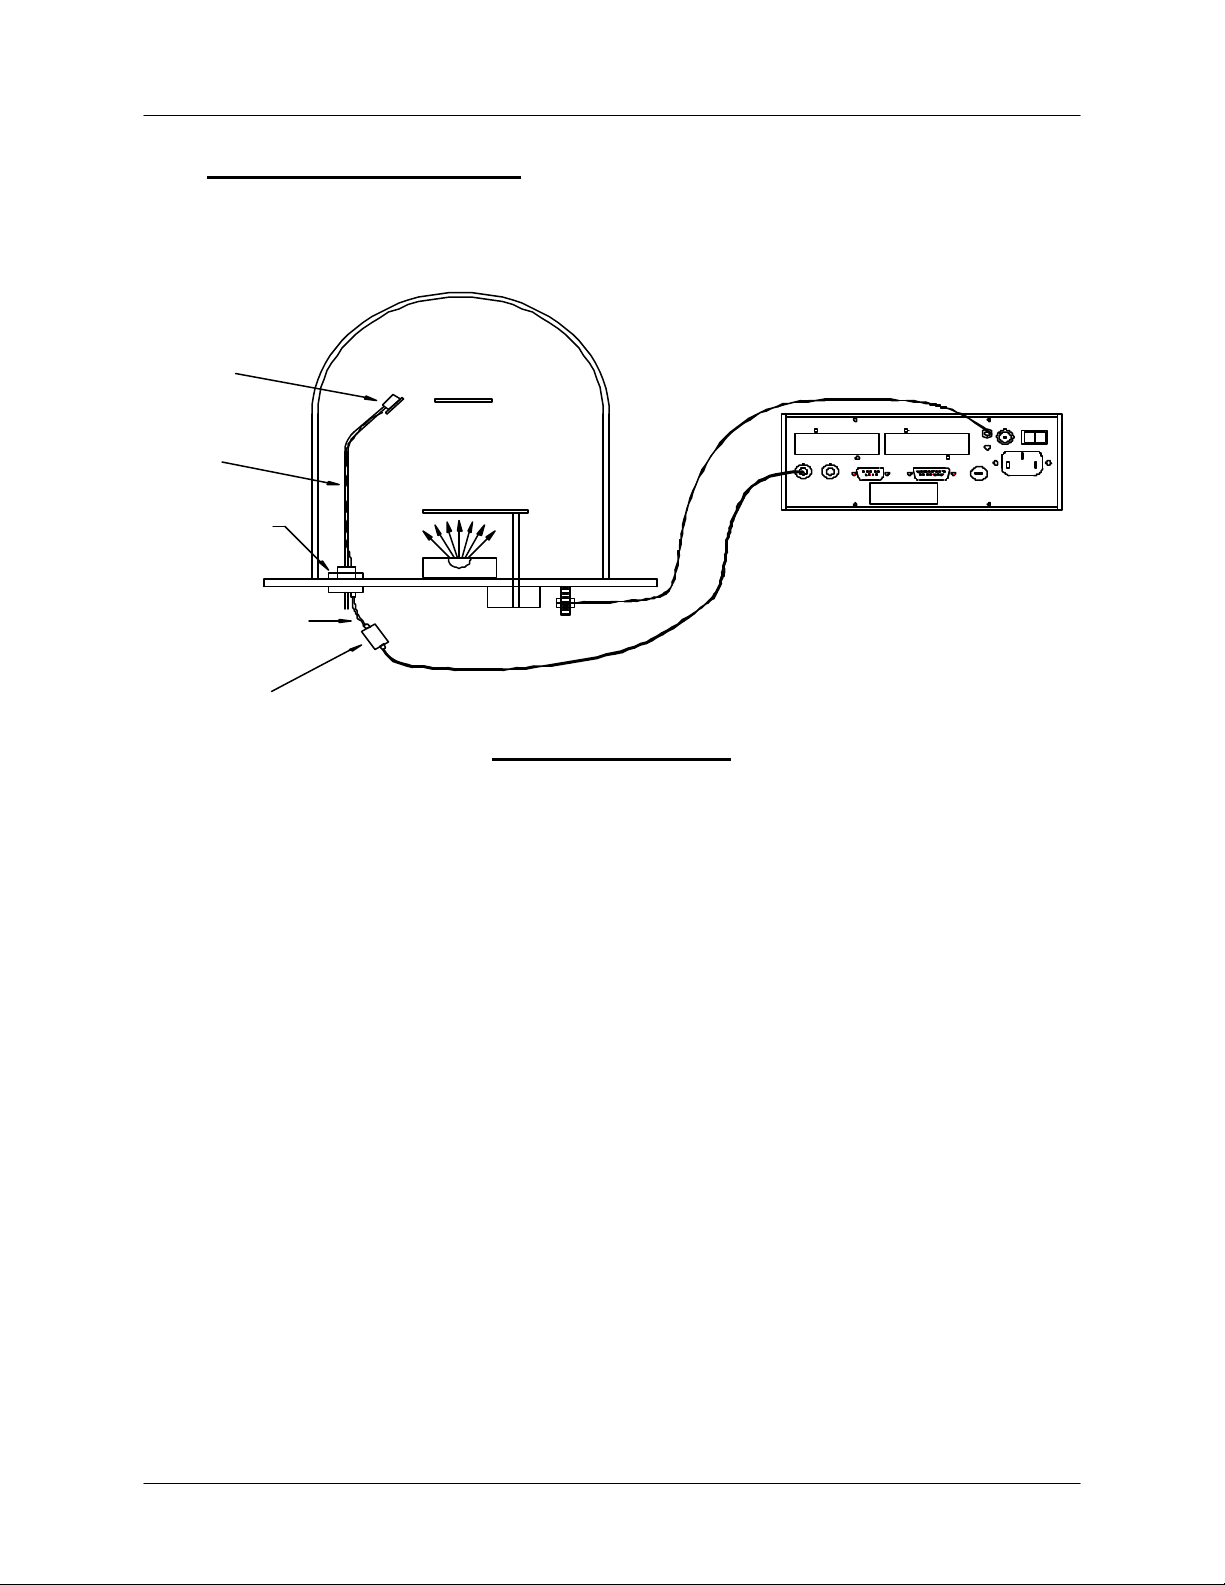
Substrate
2.6 Sensor Tooling
Sensor Tooling adjusts for the difference in deposition rate between the sensor and the
substrate being coated. It is an empirically determined value that matches the sensor
readings to your vacuum system.
Substrate
Tooling
Over 100%
The first Tooling is set in the Film Parameters Menu and is applied to the averaged Rate
and Thickness for all sensors assigned to that film. Film Tooling is a film specific value.
The second Tooling Factor, xTooling, is set in the System Parameters menu. It adjusts
the tooling for each individual sensor before it is averaged. xTooling for a sensor
applies to all films. If the individual sensor xToolings are set properly, a sensor failure
will not cause a jump in the average Rate and Thickness reading.
To adjust xTooling:
1. Press P rogram to enter program mode.
2. Press P rev to enter the System Parameters Menu
3. Press Next until FRQ DISP is shown, then press the Control Knob.
4. Adjust the Control Knob to set the XTLTOOL 1 value
Tooling
Under 100%
5. Depress the Control Knob to save the value and move to XTALTOOL 2.
6. Repeat Steps 4-5 for each of the installed sensors.
7. Press P rogram to exit the System Parameters Menu and return to normal mode.
2-9
Page 21

Chapter 2 Operation
2.7 Rate/Thickness or Frequency Display
The SQM-160 determines deposition rate and thickness by measuring the frequency
shift of a crystal oscillator over time. In some applications, the actual crystal frequency
is desired. Displaying crystal frequency can also be useful in troubleshooting sensor
operation.
To select Rate/Thickness, or Frequency displays:
1. Press P rogram to enter program mode.
2. Press P rev to enter the System Parameters Menu
3. Press Next until FRQ DISP is shown.
4. Turn the Control Knob left or right to select the desired display mode.
5. Depress the Control Knob to accept the value.
6. Press P rogram to exit the System Parameters Menu and return to normal mode.
2.8 Crystal Life Display
The SQM-160 calculates the remaining crystal life based on the FMin/Max values set in
the System Parameters Menu (see Section 2.5).
To display the remaining crystal life for the sensors used by the currently active film:
1. Press the X tal Life switch in the front panel Control section.
2. The sensor is shown in Display 1, the % remaining life, is shown in Display2.
3. Turn the Control Knob to display the % life of other sensors active for this film.
4. Press X tal Life to return to normal rate/thickness, or frequency display.
Note: You cannot enter program mode while the crystal life display is active.
2-10
Page 22
Chapter 2 Operation
2.9 Zero Thickness
Before starting each film deposition, you will probably want to reset the SQM-160
Thickness value to zero. To zero Thickness:
1. Press the Zero switch in the front panel Control section.
In addition to zeroing Thickness, pressing the Zero switch has these effects:
1. The Time display is reset to its programmed value, and starts counting down.
2. The Thickness Setpoint and Timer relays open.
3. The Time SP, Thk SP, and Final Thk LEDs turn off.
2.10 Shutter Operation
The SQM-160 Shutter Relay normally controls the source material shutter. To open or
close the Shutter Relay:
1. Press the S hutter switch in the front panel Control section.
The Open and Closed LEDs light to indicate the Shutter relay status.
2.11 Simulate Mode
In Simulate Mode, the SQM-160 simulates attached sensors. It is an easy way to
become familiar with the SQM-160 front panel controls and programming. In Simulate
Mode you can open/close the shutter to simulate deposition, zero readings, and display
crystal life. You can also test the Time and Thickness setpoint relays and LEDs.
To enter Simulate Mode:
1. Press P rogram to enter program mode.
2. Press P rev to enter the System Parameters Menu
3. Press Next until SIM MODE is shown.
4. Turn the Control Knob left or right to enable and disable Simulate Mode.
5. Depress the Control Knob to accept the value.
6. Press P rogram to exit the System Parameters Menu and return to normal mode.
2-11
Page 23

Chapter 3 Options
3.0 Introduction
The SQM-160 has two slots to accommodate option cards. The Option A slot holds a
Four Sensor Card, which expands the SQM-160 inputs to a total of six quartz crystal
sensors. The Option B Analog Output Card provides Rate and Thickness outputs for
connection to strip chart recorders.
3.1 Installation
WARNING: Hazardous voltages are present inside the SQM-160 when it is
connected to a power source. Remove the power cable before opening the case
to install option cards.
3
Sensor 1 Sensor 2
Manufactured By
Σ
Remove
Top Cover.
Remove Option
Cover Plate
Insert
Option Card
Option A Card
4 5
Sigma
instruments
Ground
110
Line Fuse
Fuse 1/2 A SB at 120VAC
Fuse 1/4 A SB at 240VAC
220
10
6
RS-232
Rate Thick
Model No. SQM-160
Ser No. 80901
Option B Card
Relay I/O
Use a 1/16” hex driver to remove the four screws that attach
the top cover to the chassis. Remove the top cover.
Use a 1/16” hex driver to remove the two 4-40 back panel
screws that hold the option cover plate. Save the screws.
Remove the option cover plate.
Insert the option card, from the inside, through the rear panel
opening. Option A slot is for the Four Sensor Card, Option B
slot is the Analog Output Card. Align the 36-pin option card
connector with the mating pins on the main board. Press the
option card connector onto the main board pins.
Secure
Option Card
Replace Top
Cover
Secure the option card to the rear panel with the screws saved
in Step 2, and to the main board with the supplied 4-40 screw.
Replace the top cover, and attach it to the chassis with the four
screws from Step 1.
3-1
Page 24
Chapter 3 Options
3.2 Four Sensor Card
The SQM-160 automatically detects the presence of the Four Sensor Card.
Refer to System Connections in Chapter 1 for sensor hookup information.
Refer to Chapter 2, Sensor Selection, to assign Four Sensor Card sensors to a film.
3.3 Analog Output Card
Once the Analog Output Card is installed, the SQM-160 System Parameters must be
set to match the device that will be attached to the Rate or Thickness output.
To setup the Analog Output Card in the System Parameters menu:
1. Press P rogram to enter program mode.
2. Press P rev to enter the System Parameters Menu
3. Use Next to move through the system parameters until R/T BNDS is displayed.
4. Depress the Control Knob to display RATE MIN .
5. Adjust the Control Knob to the Rate desired for a 0V output.
6. Depress the Control Knob to save the value and display the RATE MAX setting.
7. Adjust the Control Knob to the Rate desired for a 5V output.
8. Repeat steps 4-7 to adjust the Thickness output values.
9. Press P rogram to exit the System Parameters Menu and return to normal mode.
Refer to System Parameters Setup in Chapter 2 for more information on setting SQM160 System Parameters.
3-2
Page 25

Chapter 4 MonComm Software
4.0 Introduction
Included with the SQM-160 is a Windows 95/98 program, MonComm. MonComm is
used to setup instrument parameters, graph, and save instrument readings.
4.1 Installation
1. Insert installation Disk 1 into your computer’s A Drive.
2. In Windows 95/98 select Start, then Run. Type A:\Setup, then click OK.
3. Follow the on-screen instructions to complete the installation.
4.2 Run MonComm
Before starting the MonComm program, connect the SQM-160 to your computer with
the straight-thru DB-9 cable supplied.
In Windows 95/98 select Start, Programs,
MonComm 1.0, MonComm to start the
program.
The main MonComm screen will appear. If the
SQM-160 was located by the program,
MON Ver X.XX will appear below the menu.
If “No Instrument Found” appears instead,
check your connections, and click Find
Instrument to try again.
At this point, the download list displays the last
films downloaded to the SQM-160. To display
the setup currently stored in the SQM-160,
click Load Unit Films. The Download list is
updated with the SQM-160 films.
4-1
Page 26

Chapter 4 MonComm Software
4.3 Add and Delete Films
To add a new film to the Films List:
1. Click the New Film button.
2. A film named NewFilm# will be added to the end of the films list.
3. Click on this film to highlight it.
4. Change the name of the film - up to eight characters are allowed.
5. Select the material for the film from the Material combo box.
6. The density and the Z-factor for the material will be automatically
changed to that of selected material. Both parameters can be
edited if desired.
7. Change the tooling for the film to the desired percentage.
8. Set the thickness setpoint, final thickness,
and the time setpoint to the desired values
for the film.
9. Select the channels to enable for the film.
A checked box indicates the channel is
enabled for the film. If only two channels
are available, then enabling a channel
above 2 will have no effect.
To delete a film from the Films List:
1. Highlight the film to be deleted by clicking it once in the Films list
box.
2. Click on the Delete Film button.
4-2
Page 27

Chapter 4 MonComm Software
4.4 Download Films
To add or replace a film in the Download List:
1. Highlight the desired film by clicking on
it in the Films list box.
2. Highlight the desired position for the film
in the Download List box.
3. Click on the Add Film button. If there is
already a film in the selected position in
the Download Films box, it will be replaced
with the new film. If there is no film in the
selected position then the “UnitFilm#” will
be replaced with the new film.
To remove a film from the Download List :
1. Highlight the desired film by clicking on it in the
Download Films list box.
2. Click on the Remove Film button. A “UnitFilm#” will
be left in the list as a position holder.
To download the films in the Download List :
Click on the Download Films button. The films in the Download
List box will be placed in the SQM-160 as Films 1 - 9 . A
“UnitFilm#” in the Download List box indicates that the film in that
position will not be affected by the download.
4-3
Page 28
Chapter 4 MonComm Software
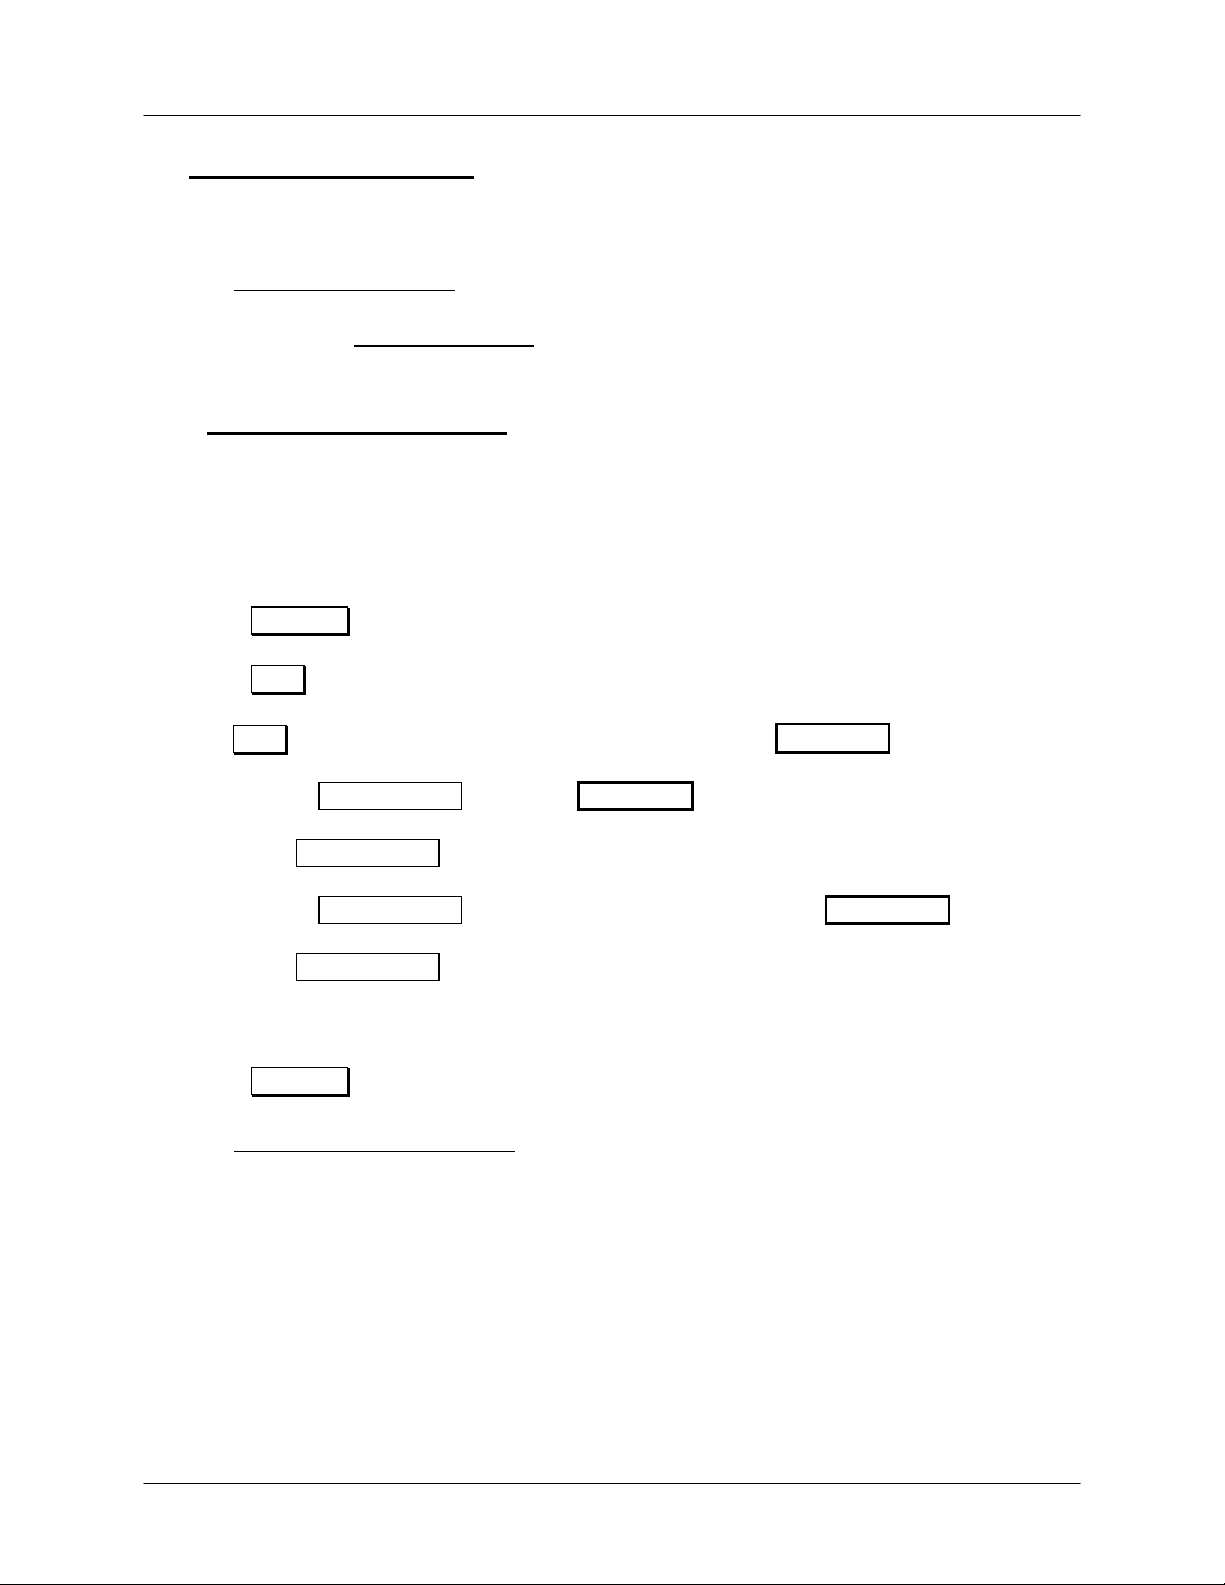
4.5 Graph Data
The SQM-160 graphs are accessed by clicking the Graph button.
Two graphs of data from the SQM-160 can be displayed. The first displays the average
rate of all active channels versus time. The second graph displays each individual
channel’s rate versus time. To the right of the graph average rate, average thickness,
each channel’s rate, elapsed time, and estimated time remaining until final thickness are
displayed.
The display is changed from one graph to the other by clicking on the Channel/Average
button in the upper left hand corner of the screen. The caption on the button is the
graph that will appear if the button is clicked.
Graphing begins when the Go button is clicked. Graphing continues until the Stop
button is clicked.
4-4
Page 29
Chapter 4 MonComm Software
To Adjust the Graph’s Scope:
1 Select the Configure menu followed by the Graph sub menu item to display the
graphs configuration form.
2. Adjust the graph
minimums and maximums
as desired. The X and Y
divisions determine the
number of ticks between
graph numerical markings
and grid placement for
each axis. The X and Y
grids can be enabled or
disabled with X and Y Grid
check boxes.
4.6 Save Data
Your can save the data for Average Thickness, Average Rate, and each channel’s Rate
in an Excel format spreadsheet.
1. Click on the File menu followed by the New sub menu.
2. Enter a name for the file in the Save In dialog box.
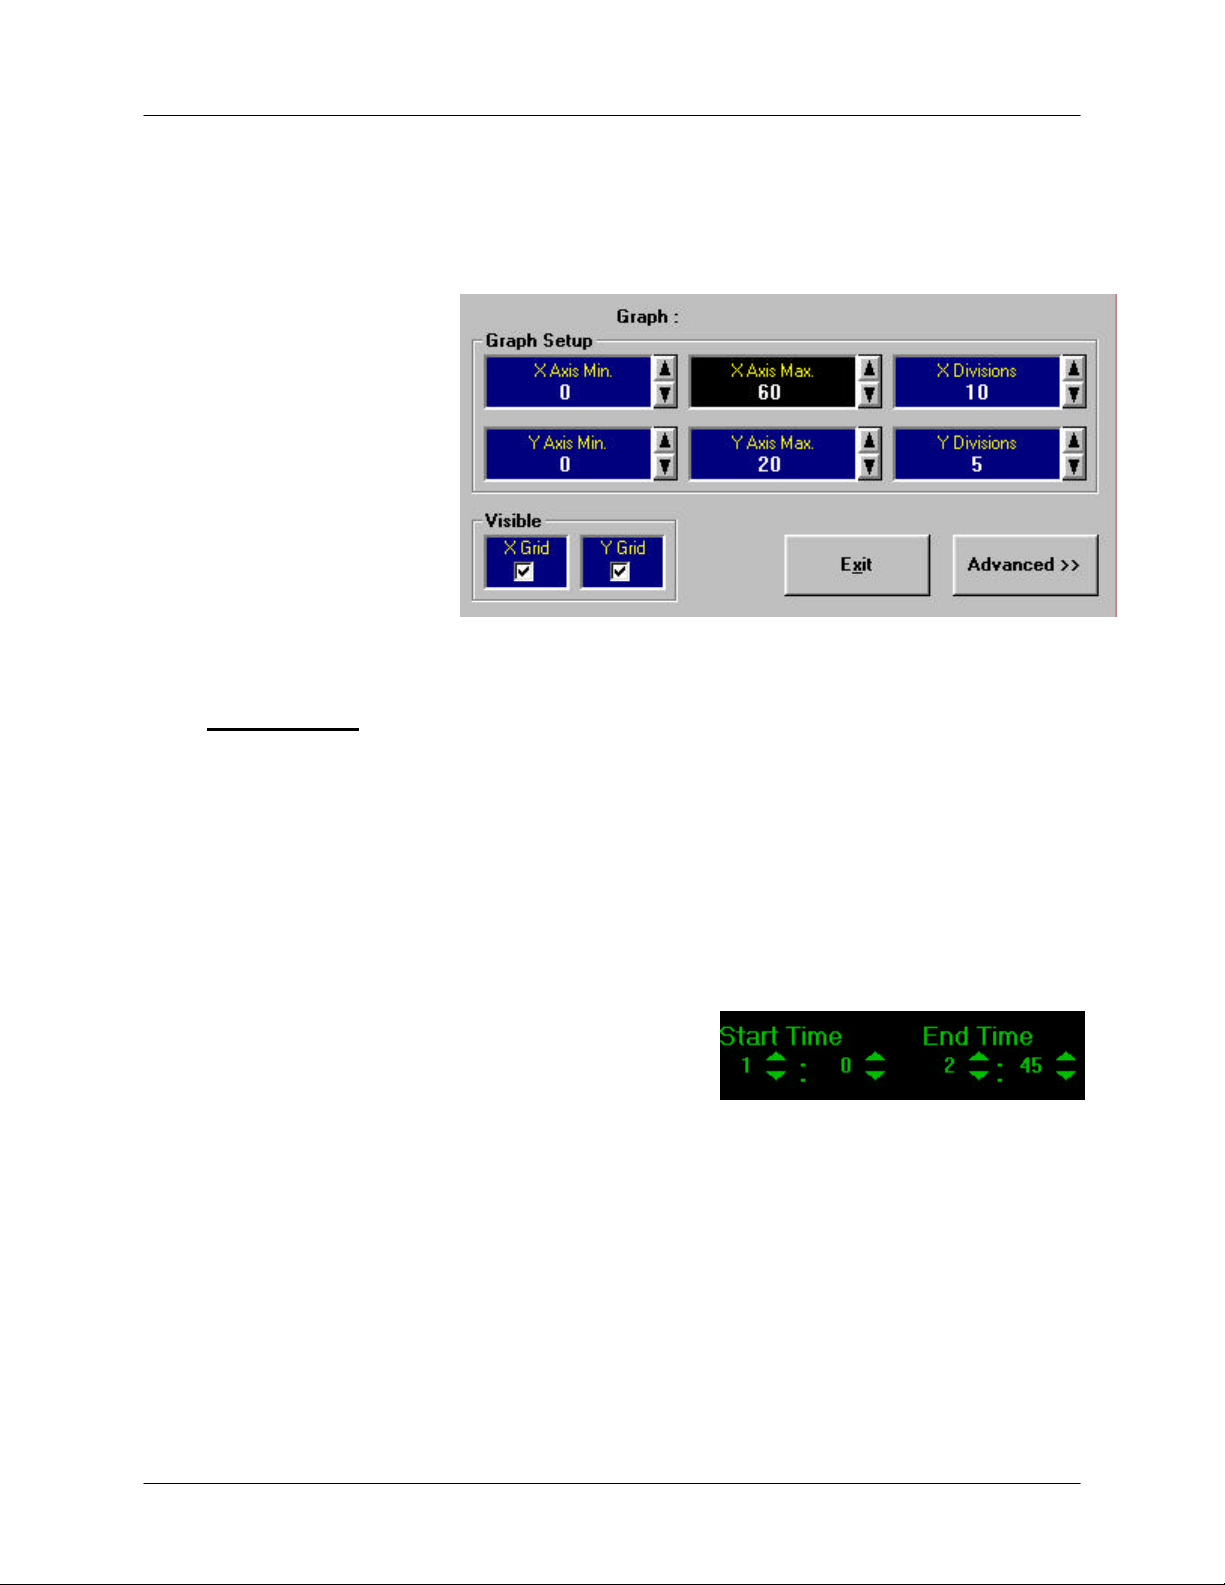
3. First set the starting time for the readings by
adjusting the Start Time display to the desired
minutes and seconds.
4. Next adjust the ending time for the window in the End Time display. The recording of
the data will begin when the graph time reaches the Start Time and end when the graph
reaches the End Time or the graphing is stopped.
4-5
Page 30
Chapter 4 MonComm Software
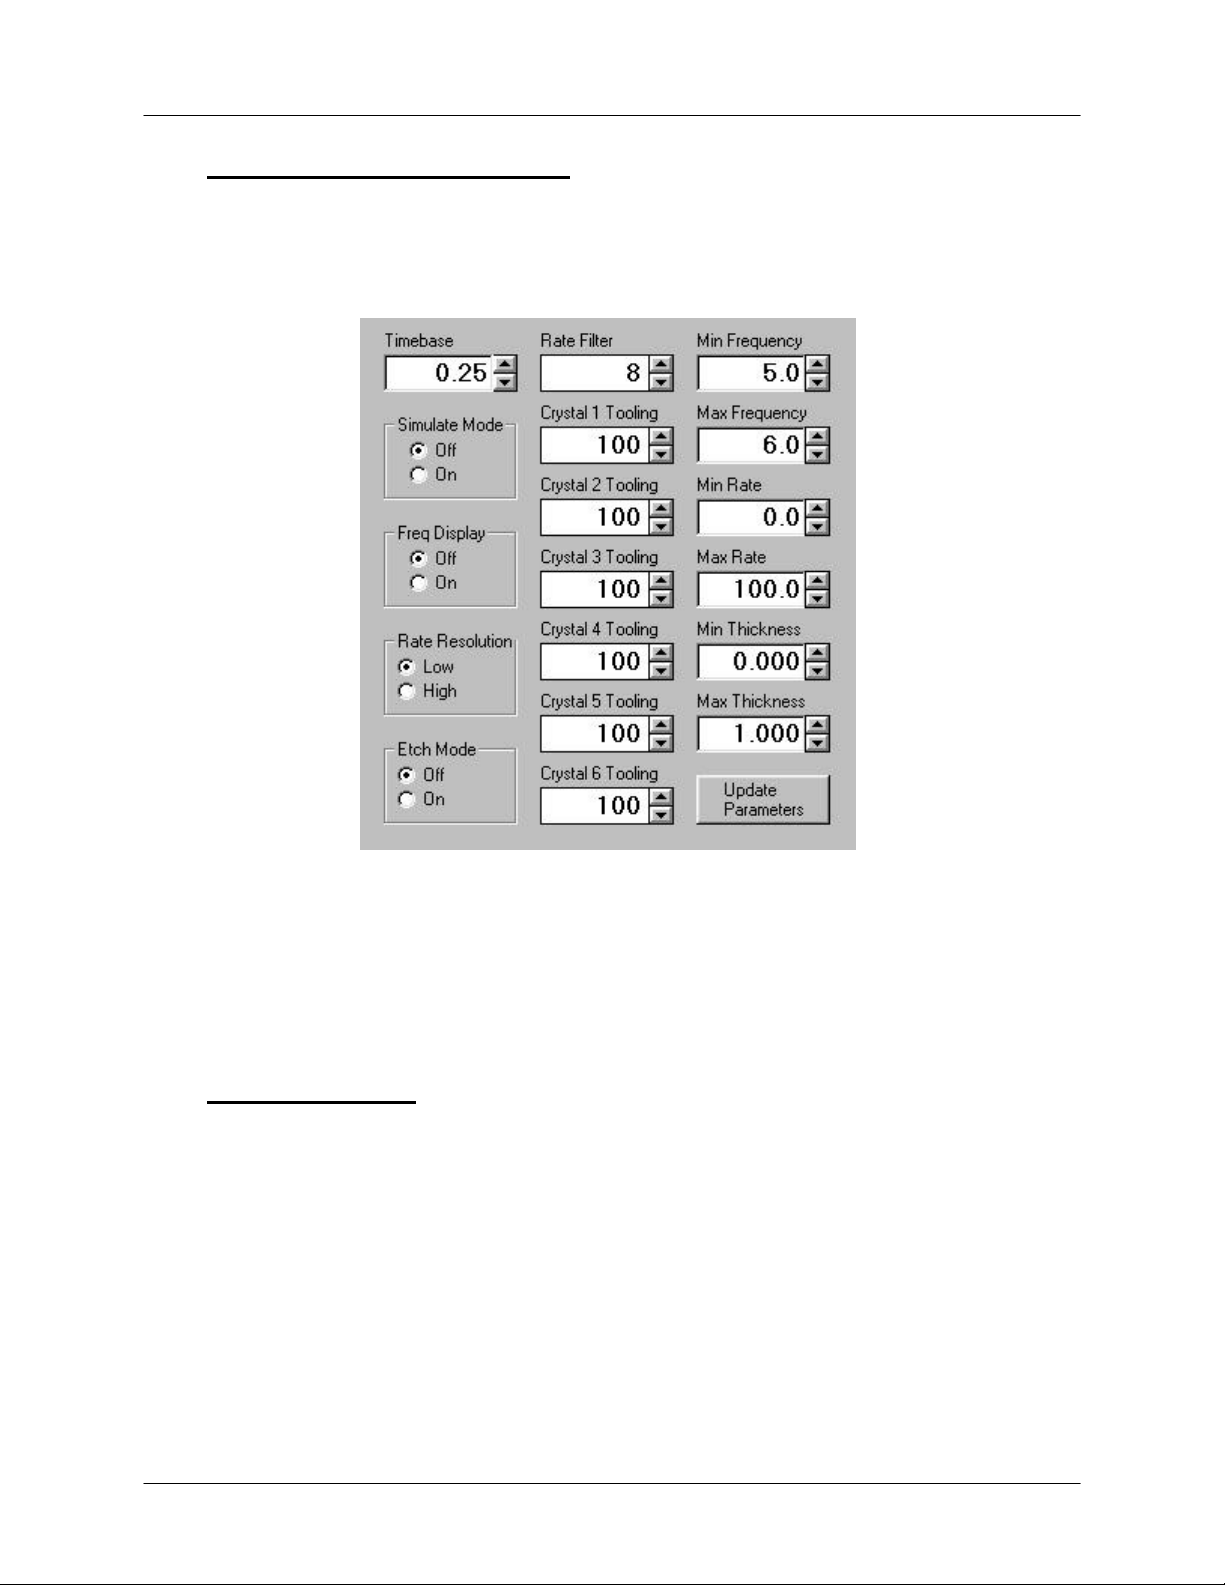
4.7 Edit System Parameters
System Parameters are accessed by clicking on the Config menu item followed by the
System sub menu. All of the system parameters, except Baud Rate, are available for
edit.
The system parameters are downloaded to the SQM-160 by clicking on the Update
Parameters button. The parameters can be reloaded into the form from the SQM-160 by
clicking the Refresh menu item.
Return to the main display by clicking on the Exit menu item.
4.8 Load Defaults
The default film and system parameters can be loaded by clicking on the Config menu
item followed by the Load Defaults sub menu item. The SQM-160 loads all default
values into its parameters upon receipt of this command.
4-6
Page 31

Chapter 5 Maintenance
5.0 Introduction
WARNING: There are no user adjustments, or serviceable parts, inside the SQM-160.
For maintenance or repair, contact
Sigma Instruments
1318 Duff Drive
Fort Collins, CO 80524 USA
970-416-9660
5.1 Fuse Replacement
WARNING: Remove the power cable before replacing the fuse.
Option A Card
3 4 5 6
Sensor 1 Sensor 2
Manufactured By
Sigma
Σ
instruments
Rate Thick
RS-232
Model No. SQM-160
Ser No. 80901
Option B Card
Relay I/O
Ground
110
Line Fuse
Fuse 1/2 A SB at 120VAC
Fuse 1/4 A SB at 240VAC
220
10
The SQM-160 is shipped with a ½ A Fuse for use with 90–120 VAC. If your line voltage
is 180–240 VAC, replace the fuse with the ¼A fuse included with your SQM-160.
WARNING: Always replace the Line Fuse with the same size and type fuse
specified above.
5-1
Page 32

Appendix
A. Material Parameters
Material Density ZFactor Material Density ZFactor
Aluminum 2.73 1.08 Manganese 7.2 0.377
Aluminum Oxide 3.97 1 Manganese Sulfide 3.99 0.94
Antimony 6.66 0.766 Mercury 13.46 0.74
Arsenic 2.9 0.966 Molybdenum 10.2 0.257
Barium 3.5 2.1 Neodymium Fluoride 6.506 1
Beryllium 1.87 0.543 Neodymium Oxide 7.24 1
Bismuth 9.8 0.79 New 1 1
Bismuth Oxide 8.92 1.003 Nickel 8.91 0.331
Boron 2.54 0.389 Niobium 8.57 0.493
Cadmium 8.64 0.682 Niobium Oxide 4.47 1
Cadmium Selenium 5.82 1 Palladium 12 0.357
Cadmium Sulfide 4.83 1.02 Platinum 21.4 0.245
Cadmium Teluridium 5.85 0.98 Potassium Chloride 1.98 2.05
Calcium 1.55 2.62 Rhenium 21.04 0.15
Calcium Fluoride 3.18 0.775 Rhodium 12.41 0.21
Carbon Diamond 3.52 0.22 Samarium 7.54 0.89
Carbon Graphite 2.25 3.26 Scandium 3 0.91
Cerium Fluoride 6.16 1 Selenium 4.82 0.864
Cerium Oxide 7.13 1 Silicon 2.32 0.712
Chromium 99.9 0.305 Silicon Dioxide 2.21 1.07
Chromium Oxide 5.21 1 Silicon Oxide 2.13 0.87
Cobalt 8.71 0.343 Silver 10.5 0.529
Copper 8.93 1 Silver Bromide 6.48 1.18
Copper Sulfide 4.6 0.82 Silver Chloride 5.56 1.32
Copper Sulfide B 5.8 0.67 Sodium 0.97 4.8
Copper Sulfide A 5.6 0.69 Sodium Chloride 2.17 1.57
Dysprosium 8.54 0.6 Sulfur 2.07 2.29
Erbium 9.05 0.74 Tantalum 16.6 0.262
Gadolinium 7.89 0.67 Tantalum Oxide 8.2 0.3
Gallium 5.93 0.593 Tellurium 6.25 0.9
Gallium Arsenide 5.31 1.59 Terbium 8.27 0.66
Germanium 5.35 0.516 Thallium 11.85 1.55
Gold 99.9 1.111 Thorium Fluoride 6.32 1
Hafnium 13.1 0.36 Tin 7.3 0.724
Hafnium Oxide 9.63 1 Titanium 4.5 0.628
Holnium 8.8 0.58 Titanium Oxide 4.9 1
Indium 7.3 0.841 Titanium Oxide IV 4.26 0.4
Indium Intimnide 5.76 0.769 Tungsten 19.3 0.163
Indium Oxide 7.18 1 Tungsten Carbide 15.6 0.151
Iridium 22.4 0.129 Uranium 18.7 0.508
Iron 7.86 0.349 Vanadium 5.96 0.53
Lanthanum 6.17 0.92 Ytterbium 6.98 1.13
Lanthanum Fluoride 5.94 1 Yttrium 4.34 0.835
Lanthanum Oxide 6.51 1 Yttrium Oxide 5.01 1
Lead 11.3 1.13 Zinc 7.04 0.514
Lead Sulfide 7.5 0.566 Zinc Oxide 5.61 0.556
Lithium 0.53 5.9 Zinc Selenide 5.26 0.722
Lithium Fluoride 2.64 0.774 Zinc Sulfide 4.09 0.775
Magnesium 1.74 1.61 Zirconium Oxide 5.6 1.001
Magnesium Fluoride 3 1
Page 33

B. Specifications
Measurement
Number of Sensors
Frequency Range
Frequency Accuracy
Frequency Resolution
Rate Accuracy
Rate Resolution
Thickness Accuracy
Thickness Resolution
Measurement Filter
Measurement Period
Film Parameters
Stored Films
Density
Tooling
Z-Factor
Final Thickness
Thickness Setpoint
Time Setpoint
Appendix
2 standard, plus 4 optional
4.0MHz to 6.0Mhz
.01% @ 2 rdgs/sec.
.1 Hz
.5% typical
.01/.1 Å/s
.5% typical
1 Å
1 to 20 readings
.15 to 2 sec
9
0.5 – 99.99 gm/cc
10 – 399 %
0.10 – 10.00
0.000 – 99.99 kÅ
0.000 – 99.99 kÅ
0:00 – 99:59 sec
System Parameters
Simulate Mode
Frequency Mode
Etch Mode
Crystal Fail Minimum.
Crystal Fail Maximum
RS-232 Baud Rate
General Specifications
Power Supply
Power Consumption
Operating Environment
Storage Environment
Operating Altitude
Rack Dimensions (HxWxD)
Weight
Accessories
On/Off
On/Off
On/Off
4.0 to 6.0 MHz
4.1 to 6.1 MHz
2.4/4.8/9.6/19.2 kb/s
90-140VAC, 180-240VAC, 50-60HZ
20VA
0°C to 50°C
0 to 80% RH non-condensing
-40°C to 70°C
0 to 2,000 meters
88.5mm x 212.7mm x 196.9mm
13.2 kg (6 lbs)
Power Cord, Rack Mount Ears,
Relay I/O Connector, RS-232 Cable,
MonComm Software, Manual
Page 34

Appendix
C. I/O Connections
A 15-pin female D-sub connector is included with the instrument to connect digital I/O to
the SQM-160 Relay I/O connector. The figure below shows the solder side pin
assignments for the connector.
1 8
9 15
Relay I/O Connector Rear View
Relays are rated for 125VAC or 30VDC, 2A maximum. Inputs can be activated either
by connecting to a switch and shorting to Ground, or they can be driven by a TTL
compatible signal. These are not isolated inputs! The voltage level applied must be
limited to between 0 and +5 volts with respect to Ground.
Pins Type Description
1,2 Relay Crystal Fail Relay, contacts closed when all
enabled sensors have failed.
3,4 Relay Timer Setpoint, contacts closed when timer
reaches Zero from its programmed value.
5,6 Relay Shutter Relay, contacts closed when shutter
is open.
7,8 Relay Thickness Setpoint Relay, contacts close
when thickness value reached.
9 Input Zero Timer Input, grounding this pin will zero
the timer.
10 Input Zero Thickness Input, grounding this pin will
zero the thickness reading.
11 Input Close Shutter Input, grounding this pin will
close the shutter.
12 Input Open Shutter Input, grounding this pin will
open the shutter.
13,14,15 Ground
Page 35

D. Declaration of Conformity
Manufacturer’s Name: Sigma Instruments
Manufacturer’s Address: 1318 Duff Drive
Fort Collins, CO 80524 USA
declares that the product:
Product Name: Rate/Thickness Monitor
Product Model: SQM-160
Product Options: All Options
Appendix
conforms to the following Product Specifications:
Safety: IEC
CSA
UL
EMC: CISPR
IEC
IEC
IEC
Supplementary Information: This product complies with the requirements of the Low
Voltage Directive 73 / 23 / EEC and the EMC Directive 89 / 336 / EEC (inclusive 93 / 68
/ EEC) and carries the “CE” mark accordingly.
Fort Collins, Colorado April 2000
Gary L. Halcomb
President
 Loading...