

Page 1
J E D F N Es I Dk C K R
用戶手冊
사용자 설명서
r
r
F40S07Z01
ELECTRONIC FLASH
EF-140 DG SA-STTL
使用説明書 ISTRUZIONI PER L’USO
INSTRUCTIONS BRUGSANVISNING
BEDIENUNGSANLEITUNG 用
MODE D’EMPLOI
GEBRUIKSAANWIJZING
PУКOВOДCТВO ПO ЭКСПЛУАТАЦИИ
INSTRUCCIONES
SIGMA CORPORATION
2-4-16 Kuriki, Asao-ku, Kawasaki-shi, Kanagawa 215-8530 Japan
Phone : 044 - 989 - 7430 Fax : 044 - 989 – 7451
株式会社シグマ
本 社
工 場
札幌営業所
大阪営業所
福岡営業所
インターネットホームページアドレス
http://www.sigma-photo.co.jp
〒215-8530 神奈川県川崎市麻生区栗木 2 丁目 4 番 16 号
(
044) 989-7430
(代) FAX: (044) 989-7451
(カスタマーサービス直通)
〒969-3395 福島県耶麻郡磐梯町大字大谷字日知坂 6594
0242(73)2771(代)
〒007-0865札幌市東区伏古 5 条 4 丁目 1 番 9 号 伏古ビル 2F
011(786)3710
〒541-0059 大阪市中央区博労町 1-7-2 堺筋トラストビル 8F
06(6271)1548
〒
812-0013
福岡市博多区博多駅東
092(475)5635
(
044) 989-7436
1-11-15
博多駅東口ビル6F
ENGLISH
Thank you for purchasing the Sigma EF-140 DG SA-STTL Electronic Flash.
This product is specifically developed for the SIG MA DP1 camera. To make the
most of all these features, and to get the maximum performance and enjoyment
from your flash, please read this instruction booklet, together with your camera’s
instruction manual, before using the flash, and also keep it handy for your future
reference.
PRECAUTIONS
Symbol denotes the important points, where warning and caution are required.
Symbol contains information regarding the actions that must be avoided.
Warning !!
Disregarding this warning sign when using the product might cause serious injury or
other dangerous results.
This flash contains high voltage circuits. To avoid electric shock or burns, do not
attempt to disassemble the flash. If the outside shell of the unit is broken or
cracked, do not touch the mechanism inside.
Do not fire the flash close to eyes. Otherwise the bright light could damage the
eyes. Keep at least 1m/3feet distance between the face and the flash unit when
taking a picture with flash.
Do not touch the synchro terminal of your camera when the flash is attached to
hot shoe. High voltage circuitry could cause electric shock.
Never use your camera in an environment where flammable, burnable, gas,
liquids or chemicals, etc, exist. Otherwise, it might cause fire or explosion.
Caution!!
Using the product and disregarding this caution sign might cause injury or damage.
Do not use this flash unit on any camera other than the SIGMA DP1 / SD14
cameras; otherwise the flash may damage the circuitry of these cameras.
This flash unit is not waterproof . When usin g the flas h and camera in the rain o
snow or near water, keep it from getting wet. It is often impractical to repair
internal electrical components damaged by water.
Never subject the flash and camera to shock, dust, high temperature or h umidity.
These factors might cause fire or malfunctioning of your equipment.
When the flash is subjected to sudden temperature change, as when the flash
unit is brought from a cold exterior to warm interior, condensation might form
inside. In such a case, place your equipment in a sealed plastic bag before such
a change, and do not use the flash unit until it reaches room temperature.
Do not store your flash in a drawer or cupboard etc., containing naphthalene,
camphor or other insecticides. These chemicals will have negative effects on the
flash unit.
Do not use a thinner, Benzene or other cleaning agents to remove dirt or finge
prints from the component. Clean with a soft, moistened cloth.
For extended storage, choose a cool dry place, preferably with good ventilation.
It is recommended that the flash be charged and fired several times a month, to
maintain proper capacitor functioning.
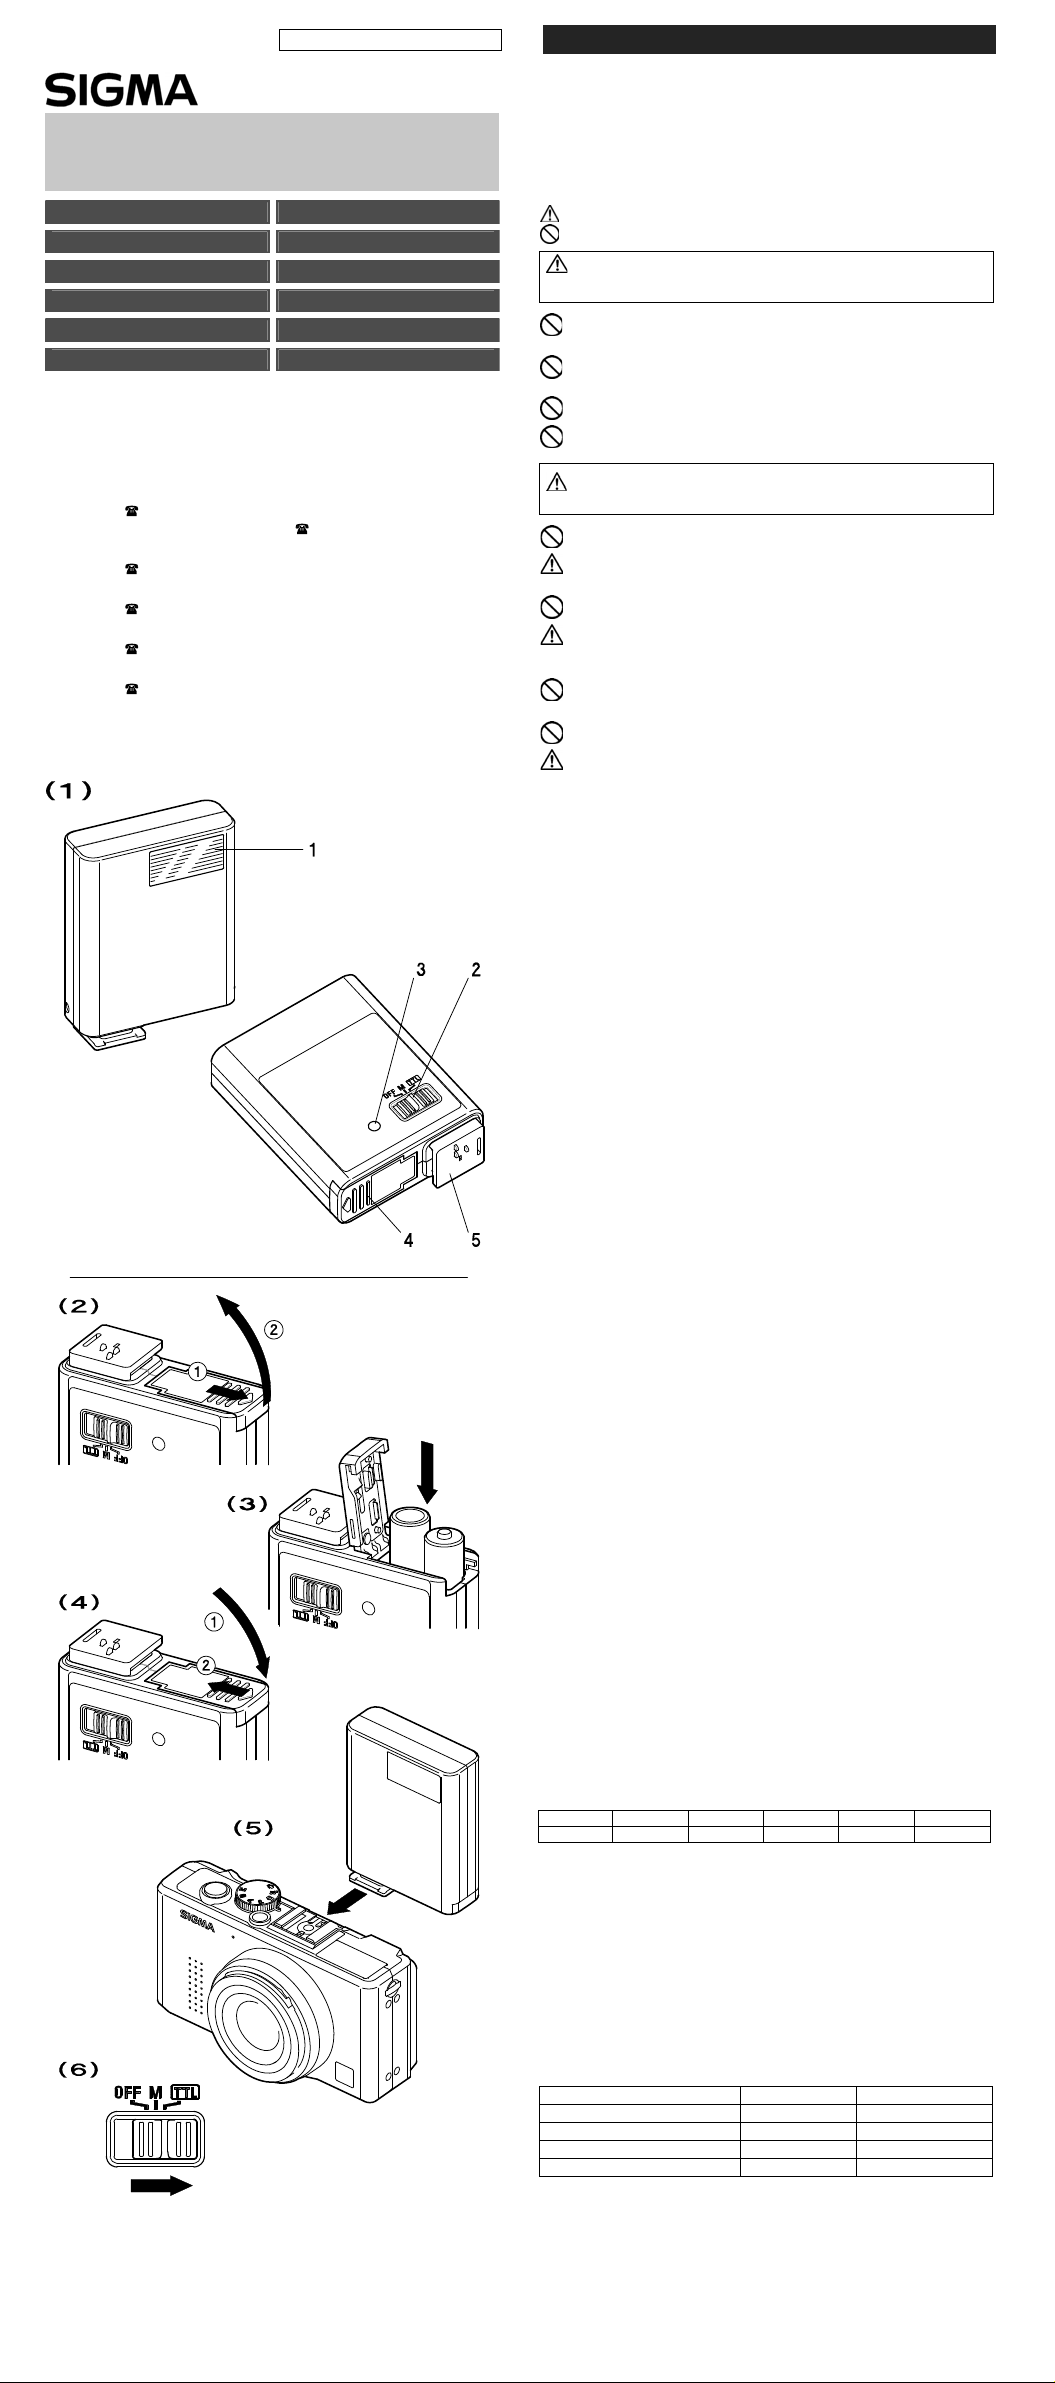
DESCRIPTION OF THE PARTS (fig.1)
1.Flash Head 2.Power Switch 3.Ready Light
4.Battery Compartment Cover 5.Shoe
ABOUT THE BATTERY
This flash unit uses “AAA” type Alkaline dry cell batteries, Ni-MH rechargeable
batteries, Oxyride dry cell batteries or Lithium batteries. Please replace the
batteries if it takes more than 30 seconds to light the Ready Lamp.
To assure proper electrical contact, clean the battery terminals before
installing the batteries
To prevent battery explosion, leakage or overheating, use two new AAA
batteries of the same type and brand. Do not mix the type or new and used
batteries.
Do not disassemble or short-circuit batteries, or expose them to fire or water;
they may explode. Also, do not recharge the batteries other than Ni-MH
rechargeable batteries.
When the flash will not be used for an extended period of time, remove the
batteries from the flash to avoid the possibility of damage from leakage.
Battery performance decreases at low temperatures. Keep the batteries
insulated when using the flash in cold weather.
BATTERY LOADING
1. Be sure to set the Power Switch to the off position then sli de the battery
cover in the direction of the arrow to open (fig.2).
2. Insert two AAA size batteries into the battery component. Be sure the + and
– ends of the batteries are aligned according to the diagram in the
component (fig.3).
3. Close the cover (fig.4).
4. Slide the Power Switch to the ON position. After few seconds, the Ready
Lamp will light, indicating that the flash unit can be fired.
ATTACHING THE FLASH TO THE CAMERA
Be sure turn off the Power Switch. Remove the hot shoe cover of the camera
and attach the flash unit to the camera as shown in the picture. (fig.5)
When you attach or remove the flash, grasp the bottom of the flash to prevent
damage to the shoe foot and camera’s hot shoe.
If the camera’s built-in flash is set in the up position, please close it before you
attach the flash unit.
TTL AUTO FLASH
In the TTL AUTO Mode, the camera will control the amount of flash lighting to
get the appropriate exposure for the subject.
1. Slide the Power Switch to the TTL Position (fig.6).
2. Focus onto the subject.
3. Press the shutter button after the flash is charged.
To conserve battery power, the flash unit automatically turns itself off when
the flash is not used within approximately 300 seconds. To turn the flash on
again, press the camera shutter button halfway.
When the exposure mode is set to AUTO or P Mode or the ISO Setting is in
Auto, the effective distance range is 0.3 meter to 7 meters.
MANUAL FLASH OPERATION
It is possible to use manual flash with this flash uni t (Flash power level can be
set to Full).
1. Set the camera’s exposure mode to M.
2. Slide the power switch to the M position.
3. Set the aperture value calculated by the following formula.
GN (Guide Number) / D (Flash to Subject Distance [m]) = F stop.
4. When the Ready Light of the flash unit is illuminated, the unit is ready to use.
The Guide Number will be varied depending on the ISO sensitivity value set in
the camera. Please refer the following chart.
ISO 50 ISO 100 ISO 200 ISO 400 ISO 800 ISO 1600
10 14 20 28 40 56
For example, an ISO sensitivity value of 400 and the distance to the subject of
5 meters, the aperture value will be F5.6 according to the above.
28 (GN) / 5 (D) =5.6 (F)
If the DP1's Exposure Mode is set to "Auto Mode", Manual Flash cannot be
used. Please set your camera's exposure mode to one of the following
modes: P, A, S or M for using Manual Flash operation of the EF-140DG.
To prevent overheating of the fl ash unit, p lease do not use you r flash unit for
at least 10 minutes after continuously firing the flash for up to 10 continuous
flash shots.
SPECIFICATIONS
TYPE: Clip-on type serial-controlled TTL auto electric flash
GUIDE NUMBER: 14 (ISO 100/m)
POWER SOURCE / RECYCLING TIME / NUMBER OF FLASHES:
Power Source(two pieces) Recycling Time Number of flashes
AAA type Ni-MH batteries About 5.5 sec. About 170 flashes
AAA type alkaline batteries About 5.5 sec. About 90 flashes
AAA type Oxyride batteries About 5 sec. About 100 flashes
AAA type Lithium batteries About 6.5 sec About 260 flashes
FLASH DURATION: about 1 / 2200 sec. (full power firing)
FLASH ILLUMINATE ANGLE: Covers the angle of a 16.6mm lens with DP1
and SD format
AUTO POWER OFF: Available
WEIGHT: 68g
DIMENSIONS : 56.5mm (W) x 73.5mm (H) x 20.5mm (L).
 Loading...