

BIKE COMPUTER TOPLINE
GBDKFINNSTRSLOSKBGRUS
BC 2209 MHR
www.sigmasport.com

CONTENTS
CONTENTS
1 Introduction and packaging contents .................................................................... 3
2 Installation on the bike ............................................................................................... 4
2.1 Installation of the 2nd bike ................................................................................................. 5
3 Start-up .......................................................................................................................... 5
4 Display change/Key functions/Function overview ........................................... 6
5 Synchronisation . .......................................................................................................... 6
6 The basic settings ....................................................................................................... 7
6.1 Setting the language .......................................................................................................... 8
6.2 Setting KMH/MPH ............................................................................................................. 8
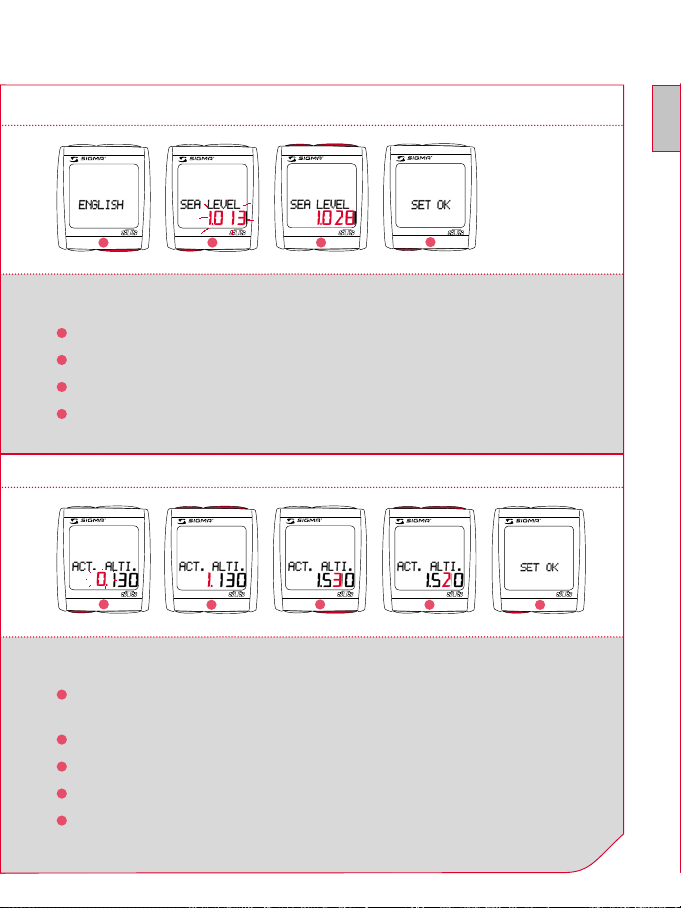
6.3 Setting air pressure to sea level (SEA LEVEL) ........................................................... 9
6.4 Setting actual altitude ........................................................................................................ 9
6.5 Setting home altitude ...................................................................................................... 10
6.6 Calculating wheel size ..................................................................................................... 10
6.7 Set wheel size bike 1 and bike 2 ................................................................................. 11
6.8 Setting the clock ............................................................................................................... 12
6.9 Setting your age ............................................................................................................... 12
6.10 Setting your weight .......................................................................................................... 13
6.11 Setting your gender ......................................................................................................... 13
6.12 Setting the total odo for bike 1 or bike 2 ................................................................. 14
6.13 Setting the total trip time for bike 1 or bike 2 ........................................................ 14
6.14 Setting the total altitude for bike 1 or bike 2 .......................................................... 15
6.15 Setting the contrast ........................................................................................................ 15
6.16 Exiting basic settings ...................................................................................................... 16
7 General functions ..................................................................................................... 16
7.1 Display illumination .......................................................................................................... 16
7.2 Compare Speed ................................................................................................................ 16
7.3 Showing/hiding the cadence/heart rate functions ............................................. 17
7.4 Calibrating the home altitude ....................................................................................... 17
7.5 Stopwatch ........................................................................................................................... 17
7.6 Countdown ......................................................................................................................... 18
7.7 Trip up/down .................................................................................................................... 19
7.8 Reset Display ..................................................................................................................... 20
7.9 Totals bike 1 and bike 2 ................................................................................................. 20
7.10 Service interval ................................................................................................................. 20
7.11 Transport mode ................................................................................................................ 21
7.12 PC interface ....................................................................................................................... 21
7.13 Cable-connected universal bracket ............................................................................. 21
2
www.sigmasport.com

CONTENTS
8 Measuring the Altitude ........................................................................................... 21
8.1 Introduction ........................................................................................................................ 21
8.2 Calibration possibilities of the BC 2209 MHR ....................................................... 22
9 The hiking mode ........................................................................................................ 23
9.1 Introduction ........................................................................................................................ 23
9.2 Synchronisation ................................................................................................................ 23
9.3 Setting of the hiking time ............................................................................................... 24
9.4 Setting the target time ................................................................................................... 24
9.5 Reset Display ..................................................................................................................... 25
9.6 Showing/hiding the heart rate functions ................................................................. 25
10 Technical Data ........................................................................................................... 26
10.1 Default/Min/Max values .............................................................................................. 26
10.2 Battery Change ................................................................................................................. 27
10.3 Trouble Shooting .............................................................................................................. 28
10.4 Warranty ............................................................................................................................ 29
1 INTRODUCTION AND PACKAGING CONTENTS
GB
Congratulations on having chosen a bicycle computer from SIGMA SPORT
®
. Your new
BC 2209 MHR will provide you reliable service in riding your bike for many years to come.
The BC 2209 MHR is a state-of-the-art measuring instrument. Please read instructions
carefully to become familiar with the functions and usage of this bicycle computer.
SIGMA wishes you an enjoyable time using your BC 2209 MHR.
The BC 2209 MHR is fitted with an automatic Start/Stop. As soon as this is assembled
on the mounting bracket a movement sensor activates the BC 2209 MHR at the smallest
movement of the bicycle or the hiking mounting. This automatically starts the connection.
BC 2209 MHR
3
1 INTRODUCTION AND PACKAGING CONTENTS
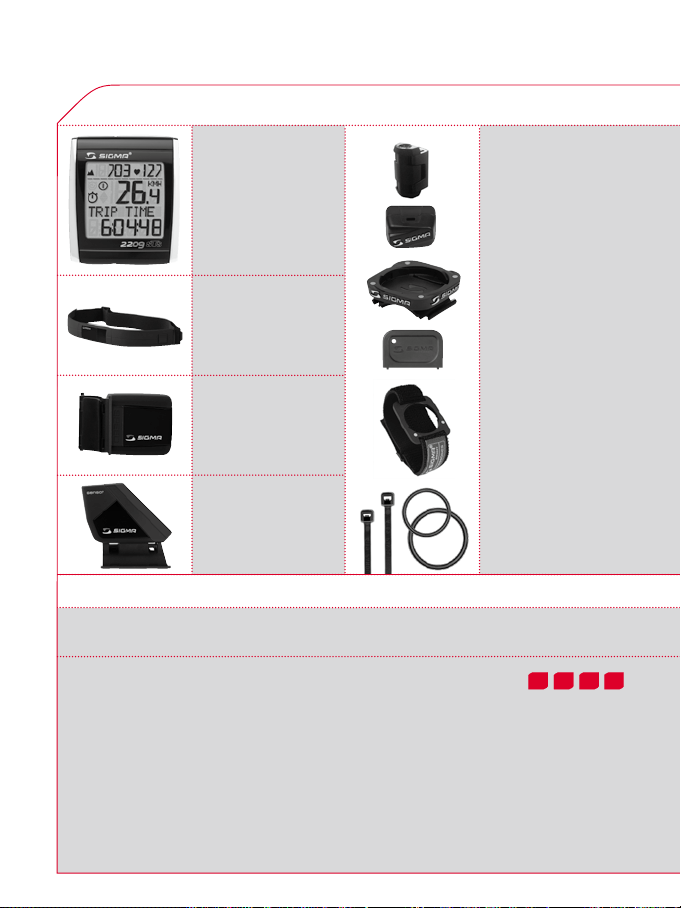
1 PACKAGING CONTENTS
Bike computer
kSpoke magnet
BC 2209 MHR
kCadence magnet
kHandlebar bracket
kBattery compartment
key
STS chest belt
including elastic belt
kWrist strap
kFastening material
STS speed
transmitter
STS cadence
transmitter
2 INSTALLATION ON THE BIKE
The illustrations for these installation texts can be found on the enclosed folding sheet!
INSTALLING THE BIKE BRACKET
kThe bracket can either be installed with cable ties (permanent attachment)
or optionally using the O-rings.
kHandelbars or front end.
kRemove the yellow foil.
4321
4
www.sigmasport.com
2 INSTALLATION ON THE BIKE
INSTALLING THE TRANSMITTERS –
5
SPEED AND CADENCE
kBoth transmitters can either be installed with cable ties
(permanent attachment) or optionally using the O-rings.
kIn order to achieve the necessary 12mm or less install the transmittter
and the magnet closer to the wheel hub.
INSTALLING THE MAGNETS –
SPEED AND CADENCE/
PUTTING ON THE CHEST BELT
kRub water or cardio-gel on the electrodes.
nd
2.1 INSTALLATION OF THE 2
BIKE
Switching between BIKE 1 and BIKE 2 is automatic.
A second speed transmitter must be used
(Accessory set “BIKE 2” Ref.-No. 00417,
“BIKE 2 incl. cadence” Ref.-No. 00415)
3 START-UP
For reasons of energy consumption, the BC 2209 MHR is supplied
without a battery.
Please insert the battery by opening the battery compartment
cover with the tool provided. Once you have inserted the battery,
close the battery compartment with the aid of the tool.
8
7
6
21
9
15 16
141312
19
18
17
24
23
22
11
10
o
p
e
n
-
c
l
o
s
e
GB
The display automatically jumps to setting mode.
BC 2209 MHR
2209
5

4 DISPLAY CHANGE/KEY FUNCTIONS/FUNCTION OVERVIEW
RESET
Reset the functions
listed below or scroll
backwards in a menu level.
SET
Set and save
the entered values.
Access the functions
listed below or scroll
forwards in a menu level.
2209
Access the functions
MODE 2
MODE 1
listed below.
MODE 1 MODE 2
BIKE MODE TRIP DIST CADENCE TRIP UP +/-
TRIP TIME AVG. PULSE TEMPERATUR
AVG. SPEED MAX. PULSE TOTAL ODO*
MAX. SPEED KCAL TOTAL TIME*
AVG. CAD CLOCK TOTAL ALTI*
TRIP CLIMB +/- STOPWATCH
MAX. ALTI COUNTDOWN
HIKING MODE HIKINGTIME AVG. PULSE STOPWATCH
TARGETTIME MAX. PULSE TEMPERATUR
TRIP CLIMB +/- KCAL TOTAL TIME
MAX. ALTI CLOCK TOTAL ALTI
*not whilst moving
5 SYNCHRONISATION
kInstallation of the BC 2209 MHR into the mounting bracket -
a pairing is only possible if the bike computer is locked onto the
mounting bracket.
kThe zeros on the speed, cadence and pulse displays are flashing.
2209
6
www.sigmasport.com
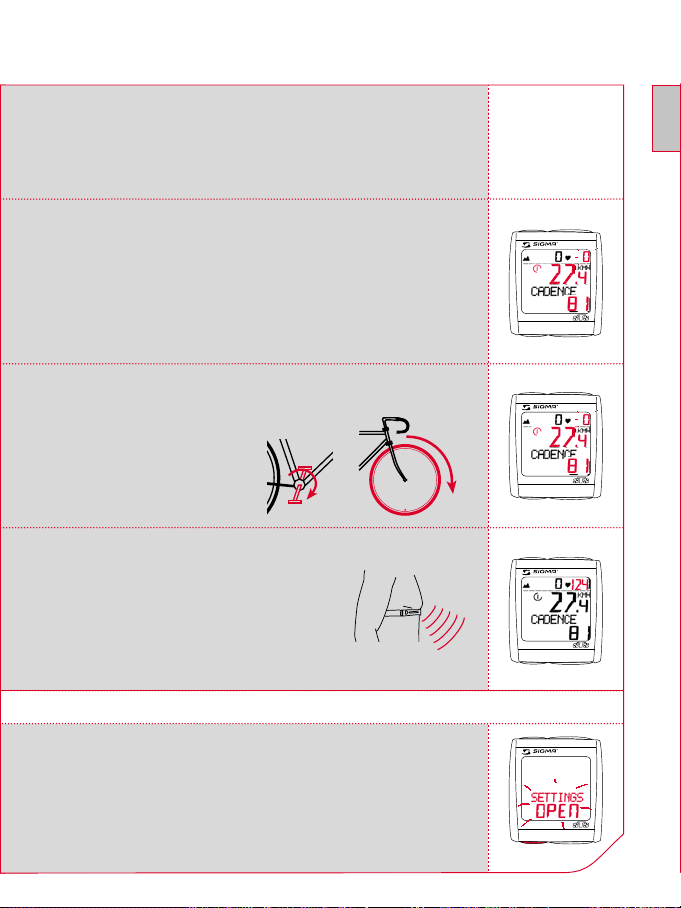
5 SYNCHRONISATION
kTo synchronise the speed, cadence and heart rate,
there are 2 options:
1. Set off, usually the receiver has paired with the transmitter
within 3 or 4 wheel turns.
2. Turn front wheel or pedals until the KMH or cadence display
stops flashing.
kWhile wearing the chest strap
either go close to the BC 2209 MHR
or climb on the bicycle. As a rule,
the BC 2209 MHR pairs with the
chest belt in less than 10 seconds.
The pulse display is no longer flashing.
GB
2209
2209
2209
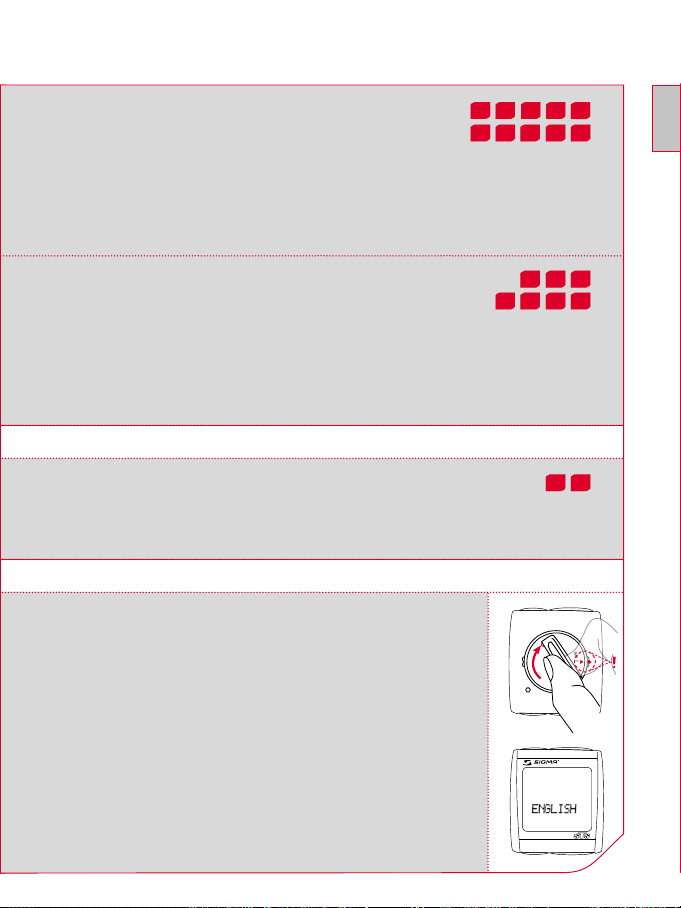
6 THE BASIC SETTINGS
kHold down SET button until the preset LANGUAGE (English)
appears on the display (SETTINGS OPEN flashes).
BC 2209 MHR
2209
n
3 sec.
7

6 THE BASIC SETTINGS
6.1 SETTING THE LANGUAGE
n
--+
n
2209 2209 2209 2209
1
n
1
k Use MODE 1 button to switch to the preset LANGUAGE
2
n
3
4
n
(as standard the BC 2209 MHR is preset to English).
2
k Press the SET button briefly. Display flashes.
3
k Set the desired language using the MODE1 button.
4
k Confirm by pressing the SET button. SET OK appears on the display.
6.2 SETTING KMH/MPH
n
n
+
2209 2209 2209 2209
1 2
1
k Change the display to KMH/MPH using the MODE 1 button.
nn n
3 4
2
k Press the SET button briefly. Display flashes.
3
k Select MPH or KMH using MODE 2.
4
k Confirm by pressing the SET button. SET OK appears on the display.
By switching from KMH to MPH, the distance format automatically changes from km to
mi, the temperature from °C to °F, the time from 24 h mode to 12 h mode, the altitude
from m to ft and the weight from kg to lb.
8
www.sigmasport.com
6 THE BASIC SETTINGS
6.3 SETTING THE AIR PRESSURE TO SEA LEVEL (SEA LEVEL)
n n
- +
2209 2209 2209 2209
1
n
2 3
n
4
n
You can find explanations about this function in Chapter “8 MEASURING THE ALTITUDE”
1
k Change the display to SEA LEVEL using the MODE 1 button.
2
k Press the SET button briefly. Display flashes.
3
k Set the value using the MODE 2 button (+) or the RESET button (-).
4
k Confirm by pressing the SET button. SET OK appears on the display.
6.4 SETTING ACTUAL ALTITUDE
nn nn
- -+ +
2209 2209 2209 2209 2209
1
n
2
3
n
4
5
n
You can find explanations about this function in Chapter “8 MEASURING THE ALTITUDE”.
GB
1
k Change the display to ACT. ALTI. using the MODE 1 button
kPress the SET button briefly. The first settings number is flashing.
2
k Set the value using the MODE 2 button (+) or the RESET button (-).
3
k Move to the next figure using the MODE 1 button.
4
k Set the value using the MODE 2 button (+) or the RESET button (-).
5
k Confirm by pressing the SET button. SET OK appears on the display.
BC 2209 MHR
9
6 THE BASIC SETTINGS
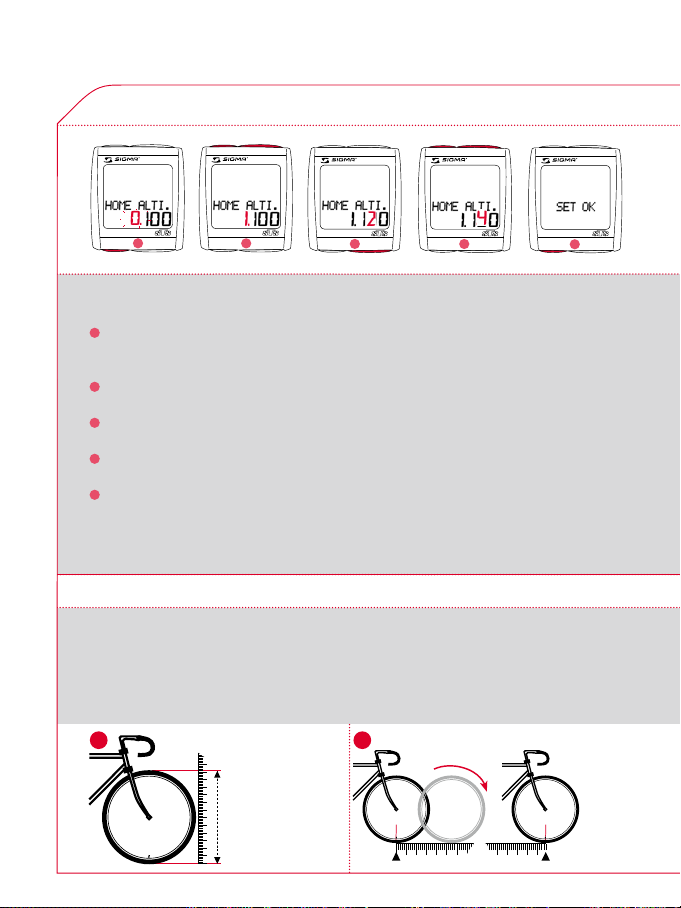
6.5 SETTING HOME ALTI.
n
--+
n
n
n
+
2209 2209
1
n n
2
2209 2209 2209
3
4
5
n
You can find explanations about this function in Chapter “8 MEASURING THE ALTITUDE”.
1
k Change the display to HOME ALTI. using the MODE 1 button.
kPress the SET button briefly. The first input figure is flashing.
2
k Set the value using the MODE 2 button (+) or the RESET button (-).
3
k Move to the next figure using the MODE 1 button.
4
k Set the value using the MODE 2 button (+) or the RESET button (-).
5
k Confirm by pressing the SET button.
SET OK appears on the display.
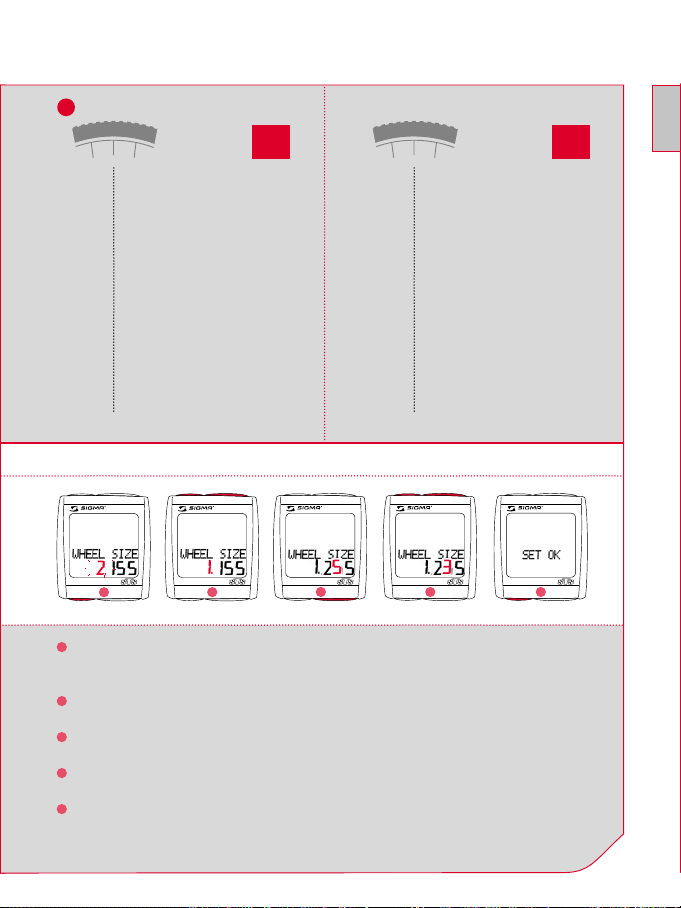
6.6 CALCULATING WHEEL SIZE
kDetermine the correct value for your wheel size
from Table “WHEEL SIZE CHART” (Tab. C).
kAlternatively: calculate/determine WS (Tab. A oder Tab. B)
A B
mm x 3,14
km/h:
WS = mm x 3,14
mph:
WS = mm x 3,14
1x
km/h:
WS = mm
mph:
WS = mm
= WS (mm)
10
www.sigmasport.com
6 THE BASIC SETTINGS
C
ETRTO ETRTO
7
.
1
5
x
x
6
1
47-305
47-406
37-540
47-507
23-571
40-559
44-559
47-559
50-559
54-559
57-559
37-590
37-584
20-571
2
16x1.75x2
20x1.75x2
24x1 3/8 A
24x1.75x2
26x1
26x1.5
26x1.6
26x1.75x2
26x1.9
26x2.00
26x2.125
26x1 3/8
26x1 3/8x1 1/2
26x3/4
kmh
mph
1272
1590
1948
1907
1973
2026
2051
2070
2089
2114
2133
2105
2086
1954
6
1
32-630
28-630
40-622
47-622
40-635
37-622
18-622
20-622
23-622
25-622
28-622
32-622
37-622
40-622
7
.
1
5
x
x
2
27x1 1/4
27x1 1/4 Fifty
28x1.5
28x1.75
28x1 1/2
28x1 3/8x1 5/8
700x18C
700x20C
700x23C
700x25C
700x28C
700x32C
700x35C
700x40C
kmh
mph
2199
2174
2224
2268
2265
2205
2102
2114
2133
2146
2149
2174
2205
2224
GB
6.7 SET WHEEL SIZE WS BIKE 1 OR WS BIKE 2
nn nn
- -+ +
2209 2209 2209 2209 2209
1
n
1
k Change the display to WS BIKE 1 or WS BIKE 2 using the MODE 1 button.
2
3 4 5
n
kPress the SET button briefly. The first input figure is flashing.
2
k Set the value using the MODE 2 button (+) or the RESET button (-).
3
k Move to the next figure using the MODE 1 button.
4
k Set the value using the MODE 2 button (+) or the RESET button (-).
5
k Confirm by pressing the SET button.
SET OK appears on the display.
BC 2209 MHR
n
11
6 THE BASIC SETTINGS
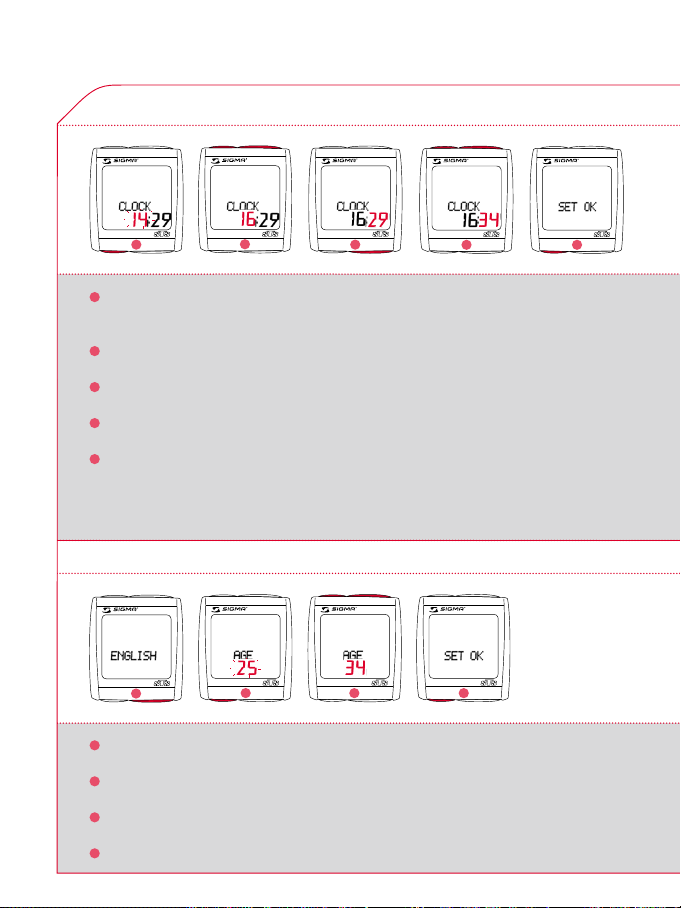
6.8 SETTING THE CLOCK
-
n
n n
n
+
2209 2209 2209
1
n
1
k Change the display to CLOCK using the MODE 1 button.
2
3
n
2209 2209
4 5
kPress the SET button briefly. The hour display will blink.
2
k Set the value using the MODE 2 button (+) or the RESET button (-).
3
k Move to the next figure using the MODE 1 button.
4
k Set the value using the MODE 2 button (+) or the RESET button (-).
5
k Confirm by pressing the SET button.
SET OK appears on the display.
6.9 SETTING YOUR AGE
n
n
--++
2209
1
n
1
k Use MODE 1 button to switch to AGE display.
2209 2209 2209
2
n n
3 4
2
k Press the SET button briefly. Display flashes.
n
3
k Set the value using the MODE 2 button (+) or the RESET button (-).
4
k Confirm by pressing the SET button. SET OK appears on the display.
12
www.sigmasport.com
6 THE BASIC SETTINGS
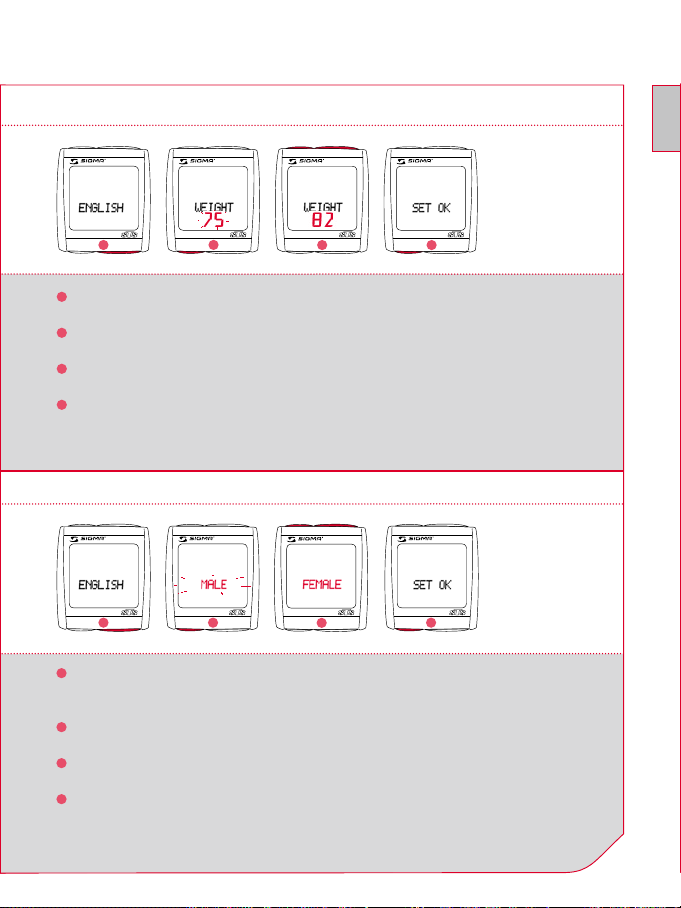
6.10 SETTING YOUR WEIGHT
n n
- +
2209
1
n
1
k Use MODE 1 button to switch to WEIGHT display.
2209 2209 2209
2
n n
3 4
2
k Press the SET button briefly. Display flashes.
3
k Set the value using the MODE 2 button (+) or the RESET button (-).
4
k Confirm by pressing the SET button.
SET OK appears on the display.
6.11 SETTING YOUR GENDER
n n
- +
2209 2209 2209 2209
1 2
n
1
k Use MODE 1 button to switch to the preset GENDER
n n
3
4
(as standard the BC 2209 MHR is preset to MALE).
2
k Press the SET button briefly. Display flashes.
GB
3
k Set the gender using the MODE 2 button (+) or the RESET button (-).
4
k Confirm by pressing the SET button.
SET OK appears on the display.
BC 2209 MHR
13
6 THE BASIC SETTINGS
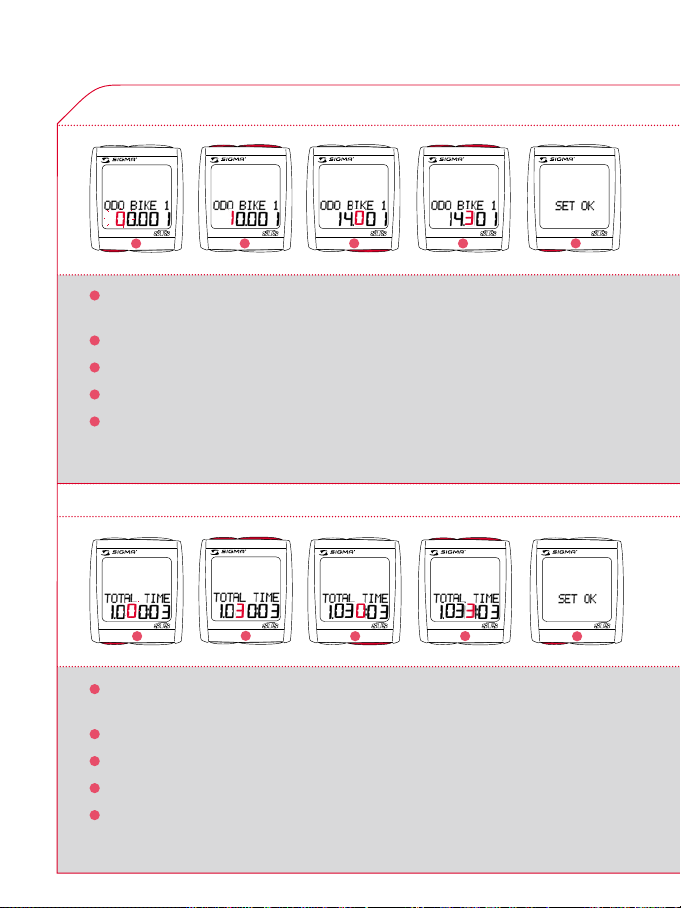
6.12 SETTING THE TOTAL ODO BIKE 1 OR BIKE 2
nn nn
- -+ +
2209 2209 2209 2209 2209
1
n
1
k Change the display to ODO BIKE 1 or ODO BIKE 2 using the MODE 1 button.
2
3
4
kPress the SET button briefly. The first settings number is flashing.
2
k Set the value using the MODE 2 button (+) or the RESET button (-).
3
k Move to the next figure using the MODE 1 button.
4
k Set the value using the MODE 2 button (+) or the RESET button (-).
5
k Confirm by pressing the SET button.
SET OK appears on the display.
6.13 SETTING THE TOTAL TRIP TIME BIKE 1 OR BIKE 2
n
n
--+
2209 2209 2209 2209 2209
1
n
1
k Change the display to TIME BIKE 1 or TIME BIKE 2 using the MODE 1 button.
2
3
n
n
+
4
kPress the SET button briefly. The first settings number is flashing.
2
k Set the value using the MODE 2 button (+) or the RESET button (-).
3
k Move to the next figure using the MODE 1 button.
4
k Set the value using the MODE 2 button (+) or the RESET button (-).
5
k Confirm by pressing the SET button.
SET OK appears on the display.
5
nn
5
nn
14
www.sigmasport.com
6 THE BASIC SETTINGS
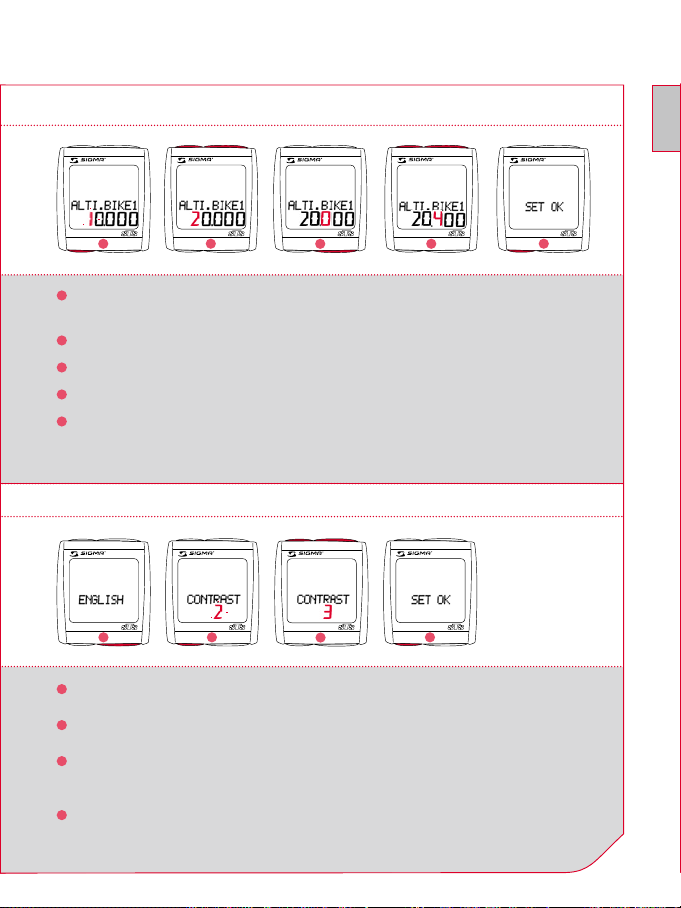
6.14 SETTING THE TOTAL ALTI BIKE 1 OR BIKE 2
nn
nn
- -
+ +
2209 2209 2209 2209 2209
1
n nn
1
k Change the display to ALTI BIKE 1 or ALTI BIKE 2 using the MODE 1 button.
2
3
4
kPress the SET button briefly. The first settings number is flashing.
2
k Set the value using the MODE 2 button (+) or the RESET button (-).
3
k Move to the next figure using the MODE 1 button.
4
k Set the value using the MODE 2 button (+) or the RESET button (-).
5
k Confirm by pressing the SET button.
SET OK appears on the display.
6.15 SETTING THE CONTRAST
n
n
-
+
2209 2209 2209 2209
1 2
n
n n
3
4
GB
5
1
k Change the display to CONTRAST using the MODE 1 button.
2
k Press the SET button briefly. Display flashes.
3
k Set the value using the MODE 2 button (+) or the RESET button (-).
(1 = weak / 3 = strong)
4
k Confirm by pressing the SET button.
SET OK appears on the display.
BC 2209 MHR
15

6 THE BASIC SETTINGS
6.16 EXITING BASIC SETTINGS
kPress the SET button down for 3 seconds in order to stop
entering settings (SETTINGS CLOSE flashes).
2209
n
3 sec.
7 GENERAL FUNCTIONS
7.1 DISPLAY ILLUMINATION
n
n
kThe lighting function is switched on/off when
you press the SET and RESET button at the
same time. LIGHT ON/OFF is shortly displayed.
kThe display is illuminated when you press any
button and the function is switched on when you
2209
n
2209
n
press it again.
The illumination is not available during pairing!
Protect the battery by avoiding unnecessary
illumination!
7.2. COMPARE SPEED
2209 2209 2209
1
1
k If the speed is nearly the same is displayed.
2
k If lower speed will be displayed.
3
k If higher speed will be displayed.
2
3
It is displayed for all functions except in the basic settings.
16
www.sigmasport.com
7 GENERAL FUNCTIONS
7.3 SHOWING/HIDING THE CADENCE/HEART RATE FUNCTION
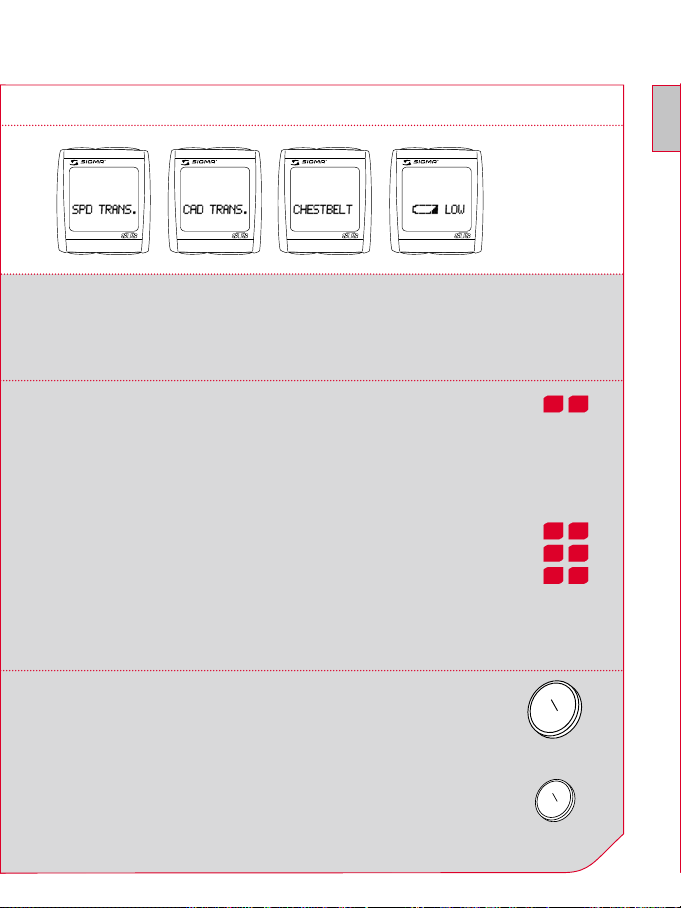
When the BC 2209 MHR is operated without cadence signal transmitter and/
or chest belt, all cadence/heart rate functions (CADENCE, AVG. CAD, PULSE,
AVG. PULSE, MAX. PULSE, KCAL) are hidden for this trip.
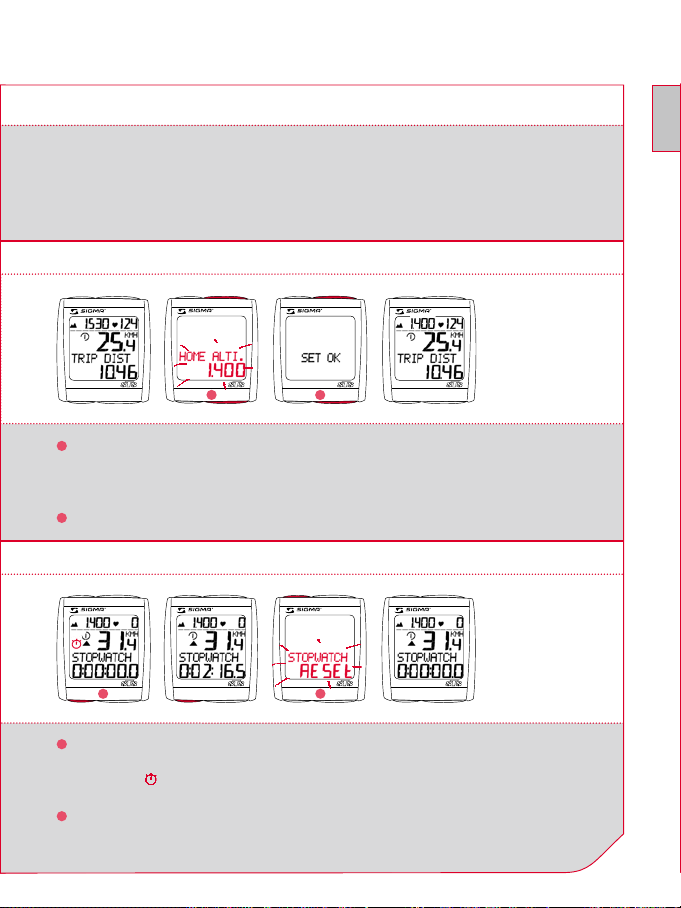
7.4 CALIBRATING THE HOME ALTI.
nn
3 sec.
2209 2209 22092209
1
k Hold down the MODE 1 and MODE 2 buttons simultaneously for 3 seconds
1
n n
3 sec.
2
to calibrate the HOME ALTI.
k“HOME ALTI.” will blink in the display.
2
k SET OK appears on the display.
7.5 STOPWATCH
n
3 sec.
2209 2209 2209 2209
1
n n
Start Stop
1
k Change the setting to STOPWATCH using the MODE 2 button.
2
kStart or stop the stopwatch using the SET button.
kThe icon
in the display means the stopwatch is running.
GB
2
k To reset the stopwatch:
hold down the RESET button for 3 seconds.
BC 2209 MHR
17
7 GENERAL FUNCTIONS
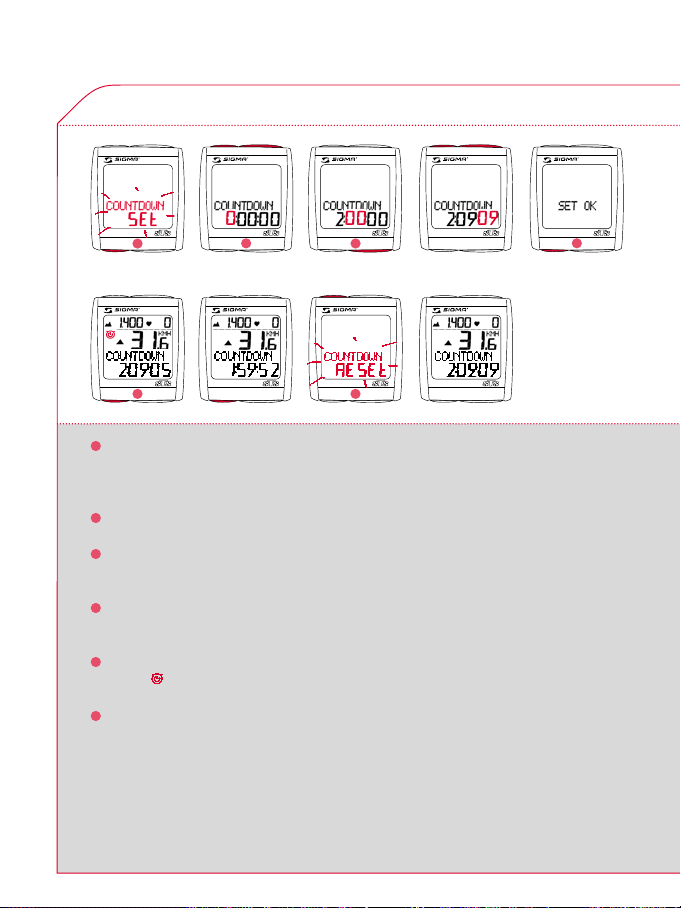
7.6 COUNTDOWN
n
--+
n
n
n
+
2209 2209 2209 2209 2209
1
n
3 sec.
2209 2209 2209 2209
5 6
n
Start
1
k Use MODE 2 to switch to COUNTDOWN +/- display.
2
n
Stop
n
3
3 sec.
n
kHold down SET button for 3 seconds
(COUNTDOWN SET flashes).
2
k Set the value using the MODE 2 button (+) or the RESET button (-).
3
k Move to the next figure using the MODE 1 button.
Set the value as described above.
4
k Confirm by pressing the SET button.
SET OK appears on the display.
5
k Use the SET button to start or stop COUNTDOWN.
The
6
k Setting the countdown to zero: Hold down RESET button for 3 seconds
icon on the display means the countdown is running.
(the display switches back to the preset value).
4
n
18
www.sigmasport.com

7 GENERAL FUNCTIONS
7.7 TRIP UP/DOWN
n n
- +
2209 2209 2209 2209
1
nn nn
- -+ +
2209 2209 2209 2209
4
1
k Change the display to TRIP UP/DOWN using the MODE 2 button.
n
3 sec.
5
2
3
n
6
nn
kHold down the SET button for 3 seconds. The display flashes “+” or “-”.
2
k Set to “+” or “-” using the MODE 2 button.
3
k Confirm by pressing the SET button.
The display will jump to the distance setting.
4
k Set the value using the MODE 2 button (+) or the RESET button (-).
5
k Move to the next figure using the MODE 1 button.
Set the value as described above.
6
k Confirm by pressing the SET button.
SET OK appears on the display.
GB
BC 2209 MHR
19
7 GENERAL FUNCTIONS
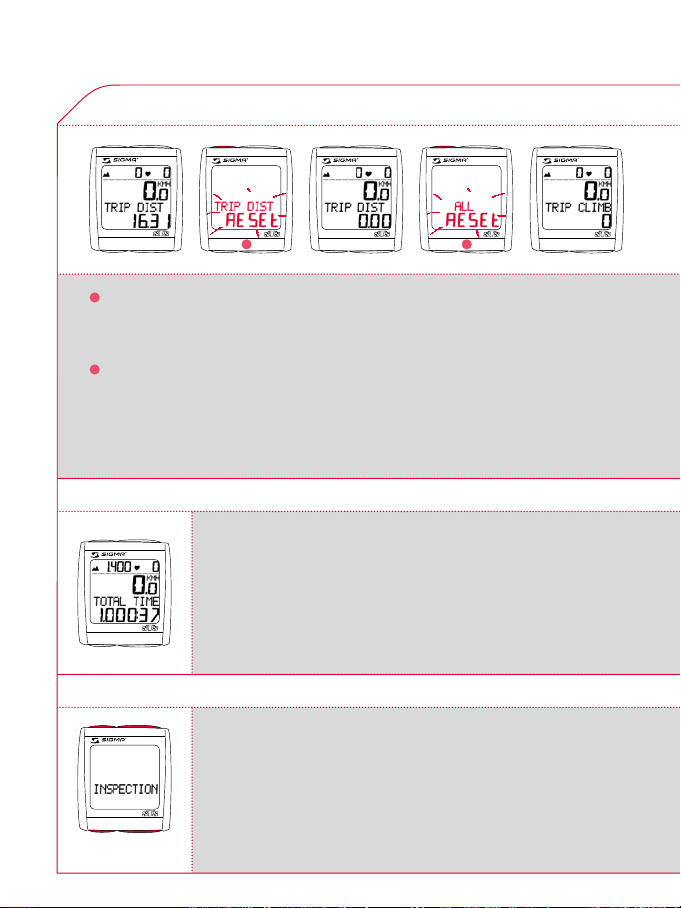
7.8 RESET DISPLAY
nn
4 sec.
2209
1
k Press MODE1/2 until the desired function is displayed.
2209 22092209 2209
1
2
kHold down the RESET button. Display flashes. After 2 seconds
only the function displayed is reset to 0.
2
k Hold down the RESET button for longer than 4 seconds to set the display from:
TRIP DIST, TRIP TIME, AVG. SPEED, MAX. SPEED , AVG. CAD, TRIP CLIMB,
MAX. ALTI, AVG. PULSE, MAX. PULSE, KCAL to zero.
7.9 TOTALS FOR BIKE 1 AND BIKE 2
The totals are first displayed separately for BIKE 1, BIKE 2 and
BIKE 1+2, if a second bike is added. If only one bike is ridden,
only the totals for the first bike are displayed.
2209
7.10 SERVICE INTERVAL
The service interval tells you when the mileage until the next bike
inspection is reached.
The service interval can only be set by your dealer. After reaching
the preset mileage, INSPECTION appears on the display.
2209
Pressing any button makes this display disappear.
Any button must be
pressed briefly
20
www.sigmasport.com
7 GENERAL FUNCTIONS
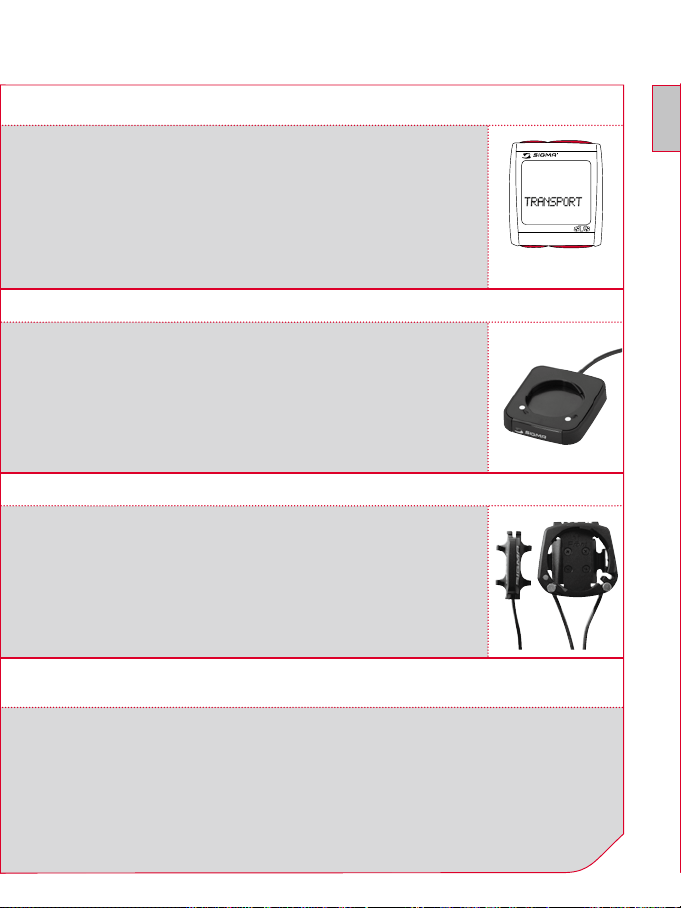
7.11 TRANSPORT MODE
If the bike is transported on a bike carrier or in the car (if clipped on
the bracket), the BC 2209 MHR will be put into so-called transport
mode by the integrated movement sensor. TRANSPORT appears on
the display. To exit this mode, you must press any button briefly.
7.12 PC INTERFACE
The BC 2209 MHR is PC-compatible. After purchasing the
SIGMA DATA CENTER SOFTWARE and its Docking Station
(Ref. No. 00432), you can quickly and easily download the total
and daily values onto your PC. Furthermore, you can quickly and
easily set your BC 2209 MHR.
7.13 CABLE-CONNECTED UNIVERSAL BRACKET
The BC 2209 MHR can be retrofitted with a cable-connected
universal bracket only for measuring the speed (the cadence
and chest belt remain wireless) Ref. No. 00433.
8 MEASURING THE ALTITUDE
8.1 INTRODUCTION
2209
Any button must be
pressed briefly
GB
The BC 2209 MHR measures the altitude using barometric air pressure. Every change in
weather means a change in air pressure, which can lead to a change of the actual altitude.
In order to compensate for this change in air pressure one must input a reference altitude
in the BC 2209 MHR (the so-called calibration). The BC 2209 MHR has a special function
that makes this calibration almost unnecessary:
BC 2209 MHR
21

8 MEASURING THE ALTITUDE
When the equipment is “sleeping” (clock and model name in the display) the last displayed
actual altitude is saves. When it “wakes” the computer adopts this saved actual altitude as
the reference altitude. The BC 2209 MHR thus „calibrates itself“.
The barometric air pressure measurement is activated by movement of the bike or of the
BC 2209 MHR, even if the BC 2209 MHR is in sleep mode. This means that the actual
altitude is updated regularly when the bike is moved. The built-in movement sensor is so
sensitive that the system also works in a car.
There are three holes underneath the BC 2209 MHR for air pressure measurement. This
holes must always stay open and therefore require regular cleaning.
NOTE: Do not push any sharp objects into the measurement hole.
8.2 CALIBRATION POSSIBILITIES OF THE BC 2209 MHR
1. THE HOME ALTITUDE
The “home altitude” is the altitude of your regular location (usually your residence).
This value can be found on road maps or national maps. It is programmed in the
BC 2209 MHR one time and can be calibrated within 3 seconds. The home altitude
stays saved by the BC 2209 MHR (even after a battery change).
2. THE ACTUAL ALTITUDE
The “actual altitude” is the altitude of the place where you are currently located,
independent of your home altitude (where you started your tour, an alpine hut or other
place). The “actual altitude” is used when you are travelling by bike and you have altitude
information.
22
www.sigmasport.com
8 MEASURING THE ALTITUDE
3. THE AIR PRESSURE AT SEA LEVEL
In the event that you are in an unknown place (no information is available on actual
altitude) then you can enter so-called “air pressure reduced to sea level” in order to
calibrate the actual altitude. The air pressure reduced to sea level can be found in the
Internet or at the airport.
NOTE: The air pressure of your weather station is the actual air pressure, not the
air pressure reduced to sea level.
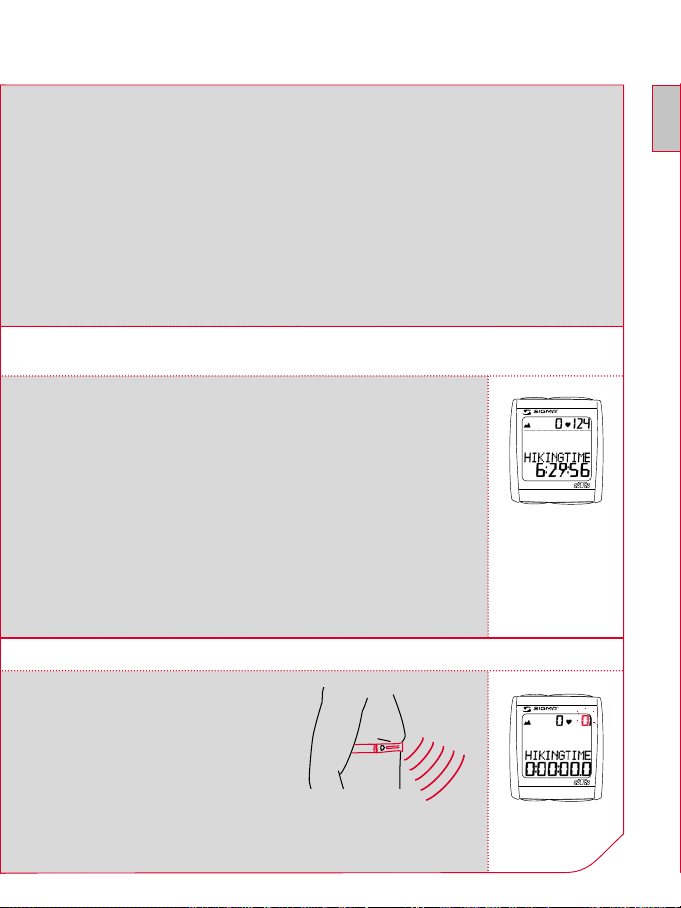
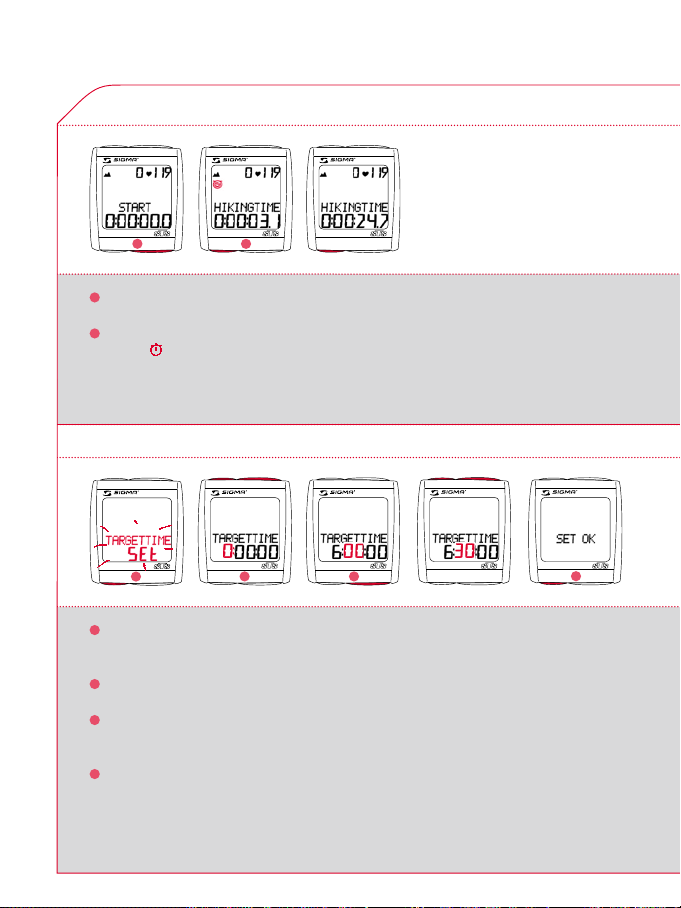
9 HIKING MODE
9.1 INTRODUCTION
The BC 2209 MHR can also be used as a hiking computer. For this
purpose a separate wrist strap is included in delivery. When the
BC 2209 MHR is fitted onto this wrist strap, all bike functions are
hidden (these remain saved, however, and can be accessed again
when cycling). Only the functions relevant for hiking are maintained.
You can therefore also use your BC 2209 MHR with altitude and
heart rate details when hiking, climbing, skiing or doing other sports.
9.2 SYNCHRONISATION
GB
2209
kPlace the BC 2209 MHR into
the wrist strap. The zeros on
the current heart rate flash.
kThe BC 2209 MHR will have
paired with the chest belt after
approx. 10 seconds, and the
data will be displayed.
BC 2209 MHR
2209
23
9 HIKING MODE
9.3 SETTING THE HIKING TIME
2209 2209 2209
1
n nn
1
k Use the MODE 1 button to switch to the HIKING TIME display.
2
k Use the SET button to start or stop the hiking time.
The
icon on the display means the hiking time is running.
2
Start Stop
9.4 SETTING THE TARGET TIME
n
--+
n
n
n
+
2209
1
n n
3 sec.
1
k Use the MODE 1 button to switch to the TARGET TIME display.
2209 2209 2209 2209
2 3
kHold down the SET button for 3 seconds (TARGET TIME SET flashes).
2
k Set the value using the MODE 2 button (+) or the RESET button (-).
3
k Move to the next figure using the MODE 1 button.
Set the value as described above.
4
k Confirm by pressing the SET button.
The change is save when SET OK is displayed.
kUse the SET button to start or stop the TARGET TIME.
24
www.sigmasport.com
4
n

9 HIKING MODE
9.5 RESET DISPLAY
nn
2209 2209
1 2
1
k Press MODE1/2 until the desired function is displayed.
2
k Hold down the RESET button. Display flashes.
2209 2209
> 4 sec.3 sec.
3
The word „RESET“ appears on the bottom part of the display and flashes.
After 2 seconds only the function displayed is reset to 0.
3
k Hold down the RESET button for longer than 4 seconds to set the display from:
HIKINGTIME, TARGETTIME, TRIP CLIMB, MAX. ALTI, AVG. PULSE, MAX. PULSE,
KCAL to zero.
9.6 SHOWING/HIDING THE HEART RATE FUNCTIONS
When the BC 2209 MHR is used without a chest belt, all heart rate functions
(PULSE, AVG. PULSE, MAX. PULSE, KCAL) for this one hike are hidden.
GB
BC 2209 MHR
25

10 TECHNICAL DATA
10.1 DEFAULT/MIN/MAX VALUES
Default Max. Min. Units
Speed 0,0 199,8 0,0 kmh/mph
Trip Distance 0,00 9999,99 0,00 km/mi
Trip Time 0:00:00 999:59:59 00:00:00 h:mm:ss
Average speed 0,00 199,99 0,00 kmh/mph
Max. speed 0,00 199,99 0,00 kmh/mph
Cadence 0 180 0 upm
Max. cadence 0 180 0 upm
Current heart rate 40 240 40 bpm
Average heart rate 40 240 0 bpm
Max. heart rate 40 240 0 bpm
Calories 0 9.999 0 Kcal
Current altitude 0 4.999/19.999 -999 m / ft
Day‘s altitude 0 99.999 0 m / ft
Max. altitude 4.999/19.999 -999 m / ft
Stopwatch 00:00,0 9:59:59 00:00:00 h:mm:ss,1/10
Countdown 0:00:00 9:59:59 00:00:00 h:mm:ss
Separate kilometre counter 0,00 999,99 -99,99 km/mi
Temperatur 0 +70/+158 -10,0 °C/°F
Total distance 0
Bike 1/2 99.999 00:00 km/mi
Bike 1+2 999.999 00:00
Total time 0:00
Bike 1/2 9.999:59 00:00 hhhh:mm
Bike 1+2 19.999 00:00 hhhhh
Total altitude 0
Bike 1/2 99.999 00:00 m / ft
Bike 1+2 999.998 00:00
26
www.sigmasport.com
10 TECHNICAL DATA
10.2 BATTERY CHANGE
2209 2209 2209 2209
The battery change on the computer head and the transmitters (speed, cadence,
and/or chest belt) is shown on the display. After changing the battery, only the time
has to be entered again.
Computer head:
kOpen cover with tool.
kTake note of polarity. When the battery compartment is open,
you must see the plus side of the battery.
kIf the sealing ring is loose, put it back in place.
kClose cover with tool.
Transmitters:
kOpen cover with tool.
kRemove battery from cover.
kTake note of polarity.
kInsert new battery in the cover.
kClose cover with tool.
GB
26
25
28
27
30
29
32
31
Battery:
Computer head: Lithium button battery CR 2450
Transmitter: Lithium button battery CR 2032
Battery lifespan:
Computer head: approx. 1 year*
Transmitter: approx. 1 year*
* if used one hour a day
BC 2209 MHR
CR 2450
CR 2032
27

10 TECHNICAL DATA
10.3 TROUBLE SHOOTING
No speed display
k Is the computer correctly clicked onto
the bracket?
k Have you checked the contacts for
oxidation/corrosion?
k Have you checked the magnet/
transmitter distance (max. 12 mm)?
k Have you checked whether the magnet
is magnetized?
k Have you checked the battery status
on the speed transmitter?
No cadence display
k Have you checked the magnet/
transmitter distance (max. 12 mm)?
k Have you checked whether the magnet
is magnetized?
k Have you checked the battery status
on the transmitter?
No pulse display
k Are the electrodes damp enough?
k Have you checked the battery status?
No display
k Have you checked the battery status
on the BC 2209 MHR?
k Is the battery inserted correctly
(+ facing up)?
k Are the battery contacts ok?
(If not, bend carefully)?
Wrong speed display
k Are 2 magnets fitted?
k Is the magnet correctly positioned
(parallel to the transmitter and centered
with the transmitter)?
k Is the wheel circumference set
correctly?
k Is the transmitter set on the right
bicycle (bicycle 1 or 2)?
Display black/dull
k Is the temperature too high (> 60°C)
or too low (< 0°C)?
No synchronization
k Have you checked the magnet/
transmitter(s) distance?
k Is/are the battery/batteries on
the transmitter(s) empty?
k Have you checked the range on the
respective transmitter?
k When using a hub dynamo,
please change the position of
the transmitter.
Display “TOO MANY SIGNALS”
k Please increase the distance to the
other transmitters and press any
button.
28
www.sigmasport.com
10 TECHNICAL DATA
10.4 WARRANTY
We are liable to our contracting partners for defects as defined by law. Batteries are
excluded from the guarantee.
SIGMA Elektro GmbH
Dr.-Julius-Leber-Straße 15
D-67433 Neustadt/Weinstraße
Service-Tel.: +49 (0)6321-9120-118
E-Mail: service@sigmasport.com
The manufacturer reserves the right to make technical changes.
After usage the batterie can be returned.
GB
BC 2209 MHR
29

INDHOLD
INDHOLD
1 Forord og pakkeindhold .......................................................................................... 31
2 Montage ...................................................................................................................... 32
2.1 Montage 2. cykel .............................................................................................................. 33
3 Ibrugtagning ............................................................................................................... 33
4 Displayskift/knapbelægning/funktionsoversigt ............................................. 34
5 Synkroniseringen . ..................................................................................................... 34
6 Grundindstillinger ..................................................................................................... 35
6.1 Indstilling af sprog ............................................................................................................ 36
6.2 Indstilling KMH/MPH ..................................................................................................... 36
6.3 Indstilling af lufttryk ved havets overflade (sea level) ............................................ 37
6.4 Indstilling af den aktuelle højde .................................................................................... 37
6.5 Indstilling af starthøjde ................................................................................................... 38
6.6 Beregning af hjulstørrelse ............................................................................................. 38
6.7 Indstilling af hjulstørrelse for cykel 1 eller cykel 2 ................................................ 39
6.8 Indstilling af klokkeslæt ................................................................................................... 40
6.9 Indstilling af alder ............................................................................................................. 40
6.10 Indstilling af vægt ............................................................................................................. 41
6.11 Indstilling af køn ................................................................................................................ 41
6.12 Indstilling af totalkilometer cykel 1 eller cykel 2 ..................................................... 42
6.13 Indstilling af totalkøretid cykel 1 eller cykel 2 ......................................................... 42
6.14 Indstilling af totalhøjde cykel 1 eller cykel 2 ............................................................ 43
6.15 Indstilling af kontrast ....................................................................................................... 43
6.16 Forlad grundindstillinger ................................................................................................ 44
7 Generelle funktioner ................................................................................................ 44
7.1 Displaybelysning ................................................................................................................ 44
7.2 Hastighedssammenligning ............................................................................................ 44
7.3 Aktivering-/deaktivering af træde-/hjertefrekvensfunktioner ........................... 45
7.4 Kalibrering af starthøjde ................................................................................................ 45
7.5 Stopur .................................................................................................................................. 45
7.6 Countdown ......................................................................................................................... 46
7.7 Kilometertæller ................................................................................................................. 47
7.8 Reset af display ................................................................................................................. 48
7.9 Totalværdier cykel 1 og cykel 2 ................................................................................... 48
7.10 Serviceinterval ................................................................................................................... 48
7.11 Transportmodus ............................................................................................................... 49
7.12 PC interface ....................................................................................................................... 49
7.13 Kabelbundet universalholder ........................................................................................ 49
30
www.sigmasport.com

INDHOLD
8 Højdemåling ................................................................................................................ 49
8.1 Forord .................................................................................................................................. 49
8.2 Kalibreringsmuligheder .................................................................................................. 50
9 Gangfunktion .............................................................................................................. 51
9.1 Forord .................................................................................................................................. 51
9.2 Synkroniseringen .............................................................................................................. 51
9.3 Indstilling af vandretid ..................................................................................................... 52
9.4 Indstilling af måltid ........................................................................................................... 52
9.5 Reset af display ................................................................................................................. 53
9.6 Aktivering-/deaktivering af hjertefrekvensfunktioner ........................................... 53
10 Tekniske data ............................................................................................................. 54
10.1 Default/min/max værdier ............................................................................................ 54
10.2 Batteriudskiftning ............................................................................................................. 55
10.3 Problemløsninger ............................................................................................................. 56
10.4 Garantihenvisninger ........................................................................................................ 57
1 FORORD OG PAKKEINDHOLD
DK
Hjertelig tillykke, fordi du har besluttet dig for en cykelcomputer fra SIGMA SPORT
Din nye BC 2209 MHR vil i årevis være dig en tro ledsager på dine cykelture.
For at lære de mange funktioner på din nye cykelcomputer at kende og for at kunne
anvende disse, bedes du læse denne betjeningsvejledning grundigt igennem.
SIGMA ønsker dig god fornøjelse ved brugen af din BC 2209 MHR.
BC 2209 MHR er udstyret med automatisk Start/Stop. Så snart denne er
monteret på holderen, starter en bevægelsessensor BC 2209 MHR ved den
mindste bevægelse af cyklen hhv. gangholderen. Derved startes automatisk pairing.
®
.
31BC 2209 MHR

1 FORORD OG PAKKEINDHOLD
1 EMBALLAGEN INDEHOLDER
Cykelcomputer
kEgermagnet
BC 2209 MHR
kTrædefrekvens magnet
kStyrholder
kBatterirumsnøgle
Brystbånd STS inkl.
elastisk bånd
kArmbånd
kMontagematerial
Hastighedssender
STS
Trædefrekvenssender STS
2 MONTAGE
Illustrationerne til disse montagetekster befinder sig i den medfølgende foldeseddel!
MONTAGE AF CYKELHOLDEREN
kHolderen kan enten monteres med kabelbindere
(permanent tilslutning) eller med O-ringene.
kStyr eller forgaffel.
kFjern den gule folie!
4321
32
www.sigmasport.com

2 MONTAGE
MONTERING AF SENDER –
HASTIGHED OG TRÆDEFREKVENS
kBegge sendere kan enten monteres med kabelbindere
(permanent tilslutning) eller med O-ringene.
kFor at opnå den krævede afstand på 12 mm eller mindre,
monteres senderen og magneten tætter på navet.
MONTERING AF MAGNETER –
HASTIGHED OG TRÆDEFREKVENS/
PÅTAGNING AF BRYSTBÅND
kElektroderne skal vædes med vand eller kardio-gel.
2.1 MONTAGE 2. CYKEL
Skift mellem HJUL 1 og HJUL 2 foretages automatisk. Der kræves
kun en ekstra hastighedssender (eftermonteringssæt „CYKEL 2“
Art.Nr.: 00417, „CYKEL 2 inkl. trædefrekvens“ Art.Nr.: 00415)
3 IBRUGTAGNING
For ikke at forbruge strøm, leveres BC 2209 MHR uden batteri.
Isæt batteriet, idet du åbner batteridækslet med det medfølgende
værktøj. Når du har lagt batteriet i, lukker du batteridækslet med
værktøjet.
8
7
5
6
9
15 16
141312
DK
19
18
17
24
23
21
22
11
10
o
p
e
n
-
c
l
o
s
e
Displayet springer automatisk i indstillingsmodus.
2209
33BC 2209 MHR

4 DISPLAYSKIFT/KNAPBELÆGNING/FUNKTIONSOVERSIGT
RESET
Nulstilling af de forneden
oplistede funktioner eller
tilbage i en menu.
SET
Indstilling og lagring
af de indtastede værdier.
Hentning af de forneden
oplistede funktioner eller
2209
Hentning af de forneden
oplistede funktioner.
MODE 2
fremad i en menu.
MODE 1
MODE 1 MODE 2
CYKELMODUS: TRIP DIST CADENCE TRIP UP +/-
TRIP TIME AVG. PULSE TEMPERATUR
AVG. SPEED MAX. PULSE TOTAL ODO*
MAX. SPEED KCAL TOTAL TIME*
AVG. CAD CLOCK TOTAL ALTI*
TRIP CLIMB +/- STOPWATCH
MAX. ALTI COUNTDOWN
HIKINGMODUS: HIKINGTIME AVG. PULSE STOPWATCH
TARGETTIME MAX. PULSE TEMPERATUR
TRIP CLIMB +/- KCAL TOTAL TIME
MAX. ALTI CLOCK TOTAL ALTI
*ikke under kørslen
5 SYNKRONISERINGEN
34
kPres BC 2209 MHR fast på holderen – Pairing er først mulig,
når cykelcomputeren hviler i holderen.
kHastighedens-, trædefrekvensens og pulsindikationens
nuller blinker.
2209
www.sigmasport.com

5 SYNKRONISERINGEN
kTil synkronisering af hastigheden-, trædefrekvensen og
pulsindikationen findes der 2 muligheder:
1. Kørsel i frihjul, som regel er modtageren pairet med
senderen efter 3 til 4 hjulomdrejninger.
2. Drej forhjul hhv. pedaler til KMH- hhv. trædefrekvens
holder op med at blinke.
kGå i nærheden af BC 2209 MHR eller
vær på cyklen med påsat brystbælte .
Som regel synkroniserer BC 2209 MHR
sig med brystbåndet inden for 10 sekunder.
DK
2209
2209
Pulsvisningen blinker ikke mere.
6 GRUNDINSTILLINGER
kHold SET-knappen trykket i 3 sekunder til det forindstillede
SPROG (engelsk) vises i displayet (SETTINGS OPEN blinker).
2209
2209
n
3 sek.
35BC 2209 MHR

6 GRUNDINSTILLINGER
6.1 INDSTILLING AF SPROG
n
--+
n
2209 2209 2209 2209
1
n
1
k Skift til det forindstillede SPROG med MODE 1-knappen
2
n
3
4
n
(standardmæssigt er BC 2209 MHR indstillet på engelsk).
2
k Tryk kort på SET-knappen. Displayet blinker.
3
k Indstil det ønskede sprog med MODE 2-knappen.
4
k Bekræft med SET-knappen. I displayet vises SET OK.
6.2 INDSTILLING KMH / MPH
n
n
+
2209 2209 2209 2209
1 2
1
k Skift til KMH/MPH-visningen med MODE 1-knappen.
nn n
3 4
2
k Tryk kort på SET-knappen. Displayet blinker.
3
k Indstil MPH eller KMH med MODE 2-knappen.
4
k Bekræft med SET-knappen. I displayet vises SET OK.
Ved omstillingen fra KMH til MPH ændrer strækningens format sig automatisk fra km til
mil, temperaturen fra °C til °F, klokkeslættet fra 24h-modus til 12h-modus, højdemeterne
fra m til ft og vægten fra kg til lb.
36
www.sigmasport.com

6 GRUNDINSTILLINGER
6.3 INDSTILLING AF LUFTTRYK VED HAVETS OVERFLADE (SEA LEVEL)
n n
- +
DK
2209 2209 2209 2209
1
n
2 3
n
4
n
Forklaringer vedr. denne funktion fremgår af kapitel „8 HØJDEMÅLINGEN“.
1
k Skift til SEA LEVEL (HAVETS OVERFLADE)-visningen med MODE 1-knappen.
2
k Tryk kort på SET-knappen. Displayet blinker.
3
k Indstil værdien med MODE 2-knappen (+) eller RESET-knappen (-).
4
k Bekræft med SET-knappen. I displayet vises SET OK.
6.4 INDSTILLING AF DEN AKTUELLE HØJDE
nn nn
- -+ +
2209 2209 2209 2209 2209
1
n
2
3
n
4
Forklaringer vedr. denne funktion fremgår af kapitel „8 HØJDEMÅLINGEN“.
1
k Skift til ACT. ALTI. (AKT. HØJDE)-visningen med MODE 1-knappen.
kTryk kort på SET-knappen. Det første ciffer blinker for ændring.
2
k Indstil værdien med MODE 2-knappen (+) eller RESET-knappen (-).
3
k Skift til næste ciffer med MODE 1-knappen.
4
k ndstil værdien med MODE 2-knappen (+) eller RESET-knappen (-).
5
k Bekræft med SET-knappen. I displayet vises SET OK.
5
n
37BC 2209 MHR

6 GRUNDINSTILLINGER
6.5 INDSTILLING AF STARTHØJDE
n
n
--+
n
n
+
2209 2209
1
n n
2
2209 2209 2209
3
4
5
n
Forklaringer vedr. denne funktion fremgår af kapitel „8 HØJDEMÅLINGEN“.
1
k Skift til HOME ALTI. (STARTHØJDE)-visningen med MODE 1-knappen.
kTryk kort på SET-knappen. Det første ciffer blinker for ændring.
2
k Indstil værdien med MODE 2-knappen (+) eller RESET-knappen (-).
3
k Skift til næste ciffer med MODE 1-knappen.
4
k Indstil værdien med MODE 2-knappen (+) eller RESET-knappen (-).
5
k Bekræft med SET-knappen.
I displayet vises SET OK.
6.6 BEREGNING AF HJULSTØRRELSE
kA Beregn fra tabel HJULSTØRRELSE (tab. C) den til din hjulstørrelse tilsvarende værdi.
kAlternativ: Beregn/konstater „WS“ (tab. A eller tab. B).
A B
mm x 3,14
km/h:
WS = mm x 3,14
mph:
WS = mm x 3,14
1x
km/h:
WS = mm
mph:
WS = mm
= WS (mm)
38
www.sigmasport.com

6 GRUNDINSTILLINGER
C
ETRTO ETRTO
7
.
1
5
x
x
6
1
47-305
47-406
37-540
47-507
23-571
40-559
44-559
47-559
50-559
54-559
57-559
37-590
37-584
20-571
2
16x1.75x2
20x1.75x2
24x1 3/8 A
24x1.75x2
26x1
26x1.5
26x1.6
26x1.75x2
26x1.9
26x2.00
26x2.125
26x1 3/8
26x1 3/8x1 1/2
26x3/4
kmh
mph
1272
1590
1948
1907
1973
2026
2051
2070
2089
2114
2133
2105
2086
1954
6
1
32-630
28-630
40-622
47-622
40-635
37-622
18-622
20-622
23-622
25-622
28-622
32-622
37-622
40-622
7
.
1
5
x
x
2
27x1 1/4
27x1 1/4 Fifty
28x1.5
28x1.75
28x1 1/2
28x1 3/8x1 5/8
700x18C
700x20C
700x23C
700x25C
700x28C
700x32C
700x35C
700x40C
kmh
mph
2199
2174
2224
2268
2265
2205
2102
2114
2133
2146
2149
2174
2205
2224
DK
6.7 INDSTILLING AF HJULSTØRRELSE FOR CYKEL 1 ELLER CYKEL 2
nn nn
- -+ +
2209 2209 2209 2209 2209
1
n
1
k Skift mellem WS BIKE 1 (HJULSTØRRELSE 1) hhv.
2
3 4 5
n
WS BIKE 2 (HJULSTØRRELSE 2) med MODE 1-knappen.
kTryk kort på SET-knappen. Det første ciffer blinker for ændring.
2
k Indstil værdien med MODE 2-knappen (+) eller RESET-knappen (-).
3
k Skift til næste ciffer med MODE 1-knappen.
4
k Indstil værdien med MODE 2-knappen (+) eller RESET-knappen (-).
5
k Bekræft med SET-knappen. I displayet vises SET OK.
n
39BC 2209 MHR

6 GRUNDINSTILLINGER
6.8 INDSTILLING AF KLOKKESLÆT
n
-
n n
n
+
2209 2209 2209
1
n
1
k Skift til CLOCK (KLOKKESLÆT)-visningen med MODE 1-knappen.
2
3
n
2209 2209
4 5
kTryk kort på SET-knappen. Timevisningen blinker.
2
k Indstil værdien med MODE 2-knappen (+) eller RESET-knappen (-).
3
k Skift til næste ciffer med MODE 1-knappen.
4
k Indstil værdien med MODE 2-knappen (+) eller RESET-knappen (-).
5
k Bekræft med SET-knappen.
I displayet vises SET OK.
6.9 INDSTILLING AF ALDER
n
n
--++
2209
1
n
1
k Skift til AGE (ALDER)-indikationen med MODE 1-knappen.
2209 2209 2209
2
n n
3 4
2
k Tryk kort på SET-knappen. Displayet blinker.
n
3
k Indstil værdien med MODE 2-knappen (+) eller RESET-knappen (-).
4
k Bekræft med SET-knappen. I displayet vises SET OK.
40
www.sigmasport.com

6 GRUNDINSTILLINGER
6.10 INDSTILLING AF VÆGT
- +
n n
DK
2209
1
n
1
k Skift til WEIGHT (VÆGT)-indikationen med MODE 1-knappen.
2209 2209 2209
2
n n
3 4
2
k Tryk kort på SET-knappen. Displayet blinker.
3
k Indstil værdien med MODE 2-knappen (+) eller RESET-knappen (-).
4
k Bekræft med SET-knappen.
I displayet vises SET OK.
6.11 INDSTILLING AF KØN
n n
- +
2209 2209 2209 2209
1 2
n
1
k Skift til den forstillede KØN-indikation med MODE 1-knappen
n n
3
4
(standardmæssigt er BC 2209 MHR indstillet med HANKØN).
2
k Tryk kort på SET-knappen. Displayet blinker.
3
k Indstil værdien med MODE 2-knappen (+) eller RESET-knappen (-).
4
k Bekræft med SET-knappen.
I displayet vises SET OK.
41BC 2209 MHR

6 GRUNDINSTILLINGER
6.12 INDSTILLING AF TOTALKILOMETER CYKEL 1 ELLER CYKEL 2
nn nn
- -+ +
2209 2209 2209 2209 2209
1
n
1
k Skift mellem ODO BIKE 1 hhv. ODO BIKE 2 med MODE 1-knappen.
2
3
4
kTryk kort på SET-knappen. Det første ciffer blinker for ændring.
2
k Indstil værdien med MODE 2-knappen (+) eller RESET-knappen (-).
3
k Skift til næste ciffer med MODE 1-knappen.
4
k Indstil værdien med MODE 2-knappen (+) eller RESET-knappen (-).
5
k Bekræft med SET-knappen. I displayet vises SET OK.
6.13 INDSTILLING AF TOTALKØRETID CYKEL 1 ELLER CYKEL 2
n
n
--+
2209 2209 2209 2209 2209
1
n
1
k Skift mellem TIME BIKE 1 hhv. TIME BIKE 2 med MODE 1-knappen.
2
3
n
n
+
4
kTryk kort på SET-knappen. Det første ciffer blinker for ændring.
2
k Indstil værdien med MODE 2-knappen (+) eller RESET-knappen (-).
3
k Skift til næste ciffer med MODE 1-knappen.
4
k Indstil værdien med MODE 2-knappen (+) eller RESET-knappen (-).
5
k Bekræft med SET-knappen. I displayet vises SET OK.
5
nn
5
nn
42
www.sigmasport.com

6 GRUNDINSTILLINGER
6.14 INDSTILLING AF TOTALHØJDE CYKEL 1 ELLER CYKEL 2
nn
nn
- -
+ +
DK
2209 2209 2209 2209 2209
1
n nn
1
k Skift mellem ALTI.BIKE1 hhv. ALTI.BIKE2 med MODE 1-knappen.
2
3
4
kTryk kort på SET-knappen. Det første ciffer blinker for ændring.
2
k Indstil værdien med MODE 2-knappen (+) eller RESET-knappen (-).
3
k Skift til næste ciffer med MODE 1-knappen.
4
k Indstil værdien med MODE 2-knappen (+) eller RESET-knappen (-).
5
k Bekræft med SET-knappen. I displayet vises SET OK.
6.15 INDSTILLING AF KONTRAST
n
n
-
+
2209 2209 2209 2209
1 2
n
1
k Skift til CONTRAST (KONTRAST)-visningen med MODE 1-knappen.
n n
3
4
2
k Tryk kort på SET-knappen. Displayet blinker.
3
k Indstil værdien med MODE 2-knappen (+) eller RESET-knappen (-)
(1 = svag / 3 = stærk).
5
4
k Bekræft med SET-knappen.
I displayet vises SET OK.
43BC 2209 MHR

6 GRUNDINSTILLINGER
6.16 FORLAD GRUNDINDSTILLINGER
kHold SET-knappen trykket i 3 sekunder for at afslutte
indstillingerne (SETTINGS CLOSE blinker).
2209
n
3 sek.
7 GENERELLE FUNKTIONER
7.1 DISPLAYBELYSNING
n
n
kLysfunktionen tændes/slukkes ved samtidigt tryk
på SET-og RESET-knappen. I displayet vises der
kort LIGHT ON/LIGHT OFF.
kDisplay-belysningen aktiveres ved tryk på en
vilkårlig knap, ved det næsten tryk, springer
2209
n
2209
n
funktionen videre.
Belysningen fungerer ikke under synkroniseringen!
For at skåne batteriet, bør unødig belysning undgås!
7.2. HASTIGHEDSSAMMENLIGNING
2209 2209 2209
1
1
k Ved næsten samme hastighed vises .
2
k Ved lavere hastighed vises der et .
3
k Ved højere hastighed vises der et .
2
3
Visningen foretages ved alle funktioner, undtaget i grundindstillinger.
44
www.sigmasport.com

7 GENERELLE FUNKTIONER
7.3 AKTIVERING-/DEAKTIVERING AF TRÆDE-/HJERTEFREKVENSFUNKTIONEN
Hvis BC 2209 MHR bruges uden trædefrekvenssignalgiver og/eller brystbånd,
deaktiveres alle træde-/hjertefrekvensfunktioner (CADENCE, AVG. CAD, PULSE,
AVG. PULSE, MAX. PULSE, KCAL) for denne tur.
7.4 KALIBRERING AF STARTHØJDE
nn
3 sek.
DK
2209 2209 22092209
1
k Tryk på MODE 1 og MODE 2 knapperne samtidig i 3 sekunder
1
n n
3 sek.
2
for at kalibrere HOME ALTI.
k„HOME ALTI.“ blinker i displayet.
2
k I displayet vises SET OK.
7.5 STOPUR
n
3 sek.
2209 2209 2209 2209
1
n n
Start Stop
1
k Skift til STOPWATCH (STOPUR)-visningen med MODE 2-knappen.
2
kStart hhv. stands stopuret med SET-knappen.
kDet løbende stopur vises ved ikon
2
k Nulstilling af stopuret:
i displayet.
Hold RESET-knappen inde i 3 sekunder.
45BC 2209 MHR

7 GENERELLE FUNKTIONER
7.6 COUNTDOWN
n
--+
n
n
n
+
2209 2209 2209 2209 2209
1
n
3 sek.
2209 2209 2209 2209
5 6
n
Start
1
k Skift til COUNTDOWN +/- display med MODE 2-knappen.
2
n
Stop
n
3
3 sek.
n
kHold SET-knappen trykket i 3 sekunder (COUNTDOWN SET blinker).
2
k Indstil værdien med MODE 2-knappen (+) eller RESET-knappen (-).
3
k Skift til næste ciffer med MODE 1-knappen.
Indstil værdien som ovenfor angivet.
4
k Bekræft med SET-knappen. I displayet vises SET OK.
5
k Start hhv. stop COUNTDOWN med SET-knappen.
Den løbende countdown vises med ikon
6
k Nulstilling af countdown: Hold RESET-knappen trykket i 3 sekunder
i displayet.
(displayet går tilbage på den forindstillede værdi).
4
n
46
www.sigmasport.com

7 GENERELLE FUNKTIONER
7.7 KILOMETERTÆLLER
- +
n n
DK
2209 2209 2209 2209
1
nn nn
- -+ +
2209 2209 2209 2209
4
1
k Skift mellem TRIP UP/DOWN-visningen med MODE 2-knappen.
n
3 sek.
5
2
3
n
6
nn
kHold SET-knappen inde i 3 sekunder. „+“ eller „-“-visningen blinker.
2
k Indstil „+“ eller „–“ med MODE 2-knappen.
3
k Bekræft indstillingen med SET-knappen.
Visningen skifter til indstilling af distance
4
k Indstil værdien med MODE 2-knappen (+) eller RESET-knappen (-).
5
k Skift til næste ciffer med MODE 1-knappen.
Indstil værdien som ovenfor angivet.
6
k Bekræft med SET-knappen. I displayet vises SET OK.
47BC 2209 MHR

7 GENERELLE FUNKTIONER
7.8 RESET AF DISPLAY
nn
4 sek.
2209
1
k Tryk på MODE 1/2-knappen, indtil den ønskede funktion vises.
2209 22092209 2209
1
2
kHold RESET-knappen trykket. Display blinker.
Efter 2 sekunder nulstilles kun den viste funktion.
2
k Hvis RESET-knappen trykkes ind i mere end 4 sekunder, viser displayet:
TRIP DIST, TRIP TIME, AVG. SPEED, MAX. SPEED , AVG. CAD, TRIP CLIMB,
MAX. ALTI, AVG. PULSE, MAX. PULSE, KCAL på nul.
7.9 TOTALVÆRDIER CYKEL 1 OG CYKEL 2
De samlede værdier vises først separat for CYKEL 1, CYKEL 2
og CYKEL 1+2, hvis der anvendes to cykler.
Så længe der kun køres på en cykel, vises der kun de samlede
værdier for den første cykel.
2209
7.10 SERVICEINTERVAL
Serviceintervallet informerer dig om, hvornår kilometertællet til
næste cykelinspektion er nået. Serviceintervallet kan kun indstilles
af din forhandler. Når det forindstillede kilometertal er nået, vises
displayet INSPECTION. Denne indikation forsvinder ved tryk på en
2209
vilkårlig kanp.
48
Tryk kort på en
vilkårlig knap.
www.sigmasport.com

7 GENERELLE FUNKTIONER
7.11 TRANSPORTMODUS
I tilfælde af en transport på bilens cykelholder eller i bilen
(hvis den sidder på holderen), går BC 2209 MHR som følge
af den integrerede bevægelsessensor i en såkaldt
transportmodus. I displayet vises TRANSPORT.
For at forlade denne modus, skal du trykke på en vilkårlig knap.
7.12 PC INTERFACE
BC 2209 MHR kan tilsluttes til en pc. Efter køb af SIGMA DATA
CENTER SOFTWAREN og docking stationen (Art.Nr.: 00432),
kan du nemt og hurtigt downloade total- og dagsværdierne på din pc.
Desuden kan du på denne måde også nemt og hurtigt indstille din
BC 2209 MHR.
7.13 KABELBUNDET UNIVERSALHOLDER
BC 2209 MHR kan senere udstyres med en kabelbundet
universalholder, der kun måler hastigheden (trædefrekvens og
brystbånd forbliver trådløse). Art.-Nr.: 00433.
2209
Tryk kort på en
vilkårlig knap.
DK
8 HØJDEMÅLING
8.1 FORORD
BC 2209 MHR beregner højdemålingen ud fra lufttrykket. Enhver vejrforandring
betyder ændring i lufttrykket, hvilket kan føre til en ændring af den aktuelle højde.
For at kompensere for denne ændring i lufttrykket skal man angive en referencehøjde
på BC 2209 MHR (den såkaldte kalibrering).
BC 2209 MHR dog en specialfunktion, som gør det næsten unødvendigt hele tiden at
kalibrere:
49BC 2209 MHR

8 HØJDEMÅLING
Når enheden „falder i søvn“ (klokkeslæt og modelnavn i displayet), gemmes den sidst
viste aktuelle højde. Når computeren „vågner op“, overtages denne gemte højde som
referencehøjde. BC 2209 MHR kalibrerer så at sige „sig selv“.
Lufttrykmåleren aktiveres ved bevægelse af cyklen hhv. BC 2209 MHR, også når
BC 2209 MHR er i søvnfunktion. Derved bliver den aktuelle højde regelmæssigt
opdateret, når der skiftes sted. Den indbyggede bevægelsessensor er så følsom,
at systemet også fungerer i en bil.
Der er tre huller på undersiden af BC 2209 MHR af hensyn til lufttrykmålingen.
Disse huller skal altid være åbne og kræver derfor regelmæssig rensning.
BEMÆRK: Før aldrig en spids genstand ind i målehullerne!
8.2 KALIBRERINGSMULIGHEDERNE
1. STARTHØJDE
„Starthøjden“ er højden for dit normale startsted (som regel din bopæl). Denne værdi kan
findes på vej- eller landkort. Den indprogrammeres i BC 2209 MHR og kan kalibreres
i løbet af 3 sekunder. Starthøjden gemmes permanent i BC 2209 MHR (også ved
batteriskift).
2. AKTUEL HØJDE
Den „aktuelle højde“ er højden på det sted, hvor du aktuelt befinder dig, uafhængigt af din
starthøjde (startstedet for din tur, en bjerghytte eller et andet sted). Den „aktuelle højde“
bruges, når du er undervejs på din cykel og har en højdeangivelse.
50
www.sigmasport.com

8 HØJDEMÅLING
3. LUFTTRYK VED HAVETS OVERFLADE
Hvis du er på et ukendt sted (ingen angivelse af aktuel højde), kan du angive det såkaldte
„lufttryk reduceret til havets overflade“, for at kalibrere den aktuelle højde.
Lufttryk reduceret til havets overflade kan du se på internettet (f.eks. www.meteo24.de),
eller du kan afløse det ved en lufthavn.
BEMÆRK: Lufttrykket ved din vejrstation er det aktuelle lufttryk, ikke lufttrykket
reduceret til havets overflade.
9 GANGFUNKTION
9.1 FORORD
BC 2209 MHR kan bruges som vandrecomputer. Dertil medfølger
der et separat armbånd i leveringsomfanget.
Når BC 2209 MHR monteres på dette armbånd bliver alle
cykelfunktionerne deaktiveret (disse gemmes dog og kan hentes
igen ved cykling).
Der bibeholdes kun de funktioner, der er relevante for vandringen.
2209
Således kan du også bruge din BC 2209 MHR med højde- og pulstal
når du vandrer, klatrer, løber på ski eller ved andre sportsgrene.
DK
9.2 SYNKRONISERINGEN
kSæt BC 2209 MHR i armbåndet.
Det aktuelle pulstals nuller blinker.
kEfter ca. 10 sekunder er
BC 2209 MHR synkroniseret med
brystbåndet, dataene vises.
2209
51BC 2209 MHR

9 GANGFUNKTION
9.3 INDSTILLING AF VANDRETID
2209 2209 2209
1
n nn
1
k Skift til HIKINGTIME (VANDRETID) med MODE 1-knappen.
2
k Start hhv. stop vandretiden med SET-knappen.
Den løbende vandretid vises ikon
2
Start Stop
i displayet.
9.4 INDSTILLING AF MÅLTID
n
n
--+
n
n
+
2209
1
n n
3 sek.
1
k Skift til TARGETTIME (MÅLTID) med MODE 1-knappen.
2209 2209 2209 2209
2 3
kHold SET-knappen trykket i 3 sekunder (MÅLTID SET blinker).
2
k Indstil værdien med MODE 2-knappen (+) eller RESET-knappen (-).
3
k Skift til næste ciffer med MODE 1-knappen.
Indstil værdien som ovenfor angivet.
4
k Bekræft med SET-knappen.
Når der vises SET OK er ændringen gemt.
kStart hhv. stop MÅLTIDEN med SET-knappen.
52
www.sigmasport.com
4
n

9 GANGFUNKTION
9.5 RESET AF DISPLAY
nn
> 4 sek.3 sek.
DK
2209 2209
1 2
1
k Tryk på MODE 1/2-knappen, indtil den ønskede funktion vises.
2
k Hold RESET-knappen trykket. Display blinker.
2209 2209
3
Ordret „RESET“ vises blinkende nederst på displayet.
Nach 2 Sekunden wird nur die angezeigte Funktion auf 0 zurückgesetzt.
3
k Hvis RESET-knappen trykkes ind i mere end 4 sekunder, viser displayet:
HIKINGTIME, TARGETTIME, TRIP CLIMB, MAX. ALTI, AVG. PULSE,
MAX. PULSE, KCAL på nul.
9.6 AKTIVERING-/DEAKTIVERING AF HJERTEFREKVENSFUNKTIONER
Hvis BC 2209 MHR bruges uden brystbånd, deaktiveres alle hjertefrekvensfunktioner
(PULSE, AVG. PULSE, MAX. PULSE, KCAL) for denne vandring.
53BC 2209 MHR

10 TEKNISKE DATA
10.1 DEFAULT/MIN/MAX VÆRDIER
Default Max. Min. Enheder
Hastighed 0,0 199,8 0,0 kmh/mph
Dagsstrækning 0,00 9999,99 0,00 km/mi
Køretid 0:00:00 999:59:59 00:00:00 h:mm:ss
Gennemsnitshastighed 0,00 199,99 0,00 kmh/mph
Max. hastighed 0,00 199,99 0,00 kmh/mph
Trædefrekvens 0 180 0 upm
Max. trædefrekvens 0 180 0 upm
Aktuel puls 40 240 40 bpm
Gennemsnitspuls 40 240 0 bpm
Max. puls 40 240 0 bpm
Kalorier 0 9.999 0 Kcal
Aktuel højde 0 4.999/19.999 -999 m / ft
Dagshøjde 0 99.999 0 m / ft
Max. højde 4.999/19.999 -999 m / ft
Stopur 00:00,0 9:59:59 00:00:00 h:mm:ss,1/10
Countdown 0:00:00 9:59:59 00:00:00 h:mm:ss
Separat kilometertæller 0,00 999,99 -99,99 km/mi
Temperatur 0 +70/+158 -10,0 °C/°F
Totalstrækning 0
Cykel 1/2 99.999 00:00 km/mi
Cykel 1+2 999.998 00:00
Totaltid 0:00
Cykel 1/2 9.999:59 00:00 hhhh:mm
Cykel 1+2 19.999 00:00 hhhhh
Totalhøjde 0
Cykel 1/2 99.999 00:00 m / ft
Cykel 1+2 999.998 00:00
54
www.sigmasport.com

10 TEKNISKE DATA
10.2 BATTERIUDSKIFTNING
2209 2209 2209 2209
Batteriskift for computer og sender (hastighed, trædefrekvens og/eller brystbånd) vises
på displayet. Efter et batteriskift skal klokkeslættet indtastes igen.
DK
Computer:
kÅbn låget med et værktøj.
kBemærk polariteten.
Ved åbnet batterirum skal du se batteriets plusside.
kEr tætningsringen løs, lægges den i igen.
kLuk låget med et værktøj.
Sender:
kÅbn låget med et værktøj.
kFjern batteriet fra låget.
kBemærk polariteten.
kSæt det nye batteri i låget.
kLuk låget med et værktøj.
Batteri:
Computer: Lithium knapcelle CR 2450
Sender: Lithium knapcelle CR 2032
Batterilevetid:
Computer: ca. 1 år*
Sender: ca. 1 år*
* ved 1 times daglig brug
25
27
29
31
CR 2450
CR 2032
26
28
30
32
55BC 2209 MHR

10 TEKNISKE DATA
10.3 PROBLEMLØSNINGER
Ingen hastighedsindikation
k Sidder computeren rigtigt i holderen?
kHar du kontrolleret kontakterne for
oxidation/korrosion?
kHar du kontrolleret afstanden
magnet/sender (max. 12 mm)?
kHar du kontrolleret, om magneten
er magnetiseret?
kHar du kontrolleret
hastighedssenderens batteritilstand?
Ingen trædefrekvensvisning
k Har du kontrolleret afstanden
magnet/sender (max. 12 mm)?
kHar du kontrolleret, om magneten
er magnetiseret?
kHar du kontrolleret senderens
batteritilstand?
Ingen pulsindikation
k Er elektroderne tilstrækkeligt fugtige?
kHar du kontrolleret batteritilstanden?
Ingen displayindikation
k Har du kontrolleret batteritilstanden
på BC 2209 MHR?
kEr batteriet lagt rigtigt i (+ opad)?
kEr batterikontakterne i orden
(bøj dem forsigtigt)?
Forkert hastighedsindikation
k Er der monteret 2 magneter?
kEr magneten rigtigt placeret
(parallelt og centreret til sender)?
kEr hjulstørrelsen rigtigt indstillet?
kEr senderen indstillet på den rigtige
cykel (cykel I eller II)?
Displayindikation sort/langsom
k Er temperaturen for høj (> 60°C)
eller for lav (< 0°C)?
Ingen synkronisering
k Har du kontrolleret afstanden
magnet/sender?
kEr batteriet i denne sender afladt?
kHar du kontrolleret den pågældende
senders rækkevidde?
kVed brug af en navdynamo, skal
senderens position ændres.
Indikation „TOO MANY SIGNALS“
k Forøg afstanden til andre sendere og
tryk på en vilkårlig knap.
56
www.sigmasport.com

10 TEKNISKE DATA
10.4 GARANTIHENVISNINGER
Vi hæfter overfor vores pågældende aftalepartner for fejl iht. de lovpligtige forskrifter.
Batterier er udelukket fra garantien.
SIGMA Elektro GmbH
Dr.-Julius-Leber-Straße 15
D-67433 Neustadt/Weinstraße
Service-Tel.: +49 (0)6321-9120-118
E-Mail: service@sigmasport.com
Producenten forbeholder sig ret til tekniske ændringer.
Batterier afleveres igen efter brug.
DK
57BC 2209 MHR

SISÄLTÖ
SISÄLTÖ
1 Johdanto ja pakkauksen sisältö ........................................................................... 59
2 Asennus ....................................................................................................................... 60
2.1 Pyörän 2 asennus ............................................................................................................ 61
3 Käyttöönotto .............................................................................................................. 61
4 Näytönvaihto/näppäimet/toiminnot .................................................................. 62
5 Synkronointi ............................................................................................................... 62
6 Perusasetukset ......................................................................................................... 63
6.1 Kielen asetus ..................................................................................................................... 64
6.2 Asetus KMH/MPH .......................................................................................................... 64
6.3 Ilmanpaineen asetus merenpinnan korkeuteen (sea level) ................................. 65
6.4 Nykyisen korkeuden asetus ........................................................................................... 65
6.5 Aloituskorkeuden asetus ................................................................................................ 66
6.6 Rengaskoon laskeminen ................................................................................................. 66
6.7 Pyörän 1 tai pyörän 2 rengaskoon asetus ............................................................... 67
6.8 Kellonajan asetus ............................................................................................................. 68
6.9 Iän asetus ........................................................................................................................... 68
6.10 Painon asetus .................................................................................................................... 69
6.11 Sukupuolen asetus ........................................................................................................... 69
6.12 Pyörän 1 tai pyörän 2 kokonaismatkan asetus ....................................................... 70
6.13 Pyörän 1 tai pyörän 2 kokonaisajoajan asetus ....................................................... 70
6.14 Pyörän 1 tai pyörän 2 kokonaiskorkeuden asetus ................................................. 71
6.15 Kontrastin asetus ............................................................................................................ 71
6.16 Perusasetuksista poistuminen ..................................................................................... 72
7 Perustoiminnot ......................................................................................................... 72
7.1 Näytön valaisu ................................................................................................................... 72
7.2 Nopeusvertailu .................................................................................................................. 72
7.3 Poljinkierrosnopeus-/syketoimintojen näyttö/piilotus ......................................... 73
7.4 Aloituskorkeuden kalibrointi .......................................................................................... 73
7.5 Sekuntikello ........................................................................................................................ 73
7.6 Lähtölaskenta .................................................................................................................... 74
7.7 Kilometrimittari ................................................................................................................. 75
7.8 Näyttöjen nollaus .............................................................................................................. 76
7.9 Pyörän 1 ja pyörän 2 kokonaisarvot ........................................................................... 76
7.10 Huoltoväli ............................................................................................................................. 76
7.11 Kuljetustila .......................................................................................................................... 77
7.12 PC-käyttöliittymä ............................................................................................................... 77
7.13 Kaapeliliitännällinen yleispidike ..................................................................................... 77
58
www.sigmasport.com

SISÄLTÖ
8 Korkeusmittaus ........................................................................................................ 77
8.1 Johdanto ............................................................................................................................. 77
8.2 BC 2209 MHR-Pyörätietokoneen kalibrointivaihtoehdot .................................... 78
9 Vaellustila ................................................................................................................... 79
9.1 Johdanto ............................................................................................................................. 79
9.2 Synkronointi ........................................................................................................................ 79
9.3 Vaellusajan asetus ........................................................................................................... 80
9.4 Tavoiteajan asetus ........................................................................................................... 80
9.5 Näyttöjen nollaus .............................................................................................................. 81
9.6 Syketoimintojen näyttö/piilotus ................................................................................... 81
10 Tekniset tiedot .......................................................................................................... 82
10.1 Oletus-/minimi-/maksimiarvot .................................................................................... 82
10.2 Paristonvaihto ................................................................................................................... 83
10.3 Vianmääritys ...................................................................................................................... 84
10.4 Takuu .................................................................................................................................... 85
1 JOHDANTO JA PAKKAUKSEN SISÄLTÖ
FIN
Kiitämme SIGMA SPORT
®
in pyörätietokoneen valinnasta. Uusi BC 2209 MHR tulee
toimimaan pyörällä ajossa luotettavasti vuosikausia.
Lue tämä käyttöohje huolellisesti läpi, jotta opit uuden pyörätietokoneen monipuoliset
toiminnot ja niiden käytön.
SIGMA toivottaa teille paljon huvia BC 2209 MHR -tietokoneen käytön aikana.
BC 2209 MHR on varustettu automaattisella Start/Stop-toiminnolla. Heti kun
BC 2209 MHR on asennettuna pidikkeeseen, liikeanturi herättää tietokoneen
pienimmästäkin pyörän tai vaelluspidikkeen liikkeestä. Tällä tavalla tahdistus
käynnistyy automaattisesti.
BC 2209 MHR
59

1 JOHDANTO JA PAKKAUKSEN SISÄLTÖ
1 PAKKAUKSEN SISÄLTÖ
Pyörätietokone
BC 2209 MHR
Rintavyö STS sekä
joustava vyö
Nopeudenlähetin
STS
Poljinkierrosnopeuden
lähetin STS
2 ASENNUS
Näiden asennustekstien kuvat ovat oheisessa lehtisessä!
PYÖRÄPIDIKKEEN ASENNUS
kPidike voidaan asentaa joko kaapelisiteillä (pysyvä k iinnitys)
tai vaihtoehtoisesti O-renkailla.
kOhjaustanko tai uloke.
kIrrota keltainen muovi!
kPinnamagneetti
kPoljinkierros-
magneetti
kOhjaustankopidike
kParistokotelon
kannen avain
kKiinnitysvälineet
kRanneke
4321
60
www.sigmasport.com

2 ASENNUS
LÄHETTIMEN ASENNUS –
5
NOPEUS JA POLJINKIERROSNOPEUS
kMolemmat lähettimet voidaan asentaa joko kaapelisiteillä
(pysyvä kiinnitys) tai vaihtoehtoisesti O-renkailla.
kJotta välttämätön 12 mm tai vähemmän saavutetaan,
asenna lähetin ja magneetit lähemmäksi keskiötä.
MAGNEETTIEN ASENNUS –
NOPEUS JA POLJINKIERROSNOPEUS /
RINTAVYÖN PUKEMINEN
kHiero elektrodeihin vettä ja sykemittausgeeliä.
2.1 PYÖRÄN 2 ASENNUS
Vaihto PYÖRÄN 1 (WHEEL 1) ja PYÖRÄN 2 (WHEEL 2) välillä
tapahtuu automaattisesti. On vain otettava käyttöön toinen
nopeudenlähetin (jälk iasennussarja „PYÖRÄ 2“ tuotenro: Art.-Nr.: 00417
„PYÖRÄ 2 sis. poljinkierrosnopeus“ tuotenro: Art.-Nr.: 00415)
3 KÄYTTÖÖNOTTO
BC 2209 MHR toimitetaan virrankulutussyistä ilman paristoa.
Aseta paristo laitteeseen avaamalla paristokotelon kansi oheisella
työkalulla. Kun olet laittanut pariston paristokoteloon, sulje se
työkalun avulla.
8
7
6
9
15 16
141312
FIN
19
18
17
24
23
21
22
11
10
o
p
e
n
-
c
l
o
s
e
Näyttö siirtyy automaattisesti asetustilaan.
BC 2209 MHR
2209
61

4 NÄYTÖNVAIHTO/NÄPPÄIMET/TOIMINNOT
RESET
Alla lueteltujen toimintojen
palautus alkutilaan tai
selaus taaksepäin tietyllä
Alla lueteltujen toimintojen
nouto tai selaus eteenpäin
tietyllä valikkotasolla.
MODE 2
valikkotasolla.
2209
SET
Syötettyjen arvojen
säätö ja tallennus.
MODE 1
Alla lueteltujen
toimintojen nouto.
MODE 1 MODE 2
PYÖRÄTILA TRIP DIST CADENCE TRIP UP +/-
TRIP TIME AVG. PULSE TEMPERATUR
AVG. SPEED MAX. PULSE TOTAL ODO*
MAX. SPEED KCAL TOTAL TIME*
AVG. CAD CLOCK TOTAL ALTI*
TRIP CLIMB +/- STOPWATCH
MAX. ALTI COUNTDOWN
VAELLUSTILA HIKINGTIME AVG. PULSE STOPWATCH
TARGETTIME MAX. PULSE TEMPERATUR
TRIP CLIMB +/- KCAL TOTAL TIME
MAX. ALTI CLOCK TOTAL ALTI
*ei ajon aikana
5 SYNKRONOINTI
62
kKiinnitä BC 2209 MHR tankopidikkeeseen - Tahdistus on
mahdollista vasta, kun pyörätietokone on kiinnitetty pidikkeeseen.
kNopeuden, poljinkierrosnopeuden ja sykkeen näytön nollat
vilkkuvat.
2209
www.sigmasport.com

5 SYNKRONOINTI
kNopeuden, poljinkierrosnopeuden ja syketaajuuden
synkronointiin on kaksi vaihtoehtoa:
1. Lähde ajamaan: vastaanotin tahdistuu yleensä 3 - 4 renkaan
pyörähdyksen jälkeen vastaanottimen kanssa.
2. Käännä etupyörää tai polkimia, kunnes KMH-näyttö tai
poljinkierrosnopeuden näyttö ei enää vilku.
kMene rintavyö päälle puettuna
BC 2209 MHR-tietokoneen lähelle
tai nouse pyörän päälle. BC 2209 MHR
synkronisoidaan yleensä rintavyön
kera alle 10 sekunnissa.
Sykenäyttö ei enää vilku.
FIN
2209
2209
2209
6 PERUSASETUKSET
kPaina SET-näppäintä 3 sekunnin ajan, kunnes esiasetettu
KIELI (englanti) tulee näyttöön (SETTINGS OPEN vilkkuu).
BC 2209 MHR
2209
n
3 sek.
63

6 PERUSASETUKSET
6.1 KIELEN ASETUS
n
--+
n
2209 2209 2209 2209
1
n
1
k MODE 1-näppäimellä vaihdetaan esiasetettuun KIELEEN
2
n
3
4
n
(BC 2209 MHR-mallissa on vakiona esiasetuksena englanti).
2
k Paina lyhyesti SET-näppäintä. Näyttö vilkkuu.
3
k Valitse MODE 1-näppäimellä haluamasi kieli.
4
k Vahvista valinta SET-näppäimellä. Näyttöön tulee SET OK.
6.2 ASETUS KMH/MPH
n
n
+
2209 2209 2209 2209
1 2
1
k Valitse MODE 1-näppäimellä KMH/MPH-näyttö.
nn n
3 4
2
k Paina lyhyesti SET-näppäintä. Näyttö vilkkuu.
3
k Valitse MODE 2-näppäimellä joko MPH tai KMH.
4
k Vahvista valinta SET-näppäimellä. Näyttöön tulee SET OK.
Kun KMH vaihdetaan MPH:ksi, matkan muoto muuttuu automaattisesti km -> mi, lämpötila
°C -> °F, kellonaika 24 h -tilasta 12 h -tilaan, korkeusmetrit m -> ft ja paino kg -> lb.
64
www.sigmasport.com

6 PERUSASETUKSET
6.3 ILMANPAINEEN ASETUS MERENPINNAN KORKEUTEEN (SEA LEVEL)
n n
- +
2209 2209 2209 2209
1
n
2 3
n
4
n
Tämä toiminto selitetään luvussa „8 KORKEUSMITTAUS“.
1
k Valitse MODE 1-näppäimellä SEA LEVEL (MERENPINNAN KORKEUTEEN)-näyttö.
2
k Paina lyhyesti SET-näppäintä. Näyttö vilkkuu.
3
k Aseta arvo MODE 2-näppäimellä (+) tai RESET-näppäimellä (-).
4
k Vahvista valinta SET-näppäimellä. Näyttöön tulee SET OK.
6.4 NYKYISEN KORKEUDEN ASETUS
nn nn
- -+ +
2209 2209 2209 2209 2209
1
n
2
3
n
4
n
Tämä toiminto selitetään luvussa „8 KORKEUSMITTAUS“.
1
k Valitse MODE 1-näppäimellä ACT. ALTI. (NYKYISEN KORKEUDEN)-näyttö.
kPaina lyhyesti SET-näppäintä. Ensimmäinen valittava luku vilkkuu.
2
k Aseta arvo MODE 2-näppäimellä (+) tai RESET-näppäimellä (-).
3
k Siirry MODE 1-näppäimellä seuraavaan kohtaan.
4
k Aseta arvo MODE 2-näppäimellä (+) tai RESET-näppäimellä (-).
5
k Vahvista valinta SET-näppäimellä. Näyttöön tulee SET OK.
FIN
5
BC 2209 MHR
65

6 PERUSASETUKSET
6.5 ALOITUSKORKEUDEN ASETUS
n
n
--+
n
n
+
2209 2209
1
n n
2
2209 2209 2209
3
4
Tämä toiminto selitetään luvussa „8 KORKEUSMITTAUS“.
1
k Valitse MODE 1-näppäimellä HOME ALTI. (ALOITUSKORKEUDEN) -näyttö.
kPaina lyhyesti SET-näppäintä. Ensimmäinen valittava luku vilkkuu.
2
k Aseta arvo MODE 2-näppäimellä (+) tai RESET-näppäimellä (-).
3
k Siirry MODE 1-näppäimellä seuraavaan kohtaan.
4
k Aseta arvo MODE 2-näppäimellä (+) tai RESET-näppäimellä (-).
5
k Vahvista valinta SET-näppäimellä.
Näyttöön tulee SET OK.
6.6 RENGASKOON LASKEMINEN
kTaulukosta „RENGASKOKOTAULUKKO“ (taul. C) voi tarkistaa
rengaskokoa vastaavan arvon.
kVaihtoehto: Laske rengaskoko eli WS (WHEEL SIZE) (taul. A tai taul. B)
A B
mm x 3,14
1x
km/h:
WS = mm x 3,14
mph:
WS = mm x 3,14
5
n
km/h:
WS = mm
mph:
WS = mm
= WS (mm)
66
www.sigmasport.com

6 PERUSASETUKSET
C
ETRTO ETRTO
7
.
1
5
x
x
6
1
47-305
47-406
37-540
47-507
23-571
40-559
44-559
47-559
50-559
54-559
57-559
37-590
37-584
20-571
2
16x1.75x2
20x1.75x2
24x1 3/8 A
24x1.75x2
26x1
26x1.5
26x1.6
26x1.75x2
26x1.9
26x2.00
26x2.125
26x1 3/8
26x1 3/8x1 1/2
26x3/4
kmh
mph
1272
1590
1948
1907
1973
2026
2051
2070
2089
2114
2133
2105
2086
1954
6
1
32-630
28-630
40-622
47-622
40-635
37-622
18-622
20-622
23-622
25-622
28-622
32-622
37-622
40-622
7
.
1
5
x
x
2
27x1 1/4
27x1 1/4 Fifty
28x1.5
28x1.75
28x1 1/2
28x1 3/8x1 5/8
700x18C
700x20C
700x23C
700x25C
700x28C
700x32C
700x35C
700x40C
kmh
mph
2199
2174
2224
2268
2265
2205
2102
2114
2133
2146
2149
2174
2205
2224
FIN
6.7 PYÖRÄN 1 TAI PYÖRÄN 2 RENGASKOON ASETUS
nn nn
- -+ +
2209 2209 2209 2209 2209
1
n
1
k Siirry MODE 1-näppäimellä WS BIKE 1 tai WS BIKE 2 näyttöön
2
3 4 5
n
kPaina lyhyesti SET-näppäintä. Ensimmäinen valittava luku vilkkuu.
2
k Aseta arvo MODE 2-näppäimellä (+) tai RESET-näppäimellä (-).
3
k Siirry MODE 1-näppäimellä seuraavaan kohtaan.
4
k Aseta arvo MODE 2-näppäimellä (+) tai RESET-näppäimellä (-).
5
k Vahvista valinta SET-näppäimellä.
Näyttöön tulee SET OK.
BC 2209 MHR
n
67

6 PERUSASETUKSET
6.8 KELLONAJAN ASETUS
-
n
n n
n
+
2209 2209 2209
1
n
1
k Valitse MODE 1-näppäimellä CLOCK (KELLONAJAN)-näyttö.
2
3
n
kPaina lyhyesti SET-näppäintä. Tuntinäyttö vilkkuu.
2
k Aseta arvo MODE 2-näppäimellä (+) tai RESET-näppäimellä (-).
3
k Siirry MODE 1-näppäimellä seuraavaan kohtaan.
4
k Aseta arvo MODE 2-näppäimellä (+) tai RESET-näppäimellä (-).
5
k Vahvista valinta SET-näppäimellä.
Näyttöön tulee SET OK.
6.9 IÄN ASETUS
n
n
--++
2209
1
n
1
k Valitse MODE 1-näppäimellä AGE (IÄN)-näyttö.
2209 2209 2209
2
n n
3 4
2
k Paina lyhyesti SET-näppäintä. Näyttö vilkkuu.
2209 2209
4 5
n
3
k Aseta arvo MODE 2-näppäimellä (+) tai RESET-näppäimellä (-).
4
k Vahvista valinta SET-näppäimellä. Näyttöön tulee SET OK.
68
www.sigmasport.com

6 PERUSASETUKSET
6.10 PAINON ASETUS
- +
n n
2209
1
n
1
k Valitse MODE 1-näppäimellä WEIGHT (PAINON)-näyttö.
2209 2209 2209
2
n n
3 4
2
k Paina lyhyesti SET-näppäintä. Näyttö vilkkuu.
3
k Aseta arvo MODE 2-näppäimellä (+) tai RESET-näppäimellä (-).
4
k Vahvista valinta SET-näppäimellä.
Näyttöön tulee SET OK.
6.11 SUKUPUOLEN ASETUS
n n
- +
2209 2209 2209 2209
1 2
n
1
k MODE 1-näppäimellä vaihdetaan esiasetettuun SUKUPUOLEN
n n
3
(BC 2209 MHR -mallissa on vakioasetuksena MIES).
2
k Paina lyhyesti SET-näppäintä. Näyttö vilkkuu.
3
k Aseta arvo MODE 2-näppäimellä (+) tai RESET-näppäimellä (-).
4
k Vahvista valinta SET-näppäimellä.
Näyttöön tulee SET OK.
FIN
4
BC 2209 MHR
69

6 PERUSASETUKSET
6.12 PYÖRÄN 1 TAI PYÖRÄN 2 KOKONAISMATKAN ASETUS
nn nn
- -+ +
2209 2209 2209 2209 2209
1
n
1
k Valitse MODE 1-näppäimellä ODO BIKE 1 - tai ODO BIKE 2-näyttö.
2
3
4
kPaina lyhyesti SET-näppäintä. Ensimmäinen valittava luku vilkkuu.
2
k Aseta arvo MODE 2-näppäimellä (+) tai RESET-näppäimellä (-).
3
k Siirry MODE 1-näppäimellä seuraavaan kohtaan.
4
k Aseta arvo MODE 2-näppäimellä (+) tai RESET-näppäimellä (-).
5
k Vahvista valinta SET-näppäimellä.
Näyttöön tulee SET OK.
6.13 PYÖRÄN 1 TAI PYÖRÄN 2 KOKONAISAJOAJAN ASETUS
n
n
--+
2209 2209 2209 2209 2209
1
n
1
k Valitse MODE 1-näppäimellä TIME BIKE1 - tai TIME BIKE2-näyttö.
2
3
n
n
+
4
kPaina lyhyesti SET-näppäintä. Ensimmäinen valittava luku vilkkuu.
2
k Aseta arvo MODE 2-näppäimellä (+) tai RESET-näppäimellä (-).
3
k Siirry MODE 1-näppäimellä seuraavaan kohtaan.
4
k Aseta arvo MODE 2-näppäimellä (+) tai RESET-näppäimellä (-).
5
k Vahvista valinta SET-näppäimellä.
Näyttöön tulee SET OK.
5
nn
5
nn
70
www.sigmasport.com

6 PERUSASETUKSET
6.14 PYÖRÄN 1 TAI PYÖRÄN 2 KOKONAISKORKEUDEN ASETUS
nn
nn
- -
+ +
2209 2209 2209 2209 2209
1
n nn
1
k Valitse MODE 1-näppäimellä ALTI.BIKE 1 - tai ALTI.BIKE 2-näyttö.
2
3
4
kPaina lyhyesti SET-näppäintä. Ensimmäinen valittava luku vilkkuu.
2
k Aseta arvo MODE 2-näppäimellä (+) tai RESET-näppäimellä (-).
3
k Siirry MODE 1-näppäimellä seuraavaan kohtaan.
4
k Aseta arvo MODE 2-näppäimellä (+) tai RESET-näppäimellä (-).
5
k Vahvista valinta SET-näppäimellä.
Näyttöön tulee SET OK.
6.15 KONTRASTIN ASETUS
n
n
-
+
2209 2209 2209 2209
1 2
n
1
k Valitse MODE 1-näppäimellä CONTRAST (KONTRASTIN)-näyttö.
n n
3
4
2
k Paina lyhyesti SET-näppäintä. Näyttö vilkkuu.
3
k Aseta arvo MODE 2-näppäimellä (+) tai RESET-näppäimellä (-)
(1 = heikko / 3 = voimakas).
5
FIN
4
k Vahvista valinta SET-näppäimellä.
Näyttöön tulee SET OK.
BC 2209 MHR
71

6 PERUSASETUKSET
6.16 PERUSASETUKSISTA POISTUMINEN
kAsetuksista poistutaan painamalla SET-näppäintä 3 sekunnin
ajan (SETTINGS CLOSE vilkkuu).
2209
n
3 sek.
7 PERUSTOIMINNOT
7.1 NÄYTÖN VALAISU
n
n
kValaisutoiminto kytketään päälle/pois päältä
painamalla yhtaikaa näppäimiä SET ja RESET.
Näytölle tulee hetkeksi teksti LIGHT ON/LIGHT OFF.
kNäyttö valaistuu painamalla mitä tahansa näppäintä
ja seuraavalla painalluksella toiminto kytketään jälleen.
2209
n
2209
n
Taustavalo ei ole käytettävissä synkronoinnin aikana!
Vältä turhaa valaistua säästääksesi paristoa!
7.2. NOPEUSVERTAILU
2209 2209 2209
1
1
k Suunnilleen samassa nopeudessa näkyy .
2
k Näytölle tulee , kun nopeus on vähäisempi.
3
k Näytölle tulee , kun nopeus on korkeampi.
2
3
Näyttö toimii kaikissa muissa toiminnoissa paitsi perusasetuksissa.
72
www.sigmasport.com

7 PERUSTOIMINNOT
7.3 POLJINKIERROSNOPEUS-/SYKETOIMINTOJEN NÄYTTÖ/PIILOTUS
Kun BC 2209 MHR -pyörätietokonetta käytetään ilman poljinkierrosnopeuden ilmaisinta ja/
tai rintavyötä, kaikki poljinkierrosnopeus-/syketoiminnot (CADENCE, AVG. CAD, PULSE,
AVG. PULSE, MAX. PULSE, KCAL) piilotetaan kyseisellä matkalla.
7.4 ALOITUSKORKEUDEN KALIBROINTI
nn
3 sek.
2209 2209 22092209
1
k HOME ALTI. kalibroidaan painamalla samanaikaisesti
1
n n
3 sek.
2
MODE 1- ja MODE 2-näppäimiä.
k„HOME ALTI.“ vilkkuu näytöllä.
2
k Näyttöön tulee SET OK.
7.5 SEKUNTIKELLO
n
3 sek.
2209 2209 2209 2209
1
n n
Start Stop
1
k Valitse MODE 2-näppäimellä STOPWATCH (SEKUNTIKELLO)-näyttö.
2
kSET-näppäimellä sekuntikello voidaan joko käynnistää tai pysäyttää.
kKäynnissä olevan sekuntikellon tunnistaa näytöllä olevasta
2
k Sekuntikellon nolla-asento:
-merkistä.
Pidä RESET-näppäintä painettuna 3 sekunnin ajan.
FIN
BC 2209 MHR
73

7 PERUSTOIMINNOT
7.6 LÄHTÖLASKENTA
--+
n
n
n
n
+
2209 2209 2209 2209 2209
1
n
3 sek.
2209 2209 2209 2209
5 6
n
Start
1
k Valitse MODE 2-näppäimellä COUNTDOWN (LÄHTÖLASKENTA) +/- -näyttö.
2
n
Stop
n
3
3 sek.
n
kPidä SET-näppäintä painettuna 3 sekunnin
ajan (COUNTDOWN SET vilkkuu).
2
k Aseta arvo MODE 2-näppäimellä (+) tai RESET-näppäimellä (-).
3
k Siirry MODE 1-näppäimellä seuraavaan kohtaan.
Aseta arvo yllä kuvatun mukaisesti.
4
k Vahvista valinta SET-näppäimellä.
Näyttöön tulee SET OK.
5
k Käynnistä tai pysäytä LÄHTÖLASKENTA SET-näppäimellä.
Käynnissä olevan lähtölaskennan tunnistaa näytöllä olevasta
6
k Lähtölaskennan nollaus: Paina RESET-näppäintä 3 sekunnin
-merkistä.
ajan (näyttöön palaa esiasetettu arvo).
4
n
74
www.sigmasport.com

7 PERUSTOIMINNOT
7.7 KILOMETRIMITTARI
- +
n n
2209 2209 2209 2209
1
nn nn
- -+ +
2209 2209 2209 2209
4
1
k Valitse MODE 2-näppäimellä TRIP UP/DOWN -näyttö.
n
3 sek.
5
2
3
n
6
nn
kPidä SET-näppäintä painettuna 3 sekunnin ajan. Näytöllä vilkkuu joko „+“ tai „-“.
2
k Valitse MODE 2-näppäimellä „+“ tai „–“.
3
k Vahvista asetus SET-näppäimellä.
Näyttö siirtyy matkan asetukseen.
4
k Aseta arvo MODE 2-näppäimellä (+) tai RESET-näppäimellä (-).
5
k Siirry MODE 1-näppäimellä seuraavaan kohtaan.
Aseta arvo yllä kuvatun mukaisesti.
6
k Vahvista valinta SET-näppäimellä.
Näyttöön tulee SET OK.
FIN
BC 2209 MHR
75

7 PERUSTOIMINNOT
7.8 NÄYTTÖJEN NOLLAUS
nn
4 sek.
2209
1
k Paina MODE 1/2-näppäintä kunnes haluttu toiminto tulee näytölle.
2209 22092209 2209
1
2
kPidä RESET-näppäintä painettuna. Näyttö vilkkuu. Näytöllä näkyvä
toiminto nollaantuu 2 sekunnin kuluttua.
2
k Jos RESET-näppäintä pidetään yli 4 sekuntia painettuna, nollautuvat näytöt
TRIP DIST, TRIP TIME, AVG. SPEED, MAX. SPEED , AVG. CAD, TRIP CLIMB,
MAX. ALTI, AVG. PULSE, MAX. PULSE, KCAL.
7.9 PYÖRÄN 1 JA PYÖRÄN 2 KOKONAISARVOT
Kokonaisarvot näytetään ensin erillisinä PYÖRÄN 1, PYÖRÄN 2 ja
PYÖRÄN 1+2 mukaan, kun toinen pyörä liitetään mukaan.
Niin kauan kuin ajetaan vain yhdellä pyörällä, ainoastaan ensimmäisen
pyörän kokonaisarvot näytetään.
2209
7.10 HUOLTOVÄLI
Huoltoväli ilmoittaa, kun on saavutettu kilometritulos, jonka
jälkeen on vuorossa pyörän seuraava tarkastus.
Ainoastaan ammattiliikkeen myyjä voi asettaa huoltovälin.
Esiasetetun kilometrimäärän jälkeen näyttöön tulee teksti
2209
Paina jotain näppäintä.
INSPECTION (TARKASTUS).
Tämä näyttö häviää mitä tahansa näppäintä painamalla.
76
www.sigmasport.com

7 PERUSTOIMINNOT
7.11 KULJETUSTILA
Mikäli pyörää kuljetetaan pyörätelineessä tai autossa
(kun pyörätietokone on pidikkeessä kiinnitettynä), integroitu
liikeanturi siirtää BC 2209 MHR:n niin kutsuttuun
kuljetustilaan. Näyttöön tulee teksti TRANSPORT (KULJETUS).
Tästä tilasta poistutaan painamalla lyhyesti mitä
tahansa näppäintä.
7.12 PC-KÄYTTÖLIITTYMÄ
BC 2209 MHR on tietokonekäyttöinen. Jos hankit
SIGMA DATA CENTER -OHJELMISTON ja sen telakka-aseman
(tuotenro: 00432), voit ladata kokonais- ja päiväarvot
tietokoneelle vaivatta ja nopeasti.
Sen lisäksi voit säätää oman BC 2209 MHR –pyörätietokoneesi
nopeasti ja helposti.
7.13 KAAPELILIITÄNNÄLLINEN YLEISPIDIKE
BC 2209 MHR voidaan varustaa jälkeenpäin kaapeliliitännällisellä
yleispitimellä pelkästään nopeuden mittausta varten
(poljinkierrosnopeus ja rintavyö pysyvät kaapelittomina).
Tuotenro: 00433.
2209
Paina jotain näppäintä.
FIN
8 KORKEUSMITTAUS
8.1 JOHDANTO
BC 2209 MHR -laitteen korkeusmittaus lasketaan barometrisen ilmanpaineen avulla.
Jokainen säänmuutos tarkoittaa myös muutosta ilmanpaineessa, mikä voi aiheuttaa
muutoksen ajankohtaisessa korkeudessa. Tämä ilmanpaineen muutos voidaan
kompensoida syöttämällä BC 2209 MHR -laitteeseen viitekorkeus (niin sanottu kalibrointi).
BC 2209 MHR on varustettu kuitenkin erikoistoiminnolla, joka tekee jatkuvasta
kalibroinnista lähes turhan:
BC 2209 MHR
77

8 KORKEUSMITTAUS
„Nukahtaessaan“ laite (kellonaika ja mallinimi näytössä) tallentaa viimeiseksi näytetyn
nykyisen korkeuden. „Herätessään“ tietokone ottaa tallennetun nykyisen korkeuden
viitekorkeudeksi. BC 2209 MHR kalibroituu niin sanotusti „itsestään“.
Barometrinen ilmanpuntari aktivoituu polkupyörän liikkeestä tai BC 2209 MHR
-tietokoneen liikkeestä silloinkin kun BC 2209 MHR on lepotilassa.
Tällä tavalla ajankohtainen korkeus päivittyy säännöllisesti, kun sijainti muuttuu.
Sisään rakennettu liikeanturi on niin herkkä, että järjestelmä toimii myös autossa.
Ilmapuntaria varten BC 2209 MHR -laitteen pohjassa on kolme reikää. Nämä reiät on
pidettävä aina avoimina ja sen vuoksi ne tarvitsevat säännöllistä puhdistusta.
HUOMIO: Älä työnnä terävää esinettä mittausreikään!
8.2 BC 2209 MHR-PYÖRÄTIETOKONEEN KALIBROINTIVAIHTOEHDOT
1. ALOITUSKORKEUS
„Aloituskorkeus“ on tavanomaisen lähtöpaikan korkeus (yleensä asuinpaikka).
Tämä arvo löytyy tiekartoista tai tavallisista kartoista. Se ohjelmoidaan kerran
BC 2209 MHR -pyörätietokoneeseen, ja se voidaan kalibroida 3 sekunnissa.
Aloituskorkeus jää pysyvästi BC 2209 MHR -pyörätietokoneen muistiin
(säilyy myös paristonvaihdon jälkeen).
2. NYKYINEN KORKEUS
„Nykyinen korkeus“ on sen paikan korkeus, jossa olet sillä hetkellä, riippumatta
omasta aloituskorkeudesta (matkan aloituspaikka, vuoristomaja tai muu paikka).
„Nykyistä korkeutta“ tarvitaan, kun olet pyörällä liikkeessä, ja jokin korkeustieto
on saatavissa.
78
www.sigmasport.com

8 KORKEUSMITTAUS
3. ILMANPAINE MERENPINNAN KORKEUDESSA
Kun olet tuntemattomassa paikassa (käytettävissä ei ole mitään tietoa nykyisestä
korkeudesta), voit syöttää niin sanotun „merenpinnan korkeuteen rajoitetun ilmanpaineen“
kalibroidaksesi nykyisen korkeuden.
Merenpinnan korkeuteen rajoitettu ilmanpaine voidaan tarkistaa Internetistä
(esim. www.meteo24.de) tai lentokentältä.
HUOMIO: Oman sääasemasi ilmanpaine on nykyinen ilmanpaine, eikä merenpinnan
korkeuteen redusoitu ilmanpaine.
9 VAELLUSTILA
9.1 JOHDANTO
BC 2209 MHR:ää voidaan käyttää myös vaellustietokoneena.
Sitä varten toimitukseen kuuluu erillinen ranneke.
Kun BC 2209 MHR:ää asennetaan tähän rannekkeseen, kaikki
pyörätoiminnot piilotetaan (ne jäävät kuitenkin tallennetuiksi ja
voidaan noutaa jälleen pyöräillessä).
Jäljelle jäävät vain vaellusta varten olennaiset toiminnot.
Tällä tavoin oman BC 2209 MHR -laitteen korkeus- sekä syketietoja
voidaan käyttää myös vaelluksen, kiipeilyn, hiihdon aikana tai muissa
urheilulajeissa.
9.2 SYNKRONOINTI
kAseta BC 2209 MHR rintavyöhön.
Nykyisen sykkeen nollat vilkkuvat.
kNoin 10 sekunnin kuluttua
BC 2209 MHR synkronoidaan
rintavyön kanssa ja tiedot näytetään.
FIN
2209
2209
BC 2209 MHR
79

9 VAELLUSTILA
9.3 VAELLUSAJAN ASETUS
2209 2209 2209
1
n nn
1
k Valitse MODE 1-näppäimellä HIKINGTIME (VAELLUSAIKA)-näyttö.
2
k Vaellusaika voidaan joko käynnistää tai pysäyttää SET-näppäimellä.
Käynnissä olevan vaellusajan tunnistaa näytöllä olevast
2
Start Stop
-merkistä.
9.4 TAVOITEAJAN ASETUS
n
--+
n
n
+
n
2209
1
n n
3 sek.
1
k Valitse MODE 1-näppäimellä TARGETTIME (TAVOITEAIKA)-näyttö.
2209 2209 2209 2209
2 3
kPidä SET-näppäintä painettuna 3 sekunnin ajan (TAVOITEAIKA ASETETTU vilkkuu).
2
k Aseta arvo MODE 2-näppäimellä (+) tai RESET-näppäimellä (-).
3
k Siirry MODE 1-näppäimellä seuraavaan kohtaan.
Aseta arvo yllä kuvatun mukaisesti.
4
k Vahvista valinta SET-näppäimellä.
Muutos on vahvistettu, kun näytöllä lukee SET OK.
kTAVOITEAIKA voidaan sekä käynnistää että pysäyttää SET-näppäimellä.
80
www.sigmasport.com
4
n

9 VAELLUSTILA
9.5 NÄYTTÖJEN NOLLAUS
nn
> 4 Sek.3 Sek.
2209 2209
1 2
1
k Paina MODE 1/2-näppäintä kunnes haluttu toiminto tulee näytölle.
2
k Pidä RESET-näppäintä painettuna. Näyttö vilkkuu.
2209 2209
3
Sana „RESET“ ilmestyy näytön alaosaan ja vilkkuu.
Näytöllä näkyvä toiminto nollaantuu 2 sekunnin kuluttua.
3
k Jos RESET-näppäintä pidetään yli 4 sekuntia painettuna, nollautuvat näytöt
HIKINGTIME, TARGETTIME, TRIP CLIMB, MAX. ALTI, AVG. PULSE, MAX. PULSE,
KCAL.
9.6 SYKETOIMINTOJEN NÄYTTÖ/PIILOTUS
Kun BC 2209 MHR:ää käytetään ilman rintavyötä, kaikki syketoiminnot
(PULSE, AVG. PULSE, MAX. PULSE, KCAL) piilotetaan kyseisellä vaelluksella.
FIN
BC 2209 MHR
81

10 TEKNISET TIEDOT
10.1 OLETUS-/MINIMI-/MAKSIMIARVOT
Oletus Max. Min. Yksiköt
Nopeus 0,0 199,8 0,0 kmh/mph
Päivämatka 0,00 9999,99 0,00 km/mi
Ajoaika 0:00:00 999:59:59 00:00:00 h:mm:ss
Keskinopeus 0,00 199,99 0,00 kmh/mph
Maksiminopeus 0,00 199,99 0,00 kmh/mph
Poljinkierrosnopeus 0 180 0 upm
Maks. poljinkierrosnopeus 0 180 0 upm
Nykyinen syke 40 240 40 bpm
Keskisyke 40 240 0 bpm
Maks. syke 40 240 0 bpm
Kalorit 0 9.999 0 Kcal
Nykyinen korkeus 0 4.999/19.999 -999 m / ft
Päiväkorkeus 0 99.999 0 m / ft
Maks. korkeus 4.999/19.999 -999 m / ft
Sekuntikello 00:00,0 9:59:59 00:00:00 h:mm:ss,1/10
Lähtölaskenta 0:00:00 9:59:59 00:00:00 h:mm:ss
Erillinen kilometrilaskuri 0,00 999,99 -99,99 km/mi
Lämpötila 0 +70/+158 -10,0 °C/°F
Kokonaismatka 0
Pyörä 1/2 99.999 00:00 km/mi
Pyörä 1+2 999.998 00:00
Kokonaisaika 0:00
Pyörä 1/2 9.999:59 00:00 hhhh:mm
Pyörä 1+2 19.999 00:00 hhhhh
Kokonaiskorkeus 0
Pyörä 1/2 99.999 00:00 m / ft
Pyörä 1+2 999.998 00:00
82
www.sigmasport.com

10 TEKNISET TIEDOT
10.2 PARISTONVAIHTO
2209 2209 2209 2209
Tietokoneen ja lähettimen paristonvaihdosta (nopeus, poljinkierrosnopeus
ja/tai rintavyö) ilmoitetaan näytön kautta. Kellonaika on syötettävä
paristonvaihdon jälkeen uudelleen.
FIN
Tietokone:
kAvaa kansi työkalulla.
kNoudata napajärjestystä. Kun paristokotelon kansi
on auki, näet pariston plus-pään.
kJos tiivisterengas on irti, aseta se takaisin paikoilleen.
kSulje kansi työkalulla.
Lähetin:
kAvaa kansi työkalulla.
kIrrota paristo kannesta.
kNoudata napajärjestystä.
kAseta kanteen uusi paristo.
kSulje kansi työkalulla.
Paristo:
Tietokone: Litiumparisto CR 2450
Lähetin: Litiumparisto CR 2032
Pariston kestoikä:
Tietokone: noin 1 vuotta*
Lähetin: noin 1 vuotta*
* Kun laitetta käytetään tunti päivässä
BC 2209 MHR
25
27
29
31
CR 2450
CR 2032
26
28
30
32
83

10 TEKNISET TIEDOT
10.3 VIANMÄÄRITYS
Ei nopeusnäyttöä
k Onko tietokone kiinnitetty oikein
sen pitimeen?
kOletko tarkistanut, etteivät kontaktit
ole hapettuneet/ruostuneet?
kOletko tarkistanut magneetin/
lähettimen välisen etäisyyden
(maks. 12 mm)?
kOletko tarkistanut, onko magneetti
magneettisoitu?
kOletko tarkistanut nopeuslähettimen
pariston tilan?
Ei poljikierrosnopeuden näyttöä
k Oletko tarkistanut magneetin/
lähettimen välisen etäisyyden
(maks. 12 mm)?
kOletko tarkistanut, onko magneetti
magneettisoitu?
kOletko tarkistanut lähettimen
pariston tilan?
Ei sykenäyttöä
k Ovatko elektrodit riittävän kosteita?
kOletko tarkistanut lähettimen tilan?
Ei näyttöä
k Oletko tarkistanut BC 2209 MHR:n
pariston tilan?
kOnko paristo asetettu oikein
(+ ylöspäin)?
kOvatko pariston koskettimet kunnossa
(taivuta varoen)?
Väärä nopeusnäyttö
k Onko 2 magneettia asennettu?
kOnko magneetti asemoitu oikein
(lähettimeen nähden samansuuntainen
ja keskellä)?
kOnko rengaskoko asetettu oikein?
kOnko lähetin säädetty oikealle pyörälle
(pyörä I tai II)?
Näyttö on tumma/hidas
k Onko lämpötila liian korkea (> 60°C)
tai liian alhainen (< 0°C)?
Ei synkronointia
k Oletko tarkistanut magneetin/lähetinten
välisen etäisyyden?
kOvatko lähetinten paristot tyhjiä?
kOletko tarkastanut kyseisen lähettimen
kantaman?
kJos käytät napadynamoa, vaihda
lähettimen sijaintia.
Näyttö ”TOO MANY SIGNALS”
k Kasvata etäisyyttä muihin lähettimiin
ja paina mitä tahansa painiketta.
84
www.sigmasport.com

10 TEKNISET TIEDOT
10.4 TAKUU
Otamme vastuun vioista kulloisenkin yhteistyökumppanin kohdalla lakimääräysten
mukaisesti. Paristot eivät kuulu takuuseen.
SIGMA Elektro GmbH
Dr.-Julius-Leber-Straße 15
D-67433 Neustadt/Weinstraße
Service-Tel.: +49 (0)6321-9120-118
E-Mail: service@sigmasport.com
Valmistaja pidättää itsellään oikeuden teknisiin muutoksiin.
Paristot voidaan palauttaa käytön jälkeen.
FIN
BC 2209 MHR
85

INNHOLD
INNHOLD
1 Forord og innhold i pakken ..................................................................................... 87
2 Montering ................................................................................................................... 88
2.1 Montering av hjul 2 .......................................................................................................... 89
3 Oppstart ...................................................................................................................... 89
4 Visningsskift/tastebelegg/funksjonsoversikt ................................................ 90
5 Synkroniseringen ...................................................................................................... 90
6 Grunnleggende innstillinger .................................................................................. 91
6.1 Innstilling av språk ............................................................................................................ 92
6.2 Innstilling av KMH/MPH ................................................................................................. 92
6.3 Innstilling av lufttrykk ved havnivå (sea level) ........................................................... 93
6.4 Innstilling av aktuell høyde ............................................................................................. 93
6.5 Innstilling av starthøyde ................................................................................................. 94
6.6 Beregne hjulomkrets ....................................................................................................... 94
6.7 Stille inn hjulomkrets for sykkel 1 eller sykkel 2 ..................................................... 95
6.8 Innstilling av klokke ........................................................................................................... 96
6.9 Innstilling av alder ............................................................................................................ 96
6.10 Innstilling av vekt ............................................................................................................... 97
6.11 Innstilling av kjønn ............................................................................................................ 97
6.12 Innstilling av totalkilometer sykkel 1 eller sykkel 2 ................................................ 98
6.13 Innstilling av total kjøretid sykkel 1 eller sykkel 2 ................................................... 98
6.14 Innstilling av totalhøyde sykkel 1 eller sykkel 2 ....................................................... 99
6.15 Innstilling av kontrast ...................................................................................................... 99
6.16 Forlate grunnleggende innstillinger ......................................................................... 100
7 Generelle funksjoner ............................................................................................. 100
7.1 Lysstyrke på skjermen ................................................................................................. 100
7.2 Sammenlign hastighet ................................................................................................. 100
7.3 Vise/skjule tritt-/hjertefrekvensfunksjonene ...................................................... 101
7.4 Kalibrering av starthøyde ........................................................................................... 101
7.5 Stoppeklokke ................................................................................................................... 101
7.6 Nedtelling ......................................................................................................................... 102
7.7 Kilometerteller ............................................................................................................... 103
7.8 Nullstill visningsskjermen ............................................................................................ 104
7.9 Totalverdier sykkel 1 og sykkel 2 .............................................................................. 104
7.10 Serviceintervall ............................................................................................................... 104
7.11 Transportmodus ............................................................................................................ 105
7.12 PC-grensesnitt ............................................................................................................... 105
7.13 Kabelbundet universalholder ..................................................................................... 105
86
www.sigmasport.com

INNHOLD
8 Høydemåling ............................................................................................................ 105
8.1 Forord ............................................................................................................................... 105
8.2 Kalibreringsmuligheter ................................................................................................ 106
9 Vandrermodus ........................................................................................................ 107
9.1 Forord ............................................................................................................................... 107
9.2 Synkroniseringen ........................................................................................................... 107
9.3 Innstilling av vandrertiden ........................................................................................... 108
9.4 Innstilling av måltiden ................................................................................................... 108
9.5 Nullstill visningsskjermen ............................................................................................ 109
9.6 Vise/skjule hjertefrekvensfunksjonene .................................................................. 109
10 Tekniske data .......................................................................................................... 110
10.1 Standard/min./maks.-verdier .................................................................................. 110
10.2 Utskiftning av batteri .................................................................................................... 111
10.3 Problemløsning .............................................................................................................. 112
10.4 Garantihenvisninger ..................................................................................................... 113
1 FORORD OG INNHOLD I PAKKEN
N
Gratulerer med beslutningen om å kjøpe en sykkelcomputer fra SIGMA SPORT
®
.
Din nye BC 2209 MHR vil være en trofast ledsager på sykkelturene dine i årevis.
For å lære de mange funksjonene på din nye sykkelcomputer, og for å kunne bruke disse,
bes du om å lese denne bruksanvisningen grundig.
SIGMA ønsker deg lykke til med bruken av din BC 2209 MHR.
BC 2209 MHR er utstyrt med automatisk start/stopp. Straks den er montert i holderen,
vil en bevegelsessensor vekke opp BC 2209 MHR ved den minste bevegelse av sykkelen
eller gangstaven. Dermed blir paringen startet automatisk.
BC 2209 MHR
87

1 FORORD OG INNHOLD I PAKKEN
1 PAKNINGENS INNHOLD
Sykkelcomputer
kEikemagnet
BC 2209 MHR
kTrittfrekvens magnet
kStyreholder
kBatterihusnøkkel
Brystbelte STS
inklusiv elastisk
belte
kArmbånd
kFestemateriale
Hastighetssender
STS
Trittfrekvenssender
STS
2 MONTERING
Figurene for disse monteringstekstene befinner seg på vedlagt foldeark!
MONTERING AV SYKKELHOLDER
kHolderen kan enten monteres med kabelbinder (varig montering)
eller eventuelt med O-ringene.
kStyre eller frontparti.
kFjern den gule folien!
4321
88
www.sigmasport.com

2 MONTERING
MONTERING AV SENDEREN –
5
HASTIGHET OG TRITTFREKVENS
kBegge senderne kan enten monteres med kabelbinder (varig montering)
eller eventuelt med O-ringene.
kFor å oppnå de nødvendige 12 mm eller mindre, monter sender og
magneten nærmere navet.
MONTERING AV MAGNETEN –
HASTIGHET OG TRITTFREKVENS/
PÅLEGGING AV BRYSTBELTET
21
kGni inn elektrodene med vann eller kardiogel.
2.1 MONTERING AV HJUL 2
Veksling mellom HJUL 1 (WHEEL 1) og HJUL 2 (WHEEL 2)
skjer automatisk. Det må kun brukes en andre hastighetssender
(etterutrustningssett „HJUL 2“ Art.-Nr.: 00417, „HJUL 2 inkl.
trittfrekvens“ Art.-Nr.: 00415)
3 OPPSTART
På grunn av strømforbruksårsaker leveres BC 2209 MHR uten
batteri.
Vennligst sett inn batteriet ved å åpne batterihusdekselet med
medfølgende verktøy. Etter at batteriet er satt inn, lukker du
batterihuset ved hjelp av medfølgende verktøy.
8
7
6
9
15 16
141312
19
18
17
24
23
22
N
11
10
o
p
e
n
-
c
l
o
s
e
Visningen hopper automatisk til innstillingsmodusen.
BC 2209 MHR
2209
89

4 VISNINGSSKIFT/TASTEBELEGG/FUNKSJONSOVERSIKT
RESET
Tilbakestilling av de
funksjonene som er
opplistet nedenfor,
eller bla tilbake i et
Hente de funksjonene
som er opplistet nedenfor,
eller bla fremover i et
MODE 2
menyområde.
menyområde.
2209
SET
Innstilling og lagring av
de angitte verdiene.
Hente de funksjonene som
er opplistet nedenfor.
MODE 1
MODE 1 MODE 2
SYKKELMODUS TRIP DIST CADENCE TRIP UP +/-
TRIP TIME AVG. PULSE TEMPERATUR
AVG. SPEED MAX. PULSE TOTAL ODO*
MAX. SPEED KCAL TOTAL TIME*
AVG. CAD CLOCK TOTAL ALTI*
TRIP CLIMB +/- STOPWATCH
MAX. ALTI COUNTDOWN
HIKINGMODUS HIKINGTIME AVG. PULSE STOPWATCH
TARGETTIME MAX. PULSE TEMPERATUR
TRIP CLIMB +/- KCAL TOTAL TIME
MAX. ALTI CLOCK TOTAL ALTI
* ikke ved bevegelse
5 SYNKRONISERINGEN
90
kTrykk BC 2209 MHR fast til holderen - paring er først
mulig når sykkelcomputeren er festet i holderen.
kNullene i hastighets-, trittfrekvens- og pulsvisningen blinker.
2209
www.sigmasport.com

5 SYNKRONISERINGEN
kFor å synkronisere hastighet, trittfrekvens og pulsfrekvens
finnes det 2 muligheter:
1. Begynne å bevege seg, da vil mottakeren ha paret seg
med senderen etter 3 til 4 hjulomdreininger.
2. Dreie forhjulet hhv. pedalene til KMH- hhv.
trittfrekvensvisningen ikke lenger blinker.
kBegynne å gå eller sette seg på sykkelen
med festet brystbånd i nærheten av
BC 2209 MHR. Som regel synkroniseres
BC 2209 MHR med brystbeltet i løpet av
mindre enn 10 sekunder.
Pulsvisningen blinker ikke lenger.
6 GRUNNLEGGENDE INNSTILLINGER
kHold SET-tasten trykket ned i 3 sekunder inntil det
forhåndsinnstilte SPRÅKET (engelsk) vises i displayet
(SETTINGS OPEN blinker).
BC 2209 MHR
2209
2209
2209
2209
n
3 sek.
N
91

6 GRUNNLEGGENDE INNSTILLINGER
6.1 INNSTILLING AV SPRÅK
--+
n
n
2209 2209 2209 2209
1
n
1
k Skift til forhåndsinnstilt SPRÅK med MODE 1-tasten
2
n
3
4
n
(som standard er BC 2209 MHR forhåndsinnstilt til engelsk).
2
k Trykk kort på SET-knappen. Skjermen blinker.
3
k SET ønsket språk ved hjelp av MODE 1-knappen.
4
k Bekreft ved å trykke på SET-knappen. SET OK vises i displayet.
6.2 INNSTILLING KMH/MPH
n
n
+
2209 2209 2209 2209
1 2
1
k Skift til visning av KMH/MPH ved knappen MODE 1.
nn n
3 4
2
k Trykk kort på SET-knappen. Skjermen blinker.
3
k Velg MPH eller KMH ved hjelp av MODE 2.
4
k Bekreft ved å trykke på SET-knappen. SET OK vises i displayet.
Med omstilling fra KMH til MPH endrer formatet for strekning seg automatisk
fra km til mi, temperaturen fra °C til °F, klokken fra 24t-modus til 12t-modus,
høydemeter fra m til ft og vekt fra kg til lb.
92
www.sigmasport.com

6 GRUNNLEGGENDE INNSTILLINGER
6.3 INNSTILLING AV LUFTTRYKK VED HAVNIVÅ (SEA LEVEL)
n n
- +
2209 2209 2209 2209
1
n
2 3
n
4
n
Forklaringer til denne funksjonen finner du i kapittel „8 HØYDEMÅLING“.
1
k Trykk på knappen MODE 1 til SEA LEVEL (HAVNIVÅ)-visningen skifter.
2
k Trykk kort på SET-knappen. Skjermen blinker.
3
k Still inn verdi med knappen MODE 2 (+) eller RESET (-).
4
k Bekreft ved å trykke på SET-knappen. SET OK vises i displayet.
6.4 INNSTILLING AV AKTUELL HØYDE
nn nn
- -+ +
2209 2209 2209 2209 2209
1
n
2
3
n
4
n
Forklaringer til denne funksjonen finner du i kapittel „8 HØYDEMÅLING“.
1
k Skift visning ved å trykke på knappen MODE 1 til ACT. ALTI. (AKTUELL HØYDE).
kTrykk kort på SET-knappen. De første sifrene som skal endres blinker.
2
k Still inn verdi med knappen MODE 2 (+) eller RESET (-).
3
k Skift til neste stilling med knappen MODE 1.
4
k Still inn verdi med knappen MODE 2 (+) eller RESET (-).
5
k Bekreft ved å trykke på SET-knappen. SET OK vises i displayet.
N
5
BC 2209 MHR
93

6 GRUNNLEGGENDE INNSTILLINGER
6.5 INNSTILLING AV STARTHØYDE
n
n
--+
n
n
+
2209 2209
1
n n
2
2209 2209 2209
3
4
5
n
Forklaringer til denne funksjonen finner du i kapittel „8 HØYDEMÅLING“.
1
k Skift til vising av HOME ALTI. (STARTHØYDE) med knappen MODE 1.
kTrykk kort på SET-knappen. De første sifrene som skal endres blinker.
2
k Still inn verdi med knappen MODE 2 (+) eller RESET (-).
3
k Skift til neste stilling med knappen MODE 1.
4
k Still inn verdi med knappen MODE 2 (+) eller RESET (-).
5
k Bekreft ved å trykke på SET-knappen.
SET OK vises i displayet.
6.6 BEREGNE HJULOMKRETS
kFinn korrekt verdi på hjuldimensjon i tabell „TABELL FOR HJULOMKRETS“ (Tab. C).
kAlternativt: beregn og finn WS (WHEEL SIZE) (Tab. A oder Tab. B)
A B
mm x 3,14
1x
km/h:
WS = mm x 3,14
mph:
WS = mm x 3,14
= WS (mm)
km/h:
WS = mm
mph:
WS = mm
94
www.sigmasport.com

6 GRUNNLEGGENDE INNSTILLINGER
C
ETRTO ETRTO
7
.
1
5
x
x
6
1
47-305
47-406
37-540
47-507
23-571
40-559
44-559
47-559
50-559
54-559
57-559
37-590
37-584
20-571
2
16x1.75x2
20x1.75x2
24x1 3/8 A
24x1.75x2
26x1
26x1.5
26x1.6
26x1.75x2
26x1.9
26x2.00
26x2.125
26x1 3/8
26x1 3/8x1 1/2
26x3/4
kmh
mph
1272
1590
1948
1907
1973
2026
2051
2070
2089
2114
2133
2105
2086
1954
6
1
32-630
28-630
40-622
47-622
40-635
37-622
18-622
20-622
23-622
25-622
28-622
32-622
37-622
40-622
7
.
1
5
x
x
2
27x1 1/4
27x1 1/4 Fifty
28x1.5
28x1.75
28x1 1/2
28x1 3/8x1 5/8
700x18C
700x20C
700x23C
700x25C
700x28C
700x32C
700x35C
700x40C
kmh
mph
2199
2174
2224
2268
2265
2205
2102
2114
2133
2146
2149
2174
2205
2224
N
6.7 STILLE INN HJULOMKRETS FOR SYKKEL 1 ELLER SYKKEL 2
nn nn
- -+ +
2209 2209 2209 2209 2209
1
n
1
k Skift til visning av WS BIKE 1 hhv. WS BIKE 2 med knappen MODE 1.
2
3 4 5
n
kTrykk kort på SET-knappen. De første sifrene som skal endres blinker.
2
k Still inn verdi med knappen MODE 2 (+) eller RESET (-).
3
k Skift til neste stilling med knappen MODE 1.
4
k Still inn verdi med knappen MODE 2 (+) eller RESET (-).
5
k Bekreft ved å trykke på SET-knappen.
SET OK vises i displayet.
BC 2209 MHR
n
95

6 GRUNNLEGGENDE INNSTILLINGER
6.8 INNSTILLING AV KLOKKE
n
-
n n
n
+
2209 2209 2209
1
n
1
k Skift til vising av CLOCK (KLOKKESLETT) med knappen MODE 1.
2
3
n
2209 2209
kTrykk kort på SET-knappen. Timevisningen blinker.
2
k Still inn verdi med knappen MODE 2 (+) eller RESET (-).
3
k Skift til neste stilling med knappen MODE 1.
4
k Still inn verdi med knappen MODE 2 (+) eller RESET (-).
5
k Bekreft ved å trykke på SET-knappen.
SET OK vises i displayet.
6.9 INNSTILLING AV ALDER
n
n
--++
2209
1
n
1
k Skift til AGE (ALDER)-visningen med MODE 1-tasten.
2209 2209 2209
2
n n
3 4
2
k Trykk kort på SET-knappen. Skjermen blinker.
4 5
n
3
k Still inn verdi med knappen MODE 2 (+) eller RESET (-).
4
k Bekreft ved å trykke på SET-knappen. SET OK vises i displayet.
96
www.sigmasport.com

6 GRUNNLEGGENDE INNSTILLINGER
6.10 INNSTILLING AV VEKT
- +
n n
2209
1
n
1
k Skift til WEIGHT (VEKT)-visningen med MODE 1-tasten.
2209 2209 2209
2
n n
3 4
2
k Trykk kort på SET-knappen. Skjermen blinker.
3
k Still inn verdi med knappen MODE 2 (+) eller RESET (-).
4
k Bekreft ved å trykke på SET-knappen.
SET OK vises i displayet.
6.11 INNSTILLING AV KJØNN
n n
- +
2209 2209 2209 2209
1 2
n
1
k Skift til forhåndsinnstilt KJØNN med MODE 1-tasten
n n
3
4
(som standard er BC 2209 MHR forhåndsinnstilt med angivelsen MANNLIG).
2
k Trykk kort på SET-knappen. Skjermen blinker.
3
k Still inn verdi med knappen MODE 2 (+) eller RESET (-).
4
k Bekreft ved å trykke på SET-knappen.
SET OK vises i displayet.
N
BC 2209 MHR
97

6 GRUNNLEGGENDE INNSTILLINGER
6.12 INNSTILLING AV TOTALKILOMETER SYKKEL 1 ELLER SYKKEL 2
nn nn
- -+ +
2209 2209 2209 2209 2209
1
n
1
k Med knappen MODE 1 skiftes displayet til ODO BIKE 1 hhv. ODO BIKE 2.
2
3
4
kTrykk kort på SET-knappen. De første sifrene som skal endres blinker.
2
k Still inn verdi med knappen MODE 2 (+) eller RESET (-).
3
k Skift til neste stilling med knappen MODE 1.
4
k Still inn verdi med knappen MODE 2 (+) eller RESET (-).
5
k Bekreft ved å trykke på SET-knappen.
SET OK vises i displayet.
6.13 INNSTILLING AV TOTAL KJØRETID SYKKEL 1 ELLER SYKKEL 2
n
n
--+
2209 2209 2209 2209 2209
1
n
1
k Skift visning til TIME BIKE1 hhv. TIME BIKE2 med knappen MODE 1.
2
3
n
n
+
4
kTrykk kort på SET-knappen. De første sifrene som skal endres blinker.
2
k Still inn verdi med knappen MODE 2 (+) eller RESET (-).
3
k Skift til neste stilling med knappen MODE 1.
4
k Still inn verdi med knappen MODE 2 (+) eller RESET (-).
5
k Bekreft ved å trykke på SET-knappen.
SET OK vises i displayet.
5
nn
5
nn
98
www.sigmasport.com

6 GRUNNLEGGENDE INNSTILLINGER
6.14 INNSTILLING AV TOTALHØYDE SYKKEL 1 ELLER SYKKEL 2
nn
nn
- -
+ +
2209 2209 2209 2209 2209
1
n nn
1
k Skift visning til ALTI.BIKE1 hhv. ALTI.BIKE2 med knappen MODE 1.
2
3
4
kTrykk kort på SET-knappen. De første sifrene som skal endres blinker.
2
k Still inn verdi med knappen MODE 2 (+) eller RESET (-).
3
k Skift til neste stilling med knappen MODE 1.
4
k Still inn verdi med knappen MODE 2 (+) eller RESET (-).
5
k Bekreft ved å trykke på SET-knappen.
SET OK vises i displayet.
6.15 INNSTILLING AV KONTRAST
n
n
-
+
2209 2209 2209 2209
1 2
n
1
k Skift til visning av CONTRAST (KONTRASTER) med knappen MODE 1.
n n
3
4
2
k Trykk kort på SET-knappen. Skjermen blinker.
3
k Still inn verdier med knappen MODE 2 (+) eller RESET (-).
(1 = svak / 3 = sterk).
5
N
4
k Bekreft ved å trykke på SET-knappen.
SET OK vises i displayet.
BC 2209 MHR
99

6 GRUNNLEGGENDE INNSTILLINGER
6.16 FORLATE GRUNNLEGGENDE INNSTILLINGER
kFor å avslutte innstillingen, hold knappen SET innetrykket
i 3 sekunder (SETTINGS CLOSE blinker).
2209
n
3 sek.
7 GENERELLE FUNKSJONER
7.1 LYSSTYRKE PÅ SKJERMEN
n
n
kLysstyrkefunksjonen slås på/av når du trykker
på SET og RESET-knappen samtidig.
På displayet vises kort LIGHT ON/LIGHT OFF.
kSkjermen lyser når du trykker på en av knappene
og funksjonen aktiveres når du trykker en gang til.
2209
n
2209
n
Under synkroniseringen er belystningen ikke
tilgjengelig! Beskytt batteriet ved å unngå å
bruke unødvendig mye belysning!
7.2. SAMMENLIGN HASTIGHET
2209 2209 2209
1
1
k Hvis hastigheten er nesten den samme vises .
2
k Med mindre fart blir vist.
3
k Med større fart blir vist.
2
3
Dette vises for alle funksjoner bortsett fra i de grunnleggende innstillingene.
100
www.sigmasport.com
 Loading...