

Page 1
Instruction Manual SmartTrak® 50 Series
®
SmartTrak
Economical/OEM Digital Gas Mass Flow Control up to 200 slpm (nlpm)
50 Series
Instruction Manual
IM-50, Rev. I, June 2017
IM-50 1
Page 2

Instruction Manual SmartTrak® 50 Series
GLOBAL SUPPORT LOCATIONS: WE ARE HERE TO HELP!
CORPORATE HEADQUARTERS
5 Harris Court, Building L Monterey, CA 93940
Phone (831) 373-0200 (800) 866-0200 Fax (831) 373-4402
www.sierrainstruments.com
EUROPE HEADQUARTERS
Bijlmansweid 2 1934RE Egmond aan den Hoef
The Netherlands
Phone +31 72 5071400 Fax +31 72 5071401
ASIA HEADQUARTERS
Second Floor Building 5, Senpu Industrial Park
25 Hangdu Road Hangtou Town
Pu Dong New District, Shanghai, P.R. China
Postal Code 201316
Phone: + 8621 5879 8521 Fax: +8621 5879 8586
IMPORTANT CUSTOMER NOTICE: OXYGEN SERVICE
Sierra Instruments, Inc. is not liable for any damage or personal injury, whatsoever, resulting from the use of Sierra
Instruments standard mass flow meters or controllers fo r oxygen gas. You are responsible for determi ni ng if this
mass flow meter or controller is appropriate for your oxygen application. You are responsible for cleaning the mass
flow meter or controller to the degree requir ed for your oxygen flow application.
© COPYRIGHT SIERRA INSTRUMENTS 2016
No part of this publication may be copied or distributed, transmitted, transcribed, stored in a retrieval system, or
translated into any human or computer language, in any form or by any means, electronic, mechanical, manual, or
otherwise, or disclosed to third parties without the express written permission of Sierra Instruments. The information
contained in this manual is subject to change without notice.
TRADEMARKS
®
SmartTrak
listed in this manual are trademarks or trade names of their respective manufacturers.
50 Series is a Registered Trademark of Sierra Instruments, Inc. Other product and company names
IM-50 2
Page 3

Instruction Manual SmartTrak® 50 Series
Table of Contents
Chapter 1: Introduction .............................................................................................................................. 4
Chapter 2: Installation ................................................................................................................................. 9
Before You Begin Installation ..................................................................................................................... 9
Installing the Instrument—Plumbing ....................................................................................................... 10
Compression Fittings ..................................................................................................................... 10
VCO Fittings .................................................................................................................................. 11
VCR Fittings .................................................................................................................................. 11
1/4 Inch Female NPT .................................................................................................................... 11
Installing Your Instrument—Mechanical Mounting ................................................................................ 12
Installing Your Instrument—Electrical Connections .............................................................................. 12
Instrument Power: ..................................................................................................................................... 13
Chapter 3: Digital Operation .................................................................................................................... 15
Loading the SmartTrak® 50 Series Software ........................................................................................... 16
Connecting SmartTrak® 50 Series to Your Computer ............................................................................ 16
Chapter 4: Analog Operation ................................................................................................................... 26
Setpoint Adjustment .................................................................................................................................. 28
Zero Adjustment ........................................................................................................................................ 28
Over-Range Condition ............................................................................................................................... 29
Chapter 5: Technical Support & Service ................................................................................................ 30
Appendix A: Gas Tables & K-Factor Calculations .................................................................................. 33
Appendix B1: 50 Low Flow (to 50 slpm) Product Specifications .......................................................... 37
Appendix B2: 50 Medium Flow (to 200 slpm) Product Specifications ................................................. 40
Appendix C: Warranty Policy…………………………………………………………………………….………43
IM-50 3
Page 4
Instruction Manual SmartTrak® 50 Series
g
Chapter 1: Introduction
This instruction manual is your guide to the SmartTrak
®
50 Series. Visit the Sierra Instruments
website www.sierrainstruments.com/products/50series.html for more information about this
product.
Using This Manual
This manual is organized into five chapters:
Chapter 1: Introduction and Theory of Operation.
Chapter 2: Installation, Plumbing & Wiring instructions.
Chapter 3: Digital Operation
Chapter 4: Analog Operation
Chapter 5: Technical Support and Service.
There are also 4 Appendices:
Appendix A: Conversion Formula and Gas Tables.
Appendix B1: Low Flow Product Specifications
Appendix B2: Medium Flow Product Specifications
Appendix C: Warranty Policy
Throughout this manual, we use the word instrument as a generic term to represent the
SmartTrak® 50 Series mass flow meters and controllers.
Safety Information!
Caution and warning statements are used throughout this book to draw your attention to
important information.
WARNING!
CAUTION! OR IMPORTANT
NOTE
This statement appears with information that
is important to protect people and equipment
from damage. Pay very close attention to all
s that apply to your application.
warnin
IM-50 4
This statement appears with information that is
important for protecting your equipment and
performance. Read and follow all cautions that
apply to your application.
Page 5

Instruction Manual SmartTrak® 50 Series
Receipt of Your Instrument
When receiving the instrument, carefully check the outside packing carton for damage that may
have occurred during shipment. If the carton is damaged, notify the local carrier and submit a
report to the factory or distributor. Remove the packing slip and check that all ordered
components are present and match your specifications. Make sure any spare parts or accessories
are not discarded with the packing material. Do not return any equipment to the factory without
first contacting one of Sierra’s Technical Support Centers:
USA (Headquarters) Customer Service:
TOLL FREE: 800-866-0200
PHONE: +1-831-373-0200
FAX: +1-831-373-4402
EMAIL: service@sierrainstruments.com
European Customer Service:
PHONE: +31 72 5071400
FAX: +31 72 5071401
EMAIL: service@sierra-instruments.nl
Asia Customer Service:
PHONE: + 8621 5879 8521
FAX: +8621 5879 8586
EMAIL: www.sierra-asia.com
IM-50 5
Page 6

Instruction Manual SmartTrak® 50 Series
Definitions Used In This Manual
The following terms are used frequently in this manual. They are presented here with their
definitions for your information.
Setpoint—The command or control signal supplied to a flow controller is called the
setpoint. The controller will maintain the flow at this value.
Full scale—The highest flow that an instrument will measure within its specified
accuracy. It is often possible for an instrument to measure a flow beyond its full scale
(FS) value, but the accuracy of this measurement may be outside of published
specifications.
LFE—Laminar Flow Element (LFE) or bypass generates pressure drop forcing a small
fraction of the total flow to pass through the sensor capillary tube.
IM-50 6
Page 7
Instruction Manual SmartTrak® 50 Series
Fig
The SmartTrak® 50 Series Flow Sensing Principle
The operating principle of the SmartTrak® 50 Series instruments is based upon heat transfer and
the first law of thermodynamics. During operation process gas enters the instrument’s flow body
and divides into two flow paths, one through the sensor tube and the other through the laminar
flow bypass. The laminar flow bypass (often called LFE for “laminar flow element”) generates a
pressure drop, P1–P2, forcing a small fraction of the total flow to pass through the sensor tube
(m1).
ure 1-1. Flow Paths through the Instrument
Two resistance temperature detector (RTD) coils around the sensor tube direct a constant amount
of heat (H) into the gas stream. During operation, the gas mass flow carries heat from the
upstream coil to the downstream coil. The resulting temperature difference (∆T) is measured by
the SmartTrak® 50 Series microprocessor. From this, SmartTrak® 50 Series calculates the output
signal. Since the molecules of the gas carry away the heat, the output signal is linearly
proportional to gas mass flow.
Figure 1-2. Flow Measuring Principle
IM-50 7
Page 8
Instruction Manual SmartTrak® 50 Series
Fig
Figure 1-3. Sensor Temperature Distribution
Figures 1-2 and 1-3 show the mass flow through the sensor tube as inversely proportional to the
temperature difference of the coils. The coils are legs of a bridge circuit with an output voltage in
direct proportion to the difference in the coils’ resistance; the result is the temperature difference
(∆T). Two other parameters, heat input (H) and coefficient of specific heat (Cp) are both constant.
Through careful design and attention to these parameters, this output signal is made linear over the
transducer’s normal operating range (Figure 1-4). As a result, the measured flow through the
sensor tube is directly proportional to the gas flow in the main body.
In SmartTrak
®
50 Series mass flow controllers, the gas which flows through the monitoring
section is precisely regulated by the built-in electromagnetic valve. The normally closed valve is
similar to an on/off solenoid valve, except that the current to the valve coil, and hence the
magnetic field, is modulated so that the ferromagnetic valve armature, or valve plug, assumes the
exact height above the valve’s orifice required to maintain the valve’s command flow (set point).
The result is excellent resolution.
View an animated tutorial on the concepts discussed in this section at:
http://sierratechsupport.com/video/flow_control.html
IM-50 8
ure 1-4. Linear Range of the Transducer’s Output Signal
Page 9

Instruction Manual SmartTrak® 50 Series
Chapter 2: Installation
Before You Begin Installation
Before installing the instrument, ensure that the installation site conforms to the
specific operating parameters recorded on the instrument’s Data Label. The Data
Label is located on the back of the instrument electronics enclosure. This is
critical because each instrument is configured for a specific application range.
Please review the gas, the mounting orientation, the maximum flow range, the
Warning!
Injury can result if line
pressure exceeds the
maximum rating of
145 psig (10 barg).
inlet and outlet pressure and the operating temperature. The line pressure should
not exceed 145 psig (10 barg). The temperature should not exceed 122°F (50°C).
The minimum operating temperature is 32°F (0°C) and ambient temperature is 050°C. If your application exceeds any of these parameters, contact your Sierra
Sales Agent before installation. You may also contact one of Sierra’s Technical
Support Centers listed on Page 5 of this manual.
Installation Check List
1. Double-check to be sure that the O-ring material used in your instrument is
compatible with the gas to be measured. The O-ring material used in your
SmartTrak® 50 Series is Viton. See Appendix A for a table of elastomer
compatibility with a wide variety of gases.
2. Sierra strongly recommends you install an in-line filter upstream of the
instrument. Recommended filter size: 10 micron. A 10 micron filter will
eliminate the possibility of sensor tube clogs, maximizing the life of the unit and
accuracy of the calibration. A 10 micron filter is available from Sierra as an
accessory. See Appendix B or contact your local Sierra distributor.
3. Do not place the instrument in areas subject to sudden temperature changes,
excessive moisture or near equipment radiating significant amounts of heat.
Be sure to allow adequate space for cable connectors and wiring.
4. For controllers, use a properly sized pressure regulator. Make sure the
pressure regulator is not too small or too big. There can be no restrictions (such as
valves, tubing or pipe internal diameters, reducers, etc.) upstream or downstream
of the controller with a dimension that is less than the valve orifice diameter. To
determine orifice diameter, consult the factory for further information. If
restricted, controller will not reach full scale.
IM-50 9
Page 10
Instruction Manual SmartTrak® 50 Series
5. Output Signals: The 50 Series has RS-232 communications as the standard
configuration, with optional RS-485, 0-5 VDC or 4-20 mA. The output signals
specified at time of order will be indicated on the data label.
6. The instrument has specific power supply requirements. See the table later in
this chapter for a complete listing of power requirements.
Installing the Instrument—Plumbing
SmartTrak® 50 Series instruments are supplied with
compression, VCO®, VCR®, Festo®-type push-in or female
NPT process connections. To ensure a successful installation,
inlet and outlet tubing should be clean prior to plumbing the
instrument into the system. The shipping caps covering the
inlet/outlet fittings should not be removed until immediately
before installation.
Follow the installation instructions that are applicable to your instrument’s process
connection. Ensure that the tubing is free from burrs or sharp rims that may result from
cutting.
CAUTION!
Before use, all plumbing should be checked carefully for leaks, especially at
the connecting fittings. All instruments are leak-tested prior to shipping. It is not a
requirement to leak test your instrument. Do not use liquid leak detectors such as Snoop® to
search for leaks inside or outside the SmartTrak® 50 Series. Instead, monitor pressure
decay.
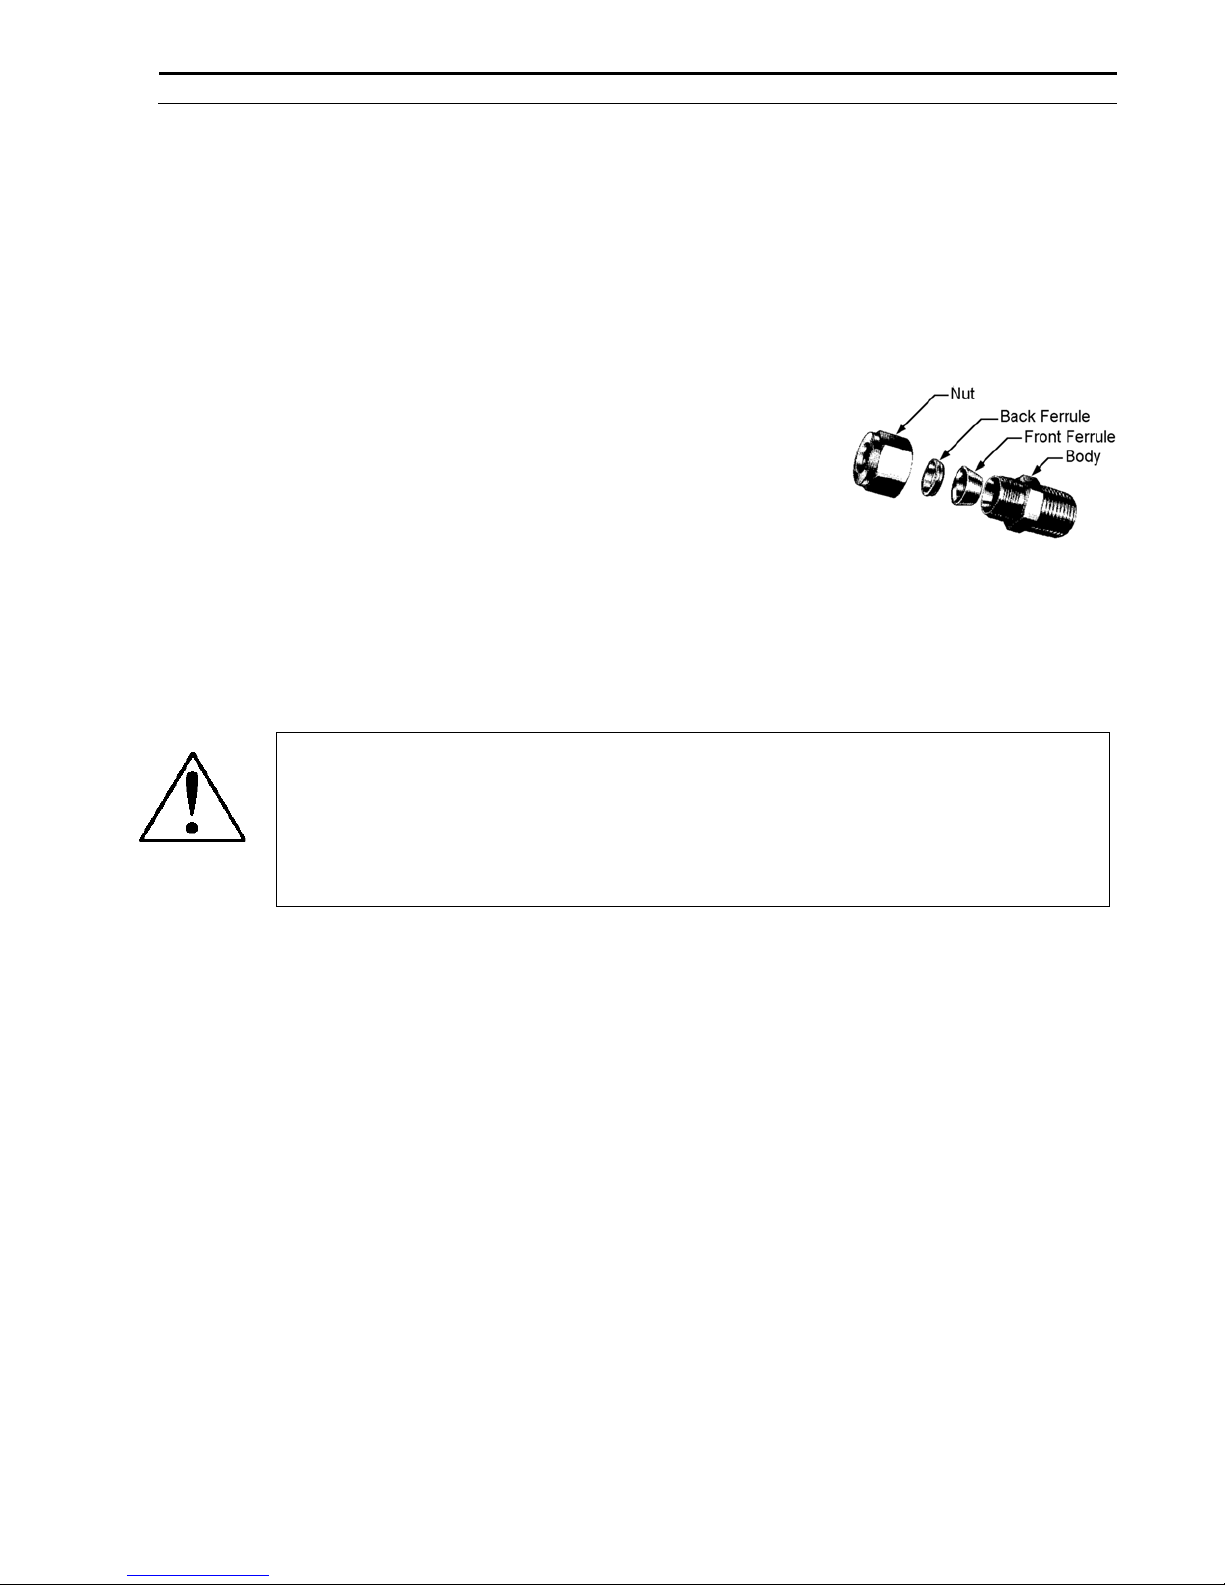
Compression Fittings
1. Position the instrument with the flow direction arrow pointing in the direction of
flow.
2. Verify the position of the front and back ferrule. Insert the tubing into the fitting.
Be sure that the tubing rests firmly on the shoulder of the fitting and that the nut is
finger-tight. Scribe the nut at the six o’clock position.
3. While holding the fitting body steady with a backup wrench, tighten the nut 1-1/4
turns, watching the scribe mark make one complete revolution and continue to the
nine o’clock position. For 1/8-inch fittings, tighten only 3/4 turns from fingertight. DO NOT OVER-TIGHTEN!
4. If you use flexible tubing (Example: Polyflow) use an “Insert” (see
www.swagelok.com)
5. Check the system’s entire flow path thoroughly for leaks. Do not use liquid leak
detectors on or near the unit. Exposing the instrument to leak detector fluid may
cause damage.
IM-50 10
Page 11

Instruction Manual SmartTrak® 50 Series
VCO Fittings
1. Position the instrument with the flow direction arrow pointing in the direction of
flow.
2. Tighten the nut finger-tight, and then 1/8 turn tighter with a wrench. Do not over-
tighten!
3. Check the system’s entire flow path thoroughly for leaks. Do not use liquid leak
detectors on or near the unit. Exposing the instrument to leak detector fluid may
cause damage.
VCR Fittings
1. Position the instrument with the flow direction arrow pointing the direction of
flow.
2. Install new gaskets that are compatible with the gas to be used.
3. Tighten the nut finger-tight, and then 1/8 turn tighter with a wrench. Do not over-
tighten!
4. Check the system’s entire flow path thoroughly for leaks. Do not use liquid leak
detectors on or near the unit. Exposing the instrument to leak detector fluid may
cause damage.
1/4 Inch Female NPT
1. Position the instrument with the flow direction arrow pointing the direction of
flow.
2. Apply high quality Teflon tape to the male NPT fitting. Alternatively, use a high
quality paste pipe thread sealant suitable for the application and gas, and apply
this compound to the inlet and outlet fittings. Avoid getting the tape or the thread
sealant onto the first two threads to keep it out of your process gas.
3. Tighten each fitting by hand. Then, tighten no more than one (1) turn. Do not
over-tighten.
4. Check the system’s entire flow path thoroughly for leaks. Do not use liquid leak
detectors on or near the unit. Exposing the instrument to leak detector fluid may
cause damage.
IM-50 11
Page 12
Instruction Manual SmartTrak® 50 Series
Installing Your Instrument—Mechanical Mounting
Mounting Your Instrument
The base plate or bottom of the instrument has four mounting holes. Two are SAE thread
and two are metric thread. For location and dimensions, please see Appendix B.
Installing Your Instrument—Electrical Connections
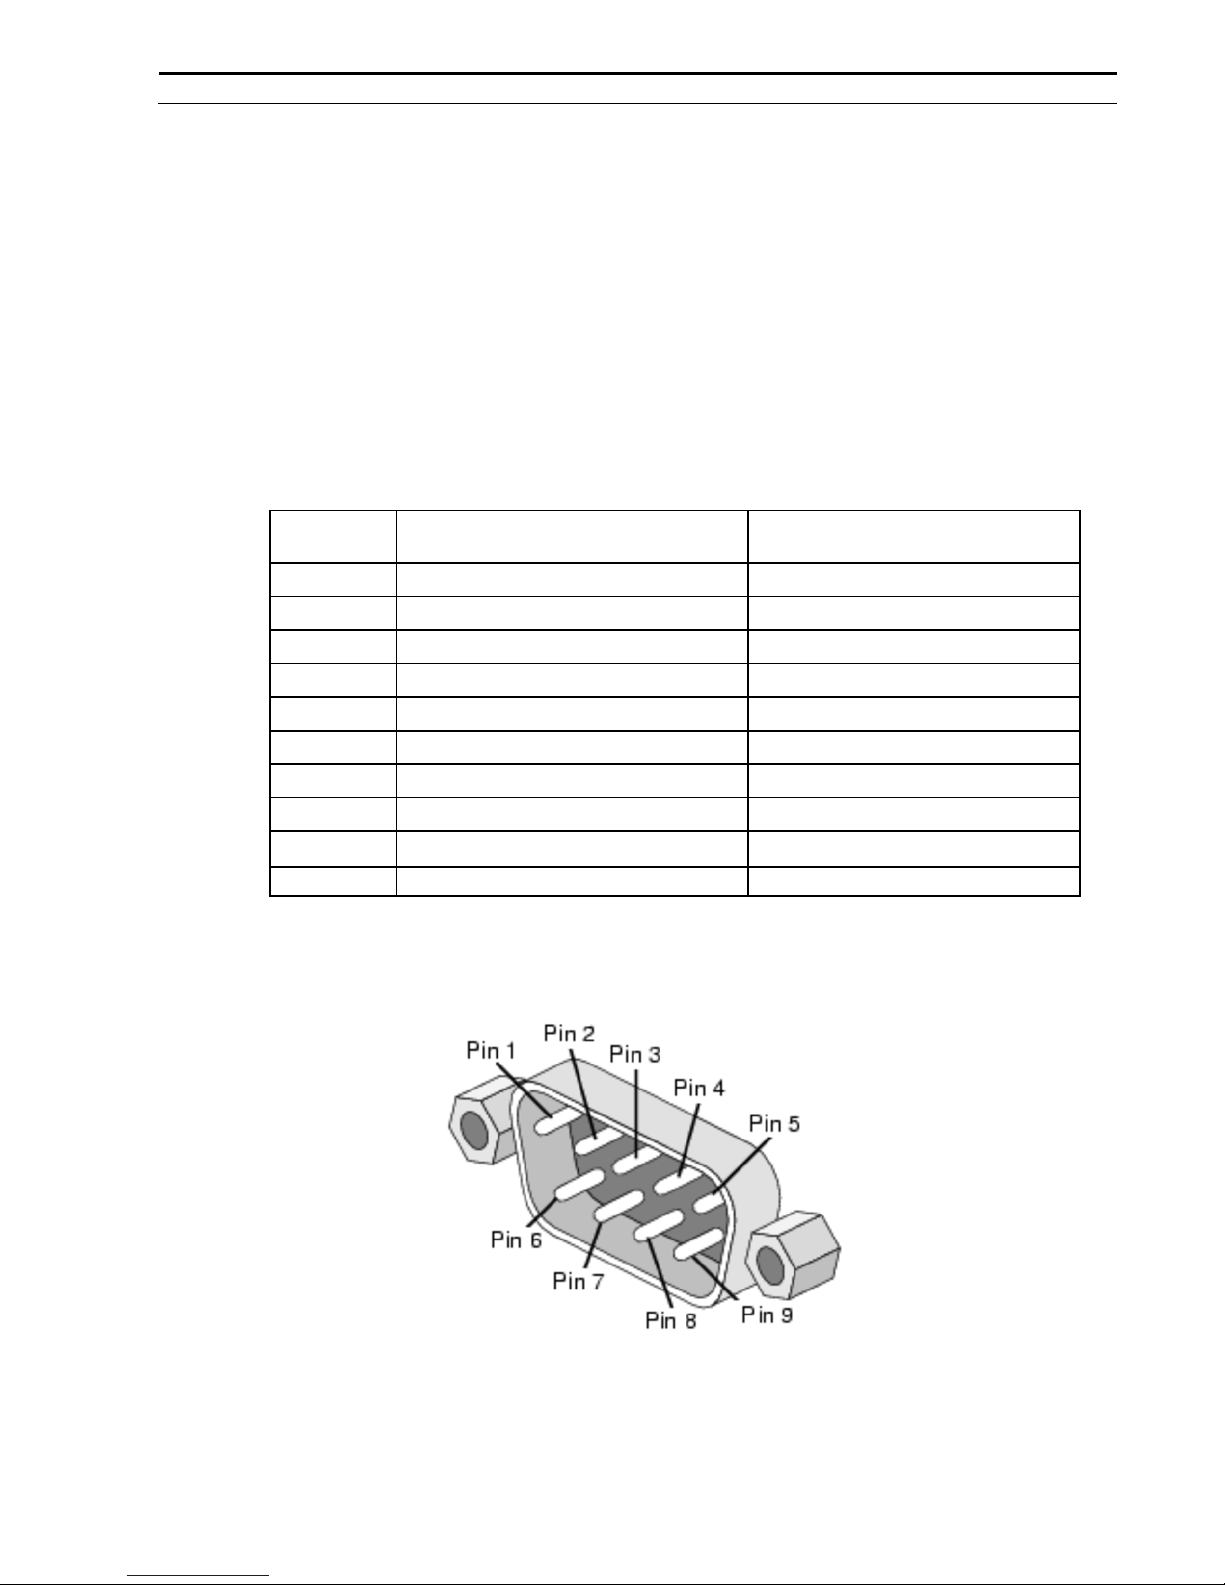
All electrical connections for your SmartTrak® 50 Series instrument can be made on
either side panel. See Figure 2-2 for the pinout
DB9 Pin-out locations on instrument. There are two DB9 connectors, one on each side of the enclosure.
50 Series
DB9 Description
1 4-20 mA / 0-5 VDC Output
2 4-20 mA / 0-5 VDC Output Return
3 4-20 mA / 0-5 VDC Setpoint in
4 4-20 mA / 0-5 VDC Setpoint Return
5 +24 VDC in/Power Input (+)
6 Power Return (-)/RS 232 Ground
7 N/C (RS-485 Bus Isolated Ground)
8 RS-232 Tx (RS-485 Bus B, +, D1)
9 RS-232 Rx (RS-485 Bus A, -, D0)
Shield/Case Earth Ground
Figure 2-2: SmartTrak® 50 Series Connections
Assure block off plate covers unused DB9...
Wire Color in Cable
White
Brown
Blue
Orange
Red
Green
Yellow
Purple
Gray
Shield/Drain Wire
IM-50 12
Page 13
Instruction Manual SmartTrak® 50 Series
Instrument Power:
The SmartTrak® 50 Series requires a 24 VDC power supply (meter can use
15 VDC). Connect power to the 9-pin connector on the side of the
instrument (pins 5 and 6). If you are supplying your own power source, it
must regulate 24 VDC, and supply at least 315 mA (445mA for RS-485
controller) (meter can use 15 VDC, 85 mA) (215mA for RS-485 Meter).
The instrument is polarity sensitive. If you reverse this wiring, the instrument will not be
damaged, but it will not function.
Instrument Grounding:
The SmartTrak® 50 Series has very high levels of RFI and EMI shielding built into the
metal electronics cover (meets or exceeds the CE Standard EN 61326-1; 2006). To
maintain the integrity of this CE rating, it is critical that a path be provided for any residual
internal noise to exit the instrument or it may register on the outputs. Grounding provides
this path.
To properly ground your instrument, secure the chassis to solid earth ground using the
mounting holes on the bottom of the flow body. If the instrument will be used without
permanent mounting (on a laboratory bench, for instance) then connect the shield wire (no
insulation) to earth ground in your facility. If you purchased a Sierra power supply, a
ground wire is provided for your convenience.
CAUTION! This instrument is not a loop-powered device! Do NOT apply power to the 4-
20 mA / 0-5 VDC output or setpoint connections.
Analog Signals:
Output Signal: Measure the current or voltage output signal, 4-20 mA / 0-5 VDC, across
pin 1 (positive) and 2 (negative). The minimum load is 50 Ohms, the maximum load is 500
Ohms.
Setpoint: To transmit an analog setpoint, supply the current signal across pins 3 (positive)
and 4 (negative).
For Digital Communication:
You can communicate with your instrument using the SmartTrak® 50 Series User Software
package and your PC running the Windows operating system. See the pinout on the previous
page regarding the necessary RS connections pending RS-232 vs. RS-485. After consulting the
pinout diagram, plug the DB9 connector into an appropriate serial port on your PC for RS-232.
For an RS-485 instrument you must go through an appropriate RS-232 or USB converter. If you
IM-50 13
Page 14

Instruction Manual SmartTrak® 50 Series
do not have a serial port, use a serial to USB convertor (available at most consumer electronics
stores or from Sierra).
To minimize the potential for RF interference, it is recommended to shield these wires. If you
are making your own cabling, Sierra recommends you use wire that comes shielded. Solder one
end of the shield wire/casing to the DB-9 connector at one end of the wire, so as to allow the
collected interference to dump to earth ground.
Digital RS-232 Communication Connections To DB9 PC Serial Port
50 Series DB9 Pin Connections PC Serial Port DB9 Pin Connections
RS-232 Transmit, Pin 8, Purple DB-9 Pin#2
RS-232 Receive, Pin 9, Gray DB-9 Pin#3
RS-232 Ground, Pin 6, Green DB-9 Pin#5
NOTE:
device or cable is connected. No damage will result, attempt communication after reversal.
Transmit and Receive may need to be reversed, depending in which type of
IM-50 14
Page 15

The Smart-Trak
50 Series is not a
loop-powered
device. Do not
apply power to the
4-20 mA outputs.
Instruction Manual SmartTrak® 50 Series
Chapter 3: Digital Operation
Mass Flow Meter
After your instrument is installed and the system has undergone a complete leak check as
discussed in detail in Chapter 2, follow these steps:
1. Power Up Your Instrument: Apply power to your instrument. See Chapter 2, Figure
®
Mass Flow Controller
2-2: SmartTrak® 50 Series Connections. After a few seconds of warm up, the display
(optional) will turn on.
2. Open the gas supply: SmartTrak® 50 Series MFM is now ready to monitor the gas
mass flow rate. Let the instrument warm up for at least 15 minutes for optimal
performance accuracy.
Your SmartTrak® 50 Series Mass Flow Meter is now ready for use!
After your instrument is installed and the system has undergone a complete leak check as
discussed in detail in Chapter 2, follow these steps:
1. The valve will remain closed until power is supplied and a setpoint is given. The
unit was shipped to you without a setpoint. However, we recommend that you
confirm this yourself, for safety sake. See Chapter 2 for wiring instructions.
CAUTION! Remember that the valve in the SmartTrak
®
50 Series is NOT a guaranteed
positive shut-off device. For dangerous applications, Sierra recommends use of an external
shut-off safety valve. DO NOT LEAVE A SETPOINT APPLIED FOR AN EXTENDED PERIOD
OF TIME TO A CONTROLLER WHEN THE GAS SUPPLY IS SHUT OFF OR BLOCKED.
Damage may result and the instrument will become hot to the touch.
WARNING! If you do not know the setpoint or the valve state of the Mass Flow Controller
before it was shut down, you must assume that the valve will open when power is applied.
TAKE NECESSARY PRECAUTIONS.
2. Power Up Your Instrument: Apply power to your instrument using Sierra’s power
supply or your own input power source. See Chapter 2, Figure 2-2: After a few
seconds of warm up the display (Optional) will turn on.
3. Open the gas supply: SmartTrak® 50 Series MFC is now ready to monitor and
control the gas mass flow rate. Let the instrument warm up for at least 15 minutes for
optimal performance accuracy.
Your SmartTrak® 50 Series Mass Flow Controller is now ready for use!
IM-50 15
Page 16

Instruction Manual SmartTrak® 50 Series
Loading the SmartTrak® 50 Series Software
If you are using your SmartTrak® 50 Series instrument or your computer for the first
time, it is necessary to install the SmartTrak® 50 Series Software into your computer. If
this software is already installed, skip this section.
Each SmartTrak® 50 Series order is shipped with a CD-ROM containing the SmartTrak®
50 Series Software. Locate this disk. At this point, EXIT OUT OF ANY OPEN
APPLICATIONS BEING RUN ON YOUR COMPUTER.
PROCEDURE:
1. Insert the SmartTrak® 50 Series Software CD into your CD-ROM
2. Open “My Computer” on your desktop
3. Open the CD Named: “SmartTrak® 50 Series” on your D-drive
4. Run “setup.exe”
5. Follow the instructions on screen
CAUTION! It is recommended that you do not change the default installation directory
for this software. The default directory is: Program Files. Changing the installation directory
may lead to malfunctions in the software.
Connecting SmartTrak® 50 Series to Your Computer
We suggest you use the Sierra Instruments RS-232 communication cable (part number
C9RS232). This pre-manufactured cable has the correct DB9 connection to mate with all
computer DB9 serial ports, and a DB9 to connect to the instrument.
1. Plug the DB9 connector into an appropriate serial port on your computer (if
you do not have a serial port, use an off-the-shelf USB-to-serial converter
available from most consumer electronics stores or from Sierra).
2. Note the serial port channel number. You can look this up in the ‘System
Properties’ window of your PC. This can be accomplished by right-clicking
on ‘My Computer,’ left-click ‘Properties,’ or in the ‘Control Panel’ under
‘System.’
3. Under the ‘Hardware’ tab, click the button ‘Device Manager.’ Once ‘Device
Manager’ is open, expand the collapsible menu item ‘Ports.’ All available
ports on your computer should be listed. Find which one is the native serial
port on your computer (generally COM1 or COM2), or the USB/serial
converter COM port.
NOTE: If you cannot find the USB/serial converter you installed listed, or it has a yellow
exclamation mark on it, you may have incorrectly installed the driver software. Please refer to the
manufacturer’s instructions on driver installation before proceeding.
IM-50 16
Page 17

Instruction Manual SmartTrak® 50 Series
If you plan to control more than one SmartTrak® 50 Series from your
computer…
If you wish to operate more than one 50 Series at a time, you will need a dedicated COM
port for each, be it native serial or a USB/serial converter. After looking up and recording
which ports are which in ‘Device Manager’ (see last paragraph for review), open up an
instance of the user software for each unit (Example: If you have 5 units, you need to
have 5 instances of the program running at once). Setup communications for each
instance to match the communication type (RS-232 vs. RS-485) for each unit, the port it
is on, and the device address (if necessary).
Once communications are established for each unit individually, you can switch between
instances with mouse clicks to take readings and change settings on multiple units using a
single PC.
NOTE: Computers have limited capacity and computational ability, as well as streaming
speeds; the more instances you run, the slower the response. Please remain patient with
the system, or consider upgrading your PC to handle the load.
If connecting your computer to the SmartTrak® 50 Series creates any confusion, please
contact Sierra Instruments or your IT person for assistance.
Running the SmartTrak® 50 Series User Software
1. Locate the program named “50 Series User Software” and open it.
WINDOWS XP WINDOWS 7
IM-50 17
Page 18

Instruction Manual SmartTrak® 50 Series
You will see the following main screen:
NOTE: Hovering the mouse pointer over any of the input fields and buttons will give you a
description of its purpose.
2. Select ComPort in the menu to set up the ComPort. (See below)
IM-50 18
Page 19

Instruction Manual SmartTrak® 50 Series
3. Select the ComPort pull down menu shown
As shown above, use the pull-down menu to choose the port number that corresponds to the
serial port channel your 50 Series is connected to. Depending on whether the unit is RS-232 or
RS-485, you’ll need to select the proper “ASCII Commands” setting to match as shown above
right.
If your unit is RS-485, you’ll want to match the Device Address, Baud Rate and Parity to that of
your instrument (default settings are shown below). Once you have established communication,
you can change the Device Address, Baud Rate, and Parity to set up the instrument for use on
your RS-485 Bus system.
IM-50 19
Page 20

Instruction Manual SmartTrak® 50 Series
4. Close the window using the X button in the upper right corner of the dialog box. The
communications are set up, and the unit should be communicating with the computer, as evident
by the changing numbers right of the COM1: port in the picture below. If the numbers are not
changing, click ‘Get Parameters.’
RESET NOTE: If you are not able to establish communication with your instrument be sure you have the proper
ComPort selected to match your PC port then hit the “Reset Host Port To Default” button in the Port Dialog Box and
power down your instrument. Next, power up the instrument again and hold the zero pushbutton (located inside your
instruments side plate behind the silver socket head cap screw) for a minimum of one second after powering up your
instrument. This will reset both the host software and your instrument to the default settings. Click on the ‘Get
Parameters’ button and communication should be established.
IM-50 20
Page 21

Instruction Manual SmartTrak® 50 Series
Important Features of the SmartTrak® 50 Series User Software
You can learn more about your unit, including the Serial Number, Firmware Version,
etc., by clicking on the ‘Info’ button.
The final window below will provide control of the system. Click the ‘Adjustments’
button.
IM-50 21
Page 22

Instruction Manual SmartTrak® 50 Series
Hovering the mouse pointer over the input fields and buttons listed above will give you a
description of its purpose. For your reference, this is shown below.
IM-50 22
Page 23

Instruction Manual SmartTrak® 50 Series
Change the value in any input field by selecting the data and inputting a desired value.
Below left, for example, we have selected Setpoint. Below right, we have entered 1.234
IM-50 23
Page 24

Instruction Manual SmartTrak® 50 Series
Select ‘Enter’ on your computer keyboard to confirm. The value will change from RED
to BLACK.
IM-50 24
Page 25

Instruction Manual SmartTrak® 50 Series
Using the 50 Series Software
A. Software Window
Across the upper half of the 50 Series User Software window, you will see three yellow
boxes. These are titled:
Flow
Setpoint (flow controllers only, meters will have numbers grayed out)
Full Scale
These boxes display the current operating conditions of your 50 Series instrument. The
features of these boxes are described below.
Flow
The box displays the mass flow rate, the engineering units, and the gas type listed.
Setpoint
The Setpoint box displays the current setpoint given to the flow controller in the
‘Adjustments’ window, the engineering units, the source of the setpoint signal, the dac values
for the valve (for Sierra troubleshooting only).
Full Scale
The box displays the full scale flow rate, the engineering units, the Com Port selected, and
communications count.
IM-50 25
Page 26

Instruction Manual SmartTrak® 50 Series
Chapter 4: Analog Operation
Your SmartTrak® 50 Series instrument has an optional analog mode
This chapter will discuss Analog Operation. The analog output option is a 4-20 mA or 0- 5
VDC output signal corresponding to 0% to 100% of the mass flow full scale range.
For mass flow controllers, one analog setpoint signal and one analog output signal of either 420 mA or 0-5 VDC may be chosen to set the mass flow rate to any desired value within the
range of the device, or to read mass flow value as an outputted analog value. This input signal
must be a direct linear representation of 0% to 100% of the desired gas mass flow full scale
value. Your unit was programmed for either 4-20 mA or 0-5 VDC, not both; please refer to
the data label or calibration certificate for this information
2-2.
Analog Operation, Mass Flow Meter
After your instrument is installed and the system has undergone a complete leak check as
discussed in detail in Chapter 2, you are ready to supply power.
Power Your Instrument: Provide adequate power per Figure 2-2. Apply power using
Sierra’s power supply or your own power source. Hook up the analog output per Figure 2-2
if desired, or use the RS communications or display (optional) to read mass flow value. Let
the instrument warm up for at least 15 minutes for optimal performance.
Analog Operation, Mass Flow Controller
After your instrument is installed and the system has undergone a complete leak check as
discussed in detail in Chapter 2, follow these steps:
1. The valve will remain closed until power is supplied. See Chapter 2 for wiring
instructions. Remember that the valve in the SmartTrak® 50 Series is not a positive
shut-off device. When power is applied, the flow control valve will operate per any
instructions it receives. When the SmartTrak® 50 Series is delivered, the valve will
be closed. However, upon subsequent power-ups, the valve will return to the state it
was in the last time the instrument was operated.
CAUTION! If you do not know the value of the setpoint or the valve state given to the
SmartTrak® 50 Series when it was last operated, you must assume that the valve will open
when power is applied. TAKE NECESSARY PRECAUTIONS. You may use the SmartTrak
50 Series Software to check the setpoint or the valve state currently on your instrument. See
Chapter 4 or Chapter 5 for information on Setpoint and Valve State.
2. Power Your Instrument: Provide adequate power per Figure 2-2. Apply power
using Sierra’s power supply or your own power source. Let the instrument warm
up for at least 15 minutes for optimal performance.
IM-50 26
®
Page 27

Instruction Manual SmartTrak® 50 Series
3. Adjust the controller setpoint to the desired flow rate by supplying an
appropriate signal (mA, voltage or digital). The effective control range of the unit
is 5% to 100% of the calibrated full scale flow range. Automatic shut-off occurs at
4.9% of the factory full scale calibrated range unless specifically modified at time of
order. (This 5-100% flow is taken directly from the functional specs and the data
sheet) SmartTrak® 50 Series will immediately begin accurately monitoring and
controlling the gas mass flow rate. Let the instrument warm up for at least 15
minutes for optimal performance.
IM-50 27
Page 28

Instruction Manual SmartTrak® 50 Series
50 Series Features
Setpoint Adjustment
The setpoint (command) input signal you supply to the 50 Series must be a direct linear
representation of 0% to 100% of the mass flow full scale value. Apply the setpoint signal
per Chapter 2. A setpoint value of 0 VDC or 4 mA will regulate the flow to 0% and a
setpoint value of 5 VDC or 20 mA will adjust the flow to 100% of the instrument’s full
scale range.
When the setpoint (command) signal is applied, the flow controller will reach the setpoint
value within two seconds to within ±2% of the selected flow rate.
CAUTION! DO NOT LEAVE A SETPOINT APPLIED FOR AN EXTENDED
PERIOD OF TIME TO A CONTROLLER WHEN THE GAS SUPPLY IS
SHUT OFF OR BLOCKED.
Damage may result and the instrument will become hot to the touch.
Zero Adjustment
Remove the silver
screw to expose
the zero
adjustment port
If you believe your instrument requires a zero adjustment, allow the instrument to warm
up for at least 15 minutes at your operating conditions (Orientation, Temperature, and
Pressure), be sure there is ZERO flow through the instrument. Remove the silver screw
to expose the zero adjustment port to expose the zero adjustment button. Using a small
screwdriver or ball point pen, press the zero button, momentarily. The display should
flash and then read zero. If the display “freezes” at another value, or if computer
communication is lost, remove power and allow the device to re-initialize.
IM-50 28
Page 29

Instruction Manual SmartTrak® 50 Series
CAUTION! Note: Zero-button needs only a light touch to activate. Pay attention for a
physical click feeling and/ or a very quiet, but audible *click* noise. DO NOT push hard!
There is no reason to hold the button down, either. If you push too hard the plastic button
may become stuck under the edge of the metal shroud that holds it. If this happens you
can use the same device you use to reset to ‘unstick’ the button, CAREFULLY. Returns for
this issue will NOT be covered by warranty, as it is considered device abuse.
Over-Range Condition
If the mass flow rate exceeds the full scale range listed on the SmartTrak® 50 Series data
label the output signal will measure above full-scale. However, the device has not been
calibrated for flows in excess of the calibrated full scale value and the value will be both
non-linear and inaccurate if an over-range condition exists. Please be aware that the
analog outputs can exceed full scale by as much as 20%, or more.
Once the over-range condition has been removed, it may take up to 30 seconds for the 50
Series to recover and resume normal operation. An over-range condition will not harm
the instrument.
IMPORTANT NOTES ABOUT PURGING
Purging Non-Reactive Gases:
Purge your 50 Series with clean, dry nitrogen for a minimum of two hours. To purge an
MFC apply a full scale setpoint.
Purging Reactive Gases:
One of the following methods may be used:
Cycle purge. This is done by alternately evacuating and purging the instrument for 2
to 4 hours with clean, dry nitrogen.
Purge the instrument with clean, dry nitrogen for 18 to 24 hours.
Evacuate the instrument for 18 to 24 hours.
IM-50 29
Page 30

Instruction Manual SmartTrak® 50 Series
Important Safety Notes About Purging
WARNING! When toxic or corrosive gases are used, purge unit thoroughly with inert
dry gas before disconnecting from the gas line to prevent personnel from being injured
when coming in contact with the instrument. Above discusses how to purge your
instrument. Always neutralize any toxic gas trapped inside the instrument before removing
it from the gas line. If an instrument used with a toxic or corrosive gas is returned to the
factory a Material Safety Data Sheet (MSDS) must be enclosed & attached to the outside
of the box to alert Sierra personnel of the potential hazard. Also make sure the inlet &
outlet are securely sealed.
Chapter 5: Technical Support & Service
Technical Support
If you encounter any problem with your instrument, review the configuration information
for each step of the installation, operation, and set up procedures as explained in this
manual. Verify that your settings and adjustments are consistent with factory
recommendations.
If the problem persists, Sierra is eager to help you. You may contact us at any of the
following Technical Support Centers listed below. It may also help to call your Sierra
Sales Agent, who is also well trained in the operation of the product.
IMPORTANT: When contacting Technical Support, make sure you have
included the following information:
The flow range, serial number, Sierra order number and model number (all
marked on the instrument data label).
The problem you are encountering and any corrective action taken.
Application information (gas, pressure, temperature, pipe and fitting configuration).
IM-50 30
Page 31

Instruction Manual SmartTrak® 50 Series
Customer Service and Support Information
Email Technical Support: service@sierrainstruments.com
Email Sales: sales@sierrainstruments.com
FACTORY USA
TOLL FREE: 800-866-0200
PHONE: +1-831-373-0200
FAX: +1-831-373-4402
EMAIL: service@sierrainstruments.com
European Sales & Service Center:
PHONE: +31 72 5071400
FAX: +31 72 5071401
EMAIL: service@sierra-instruments.nl
Asia Sales & Service Center:
PHONE: + 8221 5879 8521
FAX: +8621 5879 8586
EMAIL: www.sierra-asia.com
Returning Equipment to the Factory
Factory Calibration—All Models
Sierra Instruments maintains a fully-equipped calibration laboratory. All measuring
and test equipment used in the calibration of Sierra transducers are traceable to NIST
Standards. Sierra is ISO-9001 registered and conforms to the requirements of
ANSI/NCSL-Z540 and ISO/IEC Guide 25.
Instructions for Returning Your Instrument for Service
The following information will help you return your instrument to Sierra Instruments'
Factory Service Center and will ensure that your order is processed promptly. Prices
may vary depending on the flow range, type of gas and operating pressure of your unit.
To request detailed pricing, contact your local Sierra Instruments distributor or contact
one of our offices directly.
Please follow these easy steps to return your instrument for factory service:
1. To obtain a Return Materials Authorization (RMA) number from the Sierra
Instruments to http://www.sierrainstruments.com/rma/new.php to create a
Sierra Account.
2. Once you have created an account, click on the Submit New RMA tab and fill in
the RMA form and follow the instructions. You will receive an email
confirmation once you have submitted your RMA.
IM-50 31
Page 32

Instruction Manual SmartTrak® 50 Series
3. Print a copy of the RMA (that now includes RMA #) and send a copy of the
RMA form along with your meter back to the factory.
If you require service beyond calibration, but do not know which service(s) will be
required, describe the symptoms as accurately as possible on the RMA form.
Pack your instrument carefully. Use the original packaging and foam or bubble wrap
(packing peanuts NOT recommended) and include a copy of the RMA form
(complete with Sierra supplied RMA number) with the unit(s).
Ship the unit(s) to the following address:
Sierra Instruments, Inc.
Attention: Factory Service Center
5 Harris Court, Building L
Monterey, CA 93940 USA
RE: RMA# (your number
)
RE: RMA# (your number)
IM-50 32
Page 33

Instruction Manual SmartTrak® 50 Series
Appendix A: Gas Tables & K-Factor Calculations
K-Factor Calculations-Using SmartTrak
If you will be using SmartTrak® 50 Series with a gas other than as calibrated, you may
use the tables below. They provide K-factors and thermodynamic properties of gases
commonly used with mass flow meters and controllers. This is particularly useful if the
actual gas is not a common gas or if it is toxic, flammable, corrosive, etc. The tables can
also be used to interpret the reading of a flow meter or flow controller that has been
calibrated with a gas other than the actual gas.
Before applying the tables, set the instrument for Air. Then, the following fundamental
relationship may be used:
Q
Where:
Q = The volumetric flow rate of the gas referenced to normal
conditions of 0°C and 760 mm Hg (sccm or slm),
K = The K-factor from the following tables, referenced to Air
( ) 1 = Refers to the “actual” gas, and
( ) N = Refers to the “reference” gas, Air in this case.
= K1/KN
1/QN
®
50 Series with Other Gases
IM-50 33
Page 34

Instruction Manual SmartTrak® 50 Series
r
(
r
r
(
(
(
(
(
r
(
(
Gas Tables and K-factors
Actual Gas
Acetylene C2H2 .581 .4036 1.079 1.162
1.000 .240 1.200 1.293
Ai
Allene
Propadiene) C
Ammonia NH
Argon Ar 1.398 .1244 1.655 1.782
Arsine AsH
Boron Trichloride BCl3 .411 .1279 4.852 5.227 800 Series Recommended
Boron Trifluoride BF3 .511 .1778 2.808 3.025 KR
Boron Tribromide B
Bromine B
Bromine Pentafluoride BrF5 .261 .1369 7.244 7.803 KR
Bromine Trifluoride BrF
Bromotrifloromethane
Freon-13 B1)
1,3-Butadiene C4H6 .321 .3514 2.240 2.413
Butane C
1-Butane C4H8 .301 .3648 2.324 2.503 NEO KR
2-Butane C
2-Butane C
Carbon Dioxide CO2 .737 .2016 1.835 1.964
Carbon Disulfide CS
Carbon Monoxide CO 1.002 .2488 1.160 1.250
Carbon Tetrachloride CCl4 .311 .1655 6.368 6.860 KR
Carbon Tetrafluoride
Freon-14)
Carbonyl Fluoride COF
Carbonyl Sulfide COS .661 .1651 2.488 2.680
Chlorine CL
Chlorine Trifluoride CIF3 .401 .1650 3.829 4.125 KR
Chlorodifluoromethane
Freon-22)
Chloroform CHCI
Chloropentafluoroethane
Freon-115)
Chlorotrifluromethane
Freon-13)
Cyanogen C2N2 .611 .2613 2.156 2.322 KR
Cyanogen Chloride CICN .611 .1739 2.545 2.742
Cychlopropane C3H5 .461 .3177 1.742 1.877 KR
Deuterium D
Diborane B
Dibromodifluoromethane CB
Dibromethane .471 .075 7.204 7.76 KR
Dichlorodifluoromethane
Freon-12)
Dichlorofluoromethane
Freon-21)
Chemical
Symbol
3H4
3
3
.381 .0647 10.378 11.18 KR
3
.812 .0539 6.619 7.130
2
3
CBrF
4H10
CIS .325 .336 2.324 2.503 NEO KR
4H8
TRANS .292 .374 2.324 2.503
4H8
2
CF
4
2
CHClF
CIF5 .241 .164 6.398 6.892 KR
C
2
CCIF
1.002 .1722 1.670 1.799
2
2H6
2F2
CCI
2F2
CHCl
2
K-factor
Relative
to Air
Cp
(Cal/g)
Density
(g/l) @
70°F
Density
(g/l) @
0°C
Elastomers*
O-ring Valve
Seat
.431 .352 1.659 1.787 KR
.732 .492 .706 .760 NEO KR/NEO
.671 .1167 3.229 3.478 KR
.381 .1161 5.670 6.108 KR
.371 .1113 6.168 6.644
3
.261 .4007 2.407 2.593 NEO KR
.601 .1428 3.153 3.397
.421 .1654 3.645 3.926 KR
.541 .1710 2.734 2.945
2
.862 .114 2.936 3.163 800 Series Recommended
.461 .1544 3.581 3.858 KR
2
.391 .1309 4.944 5.326 KR
3
.381 .153 4.326 4.660 KR
3
.441 .508 1.147 1.235 KR
.190 .15 8.691 9.362 KR
.351 .1432 5.008 5.395 KR
F .421 .140 4.597 4.952 KR
If no O-ring material is specified then O-ring to be used is Viton. NEO is neoprene or equivalent. KR is DuPont Kalrez or
equivalent. Valve Seat applies only to controllers.
IM-50 34
Page 35

Instruction Manual SmartTrak® 50 Series
(
(
(
y
y
r
y
Actual Gas Chemical
Symbol
Dichloromethylsilane (CH
Dichlorosilane SiH
Dichlorotetrafluoroethane
3) 2
C
2Cl2F4
SiCl
2Cl2
(Freon-114)
1,1-Difluoroethylene
C
2H2F2
Freon-1132A)
Dimethylamine
Dimethyl Ether
CH
CH
3) 2
3) 2
2,2-Dimethylpropane C3H12 .220 .3914 2.988 3.219 KR
Ethane C
Ethanol C
2H6
O .391 .3395 1.908 2.055 KR
2H6
EthylAcetylene C4H6 .321 .3513 2.240 2.413 KR
Ethyl Chloride C
CI .391 .244 2.673 2.879 KR
2H5
Ethylene C2H4 .601 .358 1.161 1.251
Ethylene Oxide C2H4O .521 .268 1.824 1.965 KR
Fluorine F
.982 .1873 1.574 1.695 800 Series Recommended
2
Fluoroform (Freon-23) CHF3 .501 .176 2.903 3.127 KR
Freon-11 CCI3F .331 .1357 5.690 6.129 KR
Freon-12 CCI
2F2
Freon-13 CCIF3 .381 .153 4.326 4.660 KR
Freon-13 B1 CFrF3 .371 .1113 6.168 6.644 KR
Freon-14 CF
4
Freon-21 CHCI2F .421 .140 4.597 4.952 KR
Freon-22 CHCIF2 .461 .1544 3.581 3.858 KR
Freon-113
Freon-114 C
CCI2FCCIF
2Cl2F4
Freon-115 C2ClF5 .241 .164 6398 6.892 KR
Freon-C318 C
4F6
Germane GeH4 .571 .1404 3.173 3.418
Germanium Tetrachloride GeCL4 .271 .1071 8.879 9.565 KR
Helium He 1.399 1.241 .164 .1786
Hexafluoroethane
C
2F6
(Freon-116)
Hexane C6H14 .180 .3968 3.569 3.845 KR
Hydrogen H
1.001 3.419 .083 .0899
2
Hydrogen Bromide HBr 1.002 .0861 3.351 3.610 KR
Hydrogen Chloride HCl 1.002 .1912 1.510 1.627 800 Series Recommended
drogen Cyanide HCN 1.072 .3171 1.120 1.206 KR
H
Hydrogen Fluoride HF 1.002 .3479 .829 .893 800 Series Recommended
H
drogen Iodide HI 1.002 .0545 5.298 5.707 KR
Hydrogen Selenide H
Se .792 .1025 3.354 3.613 KR
2
Hydrogen Sulfide H2S .802 .2397 1.411 1.520 NEO KR
Iodine Pentafluoride IF
.251 .1108 9.190 9.90 KR
5
Isobutane CH(CH3)3 .271 .3872 3.335 2.593 KR
Isobutylene C4H8 .291 .3701 2.324 2.503 KR
Krypton K
1.456 .0593 3.471 3.739
Methane CH4 .754 .5328 .665 .715
Methanol CH3OH .581 .3274 1.327 1.429
Meth
l Acetylene C3H4 .431 .3547 1.659 1.787 KR
Methyl Bromide CH
Br .581 .1106 3.932 4.236
3
Methyl Chloride CH3Cl .193 2.253 2.092 KR
Methyl Fluoride CH
F .681 .3221 1.409 1.518 KR
3
If no O-ring material is specified then O-ring to be used is Viton. NEO is neoprene or equivalent. KR is DuPont Kalrez or
equivalent. Valve Seat applies only to controllers.
K-factor
Relative
Air
.251 .1882 5.345 5.758 KR
2
Cp
(Cal/g)
Density
(g/l) @
70°F
Density
(g/l) @
0°C
Elastomers*
O-ring Valve
Seat
.401 .150 4.183 4.506 KR
.220 .1604 7.079 7.626 KR
.185 .224 2.652 2.857 KR
NH .371 .366 1.867 2.011 KR
O .391 .3414 1.908 2.055 KR
.501 .4097 1.246 1.342
.351 .1432 5.008 5.395 KR
.421 .1654 3.645 3.926
.200 .161 7.761 8.360 KR
2
.220 .160 7.079 7.626 KR
.170 .185 7.795 8.397 KR
.241 .1834 5.716 6.157 KR
IM-50 35
Page 36

Instruction Manual SmartTrak® 50 Series
y
(
)
g
y
(
y
Actual Gas
Methyl Mercaptan CH3SH .521 .2459 1.992 2.146 KR
Meth
l Trichlorosilane
Molybdenum Hexafluoride MoF
Monoethylamine C2H5NH2 .351 .387 1.867 2.011 KR
Monomethylamine CH3NH2 .511 .4343 1.287 1.386 KR
Neon NE 1.463 .245 .836 .900
Nitric Oxide NO .992 .2328 1.243 1.339
Nitrogen N2 1.002 .2485 1.161 1.25
Nitro
en Dioxide NO2 .742 .1933 1.905 2.052 800 Series Recommended
Nitrogen Trifluoride NF
Nitrosyl Chloride NOCl .611 .1632 2.711 2.920 KR
Nitrous Oxide N
Octafluorocyclobutane
(Freon-C318)
Oxygen Difluoride OF2 .631 .1917 2.234 2.406
Oxygen O2 .998 .2193 1.326 1.427
Ozone O3 .447 .3 1.990 2.144
Pentaborane B
Pentane C
Perchloryl Fluoride CIO3F .391 .1514 4.243 4.571 KR
Perfluoropropane C
Phosgene COCl2 .441 .1394 4.101 4.418 KR
Phosphine PH3 .762 .2374 1.408 1.517 KR
Phosphorous Ox
chloride POCl3 .361 .1324 6.352 6.843 KR
Phosphorous
Pentafluoride
Phosphorous Trichloride PCl5 .301 .1250 5.688 6.127 KR
Propane C
Propylene C3H6 .411 .3541 1.742 1.877
Silane SiH4 .601 .3189 1.330 1.433 KR
Silicon Tetrachloride SiCl
Silicon Tetrafluoride SiF4 .351 .1691 4.310 4.643 KR
Sulfur Hexafluoride SF6 .261 .1592 6.049 6.516 KR
Sulfuryl Fluoride SO
Teos .090 800 Series Recommended
Tetrafluorahydrazine N
Trichlorofluormethane
(Freon-11)
Trichlorisilane SiHCl3 .331 .1380 5.610 6.043 KR
1,1,2-Trichloro-1,2,2
Trifluorethane
Freon-113)
Trisobutyl Aluminum (C4H9)Al .061 .508 8.214 8.848 KR
Titanium Tetrachloride TiCl4 .271 .120 7.858 8.465 KR
Trichloro Ethylene C2HCl3 .321 .163 5.523 5.95 KR
Trimethylamine (CH
Tungsten Hexasfuoride WF6 .251 .0810 12.328 13.28 800 Series Recommended
Uranium Hexafluoride UF6 .200 .0888 14.574 15.70 KR
Vin
l Bromide CH2CHBr .461 .1241 4.430 4.772 KR
Vinyl Chloride CH
Xenon Xe 1.443 .0378 5.438 5.858
If no O-ring material is specified then O-ring to be used is Viton. NEO is neoprene or equivalent. KR is DuPont
Kalrez or equivalent. Valve Seat applies only to controllers.
Chemical
Symbol
CH
SiCl3 .251 .164 6.191 6.669 KR
3
3
O .716 .2088 1.836 1.964
2
K-factor
Relative
Air
.210 .1373 8.695 9.366 KR
6
Cp
(Cal/g)
Density
(g/l) @
70°F
Density
(g/l) @
0°C
Elastomers*
O-ring Valve
Seat
.481 .1797 2.941 3.168 KR
C4F6 .170 .185 7.795 8.397 KR
.261 .38 2.614 2.816 KR
5H9
.210 .398 2.988 3.219 KR
5HI2
.174 .197 7.787 8.388 KR
3F8
PH
.301 .1610 5.217 5.620 KR
5
.335 .3885 1.826 1.967
3H8
.281 .1270 7.037 7.580 KR
4
.391 .1543 4.235 4.562 KR
2F2
.321 .182 4.307 4.64 KR
2F4
CCl3F .331 .1357 5.690 6.129 KR
CCl2FCClF
.200 .161 7.761 8.360 KR
2
N .281 .3710 2.450 2.639 KR
3)3
CHCl .481 .12054 2.588 2.788 KR
2
IM-50 36
Page 37

Instruction Manual SmartTrak® 50 Series
Appendix B1: 50 Low Flow (to 50 slpm) Product
Specifications
IM-50 37
Page 38

Instruction Manual SmartTrak® 50 Series
IM-50 38
Page 39

Instruction Manual SmartTrak® 50 Series
IM-50 39
Page 40

Appendix B2: 50 Medium Flow (to 200 slpm) Product
Specifications
IM-50 40
Page 41

IM-50 41
Page 42

IM-50 42
Page 43

Appendix C: Warranty Policy
LIMITED WARRANTY POLICY- REGISTER ONLINE
All Sierra products are warranted to be free from defects in material and workmanship and will
be repaired or replaced at no charge to Buyer, provided return or rejection of product is made
within a reasonable period but no longer than one (1) year for calibration and non-calibration
defects, from date of delivery. To assure warranty service, customers must register their products
online on Sierra’s website. Online registration of all of your Sierra products is required for our
warranty process. Register now at www.sierrainstruments.com/register. Learn more about
Sierra’s warranty policy at www.sierrainstruments.com/warranty.
IM-50 43
 Loading...