

Page 1
EF2100 Wood Heater Manual
Installation and Operating
Instructions
Please read this entire manual before installation. Save these instructions.
GENERAL INFORMATION
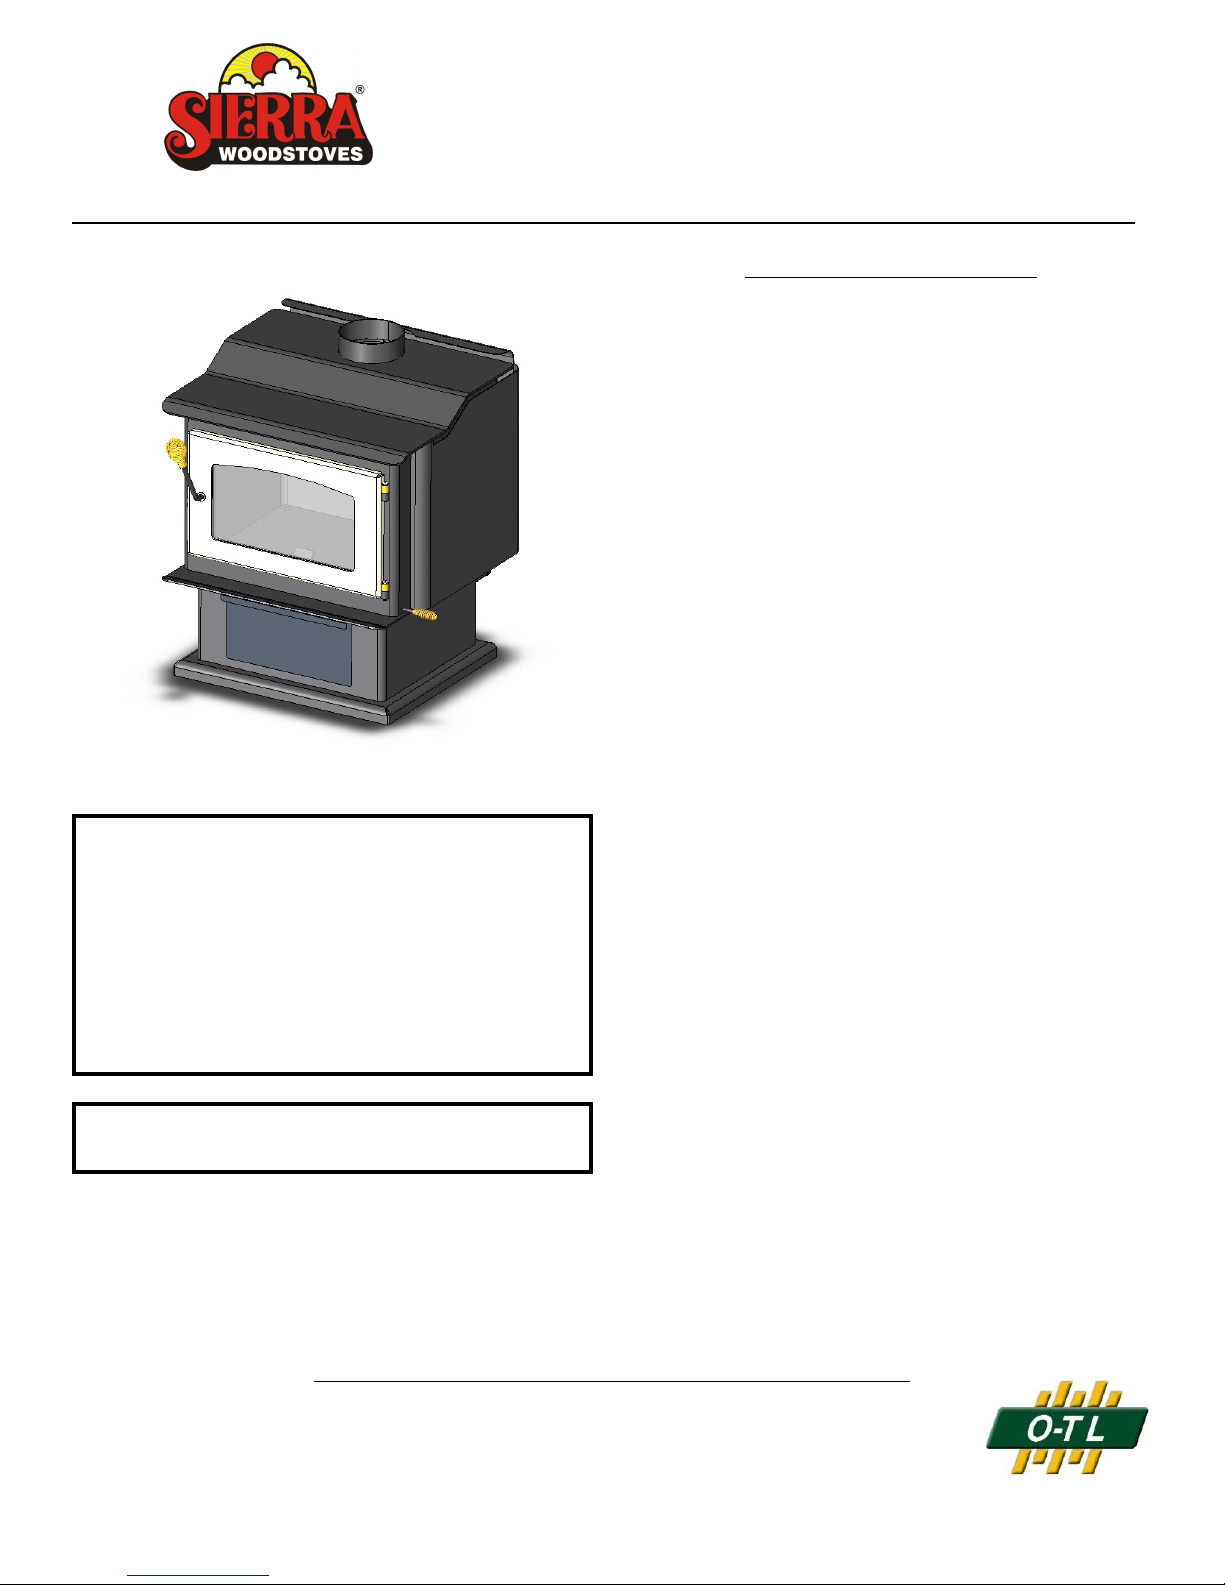
Congratulations on your purchase of the Sierra Stove. W e
are confident that your new stove will provide you with years
of safe, comfortable and efficient heating.
Your Sierra Stove is a free-standing/mobile home approved
wood fueled heating appliance tested by Omni-Test
Laboratories, Inc. ICBO TL-130 & Canadian test ULC S627.
Safety testing is according to UL' 1482 and UM 84. HUD
standards.
This manual describes the installation and operation of the
Sierra EF2100 and AFI wood heaters.
EMISSION CERTIFICATION STATUS
The EF2100 model meets the U.S. Environmental Protection
Agency's em ission limits for wood heaters sold betw een July
1, 1990 and July 1, 1992. Under specific test conditions this
heater has been shown to deliver heat at rates ranging from
11,000 to 42,900 Btu/hr capable of heating approximately
2,100-2,600 square feet. Actual heat output and space
heated is determined by: climate, home construction, species
and moisture content of wood.
These models also comply with Oregon Department of
Environmental Quality's requirements for wood heaters which
are sold after July 1, 1988.
The EF2100 and AFI comply with the Colorado Department
of Health requirements for wood heaters which are sold after
July 1, 1988.
<CAUTION: HOT WHILE IN OPERATION. KEEP
SAFETY NOTICE
CHILDREN, CLOTHING AND FURNITURE AWAY.
CONTACT MAY CAUSE SKIN BURNS.
<IF THIS HEATER IS NOT PROPERLY INSTALLED,
A HOUSE FIRE MAY RESULT.
<CONTACT LOCAL BUILDING OFFICIALS ABOUT
RESTRICTIONS AND INSTALLATION INSPECTION
REQUIREMENTS IN YOUR AREA.
< FAILURE TO COMPLY WITH OWNERS' MANUAL
INSTRUCTIONS WILL VOID YOUR WARRANTY!
WARNING: FOR INSTALLATIONS IN MOBILE
HOMES, DO NOT INSTALL IN SLEEPING ROOM.
Please read this entire manual before you install and use
your new room heater. Failure to follow instructions may
result in property damage, bodily injury, or even death.
Save these instructions for future reference.
SAFETY NOTICE
If this appliance is not properly installed, a house fire may
result. For your safety, follow the installation instructions.
Check with local building or fire officials about restrictions and
installation inspection requirements in your area.
Installation into mobile homes require outside combustion air
and special hearth attachments. For Mobile Homes, a
Combustion Air Kit P/N 11069 is available from your dealer.
It is best to have a professional install your Sierra Stove. If
you prefer to install it yourself (see Installation Instructions),
be sure to obtain the proper permits. Have the local building
officials inspect the stove and chimney pipe for safety and
code compliance after the installation is
complete.
PLEASE LEAVE THIS MANUAL WITH THE OWNER !!
DO NOT CONNECT THIS UNIT TO A CHIMNEY FLUE
SERVING ANOTHER APPLIANCE.
Listed by Omni-Test Laboratories, Inc.
256-S -02-2
Page 2
OVERALL DIMENSIONS ACHIEVING PROPER DRAFT
Draft is the force which moves air from the appliance up
through the chimney. The amount of draft in your chimney
depends on the length o f the chimney, local geography,
nearby obstructions and other factors. Too much draft may
cause excessive temperatures in the appliance. An
uncontrollable burn or a glowing red stove part or chimney
connector indicates excessive draft. Inadequate draft may
cause back puffing into the room and plugging of the
chimney. Symptoms of inadequate draft include leaking of
smoke into the room through the appliance and/or chimney
connector joints. A minimum draft of .06wc is required for
proper operation.
Your Sierra Stove must not be connected to a chimney
serving another appliance. Multiple appliances on a single
flue may cause flue gases to be drawn into the house
through an unused opening, or in the form of poor draft and
rapid creosote accumulation.
The Sierra Stove will not sm oke if installed according to
manufacturer's specifications and with a listed chim ney.
A scheduled plan for cleaning the chimney must be
observed. A build-up of resins from wet or green wood can
cause a flue fire (see Maintenance Section).
Special methods are required when passing chimney through
a wall or ceiling. See Pipe Instructions Manual and/or local
building codes.
Do Not Over-fire this Heater: Attempts to achieve heat
output rates that exceed heater design specifications can
result in perm anent damage to the heater. A glowing stove
or connector pipe is hazardous!
HEARTH PROTECTION
Floor protection and/or hearth extension is required for the
Sierra Stove. All floor protection materials must be noncombustible (i.e., metals, brick, stone, mineral fiber boards,
etc.). Any organic materials (i.e., plastics, wood. paper
products, etc.) are combustible and must not be used. The
floor protector specified may include some form of thermal
designation such as an R-value (thermal resistance), k-factor
(therm al conductivity), or C-factor (therm al conductance).
The easiest means of determining a proposed alternate floor
protecto r that meets the requirem ents liste d in this m anual is
to follow this procedure:
1) Convert specification to R-value:
i) R-value given - no conversion needed.
ii) k-factor is given with a required thickness (T) in
inches: R 1/k x t
iii) C-factor is given: R - 1/C
2) Determine t R-value of the proposed alternate
floor protector.
i) Use the formula in step (1) to convert values not
expressed as "R".
ii) For multiple layers, add R-values of each layer
to determine overall R-value.
3) If the overall R-value of the system is greater
than the R-value of the specified floor protector,
the alternate is acceptable.
Example: The specified floor protector should be 3/4 inch
thick m aterial with a k-factor of .84. The proposed alternate
is 4" brick with a C-factor of 1.25 over 1/8" m ineral board with
a k-factor of .29.
Step (a): Use formula above to convert specification to
R-value. R=1/k x T-1/.84 x.75=.893
Step (b): Calculate R of proposed system. 4" brick of
C-1.25, therefore Rbrick=1/C -1/1.25 -.80
1/8" mineral board of k-.29, therefore Rmin.bd.-
1/.29x.125-.431
Total R-Rbrick-Rmineral board-.8+.431=1.231
Step (c): Compare proposed system R of 1.231 to
specified R of .893. Since proposed system R is greater
than required, the system is acceptable.
2
Page 3
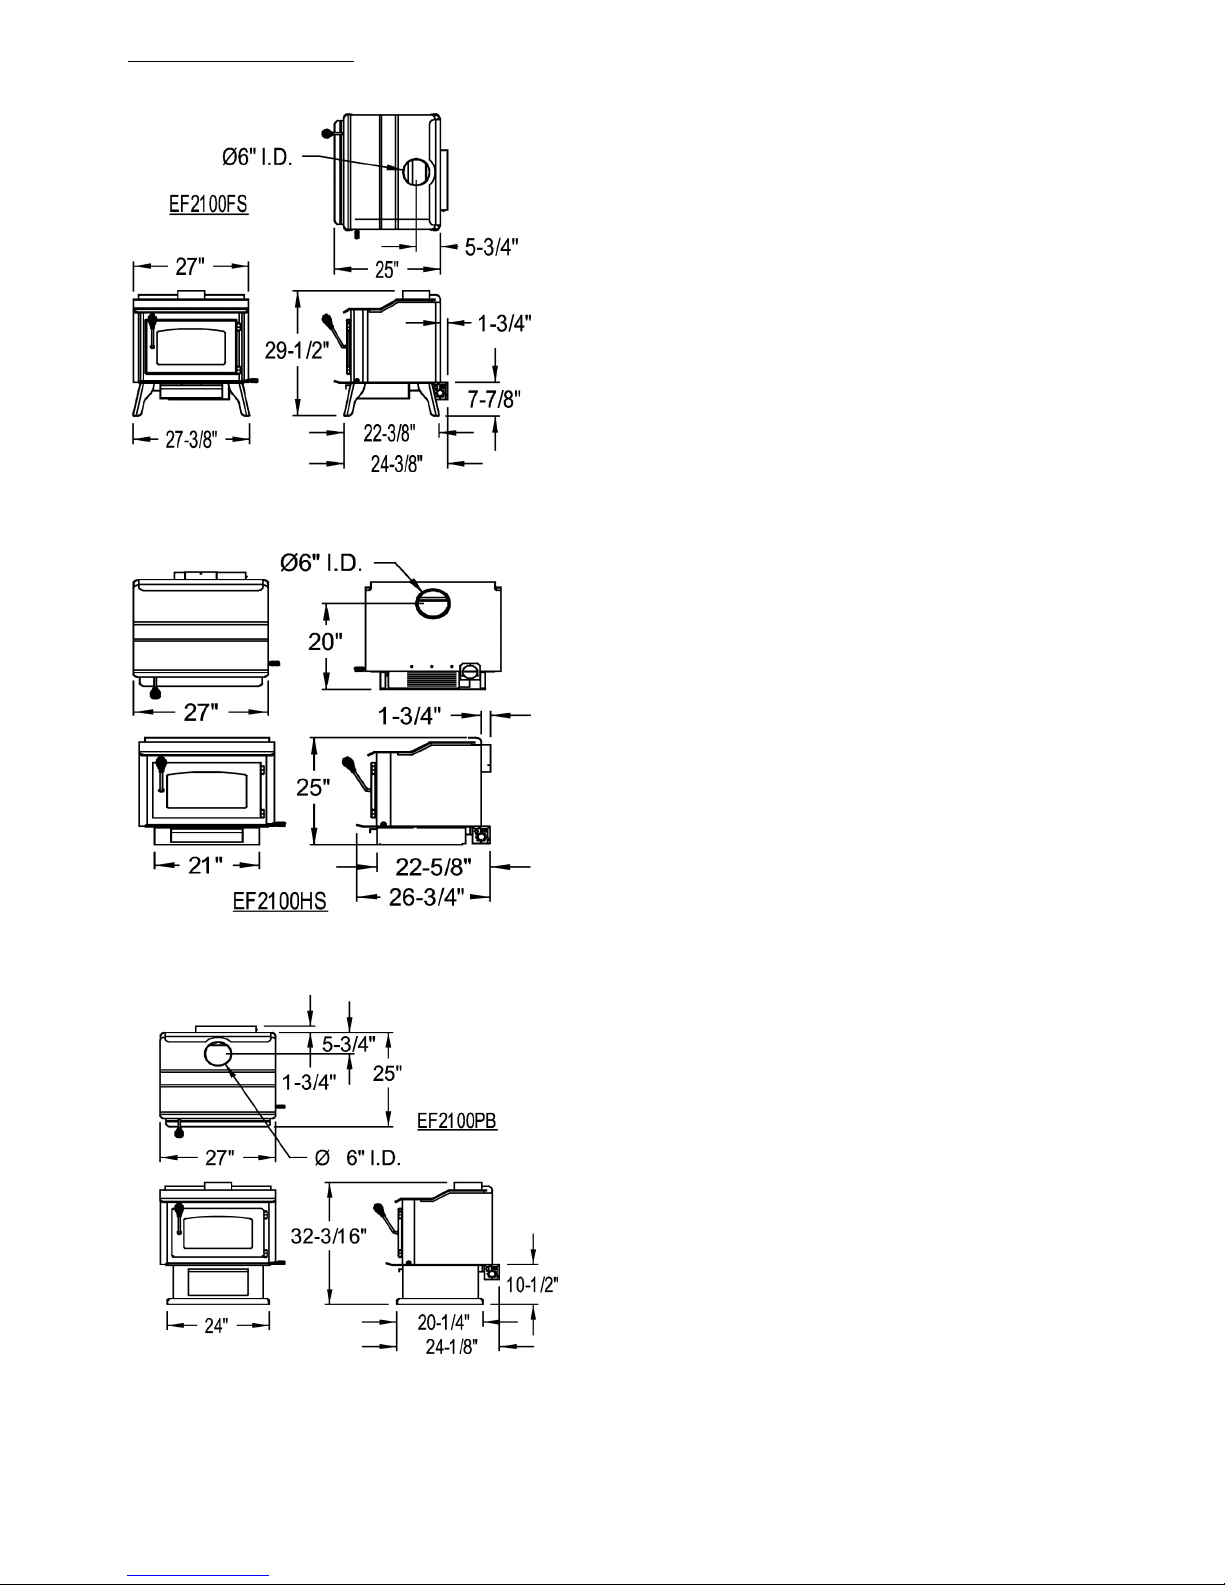
2100 Dimensions
SPECIAL FEATURES
Your Sierra Stove is
equipped with a special
design to meet clean air
standards. Please follow
the starting instructions
carefully to ensure you are
using your woodstove in the
clean, efficient manner for
which it was designed.
A special drafting pattern is employed in your Sierra Stove
which provides an "air-wash" across the inside face of the
glass thereby reducing the frequency with which the glass
require s cleaning. Proper usage of these controls is
discussed in the Starting Instructions section.
Your Sierra Stove may be configured as a free-standing
heater or a fireplace insert. The free-standing unit hasl bases
that include pedestal and standard iron legs. All units are
approved for mobile home installations with outside air.
BREAK-IN PERIOD
Your Sierra Stove has been painted with the highest quality
silicone stove paint and has special break-in procedures to
for proper curing.
* Ventilate the house. It takes heat to activate the silicone
resin and this process gives off carbon dioxide smoke.
* Don't touch the surface. It will be soft and gummy during
the curing phase. Once cured, it will not be soft again.
* Most stoves cure with three burns. The first two should be
250EF for 20 minutes, or about half of a normal fire. Let the
stove cool down between burns. The last fire should be
500EF to 700EF for at least 45 minutes. The point being,
cure slowly without a hot fire.
* Curing can usually be observed by the effect of the paint
turning flat as the heat radiates out from the hotter parts of
the stove.
OPERATING AND SAFETY TIPS
Always exercise caution when operating your stove and
follow these important safety tips.
Figure 1
1. Never use gasoline, gasoline-type lantern fuel, kerosene,
charcoal lighter fluid, or similar liquids to start or "freshen up"
a fire in this heater. Keep all such liquids well away from the
heater while it is in use.
2. A glowing red stove is dangerous! Never fire your stove
to over 1000EF surface temperature. Never stoke up the fire
so hot that it changes color of the surface of the stove. Cool
the fire quickly by closing the stove door and bottom air
control. The fire should die down once deprived of oxygen. If
the fire doesn't die, call the fire department for assistance.
CAUTION: In airtight s toves after closing the bottom air
control, volatile gases are still given off by the wood
smoldering in the firebox. A sudden burst of oxygen caused
by opening the draft control or door while stove is smoldering
will ignite the volatile gases and may result in a sudden burst
of flam e with a muffled report. This may sound very similar to
a gas furnace igniting. Always increase the air intake
gradually. D o n ot open it all the way until you see flame in
your firebox. Always open bottom air intake before you open
the door.
3. Never hang clothes near the stove to dry as they may
catch fire. Keep furniture, drapes, wood supply and any other
combustibles 3 feet away from your woodstove.
4. Never burn garbage in your woodstove. By garbage we
mean: plastics, aluminum wrappers, slick paper magazines
or styrofoam of any kind. Garbage fouls your chimney and
the air.
5. Use caution when loading fuel into stove after it is already
burning vigorously. Avoid resting fuel against the glass as this
will cause dirty spots.
6. Burn dry wood only. Do not use coal as fuel.
7. Educate your children to the dangers associated with fire,
and the presence of the hot appliance. Child guards are
available through your dealer. Never allow a child to operate
your woodstove.
8. Combustion Air: Fire consumes oxygen, therefore a fresh
outside air source must be provided in order to maintain a
healthy atm osphere within the house. O pen a window slightly
when operating the Sierra Stove.
9. Disposal of Ashes: Ashes should be placed in a metal
container with a tight-fitting lid. The closed container of ashes
should be placed on a non-combustible floor or the ground,
away from all
combustible materials,
pending final disposal. If
the ashes are disposed
of by burial in soil or
otherwise locally
dispersed, they should
be retained in the closed
container until all cinders
have thoroughly cooled.
10. Flue Fires: Always
a potentially dangerous
situation, a flue fire can
usually be controlled by
depriving the fire of
oxygen. Accomplish this
by closing the stove door
tightly and closing draft regulator snugly. The Fire
Department should always be called to avoid letting the
situation get out of control. Flue fires can be avoided by
maintaining your chimney (See Creosote and M aintenance).
11. Smoke Detectors are a very good investment for the
protection of your family and home.
12. Build fire directly on the fire bricks of the stove. Do not
use grates or andirons to elevate wood.
Figure 2
3
Page 4

INSTALLATION INSTRUCTIONS:
MOBILE HOMES
EF2100 FREESTANDING HEATER
Correct installation of the Sierra Stove em ploying outside air
requires the use of one of the approved chimney systems
and the Sierra Mobile Home Kit.
CAUTION: THE STRUCTURAL INTEGRITY OF THE
MOBILE HOME FLOOR, WALL, AND CEILING/ROOF
MUST BE MAINTAINED.
Proper installation requires a m inimum 6" listed Class A all
fuel chimney or tile lined masonry chimney. Chimney
connectors must be 6" in diameter and constructed of 22 or
24 gauge aluminized steel, black steel, or stainless steel.
Discharging into a larger chimney system may create draft
problems. Your chimney should extend a minimum of 3-feet
above your roof and at least 2-feet higher than any obstacle
within 10-feet of the chimney.
Mobile Home Kit - This kit (available through your dealer) contains:
1 Pedestal cover plate with nut & washer (for grounding wire)
1 Vent collar trim band with two #8 x 1/2" screws
1 Air intake hose with screen
1 1/4 x3" lag bolts for anchoring pedestal
The following materials will be helpful during your installation:
Carpenter's Leve l Roof Cement (Cold) Pow er drill
Masonry H ole Saw #8 C opp er W ire 5/16" drill bit
1/4"Masonry Drill Bit Silicone Caulking Plumb bob
Adjustable W rench Nails Tape Measure
Tin Snips 1/4"bolt & washer Duct Tape
STEP BY STEP INSTALLATION
W e suggest that you purchase a chimney kit from your local
dealer designed for mobile home installations. These kits
normally supply all required parts including roof flashing and
spark arresting termination. This will simplify the chimney
system installation.
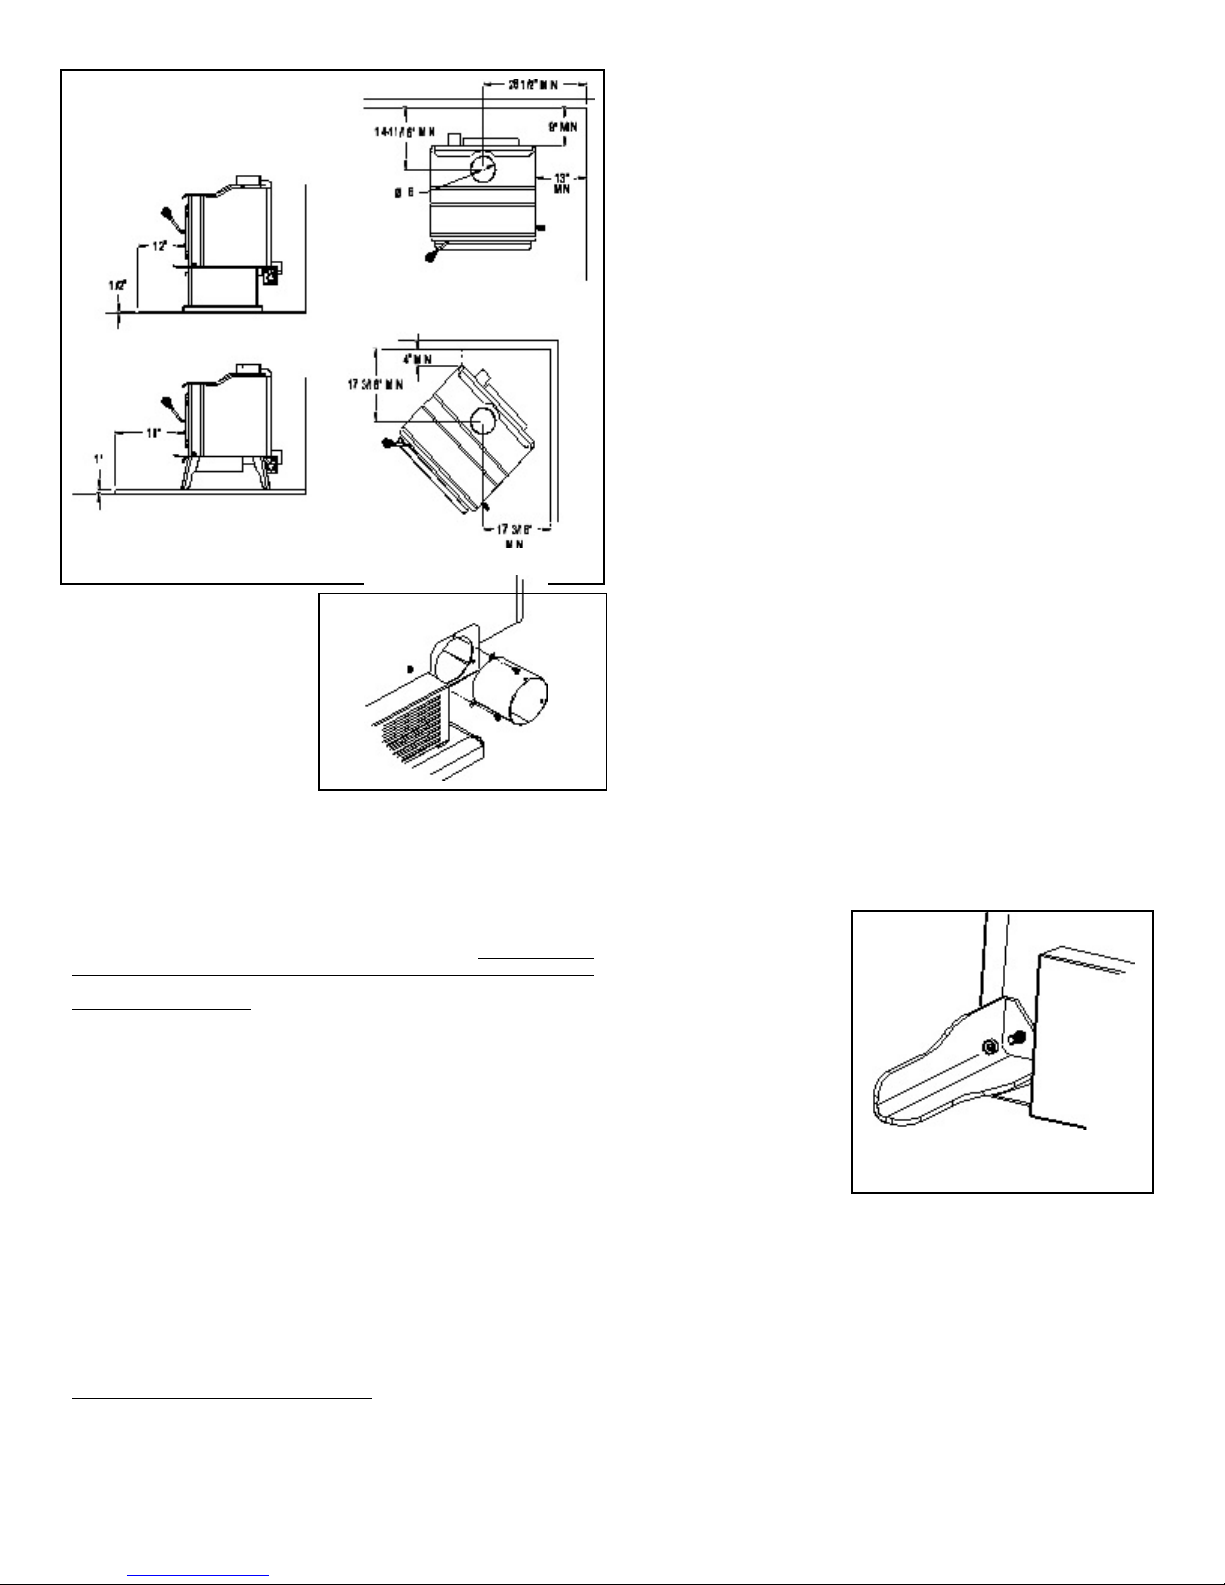
Note: For mobile home and or installations utilizing the
reduced clearances (Figure 1), the use of an air cooled
chimney connector or wall shielding is required. Refer to
installation code NFPA 211.
1. Measure ceiling height, plus attic, plus three feet above
roof and two feet above highest point of roof that is within ten
feet of the chimney. Deduct height of the Sierra Stove and
this will tell you if you need extra pipe in addition to what is
supplied in chimney m anufacturers mobile hom e kit.
2. Place the hearth pad on the floor in the desired location.
Verify the chimney will be able to pass through the ceiling
and roof between the trusses. W hen the desired location is
decided, check for proper side clearances from a
combustible walls and ceiling. Check the roof to see that
there are no roof obstructions that will be in the way of the
roof flashing.
3. Locate combustion air duct inside the pedestal area on
the hearth pad so as to miss any obstruction, such as heat
ducts, plumbing, floor joists, frame or outriggers.
Note: Some pre-cast hearths require that the com bustion air
intake aperture be cut out at the time of installation. If the
hearth you have purchased does not have a pre-cut 4 1/4"
hole in it, then the proper tools would be a masonry hole-saw
or a circular saw with which to accomplish this task.
4. Cut a 4 1/4" diameter hole through the floor. Insert the
combustion air duct (with screen up, covering the top of the
hole). Fasten the duct to the floor with nails. Then go under
the home and seal around the outside of the air duct with
duct tape. This will hold the air duct in place and keep the
plastic sheeting under your home from tearing away from the
air duct.
5. Now place the hearth pad over the air intake duct hole.
Be sure the hole in the pad lines up with the air duct hole in
the floor. You are now ready to place a #8 copper grounding
wire in position by feeding it down through the air intake duct.
Lay out a sufficient length of wire across the hearth pad
(toward the rear wall), in such a manner that you have
access to the end of it, even after placing the stove on the
pad (Figure 3).
6. Set stove on hearth pad. Feed the #8 Copper grounding
wire up through one of the 2" holes in the bottom of the
stove's pedestal (Figure 3). Carefully measure once more to
make sure that both stove and pad are placed to meet proper
clearances to combustibles Using a 5/16" metal drill bit, drill
one hole on each side of the pedestal flange for the anchor
bolts to pass through (Figure 3). Mark and drill the two
anchor holes with the 1/4" Masonry drill bit. Bolt down the
stove using the two 1/4" x 3" lag bolts provided. The #8
copper wire should now be attached to the grounding lug on
the inside of the pedestal cover plate using the hex nut and
star washer provided. The loose end of this #8 copper wire
(which is hanging down through the air intake duct) must be
secured to the steel frame beneath the home using a 1/4"
self-tapping bolt and star washer.
CAUTION: Combustion air must be taken from outside of the
mobile home and must not be obstructed by any brush, snow
or any form of debris.
7. With the stove set in place, locate the center of the
chimney by using a plumb bob and cut an appropriately sized
hole (refer to approved chimney system installation
instructio ns) through the ceiling and roof. Be careful to avoid
all electrical conduit and air duct work in the attic area.
CHIMNEY INSTALLATION
This room heater must be connected to (1) a chimney
complying with the requirements for Type HT chimney in the
Standard for Chimneys, Factory-Built, Residential Type and
Building Heating Appliance, UL 103, or (2) a code-approved
masonry chimney with a flue liner. If a m asonry chimney is
used refer to NFPA 211 and (Figure 4 & 5) for proper
installation methods.
Most chimney systems a joist shield must be installed
around the chimney where it passes through the attic space
of the home. Follow chimney manufacturer's installation
instructions carefully and refer to Figure 1.
Figure 3
4
Page 5

SPECIAL NOTICE: W hen using Simpson Duravent chimney
and DVL two-wall interior chimney it is imperative to suspend
the Cathedral Support Box not less than Three inches below
the ceiling level. The Cathedral Support Box takes the place
of the joist shield for this brand of chim ney.
In all cases, be sure that the Joist Shield for Cathedral
Support Box protects the entire section of chimney which is
exposed in the attic area. The Joist Shield for Cathedral
Support Box must extend upward at least to a level even with
the roofing material, but not more than two inches above the
roof line into the roof flashing unit.
Offsets of 15 degrees and 30 degrees in the chimney system
are available from the manufacturers of several of the
approved chimney systems and may be used with your
Sierra Mobile Home approved stove if needed.
skirt and vent collar, then secure with (3) sheet metal screws.
Each connector must be secured by (3) sheet metal screws.
Follow approved chimney system installation instructions to
complete assembly of chimney through roof.
CAUTION
1. Use only an approved chimney system.
2. Do not intermix pipe systems.
3. No single-wall stove pipe may be used.
ATTENTION: Be sure to secure the cover plate with
grounding lug on the back of the pedestal so that the room
air intake aperture is covered (Figure 3).
NOTE: Before transporting a mobile home, you are required
to remove the round top and all pipe extending above the
roof flashing, so that the overall height is less than 13 feet, 6
inches. Be sure joints are secure when pipe is reassembled.
At the time the house is set up, all weather sea l plastic
should be removed from air intake vent (beneath the home)
and chimney extensions reinstalled on the roof.
INSTALLATION INSTRUCTIONS SITE-BUILT HOMES
Sierra Products, Inc. recommends that you install outside air
in all instances where feasible. The installation method
employing room air is adequate, but not optimum.
To correctly install your new Sierra Stove in a site-built home
at regular clearance, you must observe the appropriate
clearances from (Figure 1). You will not need the M obile
Home Kit for this installation.
The installatio n instru ctions for this application are essentially
the same as those in the Mobile Home/Reduced Clearance
section. The exception is that you do not need to install the
mobile hom e kit, therefore it is not necessary to cut a hole in
the floor or the hearth pad. Follow the instructions included
in your approved pipe kit for proper chimney pipe installation.
Figure 4
Figure 4
Place the first piece of chimney onto the stove. The vent
collar is designed to accept all of the approved pipe systems
in an "inside the collar" (drip-free) fit. Be sure to fully seat this
first section on the stove. Drill (3) holes through outer pipe
Figure 6
BLOWER INSTALLATION INSTRUCTIONS
A room air circulation blower P/N 11047 is available from
your local dealer. Install blower assembly per the installation
instructions included with the kit.
EF2100 STARTING INSTRUCTIONS
1. Open door and pull air control rod (located at the lower
right side of the stove) all the way out. When the air control
rod is pulled out you are adm itting maxim um com bustion air
to your stove. Conversely, when the air control rod is pushed
all the way in, you are admitting only a bare minimum of
combustion air (Figure 7).
2. Crumple several sheets of newspaper into loose balls.
Place these just inside the door opening (about six inches)
and light. Close the door and allow these papers to burn
briskly. This will preheat your chimney and help establish a
5
Page 6

Figure 7
good draft. Next, place several more balls of paper as you did
for the pre-burn. Then place kindling wood loosely on top of
the paper, add four or five wrist-sized pieces of wood to the
top of the kindling, and light. Allow the door to remain open
about 2" for several minutes to allow the kindling to begin to
burn. Close door and allow to burn briskly. Slowly add larger
pieces of cord wood to the firebox as necessary. Once a fire
is well established, the air control lever may be pushed in
slowly until the desired burn rate is achieved. Be careful to
retain a flame as this will produce clean combustion and
clean glass.
3. When using split wood do not place flat side down as the
air must be drawn around and through the pile of wood.
Allow the fire to burn briskly for 30-45 minutes per day with
the door closed and the dampers open. This permits the
stove to reach optim um operating temperatures and will
reduce the formation of creosote in the flue. As you burn your
stove you will become more familiar with your individual startup requirements.
The stove m ay be harder to start the first few times, but will
become easier as a few ashes build up in the bottom of the
firebox. This allows the air to get under the fire better.
3a. High Altitude Starting Instructions:
Follow all steps above (l through 3) however, due to the
decreased density of oxygen supplied in a given volume of air
at higher elevations it will be necessary to allow the stove to
burn for a longer period of time with the air control rod pulled
all the way out. It may also be necessary to use more kindling
material in order to get a well-established fire going. As you
use your stove you will become more familiar with your
individual start-up requirements.
4. The best efficiency, heat control, and cleanest glass door
is achieved through proper use of the draft control under the
ash lip. Once the fire has burned briskly for 10-15 minutes
you can then regulate the fire speed and intensity with the
draft control.
CAUTION: Never open you air draft control suddenly if the
fire has been smoldering for some time and no flam e is
visible. The sudden influx of air can cause ignition of wood
gases which could create a loud report.
By using this control you will not only learn to regulate the
temperature levels in your home but also be able to keep
your glass door cleaner. Less air means slower fires and less
heat, usually used when away from the home or for overnight
burning. More air means faster, hotter fires and greater heat
output, usually used when starting your stove in the morning.
The exact setting of this control depends upon many factors-chimney height, wind velocity and direction, type of wood and
moisture content and desired home temperature.
W ith practice you will soon learn to keep your home at a
comfortable temperature level. Your Sierra Stove is specially
designed to burn clean with a constant air flow.
Therefore, do not allow your stove to smoulder for long
periods of time as this will cause excessive smoke emissions
and creosote deposits in the chimney. The glass will also stay
cleaner with small, hot fires rather than slow, sm okey,
smoldering fires.
5. Refueling: Before refueling your stove, pull the air control
rod all the way out. This will adm it m aximum com bustion air
to the stove and ensure that no unburned gases rem ain in
the firebox. Next, open the door slowly and verify that ashes
do not block flow of air from the underfire air blast located
just in the middle of the hearth just in front of the door
opening. Then rake the coals level, and lay the new fuel
charge on top of these glowing coals. Close the door slowly
and allow the wood to burn briskly for a few minutes. Once a
fire is well established, the air control lever m ay be pushed in
slowly until the desired burn rate is achieved. Be careful to
retain a flame as this will produce clean combustion, clean
glass and highest efficiencies.
6. When ashes get 4 to 5 inches deep in the firebox, and
when the fire has burned down and cooled, remove excess
ashes. Leave about an inch of ash in the bottom of the
firebox to help maintain a hot charcoal bed.
OVERNIGHT BURNING
To hold a fire overnight, load the firebox with a full supply of
wood which has a minimum diameter of six inches. Wood
still in "the round" will burn longer than split wood. After
experimenting with the slide draft for a few days, you will
discover the correct setting for your home. If the fire is out in
the m orning and wood is burned up, open the slide draft a
little more the next night.
TIPS ON FUEL
Fuel Sizes: EF2100 takes 17" to 18" wood front to back. The
ideal fuel load is about 15 lbs. Producing about 11,000 to
42,900 Btu/Hr.
Fuel Preparation: W e recommend that you burn dry wellseasoned wood. If you buy green wood, season it for one
year to eighteen m onths before using. Those who ignore this
advice and try to burn green wood will have less efficient,
more polluting fires. They tend to have dirty chimneys and get
inadequate heat from their stoves, as great amounts of heat
are required to "boil-off" the extra moisture in the fuel.
With experience, you can spot the difference between green
and seasoned wood. Seasoned wood often shows cracks
radiating outward from the heart toward the bark, like spokes
in a wheel. Green wood will not show this pattern of cracks,
and is considerably heavier. When two pieces of green or
wet wood are struck together sharply, the resultant sound will
be a dull thud.
"Hard" wood (oak, maple, ash, nut trees, etc.) is better for
overnight burning than "soft" wood (fir, cedar, pine, spruce,
etc.) PLAN AHEAD: PUT IN NEXT YEAR'S WOOD NOW!
Creosote Formation and the Need For Removal
Unseasoned or wet wood contains large amounts of
moisture. W hen this wood is heated in the fire, the water is
vaporized and driven off as steam at about 212 to 300
degrees Fahrenheit. As the temperature of the wood reaches
300-600 degrees Fahrenheit the flammable liquid in the wood
fiber cells is vaporized and it too is driven off as a steamy
smoke.
If the temperature is high enough and there is a sufficient
amount of oxygen present, the steamy flammable wood
gases will ignite and burn. The burning of these gases is
what is referred to as "secondary combustion" and appears
as the rolling orange flame above the wood.
When there is an insufficient amount of either heat or oxygen
present in the stove, this wet and steamy smoke does not
ignite and burn. Instead it is drawn through the exhaust vent
and into the chimney. As this steam begins to cool down in
the flue it condenses as droplets of moisture on the inside
6
Page 7

walls of the chimney. T his becomes creosote which is
flam m able and is the fuel which burns in a flue fire. It is
necessary to periodically clean these deposits from your
stove pipe and chimney.
Creosote deposits are dangerous and are deemed a flue
fire waiting to happen!
Visually check your chimney monthly. If creosote
deposits are more than 1/4" thick, remove them.
MAINTENANCE
The following tips on maintenance will help you keep the
Sierra Stove performing in an attractive and efficient manner.
Glass: In the event that you need to clean your glass, Bon
Ami works very well. The "sweeps trick" is to dip a damp
cloth or newspaper in the cool ashes from your firebox and
clean the glass in this manner. Any creosote deposits on your
glass should burn back off with a good hot fire.
Exterior: The exterior of the cold Sierra Stove can be
cleaned with any multi-purpose household spray cleaner and
rinsed with a damp cloth. Be sure to read the instructions on
the cleaner for best results. Use Stove Bright paint when
touching up the finish on you Sierra Stove.
Interior: EF2100 is lined with refractory panels that meet
ASTM C-155 Group-20 and ASTM C-64 specifications. The
refractories have an extended life. Should any require
replacement refer to the Replacement Parts Table and
Diagram on the following page.
Gasketing: Door and glass gasketing must be kept in good
repair to ensure that uncontrolled sources of combustion air
are not admitted to the stove. Symptoms of an air leak, or
faulty gasketing include: dirty appears near the edges of the
glass window, short burn times, inability to control the speed
of the fire. If any of these symptoms are noted, consult your
nearest dealer, and replace gaskets. These gaskets are
applied using standard furnace cem ent.
Ashes: Should be cleaned as frequently as they build up to
approximately the level of the fire chamber opening. Be sure
to leave about 1/2" of ashes for your next fire.
Cleaning the Flue: It is the manufacturer's recommendation
that the flue be inspected monthly and cleaned NOT LESS
THAN ONCE A YEAR. Either call a professional chimney
sweep or you may rent or purchase the proper brushes and
equipment to do this yourself.
Gold Doors: Gold plated doors require minimum cleaning.
Should cleaning be required use a m ild cleaner on a soft
cloth. We do not recommend the use of any type of cleanser
which contains abrasive as this will permanently mar the
finish.
By following the manufacturer’s recommendations your
Sierra Stove will give you years of service.
CONSUMER PROTECTION WARRANTY
Your Sierra Stove has a Limited Five-Year Warranty. Please
read it carefully, fill out the short registration form and return
it, within 30 days of purchase, to Sierra Products, Inc., 5061
Brooks St. Ste. B Montclair, CA 91763.
Replacement Parts EF2100
Item P/N Description Qty
1 11041 EF2100PB (Pedestal Base) a/r
or 11042 EF2100HS (Hearth Stove) a/r
or 11043 EF2100FS (Leg Unit) a/r
2 300448 Ash Box (EF2100PB only) 1
or 300453 Ash Box (EF2100FS/HS only) 1
3 201857-2 Refractory Hearth LH 1
4 201857-1 Refractory Hearth RH 1
5 201855-2 Refractory Side LH 1
6 201855-1 Refractory Side RH 1
7 201856-2 Refractory Rear LH 1
8 201856-1 Refractory Rear RH 1
9 201839 Ash Dump Plug 1
10 201822 Refractory Baffle (top) 1
11 201823-1 Combustion Tube Front 1
12 201823-2 Combustion Tube Rear 2
13 201864 Comb. Tube Retainer Bkt. 3
14 11047 Blower Kit (includes blower) 1
15 110109 Blower (only) 160cfm 120vac 60hz 1
16 11069 Combustion Air Kit 1
17 110468 Door Hinge Pin
18 201863 Standard Steel Door (black)
or 11065 Gold Plated Door 1
or 11064 Satin Nickel Door 1
19 11074 Tempered Ceramic Glass w/gasket 1
20 201865 Gasket Retainer 1
21 110469 Hi Density Fiber Rope Gasket 3/4" 5 ft
22 11066 Satin Nickel Leg Kit 1
or 11067 Gold Plated Leg Kit 1
23 1069 Back Plate Kit (EF2100HS only) 1
Should you have a warranty claim on your Sierra-Sierra Stove, notify your nearest dealer, or contact
Sierra Products, Inc. at the above address.
Sierra Products, Inc.
5061 Brooks St., Ste B
Montclair, CA 91763
(909) 399-3355
7
Page 8

P/N 140969e EF2100 WOOD STOVE MANUAL r1
8
 Loading...