

Page 1

Operation and Installation Instructions
Model ZN-31U
Dual Contact Zone Module
Operation
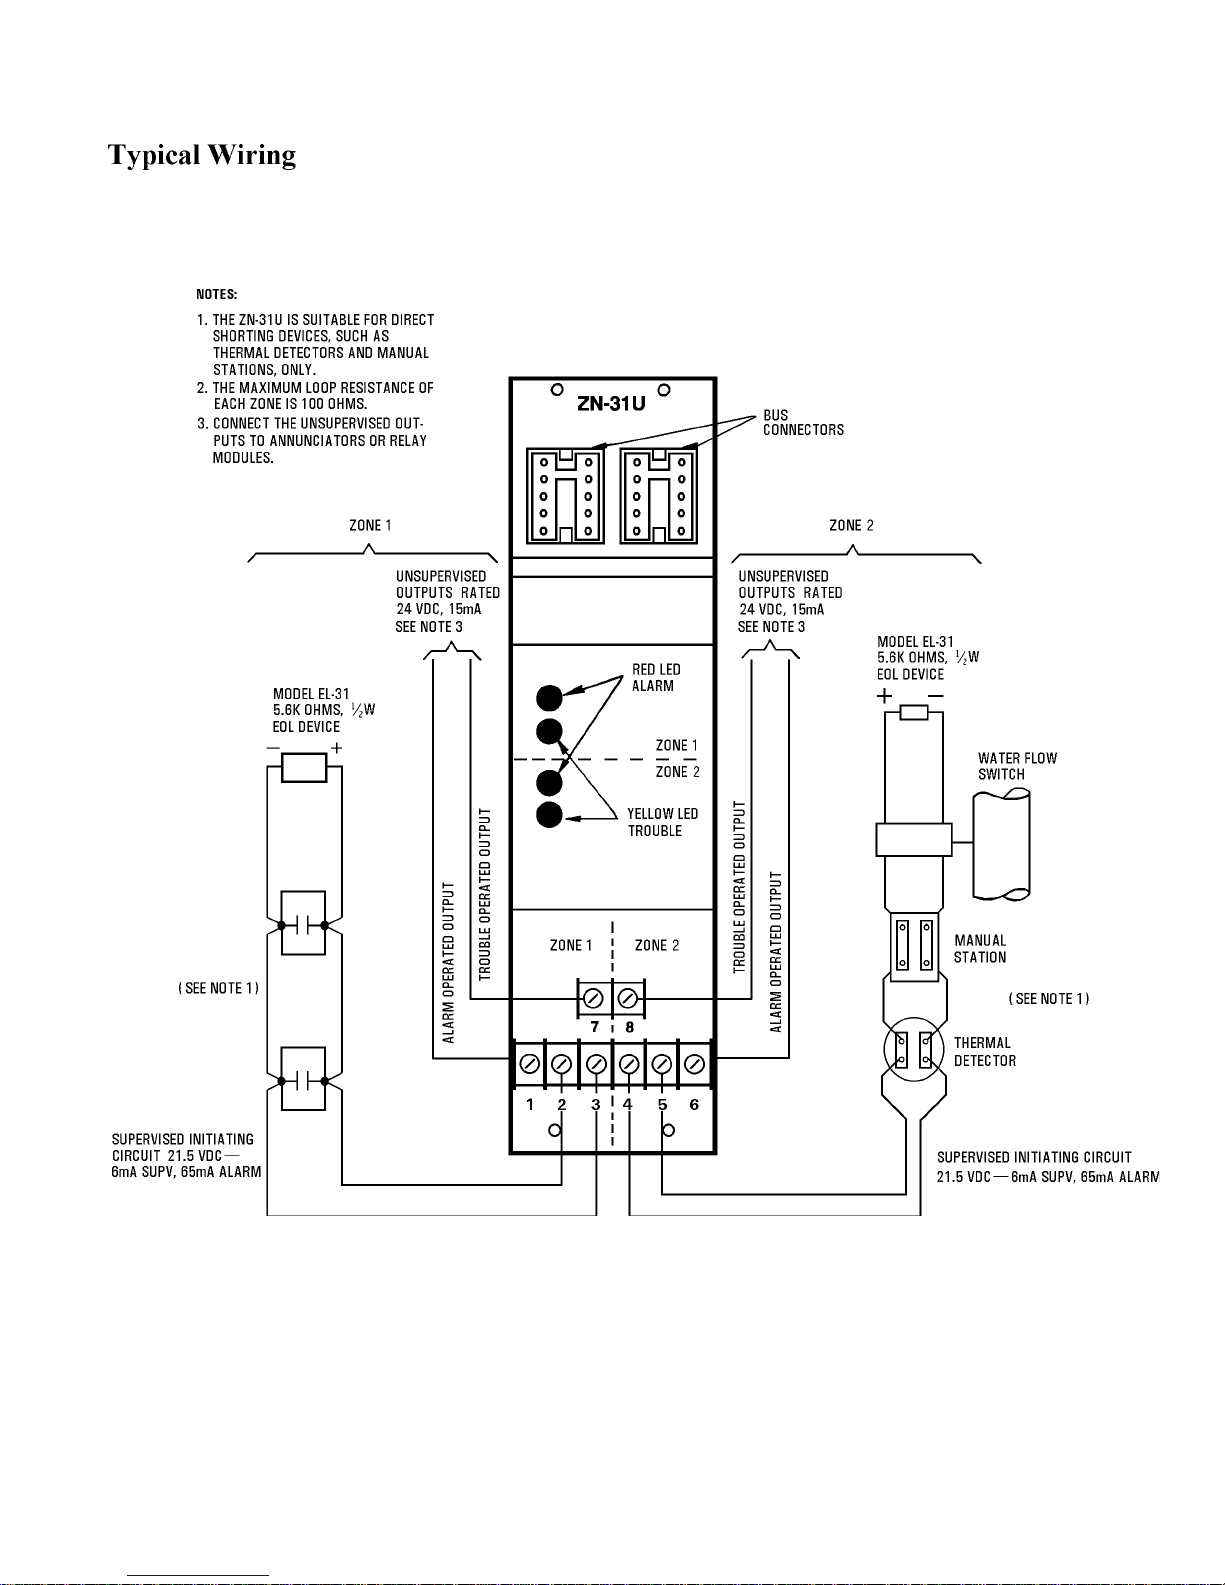
The Model ZN-31U Dual Contact Zone module is designed to provide two detector line circuits incorporating contact type devices and a similar output for
zone trouble. The contact type devices may be manual
stations, waterflow switches, thermal detectors, relay
contacts, etc.
Upon operation of any shorting type device installed in
the detection circuit, the system will lock into alarm condition, initiating the start of the sequential functions designed into the system, such as ringing alarm bells, operating coded alarm transmitters, closing doors, shutting
down fans and equipment, recalling elevators, etc. In addition to the sys-tem alarm, the red LED alarm lamp on
the face of the module for the particular zone under alarm
will be illuminated. The module also provides a currentlimited output signal for the zone under alarm for activating a supplementary alarm relay module or annunciator
module. The zone alarm indicating circuits and signaling
lamps are reset from the system control panel.
The yellow LED trouble lamps (one for each circuit) will illuminate should a break occur in the detector lines. Such
a condition will initiate a system Trouble signal. The yellow LED Trouble Indicators will be extinguished upon restoration of circult integrity or upon receipt of any system
alarm.
Note: In the event of an AC power failure and standby
battery operation, the LED Trouble Indicator is not operative.
Both red and yellow LEDs can be lamp tested from the
system control panel.
Installation
1. Mount the module to the horizontal mounting
brackets in the control enclosure.
2. Install the Model JA-5 (5 in long) bus connector cable
assembly between receptacle P2 of the module and
receptacle P1 of the module or control panel immediately preceding it in the bus.
3. Modules are to be bus-connected from right to left. For
4. If a module is the last module in the system, install either
5. Wire the circuit(s) as described in the CP-35 Control
6. If a supplementary relay module, annunciator, or other
Wiring Test
Refer to the CP-35 Control Panel Instruction Manual, Installation and Wiring.
Troubleshooting
Refer to Troubleshooting the System, in the Instruction
Manual for the Control Panel (P/N 315-085063).
1. An open or high line resistance will cause trouble.
2. Check open lines for 5.6K ohms end of line device (EL-31),
Fire Safety
Note: If the preceding module is on another row in the enclosure, a JA-24
(24 in long) bus connector cable assembly will be required.
two-row enclosures, the modules in the lower row are to
be connected from left to right. Succeeding rows are to
be alternately connected, right to left, left to right, etc.
a JS-30 (30 in long) or JS-64 (64 in long) bus connector
assembly from the unused receptacle of the last module
to terminal 41 of the CP-35 control panel. This completes
the module supervision circuit.
Panel Instruction Manual, (P/N 315-085063), Installation
and Wiring. Refer to the Wiring illustration.
Note: If a zone is not used, the EOL device should be connected to the
alarm initiating circuit terminals 2 and 3 (Zone 1) or 4 and 5 (Zone 2) of the
module.
output module is used, then the alarm outputs, terminals
1 (Zone 1) and 6 (Zone 2), should be connected to these
units.
approximately 6mA supervisory current.
Siemens Building Technologies, Inc.
8 Fernwood Road
Florham Park, New Jersey 07932
P/N 315-086275-3
Siemens Building Technologies, Ltd.
2 Kenview Boulevard
Brampton, Ontario L6T 5E4 CN
Page 2
P/N 315-086275-3
 Loading...