

Siemens WM12P160GB, WM14P160GB, WM14P36SGB, WM14S496GB, WM14S797GB Installation Instructions Manual
...
1
Safety instructions
The washing machine is heavy - take care when lifting.
Caution: frozen hoses can crack/burst. Do not install the washing mach ine outdoors or
in areas exposed to frost.
The washing machine could be damaged. Do not lift the appliance by pr otruding
components (e.g. the washing machine door).
In addition to the instructions provided in this document, special regula tions from the
relevant water and electric utility companies may apply.
If in doubt, have a technician connect the appliance.
Route hoses and cables in such a way that there is no risk of tripping.
Environmentally-friendly disposal
Dispose of packaging in an environmentally friendly man ner.
This appliance is labelled in accordance with European Directive 2002/96/EC on
Waste Electrical and Electronic Equipment - WEEE.
The directive provides an EU-wide framework for the return and recy cling of used
appliances.
Installation surface
The machine must be stable so that it does not move ar ound.
The surface on which it is installed must be firm and lev el.
Soft floors/floor coverings are not suitable.
Installation on a pedesta l
The feet of the washing machine must be secured with holding br ackets *.
* Order no. WMZ 2200, WX 9756, CZ 110600, Z 7080X0
Installation on a wood j oist floor
If possible, place the washing machine in a corner.
Screw a water-resistant wooden board (min. 30 mm thick) to the floor .
The feet of the washing machine must be secured with holding br ackets *.
* See above for order no.
Installing the appliance depending on model
Install the appliance before connecting it to the power supply.
Risk of electric shock.
For models with a continuous appliance covering plate or a square service flap, the
appliance covering plate can be replaced by a metal cover.
Instead of the appliance covering plate, you musthave a metal cover * fitted by an expert.
* Order no. WMZ 2043, WZ 20430
For models with a non-continuous appl iance covering plate or a round service flap, the
appliance covering plate must not be removed.
Only install the washing machine underneath a continuous worktop that is securely
connected to adjacent cabinets.
Recess width of 60 cm required.
2
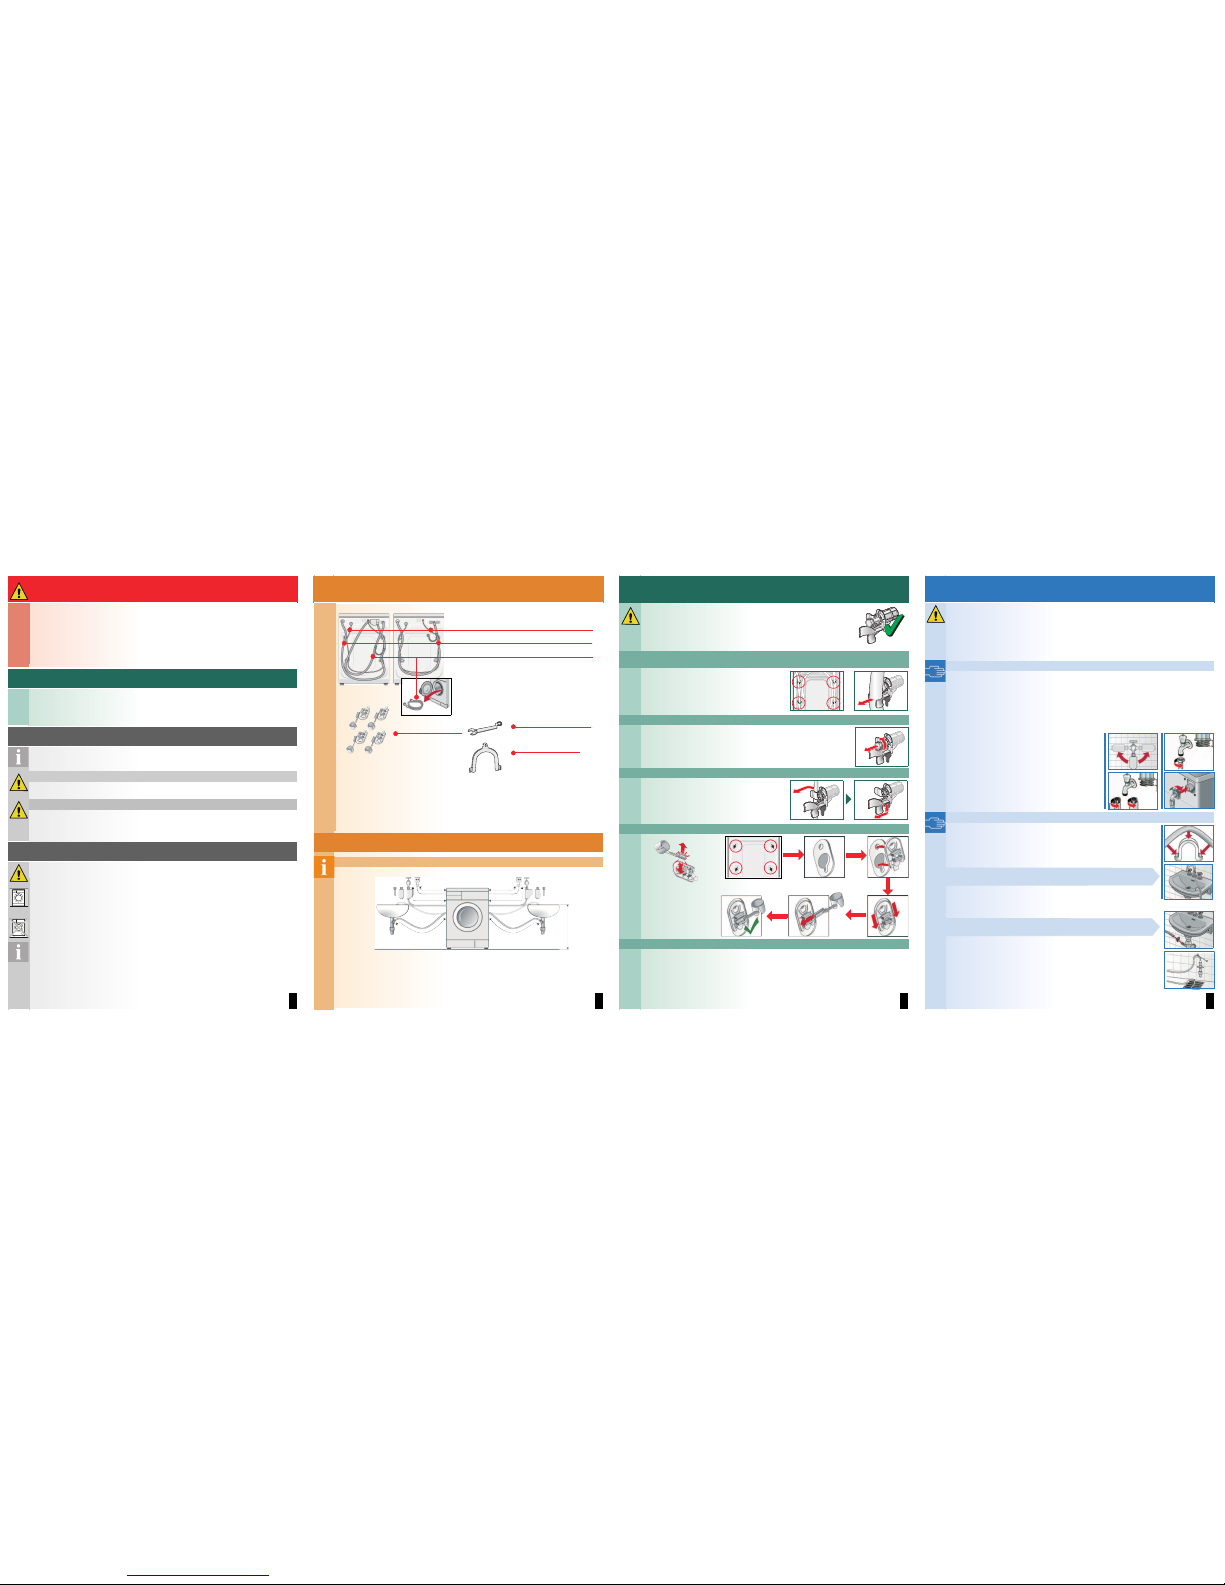
Scope of delivery dependin g on model
Also required, dependi ng on the connection:
1 hose clamp Ø 24-40 mm (specialist retailers) to co nnect to a siphon
a Page 4; water connection
Useful tools
Spirit level for levelling.
Spanner with
WAF13: for loosening the transport safety devices a Pag e 3 and
WAF17: for aligning the appliance feet a Page 5.
Hose and cable lengths depending on model
Left-hand connection
or
Right-hand connection
Note: Using hose clips limits the possible hose lengths.
Available from specialist retailers/the after-sales service:
Extension for AquaäStop and cold water inlet hose (app rox. 2.50 m).
Order no. WMZ2380, WZ10130, CZ11350, Z7070X0
Longer inlet hose (approx. 2.20 m) for standard model.
Spanner
Mains cable
Water inlet
Elbow
for fixing the drainage
hose in place
Covers
with hose clip
AquaäStop AquaäSecure/Standard
Water outlet
~
140 cm
~
95 cm
~
120 cm
~
130 cm
~
100 cm
~
135 cm
0 - max. 100 cm
Moisture inside the drum is
due to final testing.
3
Removing the transport safety devices
Before using the appliance for the first time, the 4 transport saf ety
devices must be completely removed and kept safe.
If you need to transport the appliance at a later date, always refit the
transport safety devices to prevent damage to the machine.
a Page 6.
Store the screw and sleeve screwed together.
1. Take the hoses (depen ding on model) out of the holders and the elbow.
Remove the elbow.
2. Unscrew and remove th e bolts from all 4 transport safety devices.
3. Take the mains cabl e out of the holder. Remove the sleeves.
4. Insert the covers. Secure tightly by pressing on the snap-in hook. Insert the hose clip.
5. Secure the hoses in the hose clips.
4
Water connection depe nding on model
Risk of electric shock. Do not immerse the Aqua-Stop safety device in water
(contains an electric valve).
To prevent leaks or water damage, observe the instructions in this se ction.
Caution: only operate the washing machine using cold drinking w ater.
Do not connect to the mixer tap of an unpressurised hot-water boiler .
Do not use a used inlet hose. Only use the inlet hose supplied or one wh ich was
purchased from an authorised specialist retailer.
If in doubt, have a technician connect the appliance.
Water inlet
Water inlet hose:
Caution: do not kink, squash, modify or cut through
(otherwise its strength is no longer guaranteed).
Optimum water pressure in the supply network: 100-1000 kPa (1- 10 bar)
When the tap is on, the water flow is at least 8 l/ min.
If the water pressure is higher than this, a pressure redu cing valve must be installed.
Model: AquaäStop
AquaäSecure
Standard
1. Connect the water inle t hose to the tap.
Caution: only tighten the screw connections by
hand.
2. Open the water tap carefully, checking the leak
tightness of the connection points.
Caution: the screw connection is under mains
water pressure.
Water outlet
Water outlet hose:
Caution: do not kink or pull lengthways.
Height difference between the installation surface and the drain:
0 - max. 100 cm
Outlet into a sink
Caution: secure the drain hose so that it cannot slip out.
Caution: the plug must not block drainage from the sink. During pumping,
check whether the water is draining away quickly enough. The end of the
drain hose must not be immersed in the water that is pumped out! Thi s
would result in the risk of water being sucked back into the washing
machine!
Drainage into a siphon:
Caution: the connection point must be secured with a hose clamp,
Ø 24-40 mm (specialist retailers).
.
Outlet into a plastic pipe with rubber bushing or into a drainage p it:
Caution: secure the drain hose so that it cannot slip out.
max.
90°
max.
90°
min.
10 mm
min.
10 mm
3/4
3/4
5
Manufacturer a Instruction manual
0811 / 9000460857
*460857*
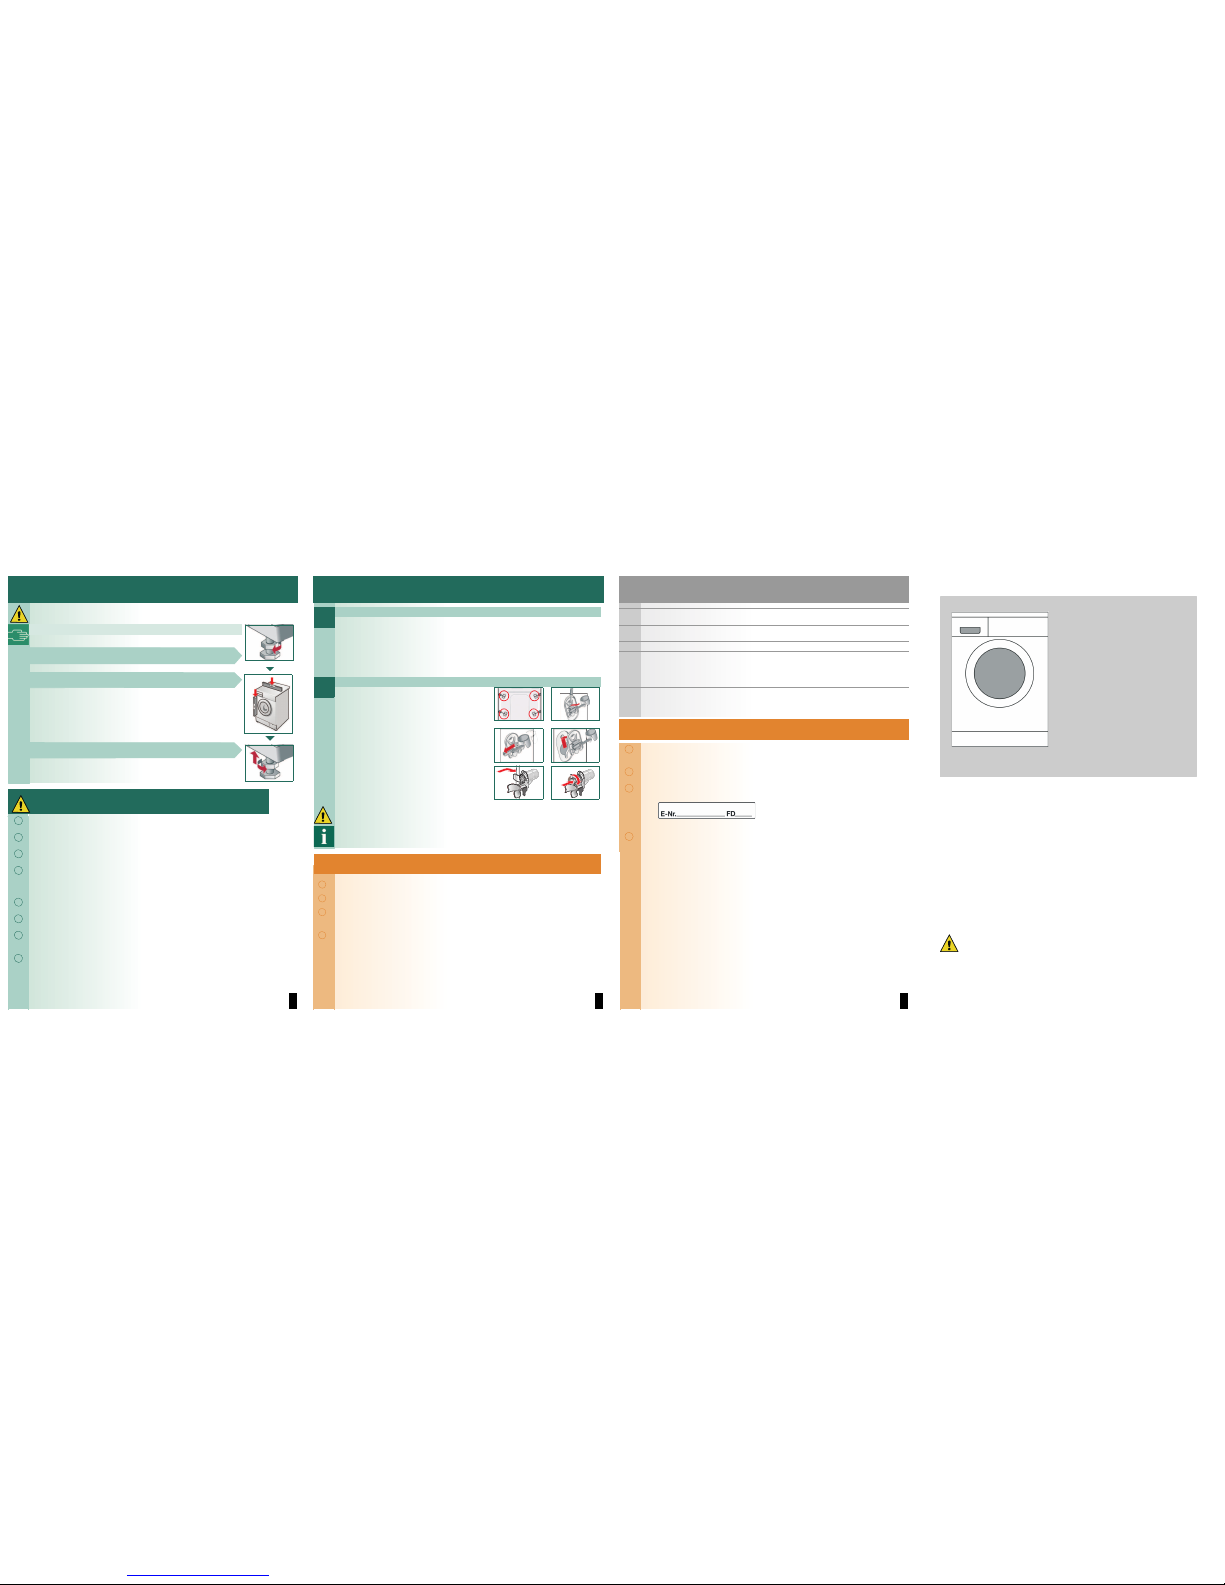
Levelling
Intense noise, vibrations and wandering may be the result of in correct levelling.
Levelling the washing mac hine with a spirit level
1. Loosen the lock nut usin g a spanner, by turning it in a clockwise
direction.
2. Change the height by turning the appliance feet.
Caution: all four appliance feet must be firmly on the ground.
The washing machine must not wobble.
Check the levelness of the washing machine with a spirit level and adjust
if necessary.
3. Tighten the lock nut aga inst the housing.
In doing so, hold the foot tight and do not adjust its height.
Caution: the lock nuts on all four appliance feet must be screwed tightly
against the housing.
Electrical connection
ʑ
The washing machine must only be connected to an alternating c urrent via a
properly installed earthed socket.
ʑ
The power supply and voltage indicated on the washing machine ( rating plate)
must be the same.
ʑ
The connected load and fuse required are specified on the rating pl ate.
ʑ
Make sure that:
the mains plug fits the socket,
the cable cross-section is adequate,
the earthing system is properly installed.
ʑ
The mains cable may only be replaced by a qualified electrician (if required).
Replacement mains cables are available from customer services.
ʑ
Do not use multiple plugs/couplings or extension cables.
ʑ
If a residual current circuit breaker is used, only use a type which displays this
symbol: .
Only this symbol guarantees compliance with the currently applica ble regulations.
ʑ
Mains plug:
do not plug in to/pull out of the socket with damp hands.
when removing the plug from the socket, pull the plu g body only, not the cable.
never pull the plug out during operation.
6
Transportation, e.g. w hen moving house
Before transporting the washing machine:
1. Turn off the tap.
2. Drain residual deterge nt solution a Instruction manual; Maintenance - drain pump.
3. Reduce the water pr essure in the inlet hose a Instruction manual; Maintenance - filter in
water inlet.
4. Disconnect the washin g machine from the power supply.
5. Disconnect the hoses.
Install the transport safe ty devices:
1. Remove the covers.
2. Insert all 4 sleeves.
Clamp the mains cable to the holders. Insert and
tighten the screws.
After transportation, the transport safety devices must be re moved. a Page 3.
To prevent unused detergent from flowing straight into the drain during the next wash:
Pour 1 litre of water into compartment II and start the Empty pro gramme.
Technical specifications
ʑ
Dimensions (width x depth x height) 60 x 59 x 85 cm
ʑ
Weight 63 - 83 kg depending on model
ʑ
Mains connection Nominal voltage 220-240 V, 50 Hz
Nominal current 10 A
Nominal power 2,300 W
ʑ
Water pressure 100-1000 kPa (1-10 bar)
1.
2.
7
Aqua-Stop warranty Only for appliances with Aqua-Stop
In addition to warranty claims against the vendor from the p urchase agreement and in
addition to our appliance warranty, we will pay damages un der the following conditions:
1. If a fault in our Aqua-Stop system causes water damage, we will reimburse damages caused
to private customers.
2. The liability warranty is valid for the service life of the appliance.
3. A warranty claim is only valid on condition that the appliance fitted with AquaäStop has been
correctly installed and connected according to our instructio ns. This condition includes the
correct fitting of an AquaäStop extension (genuine accessory).
Our warranty goes not cover defective power cables or fitting s between the Aqua-Stop
connection and the tap.
4. Appliances with Aqua- Stop do not need to be supervised during operation, nor secured
afterwards by turning off the tap.
The tap only needs to be turned off if you are away from hom e for a long period, e.g. for
several weeks' holiday.
After-sales service
ʑ
If you cannot rectify a fault yourself a Instruction manual: What do to if ..., Page 12/13,
please contact our after-sales service. We can always find a suitable remedy, so that a
technician is not called out unnecessarily.
ʑ
The contact details for your nearest after-sales service can be found here or in the After-sales
service directory (depending on the model).
ʑ
Please give the after-sales service the product number (E-Nr.) and the p roduction number
(FD) of the appliance.
Product number Production number
This information can be found:
inside the washing machine door* / on the open
service flap* and on the back of the appliance.
*depending on model
ʑ
You can rely on the competence of the manufacturer. Please conta ct us.
This way, you can ensure the repair is carried out by trained servi ce technicians who are
equipped with genuine spare parts.
Washing machine
Contents Page
ʋ Safety instructions. . . . . . . . . . . . . . . . . . . . . . 1
ʋ Environ mentally-friendly disposal . . . . . . . . . . 1
ʋ Installa tion surface. . . . . . . . . . . . . . . . . . . . . . 1
ʋ Installi ng the appliance . . . . . . . . . . . . . . . . . . 1
ʋ Scope of delivery. . . . . . . . . . . . . . . . . . . . . . . 2
ʋ Hose and cable lengths . . . . . . . . . . . . . . . . . 2
ʋ Rem oving the transport safety devices . . . . . . 3
ʋ Water connection . . . . . . . . . . . . . . . . . . . . . . 4
ʋ Levell ing . . . . . . . . . . . . . . . . . . . . . . . . . . . . . 5
ʋ Electric al connection. . . . . . . . . . . . . . . . . . . . 5
ʋ Transp ortation, e.g. when moving house. . . . . 6
ʋ Techni cal specifications. . . . . . . . . . . . . . . . . . 6
ʋ Aqua-S top warranty. . . . . . . . . . . . . . . . . . . . . 7
Installation
instructions
Do not operate the washing machine until you have read thes e instructions.
Please also observe the separate instruction manual.
Keep all the documents in a safe place for future reference, o r
to pass on to the next owner.
en
 Loading...