

Page 1

Page 2

Page 3
Page 4

Page 5

Page 6

en
Table of contents
Safety ...............................................8
General information ...........................8
Intended use......................................8
Restriction on user group...................8
Safety information ..............................9
Environmental protection and
saving energy .................................12
Disposing of packaging ...................12
Tips for saving energy......................12
Installation and connection ............12
Scope of supply...............................12
Installing and connecting the ap-
pliance.............................................12
Familiarising yourself with your
appliance ........................................13
Appliance ........................................13
Controls...........................................13
Display ............................................13
Drinks overview..............................14
Accessories....................................15
Before using for the first time.........15
Perform the initial start-up ................15
Fill the water tank.............................15
Fill coffee bean container.................15
Setting the language........................16
Setting the water hardness...............16
General information .........................16
Basic operation ..............................17
Switching the appliance on and
off....................................................17
Dispensing drinks ............................17
Dispensing a coffee drink made
from fresh beans .............................18
Dispensing a coffee drink made
from ground coffee ..........................18
Dispensing drinks with milk..............18
Using the milk container ..................19
Dispensing coffee drink with milk.....19
Dispensing special drinks ................20
Dispensing milk froth .......................20
Dispensing hot water .......................20
Drink settings...................................20
Water filter .......................................22
Childproof lock...............................22
Activating the childproof lock ...........23
Deactivating the childproof lock .......23
Cup heater1.....................................23
Basic settings.................................23
Overview of the basic settings .........23
Changing the basic settings.............24
Cleaning and servicing...................24
Dishwasher-safe components ..........24
Cleaning agent ................................25
Cleaning the appliance ....................25
Cleaning the drip tray and coffee
dregs container ...............................26
Cleaning the ground coffee com-
partment ..........................................26
Cleaning the milk system .................26
Cleaning the milk container..............27
Cleaning brewing unit ......................28
Service programmes........................28
Troubleshooting .............................32
Information on display panel ............32
Malfunctions ....................................34
Problem with results ........................35
Transportation, storage and dis-
posal...............................................38
Activate frost protection ...................38
Disposing of old appliance ..............38
1
Depending on the appliance specifications
6
Page 7

Customer Service ...........................38
Product number (E-Nr.) and pro-
duction number (FD)........................39
Warranty conditions .........................39
Technical specifications.................39
en
7
Page 8

en Safety
Safety
Please read the safety information to ensure that you use the appliance safely.
General information
You can find general information about this instruction manual
here.
¡ Read this instruction manual carefully. Only this will ensure you
use the appliance safely and efficiently.
¡ This manual is intended for the user of the appliance.
¡ Follow the safety instructions and warnings.
¡ Keep the instruction manual and the product information safe
for future reference or for the next owner.
¡ Check the appliance after unpacking it. Do not connect the ap-
pliance if it has been damaged in transit.
Intended use
Please read the information on intended use to ensure you use
the appliance correctly and safely.
Only use this appliance:
¡ As specified in this instruction manual.
¡ for preparing hot drinks.
¡ In private households and in enclosed spaces in a domestic en-
vironment.
¡ Up to an altitude of max. 2000m above sea level.
Disconnect the appliance from the power supply when:
¡ cleaning the appliance.
Restriction on user group
Avoid risks to children and vulnerable persons.
8
Page 9

Page 10

Page 11

Page 12

Page 13

Familiarising yourself with your appliance en
1
2
3
4
5
6
7
8
9
10
11
12
13
14
15
16
2. Place the appliance on a level, wa-
ter-resistant surface that is capable
of bearing its weight.
3. Using the mains plug, connect the
appliance to an earthed socket that
has been correctly installed.
Familiarising yourself
with your appliance
Familiarise yourself with the parts of
your appliance.
Appliance
You can find an overview of the parts
of your appliance here.
Note:Individual details and colours
may differ, depending on the appliance
model.
2
→Fig.
Water tank
Cover for water tank
Cup heater
Aroma lid
Bean container
Ground coffee compartment
1
Brewing chamber door
Rating plate
Drip tray
Milk container
1
Depending on the appliance specifications
Controls
Here you can find an overview of the
symbols on your appliance. Press the
symbols to make a selection, start the
dispensing process or make/adjust a
setting.
Symbol Explanation
Switch appliance on/off
Open menu/leave menu
Note:The menu buttons are only
visible when the menu is open.
Navigate upwards in the menu
Navigate downwards in the menu
Confirm/save in the menu
Go back in the menu
Dispense two cups
Select coffee strength
Adjusting the amount
Start/stop
Display
Control panel
Cup lighting
Cover
Milk system
Outlet system
1
Depending on the appliance specifications
1
Display
The display shows the selected drinks,
settings and setting options, as well as
messages about the appliance’s operating status.
The display shows additional information and action steps. The information
is hidden after a short period, or by
pressing a button. The action steps are
hidden when they have been completed.
13
Page 14

Page 15

Page 16

en Before using for the first time
1. Open the lid.
2. Fill with the coffee beans.
The appliance will adjust to the coffee beans with the next dispensing
process.
3. Close the lid.
Tip:To keep the coffee beans at their
best, store them in a sealed container
in a cool place.
You can keep the coffee beans in the
bean container for a number of days
without them losing their aroma.
Setting the language
1. Press to switch the appliance on.
a The display will show the language
that is preset.
2. Press or until the display
shows the desired language.
3. Press .
Tip:You can change the language at
any time.
→"Overview of the basic settings",
Page23
Setting the water hardness
It is important to set the water hardness
correctly, so that the appliance indicates in good time that it needs descaling. You can use the enclosed test strip
to determine the water hardness, or
ask your local water company.
1. Briefly dip the test strip in fresh tap
water.
2. Allow the water to drip off the test
strip.
a The test strip will indicate the water
hardness after 1minute.
3. If a water softening system is in-
stalled in your house, select "Softening system".
4. Press or until the display
shows the desired water hardness.
The table shows the allocation of the
levels to the different degrees of water hardness:
Level German de-
grees in °dH
Total hardness in
(mmol/l)
1 1-7 0.18 - 1.25
2 8-14 1.42 - 2.49
3 15-21 2.67 - 3.74
1
4
1
Factory setting (may vary according to
22-30 3.92 - 5.34
model)
5. Press .
6. Check whether the bean container
has been filled.
7. Press .
a The appliance now rinses itself.
a When the symbols for drink selection
and the buttons light up on the operating panel, the appliance is ready
for use.
Tip:You can change the water hardness at any time.
→"Overview of the basic settings",
Page23
General information
Please bear this information in mind so
that you can get the best out of your
appliance.
Notes
¡ The appliance has been pro-
grammed at the factory with standard settings for optimum operation.
¡ The grinder has been factory-set for
optimum operation. If coffee is only
dispensed drop by drop or is too
thin with too little crema, you can adjust the grinding level when the
grinder is running.
→"Adjusting the grinding level",
Page21
16
Page 17

Page 18

Page 19

Page 20

Page 21

Page 22

en Childproof lock
Grinding level Setting
Fine grinding level
for dark-roasted
Turn rotary selector
counter-clockwise.
beans.
Coarse grinding
level for light-roas-
Turn rotary selector
clockwise.
ted beans.
The setting only has an effect after
the second cup of coffee.
Tip:If the coffee is only dispensed
drop by drop, set a coarser grinding
level.
If the coffee is too thin with too little
crema, set a finer grinding level.
Water filter
You can use a water filter to minimize
limescale deposits and reduce impurities in the water.
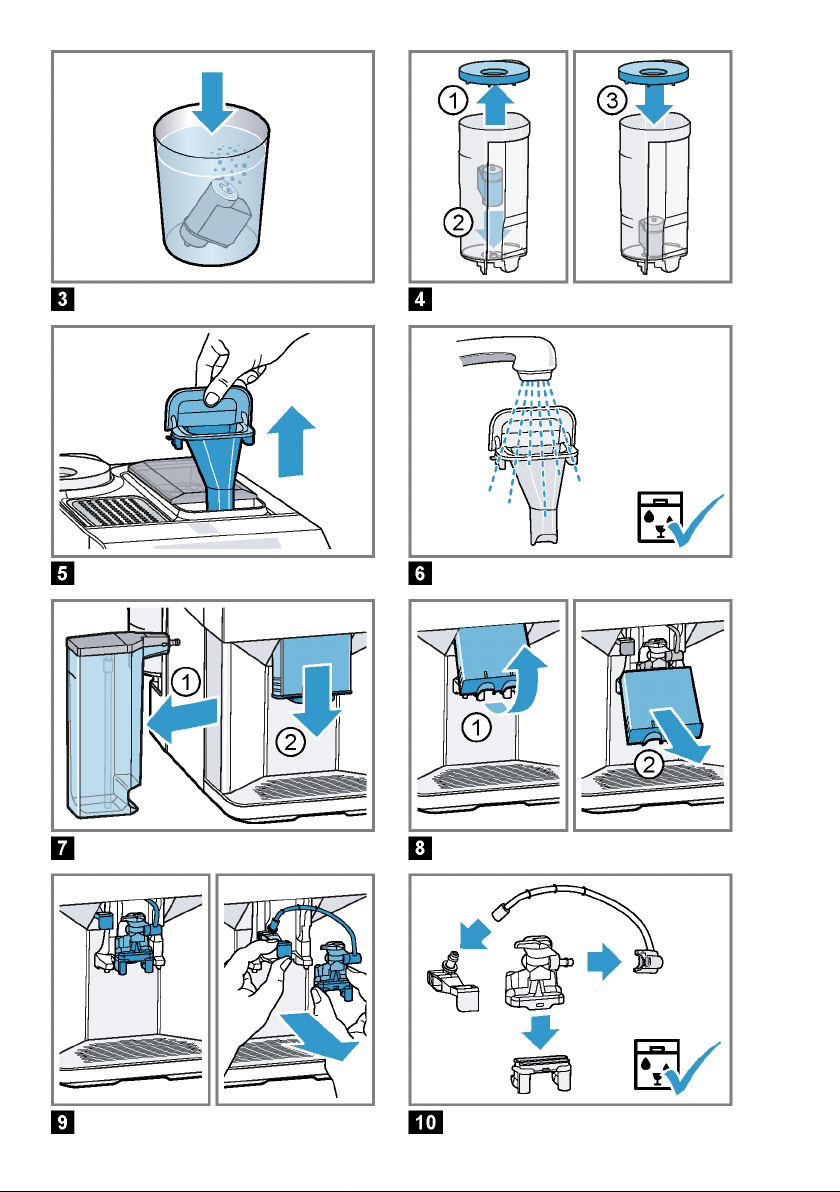
Insert water filter
ATTENTION!
Possible damage to the appliance due
to limescale build-up.
▶
Change the water filter in good time.
▶
Change the water filter after
2months at the latest.
Note:If "Replace water filter" is shown
on the display, replace the water filter.
If you are not inserting a new filter, select "No filter" and follow the instructions on the display.
1. Immerse the water filter in a glass of
water until the air escapes.
3
→Fig.
2. Press .
3. Press or "Water filter" and .
4. Use or to select "New filter"
or "Replace water filter" and press
.
5. Note:If you are not inserting a new
filter, select "No filter" in the menu
settings.
Push the water filter firmly into the
water tank and press .
4
→Fig.
6. Fill the water tank up to the "max"
mark and press .
7. Remove the milk container on the
left of the appliance.
8. Place a container with a capacity of
1litre under the outlet system and
press .
a The filter will be rinsed and the fol-
lowing message displayed: "Rinsing
complete.".
a The appliance is ready to use.
Tips
¡ You should also change your water
filter for reasons of hygiene.
¡ With a water filter you need to de-
scale your appliance less frequently.
¡ If your appliance has not been used
for a long period, for example if you
were on holiday, you should rinse
the water filter before use by dispensing a cup of hot water.
¡ The water filter can be purchased
from retailers or Customer Service.
→"Accessories", Page15
¡ Learn how to insert the water filter.
→"Insert water filter", Page22
Childproof lock
You can lock the appliance, to protect
children against scalding and burns.
22
Page 23

Page 24

en Cleaning and servicing
Setting Selection Description
Coffee temp. normal
high
max.
Set the temperature for coffee
drinks.
Note:The setting is effective for
all preparation types.
Languages See options on the appliance. Set menu language.
Changes are immediately displayed.
Autom. switch-off See options on the appliance. Set how long the appliance
should wait after preparing the
last drink before automatically
switching itself off.
Water hardness 1 (soft)
2 (medium)
3 (hard)
4 (very hard)
2
Set the appliance to the local water hardness.
→"Setting the water hardness",
Page16
Water-softening system
Key tones Key tones on
2
Switch the button tones on or off.
Key tones off
Factory settings Full reset?
Continue: OK
Cancel: ←
Restore settings to the factory
settings.
Note:All individual settings will
be deleted and reset to the factory settings.
1
Depending on the appliance specifications
2
Factory setting (may vary according to model)
Changing the basic settings
1. Press .
2. Use or to select the desired
basic setting and press .
a The display will show the setting op-
tions and the navigation symbols will
light up. The display indicates the
current setting.
3. Use or to make the desired
selection and press .
a The setting is now saved.
4. Use to go back.
5. Press to exit the menu.
24
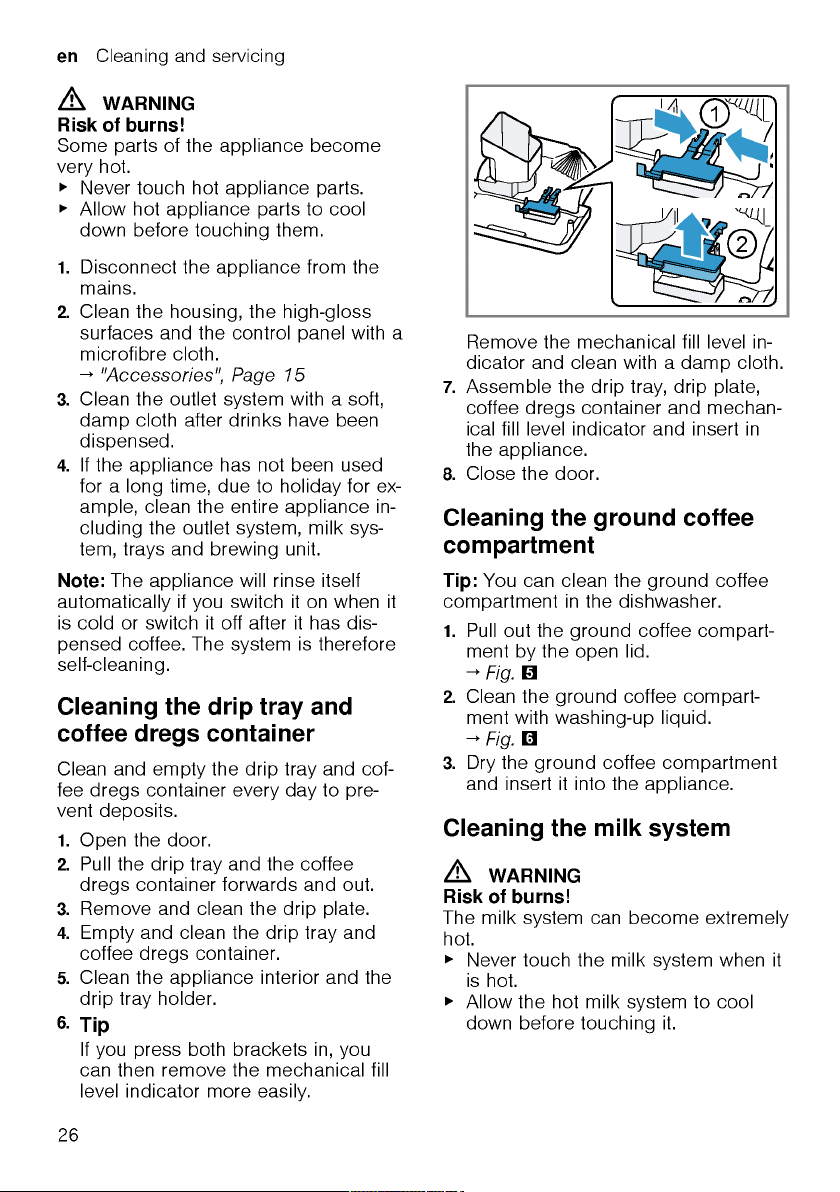
Cleaning and servicing
To keep your appliance working efficiently for a long time, it is important to
clean and maintain it carefully.
Dishwasher-safe components
Find out which components can be
cleaned in the dishwasher.
ATTENTION!
Some components are sensitive to heat
and may be damaged if they are
cleaned in a dishwasher.
▶
Follow the operating instructions of
the dishwasher.
Page 25

Page 26
Page 27

Page 28

Page 29

Cleaning and servicing en
¡ If your appliance is not descaled in
good time, the display will show the
following message: "Descaling overdue. Appliance is locked. Please
press menu for 3 sec.".
¡ If your appliance has been locked,
you can only operate it again once
the descaling process has been carried out.
¡ If you accidentally interrupt the ser-
vice programme, you must reset it.
→"Resetting service programmes",
Page29
Tips
¡ If you use a water filter, this prolongs
the time interval until a service programmes needs to be performed.
¡ You can combine the cleaning and
descaling programmes using the
calc'nClean service programme.
→"Using calc'nClean", Page30
¡ Clean your appliance with a soft,
damp cloth immediately after a service programme to remove any descaling solution residues and prevent corrosion.
Resetting service programmes
Perform the following steps if a service
programme is interrupted, e.g. due to a
power failure.
1. Rinse out the water tank.
2. Fill the water tank with fresh, non-
carbonated water up to the "max"
marking.
3. Press .
a The appliance will rinse itself for ap-
prox.2minutes.
4. Empty and clean the drip tray.
5. Insert the drip tray and close the
door.
6. Restart the service programme.
Using the milk system cleaning
programme
Rinse the milk system with water, if necessary. The rinsing process takes approx. 1minute.
1. Press .
2. Use and to select "Cleaning
and care" and press .
3. Use and to select "Milk sys-
tem" and press .
4. To start the programme, press .
a The display will guide you through
theprogramme.
5. Remove and empty the milk con-
tainer.
6. Clean the milk container, milk tube
and suction pipe.
7. Fit the components and insert the
milk container.
8. Place an empty glass under the out-
let system and press .
The milk system will now clean itself
automatically.
a The program has ended and the ap-
pliance is ready for operation.
Tip:If you want to clean the milk system particularly thoroughly, clean it regularly by hand.
→"Cleaning the milk system", Page26
Using the descaling programme
Run the descaling programme when
your appliance prompts you. The process takes approx.30minutes.
Requirement:The brewing unit is
cleaned.
→"Cleaning brewing unit", Page28
1. Press .
2. Use and to select "Cleaning
and care" and press .
3. Use and to select "Descale"
and press .
29
Page 30

en Cleaning and servicing
4. To start the programme, press .
a The display will guide you through
theprogramme.
5. Empty and insert the drip tray.
6. Remove and empty the milk con-
tainer.
7. Clean the milk container, milk tube
and suction pipe.
8. Fit the components and insert the
milk container.
9. If there is a water filter, remove it.
10.Press .
11.Empty the water tank.
12.Fill a container with 0.5l lukewarm
water.
13.Add a Siemens descaling tablet to
the water and stir until the tablet is
fully dissolved.
14.Pour the descaling solution into the
water tank up to the calc mark and
press .
15.Place the empty container under the
outlet system and press .
a The descaling programme will run
for approx.20minutes.
16.Rinse the water tank.
17.Press .
18.If there is a water filter, insert the wa-
ter filter.
→"Insert water filter", Page22
19.Press .
20.Fill the tank with fresh water up to
the "max" mark.
21.Press .
a The descaling programme takes ap-
prox.1minute and rinses the appliance.
22.Empty and insert the drip tray.
23.Remove and empty the milk con-
tainer.
24.Clean the milk container, milk tube
and suction pipe.
25.Fit the components and insert the
milk container.
a The program has ended and the ap-
pliance is ready for operation.
Using the cleaning programme
Run the cleaning programme when
your appliance prompts you. The process takes approx.9minutes.
Requirement:The brewing unit is
cleaned.
→"Cleaning brewing unit", Page28
1. Press .
2. Use and to select "Cleaning
and care" and press .
3. Use and to select "Clean"
and press .
4. To start the programme, press .
a The display will guide you through
theprogramme.
5. Empty and insert the drip tray.
6. Open the ground coffee compart-
ment.
7. Place one Siemens cleaning tablet
into the ground coffee compartment.
8. Close the ground coffee compart-
ment and press .
9. Place a container with a capacity of
min. 0.5l under the outlet system
and press .
a The cleaning programme takes ap-
prox. 7minutes.
10.Empty and insert the drip tray.
a The program has ended and the ap-
pliance is ready for operation.
Using calc'nClean
You can combine the cleaning and descaling programmes using the
calc'nClean service programme. Run
the calc'nClean programme when your
appliance prompts you. The process
takes approx.43minutes.
Requirement:The brewing unit is
cleaned.
→"Cleaning brewing unit", Page28
30
Page 31

Cleaning and servicing en
1. Press .
2. Use and to select "Cleaning
and care" and press .
3. Use and to select
"calc'nClean" and press .
4. To start the programme, press .
a The display will guide you through
theprogramme.
5. Empty and insert the drip tray.
6. Remove and empty the milk con-
tainer.
7. Clean the milk container, milk tube
and suction pipe.
8. Fit the components and insert the
milk container.
9. If there is a water filter, remove it.
10.Press .
11.Empty the water tank.
12.Fill a container with 0.5l lukewarm
water.
13.Add a Siemens descaling tablet to
the water and stir until the tablet is
fully dissolved.
14.Pour the descaling solution into the
water tank up to the calc mark and
press .
15.Place the empty container under the
outlet system and press .
a The descaling programme will run
for approx.20minutes.
16.Rinse the water tank.
17.Press .
18.If there is a water filter, insert the wa-
ter filter.
→"Insert water filter", Page22
19.Press .
20.Fill the tank with fresh water up to
the "max" mark.
21.Press .
a The programme takes ap-
prox.1minute and rinses the appliance.
22.Empty and insert the drip tray.
23.Open the ground coffee compart-
ment.
24.Place one Siemens cleaning tablet
into the ground coffee compartment.
25.Close the ground coffee compart-
ment and press .
26.Place a container with a capacity of
min. 0.5l under the outlet system
and press .
a The cleaning programme takes ap-
prox. 7minutes.
27.Empty and insert the drip tray.
28.Remove and empty the milk con-
tainer.
29.Clean the milk container, milk tube
and suction pipe.
30.Fit the components and insert the
milk container.
a The program has ended and the ap-
pliance is ready for operation.
31
Page 32

Page 33

Errors Cause Troubleshooting
Display shows "Please refill
water tank" despite the fact
that the water tank is full.
Limescale deposits in the water tank are blocking the system.
1. Clean the water tank thoroughly.
2. Start the descaling programme.
→"Using the descaling programme",
Page29
Display shows "Fill the bean
container with coffee beans."
despite the fact that the ban
container is full.
The grinder is not grinding
any coffee beans despite full
Beans are too oily and are not
falling into thegrinder.
▶
Gently tap the bean container.
▶
Change the coffee variety.
Do not use oily beans.
▶
Clean the empty bean container with
a damp cloth.
bean container.
Display shows "Please clean
brewing unit, replace and
close door.".
Brewing unit is soiled.
Mechanism of brewing unit is
stiff.
Too much ground coffee in
the brewing unit.
▶
Clean the brewing unit.
→"Cleaning brewing unit", Page28
▶
Clean the brewing unit.
→"Cleaning brewing unit", Page28
▶
Use no more than 2 level measuring
spoons of ground coffee.
→"Cleaning brewing unit", Page28
Display shows "Voltage (V) incorrect.".
Display shows "Please restart
appliance.".
Voltage in the house system is
incorrect.
Brewing unit is heavily soiled
or cannot be removed.
▶
Only operate the appliance at 220240V.
▶
Restart the appliance.
▶
Clean the brewing unit.
→"Cleaning brewing unit", Page28
Appliance has a fault. 1. Pull out the mains plug and wait
10seconds.
2. Re-insert the mains plug.
Display very frequently shows
"calc'nClean".
Water is too hard. 1. Insert a new water filter.
→"Insert water filter", Page22
2. Set the corresponding water hard-
ness.
→"Setting the water hardness",
Page16
Incorrect or too little descaling agent used.
Service programme has not
been carried out in its entirety.
▶
When descaling, only use suitable
tablets.
▶
Reset the service programme.
→"Resetting service programmes",
Page29
Troubleshooting en
33
Page 34

en Troubleshooting
Malfunctions
Errors Cause Troubleshooting
Appliance no longer responds.
Appliance only dispenses water, not coffee.
Appliance is not dispensing
milk froth.
No milk intake by the milk system.
Milk froth is too cold. Milk is too cold.
Appliance has a fault. 1. Pull out the mains plug and wait
10seconds.
2. Re-insert the mains plug.
Empty bean container is not
▶
Pour in coffee beans.
detected by the appliance.
Coffee shaft on brewing unit is
blocked.
Beans are too oily and are not
falling into thegrinder.
▶
Clean the brewing unit.
→"Cleaning brewing unit", Page28
▶
Gently tap the bean container.
▶
Change the coffee variety.
Do not use oily beans.
▶
Clean the empty bean container with
a damp cloth.
Brewing unit is not inserted
▶
Slide the brewing unit right back.
properly.
Milk system is soiled.
▶
Clean the milk system in the dishwasher.
→"Cleaning the milk system",
Page26
Milk tube not immersed in
milk.
▶
Use more milk.
▶
Check whether the milk tube is immersed in the milk.
Heavy build-up of limescale in
the appliance.
▶
Descale the appliance.
→"Using the descaling programme",
Page29
The milk system is assembled
incorrectly.
▶
Assemble the milk system correctly.
→"Cleaning the milk system",
Page26
Order for connecting the milk
container and milk system is
▶
First insert the milk system into the
outlet and then the milk container.
wrong.
Milk tube not immersed in
milk.
▶
Use more milk.
▶
Check whether the milk tube is immersed in the milk.
▶
Use lukewarm milk.
34
Page 35

Troubleshooting en
Errors Cause Troubleshooting
Appliance is not dispensing
hot water.
Milk system is soiled.
▶
Clean the milk system in the dishwasher.
→"Cleaning the milk system",
Page26
Milk system cannot be assembled or disassembled.
Order of assembly is wrong.
▶
First connect the milk system and
then the milk container. When disassembling, you must first remove the
milk container and then the milk system.
Appliance is not dispensing
drinks.
Air is in the water filter. 1. Immerse the water filter in water with
the opening facing upwards until no
more air bubbles escape.
2. Reinsert the filter.
→"Insert water filter", Page22
▶
Firmly press the water filter straight
down into the tank connection.
Residues of limescale remover are blocking the water
1. Remove the water tank.
2. Clean the water tank thoroughly.
tank.
There is dripping water on the
inner floor of the appliance.
Drip tray was removed too
soon.
▶
Wait a few seconds after the last
drink was dispensed before removing
the drip tray.
Brewing unit cannot be removed.
Appliance cannot be operated.
Change displays.
Brewing unit is not in the removal position.
Appliance is in demo mode. 1. Remove the water tank and fill with
▶
Switch the appliance back on.
fresh cold water.
2. Reinsert the water tank.
Grinder won't start. Appliance is too hot. 1. Disconnect the appliance from the
mains.
2. Wait 1hour so the appliance can cool
down.
Problem with results
Errors Cause Troubleshooting
Coffee or milk froth quality
varies widely.
Milk froth quality varies
widely.
Build-up of limescale in the appliance.
Milk froth quality depends on
the type of milk or plant-based
alternative used.
▶
Descale the appliance.
→"Using the descaling programme",
Page29
▶
Optimise the result through the selection of the milk or vegetable-based
drink type.
35
Page 36

en Troubleshooting
Errors Cause Troubleshooting
Coffee is not dispensed or has
slowed to a trickle.
Set quantity is not reached.
Grinding level is set too fine.
Heavy build-up of limescale in
the appliance.
▶
Set a coarser grinding level.
→"Adjusting the grinding level",
Page21
▶
Descale the appliance.
→"Using the descaling programme",
Page29
Air is in the water filter. 1. Immerse the water filter in water with
the opening facing upwards until no
more air bubbles escape.
2. Reinsert the filter.
→"Insert water filter", Page22
Appliance is soiled.
▶
Clean the brewing unit.
→"Cleaning brewing unit", Page28
▶
Descale and clean the appliance.
→"Using calc'nClean", Page30
Coffee strength is set too
high.
▶
Reduce the strength of your coffee to
e.g. "regular".
→"Adjusting the coffee strength",
Page20
Coffee has no crema. Type of coffee is not optimal.
▶
Use a coffee variety with a higher proportion of Robusta beans.
▶
Use beans with a darker roast.
Beans are no longer fresh.
Grinding level is not appropri-
ate for coffee beans.
▶
Use fresh beans.
▶
Adjust the grinder to a finer setting.
→"Adjusting the grinding level",
Page21
Coffee is too acidic. Grinding level is set too
coarse.
▶
Adjust the grinder to a finer setting.
→"Adjusting the grinding level",
Page21
Type of coffee is not optimal.
▶
Use a coffee variety with a higher pro-
portion of Robusta beans.
▶
Use beans with a darker roast.
Coffee is too bitter. Grinding level is set too fine.
▶
Set a coarser grinding level.
→"Adjusting the grinding level",
Page21
Type of coffee is not optimal.
Coffee tastes burnt. Grinding level is set too fine.
▶
Change the coffee variety.
▶
Set a coarser grinding level.
→"Adjusting the grinding level",
Page21
36
Page 37

Errors Cause Troubleshooting
Coffee tastes burnt. Type of coffee is not optimal.
Coffee temperature setting is
too high.
▶
Change the coffee variety.
▶
Set the coffee temperature lower.
→"Overview of the basic settings",
Page23
Coffee grounds are not compact and are too wet.
The grinding level is not set
optimally.
▶
Adjust the grinder to a coarser or
finer setting.
→"Adjusting the grinding level",
Page21
Too little ground coffee.
▶
Use 2 level measuring spoons of
ground coffee.
Beans are too oily.
▶
Use a different type of bean.
Troubleshooting en
37
Page 38

en Transportation, storage and disposal
Transportation, storage
and disposal
You can find out here how to prepare
your appliance for transportation and
storage. You will also find out how to
dispose of old appliances.
Activate frost protection
Protect your appliance from frost during transport and storage.
ATTENTION!
Residues of liquid in the appliance may
damage it during transport or storage.
▶
Empty the pipe system before transport or storage.
Requirements
¡ The appliance is ready to use.
¡ The water tank has been filled.
1. Remove the milk container.
2. Clean the brewing unit.
→"Cleaning brewing unit", Page28
3. Place a large container under the
outlet system.
4. Press repeatedly until the display
shows "Milk froth".
5. Press repeatedly until the display
shows 240ml.
6. Press .
7. Wait until steam escapes from the
appliance.
8. Remove the water tank.
a The appliance drains itself automat-
ically.
9. If the message "Please refill water
tank" appears, ignore it.
10.Empty and clean the water tank and
drip tray.
11.Insert the water tank and drip tray.
12.Switch the appliance off and discon-
nect it from the power supply.
Disposing of old appliance
Valuable raw materials can be reclaimed by recycling.
1. Unplug the appliance from the
mains.
2. Cut through the power cord.
3. Dispose of the appliance in an envir-
onmentally friendly manner.
This appliance is labelled in accordance with European Directive
2012/19/EU concerning used
electrical and electronic appliances (waste electrical and electronic equipment - WEEE).
The guideline determines the
framework for the return and recycling of used appliances as applicable throughout the EU.
Customer Service
If you have any queries, are unable to
rectify faults on the appliance yourself
or if your appliance needs to be repaired, contact Customer Service.
You can solve many problems yourself
by consulting the information on
troubleshooting in these instructions or
on our website. If this is not the case,
contact our Customer Service.
We always find an appropriate solution.
With any warranty claims we will make
sure that your appliance is repaired by
trained Customer Service technicians
using genuine spare parts, including
after the manufacturer's warranty has
expired.
Function-relevant genuine spare parts
according to the corresponding Ecodesign Order can be obtained from
Customer Service for a period of at
least 7 years from the date on which
your appliance was placed on the market within the European Economic
Area.
38
Page 39

Technical specifications en
Note:Under the terms of the manufacturer's warranty the use of Customer
Service is free of charge.
Detailed information about the warranty
period and terms of warranty in your
country are available from Customer
Service, your dealer or our website.
When contacting Customer Service,
you will need the product number (ENr.) and the production number (FD) of
your appliance.
The contact details for Customer Service can be found in the Customer Service directory at the end of the manual
or on our website.
Product number (E-Nr.) and
production number (FD)
The product number (E-Nr. ) and the
production number (FD) can be found
on the rating plate of the appliance.
Make a note of your appliance's details
and the Customer Service telephone
number to find them again quickly.
Warranty conditions
Frequency 50Hz
Connection rating 1500W
Maximum static pump pres-
sure
Maximum capacity of water
tank (without filter)
Maximum capacity of bean
container
Length of the power cable 100cm
Appliance height 37.3cm
Appliance width 24.9cm
Appliance depth 42.8cm
Weight, empty 8-9kg
Type of grinder Ceramic
15bar
1.7l
270g
You can make warranty claims for your
appliance under the following conditions.
The guarantee conditions for this appliance are as defined by our representative in the country in which it is sold. Details regarding these conditions can be
obtained from the dealer from whom
the appliance was purchased. The bill
of sale or receipt must be produced
when making any claim under the
terms of this guarantee.
Technical specifications
Facts and figures for your appliance
can be found here.
Voltage 220–240V∼
39
Page 40

fr
Table des matières
Sécurité ..........................................42
Indications générales.......................42
Utilisation conforme .........................42
Limitation du groupe d’utilisateurs....42
Consignes de sécurité .....................43
Protection de l’environnement et
économies ......................................47
Élimination de l'emballage ...............47
Économies d’énergie .......................47
Installation et branchement............47
Contenu de la livraison ....................47
Installer et raccorder l’appareil.........47
Présentation de l’appareil...............48
Appareil...........................................48
Éléments de commande ..................48
Écran...............................................48
Aperçu des boissons......................49
Accessoires....................................50
Avant la première utilisation...........50
Première mise en service.................50
Remplir le réservoir d’eau ................50
Remplir le réservoir pour café en
grains ..............................................51
Régler la langue ..............................51
Régler la dureté de l’eau..................51
Indications générales.......................52
Utilisation de base..........................52
Allumer ou éteindre l'appareil...........52
Préparation de boisson....................53
Préparer une boisson à base de
café en grains frais ..........................53
Préparer une boisson à base de
café moulu.......................................53
Préparation de boisson avec du
lait ...................................................54
Utiliser le réservoir de lait.................54
Préparer une boisson à base de
café avec du lait ..............................55
Préparer des boissons spéciales .....55
Préparer de la mousse de lait ..........55
Préparer de l'eau chaude.................56
Réglages des boissons ...................56
Filtre à eau ......................................57
Sécurité enfants .............................58
Activer la sécurité enfants ................58
Désactiver la sécurité enfants ..........58
Chauffage pour tasses1..................58
Réglages de base ...........................59
Aperçu des réglages de base..........59
Modifier des réglages de base ........60
Nettoyage et entretien ....................60
Lavage au lave-vaisselle ..................60
Produits de nettoyage......................60
Nettoyer l'appareil............................61
Nettoyer la cuvette d'égouttage et
le bac à marc de café......................61
Nettoyer le puits de café moulu .......62
Nettoyer le système de lait...............62
Nettoyer le réservoir de lait ..............63
Nettoyer l’unité de percolation..........63
Programmes d'entretien...................64
Dépannage .....................................68
Remarques sur le bandeau d’affi-
chage ..............................................68
Dysfonctionnements ........................70
Problème de résultat........................72
Transport, stockage et élimina-
tion .................................................75
Activer la protection contre le gel.....75
Éliminer un appareil usagé ..............75
1
Selon l'équipement de l'appareil
40
Page 41

Service après-vente........................75
Numéro de produit (E-Nr) et nu-
méro de fabrication (FD)..................76
Conditions de garantie.....................76
Données techniques.......................76
fr
41
Page 42

fr Sécurité
Sécurité
Respectez les informations relatives à la sécurité afin d’utiliser
votre appareil en toute sécurité.
Indications générales
Vous trouverez ici des informations générales sur la présente notice.
¡ Lisez attentivement cette notice. C’est en effet la seule manière
d’utiliser l’appareil de manière sûre et efficace.
¡ Cette notice d’utilisation s’adresse à l'utilisateur de l’appareil.
¡ Respectez les consignes de sécurité et les avertissements.
¡ Conservez la notice ainsi que les informations produit en vue
d’une réutilisation ultérieure ou pour un futur nouveau propriétaire.
¡ Contrôlez l’appareil après l’avoir déballé. Ne raccordez pas l’ap-
pareil si ce dernier a été endommagé durant le transport.
Utilisation conforme
Pour utiliser l’appareil correctement et en toute sécurité, respectez
les consignes d’utilisation conforme.
Utilisez l’appareil uniquement:
¡ en conformité avec la présente notice d’utilisation.
¡ pour préparer des boissons chaudes.
¡ pour un usage privé et dans les pièces fermées d’un domicile.
¡ jusqu’à une altitude maximale de 2000m.
Débranchez l’appareil du secteur lorsque:
¡ nettoyez l’appareil.
Limitation du groupe d’utilisateurs
Évitez les risques pour les enfants et les personnes à risque.
Les enfants de 8 ans et plus, les personnes souffrant d’un handicap physique, sensoriel ou mental ou ne détenant pas l’expérience et/ou les connaissances nécessaires pourront utiliser cet
42
Page 43

Page 44

Page 45

Page 46

Page 47

Page 48

fr Présentation de l’appareil
1
2
3
4
5
6
7
8
9
10
11
12
13
14
15
16
▶
Après chaque branchement, attendre env.5secondes.
1. Retirer les films de protection.
2. Poser l’appareil sur une surface
plane solide et résistante à l’eau.
3. Brancher la fiche secteur de l’appa-
reil sur une prise de courant à
contact de protection installée dans
les règles.
Présentation de l’appareil
Découvrez les composants de votre
appareil.
Appareil
Vous trouverez ici un aperçu des composants de votre appareil.
Remarque:Des variations de détails
et de couleurs sont possibles selon le
type d’appareil.
2
→Fig.
Réservoir d'eau
Couvercle du réservoir d’eau
Chauffage pour tasses
Couvercle préservateur d’arôme
Réservoir pour café en grains
Puits de café moulu
1
Porte du compartiment de percolation
Plaque signalétique
Cuvette d’égouttage
Réservoir de lait
1
Selon l'équipement de l'appareil
Éléments de commande
Vous trouverez ici un aperçu des symboles de votre appareil. Appuyez sur
les symboles pour effectuer une sélection, démarrer une préparation ou procéder à un réglage.
Symbole Explication
Éteindre/allumer l'appareil
Ouvrir le menu/quitter le menu
Remarque:Les touches du menu
sont visibles uniquement lorsque le
menu est ouvert.
Se déplacer vers le haut dans le menu
Se déplacer vers le bas dans le menu
Confirmer/mémoriser dans le menu
Se déplacer en arrière dans le menu
Préparer deux tasses
Sélectionner l'intensité du café
Adapter la quantité
Démarrer/arrêter
Écran
Bandeau de commande
Éclairage des tasses
Couvercle
Mousseur de lait
Système verseur
1
Selon l'équipement de l'appareil
48
Écran
1
L'écran affiche les boissons sélectionnées, les réglages effectués et les paramètres possibles, de même que des
messages concernant l'état de fonctionnement.
L'écran affiche des informations supplémentaires et des étapes de manipulation. Les informations sont masquées
au bout d'une courte durée ou par
Page 49

Page 50

Page 51

Avant la première utilisation fr
4. Si un filtre à eau est présent, mettre
le filtre à eau en place.
→"Mettre en place le filtre à eau",
Page57
5. Remplir le réservoir d’eau jusqu’au
repère «max».
6. Placer le réservoir d'eau droit dans
son support.
7. Fermer le couvercle.
Remplir le réservoir pour café
en grains
ATTENTION!
Les grains inadaptés peuvent boucher
le moulin.
▶
Utiliser exclusivement un mélange
de café en grains torréfiés pour expresso ou percolateur.
▶
Ne pas utiliser de grains de café enrobés d'un glaçage.
▶
Ne pas utiliser de grains de café caramélisés.
▶
Ne pas utiliser de grains de café traités avec un additif contenant du
sucre.
▶
Ne pas utiliser de café en poudre.
1. Ouvrir le couvercle.
2. Verser les grains de café.
L'appareil se réglera sur le café en
grains lors des prochaines préparations.
3. Fermer le couvercle.
Conseil:Stockez le café en grains
dans un endroit frais, à l’abri de l’air,
pour conserver toute sa qualité.
Vous pouvez laisser le café en grains
dans le réservoir pour café en grains
plusieurs jours sans que le café ne
perde son arôme.
Régler la langue
1. Allumer l'appareil avec .
a La langue préréglée s’affiche à
l’écran.
2. Appuyer sur ou jusqu'à ce
que l'écran affiche la langue souhaitée.
3. Appuyer sur .
Conseil:Vous pouvez modifier la
langue à tout moment.
→"Aperçu des réglages de base",
Page59
Régler la dureté de l’eau
Le réglage correct de la dureté de
l’eau est important car il permet à la
machine d’indiquer le moment où un
détartrage est nécessaire. Vous pouvez
déterminer la dureté de l'eau avec la
bandelette de test jointe ou la demander à la compagnie locale de distribution d'eau.
1. Plonger brièvement la bandelette de
test dans l'eau fraîche du robinet.
2. Laisser la bandelette de test s'égout-
ter.
a La bandelette de test indique après
1minute la dureté de l'eau.
3. Si la maison est équipée d'un adou-
cisseur d'eau, sélectionner "Adoucisseur".
4. Appuyer sur ou jusqu'à ce
que l'écran indique la dureté de l'eau
souhaitée.
Le tableau indique les équivalences
entre les niveaux et les différents degrés de dureté de l’eau:
Niveau Dureté alle-
mande en
°dH
1 1-7 0.18 - 1.25
2 8-14 1.42 - 2.49
3 15-21 2.67 - 3.74
1
4
1
Réglage usine (peut varier selon le type
22-30 3.92 - 5.34
d’appareil)
5. Appuyer sur .
Dureté totale
en (mmol/l)
51
Page 52

Page 53
Page 54

Page 55

Page 56

Page 57

Page 58

Page 59

Réglages de base fr
Réglages de base
Vous pouvez régler votre appareil en fonction de vos besoins et sélectionner des
fonctions additionnelles.
Aperçu des réglages de base
Réglage Sélection Description
Nettoyage Système de lait
Détartrer
Nettoyer
calc’nClean
Chauf. tasses
1
Chauf. tasses OFF
2
Chauf. tasses ON
Filtre à eau Nouveau filtre
Aucun filtre
Température café normale
haute
max.
Langues Voir la sélection sur l'appareil. Sélectionner la langue du menu.
Arrêt automatique Voir la sélection sur l'appareil. Régler la durée au bout de la-
Dureté de l’eau 1 (douce)
2 (moyenne)
3 (dure)
4 (très dure)
2
Adoucisseur
Tonalité touches Ton. touches ON
2
Ton. touches OFF
Réglage usine Réinitialiser tout ?
Poursuivre : OK
Annuler : ←
1
Selon l'équipement de l'appareil
2
Réglage usine (peut varier selon le type d’appareil)
Démarrer les programmes d'entretien.
→"Programmes d'entretien",
Page64
Activer ou désactiver le chauffage
pour tasses.
→"Chauffage pour tasses1",
Page58
Régler l'utilisation du filtre à eau.
Régler la température pour les
boissons à base de café.
Remarque:Le réglage sélectionné vaut pour toutes les préparations.
Les modifications sont immédiatement visibles à l'écran.
quelle l’appareil s’éteint automatiquement une fois la dernière préparation de boisson terminée.
Régler l'appareil sur la dureté de
l'eau locale.
→"Régler la dureté de l’eau",
Page51
Activer ou désactiver les tonalités
des touches.
Rétablir les réglages usine.
Remarque:Tous les réglages
personnels sont supprimés et les
réglages usine sont rétablis.
59
Page 60

Page 61

Page 62

Page 63

Page 64

fr Nettoyage et entretien
5. Saisir l'unité de percolation par la
poignée et la retirer prudemment
vers l'avant.
22
→Fig.
6. Nettoyer soigneusement l’unité de
percolation sous l'eau chaude courante.
23
→Fig.
7. Nettoyer l’intérieur de l’appareil avec
un chiffon humide et éliminer les résidus de café.
8. Laisser sécher l’unité de percolation
et l’intérieur de l’appareil.
9. Saisir l'unité de percolation par la
poignée.
10.Pousser vers le haut le levier rouge.
11.Placer l'unité de percolation sous le
levier et la pousser vers l'arrière jusqu'à la butée.
24
→Fig.
a Le levier s'enclenche.
12.Mettre en place la cuvette d'égout-
tage avec le bac à marc de café.
25
→Fig.
13.Fermer la porte.
→Fig.
26
La porte peut uniquement être fermée lorsque l'unité de percolation et
la cuvette d'égouttage sont correctement en place.
Programmes d'entretien
Votre appareil vous recommande à intervalles de temps définis d'utiliser les
programmes d'entretien. Utilisez les
programmes d'entretien pour nettoyer
soigneusement votre appareil.
ATTENTION!
Un nettoyage ou détartrage non effectués de manière correcte ou dans les
temps peuvent endommager l’appareil.
▶
Effectuer le détartrage immédiatement après l’affichage de la
consigne.
▶
Ne jamais verser de pastilles de détartrage ou d’autres produits dans le
puits de café moulu.
Selon la dureté de l'eau et l'utilisation
de l'appareil, l'écran affiche les
messages suivants, après un préavis:
¡ "Nettoyer le système de lait."
¡ "Détartrage nécessaire. Appuyer sur
Menu pendant 3 sec."
¡ "Nettoyage nécessaire. Appuyer sur
Menu pendant 3 sec."
¡ "calc’nClean nécessaire. Appuyer
sur Menu pendant 3 sec."
Remarques
¡ L'écran indique où en est l'opération.
¡ Si votre appareil n'est pas détartré à
temps, l'écran indique "Délai détart.
dépassé. Appareil verrouillé. Appuyer sur Menu pendant 3 s.".
¡ Si l’appareil est verrouillé, il ne peut
être réutilisé qu'une fois le détartrage effectué.
¡ Si vous interrompez le programme
d'entretien par mégarde, vous devez
le réinitialiser.
→"Réinitialiser les programmes
d’entretien", Page65
Conseils
¡ Si vous utilisez un filtre à eau, la du-
rée avant l'exécution des programmes d'entretien est allongée.
¡ Vous pouvez regrouper le détartrage
et le nettoyage avec le programme
d'entretien calc'nClean.
→"Utiliser le programme
calc'nClean", Page66
¡ Après un programme d'entretien,
nettoyez immédiatement votre appareil avec un chiffon doux et humide,
afin d'éliminer les résidus de la solution de détartrage et prévenir la corrosion.
64
Page 65
Nettoyage et entretien fr
Réinitialiser les programmes
d’entretien
Si un programme d’entretien a été interrompu, p.ex. par une coupure de
courant, procédez de la manière suivante.
1. Rincer le réservoir d’eau.
2. Remplir le réservoir d’eau fraîche
non gazeuse jusqu’au repère
«max».
3. Appuyer sur .
a L'appareil est rincé pendant env.
2minutes.
4. Vider et nettoyer la cuvette d'égout-
tage.
5. Mettre la cuvette d'égouttage en
place et fermer la porte.
6. Redémarrer le programme d'entre-
tien.
Utiliser le programme de nettoyage
du système de lait
Si nécessaire, rincez le système de lait
avec de l’eau. Le rinçage dure env.
1minute.
1. Appuyer sur .
2. Sélectionner "Nettoyage" avec et
et appuyer sur .
3. Sélectionner "Système de lait" avec
et et appuyer sur .
4. Appuyer sur pour démarrer le
programme.
a L'écran vous guide à travers le pro-
gramme.
5. Retirer et vider le réservoir de lait.
6. Nettoyer le réservoir de lait, le tuyau
à lait et le tube d'aspiration.
7. Monter les composants et mettre en
place le réservoir de lait.
8. Placer un verre vide sous le système
verseur et appuyer sur .
Le système de lait se nettoie auto-
matiquement.
a Le programme est terminé et l'appa-
reil est prêt à fonctionner.
Conseil:Si vous souhaitez nettoyer le
système de lait à fond, nettoyez le régulièrement à la main.
→"Nettoyer le système de lait",
Page62
Utiliser le programme de détartrage
Exécutez le programme de détartrage
lorsque votre appareil vous y invite.
L’opération dure env.30minutes.
Condition préalable:L'unité de percolation est nettoyée.
→"Nettoyer l’unité de percolation",
Page63
1. Appuyer sur .
2. Sélectionner "Nettoyage" avec et
et appuyer sur .
3. Sélectionner "Détartrer" avec et
et appuyer sur .
4. Appuyer sur pour démarrer le
programme.
a L'écran vous guide à travers le pro-
gramme.
5. Vider la cuvette d’égouttage et la
mettre en place.
6. Retirer et vider le réservoir de lait.
7. Nettoyer le réservoir de lait, le tuyau
à lait et le tube d'aspiration.
8. Monter les composants et mettre en
place le réservoir de lait.
9. Si un filtre à eau est présent, retirer
le filtre à eau.
10.Appuyer sur .
11.Vider le réservoir à eau.
12.Remplir un récipient avec 0,5l d’eau
tiède.
13.Ajouter une pastille de détartrage
Siemens dans l’eau et mélanger jusqu’à ce que la pastille soit entièrement dissoute.
14.Verser la solution détartrante dans le
réservoir à eau jusqu’au repère calc
et appuyer sur .
65
Page 66

fr Nettoyage et entretien
15.Placer le récipient vide sous le sys-
tème verseur et appuyer sur .
a Le programme de détartrage dure
env.20minutes.
16.Rincer le réservoir d'eau.
17.Appuyer sur .
18.Si un filtre à eau est présent, mettre
le filtre à eau en place.
→"Mettre en place le filtre à eau",
Page57
19.Appuyer sur .
20.Remplir d’eau fraîche jusqu’au re-
père «max».
21.Appuyer sur .
a Le programme de détartrage dure
environ1minute et rince l'appareil.
22.Vider la cuvette d’égouttage et la
mettre en place.
23.Retirer et vider le réservoir de lait.
24.Nettoyer le réservoir de lait, le tuyau
à lait et le tube d'aspiration.
25.Monter les composants et mettre en
place le réservoir de lait.
a Le programme est terminé et l'appa-
reil est prêt à fonctionner.
Utiliser le programme de nettoyage
Exécutez le programme de nettoyage
lorsque votre appareil vous y invite.
L'opération dure env. 9minutes.
Condition préalable:L'unité de percolation est nettoyée.
→"Nettoyer l’unité de percolation",
Page63
1. Appuyer sur .
2. Sélectionner "Nettoyage" avec et
et appuyer sur .
3. Sélectionner "Nettoyer" avec et
et appuyer sur .
4. Appuyer sur pour démarrer le
programme.
a L'écran vous guide à travers le pro-
gramme.
5. Vider la cuvette d’égouttage et la
mettre en place.
6. Ouvrir le puits de café moulu.
7. Placer une pastille de nettoyage Sie-
mens dans le puits de café moulu.
8. Fermer le puits de café moulu et ap-
puyer sur .
9. Placer un récipient d’une capacité
d’au moins 0,5l sous le système
verseur et appuyer sur .
a Le programme de nettoyage dure
env. 7minutes.
10.Vider la cuvette d’égouttage et la
mettre en place.
a Le programme est terminé et l'appa-
reil est prêt à fonctionner.
Utiliser le programme calc'nClean
Vous pouvez combiner les programmes de nettoyage et de détartrage avec le programme d’entretien
calc’nClean. Exécutez le programme
calc’nClean lorsque l’appareil vous y
invite. L’opération dure env.43minutes.
Condition préalable:L'unité de percolation est nettoyée.
→"Nettoyer l’unité de percolation",
Page63
1. Appuyer sur .
2. Sélectionner "Nettoyage" avec et
et appuyer sur .
3. Sélectionner "calc’nClean" avec
et et appuyer sur .
4. Appuyer sur pour démarrer le
programme.
a L'écran vous guide à travers le pro-
gramme.
5. Vider la cuvette d’égouttage et la
mettre en place.
6. Retirer et vider le réservoir de lait.
7. Nettoyer le réservoir de lait, le tuyau
à lait et le tube d'aspiration.
8. Monter les composants et mettre en
place le réservoir de lait.
9. Si un filtre à eau est présent, retirer
le filtre à eau.
66
Page 67

Nettoyage et entretien fr
10.Appuyer sur .
11.Vider le réservoir à eau.
12.Remplir un récipient avec 0,5l d’eau
tiède.
13.Ajouter une pastille de détartrage
Siemens dans l’eau et mélanger jusqu’à ce que la pastille soit entièrement dissoute.
14.Verser la solution détartrante dans le
réservoir à eau jusqu’au repère calc
et appuyer sur .
15.Placer le récipient vide sous le sys-
tème verseur et appuyer sur .
a Le programme de détartrage dure
env.20minutes.
16.Rincer le réservoir d'eau.
17.Appuyer sur .
18.Si un filtre à eau est présent, mettre
le filtre à eau en place.
→"Mettre en place le filtre à eau",
Page57
19.Appuyer sur .
20.Remplir d’eau fraîche jusqu’au re-
père «max».
21.Appuyer sur .
a Le programme dure env.1minute et
rince l’appareil.
22.Vider la cuvette d’égouttage et la
mettre en place.
23.Ouvrir le puits de café moulu.
24.Placer une pastille de nettoyage Sie-
mens dans le puits de café moulu.
25.Fermer le puits de café moulu et ap-
puyer sur .
26.Placer un récipient d’une capacité
d’au moins 0,5l sous le système
verseur et appuyer sur .
a Le programme de nettoyage dure
env. 7minutes.
27.Vider la cuvette d’égouttage et la
mettre en place.
28.Retirer et vider le réservoir de lait.
29.Nettoyer le réservoir de lait, le tuyau
à lait et le tube d'aspiration.
30.Monter les composants et mettre en
place le réservoir de lait.
a Le programme est terminé et l'appa-
reil est prêt à fonctionner.
67
Page 68

Page 69

Défaut Cause Élimination des défauts
Le message "Remplir le réservoir d’eau." s'affiche alors que
le réservoir d'eau est plein.
Le filtre à eau contient de l'air. 1. Plongez le filtre à eau dans de l'eau,
ouverture vers le haut, jusqu'à ce que
plus aucune bulle d'air ne s'échappe.
2. Remettez le filtre en place.
→"Mettre en place le filtre à eau",
Page57
Le filtre à eau est trop vieux.
▶
Mettez en place un nouveau filtre à
eau.
Des dépôts de tartre dans le
réservoir d'eau bouchent le
système.
1. Nettoyez soigneusement le réservoir
d'eau.
2. Démarrez le programme de détar-
trage.
→"Utiliser le programme de détar-
trage", Page65
Le message "Remplir le réservoir de café en grains." s'affiche alors que le réservoir
pour café en grains est plein.
Le moulin ne moud pas de
grains alors que le réservoir
pour café en grains est plein.
Le message "Nettoyer l’unité
de percolation, la remettre en
place et fermer la porte." s'affiche.
Les grains sont huileux et ne
tombent pas dans le moulin.
L’unité de percolation est
sale.
Le mécanisme de l'unité de
percolation est grippé.
▶
Tapotez légèrement sur le réservoir
pour café en grains.
▶
Changez de variété de café.
N'utilisez pas de grains huileux.
▶
Nettoyez le réservoir pour café en
grains vide avec un chiffon humide.
▶
Nettoyez l’unité de percolation.
→"Nettoyer l’unité de percolation",
Page63
▶
Nettoyez l’unité de percolation.
→"Nettoyer l’unité de percolation",
Page63
Il y a trop de café en poudre
dans l’unité de percolation.
▶
Utilisez au maximum 2 cuillères rases
de café moulu.
→"Nettoyer l’unité de percolation",
Page63
Le message "Tension (V) incorrecte." s'affiche.
Le message "Redémarrer l’appareil." s'affiche.
La tension du réseau domestique est incorrecte.
L'unité de percolation est très
sale ou ne peut pas être retirée.
▶
Ne faites fonctionner l'appareil que
sur 220-240V.
▶
Redémarrez l’appareil.
▶
Nettoyez l’unité de percolation.
→"Nettoyer l’unité de percolation",
Page63
L'appareil présente un dérangement.
1. Débranchez la fiche secteur et atten-
dez 10secondes.
2. Branchez la fiche secteur.
Dépannage fr
69
Page 70

fr Dépannage
Défaut Cause Élimination des défauts
Le message "calc’nClean"
s'affiche très fréquemment.
L’eau est trop calcaire. 1. Mettez en place un nouveau filtre à
eau.
→"Mettre en place le filtre à eau",
Page57
2. Réglez la dureté de l'eau en consé-
quence.
→"Régler la dureté de l’eau",
Page51
Produit détartrant incorrect ou
trop peu de produit utilisé.
Programme d’entretien pas
entièrement réalisé.
▶
Pour le détartrage, utilisez exclusive-
ment les pastilles appropriées.
▶
Réinitialiser le programme d’entre-
tien.
→"Réinitialiser les programmes d’en-
tretien", Page65
Dysfonctionnements
Défaut Cause Élimination des défauts
L’appareil ne réagit plus. L'appareil présente un déran-
gement.
L'appareil délivre uniquement
de l'eau, mais pas de café.
L’appareil ne détecte pas que
le réservoir pour café en
grains est vide.
La cuve à café de l’unité de
percolation est obstruée.
Les grains sont huileux et ne
tombent pas dans le moulin.
L’unité de percolation n’est
pas insérée correctement.
L’appareil de fournit pas de
Le système de lait est sale.
mousse de lait.
Le tube à lait ne plonge pas
dans le lait.
1. Débranchez la fiche secteur et atten-
dez 10secondes.
2. Branchez la fiche secteur.
▶
Versez du café en grains.
▶
Nettoyez l’unité de percolation.
→"Nettoyer l’unité de percolation",
Page63
▶
Tapotez légèrement sur le réservoir
pour café en grains.
▶
Changez de variété de café.
N'utilisez pas de grains huileux.
▶
Nettoyez le réservoir pour café en
grains vide avec un chiffon humide.
▶
Insérez l’unité de percolation complè-
tement vers l’arrière.
▶
Nettoyez le système de lait au lave-
vaisselle.
→"Nettoyer le système de lait",
Page62
▶
Utilisez plus de lait.
70
Page 71

Défaut Cause Élimination des défauts
L’appareil de fournit pas de
mousse de lait.
L'appareil est fortement entartré.
▶
Vérifiez si le tube à lait plonge dans le
lait.
▶
Détartrez l’appareil.
→"Utiliser le programme de détar-
trage", Page65
Le système de lait n’aspire
pas de lait.
Le système de lait n’est pas
assemblé correctement.
▶
Assemblez correctement le système
de lait.
→"Nettoyer le système de lait",
Page62
Le raccordement du réservoir
de lait et du système de lait
est effectué dans le mauvais
▶
Placez d'abord le système de lait
dans la buse d'écoulement, puis le ré-
servoir de lait.
ordre.
Le tube à lait ne plonge pas
dans le lait.
▶
Utilisez plus de lait.
▶
Vérifiez si le tube à lait plonge dans le
lait.
La mousse de lait est trop
Le lait est trop froid.
▶
Utilisez du lait tiède.
froide.
L'appareil ne délivre pas d'eau
chaude.
Le système de lait est sale.
▶
Nettoyez le système de lait au lave-
vaisselle.
→"Nettoyer le système de lait",
Page62
Il est impossible de monter ou
de démonter le système de
lait.
L'ordre de montage est incorrect.
▶
Raccordez tout d'abord le système de
lait, puis le réservoir de lait. Pour le
démontage, retirez tout d'abord le ré-
servoir de lait, puis le système de lait.
L'appareil de délivre pas de
boisson.
Le filtre à eau contient de l'air. 1. Plongez le filtre à eau dans de l'eau,
ouverture vers le haut, jusqu'à ce que
plus aucune bulle d'air ne s'échappe.
2. Remettez le filtre en place.
→"Mettre en place le filtre à eau",
Page57
▶
Placez le filtre à eau bien droit et ap-
puyez fortement pour l’enfoncer dans
le raccordement au réservoir.
Des résidus de détartrant obs-
truent le réservoir à eau.
1. Retirez le réservoir d'eau.
2. Nettoyez soigneusement le réservoir
d'eau.
Dépannage fr
71
Page 72

fr Dépannage
Défaut Cause Élimination des défauts
Il y a des gouttes d'eau sur le
fond de l'appareil.
La cuvette d'égouttage a été
retirée trop tôt.
▶
Attendez quelques secondes après la
préparation de la dernière boisson
avant de retirer la cuvette d’égout-
tage.
L'unité de percolation ne peut
pas être retirée.
Il est impossible de commander l'appareil.
Changer les affichages de
L’unité de percolation n’est
pas en position de retrait.
L’appareil est en mode Démo. 1. Retirez le réservoir à eau et remplis-
▶
Rallumez l'appareil.
sez-le d’eau froide fraîche.
2. Remettre le réservoir à eau en place.
l'écran.
Le moulin ne démarre pas. L'appareil est trop chaud. 1. Débranchez l’appareil du secteur.
2. Attendez 1heure pour que l’appareil
refroidisse.
Problème de résultat
Défaut Cause Élimination des défauts
Qualité très variable du café
ou de la mousse de lait.
Qualité variable de la mousse
de lait.
Le café n'est pas versé ou uniquement goutte à goutte.
La quantité réglée n'est pas
atteinte.
L'appareil est entartré.
La qualité de la mousse de lait
est fonction de la nature de la
boisson végétale ou du lait utilisé.
Le degré de mouture réglé est
trop fin.
L'appareil est fortement entartré.
Le filtre à eau contient de l'air. 1. Plongez le filtre à eau dans de l'eau,
L’appareil est encrassé.
▶
Détartrez l’appareil.
→"Utiliser le programme de détar-
trage", Page65
▶
Optimisez le résultat par le choix du
lait ou de la boisson végétale.
▶
Réglez un degré de mouture plus
grossier.
→"Régler le degré de mouture",
Page57
▶
Détartrez l’appareil.
→"Utiliser le programme de détar-
trage", Page65
ouverture vers le haut, jusqu'à ce que
plus aucune bulle d'air ne s'échappe.
2. Remettez le filtre en place.
→"Mettre en place le filtre à eau",
Page57
▶
Nettoyez l’unité de percolation.
→"Nettoyer l’unité de percolation",
Page63
72
Page 73
Défaut Cause Élimination des défauts
Le café n'est pas versé ou uniquement goutte à goutte.
La quantité réglée n'est pas
atteinte.
Le café est trop intense.
▶
Détartrez et nettoyez l’appareil.
→"Utiliser le programme
calc'nClean", Page66
▶
Réglez, p.ex., l’intensité du café sur
"normal".
→"Adapter l'intensité du café",
Page56
Le café ne présente pas de
«crème».
La variété de café n'est pas
optimale.
▶
Utilisez un café contenant une pro-
portion plus importante de Robusta.
▶
Utilisez des grains de café présentant
une torréfaction plus foncée.
Les grains ne sont pas fraî-
▶
Utilisez des grains frais.
chement torréfiés.
Le degré de mouture est inadapté aux grains de café.
▶
Réglez un degré de mouture plus fin.
→"Régler le degré de mouture",
Page57
Le café est trop acide. Le degré de mouture réglé est
trop grossier.
▶
Réglez un degré de mouture plus fin.
→"Régler le degré de mouture",
Page57
La variété de café n'est pas
optimale.
▶
Utilisez un café contenant une pro-
portion plus importante de Robusta.
▶
Utilisez des grains de café présentant
une torréfaction plus foncée.
Le café est trop amer. Le degré de mouture réglé est
trop fin.
▶
Réglez un degré de mouture plus
grossier.
→"Régler le degré de mouture",
Page57
La variété de café n'est pas
▶
Changez de variété de café.
optimale.
Le café a un goût de brûlé. Le degré de mouture réglé est
trop fin.
▶
Réglez un degré de mouture plus
grossier.
→"Régler le degré de mouture",
Page57
La variété de café n'est pas
▶
Changez de variété de café.
optimale.
La température réglée du café
est trop élevée.
▶
Réduisez la température du café.
→"Aperçu des réglages de base",
Page59
Dépannage fr
73
Page 74

fr Dépannage
Défaut Cause Élimination des défauts
Le marc de café n'est pas
compact et est trop humide.
Le degré de mouture réglé
n'est pas optimal.
▶
Réglez un degré de mouture plus
grossier ou plus fin.
→"Régler le degré de mouture",
Page57
La quantité de café moulu est
trop faible.
Les grains de café sont trop
▶
Utilisez 2 cuillères-doses rases de ca-
fé moulu.
▶
Utilisez une autre variété de grains.
huileux.
74
Page 75

Transport, stockage et élimination fr
Transport, stockage et
élimination
Apprenez comment préparer votre appareil pour le transport et le stockage.
Apprenez également comment éliminer
les appareils usagés.
Activer la protection contre le
gel
Protégez l’appareil contre le gel durant
le transport et le stockage
ATTENTION!
Les résidus de liquide risquent d’endommager l’appareil pendant le transport et le stockage.
▶
Avant le transport ou le stockage, vider le circuit.
Conditions préalables
¡ L’appareil est prêt à l’emploi.
¡ Le réservoir à eau est rempli.
1. Retirer le réservoir de lait.
2. Nettoyer l’unité de percolation.
→"Nettoyer l’unité de percolation",
Page63
3. Placer un grand récipient sous le
système verseur.
4. Appuyer à plusieurs reprises sur
jusqu’à ce que l’écran affiche
"Mousse de lait".
5. Appuyer à plusieurs reprises sur ,
jusqu’à ce que l’affichage indique
240ml.
6. Appuyer sur .
7. Attendre que la vapeur s’échappe
de l’appareil.
8. Enlever le réservoir à eau.
a L’appareil se vide automatiquement.
9. Si le message "Remplir le réservoir
d’eau." apparaît, l’ignorer.
10.Vider et nettoyer le réservoir à eau et
la cuvette d’égouttage.
11.Mettre le réservoir à eau et la cu-
vette d’égouttage en place.
12.Mettre l’appareil hors tension et le
débrancher du secteur.
Éliminer un appareil usagé
L'élimination dans le respect de l’environnement permet de récupérer de
précieuses matières premières.
1. Débrancher la fiche du cordon d’ali-
mentation secteur.
2. Couper le cordon d’alimentation sec-
teur.
3. Éliminer l’appareil dans le respect
de l’environnement.
Cet appareil est marqué selon la
directive européenne 2012/19/
UE relative aux appareils électriques et électroniques usagés
(waste electrical and electronic
equipment - WEEE).
La directive définit le cadre pour
une reprise et une récupération
des appareils usagés applicables
dans les pays de la CE.
Service après-vente
Si vous avez des questions, si vous
n’avez pas réussi à remédier par vousmême à un dérangement qui affecte
l’appareil ou si l’appareil doit être réparé, veuillez vous adresser à notre service après-vente.
Vous pouvez résoudre vous-même un
grand nombre de problèmes en
consultant l’information de dépannage
figurant dans la présente notice d’utilisation et sur notre site Web. Si ce n’est
pas le cas, veuillez vous adresser à
notre service après-vente.
Nous trouverons toujours une solution
adaptée.
75
Page 76

fr Données techniques
Pendant la période de garantie et
après expiration de la garantie du fabricant, nous nous assurons que votre
appareil est réparé avec des pièces de
rechange d’origine par des techniciens
du service après-vente.
Les pièces de rechange relatives au
fonctionnement de l’appareil et
conformes à l’ordonnance d’écoconception correspondante sont disponibles auprès de notre service-client
pour une durée d’au moins7ans à
partir de la mise sur le marché de votre
appareil dans l’Espace économique européen.
Remarque:L’intervention du service
après-vente est gratuite dans le cadre
de la garantie du fabricant.
Pour des renseignements détaillés sur
ladurée etles conditions de la garantie
dans votre pays, adressez-vous à notre
service-client ou à votre revendeur et
consulteznotre site Web.
Lorsque vous contactez le service
après-vente, vous avez besoin du numéro de produit (E-Nr.) et du numéro
de fabrication (FD) de votre appareil.
Vous trouverez les coordonnées du
service après-vente dans la liste figurant à la fin de cette notice d’utilisation
ou sur notre site Web.
Numéro de produit (E-Nr) et
numéro de fabrication (FD)
Le numéro de série ( E-Nr.) et le numéro de fabrication ( FD) sont indiqués
sur la plaque signalétique de l’appareil.
Pour retrouver rapidement les données
de votre appareil ainsi que le numéro
de téléphone du service après-vente,
notez ces données.
Les conditions de garantie applicables
sont celles publiées par notre distributeur dans le pays où a été effectué
l’achat. Le revendeur chez qui vous
vous êtes procuré l’appareil fournira les
modalités de garantie sur simple demande de votre part. En cas de recours en garantie, veuillez toujours
vous munir de la preuve d’achat.
Données techniques
Vous trouverez ici les chiffres et faits
concernant votre appareil.
Tension 220–240V∼
Fréquence 50Hz
Tension/puissance raccordée 1500W
Pression statique maximale de
la pompe
Contenance maximale du ré-
servoir d’eau (sans filtre)
Contenance maximale du ré-
servoir pour café en grains
Longueur du cordon d’alimen-
tation
Hauteur de l’appareil 37,3cm
Largeur de l’appareil 24,9cm
Profondeur de l’appareil 42,8cm
Poids à vide 8-9kg
Type de moulin Céramique
15bar
1,7l
270g
100cm
Conditions de garantie
Les conditions de garantie de votre appareil sont les suivantes.
76
Page 77

Inhoudsopgave
Veiligheid........................................78
Algemene aanwijzingen ...................78
Bestemming van het apparaat .........78
Inperking van de gebruikers.............78
Veiligheidsaanwijzingen ...................79
Milieubescherming en besparing ...82
Afvoeren van de verpakking.............82
Energie besparen ............................82
Opstellen en aansluiten..................82
Inhoud van de verpakking................82
Apparaat opstellen en aansluiten .....82
Uw apparaat leren kennen ..............83
Apparaat..........................................83
Bedieningselementen.......................83
Display ............................................83
Drankenoverzicht ...........................84
Accessoires....................................85
Voor het eerste gebruik ..................85
Eerste keer in gebruik nemen ..........85
Watertank vullen ..............................85
Bonenreservoir vullen ......................85
Taal instellen....................................86
Waterhardheid instellen....................86
Algemene aanwijzingen ...................86
De bediening in essentie ................87
Apparaat in- of uitschakelen.............87
Drankafname ...................................87
Koffiedrank uit verse bonen afne-
men.................................................88
Koffiedrank uit gemalen koffie af-
nemen .............................................88
Drankafname met melk....................88
Melkreservoir gebruiken...................89
Koffiedrank met melk afnemen.........89
Speciale dranken afnemen ..............90
nl
Melkschuim afnemen.......................90
Heet water tappen ...........................90
Drankinstellingen .............................90
Waterfilter ........................................92
Kinderslot.......................................93
Kinderslot inschakelen.....................93
Kinderslot uitschakelen ....................93
Kopjesverwarming1........................93
Basisinstellingen............................93
Overzicht van de basisinstellingen ...93
Basisinstellingen wijzigen.................94
Reiniging en onderhoud.................94
Vaatwasserbestendigheid ................94
Reinigingsmiddelen .........................95
Apparaat reinigen ............................96
Lekschaal en koffiedikreservoir
reinigen ...........................................96
Poederschacht reinigen ...................96
Melksysteem spoelen ......................97
Melkreservoir reinigen......................97
Zetgroep reinigen ............................98
Serviceprogramma's ........................98
Storingen verhelpen .....................102
Aanwijzingen op het display...........102
Functiestoringen ............................104
Probleem resultaat.........................105
Transporteren, opslaan en afvoe-
ren ................................................108
Vorstbeveiliging .............................108
Afvoeren van uw oude apparaat ....108
Servicedienst................................108
Productnummer (E-nr.) en produc-
tienummer (FD)..............................109
Garantievoorwaarden.....................109
Technische gegevens...................109
1
Afhankelijk van de apparaatuitvoering
77
Page 78

nl Veiligheid
Veiligheid
Houd de informatie omtrent veiligheid aan, zodat u het apparaat
veilig kunt gebruiken.
Algemene aanwijzingen
Hier vindt u algemene informatie over deze gebruiksaanwijzing.
¡ Lees deze gebruiksaanwijzing zorgvuldig door. Alleen dan kunt
u het apparaat veilig en efficiënt gebruiken.
¡ Deze gebruiksaanwijzing is bestemd voor de gebruiker van het
apparaat.
¡ Neem de veiligheidsvoorschriften en waarschuwingen in acht.
¡ Bewaar de gebruiksaanwijzing en de productinformatie voor la-
ter gebruik of voor volgende eigenaren.
¡ Controleer het apparaat na het uitpakken. Sluit het apparaat in
geval van transportschade niet aan.
Bestemming van het apparaat
Om het apparaat veilig en op de juiste manier te gebruiken dient
u de aanwijzingen over het beoogd gebruik in acht te nemen.
Gebruik het apparaat uitsluitend:
¡ volgens deze gebruiksaanwijzing.
¡ om hete drank te bereiden.
¡ voor huishoudelijk gebruik en in gesloten ruimtes binnen de hui-
selijke omgeving.
¡ tot een hoogte van maximaal 2000m boven zeeniveau.
Koppel het apparaat van de stroomvoorziening los als u:
¡ het apparaat reinigt.
Inperking van de gebruikers
Voorkom risico's voor kinderen en kwetsbare personen.
Dit apparaat kan worden bediend door kinderen vanaf 8 jaar en
door personen met fysieke, sensorische of geestelijke beperkingen of met gebrekkige ervaring en/of kennis, indien zij onder toezicht staan of zijn geïnstrueerd in het veilige gebruik van het apparaat en de daaruit resulterende gevaren hebben begrepen.
78
Page 79

Page 80

Page 81

Page 82

Page 83

Uw apparaat leren kennen nl
1
2
3
4
5
6
7
8
9
10
11
12
13
14
15
16
2. Het apparaat op een waterbestendig
horizontaal oppervlak met voldoende
draagkracht plaatsen.
3. Het apparaat met de stekker op een
reglementair geïnstalleerd geaard
stopcontact aansluiten.
Uw apparaat leren kennen
Lees meer over de onderdelen van uw
apparaat.
Apparaat
Hier vindt u een overzicht van de onderdelen van uw apparaat.
AanwijzingAfhankelijk van het apparaattype zijn kleur- en detailafwijkingen
mogelijk.
→Afb.
2
Watertank
Deksel watertank
Kopjesverwarming
Aromadeksel
Bonenreservoir
Poederschacht
Display
Bedieningspaneel
Kopjesverlichting
Deksel
Melksysteem
Uitloopsysteem
1
Afhankelijk van de apparaatuitvoering
1
1
Deur van zetkamer
Typeplaatje
Lekschaal
Melkreservoir
1
Afhankelijk van de apparaatuitvoering
Bedieningselementen
Hier vindt u een overzicht van de symbolen van het apparaat. Druk op de
symbolen om een keuze te maken, een
afname te starten of een instelling uit te
voeren.
Symbool Verklaring
Apparaat inschakelen/uitschakelen
Menu openen/menu verlaten
AanwijzingDe menutoetsen zijn alleen bij geopend menu zichtbaar.
In het menu naar boven navigeren
In het menu naar beneden navige-
ren
In het menu bevestigen/opslaan
In het menu teruggaan
Twee kopjes afnemen
Koffiesterkte selecteren
Inhoud aanpassen
Starten/stoppen
Display
Op het display worden de geselecteerde dranken, instellingen en instelmogelijkheden, evenals meldingen over de
bedrijfstoestand weergegeven.
Het display toont extra informatie en uit
te voeren stappen. De informatie wordt
na korte tijd of na het indrukken van
een toets verborgen. De uit te voeren
stappen worden verborgen nadat deze
zijn uitgevoerd.
83
Page 84

Page 85

Page 86

nl Voor het eerste gebruik
▶
Het reservoir niet met gemalen koffie
vullen.
1. Het deksel openen.
2. De koffiebonen vullen.
Het apparaat stelt zich bij de volgende bereidingen in op de koffiebonen.
3. Het deksel sluiten.
Tip:Om de kwaliteit optimaal te hou-
den bewaart u de koffiebonen koel en
afgesloten.
U kunt de koffiebonen meerdere dagen
in het bonenreservoir bewaren zonder
dat het aroma verloren gaat.
Taal instellen
1. Het apparaat met inschakelen.
a Op het display verschijnt de voorin-
gestelde taal.
2. Op of drukken tot de ge-
wenste taal op het display wordt
weergegeven.
3. Op drukken.
Tip:U kunt de taal op elk moment wij-
zigen.
→"Overzicht van de basisinstellingen",
Pagina93
Waterhardheid instellen
De juiste instelling van de waterhardheid is van belang, opdat het apparaat
tijdig meldt, dat het moet worden ontkalkt. U kunt de waterhardheid bepalen
met behulp van het bijgevoegde teststrookje of opvragen bij uw waterleidingbedrijf.
1. Het teststrookje kort in schoon lei-
dingwater dopen.
2. Het teststrookje laten uitlekken.
a Het teststrookje geeft na 1minuut
de waterhardheid aan.
3. Als in het huis een wateronthardings-
inrichting is geïnstalleerd, "Onthardingssyst." instellen.
4. Op of drukken tot de ge-
wenste waterhardheid op het display
wordt weergegeven.
De tabel toont de toekenning van de
niveaus aan de graden van waterhardheid:
Stand Duitse hard-
heid in °dH
Totale hardheid in
(mmol/l)
1 1-7 0.18 - 1.25
2 8-14 1.42 - 2.49
3 15-21 2.67 - 3.74
1
4
1
Fabrieksinstelling (kan afhankelijk van het
22-30 3.92 - 5.34
apparaattype afwijken)
5. Op drukken.
6. Controleren of het bonenreservoir
gevuld is.
7. Op drukken.
a Het apparaat spoelt.
a Als op het bedieningspaneel de
symbolen voor de drankselectie en
de toetsen oplichten, is het apparaat
klaar voor gebruik.
Tip:U kunt de waterhardheid op elk
moment wijzigen.
→"Overzicht van de basisinstellingen",
Pagina93
Algemene aanwijzingen
Neem de aanwijzingen in acht om het
apparaat optimaal te kunnen gebruiken.
Aanwijzingen
¡ Het apparaat is in de fabriek inge-
steld op de standaardinstellingen
voor optimaal gebruik.
¡ Het maalwerk is in de fabriek inge-
steld op een optimale werking. Wanneer de koffie er slechts druppelend
uit komt of te dun is en te weinig
crema heeft, kunt u de maalgraad
aanpassen.
→"Maalgraad instellen", Pagina91
86
Page 87

Page 88

nl De bediening in essentie
Aanwijzingen
¡ Als u ca.5seconden lang geen in-
stelling wijzigt, verlaat het apparaat
de instelmodus. De instellingen worden automatisch opgeslagen.
¡ Bij enkele instellingen wordt de kof-
fie in meerdere stappen bereid.
Wacht tot de bereiding helemaal voltooid is.
Koffiedrank uit verse bonen
afnemen
1. Het voorverwarmde kopje onder het
uitloopsysteem plaatsen.
2. Op het dranksymbool voor een kof-
fiedrank zonder melk drukken.
a Op het display worden de drank en
actuele instellingen weergegeven.
→"Drankinstellingen", Pagina90
3. De instellingen indien nodig wijzigen:
‒ De inhoud met aanpassen.
→"Inhoud aanpassen",
Pagina91
‒ De koffiesterkte met aanpas-
sen.
→"Koffiesterkte aanpassen",
Pagina90
4. Op drukken.
De koffiebonen worden voor elk zetproces vers gemalen.
a De koffie wordt gezet en loopt ver-
volgens in het kopje.
Tips
¡ U kunt de afname met voortijdig
beëindigen.
¡ In het navolgende leert u hoe u kof-
fiedranken met melk kunt afnemen.
→"Drankafname met melk",
Pagina88
Koffiedrank uit gemalen koffie
afnemen
LET OP!
De poederschacht kan verstopt raken.
▶
Geen koffiebonen gebruiken.
▶
Geen oploskoffie gebruiken.
▶
De resten gemalen koffie in de poederschacht met een zacht kwastje in
de schacht vegen.
Aanwijzing
Bij de bereiding met gemalen koffie zijn
de volgende functies niet beschikbaar:
¡ Twee kopjes tegelijk
¡ Koffiesterkte
¡ "doubleshot"
1. Het voorverwarmde kopje onder het
uitloopsysteem plaatsen.
2. Op het symbool voor de gewenste
drank drukken.
3. Net zo vaak op drukken tot "Gem.
koffie" op het display verschijnt.
4. De poederschacht openen.
5. Maximaal 2 afgestreken maatschep-
jes met gemalen koffie vullen, max.
12g.
6. De poederschacht sluiten.
7. Op drukken.
a De koffie wordt gezet en loopt ver-
volgens in het kopje.
Tips
¡ U kunt de afname met voortijdig
beëindigen.
¡ Als u nog een drank met gemalen
koffie wilt afnemen, herhaalt u het
proces.
¡ Breng de gemalen koffie altijd pas
kort voor de drankbereiding aan.
Drankafname met melk
U kunt met het apparaat koffiedranken
met melk en melkschuim afnemen.
Tip:In plaats van melk kunt u ook
plantaardige dranken zoals sojamelk
gebruiken.
AanwijzingDe kwaliteit van het melkschuim is afhankelijk van de gebruikte
soort melk of plantaardige drank.
88
Page 89

Page 90

Page 91

Page 92

nl De bediening in essentie
LET OP!
Gevaar voor schade aan het maalwerk.
Bij ondeskundige instelling van de
maalgraad kan het maalwerk worden
beschadigd.
▶
De maalgraad alleen bij een draaiend maalwerk instellen.
▶
De maalgraad met de draaiknop
trapsgewijs instellen.
Maalgraad Instelling
Fijne maalgraad
voor donker ge-
Draaiknop tegen de
klok in draaien.
brande bonen.
Grove maalgraad
voor licht gebrande
Draaiknop met de klok
mee draaien.
bonen.
De instelling van de maalgraad is
pas merkbaar vanaf het tweede kopje koffie.
Tip:Wanneer de koffie er slechts druppelend uit komt, stel de maalgraad dan
grover in.
Wanneer de koffie te dun is en te weinig crema heeft, stel de maalgraad dan
fijner in.
Waterfilter
Met een waterfilter vermindert u de
kalkafzettingen en vermindert u de verontreinigingen in het water.
Waterfilter plaatsen
LET OP!
Mogelijke apparaatschade door verkalking.
▶
Het waterfilter bijtijds vervangen.
▶
Het waterfilter uiterlijk na 2maanden
vervangen.
AanwijzingAls op het display "Waterfilter verv." wordt weergegeven, vervang
dan het waterfilter.
Als u geen nieuw filter plaatst, selecteer dan "Geen filter" en volg de aanwijzingen op het display op.
1. Het waterfilter in een glas water on-
derdompelen tot alle lucht is ontsnapt.
→Afb.
2. Op drukken.
3. Met of "Waterfilter" selecteren
3
en op drukken.
4. Met of "Nieuw filter" of "Water-
filter verv." selecteren en op drukken.
5. AanwijzingAls u geen nieuw filter
plaatst, selecteer dan "Geen filter" in
de menu-instellingen.
Het waterfilter stevig in de watertank
drukken en op drukken.
→Afb.
6. De watertank tot de markering "max"
4
met water vullen en op drukken.
7. De melkhouder links aan het appa-
raat verwijderen.
8. Een kan met een capaciteit van 1l
onder het uitloopsysteem plaatsen
en op drukken.
a Het filter wordt gespoeld en de indi-
catie "Het spoelen is voltooid." verschijnt.
a Het apparaat is klaar voor gebruik.
Tips
¡ Verwissel het waterfilter ook om hy-
giënische redenen.
¡ Met een waterfilter hoeft u het appa-
raat minder vaak te ontkalken.
¡ Spoel het geplaatste waterfilter vóór
gebruik door een kopje heet water af
te nemen, wanneer u het apparaat
bijvoorbeeld tijdens een vakantie langere tijd niet hebt gebruikt.
¡ Het waterfilter is verkrijgbaar in de
handel of via de servicedienst.
→"Accessoires", Pagina85
92
Page 93

Page 94

nl Reiniging en onderhoud
Instelling Keuze Beschrijving
Koffietemperatuur normaal
hoog
max.
Temperatuur voor koffiedranken
instellen.
AanwijzingDe instelling geldt
voor alle soorten bereiding.
Talen Zie de keuze op het apparaat. Menutaal instellen.
Wijzigingen zijn direct op het display te zien.
Autom. uitschak. Zie de keuze op het apparaat. Tijdsperiode instellen na afloop
waarvan het apparaat na de laatste drankbereiding automatisch
wordt uitgeschakeld.
Waterhardheid 1 (zacht)
2 (gemiddeld)
3 (hard)
4 (zeer hard)
2
Apparaat instellen op de plaatselijke waterhardheid.
→"Waterhardheid instellen",
Pagina86
Waterontharding
Toetssignalen Toetssignalen aan
2
Toetssignalen in- of uitschakelen.
Toetssignalen uit
Fabrieksinstelling Alles resetten?
Doorgaan: OK
Annuleren: ←
Instellingen terugzetten naar de
fabriekstoestand.
AanwijzingAlle individuele instellingen worden gewist en teruggezet naar de fabrieksinstellingen.
1
Afhankelijk van de apparaatuitvoering
2
Fabrieksinstelling (kan afhankelijk van het apparaattype afwijken)
Basisinstellingen wijzigen
1. Op drukken.
2. Met of de gewenste basisin-
stelling selecteren en op drukken.
a Op het display verschijnen de instel-
mogelijkheden en lichten de navigatiesymbolen op. Op het display
wordt de actuele instelling gemarkeerd.
3. Met of de gewenste keuze
maken en op drukken.
a De instelling is opgeslagen.
4. Met teruggaan.
5. Om het menu te verlaten op
drukken.
94
Reiniging en onderhoud
Reinig en onderhoud uw apparaat
zorgvuldig om er voor te zorgen dat het
lang goed blijft werken.
Vaatwasserbestendigheid
In het navolgende leert u welke componenten in de vaatwasser kunnen worden gereinigd.
Page 95

Page 96

Page 97

Page 98

Page 99

Reiniging en onderhoud nl
Afhankelijk van de waterhardheid en
het gebruik van het apparaat worden
op het display na een
vooraankondiging de volgende
meldingen weergegeven:
¡ "Aub melksysteem reinigen."
¡ "Ontkalken nodig. Aub 3 sec op me-
nu drukken"
¡ "Reinigen nodig. Aub 3 sec op menu
drukken"
¡ "calc'nClean nodig. Aub 3 sec op
menu drukken"
Aanwijzingen
¡ Op het display wordt aangegeven
hoe ver het proces is voortgeschreden.
¡ Als het apparaat niet bijtijds is ont-
kalkt, wordt op het display "Ontkalken over tijd. Apparaat is geblokkeerd. Aub 3 sec op menu drukken"
weergegeven.
¡ Als het apparaat is geblokkeerd, kan
dit pas weer na het ontkalken worden bediend.
¡ Als u het serviceprogramma per on-
geluk heeft onderbroken, moet u het
terugzetten.
→"Serviceprogramma's terugzetten",
Pagina99
Tips
¡ Als u een waterfilter gebruikt, wordt
het interval voor uitvoering van het
serviceprogramma verlengd.
¡ In het serviceprogramma calc´n-
Clean zijn het ontkalken en reinigen
in één functie gecombineerd.
→"calc'nClean gebruiken",
Pagina101
¡ Reinig het apparaat direct na een
serviceprogramma met een zachte
vochtige doek om resten ontkalkingsoplossing te verwijderen en
corrosie te vermijden.
Serviceprogramma's terugzetten
Voer de volgende stappen uit als een
serviceprogramma bijvoorbeeld door
een stroomuitval is onderbroken.
1. De watertank uitspoelen.
2. De watertank tot de markering "max"
met vers water zonder koolzuur vullen.
3. Op drukken.
a Het apparaat wordt ca.2minuten
gespoeld.
4. De lekschaal leegmaken en reinigen.
5. De lekschaal aanbrengen en de
deur sluiten.
6. Het serviceprogramma opnieuw star-
ten.
Melksysteem reinigen gebruiken
Spoel het melksysteem indien nodig
met water. Het spoelen duurt ca.1minuut.
1. Op drukken.
2. Met en "Reiniging" selecteren
en op drukken.
3. Met en "Melksysteem" selec-
teren en op drukken.
4. Om het programma te starten op
drukken.
a Op display ziet u de nodige aanwij-
zingen.
5. Het melkreservoir verwijderen en
leegmaken.
6. Het melkreservoir, het melkslangetje
en het aanzuigbuisje reinigen.
7. De componenten monteren en het
melkreservoir aanbrengen.
8. Een leeg glas onder het uitloopsys-
teem plaatsen en op drukken.
Het melksysteem wordt automatisch
gereinigd.
a Het programma is beëindigd en het
apparaat is klaar voor gebruik.
Tip:Als u het melksysteem bijzonder
grondig wilt reinigen, reinigt u het regelmatig handmatig.
→"Melksysteem spoelen", Pagina97
99
Page 100

nl Reiniging en onderhoud
Ontkalken gebruiken
Voer het ontkalkingsprogramma uit zodra het apparaat dit vraagt. Het programma duurt ca.30minuten.
Voorwaarde:De zetgroep is gereinigd.
→"Zetgroep reinigen", Pagina98
1. Op drukken.
2. Met en "Reiniging" selecteren
en op drukken.
3. Met en "Ontkalken" selecte-
ren en op drukken.
4. Om het programma te starten op
drukken.
a Op display ziet u de nodige aanwij-
zingen.
5. De lekschaal leegmaken en terug-
plaatsen.
6. Het melkreservoir verwijderen en
leegmaken.
7. Het melkreservoir, het melkslangetje
en het aanzuigbuisje reinigen.
8. De componenten monteren en het
melkreservoir aanbrengen.
9. Als er een waterfilter aanwezig is, dit
filter verwijderen.
10.Op drukken.
11.De watertank leegmaken.
12.Een kan met 0,5l lauw water vullen.
13.Een Siemens-ontkalkingstablet in het
water doen en roeren tot de tablet
volledig is opgelost.
14.De ontkalkingsoplossing tot de mar-
kering "calc" in de watertank gieten
en op drukken.
15.De lege kan onder het uitloopsys-
teem plaatsen en op drukken.
a Het ontkalkprogramma loopt
ca.20minuten.
16.De watertank spoelen.
17.Op drukken.
18.Als er een waterfilter aanwezig is,
dan het waterfilter aanbrengen.
→"Waterfilter plaatsen", Pagina92
19.Op drukken.
20.Vul de tank met schoon water tot
aan de aanduiding “max”.
21.Op drukken.
a Het ontkalkingsprogramma loopt
ca.1minuut en spoelt het apparaat.
22.De lekschaal leegmaken en terug-
plaatsen.
23.Het melkreservoir verwijderen en
leegmaken.
24.Het melkreservoir, het melkslangetje
en het aanzuigbuisje reinigen.
25.De componenten monteren en het
melkreservoir aanbrengen.
a Het programma is beëindigd en het
apparaat is klaar voor gebruik.
Reinigen gebruiken
Voer het reinigingsprogramma uit zodra het apparaat dit vraagt. Het programma duurt ca.9minuten.
Voorwaarde:De zetgroep is gereinigd.
→"Zetgroep reinigen", Pagina98
1. Op drukken.
2. Met en "Reiniging" selecteren
en op drukken.
3. Met en "Reinigen" selecteren
en op drukken.
4. Om het programma te starten op
drukken.
a Op display ziet u de nodige aanwij-
zingen.
5. De lekschaal leegmaken en terug-
plaatsen.
6. De poederschacht openen.
7. Een Siemens-reinigingstab in de
poederschacht doen.
8. De poederschacht sluiten en op
drukken.
9. Een kan met een capaciteit van mini-
maal 0,5l onder het uitloopsysteem
plaatsen en op drukken.
a Het reinigingsprogramma loopt
ca.7minuten.
100
 Loading...