

Page 1
Fully automatic espresso machine
Machine à expresso automatique
Volautomatische espressomachine
Ekspres do kawy
Plně automatický kávovar
Автоматическая кофемашина
Kaffeevollautomat
TI 3.1.
en Instruction manual ........................................................................ 5
fr Mode d’emploi ............................................................................ 26
nl Gebruiksaanwijzing ..................................................................... 49
pl Instrukcja obsługi ........................................................................ 71
cs Návod k použití ...........................................................................94
ru ǪȋǻǽȃȆǻȊȉȆȗȂȉǽǻȈȃȚ ............................................................. 116
de Gebrauchsanleitung .................................................................. 138
Page 2
!
"
Page 3
#
,
,,
, ,, ,,,
FOLFN
,,,
$
,9 9 9,
Page 4
%
, ,, ,,,
&
'
,,
,9 9 9,
, ,, ,,,
,,,,
Page 5

en
Table of contents
enInstruction manual
8 Intended use. . . . . . . . . . . . . . . . . 6
. Service programmes. . . . . . . . . 20
Starting Calc’nClean . . . . . . . . . . . . . 21
( Important safety information . . . 6
3 Trouble shooting . . . . . . . . . . . . 22
7 Environmental protection . . . . . .8
Saving energy. . . . . . . . . . . . . . . . . . . 8
Environmentally-friendly disposal . . . . 8
* Getting to know your appliance .8
Included in delivery. . . . . . . . . . . . . . . 8
Assembly and components . . . . . . . . 9
Controls . . . . . . . . . . . . . . . . . . . . . . . 9
4 Customer service . . . . . . . . . . . 25
Technical data. . . . . . . . . . . . . . . . . . 25
E number and FD number. . . . . . . . . 25
Guarantee . . . . . . . . . . . . . . . . . . . . . 25
_ Accessories . . . . . . . . . . . . . . . . 10
K Before using for the first time. . 11
Installing and connecting the
appliance . . . . . . . . . . . . . . . . . . . . . 11
Commissioning the appliance . . . . . 11
1 Operating the appliance . . . . . . 12
Preparing coffee using freshly ground
beans . . . . . . . . . . . . . . . . . . . . . . . . 12
Preparing drinks with milk . . . . . . . . 13
Adjusting beverage settings . . . . . . . 14
Water filter . . . . . . . . . . . . . . . . . . . . 15
Frost protection. . . . . . . . . . . . . . . . . 15
1 Settings. . . . . . . . . . . . . . . . . . . . 16
Automatic switch-off . . . . . . . . . . . . . 16
Switching the audible signal on/off. . 16
Setting the water hardness . . . . . . . . 17
Factory reset. . . . . . . . . . . . . . . . . . . 17
D Daily care and cleaning. . . . . . . 18
Cleaning agent . . . . . . . . . . . . . . . . . 18
Cleaning the appliance. . . . . . . . . . . 18
Cleaning the drip tray and coffee
grounds container. . . . . . . . . . . . . . . 19
Cleaning the milk system . . . . . . . . . 19
Cleaning the brewing unit . . . . . . . . . 19
5
Page 6

en Intended use
8 Intended use
Intended use
Check the appliance for
damage after unpacking it. Do
not connect the appliance if it
has been damaged in
transport.
This appliance is intended for
domestic use only.
Only use the appliance indoors
at room temperature and up to
2000 m above sea level.
( Important safety
information
Important safety information
Please read carefully, follow
and retain the operating
instructions. When passing on
the appliance, enclose these
instructions.
This appliance can be used by
children aged from 8 years and
above and by persons with
reduced physical, sensory or
mental capabilities or lack of
experience and knowledge if
they have been given
supervision or instruction
concerning use of the
appliance in a safe way and if
they understand the hazards
involved. Keep children under
8 years of age away from the
appliance and connecting
cable and do not allow them to
use the appliance. Children
shall not play with the
appliance. Cleaning and user
maintenance shall not be made
by children unless they are
older than 8 years and
supervised.
6
Page 7

Important safety information en
:Warning
Danger of electric shock!
■ The appliance may only be
connected to a power supply
with alternating current via a
correctly installed socket
with earthing. Ensure that the
protective conductor system
of the domestic electricity
supply has been correctly
installed.
Risk of electric shock!
■ Connect and operate the
appliance only in
accordance with the
specifications on the rating
plate. If the power cord of
this appliance is damaged, it
must be replaced by
customer service.
Risk of electric shock!
■ Do not use if the power
cable or appliance is
damaged. If a fault occurs,
pull the mains plug or switch
off the mains voltage
immediately.
Risk of electric shock!
■ To prevent hazards, the
appliance may be repaired
by our customer service
only.
Risk of electric shock!
■ Never immerse the
appliance or mains cord in
water.
:Warning
Hazard due to magnetism!
The appliance contains
permanent magnets which may
affect electronic implants, e.g.
heart pacemakers or insulin
pumps. Persons with electronic
implants should keep a
minimum distance of 10 cm
from the appliance and the
water tank when removed.
:Warning
Risk of suffocation!
Do not let children play with
packaging material. Store small
parts safely as they can be
easily swallowed.
:Warning
Risk of burns!
The milk system becomes very
hot. After use, allow it to cool
down first before touching it.
:Warning
Risk of injury!
■ Improper use of this
appliance may result in
injury.
Risk of injury!
■ Do not reach into the
grinding unit.
7
Page 8
en Environmental protection
7 Environmental
protection
Environmental protection
Saving energy
■ If the appliance is not being used,
switch it off.
■ Set the interval for automatic
switch-off to the smallest value.
■ If possible, do not interrupt coffee or
milk froth dispensing. Stopping a
process prematurely results in
higher energy consumption and the
drip tray fills up more quickly.
■ Descale the appliance regularly to
avoid a build-up of limescale.
Limescale residue results in higher
energy consumption.
Environmentally-friendly disposal
Dispose of packaging in an
environmentally-friendly manner.
This appliance is labelled in
accordance with European
Directive 2012/19/EU
concerning used electrical and
electronic appliances (waste
electrical and electronic
equipment - WEEE). The
guideline determines the
framework for the return and
recycling of used appliances
as applicable throughout the
EU.
Please ask your dealer about current
disposal routes.
* Getting to know your
appliance
Getting to know your appliance
This section provides an overview of the
scope of delivery, the assembly and the
components of your appliance. It also
introduces you to the different controls.
Note: Depending on the appliance
model, individual details and colours
may differ.
How to use these instructions:
The cover pages of the operating
instructions can be folded out towards
the front. The illustrations are identified
using numbers that are referred to in the
operating instructions.
Example: ~ Fig. !
Included in delivery
~ Fig. !
# Fully automatic coffee machine
+ Water hardness testing strip
3 Instruction manual
; Milk frother
8
Page 9

Getting to know your appliance en
Assembly and components
~ Fig. "
( On / off button (stand-by mode)
0 Control panel
8 Handle of milk frother
@ Outlet system for coffee, height
adjustable
H Milk frother (holder, frother, cover),
height adjustable
Controls
Button Meaning
Switch the appliance on and off
k
espresso Dispensing Espresso
caffe crema Dispensing Caffe crema
cappuccino Dispensing cappuccino
latte macchiato Dispensing latte macchiato
milk Frothing up milk
% Coffee strength
calc’nClean Start the service programme
--------
The appliance rinses automatically when it is switched on and off.
The appliance is not rinsed if:
■ it is still warm when switched on, or
■ coffee was not dispensed before the appliance was switched off.
The appliance is ready for use when the LEDs of the buttons for selecting drinks light
up in the control panel. The appliance has automatic switch-off. ~ "Selecting
automatic switch-off" on page 16
Adjusting the coffee strength ~ "Adjusting beverage settings" on page 14
Flashes when the service programme needs to be performed.~ "Calc’nClean
service programme" on page 21
P Drip tray (coffee grounds
container, drip grate, drip plate,
float)
X Door of brewing chamber
` Rating plate
h Brewing unit
)" Aroma lid
)* Bean container
)2 Rotary selector for setting grinding
level
): Cover for water tank
)B Water tank
9
Page 10
en Accessories
Symbol
Lights up when the water tank needs to be topped up with water or the water tank is not
'
(
inserted.
Flashes when the water filter needs to be replaced.
Lights up when trays need to be emptied.
Flashes when door of brewing chamber is open.
is continu-
Ready to use, selection possible
ously lit
is pulsing Dispensing underway
is flashing Waiting for operation, e.g. with calc’nClean
off Not available
--------
_ Accessories
Accessories
The following accessories are available
from retailers or from customer service:
Accessory Order number
Retail Customer ser-
Cleaning tablets TZ80001 00311807
Descaling tablets TZ80002 00576693
Water filter TZ70003 00575491
Care set TZ80004 00576330
--------
The contact data for customer service in
all countries can be found at the back of
these instructions.
vice
10
Page 11

Before using for the first time en
K Before using for the
first time
Before using for the first time
In this section, you will learn how to
commission your appliance.
Note: Only use the appliance in
frost-free areas. If the appliance was
transported or stored at temperatures
below 0 °C, you must wait for at least
3 hours before using it.
Installing and connecting the appliance
1. Remove any protective plastic film.
2. Place the appliance on a level,
water-resistant surface which can
bear the weight.
3. Using the mains plug, connect the
appliance to an earthed socket that
has been correctly installed.
Note: After plugging in, always wait
(approx. 5 seconds).
Commissioning the appliance
Attaching milk frother
~ Fig. #
1. Remove milk frother parts from the
bag.
2. Assemble milk frother.
3. Attach the milk frother on the front of
the appliance.
Filling the bean container
This appliance can be used to make
coffee drinks from coffee beans.
1. Open the lid )" of the bean
container )*.
2. Pour in coffee beans.
3. Close the lid again.
Notes
■ Coffee beans that have been glazed
or caramelised or that contain other
sugary additives block the brewing
unit. Only use pure bean mixes that
are suitable for use in fully automatic
espresso or coffee machines.
■ The coffee beans are freshly ground
for each brewing process.
■ Keep the coffee beans sealed and
stored in a cool place to maintain
optimum quality.
■ Coffee beans can be stored in the
bean container for a number of days
without losing their aroma.
Filling the water tank
Important: Fill the water tank with fresh,
cold, still water on a daily basis. Prior to
operation, check whether the water tank
has been sufficiently filled.
1. Carefully remove the cover of the
water tank.
2. Use the handle to remove the water
tank.
3. Fill the water tank with water up to
the "max" marking.
4. Put the water tank back in the holder
again, keeping it straight, and fit the
cover of the water tank.
11
Page 12
en Operating the appliance
General information
The factory settings of the fully
automatic coffee machine are
programmed for optimal performance.
■ The appliance switches off
automatically after a specific time.
■ Whenever a button is pressed, a
signal sounds. It can be switched
off.~ "Settings" on page 16
■ When the appliance is used for the
first time, after running a service
programme or has not been
operated for a long period, the first
beverage will not have the full aroma
and should not be consumed.
■ After commissioning the appliance,
you will only achieve a suitably thick
and stable "crema" after the first few
cups have been dispensed.
■ If the appliance is in use for a long
period of time, water droplets will
form on the ventilation slots. This is
normal.
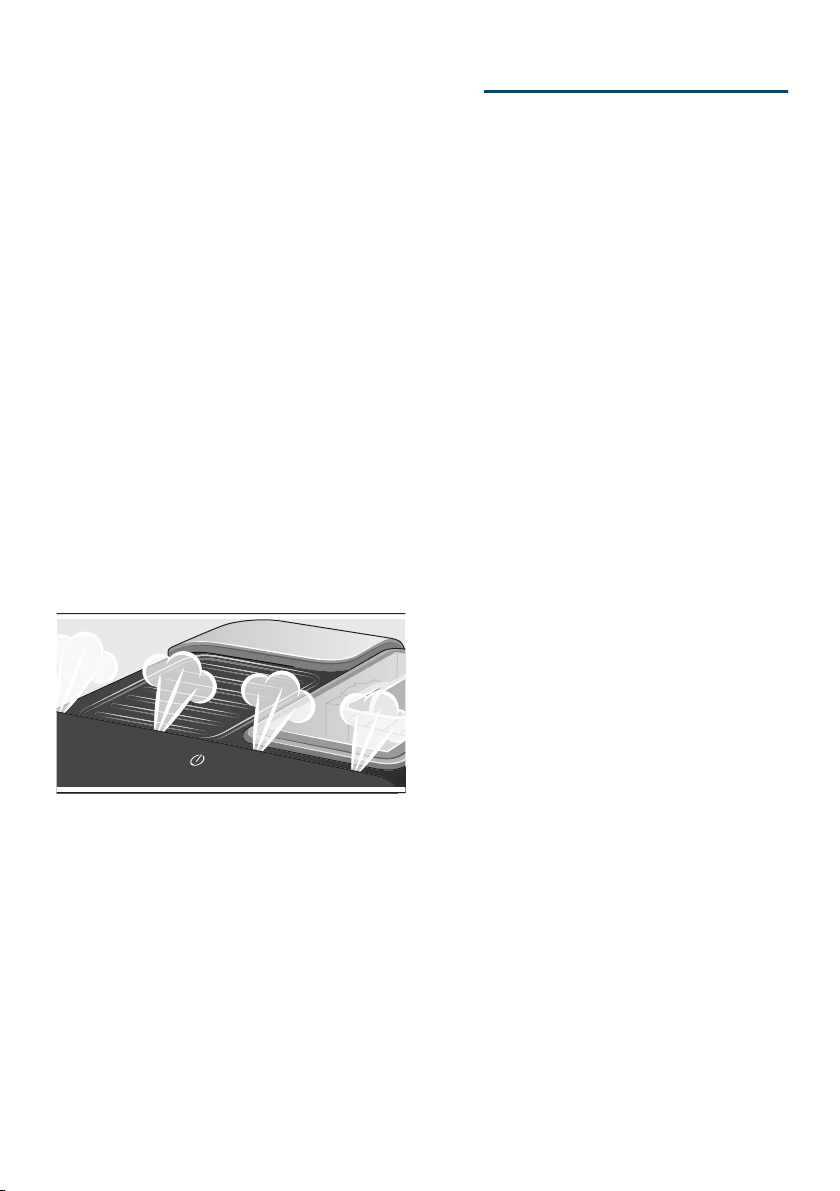
■ Escaping steam is not a fault but
due to the design of the machine.
1 Operating the
appliance
Operating the appliance
In this section, you will learn how to
make beverages with coffee and milk. It
contains information about settings,
water filters and adjustment of the
grinding level, in addition to frost
protection.
Note: Freshly prepared beverages may
be very hot.
Preparing coffee using freshly ground beans
You can choose between Espresso and
Caffe crema. ~ "Preparing drinks with
milk" on page 13
The appliance is switched on. The water
tank and bean container have been
filled.
1. Place a cup under the outlet system.
2. Touch % repeatedly to select
the required coffee strength.
3. Touch the espresso or caffe crema
button.
The coffee is brewed and then
dispensed into the cup.
Before using your new appliance, you
should check and select the water
hardness.~ "Settings" on page 16
12
Note: To stop dispensing the drink
before the end, touch espresso or caffe
crema again.
Page 13
Operating the appliance en
Preparing drinks with milk
This appliance has a milk frother. You
can make drinks of coffee with milk or
froth up milk.
Note: Dried milk residues are difficult to
remove so always perform
cleaning.~ "Daily care and cleaning"
on page 18
:Warning
Risk of burns!
The milk frother gets very hot. Hold only
by the handle. After use, let it cool down
first before touching it.
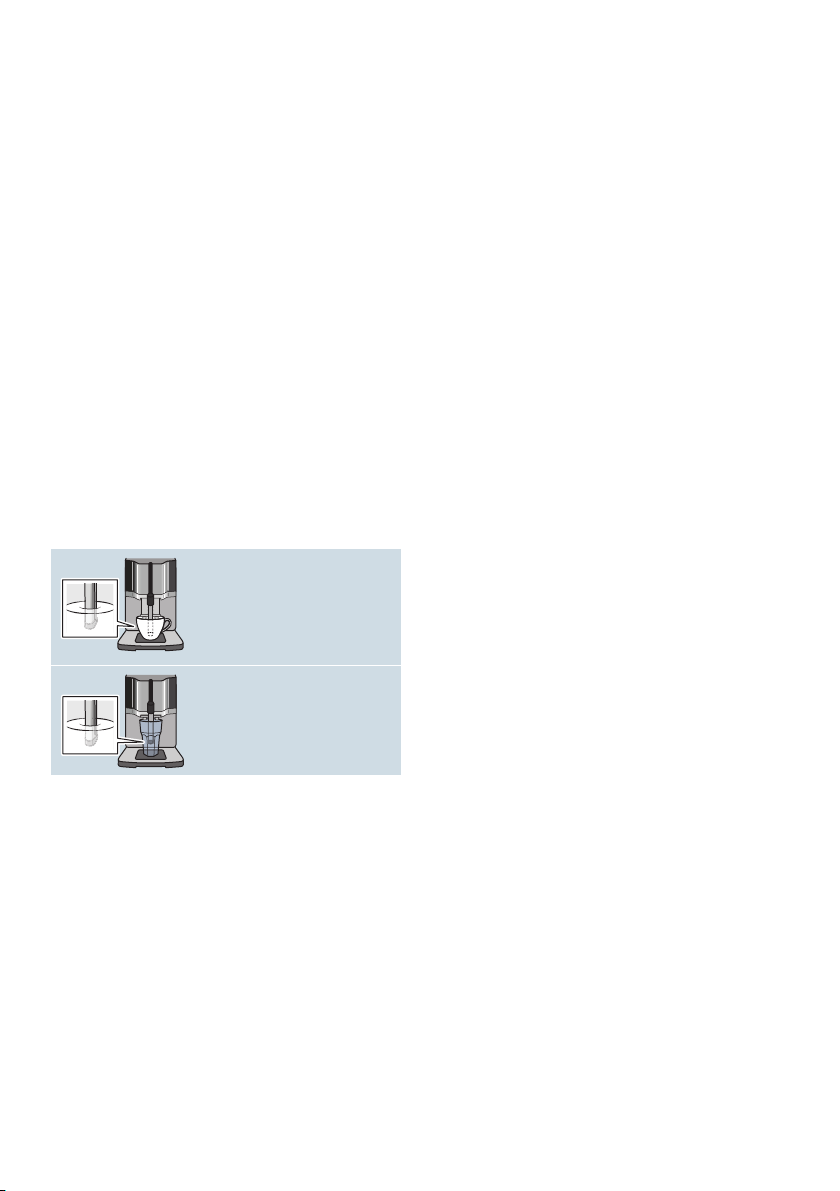
Coffee drinks with milk
You can choose between cappuccino
and latte macchiato. When doing so,
please check the position of the coffee
dispenser and milk frother.
Cappuccino
Latte Macchiato
The milk frother is installed.
1. Fill a large cup or a large glass with
approx. 100 ml milk for cappuccino
and approx. 150 ml milk for latte
macchiato.
2. Place a cup or a glass under the
outlet system.
3. Push the coffee dispenser and milk
frother right down.
4. Touch % repeatedly to select
the required coffee strength.
5. Touch the cappuccino or latte
macchiato button.
The milk is first frothed up in the cup or
glass. The coffee is then brewed and
dispensed into the cup or glass.
Note: To stop current dispensing of the
drink before the end, touch cappuccino
or latte macchiato again.
Frothing up milk
The appliance is switched on. The water
tank has been filled.
The milk frother is installed.
1. Fill a large cup or a large glass with
approx. 100 ml milk.
2. Place a cup or a glass under the
outlet system.
3. Push the coffee dispenser and milk
frother right down.
4. Touch the milk button.
The milk is frothed up.
The appliance is switched on. The water
tank and bean container have been
filled.
Note: To stop the process before the
end, touch milkagain.
13
Page 14
en Operating the appliance
Adjusting beverage settings
Adjusting beverage settings
Coffee strength
Before making a drink, you can adjust
the coffee strength:
To do so, touch % to select the
strength you require.
mild
regular
strong
Note: The coffee strength selected is
then active for all drinks made with
coffee.
Filling level
You can adjust the filling level of your
drinks.
Press and hold espresso or caffe
crema for 3 seconds.
Dispensing takes place, with the button
selected flashing.
Once the required filling level is reached
in the cup, touch the button selected to
stop. The new filling level is only
apparent after the next drink is
dispensed.
Once the required frothing time is
reached, touch the button selected to
stop.
Note: Setting the frothing time has no
impact on the amount of coffee.
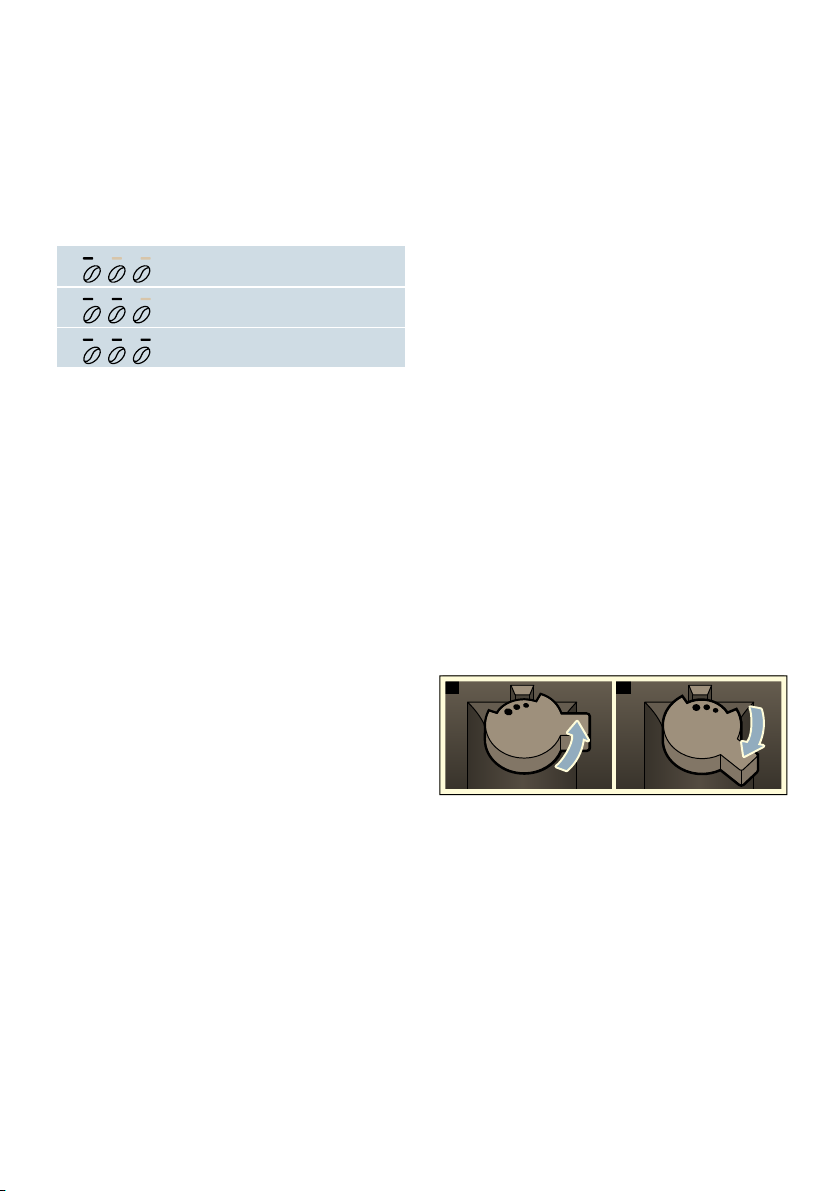
Setting the grinding level
This appliance features an adjustable
grinder. This enables the grinding level
of the coffee to be individually changed.
:Warning
Risk of injury!
Do not reach into the grinding unit.
Caution!
The appliance may be damaged! Only
adjust the grinding level when the
grinder is running!
When the grinder is in operation, use
the rotary selector )2 to set the
grinding level.
■ Finer grinding level: turn
anticlockwise. (Fig. a)
■ Coarser grinding level: turn
clockwise. (Fig. b)
D E
Note: The filling level can be selected
either for Espresso (25 - 60 ml) or Caffe
crema (80 - 200 ml).A minimum
quantity is always brewed: Espresso
approx. 25 ml and Caffe crema
approx. 80 ml.
Frothing time
You can adjust the frothing time of your
drinks.
Press and hold cappuccino, latte
macchiato or milk for 3 seconds.
The milk is frothed up, and the button
selected flashes.
14
Notes
■ The new setting will not become
apparent until after the second cup
of coffee.
■ Set a finer grinding level with
dark-roasted coffee beans and a
coarser grinding level with lighter
coffee beans.
Page 15

Operating the appliance en
Water filter
Water filter
~ Fig. '
A water filter lessens limescale
deposits, reduces impurities in water
and improves the taste of the coffee.
Water filters are available from retailers
or from customer service.
Inserting or replacing a water filter
A new water filter must be rinsed before
it can be used.
The appliance is switched on. The water
tank has been filled.
1. Press and hold % and
calc’nClean for at least 3 seconds.
2. Touch espresso button, and "W.
hardness" will be activated.
3. Touch % button and make the
following selection:
with water filter
4. Immerse the water filter (opening
facing up) in a container filled with
water until no more air bubbles rise
to the surface.
~ Fig. '
5. Then press the water filter firmly into
the empty water tank.
6. Fill the water tank with water up to
the "max" marking.
7. Place a container with a capacity of
1.0 litre under the outlet.
8. Touch espresso button to save the
setting and activate rinsing.
9. Insert water tank.
10. Touch espresso button to save the
setting and start rinsing. Water will
now flow through the filter.
11. Touch calc’nClean button to exit the
menu.
12. Then empty the container. The
appliance is ready for use again.
Removing the water filter
If the water filter has been removed and
no new one inserted, please select the
appropriate water hardness. ~ "Setting
the water hardness" on page 17
Frost protection
To prevent frost damage during
transportation and storage, the
appliance must be completely emptied
beforehand.
Info: The appliance must be ready for
use and the water tank filled.
1. Place a large container under the
outlet of the milk frother and push
the frother down.
2. Press and hold milk button for at
least 5 seconds.
The LED in the button flashes, and
the appliance now heats up.
3. As soon as steam escapes from the
milk frother, remove the water tank.
4. Allow the appliance to cool down.
Wait until ' symbol and all LEDs are
flashing.
5. Use k button to switch the
appliance off.
6. Empty the water tank and the drip
tray and thoroughly clean the
appliance.
The appliance can now be transported
or stored.
Note: The brewing unit is now secured
and cannot be removed.
15
Page 16
en Settings
1 Settings
Settings
This appliance has different factory
settings. You can customise the settings
on the appliance.
Note: If no button is pressed within
90 seconds, the appliance switches to
"Choose beverage" without saving. The
previous setting remains unchanged.
You can select the following settings:
Automatic switch-off
Selecting automatic switch-off
The appliance switches off automatically
at a specific time after the last button
was pressed. This time can be selected,
with settings from 15 minutes to
4 hours possible here.
1. Press and hold % and
calc’nClean for at least 3 seconds.
2. Touch caffe crema button and
"Automatic switch-off" will be
activated.
3. Touch % button and select the
required time.
The following settings are possible:
15 minutes
30 minutes (factory setting)
1 hour
2 hours
4 hours
Switching the audible signal on/off
Whenever a button is pressed, an
audible signal sounds.
This can be switched on or off.
1. Press and hold % and
calc’nClean for at least 3 seconds.
2. Touch cappuccino button, and
"Signal tone" menu will be activated.
3. Touch % button and switch
signal tone on or off.
On (factory setting)
Off
4. Touch cappuccino button to save
the setting.
5. Touch calc’nClean button to exit the
menu.
4. Touch caffe crema button to save
the setting.
5. Touch calc’nClean button to exit the
menu.
16
Page 17
Settings en
Setting the water hardness
It is important to set the water hardness
correctly so that the appliance indicates
in good time when the descaling
programme should be run. The preset
water hardness is level 4.
You can check the water hardness
using the enclosed test strip or by
asking your local water supplier.
1. Briefly immerse the enclosed test
strip in fresh tap water, leave it to
drip and read off the result after one
minute.
2. Press and hold % and
calc’nClean for at least 3 seconds.
3. Touch espresso button, and "W.
hardness" will be activated.
4. Touch % button and select the
water hardness.
The following settings are possible:
W. hardness 1
W. hardness 2
W. hardness 3
W. hardness 4 (factory setting)
Water filter (when used)
H2O-Softener (if available)
Subsequent changes to the water
hardness can be made at any time.
Note: When using the water filter (see
section "Accessories"), proceed as
follows. ~ "Water filter" on page 15
Factory reset
If you set the appliance back to the
factory settings, you will lose your own
settings.
1. Press and hold % and
calc’nClean for at least 3 seconds.
2. Touch latte macchiato button.
The factory settings are reactivated.
3. Touch calc’nClean button to exit the
menu.
5. Touch espresso button to save the
setting.
6. Touch calc’nClean button to exit the
menu.
The table shows the allocation of the
levels to the different degrees of water
hardness:
Level Degree of water hardness
German (°dH) French (°fH)
1 1-7 1-13
2 8-14 14-25
3 15-21 26-38
4 22-30 39-54
17
Page 18
en Daily care and cleaning
D Daily care and
cleaning
Daily care and cleaning
With good care and cleaning, your
appliance will remain fully functioning
for a long time to come. In this section,
you will learn how to correctly clean and
care for your appliance.
:Warning
Risk of electric shock!
Before cleaning the appliance, pull out
the mains plug. Never immerse the
appliance in water. Do not use a steam
cleaner.
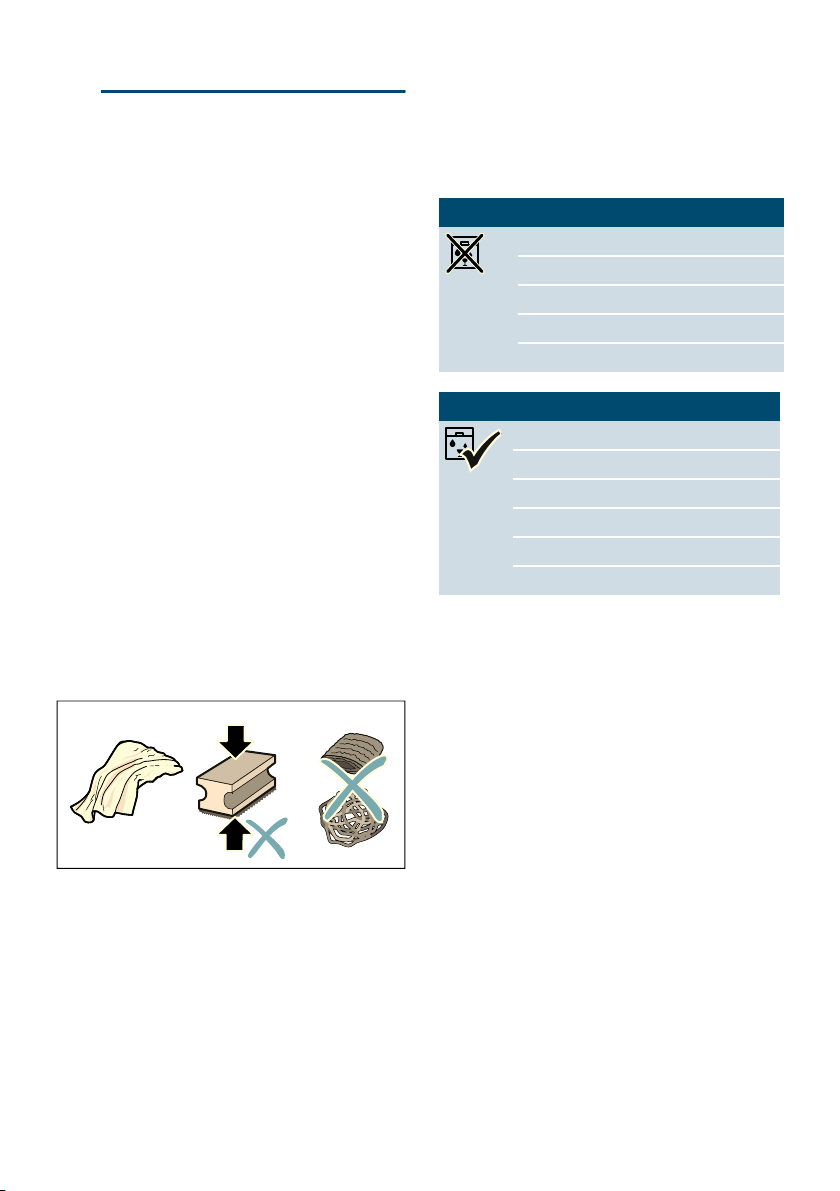
Cleaning agent
Please observe the following
information to ensure that the different
surfaces are not damaged by using the
wrong type of cleaning agent.
Do not use:
■ Harsh or abrasive cleaning agents.
■ Any cleaning agents containing
alcohol or spirits.
■ Hard scouring pads or sponges.
9
Caution!
Not all of the appliance's components
can be cleaned in the dishwasher.
~ Fig. % - '
Not dishwasher-safe:
Water tank
Cover for water tank
Aroma lid
Brewing unit
Drip tray
Dishwasher-safe:
Drip plate
Drip grate
Coffee grounds container
max.
60°C
Float
Milk frother
Cover for milk frother
Cleaning the appliance
1. Wipe the outside of the appliance
with a soft, damp cloth.
2. Clean the control panel using a
micro-fibre cloth.
3. Wipe off the coffee dispenser if
required after dispensing each
beverage.
9
Notes
■ New sponge cloths may contain
salts. Salts can cause rust film on
stainless steel. Wash new sponge
cloths thoroughly before use.
■ Always remove any limescale,
residues of coffee or milk, cleaning
or descaling solution
immediately.This residue may cause
corrosion.
18
Notes
■ If the appliance is cold when
switched on, or if it is switched off
after dispensing coffee, it rinses
automatically. The system is
therefore self-cleaning.
■ If the appliance has not been used
for a long period of time (e.g. while
you are on holiday), clean the entire
appliance thoroughly, including the
milk frother and brewing unit.
Page 19

Daily care and cleaning en
Cleaning the drip tray and coffee grounds container
~ Fig. %
Note: The drip tray and coffee grounds
container should be emptied and
cleaned every day in order to prevent
deposits.With frequent use also empty
from time to time as soon as the float is
clearly visible if or the relevant symbol
lights up.
1. Open the door.
2. Pull the drip tray with the coffee
grounds container forwards and out.
3. Remove the drip plate with grate.
4. Empty and clean the drip tray and
coffee grounds container.
5. Wipe out the inside of the appliance
(area of drip tray).
Cleaning the milk system
Cleaning the milk system
~ Fig. &
The milk system must be cleaned after
each use to remove residues.
:Warning
Risk of burns!
The milk frother gets very hot. Hold only
by the handle. After use, let it cool down
first before touching it.
1. Fill a glass half-full with water and
place under the outlet system.
2. Push the milk frother right down.
3. Touch the milk button to clean the
milk system.
4. Push the milk frother right up and
allow it to cool down.
5. Dismantle the milk frother into its
individual parts and clean
thoroughly.
6. Dry the individual parts, reassemble
and fit back onto the appliance.
Notes
■ To stop the process before the end,
touch milk again.
■ All parts of the milk system should
be cleaned in the dishwasher.
Detergent residues in the milk
system must be thoroughly removed
following the rinsing process.
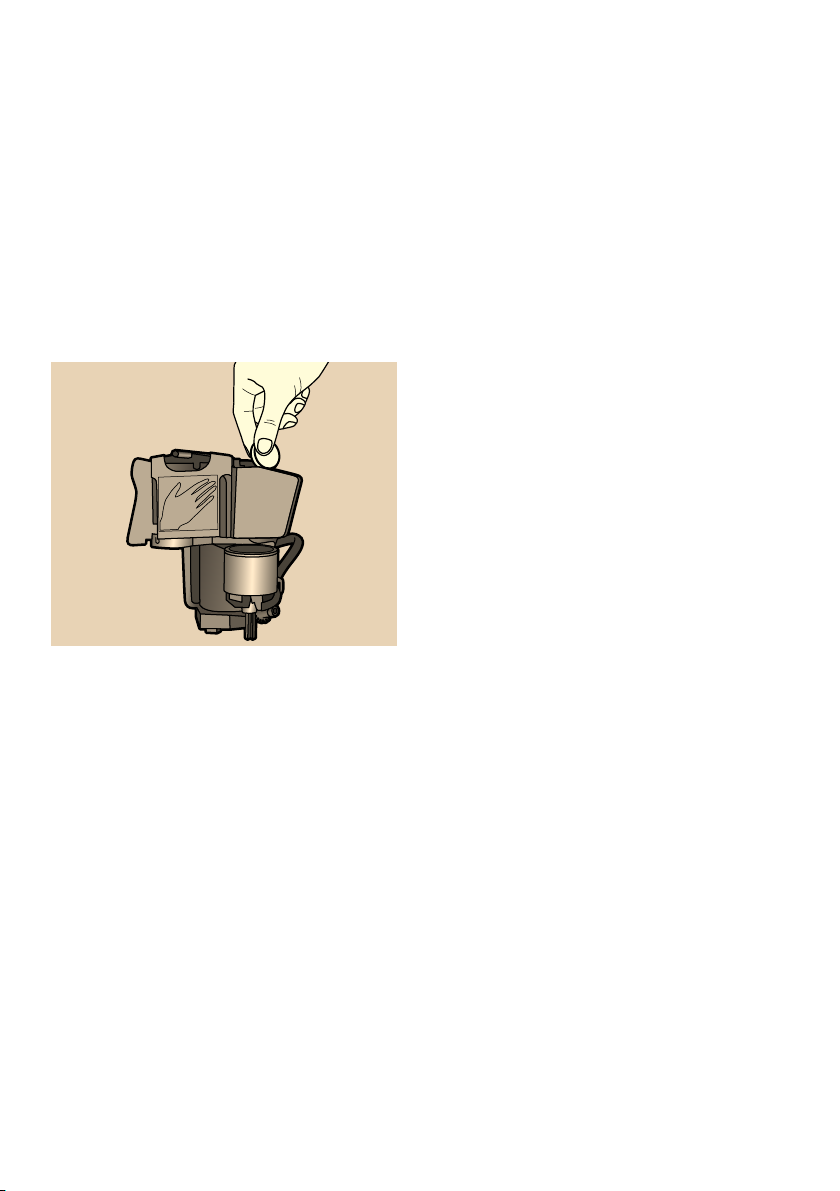
Cleaning the brewing unit
~ Fig. $, ~ Fig. %
In addition to automatic cleaning, the
brewing unit should be removed
regularly for cleaning.
Caution!
Clean the brewing unit without detergent
or products containing vinegar or acid
and do not place in the dishwasher.
Remove the brewing unit:
1. Switch off the appliance.
2. Open the door to the brewing
chamber.
3. Remove the coffee grounds
container.
4. Push the red lever up, grasp the
brewing unit by the handle and pull
forwards carefully.
5. Rinse the brewing unit thoroughly
under warm, running water.
6. Clean the interior of the appliance
thoroughly with a damp cloth,
removing any coffee residues.
7. Allow the brewing unit and the
interior of the appliance to dry.
Insert the brewing unit:
1. Hold the brewing unit only by the
handle.
2. Push the red lever up, position the
brewing unit underneath and slide
back as far as it will go. The lever
must snap into place.
3. Insert the coffee grounds container
again and close the door.
Important: If the brewing unit has not
been inserted, or the brewing unit or
drip tray not inserted correctly, it will not
be possible to close the door.
19
Page 20

en Service programmes
. Service programmes
Service programmes
The calc’nClean button will light up
every so often, with the exact frequency
depending on the water hardness and
usage of the appliance.
The appliance should be immediately
cleaned and descaled using the
programme.
Notes
■ Important: If the appliance is not
cleaned and descaled in good time,
it may be damaged.
■ Caution! For each of the service
programmes, use Calc’nClean
descaling and cleaning agents as
described in the instructions and
observe the (relevant) safety
information.
■ Do not drink the liquids.
■ Never use vinegar, vinegar-based
products, citric acid or citric
acid-based products for descaling.
■ For cleaning and descaling only use
the tablets intended for such
purpose.They have been specially
developed for this appliance, and
new stocks can be ordered through
customer service. ~ "Accessories"
on page 10
■ Never insert descaling tablets or
other products into the brewing unit.
■ Never interrupt the service
programme.
■ Prior to starting a service
programme, remove, clean and
re-insert the brewing unit. Clean the
milk frother.
■ At the end of a service programme,
wipe down the appliance using a
soft, damp cloth to immediately
remove any descaler residue. This
residue may cause corrosion.
■ New sponge cloths may contain
salts. Salts can cause rust film on
stainless steel, so cloths must
always be washed out thoroughly
before use.
■ If the service programme is
interrupted, e.g. by a power failure,
'and calc’nClean will light up.
Then proceed as follows:
1. Rinse out the water tank.
2. Pour in fresh, still water up to the
"max" marking.
3. Touch calc’nClean button.
The programme starts and rinses the
appliance.Duration: approx.
2 minutes.
4. Empty, clean and re-insert the drip
tray. Close door.
The programme has finished. The
appliance is ready for use again.
20
Page 21
Service programmes en
Starting Calc’nClean
Calc’nClean service programme
Duration: approx. 40 minutes
1. Press and hold the calc’nClean
button for approx. 5 seconds.
( symbol lights up.
2. Open the door, remove the drip tray
and coffee grounds container and
empty.
3. Remove and clean the brewing unit.
4. Place a Siemens cleaning tablet in
the brewing unit and re-insert the
unit.
5. Re-insert the drip tray and coffee
grounds container and close the
door.
' symbol lights up.
6. Remove the water filter (if there is
one).
7. Pour 0.5 litres of lukewarm water
into the empty water tank up to the
mark and dissolve a Siemens
descaling tablet in it.
8. Re-insert the water tank and place a
large container (approx. 1 litre)
under the outlet system.
9. calc’nClean flashes, touch
calc’nClean.
The programme starts, cleans and
descales the appliance. calc’nClean
pulses. Duration approx. 20 minutes.
( symbol lights up.
10. Empty the container, open the door,
empty the drip tray and re-insert.
11. Close the door and place a
container under the outlet system.
' symbol lights up.
12. Clean the water tank and replace the
water filter (if removed).
~ Fig. '
13. Fill with fresh, still water up to the
"max" mark. Place the container
under the outlet system again.
14. calc’nClean flashes, touch
calc’nClean.
The programme starts and then cleans
and rinses the appliance. calc’nClean
pulses. Duration approx. 20 minutes.
( symbol lights up.
15. Empty, clean and re-insert the drip
tray and coffee grounds container.
The programme has finished. The
appliance is ready for use again.
21
Page 22

en Trouble shooting
3 Trouble shooting
Trouble shooting
Faults often have simple explanations.
Before calling the customer service,
attempt to correct the fault yourself.
Please read through the safety
information at the beginning of these
instructions.
Fault table
Problem Reason Remedial action
please refer to the fault table and
The appliance no longer
responds.
Coffee or milk froth quality varies considerably.
The individually selected
per-cup quantity is not reached.
Coffee dispensing slows to a
trickle or stops completely
Fault in the appliance. Pull out the mains plug, wait
5 seconds, plug it back in.
Build-up of limescale in the
appliance.
Descale the appliance in accordance
with the instructions.
Grinding level is too fine. Set a coarser grinding level.
Heavy build-up of limescale in
the appliance.
Descale the appliance as described in
the instructions.
Air in the water filter. Immerse the water filter into water until
no more air bubbles escape; insert the
filter again.
No coffee dispensed, only
water.
An empty bean container is not
detected by the appliance.
Pour in coffee beans
Note: The appliance will adjust to the
coffee beans upon the next dispensing
process.
The coffee shaft on the brewing
unit is blocked.
Beans are not falling into the
grinding unit (beans too oily).
Clean the brewing unit. ~ "Cleaning
the brewing unit" on page 19
Gently tap the bean container.Possibly
change the type of coffee. When the
bean container is empty, wipe it with a
dry cloth.
Coffee has no “crema”. Unsuitable type of coffee. Use a type of coffee with a higher pro-
portion of robusta beans.
The beans are no longer freshly
Use fresh beans.
roasted.
The grinding level is not suita-
Set a finer grinding level.
ble for the coffee beans.
The coffee is too "acidic". Grinding level set too coarse. Set a finer grinding level.
Unsuitable type of coffee. Use a darker roast.
The coffee is too "bitter". Coffee is ground too fine. Set a coarser grinding level.
Unsuitable type of coffee. Change the type of coffee.
The coffee tastes "burnt". Coffee is ground too fine. Set a coarser grinding level.
Unsuitable type of coffee. Change the type of coffee.
22
Page 23

Trouble shooting en
Milk/blended milk drinks too
hot.
Milk froth too thin, loud sucking
noise.
Milk/blended milk drinks too
cold.
No milk/milk froth dispensed. The milk frother is soiled.
The water filter does not stay in
position in the water tank.
Several buttons flashing, a loud
noise can be heard.
Water dripped onto the inner
floor of the appliance when the
drip tray was removed.
The brewing unit cannot be
removed.
The appliance cannot be operated, LEDs lit up or flashing.
The grinder will not start. The appliance is too hot. Wait 1 hour so the appliance can cool
( LED flashes. The door is not properly closed. Press the door firmly closed.
( LED lit up despite empty
drip tray - what to do?
Too little milk in glass or cup. Use more milk or adjust frothing time.
Too much milk in glass or cup. Use less milk or adjust frothing time.
The milk frother is not inserted
in the milk.
The water filter is not mounted
correctly.
Water tank missing or wrongly
inserted.
Drip tray removed too early. Wait a few seconds after the last drink
The brewing unit is not in the
removal position (e.g. frost protection activated).
The appliance is in demo mode. Hold k button for at least 5 seconds
The appliance is too hot. Wait 1 hour so the appliance can cool
Emptying is not detected when
the appliance is off.
Clean the milk frother in the dishwasher. ~ "Cleaning the milk
system" on page 19
Use more milk, check whether the milk
frother is inserted in the milk. Slide the
outlet system right down.
Immerse the water filter into water until
no more air bubbles escape; insert the
filter again.
Firmly press the water filter straight
down into the tank connection.
Insert water tank correctly.
was dispensed before removing the
drip tray.
Switch the appliance on again.
to deactivate demo mode.
down.
down.
When the appliance is switched on,
remove and re-insert the drip tray.
23
Page 24

en Trouble shooting
' LED lit up despite water
tank being full.
Water tank wrongly inserted. Insert water tank correctly.
Carbonated water in the water
Fill the water tank with fresh tap water.
tank.
Float is stuck in the water tank. Remove the water tank and clean thor-
oughly.
New water filter not rinsed
according to the instructions.
Rinse the water filter according to the
instructions and then switch on.
Air in the water filter. Immerse the water filter (opening up)
in water until no more air bubbles
escape; insert the filter again.
~ "Inserting or replacing a water
filter" on page 15
Water filter is old. Insert a new water filter.
' LED flashes and all beverage LEDs flashing.
Water tank is missing or not
inserted correctly.
The pipe system in the appliance is dry.
Insert water tank correctly.
Insert water tank correctly.
Fill the water tank with fresh tap water.
Do not fill with carbonated water.
Air in the water filter. Immerse the water filter (opening up)
in water until no more air bubbles
escape; insert the filter again.
~ "Inserting or replacing a water
filter" on page 15
All LEDs flashing. Incorrect voltage in building. Operate the appliance at 220V-240V
only.
', ( and calc’nClean LEDs
flashing.
( and % LEDs flashing. Brewing unit very heavily
The ambient temperature is too
cold.
soiled, or brewing unit cannot
be removed.
Operate the appliance at temperatures
> 5 °C.
Clean brewing unit if possible, and
switch appliance off and back on
again.
% LEDs flashing. Fault in the appliance. Restart appliance.
If you are unable to solve the problem, always call the hotline.
You will find the telephone numbers at the back of these instructions
--------
24
Page 25

Customer service en
4 Customer service
Customer service
Technical data
Power connection (voltage – frequency) 220–240 V ∼, 50/60 Hz
Power rating 1300 W
Maximum static pump pressure 15 bar
Maximum water tank capacity (without filter) 1.3 l
Maximum capacity of the coffee bean container ≈ 250 g
Length of the power cable 100 cm
Dimensions (H x W x D) 37.3 x 24.9 x 42.8 cm
Weight, empty approx. 8–9 kg
Type of grinder Ceramic/steel
E number and FD number
When calling us, please give the full
product number (E no.) and the
production number (FD no.) so that we
can provide you with the correct advice.
These numbers can be found on the
rating plate `. (~ Fig. ")
To save time, you can make a note of
the data for your appliance and the
telephone number for customer service
here, should this be required.
E no.
Customer service O
The contact data for customer service in
all countries can be found at the back of
these instructions.
FD
Number
Guarantee
The guarantee conditions for this
appliance are as defined by our
representative in the country in which it
is sold. Details regarding these
conditions can be obtained from the
dealer from whom the appliance was
purchased. The bill of sale or receipt
must be produced when making any
claim under the terms of this guarantee.
Changes reserved.
25
Page 26

fr
Table des matières
frMode d’emploi
8 Utilisation conforme. . . . . . . . . 27
( Précautions de sécurité
importantes . . . . . . . . . . . . . . . . 27
7 Protection de l'environnement 29
Économie d'énergie. . . . . . . . . . . . . .29
Elimination écologique. . . . . . . . . . . .29
* Présentation de l'appareil . . . . 29
Contenu de l’emballage. . . . . . . . . . .29
Configuration et éléments . . . . . . . . . 30
Eléments de commande . . . . . . . . . .30
D Entretien et nettoyage
quotidiens . . . . . . . . . . . . . . . . . .39
Nettoyants . . . . . . . . . . . . . . . . . . . . 39
Nettoyage de l'appareil. . . . . . . . . . . 40
Nettoyer le bac d'égouttement et le bac
à marc de café. . . . . . . . . . . . . . . . . 40
Nettoyage du système à lait. . . . . . . 40
Nettoyer l’unité de percolation . . . . . 41
. Programme de service. . . . . . . .42
Démarrer Calc’nClean . . . . . . . . . . . 43
3 Anomalies, que faire ?. . . . . . . .44
_ Accessoires. . . . . . . . . . . . . . . . 31
K Avant la première utilisation . . 32
Installation et raccordement de
l’appareil . . . . . . . . . . . . . . . . . . . . . .32
Mise en service de l’appareil. . . . . . .32
1 Utilisation de l’appareil . . . . . . 33
Préparer une boisson à base de café
en grains fraîchement moulus . . . . . .33
Préparation de boissons lactées . . . .34
Ajustage des réglages des boissons.35
Filtre à eau. . . . . . . . . . . . . . . . . . . . .36
Protection contre le gel . . . . . . . . . . .36
1 Réglages . . . . . . . . . . . . . . . . . . 37
Coupure automatique . . . . . . . . . . . .37
Activer/désactiver le signal sonore . .37
Réglage de la dureté de l'eau . . . . . .38
Factory reset . . . . . . . . . . . . . . . . . . .38
4 Service après-vente . . . . . . . . . .48
Données techniques. . . . . . . . . . . . . 48
Numéro E et numéro FD . . . . . . . . . 48
Garantie . . . . . . . . . . . . . . . . . . . . . . 48
26
Page 27

Utilisation conforme fr
8 Utilisation conforme
Utilisation conforme
Contrôler l'état de l'appareil
après l'avoir déballé. Ne pas le
raccorder s'il présente des
avaries de transport.
Cet appareil est destiné
exclusivement à une utilisation
domestique et non
professionnelle.
N’utilisez l’appareil que dans
des pièces intérieures à
température ambiante et
jusqu’à 2 000 m au-dessus du
niveau de la mer.
( Précautions de
sécurité importantes
Précautions de sécurité importantes
Veuillez lire attentivement la
notice d’utilisation, suivre les
instructions qu’elle contient et
conserver la notice. Si l’appareil
change de propriétaire,
remettez-lui cette notice.
L'appareil peut être utilisé par
des enfants à partir de 8 ans et
par des personnes ayant des
capacités physiques,
sensorielles ou mentales
restreintes ou ayant un manque
d'expérience et/ou de
connaissances s'ils sont sous
surveillance ou ont été informés
de la manipulation sûre de
l'appareil et ont compris les
dangers qui en résultent. Il faut
maintenir les enfants de moins
de 8 ans à l’écart de l’appareil
et du cordon de branchement
et ne pas leur permettre
d’utiliser l’appareil. Ne jamais
permettre aux enfants de jouer
avec l’appareil. Le nettoyage et
l’entretien incombant à
l’utilisateur ne doivent pas être
effectués par des enfants sauf
s’ils ont 8 ans ou plus et sont
surveillés.
27
Page 28

fr Précautions de sécurité importantes
:Mise en garde
Risque d’électrocution !
■ L'appareil doit être branché
uniquement sur un réseau à
courant alternatif par
l'intermédiaire d'une prise
secteur installée de manière
conforme et disposant d'une
connexion à la terre.
S'assurer que le système à
conducteur de protection de
l’installation électrique de la
maison est conforme.
Risque d’électrocution !
■ Ne brancher et faire
fonctionner l’appareil que
conformément aux
indications figurant sur la
plaque signalétique. En cas
d'endommagement du
cordon d'alimentation
secteur, celui-ci doit être
remplacé par le service
après-vente.
Risque d’électrocution !
■ Ne l’utiliser que si le cordon
d’alimentation et l’appareil
ne présentent aucun dégât.
En cas de défaut,
débrancher immédiatement
la fiche secteur ou coupez la
tension du réseau.
Risque d’électrocution !
■ Pour éviter tous risques, les
réparations de l’appareil sont
réservées à notre service
après-vente.
Risque d’électrocution !
■ Ne plongez jamais l’appareil
ou le cordon d’alimentation
dans l’eau.
:Mise en garde
Danger par magnétisme !
L'appareil contient des aimants
permanents qui peuvent
exercer une influence sur les
implants électroniques tels que
les stimulateurs cardiaques ou
les pompes à insuline. Merci
aux porteurs d'implants
électroniques de respecter une
distance d'au moins 10 cm
entre eux et l'appareil et le
réservoir d'eau retiré.
:Mise en garde
Risque d'étouffement !
Ne permettez jamais aux
enfants de jouer avec les
matériaux d’emballage. Rangez
les petites pièces de manière
sûre, elles pourraient être
avalées.
:Mise en garde
Risque de brûlures !
Le système à lait devient très
chaud. Après utilisation, laisser
refroidir avant de le toucher.
:Mise en garde
Risque de blessure !
■ L’utilisation inappropriée de
l'appareil peut entraîner des
blessures.
Risque de blessure !
■ Ne pas glisser les doigts à
l’intérieur du broyeur.
28
Page 29
Protection de l'environnement fr
7 Protection de
l'environnement
Protection de l'environnement
Économie d'énergie
■ Éteindre l'appareil quand celui-ci
n'est pas utilisé.
■ Régler l'intervalle d'arrêt
automatique sur la plus petite valeur.
■ Dans la mesure du possible, ne
jamais interrompre la distribution de
café ou de mousse de lait. Une
interruption conduit à une hausse de
la consommation énergétique et à
un remplissage accéléré des bacs
collecteurs.
■ Détartrer régulièrement l’appareil
pour prévenir les dépôts de tartre.
Les dépôts de tartre conduisent à
une hausse de la consommation
énergétique.
Elimination écologique
Eliminez l'emballage en
respectant l'environnement.
Cet appareil est marqué selon
la directive européenne
2012/19/UE relative aux
appareils électriques et
électroniques usagés (waste
electrical and electronic
equipment - WEEE).
La directive définit le cadre
pour une reprise et une
récupération des appareils
usagés applicables dans les
pays de la CE.
S’informer auprès du revendeur sur la
procédure actuelle de recyclage.
* Présentation de
l'appareil
Présentation de l'appareil
Ce chapitre vous offre un aperçu des
éléments livrés, de l'assemblage et des
composants de votre appareil. Il vous
fait également découvrir les différents
éléments de commande.
Remarque : Certains détails ou
certaines couleurs peuvent varier selon
le modèle d'appareil.
Comment utiliser ce mode d’emploi :
Vous pouvez déplier les pages de la
couverture de la notice d'utilisation. Les
illustrations comportent des numéros
auxquels renvoie la notice d'utilisation.
Exemple : ~ figure !
Contenu de l’emballage
~ Figure !
# Machine à expresso automatique
+ Bandelette pour déterminer la
dureté de l’eau
3 Notice d'utilisation
; Mousseur de lait
29
Page 30

fr Présentation de l'appareil
Configuration et éléments
~ Figure "
( Touche Marche / Arrêt (mode
Veille)
0 Bandeau de commande
8 Poignée du mousseur de lait
@ Système verseur pour le café,
réglable en hauteur
H Mousseur de lait (support,
mousseur, cache), réglable en
hauteur
Eléments de commande
Touche Signification
Mettre l'appareil sous et hors tension
k
espresso Préparation Espresso
caffe crema Préparation Caffe crema
cappuccino Préparation Cappuccino
latte macchiato Préparation Latte Macchiato
milk Faire mousser du lait
% Intensité du café
calc’nClean Début du programme d'entretien
--------
L'appareil effectue automatiquement un rinçage lorsqu’il est mis en marche et arrêté.
L’appareil ne rince pas dans les cas suivants :
■ Il est encore chaud au moment de la mise en marche.
■ Vous n’avez pas prélevé de café avant de l’éteindre.
L'appareil est prêt à fonctionner lorsque les LED des touches de sélection des boissons sont allumées sur le bandeau de commande. L'appareil dispose d'une coupure
automatique. ~ "Régler la coupure automatique" à la page 37
Réglage de l’intensité du café ~ "Ajuster les réglages des boissons" à la page 35
Clignote lorsque le programme d'entretien doit être effectué.~ "Programme
d'entretien Calc´nClean" à la page 43
P Bac d'égouttement (bac à marc
de café, grille de l'égouttoir,
égouttoir, flotteur)
X Porte de la chambre de
percolation
` Plaque signalétique
h Unité de percolation
)" Couvercle préservateur d’arôme
)* Réservoir pour café en grains
)2 Sélecteur rotatif de réglage du
degré de mouture
): Couvercle du réservoir d’eau
)B Réservoir d'eau
30
Page 31

Affichage
S’allume lorsque de l’eau doit être versée dans le réservoir d’eau, lorsque le réservoir
'
(
d’eau n’est pas en place ou lorsque le filtre à eau doit être changé.
Clignote lorsque le filtre à eau doit être remplacé.
S'allume lorsque les bacs doivent être vidés.
Clignote lorsque la porte de la chambre de percolation est ouverte.
allumé Prêt à fonctionner, un choix peut être effectué
pulse Préparation en cours
clignote Attend une commande, par ex. lors de calc’nClean
Désactivé Non disponible
--------
_ Accessoires
Accessoires
Les accessoires suivants sont
disponibles dans le commerce ou
auprès du service après-vente :
Accessoires fr
Accessoires Référence
Commerce
Service
après-vente
Pastilles de nettoyage TZ80001 00311807
Pastilles de détartrage TZ80002 00576693
Filtre à eau TZ70003 00575491
Kit d'entretien TZ80004 00576330
--------
Vous trouverez les coordonnées du
service après-vente dans chaque pays
sur les dernières pages de la présente
notice.
31
Page 32

fr Avant la première utilisation
K Avant la première
utilisation
Avant la première utilisation
Ce chapitre vous explique comment
mettre en service votre appareil.
Remarque : Utiliser l'appareil
uniquement dans des locaux hors gel.
Si l'appareil a été transporté ou
entreposé à des températures
inférieures à 0°C, vous devez attendre
au moins 3 heures avant de le mettre
en service.
Installation et raccordement de l’appareil
1. Retirer les films protecteurs.
2. Poser l'appareil sur une surface
plane, résistante à l'eau et pouvant
supporter son poids.
3. Raccorder la fiche secteur de
l'appareil à une prise femelle à
contacts de terre installée de
manière règlementaire.
Remarque : Attendre un peu (env.
5 secondes) après chaque
branchement.
Mise en service de l’appareil
Mettre en place le mousseur de lait
~ Figure #
1. Retirer les composants du mousseur
de lait de l'emballage.
2. Assembler le mousseur de lait.
3. Monter le mousseur de lait à l'avant
de l'appareil.
Remplir le réservoir pour café en grains
Cet appareil vous permet de préparer
des boissons à base de café en grains.
1. Ouvrir le couvercle )" du réservoir
pour café en grains )*.
2. Remplir de café en grains.
3. Refermer le couvercle.
Remarques
■ Des grains de café avec glaçage,
des grains caramélisés ou enrobés
d’une substance sucrée quelconque
obstruent l’unité de percolation.
Utiliser exclusivement un mélange
de café en grains pour expresso ou
percolateur.
■ Les grains de café sont fraîchement
moulus avant chaque percolation.
■ Conserver le café en grains dans un
endroit frais et à l’abri de l’air pour
conserver tout son arôme.
■ Vous pouvez laisser les grains de
café dans le réservoir pour café en
grains plusieurs jours sans que le
café ne perde son arôme.
Remplir le réservoir d’eau
Important : verser chaque jour de l'eau
fraîche non gazeuse dans le réservoir
d'eau. Avant de faire fonctionner
l'appareil, vérifier qu'il y a suffisamment
d'eau dans le réservoir.
1. Retirez le couvercle du réservoir
d'eau.
2. Retirer le réservoir d’eau par la
poignée.
3. Remplir le réservoir d’eau jusqu’au
repère « max ».
4. Replacer le réservoir d'eau droit
dans son support et remettre en
place le couvercle du réservoir
d'eau.
32
Page 33

Utilisation de l’appareil fr
Indications générales
La machine à espresso automatique est
programmée en usine avec des
réglages standard de manière à
fonctionner de manière optimale.
■ L'appareil s’arrête automatiquement
après une durée définie.
■ Lorsqu'une touche est effleurée, un
son retentit. Celui-ci peut être
coupé.~ "Réglages" à la page 37
■ Lors de la première utilisation de
l'appareil ou après un programme
d'entretien ou encore après une
longue période d’inutilisation, la
première boisson servie n’a pas
encore développé son plein arôme.
Il ne faut donc pas la boire.
■ Après la mise en service de
l'appareil, plusieurs tasses doivent
avoir été préparées avant d’avoir
une « crème » fine et consistante.
■ La formation de gouttes d’eau sur
les fentes d’aération est normale en
cas d’utilisation prolongée.
■ La vapeur qui s'échappe n'est pas
un défaut, mais liée à la technique.
1 Utilisation de l’appareil
Utilisation de l’appareil
Ce chapitre vous permet d'apprendre
comment préparer des boissons à base
de café et de lait. Vous y obtenez des
informations sur les réglages, le filtre à
eau, l'ajustement du degré de mouture
et sur la protection contre le gel.
Remarque : Les boissons fraîchement
préparées peuvent être très chaudes.
Préparer une boisson à base de café en grains fraîchement moulus
Vous avez le choix entre Espresso et
Caffe crema. ~ "Préparation de
boissons lactées" à la page 34
L’appareil est allumé. Le réservoir d'eau
et le réservoir pour café en grains sont
remplis.
1. Placer une tasse sous le système
verseur.
2. Retoucher % permet de régler
l'intensité souhaitée pour le café.
3. Effleurer la touche espresso ou
caffe crema.
L'appareil effectue la percolation et le
café s’écoule ensuite dans la tasse.
Avant d'utiliser l'appareil neuf, vérifier la
dureté de l'eau et procéder au
réglage.~ "Réglages" à la page 37
Remarque : Pour arrêter
prématurément la distribution de café,
effleurer une nouvelle fois espresso
oucaffe crema.
33
Page 34

fr Utilisation de l’appareil
Préparation de boissons lactées
Cet appareil est équipé d'un mousseur
de lait. Vous pouvez préparer des cafés
avec du lait ou faire mousser du lait.
Remarque : Une fois secs, les résidus
de lait sont difficiles à nettoyer, il est
donc impératif de les nettoyer
rapidement.~ "Entretien et nettoyage
quotidiens" à la page 39
:Mise en garde
Risque de brûlure !
Le mousseur de lait est très chaud. Ne
saisir que par la poignée. Après
utilisation, laisser refroidir avant de le
toucher.
Boissons à base de café et lait
Vous avez le choix entre Cappuccino et
Latte Macchiato. Pour ce faire, veiller à
la position de la buse d'écoulement du
café et du mousseur de lait.
Cappuccino
Latte Macchiato
L’appareil est allumé. Le réservoir d'eau
et le réservoir pour café en grains sont
remplis.
Le mousseur de lait est monté.
1. Remplir une grande tasse ou un
grand verre avec env. 100 ml de lait
pour un cappuccino et env. 150 ml
de lait pour un Latte Macchiatto.
2. Placer la tasse ou le verre sous le
système verseur.
3. Pousser la buse d'écoulement du
café et le mousseur de lait
complètement vers le bas.
4. Retoucher % permet de régler
l'intensité souhaitée pour le café.
5. Effleurer la touche cappuccino ou
latte macchiato.
L'appareil fait tout d'abord mousser le
lait dans la tasse ou le verre. À la suite
de quoi l'appareil effectue la percolation
et le café s’écoule dans la tasse ou le
verre.
Remarque : Pour arrêter
prématurément l'étape actuelle de
préparation de la boisson, effleurer
cappuccino ou latte macchiato une
nouvelle fois.
Faire mousser du lait
L’appareil est allumé. Le réservoir d’eau
est rempli.
Le mousseur de lait est monté.
1. Remplir une grande tasse ou un
grand verre avec env. 100 ml de lait.
2. Placer la tasse ou le verre sous le
système verseur.
3. Pousser la buse d'écoulement du
café et le mousseur de lait
complètement vers le bas.
4. Effleurer la touche milk.
Le moussage du lait a lieu.
Remarque : Pour arrêter
prématurément le processus, effleurer
une nouvelle fois milk.
34
Page 35

Utilisation de l’appareil fr
Ajustage des réglages des boissons
Ajuster les réglages des boissons
Intensité du café
Avant de préparer une boisson, ajuster
l’intensité du café qu’elle contient :
Utiliser pour ce faire le symbole %.
doux
normal
fort
Remarque : L’intensité choisie est
activée pour toutes les boissons à base
de café.
Contenance
Vous pouvez modifier le volume de vos
boissons.
Maintenir enfoncé espresso ou caffe
crema pendant 3 secondes.
La préparation est en cours, la touche
sélectionnée clignote.
Une fois le volume atteint dans la tasse,
effleurer la touche sélectionnée pour
arrêter la préparation. Le volume réglé
en dernier n’est effectif qu’à partir de la
préparation de boisson suivante.
Remarque : Le volume peut être réglé
pour Espresso (25 - 60 ml) ou Caffe
crema (80 - 200 ml).Une quantité
minimale est toujours préparée,
Espresso env. 25 ml et Caffe crema
env. 80 ml.
Durée de préparation de la mousse
Vous pouvez modifier la durée de
préparation de la mousse pour votre
boisson.
Maintenir enfoncé cappuccino, latte
macchiato ou milk pendant
3 secondes.
La mousse de lait est en cours de
préparation, la touche sélectionnée
clignote.
Une fois la durée de préparation de la
mousse atteinte, effleurer la touche
sélectionnée pour arrêter l’opération.
Remarque : Le réglage de la durée de
préparation de la mousse n’a aucun
effet sur la quantité de café.
Régler le degré de mouture
Cet appareil est équipé d'un moulin
réglable. Celui-ci permet de varier
individuellement le degré de mouture
du café.
:Mise en garde
Risque de blessure !
Ne pas glisser les doigts à l’intérieur du
broyeur.
Attention !
L'appareil risque d'être endommagé !
Ne modifier le réglage du degré de
mouture que pendant que le moulin
tourne !
Régler le degré de mouture à l'aide du
sélecteur rotatif )2 lorsque le moulin
est en marche.
■ Degré de mouture fin : tourner dans
le sens inverse des aiguilles d’une
montre. (Fig. a)
■ Degré de mouture grossier : tourner
dans le sens des aiguilles d’une
montre. (Fig. b)
D E
Remarques
■ Le nouveau réglage n’est
perceptible qu’à partir de la seconde
tasse de café.
■ Pour les grains de café torréfiés de
couleur foncée, choisir un degré de
mouture plus fin, pour les grains
torréfiés de couleur claire, régler un
degré de mouture plus grossier.
35
Page 36

fr Utilisation de l’appareil
Filtre à eau
Filtre à eau
~ Figure '
Un filtre à eau permet de prévenir les
dépôts de tartre, de réduire les
salissures dans l’eau et d’améliorer le
goût du café. Les filtres à eau sont
disponibles dans le commerce ou
peuvent être commandés auprès du
service après-vente.
Insertion ou renouvellement d’un filtre à eau
Un filtre à eau neuf doit être rincé avant
de pouvoir être utilisé.
L’appareil est allumé. Le réservoir d’eau
est rempli.
1. Maintenir % et calc’nClean
enfoncés pendant au moins
3 secondes.
2. Effleurer la touche espresso pour
activer le menu « Dureté eau ».
3. Effleurer la touche % et effectuer
le réglage suivant :
avec filtre à eau
4. Plonger le filtre à eau (ouverture vers
le haut) dans un récipient rempli
d’eau jusqu’à ce que plus aucune
bulle ne se dégage.
~ Figure '
5. Puis enfoncer fermement le filtre à
eau dans le réservoir d'eau vide.
6. Remplir le réservoir d’eau jusqu’au
repère « max ».
7. Placer un récipient d’une
contenance d'au moins 1 litre sous
la buse d’écoulement.
8. Effleurer la touche espresso pour
enregistrer le réglage et activer le
rinçage.
9. Mettre le réservoir d’eau en place.
10. Effleurer la touche espresso pour
démarrer le rinçage. L’eau coule à
travers le filtre.
11. Effleurer la touche calc’nClean pour
quitter le menu.
12. Vider ensuite le réservoir. L'appareil
est de nouveau prêt à fonctionner.
Retrait du filtre à eau
Si le filtre à eau est retiré et qu’aucun
nouveau filtre à eau n’est mis en place,
procéder au réglage correspondant de
la dureté de l’eau. ~ "Réglage de la
dureté de l'eau" à la page 38
Protection contre le gel
Pour éviter les dommages dus à l’effet
du gel pendant le transport et le
stockage, il faut vider entièrement
l’appareil.
Info : pour cela l’appareil doit être prêt
à fonctionner et le réservoir d’eau doit
être rempli.
1. Placer un grand récipient sous la
buse d’écoulement du mousseur de
lait et faire glisser vers le bas le
mousseur de lait.
2. Maintenir la touche milk enfoncée
au moins 5 secondes.
La LED de la touche clignote,
l’appareil chauffe.
3. Dès que de la vapeur s’échappe du
mousseur de lait, retirer le réservoir
d’eau.
4. Laisser la vapeur s’échapper de
l’appareil. Attendre jusqu’à ce que le
symbole ' et toutes les LED
clignotent.
5. Éteindre l’appareil à l’aide de la
touche k.
6. Vider le réservoir d’eau et la cuvette
d’égouttage et nettoyer
minutieusement l’appareil.
L’appareil peut maintenant être
transporté ou stocké.
Remarque : L’unité de percolation est
maintenant sécurisée et ne peut pas
être retirée.
36
Page 37

Réglages fr
1 Réglages
Réglages
Cet appareil fait l'objet de différents
réglages en usine. Les réglages
peuvent être personnalisés.
Remarque : Si aucun bouton n’est
actionné dans les 90 secondes,
l’appareil passe à « Choisir boisson »
sans effectuer d’enregistrement. Le
réglage précédemment enregistré est
conservé.
Les réglages possibles sont les
suivants :
Coupure automatique
Régler la coupure automatique
L'appareil s'éteint automatiquement
après le dernier actionnement d'une
touche, au bout d'une durée
déterminée. Cette durée peut être
ajustée, de15 minutes à 4 heures.
1. Maintenir enfoncés pendant au
moins 3 secondes %
etcalc’nClean.
2. Effleurer la touche caffe crema pour
activer le menu « Coupure
automatique ».
3. Effleurer la touche % pour régler
le temps souhaité.
Les réglages suivants sont
possibles :
15 minutes
30 minutes (réglage usine)
1 heure
2 heures
4 heures
Activer/désactiver le signal sonore
Appuyer sur une touche fait retentir un
signal sonore.
Il est possible de l’allumer ou de
l’éteindre.
1. Maintenir enfoncés pendant au
moins 3 secondes %
etcalc’nClean.
2. Effleurer la touche cappuccino pour
activer le menu « Signal sonore ».
3. Effleurer la touche % pour
activer ou désactiver le signal
sonore.
Activé (réglage usine)
Désactivé
4. Effleurer la touche cappuccino pour
enregistrer le réglage.
5. Effleurer la touche calc’nClean pour
quitter le menu.
4. Effleurer la touche caffe crema pour
enregistrer le réglage.
5. Effleurer la touche calc’nClean pour
quitter le menu.
37
Page 38

fr Réglages
Réglage de la dureté de l'eau
Le réglage correct de la dureté de l’eau
est important, car il permet à l’appareil
d’indiquer le moment où un détartrage
est nécessaire. L’appareil a été préréglé
sur une dureté de l’eau de 4.
La dureté de l’eau peut être déterminée
à l’aide de la bandelette de test fournie
ou être demandée à la compagnie
locale de distribution d’eau.
1. Tremper brièvement la bandelette de
test fournie dans l’eau fraîche du
robinet, laisser égoutter, puis lire le
résultat au bout d’une minute.
2. Maintenir % et calc’nClean
enfoncés pendant au moins
3 secondes.
3. Effleurer la touche espresso pour
activer le menu « Dureté eau ».
4. Effleurer la touche % pour régler
la dureté de l’eau.
Les réglages suivants sont
possibles :
Dureté eau 1
Dureté eau 2
Dureté eau 3
Dureté eau 4 (réglage usine)
Filtre à eau (si utilisé)
Adoucisseur d’eau (si disponible)
Le tableau ci-après présente les
équivalences entre les niveaux et les
différents degrés de dureté de l’eau :
Niveau Degré de dureté de l’eau
Allemagne (°dH) France (°fH)
1 1-7 1-13
2 8-14 14-25
3 15-21 26-38
4 22-30 39-54
Une modification ultérieure de la dureté
de l’eau est possible à tout moment.
Remarque : Procéder comme suit en
cas d’utilisation d’un filtre à eau (voir
chapitre « Accessoires »). ~ "Filtre à
eau" à la page 36
Factory reset
Réinitialisation des réglages d'usine, les
réglages propres sont perdus.
1. Maintenir % et calc’nClean
enfoncés pendant au moins
3 secondes.
2. Effleurer la touche latte macchiato.
Les réglages usine sont rétablis.
3. Effleurer la touche calc’nClean pour
quitter le menu.
5. Effleurer la touche espresso pour
enregistrer le réglage.
6. Effleurer la touche calc’nClean pour
quitter le menu.
38
Page 39

Entretien et nettoyage quotidiens fr
D Entretien et nettoyage
quotidiens
Entretien et nettoyage quotidiens
Si vous entretenez et nettoyez
soigneusement votre appareil, il restera
longtemps opérationnel. Ce chapitre
vous explique comment bien entretenir
et nettoyer votre appareil.
:Mise en garde
Risque d’électrocution !
Avant de nettoyer l’appareil, débrancher
la fiche secteur. Ne jamais plonger
l’appareil dans l’eau. Ne jamais utiliser
de nettoyeur à vapeur.
Nettoyants
Afin de ne pas endommager les
différentes surfaces par des nettoyants
inappropriés, veuillez respecter les
indications suivantes.
N'utilisez pas
■ de produits agressifs ou récurants,
■ de détergent contenant de l’alcool
ou de l’alcool à brûler,
■ de tampons à récurer ni d'éponges à
dos récurant.
9
9
Remarques
■ Les lavettes éponges neuves
peuvent contenir des sels. Les sels
peuvent conduire à une rouille
superficielle de l’inox. Avant d'utiliser
des lavettes éponges neuves, les
rincer soigneusement.
■ Toujours nettoyer immédiatement les
résidus de tartre, de café, de lait, de
produit nettoyant ou de solution
détartrante. Les surfaces situées
sous de tels résidus risquent de se
corroder.
Attention !
Certains composants de l'appareil ne
conviennent pas à un lavage en
lave-vaisselle.
~ Figure % - '
Ne vont pas au lave-vaisselle :
Réservoir d'eau
Couvercle du réservoir d’eau
Couvercle préservateur d’arôme
Unité de percolation
Bac d'égouttement
Conviennent au lave-vaisselle :
Égouttoir
Grille de l'égouttoir
Bac à marc de café
60 °C
max.
Flotteur
Mousseur de lait
Cache du mousseur de lait
39
Page 40

fr Entretien et nettoyage quotidiens
Nettoyage de l'appareil
1. Essuyer l’habillage de l'appareil avec
un chiffon doux et humide.
2. Nettoyer le panneau de commande
avec un chiffon en microfibres.
3. Si nécessaire, essuyer la buse
d’écoulement du café après chaque
utilisation.
Remarques
■ Si l'appareil est mis en marche à
froid ou arrêté après la préparation
de café, il se rince automatiquement.
L’appareil se nettoie donc de
lui-même.
■ Si l’appareil est inutilisé pendant une
durée prolongée (p. ex. durant les
vacances), nettoyer soigneusement
l’ensemble de l’appareil, y compris
le mousseur de lait et l’unité de
percolation.
Nettoyer le bac d'égouttement et le bac à marc de café.
~ Figure %
Remarque : Vider et nettoyer tous les
jours la cuvette d’égouttage et le
réservoir à marc de café afin d’éviter la
formation de dépôts.En cas d’utilisation
fréquente, vider dès que le flotteur est
nettement visible ou que le symbole
correspondant s’allume.
1. Ouvrir la porte.
2. Retirer la cuvette d’égouttage avec
le réservoir à marc de café en le
tirant vers l’avant.
3. Retirer l’égouttoir et la grille de
l’égouttoir.
4. Vider et nettoyer la cuvette
d’égouttage et le réservoir à marc de
café.
5. Essuyer le compartiment intérieur de
l’appareil (cuvette d’égouttage).
Nettoyage du système à lait
Nettoyage du système à lait
~ Figure &
Il est recommandé de nettoyer le
système à lait après chaque utilisation
pour éliminer les résidus.
:Mise en garde
Risque de brûlure !
Le mousseur de lait est très chaud. Ne
saisir que par la poignée. Après
utilisation, laisser refroidir avant de le
toucher.
1. Remplir à moitié un verre avec de
l'eau et le placer sous le système
verseur.
2. Faire glisser le mousseur de lait tout
en bas.
3. Effleurer la touche milk, le nettoyage
du système à lait se met en route.
4. Faire glisser le mousseur de lait vers
le haut et le laisser refroidir.
5. Démonter les différentes pièces du
mousseur de lait et les nettoyer
minutieusement.
6. Faire sécher les pièces démontées,
les assembler puis les remonter sur
l'appareil.
Remarques
■ Pour arrêter prématurément
l'opération, effleurer une nouvelle
fois milk.
■ Tous les éléments du système à lait
doivent être nettoyés au
lave-vaisselle. Rincer soigneusement
tous les restes de produit à vaisselle
après le nettoyage.
40
Page 41

Nettoyer l’unité de percolation
~ Figure $, ~ Figure %
En plus du programme de rinçage
automatique, il est recommandé de
retirer régulièrement l’unité de
percolation pour la nettoyer.
Attention !
Nettoyer l’unité de percolation sans
produit à vaisselle ni agent à base de
vinaigre ou d'acide et ne pas la mettre
au lave-vaisselle.
Retirer l'unité de percolation :
1. Éteindre l’appareil.
2. Ouvrir la porte de la chambre de
percolation.
3. Retirer le bac à marc de café.
4. Pousser vers le haut le levier rouge,
saisir l'unité de percolation par la
poignée et la tirer
précautionneusement vers l'avant.
5. Nettoyer soigneusement l'unité de
percolation sous un jet d'eau
chaude.
6. Nettoyer soigneusement l’intérieur
de l’appareil avec un chiffon humide,
éliminer les éventuels restes de café.
7. Laisser sécher l’intérieur de l’unité
de percolation et de l'appareil.
Entretien et nettoyage quotidiens fr
Mettre en place l'unité de percolation :
1. Saisir l'unité de percolation par la
poignée.
2. Pousser vers le haut le levier rouge,
placer l'unité de percolation sous le
levier et la pousser vers l'arrière
jusqu'à la butée. Le levier doit
s'enclencher.
3. Remettre en place le bac à marc de
café et fermer la porte.
Important : la porte ne peut pas être
fermée cas d'absence de l'unité de
percolation ou du bac d'égouttement,
ou s'ils sont mal mis en place.
41
Page 42

fr Programme de service
. Programme de service
Programme de service
La touche calc’nClean s’allume à un
intervalle de temps donné, selon la
dureté de l’eau et l’utilisation de
l’appareil.
L’appareil doit alors être nettoyé et
détartré sans tarder avec le programme
correspondant.
Remarques
■ Important : si l’appareil n’est pas
nettoyé et détartré à temps, il peut
s’endommager.
■ Attention ! À chaque programme
d’entretien, utiliser le produit
détartrant et le produit nettoyant
Calc’nClean conformément aux
instructions ; respecter également
les consignes de sécurité
correspondantes.
■ Ne jamais boire les liquides.
■ Pour le détartrage, ne jamais utiliser
de vinaigre, de produit à base de
vinaigre, d’acide citrique ou de
produit à base d’acide citrique.
■ Pour le détartrage et le nettoyage,
utiliser exclusivement les pastilles
adaptées.Elles ont été conçues
spécialement pour cet appareil et
peuvent être achetées auprès du
service après-vente.
~ "Accessoires" à la page 31
■ Ne jamais mettre de pastilles de
détartrage ou d’autres produits dans
l’unité de percolation.
■ Ne jamais interrompre le programme
d’entretien.
■ Retirer l’unité de percolation, la
nettoyer et la remettre en place
avant de lancer le programme
d’entretien. Nettoyer le mousseur de
lait.
■ Une fois le programme d’entretien
terminé, essuyer l‘appareil avec un
chiffon doux et humide pour éliminer
immédiatement les résidus de
solution détartrante. Les surfaces
situées sous de tels résidus risquent
de se corroder.
■ Les lavettes éponges neuves
peuvent contenir des sels. Les sels
peuvent conduire à une rouille
superficielle de l’acier inox ; un
rinçage méticuleux des lavettes est
par conséquent indispensable avant
l’emploi.
■ Si le programme d’entretien est
interrompu, p. ex. par une coupure
de courant, alors ' et calc’nClean
s’allument.
Dans ce cas, procéder de la façon suivante :
1. Rincer le réservoir d’eau.
2. Remplir d’eau non gazeuse jusqu’au
repère « max ».
3. Effleurer la touche calc’nClean.
Le programme démarre et l’appareil
est rincé.Durée : 2 minutes env.
4. Vider la cuvette d’égouttage, la
nettoyer et la remettre en place,
refermer la porte.
Le programme est terminé. L’appareil
est de nouveau prêt à fonctionner.
42
Page 43

Programme de service fr
Démarrer Calc’nClean
Programme d'entretien Calc´nClean
Durée : 40 minutes env.
1. Maintenez la touche calc’nClean
enfoncée pendant env. 5 secondes.
Le symbole (s'allume.
2. Ouvrir la porte, retirer le bac
d'égouttement et le bac à marc de
café et les vider.
3. Retirer et nettoyer l'unité de
percolation.
4. Placer une pastille de nettoyage
Siemensdans l'unité de percolation
et remettre en place cette dernière.
11. Fermer la porte et placer un
récipient sous le système verseur.
Le symbole 's'allume.
12. Nettoyer le réservoir d’eau et
remettre le filtre à eau en place (s’il a
été préalablement retiré).
~ Figure '
13. Remplir le réservoir d'eau fraîche
non gazeuse jusqu'au repère
« max. » et le remettre en place sous
le système verseur.
14. calc’nClean clignote, effleurer
calc’nClean.
Le programme démarre, nettoie et
détartre l'appareil. calc’nClean circule.
Durée : env. 20 minutes.
Le symbole (s'allume.
15. Vider, nettoyer et remettre en place
le bac d'égouttement et le bac à
marc de café.
Le programme est terminé. La machine
est de nouveau prête à fonctionner.
5. Remettre en place le bac
d'égouttement et le bac à marc de
café et fermer la porte.
Le symbole 's'allume.
6. Retirer le filtre à eau (si disponible).
7. Verser de l’eau tiède dans le
réservoir d’eau vide jusqu’au repère
0,5 l et dissoudre une pastille de
détartrage Siemens.
8. Remettre en place le réservoir d'eau
et placer un grand récipient (env.
1 litre) sous le système verseur.
9. calc’nClean clignote, effleurer
calc’nClean.
Le programme démarre, nettoie et
détartre l'appareil. calc’nClean circule.
Durée : env. 20 minutes.
Le symbole (s'allume.
10. Vider le récipient, ouvrir la porte,
vider le bac d'égouttement et le
remettre en place.
43
Page 44

fr Anomalies, que faire ?
3 Anomalies, que faire ?
vous-même à la panne à l'aide du
tableau.
veuillez essayer de remédier par
Anomalies, que faire ?
Une anomalie de fonctionnement n'est
souvent due qu'à un problème simple.
Avant d'appeler le service après-vente,
Veuillez lire les consignes de sécurité
figurant au début de la présente notice.
Tableau de dérangements
Problème Cause Solution
L'appareil ne réagit plus. Défaut de l'appareil. Débrancher la prise, attendre
5 secondes, puis rebrancher la prise.
Qualité de la mousse de café ou
de lait très variable.
L'appareil n'a pas versé la
quantité réglée pour la tasse, le
café ne coule que goutte à
goutte ou ne coule plus.
L'appareil est entartré. Détartrer l'appareil en suivant les ins-
tructions.
La mouture est trop fine. Régler un degré de mouture plus gros-
sier.
L'appareil est fortement entar-
Détartrer l'appareil en suivant la notice.
tré.
De l'air se trouve dans le filtre à
eau.
Plonger le filtre à eau dans l'eau
jusqu'à ce que plus aucune bulle ne se
dégage et remettre le filtre en place.
De l'eau coule mais pas de
café.
L'appareil ne détecte pas que
le réservoir pour café en grains
est vide.
Remplir de café en grains
Remarque : l'appareil se réglera sur le
café en grains lors des prochaines distributions.
La cuve à café de l'unité de percolation est obstruée.
Nettoyer l'unité de percolation.
~ "Nettoyer l’unité de percolation"
à la page 41
Les grains ne tombent pas
dans le moulin (grains trop
gras).
Tapoter légèrement sur le réservoir
pour café en grains. Changer éventuellement de variété de café. Une fois le
réservoir pour café en grains vidé,
l'essuyer avec un chiffon sec.
Le café ne présente pas de
« crème ».
Variété de café inadéquate. Utiliser un café avec une proportion
plus importante de Robusta.
Les grains ne sont pas fraîche-
Utiliser des grains frais.
ment torréfiés.
Le degré de mouture n’est pas
Régler un degré de mouture plus fin.
adapté aux grains de café.
Le café est trop « acide ». Le degré de mouture est réglé
Régler un degré de mouture plus fin.
trop grossier.
Variété de café inadéquate. Utiliser un café torréfié plus foncé.
44
Page 45

Anomalies, que faire ? fr
Le café est trop « amer ». Le degré de mouture est réglé
Le café a un goût de « brûlé ». Le degré de mouture est réglé
Le lait/les boissons lactées
sont trop chauds.
Mousse de lait trop aérée, fort
bruit d'aspiration.
Le lait/les boissons lactées
sont trop froids.
Le lait/la mousse de lait ne
coule pas.
Le filtre à eau ne tient pas dans
le réservoir d’eau.
Plusieurs touches clignotent,
un « bruit » fort retentit.
Présence d’eau sur le fond
interne de l'appareil une fois
que l’on a retiré les bacs collecteurs.
L'unité de percolation ne peut
pas être retirée.
Impossible de commander
l’appareil, les LED s’allument
ou clignotent.
Le moulin ne démarre pas. L'appareil est trop chaud. Attendre 1 heure et laisser l'appareil
La LED ( clignote. La porte n’est pas bien fermée. Pousser fermement la porte.
trop fin.
Variété de café inadéquate. Changer de variété de café.
trop fin.
Variété de café inadéquate. Changer de variété de café.
Pas assez de lait dans le verre
ou la tasse.
Trop de lait dans le verre ou la
tasse.
Le mousseur de lait est
encrassé.
Le mousseur de lait ne plonge
pas dans le lait.
Le filtre d’eau n’est pas correctement fixé.
Le réservoir d’eau manque ou a
été mal inséré.
Cuvette d'égouttage retirée
trop tôt.
L'unité de percolation n'est pas
dans la position de retrait (la
protection contre le gel a p. ex.
été activée).
L’appareil est en mode Démo. Maintenir la touche k enfoncée pen-
L’appareil est trop chaud. Attendre 1 heure et laisser l’appareil
Régler une mouture plus grossière.
Régler une mouture plus grossière.
Utiliser plus de lait ou adapter la durée
de préparation de la mousse.
Utiliser moins de lait ou adapter la
durée de préparation de la mousse.
Nettoyer le mousseur de lait au
lave-vaisselle. ~ "Nettoyage du
système à lait" à la page 40
Utiliser plus de lait, vérifier si le mousseur de lait plonge dans le lait. Pousser
le système verseur complètement vers
le bas.
Plonger le filtre à eau dans l'eau
jusqu'à ce que plus aucune bulle ne se
dégage et remettre le filtre en place.
Placer le filtre d’eau bien droit et
appuyer fortement pour l’enfoncer
dans le raccordement au réservoir.
Mettre le réservoir d’eau correctement
en place.
Retirer les bacs collecteurs quelques
secondes après la distribution de la
dernière boisson.
Rallumer l'appareil.
dant au moins 5 secondes pour désactiver le mode Démo.
refroidir.
refroidir.
45
Page 46

fr Anomalies, que faire ?
La LED ( s’allume alors que la
cuvette d’égouttage est vide,
que faire ?
La LED ' s’allume alors que le
réservoir d’eau est plein.
La LED ' clignote et toutes les
LED de boisson clignotent.
Lorsque l’appareil est éteint,
l’opération de vidange n’est pas
détectée.
Le réservoir d’eau est mal
inséré.
Le réservoir d’eau contient de
l’eau gazeuse.
Le flotteur qui se trouve dans le
réservoir d’eau est grippé.
Le filtre à eau neuf n’a pas été
rincé conformément aux instructions.
De l’air se trouve dans le filtre à
eau.
Le filtre à eau est trop vieux. Mettre en place un nouveau filtre à
Le réservoir d’eau manque ou
n’a pas été correctement mis
en place.
Le circuit de l’appareil est sec. Mettre le réservoir d’eau correctement
De l’air se trouve dans le filtre à
eau.
Une fois l’appareil allumé, retirer la
cuvette d’égouttage et la remettre en
place.
Mettre le réservoir d’eau correctement
en place.
Remplir le réservoir d’eau avec de l’eau
fraîche du robinet.
Retirer le réservoir d’eau et le nettoyer
minutieusement.
Rincer le filtre à eau conformément aux
instructions et le remettre en service.
Plonger le filtre à eau (ouverture vers le
haut) dans l’eau jusqu’à ce que plus
aucune bulle ne se dégage et remettre
le filtre en place. ~ "Insertion ou
renouvellement d’un filtre à eau"
à la page 36
eau.
Mettre le réservoir d’eau correctement
en place.
en place.
Remplir le réservoir d’eau avec de l’eau
fraîche du robinet.
Ne pas y verser d’eau gazeuse.
Plonger le filtre à eau (ouverture vers le
haut) dans l’eau jusqu’à ce que plus
aucune bulle ne se dégage et remettre
le filtre en place. ~ "Insertion ou
renouvellement d’un filtre à eau"
à la page 36
46
Page 47

Anomalies, que faire ? fr
Toutes les LED clignotent. Tension incorrecte du réseau
domestique.
Les LED ', ( et calc’nClean
clignotent.
Les LED ( et % clignotent.
La température ambiante est
trop basse.
Unité de percolation très fortement encrassée ou impossibilité de la retirer.
Ne faire fonctionner l’appareil que sur
220 V – 240 V.
Utiliser l’appareil à une température
> 5 °C.
Nettoyer, si possible, l’unité de percolation, mettre l’appareil hors, puis sous
tension.
Les LED % clignotent. Défaut de l’appareil. Redémarrer l’appareil.
Appeler impérativement la hotline si les problèmes ne peuvent pas être résolus !
Les numéros de téléphone se trouvent aux dernières pages de la notice.
--------
47
Page 48

fr Service après-vente
4 Service après-vente
Service après-vente
Données techniques
Raccordement électrique (tension – fréquence) 220–240 V∼, 50 / 60 Hz
Valeur de raccordement 1 300 W
Pression statique maximale de la pompe 15 bar
Contenance maximale du réservoir d’eau (sans filtre) 1,3 l
Contenance maximale du réservoir pour café en grains ≈ 250 g
Longueur du cordon d’alimentation 100 cm
Dimensions (H x L x P) 37,3 x 24,9 x 42,8 cm
Poids à vide env. 8–9 kg
Type de moulin Céramique/acier
Numéro E et numéro FD
Lors de votre appel, veuillez indiquer le
numéro de produit (E-Nr.) complet et le
numéro de fabrication (FD-Nr.), afin de
nous permettre de mieux vous aider.
Vous trouverez ces numéros sur la
plaque signalétique `. (~ Figure ")
Vous pouvez inscrire ici les données de
votre appareil et le numéro de
téléphone du service après-vente pour
éviter d'avoir à les rechercher en cas de
besoin.
E-Nr.
Service après-vente
O
Vous trouverez les coordonnées du
service après-vente dans chaque pays
sur les dernières pages de la présente
notice.
FD-Nr.
Garantie
Les conditions de garantie applicables
sont celles publiées par notre
distributeur dans le pays où a été
effectué l’achat. Le revendeur chez qui
vous vous êtes procuré l’appareil
fournira les modalités de garantie sur
simple demande de votre part. En cas
de recours en garantie, veuillez toujours
vous munir de la preuve d’achat.
Sous réserve de modifi cations.
48
Page 49

Inhoudsopgave
nlGebruiksaanwijzing
8 Gebruik volgens de
voorschriften . . . . . . . . . . . . . . . 50
( Belangrijke
veiligheidsvoorschriften . . . . . . 50
7 Milieubescherming . . . . . . . . . . 52
Energiebesparing . . . . . . . . . . . . . . . 52
Milieuvriendelijk afvoeren . . . . . . . . . 52
* Het apparaat leren kennen . . . . 52
Standaarduitvoering . . . . . . . . . . . . . 52
Montage en onderdelen . . . . . . . . . . 53
Bedieningselementen . . . . . . . . . . . . 53
_ Toebehoren . . . . . . . . . . . . . . . . 54
K Voor het eerste gebruik. . . . . . . 55
Apparaat installeren en aansluiten . . 55
Apparaat in gebruik nemen . . . . . . . 55
nl
D Dagelijks onderhoud en
reiniging . . . . . . . . . . . . . . . . . . . 62
Schoonmaakmiddelen. . . . . . . . . . . . 62
Apparaat reinigen . . . . . . . . . . . . . . . 63
Lekschaal en koffiedikreservoir
reinigen . . . . . . . . . . . . . . . . . . . . . . . 63
Melksysteem reinigen . . . . . . . . . . . . 63
Zetgroep reinigen . . . . . . . . . . . . . . . 64
. Serviceprogramma's. . . . . . . . . 65
Calc’nClean starten . . . . . . . . . . . . . . 66
3 Wat te doen bij storingen? . . . . 67
4 Servicedienst. . . . . . . . . . . . . . . 70
Technische gegevens . . . . . . . . . . . . 70
E-nummer en FD-nummer . . . . . . . . . 70
Garantievoorwaarden . . . . . . . . . . . . 70
1 Apparaat bedienen . . . . . . . . . . 56
Koffiedrank van versgemalen bonen
zetten . . . . . . . . . . . . . . . . . . . . . . . . 56
Dranken met melk bereiden . . . . . . . 57
Drankinstellingen aanpassen . . . . . . 58
Waterfilter . . . . . . . . . . . . . . . . . . . . . 59
Vorstbescherming. . . . . . . . . . . . . . . 59
1 Instellingen. . . . . . . . . . . . . . . . . 60
Automatisch uitschakelen . . . . . . . . 60
Geluidssignaal in-/uitschakelen . . . . 60
Waterhardheid instellen . . . . . . . . . . 61
Fabrieksreset . . . . . . . . . . . . . . . . . . 61
49
Page 50

nl Gebruik volgens de voorschriften
8 Gebruik volgens de
voorschriften
Gebruik volgens de voorschriften
Controleer het apparaat na het
uitpakken. Niet aansluiten in
geval van transportschade.
Dit apparaat is alleen bestemd
voor huishoudelijk gebruik en
de huiselijke omgeving.
Gebruik het apparaat alleen
binnenshuis bij
kamertemperatuur en tot
2000 m boven de zeespiegel.
( Belangrijke veilig-
heidsvoorschriften
Belangrijke veiligheidsvoorschriften
Lees de gebruiksaanwijzing
zorgvuldig door, houd u eraan
en bewaar hem goed. Geeft u
het apparaat door aan derden,
voeg deze gebruiksaanwijzing
er dan bij.
Dit apparaat kan worden
bediend door kinderen vanaf
8 jaar en door personen met
fysieke, sensorische of
geestelijke beperkingen of met
gebrekkige ervaring en/of
kennis, indien zij onder toezicht
staan of zijn geïnstrueerd in het
veilige gebruik van het
apparaat en de daaruit
resulterende gevaren hebben
begrepen. Kinderen jonger dan
8 jaar dienen uit de buurt van
het apparaat en het
aansluitsnoer te worden
gehouden en mogen het
apparaat niet bedienen.
Kinderen mogen niet met het
apparaat spelen. Reiniging en
gebruikersonderhoud mogen
niet door kinderen worden
uitgevoerd, tenzij de kinderen
8 jaar of ouder zijn en zij deze
werkzaamheden onder toezicht
uitvoeren.
50
Page 51

Belangrijke veiligheidsvoorschriften nl
:Waarschuwing
Gevaar voor een elektrische schok!
■ Het apparaat mag uitsluitend
via een conform de
voorschriften geïnstalleerd
stopcontact met randaarde
op een stroomnet met
wisselstroom worden
aangesloten. Overtuig u
ervan dat het
randaardesysteem van de
elektrische huisinstallatie
conform de
elektrotechnische
voorschriften is geïnstalleerd.
Risico van een elektrische schok!
■ Het apparaat uitsluitend
aansluiten en gebruiken
volgens de gegevens op het
typeplaatje. Wanneer de
netaansluiting van dit
apparaat wordt beschadigd,
moet dit door de
servicedienst worden
vervangen.
Risico van een elektrische schok!
■ Gebruik het apparaat
uitsluitend indien
aansluitsnoer en apparaat
geen beschadigingen
vertonen. Trek bij storingen
direct de stekker uit het
stopcontact of schakel de
netspanning uit.
Risico van een elektrische schok!
■ Om gevaren te voorkomen
mogen reparaties aan het
apparaat uitsluitend worden
uitgevoerd door onze
klantenservice.
Risico van een elektrische schok!
■ Het apparaat en het
aansluitsnoer nooit
onderdompelen in water.
:Waarschuwing
Gevaar door magnetisme!
Het apparaat bevat
permanentmagneten die
elektronische implantaten,
zoals pacemakers of
insulinepompen, kunnen
beïnvloeden. Dragers van
elektronische implantaten
dienen op minimaal 10 cm
afstand van het apparaat en de
verwijderde watertank te blijven.
:Waarschuwing
Kans op stikken!
Laat kinderen niet met
verpakkingsmateriaal spelen.
Bewaar kleine onderdelen op
een veilige plaats, deze kunnen
ingeslikt worden.
:Waarschuwing
Risico van verbranding!
Het melksysteem wordt zeer
heet. De melkschuimer mag na
gebruik pas worden aangeraakt
wanneer hij is afgekoeld.
:Waarschuwing
Risico van letsel!
■ Onjuist gebruik van het
apparaat kan letsel tot
gevolg hebben.
Risico van letsel!
■ Grijp niet in de maler.
51
Page 52

nl Milieubescherming
7 Milieubescherming
Milieubescherming
Energiebesparing
■ Als het apparaat niet wordt gebruikt,
schakel het dan uit.
■ Het interval voor de automatische
uitschakeling op de kleinste waarde
instellen.
■ Onderbreek, indien mogelijk niet het
tappen van koffie of melkschuim. Het
voortijdig onderbreken leidt tot een
verhoogd energieverbruik en tot
sneller vollopen van de lekschaal.
■ Ontkalk het apparaat regelmatig om
kalkafzettingen te voorkomen.
Kalkresten leiden tot een hoger
energieverbruik.
Milieuvriendelijk afvoeren
Voer de verpakking op een
milieuvriendelijke manier af.
Dit apparaat is gekenmerkt in
overeenstemming met de
Europese richtlijn 2012/19/EU
betreffende afgedankte
elektrische en elektronische
apparatuur (waste electrical
and electronic equipment WEEE).
De richtlijn geeft het kader aan
voor de in de EU geldige
terugneming en verwerking van
oude apparaten.
Vraag bij uw speciaalzaak om actuele
informatie over het afvoeren van afval.
* Het apparaat leren
kennen
Het apparaat leren kennen
In dit hoofdstuk vindt u een overzicht
van de omvang van de levering, de
opbouw en de bestanddelen van het
apparaat. Bovendien leert u de
verschillende bedieningselementen
kennen.
Aanwijzing: Afhankelijk van het
apparaattype zijn kleur- en
detailafwijkingen mogelijk.
Voor het gebruik van deze
gebruiksaanwijzing:
De omslagpagina's van de
gebruiksaanwijzing kunt u aan de
voorzijde uitklappen. De illustraties zijn
van nummers voorzien waarnaar in de
gebruiksaanwijzing wordt verwezen.
Voorbeeld: ~ afb. !
Standaarduitvoering
~ Afb. !
# Volautomatische
espressomachine
+ Teststrip voor de hardheid van het
water
3 Gebruiksaanwijzing
; Melkschuimer
52
Page 53

Het apparaat leren kennen nl
Montage en onderdelen
~ Afb. "
( Toets aan / uit (stand-by-modus)
0 Bedieningspaneel
8 Greep melkschuimer
@ Uitloopsysteem voor koffie, in
hoogte verstelbaar
H Melkschuimer (houder, schuimer,
afdekking), in hoogte verstelbaar
Bedieningselementen
Toets Betekenis
Apparaat in- en uitschakelen
k
espresso Afgifte Espresso
caffe crema Afgifte Caffe crema
cappuccino Afgifte cappuccino
latte macchiato Afgifte latte macchiato
milk Melk opschuimen
% Koffiesterkte
calc’nClean Start van het serviceprogramma
--------
Het apparaat spoelt automatisch als het wordt in- en uitgeschakeld.
Het apparaat spoelt niet wanneer:
■ het bij het inschakelen nog warm is.
■ er voor het uitschakelen geen koffie werd gezet.
Het apparaat is klaar voor gebruik wanneer op het bedieningsveld de leds voor de
toetsen voor drankselectie oplichten. Het apparaat beschikt over een automatische
uitschakeling. ~ "Automatisch uitschakelen instellen" op pagina 60
Aanpassing van de koffiesterkte ~ "Drankinstelling aanpassen" op pagina 58
Knippert als het serviceprogramma uitgevoerd moet worden.~ "Serviceprogramma
Calc´nClean" op pagina 66
P Lekschaal (koffiedikreservoir,
lekrooster, lekplaat, vlotter)
X Deur voor zetkamer
` Typeplaatje
h Zetgroep
)" Aromadeksel
)* Bonenreservoir
)2 Draaiknop voor instelling
maalfijnheid
): Deksel watertank
)B Watertank
53
Page 54

nl Toebehoren
Indicatie
Licht op wanneer de watertank met water moet worden bijgevuld of de watertank ont-
'
(
breekt.
Knippert wanneer het waterfilter moet worden vervangen.
Licht op als de bakjes geleegd moeten worden.
Knippert als de deur voor de zetkamer open is.
licht op Klaar voor gebruik, er kan een keuze worden gemaakt
pulseert Afgifte loopt
knippert Wacht op bediening, bijv. bij calc’nClean
uit Niet beschikbaar
--------
_ Toebehoren
Toebehoren
Onderstaand toebehoren is in de
handel en via de servicedienst
verkrijgbaar:
Toebehoren Bestelnummer
Handel Klantenser-
vice
Reinigingstabs TZ80001 00311807
Ontkalkingstabs TZ80002 00576693
Waterfilter TZ70003 00575491
Onderhoudsset TZ80004 00576330
--------
De contactgegevens voor de
servicedienst van alle landen vindt u op
de laatste pagina van deze handleiding.
54
Page 55

Voor het eerste gebruik nl
K Voor het eerste
gebruik
Voor het eerste gebruik
In dit hoofdstuk leest u hoe u het
apparaat in gebruik neemt.
Aanwijzing: Machine alleen gebruiken
in vorstvrije ruimtes. Is de machine bij
temperaturen onder de 0 °C
getransporteerd of opgeslagen, dan
dient u minstens 3 uur te wachten
alvorens hem weer in gebruik te nemen.
Apparaat installeren en aansluiten
1. Verwijder de beschermende folie.
2. Zet het apparaat neer op een vlak en
voor het gewicht geschikt, watervast
oppervlak.
3. Het apparaat met de stekker in een
volgens de voorschriften
geïnstalleerd geaard stopcontact
steken.
Aanwijzing: Na elke aansluiting een
moment (ca. 5 seconden) wachten.
Apparaat in gebruik nemen
Bonenreservoir vullen
Met dit apparaat kunt u koffiedranken
uit koffiebonen bereiden.
1. Deksel )" van het
bonenreservoir )* openen.
2. Koffiebonen vullen.
3. Deksel weer sluiten.
Aanwijzingen
■ Geglaceerde, gekaramelliseerde
koffiebonen of bonen met andere
suikerhoudende toevoegingen
verstoppen de zetgroep. Alleen
zuivere espressobonen of
bonenmengsels voor volautomaten
gebruiken.
■ De koffiebonen worden voor elk
zetproces vers gemalen.
■ De koffiebonen koel en gesloten
bewaren, zo blijft de kwaliteit
optimaal behouden.
■ U kunt koffiebonen meerdere dagen
in het bonenreservoir bewaren
zonder dat het aroma verloren gaat.
Watertank vullen.
Belangrijk: vul de watertank dagelijks
met vers, koud water zonder koolzuur.
Controleer voor de werking, of de
watertank voldoende is gevuld.
Melkschuimer aansluiten
~ Afb. #
1. Onderdelen van de melkschuimer uit
de zak nemen.
2. Melkschuimer in elkaar zetten.
3. Melkschuimer voor op het apparaat
aansluiten.
1. Het deksel van de watertank nemen.
2. De watertank er aan de greep uit
tillen.
3. De watertank tot de markering "max"
met water vullen.
4. De watertank weer rechtop in de
houder plaatsen en het deksel op de
watertank plaatsen.
55
Page 56

nl Apparaat bedienen
Algemene aanwijzingen
De volautomatische espressomachine
is af fabriek geprogrammeerd met de
standaardinstellingen voor een optimale
werking.
■ Het apparaat schakelt zichzelf na
een geselecteerde tijd automatisch
uit.
■ Bij aanraking van een toets klinkt er
een geluid, dat kan worden
uitgeschakeld.~ "Instellingen"
op pagina 60
■ Als u het apparaat voor de eerste
keer gebruikt, nadat er een
serviceprogramma is uitgevoerd of
nadat het apparaat langere tijd niet
is gebruikt, dient u de eerste drank
niet te drinken aangezien deze nog
niet het volle aroma bezit.
■ Na de ingebruikname van het
apparaat krijgt u pas een voldoende
dikke en stabiele laag ‘crema’ nadat
u de eerste paar kopjes hebt gezet.
■ Bij langdurig gebruik kunnen zich
waterdruppels bij de
ventilatiesleuven voordoen.
■ Uittredende stoom is geen defect,
maar een normaal verschijnsel.
1 Apparaat bedienen
Apparaat bedienen
In dit hoofdstuk leest u hoe u koffie- en
melkdranken bereidt. U krijgt informatie
over de instellingen, het waterfilter, de
aanpassing van de maalfijnheid en de
vorstbescherming.
Aanwijzing: Vers bereide dranken
kunnen zeer heet zijn.
Koffiedrank van versgemalen bonen zetten
U kunt kiezen uit Espresso en Caffe
crema. ~ "Dranken met melk
bereiden" op pagina 57
Het apparaat is ingeschakeld. De
watertank en het bonenreservoir zijn
gevuld.
1. Plaats een kopje onder het
uitloopsysteem.
2. Door herhaalde aanraking van
% de gewenste koffiesterkte
instellen.
3. Toets espresso of caffe crema
aanraken.
Nu wordt de koffie gezet en aansluitend
wordt het kopje gevuld.
Voordat u uw nieuwe apparaat gebruikt,
dient u de waterhardheid te controleren
en in te stellen.~ "Instellingen"
op pagina 60
56
Aanwijzing: Om de drankbereiding
voortijdig te stoppen, espresso of caffe
crema opnieuw aanraken.
Page 57

Apparaat bedienen nl
Dranken met melk bereiden
Dit apparaat bezit een melkschuimer. U
kunt koffiedranken met melk bereiden
of melk opschuimen.
Aanwijzing: Opgedroogde melkresten
zijn moeilijk te verwijderen, daarom
moeten deze altijd worden
verwijderd.~ "Dagelijks onderhoud en
reiniging" op pagina 62
:Waarschuwing
Gevaar voor verbranding!
De melkschuimer wordt zeer heet.
Uitsluitend aan de greep vasthouden.
De melkschuimer mag na gebruik pas
worden aangeraakt wanneer hij is
afgekoeld.
Dranken met koffie en melk
U kunt kiezen uit cappuccino en latte
macchiatto. Hiervoor a.u.b. op de stand
van de koffie-uitloop en melkschuimer
letten.
Cappuccino
Latte macchiato
De melkschuimer is gemonteerd.
1. Een grote kop of een groot glas met
ca. 100 ml melk voor cappuccino en
ca. 150 ml melk voor latte
macchiatto vullen.
2. Het kopje of glas onder het
uitloopsysteem plaatsen.
3. De koffie-uitloop en melkschuimer
helemaal naar beneden schuiven.
4. Door herhaalde aanraking van
% de gewenste koffiesterkte
instellen.
5. Toets cappuccino of latte
macchiato aanraken.
Eerst wordt er melk in het kopje of glas
opgeschuimd. Vervolgens wordt de
koffie gezet en stroomt deze in het
kopje of het glas.
Aanwijzing: Om de actuele stap van
de drankbereiding voortijdig te stoppen,
cappuccino of latte macchiato opnieuw
aanraken.
Melk opschuimen
Het apparaat is ingeschakeld. De
watertank is gevuld.
De melkschuimer is gemonteerd.
1. Een grote kop of een groot glas met
ca. 100 ml melk vullen.
2. Het kopje of glas onder het
uitloopsysteem plaatsen.
3. De koffie-uitloop en melkschuimer
helemaal naar beneden schuiven.
4. Toets milk aanraken.
De melk wordt opgeschuimd.
Het apparaat is ingeschakeld. De
watertank en het bonenreservoir zijn
gevuld.
Aanwijzing: Om het proces voortijdig
te stoppen, milk opnieuw aanraken.
57
Page 58

nl Apparaat bedienen
Drankinstellingen aanpassen
Drankinstelling aanpassen
Koffiesterkte
Voordat u een drank afneemt, kunt u de
koffiesterkte aanpassen:
Stel hiervoor door aanraking van %
de gewenste sterkte in.
mild
normaal
sterk
Aanwijzing: De ingestelde koffiesterkte
is actief voor alle dranken met koffie.
Vulhoeveelheid
U kunt de vulhoeveelheid van uw
dranken veranderen.
espresso of caffe crema 3 seconden
ingedrukt houden.
De afgifte loopt, de geselecteerde toets
knippert.
Als de gewenste vulhoeveelheid in het
kopje is bereikt, de geselecteerde toets
aanraken om te stoppen. De opnieuw
ingestelde vulhoeveelheid is pas
merkbaar bij de volgende afgifte.
Aanwijzing: De vulhoeveelheid kan
telkens voor Espresso (25 - 60 ml) of
Caffe crema (80 - 200 ml) worden
ingesteld.Er wordt altijd een minimale
hoeveelheid gezet, Espresso ca. 25 ml
en Caffe crema ca. 80 ml.
Schuimduur
U kunt de schuimduur van uw dranken
veranderen.
cappuccino, latte macchiato of milk
3 seconden ingedrukt houden.
De melk wordt opgeschuimd, de
geselecteerde toets knippert.
Als de gewenste schuimduur is bereikt,
de geselecteerde toets aanraken om te
stoppen.
Aanwijzing: De instelling van de
schuimduur heeft geen invloed op de
hoeveelheid koffie.
Koffiemaalgraad instellen
Dit apparaat heeft een instelbaar
maalwerk. Hiermee kan de maalfijnheid
van de koffie individueel worden
veranderd.
:Waarschuwing
Risico van letsel!
Grijp niet in de maler.
Attentie!
Het apparaat kan beschadigd worden!
De maalfijnheid uitsluitend wijzigen bij
lopend maalwerk!
Bij lopend maalwerk de maalfijnheid
met de draaiknop )2 instellen.
■ Fijne maalfijnheid: tegen de klok in
draaien. (Afb. a)
■ Grovere maalfijnheid: met de klok
mee draaien. (Afb. b)
D E
Aanwijzingen
■ De nieuwe instelling is pas merkbaar
vanaf de tweede kop koffie.
■ Bij donker geroosterde koffiebonen
een fijnere, bij lichtere koffiebonen
een grovere maalgraad instellen.
58
Page 59

Apparaat bedienen nl
Waterfilter
Waterfilter
~ Afb. '
Een waterfilter vermindert
kalkafzettingen, reduceert
verontreinigingen in het water en
verbetert de koffiesmaak. Waterfilters
zijn verkrijgbaar in de handel of via de
klantenservice.
Waterfilter aanbrengen of vervangen
Voordat u een nieuw waterfilter kunt
gebruiken, dient u het filter te spoelen.
Het apparaat is ingeschakeld. De
watertank is gevuld.
1. % en calc’nClean ten minste
3 seconden ingedrukt houden.
2. Toets espresso aanraken, het menu
“Waterhardheid” wordt geactiveerd.
3. Toets % aanraken en als volgt
instellen:
met waterfilter
4. Het waterfilter (opening naar boven)
onderdompelen in een met water
gevulde kom tot er geen luchtbellen
meer ontsnappen.
~ Afb. '
5. Vervolgens het waterfilter stevig in
de lege watertank drukken.
6. De watertank tot de markering
"max." met water vullen.
7. Een kom met een capaciteit van min.
1,0 l onder de uitloop plaatsen.
8. Toets espresso aanraken om de
instelling op te slaan en het spoelen
te activeren.
9. Watertank aanbrengen.
10. Toets espresso aanraken om het
spoelen te starten. Er stroomt water
door het filter.
11. Toets calc’nClean aanraken om het
menu te verlaten.
12. Vervolgens de kom leegmaken. Het
apparaat is weer klaar voor gebruik.
Waterfilter verwijderen
Als het waterfilter wordt verwijderd en er
geen nieuw waterfilter wordt
aangebracht, dient u de desbetreffende
instelling van de waterhardheid uit te
voeren. ~ "Waterhardheid instellen"
op pagina 61
Vorstbescherming
Om beschadiging door vorst te
voorkomen bij transport en opslag,
moet het apparaat eerst geheel leeg
worden gemaakt.
Info: Het apparaat moet klaar zijn voor
gebruik en de watertank moet gevuld
zijn.
1. Een grote kom onder de uitloop van
de melkschuimer plaatsen en de
melkschuimer omlaag schuiven.
2. Toets milk ten minste 5 seconden
ingedrukt houden.
De led van de toets knippert, het
apparaat warmt nu op.
3. De watertank verwijderen zodra er
stoom uit de melkschuimer komt.
4. Het apparaat laten stomen. Wachten
tot het symbool ' en alle leds
knipperen.
5. Met de toets k het apparaat
uitschakelen.
6. De watertank en de lekschaal
leegmaken en het apparaat grondig
reinigen.
Het apparaat kan nu worden
getransporteerd of opgeslagen.
Aanwijzing: De zetgroep is nu
beveiligd en kan niet worden verwijderd.
59
Page 60

nl Instellingen
1 Instellingen
Instellingen
Dit apparaat beschikt over verschillende
fabrieksinstellingen. U kunt diverse
instellingen op uw individuele wensen
afstemmen.
Aanwijzing: Als er niet binnen
90 seconden op een toets wordt
gedrukt, wordt het apparaat naar "Drank
selecteren" geschakeld zonder dat de
instelling wordt opgeslagen. De eerder
opgeslagen instelling blijft behouden.
U kunt het volgende instellen:
Automatisch uitschakelen
Automatisch uitschakelen instellen
Het apparaat schakelt zichzelf na de
laatste druk op een toets op een
bepaald moment automatisch uit. Dit
moment kan ingesteld worden, de
instelling is mogelijk van 15 minuten tot
4 uur.
1. % en calc’nClean ten minste
3 seconden ingedrukt houden.
2. Toets caffe crema aanraken, het
menu “Automatische uitschakeling”
wordt geactiveerd.
3. Toets % aanraken en de
gewenste tijd instellen.
De volgende instellingen zijn
mogelijk:
15 minuten
30 minuten (fabrieksinstelling)
1 uur
2 uur
4 uur
Geluidssignaal in-/uitschakelen
Bij bediening van een toets klinkt een
geluidssignaal.
Dit kan worden in- of uitgeschakeld.
1. % en calc’nClean ten minste
3 seconden ingedrukt houden.
2. Toets cappuccino aanraken, het
menu “Geluidssignaal” wordt
geactiveerd.
3. Toets % aanraken en het
geluidssignaal in- of uitschakelen.
Aan (fabrieksinstelling)
Uit
4. Toets cappuccino aanraken om de
instelling op te slaan.
5. Toets calc’nClean aanraken om het
menu te verlaten.
4. Toets caffe crema aanraken om de
instelling op te slaan.
5. Toets calc’nClean aanraken om het
menu te verlaten.
60
Page 61

Instellingen nl
Waterhardheid instellen
De juiste instelling van de
waterhardheid is van belang, opdat het
apparaat tijdig meldt, dat het moet
worden ontkalkt. De vooraf ingestelde
waterhardheid is niveau 4.
De waterhardheid kan bij het
plaatselijke waterbedrijf worden
nagevraagd of met de bijgevoegde
teststrook worden vastgesteld.
1. De bijgevoegde teststrook kort in
vers leidingwater dopen, laten
uitdruipen en na een minuut het
resultaat aflezen.
2. % en calc’nClean ten minste
3 seconden ingedrukt houden.
3. Toets espresso aanraken, het menu
“Waterhardheid” wordt geactiveerd.
4. Toets % aanraken en de
waterhardheid instellen.
De volgende instellingen zijn
mogelijk:
Waterhardh. 1
Waterhardh. 2
Waterhardh. 3
Waterhardh. 4 (fabrieksinstelling)
Waterfilter (indien geplaatst)
H2O-ontharder (indien aanwezig)
De tabel toont de toekenning van de
niveaus aan de verschillende graden
van waterhardheid:
Niveau Waterhardheid
Duits (°dH) Frans (°fH)
1 1-7 1-13
2 8-14 14-25
3 15-21 26-38
4 22-30 39-54
Het is op ieder moment mogelijk de
waterhardheid achteraf te wijzigen.
Aanwijzing: Bij gebruik van het
waterfilter (zie hoofdstuk “Toebehoren”)
als volgt te werk gaan. ~ "Waterfilter"
op pagina 59
Fabrieksreset
Terugzetten op de fabrieksinstellingen,
eigen instellingen gaan verloren.
1. % en calc’nClean ten minste
3 seconden ingedrukt houden.
2. Toets latte macchiato aanraken.
De fabrieksinstellingen zijn nu weer
actief.
3. Toets calc’nClean aanraken om het
menu te verlaten.
5. Toets espresso aanraken om de
instelling op te slaan.
6. Toets calc’nClean aanraken om het
menu te verlaten.
61
Page 62

nl Dagelijks onderhoud en reiniging
D Dagelijks onderhoud
en reiniging
Dagelijks onderhoud en reiniging
Wanneer uw apparaat goed wordt
onderhouden en schoongemaakt blijft
het lang goed functioneren.In dit
hoofdstuk leest u hoe u het apparaat
goed kunt onderhouden en reinigen.
:Waarschuwing
Risico van een elektrische schok!
Voor het reinigen de stekker uit het
stopcontact trekken. Het apparaat niet
onderdompelen in water. Geen
stoomreiniger gebruiken.
Schoonmaakmiddelen
Om te voorkomen dat de verschillende
oppervlakken door verkeerde
schoonmaakmiddelen beschadigd
raken, dient u zich te houden aan de
volgende aanwijzingen.
Gebruik
■ geen scherpe of schurende
reinigingsmiddelen.
■ geen reinigingsmiddelen die alcohol
of spiritus bevatten.
■ geen harde schuur- en
schoonmaaksponsjes.
9
Aanwijzingen
■ Nieuwe sponsdoekjes kunnen
zouten bevatten. Deze zouten
kunnen een roestlaagje op het
roestvrij staal veroorzaken. Nieuwe
vaatdoekjes voor gebruik grondig
uitwassen.
■ Resten van kalk, koffie, melk,
reinigings- en
ontkalkingsoplossingen altijd
onmiddellijk verwijderen.Onder
dergelijke omstandigheden kan er
corrosie optreden.
Attentie!
Niet alle componenten van het apparaat
kunnen in de vaatwasser worden
gereinigd.
~ Afb. % - '
Niet geschikt voor de vaatwasser:
Watertank
Deksel watertank
Aromadeksel
Zetgroep
Lekschaal
Geschikt voor de vaatwasser:
Lekplaat
Lekrooster
Koffiedikreservoir
max.
60 °C
Vlotter
Melkschuimer
Afdekking melkschuimer
62
9
Page 63

Dagelijks onderhoud en reiniging nl
Apparaat reinigen
1. Veeg de buitenzijde met een zachte,
vochtige doek af.
2. Reinig het bedieningspaneel met
een microvezeldoekje.
3. De koffie-uitloop na elke
drankafname zo nodig afvegen.
Aanwijzingen
■ Als het apparaat in koude toestand
wordt ingeschakeld of na afname
van koffie wordt uitgeschakeld,
wordt het apparaat automatisch
gespoeld. Zo reinigt het systeem
zichzelf.
■ Als het apparaat langere tijd niet is
gebruikt (bijv. na een vakantie), het
hele apparaat inclusief
melkschuimer en zeteenheid
grondig reinigen.
Lekschaal en koffiedikreservoir reinigen
~ Afb. %
Aanwijzing: De lekschaal en het
koffiedikreservoir moeten dagelijks
worden leeggemaakt en gereinigd om
afzettingen te voorkomen.Bij vaak
gebruik tussendoor leegmaken zodra
de vlotter duidelijk zichtbaar is of het
overeenkomstige symbool oplicht.
1. Deur openen.
2. Lekschaal met koffiedikreservoir
naar voren toe eruit trekken.
3. Lekplaat met lekrooster verwijderen.
4. Lekschaal en koffiedikreservoir
leegmaken en reinigen.
5. Binnenkant van het apparaat
(lekschaal) schoonvegen.
Melksysteem reinigen
Melksysteem reinigen
~ Afb. &
Het melksysteem moet na elk gebruik
worden gereinigd om alle resten te
verwijderen.
:Waarschuwing
Gevaar voor verbranding!
De melkschuimer wordt zeer heet.
Uitsluitend aan de greep vasthouden.
De melkschuimer mag na gebruik pas
worden aangeraakt wanneer hij is
afgekoeld.
1. Een glas tot de helft met water vullen
en onder het uitloopsysteem
plaatsen.
2. De melkschuimer helemaal naar
beneden schuiven.
3. Toets milk aanraken, het
melksysteem wordt gereinigd.
4. De melkschuimer naar boven
schuiven en laten afkoelen.
5. De melkschuimer uit elkaar halen en
grondig reinigen.
6. De afzonderlijke onderdelen
afdrogen, in elkaar zetten en weer
op het apparaat bevestigen.
Aanwijzingen
■ Om het proces voortijdig te stoppen,
milk opnieuw aanraken.
■ Alle delen van het
melksysteemmoeten in de
vaatwasser worden gereinigd.
Loogresten in het melksysteem na
het spoelen grondig verwijderen.
63
Page 64

nl Dagelijks onderhoud en reiniging
Zetgroep reinigen
~ Afb. $, ~ Afb. %
Aanvullend bij het automatische
spoelen dient de zetgroep regelmatig te
worden verwijderd en gereinigd.
Attentie!
De zetgroep zonder afwasmiddel of
middelen met azijn of zuur reinigen en
niet in de vaatwasser doen.
Zetgroep eruit nemen:
1. Apparaat uitschakelen.
2. De deur van de zetkamer openen.
3. Het koffiedikreservoir verwijderen.
4. De rode hendel omhoog duwen, de
zetgroep aan de greep vastpakken
en voorzichtig naar voren toe eruit
trekken.
5. De zetgroep grondig met stromend
warm water reinigen.
6. Reinig de binnenkant van de
machine grondig met een vochtige
doek, verwijder eventueel aanwezige
koffieresten.
7. Laat de zetgroep en de binnenkant
van het apparaat drogen.
Zetgroep plaatsen:
1. De zetgroep aan de greeep
vastpakken.
2. De rode hendel omhoog duwen, de
zetgoep onder de hendel plaatsen
en tot aan de aanslag naar achteren
schuiven. De hendel moet
vastklikken.
3. Het koffiedikreservoir weer
aanbrengen en de deur sluiten.
Belangrijk: Bij ontbrekende of verkeerd
aangebrachte zetgroep of lekschaal kan
de deur niet worden gesloten.
64
Page 65

Serviceprogramma's nl
. Serviceprogramma's
Serviceprogramma's
Periodiek licht afhankelijk van de
waterhardheid en gebruiksintensiteit van
het apparaat de toets calc’nClean op.
Het apparaat moet onmiddellijk met het
programma gereinigd en ontkalkt
worden.
Aanwijzingen
■ Belangrijk: Als het apparaat niet
tijdig gereinigd en ontkalkt wordt,
kan het beschadigd raken.
■ Let op! Bij elk serviceprogramma
Calc’nClean ontkalkings- en
reinigingsmiddelen volgens de
gebruiksaanwijzing gebruiken en de
(desbetreffende)
veiligheidsinstructies in acht nemen.
■ De vloeistoffen niet drinken.
■ Voor het ontkalken nooit azijn,
middelen op basis van azijn,
citroenzuur of middelen op basis van
citroenzuur gebruiken.
■ Voor het ontkalken en reinigen
uitsluitend de daarvoor bedoelde
tabs gebruiken.Deze zijn speciaal
voor het apparaat ontwikkeld en
kunnen via de klantenservice
worden gekocht. ~ "Toebehoren"
op pagina 54
■ In geen geval ontkalkingstabs of
andere middelen in de zetgroep
doen.
■ Het serviceprogramma in geen geval
onderbreken.
■ Voor de start van een
serviceprogramma de zetgroep
verwijderen, reinigen en weer
terugzetten. De melkschuimer
reinigen.
■ Na beëindiging van een
serviceprogramma het apparaat met
een zachte vochtige doek afvegen
om resten van de
ontkalkingsoplossing onmiddellijk te
verwijderen. Onder dergelijke resten
kan corrosie worden gevormd.
■ Nieuwe sponsdoekjes kunnen
zouten bevatten. Zouten kunnen een
roestlaagje op het roestvrij staal
veroorzaken. De doekjes daarom
vóór gebruik grondig uitwassen.
■ Als het serviceprogramma door bijv.
stroomuitval wordt onderbroken,
gaan ' en calc’nClean branden.
Ga dan als volgt te werk:
1. De watertank uitspoelen.
2. Vers water zonder koolzuur tot de
markering “max.” vullen.
3. De toets calc’nClean aanraken.
Het programma start en spoelt het
apparaat.Duur ca. 2 minuten.
4. De lekschaal legen, reinigen en weer
plaatsen, de deur sluiten.
Het programma is beëindigd. Het
apparaat is weer klaar voor gebruik.
65
Page 66

nl Serviceprogramma's
Calc’nClean starten
Serviceprogramma Calc´nClean
Duur: ca. 40 minuten
1. De toets calc’nClean
ca. 5 seconden ingedrukt houden.
Symbool ( licht op.
2. De deur openen, lekschaal en
koffiedikreservoir verwijderen en
leegmaken.
3. De zetgroep verwijderen en reinigen.
4. Een Siemens-reinigingstab in de
zetgroep doen en de zetgroep weer
aanbrengen.
5. De lekschaal en het
koffiedikreservoir weer aanbrengen
en de deur sluiten.
Symbool ' licht op.
6. Het waterfilter verwijderen (indien
aanwezig).
7. De lege watertank tot de markering
vullen met 0,5 l lauwwarm water en
daarin een Siemens-ontkalkingstab
oplossen.
8. Watertank weer aanbrengen en een
grote kom (ca. 1 liter) onder het
uitloopsysteem plaatsen.
9. calc’nClean knippert, calc’nClean
aanraken.
Het programma start, reinigt en ontkalkt
het apparaat. calc’nClean
pulseert.Duur: ca. 20 minuten.
Symbool ( licht op.
10. De kom leegmaken, de deur
openen, de lekschaal leegmaken en
weer aanbrengen.
11. Deur sluiten en kom onder het
uitloopsysteem plaatsen.
Symbool ' licht op.
12. Het waterreservoir reinigen en het
waterfilter opnieuw aanbrengen
(indien u dit had verwijderd).
~ Afb. '
13. Het waterreservoir tot de markering
"max" met vers water zonder
koolzuur vullen en de kom weer
onder het uitloopsysteem plaatsen.
14. calc’nClean knippert, calc’nClean
aanraken.
Het programma start, reinigt en spoelt
het apparaat. calc’nClean pulseert.
Duur: ca. 20 minuten.
Symbool ( licht op.
15. De lekschaal en het
koffiedikreservoir leegmaken,
reinigen en weer aanbrengen.
Het programma is beëindigd. Het
apparaat is weer klaar voor gebruik.
66
Page 67

Wat te doen bij storingen? nl
3 Wat te doen bij
storingen?
Wat te doen bij storingen?
Storingen worden vaak veroorzaakt
door een kleinigheid. Probeer voordat u
Storingstabel
Probleem Oorzaak Oplossing
Het apparaat reageert niet
meer.
Sterk wisselende koffie- of
melkschuimkwaliteit.
De persoonlijk ingestelde vulhoeveelheid wordt niet bereikt,
de koffie druppelt alleen maar
of stroomt helemaal niet meer.
Er stroomt alleen water, geen
koffie.
Koffie heeft geen "crème"
(schuimlaag).
De koffie is te "zuur". De maalfijnheid is te grof inge-
Storing in het apparaat. Netstekker lostrekken, 5 seconden
Het apparaat is verkalkt. Het apparaat ontkalken volgens de
De maalfijnheid is te fijn. De maalfijnheid grover instellen.
Het apparaat is sterk verkalkt. Het apparaat conform de gebruiksaan-
Er zit lucht in het waterfilter. Het waterfilter zo lang onderdompelen
Een leeg bonenreservoir wordt
niet door het apparaat herkend.
De koffieschacht op de zetgroep is verstopt.
De bonen vallen niet in het
maalwerk (te vette bonen).
Koffiesoort niet geschikt. Gebruik een koffiesoort met een hoger
De bonen zijn niet meer brandvers.
De maalfijnheid is niet afgestemd op de koffiebonen.
steld.
Koffiesoort niet geschikt. Een donkerder gebrande soort gebrui-
contact opneemt met de servicedienst
de storing zelf op te lossen met behulp
van de tabel.
Lees de veiligheidsaanwijzingen aan het
begin van deze handleiding.
wachten, netstekker aansluiten.
handleiding.
wijzing ontkalken.
in water tot er geen luchtbellen meer
ontsnappen. Het filter weer aanbrengen.
Koffiebonen vullen
Aanwijzing: Het apparaat stelt zich bij
de volgende bereidingen in op de koffiebonen.
Zetgroep reinigen. ~ "Zetgroep
reinigen" op pagina 64
Licht tegen het bonenreservoir tikken.Eventueel een andere soort koffie
gebruiken. Het bonenreservoir leegmaken en schoonvegen met een droge
doek.
percentage robustabonen.
Verse bonen gebruiken.
De maalfijnheid fijner instellen.
Fijnere maalfijnheid instellen.
ken.
67
Page 68

nl Wat te doen bij storingen?
De koffie is te "bitter". De maalfijnheid is te fijn inge-
De koffie smaakt 'verbrand'. De maalfijnheid is te fijn inge-
Melk/melkmixdranken zijn te
heet.
Melkschuim te grof, aanzuiging is luid.
Melk/melkmixdranken zijn te
koud.
Er stroomt geen melk/melkschuim.
Het waterfilter blijft niet vastzitten in de watertank.
Meerdere toetsen knipperen, er
klinkt een luid “geluid”.
Lekwater op binnenzijde apparaatbodem bij verwijderde lekschaal.
De zetgroep kan niet worden
verwijderd.
Het apparaat kan niet worden
bediend, de leds branden of
knipperen.
Het maalwerk start niet. Het apparaat is te heet. 1 uur wachten en het apparaat af laten
Led ( knippert. De deur is niet juist gesloten. De deur stevig dicht duwen.
Led ( licht op, ondanks lege
lekschaal - wat moet u doen?
steld.
Koffiesoort niet geschikt. Een andere koffiesoort gebruiken.
steld.
Koffiesoort niet geschikt. Een andere koffiesoort gebruiken.
Te weinig melk in het glas of
kopje.
Teveel melk in het glas of
kopje.
De melkschuimer is verontreinigd.
De melkschuimer komt niet in
de melk.
Het waterfilter is niet correct
bevestigd.
Watertank ontbreekt of is
onjuist aangebracht.
Lekschaal te vroeg verwijderd. Lekschaal pas enkele seconden na de
De zetgroep is niet in positie
voor verwijdering (vorstbescherming is bijv. geactiveerd).
Het apparaat bevindt zich in
demomodus.
Het apparaat is te heet. 1 uur wachten en het apparaat af laten
Bij een uitgeschakeld apparaat
wordt het legen niet herkend.
Grovere maalfijnheid instellen.
Grovere maalfijnheid instellen.
Meer melk gebruiken of de schuimduur aanpassen.
Minder melk gebruiken of de schuimduur aanpassen.
Melkschuimer in de vaatwasmachine
reinigen. ~ "Melksysteem reinigen"
op pagina 63
Meer melk gebruiken, controleren of
de melkschuimer in de melk komt. Uitloopsysteem helemaal naar beneden
schuiven.
Dompel het waterfilter zo lang onder in
water tot er geen luchtbellen meer ontsnappen. Breng het filter hierna weer
aan.
Druk het waterfilter stevig en recht in
de tankaansluiting.
Watertank juist aanbrengen.
laatste drankbereiding wegnemen.
Apparaat weer inschakelen.
Toets k ten minste 5 seconden ingedrukt houden om de demomodus te
deactiveren.
koelen.
koelen.
De lekschaal bij ingeschakeld apparaat
verwijderen en weer plaatsen.
68
Page 69

Wat te doen bij storingen? nl
Led ' licht op, ondanks volle
watertank.
Watertank is onjuist aangebracht.
Koolzuurhoudend water in de
watertank.
Watertank juist aanbrengen.
Watertank met schoon leidingwater
vullen.
Vlotter in de watertank zit vast. Watertank verwijderen en grondig rei-
nigen.
Nieuw waterfilter niet volgens
de gebruiksaanwijzing
Waterfilter volgens de gebruiksaanwijzing spoelen en in gebruik nemen.
gespoeld.
Er zit lucht in het waterfilter. Waterfilter (opening naar boven) zo
lang onderdompelen in water tot er
geen luchtbellen meer ontsnappen.
Het filter weer aanbrengen.
~ "Waterfilter aanbrengen of
vervangen" op pagina 59
Waterfilter oud. Nieuw waterfilter plaatsen.
Led ' knippert en alle
drank-leds knipperen.
Watertank ontbreekt of is niet
juist aangebracht.
Het systeem van leidingen in
het apparaat is droog.
Watertank juist aanbrengen.
Watertank juist aanbrengen.
Watertank met schoon leidingwater
vullen.
Geen water met koolzuur gebruiken.
Er zit lucht in het waterfilter. Waterfilter (opening naar boven) zo
lang onderdompelen in water tot er
geen luchtbellen meer ontsnappen.
Het filter weer aanbrengen.
~ "Waterfilter aanbrengen of
vervangen" op pagina 59
Alle leds knipperen. Onjuiste spanning in de huisin-
stallatie.
Leds ', ( en calc’nClean
knipperen.
De omgevingstemperatuur is te
laag.
Leds ( en % knipperen. Zeer sterk verontreinigde zet-
groep of zetgroep kan niet wor-
Apparaat alleen met 220-240 V
gebruiken.
Apparaat bij temperaturen > 5 °C
gebruiken.
Zetgroep indien mogelijk reinigen,
apparaat uit- en weer inschakelen.
den verwijderd.
Leds % knipperen. Storing in het apparaat. Apparaat opnieuw starten.
Bel de hotline als u de problemen niet kunt verhelpen!
De telefoonnummers staan op de laatste pagina's van de gebruiksaanwijzing.
--------
69
Page 70

nl Servicedienst
4 Servicedienst
Servicedienst
Technische gegevens
Elektrische aansluiting (spanning – frequentie) 220–240 V ∼, 50 / 60 Hz
Aansluitwaarde 1300 W
Maximale pompdruk, statisch 15 bar
Maximale capaciteit waterreservoir (zonder filter) 1,3 l
Maximale capaciteit bonenreservoir ≈ 250 g
Lengte netsnoer 100 cm
Afmetingen (H x B x D) 37,3 x 24,9 x 42,8 cm
Gewicht, leeg ca. 8–9 kg
Type maalwerk Keramisch / staal
E-nummer en FD-nummer
Geef tijdens het telefoongesprek altijd
het volledige productnummer (E-nr.) en
het fabricagenummer (FD-nr.) van uw
apparaat op, zodat wij u goed van
dienst kunnen zijn. U vindt de nummers
op het typeplaatje `. (~ Afb. ")
Om niet te lang te hoeven zoeken
wanneer u de servicedienst nodig heeft,
kunt u hier direct de gegevens van uw
apparaat en het telefoonnummer van de
servicedienst invullen.
E-nr.
Servicedienst O
De contactgegevens voor de
servicedienst van alle landen vindt u op
de laatste pagina van deze handleiding.
FD-nr.
Garantievoorwaarden
Voor dit apparaat gelden de
garantievoorwaarden die worden
uitgegeven door de vertegenwoordiging
van ons bedrijf in het land van aankoop.
De leverancier, bij wie u het apparaat
heeft gekocht, geeft u hierover graag
meer informatie. Om aanspraak te
maken op de garantie heeft u altijd uw
aankoopbewijs nodig.
Wijzigingen voorbehouden.
70
Page 71

pl
Spis treści
plInstrukcja obsługi
8 Używanie zgodne
z przeznaczeniem . . . . . . . . . . . 72
( Ważne wskazówki dotyczące
bezpieczeństwa . . . . . . . . . . . . . 72
7 Ochrona środowiska . . . . . . . . .74
Oszczędność energii . . . . . . . . . . . . 74
Utylizacja zgodna z przepisami o
ochronnie środowiska naturalnego. . 74
* Informacje na temat urządzenia75
Zakres dostawy . . . . . . . . . . . . . . . . 75
Budowa i części . . . . . . . . . . . . . . . . 75
Elementy obsługi . . . . . . . . . . . . . . . 76
D Codzienna pielęgnacja i
czyszczenie . . . . . . . . . . . . . . . . 84
Środki czyszczące. . . . . . . . . . . . . . . 84
Czyszczenie urządzenia. . . . . . . . . . . 85
Czyszczenie pojemnika na skropliny i
pojemnika na fusy . . . . . . . . . . . . . . . 85
Czyszczenie systemu spieniania
mleka . . . . . . . . . . . . . . . . . . . . . . . . 85
Czyszczenie zaparzacza . . . . . . . . . . 86
. Programy serwisowe . . . . . . . . 87
Uruchamianie programu Calc’nClean 88
3 Co robić w razie usterki? . . . . . 89
4 Serwis. . . . . . . . . . . . . . . . . . . . . 93
_ Wyposażenie . . . . . . . . . . . . . . .77
K Przed pierwszym użyciem . . . . 77
Ustawienie i podłączenie urządzenia 77
Uruchamianie urządzenia . . . . . . . . . 77
Dane techniczne . . . . . . . . . . . . . . . . 93
Numer produktu (E-Nr.) i data
produkcji (FD) . . . . . . . . . . . . . . . . . .93
Gwarancja . . . . . . . . . . . . . . . . . . . . . 93
1 Obsługa urządzenia. . . . . . . . . . 79
Przyrządzanie napoju ze świeżo
zmielonej kawy . . . . . . . . . . . . . . . . . 79
Przygotowywanie napoju z mlekiem . 79
Dostosowywanie ustawień napojów . 80
Filtr wody . . . . . . . . . . . . . . . . . . . . . 81
Ochrona przed zamarzaniem . . . . . . 82
1 Ustawienia . . . . . . . . . . . . . . . . . 82
Automatyczne wyłączanie . . . . . . . . 82
Wyłączanie i wyłączanie sygnału
dźwiękowego . . . . . . . . . . . . . . . . . . 83
Ustawianie twardości wody. . . . . . . . 83
Reset ustaw. (przywracanie ustawień
fabrycznych) . . . . . . . . . . . . . . . . . . . 83
71
Page 72

pl Używanie zgodne z przeznaczeniem
8 Używanie zgodne
z przeznaczeniem
Używanie zgodne z przeznaczeniem
Po rozpakowaniu należy
sprawdzić stan urządzenia. Nie
podłączać, jeśli urządzenie
zostało uszkodzone podczas
transportu.
Urządzenie jest przeznaczone
wyłącznie do użytku w
gospodarstwie domowym i
podobnych otoczeniach.
Urządzenia wolno używać tylko
w pomieszczeniach, w
temperaturze pokojowej i na
wysokości nie większej niż
2000 m n.p.m.
( Ważne wskazówki
dotyczące
bezpieczeństwa
Ważne wskazówki dotyczące bezpieczeństwa
Proszę dokładnie przeczytać
instrukcję obsługi, starannie ją
przechowywać i postępować
zgodnie z zawartymi w niej
wskazówkami. Przekazując
urządzenie innej osobie należy
dołączyć niniejszą instrukcję.
Urządzenie może być
obsługiwane przez dzieci
powyżej 8 lat oraz przez osoby
o ograniczonych zdolnościach
fizycznych, czuciowych
lub umysłowych, albo
nie posiadających
odpowiedniego
doświadczenia/wiedzy tylko
pod kontrolą osoby
odpowiadającej
za bezpieczeństwo osoby
obsługującej urządzenie
lub po dokładnym pouczeniu
w obsłudze urządzenia oraz
po zrozumieniu zagrożeń
wynikających z obsługi
urządzenia. Nie dopuszczać
dzieci poniżej 8 roku życia
do urządzenia oraz
do elektrycznego przewodu
zasilającego. Nie wolno im
obsługiwać urządzenia. Dzieci
nie mogą bawić się
urządzeniem. Czynności z
zakresu czyszczenia i
normalnej konserwacji
urządzenia nie mogą być
wykonywane przez dzieci,
chyba że są one w wieku co
najmniej 8 lat i pod nadzorem.
72
Page 73

Ważne wskazówki dotyczące bezpieczeństwa pl
:Ostrzeżenie
Niebezpieczeństwo porażenia prądem!
■ Urządzenie musi być
podłączone do sieci
elektrycznej prądu
zmiennego przez prawidłowo
zainstalowane gniazdo z
uziemieniem. Proszę się
upewnić, że układ
przewodów ochronnych
domowej instalacji
elektrycznej jest wykonany
zgodnie z przepisami.
Niebezpieczeństwo porażenia prądem!
■ Urządzenie należy podłączyć
i użytkować zgodnie
z informacjami podanymi
na tabliczce znamionowej. W
przypadku uszkodzenia
przewodu zasilającego tego
urządzenia należy go
wymienić w serwisie.
Niebezpieczeństwo porażenia prądem!
■ Urządzenie można
użytkować tylko wtedy, gdy
elektryczny przewód
zasilający oraz samo
urządzenie nie są
uszkodzone. W razie awarii
natychmiast odłączyć
wtyczkę od gniazda
i wyłączyć napięcie sieciowe.
Niebezpieczeństwo porażenia prądem!
■ W celu wykluczenia zagrożeń
naprawy urządzenia może
wykonywać tylko nasz
serwis.
Niebezpieczeństwo porażenia prądem!
■ Nigdy nie zanurzać
przewodu zasilającego w
wodzie.
:Ostrzeżenie
Zagrożenie związane z efektami magnetycznymi!
Urządzenie zawiera magnesy
trwałe, które mogą mieć wpływ
na elektroniczne implanty, takie
jak np. rozruszniki serca lub
pompy insulinowe. Osoby
posiadające implanty
elektroniczne powinny
zachowywać odstępu co
najmniej 10 cm od urządzenia i
wyjętego pojemnika na wodę.
:Ostrzeżenie
Niebezpieczeństwo uduszenia!
Dzieciom nie wolno bawić się
opakowaniem urządzenia.
Drobne elementy
przechowywać w bezpiecznym
miejscu, ponieważ mogą zostać
połknięte.
:Ostrzeżenie
Niebezpieczeństwo poparzenia!
System spieniania mleka może
być bardzo gorący. Po użyciu
należy pozostawić go do
schłodzenia.
:Ostrzeżenie
Niebezpieczeństwo zranienia!
■ Nieodpowiednie używanie
urządzenia może prowadzić
do powstania obrażeń.
Niebezpieczeństwo odniesienia obrażeń!
■ Nie wkładać palców do
młynka.
73
Page 74

pl Ochrona środowiska
7 Ochrona środowiska
Ochrona środowiska
Oszczędność energii
■ Jeśli urządzenie nie jest używane,
należy je wyłączyć.
■ Ustawić interwał automatycznego
wyłączenia na najmniejszą wartość.
■ W miarę możliwości nie należy
przerywać pobierania kawy lub
pianki mlecznej. Przedwczesne jego
przerwanie powoduje zwiększenie
zużycia energii i szybsze wypełnienie
pojemnika na skroplinę.
■ Regularnie odkamieniać urządzenie,
aby uniknąć powstawania osadów
kamienia. Kamienny osad prowadzi
do zwiększonego zużycia energii.
Utylizacja zgodna z przepisami o ochronnie środowiska naturalnego
Opakowanie należy usunąć zgodnie z
przepisami o ochronie środowiska.
To urządzenie jest oznaczone
zgodnie z Dyrektywą
Europejską 2012/19/UE oraz
polską Ustawą z dnia 29 lipca
2005r. „O zużytym sprzęcie
elektrycznym i elektronicznym”
(Dz.U. z 2005 r. Nr 180, poz.
1495) symbolem
przekreślonego kontenera na
odpady. Takie oznakowanie
informuje, że sprzęt ten, po
okresie jego użytkowania nie
może być umieszczany łącznie
z innymi odpadami
pochodzącymi z gospodarstwa
domowego. Użytkownik jest
zobowiązany do oddania go
prowadzącym zbieranie
zużytego sprzętu elektrycznego
i elektronicznego. Prowadzący
zbieranie, w tym lokalne punkty
zbiórki, sklepy oraz gminne
jednostka, tworzą odpowiedni
system umożliwiający oddanie
tego sprzętu. Właściwe
postępowanie ze zużytym
sprzętem elektrycznym i
elektronicznym przyczynia się
do uniknięcia szkodliwych dla
zdrowia ludzi i środowiska
naturalnego konsekwencji,
wynikających z obecności
składników niebezpiecznych
oraz niewłaściwego
składowania i przetwarzania
takiego sprzętu.
Co do sposobu utylizacji należy
kontaktować się ze sprzedawcą.
74
Page 75

Informacje na temat urządzenia pl
* Informacje na temat
urządzenia
Informacje na temat urządzenia
Ten rozdział zawiera opis zakresu
dostawy, budowy i elementów
urządzenia. Ponadto zostaną
przedstawione różne elementy obsługi.
Wskazówka: W zależności od typu
urządzenia możliwe są niewielkie
różnice, dotyczące koloru i szczegółów
budowy.
Korzystanie z instrukcji obsługi
Strony okładkowe tej instrukcji można
rozłożyć. Znajdują się tam ilustracje
oznaczone numerami, do których
odwołuje się niniejszy tekst.
Przykład: ~ Rysunek !
Zakres dostawy
~ Rysunek !
# Ekspres do kawy
+ Pasek do mierzenia poziomu
twardości wody
3 Instrukcja obsługi
; Spieniacz mleka
Budowa i części
~ Rysunek "
( Przycisk włącz / wyłącz (tryb
gotowości)
0 Panel obsługi
8 Uchwyt spieniacza mleka
@ System wylotu kawy, o
regulowanej wysokości
H Spieniacz mleka (uchwyt, element
spieniający, pokrywa), o
regulowanej wysokości
P Pojemnik na skropliny (pojemnik
na fusy, kratka ociekowa, blacha
ociekowa, pływak)
X Drzwiczki zaparzacza
` Tabliczka znamionowa
h Zaparzacz
)" Pokrywa zatrzymująca aromat
)* Pojemnik na kawę ziarnistą
)2 Selektor obrotowy stopnia
zmielenia
): Pokrywa zbiornika wody
)B Pojemnik na wodę
75
Page 76

pl Informacje na temat urządzenia
Elementy obsługi
Przycisk Znaczenie
Włączanie i wyłączanie urządzenia
k
espresso Przygotowywanie napoju Espresso
caffe crema Przygotowywanie napoju Caffe crema
cappuccino Przygotowywanie cappuccino
latte macchiato Przygotowywanie latte macchiato
milk Spienianie mleka
% Moc kawy
calc’nClean Rozpoczynanie programu serwisowego
--------
Wskazanie
'
(
Urządzenie przepłukuje się automatycznie po każdym włączeniu i wyłączeniu.
Urządzenie nie przepłukuje się, jeżeli
■ w chwili włączenia jest jeszcze ciepłe.
■ przed wyłączeniem nie była parzona kawa.
Urządzenie jest gotowe do pracy, gdy na wyświetlaczu świecą diody przycisków
wyboru napojów. Urządzenie posiada funkcję automatycznego wyłączania.
~ "Ustawianie funkcji automatycznego wyłączania" na stronie 82
Regulacja mocy kawy ~ "Dostosowywanie ustawień napoju" na stronie 80
Miga, gdy jest konieczne wykonanie programu serwisowego.~ "Program serwisowy
Calc´nClean" na stronie 88
Świeci, gdy jest konieczne napełnienie pojemnika na wodę albo jeżeli pojemnik na wodę
nie jest zainstalowany.
Miga, gdy jest konieczna wymiana filtra.
Świeci, gdy konieczne jest opróżnienie zbiorników.
Miga, gdy są otwarte drzwiczki komory zaparzania.
świeci Urządzenie gotowe do pracy, można wybrać funkcję
pulsuje Trwa przygotowywanie napoju
miga Urządzenie czeka na czynność użytkownika, np. calc’nClean
nie świeci Urządzenie jest niedostępne
--------
76
Page 77

Wyposażenie pl
_ Wyposażenie
Wyposażenie
Poniższe akcesoria są dostępne w
handlu lub w serwisach:
Akcesoria Numer katalogowy
Handel Serwis
Tabletki czyszczące TZ80001 00311807
Odkamieniacz w
tabletkach
Filtr wody TZ70003 00575491
Zestaw pielęgnacyjny TZ80004 00576330
--------
Na ostatniej stronie tej instrukcji są
umieszczone dane kontaktowe do
serwisu we wszystkich krajach.
TZ80002 00576693
K Przed pierwszym
użyciem
Przed pierwszym użyciem
W tym rozdziale jest opisany sposób
uruchamiania urządzenia.
Wskazówka: Urządzenie można
używać wyłącznie w pomieszczeniach,
które nie są narażone na mróz. W
przypadku transportu lub
przechowywania urządzenia w
temperaturze poniżej 0 °C, należy
odczekać przed jego uruchomieniem co
najmniej 3 godziny.
Ustawienie i podłączenie urządzenia
1. Zdjąć folie ochronne.
2. Ustawić urządzenie na równej,
wodoodpornej powierzchni, która
może wytrzymać jego ciężar.
3. Podłączyć urządzenie wtyczką
sieciową do zgodnie z przepisami
zainstalowanego gniazda z
uziemieniem.
Wskazówka: Po każdym założeniu
odczekać jakiś czas (ok. 5 sekund).
Uruchamianie urządzenia
Mocowanie spieniacza mleka
~ Rysunek #
1. Wyjąć z torby elementy spieniacza
mleka.
2. Złożyć spieniacz mleka.
3. Nasadzić spieniacz mleka z przodu
urządzenia.
77
Page 78

pl Przed pierwszym użyciem
Napełnianie pojemnika na kawę ziarnistą
To urządzenie umożliwia
przygotowywanie napojów z kawy
ziarnistej.
1. Otworzyć pokrywę )" pojemnika
na kawę ziarnistą )*.
2. Wsypać kawę ziarnistą.
3. Zamknąć ponownie pokrywę.
Wskazówki
■ Kawa ziarnista kawa palona z
cukrem lub karmelizowana czy kawa
ziarnista z innymi dodatkami
zawierającymi cukier może zatykać
zaparzacz. Używać wyłącznie czystej
kawy espresso lub mieszanek
przeznaczonych dla automatycznych
ekspresów ciśnieniowych.
■ Ziarna kawy są świeżo mielone
przed każdym parzeniem.
■ Ziarna kawy należy przechowywać
w chłodnym miejscu i w zamknięciu,
dzięki temu zachowa ona optymalną
jakość.
■ Ziarna można przechowywać przez
kilka dni w pojemniku na kawę
ziarnistą bez utraty aromatu.
Wskazówki ogólne
Automat do kawy został fabrycznie
ustawiony w sposób zapewniający
optymalne działanie.
■ Po upływie ustawionego czasu
urządzenie wyłącza się
automatycznie.
■ Przy dotykaniu przycisków słychać
sygnał dźwiękowy, który można
wyłączyć.~ "Ustawienia"
na stronie 82
■ Po pierwszym użyciu, po wykonaniu
programu serwisowego lub po
dłuższym nieużywaniu urządzenia
pierwszy napój nie ma jeszcze
pełnego aromatu i nie należy go pić.
■ Po uruchomieniu urządzenia
jedwabistą i sztywną piankę uzyskuje
się dopiero po zaparzeniu kilku
filiżanek.
■ Po okresie dłuższego użytkowania
normalnym zjawiskiem jest
skraplanie się na szczelinach
wentylacyjnych.
■ Wydobywająca się z urządzenia para
nie stanowi wady, jest to
uwarunkowane technicznie.
Napełnianie pojemnika na wodę
Ważne: codziennie napełniać pojemnik
na wodę świeżą wodą niegazowaną.
Przed uruchomieniem sprawdzać, czy
pojemnik na wodę jest wystarczająco
napełniony.
1. Zdjąć pokrywę zbiornika na wodę.
2. Wyjąć pojemnik na wodę za uchwyt.
3. Napełnić pojemnik wodą do
wysokości znacznika "max".
4. Włożyć pojemnik na wodę ponownie
w pionowej pozycji w uchwyt i
założyć pokrywę pojemnika.
78
Przed pierwszym użyciem nowego
urządzenia należy sprawdzić i ustawić
twardość wody.~ "Ustawienia"
na stronie 82
Page 79

Obsługa urządzenia pl
1 Obsługa urządzenia
Obsługa urządzenia
Ten rozdział opisuje sposób
przygotowywania napojów kawowych
i mlecznych. Zawiera on również
informacje na temat ustawień, filtra
wody, regulacji stopnia zmielenia kawy
oraz ochrony przed zamarzaniem.
Wskazówka: Świeżo przygotowane
napoje mogą być bardzo gorące.
Przyrządzanie napoju ze świeżo zmielonej kawy
Można tu wybierać między wartościami
Espresso i Caffe crema.
~ "Przygotowywanie napoju z
mlekiem" na stronie 79
Urządzenie jest włączone. Pojemnik na
wodę i pojemnik na kawę ziarnistą są
napełnione.
1. Ustawić filiżankę pod wylot napoju.
2. Ustawić żądaną moc kawy,
dotykając odpowiednią ilość razy
%.
3. Dotknąć przycisku espresso albo
caffe crema.
Kawa jest parzona i nalewana do
filiżanki.
Przygotowywanie napoju z mlekiem
To urządzenie posiada spieniacz mleka.
Można przy jego użyciu przygotowywać
napoje zawierające mleko lub spieniać
mleko.
Wskazówka: Zaschnięte resztki mleka
są trudne do usunięcia, należy więc
koniecznie oczyszczać z nich
urządzenie.~ "Codzienna pielęgnacja i
czyszczenie" na stronie 84
:Ostrzeżenie
Niebezpieczeństwo oparzenia!
Spieniacz mleka nagrzewa się do
wysokiej temperatury. Należy go
chwytać tylko za uchwyt. Po użyciu
przed pierwszym dotknięciem zaczekać,
aż wystygnie.
Kawy z mlekiem
Dostępne są napoje cappuccino i latte
macchiato. W tym celu należy
odpowiednio ustawić wylot kawy i
spieniacz mleka.
Cappuccino
Wskazówka: Aby zatrzymać pobieranie
napoju wcześniej, ponownie dotknąć
przycisku espresso lub caffe crema.
Latte macchiato
Urządzenie jest włączone. Pojemnik na
wodę i pojemnik na kawę ziarnistą są
napełnione.
79
Page 80

pl Obsługa urządzenia
Spieniacz mleka jest zamontowany.
1. Na cappuccino napełnić dużą
szklankę mleka ok. 100 ml mleka,
na latte macchiato ok. 150 ml mleka.
2. Podstawić filiżankę albo szklankę
pod wylot.
3. Przesunąć wylot kawy do końca w
dół.
4. Ustawić żądaną moc kawy,
dotykając odpowiednią ilość razy
%.
5. Dotknąć przycisku cappuccino albo
latte macchiato.
Najpierw urządzenie spienia w filiżance
lub szklance mleko. Następnie
zaparzana jest kawa, która jest wlewana
do filiżanki lub szklanki.
Wskazówka: Aby zatrzymać
przygotowywanie napoju przed jego
zakończeniem, ponownie dotknąć
przycisku cappuccino lub latte
macchiato.
Spienianie mleka
Urządzenie jest włączone. Pojemnik na
wodę jest napełniony.
Spieniacz mleka jest zamontowany.
1. Napełnić dużą filiżankę lub dużą
szklankę ok. 100 ml mleka.
2. Podstawić filiżankę albo szklankę
pod wylot.
3. Przesunąć wylot kawy do końca w
dół.
4. Dotknąć przycisku milk.
Urządzenie spienia mleko.
Wskazówka: Aby zatrzymać ten
proces, ponownie dotknąć przycisku
milk.
Dostosowywanie ustawień napojów
Dostosowywanie ustawień napoju
Moc kawy
Przed pobraniem napoju można ustawić
moc kawy:
W tym celu należy wybrać żądaną moc
dotykając symbolu %.
słaba
normalna
mocna
Wskazówka: Ustawiona moc kawy
obowiązuje dla wszystkich napojów
zawierających kawę.
Ilość
Użytkownik może zmieniać ilość napoju.
Dotknąć espresso lub caffe crema i
przytrzymywać przez 3 sekundy.
Zaczyna się przygotowywanie napoju,
przycisk miga.
Po uzyskaniu żądanej ilości napoju w
filiżance dotknąć wybranego przycisku,
aby zatrzymać pobieranie. Nowa
ustawiona ilość obowiązuje dopiero od
następnego napoju.
Wskazówka: Ilość można ustawiać na
Espresso (25 - 60 ml) lub Caffe
crema (80 - 200 ml).Zaparzana jest
zawsze określona ilość minimalna,
Espresso ok. 25 ml i Caffe crema
ok. 80 ml.
Czas spieniania
Użytkownik może zmieniać czas
spieniania napojów.
Dotkn
ąć cappuccino, latte macchiato
lub milk i przytrzymywać przez
3 sekundy.
Zaczyna się spienianie mleka, wybrany
przycisk miga.
80
Page 81

Obsługa urządzenia pl
Po upływie żądanego czasu spieniania
dotknąć wybranego przycisku, aby
zatrzymać spienianie.
Wskazówka: Ustawienie czasu
spieniania nie ma wpływu na ilość kawy.
Ustawianie stopnia zmielenia kawy
To urządzenie ma regulowany młynek.
Pozwala on indywidualnie zmieniać
stopień zmielenia kawy.
:Ostrzeżenie
Niebezpieczeństwo odniesienia obrażeń!
Nie wkładać palców do młynka.
Uwaga!
Urządzenie może ulec uszkodzeniu!
Stopień zmielenia można zmienić
jedynie przy pracującym młynku!
Selektorem obrotowym )2 ustawić
stopień zmielenia kawy przy pracującym
młynku.
■ Drobniejszy stopień zmielenia kawy:
obracać w kierunku przeciwnym do
ruchu wskazówek zegara. (rys. a)
■ Grubszy stopień zmielenia kawy:
obracać zgodnie z kierunkiem
wskazówek zegara. (rys. b)
D E
Wskazówki
■ Nowe ustawienie będzie zauważalne
dopiero od drugiej filiżanki kawy.
■ W przypadku ciemno palonych
ziaren, należy nastawić drobniejszy
stopień zmielenia kawy, natomiast
w przypadku jaśniejszych ziaren,
wskazane jest ustawienie grubszego
stopnia.
Filtr wody
Filtr wody
~ Rysunek '
Filtr wody redukuje osady kamienia,
zanieczyszczenia wody oraz poprawia
smak kawy. Filtry wody są dostępne w
handlu lub w serwisie.
Zakładanie lub wymiana filtra wody
Przed pierwszym użyciem nowego filtra
wody konieczne jest jego przepłukanie.
Urządzenie jest włączone. Pojemnik na
wodę jest napełniony.
1. Dotknąć i przytrzymywać % i
calc’nClean przez co najmniej
3 sekundy.
2. Dotknąć przycisku espresso,
uaktywnia się menu “Twardość
wody”.
3. Dotknąć przycisku % i dokonać
ustawienia w następujący sposób:
z filtrem wody
4. Zanurzyć filtr wody (otworem
skierowanym do góry) do pojemnika
napełnionego wodą i przytrzymywać,
aż przestaną wypływać pęcherzyki
powietrza.
~ Rysunek '
5. Następnie mocno wcisnąć filtr wody
w pusty pojemnik na wodę.
6. Napełnić pojemnik wodą do
wysokości znacznika "max".
7. Podstawić pod wylot naczynie o
pojemności min. 1,0 l.
8. Dotknąć przycisku espresso, aby
zapisać ustawienie i rozpocząć
płukanie.
9. Włożyć pojemnik na wodę.
10. Dotknąć przycisku espresso, aby
rozpocząć płukanie. Woda
przepływa przez filtr.
11. Dotknąć przycisku calc’nClean, aby
zamknąć menu.
12. Następnie opróżnić pojemnik.
Urządzenie jest ponownie gotowe do
pracy.
81
Page 82

pl Ustawienia
Wyjmowanie filtra wody
Jeżeli filtr wody został wyjęty i nie został
zainstalowany nowy filtr wody, należy
odpowiednio ustawić twardość wody.
~ "Ustawianie twardości wody"
na stronie 83
Ochrona przed zamarzaniem
Any uniknąć uszkodzeń urządzenia
przez mróz w czasie transportu i
przechowywania, należy wcześniej
całkowicie opróżnić urządzenie.
Informacja: Urządzenie musi być
gotowe do pracy, a pojemnik na wodę
napełniony.
1. Podstawić pod wylot spieniacza
mleka duże naczynie i przesunąć
spieniacz mleka w dół.
2. Nacisnąć przycisk milk i
przytrzymywać go przez co najmniej
5 sekund.
Miga dioda LED przycisku,
urządzenie zaczyna się nagrzewać.
3. Gdy ze spieniacza mleka zacznie się
wydobywać para, zdjąć pojemnik na
wodę.
4. Zaczekać, aż z urządzenia ujdzie
para. Zaczekać, aż zacznie migać
symbol ' i wszystkie diody LED.
5. Przyciskiem k wyłączyć urządzenie.
6. Opróżnić pojemnik na wodę i
pojemnik skropliny. dokładnie
wyczyścić urządzenie.
Urządzenie może być teraz
transportowane lub przechowywane.
Wskazówka: Zaparzacz jest teraz
zabezpieczony i nie można go wyjąć.
1 Ustawienia
Ustawienia
Urządzenie posiada różne ustawienia
fabryczne. Użytkownik może
dopasowywać te ustawienia do swoich
preferencji.
Wskazówka: Jeżeli w ciągu 90 sekund
nie zostanie naciśnięty żaden przycisk,
urządzenie przejdzie bez zapisywania
ustawienia w tryb wyboru napoju.
Zapisane wcześniej ustawienie zostanie
zachowane.
Użytkownik może dokonywać
następujących ustawień:
Automatyczne wyłączanie
Ustawianie funkcji automatycznego wyłączania
Po upływie ustawionego czasu od
ostatniego naciśnięcia jakiegoś
przycisku urządzenie wyłącza się
automatycznie. Czas ten można
ustawiać, możliwe jest ustawianie od
15 min. do 4 godz.
1. Dotknąć i przytrzymywać % i
calc’nClean przez co najmniej
3 sekundy.
2. Dotknąć przycisku caffe crema,
uaktywnia się menu “Automatyczne
wyłączanie”.
3. Dotknąć przycisku % i ustawić
żądany czas.
Możliwe są następujące ustawienia:
15 minut
30 minut (ustawienie fabryczne)
1 godzina
2 godziny
4 godziny
82
4. Dotknąć przycisku caffe crema, aby
zapisać ustawienie.
5. Dotknąć przycisku calc’nClean, aby
zamknąć menu.
Page 83

Ustawienia pl
Wyłączanie i wyłączanie sygnału dźwiękowego
Po aktywacji przycisku słychać sygnał
dźwiękowy.
Można go włączać i wyłączać.
1. Dotknąć i przytrzymywać % i
calc’nClean przez co najmniej
3 sekundy.
2. Dotknąć przycisku cappuccino,
uaktywnia się menu “Sygnał
dźwiękowy”.
3. Dotknąć przycisku % i włączyć
lub wyłączyć sygnał dźwiękowy.
Wł. (ustawienie fabryczne)
Wył.
4. Dotknąć przycisku cappuccino, aby
zapisać ustawienie.
5. Dotknąć przycisku calc’nClean, aby
zamknąć menu.
Ustawianie twardości wody
Prawidłowe ustawienie twardości wody
jest ważne, ponieważ gwarantuje
prawidłową sygnalizację konieczności
odkamienienia urządzenia. Twardość
wody jest domyślnie ustawiona na
stopień 4.
Twardość wody można zmierzyć
dostarczonym paskiem pomiarowym
albo uzyskać jej wartość od lokalnego
przedsiębiorstwa wodociągowego.
1. Dostarczony pasek pomiarowy
zanurzyć na krótko w świeżej wodzie
z kranu, odsączyć, po minucie
odczytać wynik.
2. Dotknąć i przytrzymywać % i
calc’nClean przez co najmniej
3 sekundy.
3. Dotknąć przycisku espresso,
uaktywnia się menu “Twardość
wody”.
4. Dotknąć przycisku % i ustawić
twardość wody.
Możliwe są następujące ustawienia:
Tward. wody 1
Tward. wody 2
Tward. wody 3
Tward. wody 4 (ustawienie
fabryczne)
Filtr wody (jeżeli jest założony)
Zmiękczacz wody (jeżeli urządzenie
nim dysponuje)
5. Dotknąć przycisku espresso, aby
zapisać ustawienie.
6. Dotknąć przycisku calc’nClean, aby
zamknąć menu.
Tabela przedstawia przyporządkowanie
stopni do różnych poziomów twardości
wody:
Poziom Stopień twardości wody
Niemiecki (°dH) Francuski (°fH)
1 1-7 1-13
2 8-14 14-25
3 15-21 26-38
4 22-30 39-54
Stopień twardości wody można w
każdej chwili zmienić.
Wskazówka: Jeżeli używany jest filtr
wody (patrz rozdział “Akcesoria”),
należy wykonać opisane niżej
czynności. ~ "Filtr wody" na stronie 81
Reset ustaw. (przywracanie ustawień fabrycznych)
Przywrócenie ustawień fabrycznych
powoduje utratę własnych ustawień.
1. Dotknąć i przytrzymywać % i
calc’nClean przez co najmniej
3 sekundy.
2. Dotknąć przycisku latte macchiato.
Zostają ponownie uaktywnione
ustawienia fabryczne.
3. Dotknąć przycisku calc’nClean, aby
zamknąć menu.
83
Page 84

pl Codzienna pielęgnacja i czyszczenie
D Codzienna pielęgnacja
i czyszczenie
Codzienna pielęgnacja i czyszczenie
Przy odpowiedniej konserwacji
i czyszczeniu urządzenie długo
zachowuje sprawność. W tym rozdziale
opisany jest sposób prawidłowej
konserwacji i czyszczenia urządzenia.
:Ostrzeżenie
Niebezpieczeństwo porażenia prądem!
Przed czyszczeniem wyciągnąć wtyczkę
z sieci. Nigdy nie zanurzać urządzenia w
wodzie. Nie stosować urządzeń do
czyszczenia parą.
Środki czyszczące
Aby uniknąć uszkodzenia różnych
powierzchni przez użycie
nieodpowiedniego środka
czyszczącego, należy przestrzegać
poniższych wskazówek.
Nie używać
■ ostrych ani szorujących środków
czyszczących.
■ środków czyszczących
zawierających alkohol lub spirytus.
■ szorstkich gąbek lub druciaków.
9
Wskazówki
■ Nowe ściereczki gąbczaste mogą
zawierać sole. Sole mogą
powodować korozję nalotową stali
szlachetnej. Nowe ściereczki przed
użyciem dokładnie wypłukać.
■ Pozostałości kamienia, kawy, mleka i
roztworu
czyszcząco-odkamieniającego
należy zawsze od razu usuwać.Pod
takimi pozostałościami może
powstawać korozja.
Uwaga!
Nie wszystkie elementy urządzenia
nadają się do mycia w zmywarce.
~ Rysunek % - '
Do mycia w zmywarce nie nadają się:
Pojemnik na wodę
Pokrywa zbiornika wody
Pokrywa zatrzymująca aromat
Zaparzacz
Pojemnik na skropliny
Do mycia w zmywarce nadają się:
Blacha ociekowa
Kratka ociekowa
Pojemnik na fusy
maks.
60°C
Pływak
Spieniacz mleka
Pokrywa spieniacza mleka
84
9
Page 85

Codzienna pielęgnacja i czyszczenie pl
Czyszczenie urządzenia
1. Obudowę wycierać miękką, wilgotną
ściereczką.
2. Panel obsługi czyścić ściereczką z
mikrowłókna.
3. Po każdym pobraniu napoju wytrzeć
w razie potrzeby wylot kawy.
Wskazówki
■ Jeśli urządzenie jest włączane w
stanie zimnym lub wyłączane po
pobraniu kawy, przepłukuje się
automatycznie. W ten sposób
system czyści się samoczynnie.
■ Jeżeli urządzenie nie będzie
używane przez dłuższy czas (np.
przez okres urlopu), należy
dokładnie wyczyścić całe
urządzenie, włącznie ze spieniaczem
mleka i zaparzaczem.
Czyszczenie pojemnika na skropliny i pojemnika na fusy
~ Rysunek %
Wskazówka: Pojemnik na skropliny i
na fusy należy codziennie opróżniać,
aby zapobiec powstawaniu osadów.W
przypadku częstego używania
opróżniać od czasu do czasu, gdy staje
się widoczny pływak albo gdy na
wyświetlaczu pojawi się odpowiednia
wskazówka.
1. Otworzyć drzwiczki.
2. Wysunąć do przodu pojemnik na
skropliny z pojemnikiem na fusy.
3. Zdjąć blachę ociekową z kratką
ociekową.
4. Opróżnić i wyczyścić pojemnik na
skropliny i pojemnik na fusy.
5. Wytrzeć wnętrze urządzenia (strefę
pojemnika na skropliny).
Czyszczenie systemu spieniania mleka
Czyszczenie systemu spieniania mleka
~ Rysunek &
Spieniacz mleka powinien być
czyszczony po każdym użyciu w celu
usunięcia resztek mleka.
:Ostrzeżenie
Niebezpieczeństwo oparzenia!
Spieniacz mleka nagrzewa się do
wysokiej temperatury. Należy go
chwytać tylko za uchwyt. Po użyciu
przed pierwszym dotknięciem zaczekać,
aż wystygnie.
1. Napełnić szklankę do połowy wodą i
ustawić pod wylotem urządzenia.
2. Przesunąć spieniacz mleka do
końca w dół.
3. Dotknąć przycisku milk, urządzenie
czyści spieniacz mleka.
4. Przesunąć spieniacz mleka do góry i
zaczekać, aż wystygnie.
5. Rozebrać spieniacz mleka na części
i dokładnie wyczyścić.
6. Wysuszyć części, złożyć i ponownie
zainstalować w urządzeniu.
Wskazówki
■ Aby zatrzymać ten proces wcześniej,
ponownie dotknąć przycisku milk.
■ Wszystkie części spieniacza mleka
należy myć w zmywarce do naczyń.
Po umyciu dokładnie usunąć ze
spieniacza mleka resztki środków
myjących.
85
Page 86

pl Codzienna pielęgnacja i czyszczenie
Czyszczenie zaparzacza
~ rys. $, ~ rys. %
Oprócz automatycznego płukania
zaparzacz należy regularnie wyjmować i
czyścić.
Uwaga!
Zaparzacz należy czyścić bez użycia
płynu do mycia naczyń lub octu wzgl.
środków zawierających kwasy i nie
należy go myć w zmywarce do naczyń.
Wyjmowanie zaparzacza:
1. Wyłączyć urządzenie.
2. Otworzyć drzwiczki komory
zaparzania.
3. Wyjąć pojemnik na fusy.
4. Nacisnąć do góry czerwoną
dźwignię, chwycić zaparzacz za
uchwyt i ostrożnie wyciągnąć do
przodu.
5. Dokładnie umyć zaparzacz pod
bieżącą, ciepłą wodą.
6. Dokładnie wyczyścić wnętrze
urządzenia wilgotną ściereczką, w
razie potrzeby usunąć resztki kawy.
7. Zaczekać, aż zaparzacz i wnętrze
urządzenia wyschnie.
Zakładanie zaparzacza:
1. Chwytać zaparzacz za uchwyt.
2. Nacisnąć czerwoną dźwignię do
góry, włożyć zaparzacz pod dźwignię
i przesunąć do oporu do tyłu.
Dźwignia musi się zablokować.
3. Ponownie włożyć pojemnik na fusy i
zamknąć drzwiczki.
Ważne: Przy brakującym albo
nieprawidłowo włożonym zaparzaczu
lub pojemniku na skropliny drzwiczki nie
dają się zamknąć.
86
Page 87

Programy serwisowe pl
. Programy serwisowe
Programy serwisowe
W określonych odstępach czasu,
zależnych od twardości wody i
intensywności użytkowania urządzenia,
zaczyna świecić przycisk calc’nClean.
Urządzenie należy niezwłocznie
wyczyścić i odkamienić przy użyciu
odpowiedniego programu.
Wskazówki
■ Ważne: Jeżeli urządzenie nie
zostanie odkamienione w
odpowiednim czasie, może dojść do
jego uszkodzenia.
■ Uwaga! Przy każdym wykonywaniu
programu serwisowego Calc'nClean
stosować odkamieniacz oraz środek
czyszczący zgodnie z instrukcją i
przestrzegać (odpowiednich) zasad
bezpieczeństwa.
■ Nie pić cieczy.
■ Do odkamieniania nigdy nie używać
octu i kwasu cytrynowego ani
środków wyprodukowanych na ich
bazie.
■ Do odkamieniania i czyszczenia
stosować wyłącznie przeznaczone
do tego celu tabletki.Zostały one
wyprodukowane specjalnie dla tego
ekspresu i można je nabywać za
pośrednictwem serwisu.
~ "Wyposażenie" na stronie 77
■ Nigdy nie umieszczać tabletek
odkamieniających lub innych
środków w zaparzaczu.
■ Nigdy nie przerywać programu
serwisowego.
■ Przed rozpoczęciem programu
serwisowego wyjąć, wyczyścić i
ponownie włożyć zaparzacz.
Wyczyścić spieniacz mleka.
■ Po zakończeniu programu
serwisowego przetrzeć urządzenie
miękką, wilgotną ściereczką, aby od
razu usunąć pozostałości
odkamieniacza. Pod takimi
pozostałościami może powstawać
korozja.
■ Nowe ściereczki gąbkowe mogą
zawierać sole. Sole mogą
powodować korozję nalotową stali
szlachetnej, tego rodzaju ściereczki
należy więc przed użyciem starannie
wypłukać.
■ Jeżeli wykonywanie programu
serwisowego zostanie przerwane np.
wskutek przerwy w zasilaniu prądem,
świecą elementy ' i calc’nClean.
W takiej sytuacji należy wykonać następujące czynności:
1. Przepłukać pojemnik na wodę.
2. Wlać świeżą wodę niegazowaną do
poziomu znacznika “max”.
3. Dotknąć przycisku calc’nClean.
Program uruchamia się i płucze
urządzenie.Czas trwania ok. 2 minut.
4. Opróżnić pojemnik na skropliny,
wyczyścić go i włożyć ponownie,
zamknąć drzwiczki.
Program jest zakończony. Urządzenie
jest ponownie gotowe do pracy.
87
Page 88

pl Programy serwisowe
Uruchamianie programu Calc’nClean
Program serwisowy Calc´nClean
Czas trwania: ok. 40 minut
1. Nacisnąć przycisk calc’nClean i
przytrzymywać go przez
ok. 5 sekund.
Świeci symbol (.
2. Otworzyć drzwiczki, opróżnić i
wyczyścić pojemnik na skropliny i
pojemnik na fusy.
3. Wyjąć i wyczyścić zaparzacz.
4. Wrzucić jedną tabletkę czyszczącą
Siemens do zaparzacza i
zainstalować zaparzacz.
10. Opróżnić naczynie, otworzyć
drzwiczki, opróżnić i ponownie
włożyć pojemnik na skropliny.
11. Zamknąć drzwiczki i podstawić
naczynie pod wylot.
Świeci symbol '.
12. Wyczyścić pojemnik na wodę i z
powrotem włożyć filtr wody (jeżeli był
wyjmowany).
~ Rysunek '
13. Napełnić pojemnik świeżą wodą
niegazowaną do poziomu znacznika
"max", ponownie podstawić naczynie
pod wylot.
14. calc’nClean miga, dotknąć
calc’nClean.
Uruchamia się program, urządzenie jest
czyszczone i płukane. Pulsuje
calc’nClean. Trwa to ok. 20 minut.
Świeci symbol (.
15. Opróżnić i wyczyścić pojemnik na
skropliny i pojemnik na fusy, włożyć
oba ponownie.
Program jest zakończony. Urządzenie
jest ponownie gotowe do pracy.
5. Ponownie włożyć pojemnik na
skropliny oraz pojemnik na fusy i
zamknąć drzwiczki.
Świeci symbol '.
6. Wyjąć filtr wody (jeżeli jest założony).
7. Wlać do pustego pojemnika na
wodę letnią wodę do poziomu
znacznika 0,5 l i rozpuścić w tej
wodzie jedną tabletkę
odkamieniającą Siemens.
8. Ponownie założyć pojemnik na wodę
i podstawić pod wylot duże naczynie
(o pojemności ok. 1 litra).
9. calc’nClean miga, dotknąć
calc’nClean.
Uruchamia się program, urządzenie jest
czyszczone i odkamieniane. Pulsuje
calc’nClean.Trwa to ok. 20 minut.
Świeci symbol (.
88
Page 89

Co robić w razie usterki? pl
3 Co robić w razie
usterki?
Co robić w razie usterki?
Przyczynami wystąpienia usterek są
często drobiazgi. Przed wezwaniem
Tabela usterek
Problem Przyczyna Sposób usunięcia
Urządzenie przestało reagować.
Występują duże różnice
w jakości kawy lub pianki
mlecznej.
Nie jest osiągana ustawiona
indywidualnie ilość napojów,
kawa spływa tylko kroplami
albo nie spływa wcale
Wypływa tylko woda, brak
kawy.
Kawa nie ma kremowej pianki. Nieodpowiedni gatunek kawy. Używać kawy z większą ilością ziaren
Usterka w urządzeniu. Odłączyć wtyczkę od gniazda siecio-
Urządzenie jest zakamienione. Odkamienić urządzenie zgodnie z
Zbyt drobny stopień zmielenia. Ustawić grubszy stopień zmielenia.
Urządzenie jest silnie zakamie-
nione.
W filtrze wody znajduje się
powietrze.
Urządzenie nie rozpoznaje
pustego pojemnika na kawę
ziarnistą.
Zatkana komora na kawę w jednostce zaparzania.
Ziarna kawy nie wpadają do
młynka (zbyt oleiste ziarna).
Kawa ziarnista nie jest świeżo
palona.
Stopień zmielenia nie jest
dostosowany do ziaren kawy.
serwisu należy przy pomocy tabeli
spróbować usunąć usterkę we własnym
zakresie.
Proszę przeczytać wskazówki dotyczące
bezpieczeństwa podane na początku
niniejszej instrukcji.
wego, odczekać 5 sekund, ponownie
podłączyć wtyczkę do gniazda sieciowego.
instrukcją.
Odkamienić urządzenie zgodnie z
instrukcją.
Zanurzyć filtr wody w wodzie i przytrzymywać go, aż przestaną się z niego
wydobywać pęcherzyki powietrza,
ponownie założyć filtr.
Wsypać kawę ziarnistą
Wskazówka: przy następnych parze-
niach urządzenie ustawi się na kawę
ziarnistą.
Wyczyścić zaparzacz.
~ "Czyszczenie zaparzacza"
na stronie 86
Lekko postukać w pojemnik na kawę
ziarnistą.Jeżeli to możliwe, zmienić
gatunek kawy. Przetrzeć pusty pojemnik na kawę ziarnistą suchą ściereczką.
Robusty.
Użyć świeżej kawy ziarnistej.
Ustawić drobniejszy stopień zmielenia.
89
Page 90

pl Co robić w razie usterki?
Kawa jest za „kwaśna”. Został ustawiony zbyt gruby
Kawa jest za "gorzka". Został ustawiony zbyt drobny
Kawa smakuje jak „przypalona“.
Mleko i/lub napoje mieszane są
za gorące.
Za gruba pianka mleczna, głośny odgłos ssania.
Mleko i/lub napoje mieszane są
za zimne.
Nie wypływa mleko względnie
spienione mleko.
Filtr wody nie trzyma się w
pojemniku.
Miga kilka przycisków, słychać
głośny “odgłos”.
Krople wody na wewnętrznym
dnie urządzenia przy wyjętym
pojemniku na skropliny.
Nie można wyjąć zaparzacza. Zaparzacz nie znajduje się
Nie można obsługiwać urządzenia, diody LED świecą lub
migają.
Nie zaczyna pracować młynek. Urządzenie jest za gorące. Zaczekać 1 godzinę, aż urządzenie
stopień zmielenia.
Nieodpowiedni gatunek kawy. Użyć ciemniej palonej kawy.
stopień zmielenia.
Nieodpowiedni gatunek kawy. Zmienić gatunek kawy.
Został ustawiony zbyt drobny
stopień zmielenia
Nieodpowiedni gatunek kawy. Zmienić gatunek kawy.
Za mało mleka w szklance lub
filiżance.
Za dużo mleka w szklance lub
filiżance.
Spieniacz mleka jest brudny.
Spieniacz mleka nie zanurza
się w mleku.
Filtr wody jest zamontowany
nieprawidłowo.
Brakujący lub niepoprawnie
zainstalowany pojemnik na
wodę.
Pojemnik na skropliny został
wyjęty za wcześnie.
w pozycji umożliwiającej jego
wyjęcie (np. aktywna jest
ochrona przed zamarzaniem).
Aktywny jest tryb demonstracyjny urządzenia.
Ustawić drobniejszy stopień zmielenia.
Ustawić grubszy stopień zmielenia.
Ustawić grubszy stopień zmielenia.
Użyć więcej mleka lub dostosować
czas spieniania.
Użyć mniej mleka lub dostosować czas
spieniania.
Umyć zmywacz mleka w zmywarce do
naczyń. ~ "Czyszczenie systemu
spieniania mleka" na stronie 85
Użyć więcej mleka, sprawdzić, czy spieniacz mleka zanurza się w mleku. Przesunąć wylot do końca w dół.
Trzymać filtr wody tak długo zanurzony
w wodzie, aż przestaną wydobywać się
pęcherzyki powietrza, z powrotem zainstalować filtr.
Docisnąć równo filtr wody do gniazda
w pojemniku.
Poprawnie zainstalować pojemnik na
wodę.
Pojemnik na skropliny wyjmować
dopiero kilka sekund po pobraniu
ostatniego napoju.
Ponownie włączyć urządzenie.
Nacisnąć przycisk k i przytrzymywać
go przez co najmniej 5 sekund, aby
wyłączyć tryb demonstracyjny.
ostygnie.
90
Page 91

Co robić w razie usterki? pl
Miga dioda LED (. Drzwiczki nie są domknięte. Docisnąć drzwiczki.
Dioda LED ( świeci mimo
pustego pojemnika na skropliny - co robić?
Dioda LED ' świeci mimo pełnego pojemnika na wodę.
Miga dioda LED ' i migają
diody LED wszystkich napojów.
Urządzenie jest za gorące. Zaczekać 1 godzinę, aż urządzenie
Wyłączone urządzenie nie rozpoznaje opróżnienia.
Nieprawidłowo zainstalowany
pojemnik na wodę.
Woda gazowana w pojemniku
na wodę.
Zakleszczony pływak w pojemniku na wodę.
Nowy filtr wody nie został przepłukany zgodnie z instrukcją.
W filtrze wody znajduje się
powietrze.
Stary filtr wody. Zainstalować nowy filtr wody.
Brak pojemnika na wodę lub
nieprawidłowo zainstalowany
pojemnik na wodę.
Suchy układ przewodów urządzenia.
W filtrze wody znajduje się
powietrze.
ostygnie.
Wyjąć i ponownie założyć pojemnik na
skropliny przy włączonym urządzeniu.
Poprawnie zainstalować pojemnik na
wodę.
Napełnić pojemnik na wodę świeżą
wodą z kranu.
Wyjąć i dokładnie wyczyścić pojemnik
na wodę.
Przepłukać filtr wody zgodnie z instrukcją i zainstalować.
Zanurzyć filtr wody (z otworem skierowanym do góry) w wodzie i przytrzymywać go, aż przestaną się z niego
wydobywać pęcherzyki powietrza,
ponownie założyć filtr. ~ "Zakładanie
lub wymiana filtra wody" na stronie 81
Poprawnie zainstalować pojemnik na
wodę.
Poprawnie zainstalować pojemnik na
wodę.
Napełnić pojemnik na wodę świeżą
wodą z kranu.
Nie wlewać wody gazowanej.
Zanurzyć filtr wody (z otworem skierowanym do góry) w wodzie i przytrzymywać go, aż przestaną się z niego
wydobywać pęcherzyki powietrza,
ponownie założyć filtr. ~ "Zakładanie
lub wymiana filtra wody" na stronie 81
91
Page 92

pl Co robić w razie usterki?
Migają wszystkie diody LED. Nieprawidłowe napięcie domo-
wej instalacji elektrycznej.
Migają diody LED ', ( i
calc’nClean.
Za niska temperatura otoczenia.
Migają diody LED ( i %. Bardzo zanieczyszczony zapa-
rzacz albo nie można wyjąć
zaparzacza.
Podłączać urządzenie tylko do sieci
elektrycznej o napięciu 220-240 V.
Użytkować urządzenie w temperaturach > 5°C.
Jeżeli to możliwe, wyczyścić zaparzacz, wyłączyć i ponownie włączyć
urządzenie.
Migają diody LED %. Usterka w urządzeniu. Ponownie uruchomić urządzenie.
Jeśli problemu nie można rozwiązać, należy się koniecznie skontaktować z infolinią!
Numery telefonów znajdują się na ostatnich stronach instrukcji
--------
92
Page 93

Serwis pl
4 Serwis
Serwis
Dane techniczne
Zasilanie elektryczne (napięcie - częstotliwość) 220–240 V ∼, 50 / 60 Hz
Pobór mocy 1300 W
Maksymalne ciśnienie pompy, statyczne 15 bar
Maksymalna pojemność pojemnika na wodę (bez filtra) 1,3 l
Maksymalna pojemność zbiornika na ziarna kawy ≈ 250 g
Długość przewodu sieciowego 100 cm
Wymiary (wys. x szer. x głęb.) 37,3 x 24,9 x 42,8 cm
Ciężar pustego urządzenia ok. 8-9 kg
Rodzaj młynka Ceramika i stal
Numer produktu (E-Nr.) i data produkcji (FD)
Pracownikowi serwisu należy podać
numer produktu (E-Nr) oraz datę
produkcji (FD) urządzenia, aby mógł on
udzielić kompetentnej pomocy. Numery
znajdują się na tabliczce
znamionowej `. (~ Rysunek ")
Można tu wpisać dane urządzenia
i numer telefonu serwisu, aby w razie
konieczności móc szybko je odnaleźć.
E-Nr.
Serwis O
Na ostatniej stronie tej instrukcji są
umieszczone dane kontaktowe do
serwisu we wszystkich krajach.
FD-Nr.
Gwarancja
Dla urządzenia obowiązują warunki
gwarancji wydanej przez nasze
przedstawicielstwo handlowe w kraju
zakupu. Dokładne informacje
otrzymacie Państwo w każdej chwili w
punkcie handlowym, w którym
dokonano zakupu urządzenia. W celu
skorzystania z usług gwarancyinych
konieczne jest przedłożenie dowodu
kupna urządzenia. Warunki gwarancji
regulowane są odpowiednimi
przepisami Kodeksu cywilnego oraz
Rozporządzeniem Rady Ministrów z
dnia 30.05.1995 roku „W sprawie
szczególnych warunków zawierania i
wykonywania umów rzeczy ruchomych z
udziałem konsumentów”.
Zmiany zastrzeżone.
93
Page 94

cs
Obsah
csNávod k použití
8 Použití podle určení . . . . . . . . . 95
. Servisní programy . . . . . . . . . .110
Spuštění programu Calc’nClean. . . 111
( Důležitá bezpečnostní
upozornění . . . . . . . . . . . . . . . . 95
3 Porucha, co je nutno udělat? .112
7 Ochrana životního prostředí . . 97
Úspora energie . . . . . . . . . . . . . . . . .97
Ekologická likvidace . . . . . . . . . . . . .97
* Seznámení se spotřebičem . . . 97
Rozsah dodávky . . . . . . . . . . . . . . . .97
Konstrukce a součásti . . . . . . . . . . . .98
Ovládací prvky. . . . . . . . . . . . . . . . . .98
_ Příslušenství . . . . . . . . . . . . . . . 99
K Před prvním použitím. . . . . . . 100
Instalace a připojení spotřebiče. . . .100
Uvedení spotřebiče do provozu. . . .100
1 Obsluha spotřebiče . . . . . . . . 101
Příprava kávy z čerstvě namletých
kávových zrn . . . . . . . . . . . . . . . . . .101
Příprava nápojů s mlékem . . . . . . . .102
Přizpůsobení nastavení nápojů . . . .103
Vodní filtr . . . . . . . . . . . . . . . . . . . . .104
Ochrana před mrazem. . . . . . . . . . .104
1 Nastavení. . . . . . . . . . . . . . . . . 105
Automatické vypnutí . . . . . . . . . . . .105
Zapnutí/vypnutí akustického signálu105
Nastavení tvrdosti vody . . . . . . . . . .106
Factory Reset . . . . . . . . . . . . . . . . .106
4 Zákaznický servis. . . . . . . . . . .115
Technické údaje . . . . . . . . . . . . . . . 115
Číslo výrobku a výrobní číslo . . . . . 115
Záruční podmínky. . . . . . . . . . . . . . 115
D Každodenní údržba a čištění . 107
Čisticí prostředky . . . . . . . . . . . . . . .107
Čistění spotřebiče . . . . . . . . . . . . . .108
Čištění odkapávací misky a zásobníku
na kávovou sedlinu . . . . . . . . . . . . .108
Čištění mléčného systému. . . . . . . .108
Čištění spařovací jednotky. . . . . . . .109
94
Page 95

Použití podle určení cs
8 Použití podle určení
Použití podle určení
Po vybalení spotřebič
zkontrolujte. V případě
poškození během přepravy
spotřebič nezapojujte.
Tento spotřebič je určený
pouze pro soukromé použití
v domácnosti.
Přistroj použivejte pouze ve
vnitřnich prostorach při
pokojove teplotě a jen do
nadmořske vyšky 2000 m.
( Důležitá bezpečnostní
upozornění
Důležitá bezpečnostní upozornění
Návod k použití si pečlivě
pročtěte, řiďte se podle něho
a uschovejte si ho. Při
předávání přístroje dále přiložte
tento návod.
Tento spotřebič mohou
používat děti starší 8 let a
osoby s omezenými fyzickými,
senzorickými nebo duševními
schopnostmi nebo s
nedostatečnými zkušenostmi
a/nebo znalostmi, pokud jsou
pod dohledem nebo byly
instruovány o bezpečném
použití spotřebiče a pochopily z
toho vyplývající nebezpečí. Děti
mladší 8 let se nesmí zdržovat
v blízkosti spotřebiče a
připojovacích kabelů a nesmí
spotřebič obsluhovat. Děti si
nesmí hrát se spotřebičem.
Čištění a údržbu ze strany
uživatele nesmí provádět děti.
Výjimka: Děti jsou starší 8 let a
jsou pod dozorem dospělé
osoby.
95
Page 96

cs Důležitá bezpečnostní upozornění
:Varování
Nebezpečí úrazu elektrickým proudem!
■ Spotřebič smí být k síti
střídavého proudu připojen
jen pomocí předpisově
instalované zásuvky s
uzemněním. Zajistěte
předpisovou instalaci
systému ochranných vodičů
elektrické domovní instalace.
Nebezpečí úrazu elektrickým proudem!
■ Přístroj zapojujte a používejte
pouze v souladu s údaji na
typovém štítku. V případě
poškození síťové přípojky
tohoto spotřebiče musí být
tato obnovena zákaznickým
servisem.
Nebezpečí úrazu elektrickým proudem!
■ Přístroj používejte jen tehdy,
když samotný přístroj ani
přívodní kabel není
poškozený. V případě
poruchy ihned odpojte
síťovou zástrčku, nebo
vypněte síťové napětí.
Nebezpečí úrazu elektrickým proudem!
■ Aby se zabránilo ohrožení,
smí opravy na spotřebiči
provádět pouze naše servisní
služba.
Nebezpečí úrazu elektrickým proudem!
■ Nikdy neponořujte přístroj
nebo síťový kabel do vody.
:Varování
Nebezpečí v důsledku magnetického pole!
Spotřebič obsahuje
permanentní magnety, které
mohou ovlivňovat elektronické
implantáty, např.
kardiostimulátory nebo
inzulinové dávkovače. Osoby
používající elektronické
implantáty musí od přístroje a
od vyjmuté nádržky na vodu
dodržovat minimální odstup
10 cm.
:Varování
Nebezpečí udušení!
Nedovolte dětem, aby si hrály
s obalovým materiálem.
Drobné součásti bezpečně
uložte, hrozí nebezpečí
spolknutí.
:Varování
Nebezpečí popálení!
Mléčný systém je velmi horký.
Po použití ho nejprve nechte
vychladnout, než se ho budete
dotýkat.
:Varování
Nebezpečí poranění!
■ Chybné použití spotřebiče
může způsobit poranění.
Nebezpečí úrazu!
■ Nesahejte do mlýnku.
96
Page 97

Ochrana životního prostředí cs
7 Ochrana životního
prostředí
Ochrana životního prostředí
Úspora energie
■ Pokud spotřebič nepoužíváte,
vypněte ho.
■ Interval pro automatické vypnutí
nastavte na nejmenší hodnotu.
■ Pokud možno nepřerušujte odběr
kávy nebo mléčné pěny. Předčasné
přerušení vede k vyšší spotřebě
energie a k rychlejšímu naplnění
odkapávače.
■ Přístroj pravidelně odvápňujte,
zabráníte tak tvorbě vápených
usazenin. Zbytky vápníku vedou k
vyšší spotřebě energie.
Ekologická likvidace
Obal zlikvidujte v souladu s předpisy na
ochranu životního prostředí.
Tento spotřebič je označen v
souladu s evropskou směrnicí
2012/19/EU o nakládání s
použitými elektrickými a
elektronickými zařízeními
(waste electrical and electronic
equipment - WEEE).
Tato směrnice stanoví jednotný
evropský (EU) rámec pro
zpětný odběr a recyklování
použitých zařízení.
O aktuálních pokynech týkajících se
likvidace se informujte u odborného
prodejce.
* Seznámení se
spotřebičem
Seznámení se spotřebičem
V této kapitole obdržíze přehled o
rozsahu dodávky, konstrukci a
součástech Vašeho spotřebiče. Kromě
toho se seznámíte s různými ovládacími
prvky.
Upozornění: V závislosti na typu
spotřebiče jsou možné odchylky v
barvách a jednotlivých detailech.
Jak používat tento návod k použití:
Výklopné stránky návodu k použití
můžete vpředu vyklopit. Vyobrazení jsou
označena čísly, na které se v návodu k
použití odvolává.
Příklad: ~ Obrázek !
Rozsah dodávky
~ Obrázek !
# Plně automatický kávovar
+ Proužek pro testování tvrdosti
vody
3 Návod k použití
; Napěňovač mléka
97
Page 98

cs Seznámení se spotřebičem
Konstrukce a součásti
~ Obrázek "
( Tlačítko Zap. / Vyp. (provoz
stand-by)
0 Ovládací panel
8 Madlo napěňovače mléka
@ Výpustný systém pro kávu,
výškově nastavitelný
H Napěňovač mléka (uchycení,
napěňovač, kryt), výškově
nastavitelný
Ovládací prvky
Tlačítko Význam
Zapnutí a vypnutí spotřebiče
k
espresso Odběr Espresso
caffe crema Odběr Caffe crema
cappuccino Odběr Cappuccino
latte macchiato Odběr Latte macchiato
milk Napěnění mléka
% Intenzita kávy
calc’nClean Spuštění servisního programu
--------
Spotřebič se proplachuje automaticky při jeho zapnutí a vypnutí.
Spotřebič se neproplachuje, pokud:
■ Je při zapnutí ještě teplý.
■ Před vypnutím nebyla odebrána žádná káva.
Spotřebič je připraven k provozu, pokud na ovládacím panelu svítí diody LED tlačítek
pro výběr nápojů. Spotřebič je vybaven funkcí automatického vypnutí. ~ "Nastavení
automatického vypnutí" na straně 105
Přizpůsobení intenzity kávy ~ "Přizpůsobení nastavení nápojů" na straně 103
Bliká, pokud musí být proveden servisní program.~ "Servisní program Calc´nClean"
na straně 111
P Odkapávací miska (zásobník na
kávovou sedlinu, odkapávací
mřížka, odkapávací plech, plovák)
X Dvířka spařovacího prostoru
` Typový štítek
h Spařovací jednotka
)" Víko na uchování aroma
)* Zásobník na kávová zrna
)2 Otočný volič pro nastavení stupně
mletí
): Víko nádržky na vodu
)B Nádržka na vodu
98
Page 99

Ukazatel
Rozsvítí se, pokud je nutné doplnění vody do nádržky na vodu nebo nádržka na vodu chybí.
'
(
Bliká, pokud musí být vyměněn vodní filtr.
Svítí, pokud je nutné vyprázdnění nádobek.
Bliká, pokud jsou otevřená dvířka spařovacího prostoru.
svítí Připraven k provozu, může být proveden výběr
pulzuje Probíhá odběr
bliká Čeká na ovládání, např. u calc’nClean
vypnutý Není k dispozici
--------
_ Příslušenství
Příslušenství
V obchodě a u zákaznického servisu je
k dostání toto příslušenství:
Příslušenství Objednací číslo
Obchod Zákaznický
Čisticí tablety TZ80001 00311807
Odvápňovací tablety TZ80002 00576693
Vodní filtr TZ70003 00575491
Sada údržby TZ80004 00576330
--------
Kontaktní data všech zemí
zákaznického servisu se nachází na
poslední straně tohoto návodu.
servis
Příslušenství cs
99
Page 100

cs Před prvním použitím
K Před prvním použitím
Před prvním použitím
V této kapitole je popsané uvedení
spotřebiče do provozu.
Upozornění: Přístroj používejte pouze
v prostorech bez nebezpečí koroze.
Pokud přístroj transportujete nebo
skladujete při teplotě pod 0 °C, musíte
před uvedením do provozu počkat
minimálně 3 hodiny.
Instalace a připojení spotřebiče
1. Odstraňte ochranné fólie.
2. Spotřebič umístěte na rovnou a pro
jeho hmotnost dostatečnou,
vodotěsnou plochu.
3. Spotřebič připojte síťovou zástrčkou
k předpisově instalované uzemněné
zásuvce.
Upozornění: Po každém připojení chvíli
vyčkejte (cca 5 sekund).
Uvedení spotřebiče do provozu
Nasazení napěňovače mléka
~ Obrázek #
Naplnění zásobníku na kávová zrna
Pomocí tohoto spotřebiče můžete
připravovat kávové nápoje z kávových
zrn.
1. Otevřete víko )" zásobníku na
kávová zrna )*.
2. Naplňte kávová zrna.
3. Víko opět uzavřete.
Upozornění
■ Glazovaná, karamelizovaná nebo
jinak pomocí přísad s obsahem
cukru upravená kávová zrna
ucpávají spařovací jednotku.
Používejte pouze směsi na espresso
nebo jiné směsi vhodné pro
automatické přístroje na přípravu
espressa.
■ Kávová zrna jsou pro každé spaření
kávy čerstvě namleta.
■ Kávová zrna uchovávejte v chladu a
uzavřená, tak zůstane optimálně
zachována jejich kvalita.
■ Kávová zrna můžete několik dní
uchovávat v zásobníku na kávová
zrna, aniž by ztratila své aroma.
Naplnění zásobníku na vodu
Důležité: Nádržku na vodu denně plňte
čerstvou, studenou neperlivou vodou.
Před použitím zkontrolujte, zda je
nádržka na vodu dostatečně naplněna.
1. Součásti napěňovače mléka vyjměte
ze sáčku.
2. Sestavte napěňovač mléka.
3. Napěňovač mléka nasaďte vpředu
na spotřebič.
100
1. Sejměte víčko nádržky na vodu.
2. Za madlo nádržku na vodu
vytáhněte.
3. Nádržku na vodu naplňte vodou až
po značku “max”.
4. Nádržku na vodu opět rovně vložte
do uchycení.
 Loading...