

Page 1
en English
fr Fran çais
it Italiano
nl Nederlands
cs Čeština
ru Русский
TE501...
Instruction manual
Mode d‘emploi
Istruzioni per l’uso
Gebruiksaanwijzing
Návod k použití
Инструкция по эксплуатации
Page 2
en English 6
fr Français 23
it Italiano 41
nl Nederlands 59
cs Čeština 76
ru Русский 93
Included in delivery (see page 7) / Contenu de la livraison (voir page 24)
Contenuto della confezione (ved. pagina 42) / Leveringsomvang (zie pagina 60)
Rozsah dodávky (informace naleznete na straně 77)
Объем поставки (см. стр. 94)
de Deutsch
en English
fr Fr ançais
it Italian o
2
TE501...
Gebrauchsanleitung
Instruction manual
Mode d‘emploi
Istruzioni per l’uso
1
E-Nr. ……… FD… …
3 4 5
Page 3
17
16
15
14
A
4
1 2 3
13
12
11
10
5
6
9
78
Page 4

B
20
18
19
C
D
8a
8b
6a 6c
8e
6b
8c
6e
6d
8d
Page 5
E
5a
5b
5c
5d
Page 6

en
Contents
Included in delivery .....................................7
Overview.....................................................7
Controls ......................................................8
− Power on/off switch O / I ..........................8
− Service button
− Steam button B ......................................8
− Start button
− LED display .............................................8
− “Coffee strength” rotary knob ..................9
− “Drink selection” rotary knob ...................9
− Milk frother ..............................................9
Before using for
the rst time ................................................9
Water filter ................................................10
Settings..................................................... 11
− Water hardness .....................................11
− Automatic switch-off ..............................12
− Setting the brewing temperature ...........12
− Adjusting the grind settings ...................12
Preparation using coffee beans ................13
Preparation using ground coffee ..............13
Dispensing hot water ................................13
Preparing milk froth ..................................14
Maintenance and daily cleaning ...............14
− Cleaning the milk frother .......................15
− Cleaning the brewing unit......................16
Tips on saving energy ..............................17
Service programme ..................................17
Frost protection.........................................18
Accessories ..............................................19
Disposal ....................................................19
Guarantee.................................................19
Simple troubleshooting .............................20
Technical specications ............................22
A ....................................8
C .........................................8
Dear Coffee Connoisseur,
Congratulations on purchasing this fully
automatic espresso machine from Siemens.
Safety instructions
Please read the operating instructions
carefully and keep them for future reference. Please pass on these manuals to
the new owner if you sell the appliance.
This fully automatic espresso machine
is designed for preparation of small
amounts of coffee for domestic use or
for use in non-commercial, householdlike environments, such as staff kitchens
in shops, ofces, agricultural and other
small businesses or for use by guests at
bed-and-breakfast establishments, small
hotels and similar residential facilities.
Risk of electric shock
¡
Connect and operate the appliance only in
accordance with the specications on the
rating label.
Do not use if either the power cord or the
appliance is damaged.
Use indoors at room temperature only.
This appliance is not intended for use by
persons (including children) with reduced
physical, sensory or mental capabilities, or
lack of experience and knowledge, unless
they have been given supervision or instruction concerning use of the appliance by
a person responsible for their safety.
Keep children away from the appliance.
Children should be supervised to ensure
that they do not play with the appliance.
In the event of malfunction, unplug the appliance immediately.
To avoid potential hazards, repairs such as
replacing a damaged cord should only be
performed by our service personnel.
Never immerse the appliance or power cord
in water.
Do not reach into the grinding unit.
Use the appliance only in frost-free rooms.
6
Page 7

Risk of scalding
¡
The milk frother outlet (6) gets very hot.
After use, allow to cool down rst before
touching.
Use this appliance only after the milk frother
(6) has been fully assembled and installed.
Risk of suffocation
¡
Do not allow children to play with packaging
material.
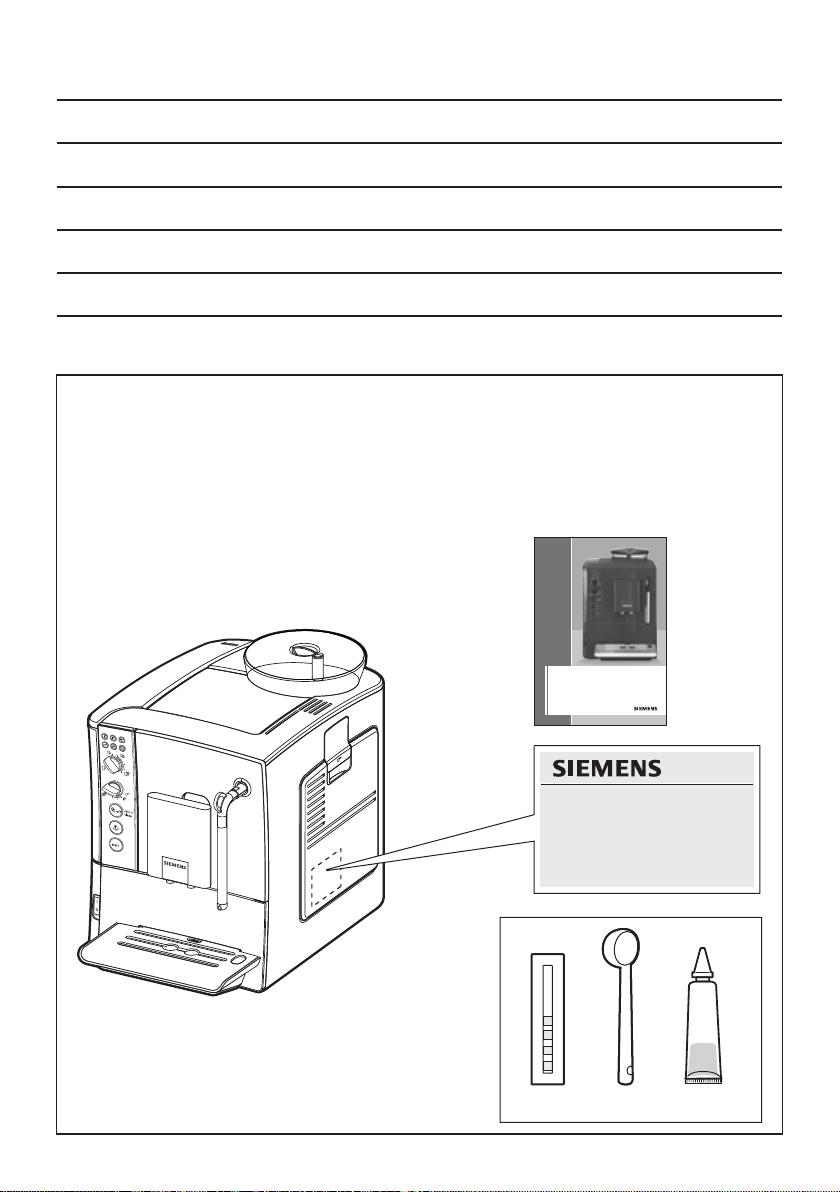
Included in delivery
(see overview image at the start of the
instructions)
1 TE501 fully automatic
espresso machine
2 Operating instructions
3 Water hardness testing strips
4 Measuring spoon
5 Grease (tube)
en
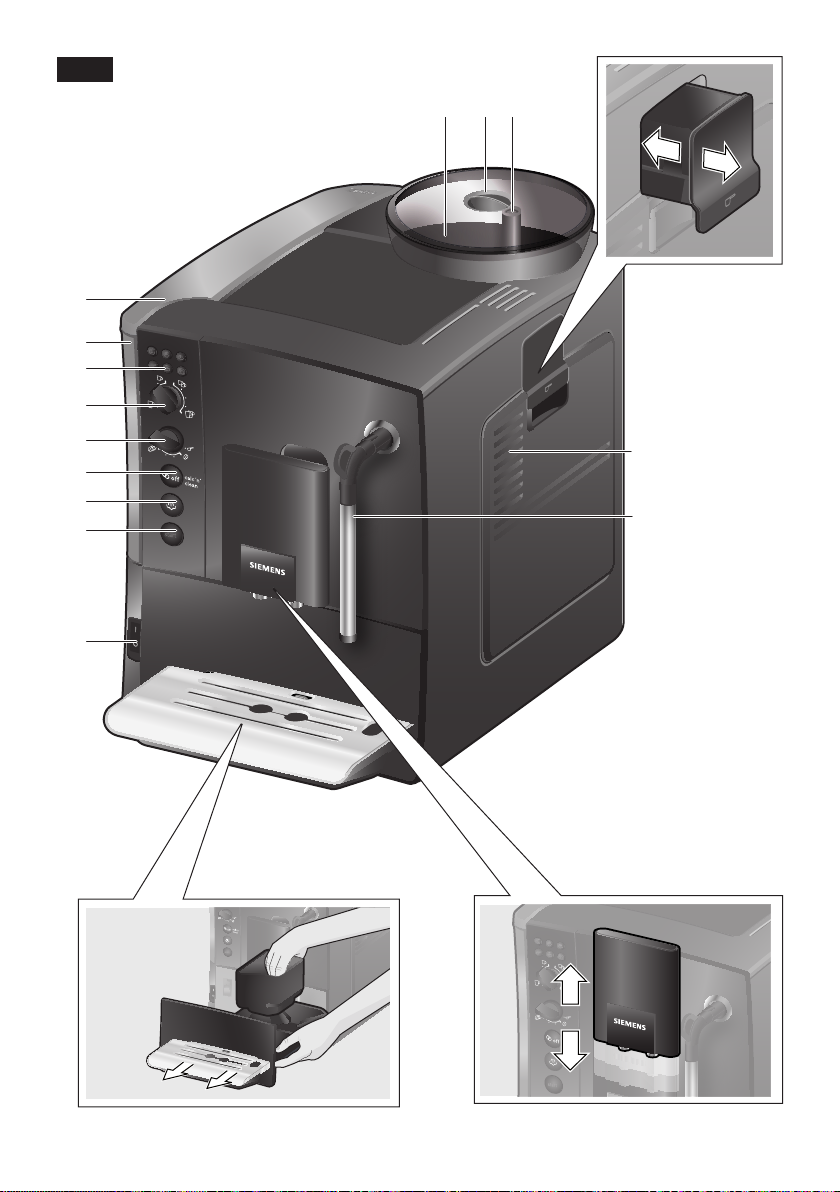
Overview
(see Figs. A, B, C, D and E at the start of
the instructions)
1 Bean container
2 Aroma cover
3 Selector for grind setting
4 Drawer
(ground coffee / cleaning tablet)
5 Brewing unit (Figure E)
a) Brewing unit
b) Door
c) Pushbutton
d) Lock
6 Milk frother (Figure C) removable
a) Steam valve
b) Metal sleeve
c) Frothing tube
d) Steam nozzle
e) Air hole
7 Height-adjustable coffee outlet
8 Drip tray (Figure D)
a) Panel
b) Coffee grounds container
c) Drip tray for coffee outlet
d) Grate for coffee outlet
e) Float
9 Power on/off switch O / I
10 Start button
11 Steam button B
12 Service button A
13 “Coffee strength” rotary knob
14 “Drink selection” rotary knob
15 LED display
16 Removable water tank
17 Water tank lid
18 Measuring spoon
(insertion aid for water lter)
19 Storage compartment for
measuring spoon
20 Power cable with storage compartment
C
7
Page 8

en
Controls
Power on/off switch O / I
The power on/off switch O / I (9) is used to
switch the appliance on or to switch it off
completely (power supply off).
Important: Before switching off, run the
rinse programme or use the service button
(12) to switch off.
Service button A
When the service button (12) is pressed
briey, the appliance rinses and switches
off. If the service button (12) ashes, the
service programme needs to be run. Press
and hold the service button (12) to start
the service programme. The service button
(12) ashes while the service programme is
running and turns off when the programme
has ended.
Steam button B
Press the steam button (11) to generate
steam for frothing milk.
Start button C
Press the start button (10) to start preparing
a drink. Press again during drink preparation to stop the dispensing process early.
LED display
The various LEDs light up and ash to indicate the following:
D lights up The water tank is empty and
needs to be relled.
D ashes The water lter is exhausted
and needs to be replaced.
E lights up The bean container is empty
and needs to be relled.
F lights up The steam valve needs to be
opened or closed.
F ashes Depending on the setting,
steam or hot water is coming
out of the milk frother.
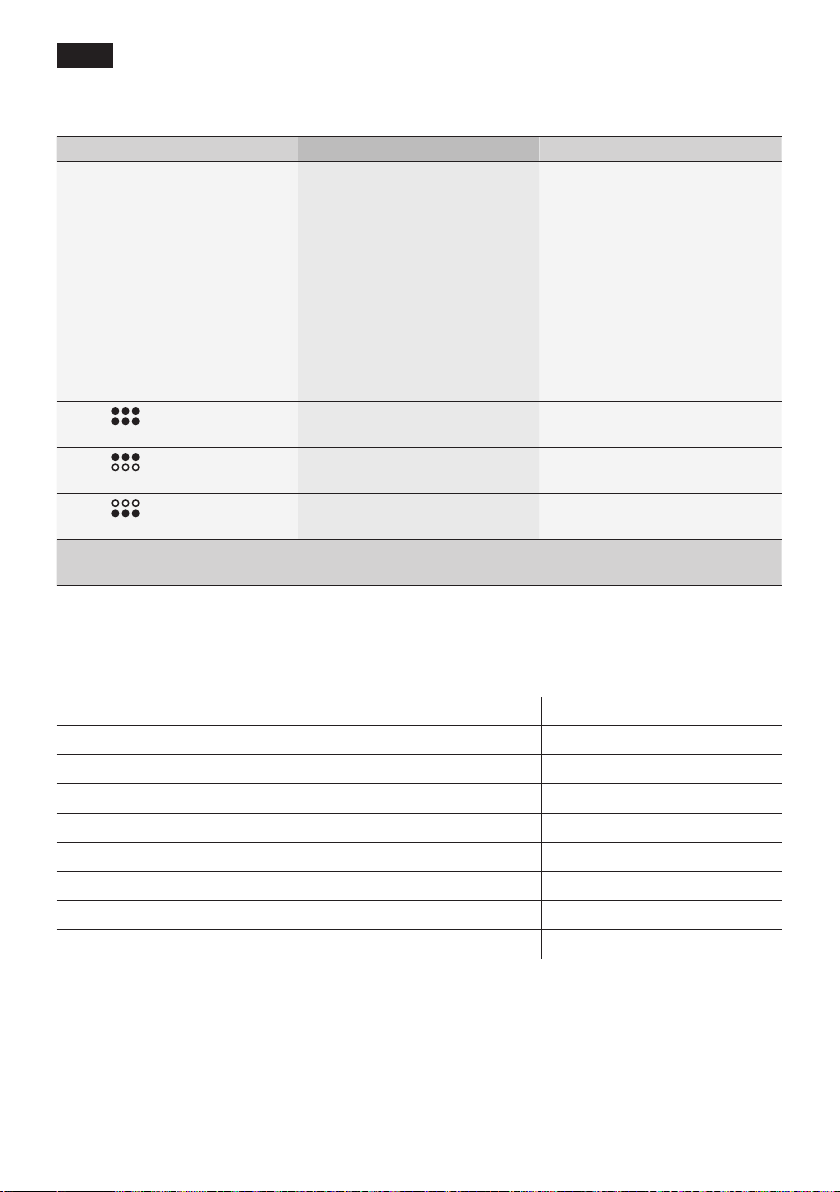
G lights up When G is selected using
the “coffee strength” rotary
knob, the symbol lights up
while ground coffee is being
dispensed.
H lights up The drip tray is missing or has
not been inserted correctly.
Insert the drip dray.
H ashes The trays are full. Empty the
trays and reinsert them.
I lights up The brewing unit door is open.
Close the door.
I ashes Remove and clean the brewing
unit.
8
Page 9
en
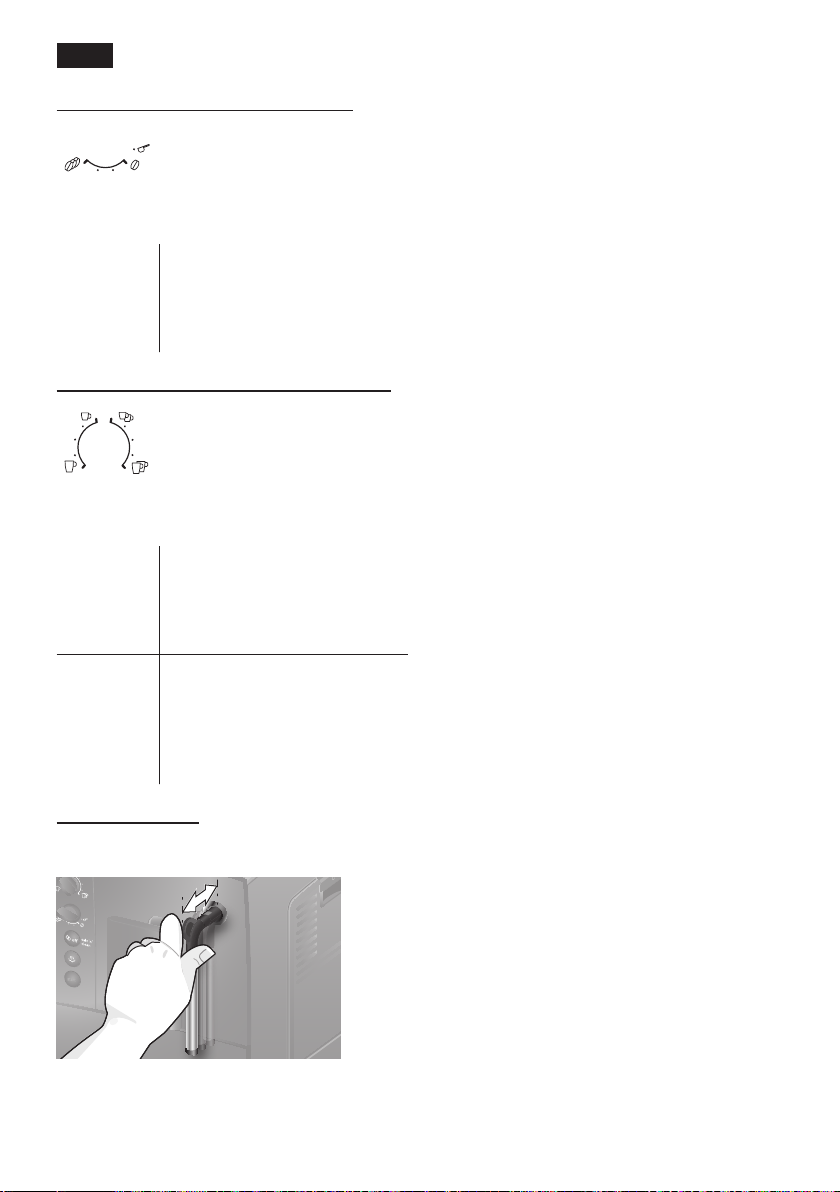
“Coffee strength” rotary knob
This rotary knob (13) is used
to adjust the coffee strength
or select the setting for preground coffee.
h
to
g
G
“Drink selection” rotary knob
a
to
c
b
to
d
Milk frother
Pull the milk frother (6a) out to open it and
push it back in to close it.
Very mild
Mild
Medium
Strong
Ground coffee
This rotary knob (14) is
used to select the required
beverage and quantity. It is
also used to change user
settings.
Small espresso
Espresso
Small café crème
Café crème
Large café crème
2 small espresso
2 espresso
2 small café crèmes
2 café crèmes
2 large café crèmes
Before using for
the rst time
General
Fill the water tank with fresh, uncarbonated
water only and preferably use only beans
or coffee blends suitable for fully automatic
espresso and coffee machines. Do not
use coffee beans that have been glazed,
caramelised or treated with other additives
containing sugar, since they will block the
brewing unit.
The water hardness setting can be adjusted
on this appliance. The factory setting for the
water hardness is 4. Check the hardness
of the water you use with the enclosed test
strip. If the test reveals a value other than 4,
change the setting on the appliance accordingly after switching on (see “Settings”,
“Water hardness” on page 11).
Setting up the appliance
1. Remove the protective lm.
2. Place the fully automatic espresso machine on a at, water-resistant surface
that can take its weight. The ventilation slots on the appliance must not be
covered.
Important: Only use the appliance in
frost-free rooms. If the appliance has been
transported or stored at temperatures below
0 °C, wait at least 3 hours before operation.
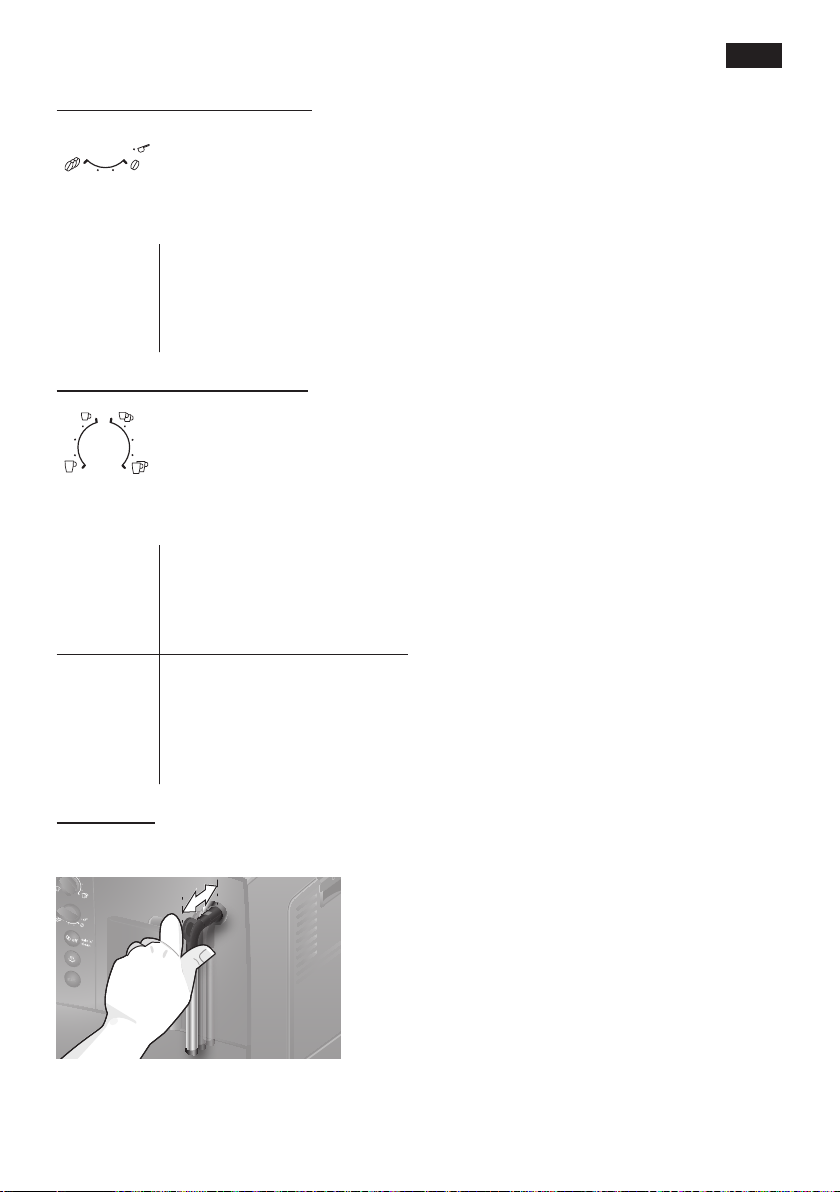
3. Pull out the mains plug from the cable
compartment (20) and plug it in. Adjust
the length of the cable by pushing it
back in and pulling it out. To do this,
place the appliance with its back ush
with the edge of the work surface and
either pull the cable downwards or
push it upwards.
9
Page 10
en
4. Assemble the milk frother. Only use the
appliance when the milk frother (6) is
completely assembled and tted.
5. Lift the water tank lid (17).
6. Remove and rinse the water tank (16)
and ll it with fresh cold water. Do not ll
above the max mark.
7. Replace the water tank (16) and push it
rmly downwards into place.
8. Close the water tank lid (17).
9. Fill the bean container (1) with coffee
beans (for preparation using ground
coffee see “Preparation using ground
coffee” on page 13).
10. Press the power on/off switch O / I (9) to
switch on the appliance. LED D ashes
and LED F lights up.
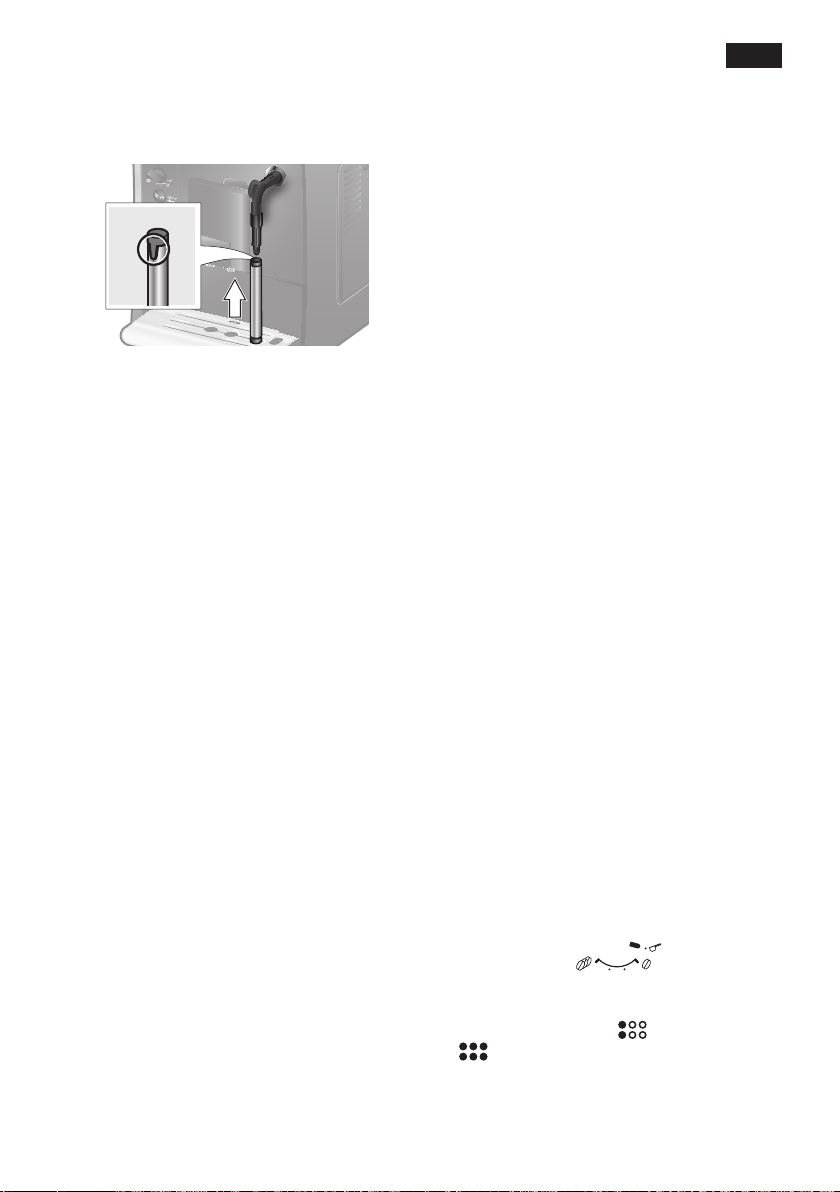
11. Place a container under the milk frother
outlet (6).
12. Carefully pull out the milk frother (6)
to open it. The appliance rinses out
the milk frother (6) with water. LED F
ashes.
13. When LED F lights up constantly,
press in the milk frother (6) to close it.
The appliance heats up and rinses. Some
water will run out of the coffee outlet. When
buttons A (12), B (11) and C (10) light
up, the appliance is ready for use.
Switching off the appliance
If the appliance has not been used for
an hour, it rinses automatically and then
switches off (the length of time can be adjusted, see “Settings”, “Automatic switch-off”
on page 11).
Exception: The appliance switches off without rinsing if only hot water or steam was
dispensed.
To switch the appliance off manually before
this, press the service button (12). The
appliance rinses and switches off.
Note: If the appliance is being used for the
rst time, the service programme has been
run, or the appliance has not been operated for a long period, the rst beverage will
not have the full aroma and should not be
consumed.
When the fully automatic espresso machine
is rst used, you will achieve a suitably thick
and stable “crema” only after the rst few
cups have been dispensed.
If the appliance is in use for a long period of
time, water droplets will form on the ventilation slits. This is normal.
Water lter
Using a water lter can prevent a build-up
of limescale deposits.
A new water lter must be rinsed before it
can be used. To do this, proceed as follows:
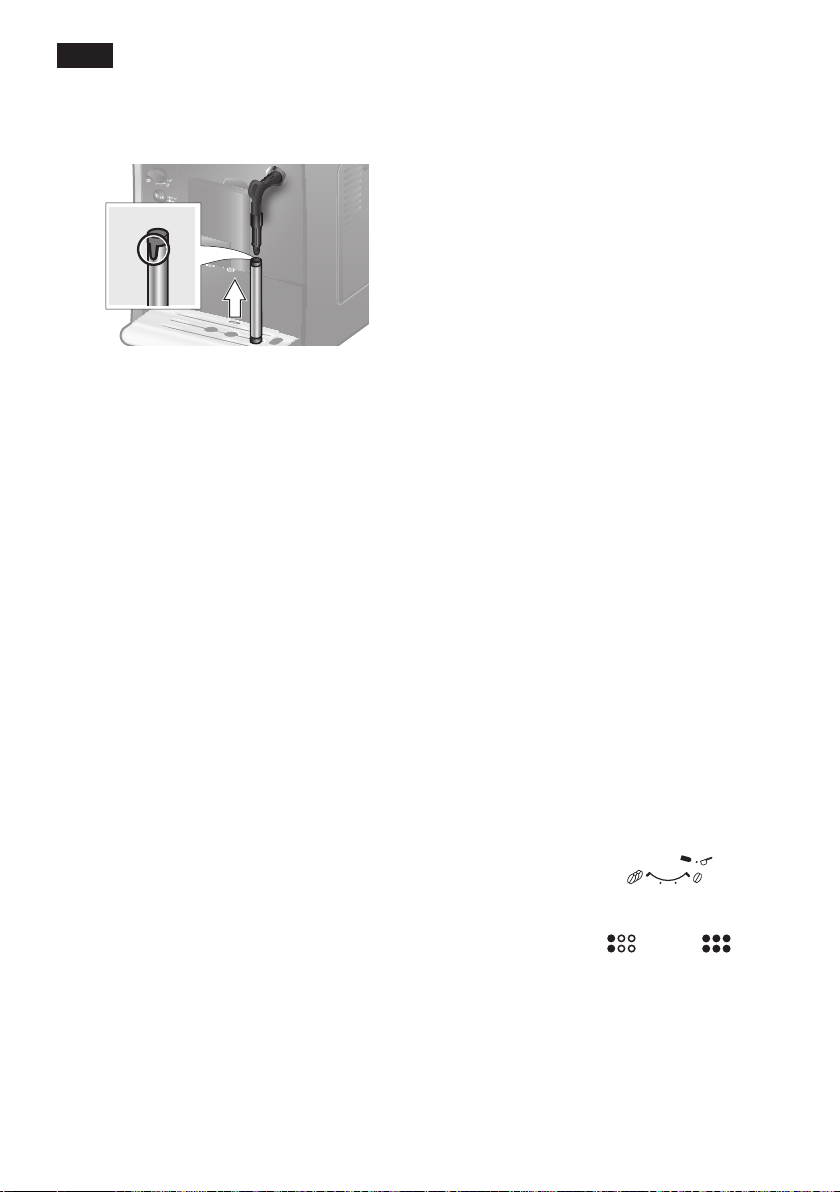
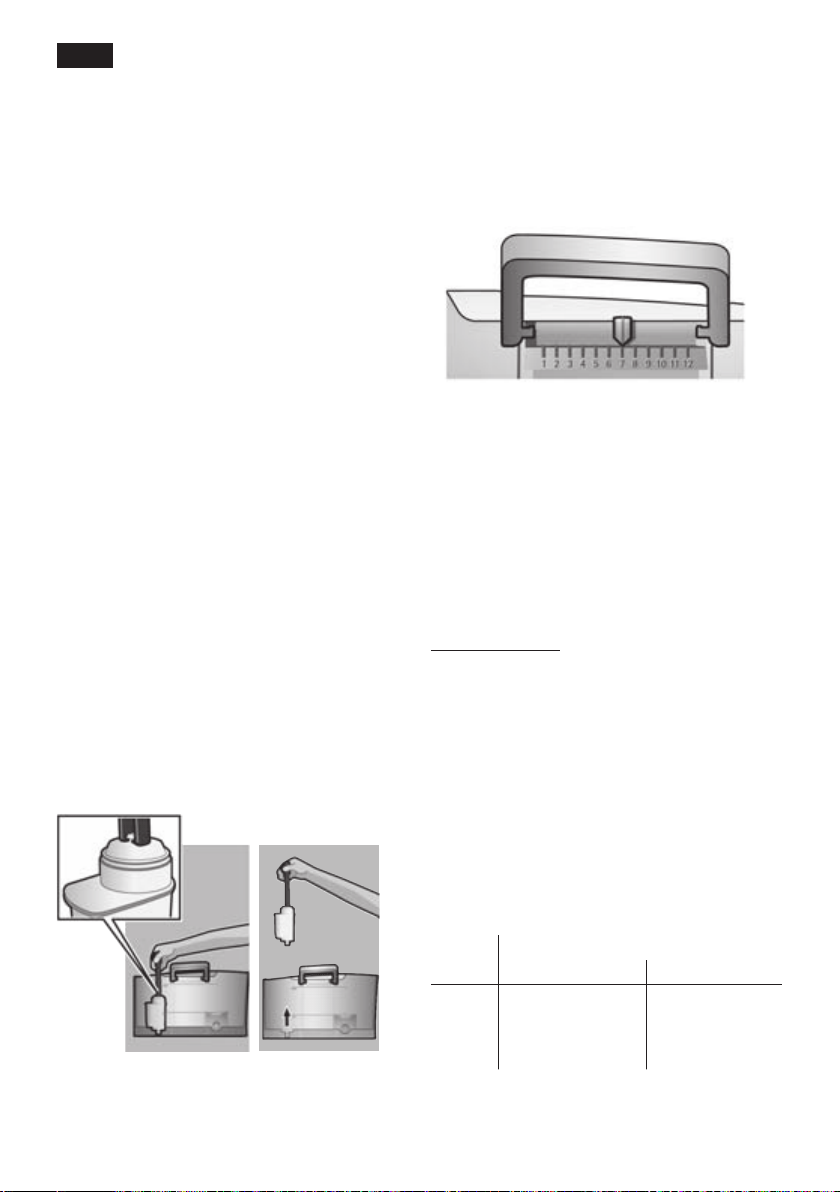
1. Press the water lter rmly into the empty
water tank with the aid of the measuring
spoon (18).
2. Fill the water tank (16) with water up to
the max mark.
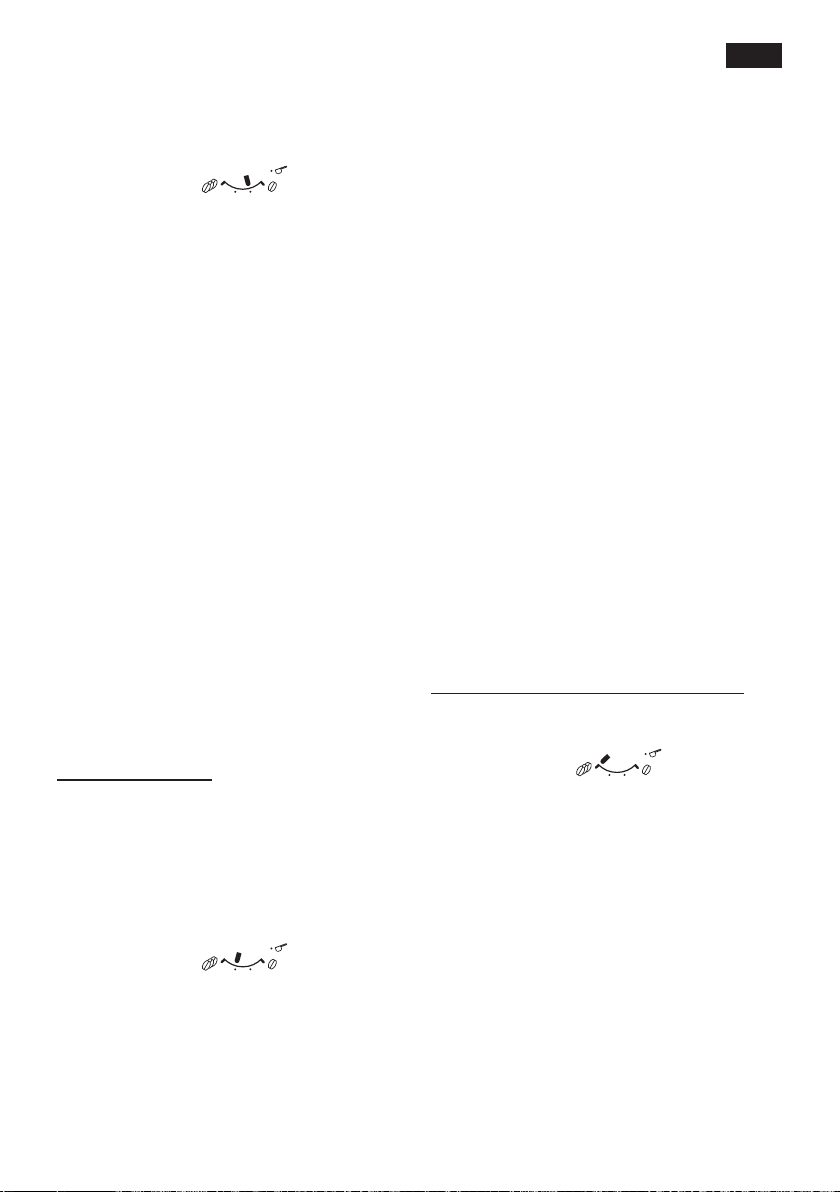
3. Turn the rotary
knob (13) to position
4. Press and hold buttons B (11) and A
(12) simultaneously for at least
5 seconds. Either “off” or “on”
lights up.
5. Press the start button (10) to select “on”.
6. Press and hold the start button (10) for
at least 5 seconds to conrm. All of the
LEDs light up briey.
7. LED D ashes and LED F lights up.
8. Place a container with a capacity of 0.5
litres under the milk frother outlet (6).
10
Page 11
en
9. Pull out the milk frother (6) to open it.
F ashes.
LED
10. Water will now ow through the lter and
rinse it.
11. When LED
press in the milk frother (6) to close it.
12. Empty the container.
The appliance is ready to use again.
Information: Rinsing the lter simultaneously activates the setting for the change
lter display (= LED D ashes).
The lter is no longer effective when the
change lter display appears, or at the
latest after two months. It needs to be replaced for reasons of hygiene and so that
there is no build-up of limescale (this could
damage the appliance). Replacement lters
can be obtained from retailers (TZ70003) or
from customer service (467873). If no new
lter is inserted, change the setting for the
lter (see "Water hardness”).
F lights up constantly,
Information: If the appliance has not been
used for a prolonged period (for example,
when you are on vacation), the existing lter
should be rinsed before the appliance is
used again. To do so, dispense a cup of hot
water and pour it away.
Settings
You can customize the settings on the
appliance.
You can make the following adjustments:
Water hardness
The water hardness setting can be adjusted
on this appliance. It is important to set the
water hardness correctly so that the appliance can accurately indicate when it is
time to run the descale process. The factory
setting for the water hardness is 4. You can
establish the water hardness either by using the test strip provided or by asking your
local water provider.
Dip the test strip in the water briey, shake it
gently and check the result after one minute.
Information: You can use the lter indicator
to mark the month in which you inserted the
lter. You can also mark the month in which
you will need to replace the lter next (at
the latest after two months).
Level Water hardness
German (°dH) French (°fH)
1
2
3
4
If you wish to change the default degree of
water hardness, or if you have inserted a
water lter, proceed as follows:
1. Turn the rotary
knob (13) to position
2. Press and hold buttons B (11) and A
(12) simultaneously for at least 5 seconds.
The set water hardness is indicated by the
number of LEDs that now light up.
3. Now press the start button (10) repeatedly until the required water hardness
is indicated, e. g., for water hardness 3,
LEDs D, E and F will light up.
1-7
8-14
15-21
22-30
1-13
14-25
26-38
39-54
11
Page 12
en
4. Press and hold the start button (10)
for at least 5 seconds. The set number
of LEDs will light up to indicate that
the selected water hardness has been
saved successfully.
Important: If a water lter is used (special
accessory order no. 467873), proceed as
follows, see “Water lter” on page 10.
Note: If no button is pressed within
90 seconds, the appliance switches to
stand-by mode without saving the new
settings. In this case, the previously saved
water hardness setting is retained.
Automatic switch-off
Here you can set the period of time after
which the appliance should switch off automatically following the last drink preparation.
A time between 15 minutes and 4 hours can
be set. The default time is 1 hour, but this
can be shortened to save energy.
1. Turn the rotary
knob (13) to position
2. Press and hold buttons B (11) and A
(12) simultaneously for at least 5 seconds. The time after which the appliance
should switch off is indicated by the
number of LEDs that now light up.
3. Now press the start button (10) repeatedly until the required number of LEDs
light up to indicate the switch-off time:
D = 15 minutes
D and E = 30 minutes
4. Press and hold the start button (10) for
at least 5 seconds. The set number of
LEDs will light up to indicate that the
selected switch-off time has been saved
successfully.
Note: If no button is pressed within
90 seconds, the appliance switches to
stand-by mode without saving the new
settings. In this case, the previously saved
switch-off time is retained.
Setting the brewing temperature
The brewing temperature can also be set.
1. Turn the rotary
knob (13) to position
2. Press and hold buttons B (11) and
A (12) for at least 5 seconds. The set
brewing temperature is indicated by the
number of LEDs that now light up.
3. Now press the start button (10) repeatedly until the required number of LEDs
light up to indicate the temperature:
LED D = low
LED D and E = medium
LED D, E,and F = high
4. Press and hold the start button (10) for
at least 5 seconds. The set number of
LEDs will light up to indicate that the
selected temperature has been saved
successfully.
Note: If no button is pressed within
90 seconds, the appliance switches to
stand-by mode without saving the new
settings. In this case, the previously saved
brewing temperature setting is retained.
D, E and F = 45 minutes
D, E, F and G = 1 hour
D, E, F, G and H = 2 hours
D, E, F, G, H and I = 4 hours
12
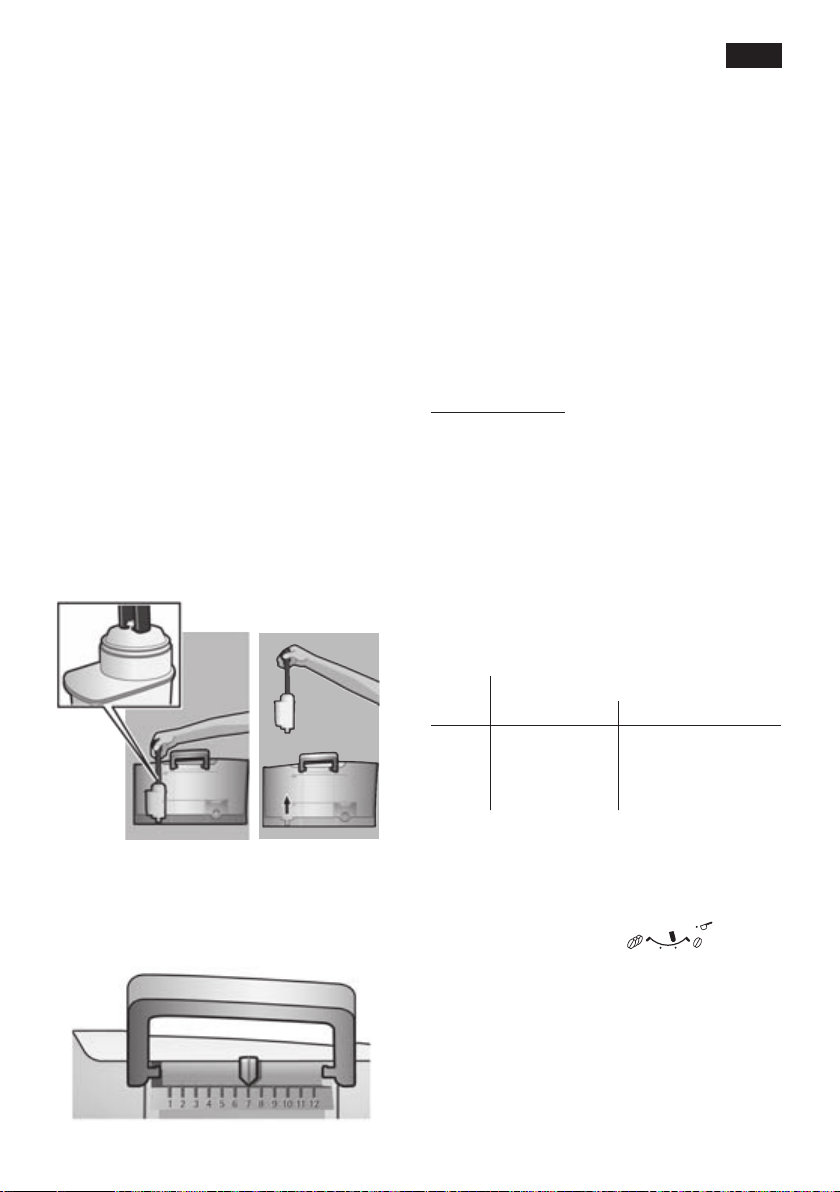
Adjusting the grind settings
The selector (3) for grind setting adjusts the
grind settings from coarse to ne.
Warning!
¡
Adjust the grinding unit only while it is running! Otherwise the appliance may be damaged. Do not reach into the grinding unit.
Page 13
en
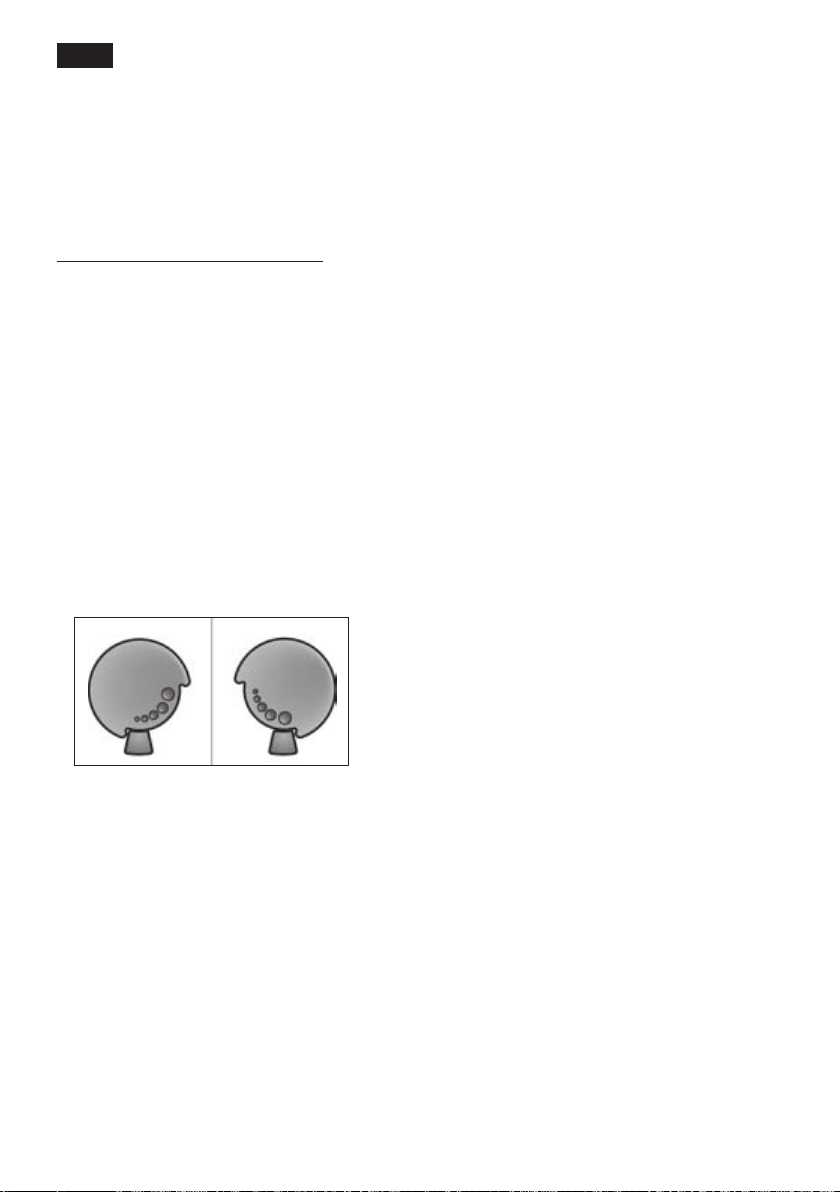
● With the grinding unit running, adjust the
selector (3) from ne (a: turn anticlockwise) to coarse (b: turn clockwise).
a b
Information: The effects of the new grind
setting will not become apparent until after
the second cup of coffee.
Tip: Choose a ner grind for dark roasted
beans and a coarser grind for lighter beans.
Preparation using coffee
beans
This fully automatic espresso machine
grinds beans freshly for each brew.
Tip: If possible, use only beans for fully
automatic coffee and espresso machines.
For optimal quality, deep-freeze the beans
or store in a cool place in sealed containers.
Coffee beans can be ground while frozen.
Important: Fill the water tank (16) with
fresh water every day. The water tank (16)
should always contain sufcient water for
operating the appliance.
Different coffee drinks can be prepared
quite simply at the press of a button.
Preparation
The appliance must be ready for use.
1. Place the pre-warmed cup(s) under the
coffee outlet (7).
Tip: For a small espresso, always preheat the cup, e.g. using hot water.
2. Select the required coffee and the
required quantity by turning the upper
rotary knob (14).
3. Select the required coffee strength by
turning the lower rotary knob (13).
4. Press the start button (10).
Coffee is brewed and then poured into the
cup(s).
Press the start button (10) again to stop the
brewing process early.
Preparation using ground
coffee
This fully automatic espresso machine can
also be operated using ground coffee (not
instant coffee powder).
Important: Fill the water tank (16) with
fresh water every day. The water tank (16)
should always contain sufcient water for
operating the appliance.
Preparation
1. Open the drawer (4).
2. Put ground coffee into the drawer (maximum two level measuring spoons).
Caution: Do not use whole beans or
instant coffee.
3. Close the drawer (4).
4. Turn the bottom rotary knob (13) to the
symbol
5. Press the start button (10).
Coffee is brewed and then poured into the cup.
G.
Dispensing hot water
Risk of burns!
¡
The milk frother (6) gets very hot. Hold the
milk frother (6) by the plastic part only.
The appliance must be ready for use.
1. Place a pre-heated cup or glass under
the milk frother outlet (6).
2. Pull out the milk frother (6) to open it.
The appliance heats up. Hot water runs
out of the milk frother outlet (6) for about
40 seconds.
13
Page 14
en
3. Stop the process by pushing in the milk
frother (6).
Preparing milk froth
Risk of burns!
¡
The milk frother (6) gets very hot. Hold the
milk frother (6) by the plastic part only.
Tip: You can froth the milk rst and then
dispense coffee, or froth the milk separately
and pour it onto the coffee.
The appliance must be ready for use.
1. Press button
Button
now heats up for approximately
20 seconds.
2. As soon as button and LED
up, immerse the milk frother so that it
reaches the bottom of a cup or glass
that is one-third lled with milk.
3. Pull out the milk frother (6) to open it.
Risk of burns!
¡
Escaping steam is very hot and may cause
liquids to sputter. Do not touch the metal
sleeve or aim it at anyone.
4. Froth the milk.
5. Push the milk frother (6) in to close it.
B (11).
B ashes and the appliance
F lights
Maintenance and daily
cleaning
Risk of electric shock
¡
Unplug the appliance before cleaning it.
Never immerse the appliance in water.
Do not use a steam cleaner.
● Wipe the housing with a soft, damp cloth.
● Do not use abrasive cloths or cleaning
agents.
● Always remove any traces of limescale,
coffee, milk and descaler immediately.
Such residue can cause corrosion.
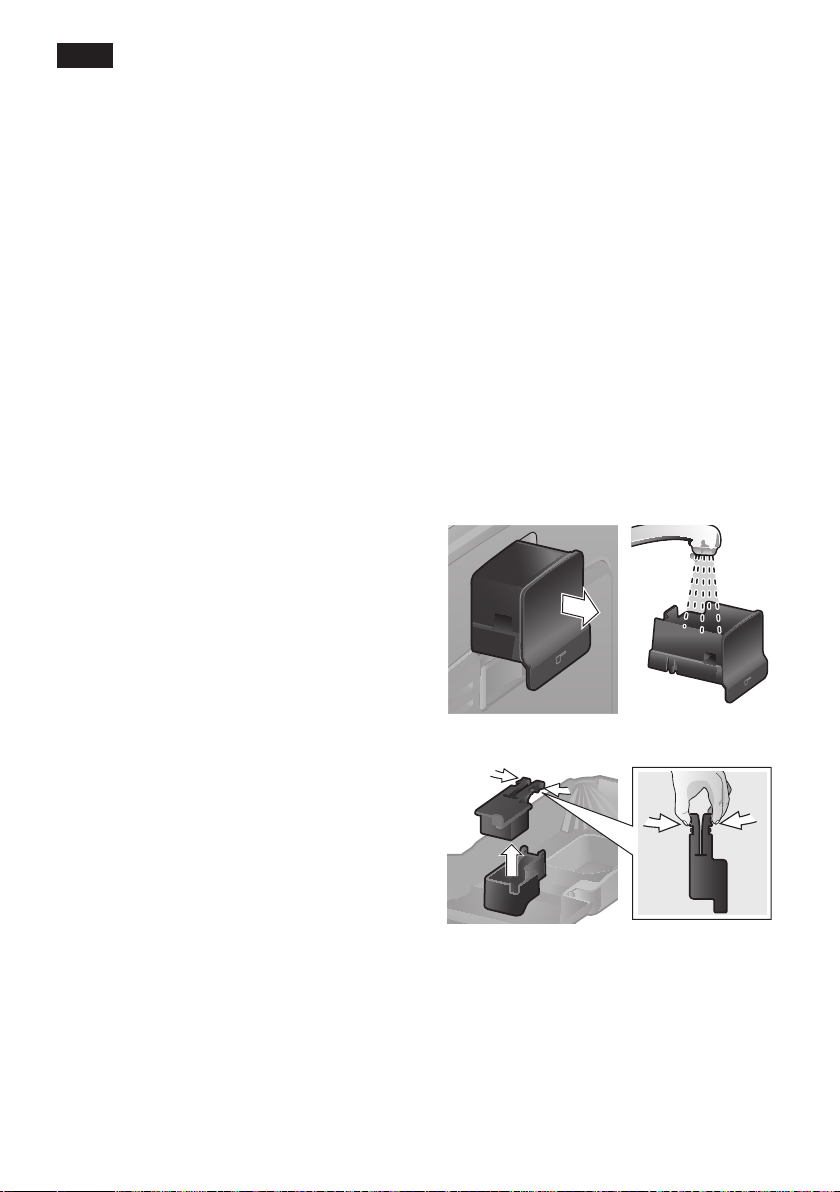
● Pull the drip tray (8c) with the coffee
grounds container (8b) forwards and out.
Remove the panel (8a) and grate (8d).
Empty and clean the drip tray and coffee
grounds container.
● Remove the drawer (4) and clean.
● Remove oat (8e) and clean with a damp
cloth.
Tip: For optimal milk froth, if possible use
cold milk with a fat content of at least 1.5 %.
Important: Dried milk residue is difcult
to remove, so the milk frother (6) must be
cleaned with lukewarm water immediately
after use.
14
● Do not put the following items in the
dishwasher: panel (8a), oat (8e),
drawer (4), brewing unit (5a).
● The following items are dishwasher-safe:
drip tray (8c), coffee grounds container
(8b), grate (8d), aroma cover (2) and
measuring spoon (18).
● Wipe out the inside of the appliance (tray
holders and drawer).
Page 15

en
Important: The drip tray (8c) and coffee
grounds container (8b) should be emptied and cleaned daily to prevent mould
developing.
Note: If the appliance is cold when switched
on with the power on/off switch O / I (9) or if
it switches off automatically after coffee has
been dispensed, the appliance performs an
automatic rinse.
Important: If the appliance is not used for
a prolonged period (for example, when you
are on vacation), clean the entire appliance
thoroughly, including the milk system and
brewing unit.
Cleaning the milk frother
The milk frother (6) must be cleaned after
each use in order to remove residues.
Important: Let the milk frother cool down
before you remove it.
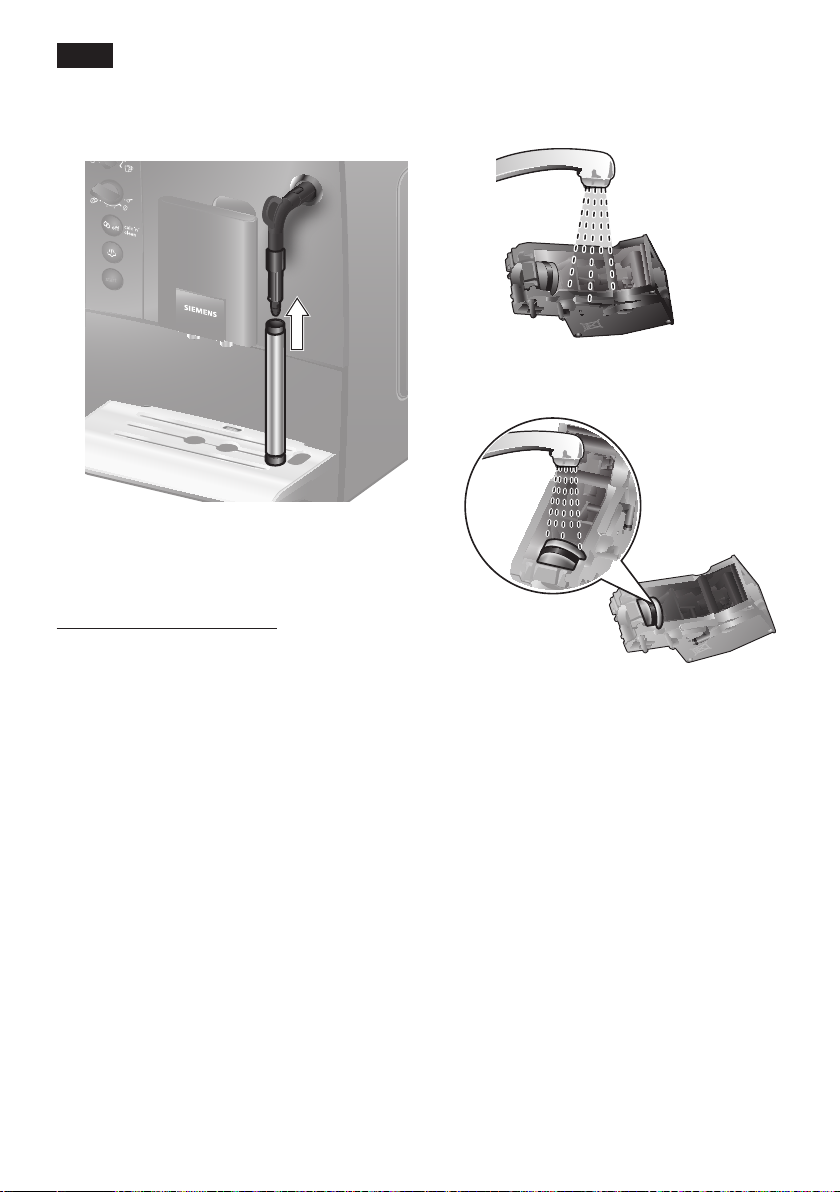
Dismantle the milk frother for cleaning:
1. To remove, take hold of the metal sleeve
and pull it downwards and off.
2. Twist the steam nozzle (6d) anticlockwise and remove it.
1
6d
2
3. Remove the frothing tube (6c).
6c
4. Clean the individual parts with a detergent solution and a soft brush. If necessary, soak in a warm detergent solution.
Clean the air hole (6e) thoroughly.
6e
5. Rinse all parts with clean water and dry.
6. Fit the steam nozzle (6d) and frothing
tube
(6c) back into the metal sleeve.
6d6c
1 2
7. Twist the steam nozzle clockwise until
the marks are aligned.
15
Page 16
en
8. Attach the milk frother to the steam
valve. Check that the red mark on the
steam valve is covered.
Risk of scalding!
¡
Only use the appliance when the milk frother (6) is completely assembled and tted.
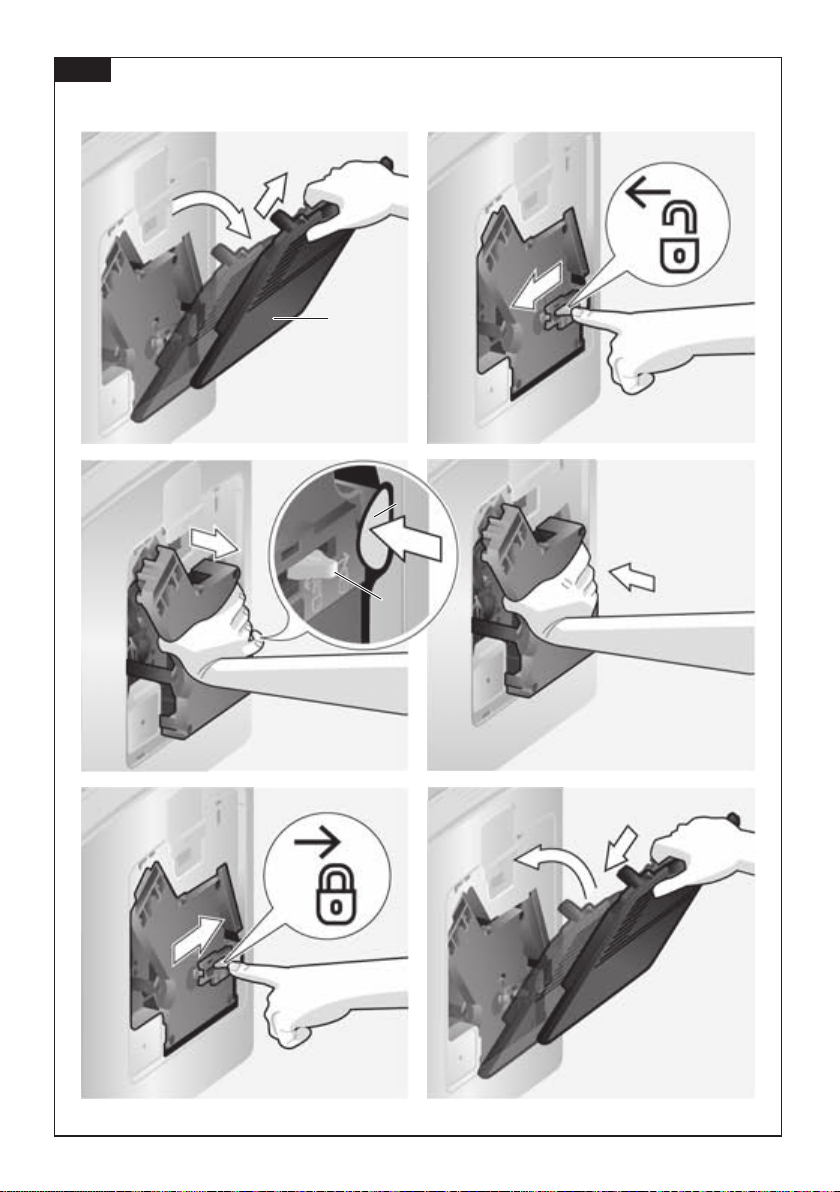
Cleaning the brewing unit
Clean the brewing unit regularly.
5. Rinse the brewing unit (5a) thoroughly
under running water.
6. Hold the brewing unit sieve under the
running water.
To pre-clean the brewing unit automatically:
Press the service button (12) briey. The
appliance will rinse if coffee was dispensed
previously. It then switches off.
In addition to the automatic cleaning programme, the brewing unit (5a) should be
removed regularly for cleaning (Figure E at
the beginning of the instructions).
1. Press the power on/off switch O / I (9) to
switch off the appliance. All lights go off.
2. Open the door (5b) to the brewing unit.
3. Slide the red lock (5d) on the brewing
unit completely to the left.
4. Press the red pushbutton (5c), grasp the
brewing unit by the recessed grips and
withdraw it from the appliance.
16
Important: Do not clean with detergent or
other cleaning agents and do not put it in
the dishwasher.
7. Wipe out the inside of the appliance
thoroughly with a damp cloth and
remove any coffee residues.
8. Allow the brewing unit (5a) and the
interior of the appliance to dry.
9. Reinsert the brewing unit (5a) fully into
the appliance.
10. Slide the red lock (5d) fully to the right
and close the door (5b).
Page 17
en
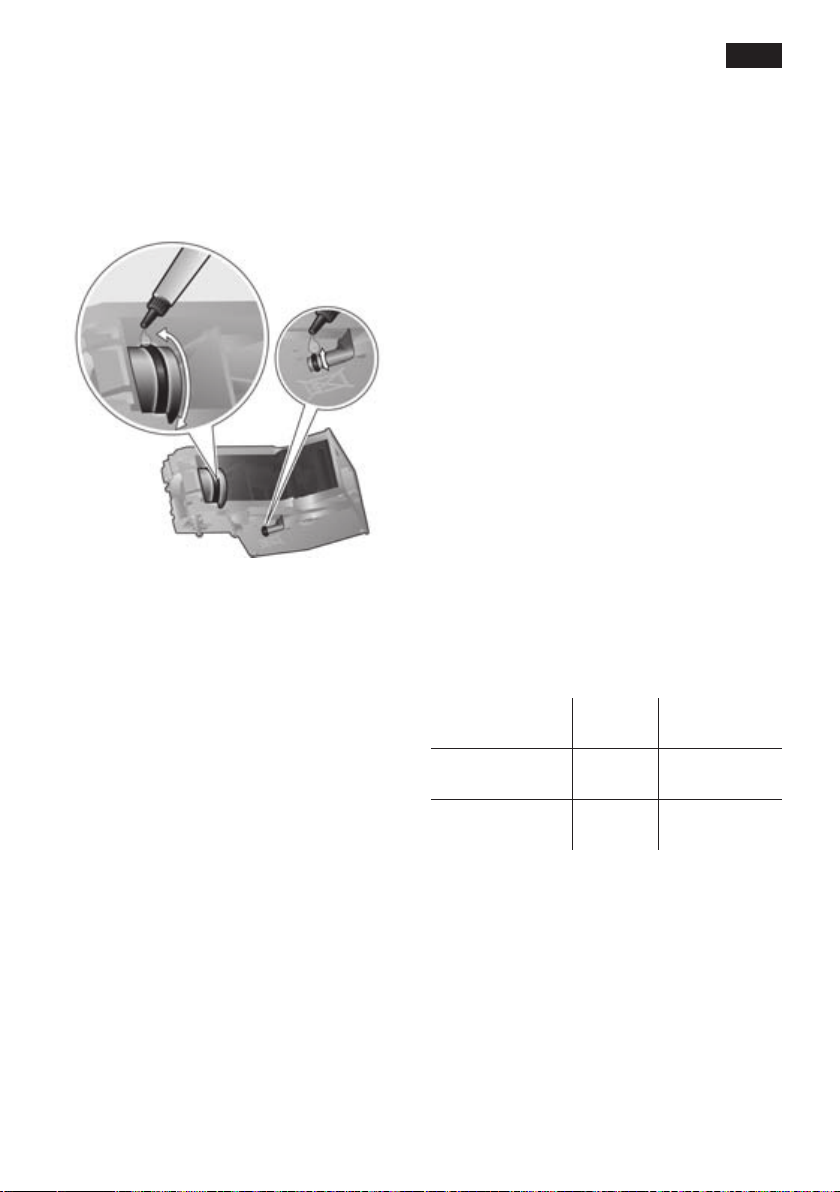
Note: After cleaning thoroughly, the seals
on the brewing unit should be greased
regularly to keep them in ideal condition.
Apply a thin layer of the special grease
intended for this purpose (order no. 311368)
all around the seals.
Tips on saving energy
● The fully automatic espresso machine
switches off automatically after one hour
(default setting). The default time of one
hour can be shortened (see “Settings”,
“Automatic switch-off” on page 11).
● Switch off the fully automatic espresso
machine when not in use. To do this,
press the service button (12). The appliance rinses and switches off.
● If possible, do not interrupt coffee or milk
froth dispensing. Stopping a process
prematurely results in higher energy consumption and the drip tray lls up more
quickly.
● Descale the appliance regularly to avoid
a build-up of limescale. Limescale residue
results in higher energy consumption.
Service programme
Duration: approx. 35 minutes
Depending on use, the service button (12)
ashes at certain intervals.
The appliance should be cleaned and
descaled immediately using the service
programme. If the service programme is
not run as instructed, the appliance may be
damaged.
Caution!
¡
Follow the instructions for using the descaling and cleaning agents for each service
programme. Please observe the safety
instructions on the packaging of the cleaning
agent.
Never interrupt the service programme.
Do not drink the liquids.
Never use vinegar, vinegar-based products,
citric acid or citric acid-based products.
Never put descaling tablets or other descaling agents in the drawer (4).
Specially developed and suitable descaling and cleaning tablets are available
from retailers or customer service.
Order number Retailer Customer
service
Cleaning
tablets
Descaling
tablets
Important: If there is a water lter in the
water tank (16), it must be removed before
starting the service programme.
To start the service programme, press and
hold the service button (12) for at least
5 seconds.
TZ60001 310575
TZ60002 310967
Information: The service button (12)
ashes while the programme is running.
17
Page 18

en
H lights up.
LED
● Empty the drip tray (8) and reinsert it.
The appliance rinses twice.
LED G lights up.
● Open the drawer (4).
● Drop a Siemens cleaning tablet into the
drawer (4) and close it.
● Press the start button (10).
LED D lights up.
● Fill the empty water tank (16) with lukewarm water up to the 0.5l mark and then
dissolve two Siemens descaling tablets in
this water.
● Press the start button (10).
The service programme will now run for
approximately 10 minutes.
LED h lights up.
● Place a container with a capacity of at
least 0.5 litres under the milk frother
outlet (6).
● Pull out the milk frother (6) to open it.
The service programme will now run for
approximately 12 minutes.
LED D lights up.
● Rinse the water tank (16) and rell it with
fresh water up to the max mark.
● Press the start button (10).
If you are using a lter, reinsert it now.
The appliance has been cleaned, descaled
and is ready for use again.
Important: Wipe down the appliance using
a soft, damp cloth to immediately remove
any descaler residue. Such residue can
cause corrosion.
Frost protection
To avoid damage caused by frost
¡
during transport and storage, the appliance must be completely emptied
rst.
Information: The appliance must be ready
for use and the water tank (16) lled.
1. Place a large container under the milk
frother outlet (6).
2. Press the steam button (11).
LED h ashes and the appliance now
heats up for approximately 20 seconds.
3. If LED h lights up, open the milk frother
(6) by pulling it out and release steam
for about 15 seconds.
4. Press the power on/off switch O / I (9) to
switch off the appliance.
5. Empty the water tank (16) and the drip
tray (8).
The service programme will now run for
approximately 30 seconds and rinse the
appliance.
LED h lights up.
● Push the milk frother (6) in to close it.
The service programme will now run for
approximately 8 minutes.
LED H lights up.
● Empty the drip tray (8) and reinsert it.
18
Page 19
en
Accessories
The following accessories are available
from retailers or from customer service:
Order number Retailer Customer
service
Cleaning
tablets
Descaling
tablets
Water lter TZ70003 467873
Grease (tube) – 311368
TZ60001 310575
TZ60002 310967
Disposal
Dispose of packaging in an environmentallyfriendly manner. This appliance is labelled
in accordance with the European Directive
2002/96/EG relating to waste electrical and
electronic equipment – WEEE.
The directive
EU-wide take-back and disposal of end-oflife appliances. Please ask your specialist
retailer about current disposal facilities.
A
provides the framework for the
Guarantee
The guarantee conditions for this appliance
are as dened by our representative in the
country in which it is sold. Details regarding
these conditions can be obtained from the
dealer from whom the appliance was purchased. The bill of sale or receipt must be
produced when making any claim under the
terms of this guarantee.
Right of modication reserved.
19
Page 20
en
Simple troubleshooting
Problem Cause Remedy
Grinding unit does not grind
the beans.
No hot water dispensed. The milk frother (6) is soiled. Clean the milk frother (6),
Too little or no milk froth. The milk frother (6) is soiled. Clean the milk frother (6),
Beans are not falling into
the grinding unit (beans too
oily).
Milk unsuitable for frothing. Use milk with a fat content of
Gently tap the bean container (1). Change the type
of coffee if necessary.
When the bean container (1)
is empty, wipe it with a dry
cloth.
see “Maintenance and daily
cleaning”.
see “Maintenance and daily
cleaning”.
at least 1.5%.
The milk frother (6) is not
assembled correctly.
Build-up of limescale in the
appliance.
Coffee dispensing slows to a
trickle or stops completely.
Coffee has no “crema”. Unsuitable type of coffee. Use a type of coffee with a
Coffee is too “acidic”. The grind setting is too
If you are unable to solve the problem, please call the hotline.
You will nd the telephone numbers at the back of these instructions.
The grind setting is too ne
or the pre-ground coffee is
too ne.
Build-up of limescale in the
appliance.
The beans are no longer
fresh.
The grind setting is not
suitable for the beans.
coarse or the pre-ground
coffee is too coarse.
Unsuitable type of coffee. Use a darker roast.
Wet the milk frother parts
and press together rmly.
Descale the appliance using two descaling tablets,
if necessary repeat the
procedure.
Adjust the grinding unit to
a coarser setting or use
coarser pre-ground coffee.
Descale the appliance.
higher proportion of robusta
beans.
Use fresh beans.
Adjust the grind setting to
ne.
Adjust the grinding unit to
a ner setting or use ner
pre-ground coffee.
20
Page 21

Simple troubleshooting
Problem Cause Remedy
Coffee is too “bitter”. The grind setting is too ne
or the pre-ground coffee is
too ne.
Unsuitable type of coffee. Change the type of coffee.
The water lter does not
stay in position in the water
tank (16).
The coffee grounds are not
compact and are too wet.
D lights up
LED
I ashes.
LED
Coffee or milk froth quality
varies widely.
Water dripped onto the inner oor of the appliance
when the drip tray (8) was
removed.
I lights up.
LED
If you are unable to solve the problem, please call the hotline.
You will nd the telephone numbers at the back of these instructions.
The water lter is not tted
correctly.
The grind setting is too ne
or too coarse, or not enough
ground coffee has been
used.
Water tank has been
incorrectly inserted or the
new water lter has not
been rinsed according to
instructions.
Brewing unit (5) is soiled. Clean the brewing unit (5).
Too much pre-ground coffee
in the brewing unit (5).
The brewing unit
mechanism is stiff.
Build-up of limescale in the
appliance.
Drip tray (8) removed too
soon.
Brewing unit (5) is missing
or has not been detected.
Adjust the grinding unit to
a coarser setting or use
coarser pre-ground coffee.
Firmly press the water lter
straight down into the tank
connection.
Adjust the grinding unit to
a coarser or ner setting,
or use 2 level measuring
spoons of ground coffee.
Insert the water tank
correctly or rinse the water
lter according to instructions and then switch on.
Clean the brewing unit (5)
(Put in no more than 2 level
measuring spoons of ground
coffee).
Remove and clean the
brewing unit, see “Mainte-
nance and daily cleaning”.
Descale the appliance with
two descaling tablets as described in the instructions.
Wait a few seconds after
the last drink was dispensed
before removing the drip
tray (8).
Switch off the appliance
with the brewing unit (5) in
place, wait three seconds
and switch on the appliance
again.
en
21
Page 22
en
Simple troubleshooting
Problem Cause Remedy
The default settings have
been changed and need to
be reset.
LEDs
ash.
Some settings have been
made that are no longer
required.
The appliance has a fault. Please contact the hotline.
Press the power on/off button O / I (9) to switch off the
appliance. Press and hold
the service button (12) and
the steam button (11) and
press the power on/off button O / I (9) to switch on the
appliance. Then press the
start button (10) to conrm.
The default settings are
reset.
LEDs
LEDs
If you are unable to solve the problem, please call the hotline.
You will nd the telephone numbers at the back of these instructions.
ash.
ash.
Incorrect voltage. Operate the appliance at
220 V-240 V only.
The ambient temperature is
too cold.
Operate the appliance at
temperatures > 5° C.
Technical specications
Electrical connection (voltage/frequency) 220-240 V / 50-60 Hz
Heating output 1600 W
Maximum pump pressure, static 15 bar
Maximum water tank capacity (without lter) 1.7 l
Maximum bean container capacity 300 g
Cable length 100 cm
Dimensions (H x B x D) 385 x 280 x 479 mm
Weight, unlled 9.3 kg
Type of grinding unit Ceramic
22
Page 23

fr
Table des matières
Contenu de la livraison .............................24
Présentation .............................................24
Eléments de commande ...........................25
− Interrupteur électrique O / I ....................25
− Bouton Service
− Bouton Vapeur B ..................................25
− Bouton Start (Démarrage)
− Afchage par LED .................................25
− Bouton rotatif « Intensité du café » .......26
− Bouton rotatif « Sélection de boisson » 26
− Mousseur de lait ....................................26
Avant la première utilisation .....................26
Filtre eau...................................................27
Réglages ..................................................28
− Dureté de l’eau ......................................28
− Arrêt automatique..................................29
− Régler la température de percolation ....29
− Régler la nesse de la mouture ............30
Préparation avec du café en grains ..........30
Préparation avec du café moulu ...............31
Préparer de l’eau chaude .........................31
Préparer de la mousse
de lait ........................................................31
Entretien et nettoyage quotidiens .............32
− Nettoyer le mousseur de lait .................33
− Nettoyer l’unité de percolation...............34
Conseils pour économiser l’énergie .........35
Programme de Service .............................35
Protection contre le gel .............................36
Accessoires ..............................................37
Mise au rebut ............................................37
Garantie ....................................................37
Eliminer soi-même les problèmes simples .. 38
Caractéristiques techniques .....................40
A .................................25
C ................25
Chère amatrice de café,
cher amateur de café.
Nous vous félicitons pour l’achat de cette
machine à espresso automatique de
marque Siemens.
Consignes de sécurité
Lire attentivement le mode d’emploi, se
conformer à ses indications et le conserver à portée de la main ! Si vous remettez
l’appareil à un tiers, veuillez-y joindre les
notices.
Cette machine Espresso tout automatique est conçue pour la préparation de
quantités usuelles, dans le cadre d’un
foyer ou d’un usage non-commercial
de type domestique. Citons par ex. les
cuisines du personnel dans les commerces, bureaux, exploitations agricoles
et établissements artisanaux ainsi que
les clients de pensions, petits hôtels et
toute autre résidence de type similaire.
! Risque de choc électrique !
Pour le raccordement et l’utilisation de la
machine, respecter impérativement les indications gurant sur la plaque signalétique.
N’utiliser la machine que si le cordon électrique et la machine ne présentent aucun
dommage.
N’utiliser la machine qu’à l’intérieur de locaux, à température ambiante.
Ne pas coner l’appareil à des enfants ou à
des personnes aux capacités sensorielles
ou intellectuelles diminuées ou ne disposant
pas d’une expérience ou d’une connaissance sufsante, sauf si elles le font sous
surveillance ou si elles ont bénécié préalablement d’une information à propos de la
manipulation de l’appareil de la part de la
personne responsable de leur sécurité.
Bien surveiller les enfants an de les empêcher de jouer avec l’appareil.
23
Page 24

fr
En cas de défaut, débrancher immédiatement le cordon électrique. Les réparations
sur la machine, par ex. le remplacement du
cordon électrique, doivent être effectuées
uniquement par notre Service après-vente
an d’éliminer tous les risques. Ne jamais
plonger la machine ou le cordon électrique
dans l’eau.
Ne pas glisser les doigts à l’intérieur du
moulin.
Utiliser la machine uniquement dans des
locaux à l’abri du gel.
Risque de brûlure !
¡
L’embout (6c) du mousseur de lait devient
brûlant. Après utilisation, bien laisser refroidir la buse avant de la saisir.
N’utilisez la machine que lorsque le mousseur de lait (6) est entièrement monté et
installé.
Risque d’étouffement !
¡
Ne pas laisser les enfants jouer avec les
emballages.
Contenu de la livraison
(voir l’illustration gurant au début du
présent Mode d’emploi)
1 Machine à espresso automatique
TES501
2 Mode d’emploi
3 Bandelette de dureté de l’eau
4 Cuillère-dose
5 Graisse (tube)
Présentation
(voir les illustrations de vue d’ensemble
A, B, C, D et E au début de la notice)
1 Réservoir à grains
2 Couvercle d’arôme
3 Sélecteur de nesse de mouture
4 Tiroir à café
(café en poudre / pastille de nettoyage)
5 Unité de percolation (gure E)
a) Unité de percolation
b) Volet
c) Bouton poussoir
d) Verrou
6 Mousseur de lait amovible (gure C)
a) Soupape à vapeur
b) Douille métallique
c) Tube
d) Cœur
e) Trou d’aération
7 Bec verseur du café
(réglable en hauteur)
8 Bac collecteur (gure D)
a) Cache
b) Réservoir à marc de café
c) Bac collecteur bec verseur du café
d) Egouttoir bec verseur du café
e) Flotteur
9 Interrupteur électrique O / I
10 Bouton Start (Démarrage) C
11 Bouton Vapeur B
12 Bouton Service A
13 Bouton rotatif « Intensité du café »
14 Bouton rotatif « Sélection de boisson »
15 Afchage par LED
16 Réservoir d’eau amovible
17 Couvercle du réservoir d’eau
18 Cuillère-dose
(outil de mise en place du ltre à eau)
19 Case de rangement de la cuillère-dose
20 Cordon secteur avec logement
24
Page 25

fr
Eléments de commande
Interrupteur électrique O / I
L’interrupteur électrique O / I (9) sert à
mettre l’appareil sous tension ou hors tension (l’alimentation électrique est coupée).
Important : Avant la mise hors tension,
exécuter le programme de rinçage ou utiliser le bouton Service (12) pour la mise hors
tension.
Bouton Service A
Après une brève pression sur le bouton
Service (12), l’appareil effectue un rinçage
puis se met hors tension. Si le bouton Service (12) clignote, exécuter le programme
de Service. Une pression longue sur le
bouton Service (12) lance le programme de
Service. Durant l’exécution du programme
de Service, le bouton Service (12) clignote ;
il s’éteint lorsque le programme est terminé.
Bouton Vapeur B
Une pression sur le bouton Vapeur (11) déclenche la production de vapeur nécessaire
à la préparation de mousse de lait.
Afchage par LED
La signication de l’allumage et du clignotement des LED est la suivante :
D est allumée Le réservoir d’eau est vide
et doit être rempli.
D clignote Le ltre à eau est usé et
doit être remplacé.
E est allumée Le réservoir à grains est
vide et doit être rempli.
F est allumée La soupape à vapeur doit
être ouverte ou fermée.
F clignote Selon le réglage, de la
vapeur ou de l’eau chaude
sort du mousseur de lait.
G est allumée Si G est sélectionnée
avec le bouton rotatif « Intensité du café », le symbole est allumé pendant
toute la durée de préparation de café en poudre.
Bouton Start (Démarrage) C
Une pression sur le bouton Démarrage (10)
déclenche la préparation de la boisson. Une
nouvelle pression durant la préparation de
la boisson permet d’arrêter l’écoulement
avant terme.
H est allumée Le bac collecteur est ab-
sent ou mal mis en place ;
le mettre en place.
H clignote Les bacs sont pleins ; vider
les bacs et les remettre en
place.
I est allumée Le volet de l’unité de per-
colation est ouvert ; fermer
le volet.
I clignote Retirer et nettoyer l’unité
de percolation.
25
Page 26
fr
Bouton rotatif « Intensité du café »
Ce bouton rotatif (13) permet
de régler l’intensité du café
ou de sélectionner le café en
poudre.
h
à
g
G
Bouton rotatif « Sélection de boisson »
a
à
c
b
à
d
Mousseur de lait
Le mousseur de lait (6) peut être ouvert et
fermé en le tirant et en l’enfonçant.
Très doux
Doux
Normal
Corsé
Café en poudre
Ce bouton rotatif (14) sert à
sélectionner la boisson souhaitée et la quantité. Il permet également de modier
les réglages de l’utilisateur.
Petit espresso
Espresso
Petit café crème
Café crème
Grand café crème
2 petits espressos
2 espressos
2 petits cafés crème
2 cafés crème
2 grands cafés crème
Avant la première
utilisation
Généralités
Utiliser exclusivement de l’eau pure, froide,
sans gaz carbonique et, de préférence, un
mélange de café en grains pour espresso
ou percolateur et remplir les conteneurs
correspondants. Ne pas employer des
grains de café avec glaçage, des grains
caramélisés ou enrobés d’une substance
sucrée quelconque ; ils obturent l’unité de
percolation.
Il est possible, sur cet appareil, de régler la
dureté de l’eau. En usine, la dureté de l’eau
est réglée sur 4. Tester la dureté de l’eau
utilisée à l’aide de la bandelette jointe. Si le
résultat du test est différent de 4, programmer l’appareil en conséquence après la
mise en service (voir « Dureté de l’eau » au
chapitre « Réglages », page 28).
Mise en service de la machine
1. Retirer le lm de protection existant.
2. Placer la machine à espresso automatique sur un plan horizontal, sufsamment solide pour supporter son poids et
résistant à l’eau. Les fentes d’aération
de l’appareil doivent être dégagées.
Important : Utiliser l’appareil uniquement
dans des locaux hors gel. Dans le cas où
l’appareil a été transporté ou entreposé à
des températures en dessous de 0 °C, attendre au moins 3 heures avant la mise en
service de l’appareil.
26
3. Tirer la che secteur hors du logement
(20) et la brancher. La longueur peut
être réglée en poussant ou en tirant.
Pour ce faire, placer le dos de l’appareil
par ex. au bord d’une table et tirer le
cordon vers le bas ou le pousser vers
le haut.
Page 27
fr
4. Monter le mousseur de lait. N’utiliser
l’appareil que si le mousseur de lait (6)
est complètement assemblé et monté.
5. Remonter le couvercle du réservoir
d’eau (17).
6. Retirer le réservoir d’eau (16), le rincer
et le remplir avec de l’eau froide fraîche.
Ne pas dépasser le repère max.
7. Positionner le réservoir d’eau (16) bien
vertical et l’enfoncer entièrement.
8. Refermer le couvercle du réservoir
d’eau (17).
9. Remplir le réservoir à grains (1) avec
du café en grains (pour la préparation
avec du café en poudre, voir le chapitre
« Avant la première utilisation », page 26).
10. Mettre l’appareil sous tension avec l’interrupteur électrique O / I (9). La LED D
clignote et la LED F est allumée.
11. Placer un récipient sous le bec verseur
du mousseur de lait (6).
12. Tirer prudemment le mousseur de
lait (6) pour l’ouvrir. L’appareil rince le
mousseur de lait (6) avec de l’eau. La
LED F clignote.
13. Lorsque la LED F s’allume, enfoncer le
mousseur de lait (6) pour le fermer.
L’appareil chauffe et effectue un rinçage.
De l’eau s’écoule du bec verseur du café.
Lorsque les boutons A (12), B (11) et
C (10) sont allumés, l’appareil est prêt à
fonctionner.
Mise hors tension de l’appareil
Si l’appareil est resté inutilisé pendant une
heure, il se rince automatiquement puis
se met hors tension (la durée est réglable,
voir « Arrêt automatique » au chapitre
« Réglages », page 28).
Exception : Si l’appareil n’a été utilisé que
pour préparer de l’eau chaude ou de la
vapeur, il se met hors tension sans rinçage.
Pour mettre l’appareil hors tension manuellement avant l’écoulement de la durée, appuyer sur le Bouton Service (12). L’appareil
effectue un rinçage et se met hors tension.
Remarque : Lors de la première utilisation,
après l’exécution du programme de Service
ou si l’appareil n’a pas fonctionné pendant
un certain temps, l’arôme de la première
boisson n’est pas complètement développé ; ne pas boire la première boisson.
Après la mise en service de la machine à
espresso automatique, plusieurs tasses
doivent avoir été préparées avant d’avoir
une « crème » ne et consistante.
La formation de gouttes d’eau aux fentes
d’aération est normale en cas d’utilisation
prolongée.
Filtre eau
Un ltre à eau peut diminuer l’entartrage.
Un ltre à eau neuf doit être rincé avant de
pouvoir être utilisé. Procéder comme suit :
1. Enfoncer fermement le ltre à eau dans
le réservoir d’eau vide à l’aide de la
cuillère-dose (18).
2. Remplir le réservoir d’eau (16) jusqu’au
repère max avec de l’eau.
3. Placer le bouton
rotatif (13) sur .
4. Enfoncer simultanément les boutons
B (11) et A (12) pendant au
moins 5 secondes. « arrêt » ou
« marche » s’allume.
5. Régler « marche » en appuyant sur le
bouton Démarrage (10).
27
Page 28
fr
6. Maintenir le bouton Démarrage (10)
enfoncé pendant au moins
5 secondes pour conrmer ; toutes les
LED s’allument brièvement.
7. La LED D clignote et la LED F s’allume.
8. Placer un récipient d’une capacité de
0,5 litre sous le bec verseur du mousseur de lait (6).
9. Ouvrir le mousseur de lait (6) en le tirant. La LED F clignote.
10. L’eau coule à travers le ltre et le rince.
11. Lorsque la LED F est allumée, fermer
le mousseur de lait (6) en l’enfonçant.
12. Vider le réservoir.
L’appareil est de nouveau prêt à
fonctionner.
Information : Le rinçage du ltre a, par
la même occasion, activé le réglage pour
le signalement Changer ltre (= la LED D
clignote).
Après le signalement Changer ltre ou au
plus tard au bout de deux mois, le ltre
n’est plus efcace. Il faut alors le remplacer pour des raisons d’hygiène et an que
l’appareil ne s’entartre pas (cela pourrait
l’endommager). Les ltres de rechange sont
disponibles dans le commerce (TZ70003)
ou auprès du Service Clientèle (467873). Si
un ltre neuf n’est pas mis en place, modier le réglage pour le ltre comme indiqué
au chapitre « Dureté de l’eau ».
Information : L’indicateur du ltre permet
de repérer le mois auquel le ltre a été
mis en place. Il est également possible de
repérer le mois auquel le ltre devra être
remplacé la prochaine fois (au bout de deux
moins au plus tard).
Information : Si l’appareil n’a pas été utilisé pendant un certain temps (par ex. durant
les vacances), il est recommandé de rincer
le ltre avant l’emploi. Pour ce faire, préparer une tasse d’eau chaude et la jeter.
Réglages
Les réglages peuvent être personnalisés.
Les réglages possibles sont les suivants :
Dureté de l’eau
Il est possible, sur cet appareil, de régler
la dureté de l’eau. Le réglage correct de la
dureté de l’eau est important car il permet à
l’appareil d’indiquer le moment où un détartrage est nécessaire. En usine, la dureté
de l’eau est réglée sur 4. La dureté de l’eau
peut être déterminée à l’aide de la bandelette fournie ou être demandée au Service
des Eaux local.
Plonger brièvement la bandelette dans
l’eau, la secouer légèrement et attendre
une minute pour lire le résultat.
28
Niveau Dureté de l’eau
Allemagne (°dH) France (°fH)
1
2
3
4
1-7
8-14
15-21
22-30
1-13
14-25
26-38
39-54
Page 29
fr
Pour entrer une autre dureté de l’eau que
celle qui est préréglée ou si un ltre à eau
est utilisé, procéder comme suit :
1. Placer le bouton
rotatif (13) sur .
2. Enfoncer simultanément les boutons
B (11) et A (12) pendant au moins
5 secondes. Le nombre de LED alors
allumées symbolise la dureté de l’eau
réglée.
3. Appuyer successivement sur le bouton
Démarrage (10) jusqu’à ce que la dureté
de l’eau souhaitée soit indiquée ; pour
une dureté de l’eau de par ex. 3, les
LED D, E et F s’allument.
4. Enfoncer le bouton Démarrage (10)
pendant au moins 5 secondes. Les LED
réglées clignotent, la dureté de l’eau
sélectionnée est enregistrée.
Important : En cas d’utilisation du ltre à
eau (accessoire spécial N° de commande
467873), procéder comme suit, voir point
« Filtre eau », page 27.
Remarque : Si aucun bouton n’est actionné
dans les 90 secondes, l’appareil se met en
veille sans effectuer d’enregistrement. La
dureté de l’eau précédemment enregistrée
est conservée.
Arrêt automatique
La durée au bout de laquelle l’appareil se
met automatiquement hors tension après
la dernière préparation d’une boisson peut
être réglée ici. Le réglage possible est de
15 minutes à 4 heures. La durée réglée par
défaut est d’une heure ; elle peut être diminuée an de faire des économies d’énergie.
1. Placer le bouton
rotatif (13) sur .
2. Enfoncer simultanément les boutons
B (11) et A (12) pendant au moins
5 secondes. Le nombre de LED alors
allumées symbolise la durée réglée
avant l’arrêt.
3. Appuyer successivement sur le bouton
Démarrage (10) jusqu’à ce que la durée
souhaitée s’afche :
D = 15 minutes
D et E = 30 minutes
D, E et F = 45 minutes
D, E, F et G = 1 heure
D, E, F, G et H = 2 heures
D, E, F, G, H et I = 4 heures
4. Enfoncer le bouton Démarrage (10)
pendant au moins 5 secondes. Les LED
réglées clignotent, la durée avant l’arrêt
sélectionnée est enregistrée.
Remarque : Si aucun bouton n’est actionné
dans les 90 secondes, l’appareil se met en
veille sans effectuer d’enregistrement. La
durée avant l’arrêt précédemment réglée
est conservée.
Régler la température de percolation
La température de percolation peut elle
aussi être réglée.
1. Placer le bouton
rotatif (13) sur .
2. Enfoncer simultanément les boutons
B (11) et A (12) pendant au moins
5 secondes. Le nombre de LED alors
allumées symbolise la durée de percolation réglée.
3. Appuyer successivement sur le bouton
Démarrage (10) jusqu’à ce que la température souhaitée s’afche :
LED D = basse
LED D et E = moyenne
LED D, E et F = élevée
4. Enfoncer le bouton Démarrage (10)
pendant au moins 5 secondes. Les LED
réglées clignotent, la température sélectionnée est enregistrée.
29
Page 30
fr
Remarque : Si aucun bouton n’est actionné
dans les 90 secondes, l’appareil se met en
veille sans effectuer d’enregistrement. La
température de percolation précédemment
enregistrée est conservée.
Régler la nesse de la mouture
Le sélecteur de réglage (3) de la mouture
permet de régler la nesse du café en
poudre.
Attention !
¡
Ne modier le réglage que lorsque le
broyeur fonctionne ! Sinon, l’appareil peut
être endommagé. Ne pas glisser les doigts
à l’intérieur du broyeur.
● Lorsque le broyeur est en marche, régler
le sélecteur (3) entre une mouture ne
(a : rotation dans les sens inverse des
aiguilles d’une montre) et une mouture
grossière (b : rotation dans le sens des
aiguilles d’une montre).
a b
Information : Le nouveau réglage n’est
perceptible qu’à partir de la seconde tasse
de café.
Conseil pratique : Pour les grains torréés
de couleur foncée, choisir une mouture plus
ne, pour les grains torréés de couleur
claire, régler une mouture plus grossière.
Préparation avec du café
en grains
Cette machine à espresso automatique
mout du café frais pour chaque préparation.
Conseil pratique : Utiliser de préférence
un mélange de café en grains pour espresso ou percolateur. Pour assurer aux grains
une qualité optimale, les conserver au frais
dans un récipient fermé ou les congeler.
Les grains de café congelés peuvent être
moulus.
Important : Remplir le réservoir (16) d’eau
fraîche tous les jours. Il doit toujours y avoir
sufsamment d’eau dans le réservoir (16)
pour l’utilisation de l’appareil.
Différents cafés peuvent être préparés en
appuyant simplement sur un bouton.
Préparation
L’appareil doit être prêt à fonctionner.
1. Placer une(des) tasse(s) préchauffée(s)
sous le bec verseur du café (7).
Conseil pratique : Pour un petit espresso, préchauffer toujours la tasse,
par ex. avec de l’eau chaude.
2. Sélectionner le café souhaité et la quantité désirée en tournant le bouton supérieur (14).
3. Sélectionner l’intensité souhaitée du
café en tournant le bouton inférieur (13).
4. Appuyer sur le bouton Démarrage (10).
Le café se fait et s’écoule ensuite dans la/
les tasse(s).
La percolation peut être arrêtée avant terme
en appuyant une nouvelle fois sur le bouton
Démarrage (10).
30
Page 31

fr
Préparation avec du café
moulu
Cet appareil peut également fonctionner
avec du café moulu (pas avec du café
soluble).
Important : Remplir le réservoir (16) d’eau
fraîche tous les jours. Il doit toujours y avoir
sufsamment d’eau dans le réservoir (16)
pour l’utilisation de l’appareil.
Préparation
1. Ouvrir le tiroir à café (4).
2. Verser au maximum 2 cuillères-doses
rases dans le tiroir.
Attention : Ne pas verser de café non
moulu ou de café soluble.
3. Fermer le tiroir à café (4).
4. Régler le bouton rotatif inférieur (13) sur
le symbole
5. Appuyer sur le bouton Démarrage (10).
Le café se fait et s’écoule ensuite dans la
tasse.
G.
Préparer de l’eau chaude
Risque de brûlure !
¡
Le mousseur de lait (6) devient très brûlant.
Ne saisir le mousseur de lait (6) que par la
partie en plastique.
L’appareil doit être prêt à fonctionner.
1. Placer une tasse préchauffée ou un
verre sous le bec verseur du mousseur
de lait (6).
2. Ouvrir le mousseur de lait (6) en le tirant. L’appareil chauffe. De l’eau chaude
s’écoule pendant env. 40 secondes du
bec verseur du mousseur de lait (6).
3. Pour arrêter l’opération, enfoncer le
mousseur de lait (6).
Préparer de la mousse
de lait
Risque de brûlure !
¡
Le mousseur de lait (6) devient très brûlant.
Ne saisir le mousseur de lait (6) que par la
partie en plastique.
Conseil pratique : Mousser d’abord le lait
puis préparer le café ou mousser le lait
séparément et le verser sur le café.
L’appareil doit être prêt à fonctionner.
1. Appuyer sur le bouton B (11).
Le bouton B clignote, l’appareil chauffe
pendant env. 20 secondes.
2. Lorsque le bouton et la LED F s’allume,
plonger le mousseur de lait jusqu’au
fond d’une tasse ou d’un verre rempli à
un tiers de lait.
3. Ouvrir le mousseur de lait (6) en le tirant.
Risque de brûlure !
¡
La vapeur qui s’échappe est brûlante et
peut provoquer des éclats de liquide. Ne
pas toucher la douille et ne pas la diriger
sur des personnes.
4. Mousser le lait.
5. Fermer le mousseur de lait (6) en
l’enfonçant.
Conseil pratique : Pour réaliser une
mousse de lait optimale, employer de préférence du lait froid avec une teneur en matières grasses d’au moins 1,5 %.
Important : Les restes de lait séchés
sont difciles à éliminer. Par conséquent,
nettoyer impérativement le mousseur de
lait (6) après chaque utilisation à l’aide
d’eau tiède.
31
Page 32

fr
Entretien et nettoyage
quotidiens
Risque de choc électrique !
¡
Avant tout nettoyage, débrancher la che
électrique.
Ne jamais plonger l’appareil dans l’eau.
Ne pas utiliser de nettoyeur à vapeur.
● Essuyer l’habillage de l’appareil avec un
chiffon doux et humide.
● Ne pas utiliser de chiffons ou de produits
nettoyants abrasifs.
● Toujours nettoyer immédiatement les
résidus de calcaire, de café, de lait ou de
solution détartrante. En effet, de la corrosion peut se former sous ces résidus.
● Retirer le bac collecteur (8c) avec le réservoir à marc de café (8b) vers l’avant.
Retirer le cache (8a) et l’égouttoir (8d).
Vider et nettoyer le bac collecteur et le
réservoir à marc de café.
● Retirer et nettoyer le tiroir à café (4).
● Les éléments suivants peuvent aller au
lave-vaisselle : bac collecteur (8c), réservoir à marc de café (8b), égouttoir (8d),
couvercle à arôme (2) et cuillère-dose (18).
● Essuyer l’intérieur de l’appareil (bacs de
réception et tiroir à café).
Important : Vider et nettoyer quotidiennement le bac collecteur (8c) et le réservoir à marc de café (8b) pour éviter les
moisissures.
Remarque : Si l’appareil est mis sous tension à froid avec l’interrupteur électrique
O / I (9) ou s’il se met hors tension automatiquement après la préparation de café, il se
rince automatiquement. Il se nettoie donc
de manière autonome.
Important : Si l’appareil reste inutilisé pendant une durée prolongée (par ex. durant
les vacances), nettoyer soigneusement
l’ensemble de l’appareil, y compris le mousseur de lait et l’unité de percolation.
● Démonter le otteur (8e) et le nettoyer
avec un chiffon humide.
● Ne pas mettre les éléments suivants au
lave-vaisselle : cache (8a), otteur (8e),
tiroir à café (4), l’unité de percolation (5a).
32
Page 33

fr
Nettoyer le mousseur de lait
Il est recommandé de nettoyer le mousseur
de lait (6) après chaque utilisation pour
éliminer les résidus.
Important : Attendre que le mousseur de
lait se soit refroidi avant de le retirer.
Pour nettoyer le mousseur de lait, il faut le
démonter :
1. Pour le retirer, saisir la douille métallique
et la retirer vers le bas.
2. Tourner le cœur (6d) dans le sens inverse des aiguilles d’une montre et le
retirer.
1
6d
6e
5. Rincer toutes les pièces à l’eau claire et
les sécher.
6. Assembler le cœur (6d) et le tube
(6c)
dans la douille métallique.
6d6c
1 2
7. Tourner le cœur dans le sens des aiguilles d’une montre jusqu’à ce que les
repères soient côte à côte.
8. Placer le mousseur de lait sur la soupape à vapeur. Le repère rouge sur la
soupape doit être recouvert.
2
Retirer le tube (6c).
3.
6c
4. Nettoyer les pièces à l’aide d’un détersif
et d’une brosse douce. Si nécessaire,
les plonger dans du détersif tiède. Nettoyer soigneusement le trou d’aération
(6e).
33
Page 34

fr
Risque de brûlure !
¡
N’utiliser l’appareil que si le mousseur
de lait (6) est complètement assemblé et
monté.
Nettoyer l’unité de percolation
Nettoyer régulièrement l’unité de
percolation !
Pré-nettoyage automatique de l’unité de
percolation :
Appuyer brièvement sur le bouton Service
(12). L’appareil effectue un rinçage si un
café a été préparé auparavant. Il se met
ensuite hors tension.
En plus du programme de nettoyage automatique, il est recommandé de retirer
régulièrement l’unité de percolation (5a)
pour le nettoyage (gure E au début du
document).
1. Mettre l’appareil hors tension avec l’interrupteur électrique O / I (9). Tous les
boutons sont éteints.
2. Ouvrir le volet (5b) de l’unité de
percolation.
3. Faire glisser entièrement vers la gauche
le verrou rouge (5d) de l’unité de
percolation.
4. Appuyer sur le bouton poussoir rouge
(5c), saisir l’unité de percolation et le
retirer.
5. Nettoyer soigneusement l’unité de percolation (5a) à l’eau courante.
6. Placer le tamis de l’unité de percolation
sous le jet d’eau.
Important : Ne pas utiliser de détersif ou
autre produit pour le nettoyage et ne pas
mettre au lave-vaisselle.
7. Nettoyer soigneusement l’intérieur de
l’appareil avec un chiffon humide, éliminer les éventuels restes de café.
8. Laisser sécher l’unité de percolation
(5a) et l’intérieur de l’appareil.
9. Replacer l’unité de percolation (5a)
jusqu’en butée.
10. Glisser le verrou rouge (5d) entièrement
vers la droite et refermer le volet (5b).
34
Page 35

fr
Remarque : Après le nettoyage appro-
fondi, il est recommandé de graisser
régulièrement les joints dans l’unité de
percolation en vue d’un entretien optimal.
A cet effet, appliquer sur tout le tour une
ne couche de graisse spéciale (N° de
commande 311368).
Conseils pour économiser
l’énergie
● La machine à espresso automatique se
met hors tension automatiquement après
une heure (réglage usine). Cette durée
d’une heure peut être raccourcie (voir
« Arrêt automatique » au chapitre « Réglages », page 28).
● Mettre l’appareil hors tension s’il n’est pas
utilisé. Pour ce faire, appuyer sur le bouton Service (12). L’appareil effectue un
rinçage et se met hors tension.
● Autant que possible ne jamais interrompre la production de café ou de
mousse de lait. Une interruption provoque
une consommation d’énergie supérieure
ainsi que le remplissage plus rapide du
bac collecteur.
● Détartrer régulièrement l’appareil pour
prévenir les dépôts de calcaire. Les dépôts de calcaire provoquent en effet une
consommation d’énergie plus élevée.
Programme de Service
Durée : env. 35 minutes
Le bouton Service (12) clignote à intervalles
réguliers, suivant l’utilisation.
L’appareil doit être nettoyé et détartré sans
délai avec le programme de Service. Si le
programme de Service n’est pas exécuté
sur instruction, l’appareil risque d’être
endommagé.
Attention !
¡
A chaque exécution du programme de
Service, utiliser le produit détartrant et le
produit nettoyant préconisés. Observer les
consignes de sécurité qui gurent sur l’emballage des produits.
N’interrompre en aucun cas le programme
de Service ! Ne pas boire les liquides !
Ne jamais utiliser de vinaigre, de produit
à base de vinaigre, d’acide citrique ou de
produit à base d’acide citrique !
Ne jamais verser de pastilles de détartrage
ou autres produits de détartrage dans le
tiroir à café (4) !
Des pastilles de détartrage et de nettoyage spéciales, parfaitement adaptées,
sont disponibles dans le commerce et
auprès du Service Clientèle.
N° de
commande
Pastilles de
nettoyage
Pastilles de
détartrage
Important : Si un ltre est présent dans
le réservoir d’eau (16), le retirer impérativement avant de lancer le programme de
Service.
Pour lancer le programme de Service, enfoncer le bouton Service (12) pendant au
moins 5 secondes.
Commerce Service
Clientèle
TZ60001 310575
TZ60002 310967
35
Page 36

fr
Information : Le bouton Service (12) cli-
gnote pendant l’exécution du programme.
La LED
L’appareil effectue deux rinçages.
La LED G s’allume.
La LED D s’allume.
Le programme de Service est maintenant
exécuté pendant env. 10 minutes.
LED h s’allume.
Le programme de Service est maintenant
exécuté pendant env. 12 minutes.
La LED D s’allume.
Le programme de Service est exécuté pendant env. 30 secondes et rince l’appareil.
H s’allume.
● Vider le bac collecteur (8) et le remettre
en place.
● Ouvrir le tiroir à café (4).
● Y placer une pastille de nettoyage
Siemens et fermer le tiroir (4).
● Appuyer sur le bouton Démarrage (10).
● Verser de l’eau tiède dans le réservoir
d’eau vide (16) jusqu’au repère 0,5l et
y dissoudre 2 pastilles de détartrage
Siemens.
● Appuyer sur le bouton Démarrage (10).
● Placer un récipient d’une capacité d’au
moins 0,5 litre sous le bec verseur du
mousseur de lait (6).
● Ouvrir le mousseur de lait (6) en le tirant.
● Rincer le réservoir d’eau (16) et le remplir
d’eau fraîche jusqu’au repère max.
● Appuyer sur le bouton Démarrage (10).
La LED
Si un ltre est utilisé, le remettre maintenant
en place.
L’appareil est nettoyé, détartré et de nouveau prêt à fonctionner.
Important : Essuyer l’appareil avec un
torchon doux et humide pour éliminer immédiatement les résidus du détartrant. En
effet, de la corrosion peut se former sous
ces résidus.
H s’allume.
● Vider le bac collecteur (8) et le remettre
en place.
Protection contre le gel
An d’éviter les problèmes dus au
¡
gel lors du transport et du stockage, vider entièrement l’appareil au
préalable.
Information : Pour cela, l’appareil doit être
prêt à fonctionner, le réservoir d’eau (16)
doit être rempli.
1. Placer un grand récipient sous le bec
verseur du mousseur de lait (6).
2. Appuyer sur le bouton Vapeur (11).
La LED h clignote, l’appareil chauffe
pendant env. 20 secondes.
3. Lorsque la LED h est allumée, ouvrir le
mousseur de lait (6) en le tirant et laisser la vapeur s’échapper pendant env.
15 secondes.
4. Mettre l’appareil hors tension avec l’interrupteur électrique O / I (9).
5. Vider le réservoir d’eau (16) et le bac
collecteur (8).
La LED h s’allume.
● Fermer le mousseur de lait (6) en
l’enfonçant.
Le programme de Service est maintenant
exécuté pendant env. 8 minutes.
36
Page 37

fr
Accessoires
Les accessoires suivants sont disponibles
dans le commerce ou auprès du Service
Clientèle :
N° de
commande
Pastilles de
nettoyage
Pastilles de
détartrage
Filtre eau TZ70003 467873
Graisse (tube) – 311368
Commerce Service
Clientèle
TZ60001 310575
TZ60002 310967
Mise au rebut
Eliminez l’emballage en respectant
l’environnement. Cet appareil est identié
selon la Directive européenne 2002/96/
CE relative aux déchets d’équipements
électriques et électroniques (DEEE). Cette
directive dénit les conditions de collecte
et de recyclage des anciens appareils
à l’intérieur de l’Union Européenne.
S’informer auprès du revendeur sur la
procédure actuelle de recyclage.
A
Garantie
Les conditions de garantie applicables
sont celles publiées par notre distributeur
dans le pays où a été effectué l’achat. Le
revendeur chez qui vous vous êtes procuré
l’appa reil fournira les modalités de garantie
sur simple demande de votre part. En cas
de recours en garantie, veuillez toujours
vous munir de la preuve d’achat.
Sous réserve de modications.
37
Page 38

fr
Eliminer soi-même les problèmes simples
Problème Cause Remède
Le broyeur ne moud
pas les grains.
Impossible de
produire de l’eau
chaude.
Trop peu ou pas de
mousse de lait.
Les grains ne tombent pas
dans le broyeur (grains trop
gras).
Le mousseur de lait (6) est
encrassé.
Le mousseur de lait (6) est
encrassé.
Lait non adapté. Utiliser du lait d’une teneur en ma-
Tapoter légèrement sur le réservoir à
grains (1). Changer éventuellement
de café.
Après avoir vidé le réservoir à grains
(1), l’essuyer avec un chiffon sec.
Nettoyer le mousseur de lait (6), voir
le chapitre « Entretien et nettoyage
quotidiens ».
Nettoyer le mousseur de lait (6), voir
le chapitre « Entretien et nettoyage
quotidiens ».
tières grasses d’au moins 1,5 %.
Le mousseur (6) n’est pas
correctement assemblé.
La machine est entartrée.
Le café ne passe
que goutte à goutte
ou ne passe plus du
tout.
Le café ne présente
pas de « crème ».
Le café est trop
« acide ».
S’il n’est pas possible de résoudre les problèmes, appeler impérativement le
Service Clientèle ! Les numéros de téléphone se trouvent aux dernières pages
de la notice.
La mouture est trop ne ou
bien le café en poudre est
trop n.
L’appareil est fortement
entartré.
Le café ne convient pas. Utiliser un café contenant plus de
Les grains ne sont pas
fraîchement torréés.
La mouture n’est pas adaptée aux grains de café.
La mouture n’est pas assez ne ou bien le café en
poudre n’est pas assez n.
Le café ne convient pas. Utiliser un café de torréfaction plus
Humecter les parties du mousseur de
lait et les comprimer fortement.
Détartrer l’appareil avec 2
détartrage, si nécessaire exécuter le
programme 2 fois.
Régler une mouture moins ne ou
utiliser un café en poudre moins n.
Détartrer l’appareil.
robusta.
Utiliser des grains fraîchement
torréés.
Régler une mouture ne.
Régler une mouture plus ne ou
utiliser un café en poudre plus n.
foncée.
tablettes de
38
Page 39

Eliminer soi-même les problèmes simples
Problème Cause Remède
Le café est trop « amer ». La mouture est trop ne ou
le café en poudre est trop
n.
Le café ne convient pas. Changer de café.
Le ltre à eau ne tient pas
dans le réservoir d’eau
(16).
Le marc de café n’est pas
compact et trop mouillé.
La LED
Forte uctuation de la
qualité du café ou de la
mousse de lait.
Gouttes d’eau à l’intérieur
de l’appareil avec le bac
collecteur (8) retiré.
La LED
S’il n’est pas possible de résoudre les problèmes, appeler impérativement le
Service Clientèle ! Les numéros de téléphone se trouvent aux dernières pages
de la notice.
I clignote.
I est allumée.
Le ltre à eau n’est pas xé
correctement.
La mouture est trop ne ou
trop grossière ou la quantité de café en poudre est
insufsante.
L’unité de percolation (5)
encrassé.
Trop de café en poudre dans
l’unité de percolation (5).
Dureté mécanique du unité
de percolation.
L’appareil est entartré. Détartrer l’appareil à l’aide de
Bac collecteur (8) retiré trop
tôt.
L’unité de percolation (5)
est absent ou n’a pas été
détecté.
Régler une mouture moins ne
ou utiliser un café en poudre
moins n.
Enfoncer le ltre à eau fermement et droit dans le raccord
du réservoir.
Régler une mouture plus grossière ou plus ne ou utiliser
2 cuillères-doses rases de
café en poudre.
Nettoyer l’unité de percolation
(5).
Nettoyer l’unité de percolation
(5) (mettre au maximum 2
cuillères-doses rases de café
en poudre).
Retirer et nettoyer l’unité de
percolation (voir le chapitre
« Entretien et nettoyage
quotidiens »).
deux tablettes de détartrage
en suivant les instructions.
Attendre quelques secondes
avant de retirer le bac collecteur (8) après la préparation de
la dernière boisson.
L’unité de percolation (5) étant
en place, mettre l’appareil hors
tension, attendre trois secondes puis le remettre sous
tension.
fr
39
Page 40

fr
Eliminer soi-même les problèmes simples
Problème Cause Remède
Les réglages usine ont été
modiés et doivent être
rétablis (« Reset »).
Les LED
clignotent.
Des réglages personnels,
désormais non souhaités,
ont été effectués.
L’appareil présente un
défaut.
Mettre l’appareil hors tension
avec l’interrupteur électrique
O / I (9). Maintenir enfoncés
le bouton Service (12) et le
bouton Vapeur (11) et mettre
l’appareil sous tension avec
l’interrupteur électrique O / I (9).
Conrmer ensuite avec le
bouton Démarrage (10). Les
réglages usine sont rétablis.
Appeler la hotline.
Les LED
Les LED
S’il n’est pas possible de résoudre les problèmes, appeler impérativement le
Service Clientèle ! Les numéros de téléphone se trouvent aux dernières pages
de la notice.
clignotent.
clignotent.
Mauvaise tension. Ne faire fonctionner l’appareil
que sur 220 V-240 V.
La température ambiante est
trop basse.
Utiliser l’appareil à une température > 5° C.
Caractéristiques techniques
Alimentation électrique (tension/fréquence) 220-240 V / 50-60 Hz
Puissance du chauffage 1600 W
Pression de pompage statique maximale 15 bars
Capacité maximale du réservoir d’eau (sans ltre) 1,7 l
Capacité maximale du réservoir à grains 300 g
Longueur du cordon d’alimentation 100 cm
Dimensions (H x L x P) 385 x 280 x 479 mm
Poids à vide 9,3 kg
Type de broyeur céramique
40
Page 41

it
Indice
Contenuto della confezione ......................42
Panoramica ..............................................42
Elementi di comando ................................43
− Interruttore di rete O / I ...........................43
− Tasto di servizio
− Tasto vapore B .....................................43
− Tasto avvio C.........................................43
− LED indicatori ........................................43
− Manopola “Intensità caffè” .....................44
− Manopola “Selezione bevande” ............44
− Inserto schiuma .....................................44
Al primo impiego .......................................44
Filtro acqua ...............................................45
Impostazioni .............................................46
− Durezza acqua ......................................46
− Spegnimento automatico ......................47
− Impostare la temperatura di bollitura.....47
− Impostare il grado di macinatura ...........48
Preparazione con chicchi di caffè .............48
Preparazione con caffè macinato .............49
Prelievo di acqua calda ............................49
Preparare la schiuma latte........................49
Cura e pulizia quotidiana ..........................50
− Pulire l’inserto schiuma .........................51
− Pulire l’unità di infusione .......................52
Suggerimenti per risparmiare energia ......53
Programmi di servizio ...............................53
Protezione dal gelo ...................................54
Accessori ..................................................54
Smaltimento..............................................54
Condizioni di garanzia ..............................55
Soluzione dei problemi più semplici .........56
Dati tecnici ................................................58
A ................................43
A tutti gli intenditori e amanti del caffè.
Congratulazioni per l’acquisto di questa macchina automatica per espresso
Siemens.
Istruzioni di sicurezza
Leggere con attenzione interamente,
osservare e conservare le istruzioni per
l’uso! Nel caso in cui cediate l’apparecchio a terzi, allegate anche le istruzioni
corrispondenti.
Questa macchina per espresso automatica è destinata alla produzione di quantità per l’uso domestico o ad usi simili a
quello domestico, quali cucine per piccoli studi, negozi, ufci, aziende agricole
o altro tipo di aziende artigianali, nonché
per l’utilizzo da parte di ospiti in pensioni,
piccoli alberghi e simili congurazioni
residenziali.
Pericolo di scarica elettrica!
¡
Nel collegamento e nell’uso dell’apparecchio rispettare i dati della targhetta di identicazione.
Usare solo se il cavo di alimentazione e
l’apparecchio non presentano danni.
Usare l’apparecchio solo in ambienti interni
a temperatura ambientale.
Non permettere l’uso dell’apparecchio ai
bambini o a soggetti con ridotte capacità
siche o psichiche o comunque non dotati
di sufciente esperienza e conoscenza, a
meno che non siano sorvegliati o non abbiano ricevuto istruzioni sull’uso dell’apparecchio da una persona che sia responsabile della loro sicurezza.
Tenere i bambini lontani dall’apparecchio.
Sorvegliare i bambini, per evitare che giochino con l’apparecchio.
In caso di guasto, estrarre immediatamente
la spina di alimentazione.
41
Page 42

it
Per evitare rischi, le riparazioni all’apparecchio, quali ad esempio la sostituzione di un
cavo di alimentazione danneggiato, devono
essere eseguite solo dal nostro servizio di
assistenza clienti.
Non immergere mai l’apparecchio o il cavo
di alimentazione in acqua.
Non toccare i dispositivi di macinazione.
Utilizzare l’apparecchio solo in ambienti
protetti dal gelo.
Pericolo di scottature!
¡
L’uscita (6c) dell’inserto schiuma diventa
molto caldo. Prima di toccarlo, dopo l’uso, è
necessario lasciarlo raffreddare.
Utilizzare l’apparecchio solo se l’inserto
schiuma (6) è completamente assemblato
e montato.
Pericolo di soffocamento!
¡
Non lasciare che i bambini giochino con il
materiale di imballaggio.
Contenuto della
confezione
(vedere la panoramica all’inizio delle
istruzioni per l’uso)
1 Macchina automatica per espresso
TE501
2 Istruzioni per l’uso
3 Striscia per la misurazione della durezza
dell’acqua
4 Dosatore per caffè in polvere
5 Grasso (tubetto)
Panoramica
(vedere le immagini esplicative A, B, C, D
ed E all’inizio delle istruzioni)
1 Contenitore chicchi
2 Coperchio salva-aroma
3 Selettore per l’impostazione del grado
di macinatura
4 Cassetto per caffè in polvere
(caffè in polvere / compressa
di detergente)
5 Unità di infusione (gura E)
a) Unità di infusione
b) Sportello
c) Pulsante a pressione
d) Blocco
6 Inserto schiuma (gura C) removibile
a) Valvola vapore
b) Tubo metallico
c) Tubo di servizio
d) Anima del tubo di servizio
e) Foro di aerazione
7 Uscita caffè regolabile in altezza
8 Vassoio di sgocciolamento (gura D)
a) Pannello raccogligocce
b) Recipiente per fondi di caffè
c) Vassoio di sgocciolamento
uscita caffè
d) Griglia di sgocciolamento uscita caffè
e) Galleggiante
9 Interruttore di rete O / I
10 Tasto avvio C
11 Tasto vapore B
12 Tasto di servizio A
13 Manopola “Intensità caffè”
14 Manopola “Selezione bevande”
15 LED indicatori
16 Serbatoio dell’acqua estraibile
17 Coperchio del serbatoio dell’acqua
18 Dosatore per caffè in polvere (guida di
inserimento per il ltro dell’acqua)
19 Vano di conservazione del dosatore per
caffè in polvere
20 Cavo di corrente con cassetto
42
Page 43

it
Elementi di comando
Interruttore di rete O / I
L’interruttore di rete O / I (9) permette di
accendere o spegnere completamente
l’apparecchio (l’alimentazione elettrica
viene interrotta).
Importante: Prima dello spegnimento,
eseguire il programma di lavaggio, oppure
spegnere tramite il tasto di servizio (12).
Tasto di servizio A
Premendo brevemente il tasto di servizio
(12) l’apparecchio esegue il lavaggio e si
spegne. Se il tasto di servizio (12) lampeggia, eseguire il programma di servizio.
Premendo a lungo il tasto di servizio (12)
si avvia il programma di servizio. Durante
l’esecuzione del programma di servizio il
tasto di servizio (12) lampeggia, e si spegne
al termine del programma.
Tasto vapore B
Premendo il tasto vapore (11) si genera il
vapore per la preparazione della schiuma
latte.
Tasto avvio C
Premendo il tasto avvio (10) si avvia la
preparazione della bevanda. Premendo
nuovamente il tasto durante la preparazione
di una bevanda, è possibile fermare in anticipo il prelievo della bevanda.
LED indicatori
L’illuminazione e il lampeggio dei LED
indicano:
D è illuminato Il serbatoio dell’acqua
è vuoto e deve essere
nuovamente riempito.
D lampeggia Il ltro dell’acqua è usurato
e deve essere sostituito.
E è illuminato Il contenitore dei chicchi di
caffè è vuoto e deve essere
nuovamente riempito.
F è illuminato La valvola vapore deve
essere aperta o chiusa.
F lampeggia A seconda
dell’impostazione
dall’inserto schiuma esce
vapore o acqua calda.
G è illuminato Selezionando G con la
manopola “Intensità caffè”,
il simbolo rimane illuminato
nché viene prelevato caffè
in polvere.
H è illuminato Il vassoio di
sgocciolamento è assente
o inserito in modo errato.
Inserire il vassoio di
sgocciolamento.
H lampeggia I vassoi sono pieni.
Svuotarli e reinserirli.
I è illuminato Lo sportello dell’unità
di infusione è aperto.
Chiudere lo sportello.
I lampeggia Rimuovere l’unità di
infusione e pulirla.
43
Page 44

it
Manopola “Intensità caffè”
La manopola (13) permette
di impostare l’intensità del
caffè o selezionare il caffè in
polvere.
h
a
g
G
Manopola “Selezione bevande”
a
a
c
b
a
d
Inserto schiuma
L’inserto schiuma (6a) può essere aperto e
chiuso mediante estrazione e inserimento.
Molto delicato
Delicato
Normale
Forte
Caffè in polvere
La manopola (14) permette
di selezionare la bevanda e
la quantità desiderate, nonché di modicare le impostazioni utente.
Espresso piccolo
Espresso
Café crème piccolo
Café crème
Café crème grande
2 espressi piccoli
2 espressi
2 café crème piccoli
2 café crème
2 café crème grandi
Al primo impiego
Istruzioni generali
Riempire i corrispondenti recipienti solo con
acqua pulita, fredda, non addizionata con
anidride carbonica e utilizzare preferibilmente miscele di caffè in chicchi per caffè
espresso o per macchine per espresso. Non
usare chicchi di caffè glassati, caramellati o
trattati con altri additivi contenenti zucchero,
in quanto otturano l’unità di infusione caffè.
Questo apparecchio consente di impostare
la durezza dell’acqua. Il valore predenito
per la durezza dell’acqua è 4. Vericare la
durezza dell’acqua impiegata con le strisce
di misurazione fornite in dotazione. Se la
prova dà un risultato diverso da 4, programmare adeguatamente l’apparecchio dopo la
messa in funzione (vedere “Durezza acqua”
nel capitolo “Impostazioni” a pagina 46).
Mettere in funzione l’apparecchio
1. Rimuovere la pellicola protettiva.
2. Posizionare la macchina automatica
per espresso su una supercie piana
e sufcientemente resistente all’acqua
in funzione del peso dell’apparecchio stesso. Le feritoie di ventilazione
dell’apparecchio devono rimanere
libere.
Importante: Usare l’apparecchio solo in
ambienti privi di gelo. Qualora l’apparecchio
venga trasportato o stoccato a temperature
inferiori a 0 °C, attendere almeno 3 ore
prima di metterlo in funzione.
44
3. Estrarre la spina di rete dal vano del cavo
(20) e collegarla. La lunghezza è regolabile
mediante reinserimento ed estrazione. Per
fare questo posizionare l’apparecchio con
il lato posteriore ad esempio sul bordo del
tavolo, quindi tirare il cavo verso il basso o
spingerlo verso l’alto.
Page 45

it
4. Montare l’inserto schiuma. Usare l’apparecchio solo se l’inserto schiuma (6) è
completamente assemblato e montato.
5. Sollevare il coperchio del serbatoio
dell’acqua (17).
6. Estrarre il serbatoio dell’acqua (16),
eseguire il risciacquo e riempire con
acqua fresca e pulita. Non superare il
contrassegno max.
7. Posizionare il serbatoio dell’acqua (16)
diritto e spingerlo completamente verso
il basso.
8. Richiudere il coperchio del serbatoio
dell’acqua (17).
9. Riempire di chicchi il contenitore dei chicchi di caffè (1) (Per la preparazione del
caffè macinato, vedere il capitolo “Preparazione con caffè macinato” a pagina 49).
10. Accendere l’apparecchio dall’interruttore
di rete O / I (9). Il LED D lampeggia e il
LED F è illuminato.
11. Posizionare il recipiente sotto l’uscita
dell’inserto schiuma (6).
12. Aprire l’inserto schiuma (6) estraendolo
delicatamente. L’apparecchio esegue un
lavaggio con acqua dell’inserto schiuma
(6). Il LED F lampeggia.
13. Se il LED F è illuminato, chiudere
l’inserto schiuma (6) inserendolo.
L’apparecchio inizia il riscaldamento e il
lavaggio. Dall’uscita caffè fuoriesce un po’
d’acqua. Se i tasti A (12), B (11) e C
(10) sono illuminati, l’apparecchio è pronto
per l’uso.
Spegnere l’apparecchio
Se non viene usato per un’ora, l’apparecchio esegue automaticamente il lavaggio e
si spegne (durata regolabile, vedere “Spegnimento automatico” nel capitolo “Impostazioni” a pagina 46).
Eccezione: Se viene prelevato solo vapore
o acqua calda, l’apparecchio si spegne
senza eseguire il lavaggio.
Per spegnere prima manualmente l’apparecchio, premere il tasto di servizio (12). L’apparecchio esegue il lavaggio e si spegne.
Nota: Al primo uso, dopo l’esecuzione del
programma di servizio e dopo un lungo
periodo di inutilizzazione dell’apparecchio,
la prima bevanda non ha ancora un aroma
pieno e non andrebbe bevuta.
Dopo la messa in funzione della macchina
automatica per espresso si ottiene una
“crema” schiumosa e solida solo dopo aver
prelevato alcune tazze.
In caso di uso prolungato la formazione di
gocce d’acqua nelle feritoie di ventilazione
è normale.
Filtro acqua
Un ltro dell’acqua può ridurre la presenza
di depositi calcarei.
Prima di usare un ltro dell’acqua nuovo,
lavarlo. Procedere come segue:
1. Spingere il ltro acqua no in fondo al
serbatoio dell’acqua vuoto aiutandosi
con il dosatore per caffè in polvere (18).
2. Riempire il serbatoio dell’acqua (16) no
al contrassegno max.
3. Posizionare la
manopola (13) in posizione
4. Tenere premuti contemporaneamente
per almeno 5 secondi i tasti B (11) e
A (12). Si illuminerà “spento” o
“acceso”.
45
Page 46

it
5. Premere il tasto avvio (10) per impostare
“acceso”.
6. Per confermare tenere premuto il tasto
avvio (10) per almeno 5 secondi; tutti i
LED si illumineranno brevemente.
7. Il LED D lampeggia e il LED F si illumina.
8. Posizionare sotto l’uscita dell’inserto
schiuma (6) un recipiente da 0,5 litri.
9. Aprire l’inserto schiuma (6) estraendolo.
Il LED F lampeggia.
10. L’acqua scorre attraverso il ltro e ne
esegue il lavaggio.
11. Se il LED F è illuminato, chiudere
l’inserto schiuma (6) inserendolo.
12. Svuotare il recipiente.
L’apparecchio è nuovamente pronto per l’uso.
Informazione: Contemporaneamente al
risciacquo del ltro viene attivata l’impostazione di visualizzazione Cambio ltro (= il
LED D lampeggia).
Dopo la visualizzazione Cambio ltro o al
più tardi dopo due mesi il ltro non è più
efcace. Il ltro deve essere sostituito per
ragioni igieniche e afnché l’apparecchio
non presenti calcicazioni (l’apparecchio
può danneggiarsi). I ltri di ricambio sono
disponibili presso i rivenditori (TZ70003) o
presso il Centro di assistenza (467873). Se
non viene usato nessun ltro nuovo, modicare l’impostazione per il ltro secondo il
capitolo “Durezza acqua”.
Informazione: L’indicatore del ltro permette di contrassegnare il mese in cui il ltro è
stato inserito. Inoltre è possibile contrassegnare il mese della sostituzione successiva
del ltro (al massimo dopo due mesi).
Informazione: Se l’apparecchio resta inutilizzato per un periodo prolungato (ad esempio durante le vacanze), prima dell’uso si
dovrebbe eseguire il risciacquo del ltro
inserito. A tale scopo prelevare una tazza di
acqua calda e gettarla via.
Impostazioni
Le impostazioni possono essere personalizzate. Cosa è possibile impostare:
Durezza acqua
Questo apparecchio consente di impostare
la durezza dell’acqua. L’impostazione corretta della durezza dell’acqua è importante
afnché l’apparecchio possa indicare per
tempo quando è necessario eseguire la
decalcicazione. Il valore predenito per la
durezza dell’acqua è 4. La durezza dell’acqua si può testare mediante le apposite
strisce di prova fornite in dotazione, oppure
è possibile richiedere questa informazione
all’azienda locale fornitrice.
Immergere la striscia di prova brevemente
nell’acqua, scuotere leggermente e leggere
il risultato dopo un minuto.
46
Page 47

it
Livello Grado di durezza dell’acqua
Tedesco (°dH) Francese (°fH)
1
2
3
4
Se è stata impostata una durezza dell’acqua
diversa da quella predenita o se viene
usato un ltro dell’acqua, procedere come
segue:
1. Posizionare la
manopola (13) in posizione
2. Tenere premuti contemporaneamente per
almeno 5 secondi i tasti B (11) e A (12).
Il numero dei LED ora illuminati rappresenta la durezza impostata per l’acqua.
3. A questo punto premere il tasto avvio
(10) nché non si illumina la durezza
desiderata dell’acqua, ad esempio per
la durezza dell’acqua 3 sono illuminati i
LED D, E ed F.
4. Tenere premuto per almeno 5 secondi
il tasto avvio (10). I LED impostati lampeggiano; la durezza selezionata per
l’acqua è salvata.
Importante: Se si impiega il ltro dell’acqua
(accessorio speciale cod. ord. 467873),
procedere come segue, ved. capitolo “Filtro
acqua” a pagina 45.
Nota: Se non viene premuto nessun tasto per 90 secondi, l’apparecchio passa
alla disponibilità caffè senza eseguire il
salvataggio. Rimane impostata la durezza
dell’acqua salvata in precedenza.
Spegnimento automatico
Qui è possibile impostare il tempo che deve
trascorrere dopo la preparazione dell’ultima
bevanda prima che l’apparecchio si spenga
automaticamente. È possibile impostare
un intervallo di tempo da un minimo di
15 minuti no a 4 ore. Il tempo predenito
è di 1 ora, ma può anche essere ridotto per
risparmiare energia.
1-7
8-14
15-21
22-30
1-13
14-25
26-38
39-54
1. Posizionare la
manopola (13) in posizione
2. Tenere premuti contemporaneamente
per almeno 5 secondi i tasti B (11) e
A (12). Il numero dei LED ora illuminati
rappresenta il tempo impostato per lo
spegnimento.
3. Premere il tasto avvio (10) nché non
si illumina il tempo di spegnimento
desiderato:
D = 15 minuti
D ed E = 30 minuti
D, E ed F = 45 minuti
D, E, F e G = 1 ora
D, E, F, G e H = 2 ore
D, E, F, G, H e I = 4 ore
4. Tenere premuto per almeno 5 secondi
il tasto avvio (10). I LED impostati lampeggiano; il tempo di spegnimento selezionato è salvato.
Nota: Se non viene premuto nessun tasto
per 90 secondi, l’apparecchio passa alla
disponibilità caffè senza eseguire il salvataggio. Rimane impostato il tempo di spegnimento salvato in precedenza.
Impostare la temperatura di bollitura
È possibile impostare anche la temperatura
di bollitura.
1. Posizionare la
manopola (13) in posizione
2. Tenere premuti per almeno 5 secondi il
tasto B (11) e il tasto A (12). Il numero
dei LED ora illuminati rappresenta la
temperatura di bollitura impostata.
3. Premere il tasto avvio (10) nché non si
illumina la temperatura desiderata:
LED D = bassa
LED D ed E = media
LED D, E ed F = alta
47
Page 48

it
4. Tenere premuto per almeno 5 secondi
il tasto avvio (10). I LED impostati lampeggiano; la temperatura selezionata è
salvata.
Nota: Se non viene premuto nessun tasto
per 90 secondi, l’apparecchio passa alla
disponibilità caffè senza eseguire il salvataggio. Rimane impostata la temperatura di
bollitura salvata in precedenza.
Impostare il grado di macinatura
Con il selettore (3) per l’impostazione del
grado di macinatura è possibile impostare
la nezza del caffè in polvere.
Attenzione!
¡
Impostare il grado di macinatura solo con
dispositivo di macinatura funzionante! In
caso contrario l’apparecchio si danneggia.
Non inserire le dita nel macinacaffè!
● Mentre il macinacaffè è in funzione impostare il selettore (3) tra caffè in polvere
ne (a: rotazione in senso antiorario) e
caffè in polvere grosso (b: rotazione in
senso orario).
a b
Informazione: La nuova impostazione
risulta effettiva solo a partire dalla seconda
tazza di caffè.
Suggerimento: Per chicchi molto tostati
impostare un grado di macinatura più ne,
per chicchi più chiari impostare un grado di
macinatura più grosso.
Preparazione con chicchi
di caffè
La presente macchina automatica per
espresso macina caffè nuovo ad ogni processo di bollitura.
Suggerimento: Usare preferibilmente
miscele di chicchi per caffè espresso o per
macchine per espresso. Per una qualità
ottimale della bevanda, conservare i chicchi
in un ambiente chiuso e freddo o surgelarli.
I chicchi di caffè possono essere macinati
anche surgelati.
Importante: Riempire il serbatoio dell’acqua (16) con acqua fresca ogni giorno.
Il serbatoio dell’acqua (16) dovrebbe
sempre contenere una quantità di acqua
sufciente per garantire il funzionamento
dell’apparecchio.
Le diverse bevande a base di caffè possono essere preparate molto semplicemente
premendo un tasto.
Preparazione
L’apparecchio deve essere pronto per l’uso.
1. Posizionare la o le tazze preriscaldate
sotto l’uscita del caffè (7).
Suggerimento: Per un espresso piccolo, riscaldare sempre prima la tazza, ad
esempio con acqua calda.
2. Selezionare il caffè e la quantità desiderati ruotando la manopola superiore (14).
3. Per selezionare l’intensità desiderata del
caffè, ruotare la manopola inferiore (13).
4. Premere il tasto avvio (10).
Il caffè viene preparato e scende nella/e
tazza/e.
Premendo nuovamente il tasto avvio (10) è
possibile terminare in anticipo il processo di
bollitura.
48
Page 49

it
Preparazione con caffè
macinato
La presente macchina automatica funziona
anche con caffè macinato (ma non con
caffè solubile).
Importante: Riempire il serbatoio dell’acqua (16) con acqua fresca ogni giorno.
Il serbatoio dell’acqua (16) dovrebbe
sempre contenere una quantità di acqua
sufciente per garantire il funzionamento
dell’apparecchio.
Preparazione
1. Aprire il cassetto per il caffè in polvere (4).
2. Versare non più di 2 dosatori per caffè
in polvere pieni nel cassetto per il caffè
in polvere.
Attenzione! Non versare chicchi interi
né caffè solubile.
3. Chiudere il cassetto per il caffè in
polvere (4).
4. Impostare la manopola inferiore (13) sul
simbolo
5. Premere il tasto avvio (10).
Il caffè viene preparato e scende nella tazza.
G.
Prelievo di acqua calda
Pericolo di ustione!
¡
L’inserto schiuma (6) si riscalda molto. Afferrare l’inserto schiuma (6) solo dalla parte
in plastica.
Preparare la schiuma latte
Pericolo di ustione!
¡
L’inserto schiuma (6) si riscalda molto.
Afferrare l’inserto schiuma (6) solo dalla
parte in plastica.
Suggerimento: Eseguire prima la schiumatura del latte e poi prelevare il caffè oppure
schiumare il latte separatamente e aggiungerlo al caffè.
L’apparecchio deve essere pronto per l’uso.
1. Premere il tasto B (11).
Il tasto B lampeggia; l’apparecchio
riscalda ora per circa 20 secondi.
2. Appena il tasto e il LED F si illumina,
immergere l’inserto schiuma no in fondo
nella tazza o nel bicchiere, che devono
essere pieni di latte per un terzo.
3. Aprire l’inserto schiuma (6) estraendolo.
Pericolo di ustione!
¡
Il vapore che fuoriesce è molto caldo e può
produrre spruzzi di liquido. Non toccare il
tubo né dirigerlo verso altre persone.
4. Schiumare il latte.
5. Chiudere l’inserto schiuma (6)
inserendolo.
Suggerimento: Per ottenere una schiuma
latte ottimale, utilizzare preferibilmente latte
freddo con almeno un livello dell’ 1,5 % di
grassi.
L’apparecchio deve essere pronto per l’uso.
1. Posizionare la tazza preriscaldata o il
bicchiere sotto l’uscita dell’inserto schiuma (6).
2. Aprire l’inserto schiuma (6) estraendolo.
L’apparecchio inizia il riscaldamento.
Per circa 40 secondi dall’uscita dell’in-
serto schiuma (6) fuoriesce acqua
calda.
3. Interrompere il processo inserendo l’in-
serto schiuma (6).
Importante: I resti secchi di latte
sono difcili da rimuovere, per cui è
assolutamente necessario pulire sempre
l’inserto schiuma (6) con acqua tiepida
dopo ogni uso.
49
Page 50

it
Cura e pulizia quotidiana
Pericolo di scossa elettrica!
¡
Prima della pulizia staccare la spina.
Non immergere mai l’apparecchio in acqua.
Non pulire con il vapore.
● Pulire l’involucro con un panno morbido
e umido.
● Non usare panni o detergenti abrasivi.
● Eliminare subito i resti di calcare, caffè,
latte e soluzione decalcicante. Sotto
questi resti possono formarsi punti di
corrosione.
● Estrarre in avanti il vassoio di sgocciolamento (8c) con il recipiente per fondi di
caffè (8b). Estrarre il pannello raccogligocce (8a) e la griglia di sgocciolamento
(8d). Svuotare e pulire il vassoio di sgocciolamento e il recipiente per fondi di
caffè.
● Rimuovere e pulire il cassetto per il caffè
in polvere (4).
● In lavastoviglie possono essere lavati i
seguenti componenti: vassoio di sgocciolamento (8c), recipiente per fondi di
caffè (8b), griglia di sgocciolamento (8d),
coperchio salva-aroma (2) e dosatore per
caffè in polvere (18).
● Pulire con uno straccio il vano interno
dell’apparecchio (alloggiamento vasche e
cassetto per il caffè in polvere).
Importante: Il vassoio di sgocciolamento
(8c) e il recipiente per i fondi di caffè (8b) si
devono svuotare e pulire quotidianamente
per evitare la formazione di muffa.
Nota: Se l’apparecchio è freddo quando
viene acceso con l’interruttore di rete O / I
(9) o si spegne automaticamente dopo
il prelievo di caffè, l’apparecchio esegue
automaticamente un lavaggio. In questo
modo il sistema si pulisce da solo.
Importante: Se l’apparecchio non verrà
utilizzato per un periodo prolungato (ad es.
in vacanza), pulire a fondo l’intero apparecchio, compreso il sistema latte e l’unità di
infusione.
● Smontare il galleggiante (8e) e pulirlo con
un panno umido.
● Non lavare in lavastoviglie i seguenti
componenti: pannello raccogligocce (8a),
galleggiante (8e), cassetto per il caffè in
polvere (4), unità di infusione (5a).
50
Page 51

it
Pulire l’inserto schiuma
L’inserto schiuma (6) dovrebbe essere
pulito dopo ogni uso, in modo da eliminare
i resti.
Importante: Prima di estrarre l’inserto
schiuma, lasciarlo raffreddare.
Per la pulizia smontare l’inserto schiuma:
1. Per l’estrazione afferrare il tubo metallico
e tirarlo verso il basso.
4. Pulire le singole parti con una miscela
di acqua e detersivo e una spazzola
morbida. Se necessario, immergerli
nella miscela calda di acqua e detersivo.
Pulire a fondo il foro di aerazione (6e).
6e
5. Lavare tutte le parti con acqua pulita e
asciugarle.
6. Inserire l’anima del tubo di servizio (6d) e
il tubo di servizio
(6c) nel tubo di metallo.
6d6c
1 2
7. Ruotare l’anima del tubo di servizio in
senso orario, nché i contrassegni non
sono l’uno vicino all’altro.
2. Ruotare l’anima del tubo di servizio (6d)
in senso antiorario ed estrarla.
1
6d
2
3. Estrarre il tubo di servizio (6c).
6c
8. Posizionare l’inserto schiuma sulla
valvola vapore. Accertarsi che il contrassegno rosso sulla valvola vapore sia
coperto.
51
Page 52

it
Pericolo di scottature!
¡
Usare l’apparecchio solo se l’inserto
schiuma (6) è completamente assemblato
e montato.
Pulire l’unità di infusione
Pulire periodicamente l’unità di infusione!
Per eseguire la pulizia preventiva automatica
dell’unità di infusione:
Premere brevemente il tasto di servizio (12).
L’apparecchio effettua il risciacquo, se
prima viene inserito il caffè. Al termine si
spegne.
Oltre al programma di pulizia automatica,
l’unità di infusione (5a) dovrebbe essere
rimossa periodicamente per pulirla (gura
E all’inizio delle istruzioni).
1. Spegnere l’apparecchio dall’interrut-
tore di rete O / I (9). Nessun tasto è
illuminato.
2. Aprire lo sportello (5b) dell’unità di
infusione.
3. Spingere completamente a sinistra il
blocco rosso (5d) sull’unità di infusione.
4. Premere il pulsante a pressione rosso
(5c), afferrare l’unità di infusione utilizzando gli appositi incavi, quindi estrarla.
5. Lavare accuratamente l’unità di infusione
(5a) sotto l’acqua corrente.
6. Tenere il ltro del bollitore sotto il getto
dell’acqua.
Importante: Pulire senza detergenti di
alcun tipo e non lavare in lavastoviglie.
7. Pulire a fondo il vano interno dell’apparecchio con un panno umido e rimuovere
eventuali residui di caffè.
8. Lasciar asciugare l’unità di infusione (5a)
e il vano interno dell’apparecchio.
9. Inserire l’unità di infusione (5a) no in
fondo.
10. Spingere il blocco rosso (5d) completamente a destra e chiudere lo sportello (5b).
Nota: Dopo una pulizia profonda, per
garantire una cura ottimale, le guarnizioni
dell’unità di infusione si dovrebbero regolarmente ingrassare. A tale scopo applicare
tutt’intorno alle guarnizioni un sottile strato
di grasso (cod. ord. 311368).
52
Page 53

it
Suggerimenti per
risparmiare energia
● La macchina automatica per caffè espresso
si spegne automaticamente dopo un’ora
(impostazione standard). Il tempo predenito di un’ora può essere ridotto (vedere
“Spegnimento automatico” nel capitolo
“Impostazioni” a pagina 46).
● Se la macchina automatica per espresso
non viene usata, spegnere l’apparecchio.
Per spegnerlo premere il tasto di servizio
(12). L’apparecchio esegue il lavaggio e
si spegne.
● Se possibile non interrompere il prelievo
di caffè o schiuma latte. L’interruzione
anticipata provoca un maggiore consumo
di energia e un riempimento più rapido
del vassoio di sgocciolamento.
● Decalcicare periodicamente l’apparecchio per evitare depositi calcarei. I residui
di calcare provocano un maggiore consumo
di energia.
Programmi di servizio
Durata: circa 35 minuti
A seconda della frequenza d’uso, il tasto
di servizio (12) lampeggia a determinati
intervalli.
L’apparecchio dovrebbe essere immediatamente pulito e decalcicato con il programma
di servizio. Se il programma di servizio non
viene eseguito come da istruzioni, l’apparecchio potrebbe danneggiarsi.
Attenzione!
¡
Per ogni programma di servizio, utilizzare i
decalcicanti e i detergenti come da istruzioni. Attenersi alle istruzioni di sicurezza
sull’imballaggio dei detergenti.
Non interrompere mai il programma di servizio! Non ingerire i liquidi!
Non usare mai aceto, liquidi o sostanze a
base di aceto, acido citrico o sostanze a
base di acido citrico!
Non inserire mai le compresse di decalcicante o altri tipi di decalcicante nel cassetto
del caffè in polvere (4)!
Speciche compresse decalcicanti
e detergenti sono disponibili presso i
rivenditori e il Centro di assistenza.
Codice
ordinazione
Compresse di
detergente
Compresse di
decalcicante
Importante: Se nel serbatoio dell’acqua (16)
è presente un ltro acqua, toglierlo assolutamente prima di avviare il programma di
servizio.
Per avviare il programma di servizio tenere
premuto per almeno 5 secondi il tasto di
servizio (12).
Informazione: Durante l’esecuzione
del programma il tasto di servizio (12)
lampeggia.
Il LED
H si illumina.
● Vuotare il vassoio di sgocciolamento (8) e
reinserirlo.
L’apparecchio esegue due lavaggi.
Il LED G si illumina.
● Aprire il cassetto per il caffè in polvere (4).
● Inserire una compressa di detergente
Siemens e chiudere il cassetto per il caffè
in polvere (4).
● Premere il tasto avvio (10).
Il LED D si illumina.
● Versare 0,5 L di acqua tiepida nel recipiente vuoto del serbatoio (16) no al
contrassegno 0,5l e sciogliervi 2 compresse di decalcicante Siemens.
Rivenditori Centro di
assistenza
TZ60001 310575
TZ60002 310967
53
Page 54

it
●Premereiltastoavvio(10).
Ilprogrammadiservizioduraoracirca
10minuti.
hsiillumina.
IlLED
●Posizionaresottol’uscitadell’inserto
schiuma(6)unrecipientedaalmeno
0,5litri.
●Aprirel’insertoschiuma(6) estraendolo.
Ilprogrammadiservizioduraoracirca
12minuti.
IlLED
Dsiillumina.
●Lavareilserbatoioacqua(16)eriempire
conacquapulitanoalcontrassegnodi
max.
●Premereiltastoavvio(10).
Ilprogrammadiservizioduraoracirca
30secondiedesegueillavaggio
dell’apparecchio.
IlLEDhsiillumina.
●Chiuderel’insertoschiuma(6)
inserendolo.
Ilprogrammadiservizioduraoracirca
8minuti.
Hsiillumina.
IlLED
●Vuotareilvassoiodisgocciolamento(8)e
reinserirlo.
Sevieneutilizzatounltro,questoèil
momentodireinserirlo.
Lapuliziaeladecalcicazionesonoterminateel’apparecchioèdinuovoprontoper
l’uso.
Importante: Pulirel’apparecchioconun
pannoumidoemorbidopereliminare
subitoiresiduidisoluzionedecalcicante.
Sottoquestirestipossonoformarsipuntidi
corrosione.
Protezione dal gelo
Per evitare danni da gelo durante il
¡
trasporto e il deposito, è prima necessario svuotare completamente
l’apparecchio.
Informazione: L’apparecchiodeveessere
prontoperl’usoeilserbatoioacqua (16)
deveesserepieno.
1. Posizionareunrecipientegrandesotto
l’uscitadell’insertoschiuma(6).
2. Premereiltastovapore(11).
IlLEDhlampeggia;l’apparecchio
riscaldaorapercirca20secondi.
3. SeilLED
schiuma(6)estraendoloelasciarevaporarepercirca15secondi.
4. Spegnerel’apparecchiodall’interruttore
direteO / I(9).
5. Svuotareilserbatoiodell’acqua(16)ela
vascadisgocciolamento(8).
hèilluminato,aprirel’inserto
Accessori
Iseguentiaccessorisonodisponibilipresso
irivenditorieilCentrodiassistenza.
Codice
ordinazione
Compressedi
detergente
Compressedi
decalcicante
Filtroacqua TZ70003 467873
Grasso
(tubetto)
Rivenditori Centrodi
assistenza
TZ60001 310575
TZ60002 310967
– 311368
54
Page 55

it
Smaltimento
Si prega di smaltire le confezioni nel rispetto
dell’ambiente. Questo apparecchio è contrassegnato conformemente alla Direttiva
europea 2002/96/CE Riuti di apparecchiature elettriche ed elettroniche (waste electrical and electronic equipement – WEEE). La
direttiva stabilisce il quadro generale per un
ritiro e recupero valido in tutta I’UE.
Informarsi presso il rivenditore specializzato
sulle attuali disposizioni per la rottamazione.
A
Condizioni di garanzia
Per questo apparecchio sono valide le condizioni di garanzia pubblicate dal nostro
rappresentante nel paese di vendita. Il
rivenditore, presso il quale è stato acquistato
l’apparecchio, è sempre ben disposto a
fornire a richiesta informazioni a proposito.
Per l’esercizio del diritto di garanzia è
comun que necessario presentare il documento di acquisto.
Con riserva di modica.
55
Page 56

it
Soluzione dei problemi più semplici
Problema Causa/situazione Soluzione
Il macinacaffè non
macina chicchi.
Non è possibile prelevare acqua calda.
Schiuma latte
assente o
insufciente.
I chicchi non cadono nel macinacaffè (chicchi troppo grassi).
L’inserto schiuma (6) è sporco. Pulire l’inserto schiuma (6),
L’inserto schiuma (6) è sporco. Pulire l’inserto schiuma (6),
Tipo di latte non adatto. Utilizzare latte con una percen-
L’inserto schiuma (6) non è
montato correttamente.
Battere leggermente il contenitore dei chicchi di caffè (1). Cambiare tipo di caffè.
Se il contenitore dei chicchi di
caffè (1) è vuoto, pulirlo con un
panno asciutto.
vedere capitolo “Cura e pulizia
quotidiana”.
vedere capitolo “Cura e pulizia
quotidiana”.
tuale di grasso non inferiore
all’1,5%.
Inumidire le parti dell’inserto
schiuma e montarle saldamente.
L’apparecchio presenta
incrostazioni di calcare.
Il caffè scende solo
a gocce oppure non
scende affatto.
Il caffè non ha
alcuna “crema”.
Il caffè è troppo
“acido”.
Se non è possibile risolvere un problema, chiamare l’assistenza! I numeri di
telefono si trovano sull’ultima pagina del manuale.
Il grado di macinatura impostato
è troppo ne oppure il caffè in
polvere è troppo ne.
L’apparecchio presenta forti
calcicazioni.
Tipo di caffè non adatto. Usare un tipo di caffè con una
I chicchi di caffè non sono tostati di fresco.
Il grado di macinatura non è
adatto ai chicchi di caffè.
Il grado di macinatura impostato
è troppo grosso oppure il caffè
in polvere è troppo grosso.
Tipo di caffè non adatto. Usare un caffè più tostato.
Decalcicare l’apparecchio
2 pastiglie decalcicanti, se
necessario avviare il programma
2 volte.
Impostare un grado di macinatura maggiore o usare caffè in
polvere meno ne.
Decalcicare l’apparecchio.
percentuale maggiore di chicchi
Robusta.
Utilizzare chicchi tostati di fresco.
Impostare il grado di macinatura
su ne.
Impostare un grado di macinatura minore o usare caffè in polvere
più ne.
con
56
Page 57

Soluzione dei problemi più semplici
Problema Causa/situazione Soluzione
Il caffè è troppo “amaro”. Il grado di macinatura impo-
stato è troppo ne oppure
il caffè in polvere è troppo
ne.
Tipo di caffè non adatto. Cambiare il tipo di caffè.
Il ltro dell’acqua non resta
incastrato nel serbatoio
dell’acqua (16).
D lampeggia.
Il LED
I fondi di caffè non sono
compatti e sono troppo
bagnati.
I lampeggia.
Il LED
Forti differenze nella qualità
del caffè o della schiuma
latte.
Presenza di gocce
d’acqua sul fondo interno
dell’apparecchio dopo
aver tolto il vassoio di
sgocciolamento (8).
Se non è possibile risolvere un problema, chiamare l’assistenza! I numeri di
telefono si trovano sull’ultima pagina del manuale.
Il ltro dell’acqua non è ssato correttamente.
Serbatoio dell’acqua non
inserito correttamente o
nuovo ltro dell’acqua non
sciacquato come descritto.
Il grado di macinatura
impostato è troppo ne o
troppo grosso, o la quantità
di caffè in polvere usata è
insufciente.
Unità di infusione
sporca (5).
Troppo caffè in polvere
nell’unità di infusione (5).
Il meccanismo dell’unità
di infusione si muove con
difcoltà.
L’apparecchio presenta incrostazioni di calcare.
Il vassoio di sgocciolamento
(8) è stato estratto troppo
presto.
Impostare un grado di macinatura maggiore o usare
caffè in polvere meno ne.
Tenere diritto il ltro dell’acqua e spingerlo saldamente nel collegamento del
serbatoio.
Inserire il serbatoio
dell’acqua correttamente
oppure sciacquare il ltro
dell’acqua come descritto e
mettere in funzione.
Impostare un grado di macinatura più grosso o più ne,
oppure usare 2 dosatori di
caffè in polvere pieni.
Pulire l’unità di infusione (5).
Pulire l’unità di infusione (5)
(Versare non più di 2 dosatori per caffè in polvere
pieni).
Rimuovere e pulire l’unità di
infusione (vedere capitolo
“Cura e pulizia quotidiana”).
Decalcicare l’apparec-
chio con due compresse
di decalcicante come da
istruzioni.
Estrarre il vassoio di sgocciolamento (8) solo alcuni
secondi dopo l’ultimo prelievo di bevanda.
it
57
Page 58

it
Soluzione dei problemi più semplici
Problema Causa/situazione Soluzione
I è illuminato.
Il LED
Le impostazioni predenite
sono state modicate e
devono essere riattivate
(“Reset”).
I LED
lampeggiano.
L’unità di infusione (5)
è assente o non è stata
riconosciuta.
Sono state eseguite vecchie
impostazioni personali.
Nell’apparecchio si è vericato un errore.
Spegnere l’apparecchio con
l’unità di infusione (5) inserita, attendere tre secondi,
quindi riaccenderlo.
Spegnere l’apparecchio
dall’interruttore di rete O / I
(9). Tenere premuti il tasto
di servizio (12) e il tasto
vapore (11) e accendere
l’apparecchio dall’interruttore
di rete O / I (9). Confermare
inne premendo il tasto
avvio (10). Le impostazioni
predenite sono attive.
Chiamare la hotline.
I LED
I LED
Se non è possibile risolvere un problema, chiamare l’assistenza! I numeri di
telefono si trovano sull’ultima pagina del manuale.
lampeggiano.
lampeggiano.
Tensione errata. Usare l’apparecchio solo
con 220 V-240 V.
La temperatura ambiente è
troppo bassa.
Usare l’apparecchio con
temperature > 5° C.
Dati tecnici
Collegamento elettrico (tensione/frequenza) 220-240 V/50-60 Hz
Potenza del riscaldamento 1600 W
Pressione massima della pompa, statica 15 bar
Capacità massima del serbatoio dell’acqua (senza ltro) 1,7 l
Capacità massima del contenitore dei chicchi di caffè 300 g
Lunghezza della linea di alimentazione 100 cm
Dimensioni (alt. x largh. x prof.) 385 x 280 x 479 mm
Peso, vuota 9,3 kg
Tipo di macinacaffè Ceramica
58
Page 59

denl
Inhoud
Leveringsomvang .....................................60
Overzicht ..................................................60
Bedieningselementen ...............................61
− Netspanningschakelaar O / I ..................61
− Servicetoets
− Stoomtoets
− Starttoets C ..........................................61
− Indicatie-LED’s ......................................61
− Draaiknop “Kofesterkte” ......................62
− Draaiknop “Drankkeuze” .......................62
− Melkopschuimer ....................................62
Vóór het eerste gebruik ............................62
Waterfilter .................................................63
Instellingen ...............................................64
− Waterhardheid .......................................64
− Automatische uitschakeling...................65
− Zettemperatuur instellen .......................65
− Instellen van de maaljnheid .................66
Kofezetten met kofebonen ....................66
Kofezetten met gemalen kofe ...............66
Heet water tappen ....................................67
Melkschuim bereiden................................67
Onderhoud en dagelijkse reiniging ...........67
− Melkopschuimer reinigen ......................68
− Zetmodule reinigen ...............................69
Tips voor energiebesparing ......................70
Onderhoudsprogramma ...........................70
Vorstbeveiliging ........................................72
Accessoires ..............................................72
Afval..........................................................72
Garantie ....................................................72
Zelf eenvoudige problemen verhelpen .....73
Technische specicaties ...........................75
A......................................61
B .......................................61
Beste kofeliefhebber,
Gefeliciteerd met uw nieuwe espressoautomaat van Siemens.
Veiligheidsinstructies
Lees de gebruiksaanwijzing zorgvuldig
door, neem ze in acht en bewaar ze!
Geef deze gebruiksaanwijzingen door
aan de nieuwe eigenaar als u het apparaat verkoopt.
Deze espressoautomaat is bedoeld voor
de verwerking van normale huishoudelijke hoeveelheden in huishoudens of
vergelijkbare, niet-bedrijfsmatige toepassingen. Hiertoe behoort bijv. het gebruik
in koferuimten voor het personeel van
winkels, kantoren, landbouw- en andere
industriële bedrijven, alsmede het gebruik door gasten van pensions, kleine
hotels en soortgelijke accommodaties.
Gevaar van elektrische schok!
¡
Het apparaat uitsluitend aansluiten en gebruiken volgens de gegevens op het typeplaatje. Gebruik het apparaat uitsluitend
indien het aansluitsnoer en het apparaat
geen beschadigingen vertonen. Het apparaat uitsluitend binnenshuis bij kamertemperatuur gebruiken.
Personen (ook kinderen) met fysieke, zintuiglijke of geestelijke beperkingen of met
een gebrek aan ervaring en kennis mogen
het apparaat niet gebruiken, tenzij ze daarbij onder toezicht staan of worden begeleid
door een persoon die voor hun veiligheid
verantwoordelijk is.
Houd het apparaat buiten het bereik van
kinderen. Let erop dat kinderen niet met het
apparaat spelen.
In geval van storing onmiddellijk de stekker
uit het stopcontact trekken.
59
Page 60

denl
Om gevaren te vermijden, mogen reparaties aan het apparaat – bijvoorbeeld het
vervangen van een beschadigd aansluitsnoer – uitsluitend worden uitgevoerd door
onze klantenservice.
Het apparaat en het aansluitsnoer niet onderdompelen in water.
Niet in het maalwerk grijpen.
Gebruik het apparaat uitsluitend in vorstvrije
ruimten.
Risico op brandwonden!
¡
De uitloop (6) van de melkschuimer wordt
zeer heet. Na gebruik eerst laten afkoelen
en pas daarna aanraken.
Gebruik dit apparaat alleen wanneer de
melkschuimer (6) volledig is gemonteerd en
geïnstalleerd.
Verstikkingsgevaar!
¡
Laat kinderen niet met verpakkingsmateriaal
spelen.
Leveringsomvang
(zie de overzichtsafbeelding voor in de
gebruiksaanwijzing)
1 Espressoautomaat TE501
2 Gebruiksaanwijzing
3 Teststrookje voor waterhardheid
4 Maatschepje
5 Vet (tube)
Overzicht
(zie de overzichtsafbeeldingen A, B, C, D
en E voor in de gebruiksaanwijzing)
1 Bonenreservoir
2 Aromadeksel
3 Draaischakelaar voor instelling
maaljnheid
4 Lade voor gemalen kofe
(voorgemalen kofe / reinigingstablet)
5 Zetmodule (afbeelding E)
a) Zetmodule
b) Luikje
c) Druktoets
d) Grendel
6 Melkschuimer (afbeelding C)
afneembaar
a) Stoomventiel
b) Metalen huls
c) Functiebuis
d) Functiekern
e) Luchtopening
7 Kofetap (in hoogte verstelbaar)
8 Lekschaal (afbeelding D)
a) Afdekplaat
b) Kofedikreservoir
c) Lekschaal kofetap
d) Lekplaat kofetap
e) Vlotter
9 Netspanningschakelaar O / I
10 Starttoets C
11 Stoomtoets B
12 Servicetoets A
13 Draaiknop “Kofesterkte”
14 Draaiknop “Drankkeuze”
15 Indicatie-LED’s
16 Afneembare watertank
17 Deksel van watertank
18 Maatschepje (aanbrenghulp voor
waterlter)
19 Opbergvakje voor maatschepje
20 Aansluitsnoer met opbergvak
60
Page 61

denl
Bedieningselementen
Netspanningschakelaar O / I
Met behulp van de netspanningschakelaar
O / I (9) schakelt u het apparaat in of uit
(door inschakeling/onderbreking van de
stroomtoevoer).
Belangrijk: voer vóór uitschakeling eerst
het spoelprogramma uit of schakel het
apparaat uit met de servicetoets (12).
Servicetoets A
Als u kort op de servicetoets (12) drukt,
wordt het apparaat gespoeld en vervolgens
uitgeschakeld. Als de servicetoets (12)
knippert, moet het onderhoudsprogramma
worden uitgevoerd. Druk in dat geval lang
op de servicetoets (12) om het onderhoudsprogramma te starten. Tijdens de uitvoering
van het onderhoudsprogramma knippert
de servicetoets (12). Zodra het programma
voltooid is, dooft de toets.
Stoomtoets B
Als u op de stoomtoets (11) drukt, wordt er
stoom ten behoeve van de melkschuimbereiding geproduceerd.
Starttoets C
Als u op de starttoets (10) drukt, wordt de
drankbereiding gestart. Als u tijdens de
drankbereiding nogmaals op deze toets
drukt, wordt de afname voortijdig gestopt.
Indicatie-LED’s
Het branden of knipperen van de desbetreffende LED’s geeft het volgende aan:
D brandt De watertank is leeg en moet
weer worden gevuld.
D knippert Het waterlter is versleten en
moet worden vervangen.
E brandt Het bonenreservoir is leeg en
moet weer worden gevuld.
F brandt Het stoomventiel moet worden
geopend of gesloten.
F knippert Afhankelijk van de instelling
komt er stoom of heet water uit
de melkopschuimer.
G brandt Als met de draaiknop “Kofe-
sterkte” de stand G is geselecteerd, brandt het symbool
zo lang er voorgemalen kofe
wordt afgenomen.
H brandt De lekschaal is afwezig of niet
correct aangebracht. Breng de
lekschaal aan.
H knippert De schalen zijn vol. Maak de
schalen leeg en breng deze
opnieuw aan.
I brandt Het luikje van de zetmodule is
open. Sluit het luikje.
I knippert Verwijder de zetmodule en
reinig deze.
61
Page 62

denl
Draaiknop “Kofesterkte”
Met deze draaiknop (13)
kan de kofesterkte worden
ingesteld of bereiding met
voorgemalen kofe worden
geselecteerd.
h
tot en met
g
G
Draaiknop “Drankkeuze”
a
tot en met
c
Zeer mild
Mild
Normaal
Sterk
Voorgemalen kofe
Met deze draaiknop (14)
worden de gewenste drank
en hoeveelheid geselecteerd.
Bovendien kunnen hiermee
de gebruikersinstellingen
worden gewijzigd.
Kleine espresso
Espresso
Kleine café crème
Café crème
Grote café crème
Vóór het eerste gebruik
Algemeen
Vul de watertank uitsluitend met zuiver,
koud water zonder koolzuur en het reservoir
bij voorkeur met espressobonen of bonenmengsels voor automaten. Gebruik geen
geglaceerde, gekarameliseerde of met
andere suikerhoudende additieven behandelde kofebonen, aangezien deze de zetmodule kunnen doen verstoppen.
Bij dit apparaat is de hardheid van het water
instelbaar. Af fabriek is het apparaat op waterhardheid 4 ingesteld. Controleer de daadwerkelijke waterhardheid met het meegeleverde
teststrookje. Als deze controle een andere
waarde dan 4 aangeeft, moet het apparaat na
ingebruikname op de desbetreffende waarde
worden geprogrammeerd (zie “Waterhardheid”
in het hoofdstuk “Instellingen” op pagina 64).
Apparaat in gebruik nemen
1. Verwijder het aanwezige beschermfolie.
2. Plaats de espressoautomaat op een
vlakke, waterbestendige ondergrond met
voldoende draagvermogen. Zorg dat de
ventilatiesleuven van het apparaat vrij
blijven.
b
tot en met
d
Melkopschuimer
De melkopschuimer (6a) kan worden geopend door deze uit te trekken en worden
gesloten door deze in te drukken.
62
2 x kleine espresso
2 x espresso
2 x kleine café crème
2 x café crème
2 x grote café crème
Belangrijk: Gebruik het apparaat alleen
in vorstvrije ruimten. Als het apparaat bij
temperaturen onder 0 °C is getransporteerd
of opgeslagen, dient u ten minste 3 uur te
wachten alvorens het apparaat in gebruik te
nemen.
3. Trek de stekker uit het snoervak (20) en
sluit deze aan op een stopcontact. Stel
de snoerlengte af door het snoer iets in
het vak terug te duwen of verder naar
buiten te trekken. Plaats het apparaat
hiervoor bijvoorbeeld met de achterzijde
tegen de tafelrand en trek het snoer
omlaag of schuif het omhoog.
4. Monteer de melkopschuimer. Gebruik
het apparaat alleen wanneer de melkopschuimer (6) volledig geassembleerd en
gemonteerd is.
Page 63

denl
Uitzondering: als er alleen heet water of
stoom is afgenomen, wordt het apparaat
zonder spoeling uitgeschakeld.
Om het apparaat eerder uit te schakelen,
kunt u op de Servicetoets (12) drukken. Het
apparaat wordt dan gespoeld en vervolgens
uitgeschakeld.
5. Klap het deksel van de watertank (17)
omhoog.
6. Verwijder de watertank (16), spoel de
tank vervolgens uit en vul deze met
vers, koud water. Neem hierbij de markering max in acht.
7. Breng de watertank (16) rechtstandig
aan en druk deze helemaal omlaag.
8. Sluit hierna het deksel (17) van de
watertank.
9. Vul het bonenreservoir (1) met kofebonen (raadpleeg hoofdstuk ““Kofezet-
ten met gemalen kofe” op pagina 66 voor
informatie over het gebruik van voorgemalen kofe).
10. Schakel het apparaat in met de netspanningschakelaar O / I (9). De LED D
knippert en de LED F brandt.
11. Plaats een bakje onder de tap van de
melkopschuimer (6).
12. Trek de melkopschuimer (6) voorzichtig
uit om deze te openen. Het apparaat
spoelt de melkopschuimer (6) nu met
water. De LED F knippert.
13. Zodra de LED F brandt, drukt u de melkopschuimer (6) in om deze te sluiten.
Het apparaat wordt nu opgewarmd en gespoeld. Hierbij loopt wat water uit de kofetap.
Zodra de toetsen A (12), B (11) en C (10)
branden, is het apparaat klaar voor gebruik.
Apparaat uitschakelen
Wanneer het apparaat een uur lang niet is
bediend, wordt het automatisch gespoeld
en uitgeschakeld (raadpleeg het gedeelte
“Automatische uitschakeling” in het hoofdstuk “Instellingen” op pagina 64 voor informatie over het instellen van deze duur).
Opmerking: Als u het apparaat voor de
eerste keer gebruikt nadat het onderhoudsprogramma is uitgevoerd of nadat het apparaat langere tijd niet is gebruikt, dient u de
eerste drank niet te drinken aangezien deze
nog niet het volle aroma heeft.
Na de ingebruikname van de espressoautomaat zult u pas een jnporige en stabiele
“crème” verkrijgen nadat er enkele kopjes
zijn afgenomen.
Bij langdurig gebruik kunnen er zich waterdruppels bij de ventilatiesleuven voordoen.
Dit is een normaal verschijnsel.
Waterlter
Het gebruik van een waterlter kan kalkafzettingen verminderen.
Voordat u een nieuw waterlter kunt gebruiken, dient u het lter te spoelen. Ga hiervoor als volgt te werk:
1. Druk het waterlter met behulp van het
maatschepje (18) in de lege watertank
vast.
2. Vul de watertank (16) tot de markering
max met water.
3. Zet de draaiknop
(13) in stand
4. Houd de toetsen B (11) en A (12) ten
minste 5 seconden gelijktijdig ingedrukt.
De LED “uit” of “aan” licht op.
5. Druk op de starttoets (10) om “aan” in te
stellen.
6. Houd de starttoets (10) ten minste
5 seconden ingedrukt om de plaatsing
te bevestigen. Alle LED’s lichten kort op.
63
Page 64

denl
7. De LED
brandt.
8. Plaats een kan met een inhoud van
0,5 liter onder de tap van de melkopschuimer (6).
9. Open de melkopschuimer (6) door deze
uit te trekken. LED F knippert.
10. Er stroomt water door het lter om dit te
spoelen.
11. Zodra de LED F brandt, sluit u de
melkopschuimer (6) door deze in te
drukken.
12. Maak het reservoir leeg.
Het apparaat is weer klaar voor gebruik.
Info: door het spoelen van het lter wordt
tegelijkertijd de instelling voor de indicatie Filter vervangen (= LED D knippert)
geactiveerd.
Als de indicatie Filter vervangen verschijnt
of het lter twee maanden is gebruikt, is de
werking van het lter uitgeput. Om hygiënische redenen en om verkalking (en schade
aan het apparaat) te voorkomen, dient u
het lter in dat geval te vervangen. Vervangingslters zijn in de handel (TZ70003) of
via de servicedienst (467873) verkrijgbaar.
Als u geen nieuw lter aanbrengt, dient u de
instelling voor het lter volgens het hoofdstuk “Waterhardheid” aan te passen.
D knippert en de LED F
Info: als het apparaat langere tijd (bijvoorbeeld tijdens een vakantie) niet is gebruikt,
moet het aangebrachte lter vóór gebruik
worden doorgespoeld. Neem hiervoor een
kopje heet water af en gooi dit weg.
Instellingen
U kunt diverse instellingen op uw individuele
wensen afstemmen.
U kunt het volgende instellen:
Waterhardheid
Bij dit apparaat is de hardheid van het water
instelbaar. De waterhardheid moet correct
worden ingesteld om ervoor te zorgen dat
apparaat bijtijds meldt dat het moet worden
ontkalkt. Af fabriek is het apparaat op waterhardheid 4 ingesteld. U kunt de hardheid
van het water vaststellen met het meegeleverde teststrookje of opvragen bij het plaatselijke drinkwaterbedrijf.
Dompel het teststrookje kort onder in water,
schud het voorzichtig af en lees na een
minuut het resultaat af.
Info: met de lterindicator kunt u de maand
markeren waarin u het lter hebt aangebracht. Ook kunt u de maand markeren
waarin u het lter weer moet vervangen
(uiterlijk na twee maanden).
64
Niveau Waterhardheidsgraad
Duits (°dH) Frans (°fH)
1
2
3
4
1-7
8-14
15-21
22-30
1-13
14-25
26-38
39-54
Page 65

denl
Ga als volgt te werk als u een andere
waterhardheid dan de vooringestelde
waarde wilt invoeren of als u een waterlter
aanbrengt:
1. Zet de draaiknop
(13) in stand
2. Houd de toetsen B (11) en A (12) ten
minste 5 seconden gelijktijdig ingedrukt.
Het aantal brandende LED’s geeft de
ingestelde waterhardheid aan.
3. Druk net zo vaak op de starttoets (10)
tot de gewenste waterhardheid wordt
aangegeven. Voor waterhardheid 3 bijvoorbeeld moeten de LED’s D, E en F
oplichten.
4. Druk ten minste 5 seconden op de starttoets (10). De ingestelde LED’s lichten
kort op en de geselecteerde waterhardheid wordt opgeslagen.
Belangrijk: ga bij gebruik van een waterlter (speciaal accessoire bestelnr. 467873)
als volgt te werk, zie “Waterlter” op pagina
63.
Opmerking: als er niet binnen 90 seconden op een toets wordt gedrukt, wordt het
apparaat weer in gereedheid geschakeld
zonder dat de instelling wordt opgeslagen.
De eerder opgeslagen waterhardheid blijft
dan behouden.
Automatische uitschakeling
Hier kan worden ingesteld hoe lang na de
laatste drankbereiding het apparaat automatisch moet worden uitgeschakeld. Deze
tijd kan op 15 minuten tot 4 uur worden
ingesteld. De vooraf ingestelde tijdsduur
van 1 uur kan worden verkort om energie te
besparen.
1. Zet de draaiknop
(13) in stand .
2. Houd de toetsen B (11) en A (12) ten
minste 5 seconden gelijktijdig ingedrukt.
Het aantal brandende LED’s geeft de ingestelde tijd voor de uitschakeling aan.
3. Druk net zo vaak op de starttoets (10)
tot de gewenste uitschakeltijd oplicht:
D = 15 minuten
D en E = 30 minuten
D, E en F = 45 minuten
D, E, F en G = 1 uur
D, E, F, G en H = 2 uren
D, E, F, G, H en I = 4 uren
4. Druk ten minste 5 seconden op de starttoets (10). De ingestelde LED’s lichten
kort op en de geselecteerde uitschakeltijd wordt opgeslagen.
Opmerking: als er niet binnen 90 seconden
op een toets wordt gedrukt, wordt het apparaat weer in gereedheid geschakeld zonder
dat de instelling wordt opgeslagen. De eerder opgeslagen tijd voor de uitschakeling
blijft dan behouden.
Zettemperatuur instellen
Ook de zettemperatuur kan worden ingesteld.
1. Zet de draaiknop
(13) in stand .
2. Houd de toetsen B (11) en A (12) ten
minste 5 seconden gelijktijdig ingedrukt.
Het aantal brandende LED’s geeft de
ingestelde zettemperatuur aan.
3. Druk net zo vaak op de starttoets (10)
tot de gewenste temperatuur oplicht:
LED D = laag
LED D en E = gemiddeld
LED D, E en F = hoog
4. Druk ten minste 5 seconden op de starttoets (10). De ingestelde LED’s lichten
kort op en de geselecteerde temperatuur wordt opgeslagen.
65
Page 66

denl
Opmerking: als er niet binnen 90 secon-
den op een toets wordt gedrukt, wordt het
apparaat weer in gereedheid geschakeld
zonder dat de instelling wordt opgeslagen.
De eerder opgeslagen zettemperatuur blijft
dan behouden.
Instellen van de maaljnheid
Met de draaischakelaar (3) voor de maaljnheid kunt u de gewenste korrelgrootte
van de gemalen kofebonen instellen.
Let op!
¡
Verstel de maaljnheid alleen terwijl het
maalwerk draait! Het apparaat kan anders beschadigd raken. Reik niet in het
maalwerk.
● Stel de draaischakelaar (3) bij draaiend
maalwerk in op een jner maalsel (door
a: linksom te draaien) of op een grover
maalsel (door b: rechtsom te draaien).
a b
verpakking. De kofebonen kunnen ook in
bevroren toestand worden gemaald.
Belangrijk: vul de watertank (16) elke dag
met vers water. Om het apparaat te kunnen
gebruiken, moet de watertank (16) steeds
voldoende water bevatten.
Er kunnen verscheidene kofedranken op
simpele wijze met één knopindruk worden
gezet.
Bereiden
Zorg ervoor dat het apparaat klaar voor
gebruik is.
1. Plaats een of twee voorverwarmde
kopjes onder de kofetap (7).
Tip: verwarm het kopje voor een kleine
espresso altijd voor, bijvoorbeeld met
heet water.
2. Selecteer met de bovenste draaiknop
(14) de gewenste kofe en gewenste
hoeveelheid.
3. Selecteer met de onderste draaiknop
(13) de gewenste sterkte van de kofe.
4. Druk op de starttoets (10).
De kofe wordt gezet en loopt hierna in de
kopje/kopjes.
Info: De nieuwe instelling is pas merkbaar
vanaf de tweede kop kofe.
Tip: Stel bij donker gebrande bonen een
jnere, en bij lichtere bonen een grovere
maling in.
Kofezetten met
kofebonen
Deze espressoautomaat gebruikt telkens
wanneer u kofe zet een vers maalsel.
Tip: gebruik bij voorkeur espressobonen of
bonenmengsels voor automaten. Bewaar
de bonen voor een optimale kwaliteit gekoeld of diepgevroren, en in een afgesloten
66
Door nogmaals op de starttoets (10) te
drukken, kan het kofezetten voortijdig
worden beëindigd.
Kofezetten met gemalen
kofe
Deze automaat kan ook met voorgemalen
kofe (geen oploskofe) worden gebruikt.
Belangrijk: vul de watertank (16) elke dag
met vers water. Om het apparaat te kunnen
gebruiken, moet de watertank (16) steeds
voldoende water bevatten.
Bereiden
1. Open de lade voor gemalen kofe (4).
Page 67

denl
2. Vul de lade met maximaal 2 afgestreken
maatschepjes kofe. Opgelet: vul de
lade niet met hele bonen of oploskofe.
3. Sluit de lade voor gemalen kofe (4).
4. Zet de onderste draaiknop (13) op het
symbool
5. Druk op de starttoets (10).
De kofe wordt gezet en loopt hierna in de
kopje.
G.
Heet water tappen
Verbrandingsgevaar!
¡
De melkopschuimer (6) wordt zeer heet.
Raak alleen het kunststof gedeelte van de
melkopschuimer (6) aan.
Zorg ervoor dat het apparaat klaar voor
gebruik is.
1. Zet een voorverwarmd kopje of glas onder de tap van de melkopschuimer (6).
2. Open de melkopschuimer (6) door deze
uit te trekken. Het apparaat warmt op.
Vervolgens loopt er ca. 40 seconden
lang heet water uit de tap van de melkopschuimer (6).
3. Druk de melkopschuimer (6) in om de
procedure voortijdig te stoppen.
Melkschuim bereiden
Verbrandingsgevaar!
¡
De melkopschuimer (6) wordt zeer heet.
Raak alleen het kunststof gedeelte van de
melkopschuimer (6) aan.
Tip: schuim eerst de melk op en neem dan
pas kofe of schuim de melk afzonderlijk op
voeg deze vervolgens toe aan de kofe.
Zorg ervoor dat het apparaat klaar voor
gebruik is.
1. Druk op toets
De toets B knippert en het apparaat
warmt nu ca. 20 seconden lang op.
B (11).
2. Wacht tot de toets en de LED
en dompel de melkopschuimer vervolgens tot de bodem van een kopje of
glas dat voor een derde met melk is
gevuld.
3. Open de melkopschuimer (6) door deze
uit te trekken.
Verbrandingsgevaar!
¡
De uittredende stoom is zeer heet en kan
vloeistof omhoog spuiten. Raak de huls niet
aan en richt deze niet op personen.
4. Schuim de melk op.
5. Sluit de melkopschuimer (6) door deze
in te drukken.
Tip: Gebruik voor een optimaal melkschuim
bij voorkeur koude melk met een vetgehalte
van ten minste 1,5 %.
Belangrijk: Reinig de melkopschuimer (6)
na elk gebruik altijd met lauwwarm water.
Opgedroogde melkresten zijn namelijk
moeilijk verwijderbaar.
F brandt
Onderhoud en dagelijkse
reiniging
Gevaar voor elektrische schokken!
¡
Neem vóór de reiniging de stekker uit het
stopcontact.
Dompel het apparaat nooit onder in water.
Gebruik geen stoomreiniger.
● Veeg de behuizing met een zachte, vochtige doek af.
● Gebruik geen schurende doeken of
reinigingsmiddelen.
● Verwijder resten van kalk, kofe, melk en
ontkalkingsoplossing altijd direct. Dergelijke resten kunnen corrosievorming
veroorzaken.
● Trek de lekschaal (8c) en het kofedikreservoir (8b) in voorwaartse richting uit het
apparaat. Verwijder de afdekplaat (8a) en
67
Page 68

denl
de lekplaat (8d). Maak de lekschaal en
het kofedikreservoir leeg en reinig deze.
● Verwijder de lade voor gemalen kofe (4)
en reinig deze.
● Vlotter (8e) en reinig deze met een vochtige doek.
● Plaats de volgende onderdelen niet in de
vaatwasser: afdekplaat (8a), vlotter (8e),
lade voor gemalen kofe (4), zetmodule
(5a).
● De volgende onderdelen zijn wel geschikt
voor de vaatwasser: lekschaal (8c), kofedikreservoir (8b), lekplaat (8d), aromadeksel (2) en maatschepje (18).
● Doe de binnenkant van het apparaat af
(de opvangschalen en lade voor gemalen
kofe).
Belangrijk: Als het apparaat langere tijd
(bijvoorbeeld tijdens een vakantie) niet is
gebruikt, moet het volledige apparaat inclusief het melksysteem en de zetmodule
worden gereinigd.
Melkopschuimer reinigen
De melkopschuimer (6) moet na elk gebruik worden gereinigd om alle resten te
verwijderen.
Belangrijk: laat de melkopschuimer eerst
afkoelen alvorens deze te demonteren.
Demonteer de melkopschuimer om deze te
kunnen reinigen:
1. Houd de metalen huls vast en trek deze
in neerwaartse richting los.
Belangrijk: de lekschaal (8c) en het kofedikreservoir (8b) moeten dagelijks geleegd
en gereinigd worden om schimmelvorming
te voorkomen.
Opmerking: Als het apparaat in koude
toestand met de netspanningschakelaar
O / I (9) wordt ingeschakeld of na afname
van kofe automatisch wordt uitgeschakeld,
wordt het apparaat automatisch gespoeld.
Zo reinigt het systeem zichzelf.
68
2. Draai de functiekern (6d) linksom en
verwijder deze.
1
2
3. Verwijder de functiebuis (6c).
6c
6d
Page 69

denl
4. Reinig de afzonderlijke onderdelen met
een zachte borstel in warm afwaswater.
Laat de onderdelen zo nodig even in
het sopje voorweken. Reinig vooral de
luchtopening (6e) zorgvuldig.
6e
5. Spoel alle onderdelen met schoon water
na en droog deze vervolgens af.
6. Breng de functiekern (6d) en functiebuis
(6c) weer in de metalen huls aan.
1 2
7. Draai de functiekern rechtsom tot de
markeringen zich op één lijn bevinden.
8. Breng de melkopschuimer op het stoomventiel aan. Controleer of de rode markering op het stoomventiel afgedekt is.
6d6c
Gevaar voor brandwonden!
¡
Gebruik het apparaat alleen wanneer de
melkopschuimer (6) volledig geassembleerd en gemonteerd is.
Zetmodule reinigen
Reinig de zetmodule regelmatig!
Zetmodule automatisch voorreinigen:
Druk kort op de servicetoets (12). Als er
voordien kofe is afgenomen, wordt het
apparaat gespoeld. Vervolgens wordt het
apparaat uitgeschakeld.
In aanvulling op het automatische reinigingsprogramma moet de zetmodule (5a) ook
regelmatig worden verwijderd en gereinigd (zie afbeelding E vóór in deze
gebruiksaanwijzing).
1. Schakel het apparaat uit met de net-
spanningschakelaar O / I (9). Er mag nu
geen enkele toets meer branden.
2. Open het luikje (5b) van de zetmodule.
3. Schuif de rode grendel (5d) op de zetmodule helemaal naar links.
4. Druk de rode druktoets (5c) in, pak de
zetmodule aan de handgrepen vast en
verwijder deze.
5. Maak de zetmodule (5a) onder stromend water zorgvuldig schoon.
69
Page 70

denl
6. Houd de zeef van de zetgroep onder de
waterstraal.
Belangrijk: gebruik geen spoel- of reinigingsmiddelen en plaats de module niet in
de vaatwasser.
7. Neem de binnenkant van het apparaat
met een vochtige doek af en verwijder
eventueel aanwezige koferesten.
8. Laat de zetmodule (5a) en het inwendige van het apparaat drogen.
9. Plaats de zetmodule (5a) tot aan de
aanslag terug.
10. Schuif de rode grendel (5d) helemaal
naar rechts en sluit het luikje (5b).
Opmerking: na grondige reinigingen moeten de afdichtingen in de zetmodule voor
een optimaal onderhoud regelmatig worden
ingevet. Breng hiervoor rondom een dun
laagje van het speciaal voor dit doel ontwikkelde vet (bestelnr. 311368) op de afdichtingen aan.
Tips voor energiebesparing
● De espressoautomaat wordt standaard
na een uur automatisch uitgeschakeld
(fabrieksinstelling). Deze vooringestelde
tijd kan desgewenst worden verkort
(zie “Automatische uitschakeling” in het
hoofdstuk “Instellingen” op pagina 64).
● Schakel het de espressoautomaat uit als
deze niet wordt gebruikt. Druk hiervoor op
de servicetoets (12). Het apparaat wordt
dan gespoeld en vervolgens uitgeschakeld.
● Onderbreek de afname van kofe of
melkschuim liefst zo min mogelijk. Een
voortijdige onderbreking leidt tot een
verhoogd energieverbruik en het sneller
vollopen van de lekschaal.
● Ontkalk het apparaat regelmatig om
kalkafzettingen te voorkomen. Kalkresten
leiden tot een hoger energieverbruik.
Onderhoudsprogramma
Duur: ca. 35 minuten
Afhankelijk van het gebruik begint na bepaalde tussenpozen de servicetoets (12) te
knipperen.
In dat geval moet het apparaat direct met het
onderhoudsprogramma worden gereinigd en
ontkalkt. Als het onderhoudsprogramma niet
volgens de instructies wordt uitgevoerd, kan
het apparaat worden beschadigd.
Let op!
¡
Gebruik bij het onderhoudsprogramma
altijd een ontkalkings- en reinigingsmiddel
conform deze gebruiksaanwijzing. Neem de
veiligheidsinstructies op de verpakking van
het reinigingsmiddel in acht.
Onderbreek het onderhoudsprogramma in
geen geval! Zorg dat niemand de betrokken
vloeistoffen drinkt!
Gebruik nooit azijn, middelen op basis van
azijn, citroenzuur of middelen op basis van
citroenzuur!
70
Page 71

Doe nooit ontkalkingstabletten of andere
ontkalkingsmiddelen in de lade voor gemalen
kofe (4)!
Speciaal ontwikkelde en geschikte ontkalkings- en reinigingstabletten zijn
verkrijgbaar via de handel en bij de
servicedienst.
Bestelnummer Handel Servicedienst
Reinigings-
tabletten
Ontkalkings-
tabletten
Belangrijk: Als een waterlter in het waterreservoir (16) geplaatst is, dient dit vóór de
start van het ontkalkingsproces in elk geval
te worden verwijderd.
Start het onderhoudsprogramma door de
servicetoets (12) ten minste 5 seconden
ingedrukt te houden.
Info: Tijdens de uitvoering van het programma knippert de servicetoets (12).
LED
H licht op.
● Maak de lekschaal (8) leeg en breng deze
opnieuw aan.
Het apparaat wordt twee maal gespoeld.
LED G licht op.
● Open de lade voor gemalen kofe (4).
● Leg er een Siemens reinigingstablet in en
sluit de lade voor gemalen kofe (4).
● Druk op de starttoets (10).
LED D licht op.
● Vul de lege watertank (16) tot de markering voor 0,5l met lauwwarm water en los
hierin 2 Siemens ontkalkingstabletten op.
● Druk op de starttoets (10).
TZ60001 310575
TZ60002 310967
denl
LED
h licht op.
● Plaats een kan met een minimale inhoud
van 0,5 liter onder de tap van de melkopschuimer (6).
● Open de melkopschuimer (6) door deze
uit te trekken.
Het onderhoudsprogramma wordt nu gedurende ca. 12 minuten uitgevoerd.
LED D licht op.
● Spoel de watertank (16) en vul deze tot
aan de markering max met vers water.
● Druk op de starttoets (10).
Het onderhoudsprogramma wordt nu gedurende ca. 30 seconden uitgevoerd en spoelt
het apparaat.
LED h licht op.
● Sluit de melkopschuimer (6) door deze in
te drukken.
Het onderhoudsprogramma wordt nu gedurende ca. 8 minuten uitgevoerd.
LED H licht op.
● Maak de lekschaal (8) leeg en breng deze
opnieuw aan.
Als er een lter werd gebruikt, brengt u dit
nu weer aan.
Hierna is het apparaat volledig gereinigd,
ontkalkt en weer klaar voor gebruik.
Belangrijk: Veeg het apparaat met een
zachte, vochtige doek af om resten van
de ontkalkoplossing direct te verwijderen.
Dergelijke resten kunnen corrosievorming
veroorzaken.
Het onderhoudsprogramma wordt nu gedurende ca. 10 minuten uitgevoerd.
71
Page 72

denl
Vorstbeveiliging
Om vorstschade tijdens transport en
¡
opslag te voorkomen, moet het apparaat vooraf volledig worden geleegd.
Info: het apparaat moet klaar voor gebruik
zijn en de watertank (16) moet zijn gevuld.
1. Plaats een grote bak onder de tap van
de melkopschuimer (6).
2. Druk op de stoomtoets (11).
De LED h knippert en het apparaat
warmt nu ca. 20 seconden lang op.
3. Wacht tot LED h brandt en open vervolgens de melkopschuimer (6) door
deze uit te trekken en laat deze ca.
15 seconden stomen.
4. Schakel het apparaat uit met de netspanningschakelaar O / I (9).
5. Maak de watertank (16) en de lekschaal
(8) leeg.
Accessoires
Onderstaande accessoires zijn in de handel
en via de servicedienst verkrijgbaar.
Bestelnummer Handel Servicedienst
Reinigings-
tabletten
Ontkalkings-
tabletten
Waterlter TZ70003 467873
Vet (tube) – 311368
TZ60001 310575
TZ60002 310967
Afval
Gooi verpakkingsmateriaal op een milieuvriendelijke manier weg. Dit apparaat is
gemarkeerd volgens de Europese richtlijn
betreffende afgedankte elektrische en
elektronische apparatuur (AEEA) 2002/96/
EG. Deze richtlijn bepaalt het kader voor de
terugname en verwerking van afgedankte
apparatuur, dat over heel Europa wordt
toegepast.
Raadpleeg uw gespecialiseerde handelaar
voor de geldende voorschriften inzake
afvalverwijdering.
A
Garantie
Voor dit apparaat gelden de garantievoorwaarden die worden uitgegeven door de
vertegenwoordiging van ons bedrijf in het
land van aankoop. De leverancier, bij wie u
het apparaat heeft gekocht, geeft u hierover
graag meer informatie. Om aanspraak te
maken op de garantie heeft u altijd uw aankoopbewijs nodig.
Wijzigingen voorbehouden.
72
Page 73

Zelf eenvoudige problemen verhelpen
Probleem Oorzaak Remedie
Maalwerk maalt geen
kofebonen.
Er kan geen warm
water worden
afgetapt.
Onvoldoende of geen
melkschuim.
De bonen vallen niet in het
maalwerk (te vette bonen).
De melkopschuimer (6) is
verontreinigd.
De melkopschuimer (6) is
verontreinigd.
Ongeschikte melk. Gebruik melk met een minimaal
Klop zacht tegen het bonenreservoir
(1). Wissel zo nodig van kofesoort.
Maak het bonenreservoir (1) leeg
en veeg deze met een droge doek
schoon.
Reinig de melkopschuimer (6) volgens het hoofdstuk “Onderhoud en
dagelijkse reiniging”.
Reinig de melkopschuimer (6) volgens het hoofdstuk “Onderhoud en
dagelijkse reiniging”.
vetgehalte van 1,5%.
denl
De melkopschuimer (6) is
niet goed in elkaar gezet.
Het apparaat is verkalkt. Ontkalk het apparaat met 2 ontkalk-
De kofe stroomt
slechts druppelsgewijs of helemaal niet
meer.
Kofe heeft
geen “crème”
(schuimlaag).
De kofe is te “zuur”. De maaljnheid is te grof
Als de storing niet kan worden verholpen, neem dan in elk geval contact op
met de hotline! De telefoonnummers staan op de laatste pagina’s van de
gebruiksaanwijzing.
De maaljnheid is te jn
ingesteld of de voorgemalen
kofe is te jnkorrelig.
Het apparaat is sterk
verkalkt.
Ongeschikte soort kofe. Gebruik een kofesoort met een
De bonen zijn niet meer
brandvers.
De maaljnheid is niet afgestemd op de kofebonen.
ingesteld of de voorgemalen
kofe is te grofkorrelig.
Ongeschikte soort kofe. Gebruik een donkere gebrande
Bevochtig de onderdelen van de
melkopschuimer en druk deze stevig in elkaar.
tabletten. Voer het programma zo
nodig 2x uit.
Stel een grovere maling in of gebruik grover gemalen kofe.
Ontkalk het apparaat.
hoger gehalte aan Robusta-bonen.
Gebruik vers gebrande bonen.
Stel de maaljnheid op jn in.
Stel een jnere maling in of gebruik
jner gemalen kofe.
kofe.
73
Page 74

denl
Zelf eenvoudige problemen verhelpen
Probleem Oorzaak Remedie
De kofe is te “bitter”. De maaljnheid is te jn in-
gesteld of de voorgemalen
kofe is te jnkorrelig.
Ongeschikte soort kofe. Wissel van soort kofe.
Het waterlter blijft
niet vast zitten in de
watertank (16).
De LED
Het kofedik is niet
compact en te nat.
De LED
Kofe of melkschuim
van sterk wisselende
kwaliteit.
Water op de binnenbodem van het apparaat bij verwijderde
lekschaal (8).
De LED
Als de storing niet kan worden verholpen, neem dan in elk geval contact op
met de hotline! De telefoonnummers staan op de laatste pagina’s van de
gebruiksaanwijzing.
D brandt.
I knippert.
I brandt.
Het waterlter is niet goed
bevestigd.
Watertank is onjuist aangebracht of nieuw waterlter is
niet conform de instructies
gespoeld.
De maaljnheid is te jn of
te grof ingesteld of er wordt
onvoldoende gemalen kofe
gebruikt.
Verontreinigde
zetmodule (5).
Te veel gemalen kofe in de
zetmodule (5).
Het mechanisme van de
zetgroep beweegt stroef.
Het apparaat is verkalkt. Ontkalk het apparaat con-
De lekschaal (8) is te vroeg
verwijderd.
De zetmodule (5) is afwezig
of wordt niet herkend.
Stel een grovere maling in of gebruik grover gemalen kofe.
Druk het waterlter rechtstandig en
stevig in de tankaansluiting.
Watertank correct aanbrengen of
waterlter conform de instructies
spoelen en in gebruik nemen.
Stel een grovere of jnere maaljnheid in of gebruik 2 afgestreken
maatschepjes voorgemalen kofe.
Reinig de zetmodule (5).
Reinig de zetmodule (5) (gebruik
maximaal 2 afgestreken maatschepjes voorgemalen kofe).
Verwijder en reinig de zetgroep (zie
het hoofdstuk “Onderhoud en dagelijkse reiniging”).
form de instructies met twee
ontkalkingstabletten.
Verwijder de lekschaal (8) pas
enkele seconden nadat de laatste
drank is afgenomen.
Schakel het apparaat bij aangebrachte zetmodule (5) uit, wacht
3 seconden en schakel het hierna
weer in.
74
Page 75

Zelf eenvoudige problemen verhelpen
Probleem Oorzaak Remedie
De
fabrieksinstellingen
zijn gewijzigd
en moeten weer
worden geactiveerd
(“Reset”).
De LED’s
knipperen.
Er zijn eigen, niet meer
gewenste instellingen
opgegeven.
Er is een storing in het apparaat aanwezig.
Schakel het apparaat uit met de netspanningschakelaar O / I (9). Houd
de servicetoets (12) en stoomtoets
(11) ingedrukt en schakel het apparaat in met de netspanningsschakelaar O / I (9). Geef vervolgens een
bevestiging met de starttoets (10).
De fabrieksinstellingen zijn nu weer
actief.
Bel de hotline.
denl
De LED’s
knipperen.
De LED’s
knipperen.
Als de storing niet kan worden verholpen, neem dan in elk geval contact op
met de hotline! De telefoonnummers staan op de laatste pagina’s van de
gebruiksaanwijzing.
Onjuiste spanning. Gebruik het apparaat alleen op
220 -240 V.
De omgevingstemperatuur
is te laag.
Gebruik het apparaat bij temperaturen > 5 °C.
Technische specicaties
Elektrische aansluiting (spanning/frequentie) 220-240 V / 50-60 Hz
Vermogen van de verwarming 1600 W
Maximale pompdruk, statisch 15 bar
Maximale inhoud watertank (zonder lter) 1,7 l
Maximale inhoud bonenreservoir 300 g
Lengte aansluitsnoer 100 cm
Afmetingen (H x B x D) 385 x 280 x 479 mm
Gewicht, ongevuld 9,3 kg
Soort maalwerk keramisch
75
Page 76

decs
Obsah
Rozsah dodávky .......................................77
Přehled .....................................................77
Ovládací prvky ..........................................78
− Síťový spínač O / I .................................78
− Servisní tlačítko
− Tlačítko na ohřev páry B ......................78
− Tlačítko start
− Ukazatel LED ........................................78
− Otočný knoík „Intenzita kávy“ ..............79
− Otočný knoík „Volba nápoje“ ...............79
− Napěňovač mléka .................................79
Před prvním použitím ...............................79
Vodní ltr...................................................80
Nastavení .................................................81
− Tvrdost vody..........................................81
− Automatické vypnutí ..............................82
− Nastavení teploty spařování..................82
− Nastavení stupně mletí .........................82
Příprava nápoje ze zrnkové kávy .............83
Příprava nápoje z mleté kávy ...................83
Odebírání horké vody ...............................84
Příprava mléčné pěny...............................84
Ošetřování a každodenní čištění ..............84
− Čištění napěňovače mléka ....................85
− Čištění spařovací jednotky ....................86
Tipy pro úsporu energie ............................87
Servisní program ......................................87
Ochrana proti mrazu .................................88
Příslušenství .............................................89
Likvidace...................................................89
Záruční podmínky .....................................89
Řešení jednoduchých problémů ...............90
Technické údaje ........................................92
A ................................78
C .....................................78
Vážený milovníku dobré kávy,
Gratulujeme Vám k zakoupení tohoto plnoautomatu na espresso rmy Siemens.
Bezpečnostní pokyny
Před použitím spotřebiče si pozorně
přečtěte tento návod k použití, postupujte
podle něj a uschovejte si jej.
Prosíme, abyste v případě prodeje spotřebiče předali tyto příručky novému
vlastníkovi.
Tento plně automatický přístroj na výrobu espresa je určen k přípravě malých
množství kávy v rámci použití v domácnosti nebo v nekomerčních prostředích
podobného typu, například v kuchyňkách pro zaměstnance v obchodech,
kancelářích či zemědělských a jiných
malých podnicích, nebo v rámci využívání hosty v zařízeních poskytujících
nocleh a snídani, malých hotelech a podobných ubytovacích zařízeních.
Pokud se na přístroji udělá více než 7500
káv ročně (tj. 7500x proces spaření), pak
spadá již do kategorie profesionálních
přístrojů a vztahuje se na něj pouze roční
záruka.
Nebezpečí úrazu elektrickým
¡
proudem!
Spotřebič připojte a provozujte v souladu s
údaji na typovém štítku.
Pokud je spotřebič nebo přívodní vedení
poškozeno, nepoužívejte jej.
Spotřebič používejte jen ve vnitřních prostorách a při pokojové teplotě.
Nedovolte, aby spotřebič používaly osoby
(včetně dětí) se sníženými schopnostmi
smyslového vnímání, omezenými duševními
schopnostmi nebo nedostatečnými zkušenostmi a znalostmi, aniž by byly pod dohledem osoby, která je zodpovědná za jejich
bezpečnost, nebo takovou osobou byly
poučeny. Děti držte mimo dosah spotřebiče.
Dbejte, aby si děti se spotřebičem nehrály.
76
Page 77

decs
V případě poruchy spotřebič ihned odpojte
od elektrické sítě.
Opravy spotřebiče, např. výměnu poškozeného přívodního vedení, smí provádět pouze
náš servisní pracovník, aby nedošlo k ohrožení zdraví a poškození majetku.
Spotřebič ani síťový kabel nikdy neponořujte
do vody. Nesahejte do mlýnku.
Spotřebič používejte výhradně v místnostech vytápěných nad bod mrazu.
Nebezpečí opaření!
¡
Výpusť šlehače mléka (6) se velmi silně zahřívá. Nedotýkejte se jí, dokud
nevychladne.
Spotřebič používejte až po úplném sestavení
a instalaci šlehače mléka (6).
Riziko udušení!
¡
Nenechávejte děti hrát si s obalovým
materiálem.
Případné technické změny, tiskové chyby
a odlišnosti ve vyobrazení jsou vyhrazeny
bez upozornění. Aktuální návod najdete na
webových stránkách
www.siemens-spotrebice.cz.
Rozsah dodávky
(viz obrázek na začátku návodu)
1 Plnoautomat na espresso TE501
2 Návod k použití
3 Lakmusové papírky na měření
tvrdosti vody
4 Odměrka na mletou kávu
5 Tuk (tuba)
Přehled
(viz přehledné vyobrazení A,B,C,D a E na
začátku návodu)
1 Zásobník zrnkové kávy
2 Víko na uchování aroma
3 Otočný volič pro nastavení stupně mletí
4 Zásobník mleté kávy
(mletá káva / čisticí tableta)
5 Spařovací jednotka (obr. E)
a) Spařovací jednotka
b) Dvířka
c) Tlačítko
d) Blokování
6 Napěňovač mléka (obr. C) snímatelný
a) Ventil páry
b) Kovové pouzdro
c) Funkční tryska
d) Funkční jádro
e) Vzduchový otvor
7 Výškově nastavitelný výtok kávy
8 Nádobka na zbytkovou vodu (obr. D)
a) Clona
b) Nádobka na kávovou sedlinu
c) Nádobka na zbytkovou vodu
výtoku kávy
d) Mřížka výtoku kávy
e) Plovák
9 Síťový spínač O / I
10 Tlačítko start
11 Tlačítko na ohřev páry B
12 Servisní tlačítko A
13 Otočný knoík „Intenzita kávy“
14 Otočný knoík „Volba nápoje“
15 Ukazatel LED
16 Snímatelný zásobník na vodu
17 Víko zásobníku na vodu
18 Odměrka na mletou kávu
(pomůcka pro vsazení vodního ltru)
19 Přihrádka na odměrku
20 Připojovací kabel s přihrádkou
C
77
Page 78

decs
Ovládací prvky
Síťový spínač O / I
Pomocí síťového spínače O / I (9) se přístroj
zapne nebo se zcela vypne (napájení se
přeruší).
Důležité upozornění: Před vypnutím nechte
proběhnout proplachovací program nebo při
vypnutí použijte servisní tlačítko (12).
Servisní tlačítko A
Po krátkém stisknutí servisního tlačítka (12)
se přístroj propláchne a vypne. Pokud bliká
servisní tlačítko (12), musí být proveden
servisní program. Po dlouhém stisknutí
servisního tlačítka (12) se spustí servisní
program. Během průběhu servisního programu bliká servisní tlačítko (12) a zhasne
po ukončení programu.
Tlačítko na ohřev páry B
Stisknutím tlačítka na ohřev páry (11) se
vytvoří pára na přípravu mléčné pěny.
Tlačítko start C
Stisknutím tlačítka start (10) se spustí
příprava nápojů. Opětovným stisknutím
během probíhající přípravy nápojů je možné
odběr předčasně ukončit.
Ukazatel LED
Svícení a blikání příslušného ukazatele
LED zobrazuje následující:
D svítí Zásobník na vodu je prázdný a
musí být naplněn.
D bliká Vodní ltr je vypotřebován a
musí být vyměněn.
E svítí Zásobník zrnkové kávy je
prázdný a musí být naplněn.
F svítí Ventil páry musí být otevřen
resp. uzavřen.
F bliká V závislosti na nastavení
vychází z napěňovače mléka
pára nebo horká voda.
G svítí Při zvolení G otočným
knoíkem „Intenzita kávy“ svítí
symbol po dobu odběru mleté
kávy.
H svítí Chybí nádobka na zbytkovou
vodu nebo není správně
vsazena, vsaďte nádobku na
zbytkovou vodu.
78
H bliká Nádobky jsou plné,
vyprázdněte je a opět vložte.
I svítí Dvířka spařovací jednotky jsou
otevřené, uzavřete je.
I bliká Vyjměte a vyčistěte spařovací
jednotku.
Page 79

decs
Otočný knoík „Intenzita kávy“
Tímto otočným knoíkem
(13) se nastavuje intenzita
kávy nebo volba mleté kávy.
h
až
g
G
Otočný knoík „Volba nápoje“
a
až
c
b
až
d
Napěňovač mléka
Napěňovač mléka (6) je možné vytažením a
vtlačením otevřít a zavřít.
Velmi jemná
Jemná
Normální
Silná
Mletá káva
Tímto otočným knoíkem
(14) se volí požadovaný nápoj a množství. Kromě toho
se jím mění také uživatelská
nastavení.
Malé espresso
Espresso
Malé café crème
Café crème
Velké café crème
2 malá espressa
2 espressa
2 malá café crème
2 café crème
2 velká café crème
Před prvním použitím
Všeobecné informace
Odpovídající zásobníky plňte pouze čistou
a studenou nesycenou vodou a především
směsí kávových zrn určenou pro kávovary
a automaty na espresso. Nepoužívejte leštěná či karamelizovaná kávová zrna nebo
kávová zrna upravená dalšími cukernatými
přísadami; ucpávají spařovací jednotku.
U tohoto přístroje můžete nastavit tvrdost
vody. Tovární nastavení tvrdosti vody je 4.
Tvrdost používané vody stanovte přiloženým lakmusovým papírkem. Pokud zjistíte
jiný stupeň tvrdosti než 4, přístroj po uvedení do provozu odpovídajícím způsobem
naprogramujte (viz „Tvrdost vody“ v kapitole
„Nastavení“ na straně 81).
Uvedení do provozu
1. Odstraňte ochrannou fólii.
2. Plnoautomat na espresso umístěte na
rovnou a vodotěsnou plochu odpovídající hmotnosti přístroje. Větrací výřezy
přístroje musí zůstat volné.
Důležité upozornění: Spotřebič používejte
pouze v prostorách bez mrazu. Pokud byl
spotřebič přepravován nebo skladován při
teplotách nižších než 0 °C, pak před uvedením do provozu vyčkejte nejméně 3 hodiny.
3. Vytáhněte síťovou zástrčku z přihrádky na
kabel (20) a připojte. Délku můžete podle
potřeby nastavit zasunutím a vysunutím.
Přístroj postavte zadní stranou např. k
hraně stolu a kabel táhněte buď směrem
dolů nebo ho posuňte směrem nahoru.
4. Instalujte napěňovač mléka. Přístroj
používejte pouze tehdy, je-li napěňovač
mléka (6) zcela sestaven a smontován.
79
Page 80

decs
5. Odklopte víko zásobníku na vodu (17).
6. Vyjměte zásobník na vodu (16), vypláchněte ho a naplňte čerstvou studenou
vodou. Dávejte pozor na označení max.
7. Nasaďte zásobník na vodu rovně (16) a
zatlačte ho až dolů.
8. Víko zásobníku na vodu (17) opět
uzavřete.
9. Zásobník zrnkové kávy (1) naplňte
zrnkovou kávou (při přípravě nápoje z
mleté kávy viz kapitola „Příprava nápoje
z mleté kávy“ na straně 83).
10. Síťovým spínačem O / I (9) přístroj
zapněte. Ukazatel LED D bliká a ukazatel LED F svítí.
11. Pod trysku napěňovače mléka (6) postavte nádobu.
12. Napěňovač mléka (6) opatrně otevřete
vytažením. Přístroj propláchne napěňovač mléka (6) vodou. Ukazatel LED F
bliká.
13. Pokud ukazatel LED F svítí, napěňovač mléka (6) uzavřete vtisknutím směrem dovnitř.
Přístroj se zahřeje a propláchne. Z výtoku
kávu vyteče malé množství vody. Pokud
tlačítka A (12), B (11) a C (10) svítí, je
přístroj připraven k provozu.
Vypnutí přístroje
Pokud nedošlo v průběhu jedné hodiny k
obsluze přístroje, přístroj se automaticky
propláchne a vypne (dobu je možné nastavit , viz „Automatické vypnutí“ v kapitole
„Nastavení“ na straně 81).
Výjimka: Pokud byla odebírána pouze horká voda nebo pára, přístroj se vypne bez
propláchnutí.
Pro předchozí manuální vypnutí přístroje
stiskněte servisní tlačítko (12). Přístroj se
propláchne a vypne.
Upozornění: Při prvním použití, po provedení servisního programu nebo pokud byl
přístroj po delší dobu mimo provoz, nemá
první připravený nápoj plné aroma. Tuto
kávu nepijte.
Po prvním uvedení plnoautomatu na espresso do provozu lze trvale dosáhnout
jemně pórovité a stálé pěny (crema) teprve
po přípravě několika šálků.
Při delším používání je normální tvorba
kapek vody u větracích výřezů.
Vodní ltr
Vodní ltr může snížit tvorbu vápených
usazenin.
Nový vodní ltr musí být před použitím propláchnut. Postupujte takto:
1. Pomocí odměrky na mletou kávu (18)
vodní ltr pevně vtlačte do prázdného
zásobníku na vodu.
2. Zásobník na vodu (16) naplňte vodou až
po značku max.
3. Otočný knoík (13)
nastavte do polohy .
4. Držte současně stisknuta tlačítka
B (11) a A (12) po dobu nejméně
5 sekund. Zasvítí buď „vyp.“ nebo
„zap.“.
5. Tlačítkem start (10) nastavte „zap.“.
6. Pro potvrzení stiskněte tlačítko start
(10) po dobu nejméně 5 sekund, všichni
ukazatelé LED se krátce rozsvítí.
7. Ukazatel LED D bliká a ukazatel LED
F svítí.
8. Pod trysku napěňovače mléka (6) postavte nádobu o objemu 0,5 litrů.
80
Page 81

decs
9. Otevřete napěňovač mléka (6) vytažením. Ukazatel LED
10. Filtrem protéká voda a proplachuje ho.
11. Pokud ukazatel LED
napěňovač mléka (6) vtisknutím směrem dovnitř.
12. Vyprázdněte nádobu.
Přístroj je opět připraven k provozu.
Informace: Proplachováním ltru bylo současně aktivováno nastavení pro indikaci
„Vyměňte ltr“ (= ukazatel LED D bliká).
Při zobrazení Vyměňte ltr nebo nejpozději
po dvou měsících je účinnost ltru vyčerpána. Filtr je nutné měnit jednak z hygienických důvodů, a také proto, aby nedošlo
k zanesení vápníkem (může dojít k poškození přístroje). Náhradní ltr je k dostání v
prodejnách (TZ70003) nebo u zákaznické
služby (467873). Pokud není použit nový
ltr, změňte nastavení ltru podle pokynů v
kapitole „Tvrdost vody“.
F bliká.
F svítí, uzavřete
Informace: Pokud nebyl přístroj po delší
dobu používán (např. po dobu dovolené),
měli byste vložený ltr před použitím propláchnout. Nechte připravit šálek horké
vody a vylejte ho.
Nastavení
Nastavení můžete individuálně přizpůsobit.
Můžete nastavit následující:
Tvrdost vody
U tohoto přístroje můžete nastavit tvrdost
vody. Správné nastavení tvrdosti vody je
důležité, aby přístroj včas oznámil, kdy
musí být odvápněn. Tovární nastavení tvrdosti vody je 4. Tvrdost vody lze zjistit pomocí přiloženého testovacího proužku nebo
u místního dodavatele vody.
Testovací proužek ponořte krátce do vody,
mírně otřepejte a po jedné minutě odečtěte
výsledek.
Stupeň Stupeň tvrdosti vody
stupnice (°dH)
1
2
3
4
Německá
1-7
8-14
15-21
22-30
Francouzská
stupnice (°fH)
1-13
14-25
26-38
39-54
Informace: Pomocí indikátoru ltru můžete
označit měsíc, ve kterém jste ltr do přístroje vložili. Můžete také označit měsíc, ve
kterém musíte ltr opět vyměnit (nejpozději
po dvou měsících).
Pokud chcete zadat jinou tvrdost vody, než
jaké je tovární nastavení, nebo při použití
vodního ltru, postupujte takto:
1. Otočný knoík (13)
nastavte do polohy
2. Držte současně stisknuta tlačítka
B (11) a A (12) po dobu nejméně
5 sekund. Počet nyní svítících ukazatelů
LED symbolizuje nastavenou tvrdost
vody.
3. Stiskněte tlačítko start (10) tolikrát, až
se zobrazí požadovaná tvrdost vody,
např. pro tvrdost vody 3 se rozsvítí
ukazatelé LED D, E a F.
81
Page 82

decs
4. Stiskněte tlačítko start (10) po dobu
nejméně 5 sekund. Nastavení ukazatelé
LED zablikají, zvolená tvrdost vody je
uložena.
Důležité upozornění: Při použití vodního
ltru (zvláštní příslušenství obj. č. 467873)
postupujte takto, informace naleznete v
části „Vodní ltr“ na straně 80.
Upozornění: Pokud nedojde během
90 sekund ke stisknutí žádného tlačítka,
přístroj přejde bez uložení do stavu připravenosti výroby kávy. Dříve uložená tvrdost
vody zůstane uchována.
Automatické vypnutí
Zde můžete nastavit, po jaké době po poslední přípravě nápoje se přístroj automaticky vypne. Nastavit lze dobu od 15 minut
do 4 hodin. Přednastavená doba je jedna
hodina; lze ji však z důvodů úspory energie
zkrátit.
1. Otočný knoík (13)
nastavte do polohy
2. Držte současně stisknuta tlačítka B (11)
a A (12) po dobu nejméně 5 sekund.
Počet nyní svítících ukazatelů LED symbolizuje nastavenou dobu pro vypnutí.
3. Tlačítko start (10) stiskněte tolikrát, až se
rozsvítí požadovaná doba pro vypnutí:
D = 15 minut
D a E = 30 minut
D, E a F = 45 minut
D, E, F a G = 1 hodina
Upozornění: Pokud nedojde během
90 sekund ke stisknutí žádného tlačítka,
přístroj přejde bez uložení do stavu
připravenosti výroby kávy. Dříve uložená
doba pro vypnutí zůstane uchována.
Nastavení teploty spařování
Můžete nastavit také teplotu spařování.
1. Otočný knoík (13)
nastavte do polohy
2. Držte stisknuto tlačítko B (11) a A
(12) po dobu nejméně 5 sekund. Počet
nyní svítících ukazatelů LED symbolizuje nastavenou teplotu spařování.
3. Tlačítko start (10) stiskněte tolikrát, až
se rozsvítí požadovaná teplota:
LED D = nízká
LED D a E = střední
LED D, E,a F = vysoká
4. Držte stisknuto tlačítko start (10) po
dobu nejméně 5 sekund. Nastavení
ukazatelé LED zablikají, zvolená teplota
je uložena.
Upozornění: Pokud nedojde během
90 sekund ke stisknutí žádného tlačítka,
přístroj přejde bez uložení do stavu připravenosti výroby kávy. Dříve uložená teplota
spařování zůstane uchována.
Nastavení stupně mletí
Pomocí otočného voliče pro nastavení
stupně mletí (3) můžete nastavit
požadovanou jemnost mleté kávy.
Pozor!
¡
Stupeň mletí můžete změnit pouze v případě,
že je mlýnek v chodu! Jinak by mohlo dojít
k poškození přístroje. Nesahejte do mlýnku.
D, E, F, G a H = 2 hodiny
D, E, F, G, H a I = 4 hodiny
4. Držte stisknuto tlačítko start (10) po
dobu nejméně 5 sekund. Nastavení ukazatelé LED zablikají, zvolená doba pro
vypnutí je uložena.
82
● V době, kdy je mlýnek v chodu nastavte
otočný volič (3) v rozmezí jemné mleté
kávy (a: otáčení proti směru hodinových
ručiček) a hrubší mleté kávy (b: otáčení
ve směru hodinových ručiček).
Page 83

decs
a b
Informace: Nové nastavení se projeví až
od druhého šálku kávy.
Tip: V případě tmavých pražených zrn
nastavte jemnější stupeň mletí, v případě
světlejších zrn nastavte hrubší stupeň mletí.
Příprava nápoje
ze zrnkové kávy
Tento plnoautomat na espresso mele pro
každé spaření čerstvou kávu.
Tip: Doporučujeme používat směsi kávových zrn určené pro kávovary a automaty
na espresso. Pro zaručení optimální kvality
skladujte kávová zrna v chladu a uzavřená
nebo je zmrazte. Kávová zrna mohou být
mleta také ve zmrazeném stavu.
Důležité upozornění: Zásobník na vodu
(16) naplňte každý den čerstvou vodou.
V zásobníku na vodu (16) by mělo být
vždy dostatečné množství vody pro provoz
přístroje.
3. Otáčením spodního otočného knoíku
(13) zvolte požadovanou intenzitu kávy.
4. Stiskněte tlačítko start (10).
Káva se spaří a poté nateče do šálku (šálků).
Po opětovném stisknutí tlačítka start (10)
můžete spařování předčasně ukončit.
Příprava nápoje
z mleté kávy
Tento automat můžete provozovat také s
mletou kávou (ne rozpustná káva).
Důležité upozornění: Zásobník na vodu
(16) naplňte každý den čerstvou vodou.
V zásobníku na vodu (16) by mělo být
vždy dostatečné množství vody pro provoz
přístroje.
Příprava
1. Otevřete zásobník mleté kávy (4).
2. Vsypávejte nejvýše dvě zarovnané
odměrky na mletou kávu.
Pozor: Zásobník neplňte kávovými zrny
nebo rozpustnou kávou.
3. Uzavřete zásobník mleté kávy (4).
4. Spodní otočný knoík (13) nastavte na
symbol G.
5. Stiskněte tlačítko start (10).
Káva se spaří a poté nateče do šálku.
Jednoduše, stisknutím tlačítka můžete připravovat různé druhy kávy.
Příprava
Přístroj musí být připraven k provozu.
1. Postavte předehřátý šálek (šálky) pod
výtok kávy (7).
Tip: Pokud připravujete malé espresso,
šálek vždy předehřejte, např. horkou
vodou.
2. Otáčením horního otočného knoíku (14) zvolte požadovanou kávu a
množství.
83
Page 84

decs
Odebírání horké vody
Nebezpečí popálení!
¡
Napěňovač mléka (6) se velmi zahřívá.
Napěňovače mléka (6) se dotýkejte pouze
za umělohmotnou část.
Přístroj musí být připraven k provozu.
1. Postavte předehřátý šálek nebo sklenici
pod trysku napěňovače mléka (6).
2. Otevřete napěňovač mléka (6) vytažením. Přístroj se zahřeje. Z trysky napěňovače mléka (6) vytéká po dobu cca
40 sekund horká voda.
3. Vtisknutím napěňovače mléka (6)
proces zastavte.
Příprava mléčné pěny
Nebezpečí popálení!
¡
Napěňovač mléka (6) se velmi zahřívá.
Napěňovače mléka (6) se dotýkejte pouze
za umělohmotnou část.
Tip: Nejdřívě napěňte mléko a pak odeberte kávu, nebo mléko napěňte zvlášť a
přidejte je do kávy.
Přístroj musí být připraven k provozu.
1. Stiskněte tlačítko B (11).
Tlačítko B bliká, přístroj se po dobu
cca 20 sekund zahřívá.
2. Jakmile tlačítko a LED F svítí, ponořte
napěňovač mléka až na dno šálku nebo
sklenice naplněného z jedné třetiny
mlékem.
3. Otevřete napěňovač mléka (6)
vytažením.
Tip: Optimální mléčné pěny lze dosáhnout
při použití studeného mléka s obsahem
tuku alespoň 1,5 %.
Důležité upozornění: Zaschlé zbytky
mléka se těžko odstraňují, proto po
každém použití napěňovač mléka (6)
bezpodmínečně vyčistěte vlažnou vodou.
Ošetřování a každodenní
čištění
Nebezpečí zasažení elektrickým
¡
proudem!
Před čištěním vytáhněte síťovou zástrčku.
Přístroj nikdy neponořujte do vody.
Nepoužívejte parní čistič.
● Povrch přístroje otírejte měkkým vlhkým
hadříkem.
● Nepoužívejte abrazivní utěrky ani čisticí
prostředky.
● Zbytky vápenitých usazenin, kávy, mléka
a odvápňovacího roztoku vždy okamžitě
odstraňte. Pod těmito zbytky se může
tvořit koroze.
● Nádobku na zbytkovou vodu (8c) s nádobkou na kávovou sedlinu (8b) vytáhněte
směrem dopředu. Sejměte clonu (8a) a
mřížku (8d). Vyprázdněte a vyčistěte nádobku na zbytkovou vodu a nádobku na
kávovou sedlinu.
● Vyjměte a vyčistěte zásobník mleté
kávy (4).
Nebezpečí popálení!
¡
Unikající pára je velmi horká a může způsobit
vystříknutí tekutin. Pozdra se nedokýkejte
nebo ho nesměřujte na osoby.
4. Napěňte mléko.
5. Napěňovač mléka (6) vtlačením
uzavřete.
84
Page 85

decs
● Plovák (8e) a vyčistěte ho vlhkým
hadříkem.
● Tyto součásti přístroje nemyjte v myčce
na nádobí: Clona (8a), plovák (8e),
zásobník mleté kávy (4), spařovací
jednotka (5a).
● Tyto součásti přístroje můžete mýt v
myčce na nádobí: Nádobka na zbytkovou
vodu (8c), nádobka na kávovou sedlinu
(8b), mřížka (8d), víko na uchování aroma
(2) a odměrka na mletou kávu (18).
● Vytřete vnitřní část přístroje (záchytné
nádobky a zásobník mleté kávy).
Důležité upozornění: Nádobku na zbytkovou vodu (8c) a nádobku na kávovou sedlinu (8b) je třeba vyprazdňovat a čistit denně,
aby se zabránilo tvorbě plísně.
Před čištěním napěňovač mléka rozeberte:
1. Uchyťte za kovové pouzdro a sejměte
směrem dolů.
2. Funkční jádro (6d) otočte proti směru
hodinových ručiček a sejměte.
1
6d
2
Upozornění: Pokud je přístroj ve studeném
stavu zapnut síťovým spínačem O / I (9)
nebo pokud se po odebrání kávy automaticky
vypne, kávovar se automaticky propláchne.
Systém je tedy samočistící.
Důležité upozornění: Pokud nebudete přístroj po delší dobu používat (např. po dobu
dovolené), měli byste důkladně vyčistit
kompletní přístroj včetně mléčného systému
a spařovací jednotky.
Čištění napěňovače mléka
Napěňovač mléka (6) je třeba čistit po
každém použití, aby se odstranily zbytky
mléka.
Důležité upozornění: Před sejmutím nechte
napěňovač mléka vychladnout.
3. Sejměte funkční trysku (6c).
6c
4. Jednotlivé části vyčistěte mycím roztokem a jemným kartáčem, v případě potřeby je nechte odmočit v teplém mycím
roztoku. Důkladně vyčistěte vzduchový
otvor (6e).
6e
85
Page 86

decs
5. Všechny části opláchněte čistou vodou
a osušte.
6. Funkční jádro (6d) a funkční trysku
umístěte v kovovém pouzdře.
1 2
7. Funkční jádro otočte ve směru hodinových ručiček tak, že se značky nachází
vedle sebe.
8. Napěňovač mléka nasaďte na ventil
páry. Dbjete na to, aby bylo červené
označení na ventilu páry zakryto.
(6c)
6d6c
Čištění spařovací jednotky
Spařovací jednotku čistěte pravidelně!
Automatické předčištění spařovací jednotky:
Krátce stiskněte servisní tlačítko (12).
Pokud byla odebrána káva, přístroj se propláchne. Poté se přístroj vypne.
Dodatečně k automatickému čisticímu programu by se spařovací jednotka (5a) měla
pravidelně sejmout a vyčistit (obr. E na
začátku návodu).
1. Přístroj vypněte síťovým spínačem O / I
(9). Nesvítí žádné tlačítko.
2. Otevřete dvířka (5b) spařovací jednotky.
3. Posuňte červený blokovací prvek (5d)
na spařovací jednotce zcela doleva.
4. Stiskněte červené tlačítko (5c), uchyťte
spařovací jednotku za úchytné prohlubně
a vyjměte.
5. Spařovací jednotku (5a) důkladně vyčistěte pod tekoucí vodou.
Nebezpečí opaření!
¡
Přístroj používejte pouze tehdy, je-li
napěňo vač mléka (6) zcela sestaven a
smontován.
86
6. Síto spařovací jednotky držte pod proudem vody.
Page 87

decs
Důležité upozornění: Čistěte čistou vodou
bez čisticích a mycích prostředků a nemyjte
v myčce na nádobí.
7. Vnitřní prostor přístroje důkladně
vyčistěte vlhkým hadříkem, odstraňte
případné zbytky kávy.
8. Spařovací jednotku (5a) a vnitřek
přístroje nechte vyschnout.
9. Nasaďte spařovací jednotku (5a) až na
doraz.
10. Posuňte červený blokovací prvek (5a)
zcela doprava a zavřete dvířka (5b).
Upozornění: Po důkladném vyčištění doporučujeme pravidelně namazat těsnění
ve spařovací jednotce. Po celém obvodu
těsnění naneste tenkou vrstvu speciálně
vyvinutého tuku (obj. č. 311368).
a k rychlejšímu naplnění nádobky na
zbytkovou vodu.
● Přístroj pravidelně odvápňujte, zabráníte
tak tvorbě vápených usazenin. Zbytky vápníku způsobují vyšší spotřebu
energie.
Servisní program
Doba trvání: ok. 35 minut
V závislosti na použití bliká v určitých časových odstupech servisní tlačítko (12).
Přístroj by měl být okamžitě vyčistěn a odvápněn servisním programem. Pokud nedojde k provedení servisního programu podle
pokynů, může dojít k poškození přístroje.
Pozor!
¡
Při každém servisním programu používejte
odvápňovací a čisticí prostředek podle návodu. Respektujte bezpečnostní pokyny na
balení čisticích prostředků.
Servisní program v žádném případě nepřerušujte! Kapaliny nepijte!
Nikdy nepoužívejte ocet, prostředky na bázi
octa, kyselinu citrónovou ani prostředky na
bázi kyseliny citrónové!
V žádném případě nevkládejte do zásobníku na mletou kávu (4) odvápňovací tablety
nebo jiné odvápňovací prostředky!
Tipy pro úsporu energie
● Plnoautomat na espresso se automaticky
vypíná po jedné hodině (nastavení z výroby). Přednastavenou dobu jedné hodiny
lze zkrátit (viz „Automatické vypnutí“ v
kapitole „Nastavení“ na straně 81).
● Pokud přístroj nepoužíváte, vypněte ho.
Stiskněte servisní tlačítko (12). Přístroj se
propláchne a vypne.
● Pokud možno nepřerušujte odběr
kávy nebo mléčné pěny. Předčasné
přerušení vede k vyšší spotřebě energie
Speciálně vyvinuté a vhodné odvápňovací a čisticí tablety jsou k dostání v
prodejnách nebo u zákaznické služby.
Objednací
číslo
Čisticí tablety TZ60001 310575
Odvápňovací
tablety
Důležité upozornění: Pokud je do
zásobníku na vodu (16) vložen vodní ltr,
musíte tento ltr před spuštěním servisního
programu bezpodmínečně odstranit.
Obchod Servisní
pracovník
TZ60002 310967
87
Page 88

decs
Pro spuštění servisního programu držte po
dobu nejméně 5 sekund stisknuto servisní
tlačítko (12).
Informace: V průběhu programu bliká
servisní tlačítko (12).
Rozsvítí se ukazatel LED
● Vyprázdněte a opět vložte nádobku na
zbytkovou vodu (8).
Přístroj se dvakrát propláchne.
Rozsvítí se ukazatel LED
● Otevřete zásobník mleté kávy (4).
● Vhoďte jednu čisticí tabletu Siemens a
uzavřete zásobník mleté kávy (4).
● Stiskněte tlačítko start (10).
Rozsvítí se ukazatel LED
● Prázdný zásobník na vodu (16) naplňte
po označení 0,5l vlažnou vodou a nechte
v ní rozpustit 2 odvápňovací tablety
Siemens.
● Stiskněte tlačítko start (10).
Servisní program nyní běží cca 10 minut.
Rozsvítí se ukazatel LED h.
● Pod trysku napěňovače mléka (6)
postavte nádobu o objemu nejméně
0,5 litrů.
● Otevřete napěňovač mléka (6) vytažením.
Servisní program nyní běží cca 12 minut.
Rozsvítí se ukazatel LED D.
● Propláchněte zásobník na vodu (16) a
naplňte ho čerstvou vodou až po značku
max.
● Stiskněte tlačítko start (10).
H.
G.
D.
Servisní program nyní běží cca 8 minut.
Rozsvítí se ukazatel LED
● Vyprázdněte a opět vložte nádobku na
zbytkovou vodu (8).
Pokud používáte ltr, tak ho nyní opět
vložte.
Přístroj je vyčistěn, odvápněn a opět
připraven k provozu.
Důležité upozornění: Pro okamžité odstranění zbytků odvápňovacího roztoku spotřebič otřete měkkým a vlhkým hadříkem. Pod
těmito zbytky se může tvořit koroze.
H.
Ochrana proti mrazu
Aby se zabránilo škodám způso-
¡
beným mrazem, musí být přístroj
před přepravou a skladováním zcela
vyprázdněn.
Informace: Přístroj musí být připraven
k provozu a zásobník na vodu (16) musí být
naplněn.
1. Pod trysku napěňovače mléka (6)
postavte velkou nádobu.
2. Stiskněte tlačítko na ohřev páry (11).
Ukazatel LED h bliká, přístroj se nyní
zahřívá po dobu cca 20 sekund.
3. Po rozsvícení ukazatele LED h, napěňovač mléka (6) vytažením otevřete a
nechte cca 15 sekund pouštět páru.
4. Přístroj vypněte síťovým spínačem
O / I (9).
5. Vyprázdněte zásobník na vodu (16) a
nádobku na zbytkovou vodu (8).
Servisní program nyní běží cca 30 minut a
proplachuje přístroj.
Rozsvítí se ukazatel LED h.
● Napěňovač mléka (6) vtlačením uzavřete.
88
Page 89

decs
Příslušenství
Vobchoděauservisníhopracovníkajek
dostánínásledujícípříslušenství.
Objednací
číslo
Čisticítablety TZ60001 310575
Odvápňovací
tablety
Vodníltr TZ70003 467873
Tuk(tuba) – 311368
Obchod Servisní
pracovník
TZ60002 310967
Likvidace
Obalzlikvidujtezpůsobemšetrnýmkživotnímuprostředí.Tentospotřebičjeoznačen
vsouladusevropskousměrnicí2002/96/
EGonakládáníspoužitýmielektrickýmia
elektronickýmizařízeními(wasteelectrical
andelectronicequipment–WEEE).
Tatosměrnicestanovíjednotnýevropský
(EU)rámecprozpětnýodběrarecyklování
použitýchzařízení.
A
Záruční podmínky
Protentopřístrojplatízáručnípodmínky,
kterébylyvydánynašíkompetentnípobočkouvzemi,vekterábylpřístrojzakoupen.
Záručnípodmínkysimůžetekdykolivvyžádatprostřednictvímsvéhoodbornéhoprodejce,ukteréhojstezakoupilipřístroj,nebo
přímovnašípobočcevpříslušnézemi.
89
Page 90

decs
Řešení jednoduchých problémů
Problém Příčina Náprava
Mlýnek nemele zrnkovou
kávu.
Nelze odebírat horkou vodu. Napěňovač mléka (6) je
Příliš málo nebo žádná
mléčná pěna.
Zrna nepadají do mlýnku
(jsou příliš olejnatá).
znečištěný.
Napěňovač mléka (6) je
znečištěný.
Nevhodné mléko. Použijte mléko s obsahem
Mírně poklepejte na zásobník zrnkové kávy (1). Příp.
zkuste použít jiný druh kávy.
Suchým hadříkem vytřete vyprázdněný zásobník
zrnkové kávy (1).
Vyčistěte napěňovač mléka
(6), viz kapitola „Ošetřování
a každodenní čištění“.
Vyčistěte napěňovač mléka
(6), viz kapitola „Ošetřování
a každodenní čištění“.
tuku nejméně 1,5 %.
Napěňovač mléka (6) není
správně sestaven.
Přístroj je zanesen
vápníkem.
Káva vytéká pouze po kapkách nebo nevytéká vůbec.
Káva nemá vrstvu pěny. Nevhodný typ kávy. Použijte typ kávy s vyšším
Káva je příliš „kyselá“. Je nastaven příliš hrubý
Nedaří-li se vám problém vyřešit, volejte autorizovaný servis!
Telefonní čísla se nachází na posledních stránkách návodu.
Je nastaven příliš jemný
stupeň mletí nebo je mletá
káva příliš jemná.
Přístroj je silně zanesen
vápníkem.
Zrna již nejsou čerstvě
pražená.
Stupeň mletí není nastaven
na kávová zrna.
stupeň mletí nebo je mletá
káva příliš hrubá.
Nevhodný typ kávy. Použijte tmavší pražení.
Navlhčete součásti napěňovače a pevně k sobě
stiskněte.
Spotřebič odvápněte pomocí
2 odvápňovacích tablet,
v případě potřeby nechte
program proběhnout 2 x.
Nastavte hrubší stupeň mletí
nebo použijte hrubší mletou
kávu.
Proveďte odvápnění.
podílem zrn robusty.
Použijte čerstvá zrna.
Nastavte jemný stupeň
mletí.
Nastavte jemnější stupeň
mletí nebo použijte jemnější
mletou kávu.
90
Page 91

Problém Příčina Náprava
Káva je příliš „hořká“. Je nastaven příliš jemný stu-
peň mletí nebo je mletá káva
příliš jemná.
Nevhodný typ kávy. Použijte jiný druh kávy.
Vodní ltr nedrží v zásobníku na vodu (16).
Ukazatel LED
Kávová sedlina není kompaktní a je příliš vlhká.
Ukazatel LED
Kvalita kávy nebo mléčné
pěny se značně liší.
Při vyjmuté nádobce na
zbytkovou vodu (8) odkapala
na vnitřní základnu přístroje
voda.
Ukazatel LED
Nedaří-li se vám problém vyřešit, volejte autorizovaný servis!
Telefonní čísla se nachází na posledních stránkách návodu.
D svítí.
I bliká.
I svítí.
Vodní ltr není správně
upevněn.
Špatně vsazená vodní nádrž
nebo vodní ltr není propláchnut podle návodu.
Je nastaven příliš jemný
nebo příliš hrubý stupeň
mletí, nebo je použito málo
mleté kávy.
Znečištěná spařovací
jednotka (5).
Spařovací jednotka (5) obsahuje příliš mnoho mleté
kávy.
Mechanismus spařovací
jednotky je těžce pohyblivý.
Přístroj je zanesen
vápníkem.
Nádobka na zbytkovou vodu
(8) byla vyjmuta příliš brzy.
Chybí spařovací jednotka
(5) nebo nebyla rozpoznána.
Nastavte hrubší stupeň mletí
nebo použijte hrubší mletou
kávu.
Vtlačte vodní ltr rovně
a pevně do přípoje v
zásobníku.
Vsaďte správně vodní nádrž
nebo propláchněte vodní ltr
podle návodu a uveďte do
provozu.
Nastavte hrubší nebo jemnější stupeň mletí nebo použijte 2 zarovnané odměrky
mleté kávy.
Vyčistěte spařovací jednotku
(5).
Vyčistěte spařovací jednotku
(5) (Používejte nejvýše dvě
zarovnané odměrky mleté
kávy).
Vyjměte a vyčistěte spařovací jednotku, viz kapitola
„Ošetřování a každodenní
čištění“.
Podle návodu proveďte odvápnění dvěma odvápňovacími tabletami.
Nádobku na zbytkovou vodu
(8) vyjměte teprve po několika sekundách po posledním
odebrání nápoje.
Přístroj se zasunutou spařovací jednotkou (5) vypněte,
vyčkejte tři sekundy a znovu
zapněte.
decs
91
Page 92

decs
Problém Příčina Náprava
Tovární nastavení bylo
změněno a má se opět
aktivovat („Reset“).
Ukazatelé LED
blikají.
Byla provedena vlastní, nyní
již nechtěná nastavení.
Došlo k závadě přístroje. Volejte servisní službu.
Pomocí síťového spínače
O / I (9) přístroj vypněte. Držte současně stisknuto servisní tlačítko (12) a tlačítko
na ohřev páry (11) a síťovým
spínačem O / I (9) přístroj
zapněte. Nakonec potvrďte
tlačítkem start (10). Tovární
nastavení jsou obnovena.
Ukazatelé LED
Ukazatelé LED
Nedaří-li se vám problém vyřešit, volejte autorizovaný servis!
Telefonní čísla se nachází na posledních stránkách návodu.
blikají.
blikají.
Chybné napětí. Přístroj provozujte pouze s
napětím 220 -240 V.
Příliš studená okolní teplota. Přístroj provozujte při
teplotách > 5° C.
Technické údaje
Elektrické připojení (napětí/frekvence) 220-240 V / 50-60 Hz
Výkon topení 1600 W
Maximální tlak čerpadla, statický 15 bar
Maximální objem zásobníku na vodu (bez ltru) 1,7 l
Maximální objem zásobníku zrnkové kávy 300 g
Délka kabelu 100 cm
Rozměry (V x Š x H) 385 x 280 x 479 mm
Hmotnost, nenaplněný stav 9,3 kg
Druh mlýnku Keramika
92
Page 93

ru
Оглавление
Объем поставки ......................................94
Обзор .......................................................94
Элементы управления ............................95
− Сетевой выключатель O / I ..................95
− Сервисная кнопка
− Кнопка пара
− Кнопка пуска C ...................................95
− Светодиодные индикаторы .................95
− Поворотный регулятор
«Крепость кофе» .................................96
− Поворотный переключатель
«Выбор напитка» .................................96
− Насадка для приготовления
молочной пены ....................................96
Перед первым использованием ............96
Фильтр для воды .....................................98
Настройки ................................................99
− Жесткость воды ...................................99
− Автоматическое отключение ..............99
− Настройка температуры
заваривания .......................................100
− Установка степени помола ...............100
Приготовление кофе
из кофейных зерен ...............................101
Приготовление кофе
из молотого кофе ..................................101
Приготовление горячей воды ...............101
Приготовление молочной пены ...........102
Уход и ежедневная очистка .................102
− Чистка насадки для приготовления
молочной пены ..................................103
− Очистка заварочного блока ..............104
Советы по экономии энергии ...............105
Сервисная программа ..........................105
Защита от замерзания..........................107
Принадлежности ...................................107
Утилизация ............................................107
Условия гарантийного обслуживания ..107
Самостоятельное устранение
небольших проблем..............................108
Технические характеристики................ 111
A ...........................95
B .....................................95
Уважаемые любители кофе!
Сердечно поздравляем Вас с приобретением полностью автоматической
кофемашины эспрессо производства
компании Siemens.
Указания по технике
безопасности
Внимательно ознакомьтесь с инструкцией по эксплуатации, при работе руководствуйтесь указа ниями данной инструкции и сохраняйте ее для
дальнейшего использования!
В случае продажи прибора просьба
передать инструкцию по эксплуатации
новому владельцу. Данная полностью
автоматическая кофемашина эспрессо
предназначена для бытового использования и рассчитана на соответствующую производитель ность; она не
предназначена для промышленного
применения.
Опасность поражения током!
¡
При подключении прибора и при работе
соблюдать данные, приведенные на типовой табличке.
Пользоваться прибором допускается
только при отсутствии повреждений кабеля и прибора.
Пользоваться прибором только внутри
помещений при комнатной температуре.
Не допускается пользование прибором
лицами (включая детей) с пониженным
уровнем физического, психического или
умственного развития или недостаточными опытом и знаниями, за исключением
случаев, в которых пользование прибором производится под присмотром лица,
ответственного за их безопасность, или
данные лица получили от него соответствующие инструкции.
Хранить прибор в недоступном для детей
месте. Следить за тем, чтобы дети не
использовали прибор как игрушку.
93
Page 94

ru
В случае сбоя в работе немедленно извлечь из розетки вилку сетевого кабеля.
Для предотвращения опасных ситуаций
ремонт прибора (например, замена поврежденного сетевого кабеля) может
выполняться только нашей сервисной
службой.
Запрещается погружать в воду прибор
или сетевой кабель.
Не суйте руки в кофемолку.
Не используйте прибор в помещениях с
минусовой температурой.
Опасность ожога горячей
¡
жидкостью!
молочной пены (6) насадки для приготовления молочной пены сильно нагревается. После использования дождаться
охлаждения, только после этого прикасаться.
Используйте прибор только после сборки
и установки насадки для приготовления
молочной пены (6).
Риск удушья!
¡
Не разрешайте детям играть с упаковочным материалом.
Объем поставки
(См. обзорную иллюстрацию в начале
инструкции)
1 Полностью автоматическая
кофемашина эспрессо TE501
2 Инструкция по эксплуатации
3 Индикаторная полоска для
определения жесткости воды
4 Мерная ложка для молотого кофе
5 Смазка (тюбик)
Обзор
(См. рисунки A, B, C, D и Е в начале
инструкции)
1 Емкость для кофейных зерен
2 Крышка, сохраняющая аромат
3
Поворотный регулятор степени помола
4 Выдвижной отсек для молотого кофе
(молотый кофе / таблетка для очистки)
5 Заварочный блок (рис. E)
a) Заварочный блок
b) Дверца
c) Нажимная кнопка
d) Фиксатор
6 Насадка для приготовления молочной
пены (рис. C) сниматься
a) Паровой клапан
b) Металлическая гильза
c) Функциональная трубка
d) Функциональный сердечник
e) Вентиляционное отверстие
7 Устройство разлива кофе
регулируется по высоте
8 Поддон для капель (рис. D)
a) Заслонка
b) Емкость для кофейной гущи
c) Поддон для капель под
устройством разлива кофе
d) Решетка-подставка под
устройством разлива кофе
e) Поплавок
9 Сетевой выключатель O / I
10 Кнопка пуска C
11 Кнопка пара B
12 Сервисная кнопка A
13 Поворотный регулятор
«Крепость кофе»
14 Поворотный переключатель
«Выбор напитка»
15 Светодиодный индикатор
16 Съемная емкость для воды
17 Крышка емкости для воды
18 Мерная ложка для молотого кофе
(помощь в установке фильтра для воды)
19 Отсек для хранения мерной ложки
20
Кабель питания с отсеком для хранения
94
Page 95

ru
Элементы управления
Сетевой выключатель O / I
Сетевой выключатель O / I (9) служит
для включения прибора или полного
его выключения (отключение подачи
электропитания).
Важно: Перед выключением выполните
программу промывки либо используйте
для выключения сервисную кнопку (12).
Сервисная кнопка A
Посредством недолгого нажатия сервисной кнопки (12) прибор промывается и
отключается. Если сервисная кнопка (12)
мигает, нужно выполнить сервисную программу. Посредством продолжительного
нажатия сервисной кнопки (12) запускается сервисная программа. Во время
выполнения сервисной программы сервисная кнопка (12) мигает, она гаснет по
окончании программы.
Кнопка пара B
Посредством нажатия кнопки пара (11)
производится пар, который служит для
приготовления молочной пены.
Кнопка пуска C
Посредством нажатия кнопки пуска (10)
запускается приготовление напитков.
Посредством повторного нажатия в процессе приготовления можно преждевременно остановить приготовление.
Светодиодные индикаторы
Если соответствующие светодиодные индикаторы горят или мигают, это означает
следующее:
D горит Емкость для воды пустая,
ее необходимо снова
наполнить.
D мигает Фильтр для воды выработал
свой ресурс, и его необходимо заменить.
E горит Емкость для кофейных зерен
пуста, ее необходимо снова
наполнить.
F горит Паровой клапан нужно от-
крыть или закрыть.
F мигает В зависимости от настройки
из насадки для приготовления молочной пены выходит
пар или горячая вода.
G горит При выборе G при помощи
поворотного регулятора
«Крепость кофе» символ
горит в процессе приготовления молотого кофе.
H горит Поддон для капель отсут-
ствует или установлен неправильно, установите поддон для капель.
H мигает Поддоны полные, опоржнить
и снова установить поддоны.
I горит Дверца заварочного блока
открыта, закройте дверцу.
I мигает Извлеките и почистите зава-
рочный блок.
95
Page 96

ru
Поворотный регулятор
«Крепость кофе»
При помощи поворотного
регулятора (13) настраивается крепость кофе и задается выбор молотого кофе.
h
до
g
G
Поворотный переключатель
«Выбор напитка»
a
до
c
b
до
d
Насадка для приготовления молочной
пены
Насадку для приготовления молочной пены (6) можно открыть и закрыть
путем вытягивания и вдавливания
соответственно.
Очень слабый
Слабый
Нормальный
Крепкий
Молотый кофе
При помощи поворотного
переключателя (14) можно
выбрать нужный напиток и
нужное количество. Кроме
того, изменяются настройки пользователя.
Малый эспрессо
Эспрессо
Малый черный кофе
Черный кофе
Большой черный кофе
2 малых эспрессо
2 эспрессо
2 малых черных кофе
2 черных кофе
2 больших черных кофе
Перед первым
использованием
Общие сведения
В соответствующие емкости следует
заливать только чистую, холодную, негазированную воду и засыпать специальные смеси кофейных зерен, предназначенные для кофеварок эспрессо и
полностью автоматических кофемашин
эспрессо. Не использовать кофейные
зерна, покры тые глазурью, карамелью
или обработанные другими сахаросодержащими добавками - они засоряют блок
заваривания.
В данном приборе можно устанавливать
жесткость воды. На заводе установлена
степень жесткости воды 4. Жесткость
используемой воды определить с помощью прилагаемой индикаторной полоски.
Если в процессе проверки выявлено
значение, отличное от 4, прибор псле
запуска в эксплуатацию запрограммируйте соответствующим образом (см.
«Жесткость воды» в главе «Настройки»
на стр. 99).
Начало работы с прибором
1. Снимите защитную пленку.
2. Поставьте полностью автоматическую
кофемашину эспрессо на ровную и
достаточно прочную для ее массы
водостойкую поверхность. Вентиляци-
онные отверстия должны оставаться
свободными.
Важно: Используйте прибор только в помещениях, защищенных от мороза. Если
прибор транспортировался или хранился
при температурах ниже 0 °C, то перед
вводом его в эксплуатацию нужно выждать не менее 3 часов.
96
3. Вытяните сетевой кабель со ште-
кером из отсека для кабеля (20) и
подключите к розетке. Необходимую
длину можно отрегулировать, убирая
кабель вверх или вытягивая его вниз.
Page 97

ru
Для этого установите заднюю часть
прибора, например, у края стола и потяните кабель вниз или вверх.
4. Установите насадку для приготовления молочной пены. Пользуйтесь
прибором только в том случае, если
насадка для приготовления молочной
пены (6) полностью собрана и установлена.
5. Поднимите крышку емкости для воды
(17).
6. Снять емкость для воды (16), промыть ее и заполнить свежей, холодной водой. Учитывайте отметку уровня заполнения max.
7. Ровно установить емкость для воды
(16) и, надавив на нее, вставить до
упора.
8. Закрыть крышку емкости для воды (17).
9. Емкость для кофейных зерен (1) наполните кофейными зернами (для
приготовления из напитка из молотого
кофе см. главу «Указания по технике
безопасности» на стр. 93).
10. Включите прибор при помощи сетевого выключателя O / I (9). Индикатор D
мигает, а индикатор F горит.
11. Поставьте сосуд под насадку для приготовления молочной пены (6).
12. Осторожно вытяните насадку для приготовления молочной пены (6), чтобы
ее открыть. Прибор промывает насадку (6) водой. индикатор F мигает.
13. Когда индикатор F мигает, вдавите
насадку для приготовления молочной
пены (6), чтобы ее закрыть.
Прибор нагревается и промывается. Из
устройства разлива кофе вытекает небольшое количество воды. Когда кнопки
A (12), B (11) и C (10) горят, прибор
готов к использованию.
Выключение прибора
Если прибор не используется в течение
часа, он автоматически промывается
и отключается (время отключения
можно настроить, см. «Автоматическое
выключение» в главе «Настройки» на
странице 99).
Исключение: При заборе только горячей
воды или пара прибор отключается без
промывки.
Чтобы выключить прибор вручную,
нажмите сервисную кнопку (12). Прибор
промывается и отключается.
Указание: При первом использовании
прибора, после выполнения сервисной
программы или после длительного перерыва в работе аромат кофе в первой
чашке не раскрывается в полной мере,
этот кофе не рекомендуется пить.
После ввода прибора в эксплуатацию
устойчивая мелкопористая пенка получается только после приготовления нескольких чашек кофе.
При длительном использовании является
нормальным, что на вентиляционных отверстиях образуются капельки воды.
97
Page 98

ru
Фильтр для воды
При помощи фильтра для воды можно
уменьшить образование накипи.
Перед использованием нового фильтра
для воды его нужно промыть. Для этого
действуйте следующим образом:
1. Фильтр для воды при помощи мерной
ложки (18) прочно вдавите в пустую
емкость для воды.
2. Емкость для воды (16) наполните
водой до отметки max.
3. Установите поворотный
регулятор (13) в положение
4. Кнопки B (11) и A (12) удерживайте
нажатыми одновременно в течение
минимум 5 секунд. Загорится либо
«выкл», либо «вкл».
5. Посредством нажатия кнопки пуска
(10) установите «вкл».
6. Для подтверждения кнопку пуска
(10) удерживайте нажатой минимум
в течение 5 секунд, пока все светодиодные индикаторы ненадолго не
загорятся.
7. Индикатор D мигает, а индикатор F
горит.
8. Установите емкость объемом 0,5 л
под насадкой для приготовления молочной пены (6).
9. Откройте насадку (6), вытянув ее.
Индикатор F мигает.
10. Вода течет через фильтр и промывает
его.
11. Когда индикатор F загорится, насадку для приготовления молочной пены
(6) закройте, вдавив ее.
12. Опорожните емкость.
Прибор снова готов к работе.
После включения индикации замены
фильтра или макс. через два месяца
резерв фильтра выработан. Замена необходима по соображениям гигие ны и с
целью предотвращения образования накипи (возможны повреждения прибора).
Запасные фильтры можно приобрести в
магазинах (TZ70003) или через сервисную службу (467873). При использовании
нового фильтра измените настройку для
фильтра, как описано в главе «Жесткость воды».
К сведению: При помощи индикатора
фильтра можно отметить месяц, в котором был вставлен новый фильтр. Вы
можете также отметить месяц, в котором
нужно следующий раз заменить фильтр
(максимум спустя два месяца).
К сведению: При промывке фильтра
одновременно активируется индикатор
замены фильтра (= индикатор D мигает).
98
К сведению: После длительного пере-
рыва в использовании фильтр следует
промыть. Для этого приготовьте чашку
горячей воды и вылейте ее.
Page 99

ru
Настройки
У Вас есть возможность индивидуально
регулировать настройки.
Можно настроить следующее:
Жесткость воды
В данном приборе можно устанавливать
жесткость воды. Правильная настройка
жесткости воды важна для обеспечения
своевременного напоминания о необходимости удаления накипи. На заводе
установлена степень жесткости воды
4. Жесткость воды можно определить с
помощью прилагаемой индикаторной полоски или узнать ее на местной станции
водоснабжения.
Ненадолго опустите индикаторную полоску в воду, потом слегка стряхните, и уже
через минуту можно будет видеть результат тестирования.
Степень Градус жесткости воды
Немецкая
шкала (°dH)
1
2
3
4
Если необходимо задать другую настройку жесткости воды или вставить фильтр
для воды, действуйте следующим
образом:
1. Установите поворотный
регулятор (13) в положение
2. Кнопки B (11) и A (12) удерживайте
нажатыми одновременно в течение
минимум 5 секунд. Количество горящих светодиодных индикаторов символизирует заданную жесткость воды.
3. Кнопку пуска (10) нажимайте до тех
пор, пока не загорится нужная жесткость воды, например, для жесткости
воды 3 горят индикаторы D, E и F.
1-7
8-14
15-21
22-30
Французская
шкала (°fH)
1-13
14-25
26-38
39-54
4. Кнопку пуска (10) удерживайте нажатой минимум в течение 5 секунд.
Заданные светодиодные индикаторы
начинают мигать, выбранная жесткость воды сохранена.
Важно: При использовании фильтра для
воды (специальная принадлежность №
арт. 467873) действуйте следующим образом, см. раздел «Фильтр для воды» на
стр. 98.
Указание: Если в течение 90 секунд
ни одна кнопка не нажимается, прибор
переходит в режим готовности для приготовления кофе, не сохраняя настройки.
Установленная до этого жесткость воды
не меняется.
Автоматическое отключение
Здесь можно задать время, по истечении
которого прибор автоматически отключается после последнего приготовления
кофе. Можно установить значение времени от 15 минут до 4 часов. Предварительно установленное время составляет
1 час, в целях экономии электроэнергии
его можно уменьшить.
1. Установите поворотный
регулятор (13) в положение
2. Кнопки B (11) и A (12) удерживайте
нажатыми одновременно в течение
минимум 5 секунд. Количество горящих светодиодных индикаторов
символизирует заданное время для
отключения.
99
Page 100

ru
3. Кнопку пуска (10) нажимайте до тех
пор, пока не загорится нужно время
отключения:
D = 15 минут
D и E = 30 минут
D, E и F = 45 минут
D, E, F и G = 1 час
D, E, F, G и H = 2 часа
D, E, F, G, H и I = 4 часа
4. Кнопку пуска (10) удерживайте нажатой минимум в течение 5 секунд.
Заданные светодиодные индикаторы
начинают мигать, выбранное время
отключения сохранено.
Указание: Если в течение 90 секунд
ни одна кнопка не нажимается, прибор
переходит в режим готовности для приготовления кофе, не сохраняя настройки.
Ранее сохраненное время отключения
остается в силе.
Настройка температуры заваривания
Также температуру заваривания можно
задать.
1. Установите поворотный
регулятор (13) в положение
2. Кнопки B (11) и A (12) удерживайте
нажатыми одновременно в течение
минимум 5 секунд. Количество горящих светодиодных индикаторов
символизирует заданную температуру
заваривания.
3. Кнопку пуска (10) нажимайте до тех
пор, пока не загорится нужная температура заваривания:
Светодиод D = низкая
Светодиод D и E = средняя
Светодиод D, E и F = высокая
4. Кнопку пуска (start)(10) удерживайте
нажатой минимум в течение 5 секунд.
Заданные светодиодные индикаторы
начинают мигать, выбранная температура сохранена.
Указание: Если в течение 90 секунд
ни одна кнопка не нажимается, прибор
переходит в режим готовности для приготовления кофе, не сохраняя настройки.
Установленная до этого температура
заваривания не меняется.
Установка степени помола
Поворотным регулятором (3) можно
установить необходимую степень помола
кофе.
Внимание!
¡
Степень помола регулировать только при
работающей кофемолке! В противном
случае возможно повреждение прибора.
Не прикасайтесь к внутренним частям
кофемолки.
● При работающей кофемолке поворотный регулятор (3) установите между
мелким помолом кофе (a: поворот против часовой стрелки) и более крупным
помолом кофе (b: поворот по часовой
стрелке).
a b
К сведению: Действие новой настройки
будет заметно лишь начиная со второй
чашки кофе.
Совет: Для зерен темной обжарки необходимо установить более тонкий помол,
а зерен более светлой обжарки – более
грубый помол.
100
 Loading...