

Page 1
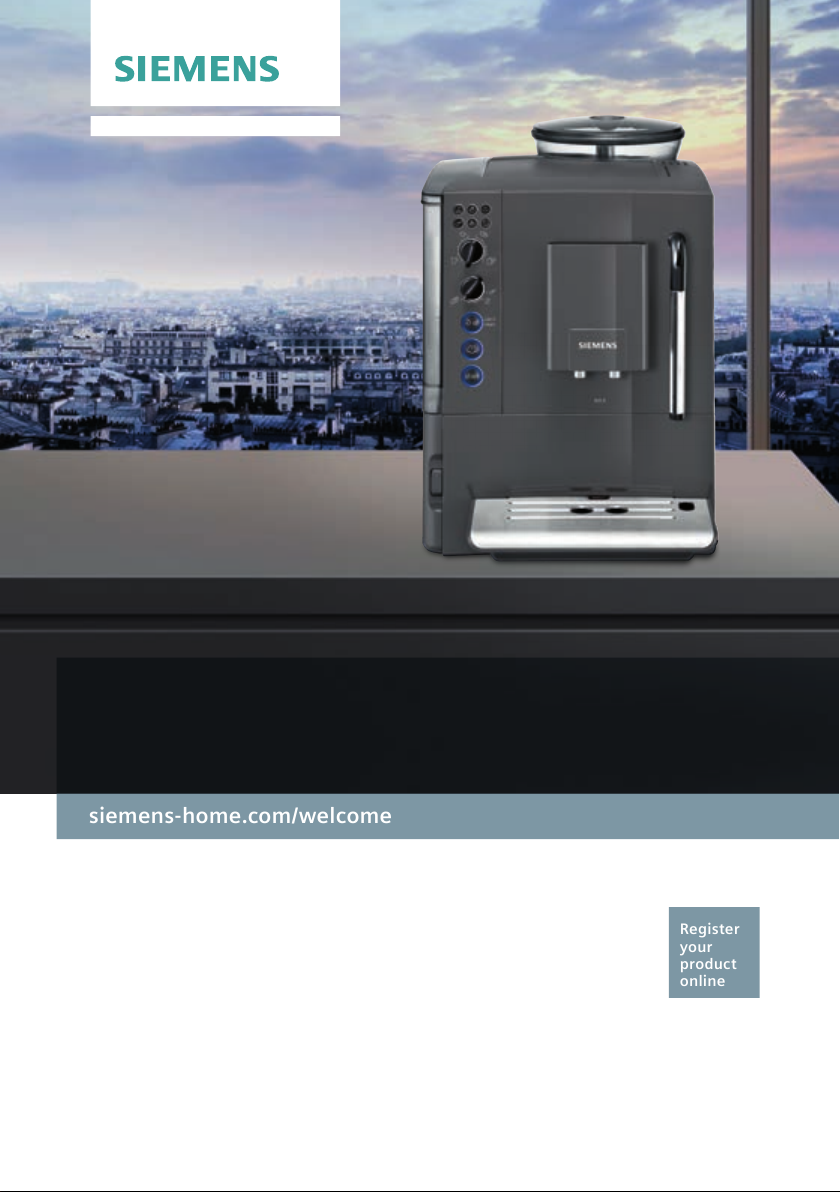
siemens-home.com/welcome
Register
your
product
online
TE 501..
en Instruction manual
fr Mode d’emploi
pl Instrukcjaobsługi
nl Gebruiksaanwijzing
cs Návodkpoužití
ru Инструкцияпоэксплуатации
Page 2
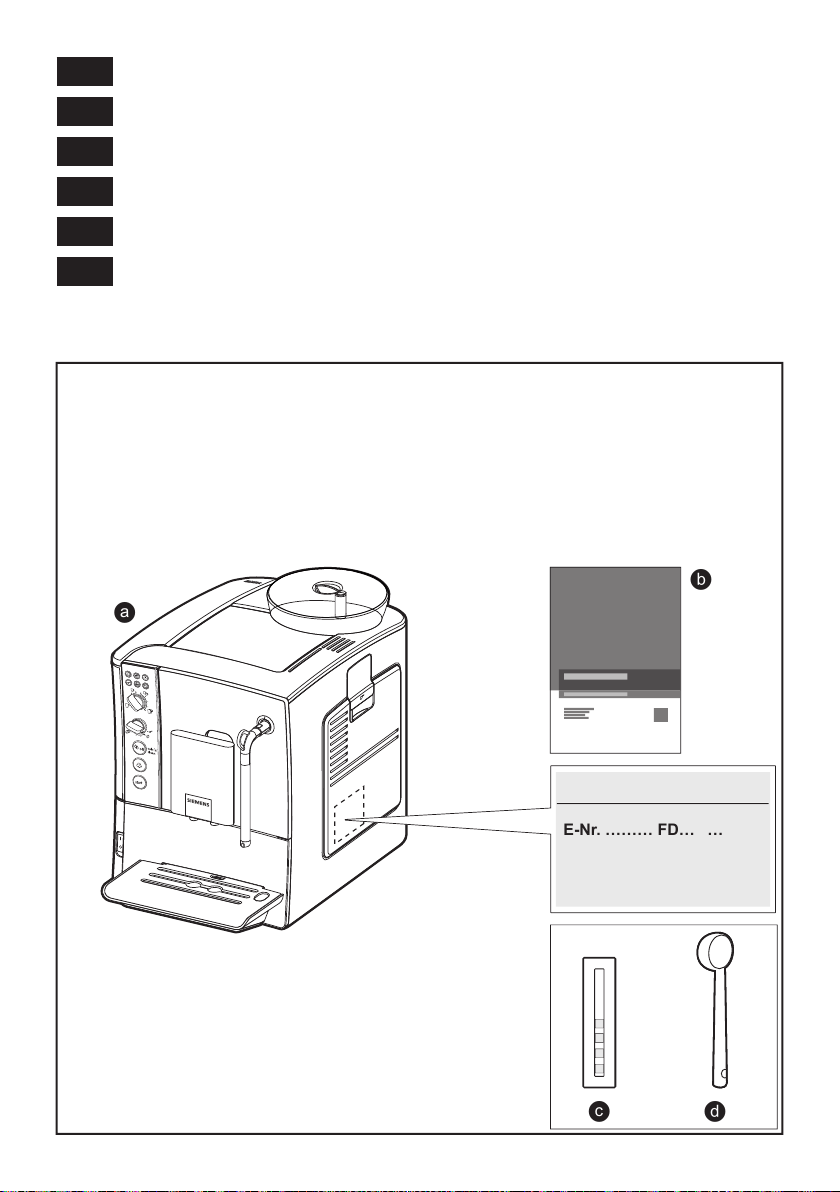
E-Nr. ……… FD… …
a
b
c d
A
5
4
6
9
8 7
10
11
12
13
14
15
16
17
1 2 3
en ���������������������������������������������������������������������������������������������������������������������������������2
fr �������������������������������������������������������������������������������������������������������������������������������20
pl �������������������������������������������������������������������������������������������������������������������������������39
nl �������������������������������������������������������������������������������������������������������������������������������58
cs �������������������������������������������������������������������������������������������������������������������������������77
ru �������������������������������������������������������������������������������������������������������������������������������95
Included in delivery (see page 2)
Contenu de l’emballage (voir page 20)
Zakres dostawy (patrz strona 39)
Leveringsomvang (zie pagina 58)
Součást dodávky (viz strana 77)
Объем поставки (см. стр. 95)
Page 3
A
5
4
6
9
8 7
10
11
12
13
14
15
16
17
1 2 3
Page 4
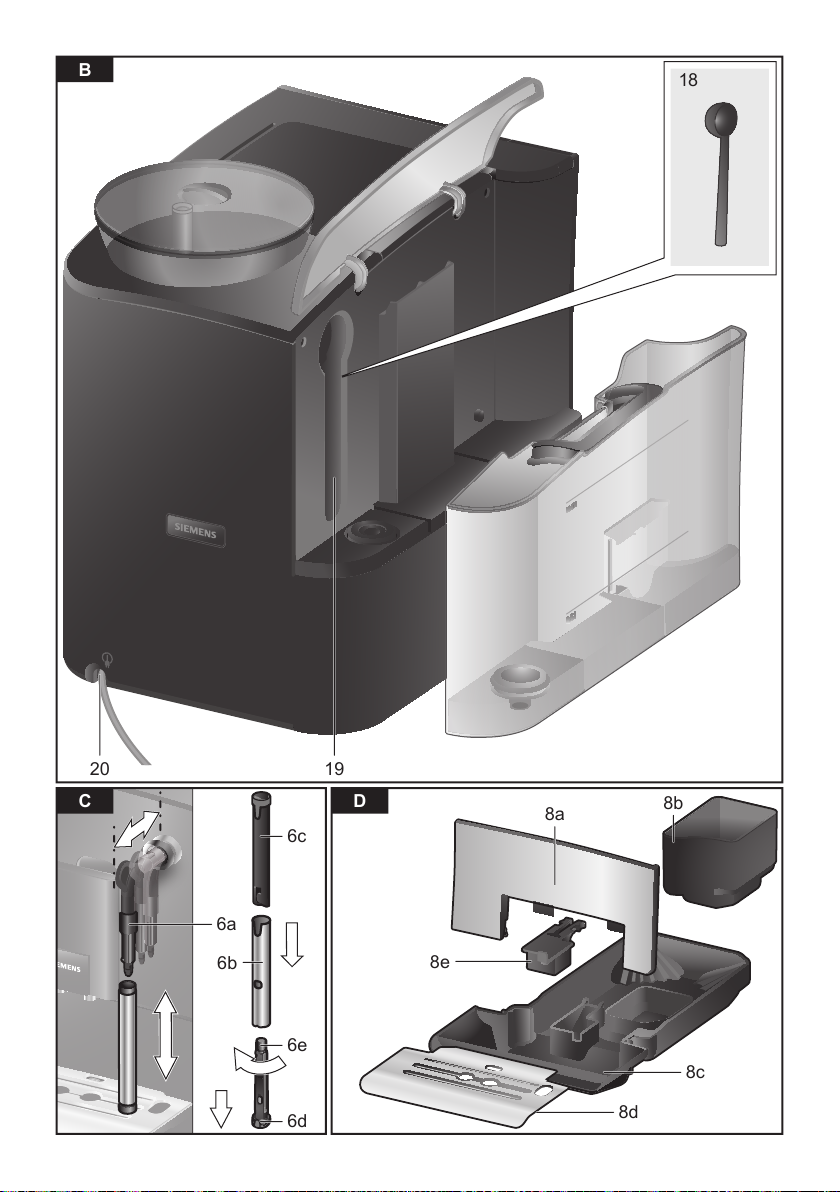
B
C D
8a
6a
18
6c
8d
8c
6e
6d
8b
1920
6b
8e
Page 5
1.
2.
2.
1.
E
5b
5e
5a
5c
5d
Page 6

en
Contents
Included in delivery ������������������������������������� 2
Overview�����������������������������������������������������2
Safety instructions ��������������������������������������3
Controls ������������������������������������������������������5
Before using for the rst time����������������������6
Water lter ��������������������������������������������������7
Settings�������������������������������������������������������8
Preparation using coffee beans ����������������10
Preparation using ground coffee ������������� 11
Dispensing hot water �������������������������������� 11
Preparing milk froth ���������������������������������� 11
Maintenance and daily cleaning ���������������12
Tips on saving energy ������������������������������14
Service programme ����������������������������������15
Frost protection ����������������������������������������16
Accessories ����������������������������������������������16
Disposal ����������������������������������������������������17
Guarantee�������������������������������������������������17
Technical specications ���������������������������� 17
Simple troubleshooting ����������������������������� 18
Dear Coffee Connoisseur�
Congratulations on purchasing this fully
automatic espresso machine from Siemens�
Included in delivery
(see overview image at the start of the
instructions)
a TE501 fully automatic espresso machine
b Operating instructions
c Water hardness testing strips
d Measuring spoon
Overview
(see Figs� A, B, C, D and E at the start of
the instructions)
1 Bean container
2 Aroma cover
3 Selector for grind setting
4 Drawer (ground coffee / cleaning tablet)
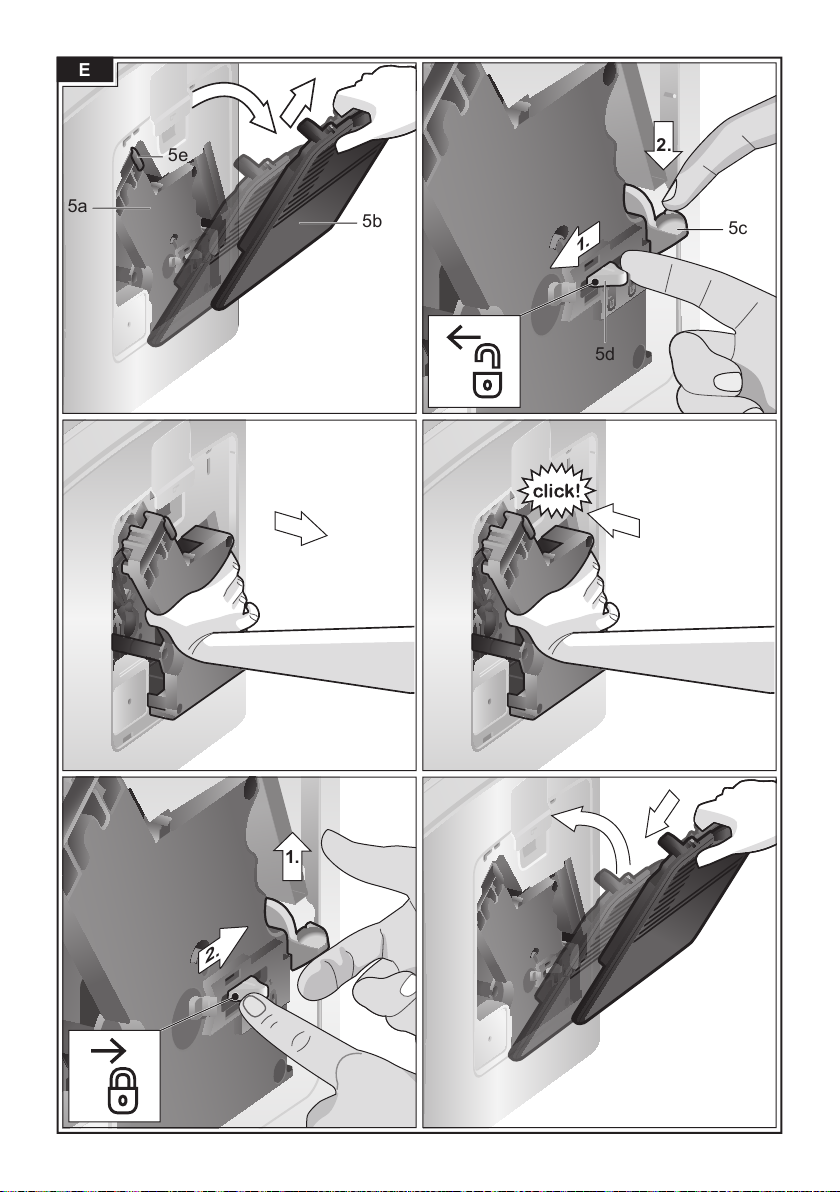
5 Brewing unit (Figure E)
a) Brewing unit
b) Door
c) Eject lever for brewing unit
d) Lock
e) Cover
6 Milk frother (Figure C) removable
a) Steam valve
b) Metal sleeve
c) Frothing tube
d) Steam nozzle
e) Air hole
7 Height-adjustable coffee outlet
8 Drip tray (Figure D)
a) Panel
b) Coffee grounds container
c) Drip tray for coffee outlet
d) Grate for coffee outlet
e) Float
9 Power on/off switch O / I
10 Start button C
11 Steam button B
12 Service button A
13 “Coffee strength” rotary knob
14 “Drink selection” rotary knob
15 LED display
16 Removable water tank
17 Water tank lid
18 Measuring spoon
(insertion aid for water lter)
19 Storage compartment for
measuring spoon
20 Power cable with storage compartment
2
Page 7

en
Safety instructions
Please read and follow the operating instructions carefully and
keep them for later reference. Enclose these instructions when
you give this appliance to someone else. This appliance is
designed for the preparation of normal household quantities in
the home, or in household-like, non-commercial environments.
Household-like environments include staff kitchens in shops,
of ces, agricultural and other small businesses or for use by
guests at bed-and-breakfast establishments, small hotels and
similar residential facilities.
¡ Danger of electric shock!
Connect and operate the appliance only according to the type plate
speci cations. To avoid potential hazards, repairs such as replacing
a damaged cable must only be carried out by our customer service
personnel�
This appliance can be used by children aged from 8 years and
above and by persons with reduced physical, sensory or mental
capabilities or lack of experience and knowledge if they have been
given supervision or instruction concerning use of the appliance in a
safe way and if they understand the hazards involved� Keep children
under 8 years of age away from the appliance and connecting
cable and do not allow them to use the appliance� Children shall
not play with the appliance� Cleaning and user maintenance shall
not be made by children unless they are older than 8 years and
supervised�
Never immerse the appliance or mains cable in water� Use only if
power cord and appliance show no signs of damage� Should a fault
occur, pull the plug or disconnect from the mains immediately�
3
Page 8

en
The appliance contains permanent magnets that may in uence
electronic implants such as pacemakers or insulin pumps� Persons
with electronic implants should keep a minimum of 10 cm away from
the front of the appliance�
¡ Risk of suffocation!
Do not allow children to play with packaging material�
Store small parts safely as they can be easily swallowed�
¡ Risk of injury!
Do not reach into the grinding unit� A misuse of the appliance can
potentially lead to injury�
¡ Risk of burns!
The milk frother gets very hot� After use, allow to cool down rst
before touching� After the use the heating element surfaces and
warming plate can be subjected to residual heat�
4
Page 9

en
Controls
Power on/off switch O / I
The power on/off switch O / I (9) is used to
switch the appliance on or to switch it off
completely (power supply off)�
Important: To switch off, use the service
button (12)�
Service button A
When the service button (12) is pressed
briey, the appliance rinses and switches
off. If the service button (12) ashes, the
service programme needs to be run� Press
and hold the service button (12) to start
the service programme� The service button
(12) ashes while the service programme is
running and turns off when the programme
has ended�
Steam button B
Press the steam button (11) to generate
steam for frothing milk�
Start button C
Press the start button (10) to start preparing
a drink� Press again during drink preparation
to stop the dispensing process early�
LED display
The various LEDs light up and ash to
indicate the following:
D lights up The water tank is empty and
needs to be relled.
D ashes The water lter is exhausted
and needs to be replaced�
Important: When you rst take
the appliance into operation
this ashing light does not
signify “Change lter” (see
“Setting up the appliance”)
E lights up The bean container is empty
and needs to be relled.
F lights up The steam valve needs to be
opened or closed�
F ashes Depending on the setting,
steam or hot water is coming
out of the milk frother�
G lights up When G is selected using
the “coffee strength” rotary
knob, the symbol lights up
while ground coffee is being
dispensed�
H lights up The drip tray is missing or has
not been inserted correctly�
Insert the drip dray�
H ashes The trays are full� Empty the
trays and reinsert them�
I lights up The brewing unit door is open�
Close the door�
I ashes Remove and clean the brewing
unit�
5
Page 10
en
“Coffee strength” rotary knob
This rotary knob (13) is used
to adjust the coffee strength
or select the setting for preground coffee�
h
to
g
G
“Drink selection” rotary knob
a
to
c
b
to
d
Milk frother
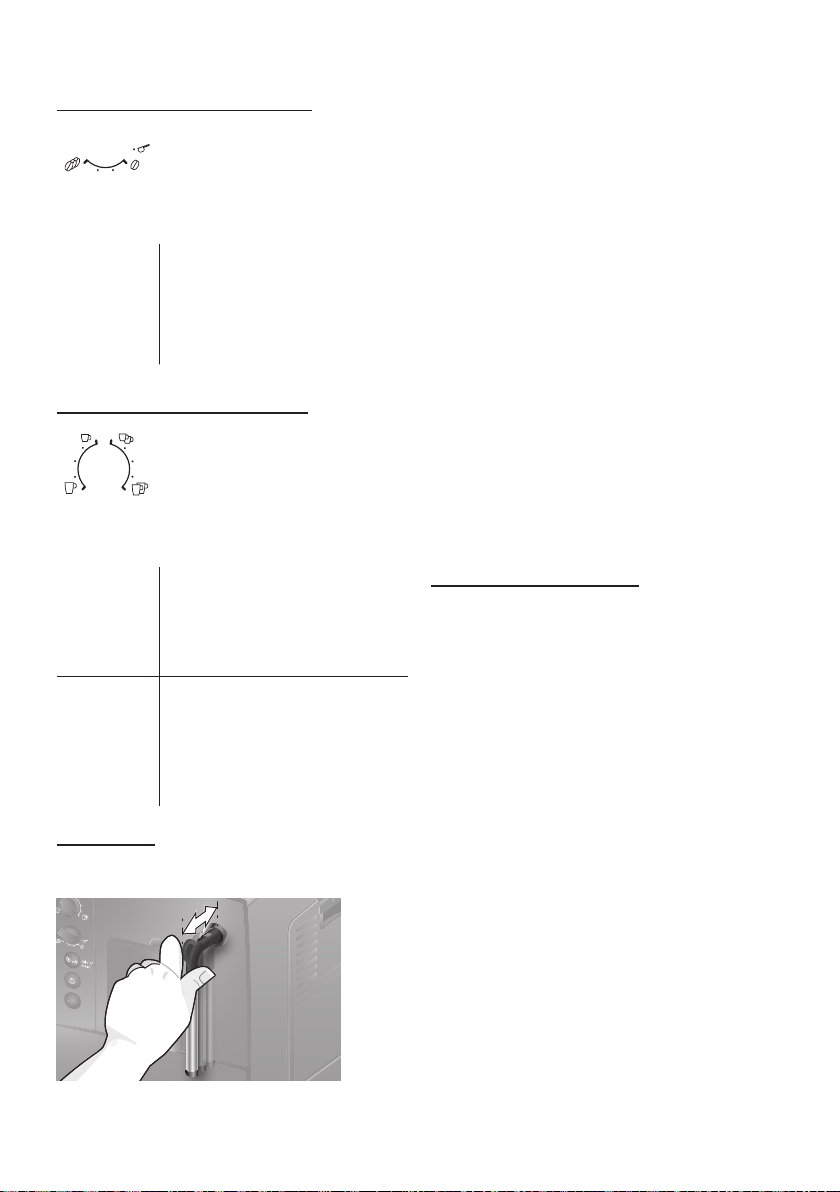
Pull the milk frother (6) out to open it and
push it back in to close it�
Very mild
Mild
Medium
Strong
Ground coffee
This rotary knob (14) is
used to select the required
beverage and quantity� It is
also used to change user
settings�
Small espresso
Espresso
Small café crème
Café crème
Large café crème
2 small espresso
2 espresso
2 small café crèmes
2 café crèmes
2 large café crèmes
Before using for
the rst time
General
Fill the appropriate container using only
pure, cold, uncarbonated water and only
roasted beans (preferably espresso or
coffee bean blends for fully automatic coffee
machines)� Do not use coffee beans that
have been glazed, caramelised or treated
with other additives containing sugar, since
they will block the brewing unit�
The water hardness setting can be adjusted
on this appliance� The factory setting for the
water hardness is 4� Check the hardness
of the water you use with the enclosed test
strip� If the test reveals a value other than 4,
change the setting on the appliance accordingly after switching on (see “Settings”,
“Water hardness”)�
Setting up the appliance
1� Remove the protective lm.
2� Place the fully automatic espresso
machine on a at, water-resistant
surface that can take its weight�
The ventilation slots on the appliance
must not be covered�
Important: Only use the appliance in
frost-free rooms� If the appliance has been
transported or stored at temperatures below
0° C, wait at least 3 hours before operation�
3� Pull out the mains plug from the cable
compartment (20) and plug it in� Adjust
the length of the cable by pushing it
back in and pulling it out� To do this,
place the appliance with its back ush
with the edge of the work surface and
either pull the cable downwards or
push it upwards�
6
Page 11
en
4� Assemble the milk frother� Only use
the appliance when the milk frother (6)
is completely assembled and tted.
5� Lift the water tank lid (17)�
6� Remove and rinse the water tank (16)
and ll it with fresh cold water. Do not ll
above the max mark�
7� Replace the water tank (16) and push it
rmly downwards into place.
8� Close the water tank lid (17)�
9� Fill the bean container (1) with
coffee beans (for preparation using
ground coffee see “Preparation using
ground coffee”)�
10� Press the power on/off switch O / I (9) to
switch on the appliance� LED D ashes
and LED F lights up�
11� Place a container under the milk frother
outlet (6)�
12� Carefully pull out the milk frother (6)
to open it� The appliance rinses out
the milk frother (6) with water� LED F
ashes.
13� When LED F lights up constantly,
press in the milk frother (6) to close it�
Exception: The appliance switches off
without rinsing if only hot water or steam
was dispensed�
To switch the appliance off manually before
this, press the service button
appliance rinses and switches off�
Note: If the appliance is being used for the
rst time, the service programme has been
run, or the appliance has not been operated
for a long period, the rst beverage will
not have the full aroma and should not be
consumed�
When the fully automatic espresso machine
is rst used, you will achieve a suitably thick
and stable “crema” only after the rst few
cups have been dispensed�
If the appliance is in use for a long period
of time, water droplets will form on the
ventilation slits� This is normal�
A (12)� The
Water lter
Using a water lter can prevent a build-up
of limescale deposits�
A new water lter must be rinsed before it
can be used� To do this, proceed as follows:
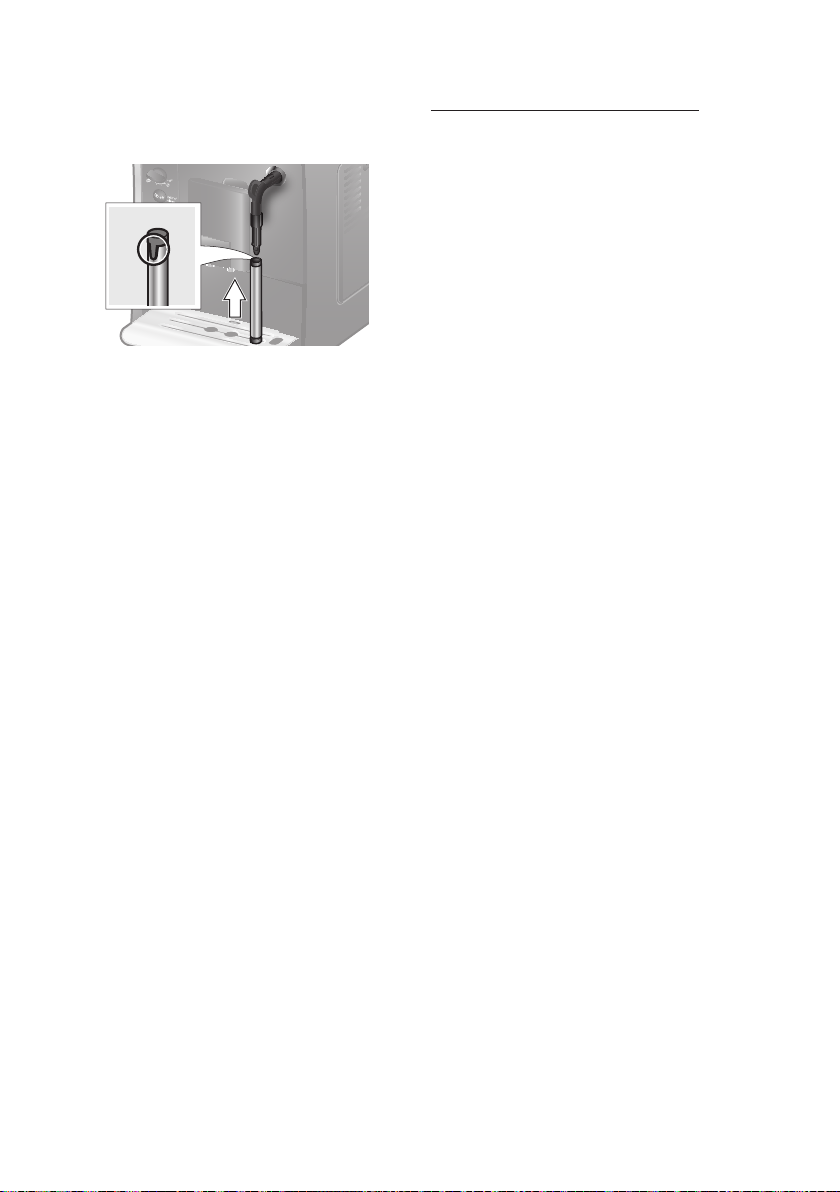
1� Press the water lter rmly into the
empty water tank with the aid of the
measuring spoon (18)�
The appliance heats up and rinses� Some
water will run out of the coffee outlet� When
buttons A (12), B (11) and C (10) light
up, the appliance is ready for use�
Switching off the appliance
The factory settings of the fully automatic
espresso machine are programmed for
optimal performance� The appliance
switches off automatically after a specic
time (the length of time can be adjusted,
see “Settings – Automatic switch-off”)�
2� Fill the water tank (16) with water up to
the max mark�
7
Page 12
en
3� Turn the rotary
knob (13) to position
4� Press and hold buttons
B (11) and
A (12) simultaneously for at least
5 seconds� Either “off” or “on”
lights up�
5� Press the start button (10) to select “on”�
6� Press and hold the start button (10) for
at least 5 seconds to conrm. All of the
LEDs light up briey.
7� LED D ashes and LED F lights up�
8� Place a container with a capacity
of 0�5 litres under the milk frother
outlet (6)�
9� Pull out the milk frother (6) to open it�
LED F ashes.
10� Water will now ow through the lter and
rinse it�
11� When LED
press in the milk frother (6) to close it�
12� Empty the container�
The appliance is ready to use again�
Information: Rinsing the lter simultaneously
activates the setting for the change lter
display (= LED D ashes).
The lter is no longer effective when the
change lter display appears, or at the
latest after two months� It needs to be
replaced for reasons of hygiene and so
that there is no build-up of limescale (this
could damage the appliance)� Replacement
lters can be obtained from retailers or from
customer service (see “Accessories”)� If no
new lter is inserted, change the setting for
the lter (see “Water hardness”).
F lights up constantly,
Information: If the appliance has not been
used for a prolonged period (for example,
when you are on vacation), the existing lter
should be rinsed before the appliance is
used again� To do so, dispense a cup of hot
water and pour it away�
Settings
You can customize the settings on the
appliance�
You can make the following adjustments:
Water hardness
The water hardness setting can be adjusted
on this appliance� It is important to set
the water hardness correctly so that the
appliance can accurately indicate when it is
time to run the descale process� The factory
setting for the water hardness is 4� You can
establish the water hardness either by using
the test strip provided or by asking your local
water provider�
Dip the test strip in the water briey, shake
it gently and check the result after one
minute�
Information: You can use the lter indicator
to mark the month in which you inserted the
lter. You can also mark the month in which
you will need to replace the lter next
(at the latest after two months)�
8
Level Water hardness
German (°dH) French (°fH)
1
2
3
4
If you wish to change the default degree of
water hardness, or if you have inserted a
water lter, proceed as follows:
1-7
8-14
15-21
22-30
1-13
14-25
26-38
39-54
Page 13
en
1� Turn the rotary
knob (13) to position
2� Press and hold buttons B (11) and
A (12) simultaneously for at least
5 seconds� The set water hardness is
indicated by the number of LEDs that
now light up�
3� Now press the start button (10) repeat-
edly until the required water hardness
is indicated, e� g�, for water hardness 3,
LEDs D, E and F will light up�
4� Press and hold the start button (10)
for at least 5 seconds� The set number
of LEDs will light up to indicate that
the selected water hardness has been
saved successfully�
Important: If a water lter is used (see
“Accessories”), proceed as follows, see
“Water lter”.
Note: If no button is pressed within
90 seconds, the appliance switches to
stand-by mode without saving the new
settings� In this case, the previously saved
water hardness setting is retained�
Automatic switch-off
Here you can set the period of time after
which the appliance should switch off
automatically following the last drink
preparation� A time between 15 minutes and
4 hours can be set� To save power you can
specify a shorter period�
1� Turn the rotary
knob (13) to position
2� Press and hold buttons B (11) and
A (12) simultaneously for at least
5 seconds� The time after which the
appliance should switch off is indicated
by the number of LEDs that now light up�
3� Now press the start button (10) repeat-
edly until the required number of LEDs
light up to indicate the switch-off time:
D = 15 minutes
D and E = 30 minutes
D, E and F = 45 minutes
D, E, F and G = 1 hour
D, E, F, G and H = 2 hours
D, E, F, G, H and I = 4 hours
4� Press and hold the start button (10) for
at least 5 seconds� The set number of
LEDs will light up to indicate that the
selected switch-off time has been saved
successfully�
Note: If no button is pressed within
90 seconds, the appliance switches to
stand-by mode without saving the new
settings� In this case, the previously saved
switch-off time is retained�
Setting the brewing temperature
The brewing temperature can also be set�
1� Turn the rotary
knob (13) to position
2� Press and hold buttons
B (11) and
A (12) for at least 5 seconds� The set
brewing temperature is indicated by the
number of LEDs that now light up�
3� Now press the start button (10) repeat-
edly until the required number of LEDs
light up to indicate the temperature:
LED
D = low
LED D and E = medium
D, E,and F = high
LED
4� Press and hold the start button (10) for
at least 5 seconds� The set number of
LEDs will light up to indicate that the
selected temperature has been saved
successfully�
Note: If no button is pressed within
90 seconds, the appliance switches to
stand-by mode without saving the new
settings� In this case, the previously saved
brewing temperature setting is retained�
9
Page 14
en
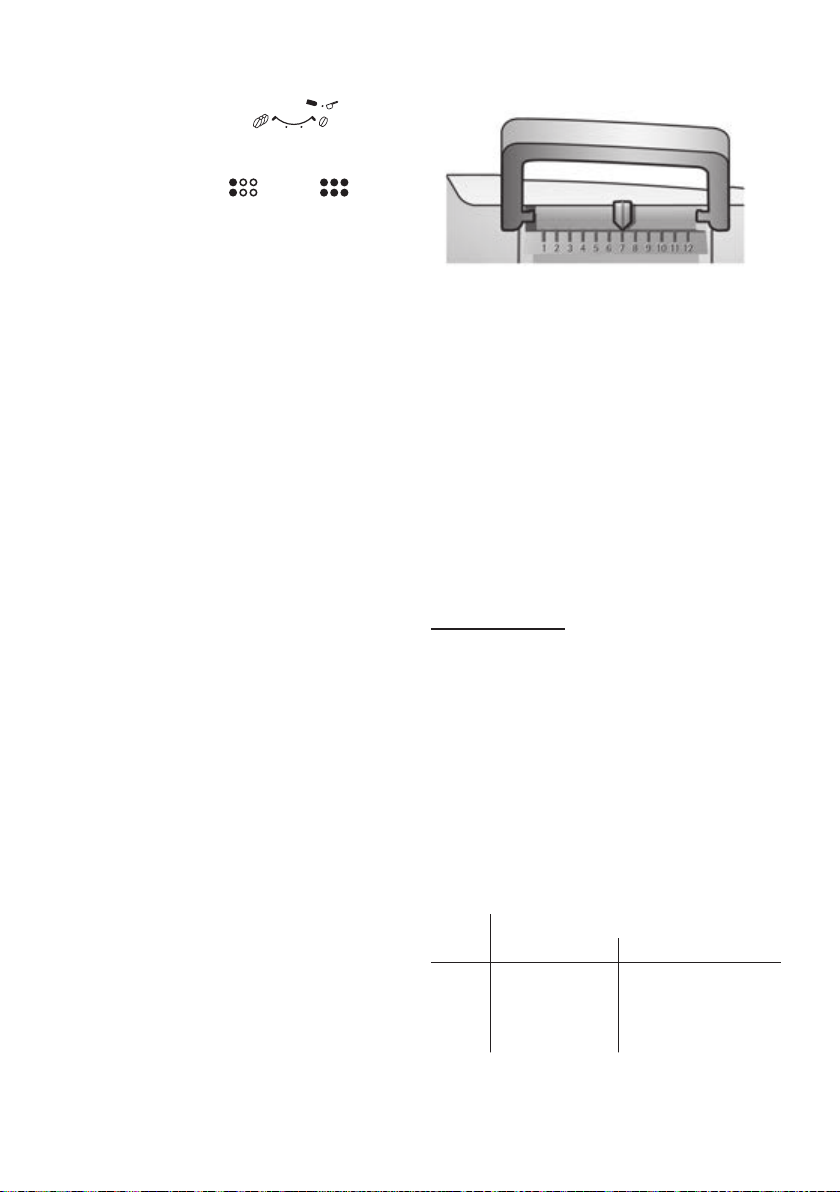
Adjusting the grind settings
The selector (3) for grind setting adjusts the
grind settings from coarse to ne.
Warning!
A
Adjust the grinding unit only while it is
running! Otherwise the appliance may be
damaged� Do not reach into the grinding
unit�
● With the grinding unit running, adjust the
selector (3) from ne (a: turn anticlock-
wise) to coarse (b: turn clockwise)�
a b
Information: The effects of the new grind
setting will not become apparent until after
the second cup of coffee�
Tip: Choose a ner grind for dark roasted
beans and a coarser grind for lighter beans�
Preparation using
coffee beans
This fully automatic espresso machine
grinds beans freshly for each brew�
Tip: If possible, use only beans for fully
automatic coffee and espresso machines�
For optimal quality, deep-freeze the beans
or store in a cool place in sealed containers�
Coffee beans can be ground while frozen�
Important: Fill the water tank (16) with
fresh water every day� The water tank (16)
should always contain sufcient water for
operating the appliance�
Different coffee drinks can be prepared
quite simply at the press of a button�
Preparation
The appliance must be ready for use�
1� Place the pre-warmed cup(s) under the
coffee outlet (7)�
Tip: For a small espresso, always
preheat the cup, e�g� using hot water�
2� Select the required coffee and the
required quantity by turning the upper
rotary knob (14)�
3� Select the required coffee strength by
turning the lower rotary knob (13)�
4� Press the start button (10)�
Coffee is brewed and then poured into the
cup(s)�
10
Press the start button (10) again to stop the
brewing process early�
Page 15

en
Preparation using
ground coffee
This fully automatic espresso machine can
also be operated using ground coffee (not
instant coffee powder)�
Important: Fill the water tank (16) with
fresh water every day� The water tank (16)
should always contain sufcient water for
operating the appliance�
Preparation
1� Open the drawer (4)�
2� Put ground coffee into the drawer
(maximum two level measuring spoons)�
Caution: Do not use whole beans or
instant coffee�
3� Close the drawer (4)�
4� Turn the bottom rotary knob (13) to the
symbol G�
5� Press the start button (10)�
Coffee is brewed and then poured into the
cup�
Dispensing hot water
Preparing milk froth
Risk of burns!
A
The milk frother (6) gets very hot� Hold the
milk frother (6) by the plastic part only�
Tip: You can froth the milk rst and then
dispense coffee, or froth the milk separately
and pour it onto the coffee�
The appliance must be ready for use�
1� Press button B (11)�
Button B ashes and the appliance
now heats up for approximately
20 seconds�
2� As soon as button and LED F lights
up, immerse the milk frother so that it
reaches the bottom of a cup or glass
that is one-third lled with milk.
3� Pull out the milk frother (6) to open it�
Risk of burns!
A
Escaping steam is very hot and may cause
liquids to sputter� Do not touch the metal
sleeve or aim it at anyone�
4� Froth the milk�
5� Push the milk frother (6) in to close it�
Risk of burns!
A
The milk frother (6) gets very hot� Hold the
milk frother (6) by the plastic part only�
The milk frother must be cleaned before
drawing hot water�
The appliance must be ready for use�
1� Place a pre-heated cup or glass under
the milk frother outlet (6)�
2� Pull out the milk frother (6) to open it�
The appliance heats up� Hot water runs
out of the milk frother outlet (6) for about
40 seconds�
3� Stop the process by pushing in the milk
frother (6)�
Tip: For optimal milk froth, if possible use
cold milk with a fat content of at least 1�5 %�
Important: Dried milk residue is difcult
to remove, so the milk frother (6) must be
cleaned with lukewarm water immediately
after use�
11
Page 16
en
Maintenance and
daily cleaning
Risk of electric shock
A
Unplug the appliance before cleaning it�
Never immerse the appliance in water�
Do not use a steam cleaner�
● Wipe the housing with a soft, damp
cloth�
● Do not use abrasive cloths or cleaning
agents�
● Always remove any traces of limescale,
coffee, milk and descaler immediately�
Such residue can cause corrosion�
● New sponge cloths may contain salts�
Salts can cause rust lm on stainless
steel and must therefore be washed out
thoroughly before use�
● Pull the drip tray (8c) with the coffee
grounds container (8b) forwards and
out� Remove the panel (8a) and grate
(8d)� Empty and clean the drip tray and
coffee grounds container�
● Remove the drawer (4) and clean�
● Remove oat (8e) and clean with a
damp cloth�
Do not put the following items in
the dishwasher: panel (8a), oat
O
(8e), drawer (4), brewing unit (5a)�
The following items are dishwashersafe: drip tray (8c), coffee grounds
N
container (8b), grate (8d), aroma
cover (2) and measuring spoon (18)�
● Wipe out the inside of the appliance
(tray holders and drawer)�
Important: The drip tray (8c) and coffee
grounds container (8b) should be emptied
and cleaned daily to prevent mould
developing�
Note: If the appliance is cold when switched
on with the power on/off switch O / I (9) or if
it switches off automatically after coffee has
been dispensed, the appliance performs an
automatic rinse�
Important: If the appliance is not used for
a prolonged period (for example, when you
are on vacation), clean the entire appliance
thoroughly, including the milk system and
brewing unit�
12
Page 17
en
1 2
Cleaning the milk frother
The milk frother (6) must be cleaned after
each use in order to remove residues�
Important: Let the milk frother cool down
before you remove it�
Dismantle the milk frother for cleaning:
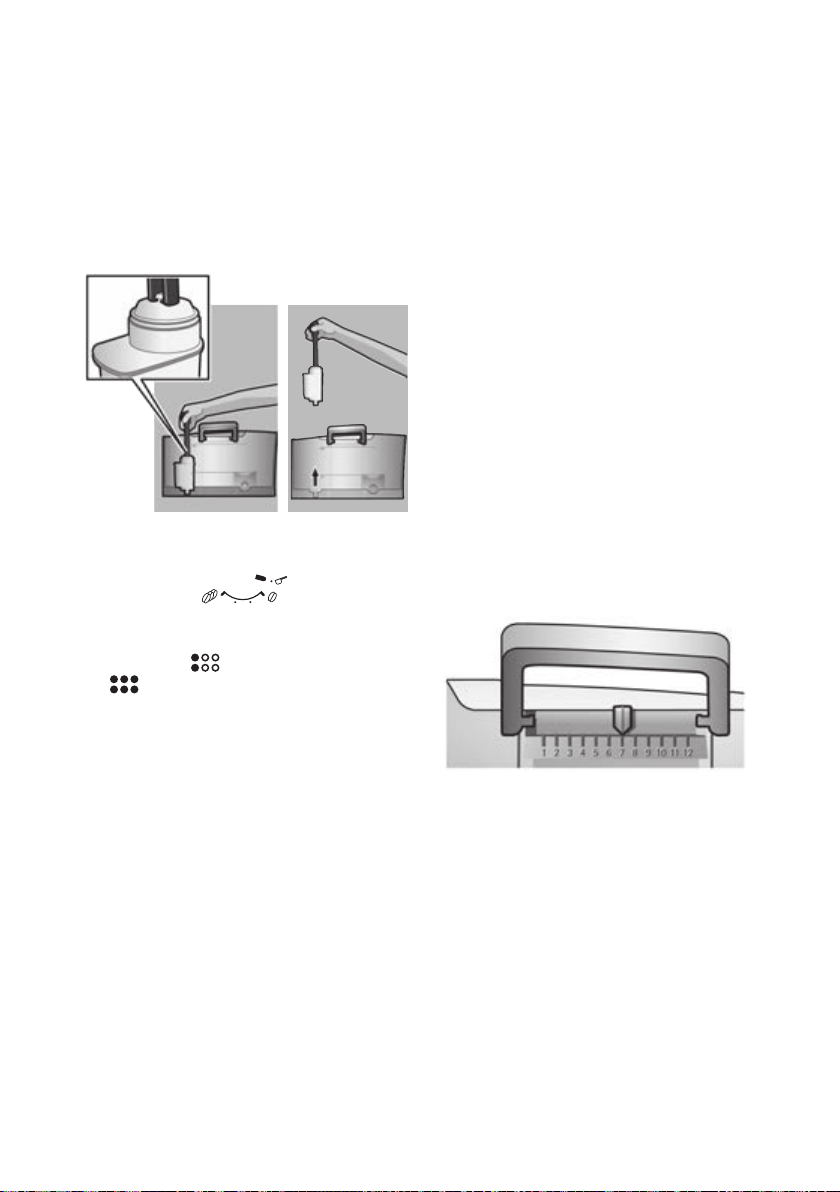
1� To remove, take hold of the metal sleeve
and pull it downwards and off�
2� Twist the steam nozzle (6d) anticlock-
wise and remove it�
1
6d
5� Rinse all parts with clean water and dry�
6� Fit the steam nozzle (6d) and frothing
tube (6c) back into the metal sleeve�
6d6c
7� Twist the steam nozzle clockwise until
the marks are aligned�
8� Attach the milk frother to the steam
valve� Check that the red mark on the
steam valve is covered�
3� Remove the frothing tube (6c)�
6c
4� Clean the individual parts with a
detergent solution and a soft brush�
If necessary, soak in a warm detergent
solution� Clean the air hole (6e)
thoroughly�
2
Risk of scalding!
A
Only use the appliance when the milk
frother (6) is completely assembled and
tted.
6e
13
Page 18
en
Cleaning the brewing unit
Clean the brewing unit regularly�
To pre-clean the brewing unit automatically:
Press the service button (12) briey. The
appliance will rinse if coffee was dispensed
previously� It then switches off�
In addition to the automatic cleaning
programme, the brewing unit (5a) should be
removed regularly for cleaning (Figure E at
the beginning of the instructions)�
1� Press the power on/off switch O / I (9) to
switch off the appliance� All lights go off�
2� Open the door (5b) to the brewing unit�
3� Slide the red lock (5d) on the brewing
unit (5a) completely to the left�
4� Press the eject lever (5c) down fully�
The brewing unit is released�
5� Grasp the brewing unit (5a) by the
recessed grips and remove carefully�
6� Remove the cover (5e) of the brewing
unit and rinse the brewing unit (5a)
thoroughly under running water�
7� Thoroughly clean the brewing unit sieve
under the running water�
Important: Do not clean with detergent or
other cleaning agents and do not put it in
the dishwasher�
8� Wipe out the inside of the appliance
thoroughly with a damp cloth and
remove any coffee residues�
9� Allow the brewing unit (5a) and the
interior of the appliance to dry�
10� Replace the cover (5e) on the brewing
unit and reinsert the brewing unit (5a)
fully into the appliance�
11� Press the eject lever (5c) up fully�
12� Slide the red lock (5d) fully to the right
and close the door (5b)�
14
Tips on saving energy
● Switch off the fully automatic espresso
machine when not in use� To do this,
press the service button (12)� The
appliance rinses and switches off�
● If possible, do not interrupt coffee
or milk froth dispensing� Stopping a
process prematurely results in higher
energy consumption and the drip tray
lls up more quickly.
● Descale the appliance regularly
to avoid a build-up of limescale�
Limescale residue results in higher
energy consumption�
Page 19

en
Service programme
Duration: approx� 35 minutes
Depending on use, the service button (12)
ashes at certain intervals.
The appliance should be cleaned and
descaled immediately using the service
programme� If the service programme is
not run as instructed, the appliance may
be damaged�
Caution!
A
Follow the instructions for using the
descaling and cleaning agents for each
service programme� Please observe the
safety instructions on the packaging of the
cleaning agent�
Never interrupt the service programme�
Do not drink the liquids�
Never use vinegar, vinegar-based products,
citric acid or citric acid-based products�
Never put descaling tablets or other
descaling agents in the drawer (4)�
Specially developed and suitable
descaling and cleaning tablets are
available from retailers or customer
service (see “Accessories”).
Important: If there is a water lter in the
water tank (16), it must be removed before
starting the service programme� Clean the
brewing unit before starting the service
programme, see chapter “Cleaning the
brewing unit”�
To start the service programme, press and
hold the service button (12) for at least
5 seconds�
Information: The service button (12)
ashes while the programme is running.
LED H lights up�
● Empty the drip tray (8) and reinsert it�
The appliance rinses twice�
LED G lights up�
● Open the drawer (4)�
● Drop a Siemens cleaning tablet into
the drawer (4) and close it�
● Press the start button (10)�
LED D lights up�
● Pour lukewarm water into the empty
water tank (16) up to the 0.5 l mark
and then dissolve 1 Siemens descaling
tablet TZ80002 in it� When using
TZ60002, 2 tablets must be dissolved�
● Press the start button (10)�
The service programme will now run for
approximately 10 minutes�
LED F lights up�
● Place a container with a capacity of at
least 0�5 litres under the milk frother
outlet (6)�
● Pull out the milk frother (6) to open it�
The service programme will now run for
approximately 12 minutes�
LED D lights up�
● Rinse the water tank (16) and rell it
with fresh water up to the max mark�
● Press the start button (10)�
The service programme will now run for
approximately 30 seconds and rinse the
appliance�
LED F lights up�
● Push the milk frother (6) in to close it�
The service programme will now run for
approximately 8 minutes�
LED H lights up�
● Empty the drip tray (8) and reinsert it�
If you are using a lter, reinsert it now.
The appliance has been cleaned, descaled
and is ready for use again�
15
Page 20

en
Important: Wipe down the appliance using
a soft, damp cloth to immediately remove
any descaler residue� Such residue can
cause corrosion� New sponge cloths may
contain salts. Salts can cause rust lm
on stainless steel and must therefore be
washed out thoroughly before use�
Frost protection
To avoid damage caused by frost
A
during transport and storage, the
appliance must be completely
emptied rst.
Information: The appliance must be ready
for use and the water tank (16) lled.
1� Place a large container under the milk
frother outlet (6)�
2� Press the steam button (11)�
LED F ashes and the appliance now
heats up for approximately 20 seconds�
3� If LED
4� Press the power on/off switch O / I (9) to
5� Empty the water tank (16) and the drip
F lights up, open the milk frother
(6) by pulling it out and release steam
for about 15 seconds�
switch off the appliance�
tray (8)�
Accessories
The following accessories are available
from retailers or from customer service:
Accessories Ordering number
Retail /
Customer service
Cleaning tablets TZ60001 / 00310575
Descaling tablets TZ80002 / 00576693
Water lter TZ70003 / 00575491
Care set TZ80004 / 00576330
16
Page 21

en
J
Dispose of packaging in an
electronic appliances (waste electrical
The guarantee conditions for this appliance
are as de ned by our representative in the
country in which it is sold� Details regarding
these conditions can be obtained from
the dealer from whom the appliance was
purchased� The bill of sale or receipt must
be produced when making any claim under
the terms of this guarantee�
Changes reserved�
Disposal
environ mentally-friendly manner� This
appliance is labelled in accordance
with European Directive 2012/19/
EU concerning used electrical and
and electronic equipment – WEEE)�
The guideline determines the framework for the return and recycling
of used appliances as applicable
throughout the EU� Please ask your
specialist retailer about current
disposal facilities�
Guarantee
Technical specications
Electrical connection (voltage – frequency) 220-240 V – 50/60 Hz
Heating output 1600 W
Maximum pump pressure, static 15 bar
Maximum water tank capacity (without lter) 1�7 l
Maximum bean container capacity 300 g
Cable length 100 cm
Dimensions (H x B x D) 385 x 280 x 479 mm
Weight, unlled 9�3 kg
Type of grinding unit Ceramic
17
Page 22
en
Simple troubleshooting
Problem Cause Remedy
Grinding unit does not
grind the beans�
No hot water dispensed� The milk frother (6) is
Too little or no milk froth� The milk frother (6) is
Coffee dispensing slows
to a trickle or stops
completely�
Coffee has no “crema”� Unsuitable type of coffee� Use a type of coffee with a higher
Coffee is too “acidic”� The grind setting is too
Coffee is too “bitter”� The grind setting is too ne
The water lter does not
stay in position in the
water tank (16)�
If you are unable to solve the problem, please call the hotline.
You will nd the telephone numbers at the back of these instructions.
Beans are not falling into
the grinding unit (beans too
oily)�
soiled�
soiled�
Milk unsuitable for frothing� Use milk with a fat content of at
The milk frother (6) is not
assembled correctly�
Build-up of limescale in the
appliance�
The grind setting is too ne
or the pre-ground coffee is
too ne.
Build-up of limescale in the
appliance�
The beans are no longer
fresh�
The grind setting is not
suitable for the beans�
coarse or the pre-ground
coffee is too coarse�
Unsuitable type of coffee� Use a darker roast�
or the pre-ground coffee is
too ne.
Unsuitable type of coffee� Change the type of coffee�
The water lter is not tted
correctly�
Gently tap the bean container
(1)� Change the type of coffee if
necessary�
When the bean container (1) is
empty, wipe it with a dry cloth�
Clean the milk frother (6), see
“Maintenance and daily cleaning”�
Clean the milk frother (6), see
“Maintenance and daily cleaning”�
least 1�5%�
Wet the milk frother parts and
press together rmly.
Descale the appliance as
described in the instructions�
Adjust the grinding unit to a
coarser setting or use coarser
pre-ground coffee�
Descale the appliance as
described in the instructions�
proportion of robusta beans�
Use fresh beans�
Adjust the grind setting to ne.
Adjust the grinding unit to a ner
setting or use ner pre-ground
coffee�
Adjust the grinding unit to a
coarser setting or use coarser
pre-ground coffee�
Firmly press the water lter
straight down into the tank
connection�
18
Page 23
Problem Cause Remedy
D ashes.
LED
The coffee grounds are
not compact and are too
wet�
I ashes.
LED
Coffee or milk froth quality
varies widely�
Water dripped onto the
inner oor of the appliance when the drip tray
(8) was removed�
The default settings have
been changed and need
to be reset�
LEDs
LEDs
LEDs
If you are unable to solve the problem, please call the hotline.
You will nd the telephone numbers at the back of these instructions.
ash.
ash.
ash.
The water tank is not
correctly installed or the
lter is worn.
Carbonated water in the
water tank�
The grind setting is too
ne or too coarse, or not
enough ground coffee has
been used�
Brewing unit (5) is soiled� Clean the brewing unit (5)�
Too much pre-ground
coffee in the
brewing unit (5)�
The brewing unit
mechanism is stiff�
Brewing unit (5) is missing
or has not been detected�
Build-up of limescale in the
appliance�
Drip tray (8) removed too
soon�
Some settings have been
made that are no longer
required�
The appliance has a fault� Please contact the hotline�
Incorrect voltage� Operate the appliance at
The ambient temperature is
too cold�
Correctly install the water tank�
If the LED continues to ash,
install a new lter and rinse, see
chapter “Filter”�
Fill the water tank with fresh tap
water�
Adjust the grinding unit to a
coarser or ner setting, or use
2 level measuring spoons of
ground coffee�
Clean the brewing unit (5) Put in
no more than 2 level measuring
spoons of ground coffee�
Remove and clean the brewing
unit, see “Maintenance and daily
cleaning”�
Switch off the appliance with the
brewing unit (5) in place, wait
three seconds and switch on the
appliance again�
Descale the appliance as
described in the instructions�
Wait a few seconds after the
last drink was dispensed before
removing the drip tray (8)�
Press the power on/off button O / I
(9) to switch off the appliance�
Press and hold the service button
(12) and the steam button (11)
and press the power on/off button
O / I (9) to switch on the appliance�
Then press the start button (10) to
conrm. The default settings are
reset�
220 V-240 V only�
Operate the appliance at
temperatures > 5° C�
en
19
Page 24

fr
Table des matières
Contenu de l’emballage ���������������������������� 20
Présentation ���������������������������������������������20
Consignes de sécurité ������������������������������21
Eléments de commande ��������������������������� 23
Avant la première utilisation ���������������������24
Filtre eau���������������������������������������������������26
Réglages ��������������������������������������������������27
Préparation avec du café en grains ���������� 29
Préparation avec du café moulu �������������� 29
Préparer de l’eau chaude �������������������������29
Préparer de la mousse de lait�������������������30
Entretien et nettoyage quotidiens ������������� 30
Conseils pour économiser l’énergie ���������33
Programme de Service �����������������������������33
Protection contre le gel ����������������������������35
Accessoires ����������������������������������������������35
Mise au rebut ��������������������������������������������35
Garantie ����������������������������������������������������35
Eliminer soi-même
les problèmes simples ������������������������������36
Caractéristiques techniques ���������������������38
Chère amatrice de café,
cher amateur de café�
Félicitation pour avoir choisi la cafetière
Siemens�
Contenu de l’emballage
(voir l’illustration gurant au début du
présent Mode d’emploi)
a Machine à espresso automatique TE501
b Mode d’emploi
c Bandelette de dureté de l’eau
d Cuillère-dose
Présentation
(voir les illustrations de vue d’ensemble
A, B, C, D et E au début de la notice)
1 Réservoir à grains
2 Couvercle d’arôme
3 Sélecteur de nesse de mouture
4 Tiroir à café
(café en poudre / pastille de nettoyage)
5 Unité de percolation (gure E)
a) Unité de percolation
b) Volet
c) Levier d’éjection pour
l’unité de percolation
d) Verrou
e) Couvercle de protection
6 Mousseur de lait amovible (gure C)
a) Soupape à vapeur
b) Douille métallique
c) Tube
d) Cœur
e) Trou d’aération
7 Bec verseur du café
(réglable en hauteur)
8 Bac collecteur (gure D)
a) Cache
b) Réservoir à marc de café
c) Bac collecteur bec verseur du café
d) Egouttoir bec verseur du café
e) Flotteur
9 Interrupteur électrique O / I
10 Bouton Start (Démarrage) C
11 Bouton Vapeur B
12 Bouton Service A
13 Bouton rotatif « Intensité du café »
14 Bouton rotatif « Sélection de boisson »
15 Afchage par LED
16 Réservoir d’eau amovible
17 Couvercle du réservoir d’eau
18 Cuillère-dose
(outil de mise en place du ltre à eau)
19 Case de rangement de la cuillère-dose
20 Cordon secteur avec logement
20
Page 25

fr
Consignes de sécurité
Lire attentivement ce mode d’emploi, s’y conformer lors de
l’utilisation et le conserver ! Veuillez joindre ce mode d’emploi
si vous passez l’appareil à quelqu’un d’autre. Cet appareil est
conçu pour la préparation de quantités usuelles, dans le cadre
d’un foyer ou d’un usage non commercial de type domestique.
Citons p. ex. les cuisines du personnel dans les commerces,
bureaux, exploitations agricoles et établissements artisanaux
ainsi que les clients de pensions, petits hôtels et toute autre
résidence de type similaire.
¡ Risque de chocs électriques !
Ne brancher et n’utiliser l’appareil que conformément aux données
indiquées sur la plaque signalétique� Les réparations sur l’appareil
telles que le remplacement d’un cordon endommagé ne doivent être
effectuées que par notre SAV a n d’éliminer tout danger.
Cet appareil peut être utilisé par des enfants à partir de 8 ans et
par des personnes ayant des facultés physiques, sensorielles
ou mentales réduites ou manquant d’expérience et/ou de
connaissances à condition d’être surveillés ou d’avoir été informés
quant à la bonne utilisation de l’appareil et d’avoir compris les
dangers qui en découlent� Les enfants de moins de 8 ans doivent
être tenus éloignés de l’appareil et du cordon d’alimentation et ne
doivent pas utiliser l’appareil� Ne pas laisser les enfants jouer avec
l’appareil� Le nettoyage et l’entretien incombant à l’utilisateur ne
doivent pas être effectués par des enfants sauf s’ils ont 8 ans ou
plus et sont surveillés�
21
Page 26

fr
Ne jamais plonger l’appareil ou le cordon électrique dans l’eau�
N’utiliser la machine que lorsque le cordon électrique et l’appareil
ne présentent aucun dommage� En cas de défaut, débrancher
immédiatement la che secteur ou couper la tension du réseau.
L‘appareil contient des aimants permanents qui peuvent
exercer une in uence sur les implants électroniques tels que
les stimulateurs cardiaques ou les pompes à insuline� Merci aux
porteurs d‘implants électroniques de respecter une distance d‘au
moins 10 cm entre eux et l‘avant de l‘appareil�
¡ Risque d’étouffement !
Ne pas laisser les enfants jouer avec les emballages�
Ranger les petites pièces de manière sûre, elles pourraient être
avalées�
¡ Risque de blessure !
Ne pas mettre les doigts dans le moulin� L’utilisation inappropriée de
la machine peut entraîner des blessures�
¡ Risque de brûlure !
Le mousseur de lait est très chaud� Après utilisation, bien laisser
refroidir avant de le toucher� Après l’utilisation, les surfaces de
l’élément chauffant ou de la plaque chauffante peuvent rester
chaudes pendant une certaine durée�
22
Page 27

fr
Eléments de commande
Interrupteur électrique O / I
L’interrupteur électrique O / I (9) sert à
mettre l’appareil sous tension ou hors
tension (l’alimentation électrique est
coupée)�
Important : Pour éteindre, utiliser le bouton
Service (12)�
Bouton Service A
Après une brève pression sur le bouton
Service (12), l’appareil effectue un
rinçage puis se met hors tension� Si le
bouton Service (12) clignote, exécuter
le programme de Service� Une pression
longue sur le bouton Service (12) lance le
programme de Service� Durant l’exécution
du programme de Service, le bouton
Service (12) clignote ; il s’éteint lorsque le
programme est terminé�
Bouton Vapeur B
Une pression sur le bouton Vapeur (11)
déclenche la production de vapeur nécessaire à la préparation de mousse de lait�
Bouton Start (Démarrage) C
Une pression sur le bouton Démarrage (10)
déclenche la préparation de la boisson� Une
nouvelle pression durant la préparation de
la boisson permet d’arrêter l’écoulement
avant terme�
Afchage par LED
La signication de l’allumage et du clignotement des LED est la suivante :
D est allumée Le réservoir d’eau est vide
et doit être rempli�
D clignote Le ltre à eau est usé et
doit être remplacé�
Important : lors de la mise
en service, le clignotement
ne signie pas « changement du ltre » (voir au
chapitre « Mise en service
de la machine »)
E est allumée Le réservoir à grains est
vide et doit être rempli�
F est allumée La soupape à vapeur doit
être ouverte ou fermée�
F clignote Selon le réglage, de la
vapeur ou de l’eau chaude
sort du mousseur de lait�
G est allumée Si G est sélectionnée
avec le bouton rotatif
« Intensité du café »,
le symbole est allumé
pendant toute la durée
de préparation de café en
poudre�
H est allumée Le bac collecteur est
absent ou mal mis en
place ; le mettre en place�
H clignote Les bacs sont pleins ; vider
les bacs et les remettre en
place�
I est allumée Le volet de l’unité de
percolation est ouvert ;
fermer le volet�
I clignote Retirer et nettoyer l’unité
de percolation�
23
Page 28
fr
Bouton rotatif « Intensité du café »
Ce bouton rotatif (13) permet
de régler l’intensité du café
ou de sélectionner le café en
poudre�
h
à
g
G
Bouton rotatif « Sélection de boisson »
a
à
c
b
à
d
Mousseur de lait
Le mousseur de lait (6) peut être ouvert et
fermé en le tirant et en l’enfonçant�
Très doux
Doux
Normal
Corsé
Café en poudre
Ce bouton rotatif (14) sert
à sélectionner la boisson
souhaitée et la quantité�
Il permet également de
modier les réglages de
l’utilisateur�
Petit espresso
Espresso
Petit café crème
Café crème
Grand café crème
2 petits espressos
2 espressos
2 petits cafés crème
2 cafés crème
2 grands cafés crème
Avant la
première utilisation
Généralités
Utiliser exclusivement de l’eau pure, froide,
sans gaz carbonique et exclusivement
du café en grains torréé (de préférence
pour expresso ou percolateur) et remplir
les conteneurs correspondants� Ne pas
employer des grains de café avec glaçage,
des grains caramélisés ou enrobés d’une
substance sucrée quelconque ; ils obturent
l’unité de percolation�
Il est possible, sur cet appareil, de régler
la dureté de l’eau� En usine, la dureté de
l’eau est réglée sur 4� Tester la dureté
de l’eau utilisée à l’aide de la bandelette
jointe� Si le résultat du test est différent de
4, programmer l’appareil en conséquence
après la mise en service (voir « Dureté de
l’eau » au chapitre « Réglages »)�
Mise en service de la machine
1� Retirer le lm de protection existant.
2� Placer la machine à espresso automa-
tique sur un plan horizontal, sufsamment solide pour supporter son poids et
résistant à l’eau� Les fentes d’aération
de l’appareil doivent être dégagées�
Important : Utiliser l’appareil uniquement
dans des locaux hors gel� Dans le cas où
l’appareil a été transporté ou entreposé
à des températures en dessous de 0° C,
attendre au moins 3 heures avant la mise
en service de l’appareil�
24
3� Tirer la che secteur hors du logement
(20) et la brancher� La longueur peut
être réglée en poussant ou en tirant�
Pour ce faire, placer le dos de l’appareil
par ex� au bord d’une table et tirer le
cordon vers le bas ou le pousser vers
le haut�
Page 29
fr
4� Monter le mousseur de lait� N’utiliser
l’appareil que si le mousseur de lait (6)
est complètement assemblé et monté�
5� Remonter le couvercle du réservoir
d’eau (17)�
6� Retirer le réservoir d’eau (16), le rincer
et le remplir avec de l’eau froide fraîche�
Ne pas dépasser le repère max�
7� Positionner le réservoir d’eau (16) bien
vertical et l’enfoncer entièrement�
8� Refermer le couvercle du réservoir
d’eau (17)�
9� Remplir le réservoir à grains (1) avec
du café en grains (pour la préparation
avec du café en poudre, voir le chapitre
« Avant la première utilisation »)�
10� Mettre l’appareil sous tension avec
l’interrupteur électrique O / I (9)� La LED
D clignote et la LED F est allumée�
11� Placer un récipient sous le bec verseur
du mousseur de lait (6)�
12� Tirer prudemment le mousseur de
lait (6) pour l’ouvrir� L’appareil rince le
mousseur de lait (6) avec de l’eau� La
LED F clignote�
13� Lorsque la LED F s’allume, enfoncer le
mousseur de lait (6) pour le fermer�
Mise hors tension de l’appareil
La machine à expresso automatique est
programmée en usine de façon à fonctionner de manière optimale� La machine
s’arrête automatiquement après une durée
dénie (la durée est réglable, voir « Arrêt
automatique » au chapitre « Réglages »)�
Exception : Si l’appareil n’a été utilisé que
pour préparer de l’eau chaude ou de la
vapeur, il se met hors tension sans rinçage�
Pour mettre l’appareil hors tension manuellement avant l’écoulement de la durée,
appuyer sur le Bouton Service A (12)�
L’appareil effectue un rinçage et se met
hors tension�
Remarque : Lors de la première utilisation,
après l’exécution du programme de Service
ou si l’appareil n’a pas fonctionné pendant
un certain temps, l’arôme de la première
boisson n’est pas complètement développé ;
ne pas boire la première boisson�
Après la mise en service de la machine à
espresso automatique, plusieurs tasses
doivent avoir été préparées avant d’avoir
une « crème » ne et consistante.
La formation de gouttes d’eau aux fentes
d’aération est normale en cas d’utilisation
prolongée�
L’appareil chauffe et effectue un rinçage�
De l’eau s’écoule du bec verseur du café�
Lorsque les boutons A (12), B (11) et
C (10) sont allumés, l’appareil est prêt à
fonctionner�
25
Page 30
fr
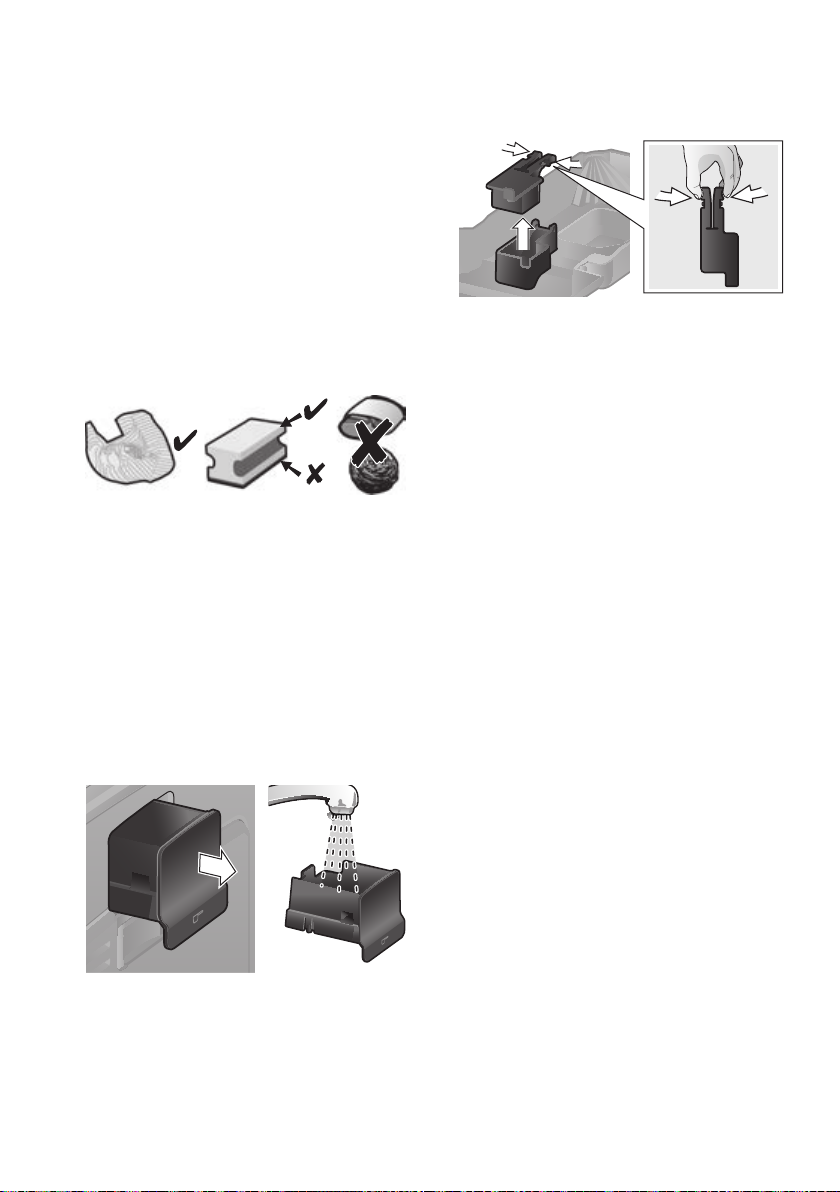
Filtre eau
Un ltre à eau peut diminuer l’entartrage.
Un ltre à eau neuf doit être rincé avant de
pouvoir être utilisé� Procéder comme suit :
1� Enfoncer fermement le ltre à eau dans
le réservoir d’eau vide à l’aide de la
cuillère-dose (18)�
2� Remplir le réservoir d’eau (16) jusqu’au
repère max avec de l’eau�
3� Placer le bouton
rotatif (13) sur
4� Enfoncer simultanément les boutons
B (11) et A (12) pendant au moins
5 secondes� « arrêt »
ou « marche » s’allume�
5� Régler « marche » en appuyant sur le
bouton Démarrage (10)�
6� Maintenir le bouton Démarrage (10)
enfoncé pendant au moins 5 secondes
pour conrmer ; toutes les LED s’allument brièvement�
7� La LED D clignote et la LED F
s’allume�
8� Placer un récipient d’une capacité de
0,5 litre sous le bec verseur du mousseur de lait (6)�
9� Ouvrir le mousseur de lait (6) en le
tirant� La LED F clignote�
10� L’eau coule à travers le ltre et le rince.
11� Lorsque la LED F est allumée, fermer
le mousseur de lait (6) en l’enfonçant�
12� Vider le réservoir�
L’appareil est de nouveau prêt à
fonctionner�
Information : Le rinçage du ltre a, par la
même occasion, activé le réglage pour le
signalement Changer ltre (= la LED
clignote)�
Après le signalement Changer ltre ou au
plus tard au bout de deux mois, le ltre
n’est plus efcace. Il faut alors le remplacer
pour des raisons d’hygiène et an que
l’appareil ne s’entartre pas (cela pourrait
l’endommager). Les ltres de rechange
sont disponibles dans le commerce ou
auprès du Service Clientèle (voir point
« Accessoires »). Si un ltre neuf n’est pas
mis en place, modier le réglage pour le
ltre comme indiqué au chapitre « Dureté
de l’eau »�
Information : L’indicateur du ltre permet
de repérer le mois auquel le ltre a été
mis en place� Il est également possible de
repérer le mois auquel le ltre devra être
remplacé la prochaine fois (au bout de deux
moins au plus tard)�
Information : Si l’appareil n’a pas été
utilisé pendant un certain temps (par ex�
durant les vacances), il est recommandé de
rincer le ltre avant l’emploi. Pour ce faire,
préparer une tasse d’eau chaude et la jeter�
D
26
Page 31

fr
Réglages
Les réglages peuvent être personnalisés�
Les réglages possibles sont les suivants :
Dureté de l’eau
Il est possible, sur cet appareil, de régler
la dureté de l’eau� Le réglage correct de la
dureté de l’eau est important car il permet
à l’appareil d’indiquer le moment où un
détartrage est nécessaire� En usine, la
dureté de l’eau est réglée sur 4� La dureté
de l’eau peut être déterminée à l’aide de
la bandelette fournie ou être demandée au
Service des Eaux local�
Plonger brièvement la bandelette dans
l’eau, la secouer légèrement et attendre
une minute pour lire le résultat�
Niveau Dureté de l’eau
Allemagne (°dH) France (°fH)
1
2
3
4
Pour entrer une autre dureté de l’eau que
celle qui est préréglée ou si un ltre à eau
est utilisé, procéder comme suit :
1� Placer le bouton
2� Enfoncer simultanément les boutons
3� Appuyer successivement sur le bouton
4� Enfoncer le bouton Démarrage (10)
1-7
8-14
15-21
22-30
rotatif (13) sur
1-13
14-25
26-38
39-54
B (11) et A (12) pendant au moins
5 secondes� Le nombre de LED alors
allumées symbolise la dureté de l’eau
réglée�
Démarrage (10) jusqu’à ce que la dureté
de l’eau souhaitée soit indiquée ; pour
une dureté de l’eau de par ex� 3, les
LED D, E et F s’allument�
pendant au moins 5 secondes� Les LED
réglées clignotent, la dureté de l’eau
sélectionnée est enregistrée�
Important : En cas d’utilisation du ltre à
eau (voir point « Accessoires »), procéder
comme suit, voir point « Filtre eau »�
Remarque : Si aucun bouton n’est actionné
dans les 90 secondes, l’appareil se met en
veille sans effectuer d’enregistrement� La
dureté de l’eau précédemment enregistrée
est conservée�
Arrêt automatique
La durée au bout de laquelle l’appareil se
met automatiquement hors tension après
la dernière préparation d’une boisson
peut être réglée ici� Le réglage possible
est de 15 minutes à 4 heures� La durée
programmée peut être raccourcie pour
économiser l‘énergie�
1� Placer le bouton
rotatif (13) sur
2� Enfoncer simultanément les boutons
B (11) et A (12) pendant au moins
5 secondes� Le nombre de LED alors
allumées symbolise la durée réglée
avant l’arrêt�
3� Appuyer successivement sur le bouton
Démarrage (10) jusqu’à ce que la durée
souhaitée s’afche :
D = 15 minutes
D et E = 30 minutes
D, E et F = 45 minutes
D, E, F et G = 1 heure
D, E, F, G et H = 2 heures
D, E, F, G, H et I = 4 heures
4� Enfoncer le bouton Démarrage (10)
pendant au moins 5 secondes� Les LED
réglées clignotent, la durée avant l’arrêt
sélectionnée est enregistrée�
Remarque : Si aucun bouton n’est actionné
dans les 90 secondes, l’appareil se met en
veille sans effectuer d’enregistrement� La
durée avant l’arrêt précédemment réglée
est conservée�
27
Page 32

fr
Régler la température de percolation
La température de percolation peut elle
aussi être réglée�
1� Placer le bouton
rotatif (13) sur
2� Enfoncer simultanément les boutons
B (11) et A (12) pendant au moins
5 secondes� Le nombre de LED alors
allumées symbolise la durée de percola-
tion réglée�
3� Appuyer successivement sur le bouton
Démarrage (10) jusqu’à ce que la
température souhaitée s’afche :
LED
D = basse
D et E = moyenne
LED
LED D, E et F = élevée
4� Enfoncer le bouton Démarrage (10)
pendant au moins 5 secondes� Les LED
réglées clignotent, la température sélec-
tionnée est enregistrée�
Remarque : Si aucun bouton n’est actionné
dans les 90 secondes, l’appareil se met en
veille sans effectuer d’enregistrement� La
température de percolation précédemment
enregistrée est conservée�
● Lorsque le broyeur est en marche,
régler le sélecteur (3) entre une mouture
ne (a : rotation dans les sens inverse
des aiguilles d’une montre) et une
mouture grossière (b : rotation dans le
sens des aiguilles d’une montre)�
a b
Information : Le nouveau réglage n’est
perceptible qu’à partir de la seconde tasse
de café�
Conseil pratique : Pour les grains torréés
de couleur foncée, choisir une mouture plus
ne, pour les grains torréés de couleur
claire, régler une mouture plus grossière�
Régler la nesse de la mouture
Le sélecteur de réglage (3) de la mouture
permet de régler la nesse du café en
poudre�
Attention !
A
Ne modier le réglage que lorsque le
broyeur fonctionne ! Sinon, l’appareil peut
être endommagé� Ne pas glisser les doigts
à l’intérieur du broyeur�
28
Page 33

fr
Préparation avec du
café en grains
Cette machine à espresso automatique
mout du café frais pour chaque préparation�
Conseil pratique : Utiliser de préférence un
mélange de café en grains pour espresso
ou percolateur� Pour assurer aux grains
une qualité optimale, les conserver au frais
dans un récipient fermé ou les congeler�
Les grains de café congelés peuvent être
moulus�
Important : Remplir le réservoir (16) d’eau
fraîche tous les jours� Il doit toujours y avoir
sufsamment d’eau dans le réservoir (16)
pour l’utilisation de l’appareil�
Différents cafés peuvent être préparés en
appuyant simplement sur un bouton�
Préparation
L’appareil doit être prêt à fonctionner�
1� Placer une(des) tasse(s) préchauffée(s)
sous le bec verseur du café (7)�
Conseil pratique : Pour un petit
espresso, préchauffer toujours la tasse,
par ex� avec de l’eau chaude�
2� Sélectionner le café souhaité et la
quantité désirée en tournant le bouton
supérieur (14)�
3� Sélectionner l’intensité souhaitée du
café en tournant le bouton inférieur (13)�
4� Appuyer sur le bouton Démarrage (10)�
Le café se fait et s’écoule ensuite dans
la/ les tasse(s)�
La percolation peut être arrêtée avant terme
en appuyant une nouvelle fois sur le bouton
Démarrage (10)�
Préparation avec du
café moulu
Cet appareil peut également fonctionner
avec du café moulu (pas avec du café
soluble)�
Important : Remplir le réservoir (16) d’eau
fraîche tous les jours� Il doit toujours y avoir
sufsamment d’eau dans le réservoir (16)
pour l’utilisation de l’appareil�
Préparation
1� Ouvrir le tiroir à café (4)�
2� Verser au maximum 2 cuillères-doses
rases dans le tiroir�
Attention : Ne pas verser de café non
moulu ou de café soluble�
3� Fermer le tiroir à café (4)�
4� Régler le bouton rotatif inférieur (13) sur
le symbole G
5� Appuyer sur le bouton Démarrage (10)�
Le café se fait et s’écoule ensuite dans la
tasse�
Préparer de l’eau chaude
Risque de brûlure !
A
Le mousseur de lait (6) devient très brûlant�
Ne saisir le mousseur de lait (6) que par la
partie en plastique�
Avant de préparer de l’eau chaude, le
mousseur de lait doit être nettoyé�
L’appareil doit être prêt à fonctionner�
1� Placer une tasse préchauffée ou un
verre sous le bec verseur du mousseur
de lait (6)�
2� Ouvrir le mousseur de lait (6) en le
tirant� L’appareil chauffe� De l’eau
chaude s’écoule pendant env� 40
secondes du bec verseur du mousseur
de lait (6)�
3� Pour arrêter l’opération, enfoncer le
mousseur de lait (6)�
29
Page 34

fr
Préparer de la
mousse de lait
Risque de brûlure !
A
Le mousseur de lait (6) devient très brûlant�
Ne saisir le mousseur de lait (6) que par la
partie en plastique�
Conseil pratique : Mousser d’abord le lait
puis préparer le café ou mousser le lait
séparément et le verser sur le café�
L’appareil doit être prêt à fonctionner�
1� Appuyer sur le bouton B (11)�
Le bouton B clignote, l’appareil chauffe
pendant env� 20 secondes�
2� Lorsque le bouton et la LED F
s’allume, plonger le mousseur de lait
jusqu’au fond d’une tasse ou d’un verre
rempli à un tiers de lait�
3� Ouvrir le mousseur de lait (6) en le
tirant�
Risque de brûlure !
A
La vapeur qui s’échappe est brûlante et
peut provoquer des éclats de liquide� Ne
pas toucher la douille et ne pas la diriger
sur des personnes�
4� Mousser le lait�
5� Fermer le mousseur de lait (6) en
l’enfonçant�
Conseil pratique : Pour réaliser une
mousse de lait optimale, employer de
préférence du lait froid avec une teneur en
matières grasses d’au moins 1,5 %�
Entretien et nettoyage
quotidiens
Risque de choc électrique !
A
Avant tout nettoyage, débrancher la che
électrique�
Ne jamais plonger l’appareil dans l’eau�
Ne pas utiliser de nettoyeur à vapeur�
● Essuyer l’habillage de l’appareil avec un
chiffon doux et humide�
● Ne pas utiliser de chiffons ou de
produits nettoyants abrasifs�
● Toujours nettoyer immédiatement les
résidus de calcaire, de café, de lait ou
de solution détartrante� En effet, de
la corrosion peut se former sous ces
résidus�
● Les chiffons éponges neufs peuvent
contenir des sels� Les sels peuvent être
responsables de rouille supercielle sur
l’acier spécial ; un rinçage soigneux est
par conséquent indispensable avant
l’emploi�
● Retirer le bac collecteur (8c) avec le
réservoir à marc de café (8b) vers
l’avant� Retirer le cache (8a) et l’égout-
toir (8d)� Vider et nettoyer le bac collec-
teur et le réservoir à marc de café�
● Retirer et nettoyer le tiroir à café (4)�
Important : Les restes de lait séchés
sont difciles à éliminer. Par conséquent,
nettoyer impérativement le mousseur de
lait (6) après chaque utilisation à l’aide
d’eau tiède�
30
Page 35

fr
1
● Démonter le otteur (8e) et le nettoyer
avec un chiffon humide�
Ne pas mettre les éléments suivants
au lave-vaisselle : cache (8a), otteur
O
(8e), tiroir à café (4), l’unité de percolation (5a)�
Les éléments suivants peuvent aller
au lave-vaisselle : bac collecteur
N
(8c), réservoir à marc de café (8 b),
égouttoir (8d), couvercle à arôme (2)
et cuillère-dose (18)�
● Essuyer l’intérieur de l’appareil (bacs de
réception et tiroir à café)�
Important : Vider et nettoyer quotidiennement le bac collecteur (8c) et le réservoir
à marc de café (8b) pour éviter les
moisissures�
Remarque : Si l’appareil est mis sous
tension à froid avec l’interrupteur électrique
O / I (9) ou s’il se met hors tension automatiquement après la préparation de café, il se
rince automatiquement� Il se nettoie donc
de manière autonome�
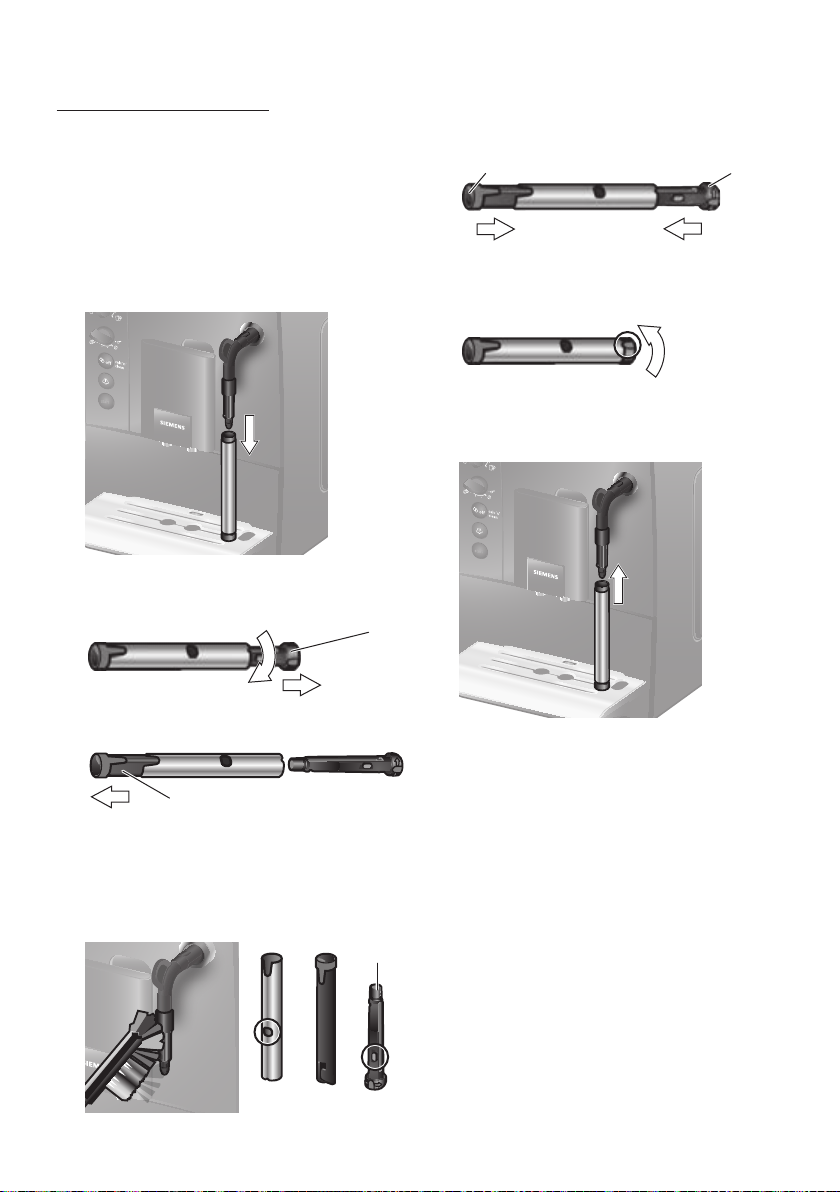
Nettoyer le mousseur de lait
Il est recommandé de nettoyer le mousseur
de lait (6) après chaque utilisation pour
éliminer les résidus�
Important : Attendre que le mousseur de
lait se soit refroidi avant de le retirer�
Pour nettoyer le mousseur de lait, il faut le
démonter :
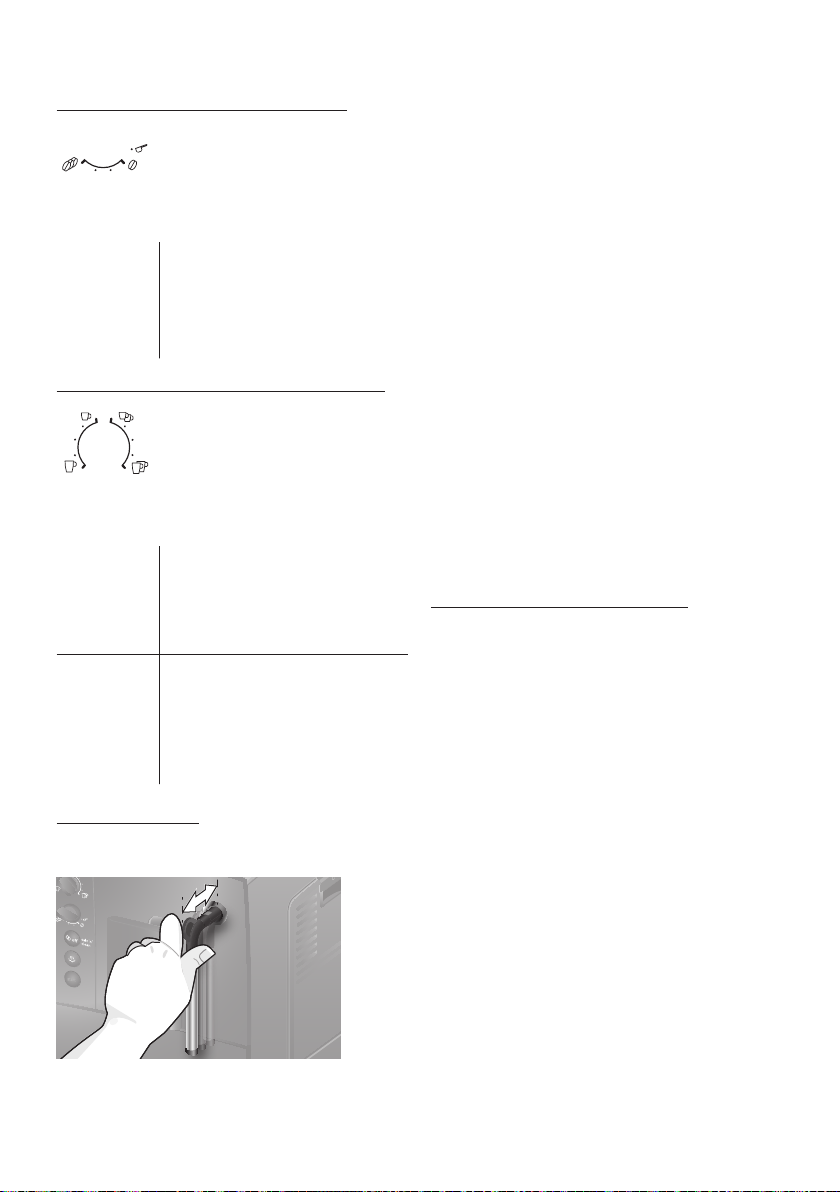
1� Pour le retirer, saisir la douille métallique
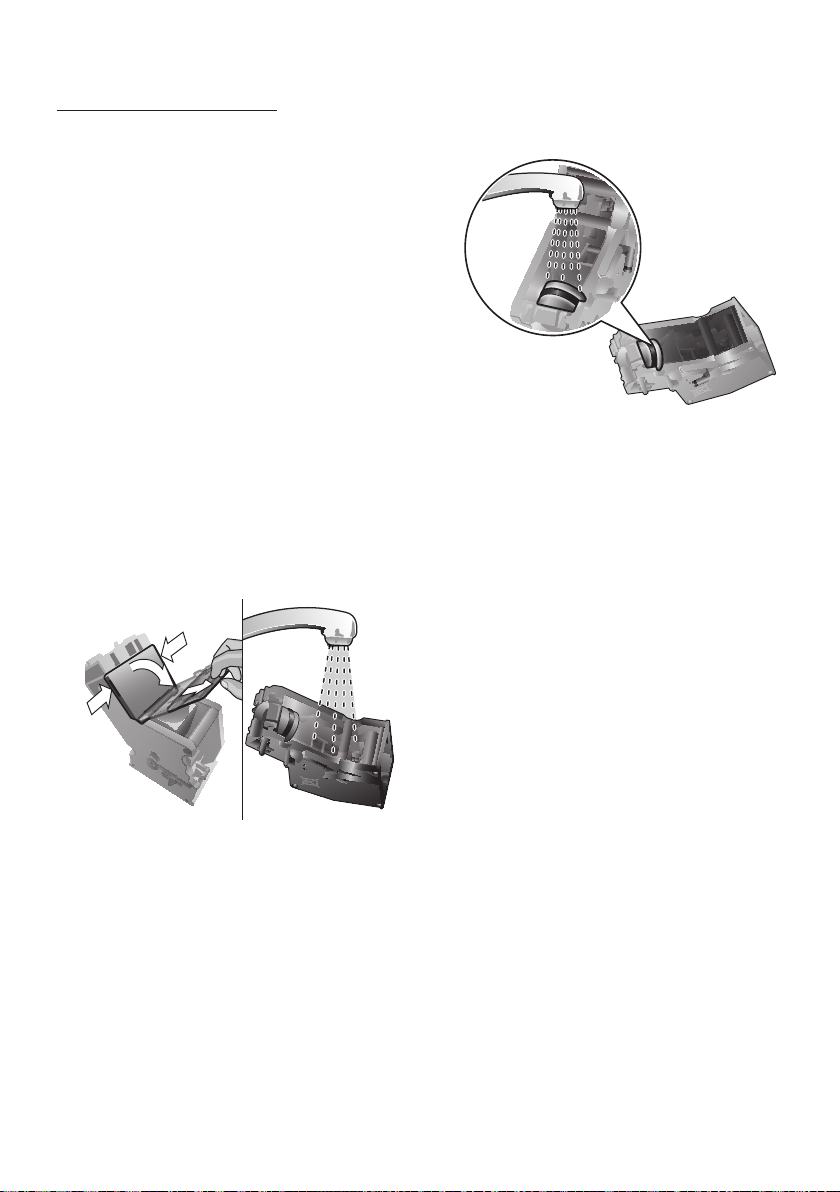
et la retirer vers le bas�
2� Tourner le cœur (6d) dans le sens
inverse des aiguilles d’une montre et le
retirer�
6d
2
Important : Si l’appareil reste inutilisé
pendant une durée prolongée (par ex�
durant les vacances), nettoyer soigneusement l’ensemble de l’appareil, y compris le
mousseur de lait et l’unité de percolation�
3� Retirer le tube (6c)�
6c
31
Page 36

fr
1 2
4� Nettoyer les pièces à l’aide d’un détersif
et d’une brosse douce� Si nécessaire,
les plonger dans du détersif tiède�
Nettoyer soigneusement le trou d’aération (6e)�
6e
5� Rincer toutes les pièces à l’eau claire et
les sécher�
6� Assembler le cœur (6d) et le tube (6c)
dans la douille métallique�
6d6c
7� Tourner le cœur dans le sens des
aiguilles d’une montre jusqu’à ce que
les repères soient côte à côte�
8� Placer le mousseur de lait sur la
soupape à vapeur� Le repère rouge sur
la soupape doit être recouvert�
Risque de brûlure !
A
N’utiliser l’appareil que si le mousseur
de lait (6) est complètement assemblé et
monté�
Nettoyer l’unité de percolation
Nettoyer régulièrement l’unité de
percolation !
Pré-nettoyage automatique de l’unité de
percolation :
Appuyer brièvement sur le bouton Service
(12)� L’appareil effectue un rinçage si un
café a été préparé auparavant� Il se met
ensuite hors tension�
En plus du programme de nettoyage
automatique, il est recommandé de retirer
régulièrement l’unité de percolation (5a)
pour le nettoyage (gure E au début du
document)�
1� Mettre l’appareil hors tension avec
l’interrupteur électrique O / I (9)� Tous les
boutons sont éteints�
2� Ouvrir le volet (5b) de l’unité de
percolation�
3� Faire glisser le verrouillage rouge (5d)
de l’unité de percolation (5a) vers la
gauche�
4� Pousser le levier d’éjection (5c) totale-
ment vers le bas� L’unité de percolation
se débloque�
5� Saisir l’unité de percolation (5a) par les
évidements et la retirer avec précaution�
32
Page 37

fr
6� Retirer le couvercle de protection (5e)
de l’unité de percolation et nettoyer
soigneusement l’unité de percolation
(5a) sous l’eau courante�
7� Nettoyer soigneusement le tamis de
l’unité de percolation sous le jet d’eau�
Important : Ne pas utiliser de détersif ou
autre produit pour le nettoyage et ne pas
mettre au lave-vaisselle�
8� Nettoyer soigneusement l’intérieur
de l’appareil avec un chiffon humide,
éliminer les éventuels restes de café�
9� Laisser sécher l’unité de percolation
(5a) et l’intérieur de l’appareil�
10� Remettre le couvercle de protection
(5e) de nouveau en place sur l’unité de
percolation (5a) et la pousser jusqu’en
butée dans l’appareil�
11� Pousser le levier d’éjection (5c)
totalement vers le haut�
12� Glisser le verrou rouge (5d) entièrement
vers la droite et refermer le volet (5b)�
Conseils pour
économiser l’énergie
● Mettre l’appareil hors tension s’il n’est
pas utilisé� Pour ce faire, appuyer sur le
bouton Service (12)� L’appareil effectue
un rinçage et se met hors tension�
● Autant que possible ne jamais
interrompre la production de café ou
de mousse de lait� Une interruption
provoque une consommation d’énergie
supérieure ainsi que le remplissage plus
rapide du bac collecteur�
● Détartrer régulièrement l’appareil pour
prévenir les dépôts de calcaire� Les
dépôts de calcaire provoquent en effet
une consommation d’énergie plus
élevée�
Programme de Service
Durée : env� 35 minutes
Le bouton Service (12) clignote à intervalles
réguliers, suivant l’utilisation�
L’appareil doit être nettoyé et détartré sans
délai avec le programme de Service� Si le
programme de Service n’est pas exécuté
sur instruction, l’appareil risque d’être
endommagé�
Attention !
A
A chaque exécution du programme de
Service, utiliser le produit détartrant et le
produit nettoyant préconisés� Observer
les consignes de sécurité qui gurent sur
l’emballage des produits�
N’interrompre en aucun cas le programme
de Service ! Ne pas boire les liquides !
Ne jamais utiliser de vinaigre, de produit
à base de vinaigre, d’acide citrique ou de
produit à base d’acide citrique !
Ne jamais verser de pastilles de détartrage
ou autres produits de détartrage dans le
tiroir à café (4) !
33
Page 38

fr
Des pastilles de détartrage et de
nettoyage spéciales, parfaitement adaptées, sont disponibles dans le commerce
et auprès du Service Clientèle (voir point
« Accessoires »).
Important : Si un ltre est présent dans
le réservoir d’eau (16), le retirer impérativement avant de lancer le programme de
Service� Avant le lancement du programme
de Service, nettoyer l’unité de percolation,
voir chapitre « Nettoyage de l’unité de
percolation »�
Pour lancer le programme de Service,
enfoncer le bouton Service (12) pendant au
moins 5 secondes�
Information : Le bouton Service (12)
clignote pendant l’exécution du programme�
La LED H s’allume�
● Vider le bac collecteur (8) et le remettre
en place�
L’appareil effectue deux rinçages�
La LED G s’allume�
● Ouvrir le tiroir à café (4)�
● Y placer une pastille de nettoyage
Siemens et fermer le tiroir (4)�
● Appuyer sur le bouton Démarrage (10)�
● Ouvrir le mousseur de lait (6) en le
tirant�
Le programme de Service est maintenant
exécuté pendant env� 12 minutes�
La LED
Le programme de Service est exécuté
pendant env� 30 secondes et rince
l’appareil�
La LED F s’allume�
Le programme de Service est maintenant
exécuté pendant env� 8 minutes�
La LED
Si un ltre est utilisé, le remettre maintenant
en place�
L’appareil est nettoyé, détartré et de
nouveau prêt à fonctionner�
D s’allume�
● Rincer le réservoir d’eau (16) et le
remplir d’eau fraîche jusqu’au repère
max�
● Appuyer sur le bouton Démarrage (10)�
● Fermer le mousseur de lait (6) en
l’enfonçant�
H s’allume�
● Vider le bac collecteur (8) et le remettre
en place�
La LED
Le programme de Service est maintenant
exécuté pendant env� 10 minutes�
LED F s’allume�
34
D s’allume�
● Verser de l’eau tiède dans le réservoir
d’eau (16) jusqu’au repère « 0,5 l » et
y dissoudre 1 pastille de détartrage
Siemens TZ80002� En cas d’utilisation
de TZ60002, dissoudre impérativement
2 pastilles�
● Appuyer sur le bouton Démarrage (10)�
● Placer un récipient d’une capacité d’au
moins 0,5 litre sous le bec verseur du
mousseur de lait (6)�
Important : Essuyer l’appareil avec un
torchon doux et humide pour éliminer immédiatement les résidus du détartrant� En
effet, de la corrosion peut se former sous
ces résidus� Les chiffons éponges neufs
peuvent contenir des sels� Les sels peuvent
être responsables de rouille supercielle sur
l’acier spécial ; un lavage soigneux est par
conséquent indispensable avant l’emploi�
Page 39

fr
J
Eliminez l’emballage en respectant
marqué selon la directive européenne
S’informer auprès du revendeur sur la
Les conditions de garantie applicables
sont celles publiées par notre distributeur
dans le pays où a été effectué l’achat� Le
revendeur chez qui vous vous êtes procuré
l’appareil fournira les modalités de garantie
sur simple demande de votre part� En cas
de recours en garantie, veuillez toujours
vous munir de la preuve d’achat�
Sous réserve de modi cations.
Protection contre le gel
An d’éviter les problèmes dus au
A
gel lors du transport et du stockage,
vider entièrement l’appareil au
préalable.
Information : Pour cela, l’appareil doit être
prêt à fonctionner, le réservoir d’eau (16)
doit être rempli�
1� Placer un grand récipient sous le bec
verseur du mousseur de lait (6)�
2� Appuyer sur le bouton Vapeur (11)�
La LED F clignote, l’appareil chauffe
pendant env� 20 secondes�
3� Lorsque la LED
le mousseur de lait (6) en le tirant et
laisser la vapeur s’échapper pendant
env� 15 secondes�
4� Mettre l’appareil hors tension avec
l’interrupteur électrique O / I (9)�
5� Vider le réservoir d’eau (16) et le bac
collecteur (8)�
F est allumée, ouvrir
Accessoires
Les accessoires suivants sont disponibles
dans le commerce ou auprès du Service
Clientèle :
Mise au rebut
l’environnement� Cet appareil est
2012/19/UE relative aux appareils
électriques et électroniques usagés
(waste electrical and electronic equipment – WEEE)� La directive définit
le cadre pour une reprise et une
récupération des appareils usagés
applicables dans les pays de la CE�
procédure actuelle de recyclage�
Garantie
Accessoires N° commande
Commerce /
Service Clientèle
Pastilles de
nettoyage
Pastilles de
détartrage
Filtre eau TZ70003
Kit d’entretien TZ80004
TZ60001
00310575
TZ80002
00576693
00575491
00576330
35
Page 40

fr
Eliminer soi-même les problèmes simples
Problème Cause Remède
Le broyeur ne moud
pas les grains�
Impossible de
produire de l’eau
chaude�
Trop peu ou pas de
mousse de lait�
Le café ne passe
que goutte à goutte
ou ne passe plus du
tout�
Le café ne présente
pas de « crème »�
Le café est trop
« acide »�
S’il n’est pas possible de résoudre les problèmes, appeler impérativement le
Service Clientèle ! Les numéros de téléphone se trouvent aux dernières pages de la
notice.
Les grains ne tombent pas
dans le broyeur (grains trop
gras)�
Le mousseur de lait (6) est
encrassé�
Le mousseur de lait (6) est
encrassé�
Lait non adapté� Utiliser du lait d’une teneur en
Le mousseur (6) n’est pas
correctement assemblé�
La machine est entartrée� Détartrer la machine suivant la
La mouture est trop ne ou
bien le café en poudre est
trop n.
L’appareil est fortement
entartré�
Le café ne convient pas� Utiliser un café contenant plus de
Les grains ne sont pas
fraîchement torréés.
La mouture n’est pas
adaptée aux grains de café�
La mouture n’est pas assez
ne ou bien le café en
poudre n’est pas assez n.
Le café ne convient pas� Utiliser un café de torréfaction plus
Tapoter légèrement sur le réservoir à
grains (1)� Changer éventuellement
de café�
Après avoir vidé le réservoir à grains
(1), l’essuyer avec un chiffon sec�
Nettoyer le mousseur de lait (6), voir
le chapitre « Entretien et nettoyage
quotidiens »�
Nettoyer le mousseur de lait (6), voir
le chapitre « Entretien et nettoyage
quotidiens »�
matières grasses d’au moins 1,5 %�
Humecter les parties du mousseur de
lait et les comprimer fortement�
notice�
Régler une mouture moins ne ou
utiliser un café en poudre moins n.
Détartrer la machine suivant la
notice�
robusta�
Utiliser des grains fraîchement
torréés.
Régler une mouture ne.
Régler une mouture plus ne ou
utiliser un café en poudre plus n.
foncée�
36
Page 41

Problème Cause Remède
Le café est trop « amer »� La mouture est trop ne ou
le café en poudre est trop
n.
Le café ne convient pas� Changer de café�
Le ltre à eau ne tient pas
dans le réservoir d’eau
(16)�
La LED
Le marc de café n’est pas
compact et trop mouillé�
La LED
Forte uctuation de la
qualité du café ou de la
mousse de lait�
S’il n’est pas possible de résoudre les problèmes, appeler impérativement le
Service Clientèle ! Les numéros de téléphone se trouvent aux dernières pages de la
notice.
D clignote�
I clignote�
Le ltre à eau n’est pas xé
correctement�
Le réservoir d’eau n’est pas
correctement mis en place
ou bien le ltre à eau est
usagé�
Le réservoir d'eau contient
de l'eau gazeuse�
La mouture est trop ne ou
trop grossière ou la quantité
de café en poudre est
insufsante.
L’unité de percolation (5)
encrassé�
Trop de café en poudre dans
l’unité de percolation (5)�
Dureté mécanique du unité
de percolation�
L’unité de percolation (5)
est absent ou n’a pas été
détecté�
L’appareil est entartré� Détartrer la machine suivant la
Régler une mouture moins ne
ou utiliser un café en poudre
moins n.
Enfoncer le ltre à eau ferme-
ment et droit dans le raccord
du réservoir�
Mettre correctement en place
le réservoir d’eau�
Si la diode électroluminescente
continue de clignoter, mettre
en place un ltre à eau neuf et
rincer, voir chapitre « Filtre à
eau »�
Remplir le réservoir d'eau avec
de l'eau fraîche du robinet�
Régler une mouture plus gros-
sière ou plus ne ou utiliser
2 cuillères-doses rases de café
en poudre�
Nettoyer l’unité de
percolation (5)�
Nettoyer l’unité de percolation
(5)� Mettre au maximum 2 cuillères-doses rases de café en
poudre�
Retirer et nettoyer l’unité de
percolation (voir le chapitre
« Entretien et nettoyage
quotidiens »)�
L’unité de percolation (5) étant
en place, mettre l’appareil
hors tension, attendre trois
secondes puis le remettre sous
tension�
notice�
fr
37
Page 42

fr
Problème Cause Remède
Gouttes d’eau à l’intérieur
de l’appareil avec le bac
collecteur (8) retiré�
Les réglages usine ont été
modiés et doivent être
rétablis (« Reset »)�
Les LED
Les LED
Les LED
S’il n’est pas possible de résoudre les problèmes, appeler impérativement le
Service Clientèle ! Les numéros de téléphone se trouvent aux dernières pages de la
notice.
clignotent�
clignotent�
clignotent�
Bac collecteur (8) retiré
trop tôt�
Des réglages personnels,
désormais non souhaités,
ont été effectués�
L’appareil présente un
défaut�
Mauvaise tension� Ne faire fonctionner l’appareil
La température ambiante est
trop basse�
Attendre quelques secondes
avant de retirer le bac collecteur (8) après la préparation de
la dernière boisson�
Mettre l’appareil hors tension
avec l’interrupteur électrique
O / I (9)� Maintenir enfoncés
le bouton Service (12) et le
bouton Vapeur (11) et mettre
l’appareil sous tension avec
l’interrupteur électrique O / I
(9). Conrmer ensuite avec le
bouton Démarrage (10)� Les
réglages usine sont rétablis�
Appeler la hotline�
que sur 220 V-240 V�
Utiliser l’appareil à une
température > 5° C�
Caractéristiques techniques
Alimentation électrique (tension – fréquence) 220-240 V – 50/60 Hz
Puissance du chauffage 1600 W
Pression de pompage statique maximale 15 bars
Capacité maximale du réservoir d’eau (sans ltre) 1,7 l
Capacité maximale du réservoir à grains 300 g
Longueur du cordon d’alimentation 100 cm
Dimensions (H x L x P) 385 x 280 x 479 mm
Poids à vide 9,3 kg
Type de moulin céramique
38
Page 43

pl
Spis treści
Zakres dostawy ����������������������������������������39
Przegląd funkcji urządzenia����������������������39
Zasady bezpieczeństwa ���������������������������40
Elementy obsługowe ��������������������������������42
Przed pierwszym użyciem ������������������������ 43
Filtr wody ��������������������������������������������������45
Ustawienia ������������������������������������������������46
Przyrządzanie napoju z
użyciem kawy ziarnistej ����������������������������47
Przyrządzanie napoju z
użyciem kawy mielonej ���������������������������� 48
Pobór gorącej wody ����������������������������������48
Spienianie mleka ��������������������������������������48
Konserwacja i codzienne czyszczenie �����49
Wskazówki dotyczące
oszczędzania energii ��������������������������������52
Program serwisowy ����������������������������������52
Ochrona przed zamarzaniem ������������������53
Akcesoria ��������������������������������������������������53
Ekologiczna utylizacja ������������������������������54
Gwarancja ������������������������������������������������54
Samodzielne rozwiązywanie
prostych problemów ���������������������������������55
Dane techniczne ���������������������������������������57
Szanowny Kliencie,
serdecznie gratulujemy zakupu automatycz-
nego ekspresu do kawy rmy Siemens.
Zakres dostawy
(patrz przegląd graczny na początku
instrukcji)
a Automatyczny ekspres do kawy TE501
b Instrukcja użytkowania
c Testery do kontroli twardości wody
d Łyżka do kawy mielonej
Przegląd funkcji
urządzenia
(patrz ilustracje A, B, C, D i E na początku
instrukcji)
1 Pojemnik na kawę ziarnistą
2 Pokrywa zatrzymująca aromat
3 Pokrętło wyboru do ustawiania stopnia
zmielenia
4 Szuada na kawę mieloną
(kawę mieloną / tabletkę do czyszczenia)
5 Jednostka zaparzania (ilustracja E)
a) Jednostka zaparzania
b) Drzwiczki
c) Dźwignia zaparzacza
d) Blokada
e) Osłona
6 Spieniacz mleka (ilustracja C)
wyjmowany
a) Zawór parowy
b) Tulejka metalowa
c) Rurka
d) Rdzeń
e) Odpowietrznik
7 Wylot kawy z regulacją wysokości
8 Skapnik (ilustracja D)
a) Osłona
b) Zasobnik na fusy
c) Skapnik pod wylotem kawy
d) Kratka ociekowa pod wylotem kawy
e) Pływak
9 Wyłącznik zasilania O / I
10 Przycisk start C
11 Przycisk przygotowania pary B
12 Przycisk serwisowy A
13 Pokrętło „Intensywność kawy”
14 Pokrętło „Wybór napoju”
15 Wskaźnik LED
16 Wyjmowany pojemnik na wodę
17 Pokrywa pojemnika na wodę
18 Łyżka do kawy mielonej
(pomoc do wkładania ltra wody)
19 Miejsce do przechowywania łyżki do
kawy mielonej
20 Przewód zasilający ze schowkiem
39
Page 44

pl
Zasady bezpieczeństwa
Należy dokładnie przeczytać instrukcję obsługi, przestrzegać
jej i zachować ją! Przekazując urządzenie innej osobie
należy dołączyć niniejszą instrukcję. To urządzenie jest
przeznaczone do przygotowywania małych ilości produktu
na użytek domowy, w warunkach zbliżonych do domowych,
lub do zastosowań niekomercyjnych. Warunki zbliżone do
domowych obejmują na przykład zastosowanie w kuchniach
dla pracowników w sklepach, biurach, gospodarstwach rolnych
i innych małych rmach. Urządzenie może być także używane
przez gości w pensjonatach, małych hotelach i podobnych
obiektach mieszkalnych.
¡ Niebezpieczeństwo porażenia prądem!
Urządzenie należy zawsze podłączać do sieci elektrycznej i
stosować zgodnie z danymi na tabliczce znamionowej. Ze względów
bezpieczeństwa wszelkie naprawy urządzenia, takie jak np.
wymiana uszkodzonego kabla sieciowego, może przeprowadzać
wyłącznie nasz serwis.
Dzieciom powyżej 8 lat oraz osobom o zredukowanych
zdolnościach zycznych, sensorycznych i umysłowych lub
nieposiadającym odpowiedniego doświadczenia i/lub wiedzy wolno
używać urządzenia tylko pod warunkiem, że znajdują się pod opieką
innych osób lub zostały poinstruowane w zakresie bezpiecznej
obsługi urządzenia i rozumieją zagrożenia z niej wynikające. Dzieci
poniżej 8 lat nie mogą obsługiwać urządzenia. Należy uniemożliwić
im dostęp do urządzenia i przewodu podłączeniowego. Dzieciom
nie wolno bawić się urządzeniem. Czynności z zakresu czyszczenia
i normalnej konserwacji urządzenia nie mogą być wykonywane
przez dzieci, chyba że są one w wieku co najmniej 8 lat i pod
nadzorem�
40
Page 45

Nigdy nie zanurzać urządzenia ani przewodu sieciowego w wodzie.
Użytkować tylko wtedy, gdy przewód zasilania oraz urządzenie są
sprawne� W razie błędu natychmiast odłączyć wtyczkę od gniazda i
wyłączyć napięcie sieciowe.
Urządzenie zawiera magnesy trwałe, które mogą mieć wpływ na
elektroniczne implanty, takie jak np� rozruszniki serca lub pompy
insulinowe. Osoby noszące elektroniczne implanty proszone są
o zachowanie minimalnego odstępu 10 cm od przedniego panelu
urządzenia.
¡ Ryzyko uduszenia!
Nie wolno pozwalać dzieciom bawić się opakowaniem. Drobne
elementy przechowywać w bezpiecznym miejscu, ponieważ mogą
zostać połknięte.
¡ Niebezpieczeństwo odniesienia obrażeń!
Nie wkładać palców do młynka do kawy. Nieodpowiednie używanie
urządzenia może prowadzić do powstania obrażeń.
pl
¡ Niebezpieczeństwo poparzenia!
Spieniacz mleka mocno się nagrzewa. Po użyciu odczekać do
ostygnięcia, a dopiero potem dotykać. Powierzchnie elementu
grzejnego lub płyty grzewczej mogą być gorące jeszcze przez jakiś
czas po użyciu.
41
Page 46

pl
Elementy obsługowe
Wyłącznik zasilania O / I
Za pomocą wyłącznika zasilania O / I (9)
urządzenie jest włączane lub całkowicie
wyłączane (przerwany zostaje dopływ
prądu).
Ważne: Do wyłączania użyć przycisku
serwisowego (12)�
Przycisk serwisowy A
Krótkie wciśnięcie przycisku serwisowego
(12) powoduje przepłukanie urządzenia
i jego wyłączenie. Jeżeli przycisk serwi-
sowy (12) miga, wówczas konieczne jest
wykonanie programu serwisowego. Długie
przytrzymanie wciśniętego przycisku
serwisowego (12) powoduje uruchomienie
programu serwisowego� Przycisk serwisowy (12), miga, gdy trwa wykonywanie
programu serwisowego i gaśnie po jego
zakończeniu.
Przycisk przygotowania pary B
Wciśnięcie przycisku przygotowania pary
(11) powoduje wytworzenie pary służącej
do przygotowania pianki mlecznej�
Wskaźnik LED
Świecenie i miganie określonego wskaźnika
LED informuje o tym, że:
D świeci się Pojemnik na wodę jest pusty
i musi zostać napełniony.
D miga Filtr wody jest zużyty i musi
zostać wymieniony.
Ważne: Podczas uruchamiania miganie nie ma
znaczenia „wymiana ltra”,
(patrz „Uruchomienie urzą-
dzenia” na stronie 43)
E świeci się Pojemnik na kawę ziarnistą
jest pusty i musi zostać
ponownie napełniony.
F świeci się Zawór parowy musi
zostać otwarty względnie
zamknięty.
F miga W zależności od ustawienia
ze spieniacza mleka wydo-
staje się para lub gorąca
woda�
Przycisk start C
Wciśnięcie przycisku start (10) powoduje
rozpoczęcie przygotowania napoju.
Poprzez ponowne wciśnięcie w trakcie
przygotowania napoju można wcześniej
zatrzymać jego pobór.
42
G świeci się Przy wyborze G pokrętłem
„Intensywność kawy”
symbol świeci się tak długo,
aż zostanie pobrana kawa
mielona�
H świeci się Brak skapnika lub jest
nieprawidłowo włożony.
Włożyć skapnik.
H miga Zasobniki są pełne, opróżnić
zasobniki i ponownie
włożyć.
I świeci się Drzwiczki do jednostki zapa-
rzania są otwarte, zamknąć
drzwiczki�
I miga Wyjąć jednostkę zaparzania
i wyczyścić.
Page 47

pl
Pokrętło „Intensywność kawy”
Przy pomocy pokrętła (13)
ustawiana jest intensywność
kawy lub wybierana jest
kawa mielona�
h
do
g
G
Pokrętło „Wybór napoju”
a
do
c
b
do
d
Spieniacz mleka
Spieniacz mleka (6) może być otwarty
bądź zamknięty poprzez wyciągnięcie lub
wciśnięcie.
Bardzo łagodna
Łagodna
Normalna
Mocna
Kawa mielona
Przy pomocy tego pokrętła
(14) wybierany jest preferowany napój oraz nasta-
wiana jest ilość. Poza tym
zmieniane są ustawienia
użytkownika.
Małe espresso
Espresso
Mała Café Crème
Café Crème
Duża Café Crème
2 małe Espresso
2 Espresso
2 małe Café Crème
2 Café Crème
2 duże Café Crème
Przed pierwszym użyciem
Informacje ogólne
Odpowiednie pojemniki należy napełniać
tylko czystą, zimną wodą niezawierającą
dwutlenku węgla oraz wyłącznie palonymi
ziarnami kawy (najlepiej specjalnymi
mieszankami ziaren kawy do ciśnieniowych
lub automatycznych ekspresów do kawy)�
Nie należy stosować lukrowanych albo
karmelizowanych kaw ziarnistych bądź też
przetworzonych z użyciem innych dodatków
zawierających cukier, gdyż mogą one
spowodować zatkanie jednostki zaparzania.
W przypadku tego urządzenia możliwe jest
ustawienie twardości wody. Fabrycznie
ustawiona jest twardość wody 4. Twardość
stosowanej wody powinna być kontrowana
przy użyciu załączonego testera. Jeżeli
tester wykaże wartość inną niż 4, wówczas
po uruchomieniu należy urządzenie odpowiednio zaprogramować (patrz „Twardość
wody” w rozdziale „Ustawienia”).
Uruchomienie urządzenia
1� Usunąć folię ochronną.
2� Automatyczny ekspres do kawy
należy ustawić na równej i dostoso-
wanej do jego ciężaru, wodoodpornej
powierzchni. Przewietrzników urzą-
dzenia nie wolno zasłaniać.
Ważne: Urządzenie użytkować wyłącznie w
pomieszczeniach, w których nie występują
temperatury poniżej 0 °C. Jeśli urządzenie
było transportowane lub przechowywane
w temperaturze niższej niż 0 °C, przed jego
uruchomieniem odczekać przynajmniej
3 godziny�
3� Wyjąć wtyczkę ze schowka (20) i
podłączyć ją. Długość może zostać
dopasowana odpowiednio do potrzeb
poprzez cofanie i wysuwanie. Urzą-
dzenie ustawić w tym celu tyłem np. do
krawędzi stołu i przewód ciągnąć albo w
dół, albo w górę�
43
Page 48

pl
4� Zamontować spieniacz mleka. Użyt-
kować urządzenie tylko wtedy, gdy
spieniacz mleka (6) jest w całości
zmontowany i zainstalowany�
5� Odchylić pokrywę pojemnika na wodę
(17)�
6� Wyjąć pojemnik na wodę (16), opłukać
go, a następnie napełnić świeżą, zimną
wodą. Zwracać uwagę na oznaczenie
max�
7� Pojemnik na wodę (16) ustawić prosto i
w całości wsunąć go w dół.
8� Ponownie zamknąć pokrywę pojemnika
na wodę (17).
9� Napełnić pojemnik na kawę ziarnistą (1)
(w celu przygotowania kawy zmielonej
patrz rozdział „Przyrządzanie napoju z
użyciem kawy mielonej”).
10� Włączyć urządzenie wyłącznikiem zasi-
lania O / I (9). Wskaźnik LED D miga,
zaś wskaźnik LED F świeci się stale.
11� Ustawić pojemnik pod wylotem
spieniacza mleka (6)�
12� Spieniacz mleka (6) ostrożnie wycią-
gnąć w celu otwarcia. Urządzenie
przepłukuje spieniacz mleka (6) wodą.
Wskaźnik LED F miga�
13� Jeżeli wskaźnik LED F świeci się,
wcisnąć spieniacz mleka (6) w celu jego
zamknięcia.
Wyłączenie urządzenia
Ustawienia fabryczne automatycznego
ekspresu do kawy zapewniają optymalną
pracę urządzenia. Po upływie ustwionego
czasu urządzenie wyłącza się automatycznie (czas, po którym nastąpi wyłączenie
można regulować, patrz „Automatyczne
wyłączanie” w rozdziale „Ustawienia”).
Wyjątek: Jeżeli pobierana była jedynie
gorąca woda lub para, wówczas urządzenie
wyłączy się bez cyklu płukania.
Aby wyłączyć urządzenie ręcznie, należy
wcisnąć przycisk serwisowy A (12). Urządzenie włączy cykl płukania i wyłączy się.
Wskazówka: Przy pierwszym użyciu, po
przeprowadzeniu programu serwisowego
lub też po dłuższym przestoju urządzenia,
pierwszy napój nie ma jeszcze pełnego
aromatu i nie powinien być wypity.
Po uruchomieniu automatycznego ekspresu
do kawy uzyskanie jedwabistej i sztywnej
pianki kremowej możliwe jest dopiero po
zaparzeniu kilku liżanek.
Po okresie dłuższego użytkowania całkiem
normalnym zjawiskiem jest tworzenie się na
przewietrznikach kropli wody�
Urządzenie podgrzewa się i następuje
płukanie. Nieco wody wypływa z wylotu
kawy. Jeżeli przyciski A (12), B (11)
i C (10) świecą się, wówczas urządzenie
jest gotowe do pracy�
44
Page 49

pl
Filtr wody
Filtr wody może pomagać w redukcji
osadów kamienia� Przed pierwszym zasto-
sowaniem ltra wody konieczne jest jego
przepłukanie. W tym celu należy wykonać
następujące czynności:
1� Używając łyżki do kawy zmielonej (18)
wcisnąć ltr wody dopustego pojemnika
na wodę.
2� Napełnić pojemnik na wodę (16) do
znaku max�
3� Pokrętło (13)
ustawić w pozycji
4� Przyciski B (11) i A (12) trzymać
wciśnięte jednocześnie przez co
najmniej 5 sekund. Zapala się funkcja
„wył.” lub „wł.”.
5� Poprzez wciśnięcie przycisku start (10)
ustawić „wł.”.
6� Przycisk start (10) trzymać wciśnięty
przez co najmniej 5 sekund w celu
potwierdzenia, wszystkie wskaźniki LED
na krótko się zapalają.
7� Wskaźnik LED D miga, zaś wskaźnik
LED
F świeci się stale.
8� Pojemnik o pojemności 0,5 litra
podstawić pod wylotem spieniacza
mleka (6) �
9� Spieniacz mleka (6) otworzyć przez
wyciągnięcie. Wskaźnik LED F miga�
10� Woda przepływa przez ltr i przepłukuje
go�
11� Jeżeli wskaźnik LED F świeci się,
wówczas należy zamknąć spieniacz
mleka (6) przez wciśnięcie go.
12� Opróżnić pojemnik.
Urządzenie jest ponownie gotowe do pracy.
Informacja: Płukanie ltra uruchamia
jednocześnie ustawienie dla funkcji
Wymiana Filtra (= wskaźnik LED
W przypadku pojawienia się komunikatu
Wymiana ltra (lub najpóźniej po dwóch
miesiącach) ltr należy uznać za zużyty.
Filtr należy wymieniać ze względów higie-
nicznych i w celu zapobiegania osadzaniu
się kamienia, który może spowodować
uszkodzenie urządzenia. Filtry zapasowe
są dostępne w handlu lub w dziale serwisowym (patrz „Akcesoria“). Jeżeli nie
zostanie zastosowany nowy ltr, wówczas
należy zmienić ustawienia ltra podane w
rozdziale „Twardość wody”.
Informacja: Przy pomocy wskaźnika ltra
można zaznaczyć miesiąc, w którym nowy
ltr został założony. Można zaznaczyć także
miesiąc, w którym należy wymienić ltr
(najpóźniej po dwóch miesiącach).
Informacja: Jeżeli urządzenie nie było
użytkowane przez dłuższy czas (np. przez
okres urlopu), wówczas należy przepłukać
ltr będący w użytku. W tym celu pobrać
liżankę gorącej wody, a następnie wylać ją.
D miga) �
45
Page 50

pl
Ustawienia
Istnieje możliwość indywidualnego dopasowania ustawień.
Następujące funkcje urządzenia można
regulować:
Twardość wody
W przypadku tego urządzenia możliwe jest
ustawienie twardości wody. Prawidłowe
ustawienie twardości wody jest ważne,
ponieważ gwarantuje, że urządzenie będzie
we właściwym czasie wskazywało, kiedy
należy usunąć osady kamienia. Fabrycznie
ustawiona jest twardość wody 4. Twardość
wody można ustalić za pomocą dołączonych testerów lub po zasięgnięciu informacji
w miejscowym zakładzie gospodarki
wodnej�
Tester zanurzyć na moment w wodzie,
lekko wstrząsnąć i po upływie minuty
odczytać wynik.
Stopień Stopień twardości wody
Niemiecki
(°dH)
1
2
3
4
Jeżeli ma zostać zmieniona twardość
ustawionej wstępnie wody lub jeżeli zastosowany zostanie ltr wody, wówczas należy
postępować w sposób następujący:
1� Pokrętło (13)
ustawić w pozycji
2� Przyciski B (11) i A (12) trzymać
wciśnięte jednocześnie przez co
najmniej 5 sekund. Liczba świecących
się wskaźników LED symbolizuje ustawioną twardość wody.
3� Przycisk start (10) wciskać dotąd, aż
zaświeci się preferowana twardość
wody, np. dla twardości 3 zapalają się
wskaźniki LED D, E i F�
1-7
8-14
15-21
22-30
Francuski
(°fH)
1-13
14-25
26-38
39-54
�
4� Przycisk start (10) trzymać wciśnięty
przez 5 sekund. Ustawione wskaźniki
LED migają, wybrana twardość wody
została zapamiętana.
Ważne: Przy zastosowaniu ltra wody
(patrz „Akcesoria“) postępować następująco, patrz sekcja „Filtr wody”.
Wskazówka: Jeżeli w przeciągu 90 sekund
nie zostanie wciśnięty żaden przycisk,
wówczas urządzenie przełączy się bez
zapamiętywania w tryb gotowości do zaparzania kawy. Ustawiona uprzednio twardość
wody pozostanie niezmieniona�
Automatyczne wyłączanie
Tutaj możliwe jest ustawienie okresu
czasu, po którym urządzenie zostanie
automatycznie wyłączone po przygotowaniu ostatniego napoju. Możliwa jest
nastawa w zakresie od 15 minut do 4
godzin� Ustawiony czas można skrócić, aby
zmniejszyć zużycie energii.
1� Pokrętło (13)
ustawić w pozycji
2� Przyciski B(11) i A (12) trzymać
wciśnięte jednocześnie przez co
najmniej 5 sekund. Liczba świecących
się wskaźników LED symbolizuje czas
ustawiony do momentu wyłączenia.
3� Przycisk start (10) wciskać tylko tak
często, aż zaświeci się preferowany
czas wyłączenia:
D = 15 minut
D oraz E = 30 minut
D, E oraz F = 45 minut
D, E, F oraz G = 1 godzina
D, E, F, G oraz H = 2 godziny
D, E, F, G, H oraz I = 4 godziny
4� Przycisk start (10) trzymać wciśnięty
przynajmniej przez 5 sekund� Ustawione
wskaźniki LED migają, wybrany czas
wyłączenia został zapamiętany.
46
Page 51

pl
Wskazówka: Jeżeli w przeciągu 90 sekund
nie zostanie wciśnięty żaden przycisk,
wówczas urządzenie przełączy się bez
zapamiętywania w tryb gotowości do zaparzania kawy. Zapamiętany wcześniej czas
wyłączania pozostanie zachowany.
Ustawianie temperatury parzenia
Także temperatura parzenia może być
regulowana�
1� Pokrętło (13)
ustawić w pozycji �
2� Przyciski B (11) i A (12) trzymać
wciśnięte jednocześnie przez co
najmniej 5 sekund. Liczba świecących
się wskaźników LED symbolizuje ustawioną temperaturę parzenia.
3� Przycisk start (10) wciskać tylko
dotąd, aż zaświeci się preferowana
temperatura:
LED D = niska
LED D oraz E = średnia
LED D, E oraz F = wysoka
4� Przycisk start (10) trzymać wciśnięty
przynajmniej przez 5 sekund� Ustawione
wskaźniki LED migają, wybrana temperatura została zapamiętana.
Wskazówka: Jeżeli w przeciągu 90 sekund
nie zostanie wciśnięty żaden przycisk,
wówczas urządzenie przełączy się bez
zapamiętywania w tryb gotowości do zapa-
rzania kawy� Ustawiona uprzednio temperatura parzenia pozostanie niezmieniona�
Ustawianie stopnia zmielenia
Za pomocą pokrętła wyboru stopnia
zmielenia (3) można ustawić preferowany
stopień rozdrobnienia kawy mielonej:
● Przy pracującym młynku ustawić
pokrętło wyboru (3) pomiędzy drobno
zmieloną kawą (a: obracanie w kierunku
przeciwnym do ruchu wskazówek
zegara) a grubiej zmieloną kawą (b:
obracanie w kierunku zgodnym z
ruchem wskazówek zegara)�
a b
Informacja: Nowe ustawienie będzie
zauważalne dopiero od drugiej liżanki
kawy�
Wskazówka: W przypadku ciemno palo-
nych ziaren należy nastawić drobniejsze
zmielenie, natomiast w przypadku, gdy
ziarna są jaśniejsze grubsze zmielenie.
Przyrządzanie napoju z
użyciem kawy ziarnistej
Automatyczny ekspres do kawy mieli
świeżą kawę do każdego zaparzania.
Wskazówka: Należy prefereować
mieszanki kawy ziarnistej przeznaczone
specjalnie do automatycznych ekspresów�
Dla uzyskania optymalnej jakości ziarna
kawę należy przechowywać w chłodnym
miejscu lub w zamrażalce. Ziarna kawy
można także mielić w stanie głęboko
zmrożonym.
Uwaga!
A
Stopień zmielenia można zmienić jedynie
przy włączonym młynku! W przeciwnym
razie urządzenie może zostać uszkodzone.
Nie wolno dotykać młynka.
Ważne: Należy codziennie uzupełniać
pojemnik na wodę (16) świeżą wodą. W
pojemniku na wodę (16) powinna być
zawsze wystarczająca ilość wody do pracy
urządzenia.
47
Page 52

pl
Różne warianty kawy mogą być przygotowane poprzez jedno proste wciśnięcie
przycisku�
Przygotowanie
Urządzenie musi być gotowe do pracy.
1� Podstawić podgrzaną liżankę/liżanki
pod wylot kawy (7)�
Wskazówka: W przypadku małego
espresso zawszę podgrzać liżankę,
np. gorącą wodą.
2� Wybrać preferowany wariant kawy i
preferowaną ilość obracając górne
pokrętło (14).
3� Wybrać preferowaną intensywność
kawy obracając dolne pokrętło (13).
4� Nacisnąć przycisk start (10):
Kawa jest parzona, a następnie spływa do
liżanki(ek).
Ponowne naciśnięcie przycisku start (10)
spowoduje wcześniejsze zakończenie
procesu zaparzania�
Przyrządzanie napoju z
użyciem kawy mielonej
Ten automatyczny ekspres do kawy może
parzyć również kawę mieloną (nie chodzi o
kawę rozpuszczalną).
Kawa jest parzona, a następnie spływa do
liżanki.
Pobór gorącej wody
Niebezpieczeństwo poparzenia!
A
Spieniacz mleka (6) mocno się nagrzewa.
Spieniacz mleka (6) chwytać tylko za część
z tworzywa sztucznego�
Przed pobraniem gorącej wody należy
oczyścić spieniacz mleka.
Urządzenie musi być gotowe do pracy.
1� Ustawić liżankę lub szklankę pod
wylotem spieniacza mleka (6)�
2� Spieniacz mleka (6) otworzyć przez
wyciągnięcie. Urządzenie nagrzewa
się. Gorąca woda wypływa przez ok.
40 sekund z otworu wylotowego spieniacza mleka (6)�
3� Poprzez wciśnięcie spieniacza mleka (6)
zatrzymać proces.
Spienianie mleka
Niebezpieczeństwo poparzenia!
A
Spieniacz mleka (6) mocno się nagrzewa.
Spieniacz mleka (6) chwytać tylko za część
z tworzywa sztucznego�
Ważne: Należy codziennie uzupełniać
pojemnik na wodę (16) świeżą wodą. W
pojemniku na wodę (16) powinna być
zawsze wystarczająca ilość wody do pracy
urządzenia.
Przygotowanie
1� Otworzyć szuadę na kawę mieloną (4).
2� Wsypać maksymalnie 2 płaskie łyżki
kawy do szuady na kawę mieloną.
Uwaga: Nie napełniać kawą pełnoziar-
nistą ani kawą rozpuszczalną.
3� Zamknąć szuadę na kawę mieloną (4).
4� Dolne pokrętło (13) ustawić na
symbol G�
5� Nacisnąć przycisk start (10).
48
Wskazówka: Najpierw spienić mleko, a
następnie pobrać kawę lub mleko spienić
osobno i nałożyć je na kawę.
Urządzenie musi być gotowe do pracy.
1� Nacisnąć przycisk B (11)�
Przycisk B miga, urządzenie nagrzewa
się przez ok. 20 sekund.
2� Gdy tylko zaświeci się przycisk i LED
F, zanurzyć spieniacz mleka do dna
w liżance lub szklance wypełnionej w
jednej trzeciej mlekiem�
3� Spieniacz mleka (6) otworzyć przez
wyciągnięcie.
Page 53

pl
Niebezpieczeństwo poparzenia!
A
Wydostająca się para jest bardzo gorąca,
może ona powodować rozpryskiwanie się
płynów. Nie dotykać tulejki i nie kierować jej
na osoby�
4� Spienić mleko.
5� Spieniacz mleka (6) zamknąć przez
wciśnięcie.
Wskazówka: Aby uzyskać optymalną
piankę mleczną, zaleca się zastosowanie
zimnego mleka o zawartości tłuszczu
minimum 1,5 %�
Ważne: Zaschnięte resztki mleka są trudne
do usunięcia, z tego względu koniecznie
po każdym użyciu przemyć spieniacz mleka
(6) letnią wodą.
Konserwacja i
codzienne czyszczenie
Niebezpieczeństwo porażenia
A
prądem!
Przed czyszczeniem wyciągnąć wtyczkę
z sieci. Nigdy nie wolno zanurzać urządzenia w wodzie. Nie stosować oczysz-
czacza parowego�
● Obudowę przemywać miękką, wilgotną
ściereczką.
● Nie stosować szorujących materiałów
lub środków czyszczących.
● Pozostałości kamienia, kawy, mleka
i odkamieniacza należy natychmiast
usunąć. Takie pozostałości mogą
spowodować korozję.
● Nowe ściereczki gąbczaste mogą
zawierać sole. Sole mogą spowodować
nalot rdzy na stali szlachetnej, dlatego
przed użyciem należy je koniecznie
starannie wypłukać.
● Skapnik (8c) z zasobnikiem na fusy (8b)
wysunąć do przodu. Wyjąć osłonę (8a)
oraz kratkę ociekową (8d). Opróżnić
skapnik i zasobnik na fusy�
● Wyjąć i opróżnić szuadę na kawę
mieloną (4).
● Pływak (8e) wymontować i wyczyścić
wilgotną szmatką.
Następujących elementów nie należy
wkładać do zmywarki: Osłona (8a),
O
pływak (8e), szuada na kawę mieloną
(4), jednostka zaparzania (5a)�
Następujące elementy są przystosowane do mycia w zmywarce: Skapnik
N
(8c), zasobnik na fusy (8 b), kratka
ociekowa (8d), pokrywa zatrzymu-
jąca aromat (2) oraz łyżka do kawy
mielonej (18)�
● Wytrzeć wnętrze urządzenia (podstawki
oraz szuadę na kawę mieloną).
Ważne: Skapnik (8c) oraz zasobnik na fusy
(8b) powinny być opróżniane i myte, aby
zapobiec powstawaniu pleśni.
49
Page 54

pl
1
Wskazówka: Jeżeli urządzenie zostanie
włączone w „stanie zimnym” wyłącznikiem
zasilania O / I (9) i po pobraniu kawy auto-
matycznie wyłączone, wówczas nastąpi
automatyczne przepłukanie. W ten sposób
system czyści się samoczynnie.
Ważne: Jeżeli urządzenie nie będzie
używane przez dłuższy okres czasu (np.
z powodu urlopu), należy wszystkie jego
elementy wraz z systemem spieniania
mleka oraz jednostką zaparzania gruntownie wyczyścić.
Czyszczenie spieniacza mleka
Spieniacz mleka (6) powinien być czyszczony przed każdorazowym użyciem w celu
usunięcia osadów.
Ważne: Spieniacz mleka powinien ostygnąć
przed zdjęciem z urządzenia.
Zdemontować spieniacz mleka na części w
celu jego wyczyszczenia:
1� W celu zdemontowania chwycić meta-
lową tulejkę i pociągnąć ją w dół.
2� Rdzeń (6d) obrócić w kierunku prze-
ciwnym do ruchu wskazówek zegara i
wyjąć.
6d
2
3� Wysunąć rurkę (6c).
6c
4� Pojedyncze części przemyć ługiem do
mycia i wyczyścić miękką szczoteczką,
w razie potrzeby zanurzyć w ciepłym
ługu do mycia. Otwór odpowietrzający
(6e) gruntownie wyczyścić.
6e
5� Wszystkie części przepłukać czystą
wodą i wysuszyć.
6� Rdzeń (6d) i rurkę (6c) wetknąć do tulei
metalowej�
6d6c
50
1 2
7� Rdzeń obrócić w kierunku zgodnym z
ruchem wskazówek zegara, aż znaczniki znajdą się obok siebie.
Page 55

pl
8� Spieniacz mleka nasadzić na zawór
parowy. Zwrócić uwagę, aby czerwony
znacznik przy zaworze parowym był
zakryty�
Niebezpieczeństwo poparzenia!
A
Użytkować urządzenie tylko wtedy, gdy
spieniacz mleka (6) jest w całości zmonto-
wany i zainstalowany�
Czyszczenie jednostki zaparzania
Czyszczenie jednostki zaparzania przepro-
wadzać regularnie!
Wstępne automatyczne czyszczenie
jednostki zaparzania:
Przycisk serwisowy (12) wcisnąć na krótko.
Urządzenie zostanie poddane płukaniu,
jeżeli wcześniej została pobrana kawa.
Następnie urządzenie wyłączy się.
Dodatkowo do automatycznego programu
czyszczenia jednostka zaparzania (5a)
powinna być regularnie wyjmowana w celu
czyszczenia (ilustracja E na początku
instrukcji)�
1� Włączyć urządzenie wyłącznikiem
zasilania O / I (9). Żaden przycisk nie
świeci się.
2� Otworzyć drzwiczki (5b) jednostki
zaparzania�
3� Przesunąć czerwoną blokadę (5d) zapa-
rzacza (5a) do końca w lewo.
4� Wcisnąć dźwignię (5c) całkowicie w dół.
Zaparzacz jest zwolniony�
5� Ostrożnie wyjąć zaparzacz (5a), chwy-
tając za wgłębienia.
6� Zdjąć osłonę (5e) zaparzacza i
starannie umyć zaparzacz (5a) pod
bieżącą wodą.
7� Sitko zaparzacza starannie oczyścić
pod strumieniem wody�
Ważne: Nie korzystać z detergentów, ani
nie wkładać do zmywarki do naczyń.
8� Wnętrze urządzenia wyczyścić wilgotną
ściereczką, ewentualnie usunąć resztki
kawy�
9� Wysuszyć jednostkę zaparzania (5a) i
wnętrze urządzenia.
10� Ponownie założyć osłonę (5e) na zapa-
rzacz i wsunąć zaparzacz (5a) do oporu
w urządzenie.
11� Wcisnąć dźwignię (5c) całkowicie do
góry�
12� Przesunąć czerwoną blokadę (5d) do
oporu w prawo i zamknąć drzwiczki
(5b)�
51
Page 56

pl
Wskazówki dotyczące
oszczędzania energii
● Jeżeli automatyczny ekspres do kawy
nie jest używany, wówczas należy go
wyłączyć. W tym celu wcisnąć przycisk
serwisowy (12). Urządzenie włączy cykl
przepłukiwania i wyłączy się.
● Pobierania kawy lub pianki mlecznej
należy w miarę możliwości nie przerywać. Przedwczesne jego przerwanie
powoduje zwiększenie zużycia energii i
szybsze wypełnienie skapnika.
● Regularnie usuwać osady kamienia
w urządzeniu, aby uniknąć tworzenia
się złogów. Złogi powodują większe
zużycie energii.
Program serwisowy
Czas trwania: ok� 35 minut
W zależności od trybu użytkowania
ekspresu przycisk serwisowy (12) miga w
określonych odstępach czasu. Urządzenie
powinno być niezwłocznie oczyszczone i
usnięte w nim osady kamienia za pomocą
programu serwisowego. Jeżeli programu
serwisowego nie przeprowadza się zgodnie
z instrukcją, może nastąpić uszkodzenie
urządzenia.
Uwaga!
A
W przypadku każdego programu serwisowego stosować środki do usuwania
kamienia i czyszczenia zgodnie z instrukcją.
Przestrzegać zaleceń bezpieczeństwa
podanych na opakowaniu środka
czyszczącego.
Programu serwisowego nie wolno w
żadnym wypadku przerywać! Nie pić
płynów!
Do usuwania kamienia nigdy nie używać
octu i kwasku cytrynowego oraz środków
wyprodukowanych na ich bazie!
W żadnym wypadku nie umieszczać
tabletek lub innych środków do usuwania
kamienia w szuadzie na kawę mieloną (4)!
Specjalny odkamieniacz w tabletkach
oraz tabletki do czyszczenia dostępne są
w sklepach i w dziale serwiowym (patrz
„Akcesoria”).
Ważne: Jeśli ltr wody jest wstawiony do
pojemnika na wodę (16), ltr ten należy
koniecznie usunąć przed uruchomieniem
programu serwisowego. Oczyścić jednostkę
zaparzania przed włączeniem programu
serwisowego, patrz rozdział „Czyszczenie
jednostki zaparzania”�
Celem uruchomienia programu serwiso-
wego należy trzymać przycisk serwisowy
(12) wciśniętym przez co najmniej
5 sekund�
Informacja: Podczas trwania programu
miga przycisk serwisowy (12)�
Wskaźnik LED
● Opróżnić skapnik (8) i ponownie
założyć go.
Nastąpi dwukrotne przepłukanie
urządzenia.
Wskaźnik LED
● Otworzyć szuadę na kawę mieloną (4).
● Wrzucić tabletkę do czyszczenia
Siemens i zamknąć szuadę (4) na
kawę mieloną.
● Nacisnąć przycisk start (10).
Wskaźnik LED
● Do pustego pojemnika na wodę (16)
wlać letnią wodę do oznaczenia „0,5 l” i
rozpuścić w niej 1 tabletkę odkamieniającą Siemens TZ80002. W przypadku
stosowania TZ60002 rozpuścić
koniecznie 2 tabletki�
● Nacisnąć przycisk start (10).
H zapala się.
G zapala się.
D zapala się.
52
Page 57

pl
Program serwisowy będzie teraz
wykonywany przez ok� 10 minut�
Wskaźnik LED F zapala się.
● Pojemnik o pojemności co najmniej
0,5 litra podstawić pod wylotem
spieniacza mleka (6)�
● Spieniacz mleka (6) otworzyć przez
wyciągnięcie.
Program serwisowy będzie teraz
wykonywany przez ok� 12 minut�
Wskaźnik LED D zapala się.
● Przepłukać pojemnik na wodę (16) i
wlać świeżą wodę do poziomu max�
● Nacisnąć przycisk start (10).
Program serwisowy będzie teraz
wykonywany przez ok� 30 sekund,
przepłukując urządzenie.
Wskaźnik LED F zapala się.
● Spieniacz mleka (6) zamknąć przez
wciśnięcie.
Program serwisowy będzie teraz
wykonywany przez ok� 8 minut�
Wskaźnik LED H zapala się.
● Opróżnić skapnik (8) i ponownie
założyć go.
Ochrona przed
zamarzaniem
W celu uniknięcia szkód na skutek
A
mrozu podczas transportu i przecho-
wywania urządzenie należy uprzednio
całkowicie opróżnić.
Informacja: W tym celu urządzenie musi
być gotowe do pracy, zaś pojemnik na
wodę (16) napełniony.
1� Ustawić duży pojemnik pod wylotem
spieniacza mleka (6)�
2� Nacisnąć przycisk wytwarzania pary (11).
Wskaźnik LED F miga, urządzenie
nagrzewa się przez ok. 20 sekund.
3� Jeżeli świeci się wskaźnik LED F,
wówczas należy otworzyć spieniacz
mleka (6) przez wykręcenie i pozwolić
przez ok� 15 sekund na wydostawanie
się pary.
4� Włączyć urządzenie wyłącznikiem
zasilania O / I (9)�
5� Opróżnić pojemnik na wodę (16) i
skapnik (8)�
Akcesoria
Poniższe akcesoria można zakupić w sklepach lub poprzez dział serwisu.
Jeżeli będzie używany ltr, należy go teraz
ponownie wsunąć.
Urządzenie jest teraz oczyszczone,
odwapnione i gotowe do pracy�
Ważne: Przetrzeć urządzenie miękką,
wilgotną ściereczką, aby natychmiast
usunąć pozostałości odkamieniacza. Takie
pozostałości mogą spowodować korozję.
Nowe ściereczki gąbczaste mogą zawierać
sole. Sole mogą spowodować nalot rdzy
na stali szlachetnej, dlatego przed użyciem
należy je koniecznie starannie przepłukać.
Akcesoria Numer katalogowy
Handel /
Serwis
Tabletki czyszczące TZ60001
00310575
Odkamieniacz w
tabletkach
Filtr wody TZ70003
Zestaw
pielęgnacyjny
TZ80002
00576693
00575491
TZ80004
00576330
53
Page 58

pl
J
To urządzenie jest oznaczone
nych oraz niewłaściwego składowania
Dla urządzenia obowiązują warunki
gwarancji wydanej przez nasze przedstawicielstwo handlowe w kraju zakupu�
Dokładne informacje otrzymacie Państwo
w każdej chwili w punkcie handlowym,
w którym dokonano zakupu urządzenia.
W celu skorzystania z usług gwarancyinych
konieczne jest przedłożenie dowodu
kupna urządzenia. Warunki gwarancji
regulowane są odpowiednimi przepisami
Kodeksu cywilnego oraz Rozporządze-
niem Rady Ministrów z dnia 30�05�1995
roku „W sprawie szczególnych warunków
zawierania i wykonywania umów rzeczy
ruchomych z udziałem konsumentów”.
Zmiany zastrzeżone.
Ekologiczna utylizacja
zgodnie z Dyrektywą Europejską
2012/09/UE oraz polską Ustawą z
dnia 29 lipca 2005 r. „O zużytym
sprzęcie elektrycznym i elektro-
nicznym” (Dz�U� z 2005 r� Nr 180,
poz. 1495) symbolem przekreślonego
kontenera na odpady�
Takie oznakowanie informuje, że
sprzęt ten, po okresie jego użytkowania nie może być umieszczany
łącznie z innymi odpadami pochodzącymi z gospodarstwa domowego.
Użytkownik jest zobowiązany do
oddania go prowadzącym zbieranie
zużytego sprzętu elektrycznego i
elektronicznego. Prowadzący zbie-
ranie, w tym lokalne punkty zbiórki,
sklepy oraz gminne jednostka, tworzą
odpowiedni system umożliwiający
oddanie tego sprzętu. Właściwe
postępowanie ze zużytym sprzętem
elektrycznym i elektronicznym przy-
czynia się do uniknięcia szkodliwych
dla zdrowia ludzi i środowiska naturalnego konsekwencji, wynikających
z obecności składników niebezpiecz-
Gwarancja
i przetwarzania takiego sprzętu.
54
Page 59

Samodzielne rozwiązywanie prostych problemów
Problem Przyczyna Pomoc
Młynek nie mieli kawy
ziarnistej�
Niemożliwy pobór
gorącej wody.
Zbyt mało lub całkowity
brak pianki mlecznej�
Kawa wypływa tylko
kroplami lub nie
wypływa wcale.
Kawa nie ma kremowej
pianki�
Kawa jest za „kwaśna”. Ustawiono zbyt gruby
Jeśli problem nie może zostać rozwiązany, należy koniecznie skontaktować się z
infolinią! Numery telefonów znajdują się na ostatnich stronach instrukcji.
Kawa ziarnista nie wpada
do młynka (ziarna za bardzo
oleiste)�
Spieniacz mleka (6) jest
zabrudzony�
Spieniacz mleka (6) jest
zabrudzony�
Nieodpowiednie mleko� Stosować mleko o zawartości
Spieniacz mleka (6) jest
nieprawidłowo zmontowany.
Urządzenie jest
zakamienione�
Ustawiono zbyt drobny
stopień zmielenia lub
zastosowana kawa jest zbyt
drobno zmielona�
Urządzenie jest mocno
zakamienione�
Niewłaściwy gatunek kawy. Użyć gatunku kawy o wyższym
Kawa ziarnista nie ma
aromatu kawy świeżo
palonej�
Stopień zmielenia nie jest
dostosowany do kawy
ziarnistej�
stopień zmielenia lub
zastosowana kawa mielona
nie jest odpowiednio drobno
zmielona�
Niewłaściwy gatunek kawy. Zastosować ciemniej paloną
Puknąć lekko w pojemnik na
kawę ziarnistą (1). W miarę możliwości zmienić gatunek kawy.
Przy opróżnionym pojemniku na
kawę ziarnistą (1) przetrzeć go
suchą szmatką.
Wyczyścić spieniacz mleka (6),
patrz rozdział „Konserwacja i
codzienne czyszczenie“�
Wyczyścić spieniacz mleka (6),
patrz rozdział „Konserwacja i
codzienne czyszczenie“�
tłuszczu co najmniej 1,5 %.
Elementy spieniacza mleka
nawilżyć i połączyć mocno ze
sobą.
Odkamienić urządzenie zgodnie
z instrukcją.
Ustawić stopień zmielenia na
grubszy lub zastosować grubiej
zmieloną kawę.
Odkamienić urządzenie zgodnie
z instrukcją.
udziale ziaren w gatunku robusta�
Zastosować kawę świeżo paloną.
Ustawić stopień zmielenia na
drobny�
Ustawić stopień zmielenia na
drobniejszy lub zastosować
drobniej zmieloną kawę.
mieszankę.
pl
55
Page 60

pl
Problem Przyczyna Pomoc
Kawa jest za „gorzka”. Stopień zmielenia usta-
wiono na zbyt drobny lub
zastosowana kawa mielona
jest zbyt drobno zmielona�
Niewłaściwy gatunek kawy. Zmienić gatunek kawy.
Filtr wody nie trzyma się
w pojemniku na wodę
(16)�
Wskaźnik LED
Fusy nie są zbite i są za
wilgotne�
Wskaźnik LED
Duże wahania w jakości
kawy i jakości pianki
mlecznej�
Krople wody na
wewnętrznym dnie urządzenia przy wyjętym
skapniku (8)�
Jeśli problem nie może zostać rozwiązany, należy koniecznie skontaktować się z
infolinią! Numery telefonów znajdują się na ostatnich stronach instrukcji.
D miga�
I miga�
Filtr wody jest niewłaściwie
zamocowany�
Pojemnik na wodę nie jest
włożony prawidłowo lub ltr
wody jest zużyty.
Woda zawierająca
dwutlenek węgla w pojemniku na wodę.
Stopień zmielenia usta-
wiono na zbyt drobny lub
zbyt gruby bądź użyto zbyt
mało kawy mielonej.
Brudna jednostka
zaparzania (5)�
Zbyt dużo kawy mielonej w
jednostce zaparzania (5)�
Mechanizm jednostki zaparzania ma utrudnione ruchy�
Brak jednostki zaparzania
(5) lub nie została ona
rozpoznana�
Urządzenie jest
zakamienione�
Skapnik (8) zbyt wcześnie
wyjęty.
Ustawić stopień zmielenia na
grubszy lub zastosować grubiej
zmieloną kawę.
Filtr wody wcisnąć prosto i mocno
w celu połączenia z pojemnikiem.
Włożyć prawidłowo pojemnik
na wodę. Jeśli dioda LED nadal
miga, włożyć nowy ltr wody i
wykonać płukanie, patrz rozdział
„Filtr wody”.
Napełnić pojemnik na wodę
świeżą wodą z kranu.
Ustawić stopień zmielenia
kawy na drobniejszy lub użyć
2 płaskich łyżeczek/miarek kawy.
Wyczyścić jednostkę
zaparzania (5)�
Wyczyścić jednostkę zaparzania (5). Napełnić maksymalnie
dwiema płaskimi łyżkami kawy
mielonej�
Wyjąć i oczyścić jednostkę zaparzania, patrz rozdział „Konser-
wacja i codzienne czyszczenie“�
Wyłączyć urządzenie przy
włożonej jednostce zaparzania
(5), odczekać trzy sekundy i
ponownie włączyć.
Odkamienić urządzenie zgodnie
z instrukcją.
Skapnik (8) wyjmować dopiero
po kilku sekundach od ostatniego
pobrania napoju�
56
Page 61

Problem Przyczyna Pomoc
Ustawienia fabryczne
zostały zmienione i
powinny zostać znów
aktywowane („Reset”).
Wskaźniki LED
migają.
Wskaźniki LED
migają.
Wskaźniki LED
migają.
Jeśli problem nie może zostać rozwiązany, należy koniecznie skontaktować się z
infolinią! Numery telefonów znajdują się na ostatnich stronach instrukcji.
Dokonano własnych
ustawień, które nie są już
potrzebne�
W urządzeniu wystąpiła
usterka�
Nieprawidłowe napięcie. Eksploatować urządzenie tylko
Temperatura otoczenia jest
zbyt niska�
Włączyć urządzenie wyłącznikiem zasilania O / I (9). Trzymać
wciśnięty przycisk serwisowy
(12) oraz przycisk przygotowania
pary (11) i włączyć urządzenie
wyłącznikiem zasilania O / I (9)�
Następnie potwierdzić przyci-
skiem start (10)�
Ustawienia fabryczne są znów
aktywne�
Proszę zadzwonić na gorącą linię
pomocy serwisowej�
przy napięciu 220 -240 V.
Eksploatować urządzenie w
temperaturze > 5° C�
pl
Dane techniczne
Zasilanie elektryczne (napięcie – częstotliwość) 220-240 V – 50/60 Hz
Moc nagrzewania 1600 W
Maksymalne ciśnienie pompy, statyczne 15 bar
Maksymalna pojemność pojemnika na wodę (bez ltra). 1,7 l
Maksymalna pojemność pojemnika na kawę ziarnistą 300 g
Długość przewodu 100 cm
Wymiary (wys. x szer. x głęb.) 385 x 280 x 479 mm
Ciężar, niewypełniony 9,3 kg
Rodzaj młynka Ceramiczny
57
Page 62

nl
Overzicht
Leveringsomvang �������������������������������������58
Overzicht ��������������������������������������������������58
Veiligheidsaanwijzingen����������������������������59
Bedieningselementen ������������������������������� 61
Vóór het eerste gebruik ����������������������������62
Waterlter �������������������������������������������������64
Instellingen �����������������������������������������������65
Kofezetten met kofebonen �������������������� 66
Kofezetten met gemalen kofe ��������������67
Heet water tappen ������������������������������������67
Melkschuim bereiden��������������������������������67
Onderhoud en dagelijkse reiniging ����������� 68
Tips voor energiebesparing ����������������������71
Onderhoudsprogramma ���������������������������71
Vorstbeveiliging ���������������������������������������72
Accessoires ����������������������������������������������72
Afval����������������������������������������������������������73
Garantie ����������������������������������������������������73
Zelf eenvoudige problemen verhelpen �����74
Technische specicaties ��������������������������� 76
Beste kofeliefhebber,
Gefeliciteerd met uw nieuwe espressoautomaat van Siemens�
Leveringsomvang
(zie de overzichtsafbeelding voor in de
gebruiksaanwijzing)
a Espressoautomaat TE501
b Gebruiksaanwijzing
c Teststrookje voor waterhardheid
d Maatschepje
(zie de overzichtsafbeeldingen A, B, C, D
en E voor in de gebruiksaanwijzing)
1 Bonenreservoir
2 Aromadeksel
3 Draaischakelaar voor instelling
maaljnheid
4 Lade voor gemalen kofe
(voorgemalen kofe / reinigingstablet)
5 Zetmodule (afbeelding E)
a) Zetmodule
b) Luikje
c) Uitwerphendel voor zetgroep
d) Grendel
e) Afdekplaatje
6 Melkschuimer (afbeelding C)
afneembaar
a) Stoomventiel
b) Metalen huls
c) Functiebuis
d) Functiekern
e) Luchtopening
7 Kofetap (in hoogte verstelbaar)
8 Lekschaal (afbeelding D)
a) Afdekplaat
b) Kofedikreservoir
c) Lekschaal kofetap
d) Lekplaat kofetap
e) Vlotter
9 Netspanningschakelaar O / I
10 Starttoets
11 Stoomtoets B
12 Servicetoets A
13 Draaiknop “Kofesterkte”
14 Draaiknop “Drankkeuze”
15 Indicatie-LED’s
16 Afneembare watertank
17 Deksel van watertank
18 Maatschepje
(aanbrenghulp voor waterlter)
19 Opbergvakje voor maatschepje
20 Aansluitsnoer met opbergvak
C
58
Page 63

nl
Veiligheidsaanwijzingen
Lees de gebruiksaanwijzing zorgvuldig door, neem deze altijd
in acht en bewaar deze goed! Als u dit apparaat aan iemand
anders geeft, lever dan ook deze gebruiksaanwijzing mee.
Dit apparaat is bedoeld voor de verwerking van normale
huishoudelijke hoeveelheden in huishoudens of vergelijkbare,
niet-commerciële toepassingen. Hiertoe behoren bijvoorbeeld
ook het gebruik in personeelskeukens van winkels, kantoren,
landbouw- en andere industriële bedrijven, alsmede het
gebruik door gasten van pensions, kleine hotels en soortgelijke
accommodaties.
¡ Gevaar voor elektrische schokken!
Sluit het apparaat aan, en gebruik het conform de informatie op
het typeplaatje� Om gevaarlijke situaties te vermijden mogen
reparaties aan het apparaat, zoals vervanging van een beschadigd
aansluitsnoer, alleen door onze servicedienst worden uitgevoerd�
Dit apparaat mag door kinderen van 8 jaar en ouder en door
personen met verminderde lichamelijke, zintuiglijke of geestelijke
vermogens of gebrek aan ervaring en/of kennis worden gebruikt
indien dit onder toezicht gebeurt of indien zij over het veilige gebruik
van het apparaat zijn geïnstrueerd en de hieruit voortvloeiende
gevaren hebben begrepen� Kinderen onder de 8 moeten van het
apparaat en aansluitsnoer worden weggehouden en mogen het
apparaat niet bedienen� Kinderen mogen niet met het apparaat
spelen� Reiniging en gebruikersonderhoud mogen niet door
kinderen worden uitgevoerd, tenzij de kinderen 8 jaar of ouder zijn
en zij deze werkzaamheden onder toezicht uitvoeren�
59
Page 64

nl
Dompel het apparaat of aansluitsnoer nooit onder in water� Gebruik
het apparaat uitsluitend indien het aansluitsnoer en het apparaat
geen beschadigingen vertonen� Trek bij storingen direct de stekker
uit het stopcontact of schakel de netspanning uit�
Het apparaat bevat permanente magneten die elektronische
implantaten zoals pacemakers en insulinepompen kunnen
beïnvloeden� Dragers van elektronische implantaten dienen op
minimaal 10 cm afstand van het frontpaneel te blijven�
¡ Verstikkingsgevaar!
Laat kinderen niet met verpakkingsmateriaal spelen�
Bewaar kleine onderdelen op een veilige plaats om te voorkomen
dat deze worden ingeslikt�
¡ Gevaar voor letsel!
Grijp niet in het maalwerk� Onjuist gebruik van het apparaat kan
letsel tot gevolg hebben�
¡ Verbrandingsgevaar!
De melkschuimer wordt zeer heet� Laat dit na gebruik eerst afkoelen
alvorens het aan te raken� Na het gebruik kunnen de oppervlakken
van het verwarmingselement of de warmhoudplaat nog enige tijd
heet zijn�
60
Page 65

nl
Bedieningselementen
Netspanningschakelaar O / I
Met behulp van de netspanningschakelaar
O / I (9) schakelt u het apparaat in of uit
(door inschakeling/onderbreking van de
stroomtoevoer)�
Belangrijk: Gebruik de servicetoets (12)
voor het uitschakelen�
Servicetoets A
Als u kort op de servicetoets (12) drukt,
wordt het apparaat gespoeld en vervolgens
uitgeschakeld� Als de servicetoets (12)
knippert, moet het onderhoudsprogramma
worden uitgevoerd� Druk in dat geval lang
op de servicetoets (12) om het onderhoudsprogramma te starten� Tijdens de uitvoering
van het onderhoudsprogramma knippert
de servicetoets (12)� Zodra het programma
voltooid is, dooft de toets�
Stoomtoets B
Als u op de stoomtoets (11) drukt, wordt er
stoom ten behoeve van de melkschuimbereiding geproduceerd�
Starttoets C
Als u op de starttoets (10) drukt, wordt de
drankbereiding gestart� Als u tijdens de
drankbereiding nogmaals op deze toets
drukt, wordt de afname voortijdig gestopt�
Indicatie-LED’s
Het branden of knipperen van de desbetreffende LED’s geeft het volgende aan:
D brandt De watertank is leeg en moet
weer worden gevuld�
D knippert Het waterlter is versleten en
moet worden vervangen�
Belangrijk: het knipperen
tijdens het in gebruik nemen
betekent niet dat het lter
moet worden vervangen
(zie “ Apparaat in gebruik
nemen”)
E brandt Het bonenreservoir is leeg en
moet weer worden gevuld�
F brandt Het stoomventiel moet worden
geopend of gesloten�
F knippert Afhankelijk van de instelling
komt er stoom of heet water uit
de melkopschuimer�
G brandt Als met de draaiknop “Kofe-
sterkte” de stand G is geselecteerd, brandt het symbool
zo lang er voorgemalen kofe
wordt afgenomen�
H brandt De lekschaal is afwezig of niet
correct aangebracht� Breng de
lekschaal aan�
H knippert De schalen zijn vol� Maak de
schalen leeg en breng deze
opnieuw aan�
I brandt Het luikje van de zetmodule is
open� Sluit het luikje�
I knippert Verwijder de zetmodule en
reinig deze�
61
Page 66

nl
Draaiknop “Kofesterkte”
Met deze draaiknop (13)
kan de kofesterkte worden
ingesteld of bereiding met
voorgemalen kofe worden
geselecteerd�
h
tot en met
g
G
Draaiknop “Drankkeuze”
a
tot en met
c
b
tot en met
d
Melkopschuimer
De melkopschuimer (6a) kan worden
geopend door deze uit te trekken en
worden gesloten door deze in te drukken�
Zeer mild
Mild
Normaal
Sterk
Voorgemalen kofe
Met deze draaiknop (14)
worden de gewenste drank
en hoeveelheid geselecteerd� Bovendien kunnen
hiermee de gebruikersinstellingen worden gewijzigd�
Kleine espresso
Espresso
Kleine café crème
Café crème
Grote café crème
2 x kleine espresso
2 x espresso
2 x kleine café crème
2 x café crème
2 x grote café crème
Vóór het eerste gebruik
Algemeen
Vul het waterreservoir uitsluitend met
zuiver, koud water zonder koolzuur en het
bonenreservoir uitsluitend met geroosterde
bonen (bij voorkeur espressobonen of
bonenmelanges voor volautomatische
kofemachines). Gebruik geen geglaceerde, gekarameliseerde of met andere
suikerhoudende additieven behandelde
kofebonen, aangezien deze de zetmodule
kunnen doen verstoppen�
Bij dit apparaat is de hardheid van het
water instelbaar� Af fabriek is het apparaat
op waterhardheid 4 ingesteld� Controleer de daadwerkelijke waterhardheid
met het meegeleverde teststrookje� Als
deze controle een andere waarde dan 4
aangeeft, moet het apparaat na ingebruikname op de desbetreffende waarde worden
geprogrammeerd (zie “Waterhardheid” in
het hoofdstuk “Instellingen”)�
Apparaat in gebruik nemen
1� Verwijder het aanwezige beschermfolie�
2� Plaats de espressoautomaat op een
vlakke, waterbestendige ondergrond
met voldoende draagvermogen� Zorg
dat de ventilatiesleuven van het appa-
raat vrij blijven�
Belangrijk: Gebruik het apparaat alleen
in vorstvrije ruimten� Als het apparaat bij
temperaturen onder 0 °C is getransporteerd
of opgeslagen, dient u ten minste 3 uur te
wachten alvorens het apparaat in gebruik te
nemen�
3� Trek de stekker uit het snoervak (20) en
sluit deze aan op een stopcontact� Stel
de snoerlengte af door het snoer iets in
het vak terug te duwen of verder naar
buiten te trekken� Plaats het apparaat
hiervoor bijvoorbeeld met de achterzijde
tegen de tafelrand en trek het snoer
omlaag of schuif het omhoog�
62
Page 67

nl
4� Monteer de melkopschuimer� Gebruik
het apparaat alleen wanneer de melkopschuimer (6) volledig geassembleerd en
gemonteerd is�
5� Klap het deksel van de watertank (17)
omhoog�
6� Verwijder de watertank (16), spoel de
tank vervolgens uit en vul deze met
vers, koud water� Neem hierbij de
markering max in acht�
7� Breng de watertank (16) rechtstandig
aan en druk deze helemaal omlaag�
8� Sluit hierna het deksel (17) van de
watertank�
9� Vul het bonenreservoir (1) met
kofe bonen (Raadpleeg hoofdstuk
“Kofezetten met gemalen kofe”
voor informatie over het gebruik van
voorgemalen kofe).
10� Schakel het apparaat in met de
netspanningschakelaar O / I (9)� De LED
D knippert en de LED F brandt�
11� Plaats een bakje onder de tap van de
melkopschuimer (6)�
12� Trek de melkopschuimer (6) voorzichtig
uit om deze te openen� Het apparaat
spoelt de melkopschuimer (6) nu met
water� De LED F knippert�
13� Zodra de LED F brandt, drukt u de
melkopschuimer (6) in om deze te
sluiten�
Apparaat uitschakelen
Het espressoapparaat is ingesteld met
standaardinstellingen voor een optimale
werking� Het apparaat schakelt zich na
een geselecteerde tijd automatisch uit
(raadpleeg het gedeelte “Automatische
uitschakeling” in het hoofdstuk “Instellingen”
voor informatie over het instellen van deze
duur)�
Uitzondering: als er alleen heet water of
stoom is afgenomen, wordt het apparaat
zonder spoeling uitgeschakeld�
Om het apparaat eerder uit te schakelen,
kunt u op de Servicetoets A (12) drukken�
Het apparaat wordt dan gespoeld en vervolgens uitgeschakeld�
Opmerking: Als u het apparaat voor de
eerste keer gebruikt nadat het onderhoudsprogramma is uitgevoerd of nadat het
apparaat langere tijd niet is gebruikt, dient
u de eerste drank niet te drinken aangezien
deze nog niet het volle aroma heeft�
Na de ingebruikname van de espressoau-
tomaat zult u pas een jnporige en stabiele
“crème” verkrijgen nadat er enkele kopjes
zijn afgenomen�
Bij langdurig gebruik kunnen er zich waterdruppels bij de ventilatiesleuven voordoen�
Dit is een normaal verschijnsel�
Het apparaat wordt nu opgewarmd en
gespoeld� Hierbij loopt wat water uit de
kofetap. Zodra de toetsen A (12), B (11)
en C (10) branden, is het apparaat klaar
voor gebruik�
63
Page 68

nl
Waterlter
Het gebruik van een waterlter kan kalk-
afzettingen verminderen�
Voordat u een nieuw waterlter kunt
gebruiken, dient u het lter te spoelen. Ga
hiervoor als volgt te werk:
1� Druk het waterlter met behulp van het
maatschepje (18) in de lege watertank
vast�
2� Vul de watertank (16) tot de markering
max met water�
3� Zet de draaiknop
(13) in stand
4� Houd de toetsen B (11) en A (12) ten
minste 5 seconden gelijktijdig ingedrukt�
De LED
5� Druk op de starttoets (10) om “aan” in te
stellen�
6� Houd de starttoets (10) ten minste
5 seconden ingedrukt om de plaatsing
te bevestigen� Alle LED’s lichten kort op�
7� De LED
brandt�
8� Plaats een kan met een inhoud van
0,5 liter onder de tap van de melkopschuimer (6)�
9� Open de melkopschuimer (6) door deze
uit te trekken� LED
10� Er stroomt water door het lter om dit te
spoelen�
11� Zodra de LED F brandt, sluit u de
melkopschuimer (6) door deze in te
drukken�
12� Maak het reservoir leeg�
Het apparaat is weer klaar voor gebruik�
“uit” of “aan” licht op�
D knippert en de LED F
F knippert�
Info: door het spoelen van het lter wordt
tegelijkertijd de instelling voor de indicatie
Filter vervangen (= LED D knippert)
geactiveerd�
Als de indicatie Filter vervangen verschijnt
of het lter twee maanden is gebruikt,
is de werking van het lter uitgeput. Om
hygiënische redenen en om verkalking (en
schade aan het apparaat) te voorkomen,
dient u het lter in dat geval te vervangen.
Vervangingslters zijn in de handel of via de
servicedienst (zie “Accessoires”) verkrijg-
baar. Als u geen nieuw lter aanbrengt,
dient u de instelling voor het lter volgens
het hoofdstuk “Waterhardheid” aan te
passen�
Info: met de lterindicator kunt u de maand
markeren waarin u het lter hebt aange-
bracht� Ook kunt u de maand markeren
waarin u het lter weer moet vervangen
(uiterlijk na twee maanden)�
Info: als het apparaat langere tijd (bijvoorbeeld tijdens een vakantie) niet is gebruikt,
moet het aangebrachte lter vóór gebruik
worden doorgespoeld� Neem hiervoor een
kopje heet water af en gooi dit weg�
64
Page 69

nl
Instellingen
U kunt diverse instellingen op uw individuele wensen afstemmen�
U kunt het volgende instellen:
Waterhardheid
Bij dit apparaat is de hardheid van het water
instelbaar� De waterhardheid moet correct
worden ingesteld om ervoor te zorgen
dat apparaat bijtijds meldt dat het moet
worden ontkalkt� Af fabriek is het apparaat
op waterhardheid 4 ingesteld� U kunt de
hardheid van het water vaststellen met het
meegeleverde teststrookje of opvragen bij
het plaatselijke drinkwaterbedrijf�
Dompel het teststrookje kort onder in water,
schud het voorzichtig af en lees na een
minuut het resultaat af�
Niveau Waterhardheidsgraad
Duits (°dH) Frans (°fH)
1
2
3
4
Ga als volgt te werk als u een andere
waterhardheid dan de vooringestelde
waarde wilt invoeren of als u een waterlter
aanbrengt:
1� Zet de draaiknop
(13) in stand
2� Houd de toetsen B (11) en A (12) ten
minste 5 seconden gelijktijdig ingedrukt�
Het aantal brandende LED’s geeft de
ingestelde waterhardheid aan�
3� Druk net zo vaak op de starttoets (10)
tot de gewenste waterhardheid wordt
aangegeven� Voor waterhardheid 3
bijvoorbeeld moeten de LED’s D, E en
F oplichten�
4� Druk ten minste 5 seconden op de start-
toets (10)� De ingestelde LED’s lichten
kort op en de geselecteerde waterhard-
heid wordt opgeslagen�
1-7
8-14
15-21
22-30
1-13
14-25
26-38
39-54
Belangrijk: ga bij gebruik van een water-
lter (zie “Accessoires”) als volgt te werk,
zie “Waterlter”.
Opmerking: als er niet binnen 90 seconden
op een toets wordt gedrukt, wordt het
apparaat weer in gereedheid geschakeld
zonder dat de instelling wordt opgeslagen�
De eerder opgeslagen waterhardheid blijft
dan behouden�
Automatische uitschakeling
Hier kan worden ingesteld hoe lang na de
laatste drankbereiding het apparaat automatisch moet worden uitgeschakeld� Deze
tijd kan op 15 minuten tot 4 uur worden
ingesteld� De vooraf ingestelde tijdsduur
kan ten behoeve van de energiebesparing
worden verkort�
1� Zet de draaiknop
(13) in stand �
2� Houd de toetsen B (11) en A (12) ten
minste 5 seconden gelijktijdig ingedrukt�
Het aantal brandende LED’s geeft de
ingestelde tijd voor de uitschakeling
aan�
3� Druk net zo vaak op de starttoets (10)
tot de gewenste uitschakeltijd oplicht:
D = 15 minuten
D en E = 30 minuten
D, E en F = 45 minuten
D, E, F en G = 1 uur
D, E, F, G en H = 2 uren
D, E, F, G, H en I = 4 uren
4� Druk ten minste 5 seconden op de start-
toets (10)� De ingestelde LED’s lichten
kort op en de geselecteerde uitschakeltijd wordt opgeslagen�
Opmerking: als er niet binnen 90 seconden
op een toets wordt gedrukt, wordt het apparaat weer in gereedheid geschakeld zonder
dat de instelling wordt opgeslagen� De
eerder opgeslagen tijd voor de uitschakeling blijft dan behouden�
65
Page 70

nl
Zettemperatuur instellen
Ook de zettemperatuur kan worden
ingesteld�
1� Zet de draaiknop
(13) in stand �
2� Houd de toetsen B (11) en A (12) ten
minste 5 seconden gelijktijdig ingedrukt�
Het aantal brandende LED’s geeft de
ingestelde zettemperatuur aan�
3� Druk net zo vaak op de starttoets (10)
tot de gewenste temperatuur oplicht:
LED D = laag
LED D en E = gemiddeld
LED D, E en F = hoog
4� Druk ten minste 5 seconden op de start-
toets (10)� De ingestelde LED’s lichten
kort op en de geselecteerde tempera-
tuur wordt opgeslagen�
Opmerking: als er niet binnen 90 seconden
op een toets wordt gedrukt, wordt het
apparaat weer in gereedheid geschakeld
zonder dat de instelling wordt opgeslagen�
De eerder opgeslagen zettemperatuur blijft
dan behouden�
Instellen van de maaljnheid
Met de draaischakelaar (3) voor de maal-
jnheid kunt u de gewenste korrelgrootte
van de gemalen kofebonen instellen.
Info: De nieuwe instelling is pas merkbaar
vanaf de tweede kop kofe.
Tip: Stel bij donker gebrande bonen een
jnere, en bij lichtere bonen een grovere
maling in�
Kofezetten met
kofebonen
Deze espressoautomaat gebruikt telkens
wanneer u kofe zet een vers maalsel.
Tip: gebruik bij voorkeur espressobonen of
bonenmengsels voor automaten� Bewaar
de bonen voor een optimale kwaliteit
gekoeld of diepgevroren, en in een afge-
sloten verpakking. De kofebonen kunnen
ook in bevroren toestand worden gemaald�
Belangrijk: vul de watertank (16) elke dag
met vers water� Om het apparaat te kunnen
gebruiken, moet de watertank (16) steeds
voldoende water bevatten�
Er kunnen verscheidene kofedranken op
simpele wijze met één knopindruk worden
gezet�
Let op!
A
Verstel de maaljnheid alleen terwijl het
maalwerk draait! Het apparaat kan anders
beschadigd raken� Reik niet in het maalwerk�
● Stel de draaischakelaar (3) bij draaiend
maalwerk in op een jner maalsel (door
a: linksom te draaien) of op een grover
maalsel (door b: rechtsom te draaien)�
a b
66
Bereiden
Zorg ervoor dat het apparaat klaar voor
gebruik is�
1� Plaats een of twee voorverwarmde
kopjes onder de kofetap (7).
Tip: verwarm het kopje voor een kleine
espresso altijd voor, bijvoorbeeld met
heet water�
2� Selecteer met de bovenste draaiknop
(14) de gewenste kofe en gewenste
hoeveelheid�
3� Selecteer met de onderste draaiknop
(13) de gewenste sterkte van de kofe.
4� Druk op de starttoets (10)�
De kofe wordt gezet en loopt hierna in de
kopje/kopjes�
Page 71

nl
Door nogmaals op de starttoets (10) te
drukken, kan het kofezetten voortijdig
worden beëindigd�
Kofezetten met
gemalen kofe
Deze automaat kan ook met voorgemalen
kofe (geen oploskofe) worden gebruikt.
Belangrijk: vul de watertank (16) elke dag
met vers water� Om het apparaat te kunnen
gebruiken, moet de watertank (16) steeds
voldoende water bevatten�
Bereiden
1� Open de lade voor gemalen kofe (4).
2� Vul de lade met maximaal 2 afgestreken
maatschepjes kofe. Opgelet: vul de
lade niet met hele bonen of oploskofe.
3� Sluit de lade voor gemalen kofe (4).
4� Zet de onderste draaiknop (13) op het
symbool G�
5� Druk op de starttoets (10)�
De kofe wordt gezet en loopt hierna in de
kopje�
Heet water tappen
Verbrandingsgevaar!
A
De melkopschuimer (6) wordt zeer heet�
Raak alleen het kunststof gedeelte van de
melkopschuimer (6) aan�
3� Druk de melkopschuimer (6) in om de
procedure voortijdig te stoppen�
Melkschuim bereiden
Verbrandingsgevaar!
A
De melkopschuimer (6) wordt zeer heet�
Raak alleen het kunststof gedeelte van de
melkopschuimer (6) aan�
Tip: schuim eerst de melk op en neem dan
pas kofe of schuim de melk afzonderlijk op
voeg deze vervolgens toe aan de kofe.
Zorg ervoor dat het apparaat klaar voor
gebruik is�
1� Druk op toets B (11)�
De toets B knippert en het apparaat
warmt nu ca� 20 seconden lang op�
2� Wacht tot de toets en de LED F
brandt en dompel de melkopschuimer
vervolgens tot de bodem van een kopje
of glas dat voor een derde met melk is
gevuld�
3� Open de melkopschuimer (6) door deze
uit te trekken�
Verbrandingsgevaar!
A
De uittredende stoom is zeer heet en kan
vloeistof omhoog spuiten� Raak de huls niet
aan en richt deze niet op personen�
4� Schuim de melk op�
5� Sluit de melkopschuimer (6) door deze
in te drukken�
Voordat er warm water wordt afgenomen,
moet de melkschuimer zijn gereinigd�
Zorg ervoor dat het apparaat klaar voor
gebruik is�
1� Zet een voorverwarmd kopje of glas
onder de tap van de melkopschuimer (6)�
2� Open de melkopschuimer (6) door deze
uit te trekken� Het apparaat warmt op�
Vervolgens loopt er ca� 40 seconden
lang heet water uit de tap van de melk-
opschuimer (6)�
Tip: Gebruik voor een optimaal melkschuim
bij voorkeur koude melk met een vetgehalte
van ten minste 1,5 %�
Belangrijk: Reinig de melkopschuimer (6)
na elk gebruik altijd met lauwwarm water�
Opgedroogde melkresten zijn namelijk
moeilijk verwijderbaar�
67
Page 72

nl
Onderhoud en
dagelijkse reiniging
Gevaar voor elektrische schokken!
A
Neem vóór de reiniging de stekker uit het
stopcontact�
Dompel het apparaat nooit onder in water�
Gebruik geen stoomreiniger�
● Veeg de behuizing met een zachte,
vochtige doek af�
● Gebruik geen schurende doeken of
reinigingsmiddelen�
● Verwijder resten van kalk, kofe, melk
en ontkalkingsoplossing altijd direct�
Dergelijke resten kunnen corrosievor-
ming veroorzaken�
● Nieuwe sponsdoekjes kunnen zouten
bevatten� Deze zouten kunnen een
roestlaagje op het roestvrij staal veroor-
zaken� Spoel deze doekjes daarom altijd
vóór gebruik grondig uit�
● Trek de lekschaal (8c) en het kofe-
dikreservoir (8b) in voorwaartse richting
uit het apparaat� Verwijder de afdekplaat
(8a) en de lekplaat (8d)� Maak de
lekschaal en het kofedikreservoir leeg
en reinig deze�
● Verwijder de lade voor gemalen kofe
(4) en reinig deze�
● Vlotter (8e) en reinig deze met een
vochtige doek�
Plaats de volgende onderdelen niet
in de vaatwasser: afdekplaat (8a),
O
vlotter (8e), lade voor gemalen kofe
(4), zetmodule (5a)�
De volgende onderdelen zijn wel
geschikt voor de vaatwasser:
N
lekschaal (8c), kofe dikreservoir (8b),
lekplaat (8d), aromadeksel (2) en
maatschepje (18)�
● Doe de binnenkant van het apparaat
af (de opvangschalen en lade voor
gemalen kofe).
Belangrijk: de lekschaal (8c) en het kofe-
dikreservoir (8b) moeten dagelijks geleegd
en gereinigd worden om schimmelvorming
te voorkomen�
Opmerking: Als het apparaat in koude
toestand met de netspanningschakelaar
O / I (9) wordt ingeschakeld of na afname
van kofe automatisch wordt uitgeschakeld,
wordt het apparaat automatisch gespoeld�
Zo reinigt het systeem zichzelf�
Belangrijk: Als het apparaat langere tijd
(bijvoorbeeld tijdens een vakantie) niet
is gebruikt, moet het volledige apparaat
inclusief het melksysteem en de zetmodule
worden gereinigd�
68
Page 73

nl
1
Melkopschuimer reinigen
De melkopschuimer (6) moet na elk
gebruik worden gereinigd om alle resten te
verwijderen�
Belangrijk: laat de melkopschuimer eerst
afkoelen alvorens deze te demonteren�
Demonteer de melkopschuimer om deze te
kunnen reinigen:
1� Houd de metalen huls vast en trek deze
in neerwaartse richting los�
2� Draai de functiekern (6d) linksom en
verwijder deze�
6d
4� Reinig de afzonderlijke onderdelen met
een zachte borstel in warm afwaswater�
Laat de onderdelen zo nodig even in
het sopje voorweken� Reinig vooral de
luchtopening (6e) zorgvuldig�
6e
5� Spoel alle onderdelen met schoon water
na en droog deze vervolgens af�
6� Breng de functiekern (6d) en functiebuis
(6c) weer in de metalen huls aan�
6d6c
1 2
7� Draai de functiekern rechtsom tot de
markeringen zich op één lijn bevinden�
3� Verwijder de functiebuis (6c)�
6c
2
8� Breng de melkopschuimer op het stoom-
ventiel aan� Controleer of de rode markering op het stoomventiel afgedekt is�
69
Page 74

nl
Gevaar voor brandwonden!
A
Gebruik het apparaat alleen wanneer de
melkopschuimer (6) volledig geassembleerd en gemonteerd is�
Zetmodule reinigen
Reinig de zetmodule regelmatig!
Zetmodule automatisch voorreinigen:
Druk kort op de servicetoets (12)� Als er
voordien kofe is afgenomen, wordt het
apparaat gespoeld� Vervolgens wordt het
apparaat uitgeschakeld�
In aanvulling op het automatische
reinigings programma moet de zetmodule
(5a) ook regelmatig worden verwijderd en
gereinigd (zie afbeelding E vóór in deze
gebruiksaanwijzing)�
1� Schakel het apparaat uit met de
netspanningschakelaar O / I (9)� Er mag
nu geen enkele toets meer branden�
2� Open het luikje (5b) van de zetmodule�
3� Schuif de rode grendel (5d) op de
zetgroep (5a) helemaal naar links�
4� Druk de uitwerphendel (5c) helemaal
omlaag� De zetgroep komt los�
5� Pak de zetgroep (5a) beet bij de grepen
en haal de zetgroep er voorzichtig uit�
6� Verwijder de afdekking (5e) van de
zetgroep en reinig de zetgroep (5a)
grondig met stromend water�
7� Reinig de zeef van de zetgroep grondig
onder de waterstraal�
Belangrijk: gebruik geen spoel- of reinigingsmiddelen en plaats de module niet in
de vaatwasser�
8� Neem de binnenkant van het apparaat
met een vochtige doek af en verwijder
eventueel aanwezige koferesten.
9� Laat de zetmodule (5a) en het inwen-
dige van het apparaat drogen�
10� Plaats de afdekking (5e) weer op de
zetgroep en schuif de zetgroep (5a) tot
de aanslag in het apparaat�
11� Druk de uitwerphendel (5c) helemaal
omhoog�
12� Schuif de rode grendel (5d) helemaal
naar rechts en sluit het luikje (5b)�
70
Page 75

nl
Tips voor
energiebesparing
● Schakel het de espressoautomaat
uit als deze niet wordt gebruikt� Druk
hiervoor op de servicetoets (12)� Het
apparaat wordt dan gespoeld en vervol-
gens uitgeschakeld�
● Onderbreek de afname van kofe of
melkschuim liefst zo min mogelijk� Een
voortijdige onderbreking leidt tot een
verhoogd energieverbruik en het sneller
vollopen van de lekschaal�
● Ontkalk het apparaat regelmatig
om kalkafzettingen te voorkomen�
Kalkresten leiden tot een hoger
energieverbruik�
Onderhoudsprogramma
Duur: ca� 35 minuten
Afhankelijk van het gebruik begint na
bepaalde tussenpozen de servicetoets (12)
te knipperen�
In dat geval moet het apparaat direct
met het onderhoudsprogramma worden
gereinigd en ontkalkt� Als het onderhoudsprogramma niet volgens de instructies
wordt uitgevoerd, kan het apparaat worden
beschadigd�
Let op!
A
Gebruik bij het onderhoudsprogramma
altijd een ontkalkings- en reinigingsmiddel
conform deze gebruiksaanwijzing� Neem de
veiligheidsinstructies op de verpakking van
het reinigingsmiddel in acht�
Onderbreek het onderhoudsprogramma in
geen geval! Zorg dat niemand de betrokken
vloeistoffen drinkt!
Gebruik nooit azijn, middelen op basis van
azijn, citroenzuur of middelen op basis van
citroenzuur!
Doe nooit ontkalkingstabletten of andere
ontkalkingsmiddelen in de lade voor
gemalen kofe (4)!
Speciaal ontwikkelde en geschikte
ontkalkings- en reinigingstabletten zijn
verkrijgbaar via de handel en bij de
servicedienst (zie “Accessoires”).
Belangrijk: Als een waterlter in het water-
reservoir (16) geplaatst is, dient dit vóór de
start van het ontkalkingsproces in elk geval
te worden verwijderd� Reinig de zetgroep
voor de start van het serviceprogramma, zie
hoofdstuk “Zetgroep reinigen”�
Start het onderhoudsprogramma door de
servicetoets (12) ten minste 5 seconden
ingedrukt te houden�
Info: Tijdens de uitvoering van het
programma knippert de servicetoets (12)�
LED H licht op�
● Maak de lekschaal (8) leeg en breng
deze opnieuw aan�
Het apparaat wordt twee maal gespoeld�
LED G licht op�
● Open de lade voor gemalen kofe (4).
● Leg er een Siemens reinigingstablet in
en sluit de lade voor gemalen kofe (4).
● Druk op de starttoets (10)�
LED D licht op�
● Vul het lege waterreservoir (16) tot de
markering voor “0,5 l” met lauwwarm
water en los hierin 1 Siemens ontkalkingstablet TZ80002 op� Los bij gebruik
van de ontkalkingstabletten TZ60002
altijd 2 tabletten op�
● Druk op de starttoets (10)�
Het onderhoudsprogramma wordt nu
gedurende ca� 10 minuten uitgevoerd�
LED F licht op�
● Plaats een kan met een minimale
inhoud van 0,5 liter onder de tap van de
melk opschuimer (6)�
71
Page 76

nl
● Open de melkopschuimer (6) door deze
uit te trekken�
Het onderhoudsprogramma wordt nu
gedurende ca� 12 minuten uitgevoerd�
LED D licht op�
● Spoel de watertank (16) en vul deze tot
aan de markering max met vers water�
● Druk op de starttoets (10)�
Het onderhoudsprogramma wordt nu gedurende ca� 30 seconden uitgevoerd en spoelt
het apparaat�
LED F licht op�
● Sluit de melkopschuimer (6) door deze
in te drukken�
Het onderhoudsprogramma wordt nu gedurende ca� 8 minuten uitgevoerd�
LED H licht op�
● Maak de lekschaal (8) leeg en breng
deze opnieuw aan�
Als er een lter werd gebruikt, brengt u dit
nu weer aan�
Hierna is het apparaat volledig gereinigd,
ontkalkt en weer klaar voor gebruik�
Belangrijk: Veeg het apparaat met een
zachte, vochtige doek af om resten van
de ontkalkoplossing direct te verwijderen�
Dergelijke resten kunnen corrosievorming
veroorzaken� Nieuwe sponsdoekjes kunnen
zouten bevatten� Deze zouten kunnen een
roestlaagje op het roestvrij staal veroorzaken� Spoel deze doekjes daarom altijd
vóór gebruik grondig uit�
Vorstbeveiliging
Om vorstschade tijdens transport en
A
opslag te voorkomen, moet het apparaat vooraf volledig worden geleegd.
Info: het apparaat moet klaar voor gebruik
zijn en de watertank (16) moet zijn gevuld�
1� Plaats een grote bak onder de tap van
de melkopschuimer (6)�
2� Druk op de stoomtoets (11)�
De LED
warmt nu ca� 20 seconden lang op�
3� Wacht tot LED
vervolgens de melkopschuimer (6) door
deze uit te trekken en laat deze ca�
15 seconden stomen�
4� Schakel het apparaat uit met de
netspanningschakelaar O / I (9)�
5� Maak de watertank (16) en de lekschaal
(8) leeg�
F knippert en het apparaat
F brandt en open
Accessoires
Onderstaande accessoires zijn in de handel
en via de servicedienst verkrijgbaar�
Accessoires Bestelnummer
Handel /
Klantenservice
Reinigingstabletten TZ60001
00310575
Ontkalkingstabletten TZ80002
00576693
Waterlter TZ70003
00575491
Onderhoudsset TZ80004
00576330
72
Page 77

Afval
J
Gooi verpakkingsmateriaal op een
Voor dit apparaat gelden de garantievoor-waarden die worden uitgegeven door
de vertegenwoordiging van ons bedrijf in
het land van aankoop� De leverancier, bij
wie u het apparaat heeft gekocht, geeft
u hierover graag meer informatie� Om
aanspraak te maken op de garantie heeft
u altijd uw aankoopbewijs nodig�
Wijzigingen voorbehouden�
milieuvriendelijke manier weg� Dit
apparaat is gekenmerkt in overeenstemming met de Europese richtlijn
2012/19/EU betreffende afgedankte
elektrische en elektronische apparatuur (waste electrical and electronic
equipment – WEEE)� De richtlijn
geeft het kader aan voor de in de EU
geldige terugneming en verwerking
van oude apparaten� Raadpleeg uw
gespecialiseerde handelaar voor
de geldende voorschriften inzake
afvalverwijdering�
Garantie
nl
73
Page 78

nl
Zelf eenvoudige problemen verhelpen
Probleem Oorzaak Remedie
Maalwerk maalt geen
kofebonen.
Er kan geen warm
water worden
afgetapt�
Onvoldoende of geen
melkschuim�
De kofe stroomt
slechts druppelsgewijs of helemaal niet
meer�
Kofe heeft
geen “crème”
(schuimlaag)�
De bonen vallen niet in het
maalwerk (te vette bonen)�
De melkopschuimer (6) is
verontreinigd�
De melkopschuimer (6) is
verontreinigd�
Ongeschikte melk� Gebruik melk met een minimaal
De melkopschuimer (6) is
niet goed in elkaar gezet�
Het apparaat is verkalkt� Ontkalk het apparaat conform de
De maaljnheid is te jn
ingesteld of de voorgemalen
kofe is te jnkorrelig.
Het apparaat is sterk
verkalkt�
Ongeschikte soort kofe. Gebruik een kofesoort met een
De bonen zijn niet meer
brandvers�
De maaljnheid is niet afgestemd op de kofebonen.
Klop zacht tegen het bonenreservoir
(1). Wissel zo nodig van kofesoort.
Maak het bonenreservoir (1) leeg
en veeg deze met een droge doek
schoon�
Reinig de melkopschuimer (6)
volgens het hoofdstuk “Onderhoud
en dagelijkse reiniging”�
Reinig de melkopschuimer (6)
volgens het hoofdstuk “Onderhoud
en dagelijkse reiniging”�
vetgehalte van 1,5%�
Bevochtig de onderdelen van de
melkopschuimer en druk deze
stevig in elkaar�
instructies�
Stel een grovere maling in of
gebruik grover gemalen kofe.
Ontkalk het apparaat conform de
instructies�
hoger gehalte aan Robusta-bonen�
Gebruik vers gebrande bonen�
Stel de maaljnheid op jn in.
De kofe is te “zuur”. De maaljnheid is te grof
ingesteld of de voorgemalen
kofe is te grofkorrelig.
Ongeschikte soort kofe. Gebruik een donkere gebrande
De kofe is te “bitter”. De maaljnheid is te jn
ingesteld of de voorgemalen
kofe is te jnkorrelig.
Ongeschikte soort kofe. Wissel van soort kofe.
Als de storing niet kan worden verholpen, neem dan in elk geval contact op
met de hotline! De telefoonnummers staan op de laatste pagina’s van de
gebruiksaanwijzing.
74
Stel een jnere maling in of gebruik
jner gemalen kofe.
kofe.
Stel een grovere maling in of
gebruik grover gemalen kofe.
Page 79

Probleem Oorzaak Remedie
Het waterlter blijft
niet vast zitten in de
watertank (16)�
De LED
Het kofedik is niet
compact en te nat�
De LED
Kofe of melkschuim
van sterk wisselende
kwaliteit�
Water op de binnenbodem van het apparaat bij verwijderde
lekschaal (8)�
Als de storing niet kan worden verholpen, neem dan in elk geval contact op
met de hotline! De telefoonnummers staan op de laatste pagina’s van de
gebruiksaanwijzing.
D knippert�
I knippert�
Het waterlter is niet goed
bevestigd�
De watertank is niet correct
ingezet of het waterlter is
opgebruikt�
Koolzuurhoudend water in
het waterreservoir�
De maaljnheid is te jn of
te grof ingesteld of er wordt
onvoldoende gemalen kofe
gebruikt�
Verontreinigde
zetmodule (5)�
Te veel gemalen kofe in de
zetmodule (5)�
Het mechanisme van de
zetgroep beweegt stroef�
De zetmodule (5) is afwezig
of wordt niet herkend�
Het apparaat is verkalkt� Ontkalk het apparaat conform de
De lekschaal (8) is te vroeg
verwijderd�
Druk het waterlter rechtstandig en
stevig in de tankaansluiting�
Zet de watertank correct in�
Als de LED nog steeds knippert,
plaats dan een nieuw waterlter en
spoel het vervolgens, zie hoofdstuk
“Waterlter”.
Vul het waterreservoir met schoon
leidingwater�
Stel een grovere of jnere maaljnheid in of gebruik 2 afgestreken
maatschepjes voorgemalen kofe.
Reinig de zetmodule (5)�
Reinig de zetmodule (5)� Gebruik
maximaal 2 afgestreken maat-
schepjes voorgemalen kofe.
Verwijder en reinig de zetgroep (zie
het hoofdstuk “Onderhoud en dagelijkse reiniging”)�
Schakel het apparaat bij aangebrachte zetmodule (5) uit, wacht
3 seconden en schakel het hierna
weer in�
instructies�
Verwijder de lekschaal (8) pas
enkele seconden nadat de laatste
drank is afgenomen�
nl
75
Page 80

nl
Probleem Oorzaak Remedie
De fabrieksinstellingen zijn gewijzigd
en moeten weer
worden geactiveerd
(“Reset”)�
De LED’s
knipperen�
De LED’s
knipperen�
De LED’s
knipperen�
Als de storing niet kan worden verholpen, neem dan in elk geval contact op
met de hotline! De telefoonnummers staan op de laatste pagina’s van de
gebruiksaanwijzing.
Er zijn eigen, niet meer
gewenste instellingen
opgegeven�
Er is een storing in het
apparaat aanwezig�
Onjuiste spanning� Gebruik het apparaat alleen op
De omgevingstemperatuur
is te laag�
Schakel het apparaat uit met
de netspanningschakelaar O / I
(9)� Houd de servicetoets (12)
en stoomtoets (11) ingedrukt en
schakel het apparaat in met de
netspanningsschakelaar O / I (9)�
Geef vervolgens een bevestiging
met de starttoets (10)� De fabrieksinstellingen zijn nu weer actief�
Bel de hotline�
220 -240 V�
Gebruik het apparaat bij
temperaturen > 5 °C�
Technische specicaties
Elektrische aansluiting (spanning – frequentie) 220-240 V – 50/60 Hz
Vermogen van de verwarming 1600 W
Maximale pompdruk, statisch 15 bar
Maximale inhoud watertank (zonder lter) 1,7 l
Maximale inhoud bonenreservoir 300 g
Lengte aansluitsnoer 100 cm
Afmetingen (H x B x D) 385 x 280 x 479 mm
Gewicht, ongevuld 9,3 kg
Soort maalwerk keramisch
76
Page 81

cs
Obsah
Součást dodávky ��������������������������������������77
Přehled �����������������������������������������������������77
Bezpečnostní pokyny �������������������������������78
Ovládací prvky ������������������������������������������80
Před prvním použitím �������������������������������81
Vodní ltr���������������������������������������������������83
Nastavení �������������������������������������������������84
Příprava nápoje ze zrnkové kávy �������������85
Příprava nápoje z mleté kávy �������������������86
Odebírání horké vody �������������������������������86
Příprava mléčné pěny�������������������������������86
Ošetřování a každodenní čištění �������������� 87
Tipy pro úsporu energie ����������������������������89
Servisní program ��������������������������������������90
Ochrana proti mrazu ��������������������������������91
Příslušenství ���������������������������������������������91
Likvidace���������������������������������������������������91
Záruční podmínky �������������������������������������91
Řešení jednoduchých problémů ��������������� 92
Technické údaje ����������������������������������������94
Vážený milovníku dobré kávy,
Gratulujeme Vám k zakoupení tohoto
plnoautomatu na espresso rmy Siemens.
Součást dodávky
(viz obrázek na začátku návodu)
a Plnoautomat na espresso TE501
b Návod k použití
c Lakmusové papírky na měření
tvrdosti vody
d Odměrka na mletou kávu
Přehled
(viz přehledné vyobrazení A,B,C,D a E na
začátku návodu)
1 Zásobník zrnkové kávy
2 Víko na uchování aroma
3 Otočný volič pro nastavení stupně mletí
4 Zásobník mleté kávy
(mletá káva / čisticí tableta)
5 Spařovací jednotka (obr. E)
a) Spařovací jednotka
b) Dvířka
c) Vyhazovací páčka spařovací jednotky
d) Blokování
e) Kryt
6 Napěňovač mléka (obr. C) snímatelný
a) Ventil páry
b) Kovové pouzdro
c) Funkční tryska
d) Funkční jádro
e) Vzduchový otvor
7 Výškově nastavitelný výtok kávy
8 Nádobka na zbytkovou vodu (obr. D)
a) Clona
b) Nádobka na kávovou sedlinu
c) Nádobka na zbytkovou vodu
výtoku kávy
d) Mřížka výtoku kávy
e) Plovák
9 Síťový spínač O / I
10 Tlačítko start
11 Tlačítko na ohřev páry B
12 Servisní tlačítko A
13 Otočný knoík „Intenzita kávy“
14 Otočný knoík „Volba nápoje“
15 Ukazatel LED
16 Snímatelný zásobník na vodu
17 Víko zásobníku na vodu
18 Odměrka na mletou kávu
(pomůcka pro vsazení vodního ltru)
19 Přihrádka na odměrku
20 Připojovací kabel s přihrádkou
C
77
Page 82

cs
Bezpečnostní pokyny
Návod k použití si pečlivě pročtěte, řiďte se podle něho a
uschovejte si ho! Při předání spotřebiče dalším osobám
předejte také tento návod. Tento spotřebič je určen k přípravě
malých množství v rámci použití v domácnosti nebo v
nekomerčních prostředích podobného typu. Použití podobné
použití v domácnosti je např. v kuchyňkách pro zaměstnance,
v obchodech, kancelářích či zemědělských a jiných malých
podnicích, nebo v rámci využívání hosty v zařízeních
poskytujících nocleh a snídani, malých hotelech a podobných
ubytovacích zařízeních.
¡ Nebezpečí úrazu elektrickým proudem!
Spotřebič připojte a provozujte v souladu s údaji na typovém štítku.
Opravy spotřebiče, např. výměnu poškozeného přívodního vedení,
smí provádět pouze náš servisní pracovník, aby nedošlo k ohrožení
zdraví a poškození majetku.
Tento spotřebič mohou děti starší 8 let a osoby se sníženými
fyzickými, senzorickými nebo mentálními schopnostmi, nebo osoby
s nedostatkem zkušeností a/nebo znalostí používat pod dozorem,
nebo pokud byly o bezpečném používání zařízení poučeny a
porozuměly hrozícímu nebezpečí. Spotřebič a připojovací vedení
nepatří do rukou dětí mladších 8 let a tyto děti nesmí přístroj
obsluhovat� Se spotřebičem si nesmí hrát děti. Čištění a údržbu ze
strany uživatele nesmí provádět děti. Výjimka: Děti jsou starší 8 let a
jsou pod dozorem dospělé osoby.
78
Page 83

Spotřebič ani síťový kabel nikdy neponořujte do vody. Pokud
je spotřebič nebo přívodní vedení poškozeno, nepoužívejte jej.
V případě poruchy ihned odpojte síťovou zástrčku nebo vypněte
síťové napětí.
Přístroj obsahuje permanentní magnety, které mohou ovlivňovat
funkci elektronických implantátů jako např. kardiostimulátory nebo
inzulínové pumpy. Osoby používající elektronické implantáty musí
od čela přístroje dodržovat minimální odstup 10 cm.
¡ Nebezpečí udušení!
Obalový materiál není hračka pro děti.
Drobné součásti bezpečně uložte, hrozí nebezpečí spolknutí.
¡ Nebezpečí popálení!
Nesahejte do mlýnku. Chybné použití spotřebiče může způsobit
poranění.
cs
¡ Nebezpečí úrazu!
Výpusť šlehače mléka se velmi silně zahřívá. Po použití jej nejprve
nechte vychladnout; teprve poté se ho můžete dotknout. Po použití
může být povrch topného článku nebo varné desky ještě nějakou
dobu horký.
79
Page 84

cs
Ovládací prvky
Síťový spínač O / I
Pomocí síťového spínače O / I (9) se přístroj
zapne nebo se zcela vypne (napájení se
přeruší).
Důležité upozornění: Pro vypnutí použijte
servisní tlačítko (12).
Servisní tlačítko A
Po krátkém stisknutí servisního tlačítka (12)
se přístroj propláchne a vypne. Pokud bliká
servisní tlačítko (12), musí být proveden
servisní program. Po dlouhém stisknutí
servisního tlačítka (12) se spustí servisní
program. Během průběhu servisního
programu bliká servisní tlačítko (12) a
zhasne po ukončení programu.
Tlačítko na ohřev páry B
Stisknutím tlačítka na ohřev páry (11) se
vytvoří pára na přípravu mléčné pěny.
Tlačítko start C
Stisknutím tlačítka start (10) se spustí
příprava nápojů. Opětovným stisknutím
během probíhající přípravy nápojů je možné
odběr předčasně ukončit.
Ukazatel LED
Svícení a blikání příslušného ukazatele
LED zobrazuje následující:
D svítí Zásobník na vodu je prázdný
a musí být naplněn.
D bliká Vodní ltr je vypotřebován
a musí být vyměněn.
Důležité: Při uvedení do
provozu neznamená blikání
„Výměna ltru“ (viz „Uvedení
do provozu“)
E svítí Zásobník zrnkové kávy je
prázdný a musí být naplněn.
F svítí Ventil páry musí být otevřen
resp. uzavřen.
F bliká V závislosti na nastavení
vychází z napěňovače mléka
pára nebo horká voda.
G svítí Při zvolení G otočným knof-
líkem „Intenzita kávy“ svítí
symbol po dobu odběru mleté
kávy.
80
H svítí Chybí nádobka na zbytkovou
vodu nebo není správně
vsazena, vsaďte nádobku na
zbytkovou vodu�
H bliká Nádobky jsou plné, vyprázd-
něte je a opět vložte.
I svítí Dvířka spařovací jednotky jsou
otevřené, uzavřete je.
I bliká Vyjměte a vyčistěte spařovací
jednotku�
Page 85

cs
Otočný knoík „Intenzita kávy“
Tímto otočným knoíkem
(13) se nastavuje intenzita
kávy nebo volba mleté kávy.
h
až
g
G
Otočný knoík „Volba nápoje“
a
až
c
b
až
d
Napěňovač mléka
Napěňovač mléka (6) je možné vytažením a
vtlačením otevřít a zavřít.
Velmi jemná
Jemná
Normální
Silná
Mletá káva
Tímto otočným knoíkem
(14) se volí požadovaný
nápoj a množství. Kromě
toho se jím mění také uživatelská nastavení.
Malé espresso
Espresso
Malé café crème
Café crème
Velké café crème
2 malá espressa
2 espressa
2 malá café crème
2 café crème
2 velká café crème
Před prvním použitím
Všeobecné informace
Odpovídající zásobníky plňte pouze čistou
a studenou nesycenou vodou a výhradně
praženými zrny (především směsí kávových
zrn určenou pro kávovary a automaty na
espresso)� Nepoužívejte leštěná či karamelizovaná kávová zrna nebo kávová zrna
upravená dalšími cukernatými přísadami;
ucpávají spařovací jednotku.
U tohoto přístroje můžete nastavit tvrdost
vody. Tovární nastavení tvrdosti vody
je 4. Tvrdost používané vody stanovte
přiloženým lakmusovým papírkem. Pokud
zjistíte jiný stupeň tvrdosti než 4, přístroj
po uvedení do provozu odpovídajícím
způsobem naprogramujte (viz „Tvrdost
vody“ v kapitole „Nastavení“).
Uvedení do provozu
1� Odstraňte ochrannou fólii.
2� Plnoautomat na espresso umístěte na
rovnou a vodotěsnou plochu odpovída-
jící hmotnosti přístroje. Větrací výřezy
přístroje musí zůstat volné.
Důležité upozornění: Spotřebič používejte
pouze v prostorách bez mrazu. Pokud byl
spotřebič přepravován nebo skladován
při teplotách nižších než 0 °C, pak před
uvedením do provozu vyčkejte nejméně
3 hodiny�
3� Vytáhněte síťovou zástrčku z přihrádky
na kabel (20) a připojte. Délku můžete
podle potřeby nastavit zasunutím a
vysunutím. Přístroj postavte zadní
stranou např. k hraně stolu a kabel
táhněte buď směrem dolů nebo ho
posuňte směrem nahoru�
81
Page 86

cs
4� Instalujte napěňovač mléka. Přístroj
používejte pouze tehdy, je-li napěňovač
mléka (6) zcela sestaven a smontován.
5� Odklopte víko zásobníku na vodu (17).
6� Vyjměte zásobník na vodu (16),
vypláchněte ho a naplňte čerstvou
studenou vodou. Dávejte pozor na
označení max�
7� Nasaďte zásobník na vodu rovně (16) a
zatlačte ho až dolů.
8� Víko zásobníku na vodu (17) opět
uzavřete.
9� Zásobník zrnkové kávy (1) naplňte
zrnkovou kávou (při přípravě nápoje z
mleté kávy viz kapitola „Příprava nápoje
z mleté kávy“).
10� Síťovým spínačem O / I (9) přístroj
zapněte. Ukazatel LED D bliká a
ukazatel LED F svítí.
11� Pod trysku napěňovače mléka (6)
postavte nádobu.
12� Napěňovač mléka (6) opatrně otevřete
vytažením. Přístroj propláchne napěňovač mléka (6) vodou. Ukazatel LED
F bliká.
13� Pokud ukazatel LED F svítí, napě-
ňovač mléka (6) uzavřete vtisknutím
směrem dovnitř.
Vypnutí přístroje
Plnoautomat na espresso je z výroby
standardně nastaven na optimální provoz.
Po uplynutí zvolené doby se přístroj
automaticky vypne (dobu je možné nastavit,
viz „Automatické vypnutí“ v kapitole
„Nastavení“).
Výjimka: Pokud byla odebírána pouze
horká voda nebo pára, přístroj se vypne bez
propláchnutí.
Pro předchozí manuální vypnutí přístroje
stiskněte servisní tlačítko A (12). Přístroj
se propláchne a vypne.
Upozornění: Při prvním použití, po provedení servisního programu nebo pokud byl
přístroj po delší dobu mimo provoz, nemá
první připravený nápoj plné aroma. Tuto
kávu nepijte.
Po prvním uvedení plnoautomatu na
espresso do provozu lze trvale dosáhnout
jemně pórovité a stálé pěny (crema) teprve
po přípravě několika šálků.
Při delším používání je normální tvorba
kapek vody u větracích výřezů.
Přístroj se zahřeje a propláchne. Z výtoku
kávu vyteče malé množství vody. Pokud
tlačítka A (12), B (11) a C (10) svítí, je
přístroj připraven k provozu.
82
Page 87

cs
Vodní ltr
Vodní ltr může snížit tvorbu vápených
usazenin�
Nový vodní ltr musí být před použitím
propláchnut. Postupujte takto:
1� Pomocí odměrky na mletou kávu (18)
vodní ltr pevně vtlačte do prázdného
zásobníku na vodu.
2� Zásobník na vodu (16) naplňte vodou až
po značku max�
3� Otočný knoík (13)
nastavte do polohy �
4� Držte současně stisknuta tlačítka
B (11) a A (12) po dobu nejméně
5 sekund. Zasvítí buď
„zap.“.
5� Tlačítkem start (10) nastavte „zap.“.
6� Pro potvrzení stiskněte tlačítko start
(10) po dobu nejméně 5 sekund, všichni
ukazatelé LED se krátce rozsvítí.
7� Ukazatel LED D bliká a ukazatel LED
F svítí.
8� Pod trysku napěňovače mléka (6)
postavte nádobu o objemu 0,5 litrů.
9� Otevřete napěňovač mléka (6) vyta-
žením. Ukazatel LED
10� Filtrem protéká voda a proplachuje ho.
11� Pokud ukazatel LED F svítí, uzavřete
napěňovač mléka (6) vtisknutím
směrem dovnitř.
12� Vyprázdněte nádobu.
Přístroj je opět připraven k provozu.
„vyp.“ nebo
F bliká.
Informace: Proplachováním ltru bylo
současně aktivováno nastavení pro indikaci
„Vyměňte ltr“ (= ukazatel LED D bliká).
Při zobrazení Vyměňte ltr nebo nejpozději
po dvou měsících je účinnost ltru vyčerpána. Filtr je nutné měnit jednak z hygienických důvodů, a také proto, aby nedošlo
k zanesení vápníkem (může dojít k poškození přístroje). Náhradní ltr je k dostání v
prodejnách nebo u zákaznické služby (viz
„Příslušenství“). Pokud není použit nový
ltr, změňte nastavení ltru podle pokynů v
kapitole „Tvrdost vody“.
Informace: Pomocí indikátoru ltru můžete
označit měsíc, ve kterém jste ltr do
přístroje vložili. Můžete také označit měsíc,
ve kterém musíte ltr opět vyměnit (nejpozději po dvou měsících).
Informace: Pokud nebyl přístroj po delší
dobu používán (např. po dobu dovolené),
měli byste vložený ltr před použitím
propláchnout. Nechte připravit šálek horké
vody a vylejte ho�
83
Page 88

cs
Nastavení
Nastavení můžete individuálně přizpůsobit.
Můžete nastavit následující:
Tvrdost vody
U tohoto přístroje můžete nastavit tvrdost
vody. Správné nastavení tvrdosti vody je
důležité, aby přístroj včas oznámil, kdy
musí být odvápněn. Tovární nastavení
tvrdosti vody je 4� Tvrdost vody lze zjistit
pomocí přiloženého testovacího proužku
nebo u místního dodavatele vody.
Testovací proužek ponořte krátce do vody,
mírně otřepejte a po jedné minutě odečtěte
výsledek.
Stupeň Stupeň tvrdosti vody
Německá
stupnice (°dH)
1
2
3
4
Pokud chcete zadat jinou tvrdost vody, než
jaké je tovární nastavení, nebo při použití
vodního ltru, postupujte takto:
1� Otočný knoík (13)
2� Držte současně stisknuta tlačítka
1-7
8-14
15-21
22-30
nastavte do polohy
B (11) a A (12) po dobu nejméně
5 sekund. Počet nyní svítících ukazatelů
LED symbolizuje nastavenou tvrdost
vody�
3� Stiskněte tlačítko start (10) tolikrát, až
se zobrazí požadovaná tvrdost vody,
např. pro tvrdost vody 3 se rozsvítí
ukazatelé LED D, E a F�
4� Stiskněte tlačítko start (10) po dobu
nejméně 5 sekund. Nastavení ukazatelé
LED zablikají, zvolená tvrdost vody je
uložena.
Důležité upozornění: Při použití vodního
ltru (viz „Příslušenství“) postupujte takto,
informace naleznete v části „Vodní ltr“.
Francouzská
stupnice (°fH)
1-13
14-25
26-38
39-54
Upozornění: Pokud nedojde během
90 sekund ke stisknutí žádného tlačítka,
přístroj přejde bez uložení do stavu připravenosti výroby kávy. Dříve uložená tvrdost
vody zůstane uchována.
Automatické vypnutí
Zde můžete nastavit, po jaké době po
poslední přípravě nápoje se přístroj
automaticky vypne� Nastavit lze dobu od
15 minut do 4 hodin� Za účelem úspory
energie je možné zkrátit přednastavený čas.
1� Otočný knoík (13)
nastavte do polohy
2� Držte současně stisknuta tlačítka B
(11) a A (12) po dobu nejméně 5
sekund. Počet nyní svítících ukazatelů
LED symbolizuje nastavenou dobu pro
vypnutí.
3� Tlačítko start (10) stiskněte tolikrát,
až se rozsvítí požadovaná doba pro
vypnutí:
D = 15 minut
D a E = 30 minut
D, E a F = 45 minut
D, E, F a G = 1 hodina
D, E, F, G a H = 2 hodiny
D, E, F, G, H a I = 4 hodiny
4� Držte stisknuto tlačítko start (10) po
dobu nejméně 5 sekund. Nastavení
ukazatelé LED zablikají, zvolená doba
pro vypnutí je uložena.
Upozornění: Pokud nedojde během
90 sekund ke stisknutí žádného tlačítka,
přístroj přejde bez uložení do stavu připravenosti výroby kávy. Dříve uložená doba
pro vypnutí zůstane uchována.
Nastavení teploty spařování
Můžete nastavit také teplotu spařování.
1� Otočný knoík (13)
nastavte do polohy
2� Držte stisknuto tlačítko B (11) a A
(12) po dobu nejméně 5 sekund. Počet
nyní svítících ukazatelů LED symbolizuje nastavenou teplotu spařování.
84
Page 89

cs
3� Tlačítko start (10) stiskněte tolikrát, až
se rozsvítí požadovaná teplota:
LED
D = nízká
LED D a E = střední
D, E,a F = vysoká
LED
4� Držte stisknuto tlačítko start (10) po
dobu nejméně 5 sekund. Nastavení
ukazatelé LED zablikají, zvolená teplota
je uložena.
Upozornění: Pokud nedojde během
90 sekund ke stisknutí žádného tlačítka,
přístroj přejde bez uložení do stavu připravenosti výroby kávy. Dříve uložená teplota
spařování zůstane uchována.
Nastavení stupně mletí
Pomocí otočného voliče pro nastavení
stupně mletí (3) můžete nastavit požadovanou jemnost mleté kávy.
Pozor!
A
Stupeň mletí můžete změnit pouze
v případě, že je mlýnek v chodu! Jinak by
mohlo dojít k poškození přístroje. Nesahejte
do mlýnku.
● V době, kdy je mlýnek v chodu nastavte
otočný volič (3) v rozmezí jemné mleté
kávy (a: otáčení proti směru hodinových
ručiček) a hrubší mleté kávy (b: otáčení
ve směru hodinových ručiček).
a b
Příprava nápoje
ze zrnkové kávy
Tento plnoautomat na espresso mele pro
každé spaření čerstvou kávu.
Tip: Doporučujeme používat směsi kávových zrn určené pro kávovary a automaty
na espresso. Pro zaručení optimální kvality
skladujte kávová zrna v chladu a uzavřená
nebo je zmrazte. Kávová zrna mohou být
mleta také ve zmrazeném stavu�
Důležité upozornění: Zásobník na vodu
(16) naplňte každý den čerstvou vodou.
V zásobníku na vodu (16) by mělo být
vždy dostatečné množství vody pro provoz
přístroje.
Jednoduše, stisknutím tlačítka můžete
připravovat různé druhy kávy.
Příprava
Přístroj musí být připraven k provozu.
1� Postavte předehřátý šálek (šálky) pod
výtok kávy (7).
Tip: Pokud připravujete malé espresso,
šálek vždy předehřejte, např. horkou
vodou�
2� Otáčením horního otočného knoíku
(14) zvolte požadovanou kávu a
množství.
3� Otáčením spodního otočného knoíku
(13) zvolte požadovanou intenzitu kávy.
4� Stiskněte tlačítko start (10).
Káva se spaří a poté nateče do šálku (šálků).
Informace: Nové nastavení se projeví až
od druhého šálku kávy.
Tip: V případě tmavých pražených zrn
nastavte jemnější stupeň mletí, v případě
světlejších zrn nastavte hrubší stupeň mletí.
Po opětovném stisknutí tlačítka start (10)
můžete spařování předčasně ukončit.
85
Page 90

cs
Příprava nápoje
z mleté kávy
Tento automat můžete provozovat také s
mletou kávou (ne rozpustná káva).
Důležité upozornění: Zásobník na vodu
(16) naplňte každý den čerstvou vodou.
V zásobníku na vodu (16) by mělo být
vždy dostatečné množství vody pro provoz
přístroje.
Příprava
1� Otevřete zásobník mleté kávy (4).
2� Vsypávejte nejvýše dvě zarovnané
odměrky na mletou kávu.
Pozor: Zásobník neplňte kávovými zrny
nebo rozpustnou kávou.
3� Uzavřete zásobník mleté kávy (4).
4� Spodní otočný knoík (13) nastavte na
symbol G�
5� Stiskněte tlačítko start (10).
Káva se spaří a poté nateče do šálku.
Odebírání horké vody
Nebezpečí popálení!
A
Napěňovač mléka (6) se velmi zahřívá.
Napěňovače mléka (6) se dotýkejte pouze
za umělohmotnou část.
Před odběrem horké vody musí být vyčištěn
šlehač mléka.
Přístroj musí být připraven k provozu.
1� Postavte předehřátý šálek nebo sklenici
pod trysku napěňovače mléka (6).
2� Otevřete napěňovač mléka (6) vyta-
žením. Přístroj se zahřeje. Z trysky
napěňovače mléka (6) vytéká po dobu
cca 40 sekund horká voda.
3� Vtisknutím napěňovače mléka (6)
proces zastavte�
Příprava mléčné pěny
Nebezpečí popálení!
A
Napěňovač mléka (6) se velmi zahřívá.
Napěňovače mléka (6) se dotýkejte pouze
za umělohmotnou část.
Tip: Nejdřívě napěňte mléko a pak
odeberte kávu, nebo mléko napěňte zvlášť
a přidejte je do kávy.
Přístroj musí být připraven k provozu.
1� Stiskněte tlačítko B (11)�
Tlačítko B bliká, přístroj se po dobu
cca 20 sekund zahřívá.
2� Jakmile tlačítko a LED F svítí, ponořte
napěňovač mléka až na dno šálku nebo
sklenice naplněného z jedné třetiny
mlékem�
3� Otevřete napěňovač mléka (6)
vytažením.
Nebezpečí popálení!
A
Unikající pára je velmi horká a může
způsobit vystříknutí tekutin. Pozdra se
nedokýkejte nebo ho nesměřujte na osoby.
4� Napěňte mléko.
5� Napěňovač mléka (6) vtlačením
uzavřete.
Tip: Optimální mléčné pěny lze dosáhnout
při použití studeného mléka s obsahem
tuku alespoň 1,5 %.
Důležité upozornění: Zaschlé zbytky
mléka se těžko odstraňují, proto po každém
použití napěňovač mléka (6) bezpodmí-
nečně vyčistěte vlažnou vodou.
86
Page 91

cs
Ošetřování a každodenní
čištění
Nebezpečí zasažení
A
elektrickým proudem!
Před čištěním vytáhněte síťovou zástrčku.
Přístroj nikdy neponořujte do vody.
Nepoužívejte parní čistič.
● Povrch přístroje otírejte měkkým vlhkým
hadříkem.
● Nepoužívejte abrazivní utěrky ani čisticí
prostředky.
● Zbytky vápenitých usazenin, kávy,
mléka a odvápňovacího roztoku vždy
okamžitě odstraňte. Pod těmito zbytky
se může tvořit koroze.
● Nové hadříkové houbičky na čištění
mohou obsahovat soli� Soli mohou
způsobit na ušlechtilé oceli náletovou
rez, proto je před použitím vždy
důkladně propláchněte.
● Nádobku na zbytkovou vodu (8c) s
nádobkou na kávovou sedlinu (8b)
vytáhněte směrem dopředu. Sejměte
clonu (8a) a mřížku (8d). Vyprázdněte a
vyčistěte nádobku na zbytkovou vodu a
nádobku na kávovou sedlinu.
● Vyjměte a vyčistěte zásobník mleté
kávy (4).
● Plovák (8e) a vyčistěte ho vlhkým
hadříkem.
Tyto součásti přístroje nemyjte
v myčce na nádobí: Clona (8a),
O
plovák (8e), zásobník mleté kávy (4),
spařovací jednotka (5a)�
Tyto součásti přístroje můžete
mýt v myčce na nádobí: Nádobka
N
na zbytkovou vodu (8c), nádobka
na kávovou sedlinu (8b), mřížka
(8d), víko na uchování aroma (2) a
odměrka na mletou kávu (18).
● Vytřete vnitřní část přístroje (záchytné
nádobky a zásobník mleté kávy).
Důležité upozornění: Nádobku na zbytkovou vodu (8c) a nádobku na kávovou
sedlinu (8b) je třeba vyprazdňovat a čistit
denně, aby se zabránilo tvorbě plísně.
Upozornění: Pokud je přístroj ve studeném
stavu zapnut síťovým spínačem O / I (9)
nebo pokud se po odebrání kávy automaticky vypne, kávovar se automaticky
propláchne. Systém je tedy samočistící.
Důležité upozornění: Pokud nebudete
přístroj po delší dobu používat (např. po
dobu dovolené), měli byste důkladně
vyčistit kompletní přístroj včetně mléčného
systému a spařovací jednotky.
87
Page 92

cs
1 2
Čištění napěňovače mléka
Napěňovač mléka (6) je třeba čistit po
každém použití, aby se odstranily zbytky
mléka�
Důležité upozornění: Před sejmutím
nechte napěňovač mléka vychladnout.
Před čištěním napěňovač mléka rozeberte:
1� Uchyťte za kovové pouzdro a sejměte
směrem dolů.
2� Funkční jádro (6d) otočte proti směru
hodinových ručiček a sejměte.
1
6d
4� Jednotlivé části vyčistěte mycím
roztokem a jemným kartáčem, v případě
potřeby je nechte odmočit v teplém
mycím roztoku. Důkladně vyčistěte
vzduchový otvor (6e).
6e
5� Všechny části opláchněte čistou vodou
a osušte.
6� Funkční jádro (6d) a funkční trysku (6c)
umístěte v kovovém pouzdře.
6d6c
7� Funkční jádro otočte ve směru hodino-
vých ručiček tak, že se značky nachází
vedle sebe�
3� Sejměte funkční trysku (6c).
6c
88
2
8� Napěňovač mléka nasaďte na ventil
páry. Dbjete na to, aby bylo červené
označení na ventilu páry zakryto.
Page 93

cs
Nebezpečí opaření!
A
Přístroj používejte pouze tehdy, je-li
napěňo vač mléka (6) zcela sestaven a
smontován.
Čištění spařovací jednotky
Spařovací jednotku čistěte pravidelně!
Automatické předčištění spařovací jednotky:
Krátce stiskněte servisní tlačítko (12).
Pokud byla odebrána káva, přístroj se
propláchne. Poté se přístroj vypne.
Dodatečně k automatickému čisticímu
programu by se spařovací jednotka (5a)
měla pravidelně sejmout a vyčistit (obr. E
na začátku návodu).
1� Přístroj vypněte síťovým spínačem
O / I (9). Nesvítí žádné tlačítko.
2� Otevřete dvířka (5b) spařovací jednotky.
3� Posuňte červenou pojistku (5d) na
spařovací jednotce (5a) do levé krajní
polohy�
4� Stiskněte vyhazovací páčku (5c) zcela
dolů. Spařovací jednotka se uvolní.
5� Uchopte spařovací jednotku (5a) za
výřezy a opatrně ji vytáhněte.
6� Sejměte kryt (5e) spařovací jednotky a
spařovací jednotku (5a) důkladně vyčistěte pod tekoucí vodou.
7� Síto spařovací jednotky důkladně vyčis-
těte pod proudem vody.
Důležité upozornění: Čistěte čistou vodou
bez čisticích a mycích prostředků a nemyjte
v myčce na nádobí.
8� Vnitřní prostor přístroje důkladně
vyčistěte vlhkým hadříkem, odstraňte
případné zbytky kávy.
9� Spařovací jednotku (5a) a vnitřek
přístroje nechte vyschnout.
10� Na spařovací jednotku nasaďte opět kryt
(5e) a spařovací jednotku (5a) zasuňte
do spotřebiče až na doraz.
11� Stiskněte vyhazovací páčku (5c) zcela
nahoru�
12� Posuňte červený blokovací prvek (5d)
zcela doprava a zavřete dvířka (5b).
Tipy pro úsporu energie
● Pokud přístroj nepoužíváte, vypněte ho.
Stiskněte servisní tlačítko (12). Přístroj
se propláchne a vypne.
● Pokud možno nepřerušujte odběr kávy
nebo mléčné pěny. Předčasné přerušení
vede k vyšší spotřebě energie a k rychlejšímu naplnění nádobky na zbytkovou
vodu�
● Přístroj pravidelně odvápňujte, zabráníte
tak tvorbě vápených usazenin. Zbytky
vápníku způsobují vyšší spotřebu
energie�
89
Page 94

cs
Servisní program
Doba trvání: ok. 35 minut
V závislosti na použití bliká v určitých časových odstupech servisní tlačítko (12).
Přístroj by měl být okamžitě vyčistěn a
odvápněn servisním programem. Pokud
nedojde k provedení servisního programu
podle pokynů, může dojít k poškození
přístroje.
Pozor!
A
Při každém servisním programu používejte
odvápňovací a čisticí prostředek podle
návodu. Respektujte bezpečnostní pokyny
na balení čisticích prostředků.
Servisní program v žádném případě nepřerušujte! Kapaliny nepijte!
Nikdy nepoužívejte ocet, prostředky na bázi
octa, kyselinu citrónovou ani prostředky na
bázi kyseliny citrónové!
V žádném případě nevkládejte do zásobníku na mletou kávu (4) odvápňovací
tablety nebo jiné odvápňovací prostředky!
Speciálně vyvinuté a vhodné odvápňovací a čisticí tablety jsou k dostání v
prodejnách nebo u zákaznické služby
(viz „Příslušenství“).
Důležité upozornění: Pokud je do
zásobníku na vodu (16) vložen vodní ltr,
musíte tento ltr před spuštěním servisního
programu bezpodmínečně odstranit. Před
spuštěním servisního programu vyčistěte
spařovací jednotku, viz kapitola „Čištění
spařovací jednotky“.
Pro spuštění servisního programu držte po
dobu nejméně 5 sekund stisknuto servisní
tlačítko (12).
Informace: V průběhu programu bliká
servisní tlačítko (12).
Rozsvítí se ukazatel LED H�
● Vyprázdněte a opět vložte nádobku na
zbytkovou vodu (8)�
Přístroj se dvakrát propláchne.
Rozsvítí se ukazatel LED
● Otevřete zásobník mleté kávy (4).
● Vhoďte jednu čisticí tabletu Siemens a
uzavřete zásobník mleté kávy (4).
● Stiskněte tlačítko start (10).
Rozsvítí se ukazatel LED D�
● Nalejte do prázdného zásobníku na
vodu (16) vlažnou vodu až po značku
„0,5 l“ a nechte v ní rozpustit 1 odvápňovací tabletu Siemens TZ80002.
Při použití TZ60002 bezpodmínečně
rozpusťte 2 tablety.
● Stiskněte tlačítko start (10).
Servisní program nyní běží cca 10 minut.
Rozsvítí se ukazatel LED F�
● Pod trysku napěňovače mléka (6)
postavte nádobu o objemu nejméně
0,5 litrů.
● Otevřete napěňovač mléka (6)
vytažením.
Servisní program nyní běží cca 12 minut.
Rozsvítí se ukazatel LED D�
● Propláchněte zásobník na vodu (16)
a naplňte ho čerstvou vodou až po
značku max�
● Stiskněte tlačítko start (10).
Servisní program nyní běží cca 30 minut
a proplachuje přístroj.
Rozsvítí se ukazatel LED F�
● Napěňovač mléka (6) vtlačením
uzavřete.
Servisní program nyní běží cca 8 minut.
Rozsvítí se ukazatel LED H�
● Vyprázdněte a opět vložte nádobku na
zbytkovou vodu (8)�
Pokud používáte ltr, tak ho nyní opět
vložte.
G�
90
Page 95

cs
J
Obal zlikvidujte způsobem šetrným
k životnímu prostředí. Tento spotřebič
Pro tento přístroj platí záruční podmínky,
které byly vydány naší kompetentní
pobočkou v zemi, ve která byl přístroj
zakoupen�
Záruční podmínky si můžete kdykoliv
vyžádat prostřednictvím svého odborného
prodejce, u kterého jste zakoupili přístroj,
nebo přímo v naší pobočce v příslušné
zemi�
Změny vyhrazeny.
Přístroj je vyčistěn, odvápněn a opět
připraven k provozu.
Důležité upozornění: Pro okamžité
odstranění zbytků odvápňovacího roztoku
spotřebič otřete měkkým a vlhkým
hadříkem. Pod těmito zbytky se může tvořit
koroze. Nové hadříkové houbičky na čištění
mohou obsahovat soli. Soli mohou způsobit
na ušlechtilé oceli náletovou rez, proto je
před použitím vždy důkladně propláchněte.
Ochrana proti mrazu
Aby se zabránilo škodám způso-
A
beným mrazem, musí být přístroj
před přepravou a skladováním zcela
vyprázdněn.
Informace: Přístroj musí být připraven
k provozu a zásobník na vodu (16) musí
být naplněn.
1� Pod trysku napěňovače mléka (6)
postavte velkou nádobu.
2� Stiskněte tlačítko na ohřev páry (11).
Ukazatel LED F bliká, přístroj se nyní
zahřívá po dobu cca 20 sekund.
3� Po rozsvícení ukazatele LED F, napě-
ňovač mléka (6) vytažením otevřete a
nechte cca 15 sekund pouštět páru.
4� Přístroj vypněte síťovým spínačem
O / I (9)�
5� Vyprázdněte zásobník na vodu (16) a
nádobku na zbytkovou vodu (8).
Příslušenství
V obchodě a u servisního pracovníka je k
dostání následující příslušenství.
Příslušenství Objednací číslo
V obchodě /
V servisu
Čisticí tablety TZ60001
00310575
Odvápňovací
tablety
Vodní ltr TZ70003
Sada pro údržbu TZ80004
TZ80002
00576693
00575491
00576330
Likvidace
je označen v souladu s evropskou
směrnicí 2012/19/EU o nakládání s
použitými elektrickými a elektronickými zařízeními (waste electrical and
electronic equipment – WEEE)� Tato
směrnice stanoví jednotný evropský
(EU) rámec pro zpětný odběr a recyklování použitých zařízení.
Záruční podmínky
91
Page 96

cs
Řešení jednoduchých problémů
Problém Příčina Náprava
Mlýnek nemele zrnkovou
kávu.
Nelze odebírat horkou vodu. Napěňovač mléka (6) je
Příliš málo nebo žádná
mléčná pěna.
Káva vytéká pouze po
kapkách nebo nevytéká
vůbec.
Káva nemá vrstvu pěny. Nevhodný typ kávy. Použijte typ kávy s vyšším
Káva je příliš „kyselá“. Je nastaven příliš hrubý
Káva je příliš „hořká“. Je nastaven příliš jemný
Nedaří-li se vám problém vyřešit, volejte autorizovaný servis!
Telefonní čísla se nachází na posledních stránkách návodu.
Zrna nepadají do mlýnku
(jsou příliš olejnatá).
znečištěný.
Napěňovač mléka (6) je
znečištěný.
Nevhodné mléko� Použijte mléko s obsahem
Napěňovač mléka (6) není
správně sestaven.
Přístroj je zanesen
vápníkem.
Je nastaven příliš jemný
stupeň mletí nebo je mletá
káva příliš jemná.
Přístroj je silně zanesen
vápníkem.
Zrna již nejsou čerstvě
pražená.
Stupeň mletí není nastaven
na kávová zrna.
stupeň mletí nebo je mletá
káva příliš hrubá.
Nevhodný typ kávy. Použijte tmavší pražení.
stupeň mletí nebo je mletá
káva příliš jemná.
Nevhodný typ kávy. Použijte jiný druh kávy.
Mírně poklepejte na
zásobník zrnkové kávy (1).
Příp. zkuste použít jiný druh
kávy.
Suchým hadříkem vytřete
vyprázdněný zásobník
zrnkové kávy (1).
Vyčistěte napěňovač mléka
(6), viz kapitola „Ošetřování
a každodenní čištění“.
Vyčistěte napěňovač mléka
(6), viz kapitola „Ošetřování
a každodenní čištění“.
tuku nejméně 1,5 %.
Navlhčete součásti napě-
ňovače a pevně k sobě
stiskněte.
Podle návodu proveďte
odvápnění.
Nastavte hrubší stupeň mletí
nebo použijte hrubší mletou
kávu.
Podle návodu proveďte
odvápnění.
podílem zrn robusty.
Použijte čerstvá zrna.
Nastavte jemný stupeň
mletí.
Nastavte jemnější stupeň
mletí nebo použijte jemnější
mletou kávu.
Nastavte hrubší stupeň mletí
nebo použijte hrubší mletou
kávu.
92
Page 97

Problém Příčina Náprava
Vodní ltr nedrží v zásobníku na vodu (16).
Ukazatel LED
Kávová sedlina není
kompaktní a je příliš vlhká.
Ukazatel LED
Kvalita kávy nebo mléčné
pěny se značně liší.
Při vyjmuté nádobce na
zbytkovou vodu (8) odkapala
na vnitřní základnu přístroje
voda�
Nedaří-li se vám problém vyřešit, volejte autorizovaný servis!
Telefonní čísla se nachází na posledních stránkách návodu.
D bliká.
I bliká.
Vodní ltr není správně
upevněn.
Není správně umístěn
zásobník na vodu nebo je
spotřebován vodní ltr.
Ve vodní nádrži se nachází
voda nasycená oxidem
uhličitým.
Je nastaven příliš jemný
nebo příliš hrubý stupeň
mletí, nebo je použito málo
mleté kávy.
Znečištěná spařovací
jednotka (5)�
Spařovací jednotka (5)
obsahuje příliš mnoho mleté
kávy.
Mechanismus spařovací
jednotky je těžce pohyblivý.
Chybí spařovací jednotka (5)
nebo nebyla rozpoznána.
Přístroj je zanesen
vápníkem.
Nádobka na zbytkovou vodu
(8) byla vyjmuta příliš brzy.
Vtlačte vodní ltr rovně
a pevně do přípoje v
zásobníku.
Správně umístěte zásobník
na vodu�
Pokud nadále bliká ukazatel
LED, vložte nový vodní ltr
a propláchněte, viz kapitola
„Vodní ltr“.
Naplňte vodní nádrž čers-
tvou vodou z vodovodu�
Nastavte hrubší nebo
jemnější stupeň mletí
nebo použijte 2 zarovnané
odměrky mleté kávy.
Vyčistěte spařovací jednotku
(5)�
Vyčistěte spařovací jednotku
(5). Používejte nejvýše dvě
zarovnané odměrky mleté
kávy.
Vyjměte a vyčistěte spařovací jednotku, viz kapitola
„Ošetřování a každodenní
čištění“.
Přístroj se zasunutou spařovací jednotkou (5) vypněte,
vyčkejte tři sekundy a znovu
zapněte.
Podle návodu proveďte
odvápnění.
Nádobku na zbytkovou
vodu (8) vyjměte teprve
po několika sekundách po
posledním odebrání nápoje.
cs
93
Page 98

cs
Problém Příčina Náprava
Tovární nastavení bylo
změněno a má se opět aktivovat („Reset“).
Ukazatelé LED
Ukazatelé LED
Ukazatelé LED
Nedaří-li se vám problém vyřešit, volejte autorizovaný servis!
Telefonní čísla se nachází na posledních stránkách návodu.
blikají.
blikají.
blikají.
Byla provedena vlastní, nyní
již nechtěná nastavení.
Došlo k závadě přístroje. Volejte servisní službu.
Chybné napětí. Přístroj provozujte pouze s
Příliš studená okolní teplota. Přístroj provozujte při
Pomocí síťového spínače
O / I (9) přístroj vypněte.
Držte současně stisknuto
servisní tlačítko (12) a
tlačítko na ohřev páry (11)
a síťovým spínačem O / I (9)
přístroj zapněte. Nakonec
potvrďte tlačítkem start
(10). Tovární nastavení jsou
obnovena�
napětím 220 -240 V.
teplotách > 5° C.
Technické údaje
Elektrické připojení (napětí – frekvence) 220-240 V – 50/60 Hz
Výkon topení 1600 W
Maximální tlak čerpadla, statický 15 bar
Maximální objem zásobníku na vodu (bez ltru) 1,7 l
Maximální objem zásobníku zrnkové kávy 300 g
Délka kabelu 100 cm
Rozměry (V x Š x H) 385 x 280 x 479 mm
Hmotnost, nenaplněný stav 9,3 kg
Druh mlýnku Keramika
94
Page 99

ru
Содержание
Объем поставки ���������������������������������������� 95
Обзор ��������������������������������������������������������� 95
Указания по безопасности ����������������������� 96
Элементы управления ����������������������������� 98
Перед первым использованием ������������� 99
Фильтр для воды ������������������������������������ 101
Настройки ������������������������������������������������ 102
Приготовление кофе из
кофейных зерен ������������������������������������� 104
Приготовление кофе из
молотого кофе ��������������������������������������� 104
Приготовление горячей воды ���������������� 105
Приготовление молочной пены ������������ 105
Уход и ежедневная очистка ������������������� 106
Советы по экономии энергии ���������������� 109
Сервисная программа ��������������������������� 109
Защита от замерзания ��������������������������� 111
Принадлежности �������������������������������������111
Утилизация ����������������������������������������������111
Условия гарантийного обслуживания ���111
Самостоятельное устранение
небольших проблем ��������������������������������112
Технические характеристики ������������������114
Уважаемые любители кофе!
Сердечно поздравляем Вас с приобретением полностью автоматической кофемашины эспрессо производства компании
Siemens�
Объем поставки
(См. обзорную иллюстрацию в начале
инструкции)
a Полностью автоматическая
кофемашина эспрессо TE501
b Инструкция по эксплуатации
c Индикаторная полоска для
определения жесткости воды
d Мерная ложка для молотого кофе
Обзор
(См. рисунки A, B, C, D и Е в начале
инструкции)
1 Емкость для кофейных зерен
2 Крышка, сохраняющая аромат
3 Поворотный регулятор степени
помола
4 Выдвижной отсек для молотого кофе
(молотый кофе / таблетка для очистки)
5 Заварочный блок (рис. E)
a) Заварочный блок
b) Дверца
c) Рычаг блока заваривания
d) Фиксатор
e) Крышка
6 Насадка для приготовления молочной
пены (рис. C) сниматься
a) Паровой клапан
b) Металлическая гильза
c) Функциональная трубка
d) Функциональный сердечник
e) Вентиляционное отверстие
7 Устройство разлива кофе регулируется
по высоте
8 Поддон для капель (рис. D)
a) Заслонка
b) Емкость для кофейной гущи
c) Поддон для капель под устройством
разлива кофе
d) Решетка-подставка под
устройством разлива кофе
e) Поплавок
9 Сетевой выключатель O / I
10 Кнопка пуска
11 Кнопка пара B
12 Сервисная кнопка A
13 Поворотный регулятор
«Крепость кофе»
14 Поворотный переключатель
«Выбор напитка»
15 Светодиодный индикатор
16 Съемная емкость для воды
17 Крышка емкости для воды
18 Мерная ложка для молотого кофе
(помощь в установке фильтра для
воды)
19 Отсек для хранения мерной ложки
20 Кабель питания с отсеком для
хранения
C
95
Page 100

ru
Указания по безопасности
Внимательно прочтите инструкцию по эксплуатации,
соблюдайте ее указания и тщательно храните ее!
Передавая прибор другому человеку, дайте ему эту
инструкцию. Данный прибор предназначен для домашнего
использования, или для использования в некоммерческой,
бытовой среде.
¡ Опасность поражения током!
При подключении прибора и его эксплуатации соблюдайте
данные, приведенные на заводской табличке. Ремонт прибора
(напр., замену поврежденного сетевого кабеля) разрешается
производить из соображений безопасности только нашей
сервисной службе.
Этот прибор могут использовать дети старше 8 лет и лица с
ограниченными физическими, сенсорными или умственными
способностями или не имеющими достаточного опыта или
знаний, если они находятся под присмотром или прошли
соответствующий инструктаж относительно безопасного
пользования прибором и уяснили для себя, какую опасность
несет в себе прибор. Детей младше 8 лет нельзя подпускать
к прибору и шнуру питания, им не разрешается пользоваться
прибором. Детям нельзя играть с прибором. Производить
очистку и техобслуживание детям не разрешается, за
исключением тех случаев, если они старше 8 лет и выполняют
эти действия под наблюдением взрослых.
96
 Loading...