

Siemens TC65 User Manual
s
TC65 JAVA User's Guide
Siemens Cellular Engine
Version: 05
DocID: TC65 JAVA User's Guide_V05
JAVA™ Users Guide

TC65 JAVA User's Guide
s
Strictly confidential / Released
Document Name:
Version:
Date:
DocId:
Status:
TC65 JAVA User's Guide
05
September 26, 2005
TC65 JAVA User's Guide_V05
Strictly confidential / Released
General Notes
Product is deemed accepted by recipient and is provided without interface to recipient’s products. The
documentation and/or product are provided for testing, evaluation, integration and information
purposes. The documentation and/or product are provided on an “as is” basis only and may contain
deficiencies or inadequacies. The documentation and/or product are provided without warranty of any
kind, express or implied. To the maximum extent permitted by applicable law, Siemens further
disclaims all warranties, including without limitation any implied warranties of merchantability,
completeness, fitness for a particular purpose and non-infringement of third-party rights. The entire
risk arising out of the use or performance of the product and documentation remains with recipient.
This product is not intended for use in life support appliances, devices or systems where a malfunction
of the product can reasonably be expected to result in personal injury. Applications incorporating the
described product must be designed to be in accordance with the technical specifications provided in
these guidelines. Failure to comply with any of the required procedures can result in malfunctions or
serious discrepancies in results. Furthermore, all safety instructions regarding the use of mobile
technical systems, including GSM products, which also apply to cellular phones must be followed.
Siemens or its suppliers shall, regardless of any legal theory upon which the claim is based, not be
liable for any consequential, incidental, direct, indirect, punitive or other damages whatsoever
(including, without limitation, damages for loss of business profits, business interruption, loss of
business information or data, or other pecuniary loss) arising out the use of or inability to use the
documentation and/or product, even if Siemens has been advised of the possibility of such damages.
The foregoing limitations of liability shall not apply in case of mandatory liability, e.g. under the
German Product Liability Act, in case of intent, gross negligence, injury of life, body or health, or
breach of a condition which goes to the root of the contract. However, claims for damages arising from
a breach of a condition, which goes to the root of the contract, shall be limited to the foreseeable
damage, which is intrinsic to the contract, unless caused by intent or gross negligence or based on
liability for injury of life, body or health. The above provision does not imply a change on the burden of
proof to the detriment of the recipient. Subject to change without notice at any time. The interpretation
of this general note shall be governed and construed according to German law without reference to
any other substantive law.
Copyright
Transmittal, reproduction, dissemination and/or editing of this document as well as utilization of its
contents and communication thereof to others without express authorization are prohibited. Offenders
will be held liable for payment of damages. All rights created by patent grant or registration of a utility
model or design patent are reserved.
Copyright © Siemens AG 2005
Trademark notices
MS Windows® is a registered trademark of Microsoft Corporation.
Java™
Borland® JBuilder® is a registered trademark of Borland Software Corporation
and Sun™ Java Studio Mobility 6 2004Q3 are registered trademarks of Sun Microsystems Inc.
TC65 JAVA User's Guide_V05 Page 2 of 90 26.09.2005

TC65 JAVA User's Guide
Strictly confidential / Released
s
Table of Contents
1 Preamble........................................................................................................................8
2 Overview........................................................................................................................9
2.1 Related Documents...............................................................................................9
2.2 Terms and Abbreviations.....................................................................................10
3 Installation...................................................................................................................11
3.1 System Requirements .........................................................................................11
3.2 Installation CD .....................................................................................................11
3.2.1 Components...........................................................................................12
3.2.1.1 Module Exchange Suite ....................................................................12
3.2.1.2 WTK ..................................................................................................12
3.2.1.3 SDK and Java Studio........................................................................12
3.3 Siemens Mobility Toolkit Installation....................................................................13
3.3.1 Installing the Standard Development Toolkit .........................................13
3.3.2 Installing the SMTK Environment...........................................................13
3.3.3 Installing Sun Java Studio Mobility 6 .....................................................14
3.3.4 Installing Eclipse 3.0..............................................................................14
3.3.5 Installing Borland JBuilder X and 2005..................................................14
3.3.6 Installing Module Exchange Suite (MES)...............................................14
3.4 SMTK Uninstall....................................................................................................15
3.5 Upgrades.............................................................................................................15
4 Software Platform .......................................................................................................16
4.1 Software Architecture ..........................................................................................16
4.2 Interfaces.............................................................................................................17
4.2.1 ASC0 - Serial Device.............................................................................17
4.2.2 General Purpose I/O..............................................................................17
4.2.3 DAC/ADC...............................................................................................17
4.2.4 ASC1......................................................................................................17
4.2.5 Digital Audio Interface (DAI) ..................................................................17
4.2.6 I2C/SPI...................................................................................................17
4.2.7 JVM Interfaces.......................................................................................18
4.2.7.1 IP Networking....................................................................................18
4.2.7.2 Media ................................................................................................18
4.2.7.3 Other Interfaces ................................................................................18
4.3 Data Flow of a Java Application Running on the Module....................................19
4.4 Handling Interfaces and Data Service Resources...............................................20
4.4.1 Module States........................................................................................20
4.4.1.1 State 1: Default – No Java Running..................................................21
4.4.1.2 State 2: No Java Running, General Purpose I/O and I2C.................21
4.4.1.3 State 3: No Java Running, General Purpose I/O and SPI.................21
4.4.1.4 State 4: Default – Java Application Active.........................................21
4.4.1.5 State 5: Java Application Active, General Purpose I/O and I2C .......22
4.4.1.6 State 6: Java Application Active, General Purpose I/O and SPI.......22
4.4.2 Module State Transitions.......................................................................23
TC65 JAVA User's Guide_V05 Page 3 of 90 26.09.2005

TC65 JAVA User's Guide
Strictly confidential / Released
5 Maintenance ................................................................................................................24
5.1 IP Service ............................................................................................................24
5.2 Power Saving.......................................................................................................25
5.3 Charging..............................................................................................................25
5.4 Airplane Mode......................................................................................................26
5.5 Alarm ...................................................................................................................26
5.6 Shutdown.............................................................................................................26
5.6.1 Automatic Shutdown..............................................................................26
5.6.2 Manual Shutdown..................................................................................27
5.6.3 Restart after Switch Off..........................................................................27
5.7 Special AT Command Set for Java Applications .................................................27
5.7.1 Switching from Data Mode to Command Mode.....................................27
5.7.2 Mode Indication after MIDlet Startup .....................................................27
5.7.3 Long Responses....................................................................................27
5.7.4 Configuration of Serial Interface ............................................................28
5.7.5 Java Commands....................................................................................28
s
5.8 Restrictions..........................................................................................................28
5.8.1 Flash File System ..................................................................................28
5.8.2 Memory..................................................................................................28
5.9 Performance........................................................................................................29
5.9.1 Java .......................................................................................................29
5.9.2 Pin I/O....................................................................................................30
5.9.3 Data Rates on RS-232 API....................................................................30
5.9.3.1 Plain Serial Interface.........................................................................31
5.9.3.2 Voice Call in Parallel .........................................................................31
5.9.3.3 Scenarios with GPRS Connection.....................................................32
5.9.3.3.1 Upload...............................................................................................32
5.9.3.3.2 Download ..........................................................................................33
6 MIDlets .........................................................................................................................34
6.1 MIDlet Documentation.........................................................................................34
6.2 MIDlet Life Cycle..................................................................................................34
6.3 Hello World MIDlet...............................................................................................36
7 File Transfer to Module...............................................................................................37
7.1 Module Exchange Suite.......................................................................................37
7.1.1 Windows Based.....................................................................................37
7.1.2 Command Line Based ...........................................................................37
7.2 Over the Air Provisioning.....................................................................................38
7.3 Security Issues ....................................................................................................38
7.3.1 Module Exchange Suite.........................................................................38
7.3.2 OTAP.....................................................................................................38
8 Over The Air Provisioning (OTAP) ............................................................................39
8.1 Introduction to OTAP...........................................................................................39
8.2 OTAP Overview...................................................................................................39
8.3 OTAP Parameters ...............................................................................................40
TC65 JAVA User's Guide_V05 Page 4 of 90 26.09.2005

TC65 JAVA User's Guide
Strictly confidential / Released
8.4 Short Message Format........................................................................................41
8.5 Java File Format..................................................................................................42
8.6 Procedures ..........................................................................................................43
8.6.1 Install/Update.........................................................................................43
8.6.2 Delete.....................................................................................................44
8.7 Time Out Values and Result Codes ....................................................................45
8.8 Tips and Tricks for OTAP ....................................................................................45
8.9 OTAP Tracer........................................................................................................46
8.10 Security................................................................................................................46
8.11 How To ................................................................................................................47
9 Compile and Run a Program without a Java IDE.....................................................48
9.1 Build Results........................................................................................................48
9.2 Compile................................................................................................................49
9.3 Run on the Module with Manual Start..................................................................49
s
9.4 Run on the Module with Autostart........................................................................49
9.4.1 Switch on Autostart................................................................................50
9.4.2 Switch off Autostart................................................................................50
10 Debug Environment....................................................................................................51
10.1 Data Flow of a Java Application in the Debug Environment................................51
10.2 Emulator ..............................................................................................................52
10.3 Java IDE..............................................................................................................53
10.3.1 Sun Java Studio Mobility 6 2004Q3.......................................................54
10.3.1.1 Switching emulators..........................................................................55
10.3.1.2 Projects .............................................................................................56
10.3.1.3 Templates .........................................................................................57
10.3.1.4 Examples...........................................................................................57
10.3.1.5 Compile and run................................................................................57
10.3.2 Borland JBuilder X.................................................................................58
10.3.2.1 Examples...........................................................................................59
10.3.3 Borland JBuilder 2005............................................................................61
10.3.3.1 Examples...........................................................................................62
10.3.4 Eclipse 3.0 .............................................................................................62
10.3.4.1 Integration .........................................................................................62
10.3.4.2 Switching Emulators..........................................................................64
10.3.4.3 Example ............................................................................................65
10.3.4.4 Compile and debug...........................................................................67
10.4 Breakpoints..........................................................................................................68
11 Java Security...............................................................................................................69
11.1 Secure Data Transfer ..........................................................................................70
11.1.1 Create a Secure Data Transfer Environment Step by Step...................72
11.2 Execution Control ................................................................................................73
11.2.1 Change to Secured Mode Concept........................................................74
11.2.2 Concept for the Signing the Java MIDlet ...............................................75
11.3 Application and Data Protection ..........................................................................76
TC65 JAVA User's Guide_V05 Page 5 of 90 26.09.2005

TC65 JAVA User's Guide
Strictly confidential / Released
11.4 Structure and Description of the Java Security Commands ................................76
11.4.1 Structure of the Java Security Commands ............................................77
11.4.2 Build Java Security Command...............................................................78
11.4.3 Send Java Security Command to the Module........................................79
11.5 Create a Java Security Environment Step by Step..............................................80
11.5.1 Create Key store....................................................................................80
11.5.2 Export X.509 Root Certificate ................................................................80
11.5.3 Create Java Security Commands..........................................................80
11.5.4 Sign a MIDlet .........................................................................................81
11.6 Attention...............................................................................................................81
12 Java Tutorial................................................................................................................82
12.1 Using the AT Command API................................................................................82
12.1.1 Class ATCommand................................................................................82
12.1.1.1 Instantiation with or without CSD Support.........................................82
12.1.1.2 Sending an AT Command to the Device, the send() Method............83
12.1.1.3 Data Connections..............................................................................83
12.1.1.4 Synchronization.................................................................................85
12.1.2 ATCommandResponseListener Interface..............................................85
12.1.2.1 Non-blocking ATCommand.send() Method.......................................85
12.1.3 ATCommandListener Interface..............................................................86
12.1.3.1 ATEvents...........................................................................................86
12.1.3.2 Implementation..................................................................................86
12.1.3.3 Registering a Listener with an ATCommand Instance......................87
s
12.2 Programming the MIDlet......................................................................................88
12.2.1 Threads..................................................................................................88
12.2.2 Example.................................................................................................88
13 Differences from the TC45 .........................................................................................90
Figures
Figure 1: Overview...................................................................................................................9
Figure 2: Interface Configuration............................................................................................18
Figure 3: Data flow of a Java application running on the module...........................................19
Figure 4: Module State 1........................................................................................................21
Figure 5: Module State 2........................................................................................................21
Figure 6: Module State 3........................................................................................................21
Figure 7: Module State 4........................................................................................................21
Figure 8: Module State 5........................................................................................................22
Figure 9: Module State 6........................................................................................................22
Figure 10: Module State Transition Diagram..........................................................................23
Figure 11: Test case for measuring Java command execution throughput............................29
Figure 12: Test case for measuring Java MIDlet performance and handling pin-IO..............30
Figure 13: Scenario for testing data rates on ASC1...............................................................31
Figure 14: Scenario for testing data rates on ASC1 with a voice call in parallel....................31
Figure 15: Scenario for testing data rates on ASC1 with GPRS data upload ........................32
Figure 16: Scenario for testing data rates on ASC1 with GPRS data download....................33
Figure 17: OTAP Overview ....................................................................................................39
Figure 18: OTAP: Install/Update Information Flow.................................................................43
Figure 19: OTAP: Delete Information Flow ............................................................................44
Figure 20: Data flow of a Java application in the debug environment....................................51
Figure 21: Sun Java Studio Mobility 6 - The installed emulators ...........................................54
TC65 JAVA User's Guide_V05 Page 6 of 90 26.09.2005

TC65 JAVA User's Guide
Strictly confidential / Released
Figure 22: Sun Java Studio Mobility 6 - Switching Emulators................................................55
Figure 23: Sun Java Studio Mobility 6 - Project Manager.....................................................56
Figure 24: Sun Java Studio Mobility 6 - Selecting a template...............................................57
Figure 25: JBuilderX – JDK settings.......................................................................................58
Figure 26: JBuilderX – Siemens Library.................................................................................58
Figure 27: JBuilderX – Sample Projects.................................................................................59
Figure 28: JBuilderX – Starting the debugging session .........................................................60
Figure 29: JBuilder2005 – JDK settings.................................................................................61
Figure 30: JBuilderX – Siemens Library.................................................................................61
Figure 31: JBuilder2005 – Sample Projects...........................................................................62
Figure 32: Eclipse – Plug-in installation .................................................................................63
Figure 33: Eclipse – Plug-in installation, restart.....................................................................63
Figure 34: Eclipse – IMP-NG component...............................................................................64
Figure 35: Eclipse – J2ME platform .......................................................................................64
Figure 36: Eclipse – Project import ........................................................................................65
Figure 37: Eclipse - Example .................................................................................................66
Figure 38: Eclipse – Create package.....................................................................................67
Figure 39: Eclipse - Configuration..........................................................................................68
Figure 40: Mode 1 - Java Security not activated....................................................................70
Figure 41: Mode 2 - Java Security activated (server certificate = certificate into module).....71
Figure 42: Mode 2 - Java Security activated (server certificate and self signed root certificate
in module form a chain)...................................................................................................71
Figure 43: Switch to Security Mode........................................................................................74
Figure 44: Prepare MIDlet for Secured Mode ........................................................................75
Figure 45: Build Java Security Command..............................................................................78
s
Tables
Table 1: Download data rate with different number of timeslots, CS2 ...................................32
Table 2: Download data rate with different number of timeslots, CS4 ...................................32
Table 3: Download data rate with different number of timeslots, CS2 ...................................33
Table 4: Download data rate with different number of timeslots, CS4 ...................................33
Table 5: A typical sequence of MIDlet execution ...................................................................35
Table 6: Parameters and keywords........................................................................................40
TC65 JAVA User's Guide_V05 Page 7 of 90 26.09.2005

TC65 JAVA User's Guide
Strictly confidential / Released
s
1 Preamble
This document is also valid for the TC65 Terminal with the main exception that the terminal
does not feature the USB, ASC1, DAC and DAI interface. For other exceptions and
differences please see [3] and [4].
TC65 JAVA User's Guide_V05 Page 8 of 90 26.09.2005
TC65 JAVA User's Guide
Strictly confidential / Released
s
2 Overview
The TC65 module features an ultra-low profile and low-power consumption for data (CSD
and GPRS), voice, SMS and fax. Java technology and several peripheral interfaces on the
module allow you to easily integrate your application.
This document explains how to work with the TC65 module, the installation CD and the tools
provided on the installation CD.
Old solution:
The customer app lication was
distributed across 2 µC, external µC
and internal µC on the module
µC
Customer SW
ROM
RAM
TCxx
Customer A pp lication
Figure 1: Overview
New solution:
The customer application
exists only on the m odule
ROM
RAM
TC65
Customer SW
Cu stomer App lic ation
2.1 Related Documents
In addition to the Java Docs for the development API (see Chapter 4), the following
documents are included with the SMTK:
[1] Multiplexer Installation Guide
[2] DSB75 Support Box - Evaluation Kit for Siemens Cellular Engines
[3] TC65 AT Command Set
[4] TC65 Hardware Interface Description
[5] Java doc \wtk\doc\html\index.html
[6] IMP-NG, JSR228, Standard
[7] Application Note 24: Application Developer’s Guide
TC65 JAVA User's Guide_V05 Page 9 of 90 26.09.2005

TC65 JAVA User's Guide
Strictly confidential / Released
2.2 Terms and Abbreviations
Abbreviation Description
API Application Program Interface
ASC Asynchronous Serial Controller
CLDC Connected Limited Device Configuration
CSD Circuit-Switched Data
DAI Digital Audio Interface
DCD Data Carrier Detect
DSR Data Set Ready
GPIO General Purpose I/O
GPRS General Packet Radio Service
GPS Global Positioning System
HTTP Hypertext Transfer Protocol
s
I/O Input/Output
IDE Integrated Development Environment
IP Internet Protocol
J2ME™ Java 2 Mobile Edition
J2SE™ Java 2 Standard Edition
JAD Java Application Description
JAR Java Archive
JDK Java Development Kit
JVM Java Virtual Machine
LED Light Emitting Diode
ME Mobile Engine
MIDP Mobile Information Device Protocol
OTA Over The Air
OTAP Over The Air Provisioning of Java Applications
PDP Packet Data Protocol
PDU Protocol Data Unit
SDK Standard Development Kit
SMS Short Message Service
SMTK Siemens Mobile Toolkit
TCP Transfer Control Protocol
URC Unsolicited Result Code
URL Universal Resource Locator
VBS Visual Basic Script
WTK Wireless Toolkit
TC65 JAVA User's Guide_V05 Page 10 of 90 26.09.2005

TC65 JAVA User's Guide
Strictly confidential / Released
s
3 Installation
3.1 System Requirements
The Siemens Mobility Toolkit (SMTK) TC65 requires that you have:
1. Windows 2000 or Windows XP installed
2. 40Mbytes free disk space for SMTK
3. Administration privileges
4. Java 2 SDK, Standard Edition 1.4. To install the JDK version 1.4.2_07 provided, follow
the instructions in Section 3.3.1.
If a Java IDE such as Sun Java Studio Mobility 6 2004Q3, Eclipse 3.0.1, Eclipse 3.0.2,
JBuilder X or 2005 is installed, it can be integrated into the SMTK environment during the
installation of the SMTK. To install one of the IDEs, follow the installation instructions in
Section 3.3.3 and Section 3.3.4 respectively.
3.2 Installation CD
The Siemens Mobility Toolkit TC65 Installation CD includes:
• Module Exchange Suite
• EclipseME plugin
• TC65 WTK
bin
- various tools
doc
- html
- java docs for APIs
lib
- classes.zip
src
- various examples
• Java SDK
J2sdk-1_4_2_07-windows-i586-p.exe
• Sun Java Studio Mobility 6
jstudio_M04q3-win-ml.exe
• Documents:
DSB75_HW_Description.pdf
TC65_AT_Command_Set.pdf
TC65_HW_Description.pdf
TC65T_HW_Description.pdf
TC65_ReleaseNote.pdf
WM_AN_24_Dev_Guide.pdf
TC65_Java_UserGuide.pdf (this document)
Some of the content can only be accessed after the installation.
TC65 JAVA User's Guide_V05 Page 11 of 90 26.09.2005

TC65 JAVA User's Guide
Strictly confidential / Released
s
3.2.1 Components
3.2.1.1 Module Exchange Suite
The Module Exchange Suite allows the developer to access the Flash file system on the
cellular engine from the development environment over a serial interface. File transfers from
PC to module are greatly facilitated by this suite.
3.2.1.2 WTK
wtk is the directory where all the necessary components for TC65 Java application creation
and debugging are stored.
3.2.1.3 SDK and Java Studio
This is software provided by SUN to support Java application development.
TC65 JAVA User's Guide_V05 Page 12 of 90 26.09.2005

TC65 JAVA User's Guide
Strictly confidential / Released
s
3.3 Siemens Mobility Toolkit Installation
The SMTK comes with an installation CD. The installation program automatically installs the
necessary components and IDE integrations. Software can be uninstalled and updated with
the install program. The next sections cover the installation and removal of the SMTK and
the installation of the SDK and the supported IDEs.
3.3.1 Installing the Standard Development Toolkit
1. The JDK version 1.4.2_07 is provided on the TC65 SMTK installation disk in the
subdirectory “JDK 1.4”. To begin the installation, start the j2sdk-1_4_2_07-windows-i586p.exe and follow the instructions of the JDK setup procedure. If there is no JDK installed
on the target machine the installation of the provided JDK will be offered automatically
during the SMTK installation process.
2. Once the toolkit has been installed, the environment variable “path” can be altered to
comfortably use the JDK tools. This is not necessary for using the Siemens SMTK.
3. Open the Control Panel.
a) Open System.
b) Click on Advanced.
c) Click on the Environment Variables button.
d) Choose path from the list of system variables.
e) Append the path for the bin directory of the newly installed SDK to the list of
directories for the path variable.
3.3.2 Installing the SMTK Environment
Before you start the installation please make sure all applications, especially the IDEs are
closed.
1. Insert CD, start setup.exe. When the dialog box appears simply press the “Next” button to
continue the procedure.
2. You will be asked to read the license agreement. If you accept the agreement, press
“Yes” to continue with the installation.
3. A file including special information about the installation and use of the SMTK is shown.
Press “Next” to continue.
4. You will be asked to enter the path name where Eclipse 3.0.1 or 3.0.2 is installed.
Please type in the folder where Eclipse with the ME plugin is installed and press “Next”.
If you have not installed Eclipse or do not want to integrate the SMTK into Eclipse, please
press “Next” without typing in a selected folder.
5. The installation software checks for the Java SDK. If there is no SDK on the system the
installation procedure now offers to install the provided JDK. If this step is refused, the
setup process will not continue because a properly installed JDK is mandatory for using
the SMTK environment.
6. At this point, the installation software checks for a Java IDE to be integrated with the
SMTK. A Java IDE is not necessary to use the TC65 SMTK. The IDE installation can be
done at any time even if the TC65 SMTK is already installed. To integrate the SMTK into
the Java IDE run the SMTK setup program in maintenance mode again. However, you
can continue the setup procedure and install the IDE installation later or cancel the setup
program at this stage and restart it after installing one of the supported Java IDEs. In
case you wish to install a Java IDE please follow the instructions below and in Section
3.3.3. If no installed IDE is found the TC65 SMTK offers to install SUN Java Studio
Mobility 6 2004Q3. Alternatively, you can install the SUN IDE by following the
instructions in Section 3.3.3.
TC65 JAVA User's Guide_V05 Page 13 of 90 26.09.2005

TC65 JAVA User's Guide
Strictly confidential / Released
7. If the SDK and one or more Java IDEs are found, you will be asked to choose which IDE
you want integrated into the TC65 development environment. Once an IDE has been
found and selected, press "Next" to continue. Ensure that your Java IDE is closed.
8. Select the folder where the TC65 SMTK will be installed. A folder will be suggested to
you but you may browse to select a different one.
9. Choose the path that TC65 will appear under in the Start Menu.
10. A brief summary of all entries made is shown. Press “Next” to continue.
11. A dialog box will inform you that the Module Exchange Suite (MES) will be installed in the
next step. Please press “OK”. A separate setup wizard for the Module Exchange Suite
will be opened. Please follow the setup wizard’s instructions.
12. After step 11, all necessary files will be copied from the CD into the target folder.
13. This is the final step. Again, a listing of all installed components appears. Please press
“Finish” to end the installation
s
3.3.3 Installing Sun Java Studio Mobility 6
1. Sun Java Studio Mobility 6 is provided on the TC65 SMTK installation disk in the
subdirectory “SJSM6”. To begin installation, start jstudio_M04q3-win-ml.exe and follow
the Sun Studio setup procedure instructions.
2. On the first use of Sun™ Studio 6 after installation, you will be prompted to specify a
personal Java folder. Each user may have their own Java folder.
Note: The integration of the SMTK into Sun™ Studio 6 is only possible if the personal
user folder is set. It can only be rolled back by the user who installed the SMTK. If all
users use the same Java folder, any user may roll back the integration.
3.3.4 Installing Eclipse 3.0
Eclipse can be freely downloaded from http://www.eclipse.org. In order to use Eclipse with
the TC65 the EclipseME plug-in is also needed. It can be downloaded from
http://eclipseme.org/
currently recommend that this version be used.
. A customized version of this plug-in also comes with TC65 SMTK. It is
3.3.5 Installing Borland JBuilder X and 2005
Borland JBuilder can be purchased from http://www.borland.com/jbuilder.
Note: The installation path name of JBuilder should not include space characters.
There are also 30 days trial versions available on the website. Installation instructions can be
found on the web page.
3.3.6 Installing Module Exchange Suite (MES)
The Module Exchange Suite (MES) is installed during the SMTK installation. If you would like
to install the Module Exchange Suite separately, repair or remove it, please use the Module
Exchange Suite (MES) setup.exe, which is located on the TC65 SMTK installation disk in the
subdirectory “MES”.
TC65 JAVA User's Guide_V05 Page 14 of 90 26.09.2005

TC65 JAVA User's Guide
Strictly confidential / Released
s
3.4 SMTK Uninstall
The TC65 SMTK install package comes with an uninstall facility. The entire SMTK or parts of
the package can be removed. To start the uninstall facility, open the Control Panel, select
Add/Remove Programs, select TC65 Software Development Kit and follow the instructions.
The Module Exchange Suite (MES) is not uninstalled automatically with the SMTK. If you
would like to uninstall the Module Exchange Suite (MES) as well, please run the MES
uninstall facility. To run the uninstall program, open the Control Panel, select Add/Remove
Programs, select Siemens Module Exchange Suite (MES) and follow the instructions.
3.5 Upgrades
The SMTK can be modified, repaired or removed by running the setup program on the
Installation CD.
TC65 JAVA User's Guide_V05 Page 15 of 90 26.09.2005

TC65 JAVA User's Guide
Strictly confidential / Released
s
4 Software Platform
In this chapter, we discuss the software architecture of the SMTK and the interfaces to it.
4.1 Software Architecture
The SMTK enables a customer to develop a Java application on a PC and have it be
executable on the TC65 module. The application is then loaded onto the module. The
platform is comprised of:
• the Java™ 2 Micro Edition (J2ME™), which forms the base of the architecture.
The J2ME™ is provided by SUN Microsystems, http://java.sun.com/j2me/
designed for embedded systems and has a small memory footprint. TC65 uses:
CLDC 1.1 HI, the connected limited device configuration hot spot implementation.
IMP-NG, the information module profile 2
MIDP 2.0 but without the lcdui package.
nd
generation, this is for the most part identical to
. It is specifically
• Additional Java virtual machine interfaces:
AT Command API
File I/O API
The data flow through these interfaces is shown in Figure 3 and Figure 20.
• Memory space for Java programs:
Flash File System: around 1700k
RAM: around 400k
Application code and data share the space in the flash file system and in RAM.
• Additional accessible periphery for Java applications
• A maximum of ten digital I/O pins usable, for example, as:
Output: status LEDs
• Input: Emergency Button
• One I2C/SPI Interface.
• One Digital Analog Converter and two Analog Digital Converters.
• Serial interface (RS-232 API): This standard serial interface could be used, for
example, with an external GPS device or a current meter.
For detailed information see chapter 4.2.
TC65 JAVA User's Guide_V05 Page 16 of 90 26.09.2005

TC65 JAVA User's Guide
Strictly confidential / Released
s
4.2 Interfaces
4.2.1 ASC0 - Serial Device
ASC0, an Asynchronous Serial Controller, is a 9-wire serial interface. It is described in the
Hardware Interface Description [4]. Without a running Java application the module can be
controlled by sending AT commands over ASC0. Furthermore, ASC0 is designed for
transferring files from the development PC to the module and for controlling the module with
AT commands. When a Java application is started, ASC0 can be used as an RS-232 port.
Refer to the Java doc [5] for details.
4.2.2 General Purpose I/O
There are ten I/O pins that can be configured for general purpose I/O. When the TC65 starts
up, all 10 pins are set, by default, to a high-impedance state for use as input. One pin can be
configured as a pulse counter. All lines can be accessed under Java by AT commands. See
[3] and [4] for information on configuring the pins.
4.2.3 DAC/ADC
There are two analogue input lines and one analogue output line. They are accessed by AT
commands. See [3] and [4] for details.
4.2.4 ASC1
ASC1 is the second serial interface on the module. This is a 4-pin interface (RX, TX, RTS,
CTS). It can be used as a second AT interface when a Java application is not running or by a
running Java application as System.out.
4.2.5 Digital Audio Interface (DAI)
The TC65 has a seven-line serial interface with one input data clock line and input/output
data and frame lines to support the DAI. Refer to the AT Command Set [3] and Hardware
Interface Description [4] documents for more information.
4.2.6 I2C/SPI
There is a 4 line serial interface which can be used as I2C or SPI interface. It is described in
the Hardware Interface Description [4]. The at^sspi at command configures and drives this
interface. For details see [4].
TC65 JAVA User's Guide_V05 Page 17 of 90 26.09.2005

TC65 JAVA User's Guide
Strictly confidential / Released
s
4.2.7 JVM Interfaces
IMP-NG File API AT Command API
Connected Limit e d Device Configuration (CLDC)
J2ME
Figure 2: Interface Configuration
J2ME, CLDC and MIDP were implemented by SUN. IMP-NG is a stripped down version of
MIDP 2.0 prepared by Siemens and does not include the graphical interface LCDUI.
Siemens developed the File I/O API and the AT command API. Documentation for J2ME and
CLDC can be found at http://java.sun.com/j2me/
in …/ Java doc [5].
. Documentation for the other APIs is found
4.2.7.1 IP Networking
IMP-NG provides access to TCP/IP similarly to MIDP 2.0.
Because the used network connection, CSD or GPRS, is fully transparent to the Java
interface, the CSD and GPRS parameters must be defined separately either by the AT
command at^sjnet [3] or by parameters given to the connector open method, see Java doc
[5].
4.2.7.2 Media
TC65 does not support the media package. See Java doc [5].
4.2.7.3 Other Interfaces
TC65 supports neither the PushRegistry interfaces and mechanisms nor any URL schemes
for the PlatformRequest method. See Java doc [5].
TC65 JAVA User's Guide_V05 Page 18 of 90 26.09.2005
TC65 JAVA User's Guide
s
Strictly confidential / Released
4.3 Data Flow of a Java Application Running on the Module
AT Parser
system.out ASC1
Flash File
System
TCP/IP
GPIO
DAI
AT Command
API
I2C/SPI DAC/ADC
JVM
File I/O API
IMP-NG
ASC0
Figure 3: Data flow of a Java application running on the module.
The diagram shows the data flow of a Java application running on the module. The data flow
of a Java application running in the debug environment can be found in Figure 20.
The compiled Java applications are stored as JAR files in the Flash File System of module.
When the application is started, the JVM interprets the JAR file and calls the interfaces to the
module environment.
The module environment consists of the:
• Flash File System: available memory for Java applications
• TCP/IP: module internal TCP/IP stack
• GPIO: general purpose I/O
• DAI: Digital Audio Interface
• ASC0: Asynchronous serial interface 0
• ASC1: Asynchronous serial interface 1
• I2C: I2C bus interface
• SPI: Serial Peripheral Interface
• DAC: digital analog converter
• ADC: analog digital converter
• AT parser: accessible AT parser
The Java environment on the module consists of the:
• JVM: Java Virtual Machine
• AT command API: Java API to AT parser
• File API: Java API to Flash File System
• IMP-NG: Java API to TCP/IP and ASC0
TC65 JAVA User's Guide_V05 Page 19 of 90 26.09.2005

TC65 JAVA User's Guide
s
Strictly confidential / Released
4.4 Handling Interfaces and Data Service Resources
To develop Java applications the developer must know which resources, data services and
hardware access are available.
• There are three AT parsers available
• There is hardware access over
- two serial interfaces: ASC1 (System.out only) and ASC0 (fully accessible).
- general purpose I/O. To configure the hardware access, please refer to the AT
Command Set [3] and the Hardware Interface Description [4].
- I2C/SPI
- All restrictions of combinations are described in section 4.4.1.
• A Java application has:
- three instances of the AT command class, one with CSD and two without, each of
which would, in turn, be attached to one of the three AT parsers.
- one instance of access to a serial interface, ASC0, through the RS-232 API.
- System.out over the serial interface, ASC1, for debugging.
4.4.1 Module States
The module can exist in the following six states in relation to a Java application, the serial
interfaces, GPIO and I2C/SPI.
commands referenced. A state transition diagram is shown in
Figure 10.
This section shows how Java applications must share AT parsers, GPIO pins and I2C/SPI
resources. DAC, ADC and DAI are not discussed here. The USB interface is an alternative to
ASC1. When the USB is plugged in, the ASC1 interface is deactivated.
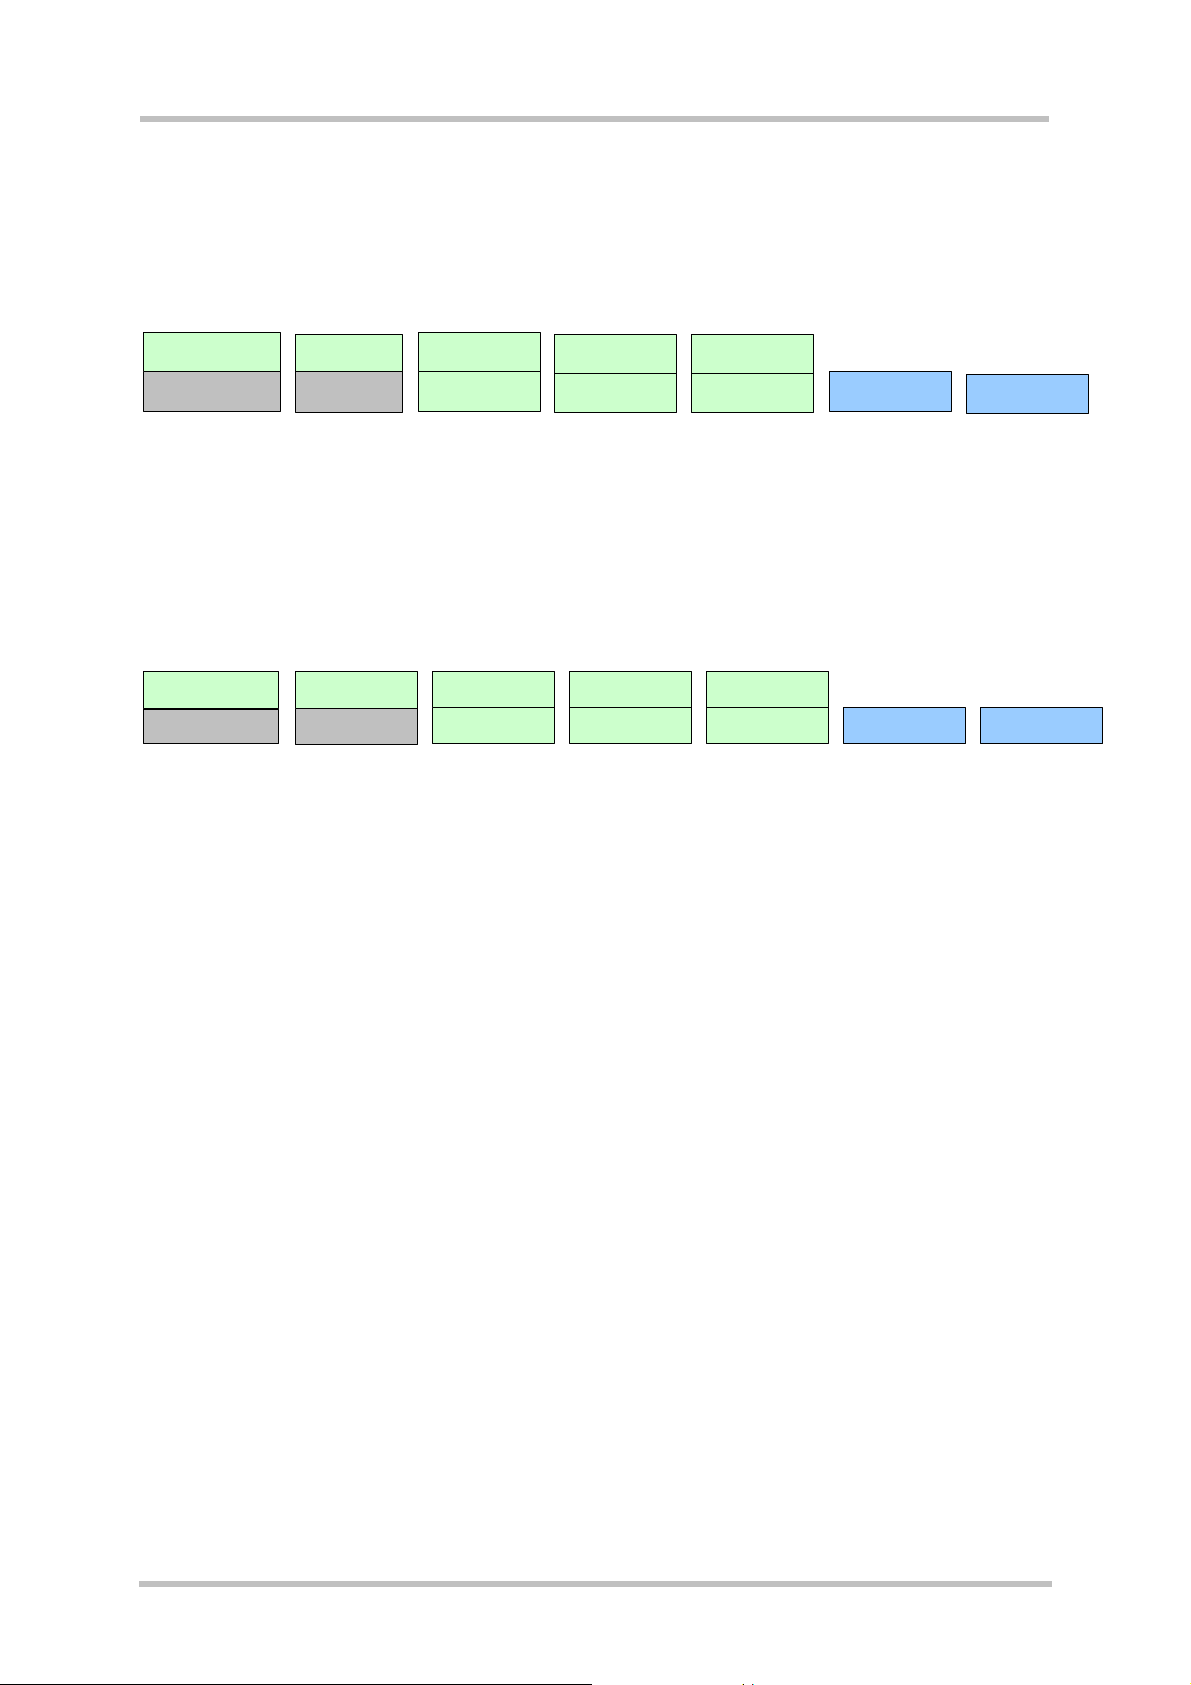
Color legend for the following figures
See the AT Command Set [3] for information about any AT
Default configuration of module
Default configuration when Java
application is started
configured by AT Command
TC65 JAVA User's Guide_V05 Page 20 of 90 26.09.2005
TC65 JAVA User's Guide
s
Strictly confidential / Released
4.4.1.1 State 1: Default – No Java Running
This is the default state. The Java application is inactive and there is an AT interface with
CSD on ASC0 as well as ASC1. All HW interface pins are configured as inputs.
AT parser
with CSD
ASC 0
AT parser
with CSD
ASC1 or USB
10 GPIO, I2C/SPI pins
(unused)
Figure 4: Module State 1
4.4.1.2 State 2: No Java Running, General Purpose I/O and I2C
The Java application is inactive. There is an AT parser with CSD on ASC0 as well as ASC1.
Up to ten I/0 pins are used as general purpose I/O plus a I2C interface. The pins are
configured by at^scpin or at^sspi (refer to AT Command Set [3]).
AT parser
w ith C SD
AT parser
w ith C SD
ASC 0
ASC 1 or USB I2C
up to 10 GPIO pins
Figure 5: Module State 2
4.4.1.3 State 3: No Java Running, General Purpose I/O and SPI
The Java application is inactive and there is an AT interface with CSD on ASC0 as well as
ASC1. There is an SPI interface as well at ten I/0 pins that can be used for general purpose
I/O. The pins are configured with at^scpin or at^sspi (refer to AT Command Set [3]).
AT parser
with CSD
ASC 0
AT parser
with CSD
up to 10 GPIOs SPIASC 1 or USB
Figure 6: Module State 3
4.4.1.4 State 4: Default – Java Application Active
The Java application is active and ASC1 is used as System.out and the Java instance of the
RS-232 serial interface is connected to ASC0. Java instances of AT commands are
connected to the available AT parsers. The Java application is activated with at^sjra (refer to
AT Command Set [3]) or autostart.
Java access to serial
interface (CommConnection)
ASC 0
System.out
ASC1
AT parser
with CSD
Java AT command API
with CSD
AT parser
without CSD
Java AT com m an d AP I
without CSD
AT parser
without CSD
Java AT command A PI
without CSD
Figure 7: Module State 4
TC65 JAVA User's Guide_V05 Page 21 of 90 26.09.2005
TC65 JAVA User's Guide
s
Strictly confidential / Released
4.4.1.5 State 5: Java Application Active, General Purpose I/O and I2C
The Java application is active, ASC1 is used as System.out and the Java instance of the RS232 serial interface is connected to ASC0. The Java application is activated with at^sjra. The
I/O pins are configured with at^scpin or at^sspi. Refer to the AT Command Set [3] for AT
command details.
Java access to serial
interface (Com m C onnection)
ASC 0
System.out
ASC 1
AT parser 0
w ith C SD
Java AT comm and AP I
w ith C SD
AT parser
w itho u t CSD
Java AT comm and AP I
w itho u t CSD
AT parser
without CSD
Java AT command API
without CSD
up to 10 GPIO pins:
I2C :
Figure 8: Module State 5
4.4.1.6 State 6: Java Application Active, General Purpose I/O and SPI
The Java application is running, ASC0 is used as System.out and the Java instance of the
RS-232 serial interface is connected to ASC1. The Java application is activated with at^sjra
(refer to the AT Command Set [3]).
Java access to serial
interface (CommConnection)
ASC 0
System.out
ASC 1
AT parser 0
with CSD
Java AT command API
with CSD
Figure 9: Module State 6
AT parser
without CSD
Java AT comm and API
without CSD
AT parser
witho u t CSD
Java AT command AP I
witho u t CSD
up to 10 GPIO pins SPI
TC65 JAVA User's Guide_V05 Page 22 of 90 26.09.2005
TC65 JAVA User's Guide
Strictly confidential / Released
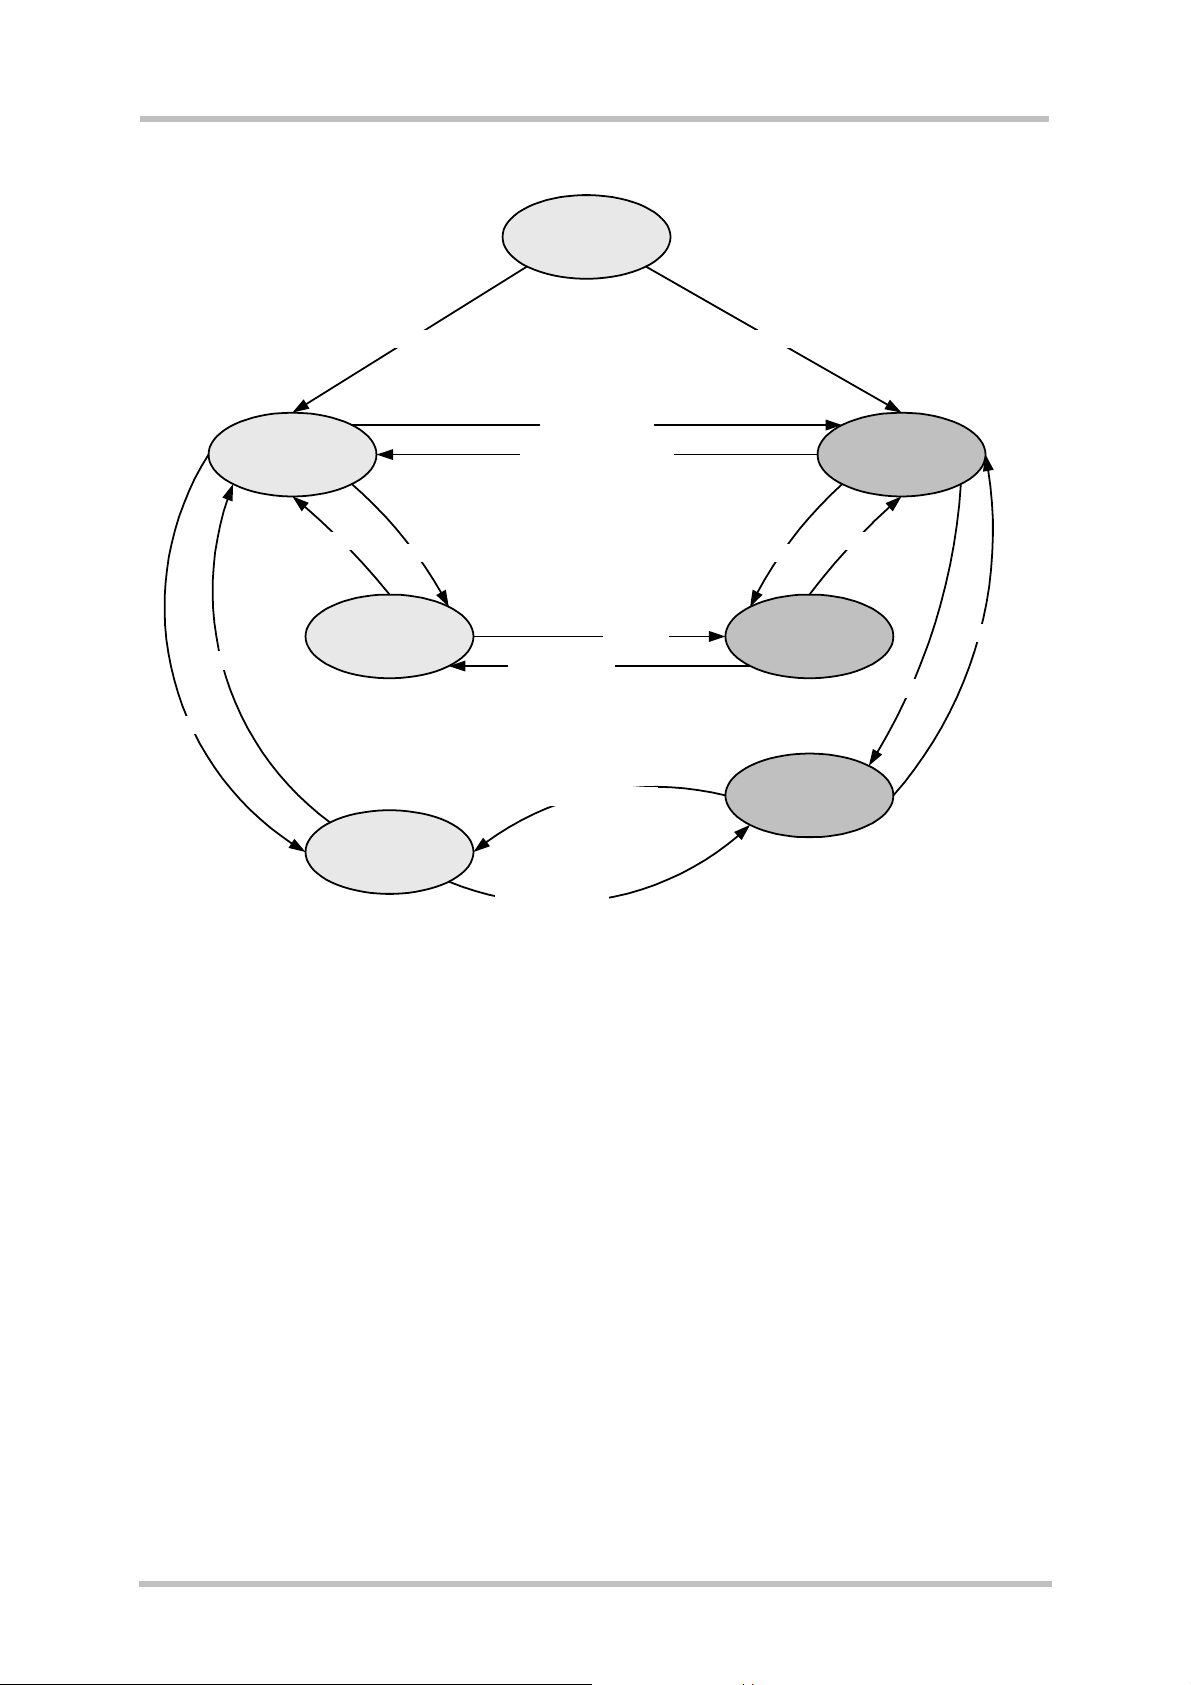
4.4.2 Module State Transitions
switch on
no Java autostart Java autostart
start java: at^sjra
State 1: Default, no Java
appl. running
destroy java application
s
State 4: Default,
Java active
close SPI
open SPI
close I2C
State 2: no Java appl.
State 3: no Java appl.
open I2C
running, using I2C
running, using SPI
start java:
destroy
Java application
destroy java application
start java: at^sjra
at^sjra
open I2C
State 5: Java active,
State 6: Java active,
using I2C
using SPI
close I2C
close SPI
open SPI
Figure 10: Module State Transition Diagram
Note: No AT parser is available over serial interface ASC0 or ASC1 while a Java application
is running on the module. System.out is available on ASC1 for debugging while a Java
application is running.
TC65 JAVA User's Guide_V05 Page 23 of 90 26.09.2005

TC65 JAVA User's Guide
Strictly confidential / Released
s
5 Maintenance
The basic maintenance features of the TC65 are described below. Explicit details of these
functions and modes can be found in the AT Command Set [3] and the Hardware Interface
Description [4].
5.1 IP Service
Apart from the standard Java IP networking interfaces (UDPDatagramConnection,
SocketConnection, ...) the TC65 also supports a set of Internet Services via AT command.
There are some correlations between the Java and the AT IP Services.
1. the connection profile 0 is also used by Java: when Java starts up a networking
connection it tries to set and activate connection profile 0 with the parameters
configured by at^sjnet or in the connector.open method.
2. Java tries to (re-)use an active Internet Service profile: if using connection profile 0
fails, because e.g. this (or another) connection profile is already used by the Internet
Services, Java networking also uses this, already active, profile.
3. deactivation of the connection profile happens when all applications are “finished”:
Java has its networking idle time, the Internet Services have the inactTO.
So that means that Java networking and AT Internet Services can be used in parallel but
care has to be taken about configuring and activation of the connection profile. In the
simplest case use connection profile 0 for the Internet Services and set the parameters to the
same values as the Java networking parameters. This way it makes no difference whether
the connection is activated by the Internet Services or Java.
There are some aspects which have to be kept in mind for all IP Services (Java and AT
command):
• when an open TCP connection is cut (e.g. the other side dies/is switched off) it takes
around 10 minutes during which retransmissions are send, until the situation is
detected as an error (in Java an exception is thrown).
• the number of IP services used in parallel should be kept small. An active IP service
uses up resources and may deteriorate the overall performance.
TC65 JAVA User's Guide_V05 Page 24 of 90 26.09.2005

TC65 JAVA User's Guide
Strictly confidential / Released
s
5.2 Power Saving
The module supports several power saving modes which can be configured by the AT
command at+cfun [3]. Power saving affects the Java application in two ways. First, it limits
access to the serial interface (RS-232-API) and the GPIO pins. Second, power saving
efficiency is directly influenced by the way a Java application is programmed.
Java hardware access limitations:
• In NON-CYCLIC SLEEP mode (cfun=0) the serial interface cannot be accessed while in
CYCLIC SLEEP mode (CFUN=7 or 9) the serial interface can be used with hardware flow
control (CTS/RTS).
• In all SLEEP modes the GPIO polling frequency is reduced so that only signal changes
which are less than 0.2Hz can be detected properly. Furthermore, the signal must be
constant for at least 2.12s to detect any changes. For further details refer to [4].
Java power saving efficiency:
• As long as any Java thread is active, power consumption cannot be reduced, regardless
whether any SLEEP mode has been activated or not. A Java application designed to be
power efficient should not have any unnecessarily active threads (e.g. no busy loops).
5.3 Charging
Please refer to [3] and [4] for general information about charging. Charging can be monitored
by the running Java application. The JVM is active in Charge mode and in Charge-Only
mode if autostart is activated. Only a limited number of AT commands are available when the
module is in Charge-Only mode. A Java application must be able to handle the Charge-Only
mode and reset the module to reinstate the normal mode. See [4] for information about the
Charge-Only mode.
The Charge-Only mode is indicated by URC “^SYSSTART CHARGE-ONLY MODE”.
Note: When a Java application is started in Charge-Only mode only AT Command APIs
without CSD are available. The mode-indicating URC is created after issuing the very first AT
command on any opened channel. To read the URC it is necessary to register a listener (see
[5]) on this AT command API instance before passing the first AT command.
TC65 JAVA User's Guide_V05 Page 25 of 90 26.09.2005

TC65 JAVA User's Guide
Strictly confidential / Released
s
5.4 Airplane Mode
The main characteristic of this mode is that the RF is switched off and therefore only a limited
set of AT commands is available. The mode can be entered or left using the appropriate
at^scfg command. This AT command can also be used to configure the airplane mode as the
standard startup mode, see [4]. The JVM is started when autostart is enabled. A Java
application must be able to handle this mode. The airplane mode is indicated by URC
“SYSSTART AIRPLANE MODE”. Since the radio is off all classes related to networking
connections, e.g. SocketConnection, UDPDatagramConnection, SocketServerConnection,
HTTPConnection, will throw an exception when accessed.
5.5 Alarm
The ALARM can be set with the at+cala AT command. Please refer to the AT Command Set
[3] and Hardware Interface Description [4] for more information. One can set an alarm, switch
off the module with at^smso, and have the module restart at the time set with at+cala. When
the alarm triggers the module restarts in a limited functionality mode, the “airplane mode”.
Only a limited number of AT commands are available in this mode, although the JVM is
started when autostart is enabled. A Java application must be able to handle this mode and
reset the module to reinstate the normal mode. The mode of a module started by an alarm is
indicated by the URC “^SYSSTART AIRPLANE MODE”.
Note: For detailed information which functionality is available in this mode see [4]. The mode
indicating URC is created after issuing the very first AT command on any opened channel.
5.6 Shutdown
If an unexpected shutdown occurs, data scheduled to be written will get lost due to a
buffered write access to the flash file system. The best and safest approach to powering
down the module is to issue the AT^SMSO command. This procedure lets the engine log off
from the network and allows the software to enter a secure state and save all data. Further
details can be found in [4].
5.6.1 Automatic Shutdown
The module is switched off automatically in different situations:
• under- or overtemperature
• under- or overvoltage
The shutdown will happen without a warning notification unless the appropriate URC has
been activated. If the URCs are enabled, the module will deliver an alert before switching off.
To activate the URCs for temperature conditions use the at^sctm command; to activate the
voltage condition URCs use the at^sbc command. It is recommended that these URCs be
activated so that the module can be shut by the application with at^smso after setting an
alarm, see Section 5.5. The commands are described in the AT Command Set [3], while a
description of the shutdown procedure can be found in [4].
TC65 JAVA User's Guide_V05 Page 26 of 90 26.09.2005

TC65 JAVA User's Guide
Strictly confidential / Released
s
5.6.2 Manual Shutdown
The module can be switched off manually with the AT command, at^smso or when using the
TC65 terminal by pressing the ignition key for a period of time (see [4]). In these cases the
midlets destroyApp method is called and the application has 5s time to clean up and call the
notifydestroy method. After the 5s the VM is shut down.
5.6.3 Restart after Switch Off
When the module is switched off without setting an alarm time (see the AT Command Set
[3]), e.g. after a power failure, external hardware must restart the module with the Ignition line
(IGT). The Hardware Interface Description [4] explains how to handle a switched off situation.
5.7 Special AT Command Set for Java Applications
For the full AT command set refer to [3]. There are differences in the behaviour AT
commands issued from a Java application in comparison to AT commands issued over a
serial interface.
5.7.1 Switching from Data Mode to Command Mode
Cancellation of the data flow with “+++” is not available in Java applications, see [3] for
details. To break the data flow use breakConnection(). Refer to \wtk\doc\index.html [5].
5.7.2 Mode Indication after MIDlet Startup
After starting a module without autobauding on, the startup state is indicated over the serial
interface. Similarly, after MIDlet startup the module sends its startup state (^SYSSTART,
^SYSSTART ALARM MODE etc.) to the MIDlet. This is done via a URC to the AT Command
API instance which executes the very first AT Command from within Java. To read this URC
it is necessary to register a listener (see [5]) on this AT Command API instance before
passing the first AT Command.
5.7.3 Long Responses
The AT Command API can handle responses of AT commands up to a length of 1024 bytes.
Some AT commands have responses longer than 1024 bytes, for these responses the Java
application will receive an Exception.
Existing workarounds:
• Instead of listing the whole phone book, read the entries one by one
• Instead of listing the entire short message memory, again list message after message
• Similarly, read the provider list piecewise
• Periods of monitoring commands have to be handled by Java, e.g. at^moni, at^smong.
These AT commands have to be used without parameters, e.g. for at^moni the periods
must be implemented in Java.
TC65 JAVA User's Guide_V05 Page 27 of 90 26.09.2005
 Loading...