

Page 1

Issued by
Information and Communication mobile
Haidenauplatz 1
D-81667 Munich
© Siemens AG 2003
All rights reserved. Subject to availability.
Rights of modification reserved.
Siemens Aktiengesellschaft
www.my-siemens.com
Ref.No.: A31008-H6850-A101-1-7619
s
Be inspired
*A5B00075103055*
ST55
Page 2

Contents
1
Safety precautions ..................... 3
Overview of the phone .............. 5
Display symbols (selection) ....... 7
Getting started ........................... 8
Insert SIM card/battery ............. 8
Charge battery ......................... 9
Switch on, off/PIN entry ........... 10
Copy SIM addresses ................ 10
Standby mode ........................ 10
General instructions ................. 11
User guide ............................. 11
Menu controls ........................ 11
Menu speed dialling ............... 12
Codes .................................... 12
Preventing accidental
activation ............................... 13
SIM services ........................... 14
Calling ...................................... 15
Dialling with number keys ...... 15
End call .................................. 15
Set volume ............................. 15
Redial previous numbers ........ 15
If the number is busy .............. 16
Accept call ............................. 16
Reject call .............................. 16
Swapping calls ....................... 17
Multiparty .............................. 18
Call menu .............................. 19
Control codes (DTMF) ............. 19
Text entry .................................20
Text entry without T9 .............20
Text entry with T9 .................. 21
Predefined text .......................22
Contacts ....................................23
Create new entry .................... 23
Change entry ..........................24
Call .........................................24
Contacts menu .......................24
SIM entries .............................25
Group .....................................26
Records .....................................27
Missed calls ............................27
Calls received ......................... 27
Calls dialled ............................27
Time/Charge ............................28
Display ...................................28
Charge settings ...................... 28
Camera .....................................29
Take photos ............................29
My photos ..............................30
Settings ..................................31
Surf & Fun ................................. 32
Downloads ................................35
SMS ...........................................36
Writing and sending text
Messages (SMS) ..................... 36
Read new SMS ....................... 38
Lists .......................................38
See also Index at the end of this User Guide
Page 3

2
Contents
SMS setup .............................. 40
MMS ......................................... 41
Writing/sending
MMS Messages ...................... 41
Receive MMS .......................... 42
Lists ....................................... 42
MMS setup ............................. 43
E-mail ....................................... 45
Write new e-mail .................... 45
Receive/read e-mail ................ 45
Email setup ............................ 46
Voice msg./mailbox .................. 48
Cell broadcast .......................... 49
Settings .................................... 50
Audio Settings ........................ 50
Device .................................... 51
During calls ............................ 53
Security ................................. 54
Network ................................. 54
Connectivity ........................... 55
Divert ....................................... 57
Barrings .................................... 59
Closed user group .................... 60
Fast access key ......................... 61
Left soft key ........................... 61
Extras ....................................... 62
General.................................. 62
Organiser ............................... 62
Clock ..................................... 64
Calculation ............................. 65
Voice control .......................... 66
Voice recording ......................67
Customer Care ..........................69
Questions & Answers ................71
Care and maintenance .............74
Product data ............................. 75
Accessories ...............................76
Battery quality statement ........77
Guarantee certificate (UK) .......78
Guarantee certificate (IRL) .......79
SAR – European Union (RTTE) ...81
SAR – International (ICNIRP) .....83
Index .........................................84
See also Index at the end of this User Guide
Page 4

Safety precautions
Information for parents
Please read the operating instructions and safety precautions carefully before use.
Explain the content and the hazards associated with using the phone to your children.
Remember to comply with legal
requirements and local
restrictions when using the
phone. For example in
aeroplanes, petrol stations,
hospitals or while driving.
Mobile phones can interfere
with the functioning of medical
devices such as hearing aids
or pacemakers. Keep at least
20 cm/9 inches between phone
and pacemaker. When using
the mobile phone hold it to the
ear which is further away from
the pacemaker. For more
information consult your doctor.
The SIM card may be removed.
Caution! Small parts like this
could be swallowed by young
children.
The mains voltage specified on
the power supply unit (volt) must
not be exceeded. Otherwise the
power supply unit may be
destroyed.
The ringtone (p. 50) and info
tones are reproduced through
the loudspeaker. Do not hold the
phone to your ear when it rings.
Otherwise you risk serious
permanent damage to your
hearing.
Only use original Siemens
batteries (100% mercury-free)
and charging devices.
Otherwise you risk serious
damage to health and property:
The battery could explode, for
instance.
Do not open the phone. Only the
battery (100 % mercury-free) or
SIM card may be changed.
You must not open the battery
under any circumstances.
Any other changes to this device
are strictly prohibited and will
invalidate the operating licence.
3
Page 5
4
Important:
Please dispose of unwanted
batteries and phones as
permitted by the laws in your
country.
The phone may cause
interference in the vicinity of
TV sets, radios and PCs.
Use only Siemens original
accessories. This will avoid
potential risks to health or
property and ensure compliance
with all relevant regulations.
Improper use will invalidate the guarantee!
Safety precautions
Page 6
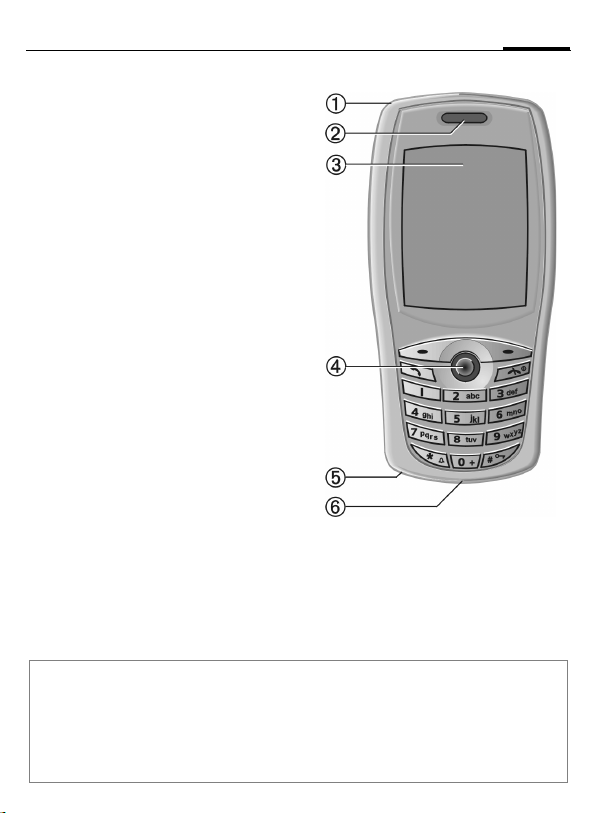
Overview of the phone
c Integrated antenna
Do not interfere with the phone above the
battery cover unnecessarily. This reduces
the signal quality.
d Loudspeaker
e Display
f Joystick
In standby mode:
G
G
Hold down – voice control.
Press briefly – voice menu.
H Open contacts.
F Function as for soft keys.
C Open menu.
In lists and menus:
I Scroll up and down.
D Back a menu level.
E/ C Select a function.
During a call:
G
H
Increase volume.
Reduce volume.
D Function as for left soft key.
E/ C Open call menu.
g Microphone
h Connection socket
For charger, headset etc.
5
Note
Your phone's display and the camera lens on the back of the phone are delivered with a
protective film.
Remove this film before getting started.
In rare cases static discharge may cause discoloration at the edges of the display. However
this will disappear within 10 minutes.
Page 7
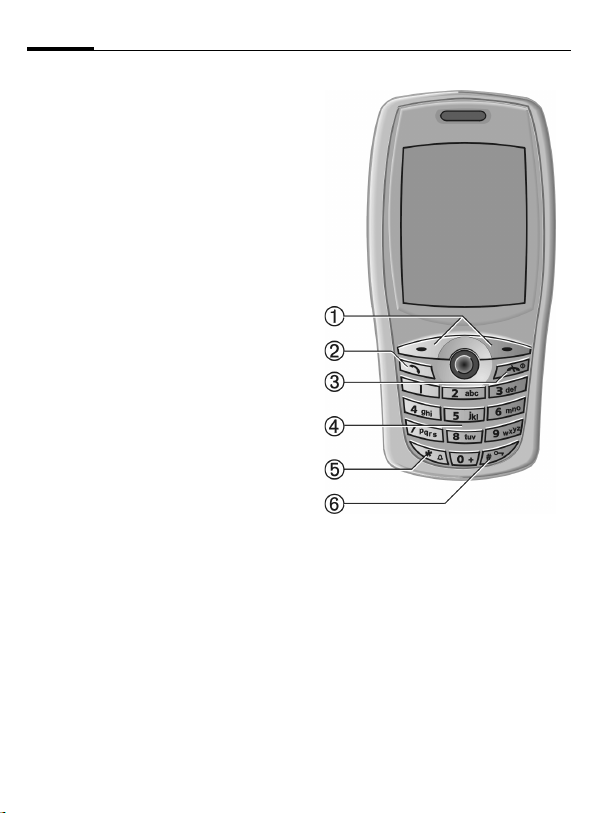
6
Overview of the phone
c Soft keys
The current functions of these keys are
shown in the bottom line of the display as
§text§/symbol.
d
Dial phone number/name displayed, take
calls. Show last phone numbers dialled in
standby mode.
e
• Switched off: hold down to switch on.
• During a conversation or in an application:
press briefly to finish.
• In menus: press briefly to go back a level.
Hold down to go back to standby mode.
• In standby mode: hold down to switch off
phone.
B
A
Call key
On/Off/End key
f Input keys
Numbers, letters.
*
g
• In standby mode: switch all signal tones
on/off (except alarm).
• During call: switch mute on/off.
h
In standby mode: switch key lock on/off.
Activating the keypad lock also avoids
connecting to the Internet unintentionally by
double clicking on the joystick.
#
Hold down
Hold down
Page 8
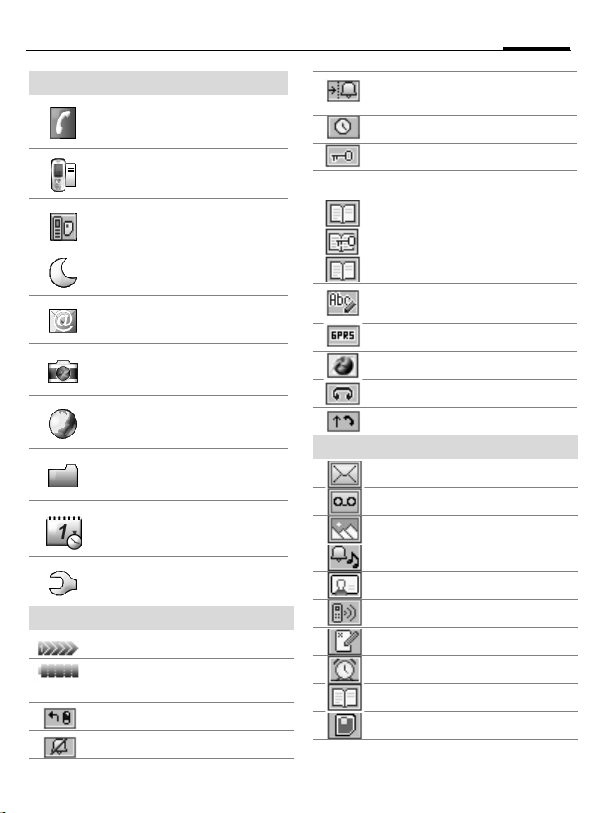
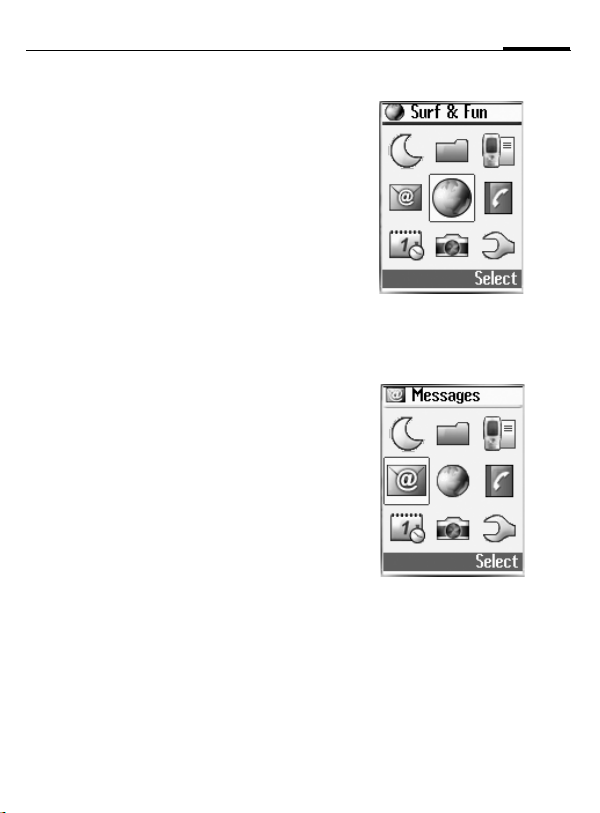
Display symbols (selection)
7
Menu symbols
Contacts
Records
SIM services
or
Profiles
Messages
Camera
Internet
Explorer
Organizer
Settings
Display symbols
Signal strength.
Battery charging status,
e.g., 100 %.
All calls are diverted.
Ringer off.
Soft keys
Ringtone only if the caller is stored
in contacts or as a group member.
Alarm clock active.
Key lock active.
Phone numbers/names:
On the SIM card.
On the SIM card (PIN2 protected).
Contacts (in phone).
Text input with T9.
Registered.
Internet online.
Headset active.
Auto answer feature on.
Message received.
Voice message received.
MMS received: logo.
MMS received: ringtone.
MMS received: caller ID.
Missed call.
Missed appointment.
Missed alarm.
Open contacts.
Message memory full.
Page 9
8
Getting started
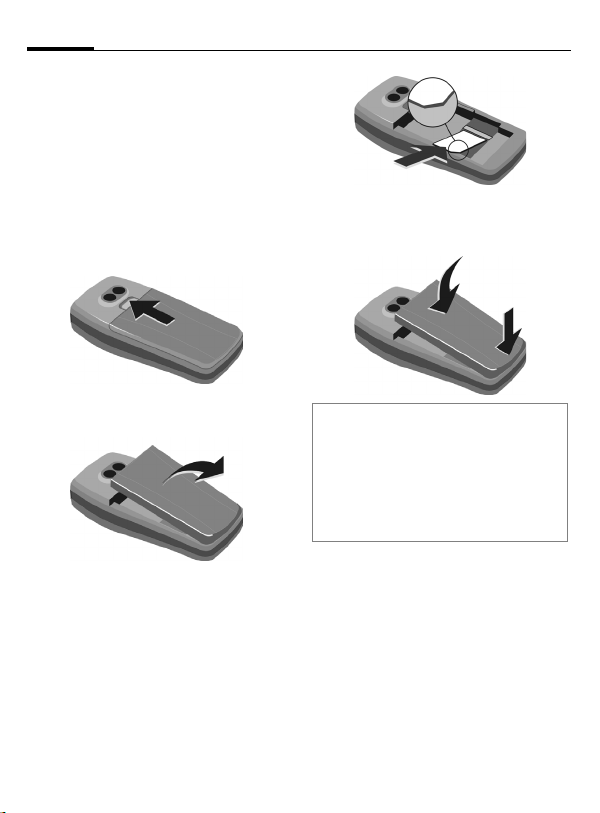
Insert SIM card/battery
The service provider supplies you
with a SIM card on which all the
important data for your line is
stored. If the SIM card has been
delivered in credit-card size, snap the
smaller segment out and remove
any rough edges.
• Push the catch in the direction of
the arrow
n.
n
p
• Insert the lugs into the openings
, then press the battery onto the
q
phone until it clicks into position.
q
• Remove the cover with the
integrated battery
o
.
o
• Insert the SIM card in the opening
with the contact area facing
downwards and push gently until it
engages below the holder (make
sure the angled corner is in the
correct position)
p.
Additional information
Please switch off your phone before
removing the battery!
Only 3V SIM cards are supported. Please
contact your service provider if you have an
older card.
SIM card problems ............................ p. 71
Functions without SIM
Emergency number (SOS)
§SOS§ Press the soft key to make an
§Menu§ Press soft key. The f unctions are
emergency call on the network
without a SIM card and without
entering a PIN (not available in
all countries). Only to be used
in real emergencies!
displayed.
Page 10
Getting started
9
Charge battery
The battery is not fully charged
when delivered. Plug charger cable
into the bottom of the phone
plug the charger cable into a mains
power socket and charge for at least
2.5 hours.
n
o
To remove, push the buttons on the
side of the connector in the direction
of the arrows
Charging time
An empty battery is fully charged
after about 2.5 hours. Charging is
only possible within a temperature
range of +5 °C to +40 °C. The mains
voltage specified on the power
supply unit must not be exceeded.
o
.
n,
o
Charge icon not visible
If the battery has been discharged
fully the charge icon is not
immediately visible when the
charger is plugged in. It will appear
after up to 2 hours. In this case the
battery is fully charged after 3-4
hours.
Please only use the power supply unit
provided!
Display while in service
Charge level display during
operation (empty-full):
A beep sounds when the battery is
nearly empty. The charge level of the
battery is only displayed correctly
after an uninterrupted charging/
discharging cycle. You should
therefore not remove the battery
unnecessarily and where possible not
finish the charging process early.
Additional information
The charger heats up when used for long
periods. This is normal and not dangerous.
Operating time
A full battery will deliver up to
140 hours of standby time or
270 minutes of talktime (p. 75).
Page 11
10
Switch on, off/PIN entry
Switch on/off
A
Hold down On/Off/End key
to switch on or off.
Enter PIN
The SIM card can be protected with a
4to 8-digit PIN.
J
§OK§ Confirm entry with right
Additional information
Change PIN ......................................p. 13
Other network (roaming) ................... p. 55
Clear SIM card barring ...................... p. 13
Enter the PIN using the
number keys. The
characters
ensure nobody can read
your PIN on the display.
Correct errors with §Clear§.
soft key. Logging on to the
network will take a few
seconds.
****
appear to
Signal strength
Strong receive signal.
A weak signal reduces the
call quality and may lead to
loss of the connection.
Change your location.
Copy SIM addresses
You can copy entries from the SIM
card into the phone (contacts).
Please do not interrupt this procedure.
During this time do not accept
incoming calls. Follow instructions in
the display.
You can also copy data from the SIM
card at a later time: Copy all function
(options menu for SIM entries, p. 25).
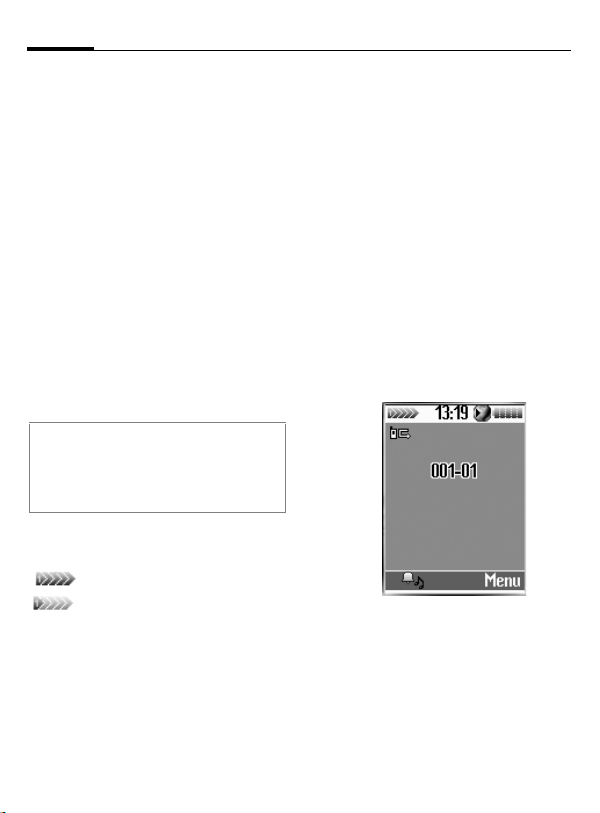
Standby mode
When the name of the service
provider appears on the display, the
phone is in standby mode and ready for
use.
The right soft key may have different
functions pre-assigned (p. 61).
A
Hold down the On/Off/End
key to return to standby
mode from any situation.
Page 12
General instructions
11
User guide
The following symbols are used to
explain operation:
J
A
B
<>
C
D F E
H I G
§Select§
L
Enter numbers or letters.
On/Off/End key
Call key
Soft keys
Press the joystick, e.g., to
call up the menu.
Press the joystick in the
direction indicated.
Displays a soft-key function.
Function depends on the
service provider, special
registration may be
necessary.
Menu controls
The steps needed to reach a function
are shown in a condensed form in this
user guide, e.g. to call up messages
and from there call up SMS:
CMMessagesMSMS
This corresponds to:
n
C From standby mode click
on the joystick to open the
menu.
o
D Use the joystick to select
the menu item "Messages"
and confirm by clicking on
the joystick.
C A further click on the
joystick selects "New SMS".
Page 13

12
General instructions
Menu speed dialling
All menu functions are numbered
internally. A function may be
selected directly by entering these
numbers in sequence.
E.g., write new SMS (from standby
mode):
C
4
Press for menu view.
for Messages
1 for SMS
1 for New SMS
Codes
The phone and SIM card are
protected against misuse by several
security codes.
Keep these confidential numbers in a
safe place where you can access
them again if required.
PIN
PIN2
PUK
PUK2
Phone
code
Protects your SIM card
(personal identification
number).
For setting the charge detail
display and to access additional
functions on special SIM cards.
Key code for unlocking SIM
cards after the wrong PIN has
been entered repeatedly.
Protects your phone. Must be
entered at the first security
setting.
CMSettingsMSecurity MCodes
MSelect function.
PIN control
The PIN is usually requested each
time the phone is switched on. You
can deactivate this feature but you
risk unauthorised use of the phone.
Some service providers do not
permit deactivating the control.
Page 14

General instructions
13
§Edit§ Press.
J
§OK§ Confirm input.
§Edit§ Press.
§OK§ Confirm.
Enter PIN.
Change PIN
You can change the PIN to any 4 to 8digit number you find easier to
remember.
J
§OK§ Press.
J,
J,
Enter current PIN.
§OK§ Enter new PIN.
§OK§ Repeat new PIN.
Change PIN2
(Display only if PIN2 is available).
Proceed as with Change PIN.
Chg. phonecode
You define and enter the phone
code (4-8 digits) when you call up a
phone-code protected function for
the first time. It is then valid for all
phone-code protected functions.
Following the third unsuccessful
attempt, access to the phone code
and the functions that use it is
denied. If this happens please
contact Siemens Service (p. 69).
L
Clear SIM card barring
If the PIN is entered incorrectly three
times, the SIM card is barred. Enter
the PUK (MASTER PIN), provided
with the SIM card by your service
provider, according to instructions. If
the PUK (MASTER PIN) has been lost,
please contact your service provider.
Additional information
Keylock..............................................p. 52
Further security settings ....................p. 54
Preventing accidental
activation
Even if PIN entry is deactivated,
confirmation is required to switch on
the phone.
This prevents the phone from being
switched on accidentally, e. g.,
when carried in a pocket or whilst
you are on an aircraft.
A
§OK§ Press. The phone switches
Press down.
on.
Page 15

14
General instructions
SIM services
(optional)
Your service provider may offer
special applications such as mobile
banking, share prices, etc. via the
SIM card. To do this you need an
appropriate SIM card. Where there
are several applications, these are
displayed in a SIM services menu.
With the SIM services menu, your
phone is ready to support future
additions in your service provider's
user package. For further
information, please contact your
service provider.
If your SIM card does not offer this
function, this menu item will be
replaced by the menu item "Audio
Settings" which will give you direct
access to all the audio settings for
your phone (p. 50).
L
Page 16

Calling
15
Dialling with number
keys
The phone must be switched on
(standby mode).
J
§Clear§ A short press clears the last
B
Additional information
§Save§ Save phone number in contacts/
to SIM card............................... p. 23/p. 25
§Menu§ Call menu.............................p. 19
Microphone off ..................................p. 19
Auto key lock..................................... p. 52
Control codes (DTMF) ...................... p. 19
Voice dialing...................................... p. 66
International dialling codes
In standby mode:
0
§+List§ Press and select country.
Phone number memo
You can use the keypad to enter a phone
number during a conversation. The person
to whom you are speaking can hear these
entries. When the connection has ended
you can save or dial the phone number.
Enter number (always with
area code, if necessary
with international dialling
code).
digit, a long press clears the
entire phone number.
Press Call key. The
displayed phone number is
dialled.
Hold down until a “+” is
displayed.
End call
A
Press the End key briefly.
The call is ended. Press this
key even if the person on
the other end of the line
has hung up first.
Set volume
I
Use the joystick (top/
bottom) to adjust the
volume (only possible
during conversation).
Redial previous numbers
To redial the phone number last
called:
B
To redial other numbers that were
dialled previously:
B
I
Press the Call key twice.
Press the Call key once.
Pick out the required
phone number from the
list, then press the ...
B ... key.
Page 17

16
Calling
If the number is busy
If the called number is busy or
cannot be reached because of
network problems several options
are available (depending on the
service provider). An incoming call
or any other use of the phone
interrupts these functions.
Either
Auto redial
§Auto§ Press. The phone number
is automatically dialled ten
times at increasing
time intervals. End with:
A End key.
Or
Reminder
§Prompt§ Press. A beep reminds you
to redial the displayed
phone number after 15
minutes.
Accept call
The phone must be switched on
(standby mode). An incoming call
will interrupt any other use of the
phone.
§Answer§ Press.
Or
B Press.
If the phone number has been
transmitted by the network, it is
displayed. If the name is in contacts
the relevant name appears instead.
Warning!
Please make sure you have accepted the
call before holding the phone to your ear.
This will avoid damage to your hearing from
loud ringtones!
Additional information
Missed calls.......................................p. 27
Accept call using any key .................. p. 53
Switch off ringtone............................. p. 50
Reject call
§Reject§ Press. The call will be
Or
diverted if this has been
set previously (p. 57).
A Press briefly.
Page 18

Calling
Swapping calls
Establish a second connection
You can call another number during
a call.
§Hold§ The current call is put on
J
B
(Swap) Swap back and forth
End current call
A
§Return§ You are now connected to
Incoming calls during a call
You may need to register for this
service with your service provider
and set your phone accordingly.
hold.
Now dial the new phone
number.
Press. The number is
dialled.
between the calls.
End the current call.
the caller.
L
During a call, you may be advised
that there is another call waiting.
You will hear a special tone during
the call. You have the following
options:
Accept the waiting call in addition to
the first
B
Reject the waiting call
§Reject§ Reject the waiting call.
Accept the waiting call and end the
current call
A
§Answer§ Accept new call.
Accept the waiting call,
putting the current call on
hold to do so. Always
proceed as above to swap
between the two calls.
End the current call.
17
Page 19

18
Multiparty
Call up to 5 parties one by one and
link them together in a multiparty
call. Some of the functions described
may not be supported by your
service provider or may have to be
enabled specially. Once you have
established a connection:
§Hold§ The current call is put on
§Menu§ ... open menu and select
hold.
/
Now dial a new number.
J
When the new connection
is established ...
Multiparty. The held calls
are joined for the
multiparty conversation.
Calling
L
Multiparty menu
§Menu§ Open the menu
Join all All held calls are joined for
Hold all All active calls are held.
Transfer The original call is joined to
End all All active calls are ended.
the multiparty conversation.
the second one. For you,
both calls are now ended.
End
A
All calls in the multiparty
conversation are ended
when the End key is
pressed.
Page 20

Calling
19
Call menu
The following functions are only
available during a call:
§Menu§ Open menu.
Voice memo
Starts the voice recording.
Mute Switch microphone on/off.
If switched off, the person
on the other end of the
line cannot hear you
(muting).
Loudspeaker
Activate/deactivate.
Volume Adjust volume during a
call.
Multiparty See Multiparty menu above.
Contacts Opens contacts to select a
phone number.
Messages An SMS can be sent
(p. 36).
Control codes (DTMF)
Send control code
You can, for example, enter control
codes (numbers) for remote access
to an automatic answering machine
while another connection exists.
These entries are transmitted
directly as DTMF codes (control
codes).
J
Enter DTMF control code.
B Send.
Store in contacts
Store phone numbers and control
codes (DTMF codes) in the same
way as a normal entry.
J
0
J
0
J
Press §Save§.
You may also store just the
DTMF codes (numbers) and then
send them during the call.
Enter phone number.
Press until a “+” appears in
the display (wait for the
connection to be
established).
Enter DTMF codes
(numbers).
If necessary, wait again for
3 seconds at a time for the
receiver to process the
entries safely.
Enter a name.
Page 21

20
Text entry
Text entry without T9
Press number key repeatedly until
the required letter appears. After a
brief interval the cursor will advance.
Example:
2
Ä, ä, 1–9 Umlauts and numbers are
Clear
§
1
F I
*
Press briefly once for a,
twice for b etc. The first
letter of a name is
automatically written in
upper case.
displayed after the
relevant letters.
§ Press briefly to delete the
letter before the cursor,
hold down to erase the
whole word.
Press briefly once for a
space.
Use the joystick to guide
the cursor (forwards/back
and up/down).
Press briefly: Swap
between T9Abc, T9abc,
T9
ABC, Abc, abc, ABC, 123.
Status shown in top line of
display.
Correct a word
F
§Clear§ Deletes the letter to the
J
Move letter by letter to the
left/right.
left of the cursor.
Letters are inserted at the
cursor position.
Special characters
0
F I
§Select§ Press or confirm choice by
Hold down (T9 switched
off). The symbols chart is
displayed:
Navigate to the required
symbol.
clicking on the joystick.
Page 22

Text entry
21
Text entry with T9
"T9" deduces the correct word from
the individual key entries by making
comparisons with an extensive dictionary.
T9 menu
CMSettingsMDeviceMT9 input
Select input language
Select the language in which you
want to compose your message.
T9 input language
§Select§ Confirm, the new langua-
Set T9 as standard
The T9 system is set as standard for
text entry.
T9 preferred
§Select§ Confirm.
Briefly activate, deactivate T9
#
Write a word using T9
Since the display changes as you proceed, it is best if you finish a word without looking at the display.
Select.
ge is set.
Select.
Shown in the
display.
Press briefly to activate/
deactivate T9.
Simply press the keys beneath which
the relevant letter is located once
only. For "hotel", for example:
4 6 8 3 5
1
Do not use special characters such as
Ä. Use the standard characters instead, e.g. A; T9 will do the rest for
you.
Additional information
0
E
Correct a word
Press. A blank ends a word.
Set a full stop. A word is
concluded if it is followed by a
space. Within a word, a full
stop represents an apostrophe
or hyphen:
e.g. §provider.s§ = provider’s.
Move to the right. Ends a word.
F Move left or right, word by
word, until the required
word is §highlighted§.
Scroll through the T9 word
suggestions again.
§Clear§ Deletes the character to
the left of the cursor and
displays a new possible
word!
Page 23

22
Text entry
T9 word suggestions
If several options are found in the
dictionary for a key sequence
(a word), the most probable is displayed first. If the word you want has
not been recognised, the next suggestion from T9 may be correct.
The word must be §highlighted§. Then
press:
The displayed word is replaced with a different
wo rd. If t his wor d is als o in correct, press
Repeat until the correct
word is displayed. If the
word is not in the dictionary, write it without T9 or
add it to the dictionary. To
activate:
(Spell) Select.
The last suggestion is deleted and
the word may now be entered without T9 support. Press §Save§ to add it
automatically to the dictionary.
Additional information
Within a "T9 word", individual letters may
not be edited without first removing the T9
status. In most cases it is better to rewrite
the complete word.
T9® Text Input is licensed under one or more of
the following:
U.S. Pat. Nos. 5, 818, 437, 5, 953, 541,
5, 187, 480, 5, 945, 928, and 6, 011, 554;
Canadian Pat. No. 1,331,057;
United Kingdom Pat. No. 2238414B;
Hong Kong Standard Pat. No. HK0940329;
Republic of Singapore Pat. No. 51383;
Euro.Pat. No. 0 842 463 (96927260.8)
DE/DK, FI, FR, IT, NL, PT, ES, SE, GB;
and additional patents are pending worldwide.
Predefined text
Text modules can be stored in the
phone for adding to your SMS messages.
Write text modules
CMMessagesMSMS
MPredefined text
§Edit§ <Empty> Select and save
with §OK§.
J Write text module.
Use text modules
J Write message.
§Options) Open text menu.
H Select text modules.
H Select text module from
the list.
§Select§ Confirm. The text module
§Select§ Confirm. The text module
is displayed.
is inserted in the message
to the right of the cursor.
Page 24

Contacts
23
255 entries with several phone and
fax numbers plus additional address
details. These entries are managed
separately from the entries on the
SIM card. However, you can
exchange data between contacts
and the SIM card.
Open contacts:
CMContacts
SIM entries
Select or edit phone
numbers stored on the SIM
card (p. 25).
Group Entries can be organised
by groups (p. 26).
The list of phone numbers in the
phone memory follows next.
Create new entry
CMContacts
New entry Press.
J
J
Group Open group menu (p. 26).
Always enter phone
number with dialling code.
Enter first and/or last
names.
F Select a group.
Make further entries field by field.
Tel./Office: Post code:
Tel./Mobile: City:
FAX: Country:
Company: URL:
E-mail: Caller pictures
Street: Ringtone
Page 25

24
Contacts
Caller pictures
Assign a picture to a contact. It is
displayed if you are called by the
corresponding phone number.
Ringtone
Assign a specific ringtone to a
contact. It is played if you are called
by the corresponding phone
number.
)Save) Save the entry.
Change entry
Open contacts (in standby mode):
CMContacts
I
§View§ Press.
Select required entry.
I Select input field.
§Edit§ Open entry.
J
§Save§ Save setting.
Make changes.
Call
Open contacts (in standby mode):
CMContacts
I
Select name.
B The number is dialled.
If several phone numbers are stored
for one contact:
I
B
Contacts menu
Different functions are available,
depending on the context:
§Options)
View, Edit, New entry, Delete, Delete all,
Voice dialing (p. 66), Copy entry, SIM
entries, Send SMS, Capacity
Special functions:
Copy entry
SIM entries
Send SMS Use the current entry as
Select phone number.
The number is dialled.
Open menu.
Copy current entry from
contacts to the SIM card.
Access to the phone
numbers stored on the SIM
card. See below.
the recipient for an SMS.
The text entry is opened
(p. 36).
Page 26

Contacts
25
SIM entries
The entries on the SIM card are
managed separately from the
contacts stored in the phone.
However, you can exchange data
between the SIM card and the
contacts.
Own number
Enter own phone numbers
for information.
Entries on SIM card:
Phone No.
Always enter phone
number with dialling code.
Name Enter first and/or last
names.
Record No.
Each entry is automatically
assigned a record number.
Location: SIM
Entries are stored on the
SIM card and so can also be
used on other GSM
phones.
Protected SIM
On special SIM cards,
phone numbers can be
stored in a protected
location. PIN2 is required
for editing.
Activate with the function
Protected SIM only (p. 54).
SIM card options
Special functions:
§Options)
Copy entry
Copy all Copy all entries from the
Contacts Access to the phone
Send SMS Use the current entry as
Open menu.
Copy current entry from
the SIM card to contacts.
SIM card to contacts.
numbers saved in contacts
(phone memory).
the recipient for an SMS.
The text entry is opened
(p. 36).
Call using record no.
Entries on the SIM card may be
dialled in standby mode by entering
the record number.
J
#
B
Enter record number.
Press.
Press.
Page 27

26
Contacts
Group
Five groups are specified in your
phone to enable you to arrange your
contacts clearly.
Display groups
CMContactsMGroup
I
§View§ Display members of the
Add group member
I
New entry Create new entry. Proceed
Or
§Select§ The entry is added to the
Select group. The number
of members in the group is
shown in brackets after
the group name.
group.
Select group and, after
clicking with the joystick,
select members list.
as for contacts.
Select from contacts.
group.
Group options
§Options)§
Edit name, View members, Remove
entries, Group image, Group melody,
SMS to group
Special functions:
Group image
Assign to a group a symbol that
appears on the display when one of
its members calls you.
Group melody
Assign to a group a ringtone that
always rings when one of its
members calls.
SMS to group
Highlight members of the group to
whom an SMS is to be sent.
Open menu.
I Select entry.
§Select§ Highlight entry and select.
§OK§ Confirm, then write
message and send SMS
(p. 36).
Page 28

Records
27
numbers of calls for convenient
redialling.
CMCall registerMRecords
I Select record.
§Select§ Press.
I Select phone number.
B Dial phone number.
Or
(View) Display information on the
phone number.
Missed calls
The phone numbers of calls that you
have received but not answered are
stored for call back purposes.
Icon for missed call (in
standby mode). When you
press the right soft key, the
phone number is
displayed.
Requirement: The network supports
the "Caller Identity" feature.
Calls dialled
Access to the last numbers dialled.
B
Fast access in standby
mode.
Records menu
§Options)
The records menu can be called up if
an entry is highlighted.
§Options)
View, Correct number., Copy to, Delete,
Delete all
Special functions:
Correct number.
Copy to Store entry on SIM (see
Additional information
When copying to the SIM card a new entry
can be created with the phone number or
an existing entry can be corrected. Once
the input field has been selected, the phone
number is transferred to the entry with
§Insert§.
Open menu.
Open menu.
Load number into display
and edit it there if
necessary before dialling.
also below).
Calls received
Received calls are listed.
Page 29

28
Time/Charge
You can display charge details and
the duration of different types of
calls while you speak, as well as
setting a unit limit for outgoing calls.
Display
I
§Select§ Display data.
Once displayed you can:
§Reset§ Reset display.
§OK§ End display.
Select type of call:
Last call
All calls
Remain. units
Incoming calls
Outgoing calls
Charge settings
CMCall registerMCharge settings
Currency
(PIN2 required)
Enter the currency in which the
charge details are to be shown.
L
Cost/unit
(PIN2 required)
Enter the charges per unit/period.
Credit limit
(PIN2 required)
Special SIM cards allow you or the
service provider to define a credit or
a period after which the phone is
barred for outgoing calls.
§Edit§ Press, enter PIN2.
Credit limit
J
§OK§ Confirm.
Then confirm the credit or reset the
counter. The status display for
prepaid cards may vary, depending
on the service provider.
Switch on.
Enter number of units.
L
L
Auto display
Call duration and call charges are
automatically displayed for each call.
Page 30

Camera
29
take photos and send them via the
Multimedia Messaging Service or as
an attachment to an e-mail.
The photos are stored in JPEG format
in the phone and can be displayed
using most picture viewing
programs.
Take photos
First the camera must be activated.
CMCameraMActivate
The actual picture composition is
shown in the display.
The following functions are
available:
G H
D E
C
§Yes§ Press to save the photo in
Zoom in/out.
Adjust exposure.
Press. The photo is stored
temporarily.
the photo album. Each
photo is saved under a
sequence number and
dated.
Page 31

30
Camera
Once the photo has been saved you
are immediately offered the
following options:
View finder
Send via MMS,
Send via Email
Set to wallpaper
Go to my photos
Additional information
When you take a photo the settings are not
stored permanently.
0 Status display with information
Activate the display for a
new picture.
Send the photos as an
MMS or as an e-mail
attachment.
Use the photo as a
background image.
Open the photo album.
on zoom, brightness, quality,
colours, highest mode, and
resolution. Press the # key
to display the settings and
change them by pressing the
relevant digits.
My photos
CMCameraMMy photos
All saved photos are available in the
photo album.
Display photo.
I
§Options)
View Select.
You have the following options in
display mode:
§Options)
Zoom in/Zoom out, Previous, Next,
Delete, Info, Set to wallpaper
I
My photos options
Depending on the actual situation,
different functions will be displayed.
§Options)
View, Send via MMS, Send via Email, Set
to wallpaper, Create new album, Cut,
Copy, Delete, Delete all, Rename, Info,
Copy to
Select required photo. The
current photo is shown as
a small picture at the
bottom of the display.
Open menu.
Open menu.
Scroll between the photos
in the photo album.
Open menu.
Page 32

Camera
31
Special functions:
Create new album
Create a new album, give it
a name and protect its
access with a password.
Copy, Cut, Paste
Cut/copy pictures from an
album and paste into
another album.
Copy to Use picture as a
background image
(wallpaper) or for
identifying a caller (p. 24).
Settings
Resolution
You can set the picture resolution
(in dpi) for external use (e.g., on a
PC) regardless of what is shown in
the display (always 118x126).
• 160X120
• 320X240
• 640X480
Please note that higher resolution
requires more memory.
Quality
Set the quality (High, Medium, Low)
when taking a photograph. A higher
rate means you can take fewer
pictures but of better quality.
Brightness
F Set display brightness.
Special effects
You can take photos with a colour
tint:
Normal, Mono, Sepia, Bluish
F Change the setting and
confirm with §Select§.
Nightshot
Increase the exposure time in poor
light conditions. Please note that if
the camera or object you are
photographing move, the picture
will be blurred.
Page 33

32
Surf & Fun
Internet (WAP)
Get the latest information from the
Internet that is specifically adapted
to the display options of your phone.
Clicking on the Internet symbol in
the main menu takes you directly to
the pre-set start page.
CMSurf & FunMHomepage
The browser is activated as soon as
you call up the function. The
functions of the soft keys vary,
depending on the internet page, for
example "link" or "menu". The
contents of the option menus are
also variable.
Browser menu.
Click upwards to highlight
the browser menu and
confirm with .
Home
Favorites
Reload
The first WAP Internet
page displayed after the
connection has been
established (possibly
determined/preset by the
provider).
Up to 50 URLs stored in the
phone for fast access.
Reload page.
Go to ...
Show URL
Exit Close browser and clear
Advanced ... Inbox
Enter URL to access WAP
page directly, e.g.
wap.my-siemens.com
Select from list of most
recently visited WAP
addresses.
Shows the URL for the
current page.
down connection.
WAP push messages are
stored here (depending on
provider).
Restart Browser
About
Information about the WAP
browser used plus security
information.
End connection
A
Hold down to clear down
the connection and close
the browser.
Page 34

Surf & Fun
33
Settings
MSurf & Fun MSelect a
C
function.
Homepage
Select the homepage set. See also
below: Set WAP profiles.
Favourites
A list of 15 URLs stored in the phone
for fast access.
Start Start selection and visit
§Options)
Edit Change entry or create a
Delete Delete entry.
Delete all Delete all positions.
WAP proflies
Preparation of the phone for WAP Internet access depends on the current
service provider:
• The settings have already been
• Access profiles for a number of
URL.
Open menu.
new entry.
made. You can start immediately.
providers have already been set.
Then select and activate profile.
• The access profile must be set
manually.
If necessary, check with your service
provider for details.
Activate WAP profile
You can change the current profile
each time you access the Internet.
I
§Activate§ Activate. The current profi-
Set WAP profiles
Up to 5 WAP profiles can be set (if
not barred by provider). The entries
may vary depending on the service
provider:
Select profile.
le is selected.
I Select profile.
§Edit§ Open to make settings.
Profile name
IP address
IP port Enter port number.
Homepage
Enter/change name.
Enter IP address.
Enter homepage, if not set
by the service provider.
Page 35

34
Surf & Fun
Linger time
Select mode
CSD settings
GPRS settings
Time in seconds after
which a connection should
be ended if no input or
data exchange takes place.
Connect using GPRS or
CSD.
Select or set access profile
via CSD
Select or set access profile
via GPRS
WAP Push Setting
Switch on / Switch off
Servicecentre only
You can activate or deactivate the receipt of messages from you provider.
You will receive only WAP
push messages from a previously defined service
centre.
Page 36

Downloads
35
the folders for the different items
that can be downloaded such as
pictures, sounds and games.
MDownloads
C
Various different items are already
located in each folder. Select the
folder you require:
Sounds
Pictures
Wallpaper
§Select§ The folder is opened and
I
§Select§ The picture is shown or the
the contents shown as a
list.
Select the item you
require.
sound played or else the
game is started.
Download more
At the beginning of each file you will
find the direct number for
downloading additional items.
Download more
Select.
C Press.
Download options
§Options)
Different functions are available,
depending on the folder selected.
View, Send via MMS, Send via Email, Set
to wallpaper, Create new album, Cut,
Copy, Delete, Delete all, Rename, Info,
Copy to, Change password, Detail
Special functions:
Create new album
Create a new album (folder) for
downloaded items. You can protect
a new album with a password.
Change password
Change the password for an album.
Open menu.
Page 37

36
SMS
long text messages (up to 1600 characters) on your phone. They are automatically composed of up to 10
"normal" SMS messages (note higher
charges).
Additionally you can insert pictures
and sounds in an SMS.
Depending on the service provider,
e-mails and faxes can also be sent
and e-mails received via SMS
(change setting if necessary, p. 40).
Writing and sending text
Messages (SMS)
MMessagesMSMS
C
MNew SMS
J
Text input using "T9" (p. 21)
allows you to create longer
messages very quickly
using just a few key strokes.
§Clear§ Press briefly to delete
letter by letter, hold down
to delete an entire word.
§Options)
Send message
§OK§ Confirm. Send the SMS to
Display in the uppermost line:
abc/Abc/
ABC/123
New SMS
150
Additional information
SMS profiles...................................... p. 40
Message type, Validity period,
Service centre may be requested... p. 40
Enter special characters ....................p. 20
Open menu.
Select.
/
Enter phone number or se-
J
lect from contacts.
the service centre for
transmission. The sent
SMS is saved in the Outbox
list.
T9 active.
Switch between upper-case/
lower-case letters and digits.
Display title.
Characters still available.
Page 38

SMS
37
Text menu
§Options)
Send message, Store message, Message
size, Text format, Add pic.&sound, Delete
all, Predefined text, Add ph.number
Special functions:
Text format
Add pic.&sound
Predefined text
Add ph.number
Open menu.
Comprises the following
functions for formatting
text:
Font color
Background color
Font size
Bold
Underline
Italic
StrikeThrough
Alignment
Line feed
See below.
Use text blocks (p. 22).
Add a phone number from
contacts.
Add pic.&sound
Insert pictures and sounds into message.
J
§Options) Open text menu at the end
Add pic.&sound
§Select§ Press. The first entry of the
Write message.
of a word.
Select a section from the
following menu:
Pre. animation
Pre. sound
Own animation
Own Pic
Own sound
selected section is displayed.
I Select entry.
§Select§ The selection is added to
the SMS.
Page 39

38
SMS
Additional information
Pictures and sounds can only be played
back if the destination phone supports the
EMS standard.
In input mode, a wildcard (musical note) is
shown when a melody is selected.
SMS to group
You can send an SMS message as a
"circular" to a recipient group. See contacts
p. 26.
SMS status report
If the message cannot be transmitted to the
service centre you are offered the chance
to repeat the transmission. If this also fails,
contact your service provider.
The Delivered message only indicates
transmission to the service centre. This will
then attempt to relay the message within a
certain period.
See also Validity period, p. 40.
SMS push
This function allows you to dial an Internet
address (URL) directly from a received
SMS. Once marked, the highlighted URL is
displayed. Pressing the Call key dials the
highlighted Internet address.
Read new SMS
Arrival of a new SMS announced on display.
>
To read the SMS, press the
right soft key below the
letter symbol.
Lists
All SMS messages are archived in
four different lists, according to their
status.
CMMessagesMSMS
MSelect list.
Inbox
The list of received SMS messages is
displayed.
New, unread messages.
Read messages.
Draft
The list of the SMS messages not yet
completely transmitted is displayed.
Transmission can be restarted.
Outbox
The list of sent SMS messages is displayed.
Page 40

SMS
39
SMS archive
The list of text messages stored in
the phone is displayed.
Messages in the archive.
Read options
Each list offers different functions as
applicable.
I
(Read) Display SMS.
(Options) Open menu and select the
Detail, Reply, Forward, Edit, Delete,
Delete all, Extract number, Move to
archive, Extract media, Extract URL
Special functions:
Delete Deletes selected SMS.
Reply Create New.
Forward Forward text message.
Edit Edit text message.
Select required SMS.
function you require:
Edit Edit received SMS.
Answer is yes/Answer is
no Answer with yes or no
only.
Detail Shows date/time plus
Delete all Deletes all the text mes-
Move to archive
Additional information
Ringtones, logos ...
You can receive links for downloading
ringtones, logos, screensavers, animations
and information about applications with
an SMS. Please highlight this link and, by
pressing the Call key
download.
Please check that the dial-in access (p. 54)
is configured.
recipient/sender.
sages in this list.
Move SMS message to archive.
Message memory full. Delete
SMS messages you no longer
require or move them to the
archive.
, start the
B
Page 41

40
SMS
SMS setup
C MMessagesMSMS
MSMS setup
Up to 5 SMS profiles can be set. The
transmission characteristics of an
SMS are defined in these. The presetting depends on the SIM card inserted.
Activate the preselected profile
I Select profile.
§Activate§ Press to activate profile.
Set/change profile
I Select profile.
§Options§ Open menu.
Edit Select.
Service centre
Enter or edit the service centre phone numbers (you can obtain this information from your service provider).
Message type
Manual
The message type is
requested for each
message.
Normal text
Normal SMS message
(standard setting).
Transmit to other services
via SMS:
Fax, Voicemail, ERMES,
Paging, X.400, Internet
Validity period
Select the period in which the service centre is to try to deliver the
message:
1 day
2 days
1 week
4 weeks
6 months
Status report
You will receive confirmation as to
whether a message has been delivered successfully or not. This service may be subject to a charge.
Direct reply
The reply to your SMS message is
handled via your service centre
when Direct Answer is activated (for
information please contact your service provider).
SMS via GPRS
Send SMS automatically by GPRS
(if available). Requirement: GPRS is
activated. Ensure that your service
provider offers this function.
L
L
L
Page 42

MMS
enables you to send texts, pictures
(also photos) and sounds in a combined message to another mobile phone or to an e-mail address.
Depending on your phone's settings,
you will either receive the complete
message automatically or be notified
that an MMS has been saved in the
network, giving sender and size details. You may then download it to
your phone to read it.
Ask your service provider whether
this service is available. You may
need to register for this service separately.
Writing/sending MMS
Messages
An MMS consists of the address header and the content.
An MMS message can consist of a series of pages, each one of which may
include a combination of text,
sounds and pictures.
Texts can be written with the help of
T9 (p. 21).
41
Pictures and graphics can be created
using the integrated digital camera
or selected from the standard
animations and inserted into an
MMS.
C MMessagesMMMS
MNew MMS
(Insert) Press.
Picture
Insert a picture. The picture list is
opened for selection.
Text modules
Write a text with the help of T9.
Photo
Select from the photo album and
insert.
Text modules
The list of text modules is opened for
selection.
Sound
Add a sound.
Ringtone
Add a ringtone.
Insert wallpaper
The list of background images (wallpapers) is opened for selection.
Insert page
A new page is added to the MMS.
Page 43

42
MMS
Display time
Set duration of display for individual
pages (1 seconds to 33 seconds).
Options for writing MMS
messages
(Options) Open menu.
Send MMS
Enter recipient details:
To: Phone number/e-mail
address of recipient.
Subject: Enter MMS heading (up to
40 characters).
Cc: E-mail address for the copy
recipient.
Bcc: E-mail address for blind
copy recipients (the
other recipients are not
shown the Bcc recipient).
Store MMS
Stores the MMS as a draft.
Delete items
Delete an item on a page, e.g.,
apicture.
Info
Information about the size of the
message.
Preview page, Preview MMS
Play back page/whole MMS in the
display. Use any key to cancel.
Receive MMS
Arrival of new MMS
announced on display.
>
Receive according to setting:
• complete MMS,
• notification only. To receive the
Press the right soft key to
read the MMS or notification.
complete MMS, press §View§.
Lists
All MMS messages are saved in four
different lists:
CMMessagesMMMS
MSelect list.
Inbox
The list of MMS messages and notifications received is displayed.
§View§ Automatic presentation of
I
J
A End playback.
the MMS. Use any key to
cancel.
Scroll page by page with
the control key.
Call up individual pages
directly by number key.
Page 44

MMS
43
Draft
The list of the MMS messages not yet
completely transmitted is displayed.
Transmission can be restarted.
Outbox
The list of sent MMS messages is
displayed.
List options
The following functions are available
depending on the list selected:
§Options§ Open menu.
Reply, Reply all, Forward, Call, Delete,
Info, Extract, View again
Special functions:
Extract
Pictures Save picture as a screensa-
ver.
Sounds Save sound as a ringtone.
MMS setup
CMMessages
MMMSMMMS setup
I
Validity
Select the period in which the service centre is to try to deliver the
message. Choose between:
1 day
2 days
1 week
4 weeks
Maximum*
* Maximum period that the service provider
permits.
Delivery report
Request delivery confirmation for
sent messages.
MMS retrieve
Choose between Auto download,
Deferred retrieve for an SMS, or reject
reception.
Allow info receiving
Only the notification is received.
Allow Spam
Permit reception of advertising SMS
(SPAM).
Select a function.
 Loading...