

Siemens SiPass Entro, Bewator Entro Configuration Manual

SiPass Entro / Bewator Entro
InfoPoint Terminal
Configuration Manual
Version 6.5
Building Technologies
Fire Safety & Security Products

Liefermöglichkeiten und technische Änderungen vorbehalten.
Data and design subject to change without notice. / Supply subject to availability.
Sous réserve de modifications techniques et de la disponibilité.
Data och konstruktion kan komma att ändras utan föregående meddelande. / Leverans i mån av tillgång.
© 2009 Copyright by Siemens Building Technologies, Fire & Security Products GmbH & Co. oHG
Wir behalten uns alle Rechte an diesem Dokument und an dem in ihm dargestellten Gegenstand vor. Der Empfänger erkennt diese Rechte
an und wird dieses Dokument nicht ohne unsere vorgängige schriftliche Ermächtigung ganz oder teilweise Dritten zugänglich machen oder
außerhalb des Zweckes verwenden, zu dem es ihm übergeben worden ist.
We reserve all rights in this document and in the subject thereof. By acceptance of the document the recipient acknowledges these rights
and undertakes not to publish the document nor the subject thereof in full or in part, nor to make them available to any third party without our
prior express written authorization, nor to use it for any purpose other than for which it was delivered to him.
Nous nous réservons tous les droits sur ce document, ainsi que sur l'objet y figurant. La partie recevant ce document reconnaît ces droits et
elle s'engage à ne pas le rendre accessible à des tiers, même partiellement, sans notre autorisation écrite préalable et à ne pas l'employer
à des fins autres que celles pour lesquelles il lui a été remis.
Alla rättigheter till detta dokument och till föremålet för det förbehålles. Genom att acceptera dokumentet erkänner mottagaren dessa
rättigheter och förbinder sig att inte publicera dokumentet, eller föremålet därför, helt eller delvis, och att inte göra dem tillgängliga för tredje
part utan skriftligt tillstånd från oss, och att inte använda dem för något annat syfte än det för vilket de levererats.

Contents (English)
1 Introduction .............................................................................................7
1.1 What is InfoPoint?.....................................................................................7
1.2 What equipment is needed? .....................................................................7
1.3 InfoPoint for Entro .....................................................................................8
2 The front panel ........................................................................................9
3 Installation .............................................................................................10
3.1 Mechanical installation............................................................................10
3.2 Electrical installation ...............................................................................10
3.2.1 Power supply...........................................................................................11
3.2.2 Installation...............................................................................................11
4 Set-up .....................................................................................................12
4.1 Factory settings – and to reset................................................................12
4.2 Restart of InfoPoint .................................................................................13
4.3 Updating firmware...................................................................................13
4.4 Change settings ......................................................................................13
4.5 Entering characters.................................................................................14
5 Technical data .......................................................................................15
Inhalt (Deutsch)
6 Einleitung...............................................................................................16
6.1 Was ist InfoPoint? ...................................................................................16
6.2 Erforderliche Ausrüstung ........................................................................16
6.3 InfoPoint für Entro ...................................................................................17
7 Frontseite...............................................................................................18
8 Installation .............................................................................................19
8.1 Mechanische Installation.........................................................................19
8.2 Elektrische Installation ............................................................................19
8.2.1 Stromversorgung.....................................................................................20
8.2.2 Anschluss................................................................................................20
9 Inbetriebnahme .....................................................................................21
9.1 Werkseitige Voreinstellungen und Reset................................................21
9.2 InfoPoint neu starten...............................................................................22
9.3 Softwareaktualisierung............................................................................22
9.4 Einstellungen ändern ..............................................................................22
10 Zeichen eingeben..................................................................................23
11 Technische Daten .................................................................................24
Building Technologies
Fire Safety & Security Products 06.2009
3

Table des matières (Français)
12 Introduction ...........................................................................................25
12.1 Qu’est-ce que l’InfoPoint ?......................................................................25
12.2 Équipement requis ..................................................................................25
13 InfoPoint pour Entro .............................................................................26
14 Face avant..............................................................................................27
15 Installation .............................................................................................28
15.1 Installation mécanique ............................................................................28
15.2 Installation électrique ..............................................................................28
15.2.1 Alimentation.............................................................................................29
15.2.2 Installation ...............................................................................................29
16 Paramétrage ..........................................................................................30
16.1 Redémarrage d’InfoPoint ........................................................................31
16.2 Mise à jour du logiciel..............................................................................31
16.3 Modification des paramètres...................................................................31
16.4 Saisie de texte.........................................................................................32
17 Caractéristiques techniques................................................................33
Innehåll (Svenska)
18 Introduktion ...........................................................................................34
18.1 Vad är InfoPoint? ....................................................................................34
18.2 Vilken utrustning behövs?.......................................................................34
18.3 InfoPoint till Entro ....................................................................................35
19 Frontpanelen .........................................................................................36
20 Installation .............................................................................................37
20.1 Mekanisk installation ...............................................................................37
20.2 Elektrisk installation.................................................................................37
20.2.1 Strömförsörjning......................................................................................38
20.2.2 Inkoppling................................................................................................38
21 Driftsättning...........................................................................................39
21.1 Grundinställningar – och återställning till dessa......................................39
21.2 Omstart av InfoPoint ...............................................................................40
21.3 Uppdatering av programvara ..................................................................40
21.4 Ändra inställningar ..................................................................................40
21.5 Teckeninmatning.....................................................................................41
22 Tekniska data ........................................................................................42
4
Building Technologies
Fire Safety & Security Products 06.2009

Building Technologies
Fire Safety & Security Products 06.2009
5


1 Introduction
This document is valid for both the Siemens and the Bewator branded products.
This manual describes how to install and set up the InfoPoint terminal. The product
is intended for use in reservation applications running within the Entro Access Control system. The unit is usually placed close to where it will reserve times e.g. a
conference room or a laundry room.
Note that the InfoPoint can exist in applications where ordinary PCs are also used
for similar functions.
1.1 What is InfoPoint?
The InfoPoint is a complete, intelligent TCP/IP-based terminal, which is similar to a
web browser in a PC.
Introduction
The terminal consists of a colour screen and navigation keys.
The InfoPoint has a proximity reader for identifying the user and has the ability to
send and receive information to and from a web server in much the same way as
you can with a newspaper web site.
Available functions and commands are software controlled by the host system.
1.2 What equipment is needed?
The InfoPoint is intended for integration within a system such as, for example, a
reservation system. InfoPoint requires a LAN connection and must have its own IPaddress. Furthermore the InfoPoint must be able to communicate with a web
server such as the Entro SR35i Segment Controller equipped with a CF8 memory
flash card.
Note that the InfoPoint can also operate with the older SR32i Segment Controller
but requires an upgrade of Entro software to version 4.7.
System Power supplies can be located centrally or locally to field hardware depending upon individual installation considerations.
The system requires the use of proximity cards or tags.
Building Technologies
Fire Safety & Security Products 06.2009
7
Introduction
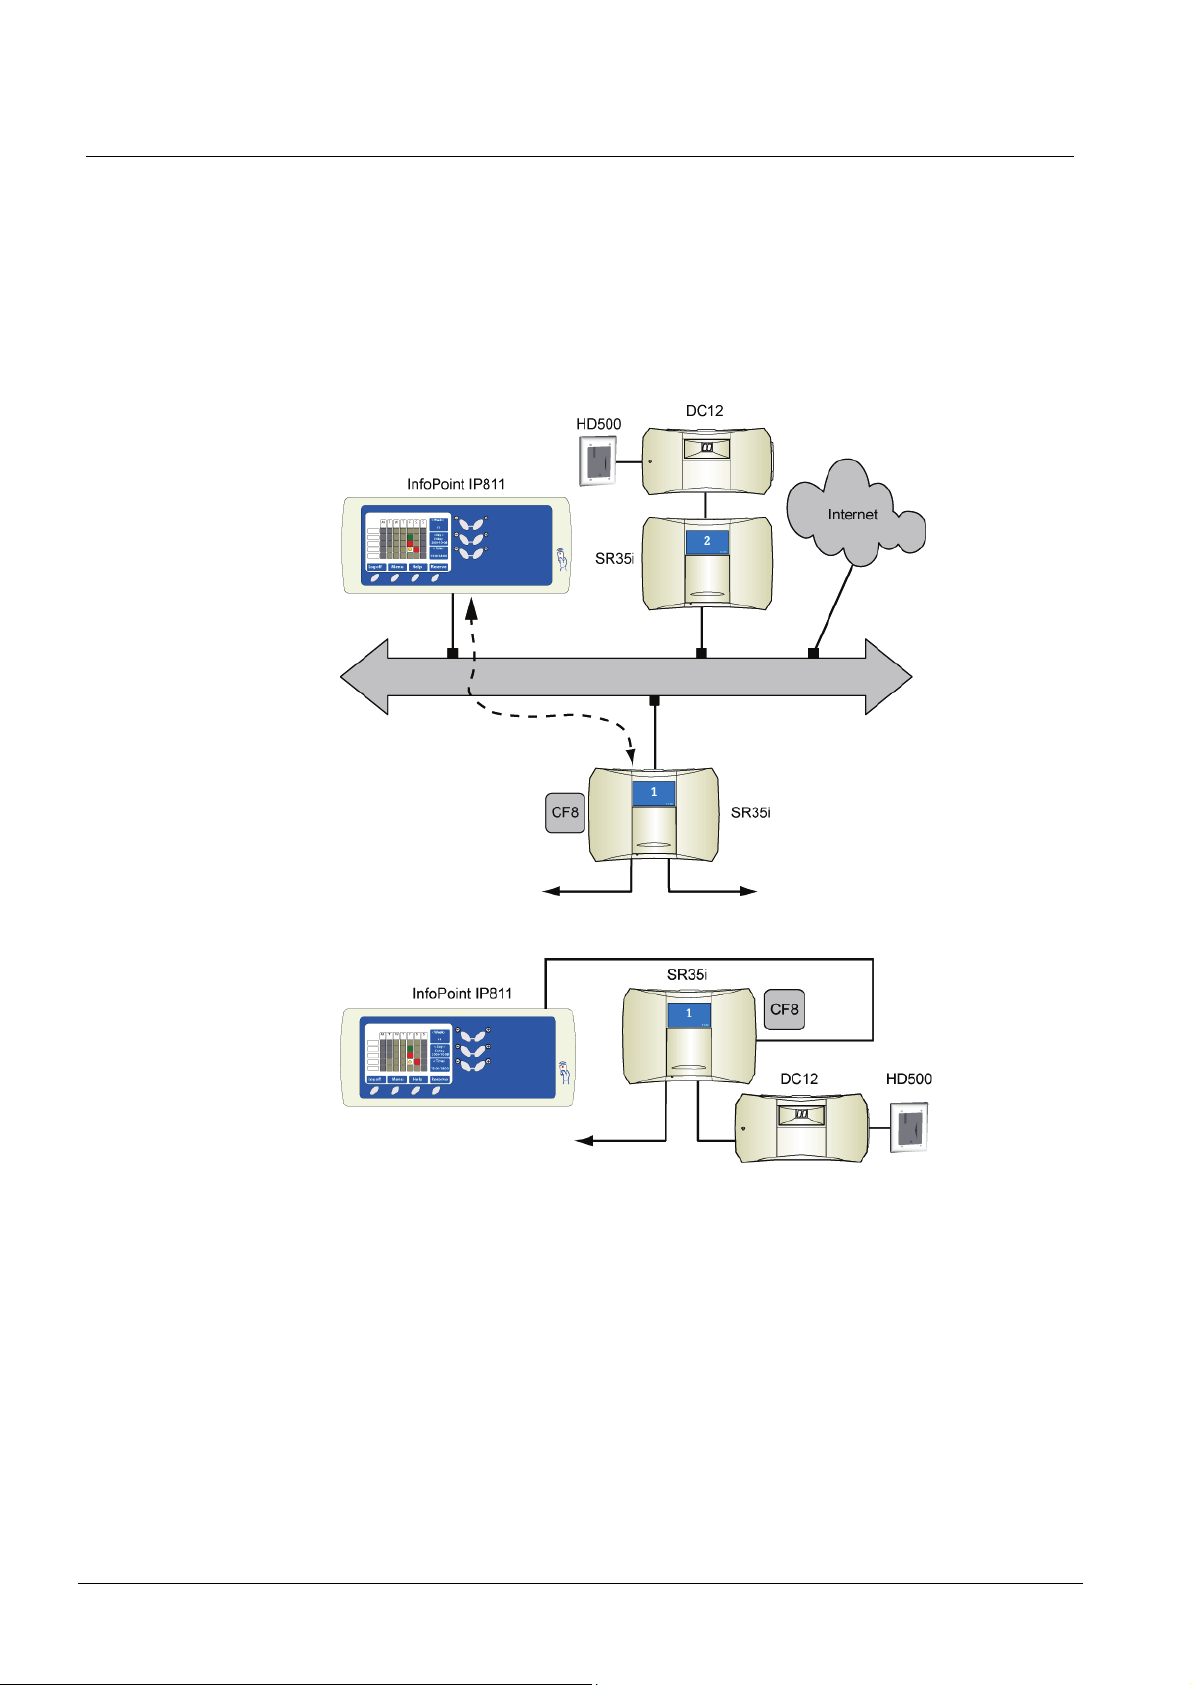
InfoPoint for Entro
The SR35i Segment Controller acts as a web server for the InfoPoint. The SR35i
(or the older SR32i) must contain a CF8 memory flash card to store the information
(web pages), which would be displayed on the InfoPoint. It is important that the Entro system is set up with the appropriate information regarding reservation objects
and functions.
The InfoPoint can be used together with any element within the system, but in
practice it is most often used for the system component nearest to where it is
mounted.
Fig. 1 InfoPoint in Local Area Network and Internet
Fig. 2 InfoPoint directly connected to SR35i
In the above example the InfoPoint is used to reserve, cancel or control time intervals. The information is sent to the Access Control system which stores the time intervals etc. The user presents his/her card and can gain access to the reserved
door.
8
Building Technologies
Fire Safety & Security Products 06.2009
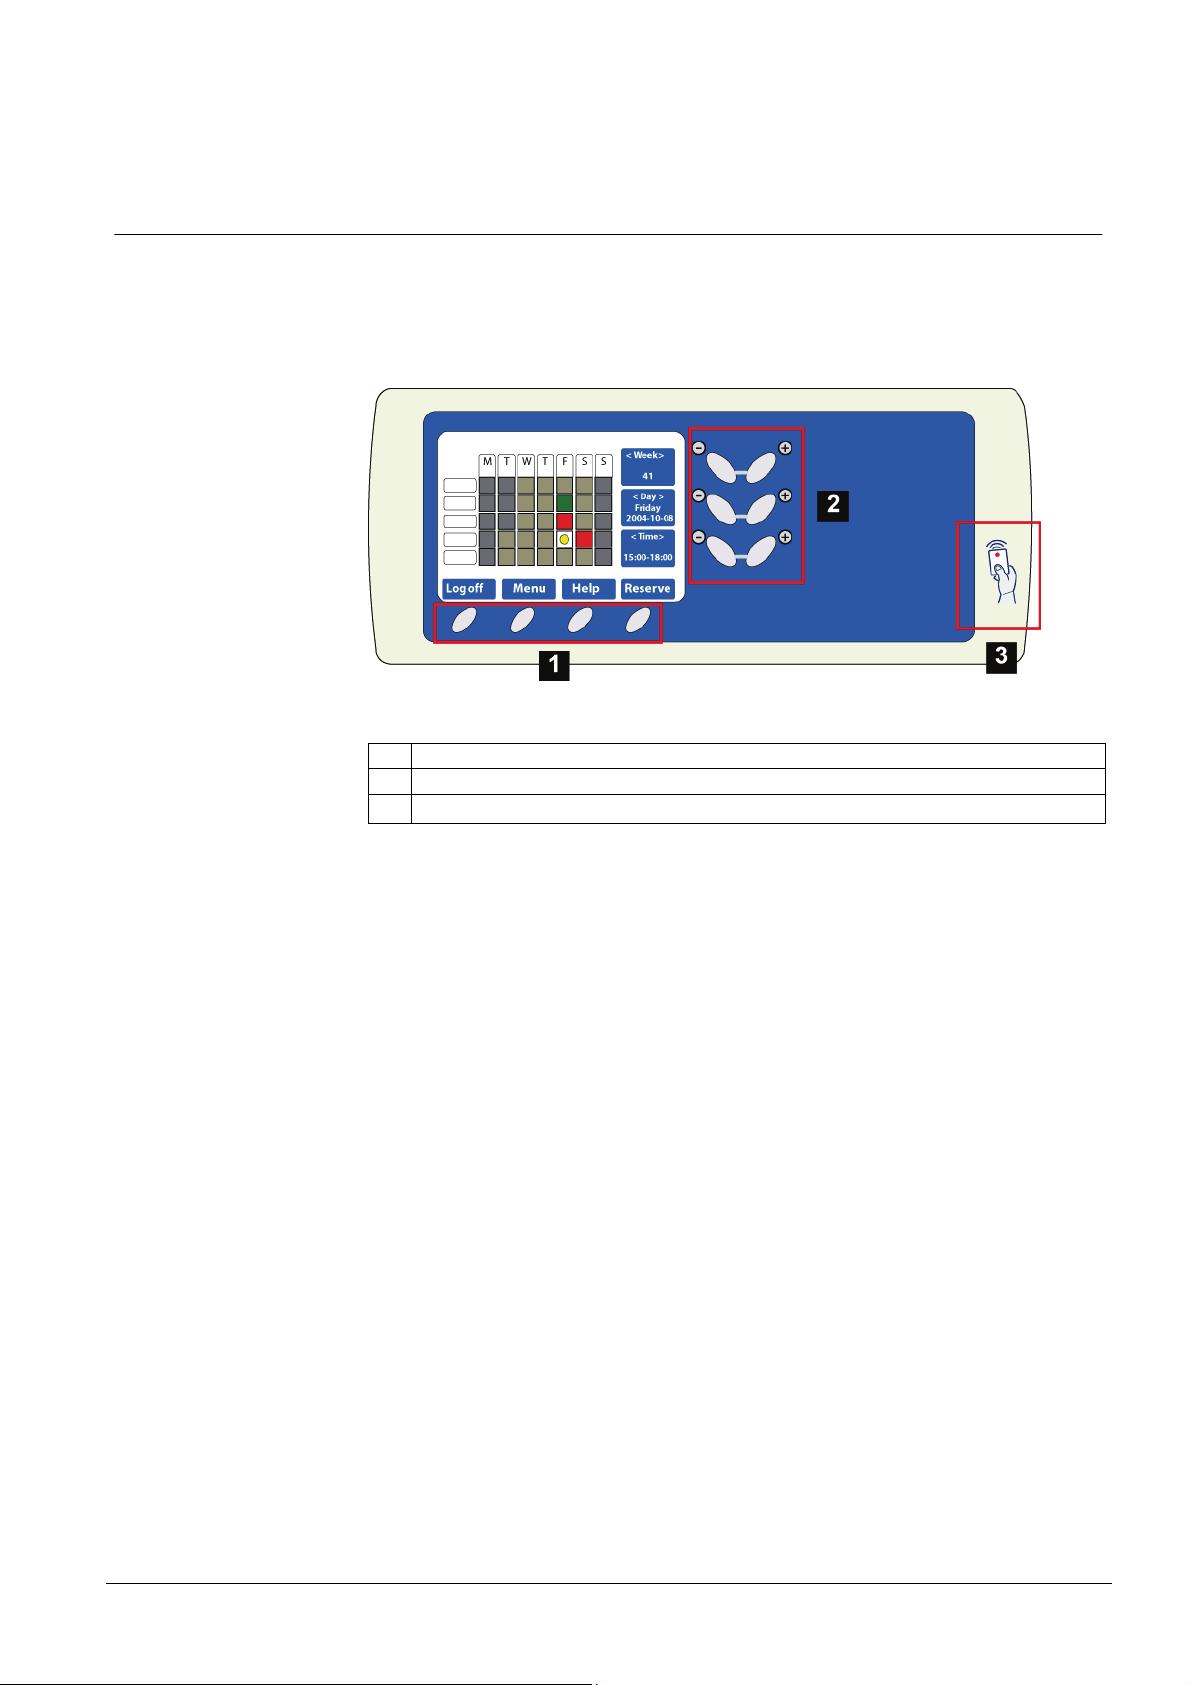
2 The front panel
The InfoPoint consists of a colour screen, navigation keys and an integrated software function for entering characters and digits (used for certain settings).
The InfoPoint has an integrated proximity reader.
The front panel
Fig. 3 Front panel
1. Function keys for commands
2. Keys for navigating
3. Embedded proximity reader
Building Technologies
Fire Safety & Security Products 06.2009
9

Installation
3 Installation
The InfoPoint unit has all the connections at the rear and in normal circumstances
you should never need to open the unit.
3.1 Mechanical installation
The InfoPoint can be either surface-mounted or flush-mounted (in a flush-mounting
box BB7 ordered separately). Recommended height may be 140-150 cm. To cater
for disabled persons a suitable height is approximately 90-100 cm.
The InfoPoint is supplied with a wall mount kit as standard. It includes e.g. four
screws of type SecuFast Resitorx 3.5mm to fix the IP811. Please ensure you have
the necessary tools available.
Whether you intend to flush-mount it or not – remember that the cable hole must
allow sufficient clearance for the TCP/IP RJ45-connector. Alternatively the connector may be mounted on the free end of a Cat-5 cable.
It is important that the InfoPoint is mounted in such a way that light sources are not
reflected in the screen and the viewing angle is optimised for the user.
Mark the position and test mount the unit, but wait with the final mount, until you
have carried on with the further installation and set-up.
Remember that the terminal has an integrated proximity reader and considerations must be taken for electrical noise and disturbances.
3.2 Electrical installation
The terminal normally only has two connectors – one for the network and one for
the power supply.
The LAN connection (10BaseT) is made through a standard Cat-5 cable to a local
(or global) network with 10Mbit/s.
10
Building Technologies
Fire Safety & Security Products 06.2009
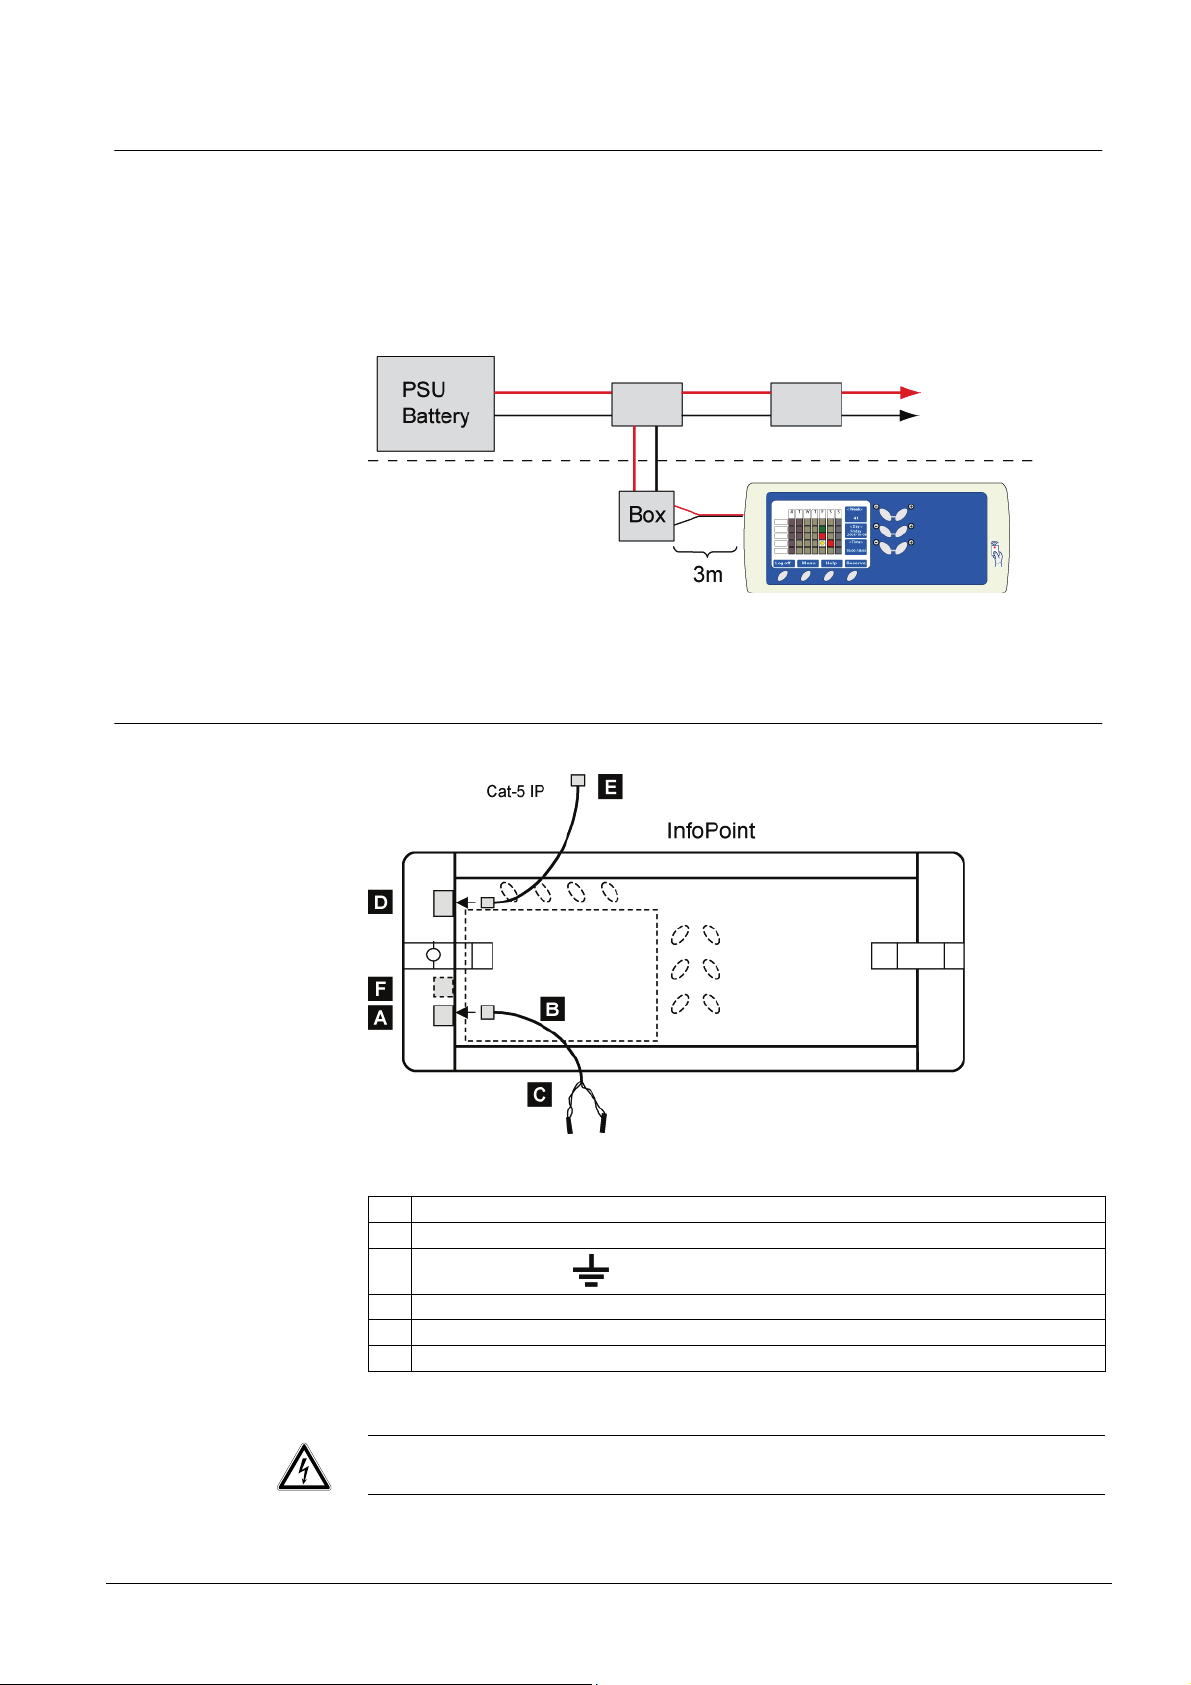
3.2.1 Power supply
The power supply is connected via a special modular connector and cable assembly. This has a free end with connections for plus (+) and minus (-) for connection
to a suitable power source.
We recommend that the InfoPoint be powered from a battery-backed power supply
(in the access control system) via a junction box connected to the door controller.
If a local power supply is to be used, we recommend a PSU with filtered DC output
(12 or 24V DC).
Installation
3.2.2 Installation
Fig. 4 Rear view of InfoPoint
A Power supply input (modular type connector).
B Supplied cable with modular type connector and with a free end. Length 3 metres.
C
Polarity
D Standard TCP/IP LAN connection, 10BaseT connector. Type RJ45.
E Standard Cat-5 cable for LAN connection
F Reserved for external unit.
+ = 24V, = 0V.
WARNING
The unit includes high-voltage driven components.
11
Building Technologies
Fire Safety & Security Products 06.2009

Set-up
4 Set-up
The InfoPoint has integrated software for browsing the reservation functions in the
Segment Controller. It needs only to be set-up with the IP-address for the SR35i
Segment Controller in order to gain access to these functions.
In addition, the factory settings listed in the table on the next page will be used by
default. However, these parameters must be decided together with the IT-manager
and must be coordinated with the overall host computer network.
If there is a DHCP server (Dynamic Host Configuration Protocol) available in the
network, the InfoPoint networking parameters (such as IP address, Netmask and
Gateway) could be configured automatically. (This requires that the parameter
DHCP be set to YES).
4.1 Factory settings – and to reset
The first time you power up the InfoPoint, it has some factory set parameters according to the table below. To edit any of these - see Change settings.
To reset the factory settings:
1. Disconnect the power supply – or restart.
2. Press and hold the marked button (see figure). Hold it down until you hear
three beeps. z
3. Using the minus button furthest down, go down to the Factory settings and
press YES.
4. A warning message is displayed and you have to choose whether to proceed
(YES) - or not (NO).
Factory settings:
DHCP (NO or YES) ÆNO
- DHCP NO Æ Own IP address: 10.1.200.200 For InfoPoint
- DHCP NO Æ Netmask: 255.255.255.0 For InfoPoint
- DHCP NO Æ Gateway: 10.1.200.1 For InfoPoint
DNS Server 1 0.0.0.0 Name Server
DNS Server 2 0.0.0.0 Name Server
Server IP-address 10.1.200.101 IP-address for SR35i. Do not
Server Path /infopoint/ Search path to the CF8 memory
Start page index.iml Start page SR35i
DynDNS Server members.dyndns.org DHCP function
DynDNS Username <empty> DHCP function
DynDNS Password <empty> DHCP function
DynDNS Hostname <empty> DHCP function
enter a dot after the last digit!
If using names instead, the IP for
the DNS above must be set.
card of the SR35i.
12
Building Technologies
Fire Safety & Security Products 06.2009

4.2 Restart of InfoPoint
If you need to restart the InfoPoint you do this by simultaneously pressing the three
keys shown in the figure (compare to Ctrl Alt Del in a PC).
Note that no parameters are changed – only a restart takes place in the same way
as you connect the power.
4.3 Updating firmware
If the Entro system offers a new firmware version for the InfoPoint you can
download this (from the SR35i) with a special command. The file is stored on the
CF8 card and the InfoPoint will check if it is a recent version. (If it is older it will not
be downloaded).
Remember that all address settings (such as IP, Server IP, Netmask etc) must be
correct in order for the download to take place. If Reservation has been working
before, the settings should of course be correct.
Set-up
You start the download by restarting (see above) and then press and hold down
the key furthest to the right. z
A message will be shown when downloading starts.
4.4 Change settings
If any parameters need to be changed (e g the IP-address) – proceed as follows:
1. Disconnect the power supply – or reboot and hold the marked button (see figure) to the right until you hear three beeps. z
2. Actual settings are displayed on the screen. There are two pages with settings
and you will see the next one by pressing “Next Page”.
3. Edit necessary changes accordingly.
4. Save by pressing the function button Save and Exit (or abort by pressing
Cancel). z
13
Building Technologies
Fire Safety & Security Products 06.2009
Set-up
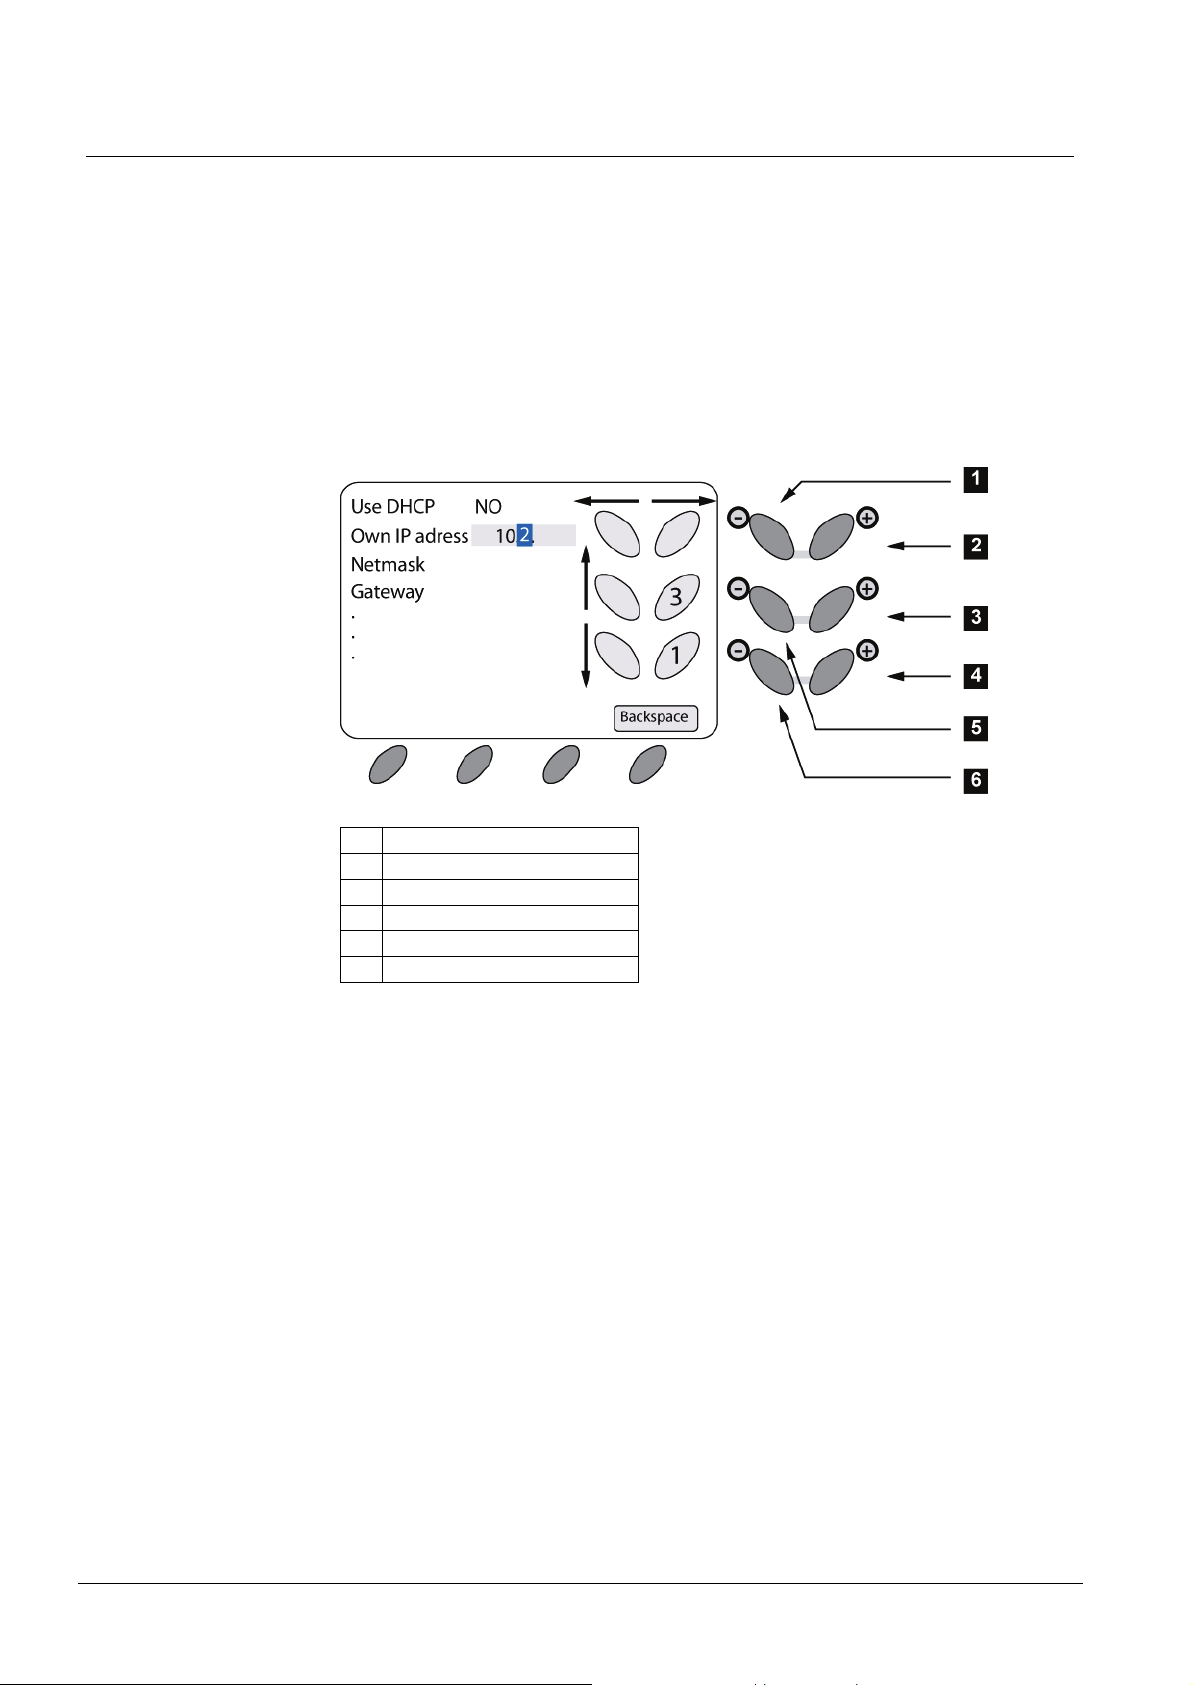
4.5 Entering characters
Several parameters allow/require that both digits and letters can be entered when
setting up the InfoPoint. The buttons to the right of the screen are used for navigating the cursor as well as choosing the character.
The “minus” buttons furthest to the left navigate up/down amongst the parameters
and the top “plus/minus” buttons move the cursor left/right. The “Backspace” button
erases one character and moves the cursor left.
When the cursor is in the correct position the “plus” buttons to the right are used for
scrolling through the character set. The current character is shown in the cursor
while the character before/after is displayed in the button symbols on the screen.
By moving the cursor right or left the character has been confirmed.
1. Move cursor left
2. Move cursor right
3. Choose next character
4. Choose previous character
5. Parameter up
6. Parameter down
The illustration shows how “2” is the current character and “1” or “3” can be selected with the “plus” buttons to the right.
14
Building Technologies
Fire Safety & Security Products 06.2009
 Loading...