

Siemens SE70891GB Instructions Manual
Instructions for Use
en
5600 043 313 (8104)

en
Safety information 3. . . . . . . . .
Getting to know your dishwasher 4
Before using your appliance
for the first time 5. . . . . . . . . . . .
Filling with salt 6. . . . . . . . . . . .
Setting up the water softener 7
Filling the rinse-aid container 8
Not suitable for the dishwasher 9
Arranging crockery , glasses,
etc. in the dishwasher 10. . . . . .
Detergents 13. . . . . . . . . . . . . . .
Opening and closing the door 15
Index
Adjusting the appliance 15. . . . .
Programme overview 16. . . . . .
Selecting options/
standard settings 17. . . . . . . . . .
Information about
programme sequence 22. . . . . .
Care and maintenance 24. . . . .
Fault finding 25. . . . . . . . . . . . . .
Customer Service 28. . . . . . . . .
Other information 28. . . . . . . . . .
Installation 29. . . . . . . . . . . . . . . .

en
Safety information
At time of delivery
Check packaging and dishwasher
immediately for signs of transport
damage. If the appliance is damaged,
do not put it into use but contact your
supplier without delay .
Please dispose of packaging materials
properly.
During installation
Site the dishwasher and connect it up in
accordance with the installation
instructions.
The dishwasher must not be connected
to the electricity supply while installation
is being carried out.
Ensure that the domestic wiring is
properly earthed.
The mains electricity supply must
conform to the details shown on the
dishwasher nameplate.
Do not connect the dishwasher to the
electricity supply via an extension
cable.
Built-under and built-in appliances
should always be installed under a
continuous work surface which is
attached to the adjacent cupboards, in
order to ensure that the appliance is
entirely stable.
After the appliance has been installed,
the mains plug should still be easily
accessible.
Not on all models:
The plastic housing on the water input
contains an electrically operated valve.
The connecting wires are inside the
inlet hose. Do not cut through this hose
and do not immerse the plastic housing
in water.
Warning
For safety reasons, if the appliance is not
fitted in a recess, thereby making a side
wall accessible, the door hinge area
should be covered at the side.
(Risk of injury)
Covers are available as optional
accessories from customer services or
specialist stores.
During normal use
Use the dishwasher solely in a
domestic environment and for its
designated purpose: washing
household tableware and other utensils.
Do not place any heavy objects or
stand on the door when it is open. The
appliance could tip forward.
The water inside the dishwasher is not
suitable for drinking.
Do not use solvents of any kind inside
your dishwasher. They could cause an
explosion.
Open the door very carefully if the
dishwasher is operating. There is a risk
of water squirting out.
If your family includes children
Do not permit small children to play with
or operate the dishwasher.
Keep children away from detergents
and rinse-aids.
Keep small children away from the
open door of the dishwasher. There
could still be some detergent left inside.
3
en
If a fault occurs
Repairs or other work on the
dishwasher should only be carried out
by a qualified specialist.
The dishwasher must be disconnected
from the electricity supply before any
repairs or other work are started. Pull
the mains plug out of the wall socket or
switch off at the fuse box. Grasp the
plug to remove it from the socket; do
not tug on the cable. Turn the water off
at the tap.
When disposing of old
appliances
Appliances that have reached the end
of their service life should be rendered
inoperable in order to exclude the
possibility of subsequent accidents. Pull
the mains plug out of the wall socket,
cut through the connecting cable and
disable the door lock.
Take the appliance to a designated
waste disposal centre.
Warning
Children could get locked in the appliance
(risk of suffocation) or get stuck in other
positions.
Therefore: Remove the mains plug, cut the
mains wire and set aside. Damage the
door lock so that the door can no longer
be closed.
Getting to know your
dishwasher
Illustrations of the control panel and the
interior of the dishwasher are shown on
the rear fold-out cover of this manual. Fold
this page out before you read the manual.
Control panel
1 Main switch
2 Door opener
3 Display with buttons (see chapter
“Operating principle, display with
buttons”)
Appliance interior
Top basket
20
Additional cutlery basket * for the top
21
basket
Additional cup rack *
22
Upper spray arm
23
Lower spray arm
24
Salt dispenser
25
Filters
26
Cutlery basket
27
Bottom basket
28
Lock
29
Rinse-aid dispenser with refill
30
indicator
Detergent dispenser
31
Rating plate
32
* some models
4
en
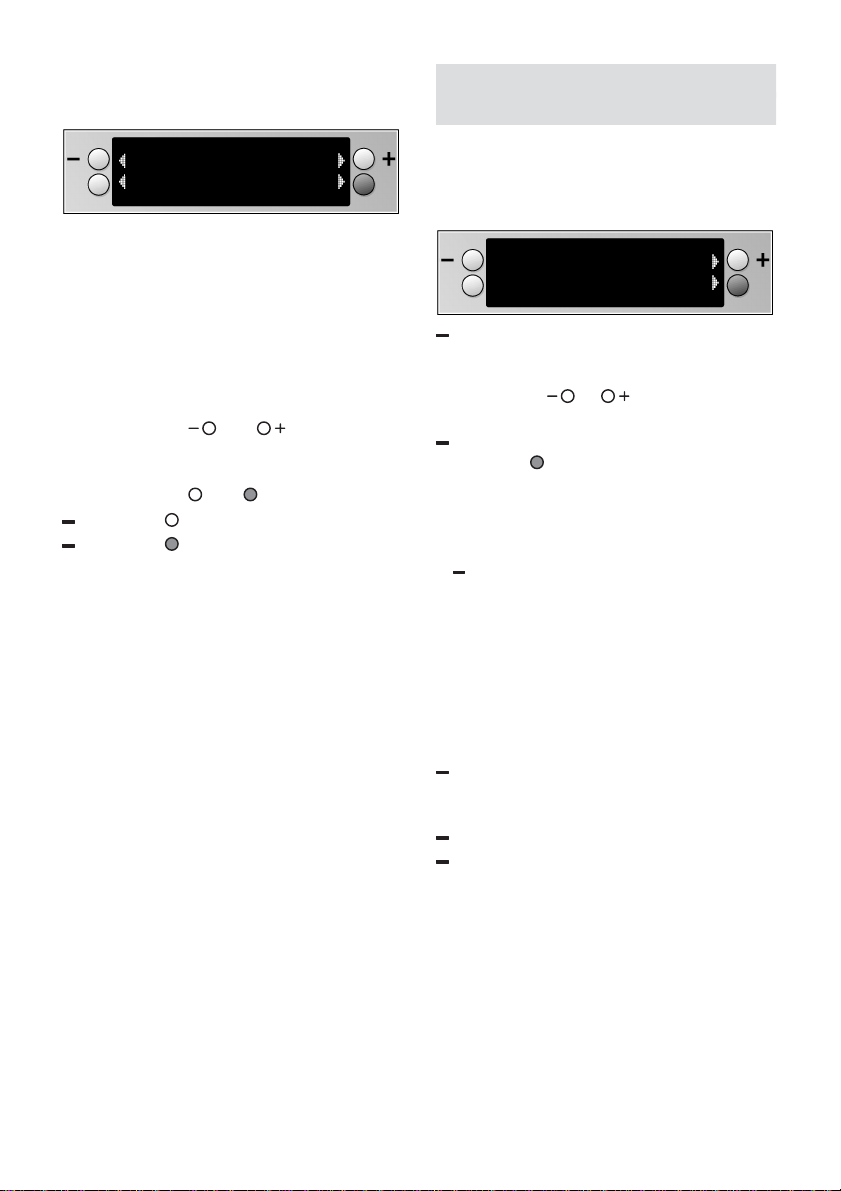
Operating principle, display
with buttons
Auto Wash
Options Start
The display indicates in clear text the
programmes, options and settings which
are to be selected as well as the
executable operations.
The illuminated arrows identify the buttons
which you can press.
If a button is pressed which is not
indicated by an arrow, a buzzer is emitted.
Y ou can select programmes and settings
by pressing the
You can execute operations which are
displayed in clear text next to the buttons
by pressing the and buttons, i.e.
Press the button: Select options,
Press the button: Start the selected
programme or acknowledge the
selected setting.
and buttons.
Before using your appliance
for the first time
Before you can use your appliance for the
first time, you must select the language.
When the appliance has been switched
on, the following display is output:
DE EN FR NL IT EL
Deutsch Ok
“Deutsch” is displayed and the
language code DE flashes. If you would
like to select another language, depress
repeatedly
the desired language flashes.
Acknowledge the selected language
with “ok”
All subsequent clear text displays will now
be displayed in the selected language.
Incorrect language set
Return to language selection:
1. Switch off the appliance.
2. Switch on the appliance, holding
down the main switch until the display
is lit.
3. Select the language and acknowledge.
or until the code of
.
Providing operating materials
To operate the dishwasher you will require
salt (only for appropriate water
hardness, see chapter “Adjusting
the softening system”),
rinse aid,
detergent.
Only use products which are suitable
for the dishwasher.
Before using the appliance for the first time
and after selecting the language, fill with
salt (if required) and rinse aid and adjust
the softening system. Proceed as
described in the chapters “Filling with salt”,
“Filling with rinse aid” and “Adjusting the
softening system”.
5
en
Filling with salt
Note
If the degree of hardness of your
tap water corresponds with value
on the appliance (see chapter
“Adjusting the softening
system”), it is not necessary to fill
the dispenser with salt, as salt is
not used during operation of the
dishwasher. Salt is required for
values to .
During the washing process the salt is
automatically washed into the softener
and dissolves the calcification.
The calcareous solution is pumped out of
the dishwasher. The softening system is
then reset to standby .
This regeneration sequence does not
function until the salt has dissolved in the
water.
When the appliance is switched on,
low salt is indicated by “Refill salt”. (This
display is no longer indicated as soon as
you have set the value for the softening
system to
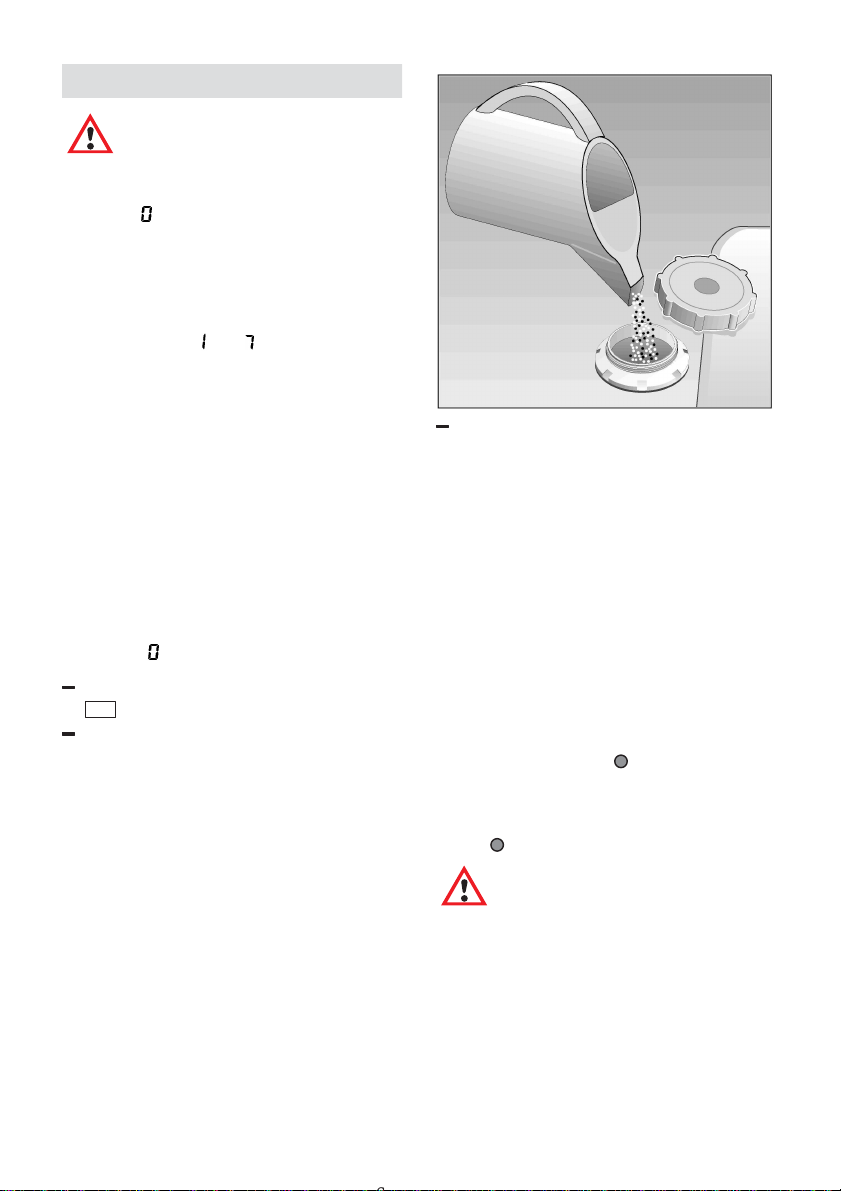
Open the screw cap on the dispenser
25 .
Before switching on the appliance for
the first time, pour approx. 1 litre of
water into the salt dispenser.
Use the enclosed salt filler.
).
Add salt until the salt dispenser is full
(max. 1.5 kg). When you add salt, water
is displaced and runs away. Salt should
always be refilled immediately before
washing. This ensures that the
overflowing salt solution is immediately
diluted and washed out. Then remove
salt residue from the filling area and
screw down the dispenser without
jamming the threaded plug.
As soon as the salt concentration is
adequately high, the “Refill salt” display
goes out.
If you do not want to wait for the display
to go out before washing, acknowledge
that salt has been added by pressing the
“Acknowledge” button
If you do not want to add any salt at the
moment, you can skip the “Refill salt”
display by pressing the “Acknowledge”
button .
.
Warning!
Do not pour detergent into the
container for special salt. This
would destroy the water
softener.
6
en
Setting up the water
softener
In order to provide satisfactory rinsing
results, the dishwasher requires soft water,
i.e., containing little or no lime, otherwise
water stains will be left behind on the
dishes and interior containers.
If the tap water exceeds a certain level of
hardness, it must be softened, i.e.,
decalcified, so that it can be used in the
dishwasher.
This is achieved by adding a special salt
to the water softener inside the
dishwasher.
The water softener, that is the required
amount of salt, is set up according to how
hard the tap water is.
The softening system must be adjusted
before the appliance is used for the first
time or if the water hardness changes.
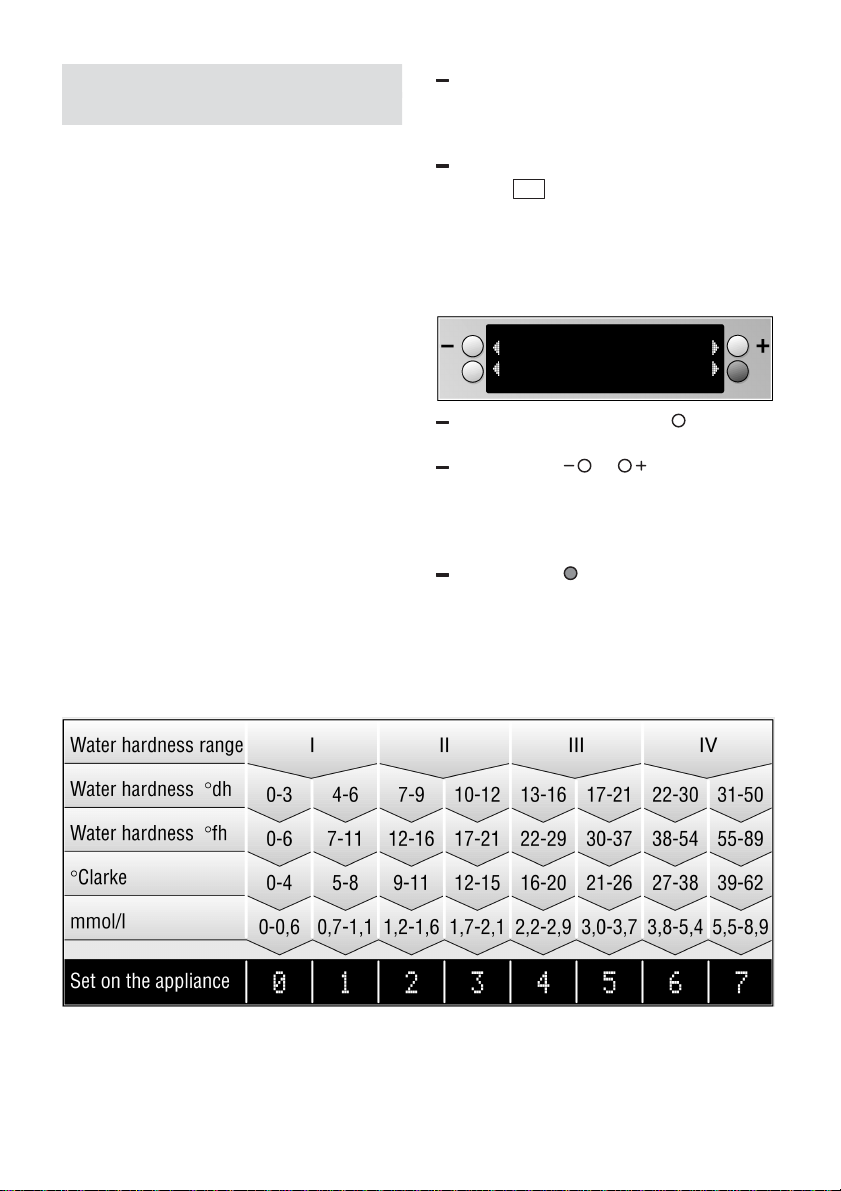
Determine the degree of hardness
of your tap water. Your water utilities
company or customer service will
advise you.
Switch on the appliance with the main
switch
displayed (if switching on the appliance
for the first time, only when a language
has been selected and dispensers
have been filled with salt (if required)
and rinse aid).
1 . The main menu is
Auto Wash
Options Start
Press the “Options” button until the
word ”Hardness” is displayed.
Using button or , select a value
between 0 and 7 which corresponds
with the degree of hardness of your tap
water in the following table. A value of 4
has been set at the factory .
Press button . The value has now
been stored and you are returned to the
main menu.
7
en
Filling the rinse-aid
container
The purpose of a rinse-aid is to prevent
the formation of water marks on tableware
and utensils, and to ensure that glasses
are clean and sparkling. The rinse-aid is
consumed during the washing process.
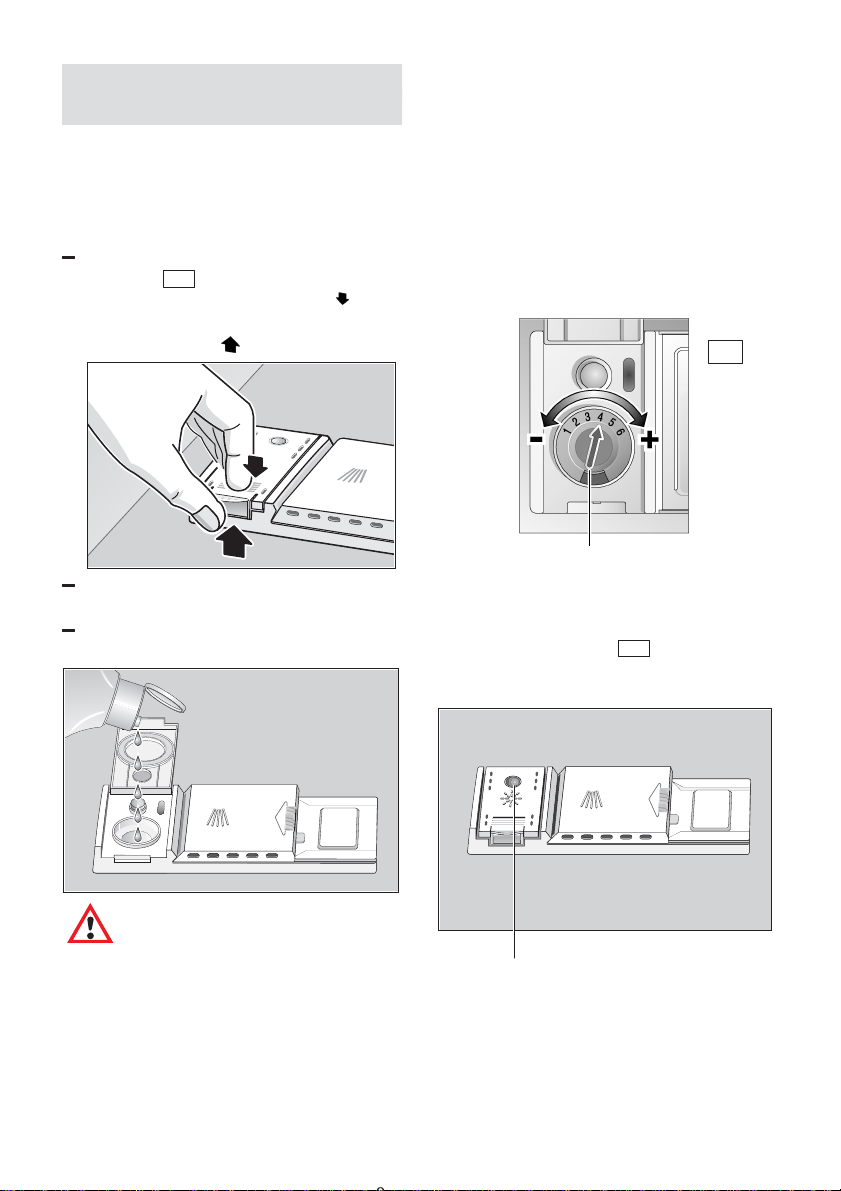
Fold back the lid on the rinse-aid
container
To open the lid, press the mark
the rinse-aid lid and simultaneously lift
the lid off the lug .
Pour the rinse-aid into the filler hole
until the level indicator turns dark.
Close the lid, ensuring that you hear it
snap closed.
30 .
on
Adjusting the amount of
rinse-aid
The amount of rinse-aid added to the
water can be varied by adjusting the
stepless control. The rinse-aid control has
been set to ”4” in the factory .
Do not alter the setting of the rinse-aid
control unless streaks (turn knob towards
”–”) or water marks (turn knob towards ”+”)
are left on the dishes.
30
rinse–aid control
Low rinse-aid indicator
As long as the rinse-aid refill indicator on
the panel or dispenser
illuminated, there is sufficient rinse-aid in
the dishwasher.
30 has not
Important
Use only rinse-aids intended
for use in domestic
dishwashers.
8
LOW RINSE-AID indicator
en
Not suitable for the
dishwasher
What you should not put into
the dishwasher:
Cutlery and tableware manufactured in
whole or part from wood. They become
faded and unsightly in appearance.
Furthermore, the adhesives that are used
are not suitable for the temperatures that
occur inside the dishwasher. Delicate
decorative glassware and vases, special
antique or irreplaceable china. The
decorative patterns on such items will not
be dishwasher-proof.
Plastic objects that are not resistant to hot
water, copper and pewter utensils are also
not suitable. Decorative patterns printed or
painted onto the surface of crockery ,
glasses, etc., aluminium and silver items
tend to become discoloured or faded if
washed in the dishwasher. Some types of
glass can become opaque in appearance
after they have been washed many times
in a dishwasher. Highly absorbent
materials, such as sponges and towels,
should never be placed in the dishwater.
Our recommendation:
In future, only purchase table or
kitchenware that has been confirmed as
being dishwasher-proof.
Damage to glassware and other
dishes
Possible causes:
type of glass or manufacturing process
chemical composition of detergent
water temperature and duration of
dishwasher programme.
Suggested remedy:
Use glassware or porcelain dishes that
have been marked ’dishwasher–proof’
by the manufacturer.
Use a mild detergent that is described
as ’kind to dishes’. If necessary , seek
further information from detergent
manufacturers.
Select a programme with as low a
temperature and as short a duration as
possible.
To prevent damage, take glass and
cutlery out of the dishwasher as soon
as possible after the programme has
ended.
Important
Dishes or cutlery that have
been soiled by tobacco ash,
wax, lubricating grease or
paint, should not be put in the
dishwasher.
9
en
Arranging crockery , glasses,
etc. in the dishwasher
Loading the dishwasher
Scrape off any large amounts of left-over
food. It is not necessary to rinse the dishes
under running water.
Place objects in the dishwasher in such a
way that
items such as cups, glasses, pots/pans,
etc. are stood upside down,
curved items, or those with recesses,
should be at a slant so that water can
run off,
they are stacked securely and cannot
tip over,
they do not prevent the spray arms from
rotating while washing takes place.
Very small items should not be washed in
the dishwasher as they could easily fall out
of the baskets.
Removing the dishes
To prevent water dripping from the top
basket onto the dishes in the lower basket,
we recommend that you empty the lower
basket first and then the top basket.
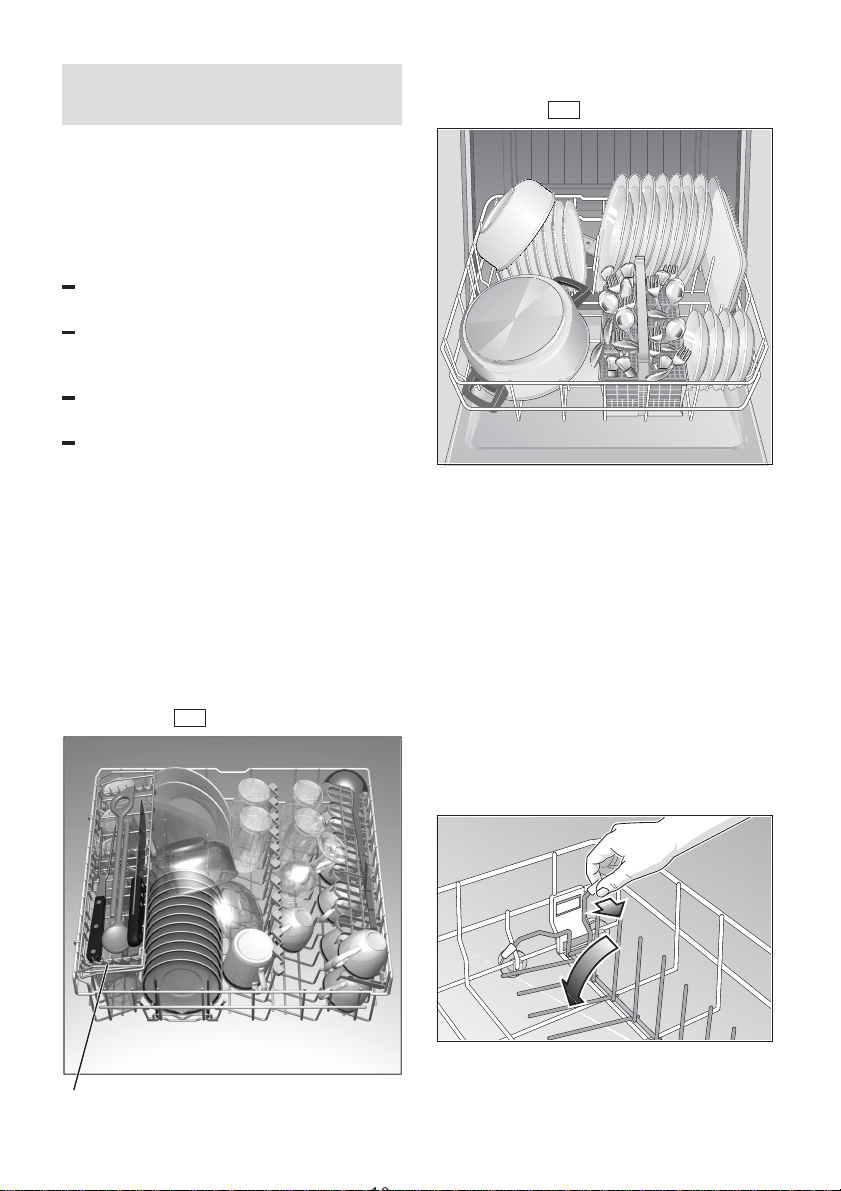
Cups and glasses
Upper basket 20
Pots and pans
Lower basket 28
Cutlery
Cutlery should always be inserted in
random order with the handles pointing
downwards (take care with knife blades!).
This enables the jet of water to reach the
individual items more easily .
To prevent the risk of injury, place long and
pointed implements and knives on the
shelf (some models) or knife shelf
(available as an accessory).
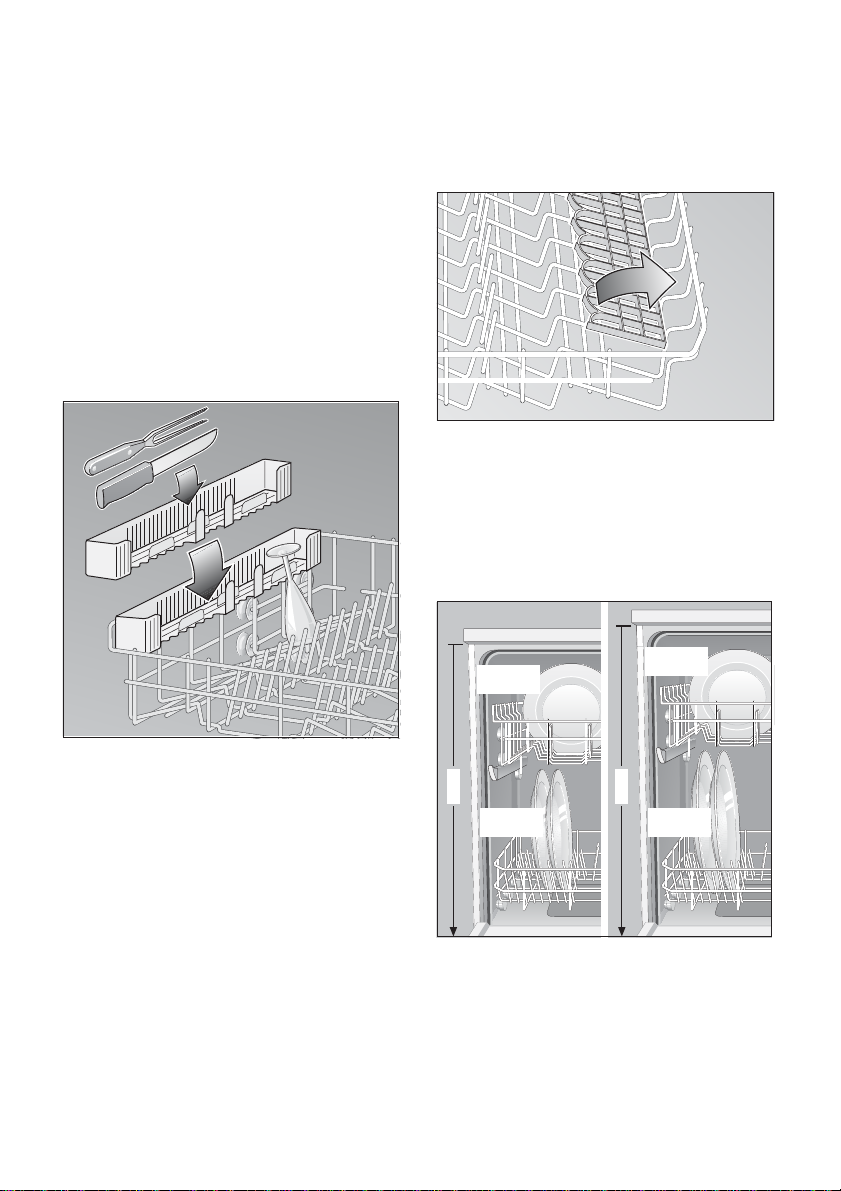
Folding spikes *
* on applicable models
To improve stacking of pots and pans, the
spikes can be folded down.
* on applicable models
10
en
Spray head for baking sheets *
* on applicable models
Please refer to the drawings enclosed in
the envelope
Large baking sheets or grids can be
cleaned with the aid of the special spray
head. Remove the top basket and attach
the spray head as shown in the drawing.
Arrange the baking sheets as illustrated,
so that the jet of water can reach all parts
of them (max. 4 baking sheets and
2 grids).
Knife rack *
* on applicable models
Shelf *
* not on all models
Lean tall glasses and those with long
stems against the shelf – not against other
items to be washed.
Long items, serving cutlery , salad servers
or knives should be placed on the shelf so
that they do not obstruct the rotation of the
spray arms. The shelf can be folded back
when not required for use.
Adjusting position of basket *
* not on all models
Ø max.
Ø max.
20/*25cm
20/*25cm
81cm
Ø max.
30/*25cm
86cm
Ø max.
34/*29cm
The top basket can be inserted on either
its upper or lower rollers, according to
requirement. This enables more height to
be gained for bigger dishes in either the
top or bottom basket.
11
 Loading...