

Page 1

Remote Control
User Manual
Page 2

Congratulations!
Dear Customer,
Your hearing instruments are equipped with technology that
allows them to be controlled by your remote control.
These instructions describe how to operate your remote
control quickly and easily.
It also provides you with important information on how to
handle your instruments.
Your Audiologist or Hearing Care Provider can answer any
further questions about instructions and proper use.
Page 3
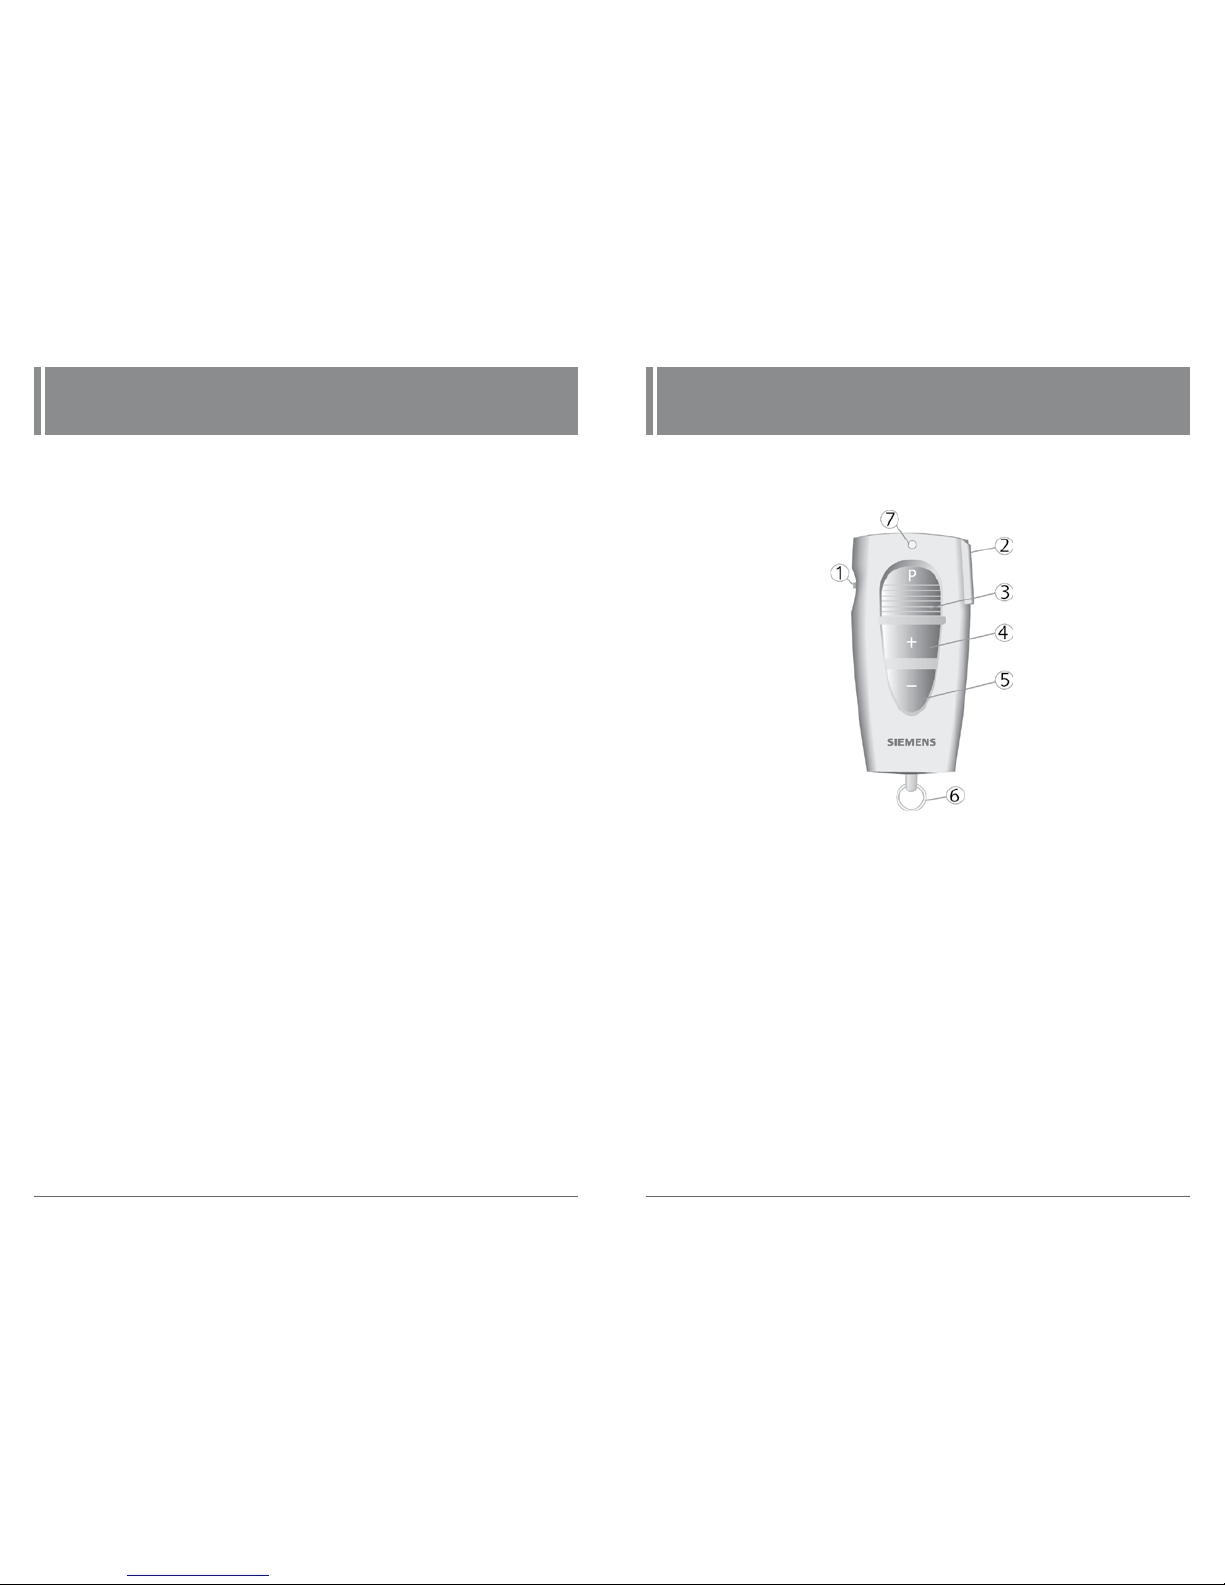
TABLE OF CONTENTS
2
YOUR REMOTE CONTROL
3
Table of Contents
Your remote control-ProPocket™ and ePocket® ..........3
Safety Information................................6
Changing the batteries ............................9
Key lock .......................................10
Turning your hearing instruments on and off..........11
Adjusting the volume.............................12
Changing the program ...........................13
Your remote control-ePen® ........................14
Tips for using your remote control ..................19
Maintenance and Care............................20
Technical information ............................21
Performance Checklist ............................23
Warranty and Service.............................24
Your Remote Control
ProPocket™ Remote Control
1 Lock switch
2 On/Off of hearing instruments
3 Program change
4 Volume up
5 Volume down
6 Accessory ring
7 LED
Fig. 1: ProPocket remote control
Page 4
YOUR REMOTE CONTROL
4
YOUR REMOTE CONTROL
5
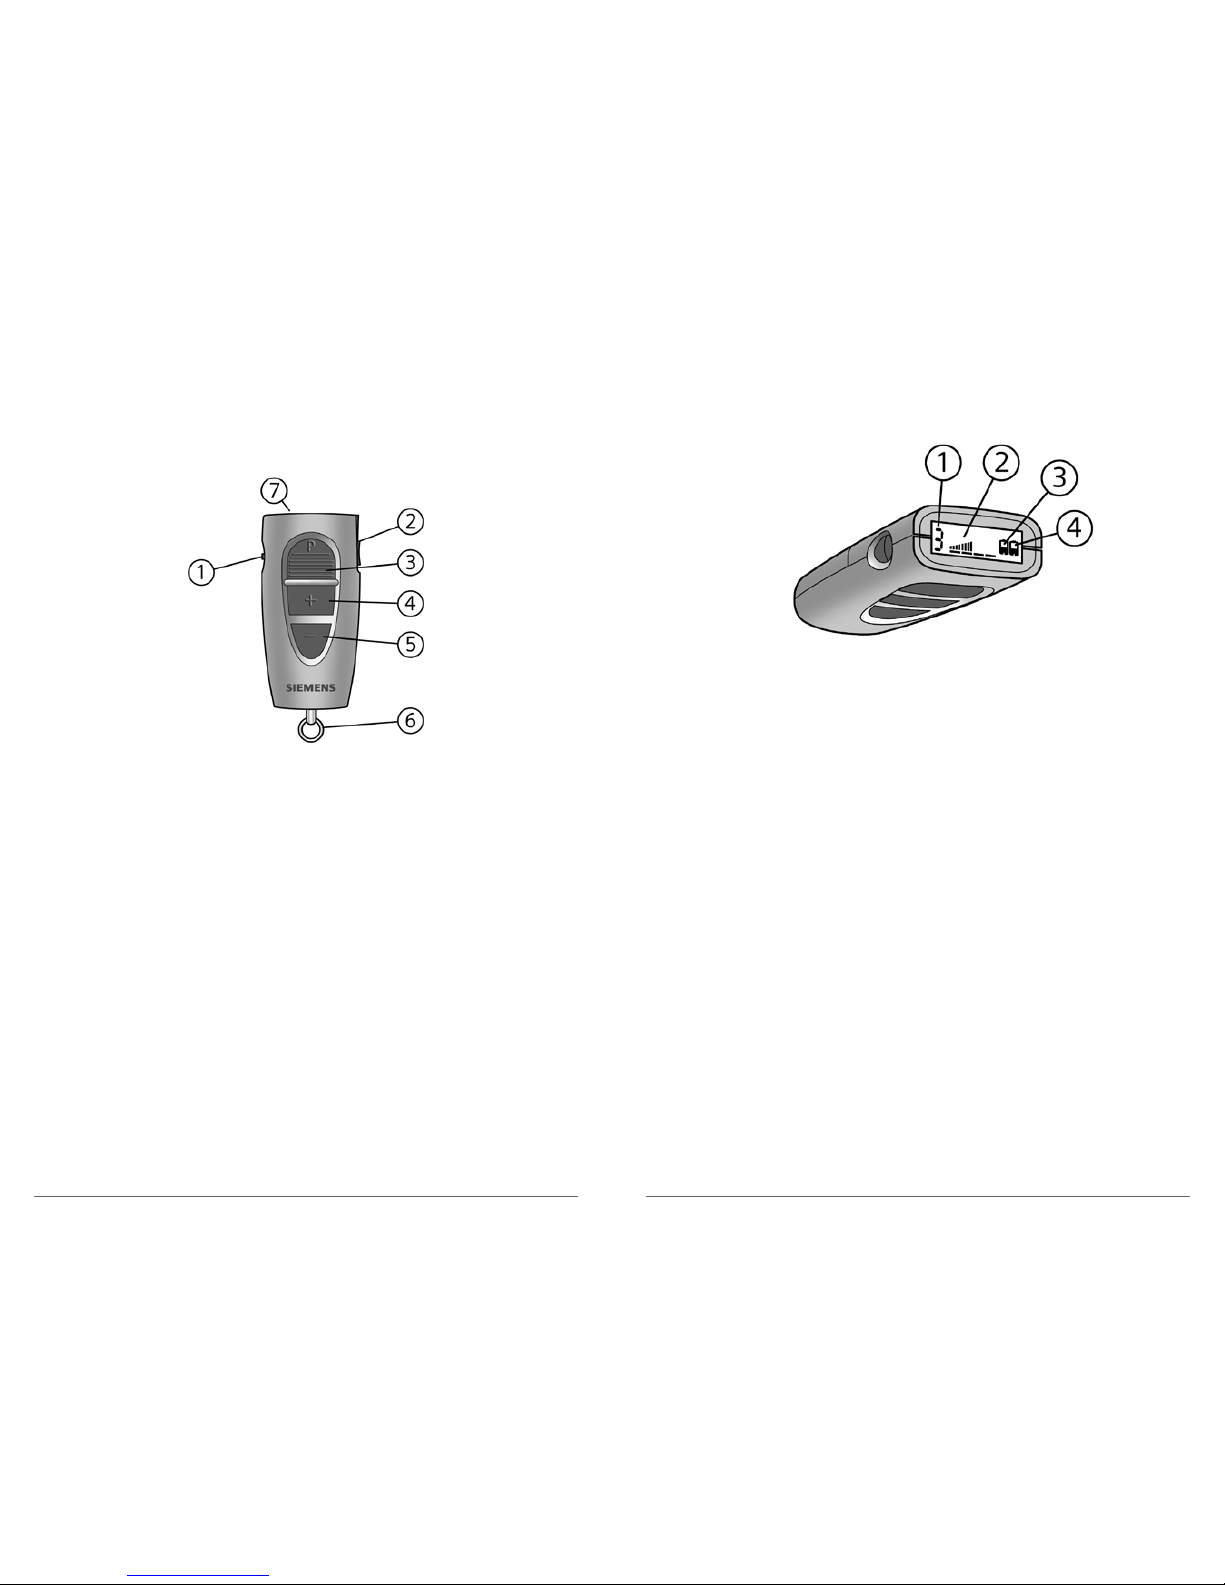
ePocket® Remote Control
The ePocket and ProPocket use two AAAA batteries.
1 Key lock
2 Data Read Out button
3 Program change button
4 Volume up
5 Volume down
6 Key ring
7 Display
Fig. 2: Location of features
Using the Data Read Out button allows you to read the
following information on the display:
1 Program/memory number
2 Volume status
3 Battery status left hearing system
4 Battery status right hearing system
Fig. 3: Data Read Out information for ePocket
Page 5
SAFETY INFORMATION
6
SAFETY INFORMATION
7
Safety Information
WARNING
Wireless systems may interfere with measuring devices
and electronic equipment.
• Do not use remote control in hospitals or airplanes.
• Have the key lock activated in hospitals or airplanes.
• Have the ePen tip closed in hospitals or airplanes.
• Prior to use in conjunction with an electronic implant or
life supporting system, have the electromagnetic
compatibility verified
In case the hearing instrument is controlled by another
person’s remote control, please return with the remote
control and hearing instruments to your Audiologist or
Hearing Care Provider.
WARNING
Pacemaker compatibility
Siemens remote control devices have been tested and found
not to cause interference with cardiac pacemakers that are
manufactured and operated in compliance with applicable
safety standards, provided a minimum distance of 12 inches
(30cm) is maintained between the remote control and the
pacemaker. To accommodate this provision:
• Do not activate the remote within 12 inches of the
pacemaker.
• Do not carry the remote in your breast pocket.
• Do not wear the remote with a lanyard around your neck.
• Do not place remote directly on the skin over the
implanted pacemaker.
Following these precautions, Siemens remote controls can be
operated safely by, or within the vicinity of, individuals fitted
with these pacemakers.
WARNING
Choking hazard posed by small parts.
• Keep hearing instruments, batteries and accessories out
of children‘s reach.
• If swallowed, consult a physician or hospital immediately.
• If infants, small children or mentally disabled persons need
to wear hearing instruments, ensure adequate supervision.
Battery tips
CAUTION! Batteries can be harmful if swallowed.
• If a battery is accidentally swallowed, seek medical
attention immediately, or call The National Button
Battery Hotline collect at (202) 625-3333.
Page 6
SAFETY INFORMATION
8
CHANGING THE BATTERIES
9
• Always use the battery size recommended on your
warranty card or by your Audiologist or Hearing Care
Provider for your model for best performance.
• Remove the battery from your instrument when not in
use. This prevents possible damage from expansion or
leakage of the battery, if the instrument is not fully
turned off.
• Always carry spare batteries in the event that your current
battery goes dead. Place each spare battery in an individual,
non-metallic container to prevent contact with other
batteries or metal objects, such as keys or coins.
• Follow your local recycling rules for battery disposal.
Note: Do not throw used batteries into household trash. Return
them to your Audiologist or Hearing Care Provider for
environmentally correct disposal.
WARNING
Risk in explosive environments, e.g., mining areas!
• Don’t use your hearing instruments in areas where there
is a danger of explosions.
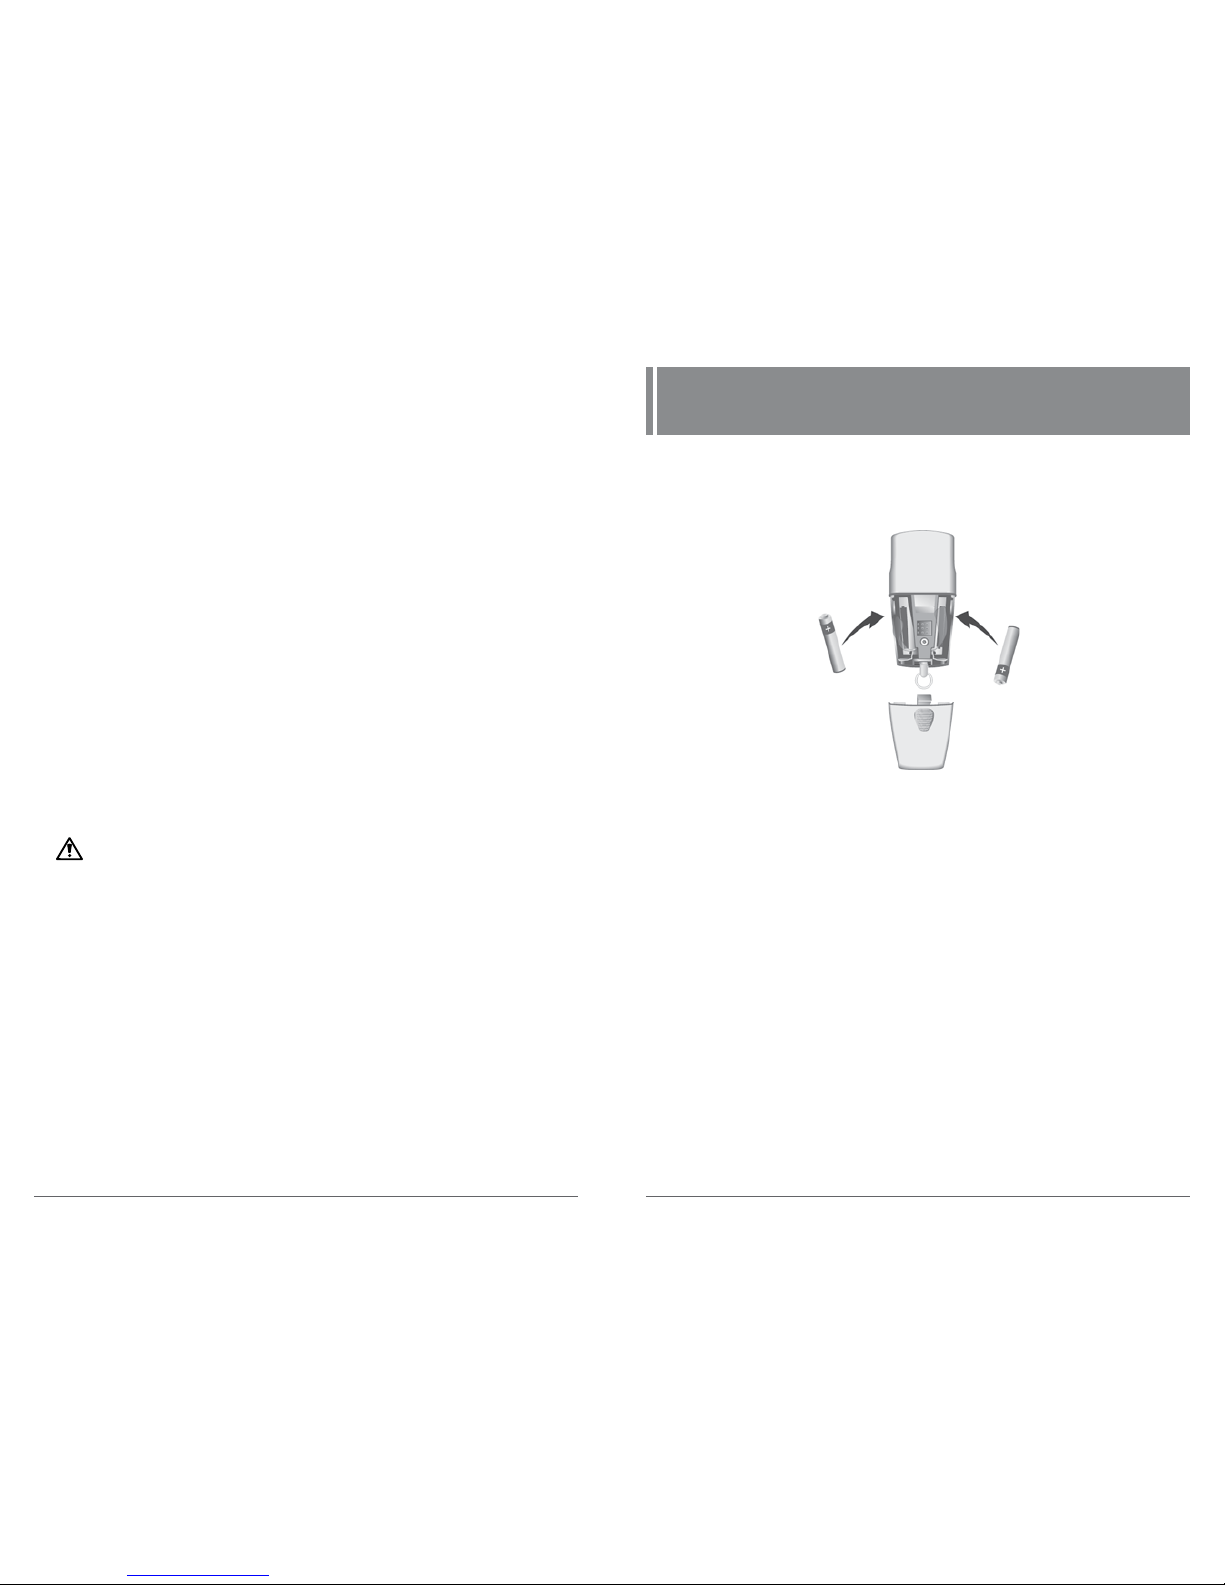
Changing the Batteries
The ProPocket or ePocket remote control is powered by two
AAAA batteries.
• The battery compartment cover is located on the back of
the remote control. Press the ridged indentation with your
thumb in order to slide the cover off.
• Insert two batteries as shown in the picture. Make sure the
polarity symbols on the battery and compartment are
aligned (Fig. 4).
• Slide the battery cover back in place. A click is audible when
the battery compartment is fully closed.
Fig. 4: Installing remote control batteries
Page 7
KEY LOCK
10
TURNING YOUR HEARING INSTRUMENTS ON AND OFF
11
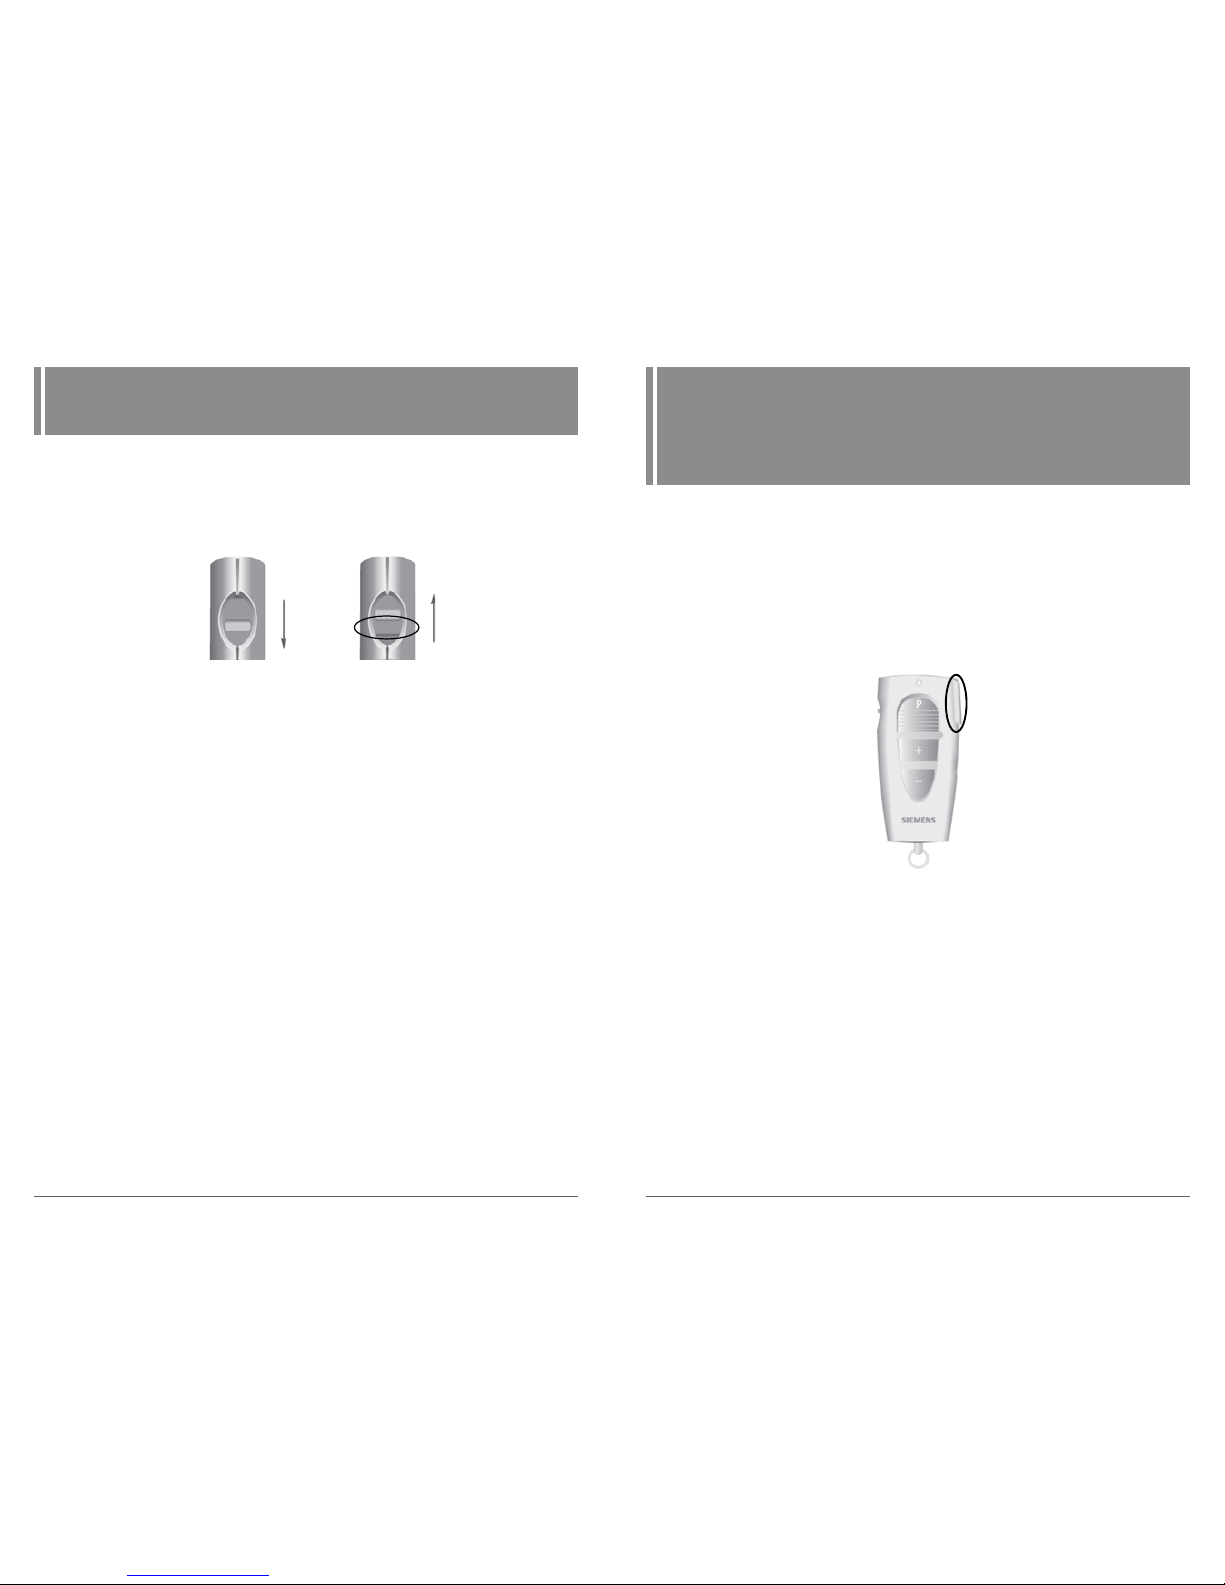
Key Lock
The lock switch deactivates the buttons on the remote
control so that accidentally pressing the buttons will not
have any effect.
• Slide the control over so the green section is covered. The
lock is activated. When pressing a button the LED blinks 3
times to indicate that the lock is activated. (Fig. 5)
• Slide the control in the other direction so the green section
shows. The lock is deactivated. (Fig. 5)
Fig. 5: Lock and unlock
Lock
Unlock
Green
section
Turning Your Hearing
Instruments On and Off
ProPocket only
• Make sure the distance between your remote control
and hearing instrument does not exceed 1 meter.
• If you are wearing two hearing instruments, both
instruments will be turned on/off at the same time.
• Press the On/Off button to turn your hearing instruments
on (Fig. 6).
• Press the On/Off button to turn your hearing instruments
off (Fig. 6).
Fig. 6: On/Off button
On/Off Button
Page 8

ADJUSTING THE VOLUME
12
CHANGING THE PROGRAM
13
Adjusting the Volume
• Make sure the distance between your remote control and
hearing instrument does not exceed 1 meter.
• If you are wearing two hearing instruments, the volume
will be changed on both instruments at the same time.
Your Audiologist or Hearing Care Provider can program your
hearing instruments so that you hear acoustic signals to
indicate when the volume has been changed and when the
volume limit has been reached.
Fig. 7: Volume up
Fig. 8: Volume down
Press the “Volume up” (+)
button to increase the volume
of your hearing instruments.
Press the “Volume down” (-)
button to decrease the volume
of your hearing instruments.
Changing the Program
• Make sure the distance between your remote control
and hearing instrument does not exceed 1 meter.
• If you are wearing two hearing instruments, the program
will be changed on both instruments at the same time.
Each time you press the program button (Fig. 9), your
hearing instruments switch to the next program, confirming
each change with an acoustic signal (if programmed this way
by your Audiologist or Hearing Care Provider).
Example: The hearing instruments are in program 1. You want
to change to program 2.
• Press the program button once. You will hear an acoustic
signal. You are now in program 2.
Fig. 9: Program button
Page 9
YOUR REMOTE CONTROL-ePEN
14
YOUR REMOTE CONTROL-ePEN
15
Your Remote Control-ePen
The remote control uses one AAA battery.
1 ePen tip with hidden control panel
and volume function
2 Battery compartment
3 Volume control
4 LED
5 Hearing instruments on/off
6 Program button
2
4
5
6
3
1
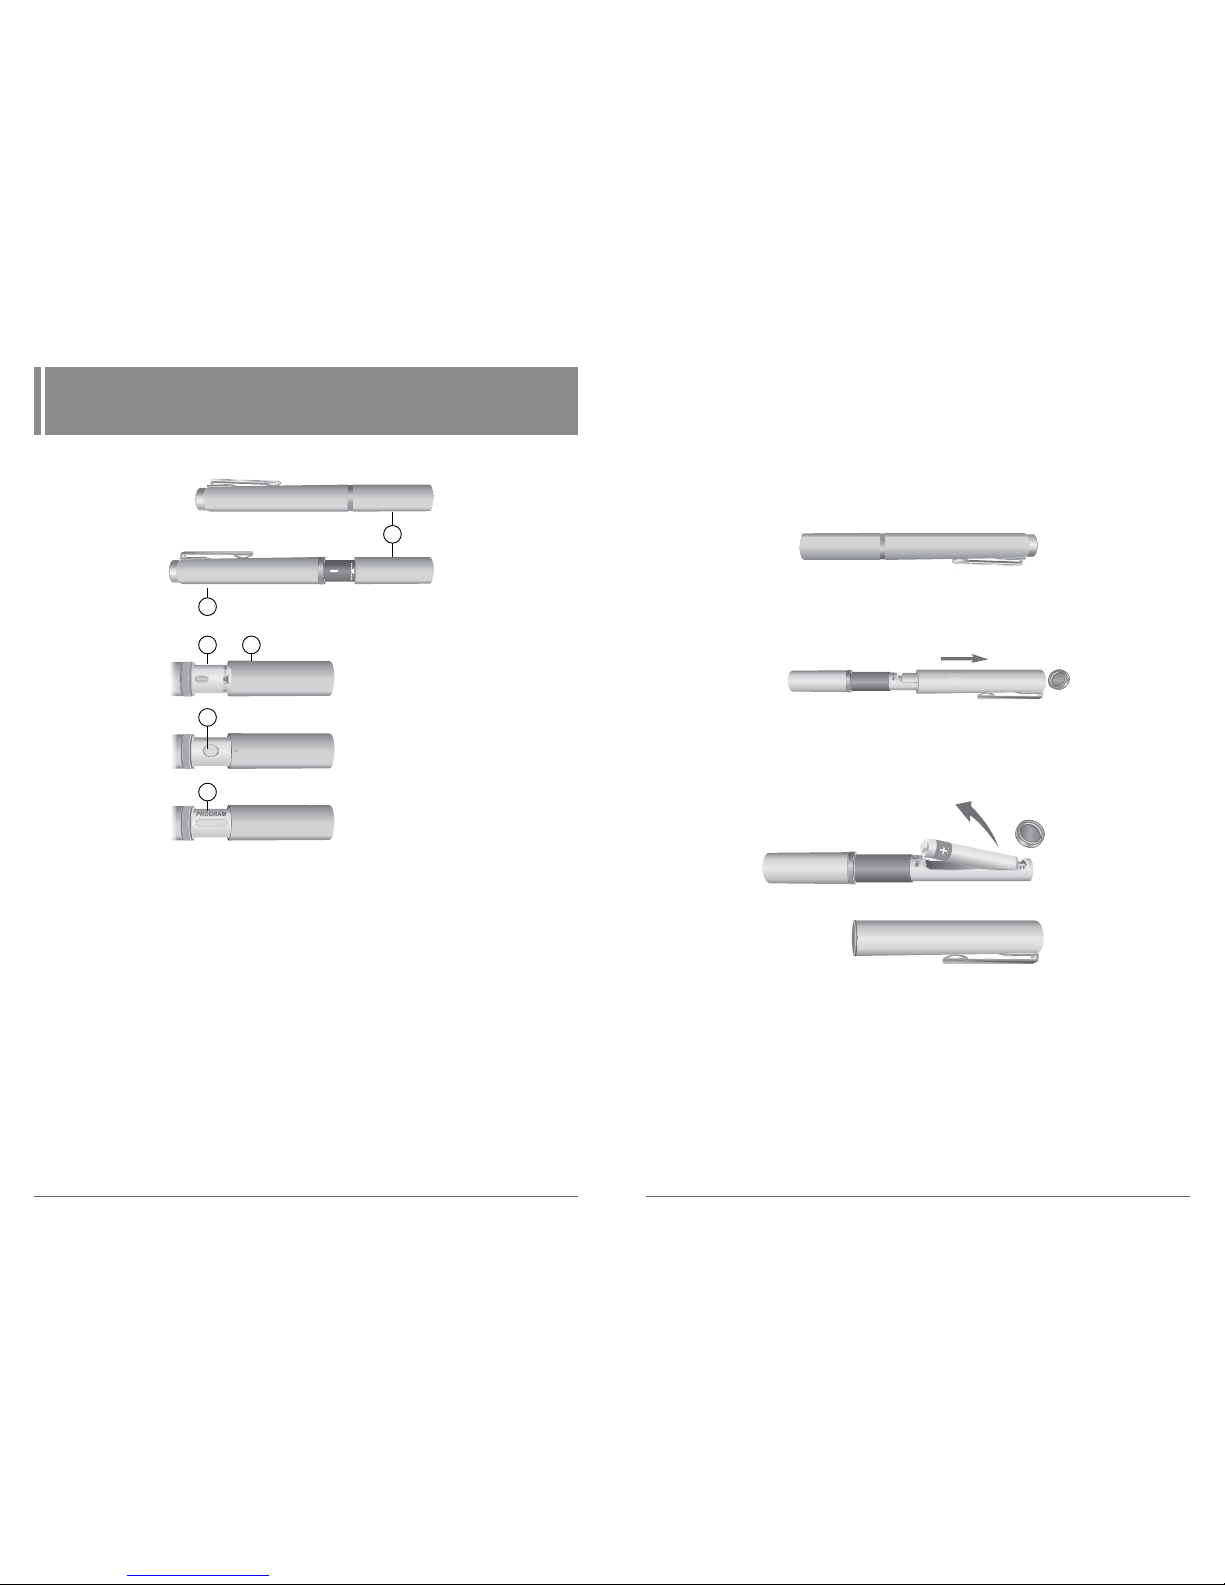
Changing the batteries
The remote control is powered by one AAA battery.
• Unscrew the top of the ePen
• Remove the cover of the ePen by sliding it off, as shown
in the picture.
• Insert a battery as shown in the picture. Make sure the
polarity symbols on the battery and compartment
are aligned.
• Reattach the cover and top.
+
Page 10

YOUR REMOTE CONTROL-ePEN
16
YOUR REMOTE CONTROL-ePEN
17
Turning the remote control off
The remote control is only “on” when a button is pressed or
the volume is adjusted. Therefore the remote control does
not have a switch to turn it “off.”
• To avoid accidentally pressing a button, keep the cap
of the remote control closed. A closed cap works like a
key lock.
Turning your hearing instruments on and off
Make sure the distance between your remote control and
hearing instrument does not exceed 40 inches (1 meter).
If you are wearing two hearing instruments, both instruments
will be turned on/off at the same time.
• Slide open the cap of the remote control to uncover
the control panel.
• Press the on/off button to turn your hearing instruments on.
• Press the on/off button to turn your hearing instruments off.
Adjusting the volume
• Slide open the cap of the remote control to uncover the
control panel.
• Turn the cap towards the “+” sign to increase the volume
of your hearing instruments.
• Turn the cap towards the “–” sign to decrease the volume
of your hearing instruments.
• When you turn the cap and release it, the volume changes
one step. The LED on the remote control blinks.
• When you turn the cap and hold it in the turned position,
the volume changes continuously. The LED on the remote
control blinks once and then stays on. You will hear an
acoustic signal in your hearing instruments when the
volume limit is reached.
Your Audiologist or Hearing Care Provider can activate/
deactivate the acoustic signals in your hearing instruments.
Page 11

YOUR REMOTE CONTROL-ePEN
18
TIPS FOR USING YOUR REMOTE CONTROL
19
Changing the program
Each time you press the program button, your hearing
instruments switch to the next program, confirming each
change with an acoustic signal.
Example:
Your hearing instruments are in program 1. You want to
change to program 3.
• Press the program button twice.
Your Audiologist or Hearing Care Provider can activate/
deactivate acoustic signals to indicate when the program
has been changed.
Tips for Using Your
Remote Control
Safety notes for batteries
Note: Leaking batteries damage the instrument. Remove batteries
when the instrument is not in use for a prolonged period
of time.
Do not throw used batteries into household trash. Return
them to your Audiologist or Hearing Care Provider for
environmentally correct disposal.
Choking hazard posed by small parts. Keep batteries and
remote control out of children‘s reach. If swallowed consult
a physician or hospital immediately.
Page 12

MAINTENANCE AND CARE
20
TECHNICAL INFORMATION
21
Maintenance and Care
Protection
Use the “cover” (see “Accessories” section) to protect against
accidental drips or splashes when you go near water such as
a sink.
Cleaning
Note: Do NOT put your remote control in water! The cover does
NOT make your remote control waterproof. Do NOT
clean your remote control with alcohol or benzine.
• Clean the remote control as necessary with a soft tissue.
• Avoid abrasive cleaning liquids with additives such as
citric aids, ammonia, etc.
Note: The remote control is sensitive to extreme heat, high humidity,
strong magnetic fields (> 0.1T), X-rays and mechanical stress.
Do not expose the remote control to extreme temperature or
high humidity. Do not leave it in direct sunlight. Do not
immerse it in water.
Do not let
your hearing
instrument
get wet.
Technical Information
Wireless Technology
Wireless technology provides synchronization between two
hearing instruments. If you change the program or volume
on one instrument, the other is automatically changed. In
addition, wireless technology automatically adjusts the system
to change both hearing instruments simultaneously to adapt
to different listening situations.
Operating frequencies for ePen and ProPocket: Fc=3.28 MHz
CE, FCC and IC compliance information can be found inside
the battery compartment.
Changes or modifications not expressly approved by the party
responsible for compliance could void the user’s authority
to operate the equipment.
ePen remote control
FCC: SGI-WL300
IC: 267AB-WL300
ProPocket remote control
FCC: SGI-WL101
IC: 267AB-W101
ePocket remote control
IC: 267AB-WL100
This Class B digital apparatus II radiocommunication device
complies with Part 15 of the FCC rules and Industry Canada
Page 13

TECHNICAL INFORMATION
22
PERFORMANCE CHECKLIST
23
Standard RSS-210. Operation is subject to the following two
conditions:
(1) this device may not cause interference.
(2) this device must accept any interference, including
interference that may cause undesired operation of
the device.
This equipment has been tested and found to comply with
the limits for a Class B digital device, pursuant to Part 15
of the FCC rules and Industry Canada Standard RSS-210.
These limits are designed to provide reasonable protection
against harmful interference in a residential installation. This
equipment generates, uses and can radiate radio frequency
energy and, if not installed and used in accordance with
the instructions, may cause harmful interference to radio
communications. However, there is no guarantee that
interference will not occur in a particular installation. If
this equipment does cause harmful interference to radio or
television reception, which can be determined by turning the
equipment off and on, the user is encouraged to try to correct
the interference by one or more of the following measures:
• Reorient or relocate the receiving antenna.
• Increase the separation between the equipment
and receiver.
• Connect the equipment into an outlet on a circuit different
from that to which the receiver is connected.
• Consult the dealer or an experienced radio/TV technician
for help.
Performance Checklist
If you still encounter problems after trying these suggestions
consult your Audiologist or Hearing Care Provider.
Problem Possible Solution
The remote
control does
not work
Another remote
control affects
your hearing
instruments
• Check if the key lock is locked.
Unlock it.
• Check if batteries are empty.
Change the batteries.
• Move away from the electro-magnetic
noise sources.
• Return remote control and hearing
instruments to your Audiologist or
Hearing Care Provider.
Page 14

WARRANTY AND SERVICE
24
WARRANTY AND SERVICE
25
Warranty and Service
Your remote control has a one-year warranty that covers
defects in material and workmanship from the original date
of purchase. There is no loss and damage coverage for the
remote control. Remotes received for warranty service at an
authorized Siemens Service Center will be repaired or replaced
with new or reconditioned components, without charge, to
meet the performance specifications of the product.
Warranty service must only be performed by an authorized
Siemens Service Center. Service performed by unauthorized
service entities voids this warranty and repairs so necessitated
will be done on a parts and labor cost basis.
This warranty does not cover malfunctions due to unusual
wear and tear or mistreatment of the product such as physical
shock or tampering with the product, any of which voids all
warranties.
In case of malfunction or loss, take your Siemens remote
control and proof of purchase to the Audiologist or Hearing
Care Provider from whom the unit was purchased. If factory
service or replacement is needed, your Audiologist or Hearing
Care Provider will forward the unit to an authorized Siemens
Service Center.
IMPORTANT
Record your remote control serial number and date of
purchase here for future reference.
Serial number _______________________________
Date of purchase _______________________________
The serial number is located inside the battery
compartment (Fig. 10).
The year of manufacture is incorporated into the serial
number. The warranty is based upon the date of purchase,
not the date of manufacture.
The serial number may look similar to this sample: AV12345.
The second letter of this serial number refers to the year
of manufacture of the remote control. The letters U and V
indicate a 2009 year of manufacture. Your Audiologist or
Hearing Care Provider can answer any questions you may
have about the identifying code on your remote control.
Fig. 10: Serial Number
Page 15

Guide d’utilisation
de la télécommande
Page 16

TABLE DES MATIÈRES
1
Félicitations!
Chers clients et clientes,
Vos aides auditives sont munies d’une technologie leur
permettant d’être contrôlées par votre télécommande.
Ces instructions décrivent de quelle manière utiliser rapidement
et facilement votre télécommande.
Vous trouverez également dans ce guide d’importants
renseignements sur le fonctionnement et la manipulation de
vos aides auditives.
Votre audiologiste ou votre professionnel de la santé auditive
saura répondre à toutes vos questions relatives au présent guide
et au bon usage des appareils.
Table des matières
Votre télécommande - ProPocketMC et ePocketMD ........2
Renseignements relatifs à la sécurité .................5
Installation des piles ..............................8
Verrou de sécurité ................................9
Mise en route et arrêt des aides auditives.............10
Contrôle de volume ..............................11
Changement de programme ......................12
Votre télécommande - ePenMD......................13
Conseils relatifs à l’utilisation de votre télécommande...18
Soin et entretien ................................19
Renseignements techniques .......................20
Liste de vérification du rendement des aides auditives ..22
Garantie et service ...............................23
Page 17

VOTRE TÉLÉCOMMANDE
2
VOTRE TÉLÉCOMMANDE
3
Votre télécommande
Télécommande ProPocket
MC
Fig. 1 : Télécommande ProPocket
1 Verrou de sécurité
2 Fonction marche/arrêt des aides auditives
3 Bouton-poussoir
4 Augmentation du volume
5 Réduction du volume
6 Anneau pour porte-clés
7 Voyant DEL
Télécommande ePocket
MD
Fig. 2 : Emplacement des caractéristiques
Les télécommandes ePocket et ProPocket utilisent des
piles AAAA.
1 Verrou de sécurité
2 Bouton d’affichage des données
3 Emplacement du bouton-poussoir
4 Augmentation du volume
5 Réduction du volume
6 Anneau pour porte-clés
7 Écran d’affichage
Page 18

VOTRE TÉLÉCOMMANDE
4
RENSEIGNEMENTS RELATIFS À LA SÉCURITÉ
5
Fig. 3 : Renseignements sur l’affichage des données pour
la télécommande ePocket
L’utilisation du bouton d’affichage des données vous permet
de lire à l’écran les informations suivantes :
1 Numéro de programme/mémoire
2 État du volume
3 État de la pile de l’aide auditive gauche
4 État de la pile de l’aide auditive droite
Renseignements relatifs à la sécurité
MISE EN GARDE
Les systèmes sans fil peuvent perturber le fonctionnement des
appareils de mesure et du matériel électronique.
• N’utilisez pas la télécommande dans les hôpitaux ou à bord
d’un avion.
• Veillez à enclencher le verrou de votre télécommande dans
les hôpitaux ou à bord d’un avion.
• Veillez à maintenir l’extrémité de la télécommande ePen
fermée dans les hôpitaux ou à bord d’un avion.
• Avant toute utilisation conjointement avec un implant
électronique ou un système de maintien des fonctions
vitales, vériez la compatibilité électromagnétique.
Si vos aides auditives répondent à la télécommande d’une
autre personne, veuillez retourner la télécommande et les
aides auditives à votre audiologiste ou à votre professionnel
de la santé auditive.
MISE EN GARDE
Compatibilité avec les stimulateurs cardiaques
Les appareils Siemens dotés d’une télécommande ont été
testés et ont montré qu’ils ne provoquaient pas d’interférences
en présence de stimulateurs cardiaques fabriqués et
fonctionnant conformément aux de normes de sécurité en
vigueur, à condition de maintenir une distance minimale de
30 cm (12 pouces) entre la télécommande et le stimulateur
cardiaque. Afin de satisfaire à cette disposition :
Page 19

RENSEIGNEMENTS RELATIFS À LA SÉCURITÉ
6
RENSEIGNEMENTS RELATIFS À LA SÉCURITÉ
7
• N’activez pas la télécommande à moins de 30 cm
(12 pouces) du stimulateur cardiaque.
• Ne portez pas la télécommande dans votre poche poitrine
• Ne portez pas la télécommande accrochée à un cordon
autour de votre cou.
• Ne placez pas la télécommande directement au contact de la
peau, sur le stimulateur cardiaque implantable.
En prenant ces précautions, les télécommandes Siemens
peuvent être utilisées en toute sécurité par des personnes
portant ces stimulateurs cardiaques ou situées à proximité.
MISE EN GARDE
Les petites pièces sont susceptibles de provoquer
un étouffement.
• Gardez les aides auditives, les piles et les accessoires hors
de portée des enfants.
• En cas d’ingestion, consultez un médecin ou rendez-vous
sur-le-champ à l’hôpital.
• Si des nourrissons, des jeunes enfants ou des personnes
présentant une déficience mentale doivent porter des
aides auditives, assurez-vous qu’ils fassent l’objet d’une
surveillance adéquate.
Conseils relatifs à la pile
ATTENTION! Les piles peuvent présenter un danger en
cas d’ingestion.
• Si une pile est avalée accidentellement, consultez
immédiatement un médecin ou appelez le National Battery
Hotline à frais virés au 202-625-3333.
Si une pile est avalée accidentellement, consultez
immédiatement un médecin ou appelez le National Battery
Hotline à frais virés au 202-625-3333.
• Utilisez toujours le format de pile recommandé pour votre
modèle d’appareil sur votre fiche de garantie ou par votre
audiologiste ou votre professionnel de la santé auditive et
ainsi profiter d’un meilleur rendement.
• Retirez la pile de votre appareil quand vous ne le portez
pas. Cela prévient les dommages qui peuvent être causés
par une pile qui fuit ou se dilate, si l’aide auditive n’est pas
bien éteinte.
• Ayez toujours une pile de rechange au cas où votre pile
actuelle se déchargerait. Placez chaque pile de rechange
dans un contenant individuel non métallique pour empêcher
tout contact avec une autre pile ou un objet métallique,
comme des clés ou des pièces de monnaie.
• Respectez les mesures de recyclage de votre région quand
vous jetez vos piles.
Note : Ne jetez pas les piles usagées dans les ordures ménagères.
Remettez-les plutôt à votre audiologiste ou à votre
professionnel de la santé auditive pour une mise au rebut
conforme à la réglementation en vigueur en matière de
protection de l’environnement.
MISE EN GARDE
Les milieux explosifs, comme par exemple les domaines
miniers, présentent un risque!
• N’utilisez pas vos aides auditives dans des zones à risque
d’explosions.
Page 20

INSTALLATION DES PILES
8
VERROU DE SÉCURITÉ
9
Verrou de sécurité
Le verrou de sécurité désactive les boutons de la
télécommande si bien que les touches ne sont plus
fonctionnelles.
Verrouillé
Déverrouillé
Partie
verte
Fig. 5 : Verrouillage et déverrouillage
• Poussez la glissière de façon à couvrir la partie verte.
Le verrou de sécurité est alors activé. En appuyant sur un
bouton, un voyant DEL clignote 3 fois pour indiquer que le
verrou de sécurité est activé (fig. 5).
• Poussez la glissière dans le sens contraire pour faire
apparaître la partie verte. Le verrou de sécurité est alors
désactivé (fig. 5).
Installation des piles
La télécommande ProPocket ou ePocket est alimentée par
deux piles AAAA.
Fig. 4 : Installation des piles de la télécommande
• Le couvercle du compartiment des piles est situé à l’arrière
de la télécommande. Appuyez sur la partie ondulée du
couvercle de la télécommande avec votre pouce et faites-la
glisser pour ouvrir la porte du compartiment des piles.
• Insérez deux piles tel qu’indiqué sur l’illustration ci-dessus
en faisant correspondre les signes + et - sur la porte du
compartiment des piles (fig. 4).
• Refermez la porte du compartiment des piles. Vous
entendrez un clic conrmant que la porte est bien fermée.
Page 21

MISE EN ROUTE ET ARRÊT DES AIDES AUDITIVES
10
CONTRÔLE DE VOLUME
11
Contrôle de volume
• Assurez-vous que la distance entre la télécommande et vos
aides auditives n’excède pas 1 mètre.
• Si vous portez deux aides auditives, le volume changera
dans les deux appareils en même temps.
Fig. 7 : Augmentation
du volume
Appuyez sur le bouton (+) pour
augmenter le volume de vos
aides auditives.
Appuyez sur le bouton (-)
pour réduire le volume de vos
aides auditives.
Fig. 8 : Réduction du volume
Votre audiologiste ou votre professionnel de la santé auditive
peut programmer vos appareils pour que vous entendiez un
indicateur sonore vous indiquant que le volume a été modifié
ou que la limite de volume est atteinte.
Mise en route et arrêt
des aides auditives
ProPocket seulement
• Assurez-vous que la distance entre la télécommande et vos
aides auditives n’excède pas 1 mètre.
• Si vous portez deux aides auditives, les deux appareils
s’allumeront et s’éteindront en même temps.
Fonction
marche/arrêt
Fig. 6 : Fonction marche/arrêt
• Appuyez sur le bouton marche/arrêt pour allumer les aides
auditives (fig. 6).
• Appuyez sur le bouton marche/arrêt pour éteindre les aides
auditives (fig. 6).
Page 22

CHANGEMENT DE PROGRAMME
12
VOTRE TÉLÉCOMMANDE - ePEN
13
Changement de programme
• Assurez-vous que la distance entre la télécommande et vos
aides auditives n’excède pas 1 mètre.
• Si vous portez deux aides auditives, le programme changera
dans les deux appareils en même temps.
Chaque fois que vous appuyez sur le bouton-poussoir (g. 9),
votre aide auditive sélectionne le programme suivant. Cette
modification du programme est confirmée par un indicateur
sonore (si votre audiologiste ou votre professionnel de la santé
auditive a programmé votre appareil ainsi).
Fig. 9 : Bouton-poussoir
Exemple : L’aide auditive est au programme 1. Vous souhaitez
passer au programme 2.
• Appuyez une fois sur le bouton-poussoir. Vous entendrez
un indicateur sonore vous indiquant que l’appareil est
maintenant au programme 2.
Votre télécommande - ePen
La télécommande utilise une pile AAA.
1 Extrémité ePen dotée d’un panneau de commande et
d’une fonction de contrôle de volume cachés
2 Compartiment de la pile
3 Contrôle de volume
4 Voyant DEL
5 Fonction marche/arrêt des aides auditives
6 Bouton-poussoir
2
4
5
6
3
1
Page 23

VOTRE TÉLÉCOMMANDE - ePEN
14
VOTRE TÉLÉCOMMANDE - ePEN
15
Arrêt de la télécommande
La télécommande est allumée uniquement si un bouton
est enfoncé ou si le volume est ajusté. Par conséquent, la
télécommande ne possède pas d’interrupteur permettant
de l’éteindre.
• Pour éviter d’appuyer accidentellement sur une touche,
maintenez la gaine de la télécommande fermée. Une gaine
fermée fonctionne comme un verrou de sécurité.
Mise en route et arrêt des aides auditives
Assurez-vous que la distance entre la télécommande et vos
aides auditives n’excède pas 1 mètre (40 pouces).
Si vous portez deux aides auditives, les deux appareils
s’allumeront et s’éteindront en même temps.
• Faites glisser la gaine de la télécommande pour découvrir
le panneau de commande.
• Appuyez sur le bouton marche/arrêt pour allumer vos
aides auditives.
• Appuyez sur le bouton marche/arrêt pour éteindre vos
aides auditives.
Installation de la pile
La télécommande est alimentée par une pile AAA.
• Dévissez la partie supérieure de la télécommande ePen.
• Retirez le capuchon de la télécommande ePen et faites-le
glisser comme le montre l’illustration.
• Insérez une pile tel qu’indiqué en faisant correspondre les
signes + et - de la pile sur le compartiment de la pile.
+
• Remettez le capuchon en place et xez à nouveau la
partie supérieure.
Page 24

VOTRE TÉLÉCOMMANDE - ePEN
16
VOTRE TÉLÉCOMMANDE - ePEN
17
Changement de programme
Chaque fois que vous appuyez sur le bouton-poussoir, vos
aides auditives passent au programme suivant, confirmant
chaque changement par un indicateur sonore.
Exemple :
Votre aide auditive est au programme 1. Vous souhaitez
passer au programme 3.
• Appuyez deux fois sur le bouton-poussoir.
Votre audiologiste ou votre professionnel de la santé auditive
peut activer ou désactiver les indicateurs sonores visant à
indiquer une modification de programme.
Contrôle de volume
• Faites glisser la gaine de la télécommande pour découvrir le
panneau de commande.
• Tournez la gaine vers le signe + pour augmenter le volume
de vos aides auditives.
• Tournez la gaine vers le signe - pour réduire le volume de
vos aides auditives.
• Lorsque vous tournez la gaine et que vous la relâchez,
le volume change d’un échelon. Le voyant DEL de la
télécommande clignote.
• Lorsque vous tournez la gaine et que vous la maintenez
dans cette position, le volume change continuellement. Le
voyant DEL de la télécommande clignote une fois puis reste
xe. Vous entendrez un indicateur sonore dans vos aides
auditives quand la limite de volume est atteinte.
Votre audiologiste ou votre professionnel de la santé auditive
peut activer ou désactiver les indicateurs sonores de vos
aides auditives.
Page 25

CONSEILS RELATIFS À L’UTILISATION DE LA TÉLÉCOMMANDE
18
SOIN ET ENTRETIEN
19
Conseils relatifs à l’utilisation
de la télécommande
Notes de sécurité concernant les piles
Note : Des piles qui fuient sont susceptibles d’endommager l’appareil.
Retirez les piles quand vous n’utilisez pas votre appareil
pendant une période prolongée.
Ne jetez pas les piles usagées dans les ordures ménagères.
Remettez-les plutôt à votre audiologiste ou à votre
professionnel de la santé auditive pour une mise au rebut
conforme à la réglementation en vigueur en matière de
protection de l’environnement.
Les petites pièces sont susceptibles de provoquer un
étouffement. Gardez les piles et la télécommande hors de
portée des enfants. En cas d’ingestion, consultez un médecin
ou rendez-vous sur-le-champ à l’hôpital.
Soin et entretien
Protection
Utilisez l’étui (voir la section Accessoires) pour protéger la
télécommande contre les éclaboussures accidentelles lorsque
vous êtes à proximité d’une source d’eau, comme un évier.
Nettoyage
Note : N’immergez PAS la télécommande dans l’eau! L’étui n’assure
PAS l’étanchéité totale de votre télécommande. N’utilisez PAS
d’alcool ou de benzène pour nettoyer la télécommande.
• Nettoyez la télécommande à l’aide d’un papier-mouchoir au
besoin.
• Évitez d’utiliser des produits d’entretien abrasifs contenant
des additifs comme les acides citriques, l’ammoniac, etc.
Note : La télécommande est sensible aux éléments suivants : chaleur
extrême, humidité élevée, champs magnétiques puissants
(> 0,1 T), rayons X et contraintes mécaniques. N’exposez pas
votre télécommande à des températures extrêmes ou à une
forte humidité. Ne la laissez pas exposée aux rayons directs
du soleil et ne l’immergez pas dans l’eau.
Évitez de mouiller
vos aides auditives.
Page 26

RENSEIGNEMENTS TECHNIQUES
20
RENSEIGNEMENTS TECHNIQUES
21
Renseignements techniques
Technologie sans fil
La technologie sans fil permet de synchroniser deux aides
auditives. Si vous changez le programme ou le volume d’un
des appareils, l’autre sera automatiquement modifié. De plus,
la technologie sans fil ajuste automatiquement le système de
façon à modier les deux aides auditives simultanément an
de s’adapter aux différentes situations d’écoute.
Fréquences de fonctionnement des télécommandes ePen et
ProPocket : Fc = 3,28 MHz
CE, FCC et les informations de conformité d’Industrie Canada
se retrouvent à l’intérieur du compartiment de la (des) pile(s).
Tout changement ou modification non expressément
approuvés par le fabricant pourrait annuler le droit de
l’utilisateur à faire fonctionner le présent équipement.
Télécommande ePen
FCC : SGI-WL300
IC : 267AB-WL300
Télécommande ProPocket
FCC : SGI-WL101
IC : 267AB-W101
Télécommande ePocket
IC : 267AB-WL100
Ce dispositif numérique de radiocommunication de
catégorie II, de classe B, est conforme à la norme CNR-210
d’Industrie Canada et à la partie 15 des règles de la Federal
Communication Commission (FCC).
L’usage fait l’objet des deux conditions suivantes :
(1) ce dispositif ne doit pas causer d’interférence et
(2) ce dispositif doit s’adapter à toute interférence, y compris
l’interférence pouvant causer le fonctionnement involontaire
du dispositif.
Ce matériel a été testé et a montré qu’il respectait les
limites fixées pour les appareils numériques de classe B,
conformément à la partie 15 des règles de la FCC et à la norme
CNR-210 d’Industrie Canada. Ces limites sont prévues pour
offrir une protection raisonnable contre les interférences
nuisibles dans une installation résidentielle. Cet équipement
produit, utilise et peut émettre de l’énergie radioélectrique.
Si l’appareil n’est pas installé et utilisé conformément aux
instructions, il peut provoquer des interférences nuisibles
aux communications radio. Il n’est toutefois pas possible
de garantir l’absence d’interférence dans une installation
particulière. Si cet équipement provoque une interférence
nuisible à la réception radio ou télévisuelle (qu’il est possible
de déterminer en arrêtant, puis en rallumant l’appareil),
l’utilisateur est invité à corriger cette situation en adoptant
l’une ou plusieurs des mesures suivantes :
• Réorientez ou relocalisez l’antenne réceptrice.
• Augmentez la distance de séparation entre l’équipement et
le récepteur.
• Connectez l’appareil à une prise sur un circuit différent de
celui où le récepteur est branché.
• Pour obtenir de l’aide, contactez le revendeur ou un
technicien radio/TV expérimenté.
Page 27

LISTE DE VÉRIFICATION DU RENDEMENT DES AIDES AUDITIVES
22
GARANTIE ET SERVICE
23
Liste de vérification du rendement
des aides auditives
Problème Solution possible
La télécommande ne
fonctionne pas
• Vérier si le verrou de sécurité est enclenché et, si
c’est le cas, le déverrouiller
• Vérier si les piles sont déchargées et, si c’est le cas,
les remplacer
• S’éloigner des sources de bruit électromagnétique
Une autre télécommande
affecte le fonctionnement
de vos aides auditives
• Rapporter la télécommande et les aides auditives
à votre audiologiste ou à votre professionnel de la
santé auditive
Si la difculté que vous éprouvez avec votre aide auditive
n’apparaît pas dans la liste de vérication, veuillez consulter
votre audiologiste ou votre professionnel de la santé auditive.
Garantie et service
Votre télécommande est protégée par une garantie de 1 (un)
an pièces et main d’œuvre à partir de la date d’achat initial.
Votre télécommande n’est pas protégée contre les pertes et
les altérations. Conformément à la garantie, toute pièce de
télécommandes expédiée dans un Centre de service Siemens
autorisé sera réparée ou remplacée par des pièces neuves ou
remises à neuf, sans frais, pour répondre aux spécifications
techniques du produit.
Toute réparation doit être effectuée par un Centre de service
Siemens autorisé. Toute réparation non conforme effectuée
dans un centre de réparation non autorisé rend nulle et non
avenue cette garantie, et le coût de la réparation sera calculé
en fonction du prix des pièces et de la main d’œuvre.
Cette garantie ne couvre pas les défectuosités causées par
une usure excessive ou une mauvaise utilisation du produit,
comme les chocs physiques ou par des interventions non
autorisées, chacun des cas rendant nulle et non avenue
la garantie.
En cas de défaillance ou de perte, apportez la télécommande
Siemens et/ou la preuve d’achat à l’audiologiste ou au
professionnel de la santé auditive chez qui vous l’avez achetée.
S’il faut la réparer à l’usine ou la remplacer, votre audiologiste
ou votre professionnel de la santé devra l’envoyer à un Centre
de service Siemens autorisé.
Page 28

GARANTIE ET SERVICE
24
Fig. 10 : Numéro de série
IMPORTANT
Inscrivez ci-dessous le numéro de série et la date d’achat de
votre télécommande pour référence.
Numéro de série _______________________________
Date d’achat ___________________________________
Le numéro de série est situé à l’intérieur du compartiment de
la pile (fig. 10).
L’année de fabrication est intégrée dans le numéro de série.
La garantie est établie en fonction de la date d’achat et non de
la date de fabrication.
Le numéro de série pourrait ressembler à cet exemple :
AV12345. La deuxième lettre de ce numéro de série fait
référence à l’année de fabrication de la télécommande.
Les lettres U et V indiquent que l’année de fabrication est
2009. Votre audiologiste ou votre professionnel de la santé
auditive saura répondre à toutes questions au sujet du code
d’identification de votre télécommande.
Page 29

Information in this brochure is subject
to change without notice.
Copyright © 2009 Siemens Hearing
Instruments, Inc. All rights reserved.
Les renseignements contenus dans le
présent guide peuvent faire l’objet de
modifications sans préavis.
Tous droits réservés © 2009 Siemens
Hearing Instruments, Inc.
Local Contact Information
Siemens Hearing Instruments, Inc.
P.O. Box 1397
Piscataway, NJ 08855-1397
www.usa.siemens.com/hearing
Siemens Hearing Instruments
A Division of Siemens Canada Ltd.
320 Pinebush Road
Cambridge, Ontario
Canada
N1T 1Z6
www.siemens.ca/hearing
Global Siemens Headquarters
Siemens AG
Wittelsbacherplatz 2
80333 Muenchen
Germany
Legal Manufacturer
Siemens Audiologische Technik GmbH
Gebberstrasse 125
91058 Erlangen
Germany
Global Business Unit
Siemens Audiologische Technik GmbH
Gebberstrasse 125
91058 Erlangen
Germany
Phone: +49 9131 308 0
Global Siemens
Healthcare Headquarters
Siemens AG
Healthcare Sector
Henkestrasse 127
91058 Erlangen
Germany
Phone: +49 9131 84 0
www.siemens.com/healthcare
10295010 10/09 1.0 22P208 10K
SHI/10822-9
www.siemens.com/hearing
 Loading...