

Page 1
CE1B3074en / 28.07.2003 Subject to alteration Siemens Building Technologies / HVAC Products
Operating Instructions
RDX…
RDX... – the temperature controller that allows you to easily set the room temperature you want. You have
2 choices. You can either rely on the factory settings or make adjustments that suit your individual needs.
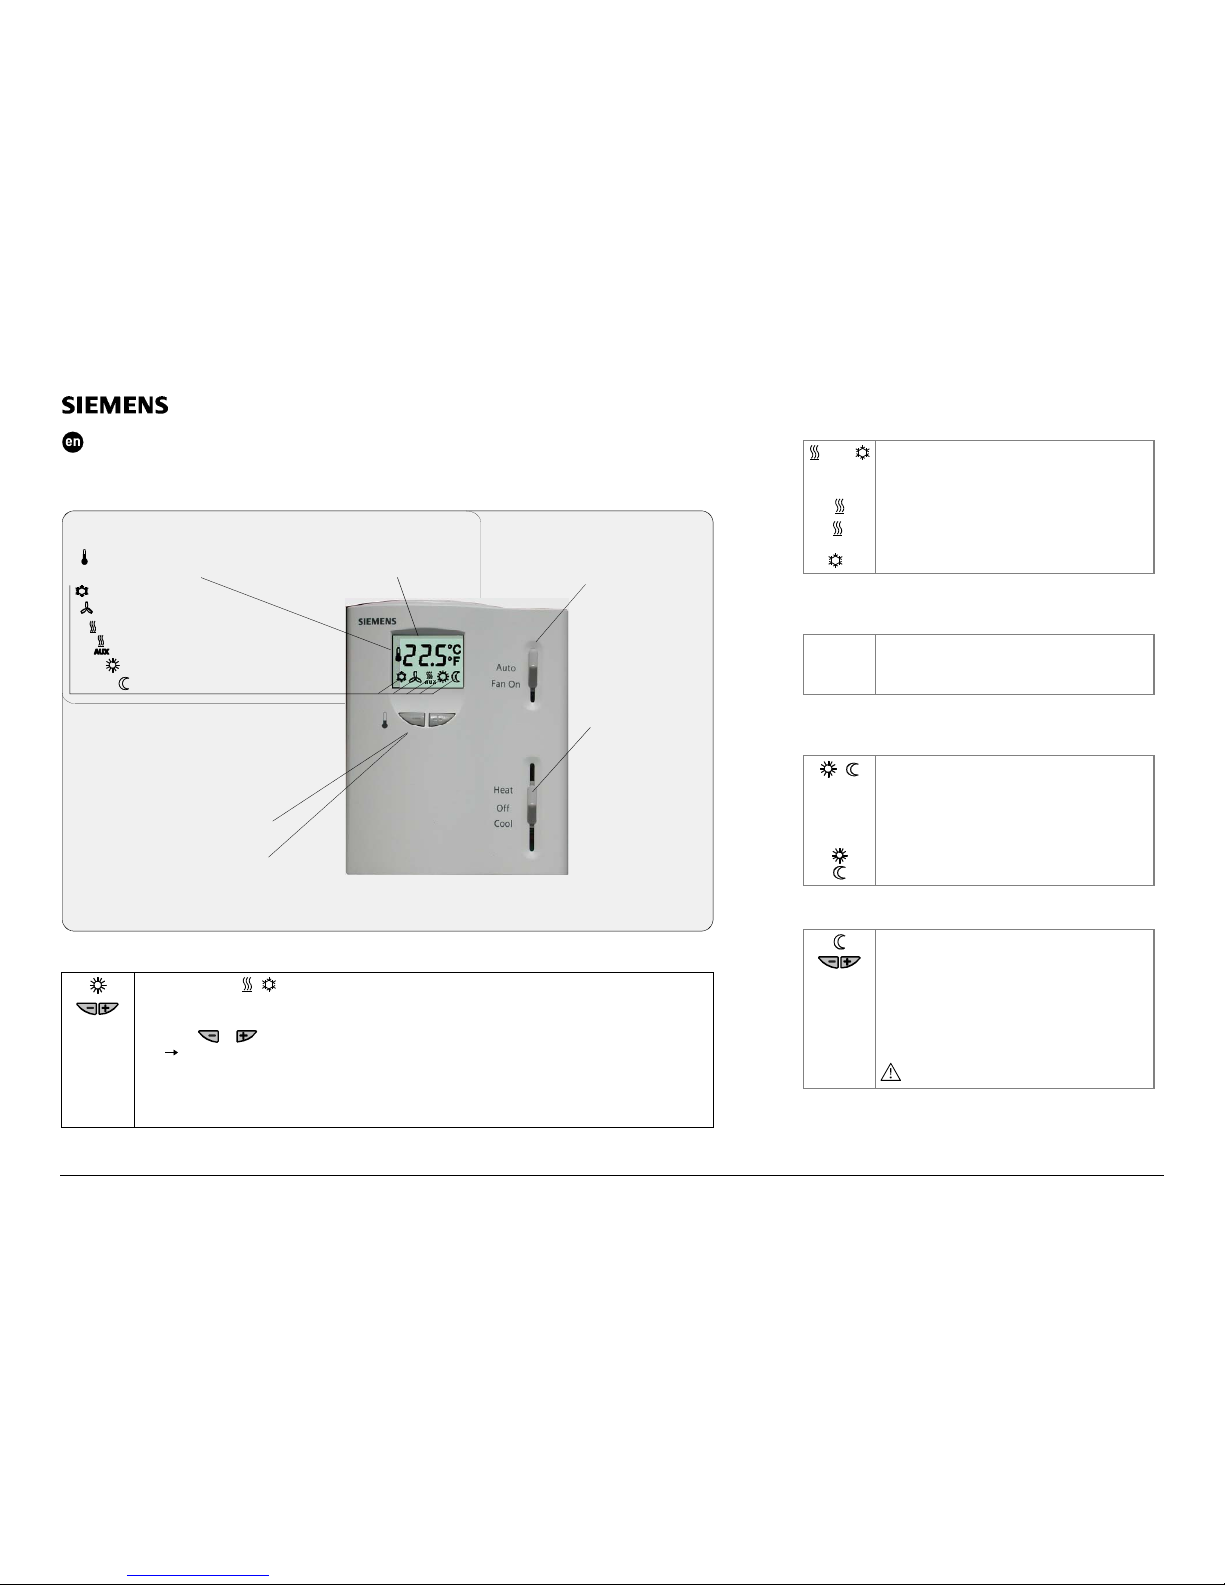
Settings and operation
Warmer / cooler
adjustment of
temperature setpoints
3074Z01en
Buttons for setpoint
adjustments
Fan operating mode selector
Automatic or Continuous On
Operating mode
selector
Heating,
OFF or
Cooling
Display
Normal operation
Energy saving mode
Display of current
room temperature
(in Celsius / Fahrenheit),
or new setpoint
Heating ON
Fan output is switched On
Cooling On
Display of actual
room temperature
Heating and auxiliary heating On
Are your rooms too warm or too cold?
Normal operation
/
The + / - buttons allow you to increase or decrease the current room temperature setpoint in steps of 0.5 °C.
To do this, proceed as follows:
• Press
or once
The setpoint display starts flashing
• Press the buttons again to change the room temperature setpoint
10 seconds after the last press, the new temperature setpoint will automatically be stored. The display stops
flashing.
Changing from heating to cooling mode
/OFF/
AUX
With the manual changeover, modes can be
selected from heating mode, Off to cooling mode.
Off = not in operation.
Display shows that the heating output is active
Display shows that the heating and auxiliary heating
outputs are both active
Display shows that the cooling output is active
Changing the fan operating mode from Automatic
to Continuous On
Auto
Fan On
The fan output is switched on when the heating or
cooling output is activated
The fan output is switched on permanently
Changing from normal operation to energy
saving mode
/
Changeover from normal operation to energy saving
mode takes place automatically via an external
contact
(window switch / remote operation switch, etc.).
(Function inactive if the Heat-Off- Cool switch is in
the Off position)
Display shows normal operation.
Display shows energy saving mode.
Energy saving mode
If you want to change the factory-set temperature
setpoints (16 °C for heating and 28 °C for cooling),
follow the procedure given below (“Changing the
control parameters”).
Important:
The setpoint of energy saving mode can be
set to Off.
This means that the controller is not active in energy
saving mode and the parameter display shows Off.
Risk of frost!
Page 2
CE1B3074en / 28.07.2003 Subject to alteration Siemens Building Technologies / HVAC Products
Commissioning (by qualified HVAC staff)
Parameter
Setting range
Factory setting
User setting (Please record all
changes you make)
P01
Setpoint of heating in energy saving mode
(operating mode changeover switch activated)
OFF, 8…18 °C in increments of 0,5 K
16 °C
P02
Setpoint of cooling in energy saving mode
(operating mode changeover switch activated)
OFF, 24…35 °C in increments of 0,5 K
28 °C
P03
Minimum setpoint limitation in normal mode 8… 20 °C in increments of 1 K 8 °C
P04
Maximum setpoint limitation in normal mode 21…35 °C in increments of 1 K 35 °C
P05
Minimum compressor off-time, outputs Y14, Y24 (heat pump) 1...10 Minutes (in increments of 1 Min.) 3 Min.
P06
Minimum compressor on-time, outputs Y14, Y24 (heat pump) 1...10 Minutes (in increments of 1 Min.) 1 Min.
P07
Auxiliary heater minimum hold time 1...10 Minutes (in increments of 1 Min.) 1 Min.
P08
Fan overrun after auxiliary heater shut down 30...300 Seconds (in increments of 10 Sec.) 30 Sec.
P09
Sensor calibration -3…+3 K in increments of 0,5 K 0 K
P10
P-band in heating mode 0.5…+4 K in increments of 0,5 K 2 K
P11
P-band in cooling mode 0.5…+4 K in increments of 0,5 K 1 K
P12
Setpoint differential between heating and auxiliary heating 0.5…+5 K in increments of 0,5 K 2 K
P13
Value of current room temperature (only display, no setting) 0…49 °C -
P14
Active temperature sensor (only display, no setting)
1: Room temperature sensor active
2: Remote temperature sensor active
-
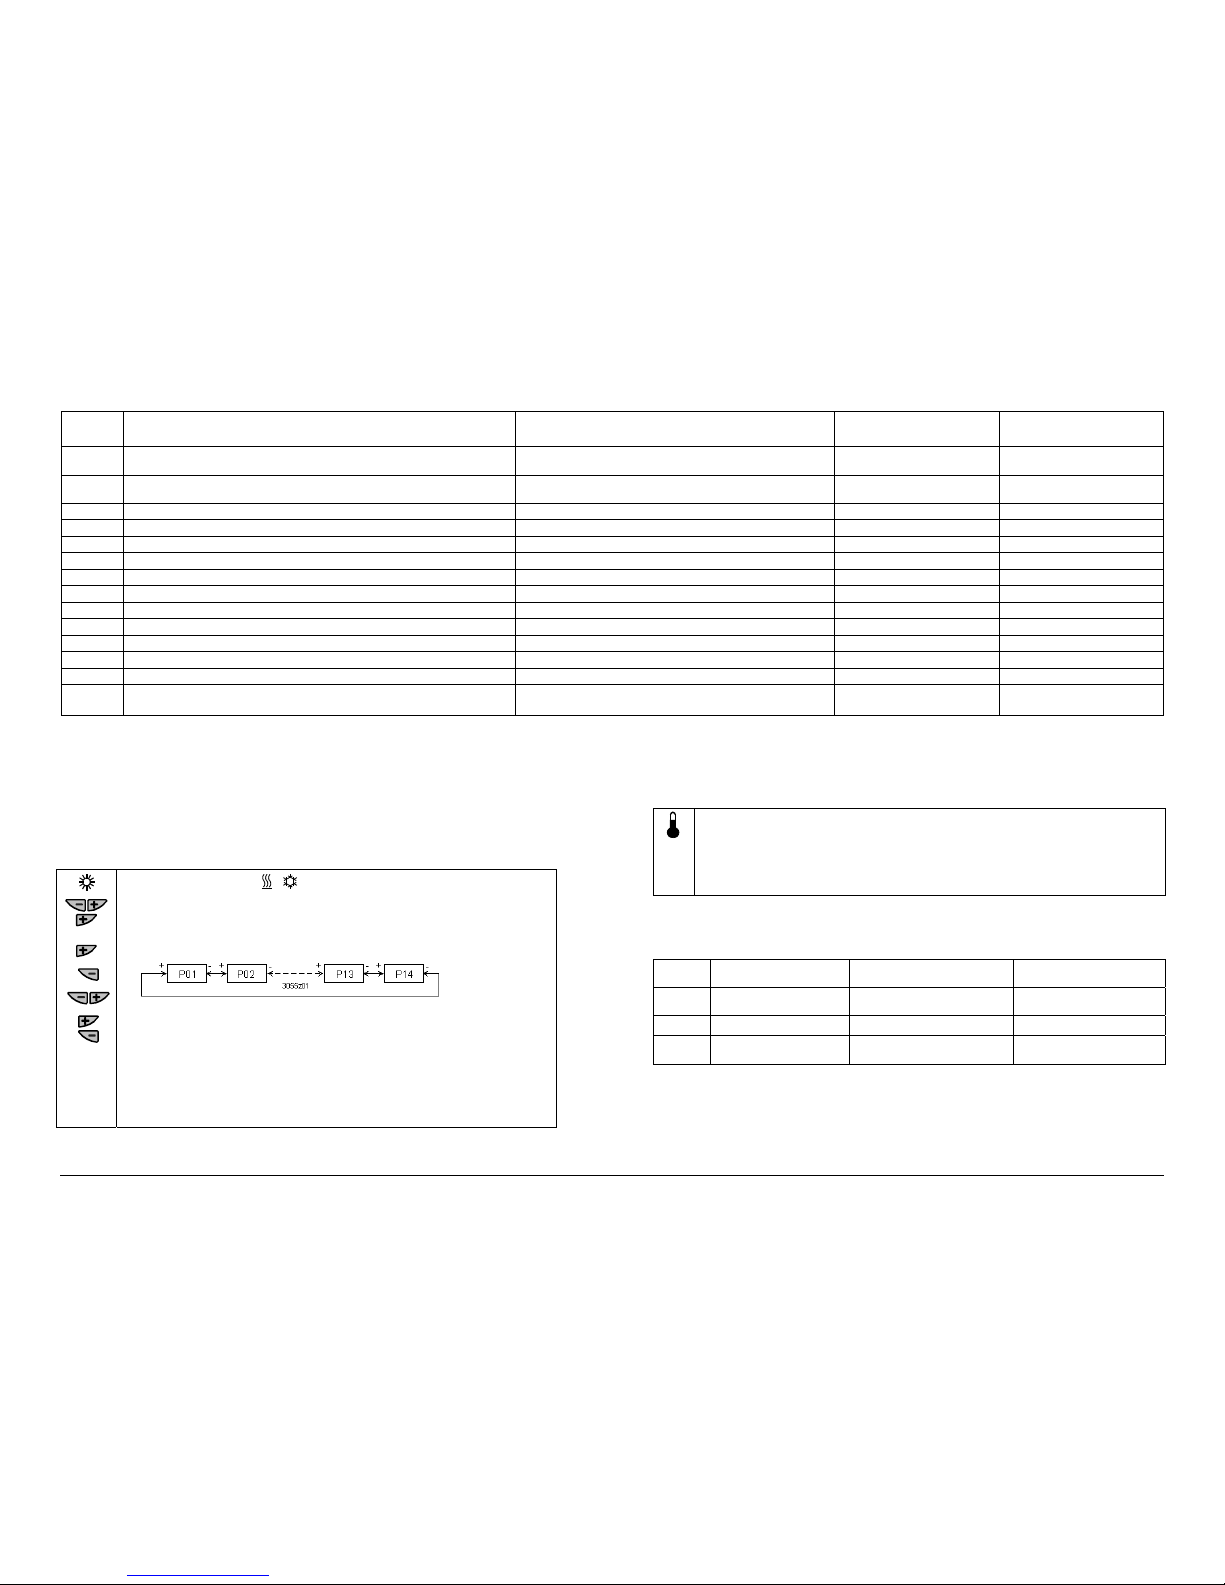
Changing the control parameters
To optimize the control performance, a number of control parameters can be adjusted. This can also be
made during operation without opening the controller.
Do you want to change the control parameters of the heating and / or cooling setpoints in the normal or
energy saving mode? Or do you want to increase / decrease the switching differential in heating and
cooling mode?
Then, proceed as follows:
(For factory settings, see above under “Commissioning)
Sensor calibration
If the room temperature displayed by the controller does not match with the temperature effectively
measured, the temperature sensor can be recalibrated. For that purpose, parameter P09 must be
changed
Proceed as described under “Changing the control parameters” and follow steps 1 through 3 to
select parameter P09.
With step 4, the room temperature displayed can now be matched to the temperature
effectively measured. Each push of the + or – button changes the temperature by + or – 0.5 °C
up to a maximum of + / - 3 °C. With step 7, the recalibration is automatically stored 10 seconds
after the last readjustment..
DIP-switch setting
DIPswitch
Function
Position ON
(Factory setting)
Position OFF
1
Operating action of
remote ON/OFF switch
Changeover activated when
switch is closed (N.O.)
Changeover activated
when switch is open (N.C.)
2 Auxiliary heat function No auxiliary heater connected Auxiliary heater connected
3
Display of
temperature/setpoint
Room temperature Temperature setpoint
1.
Normal operation mode /
2. Press the + and – buttons simultaneously for a min. of 3 and a max. of 5 seconds.
Release them and within 2 seconds, press the + button again for 3 seconds. The
display will show “P01”.
3. Select the required parameter by repeatedly pressing the + or – button:
4. Press the + and – buttons simultaneously, the current value of the selected
parameter appears, which can be changed by repeatedly pressing the + or –
button.
5. By pressing buttons + and - simultaneously again or 5 seconds after the last press
of a button, the last parameter will be displayed again.
6. If you wish to display and change additional parameters, repeat steps 3 through 5.
7. 10 seconds after the last display or setting, all changes will be stored.
 Loading...