

Page 1
CE1B3075en / 31.10.2008 Subject to alteration Building Technologies
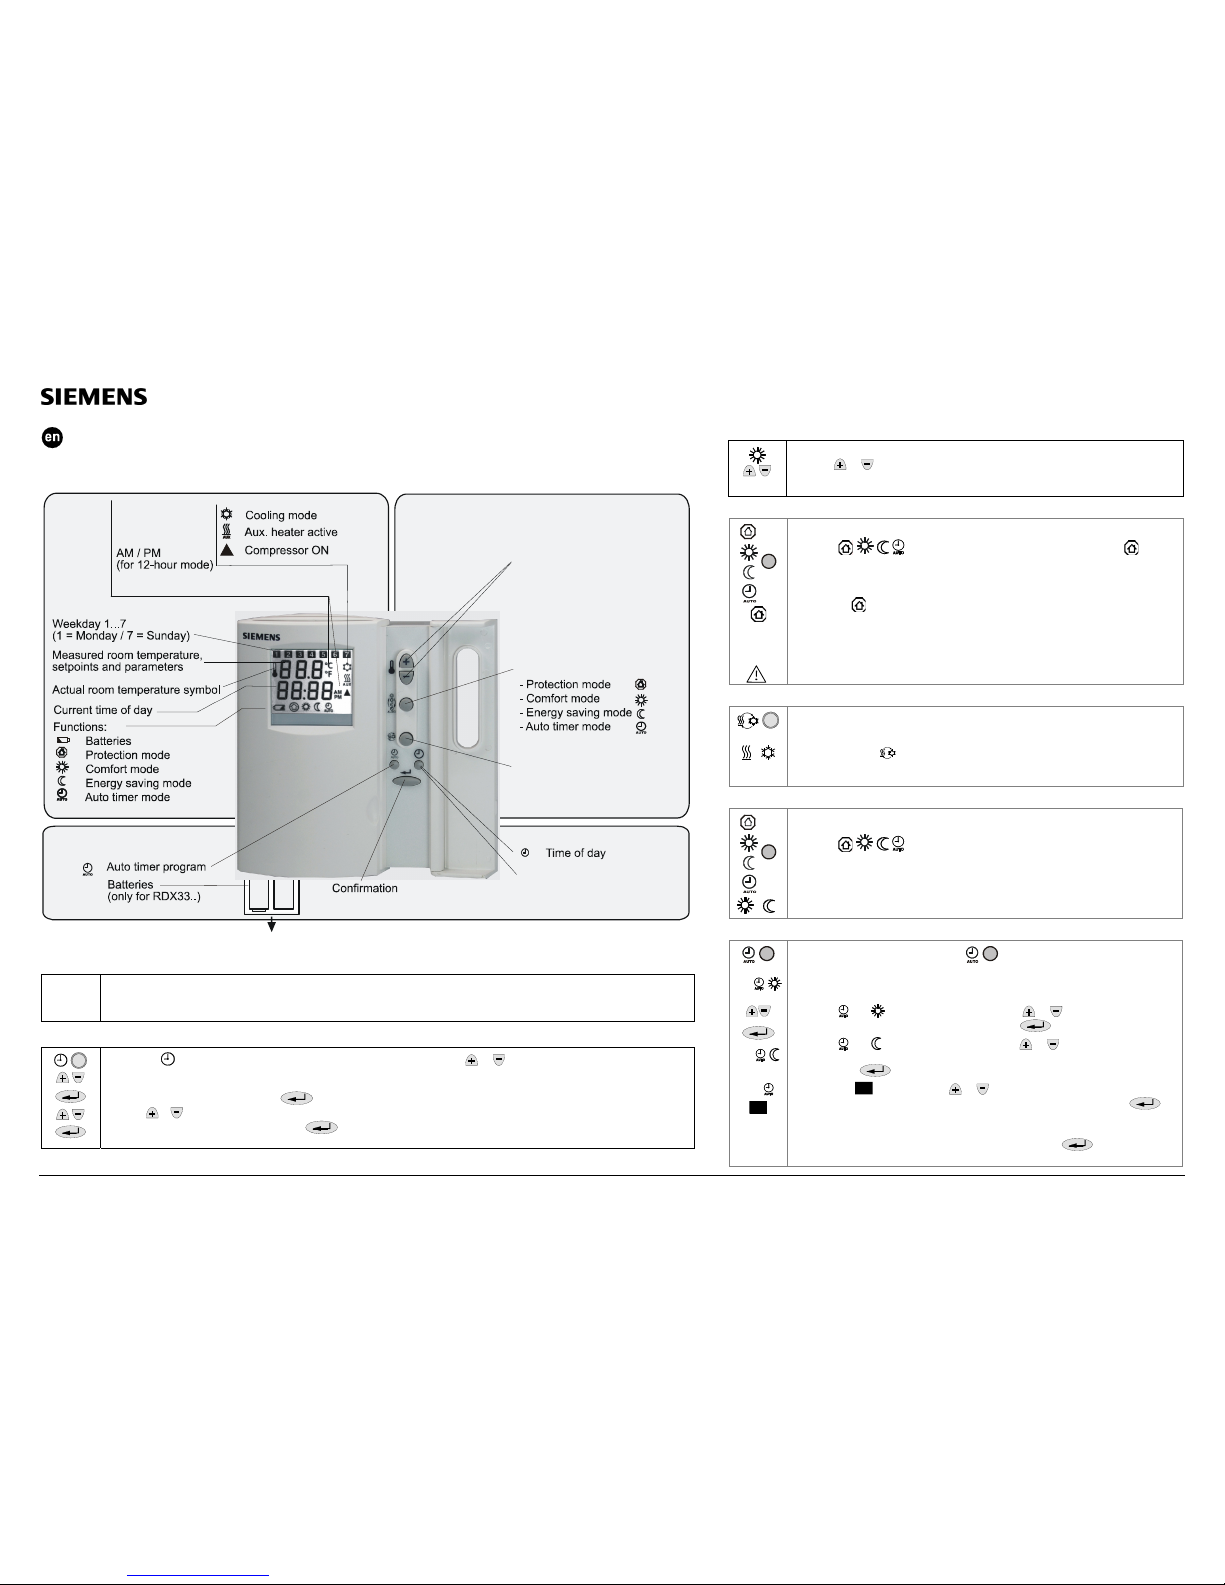
Operating Instructions RDX33… / RDX43...
RDX33… / RDX43... – the temperature controller that allows you to set the ideal room temperature you want. The controller provides
protection-,comfort-, energy saving- or auto timer mode with 8 programmable timers.
1.5V
'AA'
1.5V
'AA'
+-
Operation
Warmer / colder
setting the
temperature setpoints
and the time of day
3075Z01en
Display
Button operating mode
Settings
Heating / cooling
changeover button
°C
Temperature
°F
Temperature
1...7
Weekday
Commissioning
Initial
power-up
• Remove the black transit tabs from the 2 alkaline batteries. Check to see if the battery holder is in its correct position. If no
batteries are inserted, fit 2 alkaline batteries type AA in the battery compartment
• Once batteries are fitted, all symbols will appear on the display as shown for about 2 seconds.
Setting the time of day and the weekday
1. Keep the button pressed until the time digits start to flash and then press or to set the time of day. If the current
time is the 24-hour format and you wish to change to the 12-hour format, set P17 to 0 = 12-hour format (or vice versa 1 back
to the 24-hour format).
2. Confirm the time of day by pressing
and the weekday indicator starts to flash.
3. Press
or to set the current weekday.
4. Confirm the current weekday by pressing
.
Are your rooms too warm or too cold?
Do you want to set your controller to protection?
Press the
button several times until the display shows the symbol
to indicate that protection is selected.
In protection
, the controller maintains the adjusted lower setpoint of heating
(parameter P03) or the higher setpoint of cooling (parameter P04).
Important:
If the setpoint of protection is set to OFF (factory setting), the controller will not be
active.
Risk of frost!
Do you want to change from heating to cooling mode?
/
The changeover between cooling and heating is done by a remote changeover
switch.
When pressing the
button, the controller changes from heating to cooling or vice
versa.
Do you want to change to auto timer-, comfort or energy saving mode?
/
Press the
button several times until the display shows the symbols to
indicate which mode you want to select.
The controller will automatically change over comfort mode and energy saving mode
according to the 8 preprogrammed timers.
Do you want to set the programmable timer settings?
A..
A..
A..
1
To adjust the time schedule, keep the button pressed for 3 seconds to go to
the programmable timer setting mode.
This mode is indicated by displaying Ax (x= auto timer 1...8) and the time xx:xx
flashing. For each auto timer, proceed as follows:
1. The
and symbols are displayed. Press or to adjust the comfort
operation start time and confirm by pressing
.
2. The
and symbols are displayed. Press or to adjust the comfort
operation end time or energy saving start time respectively and confirm by
pressing
.
3. Symbol
1
will flash. Press or to select or deselect each day and
advance to the next day. Confirm setting for actual timer by pressing
and advance to the next timer
The controller will leave the programmable timer setting mode if no button is pressed
within 20 seconds. All changes made after the last press of
button will not be
saved.
Only applicable in comfort operation.
Pressing
or allows you to increase or decrease the current room temperature
setpoint for comfort operation in increments of 0.5 °C. The maximum setting range is
from 5...40 °C, unless it is limited by parameters P05 and P06.
Page 2
CE1B3075en / 31.10.2008 Subject to alteration Building Technologies
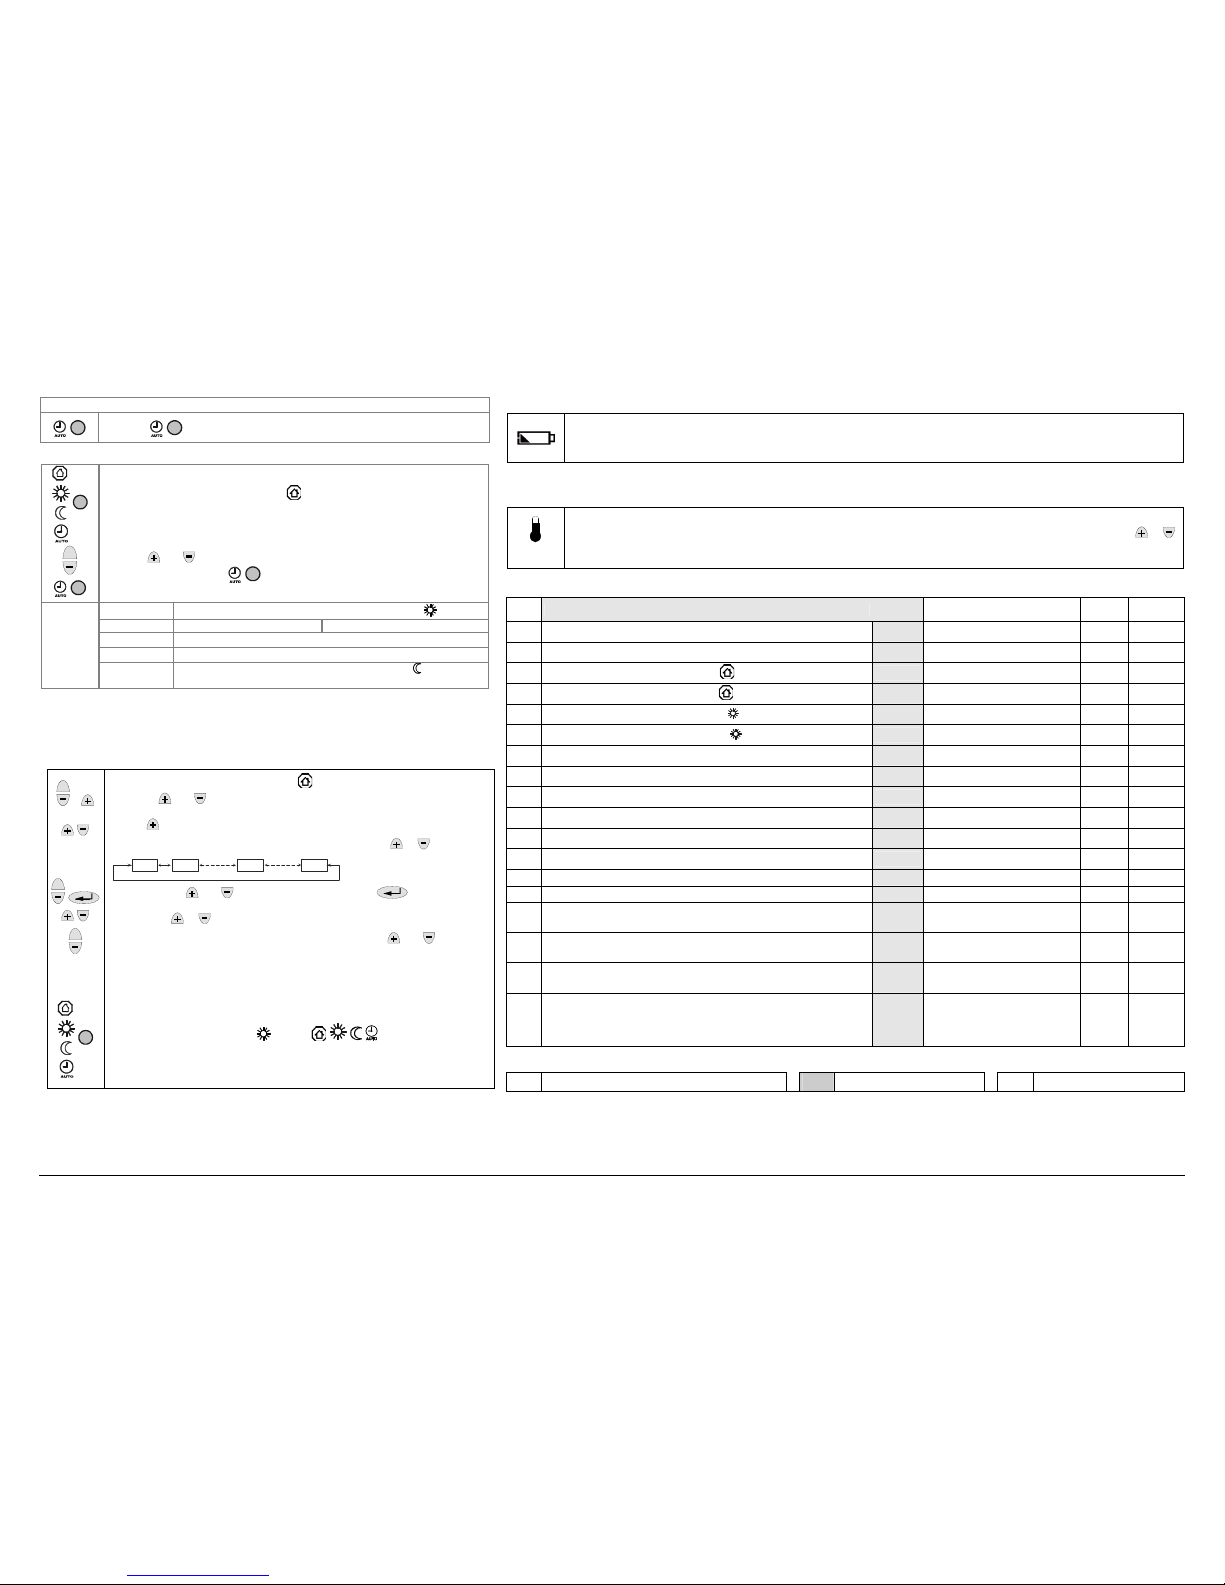
Do you want to reload the default timer settings?
+
1.
Set the controller to protection mode .
2. Press and simultaneously for 3 seconds. Release them and, within 2
seconds, press 2 times
.
Day/s
Time when controller is in normal operation
Mo (1) – Fr (5) 06:30 – 08:30 (A1) 17:30 – 22:30 (A2)
Sa (6) 08:00 – 23:00 (A3)
Su (7) 08:00 – 22:30 (A4)
Default
settings
- in the remaining time controller is in energy saving
- timer A5…A8 are free, no default setting
Changing the control parameters
To optimize the control performance, a number of control parameters can be adjusted. This can
also be made during operation without opening the controller.
If you want to change the control parameters, proceed as follows:
(For factory settings, see table on the right-hand side)
+
/
+
+
1. Set the controller to protection mode
2. Press
and simultaneously for a minimum of 3 and a
maximum of 5 seconds. Release them and, within 2 seconds, press
the
again for 3 seconds. The display will show “P01”.
3. Select the required parameter by repeatedly pressing the
or button:
P01 P02
P18
+-+-+
3075Z03
+
-
4. By pressing
and simultaneously, or by pressing , the current
value of the selected parameter appears, which can be changed by repeatedly
pressing
or .
5. 5 seconds after the last press of a button, or by pressing
and
simultaneously, the value will be stored.
6. If you wish to display and change additional parameters,
repeat steps 3 through 5.
7. 10 seconds after the last display or setting, all changes are
stored and the controller will return to standby.
8. Switch to comfort operation with the button.
Changing the batteries
1. Get 2 new batteries of type AA alkaline, 1.5 volts.
2. Within 1 minute: Remove the battery holder, then the batteries, insert new batteries and replace the battery holder.
3. Make certain the old batteries are disposed of properly, in compliance with environmental requirements.
Recalibrating the sensor
If the room temperature displayed by the controller does not agree with the temperature effectively measured, the temperature sensor can be
recalibrated. For that purpose parameter P07 must be changed.
Proceed as described under “Changing the control parameters” and follow steps 1 through 3 to select parameter P07.
With step 4, the room temperature displayed can now be matched to the temperature effectively measured. Each push of the
or
button changes the temperature by + or – 0.5 °C up to a maximum of + / - 3 °C. With step 7, the recalibration is automatically stored 10
seconds after the last readjustment.
Commissioning (by qualified HVAC staff) (all temperature settings can be made in increments of 0.5 K and the time in increments of 1 min.)
Parameter
Controller’s parameter factory settings: Setting range , step RDX33 RDX43
P01 Setpoint of heating in energy saving mode (W heat
Eco
) 16 OFF, 5 °C…W cool
Eco
, 0.5 K
P02 Setpoint of cooling in energy saving mode (W cool
Eco
) 28 OFF, W heat
Eco
…40 °C, 0.5 K
P03*
Setpoint of heating in protection mode
(W heat
PROT
)
8 °C OFF, 5 °C…W cool
PROT,
0.5 K
P04*
Setpoint of cooling in protection mode
(W cool
PROT
)
OFF OFF, W heat
PROT
…40 °C, 0.5 K
P05
Min. setpoint limitation in Comfort mode
(W min
Comf.
)
5 °C 5…40 °C, 0.5 K
P06
Max. setpoint limitation in Comfort mode
(W max
Comf.
)
35 °C 5…40 °C, 0.5 K
P07 Sensor calibration 0 K -3…+3 K, 0.5 K
P08 Switching differential heating SDH 2 K 0.5…+4K, 0.5 K
P09 Switching differential cooling SDC 1 K 0.5…+4K, 0.5 K
P10 Setpoint differential between heating & auxiliary heating WD 2 K 0.5…+5K, 0.5 K X
P11 Minimum compressor on-time (Q14) 1 min. 1…10 minutes, 1 min.
P12 Minimum compressor off-time (Q14) 3 min. 1…10 minutes, 1 min.
P13 Auxiliary heater minimum hold-time 1 min. 1…10 minutes, 1 min. X
P14 Selection of °C or °F °C
C or °F
P15 Display of temperature or setpoint ON
OFF: Setpoint
ON: Room temperature
P16 Auxiliary heater in heating mode 1: Enable
0: Disable
1: Enable
X
P17 Time format option 1: 24 h
0: 12 hour format
1: 24 hour format
P18 Operating action changeover heating/cooling Q21 - Q22 0:
0: Open (heating), close
(cooling)
1: Close (heating), open
(cooling)
Legend to table
Adjustable: Please record all changes you make
Not adjustable / display only
X
Not available
P03* / P04*: P04 is at least min. 5 K higher than P03
Energy saving tips without sacrificing comfort
●
Never allow room temperatures to exceed 21˚C.
● Air out rooms for short periods of time only, but properly, with the windows wide open.
Do you want to view the programmable timer settings?
Press the button to sequentially review the 8 auto timers.
 Loading...