

Siemens optiPoint 410 advance S, optiPoint 420 advance S User Manual

HiPath2000
HiPath 3000
HiPath 4000
optiPoint 410 advance S V6.0
optiPoint 420 advance S V6.0
User Manual

Safety Precautions
Safety Precautions
For Your Safety
The IP telephone optiPoint 410/420 advance S V6.0 complies with the European standard EN 60 950, which deals with the safety of information
technology appliances including electronic office equipment. This device
has been designed with safety in mind, thus protecting both individuals
and objects.
There is always the danger of small objects being swallowed by young children. In the case of the optiPoint 410/420 advance S V6.0, this applies in
particular to the connecting cord clip.
Please make sure that such items are not accessible to children.
• Use only the enclosed power supply together with the special LAN
• Never open the power supply enclosure.
cable.
Protection of the Telephone
• The telephone must not be used in bathrooms, etc. as it is not splashproof.
• Before connecting or disconnecting the LAN cable, pull the power plug
out of the plug receptacle first.
• The device must not come into contact with abrasive liquids or liquids
which are liable to discolor it, such as tea, coffee, fruit juices or soft
drinks.
Location of the Telephone
• The telephone should be operated in a controlled environment with an
ambient temperature between 5 °C and 40 °C (41 °F and 104 °F).
• To ensure good handsfree talking quality, the area in front of the microphone (front right) should be kept clear. The optimum handsfree distance is 20 inches (50 cm).
• Do not install the telephone in a room where large quantities of dust
accumulate; this can considerably reduce the service life of the telephone.
• Do not expose the telephone to direct sunlight or any other source of
heat, as this is liable to damage the electronic equipment and the plastic casing.
• Do not operate the telephone in damp environments such as bathrooms.
2
Safety Precautions
Important Notes
Never operate the telephone in an environment where there is a risk of
explosion.
Only use Siemens accessories. The use of other manufacturers’ accessories may be dangerous and will render the warranty and approval null
and void.
Never open the telephone set or an add-on unit. If any problems arise,
contact your service personnel.
The information provided in this document contains merely general descriptions or characteristics of performance which in case of actual use do not always apply as described or
which may change as a result of further development of the products.
An obligation to provide the respective characteristics shall only exist if expressly agreed
in the terms of contract. The trademarks used are owned by Siemens AG or their respective owners.
Labels
The device conforms to the EU guideline 1999/5/EG, as attested by the CE
mark.
This device has been manufactured in accordance with our certified environmental management system (ISO 14001). This process ensures that energy
consumption and the use of primary raw materials are kept to a minimum,
thus reducing waste production.
All electrical and electronic products should be disposed of separately from
the municipal waste stream via designated collection facilities appointed by
the government or the local authorities.
The correct disposal and separate collection of your old appliance will help
prevent potential negative consequences for the environment and human
health. It is a precondition for reuse and recycling of used electrical and electronic equipment.
For more detailed information about disposal of your old appliance, please
contact your city office, waste disposal service, the shop where you
purchased the product or your sales representative.
The statements quoted above are only fully valid for equipment which is installed and sold in the countries of the European Union and is covered by
the directive 2002/96/EC. Countries outside the European Union may have
other regulations regarding the disposal of electrical and electronic equipment.
3

Contents
Contents
Safety Precautions. . . . . . . . . . . . . . . . . . . . . . . . . . . . .2
For Your Safety . . . . . . . . . . . . . . . . . . . . . . . . . . . . . . . . . . . . . . . . . . . . 2
Protection of the Telephone . . . . . . . . . . . . . . . . . . . . . . . . . . . . . . . . . . 2
Location of the Telephone. . . . . . . . . . . . . . . . . . . . . . . . . . . . . . . . . . . . 2
Important Notes . . . . . . . . . . . . . . . . . . . . . . . . . . . . . . . . . . . . . . . . . . . 3
Labels . . . . . . . . . . . . . . . . . . . . . . . . . . . . . . . . . . . . . . . . . . . . . . . . . . . 3
General Information. . . . . . . . . . . . . . . . . . . . . . . . . . . .9
About These Operating Instructions . . . . . . . . . . . . . . . . . . . . . . . . . . . . 9
Intended Use. . . . . . . . . . . . . . . . . . . . . . . . . . . . . . . . . . . . . . . . . . . . . . 9
Product Identification. . . . . . . . . . . . . . . . . . . . . . . . . . . . . . . . . . . . . . . . 9
Echo Effect . . . . . . . . . . . . . . . . . . . . . . . . . . . . . . . . . . . . . . . . . . . . . . 10
Service. . . . . . . . . . . . . . . . . . . . . . . . . . . . . . . . . . . . . . . . . . . . . . . . . . 10
Notes and Symbols . . . . . . . . . . . . . . . . . . . . . . . . . . . . . . . . . . . . . . . . 10
Safety. . . . . . . . . . . . . . . . . . . . . . . . . . . . . . . . . . . . . . . . . . . . . . . . 10
Symbols in the Manual . . . . . . . . . . . . . . . . . . . . . . . . . . . . . . . . . . 11
Introduction. . . . . . . . . . . . . . . . . . . . . . . . . . . . . . . . . .12
Overview . . . . . . . . . . . . . . . . . . . . . . . . . . . . . . . . . . . . . . . . . . . . . . . . 12
Features . . . . . . . . . . . . . . . . . . . . . . . . . . . . . . . . . . . . . . . . . . . . . . . . 13
Telephone Types . . . . . . . . . . . . . . . . . . . . . . . . . . . . . . . . . . . . . . . . . . 13
Layout of the optiPoint 420 advance S V6.0 . . . . . . . . . . . . . . . . . . . . . 14
Display and Dialog Keys . . . . . . . . . . . . . . . . . . . . . . . . . . . . . . . . . . . . 15
Keypad. . . . . . . . . . . . . . . . . . . . . . . . . . . . . . . . . . . . . . . . . . . . . . . . . . 16
Programmable Keys . . . . . . . . . . . . . . . . . . . . . . . . . . . . . . . . . . . . . . . 17
Control Keys . . . . . . . . . . . . . . . . . . . . . . . . . . . . . . . . . . . . . . . . . . . . . 18
Operating the Telephone with the Display . . . . . . .19
Standard Telephone Functions . . . . . . . . . . . . . . . . . . . . . . . . . . . . . . . 19
Function Selection. . . . . . . . . . . . . . . . . . . . . . . . . . . . . . . . . . . . . . . . . 19
Incoming Calls . . . . . . . . . . . . . . . . . . . . . . . . . . . . . . . . . . . . . . . . . . . . 20
Answering a Call With the Handset. . . . . . . . . . . . . . . . . . . . . . . . . 20
Answering a Call Without the Headset (Speakerphone Mode) . . . . 20
Ending a Call . . . . . . . . . . . . . . . . . . . . . . . . . . . . . . . . . . . . . . . . . . 21
Switching to Speakerphone Mode . . . . . . . . . . . . . . . . . . . . . . . . . 21
Switching to the Handset . . . . . . . . . . . . . . . . . . . . . . . . . . . . . . . . 22
Open Listening During the Call . . . . . . . . . . . . . . . . . . . . . . . . . . . . 22
Refusing a Call . . . . . . . . . . . . . . . . . . . . . . . . . . . . . . . . . . . . . . . . . 22
Holding a Call. . . . . . . . . . . . . . . . . . . . . . . . . . . . . . . . . . . . . . . . . . . . . 23
Using the Menu . . . . . . . . . . . . . . . . . . . . . . . . . . . . . . . . . . . . . . . . 23
4

Contents
Transferring a Call . . . . . . . . . . . . . . . . . . . . . . . . . . . . . . . . . . . . . . . . . 23
Making Calls . . . . . . . . . . . . . . . . . . . . . . . . . . . . . . . . . . . . . . . . . . . . . 24
Dialing Following Line Seizure . . . . . . . . . . . . . . . . . . . . . . . . . . . . . 24
Dialing Before Line Seizure . . . . . . . . . . . . . . . . . . . . . . . . . . . . . . . 25
Using DTMF Tone Dialing . . . . . . . . . . . . . . . . . . . . . . . . . . . . . . . . 25
Call Log . . . . . . . . . . . . . . . . . . . . . . . . . . . . . . . . . . . . . . . . . . . . . . . . . 26
Displaying the Call Log. . . . . . . . . . . . . . . . . . . . . . . . . . . . . . . . . . . 27
"Missed calls" Key . . . . . . . . . . . . . . . . . . . . . . . . . . . . . . . . . . . . . . 29
Redial Key . . . . . . . . . . . . . . . . . . . . . . . . . . . . . . . . . . . . . . . . . . . . 29
Consulting with a Second Party. . . . . . . . . . . . . . . . . . . . . . . . . . . . . . . 30
Introducing Consultation . . . . . . . . . . . . . . . . . . . . . . . . . . . . . . . . . 30
Canceling Consultation Hold . . . . . . . . . . . . . . . . . . . . . . . . . . . . . . 31
Alternating Between Two Parties . . . . . . . . . . . . . . . . . . . . . . . . . . 31
Dialing Aids . . . . . . . . . . . . . . . . . . . . . . . . . . . . . . . . . . . . . . . . . . . . . . 31
Dialing with Selected Dialing Key . . . . . . . . . . . . . . . . . . . . . . . . . . 31
Using Auto Dial Timer . . . . . . . . . . . . . . . . . . . . . . . . . . . . . . . . . . . 32
Using Abbreviated Dialing . . . . . . . . . . . . . . . . . . . . . . . . . . . . . . . . 33
Using Notebook Functions . . . . . . . . . . . . . . . . . . . . . . . . . . . . . . . 33
Using Repdial Keys . . . . . . . . . . . . . . . . . . . . . . . . . . . . . . . . . . . . . 34
Deactivating the Ringer . . . . . . . . . . . . . . . . . . . . . . . . . . . . . . . . . . . . . 35
Activating Do Not Disturb . . . . . . . . . . . . . . . . . . . . . . . . . . . . . . . . . . . 35
Activating/Deactivating Do Not Disturb . . . . . . . . . . . . . . . . . . . . . . 35
Using a Key to Activate/Deactivate Do Not Disturb. . . . . . . . . . . . . 36
Customizing the Telephone. . . . . . . . . . . . . . . . . . . .37
Accessing the Setup Menu . . . . . . . . . . . . . . . . . . . . . . . . . . . . . . . . . . 37
Settings . . . . . . . . . . . . . . . . . . . . . . . . . . . . . . . . . . . . . . . . . . . . . . . . . 38
Configuration . . . . . . . . . . . . . . . . . . . . . . . . . . . . . . . . . . . . . . . . . . . . . 38
Country Options. . . . . . . . . . . . . . . . . . . . . . . . . . . . . . . . . . . . . . . . 38
Language . . . . . . . . . . . . . . . . . . . . . . . . . . . . . . . . . . . . . . . . . . . . . 39
Date/Time . . . . . . . . . . . . . . . . . . . . . . . . . . . . . . . . . . . . . . . . . . . . 39
Call Duration. . . . . . . . . . . . . . . . . . . . . . . . . . . . . . . . . . . . . . . . . . . 40
Call Transfer. . . . . . . . . . . . . . . . . . . . . . . . . . . . . . . . . . . . . . . . . . . 41
Call Join . . . . . . . . . . . . . . . . . . . . . . . . . . . . . . . . . . . . . . . . . . . . . . 41
Contrast . . . . . . . . . . . . . . . . . . . . . . . . . . . . . . . . . . . . . . . . . . . . . . 42
Dialing Mode . . . . . . . . . . . . . . . . . . . . . . . . . . . . . . . . . . . . . . . . . . 42
Call Display . . . . . . . . . . . . . . . . . . . . . . . . . . . . . . . . . . . . . . . . . . . 43
Daylight Saving . . . . . . . . . . . . . . . . . . . . . . . . . . . . . . . . . . . . . . . . 43
Auto Dial Timer . . . . . . . . . . . . . . . . . . . . . . . . . . . . . . . . . . . . . . . . 44
Hold Ringback Timer . . . . . . . . . . . . . . . . . . . . . . . . . . . . . . . . . . . . 44
Music On Hold. . . . . . . . . . . . . . . . . . . . . . . . . . . . . . . . . . . . . . . . . 45
Do Not Disturb. . . . . . . . . . . . . . . . . . . . . . . . . . . . . . . . . . . . . . . . . 46
Hold Ringback . . . . . . . . . . . . . . . . . . . . . . . . . . . . . . . . . . . . . . . . . 46
Idle State Options . . . . . . . . . . . . . . . . . . . . . . . . . . . . . . . . . . . . . . 46
Inactivity Timeout. . . . . . . . . . . . . . . . . . . . . . . . . . . . . . . . . . . . . . . 47
DSM Call View. . . . . . . . . . . . . . . . . . . . . . . . . . . . . . . . . . . . . . . . . 48
USB Keyboard Type. . . . . . . . . . . . . . . . . . . . . . . . . . . . . . . . . . . . . 48
5

Contents
Displaying Icons Instead of Text . . . . . . . . . . . . . . . . . . . . . . . . . . . 49
Options for on-hook dialing . . . . . . . . . . . . . . . . . . . . . . . . . . . . . . . 49
Suppressing message about missed calls. . . . . . . . . . . . . . . . . . . . 50
Rejecting a call during dialing. . . . . . . . . . . . . . . . . . . . . . . . . . . . . . 50
Local Functions . . . . . . . . . . . . . . . . . . . . . . . . . . . . . . . . . . . . . . . . . . . 51
Abbreviated Dialing . . . . . . . . . . . . . . . . . . . . . . . . . . . . . . . . . . . . . 51
User Password . . . . . . . . . . . . . . . . . . . . . . . . . . . . . . . . . . . . . . . . 52
Lock Phone . . . . . . . . . . . . . . . . . . . . . . . . . . . . . . . . . . . . . . . . . . . 53
Memory . . . . . . . . . . . . . . . . . . . . . . . . . . . . . . . . . . . . . . . . . . . . . . 53
Assigning Function Keys . . . . . . . . . . . . . . . . . . . . . . . . . . . . . . . . . . . 54
Example 1: Assigning the Mute Function to a Function Key. . . . . . 55
Example 2: Assigning Repertory Dialing to a Function Key . . . . . . . 56
Example 3: Assigning a Number or Name to a Function Key . . . . . 58
Using Function Keys . . . . . . . . . . . . . . . . . . . . . . . . . . . . . . . . . . . . 60
Audio Settings . . . . . . . . . . . . . . . . . . . . . . . . . . . . . . . . . . . . . . . . . . . . 61
Loudspeaker Volume. . . . . . . . . . . . . . . . . . . . . . . . . . . . . . . . . . . . 61
Ringer Volume . . . . . . . . . . . . . . . . . . . . . . . . . . . . . . . . . . . . . . . . . 62
Ringer . . . . . . . . . . . . . . . . . . . . . . . . . . . . . . . . . . . . . . . . . . . . . . . 63
Handset Volume . . . . . . . . . . . . . . . . . . . . . . . . . . . . . . . . . . . . . . . 63
Headset Volume . . . . . . . . . . . . . . . . . . . . . . . . . . . . . . . . . . . . . . . 64
Room Acoustics. . . . . . . . . . . . . . . . . . . . . . . . . . . . . . . . . . . . . . . . 64
Key Clicks . . . . . . . . . . . . . . . . . . . . . . . . . . . . . . . . . . . . . . . . . . . . 65
Operating the Telephone with the optiPoint display
module . . . . . . . . . . . . . . . . . . . . . . . . . . . . . . . . . . . . . .66
Using the Display. . . . . . . . . . . . . . . . . . . . . . . . . . . . . . . . . . . . . . . . . . 66
Call View Start Display. . . . . . . . . . . . . . . . . . . . . . . . . . . . . . . . . . . . . . 66
Swap Display . . . . . . . . . . . . . . . . . . . . . . . . . . . . . . . . . . . . . . . . . . 67
Applications Display . . . . . . . . . . . . . . . . . . . . . . . . . . . . . . . . . . . . . . . 67
Incoming call . . . . . . . . . . . . . . . . . . . . . . . . . . . . . . . . . . . . . . . . . . . . . 68
Incoming Call in Idle Mode . . . . . . . . . . . . . . . . . . . . . . . . . . . . . . . 68
Answering a Call . . . . . . . . . . . . . . . . . . . . . . . . . . . . . . . . . . . . . . . 69
Reject Call . . . . . . . . . . . . . . . . . . . . . . . . . . . . . . . . . . . . . . . . . . . . 70
Ringer . . . . . . . . . . . . . . . . . . . . . . . . . . . . . . . . . . . . . . . . . . . . . . . 70
Placing a Call on Hold . . . . . . . . . . . . . . . . . . . . . . . . . . . . . . . . . . . 71
Ending a Call . . . . . . . . . . . . . . . . . . . . . . . . . . . . . . . . . . . . . . . . . . 71
Displaying Missed Calls . . . . . . . . . . . . . . . . . . . . . . . . . . . . . . . . . . 72
Making Calls . . . . . . . . . . . . . . . . . . . . . . . . . . . . . . . . . . . . . . . . . . . . . 73
Off-Hook Dialing . . . . . . . . . . . . . . . . . . . . . . . . . . . . . . . . . . . . . . . 73
On-Hook Dialing. . . . . . . . . . . . . . . . . . . . . . . . . . . . . . . . . . . . . . . . 76
Ending a Call . . . . . . . . . . . . . . . . . . . . . . . . . . . . . . . . . . . . . . . . . . 77
Dialing from Contacts . . . . . . . . . . . . . . . . . . . . . . . . . . . . . . . . . . . 78
Using Repdial Keys . . . . . . . . . . . . . . . . . . . . . . . . . . . . . . . . . . . . . 79
Repertory Dialing . . . . . . . . . . . . . . . . . . . . . . . . . . . . . . . . . . . . . . . 79
6

Contents
Conducting Two Calls Simultaneously . . . . . . . . . . . . . . . . . . . . . . . . . 80
Consultation. . . . . . . . . . . . . . . . . . . . . . . . . . . . . . . . . . . . . . . . . . . 80
Call transfer . . . . . . . . . . . . . . . . . . . . . . . . . . . . . . . . . . . . . . . . . . . 82
Alternate – Alternating Between Two Parties . . . . . . . . . . . . . . . . . 84
Redial Last Number . . . . . . . . . . . . . . . . . . . . . . . . . . . . . . . . . . . . 85
Call Log . . . . . . . . . . . . . . . . . . . . . . . . . . . . . . . . . . . . . . . . . . . . . . . . . 86
Dialed Calls . . . . . . . . . . . . . . . . . . . . . . . . . . . . . . . . . . . . . . . . . . . 86
Missed Calls . . . . . . . . . . . . . . . . . . . . . . . . . . . . . . . . . . . . . . . . . . 87
Received Calls . . . . . . . . . . . . . . . . . . . . . . . . . . . . . . . . . . . . . . . . . 89
Do Not Disturb. . . . . . . . . . . . . . . . . . . . . . . . . . . . . . . . . . . . . . . . . 90
Character Input . . . . . . . . . . . . . . . . . . . . . . . . . . . . . . . . . . . . . . . . . . . 91
Changing Character Mode . . . . . . . . . . . . . . . . . . . . . . . . . . . . . . . . 91
Switching Between Overwrite and Insert Mode . . . . . . . . . . . . . . . 92
Navigating on the Display Module. . . . . . . . . . . . . . . . . . . . . . . . . . . . . 94
Selecting and Activating Control Elements . . . . . . . . . . . . . . . . . . . 94
Edit Fields . . . . . . . . . . . . . . . . . . . . . . . . . . . . . . . . . . . . . . . . . . . . 95
Control Keys on the Telephone . . . . . . . . . . . . . . . . . . . . . . . . . . . . 95
Setup Menu in the Display Module. . . . . . . . . . . . . . . . . . . . . . . . . . . . 96
Web Interface. . . . . . . . . . . . . . . . . . . . . . . . . . . . . . . .97
General Information. . . . . . . . . . . . . . . . . . . . . . . . . . . . . . . . . . . . . . . . 97
Preparatory Steps . . . . . . . . . . . . . . . . . . . . . . . . . . . . . . . . . . . . . . . . . 98
Menu Structure . . . . . . . . . . . . . . . . . . . . . . . . . . . . . . . . . . . . . . . . . . . 99
Change User Password . . . . . . . . . . . . . . . . . . . . . . . . . . . . . . . . . . 99
Function Keys . . . . . . . . . . . . . . . . . . . . . . . . . . . . . . . . . . . . . . . . 100
Select Function Key . . . . . . . . . . . . . . . . . . . . . . . . . . . . . . . . . . . . 101
Country Settings . . . . . . . . . . . . . . . . . . . . . . . . . . . . . . . . . . . . . . 102
Language Settings . . . . . . . . . . . . . . . . . . . . . . . . . . . . . . . . . . . . . 102
Audio Settings . . . . . . . . . . . . . . . . . . . . . . . . . . . . . . . . . . . . . . . . 103
Call-Related Parameters. . . . . . . . . . . . . . . . . . . . . . . . . . . . . . . . . 103
Alphabetic Reference . . . . . . . . . . . . . . . . . . . . . . . . . . . . . . . . . . . . . 104
Using Editors. . . . . . . . . . . . . . . . . . . . . . . . . . . . . . . .110
Entering Text . . . . . . . . . . . . . . . . . . . . . . . . . . . . . . . . . . . . . . . . . . . . 110
Entering Characters. . . . . . . . . . . . . . . . . . . . . . . . . . . . . . . . . . . . . . . 110
Navigating During Text Entry. . . . . . . . . . . . . . . . . . . . . . . . . . . . . . . . 112
7

Contents
Appendix . . . . . . . . . . . . . . . . . . . . . . . . . . . . . . . . . . .113
Idle Mode Display . . . . . . . . . . . . . . . . . . . . . . . . . . . . . . . . . . . . . . . . 113
User Menu. . . . . . . . . . . . . . . . . . . . . . . . . . . . . . . . . . . . . . . . . . . . . . 114
Telephone Menu . . . . . . . . . . . . . . . . . . . . . . . . . . . . . . . . . . . . . . . . . 117
Dialing . . . . . . . . . . . . . . . . . . . . . . . . . . . . . . . . . . . . . . . . . . . . . . 117
Connection Status . . . . . . . . . . . . . . . . . . . . . . . . . . . . . . . . . . . . . 117
Consultation Call . . . . . . . . . . . . . . . . . . . . . . . . . . . . . . . . . . . . . . 118
Incoming Calls . . . . . . . . . . . . . . . . . . . . . . . . . . . . . . . . . . . . . . . . 118
Messages and Alarms. . . . . . . . . . . . . . . . . . . . . . . . . . . . . . . . . . . . . 119
Status Messages . . . . . . . . . . . . . . . . . . . . . . . . . . . . . . . . . . . . . . 119
Error Messages . . . . . . . . . . . . . . . . . . . . . . . . . . . . . . . . . . . . . . . 120
Labeling the Keys . . . . . . . . . . . . . . . . . . . . . . . . . . . . . . . . . . . . . . . . 121
Index. . . . . . . . . . . . . . . . . . . . . . . . . . . . . . . . . . . . . . .122
Important Functions at a Glance. . . . . . . . . . . . . . .125
8

General Information
General Information
About These Operating Instructions
These operating instructions will help you get to know the optiPoint 410/
420 advance S V6.0 and to use its functions. The instructions contain important information for safe and proper operation of the optiPoint 410/
420 advance S V6.0. Follow them carefully to avoid improper operation
and get the most out of your multi-function telephone in a network environment.
Everybody involved in installing, operating or programming the
optiPoint 410/420 advance S V6.0 must read these operating instructions.
For your own protection, please read the section dealing with safety.
Follow the safety instructions carefully in order to avoid endangering
yourself or other persons and to prevent damage to the unit.
The layout of this operating manual is extremely user-friendly. You will be
guided through operation of the optiPoint 410/420 advance S V6.0 step by
step – starting with a description of simple basic functions, through configuration of all operating parameters to a description of the additional features. Administrative tasks are described in a separate manual. The quick
reference guide is meant to give you quick and reliable explanations regarding frequently used functions.
Intended Use
The optiPoint 410/420 advance S V6.0 telephone is a desktop unit designed for voice transmission and for connection to a LAN. It can be operated also as a stand-alone unit. Any other use is regarded as not prescribed.
Product Identification
The characteristics of the telephone – precise product name and serial
number – are displayed on the nameplate on the underside of the telephone. Please have these at hand when you contact our service department regarding problems or defects on the unit itself.
9

General Information
Echo Ef fect
In some cases, while using the telephone you may hear an echo, which
can be quite strong. This is not due to any design defect or other fault with
your IP telephone, but caused by the other client. For example, if the echo
occurs during a call, it may be that the loudspeakers and microphones
need to be repositioned.
Service
The Siemens service department can only help you with encountered problems or defects on the unit itself.
Should you have any questions regarding the operation, your specialist retailer or network administrator will gladly help you with the
right answers.
For any questions regarding the telephone connection, please contact your network provider.
In the case of any trouble or defects on the unit itself, please dial the service number of your country.
Notes and Symbols
Safety
Information that is important for preventing injury or damages is marked
specially, as they are important instructions for correct use of the unit.
7
This symbol indicates a hazard. Failure to follow the instructions
given may result in injury or in damage to the unit.
This symbol indicates the following:
• Key information important for the proper use of the telephone
• Particularly important information about the differences between single-and multiline mode.
10

Step by Step
General Information
Symbols in the Manual
You will find a graphic representation of the Telephone
menu operating steps in logical sequence in the left column. Below is an explanation of the symbols:
n Lift the handset (off-hook).
t Replace the handset.
s Conduct a call.
o Enter a telephone number or code.
dd Enter the code.
u or v Increase or reduce the value depending on the current
operating mode.
Dial?
02=Call log
Press key.
Press the illuminated key.
Press the blinking key.
: The option appears on the display.
Use the
: Search for an option.
Press the
until the option appears on the display.
Then press the
: key to confirm your selection.
< >
keys
key to confirm your selection
:
.
11

Introduction
Introduction
Overview
The optiPoint 410/420 advance S V6.0 is a modern multi-functional IP
telephone. It is designed for connection to data networks and is not directly connected with an ISDN system or to the PSTN.
This manual describes how to use the optiPoint 410/
420 advance S V6.0 when it is connected to HiPath 3000/
HiPath 4000 from Siemens.
Some of the features described in this manual are only available because they are provided by HiPath 3000/HiPath 4000. If you are not
using the optiPoint 410/420 advance S V6.0 in a HiPath 3000/
HiPath 4000 environment, contact the administrator to obtain the
corresponding operating manual.
The optiPoint 410/420 advance S V6.0 enables voice communication via
the standard Internet Protocol (IP). It is compatible with the signaling stack
in compliance with the SIP (Session Initiation Protocol) protocol specification.
The optiPoint 410/420 advance S V6.0 can be used just like a conventional
telephone – the only difference being that your calls are directed via a data
network. The telephone has an Ethernet interface so that when using the
TCP/IP protocol, you can make the telephone calls both via your own intranet and via the worldwide Internet.
The optiPoint 410/420 advance S V6.0 also supports other standard protocols, which optimizes the data and voice transmission and simplifies the
administration of the unit. For example, the administrator can download
updates for equipment software or feature enhancements to the
optiPoint 410/420 advance S V6.0 via the FTP server.
The optiPoint 410/420 advance S V6.0 features a four-line display and special dialog keys, which allow user-friendly navigation through the menu
structure of the unit’s software. A wide variety of features and programmable keys enable you to configure the telephone individually to meet most
requirements.
12

Introduction
Features
• Four-line alphanumeric display
• Time and date indication
• Speakerphone and loudspeaker
• Redial and storage of last 20 numbers
• On-hook dialing
• Menu texts in the national language
• 18 and/or 19 (optiPoint 410 advance S V6.0) function keys which are all
programmable on two levels
• 3 dialog keys for menu navigation
• Assignment of selected destination numbers to dialing keys
• Display of the caller’s phone number or name
• Call Transfer, Toggle, Call Holding
• Password-protected user settings
• Variable ringer tone, volume, and sequence
Telephone Types
The administrator can set up the optiPoint 410/420 advance S V6.0 as a
single-line telephone.
13
Introduction
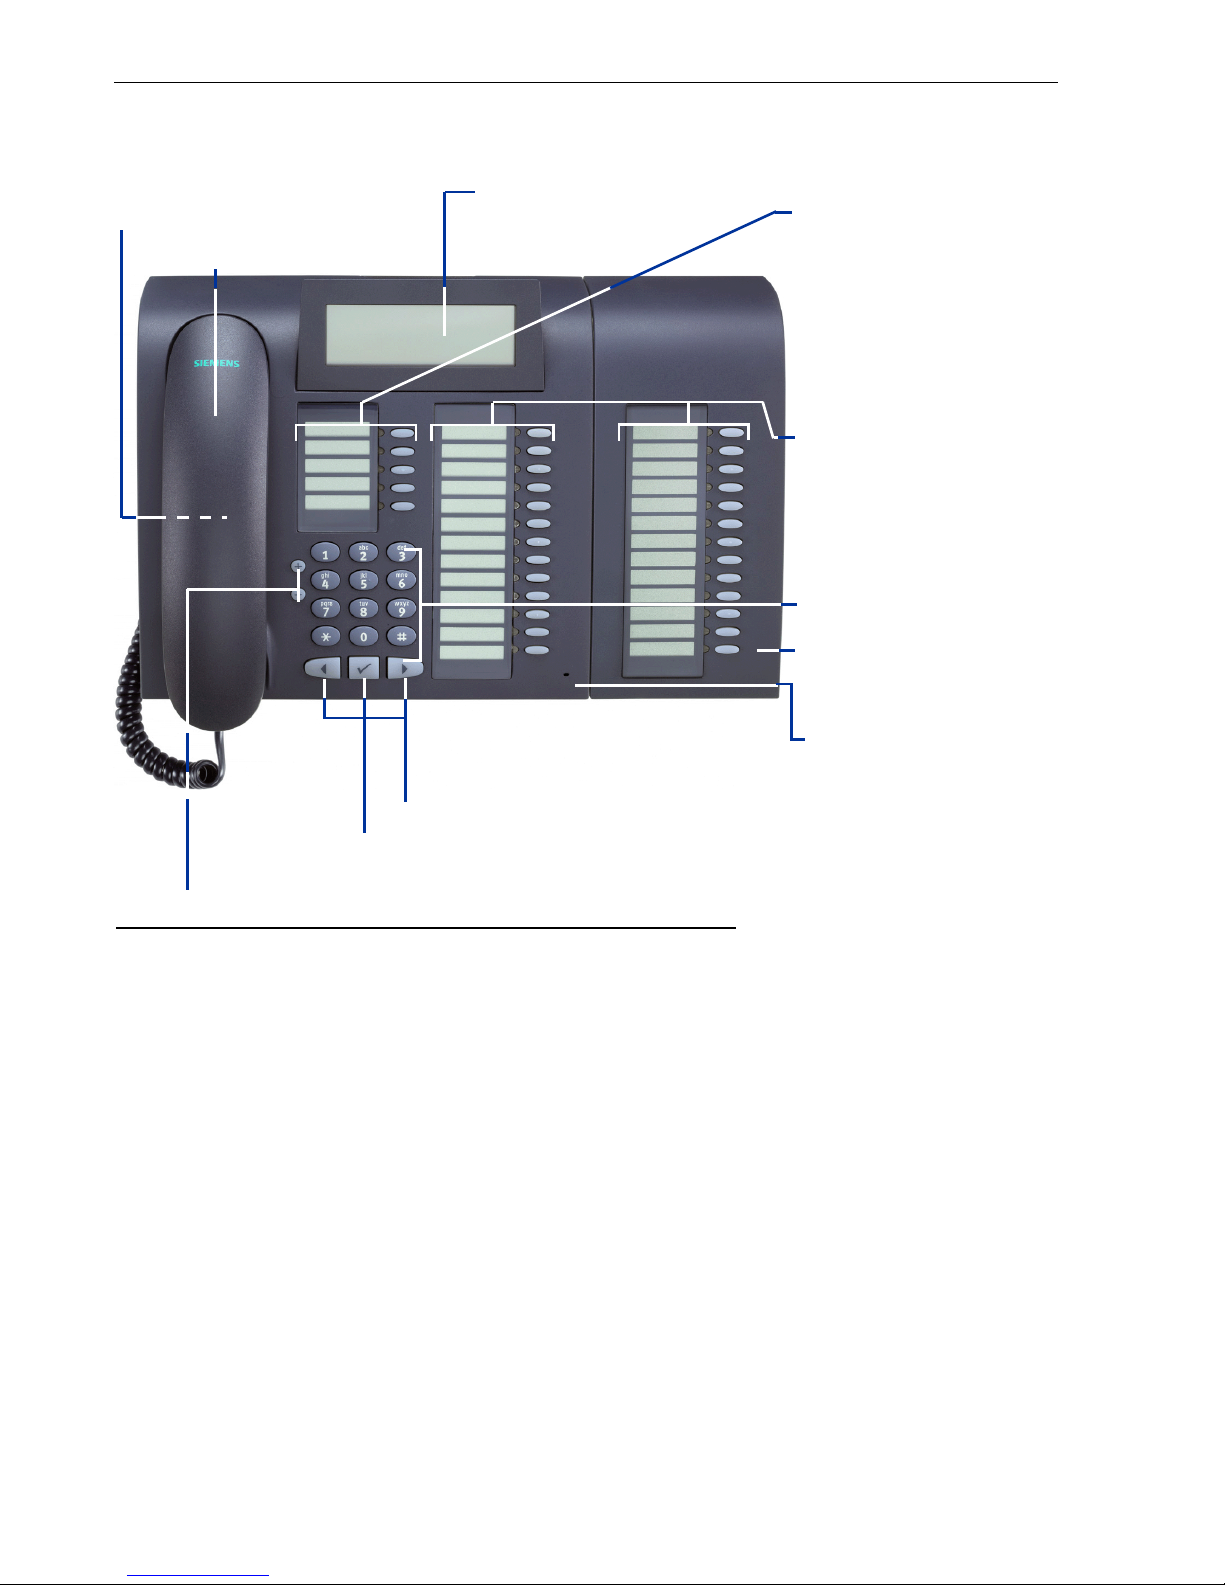
Layout of the optiPoint 420 advance S V6.0
Loudspeaker for
open listening
Handset
Illuminated graphics
display, 4 lines of 24
characters each
Key fields –
Programmable*:
function keys
Key fields
Programmable* function keys
Dialing keypad
optiPoint self labeling
key module
Microphone for
speakerphone
–
Dialog keys for scrolling through functions
Dialog key for confirming a function
Keys for phone settings
* With automatic key labelling
14

Introduction
Display and Dialog Keys
The optiPoint 410/420 advance S V6.0 features a four-line display. In normal mode the Idle menu appears on the display.
14:15 26.09.04
1228
User Name
Menu >
Time and Date
Telephone Number
Editable display
Shows telephone menu
The idle menu displays the time and date in the first line. The telephone
number is displayed in the second line. The user can define any name for
the third line during configuration, such as the user name or the name of
the communication platform. The fourth line provides access to the telephone menu. The arrow icon ">" on the right hand side of the fourth line
indicates that additional functions are available. Any status messages are
displayed in this line (if necessary, several are displayed alternately).
If you want to define settings, use the three dialog keys
<, >
, : and
the function key "Cancel" to navigate within the hierarchically structured
menu system. The menu structure is nested into a maximum of four levels.
Within this structure, the third line displays the currently selected menu
while the fourth line displays a menu option.
15

Introduction
Keypad
The optiPoint 410/420 advance S V6.0 keypad features digits, letters and
some special characters. Depending on the selected input mode, you can
key in letters and special characters by pressing the relevant key as often
as necessary until the required character appears on the display.
Examples of letter inputs are the password, the user name, or FTP download files and file paths respectively.
For example, if you want to enter the letter "R", press "7" three times as "R"
is at the third position. For the letter "U", press "8" twice.
16
Introduction
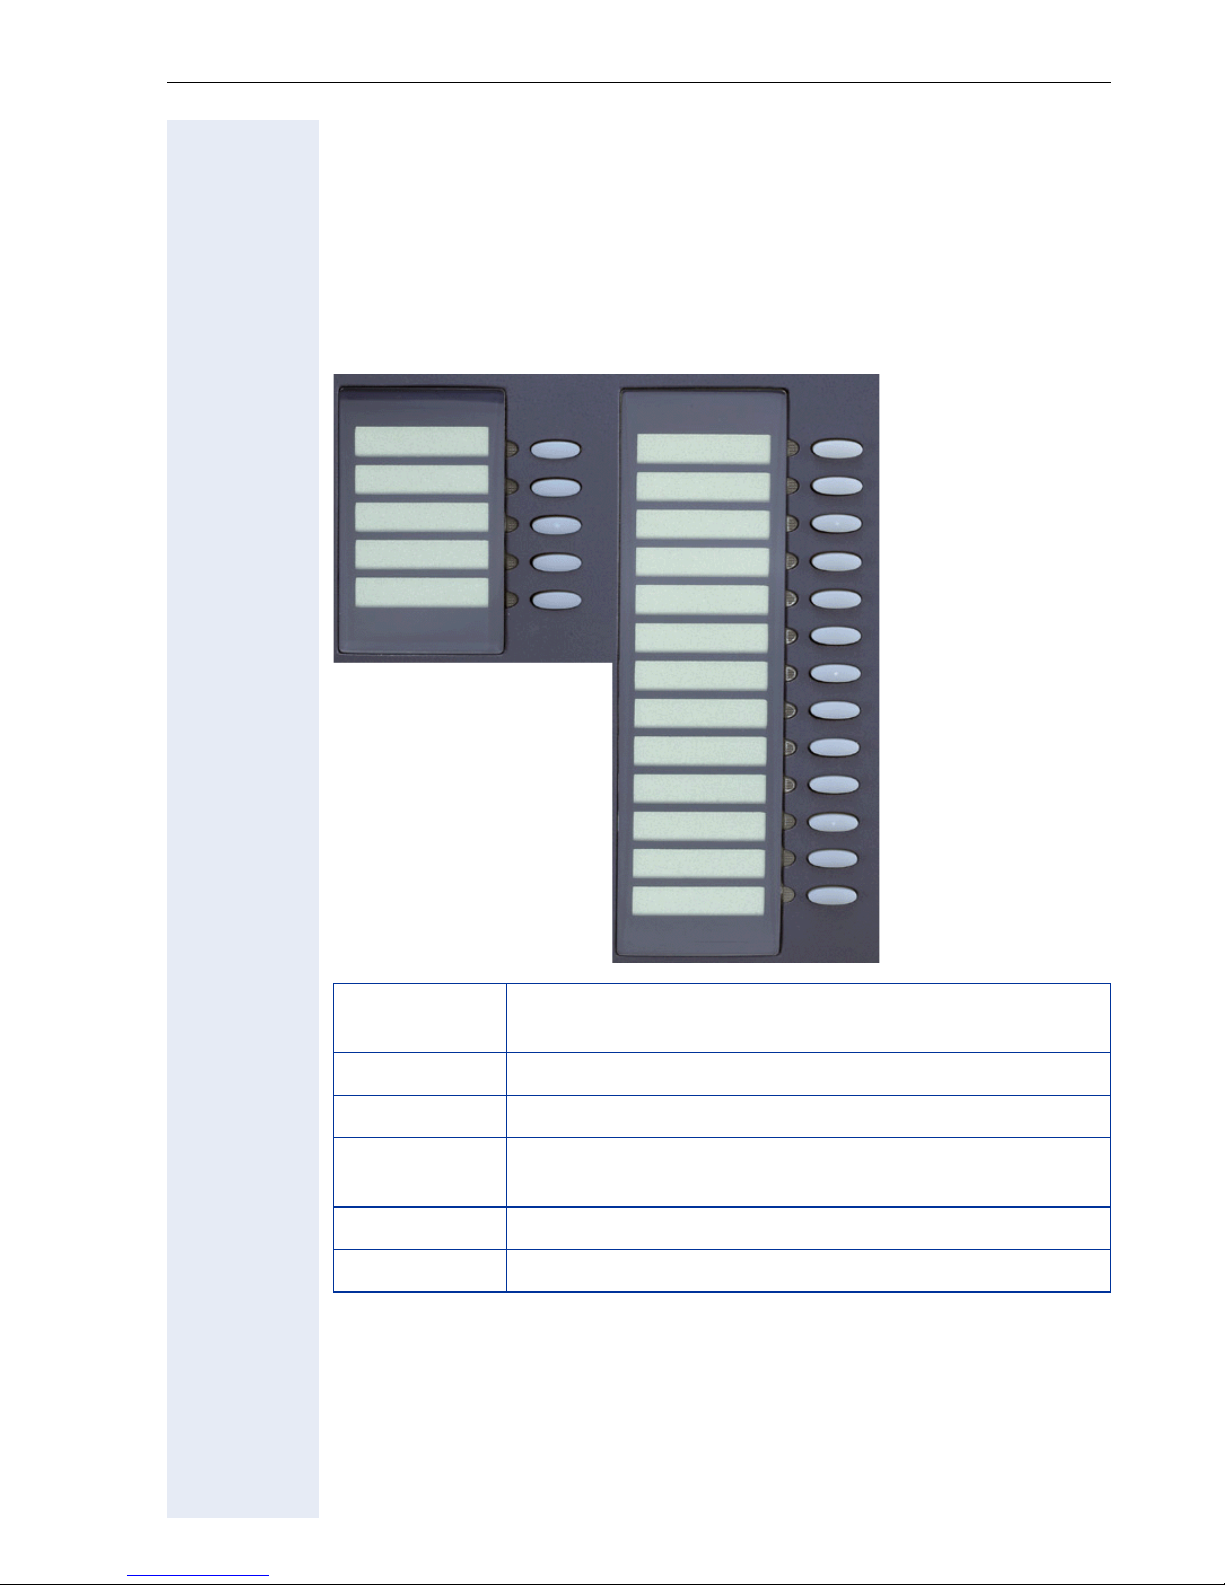
Progr ammable Keys
optiPoint 410/420 advance S V6.0 is equipped with 18 and/or 19
(optiPoint 410 advance S V6.0) function keys all of which are user-programmable on two levels (the "Stop/Escape" and "Shift" keys should be retained). Five of these keys are pre-assigned in the first level
With the optiPoint 420 advance S V6.0 you also have the option of assigning a name for the key, which is then automatically displayed.
.
Loudspeaker
Redial
Missed Calls
Function
Key
1
2
3
4
5
Function
Cancel/Rel.
Shift
6
7
8
9
10
11
12
13
14
15
16
17
18
1 Switch loudspeaker of the base unit on/off.
2 Redial one of the last 20 numbers dialed.
3 Displays the last 20 missed calls and permits selection,
17 Cancel the current action.
18 Shift to the second key level.
Each feature key has a corresponding visual indicator (LED) to indicate the
status of the feature.
editing and redial functions.
17
Introduction
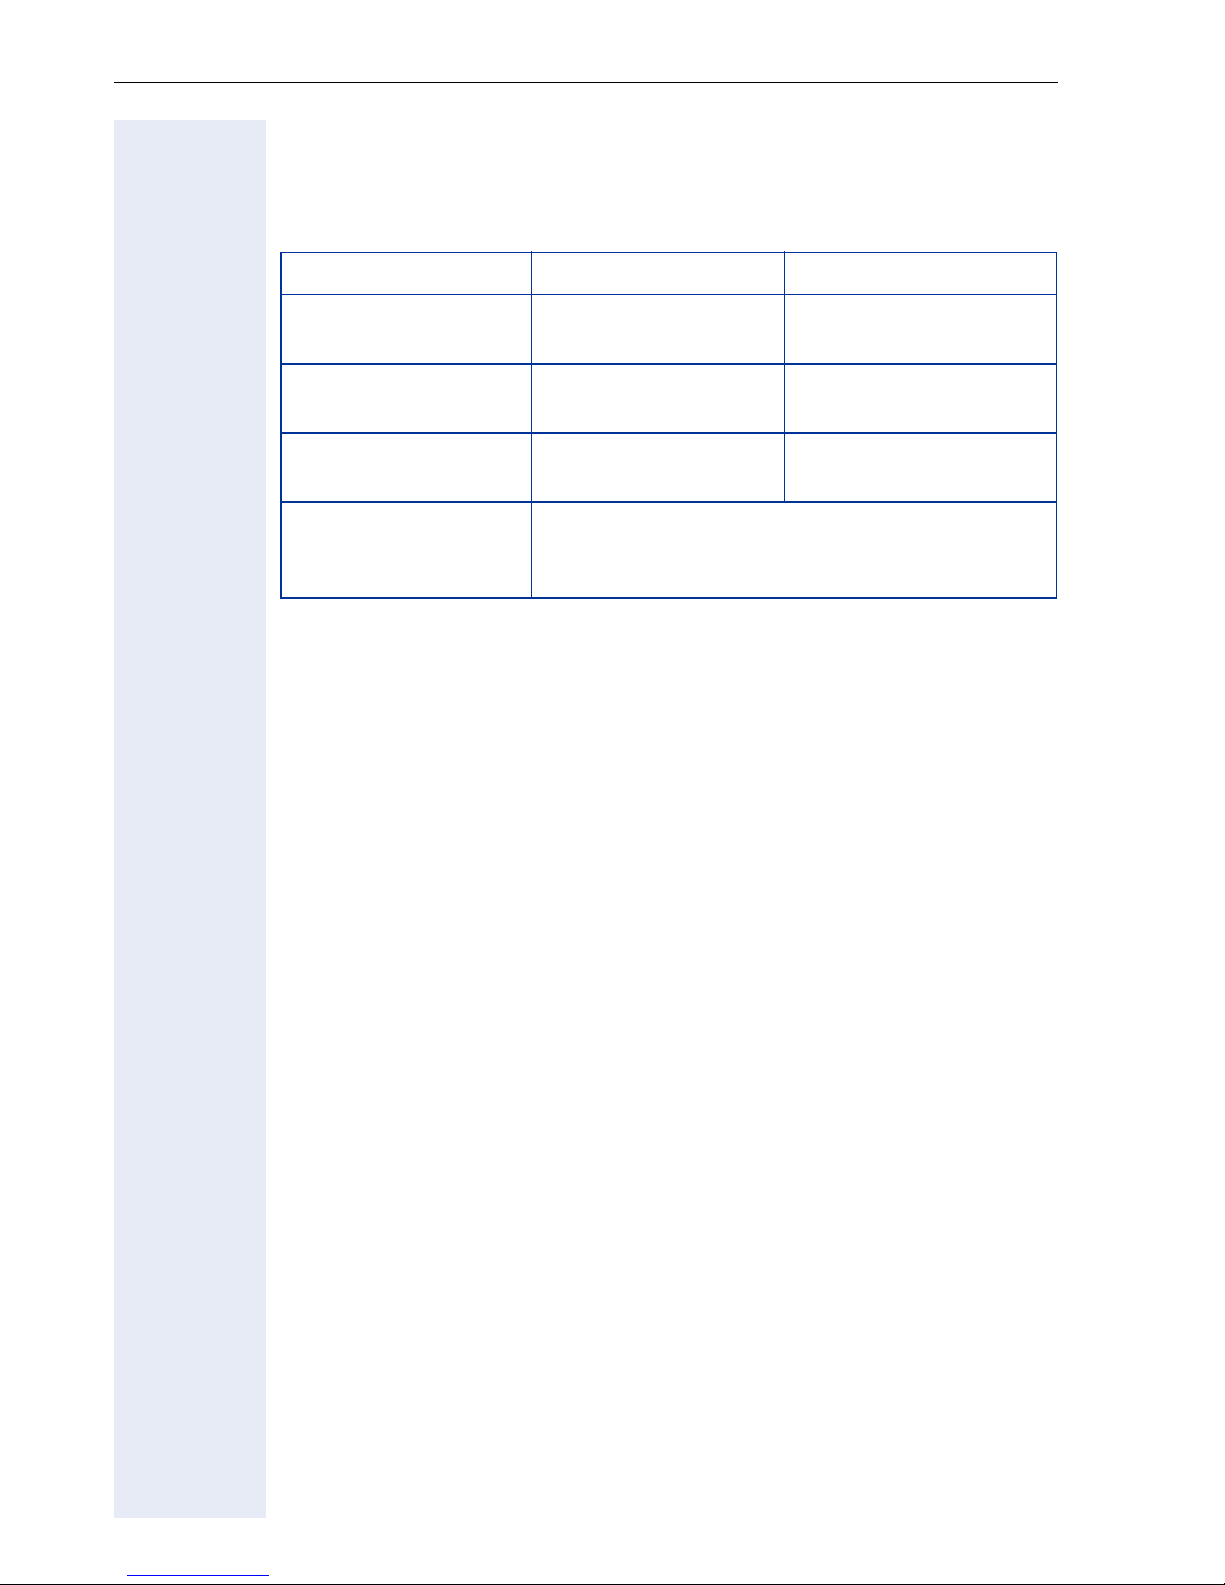
Control Keys
The control keys v and u are located to the left of the dialing keypad. Depending on the operating mode you can modify the following settings:
Mode
Incoming call Reduce ring tone vol-
Speakerphone Reduce loudspeaker
Handset-controlled
call
Setting using the configuration menu
and "Audio Settings"
v
Key u Key
Increase ring tone vol-
ume
volume on telephone
Reduce loudspeaker
volume on handset
Adjust volume of loudspeaker, handset, key click
and ring tone as well as ring tone sequence and
melody (confirm with
ume
Increase loudspeaker
volume on telephone
Increase loudspeaker
volume on handset
:
)
18

Operating the Telephone with the Display
Operating the Telephone with the Display
The optiPoint 410/420 advance S V6.0 offers all functions on the display in
dialog menus which are independent of status. With the three dialog keys
you can scroll through the individual functions, select the function you require and activate it. You can also assign enhanced functions to the keys
such as destination numbers or shortcuts for certain actions.
You can set up a connection to a specified phone number by pressing the
:
key. Use the < key to edit and correct the phone number.
Standard Telephone Functions
The keypad is used for dialing phone numbers. You can choose to dial a
normal phone number (E.164 phone number) or a URL. The number of digits in an E.164 number and the log-on number for user mobility is restricted
to 20 digits. Other numbers such as phone numbers to be dialed are restricted to 24 digits.
Dialing aids and enhanced functions can be activated using individually programmable function keys.
Examples of dialing aids and enhanced functions:
• Redial
• Selected dialing
• Repertory dialing
• Abbreviated dialing
• Handsfree operation
•Mute
• Last number redial
You can use dialog menus to perform most other actions.
Function Selection
A function is selected with the keys
key. The arrow icon (>) in the fourth line indicates that additional functions
are available. In idle mode, there are no menu options available (no prompt).
At the end of the menu list the
at the beginning of the list the
>
<
or > and confirmed with the
key goes to the beginning of the list, and
<
key goes to the end of the list.
:
When you select a function using the : key, you are led step by step
through the call procedure until all parameters have been entered.
19

Operating the Telephone with the Display
Step by Step
Incoming Calls
The optiPoint 410/420 advance S V6.0 rings giving the
set call signal page 63.
If calling party information is transferred, it appears in
the display.
Answering a Call With the Handset
The telephone rings. The caller is displayed on the
screen.
If you are defining settings on the telephone
when a call arrives, the process is paused. After
the telephone conversation, the telephone automatically returns you to the point in the menu
structure you were in before the call.
u or v Set call volume. To raise or lower the volume, press the
Answer call? >
Loudspeaker
u or v Adjust volume. To raise or lower the volume, keep
n Lift the handset.
relevant key until the desired volume is set.
Answering a Call Without the Headset
(Speakerphone Mode)
The telephone rings. The caller is displayed on the
screen.
: Confirm
or
Press key. LED lights up.
Speakerphone mode.
pressing the keys until the desired volume is set.
Notes on speakerphone mode:
• Tell the other party that you are using speakerphone
mode.
• The speakerphone works bests at a low receiving
volume.
• The ideal distance between the user and the telephone set in speakerphone mode is about 50 cm
(approx. 20 inches).
20

Step by Step
Operating the Telephone with the Display
Ending a Call
Loudspeaker
Press key. LED goes out.
or
Cancel/Rel.
Press key.
or
Disconnect? >
> : Select and confirm.
If the call has been terminated by the other party,
the message "Cleared"
Switching to Speakerphone Mode
Prerequisite: You are conducting a call with the handset.
Loudspeaker
and
t Hold down the key while replacing the handset. Then
release the key.
Proceed with the call.
Country Options set to US
appears in the display.
Loudspeaker
In case you have set the country options to US, you do
not have to hold the loudspeaker key to switch to speakerphone mode while replacing te handset.
Press key.
t Replace the handset and proceed with the call in spea-
kerphone mode.
21

Operating the Telephone with the Display
Step by Step
Switching to the Handset
Prerequisite: You are conducting a call in speakerphone mode.
n and s Lift the handset. Continue the call.
Open Listening During the Call
You can allow other people in the room to join the telephone conversation. Inform the party at the other end of
the line that you are switching to loudspeaker.
Prerequisite: You are conducting a call with the handset.
Activating this function:
Loudspeaker
Loudspeaker
Press key. LED lights up.
Deactivating this function:
Press key. LED goes out.
Refusing a Call
You can refuse an incoming call. If the number of the
caller is transmitted, it is stored in the Missed Calls list
so you can call that person back at a later date.
Refuse call? >
> : Select "Refuse call" and confirm.
The display returns to the idle menu.
The person calling receives a negative response.
22

Operating the Telephone with the Display
Step by Step
Holding a Call
You can use this function to put a current call on "hold"
to prevent the party at the other end of the line from
hearing an internal consultation for instance.
Using the Menu
Prerequisite: You are in the middle of a call.
Hold? >
> : Select and confirm.
The call is placed on hold. The held party’s number and
the message "On Hold" appear on the display.
After a configurable time interval, a double tone signal
reminds you that the party is still on hold and the message "Still on Hold" appears on the display.
Reconnect? >
: Confirm this option to resume the held call. You may
now either initiate a consultation call or terminate the
call.
Transferring a Call
You can transfer your current call to another party with
or without consultation.
Consultation? >
> : Select and confirm (see also page 30).
o Enter the telephone number of the party to whom the
call is to be transferred.
Dial? >
Complete Transfer? >
> : Select and confirm (you may also simply replace the
: Confirm.
The party answers.
s Notify user of call transfer.
handset to connect the parties).
The display indicates that the parties have been connected. Replace the handset.
23

Operating the Telephone with the Display
Step by Step
Making Calls
You can enter a phone number with the handset off- or
on-hook.
Dialing Following Line Seizure
n Lift the handset.
Redial the last number.
If you have activated the function Busy when dialing (see page 50), you cannot be interrupt-
ed by an incoming call. The caller hears busy
tone.
Redial 72261496? >
> : Select and confirm. The number is dialed and the con-
nection is set up.
or Dial the number.
o Enter the phone number and
Dial? >
: Confirm.
If the telephone is expecting input, you can also press a
function key to which a dialing destination has been assigned, such as the Redial, Missed Calls key or a repdi-
al key. Refer to page 31 for information about fea-
tures that simplify dialing.
24
Step by Step
Operating the Telephone with the Display
Dialing Before Line Seizure
o Enter the phone number.
Dial? >
Loudspeaker
: Confirm your entry.
or
Press the Loudspeaker key.
or Wait until the Auto Dial Timer has timed out.
The number is dialed and the connection is set up.
If you are using a dial plan and have set Hot-Key-
pad (see page 49), dialing takes place auto-
matically as soon as the character string entered
matches an entry in the dial plan.
Using DTMF Tone Dialing
During a call, you can use DTMF tone dialing to operate
answering machines, voice mailboxes, and so on. Depending on the dialing key pressed, different key sequences are sent out. The keys 0 - 9, the asterisk (*)
key, and the hash (#) key can be used.
Refer to the operating instructions for the answering
machine, voice mailbox, or other device for the specific
tones needed to operate it correctly.
25

Operating the Telephone with the Display
Step by Step
Call Log
The Call Log menu contains four lists for:
• Missed calls
• Dialed calls
• Received calls
The Call Log contains up to 20 of the last parties stored
for the relevant list. The following call details are stored:
• Phone number
• The number of call attempts from each user (max.
• The date and time of the last call attempt from each
To ensure that entries can be saved in the "Missed
Calls" and "Received Calls" lists, the Caller ID must be
displayed as a name, number or both.
99)
user
This is not the case if:
• "No display" is set for "Call display" ( page 43).
• The caller ID was not transferred.
26

Operating the Telephone with the Display
Step by Step
Displaying the Call Log
02=Call Log? >
> : Select and confirm.
Select list
1=Missed calls? >
2=Dialled calls? >
> : Select and confirm.
3=Received calls? >
> : Select and confirm.
3=543219876? >
> : For example, select the third entry and confirm.
: Confirm.
or
or
The lists are sorted chronologically, with the most recent entry first.
You can scroll through the lists using the
keys.
Select entry
Select the entry you require from the relevant list.
Display details
You can display details for the selected party.
<
and >
2=Details? >
> : Select and confirm.
The display shows the date and time of the call. If the
same call has been entered repeatedly, the date and
time of the last call appear in the display.
27

Operating the Telephone with the Display
Step by Step
Call party
Once you have selected the required party, you can proceed as follows to make the call.
1=Dial? >
> : Select and confirm.
Dial? >
> : Confirm - the call is connected.
Delete party from list
You can delete the selected party from the list if you no
longer require the entry.
3=Delete? >
> : Select and confirm. The current entry has been deleted
and the numbering of subsequent entries moves up in
the list.
Delete all parties from list
You can delete the entire list for any entry. To do this, select the following option.
4=Delete ALL? >
> : Select and confirm. All entries in the current list are de-
leted.
Select next/previous entry
If you have selected a party, you can use the following
options to scroll to the next/previous party.
5=Next entry? >
> : Select and confirm.
or
6=Previous entry? >
> : Select and confirm.
Press the "Cancel/Rel." key or select 0=End to quit the
Call Log.
28

Step by Step
Operating the Telephone with the Display
"Missed calls" Key
If the "Missed Calls" list contains new entries that have
not yet been displayed, the LED for the "Missed calls"
key blinks. While you are checking the list, the LED
lights continuously. When you exit, the LED only blinks
if a new missed call entry has not yet been accessed.
Prerequisite: The key has been configured
( page 54).
Missed Calls
Repeat Dial
Press key to display the "Missed Calls" list immediately
( page 27).
Redial Key
You can also use the redial key to display a list of the last
20 numbers dialed.
The last 20 numbers dialed are automatically stored, regardless of which line was used to place the call. If the
dialed party was busy or did not answer, you can redial
the number without having to re-enter the number for
your next attempt. The number dialed last is the first
one in the list.
Prerequisite: The key has been configured
( page 54).
Press key to display the "Dialed calls" list immediately
( page 27).
29

Operating the Telephone with the Display
Step by Step
Consulting with a Second Party
During a call, you can consult with a second party while
placing the first party on "hold".
You can transfer the call which is on hold to the second
party – even if the latter has not yet answered (see
page 23).
Introducing Consultation
Prerequisite: You are in the middle of a call.
Consultation? >
Please dial #? >
and/or
Dial? >
: Confirm
: Confirm.
o Enter the number of the second party to be called.
: Confirm to dial the number.
The connection is set up and displayed.
You can terminate the dialing process with the
Cancel key during input of the number and then
return to the first party.
30
 Loading...