

Siemens HiPath 3000, openstage m3, openstage m3 ex plus, openstage m3 plus, openstage m3 ex Operating Instruction
Page 1

Documentation
HiPath 3000
OpenStage M3 / M3 Plus
OpenStage M3 Ex / M3 Ex Plus
on HiPath Cordless Office
Operating Instructions
Siemens Enterprise Communications
www.siemens-enterprise.com
Page 2

Safety notes
Safety notes
Using the OpenStage M3 Ex and OpenStage M3 Ex Plus handsets in potentially explosive working environments
This handset fulfils the requirements of the ATEX Directive and meets the
required EN and IEC standards (see the appendix in the operating manual).
See also the notes in the declaration of conformity.
OpenStage M3 Ex and OpenStage M3 Ex Plus were designed for use in
potentially explosive working environments (Ex zones) and in compliance
with fire prevention regulations. Local and operational factors may lead to
an explosive atmosphere in an Ex zone. Therefore, please observe the
following Ex safety notes:
Handset:
• The handset may only be operated in Ex zones where it is
certified. Refer to the appendix in the operating manual, the
device identification and the EC type examination certificate. A
copy of the prototype verification certificate ZELM 08 ATEX
0379 X can be found in the appendix of this operating manual.
• Users must check the handset for damage and verify that it is
operating correctly before using it in the Ex zone. A damaged
handset or a handset that is not fully functional may not be
brought into or used in the Ex zone.
• The following requirements must be met to satisfy the Ex
protection and IP rating IP 65 (casing protection) in an Ex zone:
– The battery compartment seal must not be damaged.
– The cover of the battery compartment must be tightly
screwed on.
• Deactivate the handset immediately and remove it from the Ex
zone if the following situations occur:
– You notice damage to the handset.
– If liquids have seeped into the handset.
• Repair a damaged handset immediately.
• Only service employees with Ex zone training and authorisation
should repair and service the handset.
• When swapping out a malfunctioning device/battery, the
technician must return the malfunctioning device/battery to the
manufacturer while specifying the customer data.
• Inappropriate use of the handset will result in revocation of its
certification for use in Ex zones.
2
Page 3
Safety notes
Battery pack:
• Only use the approved battery pack (see page 167). Ex
authorisation is only valid and the handset can only be operated
if this battery pack is installed. Other battery packs are strictly
prohibited. If they are used, Ex protection is no longer valid.
• Never open the handset battery compartment in an Ex zone.
Battery pack removal, charging or transportation is not permitted
in these zones.
Charging the battery pack:
• The battery pack may only be charged:
– Outside the Ex zone
– While inside the handset
– Using the supplied charging unit.
• The charging unit should only be used outside the Ex zone.
Headset:
• A corded headset may not be used in the Ex zone. Only Ex
authorised Bluetooth headsets may be used. For more
information, consult your system administrator.
USB cable connection:
• Data may not be transferred via USB cable in the Ex zone.
3
Page 4

Safety notes
Using OpenStage M3, OpenStage M3 Plus, OpenStage M3 Ex and OpenStage M3 Ex Plus
Attention:
• Do not use OpenStage M3 and OpenStage M3 Plus handsets
in potentially explosive environments!
• Please observe local safety regulations when using the handset.
• The ringer, signal tones and handsfree talking (speakerphone
mode) are played over the loudspeaker. Do not hold the handset
to your ear when it rings, when a signal tone is emitted or if
speakerphone mode is switched on. Otherwise you may
seriously and permanently impair your hearing.
• A transmitter signal is emitted by your handset. Please observe
local safety regulations.
• Handsets can interfere with the operation of medical
equipment. Please observe the technical requirements of the
relevant environment (hospital, for instance).
• The handset can cause unpleasant humming in hearing aids.
Caution:
• To avoid mutual interference, do not operate the handset in the
vicinity of electronic equipment.
• Only use the charging shell provided to charge the handset.
• If you give your handset to someone else, remember to include
the operating manual with it.
Using the battery pack for OpenStage M3 and OpenStage M3 Plus
Attention:
• Only use the original battery pack from the manufacturer of the
OpenStage M3/OpenStage M3 Plus!
• Do not use a standard rechargeable battery pack. This can result
in serious injury and material damage (risk of explosion,
degradation of battery pack cladding, functional interference and
handset damage).
• Avoid contact with fire and water.
4
Page 5

Compliance with BGR 139 (personal alarm functionality)
Only for OpenStage M3 Plus and OpenStage M3 Ex Plus!
Notes:
• For BGR-compliant operation as a personal alarm signal device
with a voice communication capability (PNG-S), the handset
must operate in conjunction with an alarm server. Handset
operation without an alarm server is not BGR-compliant.
• The alarm functionality cannot be deactivated by the user.
Deactivation is only possible via a control call from the alarm
server.
• For compliance with BGR 139, the handset may only be
configured by specially qualified technicians. The PNG
configuration menu is PIN-protected to prevent unauthorised
configuration changes. The PIN should be kept secret.
Attention:
• The pre-alarm volume starts low and gradually rises until it
becomes very loud. Users should be aware of this.
• The battery pack must always be sufficiently charged for the
anticipated period of operation. The battery pack’s charging
capacity diminishes over its life. It should therefore be replaced
by specially qualified technicians when capacity levels become
insufficient (discharging accelerates over time). If necessary,
consult your safety officer.
Safety notes
5
Page 6

Safety notes
WEEE mark
Notes:
• All electrical and electronic products should be
disposed of separately from the municipal waste
stream via designated collection facilities
appointed by the government or the local
authorities.
• The correct disposal and separate collection of
your old appliance will help prevent potential
negative consequences for the environment and human health.
It is a precondition for reuse and recycling of used electrical and
electronic equipment.
• For more detailed information about disposal of your old
appliance, please contact your city office, waste disposal
service, the shop where you purchased the product or your
sales representative.
The statements quoted above are only fully valid for equipment
which is installed and sold in the countries of the European Union
and is covered by the European Directive 2002/96/EC. Countries
outside the European Union may have other regulations regarding
the disposal of electrical and electronic equipment.
6
Page 7
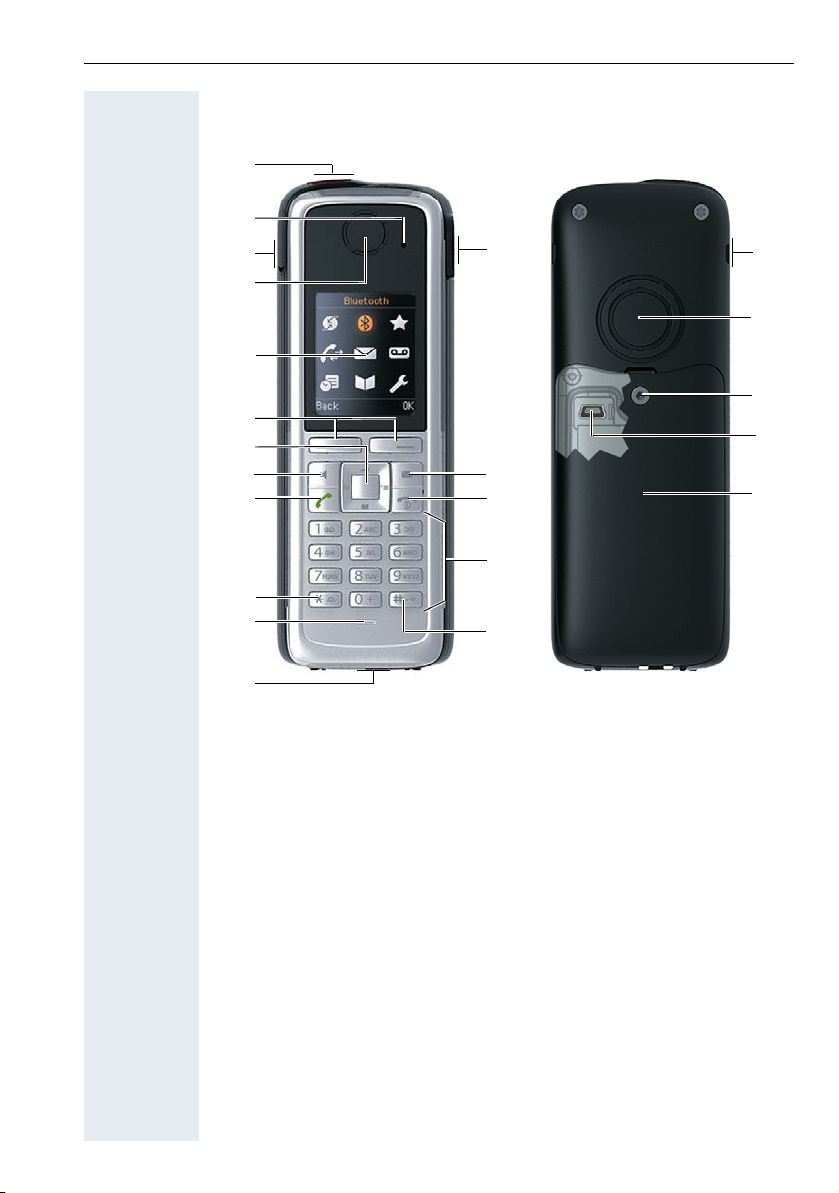
Controls, parts of the device
5
6
7
8
16
9
15
10
12
14
18
21
2
4
11
17
13
20
1
3
22
19
Controls, parts of the device
1 Alarm and emergency call
key (red)
2 LED for indicating mode
activation and alarm status
3 Example of a 2.5 mm jack
for headset (not for
OpenStage M3 Ex/
OpenStage M3 Ex Plus)
4 Earpiece 15 On-hook and on/off key
5 Display 16 Message key
6 Display keys 17 Volume key (+/-)
7Control key 18Battery cover
8 Speakerphone key 19 Mini USB connection (under battery
9 Talk key 20 Screw for battery cover
10 Star key 21 Tone ringing/speakerphone
11 Microphone 22 Notch for attachment clip (both sides)
How to use the keys: page 24
12 Jack for pull cord or dummy
connector
13 Hash key
14 Number keys
cover)
loudspeaker
7
Page 8

Inhaltsverzeichnis
Contents
Safety notes. . . . . . . . . . . . . . . . . . . . . . . . . . . . . . . . . . .2
Using the OpenStage M3 Ex and OpenStage M3 Ex Plus handsets in
potentially explosive working environments . . . . . . . . . . . . . . . . . . . . . . 2
Using OpenStage M3, OpenStage M3 Plus, OpenStage M3 Ex and
OpenStage M3 Ex Plus . . . . . . . . . . . . . . . . . . . . . . . . . . . . . . . . . . . . . . 4
Using the battery pack for OpenStage M3 and OpenStage M3 Plus . . . 4
Compliance with BGR 139 (personal alarm functionality) . . . . . . . . . . . . 5
WEEE mark . . . . . . . . . . . . . . . . . . . . . . . . . . . . . . . . . . . . . . . . . . . . . . . 6
Controls, parts of the device . . . . . . . . . . . . . . . . . . . .7
Operating instructions . . . . . . . . . . . . . . . . . . . . . . . .13
Alarm functionality . . . . . . . . . . . . . . . . . . . . . . . . . . .13
Putting the handset into service . . . . . . . . . . . . . . . .14
Checking the package contents . . . . . . . . . . . . . . . . . . . . . . . . . . . . . . 14
Removing the protective cover . . . . . . . . . . . . . . . . . . . . . . . . . . . . . . . 14
Installing the charger . . . . . . . . . . . . . . . . . . . . . . . . . . . . . . . . . . . . . . . 14
Fitting the attachment clip. . . . . . . . . . . . . . . . . . . . . . . . . . . . . . . . . . . 15
Inserting the battery . . . . . . . . . . . . . . . . . . . . . . . . . . . . . . . . . . . . . . . 17
Charging and using the battery . . . . . . . . . . . . . . . . . . . . . . . . . . . . . . . 19
Inserting the dummy plug or connector . . . . . . . . . . . . . . . . . . . . . . . . 20
Connecting a corded headset . . . . . . . . . . . . . . . . . . . . . . . . . . . . . . . . 20
Connecting a USB data cable . . . . . . . . . . . . . . . . . . . . . . . . . . . . . . . . 21
Setting the handset display language . . . . . . . . . . . . . . . . . . . . . . . . . . 22
Setting the system display language. . . . . . . . . . . . . . . . . . . . . . . . . . . 23
Description of controls . . . . . . . . . . . . . . . . . . . . . . . .24
Function keys . . . . . . . . . . . . . . . . . . . . . . . . . . . . . . . . . . . . . . . . . . . . 24
Control key . . . . . . . . . . . . . . . . . . . . . . . . . . . . . . . . . . . . . . . . . . . . . . 25
Display keys . . . . . . . . . . . . . . . . . . . . . . . . . . . . . . . . . . . . . . . . . . . . . 26
Menu icons in the main menu. . . . . . . . . . . . . . . . . . . . . . . . . . . . . . . . 27
8
Page 9

Inhaltsverzeichnis
Conducting calls – the basic functions . . . . . . . . . . 29
Activating/deactivating the handset. . . . . . . . . . . . . . . . . . . . . . . . . . . . 29
First seize the line, then dial . . . . . . . . . . . . . . . . . . . . . . . . . . . . . . . . . 30
Dial first, then seize the line . . . . . . . . . . . . . . . . . . . . . . . . . . . . . . . . . 31
Manual redial . . . . . . . . . . . . . . . . . . . . . . . . . . . . . . . . . . . . . . . . . . . . . 32
Callback . . . . . . . . . . . . . . . . . . . . . . . . . . . . . . . . . . . . . . . . . . . . . . . . . 33
Consultation. . . . . . . . . . . . . . . . . . . . . . . . . . . . . . . . . . . . . . . . . . . . . . 34
Answering or rejecting a call . . . . . . . . . . . . . . . . . . . . . . . . . . . . . . . . . 35
Picking up a call in a call pickup group. . . . . . . . . . . . . . . . . . . . . . . . . . 36
Ending a call. . . . . . . . . . . . . . . . . . . . . . . . . . . . . . . . . . . . . . . . . . . . . . 36
Forwarding calls. . . . . . . . . . . . . . . . . . . . . . . . . . . . . . . . . . . . . . . . . . . 37
Activating or deactivating the keypad lock . . . . . . . . . . . . . . . . . . . . . . 38
After leaving the radio network . . . . . . . . . . . . . . . . . . . . . . . . . . . . . . . 38
Conducting calls – enhanced functions . . . . . . . . . 39
Speakerphone mode . . . . . . . . . . . . . . . . . . . . . . . . . . . . . . . . . . . . . . . 39
Conducting calls with the headset . . . . . . . . . . . . . . . . . . . . . . . . . . . . 40
Corded headset . . . . . . . . . . . . . . . . . . . . . . . . . . . . . . . . . . . . . . . . 40
Cordless headset . . . . . . . . . . . . . . . . . . . . . . . . . . . . . . . . . . . . . . . 40
Number redial . . . . . . . . . . . . . . . . . . . . . . . . . . . . . . . . . . . . . . . . . . . . 43
Automatic redial. . . . . . . . . . . . . . . . . . . . . . . . . . . . . . . . . . . . . . . . 43
Deleting a redial entry or list . . . . . . . . . . . . . . . . . . . . . . . . . . . . . . 43
Adding a telephone number to the redial list. . . . . . . . . . . . . . . . . . 44
System speed dialling . . . . . . . . . . . . . . . . . . . . . . . . . . . . . . . . . . . . . . 45
System speed dialling, individual. . . . . . . . . . . . . . . . . . . . . . . . . . . . . . 46
System phonebook . . . . . . . . . . . . . . . . . . . . . . . . . . . . . . . . . . . . . . . . 47
Telephone database (LDAP) . . . . . . . . . . . . . . . . . . . . . . . . . . . . . . . . . 48
The handset's phonebook . . . . . . . . . . . . . . . . . . . . . . . . . . . . . . . . . . . 51
Saving an entry . . . . . . . . . . . . . . . . . . . . . . . . . . . . . . . . . . . . . . . . 52
Finding and dialling an entry . . . . . . . . . . . . . . . . . . . . . . . . . . . . . . 53
Dialling an entry with the speed dialling digit. . . . . . . . . . . . . . . . . . 53
Viewing an entry . . . . . . . . . . . . . . . . . . . . . . . . . . . . . . . . . . . . . . . 53
Changing an entry . . . . . . . . . . . . . . . . . . . . . . . . . . . . . . . . . . . . . . 54
Marking a VIP (Very Important Person) entry. . . . . . . . . . . . . . . . . . 55
Deleting an entry or phonebook. . . . . . . . . . . . . . . . . . . . . . . . . . . . 55
Displaying available memory . . . . . . . . . . . . . . . . . . . . . . . . . . . . . . 56
Sending an entry or phonebook to the handset or system . . . . . . . 56
Directed assignment of an MSN (multiple subscriber number) . . . . . . 58
Making calls using identification codes . . . . . . . . . . . . . . . . . . . . . . . . . 59
Using the handset as a second line. . . . . . . . . . . . . . . . . . . . . . . . . . . . 60
Deactivating the phone number display . . . . . . . . . . . . . . . . . . . . . . . . 61
Directed call transfer . . . . . . . . . . . . . . . . . . . . . . . . . . . . . . . . . . . . . . . 62
Activating/deactivating do not disturb . . . . . . . . . . . . . . . . . . . . . . . . . . 62
Call charge display. . . . . . . . . . . . . . . . . . . . . . . . . . . . . . . . . . . . . . . . . 63
Call tracing. . . . . . . . . . . . . . . . . . . . . . . . . . . . . . . . . . . . . . . . . . . . . . . 64
Entrance telephone . . . . . . . . . . . . . . . . . . . . . . . . . . . . . . . . . . . . . . . . 64
9
Page 10

Inhaltsverzeichnis
TDS telephone data service. . . . . . . . . . . . . . . . . . . . . . . . . . . . . . . . . . 67
Activating control relays . . . . . . . . . . . . . . . . . . . . . . . . . . . . . . . . . . . . 68
Sending a signal to the network . . . . . . . . . . . . . . . . . . . . . . . . . . . . . . 69
External call forwarding with a multiple subscriber number . . . . . . . . . 69
Using night service . . . . . . . . . . . . . . . . . . . . . . . . . . . . . . . . . . . . . . . . 71
Using dual-tone multifrequency signalling. . . . . . . . . . . . . . . . . . . . . . . 72
Parking/activating calls. . . . . . . . . . . . . . . . . . . . . . . . . . . . . . . . . . . . . . 73
Conducting calls – with multiple users . . . . . . . . . .74
Call waiting . . . . . . . . . . . . . . . . . . . . . . . . . . . . . . . . . . . . . . . . . . . . . . 74
Call waiting tone off/on . . . . . . . . . . . . . . . . . . . . . . . . . . . . . . . . . . . . . 75
Disabling/enabling automatic call waiting . . . . . . . . . . . . . . . . . . . . . . . 76
Busy override . . . . . . . . . . . . . . . . . . . . . . . . . . . . . . . . . . . . . . . . . . . . 77
Transferring a call (joining). . . . . . . . . . . . . . . . . . . . . . . . . . . . . . . . . . . 77
Placing a call on hold . . . . . . . . . . . . . . . . . . . . . . . . . . . . . . . . . . . . . . . 79
Toggling (switching between calls) . . . . . . . . . . . . . . . . . . . . . . . . . . . . 79
Conducting a conference. . . . . . . . . . . . . . . . . . . . . . . . . . . . . . . . . . . . 80
Using the second call function . . . . . . . . . . . . . . . . . . . . . . . . . . . . . . . 83
Group functions . . . . . . . . . . . . . . . . . . . . . . . . . . . . . .84
Activating/deactivating group calls . . . . . . . . . . . . . . . . . . . . . . . . . . . . 84
Ringing group on . . . . . . . . . . . . . . . . . . . . . . . . . . . . . . . . . . . . . . . . . . 87
UCD (Universal Call Distribution). . . . . . . . . . . . . . . . . . . . . . . . . . . . . . 89
Mulap group (Multiple Line Application) . . . . . . . . . . . . . . . . . . . . . . . . 94
Message functions . . . . . . . . . . . . . . . . . . . . . . . . . . .96
Leaving a message/advisory message . . . . . . . . . . . . . . . . . . . . . . . . . 96
Sending/calling text messages . . . . . . . . . . . . . . . . . . . . . . . . . . . . . . . 98
Answering a message or voicemail message . . . . . . . . . . . . . . . . . . . . 99
Caller list . . . . . . . . . . . . . . . . . . . . . . . . . . . . . . . . . . . . . . . . . . . . . . . 102
Additional functions . . . . . . . . . . . . . . . . . . . . . . . . .104
Handset alarm clock function . . . . . . . . . . . . . . . . . . . . . . . . . . . . . . . 104
Handset appointment reminder function. . . . . . . . . . . . . . . . . . . . . . . 106
System appointment function . . . . . . . . . . . . . . . . . . . . . . . . . . . . . . . 109
Selecting a base . . . . . . . . . . . . . . . . . . . . . . . . . . . . . . . . . . . . . . . . . 111
Setting the base . . . . . . . . . . . . . . . . . . . . . . . . . . . . . . . . . . . . . . . . . 112
Speed dialling . . . . . . . . . . . . . . . . . . . . . . . . . . . . . . . . . . . . . . . . . . . 113
Changing display key assignments . . . . . . . . . . . . . . . . . . . . . . . . . . . 114
Data communication with the PC . . . . . . . . . . . . . . . . . . . . . . . . . . . . 115
10
Page 11

Inhaltsverzeichnis
Bluetooth interface . . . . . . . . . . . . . . . . . . . . . . . . . . . . . . . . . . . . . . . 116
Activating/deactivating Bluetooth mode . . . . . . . . . . . . . . . . . . . . 116
Registering Bluetooth devices. . . . . . . . . . . . . . . . . . . . . . . . . . . . 117
Editing the list of known (trusted) devices. . . . . . . . . . . . . . . . . . . 118
Phonebook transfer . . . . . . . . . . . . . . . . . . . . . . . . . . . . . . . . . . . . 120
Setting the handset . . . . . . . . . . . . . . . . . . . . . . . . . . 121
Setting the speaker volume. . . . . . . . . . . . . . . . . . . . . . . . . . . . . . . . . 121
During a call . . . . . . . . . . . . . . . . . . . . . . . . . . . . . . . . . . . . . . . . . . 121
In idle status. . . . . . . . . . . . . . . . . . . . . . . . . . . . . . . . . . . . . . . . . . 122
Setting advisory tones . . . . . . . . . . . . . . . . . . . . . . . . . . . . . . . . . . . . . 123
Activating/deactivating the vibration alert . . . . . . . . . . . . . . . . . . . . . . 124
Setting the ringer. . . . . . . . . . . . . . . . . . . . . . . . . . . . . . . . . . . . . . . . . 125
Setting ringing tones and pictures with resource directory. . . . . . . . . 127
Viewing screensavers and caller pictures / Playing sounds. . . . . . 127
Renaming and deleting screensavers/caller pictures/sounds . . . . 128
Checking the available memory. . . . . . . . . . . . . . . . . . . . . . . . . . . 129
Activating or deactivating the ringer . . . . . . . . . . . . . . . . . . . . . . . . . . 130
Activating or deactivating the alerting tone . . . . . . . . . . . . . . . . . . . . . 130
Activating/deactivating automatic call answering . . . . . . . . . . . . . . . . 131
Setting the date and time . . . . . . . . . . . . . . . . . . . . . . . . . . . . . . . . . . 132
Setting the display. . . . . . . . . . . . . . . . . . . . . . . . . . . . . . . . . . . . . . . . 133
Setting the conversion list for vCard transfer . . . . . . . . . . . . . . . . . . . 137
Setting the menu view . . . . . . . . . . . . . . . . . . . . . . . . . . . . . . . . . . . . 137
Resetting the defaults . . . . . . . . . . . . . . . . . . . . . . . . . . . . . . . . . . . . . 139
Telephone blocking. . . . . . . . . . . . . . . . . . . . . . . . . . 141
Handset telephone lock. . . . . . . . . . . . . . . . . . . . . . . . . . . . . . . . . . . . 141
Telephone lock code programming . . . . . . . . . . . . . . . . . . . . . . . . . . . 142
Locking/unlocking the handset . . . . . . . . . . . . . . . . . . . . . . . . . . . . . . 143
Central telephone lock / Locking/unlocking other handsets . . . . . . . . 144
System functions . . . . . . . . . . . . . . . . . . . . . . . . . . . .145
Calling functions via the menu . . . . . . . . . . . . . . . . . . . . . . . . . . . . . . 145
Calling functions via codes . . . . . . . . . . . . . . . . . . . . . . . . . . . . . . . . . 145
Functions and codes . . . . . . . . . . . . . . . . . . . . . . . . . . . . . . . . . . . . . . 146
11
Page 12

Inhaltsverzeichnis
Personal alarm functionality . . . . . . . . . . . . . . . . . .149
Alarm statuses. . . . . . . . . . . . . . . . . . . . . . . . . . . . . . . . . . . . . . . . . . . 149
Terms . . . . . . . . . . . . . . . . . . . . . . . . . . . . . . . . . . . . . . . . . . . . . . . . . 149
Alarm types (overview) . . . . . . . . . . . . . . . . . . . . . . . . . . . . . . . . . . . . 154
Activating monitoring. . . . . . . . . . . . . . . . . . . . . . . . . . . . . . . . . . . . . . 155
Prealarm. . . . . . . . . . . . . . . . . . . . . . . . . . . . . . . . . . . . . . . . . . . . . 155
Technical warning on the handset . . . . . . . . . . . . . . . . . . . . . . . . . 156
Sending an emergency alarm signal/calling for assistance . . . . . . 158
Deactivating monitoring. . . . . . . . . . . . . . . . . . . . . . . . . . . . . . . . . . . . 160
Function test when activating Alarm Mode and PNG Mode. . . . . . . . 161
Appendix . . . . . . . . . . . . . . . . . . . . . . . . . . . . . . . . . . .163
Troubleshooting. . . . . . . . . . . . . . . . . . . . . . . . . . . . . . . . . . . . . . . . . . 163
Cleaning the handset. . . . . . . . . . . . . . . . . . . . . . . . . . . . . . . . . . . . . . 165
General specifications . . . . . . . . . . . . . . . . . . . . . . . . . . . . . . . . . . . . . 166
Handset . . . . . . . . . . . . . . . . . . . . . . . . . . . . . . . . . . . . . . . . . . . . . 166
DECT . . . . . . . . . . . . . . . . . . . . . . . . . . . . . . . . . . . . . . . . . . . . . . . 166
Bluetooth . . . . . . . . . . . . . . . . . . . . . . . . . . . . . . . . . . . . . . . . . . . . 167
Battery . . . . . . . . . . . . . . . . . . . . . . . . . . . . . . . . . . . . . . . . . . . . . . 167
Handset operating times/charging times. . . . . . . . . . . . . . . . . . . . 167
Charging shells . . . . . . . . . . . . . . . . . . . . . . . . . . . . . . . . . . . . . . . 167
Accessories . . . . . . . . . . . . . . . . . . . . . . . . . . . . . . . . . . . . . . . . . . . . . 168
EU directive . . . . . . . . . . . . . . . . . . . . . . . . . . . . . . . . . . . . . . . . . . . . . 168
Writing and editing text . . . . . . . . . . . . . . . . . . . . . . . . . . . . . . . . . . . . 168
Setting upper/lower case or digits. . . . . . . . . . . . . . . . . . . . . . . . . 168
Writing names . . . . . . . . . . . . . . . . . . . . . . . . . . . . . . . . . . . . . . . . 169
Accessing additional functions via the PC interface . . . . . . . . . . . . . . 169
Declaration of conformity . . . . . . . . . . . . . . . . . . . . . . . . . . . . . . . . . . 170
Index. . . . . . . . . . . . . . . . . . . . . . . . . . . . . . . . . . . . . . .171
12
Page 13

Operating instructions
Operating instructions
These operating instructions describe your handset and its functions on
your communications system.
All functions that can be performed via your handset are described here. If
some of the required functions are not available on your handset, it may be
due to one of the following:
• The function is not configured for you or your handset - please contact
your system administrator.
• Your communications platform does not feature this function - please
contact your contract partner for the communications system.
Alarm functionality
Only for OpenStage M3 Plus and OpenStage M3 Ex Plus!
OpenStage M3 Plus and OpenStage M3 Ex Plus offer personal alarm
functionality with voice communication capability. A device with this
functionality is also described in abbreviated form as PNG (personal alarm
device) or as PNG-S (personal alarm device with voice communication
capability).
A manual alarm can be triggered via an alarm key. Sensors detect non
movement, man down and escape states, which can be signalled as
automatic alarms.
An integrated time alarm function is used to determine whether the
person being monitored is still responsive. A pull cord is used to check
whether the OpenStage M3 Plus is still on the monitored person.
OpenStage M3 Plus and OpenStage M3 Ex Plus optionally monitor the
following operating functions:
• Battery charging
• Synchronicity with DECT base
• Communication with an alarm server
A technical warning is reported on the handset in the event of a
malfunction.
For more information on the alarm functionality please refer to Kapitel ,
“Personal alarm functionality”.
13
Page 14

Putting the handset into service
Remove the protective cover from the display before
putting the handset into service.
Putting the handset into service
Checking the package contents
•Handset
• Battery pack
• Accessory pack containing the following:
– Battery cover
– Screw for battery cover
– Allen key
– Attachment clip
– Holder for attachment clip
– Dummy plug (OpenStage M3 and OpenStage M3 Ex only)
– Connector with cord for man down alarm (OpenStage M3 Plus and
OpenStage M3 Ex Plus only)
• Document "Information on Handset"
• Document "Safety Notes"
Removing the protective cover
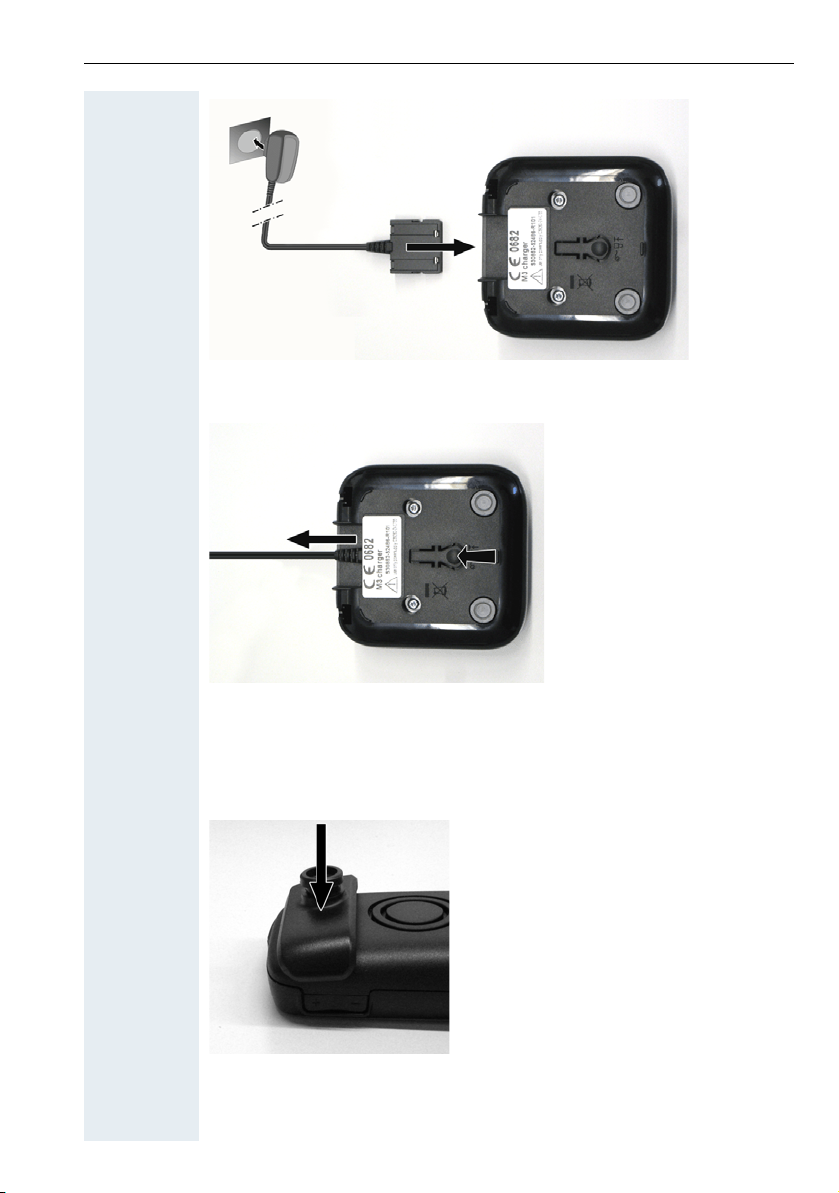
Installing the charger
The charger is designed for operation in closed, dry rooms within a
temperature range of +5 °C to +45 °C.
Position the charger on a level, non-slip surface.
The phone's feet do not usually leave any marks on surfaces. However,
due to the multitude of different varnishes and polishes used on today's
furnishings, the occurrence of marks on the surfaces cannot be completely
ruled out.
Please note:
• Never expose the telephone to the influence of heat sources,
direct sunlight or other electrical devices.
• Protect your handset from moisture, dust, corrosive liquids and
fumes.
1. Connect the flat plug from the power adapter to the charger.
2. Plug the power adapter into the plug socket.
14
Page 15
Putting the handset into service
1
2
To disconnect the flat plug from the charger, press the release button and
disconnect the flat plug.
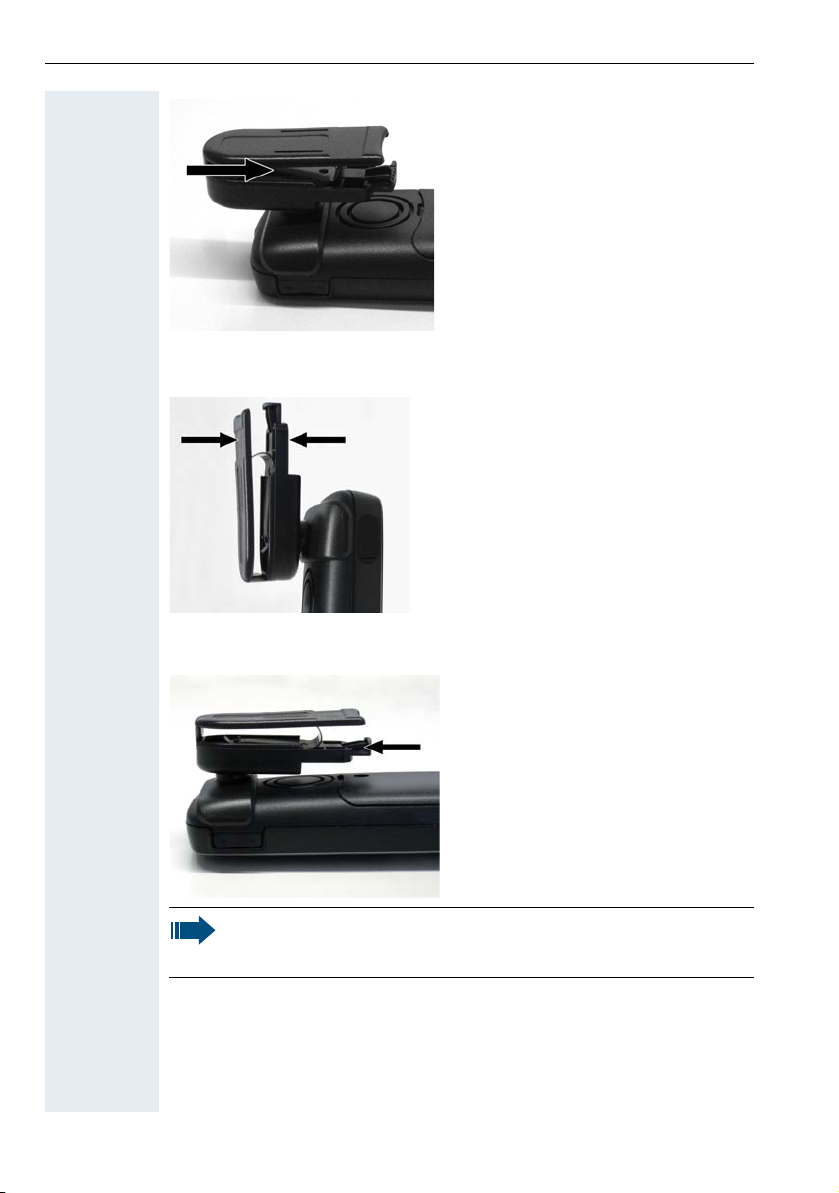
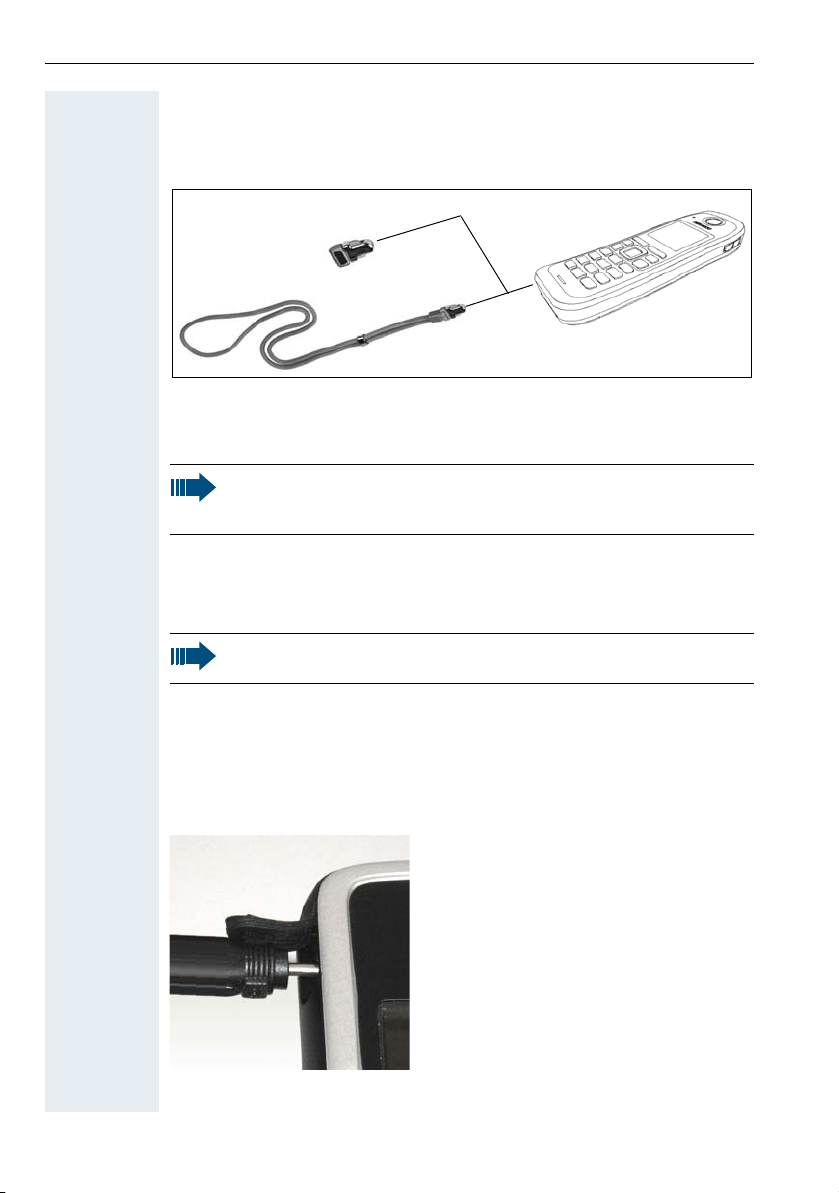
Fitting the attachment clip
1. Press the attachment clip pin on the back of the handset until the tabs
on the sides engage audibly in the recesses on the phone.
2. Slide the attachment clip onto the pin as it clicks audibly into place.
15
Page 16
Putting the handset into service
3. Secure the handset with the attachment clip to the belt. To do this,
open the brackets by squeezing the free end and attach it to the belt.
To remove the handset, press the opener on the attachment clip and slide
the handset from the pin.
While you are wearing the handset on the belt you will be able to
read the display without having to remove the handset, see
page 135.
16
Page 17
Putting the handset into service
1
2
3
Inserting the battery
The handset is supplied with an approved battery. The battery is not
charged when supplied. It is first charged in the handset.
• Do not remove the battery in Ex zones.
• Please observe the safety notes page 2.
• Only use approved batteries page 167.
• Open the battery compartment in a dust-free environment only.
• Your phonebook entries and all settings remain stored even if
you remove the battery. The date and time settings will be
reset.
• Only remove the battery if it is defective. The battery's life
diminishes each time it is removed.
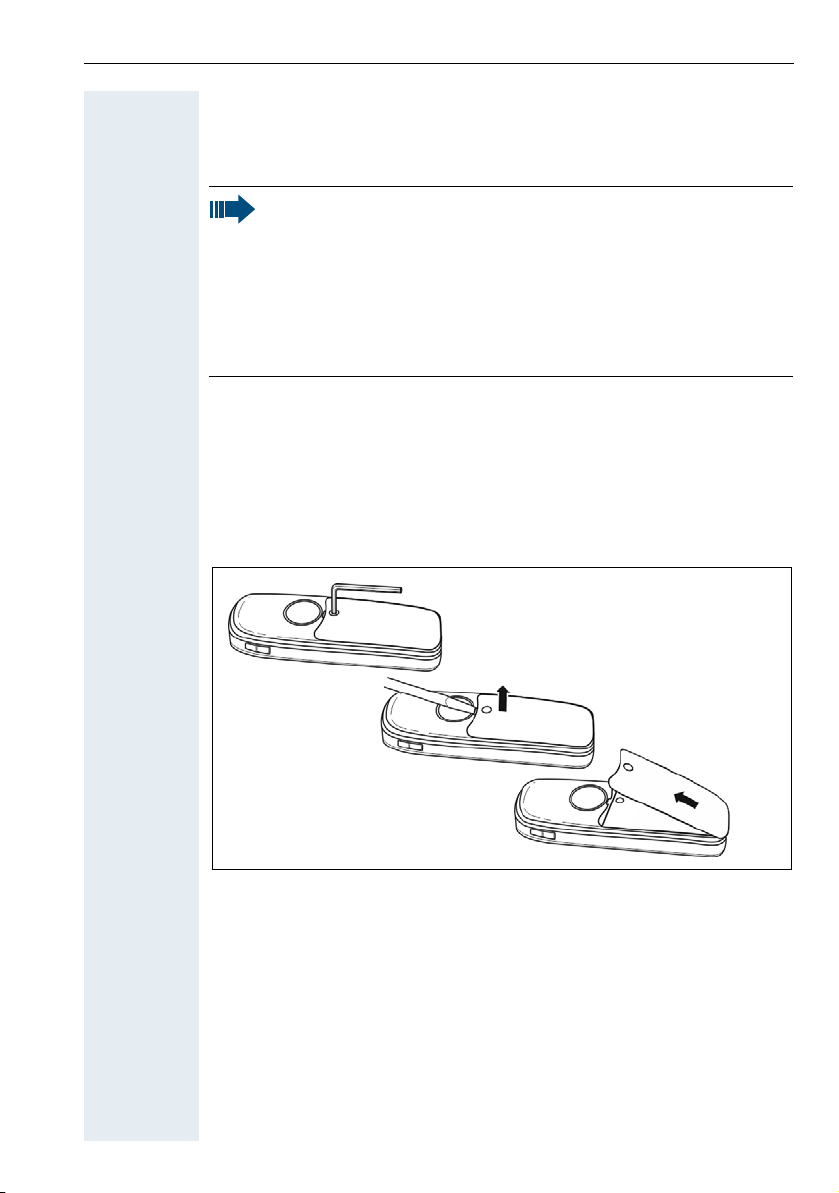
Opening the battery compartment
1. Loosen and remove the screw from the battery cover with the Allen
key.
2. Insert a suitable screwdriver into the recess between the housing and
battery cover, turn it and then raise the battery cover.
3. Lift up the battery cover from the housing.
Inserting the battery
Insert the battery pack (at an angle, nose first and the contacts facing
down). Then press it down into the compartment until the battery pack's
positioning clip firmly snaps into place.
17
Page 18

Putting the handset into service
1
2
3
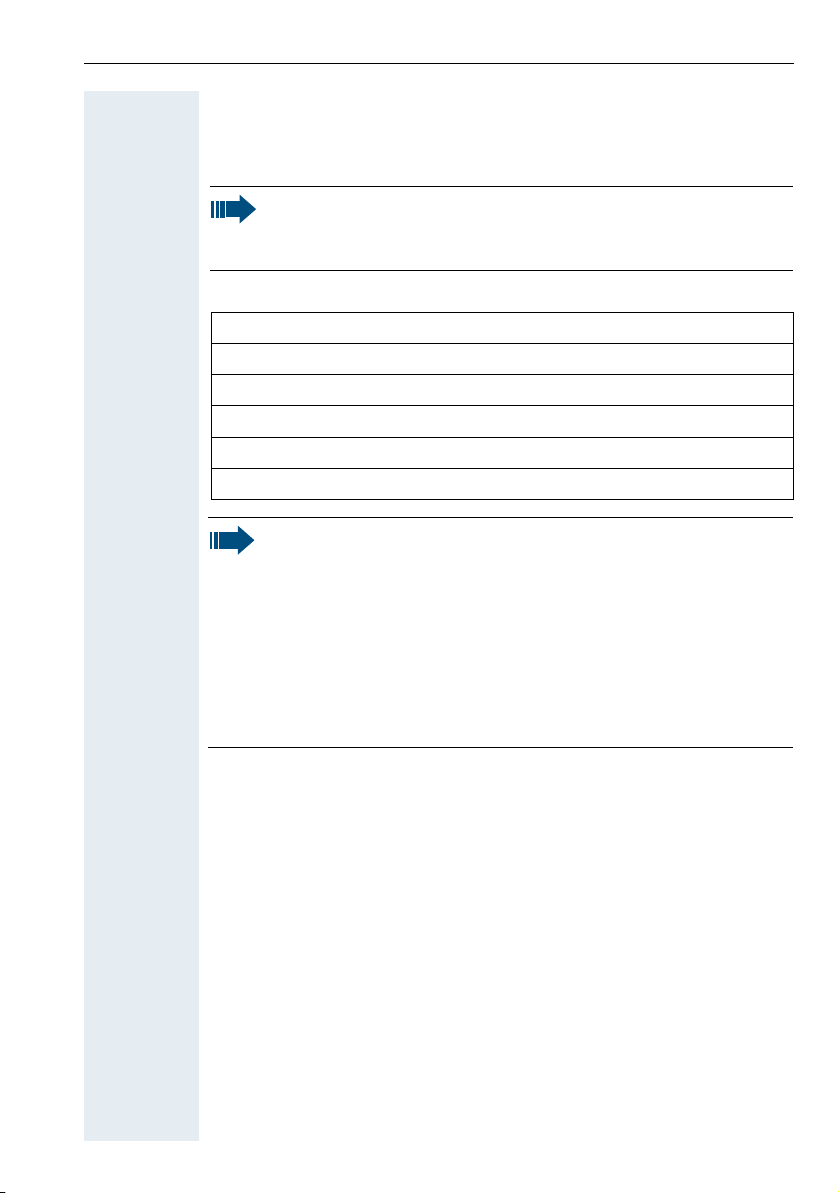
Closing the battery compartment
1. Replace the battery cover at the bottom of the housing into the
recesses.
2. Then press down the battery cover until it rests firmly on the seal.
3. Insert and tighten the Allen screw.
18
Page 19
Putting the handset into service
Charging and using the battery
To charge the battery, insert the handset into the charging shell with the
keypad facing forwards.
Important:
Only place the handset in the designated charger. (For order
numbers see page 167).
The charging status is indicated by the charge status LED.
{ lighting white: charged over 66%
{ lighting white: charged between 34 % and 66 %
y lighting white: charged between 11% and 33%
y lighting red: charged below 11%
y flashing red: battery almost empty (less than 10 minutes talktime)
xy xy x{ x{ lighting white: battery being charged
• Initial charging: Charge the battery for at least 10 hours without
a break, regardless of the charging status icon.
• For future charging: you can replace your handset in the
charging shell each time it has been used. Charging is
electronically controlled which ensures that the battery is
charged optimally.
• The capacity of the Ex battery pack can diminish due to ageing
to the extent that it is no longer sufficient (increasingly faster
discharge) for the intended operating life. The Ex battery pack
must then be replaced by appropriately trained service
personnel.
19
Page 20
Putting the handset into service
1
2
1
2
Inserting the dummy plug or connector
Insert the dummy connector (1) / connector with cord (2) into the recess
provided. Make sure the dummy connector is positioned correctly.
If you do not require the man down alarm function on the
OpenStage M3 Plus or OpenStage M3 Ex Plus you can also use the
connector without a cord as a dummy connector.
Regardless of whether or not a cord is used, the handset can be
placed with the connector inserted in the charger. Run the cord out
from the front of the charger.
Connecting a corded headset
Not for OpenStage M3 Ex and OpenStage M3 Ex Plus!
You can connect a headset with a 2.5 mm jack plug to the left side of your
handset.
1. To do this, open the rubber cover using your finger nail and bend it
outward.
2. Insert the jack plug into the socket.
The headset volume corresponds to the setting for the earpiece volume
20
page 121.
Page 21
Putting the handset into service
1
2
Use a Bluetooth headset for Ex-proof equipment, page 116.
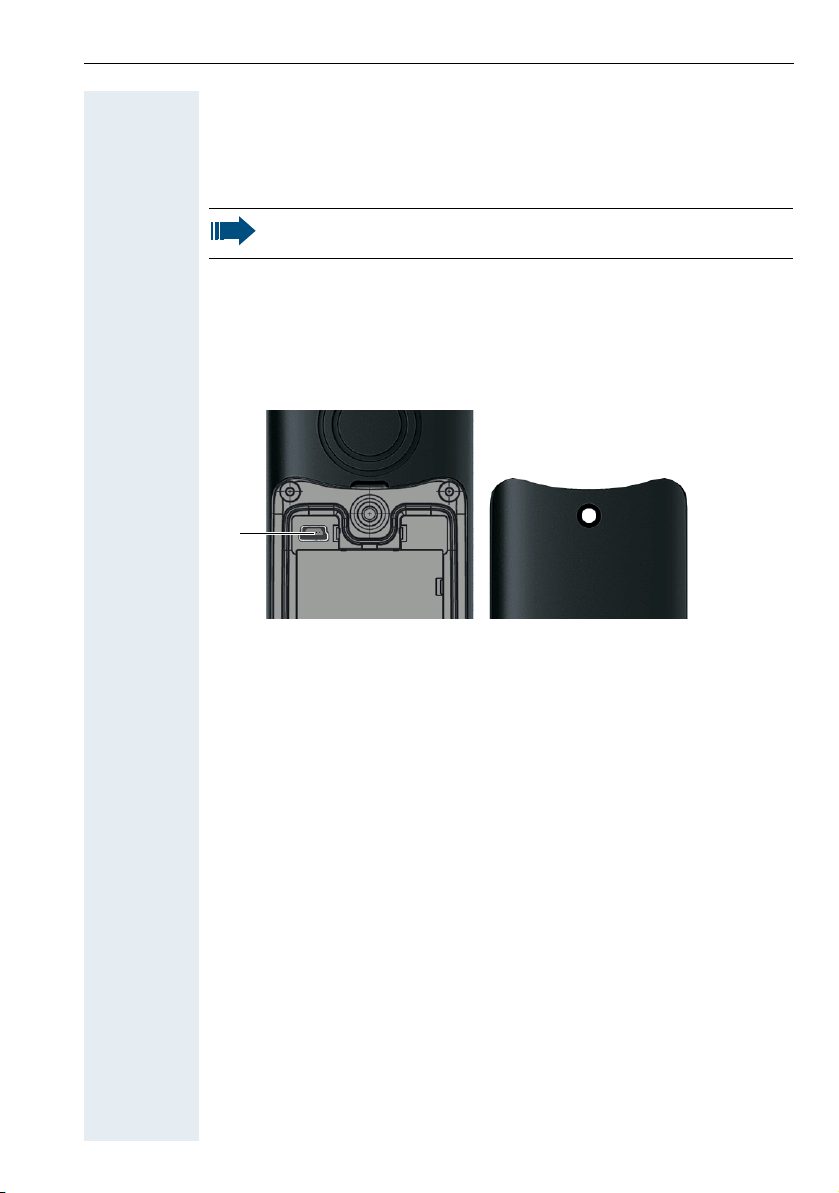
Connecting a USB data cable
The USB cable must not be connected in Ex zones!
You can connect a USB data cable into the port under the battery cover of
your handset.
1. To do this, open the battery cover, as when inserting the battery
page 17.
2. Insert the mini-USB plug into the socket.
21
Page 22

Putting the handset into service
Settings
Ï
Language
Deutsch
English
Francais
Italiano
Espanol
Portugues
Nederlands
Dansk
Norsk
Svenska
Suomi
Cesky
Polski
Turkce
Ellinika
Magyar
Russkij
Hrvatski
Slovenscina
Romana
Srpski
Catala
Bulgarski
Bosanski
Ukrayinska
Arabic
Step by Step
[ Select the menu icon and confirm.
u v
[ Select the menu item and confirm.
st
[ Select and confirm the language you require.
st
Setting the handset display language
If your preferred language for handset display texts is
not set as the default, you can set this yourself.
Opening the main menu
v Open the handset's main menu.
Opening the first submenu
Opening the second submenu
Selecting a language
a Press the On-hook key to end the operation.
• If you inadvertently set a display language
that you do not understand, press "v
5" and then select the correct language.
• If you want to reset the default display
language: page 139.
• You can also change the language of the
display texts for the communications system:
page 23.
O
22
Page 23

Putting the handset into service
Menu
Service?
More features?
*
48=
Select language?
11=German
...
Step by Step
Setting the system display language
If you wish to change the language of the display texts,
then you must also change the system language on the
handset. A different language can be set for every
handset on the system.
c or d Press and hold the Talk or Speakerphone key.
Open the system menu.
> < [Select the menu item and confirm.
> < [Select the menu item and confirm.
> < [Select the menu item and confirm.
> < [Select and confirm the language you require.
a Press the On-hook key to end the operation.
A description of further settings can be found
from page 121.
23
Page 24

Description of controls
Description of controls
Function keys
The following function keys are available:
Key Name Usage
a
c
d
f
*
#
Alarm and
On-hook and
on/off key
Talk key • Answer a call
Speakerphone
key
Message list • Access message lists
Star key • When entering the phone number:
Hash key • When entering the phone number:
emergency call
key
• End a call
• Cancel functions
• Go back to the next menu level up
• Activate or deactivate the handset
• Dial a phone number
• Open the redial list
• Access telephone system functions
• Answer a call
• Dial a phone number
• Toggle between handset and
speakerphone mode
• Access telephone system functions
– Press and release: Insert "*"
– Press and hold: Insert "R"
• In editor mode (string): Show all
special characters
• In idle status: Press and hold to switch
on/off the ringer
– Press and release: Insert "#"
– Press and hold: Insert a dialling
• In editor mode (string): Toggle
between uppercase and lowercase
and digits
• In idle status: Press and hold to switch
on/off the keypad lock
• For triggering a manual alarm or
emergency call
pause (for example between the
prefix and the phone number or
when checking a mailbox)
24
Page 25

Description of controls
Key Name Usage
Volume key (+/-)• Adjust the volume for ringtones
• When conducting a call: Adjust the
volume in handset and speakerphone
mode and for the headset
Control key
The control key is assigned different functions depending on the operating
situation:
Situation
In idle status Call volume Open the
During a call Call volume Open the
In the main
menu
In lists and
menus
In the input
field
Change values
t
Press top of
key
Select a menu
icon
Next-higher
item in the list
Move the
cursor up one
line
- -
The centre key (central key of control key) has an OK function for
confirming/adopting a selection.
s
Press bottom
of key
handset's
phonebook
handset's
phonebook
Select a menu
icon
Next-lower
item in the list
Move the
cursor down
one line
u
Press left side
of key
- Open the
- Select
Select a menu
icon
Next menu
level up, cancel
Move the
cursor to the
left
Reduce value Increase value
v
Press ri ght side
of key
handset's main
menu
"Loudspeaker
Vol", "GAP
DTMF", "Base
Settings"
Select a menu
icon
Select an entry
(OK)
Move the
cursor to the
right
25
Page 26
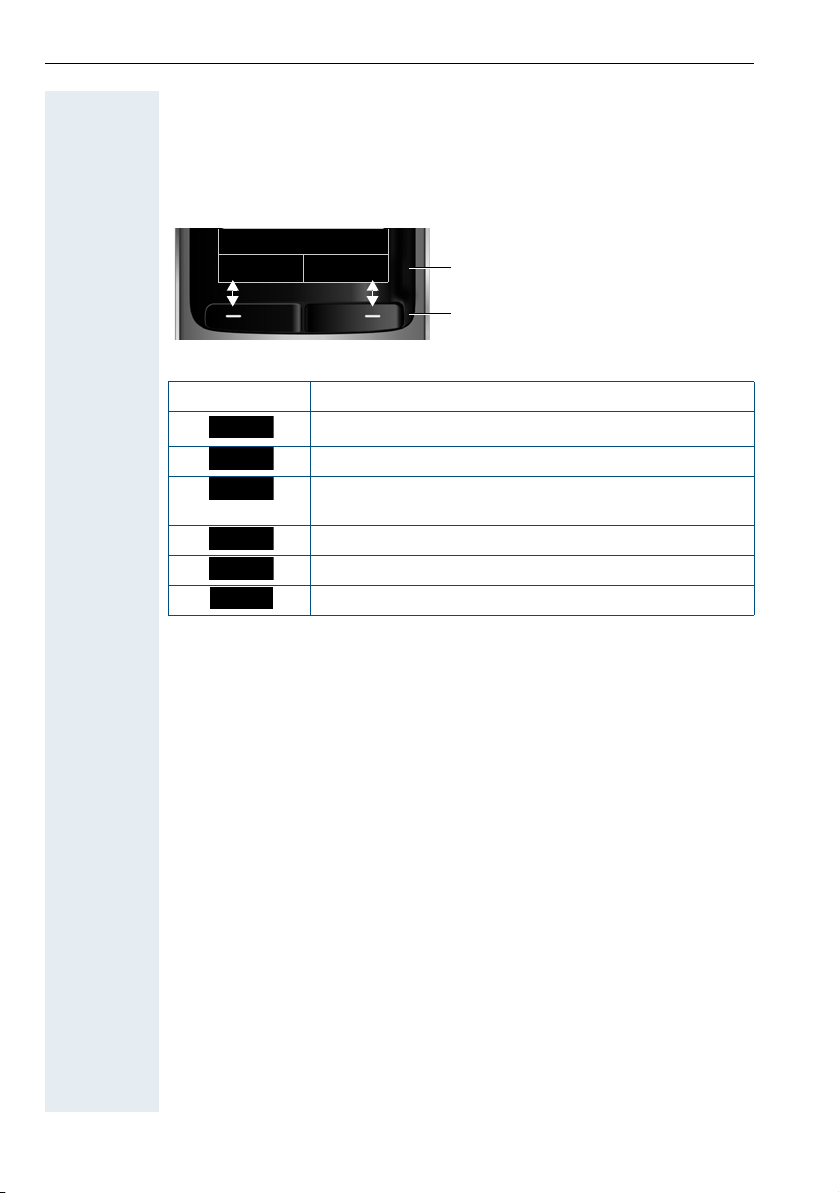
Description of controls
Back Save
Current display key
functions
Display keys
Options
OK
Û
Back
Save
Þ
Display keys
The handset has two display keys, each with one or two functions. When
the key is allocated two functions, press the right or left side of the key to
select the corresponding function. The display key assignment depends
on the operating status.
Some important display keys include:
Icon Usage
Open a context-specific menu
Confirm your selection
Delete character by character/word by word from right
to left
Go back one menu level/cancel operation
Save input
Open redial list
26
Page 27

Description of controls
·òÉ
ì
Ê
Ì
Menu icons in the main menu
v or w The handset's main menu can be opened by right-clicking or pressing the
centre key of the control key.
u v t s The menu icons are selected by pressing the left/right and top/bottom of
the control key.
Alternatively, you can also press one of the numerical keys, e. g.
"Alarm Clock" or
Menu options that are only available in expert mode are marked with the
icon. Expert mode can be set by switching the menu view from
•
simplified to complete. To set, see page 137.
Icon Name Usage
O for "Settings".
Resource
Directory
Bluetooth Configure Bluetooth interface:
Additional
Features
Alarm Clock Configure alarm call function.
Manage images and tones:
• Screensavers
• Caller Pictures
• Sounds
• Capacity
• Activation
• Search for Headset
• Search Data Device
• Known Devices
• Own Device
Alarm and emergency call
configuration:
• [Mode] Activation
• Configuration (only with Service
PIN)
• Operating Mode (only with Service
PIN, only with OpenStage M3 Plus
and OpenStage M3 Ex Plus)
• Display Rotate (only with
OpenStage M3 Plus and
OpenStage M3 Ex Plus)
For information on configuring and
selecting the operating mode, see the
"Alarm and Emergency Call
Configuration" Service Manual.
4 for
Call Lists Open call list if calls are available.
Voice Mail Call mailbox if voicemail calls are
available on the network answering
machine.
27
Page 28

Description of controls
á
Â
Ï
Icon Name Usage
Organizer Manage appointments:
• Calendar
• Missed Alarms
Directory Manage phonebook.
Settings Configure handset:
•Date/Time
• Audio Settings
– Handset Volume
– Advisory Tones
–Vibration
– Ringtones (Handset)
• Display + Keypad
– Screensaver
– Large Font
– Colour Schemes
– Display Backlight
– Keypad Illumination
– Auto Keylock
• Language
• Registration
– Register Handset
– Select Base (only if registered on
several systems)
• Telephony
– Auto Answer
–Aera Codes
•System
– Handset PIN
– Handset Reset
– Base Reset
• Menu View
– Simplified
– Complete
28
Page 29

Step by Step
Please enter
PIN:
Conducting calls – the basic functions
Conducting calls – the basic
functions
You can use your handset to make both internal and
external calls.
Internal calls are calls that
• you make within the range of a communications
system, for example, within your company,
• you make between networked communications
systems, for example, to different company
locations.
External calls are calls that you conduct with users of
the public telephone network.
Activating/deactivating the handset
a Press the On-hook key until the activation or
deactivation is confirmed by a signal.
PIN
If the default PIN has not been changed (0000), the
handset is ready for operation as soon as it is switched
on. If a PIN was set, it must be entered before the
handset can be operated.
o Enter the PIN.
[ Confirm your entry. The handset is ready to use.
Displaying the connection quality
The strength of the incoming signal is displayed by the
"receive field strength" icon in idle status:
| Flashing, no reception
Ò Low receive field strength
Ñ 50% receive field strength
i 75% receive field strength
Ð 100% receive field strength
The radio range is different indoors and outdoors
page 166. Please consult your system administrator
in the event of range problems.
29
Page 30

Conducting calls – the basic functions
Busy
Please replace
handset.
Step by Step
c or d When the handset is in idle status: Press and hold the
Charging the battery
You may only use the charging shell provided for the
handset.
The handset charges when sitting in the charging shell,
even when deactivated.
If the handset deactivates because the battery is flat, it
automatically reactivates and is ready for operation as
soon as you place it in the charging shell. The charging
operation starts. If a PIN was set, it must be entered
first to allow charging to start.
Language
If your preferred language for the display texts is not
set, you can set this yourself page 22.
First seize the line, then dial
Talk or Speakerphone key.
30
o Enter the number you wish to dial. The user is called.
Typing errors cannot be corrected. In case of typing
errors: Press the On-hook key.
Either:
p The user answers. You are conducting the call.
Or:
The user is busy or rejects the call. You are routed to the
other party's mailbox (if configured) or can program a
callback request page 33.
a Press the On-hook key to end the operation.
Page 31

Conducting calls – the basic functions
Busy
Please replace
handset.
Step by Step
Dial first, then seize the line
Dialling preparation
o and possibly X Enter the required phone number and correct individual
characters as necessary using the "Delete" display key.
possibly # Insert a dial pause. A "P" appears between the digits
entered. You may have to insert a pause, for example,
between the prefix and the phone number or when
checking a mailbox.
The dialling preparation function is also available
with number redial and when dialling from the
handset's phonebook ( Ó ).
Dialling
c or d Press the Talk or Speakerphone key. The user is called.
Either:
p The user answers. You are conducting the call.
Or:
The user is busy or rejects the call. You are routed to the
other party's mailbox (if configured) or can program a
callback request page 33.
a Press the On-hook key to end the operation.
31
Page 32

Conducting calls – the basic functions
Show
Options
Display Number
Step by Step
c When the handset is in idle status: Press the Talk or
st Select the required telephone number.
if nec. If you want to see details of the selected phone
Either:
c or d Press the Talk or Speakerphone key briefly. The
Or:
Manual redial
The last 20 phone numbers dialled are saved in the
redial list. A phone number that was dialled several
times is only saved once.
Speakerphone key briefly. The redial list is displayed.
number: Press the display key.
connection is set up.
Open the redial menu. The menu contains the following
functions page 43:
• Copy to Directory
• Automatic Redial
• Display Number
• Delete Entry
• Delete all
st [ Select the menu item and confirm.
32
o Change or complete the phone number, for example,
with DDIA.
c or d Press the Talk or Speakerphone key briefly. The
connection is set up.
Page 33

Step by Step
Callbck
Conducting calls – the basic functions
Callback
This function enables you to call a user who does not
answer or whose line is busy. The Callback function
enables you to contact him as soon as he hangs up or
re-uses his telephone. Please note that a line is
signalled as busy when it is being called by another
user. You can continue to use your handset without
restriction when a callback has been booked.
You can also send a callback request as a message
page 98. This function can also be called by entering
the code page 145.
Booking a callback
p The number is dialled. You hear the busy tone or the
user does not answer.
Save the callback request.
a Press the On-hook key to end the operation.
You receive a callback
You will receive the callback as soon as the user you
want has hung up or the first time he uses his
telephone. The following appears on your handset
display "Callback:...".
c or d Press the Talk or Speakerphone key briefly. The
connection is set up.
Callbacks are repeated until a connection is
established or until the callback is deleted. A
handset can initiate up to five callbacks and can
be the destination for up to five callback
requests. If these conditions are met, any
further callbacks are rejected.
33
Page 34

Conducting calls – the basic functions
Menu
Service?
More features?
#58=View callbacks?
Mnu
Delete?
Enquiry
Step by Step
Deleting a callback request
c or d Press and hold the Talk or Speakerphone key.
Open the system menu.
> < [ Select the menu item and confirm.
> < [ Select the menu item and confirm.
> < [ Select the menu item and confirm.
> < Select the entry.
Open the additional menu.
> < [ Select the menu item and confirm.
a Press the On-hook key to end the operation.
Consultation
You interrupt your call to consult with a user (including
external users) and then resume the original call.
34
p You are conducting a call.
Activating and conducting an enquiry/consultation call
Activate enquiry. The current call is placed "on hold", so
that the first user waits.
o Enter the phone number for the consultation call.
p The number is dialled. The user answers. The
consultation starts.
The second user is busy or does not answer
Press the display key to cancel the consultation. You are
reconnected with the first partner.
During the consultation you can
• book a callback page 33,
• activate call waiting page 74,
• busy override page 77 or
• press the menu key to send a callback or message
to the second partner.
Page 35

Step by Step
Menu
Quit and return?
Conducting calls – the basic functions
The consultation is ended and you return to the waiting call
Either: The second user hangs up. You are reconnected with
the first partner.
Or:
Open the system menu.
> < [ Select the menu item and confirm.
You will be connected to the first party again. The
second partner hears the busy tone and hangs up; an
OpenStage handset hangs up automatically.
However, you can also
• toggle between the partners page 79,
• set up a conference page 80 or
• transfer the waiting partner to the second partner
page 77.
Answering or rejecting a call
Accepting a call
Your handset rings page 131. The caller information
appears on the display. The name and/or telephone
number of the caller can be displayed. You have the
following options for answering a call:
k The handset is in the charging shell: Remove the
handset from the charging shell (only works if "Auto
Answer" is active) page 131.
c or d The handset is not in the charging shell. Press the Talk
key or Speakerphone key.
When you have accepted the call you can:
• transfer the call page 77,
• place the call on hold and consult with someone
else in the room page 79,
• place the call on hold and call a second partner
page 34 in order to forward page 77 or toggle
the call page 79 or to set up a conference
page 80.
Rejecting a call
If you do not wish to be disturbed, you can reject the
call.
35
Page 36

Conducting calls – the basic functions
Reject call
Menu
Group Pickup?
Step by Step
Confirm the message displayed with one of the two
display keys. The call is rejected and the caller hears the
busy tone. You are routed to the other party's mailbox
(if configured) or can program a callback request
page 33.
Picking up a call in a call pickup group
You can use your handset to pick up calls to telephones
within your call pickup group (set by the service
engineer). This is also possible when you are
conducting a call.
Prerequisite:
You hear that a telephone in your call pickup group is
ringing.
c Press and hold down the Talk key. The message "Call
for:" appears on the display.
Open the system menu.
> < [ Select the menu item and confirm.
p You are conducting the call.
36
Ending a call
a or k Press the On-hook key briefly or place the handset in
the charging shell.
The call charges are displayed, depending on the
communications system.
Page 37

Conducting calls – the basic functions
Menu
Forwarding on?
1=all calls?
2=external calls
only?
3=internal calls only?
Save
Step by Step
Forwarding calls
This function is for when you leave your desk for a while
and want certain calls to be forwarded to your new
location. The forwarding destination for internal calls
can be any internal or external phone number. The
destination number is usually an external phone
number because you can be reached internally anytime
by means of your handset.
Activating call forwarding
c or d Press and hold the Talk or Speakerphone key.
Open the system menu.
> < [ Select the menu item and confirm.
Either:
> < [ Select the menu item and confirm.
Or:
> < [ Select the menu item and confirm.
> < [ Select the menu item and confirm.
Or:
then:
o Enter the destination number.
Save the settings.
a Press the On-hook key to end the operation.
The external code must be entered before
external phone numbers.
37
Page 38

Conducting calls – the basic functions
Menu
Divert cancelled?
Step by Step
Deactivating call forwarding
Prerequisite:
The room monitor function is activated.
c or d Press and hold the Talk or Speakerphone key.
Open the system menu.
> < [ Select the menu item and confirm.
a Press the On-hook key to end the operation.
Activating or deactivating the keypad lock
This feature protects against accidentally pressing
buttons when the handset is in a pocket, forexample.
The keypad lock turns off automatically when a call
comes in and turns back on when the call has ended.
# Press the hash key until the activation or deactivation is
confirmed by a signal.
A key icon on the display indicates that the keypad lock
is active.
38
After leaving the radio network
The message "No base" flashes on the display. The
handset repeatedly attempts to synchronise with a
base. The intervals between synchronisation attempts
increase on account of the integrated power saving
function.
You can switch off your handset to save the battery.
Page 39

Step by Step
Conducting calls – enhanced functions
Conducting calls – enhanced
functions
Speakerphone mode
Features
Speakerphone mode offers you the following
advantages:
• Other persons can listen to and participate in the
call.
• Your hands are free.
• When dialling, you can hear the ring tone, for
example, without having to lift the handset to your
ear.
Speakerphone mode can be used effectively up to a
background noise level of 50 dB (A).
Activating speakerphone mode
Speakerphone mode can be activated during a call,
when dialling or when answering a call:
d Press the speakerphone key. Inform the other party
when you want to activate the speakerphone to let
others listen in.
Make sure you switch back to handset mode
before you return the telephone directly to your
ear. In this way you can avoid causing damage to
your hearing.
Switching between speakerphone and handset mode
d Press the speakerphone key. The handset switches
from speakerphone to handset mode or vice versa.
If you wish to replace the handset in the
charging shell during a call, forexample,
because the battery is flat, hold down the
Speakerphone key to prevent the call from being
disconnected.
39
Page 40

Conducting calls – enhanced functions
Step by Step
Setting the speakerphone volume
The volume can be set during the call page 121.
Conducting calls with the headset
The handset can be used with a corded and cordless
headset.
Corded headset
Not for OpenStage M3 Ex and
OpenStage M3 Ex Plus!
You can connect a corded headset via the jack on the
side of the handset, see page 20. The headset must
have a (2.5 mm) jack plug.
The earpiece and microphone functions are activated
on the headset once it is connected.
Cordless headset
You can use a cordless Bluetooth headset with your
handset. This means your hands are free while making
calls and there are no annoying cables, for example,
when you are working at your computer or when you
are on the road.
Your Bluetooth headset must be registered on your
handset before you can use it for the first time. After
this, you can continue to use your Bluetooth headset
until you decide to deregister it.
• If you register a headset, any headset that is
already registered will be overwritten.
• If you would like to use a headset with your
handset that is already registered at another
device (e.g. a handset), please deactivate this
connection before you start the registration
process.
• Theoretically, third parties can tap Bluetooth
connections.
• To improve protection against unauthorised
tapping, deregister any devices you no longer
require.
40
Page 41

Conducting calls – enhanced functions
Bluetooth
ò
Search for Headset
Found Devices
S55 Headset
Options
Trust Device
agreed PIN:
Activation ³
Step by Step
During a call, a second caller is not signalled at the
Bluetooth headset.
Registering a Bluetooth headset at the handset
ò
Set the headset to login mode (see the user manual
supplied with your headset).
v Open the handset's main menu.
u v [ Select the menu icon and confirm.
st [ Select the menu item and confirm. The handset
searches for a Bluetooth headset and sets up a wireless
connection. The names of the devices found are
displayed.
st Select the required headset.
Press the display key.
st [ Select the menu item and confirm.
st [ If necessary, enter and confirm the Bluetooth PIN for
your headset (see the user manual supplied with your
headset). The device is saved in the list of known
devices.
The Bluetooth interface is automatically activated on
your handset. The active Bluetooth function is ticked.
41
Page 42

Conducting calls – enhanced functions
Bluetooth
ò
Known Devices
S55 Headset
Options
Delete Entry
Step by Step
ò
ò
ò
c or d Press the Talk key or Speakerphone key on the handset.
v Open the handset's main menu.
Conducting calls via the Bluetooth headset
If a Bluetooth headset is registered at the handset, the
Bluetooth headset is activated immediately upon
dialling.
Accepting a call on the Bluetooth headset
The headset uses a call tone to signal an incoming call.
Press the Talk key on the Bluetooth headset (see the
user manual supplied with your headset).
Number redial
To redial a number, double-click the Talk key on the
headset.
Switching from the Bluetooth headset to the
earpiece or speakerphone during a call
You are conducting a call via the Bluetooth headset.
The Bluetooth headset is disconnected. You can
continue the call directly on the handset.
Deregistering the Bluetooth headset at the handset
To improve protection against unauthorised tapping,
deregister the Bluetooth headset at the handset if you
no longer wish to use it.
u v [ Select the menu icon and confirm.
st [ Select the menu item and confirm. The name of the
st [ Select the menu item and confirm. The Bluetooth
42
registered or detected Bluetooth headset is displayed.
Press the display key.
headset is deregistered and can no longer be detected
by the handset.
Page 43

Step by Step
Options
Automatic Redial
Off
Options
Conducting calls – enhanced functions
Number redial
The last 20 phone numbers dialled are saved in the
redial list. A phone number that was dialled several
times is only saved once.
If you tried to call a party from the handset's telephone
directory, the name of the party is displayed in case of
number redial. For information on manual number
redial, see page 32.
Automatic redial
The phone number is automatically redialled ten times
at 20-second intervals. Speakerphone mode is
automatically activated, the Talk key flashes. The
function is deactivated after ten unsuccessful attempts
and when a call is made in the interim.
c Press the Talk key. The redial list is displayed.
st Select the required telephone number.
Press the display key.
st [ Select the menu item and confirm. Automatic redial is
activated.
Either:
c The user answers. Press the Talk key and conduct the
call.
Or:
If you wish to cancel the function: press the Display key
or any key.
Deleting a redial entry or list
c Press the Talk key. The redial list is displayed.
st Select the required telephone number.
Press the display key.
43
Page 44

Conducting calls – enhanced functions
Delete Entry
Delete All
Options
Copy to Directory
<New Entry>
1 Phone (Mobile)
2 Phone (Office)
3 Phone (Home)
OK
New Entry
Back
08912345678
copy number to:
äkl
1
2
3
Step by Step
Either:
st [ Select the menu item and confirm. The telephone
number is deleted.
Or:
st [ Select the menu item and confirm. The redial list is
deleted.
a Press the On-hook key to end the operation.
Adding a telephone number to the redial list
During dial preparation, you can add a number from
your handset's redial list to your phonebook.
c Press the Talk key briefly. The redial list is displayed.
st Select the required telephone number.
Press the display key.
st [ Select the menu item and confirm. The phonebook is
displayed.
st [ Select the menu item and confirm. The following
selection mask appears:
44
u v Select the icon for the required phone number type
under which the phone number is to be added.
[ Confirm your entry.
st o Enter the remaining contact information, such as the
first name and surname. For further information, see
page 51 and page 52.
Page 45

Conducting calls – enhanced functions
Menu
Service?
*
7=Use speed
dialing?
Menu
Service?
Step by Step
System speed dialling
Your system administrator can save up to 1000 external
phone numbers as system speed dialling destinations
in your communications system. You can dial these
speed dialling destinations with a three-digit code (000
- 999).
Dialling a system speed dialling destination
c or d Press and hold the Talk or Speakerphone key.
Open the system menu.
> < [Select the menu item and confirm.
> < [Select the menu item and confirm. This function can
also be activated directly by entering the appropriate
code page 145.
o Enter the required code (3 digits, 000 - 999).
The saved speed dialling destinations and the
associated codes can be obtained from the
organisational unit responsible for administering
the communications system.
Dialling a system speed dialling destination with suffix-dialling or a DID number
System speed dialling destinations can be saved in your
communications system and then dialled by means of
suffix-dialling or DDIA. These speed dialling
destinations let you enter an additional suffix-dialling or
DID number up to five seconds after entering the threedigit service code. If you do not make an entry within
this time frame, the default suffix-dialling number,
forexample, "0" for the exchange, is dialled.
c or d Press and hold the Talk or Speakerphone key.
Open the system menu.
> < [Select the menu item and confirm.
45
Page 46

Conducting calls – enhanced functions
*
7=Use speed
dialing?
Menu
Service?
*
92=Change Speed
Dial?
Abb. dial no:
Mnu
Change entry?
Save
Step by Step
> < [ Select the menu item and confirm.
o Enter the required code (3 digits, 000 - 999).
o Within five seconds: enter the suffix-dialling or DID
number.
System speed dialling, individual
You can save up to ten external phone numbers as
speed dialling destinations for your handset in your
communications system. These speed dialling
destinations are dialled using a 2-digit code (*0 to *9).
Please note that you may need to save an external code
in front of the phone number.
This function can also be called by entering the code
page 145.
Setting up an individual speed dialling destination
c or d Press and hold the Talk or Speakerphone key.
Open the system menu.
> < [Select the menu item and confirm.
> < [Select the menu item and confirm.
> Call the first destination.
> Call the next destination.
Open the additional menu.
> < [Select the menu item and confirm.
o Enter the external phone number (with external code).
Save the settings.
a Press the On-hook key to end the operation.
46
Page 47

Conducting calls – enhanced functions
Menu
Service?
*
7=Use speed
dialing?
Abb. dial no:
Phonebk
1=intnl
Step by Step
Dialling an individual speed dialling destination
c or d Press and hold the Talk or Speakerphone key.
Open the system menu.
> < [Select the menu item and confirm.
> < [Select the menu item and confirm.
o Enter the code for the speed dialling destination.
*
System phonebook
If the system administrator has entered a name for at
least one internal user or system speed dialling
destination, then you can use the system phonebook
for dialling.
Opening the system phonebook
c or d Press and hold the Talk or Speakerphone key.
Open the system phonebook. The first entry is
displayed on the screen.
If applicable:
> < [If several phonebooks have been configured: Select the
menu item and confirm.
Finding an entry
o Enter the first letters of the name you are looking for
(see page 48). The name is searched for.
The search result becomes more precise as each letter
is entered, i.e. the number of names found is reduced.
> < Select the user you want.
Dial entry
[ Confirm your selection. The selected number is called.
Quitting the phonebook
Press the display key.
47
Page 48

Conducting calls – enhanced functions
Phonebk
2=LDAP
Step by Step
c or d Press and hold the Talk or Speakerphone key.
If applicable:
Phone numbers dialled from the system
phonebook are not stored in the redial list.
Telephone database (LDAP)
If your company has an LDAP telephone database and
access to it is configured in your communications
system, you can query it with your handset. This LDAP
telephone database can contain far more entries than
the phonebook on your communications system or your
handset. The LDAP telephone database is installed on
an LDAP server. This telephone database is accessed
over the LDAP Internet protocol (Lightweight Directory
Access Protocol).
This function can also be called by entering the code
page 145.
Activating the LDAP telephone database
Press the display key.
> < [If several phonebooks have been configured: Select the
menu item and confirm.
Entering a name and finding an entry
You can now enter the name via the handset's keypad.
Each key is assigned several letters and each letter is
selected by pressing the key an appropriate number of
times. For example, you have to press the "7" key three
times to enter an "r".
o Enter the name you want to find (maximum 16
characters). Partial entries are accepted, for example
"mei" for Meier. The more characters entered, the more
precise the search result.
If configured, you can search for first and last names.
First and last names must be separated by a space. Do
this by pressing the "0" key. Partial entries are accepted,
forexample, "mei P" for "Meier Peter".
If applicable:
48
Page 49

Step by Step
Delete Character?
Search?
Call?
Scroll Next?
Scroll Previous?
Call?
Change search
string?
Conducting calls – enhanced functions
> < [
If you wish to delete an incorrect letter entered by
mistake: Select the menu item and confirm.
then:
> < [Select the menu item and confirm. The system starts to
search for the entry. This can take a few seconds. The
entries found are then displayed.
Selecting an entry
Either: If a single entry is found, it is displayed.
[ Select the menu item and confirm. The user is called.
Or: If more than one entry is found, the first entry is
displayed. A maximum of 50 hits can be displayed.
> < [If you wish to scroll forward: Select the menu item and
confirm.
> < [If you wish to scroll backward: Select the menu item
and confirm.
> < [Select the menu item and confirm. The user is called.
If no entries were found
If no entries were found, you can extend the search
range by deleting some of the characters entered.
> < [Select the menu item and confirm. You can now change
your search entry.
49
Page 50

Conducting calls – enhanced functions
Change search
string?
Show results?
Step by Step
If too many entries were found
The hit list is not displayed in full if more than 50 entries
matching your search query were found. We
recommend narrowing down the search by entering
more characters. However, even if you do not do this,
you can still display the entire hit list, select the required
entry and call the selected party.
Either:
> < [Select the menu item and confirm. You can now change
your search entry.
Or:
> < [Select the menu item and confirm. The hit list is
displayed.
50
Page 51

Step by Step
The handset's phonebook
You can save contact information for frequent call
partners in the phonebook. Once a phone number has
been saved in this way you no longer have to enter it in
full when you want to call someone. All you have to do
is select the required phonebook entry.
You can save a total of 500 entries at most in the
phonebook.
Gigaset QuickSync page 115 is a software
application for transferring data between your cordless
OpenStage phone and your PC. You can use it at your
phone to load data from your PC to your OpenStage
over a USB data cable or Bluetooth and synchronise
contacts with Microsoft Outlook, Microsoft Outlook
Express and contacts in Microsoft Windows.
You can save the following contact information for every
entry in the phonebook:
Information Explanation
Conducting calls – enhanced functions
First Name*,
Surname
Phone (Home),
Phone (Mobile)*,
Phone (Office)*
E-Mail* E-mail address with up to 60 characters. The special character
Anniversary You can select either "On" or "Off". If "On" is selected:
Caller Melody (VIP) Mark an address book entry as a VIP (Very Important Person) by
Caller Picture* Display a picture for an incoming call when CLIP is active.
A name must be entered in at least one of the fields. Each name
can contain up to 16 characters.
A number must be entered in at least one of the fields. Each
number can contain up to 32 digits.
"@" can be inserted after pressing the asterisk key.
• Anniversary (Date): Day/month/year, 8 digits*
• Anniversary (Time): Hour/minute, 4 digits, for reminder call
• Anniversary (Signal): Type of signalling, acoustic or visual
(time need not be specified)
assigning a specific ringtone to it.
Caution: This function is not supported by the system and should
therefore not be used.
* = new for vCard format
51
Page 52
Conducting calls – enhanced functions
New Entry
Save
Step by Step
Saving an entry
s Open the phonebook.
st [ Select the menu item and confirm. The input mask is
st Jump to the next line.
displayed.
o Enter the relevant information, see above.
... etc.
Functions for text input:
Switches mode from abc to Abc, from Abc
to 123 and from 123 to abc
#
X
*
Save the settings.
a Press the On-hook key to end the operation.
Changing the sequence of entries:
The phonebook entries are generally sorted in
alphabetical order by surname. Spaces and digits have
first priority here. If the phonebook only contains a
subscriber's first name, this is listed instead of the
surname in the sequence.
The sort sequence is as follows:
1. S p a c e
If predictive text is off:
press the key briefly.
If predictive text is on:
press and hold down the key.
Deletes the letter to the left of the cursor.
Opens the table of special characters.
52
2. Digits (0 - 9)
3. Letters (alphabetical)
4. Other characters
If you want to change the sequence of entries in the
alphabetical list, you could insert a space or a digit
before the first letter of the surname. These entries
then move to the top of the phonebook. Names
preceded by an asterisk are listed at the end of the
phonebook.
Page 53

Step by Step
Options
Display Number
Show
Edit
Options
Conducting calls – enhanced functions
Finding and dialling an entry
s Open the phonebook.
st or o You can scroll to the required entry or enter the first
letter of the relevant entry.
If necessary, press a key several times in succession to
enter the required letter (e. g. press 7 three times for r).
Either:
c Press the Talk key. The assigned phone number is
dialled.
Or:
Open the menu.
st [ Select the menu item and confirm. The number is
displayed.
o Change or complete the phone number, forexample,
with DDIA.
c Press and hold down the Talk key.
Dialling an entry with the speed dialling digit
You can call up and dial the phone number associated
with an entry to which you assigned a speed dialling
digit by simply pressing this speed dialling digit
page 113.
o Press and hold down the required speed dialling digit.
The assigned phone number is dialled.
Viewing an entry
s Open the phonebook.
st or o You can scroll to the required entry or enter the first
letter of the relevant entry.
If necessary, press a key several times in succession to
enter the required letter.
Press the display key. The entry's data is displayed.
Changing to the list
or Select
53
Page 54

Conducting calls – enhanced functions
Show
Edit
Options
Edit Entry
Sichern
Step by Step
or
a Press the On-hook key to return to the list.
Changing an entry
s Open the phonebook.
st or o You can scroll to the required entry or enter the first
letter of the relevant entry.
If necessary, press a key several times in succession to
enter the required letter.
Either:
Press the display keys one after the other. The entry's
st [ Select the menu item and confirm. The entry's data is
then:
data is displayed.
Or:
Press the display key.
displayed.
o Enter changes.
Press the display key.
a Press the On-hook key to return to the list.
54
Page 55

Step by Step
Options
VIP Entry
Options
Delete Entry
Delete List
Yes
Conducting calls – enhanced functions
Marking a VIP (Very Important Person) entry
An incoming call for a VIP-marked entry is signalled with
a VIP ringtone.
s When the handset is idle: Open the phonebook.
st Select the entry you want.
Open the menu.
st [ Select the menu item and confirm. The input mask for
marking a VIP entry is displayed.
u On v Activate the VIP marking.
VIP:
s Move the cursor down one line.
Melodies: u Circles v Select a melody, for example "Circles".
a Press the On-hook key to end the operation.
Deleting an entry or phonebook
s Open the phonebook.
st Select the entry you want.
Press the display key.
Either:
st [ Select the menu item and confirm. The telephone
number is deleted.
Or:
st [ Select the menu item and confirm. A security check
question appears.
Confirm the security check question. The phonebook is
deleted.
a Press the On-hook key to end the operation.
55
Page 56

Conducting calls – enhanced functions
Options
Available Memory
Options
Step by Step
s Open the phonebook.
st Select any entry.
Displaying available memory
Press the display key.
st [ Select the menu item and confirm. The amount of
memory used and available is displayed.
a Press the On-hook key to end the operation.
Sending an entry or phonebook to the handset or system
You can send individual entries or the entire phonebook
to other handsets or to the communications system.
For phonebook transfer in vCard format via Bluetooth
see page 116.
If your handset and the recipient's handset have phone
numbers between 1 and 99, you can send or receive a
list or entry directly from one handset to the other. If the
handsets' phone numbers start at 100, you must first
send the list or entry to the communications system.
The recipient can then use his or her handset to
download the list or entry from the communications
system.
Restrictions when copying over the
communications system
The entries in the handset's phonebook are stored in
vCard format page 51. The communications system,
however, uses another format. This can cause loss of
phonebook entry information. The features that are new
for the vCard format are indicated in the table
page 51 by "new for vCard format". The phone
numbers are not affected.
56
Sending a list/entry
s Open the phonebook.
st Select the entry you want.
Press the display key.
Page 57

Conducting calls – enhanced functions
Send List
Send Entry
Menu
Service?
Load list buffer?
Step by Step
Either:
st [ Select the menu item and confirm.
Or:
st [ Select the menu item and confirm.
then:
o Enter the station number. The following phone numbers
are possible:
• 1... 98 – the list or entry is sent directly to the
recipient's handset.
• 00 – the list or entry is sent to the communications
system and can then be downloaded by any
handset.
• 99 – The list or entry is sent to the communications
system and can then only be downloaded by your
handset.
[ Confirm your entry. The list or entry is sent.
If a phone number from 1 to 98 was dialled, the list or
the entry is automatically received by the recipient's
handset.
> < [Select the menu item and confirm.
> < [Select the menu item and confirm.
Loading a list or entry from the communications system
Prerequisite: You sent an entry or list to the
communications system by dialling the phone number
00 or 99.
c or d Press and hold the Talk or Speakerphone key.
Open the system menu.
a Press the On-hook key once. You will receive a call from
the system and the transfer starts once you answer this
call.
Deleting a list or entry in the communications system
Prerequisite: A currently unused list or entry is saved on
the communications system.
c or d Press and hold the Talk or Speakerphone key.
57
Page 58

Conducting calls – enhanced functions
Menu
Service?
Erase list buffer?
Menu
Service?
*
41=Temporary
MSN?
MSN no.: 111
111:
Step by Step
Open the system menu.
> < [Select the menu item and confirm.
> < [Select the menu item and confirm. The handset starts
to delete the list/entry.
a Press the On-hook key to end the operation.
Directed assignment of an MSN (multiple subscriber number)
Multiple subscriber numbers are phone numbers
belonging to an ISDN multiple device line. They are
used for the directed addressing of terminals, for
example when a fax machine has a separate number.
Before selecting an external connection, you can
directly assign a configured multiple subscriber
number. The assigned number then appears on the
called party’s display.
This function can also be called by entering the code
page 145.
c or d Press the Talk or Speakerphone key.
Open the system menu.
> < [Select the menu item and confirm.
> < [Select the menu item and confirm.
58
o Enter the required multiple subscriber number.
o Enter the required external phone number. The phone
number is dialled.
Page 59

Conducting calls – enhanced functions
Menu
Service?
*
60=
Account code?
Project Code:
Save
Please dial.
Step by Step
Making calls using identification codes
In the case of calls you make to external partners, you
can enter and charge the call costs on the basis of
individuals, customers, accounts and private calls,
forexample, by means of account codes. The account
code (ACCT) can contain up to 11 characters and is
included in the data printout. The ACCT is only
transferred after a call has been completed. The ACCT
can be entered before and during the external call.
The call costs can only be assigned using call
detail recording software, which must be set up
by service personnel.
This function can also be called by entering the code
page 145.
c or d Press the Talk or Speakerphone key.
Open the system menu.
> < [Select the menu item and confirm.
> < [Select the menu item and confirm.
o Enter the required account code (optional).
Save the settings.
o Enter the external phone number. The phone number is
dialled.
If a call is transferred, the costs are still assigned
to the ACCT entered.
59
Page 60

Conducting calls – enhanced functions
Menu
Service?
*
508=Temporary
Phone?
Home Extn. no:
PIN no :
<Name>
<Name>: ...
Step by Step
Using the handset as a second line
You can use your mobile phone for an outgoing call as if
it were another line (temporary phone).
This function can also be called by entering the code
page 145.
c or d Press and hold the Talk or Speakerphone key.
Open the system menu.
> < [Select the menu item and confirm.
> < [Select the menu item and confirm.
o Enter the internal phone number for the relevant line.
o
Enter the code (lock code) for the relevant line
page 142. Do not use the default phone code (00000)
for the user.
If there is no personal code for the relevant line, the
system will prompt you to enter the code.
o Enter the number you wish to dial. The phone number
is dialled.
The "Temporary phone" function is discontinued again
after the call is complete.
60
Page 61

Conducting calls – enhanced functions
Menu
Suppress call ID?
Call ID suppressed
Menu
Restore caller ID?
Call ID restored
Step by Step
Deactivating the phone number display
Your service engineer can deactivate the display of your
phone number and name on the called party’s display
for external outgoing calls. You can also activate and
deactivate the phone number display on your own
handset yourself.
Deactivating the phone number display
c or d Press and hold the Talk or Speakerphone key.
Open the system menu.
> < [Select the menu item and confirm.
a Press the On-hook key to end the operation.
Activating the phone number display
c or d Press and hold the Talk or Speakerphone key.
Open the system menu.
> < [Select the menu item and confirm.
a Press the On-hook key to end the operation.
Activation and deactivation of the phone
number display relates to external or networked
connections. An external provider must support
this function.
61
Page 62

Conducting calls – enhanced functions
Menu
Service?
*
59=Pickup -
directed?
Mnu
Accept call?
Select extension?
Step by Step
Directed call transfer
You can transfer calls to other telephones to your
handset. This is also possible when you are conducting
a call.
This function can also be called by entering the code
page 145.
Another telephone rings.
c or d Press and hold the Talk or Speakerphone key.
Open the system menu.
> < [Select the menu item and confirm.
> < [Select the menu item and confirm. The called user is
displayed.
Open the additional menu.
Either:
> < [Select the menu item and confirm.
Or:
If several users are called simultaneously, only
the first user called is displayed. However, you
can transfer by entering the phone number of
any of the users called.
> < [Select the menu item and confirm.
then:
p You are conducting the call.
Activating/deactivating do not disturb
You can block calls to your handset on a temporary
basis, while still being able to make calls yourself.
Internal callers hear the busy tone, while external callers
reach another telephone defined by the service
engineer (intercept position). Authorised internal callers
automatically override the DND feature after five
seconds.
62
Page 63

Conducting calls – enhanced functions
Menu
Do Not Disturb ON?
Menu
Do Not Disturb OFF?
Menu
Service?
*
65=Show call
charges?
Step by Step
Activating do not disturb
c or d Press and hold the Talk or Speakerphone key.
Open the system menu.
> < [Select the menu item and confirm.
a Press the On-hook key to end the operation.
Deactivating do not disturb
c or d Press and hold the Talk or Speakerphone key.
Open the system menu.
> < [Select the menu item and confirm.
a Press the On-hook key to end the operation.
Call charge display
After a call has ended, the display shows the
connection charges for the current call as standard. If
the costs are to be displayed continuously during an
outgoing call, this function must be requested from the
carrier.
> < [Select the menu item and confirm.
> < [Select the menu item and confirm.
If a call is transferred, the costs are assigned to
the telephone to which the call was transferred
from this point onwards.
You can check and display the call charges for your
phone number as a total for a period that can be set by
the service engineer.
First the call charges for the last charged call are
displayed. The total call charges are displayed after five
seconds.
This function can also be called directly by entering the
code page 145.
c or d Press and hold the Talk or Speakerphone key.
Open the system menu.
a Press the On-hook key to end the operation.
63
Page 64

Conducting calls – enhanced functions
Menu
Service?
*
84=Trace call?
Step by Step
Call tracing
You can apply to your carrier for "call tracing" on
malicious calls. An authorised extension is then in a
position to request the identification of the phone
number.
This also works for 30 seconds after the malicious caller
has hung up. However, you should not hang up.
This function can also be called by entering the code
page 145.
p You receive a malicious call.
Do not hang up.
Open the system menu.
> < [Select the menu item and confirm.
> < [Select the menu item and confirm. The caller is
identified in the attendant console.
a Press the On-hook key to end the operation.
64
Entrance telephone
If the service engineer has set up an entrance
telephone, you can speak to the door intercom and
activate the door opener from your handset.
Some of the functions described below can also be
called directly by entering the relevant code
page 145.
Talking to a visitor by means of the door opener equipment
Your handset rings.
Either:
c
Press the Talk key within 30 seconds. You are connected
to the entrance telephone immediately.
o Enter the internal phone number for the door opener.
You are connected to the door opener.
Page 65

Conducting calls – enhanced functions
Open door?
Menu
Service?
*
61=Open door?
Menu
Service?
*
89=Door release
ON?
Step by Step
Using the handset to open the door opener during a call
> < [Select the menu item and confirm.
Using the handset to open the door opener without holding a conversation
c or d Press and hold the Talk or Speakerphone key.
Open the system menu.
> < [Select the menu item and confirm.
> < [Select the menu item and confirm.
o Enter the internal phone number for the door opener.
The door is opened.
a Press the On-hook key to end the operation.
Activating the door release
This function only works if it has been configured by the
service engineer.
c or d Press and hold the Talk or Speakerphone key.
Open the system menu.
> < [Select the menu item and confirm.
> < [Select the menu item and confirm.
o Follow the user guidance system from this point
onwards. Enter the internal phone number of the door
opener, as well as the code and type of door release:
• 1=enable with ring,
• 2=enable w/o ring,
• 3=change password.
[ Confirm your entries.
a Press the On-hook key to end the operation.
Standard code 00000. To change the code,
confirm option "3=change password". Follow
the user guidance system.
65
Page 66

Conducting calls – enhanced functions
Menu
Service?
*
89=Door release
OFF?
Step by Step
Deactivating the door opener
c or d Press and hold the Talk or Speakerphone key.
Open the system menu.
> < [Select the menu item and confirm.
> < [Select the menu item and confirm.
a Press the On-hook key to end the operation.
66
Page 67

Conducting calls – enhanced functions
Menu
Service?
*
42=
Tel. data service?
TDS code:
Step by Step
TDS telephone data service
You can use your mobile phone to operate connected
computers and their programs, for example, access
hotel services or information systems.
This function can also be called by entering the code
page 145.
c or d Press and hold the Talk or Speakerphone key.
Open the system menu.
> < [Select the menu item and confirm.
> < [Select the menu item and confirm.
#
o Press the "#" key and enter the required code (0... 9).
The connected computer responds. The computer will
guide you through the data entry process. It will
process your entries directly.
a Press the On-hook key to end the operation.
67
Page 68

Conducting calls – enhanced functions
Menu
Service?
*
90=Control Relay
On?
Menu
Service?
#90=Control Relay
Off?
Step by Step
Activating control relays
The service engineer can set up a maximum of 4 control
relays that enable various equipment (forexample, door
opener) to be activated and deactivated.
It is possible to access a specific control relay.
Depending on the configuration, the control relays can
be
• activated and deactivated automatically, or
• activated and deactivated automatically on the basis
of a timer.
Prerequisite: The service engineer has set up at least
one switch.
This function can also be called by entering the code
page 145.
Activating a control relay
c or d Press and hold the Talk or Speakerphone key.
Open the system menu.
> < [ Select the menu item and confirm.
> < [Select the menu item and confirm.
o Follow the user guidance system from this point
onwards. Enter the required switch code (1... 4).
a Press the On-hook key to end the operation.
Deactivating a control relay
c or d Press and hold the Talk or Speakerphone key.
Open the system menu.
> < [Select the menu item and confirm.
> < [Select the menu item and confirm.
o Follow the user guidance system from this point
onwards. Enter the required switch code (1... 4).
a Press the On-hook key to end the operation.
68
Page 69

Conducting calls – enhanced functions
Menu
Service?
*
51=Recall to
Network?
Menu
Service?
Trunk FWD on?
Step by Step
Sending a signal to the network
To enable ISDN-type services/features to be started via
analogue lines (for example, call waiting when a line is
busy, three-way conference calls, etc.), you must send
a signal to the network before dialling the service code
and/or phone number.
This function can also be called by entering the code
page 145.
p You have an external connection.
Open the system menu.
> < [Select the menu item and confirm.
> < [Select the menu item and confirm.
o Enter the service code and/or the phone number.
External call forwarding with a multiple subscriber number
> < [Select the menu item and confirm.
> < [Select the menu item and confirm.
If your communications system is connected to an
ISDN multiple device line, then you can forward all
incoming calls from the public network through your
multiple subscriber number (MSN) to an external
destination.
There are three types of forwarding:
• Calls are forwarded immediately (1=immediate call
forwarding).
• Calls are forwarded after a certain time
(2=unanswered calls).
• Calls are only forwarded when the line is busy
(3=when busy).
Activating call forwarding to a "trunk"
c or d Press and hold the Talk or Speakerphone key.
Open the system menu.
69
Page 70

Conducting calls – enhanced functions
1=immediate?
2=on no answer?
3=on busy?
Save
Menu
Service?
Forward by Network
OFF?
Step by Step
o [ Enter and confirm your own multiple subscriber
number.
Either:
> < [Select the menu item and confirm.
Or:
> < [Select the menu item and confirm.
Or:
> < [Select the menu item and confirm.
then:
o Enter the destination number (without the external
code).
Save the settings.
Deactivating call forwarding to a "trunk"
c or d Press and hold the Talk or Speakerphone key.
Open the system menu.
> < [Select the menu item and confirm.
> < [Select the menu item and confirm.
o Follow the user guidance system from this point
onwards (enter a multiple subscriber number or DID
and forwarding type).
[ Confirm your entries.
a Press the On-hook key to end the operation.
70
Page 71

Conducting calls – enhanced functions
Menu
Night answer on?
*=standard?
Save
Menu
Night Service - OFF?
Step by Step
Using night service
In night service mode, for example, during lunch breaks
or after office hours, all external calls are forwarded to a
particular internal telephone (night station). The night
station can be defined by the service engineer (=
standard night service) or by you (= temporary night
service). When night service is active, the night station
assumes the function of the intercept station.
Activating night service
Prerequisite: A service engineer must have activated
the function for you.
c or d Press and hold the Talk or Speakerphone key.
Open the system menu.
> < [Select the menu item and confirm.
Either:
> < [Select the menu item and confirm.
"Standard night service" is configured.
Or:
o Enter your internal station number.
Save the settings.
"Temporary night service" is configured.
a Press the On-hook key to end the operation.
Deactivating night service
c or d Press and hold the Talk or Speakerphone key.
Open the system menu.
> < [Select the menu item and confirm.
a Press the On-hook key to end the operation.
71
Page 72

Conducting calls – enhanced functions
Menu
Service?
*
53=Tone dialling?
Step by Step
Using dual-tone multifrequency signalling
Your handset operates on the basis of digital
information transmission. However, certain
applications, for example answering machines, can only
be operated using analogue technology. For this you
have to send signals using the dual-tone multifrequency
signalling (DTMF) process.
Depending on how your system is configured
(automatic tone dialling on or off - to be configured by
the service engineer) you must first switch to DTMF
dialling. This means, forexample, that you can
communicate with a variety of voice storage systems.
You will find further details in the operating instructions
for the relevant applications.
Automatic tone dialling is not active
During a connection you have to first switch to dualtone multifrequency signalling.
p You are conducting a call.
Open the system menu.
> < [Select the menu item and confirm.
> < [Select the menu item and confirm.
o Enter the numbers. All entries are sent as DTMF
signals.
Automatic tone dialling is active
o Enter the numbers. All entries are sent as DTMF
signals.
72
Page 73

Conducting calls – enhanced functions
Menu
Service?
*
56=Park a call?
Menu
Service?
#56=Retrieve call?
Step by Step
Parking/activating calls
You can park up to ten calls (i.e. place them on hold) to
conduct another call in the interim or to continue them
on other telephone in your communications system.
Parking a call
p You are on a call you wish to park.
Open the system menu.
> < [Select the menu item and confirm.
> < [Select the menu item and confirm.
o Enter the parking position number (0... 9) and note it
down.
If the parking position number entered is already in use,
you have to enter another one.
Picking up a specific parked call
Prerequisite:
One or more calls have been parked. Your handset is in
stand-by status.
c or d Press and hold the Talk or Speakerphone key.
Open the system menu.
> < [Select the menu item and confirm.
> < [Select the menu item and confirm.
o Enter the parking position number you have noted.
If a parked call is not picked up, it returns to the
station from which it was parked after a certain
time (= recall). The following appears on the
display "Recalling: (phone no. or name)" or
"recalling from (phone no. or name)" .
73
Page 74

Conducting calls – with multiple users
2ndCall
Step by Step
p Wait until the message "Camp-on" appears on the
Conducting calls – with multiple
users
Call waiting
You need to speak to a user in your communications
system urgently, even though his line is busy. You can
send a call waiting signal during his call to let him know
you want to talk to him. The user either answers
immediately or you will be automatically connected to
him when he has finished his call.
This function is only available if it has been configured
by the service engineer.
The user is busy. You want to use call waiting.
display (ringing tone).
You receive a call waiting signal (second call)
You are still available to other callers, even though you
are on the telephone. The call waiting signal informs you
of the second call while you are conducting a call. You
can answer this call without ending the first call.
p You are on a call and hear a call waiting signal.
If you want to answer the second call, you can either
place the first call on hold (the first caller waits) or end
the first call.
Placing the first call on hold and answering the second call
Answer the second call.
Talk to the second caller. The first caller waits. His call is
on hold. You can now:
• toggle between the two callers page 79 or
• set up a conference page 80.
74
Page 75

Conducting calls – with multiple users
Menu
Quit and return?
Menu
Waiting tone off?
Menu
Waiting tone on?
Step by Step
Ending the second call
Either:
Open the system menu.
> < [Select the menu item and confirm.
Or:
a Press the On-hook key. The following message appears
on the display: "Recalling". Your telephone rings.
c Press the Talk key to talk to the first caller again.
Ending the first call
a Press the On-hook key. The first call is ended. Your
telephone rings.
c Press the Talk key and answer the second call.
Ending both calls
a Press the On-hook key. Your handset rings.
c Press the Talk key to talk to the other caller again.
a Press the On-hook key. Both calls are ended.
> < [Select the menu item and confirm.
> < [Select the menu item and confirm.
Call waiting tone off/on
You can suppress the call waiting tone for external calls.
Deactivating the call waiting tone
c or d Press and hold the Talk key or press and hold the
Speakerphone key.
Open the system menu.
a Press the On-hook key to end the operation.
Activating the call waiting tone
c or d Press and hold the Talk key or press and hold the
Speakerphone key.
Open the system menu.
75
Page 76

Conducting calls – with multiple users
Menu
Service?
Call wait.term.off?
Menu
Service?
Call wait.term.on?
Step by Step
a Press the On-hook key to end the operation.
Disabling/enabling automatic call waiting
You can disable/ enable automatic call waiting signalling
for a second call during a telephone conversation.
Disabling the call waiting tone
c or d Press and hold the Talk key or press and hold the
Speakerphone key.
Open the system menu.
> < [Select the menu item and confirm.
> < [Select the menu item and confirm.
a Press the On-hook key to end the operation.
Enabling the call waiting tone
c or d Press and hold the Talk key or press and hold the
Speakerphone key.
Open the system menu.
> < [Select the menu item and confirm.
> < [Select the menu item and confirm.
a Press the On-hook key to end the operation.
76
Page 77

Step by Step
Override
<Name>
Menu
Start transfer?
Conducting calls – with multiple users
Busy override
You need to speak to an internal user urgently, even
though his line is busy. The "Override" function allows
you to interrupt the ongoing call to pass on a message.
This function is only available when the code has been
input and if it has been configured by the service
engineer.
p The user is busy.
* L2 Call the function.
o Enter the phone number of the busy user.
The override is established. The user name or phone
number, to whom/which the call has been transferred,
is displayed.
Override is ended when you replace the handset.
During override
• all users hear an override tone and
everything that is said,
• all users see the following message on the
display "Override:....:”.
Transferring a call (joining)
Transferring a call means that you wish to hand over a
call you are conducting on your handset to another user.
Transferring (without announcing the call transfer)
p You can use this function to forward a call you answered
to another user.
Open the system menu.
> < [Select the menu item and confirm.
The current call is placed "on hold", so that the first user
waits.
o Enter the phone number of the user to whom the call is
to be transferred.
p The number is dialled.
77
Page 78

Conducting calls – with multiple users
Menu
Transfer?
Menu
Start transfer?
Menu
Transfer?
Step by Step
Either:
a Press the On-hook key. The target user's phone rings.
He picks up the call by lifting the handset.
Or:
Open the system menu.
> < [Select the menu item and confirm.
a Press the On-hook key. The target user's phone rings.
He picks up the call by lifting the handset.
You receive a recall:
• immediately if you have made a mistake,
• 45 seconds after the transfer if the destination user
does not answer.
If you do not answer recalls, another telephone defined
by the service engineer is called (intercept station).
Transferring (with announcement of call transfer)
p You can use this function to forward a call you answered
to another user.
Open the system menu.
> < [Select the menu item and confirm.
The current call is placed "on hold", so that the first user
waits.
o Enter the phone number of the user to whom the call is
to be transferred.
p The number is dialled. The user answers. You announce
the call presently on hold.
Either:
a Press the On-hook key. The user takes the call.
Or:
Open the system menu.
> < [Select the menu item and confirm.
78
Page 79

Conducting calls – with multiple users
Enquiry
Menu
Return to held call?
Enquiry
Toggle
Step by Step
Placing a call on hold
You can interrupt a call temporarily if, forexample, you
want to talk to someone else in the room. The line is
placed "on hold".
p You are conducting a call.
Press the display key. The current call is placed "on
hold", the user waits.
Resuming the call with the waiting user
Either:
Open the system menu.
> < [ Select the menu item and confirm.
You are reconnected to the partner.
Toggling (switching between calls)
The Toggle function allows you to switch between two
users without allowing them to speak to each other
directly. The two users can be either external or internal
users. You can also withdraw from the calls and connect
the two users with each other. You can also start a
conference.
p You are conducting a call.
Press the display key. The current call is placed "on
hold", the user waits.
o Enter the phone number of the second user.
p The second user answers.
Press the display key to switch between the two calls.
When you end the call, both users are still connected
(only possible with 2 external users if the "Transit"
feature is activated by your service engineer).
79
Page 80

Conducting calls – with multiple users
Menu
Start conference?
Menu
Conference?
Menu
Conference?
Step by Step
Conducting a conference
You can connect up to 5 internal or external partners
with each other in a telephone conference. You can
include up to 4 external users in the conference.
For information purposes, you will hear an alerting tone
every 30 seconds during a conference call (can be
disabled - ask your service engineer).
Setting up a conference
You decide to set up a conference while talking to a
user.
p You are on a call and wish to start a conference.
Open the system menu.
> < [ Select the menu item and confirm.
o Enter the phone number of the new user.
p The user is free and answers the phone. You announce
the conference.
Open the system menu.
> < [ Select the menu item and confirm.
You and your two partners are connected in a
conference call.
Forming a conference
A conference has not yet been set up. However, you are
already connected to two users and are toggling
between them. You now want to form a conference
involving all partners.
p You are talking to one user.
Open the system menu.
> < [ Select the menu item and confirm.
You and your two partners are connected in a
conference call.
80
Page 81

Conducting calls – with multiple users
Menu
Add party?
Menu
Conference?
Menu
End conference?
Mnu
View conf parties?
Step by Step
Expanding a conference
You can expand an existing conference to include up to
five users.
p You are connected with two or more partners in a
conference call.
Open the system menu.
> < [Select the menu item and confirm. Conference is
placed "on hold", the users wait.
o Enter the phone number of the new user.
p The user is free and answers the phone. You announce
the conference.
Open the system menu.
> < [Select the menu item and confirm. The new user is
included in the conference call.
Ending a conference
p You are connected with two or more partners in a
conference call.
Open the system menu.
> < [Select the menu item and confirm. The conference is
> < [Select the menu item and confirm. The first party is
ended.
Leaving a conference
a Press the On-hook key. You exit the conference.
When one user leaves the conference, the other two
users remain connected.
Viewing the names of conference parties
As the convener of the conference, you can view the
names of all conference parties.
p You are connected with two or more partners in a
conference call.
Viewing the conference parties list
Open the additional menu.
displayed.
81
Page 82

Conducting calls – with multiple users
Mnu
Exit list?
Menu
View conf parties?
Mnu
Remove party?
Menu
Withdraw?
Step by Step
> View other parties.
Closing the conference party list
Open the additional menu.
> < [Select the menu item and confirm. The conference
party list is closed.
or
Press the display key to close the list.
Disconnecting a party from the conference
As the convener of the conference, you can disconnect
users from the conference.
p You are connected with two or more partners in a
conference call.
Open the system menu.
> < [Select the menu item and confirm. The first party is
displayed.
> Display the required party.
Select the menu item and confirm.
> < [Select the menu item and confirm. The relevant party is
disconnected from the conference.
Connecting parties
As the conference convener, you can leave the
conference and thereby connect the other parties with
each other. If you were previously connected with two
or more parties, the other parties remain in a
conference. Otherwise, the remaining two users
conduct a one-to-one call.
p You are connected with two or more partners in a
conference call.
Open the system menu.
> < [ Select the menu item and confirm. The first party is
displayed.
a Press the On-hook key. You leave the conference; the
remaining parties are connected with each other.
82
Page 83

Step by Step
Conducting calls – with multiple users
Using the second call function
The second call is an incoming call that is signalled on
your handset during a call (call waiting) and that can be
queried by you (for example, page 74).
A second call can be answered in the following call
states:
• You are on a single call,
• You are on a consultation call,
• You are holding a conference,
• You are on a call which you intend to add to a
conference,
• You are toggling between two partners.
83
Page 84

Group functions
Menu
Leave hunt group?
Join hunt group?
Step by Step
Group functions
Activating/deactivating group calls
If this has been configured by the service engineer, you
belong to one or more groups of internal users that can
be reached at a hunt group or group call phone number.
Calls are signalled on all telephones in the group either
in succession (=hunt group) or simultaneously (=group
call), until a member of the group answers the call.
Every user in the group can also remain available under
his own phone number.
You can leave and re-join specific groups or leave and rejoin all groups.
These functions can also be called directly by entering
the relevant code page 145.
You belong to a hunt group or group call group
Use this function to leave or re-join the hunt group or
group.
c or d Press and hold the Talk key or press and hold the
Speakerphone key.
Open the system menu.
Either:
> < [Select the menu item and confirm. You have now left
the hunt group or group.
Or:
> < [Select the menu item and confirm. You have now re-
joined the hunt group or group.
then:
a Press the On-hook key to end the operation.
84
Page 85

Group functions
Menu
Leave hunt group?
Join hunt group?
Group 1
Group 2
Mnu
Leave hunt group?
Join hunt group?
Menu
Leave hunt group?
Join hunt group?
Group 1
Group 2
Step by Step
You belong to multiple groups
Leaving and re-joining individual groups
c or d Press and hold the Talk key or press and hold the
Speakerphone key.
Open the system menu.
Either:
[ Select the menu item and confirm.
Or:
> < [Select the menu item and confirm.
then:
> Select the required group and call the additional menu.
Either:
> < [Select the menu item and confirm. You have now left
the selected group.
Or:
> < [Select the menu item and confirm. You have now joined
> < [Select the menu item and confirm.
> < [Select the menu item and confirm.
the selected group.
then:
a Press the On-hook key to end the operation.
Leaving and re-joining all groups
c or d Press and hold the Talk key or press and hold the
Speakerphone key.
Open the system menu.
Either:
Or:
then:
The list of groups is displayed.
# Press the hash key. You have now left all groups.
85
Page 86

Group functions
Step by Step
Or:
* Press the star key. You have now joined all groups.
then:
a Press the On-hook key to end the operation.
86
Page 87

Step by Step
Menu
Service?
*
81=
Ringing group on?
Mnu
Add ext to group?
Save
Mnu
Add another ext?
Save
Menu
Service?
*
81=
Ringing group on?
Group functions
Ringing group on
You can have calls to your handset signalled acoustically
on up to five other telephones. The call is received by
the person who answers the call first.
Adding users to a group
First user
c or d Press and hold the Talk key or press and hold the
Speakerphone key.
Open the system menu.
> < [Select the menu item and confirm.
> < [Select the menu item and confirm.
Open the additional menu.
[ Confirm the option shown.
o Enter the required internal phone number.
Save the settings.
Other users:
Open the additional menu.
> < [Select the menu item and confirm.
o Enter the required internal phone number.
Save the settings.
a Press the On-hook key to end the operation.
Deleting users
c or d Press and hold the Talk key or press and hold the
Speakerphone key.
> < [Select the menu item and confirm.
> < [Select the menu item and confirm.
Open the system menu.
87
Page 88

Group functions
<x> in group
Mnu
Display/Clear?
Mnu
Delete?
Step by Step
The number of parties added is displayed.
Open the additional menu.
> < [Select the menu item and confirm. The first user added
is displayed.
> Scroll to the required user.
Open the additional menu.
> < [Select the menu item and confirm. The addition of the
first user is cleared.
a Press the On-hook key to end the operation.
88
Page 89

Step by Step
Menu
Service?
UCD Menu?
*
401=Log on?
Menu
Service?
UCD Menu?
#401=Log off?
UCD (Universal Call Distribution)
This function enables calls to be distributed in a team.
An incoming call is always delivered to the team
member who has been idle longest. Team members
can also work in separate rooms, for example, on the
company's premises and at a teleworking station. The
teams (call distribution groups) and team members are
set up by the service engineer.
Logging on/off
You must log on and off at the system when you start/
finish work.
Register
c or d Press and hold the Talk key or press and hold the
Speakerphone key.
Open the system menu.
> < [Select the menu item and confirm.
Group functions
> < [Select the menu item and confirm.
> < [ Select the menu item and confirm.
o Enter your identifier number (assigned by the service
engineer).
a Press the On-hook key to end the operation.
Logging off
c or d Press and hold the Talk key or press and hold the
Speakerphone key.
Open the system menu.
> < [ Select the menu item and confirm.
> < [Select the menu item and confirm.
> < [Select the menu item and confirm.
a Press the On-hook key to end the operation.
89
Page 90

Group functions
Menu
Service?
UCD Menu?
*
402=Log on?
Menu
Service?
UCD Menu?
#402=Not available?
Step by Step
Logging on/off temporarily
You can log on or off at the system temporarily, for
example, during break times.
Register
c or d Press and hold the Talk key or press and hold the
Speakerphone key.
Open the system menu.
> < [Select the menu item and confirm.
> < [Select the menu item and confirm.
> < [Select the menu item and confirm.
a Press the On-hook key to end the operation.
Logging off
c or d Press and hold the Talk key or press and hold the
Speakerphone key.
Open the system menu.
> < [Select the menu item and confirm.
> < [ Select the menu item and confirm.
> < [ Select the menu item and confirm.
a Press the On-hook key to end the operation.
90
Page 91

Step by Step
Menu
Service?
UCD Menu?
*
403=
Work on?
Menu
Service?
UCD Menu?
#403=
Work of f?
Wrap-up time
If you need more time than the actual call lasts, you can
request/activate a wrap-up time for the last call. This
can be a fixed length of time or, alternatively, you must
deactivate the wrap-up time yourself (log back on).
Requesting time
c or d Press and hold the Talk key or press and hold the
Speakerphone key.
Open the system menu.
> < [Select the menu item and confirm.
> < [Select the menu item and confirm.
> < [Select the menu item and confirm.
a Press the On-hook key to end the operation.
Logging back on
c or d Press and hold the Talk key or press and hold the
Speakerphone key.
Open the system menu.
Group functions
> < [Select the menu item and confirm.
> < [Select the menu item and confirm.
> < [Select the menu item and confirm.
a Press the On-hook key to end the operation.
91
Page 92

Group functions
Menu
Service?
UCD Menu?
*
404=UCD night on?
Menu
Service?
UCD Menu?
#404=UCD night off?
Menu
Service?
UCD Menu?
Step by Step
UCD night service
UCD night service is a separate night service for call
distribution. It is not affected by the system night
service.
All incoming calls are forwarded to a special call
distribution destination.
Night destination on
c or d Press and hold the Talk key or press and hold the
Speakerphone key.
Open the system menu.
> < [Select the menu item and confirm.
> < [Select the menu item and confirm.
> < [Select the menu item and confirm.
a Press the On-hook key to end the operation.
Night destination off
c or d Press and hold the Talk key or press and hold the
Speakerphone key.
Open the system menu.
> < [Select the menu item and confirm.
> < [Select the menu item and confirm.
> < [Select the menu item and confirm.
a Press the On-hook key to end the operation.
Display the number of waiting calls
You can check the number of waiting calls for the group.
c or d Press and hold the Talk key or press and hold the
Speakerphone key.
Open the system menu.
> < [Select the menu item and confirm.
> < [Select the menu item and confirm.
92
Page 93

Step by Step
*
405=Calls in
queue?
Group functions
> < [
Select the menu item and confirm.
a Press the On-hook key to end the operation.
93
Page 94

Group functions
Menu
Service?
More features?
#85=Leave hunt
group?
*
85=Join hunt
group?
Step by Step
Mulap group (Multiple Line Application)
If your handset's line belongs to a Mulap group
(Multiple Line Application), then you can
• answer calls for the group (press the Talk key in
group calls)
• make external telephone calls under the group
phone number (the group phone number is stored
in the called party's caller list, for example)
• activate and deactivate the group call function for
your handset's line
• forward the lines of the Mulap group to internal or
external destinations
Activating/deactivating group calls
c or d Press and hold the Talk key or press and hold the
Speakerphone key.
Open the system menu.
> < [Select the menu item and confirm.
> < [Select the menu item and confirm.
Either:
> < [Select the menu item and confirm.
Or:
> < [Select the menu item and confirm.
then:
a Press the On-hook key to end the operation.
Forwarding a Mulap line
You can immediately forward internal and/or external
calls to your lines to different internal or external
telephones (destinations) (external destinations are also
possible if the system is configured accordingly).
If you activate call forwarding for a line, this shall apply
to all line keys of your group for this line.
94
Page 95

Step by Step
Menu
Service?
More features:
*
501=Forward Line:
On?
1=all calls?
2=external calls
only?
3=internal calls only?
Save
Menu
Service?
More features:
#501=Forward Line:
Off?
Forwarding on
c or d
Press and hold down the Talk key or press and
Speakerphone key.
Open the system menu.
> < [Select the menu item and confirm.
> < [Select the menu item and confirm.
> < [Select the menu item and confirm.
o Enter a line number.
Either:
> < [Select the menu item and confirm.
Or:
> < [Select the menu item and confirm.
Or:
> < [Select the menu item and confirm.
Group functions
hold
the
> < [Select the menu item and confirm.
> < [Select the menu item and confirm.
> < [Select the menu item and confirm.
o Enter the destination number.
Save the settings.
a Press the On-hook key to end the operation.
Forwarding off
c or d Press and hold the Talk key or press and hold the
Speakerphone key.
Open the system menu.
o Enter a line number.
a Press the On-hook key to end the operation.
95
Page 96

Message functions
Menu
Advisory msg. on?
0 = Will return at:
1 = On vacation until:
Save
Enter message text
Step by Step
Message functions
The message functions enable you to react to
voicemail/callback services of the communication
system or of other users or to initiate information
features yourself.
Leaving a message/advisory message
A number of advisory messages are stored in your
communication system that can be automatically sent
to the caller when an internal call is not answered (in the
case of handsets and telephones with display). These
advisory messages can be selected and supplemented
in part by you:
0 = Will return at:
1 = On vacation until:
2 = I am out until:
3 = Out all day
4 = Out to lunch
5 = Not available
6 = Home phone:
7 = Contact:
8 = Avail at:
9 = Am in room:
These advisory messages are standard texts and may
have been changed in your communication system.
Activating an advisory message
c or d Press and hold the Talk key or press and hold the
Speakerphone key.
Open the system menu.
> < [ Select the menu item and confirm.
Either:
> < [ Select the required advisory message.
If necessary o Expand the message as necessary.
Save the settings.
Or:
> < [Select the menu item and confirm.
96
Page 97

Step by Step
Save
Menu
Absence Text OFF?
Message functions
Enter the required advisory message.
o
You can enter the text via the handset's keypad.
Each key is assigned several letters and each
letter is selected by pressing the key an
appropriate number of times. For example, you
have to press the "7" key three times to enter an
"r".
Typing errors can be corrected: activate delete mode by
double-clicking the hash key and then use the hash key
to delete a character.
Save the message.
a Press the On-hook key to end the operation.
Deactivating an advisory message
c or d Press and hold the Talk key or press and hold the
Speakerphone key.
Open the system menu.
> < [Select the menu item and confirm.
a Press the On-hook key to end the operation.
97
Page 98

Message functions
Menu
Send Message?
Message to:
0 = Please callback
1 = Someone is
waiting
Enter message text
Step by Step
Sending/calling text messages
You can send short messages to individual internal
users or to groups of internal users. These must have a
handset or telephone with display.
These text messages can be selected and
supplemented in part by you:
0 = Please call back
1 = Someone is waiting
2 = Appointment
3 = Urgent call
4 = Do not disturb
5 = FAX waiting
6 = Dictation please
7 = Please make copies
8 = Please make coffee
9 = Ready to depart
These text messages are standard texts and may have
been changed in your communication system.
Send a text message
c or d Press and hold the Talk key or press and hold the
Speakerphone key.
Open the system menu.
> < [Select the menu item and confirm.
o Enter the phone number for the required internal user
or the group.
Either:
> < [ Select the required advisory message.
Or:
> < [Select the menu item and confirm.
o Enter the required text message.
Typing errors can be corrected: activate delete mode by
double-clicking the hash key and then use the hash key
to delete a character.
98
Page 99

Step by Step
Send
Menu
Display Messages?
Msg. from:
...
Mnu
Text?
Mnu
Time/date sent?
Message functions
You can enter the text via the handset's keypad.
Each key is assigned several letters and each
letter is selected by pressing the key an
appropriate number of times. For example, you
have to press the "7" key three times to enter an
"r".
then:
Press the display key.
a Press the On-hook key to end the operation.
Answering a message or voicemail message
An advisory message appears and the message key
flashes when one or more information messages or
voicemails have been received for you.
Viewing a new message
Either:
f Press the message key.
Or:
c or d Press and hold the Talk key or press and hold the
Speakerphone key.
Open the system menu.
> < [Select the menu item and confirm.
> < [Select the menu item and confirm.
> < [Select the menu item and confirm. The time of the
> [ Select the required message and confirm your
selection.
then:
Open the additional menu.
Open the additional menu.
message is displayed.
Either:
99
Page 100

Message functions
Mnu
Call Sender?
Delete?
Menu
Display Messages?
Menu
Display Messages?
Msg. from:
...
Mnu
Text?
<Text>
Mnu
Step by Step
Open the additional menu.
> < [Select the menu item and confirm. You call back the
sender.
Or:
> < [Select the menu item and confirm. The entry is deleted.
then:
a Press the On-hook key to end the operation.
Checking for a new voicemail message
Either:
f Press the message key.
Or:
c or d Press and hold the Talk key or press and hold the
Speakerphone key.
Open the system menu.
> < [Select the menu item and confirm.
o Follow the user guidance system from this point
onwards.
a Press the On-hook key to end the operation.
Checking for an old text message
Old messages that have not been deleted cannot be
displayed using the message key f. To view these
messages, proceed as follows:
c or d Press and hold the Talk key or press and hold the
Speakerphone key.
Open the system menu.
> < [Select the menu item and confirm.
> Select the required message and call the additional
menu.
> < [Select the menu item and confirm.
> < Open the additional menu.
100
 Loading...