

Page 1
Documentation
Para maiores informações sobre este ou outro produto Siemens
ligue: 11 2858-0444
ou clique : www.asttecom.com.br
Manual Telefone OpenStage 60T/80T
HiPath 500, HiPath 3000, HiPath 5000
OpenStage60T/80T
OpenStage Key Module
User Guide
Communication for the open minded
Siemens Enterprise Communications
www.siemens-enterprise.com
Page 2
Important information
Important information
Trademarks
Q
For safety reasons, the telephone should only be supplied with power:
• using the original power supply unit.
Part number: L30250-F600-C14x (x: 1=EU, 2=UK,
3=US).
Never open the telephone or a key module. Should you
encounter any problems, contact the responsible service personnel.
Use only original Siemens accessories. The use of
other accessories may be hazardous and will render the
warranty, extended manufacturer’s liability and the CE
marking invalid.
The device conforms to the EU directive 1999/5/EC as attested by the CE marking.
All electrical and electronic products should be disposed of
separately from the municipal waste stream via designated
collection facilities appointed by the government or the local
authorities.
Proper disposal and separate collection of your old appliance will help prevent potential damage to the environment
and human health. It is a prerequisite for reuse and recycling
of used electrical and electronic equipment.
For more detailed information about disposal of your old appliance, please contact your city office, waste disposal service, the shop where you purchased the product or your sales representative.
The statements quoted above are only fully valid for equipment which is installed and sold in the countries of the European Union and is covered by the directive 2002/96/EC.
Countries outside the European Union may impose other regulations regarding the disposal of electrical and electronic
equipment.
2
Page 3

Important information
Location of the telephone
• The telephone should be operated in a controlled environment with an
ambient temperature between 5°C and 40°C.
• To ensure good speakerphone quality, the area in front of the microphone (front right) should be kept clear. The optimum speakerphone distance is 50 cm.
• Do not install the telephone in a room where large quantities of dust
accumulate; this can considerably reduce the service life of the telephone.
• Do not expose the telephone to direct sunlight or any other source of
heat, as this is liable to damage the electronic components and the
plastic casing.
• Do not operate the telephone in damp environments such as
bathrooms.
Software update
During a software update, the phone must not be disconnected
from the power supply unit or the phone line.
An update action is indicated by messages on the display and/or by
flashing LEDs.
Product Support on the Internet
Information and support for our products can be found on the Internet:
http://www.siemens-enterprise.com/.
Technical notes, current information about firmware updates, frequently
asked questions and lots more can be found on the Internet at:
http://wiki.siemens-enterprise.com/.
3
Page 4

Contents
Contents
Important information . . . . . . . . . . . . . . . . . . . . . . . . . .2
Trademarks . . . . . . . . . . . . . . . . . . . . . . . . . . . . . . . . . . . . . . . . . . . . . . . 2
Location of the telephone . . . . . . . . . . . . . . . . . . . . . . . . . . . . . . . . . . . . 3
Software update . . . . . . . . . . . . . . . . . . . . . . . . . . . . . . . . . . . . . . . . . . . 3
Product Support on the Internet . . . . . . . . . . . . . . . . . . . . . . . . . . . . . . . 3
General information. . . . . . . . . . . . . . . . . . . . . . . . . . .11
About this manual . . . . . . . . . . . . . . . . . . . . . . . . . . . . . . . . . . . . . . . . . 11
Service. . . . . . . . . . . . . . . . . . . . . . . . . . . . . . . . . . . . . . . . . . . . . . . . . . 11
Intended use . . . . . . . . . . . . . . . . . . . . . . . . . . . . . . . . . . . . . . . . . . . . . 12
Telephone type . . . . . . . . . . . . . . . . . . . . . . . . . . . . . . . . . . . . . . . . . . . 12
Speakerphone quality and display legibility . . . . . . . . . . . . . . . . . . . . . . 12
Multi-line telephone, executive/secretary functions . . . . . . . . . . . . . . . 13
Team functions . . . . . . . . . . . . . . . . . . . . . . . . . . . . . . . . . . . . . . . . 13
Getting to know your OpenStage phone . . . . . . . . .14
The user interface of your OpenStage 60 T/80 T . . . . . . . . . . . . . . . . . 14
Ports on the underside of the phone. . . . . . . . . . . . . . . . . . . . . . . . . . . 15
OpenStage Manager . . . . . . . . . . . . . . . . . . . . . . . . . . . . . . . . . . . . . . . 16
Features. . . . . . . . . . . . . . . . . . . . . . . . . . . . . . . . . . . . . . . . . . . . . . 16
OpenStage Key Module . . . . . . . . . . . . . . . . . . . . . . . . . . . . . . . . . . . . 17
Keys and controls . . . . . . . . . . . . . . . . . . . . . . . . . . . . . . . . . . . . . . . . . 18
Function keys. . . . . . . . . . . . . . . . . . . . . . . . . . . . . . . . . . . . . . . . . . 18
Audio controls . . . . . . . . . . . . . . . . . . . . . . . . . . . . . . . . . . . . . . . . . 18
Mode keys. . . . . . . . . . . . . . . . . . . . . . . . . . . . . . . . . . . . . . . . . . . . 19
TouchGuide . . . . . . . . . . . . . . . . . . . . . . . . . . . . . . . . . . . . . . . . . . . 20
Programmable sensor keys . . . . . . . . . . . . . . . . . . . . . . . . . . . . . . . 22
Keypad. . . . . . . . . . . . . . . . . . . . . . . . . . . . . . . . . . . . . . . . . . . . . . . 24
Graphic display . . . . . . . . . . . . . . . . . . . . . . . . . . . . . . . . . . . . . . . . . . . 25
Appearance . . . . . . . . . . . . . . . . . . . . . . . . . . . . . . . . . . . . . . . . . . . 25
Display keyboard . . . . . . . . . . . . . . . . . . . . . . . . . . . . . . . . . . . . . . . 26
Context-dependent displays . . . . . . . . . . . . . . . . . . . . . . . . . . . . . . . . . 28
Idle mode. . . . . . . . . . . . . . . . . . . . . . . . . . . . . . . . . . . . . . . . . . . . . 28
Telephony dialogs . . . . . . . . . . . . . . . . . . . . . . . . . . . . . . . . . . . . . . 29
Messages . . . . . . . . . . . . . . . . . . . . . . . . . . . . . . . . . . . . . . . . . . . . 29
Context menus . . . . . . . . . . . . . . . . . . . . . . . . . . . . . . . . . . . . . . . . 30
Pop-up window . . . . . . . . . . . . . . . . . . . . . . . . . . . . . . . . . . . . . . . . 30
Application tab . . . . . . . . . . . . . . . . . . . . . . . . . . . . . . . . . . . . . . . . . 31
4
Page 5

Contents
Applications available on your OpenStage phone 32
Application navigation . . . . . . . . . . . . . . . . . . . . . . . . . . . . . . . . . . . . . . 32
Telephony interface . . . . . . . . . . . . . . . . . . . . . . . . . . . . . . . . . . . . . . . . 33
Phonebooks. . . . . . . . . . . . . . . . . . . . . . . . . . . . . . . . . . . . . . . . . . . . . . 34
Personal phonebook . . . . . . . . . . . . . . . . . . . . . . . . . . . . . . . . . . . . 35
LDAP directory. . . . . . . . . . . . . . . . . . . . . . . . . . . . . . . . . . . . . . . . . 36
System phonebook . . . . . . . . . . . . . . . . . . . . . . . . . . . . . . . . . . . . . 36
Call lists . . . . . . . . . . . . . . . . . . . . . . . . . . . . . . . . . . . . . . . . . . . . . . . . 37
Managing call lists . . . . . . . . . . . . . . . . . . . . . . . . . . . . . . . . . . . . . . 37
Entry details . . . . . . . . . . . . . . . . . . . . . . . . . . . . . . . . . . . . . . . . . . . 38
Mailbox . . . . . . . . . . . . . . . . . . . . . . . . . . . . . . . . . . . . . . . . . . . . . . . . . 39
Messages . . . . . . . . . . . . . . . . . . . . . . . . . . . . . . . . . . . . . . . . . . . . 39
Voicemail . . . . . . . . . . . . . . . . . . . . . . . . . . . . . . . . . . . . . . . . . . . . . 39
Menu . . . . . . . . . . . . . . . . . . . . . . . . . . . . . . . . . . . . . . . . . . . . . . . . . . 40
Settings – Service Menu . . . . . . . . . . . . . . . . . . . . . . . . . . . . . . . . . 40
Settings – telephone user menu . . . . . . . . . . . . . . . . . . . . . . . . . . . 40
Settings – administration . . . . . . . . . . . . . . . . . . . . . . . . . . . . . . . . . 41
Help function . . . . . . . . . . . . . . . . . . . . . . . . . . . . . . . . . . . . . . . . . . . . . 42
Basic functions . . . . . . . . . . . . . . . . . . . . . . . . . . . . . .43
Answering a call . . . . . . . . . . . . . . . . . . . . . . . . . . . . . . . . . . . . . . . . . . 43
Answering a call via the handset . . . . . . . . . . . . . . . . . . . . . . . . . . . 43
Answering a call via the loudspeaker (speakerphone mode). . . . . . 44
Accepting a call via the headset. . . . . . . . . . . . . . . . . . . . . . . . . . . . 44
Switching to speakerphone mode. . . . . . . . . . . . . . . . . . . . . . . . . . . . . 45
Switching to the handset. . . . . . . . . . . . . . . . . . . . . . . . . . . . . . . . . . . . 45
Open listening . . . . . . . . . . . . . . . . . . . . . . . . . . . . . . . . . . . . . . . . . . . . 46
Making calls. . . . . . . . . . . . . . . . . . . . . . . . . . . . . . . . . . . . . . . . . . . . . . 47
Off-hook dialing . . . . . . . . . . . . . . . . . . . . . . . . . . . . . . . . . . . . . . . . 47
En-bloc dialing . . . . . . . . . . . . . . . . . . . . . . . . . . . . . . . . . . . . . . . . . 47
On-hook dialing . . . . . . . . . . . . . . . . . . . . . . . . . . . . . . . . . . . . . . . . 48
Dialing with the headset connected . . . . . . . . . . . . . . . . . . . . . . . . 49
Dialing with DDS keys . . . . . . . . . . . . . . . . . . . . . . . . . . . . . . . . . . . 49
Ending a call. . . . . . . . . . . . . . . . . . . . . . . . . . . . . . . . . . . . . . . . . . . . . . 49
Rejecting a call. . . . . . . . . . . . . . . . . . . . . . . . . . . . . . . . . . . . . . . . . . . . 49
Turning the microphone on and off . . . . . . . . . . . . . . . . . . . . . . . . . . . . 50
Calling a second party (consultation) . . . . . . . . . . . . . . . . . . . . . . . . . . . 51
Switching to the held party (alternating) . . . . . . . . . . . . . . . . . . . . . 51
Transferring a call. . . . . . . . . . . . . . . . . . . . . . . . . . . . . . . . . . . . . . . 52
Using callback . . . . . . . . . . . . . . . . . . . . . . . . . . . . . . . . . . . . . . . . . . . . 53
Storing a callback . . . . . . . . . . . . . . . . . . . . . . . . . . . . . . . . . . . . . . . 53
Accepting a callback. . . . . . . . . . . . . . . . . . . . . . . . . . . . . . . . . . . . . 53
Viewing and deleting a stored callback . . . . . . . . . . . . . . . . . . . . . . 54
5
Page 6

Contents
Enhanced phone functions. . . . . . . . . . . . . . . . . . . . .55
Answering calls . . . . . . . . . . . . . . . . . . . . . . . . . . . . . . . . . . . . . . . . . . . 55
Accepting a call via the headset . . . . . . . . . . . . . . . . . . . . . . . . . . . 55
Answering a call for another phone . . . . . . . . . . . . . . . . . . . . . . . . . 55
Using the speakerphone . . . . . . . . . . . . . . . . . . . . . . . . . . . . . . . . . 56
Answering calls from the entrance telephone
and opening the door. . . . . . . . . . . . . . . . . . . . . . . . . . . . . . . . . . . . 57
Accepting a call from an answering machine . . . . . . . . . . . . . . . . . 58
Making calls. . . . . . . . . . . . . . . . . . . . . . . . . . . . . . . . . . . . . . . . . . . . . . 59
Redialing from a call list . . . . . . . . . . . . . . . . . . . . . . . . . . . . . . . . . . 59
Using a personal phonebook . . . . . . . . . . . . . . . . . . . . . . . . . . . . . . 59
Using a system phonebook . . . . . . . . . . . . . . . . . . . . . . . . . . . . . . . 61
Using the LDAP directory . . . . . . . . . . . . . . . . . . . . . . . . . . . . . . . . 61
Making calls using system speed-dial numbers . . . . . . . . . . . . . . . 62
Dialing with speed-dial keys . . . . . . . . . . . . . . . . . . . . . . . . . . . . . . 62
Talking to your colleague with a speaker call. . . . . . . . . . . . . . . . . . 64
Talking to your colleague with discreet calling (not for HiPath 500) 64
Automatic connection setup/hotline . . . . . . . . . . . . . . . . . . . . . . . . 65
Reserving a trunk. . . . . . . . . . . . . . . . . . . . . . . . . . . . . . . . . . . . . . . 65
Assigning a station number (not for U.S.) . . . . . . . . . . . . . . . . . . . . 66
Associated dialing/dialing aid . . . . . . . . . . . . . . . . . . . . . . . . . . . . . . 66
During a call. . . . . . . . . . . . . . . . . . . . . . . . . . . . . . . . . . . . . . . . . . . . . . 67
Using call waiting (second call) . . . . . . . . . . . . . . . . . . . . . . . . . . . . 67
Preventing and allowing a second call (call waiting) . . . . . . . . . . . . 68
Activating/deactivating the camp-on tone . . . . . . . . . . . . . . . . . . . . 68
Parking a call . . . . . . . . . . . . . . . . . . . . . . . . . . . . . . . . . . . . . . . . . . 69
Placing an external call on hold . . . . . . . . . . . . . . . . . . . . . . . . . . . . 70
Conducting a conference. . . . . . . . . . . . . . . . . . . . . . . . . . . . . . . . . 71
Activating tone dialing/DTMF suffix-dialing . . . . . . . . . . . . . . . . . . . 73
Recording a call . . . . . . . . . . . . . . . . . . . . . . . . . . . . . . . . . . . . . . . . 74
Transferring a call after a speaker call announcement in a group . . 75
Sending a trunk flash (not for HiPath 500). . . . . . . . . . . . . . . . . . . . 76
If you cannot reach a destination. . . . . . . . . . . . . . . . . . . . . . . . . . . . . . 77
Call waiting (camp-on) . . . . . . . . . . . . . . . . . . . . . . . . . . . . . . . . . . . 77
Busy override – joining a call in progress. . . . . . . . . . . . . . . . . . . . . 77
Using night answer . . . . . . . . . . . . . . . . . . . . . . . . . . . . . . . . . . . . . . . . 78
Call forwarding. . . . . . . . . . . . . . . . . . . . . . . . . . . . . . .79
Active call forwarding indication . . . . . . . . . . . . . . . . . . . . . . . . . . . . . . 79
Overview of call forwarding types. . . . . . . . . . . . . . . . . . . . . . . . . . . . . 80
Call forwarding key . . . . . . . . . . . . . . . . . . . . . . . . . . . . . . . . . . . . . . . . 80
Editing call forwarding instructions . . . . . . . . . . . . . . . . . . . . . . . . . 80
Editing forwarding destinations . . . . . . . . . . . . . . . . . . . . . . . . . . . . 81
Forwarding express activation for "all calls" . . . . . . . . . . . . . . . . . . . 83
Activating call forwarding via the Program/Service menu . . . . . . . . . . 83
Configuration via the Program/Service menu . . . . . . . . . . . . . . . . . 83
6
Page 7

Contents
Deactivating call forwarding . . . . . . . . . . . . . . . . . . . . . . . . . . . . . . . . . 84
Using system forwarding instructions. . . . . . . . . . . . . . . . . . . . . . . . . . 85
Call forwarding no reply (CFNR). . . . . . . . . . . . . . . . . . . . . . . . . . . . 85
Call forwarding in the carrier network and
forwarding multiple subscriber numbers (MSN) (not for U.S.) . . . . 86
Programming sensor keys . . . . . . . . . . . . . . . . . . . . . 87
Configuring function keys . . . . . . . . . . . . . . . . . . . . . . . . . . . . . . . . . . . 87
Overview of functions . . . . . . . . . . . . . . . . . . . . . . . . . . . . . . . . . . . 88
Programming a procedure key . . . . . . . . . . . . . . . . . . . . . . . . . . . . . . . 91
Configuring repdial keys . . . . . . . . . . . . . . . . . . . . . . . . . . . . . . . . . . . . 93
Changing the label . . . . . . . . . . . . . . . . . . . . . . . . . . . . . . . . . . . . . . . . . 94
Deleting sensor key programming . . . . . . . . . . . . . . . . . . . . . . . . . . . . 95
Phonebooks and call lists . . . . . . . . . . . . . . . . . . . . . 96
Personal phonebook . . . . . . . . . . . . . . . . . . . . . . . . . . . . . . . . . . . . . . . 96
Creating a new contact . . . . . . . . . . . . . . . . . . . . . . . . . . . . . . . . . . 96
Changing contact data . . . . . . . . . . . . . . . . . . . . . . . . . . . . . . . . . . . 98
Managing the phonebook . . . . . . . . . . . . . . . . . . . . . . . . . . . . . . . . 99
Managing groups . . . . . . . . . . . . . . . . . . . . . . . . . . . . . . . . . . . . . . 100
LDAP database . . . . . . . . . . . . . . . . . . . . . . . . . . . . . . . . . . . . . . . . . . 102
Finding an LDAP entry. . . . . . . . . . . . . . . . . . . . . . . . . . . . . . . . . . 102
Call lists . . . . . . . . . . . . . . . . . . . . . . . . . . . . . . . . . . . . . . . . . . . . . . . . 104
View details . . . . . . . . . . . . . . . . . . . . . . . . . . . . . . . . . . . . . . . . . . 104
Deleting entries . . . . . . . . . . . . . . . . . . . . . . . . . . . . . . . . . . . . . . . 104
Copying entries from the call logs
into the personal phonebook . . . . . . . . . . . . . . . . . . . . . . . . . . . . 105
Displaying and assigning call charges . . . . . . . . . 106
Displaying call charges (not for U.S.). . . . . . . . . . . . . . . . . . . . . . . . . . 106
Displaying call charges for another telephone (not for U.S.) . . . . . . . . 107
Dialing with call charge assignment . . . . . . . . . . . . . . . . . . . . . . . . . . 108
Privacy/security . . . . . . . . . . . . . . . . . . . . . . . . . . . . . 109
User password . . . . . . . . . . . . . . . . . . . . . . . . . . . . . . . . . . . . . . . . . . 109
Turning ringer cutoff on and off. . . . . . . . . . . . . . . . . . . . . . . . . . . . . . 110
Deactivating the ring tone . . . . . . . . . . . . . . . . . . . . . . . . . . . . . . . . . . 110
Do not disturb . . . . . . . . . . . . . . . . . . . . . . . . . . . . . . . . . . . . . . . . . . . 111
Suppressing your phone number on the called party’s phone . . . . . . 111
Silent Monitor (not for HiPath 500) . . . . . . . . . . . . . . . . . . . . . . . . . . . 112
Monitoring a room . . . . . . . . . . . . . . . . . . . . . . . . . . . . . . . . . . . . . . . . 112
Trace call: identifying anonymous callers (not for U.S.). . . . . . . . . . . . 113
7
Page 8

Contents
Locking the telephone to prevent unauthorized use . . . . . . . . . . . . . . 114
Locking another telephone to prevent unauthorized use . . . . . . . . . . 115
Saving your PIN . . . . . . . . . . . . . . . . . . . . . . . . . . . . . . . . . . . . . . . . . . 116
More functions/services. . . . . . . . . . . . . . . . . . . . . .117
Appointments function . . . . . . . . . . . . . . . . . . . . . . . . . . . . . . . . . . . . 117
Saving appointments . . . . . . . . . . . . . . . . . . . . . . . . . . . . . . . . . . . 117
Using timed reminders . . . . . . . . . . . . . . . . . . . . . . . . . . . . . . . . . 118
Sending a message . . . . . . . . . . . . . . . . . . . . . . . . . . . . . . . . . . . . . . . 119
Creating and sending a message. . . . . . . . . . . . . . . . . . . . . . . . . . 119
Viewing and editing incoming messages. . . . . . . . . . . . . . . . . . . . 120
Leaving an advisory message . . . . . . . . . . . . . . . . . . . . . . . . . . . . . . . 121
Deleting advisory messages . . . . . . . . . . . . . . . . . . . . . . . . . . . . . 121
Displaying the number of waiting calls/overload display . . . . . . . . . . . 122
Using another telephone like your own for a call . . . . . . . . . . . . . . . . 122
Change number (exchanged phone/move/relocate) . . . . . . . . . . . . . . 123
Fax details and message on answering machine . . . . . . . . . . . . . . . . 124
Resetting services and functions
(system-wide cancellation for a telephone). . . . . . . . . . . . . . . . . . . . . 124
Activating functions for another telephone . . . . . . . . . . . . . . . . . . . . . 125
Using system functions from outside
DISA (direct inward system access) . . . . . . . . . . . . . . . . . . . . . . . . . . 126
Using functions in ISDN via code dialing (keypad dialing) . . . . . . . . . . 128
Controlling Connected Computer or Their Programs/Tel. Data Service 129
Communicating with PC applications over a CSTA interface . . . . . . . 130
Controlling relays (only for HiPath 3000) . . . . . . . . . . . . . . . . . . . . . . . 131
Sensors (HiPath 33x0/35x0 only). . . . . . . . . . . . . . . . . . . . . . . . . . . . . 131
Paging persons (not for U.S., not for HiPath 500) . . . . . . . . . . . . . . . 132
Making calls in the team/executive/
secretary configuration . . . . . . . . . . . . . . . . . . . . . .133
Lines . . . . . . . . . . . . . . . . . . . . . . . . . . . . . . . . . . . . . . . . . . . . . . . . . . 133
Line utilization . . . . . . . . . . . . . . . . . . . . . . . . . . . . . . . . . . . . . . . . 133
Line seizure . . . . . . . . . . . . . . . . . . . . . . . . . . . . . . . . . . . . . . . . . . 134
Trunk keys . . . . . . . . . . . . . . . . . . . . . . . . . . . . . . . . . . . . . . . . . . . . . . 134
Answering calls with the trunk keys . . . . . . . . . . . . . . . . . . . . . . . 135
Dialing with trunk keys. . . . . . . . . . . . . . . . . . . . . . . . . . . . . . . . . . 135
Placing a call on hold on a trunk key and retrieving the held call . . 135
Making calls on multiple lines alternately . . . . . . . . . . . . . . . . . . . 136
MULAP conference release. . . . . . . . . . . . . . . . . . . . . . . . . . . . . . 136
Direct station selection key . . . . . . . . . . . . . . . . . . . . . . . . . . . . . . . . . 137
Using DSS keys to answer calls . . . . . . . . . . . . . . . . . . . . . . . . . . 137
Calling a team member directly. . . . . . . . . . . . . . . . . . . . . . . . . . . 137
Transferring a call in progress . . . . . . . . . . . . . . . . . . . . . . . . . . . . 138
Accepting a call for another team member . . . . . . . . . . . . . . . . . . 138
8
Page 9

Contents
Forwarding calls on trunks. . . . . . . . . . . . . . . . . . . . . . . . . . . . . . . . . . 139
Transferring calls directly to the executive phone . . . . . . . . . . . . . . . . 141
Using team functions . . . . . . . . . . . . . . . . . . . . . . . . 142
Activating/deactivating a group call . . . . . . . . . . . . . . . . . . . . . . . . . . . 142
Accepting a call for another member of your team. . . . . . . . . . . . . . . 144
Ringing group . . . . . . . . . . . . . . . . . . . . . . . . . . . . . . . . . . . . . . . . . . . 144
Uniform Call Distribution (UCD). . . . . . . . . . . . . . . . . . . . . . . . . . . . . . 145
Special functions in the LAN
(not for HiPath 500) . . . . . . . . . . . . . . . . . . . . . . . . . . 147
Leaving hunt group/group call . . . . . . . . . . . . . . . . . . . . . . . . . . . . . . . 147
Setting up "follow me" call forwarding. . . . . . . . . . . . . . . . . . . . . . . . . 148
Using night answer . . . . . . . . . . . . . . . . . . . . . . . . . . . . . . . . . . . . . . . 149
Ringing group . . . . . . . . . . . . . . . . . . . . . . . . . . . . . . . . . . . . . . . . . . . 150
Controlling relays (only for HiPath 3000) . . . . . . . . . . . . . . . . . . . . . . . 151
Opening a door . . . . . . . . . . . . . . . . . . . . . . . . . . . . . . . . . . . . . . . . . . 152
Individual phone configuration . . . . . . . . . . . . . . . 153
Adjusting display settings . . . . . . . . . . . . . . . . . . . . . . . . . . . . . . . . . . 153
Adjusting the display to a comfortable reading angle . . . . . . . . . . 153
Screensaver . . . . . . . . . . . . . . . . . . . . . . . . . . . . . . . . . . . . . . . . . . 153
Color scheme. . . . . . . . . . . . . . . . . . . . . . . . . . . . . . . . . . . . . . . . . 156
Lamp brightness for TouchSlider. . . . . . . . . . . . . . . . . . . . . . . . . . . . . 157
Set the sensitivity of the TouchGuide . . . . . . . . . . . . . . . . . . . . . . . . . 158
Contrast for the OpenStage Key Module . . . . . . . . . . . . . . . . . . . . . . 159
Adjusting audio settings . . . . . . . . . . . . . . . . . . . . . . . . . . . . . . . . . . . 160
Volumes. . . . . . . . . . . . . . . . . . . . . . . . . . . . . . . . . . . . . . . . . . . . . 160
Room character . . . . . . . . . . . . . . . . . . . . . . . . . . . . . . . . . . . . . . . 161
Setting headset port use . . . . . . . . . . . . . . . . . . . . . . . . . . . . . . . . 162
Ringtone . . . . . . . . . . . . . . . . . . . . . . . . . . . . . . . . . . . . . . . . . . . . 163
Activating/deactivating the ringer. . . . . . . . . . . . . . . . . . . . . . . . . . 164
Adjusting the volume during a call. . . . . . . . . . . . . . . . . . . . . . . . . 164
En-bloc dialing . . . . . . . . . . . . . . . . . . . . . . . . . . . . . . . . . . . . . . . . . . . 164
Language for system functions . . . . . . . . . . . . . . . . . . . . . . . . . . . . . . 165
Configuring Bluetooth . . . . . . . . . . . . . . . . . . . . . . . . . . . . . . . . . . . . . 166
Bluetooth settings . . . . . . . . . . . . . . . . . . . . . . . . . . . . . . . . . . . . . 166
Connecting/disconnecting a Bluetooth device. . . . . . . . . . . . . . . . 168
Managing Bluetooth devices . . . . . . . . . . . . . . . . . . . . . . . . . . . . . 169
Context menu . . . . . . . . . . . . . . . . . . . . . . . . . . . . . . . . . . . . . . . . . . . 172
Closing automatically . . . . . . . . . . . . . . . . . . . . . . . . . . . . . . . . . . . 172
Setting the automatic display duration. . . . . . . . . . . . . . . . . . . . . . 173
Resetting user data . . . . . . . . . . . . . . . . . . . . . . . . . . . . . . . . . . . . . . . 174
Phone test . . . . . . . . . . . . . . . . . . . . . . . . . . . . . . . . . . . . . . . . . . . . . . 175
9
Page 10

Contents
Bluetooth . . . . . . . . . . . . . . . . . . . . . . . . . . . . . . . . . . .176
Discoverability . . . . . . . . . . . . . . . . . . . . . . . . . . . . . . . . . . . . . . . . . . . 176
Linking . . . . . . . . . . . . . . . . . . . . . . . . . . . . . . . . . . . . . . . . . . . . . . . . . 176
Transferring contacts. . . . . . . . . . . . . . . . . . . . . . . . . . . . . . . . . . . . . . 177
Receiving a vCard . . . . . . . . . . . . . . . . . . . . . . . . . . . . . . . . . . . . . 177
Sending a vCard. . . . . . . . . . . . . . . . . . . . . . . . . . . . . . . . . . . . . . . 178
Using a Bluetooth headset . . . . . . . . . . . . . . . . . . . . . . . . . . . . . . . . . 179
Testing a Bluetooth headset . . . . . . . . . . . . . . . . . . . . . . . . . . . . . 179
Data backup to USB memory stick. . . . . . . . . . . . .180
Backing up user data . . . . . . . . . . . . . . . . . . . . . . . . . . . . . . . . . . . . . . 181
Restoring user data . . . . . . . . . . . . . . . . . . . . . . . . . . . . . . . . . . . . . . . 182
Restoring all user data . . . . . . . . . . . . . . . . . . . . . . . . . . . . . . . . . . 182
Restoring selected user data . . . . . . . . . . . . . . . . . . . . . . . . . . . . . 183
Checking backups . . . . . . . . . . . . . . . . . . . . . . . . . . . . . . . . . . . . . . . . 184
Deleting backups. . . . . . . . . . . . . . . . . . . . . . . . . . . . . . . . . . . . . . . . . 184
Differing display view in a HiPath 4000 environment
(not for HiPath 500). . . . . . . . . . . . . . . . . . . . . . . . . . .185
Fixing problems . . . . . . . . . . . . . . . . . . . . . . . . . . . . .186
Responding to error messages on the screen . . . . . . . . . . . . . . . . . . 186
Contact partner in the case of problems . . . . . . . . . . . . . . . . . . . . . . . 187
Troubleshooting. . . . . . . . . . . . . . . . . . . . . . . . . . . . . . . . . . . . . . . . . . 188
Caring for your telephone . . . . . . . . . . . . . . . . . . . . . . . . . . . . . . . . . . 188
Index. . . . . . . . . . . . . . . . . . . . . . . . . . . . . . . . . . . . . . .189
Overview of functions and codes . . . . . . . . . . . . . .193
Display icons. . . . . . . . . . . . . . . . . . . . . . . . . . . . . . . .198
10
Page 11

General information
General information
About this manual
This document contains general descriptions of the technical options,
which may not always be available in individual cases. The respective features must therefore be individually defined in the terms of the contract.
If a particular function on your phone is not available to you, this may be
due to one of the following reasons:
• The function is not configured for you or your telephone. Please contact your system support representative.
• Your communications platform does not feature this function. Please
contact your Siemens sales partner for information on how to upgrade.
This user guide is intended to help you familiarize yourself with OpenStage
and all of its functions. It contains important information on the safe and
proper operation of your OpenStage phone. These instructions should be
strictly complied with to avoid operating errors and ensure optimum use of
your multifunctional telephone in the network.
These instructions should be read and followed by every person installing,
operating or programming an OpenStage phone.
For your own protection, please read the section dealing with safety
in detail. Follow the safety instructions carefully in order to avoid endangering yourself or other persons and to prevent damage to the
unit.
This user guide is designed to be simple and easy to understand, providing
clear step-by-step instructions for operating your OpenStage phone.
Administrative tasks are dealt with in a separate manual. The Quick Reference Guide contains quick and reliable explanations of frequently used
functions.
Service
The Siemens service department can only help you if you experience problems or defects with the phone.
Should you have any questions regarding operation, your specialist
retailer or network administrator will gladly help you.
For queries regarding connection of the telephone, please contact
your network provider.
If you experience problems or defects with the phone, please dial the service number for your country.
11
Page 12

General information
Intended use
The OpenStage phone was designed as a device for voice transmission
and should be used on a desk. Any other use is regarded as unauthorized.
Telephone type
The identification details (exact product designation and serial number) of
your telephone can be found on the nameplate on the underside of the
base unit. Specific details concerning your communications platform can
be obtained from your service technician.
Please have this information ready when you contact our service department regarding faults or problems with the product.
Speakerphone quality and display legibility
• To ensure good speakerphone quality, the area in front of the telephone
• Proceed as follows to optimize display legibility:
(front right) should be kept clear.
The optimum handsfree distance is 20 in. (50 cm).
– Turn the phone to tilt the display. This ensures you have a frontal view
of the display while eliminating light reflexes.
12
Page 13

General information
Multi-line telephone, executive/secretary functions
Your OpenStage 60/80 T is a "multi-line telephone". This means that your
service personnel can configure multiple lines on your phone, which is not
the case with single-line phones. Each line is assigned an individual phone
number which you can use to make and receive calls.
The programmable sensor keys function as line keys on multi-line phones
! page 134.
When using a multi-line phone to make and receive calls, certain particulars must be taken into account ! page 135 ff.
The executive-secretary configuration is a special case. This is a multi-line
telephone with special features (e.g. "Ring Transfer" and "Accept call"), configured especially for executive/secretary use ! page 133 ff.
Team functions
To increase the efficiency of telephony, your service personnel can configure various Team functions such as pickup groups, hunt groups, and call
distribution groups.
13
Page 14
Getting to know your OpenStage phone
Getting to know your OpenStage phone
The following sections describe the most frequently used operating elements and the displays on your OpenStage phone.
The only difference between the OpenStage 80 T and
OpenStage 60 T is in their casing.
The user interface of your
OpenStage 60 T/80 T
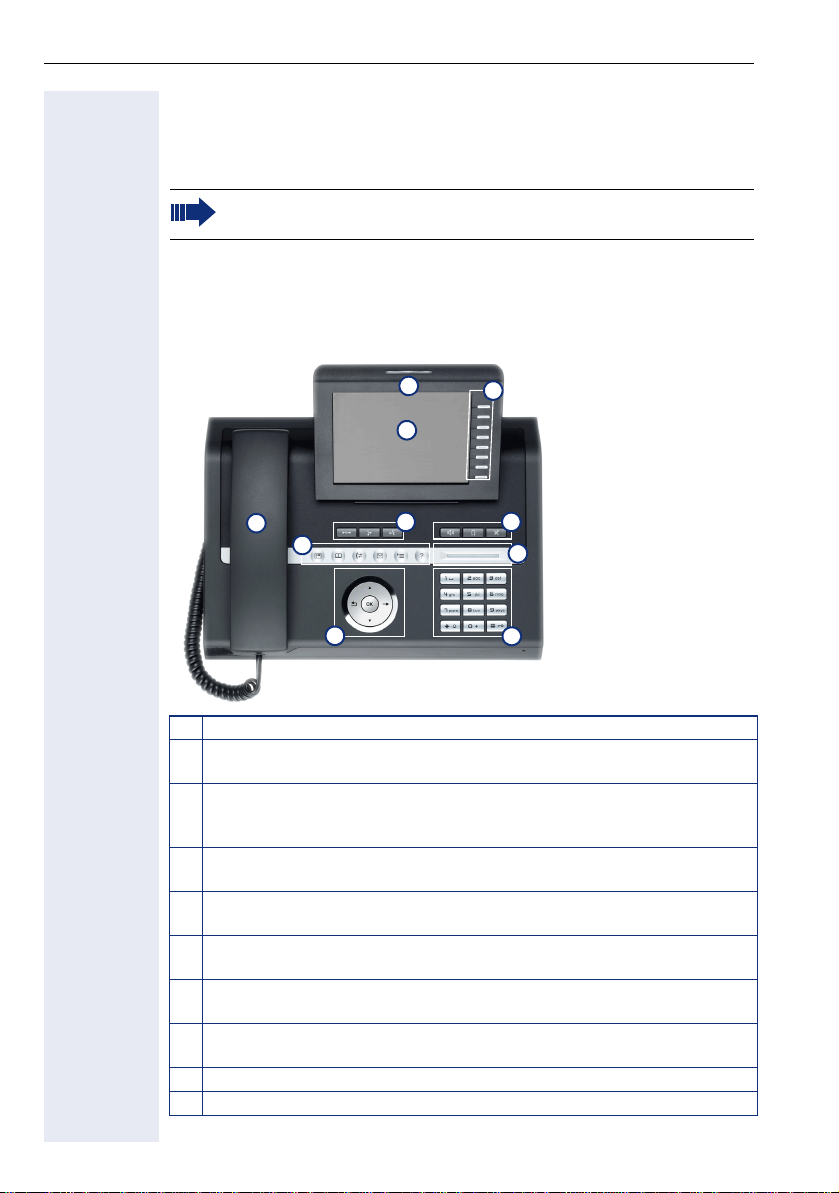
The diagram shows an OpenStage 60 T, the description applies to both
product variants.
9
2
1
3
4
6
5
7
8
10
1 You can make and receive calls as normal using the handset.
2 The large graphic display permits intuitive operation of the phone
! page 25.
3 Using the mode keys you can conveniently use the phone’s applica-
tions. To select a tab within an function press the relevant key repeatedly until the required tab is displayed ! page 19.
4 Use the TouchGuide to navigate conveniently through the applica-
tions on your telephone ! page 20.
5 You can customize your telephone by assigning phone numbers and
functions to the programmable sensor keys ! page 22.
6 The function keys allow you to call up the most frequently used func-
tions during a call (e.g. Disconnect) ! page 18.
7 Audio keys are also available, allowing you to optimally configure the
audio features on your telephone ! page 18.
8 The TouchSlider allows you to adjust the current volume (e.g. tele-
phone rings - ringer volume) ! page 18.
9 Incoming calls are visually signaled via the call display.
10 The keypad can be used to enter phone numbers and text ! page 24.
14
Page 15
Getting to know your OpenStage phone
Ports on the underside of the phone
USB
(For example, 1st party CTI or OpenStage Manager)
USB memory stick
HiPath
[1]
Power supply
unit
Port for key
modules
OpenStage operating features
OpenStage 80 T 60 T
Display type Color TFT
320x240
Illuminated display
Programmable sensor keys 8 8
Full-duplex speakerphone function
Headset
Bluetooth
USB master/slave
Interface for key modules
OpenStage phone adapter
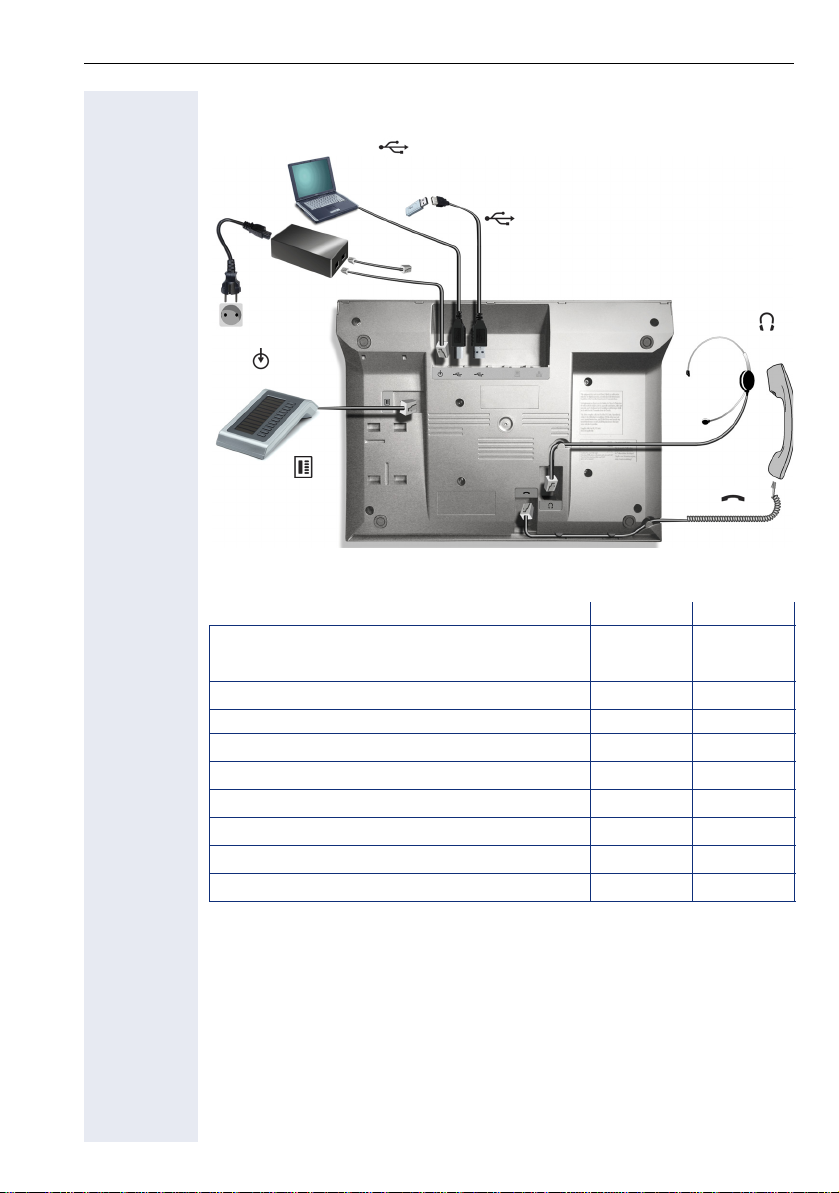
[1] Use an extension cable such as C39195-Z7704-A5 to connect the USB memory stick.
The port is not suitable for USB hubs.
[1]
Headset
Handset
Color TFT
320x240
;;
;;
;;
;;
;;
;;
;;
15
Page 16

Getting to know your OpenStage phone
OpenStage Manager
This program offers an additional option for tailoring your phone to your
personal needs.
OpenStage Manager is suitable for the following models:
• OpenStage 60 (SIP/HFA)
• OpenStage 60 T
• OpenStage 80 (SIP/HFA)
• OpenStage 80 T
• OpenStage 60 G / 80 G (SIP/HFA)
Features
• Phonebook management
• Assignment of images to contacts
• Synchronization of contacts
• Save and restore
• Key programming
• Screensaver
• Ring tones
Contact your service personnel for the latest version of OpenStage
Manager.
16
Page 17

Getting to know your OpenStage phone
OpenStage Key Module
The OpenStage Key Module is a key module attached to the side of the
phone that provides 12 additional illuminated, programmable keys.
Like keys on the phone, these keys can be programmed and used according to your needs ! page 22.
The diagram shows an OpenStage Key Module for OpenStage 80 T.
You can attach up to two OpenStage Key Modules to your
OpenStage 60 T/80 T.
17
Page 18
Getting to know your OpenStage phone
Keys and controls
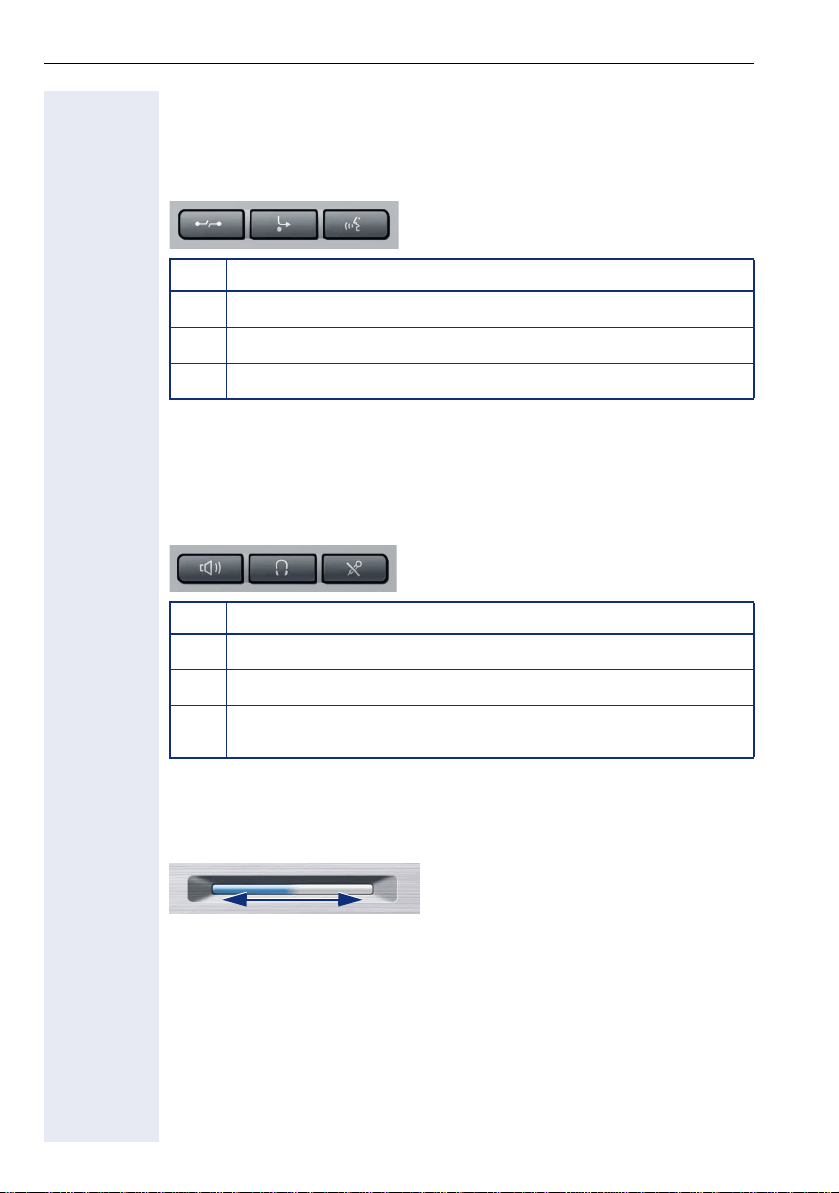
Function keys
Key Function when key is pressed
End (disconnect) call ! page 49.
s
Call forwarding
r
Key currently has no function.
q
[1] If the LED key flashes on the phone, your phone was configured as a forwarding destina-
tion.
Audio controls
Audio keys
Key Function when key is pressed
Activate/deactivate the loudspeaker ! page 44.
n
Activate/deactivate headset ! page 55.
o
Activate/deactivate microphone (also for speakerphone mode)
p
! page 50.
[1]
! page 79.
To u c h S l i d e r
Similar to the TouchGuide ! page 20, you can set properties for your telephone, such as the volume, by sliding your finger over the TouchSlider.
Icon used in the manual:
X
The blue illuminated slider control displays the volume setting for the current tone (ring tone, handset tone and loudspeaker tone). You can adjust
the volume by moving the slider left or right.
Set the lamp brightness of the TouchSlider ! page 157.
18
Page 19

Getting to know your OpenStage phone
Mode keys
These sensor keys allow you to switch to the required application with the
simple stroke of a key. To select a tab within an application press the relevant key repeatedly until the required tab is displayed.
Key Function when key is pressed LED display
Display telephony interface
t
! page 33
Display phonebooks ! page 34 Blue: Application is active
u
Display call lists ! page 37
w
Display messages ! page 39
x
Display user/applications menu
v
! page 40
Display Help function ! page 42 Blue: Application is active
y
The icons for the mode keys also appear on the display ! page 31.
Blue: Application is active
Blue: Application is active
White: New entry in call list
Blue: Application is active
White: New voicemail
Blue: Application is active
19
Page 20
Getting to know your OpenStage phone
TouchGuide
Before using the telephone, remove the protective covering from
the TouchGuide ring surface.
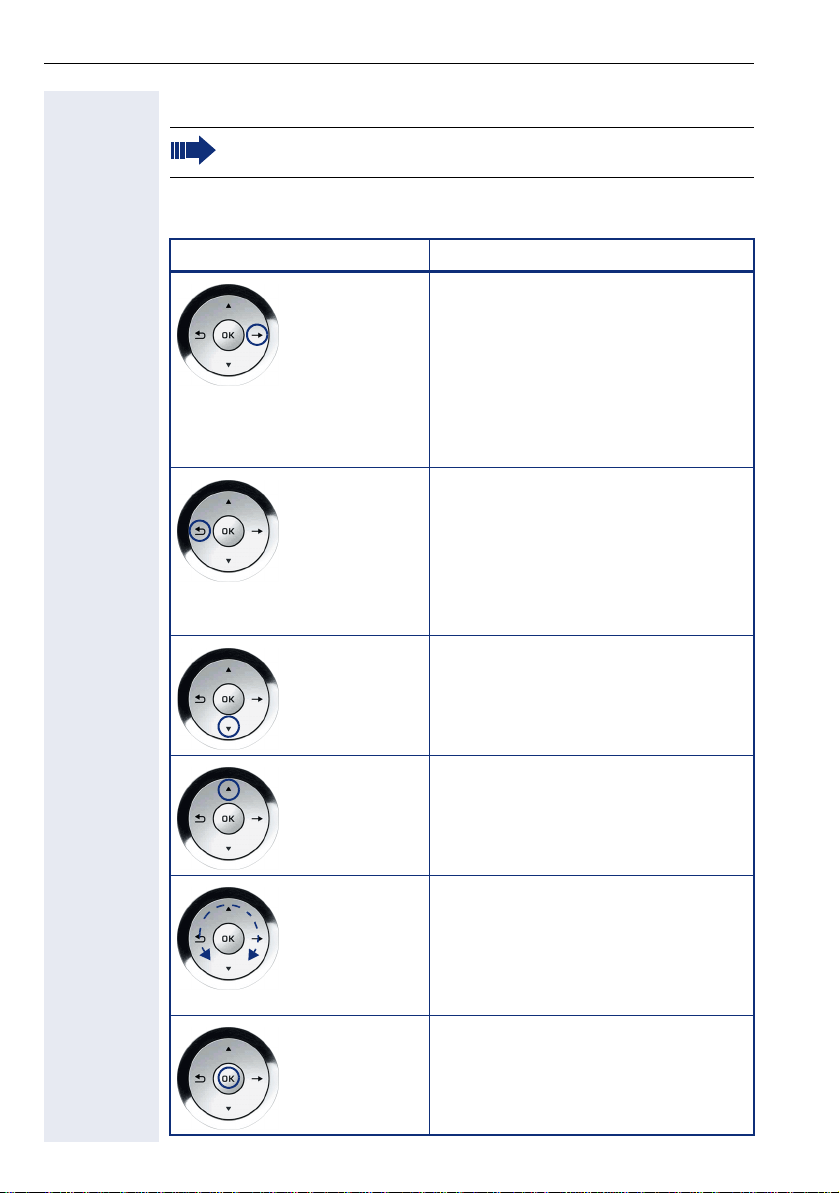
With this control, you can manage most of your phone’s functions, as well
as its displays.
Operation Functions when key is pressed
Press
Press
Press
c
a
d
In idle mode:
• Open the idle menu ! page 28
In lists and menus:
• Go to next level
Entry selected:
• Perform action
You can now access a context menu:
• Open the context menu
In lists and menus:
• One level back
Entry selected:
• cancel action
In input fields:
• Delete character to the left of the
cursor
In lists and menus:
• Scroll down
• Hold down: Jump to the end of the
list/menu
In lists and menus:
b
Press
Move your finger
around the inner
wheel W
Press
i
20
• Scroll up
• Hold down: Jump to the start of the
list/menu
In lists and menus:
• Scroll up or down
In input fields:
• Select a character in the display keyboard ! page 26
• Set sensitivity ! page 158.
Entry selected:
• Perform action
• Initiate call
In idle mode:
• Open the idle menu ! page 28
Page 21

Getting to know your OpenStage phone
Browsing in the call list and phonebook tabs
If you are in the phonebook, you normally navigate between the "Personal"
and "Corporate" tabs using the u key or if you are in the call lists you navigate between the "Missed", "Received", "Dialled" and "Forwarded" tabs using the w key,
Alternatively you can use the TouchGuide to navigate between the tabs.
Firstly enter the tab line using the b key and then browse left or right us-
ing the a and c keys. Once you have reached the required tab, press
the d or i key to enter the corresponding selection list.
If you are in one of the phonebook or caller lists or in one of the settings
menu, you are go back to the telephony interface by repeatedly pressing
the a key.
21
Page 22
Getting to know your OpenStage phone
Programmable sensor keys
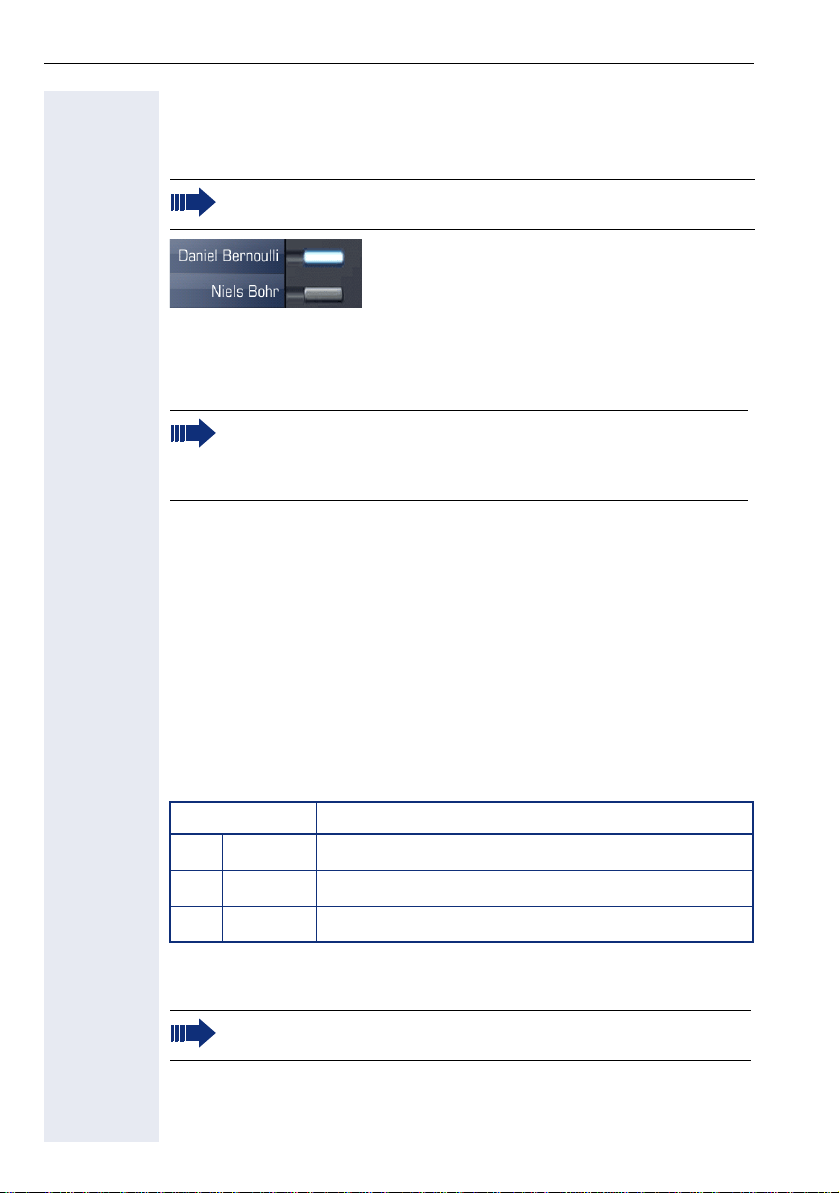
Your OpenStage 60 T/80 T has eight illuminated sensor keys to which you
can assign functions or numbers.
Increase the number of programmable sensor keys by connecting a
key module ! page 17.
Depending on how they are programmed, you can use the sensor keys as:
• Function keys ! page 87
•Repdial keys ! page 93
•Procedure keys ! page 91
You can program internal and external station numbers on the second level for all programmable sensor keys (except the Shift key).
The LED function is not available for internal station numbers on
the second level.
Touch the key to activate the programmed function or dial the stored number.
Press and hold a function key or repdial key to open a menu for programming it. Direct station selection (DSS) keys can only be programmed via
the service menu.
A label indicating the key’s function is displayed to the left of the key; it cannot be changed. You can change the labels for repdial or DSS keys according to your requirements ! page 94.
The status of a function is shown by the LED on the corresponding sensor
key.
Meaning of LED displays on function keys
LED Meaning of function key
Off The function is deactivated.
S
Flashing
T
On The function is activated.
R
[1] In this manual, flashing sensor keys are identified by this icon, regardless of the flashing
interval. The flashing interval represents different statuses, which are described in detail in
the corresponding sections of the manual.
The programmable sensor keys on multi-line phones function as
trunk keys ! page 134.
22
[1]
Indicates the function status.
Page 23

Getting to know your OpenStage phone
Te x t i n p u t
Example: Changing the key label ! page 94.
Enter the required characters via the keypad.
Select the functions using the keys d and b.
Confirm your entry with i.
L1 label: Ma
Save
#=Delete Character
Characters entered
Save entry
Delete character
[1]
Previous
Exit
[1] Alternatively, press the key #
Character overview (depends on the current language setting)
Key 1x2x3x4x5x
[1]
1
2
3
4
5
6
7
8
1
abc2
def 3
gh i 4
jkl5
mn o 6
pqr s7
tuv8
9
0
*
#
[1] Space
[2] Next letter in upper case
[3] Delete character
wx y z 9
+. - 0
[2]
[3]
23
Page 24

Getting to know your OpenStage phone
Keypad
Te x t i n p u t
In cases where text input is possible, you can use the keypad to input text,
punctuation and special characters in addition to the digits 0 to 9 and the
hash and asterisk symbols. To do this, press the numerical keys repeatedly.
Example: To enter the letter "h", press the number
twice. When entering the text, all available characters for this key are displayed. After a short while, the character in focus is displayed in the input
field.
To speed up the input, you can confirm your entry by pressing "i"
on the TouchGuide after you have selected the required character.
To enter a digit in an alphanumerical input field, press the relevant
key and hold it down. You no longer need to scroll through the entire
list of possible characters.
Alphabetic labeling of dial keys is also useful when entering vanity numbers (letters associated with the phone number’s digits as indicated on the
telephone spell a name, e.g. 0700 - PATTERN = 0700 - 7288376).
Multi-function keys
4 key on the keypad
Function
Long press
(key held down)
Key label
! page 23.
Display keyboard
! page 26
24
Turn ringtone on/off
! page 110.
Next letter in upper case. Delete character.
Write special characters. Switch between upper
*#
Turn phone lock on/off
! page 114.
and lower-case text and
number entry.
Page 25
Getting to know your OpenStage phone
Graphic display
Your OpenStage 60 T/80 T is equipped with a tilt-and-swivel color display
! page 15.
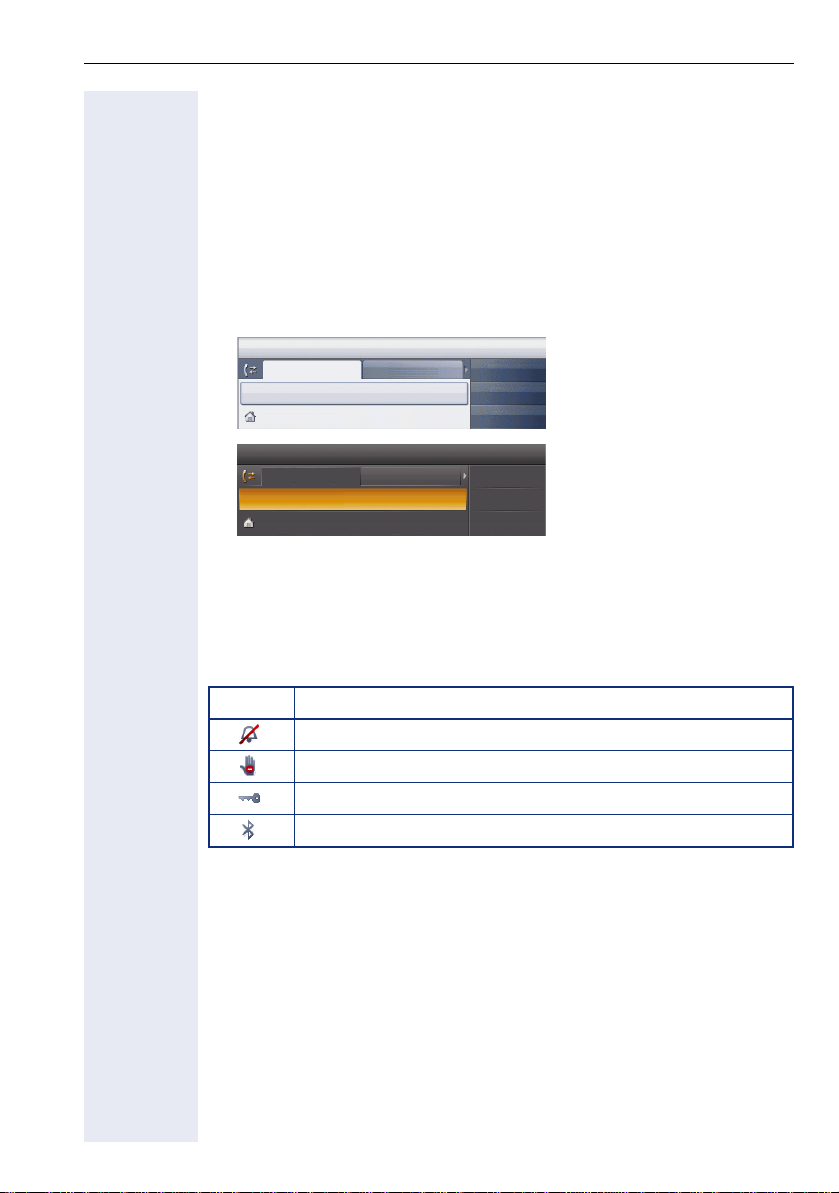
Appearance
You can customize your display to suit your personal requirements:
• Angle the display as required ! page 12.
• Angle the display as required ! page 12. Select your preferred display
design ! page 156.
14:27 FR 26.01.07 123456
Dialled Received
Options
g
Paul, Auster 10:24
14:27 FR 26.01.07 123456
Dialled
Options
g
Paul, Auster 10:24
Received
Paul, R..
Peter, A..
Anna, S..
Paul, R..
Peter, A..
Anna, S..
Crystal Sea
Warm Grey
Status bar
The time, weekday, date, and your phone number are displayed in the status bar.
In addition, different icons represent different situations and switches:
Icon Explanation
The ring tone is deactivated ! page 110
The "Do not disturb" function is activated ! page 111
The phone lock is activated ! page 114
The Bluetooth function is activated ! page 166
25
Page 26
Getting to know your OpenStage phone
Display keyboard
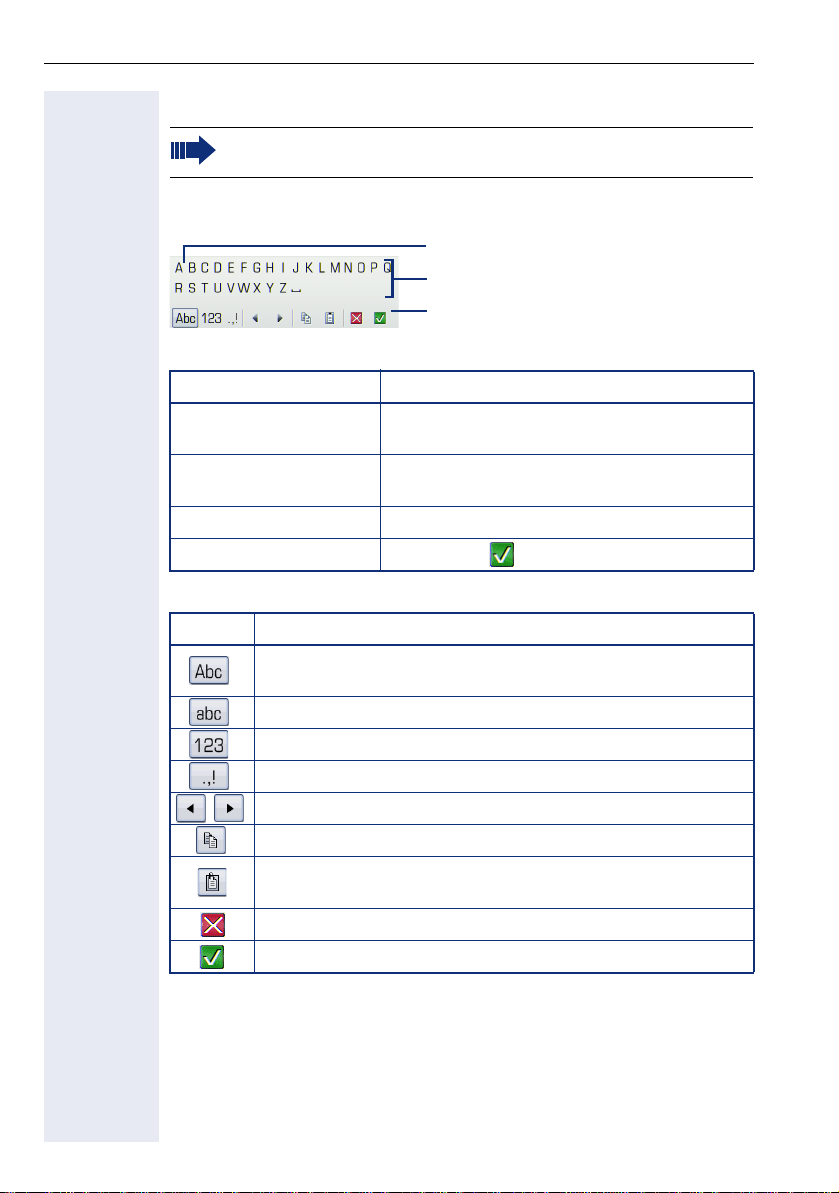
Simple text and characters can also be entered at any time using the
keypad ! page 24.
Depending on the context, the display keyboard is displayed with different
elements.
Use the TouchGuide to operate the display keyboard ! page 20.
Operation Function
Move your finger around
the wheel
i Select the element in focus (enters the char-
Press
Press
h Delete character to the left
Press g Set focus to
You can select the following functions from the function bar:
Element Explanation
Switch to upper/lower case characters for first letter of words
(initial letter upper case, all subsequent letters lower case).
Switch to lower case characters.
Switch to numeric characters
Switch to punctuation and special characters
Move cursor one character to the right/left
Copy entire content of the active field to the clipboard
Insert clipboard content at cursor position. Existing content is
not overwritten.
Cancel action without changes.
Confirm changes.
Element in focus
Letters, digits, punctuation or special
characters
Function bar
Set the focus on the next/previous element
acter or performs the function)
26
Page 27

Getting to know your OpenStage phone
Character overview (depends on the current language setting)
Key 1x2x3x4x5x6x7x8x9x10x11x12x13x14x
[1]
1
1
2
3
4
5
6
7
8
9
0
*
#
[1] Space
[2]
[3] Switch between upper and lower-case text and number entry
abc2ä
def3
gh i 4
jkl5
mn o 6ö
pqr s7ß
tuv8ü
wx y z 9
0+
[2]
.*#,?!’ - ( )@/ : _
[3]
Additional special characters are available on the display keyboard
27
Page 28
Getting to know your OpenStage phone
Context-dependent displays
Depending on the situation at hand, the graphic display on your OpenStage
phone displays different content, to which you can respond intuitively.
Idle mode
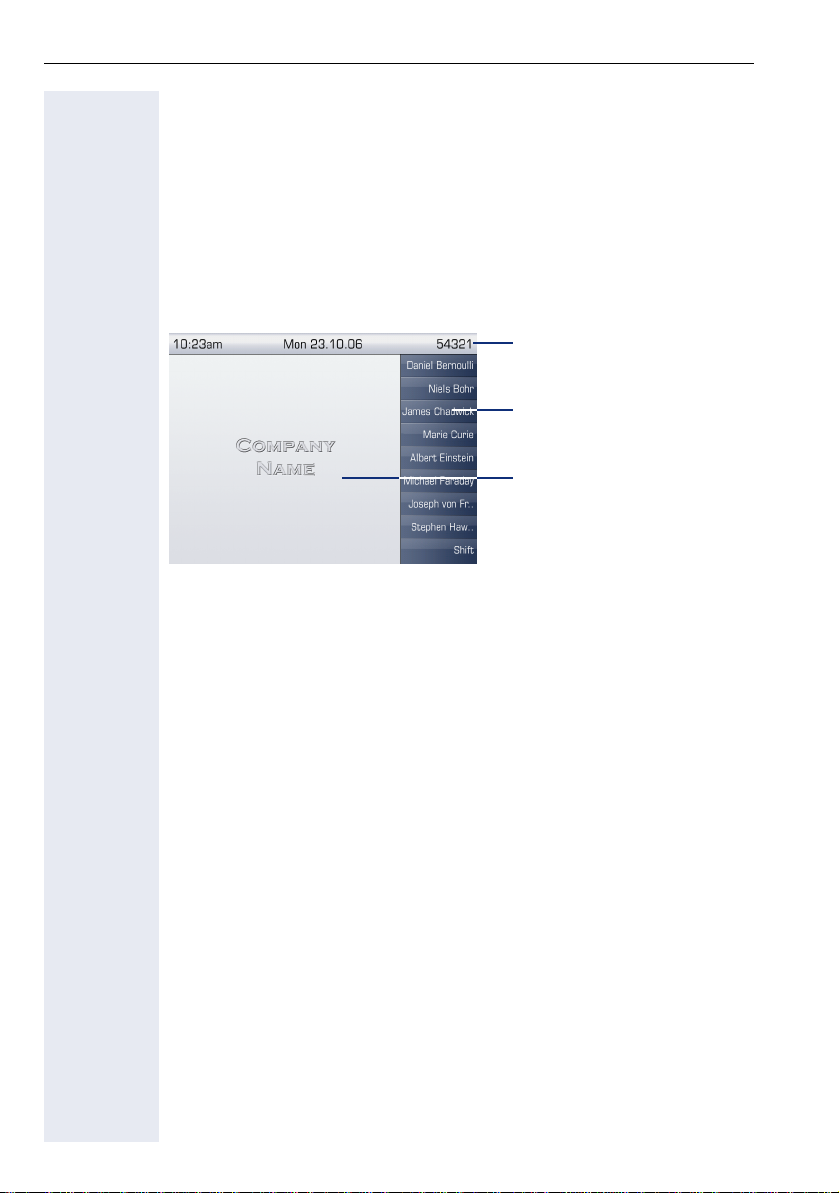
If there are no calls taking place or settings being made, your OpenStage
is in idle mode.
In addition to the status bar and the programmable sensor key list, the
graphic display offers a wide range of context-dependent displays.
Idle menu
In idle mode, press g on the TouchGuide ! page 20 to display the idle
menu. You can call up various functions here. The sequence and status of
the entries correspond to the status of the function.
It may contain the following entries:
• Caller list
• Forwarding on
• Lock phone
• Do not disturb on
• Advisory msg. on
• Ringer cutoff on
• Send message
• View callbacks
• Phonebook
• HF answerback on
• Join group
• Suppress call ID
• Call waiting tone off
• DISA intern
[1]
Status bar ! page 25
Label for the programmable
sensor keys list ! page 22
Context-dependent displays
! page 28
[1] Only appears if callback requests are saved
28
Page 29
Getting to know your OpenStage phone
Telephony dialogs
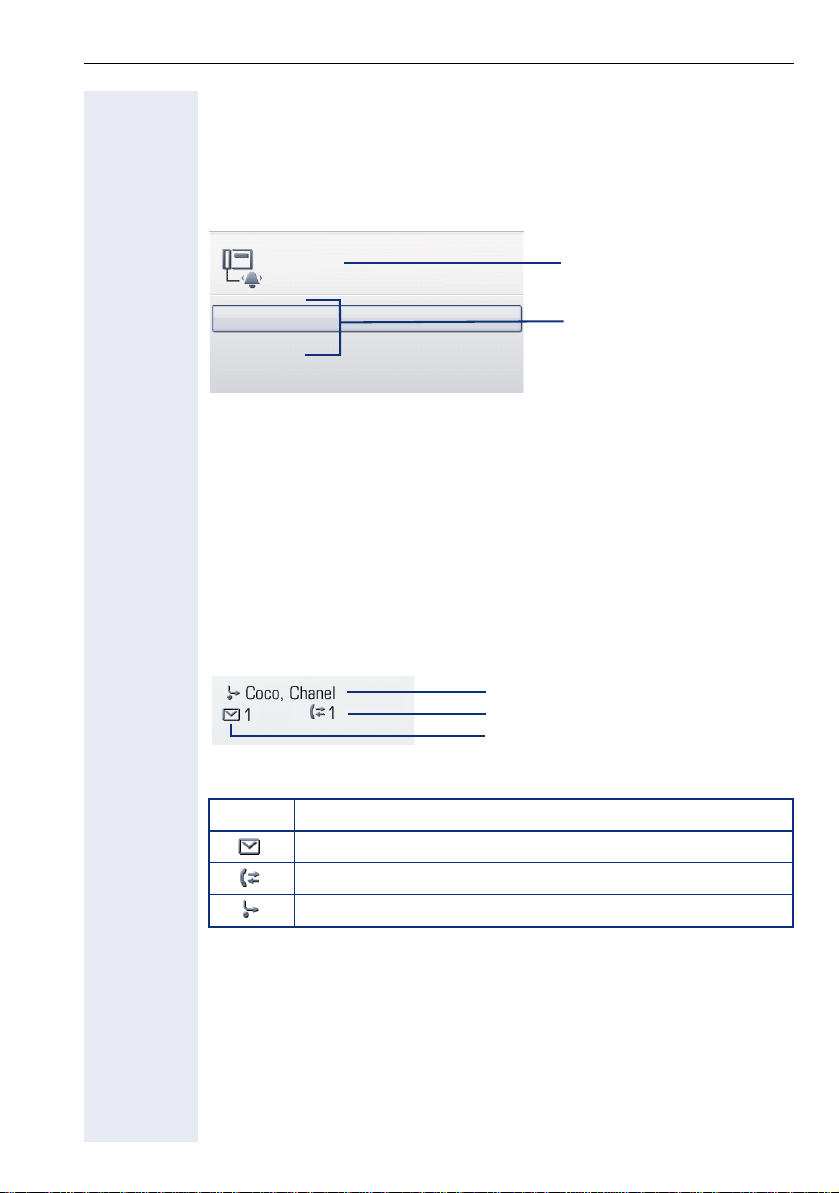
The dialogs in the lower area of the display prompt you to input data or provide you with information about the call states.
Example: You dialed the phone number of a contact saved in the phonebook.
Coco, Chanel
220870
Information on the connection status and caller
Callback
Send message
The pop-up menu (! page 30) provides functions suited to the situation,
which you can select and confirm using the TouchGuide ! page 20.
Situation-specific functions
Messages
The messages displayed in the upper left area of the display advise you of
current settings or events.
Example:
• Call forwarding is activated for all calls. All calls are forwarded to the
party named "Coco Chanel"
• You received a message while you were absent.
• A call list contains a new entry
Explanation of all message icons:
Icon Explanation
You have received one or more new messages
One or more new entries have been added to the call lists
Call forwarding is active
[1]
.
Activated call forwarding
Call list entry
Messages received
[1] The display depends on whether you defined a party from the personal phonebook or the
system phonebook as the forwarding destination.
29
Page 30
Getting to know your OpenStage phone
p
Context menus
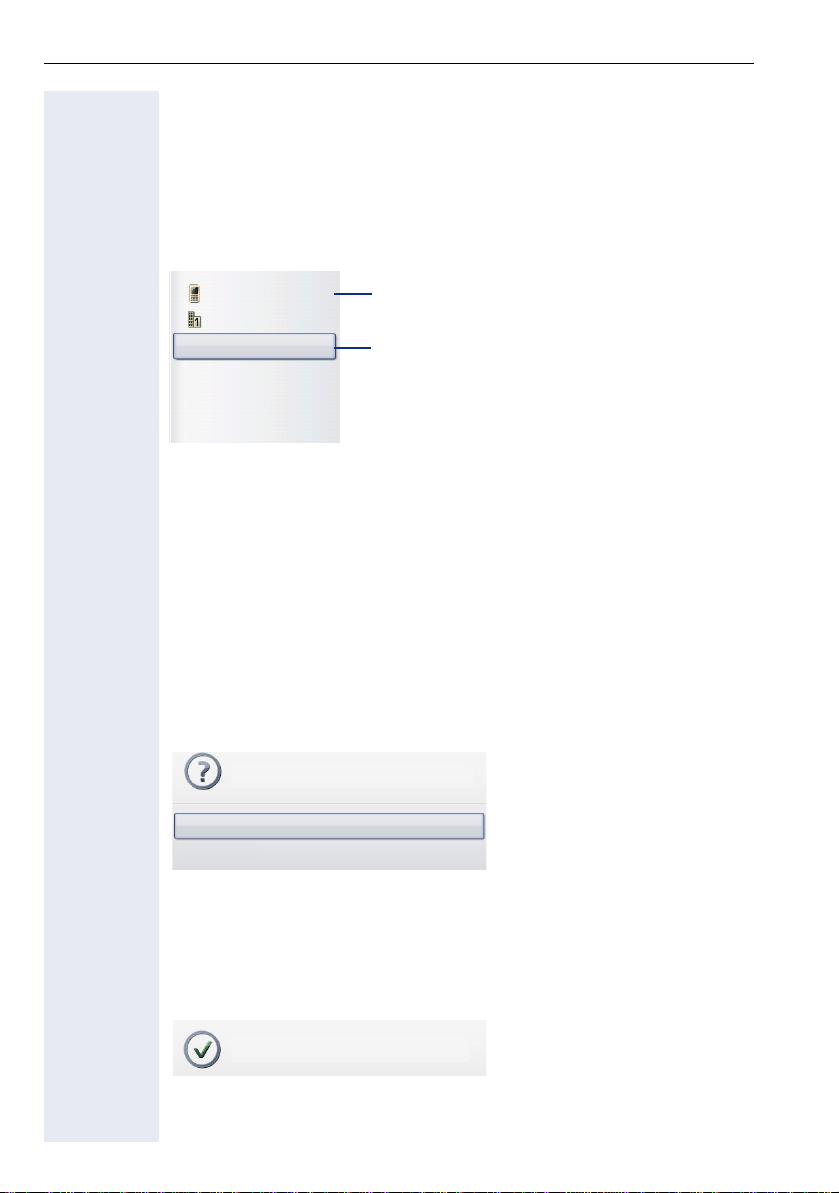
If the arrow icon g appears next to a selected entry, additional menu lev-
els or selection options are available in the form of a context menu. Navigate through these options using the TouchGuide ! page 20.
You can set context menus to automatically close in certain situations
(for example, during a connection) ! page 172. You can also select the dis-
play duration ! page 172.
Dial
Dial
Details
Delete
Send
New contact
First entry (selected when the menu is called u
Selected entry
Pop-up window
In certain situations, a pop-up window opens automatically in the lower
third of the display.
Pop-up menu
You will be prompted to use a pop-up menu to select situation-dependant
functions and to confirm them or to make entries.
You can use the TouchGuide to navigate within the pop-up menu
! page 20.
Example:
The following pop-up menu opens after you change a setting and press the
h key on your TouchGuide.
Save changes?
Save
Do not save
Pop-up message
Pop-up messages only indicate actions or states for which further action is
not required.
Example:
The following pop-up message appears briefly when you change a setting.
Changes saved successfully
30
Page 31
Getting to know your OpenStage phone
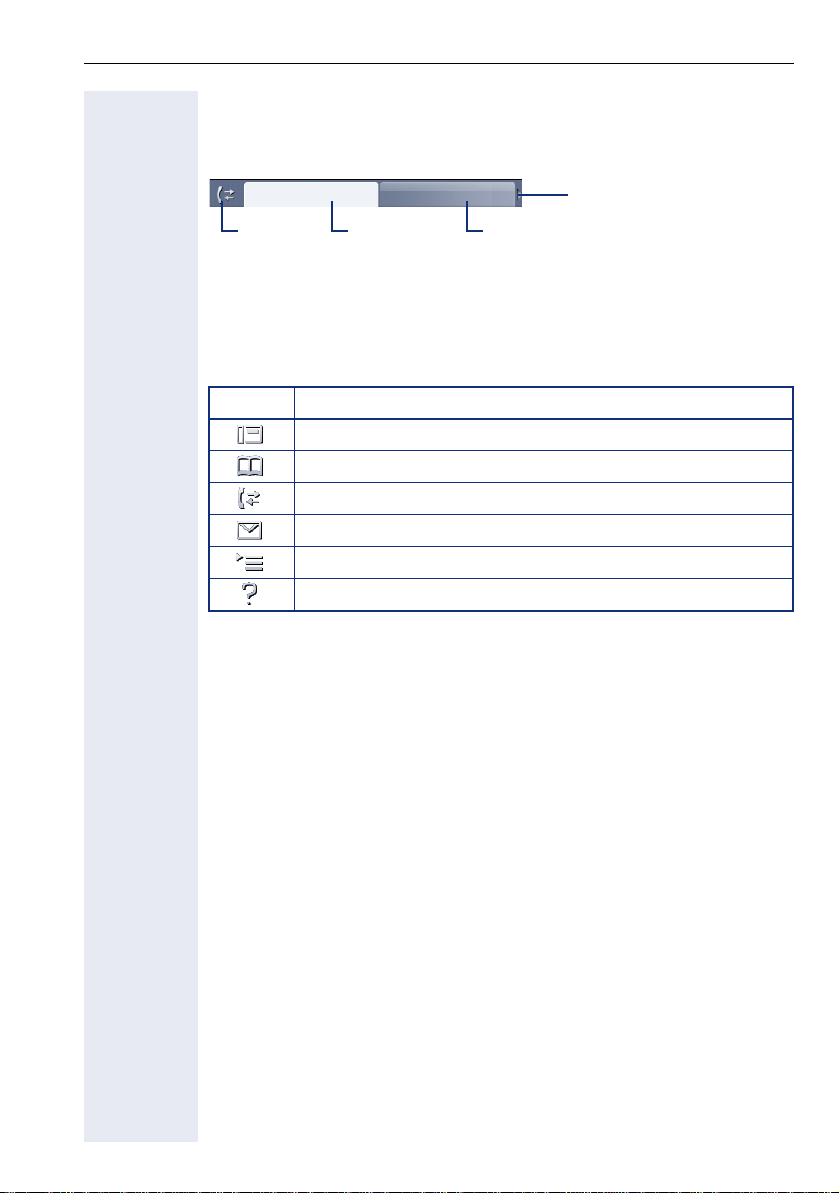
Application tab
In many cases you can select further content within an application using
tabs.
Missed Received
Icon
Example: Press the
this key repeatedly to switch between the various tabs.
The icon displayed to the left of the tab indicates the application you are
currently working in.
Icon Explanation
Active tab
w mode key to open the call lists ! page 19. Press
Telephony interface ! page 33
Phonebooks ! page 34
Call lists ! page 37
Messages ! page 39
Menu ! page 40
Help function ! page 42
Additional tab
Arrow icon: Additional tabs
31
Page 32

Applications available on your OpenStage phone
Applications available on your OpenStage
phone
The following descriptions provide an overview of the various applications
available on your OpenStage phone.
Application navigation
Activating an application
You can switch to the relevant application using the mode keys ! page 19.
Scrolling through application tabs
If an application has more than one tab, you can press a mode key repeatedly to select the relevant tab ! page 31.
Scrolling through lists
You can use the TouchGuide to scroll through entries and confirm the functions you want ! page 20.
Opening context menus
If the arrow
entry ! page 30.
g appears beside an entry, a context menu is available for this
32
Page 33
Applications available on your OpenStage phone
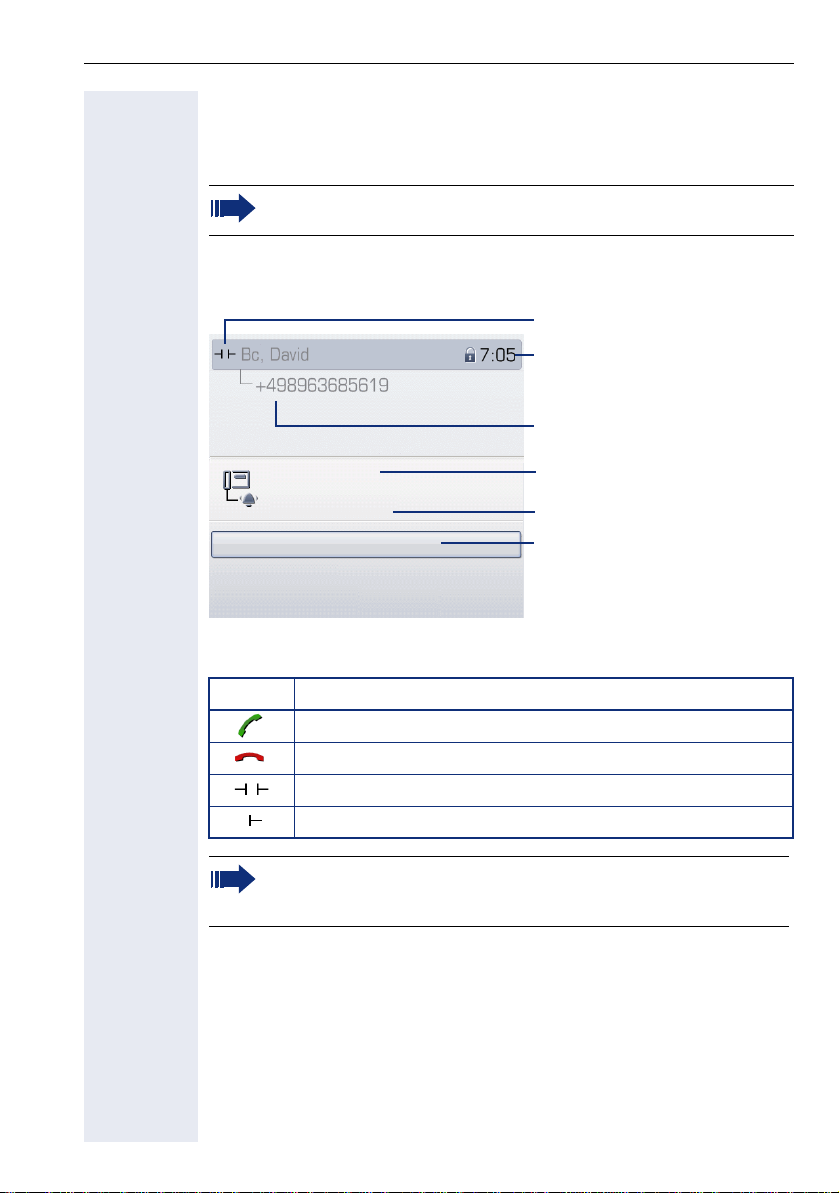
Telephony interface
Additional information is displayed in the telephony interface when your
phone rings, when you dial a number or during a call, for instance.
The same information is available on multi-line telephones for the
selected line in the "Overview" tab.
To access the menu: Press the t key.
Example:
Icon indicating call status
Call duration
Current call(s) stored in the
phonebook (where available,
with information)
Chanel, Coco
220870
no answer
Return to held call
Directory
Caller information
System messages
Pop-up menu with situation-dependent options
Icons for frequent call states
Icon Explanation
The call is active.
The call has been disconnected.
You have placed the call on hold (e.g. consultation hold).
Your call partner has placed the call on hold.
Detailed descriptions of the various functions can be found in the
sections "Making calls – basic functions" ! page 43 and "Making
calls – enhanced phone functions" ! page 55.
33
Page 34
Applications available on your OpenStage phone
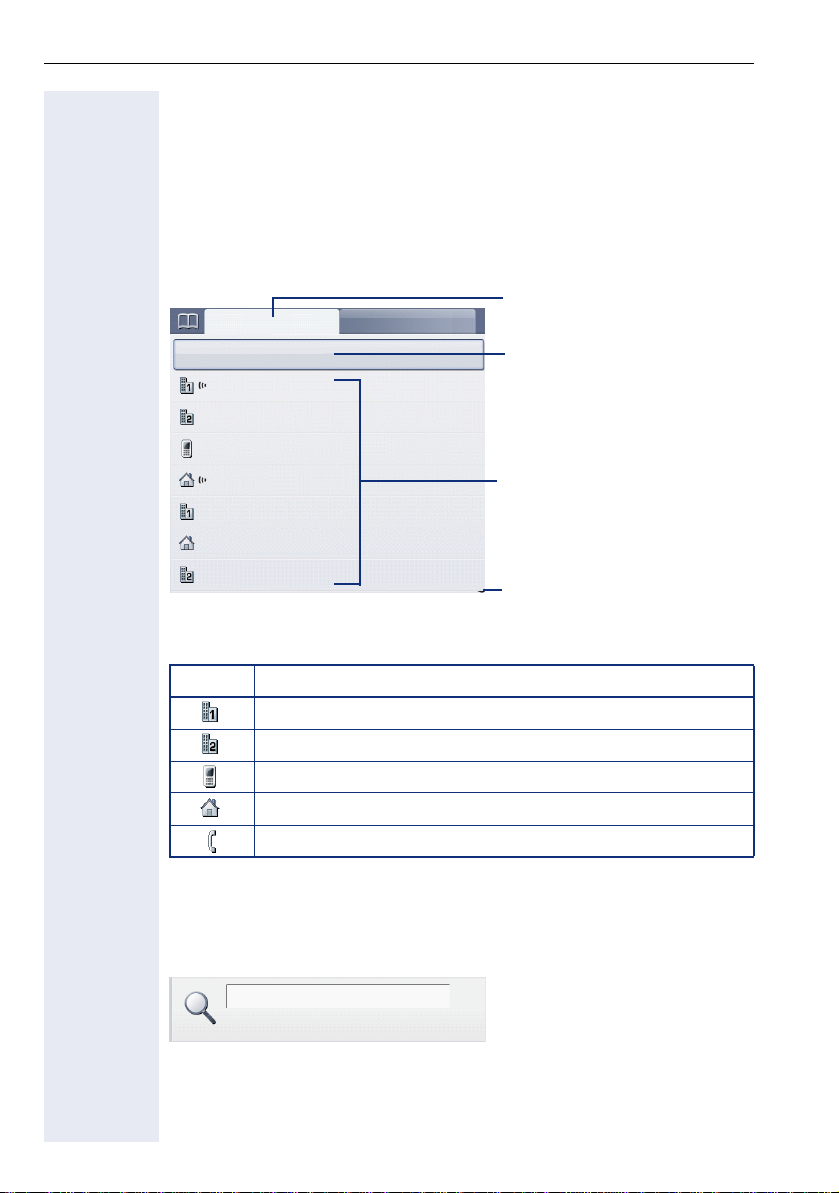
Phonebooks
In addition to the personal phonebook, this application contains entries
from other directory services such as an LDAP corporate directory and the
company’s internal phonebook.
To access the menu: Press u repeatedly until the required tab is dis-
played.
Example:
Personal
g
Options
Bernoulli, Daniel
Bohr, Niels
Chadwick, James
Curie, Marie
Einstein, Albert
Faraday, Michael
Watt, James
Corporate
Ta b
Additional options for processing the phonebook in
the context menu
Contacts
Further entries are available
Phonebook icons
Icon Explanation
Primary business number
Secondary business number
Mobile phone number
Private phone number
The phone number is not saved in the personal phonebook.
Search contacts
When in the phonebook or directory list view, press the keypad key that
corresponds to the first letter of your search term.
A field opens for you to enter the search term:
A
ABC2
Enter your search term using the keypad ! page 24.
The cursor jumps to the first entry in the list that matches the character you
entered in the search field.
34
Page 35

Applications available on your OpenStage phone
Personal phonebook
The "Personal" tab contains your personal phonebook. You can store up to
1000 contacts in this phonebook. The entries are sorted in alphabetical order in the phonebook list and displayed with the icon for the specified default phone number.
There are two ways of creating new contacts:
• Via the phonebook list context menu ! page 96
Contact details
The type of data displayed for a call in the telephony interface ! page 33
is dependent on the information you have stored for the contact in your
personal phonebook.
A contact consists of the entry in the "First name" or "Last name" fields and
at least one phone number ! page 96.
In addition, you can store non-telephony-specific data (e.g. address, function, etc.) for each entry.
You can store several phone numbers for each contact. In this case, however, you should define a preferred number ! page 97.
Classify your contacts into groups ! page 100.
Store a picture of the contact ! page 97.
Managing contacts
All saved contacts are listed in alphabetical order in the "Personal" tab.
You can use the "Options" context menu to
• create new contacts ! page 96
• define contact display format ! page 99
• sort contacts into groups ! page 100
• delete the entire phonebook list ! page 99
To manage your contact data professionally and to synchronize your
data with the Outlook e-mail program, we recommend using
OpenStage Manager ! page 16.
Using contacts
The following functions are available via the context menu of a selected
contact:
• Calling a contact ! page 59
• Editing a contact ! page 98
• Deleting a contact ! page 99
35
Page 36

Applications available on your OpenStage phone
LDAP directory
If you have access to an LDAP directory (contact the responsible service
personnel), you can search contacts in a company-wide directory.
Searching for a contact
• Searching for an entry ! page 102
Using a contact
• Call contact ! page 61
System phonebook
The "System" tab contains the central speed-dial directory, which is configured and maintained by your service personnel. This directory contains all
internal phone numbers and speed-dial numbers that were assigned a
name.
• Dialing from the system phonebook ! page 61
• Dialing with system speed-dial numbers ! page 62
36
Page 37
Applications available on your OpenStage phone
Call lists
All calls and numbers dialed on your phone are logged in chronological order in call lists.
Callers with suppressed numbers cannot be saved in the call lists.
The following call lists are displayed individually on separate tabs:
• "Missed" tab: missed calls
• "Received" tab: answered calls
• "Dialled" tab: dialed numbers
Callers with suppressed numbers cannot be saved in the call lists.
When new entries are added to the call lists, a message appears
(! page 29) on the idle display and the LED of the mode key
(! page 19) lights up white.
To access the menu: Press
played.
w repeatedly until the required tab is dis-
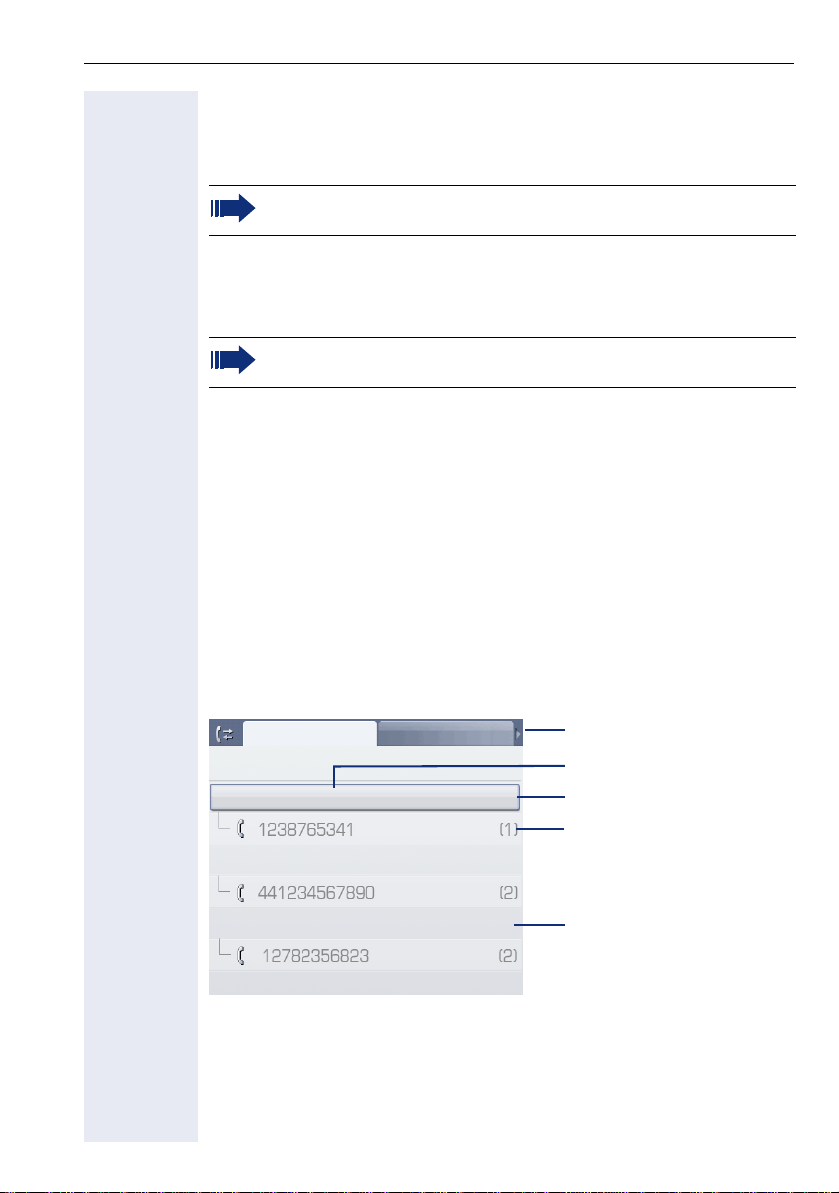
Managing call lists
Each call list may contain up to 30 entries. Once this limit is reached, the
oldest entry in the log is deleted.
Multiple calls from the same number are only listed once. The number of
call attempts is logged in the "Details" context menu.
Example: "Missed" tab
w
Missed
Options
Bernoulli, Daniel g 18.10.
Curie, Marie 18.10.
Bohr, Niels 17.10.
You can select the following function in the "Options" context menu:
• Delete All ! page 104
Received
Additional tabs
Selected new entry with
context menu
Date of call
Number of call attempts
Old entry
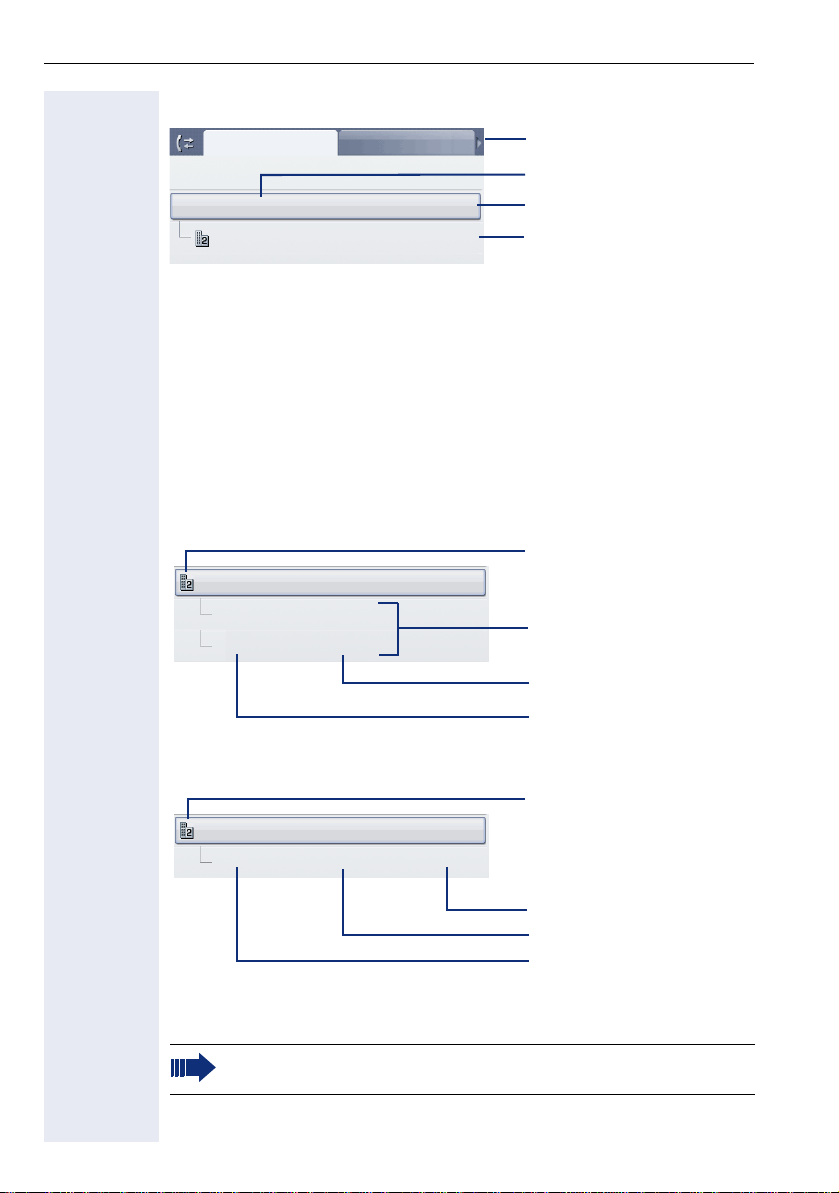
37
Page 38
Applications available on your OpenStage phone
Example: "Dialled" tab
Dialled
Options
Coco, Chanel g 12.07.
220870 (3)
The following functions are available via the context menu of a selected entry:
•Dial ! page 59
• Details ! page 104
• Delete ! page 104
• Transfer entry to personal phonebook ! page 105
Missed
Additional tabs
Selected entry with con-
text menu
Date of call
Number of call attempts
Entry details
Up to ten call attempts/calls can be stored under "Details" for each entry.
Example: entry in the "Missed" tab
Information from the
1238765341 g
12.07 10:56
10.07 08:04
phonebook
Entries, sorted by most recent
Time
Date
Example: entry in the "Dialled" tab
Information from the
220870 g
12.07 10:56 2:14
In this view, the context menu contains the following entry:
•Dial ! page 59
If a caller is already entered as a contact in the local phonebook, the
stored data is displayed.
38
phonebook
Call duration
Time
Date
Page 39

Applications available on your OpenStage phone
Mailbox
Depending on the type and configuration of your communications platform
(contact the relevant service personnel), messages from services, such as
HiPath Xpressions are displayed in this application in addition to messages
received.
"Messages" and/or "Voicemail" are displayed in the tab "Messages".
Messages
You can send short text messages to individual internal stations or groups.
In idle mode (! page 28) the following signals alert you to the presence of
new messages:
x key LED illuminates
•
• Display ! page 29.
To access the menu: Press the
Example:
Messages
Msg. from: Coco, Chanel
Message sent
Call sender
Delete
Exit
x key. The "Messages" tab is active.
Information on the sender
Functions
For a description of how to edit the entries ! page 119.
Voicemail
If your telephone is connected to a voicemail system (such as Entry Voice
Mail), the Mailbox key will also light up to alert you to any messages that
have arrived.
An appropriate message also appears on the display (for instance, in Entry
Voice Mail: "<x> new messages").
To play back your voicemail, follow the instructions on the display.
39
Page 40
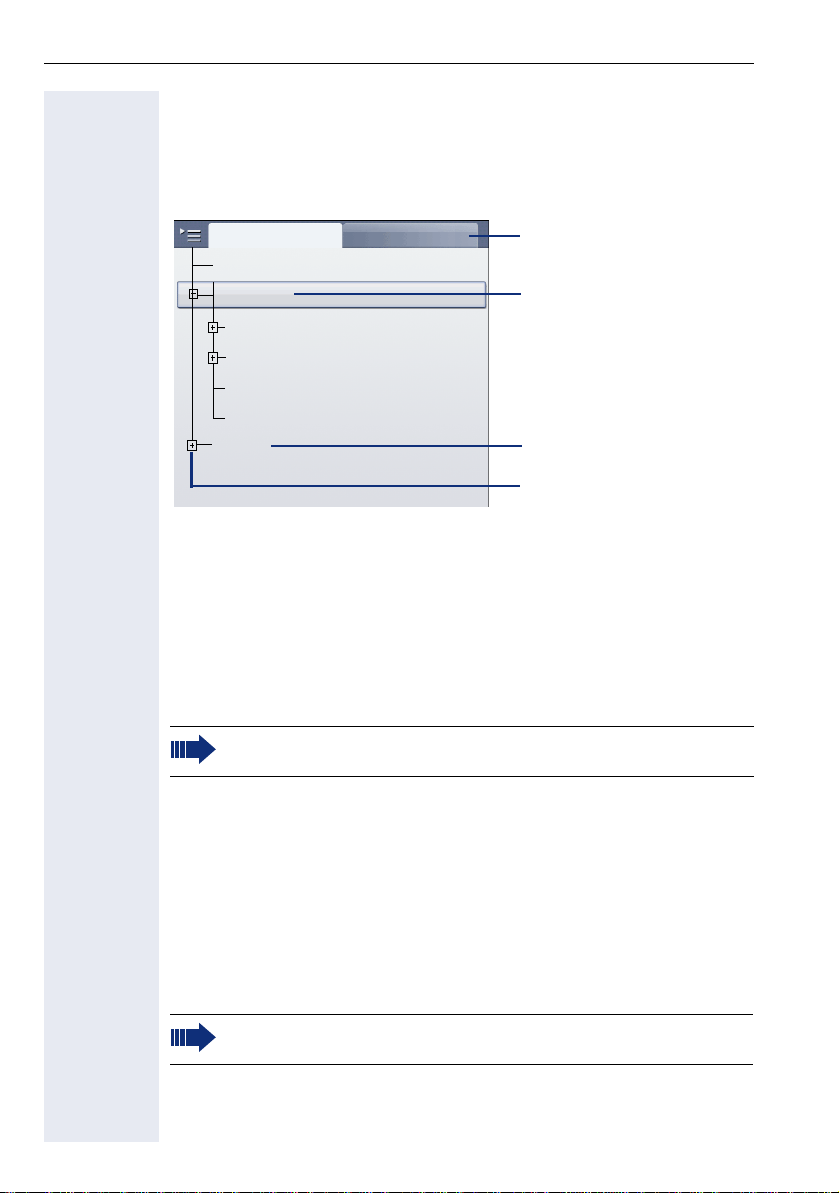
Applications available on your OpenStage phone
[1]
Menu
This menu includes a configuration area for users and administrators, as
well as an area for any available applications (contact service personnel).
To access the menu: Press the
Settings
Service Menu
User
Audio
Configuration
Phone
Security
Admin
[1] This function is not yet available.
Settings – Service Menu
Open the Program/Service menu in your communication system and use
the comprehensive functions it offers.
To access the menu: Press
played.
Confirm the "Service Menu" entry by pressing
Applications
v key.
XML applications
User menu, open
Password-protected administration area
Additional menu levels are
available
v repeatedly until the "Settings" tab is dis-
i.
An overview of the maximum functions available can be found at
! page 193.
Settings – telephone user menu
Here you can configure settings for your OpenStage.
To access the menu: Press v repeatedly until the "Settings" tab is dis-
played.
Select and confirm the "User" entry using the TouchGuide ! page 20.
If necessary, enter the user password ! page 109.
The menu structure comprises several levels.
Go to the page references next to the menu entries below to view
descriptions of the corresponding parameters.
40
Page 41

Applications available on your OpenStage phone
Audio
Optimize the volumes, audio settings and ring tones of your OpenStage for
your environment and according to your personal requirements.
Vol um es ! page 160
Settings ! page 161, ! page 163
Configuration
Call forwarding ! page 79
Set up call forwarding for your telephone.
Context menu ! page 172
Define whether context menus should close automatically, and define the
display duration.
Bluetooth ! page 166
Prepare your phone for Bluetooth operation.
Phone
Adjust the display design settings and program the sensor keys on your
OpenStage.
Screensaver ! page 153
Display ! page 153
Key programming ! page 79
Security
Protect your settings and data by assigning a password ! page 109.
Reset user data
Delete all personal settings here ! page 174.
Settings – administration
You can access the administration area via the "Admin" menu and by entering the administration password.
Refer to the administration manual supplied with your phone for more detailed information on this topic.
41
Page 42

Applications available on your OpenStage phone
Help function
You can call up the "Help" function at any time, even during a call.
Calling up the "Help" function
Press y. The "Help" function is activated.
If service personnel have activated a function on your phone, which continuously transmits operating data to a server, you will see the flashing
icon in the upper display line.
42
Page 43

Step by Step
Basic functions
Basic functions
Please read the introductory chapters "Getting to
know your OpenStage phone" ! page 14 and
"Applications available on your OpenStage
phone" ! page 32 carefully before performing
any of the steps described here on your phone.
Answering a call
Your OpenStage phone rings with the tone signal set
when an incoming call is received. The call is also visually signaled on the call display.
• When you receive an internal call, your telephone
rings once every four seconds (single-tone sequence).
• When you receive an external call, your telephone
rings twice in rapid succession every four seconds
(dual-tone sequence).
• When you receive a call from the entrance telephone, your telephone rings three times in rapid
succession every four seconds (triple-tone sequence).
• If a call is waiting, you hear a short tone (beep) every
six seconds.
If transmitted, calling party information (name, phone
number) appears on the graphic display.
Answering a call via the handset
The phone is ringing. The caller is displayed.
^ Lift the handset.
if nec.
X Set the call volume.
Your service personnel can adjust the ring cadence for external and internal calls for you.
In other words, different ring cadences can be
set for different internal callers.
An incoming call will interrupt any ongoing telephone setting operations.
43
Page 44

Basic functions
Step by Step
Answer
Answering a call via the loudspeaker
(speakerphone mode)
Suggestions for using speakerphone mode
• Tell the other party that speakerphone mode is active.
• Adjust the call volume while speakerphone mode is
active.
• The ideal distance between the user and the phone
in speakerphone mode is about 50 cm.
The phone is ringing. The caller is displayed.
n Press the key shown. The LED lights up.
or
Confirm.
The speakerphone function is activated.
if nec.
X Set the call volume.
Ending a call
n Press the key shown. The LED goes out.
or
s Press the key shown.
Accepting a call via the headset
Prerequisite: A headset is connected.
Make sure your headset port is set up properly
! page 162.
The phone rings. The o key flashes.
o Press the key shown.
if nec.
X Set the call volume.
44
Page 45

Step by Step
Basic functions
Switching to speakerphone mode
People present in the room can participate in your call.
Prerequisite: You are conducting a call via the handset.
n] Hold down the key and replace the handset. Then re-
lease the key and proceed with your call.
if nec. X Set the call volume.
U.S. mode
If your communication system is set to US mode (contact your service personnel), you do not have to hold
down the speaker key when replacing the handset
when switching to speakerphone mode.
n Press the key shown.
] Replace the handset. Proceed with your call.
if nec.
X Set the call volume.
Switching to the handset
Prerequisite: You are conducting a call in speakerphone mode.
^ Lift the handset.
n The LED key goes out.
45
Page 46

Basic functions
Step by Step
Open listening
People present in the room can silently monitor your
call.
You are recommended not to activate the speakerphone feature when using a Bluetooth headset
! page 179 because depending on headset and
environment, this can lead to reduced speech
quality.
People present in the room can silently monitor your
call.
Prerequisite: You are conducting a call via the handset.
Activating
n Press the key shown. The LED lights up.
Deactivating
n Press the lit key. The LED goes out.
46
Page 47

Step by Step
Basic functions
Making calls
Off-hook dialing
^ Lift the handset.
j Internal calls: Enter the station number.
External calls: Enter the external code and the station
number.
The called party does not answer or is busy
\ Replace the handset.
En-bloc dialing
If "en-bloc dialing" is activated, the connection to the entered number is only set up when you have confirmed
"Dial".
j internal: Enter the station number.
External calls: Enter the external code and the station
number.
if nec. h Delete existing characters.
Dial
Confirm the option shown. The connection is set up.
n The speaker key lights up. The party you are calling an-
swers via loudspeaker. You can use speakerphone mode.
You can pick up the handset before or after dialing.
47
Page 48

Basic functions
Step by Step
On-hook dialing
j Internal calls: Enter the station number.
External calls: Enter the external code and the station
number.
Your system may also be programmed so that
you have to press the Internal key before you dial
an internal number.
To call an external party, you have to enter an external code before dialing the party’s telephone
number (Prime Line is not active; contact your
service personnel).
The other party answers with speaker:
^ Lift the handset.
or On-hook dialing: Speakerphone mode.
The called party does not answer or is busy:
n Press the key shown. The LED goes out.
48
Page 49

Step by Step
Basic functions
Dialing with the headset connected
Prerequisite: The headset is connected.
j internal: Enter the station number.
External calls: Enter the external code and the station
number.
o The headset key lights up.
The connection is established as soon as your input is
complete.
Make sure your headset port is set up properly
! page 162.
Dialing with DDS keys
Prerequisite: You have saved a number on a sensor key
! page 93.
S Press the programmable repdial key.
If the required phone number is on a different level, first
press the programmed sensor key to shift levels "Layer
X".
Reject call
You can press the DDS key during a call and automatically initiate a callback! page 51.
Ending a call
\ Replace the handset.
s Press the key shown.
or
n Press the key shown.
Rejecting a call
The phone is ringing. The caller is displayed.
Select and confirm the option shown.
The connection is cleared down. The caller receives the
message "Currently not possible".
49
Page 50

Basic functions
Step by Step
Turning the microphone on and off
To prevent the other party from listening in while you
consult with someone in your office, you can temporarily switch off the handset microphone or the handsfree
microphone. You can also switch on the handsfree microphone to answer an announcement via the
! page 56 telephone speaker.
Prerequisite: A connection is set up, the microphone is
activated.
p Press the key shown. The LED lights up.
or
p Press the lit key. The LED goes out.
50
Page 51
Step by Step
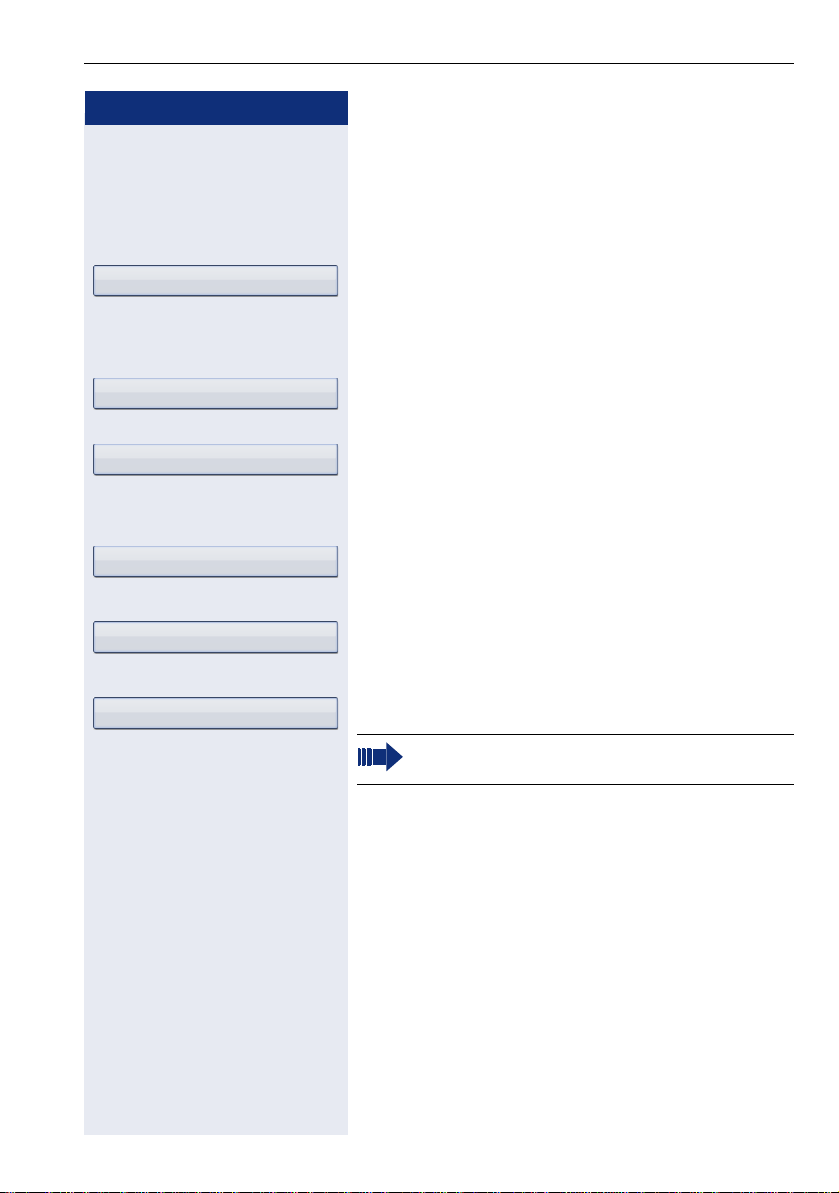
Consultation
Return to held call
Quit and return
Calling a second party (consultation)
You can call a second party while a call is in progress.
The first party is placed on hold.
if nec.
g Open the context menu ! page 30.
Confirm.
j Call the second party.
Returning to the first party
Confirm.
or
Select and confirm the option shown.
Switching to the held party (alternating)
Basic functions
Toggle/Connect
Conference
Leave conference
Select and confirm the option shown.
Initiating a three-party conference
Select and confirm the option shown.
Joining calling parties from a conference
Select and confirm the option shown.
For more information on conferences, see
! page 71.
51
Page 52

Basic functions
Step by Step
Consultation
Transfer
Transferring a call
If the person you are speaking to wants to talk to another colleague of yours, you can transfer the call that colleague.
if nec.
g Open the context menu ! page 30.
Confirm.
j Enter the number of the party to which you want to
transfer the call.
[ Announce the call, if necessary.
\ Replace the handset.
Select and confirm the option shown
[1]
.
[1] „Differing display view in a HiPath 4000 environment (not for
HiPath 500)” ! Seite 185
52
Page 53

Step by Step
Callback
Basic functions
Using callback
You can request a callback if the station called is busy or
if nobody answers. This feature saves you from having
to make repeated attempts to reach the user.
You receive a callback,
• When the other party is no longer busy,
• When the user who did not answer has conducted
another call.
When configured (contact your service personnel), all callback requests are automatically deleted over night.
Storing a callback
Prerequisite: You have reached a busy line or no one
answers.
Confirm.
Accepting a callback
Answer
Prerequisite: A callback was saved. Your telephone
rings. "Callback: ..." appears on the display.
^ Lift the handset.
or
n Press the key shown. The LED lights up.
or
Confirm.
Z You hear a ring tone.
53
Page 54

Basic functions
Step by Step
View callbacks
Viewing and deleting a stored callback
c Open the idle menu ! page 28.
Select and confirm the option shown
[1]
.
Next callback
Delete
Exit
Select and confirm to display additional entries.
Deleting a displayed entry
Confirm.
Ending retrieval
Select and confirm the option shown.
or
n Press the key shown. The LED goes out.
[1] „Differing display view in a HiPath 4000 environment (not for
HiPath 500)” ! Seite 185
54
Page 55
Step by Step
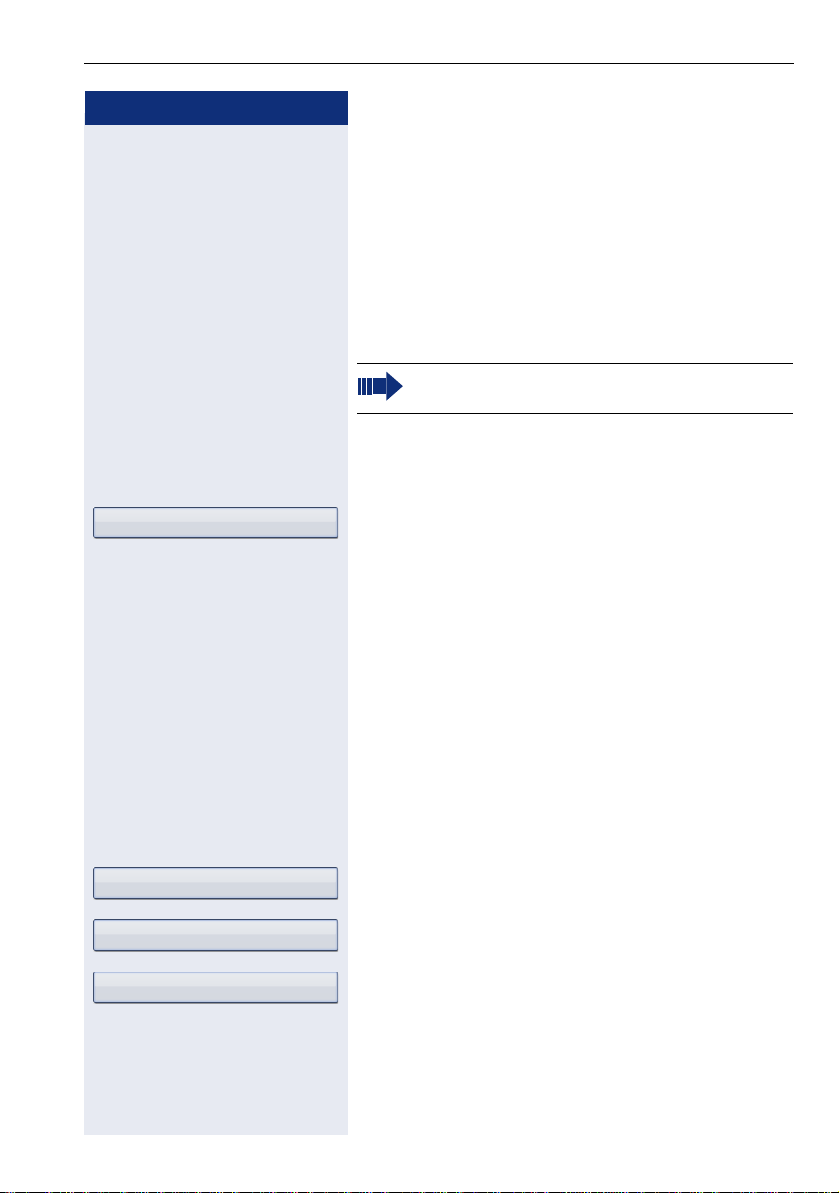
Answer
Enhanced phone functions
Answering calls
Accepting a call via the headset
Prerequisite: You have connected a headset or are using a Bluetooth headset ! page 179.
o The LED flashes when a call is received.
Press the key shown.
or
Confirm.
X Set the call volume.
if nec.
Ending a call
o Press the key shown. The LED goes out.
or
s Press the key shown. The LED goes out.
Enhanced phone functions
Make sure your headset port is set up properly
! page 162.
Calls g
Pickup - directed
Answer
Answering a call for another phone
You hear another telephone ring.
T Press the flashing key.
or
v Open the Program/Service menu ! page 40.
Select and confirm the option shown
Select and confirm the option shown.
Confirm.
or
j If you know the number of the telephone that is ringing,
enter it directly.
[1] „Differing display view in a HiPath 4000 environment (not for
HiPath 500)”
! Seite 185
[1]
.
55
Page 56
Enhanced phone functions
Step by Step
Accepting a call in a team ! page 142.
Using the speakerphone
A colleague addresses you directly over the speaker
with a speaker call. You hear a tone before the announcement. The other party’s name or station number
appears on the screen.
You can conduct the call with the handset or in speakerphone mode.
^ Lift the handset and answer the call.
or
Mute off
HF answerback on
HF answerback off
Press the "OK" key to confirm your selection and answer
the call.
or
n Press the key and answer the call.
If "handsfree answerback" is enabled (see below), you do not need to switch on the microphone - you can answer directly. You can answer
immediately in speakerphone mode.
If handsfree answerback is disabled (default setting), follow the procedure described above.
Placing a speaker call to a colleague ! page 64.
Enabling and disabling handsfree answerback
c Open the idle menu ! page 28.
Select and confirm the option shown,
or
select and confirm the option shown.
56
Page 57
Step by Step
Open door
Enhanced phone functions
Answering calls from the entrance telephone and opening the door
If an entrance telephone has been programmed, you
can use your telephone to speak to someone at the entrance telephone and to activate a door opener.
If you have the proper authorization (contact your service personnel), you can activate the door opener, enabling visitors to open the door themselves by entering
a 5-digit code (using a DTMF transmitter or the keypad
installed).
Speaking to visitors via the entrance telephone
Prerequisite: Your telephone rings.
^ Lift the handset within 30 seconds. You are connected
to the entrance telephone immediately.
or
^ Lift the handset and answer the call.
j Dial the entrance telephone number.
Opening the door from your telephone during a call
from the entrance telephone
Confirm.
Open door
Opening the door from your telephone without
calling the entrance telephone
v Open the Program/Service menu ! page 40.
Select and confirm the option shown.
j Dial the entrance telephone number.
Special features must be taken into consideration if your telephone operates with
HiPath 5000 (system networking via PC network) ! page 152!
Opening the door with a code (at the door)
j After ringing the bell, enter the five-digit code (using the
keypad or a DTMF transmitter). Depending on how the
door opener has been programmed, a doorbell call signal may or may not be forwarded.
57
Page 58
Enhanced phone functions
Step by Step
More features g
Activating the door opener
v Open the Program/Service menu ! page 40.
Select and confirm the option shown.
Door opener on
3=change password
1=enable with ring
2=enable w/o ring
More features g
Door opener off
Select and confirm the option shown.
j Dial the entrance telephone number.
j Confirm the five-digit code to change the code.
or
Select the displayed function and press the "OK" dialog
key to change the code.
Select and confirm the option shown.
or
Select and confirm the option shown. You can also open
the door without a doorbell ring.
Deactivating the door opener
v Open the Program/Service menu ! page 40.
Select and confirm the option shown.
Select and confirm the option shown.
Accepting a call from an answering machine
Prerequisite: An answering machine is configured
(consult your service personnel).
x The LED lights up. Press the key shown.
For a more detailed description of how this function
works, see ! page 39.
58
Page 59
Step by Step
Niels, Bohr g 18.10.
Dial
Details
Dial
Enhanced phone functions
Making calls
Redialing from a call list
For information about the call lists as well as sample entries, refer to ! page 37.
w Press the key until the call list you want is active.
Select and confirm the entry you want.
The phone number is dialed immediately.
or
g Open the context menu.
Confirm.
The phone number is dialed.
or
g Open the context menu.
Select and confirm the option shown.
g Open the context menu.
Confirm.
The phone number is dialed.
Niels, Bohr g
Using a personal phonebook
For information about the personal phonebook as well
as sample entries, refer to ! page 34. For a description
of how to create contacts, see ! page 96.
Calling a contact from the phonebook list
u Press the key shown until the "Personal" tab is active.
Search for a contact ! page 34
or
Select with the TouchGuide.
i Confirm. The phone number defined as the default
number (! page 97) is dialed.
or
g Open the context menu.
59
Page 60
Enhanced phone functions
Step by Step
Dial
Options g
Groups
VIP g
View
Niels, Bohr g
Dial
Select and confirm the required phone number using
the icons.
Explanation of the icons ! page 34.
Calling a contact from a group
u Press the key shown until the "Personal" tab is active.
Select and confirm the option shown.
g Open the context menu.
Select and confirm the option shown.
Select the required group.
g Open the context menu.
Confirm.
Select group member.
i Confirm. The phone number defined as the default
number (! page 97) is dialed.
or
g Open the context menu.
Select and confirm the required phone number using
the icons.
Explanation of the icons ! page 34.
60
Page 61
Step by Step
Directory
1=internal
Marie, Curie g
Enhanced phone functions
Using a system phonebook
For information about the system phonebook, see
! page 36.
u Press the key shown until the "System" tab is active.
or
c Open the idle menu ! page 28.
Select and confirm the option shown.
if nec. If the system phonebook contains multiple directories
(not for HiPath 500):
Confirm.
Search for a contact ! page 34
or
Select with the TouchGuide.
i Confirm. The phone number is dialed immediately.
or
Call
Isaac, Newton g
Dial
Call
g Open the context menu.
Select and confirm the option shown.
Using the LDAP directory
For information about the LDAP directory, refer to
! page 36.
Prerequisite: You searched for and selected a contact
in an LDAP database (! page 102).
Confirm; the phone number is dialed immediately.
or
g Open the context menu.
Confirm.
or
Select and confirm the option shown.
61
Page 62

Enhanced phone functions
Step by Step
Use speed dialing
Use speed dialing
Making calls using system speed-dial numbers
Prerequisite: You know the system speed-dial numbers (consult your service personnel).
v Open the Program/Service menu ! page 40.
Select and confirm the option shown
[1]
j Enter a three-digit speed-dial number.
if nec. Suffix-dialing
j If necessary, you can suffix-dial additional digits
(for example, the user’s extension) at the end of the
saved station number.
If this feature is configured, a suffix is automatically dialed (for example, "0" for the exchange) if no entries are
made within 4 or 5 seconds.
Dialing with speed-dial keys
Prerequisite: You have configured speed-dial keys
! page 62.
v Open the Program/Service menu ! page 40.
Select and confirm the option shown
[1]
.
.
Destinations g
Change Speed Dial
Change
62
* Press the key shown.
j Press the required speed-dial key.
Configure a speed-dial key
You can program the keys
ten frequently used phone numbers.
0 to 9 with
v Open the Program/Service menu ! page 40.
Confirm.
Select and confirm the option shown
[1]
.
* Press the key shown.
j Press the required speed-dial key. If the key is already in
use, the programmed phone number appears on the
screen.
Confirm.
[1] „Differing display view in a HiPath 4000 environment (not for
HiPath 500)” ! Seite 185
Page 63
Step by Step
Save
previous
Next
Enhanced phone functions
First enter the external code and then the external sta-
j
tion number.
Confirm.
or If you make a mistake
Select and confirm the option shown.
This deletes all entered digits.
Confirm.
or
Change
Delete
Exit
Select and confirm the option shown.
or
Select and confirm the option shown.
or
Select and confirm the option shown.
63
Page 64
Enhanced phone functions
Step by Step
Calls g
Talking to your colleague with a speaker call
You can make a loudspeaker announcement through a
loudspeaker if connected (ask your service personnel),
or to an internal user with a system telephone without
any action on their part.
v Open the Program/Service menu ! page 40.
Select and confirm the option shown.
Speaker call
*945 Enter the code.
Select and confirm the option shown
[1]
.
j Enter the station number.
Responding to a speaker call ! page 56.
Talking to your colleague with discreet calling (not for HiPath 500)
If this function has been configured (ask your service
personnel), you can join an ongoing call conducted by
an internal user at a system telephone with display.
You can listen in unnoticed and speak to the internal
user without being overheard by the other party (discreet calling).
^ Lift the handset.
j Enter your internal station number.
Your service personnel can protect your telephone against discreet calling.
[1] „Differing display view in a HiPath 4000 environment (not for
HiPath 500)” ! Seite 185
64
Page 65

Step by Step
Reserve trunk
Enhanced phone functions
Automatic connection setup/hotline
If this function is configured (contact your service personnel), the system automatically sets up a connection
to a preset internal or external destination.
^ Lift the handset.
Depending on the setting, the connection is either set
up immediately or only after a preset period of time
(hotline after a timeout).
Reserving a trunk
If configured (ask your service personnel), you can reserve an occupied trunk for yourself.
When the line is free, you receive a call and a note on
the display.
Prerequisite: "Currently busy" appears on the display.
Confirm.
Reserved line is free
Z Your telephone rings. "Trunk is free" appears on the dis-
play.
^ Lift the handset.
Z You will hear the dial tone.
j Enter the external phone number.
65
Page 66

Enhanced phone functions
Step by Step
Calls g
Assigning a station number (not for U.S.)
If this function has been configured (contact your service personnel), you can selectively assign a specific
number (DID number) to your telephone before making
an external call. The assigned number then appears on
the called party’s display.
v Open the Program/Service menu ! page 40.
Select and confirm the option shown.
Temporary MSN
Associated dial
Select and confirm the option shown.
j Enter the DID number you wish to use.
j Enter the external phone number.
Associated dialing/dialing aid
If this function has been configured (contact your service personnel), you can use a dialing aid to dial numbers and set up calls for your telephone.
The operating procedure depends on whether the dialing aid is connected to the S
You can also use your system telephone as a dialing aid
for other telephones.
Dialing aid on the S
On the PC, select a destination and start dialing.
0
^ The speaker on your telephone is switched on. Lift the
handset when the other party answers.
Dialing aid at the a/b (T/R) port:
On the PC, select a destination and start dialing.
"Lift the handset" appears on the PC screen.
^ Lift the handset.
Associated dialing from your telephone for another
telephone
v Open the Program/Service menu ! page 40.
Select and confirm the option shown.
bus or the a/b (T/R) port.
0
bus:
j Enter the internal station number ("Dial for:").
j Enter the number you wish to dial.
66
Page 67

Step by Step
Enhanced phone functions
During a call
Using call waiting (second call)
You can be reached by a caller even if you are already
conducting a call. The call waiting tone signals a second
call.
You can ignore or accept the second call.
When you accept the waiting call, you can either end
the first call or place it on hold and resume the call later
on.
You can block the second call or the signal tone
(! page 68).
Prerequisite: You are conducting a call and hear the
camp-on tone (approximately every six seconds).
Ending the first call and answering the second call
\ Replace the handset. Your telephone rings.
^ Answer the second call. Lift the handset.
Placing the first call "on hold" and answering the
second call
Call waiting
Quit and return
Select and confirm the option shown.
You are immediately connected to the second caller.
The first party is placed on hold.
Ending the second call and resuming the first one
Confirm.
or
\ Replace the handset. "Recall" appears on the display.
^ Lift the handset.
You are reconnected with the first party.
67
Page 68

Enhanced phone functions
Step by Step
Call wait.trm.off
Call wait.term.on
Waiting tone on
Preventing and allowing a second call (call waiting)
If this function has been configured (ask your service
personnel), you can prevent or allow a second call
! page 67 from being signaled by automatic camp-on
during an ongoing call.
v Open the Program/Service menu ! page 40.
Select and confirm the option shown
or
Select and confirm the option shown.
[1]
,
Activating/deactivating the camp-on tone
You can suppress the camp-on tone (every six seconds)
for external calls. A one-time special dial tone then
alerts you to the waiting call.
Activating the call waiting tone
c Open the idle menu ! page 28.
Select and confirm the option shown.
Waiting tone off
68
Deactivating the call waiting tone
c Open the idle menu ! page 28.
Select and confirm the option shown.
[1] „Differing display view in a HiPath 4000 environment (not for
HiPath 500)” ! Seite 185
Page 69
Step by Step
Calls g
Enhanced phone functions
Parking a call
You can park up to ten calls, either internal, external, or
both. Parked calls can be displayed on and picked up
from another telephone. This feature is useful if you
want to continue a call at another phone.
Prerequisite: You are conducting a call.
v Open the Program/Service menu ! page 40.
Select and confirm the option shown.
Park a call
Calls g
Retrieve call
Select and confirm the option shown.
0 ... 9 Enter the number of the park slot (0 - 9) and make a note
of it. If the park slot number you entered is not displayed, it is already in use; enter another one.
Retrieving a parked call
Prerequisite: One or more calls have been parked. The
phone is idle.
v Open the Program/Service menu ! page 40.
Select and confirm the option shown.
Select and confirm the option shownSelect and confirm
the option shown
[1]
.
0 ... 9 Enter the park slot number you noted earlier.
If the park slot number you enter is not in use, you cannot retrieve the call.
If a parked call is not picked up, after a specific period of time the call is returned to the telephone
from where it was parked (recall).
[1] „Differing display view in a HiPath 4000 environment (not for
HiPath 500)” ! Seite 185
69
Page 70

Enhanced phone functions
Step by Step
Held on line: 801
\ or s Replace the handset or press the key shown.
Retrieve line
Placing an external call on hold
If you have programmed a hold key on your phone
! page 87, you can put external calls on hold.
Then all other stations can accept the call on the assigned trunk.
S Press the "Hold" key.
The message of the relevant trunk appears (e.g. 801)
and note the trunk number.
If available, the LED of the assigned trunk key flashes
slowly.
if nec.
Depending on the configuration, this may be necessary
so other members can also pick up the call on hold.
Picking up a held call:
Prerequisite: One or more calls are on hold. The phone
is idle.
v Open the Program/Service menu ! page 40.
Select and confirm the option shown.
or
S If the "Retrieve" ! page 87 key is available, press it.
j Enter the noted trunk number.
or
T If there is a "Line:" key available for the relevant trunk,
this flashes slowly. Press the key shown.
70
Page 71
Step by Step
Start conference
Return to held call
Conference
Enhanced phone functions
Conducting a conference
In a conference call, you can talk to as many as four other parties at the same time. These may be internal or
external users.
You can only add parties to or remove them from
a conference if you initiated the conference.
[ You are conducting a call.
if nec.
g Open the context menu ! page 30.
Select and confirm the option shown.
j Call a third party.
if nec. If the third party does not answer:
Confirm.
Inform this party that you are initiating a conference.
Select and confirm the option shown.
Z A tone sounds every 30 seconds to indicate that a con-
ference is in progress.
Add party
Conference
Remove party
Adding up to five parties to a conference
if nec.
g Open the context menu ! page 30.
Confirm.
j Call the new party.w
Select and confirm the option shown.
Removing parties from the conference
W Select a station.
g Open the context menu ! page 30.
Select and confirm the option shown.
If a participant that was connected to the conference via an unencrypted line leaves, the conference remains unsecured.
71
Page 72

Enhanced phone functions
Step by Step
End conference
Drop last conf. party
Leave conference
Ending a conference
g Open the context menu ! page 30.
Select and confirm the option shown.
or
\ Replace the handset, if this feature is configured (con-
tact your service personnel).
Removing party from the conference
W Select a station.
g Open the context menu ! page 30.
Select and confirm the option shown.
Leaving a conference
g Open the context menu ! page 30.
Select and confirm the option shown.
or
\ Replace the handset, if this feature is configured (con-
tact your service personnel).
72
Page 73

Step by Step
Calls g
Enhanced phone functions
Activating tone dialing/DTMF suffix-dialing
You can transmit dual-tone multifrequency (DTMF) signals to control devices such as an answering machine
or automatic information system.
v Open the Program/Service menu ! page 40.
Select and confirm the option shown.
DTMF dialing
Select and confirm the option shown.
j You can use the keys 0 through 9, ) and
to transmit DTMF signals.
(
Ending the call also deactivates DTMF suffix dialing.
Your system may be configured so that you can
start DTMF suffix-dialing immediately after setting up a connection.
73
Page 74

Enhanced phone functions
Step by Step
Recording a call
If configured (contact your service personnel), you can
record an ongoing call.
Prerequisite: You are on a call, the "Recording" key is
configured ! page 87.
S Press the "Recording" key. The LED lights up.
You and the other party hear an acoustic announcement, indicating that recording has started, and an
acoustic signal is emitted approx. every 15 seconds during the entire recording session.
During recording, it is not possible to add further
call parties.
Stopping recording
R Press the illuminated "Recording" key. The LED goes
out.
Listening to a recording
Playback of the recording depends on the voice recording system used (see the associated user guide).
74
Page 75
Step by Step
Consultation
Calls g
Enhanced phone functions
Transferring a call after a speaker call announcement in a group
If this function has been configured (contact your service personnel), you can use a speaker call (announcement, ! page 142) to announce a call in progress to a
group of users ! page 64.
After a member of the group has accepted the call request, you can transfer the waiting party.
Prerequisite: You are conducting a call.
Confirm. The other party is placed on hold.
v Open the Program/Service menu ! page 40.
Select and confirm the option shown.
Speaker call
Transfer
Select and confirm the option shown.
j Enter the group’s station number.
[ Announce the call.
When a member of the group accepts the call
! page 56, you are connected to this party.
\ Replace the handset.
or
Select and confirm the option shown
If the connection between the two other parties
is not established within 45 seconds, the call
from the first party returns to you (recall).
[1]
.
[1] „Differing display view in a HiPath 4000 environment (not for
HiPath 500)” ! Seite 185
75
Page 76

Enhanced phone functions
Step by Step
Calls g
Sending a trunk flash (not for HiPath 500)
To activate ISDN-type services and features through the
network carrier’s analog trunks or those of other communications platforms (such as "consultation hold"), you
must send a signal to the trunks before dialing the service code or telephone number.
Prerequisite: You have set up an external connection.
v Open the Program/Service menu ! page 40.
Select and confirm the option shown.
Trunk flash
Select and confirm the option shown
[1]
.
j Enter the service code and/or telephone number.
[1] „Differing display view in a HiPath 4000 environment (not for
HiPath 500)” ! Seite 185
76
Page 77
Step by Step
Camp-on
Override
Enhanced phone functions
If you cannot reach a destination
Call waiting (camp-on)
Prerequisite: You have dialed an internal number and
hear a busy signal. It is important that you reach the
called party.
Wait (approx. 5 seconds) until "Camp-on" appears on the
display and the busy tone is followed by the ring tone.
The called party can then respond ! page 67.
The called party can prevent automatic call waiting ! page 68.
If this feature is configured (contact your service
personnel), you will hear the ring tone and the
message "Camp-on" is immediately displayed.
Busy override – joining a call in progress
This function is only possible if configured by your service personnel.
Prerequisite: You have dialed an internal number and
hear a busy signal. It is important that you reach the
called party.
Select and confirm the option shown.
The called party and person to whom this party is talking hear an alerting tone every two seconds.
If the called party has a system telephone with display,
the following appears on the screen: "Override: (number
or name)".
You can now start talking.
77
Page 78
Enhanced phone functions
Step by Step
Night answer on
Using night answer
When night answer mode is active, for example during
a lunch break or after office hours, all external calls are
immediately forwarded to a specific internal telephone
(night station). The night station can be defined by service personnel ( standard night answer service) or by
you ( temporary night answer service).
Activating
Select and confirm the option shown.
*=default
Save
Night answer off
Press the "OK" dialog key to confirm ( standard night answer service).
or
j Enter the destination number ( temporary night answer
service).
Confirm.
Deactivating
Select and confirm the option shown.
Service personnel can also configure an "automatic
night answer service". The automatic night answer service activates at specific times for your telephone depending on how it is programmed.
You can deactivate the automatic night answer service or
replace it with a night answer service you configured.
78
Page 79

Step by Step
Call forwarding
Call forwarding
You can immediately forward internal or external calls to
different internal or external telephones (destinations).
(An external destination requires special configuration
in the system.)
Select your preferred method:
• „Call forwarding key” ! Seite 80
• „Activating call forwarding via the Program/Service
menu” ! Seite 83
You can program additional call forwarding instructions
via the Program/Service menu, „Using system forwarding instructions” ! Seite 85.
When call forwarding is active, a special dial tone
sounds when you lift the handset.
If DID DTMF is active (contact your service personnel), you can also forward calls to this destination.
The call forwarding key flashes if you are a call
forwarding destination ! page 18.
Active call forwarding indication
An active call forwarding instruction is indicated on the
display when your phone is idle ! page 28:
r The LED lights up.
The call forwarding icon, the station number and, where
applicable, the name of the forwarding destination are
displayed on the first line below the status bar.
The name of the party is used if stored in the phonebook.
220870 Dalai Lama
If call forwarding is activated for internal or external
calls, the number is preceded by the abbreviation "INT"
or "EXT".
INT Dalai, Lama
79
Page 80

Call forwarding
Step by Step
Overview of call forwarding types
Different input masks are displayed depending on how
you program call forwarding (call forwarding key
! page 80 or Program/Service menu ! page 83). The
entries in the relevant menus correspond as explained
in the following table:
Call forwarding key Program/Service
menu
Variable: All calls 1=all calls
All calls are forwarded, the saved number is deleted after
shutdown.
Variable: External calls 2=external calls only
Only external calls are forwarded.
Variable: Internal calls 3=internal calls only
Only internal calls are forwarded.
Call forwarding key
r The call forwarding key offers a quick way to activate/de-
activate call forwarding instructions ! page 83 and
open the "Forwarding" page where you can edit these
instructions ! page 80.
Edit call forwarding
Variable: All calls
80
Editing call forwarding instructions
Press the call forwarding key to open the "Forwarding"
page. It provides an overview of all call forwarding types
! page 80.
You can select a call forwarding type here and set station numbers as forwarding destinations.
r Press the key quickly. The LED lights up.
Select and confirm the option shown.
The "Forwarding" page opens.
Select a call forwarding type ! page 80
i Confirm the option shown to enter a forwarding desti-
nation directly ! page 81.
or
g Enter the station number via a context menu ! page 81.
The forwarding destination is automatically deleted
when call forwarding is deactivated ! page 84.
All changes made here take effect immediately
after a short timeout.
Page 81
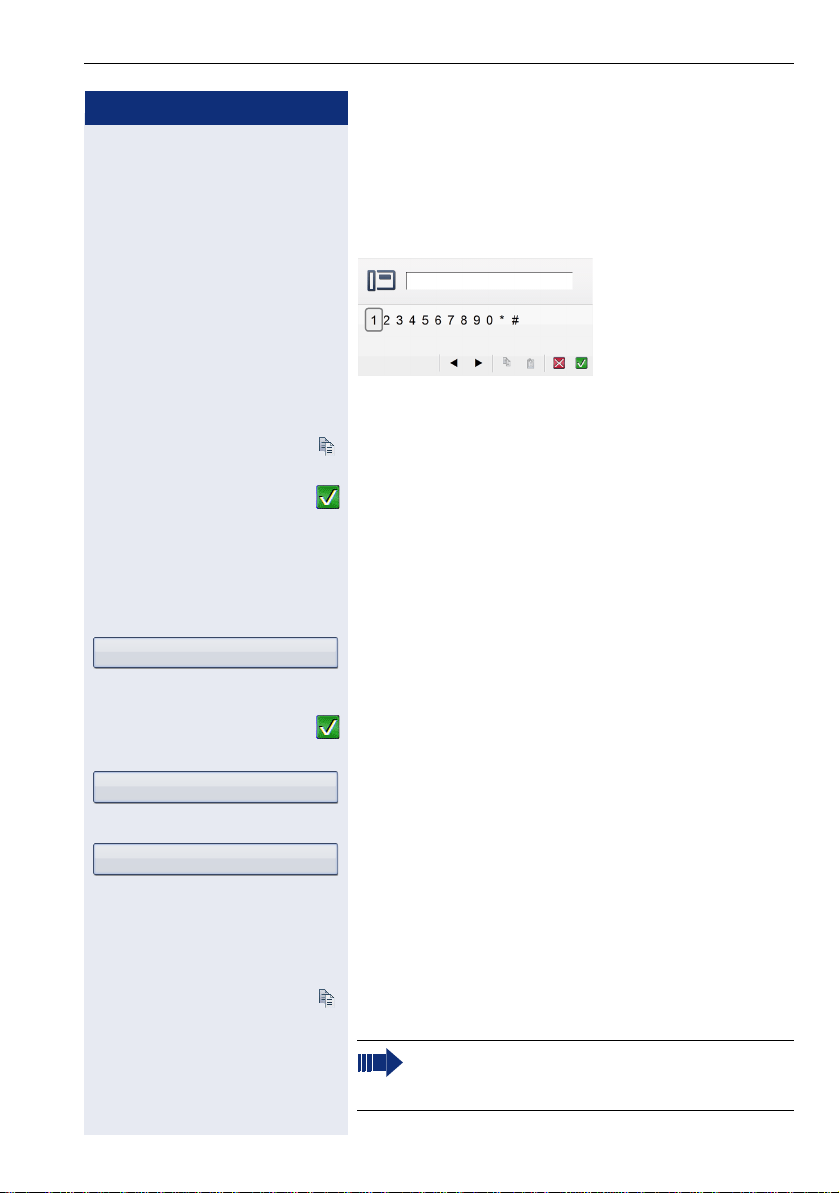
Step by Step
Call forwarding
Editing forwarding destinations
Entering a station number directly
Prerequisite: The cursor is in a station number input
field.
2208|
j Enter the station number.
or
W Select and confirm the option shown to insert the sta-
tion number just copied ! page 81.
W Select and confirm the option shown.
Entering a station number via a context menu
Prerequisite: You selected a call forwarding type
! page 80.
g Open the context menu.
Enter destination
Paste
220870
Select and confirm the option shown.
j Enter the station number.
W Select and confirm the option shown.
or
Select and confirm the option shown to insert the station number just copied ! page 81.
or
Select and confirm a forwarding destination in the list of
favorites ! page 82.
Copying a station number
Prerequisite: The cursor is in an input field that con-
tains a station number:
W Select and confirm the option shown to copy the station
number.
The station number copied remains in the clipboard until you copy another station number or
you finish editing call forwarding.
81
Page 82
Call forwarding
Step by Step
Saving a station number as a favorite for call
forwarding
You can save up to five station numbers as favorites.
These station numbers then appear in the context
menu when you are programming a call forwarding destination.
If you use a station number for a contact that is already
stored in the personal phonebook, the submenu for the
call forwarding type selected shows the relevant name
with the appropriate icon rather than the station number.
Example:
Variable: All calls g
Dalai, Lama
r Press the key shown.
Edit call forwarding
Variable: All calls g
Edit favourites
Save & exit g
Save & exit
Select and confirm the option shown.
The "Forwarding" page opens.
Select a call forwarding instruction of your choice.
g Open the context menu.
Select and confirm the option shown.
The "Edit favourite numbers" page opens. Existing station numbers are displayed.
Select and confirm the station number input field,
e.g. "1".
j Enter the station number ! page 81.
b Select the "Options" entry.
Select and confirm the option shown.
Confirm the option shown in the context menu.
82
Page 83
Step by Step
Call forwarding
Forwarding express activation for "all calls"
r Press the key quickly. The LED lights up.
j Enter the forwarding destination ! page 81.
Set forwarding
Dalai, Lama
Forwarding on
1=all calls
2=external calls only
3=internal calls only
Confirm.
or The last forwarding destination saved for "all calls" is the
first entry in the pop-up menu:
Select and confirm the option shown.
Call forwarding is now active for all calls. The forwarding
destination is automatically deleted when call forwarding is deactivated ! page 84.
Activating call forwarding via the Program/Service menu
Configuration via the Program/Service menu
c Open the idle menu ! page 28.
Special features must be taken into consideration
if your telephone operates with HiPath 5000 (system networking via PC network) ! page 148!
Select and confirm the option shown.
Confirm.
or
Select and confirm the option shown.
or
Select and confirm the option shown.
Save
j Enter the destination number.
Confirm.
83
Page 84

Call forwarding
Step by Step
Forwarding off
Deactivating call forwarding
r Press the lit key. The LED goes out.
or
c Open the idle menu ! page 28.
Select and confirm the option shown.
84
Page 85
Step by Step
Destinations g
Call forwarding
Using system forwarding instructions
Call forwarding no reply (CFNR)
Calls that are not answered after three rings (=default,
can be adjusted by service personnel) or that are received while another call is ongoing can be automatically forwarded to a specified telephone.
v Open the Program/Service menu ! page 40.
Confirm.
CFNR on
Change
Save
Destinations g
CFNR off
Delete
Exit
Select and confirm the option shown.
if nec. If a phone number is already entered:
Confirm.
j Enter the destination phone number.
• Enter the internal station number for internal destinations.
• Enter the external code and the external station
number for external destinations.
Confirm.
Deactivating call forwarding/deleting a destination
v Open the Program/Service menu ! page 40.
Confirm.
Select and confirm the option shown.
Confirm the option shown to deactivate and delete the
forwarding destination.
or
Select and confirm to deactivate but not delete the forwarding destination.
If CFNR is activated, "CFNR on" appears briefly
on the display when you hang up.
85
Page 86
Call forwarding
Step by Step
Trunk FWD on
Call forwarding in the carrier network and forwarding multiple subscriber numbers (MSN) (not for U.S.)
If this function has been configured (contact your service personnel), you can forward calls to your assigned
multiple subscriber number (MSN) (DID number) directly within the carrier network.
For example, you can forward your phone line to your
home phone after business hours.
Select and confirm the option shown.
1=immediate
2=on no answer
3=on busy
Select and confirm the call forwarding type required.
or
or
j Enter your DID number.
j Enter the destination number (without the external code).
Save
Trunk FWD off
Confirm.
Deactivating call forwarding
Select and confirm the option shown.
Confirm the displayed call forwarding type.
or
1 or 2 or 3 Enter the activated call forwarding type.
j Enter your DID number.
86
Page 87

Step by Step
Programming sensor keys
Programming sensor keys
You can program frequently used functions, phone
numbers or procedures on your OpenStage 60/80 T’s
sensor keys.
Configuring function keys
See also ! page 22.
Example: Programming the Shift key
S Press and hold the required sensor key.
Assign functionality
Key assignments
Change key
More features g
Shift Key
Save incomplete
Save
Confirm the option shown.
or
v Open the Program/Service menu ! page 40.
Select and confirm the option shown.
S Press the required sensor key.
If the key is already in use, the programmed phone
number appears on the screen.
Confirm the option shown.
A list of all available functions is displayed, see
the overview ! page 88.
Select and confirm the option shown.
Confirm the option shown.
if nec.
Select and confirm the option shown.
Some functions (e.g. with "Call forwarding") cannot be
saved completely. This means that when later initiating
the function by pressing the button, further inputs are
required.
Confirm.
87
Page 88

Programming sensor keys
Step by Step
The programmed function is activated by briefly
touching the key. For functions that can be
switched on/off such as "Do not disturb", press
once to switch the function on and press again to
switch the function off. When the function is
switched on, the LED lights up.
The label appears automatically and can be altered
! page 94.
The LED displays ! page 22 and ! page 88 show the
status of the function.
Overview of functions
The functions are split into the following menus:
• Destinations
• Feature Settings
• PIN and Authorization
• Calls
• More features
The available functions depend on your configuration. If a function is missing, contact your service personnel.
Saved function LED messages
Call forwarding, Forwarding - trunk, Forward line,
Night answer, Do not disturb, Telephone lock, Advisory message, Ringer cutoff, HF answerback on/off,
Join/leave group, Caller ID suppression, Call
wait.term., Waiting tone off, Ring Transfer, Recording, Door opener on/off, Control Relay (only for
HiPath 3000), Ringing group on, Shift Key, UCD
(Available on/off, Work on/off), Night answer on/off,
MULAP Privacy Release:
S Saved function is not activated.
R Saved function is activated.
Callback:
S You have no entry for callback.
R You have an entry for callback.
88
Page 89

Step by Step
Programming sensor keys
Repdial key (Internal number, DSS:
S Party not on a call.
R Party is on a call or has activated DND.
T Flashing quickly - I’m being called, please accept.
Flashing slowly - another party is being called and has
not yet answered.
Call key, General call key, Trunk key, MULAP Key,
Temporary MSN:
S No call via corresponding trunk.
R Active call via the corresponding trunk.
T Flashing quickly - call on the relevant trunk, call pickup
is possible by pressing the sensor key.
Flashing slowly - a call is placed on hold on the relevant
trunk.
Tr un k g ro up ke y :
S At least one trunk is free.
R All lines in this trunk group are occupied.
View call charges:
S No chargeable calls have been set up since the last
check.
R Chargeable calls have been set up since the last check.
Call forwarding, Forward Line:
T Flashing slowly - your line is a call forwarding destina-
tion.
Fax details:
S No fax received or no message on the answering ma-
chine.
R Fax received or message on the answering machine.
View number of calls:
S No waiting callers.
T Flashing quickly - callers waiting (certain number is ex-
ceeded).
Flashing quickly - callers waiting (certain number is
reached).
Data I/O Service:
S No connection to an application.
R Active connection to an application.
T Flashing slowly, connection to an application is tempo-
rarily interrupted.
89
Page 90

Programming sensor keys
Step by Step
The following functions saved on keys do not support LED:
Repdial key (external), Procedure key, Trace call, Speed
dial, Clear, Lock all phones, Send message, Directory
(1=internal, 2=LDAP not for HiPath 500), Call waiting,
Toggle/Connect, Conference, Speaker call, Retrieve
line, Reserve trunk, Release trunk, Temporary Phone,
Override, Park a call, Pickup - directed, Pickup - group,
Account code, Show call charges, Page (not for
HiPath 500), Answer page, Timed reminder, Open door,
DTMF dialing, Recall-key, Room monitor, Hold key, Consult internal, Consultation, Associated dial, , Tel. data
service, Relocate, Mobile Login, Discreet calling (not for
HiPath 500).
90
Page 91
Step by Step
Programming sensor keys
Programming a procedure key
Numbers and functions which require further input, i.e.
which contain several operating steps, can be saved on
a key on your telephone.
S Press and hold the required sensor key.
Assign functionality
Select and confirm the option shown.
or
v Open the Program/Service menu ! page 40.
Key assignments
Select and confirm the option shown.
S Press the required sensor key.
If the key is already in use, the programmed phone
number appears on the screen.
Change key
Change key
More features g
Procedure key
Confirm the option shown.
Confirm.
Select and confirm the option shown.
Confirm.
j Enter procedure. Example:
*67 Code for associated dialing.
231 Number of the phone to for which the call should be
made.
01234 the number to be called.
if nec.
S Press "Pause" to enter pauses (a "P" appears on the dis-
play).
Save
previous
if nec.
Key label
Confirm.
or If you make a mistake:
Select and confirm the option shown.
This deletes all entered digits.
Select and confirm the option shown ! page 94.
91
Page 92

Programming sensor keys
Step by Step
Exit
Another key
Confirm.
or
Select and confirm the option shown.
Select the stored procedure by clicking the sensor key.
Procedures with activatable/deactivatable functions are activated by pressing the sensor key
once and deactivated by pressing it again.
You can press the procedure key during a call to
automatically send the saved digits as DTMF signals ! page 73.
92
Page 93
Step by Step
Programming sensor keys
Configuring repdial keys
You can also program internal and external station numbers on the second level. The LED function is not available for internal station numbers on the second level.
To program the second level, you must program a "Shift"
key ! page 87.
See also ! page 22.
S Press and hold the required sensor key.
Assign functionality
Prog. feature key
Next layer
Change key
Destinations g
Repdial key
Speed dial
Key label
Select and confirm the option shown.
or
v Open the Program/Service menu ! page 40.
Select and confirm the option shown.
S Press the required sensor key.
If the key is already in use, the programmed phone
number appears on the screen.
if nec.
Select and confirm to save the phone number on the
second level.
Confirm.
Confirm.
Confirm.
j Enter the station number.
or
Select and confirm the option shown.
j Enter the speed-dial number (the speed-dial numbers
correspond to the system phonebook ! page 36).
if nec.
Select and confirm the option shown ! page 94.
Exit
Another key
Confirm.
or
Select and confirm the option shown.
93
Page 94
Programming sensor keys
Step by Step
Changing the label
The label set when a repdial key was programmed can
also be subsequently changed.
Changing the label
v Open the Program/Service menu ! page 40.
Prog. feature key
Change key
+=Next layer
Key label
Change
Change
Default label
Save
Previous
Exit
Select and confirm the option shown.
S Press the required sensor key.
The seizure is displayed on the screen.
Confirm.
if nec.
Select and confirm to make the change on the second
level.
Select and confirm the option shown.
Confirm.
j Enter the required key label text ! page 24.
Confirm.
or
Select and confirm to reset to the default label.
Select and confirm the option shown.
or
Select and confirm to cancel the entry.
Confirm.
94
Page 95

Step by Step
Programming sensor keys
Deleting sensor key programming
S Hold down the required key.
Assign functionality
Next layer
Clear key
Exit
Select and confirm the option shown.
if nec.
Select and confirm the option shown to delete the entries on the second level.
Select and confirm the option shown.
Select and confirm the option shown.
95
Page 96
Phonebooks and call lists
Step by Step
Options g
Phonebooks and call lists
Personal phonebook
For a detailed description of this function, see
! page 34.
Creating a new contact
u Press the key until the "Personal" tab is active.
Confirm.
New contact
Last name
Business 1
Save & exit
Save
Confirm.
The form for entering contact data opens.
Confirm.
j Enter and confirm text ! page 26.
Select and confirm the option shown.
j Enter and confirm the phone number ! page 24.
e Select and fill out additional fields.
if nec.
b Select the "Options" entry.
Select and confirm the option shown.
or
h Press the key shown.
Confirm.
96
Page 97
Step by Step
Niels, Bohr g
Details
Phonebooks and call lists
Defining the default number
If you have multiple numbers saved for a contact, you
can define the default number here that should be used
when dialing directly using the phonebook ! page 59.
u Press the key until the "Personal" tab is active.
Select a contact.
g Open the context menu.
Select and confirm the option shown.
Select the "Default No." entry.
Business 1 g
Mobile
Save & exit
Save
Niels, Bohr g
Details
No picture g
Image 1
The phone displays the current setting.
Confirm.
Select and confirm the required phone number.
b Select the "Options" entry.
Select and confirm the option shown.
or
h Press the key shown.
Confirm.
Saving a picture for a contact
Prerequisite: Your service personnel have loaded pic-
tures to the OpenStage.
u Press the key until the "Personal" tab is active.
Select a contact.
g Open the context menu.
Select and confirm the option shown.
Select the "Picture" entry.
The phone displays the current setting.
Confirm.
Select and confirm the picture you wish to use.
Save & exit
b Select the "Options" entry.
Select and confirm the option shown.
97
Page 98
Phonebooks and call lists
Step by Step
Save
Niels, Bohr g
Details
if nec.
or
h Press the key shown.
Confirm.
Changing contact data
u Press the key until the "Personal" tab is active.
Select a contact.
g Open the context menu.
Select and confirm the option shown.
e Select the required field.
if nec.
h Delete existing text.
j Enter and confirm the new text ! page 26.
e Select and edit additional fields.
b Select the "Options" entry.
Save & exit
Save
98
Select and confirm the option shown.
or
h Press the key shown.
Confirm.
Page 99
Step by Step
Options g
Phonebooks and call lists
Managing the phonebook
Defining the contact display format
u Press the key until the "Personal" tab is active.
Confirm.
Display
Niels, Bohr g
Delete
Delete
Options g
Select and confirm the option shown in the context
menu.
e Select and confirm the display format.
Example Option
Miller, Peter Lastname, Firstname
Peter Miller Firstname Lastname
Miller, P Lastname, F
P Miller F Lastname
h Press the key shown.
The display format is changed immediately.
Deleting contacts from the phonebook
u Press the key until the "Personal" tab is active.
Select a contact.
g Open the context menu.
Select and confirm the option shown.
Confirm in the pop-up menu.
The selected entry is deleted.
Deleting all phonebook entries
u Press the key until the "Personal" tab is active.
Confirm.
Delete all
Delete all entries
Select and confirm the option shown in the context
menu.
Confirm in the pop-up menu.
All entries are deleted.
99
Page 100
Phonebooks and call lists
Step by Step
Options g
Managing groups
Creating a group
u Press the key until the "Personal" tab is active.
Confirm.
Groups
Options g
New group
Save & exit
Save
Niels, Bohr g
Details
No group g
Select and confirm the option shown in the context
menu.
Confirm.
Confirm the option shown in the context menu.
Select the "Group name" entry.
Confirm.
j Give the group a name ! page 26.
b Select the "Options" entry.
Select and confirm the option shown.
or
h Press the key shown.
Confirm.
The new group is stored.
Adding a contact to a group
u Press the key until the "Personal" tab is active.
Select a contact.
g Open the context menu.
Select and confirm the option shown.
Select the "Groups" entry.
Confirm.
VIP
Save & exit
100
In the context menu, select and confirm a group.
b Select the "Options" entry.
Select and confirm the option shown.
 Loading...