

Siemens OpenStage 15 G, OpenScape Office, OpenStage 20, OpenStage 20 E, OpenStage 20 G Administration Manual
...
Documentation
HiPath 3000, HiPath 4000
OpenScape Office, OpenScape Business
OpenStage 15, OpenStage 15 G, OpenStage 20,
OpenStage 20 E, OpenStage 20 G, OpenStage 40,
OpenStage 40 G, OpenStage 60, OpenStage 60 G,
OpenStage 80, OpenStage 80 G
Administration Manual
A31003-S2010-M100-18-76A9
Siemens Enterprise Communications
www.siemens-enterprise.com


bkTOC.fm
Nur für den internen Gebrauch Content
Content 0
1 Overview . . . . . . . . . . . . . . . . . . . . . . . . . . . . . . . . . . . . . . . . . . . . . . . . . . . . . . . . . . . . 1-1
1.1 Important Notes . . . . . . . . . . . . . . . . . . . . . . . . . . . . . . . . . . . . . . . . . . . . . . . . . . . . . . 1-1
1.2 Maintenance Notes . . . . . . . . . . . . . . . . . . . . . . . . . . . . . . . . . . . . . . . . . . . . . . . . . . . 1-2
1.3 About the Manual. . . . . . . . . . . . . . . . . . . . . . . . . . . . . . . . . . . . . . . . . . . . . . . . . . . . . 1-2
1.4 Conventions for this Document . . . . . . . . . . . . . . . . . . . . . . . . . . . . . . . . . . . . . . . . . . 1-2
1.5 The OpenStage Family . . . . . . . . . . . . . . . . . . . . . . . . . . . . . . . . . . . . . . . . . . . . . . . . 1-3
1.5.1 OpenStage 60/80 . . . . . . . . . . . . . . . . . . . . . . . . . . . . . . . . . . . . . . . . . . . . . . . . . 1-3
1.5.2 OpenStage 40 . . . . . . . . . . . . . . . . . . . . . . . . . . . . . . . . . . . . . . . . . . . . . . . . . . . . 1-4
1.5.3 OpenStage 20 . . . . . . . . . . . . . . . . . . . . . . . . . . . . . . . . . . . . . . . . . . . . . . . . . . . . 1-5
1.5.4 OpenStage 15 . . . . . . . . . . . . . . . . . . . . . . . . . . . . . . . . . . . . . . . . . . . . . . . . . . . . 1-6
1.6 Administration Interfaces . . . . . . . . . . . . . . . . . . . . . . . . . . . . . . . . . . . . . . . . . . . . . . . 1-6
1.6.1 Web-based Management (WBM) . . . . . . . . . . . . . . . . . . . . . . . . . . . . . . . . . . . . . 1-6
1.6.2 Deployment Service (DLS) . . . . . . . . . . . . . . . . . . . . . . . . . . . . . . . . . . . . . . . . . . 1-7
1.6.3 Local Phone Menu . . . . . . . . . . . . . . . . . . . . . . . . . . . . . . . . . . . . . . . . . . . . . . . . 1-7
2 Startup . . . . . . . . . . . . . . . . . . . . . . . . . . . . . . . . . . . . . . . . . . . . . . . . . . . . . . . . . . . . . . 2-1
2.1 Prerequisites . . . . . . . . . . . . . . . . . . . . . . . . . . . . . . . . . . . . . . . . . . . . . . . . . . . . . . . . 2-1
2.2 Assembling and Installing the Phone. . . . . . . . . . . . . . . . . . . . . . . . . . . . . . . . . . . . . . 2-2
2.2.1 Shipment . . . . . . . . . . . . . . . . . . . . . . . . . . . . . . . . . . . . . . . . . . . . . . . . . . . . . . . . 2-2
2.2.2 Connectors at the bottom side . . . . . . . . . . . . . . . . . . . . . . . . . . . . . . . . . . . . . . . 2-2
2.2.3 Assembly. . . . . . . . . . . . . . . . . . . . . . . . . . . . . . . . . . . . . . . . . . . . . . . . . . . . . . . . 2-4
2.2.4 Connecting the Phone. . . . . . . . . . . . . . . . . . . . . . . . . . . . . . . . . . . . . . . . . . . . . . 2-5
2.2.5 Key Module . . . . . . . . . . . . . . . . . . . . . . . . . . . . . . . . . . . . . . . . . . . . . . . . . . . . . . 2-7
2.3 Quick Start . . . . . . . . . . . . . . . . . . . . . . . . . . . . . . . . . . . . . . . . . . . . . . . . . . . . . . . . . . 2-8
2.3.1 Access the Web Interface (WBM) . . . . . . . . . . . . . . . . . . . . . . . . . . . . . . . . . . . . . 2-9
2.3.2 Basic Network Configuration. . . . . . . . . . . . . . . . . . . . . . . . . . . . . . . . . . . . . . . . . 2-9
2.3.3 Extended Network Configuration. . . . . . . . . . . . . . . . . . . . . . . . . . . . . . . . . . . . . 2-10
2.3.4 VLAN Discovery . . . . . . . . . . . . . . . . . . . . . . . . . . . . . . . . . . . . . . . . . . . . . . . . . 2-10
2.3.4.1 Using a Vendor Class. . . . . . . . . . . . . . . . . . . . . . . . . . . . . . . . . . . . . . . . . . 2-10
2.3.4.2 Using Option #43 "Vendor Specific" . . . . . . . . . . . . . . . . . . . . . . . . . . . . . . . 2-16
2.3.5 DLS Server Address . . . . . . . . . . . . . . . . . . . . . . . . . . . . . . . . . . . . . . . . . . . . . . 2-18
2.3.5.1 Using Vendor Class . . . . . . . . . . . . . . . . . . . . . . . . . . . . . . . . . . . . . . . . . . . 2-18
2.3.5.2 Using Option #43 "Vendor Specific" . . . . . . . . . . . . . . . . . . . . . . . . . . . . . . . 2-25
2.3.6 HFA Gateway Settings . . . . . . . . . . . . . . . . . . . . . . . . . . . . . . . . . . . . . . . . . . . . 2-27
2.3.7 Using the Web Interface (WBM) . . . . . . . . . . . . . . . . . . . . . . . . . . . . . . . . . . . . . 2-27
2.3.8 Using the Local Menu . . . . . . . . . . . . . . . . . . . . . . . . . . . . . . . . . . . . . . . . . . . . . 2-27
A31003-S2010-M100-18-76A9
OpenStage HFA Family, Administration Manual
0-1

bkTOC.fm
Content Nur für den internen Gebrauch
3 Administration . . . . . . . . . . . . . . . . . . . . . . . . . . . . . . . . . . . . . . . . . . . . . . . . . . . . . . . . 3-1
3.1 Access via Local Phone . . . . . . . . . . . . . . . . . . . . . . . . . . . . . . . . . . . . . . . . . . . . . . . . 3-1
3.2 LAN Settings . . . . . . . . . . . . . . . . . . . . . . . . . . . . . . . . . . . . . . . . . . . . . . . . . . . . . . . . . 3-5
3.2.1 LAN Port Settings. . . . . . . . . . . . . . . . . . . . . . . . . . . . . . . . . . . . . . . . . . . . . . . . . . 3-5
3.2.2 VLAN . . . . . . . . . . . . . . . . . . . . . . . . . . . . . . . . . . . . . . . . . . . . . . . . . . . . . . . . . . . 3-7
3.2.2.1 Automatic VLAN discovery using DHCP . . . . . . . . . . . . . . . . . . . . . . . . . . . . . 3-8
3.2.2.2 Automatic VLAN discovery using LLDP-MED (V2) . . . . . . . . . . . . . . . . . . . . 3-10
3.2.2.3 Manual configuration of a VLAN ID . . . . . . . . . . . . . . . . . . . . . . . . . . . . . . . . 3-12
3.3 IP Network Parameters . . . . . . . . . . . . . . . . . . . . . . . . . . . . . . . . . . . . . . . . . . . . . . . . 3-13
3.3.1 Quality of Service (QoS). . . . . . . . . . . . . . . . . . . . . . . . . . . . . . . . . . . . . . . . . . . . 3-13
3.3.1.1 Layer 2 / 802.1p. . . . . . . . . . . . . . . . . . . . . . . . . . . . . . . . . . . . . . . . . . . . . . . 3-13
3.3.1.2 Layer 3 / Diffserv . . . . . . . . . . . . . . . . . . . . . . . . . . . . . . . . . . . . . . . . . . . . . . 3-14
3.3.2 Use DHCP . . . . . . . . . . . . . . . . . . . . . . . . . . . . . . . . . . . . . . . . . . . . . . . . . . . . . . 3-16
3.3.3 IP Address - Manual Configuration. . . . . . . . . . . . . . . . . . . . . . . . . . . . . . . . . . . . 3-18
3.3.4 Default Route/Gateway . . . . . . . . . . . . . . . . . . . . . . . . . . . . . . . . . . . . . . . . . . . . 3-19
3.3.5 Specific IP Routing . . . . . . . . . . . . . . . . . . . . . . . . . . . . . . . . . . . . . . . . . . . . . . . . 3-20
3.3.6 DNS . . . . . . . . . . . . . . . . . . . . . . . . . . . . . . . . . . . . . . . . . . . . . . . . . . . . . . . . . . . 3-21
3.3.6.1 DNS Domain Name . . . . . . . . . . . . . . . . . . . . . . . . . . . . . . . . . . . . . . . . . . . . 3-21
3.3.6.2 DNS Servers . . . . . . . . . . . . . . . . . . . . . . . . . . . . . . . . . . . . . . . . . . . . . . . . . 3-22
3.3.6.3 Terminal Hostname (V2) . . . . . . . . . . . . . . . . . . . . . . . . . . . . . . . . . . . . . . . . 3-23
3.3.7 Configuration & Update Service (DLS). . . . . . . . . . . . . . . . . . . . . . . . . . . . . . . . . 3-24
3.3.8 SNMP . . . . . . . . . . . . . . . . . . . . . . . . . . . . . . . . . . . . . . . . . . . . . . . . . . . . . . . . . . 3-25
3.4 HiPath Service Menu . . . . . . . . . . . . . . . . . . . . . . . . . . . . . . . . . . . . . . . . . . . . . . . . . 3-28
3.5 System Settings . . . . . . . . . . . . . . . . . . . . . . . . . . . . . . . . . . . . . . . . . . . . . . . . . . . . . 3-29
3.5.1 System Identity. . . . . . . . . . . . . . . . . . . . . . . . . . . . . . . . . . . . . . . . . . . . . . . . . . . 3-29
3.5.2 HFA Gateway Settings . . . . . . . . . . . . . . . . . . . . . . . . . . . . . . . . . . . . . . . . . . . . . 3-29
3.5.3 HFA Emergency Gateway Settings . . . . . . . . . . . . . . . . . . . . . . . . . . . . . . . . . . . 3-31
3.5.4 Server and Standby Server ports . . . . . . . . . . . . . . . . . . . . . . . . . . . . . . . . . . . . . 3-32
3.5.5 Redundancy . . . . . . . . . . . . . . . . . . . . . . . . . . . . . . . . . . . . . . . . . . . . . . . . . . . . . 3-33
3.5.6 Emergency number . . . . . . . . . . . . . . . . . . . . . . . . . . . . . . . . . . . . . . . . . . . . . . . 3-35
3.5.7 LIN . . . . . . . . . . . . . . . . . . . . . . . . . . . . . . . . . . . . . . . . . . . . . . . . . . . . . . . . . . . . 3-35
3.5.8 Not Used Timeout. . . . . . . . . . . . . . . . . . . . . . . . . . . . . . . . . . . . . . . . . . . . . . . . . 3-37
3.5.9 Energy Saving (OpenStage 40/60/80) . . . . . . . . . . . . . . . . . . . . . . . . . . . . . . . . . 3-38
3.5.10 Date and Time . . . . . . . . . . . . . . . . . . . . . . . . . . . . . . . . . . . . . . . . . . . . . . . . . . 3-39
3.5.10.1 SNTP is available, but no automatic configuration by DHCP server . . . . . . 3-39
3.5.11 Security. . . . . . . . . . . . . . . . . . . . . . . . . . . . . . . . . . . . . . . . . . . . . . . . . . . . . . . . 3-41
3.6 Dialing . . . . . . . . . . . . . . . . . . . . . . . . . . . . . . . . . . . . . . . . . . . . . . . . . . . . . . . . . . . . . 3-43
3.6.1 Canonical Dialing Configuration . . . . . . . . . . . . . . . . . . . . . . . . . . . . . . . . . . . . . . 3-43
3.6.2 Canonical Dial Lookup . . . . . . . . . . . . . . . . . . . . . . . . . . . . . . . . . . . . . . . . . . . . . 3-47
3.7 Mobility (OpenStage 60/80, V1R3 Onwards) . . . . . . . . . . . . . . . . . . . . . . . . . . . . . . . 3-49
3.7.1 Platform Specific Behaviour . . . . . . . . . . . . . . . . . . . . . . . . . . . . . . . . . . . . . . . . . 3-50
A31003-S2010-M100-18-76A9
0-2 OpenStage HFA Family, Administration Manual

bkTOC.fm
Nur für den internen Gebrauch Content
3.8 Transferring Phone Software, Application and Media Files . . . . . . . . . . . . . . . . . . . . 3-51
3.8.1 FTP/HTTPS Server . . . . . . . . . . . . . . . . . . . . . . . . . . . . . . . . . . . . . . . . . . . . . . . 3-51
3.8.2 Common FTP Settings . . . . . . . . . . . . . . . . . . . . . . . . . . . . . . . . . . . . . . . . . . . . 3-51
3.8.3 Phone Software. . . . . . . . . . . . . . . . . . . . . . . . . . . . . . . . . . . . . . . . . . . . . . . . . . 3-53
3.8.3.1 FTP/HTTPS Access Data. . . . . . . . . . . . . . . . . . . . . . . . . . . . . . . . . . . . . . . 3-53
3.8.3.2 Download/Update Phone Software . . . . . . . . . . . . . . . . . . . . . . . . . . . . . . . 3-55
3.8.4 Picture Clips . . . . . . . . . . . . . . . . . . . . . . . . . . . . . . . . . . . . . . . . . . . . . . . . . . . . 3-56
3.8.4.1 FTP/HTTPS Access Data. . . . . . . . . . . . . . . . . . . . . . . . . . . . . . . . . . . . . . . 3-56
3.8.4.2 Download Picture Clip . . . . . . . . . . . . . . . . . . . . . . . . . . . . . . . . . . . . . . . . . 3-58
3.8.5 LDAP Template. . . . . . . . . . . . . . . . . . . . . . . . . . . . . . . . . . . . . . . . . . . . . . . . . . 3-59
3.8.5.1 FTP/HTTPS Access Data. . . . . . . . . . . . . . . . . . . . . . . . . . . . . . . . . . . . . . . 3-59
3.8.5.2 Download LDAP Template . . . . . . . . . . . . . . . . . . . . . . . . . . . . . . . . . . . . . . 3-61
3.8.6 Logo . . . . . . . . . . . . . . . . . . . . . . . . . . . . . . . . . . . . . . . . . . . . . . . . . . . . . . . . . . 3-62
3.8.6.1 FTP/HTTPS Access Data. . . . . . . . . . . . . . . . . . . . . . . . . . . . . . . . . . . . . . . 3-62
3.8.6.2 Download Logo. . . . . . . . . . . . . . . . . . . . . . . . . . . . . . . . . . . . . . . . . . . . . . . 3-64
3.8.7 Screensaver . . . . . . . . . . . . . . . . . . . . . . . . . . . . . . . . . . . . . . . . . . . . . . . . . . . . 3-65
3.8.7.1 FTP/HTTPS Access Data. . . . . . . . . . . . . . . . . . . . . . . . . . . . . . . . . . . . . . . 3-65
3.8.7.2 Download Screensaver . . . . . . . . . . . . . . . . . . . . . . . . . . . . . . . . . . . . . . . . 3-67
3.8.8 Ringer File. . . . . . . . . . . . . . . . . . . . . . . . . . . . . . . . . . . . . . . . . . . . . . . . . . . . . . 3-68
3.8.8.1 FTP/HTTPS Access Data. . . . . . . . . . . . . . . . . . . . . . . . . . . . . . . . . . . . . . . 3-69
3.8.8.2 Download Ringer File . . . . . . . . . . . . . . . . . . . . . . . . . . . . . . . . . . . . . . . . . . 3-71
3.8.9 ´HPT Dongle Key . . . . . . . . . . . . . . . . . . . . . . . . . . . . . . . . . . . . . . . . . . . . . . . . 3-72
3.8.9.1 FTP/HTTPS Access Data. . . . . . . . . . . . . . . . . . . . . . . . . . . . . . . . . . . . . . . 3-72
3.8.9.2 Download Dongle Key File . . . . . . . . . . . . . . . . . . . . . . . . . . . . . . . . . . . . . . 3-74
3.9 Corporate Phonebook: Directory Settings . . . . . . . . . . . . . . . . . . . . . . . . . . . . . . . . . 3-75
3.9.1 LDAP. . . . . . . . . . . . . . . . . . . . . . . . . . . . . . . . . . . . . . . . . . . . . . . . . . . . . . . . . . 3-75
3.9.2 Picture via LDAP (starting with HiPath 4000 V6) . . . . . . . . . . . . . . . . . . . . . . . . 3-77
3.9.2.1 "Softgate V6"settings for central access to subscriber pictures . . . . . . . . . . 3-78
3.9.2.2 Local Phone Configuration . . . . . . . . . . . . . . . . . . . . . . . . . . . . . . . . . . . . . . 3-78
3.9.2.3 Phone Canonical Settings . . . . . . . . . . . . . . . . . . . . . . . . . . . . . . . . . . . . . . 3-80
3.10 Speech. . . . . . . . . . . . . . . . . . . . . . . . . . . . . . . . . . . . . . . . . . . . . . . . . . . . . . . . . . . 3-81
3.10.1 RTP Base Port . . . . . . . . . . . . . . . . . . . . . . . . . . . . . . . . . . . . . . . . . . . . . . . . . 3-81
3.10.2 Codec Preferences . . . . . . . . . . . . . . . . . . . . . . . . . . . . . . . . . . . . . . . . . . . . . . 3-82
3.11 Display General Phone Information. . . . . . . . . . . . . . . . . . . . . . . . . . . . . . . . . . . . . 3-84
3.12 Applications (V2 on OpenStage 60/80) . . . . . . . . . . . . . . . . . . . . . . . . . . . . . . . . . . 3-85
3.12.1 XML Applications/Xpressions . . . . . . . . . . . . . . . . . . . . . . . . . . . . . . . . . . . . . . 3-85
3.12.1.1 Setup/Configuration . . . . . . . . . . . . . . . . . . . . . . . . . . . . . . . . . . . . . . . . . . 3-85
3.12.1.2 HTTP Proxy . . . . . . . . . . . . . . . . . . . . . . . . . . . . . . . . . . . . . . . . . . . . . . . . 3-90
3.12.1.3 Modify an Existing Application . . . . . . . . . . . . . . . . . . . . . . . . . . . . . . . . . . 3-92
3.12.1.4 Remove an Existing Application . . . . . . . . . . . . . . . . . . . . . . . . . . . . . . . . . 3-93
3.13 Password . . . . . . . . . . . . . . . . . . . . . . . . . . . . . . . . . . . . . . . . . . . . . . . . . . . . . . . . . 3-94
3.14 Troubleshooting: Lost Password . . . . . . . . . . . . . . . . . . . . . . . . . . . . . . . . . . . . . . . 3-95
3.15 Restart Phone . . . . . . . . . . . . . . . . . . . . . . . . . . . . . . . . . . . . . . . . . . . . . . . . . . . . . 3-96
3.16 Factory Reset . . . . . . . . . . . . . . . . . . . . . . . . . . . . . . . . . . . . . . . . . . . . . . . . . . . . . 3-97
A31003-S2010-M100-18-76A9
OpenStage HFA Family, Administration Manual
0-3

bkTOC.fm
Content Nur für den internen Gebrauch
3.17 SSH - Secure Shell Access (V2). . . . . . . . . . . . . . . . . . . . . . . . . . . . . . . . . . . . . . . . 3-98
3.18 Display License Information . . . . . . . . . . . . . . . . . . . . . . . . . . . . . . . . . . . . . . . . . . . 3-99
3.19 HPT Interface (For Service Staff) . . . . . . . . . . . . . . . . . . . . . . . . . . . . . . . . . . . . . . 3-100
3.20 Diagnostics . . . . . . . . . . . . . . . . . . . . . . . . . . . . . . . . . . . . . . . . . . . . . . . . . . . . . . . 3-101
3.20.1 LLDP-MED (V2) . . . . . . . . . . . . . . . . . . . . . . . . . . . . . . . . . . . . . . . . . . . . . . . . 3-101
3.20.2 Fault Trace Configuration. . . . . . . . . . . . . . . . . . . . . . . . . . . . . . . . . . . . . . . . . 3-103
3.20.3 Easy Trace Profiles . . . . . . . . . . . . . . . . . . . . . . . . . . . . . . . . . . . . . . . . . . . . . 3-110
3.20.3.1 No Tracing for All Services . . . . . . . . . . . . . . . . . . . . . . . . . . . . . . . . . . . . 3-110
3.20.3.2 Bluetooth Handsfree . . . . . . . . . . . . . . . . . . . . . . . . . . . . . . . . . . . . . . . . . 3-111
3.20.3.3 Bluetooth Headset . . . . . . . . . . . . . . . . . . . . . . . . . . . . . . . . . . . . . . . . . . . 3-111
3.20.3.4 Call Connection . . . . . . . . . . . . . . . . . . . . . . . . . . . . . . . . . . . . . . . . . . . . . 3-111
3.20.3.5 Call Log . . . . . . . . . . . . . . . . . . . . . . . . . . . . . . . . . . . . . . . . . . . . . . . . . . . 3-112
3.20.3.6 LDAP Phonebook . . . . . . . . . . . . . . . . . . . . . . . . . . . . . . . . . . . . . . . . . . . 3-112
3.20.3.7 DAS Connection . . . . . . . . . . . . . . . . . . . . . . . . . . . . . . . . . . . . . . . . . . . . 3-112
3.20.3.8 DLS Data Errors. . . . . . . . . . . . . . . . . . . . . . . . . . . . . . . . . . . . . . . . . . . . . 3-113
3.20.3.9 802.1x . . . . . . . . . . . . . . . . . . . . . . . . . . . . . . . . . . . . . . . . . . . . . . . . . . . . 3-113
3.20.3.10 Help Application. . . . . . . . . . . . . . . . . . . . . . . . . . . . . . . . . . . . . . . . . . . . 3-113
3.20.3.11 Sidecar. . . . . . . . . . . . . . . . . . . . . . . . . . . . . . . . . . . . . . . . . . . . . . . . . . . 3-114
3.20.3.12 Key Input . . . . . . . . . . . . . . . . . . . . . . . . . . . . . . . . . . . . . . . . . . . . . . . . . 3-114
3.20.3.13 LAN Connectivity . . . . . . . . . . . . . . . . . . . . . . . . . . . . . . . . . . . . . . . . . . . 3-114
3.20.3.14 Local Phonebook . . . . . . . . . . . . . . . . . . . . . . . . . . . . . . . . . . . . . . . . . . . 3-114
3.20.3.15 Messaging . . . . . . . . . . . . . . . . . . . . . . . . . . . . . . . . . . . . . . . . . . . . . . . . 3-115
3.20.3.16 Mobility. . . . . . . . . . . . . . . . . . . . . . . . . . . . . . . . . . . . . . . . . . . . . . . . . . . 3-115
3.20.3.17 Phone administration . . . . . . . . . . . . . . . . . . . . . . . . . . . . . . . . . . . . . . . . 3-115
3.20.3.18 Server based applications . . . . . . . . . . . . . . . . . . . . . . . . . . . . . . . . . . . . 3-116
3.20.3.19 Speech. . . . . . . . . . . . . . . . . . . . . . . . . . . . . . . . . . . . . . . . . . . . . . . . . . . 3-116
3.20.3.20 Tone. . . . . . . . . . . . . . . . . . . . . . . . . . . . . . . . . . . . . . . . . . . . . . . . . . . . . 3-116
3.20.3.21 USB Backup/Restore . . . . . . . . . . . . . . . . . . . . . . . . . . . . . . . . . . . . . . . . 3-116
3.20.3.22 Voice Dialling . . . . . . . . . . . . . . . . . . . . . . . . . . . . . . . . . . . . . . . . . . . . . . 3-117
3.20.3.23 Web Based Management (OpenStage 15/20/40) . . . . . . . . . . . . . . . . . . 3-117
3.20.3.24 Web Based Management (OpenStage 60/80). . . . . . . . . . . . . . . . . . . . . 3-117
3.20.4 QoS Reports. . . . . . . . . . . . . . . . . . . . . . . . . . . . . . . . . . . . . . . . . . . . . . . . . . . 3-118
3.20.5 Ping . . . . . . . . . . . . . . . . . . . . . . . . . . . . . . . . . . . . . . . . . . . . . . . . . . . . . . . . . 3-121
3.20.6 Memory Status Information . . . . . . . . . . . . . . . . . . . . . . . . . . . . . . . . . . . . . . . 3-122
3.20.7 Core dump . . . . . . . . . . . . . . . . . . . . . . . . . . . . . . . . . . . . . . . . . . . . . . . . . . . . 3-125
3.20.8 Remote Tracing - Syslog (V2) . . . . . . . . . . . . . . . . . . . . . . . . . . . . . . . . . . . . . 3-126
3.21 Bluetooth . . . . . . . . . . . . . . . . . . . . . . . . . . . . . . . . . . . . . . . . . . . . . . . . . . . . . . . . . 3-127
A31003-S2010-M100-18-76A9
0-4 OpenStage HFA Family, Administration Manual

bkTOC.fm
Nur für den internen Gebrauch Content
4 Examples and HowTos. . . . . . . . . . . . . . . . . . . . . . . . . . . . . . . . . . . . . . . . . . . . . . . . . 4-1
4.1 Canonical Dialing. . . . . . . . . . . . . . . . . . . . . . . . . . . . . . . . . . . . . . . . . . . . . . . . . . . . . 4-1
4.1.1 Canonical Dialing Settings . . . . . . . . . . . . . . . . . . . . . . . . . . . . . . . . . . . . . . . . . . 4-1
4.1.2 Canonical Dial Lookup . . . . . . . . . . . . . . . . . . . . . . . . . . . . . . . . . . . . . . . . . . . . . 4-2
4.1.2.1 Conversion examples . . . . . . . . . . . . . . . . . . . . . . . . . . . . . . . . . . . . . . . . . . . 4-3
4.2 How to Create Logo Files for OpenStage Phones. . . . . . . . . . . . . . . . . . . . . . . . . . . . 4-5
4.2.1 For OpenStage 40. . . . . . . . . . . . . . . . . . . . . . . . . . . . . . . . . . . . . . . . . . . . . . . . . 4-5
4.2.2 For OpenStage 60/80 . . . . . . . . . . . . . . . . . . . . . . . . . . . . . . . . . . . . . . . . . . . . . . 4-6
4.3 How to Set Up the Corporate Phonebook (LDAP). . . . . . . . . . . . . . . . . . . . . . . . . . . . 4-9
4.3.1 Prerequisites: . . . . . . . . . . . . . . . . . . . . . . . . . . . . . . . . . . . . . . . . . . . . . . . . . . . . 4-9
4.3.2 Create an LDAP Template . . . . . . . . . . . . . . . . . . . . . . . . . . . . . . . . . . . . . . . . . 4-10
4.3.3 Load the LDAP Template into the Phone . . . . . . . . . . . . . . . . . . . . . . . . . . . . . . 4-13
4.3.4 Configure LDAP Access . . . . . . . . . . . . . . . . . . . . . . . . . . . . . . . . . . . . . . . . . . . 4-14
4.3.5 Test . . . . . . . . . . . . . . . . . . . . . . . . . . . . . . . . . . . . . . . . . . . . . . . . . . . . . . . . . . . 4-14
5 Technical Reference. . . . . . . . . . . . . . . . . . . . . . . . . . . . . . . . . . . . . . . . . . . . . . . . . . . 5-1
5.1 Menus . . . . . . . . . . . . . . . . . . . . . . . . . . . . . . . . . . . . . . . . . . . . . . . . . . . . . . . . . . . . . 5-1
5.1.1 Web Interface Menu . . . . . . . . . . . . . . . . . . . . . . . . . . . . . . . . . . . . . . . . . . . . . . . 5-1
5.1.1.1 Menu Structure . . . . . . . . . . . . . . . . . . . . . . . . . . . . . . . . . . . . . . . . . . . . . . . . 5-1
5.1.1.2 Web Pages . . . . . . . . . . . . . . . . . . . . . . . . . . . . . . . . . . . . . . . . . . . . . . . . . . . 5-4
5.1.2 Local Phone Menu . . . . . . . . . . . . . . . . . . . . . . . . . . . . . . . . . . . . . . . . . . . . . . . 5-30
5.2 Troubleshooting: Error Messages . . . . . . . . . . . . . . . . . . . . . . . . . . . . . . . . . . . . . . . 5-37
Glossary . . . . . . . . . . . . . . . . . . . . . . . . . . . . . . . . . . . . . . . . . . . . . . . . . . . . . . . . . . . . . . 6-1
Index . . . . . . . . . . . . . . . . . . . . . . . . . . . . . . . . . . . . . . . . . . . . . . . . . . . . . . . . . . . . . . . . . 7-1
A31003-S2010-M100-18-76A9
OpenStage HFA Family, Administration Manual
0-5

bkTOC.fm
Content Nur für den internen Gebrauch
A31003-S2010-M100-18-76A9
0-6 OpenStage HFA Family, Administration Manual

1Overview
Q
1.1 Important Notes
Do not operate the equipment in environments where there is a danger of explosions.
For safety reasons the phone should only be operating using the supplied plug in power
unit.
Use only original accessories!
Using other accessories may be dangerous, and will invalidate the warranty, extended
manufacturer’s liability and the CE mark.
Never open the telephone or add-on equipment. If you encounter any problems, contact System Support.
uebersicht.fm
Overview
Important Notes
7
Installation requirement for USA, Canada, Norway, Finland and Sweden: Connection
to networks which use outside cables is prohibited. Only in-house networks are permitted.
For USA and Canada only:
This equipment has been tested and found to comply with the limits for a Class B
digital device, pursuant to Part 15 of the FCC Rules. These limits are designed to
provide reasonable protection against harmful interference when the equipment is
operated in a residential installation. This equipment generates, uses, and can radiate radio frequency energy and, if not installed and used in accordance with the instructions, may cause harmful interference to radio communications. However, there
is no guarantee that interference will not occur in a particular installation. If this
equipment does cause harmful interference to radio or television reception, which
can be determined by turning the equipment off and on, the user is encouraged to
try to correct the interference by one or more of the following measures:
• Reorient or relocate the receiving antenna.
• Increase the separation between the equipment and receiver.
• Connect the equipment into an outlet on a circuit different from that to which the
receiver is connected.
• Consult the dealer or an experienced radio/TV technician for help.
This product is a UL Listed Accessory, I.T.E., in U.S.A. and Canada.
This equipment also complies with the Part 68 of the FCC Rules and the Industrie
Canada CS-03.
A31003-S2010-M100-18-76A9
OpenStage HFA Family, Administration Manual
1-1

uebersicht.fm
Overview
Maintenance Notes
1.2 Maintenance Notes
Do not operate the telephone in environments where there is a danger of explosions.
Use only original accessories. Using other accessories may be dangerous, and
will invalidate the warranty and the CE mark.
Never open the telephone or a key module. If you encounter any problems, contact System Support.
1.3 About the Manual
The instructions within this manual will help you in administering and maintaining the OpenStage phone. The instructions contain important information for safe and proper operation of
the phones. Follow them carefully to avoid improper operation and get the most out of your
multi-function telephone in a network environment.
This guide is intended for service providers and network administrators who administer VoIP
services using the OpenStage phone hand have a fundamental understanding of HFA/CorNet.
The tasks described in this guide are not intended for end users. Many of these tasks affect the
ability of a phone to function on the network and require an understanding of IP networking and
telephony concepts.
These instructions are laid out in a user-oriented manner, which means that you are led through
the functions of the OpenStage phone step by step, wherever expedient. For the users, a separate manual is provided.
1.4 Conventions for this Document
The terms for parameters and functions used in this document are derived from the web interface (WBM). In some cases, the the phone’s local menu uses shorter, less specific terms and
abbreviations. In a few cases the terminologies differ in wording. If so, the local menu term is
added with a preceding "/".
A31003-S2010-M100-18-76A9
1-2 OpenStage HFA Family, Administration Manual
1.5 The OpenStage HFA Family
2
7
10
1
4
6
5
9
3
8
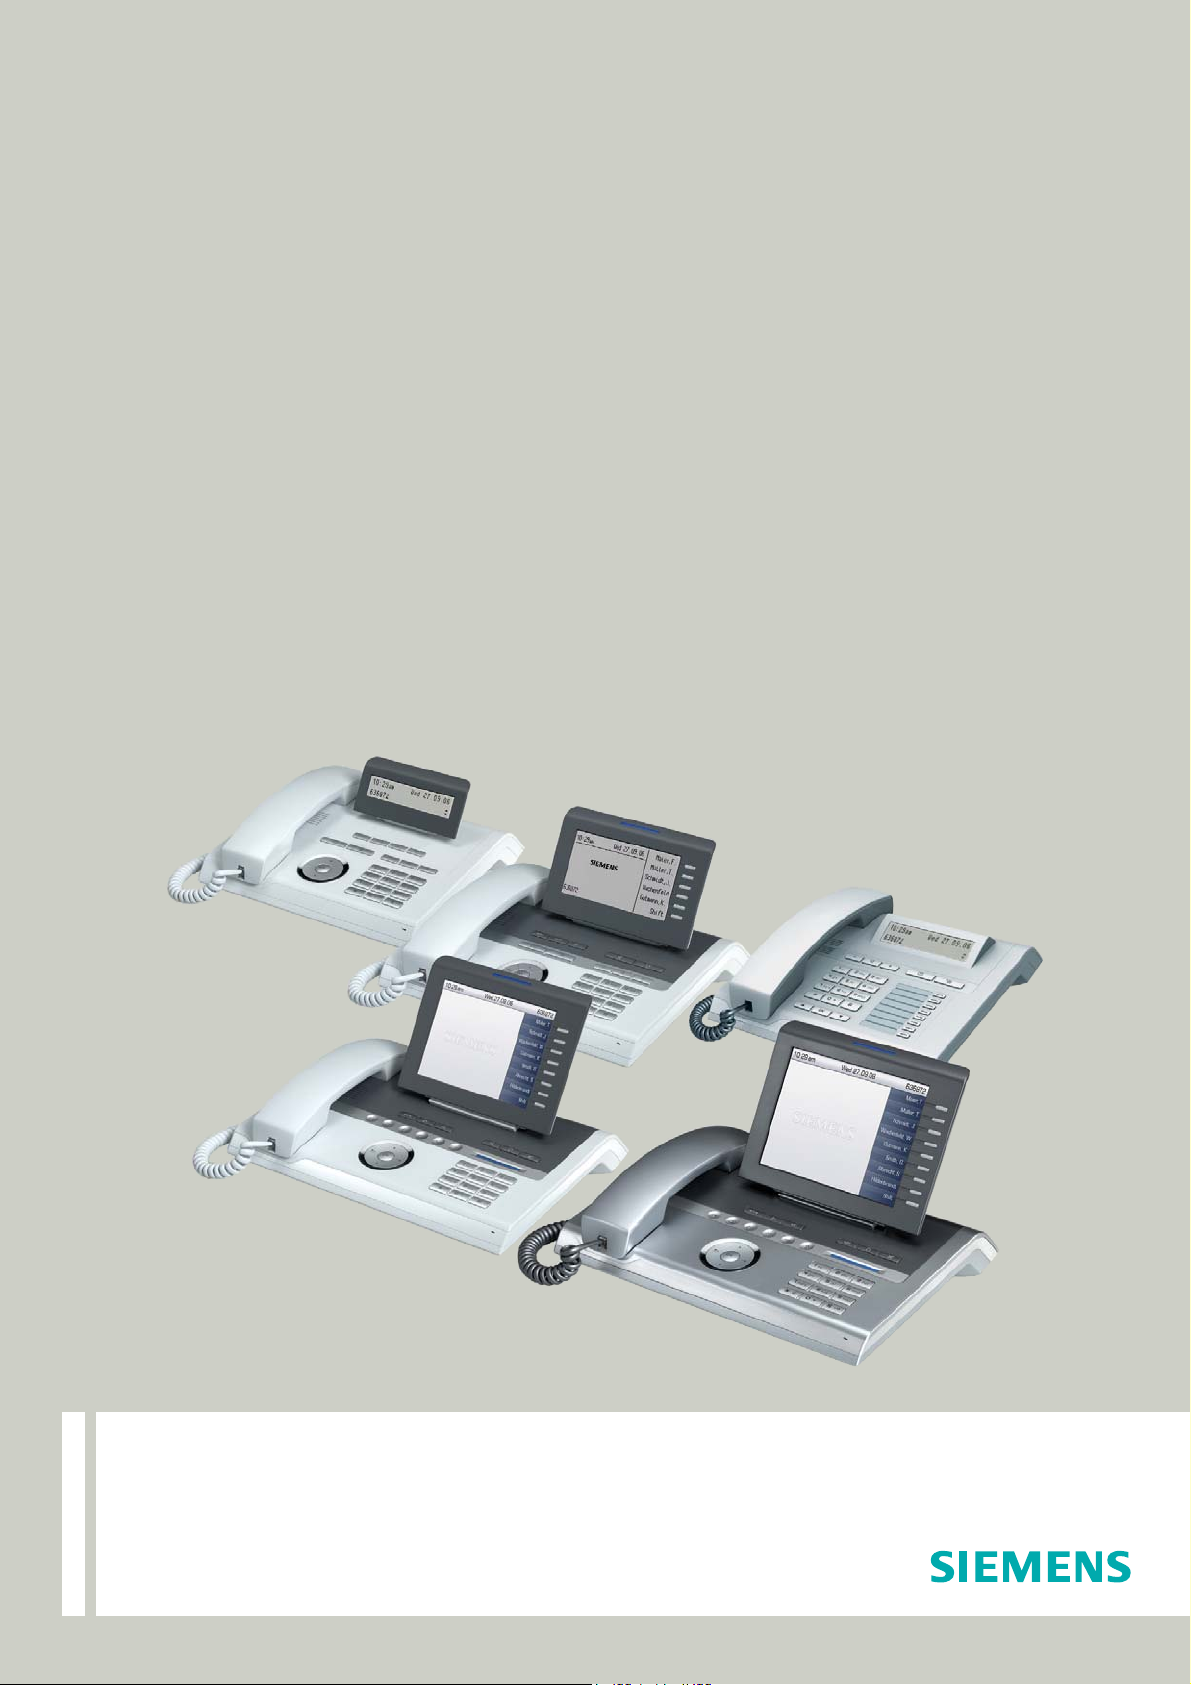
1.5.1 OpenStage 60/60 G/80/80 G HFA
uebersicht.fm
Overview
The OpenStage HFA Family
1The Handset lets you pick up and dial calls in the usual manner.
2The Graphics Display provides intuitive support for telephone operation.
3 The user-friendly Application Keys provide easy access to your telephone’s
applications.
4 With the TouchGuide, the user/administrator can navigate in the various pho-
ne functions, applications, and configuration menus.
5 You can customize your telephone in line with your personal needs by assig-
ning individual phone numbers and functions to the Program Keys.
6 Press the Function Keys to access frequently used telephony functions.
7The Audio Keys let you optimize the audio settings on your telephone.
8With the TouchSlider, the user can adjust the volume, e.g. of ringtones.
9 Inbound calls are visually signaled on the alert bar.
10 The keypad is used for entering phone numbers and text.
[Feature overview]
A31003-S2010-M100-18-76A9
OpenStage HFA Family, Administration Manual
1-3
uebersicht.fm
1
2
3
4
5
6 7
8
9
Overview
The OpenStage HFA Family
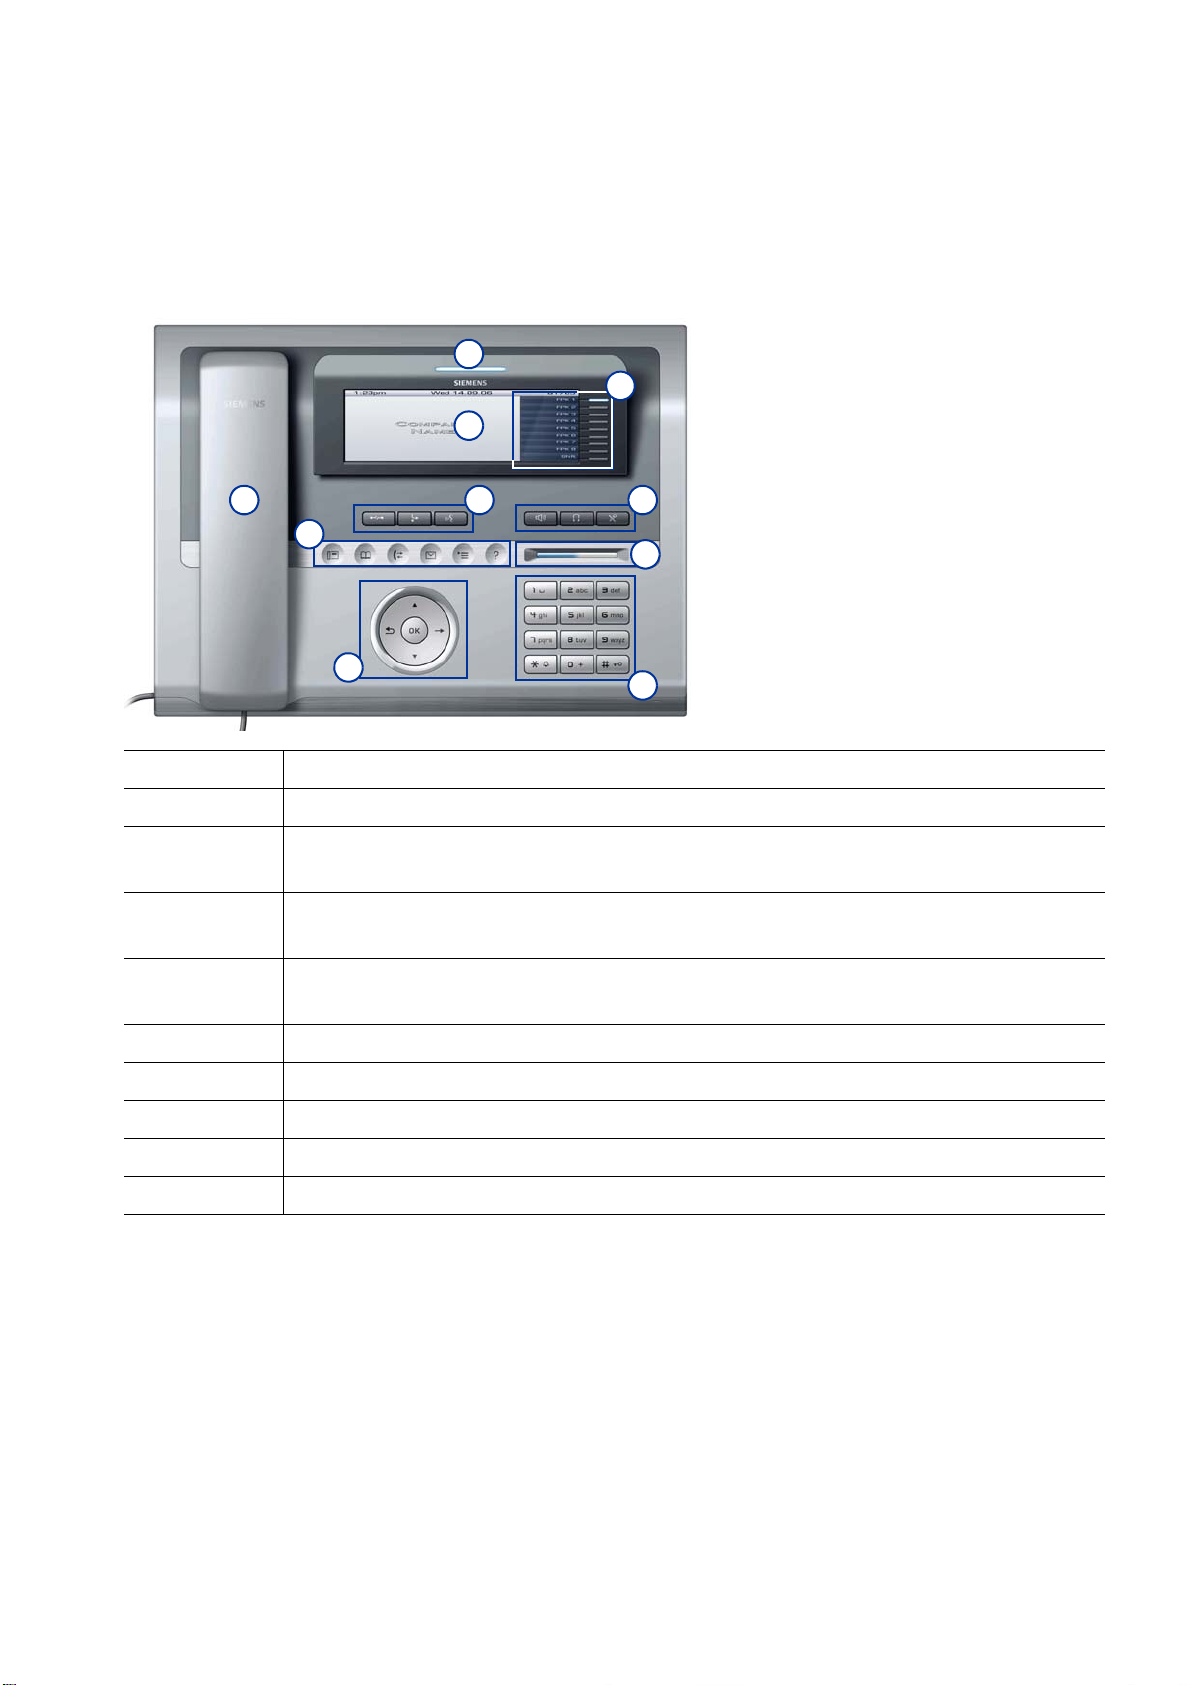
1.5.2 OpenStage 40/40 G HFA
1 The Handset lets you pick up and dial calls in the usual manner.
2 The Graphics Display provides intuitive support for telephone operation.
3 The user-friendly Application Keys provide easy access to your telephone’s
applications.
4 With the Navigation Key, the user/administrator can navigate in the various
phone functions, applications, and configuration menus.
5 You can customize your telephone in line with your personal needs by assig-
ning individual phone numbers and functions to the Program Keys.
6 Press the Function Keys to access frequently used telephony functions.
7 The Audio Keys let you optimize the audio settings on your telephone.
8 Inbound calls are visually signaled on the Call Display.
9 The keypad is used for entering phone numbers and text.
A31003-S2010-M100-18-76A9
1-4 OpenStage HFA Family, Administration Manual
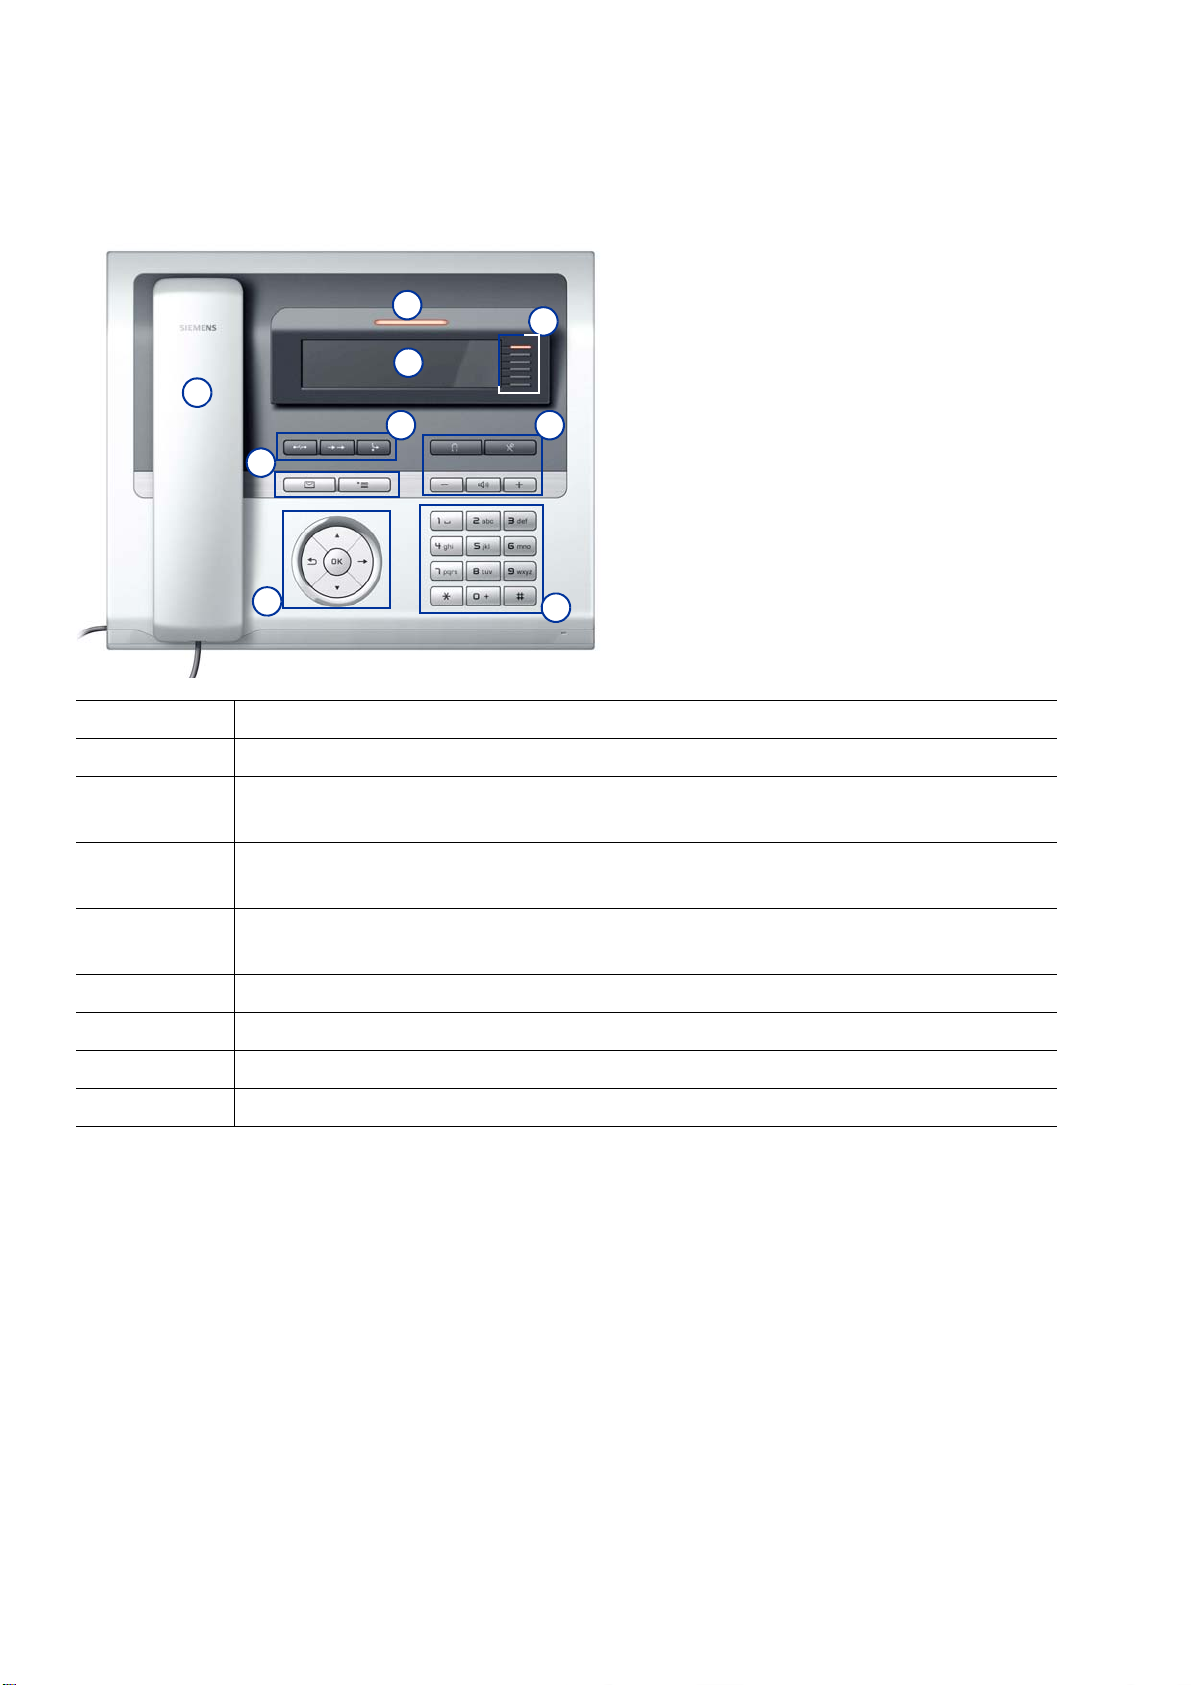
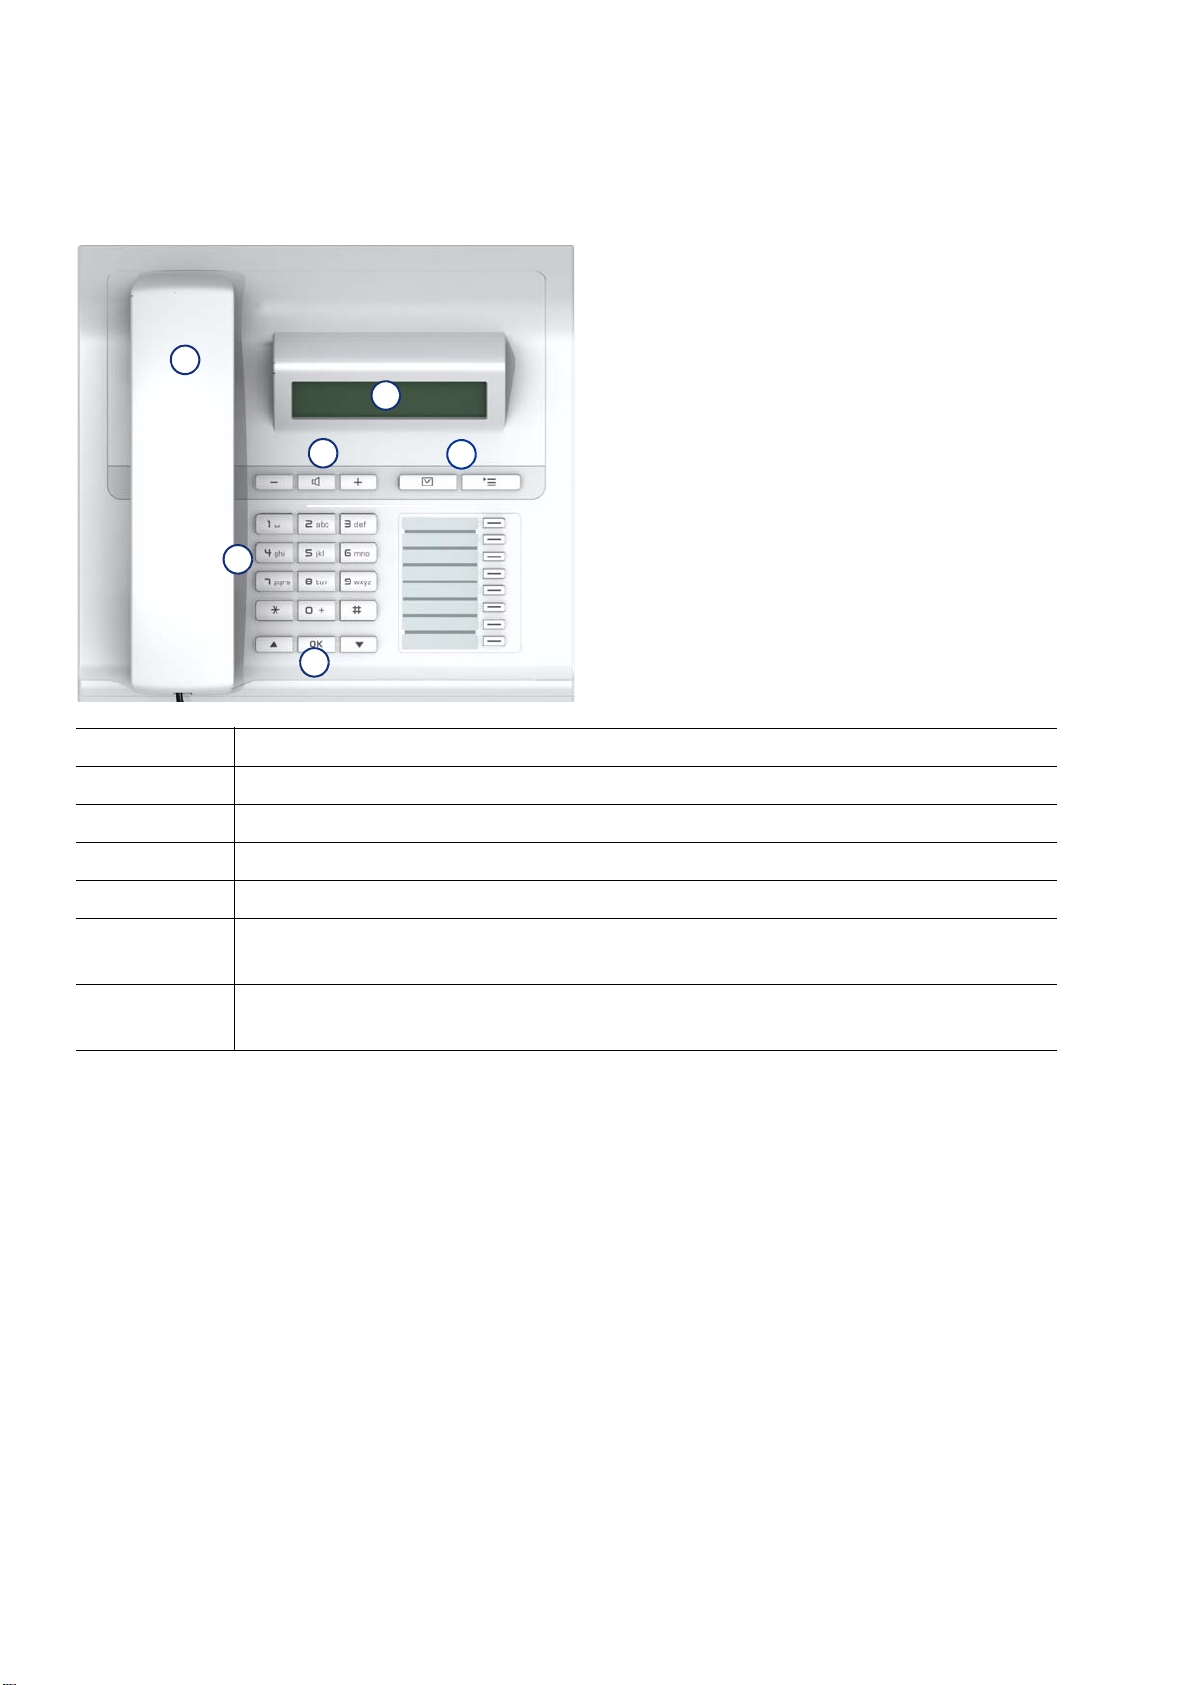
1.5.3 OpenStage 20/20 E/20 G HFA
1
3
2
4
5
6
uebersicht.fm
Overview
The OpenStage HFA Family
1The Handset lets you pick up and dial calls in the usual manner.
2The Display provides intuitive support for telephone operation.
3 The user-friendly Application Keys provide easy access to your telephone’s
applications.
4 Press the Function Keys to access frequently used telephony functions.
5With the Navigation Key, the user/administrator can navigate in the various
phone functions, applications, and configuration menus.
6The keypad is used for entering phone numbers and text.
A31003-S2010-M100-18-76A9
OpenStage HFA Family, Administration Manual
1-5
uebersicht.fm
7
1
5
3
4
2
6
Overview
The OpenStage HFA Family
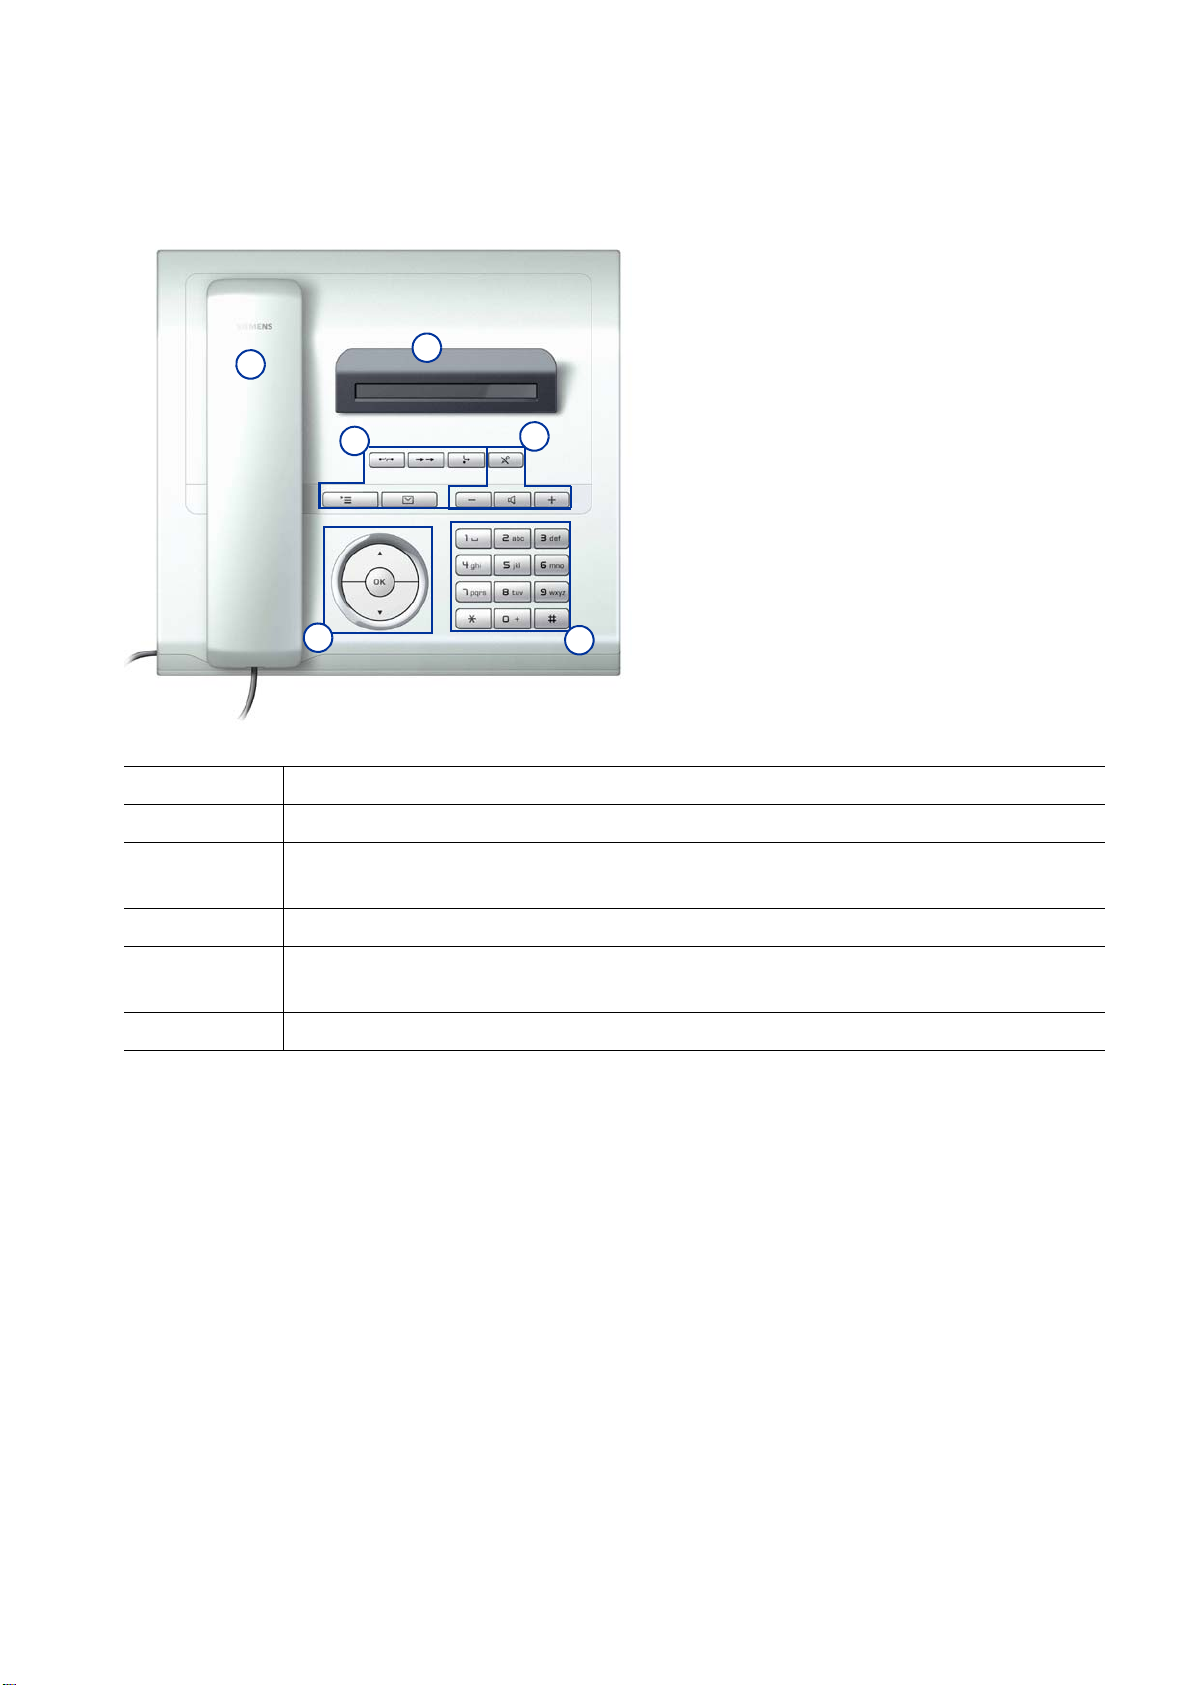
1.5.4 OpenStage 15/15 G HFA
1 With the Handset, the user can pick up and dial calls in the usual manner.
2 The Display provides intuitive support for telephone operation.
3 With the Audio Keys, the user can optimize the audio settings.
4 Press the Function Keys to access frequently used telephony functions.
5 The Keypad is used for entering phone numbers and text.
6 With the Navigation Keys, the user/administrator can navigate in the various
phone functions, applications, and configuration menus.
7 The Program Keys enable the user to customize the telephone in line with
his/her personal needs by assigning individual phone numbers and functions.
A31003-S2010-M100-18-76A9
1-6 OpenStage HFA Family, Administration Manual

uebersicht.fm
Overview
Administration Interfaces
1.6 Administration Interfaces
You can configure the OpenStage phone by using any of the following methods.
1.6.1 Web-based Management (WBM)
This method employs a web browser for communication with the phone via HTTP or HTTPS. It
is applicable for remote configuration of individual IP phones in your network. Direct access to
the phone is not required.
To use this method, the phone must first obtain IP connectivity.
>
The remote configuration is not applicable while the phone is not in idle mode.
1.6.2 Deployment Service (DLS)
The Deployment Service (DLS) is a HiPath Management application for administering phones
and soft clients in both HiPath and non-HiPath networks. It has a Java-supported, web-based
user interface, which runs on an internet browser. For further information, please refer to the
Deployment Service Administration Guide.
1.6.3 Local Phone Menu
This method provides direct configuration of an the OpenStage phone. Direct access to the
phone is required.
As long as the IP connection is not properly configured, you have to use this method
>
to set up the phone.
A31003-S2010-M100-18-76A9
OpenStage HFA Family, Administration Manual
1-7

uebersicht.fm
Overview
Changes in SW-Version V2R1
1.7 Changes in SW-Version V2R1
Support of “stackless solution”
It was decided for SME to abandon the H.323 protocol and extend the CorNet protocol to support media channel negotiation.
There is no change in the implemented functionality.
The only new add-on of V2R1 is the support for the new CorNet TC based payload signaling
protocol.
A31003-S2010-M100-18-76A9
1-8 OpenStage HFA Family, Administration Manual

inbetriebnahme.fm
Startup
Prerequisites
2Startup
2.1 Prerequisites
The advance acts as an endpoint client on an IP telephony network, and has the following network requirements:
• An Ethernet connection to a LAN
Only use switches in the LAN to which the OpenStage phone is connected. An
7
• A HiPath Communications System: HiPath 3000, HiPath 4000, OpenScape Office or
OpenScape Business.
• Usage of Voice VLANs is recommended.
• An FTP Server for file transfer, e. g. firmware, configuration data, application software
• A Dynamic Host Configuration Protocol (DHCP) server (recommended).
operation at hubs can cause serious malfunctions in the hub and in the whole
network.
See also: http://wiki.siemens-enterprise.com/wiki/IEEE_802.1x.
A31003-S2010-M100-18-76A9
OpenStage HFA Family, Administration Manual
2-1
inbetriebnahme.fm
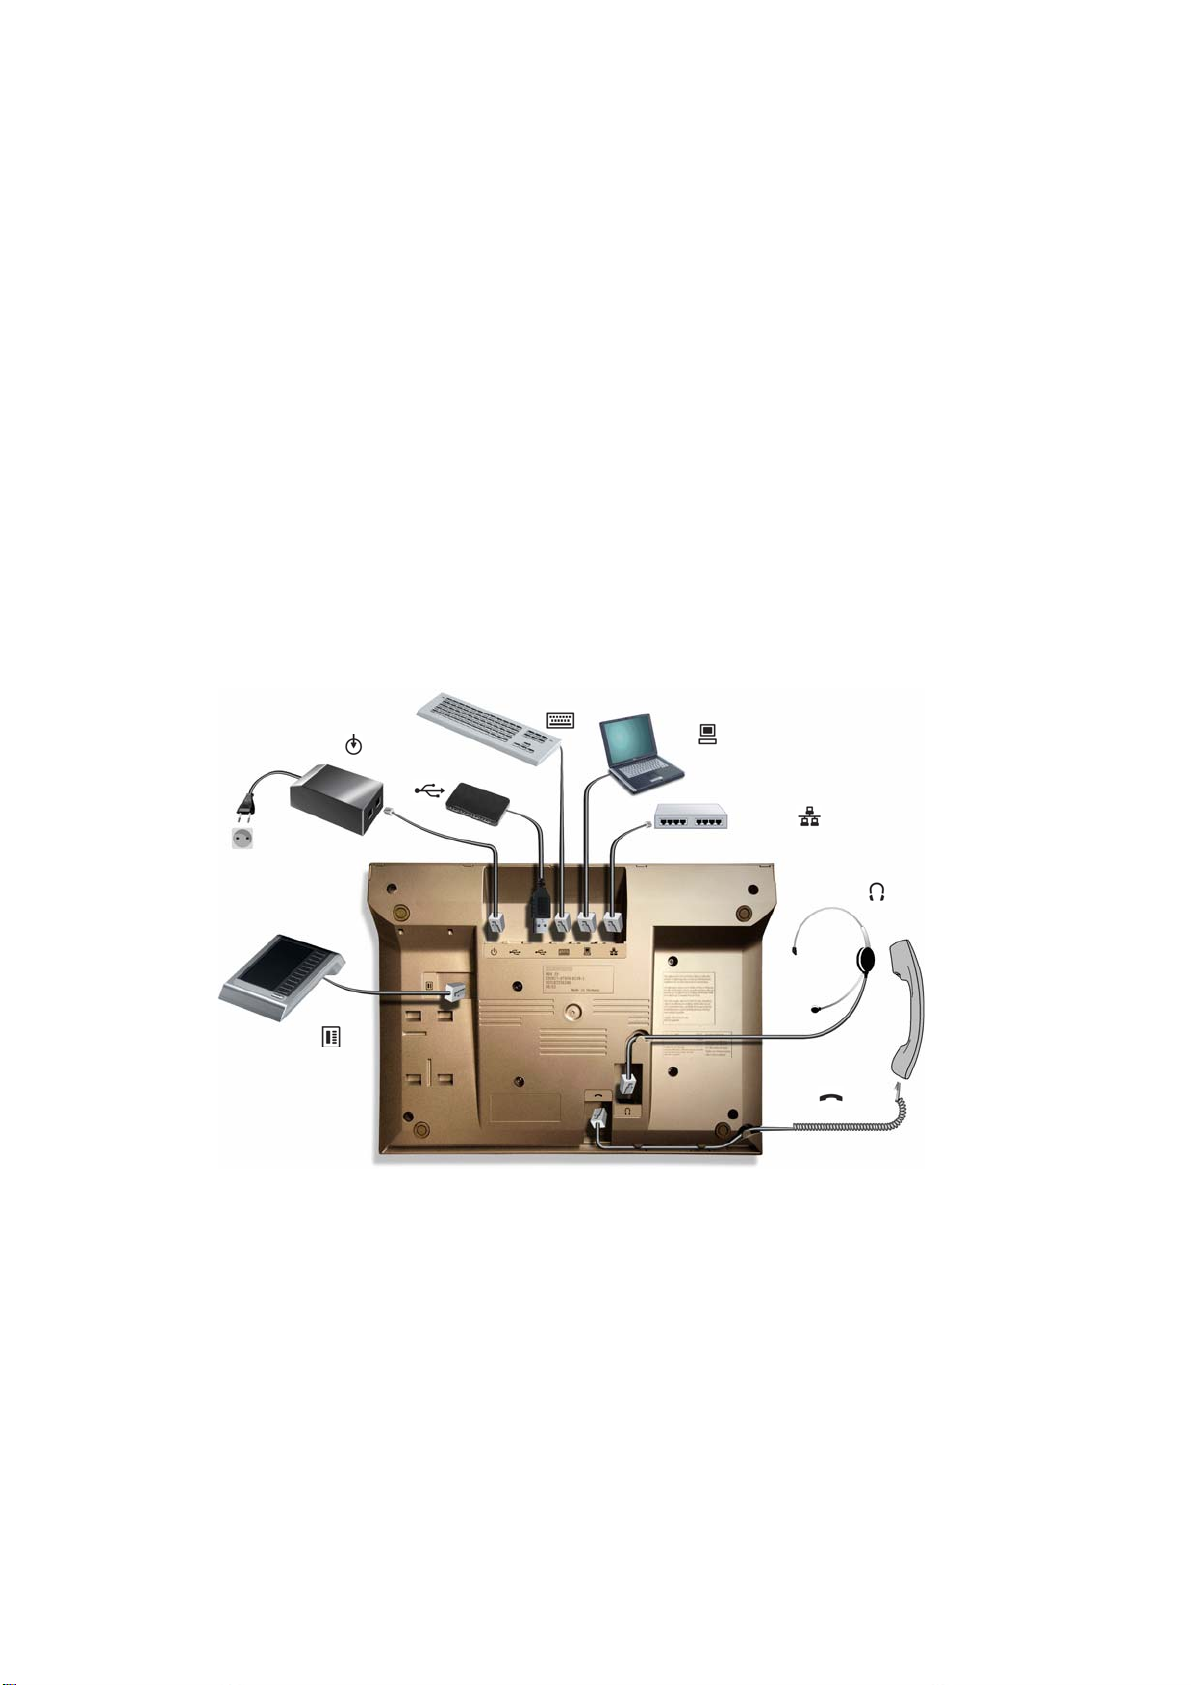
PC
Switch
Headset
Handset
Keyboard
Power supply
Key Module
USB
Extension
Startup
Assembling and Installing the Phone
2.2 Assembling and Installing the Phone
2.2.1 Shipment
• Phone
• Handset
• Handset cable
• Subpackage:
• Document "Information and Important Operating Procedures"
• Emergency number sticker
2.2.2 Connectors at the bottom side
OpenStage 60
2-2 OpenStage HFA Family, Administration Manual
A31003-S2010-M100-18-76A9
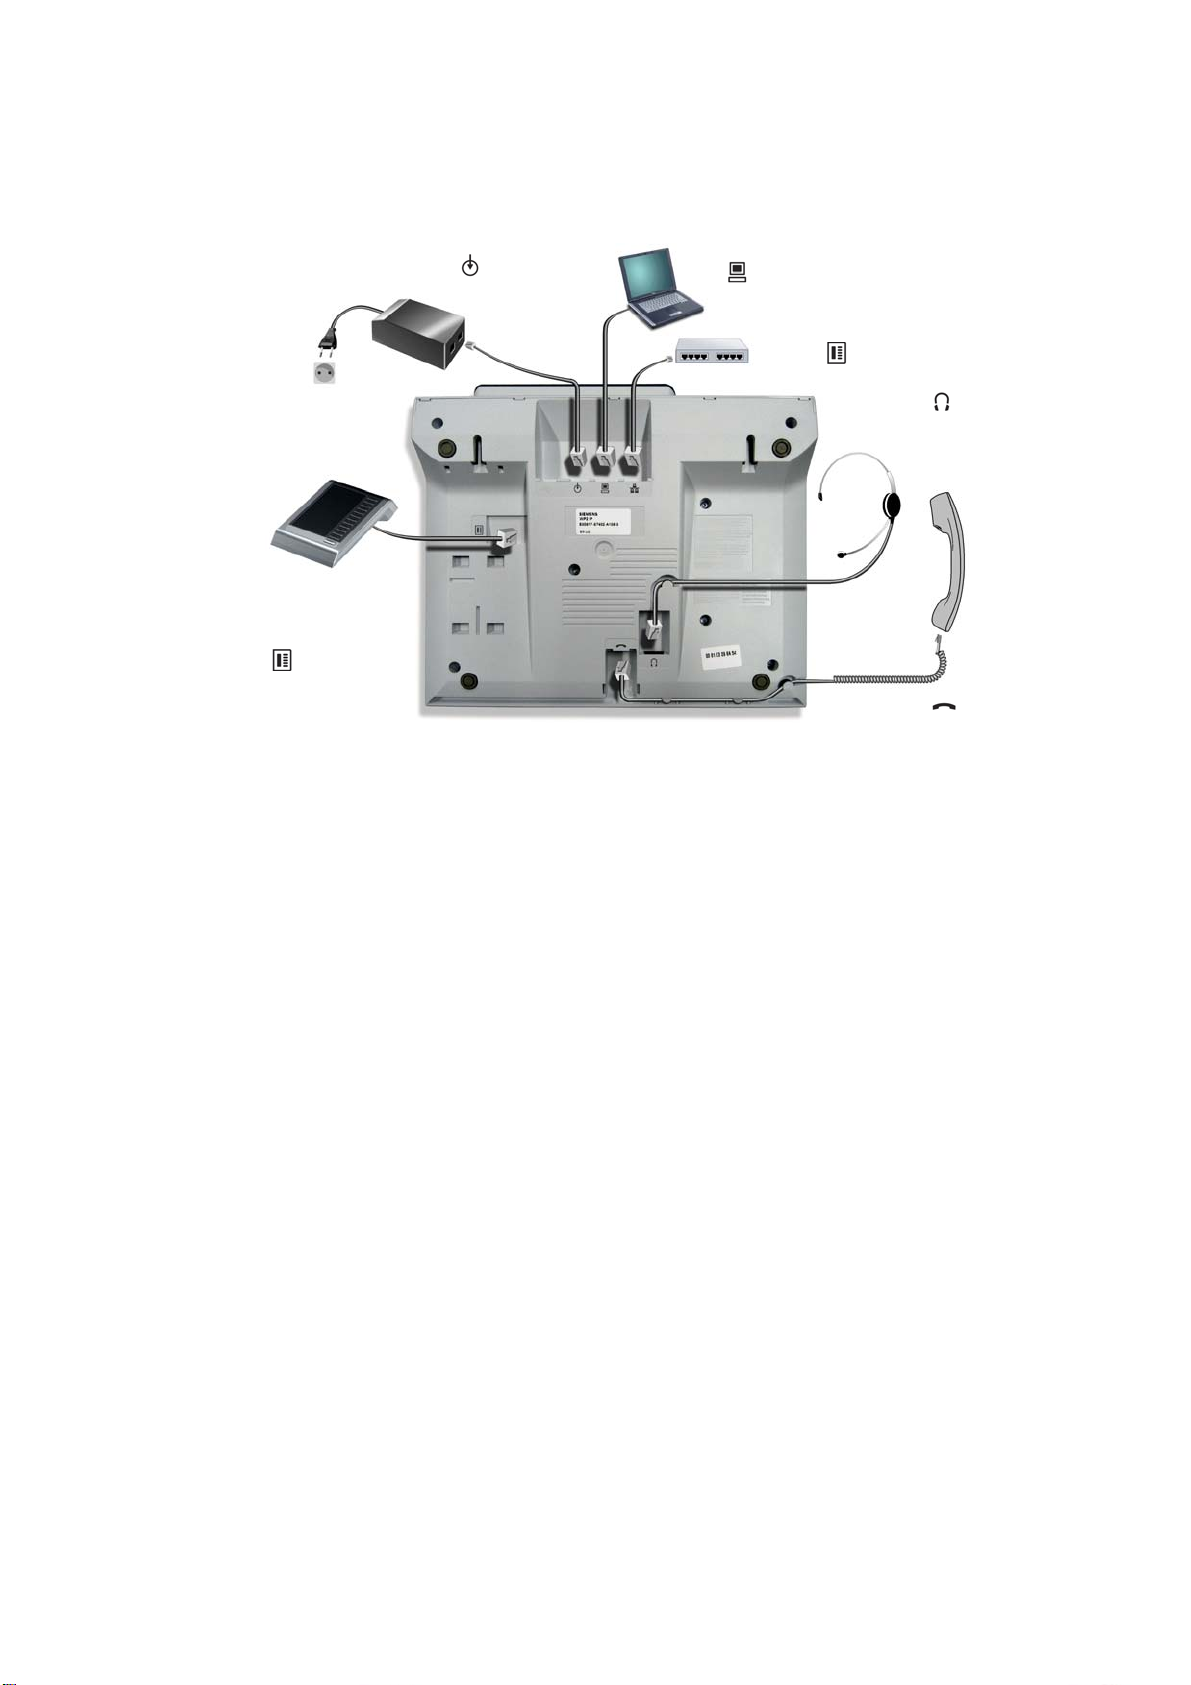
OpenStage 40 (OpenStage 15 and 20 similar, except 1)
PC
Switch
Headset
[1]
Handset
Power supply
Key Module
[1]
[1] OpenStage 40 and
OpenStage 15 only
inbetriebnahme.fm
Startup
Assembling and Installing the Phone
A31003-S2010-M100-18-76A9
OpenStage HFA Family, Administration Manual
2-3

inbetriebnahme.fm
Startup
Assembling and Installing the Phone
2.2.3 Assembly
1. Handset
Insert the plug on the long end of the handset cable into the jack on the base of the
telephone and press the cable into the groove provided for it. Next, insert the plug on the
short end of the handset cable into the jack on the handset.
2. Emergency Number Sticker
Write your telephone number and those for the fire and police departments on the included
label and attach it to the telephone housing underneath the handset (see arrow).
A31003-S2010-M100-18-76A9
2-4 OpenStage HFA Family, Administration Manual
inbetriebnahme.fm
Startup
Assembling and Installing the Phone
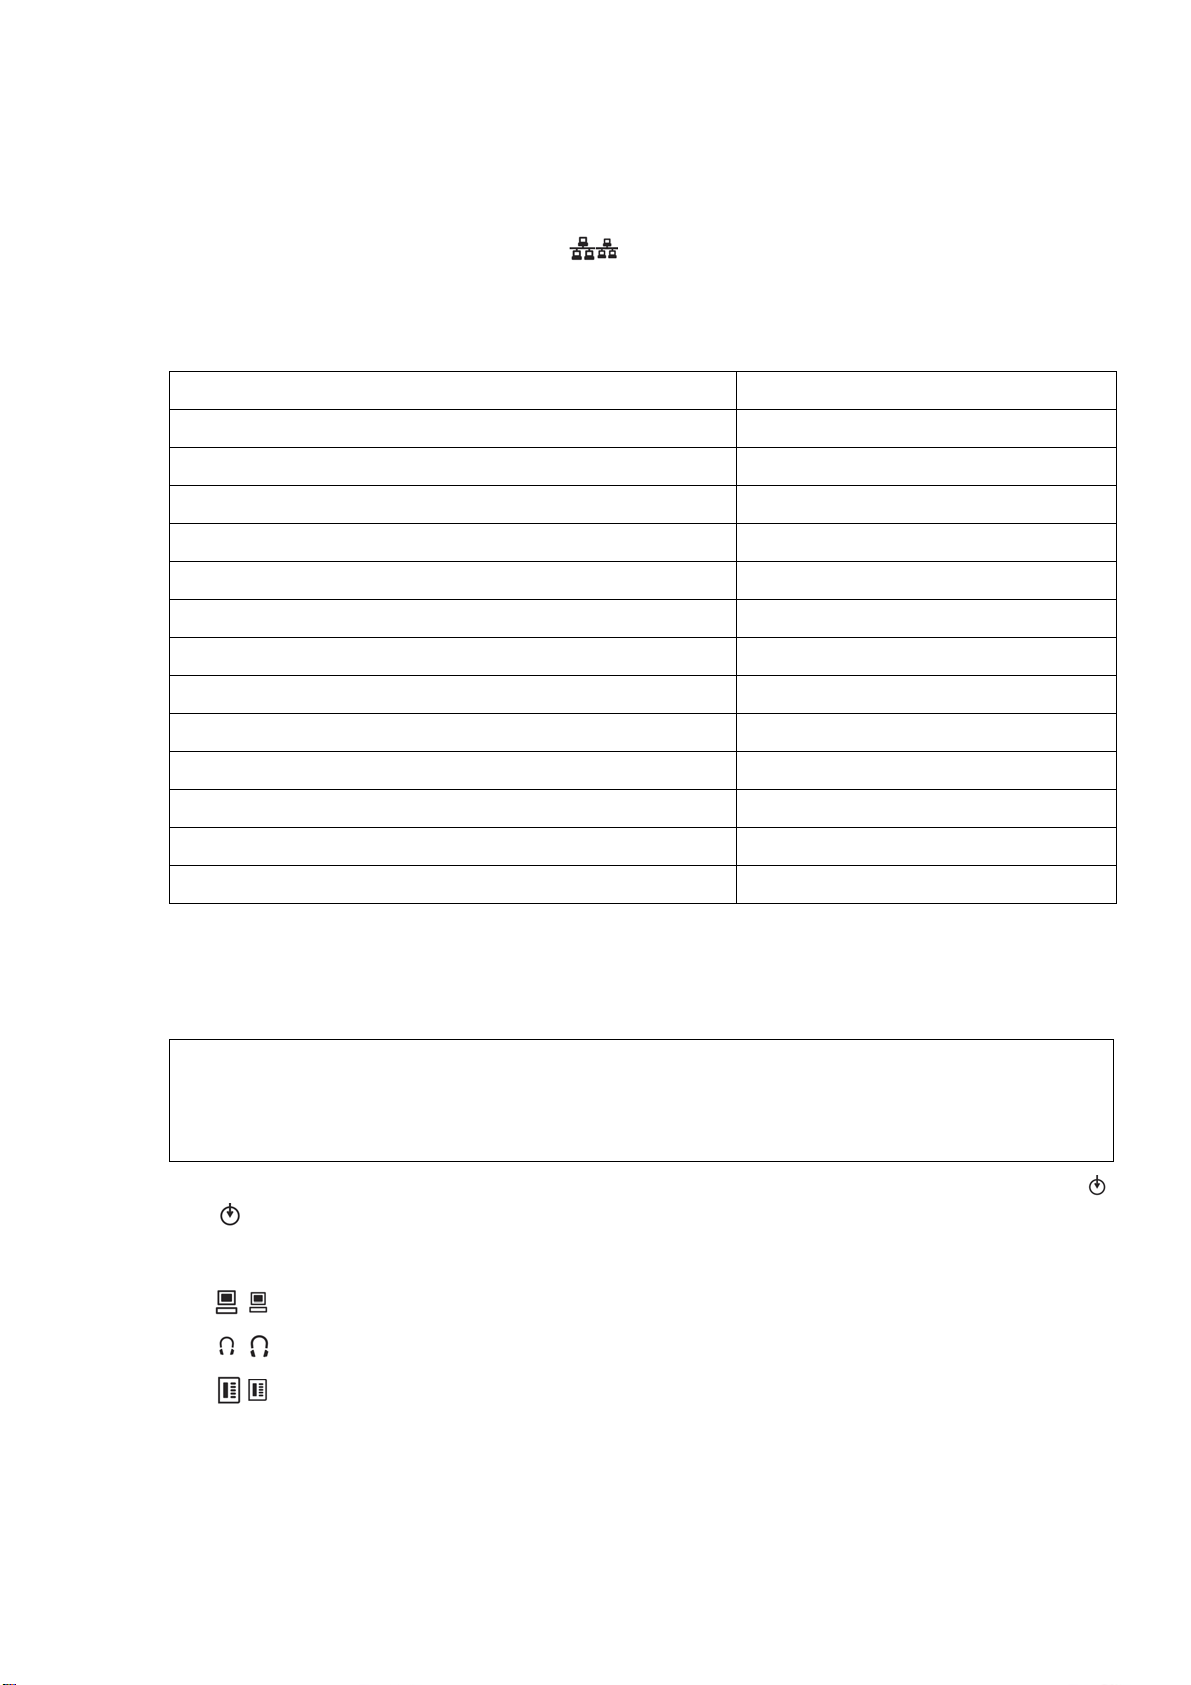
2.2.4 Connecting the Phone
1. Plug the LAN cable into the connector at the bottom of the telephone and connect the
cable to the LAN/switch. If PoE (Power over Ethernet) is to be used, the PSE (Power Sourcing Equipment) must meet the IEEE 802.3af specification.
For details about the required power supply, see the following table:
Model Power Consumption/Supply
OpenStage 15
OpenStage 15 G
OpenStage 20 Power Class 1
OpenStage 20 E Power Class 1
OpenStage 20 G Power Class 2
OpenStage 40
1
1
2
Power Class 1
Power Class 2
Power Class 2
OpenStage 40 + 2nd Key Module Power Class 2
OpenStage 40 G
2
Power Class 3
OpenStage 40 G + 2nd Key Module Power Class 3
OpenStage 60/80
3
Power Class 3
OpenStage 60/80 + 2nd Key Module Power Class 3
OpenStage 60/80 G
3
Power Class 3
OpenStage 60/80 G + 2nd Key Module External power unit required
1 Includes 1 Key Module 15.
2 Includes 1 Key Module.
3 Includes 1 Key Module + USB-Extension with Acoustic Unit.
2. Only if Power over Ethernet (PoE) is NOT supported:
Use only the plug-in power supply unit fitting the OpenStage phone:
7
EU: C39280-Z4-C510
UK: C39280-Z4-C512
USA: C39280-Z4-C511
Plug the power supply unit into the mains. Connect the plug-in power supply unit to the
jack at the bottom of the phone.
3. If applicable, connect the following optional jacks:
• LAN connection to PC
• Headset (accessory)
• Connection to add-on device (accessory)
A31003-S2010-M100-18-76A9
OpenStage HFA Family, Administration Manual
2-5

inbetriebnahme.fm
Startup
Assembling and Installing the Phone
• Connection to external keyboard (accessory)
• USB master for connection to a USB device (e. g. accessory USB Acoustic
Adapter)
To prevent damage on the OpenStage phone, connect an USB stick using
7
7
the adapter cable C39195-Z7704-A5.
Do not connect a USB hub to the phone’s USB port, as this may lead to
stability problems.
A31003-S2010-M100-18-76A9
2-6 OpenStage HFA Family, Administration Manual

inbetriebnahme.fm
Startup
Assembling and Installing the Phone
2.2.5 Key Module
A key module provides 12 additional program keys. Key modules are available for OpenStage
15/40/60/80 phones. A maximum of 2 key modules can be connected to one phone.
The following table shows which key modules can be connected to the particular phone types.
Phone Type OpenStag Key Module 15 OpenStage Key Module
OpenStage 15 1 -
OpenStage 40 1 2
OpenStage 60/80 - 2
Please note that OpenStage Key Modules (self-labeling) and
>
OpenStage Key Module 15 (paper label) can not be combined. For key labelling, a
special tool is available; please refer to:
http://wiki.siemens-enterprise.com/index.php/Key_Labelling_Tool
The configuration of a key on the key module is just the same as the configuration of a phone
key.
A31003-S2010-M100-18-76A9
OpenStage HFA Family, Administration Manual
2-7

inbetriebnahme.fm
Startup
Quick Start
2.3 Quick Start
This section describes a typical case: the setup of an OpenStage endpoint in an environment
using a DHCP server and the web interface. For different scenarios, cross-references to the
corresponding section of the administration chapter are given.
Alternatively, the DLS (Deployment Service) administration tool can be used. Its
>
>
Plug & Play functionality allows to provide the phone with configuration data by assigning an existing data profile to the phone’s MAC address or E.164 number. For
further information, see the Deployment Service Administration Manual.
Any settings made by a DHCP server are not configurable by other configuration
tools.
A31003-S2010-M100-18-76A9
2-8 OpenStage HFA Family, Administration Manual
inbetriebnahme.fm
Startup
Quick Start
2.3.1 Access the Web Interface (WBM)
1. Open your web browser (MS Internet Explorer or Firefox) and enter the appropriate URL.
Example: https://192.168.1.15 or https://myphone.phones (firmware V2)
Up to firmware V1R4, unencrypted HTTP can be used for web access. In this
>
For configuring the phone’s DNS name, which is possible which firmware V2, please refer
to section 3.3.6.3, “Terminal Hostname (V2)”.
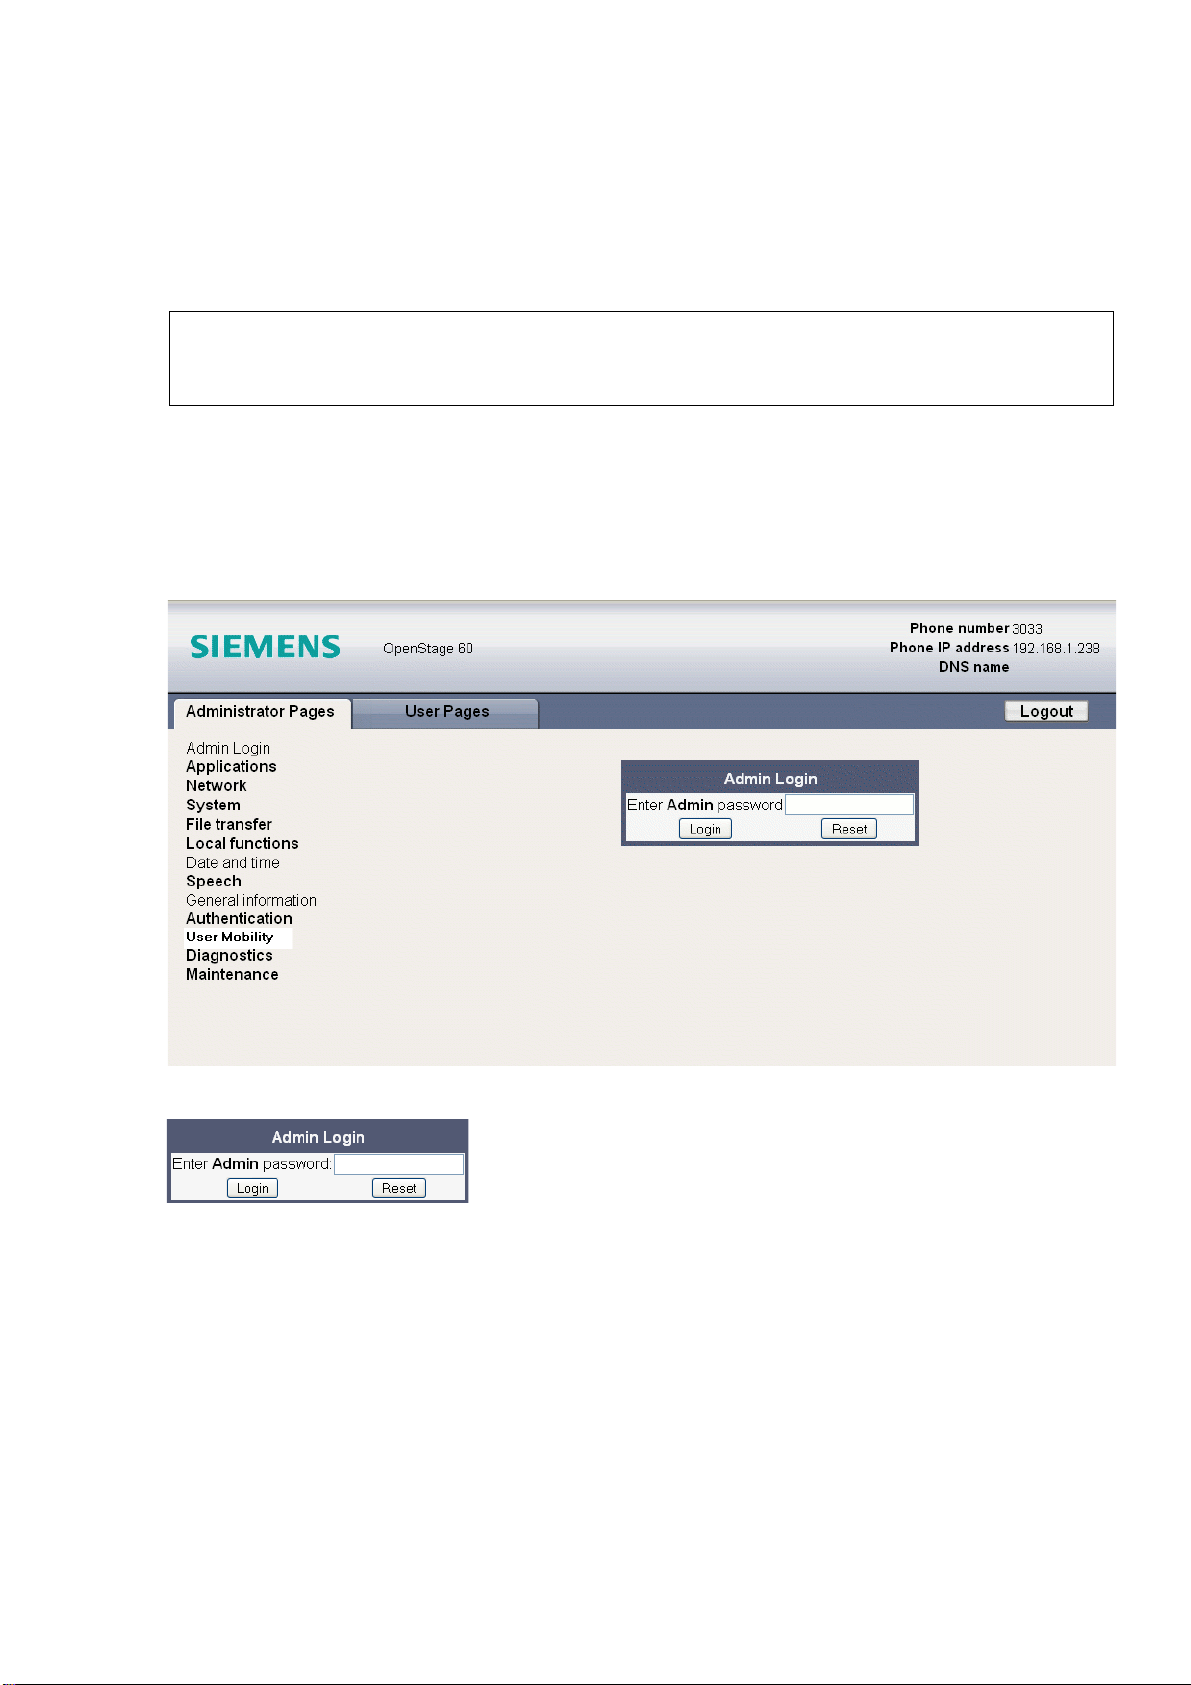
If the browser displays a certificate notification, accept it. The start page of the web interface appears. In the upper right corner, the phone number, the phone’s IP address, as well
as the DNS name assigned to the phone are displayed. The left corner contains the user
menu tree.
case, port 8085 must be added to the phone address or DNS name, for example
http://192.168.1.15:8085
2. Click on the tab "Administrator Pages". In the dialog box, enter the admin password:
3. The administration menu is displayed in the left column. If you click on an item which is
printed in normal style, the corresponding dialog opens in the center of the page. If you
click on an item printed in bold letters, a sub-menu opens in the right column.
2.3.2 Basic Network Configuration
For basic functionality, DHCP must provide the following parameters:
A31003-S2010-M100-18-76A9
OpenStage HFA Family, Administration Manual
2-9

inbetriebnahme.fm
Startup
Quick Start
• IP Address: IP Address for the phone.
• Subnet Mask (option #1): Subnet mask of the phone.
• Default Route (option #3 "Router"): IP Address of the default gateway which is used for
connections beyond the subnet.
• DNS IP Addresses (option #6 "Domain Server"): IP Addresses of the primary and sec-
ondary DNS servers.
If no DHCP server is present, see section 3.3.3, “IP Address - Manual Configuration” for IP address and subnet mask, and section 3.3.4, “Default Route/Gateway” for default route.
2.3.3 Extended Network Configuration
To have constant access to other subnets, you can enter a total of two more network destinations. For each further domain/subnet you wish to use, first the IP address for the destination,
and then that of the router must be given. The option’s name and code are as follows:
• option #33 "Static Routing Table"
For manual configuration of specific/static routing see section 3.3.5, “Specific IP Routing”.
Also the DNS domain wherein the phone is located can be specified by DHCP.
The option’s name and code are as follows:
• option #15 "Domain Name"
For manual configuration of the DNS domain name see section 3.3.6.1, “DNS Domain Name”.
2.3.4 VLAN Discovery
If the phone is to be located in a VLAN (Virtual LAN), a VLAN ID must be assigned. If the VLAN
shall be provided by DHCP, VLAN Discovery must be set to "DHCP" (see section 3.2.2.1, “Au-
tomatic VLAN discovery using DHCP”). The corresponding DHCP option is vendor-specific,
thus a specific procedure is necessary.
2.3.4.1 Using a Vendor Class
It is recommended to define a vendor class on the DHCP server, thus enabling server and
phone to exchange vendor-specific data exclusively. The data is disclosed from other clients.
The following steps are required for the configuration of the Windows DHCP server.
Setting up a new vendor class using the Windows DHCP Server
1. In the Windows Start menu, select Start > Programs > Administrative Tools > DHCP.
2. In the DHCP console menu, right-click the DHCP server in question and select Define
Vendor Classes... in the context menu.
A31003-S2010-M100-18-76A9
2-10 OpenStage HFA Family, Administration Manual
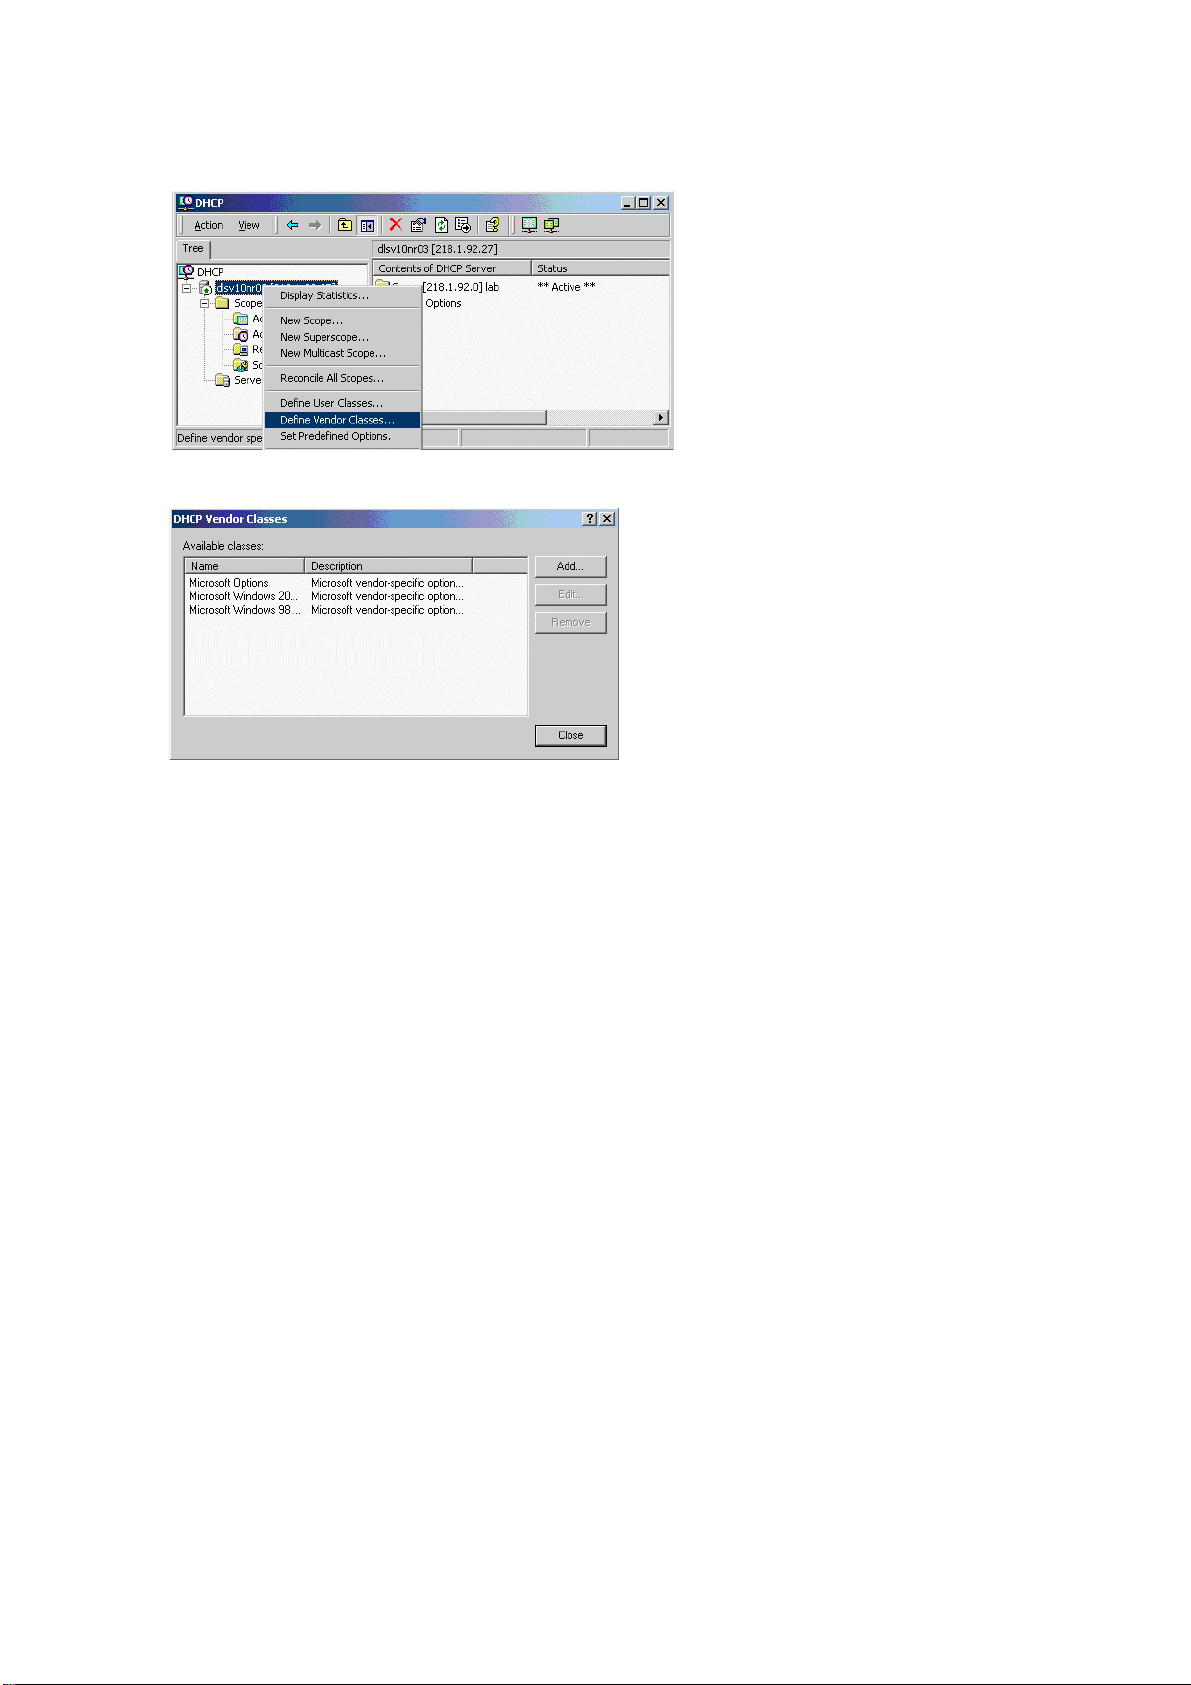
3. A dialog window opens with a list of the classes that are already available.
inbetriebnahme.fm
Startup
Quick Start
A31003-S2010-M100-18-76A9
OpenStage HFA Family, Administration Manual
2-11
inbetriebnahme.fm
Startup
Quick Start
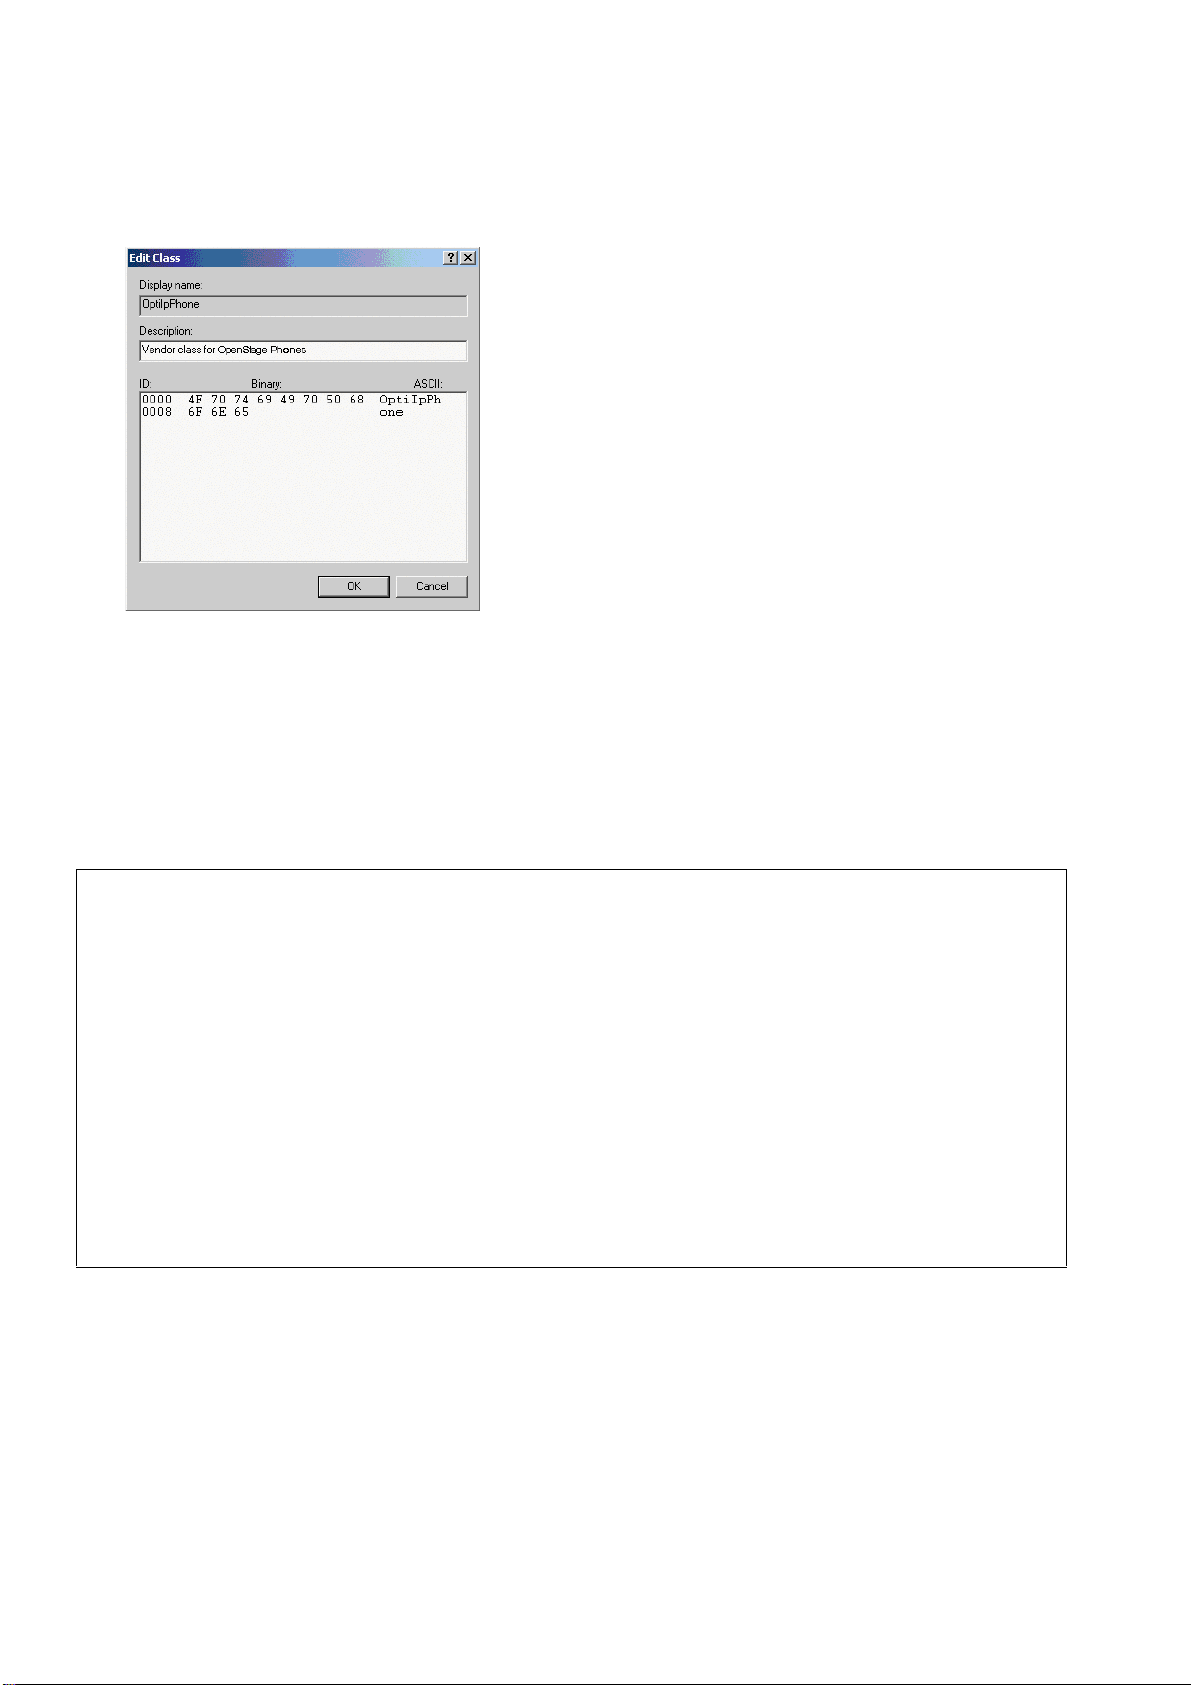
4. Define a new vendor class with the name OptiIpPhone and enter a description of this
class.
Click OK to apply the changes. The new vendor class now appears in the list.
5. Exit the window with Close.
Add Options to the New Vendor Class
Next, two options resp. tags will be added to the vendor class. Two passes are needed for this:
in the first pass, tag #1 with the required value "Siemens" is entered, and in the second pass,
the VLAN ID is entered as tag #2.
For DHCP servers on a Windows 2003 Server (pre-SP2):
>
Windows 2003 Server contains a bug that prevents you from using the DHCP console to create an option with the ID 1 for a user-defined vendor class. Instead, this
entry must be created with the netsh tool in the command line (DOS shell).
You can use the following command to configure the required option (without error
message) so that it is also appears later in the DHCP console:
netsh dhcp server add optiondef 1 "Optipoint element 001"
STRING 0 vendor=OptiIpPhone comment="Tag 001 for Optipoint"
The value SIEMENS for optiPoint Element 1 can then be re-assigned over the
DHCP console.
This error was corrected in Windows 2003 Server SP2.
A31003-S2010-M100-18-76A9
2-12 OpenStage HFA Family, Administration Manual
inbetriebnahme.fm
Startup
Quick Start
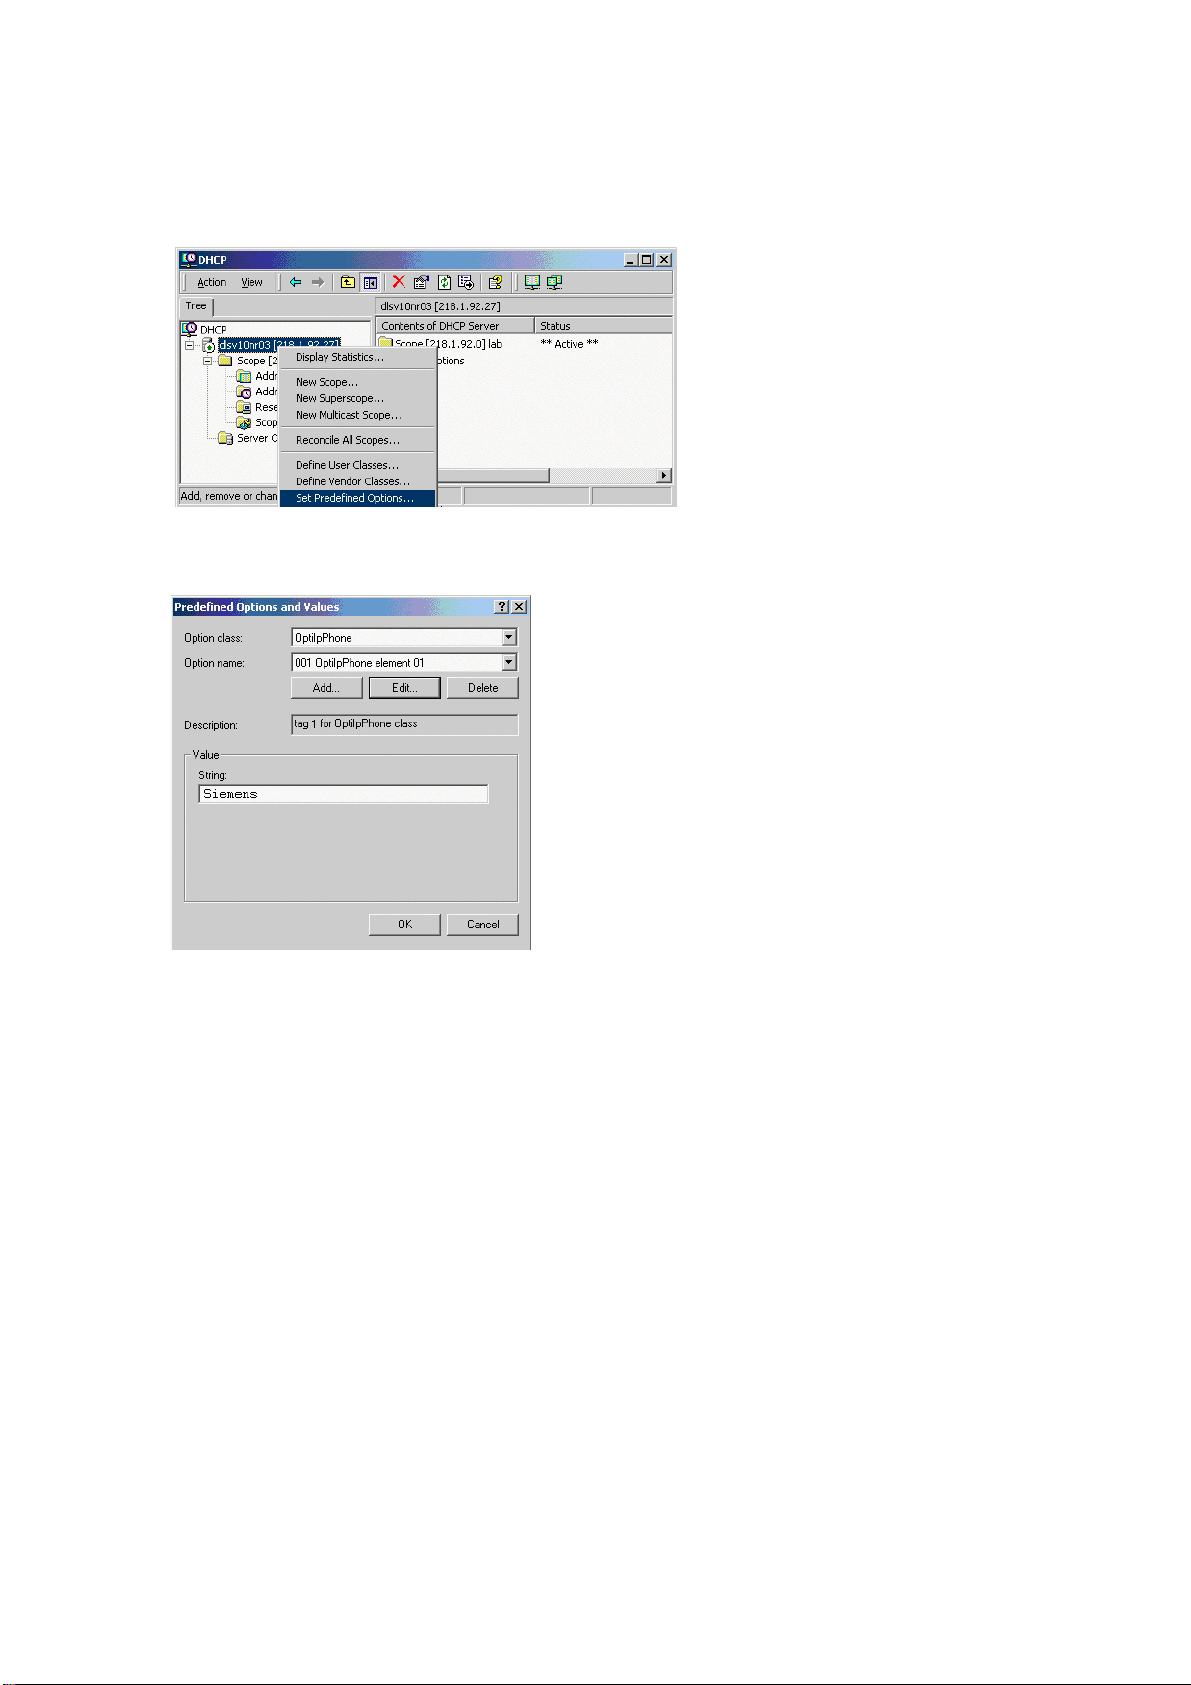
6. In the DHCP console menu, right-click the DHCP server in question and select Set Predefined Options from the context menu.
7. In the dialog, select the previously defined OptiIpPhone class and click on Add... to add
a new option.
A31003-S2010-M100-18-76A9
OpenStage HFA Family, Administration Manual
2-13

inbetriebnahme.fm
Startup
Quick Start
8. Enter the following data for the new option:
1. First Pass: Option 1
• Name: Free text, e. g. "OptiIpPhone element 01"
• Data type: "String"
• Code: "1"
• Description: Free text.
2. Second Pass: Option 2
• Name: Free text, e. g. "OptiIpPhone element 02"
• Data type: "Long"
• Code: "2"
• Description: Free text.
9. Enter the value for this option.
1. First Pass: "Siemens"
2. Second Pass: VLAN ID
10. Press OK, repeat steps 7 to 9 for the second pass, and press OK again.
A31003-S2010-M100-18-76A9
2-14 OpenStage HFA Family, Administration Manual
 Loading...