

Page 1

Preface
RUGGEDCOM NETCONF
Reference Guide
Introduction
NETCONF Capabilities and
Namespaces
NETCONF Sessions
Getting Data
Changing Configuration
Data
RUGGEDCOM ROX II Actions
Examples
NETCONF XML Elements
1
2
3
4
5
6
7
8
For RX1400, RX1500, RX1501, RX1510, RX1511,
RX1512, RX5000, MX5000, MX5000RE
06/2017
RC1065-EN-03
Page 2

RUGGEDCOM NETCONF
Reference Guide
Copyright © 2017 Siemens Canada Ltd
All rights reserved. Dissemination or reproduction of this document, or evaluation and communication of its contents, is not authorized
except where expressly permitted. Violations are liable for damages. All rights reserved, particularly for the purposes of patent application or
trademark registration.
This document contains proprietary information, which is protected by copyright. All rights are reserved. No part of this document may be
photocopied, reproduced or translated to another language without the prior written consent of Siemens Canada Ltd.
Disclaimer Of Liability
Siemens has verified the contents of this document against the hardware and/or software described. However, deviations between the product
and the documentation may exist.
Siemens shall not be liable for any errors or omissions contained herein or for consequential damages in connection with the furnishing,
performance, or use of this material.
The information given in this document is reviewed regularly and any necessary corrections will be included in subsequent editions. We
appreciate any suggested improvements. We reserve the right to make technical improvements without notice.
Registered Trademarks
RUGGEDCOM™ and ROS™ are trademarks of Siemens Canada Ltd.
Linux® is the registered trademark of Linus Torvalds in the United States and other countries.
The registered trademark Linux® is used pursuant to a sublicense from LMI, the exclusive licensee of Linus Torvalds, owner of the mark on a
world-wide basis.
Other designations in this manual might be trademarks whose use by third parties for their own purposes would infringe the rights of the
owner.
Open Source
RUGGEDCOM ROX II is based on Linux®. Linux® is made available under the terms of the GNU General Public License Version 2.0 [http://
www.gnu.org/licenses/gpl-2.0.html].
RUGGEDCOM NETCONF contains additional Open Source Software. For license conditions, refer to the associated License Conditions
document.
Security Information
Siemens provides products and solutions with industrial security functions that support the secure operation of plants, machines, equipment
and/or networks. They are important components in a holistic industrial security concept. With this in mind, Siemens' products and solutions
undergo continuous development. Siemens recommends strongly that you regularly check for product updates.
For the secure operation of Siemens products and solutions, it is necessary to take suitable preventive action (e.g. cell protection concept) and
integrate each component into a holistic, state-of-the-art industrial security concept. Third-party products that may be in use should also be
considered. For more information about industrial security, visit http://www.siemens.com/industrialsecurity.
To stay informed about product updates as they occur, sign up for a product-specific newsletter. For more information, visit http://
support.automation.siemens.com.
Contacting Siemens
Address
Siemens Canada Ltd
Industry Sector
300 Applewood Crescent
Concord, Ontario
Canada, L4K 5C7
Telephone
Toll-free: 1 888 264 0006
Tel: +1 905 856 5288
Fax: +1 905 856 1995
E-mail
ruggedcom.info.i-ia@siemens.com
Web
www.siemens.com/ruggedcom
ii
Page 3

RUGGEDCOM NETCONF
Reference Guide
Table of Contents
Table of Contents
Preface ............................................................................................................ ix
How This Guide Is Organized ............................................................................................................... ix
Alerts .................................................................................................................................................. x
Related Documents .............................................................................................................................. x
Accessing Documentation ..................................................................................................................... x
Training .............................................................................................................................................. xi
Customer Support ............................................................................................................................... xi
Chapter 1
Introduction ..................................................................................................... 1
1.1What is NETCONF? ........................................................................................................................ 1
1.2What Can NETCONF Do? ............................................................................................................... 3
1.3Who Should Use This Guide ........................................................................................................... 3
1.4Supported IETF RFCs ..................................................................................................................... 3
1.5Sample NETCONF sessions ............................................................................................................ 3
1.5.1Sample Session: Getting Data ............................................................................................. 4
1.5.2 Sample Session: Performing an Action ................................................................................. 6
1.5.3Sample Session: Editing Data .............................................................................................. 9
Chapter 2
NETCONF Capabilities and Namespaces ........................................................... 15
2.1IETF Capabilities .......................................................................................................................... 15
2.2Vendor-Defined Capabilities ......................................................................................................... 17
2.3IETF Namespaces ........................................................................................................................ 17
2.4Vendor-Defined Namespaces ....................................................................................................... 18
2.5RUGGEDCOM Namespaces ........................................................................................................... 18
2.6Viewing the Capabilities on a Device ............................................................................................ 20
Chapter 3
NETCONF Sessions .......................................................................................... 23
3.1Configuring/Monitoring NETCONF in RUGGEDCOM NETCONF ......................................................... 23
3.2Connecting to the NETCONF Service ............................................................................................ 23
3.3 Saying Hello ............................................................................................................................... 24
3.3.1RUGGEDCOM ROX II NETCONF <hello> Message ................................................................. 25
3.4Closing the Session ..................................................................................................................... 26
iii
Page 4

Table of Contents
RUGGEDCOM NETCONF
Reference Guide
3.5Killing a Session .......................................................................................................................... 26
Chapter 4
Getting Data ................................................................................................... 29
4.1Using the <get> Command .......................................................................................................... 29
4.2Using the <get-config> Command ................................................................................................ 30
4.3 Using XPaths with <get> and <get-config> ................................................................................... 31
4.4 Getting Information for a Specific Object ...................................................................................... 33
4.4.1Specifying Objects with Hierarchical XML Elements ............................................................. 33
4.4.2Specifying Objects with XPaths ......................................................................................... 34
4.5Getting Default Values ................................................................................................................ 34
4.6Getting Data Models from the Device ........................................................................................... 35
4.6.1Getting Schemas from the Device ..................................................................................... 36
4.6.2Getting YIN and YANG Files from the Device ...................................................................... 37
4.6.3Using pyang .................................................................................................................... 38
4.6.3.1Using the Text-Based Tree ...................................................................................... 39
Chapter 5
Changing Configuration Data .......................................................................... 41
5.1Changing Data in the Running Configuration ................................................................................ 41
5.2Changing Data in the Candidate Configuration .............................................................................. 42
5.2.1Locking Data Stores ......................................................................................................... 43
5.2.2Copying Data ................................................................................................................... 44
5.2.3Replacing Data ................................................................................................................. 46
5.2.4Deleting Data ................................................................................................................... 48
5.2.5Validating Changes .......................................................................................................... 50
5.2.6Committing Changes ........................................................................................................ 51
Chapter 6
RUGGEDCOM ROX II Actions ............................................................................ 53
6.1Admin Namespace Actions .......................................................................................................... 54
6.1.1snmp-discover .................................................................................................................. 55
6.1.2launch-upgrade ................................................................................................................ 55
6.1.3decline-upgrade ............................................................................................................... 56
6.1.4rollback-reboot ................................................................................................................. 56
6.1.5 roxflash ........................................................................................................................... 57
6.1.6clear-all-alarms ................................................................................................................. 57
6.1.7acknowledge-all-alarms .................................................................................................... 57
6.1.8 shutdown ........................................................................................................................ 58
6.1.9 reboot ............................................................................................................................. 58
6.1.10set-system-clock ............................................................................................................. 58
iv
Page 5

RUGGEDCOM NETCONF
Reference Guide
6.2Interfaces Namespace Actions ...................................................................................................... 61
6.3Services Namespace Actions ........................................................................................................ 67
6.4Switch Namespace Actions .......................................................................................................... 69
6.5Tunnel Namespace Actions .......................................................................................................... 71
Table of Contents
6.1.11restore-factory-defaults ................................................................................................... 59
6.1.12delete-logs ..................................................................................................................... 59
6.1.13install-files ..................................................................................................................... 59
6.1.14backup-files (Backup Files) .............................................................................................. 60
6.1.15full-configuration-save .................................................................................................... 60
6.1.16full-configuration-load .................................................................................................... 61
6.2.1reset (Modem) ................................................................................................................. 62
6.2.2at (Modem) ..................................................................................................................... 62
6.2.3reset (Cellular Modem) ..................................................................................................... 63
6.2.4at (Cellular Modem) ......................................................................................................... 63
6.2.5reset (Serial Port) ............................................................................................................. 64
6.2.6clear-serial-port-stats ........................................................................................................ 64
6.2.7restart-serserver ............................................................................................................... 65
6.2.8reset-port (Switch Port) .................................................................................................... 65
6.2.9clear-port-stats (Switch Port) ............................................................................................. 66
6.2.10start-cable-test (Switch Port) ........................................................................................... 66
6.2.11clear-cable-stats-port (Switch Port) .................................................................................. 67
6.3.1 ntp-status ........................................................................................................................ 67
6.3.2log (Link-Failover) ............................................................................................................ 68
6.3.3start-test (Link Failover) .................................................................................................... 68
6.3.4cancel-test (Link Failover) ................................................................................................. 69
6.3.5show-active-leases (DHCP Server) ...................................................................................... 69
6.4.1clear-stp-stats (Switch) ..................................................................................................... 70
6.4.2flush-dynamic-rules (Switch) ............................................................................................. 70
6.4.3reset-all-switch-ports (Switch) ........................................................................................... 70
6.4.4clear-all-switch-stats (Switch) ............................................................................................ 71
6.4.5clear-cable-stats-all (Switch) .............................................................................................. 71
6.5.1display-public-key (IPSEC) ................................................................................................. 72
6.5.2status (IPSEC) .................................................................................................................. 72
6.5.3install-certificate (IPSEC) ................................................................................................... 72
6.5.4install-ca-certificate (IPSEC) ............................................................................................... 73
6.5.5install-crl-file (IPSEC) ........................................................................................................ 74
6.5.6remove-ca-certificate (IPSEC) ............................................................................................. 75
6.5.7remove-certificate (IPSEC) ................................................................................................. 75
6.5.8remove-crl (IPSEC) ............................................................................................................ 76
v
Page 6

Table of Contents
Chapter 7
RUGGEDCOM NETCONF
Reference Guide
Examples ........................................................................................................ 77
7.1Getting the System Name ........................................................................................................... 80
7.2Getting the ROX Release ............................................................................................................. 80
7.3Getting the Chassis Status ........................................................................................................... 81
7.4Setting the System Clock ............................................................................................................. 81
7.5Acknowledging Alarms ................................................................................................................ 81
7.6Clearing All Alarms ..................................................................................................................... 82
7.7Viewing Alarms ........................................................................................................................... 82
7.8Restoring Factory Defaults ........................................................................................................... 82
7.9Changing the System Name by Locking and Committing ............................................................... 83
7.10Changing the System Name Directly ........................................................................................... 84
7.11Creating a Static VLAN .............................................................................................................. 85
7.12Assigning a PVID on a Port ........................................................................................................ 86
7.13 Disabling Spanning Tree on a Specific Port .................................................................................. 87
7.14Configuring an IP Address on a Specific Port ............................................................................... 88
7.15Deleting an IP Address .............................................................................................................. 90
7.16Setting a Static Route ................................................................................................................ 91
7.17Disabling Spanning Tree Globally ............................................................................................... 92
7.18Retrieving all IP Addresses from the Running Configuration .......................................................... 94
7.19 Retrieving the Active Routes on a Device .................................................................................... 94
7.20Configuring Static Multicast Routing on a Layer 3 Device ............................................................. 95
7.21Enabling Static Multicast Routing on a Layer 3 Device .................................................................. 96
7.22Retrieving Static Multicast Status on a Layer 3 Device .................................................................. 97
7.23Replacing an IP Address ............................................................................................................. 98
7.24Configuring a Port to Dynamically Obtain an IP Address ............................................................... 99
7.25Configuring OSPF Area and Network on a Layer 3 Device ........................................................... 100
7.26 Enabling the OSPF Passive-Default Option ................................................................................. 102
7.27Configure an OSPF Non-Passive Port ......................................................................................... 103
7.28Configuring OSPF Parameters ................................................................................................... 104
7.29Enabling the OSPF redistribute-connected Option ...................................................................... 106
7.30Enabling OSPF on a Layer 3 Device .......................................................................................... 107
7.31Retrieving OSPF Status ............................................................................................................ 108
7.32Retrieving All Data from the Routing Namespace ....................................................................... 109
7.33Configuring DHCP Server ......................................................................................................... 109
7.34Configure the DHCP Server Port Listening for DHCP Client Requests ............................................. 110
7.35Enabling the DHCP Server Service ............................................................................................. 112
7.36Disabling an Ethernet Port ....................................................................................................... 113
7.37Enabling an Ethernet Port ........................................................................................................ 114
7.38Checking an IP Address on a Specific Port using the Interfaces Namespace ................................... 115
vi
Page 7

RUGGEDCOM NETCONF
Reference Guide
Table of Contents
7.39Retreiving All Data From Running Database Including Default Values ........................................... 116
7.40Retreiving All Data From Running Database Including Default Tags and Values ............................. 116
7.41Changing a User's Password ..................................................................................................... 117
7.42 Displaying the Status of the IPsec Service ................................................................................. 118
7.43 Selecting a Certificate for an IPSec Tunnel ................................................................................ 118
7.44Installing a CA Certificate ......................................................................................................... 120
7.45Configuring a Signed CA Certificate .......................................................................................... 121
7.46Installing a Private Key to a Signed CA Certificate ...................................................................... 121
7.47Installing a CRL File ................................................................................................................. 122
7.48Removing a Certificate ............................................................................................................ 123
7.49Removing a CA certificate ........................................................................................................ 123
7.50Removing a CRL File ................................................................................................................ 124
Chapter 8
NETCONF XML Elements ................................................................................ 125
8.1 ]]>]]> ....................................................................................................................................... 125
8.2<close-session/> ........................................................................................................................ 126
8.3 <commit> ................................................................................................................................. 126
8.4<copy-config> ........................................................................................................................... 127
8.5 <data> ..................................................................................................................................... 127
8.6<discard-changes> .................................................................................................................... 128
8.7<edit-config> ............................................................................................................................ 128
8.8 <error-info> .............................................................................................................................. 128
8.9 <get-config> ............................................................................................................................. 129
8.10 <hello> ................................................................................................................................... 129
8.11<kill-session> .......................................................................................................................... 131
8.12 <lock> .................................................................................................................................... 131
8.13 <ok/> ..................................................................................................................................... 132
8.14 <rpc> ..................................................................................................................................... 132
8.15 <rpc-error> ............................................................................................................................. 132
8.16 <rpc-reply> ............................................................................................................................. 133
8.17 <target> ................................................................................................................................. 134
8.18 <unlock> ................................................................................................................................ 134
8.19 <validate> .............................................................................................................................. 135
vii
Page 8

Table of Contents
RUGGEDCOM NETCONF
Reference Guide
viii
Page 9

RUGGEDCOM NETCONF
Reference Guide
Preface
This guide describes how to use RUGGEDCOM NETCONF – the Network Configuration Protocol – to manipulate
configuration data on RUGGEDCOM devices running RUGGEDCOM NETCONF v.
CONTENTS
• “How This Guide Is Organized”
• “Alerts”
• “Related Documents”
• “Accessing Documentation”
• “Training”
• “Customer Support”
Preface
How This Guide Is Organized
• Chapter1, Introduction introduces RUGGEDCOM NETCONF and demonstrates what a typical NETCONF session
with RUGGEDCOM NETCONF looks like. Read this section for a quick introduction to RUGGEDCOM NETCONF on
RUGGEDCOM NETCONF.
• Chapter2, NETCONF Capabilities and Namespaces describes the RUGGEDCOM NETCONF functions and data
models supported by RUGGEDCOM NETCONF. Read this section to learn about the RUGGEDCOM NETCONF
functions supported by RUGGEDCOM NETCONF.
• Chapter3, NETCONF Sessions describes how to connect to and communicate with a device with RUGGEDCOM
NETCONF. Read this section to learn about connecting to your device, responding to the device's initial
NETCONF message, locking and unlocking datastores, and signing off from the device.
• Chapter4, Getting Data describes how to retrieve configuration data from RUGGEDCOM NETCONF. Read this
section to learn how to retrieve individual configuration elements, subsections of configuration data, or the
entire configuration from the device.
• Chapter5, Changing Configuration Data describes how to change RUGGEDCOM NETCONF configuration data.
Read this section to learn how to set configuration data and perform actions.
• Chapter6, RUGGEDCOM ROX II Actions describes how to activate NETCONF actions on a device. Read this
section to learn how to activate NETCONF commands, such as rebooting and clearing statistics, on the device.
• Chapter7, Examples describes many examples of how to configure RUGGEDCOM NETCONF data. Read this
section to learn how to perform common network configuration tasks through RUGGEDCOM NETCONF.
• Chapter8, NETCONF XML Elements describes the XML elements unique to NETCONF commands. Read this
section to learn about the XML elements used to build NETCONF commands and for information on what the
elements mean when they are returned in a message from the server.
How This Guide Is Organized ix
Page 10
Preface
Alerts
The following types of alerts are used when necessary to highlight important information.
DANGER!
DANGER alerts describe imminently hazardous situations that, if not avoided, will result in death or
serious injury.
WARNING!
WARNING alerts describe hazardous situations that, if not avoided, may result in serious injury and/or
equipment damage.
CAUTION!
CAUTION alerts describe hazardous situations that, if not avoided, may result in equipment damage.
IMPORTANT!
IMPORTANT alerts provide important information that should be known before performing a procedure
or step, or using a feature.
RUGGEDCOM NETCONF
Reference Guide
NOTE
NOTE alerts provide additional information, such as facts, tips and details.
Related Documents
Other documents that may be of interest include:
• RUGGEDCOM NETCONF Web Interface User Guide for the RUGGEDCOM RX1400
• RUGGEDCOM NETCONF Web Interface User Guide for the RUGGEDCOM RX1500/RX1501/RX1510/RX1511/
RX1512
• RUGGEDCOM NETCONF Web Interface User Guide for the RUGGEDCOM RX5000
• RUGGEDCOM NETCONF CLI User Guide for the RUGGEDCOM RX1400
• RUGGEDCOM NETCONF CLI User Guide for the RUGGEDCOM RX1500/RX1501/RX1510/RX1511/RX1512
• RUGGEDCOM NETCONF CLI User Guide for the RUGGEDCOM RX5000
Most documents are available on Siemens' Industry Online Support portal [https://support.industry.siemens.com]
or mobile application. For all others, contact a Siemens Sales representative or Siemens Customer Support.
Accessing Documentation
The latest user documentation for RUGGEDCOM NETCONF v is available online at www.siemens.com/ruggedcom.
To request or inquire about a user document, contact Siemens Customer Support.
x Alerts
Page 11

RUGGEDCOM NETCONF
Reference Guide
Training
Siemens offers a wide range of educational services ranging from in-house training of standard courses on
networking, Ethernet switches and routers, to on-site customized courses tailored to the customer's needs,
experience and application.
Siemens' Educational Services team thrives on providing our customers with the essential practical skills to make
sure users have the right knowledge and expertise to understand the various technologies associated with critical
communications network infrastructure technologies.
Siemens' unique mix of IT/Telecommunications expertise combined with domain knowledge in the utility,
transportation and industrial markets, allows Siemens to provide training specific to the customer's application.
For more information about training services and course availability, visit www.siemens.com/ruggedcom or
contact a Siemens Sales representative.
Customer Support
Customer support is available 24 hours, 7 days a week for all Siemens customers. For technical support or general
information, contact Siemens Customer Support through any of the following methods:
Online
Visit http://www.siemens.com/automation/support-request to submit a Support Request (SR) or check on the status of an
existing SR.
Preface
Telephone
Call a local hotline center to submit a Support Request (SR). To locate a local hotline center, visit http://
www.automation.siemens.com/mcms/aspa-db/en/automation-technology/Pages/default.aspx.
Mobile App
Install the Industry Online Support app by Siemens AG on any Android, Apple iOS or Windows mobile device and be able to:
• Access Siemens' extensive library of support documentation, including FAQs and manuals
• Submit SRs or check on the status of an existing SR
• Contact a local Siemens representative from Sales, Technical Support, Training, etc.
• Ask questions or share knowledge with fellow Siemens customers and the support community
Training xi
Page 12

Preface
RUGGEDCOM NETCONF
Reference Guide
xii Customer Support
Page 13

RUGGEDCOM NETCONF
Reference Guide
Introduction
Welcome to the RUGGEDCOM NETCONF Reference Guide. This document aims to describe the Network
Configuration Protocol (NETCONF) and how it can be used to control the configuration of a device running
RUGGEDCOM ROX II.
All versions of RUGGEDCOM ROX II supports NETCONF sessions.
CONTENTS
• Section1.1, “What is NETCONF?”
• Section1.2, “What Can NETCONF Do?”
• Section1.3, “Who Should Use This Guide”
• Section1.4, “Supported IETF RFCs”
• Section1.5, “Sample NETCONF sessions”
Chapter 1
Introduction
Section1.1
What is NETCONF?
The Network Configuration Protocol (NETCONF) is a network configuration protocol developed by the Internet
Engineering Task Force (IETF). NETCONF provides functions to download, upload, change, and delete the
configuration data on network devices. Devices running the RUGGEDCOM ROX II operating system also support
the ability to collect data and perform direct actions on the device, such as rebooting the device, clearing statistics,
and restarting services.
NETCONF actions and data are described using Extensible Markup Language (XML). NETCONF uses a collection
of XML elements to identify functions and operations. Configuration data is represented as a hierarchy of XML
elements that describe the path to a configurable setting and its data.
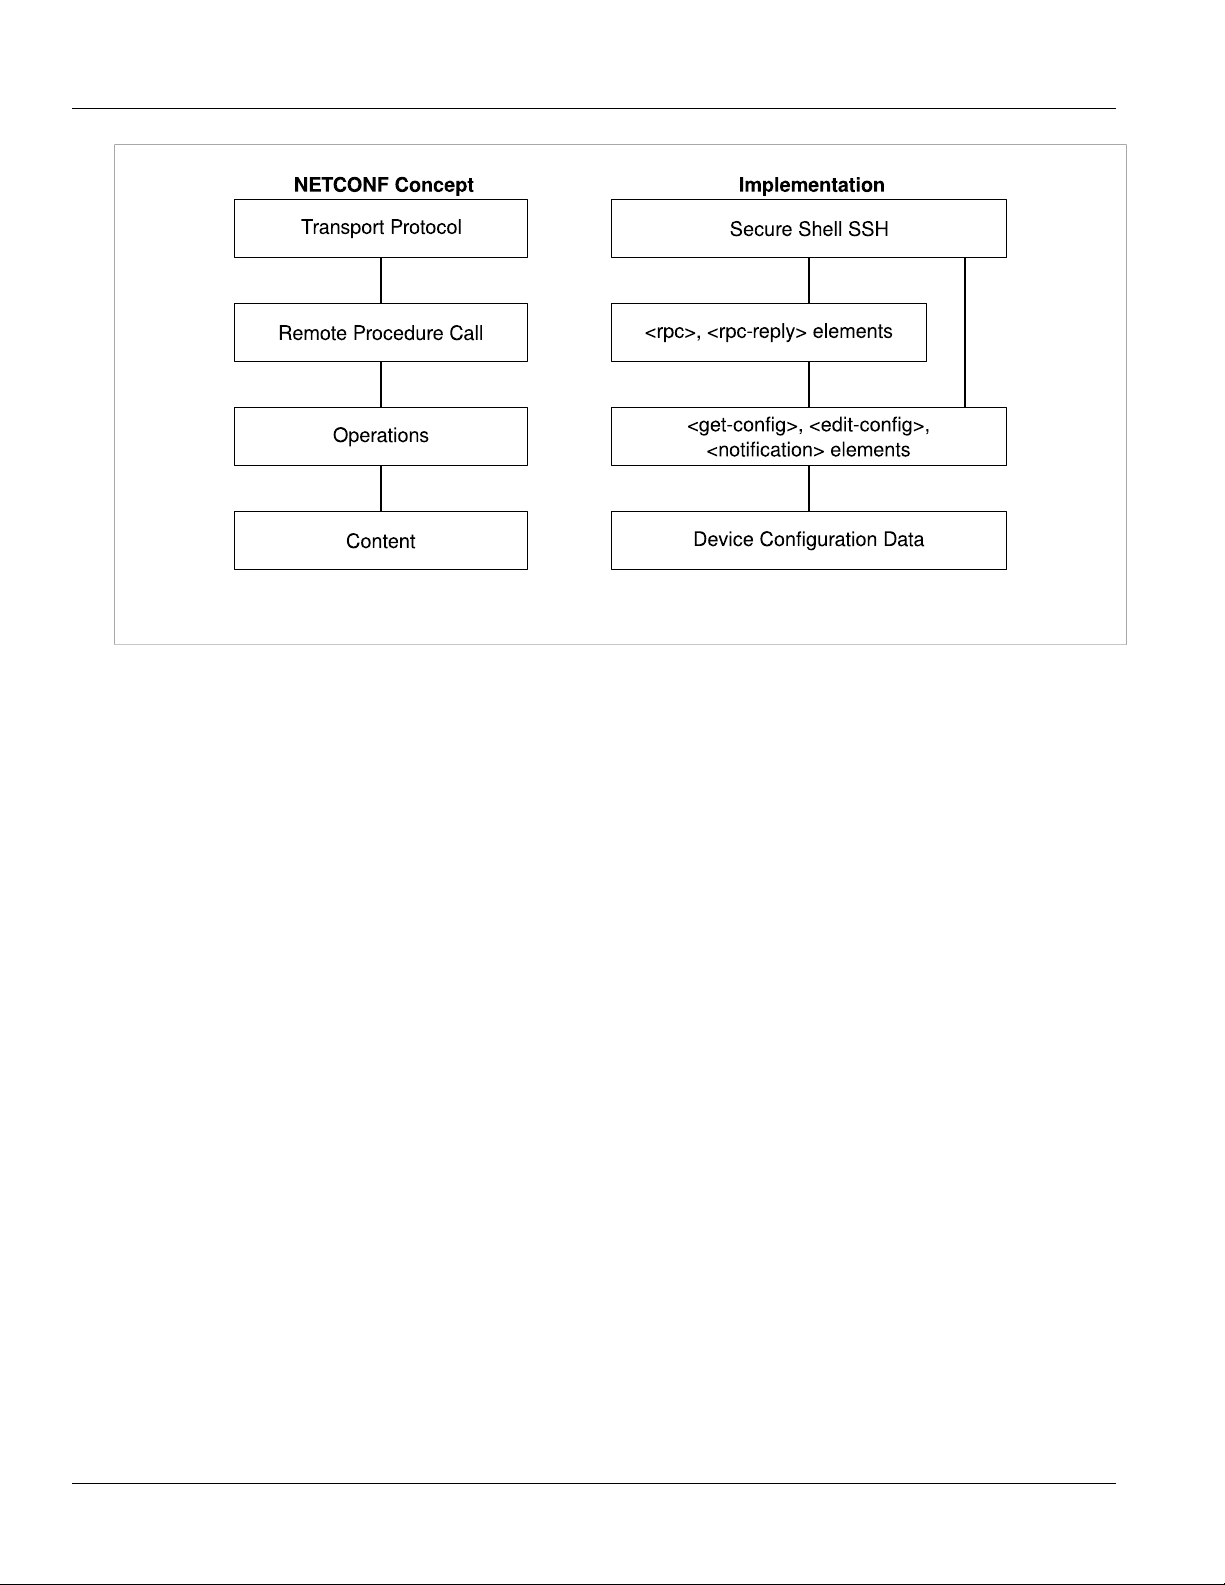
The NETCONF protocol can be thought of as having four conceptual layers:
What is NETCONF? 1
Page 14
Chapter 1
Introduction
Figure1:NETCONF Concepts and Implementation
RUGGEDCOM NETCONF
Reference Guide
• The Transport Protocol layer provides connectivity between the device and the NETCONF client. RUGGEDCOM
ROX II supports the use of Secure Shell (SSH) for the connection.
• The Remote Procedure Call layer represents NETCONF requests and responses. Requests from the client to the
device are wrapped within <rpc> elements in the XML query text. Responses from the device to the client are
wrapped within <rpc-reply> elements in the XML response text.
• The Operations layer represents actions and functions performed on the RUGGEDCOM ROX II server. The
operations available for use are defined by the NETCONF capabilities advertised by the device.
• The Content layer represents the configuration data on the device. NETCONF can query, manipulate,
and monitor the configuration data on the device. The configuration data is defined by the RUGGEDCOM
namespaces. The configuration data is structured in NETCONF in the same way as it is in the RUGGEDCOM ROX
II web interface and command line interface (CLI).
The NETCONF protocol is defined in several Internet Engineering Task Force Request For Comment (RFC)
documents. It is not necessary to read the RFCs to use NETCONF with devices, but this guide provides links to the
RFCs for those interested in the design details of the NETCONF protocol.
For more general background information on NETCONF, refer to the Internet Engineering Task Force RFC 6241
[http://tools.ietf.org/html/rfc6241]. This RFC, published in June 2011, is the current main defining document for
the NETCONF protocol.
For historical interest, refer to Internet Engineering Task Force RFC 4741 [http://tools.ietf.org/html/rfc4741]. This
RFC, published in 2006, contains the initial definition of the NETCONF protocol. Note that RFC 6241 obsoletes RFC
4741.
Several additional RFCs define the NETCONF capabilities and namespaces. Links to these documents appear
throughout Chapter2, NETCONF Capabilities and Namespaces, where this guide discusses the capabilities and
namespaces supported by devices.
2 What is NETCONF?
Page 15

RUGGEDCOM NETCONF
Reference Guide
Section1.2
What Can NETCONF Do?
NETCONF provides an easy-to-use application programming interface (API) for RUGGEDCOM NETCONF. It provides
the ability to view and manipulate configuration data, monitor device status, and perform device management
commands.
Use NETCONF to develop custom configuration management tools and applications, such as:
• shell scripts for common device management tasks
• custom device management interfaces
• custom configuration management applications and databases
• integrating devices into existing configuration management applications and databases
Section1.3
Who Should Use This Guide
This guide is for network administrators and programmers tasked with the configuration management of network
devices.
Readers should be familiar with the following:
• general use and function of the RUGGEDCOM ROX II software.
• network design and network management concepts and tasks.
• using Secure Shell (SSH) to connect to RUGGEDCOM ROX II.
• how to create well-formed and valid XML documents.
Chapter 1
Introduction
Section1.4
Supported IETF RFCs
RUGGEDCOM ROX II supports the following IETF Request For Comments (RFC):
• Internet Engineering Task Force RFC 5277 [http://tools.ietf.org/html/rfc5277]
• Internet Engineering Task Force RFC 5717 [http://tools.ietf.org/html/rfc5217]
• Internet Engineering Task Force RFC 6021 [http://tools.ietf.org/html/rfc6021]
• Internet Engineering Task Force RFC 6022 [http://tools.ietf.org/html/rfc6022]
• Internet Engineering Task Force RFC 6241 [http://tools.ietf.org/html/rfc6241]
• Internet Engineering Task Force RFC 6243 [http://tools.ietf.org/html/rfc6243]
Section1.5
Sample NETCONF sessions
This section provides a walk-through of three typical types of NETCONF sessions:
What Can NETCONF Do? 3
Page 16
Chapter 1
Introduction
RUGGEDCOM NETCONF
Reference Guide
• Section1.5.1, “Sample Session: Getting Data” describes a simple session where you connect to a device, get
data from the device, and close the session
• Section1.5.2, “Sample Session: Performing an Action” describes a simple session where you connect to a device,
perform an action on the device, and close the session
• Section1.5.3, “Sample Session: Editing Data” describes a more complex session where you connect to a device,
prepare the device data-stores for editing, edit the data, commit the data, and close the session
Each sample provides an overview of the primary steps in the session, a schematic illustration of the primary steps,
and the actual NETCONF code sent to and received from the device.
Read these sections to become familiar with the general flow of typical NETCONF sessions. Also, review these
sections to become familiar with examples of working NETCONF XML code. The text in these examples can be
copied and tested on an operating RUGGEDCOM NETCONF device.
The XML code in these examples has been formatted for legibility. Line breaks and white space have been added
to the XML text to make the lines easier to read and to show the element hierarchy. When sending XML text to the
device, the line breaks and whitespace are not required. You can send XML text to the device in a single line, as
long as the XML is well-formed.
Text returned from the device has also been formatted for legibility. The text returned from the device typically
appears in a single line, without whitespace between the elements.
In these examples, the <hello> message from the device has been truncated for clarity.
CONTENTS
• Section1.5.1, “Sample Session: Getting Data”
• Section1.5.2, “Sample Session: Performing an Action”
• Section1.5.3, “Sample Session: Editing Data”
Section1.5.1
Sample Session: Getting Data
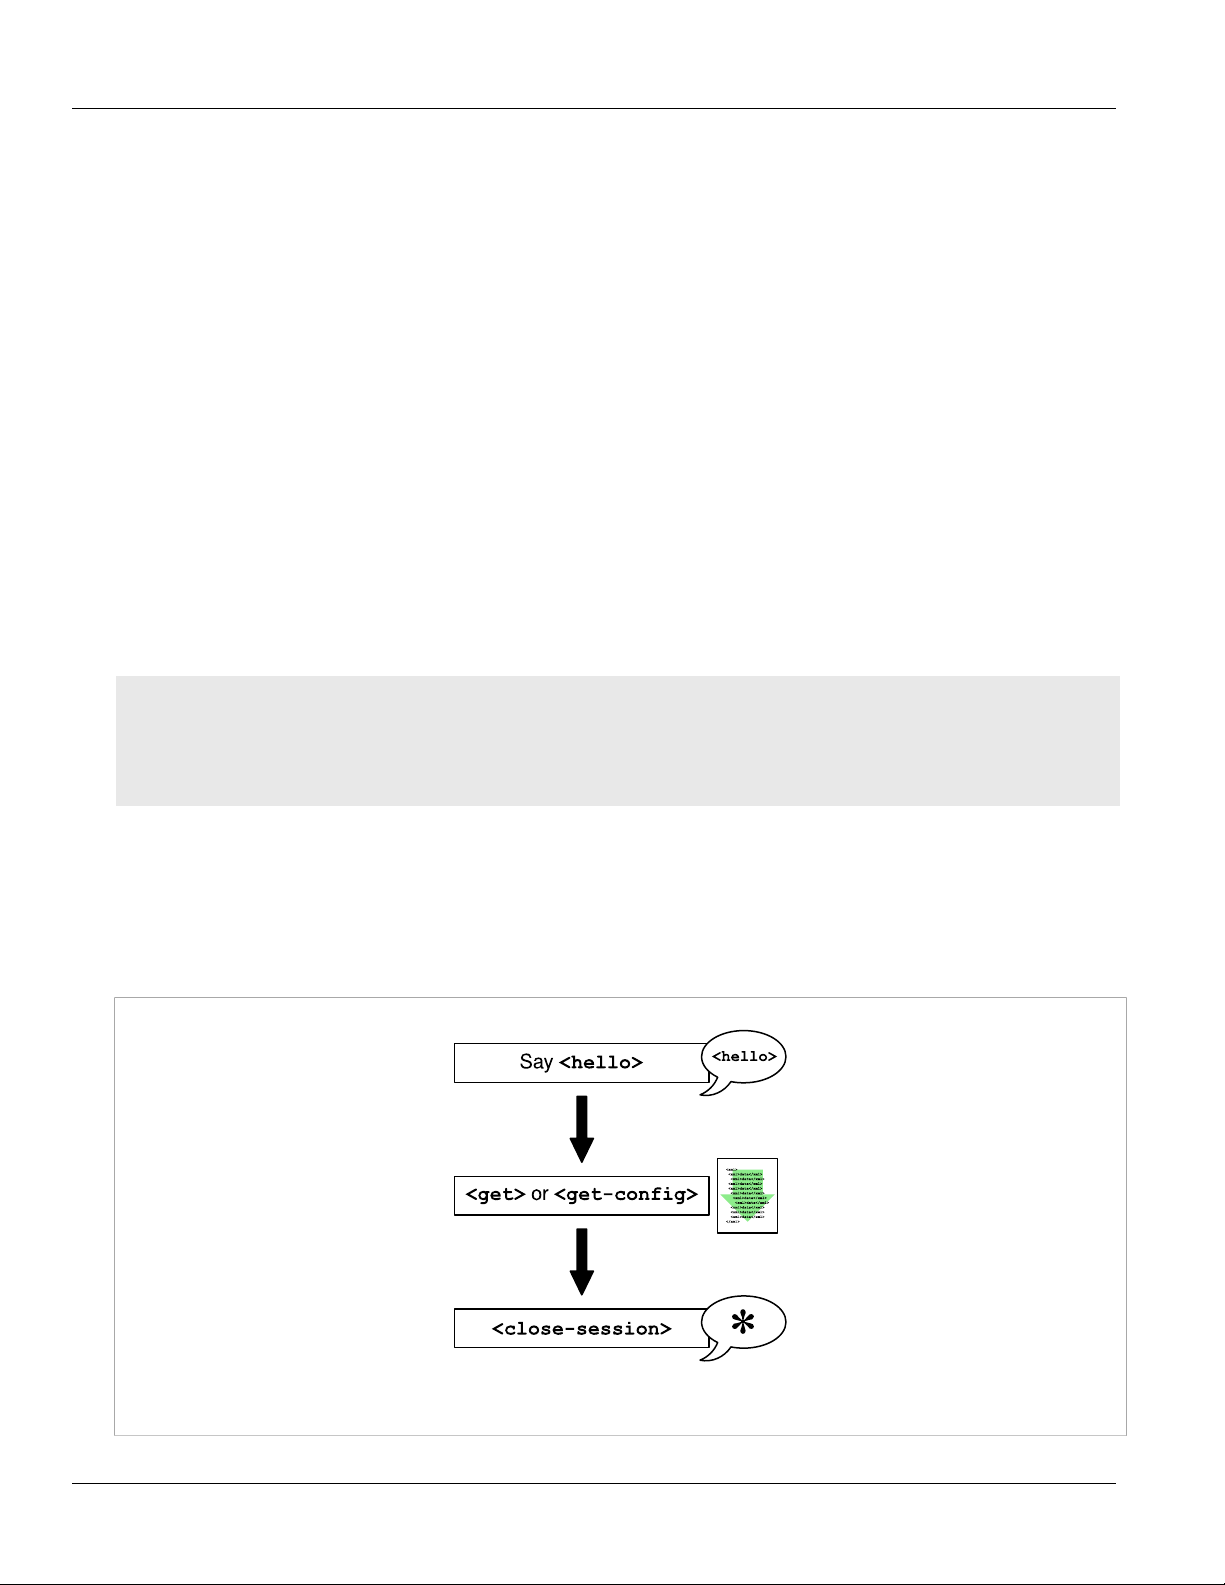
To retrieve data from a device, do the following:
Figure2:Getting Data
4 Sample Session: Getting Data
Page 17

RUGGEDCOM NETCONF
Reference Guide
Basic Steps
1. Connect to the device and exchange <hello> messages.
2. Issue <get> or <get-config> commands to retrieve data from the device. You determine the data to
retrieve by stating the RUGGEDCOM namespace from which you want to retrieve the data, and then stating
the path through the data model to the information you want to return.
3. Close the session. Closing the session ensures that the NETCONF session closes gracefully without incomplete
processes or locked datastores.
Detailed Steps
1. Log in to the device via ssh:
$ ssh {user}@{ipAddress} -p 830 -s netconf
• {user} is a user name on the device. Typically, the user should be assigned the administrative user role.
• {ipAddress} is an address on the device listening for NETCONF activity. The -p parameter indicates the
port listening for NETCONF activity. Port 830 is the default NETCONF port. The -s parameter indicates the
subsystem. All NETCONF communication must be identified with -s netconf. You can configure the IP
addresses and ports on which RUGGEDCOM NETCONF listens for NETCONF. For more information, refer to
Section3.1, “Configuring/Monitoring NETCONF in RUGGEDCOM NETCONF”.
The device responds with its <hello> statement:
Chapter 1
Introduction
<?xml version="1.0" encoding="UTF-8"?>
<hello xmlns="urn:ietf:params:xml:ns:netconf:base:1.0">
<capabilities>
.
.
.
</capabilities>
<session-id>797</session-id>
</hello>]]>]]>
2. Respond to the device with the client's <hello> statement. The client's <hello> statement can describe the
client's capabilities, or it can respond with just the base NETCONF capability. This example shows the minimal
<hello> response:
<hello xmlns="urn:ietf:params:xml:ns:netconf:base:1.0">
<capabilities>
<capability>urn:ietf:params:netconf:base:1.0</capability>
</capabilities>
</hello>]]>]]>
3. Issue an <rpc> request to retrieve data from the device:
<rpc message-id="1001" xmlns="urn:ietf:params:xml:ns:netconf:base:1.0">
<get-config>
<source>
<running/>
</source>
<filter type="subtree">
<admin xmlns="http://ruggedcom.com/ns/rmf_admin">
<system-name></system-name>
</admin>
</filter>
</get-config>
</rpc>]]>]]>
Sample Session: Getting Data 5
Page 18

Chapter 1
Introduction
• All commands must be enclosed within <rpc> tags. The message-id attribute is not required but is
• The <source> element indicates the datastore from which we are requesting data. In this example we are
• The <filter> element encloses the data model tags. The type="subtree" attribute is mandatory.
• The <admin> element is the root of the RUGGEDCOM admin namespace. Within the <admin> element,
• The ]]>]]> string indicates the end of the NETCONF message. Each NETCONF message must end with
The device responds with the requested data:
RUGGEDCOM NETCONF
Reference Guide
recommended. The message-id attribute is returned in the device response, allowing you to match
responses with requests.
requesting data from the running configuration database.
additional elements navigate down to the desired element. In this example, we are navigating to admin/
system-name in the RUGGEDCOM NETCONF data model.
]]>]]>
<?xml version="1.0" encoding="UTF-8"?>
<rpc-reply xmlns="urn:ietf:params:xml:ns:netconf:base:1.0" message-id="1001">
<data>
<admin xmlns="http://ruggedcom.com/ns/rmf_admin">
<system-name>Substation Ethernet Switch 2</system-name>
</admin>
</data>
</rpc-reply>]]>]]>
• The <rpc-reply> element contains the response. Notice the message-id attribute returned with the
<rpc-reply> element; it corresponds to the <message-id> sent in the <rpc> request.
4. After receiving the data, close the session:
<rpc message-id="1002" xmlns="urn:ietf:params:xml:ns:netconf:base:1.0">
<close-session/>
</rpc>]]>]]>
The device responds with the following and closes the session:
<?xml version="1.0" encoding="UTF-8"?>
<rpc-reply xmlns="urn:ietf:params:xml:ns:netconf:base:1.0" message-id="1002">
<ok/>
</rpc-reply>]]>]]
Section1.5.2
Sample Session: Performing an Action
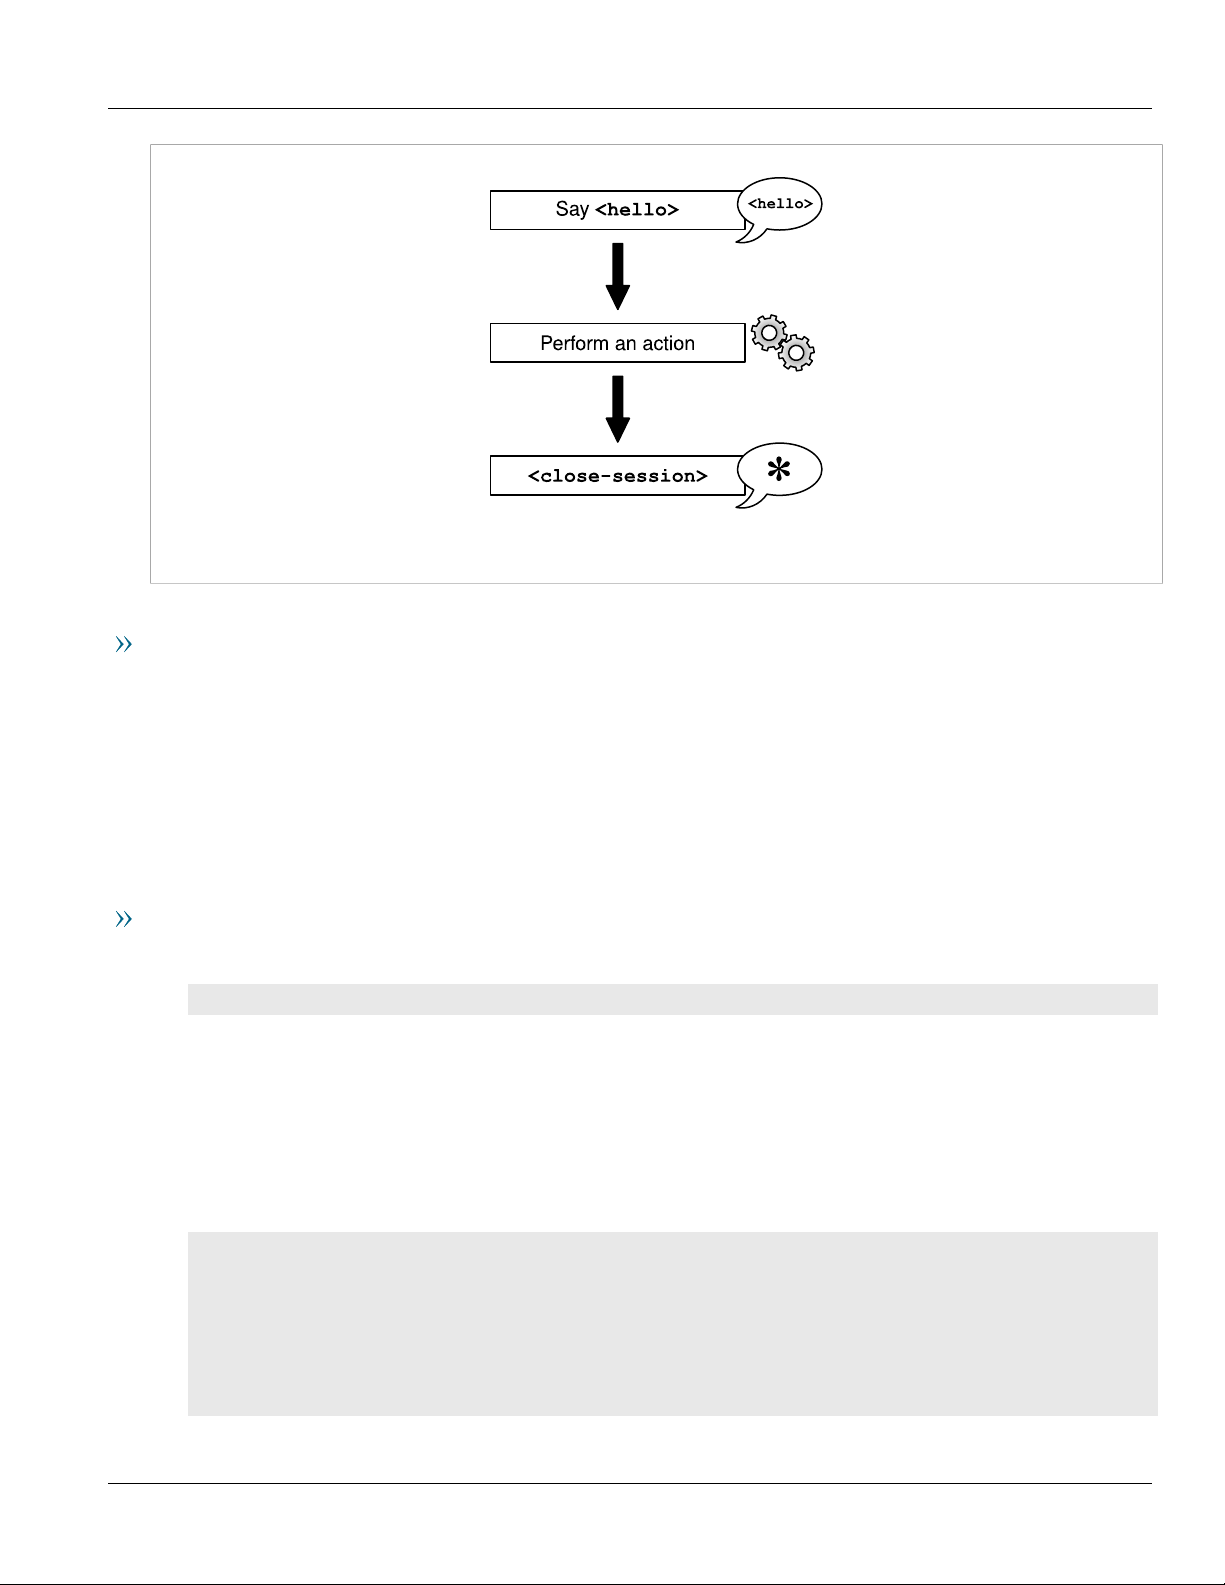
To perform an action on a device, do the following:
6 Sample Session: Performing an Action
Page 19
RUGGEDCOM NETCONF
Reference Guide
Figure3:Performing an Action
Basic Steps
Chapter 1
Introduction
1. Connect to the device and exchange <hello> messages.
2. Issue an <rpc> command with the action to perform. The <rpc> request must contain the <action>
element referring to the action namespace. You determine the action to perform by stating the RUGGEDCOM
namespace where the command is found, and then stating the path through the data model to the
command.
3. Close the session. Closing the session ensures that the NETCONF session closes gracefully without incomplete
processes or locked datastores.
Detailed Steps
1. Log in to the device via ssh:
$ ssh {user}@{ipAddress} -p 830 -s netconf
• {user} is a user name on the device. Typically, the user should be assigned the administrative user role.
• {ipAddress} is an address on the device listening for NETCONF activity. The -p parameter indicates the
port listening for NETCONF activity. Port 830 is the default NETCONF port. The -s parameter indicates the
subsystem. All NETCONF communication must be identified with -s NETCONF. You can configure the IP
addresses and ports on which RUGGEDCOM NETCONF listens for NETCONF. For more information, refer to
Section3.1, “Configuring/Monitoring NETCONF in RUGGEDCOM NETCONF”.
The device responds with its <hello> statement:
<?xml version="1.0" encoding="UTF-8"?>
<hello xmlns="urn:ietf:params:xml:ns:netconf:base:1.0">
<capabilities>
.
.
.
</capabilities>
<session-id>797</session-id>
</hello>]]>]]>
Sample Session: Performing an Action 7
Page 20

Chapter 1
Introduction
RUGGEDCOM NETCONF
Reference Guide
2. Respond to the device with the client's <hello> statement. The client's <hello> statement can describe the
client's capabilities, or it can respond with just the base NETCONF capability. This example shows the minimal
<hello> response:
<hello xmlns="urn:ietf:params:xml:ns:netconf:base:1.0">
<capabilities>
<capability>urn:ietf:params:netconf:base:1.0</capability>
</capabilities>
</hello>]]>]]>
3. Issue an <rpc> request with the action to perform:
<rpc message-id="1005" xmlns="urn:ietf:params:xml:ns:netconf:base:1.0">
<action xmlns="http://tail-f.com/ns/netconf/actions/1.0">
<data>
<admin xmlns="http://ruggedcom.com/ns/rmf_admin">
<set-system-clock>
<time>2012-03-26 18:00:00</time>
</set-system-clock>
</admin>
</data>
</action>
</rpc>]]>]]>
• All commands must be enclosed within <rpc> tags. The message-id attribute is not required but is
recommended. The message-id attribute is returned in the device response, allowing you to match
responses with requests.
• The <action> element indicates that this request is to perform an action on the device. The <action>
element must refer to the action namespace in the xmlns attribute.
• The <admin> element is the root of the RUGGEDCOM admin namespace. Within the <admin> element,
additional elements navigate down to the desired command. In this example, we are navigating to admin/
set-system-clock in the RUGGEDCOM NETCONF data model.
• The ]]>]]> string indicates the end of the NETCONF message. Each NETCONF message must end with
]]>]]>
The device responds with the results of the command:
<?xml version="1.0" encoding="UTF-8"?>
<rpc-reply xmlns="urn:ietf:params:xml:ns:netconf:base:1.0" message-id="1005">
<data>
<admin xmlns='http://ruggedcom.com/ns/rmf_admin'>
<set-system-clock>
<system-clock>Mon Mar 26 18:00:01 2012</system-clock>
</set-system-clock>
</admin>
</data>
</rpc-reply>]]>]]>
• The <rpc-reply> element contains the response. Notice the message-id attribute returned with the
<rpc-reply> element; it corresponds to the <message-id> sent in the <rpc> request.
4. After receiving the response, close the session:
<rpc message-id="1006" xmlns="urn:ietf:params:xml:ns:netconf:base:1.0">
<close-session/>
</rpc>]]>]]>
The device responds with the following and closes the session:
<?xml version="1.0" encoding="UTF-8"?>
<rpc-reply xmlns="urn:ietf:params:xml:ns:netconf:base:1.0" message-id="1006">
8 Sample Session: Performing an Action
Page 21
RUGGEDCOM NETCONF
<hello>
Say <hello>
<close-session>
*
<edit-config>
<validate>
<commit>
<unlock> datastores
<xml>
<xml>data</xml>
<xml>data</xml>
<xml>data</xml>
<xml>data</xml>
<xml>data</xml>
<xml>data</xml>
<xml>data</xml>
<xml>data</xml>
<xml>data</xml>
<xml>data</xml>
</xml>
<xml>
<xml>data</xml>
<xml>data</xml>
<xml>data</xml>
<xml>data</xml>
<xml>data</xml>
<xml>data</xml>
<xml>data</xml>
<xml>data</xml>
<xml>data</xml>
<xml>data</xml>
</xml>
<discard-changes/>
<xml>
<xml>data</xml>
<xml>data</xml>
<xml>data</xml>
<xml>data</xml>
<xml>data</xml>
<xml>data</xml>
<xml>data</xml>
<xml>data</xml>
<xml>data</xml>
<xml>data</xml>
</xml>
<lock> datastores
Reference Guide
<ok/>
</rpc-reply>]]>]]
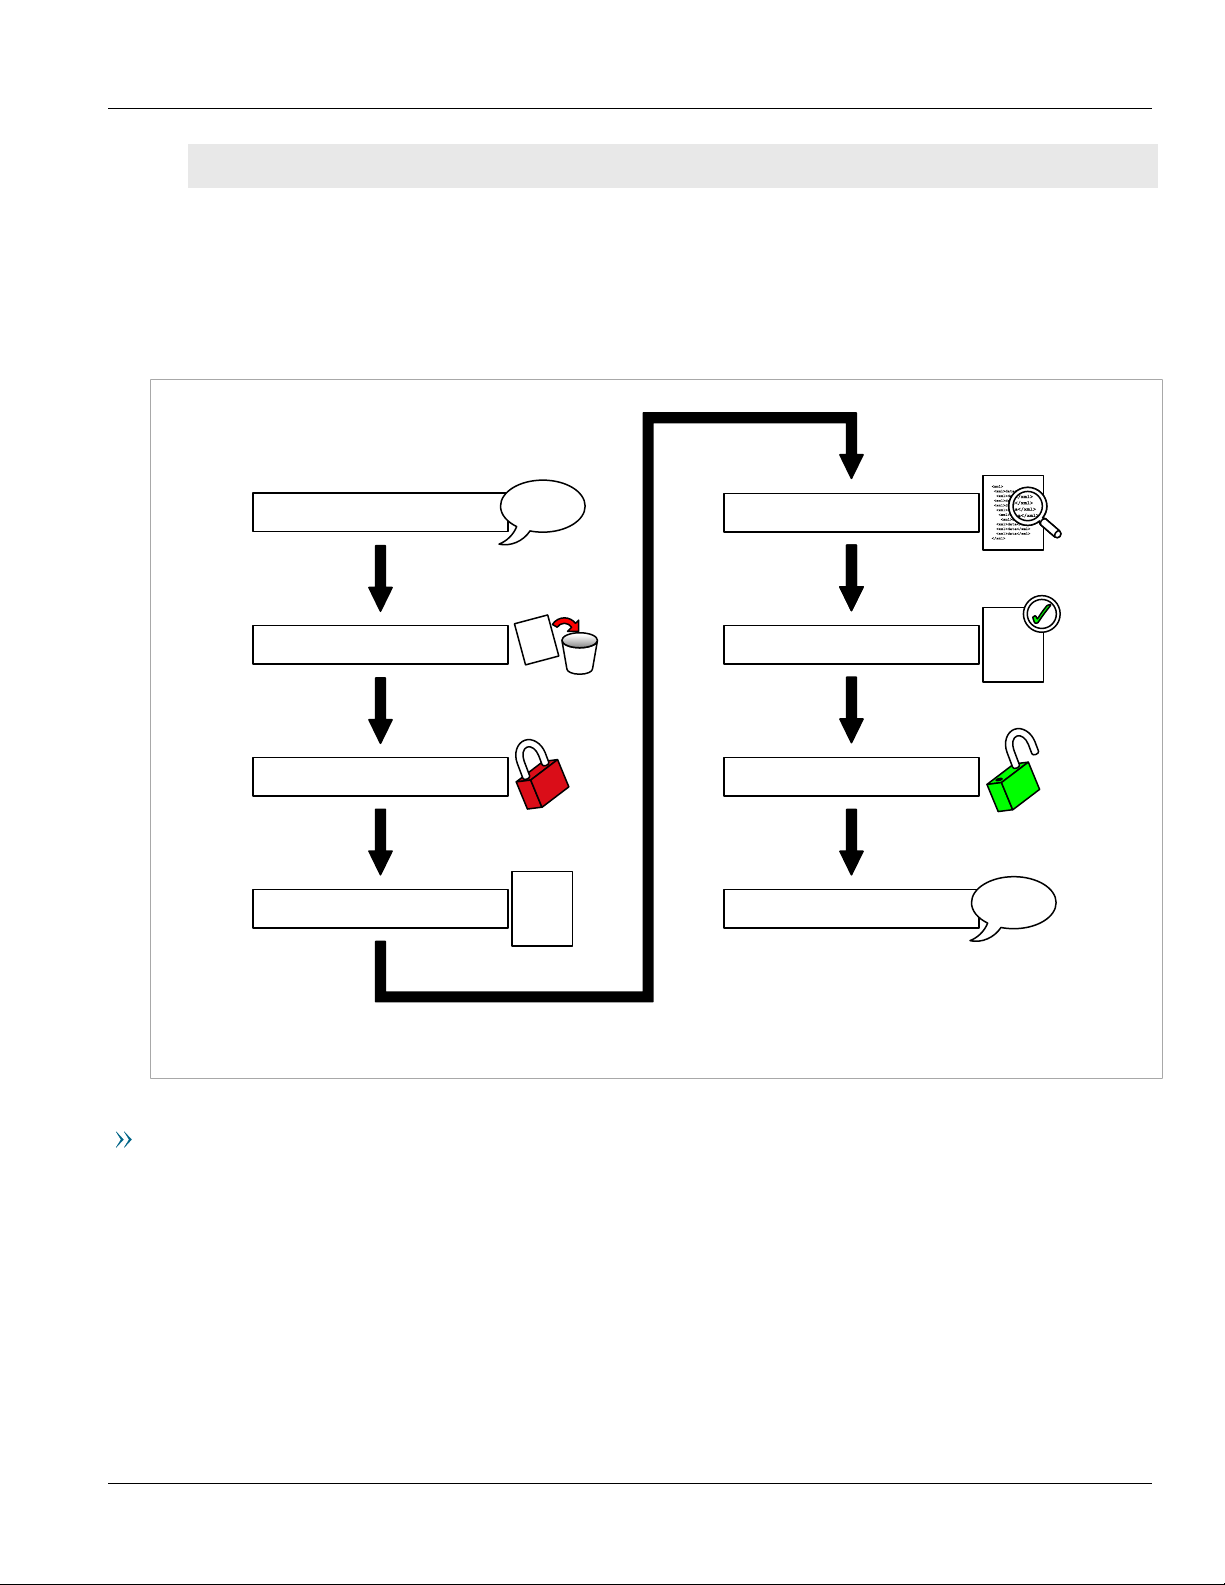
Section1.5.3
Sample Session: Editing Data
To edit data on the device, do the following:
Chapter 1
Introduction
Figure4:Session Schematic: Editing Data
Basic Steps
1. Connect to the device and exchange <hello> messages.
2. Issue an <rpc> command to discard changes. Discarding changes removes changes that are incomplete and
not yet committed to the datastores. It is strongly recommended that you discard any such stray changes
before making changes to the device configuration. Discarding changes helps to ensure that you are making
changes to a known state of the configuration.
3. Issue an <rpc> command to lock the candidate and running datastores. Locking the datastores prevents
other users in other sessions from editing the database while the NETCONF session is working with it. It is
strongly recommended that you lock the datastores before making changes to the device configuration.
Sample Session: Editing Data 9
Page 22

Chapter 1
Introduction
RUGGEDCOM NETCONF
Reference Guide
4. Issue an <rpc> command to edit the configuration. You determine which data to edit by stating the
RUGGEDCOM namespace where the data to be changed is found, and then stating the path through the data
model to the items to change.
5. Issue an <rpc> command to validate the changes. Validating the changes ensures that the syntax of the
changes is correct.
6. Issue an <rpc> command to commit the changes. Committing the changes applies the changes to the
running configuration, making the changes take effect on the running device.
7. Issue an <rpc> command to unlock the datastores. Unlock the datastores to allow other users in other
sessions to modify the configuration data.
8. Close the session. Closing the session ensures that the NETCONF session closes gracefully without incomplete
processes or locked datastores.
Detailed Steps
The following procedure provides more details:
1. Log in to the device via ssh:
$ ssh {user}@{ipAddress} -p 830 -s netconf
• {user} is a user name on the device. Typically, the user should be assigned the administrative user role.
• {ipAddress} is an address on the device listening for NETCONF activity. The -p parameter indicates the
port listening for NETCONF activity. Port 830 is the default NETCONF port. The -s parameter indicates the
subsystem. All NETCONF communication must be identified with -s NETCONF. You can configure the IP
addresses and ports on which RUGGEDCOM NETCONF listens for NETCONF. For more information, refer to
Section3.1, “Configuring/Monitoring NETCONF in RUGGEDCOM NETCONF”.
The device responds with its <hello> statement:
<?xml version="1.0" encoding="UTF-8"?>
<hello xmlns="urn:ietf:params:xml:ns:netconf:base:1.0">
<capabilities>
.
.
.
</capabilities>
<session-id>797</session-id>
</hello>]]>]]>
2. Respond to the device with the client's <hello> statement. The client's <hello> statement can describe the
client's capabilities, or it can respond with just the base NETCONF capability. This example shows the minimal
<hello> response:
<hello xmlns="urn:ietf:params:xml:ns:netconf:base:1.0">
<capabilities>
<capability>urn:ietf:params:netconf:base:1.0</capability>
</capabilities>
</hello>]]>]]>
3. Issue an <rpc> request to discard configuration changes:
<rpc xmlns="urn:ietf:params:xml:ns:netconf:base:1.0" message-id="1012">
<discard-changes/>
</rpc>
]]>]]>
10 Sample Session: Editing Data
Page 23

RUGGEDCOM NETCONF
Reference Guide
• The <discard-changes> command discards any uncommitted changes that may be present in the
configuration. It is recommended that you perform this step to ensure that the changes you make are made
to a known state of the configuration.
The device responds with the following:
<?xml version="1.0" encoding="UTF-8"?>
<rpc-reply xmlns="urn:ietf:params:xml:ns:netconf:base:1.0" message-id="1012">
<ok/>
</rpc-reply>]]>]]>
Any uncommitted changes are removed from the configuration.
4. Issue an <rpc> request to lock the running configuration:
<rpc xmlns="urn:ietf:params:xml:ns:netconf:base:1.0" message-id="1010">
<lock>
<target>
<running/>
</target>
</lock>
</rpc>
]]>]]>
• All commands must be enclosed within <rpc> tags. The message-id attribute is not required but is
recommended. The message-id attribute is returned in the device response, allowing you to match
responses with requests.
• The <lock> element indicates that this request is to lock a configuration.
• The <target> element specifies the configuration to lock. In this <rpc>, the lock target is the
<running> configuration.
• The ]]>]]> string indicates the end of the NETCONF message. Each NETCONF message must end with
]]>]]>
The device responds with the following:
Chapter 1
Introduction
<?xml version="1.0" encoding="UTF-8"?>
<rpc-reply xmlns="urn:ietf:params:xml:ns:netconf:base:1.0" message-id="1010">
<ok/>
</rpc-reply>]]>]]>
The running configuration is now locked.
5. Issue an <rpc> request to lock the candidate configuration:
<rpc xmlns="urn:ietf:params:xml:ns:netconf:base:1.0" message-id="1011">
<lock>
<target>
<candidate/>
</target>
</lock>
</rpc>]]>]]>
The device responds with the following:
<?xml version="1.0" encoding="UTF-8"?>
<rpc-reply xmlns="urn:ietf:params:xml:ns:netconf:base:1.0" message-id="1011">
<ok/>
</rpc-reply>]]>]]>
The candidate configuration is now locked.
6. Issue an <rpc> request to edit the candidate configuration:
Sample Session: Editing Data 11
Page 24

Chapter 1
Introduction
• The <edit-config> element indicates that this request is to edit the configuration.
• The <target> element specifies the configuration to be edited. In this example, the <candidate>
• The <config> element contains the path to the value to be edited.
• The <admin> element specifies that the value to be edited is in the RUGGEDCOM admin namespace. In this
The device responds with the following:
RUGGEDCOM NETCONF
Reference Guide
<rpc message-id="1014" xmlns="urn:ietf:params:xml:ns:netconf:base:1.0">
<edit-config>
<target>
<candidate/>
</target>
<config>
<admin xmlns="http://ruggedcom.com/ns/rmf_admin">
<system-name>Substation Ethernet: Switch 01</system-name>
</admin>
</config>
</edit-config>
</rpc>]]>]]>
configuration is to be edited.
example, the <system-name> value is being edited.
<?xml version="1.0" encoding="UTF-8"?>
<rpc-reply xmlns="urn:ietf:params:xml:ns:netconf:base:1.0" message-id="1014">
<ok/>
</rpc-reply>]]>]]>
The edit is applied to the <candidate> configuration.
7. Issue an <rpc> request to validate the candidate configuration:
<rpc message-id="1015" xmlns="urn:ietf:params:xml:ns:netconf:base:1.0">
<validate>
<source>
<candidate/>
</source>
</validate>
</rpc>]]>]]>
• The <validate> element indicates that this request is to validate a specified configuration.
• The <source> element specifies the configuration to be validated. In this example, the <candidate>
configuration is to be validated.
The device responds with the following:
<?xml version="1.0" encoding="UTF-8"?>
<rpc-reply xmlns="urn:ietf:params:xml:ns:netconf:base:1.0" message-id="1015">
<ok/>
</rpc-reply>]]>]]>
The candidate configuration is validated and its syntax is found to be correct. Had there been syntax errors,
the device would return a message with <error-type>, <error-tag>, <error-severity>, <error-
path>, <error-info>, and <bad-element> elements to describe and identify the syntax error.
8. Issue an <rpc> request to commit the changes:
<rpc message-id="1016" xmlns="urn:ietf:params:xml:ns:netconf:base:1.0">
<commit/>
</rpc>]]>]]>
The device responds with the following:
12 Sample Session: Editing Data
Page 25

RUGGEDCOM NETCONF
Reference Guide
<?xml version="1.0" encoding="UTF-8"?>
<rpc-reply xmlns="urn:ietf:params:xml:ns:netconf:base:1.0" message-id="1016">
<ok/>
</rpc-reply>]]>]]>
The changes made to the <candidate> configuration are committed and promoted to the <running>
configuration.
9. Issue an <rpc> request to unlock the candidate configuration:
<rpc xmlns="urn:ietf:params:xml:ns:netconf:base:1.0" message-id="1017">
<unlock>
<target>
<candidate/>
</target>
</unlock>
</rpc>]]>]]>
The device responds with the following:
<?xml version="1.0" encoding="UTF-8"?>
<rpc-reply xmlns="urn:ietf:params:xml:ns:netconf:base:1.0" message-id="1017">
<ok/>
</rpc-reply>]]>]]>
Chapter 1
Introduction
10. Issue an <rpc> request to unlock the running configuration:
<rpc xmlns="urn:ietf:params:xml:ns:netconf:base:1.0" message-id="1018">
<unlock>
<target>
<running/>
</target>
</unlock>
</rpc>]]>]]>
The device responds with the following:
<?xml version="1.0" encoding="UTF-8"?>
<rpc-reply xmlns="urn:ietf:params:xml:ns:netconf:base:1.0" message-id="1018">
<ok/>
</rpc-reply>]]>]]>
11. Close the session:
<rpc xmlns="urn:ietf:params:xml:ns:netconf:base:1.0" message-id="1019" >
<close-session/>
</rpc>]]>]]>
The device responds with the following and closes the session:
<?xml version="1.0" encoding="UTF-8"?>
<rpc-reply xmlns="urn:ietf:params:xml:ns:netconf:base:1.0" message-id="1019">
<ok/>
</rpc-reply>]]>]]
Sample Session: Editing Data 13
Page 26

Chapter 1
Introduction
RUGGEDCOM NETCONF
Reference Guide
14 Sample Session: Editing Data
Page 27

RUGGEDCOM NETCONF
Reference Guide
NETCONF Capabilities and Namespaces
NETCONF Capabilities and
Namespaces
This section describes the NETCONF capabilities supported by RUGGEDCOM ROX II.
NETCONF capabilities describe the functions and namespaces supported by a NETCONF peer. When you connect
to the NETCONF service on a device, the device advertises its capabilities in a <hello> message.
Capabilities and namespaces are reported within <capability> elements in the <hello> message. A
<capability> element describes a capability or a namespace:
• a capability is a function or service provided by the device. For example, the ability to commit changes to the
database or to lock a portion of the database are capabilities.
• a namespace is a definition of data elements. For example, the definition of standard Internet address elements
and the definition of NETCONF configuration parameters are namespaces.
NETCONF supports both standard IETF NETCONF capabilities and vendor-defined capabilities that are unique to
the product platform.
NETCONF uses namespaces that define the NETCONF configuration data model and that support various
capabilities.
Chapter 2
CONTENTS
• Section2.1, “IETF Capabilities”
• Section2.2, “Vendor-Defined Capabilities”
• Section2.3, “IETF Namespaces”
• Section2.4, “Vendor-Defined Namespaces”
• Section2.5, “RUGGEDCOM Namespaces”
• Section2.6, “Viewing the Capabilities on a Device”
Section2.1
IETF Capabilities
The following are the standard IETF capabilities supported by NETCONF. These capabilities define most of the
actions that can be performed through NETCONF on a device.
Capabilities Description
<capability>urn:ietf:params:netconf:base:1.0</capability> This is the base NETCONF capability. When replying to the <hello>
message from a device, the NETCONF client must respond with at
least this capability.
For more information on this capability, see Internet Engineering
Task Force RFC 6241 [http://tools.ietf.org/html/rfc6241].
IETF Capabilities 15
Page 28

Chapter 2
NETCONF Capabilities and Namespaces
Capabilities Description
RUGGEDCOM NETCONF
Reference Guide
<capability>urn:ietf:params:netconf:capability:writablerunning:1.0</capability>
<capability>urn:ietf:params:netconf:capability:candidate:1.0</
capability>
<capability>urn:ietf:params:netconf:capability:confirmedcommit:1.0</capability>
<capability>urn:ietf:params:netconf:capability:XPath:1.0</
capability>
<capability>urn:ietf:params:netconf:capability:url:1.0?
scheme=ftp,sftp,file</capability>
<capability>urn:ietf:params:netconf:capability:validate:1.0</
capability>
Supports writing to the running configuration: you can update
configuration data in the running configuration.
For more information on this capability, see Internet Engineering
Task Force RFC 6241 [http://tools.ietf.org/html/rfc6241].
Supports a candidate configuration: you can make changes to a
candidate configuration, validate and review the changes, and then
commit the candidate to make it the running configuration.
For more information on this capability, see Internet Engineering
Task Force RFC 6241 [http://tools.ietf.org/html/rfc6241].
Supports the confirmed commit operation: you can require that a
commit be confirmed before a candidate configuration is promoted
to become the running configuration.
For more information on this capability, see Internet Engineering
Task Force RFC 6241 [http://tools.ietf.org/html/rfc6241].
Supports the use of XPath expressions: you can used XPath
expressions in the <filter> element to define the path to the
configuration item to be retrieved or set.
For more information on this capability, see Internet Engineering
Task Force RFC 6241 [http://tools.ietf.org/html/rfc6241].
Supports file transfer for configuration data: you can upload or
download configuration data as a file through a specified protocol.
For more information on this capability, see Internet Engineering
Task Force RFC 6241 [http://tools.ietf.org/html/rfc6241].
Supports the validate operation: you can validate a specified
configuration for syntax errors.
For more information on this capability, see Internet Engineering
Task Force RFC 6241 [http://tools.ietf.org/html/rfc6241].
<capability>urn:ietf:params:netconf:capability:rollback-onerror:1.0</capability>
<capability>urn:ietf:params:netconf:capability:notification:1.0</
capability>
<capability>urn:ietf:params:netconf:capability:interleave:1.0</
capability>
<capability>urn:ietf:params:netconf:capability:partial-lock:1.0</
capability>
<capability>urn:ietf:params:netconf:capability:with-defaults:1.0?
basic-mode=trim&also-supported=report-all-tagged</capability>
Supports the rollback-on-error operation: you can require the
configuration to roll back to its previous state if a commit fails.
For more information on this capability, see Internet Engineering
Task Force RFC 6241 [http://tools.ietf.org/html/rfc6241].
Supports the notification operation: you can have the NETCONF
server advise a NETCONF client of changes to the configuration data
or device state.
For more information on this capability, see Internet Engineering
Task Force RFC 5277 [http://tools.ietf.org/html/rfc5277].
Supports the interleave capability: the device handles NETCONF
notification messages and other NETCONF operations
asynchronously.
For more information on this capability, see Internet Engineering
Task Force RFC 5277 [http://tools.ietf.org/html/rfc5277].
Supports the partial-lock capability: you can lock a specified portion
of the configuration database for updating.
For more information on this capability, see Internet Engineering
Task Force RFC 5717 [http://tools.ietf.org/html/rfc5717].
Supports the with-defaults capability: you can control how the
NETCONF server reports default data in the data model.
For more information on this capability, see Internet Engineering
Task Force RFC 6243 [http://tools.ietf.org/html/rfc6243].
16 IETF Capabilities
Page 29

RUGGEDCOM NETCONF
Reference Guide
NETCONF Capabilities and Namespaces
Section2.2
Vendor-Defined Capabilities
The following capabilities are provided by the vendor of the development tools used to create the RUGGEDCOM
NETCONF software. These vendor-defined capabilities complement and extend the standard IETF capabilities.
Capabilities Description
Chapter 2
<capability>http://tail-f.com/ns/netconf/with-defaults/1.0</
capability>
<capability>http://tail-f.com/ns/netconf/actions/1.0</
capability>
<capability>http://tail-f.com/ns/netconf/commit/1.0</
capability>
<capability>http://tail-f.com/yang/common-monitoring?
module=tailf-common-monitoring&revision=2013-06-14</
capability>
<capability>http://tail-f.com/yang/confd-monitoring?
module=tailf-confd-monitoring&revision=2013-06-14</
capability>
<capability>http://tail-f.com/yang/netconf-monitoring?
module=tailf-netconf-monitoring&revision=2012-06-14</
capability>
This vendor-defined capability extends the standard IETF withdefaults capability.
This vendor-defined capability supports the execution of actions on
the device: you can issue direct commands through NETCONF, such
as reboot, clear-all-alarms, restore-factory-defaults, and others.
This vendor-defined capability extends the commit capability: you
can make changes to a candidate configuration and commit the
changes to promote them to the running configuration.
These vendor-defined capabilities support NETCONF monitoring on
the device.
Section2.3
IETF Namespaces
NETCONF uses several namespaces to data types and configuration data models. Some namespaces are associated
with and provide support for specific NETCONF capabilities.
The following are the standard IETF namespaces supported by NETCONF:
Capabilities Description
<capability>urn:ietf:params:xml:ns:yang:ietf-inet-types?module=ietfinet-types&revision=2010-09-24</capability>
<capability>urn:ietf:params:xml:ns:yang:ietf-netconf-monitoring?
module=ietf-netconf-monitoring&revision=2010-10-04</capability>
<capability>urn:ietf:params:xml:ns:yang:ietf-yang-types?
module=ietf-yang-types&revision=2010-09-24</capability>
<capability>urn:ietf:params:xml:ns:yang:ietf-netconf-with-defaults?
revision=2010-11-11&module=ietf-with-defaults</capability>
Defines data types for Internet addresses and related items.
For more information on this namespace, see Internet Engineering
Task Force RFC 6021 [http://tools.ietf.org/html/rfc6021].
Defines data types for NETCONF monitoring.
For more information on this namespace, see Internet Engineering
Task Force RFC 6022 [http://tools.ietf.org/html/rfc6022].
Defines data types for general YANG data types. YANG is the data
modeling language used to develop the RUGGEDCOM NETCONF
software.
For more information on this namespace, see Internet Engineering
Task Force RFC 6022 [http://tools.ietf.org/html/rfc6022].
Defines items used by the with-defaults capability.
For more information on this namespace, see Internet Engineering
Task Force RFC 6243 [http://tools.ietf.org/html/rfc6243].
Vendor-Defined Capabilities 17
Page 30

Chapter 2
NETCONF Capabilities and Namespaces
Section2.4
Vendor-Defined Namespaces
The following namespaces support vendor-defined NETCONF capabilities:
Namespace Description
RUGGEDCOM NETCONF
Reference Guide
<capability>http://tail-f.com/ns/netconf/with-defaults/1.0</
capability>
<capability>http://tail-f.com/ns/netconf/actions/1.0</
capability>
<capability>http://tail-f.com/ns/netconf/commit/1.0</
capability>
Section2.5
Supports and extends the IETF with-defaults capability.
Supports the vendor-defined actions capability.
Supports the vendor-defined commit capability.
RUGGEDCOM Namespaces
The RUGGEDCOM namespaces define the configuration data model on the device. Depending on the physical
configuration of your device, not all RUGGEDCOM namespaces may be present. For example, if your device does
not have switch interfaces, the switch namespace will not be present.
• <capability>http://ruggedcom.com/ns/rmf?module=rmf&revision=2012-11-28</capability>
The parent container for all RUGGEDCOM ROX II configuration data.
• <capability>http://ruggedcom.com/ns/rmf_admin?module=rmf_admin&revision=2012-11-28</capability>
The admin namespace contains administrative configuration data. The admin namespace is the equivalent
of the admin menu level in the RUGGEDCOM ROX II web user interface, and the admin command in the
RUGGEDCOM ROX II command line interface.
• <capability>http://ruggedcom.com/ns/rmf_chassis?module=rmf_chassis&revision=2012-11-28</
capability>
The chassis namespace contains chassis configuration data. The chassis namespace is the equivalent of
the chassis menu level in the RUGGEDCOM ROX II web user interface, and the chassis command in the
RUGGEDCOM ROX II command line interface.
• <capability>http://ruggedcom.com/ns/rmf_crossbow?module=rmf_crossbow&revision=2013-10-10</
capability>
The crossbow namespace contains CROSSBOW configuration data. The crossbow namespace is the equivalent of
the apps/crossbow menu level in the RUGGEDCOM ROX II web user interface, and the crossbow command in
the RUGGEDCOM ROX II command line interface.
• <capability>http://ruggedcom.com/ns/rmf_elan?module=rmf_elan&revision=2012-11-28</capability>
The elan namespace contains ELAN configuration data. The elan namespace is the equivalent of the apps/elan
menu level in the RUGGEDCOM ROX II web user interface, and the elan command in the RUGGEDCOM ROX II
command line interface.
• <capability>http://ruggedcom.com/ns/rmf_events?module=rmf_events&revision=2012-11-28</capability>
The events namespace contains event configuration data.
• <capability>http://ruggedcom.com/ns/rmf_global?module=rmf_global&revision=2012-11-28</capability>
The global namespace contains global configuration data. The global namespace is the equivalent of the global
menu level in the RUGGEDCOM ROX II web user interface, and the global command in the RUGGEDCOM ROX
II command line interface.
18 Vendor-Defined Namespaces
Page 31

RUGGEDCOM NETCONF
Reference Guide
NETCONF Capabilities and Namespaces
• <capability>http://ruggedcom.com/ns/rmf_if?module=rmf_if&revision=2012-11-28</capability>
The interface namespace contains interface configuration data. The interface namespace is the equivalent of
the interface menu level in the RUGGEDCOM ROX II web user interface, and the interface command in the
RUGGEDCOM ROX II command line interface.
• <capability>http://ruggedcom.com/ns/rmf_ifs?module=rmf_ifs&revision=2012-11-28</capability>
The interfaces namespace contains interfaces read-only data. The interface namespace is the equivalent of the
interfaces menu level in the RUGGEDCOM ROX II web user interface, and the interfaces command in the
RUGGEDCOM ROX II command line interface.
• <capability>http://ruggedcom.com/ns/rmf_ifswitch?module=rmf_ifswitch&revision=2012-11-28</
capability>
The switch namespace contains switch configuration data. The switch namespace is the equivalent of
the switch menu level in the RUGGEDCOM ROX II web user interface, and the switch command in the
RUGGEDCOM ROX II command line interface.
• <capability>http://ruggedcom.com/ns/rmf_iftunnel?module=rmf_iftunnel&revision=2012-11-28</
capability>
The tunnel namespace contains tunnel configuration data. The tunnel namespace is the equivalent of
the tunnel menu level in the RUGGEDCOM ROX II web user interface, and the tunnel command in the
RUGGEDCOM ROX II command line interface.
• <capability>http://ruggedcom.com/ns/rmf_ip?module=rmf_ip&revision=2012-11-28</capability>
The ip namespace contains ip address configuration data. The ip namespace is the equivalent of the ip menu
level in the RUGGEDCOM ROX II web user interface, and the ip command in the RUGGEDCOM ROX II command
line interface.
• <capability>http://ruggedcom.com/ns/rmf_mpls?module=rmf_mpls&revision=2012-11-28</capability>
The mpls namespace contains mpls configuration data. The mpls namespace is the equivalent of the mpls
menu level in the RUGGEDCOM ROX II web user interface, and the mpls command in the RUGGEDCOM ROX II
command line interface.
• <capability>http://ruggedcom.com/ns/rmf_qos?module=rmf_qos&revision=2012-11-28</capability>
The qos namespace contains quality of service configuration data. The qos namespace is the equivalent of the
qos menu level in the RUGGEDCOM ROX II web user interface, and the qos command in the RUGGEDCOM ROX
II command line interface.
• <capability>http://ruggedcom.com/ns/rmf_routing?module=rmf_routing&revision=2012-11-28</
capability>
The routing namespace contains routing configuration data. The routing namespace is the equivalent of
the routing menu level in the RUGGEDCOM ROX II web user interface, and the routing command in the
RUGGEDCOM ROX II command line interface.
• <capability>http://ruggedcom.com/ns/rmf_security?module=rmf_security&revision=2012-11-28</
capability>
The security namespace contains security configuration data. The security namespace is the equivalent of
the security menu level in the RUGGEDCOM ROX II web user interface, and the security command in the
RUGGEDCOM ROX II command line interface.
• <capability>http://ruggedcom.com/ns/rmf_services?module=rmf_services&revision=2012-11-28</
capability>
The services namespace contains services configuration data. The services namespace is the equivalent of
the services menu level in the RUGGEDCOM ROX II web user interface, and the services command in the
RUGGEDCOM ROX II command line interface.
• <capability>http://ruggedcom.com/ns/rox_apps?module=rox_apps&revision=2012-11-28</capability>
The apps namespace contains apps configuration data. The apps namespace is the equivalent of the apps
menu level in the RUGGEDCOM ROX II web user interface, and the apps command in the RUGGEDCOM ROX II
command line interface.
Chapter 2
RUGGEDCOM Namespaces 19
Page 32

Chapter 2
NETCONF Capabilities and Namespaces
• <capability>http://ruggedcom.com/ns/rmf_mpls?module=rmf_mpls&revision=2012-11-28</capability>
The mpls namespace contains mpls configuration data. The mpls namespace is the equivalent of the mpls
menu level in the RUGGEDCOM ROX II web user interface, and the mpls command in the RUGGEDCOM ROX II
command line interface.
Section2.6
Viewing the Capabilities on a Device
To view the capabilities on a device, do the following:
1. Log in to the device's NETCONF service via Secure Shell (SSH):
$ ssh {user}@{ipAddress} -p 830 -s netconf
• {user} is an administrative role user on the device.
• {ipAddress} is an address on the device listening for NETCONF activity. The -p parameter indicates the
port listening for NETCONF activity. Port 830 is the default NETCONF port. The -s parameter indicates the
subsystem. All NETCONF communication must be identified with -s NETCONF. You can configure the IP
addresses and ports on which RUGGEDCOM ROX II listens for NETCONF. For more information, refer to
Section3.1, “Configuring/Monitoring NETCONF in RUGGEDCOM NETCONF”.
2. When prompted, provide the user's password.
3. The device responds with a <hello> message, listing its capabilities.
RUGGEDCOM NETCONF
Reference Guide
<?xml version="1.0" encoding="UTF-8"?>
<hello xmlns="urn:ietf:params:xml:ns:netconf:base:1.0">
<capabilities>
<capability>urn:ietf:params:netconf:base:1.0</capability>
<capability>urn:ietf:params:netconf:base:1.1</capability>
<capability>urn:ietf:params:netconf:capability:writable-running:1.0</capability>
<capability>urn:ietf:params:netconf:capability:candidate:1.0</capability>
<capability>urn:ietf:params:netconf:capability:confirmed-commit:1.0</capability>
<capability>urn:ietf:params:netconf:capability:confirmed-commit:1.1</capability>
<capability>urn:ietf:params:netconf:capability:XPath:1.0</capability>
<capability>urn:ietf:params:netconf:capability:url:1.0?scheme=ftp,sftp,file</capability>
<capability>urn:ietf:params:netconf:capability:validate:1.0</capability>
<capability>urn:ietf:params:netconf:capability:validate:1.1</capability>
<capability>urn:ietf:params:netconf:capability:rollback-on-error:1.0</capability>
<capability>urn:ietf:params:netconf:capability:notification:1.0</capability>
<capability>urn:ietf:params:netconf:capability:interleave:1.0</capability>
<capability>urn:ietf:params:netconf:capability:partial-lock:1.0</capability>
<capability>http://tail-f.com/ns/netconf/with-defaults/1.0</capability>
<capability>http://tail-f.com/ns/netconf/actions/1.0</capability>
<capability>http://tail-f.com/ns/netconf/commit/1.0</capability>
<capability>urn:ietf:params:netconf:capability:with-defaults:1.0?basic-mode=trim&alsosupported=report-all-tagged</capability>
<capability>urn:ietf:params:xml:ns:yang:ietf-netconf-with-defaults?
revision=2010-11-11&module=ietf-with-defaults</capability>
<capability>http://ruggedcom.com/ns/rmf?module=rmf&revision=2012-03-07</capability>
<capability>http://ruggedcom.com/ns/rmf_admin?module=rmf_admin&revision=2012-03-07</capability>
<capability>http://ruggedcom.com/ns/rmf_chassis?module=rmf_chassis&revision=2012-03-07</
capability>
<capability>http://ruggedcom.com/ns/rmf_events?module=rmf_events&revision=2012-03-07</
capability>
<capability>http://ruggedcom.com/ns/rmf_global?module=rmf_global&revision=2012-03-07</
capability>
<capability>http://ruggedcom.com/ns/rmf_if?module=rmf_if&revision=2012-03-07</capability>
<capability>http://ruggedcom.com/ns/rmf_ifs?module=rmf_ifs&revision=2012-03-07</capability>
20 Viewing the Capabilities on a Device
Page 33

RUGGEDCOM NETCONF
Reference Guide
<capability>http://ruggedcom.com/ns/rmf_iftunnel?module=rmf_iftunnel&revision=2012-03-07</
capability>
<capability>http://ruggedcom.com/ns/rmf_ip?module=rmf_ip&revision=2012-03-07</capability>
<capability>http://ruggedcom.com/ns/rmf_qos?module=rmf_qos&revision=2012-03-07</capability>
<capability>http://ruggedcom.com/ns/rmf_routing?module=rmf_routing&revision=2012-03-07</
capability>
<capability>http://ruggedcom.com/ns/rmf_security?module=rmf_security&revision=2012-03-07</
capability>
<capability>http://ruggedcom.com/ns/rmf_services?module=rmf_services&revision=2012-03-07</
capability>
<capability>http://tail-f.com/yang/common-monitoring?module=tailf-commonmonitoring&revision=2011-09-22</capability>
<capability>http://tail-f.com/yang/confd-monitoring?module=tailf-confdmonitoring&revision=2011-09-22</capability>
<capability>http://tail-f.com/yang/netconf-monitoring?module=tailf-netconfmonitoring&revision=2011-09-22</capability>
<capability>urn:ietf:params:xml:ns:yang:ietf-inet-types?module=ietf-inettypes&revision=2010-09-24</capability>
<capability>urn:ietf:params:xml:ns:yang:ietf-netconf-monitoring?module=ietf-netconfmonitoring&revision=2010-10-04</capability>
<capability>urn:ietf:params:xml:ns:yang:ietf-yang-types?module=ietf-yangtypes&revision=2010-09-24</capability>
</capabilities>
<session-id>1020</session-id>
</hello>]]>]]>
NETCONF Capabilities and Namespaces
Chapter 2
Viewing the Capabilities on a Device 21
Page 34

Chapter 2
NETCONF Capabilities and Namespaces
RUGGEDCOM NETCONF
Reference Guide
22 Viewing the Capabilities on a Device
Page 35

RUGGEDCOM NETCONF
Reference Guide
NETCONF Sessions
NETCONF Sessions
This section describes how to do the following:
• connect to the NETCONF service on a device via Secure Shell (SSH). You must do this each time you connect to
the device to start a NETCONF session.
• respond to the device's <hello> message. You must do this each time you start a NETCONF session.
• close the session gracefully with the <close-session> command. Closing the session with the <close-
session> command is recommended, but is optional.
• kill the session with the <kill-session> command. Closing the session with the <kill-session>
command is optional.
CONTENTS
• Section3.1, “Configuring/Monitoring NETCONF in RUGGEDCOM NETCONF”
Chapter 3
• Section3.2, “Connecting to the NETCONF Service”
• Section3.3, “Saying Hello”
• Section3.4, “Closing the Session”
• Section3.5, “Killing a Session”
Section3.1
Configuring/Monitoring NETCONF in RUGGEDCOM NETCONF
Before sending NETCONF XML messages to any RUGGEDCOM NETCONF device, make sure NETCONF sessions are
enabled and configured. For more information, refer to either the RUGGEDCOM ROX II Web Interface or CLI User
Guides for the device.
The RUGGEDCOM ROX II User Guides also detail how to look up important statistics, such as the number of bad
hellos, the total number of dropped sessions, etc.
Section3.2
Connecting to the NETCONF Service
RUGGEDCOM ROX II supports the use of Secure Shell (SSH) to connect to the NETCONF service on the device. To
connect to the NETCONF service, specify an IP address, port, and subsystem:
$ ssh {user}@{ipAddress} -p 830 -s netconf
Configuring/Monitoring NETCONF in RUGGEDCOM
NETCONF 23
Page 36

Chapter 3
NETCONF Sessions
RUGGEDCOM NETCONF
Reference Guide
• {user}
A user name on the device assigned the administrative user role.
• {ipAddress}
The IP address or hostname of the device.
• -p 830
Specifies port 830. The default NETCONF port is port 830.
• -s netconf
Specifies the NETCONF subsystem. You must always specify the NETCONF subsystem when initiating a
NETCONF session.
You can configure the IP addresses and ports on which RUGGEDCOM ROX II listens for NETCONF. For more
information, refer to Section3.1, “Configuring/Monitoring NETCONF in RUGGEDCOM NETCONF”.
When prompted, provide the user password.
When you connect to the device, the device responds with a <hello> message, listing its NETCONF capabilities.
For more information on the <hello> message and on how to respond to it, refer to Section3.3, “Saying Hello”.
Section3.3
Saying Hello
When you open a NETCONF session, the device responds with a <hello> message. The <capabilities>
elements in the message list the NETCONF commands, functions, and namespaces supported on the device. The
<hello> message also includes a <session-id> element, containing a numeric identifier for the new session.
Before you can issue NETCONF requests, you must respond to the <hello> message. The minimal response is to
reply with a <hello> message listing just the netconf:base capability from the client. You can also reply with
the client's actual capabilities, or reply by returning the device's capabilities back to the device. In all examples in
this guide, we respond to the <hello> message with the minimal response.
NOTE
Your reply to the <hello> message must not contain a <session-id>. Including a <session-id>
in your response results in a bad element error and the device closes the session.
If you choose to return the device's <hello> message as the response, make sure that only one version of each
capability is present in your response. RUGGEDCOM ROX II advertises two versions of the following capabilities:
<capability>urn:ietf:params:netconf:base:1.0</capability>
<capability>urn:ietf:params:netconf:base:1.1</capability>
<capability>urn:ietf:params:netconf:capability:confirmed-commit:1.0</capability>
<capability>urn:ietf:params:netconf:capability:confirmed-commit:1.1</capability>
<capability>urn:ietf:params:netconf:capability:validate:1.0</capability>
<capability>urn:ietf:params:netconf:capability:validate:1.1</capability>
You must return either version 1.0 or version 1.1 of each capability. Do not return both versions of each capability.
CONTENTS
• Section3.3.1, “RUGGEDCOM ROX II NETCONF <hello> Message”
24 Saying Hello
Page 37

RUGGEDCOM NETCONF
Reference Guide
NETCONF Sessions
Section3.3.1
RUGGEDCOM ROX II NETCONF <hello> Message
The following is the hello message returned when you connect to the NETCONF service on a device running the
RUGGEDCOM ROX II operating system:
<?xml version="1.0" encoding="UTF-8"?>
<hello xmlns="urn:ietf:params:xml:ns:netconf:base:1.0">
<capabilities>
<capability>urn:ietf:params:netconf:base:1.0</capability>
<capability>urn:ietf:params:netconf:base:1.1</capability>
<capability>urn:ietf:params:netconf:capability:writable-running:1.0</capability>
<capability>urn:ietf:params:netconf:capability:candidate:1.0</capability>
<capability>urn:ietf:params:netconf:capability:confirmed-commit:1.0</capability>
<capability>urn:ietf:params:netconf:capability:confirmed-commit:1.1</capability>
<capability>urn:ietf:params:netconf:capability:xpath:1.0</capability>
<capability>urn:ietf:params:netconf:capability:url:1.0?scheme=ftp,sftp,file</capability>
<capability>urn:ietf:params:netconf:capability:validate:1.0</capability>
<capability>urn:ietf:params:netconf:capability:validate:1.1</capability>
<capability>urn:ietf:params:netconf:capability:rollback-on-error:1.0</capability>
<capability>urn:ietf:params:netconf:capability:notification:1.0</capability>
<capability>urn:ietf:params:netconf:capability:interleave:1.0</capability>
<capability>urn:ietf:params:netconf:capability:partial-lock:1.0</capability>
<capability>http://tail-f.com/ns/netconf/with-defaults/1.0</capability>
<capability>http://tail-f.com/ns/netconf/actions/1.0</capability>
<capability>http://tail-f.com/ns/netconf/commit/1.0</capability>
<capability>urn:ietf:params:netconf:capability:with-defaults:1.0?basic-mode=trim&alsosupported=report-all-tagged</capability>
<capability>urn:ietf:params:xml:ns:yang:ietf-netconf-with-defaults?revision=2010-11-11&module=ietfwith-defaults</capability>
<capability>http://ruggedcom.com/ns/rmf?module=rmf&revision=2012-03-07</capability>
<capability>http://ruggedcom.com/ns/rmf_admin?module=rmf_admin&revision=2012-03-07</capability>
<capability>http://ruggedcom.com/ns/rmf_chassis?module=rmf_chassis&revision=2012-03-07</capability>
<capability>http://ruggedcom.com/ns/rmf_events?module=rmf_events&revision=2012-03-07</capability>
<capability>http://ruggedcom.com/ns/rmf_global?module=rmf_global&revision=2012-03-07</capability>
<capability>http://ruggedcom.com/ns/rmf_if?module=rmf_if&revision=2012-03-07</capability>
<capability>http://ruggedcom.com/ns/rmf_ifs?module=rmf_ifs&revision=2012-03-07</capability>
<capability>http://ruggedcom.com/ns/rmf_iftunnel?module=rmf_iftunnel&revision=2012-03-07</
capability>
<capability>http://ruggedcom.com/ns/rmf_ip?module=rmf_ip&revision=2012-03-07</capability>
<capability>http://ruggedcom.com/ns/rmf_qos?module=rmf_qos&revision=2012-03-07</capability>
<capability>http://ruggedcom.com/ns/rmf_routing?module=rmf_routing&revision=2012-03-07</capability>
<capability>http://ruggedcom.com/ns/rmf_security?module=rmf_security&revision=2012-03-07</
capability>
<capability>http://ruggedcom.com/ns/rmf_services?module=rmf_services&revision=2012-03-07</
capability>
<capability>http://tail-f.com/yang/common-monitoring?module=tailf-commonmonitoring&revision=2011-09-22</capability>
<capability>http://tail-f.com/yang/confd-monitoring?module=tailf-confdmonitoring&revision=2011-09-22</capability>
<capability>http://tail-f.com/yang/netconf-monitoring?module=tailf-netconfmonitoring&revision=2011-09-22</capability>
<capability>urn:ietf:params:xml:ns:yang:ietf-inet-types?module=ietf-inet-types&revision=2010-09-24</
capability>
<capability>urn:ietf:params:xml:ns:yang:ietf-netconf-monitoring?module=ietf-netconfmonitoring&revision=2010-10-04</capability>
<capability>urn:ietf:params:xml:ns:yang:ietf-yang-types?module=ietf-yang-types&revision=2010-09-24</
capability>
</capabilities>
<session-id>1020</session-id>
</hello>]]>]]>
Chapter 3
The following is the minimal hello response required from the NETCONF client:
<hello xmlns="urn:ietf:params:xml:ns:netconf:base:1.0">
RUGGEDCOM ROX II NETCONF <hello> Message 25
Page 38

Chapter 3
NETCONF Sessions
<capabilities>
<capability>urn:ietf:params:netconf:base:1.0</capability>
</capabilities>
</hello>]]>]]>
RUGGEDCOM NETCONF
Reference Guide
The device does not reply to the <hello> response unless there is an error. After issuing the <hello> response,
you can begin sending NETCONF requests.
Section3.4
Closing the Session
Closing a session requests the graceful termination of a NETCONF session. It is recommended that you use
the <close-session> command to close each NETCONF session. Upon closing the session, the device also
terminates the SSH connection.
When the server receives a <close-session> request, it does the following:
• gracefully closes the session
• releases any locks and resources associated with the session
• gracefully closes any associated connections
• ignores any NETCONF requests received after the <close-session> request
If the NETCONF device can complete the request, it sends an <rpc-reply> document containing the <ok>
element.
If the NETCONF device cannot complete the request, it sends an <rpc-reply> document containing the <rpc-
error> element.
To close a NETCONF session, send the following:
<rpc message-id="2010" xmlns="urn:ietf:params:xml:ns:netconf:base:1.0">
<close-session/>
</rpc>]]>]]>
Upon successfully closing the session, the device responds with the following:
<?xml version="1.0" encoding="UTF-8"?>
<rpc-reply xmlns="urn:ietf:params:xml:ns:netconf:base:1.0" message-id="2010">
<ok/>
</rpc-reply>]]>]]>
Section3.5
Killing a Session
Killing a session terminates a specified NETCONF session, cancelling any operations in progress and releasing
all locks, resources, and connections for the session. Use the <kill-session> command to close NETCONF
sessions other than the current session. You cannot use <kill-session> to close the session from which the
command is used.
<kill-session> does not roll back the configuration or state changes made by the configuration being
terminated. If the session being terminated is performing a confirmed commit when the <kill-session> is
issued, the NETCONF server restores the configuration to its state before the confirmed commit was issued.
26 Closing the Session
Page 39

RUGGEDCOM NETCONF
Reference Guide
NETCONF Sessions
To kill a session, you need to know its <session-id>. To determine the <session-id> of another session,
attempt to <lock> a configuration. If the configuration is already locked by another session, the <session-id>
for the session is reported in the <rpc-error> message received from the unsuccessful <lock> attempt.
To kill a session where you know the <session-id>, issue the following:
<rpc message-id="2030" mlns="urn:ietf:params:xml:ns:netconf:base:1.0">
<kill-session>
<session-id>1968</session-id>
</kill-session>
</rpc>>>>]]>
The device responds with the following message and kills the session:
<rpc-reply message-id="2030" xmlns="urn:ietf:params:xml:ns:netconf:base:1.0">
<ok/>
</rpc-reply>
To kill a session where you do not know the <session-id>, first attempt to <lock> a configuration. In this
example, we attempt to lock the already locked <running> configuration:
<rpc message-id="2040" xmlns="urn:ietf:params:xml:ns:netconf:base:1.0">
<lock>
<target>
<running/>
</target>
</lock>
</rpc>]]>]]>
Chapter 3
The device responds with the following:
<?xml version="1.0" encoding="UTF-8"?>
<rpc-reply xmlns="urn:ietf:params:xml:ns:netconf:base:1.0" message-id="2040">
<rpc-error>
<error-type>protocol</error-type>
<error-tag>lock-denied</error-tag>
<error-severity>error</error-severity>
<error-info>
<session-id>1968</session-id>
</error-info>
</rpc-error>
</rpc-reply>]]>]]>
Incorporate the <session-id> into the <kill-session> command:
<rpc xmlns="urn:ietf:params:xml:ns:netconf:base:1.0" message-id="2041">
<kill-session>
<session-id>1968</session-id>
</kill-session>
</rpc>
The device responds with the following message and kills the specified session:
<rpc-reply message-id="2041" xmlns="urn:ietf:params:xml:ns:netconf:base:1.0">
<ok/>
</rpc-reply>
Killing a Session 27
Page 40

Chapter 3
NETCONF Sessions
RUGGEDCOM NETCONF
Reference Guide
28 Killing a Session
Page 41

RUGGEDCOM NETCONF
Reference Guide
Getting Data
This section describes how to use NETCONF to retrieve configuration data from RUGGEDCOM ROX II.
NETCONF features two get commands to retrieve data from the device:
• <get> retrieves device state data and information from the running configuration. For more information, refer
to Section4.1, “Using the <get> Command”.
• <get-config> retrieves information from a either the candidate or running configuration. For more
information, refer to Section4.2, “Using the <get-config> Command”.
When getting information, you specify the information to retrieve by stating the path through the RUGGEDCOM
ROX II data model. You can specify the path with a series of hierarchical XML elements, or with an XPath to the
desired content.
To determine the path to the desired data, you can retrieve XML files containing the RUGGEDCOM ROX II data
model from the device.
The RUGGEDCOM ROX II database is modelled using YANG, an IETF standard for NETCONF data modelling. The
data model for RUGGEDCOM ROX II is defined in several YANG files. Typically, each RUGGEDCOM namespace is
defined in a single YANG file. YANG files contain structured content, but they are not in XML.
YIN files are XML versions of YANG data model files. YIN files are well-formed XML files, making them easily
parseable and able to be programmatically traversed and manipulated. You can use YIN files to find the path to
every data element in the RUGGEDCOM ROX II data model.
For more information on the YANG data modelling language, see Internet Engineering Task Force RFC 6020
[http://tools.ietf.org/html/rfc6020].
Chapter 4
Getting Data
CONTENTS
• Section4.1, “Using the <get> Command”
• Section4.2, “Using the <get-config> Command”
• Section4.3, “Using XPaths with <get> and <get-config>”
• Section4.4, “Getting Information for a Specific Object”
• Section4.5, “Getting Default Values”
• Section4.6, “Getting Data Models from the Device”
Section4.1
Using the <get> Command
Use the <get> command to retrieve information from the running configuration.
The <filter> element contains the path to the information to retrieve. You can specify the path with
hierarchical XML elements, or with an XPath.
When using hierarchical elements, do the following:
Using the <get> Command 29
Page 42

Chapter 4
Getting Data
RUGGEDCOM NETCONF
Reference Guide
• specify the <filter> element's type attribute as subtree
• construct the path to the desired element within the <filter> element
• specify the namespace for the root element in the path
You can use an XPath in the <filter> element, instead of the hierarchical XML element structure. For
information on how to use an XPath, refer to Section4.3, “Using XPaths with <get> and <get-config>”.
The following example shows how to return the state of the Developer Log Enabled setting using hierarchical
XML elements. In this example, the Developer Log is enabled, so the value for the Enabled setting is returned as
true.
<rpc message-id="3010"
xmlns="urn:ietf:params:xml:ns:netconf:base:1.0">
<get>
<filter type="subtree">
<admin xmlns="http://ruggedcom.com/ns/rmf_admin">
<logging>
<diagnostics>
<developer-log>
<enabled />
</developer-log>
</diagnostics>
</logging>
</admin>
</filter>
</get>
</rpc>]]>]]>
The device returns the following:
<?xml version="1.0" encoding="UTF-8"?>
<rpc-reply xmlns="urn:ietf:params:xml:ns:netconf:base:1.0" message-id="3010">
<data>
<admin xmlns="http://ruggedcom.com/ns/rmf_admin">
<logging>
<diagnostics>
<developer-log>
<enabled>true</enabled>
</developer-log>
</diagnostics>
</logging>
</admin>
</data>
</rpc-reply>]]>]]>
Section4.2
Using the <get-config> Command
Use the <get-config> command to retrieve information from a specified configuration, either the running
configuration or the candidate configuration.
The <filter> element contains the path to the information to retrieve. You can specify the path with
hierarchical XML elements, or with an XPath.
When using hierarchical elements, do the following:
• use the <source> element to specify the configuration to query. The configuration can be either
<candidate> or <running>.
• specify the <filter> element's type attribute as subtree
30 Using the <get-config> Command
Page 43

RUGGEDCOM NETCONF
Reference Guide
• construct the path to the desired element within the <filter> element
• specify the namespace for the root element in the path
You can also use an XPath in the <filter> element, instead of the hierarchical XML element structure. For
information on how to use an XPath, refer to Section4.3, “Using XPaths with <get> and <get-config>”.
The following example shows how to return the list of users from the running configuration:
<rpc message-id="3050"
xmlns="urn:ietf:params:xml:ns:netconf:base:1.0">
<get-config>
<source>
<running/>
</source>
<filter type="subtree">
<admin xmlns="http://ruggedcom.com/ns/rmf_admin">
<users />
</admin>
</filter>
</get-config>
</rpc>]]>]]>
The device returns the following:
<?xml version="1.0" encoding="UTF-8"?>
<rpc-reply xmlns="urn:ietf:params:xml:ns:netconf:base:1.0" message-id="3050">
<data>
<admin xmlns="http://ruggedcom.com/ns/rmf_admin">
<users>
<userid>
<name>admin</name>
<password>$1$z6HPcW$nIHgNp6EXWzN.l9SlhAVE1</password>
<role>administrator</role>
</userid>
<userid>
<name>guest</name>
<password>$1$YEkflk$EEEV0mzCClp9oFVWVAiba1</password>
<role>guest</role>
</userid>
<userid>
<name>oper</name>
<password>$1$1iSWr$S64yY2AzheWLDhSdbwfQP0</password>
<role>operator</role>
</userid>
</users>
</admin>
</data>
</rpc-reply>]]>]]>
Chapter 4
Getting Data
Section4.3
Using XPaths with <get> and <get-config>
Instead of using a structure of hierarchical XML elements, you can use XPaths with the <get> and <getconfig> commands. XPaths are easy to construct and remove the need to specify the namespace of the data
path's root element in the query.
When using an XPath, do the following:
• specify the <filter> element's type attribute as xpath.
• specify the <filter> element's select attribute with the XPath to the desired element.
Using XPaths with <get> and <get-config> 31
Page 44

Chapter 4
Getting Data
RUGGEDCOM NETCONF
Reference Guide
The following example shows how to return the state of the Developer Log Enabled setting using an XPath. In this
example, the Developer Log is enabled, so the value for the Enabled setting is returned as true.
<rpc message-id="3020"
xmlns="urn:ietf:params:xml:ns:netconf:base:1.0">
<get>
<filter type="xpath" select="admin/logging/diagnostics/developer-log/enabled"/>
</get>
</rpc>]]>]]>
The device returns the following:
<?xml version="1.0" encoding="UTF-8"?>
<rpc-reply xmlns="urn:ietf:params:xml:ns:netconf:base:1.0" message-id="3020">
<data>
<admin xmlns="http://ruggedcom.com/ns/rmf_admin">
<logging>
<diagnostics>
<developer-log>
<enabled>true</enabled>
</developer-log>
</diagnostics>
</logging>
</admin>
</data>
</rpc-reply>]]>]]>
The following example shows how to use an XPath with the <get-config> command.
<rpc message-id="3020"
xmlns="urn:ietf:params:xml:ns:netconf:base:1.0">
<get-config>
<source>
<running/>
</source>
<filter type="xpath" select="admin/logging/diagnostics/developer-log/enabled"/>
</get-config>
</rpc>]]>]]>
The device returns the following:
<?xml version="1.0" encoding="UTF-8"?>
<rpc-reply xmlns="urn:ietf:params:xml:ns:netconf:base:1.0" message-id="3020">
<data>
<admin xmlns="http://ruggedcom.com/ns/rmf_admin">
<logging>
<diagnostics>
<developer-log>
<enabled>true</enabled>
</developer-log>
</diagnostics>
</logging>
</admin>
</data>
</rpc-reply>]]>]]>
32 Using XPaths with <get> and <get-config>
Page 45

RUGGEDCOM NETCONF
Reference Guide
Section4.4
Getting Information for a Specific Object
To retrieve information for a specific object, such as a user, an interface, or other identified object, specify the
identification for the item item in the XML element hierarchy or XPath.
CONTENTS
• Section4.4.1, “Specifying Objects with Hierarchical XML Elements”
• Section4.4.2, “Specifying Objects with XPaths”
Section4.4.1
Specifying Objects with Hierarchical XML Elements
When using hierarchical XML elements, enclose the identifying data within its element. For example:
{element}
...
{element}{data}{/element}
...
{/element}
Chapter 4
Getting Data
Where:
• {element} is an element in the data model.
• ... represents multiple elements in the data model to the target element.
• {data} is the identifying data for the object whose information you want to retrieve.
For example, to return the role for a specific user, send an rpc-message similar to the following:
<rpc message-id="3030"
xmlns="urn:ietf:params:xml:ns:netconf:base:1.0">
<get>
<filter type="subtree">
<admin xmlns="http://ruggedcom.com/ns/rmf_admin">
<users>
<userid>
<name>oper</name>
<role />
</userid>
</users>
</admin>
</filter>
</get>
</rpc>]]>]]>
The device returns the following rpc-reply:
<?xml version="1.0" encoding="UTF-8"?>
<rpc-reply xmlns="urn:ietf:params:xml:ns:netconf:base:1.0" message-id="3020">
<data>
<admin xmlns="http://ruggedcom.com/ns/rmf_admin">
<users>
<userid>
<name>oper</name>
<role>operator</role>
</userid>
Getting Information for a Specific Object 33
Page 46

Chapter 4
Getting Data
</users>
</admin>
</data>
</rpc-reply>]]>]]>
Section4.4.2
Specifying Objects with XPaths
When using XPath, use the following syntax in the select statement:
select="{element}/.../{element}[{element}='{data}']/{element}"/>
• {element} is an element in the data model.
• ... represents multiple elements in the data model to the target element.
• {data} is the identifying data for the object whose information you want to retrieve.
For example, to return the role for a specific user, send an rpc-message similar to the following:
<rpc message-id="3030"
xmlns="urn:ietf:params:xml:ns:netconf:base:1.0" with-defaults="true">
<get>
<filter type="xpath"
select="admin/users/userid[name='oper']/role"/>
</get>
</rpc>]]>]]>
RUGGEDCOM NETCONF
Reference Guide
The device returns the following:
<?xml version="1.0" encoding="UTF-8"?>
<rpc-reply xmlns="urn:ietf:params:xml:ns:netconf:base:1.0" message-id="3030">
<data>
<admin xmlns="http://ruggedcom.com/ns/rmf_admin">
<users>
<userid>
<name>oper</name>
<role>operator</role>
</userid>
</users>
</admin>
</data>
</rpc-reply>]]>]]>
Section4.5
Getting Default Values
The NETCONF standard does not require NETCONF servers to return the default values from the database. If you
query an object that has a default value, the server may return just the data structure and not the default value.
For example, the NETCONF Trace Log Enabled setting is disabled by default. When you query this value, NETCONF
does not return the default setting. When you issue this query:
<rpc message-id="3030"
xmlns="urn:ietf:params:xml:ns:netconf:base:1.0">
<get>
<filter type="xpath" select="admin/logging/diagnostics/xpath-trace-log/enabled" />
</get>
34 Specifying Objects with XPaths
Page 47

RUGGEDCOM NETCONF
Reference Guide
</rpc>]]>]]>
The device returns the following:
<?xml version="1.0" encoding="UTF-8"?>
<rpc-reply xmlns="urn:ietf:params:xml:ns:netconf:base:1.0" message-id="3030">
<data>
<admin xmlns="http://ruggedcom.com/ns/rmf_admin">
<logging>
<diagnostics>
<xpath-trace-log>
</xpath-trace-log>
</diagnostics>
</logging>
</admin>
</data>
</rpc-reply>]]>]]>
Note that the <enabled> element is not returned.
To return the default values for elements, add a with-defaults attribute to the <rpc> element, and set the
attribute to true.
When you issue this query:
<rpc message-id="3030"
xmlns="urn:ietf:params:xml:ns:netconf:base:1.0" with-defaults="true">
<get>
<filter type="xpath" select="admin/logging/diagnostics/xpath-trace-log/enabled" />
</get>
</rpc>]]>]]>
Chapter 4
Getting Data
The device returns the following:
<?xml version="1.0" encoding="UTF-8"?>
<rpc-reply xmlns="urn:ietf:params:xml:ns:netconf:base:1.0" message-id="3030">
<data>
<admin xmlns="http://ruggedcom.com/ns/rmf_admin">
<logging>
<diagnostics>
<xpath-trace-log>
<enabled>false</enabled>
</xpath-trace-log>
</diagnostics>
</logging>
</admin>
</data>
</rpc-reply>]]>]]>
Section4.6
Getting Data Models from the Device
Most data available in RUGGEDCOM ROX II can be accessed using NETCONF.
To access data within in RUGGEDCOM ROX II, the user only need to provide the path the target parameter from
which data will be retrieved or updated. To determine the path to a parameter, refer to the following references:
• RUGGEDCOM ROX II User Guide
User Guides for RUGGEDCOM ROX II detail each parameter in the RUGGEDCOM ROX II user interface. Make sure
to reference the User Guide specific to the target device.
Getting Data Models from the Device 35
Page 48

Chapter 4
Getting Data
• RUGGEDCOM ROX II CLI
Paths to parameters in the RUGGEDCOM ROX II CLI are a direct representation of the underlying data model.
• YANG/YIN Files
YANG and YIN files detail the RUGGEDCOM ROX II data model in formats that can be parsed and transformed as
needed. YANG files are based on the IETF standard for NETCONF data modeling. YIN files are well-formed XML
versions of the YANG files.
Typically, each RUGGEDCOM namespace is defined in one or more separate YANG/YIN files. These files
can be downloaded directly from the device and then opened in the open-source pyang utility to create
human-readable tree diagrams of the elements in each file. For information about using pyang, refer to the
Section4.6.3, “Using pyang”.
For information on how to download YANG and YIN files, refer to Section4.6.2, “Getting YIN and YANG Files
from the Device”.
NOTE
Paths to NETCONF action commands can be determined from the YANG files. However, YANG files
can be difficult to decipher for some users. For a list of commonly used NETCONF actions and their
paths, refer to Chapter6, RUGGEDCOM ROX II Actions.
NOTE
For more information on the YANG data modeling language, refer to RFC 6020 [http://tools.ietf.org/
html/rfc6020].
RUGGEDCOM NETCONF
Reference Guide
CONTENTS
• Section4.6.1, “Getting Schemas from the Device”
• Section4.6.2, “Getting YIN and YANG Files from the Device”
• Section4.6.3, “Using pyang”
Section4.6.1
Getting Schemas from the Device
This section describes how to download a list of schemas from RUGGEDCOM ROX II. This general list of schemas
provides information needed to download specific schemas from the device.
To get a list of schemas from the device, do the following:
1. Log in to the device and start a NETCONF session. For instructions on how to initiate a NETCONF session, refer
to Section3.2, “Connecting to the NETCONF Service”
2. Issue this command:
<rpc message-id="4010" xmlns="urn:ietf:params:xml:ns:netconf:base:1.0">
<get>
<filter type="subtree">
<netconf-state xmlns="urn:ietf:params:xml:ns:yang:ietf-netconf-monitoring">
<schemas/>
</netconf-state>
</filter>
</get>
</rpc>
The device responds with a list of schemas.
36 Getting Schemas from the Device
Page 49

RUGGEDCOM NETCONF
Reference Guide
3. Review the list and locate the <schema> entries for items you want to retrieve. For example, shown here are
the <schema> entries for the rmf_admin namespace:
<schema>
<identifier>rmf_admin</identifier>
<version>2012-03-07</version>
<format>yin</format>
<namespace>http://ruggedcom.com/ns/rmf_admin</namespace>
<location>NETCONF</location>
</schema>
<schema>
<identifier>rmf_admin</identifier>
<version>2012-03-07</version>
<format>yang</format>
<namespace>http://ruggedcom.com/ns/rmf_admin</namespace>
<location>NETCONF</location>
</schema>
4. Make a note of the <identifier>, <format>, and <version> data. You need this information to retrieve
the YIN or YANG file from the device.
5. After finding the <identifier>, <format>, and <version> for the schema you want to download, you
can retrieve the YIN and YANG files. For instructions, refer to Section4.6.2, “Getting YIN and YANG Files from
the Device”.
Chapter 4
Getting Data
Section4.6.2
Getting YIN and YANG Files from the Device
To retrieve a specific YIN or YANG file, do the following:
1. Log in to the device and start a NETCONF session. For instructions on how to initiate a NETCONF session, refer
to Section3.2, “Connecting to the NETCONF Service”.
2. Download a list of schemas from RUGGEDCOM NETCONF and determine the identifier, version and format of
the schema associated with the target YIN or YANG file. For more information, refer to Section4.6.1, “Getting
Schemas from the Device”.
3. Issue this command:
<rpc message-id="101" xmlns="urn:ietf:params:xml:ns:netconf:base:1.0">
<get-schema xmlns="urn:ietf:params:xml:ns:yang:ietf-netconf-monitoring">
<identifier>{identifier}</identifier>
<version>{version}</version>
<format>{format}</format>
</get-schema>
</rpc>]]>]]>
• {identifier}
Specifies the schema name.
• {version}
Specifies the schema version number.
• {format}
Specifies the schema format: yin or yang.
For example, this command retrieves the rmf_admin YIN file:
<rpc message-id="101" xmlns="urn:ietf:params:xml:ns:netconf:base:1.0">
<get-schema xmlns="urn:ietf:params:xml:ns:yang:ietf-netconf-monitoring">
<identifier>rmf_admin</identifier>
Getting YIN and YANG Files from the Device 37
Page 50

Chapter 4
Getting Data
<version>2012-03-07</version>
<format>yin</format>
</get-schema>
</rpc>]]>]]>
RUGGEDCOM NETCONF
Reference Guide
The device returns the text from the specified YIN or YANG file.
Section4.6.3
Using pyang
pyang is an open-source utility used to validate and transform YANG and YIN files. pyang is particularly useful for
transforming YANG and YIN files into text-based output that clearly illustrated the hierarchy of the elements in the
RUGGEDCOM ROX II data model files.
Download pyang from the pyang project site [http://code.google.com/p/pyang/]. pyang is a Python-based
application. If you do not already have Python installed, download it from python.org [http://www.python.org/].
This section describes how to us pyang to convert a YANG or YIN file to a text-based tree diagram of a
RUGGEDCOM ROX II schema.
To convert a YANG or YIN file to a text-based tree diagram, do the following:
1. Before beginning, download one or more YANG or YIN files from RUGGEDCOM ROX II. For instructions on
downloading schemas, refer to Section4.6.2, “Getting YIN and YANG Files from the Device”.
2. At a command line prompt; type this command:
pyang {inputFile} -o {outputFile} -f tree
• {inputFile}
The path to and filename of the YANG or YIN file that you want to convert.
• {outputFile}
The path to and filename of the text-based tree diagram that you want to create.
For example, to convert the rmf_services.yan file to a text-based tree diagram, type the following
command. This example assumed that you are issuing the command in the same directory as where the
rmf_services.yang file is located.
pyang rmf_services.yang -o rmf_services.txt -f tree
pyang creates the rmf_services.txt file.
3. Open the output file in a text editor. This example shows a portion of the rmf_services.yang file
rendered as a text-based tree:
module: rmf_services
+--rw services
+--rw time
+--rw ntp
+--rw enabled? boolean
+--rw server [name]
| +--rw name inet:host
| +--rw enabled? empty
| +--rw peer? empty
| +--rw minpoll? ntpPollType
| +--rw maxpoll? ntpPollType
| +--rw iburst? empty
| +--rw ntp-version? ntpVersionType
| +--rw prefer? empty
38 Using pyang
Page 51

RUGGEDCOM NETCONF
Reference Guide
| +--rw key? leafref
.
.
.
• rw indicates a read-write node.
• ro indicates a read-only node.
• [square braces] indicate an identifier or name for a data object.
• text following the node name indicates the data type for the node, such as boolean, string, and so on.
CONTENTS
• Section4.6.3.1, “Using the Text-Based Tree”
Section4.6.3.1
Using the Text-Based Tree
Refer to the text-based tree to help build paths and element references in your NETCONF commands. Use the
structure shown in the text-based tree diagram to build the XML used in your NETCONF <rpc> messages.
Chapter 4
Getting Data
For example, to enable the NTP service on a device, locate the ntp/enabled field in the tree:
+--rw services
+--rw time
+--rw ntp
+--rw enabled? boolean
.
.
.
In the XML, this tree structure looks like the following:
<services>
<ntp>
<enabled></enabled>
</ntp>
</services>
To set the Enabled field to true, the XML in your NETCONF <rpc> looks like the following:
<rpc message-id="233" xmlns="urn:ietf:params:xml:ns:netconf:base:1.0">
<edit-config>
<target>
<candidate/>
</target>
<config>
<services xmlns="http://ruggedcom.com/ns/rmf_services">
<ntp>
<enabled>true</enabled>
</ntp>
</services>
</config>
</edit-config>
</rpc>]]>]]>
Note that you need to add the XML namespace to the root element in the data structure.
To address an identified object, you need to refer to the object's identifying name or key. In this example, we want
to set a peer IP address for the NTP server named ntp_server_01.
Using the Text-Based Tree 39
Page 52

Chapter 4
Getting Data
RUGGEDCOM NETCONF
Reference Guide
Again, refer to the text-based tree diagram to locate the services/ntp/server(name)/peer field in the tree:
+--rw services
+--rw time
+--rw ntp
+--rw enabled? boolean
+--rw server [name]
| +--rw name inet:host
| +--rw enabled? empty
| +--rw peer? empty
.
.
.
In the XML, this tree structure looks like the following:
<services>
<ntp>
<server>
<name></name>
<peer></peer>
</server>
</ntp>
</services>
To set a peer for the NTP server, the XML in your NETCONF rpc looks like the following:
<rpc message-id="233" xmlns="urn:ietf:params:xml:ns:netconf:base:1.0">
<edit-config>
<target>
<candidate/>
</target>
<config>
<services xmlns="http://ruggedcom.com/ns/rmf_services">
<ntp>
<server>
<name>ntp_server_01</name>
<peer>192.168.0.100</peer>
</server>
</ntp>
</services>
</config>
</edit-config>
</rpc>]]>]]>
40 Using the Text-Based Tree
Page 53

RUGGEDCOM NETCONF
Reference Guide
Changing Configuration Data
Changing Configuration Data
This section describes how to change configuration data and perform actions on your device through NETCONF.
You can edit configuration data in two ways:
• You can edit the running configuration directly. In this approach, any changes you make to the running
configuration take effect immediately. You do not need to use the <commit> command to apply the changes.
You cannot use the <validate> command to check the syntax of the changes before they take effect.
However, you can use the <validate> command after making the changes to confirm that they are correct.
Obviously, making changes to the running configuration is potentially risky. It is recommended that you use this
approach only after gaining experience with NETCONF and confirming that your scripts and procedures work
reliably.
• You can edit the candidate configuration and then commit the changes to the running configuration. In this
approach, you make changes to a safe workspace called the candidate configuration. After making changes,
you can use the <validate> command to confirm the syntax of the candidate configuration. If necessary,
you can discard the changes with the <discard-changes> command, allowing you to cancel the editing
process and clear any errors. After reviewing and validating the changes, you apply the changes to the running
configuration with the <commit> command. Editing the candidate configuration and then committing the
changes is the recommended approach for editing configuration data.
Chapter 5
CONTENTS
• Section5.1, “Changing Data in the Running Configuration”
• Section5.2, “Changing Data in the Candidate Configuration”
Section5.1
Changing Data in the Running Configuration
To edit data in the running configuration, simply specify the running configuration as the target in the edit-config
command. You do not need to commit the change with the commit command. You cannot validate the syntax of
the change with the validate command before the change takes effect. If you want to validate the change, use the
validate commands on the running configuration after making the change.
CAUTION!
Making changes directly to the running configuration is potentially risky: you may interrupt service
on the device, or your changes may conflict with those of other users working on other management
interfaces. Making changes to the running configuration should only be done by those with sufficient
system expertise and experience to make sure that such changes are performed properly.
To edit the running configuration, do the following:
1. Connect to and log in to the device.
2. Issue the <edit-config> command:
Changing Data in the Running Configuration 41
Page 54

Chapter 5
Changing Configuration Data
<rpc message-id="233" xmlns="urn:ietf:params:xml:ns:netconf:base:1.0">
<edit-config>
<target>
<running/>
</target>
<config>
{path}
</config>
</edit-config>
</rpc>]]>]]>
• {path}
The XML elements describing the path to and the data for the element to be edited.
For example, to create a static VLAN:
<rpc message-id="233" xmlns="urn:ietf:params:xml:ns:netconf:base:1.0">
<edit-config>
<target>
<running/>
</target>
<config>
<switch xmlns="http://ruggedcom.com/ns/rmf_ifswitch">
<vlans>
<static-vlan>
<vid>0086</vid>
</static-vlan>
</vlans>
</switch>
</config>
</edit-config>
</rpc>]]>]]>
RUGGEDCOM NETCONF
Reference Guide
After making changes to the running configuration, you can use the validate command to check the syntax on the
configuration. For instructions on how to validate a configuration, refer to Section5.2.5, “Validating Changes”.
Section5.2
Changing Data in the Candidate Configuration
The recommended approach for changing data is to make your changes to the candidate configuration before
committing the changes to the running configuration. Making changes to the candidate configuration provides
the opportunity to validate the syntax of the configuration and to discard the changes if required.
As illustrated in Section1.5.3, “Sample Session: Editing Data”, editing data in the candidate configuration and
committing it involves a multi-step workflow:
1. Connect to the device and say hello.
2. Lock the candidate and running configuration datastores.
3. Discard any stray changes to restore the configurations to a known state.
4. Edit the candidate configuration.
5. Validate the candidate configuration.
6. Commit the changes.
7. Unlock the datastores.
8. Close the session.
42 Changing Data in the Candidate Configuration
Page 55

RUGGEDCOM NETCONF
Reference Guide
Changing Configuration Data
This section describes how to lock the datastores, edit and delete data, validate the configuration, commit the
changes, and lock the datastores.
For instructions on how to initiate a NETCONF session, refer to Section3.2, “Connecting to the NETCONF Service”.
For instructions on how to close a NETCONF session, refer to Section3.4, “Closing the Session”.
CONTENTS
• Section5.2.1, “Locking Data Stores”
• Section5.2.2, “Copying Data”
• Section5.2.3, “Replacing Data”
• Section5.2.4, “Deleting Data”
• Section5.2.5, “Validating Changes”
• Section5.2.6, “Committing Changes”
Section5.2.1
Locking Data Stores
Chapter 5
To lock the candidate and running datastores, do the following:
1. Issue an <rpc> request to lock the running configuration:
<rpc xmlns="urn:ietf:params:xml:ns:netconf:base:1.0" message-id="1010">
<lock>
<target>
<running/>
</target>
</lock>
</rpc>
]]>]]>
• All commands must be enclosed within <rpc> tags. The message-id attribute is not required but is
recommended. The message-id attribute is returned in the device response, allowing you to match
responses with requests.
• The <lock> element indicates that this request is to lock a configuration.
• The <target> element specifies the configuration to lock. In this <rpc>, the lock target is the
<running> configuration.
• The ]]>]]> string indicates the end of the NETCONF message. Each NETCONF message must end with
]]>]]>
The device responds with the following:
<?xml version="1.0" encoding="UTF-8"?>
<rpc-reply xmlns="urn:ietf:params:xml:ns:netconf:base:1.0" message-id="1010">
<ok/>
</rpc-reply>]]>]]>
The running configuration is now locked
2. Issue an <rpc> request to lock the candidate configuration:
<rpc xmlns="urn:ietf:params:xml:ns:netconf:base:1.0" message-id="1011">
<lock>
<target>
<candidate/>
Locking Data Stores 43
Page 56

Chapter 5
Changing Configuration Data
</target>
</lock>
</rpc>]]>]]>
RUGGEDCOM NETCONF
Reference Guide
The device responds with the following:
<?xml version="1.0" encoding="UTF-8"?>
<rpc-reply xmlns="urn:ietf:params:xml:ns:netconf:base:1.0" message-id="1011">
<ok/>
</rpc-reply>]]>]]>
The candidate configuration is now locked.
Section5.2.2
Copying Data
You can use the copy-config command to do the following:
• copy a specified configuration to an XML file on the device. Do this when you want to save a configuration to a
file and then download the file through the web interface or command line interface.
• copy an XML file on the device to a specified configuration. Do these when you want to overwrite a specified
configuration with a file that has been uploaded to the device through the web interface or through the
command line interface.
When using copy-config to save the configuration to an XML file, the file is saved in the /var/lib/config
directory on the device. You can download the through the RUGGEDCOM ROX II Web interface or through the
command line interface.
To save a configuration to an XML file, do the following:
1. Connect to and log in to the device.
2. Issue the copy-config command:
<rpc message-id="101" xmlns="urn:ietf:params:xml:ns:netconf:base:1.0">
<copy-config>
<target>
<url>file:///{filename.xml}</url>
</target>
<source>
<{configuration}/>
</source>
</copy-config>
</rpc>]]>]]>
• {filename.xml}
Specify a filename for the new XML file.
• {configuration}
Specify the configuration to save: running or candidate.
For example, this command saves the running configuration to a file named running_config_01.xml:
<rpc message-id="101" xmlns="urn:ietf:params:xml:ns:netconf:base:1.0">
<copy-config>
<target>
<url>file:///running_config_01.xml</url>
</target>
<source>
<running/>
44 Copying Data
Page 57

RUGGEDCOM NETCONF
Reference Guide
</source>
</copy-config>
</rpc>]]>]]>
Changing Configuration Data
The file is saved to the /var/lib/config directory on the device.
To overwrite a configuration with a configuration file, do the following:
1. Upload an XML configuration file to the device. For instructions on how to upload a configuration file, refer
to the RUGGEDCOM NETCONF v Web Interface User Guide or RUGGEDCOM NETCONF v CLI User Guide for the
device.
2. Connect to and log in to the device.
3. Lock the running configuration:
<rpc xmlns="urn:ietf:params:xml:ns:netconf:base:1.0" message-id="230">
<lock>
<target>
<running/>
</target>
</lock>
</rpc>]]>]]>
4. Lock the target configuration:
<rpc xmlns="urn:ietf:params:xml:ns:netconf:base:1.0" message-id="231">
<lock>
<target>
<candidate/>
</target>
</lock>
</rpc>]]>]]>
Chapter 5
5. Discard any configuration changes:
<rpc xmlns="urn:ietf:params:xml:ns:netconf:base:1.0" message-id="232">
<discard-changes/>
</rpc>]]>]]>
6. Use copy-config to copy the file to a specified configuration:
<rpc message-id="233" xmlns="urn:ietf:params:xml:ns:netconf:base:1.0">
<copy-config>
<target>
<{configuration}/>
</target>
<source>
<url>file:///{filename}</url>
</source>
</copy-config>
</rpc>]]>]]>
• {configuration}
The target configuration: can be candidate or running.
• {filename}
The name of the configuration file uploaded to /var/lib/config
For example, this command loads the configuration file standard_config.xml to the running
configuration:
<rpc message-id="233" xmlns="urn:ietf:params:xml:ns:netconf:base:1.0">
<copy-config>
<target>
Copying Data 45
Page 58

Chapter 5
Changing Configuration Data
<running/>
</target>
<source>
<url>file:///standard_config.xml</url>
</source>
</copy-config>
</rpc>]]>]]>
7. Commit the changes:
<rpc message-id="234" xmlns="urn:ietf:params:xml:ns:netconf:base:1.0">
<commit/>
</rpc>]]>]]>
8. Unlock the candidate configuration:
<rpc xmlns="urn:ietf:params:xml:ns:netconf:base:1.0" message-id="235">
<unlock>
<target>
<candidate/>
</target>
</unlock>
</rpc>]]>]]>
9. Unlock the running configuration:
RUGGEDCOM NETCONF
Reference Guide
<rpc xmlns="urn:ietf:params:xml:ns:netconf:base:1.0" message-id="236">
<unlock>
<target>
<running/>
</target>
</unlock>
</rpc>]]>]]>
Section5.2.3
Replacing Data
To replace an existing configuration value with a new value, do the following:
1. Connect to and log in to the device.
2. Lock the running configuration:
<rpc xmlns="urn:ietf:params:xml:ns:netconf:base:1.0" message-id="230">
<lock>
<target>
<running/>
</target>
</lock>
</rpc>]]>]]>
3. Lock the target configuration:
<rpc xmlns="urn:ietf:params:xml:ns:netconf:base:1.0" message-id="231">
<lock>
<target>
<candidate/>
</target>
</lock>
</rpc>]]>]]>
4. Discard any configuration changes:
46 Replacing Data
Page 59

RUGGEDCOM NETCONF
Reference Guide
<rpc xmlns="urn:ietf:params:xml:ns:netconf:base:1.0" message-id="232">
<discard-changes/>
</rpc>]]>]]>
5. Issue an <rpc> request with the replace operation:
<rpc message-id="233" xmlns="urn:ietf:params:xml:ns:netconf:base:1.0">
<edit-config>
<target>
<candidate/>
</target>
<config>
<{root element}
xmlns="{namespace URL}"
xmlns:nc="urn:ietf:params:xml:ns:netconf:base:1.0">
{configuration data with nc:operation="replace" attribute}
</{root element}>
</config>
</edit-config>
</rpc>]]>]]>
• {root element}
The top level element in the data model under which the data is located. Note that you need to declare the
xmlns:nc="urn:ietf:params:xml:ns:netconf:base:1.0" namespace at this point.
• {namespace}
The URL to the RUGGEDCOM namespace for the top level element.
• {configuration data with nc:operation="replace" attribute}
The path to the data to be replaced, with the nc:operation="replace" attribute on the element
containing the data to be replaced.
For example, to replace an existing IP address with a new address, issue the following request.
Changing Configuration Data
Chapter 5
<rpc message-id="233" xmlns="urn:ietf:params:xml:ns:netconf:base:1.0">
<edit-config>
<target>
<candidate/>
</target>
<config>
<ip xmlns:nc="urn:ietf:params:xml:ns:netconf:base:1.0"
xmlns="http://ruggedcom.com/ns/rmf_ip">
<ifname>fe-cm-1</ifname>
<ipv4 nc:operation="replace">
<address>
<ipaddress>192.168.1.42/24</ipaddress>
</address>
</ipv4>
</ip>
</config>
</edit-config>
</rpc>]]>]]>
6. Commit the change:
<rpc message-id="234" xmlns="urn:ietf:params:xml:ns:netconf:base:1.0">
<commit/>
</rpc>]]>]]>
7. Unlock the candidate configuration:
<rpc xmlns="urn:ietf:params:xml:ns:netconf:base:1.0" message-id="235">
<unlock>
Replacing Data 47
Page 60

Chapter 5
Changing Configuration Data
<target>
<candidate/>
</target>
</unlock>
</rpc>]]>]]>
8. Unlock the target configuration:
<rpc xmlns="urn:ietf:params:xml:ns:netconf:base:1.0" message-id="236">
<unlock>
<target>
<running/>
</target>
</unlock>
</rpc>]]>]]>
Section5.2.4
Deleting Data
To delete a specific configuration setting, do the following:
1. Connect to and log in to the device.
2. Lock the running configuration:
RUGGEDCOM NETCONF
Reference Guide
<rpc xmlns="urn:ietf:params:xml:ns:netconf:base:1.0" message-id="230">
<lock>
<target>
<running/>
</target>
</lock>
</rpc>]]>]]>
3. Lock the target configuration:
<rpc xmlns="urn:ietf:params:xml:ns:netconf:base:1.0" message-id="231">
<lock>
<target>
<candidate/>
</target>
</lock>
</rpc>]]>]]>
4. Discard any configuration changes:
<rpc xmlns="urn:ietf:params:xml:ns:netconf:base:1.0" message-id="232">
<discard-changes/>
</rpc>]]>]]>
5. Issue an <rpc> request with the delete operation:
<rpc message-id="233" xmlns="urn:ietf:params:xml:ns:netconf:base:1.0">
<edit-config>
<target>
<candidate/>
</target>
<config>
<{root element}
xmlns="{namespace URL}"
xmlns:nc="urn:ietf:params:xml:ns:netconf:base:1.0">
{configuration data with nc:operation="delete" attribute}
</{root element}>
</config>
48 Deleting Data
Page 61

RUGGEDCOM NETCONF
Reference Guide
</edit-config>
</rpc>]]>]]>
• {root element}
The top level element in the data model under which the data is located. Note that you need to declare the
xmlns:nc="urn:ietf:params:xml:ns:netconf:base:1.0" namespace at this point.
• {namespace}
The URL to the RUGGEDCOM namespace for the top level element.
• {configuration data with nc:operation="delete" attribute}
The path to the data to be deleted, with the nc:operation="delete" attribute on the element
containing the data to be deleted.
For example, to clear the Passive Interface setting on an interface in OSPF, issue the following request.
<rpc message-id="233" xmlns="urn:ietf:params:xml:ns:netconf:base:1.0">
<edit-config>
<target>
<candidate/>
</target>
<config>
<routing xmlns="http://ruggedcom.com/ns/rmf_routing"
xmlns:nc="urn:ietf:params:xml:ns:netconf:base:1.0">
<dynamic>
<ospf>
<interface>
<ifname>switch.0022</ifname>
<passive nc:operation="delete"/>
</interface>
</ospf>
</dynamic>
</routing>
</config>
</edit-config>
</rpc>]]>]]>
Changing Configuration Data
Chapter 5
6. Commit the change:
<rpc message-id="234" xmlns="urn:ietf:params:xml:ns:netconf:base:1.0">
<commit/>
</rpc>]]>]]>
7. Unlock the candidate configuration:
<rpc xmlns="urn:ietf:params:xml:ns:netconf:base:1.0" message-id="235">
<unlock>
<target>
<candidate/>
</target>
</unlock>
</rpc>]]>]]>
8. Unlock the target configuration:
<rpc xmlns="urn:ietf:params:xml:ns:netconf:base:1.0" message-id="236">
<unlock>
<target>
<running/>
</target>
</unlock>
</rpc>]]>]]>
Deleting Data 49
Page 62

Chapter 5
Changing Configuration Data
RUGGEDCOM NETCONF
Reference Guide
Section5.2.5
Validating Changes
You can validate the syntax of a specified configuration with the validate comment. Validation confirms the syntax
of the specified configuration. After making extensive changes to the candidate configuration, it is recommended
that your validate the candidate configuration before committing it.
To validate a configuration, do the following:
1. Connect to and log in to the device.
2. Issue an <rpc> request with the validation command:
<rpc message-id="103"
xmlns="urn:ietf:params:xml:ns:netconf:base:1.0">
<validate>
<source>
<{configuration}/>
</source>
</validate>
</rpc>]]>]]>
• {configuration}
The configuration to validate: candidate or running.
For example, to validate the candidate configuration, issue this command:
<rpc message-id="103"
xmlns="urn:ietf:params:xml:ns:netconf:base:1.0">
<validate>
<source>
<candidate/>
</source>
</validate>
</rpc>]]>]]>
If the configuration syntax is correct, the device responds with the following:
<?xml version="1.0" encoding="UTF-8"?>
<rpc-reply xmlns="urn:ietf:params:xml:ns:netconf:base:1.0" message-id="103">
<ok/>
</rpc-reply>]]>]]>
If the configuration syntax is not correct, the device responds with an <rpc-error> message. For example:
<?xml version="1.0" encoding="UTF-8"?>
<rpc-reply xmlns="urn:ietf:params:xml:ns:netconf:base:1.0" message-id="103">
<rpc-error>
<error-type>application</error-type>
<error-tag>operation-failed</error-tag>
<error-severity>error</error-severity>
<error-path xmlns:rmf_admin="http://ruggedcom.com/ns/rmf_admin">
/rmf_admin:admin/rmf_admin:authentication
</error-path>
<error-message xml:lang="en">/admin/authentication: admin/timezone must be set</error-message>
<error-info>
<bad-element>authentication</bad-element>
</error-info>
</rpc-error>
</rpc-reply>]]>]]>
• The <error-type>, <error-tag>, and <error-severity> elements provide information about the nature
of the syntax error.
50 Validating Changes
Page 63

RUGGEDCOM NETCONF
Reference Guide
Changing Configuration Data
• The <error-path> element indicates where in the configuration the syntax error is found.
• The <error-message> element provides a message, when one is available, describing the error.
• The <bad-element> element indicates the element related to the error.
For more information on NETCONF errors, see Internet Engineering Task Force RFC 6241 Appendix A. NETCONF
Error List [http://tools.ietf.org/html/rfc6241#appendix-A].
Section5.2.6
Committing Changes
After making changes to the candidate configuration, you can commit the changes to make the changes active
in the running configuration. It is recommended that you first validate the candidate configuration before issuing
the commit command. For instructions on how to validate a configuration, refer to Section5.2.5, “Validating
Changes”.
To commit changes made to the candidate configuration, issue this command:
<rpc message-id="234" xmlns="urn:ietf:params:xml:ns:netconf:base:1.0">
<commit/>
</rpc>]]>]]>
Chapter 5
Committing Changes 51
Page 64

Chapter 5
Changing Configuration Data
RUGGEDCOM NETCONF
Reference Guide
52 Committing Changes
Page 65

RUGGEDCOM NETCONF
Reference Guide
RUGGEDCOM ROX II Actions
RUGGEDCOM ROX II Actions
This section describes how to activate RUGGEDCOM ROX II actions on the device with an <rpc> message through
NETCONF. Actions perform functions directly on the device, such as shutting down the device, rebooting, clearing
port statistics, and more.
To activate most actions, the <rpc> simply specifies the path to the action in the RUGGEDCOM ROX II data model.
Some actions require parameters, such as module and port numbers, object identifiers, and other settings. Where
required, this section describes the parameters for each action.
This section organizes the actions by the RUGGEDCOM namespace in which the actions are found.
Table:Actions and RUGGEDCOM ROX II Web Interface Equivalents
Action Path to Action in RUGGEDCOM ROX II
Section6.1.1, “snmp-discover” admin» snmp» snmp-discover
Chapter 6
Section6.1.2, “launch-upgrade” admin» software-upgrade» launch-upgrade
Section6.1.3, “decline-upgrade” admin» software-upgrade» decline-upgrade
Section6.1.4, “rollback-reboot” admin» software-upgrade» rollback-reboot
Section6.1.5, “roxflash” admin» rox-imaging» roxflash
Section6.1.6, “clear-all-alarms” admin» clear-all-alarms
Section6.1.7, “acknowledge-all-alarms” admin» acknowledge-all-alarms
Section6.1.8, “shutdown” admin» shutdown
Section6.1.9, “reboot” admin» reboot
Section6.1.10, “set-system-clock” admin» set-system-clock
Section6.1.11, “restore-factory-defaults” admin» restore-factory-defaults
Section6.1.12, “delete-logs” admin» delete-logs
Section6.1.13, “install-files” admin» install-files
Section6.1.14, “backup-files (Backup Files)” admin» install-files
Section6.1.15, “full-configuration-save” admin» full-configuration-save
Section6.1.16, “full-configuration-load” admin» full-configuration-load
Section6.2.5, “reset (Serial Port)” interfaces» serial» port{interface}» reset
Section6.2.6, “clear-serial-port-stats” interfaces» serial» port{interface}» clear-serial-port-stats
Section6.2.7, “restart-serserver” interfaces» serial» restart-serserver
Section6.2.8, “reset-port (Switch Port)” interfaces» switch{interface}» reset-port
Section6.2.9, “clear-port-stats (Switch Port)” interfaces» switch{interface}» clear-port-stats
Section6.2.10, “start-cable-test (Switch Port)” interfaces» switch{interface}» diagnostics» start-cable-test
53
Page 66

Chapter 6
RUGGEDCOM ROX II Actions
Action Path to Action in RUGGEDCOM ROX II
RUGGEDCOM NETCONF
Reference Guide
Section6.2.11, “clear-cable-stats-port (Switch Port)”
Section6.3.1, “ntp-status” services» time» ntp» ntp-status
Section6.3.2, “log (Link-Failover)” services» link-failover{interface}» log
Section6.3.3, “start-test (Link Failover)” services» link-failover{interface}» start-test
Section6.3.4, “cancel-test (Link Failover)” services» link-failover{interface}» cancel-test
Section6.3.5, “show-active-leases (DHCP Server)” services» dhcpserver» show-active-leases
Section6.4.1, “clear-stp-stats (Switch)” switch» spanning-tree» clear-stp-stats
Section6.4.2, “flush-dynamic-rules (Switch)” switch» layer3-switching» flush-dynamic-rules
Section6.4.3, “reset-all-switch-ports (Switch)” switch» reset-all-switch-ports
Section6.4.4, “clear-all-switch-stats (Switch)” switch» clear-all-switch-stats
Section6.4.5, “clear-cable-stats-all (Switch)” switch» clear-cable-stats-all
interfaces» switch{interface}» diagnostics» clear-cable-statsport
CONTENTS
• Section6.1, “Admin Namespace Actions”
• Section6.2, “Interfaces Namespace Actions”
• Section6.3, “Services Namespace Actions”
• Section6.4, “Switch Namespace Actions”
• Section6.5, “Tunnel Namespace Actions”
Section6.1
Admin Namespace Actions
This section describes how to perform actions related to administration namespaces using <rpc> messages
through NETCONF.
CONTENTS
• Section6.1.1, “snmp-discover”
• Section6.1.2, “launch-upgrade”
• Section6.1.3, “decline-upgrade”
• Section6.1.4, “rollback-reboot”
• Section6.1.5, “roxflash”
• Section6.1.6, “clear-all-alarms”
• Section6.1.7, “acknowledge-all-alarms”
• Section6.1.8, “shutdown”
• Section6.1.9, “reboot”
• Section6.1.10, “set-system-clock”
54 Admin Namespace Actions
Page 67

RUGGEDCOM NETCONF
Reference Guide
RUGGEDCOM ROX II Actions
• Section6.1.11, “restore-factory-defaults”
• Section6.1.12, “delete-logs”
• Section6.1.13, “install-files”
• Section6.1.14, “backup-files (Backup Files)”
• Section6.1.15, “full-configuration-save”
• Section6.1.16, “full-configuration-load”
Section6.1.1
snmp-discover
This action discovers the SNMP engine ID for a given IP address and port. Parameters include the {ip address},
{port}, and {trap-port}.
<rpc message-id="101" xmlns="urn:ietf:params:xml:ns:netconf:base:1.0">
<action xmlns="http://tail-f.com/ns/netconf/actions/1.0">
<data>
<admin xmlns="http://ruggedcom.com/ns/rmf_admin">
<snmp>
<snmp-discover>
<address>{ipAaddress}</address>
<port>{port}</port>
<trap-port>{trapPort}</trap-port>
</snmp-discover>
</snmp>
</admin>
</data>
</action>
</rpc>]]>]]>
Chapter 6
• {ipAddress}
The SNMP IP address the device listens on.
• {port}
The SNMP data port the device listens on (if any).
• {trapPort}
The SNMP trap port the device listens on (if any).
Section6.1.2
launch-upgrade
This action launches a RUGGEDCOM ROX II software upgrade to the alternate partition on the device. The
repository address and target release must be configured in admin/software-upgrade/upgrade-settings.
A reboot is required to run the new software release in the alternate partition. All configurations are locked from
the start of the upgrade to the subsequent reboot.
This action does not take any parameters.
<rpc message-id="101" xmlns="urn:ietf:params:xml:ns:netconf:base:1.0">
<action xmlns="http://tail-f.com/ns/netconf/actions/1.0">
<data>
<admin xmlns="http://ruggedcom.com/ns/rmf_admin">
snmp-discover 55
Page 68

Chapter 6
RUGGEDCOM ROX II Actions
<software-upgrade>
<launch-upgrade/>
</software-upgrade>
</admin>
</data>
</action>
</rpc>]]>]]>
RUGGEDCOM NETCONF
Reference Guide
Section6.1.3
decline-upgrade
This action declines a RUGGEDCOM ROX II software upgrade. After an upgrade occurs and while the system is
awaiting a reboot to the upgraded partition, use the <decline-upgrade> action to cancel the attempt to run
the upgraded partition. This action also unlocks all configurations locked by the <launch-upgrade> process. If
no update has been applied, or if the device is not awaiting a reboot after applying an update, this action has no
effect.
This action does not take any parameters.
<rpc message-id="101" xmlns="urn:ietf:params:xml:ns:netconf:base:1.0">
<action xmlns="http://tail-f.com/ns/netconf/actions/1.0">
<data>
<admin xmlns="http://ruggedcom.com/ns/rmf_admin">
<software-upgrade>
<decline-upgrade/>
</software-upgrade>
</admin>
</data>
</action>
</rpc>]]>]]>
Section6.1.4
rollback-reboot
This action boots the device to a previous software release on the alternate partition. This action does not take any
parameters.
<rpc message-id="101" xmlns="urn:ietf:params:xml:ns:netconf:base:1.0">
<action xmlns="http://tail-f.com/ns/netconf/actions/1.0">
<data>
<admin xmlns="http://ruggedcom.com/ns/rmf_admin">
<software-upgrade>
<rollback-reboot/>
</software-upgrade>
</admin>
</data>
</action>
</rpc>]]>]]>
56 decline-upgrade
Page 69

RUGGEDCOM NETCONF
Reference Guide
Section6.1.5
RUGGEDCOM ROX II Actions
roxflash
This action flashes a RUGGEDCOM ROX II image to the alternate partition. On rebooting, the device boots from the
flashed partition. Configurations are not transferred. This action takes a single parameter: {url}.
<rpc message-id="101" xmlns="urn:ietf:params:xml:ns:netconf:base:1.0">
<action xmlns="http://tail-f.com/ns/netconf/actions/1.0">
<data>
<admin xmlns="http://ruggedcom.com/ns/rmf_admin">
<rox-imaging>
<roxflash>
<url>{url}</url>
</roxflash>
</rox-imaging>
</admin>
</data>
</action>
</rpc>]]>]]>
NOTE
To determine which file transfer protocol is supported, refer to the RUGGEDCOM ROX II User Guide for
the device.
Chapter 6
• {url}
The URL of the RUGGEDCOM NETCONF image to download. The URL format is protocol://
user:password@host:port/path-to-file. If the server does not require authentication,
user:password can be omitted. When using the default port for the protocol, :port may also be omitted.
Section6.1.6
clear-all-alarms
This action clears all clearable alarms in the active list. Note that not all alarms can be cleared. This action does not
take any parameters.
<rpc message-id="101" xmlns="urn:ietf:params:xml:ns:netconf:base:1.0">
<action xmlns="http://tail-f.com/ns/netconf/actions/1.0">
<data>
<admin xmlns="http://ruggedcom.com/ns/rmf_admin">
<clear-all-alarms/>
</admin>
</data>
</action>
</rpc>]]>]]>
Section6.1.7
acknowledge-all-alarms
This action acknowledges all alarms in the active list. The alarms remain in the active list, but Alarm LED and
critical alarm relay are shut off. This action does not take any parameters.
<rpc message-id="101" xmlns="urn:ietf:params:xml:ns:netconf:base:1.0">
<action xmlns="http://tail-f.com/ns/netconf/actions/1.0">
roxflash 57
Page 70

Chapter 6
RUGGEDCOM ROX II Actions
<data>
<admin xmlns="http://ruggedcom.com/ns/rmf_admin">
<acknowledge-all-alarms/>
</admin>
</data>
</action>
</rpc>]]>]]>
RUGGEDCOM NETCONF
Reference Guide
Section6.1.8
shutdown
This action shuts down the device. After using this action, the device shuts down and provides a time-out period
during which you can remove power from the device. The default time-out period is 300 seconds (five minutes).
At the end of the time-out period, the device reboots and restarts.
This action does not take any parameters.
<rpc message-id="101" xmlns="urn:ietf:params:xml:ns:netconf:base:1.0">
<action xmlns="http://tail-f.com/ns/netconf/actions/1.0">
<data>
<admin xmlns="http://ruggedcom.com/ns/rmf_admin">
<shutdown/>
</admin>
</data>
</action>
</rpc>]]>]]>
Section6.1.9
reboot
This action reboots the device. This action does not take any parameters.
<rpc message-id="101" xmlns="urn:ietf:params:xml:ns:netconf:base:1.0">
<action xmlns="http://tail-f.com/ns/netconf/actions/1.0">
<data>
<admin xmlns="http://ruggedcom.com/ns/rmf_admin">
<reboot/>
</admin>
</data>
</action>
</rpc>]]>]]>
Section6.1.10
set-system-clock
This action sets the date and time on the system. This action takes a single parameter: <time>.
<rpc message-id="101" xmlns="urn:ietf:params:xml:ns:netconf:base:1.0">
<action xmlns="http://tail-f.com/ns/netconf/actions/1.0">
<data>
<admin xmlns="http://ruggedcom.com/ns/rmf_admin">
<set-system-clock>
<time>{time}</time>
</set-system-clock>
58 shutdown
Page 71

RUGGEDCOM NETCONF
Reference Guide
</admin>
</data>
</action>
</rpc>]]>]]>
RUGGEDCOM ROX II Actions
• {time}
The date and time in the format YYYY-MM-DD HH:MM:SS.
Section6.1.11
restore-factory-defaults
This action restores the device to its factory default settings. This action does not take any parameters.
<rpc message-id="101" xmlns="urn:ietf:params:xml:ns:netconf:base:1.0">
<action xmlns="http://tail-f.com/ns/netconf/actions/1.0">
<data>
<admin xmlns="http://ruggedcom.com/ns/rmf_admin">
<restore-factory-defaults/>
</admin>
</data>
</action>
</rpc>]]>]]>
Chapter 6
Section6.1.12
delete-logs
This action deletes all log files on the device. This action does not take any parameters.
<rpc message-id="101" xmlns="urn:ietf:params:xml:ns:netconf:base:1.0">
<action xmlns="http://tail-f.com/ns/netconf/actions/1.0">
<data>
<admin xmlns="http://ruggedcom.com/ns/rmf_admin">
<delete-logs/>
</admin>
</data>
</action>
</rpc>]]>]]>
Section6.1.13
install-files
This action copies files from a specified URL to the device. Parameters include <file-type> and <url>.
<rpc message-id="101" xmlns="urn:ietf:params:xml:ns:netconf:base:1.0">
<action xmlns="http://tail-f.com/ns/netconf/actions/1.0">
<data>
<admin xmlns="http://ruggedcom.com/ns/rmf_admin">
<install-files>
<file-type>{fileType}</file-type>
<url>{url}</url>
</install-files>
</admin>
</data>
</action>
restore-factory-defaults 59
Page 72

Chapter 6
RUGGEDCOM ROX II Actions
</rpc>]]>]]>
• {fileType}
The type of file to copy to the device. Must be one of the following: config, featurekey,
elancertificate, ipseccertificate, cacertificate, or crlfiles.
• {url}
The URL and filename of the RUGGEDCOM NETCONF file to copy. The file transfer supports SCP, SFTP, FTPS,
and HTTP. The URL format is protocol://user:password@host:port/path-to-file. If the port is not
specified, the device uses the default port for the protocol.
Section6.1.14
backup-files (Backup Files)
This action copies files from the device to a specified URL. Parameters include <file-type>, <file>,
<timestamp>, and <url>.
<rpc message-id="101" xmlns="urn:ietf:params:xml:ns:netconf:base:1.0">
<action xmlns="http://tail-f.com/ns/netconf/actions/1.0">
<data>
<admin xmlns="http://ruggedcom.com/ns/rmf_admin">
<backup-files>
<file-type>{fileType}</file-type>
<file>{file}</file>
<timestamp>{timeStamp}</timestamp>
<url>{url}</url>
</backup-files>
</admin>
</data>
</action>
</rpc>]]>]]>
RUGGEDCOM NETCONF
Reference Guide
• {fileType}
The type of file to copy from the device. Must be one of the following: config, featurekey,
elancertificate, ipseccertificate, cacertificate, or crlfiles.
• {file}
The name of the file to copy.
• {timeStamp}
A Boolean value: true or false. When true, the system appends a timestamp to the filename. This option
does not apply if the file name contains an * (asterisk) character.
• {url}
The URL to which to copy the file. The file transfer supports SCP, SFTP, FTP, and HTTP. The URL format is
protocol://user:password@host:port/path-to-file/. Note that the URL must end with a / (forward
slash_ character. If the port is not specified, the device uses the default port for the protocol.
Section6.1.15
full-configuration-save
This action saves the RUGGEDCOM ROX II configuration in the specified format to a specified file. Files are saved to
the /var/lib/config directory on the device. Parameters include <format> and <file-name>.
60 backup-files (Backup Files)
Page 73

RUGGEDCOM NETCONF
Reference Guide
<rpc message-id="101" xmlns="urn:ietf:params:xml:ns:netconf:base:1.0">
<action xmlns="http://tail-f.com/ns/netconf/actions/1.0">
<data>
<admin xmlns="http://ruggedcom.com/ns/rmf_admin">
<full-configuration-save>
<format>{format}</format>
<file-name>{fileName}</file-name>
</full-configuration-save>
</admin>
</data>
</action>
</rpc>]]>]]>
• {format}
The format for the configuration file: cli.
• {fileName}
The name for the configuration file.
Section6.1.16
full-configuration-load
RUGGEDCOM ROX II Actions
Chapter 6
This action loads a configuration from the specified file found in the /var/lib/config directory on the device.
Parameters include <format> and <file-name>.
<rpc message-id="101" xmlns="urn:ietf:params:xml:ns:netconf:base:1.0">
<action xmlns="http://tail-f.com/ns/netconf/actions/1.0">
<data>
<admin xmlns="http://ruggedcom.com/ns/rmf_admin">
<full-configuration-load>
<format>{format}</format>
<file-name>{fileName}</file-name>
</full-configuration-load>
</admin>
</data>
</action>
</rpc>]]>]]>
• {format}
The format for the configuration file: cli.
• {fileName}
The name for the configuration file.
Section6.2
Interfaces Namespace Actions
This section describes how to perform actions related to interface namespaces using <rpc> messages through
NETCONF.
CONTENTS
• Section6.2.1, “reset (Modem)”
full-configuration-load 61
Page 74

Chapter 6
RUGGEDCOM ROX II Actions
• Section6.2.2, “at (Modem)”
• Section6.2.3, “reset (Cellular Modem)”
• Section6.2.4, “at (Cellular Modem)”
• Section6.2.5, “reset (Serial Port)”
• Section6.2.6, “clear-serial-port-stats”
• Section6.2.7, “restart-serserver”
• Section6.2.8, “reset-port (Switch Port)”
• Section6.2.9, “clear-port-stats (Switch Port)”
• Section6.2.10, “start-cable-test (Switch Port)”
• Section6.2.11, “clear-cable-stats-port (Switch Port)”
Section6.2.1
reset (Modem)
This action resets the modem. Resetting the modem takes approximately 15 seconds. Resetting the modem
terminates the PPP connection.
Specify the modem interface name in the <ifname> element. This action does not take any parameters.
RUGGEDCOM NETCONF
Reference Guide
<rpc message-id="101" xmlns="urn:ietf:params:xml:ns:netconf:base:1.0">
<action xmlns="http://tail-f.com/ns/netconf/actions/1.0">
<data>
<interfaces xmlns="http://ruggedcom.com/ns/rmf_ifs">
<modem>
<ifname>{interfaceName}</ifname>
<reset/>
</modem>
</interfaces>
</data>
</action>
</rpc>]]>]]>
• {interfaceName}
The interface name for the modem.
Section6.2.2
at (Modem)
This action sends an AT command to the modem. The command must begin with the prefix AT.
Specify the modem interface name in the <ifname> element. This action takes a single parameter: <command>.
<rpc message-id="101" xmlns="urn:ietf:params:xml:ns:netconf:base:1.0">
<action xmlns="http://tail-f.com/ns/netconf/actions/1.0">
<data>
<interfaces xmlns="http://ruggedcom.com/ns/rmf_ifs">
<modem>
<ifname>{interfaceName}</ifname>
<at>
<command>{atCommand}</command>
</at>
62 reset (Modem)
Page 75

RUGGEDCOM NETCONF
Reference Guide
</modem>
</interfaces>
</data>
</action>
</rpc>]]>]]>
RUGGEDCOM ROX II Actions
• {interfaceName}
The name of the modem interface.
• {atCommand}
The AT command to send to the modem. The command must begin with the prefix AT.
Section6.2.3
reset (Cellular Modem)
This action resets the cellular modem. Specify the modem module and port in the <module> and <port>
elements. This action does not take any parameters.
<rpc message-id="101" xmlns="urn:ietf:params:xml:ns:netconf:base:1.0">
<action xmlns="http://tail-f.com/ns/netconf/actions/1.0">
<data>
<interfaces xmlns="http://ruggedcom.com/ns/rmf_ifs">
<cellmodem>
<module>{module}</module>
<port>{port}</port>
<reset/>
</cellmodem>
</interfaces>
</data>
</action>
</rpc>]]>]]>
Chapter 6
• {module}
The module number for the cellular modem.
• {port}
The port number for the cellular modem.
Section6.2.4
at (Cellular Modem)
This action sends an AT command to the cellular modem. The command must begin with the prefix AT. Specify
the modem module and port in the <module> and <port> elements. This action takes a single parameter:
<command>.
<rpc message-id="101" xmlns="urn:ietf:params:xml:ns:netconf:base:1.0">
<action xmlns="http://tail-f.com/ns/netconf/actions/1.0">
<data>
<interfaces xmlns="http://ruggedcom.com/ns/rmf_ifs">
<cellmodem>
<module>{module}</module>
<port>{port}</port>
<at>
<command>{atCommand}</command>
</at>
reset (Cellular Modem) 63
Page 76

Chapter 6
RUGGEDCOM ROX II Actions
</cellmodem>
</interfaces>
</data>
</action>
</rpc>]]>]]>
• {module}
The module number for the cellular modem.
• {port}
The port number for the cellular modem.
• {atCommand}
The AT command to send to the modem. The command must begin with the prefix AT.
Section6.2.5
reset (Serial Port)
This action resets the specified serial port. Specify the serial module and port in the <module> and <port>
elements. This action does not take any parameters.
RUGGEDCOM NETCONF
Reference Guide
<rpc message-id="101" xmlns="urn:ietf:params:xml:ns:netconf:base:1.0">
<action xmlns="http://tail-f.com/ns/netconf/actions/1.0">
<data>
<interfaces xmlns="http://ruggedcom.com/ns/rmf_ifs">
<serial>
<module>{module}</module>
<port>{port}</port>
<reset/>
</serial>
</interfaces>
</data>
</action>
</rpc>]]>]]>
• {module}
The module number for the serial port.
• {port}
The port number for the serial port.
Section6.2.6
clear-serial-port-stats
This action clears the port statistics for the specified serial port. Specify the serial module and port in the
<module> and <port> elements. This action does not take any parameters.
<rpc message-id="101" xmlns="urn:ietf:params:xml:ns:netconf:base:1.0">
<action xmlns="http://tail-f.com/ns/netconf/actions/1.0">
<data>
<interfaces xmlns="http://ruggedcom.com/ns/rmf_ifs">
<serial>
<module>{module}</module>
<port>{port}</port>
<clear-serial-port-stats/>
64 reset (Serial Port)
Page 77

RUGGEDCOM NETCONF
Reference Guide
</serial>
</interfaces>
</data>
</action>
</rpc>]]>]]>
• {module}
The module number for the serial port.
• {port}
The port number for the serial port.
Section6.2.7
restart-serserver
This action restarts the serial server. This action does not take any parameters.
<rpc message-id="101" xmlns="urn:ietf:params:xml:ns:netconf:base:1.0">
<action xmlns="http://tail-f.com/ns/netconf/actions/1.0">
<data>
<interfaces xmlns="http://ruggedcom.com/ns/rmf_ifs">
<serial>
<restart-serserver/>
</serial>
</interfaces>
</data>
</action>
</rpc>]]>]]>
RUGGEDCOM ROX II Actions
Chapter 6
Section6.2.8
reset-port (Switch Port)
This action resets the specified switch port. Specify the switch module and port in the <module> and <port>
elements. This action does not take any parameters.
<rpc message-id="101" xmlns="urn:ietf:params:xml:ns:netconf:base:1.0">
<action xmlns="http://tail-f.com/ns/netconf/actions/1.0">
<data>
<interfaces xmlns="http://ruggedcom.com/ns/rmf_ifs">
<switch>
<module>{module}</module>
<port>{port}</port>
<reset-port/>
</switch>
</interfaces>
</data>
</action>
</rpc>]]>]]>
• {module}
The module number for the switch port.
• {port}
The port number for the switch port.
restart-serserver 65
Page 78

Chapter 6
RUGGEDCOM ROX II Actions
Section6.2.9
clear-port-stats (Switch Port)
This action clears the port statistics for the specified switch port. Specify the switch module and port in the
<module> and <port> elements. This action does not take any parameters.
<rpc message-id="101" xmlns="urn:ietf:params:xml:ns:netconf:base:1.0">
<action xmlns="http://tail-f.com/ns/netconf/actions/1.0">
<data>
<interfaces xmlns="http://ruggedcom.com/ns/rmf_ifs">
<switch>
<slot>{module}</slot>
<port>{port}</port>
<clear-port-stats/>
</switch>
</interfaces>
</data>
</action>
</rpc>]]>]]>
• {module}
The module number for the switch port.
• {port}
The port number for the switch port.
RUGGEDCOM NETCONF
Reference Guide
Section6.2.10
start-cable-test (Switch Port)
This action starts cable test diagnostics on the specified switch port. Specify the switch module and port in the
<module> and <port> elements. This action does not take any parameters.
<rpc message-id="101" xmlns="urn:ietf:params:xml:ns:netconf:base:1.0">
<action xmlns="http://tail-f.com/ns/netconf/actions/1.0">
<data>
<interfaces xmlns="http://ruggedcom.com/ns/rmf_ifs">
<switch>
<slot>{module}</slot>
<port>{port}</port>
<diagnostics>
<start-cable-test/>
</diagnostics>
</switch>
</interfaces>
</data>
</action>
</rpc>]]>]]>
• {module}
The module number for the switch port.
• {port}
The port number for the switch port.
66 clear-port-stats (Switch Port)
Page 79

RUGGEDCOM NETCONF
Reference Guide
Section6.2.11
RUGGEDCOM ROX II Actions
clear-cable-stats-port (Switch Port)
This action clears the cable test diagnostic statistics on the specified switch port. Specify the switch module and
port in the <module> and <port> elements. This action does not take any parameters.
<rpc message-id="101" xmlns="urn:ietf:params:xml:ns:netconf:base:1.0">
<action xmlns="http://tail-f.com/ns/netconf/actions/1.0">
<data>
<interfaces xmlns="http://ruggedcom.com/ns/rmf_ifs">
<switch>
<slot>{module}</slot>
<port>{port}</port>
<diagnostics>
<clear-cable-stats-port/>
</diagnostics>
</switch>
</interfaces>
</data>
</action>
</rpc>]]>]]>
• {module}
The module number for the switch port.
• {port}
The port number for the switch port.
Chapter 6
Section6.3
Services Namespace Actions
This section describes how to perform actions related to services namespaces using <rpc> messages through
NETCONF.
CONTENTS
• Section6.3.1, “ntp-status”
• Section6.3.2, “log (Link-Failover)”
• Section6.3.3, “start-test (Link Failover)”
• Section6.3.4, “cancel-test (Link Failover)”
• Section6.3.5, “show-active-leases (DHCP Server)”
Section6.3.1
ntp-status
This action displays the status of the running NTP system. This action does not take any parameters.
<rpc message-id="101" xmlns="urn:ietf:params:xml:ns:netconf:base:1.0">
<action xmlns="http://tail-f.com/ns/netconf/actions/1.0">
<data>
<services xmlns="http://ruggedcom.com/ns/rmf_services">
clear-cable-stats-port (Switch Port) 67
Page 80

Chapter 6
RUGGEDCOM ROX II Actions
<time>
<ntp>
<ntp-status/>
</ntp>
</time>
</services>
</data>
</action>
</rpc>]]>]]>
Section6.3.2
log (Link-Failover)
This action displays the link failover log. This action does not take any parameters.
<rpc message-id="101" xmlns="urn:ietf:params:xml:ns:netconf:base:1.0">
<action xmlns="http://tail-f.com/ns/netconf/actions/1.0">
<data>
<services xmlns="http://ruggedcom.com/ns/rmf_services">
<link-failover>
<main>{ip-interface-name}</main>
<log/>
</link-failover>
</services>
</data>
</action>
</rpc>]]>]]>
RUGGEDCOM NETCONF
Reference Guide
Section6.3.3
start-test (Link Failover)
This action starts a test of the link failover function. Specify the name of the interface to test in the <name>
element. Parameters include <test-duration> and <start-test-delay>.
<rpc message-id="101" xmlns="urn:ietf:params:xml:ns:netconf:base:1.0">
<action xmlns="http://tail-f.com/ns/netconf/actions/1.0">
<data>
<services xmlns="http://ruggedcom.com/ns/rmf_services">
<link-failover>
<main>{interfaceName}</main>
<start-test>
<test-duration>{testDuration}</test-duration>
<start-test-delay>{testDelay}</start-test-delay>
</start-test>
</link-failover>
</services>
</data>
</action>
</rpc>]]>]]>
• {interfaceName}
The name of the interface on which to perform the link failover test.
• {testDuration}
The amount of time, in minutes, to run the test before restoring service to the main trunk.
68 log (Link-Failover)
Page 81

RUGGEDCOM NETCONF
Reference Guide
RUGGEDCOM ROX II Actions
• {crlFileName}
The amount of time, in minutes, to wait before starting the link failover test.
Section6.3.4
cancel-test (Link Failover)
This action stops the link failover test on the specified interface. Specify the name of the interface in the <name>
element. This action does not take any parameters.
<rpc message-id="101" xmlns="urn:ietf:params:xml:ns:netconf:base:1.0">
<action xmlns="http://tail-f.com/ns/netconf/actions/1.0">
<data>
<services xmlns="http://ruggedcom.com/ns/rmf_services">
<link-failover>
<main>{interfaceName}</main>
<cancel-test/>
</link-failover>
</services>
</data>
</action>
</rpc>]]>]]>
Chapter 6
• {interfaceName}
The name of the interface on which to stop the link failover test.
Section6.3.5
show-active-leases (DHCP Server)
This action returns a list of active leases from the DHCP server. This action does not take any parameters.
<rpc message-id="101" xmlns="urn:ietf:params:xml:ns:netconf:base:1.0">
<action xmlns="http://tail-f.com/ns/netconf/actions/1.0">
<data>
<services xmlns="http://ruggedcom.com/ns/rmf_services">
<dhcpserver>
<show-active-leases/>
</dhcpserver>
</services>
</data>
</action>
</rpc>]]>]]>
Section6.4
Switch Namespace Actions
This section describes how to perform actions related to switch namespaces using <rpc> messages through
NETCONF.
CONTENTS
• Section6.4.1, “clear-stp-stats (Switch)”
cancel-test (Link Failover) 69
Page 82

Chapter 6
RUGGEDCOM ROX II Actions
• Section6.4.2, “flush-dynamic-rules (Switch)”
• Section6.4.3, “reset-all-switch-ports (Switch)”
• Section6.4.4, “clear-all-switch-stats (Switch)”
• Section6.4.5, “clear-cable-stats-all (Switch)”
Section6.4.1
clear-stp-stats (Switch)
This action clears the spanning-tree protocol statistics. This action does not take any parameters.
<rpc message-id="101" xmlns="urn:ietf:params:xml:ns:netconf:base:1.0">
<action xmlns="http://tail-f.com/ns/netconf/actions/1.0">
<data>
<switch xmlns="http://ruggedcom.com/ns/rmf_ifswitch">
<spanning-tree>
<clear-stp-stats/>
</spanning-tree>
</switch>
</data>
</action>
</rpc>]]>]]>
RUGGEDCOM NETCONF
Reference Guide
Section6.4.2
flush-dynamic-rules (Switch)
This action deletes all dynamic entries from the routing-rules-summary table. This action does not take any
parameters.
<rpc message-id="101" xmlns="urn:ietf:params:xml:ns:netconf:base:1.0">
<action xmlns="http://tail-f.com/ns/netconf/actions/1.0">
<data>
<switch xmlns="http://ruggedcom.com/ns/rmf_ifswitch">
<layer3-switching>
<flush-dynamic-rules/>
</layer3-switching>
</switch>
</data>
</action>
</rpc>]]>]]>
Section6.4.3
reset-all-switch-ports (Switch)
This action resets all switch ports. This action does not take any parameters.
<rpc message-id="101" xmlns="urn:ietf:params:xml:ns:netconf:base:1.0">
<action xmlns="http://tail-f.com/ns/netconf/actions/1.0">
<data>
<switch xmlns="http://ruggedcom.com/ns/rmf_ifswitch">
<reset-all-switch-ports/>
</switch>
</data>
70 clear-stp-stats (Switch)
Page 83

RUGGEDCOM NETCONF
Reference Guide
</action>
</rpc>]]>]]>
Section6.4.4
clear-all-switch-stats (Switch)
This action clears all switch statistics. This action does not take any parameters.
<rpc message-id="101" xmlns="urn:ietf:params:xml:ns:netconf:base:1.0">
<action xmlns="http://tail-f.com/ns/netconf/actions/1.0">
<data>
<switch xmlns="http://ruggedcom.com/ns/rmf_ifswitch">
<clear-all-switch-stats/>
</switch>
</data>
</action>
</rpc>]]>]]>
Section6.4.5
RUGGEDCOM ROX II Actions
Chapter 6
clear-cable-stats-all (Switch)
This action clears all cable test diagnostic statistics. This action does not take any parameters.
<rpc message-id="101" xmlns="urn:ietf:params:xml:ns:netconf:base:1.0">
<action xmlns="http://tail-f.com/ns/netconf/actions/1.0">
<data>
<switch xmlns="http://ruggedcom.com/ns/rmf_ifswitch">
<clear-cable-stats-all/>
</switch>
</data>
</action>
</rpc>]]>]]>
Section6.5
Tunnel Namespace Actions
This section describes how to perform actions related to tunnel namespaces using <rpc> messages through
NETCONF.
CONTENTS
• Section6.5.1, “display-public-key (IPSEC)”
• Section6.5.2, “status (IPSEC)”
• Section6.5.3, “install-certificate (IPSEC)”
• Section6.5.4, “install-ca-certificate (IPSEC)”
• Section6.5.5, “install-crl-file (IPSEC)”
• Section6.5.6, “remove-ca-certificate (IPSEC)”
• Section6.5.7, “remove-certificate (IPSEC)”
clear-all-switch-stats (Switch) 71
Page 84

Chapter 6
RUGGEDCOM ROX II Actions
• Section6.5.8, “remove-crl (IPSEC)”
Section6.5.1
display-public-key (IPSEC)
This action displays the public RSA key. This action does not take any parameters.
<rpc message-id="101" xmlns="urn:ietf:params:xml:ns:netconf:base:1.0">
<action xmlns="http://tail-f.com/ns/netconf/actions/1.0">
<data>
<tunnel xmlns="http://ruggedcom.com/ns/rmf_iftunnel">
<ipsec>
<display-public-key/>
</ipsec>
</tunnel>
</data>
</action>
</rpc>]]>]]>
Section6.5.2
RUGGEDCOM NETCONF
Reference Guide
status (IPSEC)
This action displays the status of the running IPSec service. This action does not take any parameters.
<rpc message-id="101" xmlns="urn:ietf:params:xml:ns:netconf:base:1.0">
<action xmlns="http://tail-f.com/ns/netconf/actions/1.0">
<data>
<tunnel xmlns="http://ruggedcom.com/ns/rmf_iftunnel">
<ipsec>
<status/>
</ipsec>
</tunnel>
</data>
</action>
</rpc>]]>]]>
Section6.5.3
install-certificate (IPSEC)
This action uploads an IPSec certificate to the device. The certificate must be located at a network location
accessible to the device. Parameters include <remote-host>, <remote-port>, <remote-pem-file-path>,
<remote-key-file-path>, <user>, and <password>.
<rpc message-id="101" xmlns="urn:ietf:params:xml:ns:netconf:base:1.0">
<action xmlns="http://tail-f.com/ns/netconf/actions/1.0">
<data>
<tunnel xmlns="http://ruggedcom.com/ns/rmf_iftunnel">
<ipsec>
<certificate>
<install-certificate>
<remote-host>{remoteHost}</remote-host>
<remote-port>{remotePort}</remote-port>
<remote-pem-file-path>{pemFilePath}</remote-pem-file-path>
<remote-key-file-path>{keyFilePath}</remote-key-file-path>
72 display-public-key (IPSEC)
Page 85

RUGGEDCOM NETCONF
Reference Guide
<user>{remoteUserName}</user>
<password>{remoteUserPassword}</password>
</install-certificate>
</certificate>
</ipsec>
</tunnel>
</data>
</action>
</rpc>]]>]]>
• {remoteHost}
The hostname or IP address of the remote host.
• {remotePort}
The remote host network port for the ssh protocol,
• {pemFilePath}
The absolute path and file name for the certificate .pem file on the remote host.
• {keyFilePath}
The absolute path and file name for certificate .key file on the remote host.
• {remoteUserName}
A user name on the remote host.
• {remotePassword}
The password for the user name on the remote host.
RUGGEDCOM ROX II Actions
Chapter 6
Section6.5.4
install-ca-certificate (IPSEC)
This action uploads an IPSec ca-certificate to the device. The ca-certificate must be located at a network location
accessible to the device. Parameters include <remote-host>, <remote-port>, <remote_cacert_path>,
<user>, and <password>.
<rpc message-id="101" xmlns="urn:ietf:params:xml:ns:netconf:base:1.0">
<action xmlns="http://tail-f.com/ns/netconf/actions/1.0">
<data>
<tunnel xmlns="http://ruggedcom.com/ns/rmf_iftunnel">
<ipsec>
<certificate>
<install-ca-certificate>
<remote-host>{remoteHost}</remote-host>
<remote-port>{remotePort}</remote-port>
<remote_cacert_path>{caCertFilePath}</remote_cacert_path>
<user>{remoteUserName}</user>
<password>{remoteUserPassword</password>
</install-ca-certificate>
</certificate>
</ipsec>
</tunnel>
</data>
</action>
</rpc>]]>]]>
• {remoteHost}
The hostname or IP address of the remote host.
install-ca-certificate (IPSEC) 73
Page 86

Chapter 6
RUGGEDCOM ROX II Actions
• {remotePort}
The remote host network port for the ssh protocol,
• {caCertFilePath}
The absolute path and file name for the ca-certificate file on the remote host.
• {remoteUserName}
A user name on the remote host.
• {remotePassword}
The password for the user name on the remote host.
Section6.5.5
install-crl-file (IPSEC)
This action uploads an IPSec crl file to the device. The crl file must be located at a network location accessible
to the device. Parameters include <remote-host>, <remote-port>, <remote-crl-path>, <user>, and
<password>.
<rpc message-id="101" xmlns="urn:ietf:params:xml:ns:netconf:base:1.0">
<action xmlns="http://tail-f.com/ns/netconf/actions/1.0">
<data>
<tunnel xmlns="http://ruggedcom.com/ns/rmf_iftunnel">
<ipsec>
<certificate>
<install-crl-file>
<remote-host>{remoteHost}</remote-host>
<remote-port>{remotePort}</remote-port>
<remote-crl-path>{crlFilePath}</remote-crl-path>
<user>{remoteUserName}</user>
<password>{remotePassword}</password>
</install-crl-file>
</certificate>
</ipsec>
</tunnel>
</data>
</action>
</rpc>]]>]]>
RUGGEDCOM NETCONF
Reference Guide
• {remoteHost}
The hostname or IP address of the remote host.
• {remotePort}
The remote host network port for the ssh protocol,
• {crlFilePath}
The absolute path and file name for the crl file on the remote host.
• {remoteUserName}
A user name on the remote host.
• {remotePassword}
The password for the user name on the remote host.
74 install-crl-file (IPSEC)
Page 87

RUGGEDCOM NETCONF
Reference Guide
RUGGEDCOM ROX II Actions
Section6.5.6
remove-ca-certificate (IPSEC)
This action removes the specified ca-certificate from the IPSec configuration. Specify the certificate name in the
<name> element. This action does not take any parameters.
<rpc message-id="101" xmlns="urn:ietf:params:xml:ns:netconf:base:1.0">
<action xmlns="http://tail-f.com/ns/netconf/actions/1.0">
<data>
<tunnel xmlns="http://ruggedcom.com/ns/rmf_iftunnel">
<ipsec>
<certificate>
<ca-certificate>
<ca-certs>
<name>{certificateName}</name>
<remove-ca-certificate/>
</ca-certs>
</ca-certificate>
</certificate>
</ipsec>
</tunnel>
</data>
</action>
</rpc>]]>]]>
Chapter 6
• {certificateName}
The name of the certificate to remove.
Section6.5.7
remove-certificate (IPSEC)
This action removes the specified certificate from the IPSec configuration. Specify the certificate name in the
<name> element. This action does not take any parameters.
<rpc message-id="101" xmlns="urn:ietf:params:xml:ns:netconf:base:1.0">
<action xmlns="http://tail-f.com/ns/netconf/actions/1.0">
<data>
<tunnel xmlns="http://ruggedcom.com/ns/rmf_iftunnel">
<ipsec>
<certificate>
<certificate>
<certs>
<name>{certificateName}</name>
<remove-certificate/>
</certs>
</certificate>
</certificate>
</ipsec>
</tunnel>
</data>
</action>
</rpc>]]>]]>
• {certificateName}
The name of the certificate to remove.
remove-ca-certificate (IPSEC) 75
Page 88

Chapter 6
RUGGEDCOM ROX II Actions
Section6.5.8
remove-crl (IPSEC)
This action removes the specified crl file from the IPSec configuration. Specify the crl file name in the <name>
element. This action does not take any parameters.
<rpc message-id="101" xmlns="urn:ietf:params:xml:ns:netconf:base:1.0">
<action xmlns="http://tail-f.com/ns/netconf/actions/1.0">
<data>
<tunnel xmlns="http://ruggedcom.com/ns/rmf_iftunnel">
<ipsec>
<certificate>
<crl>
<crls>
<name>{crlFileName}</name>
<remove-crl/>
</crls>
</crl>
</certificate>
</ipsec>
</tunnel>
</data>
</action>
</rpc>]]>]]>
RUGGEDCOM NETCONF
Reference Guide
• {crlFileName}
The name of the crl file to remove.
76 remove-crl (IPSEC)
Page 89

RUGGEDCOM NETCONF
Reference Guide
Examples
This section provides examples of how to set and retrieve data on a device. Each example shows how to set or
retrieve a specific element or set of elements. Each example also demonstrates a general NETCONF concept, such
as how to retrieve data from the running configuration, or how to use special attributes to delete or replace data.
Each example assumes that you are connected to a device and have established a NETCONF session. For
instructions on how to establish a NETCONF session, seeChapter3, NETCONF Sessions.
Each example provides all of the <rpc> commands necessary to perform the function.
NETCONF Example Example demonstrates these techniques:
Section7.1, “Getting the System Name” Querying for running configuration data.
Section7.2, “Getting the ROX Release” Querying for fixed system data.
Chapter 7
Examples
Section7.3, “Getting the Chassis Status” Querying for state information.
Section7.4, “Setting the System Clock” Using an action command.
Section7.5, “Acknowledging Alarms” Using an action command.
Section7.6, “Clearing All Alarms” Using an action command.
Section7.7, “Viewing Alarms” Querying for state information.
Section7.8, “Restoring Factory Defaults” Using an action command.
Section7.9, “Changing the System Name by Locking and
Committing”
Section7.10, “Changing the System Name Directly” Editing configuration data in the running configuration.
Section7.11, “Creating a Static VLAN” Recommended editing procedure.
Section7.12, “Assigning a PVID on a Port” Recommended editing procedure.
Section7.13, “Disabling Spanning Tree on a Specific Port” Recommended editing procedure.
Section7.14, “Configuring an IP Address on a Specific Port” Recommended editing procedure.
Section7.15, “Deleting an IP Address” Recommended editing procedure.
Section7.16, “Setting a Static Route” Recommended editing procedure.
Section7.17, “Disabling Spanning Tree Globally” Recommended editing procedure.
Recommended editing procedure.
Deleting data with the nc:operation="delete" attribute.
Section7.18, “Retrieving all IP Addresses from the Running
Configuration”
Section7.19, “Retrieving the Active Routes on a Device” Querying for running configuration data.
Section7.20, “Configuring Static Multicast Routing on a Layer 3
Device”
Section7.21, “Enabling Static Multicast Routing on a Layer 3 Device” Recommended editing procedure.
Recommended editing procedure.
Recommended editing procedure.
77
Page 90

Chapter 7
Examples
NETCONF Example Example demonstrates these techniques:
Section7.22, “Retrieving Static Multicast Status on a Layer 3 Device” Querying for running configuration data.
Section7.23, “Replacing an IP Address” Recommended editing procedure.
Replacing data with the nc:operation="replace" attribute.
RUGGEDCOM NETCONF
Reference Guide
Section7.24, “Configuring a Port to Dynamically Obtain an IP
Recommended editing procedure.
Address”
Section7.25, “Configuring OSPF Area and Network on a Layer 3
Recommended editing procedure.
Device”
Section7.26, “Enabling the OSPF Passive-Default Option” Recommended editing procedure.
Section7.27, “Configure an OSPF Non-Passive Port” Recommended editing procedure.
Deleting information with the nc:operation="delete" attribute.
Section7.28, “Configuring OSPF Parameters” Recommended editing procedure.
Section7.29, “Enabling the OSPF redistribute-connected Option” Recommended editing procedure.
Section7.30, “Enabling OSPF on a Layer 3 Device” Recommended editing procedure.
Section7.31, “Retrieving OSPF Status” Querying for running configuration data.
Section7.32, “Retrieving All Data from the Routing Namespace” Querying for running configuration data.
Section7.33, “Configuring DHCP Server” Recommended editing procedure.
Section7.34, “Configure the DHCP Server Port Listening for DHCP
Recommended editing procedure.
Client Requests”
Section7.35, “Enabling the DHCP Server Service” Recommended editing procedure.
Section7.36, “Disabling an Ethernet Port” Recommended editing procedure.
Deleting data with the nc:operation="delete" attribute.
Section7.37, “Enabling an Ethernet Port” Recommended editing procedure.
Section7.38, “Checking an IP Address on a Specific Port using the
Querying for running configuration data.
Interfaces Namespace”
Section7.39, “Retreiving All Data From Running Database Including
Default Values”
Section7.40, “Retreiving All Data From Running Database Including
Default Tags and Values”
Querying for configuration data (including values) from a running
database.
Querying for configuration data (including tags and values) from a
running database.
Section7.41, “Changing a User's Password” Querying for configuration data (including tags and values) from a
running database.
Section7.42, “Displaying the Status of the IPsec Service” Displaying the status of the running IPSec service.
Section7.43, “Selecting a Certificate for an IPSec Tunnel” Selecting a certificate to use for an IPSec tunnel.
Section7.44, “Installing a CA Certificate” Installing a CA certificate to the device.
Section7.45, “Configuring a Signed CA Certificate” Configuring a signed CA certificate.
Section7.46, “Installing a Private Key to a Signed CA Certificate” Installing a private key to a signed CA certificate.
Section7.47, “Installing a CRL File” Installing a CRL file to the device.
Section7.48, “Removing a Certificate” Removing a certificate from the device.
Section7.49, “Removing a CA certificate” Removing a CA certificate from the device.
78
Page 91

RUGGEDCOM NETCONF
Reference Guide
NETCONF Example Example demonstrates these techniques:
Section7.50, “Removing a CRL File” Removing a CRL file from the device.
CONTENTS
• Section7.1, “Getting the System Name”
• Section7.2, “Getting the ROX Release”
• Section7.3, “Getting the Chassis Status”
• Section7.4, “Setting the System Clock”
• Section7.5, “Acknowledging Alarms”
• Section7.6, “Clearing All Alarms”
• Section7.7, “Viewing Alarms”
• Section7.8, “Restoring Factory Defaults”
• Section7.9, “Changing the System Name by Locking and Committing”
• Section7.10, “Changing the System Name Directly”
• Section7.11, “Creating a Static VLAN”
• Section7.12, “Assigning a PVID on a Port”
• Section7.13, “Disabling Spanning Tree on a Specific Port”
• Section7.14, “Configuring an IP Address on a Specific Port”
• Section7.15, “Deleting an IP Address”
• Section7.16, “Setting a Static Route”
• Section7.17, “Disabling Spanning Tree Globally”
• Section7.18, “Retrieving all IP Addresses from the Running Configuration”
• Section7.19, “Retrieving the Active Routes on a Device”
• Section7.20, “Configuring Static Multicast Routing on a Layer 3 Device”
• Section7.21, “Enabling Static Multicast Routing on a Layer 3 Device”
• Section7.22, “Retrieving Static Multicast Status on a Layer 3 Device”
• Section7.23, “Replacing an IP Address”
• Section7.24, “Configuring a Port to Dynamically Obtain an IP Address”
• Section7.25, “Configuring OSPF Area and Network on a Layer 3 Device”
• Section7.26, “Enabling the OSPF Passive-Default Option”
• Section7.27, “Configure an OSPF Non-Passive Port”
• Section7.28, “Configuring OSPF Parameters”
• Section7.29, “Enabling the OSPF redistribute-connected Option”
• Section7.30, “Enabling OSPF on a Layer 3 Device”
• Section7.31, “Retrieving OSPF Status”
• Section7.32, “Retrieving All Data from the Routing Namespace”
• Section7.33, “Configuring DHCP Server”
Chapter 7
Examples
• Section7.34, “Configure the DHCP Server Port Listening for DHCP Client Requests”
79
Page 92

Chapter 7
Examples
• Section7.35, “Enabling the DHCP Server Service”
• Section7.36, “Disabling an Ethernet Port”
• Section7.37, “Enabling an Ethernet Port”
• Section7.38, “Checking an IP Address on a Specific Port using the Interfaces Namespace”
• Section7.39, “Retreiving All Data From Running Database Including Default Values”
• Section7.40, “Retreiving All Data From Running Database Including Default Tags and Values”
• Section7.41, “Changing a User's Password”
• Section7.42, “Displaying the Status of the IPsec Service”
• Section7.43, “Selecting a Certificate for an IPSec Tunnel”
• Section7.44, “Installing a CA Certificate”
• Section7.45, “Configuring a Signed CA Certificate”
• Section7.46, “Installing a Private Key to a Signed CA Certificate”
• Section7.47, “Installing a CRL File”
• Section7.48, “Removing a Certificate”
• Section7.49, “Removing a CA certificate”
• Section7.50, “Removing a CRL File”
RUGGEDCOM NETCONF
Reference Guide
Section7.1
Getting the System Name
In this example, a single <rpc> queries the running configuration and returns the system name.
This example shows how to issue a query for configuration data directly from the running configuration.
<rpc message-id="2"
xmlns="urn:ietf:params:xml:ns:netconf:base:1.0" with-defaults="true">
<get-config>
<source>
<running/>
</source>
<filter type="subtree">
<admin xmlns="http://ruggedcom.com/ns/rmf_admin">
<system-name></system-name>
</admin>
</filter>
</get-config>
</rpc>]]>]]>
Section7.2
Getting the ROX Release
In this example, a single <rpc> queries the running configuration and returns the ROX release information.
This example shows how to issue a query for fixed system data from the device.
<rpc message-id="2"
xmlns="urn:ietf:params:xml:ns:netconf:base:1.0">
80 Getting the System Name
Page 93

RUGGEDCOM NETCONF
Reference Guide
<get>
<filter type="subtree">
<chassis xmlns="http://ruggedcom.com/ns/rmf_chassis">
<chassis-status>
<rox-release></rox-release>
</chassis-status>
</chassis>
</filter>
</get>
</rpc>]]>]]>
Section7.3
Getting the Chassis Status
In this example, a single <rpc> queries retrieves the chassis status information from the device.
This example shows how to issue a query for state information directly from the device.
<rpc message-id="2"
xmlns="urn:ietf:params:xml:ns:netconf:base:1.0">
<get>
<filter type="subtree">
<chassis xmlns="http://ruggedcom.com/ns/rmf_chassis">
<status></status>
</chassis>
</filter>
</get>
</rpc>]]>]]>
Chapter 7
Examples
Section7.4
Setting the System Clock
In this example, a single <rpc> sets the system clock with the set-system-clock action.
This example shows how to use a RUGGEDCOM ROX II action on a running device.
<rpc message-id="101" xmlns="urn:ietf:params:xml:ns:netconf:base:1.0">
<action xmlns="http://tail-f.com/ns/netconf/actions/1.0">
<data>
<admin xmlns="http://ruggedcom.com/ns/rmf_admin">
<set-system-clock>
<time>2011-01-12 17:52:25</time>
</set-system-clock>
</admin>
</data>
</action>
</rpc>]]>]]>
Section7.5
Acknowledging Alarms
In this example, a single <rpc> acknowledges all alarms on the device with the acknowledge-all-alarms
action.
Getting the Chassis Status 81
Page 94

Chapter 7
Examples
This example shows how to use a NETCONF action on a running device.
<rpc message-id="101" xmlns="urn:ietf:params:xml:ns:netconf:base:1.0">
<action xmlns="http://tail-f.com/ns/netconf/actions/1.0">
<data>
<admin xmlns="http://ruggedcom.com/ns/rmf_admin">
<acknowledge-all-alarms/>
</admin>
</data>
</action>
</rpc>]]>]]>
Section7.6
Clearing All Alarms
In this example, a single <rpc> clears all alarms on the device with the clear-all-alarms action.
This example shows how to use a NETCONF action on a running device.
<rpc message-id="101" xmlns="urn:ietf:params:xml:ns:netconf:base:1.0">
<action xmlns="http://tail-f.com/ns/netconf/actions/1.0">
<data>
<admin xmlns="http://ruggedcom.com/ns/rmf_admin">
<clear-all-alarms/>
</admin>
</data>
</action>
</rpc>]]>]]>
RUGGEDCOM NETCONF
Reference Guide
Section7.7
Viewing Alarms
In this example, a single <rpc> queries the device and returns a list of active alarms.
This example shows how to issue a query for state information directly from the device.
<rpc message-id="2"
xmlns="urn:ietf:params:xml:ns:netconf:base:1.0">
<get>
<filter type="subtree">
<admin xmlns="http://ruggedcom.com/ns/rmf_admin">
<alarms></alarms>
</admin>
</filter>
</get>
</rpc>]]>]]>
Section7.8
Restoring Factory Defaults
In this example, a single <rpc> restores the factory default settings with the restore-factory-defaults action.
This example shows how to use a RUGGEDCOM ROX II action on a running device.
82 Clearing All Alarms
Page 95

RUGGEDCOM NETCONF
Reference Guide
<rpc message-id="101" xmlns="urn:ietf:params:xml:ns:netconf:base:1.0">
<action xmlns="http://tail-f.com/ns/netconf/actions/1.0">
<data>
<admin xmlns="http://ruggedcom.com/ns/rmf_admin">
<restore-factory-defaults/>
</admin>
</data>
</action>
</rpc>]]>]]>
Section7.9
Changing the System Name by Locking and Committing
In this example, multiple <rpc> requests change the system name in the candidate configuration and then
commit the changes.
The following is the recommended procedure for making configuration changes on a device:
1. Discard uncommitted changes:
Chapter 7
Examples
<rpc xmlns="urn:ietf:params:xml:ns:netconf:base:1.0" message-id="232">
<discard-changes/>
</rpc>]]>]]>
2. Lock the running configuration:
<rpc xmlns="urn:ietf:params:xml:ns:netconf:base:1.0" message-id="230">
<lock>
<target>
<running/>
</target>
</lock>
</rpc>]]>]]>
3. Lock the candidate configuration:
<rpc xmlns="urn:ietf:params:xml:ns:netconf:base:1.0" message-id="231">
<lock>
<target>
<candidate/>
</target>
</lock>
</rpc>]]>]]>
4. Change the system-name setting:
<rpc message-id="233" xmlns="urn:ietf:params:xml:ns:netconf:base:1.0">
<edit-config>
<target>
<candidate/>
</target>
<config>
<admin xmlns="http://ruggedcom.com/ns/rmf_admin">
<system-name>Substation 24 Locker 2 Router 1</system-name>
</admin>
</config>
</edit-config>
</rpc>]]>]]>
Changing the System Name by Locking and Committing 83
Page 96

Chapter 7
Examples
5. Commit the changes:
<rpc message-id="234" xmlns="urn:ietf:params:xml:ns:netconf:base:1.0">
<commit/>
</rpc>]]>]]>
6. Unlock the candidate configuration:
<rpc xmlns="urn:ietf:params:xml:ns:netconf:base:1.0" message-id="235">
<unlock>
<target>
<candidate/>
</target>
</unlock>
</rpc>]]>]]>
7. Unlock the running configuration:
<rpc xmlns="urn:ietf:params:xml:ns:netconf:base:1.0" message-id="236">
<unlock>
<target>
<running/>
</target>
</unlock>
</rpc>]]>]]>
RUGGEDCOM NETCONF
Reference Guide
Section7.10
Changing the System Name Directly
In this example, a single <rpc> request changes the system name directly in the running configuration.
This example shows how to change configuration data on the running configuration directly without locking the
datastores. Changes made in this manner are applied to the running configuration immediately.
CAUTION!
Exercise caution when making changes directly to the running configuration. Making an error in the
configuration settings may interrupt service.
<rpc message-id="233" xmlns="urn:ietf:params:xml:ns:netconf:base:1.0">
<edit-config>
<target>
<running/>
</target>
<config>
<admin xmlns="http://ruggedcom.com/ns/rmf_admin">
<system-name>REAL-Test</system-name>
</admin>
</config>
</edit-config>
</rpc>]]>]]>
84 Changing the System Name Directly
Page 97

RUGGEDCOM NETCONF
Reference Guide
Section7.11
Creating a Static VLAN
In this example, multiple <rpc> requests create a static VLAN in the candidate configuration and then commit the
changes.
The following shows the recommended procedure for making configuration changes on a device:
1. Lock the running configuration:
<rpc xmlns="urn:ietf:params:xml:ns:netconf:base:1.0" message-id="230">
<lock>
<target>
<running/>
</target>
</lock>
</rpc>]]>]]>
2. Lock the candidate configuration:
<rpc xmlns="urn:ietf:params:xml:ns:netconf:base:1.0" message-id="231">
<lock>
<target>
<candidate/>
</target>
</lock>
</rpc>]]>]]>
Chapter 7
Examples
3. Discard uncommitted changes:
<rpc xmlns="urn:ietf:params:xml:ns:netconf:base:1.0" message-id="232">
<discard-changes/>
</rpc>]]>]]>
4. Configure the static VLAN parameters:
<rpc message-id="233" xmlns="urn:ietf:params:xml:ns:netconf:base:1.0">
<edit-config>
<target>
<candidate/>
</target>
<config>
<switch xmlns="http://ruggedcom.com/ns/rmf_ifswitch">
<vlans>
<static-vlan>
<vid>0086</vid>
</static-vlan>
</vlans>
</switch>
</config>
</edit-config>
</rpc>]]>]]>
5. Commit the changes:
<rpc message-id="234" xmlns="urn:ietf:params:xml:ns:netconf:base:1.0">
<commit/>
</rpc>]]>]]>
6. Unlock the candidate configuration:
<rpc xmlns="urn:ietf:params:xml:ns:netconf:base:1.0" message-id="235">
<unlock>
<target>
Creating a Static VLAN 85
Page 98

Chapter 7
Examples
<candidate/>
</target>
</unlock>
</rpc>]]>]]>
RUGGEDCOM NETCONF
Reference Guide
7. Unlock the target configuration:
<rpc xmlns="urn:ietf:params:xml:ns:netconf:base:1.0" message-id="236">
<unlock>
<target>
<running/>
</target>
</unlock>
</rpc>]]>]]>
Section7.12
Assigning a PVID on a Port
In this example, multiple <rpc> requests assign a PVID to a port in the candidate configuration and then commit
the changes.
The following is the recommended procedure for making configuration changes on a device:
1. Lock the running configuration:
<rpc xmlns="urn:ietf:params:xml:ns:netconf:base:1.0" message-id="230">
<lock>
<target>
<running/>
</target>
</lock>
</rpc>]]>]]>
2. Lock the candidate configuration:
<rpc xmlns="urn:ietf:params:xml:ns:netconf:base:1.0" message-id="231">
<lock>
<target>
<candidate/>
</target>
</lock>
</rpc>]]>]]>
3. Discard uncommitted changes:
<rpc xmlns="urn:ietf:params:xml:ns:netconf:base:1.0" message-id="232">
<discard-changes/>
</rpc>]]>]]>
4. Configure the PVID parameters:
<rpc message-id="233" xmlns="urn:ietf:params:xml:ns:netconf:base:1.0">
<edit-config>
<target>
<candidate/>
</target>
<config>
<interface xmlns="http://ruggedcom.com/ns/rmf_if">
<switch>
<slot>lm4</slot>
<port>6</port>
<vlan>
86 Assigning a PVID on a Port
Page 99

RUGGEDCOM NETCONF
Reference Guide
<pvid>0086</pvid>
<format>untagged</format>
</vlan>
</switch>
</interface>
</config>
</edit-config>
</rpc>]]>]]>
5. Commit the changes:
<rpc message-id="234" xmlns="urn:ietf:params:xml:ns:netconf:base:1.0">
<commit/>
</rpc>]]>]]>
6. Unlock the candidate configuration:
<rpc xmlns="urn:ietf:params:xml:ns:netconf:base:1.0" message-id="235">
<unlock>
<target>
<candidate/>
</target>
</unlock>
</rpc>]]>]]>
7. Unlock the running configuration:
Chapter 7
Examples
<rpc xmlns="urn:ietf:params:xml:ns:netconf:base:1.0" message-id="236">
<unlock>
<target>
<running/>
</target>
</unlock>
</rpc>]]>]]>
Section7.13
Disabling Spanning Tree on a Specific Port
In this example, multiple <rpc> requests disable spanning tree on a specified port in the candidate configuration
and then commit the changes.
The following is the recommended procedure for making configuration changes on a device.
1. Lock the running configuration:
<rpc xmlns="urn:ietf:params:xml:ns:netconf:base:1.0" message-id="230">
<lock>
<target>
<running/>
</target>
</lock>
</rpc>]]>]]>
2. Lock the candidate configuration:
<rpc xmlns="urn:ietf:params:xml:ns:netconf:base:1.0" message-id="231">
<lock>
<target>
<candidate/>
</target>
</lock>
</rpc>]]>]]>
Disabling Spanning Tree on a Specific Port 87
Page 100

Chapter 7
Examples
3. Discard uncommitted changes:
<rpc xmlns="urn:ietf:params:xml:ns:netconf:base:1.0" message-id="232">
<discard-changes/>
</rpc>]]>]]>
4. Disable spanning tree with the nc:delete attribute:
<rpc message-id="233" xmlns="urn:ietf:params:xml:ns:netconf:base:1.0">
<edit-config>
<target>
<candidate/>
</target>
<config>
<interface xmlns:nc="urn:ietf:params:xml:ns:netconf:base:1.0" xmlns="http://ruggedcom.com/ns/
rmf_if">
<switch>
<slot>lm4</slot>
<port>6</port>
<spanning-tree>
<enabled nc:operation="delete"/>
</spanning-tree>
</switch>
</interface>
</config>
</edit-config>
</rpc>]]>]]>
RUGGEDCOM NETCONF
Reference Guide
5. Commit the changes:
<rpc message-id="234" xmlns="urn:ietf:params:xml:ns:netconf:base:1.0">
<commit/>
</rpc>]]>]]>
6. Unlock the candidate configuration:
<rpc xmlns="urn:ietf:params:xml:ns:netconf:base:1.0" message-id="235">
<unlock>
<target>
<candidate/>
</target>
</unlock>
</rpc>]]>]]>
7. Unlock the running configuration:
<rpc xmlns="urn:ietf:params:xml:ns:netconf:base:1.0" message-id="236">
<unlock>
<target>
<running/>
</target>
</unlock>
</rpc>]]>]]>
Section7.14
Configuring an IP Address on a Specific Port
In this example, multiple <rpc> requests configure an IP address on a specified port in the candidate
configuration and then commit the changes.
The following is the recommended procedure for making configuration changes on a device:
88 Configuring an IP Address on a Specific Port
 Loading...