

Page 1
Mühlhäuser
Laser Light Localizer
Installation Instructions
Option
SP
Installation Instructions
Valid for:
SIREMOBIL Compact
ARCADIS Varic
03779001
Print No.:
Replaces: RXR2-130.812.01.01.02
RXR2-130.812.01.02.02
© Siemens AG
The reproduction, transmission or use
of this document or its contents is not
permitted without express written
authority. Offenders will be liable for
damages. All rights, including rights
created by patent grant or registration
of a utility model or design, are
reserved.
English
Doc. Gen. Date: 01.05
2004
Page 2

2 Revision / Disclaimer
1Revision / Disclaimer
Document revision level
The document corresponds to the version/revision level effective at the time of system
delivery. Revisions to hardcopy documentation are not automatically distributed.
Please contact your local Siemens office to order current revision levels.
Disclaimer
The installation and service of equipment described herein is to be performed by qualified
personnel who are employed by Siemens or one of its affiliates or who are otherwise
authorized by Siemens or one of its affiliates to provide such services.
Assemblers and other persons who are not employed by or otherwise directly affiliated
with or authorized by Siemens or one of its affiliates are directed to contact one of the
local offices of Siemens or one of its affiliates before attempting installation or service procedures.
Laser Light Localizer RXR2-130.812.01.02.02 Siemens AG
01.05 CS SD 24
Page 2 of 18
Medical Solutions
Page 3

Table of Contents 3
1- 0Table of Contents
1 _______ Safety Information _______________________________________________ 4
Protection against laser beams . . . . . . . . . . . . . . . . . . . . . . . . . . . . . . . . . . . . . . . . . . . . 4
Labels for U.S.A.: . . . . . . . . . . . . . . . . . . . . . . . . . . . . . . . . . . . . . . . . . . . . . . . . . . . . 4
Labels for all other countries: . . . . . . . . . . . . . . . . . . . . . . . . . . . . . . . . . . . . . . . . . . . 5
2 _______ Prerequisites and Preparation _____________________________________ 6
Note . . . . . . . . . . . . . . . . . . . . . . . . . . . . . . . . . . . . . . . . . . . . . . . . . . . . . . . . . . . . . . . . . 6
Required parts . . . . . . . . . . . . . . . . . . . . . . . . . . . . . . . . . . . . . . . . . . . . . . . . . . . . . . . . . 7
Required aids . . . . . . . . . . . . . . . . . . . . . . . . . . . . . . . . . . . . . . . . . . . . . . . . . . . . . . . 8
Removing the cover . . . . . . . . . . . . . . . . . . . . . . . . . . . . . . . . . . . . . . . . . . . . . . . . . . 8
3 _______ Installation, Wiring, and Programming ______________________________ 9
Wiring on the SIREPHOS. . . . . . . . . . . . . . . . . . . . . . . . . . . . . . . . . . . . . . . . . . . . . . . . . 9
Installing the localizer unit on the SIREPHOS . . . . . . . . . . . . . . . . . . . . . . . . . . . . . . 9
1a. Changing the configuration (only SIREMOBIL Compact): . . . . . . . . . . . . . . . . . . . . 10
1b. Changing the configuration (only ARCADIS Varic): . . . . . . . . . . . . . . . . . . . . . . . . . 11
4 _______ Functional Test and Final Steps___________________________________ 12
Functional test . . . . . . . . . . . . . . . . . . . . . . . . . . . . . . . . . . . . . . . . . . . . . . . . . . . . . . . . 12
Final steps . . . . . . . . . . . . . . . . . . . . . . . . . . . . . . . . . . . . . . . . . . . . . . . . . . . . . . . . . . . 13
Attaching the cover . . . . . . . . . . . . . . . . . . . . . . . . . . . . . . . . . . . . . . . . . . . . . . . . . . 13
Attaching the cover panels . . . . . . . . . . . . . . . . . . . . . . . . . . . . . . . . . . . . . . . . . . . . 13
Installing the I.I. attachment . . . . . . . . . . . . . . . . . . . . . . . . . . . . . . . . . . . . . . . . . . . 13
Affixing the identification labels for the U.S.A. . . . . . . . . . . . . . . . . . . . . . . . . . . . . . . . . 14
Affixing the identification labels for Great Britian and other countries . . . . . . . . . . . . . . 16
5 _______ Changes to Previous Version_____________________________________ 18
Siemens AG RXR2-130.812.01.02.02 Laser Light Localizer
Medical Solutions
01.05 CS SD 24
Page 3 of 18
Page 4
4 Safety Information
1Safety Information
2-
Protection against laser beams 0
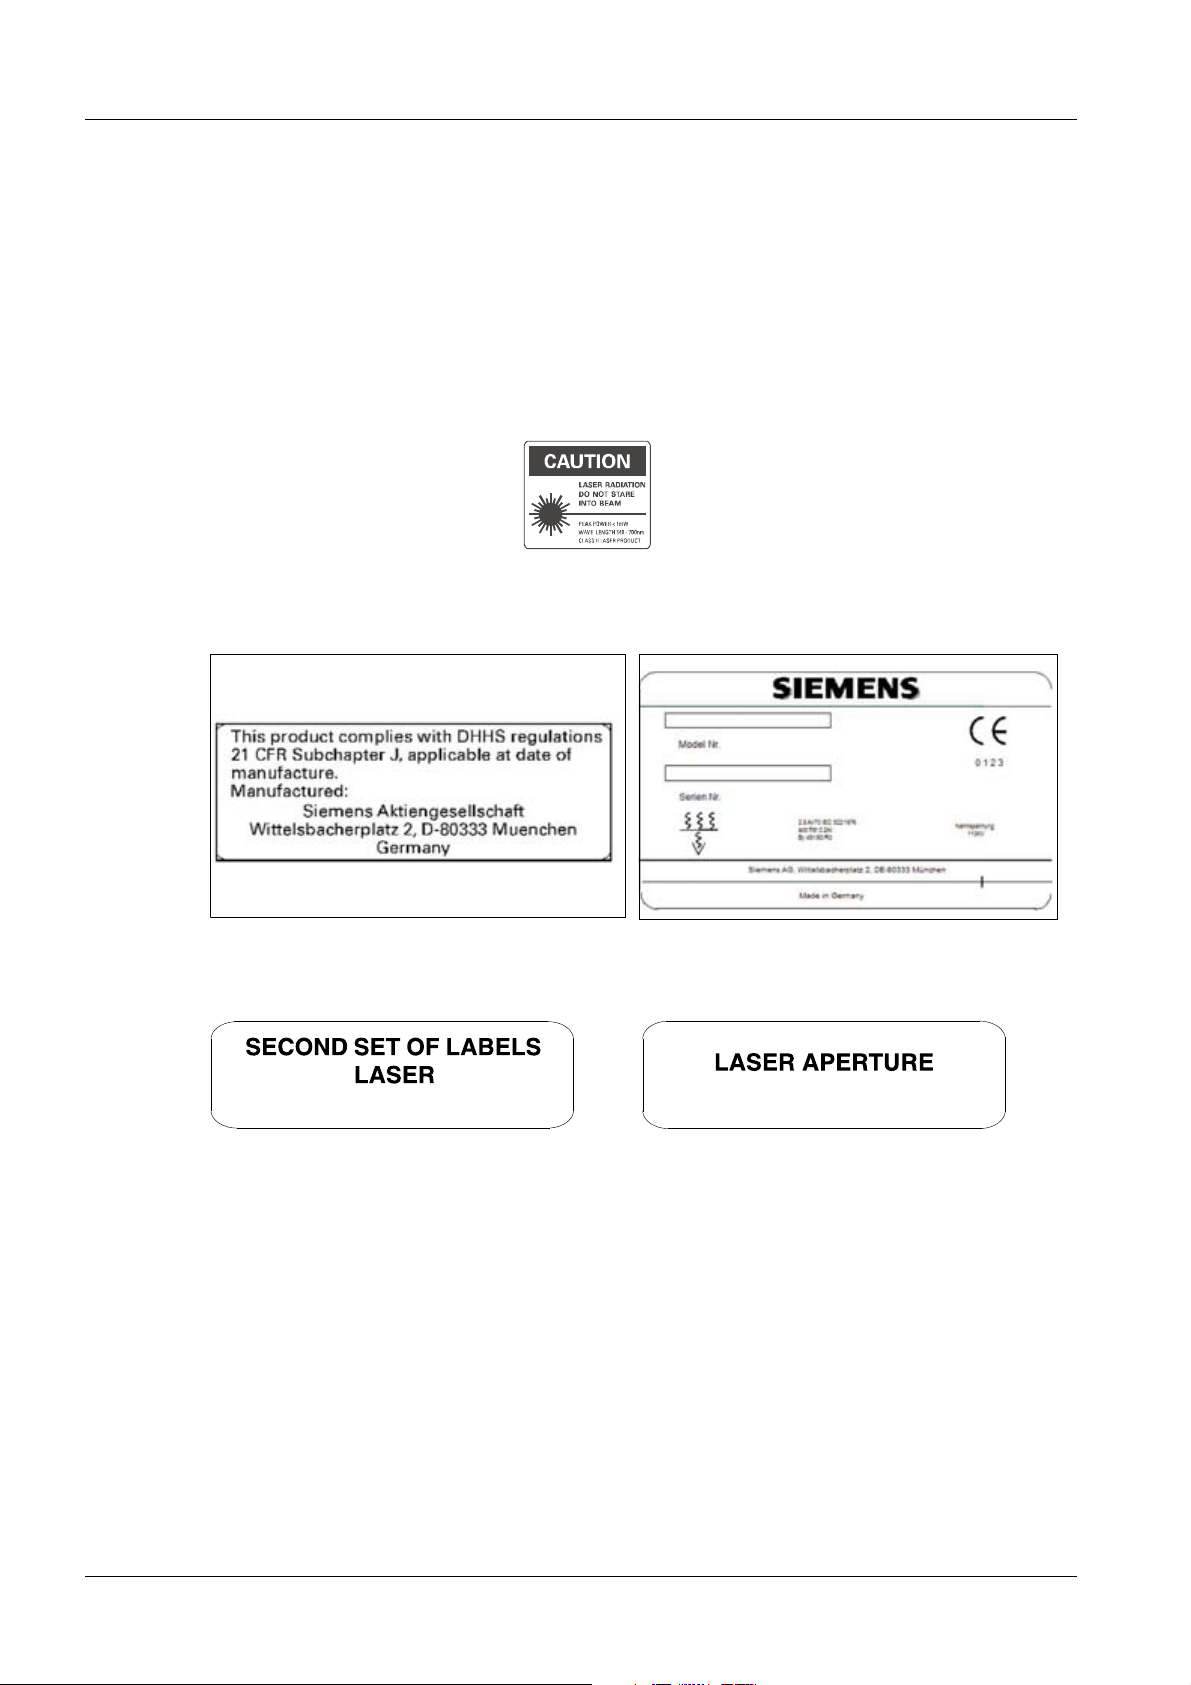
This product contains two Class 2 lasers (USA: Laser class 2).
Observe the safety information in ARTD-002.731.03.xx.xx.
When working with the laser light localizer, do no look directly into the laser beam.
Labels for U.S.A.: 0
Fig. 1: Laser-Klasse-Piktogram
Fig. 2: Certification label
Fig. 4: Label
Fig. 3: Identification label
Fig. 5: Laser aperture label
Laser Light Localizer RXR2-130.812.01.02.02 Siemens AG
01.05 CS SD 24
Page 4 of 18
Medical Solutions
Page 5
Safety Information 5
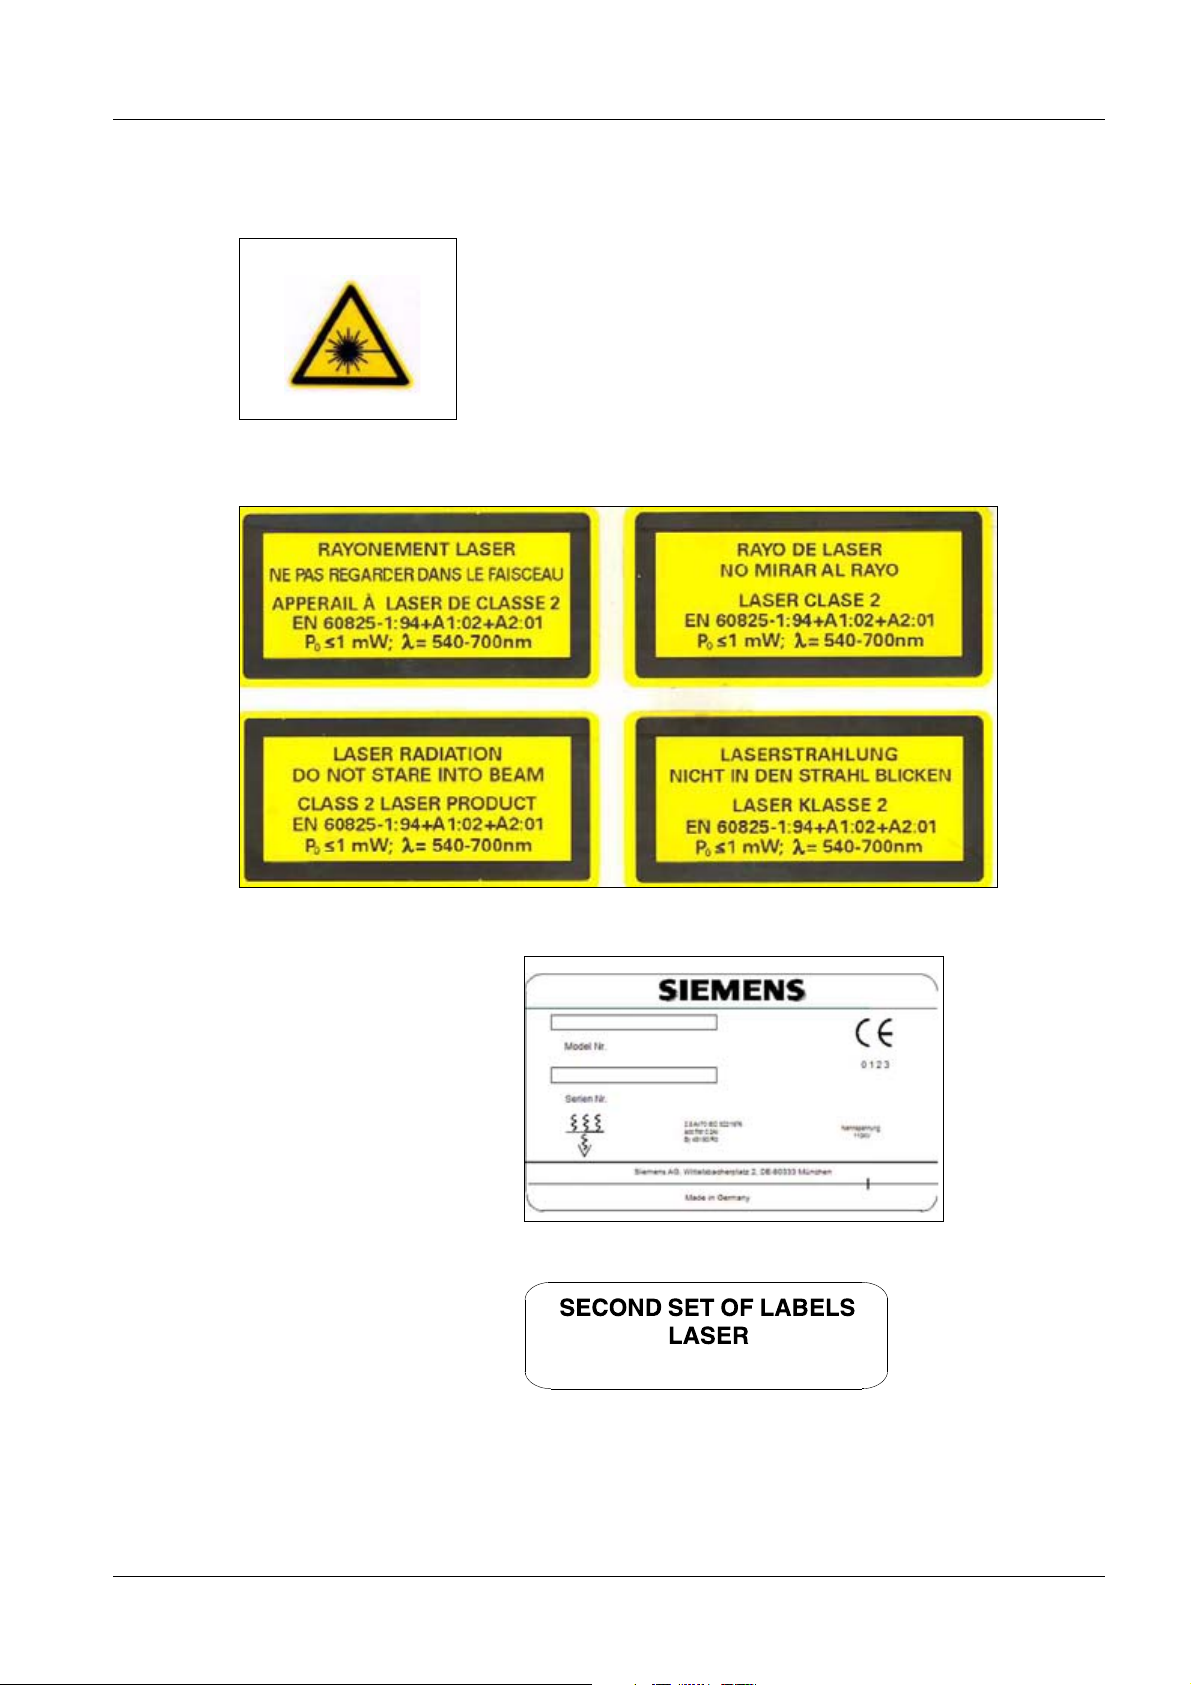
Labels for all other countries: 0
Warning label according to IEC 825
Fig. 6: Warning label according to IEC 825
(use local language)
Fig. 7: Warnschilder nach IEC 825
Identification label:
Fig. 8: Identification label
Fig. 9: Label
Siemens AG RXR2-130.812.01.02.02 Laser Light Localizer
Medical Solutions
01.05 CS SD 24
Page 5 of 18
Page 6

6 Prerequisites and Preparation
2Prerequisites and Preparation
3-
Note 0
These installation instructions only apply to retrofitting SIREMOBIL Compact or ARCADIS
Varic systems with a laser light localizer.
Laser Light Localizer RXR2-130.812.01.02.02 Siemens AG
01.05 CS SD 24
Page 6 of 18
Medical Solutions
Page 7

Prerequisites and Preparation 7
Required parts 0
Laser light localizer complete for ARCADIS Varic 80 79 720
Laser light localizer complete for SIREMOBIL Compact 37 79 001 G5429
Fig. 10: Overview of required parts
Tab. 1 List of required parts
1 Localizer unit
2 I.I. attachment 23 cm (9") I.I. (only ARCADIS Varic)
2 I.I. attachment 17 cm (7") and 23 cm (9") I.I. (only SIREMOBIL Compact)
4 SIREPHOS cover
5 Sterile covers
7 Adjustment device
8 Warning labels according to IEC 825 (text and symbol)
8 Identification label
8 For U.S.A.: “Laser class 2” warning logotype and DHHS certification label
8 Various small parts
Siemens AG RXR2-130.812.01.02.02 Laser Light Localizer
Medical Solutions
01.05 CS SD 24
Page 7 of 18
Page 8

8 Prerequisites and Preparation
Required aids 0
• Service PC (only SIREMOBIL Compact)
• Toolbox (including Allen key)
Removing the cover 0
• Disconnect the system power plug.
• Remove the cover plate from the basic unit.
• Remove the SIREPHOS cover by carefully loosening the bonding surfaces on the long
sides of the cover.
Laser Light Localizer RXR2-130.812.01.02.02 Siemens AG
01.05 CS SD 24
Page 8 of 18
Medical Solutions
Page 9

Installation, Wiring, and Programming 9
3Installation, Wiring, an d Programming
4-
Wiring on the SIREPHOS 0
• Loosen and remove the cover from the tube collimator.
• Route the spare leads (white and gray) up and out through the back.
• Replace the cover of the tube collimator.
Installing the localizer unit on the SIREPHOS 0
Fig. 11: SIREPHOS localizer unit
Pos. 5 Screws
Pos. 6 Threaded holes
Pos. 7 Solder terminal
Pos. 8 Cable ties
• Loosen the screw (5/Fig. 11 / p. 9).
• Insert the bolts provided into the threaded holes.
• Place the spacers provided over the threaded holes (6/Fig. 11 / p. 9).
• Attach the localizer unit (Fig. 11 / p. 9) and secure to the SIREPHOS using 4 screws.
(5/Fig. 11 / p. 9)(6/Fig. 11 / p. 9)
• Solder spare lead "white" to solder terminal X55.1.
• Solder spare lead "gray" to solder terminal X55.4.
• Secure the two spare leads using cable ties.
Siemens AG RXR2-130.812.01.02.02 Laser Light Localizer
Medical Solutions
01.05 CS SD 24
Page 9 of 18
Page 10

10 Installation, Wiring, and Programming
1a. Changing the configuration (only SIREMOBIL Compact): 0
• Connect the service PC to the serial interface of the SIREMOBIL.
• The service program must already be installed on the PC.
• Remove the service program floppy disk from the log book and insert into drive A.
• Switch on the system.
• Switch on the service PC.
• Start the service program.
• Click "Get from Unit".
• Select "Laser" in the Adjustment, Parameters menu.
• Select yes for "Laser existing".
• Click "Set Value".
• Click "Put to unit".
• Wait for the system to boot.
• Back up the parameters (Data menu, Backup, Parameter).
Laser Light Localizer RXR2-130.812.01.02.02 Siemens AG
01.05 CS SD 24
Page 10 of 18
Medical Solutions
Page 11

Installation, Wiring, and Programming 11
1b. Changing the configuration (only ARCADIS Varic): 0
• Log on to the service menu.
• Click <Main System>-<Configuration>-<Options>.
• Set "Laser Existing" to <yes> and click <Save>.
• Back up the parameters.
Siemens AG RXR2-130.812.01.02.02 Laser Light Localizer
Medical Solutions
01.05 CS SD 24
Page 11 of 18
Page 12

12 Functional Test and Final Steps
4Functional Test and Final Steps
5-
Functional test 0
• Switch on the system.
• Die Funktion des Tasters am Bedienpult des Grundgerätes testen: Bei einge-
schaltetem Laserlichtvisier müssen die beiden Laserdioden und die LED im Taster
leuchten.
• Test the automatic shut-off of the laser light localizer: Switch on the laser light localizer.
The two laser diodes must shut off automatically after 5 minutes.
NOTE
Before performing the final steps, the laser light localizer has to be
adjusted according to the adjustment instructions provided.
Laser Light Localizer RXR2-130.812.01.02.02 Siemens AG
01.05 CS SD 24
Page 12 of 18
Medical Solutions
Page 13

Functional Test and Final Steps 13
Final steps 0
Attaching the cover 0
NOTE
The laser light localizer has to be adjusted before attaching the
cover.
• Place the cover provided on the SIREPHOS.
• Tighten the cover screws.
Note for U.S.A.: When using the laser light localizer, remove the spacer!
Attaching the cover panels 0
• Replace the cover panels on the SIREMOBIL.
Installing the I.I. attachment 0
Fig. 12: I.I. attachment
Fig. 13: I.I. attachment
• Install the I.I. attachment on the I.I. retaining ring using the three clamps (Fig. 12 / p. 13)
(Fig. 13 / p. 13). A cassette holder can no longer be installed. The fluoroscopy grid re-
mains on the I.I. input.
Siemens AG RXR2-130.812.01.02.02 Laser Light Localizer
Medical Solutions
01.05 CS SD 24
Page 13 of 18
Page 14
14 Functional Test and Final Steps
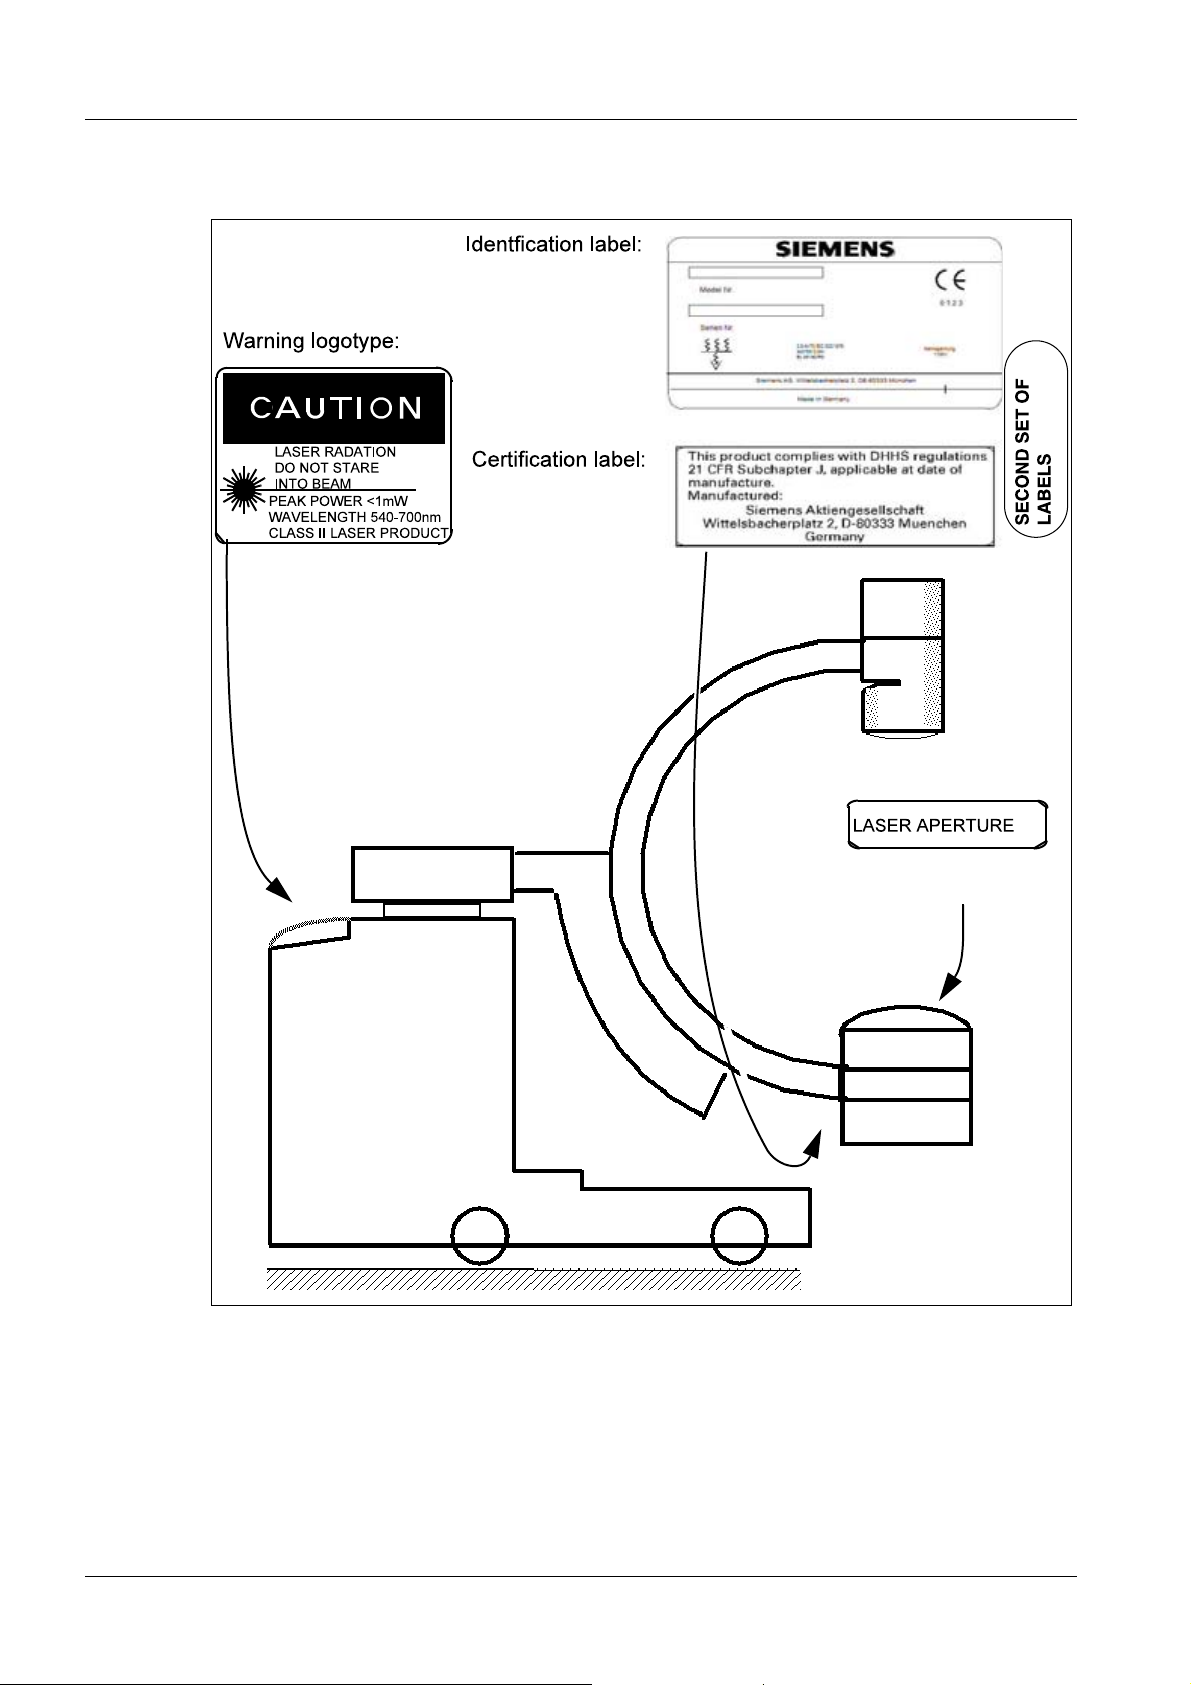
Affixing the identification labels for the U.S.A. 0
Fig. 14: Checking the identification labels
Laser Light Localizer RXR2-130.812.01.02.02 Siemens AG
01.05 CS SD 24
Page 14 of 18
Medical Solutions
Page 15
Functional Test and Final Steps 15
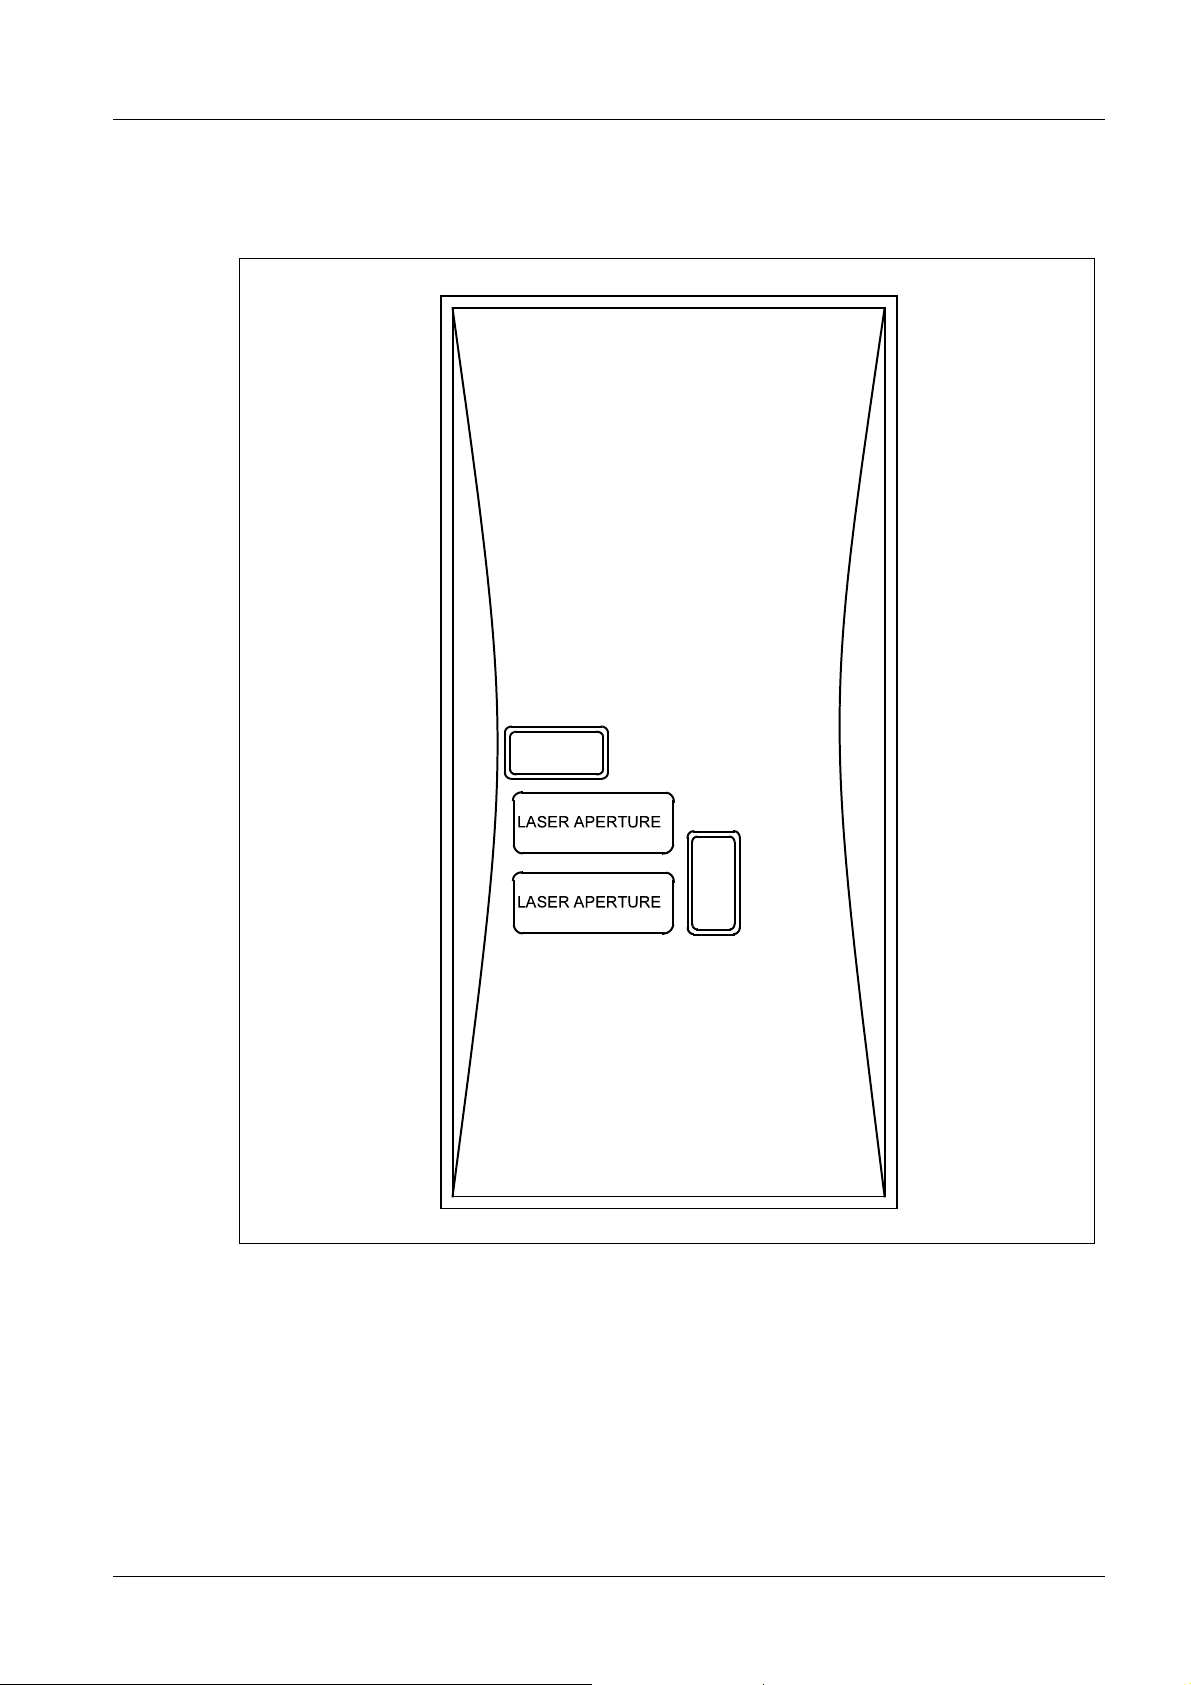
• Affix the identification labels provided (Fig. 14 / p. 14) (Fig. 15 / p. 15).
Affix the identification label, "Laser class 2" warning logotype, DHHS certification label,
and the two laser aperture labels.
Fig. 15: Label for C-arm side
Siemens AG RXR2-130.812.01.02.02 Laser Light Localizer
Medical Solutions
01.05 CS SD 24
Page 15 of 18
Page 16
16 Functional Test and Final Steps
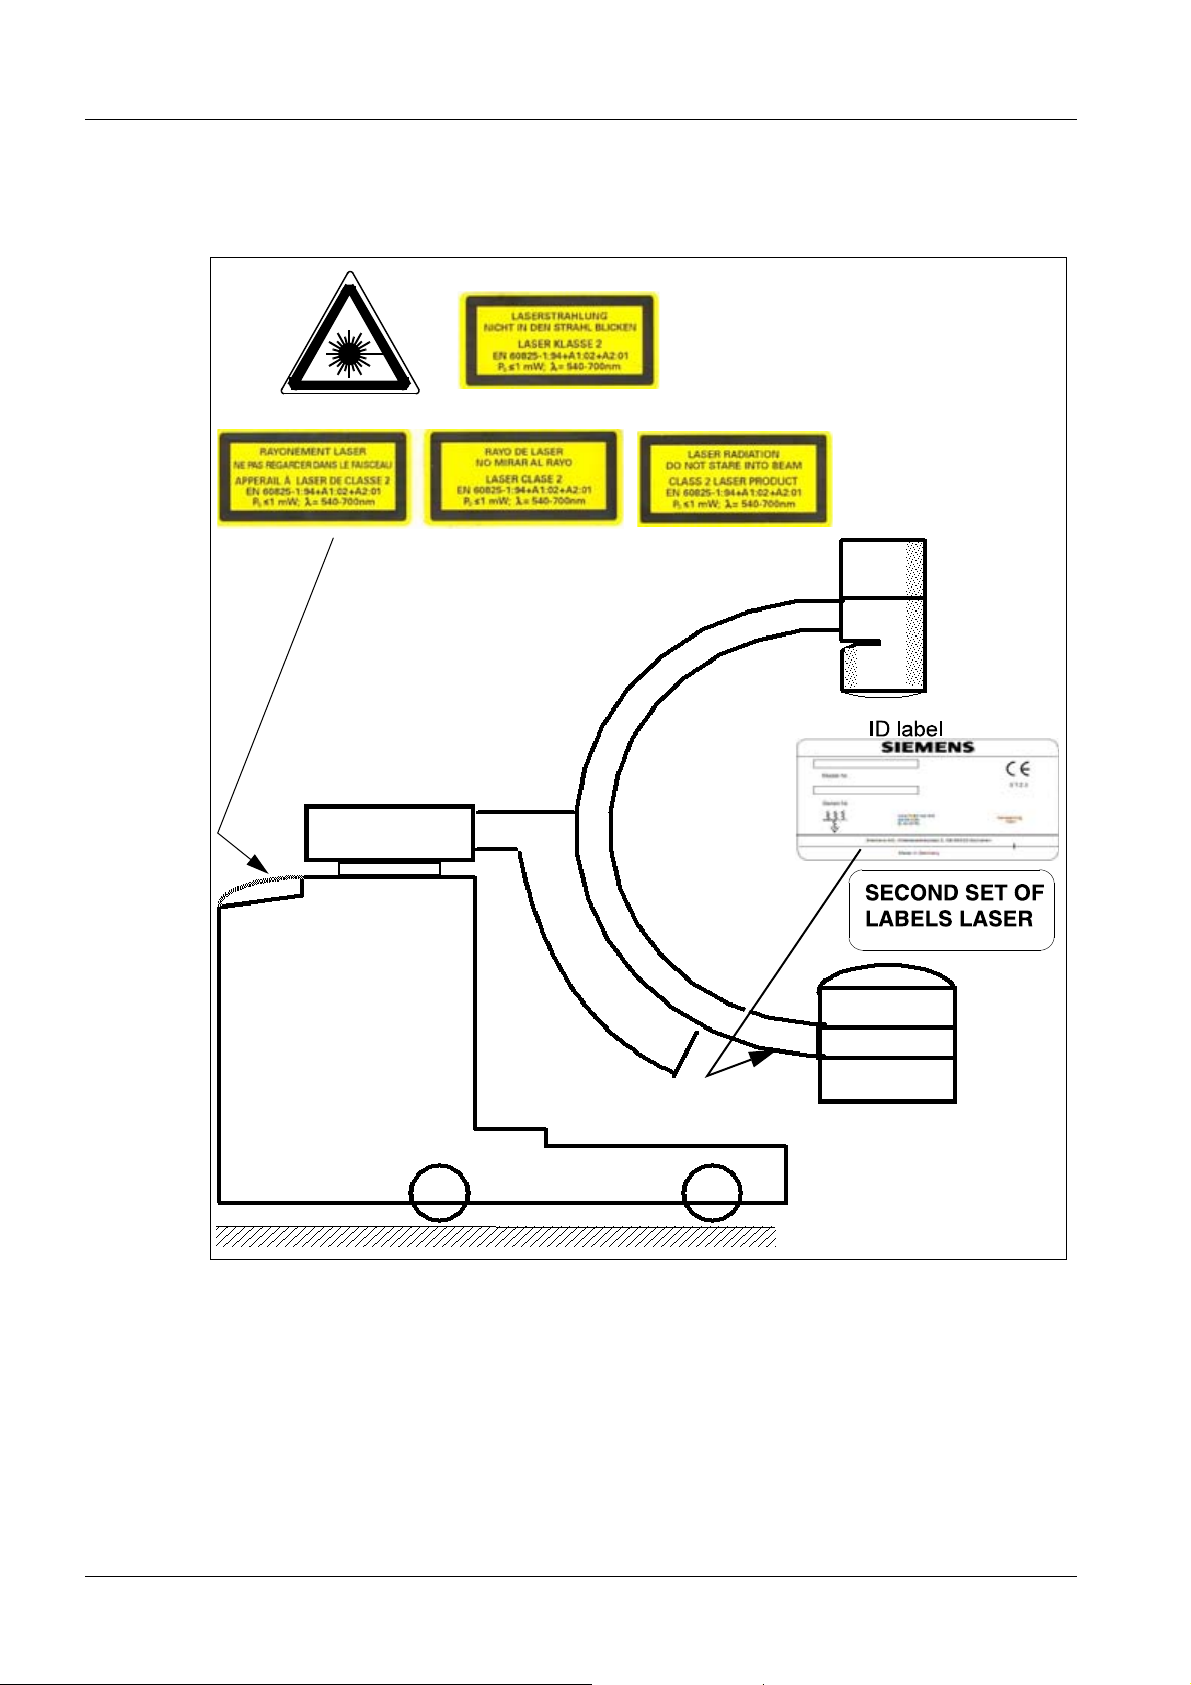
Affixing the identification labels for Great Britian and other countries
0
Fig. 16: Affixing the warning labels
• Affix the identification labels provided as shown in (Fig. 16 / p. 16) (other countries).
Laser Light Localizer RXR2-130.812.01.02.02 Siemens AG
01.05 CS SD 24
Page 16 of 18
Medical Solutions
Page 17

Functional Test and Final Steps 17
Great Britain: Affix warning label according to IEC 825 (text) in local language,
warning label according to IEC 825 (symbol) and identification
label.
Also affix laser aperture labels (Fig. 15 / p. 15).
Other countries: Affix warning label according to IEC 825 (text) in local language,
warning label according to IEC 825 (symbol) and identification
label.
Siemens AG RXR2-130.812.01.02.02 Laser Light Localizer
Medical Solutions
01.05 CS SD 24
Page 17 of 18
Page 18

18 Changes to Previous Version
5Changes to Previous Version
6-
Cover sheet changed
Laser Light Localizer RXR2-130.812.01.02.02 Siemens AG
01.05 CS SD 24
Page 18 of 18
Medical Solutions
 Loading...