

Page 1
Page 2
Page 3
3
de
Hinweise zur
Entsorgung
Altgerät entsorgen
Bitte beachten, wenn Ihr neues Gerät ein
Altgerät ersetzt.
Altgeräte sind kein wertloser Abfall!
Durch umweltgerechte Entsorgung
können wertvolle Rohstoffe
wiedergewonnen werden.
Altgerät unbrauchbar machen:
1. Netzstecker ziehen,
2. Anschlusskabel durchtrennen und mit
dem Netzstecker entfernen,
3. Türschloss entfernen, damit
spielende Kinder sich nicht
einsperren und in Lebensgefahr
geraten.
Kältegeräte enthalten Kältemittel und in
der Isolierung Gase. Kältemittel und
Gase müssen fachgerecht entsorgt
werden. Rohre des KältemittelKreislaufes bis zur fachgerechten
Entsorgung nicht beschädigen.
Verpackung entsorgen
Achtung:
Verpackungsmaterial ist kein Spiel-
zeug für Kinder – Erstickungsgefahr
durch Faltkartons und Folien!
Ihr neues Gerät wurde auf dem Weg zu
Ihnen durch die Verpackung geschützt.
Alle eingesetzten Materialien sind
umwelt-verträglich und wieder
verwertbar. Bitte helfen Sie mit:
Entsorgen Sie die Verpackung
umweltgerecht.
Über aktuelle Entsorgungswege informieren Sie sich bitte bei Ihrem Fachhändler oder bei der Gemeindeverwaltung.
Dieses Gerät ist entsprechend der
europäischen Richtlinie 2002/96/EG
über Elektro- und Elektronikaltgeräte
(waste electrical and electronic
equipment - WEEE) gekennzeichnet.
Die Richtlinie gibt den Rahmen für eine
EU-weit gültige Rücknahme und
Verwertung der Altgeräte vor.
Hinweise zu Ihrer
Sicherheit
Bevor Sie das Gerät in
Betrieb nehmen
Lesen Sie Gebrauchs- und Montageanleitung aufmerksam durch! Sie enthalten
wichtige Informationen über Aufstellen,
Gebrauch und Wartung des Gerätes.
Der Hersteller haftet nicht, wenn Sie
die Hinweise und Warnungen der
Gebrauchsanweisung missachten.
Bewahren Sie Gebrauchs- und Montageanweisung für einen Nachbesitzer auf.
Warnungen
• Das Gerät enthält in geringer Menge
das umweltfreundliche, aber brennbare Kältemittel R600a. Achten Sie
darauf, dass die Rohre des KältemittelKreislaufes bei Transport oder
Montage nicht beschädigt werden.
Herausspritzendes Kältemittel kann zu
Augenverletzungen führen oder sich
entzünden.
Wenn Kältemittel austritt, darauf
achten:
– dass kein offenes Feuer oder Zünd-
quellen in der Nähe sind.
– Netzstecker ziehen, Raum für einige
Minuten gut durchlüften.
DE.qxd 21/10/05 18:20 Page 3
Page 4
4
de
• Je mehr Kältemittel in einem Gerät ist,
umso größer muss der Raum sein,
in dem das Gerät steht. In zu kleinen
Räumen kann bei einem Leck ein
brennbares Gas-Luft-Gemisch entstehen.
• Pro 8 g Kältemittel muss der Raum
mindestens 1 m
3
groß sein. Die
Menge des Kältemittels Ihres Gerätes
steht auf dem Typschild im Inneren
des Gerätes.
• Bei Notfällen
– Augen ausspülen und Arzt aufsuchen.
– Zündfunken und offenes Feuer vom
Gerät fernhalten.
– Netzstecker ziehen, Raum einige
Minuten gut lüften.
• In folgenden Fällen Netzstecker
ziehen oder Sicherung ausschalten
– Abtauen
– Reinigen
Am Netzstecker ziehen, nicht am Anschlusskabel.
• Beschädigte oder defekte Geräte nicht
in Betrieb nehmen. Im Zweifelsfall
beim Händler erkundigen.
• Nie elektrische Geräte innerhalb des
Gerätes verwenden (z. B. Heizgeräte,
elektrische Eisbereiter usw.)
• Keine Produkte mit brennbaren Treibgasen (z. B. Spraydosen) und keine
explosiven Stoffe lagern - Explosions-
gefahr!
• Das Gerät ist kein Spielzeug für Kinder!
• Nie das Gerät mit einem Dampfreinigungsgerät abtauen oder reinigen!
Der Dampf kann an elektrische Teile
gelangen und einen Kurzschluss oder
einen Stromschlag auslösen.
Beim Gebrauch beachten
• Be- und Entlüftungsöffnungen niemals
abdecken oder zustellen!
• Nur Fachkräfte dürfen Reparaturen
durchführen. Unsachgemäße Reparaturen können den Benutzer erheblich
gefährden.
• Sockel, Auszüge, Türen usw. nicht als
Trittbrett oder zum Abstützen miss-
brauchen.
• Hochprozentigen Alkohol nur dicht
verschlossen und stehend lagern.
• Bei Gerät mit Türschloss: Schlüssel
wahren!
• Kunststoff-Teile und Türdichtung nicht
sonst porös.
• Im Gefrierraum keine Flüssigkeiten in
Flaschen und Dosen lagern (besonders
kohlensäurehaltige Getränke).
Flaschen und Dosen platzen!
• Eis am Stiel und Eiswürfel nicht sofort
vom Gefrierraum in den Mund nehmen.
Gefrierverbrennungsgefahr durch
sehr tiefe Temperatur!
•
Gefriergut nicht mit nassen Händen
festfrieren!
• Reifschicht und festgefrorenes Gefriergut nicht mit Messer oder spitzem
Gegenstand abschaben. Sie könnten
damit die Kältemittelrohre
beschädigen. Herausspritzendes
Kältemittel kann sich entzünden oder
zu Augenverletzungen führen.
• Zum Beschleunigen des
Abtauvorgangs nur vom Hersteller
empfohlene Mittel benutzen.
Warnung
• Die Lüftungsschlitze in der
Kühlschrankstruktur dürfen nicht
verdeckt werden.
• Zur Beschleunigung des
Abtauvorgangs dürfen nur
mechanische Hilfsmittel oder andere
Mittel verwendet werden, die vom
Hersteller empfohlen werden.
• Achten Sie darauf, dass der
Kühlkreislauf nicht beschädigt wird.
DE.qxd 21/10/05 18:20 Page 4
Reichweite von Kindern aufbe-
Öl oder Fett verschmutzen. Kunst-
Teile und Türdichtung werden
außer
mit
stoff-
Die Hände können daran
berühren.
Page 5
5
de
• Für den Kühl-/Gefrierschrank nur die
vom Hersteller empfohlenen internen
elektrischen Komponenten
verwenden.
Allgemeine
Bestimmungen
Das Gerät eignet sich
• zum Kühlen und Gefrieren von
Lebensmitteln,
• zur Eisbereitung.
Das Gerät ist für die Verwendung im
Haushalt bestimmt.
Beim gewerblichen Einsatz gelten die
entsprechenden Normen und
Vorschriften.
Das Gerät ist funkentstört nach EURichtlinie 89/336/EEC.
Der Kältekreislauf ist auf Dichtheit geprüft.
Dieses Erzeugnis entspricht den
einschlägigen Sicherheitsbestimmungen
für Elektrogeräte (EN 60335/2/24).
Ihr neues Gerät
Detailabweichungen – insbesondere bei
Ausstattungsmerkmalen – je nach
Gerätetyp.
Bild Q
1 Eisschale
2 Temperaturwähler und Innen-
beleuchtung
3 Traggitter
4 Fleischbehälter
5 Tauwasserablaufrinne
6 Platte
7 Gemüseschale
8 Belüftungsgitter im Sockel
9 Behälter
10 große Absteller
11 Türdichtung
22 Gefrierschalter (Bild E)
A Gefrierabteil
B Kühlraum
Raumtemperatur und
Belüftung beachten
Die Klimaklasse steht auf dem
Typenschild (Bild !0). Sie gibt an,
innerhalb welcher Raumtemperaturen
das Gerät betrieben werden kann.
Klimaklasse zulässige Raum-
temperatur
SN +10 °C bis 32 °C
N
ST
T
DE.qxd 21/10/05 18:20 Page 5
+16 °C bis 32 °C
+16
+16
°C bis 38 °C
°C bis 43 °C
Page 6
6
de
Einschalten und
Temperaturwahl
Vor der ersten Inbetriebnahme den
Innenraum reinigen (siehe Reinigen).
Gerät einschalten
Temperaturwähler (Bild E) aus der
„O"-Stellung herausdrehen.
Das Gerät beginnt zu kühlen.
Sollte sich nach dem Schließen des
Gefrierabteils die Tür nicht sofort wieder
öffnen lassen, warten Sie bitte zwei bis
drei Minuten, bis sich der entstandene
Unterdruck ausgeglichen hat.
Temperatur einstellen
Die temperaturen in den beiden Räumen
können Sie zentral über den
Temperaturwähler (Bild E) einstellen.
Höhere Ziffern ergeben in beiden
Räumen tiefere Temperaturen.
Bei Temperaturwähler- Stellung „O” ist
die Kühlung abgeschaltet, von „1” an
nimmt
die Kühlung zu.
Wir empfehlen eine mittlere Einstellung
(ca. „2-3”).
Zum Eingefrieren frischer Lebensmittel
Temperaturwähler auf „3” drehen (siehe
auch „Lebensmittel gefrieren").
Bei Lagerung von
Gefriergut beachten
Sinkt die Temperatur des Raumes in
dem das Gerät steht unter + 18ºC ab, ist
der Wippschalter einzuschalten (rote
Markierung wird sichtbar) Bild (E/22).
Wenn Sie dies tun, brennt die
Kühlschrankbeleuchtung ständig mit
geminderter Leistung. Dies bewirkt, dass
die für die Langzeitlagerung erforderliche
Temperatur im Gefrierteil beibehalten wird.
Belüftung
Die Luft an der Rückwand des Geräts
erwärmt sich. Die erwärmte Luft muss
ungehindert abziehen können. Die
Kühlmaschine muss sonst mehr leisten.
Dies erhöht den Stromverbrauch.
Daher: Nie Be- und
Entlüftungsöffnungen abdecken oder
zustellen!
Nutzinhalt
Die Angaben zum Nutzinhalt finden Sie
in Ihrem Gerät auf dem Typenschild.
Gerät anschließen
Nach dem Aufstellen des Gerätes sollte
man mind.
1
/2Std. warten, bis das Gerät
in Betrieb genommen wird. Während des
Transports kann es vorkommen, dass
sich das im Verdichter enthaltene Öl im
Kältesystem verlagert.
Vor der ersten Inbetriebnahme den
Innenraum des Gerätes reinigen
(siehe Reinigen).
Die Steckdose sollte frei zugänglich sein.
Das Gerät an 220–240 V/50 Hz
Wechselstrom über eine
vorschriftsmäßig installierte Steckdose
anschließen. Die Steckdose muss mit
einer 10-A-Sicherung oder höher
abgesichert sein.
Bei Geräten, die in nicht-europäischen
Ländern betrieben werden, ist auf dem
Typschild zu überprüfen, ob die angegebene Spannung und Stromart mit
den Werten Ihres Stromnetzes übereinstimmt. Das Typschild befindet
sich im Gerät links unten. Ein
eventuell notwendiger Austausch der
Netzanschlussleitung darf nur durch
einen Fachmann erfolgen.
DE.qxd 21/10/05 18:20 Page 6
Page 7
7
de
• Öl und Fett nicht mit den Kunststoffteilen
und der Türdichtung in Berührung bringen
(diese könnten sonst porös werden).
• Im Gerät keine explosiblen Stoffe
aufbewahren.
• Hochprozentigen Alkohol nur
verschlossen, stehend lagern.
• Im Kühlraum befinden sich die
kältesten Bereiche an der Rückwand
und über der untersten Ablage.
Einordnungsbeispiel
Bild Q
Im Gefrierabteil (A),
Lebensmittel einfrieren, lagern und
Eis bereiten.
Auf den Traggittern (3),
von oben nach unten Backwaren,
fertige Speisen, Molkereiprodukte.
Im Fleischbehälter (4),
Fleisch und Wurst.
Auf der untersten Ablage (6),
Fleisch und Wurst.
In der Gemüseschale (7),
Gemüse, Obst, Salat.
In der Tür in den Behältern (9),
Tuben und kleine Dosen.
In den Abstellern (10),
große Flaschen.
Kältezonen im Kühlraum
beachten!
Durch die Luftzirkulation im Kühlraum
entstehen Zonen unterschiedlicher Kälte.
Die Zone für empfindliche Lebensmittel
ist je nach Modell, ganz unten zwischen
dem seitlichen eingeprägten Pfeil und
der darunter liegenden Glasablage
(Bild !1/1 und 2) oder zwischen den
beiden Pfeilen (Bild !2/1 und 2)
Ideal zum Lagern von Fleisch, Fisch,
Wurst, Salatmischungen usw.
Gerät ausschalten
und stillegen
Gerät ausschalten
Temperaturwähler (BildE) auf „O"Stellung drehen, damit ist die Kühlung
des gesamten Gerätes ausgeschaltet.
Gerät stillegen
Wenn das Gerät längere Zeit nicht
benutzt wird, Netzstecker ziehen, Gerät
abtauen und reinigen. Türen offen
lassen.
Lebensmittel
einordnen
Inneneinrichtung
verändern
Die Traggitter im Kühlraum können bei
Bedarf umgesetzt werden. Zum
Umsetzen Traggitter nach vorne ziehen,
absenken und an gewünschter Stelle
neu einsetzen. Bild R
Zum Lagern von Flaschen kann das
Traggitter schräg eingesetzt werden.
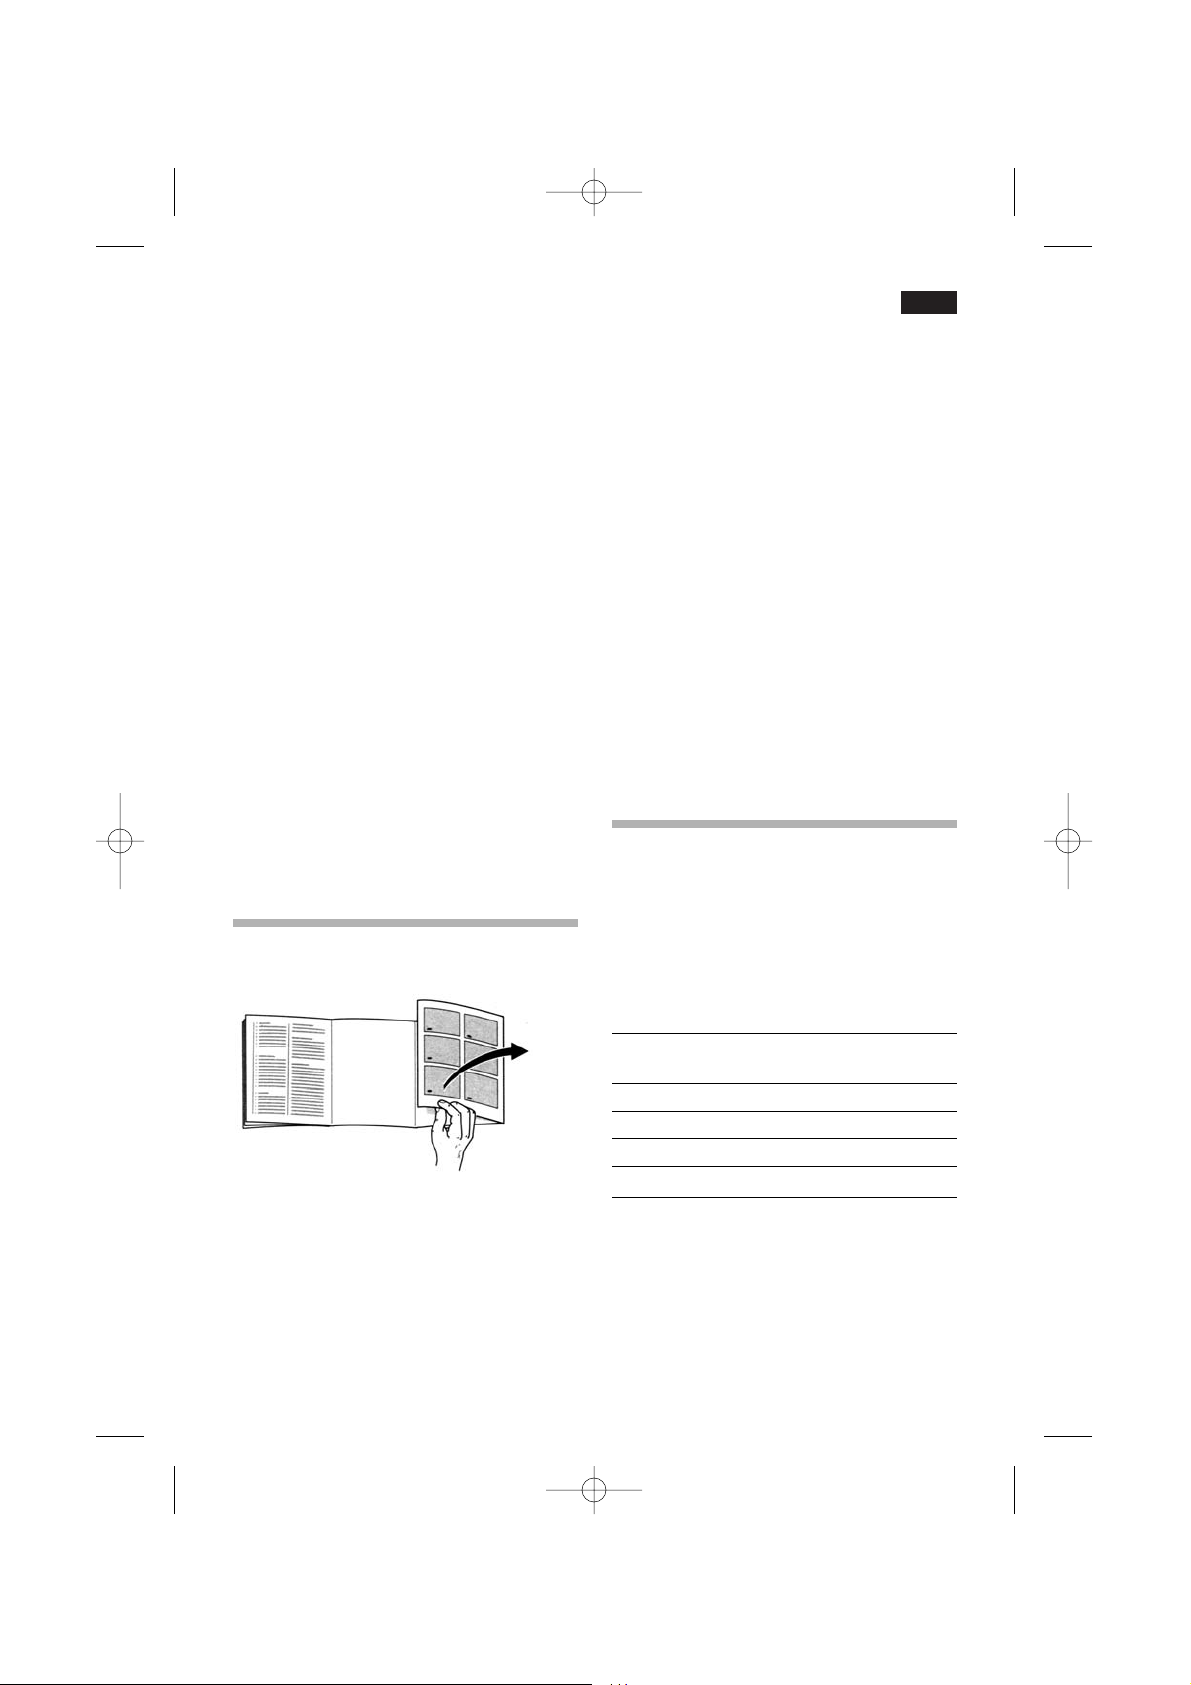
Die Absteller in der Innentür können zum
Reinigen abgenommen werden (Bild Y).
Bei dem Einordnen
beachten
• Warme Speisen und Getränke
außerhalb des Gerätes abkühlen
lassen.
• Lebensmittel möglichst verpackt oder
gut abgedeckt einordnen.
DE.qxd 21/10/05 18:20 Page 7
Page 8
8
de
Zum Verschließen eignen sich:
Gummiringe, Kunststoffklipse,
Bindfäden, kältebeständige Klebebänder
oder ähnliches. Beutel und
Schlauchfolien aus Polyäthylen können
mit einem Folienschweißgerät
verschweißt werden.
Vor dem Einlegen in das Gefrierteil, den
lnhalt der Gefrierpakete kennzeichnen
und mit dem Einlegedatum versehen.
Gefriervermögen
Angaben über das max.
Gefriervermögen nach aktueller Norm
finden Sie auf dem Typschild.
Die maximale Gefrierkapazität für
frische Lebensmittel innerhalb von 24
Stunden (die auf den Gefrierrosten
verteilt liegen) ist auf dem
Typenschild (in kg/24 Std)
angegeben. Siehe Abbildung !0.
Legen Sie die zu gefrierenden
Lebensmittel breitflächig auf den Boden
des Gefrierabteils. Achten Sie bitte
darauf, daß bereits gefrorene und frisch
einzufrierende Lebensmittel nicht
miteinander in Berührung kommen.
Temperaturwähler zum
Gefrieren einstellen und
Gefrierschalter einschalten
Beim Einlegen frischer re den
Temperaturwähler auf eine mittlere
Einstellung (ca. „3”) drehen. Bei dieser
Einstellung können bis zu 2,5 kg
Lebensmittel gefroren werden. Bei
größeren Mengen zusätzlich den
Gefrierschalter (bild E/22) betätigen
(Wippschalter drücken -rote Markierung
wird sichtbar). Ca. 24 Stunden nach dem
Einlegen der Lebensmittel ist der
Gefriervorgang beendet, der
Gefrierschalter kann wieder
ausgeschalter werden.
Lebensmittel
eingefrieren, lagern
und Eis bereiten
Beim Kauf von
Tiefkühlkost beachten
• Achten Sie auf die Verpackung, sie
sollte nicht beschädigt sein.
• Das Haltbarkeitsdatum darf nicht
überschritten sein.
• Die Temperaturanzeige von der
Verkaufstruhe sollte -18º C oder kälter
anzeigen.
• Tiefkühlkost ganz zum Schluß
einkaufen und gut eingepackt in
Zeitungspapier oder in einer
Kühltasche schnell nach Hause
transportieren und in das Gefrierabteil
legen.
Lebensmittel verpacken
Werden Lebensmittel selbst eingefroren,
nur frische einwandfreie Lebensmittel
verwenden. Die Lebensmittel luftdicht
verpacken, damit sie nicht ihren
Geschmack verlieren oder austrocknen.
Zum Verpacken geeignet sind:
Kunststoff-Folien, Schlauchfolien aus
Polyäthylen, Alu-Folien und
Gefrierdosen. Diese Produkte finden Sie
im Fachhandel.
Ungeeignet sind:
Packpapier, Pergamentpapier,
Cellophan, Müllbeutel und gebrauchte
Einkaufstüten.
Die Lebensmittel in die Verpackung
einlegen, Luft völlig herausdrücken und
Packung dicht verschließen.
DE.qxd 21/10/05 18:20 Page 8
Page 9
9
de
Andernfalls, wenn Geschmack, Geruch
und Aussehen unverändert sind, durch
Kochen, Braten oder zu einem
Fertiggericht weiter-verarbeiten und
erneut eingefrieren.
Die max.Lagerdauer nicht mehr voll nutzen.
Eis bereiten
Bild U
Stellen Sie die zu 3/4 mit Wasser
gefüllte Eisschale auf den Boden des
Gefrierabteiles. Die gefrorenen
Eiswürfel lassen sich durch Verwinden
der Eisschale leicht lösen.
Abtauen
Kühlraum
Der Kühlraum taut vollautomatisch ab.
Das Tauwasser wird in die
Tauwasserablaufrinne (Bild I/7)
aufgefangen, zur Kühlmaschine geleitet
und dort verdunstet. Ablaufrinne und
Ablaufloch (bild I/19) stets sauber
halten damit das Tauwasser ungehindert
abfließen kann.
Gefrierabteil
Das Gefrierabteil (Bild Q/A) taut nicht
automatisch ab, da die gefrorenen
Lebensmittel nicht antauen dürfen.
Die Reif- oder Eisschicht verschlechtert
die Kälteabgabe an das Gefriergut und
läßt den Stromverbrauch ansteigen.
Reifschicht abschaben
Zum Entfernen der Reifschicht einen
Reifschaber verwenden. Das
Gefrierabteil darf auf keinen Fall
beschädigt werden, deshalb keine
spitzen oder scharfkantigen
Metallgegenstände verwenden.
Beim Einlegen von
Gefriergut beachten
Bereits gefrorene Lebensmittel dürfen
nicht mit den frisch einzufrierenden
Lebensmitteln in Berührung kommen.
Bei Lagerung von
Gefriergut beachten
Sinkt die Temperatur des Raumes in
dem das Gerät steht unter +18ºC ab, ist
der Wippschalter einzuschalten (rote
Markierung wird sichtbar) Bild (E/22).
Wenn Sie dies tun, brennt die
Kühlschrankbeleuchtung ständig mit
geminderter Leistung. Dies bewirkt, dass
die für die Langzeitlagerung erforderliche
Temperatur im Gefrierteil beibehalten wird.
Lagerdauer
Um Qualitätsminderungen des
Gefriergutes zu vermeiden, ist es
wichtig, daß die zulässige Lagerdauer
nicht überschritten wird. Die Lagerdauer
richtet sich nach der Art der
Lebensmittel. Bei -18ºC können Fisch,
Wurst, fertige Speisen und Backwaren
bis zu 2 Monate, Käse, Geflügel, Fleisch
bis zu 4 Monate und Gemüse und Obst
bis zu 6 Monate gelagert werden.
Auftauen von Gefriergut
Je nach Art und Verwendungszweck
kann zwischen folgenden Möglichkeiten
gewählt werden:
Bei Raumtemperatur,
im Kühlschrank,
im elektrischen Backofen,
mit/ohne Heißluftventilator,
im Mikrowellengerät.
An- und aufgetautes Gefriergut kann
erneut eingefroren werden, wenn
Fleisch und Fisch nicht länger als einen
Tag, anderes Gefrier- gut nicht länger
als drei Tage über 3º C angestiegen ist.
DE.qxd 21/10/05 18:20 Page 9
Page 10
10
de
Eisschicht abtauen
Wenn das Gefrierabteil stark vereist ist
sollte es abgetaut werden. Wenn noch
Gefriergut im Gerät lagert, ist ca. 4
Stunden vor dem Abtauen der
Gefrierschalter Bild E/22 einzuschalten,
damit die Lebensmittel eine sehr tiefe
Temperatur erreichen. Danach die
Gefriergutschalen mit den Lebensmittleln
herausnehmen.
Gehen Sie wie folgt vor:
• Gefriergut entnehmen, in
Zeitungspapier wickeln und an einem
kühlen Ort lagern.
• Temperaturwähler (Bild Q/2) auf „O”
drehen oder Netzstecker ziehen. arauf
achten, daß kein Tauwasser in den
Temperaturwähler gelangt.
• Tür offen lassen, Tauwasser mit Tuch
oder Schwamm aufwischen.
• Gefrierabteil trockenreiben, Gerät
wieder inschalten und Gefriergut
einlegen.
Abtauhilfen
Vorsicht bei Verwendung von
Abtausprays, diese können explosible
Gase bilden, kunststoffschädigende
Lösungs- oder Treibmittel enthalten oder
gesundheitschädlich sein. Achten Sie
auf die Herstellerangaben.
Reinigen
Vor dem Reinigen grundsätzlich Netzstecker ziehen bzw. Sicherung
abschalten oder herausschrauben.
Zur Reinigung des gesamten Gerätes
außer der Türdichtung eignet sich
lauwarmes Wasser mit etwas Spülmittel.
Ungeeignet sind sand- oder säurehaltige
Putzmittel und Lösungsmittel.
Die Türdichtung (Bild Q/11) nur mit
klarem Wasser abwischen und danach
gründlich trockenreiben.
Darauf achten, daß kein
Reinigungswasser in den
Temperaturwähler (Bild Q/2) gelangt.
Ablaufrinne (Bild I/7) und Ablaufloch
(Bild I/19) im Kühlraum häufiger
reinigen, damit das Tauwasser
ungehindert ablaufen kann.
Ablauföffnungen mit Stäbchen o.ä.
durchstoßen. Darauf achten, daß
möglichst kein Reinigungswasser durch
die Ablauföffnung in die
Verdunstungsschale läuft.
Die Außenwände können zusätzlich mit
einem Lackpflegemittel behandelt
werden. Die Tür dabei geschlossen
lassen, damit das Lackpflegemittel nicht
an die inneren Kunststoffteile gelangen
kann.
Energiespartips
• Gerät in einem kühlen gut belüftbaren
Raum aufstellen, vor direkter
Sonnenbestrahlung schützen und
nicht im Bereich einer Wärmequelle
(Heizkörper etc) anordnen.
• Warme Speisen erst nach dem
Abkühlen in das Gerät geben.
• Zum Auftauen Gefrierwaren in den
Kühlraum legen. Sie nutzen damit die
kälte, die in der Gefrierware steckt, zu
Kühlung der Lebensmittel im
Kühlraum.
• Gefrierabteil bei Eisbildung abtauen.
Eine dicke Eisschicht verschlechtert
die Kälteabgabe an das Gefriergut un
läßt den Stromverbrauch ansteigen.
• Zum Be- oder Entladen, Gerätetür so
kurz wie möglich öffnen.
DE.qxd 21/10/05 18:20 Page 10
Page 11
11
de
Mögliche Ursachen
- Entweder steht das Gerät nicht fest bzw.
eben oder ein Fremdkörper ist im Bereich
der Kühlmaschine eingeklemmt.
- Ein Teil an der Rückwand kann nicht frei
schwingen und berührt das Gerät oder die
Wand, biegen Sie dieses Teil vorsichtig weg.
- Die Glühlampe ist defekt. Netzstecker
ziehen, Abdeckung Bild O abnehmen.
Glühlampe max. 15W, 220-240V, Sockel E
14 auswechseln.
- Der Lichtschalter (Bild T/1) klemmt. Prüfen
Sie, ob er sich bewegen läßt. Wenn nicht,
rufen Sie bitte den Kundendienst.
- Der Temperaturwähler (Bild O/3) steht „O”.
- Temperaturwähler ist zu tief eingestellt.
- Der Geifrierschalter Bild E/22 wurde beim
Einlegen frischer Lebensmittel nicht
eingeschaltet.
- Tür wurde häufig geöffnet.
- Es wurden große Mengen Lebensmittel im
Kühlraum frisch eingelagert.
- Zu starke Reifschicht im Gefrierabteil.
- Die Be- und Entlüftung ist abgedeckt.
- Ein Fremdkörper ist zwischen Kühlmaschine
und der Wand eingeklemmt.
- Stecker ist lose in der Steckdose,
- Sicherung hat ausgelöst,
- Temperaturwähler (Bild Q/2) steht auf „O".
Störungen
Bei ungewöhnlichen Geräuschen:
Wenn die Kühlraum-Beleuchtung
nicht funktioniert:
Im Kühlraum zu kalt:
Kühlleistung läßt nach:
Keine Kühlleistung:
Kleine Störungen selbst beheben
Bevor Sie den Kundendienst rufen, prüfen Sie bitte, ob Sie aufgrund der
nachfolgenden Aufstellung die Störung selbst beheben können.
Bei Beratungsfällen müssen Sie, auch während der Garantiezeit, die vollen
Kosten für den Monteureinsatz übernehmen.
DE.qxd 21/10/05 18:20 Page 11
Page 12

12
de
Kleine Störungen
selbst beheben
Kann die Störung anhand der zuvor
genannten Hinweise nicht beseitigt
werden, rufen Sie bitte den
Kundendienst.
Führen Sie in diesem Fall keine weiteren
Arbeiten, vor allem an den elektrischen
Teilen des Gerätes, selbst aus.
Öffnen Sie die Tür nicht unnötig oft,
damit Kälteverlust vermieden wird.
Kundendienst
Typenschild
Abbildung !0
Wenn Sie sich an den zuständigen
Kundendienst wenden, so geben Sie
bitte stets die Gerätenummer (23) und
die Herstellnummer (24) an. Beide
Angaben finden Sie schwarz eingerahmt
auf dem Typenschild.
Das Typenschild selber befindet sich im
Inneren des Kühlschranks und zwar
links von den Obst- und
Gemüseschalen.
Die Anschrift und Telefonnummer lhres
zuständigen Kundendienstes finden Sie
in unserer Kundendienstaufstellung oder
aber im örtlichen Telefonbuch.
DE.qxd 21/10/05 18:20 Page 12
Page 13
13
en
Information
concerning disposal
Disposal of your old
appliance
When replacing your old appliance with
a new one, please comply with the
following:
Old appliances are not worthless
rubbish! Valuable raw materials can be
reclaimed by recycling old appliances.
Render your old appliance unusable:
1. Pull out the mains plug.
2. Cut off the power cord and discard
with the mains plug.
3. Remove the lock to prevent
children from locking themselves in
the refrigerator and suffocating.
Refrigerators contain refrigerants and
the insulation contains gases.
Refrigerant and gases must be disposed
of properly. Ensure that tubing of the
refrigerant circuit is not damaged prior
to proper disposal.
Disposal of packaging
Warning:
Keep children away from packaging
materials. Danger of suffocation from
folding cartons and plastic film!
You received your new appliance in
a protective shipping carton. All
packaging materials are environmentally
friendly and recyclable. Please
contribute to a better environment by
disposing of packaging materials in an
environmentally-friendly manner.
Please ask your dealer or inquire at
your local authority about current means
of disposal.
This appliance is labelled in
accordance with European Directive
2002/96/EG concerning used electrical
and electronic appliances (waste
electrical and electronic equipment WEEE). The guideline determines the
framework for the return and recycling of
used appliances as applicable
throughout the EU.
Safety information
Before you switch ON the
appliance
Please read the operating and
installation instructions carefully. They
contain important information on how to
install, use and maintain the appliance.
The manufacturer is not liable if you fail
to comply with the instructions and
warnings. Please retain these operating
and installation instructions as they may
be required by a subsequent user of the
appliance.
Warnings
• This appliance contains a small
quantity of environmentally-friendly but
flammable R600a refrigerant. Ensure
that the tubing of the refrigerant circuit
is not damaged during transportation
and installation. Leaking refrigerant
may cause eye injuries or ignite.
If refrigerant is escaping, ensure that:
– there are no naked flames or ignition
sources in the vicinity.
– Pull out the mains plug and ventilate
the room for several minutes.
• The more refrigerant an appliance
contains, the larger the room must be.
Leaking refrigerant can form a flammable gas-air mixture in rooms which
are too small.
EN.qxd 21/10/05 18:21 Page 13
Page 14
14
en
• The room must be at least 1 m3per 8
g of refrigerant. The amount of
refrigerant in your appliance is
indicated on the rating plate inside the
appliance.
• In an emergency
– Rinse eyes and call a doctor.
– Keep ignition sources and naked
flames away from the appliance.
– Pull out the mains plug and ventilate
the room for several minutes.
• In the following cases pull out the
mains plug or switch off the fuse.
– Defrosting
– Cleaning
Do not pull out the mains plug by
tugging the cable.
• Do not switch on damaged or
defective appliances. If in doubt,
contact your dealer.
• Never use electrical appliances inside
the refrigerator (e.g. heater, electric
ice maker, etc.).
• Do not store products which contain
flammable propellants (e.g. spray
cans) or explosive substances in the
appliance – Risk of explosion!
• Do not allow children to play with the
appliance!
• NEVER use a steam cleaner to
defrost or clean the appliance. Steam
may come into contact with electrical
components and cause a short-circuit
or an electric shock.
When using the appliance, comply
with the following:
• Never cover or block the ventilation
openings!
• Repairs may be performed by
qualified technicians only. Improper
repairs may put the user in
considerable danger.
• Do not stand or support yourself on
the base, drawers or doors, etc.
• Bottles which contain a high percentage of alcohol must be sealed and
stored in an upright position.
• If the appliance features a lock, keep
the key out of the reach of children.
• Keep plastic parts and the door seal
free of oil and grease. Otherwise,
porous.
• Do not store bottled or canned drinks
(especially carbonated drinks) in the
freezer compartment. Bottles and
cans will explode.
• Do not put an ice lolly or ice cube
directly from the freezer compartment
into your mouth. Risk of burns from
very low temperatures!
•
Never touch frozen food with wet
food!
• Do not scrape off hoarfrost or stuck
frozen food with a knife or pointed
object. You could damage the
refrigerant tubing. Leaking refrigerant
may ignite or cause eye injuries.
• Use only agents recommended
by the manufacturer to accelerate
the defrosting process.
Important
• Do not block the ventilation grilles on
the refrigerator casing.
• Do not use mechanical devices or any
other method to accelerate the
thawing-out process, other than those
recommended by the manufacturer.
•
Do not damage the refrigeration
circuit.
• Always use the internal electrical
components recommended by the
manufacturer for your
refrigerator/freezer.
EN.qxd 21/10/05 18:21 Page 14
and door seal will become
parts
Your hands could freeze to the
hands.
Page 15
15
en
General requirements
The appliance is suitable
• for refrigerating and freezing food,
• for making ice.
The appliance is designed for domestic
use.
If the appliance is used industrially, the
appropriate standards and regulations
shall apply.
The appliance has been interferencesuppressed in compliance with EU
Directive 89/336/EEC.
The refrigerant circuit has been tested
for leaks.
This product complies with the relevant
safety regulations for electrical
appliances (EN 60335/2/24).
Your new appliance
Details may differ according to the
appliance type, especially with respect
to features.
Fig. Q
1 Ice-cube tray
2 Temperature selector/inner light
3 Racks
4 Meat container
5 Discharge gutter for thaw-water
6 Shelf
7 Vegetable bin
8 Kickstrip with ventilation outlet
9 Container
10 Big shelf
11 Door seal
22 Freezer switch (Fig. E)
A Deep-freezing compartment
B Refrigerator
Observe ambient
temperature and
ventilation
The climatic class can be found on the
rating plate (Fig. !0) and indicates the
ambient temperatures at which the
appliance can be operated.
Climatic class Permitted ambient
temperature
SN +10 °C to 32 °C
N +16 °C to 32 °C
ST
T
Ventilation
The air on the rear panel of the
appliance heats up. The warm air must
be able to escape. Otherwise, the
refrigerator must work harder. This will
increase the power consumption.
Therefore: Never cover or block
ventilation openings!
EN.qxd 21/10/05 18:21 Page 15
°C to 38 °C
+16
°C to 43 °C
+16
Page 16
16
en
Usable capacity
Information on the usable capacity can
be found inside your appliance on the
rating plate.
Connecting the
appliance
After installing the appliance, wait at
least
1
/2hour until the appliance starts
up. During transportation the oil in the
compressor may have flowed into the
refrigeration system.
Before switching on the appliance for
the first time, clean the interior (see
Cleaning).
The socket should be easily accessible.
Connect the appliance to 220–240 V/
50 Hz alternating current via a correctly
installed earthed socket. The socket
must be fused with a 10 A fuse or
higher.
If the appliance is to be operated in
a non-European country, check
on the rating plate whether the
indicated voltage and current type
correspond to the values of your
mains supply. The rating plate is
located in the appliance at the bottom
left-hand side. The mains connection
cable may be replaced by an
electrician only.
Turning on and
temperature selection
Clean the inside of the appliance
thoroughly, before using the first time
(see cleaning).
Turning on
Turn temperature selector (figure E)
out of the position “O”.
The refrigerating process begins.
Should the door of the freezer
compartment refuse to come open
shortly after having closed it, please wait
for two or three minutes for the suction
produced, when the door was first
opened, to release.
Temperature selection
Use the temperature selector (Figure E)
to adjust the temperature of both freezer
and refrigerating compartments.
Observe the high figures yield low
degrees of temperature.
When the temperature selector is placed
at setting “O” the refrigerating process is
turned off.
From setting “1” onwards it starts and
increases.
We suggest a medium temperature
setting (approximately “2-3”).
To freeze foods, rotate the temperature
control to “3” (see also “Freezing”).
Observe the following for
the storage of frozen
food:
If the temperature of the room where the
appliance has been placed drops below
+18ºC the freezer switch should be
connected. A red mark will indicate it is
on (figure E/22). On connecting the
switch, the inner light will remain on at
reduced power. This ensures that the
temperature required in the freezer
compartment for long-life storage of food
is maintained.
EN.qxd 21/10/05 18:21 Page 16
Page 17
17
en
Switching-off and
setting out of use
Switching-off
Turn the temperature selector (Figure E)
to the setting “O”.
The refrigerating process stops for the
whole appliance.
Setting out of use
If the appliance is set out of use for a
long period of time, unplug, allow to
defrost and clean. Leave the door of the
freezer compartment and appliance's
door open.
Arranging food
How to rearrange the
inner fittings
The shelf racks in the refrigerator area
may be adjusted to different levels. To
adjust, pull rack forward, push it down
and reinstall at the desired position.
(Fig. R).
The containers on the inside of the door
may be taken out for cleaning (Fig. Y).
Please observe the
following when arranging
food inside the appliance:
• Allow warm food or beverages to cool
down before placing inside the
appliance.
• Wrap or cover food well before placing
inside the appliance.
• Oil or fat should not be allowed to
come in contact with the plastic parts
of the appliance or with the door seal
(these are materials which tend to
become easily porous).
• Do not store explosive substances
inside the appliance.
• Keep high-proof alcoholic beverages
in air-tight bottles or jars and store in
upright position.
• The coldest areas in the refrigerator
are the rear wall and the area around
the bottom shelf.
Example of arrangement
Figure Q
In the freezer compartment (A):
freezing of fresh products, storage of
deep-frozen goods and making ice
cubes.
In the refrigerator (B):
On racks (3), from top to bottom:
pastries, ready-cooked meals,
dairy products.
In the meat containers (4)
meat and cold slices.
On the shelf (6):
meat, sausages and cold slices.
In the vegetable bin (7):
vegetables, lettuce and fruit.
In the door compartment (9):
tubes and small tins.
On the large shelf (10):
large bottles.
EN.qxd 21/10/05 18:21 Page 17
Page 18
18
en
Note refrigeration zones
in the refrigerator
compartment!
The air circulation in the refrigerator
compartment means that there are
zones at different temperatures.
Depending on the model, the zone for
sensitive foods is right at the bottom
between the arrow on the side and the
glass surface below (fig. !1/1 and 2) or
between the two arrows (fig. !2/1 and 2).
Ideal for storing meat, fish, sausage and
salad mixtures, etc.
Freezing fresh
products storing
frozen food and
making ice
Observe the following
when
purchasing deep-frozen food:
• Inspect the package and ensure that it
is perfect conditions.
• Check the expiry date stamped on the
package; make sure it has not run out.
• Check the thermometer in the freezer
of the store where you purchase your
goods; it should indicate a
temperature lower than -18ºC.
• When shopping, ensure that the deepfrozen products are the last items to
be purchased; wrap them up in
newspaper or place in a insulating bag
and take them home at once, place in
the home freeze right away.
Wrapping-up
If home freezing, ensure that the
products of your choice are absolutely
fresh and in perfect condition. Pack food
airtight so that it does not lose its taste
or dehydrate.
Suitable wrapping material:
Plastic film, polyethylene bags, alu-foil
and freezing containers.
All these products are available at your
local dealers and most large
supermarkets.
Unsuitable wrapping material:
wrapping paper, wax-coated paper,
butcher's paper, cellophane, rubbish
bags or used carrier bags.
Wrap-up food, press down on parcel to
remove all air and seal airtight.
Suitable sealing material:
rubber bands, plastic clips, string, waterproof adhesive tape or similar. Plastic
and polyethylen bags may be heatsealed with an appropriate machine.
Label package indicating contents and
date of freezing before storing in the
freezer compartment.
Freezing capacity
Information about the max. freezing
capacity according to current
standards can be found on the rating
plate.
The maximum freezing capacity for
fresh food in 24 h (distributed on the
freezer racks) is indicated on the
characteristics plate (in Kg/24h), see
figure !!0.
Place the products flat (widest side
down) on the bottom of the freezer
compartment. Ensure that the fresh food
to be frozen does not come in contact
with any frozen products stored in the
appliance.
EN.qxd 21/10/05 18:21 Page 18
Page 19
19
en
Adjust temperature
selector to freezing and
switch on freezing
process
Turn temperature selector to an average
temperature setting (approx. “3”)
whenever fresh products are put in to
freeze.
This temperature setting is sufficient for
freezing up to 2,5 kg of food. For larger
amounts you should additionally actuate
the freezing switch (Fig. E/22).
(Press the rocker switch -red marking
appears).
If takes approximately 24 hours for the
freezing process to reach full completion;
once the food is thoroughly frozen, you
may disengege the freezing switch.
Please observe following
when putting fresh food
into the freezer
compartment:
Please carefully ensure that freshly
freezing food does not come into
contact with food which is already
frozen.
Observe the following
tips for better storage of
frozen food:
If the temperature of the room where the
appliance has been placed drops below
+18ºC the freezer switch should be
connected. A red mark will indicate it is
on (figure E/22). On connecting the
switch, the inner light will remain on at
reduced power. This ensures that the
temperature required in the freezer
compartment for long-life storage of
food is maintained.
Storage life
To avoid quality loss, it is important not
to be exceed the admissible storage life
assigned to each product. The length of
admissible storage varies from product
to product. Fish, cold slices, readycooked meals bread and pastries will
keep out to two months at a temperature
of -18ºC. At the same degree of
temperature you may keep meat, poultry
and cheese for up to four months and
fruit and vegetables for up to six months.
Defrosting frozen
products
Depending on the type of food and the
use intended for it, you may choose
among any of the following defrosting
methods:
- at ambient temperature,
- in the refrigerator,
- in an electric oven.
- with/without fanheater,
- in a microwave oven.
You may refreeze food that has partially
or totally defrosted provided that:
- in the case of meat and fish, these
products were not kept for longer than
a day at a temperature of 3ºC or
higher;
- in the case of other products, these
were not kept for longer than three
days at a temperature of 3ºC or
higher.
Otherwise, check food for smell,
appearance and flavour, if these have
remained unaltered, boil, fry, roast or
cook food to some kind of ready meal
and refreeze. Observe that the
maximum admissible storage life in this
case is shorter than average.
EN.qxd 21/10/05 18:21 Page 19
Page 20
20
en
Making ice
Figure U
Fill ice tray 3/4 full with water and place
on the bottom of the freezer
compartment. Ice cubes will be easier to
remove if the tray is given a gentle twist.
Defrosting
Refrigerator
The refrigerator defrosts automatically.
The thaw-water collects in the discharge
gutter (figure I/7) and is then
conducted to the refrigerating unit to
evaporate. Ensure that the discharge
gutter and the discharge outlet
(figure I/19) are clean at all times, so
that water may drain unhindered.
Freezer compartment
For safety reasons, the freezer
compartment (Figure Q/A) does not
defrost automatically, since the products
stored in this area, are not supposed to
accidentally thaw out. Intensive frost
and ice build-up adversely influence the
cold transmission to the frozen products
and cause the rate of energy
consumption to increase.
Scrape off frost build-ups
To remove frost build-ups you may use
the standard frost scrapers available at
most local dealers and large
supermarkets. Ensure that the freezer
compartment is not damaged when frost
is scraped. Never use sharp or pointed
items or metal utensils to remove frost.
Allow ice coats to thaw out
If a thick ice coat has built up inside the
freezer compartment, it should be
allowed to thaw out.
If there are still frozen products in the
freezer, swicht on the freezer switch
(Fig. E/22) about 4 hours before
defrosting so that the food is once again
deep frozen.
Observe the following procedure:
• Remove frozen products, wrap up well
in newspaper and store in a cool
place.
• Turn the temperature selector
(Figure Q/2) to setting "O" or unplug.
Do not allow thaw water to run into
the temperature selector.
• Leave door open and wipe-up thaw
water with a cloth or sponge.
• Rub freezer compartment dry, switch
appliance on once more and reinsert
frozen products.
Defrosting aids
Be extremely careful when using
defrosting sprays. These sprays may
cause the formation of explosive gases,
contain propellants or substances which
may be a major health hazzard and
even damage the plastic parts of the
appliance.
When making use of these sprays, read
the manufacturer's instructions most
carefully and adhere strictly to the given
indications.
EN.qxd 21/10/05 18:21 Page 20
Page 21

21
en
Cleaning
Before cleaning, make it a rule to
unplug the appliance and/or
disengage the fuse
Use luke-warm water with a little
desinfectant and washing-up liquid to
clean the entire appliance, except for the
door seal. Never use sand, abrasive
cleansers or acids, e.g. chemical
solvents.
Clean the door seal (Figure Q/11) with
clear water and dry thoroughly
afterwards.
Do not allow cleaning water to get into
the temperature selector.
The discharge gutter (Figure I/7) and
the discharge outlet (Figure I/19)
should be cleaned more frequently to
ensure that thawwater can drain
unhindered. Pierce the discharge outlet
with a toothpick or similar object to get
it clean. Try to prevent cleaning water
from getting into discharge outlet and
running through to the evaporating plate.
In you so wish, you may additionally use
a standard furniture polish to clean the
outer cabinet panels. Ensure that the
door of the appliance is closed while
doing this, to prevent the polish from
getting to the door seal or to the plastic
parts inside the appliance.
Energy saving tips
• Install appliance in a cool and well
ventilated room, do not expose to
direct sunlight and keep away from
heat sources (radiators, cookers etc.).
• Allow warm food and beverages to
cool down before storing in the
appliance.
• When defrosting, place the deepfrozen goods inside the refrigerator.
The cold loss from the frozen goods
can be effectively used-up to assist
the cooling process inside the
refrigerator.
• Allow freezer compartment to thaw out
when ice has built-up. A thick coat of
ice adversely affects the cold
transmission to the frozen goods and
causes the rate of energy
consumption to increase.
• When putting in or taking out food,
avoid keeping the door of the
appliance open for too long.
EN.qxd 21/10/05 18:21 Page 21
Page 22
22
en
Problem
Unusual noises:
The inner light does not
work:
The temperature inside
the refrigerator is too
cold:
Cooling output
deteriorates:
Total lack of cooling:
Small problems for self-help
Before calling the service engineer, check the following points and see if you
can solve the problem yourself.
If the service engineer is simply called-in for advice, i.e. if he finds no real fault
with the appliance when he visits, you will be charged the full cost of service
time, even before the guarantee period has run out.
Possible cause
- The appliance may not be standing level or some
kind of object is caught near the refrigerating unit.
- A part on the rear wall of the appliance cannot turn
freely and rubs against the appliance or against the
wall.
In this case, bend part carefully away.
- The bulb has burnt out. Pull plug out of supply
socket. Remove screen (Fig. O) then remove bulb
and exchange for a new one, maximum 15W, 220240 V, E 14 base.
- The light switch sitcks (Figure T/1). Try to get the
switch to move. If it doesn't budge call customer
service.
- The temperature selector (figureO/3) is on setting
“O”.
- Temperature setting dial is set at a too low position.
- Fresh food was put into freeze without switching on
the super-freeze (Fig. E/22).
- The door was opened too often.
- A large amount of food was placed in the
refrigerator.
- A thick layer of frost has built up inside the freezer.
- The relief outlet and the ventilation grid are covered.
- Some kind of object is caught between the
refrigerating unit and the wall.
- Plug does not fit properly into socket.
- The fuse has disengaged.
- Temperature selector (figure Q/2) is on setting “O”.
EN.qxd 21/10/05 18:21 Page 22
Page 23
23
en
Small problems for
self-help
If you have not managed to solve the
problem with help of the above
mentioned tips, call customer service.
Do not insist on solving the problem
yourself. Above all, refrain from working
on the electrical parts.
Try not to open the door of the
appliance unnecessarily to avoid cooling
loss.
After-Sales Service
Figure !0
When calling the Technical Assistance
Service, please quote the number the
appliance (23) and the serial number
(24). Both these numbers are to be
found set out on the Specifications Plate
in the area outlined in black.
The Specifications Plate is situated at
the bottom left-hand side of the
refrigerator compartment near the
vegetable drawer.
You will find the address and telephone
number of your nearest Technical
Service Agent on the list of Service
Centres, or in your local telephone
directory.
EN.qxd 21/10/05 18:21 Page 23
Page 24
fr
Conseils pour la mise
au rebut
Mise au rebut de
l’ancien appareil
A respecter lorsque votre nouvel
appareil en remplace un ancien.
Les appareils usagés ne sont pas des
déchets sans valeur. Leur élimination
dans le respect de l’environnement
permet d’en récupérer de précieuses
matières premières.
Rendez l’ancien appareil inutilisable :
1. Débranchez la fiche mâle de la prise
de courant.
2. Sectionnez le cordon d’alimentation
puis enlevez-le avec la fiche mâle.
3. Démontez la serrure. Vous
empêcherez ainsi que des enfants
ne s’enferment dans l’appareil en
jouant et risquent leur vie.
Les appareils frigorifiques contiennent
des fluides frigorigènes et des gaz
isolants qui nécessitent une mise au
rebut adéquate. Veillez à ce que les
tuyaux du circuit frigorifique de votre
appareil ne soient pas endommagés
jusqu’à son élimination dans les règles
de l’art. Jusqu’à l’enlèvement de
l’appareil, veillez bien à ce que son
circuit frigorifique ne soit
pas endommagé.
Mise au rebut de
l’emballage
Attention :
Ne permettez pas aux enfants de
jouer avec les emballages et ses
pièces constitutives. Ils risquent de
s’étouffer avec les cartons pliants et
les feuilles de plastique.
Pour vous parvenir, votre nouvel
appareil a été conditionné dans un
emballage de protection. Tous les
matériaux qui le constituent sont
compatibles avec l’environnement et
recyclables. Aidez-nous à recycler
l’emballage en respectant
l’environnement.
Pour savoir comment vous débarrasser
de l’emballage, veuillez consulter votre
revendeur ou les services administratifs
de votre mairie.
Cet appareil est marqué selon la
directive européenne 2002/96/CE
relative aux appareils électriques et
électroniques usagés (waste electrical
and electronic equipment - WEEE).
La directive définit le cadre pour une
reprise et une récupération des
appareils usagés applicables dans les
pays de la CE.
Consignes
de sécurité
Avant de mettre l’appareil
en service
Veuillez lire attentivement et entièrement
les informations figurant dans les notices
d’utilisation et de montage.
Elle contiennent des remarques
importantes concernant l’installation,
l’utilisation et l’entretien de l’appareil.
Le fabricant décline toute responsabilité
si les consignes et mises en garde
contenues dans la notice d’utilisation ne
sont pas respectées. Conservez les
notices d’utilisation et de montage car
elles pourront servir ultérieurement si
l’appareil change de propriétaire.
FR.qxd 21/10/05 18:22 Page 26
Page 25
fr
Attention :
• Cet appareil contient une petite
quantité d’un fluide réfrigérant
écologique mais inflammable, le R
600a. Pendant le transport et la mise
en place de l’appareil, veillez à ne pas
endommager les tuyauteries du circuit
frigorifique. Si le fluide réfrigérant jaillit,
il peut provoquer des lésions oculaires
ou s’enflammer. Si du fluide réfrigérant
fuit, veuillez respecter les consignes
suivantes :
– Il ne doit y avoir aucune flamme
nue ni de source d’inflammation
à proximité du point de fuite.
– Débranchez l’appareil, aérez à fond
la pièce pendant quelques minutes.
• Plus l’appareil contient du fluide
réfrigérant et plus grande doit être la
pièce dans laquelle il se trouve. Dans
les pièces trop petites, un mélange
gaz-air inflammable peut se former en
cas de fuite.
• Comptez 1 m
3
de volume minimum de
la pièce pour 8g de fluide réfrigérant.
La quantité de fluide présente dans
l’appareil est indiquée sur la plaque
signalétique située à l’intérieur de ce
dernier.
• En cas d’urgence
– En cas de contact avec les yeux,
rincez-les abondamment et rendezvous chez un médecin.
– De l’appareil, éloignez toute source
d’étincelles et de flammes nues.
– Débranchez la fiche mâle de la prise
de courant. Aérez bien la pièce
pendant quelques minutes.
• Dans les cas suivants, débranchez la
fiche mâle de la prise de courant ou
défaites le fusible / coupez le
disjoncteur :
– Si vous dégivrez l’appareil.
– Si vous nettoyez l’appareil.
Pour débrancher l’appareil, tirez sur la
fiche mâle et non pas sur son cordon.
• Ne mettez pas en service un appareil
endommagé. Dans le doute,
renseignez-vous auprès du revendeur.
• N’utilisez pas d’appareils électriques à
l’intérieur de l’appareil (par ex.
appareils de chauffage, machine à
glaçons, etc.).
• Ne stockez dans l’appareil ni produits
contenant des gaz propulseurs
inflammables (par ex. bombes
aérosols) ni produits explosifs –
Risque d’explosion !
• L’appareil n’est pas un jouet, éloignez
les enfants.
• Ne dégivrez ni ne nettoyez jamais
l’appareil avec un nettoyeur à vapeur.
La vapeur pourrait atteindre des
pièces électroconductrices et
provoquer un court-circuit ou vous
faire électrocuter.
Consignes d’utilisation à respecter
• Pour cette raison, ne recouvrez et
n’obstruez en aucun cas les orifices
d’aération.
• Les réparations sont réservées à des
spécialistes. Des réparations
inexpertes s’accompagnent de risques
considérables pour l’utilisateur.
• Ne vous servez pas des socles,
clayettes et portes comme
marchepieds ou pour vous appuyer.
• Stockez les boissons fortement
alcoolisées en position verticale dans
des récipients bien fermés.
• Si l’appareil est équipé d’une serrure :
rangez la clé hors de portée des
enfants.
• L’huile et la graisse ne doivent pas
entrer en contact avec les parties en
matières plastiques et le joint de porte.
(ces derniers pourraient sinon devenir
poreux).
FR.qxd 21/10/05 18:22 Page 27
Page 26
fr
• Dans le compartiment congélateur, ne
stockez pas de boissons, gazeuses en
particulier, en bouteilles ou en boîtes
car elles éclateraient.
• Ne portez pas directement à la bouche
les esquimaux ou les glaçons qui
sortent du compartiment congélateur
(risque de brûlures dû à la
température très basse).
• Ne touchez pas les aliments congelés
avec les mains mouillées car elles
risqueraient de rester collées.
• Ne tentez jamais de racler le givre ou
la glace avec un couteau. Vous
risqueriez d’endommager les tuyaux
de fluide réfrigérant. Ce fluide, en
fuyant, pourrait s’enflammer et vous
blesser aux yeux.
• Pour accélérer le dégivrage, n’utilisez
que les moyens recommandés par le
fabricant.
Mises en garde
• Faites en sorte de ne pas obstruer les
grilles de ventilation de la structure du
réfrigérateur
• N'utilisez pas de dispositifs
mécaniques ni tout autre moyen
d'accélération du processus de
décongélation différent de ceux
recommandés par le fabricant.
• Faites en sorte de ne pas
endommager le circuit de réfrigération.
• Pour le réfrigérateur/congélateur,
utilisez toujours le type de composants
électriques internes recommandé par
le fabricant.
Dispositions générales
L’appareil convient pour
• Réfrigérer et congeler des aliments.
• Préparer des glaçons.
Cet appareil est destiné à un usage
domestique.
Si l’appareil sert à des fins
professionnelles, les normes et
prescriptions correspondantes
s’appliqueront.
L’appareil a été antiparasité
conformément à la directive
UE 89/336/CEE.
Le circuit frigorifique a subi un contrôle
d’étanchéité.
Ce produit est conforme aux dispositions
de sécurité applicables aux appareils
électriques (EN 60335/2/24).
FR.qxd 21/10/05 18:22 Page 28
Page 27
fr
Votre nouvel appareil
Selon le modèle, votre appareil peut
présenter des détails différents en
particulier quant à son équipement.
Fig. Q
1 bac à glaçons
2 thermostat et éclairage intérieur
3 clayettes
4 boites à viande
5 goulotte d'ecoulement de l'eau de
degivrage
6 plaque
7 bac à légumes
8 grille d'aération dans le socle
9 balconets
10 porte-bouteilles
11 joint de porte
22 interrupteur de congélation
(Fig. E)
A compartiment congélateur
B compartiment de réfrigération
Contrôler la
température
ambiante et l’aération
La catégorie climatique de l’appareil
figure sur sa plaque signalétique
(Fig. !0). Elle indique les températures
ambiantes dans lesquelles l’appareil
peut fonctionner.
Catégorie climatique Température
ambiante
admissible
SN +10 °C à 32 °C
N
ST
T
Aération
L’air entrant en contact avec la paroi
arrière de l’appareil se réchauffe. Cet air
chaud doit pouvoir s’échapper sans
obstacle. S’il ne le peut pas, le groupe
frigorifique doit fonctionner plus longtemps, ce qui augmente la
consommation de courant.
Pour cette raison, ne recouvrez ni
n’obstruez jamais les orifices d’aération
de l’appareil.
Contenance utile
Vous trouverez les indications relatives à
la contenance utile sur la plaque
signalétique de votre appareil.
FR.qxd 21/10/05 18:22 Page 29
+16 °C à 32 °C
°C à 38 °C
+16
°C à 43 °C
+16
Page 28
fr
Branchement
de l’appareil
Après l’installation de l’appareil en
position verticale, attendez au moins une
demi-heure avant de le mettre en
service. Il peut en effet arriver, pendant
le transport, que l’huile présente dans le
compresseur se déplace vers le circuit
frigorifique.
Avant la première mise en service,
nettoyez le compartiment intérieur de
l’appareil (voir Nettoyage).
La prise femelle doit être librement
accessible. Branchez la fiche mâle de
l’appareil dans une prise secteur en
220–240 V / 50 Hz, réglementairement
reliée à la terre. Cette prise doit être
protégée par un fusible supportant un
ampérage de 10 A minimum.
Sur les appareils destinés aux pays
non européens, vérifiez si la tension
de branchement et le type de courant
spécifiés sur la plaque signalétique
concordent bien avec ceux offerts par
le secteur du pays concerné.
La plaque signalétique se trouve en
bas à gauche dans l’appareil. S’il faut
changer le cordon d’alimentation
secteur, seul un spécialiste pourra
réaliser cette opération.
Mise en service et
réglage de la
température
Avant la première mise en service,
nettoyez l’intérieur (voir nettoyage).
Mise en service de
l’appareil
Tournez le sélecteur de température
(Fig. E) qui se trouve sur «0».
L’appareil se met en marche.
Remarques:
Lorsque le groupe frigorifique
fonctionne, des perles d’eau ou une
couche de givre se forment sur la paroi
arrière de l’appareil. Ceci est normal. Le
dégivrage s’effectue de façon
entièrement automatique, il est donc
inutile de racler le givre ou d’essuyer
l’eau. L’eau de dégivrage s’écoule a
travers le tuyau d’écoulement (Fig. I/7)
dans un bac situé à l’arrière de
l’appareil oú elle s’évapore.
Aprés la fermeture du compartiment
congélateur, la porte ne s’ouvre pas
immédiatement, attendre deux à trois
minutes jusqu’à ce que la dépression qui
s’est formée, se soit neutralisée.
Réglage de la
température
Le thermostat (Fig E) permet le réglage
de la température des deux
compartiments en fonction de la
température ambiante. Les chiffres
élevés correspondent aux basses
températures.
Position du thermostat «0»=mise hors
circuit de l’appareil. A partir de «1»
l’appareil fonctionne.
FR.qxd 21/10/05 18:22 Page 30
Page 29
fr
Nous recommandons un réglage
moyen (environ «2-3»).
Pour la congélatio, réglez le thermostat
sur le repère «3» (voir également la
rubrique «congélation»).
A noter au stockage de
produits congelés
Si la températura de l’endroit prévu pour
l’appareil descend au-dessous de +18ºC
il convient de mettre en marche le
commutateur de congélation; la marque
rouge sera visible (figure E/22).
Lorsqu’on réalise cette opération, la
lumière intérieure reste allumée à basse
intensité; de cette façon, la température
nécessaire pour le stockage à long
terme des aliments dans le
compartiment du congélateur sera
maintenue.
Arrêt
Arrêt
Placer le thermostat sur «0», Fig E
l’appareil est hors circuit.
Arrêt prolongé
Dans le cas d'un arrêt prolongé:
dèbranchez l’appareil, dégivrez et
nettoyez. Laissez les portes ouvertes.
Rangement des
aliments
Possibilités de
transformation de
l’aménagement intérieur
Les clayettes du réfrigérateur peuvent
être réglées à volonté. Pour cela, les
tirer vers l’avant, les abaisser et les
replacer à l’endroit désiré (Fig. R).
Pour déposer des bouteilles, la grille
porteuse peut être placeé obliquement.
Les balconnets de la contre-porte
peuvent être retirés afin de faciliter le
nettoyage (Fig. Y).
Attention lors du
rangement!
• Laissez refroidir hors de l’appareil les
boissons et les aliments chauds.
• Disposez les denrées autant que
possible bien emballées ou bien
recouvertes.
• Ne pas mettre les parties en plastique
et le joint de la porte en contact avec
de l’huile ou des matières grasses
(Ces parties pourraient devenir
poreuses).
• Ne pas entreposer de matières
explosives dans l’appareil.
• Placez les boissons fortement
alcoolisées debout et hermétiquement
fermées.
• Les zones les plus froides dans le
réfrigérateur sont la paroi arrière et le
dessus de la plaque.
FR.qxd 21/10/05 18:22 Page 31
Page 30

fr
Exemple de rangement
Fig. Q
Dans le congélateur (A),
congeler les aliments, les conserver et
préparer des glaçons.
Sur les clayettes (3),
de haut en bas, patisseries, plats cuisinés, produits laitiers.
Dans les boites à viande (4),
viande et charcuterie.
Sur la plaque (6),
viande et charcuterie.
Dans le bac à légumes (7),
légumes, fruits, salades.
Dans le balconet (9) de la porte,
tubes et petites boites.
Dans les porte-bouteilles (10),
grandes bouteilles.
Contrôlez les zones de
froid dans l’appareil
Vu que l’air circule dans le compartiment
réfrigérateur, certaines zones sont plus
froides que d’autres.
Selon le modèle, la zone adaptée aux
produits délicats se trouve complètement
en bas, entre la flèche imprimée
latéralement et la clayette en verre
située en-dessous (fig. !1/1 et 2), ou
entre les deux flèches (fig. !2/1 et 2).
Cette zone convient idéalement pour
ranger la viande, le poisson, la
charcuterie, les salades mixtes, etc.
Congélation stockage
des produits et
préparation de
glaçons
Attention lors de l’achat
de produits surgelés!
• N’achetez que des aliments dont
l’emballage est intact.
• La durée de conservation ne doit pas
être périmée.
• La température du congélateur
commercial ne doit pas être
supérieure à -18ºC.
• Achetez les produits surgelés en
dernier, enveloppez-les dans du papier
journal ou utilisez un sac isotherme
pour le transport. Stockez le plus
rapidement possible les surgelés dans
votre congélateur.
Emballage des produits
frais
Ne congeler que des produits frais de
première qualité que vous emballerez
sous vide afin d’éviter qu’ils ne perdent
leur saveur ou se désèchent.
Se prêtent à l’emballage:
Films plastiques, films polyéthylènes,
feuilles d’aluminium et boites
hermétiques. Ces articles sont en vente
dans le commerce.
N'utilisez pas:
Le papier d’emballage, le papiersulphurisé, les feullies de cellophane, les
sacspoubelle et les sacs en plastique
ayant déjà servis. Déposez les produits
frais dans l’emballage, en extraire l'air et
fermez-le hermétiquement.
FR.qxd 21/10/05 18:22 Page 32
Page 31

fr
Pour fermer les emballages, vous
pouvez utiliser:
des élastiques, des clips en plastique,
des ficelles, des rubans adhésifs
résistants au froid etc. Les sachets et les
feuilles en polyéthylène peuvent être
fermés à l’aide d’une thermosoudeuse.
Collez sur chaque paquet une étiquette
indiquant le contenu et la date de
congélation avant des les stocker dans
le compartiment congélateur.
Pouvoir de congélation
Les indications relatives à la capacité
de congélation maximale selon la
norme actuelle se trouvent sur la
plaque signalétique.
La capacité maximum de surgélation
d´aliments frais en 24 h, (placés sur les
clayettes de surgélation), est indiqué
sur la plaque de caractéristiques (en
Kg/24h), croquis !0.
Placer les produits à congeler dans le
conpartiment congélation en prenant
soin de ne pas gêner la circulation de
l’air à l'intérieur de l’appareil. Veillez à ce
que les produits déjà congelés n'entrent
pas en contact avec les denrées fraîches.
Réglage du thermostat
pour la congélation et
utilisation du commutateur
de congélation
A la mise en place des aliments plager le
thermostat sur une température moyenne
(environ “3”). Dans cette position on peut
congeler 2,5 kg d’aliments. Si les quantités
sont plus élevées il est nécessarie d’utiliser
le commutateur de congélation (Fig. E/22).
(Appuyer sur le commutateur -la marque
rouge apparaît).
Le processus de congélation est terminé
après 24h environ, remettre le
commutateur hors circuit.
A noter pendant la
congélacion
Les denrées déjà congelées en doivent
pas êtres mises en contact avec les
aliments frais.
A noter au stockage de
produits congelés
Si la températura de l’endroit prévu pour
l’appareil descend au-dessous de
+18ºC, il convient de mettre en marche
le commutateur de congélation; la
marque rouge sera visible (figure E/22).
Lorsqu’on réalise cette opération, la
lumière intérieure reste allumée à basse
intensité; de cette façon, la température
nécessaire pour le stockage à long
terme des aliments dans le compartiment
du congélateur sera maintenue.
Durées de conservation
Pour éviter une altération des produits
congélés, veillez à ne pas dépasser la
date limite de conservation. Celle-ci
varie en fonction des produits. A une
température de -18ºC vous pouvez
stocker poissons, saucisses, plats
cuisinés et patisseries pendant 2 mois,
fromages, volailles, viandes pendant 4
mois, légumes et fruits pendant 6 mois.
Décongélation des
produits
En fonction de l’utilisation réservée aux
aliments, vous pouvez opter pour une
des solutions suivantes:
décongélation à température ambiante,
à l’intérieur du réfrigérateur,
dans un four électrique traditionnel ou á
chaleur tournante, dans un four à
micro-ondes.
FR.qxd 21/10/05 18:22 Page 33
Page 32

fr
Il est possible de recongeler des
denrées partiellement décongelées si, à
partir du moment où la température à
atteint +3ºC, il ne s'est pas écoulé plus
d’un jour pour la viande et le poisson ou
plus de trois jours pour les autres
denrées. Si le goût, l’odeur ou l’aspect
ont été modifiés, cuire les denrées et
congeler à nouveuau les mets cuisinés.
Ne pas dépasser la durée maximale de
conservation.
Préparation des glaçons
Fig. U
Remplissez les bacs glaçons au 3/4
d’eau eta placez-les dans le congélateur.
Les glaçons se démoulent facilement par
simple torsion du bac.
Dégivrage
Compartiment réfrigérateur
Le dégivrage s’effectue de façon
entièrement automatique. L’eau s’écoule
par la goulotte (Fig.I/7) et le tuyau
d’écoulement dans un bac situé à
l’arrière de l’appareil où elle s’évapore.
Nettoyez les fréquemment (Fig. I/19)
afin que l'eau puisse toujours s’écouler
librement.
Compartiment congélateur
Dans le compartiment congélateur le
dégivrage n’est pas automatique
puisque les produits stockés ne doivent
en aucun cas être soumis à un début de
décongélation.
La couche de givre augmente la
consommation de courant, et peut nuire
au rendement frigorifique.
Raclage de la couche de givre
Otez la couche de givre à l’aide d’une
raclette.
N’employez jamais d’objets métalliques
pointus, vous pourriez abîmer les
plaques de congélation.
Dégivrage de la couche de glace
Si la courche de givre atteint 1/2 cm, il
est nécessaire de dégivrer l’appareil.
S'il y a encore des congelés dans
l’appareil avant le dégivrage, actionner
le commutateur de congélation
(Fig. E/22) en marche environ 4 heures
avant l’operation, afin que les denrées
atteignent une fois de plus une
température très basse. Puis retirer les
casiers avec les congelés et placer les
éléments frigorifiques sur les aliments.
Procédez de la manière suivante:
• Enlevez les aliments et enveloppez-les
dans plusieur épaisseurs de paier
journal puis déposez-les dans un
endroit frais.
• Placez le thermostat (Fig. Q/2) sur le
repère «0» ou débranchez l’appareil.
Veillez à ce que l'eau ne pénètres pas
dans le thermostat.
• Laissez la porte ouverte, absorbez
l’eau de dégivrage à l’aide d’une
éponge ou d’un chiffon.
• Essuyez le compartiment congélateur
avec un chiffon sec, remettez l’appareil
en service et replacez les aliments
congelés.
Accélération du dégivrage
La dureé du dégivrage est réduite en
plaçant un récipient d’eau chaude dans
le congélateur.
Une grande prudence est recommandée
si on utilise des bombes aérosols
dégivrantes, qui peuvent causer la
formation de gaz explosifs ou contenir
des solvants ou des gaz susceptibles de
détériorer le plastique ou de nuire à la
santé.
FR.qxd 21/10/05 18:22 Page 34
Page 33

fr
Nettoyage
Avant de procéder au nettoyage, ayez
soin de débrancher l’appareil ou de
retirer la fusible.
Excepté pour le joint de la porte, utilisez
de l’eau tiède additionnée d'une petite
quantité de produit de vaisselle.
N’utilisez pas de poudres abrasives, ni
de produits détergents ou solvants!
Nettoyez le joint de porte (Fig. Q/11)
exclusivement à l’eau claire et essuyezle soigneusement avec un chiffon sec.
Veillez à ce qu’il n'y ait pas d’eau qui
s’infiltre dans le thermostat. (Fig. Q/2).
La gouttière (Fig. I/7) et l’écoulement
(Fig. I/19) dans le réfrigérateur doivent
être nettoyéz plus fréquemment afin que
l’eau de dégivrage puisse s'évacuer
librement. A cet effet, utilisez
éventuellement des bâtonnets pour
dégager l’ouverture d’écoulement.
Les parois extérieures de l’appareil
peuvent être entretenues au moyen des
produits que l’on trouve couramment
dans le commerce. Laissez la porte
fermée pendant l’opération, afin que le
produit de nettoyage n’entre pas en
contact avec les piéces en matière
plastique de l’intérieur.
Economie d’énergie
• Placez votre congélateur dans un
endroit frais et bien aéré. Veillez à ce
qu'il ne soit pas exposé aux rayons
solaires et qu'il ne se trouve pas à
proximité immédiate d’une source de
chaleur (radiateur etc.).
• Laissez refroidir hors de l’appareil les
aliments chauds.
• Placez les produits à décongeler dans
votre réfrigérateur. Ainsi, vous pouvez
utiliser le froid qu'ils ont emmagasiné
pour le rafraîchissement des produits
se trouvant dans le réfrigérateur.
• Dégivrez dès qu’il se forme une
couche de glace à l’intérieur du
congélateur, celle-ci gêne l’arrivée du
froid aux produits et augmente la
consommation de courant.
• Ouvrez et fermez les portes de
l’appareil, aussi rapidement que
possible. Moins la porte du
congélateur restera ouverte, moins il y
aura formation de givre.
FR.qxd 21/10/05 18:22 Page 35
Page 34

fr
Commet réparer soi-même les petites
pannes
Avant d’appeler le service après-vente, nous vous conseillons de lire
attentivement les conseils suivants qui vous permettront peut-ètre de remédir
au défaut.
En cas d’intervention inotile du service après-vente, vous devez prendre en
charge la totalité des frais occasionnés par la mise à disposition d'un
technicien, même pendant la période de garantie.
Dérangements
En cas de bruits anormaux:
Si l’éclairage intérieur ne
fonctionne pas:
Si la température à
l’intérieur de l’appareil est
trop basse:
Si le rendement frigorifique
diminue:
Si le rendement frigorifique
est nul:
Causes possibles
- L’appareil n’est pas bien d’aplomb ou alors un corps
étranger est coincé au niveau du groupe frigorifique.
- Un élément de la paroi arrière vient buter contre la
carcasse de l’appareil ou le mur, ce qui l’empêche
de vibrer librement: dans ce cas, repliez la partie
en cause avec précaution.
- La lampe est grillée. Retirer la fiche de laprise de
courant, retirer le couvercle (Fig. O) et remplacer
la lampe 220-240 V max. 15 watts culot E 14.
- L’interrupteur de porte (Fig. T/1) est coincé,
vérifiez s’il est possible de l’enfoncer. Dans le cas
contraire, appelez le service après-vente.
- Le thermostat (Fig. O/3) est sur «0».
- Le thermostat est réglé sur une temperature trop
basse.
- Le comutateur de congélation (Fig. E/22) n'a pas
été mis en service avant la mise en place
d’aliments frais.
- La porte a êté ouverte fréquemment.
- Vous venez de congeler une grande quantité de
denrées.
- Une couche importante de givre s’est déposée
dans le compartiment congélateur.
- La grille d'aération du haut ou du bas de l’appareil
est masquée.
- Un corps étranger est coincé entre le groupe
frigorifique et le mur.
- L’appareil est mal branché.
- Un fusible a sauté.
- Le thermostat est sur “0”.
FR.qxd 21/10/05 18:22 Page 36
Page 35

fr
Commet réparer
soi-même les petites
pannes
Si les conseils ci-dessus ne vous ont pas
permis de remédier au défaut, prévenez
sans retard le service après-vente.
N’essayez pas de réparer l’appareil par
vos propres moyens et n’intervenez
surtout pas dans la partie électrique.
N'ouvrez pas les portes inutilement, afin
d’éviter toute déperdition de froid.
Service après-vente
Plaque de
caractéristiques
Fig !0
Si l’on appelle le service d’assistance
technique, citer le numéro d’appareil (23)
et le numéro de production (24). Ces
deux données se trouvent sur la zone
encadrée de noir, de la plaque de
caractéristiques.
Cette plaque se trouve sur la partie
inférieure du réfrigérateur, à gauche,
près du bac à légumes.
L’ adresse et le numéro de téléphone du
bureau d’assistance technique le plus
proche de votre domicile se trouve sur la
liste de bureaux après-vente ou le guide
téléphonique de votre ville.
FR.qxd 21/10/05 18:22 Page 37
Page 36

nl
Uw nieuwe apparaat is op weg naar
u beschermd door de verpakking.
De gebruikte materialen zijn
onschadelijk voor het milieu en kunnen
opnieuw worden gebruikt. Help daarom
mee en zorg dat de verpakking
milieuvriendelijk wordt afgevoerd.
U kunt bij uw leverancier of bij de
reinigingsdienst in uw gemeente
informeren hoe u uw oude apparaat en
het verpakkingsmateriaal van het
nieuwe apparaat kunt (laten) afvoeren
voor een milieuvriendelijke verwerking.
Dit apparaat is gekenmerkt in
overeenstemming met de Europese
richtlijn 2002/96/EG
betreffende afgedankte elektrische en
elektronische apparatuur (waste
electrical and electronic equipment WEEE).
De richtlijn geeft het kader aan voor de
in de EU geldige terugneming en
verwerking van oude apparaten.
Aanwijzingen voor
uw veiligheid
Voordat u het apparaat
in gebruik neemt
Lees de gebruiksaanwijzing en het
installatievoorschrift nauwkeurig door.
U vindt daarin belangrijke informatie
over plaatsing, gebruik en onderhoud
van het apparaat.
De fabrikant aanvaardt geen aansprakelijkheid als de aanwijzingen en waarschuwingen in de gebruiksaanwijzing
niet in acht worden genomen. Bewaar
de gebruiksaanwijzing en het
installatievoorschrift voor een eventuele
latere bezitter van het apparaat.
Aanwijzingen over
de afvoer
Afvoer van het oude
apparaat
Van toepassing als uw nieuwe apparaat
een oud apparaat vervangt.
Oude apparaten zijn geen waardeloos
afval! Door een milieuvriendelijke afvoer
kunnen waardevolle grondstoffen
worden teruggewonnen.
Het afgedankte apparaat onbruikbaar
maken:
1. stekker uit het stopcontact trekken;
2. aansluitkabel doorknippen en samen
met de stekker verwijderen;
3. deurslot verwijderen of onklaar
maken. Hiermee voorkomt u dat
kinderen zichzelf tijdens het spelen
in het apparaat opsluiten en in
levensgevaar geraken.
Koelapparaten bevatten koelmiddel en
in de isolatie gas. die zorgvuldig moeten
worden afgevoerd. Met het oog op een
doelmatige en milieuvriendelijke afvoer
mogen de leidingen van het koelcircuit
tot het moment van transport niet
beschadigd worden.
Afvoeren van de
verpakking van uw
nieuwe apparaat
Attentie!
Verpakkingsmateriaal is geen
speelgoed voor kinderen – gevaar voor
verstikking door vouwkarton en folie!
NL.qxd 21/10/05 18:22 Page 38
Page 37

nl
Attentie!
• Het apparaat bevat een geringe
hoeveelheid van het milieuvriendelijke
maar brandbare koelmiddel R600a.
Let erop dat de leidingen van het
koelcircuit bij het transport of de
installatie niet beschadigd worden.
Koelmiddel dat naar buiten spuit kan
vlam vatten of tot oogletsel leiden.
Let erop als er koelmiddel naar buiten
komt
– dat zich geen open vuur of
ontstekingsbronnen in de buurt van
het lek bevinden.
– Stekker uit het stopcontact trekken
en de ruimte een paar minuten goed
luchten.
• Hoe meer koelmiddel het apparaat
bevat, des te groter moet de ruimte
zijn waarin het apparaat wordt
opgesteld. In een te kleine ruimte kan
bij een lek een ontvlambaar mengsel
van gas en lucht ontstaan.
• Per 8 g koelmiddel moet de ruimte
minimaal 1 m3 groot zijn. De
hoeveelheid koelmiddel in uw
apparaat vindt u op het typeplaatje
aan de binnenkant van het apparaat.
• In noodgevallen
– Ogen uitspoelen en een arts
raadplegen.
– Vonken en open vuur buiten bereik
van het apparaat houden.
– Stekker uit het stopcontact trekken
en de ruimte een paar minuten goed
luchten.
• In de volgende gevallen de stekker uit
het stopcontact trekken resp. de
zekering uitschakelen of losdraaien:
– ontdooien
– schoonmaken
Altijd aan de stekker trekken, nooit
aan de aansluitkabel.
• Een (bijv. tijdens het transport)
beschadigd of defect apparaat niet in
gebruik nemen. In geval van twijfel
eerst contact opnemen met uw
leverancier.
• Nooit elektrische apparaten in het
apparaat gebruiken (bijv.
verwarmingsapparaten, elektrische
ijsmaker etc.).
• Geen producten met brandbare
drijfgassen (bijv. spuitbussen) en geen
explosieve stoffen in het apparaat
opslaan – Explosiegevaar!
• Het apparaat is geen speelgoed voor
kinderen!
• Het apparaat nooit met een stoomreiniger ontdooien of schoonmaken!
De hete stoom kan in de onder
spanning staande onderdelen van het
apparaat terechtkomen en kortsluiting
of een elektrische schok veroorzaken.
In acht nemen tijdens het gebruik
• De luchtaanvoer- en luchtafvoeropeningen nooit afdekken of dichtmaken!
• Reparaties mogen alleen door een
vakkundig monteur worden
uitgevoerd. Door ondeskundige
reparatie kan er gevaar voor de
gebruiker ontstaan.
NL.qxd 21/10/05 18:22 Page 39
Page 38

nl
• Plint, uittrekbare manden of laden,
deuren etc. niet als opstapje
gebruiken of om op te leunen.
• Dranken met een hoog alcoholpercentage altijd goed afgesloten en staand
bewaren.
• Bij een apparaat met deurslot: sleutel
buiten het bereik van kinderen
bewaren!
• Zorg dat de kunststof delen en de
deurafdichting niet met olie of vet in
aanraking komen. Ze kunnen poreus
worden.
• Flessen en blikjes met vloeistoffen –
vooral koolzuurhoudende dranken –
niet in de diepvriesruimte opslaan.
De flessen en blikjes springen!
• IJslollies en ijsblokjes niet direct uit de
diepvriesruimte in de mond nemen.
(gevaar voor verbranding door de
zeer lage temperatuur).
• Diepvrieswaren niet met natte handen
aanraken. Uw handen kunnen eraan
vastvriezen.
• Een laag rijp en vastgevroren
diepvrieswaren niet met een mes of
een scherp voorwerp afschrapen of
losmaken. Hierdoor kunt u de
koelleidingen beschadigen.
Koelmiddel dat naar buiten spuit, kan
vlam vatten of tot oogletsel leiden.
• Om het ontdooiproces te versnellen
alleen de door de fabrikant
aanbevolen middelen gebruiken.
Waarschuwingen
• Draagt u er zorg voor de
ventilatieroosters van de structuur van
de koelkast niet te versperren.
• Gebruikt u geen mechanische
voorzieningen noch enig ander middel
ter versnelling van het ontdooiproces,
anders dan die welke worden
aanbevolen door de fabrikant.
• Draagt u er zorg voor het koelcircuit
niet te beschadigen.
• Gebruikt u voor de koelkast/vriezer
altijd het type inwendige elektrische
componenten als aanbevolen door de
fabrikant.
Algemene bepalingen
Het apparaat is geschikt
• voor het koelen en invriezen van
levensmiddelen,
• voor het bereiden van ijs.
Het apparaat is bedoeld voor
huishoudelijk gebruik.
Bij gebruik voor bedrijfsdoeleinden de
daarvoor geldende normen en
voorschriften in acht nemen.
Het apparaat is ontstoord volgens
E-U richtlijn 89/336/EEC.
Het koelmiddelsysteem is gecontroleerd
op dichtheid.
Dit apparaat voldoet aan de veiligheidsbepalingen voor elektrische apparaten
(EN 60335/2/24).
NL.qxd 21/10/05 18:22 Page 40
Page 39

nl
Let op de omgevingstemperatuur
en de beluchting
De klimaatklasse staat op het
typeplaatje (Afb. !0). Hierdoor wordt
aangegeven binnen welke
omgevingstemperaturen het apparaat
gebruikt kan worden.
klimaatklasse toegestane
kamertemperatuur
SN +10 °C tot 32 °C
N +16 °C tot 32 °C
ST
T
Beluchting
De lucht aan de achterzijde van het
apparaat wordt warm. De verwarmde
lucht moet ongehinderd afgevoerd
kunnen worden. Anders moet de
koelmachine meer presteren waardoor
het energieverbruik toeneemt.
De be- en ontluchtingsopeningen mogen
dan ook nooit worden afgedekt!
Netto-inhoud
De gegevens over de netto-inhoud vindt
u op het typeplaatje in uw apparaat.
Uw nieuwe apparaat
Afhankelijk van het model zijn kleine
afwijkingen mogelijk – vooral wat betreft
de uitvoering van het interieur.
Afb. Q
1 Ijsbakje
2 Temperatuurkiezer en
binnenverlichting
3 Draagrooster
4 Vleesbox
5 Dooiwatergootje
6 Plaat
7 Groentelade
8 Plint met ventilatierooster
9 Voorraadrekje
10 Flessenrek
11 Deurafdichting
22 Diepvriesschakelaar (Afb E)
A Vriesruimte
B Koelruimte
NL.qxd 21/10/05 18:22 Page 41
°C tot 38 °C
+16
°C tot 43 °C
+16
Page 40

nl
Apparaat aansluiten
Na het opstellen van het apparaat dient
men minstens
1
/2uur wachten voordat
u het apparaat in gebruik neemt. Tijdens
het transport kan het gebeuren dat de
olie van de compressor in het
koelsysteem terecht komt.
Voordat u het apparaat voor het eerst
in gebruik neemt de binnenkant van
het apparaat schoonmaken
(zie Schoonmaken).
Inschakelen en
temperatuurkeuze
Maak voordat u het apparaat voor het
eerst in gebruik neemt de binnenkant
schoon
(zie „schoonmaken”).
Inschakelen
Temperatuurkiezer (afb. E) uit de
„O”-stand draaien.
Het apparaat begint te koelen.
Attentie:
Als de deur van de vriesruimte na het
sluiten niet meteen weer geopend kan
worden:
twee à drie minuten wachten tot de
ontstane onderdruk is opgeheven.
Instellen van de
temperatuur
Met de temperatuurkiezer (afb. E) wordt
zowel in de koelruimte als in de
vriesruimte de temperatuur ingesteld.
Hoe hoger het cijfer, des te lager de
temperatuur in beide ruimten.
Op stand „O” is het koelsysteem
uitgeschakeld, vanaf „1” neemt de
koeling toe.
Wij adviseren een gemiddelde
instelling (ca. „2-3”).
Voor invriezen temperatuurkiezer op „3”
draaien (zie ook levensmiddelen
invriezen).
Attentie bij het bewaren
van diepvriesgoederen
Indien de temperatuur in de voor het
apparaat bestemde ruimte daalt tot
minder dan +18ºC is het nodig de
vriesschakelaar in werking te stellen: de
rode markering wordt zichtbaar
(Figuur E/22). Wanneer deze handeling
wordt verricht, zal het licht binnenin op
verminderde kracht blijven branden. Op
deze wijze wordt in de vriesruimte de
noodzakelijke temperatuur in stand
gehouden voor langdurig bewaren.
Uitschakelen en
buiten werking
stellen
Uitschakelen
Temperatuurkiezer (afb E) op „O”
draaien. In het hele apparaat is de
koeling nu uitgeschakeld.
Buiten werking stellen
Wordt het apparaat langere tijd niet
gebruikt: stekker uit het stopcontact
trekken, apparaat laten ontdooien en
schoonmaken.
Deuren open laten staan.
NL.qxd 21/10/05 18:22 Page 42
Page 41

nl
Levensmiddelen
inruimen
Verandering van het
interieur
De draagroosters in de koelruimte
kunnen verzet worden. Hiervoor de
roosters naar voren trekken, ietsje laten
zakken, en ze op de gewenste plaats er
weer inzetten. Afb R.
Voor het bewaren van flessen kan het
draagrooster schuin worden geplaatst.
De vakken van de binnendeur kunnen
voor het reinigen eruit worden gehaald.
Afb Y.
Attentie bij het inruimen
• Warme dranken en gerechten buiten
het apparaat laten afkoelen.
• De levensmiddelen liefst verpakt of
goed afgedekt bewaren.
• Zorg dat de kunststof-delen en de
deurafdichting niet met olie of vet in
aanraking komen (ze kunnen poreus
worden).
• Geen explosieve stoffen in het
apparaat bewaren.
• Dranken met een hoog alcohol-
percentaje rechtop en goed gesloten
bewaren.
• De koelste plaatsen in de koelruimte
bevinden zich aan de achterwand en
boven de onderste plaat.
Een voorbeeld van
inruimen
Afb Q
In de vriesruimte (A):
Levensmiddelen invriezen en opslaan,
ijsblokjes maken.
Op de draagroosters (3):
van boven naar beneden:
brood en gebak, kant-en-klaargerechten,
zuivelprodukten.
In de vleesbox (4)
vlees en worst.
Op de plaat (6):
vlees en worst.
In de groentelade (7):
groente, fruit en sla.
In de vakken in de deur (9):
tubes en blikjes.
In het flessenrek (10):
grote flessen.
Let op de koudezones in
de koelruimte!
Door de luchtcirculatie in de koelruimte
ontstann verschillende koudezones.
De zone voor gevoelige levensmiddelen
bevindt zich, afhankelijk van het model,
helemaal onderaan tussen de aan de
zijkant afgebeelde pijl en de glasplaat
eronder (afb. !1/1 en 1/2). of tussen de
twee pijlen) (afb. !2/1 en /2).
Ideaal voor het opslaan van vlees, vis,
worst, gemengde salades etc.
NL.qxd 21/10/05 18:22 Page 43
Page 42

nl
Levensmiddelen
invriezen en opslaan,
ijsblokjes maken
Attentie bij het inkopen
van diepvriesprodukten
• Let erop dat de verpakking niet
beschadigd is.
• De op de verpakking aangegeven
bewaartijd mag niet verstreken zijn.
• In de winkel moet de temperatuur in
de diepvrieskist ten minste -18ºC zijn.
• Koop de diepvriesprodukten op het
allerlaatste moment. Breng ze in
kranten gewikkeld of in een koeltas
snel naar huis en leg ze in de
vriesruimte.
Verpakken van
levensmiddelen
Gebruik uitsluitend verse
levensmiddelen als u zelf wilt invriezen.
De levensmiddelen
luchtdicht verpakken zodat ze niet
uitdrogen of hun smaak verliezen.
Voor verpakking geschikt:
Kunststof-, polytheen- en aluminiumfolie,
diepvriesdozen. Deze produkten zijn in
de handel verkrijgbaar.
Niet geschikt:
pakpapier, vetvrij papier, cellofaan,
vuilniszakken en gebruikte
boodschappentasjes.
De levensmiddelen verpakken, lucht
eruit persen en het geheel van een
sluiting voorzien.
Als sluiting geschikt:
elastiekjes, clips van kunststof, touwtjes,
koudebestendig plakband e.d. Zakjes en
folie van polytheen kunnen met een
speciaal lasapparaat worden dichtgelast.
Vermeld op de pakjes inhoud en datum,
voordat u ze in de vriesruimte legt.
Invriescapaciteit
Gegevens over de maximale
invriescapaciteit volgens de actuele
norm vindt u op het typeplaatje.
De maximale capaciteit voor het
diepvriezen van verse levensmiddelen
in 24 uur (verdeeld over de diepvries
roosters) vindt men op de plaat met
de kenmerken (in kg/24uur), zie
figuur !0.
Leg de in te vriezen levensmiddelen
naast elkaar op de bodem van de
vriesruimte.
Ingevroren produkten mogen niet met
de nog in te vriezen levensmiddelen in
aanraking komen.
Temperatuurregelaar
instellen op vriezen en de
vriesknop indrukken
Bij het opslaan van verse
levensmiddelen de
temperaatuurregelaar op een
gemiddelde stand (ca.3) draaien. Bij
deze instelling kan tot ongeveer 2,5 kg.
levensmiddelen worden ingevroren. Bij
grotere hoeveelheden moet ook de
vriesknop (Afb. E/22) worden ingedrukt
(tuimelschakelaar indrukken -het rode
vlakje wordt zichtbaar). Na ongeveer 24
uur zijn de levensmiddelen ingevroren.
De vriesknop kan weer worden
uitgeschakeld.
NL.qxd 21/10/05 18:22 Page 44
Page 43

nl
Attentie bij het invriezen
van levensmiddelen
Ingevroren levensmiddelen mogen niet
in aanraking komen met verse, nog in te
vriezen levensmiddelen.
Attentie bij het opslaan
van diepvrieswaren
Indien de temperatuur in de voor het
apparaat bestemde ruimte daalt tot
minder dan +18ºC is het nodig de
vriesschakelaar in werking te
stellen: de rode markering wordt zichtbaar
(Figuur E/22). Wanneer deze handeling
wordt verricht, zal het licht binnenin op
verminderde kracht blijven branden. Op
deze wijze wordt in de vriesruimte de
noodzakelijke temperatuur in stand
gehouden voor langdurig bewaren.
Bewaartijd
Om te voorkomen dat de kwaliteit van
de levensmiddelen vermindert, mag de
toelaatbare bewaartermijn niet
overschreden worden. De bewaartijd is
afhankelijk van het soort levensmiddel.
Bij een temperatuur van -18ºC kunnen
vis, worst, kant-en-klaargerechten,
brood en gebak max. 2 maanden, kaas,
gevogelte en vlees max. 4 maanden en
groente en fruit max. 6 maanden worden
opgeslagen.
Ontdooien van
diepvriesprodukten
Afhankelijk van soort en gebruik van de
levensmiddelen kunt u kiezen uit de
volgende mogelijkheden:
bij kamertemperatuur,
in de koelkast,
in de elektrische oven,
met of zonder heteluchtverwarming,
in de magnetron.
Half of geheel ontdooide diepvriesprodukten kunnen opnieuw worden
ingevroren: vlees en vis als de
temperatuur niet langer dan een dag,
andere produkten als de temperatuur
niet langer dan drie dagen boven de 3ºC
is gestegen.
In andere gevallen de levensmiddelen als tenminste geur, smaak en uiterlijk
niet veranderd zijn- koken, braden of op
een andere manier bereiden en opnieuw
invriezen.
De opnieuw ingevroren produkten zijn
minder lang houdbar.
Ijsblokjes maken
Afb. U
Plaats het voor 3/4 met water gevulde
ijsbakje op de bodem van de
vriesruimte. Door het ijsbakje iets te
verbuigen laten de ijsblokjes
gemakkelijker los.
NL.qxd 21/10/05 18:22 Page 45
Page 44

nl
Ontdooien
Koelruimte
De koelruimte wordt automatisch
ontdooid. Het dooiwater wordt in het
dooiwatergootje (afb I/7) opgevangen
en naar de koel-machine afgevoerd
waar het verdampt. Gootje en
afvoergaatje (afb. I/19) goed
schoonhouden zodat het dooiwater
gemakkelijk kan weglopen.
Vriesruimte
De vriesruimte (afb. Q/A) wordt niet
automatisch ontdooid omdat de
ingevroren levensmiddelen niet mogen
ontdooien.
Een dikke laag rijp of ijs vermindert de
vriescapaciteit waardoor het
energieverbruik toeneemt.
Verwijderen van rijp:
Gebruik hiervoor een schraper.
De vriesruimte mag beslist niet
beschadigd worden. Gebruik daarom
geen scherpe of hoekige voorwerpen
van metaal.
Ontdooien van de ijslaag:
de vriesruimte moet ontdooid worden als
zich een dikke laag ijs heeft gevormd.
Als er nog diepvriesgoederen liggen
opgeslagen, ongeveer 4 uur voor het
ontdooien de diepvriesschakelaar
indrukken om de levensmiddelen door
en door te laten bevriezen. Daarna de
vriesladen met de levensmiddelen uit de
kast nemen.
U gaat als volgt te werk:
• diepvriesprodukten uit de vriesruimte
nemen, in kranten wikkelen en op een
koele plaats bewaren.
• temperatuurkiezer (afb. Q/2) op „O"
draaien of de stekker uit het
stopcontact halen. Pas op dat het
dooiwater niet in de temperatuurkiezer
terechtkomt.
• deur open laten en het dooiwater met
een spons of doekje afwissen.
• vriesruimte droogwrijven, apparaat
weer inschakelen en de
levensmiddelen erin leggen.
Tips bij het ontdooien
Wees voorzichtig met ontdooi-sprays.
Deze kunnen explosieve gassen
ontwikkelen, kunststofoplossende
bestanddelen of drijfgassen bevatten of
schadelijk zijn voor de gezondheid.
Lees altijd eerst de gebruiksaanwijzing.
NL.qxd 21/10/05 18:22 Page 46
Page 45

nl
Schoonmaken
Vóór het schoonmaken altijd de
stekker uit het stopcontact trekken of
de zekering losdraaien.
Behalve de deurafdichting kan het hele
apparaat met lauw water met een
scheutje afwasmiddel worden
schoongemaakt.
Geen zand- of zuurhoudende middelen,
c.q. chemische oplosmiddelen
gebruiken. De deurafdichting (afb. Q/11)
alleen met schoon water afnemen en
grondig droogwrijven.
Zorg dat het sop niet in de temperatuurkiezer (afb. Q/2) terechtkomt.
Afvoergootje (afb. I/7) en afvoerpijpje
(afb. I/19) regelmatig schoonmaken
zodat het dooiwater gemakkelijk kan
weglopen. De openingen met een stokje
doorprikken. Let op dat er geen sop via
het afvoerpijpje in het verdampingsbakje
terechtkomt.
De buitenkant kan ook nog met een
speciaal middel voor het onderhoud van
lak behandeld worden.
Houd daarbij de deur gesloten zodat het
middel niet met de kunststof-delen aan
de binnenkant in aanraking kan komen.
Tips om energie te
besparen
• Het apparaat in een koele, goed te
ventileren ruimte plaatsen. Niet in de
zon of in de buurt van een
warmtebron (radiator etc.) plaatsen.
• Warme gerechten pas na het afkoelen
in het apparaat zetten.
• Als u diepvrieswaren wilt ontdooien,
leg deze dan eerst in de koelruimte. U
benut daardoor de in de diepvriesprodukten aanwezige koude voor het
koelen van de levensmiddelen in de
koelruimte.
• De vriesruimte bij ijsvorming
ontdooien. Een dikke laag ijs
vermindert de afgifte van kou,
waardoor het energieverbruik stijgt.
• Bij het in- en uitladen de deur zo kort
mogelijk openen. Hoe korter de deur
geopend wordt, des te minder ijs zich
kan afzetten op het vriesrooster.
NL.qxd 21/10/05 18:22 Page 47
Page 46

nl
Kleine storingen zelf verhelpen
Ga alvorens de Servicedienst in te schakelen aan de hand van de volgende
punten eerst even na of u de storing zelf kunt verhelpen.
Ook in de garantietijd moet u de volledige kosten voor monteursbezoek
betalen, al gaat het alleen maar om advies.
Storingen
Abnormale geluiden:
Binnenverlichting
functioneert niet:
Te koud in de
koelruimte:
Vermindering van de
koelcapaciteit:
Geen koelcapaciteit:
Eventuele oorzaken
- Het apparaat staat niet waterpas of een vreemd
voorwerp is in de omgeving van de koelmachine
beklemd geraakt.
- Een onderdeeltje aan de achterwand kan niet vrij
trillen en raakt het apparaat of de muur.
Buig dit deeltje voorzichtig opzij.
- Het lampje is kapot: stekker uit stopcontact trekken,
afdekkapje Afb. O, eraf halen.
Lampje max. 15W, 220-240V, fitting E14 verwisselen.
- De lichtschakelaar (afb. T/1) zit klem.
Probeer of u er beweging in krijgt. Zo niet, schakel
dan de Servicedienst in.
- De temperatuurkiezer (afb. O/3) staat op „O”.
- Temperatuurregelaar is te laag ingesteld.
- De vriesknop Afb E/22 werd bij het invriezen van
verse levensmiddelen niet ingedrukt.
- De deur werd te vaak geopend.
- Er werden grote hoeveelheden verse levensmiddelen in de koelruimte opgeslagen.
- Een te dikke laag rijp in de vriesruimte.
- De be- en ontluchtingsopeningen zijn afgedekt.
- Een vreemd voorwerp is tussen de koelmachine en
de muur beklemd geraakt.
- De stekker zit los in het stopcontact.
- De zekering is doorgeslagen.
- De temperatuurkiezer (afb. Q/2) staat op „O”.
NL.qxd 21/10/05 18:22 Page 48
Page 47

nl
Klantenservice
Gegevensplaat
Fig. !0
Wanneer u de technische hulpdienst
belt, het nummer van het apparaat (23)
en het serie-nummer (24) opgeven.
Beide gegevens treft u aan in de zwart
gemarkeerde zone van de
gegevensplaat.
Deze plaat bevindt zich aan de
onderkant van de koelkast, aan de
linkerzijde, naast de groentelade.
Het adres en telefoonnummer van het
dichtstbijzijnde kantoor van de
technische hulpdienst staat op de lijst
van kantoren voor klantenservice, of in
de telefoongids van uw stad.
Kleine storingen zelf
verhelpen
Als de storing aan de hand van de
hiervoor genoemde punten niet
verholpen kan worden, schakel dan de
Servicedienst in.
Voer zelf geen reparaties aan het
apparaat uit, vooral niet aan de
elektrische onderdelen.
Om koudeverlies te vermijden de deur
niet onnodig openen.
NL.qxd 21/10/05 18:22 Page 49
Page 48

no
Fjerning og
opphugging av
gamle skap
Opphugging av det
gamle skapet
Gamle skap består av materialer som
kan gjenvinnes. Derfor skal apparatet
innleveres til den kommunale
innsamlings- eller gjenvinningssentral
for resirkulerbare materialer.
Det gamle skapet bør ubrukeliggjøres
før det kasseres og erstattes med et
nytt:
• Trekk støpselet ut av stikkontakten.
• Kutt av tilkoblingsledningen og fjern
den sammen med støpselet.
• Demonter eller ubrukeliggjør smekkeller tverrlåser på døren for å hindre
at lekende barn stenges inne og
utsettes for livsfare (kvelning).
Alle kjøle- og fryseskap inneholder
isolerende gasser og kjølevæske som
krever en forsvarlig behandling og
elimineringsprosess. Pass på at
rørledningene i skapets kjølekretsløp
ikke skades før det leveres til det
ansvarlige kommunale mottak.
Råd om fjerning av
emballasjen
La ikke barn leke med emballasjen eller
med deler av den. Skapet er ikke et
leketøy! Kartongene og plastlaminatene
kan forårsake fare for kvelning!
Det nye skapet er beskyttet av
emballasjen under transporten til
hjemmet. Alle emballasjematerialer er
miljøvennlige og kan resirkuleres eller
gjenbrukes.
Bidra aktivt til miljøvern ved alltid å
bruke miljøforsvarlige metoder for
fjerning og gjenvinning av
emballasjematerialene.
Din forhandler eller de lokale
myndigheter kan opplyse om de mest
hensiktsmessige og miljøforsvarlige
avhendingsmuligheter for disse
materialene.
Dette apparatet er klassifisert i
henhold til det europeiske direktivet
2002/96/EF om avhending av elektriskog elektronisk utstyr (waste electrical
and electronic equipment – WEEE).
Direktivet angir rammene for innlevering
og gjenvinning av innbytteprodukter.
Forholdsregler om
sikkerhet og
informasjon av
generell karakter
Les nøye bruksanvisningen og all
tilleggsinformasjon som følger med
skapet. Oppbevar bruksanvisningen for
senere bruk eller til en mulig senere
eier.
Skapet er fremstilt
• kun for privat husholdningsbruk,
• til kjøling og nedfrysing av matvarer.
Ved eventuell bruk i næringsvirksomhet
må vedrørende forskrifter overholdes.
NO.qxd 21/10/05 18:22 Page 50
Page 49

no
Obs!
Foreta installering og elektrisk kobling
av skapet i følge de vedlagte
monteringsinstruksjoner.
Hvis skapet har synlige skader eller
mangler, bør det ikke settes i gang. I
tvilstilfelle bør man henvende seg til
forhandleren av apparatet.
Obs!
Sperr ikke åpningene for ventilasjon og
luftsirkulasjon på skapet.
Obs!
Skal man fremskynde
avrimingsprosessen, må man kun bruke
midler tilrådet av fabrikanten.
Obs!
Bruk ikke elektriske apparater som ikke
er godkjente av fabrikanten innvendig i
kjøle- eller frysedelen.
Obs!
Gjør ikke skade på deler eller elementer
i kjølekretsløpet.. eks. ved å perforere
kjølevæskekanalene med spisse
gjenstander, bøye rørledningene, skrape
på overflatebelegget el. lign. Større
utslipp av kjølevæsken kan medføre sår
i øynene eller forårsake at skapet settes
i brann.
I nødsituasjon
• Skyll øynene godt med mye vann;
lege varsles.
• Hold skapet unna tenningsgnister eller
brannkilder.
• Trekk ut tilkoblingsledningen. Ventiler
rommet skikkelig i noen minutter.
Eksplosjonsfare
Oppbevar drikkevarer med høyt
alkoholinnhold på flasker med
hermetisk lukking. De bør dessuten
alltid settes i oppreist stilling.
Bemerk
• Unngå tiltetting av ventilasjonsgitrene
på kjøleskapets yttervegger.
• Bruk ikke mekaniske anordninger eller
andre midler egnet til å fremskynde
avrimingsprosessen utenom de
anbefalte av fabrikanten.
• Unngå å skade kjølekretsløpet.
• Bruk alltid en type innvendige
elektriske komponenter anbefalt av
fabrikanten til kjøle/fryseskapet.
Bli fortrolig med
skapet
Denne bruksanvisningen gjelder flere
skapmodeller. Det kan derfor
forekomme at beskrevne detaljer og
prestasjoner ved utstyret ikke stemmer
overens med de som finnes på ens eget
apparat.
Figur Q
1 Is-boks
2 Temperaturvelger og innvendig
belysning.
3 Trådgitter
4 Boks til kjøtt
5 Smeltevannsrenne
6 Plate
7 Grønnsaksskuff
8 Luftegitter i sokkel
NO.qxd 24/10/05 10:15 Page 51
Page 50

no
19 Beholder
10 Stor hylle
11 Tetningslist rundt dør
22 Fryseskaps bryter (bilde E)
A Frysedel
B Kjøledel
Klimagraderinger –
Maksimalt tillatt
romtemperatur
Klimagraderingen av hvert apparat er
avmerket på skapets typeskilt og viser
yttergrensene for hvilke
romtemperaturer skapet kan fungere i.
Klimagradering Tillatt
romtemperatur
SN +10 ºC til 32 ºC
N
ST
T
Ventilasjon
Varmluften som avgis på skapets
bakvegg, bør ha fritt avløp. Ellers må
apparatet øke kuldeproduksjonen, noe
som medfører unødvendig høyt
energiforbruk. Av denne grunn må man
være spesielt oppmerksom på at
ventilasjonsinn- og uttak aldri er tiltettet.
Nytteinnhold
Angivelser om nytteinnhold finnes på
typeskiltet i apparatet.
Tilkobling av skapet
Skapet bør gjøres rent før første gangs
bruk.
Tilkobling av skapet
Stikkontakten bør være lett tilgjengelig.
Enheten kobles til et elektrisitetsnett
med vekselstrøm på 220-240 V (N/SN),
220-230 V (ST)/50 Hz ved hjelp av en
forskriftsmessig installert stikkontakt
med jordledning. Stikkontakten bør være
vernet med en sikring på minst 10
ampere.
Apparatene som sendes til land
utenfor Europa bør kontrolleres slik
at spenningsverdiene for tilkobling
og strømtypen oppført på skapets
typeskilt stemmer overens med
landets elektrisitetsnett. Typeskiltet
er plassert nederst på venstre side.
Hvis det skulle bli nødvendig å skifte
ut støpselet til tilkoblingskontakten,
kan dette kun utføres av teknikere
spesialutdannet i våre merker.
Tilkobling og
temperaturvalg
Før kjøleskapet settes igang, skal det
vaskes innvendig (se renhold)
Tilkobling
Temperaturvelger (bilde E) dreies fra
„O”-stilling.
Skapet begynner å kjøle.
Henvisning:
Dersom det er umulig å åpne frysedøren
straks etter at den er lukket, vent i 2-3
min. inntil undertrykket har jevnet seg ut.
NO.qxd 24/10/05 10:15 Page 52
+16 ºC til 32 ºC
ºC til 38 ºC
+16
ºC til 43 ºC
+16
Page 51

no
Temperaturinnstilling
Temperaturen i kjøle- og frysedelen kan
innstilles sentralt fra temperaturvelgeren
(bilde E). Høyere tall på
temperaturvelgere vil si at temperaturen
blir lavere i både kjøle- og frysedelen.
Ved temperatur-innstilling „O” er kjølingen
slått av. Kjølingen begynner på „1”.
Vi anbefaler en middels innstilling
(ca. „2-3”).
For innfrysing settes temperaturvelgeren
på „3” (se også „Innfrysing av matvarer”).
Ved lagring av frysevarer
vær oppmerksom på
Synker romtemperaturen der skapet står
under +18°C, er det nødvendig å slå på
bryteren for frysing, et rødt signal vil
være synlig (bilde E/22). Når denne
operasjonen gjennomføres, vil lyset på
innsiden av skapet forbli tent med
redusert styrke; dette sikrer at
temperaturen som behøves for
langtidslagring bibeholdes.
Apparater som er
avslått og ikke i bruk
Avslått apparat
Temperaturvelger (bilde E), dreies i
stilling „O”. Dermed kobles, kjølingen ut i
både kjøle- og frysedelen.
Apparat ikke i bruk
Dersom et apparat ikke skal benyttes i
lengere tid, bør man trekke ut støpselen.
Apparatet rimes av og gjøres rent. La
døren stå åpen.
Plassering av
matvarer
Forandring av
innredningen i skapet
Hyllene i kjøleskapet kan flyttes. Når de
skal flyttes -trekkes de fram - senkes
ned - trekkes ut - settes inn på ønsket
sted (bilde R).
Matvarenes plassering
• Varme retter og drikker skal først
avkjøles før de settes inn i skapet.
• Matvarene bør pakkes inn, evt.
tildekkes.
• Olje og fett må ikke komme i berøring
med kunststoffdeler rundt døren (disse
kan bli porøse).
• Oppbevar ikke eksplosive stoffer i
skapet.
• Høyprosentlig alkohol oppbevares
lukket og stående.
• I kjøledelen er det kaldeste området
på bakveggen og over den nederste
hyllen.
Eksempel på
matvareplassering
Bilde Q
I frysedelen (A),
innfrysing av matvarer, lagring og
innfrysing av is.
På trådgitteret (3),
ovenfra og ned, bakevarer, ferdige retter,
melkeprodukter.
I kjøtt-beholderen (4),
kjøtt og pølser.
På platen (6),
kjøtt og pølser.
NO.qxd 21/10/05 18:22 Page 53
Page 52

no
I grønnsaksskuffen (7),
grønnsaker, frukt og salat.
På den to-delte hyllen i døren (9),
små flasker.
På den store hyllen nederst i døren
(10), store flasker.
Ta hensyn til kuldesonene
i kjølerommet
På grunn av luftsirkulasjonen i
kjølerommet oppstår det soner med
forskjellig kulde.
Sonen for ømfintlige matvarer er alt etter
modell helt nede mellom pilen som er
markert på siden og glassplaten som
ligger under dette (bilde !1/1 og 2) eller
mellom de to pilene (bilde !2/1 og 2).
Ideelf for lagring av kjøtt, fisk, pålegg,
salatblandinger osv.
Innfrysing og lagring
av matvarer, laging
av is
Ved kjøp av frysevarer
påse at:
• Pass på at forpakningen ikke er
skadet.
• Holdbarhetsdatoen må ikke være
overskredet.
• Temperaturhenvisninger fra
salgsdisken skal være -18°C eller
kaldere.
• Frossenmat handles inn til slut,
pakkes inn i avispapir og fraktes hurtig
hjem i frysebag og legges i fryseren.
Pakking av matvarer som
skal fryses
Dersom man skal fryse inn matvarer
selv, bruk kun friske matvarer.
Matvarene skal pakkes luft-tett, slik at
de ikke mister smak eller tørker ut.
Til innpakning egner seg:
Kunststoff-folie, plastfolie, polyethylen,
Alu-folie eller fryseposer. Disse kan
kjøpes hos dagligvare-forhandlere.
Ikke egnet til innpakning:
pakke-papir, pergamentpapir, cellofan,
søppelpose eller brukt bærepose.
Legg matvarene inn i forpakningen,
trykk ut luften og lukk tett.
Til lukking egner seg:
Gummiring, kunststoff -klips, tråd,
klebebånd som tåler kulde eller lign.
Pose eller plastfolie av polyethylen kan
sveises sammen med
plastsveiseapparat.
Før frysevarene legges i fryseren, bør
disse merkes, og forskynes med
innleggelsesdato.
Innfrysningskapasitet
Angivelsene om den max.
frysekapasiteten etter aktuell norm
finnes på typeskiltet.
Maksimal innfrysingskapasitet av
ferske matvarer pr. døgn (fordelt på
fryseristene) er angitt på typeskiltet
(i kg/24 t), se figur !0.
Legg matvarene flatt utover nederst i
fryseren. Pass på at nylig frossne
matvarer og matvarer som skal fryses
ikke kommer i berøring med hverandre.
Innpakking av matvarer
Bruk kun ferske, feilfrie varer. Matvarene
pakkes inn lufttett, slik at de ikke mister
smaken eller tørker ut.
NO.qxd 21/10/05 18:22 Page 54
Page 53

no
Frysepakkene merkes og påsettes
innfrysingsdato. (Utførlig beskrivelse, se
fryserådgiver).
Frysing av matvarer
Allerede frossede matvarer må ikke
komme i berøring med ferske matvarer
som skal nedfryses.
Temperaturbryteren innstilles for
nedfrysing og lagring (bilde E/22).
For innfrysing og langtidslagring
innstilles temperaturbryteren på siffer 2
1/2 (Tilsvarer -18°C og kaldere).
Henvisninger
• Ved nedlegging av ferske matvarer i
fryseboksen, arbeider fryseren inntil
matvarene er gjennomfrosset. Herved
kan eventuel også kjølerommet
nedkjøles mer.
Det er vanligvis ikke nødvending å
forandre på temperaturinnstillingen.
• Bilde E/22 settes på 24 timer før
inlegging av matvarer (ferske). Den
venstre vippebryteren trykkes ned, rød
merking blir synlig. Fryse prosessen
avsluttes ca. 24 timer etter inlegging.
Temperatur velger settess i normal pos.
Ved lagring av frysevarer
vær oppmerksom på
Synker romtemperaturen der skapet står
under +18°C er det nødvendig å slå på
bryteren for frysing, et rødt signal vil
være synlig (bilde E/22). Når denne
operasjonen gjennomføres, vil lyset på
innsiden av skapet forbli tent med
redusert styrke; dette sikrer at
temperaturen som behøves for
langtidslagring bibeholdes.
Lagringstid
For å unngå kvalitetsforringelse er det
viktig å følge den anbefalte lagringstid
for hvert produkt.
Oppbevaringstiden vil kunne variere.
Ved -18°C. eller kaldere anbefales
følgende lagringstider:
Fisk, kjøttpålegg, halvfabrikata, brød og
kaker: Inntil 2 måneder.
Kjøtt, kylling og ost: Inntil 4 måneder.
Frukt og grønnsaker:Inntil 6 måneder.
Tinning av frossne
matvarer
Alt etter slag og bruksmål kan man
velge mellom følgende
tiningsmuligheter:
Romtemperatur
i kjøleskapet
i stekeovn med/uten varmluft
i mikrobølgeovn.
Tinte frysevarer kan fryses på nytt.
Flesk og fisk ikke oppbevares lenger
enn 1 dag. Andre frysevarer ikke lenger
enn 3 dager.
I andre tilfeller, hvis smak, lukt og
utseende er uforandret, kan de kokes,
stekes eller lages til en rett, og deretter
fryses igjen.
Matvaren holder deg etter dette ikke like
lenge i fryseren.
Å lage is
Bilde U
Fyll is-skålen ¾ full med vann og sett
den i bunnen av fryseren. Isbitene fås
enklest ut av is-skålen dersom den
bøyes.
NO.qxd 21/10/05 18:22 Page 55
Page 54

no
Avriming
Kjølerom
Kjølerommet hat helautomatisk
avriming. Smeltevannet renner via en
oppsamlings-renne (bilde I/7) og
fordamper på baksiden av skapet.
Oppsamlingsrenne og avløpsrør
(bilde I/19) bør kontrolleres og
rengjøres ofte, slik at vannet alltid kan
passere uhindret.
Frysedelen
Frysedelen (bilde Q/A) avrimes ikke
automatisk, fordi varene ikke skal tine.
Rimog islaget gjør frysingen dårligere på
frysevarene og øker strømforbruket.
Rim skrapes av.
For å fjerne rimlaget, brukes en
isskrape. Bruk ikke spisse
metallgjenstander. Frysedelen må ikke
bli skadet eller få hull.
Avriming av frysedelen
Hvis frysedelen er sterkt nediset, må
den avises.
Det beste er å gjøre dette når lite
nedfryste varer ligger i apparatet. Hvis
det ligger nedfryste varer i apparatet,
bør superfrys innkobles ca. 4 timer før
avrimingen begynner, slik at matvarene
oppnår en velding lav temperatur.
Deretter tas fryseskuffene med
matvarene ut og fryseelementene
legges på matvarene.
Gå fram på følgende måte:
• Ta ut frossenvarene, pakk dem inn i
avis-papir, og legg dem på et kjølig
sted.
• Temperaturvelger (bilde Q/2) settes
på „O" eller ta ut stikk-kontakten. Pass
på at smeltevannet ikke kommer fram
til temperaturvelgeren.
• La døren stå åpen. Tørk smeltevannet
opp met klut eller svamp.
• Tørk frysedelen. Skapet kobles til
igjen, og matvarene legges i.
Hjelpemidler
Vær forsiktig med å bruke
avrimingsspray. Disse kan danne
eksplosive gasser, kan inneholde
kunststoffskadelige løsnings-eller
drivmidler eller være helsefarlige.
Se på produsentens henvisninger.
NO.qxd 21/10/05 18:22 Page 56
Page 55

no
Rengjøring
Husk alltid å trekke ut støpselet, hhv.
ta ut sikringen.
Til rengjøring av hele skapet utenpå, er
lunkent vann med litt oppvaskmiddel
egnet.
Uegnet er sand- eller syreholdige vaskemidler eller løsningsmidler.
Dørtetningen (bilde Q/11) vaskes med
rent vann, og tørkes godt.
Pass på at det ikke kommer vann i
temperaturvelgeren (bilde Q/2).
Avløpsrøret og -hullet (bilde I/7 og 19)
skal renses ofte, slik at smeltevannet
alltid kan renne fritt. Stikk en pinne e.l.
gjennom avløpsåpningene.
Utvendig behandles i tillegg med et
poleringsmiddel. Døren skal da være
lukket, slik at poleringsmiddelet ikke skal
komme inn på kunststoffdelene i skapet.
Energisparetips
• Sett skapet i et kaldt, godt ventilert
rom. Utsett det ikke for direkte sollys,
og ikke i nærheten av en varmekilde
(varmovn etc.)
• Sett ikke varm mat inn i skapet.
• Frysevarer som skal tines, kan legges
inn i kjøleskapet. Det drar således
nytte av kulden som frysevarene avgir,
for kjøling av matvarene i kjøleskapet.
• Frysedelen skal avrimes ved
isdannelse.
Et tykt islag gjør kuldeopptaket i
frysevarene dårligere, og
strømforbruket øker.
• Når man legger varer inn eller tar
varer ut, ha frysedøren så kort som
mulig åpen.
NO.qxd 02/11/05 10:48 Page 57
Page 56

no
Feil
Unaturlig støy:
Lampen i kjøle-rommet
lyser ikke:
For kaldt i kjøleskapet:
Kjøleevnen avtar:
Ingen kjøling:
Små feil ma kan klare selv
Før en serviceman tilkalles, bør De ha kontrolleret de etterfølgende punkter.
Blir servicemannen tilkalt uten at disse punktene er kontrollert, blir De belastet
for service-omkostninger selv i garantitiden.
Mulig årsak
- Enten står ikke skapet støtt, eller et fremm-dlegeme
er klemt fast ved kondensatoren.
- En del på gitteret kan ikke svinge fritt og berører
skapet eller ryggen, bøy denne delen forsiktig ut.
- Enten er lyspæren defekt: trekk ut stikkontakten eller
skru ut sikringen, skrift ut lyspæren maks. 15W, 220240V, (fatning E14), (bilde O)
- Lysbryter (bilde T/1) sitter fast.
Prøv om det går an å bevege den, hvis ikke tilkall
service.
- Temperaturvelger (bilde O/3) står på „O”.
- Temperaturvelgeren er for høyt innstilt.
- En stor mengde friske matvarer er nettopp lagt inn i
frysedelen. (Se frysing av matvarer).
- Døren åpnes ofte.
- En stor mengde matvarer er nylig lagt inn i fryseren.
- For sterk isdannelse i frysedelen.
- Ventilasjonen/luftingen er tildekket.
- Et fremmedlegeme har satt seg fast mellom kjøleanlegget og veggen.
- Stikk-kontakten står ikke i.
- Sikringen har gått.
- Temperaturvelger (bilde Q/2) står på „O”
NO.qxd 21/10/05 18:22 Page 58
Page 57

no
Små feil ma kan
klare selv
Dersom feilen ikke kan henvises til de
forannevnte eksemplene, tilkall service.
Utfør ikke mer arbeide, fremfor alt ikke i
de elektriske delene i apparatet.
Døren skal ikke åpnes unødvendig ofte,
dette for å unngå kuldetap.
Teknisk service
Ved reparasjon eller vedvarende feil
som ikke kan rettes opp ved hjelp av
overstående råd og informasjon:
• Skapet kobles fra nettet, eller
sikringen kobles ut.
• Skapdørene skal ikke åpnes
unødvendig.
Telefonnummer til nærmeste service
står i stedets telefonkatalog eller i
innholdsfortegnelsen over
serviceavdelinger. Når man henvender
seg til teknisk service, bør man huske å
oppgi produktets modellnummer (E-Nr.)
og serienummer (FD).
Begge numre står på skapets typeskilt.
Fig. !0
Vær oppmerksom på at ved å oppgi
disse fabrikasjonsdata kan man bidra til
å unngå unødvendig forflytting og
utgifter til servicepersonell som i så
tilfelle, ville bli belastet kunden.
NO.qxd 21/10/05 18:22 Page 59
Page 58

sv
Eliminering och
isärplockning av
använda apparater
Isärplockning av den
använda apparaten
De använda apparaten har material som
kan återanvändas, för detta ändamål
bör apparaten lämnas in till ett officiellt
center för insamling eller återvinning av
återanvändbara material.
Innan man gör sig av med sin
använda apparat och byter ut den mot
en ny, bör man göra den obrukbar:
• Dra ut apparatens kontakt ur
strömuttaget.
• Klipp av apparatens kopplings-kabel
och ta bort den tillsammans med
kontakten.
• Demontera dörrens lås och spärrar
och gör dem obrukbara så att barn
som leker med enheten inte kan låsa
in sig i den och så riskera att dö (av
kvävning).
Alla kyl- och frysapparater har gaser för
isolering och kylning som kräver speciell
behandling och eliminering. Observera
att kylkretsens ledningar i apparaten inte
har blivit skadade eller förstörda innan
Du lämnar in den till det motsvarande
officiella centret för Insamling.
Råd för eliminering av
förpackningen
Tillåt inte att barn leker med
förpacknings-materialet eller delar av
dess element. Apparaten är inte någon
leksak! Det finns fara för kvävning på
grund av kartongerna och plastplattorna!
Din nya apparat skyddas under
transporten till Ditt hem av en
förpackning. Alla materialen som
används i förpackningen respekterar
miljön och kan återvinnas eller
återanvändas.
Delta aktivt i att skydda miljön genom att
använda metoder för eliminering och
återvinning av förpackningens material
som respekterar miljön.
Din distributör eller lokala administration
informerar gärna om de mest effektiva
och aktuella sätten och möjligheterna att
eliminera dessa material och samtidigt
respektera miljön.
Denna enhet är märkt i enlighet
med der europeiska direktivet
2002/96/EG om avfall som utgörs av
eller innehåller elektroniska produkter
(waste electrical and electronic
equipment - WEEE).
Direktivet anger ramarna för inom EU
giltigt återtagande och korrekt
återvinning av uttjänta enheter.
Säkerhetsråd och
varningar av generell
karaktär
Läs och observera noggrannt dessa
användnings-instruktioner, likväl som all
extra information som bifogas med
apparaten. Spara användningsinstruktionerna för rådfrågning eller för
en möjlig senare ägare.
Apparaten har designats för:
• användning enbart i hemmiljö,
• kylning och frysning av matvaror.
I fall av användning med industriella
syften, bör man beakta de motsvarande
normerna och föreskrifterna.
SV.qxd 21/10/05 18:23 Page 60
Page 59

sv
Observera!
Utför installeringen och kopplingen av
apparaten till el-nätet i
överensstämmelse med monteringsinstruktionerna som bifogas.
Om apparaten har skador eller är
förstörd, bör den inte sättas igång. I
tvivelaktiga fall bör Du rådfråga
distributören där Du köpte apparaten.
Observera!
Täpp inte för apparatens öppningar för
ventilation och luftning.
Observera!
Använd endast de medel som
fabrikanten råder att påskynda
upptiningsprocessen
Observera!
Använd inte elektriska apparater som
inte är auktoriserade av fabrikanten i
facken som är till för bevaring och
infrysning av matvaror.
Observera!
Skada inte delarna och elementen som
utgör kylkretsen, till exempel genom att
perforera ledningarna med kylagenten
med spetsiga föremål, genom att böja
ledningarna eller skrapa på
ytbeläggningarna, etc. Om kylagenten
kommer ut i en stråle kan den skada
ögonen eller börja att brinna.
I nödfall
• Skölj ögonen med mycket vatten och
kalla på läkare.
• Håll apparaten borta från gnistor eller
källor med eld.
• Dra ut kopplingskabeln ur
strömuttaget. Ventilera området
ordentligt under några minuter.
Fara för explosion
Bevara drycker med hög grad av alkohol
i behållare som tillsluts hermetiskt;
dessutom bör de alltid placeras i vertikal
position.
OBS!
• Se till att ventilationsgallren på
kylskåpets stomme inte täpps till.
• Använd aldrig skarpa verktyg eller
andra metoder, som inte
rekommenderats av tillverkaren, för att
påskynda avfrostningen.
• Se till att kylslingorna inte skadas.
• Använd enbart av tillverkaren
rekommenderade interna elektriska
komponenter för kyl/frysskåpet.
Lära känna enheten
Dessa service-instruktioner gäller för
olika modeller av apparater; därför kan
det hända att detaljer och karakterisktika
av utrustning som beskrivs inte stämmer
överens med Din konkreta apparat.
Bild Q
1 Islåda
2 Termostaten och belysning
3 Förvaringshylla
4 Korv-och köttbehållare
SV.qxd 21/10/05 18:23 Page 61
Page 60

sv
8 Ventilationsgaller i sockeln
9 Behållare
10 Förvaringsbehållare (stor)
11 Dörrtätning
22 Termostat (bild E)
A Frysdelen
B Kyldelen
Klimat-klasser Maximal tillåten
rumstemperatur
Varje apparats klimatklass är signalerad
plattan med dess karakteristika och är
till för att vara referens för att veta inom
vilka intervall av rumstemperatur som
den kan fungera.
Klimatklass Tillåten
rumstemperatur
SN +10 °C till 32 °C
N +16 °C till 32 °C
ST
T
Ventilation
Den återuppvärmda luften i apparatens
bakre vägg bör ha fritt utlopp. I motsatt
fall måste apparaten öka sin kapacitet
och så provera en ökad förbrukning av
hög och onödig el-energi. För detta skäl
bör man noggrannt observera att
öppningarna för ventilering och luftning
aldrig är tilltäppta.
Nyttovolym
Uppgifter om nyttovolym finner du på
typskylten i produkten.
Ikoppling av
apparaten
Gör ren apparaten innan Du sätter igång
den för första gången.
Ikoppling av apparaten
Strömuttaget bör vara fritt tillgängligt.
Koppla i enheten till ett el-nät med
växelström på 220-240 V (N/SN), 220230 V (ST)/50 Hz genom ett strömuttag
som installerats enligt lag och som är
jordat. Strömuttaget bör vara skyddat
med en säkring på minst 10 ampere.
I apparater som är avsedda för länder
utanför den Europeiska kontinenten,
bör man försäkra sig om att värdena
för kopplings-spänningen och
strömtypen som finns på apparatens
platta med karakteristika
överensstämmer med dem i det
nationella nätet. Apparatens platta
med karakteristika befinner sig på
den lägre vänstra sidan. I fall det
skulle vara nödvändigt att byta ut
kopplingskontakten till strömnätet,
får detta endast utföras av
varumärkets specialiserade tekniker.
SV.qxd 21/10/05 18:23 Page 62
5 Smältvattens ränna
6 Glashylla
7 Grönsaksbehållare
°C till 38 °C
+16
°C till 43 °C
+16
Page 61

sv
Igångsättning och
temperaturval
Rengör kyl-och frysrummet före starten
(se Rengöring).
Start
Ställ termostaten (bild E) förbi “O”.
Skåpet börjar då kyla.
Om dörren inte kan öppnas omedelbart
efter stängning, vänta då två till tre
minuter tills undertrycket i frysrummet
har jämnat ut sig.
Temperaturval
Temperaturen i båda utrymmen kan
inställas centralt med termostaten
(bild E). Högre siffror betyder lägre
temperaturer i utrymmen.
Då termostaten står vid “O” är kyl- och
frysskåpet ur drift, vid ¨1¨ börjar
apparaten att kyla.
Vi rekommenderar en
mellaninställning omkring “2-3”.
Iakttas vid lagring av
livsmedel
Sjunker temperaturen i rummet, där
skåpet står, under +18°C måste
frysreglaren påsättas -der rötta market
kan man se bra (bild E/22). När Ni
utförer denna operation, inre ljuset
stannar kvar tändad med förminskad
potens; detta påverkar, att den önskade
temperaturen för längring av livsmedel
fortsätts.
Avstängning och att
ta ut ur drift
Avstängning
Termostaten (bild E) skall sättas på “O”,
härmed är hela apparaten avstängd.
Att ta apparaten ur drift
Om skåpet inte användes: drag
kontakten från vägguttaget, frosta av
och rengör, låt dörrarna stå öppna.
Placering
Ändringsmöjligheter av
inredningen
Vid behov kan gallerinredningens
placering i kylutrymmet ändras. Gallret
dras fram, trycks ned, tas ut och skjuts i
önskat läge. (Bild R).
För placering av höga flaskor kan
gallrets klaff öppnas.
Facken i dörren kan tas ut för rengöring.
(Bild Y).
Observeras vid placering
av livsmedel
• Varm mat och dryck skall vara
rumsvarma, när de placeras i skåpet.
• Livsmedel placeras helst förpackade
eller vältäckta.
• Olja och fet skall inte komma i kontakt
med plastinredningen och
dörrtätningen (de kan bli porösa).
• Förvara inte explosivt material i
kylskåpet.
• Högprocentig alkohol lagras ändast i
vältillslutet kärl och i stående läge.
SV.qxd 21/10/05 18:23 Page 63
Page 62

sv
• Bakväggen och glashyllan är de
kallaste områderna av skåpet.
Placeringsexempel
Bild Q
Frysutrymme (A)
Frysning och lagring av livsmedel,
isberedning.
På gallren (3)
Räknat uppifrån bakverk, färdiga rätter,
mjölkprodukter.
I köttbehållaren (4)
Kött och korv
På glashyllan (6)
Kött och korv
I grönsakslådan (7)
Grönsaker, frukt och sallad.
I dörrboxarna (9)
Små konserver, tuber.
I flaskhyllorna (10)
Stora flaskor.
Observera köldzonerna i
kylutrymmet
På grund av luftcirkulationen uppstår
zoner med olika temperatur i kylskåpet.
Zonen för ömtåliga matvaror finns
beroende på modell längst ned mellan
pilen som är inpräglad på sidan och
glashyllan som finns under den
(bild !1/1 och 2) eller mellan de båda
pilarna (bild !2/1 och 2).
Idealiskt för förvaring av kött, fisk, korv,
sallader osv.
Infrysning och
lagring, isberedning
Observeras vid inköpning av
frysgods
• Förpackningen får inte vara skadad.
• Fryspaketen skall vara
datumstämplade.
• Varorna i inköpsaffärens kylskåp
måste ha en temperatur om minst 18°C eller kallare.
• Frysgods skall köpas till sist och
bevaras i tidningspapper eller i en
kylväska under transporten.
Förpackning av livsmedel
Använd endast färska felfria livsmedel.
Livsmedel skall förpackas lufttätt så att
de inte förlorar smaken eller torkar.
Lämpliga materialer för
förpackningen:
Folier, plastpåsar av polyetylen,
aluminiumpapper och fryslådor.
Olämpliga materialer:
Papper, smörpapper, cellofan, soppåsar
och användna plastpåsar.
Sätt livsmedel i förpackningen, tryck ut
luften och tillslutna förpackningen väl.
Lämpliga materialer för stängning:
Gummiring, plastclips, snör och
frystålande tejp.
Fryspaketer skall beskrivas och förses
med datum av frysningen.
SV.qxd 21/10/05 18:23 Page 64
Page 63

sv
Infrysningskapacitet
Uppgifter om max.
infrysningsförmåga enligt aktuell
norm hittar du på typskylten.
Upplysning gällande maxkapaciteten
för infrysning av färska matvaror
(fördelade på frysgallren) under en
24-timmarsperiod finns på den skylt
som visar apparatens egenskaper
(i kg/24timmar), se bild !0.
Sätt de livsmedel, som skall djupfrysas,
brett på understa hyllan i skåpet. Redan
djupfrysta livsmedel får inte komma i
kontakt med färska icke frysta livsmedel.
Inställning av termostaten
och frysreglagen
Vid frysning skall termostaten ställas på
mellersta inställning (omkring “2-3”).
Med denna inställning kan man frysa in
max. 2,5kg livsmedel. Vid mera gods
skall man sätta på frysreglagen
(bild E/22) (tryck på vippreglagen- röda
ljuset tänds). Efter 24 timmar är
djupfrysningen färdig och frysreglagen
kan kopplas av.
Iaktta med inläggning av
frysgods
Redan djupfrysta livsmedel får inte
komma i kontakt med färska icke frysta
livsmedel.
Iaktta med lagring av
frysgods
Sjunker temperaturen i rummet, där skåpet
står, under +18°C måste frysreglaren
påsättas - der rötta market kan man se
bra (bild E/22). När Ni utförer denna
operation, inre ljuset stannar kvar
tändad med förminskad potens; detta
påverkar, att den önskade temperaturen
för längring av livsmedel fortsätts.
Lagringstid
För att undvika kvalitetsminskning av
frysgods är det viktigt att inte överskrida
lagringstiden. Det beror på frysgodset,
hur länge man kan lagra dem.
Vid -18°C kan man lagra fisk, korv,
färdiga rätter och bakverk ända opp till 2
månader, ost, hönsdjur, kött ända till 4
månader och grönsaker och frukt ända
opp till 6 månader.
Upptining av frysgods
Beroende på sätt och
avändningsändamål kan man välja
bland följande möjligheter:
vid rumstemperatur
i kylskåpet
i ugnen
med/utan varmluftsventilator
i mikrovågsuggnen.
Delvis eller helt upptinade varor
förbrukas omgående, de skall helst inte
djupfrysas en gång till. Efter vidare
bearbetning är dock en ny djupfrysning
möjligt.
Utnyttja inte mera den yttersta
lagringstiden.
Isberedning
Bild U
Fyll islådan till 3/4 med vatten och ställ
den på fryshyllan. Om du böjer islådan
så lossar istärningarna lätt.
SV.qxd 21/10/05 18:23 Page 65
Page 64

sv
Avfrostning
Kylutrymmet
Kylutrymmet avfrostas automatiskt.
Tövatten samlas i avloppsränna
(bild I/7) och ledes genom avloppsrör
(bild I19) till avdunstingskärlet på
kylskåpets baksida där vattnet samlas
och avdunstas. Se till att tövattnet alltid
kan rinna av obehindrat.
Frysutrymmet
Frysutrymmet (bild Q/A) avfrostas inte
automatiskt, för de djupfrysta livsmedel
får inte tina upp.
Större frost- eller iskikt minskar
frysskåpets effektivitet och ökar
elförbrukningen.
Skrapa bort frostskikten
Använd en plastskrapare för att ta bort
frostskikten.
Frysutrymmet får aldrig skadas, använd
därför inga vassa metallverktyg för att
skrapa bort is.
Avfrostning
Om isskiktet är tjockt i frysskåpet måste
man avfrosta detta.
Om det finns matvaror i frysskåpet, så
skall man sätta termostaten på 4 timmar
före avfrostning, så att matvarorna
uppnår en mycket låg temperatur.
Därefter tag frysgodslådorna med
livsmedeln ut.
Gör sedan så här:
• Tag matvarorna ut och linda
tidningspapper om dem och sätt dem
på ett svalt ställe.
• Stäng termostaten (bild Q/2) eller dra
ut stickkontakten. Observera att
tövattnet inte rinner i termostaten.
• Lämna frysskåpsdörren öppen, torka
tövattnet med en trasa eller en svamp.
• Torka frysutrymmet, sätt apparaten på
och lägg frysgodsen in igen.
Hjälpmedel vid avfrostning
Var försiktig, om du använder
avfrostningsspray. Den kan bilda
explosiva gaser, innehålla plastskadliga
lösnings- eller drivmedel eller vara
hälsovådlig.
Läs varudeklarationen.
SV.qxd 21/10/05 18:23 Page 66
Page 65

sv
Rengöring
Före rengöring skall alltid
stickkontakten dras ut eller säkringen
skruvas ut.
För hela apparatens rengöring med
undantag av dörrtätningen lämpar sig
handvarmt vatten med milt, lätt
diskmedel.
Olämpliga är sand- eller syrabaserande
rengöringsmedel resp. kemiska
lösningsmedel.
Dörrtätningen (bild Q/2) tvättas med
klart vatten och torkas därefter noga.
Observera att rengöringsvatten inte
rinner genom avloppsröret till
avdunstningskärlet.
Ytterväggarna kan dessutom behandlas
med lackpolitur.
Håll dörren stängd så att lackpolituren ej
kan nå de inre plastdelarna.
Energispartips
• Apparaten skall placeras i ett svalt, väl
ventilerat rum, utan solbestrålning.
Närheten av värmekälla (t. ex.
värmeelement) bör undvikas.
• Varma rätter insorteras först efter
avkylning.
• Frysvaror läggs i kylrummet för
upptining. På så sätt utnyttjas
frysvarans kyla för kylning av
livsmedel i kylskåpet.
• Frysutrymmet avfrostas vid isbildning.
Ett tjockt isskikt försämrar överföring
av kyla till frysgods och ökar
elförbrukningen.
• För in- och utlastning öppnas dörren
så kort som möjligt.
SV.qxd 21/10/05 18:23 Page 67
Page 66

sv
Störing
Vid ovanliga ljud:
Om kylskåpsbelysning
inte lyser:
Om kylutrymmet är för
kallt:
Om effekten minskar:
Ingen kyleffekt:
Reparation av småfel
Inte för varje störing behövs kundservice. Många gånger är det bara småfel
som skall åtgärdas. Innan kundservice tilkallas bör därför prövas, om störingen
med ledning av följande tips kan avhjälpas själv.
I sådana fall måste nämligen hela kostnaden för serviceinsatsen betalas, även
under garantitiden.
Möjliga orsaker
- Antingen står apparaten inte stadigt eller ett
främmande föremål sitter fästklämmt mellan väggen
och kylaggregatet så att en del av bakre väggen inte
kan vibrera fritt utan vidrör apparaten eller väggen avlägsna föremålet försiktigt.
- Glödlampan är sönder. Dra ut kontakten och
avskärmningen (bild O) och byt glödlampan
(220-240 V, max. 15 W, E 14).
- Ljusströmbrytaren (bild T/1) är i felläge.
Tryck upp eller dra ner ljusströmbrytaren för att få
den i normalläge. Om det inte är möjligt kalla på
kundservicen.
- Termostaten står vid “O” (bild O/3).
- Termostaten är inställd för lågt.
- Frysreglage (bild E/22) är inte påsatt före
djupfrysning av färska varor.
- Dörren har öppnats för ofta.
- För stora mängder av livsmedel har lagrats in.
- För tjockt frostskikt i frysrummet.
- Ventilationsgallret är övertäckt.
- Ett främmande föremål klämmer mellan
kylaggregaten och väggen.
- Kontakten är inte riktigt inne.
- Säkringen är utskruvad.
- Termostaten står vid “O” (bild Q/2).
SV.qxd 21/10/05 18:23 Page 68
Page 67

sv
Reparation av småfel
Kan störingen med hjälp av
ovanstående tips inte åtgärdas, kalla
omedelbart på kundservicen.
Genomför inga fler arbeten själv,
framförallt inte på elektriska delarna av
apparaten.
Öppna inte dörrarna i onödan,
kyleffekten minskar.
Teknisk Assistans
Service
Om en reparation måste utföras eller
om felet består och Du inte kan reparera
det med hjälp av de tidigare nämnda
råden och varningarna:
• Koppla ur apparaten ur el-nätet eller
aktivera säkringen.
• Öppna inte apparatens dörrar i
onödan.
Telefonnumret till den närmaste
Tekniska Assistans Servicen kan hittas i
den motsvarande telefonkatalogen eller
i adresslistan för Teknisk Assistans
Service. Glöm inte att uppge din enhets
produkt-nummer (E-Nr.) och
fabrikationsnumret (FD) då Du ber om
den Tekniska Assistans Servicens
intervention.
Båda numren finns på plattan med
apparatens karakteristika. Bild !0
Tänk på att när Du uppger Din enhets
produktnummer och fabrikationsnummer
kan Du medverka till att undvika
onödiga förflyttningar och utgifter för den
Tekniska Assistans Servicen, som
annars skulle dras av på Ditt konto.
SV.qxd 21/10/05 18:23 Page 69
Page 68

fi
Käytettyjen laitteiden
eliminointi ja
hävittäminen
Käytetyn laitteen
hävittäminen
Käytetyissä laitteissa on materiaaleja,
jotka voidaan käyttää uudelleen, tästä
syystä luovuttakaa laite resikloitavien
materiaalien keräys- ja uudelleen
käytön viralliseen keräys keskukseen.
Ennen kuin luovutte käytetystä
laitteestanne ja korvaatte sen uudella,
se on tehtävä käyttökelvottomaksi:
• Ottakaa pistoke irti pistorasiasta.
• Leikatkaa kytkentä johdin poikki ja
ottakaa se pois pistokkeen kanssa.
• Hajoittakaa oven lukot ja sulkimet tai
tehkää ne käyttökelvottomiksi, jotta
lapset leikkiessään yksikön kanssa,
eivät voisi jäädä suljetuiksi sen sisälle
ja silloin voida olla kuoleman vaarassa
(asfyksia).
Kaikissa jäähdytys- ja pakastin laitteissa
on eristys – ja jäähdyttäviä kaasuja, ja
niitä on kohdeltava ja eliminoitava
erikoisella tavalla. Tarkkailkaa, etteivät
laitteenne kylmä virtapiirin putket
vaurioidu tai vahingoitu ennen kuin
luovutatte sen Viralliseen Keräys
keskukseen.
Neuvoja pakkauksen
eliminoimiseksi
Älkää antako lasten leikkiä pakkauksen
materiaalien tai niiden osien kanssa.
Laite ei ole mikään leikkikalu! Vaara on
olemassa, että voisi koitua asfyksia
pahvien tai muovi laminoiden vuoksi!
Laitteenne on suojattu kuljetuksen
aikana kotiinne asti pakkauksella. Kaikki
käytetyt pakkaus materiaalit ovat
ympäristöystävällisiä ja ne voidaan
resikloida tai käyttää uudelleen.
Ottakaa aktiivisesti osaa
ympäristösuojeluun vaatimalla
pakkauksen materiaalien elimointi ja
uudelleen käyttömenetelmiä, jotka ovat
ympäristöystävällisiä.
Teidän jakelijanne tai Paikallinen Hallinto
informoivat Teitä mielellään
tehokkaimmista ja nykyaikaisimmista
mahdollisuuksista näiden materiaalien
ympäristöystävällisestä eliminoinnista.
Tämän laitteen merkintä perustuu
käytettyjä sähkö- ja elektroniikkalaitteita
(waste electrical and electronic
equipment - WEEE) koskevaan
direktiiviin 2002/96/EG.
Tämä direktiivi määrittää käytettyjen
laitteiden palautus- ja kierrätyssäännökset koko EU:n alueella.
Turvallisuus ohjeita
ja yleisluontoisia
varoituksia
Lukekaa ja tarkkailkaa tunnollisesti näitä
käyttöohjeita, samoin kuin muita
lisätietoja, jotka tulevat laitteen
yhteydessä. Säilyttäkää käyttö ohjeet,
jotta voitte hakea niistä neuvoja tai
mahdollista uutta omistajaa varten.
Laite on suunniteltu:
• ainoastaan kotikäyttöön,
• elintarvikkeiden jäähdytystä ja
pakastusta varten.
Mikäli sitä käytetään teollisuus
tarkoituksiin, on otettava huomioon
vastaavat normit ja säännöt.
FI.qxd 21/10/05 18:23 Page 70
Page 69

fi
Huomio!
Suorittakaa laitteen asennus ja kytkentä
sähköverkostoon mukana seuraavien
asennus ohjeiden mukaisesti.
Mikäli laitteessa esiintyisi vaurioita tai
joitakin vahinkoja, älkää pistäkö sitä
toimimaan. Mikäli epäilette asiaa,
ottakaa yhteyttä jakelijaan, joka teille on
toimittanut laitteen, ja kysykää häneltä
neuvoja.
Huomio!
Älkää peittäkö laitteen tuuletus- ja
ilmanvaihtoaukkoja.
Huomio!
Sulattamisen nopeuttamiseksi saa
käyttää ainoastaan valmistajan ohjeiden
mukaisia keinoja.
Huomio!
Älkää käyttäkö elintarvikkeiden säilytystai pakastusosastoissa muita kuin
valmistajan sallimia sähkölaitteita.
Huomio!
Älkää vahingoittako kylmäkoneiston
osia. tai kappaleita,esimerkiksi
lävistämällä jäähdytysaineiden putkia
terävillä esineillä , taivuttamalla putkia tai
raapimalla pintojen päällysteitä, jne. Jos
jäähdytysaineita tulee ulos voimakkaasti,
ne saattavat aiheuttaa vammoja silmiin
tai saada sen syttymään palamaan.
Kiire tapauksissa
• Huuhdelkaa silmät runsaalla vedellä;
kutsukaa lääkäri.
• Pitäkää laite erillään sytytys liekeistä
tai tulen kanssa tekemisissä olevista
lähteistä.
• Irroittakaa kytkin johto pistorasiasta.
Tuulettakaa alue perusteellisesti
useamman minuutin ajan.
Räjähdys vaara
Säilyttäkää korkeasti alkohoolipitoiset
juomat pulloissa, joissa on hermeettinen
sulkija; ja ottakaa myös huomioon, että
ne on aina sijoitettava pystysuoraan
asentoon.
Huomaa:
• Jääkaapin rungon ilmanvaihtoverkkoja
ei pidä tukkia.
• Sulatusvaihetta ei pidä yrittää lyhentää
mekaanisesti eikä muilla kuin
valmistajan sallimilla keinoilla.
• Älä vahingoita jäähdytyslaitteita.
• Käytä jääkaappi-pakastimessa
ainoastaan valmistajan suosittelemia
sähköosia.
Laitteeseen
tutustuminen
Nämä ohjeet laitteen käytön suhteen
pätevät laitteen eri malleihin; tästä
syystä on mahdollista, että kuvailemme
laitteen yksityiskohtia tai ominaisuuksia,
jotka eivät ole sovellettavissa juuri teidän
malliinne.
FI.qxd 21/10/05 18:23 Page 71
Page 70

fi
5 Sulatusvedenpoistokouru
6 Lasihylly
7 Vihanneslaatikko
8 Sokkelinilmankiertosäleikkö
9 Laatikko
10 Iso hylly
11 Oven tiiviste
22 Pakastinkytkin (kuva E)
A Pakastin
B Jääkaappi
Lämpötasot - Korkein
sallittu ympäristön
lämpötila
Jokaisen laitteen lämpötaso käy ilmi
laitteen tunnuslevystä ja ilmoittaa millä
ympäristön lämpötiloilla se voi toimia.
Lämpötaso Sallittu ympäristö
lämpötila
SN +10 °C asti 32 °C
N
ST
T
Tuuletus
Laitteen takaseinän uudelleen
lämminneen ilman on päästävä esteittä
ulos. Muussa tapauksessa laitteen on
lisättävä tehoaan ja siten aiheutuu
korkeampi ja hyödytön energian kulutus.
Siksi kannattaa tarkkailla, että tuuletusja ilmastointi aukoissa ei ole esteitä.
Hytötytilavuus
Tiedot hyötytilavuudesta löydät laitteesi
tyyppikilveltä.
Laitteen kytkentä
Puhdistakaa laite ennen kuin
käynnistätte sitä ensimmäistä kertaa.
Laitteen kytkentä
Pistorasian on oltava helposti käsillä.
Kytkekää laite sähköverkostoon , jossa
on vaihtovirta 220-240 V (N/SN),
220-230 V (ST)/50 Hz pistorasian avulla,
joka on asennettu sääntöjen mukaisesti
ja jossa on maadotin. Pistorasian on
oltava suojattu vähintään 10 ampeerin
sulakkeella.
Laitteissa, jotka viedään Euroopan
mannermaan ulkopuolelle, on
tarkistettava , että kytkentä jännitteen
arvot ja sähkövirran tyyppi , jotka
käyvät ilmi laitteen tunnuslevystä,
ovat samat kuin maan
sähköverkostossa. Laitteen
tunnuslevy on alhaalla vasemmalla
sivulla. Mikäli olisi tarpeen muuttaa
kytkennän pistoke sähköverkostoon,
voivat tämän toimenpiteen suorittaa
ainoastaan merkkiin erikoistuneet
teknikot.
FI.qxd 21/10/05 18:23 Page 72
Kuva
Q
1 Jääpalalaatikko
2 Lämpöastevalitsin ja sisävalaisin
3 Ritilähylly
4 Liha- ja makkaralaatikko
+16 °C asti 32 °C
°C asti 38 °C
+16
°C asti 43 °C
+16
Page 71

fi
Laitteen pois
kytkentä ja poisotto
Pois kytkentä
Pääkytkin käännetään O:lle (kuva E) ja
koko laite on pois päältä.
Käytöstä poisotto
Jos laite ei ole pitkään aikaan käytössä,
vedetään pistokytkin irti, kaappi
sulatetaan ja puhdistetaan. Ovet
jätetään auki.
Elintarvikkeiden
sijoittelu
Muutosmahdollisuuksia
kaapin sisäosassa
Ritilähyllyjen paikkaa voit tarpeen
vaatiessa vaihtaa. Vedä ritilähylly esiin
niin pitkälle kuin voit, työnnä sitä
alareunasta alaspäin ja vedä irti ja aseta
halutulle paikalle (kuva R).
Korkeita pulloja varten voi ritilähyllyn
luukun avata.
Ovessa olevat lokerot voidaan poistaa
puhdistusta varten (kuva Y).
Huomioi elintarvikkeita
sijoittaessasi
• Anna kuumien ruokien ja juomien
ensin jäähtyä kaapin ulkopuolella.
• Elintarvikkeet säilytetään pakattuina tai
hyvin peitettyinä.
• Öljy tai rasva ei saa joutua
kosketuksiin kaapin muoviosien ja
oven tiivisteen kanssa (ne voivat
muuten tulla huokoisiksi).
Kytkentä ja
lämpötilan valinta
Ennen käynnistystä ole hyvä ja puhdista
sisältä (katso Puhdistaminen).
Kytkentä
Lämpötilanvalitsin käännetään O:sta.
Laite aloittaa jäähdyttämisen.
Jos pakastimen ovi ei heti kytkennän
jälkeen halua avautua, odota pari kolme
minuuttia, kunnes alipaine on ehtinyt
tasoittua.
Lämpötilan valinta
Lämpötila laitteen molemmissa osissa
voidaan säätää lämpötilaliukukytkimestä
(kuva E). Korkeat luvut tarkoittavat
kylmää lämpötilaa laitteen molemissa
osissa.
Lämpötilankytkimen ollessa O:ssa laite
ei jäähdytä, luvusta 1 alkaen laite alkaa
toimia
Suosittelemme keskeistä lämpötilaa
(n. 2-3).
Pakastaessa tuoreita elintarvikkeita
valitse luku 3 (katso myös
"Elintarvikkeiden pakastus").
Elintarvikkeiden säilytys
Mikäli laitteelle valitun paikan lämpötila
laskee alle +18ºC on pakastimen kytkin
pistettävä käyntiin- punainen merkki
selvästi näkyvissä (kuva E/22). Kun
tämä toimenpide on suoritettu, sisävalo
jää sytyksiin alhaisella teholla ja näin
voidaan pitää yllä tarpeellinen lämpötila
pitkäiskaista säilytystä varten pakastin
osastossa.
FI.qxd 21/10/05 18:23 Page 73
Page 72

fi
Elintarvikkeiden
pakastus, säilytys ja
jään valmistus
Huomioi pakasteita
ostaessasi
• Osta vain ehjiä pakkauksia
• Tarkista viimeinen myyntipäiväsuositus
• Myyntipakastearkun lämpötilan tulee
olla vähintään -18ºC
• Hankkiessasi elintarvikkeita osta
pakasteet lopuksi, vie ne hyvin
pakattuina nopeasti kotiin ja pistä ne
heti pakastimeen.
Elintarvikkeiden pakkaus
Käytä vain ensiluokkaisia elintarvikkeita.
Pakkaa elintarvikkeet ilmatiiviisti, etteivät
ne menettäisi makuaan eivätkä kuivuisi.
Pakkaukisiin sopivia ovat:
muovipussit polyetyleenistä, foliot sekä
pakastelaatikot.
Pakkauksiin sopimattomia ovat:
paperi, voipaperi, sellofaani, jätepussit
sekä käytetyt ostosmuovipussit.
Aseta elintarvikkeet pakkauksiin, poista
ilma ja sulje pakkaus tiiviisti.
Sulkemiseen sopivia ovat:
Kumirenkaat, mouvirenkaat, narut,
kylmääkestävät teipit jne. Muovi- tai
foliopussit voidaan sulkea
foliohitsaajalla. Merkitse sisältö ja
pakastuspäivämäärä pakkausten päälle.
• Kaapissa ei saa säilyttää räjähtäviä
aineita.
• Korkeaprosenttista alkoholia saa
säilyttää vain suljetuissa pulloissa ja
ne pystyssä.
• Jääkaapin kylmimmät alueet ovat
takaseinällä ja lasihyllyn yläpuolella.
Sijoitusesimerkki
Kuva Q
Pakastekaapissa (A):
Elintarvikkeiden pakastus, säilytys ja
jään valmistus
Ritilähyllyillä (3)
Ylhäältä alas leivonnaiset, valmiit ruoat,
maitotaloustuotteet
Lihalokerossa (4)
Liha ja makkara
Alahyllyllä (6)
Liha ja makkara
Vihanneslaatikossa (7)
Vihannekset, hedelmät ja salaatti
Ovilokeroissa (9)
Pienet purkit ja pursot
Ovihyllyssä (10)
Suuret pullot
Huomioi jääkaappiosan
kylmäalueet
Ilmankierrosta johtuen jääkaappiosassa
on kylmempiä ja lämpimämpiä alueita.
Herkille elintarvikkeille tarkoitettu alue on
mallin mukaan aivan alhaalla sivussa
olevan nuolen ja sen alapuolella olevan
lasihyllyn välissä (kuva !1/1 ja 2) tai
molempien nuolien välissä (kuva !2/1 ja 2).
Se sopii ihanteellisesti kalan, lihan,
makkaran, salaattisekoitusten tms.
säilyttämiseen.
FI.qxd 21/10/05 18:23 Page 74
Page 73

fi
Huomioi pakasteitten
säilytyksessä
Mikäli laitteelle valitun paikan lämpötila
laskee alle +18ºC on pakastimen kytkin
pistettävä käyntiin - punainen merkki
selvästi näkyvissä (kuva E/22). Kun
tämä toimenpide on suoritettu, sisävalo
jää sytyksiin alhaisella teholla ja näin
voidaan pitää yllä tarpeellinen lämpötila
pitkäiskaista säilytystä varten pakastin
osastossa.
Säilytysaika
Jotta pakasteiden laatu ei kärsisi on
tärkeää, ettet ylitä suurinta sallittua
pakasteiden säilytysaikaa.
-18ºC lämpötilassa voidaan säilyttää
kalaa, makkaraa, valmiita ruokia ja
leivonnaisia 2 kuukautta, juustoa,
siipikarjaa, lihaa 4 kuukautta ja
vihanneksia ja hedelmiä noin 6
kuukautta.
Pakasteiden sulatus
Tarpeen mukaan voit valita seuraavista
mahdollisuuksista:
huoneen lämmössä
jääkaapissa
sähkölieden uunissa
kiertopuhaltimella/tai ilman
mikroaaltouunissa
Sulaneet pakasteet voidaan pakastaa
uudelleen, jos lihan tai kalan lämpötila ei
ole noussut yhden päivän aikana yli 3ºC,
muiden pakasteiden kolmen päivän
aikana.
Muussa tapauksessa, jos maku, haju tai
näkö eivät ole muuttuneet, voidaan
elintarvikkeet pakastaa uudelleen keiton
tai paiston jälkeen.
Pakasteita ei pidä säilyttää sen jälkeen
enää täyttä suositeltua aikaa.
Pakastusteho
Tiedot nykyisen standardin
mukaisesta maksimi pakastustehosta
löydät tyyppikilvestä.
Suurin mahdollinen pakastettavien
elintarvikkeiden määrä 24 tunnin
aikana (kun elintarvikepakkaukset on
jaoteltu pakastimen eri ritilöille) käy
ilmi arvokilvestä (Kg/24h), katso
kuva !0.
Aseta pakastettavat elintarvikkeet
pakastimen pohjalle mahdollisimman
leveästi. Varo, etteivät pakasteet joudu
kosketuksiin vasta pakastettavien
tuoreiden elintarvikkeiden kanssa.
Läpötilakytkimen
asentaminen ja
pakastekytkimen
päällepaneminen
Pakastaessasi tuoreita elintarvikkeita
käännä lämpötilakytkin luvulle 3. Tällä
määrällä voi pakastaa enintään 2,5 kg.
Suuria määriä pakastaessa käynnistä
lisäksi pakastekytkin (kuva E/22, paina
näppäinta - punainen valo syttyy).
Noin 24 tunnin kuluttua pakastamisen
alkamisesta toimii jäädytys täydellä
teholla ja pakastekytkimen voi ottaa pois
päältä.
Huomioi asettaessasi
pakastettavia
elintarvikkeita
pakastimeen:
Varo, etteivät pakasteet joudu
kosketuksiin tuoreiden elintarvikkeiden
kanssa.
FI.qxd 21/10/05 18:23 Page 75
Page 74

fi
Menettele seuraavanlaisesti:
• Ota pakasteet ja kääri ne
sanomalehtipaperiin.
• Pääkytkin, (kuva Q/2), käännetään
O:lle, tai pistoke otetaan irti. Huolehdi
siitä, ettei sulamisvettä joudu
kytkimeen.
• Jätä ovi auki, sulamisvesi pyyhitään
sienellä tai pyyhkeellä pois.
• Pakastin kuivataan, kaappi kytketään
taas päälle ja pakasteet asetetaan
takaisin kaappiin.
Sulatusapu
Kaupanolevia sulatussuihkeita
käytettäessä on oltava varovainen. Ne
saattavat muodostaa kaasuja tai voivat
sisältää muovia
vahingoittavia liuottimia tai
ponnekaasuja tai voivat olla muuten
terveydelle vaarallisia.
Lue valmistajan tuoteselostus.
Jään valmistus
Kuva U
Jääkaukalo täytetään 3/4 vedellä ja se
asetetaan pakastekaappiin. Jääkuutiot
irtoavat helposti, kun taivutat hieman
kaukaloa.
Sulatus
Jääkaappi
Sulaminen jääkaapissa tapahtuu
automaattisesti. Sulamisvesi valuu
keräilykourua pitkin, kuva I/7, veden
poistoputkeen, sieltä haihdutusastiaa,
jossa vesi haihtuu. Huolehdi siitä, että
sulamisvesi pääsee valumaan esteettä
vedenpoistoputken kautta
haihdutusastiaan (kuva I/19).
Pakastekaappi
Pakastekaappi ei sula automaattisesti,
koska pakasteet eivät saa sulaa.
Paksu huurre ja jääkerros pakastimessa
heikentää kaapin tehoa ja nostaa
sähkönkulutusta.
Huurrekerroksen poistaminen
Käytä huurteen poistamiseksi muovista
jäälastaa.
Pakastinta ei missään tapauksessa saa
vahingoittaa terävillä tai piikkisillä
esineillä.
Jääkerroksen poistaminen
Jos jääkerros on kovin paksu, pitää
kaappi sulattaa.
Jos kaapissa on vielä pakasteita, kytke
n. 4 tuntia ennen sulatusta pikapakastin
päälle, (kuva E/22), jotta kaapissa
olevien elintarvikkeiden lämpötila
saataisiin mahdollisemman alhaiseksi.
Ota sen jälkeen pakastelaatikot
sisältöineen ulos kaapista.
FI.qxd 21/10/05 18:23 Page 76
Page 75

fi
Puhdistus
Ennen puhdistamista on pistotulppa
aina vedettävä pistorasiasta tai sulake
kierrettävä irti.
Koko laitteen, lukuunottamatta oven
tiivistettä, puhdistamiseen käytetään
vettä, jossa on hieman
astianpesuainetta.
Mitään hiekka- tai happopitoisia
puhdistusaineita ei saa käytää. Oven
tiiviste pyyhitään vain kirkkaalla vedellä
ja hangataan kuivaksi (kuva Q/11).
Huolehdi siitä, ettei sulamisvettä joudu
lämpökytkimeen (kuva Q/2).
Jääkaapissa oleva sulamisveden
poistokouru (kuva I/7) ja poistoaukko
(kuva I/19) pitää puhdistaa useammin,
jotta
sulamisvesi pääsee esteettä valumaan.
Sulamisveden poistoaukon voi puhdistaa
esim. tikulla. Pidä huoli siitä, ettei
puhdistusvettä joudu haihtumisastiaan.
Ulkovaipan voit käsitellä lisäksi
lakkapintojen hoitoaineilla. Pidä ovi
suljettuna, ettei hoitoainetta pääse
sisävaipan pinnoille.
Energiansäästöohjeita
• Sijoita kaappi viileään, ilmastoituun
huonetilaan, suojaa se suoralta
auringonpaisteelta, älä sijoita kaappia
minkään lämmönlähteen
(lämpöpatterin jne.) läheisyyteen.
• Anna lämpimien ruokien ensin jäähtyä
kaapin ulkopuolella.
• Aseta sulatettavat pakasteet sulamaan
jääkaappiin. Täten hyödynnät
pakasteissa olevan kylmän
jääkaapissa olevien elintarvikkeiden
jäähdyttämiseen.
• Sulata pakastin jäästä. Paksu
jääkerros estää kylmän pääsyn
pakasteihin ja lisää sähkönkulutusta.
• Avaa kaapin ovea mahdollisemman
lyhyesti.
FI.qxd 21/10/05 18:23 Page 77
Page 76

fi
Mahdolliset syyt
- Kaappi ei seiso tukevasti eikä tasaisesti tai
vieras esine on juuttunut kaapin takaseinän
jäähdytyskoneistoon.
- Jäähdytyskoneiston putket eivät voi heilua
vapaasti tai koskettavat seinää - taivuta
putkiavarovasti.
- Hehkulamppu on rikki. Vedä pistotulppa irti,
poista lampun kupu (kuva O), ja vaihda
hehkulamppu 220-240 V, kork.15 W kanta E14.
- Valokytkin (kuva T/1) on juuttunut kiinni. Paina
valokytkintä ylös- tai alaspäin. Jos se ei liiku,
soita huoltoon.
- Lämpökytkin (kuva O/3) on O:ssa.
- Lämpökytkin on asennettu liian alhaiselle
lämpötilalle.
- Pakastinkyhein (kuva E/22) ei ole kytketty
päälle ennen tuoreitten elintarvikkeiden
pakastamista.
- Ovea on avattu tiheään.
- Kaappiin on sijoitettu suuria määriä tuoreita
elintarvikkeita.
- Paksu jääkerros pakastimessa.
- Ilamanvaihtosäleikkö on peitetty.
- Vieras esine on juuttunut seinän ja
jäähdytyskoneen väliin.
- Pistotulppa ei ole pistorasiassa kunnolla.
- Sulake on rikki.
- Lämpökytkin (kuva Q/2) on O:ssa.
Häiriöt
Meluisa käyttöääni
Jääkaapin sisävalo ei toimi
Jääkaapissa on liian kylmä
Jäähdytysteho heikkenee
Jäähdytys ei toimi
Pienet häiriöt voit poistaa itse
Ennenkuin otat yhteyttä huoltoon, tarkista, voitko itse poistaa vian allaolevien
ohjeiden avulla.
Muutoin joudut itse maksamaan huoltokäynnin, vaikka takuu olisikin vielä
voimassa.
FI.qxd 21/10/05 18:23 Page 78
Page 77

fi
Pienet häiriöt voit
poistaa itse
Jos häiriöitä ei voi poistaa
edellämainittujen ohjeiden avulla, ota
yhteys huoltoon.
Älä missään tapauksessa tee muita
korjauksia itse, ei varsinkaan kaapin
sähkölaitteessa.
Älä avaa enää tarpeettomasti kaapin
ovea, jotta kylmyys ei menisi hukkaan.
Teknillinen
Huoltopalvelu
Mikäli korjauksesta on kysymys tai vika
vain jatkuu edelleen ettekä voi korjata
sitä edellä antamiemme neuvojen tai
varoitusten avulla:
• Kytkekää laite irti sähköverkostosta tai
aktivoikaa sulake.
• Älkää turhaan aukaisko laitteen ovia.
Lähimmän Teknillisen Huoltopalvelun
numero löytyy joko puhelinluettelosta tai
Teknillisen Huoltopalvelun omasta osoite
luettelosta. Kun pyydätte Teknillisen
Huollon Palvelu keskuksen palveluja,
älkää unohtako ilmoittaa tuote numeroa
(E-Nr.) ja yksikkönne valmistajan
numeroa (FD) .
Molemmat numerot löytyvät laitteenne
tunnuslevystä. Kuva. !0
Ottakaa huomioon, että ilmoittaessanne
tuotteen ja valmistajan numeron teidän
omassa laitteessanne voitte välttyä
Teknillisen Huollon kustannuksista ja
niiden siirtymisestä paikasta toiseen,
muussa tapauksessa joutuisitte itse
maksamaan kulut.
FI.qxd 21/10/05 18:23 Page 79
Page 78

da
Bortskaffelse og
ophugning af brugte
apparater
Ophugning af det
brugte apparat
I brugte apparater er der materialer, der
kan genbruges. Indlever derfor det
gamle apparat til et anerkendt center for
opsamling eller behandling af
genbrugsmaterialer.
Før det gamle apparat smides væk
ved erhvervelse af et nyt, bør det
gøres ubrugeligt.
• Dertil tages apparatets stik ud af
stikkontakten.
• Tilslutningsledningen skæres over og
bortskaffes sammen med stikket.
• Dørens lukke- og låseanordninger
afmonteres eller gøres ubrugelige for
således at undgå, at børn ved leg
med apparatet låses inde og kommer i
livsfare (kvælning)
Alle køleskabe og dybfrysere indeholder
isolerings- og kølemidler, som kræver
særlig behandling til bortskaffelse. Sørg
for, at rørene til apparatets kølekredsløb
ikke lider skade, inden apparatet
indleveres til det pågældende
opsamlingscenter.
Råd vedrørende
bortskaffelse af
emballage
Vær opmærksom på, at børn ikke leger
med emballagen eller nogle af dens
dele. Apparatet er ikke noget legetøj!
Der er fare for kvælning som følge af
leg med papstykker og plasticposer!
Det nye apparat har under transporten
til bestemmelsesstedet været beskyttet i
emballagen. Ved fremstilling af
emballagematerialet er der taget hensyn
til miljøet, og det kan genindvindes til
genbrug.
Vær med til at beskytte miljøet ved at
gøre brug af miljøvenlige metoder til
bortskaffelse og genindvinding af
emballagematerialer.
Såvel forhandler som kommunen
oplyser gerne om de bedste muligheder
for bortskaffelse af disse materialer
under hensyntagen til miljøet.
Dette apparat er klassificeret iht.
det europæiske direktiv 2002/96/EF om
affald af elektrisk- og elektronisk udstyr
(waste electrical and electronic
equipment - WEEE).
Dette direktiv angiver rammerne for
indlevering og recycling af kasserede
apparater gældende for hele EU.
Råd vedrørende
sikkerhed og
bemærkninger i al
almindelighed
Gennemlæs denne brugsanvisning
omhyggeligt samt alle øvrige
oplysninger, der følger med apparatet.
Opbevar brugsanvisningen til evt.
senere brug eller til andre, der skulle
overtage apparatet.
Apparatet er fremstillet til
• eksklusiv afbenyttelse i privat
husholdning,
• afkøling og dybfrysning af fødevarer.
Til industribrug bør man tage hensyn til
gældende regler og bestemmelse.
DA.qxd 21/10/05 18:24 Page 80
Page 79

da
Vigtigt!
Apparatets montering og tilslutning til
strømnettet må kun udføres i henhold til
medfølgende montageanvisning.
Hvis der konstateres beskadigelse eller
mangler, må apparatet ikke sættes i
gang. I tilfælde af tvivl er det tilrådelig at
kontakte forhandleren, der har leveret
apparatet.
Vigtigt!
Sørg for, at apparatets åbninger til
ventilation og udluftning ikke bliver
tilstoppet.
Vigtigt!
Med henblik på at tilskynde processen
for afisning bør man benytte de af
fabrikanten tilrådede midler.
Vigtigt!
Inde i rummene til opbevaring af
fødevarer og dybfrysning må man ikke
benytte elektriske apparater, der ikke er
godkendt af fabrikanten.
Vigtigt!
Pas på ikke at beskadige
kølekredsløbets dele og komponenter,
f.eks. stikke hul i kølemidlets kanaler
med spidse genstande, bøje kanalerne
eller skrabe overfladernes beklædning
etc. Udstrømning af kølemiddel kan
forårsage øjenskade eller få øjnene til at
hæve.
I nødstilfælde
• Skyl øjnene med rigeligt vand og søg
lægehjælp.
• Hold apparatet på afstand af
tændgnister og ildkilder.
• Træk fødekablet ud af stikkontakten.
Ventiler rummet grundigt i adskillige
minutter.
Fare for eksplosion
Opbevar drikkevarer med stort
alkoholindhold i beholdere med
hermetisk lukning, hvilke desuden altid
bør anbringes i lodret stilling.
Vigtigt
• Sørg for ikke at tilstoppe
ventilationsgitteret på køleskabets
struktur.
• Til fremskyndelse af fryseprocessen
bør man ikke anvende andre
mekaniske anordninger eller midler
end dem, der er blevet anbefalet af
fabrikanten.
• Undgå beskadigelse af
kølekredsløbet.
• Til køleskabet/fryseboksen bør man
kun benytte den type interne elkomponenter, der er blevet anbefalet
af fabrikanten.
Bliv dus med
enheden
Nærværende brugsanvisninger gælder
for apparatets forskellige modeller;
derfor kan der fremgå beskrivelser og
karaktertræk for udstyret, som ikke
svarer til det pågældende apparat.
DA.qxd 21/10/05 18:24 Page 81
Page 80

da
Figur
Q
1 Bakke til isterninger
2 Temperaturvælger/afbryder for lys i
køleskabet
3 Hylderiste
4 Beholdere til kød
5 Smeltevandsrende
6 Køleplade
7 Beholder til grøntsager
8 Ventilationsrist i bunden af skabet
9 Sidehylder
10 Flaskehylder
11 Lufttæt dørlukning
22 Afbryder for fryserafdelingen
(figur E)
A Fryserafdelingen
B Køleskabet
Klimatyper Højest mulige
stuetemperatur
Hvert apparats klimatype fremgår af
dets plade med tekniske data og tjener
som reference for at vide, inden for
hvilke marginer for stuetemperatur
apparatet kan fungere.
Klimatype Acceptabel
omkringværende
temperatur
SN +10 °C til 32 °C
N +16 °C til 32 °C
ST
T
Ventilation
Den opvarmede luft ved væggen bag
apparatet bør have fri passage. I
modsat fald vil apparatet tvinges til at
øge dets ydelse, hvilket bevirker et øget
og unødvendigt elektrisk energiforbrug.
Derfor bør man være særlig
opmærksom på, at ventilations- og
udluftningsåbninger aldrig er tilstoppede.
Effektiv volumen
Angivelserne vedr. effektiv volumen
findes på typeskiltet i skabet.
Apparatets
tilslutning
Rengør apparatet forud for dets
igangsættelse for første gang.
Apparatets tilslutning
Stikkontakten bør være frit tilgængelig.
Enheden tilsluttes strømnettet med
vekselstrøm på 220-240 V (N/SN), 220230 V (ST)/50 Hz via en reglementeret
installeret stikkontakt med
jordforbindelse. Stikkontakten bør være
beskyttet med en sikring på mindst 10
ampere.
For apparater, der er bestemt til lande
uden for det europæiske kontinent,
bør det efterprøves, om værdierne for
tilslutningsspænding og strømtypen
jfr. apparatets plade med tekniske
data stemmer overens med landets
strømnet. Apparatets plade med
tekniske data befinder sig nederst på
venstre side. Såfremt det skulle blive
nødvendigt at udskifte
tilslutningsstikket til strømnettet, må
dette kun udføres af tekniske fagfolk
fra varemærket.
DA.qxd 21/10/05 18:24 Page 82
°C til 38 °C
+16
°C til 43 °C
+16
Page 81

da
Start af kølefryseskabet og
temperaturvalg
Rengør køle-fryseskabet inden det tages
i brug (se rengøring).
Start af køle-fryseskabet
Drej temperaturvælgeren (figur E)
som ved levering befinder sig i “O”
stilling. Derved startes køleprocessen.
Bemærk
Når køle-fryseskabet fungerer dannes
der vanddråber eller rim på bagpladen.
Dette er normalt. Køle-fryseskabet
afrimer “automatisk”, hvorfor det hverken
er nødvendigt at skrabe rimen af eller
tørre vanddråberne. Vandet føres ud via
afvandingskanalen (figur I/7) til en
beholder på bagsiden af køleskabet,
hvorfra det fordamper.
Ved lukning af døren til fryseafdelingen
dannes der et undertryk inde i fryseren.
Vent 2-3 minutter før døren igen åbnes,
for at give tid til kompensation af
trykforskellen.
Temperaturvalg
Brug temperaturvælgeren (figur E) til at
regulere køleskabets og fryserens
temperatur i forhold til omgivelsernes
temperatur. Det højeste tal svarer til
laveste temperatur.
Når temperaturvælgeren befinder sig i
position “O” er der slukket for
afkølingsprocessen. Køleprocessen
starter igen så snart vælgeren er i
position “1”.
Normalt anbefales det at holde en
middeltemperatur (indstilling omkring
“2-3”).
For indfrysning af fødevarer drejes
vælgeren til position “3” (se ligeldes
“Fryser”).
Vigtigt for opbevaring af
frosne produkter
Såfremt temperaturen på stedet hvor
kølefryseskabet befinder sig falder til
under +18ºC skal afbryderen for
fryseren aktiveres, hvorved den røde
lampe lyser (figur E/22). Denne proces
bevirker at lyset inde i fryseren forbliver
tændt men med nedsat styrke. Herved
holdes den nødvendige temperatur for
lang tids opbevaring i fryseren.
Slukning og
afbrydelse
Slukning
Drej temperaturvælgeren til “O”-stilling
(figur E). Køleprocessen standses i
hele kølefryseskabet.
Afbrydelse
Såfremt køle-fryseskabet ikke skal
bruges i længere tid tilrådes det at
trække stikket ud, lade skabet afrime og
derefter gøre det rent. Lad dørene til
køleskab og fryser stå åbne.
DA.qxd 21/10/05 18:24 Page 83
Page 82

da
Fordeling af varerne
Ændring af indretningen
Hylderistene i køleskabet kan placeres i
varierende højde alt efter behov. Træk
hylden fremad og løft den for at tage den
ud af køleskabet for derefter at placere
den på den ønskede rille (fig. R).
Der er højde nok til at flasker kan stå
lodret i flaskehylden.
Beholderne der er fastgjort på
indersiden af døren kan tages ud for
rengøring (fig. Y).
Råd for opbevaring af
fødevarer:
• Afkøl tilberedte retter og drikke inden
de placeres i køle-fryseskabet.
• Alle fødevarer bør indpakkes eller
kommes i beholdere inden de
anbringes i køle-fryseskabet .
• Olie eller fedt bør ikke komme i
kontakt med dele af plastik og heller
ikke med tætningen i døren (kan
risikere at blive porøs).
• Eksplosive materialer må aldrig
anbringes i køle-fryseskabet.
• Drikkevarer med en høj
alkoholprocent bør lukkes hermetisk
og placeres opretstående.
• I køleskabet er den koldeste zone
bagvæggen samt kølepladen.
Beskrivelse af kølefryseskabet
Forslag til fordeling af
varerne
Figur Q
I fryseren (A):
Indfrysning og opbevaring af fødevarer
samt fremstilling af isterninger.
I køleskabet (B):
På hylderistene (3) ovenfra og
nedefter: bagærk, tilberedte madvarer,
mælkeprodukter.
I beholderne til kød (4):
kød og pålæg.
På pladen (6):
kød og pålæg.
I grønsagsbeholderen (7):
grønsager, hovedsalat og frugt.
smør og ost.
I beholderen i døren (9):
tuber og mindre dåser
I flaskehylderne (10):
store flasker
Overhold kuldezonerne i
køleafdelingen
Luftcirkulationen i køleafdelingen sørger
for, at der opstår zoner med forskellig
kuldeeffekt.
Zonen til sarte fødevarer befinder sig,
afhængigt af modellen, nederst i skabet
mellem den indprægede pil (i siden) og
den underliggende glashylde
(Billede !1/1 og 2 ) eller mellem de to
pile (Billede !2/1 og 2). Denne zone er
velegnet til opbevaring af kød, fisk,
pålæg, salatblandinger osv.
DA.qxd 21/10/05 18:24 Page 84
Page 83

da
Frysning og
opbevaring af
produkter-fremstilling
af isterninger
Ved indkøb af dybfrosne
fødevarer bør følgende
observeres:
• Køb kun produkter hvis indpakning er
hel og tæt.
• Kontroller at datoen for holdbarhed
ikke er overskredet.
• Frysertemperaturen i den forretning
hvor varerne indkøbes bør være under
-18C.
• Tag de dybfrosne varer til sidst. Pak
dem ind i avispapir eller læg dem i en
isoterm pose og tag straks hjem for at
anbringe varerne i fryseren.
Emballage af friske
produkter
Brug kun absolut friske produkter til
hjemmefrysning, emballeret i vakuum for
ikke at blive tørre.
Materiale der er velegnet til
indpakning:
Plastfolie af polyetylen, aluminiumsfolie
og lufttætte kasser. Det drejer sig om
produkter der kan købes i en
hvilkensomhelst forretning.
Materiale der er uegnet til
indpakning:
Indpakningspapir, sulfatbehandlet papir,
cellofan, affaldsposer samt brugte
plastikposer.
Materiale der er velegnet til lukning af
indpakningen:
Gummistrimler, plastikclips, snor,
vandfast tape eller lignende. Et apparat
til forsegling af plastfolie og polyetylen
poser anbefales.
Forsyn pakkerne med etiketter der
angiver indholdet og indfrysningsdato
inden placering i fryseren.
Frysekapacitet
Oplysninger om den max.
frysekapacitet fremgår af typeskiltet.
Den maksimale kapacitet for
nedfrysning af friske madvarer på 24
timer, (fordelt oven på frysegitrene)
figurerer på skiltet med tekniske data
(i kg/24 t), se figur !0.
Anbring produkterne således at
luftcirkulationen i fryseren ikke
forhindres. Sørg for at de friske
produkter ikke berører de frosne.
Temperaturvælger for
fryser samt fryseafbryder
Indstil temperaturvælgeren på “3” for
indrysning. I denne position kan 2,5 kg
fødevarer indfryses. Hvis det drejer sig
om større mængder skal
fryseafbryderen anvendes (fig. E/22).
(Ved tryk på denne knap ses et rødt
signal). Når indfrysningsprocessen er
afsluttet (ca. 24 timer) afbrydes
processen ved igen at trykke på samme
knap.
Meget vigtigt for
indfrysning:
Undgå en hvilken som helst kontakt
mellem de allerede indfrosne og de
friske produkter.
DA.qxd 21/10/05 18:24 Page 85
Page 84

da
Vigtigt for opbevaring af
de frosne produkter:
Såfremt omgivelsestemperaturen hvor
køle-fryseskabet befinder sig falder til
under -18ºC er det nødvendigt at
aktivere fryseafbryderen således at det
røde signal ses (figur E/22). Ved denne
operation forbliver det interne lys tændt
men med reduceret styrke; herved
bibeholdes den nødvendige temperatur
til langtidsopbevaring i fryserafdelingen.
Opbevaringsperiode
For at sikre den optimale kvalitet af de
frosne produkter bør opbevaringstiden
ikke overskrides. Tiden er afhængig af
produktet. Ved -18ºC kan fisk, pølser,
færdiglavede retter samt bagværk
opbevares i 2 måneder; ost, fjerkræ og
kød i 4 måneder; grøntsager og frugt i 6
måneder.
Optøning af produkterne
Alt efter anvendelsen af de frosne
produkter kan følgende metoder
anvendes:
- optøning ved stuetemperatur
- i køleskab
- i en normal ovn, en ovn med
luftcirkulering eller en mikrobølgeovn
Helt eller delvist optøede produkter kan
kun genfryses, såfremt de højest har
været udsat for en dag ved en
temperatur på +3ºC hvis det drejer sig
om kød eller fisk, og for andre
produkter, at de maksimalt har været
opbevaret i tre dage ved en temperatur
på + 3ºC.
Kontroller al lugt, smag og udseende
ikke har ændret sig, tilbered produkterne
og indfrys dem igen.
De maksimale opbevaringstider bør
aldrig overskrides.
Fremstillling af isterninger
Figur U
Fyld bakkerne til isterninger 3/4 op med
vand og anbring dem i fryseren.
Bøj bakken let for at lette udtagningen af
de færdige isterninger.
Optøming
Køleskabsafdelingen
Afrimnming foregår automatisk. Vandet
føres gennem en kanal og
afvandingsrøret (figur I/19) til depotet
på bagsiden af skabet, hvorfra det
fordamper.
Sørg for at begge kanaler (figur I/19)
altid er rene for at begge
afrimningsvandet ikke møder
forhindringer.
Fryserafdelingen
I fryserafdelingen er optøningen ikke
automatisk, for ikke at risikere uønsket
optøning af de frosne produkter.
Såfremt hylderne i fryseren har et lag af
rim eller is stiger strømforbruget og kølefryseskabets funktioner kan nedsættes.
Fjernelse af rimfrost eller isbelægning
Brug medfølgende skraber af plastik.
Brug aldrig spidse metalgenstande som
kan volde skade på frysepladerne.
Optøning
Såfremt der har dannet sig et islag på
omkring 1/2 cm er det nødvendigt at
optø køle- fryseskabet.
Såfremt der er frysevarer i
fryseafdelingen skal frysekontakten
(fig. E/22) aktiveres ca. 4 timer før
optøningen, for at varerne kommer ned
på så lav temperatur som muligt.
DA.qxd 21/10/05 18:24 Page 86
Page 85

da
Gør som følger:
• Fjerne de frosne varer og indpak den
omhyggeligt i avispapir for opbevaring
på et køligt sted.
• Indstil temperaturvælgeren (figur Q/2)
til position “0” eller træk stikkontakten
ud.
• Lad døren stå åben og tør
optøningsvandet op med en klud eller
svamp.
• Når optøningen er slut tørres hele
fryseren godt med et tørt viskestykke;
tænd igen for køle-fryseskabet og
placer de frosne varer i fryseren igen.
Hurtig optøning
Optøningen fremskyndes ved at placere
en beholder med kogende vand i
fryseren.
Ved eventuel brug af aerosoler til
optøning tilrådes højeste forsigtighed,
da der muligvis kan dannes
eksplosionsfarlige gasser eller
opløsningsmidler der kan skade
plastikdelene og være sundhedsfarlige.
Rengøring
Før rengøring af køle-fryseskabet,
afbryd den elektriske forbindelse
eller fjern sikringen
Med undtagelse af dørtætningen bruges
lunkent vand med sæbe til rengøring.
Brug ikke svidende eller ætsende
produkter, koncentrerede vaskemidler
eller opløsningsmidler. Dørtætninge
(fig. Q/11) afvaskes udelukkende med
rent vand og tørres omhyggeligt med en
tør klud.
Undgå at der kommer vand i
termostaten (fig. Q/2).
Rengør ofte kanalen (fig I/7) og
afløbsrøret (fig I/19) i køleskabet,
således at vandet fra den automatiske
afrimning kan løbe ud uden besvær.
Såfremt nødvendigt kan en vatpind
bruges til at rense åbningen af
afløbsrøret hvis det er tilstopped.
Rengør de udvendige vægge af kølefryseskabet med normale
rengøringsmidler. Hold døren lukket
under den ydre rengøring for at undgå
at rengøringsprodukterne kommer i
kontakt med plastik panelerne i skabets
indre.
Strømbesparelser
• Anbring fryseren på et køligt, godt
ventileret sted. Undgå direkte sollys
samt varmekilder (radiator etc).
• Afkøl fødevarerne inden anbringelse i
kølefryseskabet.
• Optø produkterne i køleafdelingen.
Derved vil den frigivne kulde hjælpe
med til at afkøle de varer der befinder
sig i køleskabsafdelingen.
• Optø fryseren såfremt der har dannet
sig et lag is, idet dette nedsætter
kuldefordelingen og øger
strømforbruget.
• Sørg for hurtig åbning og lukning af
skabets døre. Derved formindskes
dannelsen af rim.
DA.qxd 21/10/05 18:24 Page 87
Page 86

da
Problem
Underlige lyde:
Lyset inde i skabet
fungerer ikke:
Temperaturen i køleskabet er for lav:
Køleevnen er nedsat:
Skabet køler overhovedet ikke:
Små fejl man selv kan klare
Før De kontakter den tekniske service, beder vi Dem venligst gennemlæse
følgende, som kan være Dem til stor gavn i forbindelse med mindre problemer.
Husk, at selv i garantiperioden skal De selv betale udgifterne til besøg af en
tekniker, mens selve reparationen er dækket.
Mulige årsager
- Køle- fryseskabet står ikke fast eller der er et
fremmedlegeme i køleskabszonen.
- En mindre del på bagsiden af skabet kan ikke
bevæge sig frit og rører køle- fryseskabet eller
væggen. Giv delen et lettere bøj til lyden forsvinder.
- Pæren er sprunget. Træk kontakten ud af stikket,
fjern dækslet (fig O) sæt en ny pære i (maksimum
15 W, 220-240 V, fatning E 14).
- Afbryderen i døren har sat sig fast (figur T/1), prøv
at bevæge den. Såfremt det ikke lykkes tilkald
teknisk service.
- Temperaturvælgeren (figur O/3) er i “0” stilling.
- Temperaturvælgeren er i en stilling der svarer til
meget lav temperatur.
- Fryseafbryderen er ikke blevet aktiveret (fig E/22)
inden anbringelse af friske varer.
- Døren er blevet åbnet for mange gange.
- For stor mængde fødevarer er placeret for
nedfrysning.
- Der er et for tykt lag is i fryseren.
- _vre eller nedre ventilationsrist på køle-fryseskabet
er tilstoppet
- Der er et fremmedlegeme mellem køleskabet og
væggen.
- køle-fryseskabet er ikke korrekt tilsluttet elnettet.
- Sikringen er løs.
- Temperaturvælgeren er i position "0".
DA.qxd 21/10/05 18:24 Page 88
Page 87

da
Små fejl man selv
kan klare
Såfremt De efter at have prøvet disse
anvisninger ikke er i stand til at løse
problemet bør teknisk service tilkaldes.
Forsøg aldrig at manipulere de
elektriske komponenter.
Lad være med at åbne døren for ikke at
miste kulde.
Teknisk
Kundeservice
Såfremt der foretages reparation eller
hvis skaden varer ved og ikke kan
udbedres under hensyntagen til
ovenstående råd og bemærkninger:
• Der afbrydes for apparatets tilslutning
til strømnettet eller sikringen slås fra.
• Undgå unyttig åbning af apparatets
døre.
Telefonnummeret til nærmeste Tekniske
Kundeservice kan man finde i den
tilsvarende telefonbog eller i Teknisk
Kundeservices adressebog. Ved
tilkaldelse af den Tekniske Kundeservice
bør man ikke glemme at opgive den
pågældende enheds produktnummer
(E-Nr.) og fabrikationsnummer (FD).
Begge numre befinder sig på apparatets
plade med tekniske data. Fig. !0.
Vær opmærksom på, at ved at opgive
enhedens produkt- og
fabrikationsnummer kan man være med
til at undgå den Tekniske
Kunderservices unødige rejser frem og
tilbage og ekstraudgifter, som i sidste
ende ville gå for kundens regning.
DA.qxd 21/10/05 18:24 Page 89
Page 88

ru
Удаление и разборка
использованных
аппаратов
ÐÐààççááîîððêêàà
èèññïïîîëëüüççîîââààííííîîããîî ààïïïïààððààòòàà
Использованные аппараты содержат
материалы, которые можно восстановить,
поэтому сдайте аппарат для этого в
официальный центр приема и
восстановления рециркулируемых
материалов.
До того как сдать Ваш аппарат или
поменять его на новый, Вы должны
привести его в нерабочее состояние:
• Для этого уберите вилку из
токоприемника.
• Перережьте кабель соединения аппарата
и уберите его вместе с вилкой.
• Разберите задвижки или замки двери и
приведите их в нерабочее состояние,
чтобы дети не играли с аппаратом.
Играя с ним, они могут закрыться в нем
и подвергнуться опасности
смертельного исхода (удушье).
Все холодильные и морозильные аппараты
содержат изоляционные и охлаждающие
газы, которые требуют специального
обращения и уничтожения. Обратите
внимание на то, чтобы трубы сети холода
Вашего аппарата не имели ни
повреждений, ни дефектов до сдачи его в
соответствующий официальный центр
приема.
ÑÑîîââååòòûû ïïîî óóääààëëååííèèþþ
óóïïààêêîîââêêèè
Не давайте детям играть с упаковочным
материалом или с частью его элементов.
Аппарат - это не игрушка! Есть опасность
удушья, в связи с тем, что коробки и
пластины сделаны из пластмассы!
Во время транспортировки до Вашего
дома новый аппарат защищен упаковкой.
Все упаковочные материалы сделаны в
соответствии с нормами защиты
окружающей среды, и их можно
регенерировать или использовать вторично.
Сделайте Ваш активный вклад в защиту
окружающей среды, удаляя и
регенерируя упаковочные материалы в
соответствии с нормами ее защиты.
Ваш Дистрибьютор или местный
управляющий с удовольствием
проинформируют Вас о наиболее
эффективных и современных методах и
возможностях удаления, в соответствии с
нормами защиты окружающей среды.
данный прибор имеет отметку о
соответствии европейским нормам
2002/96/EG утилизации злектрических и
злектронных приборов (waste electrical
and electronic equipment - WEEE).
данные нормы определяют действующие
на территории Eвросоюза правила
возврата и утилизации старых приборов.
Советы по мерам
безопасности и
предупреждения общего
характера
Внимательно читайте и смотрите
настоящую инструкцию, а также всю
дополнительную информацию, которая
сопровождает аппарат. Сохраняйте
инструкции для любой консультации или
для возможного последующего
пользователя.
Аппарат был разработан для
• для исключительного пользования в доме.
• Для охлаждения или замораживания
продуктов
RU.qxd 21/10/05 18:24 Page 90
Page 89

ru
В случае использования для промышленных
целей, вы должны соблюдать
соответствующие нормы и компоновки.
Внимание!
Следует монтировать и подсоединять
аппарат к электрической сети в
соответствии с прилагаемыми
инструкциями по монтажу.
Если в аппарате есть повреждения или
дефекты, его не следует включать. Если
у Вас есть вопросы, консультируйтесь с
дистрибьютором, у которого Вы
приобрели аппарат.
Внимание!
Не преграждать зоны вентиляции и
прохода воздуха аппарата
Внимание!
Не ускорять процесс размораживания,
использовать только методы,
рекомендуемые изготовителем.
Внимание!
Не использовать внутри отделений для
хранения продуктов и морозильнике
электрические приборы, не разрешенные
изготовителем.
Внимание!
Не повреждать детали и элементы,
составляющие цепь холода., например,
прокалывая провода охладительного
элемента острыми предметами, сгибая
провода или царапая покрытия
поверхностей, итд. Выход струи
охладительного элемента может вызвать
повреждения глаз или их воспаление.
В случае аварии
• Промыть глаза обильной струей воды;
обратиться к врачу.
• Поместить аппарат на расстоянии от
источников огня или искр.
• Уберите соединительный кабель из
токоприемника. Хорошо проветрите
помещение в течение нескольких минут.
Опасность взрыва
Храните напитки с высоким содержанием
алкоголя в герметично закрытых
положении
Меры предосторожности
• Старайтесъ не загораживатъ
вентиляционные решетки структуры
холодилъника
• Не используйте механические
приспособления, ни любое другое
средство для ускорения процесса
размораживания, которые не
рекомендуются производителем.
• Старайтесь не повреждать
охладительную линию.
• Для холодилъника/морозильника
исподьзуйте всегда внутренние
электрические компоненты,
рекомендованные.
Познакомьтесь с
аппаратом
Настоящие инструкции действительны
для различных моделей аппарата.
Поэтому, возможно, в них описываются
детали и характеристики установки,
которые не соответствуют именно с
Вашим аппаратом.
RU.qxd 21/10/05 18:24 Page 91
кроме этого, они всегда
находиться в вертикальном
упаковках;
должны
Page 90

ru
Рисунок
Q
1 Емкость äëÿ ëüäà
2 Устройство выбора температурного
режима/внутреннее освещение
3 Решетка
4 Емкость для мясных изделий
5 Сточный желоб для слива воды при
размораживании холодильника
6 Стекло
7 Емкость для овощей
8 Планка с вентиляционными
отверстиями
9 Полка
10 Большая полка
11 Уплотнитель двери
22 Кнопка глубокой заморозки (ðèñ. E)
À. Морозильная камера
В. Холодильная камера
ÊÊëëèèììààòòèè÷÷ååññêêèèåå êêëëààññññûû
ÌÌààêêññèèììààëëüüííààÿÿ ääîîïïóóññêêààååììààÿÿ
òòååììïïååððààòòóóððàà îîêêððóóææààþþùùååéé
ññððååääûû
Климатический класс каждого аппарата
указан на табличке с его
характеристиками и служит отсылкой
для того, чтобы знать в каких пределах
температуры окружающей среды он
может функционировать.
Климатический Допускаемая
класс температура
окружающей среды
SN
+10° Ñ äî 32° Ñ
N
ST
T
ÂÂååííòòèèëëÿÿööèèÿÿ
Нагретый воздух на стене за аппаратом
должен свободно выпускаться. В
противоположном случае, аппарат
должен будет увеличить свою
производительность, потребляя
бесполезно, тем самым, большое
количество электроэнергии. По этой
причине, нужно обращать особое
внимание, чтобы отверстия для
вентиляции и воздуха не были забиты.
ÏÏîîëëååççííûûéé îîááúúååìì
Данные, касающиеся полезного объема,
Вы сможете найти внутри Вашего
бытового прибора в его фирменной
Таблиуке
Подключение аппарата/
Запуск в ход/
Регулирование
температуры
Чистить аппарат для запуска его в ход в
первый раз.
ÏÏîîääêêëëþþ÷÷ååííèèåå ààïïïïààððààòòàà
К токоприемнику должен быть
свободный вход. Включить аппарат в
электрическую сеть с переменным током
220-240 В (N/SN), 220-230 В (S/T)/50
Гц посредством правильно
установленного токоприемника и
снабженного заземлением. Токоприемник
должен быть защищен предохранителем
10 ампер, как минимум.
RU.qxd 21/10/05 18:24 Page 92
+16° Ñ äî 32°Ñ
° Ñ äî 38°Ñ
+16
° Ñ äî 43°Ñ
+16
Page 91

ru
 аппаратах, предназначенных äëÿ íå
европейских стран, нужно проверить,
чтобы величины напряжения и тип тока,
которые указаны на табличке с
характеристиками аппарата,
соответствовали бы национальной сети.
Табличка ñ характеристиками аппарата
находится на левой боковой внутренней
стороне. Если нужно заменить вилку
подключения к электрической сети, это
могут сделать только техники
специализирующиеся на этой марке.
Внимание!
Ни в коем случае не подсоединять
аппарат ни к электронным соединителям,
предназначенных для экономии энергии
(например, Ecoboy, Sava, Plug итд.), ни
к обратным детекторам, которые
преобразуют постоянный òîê â
переменный ток 230 В (например,
установки солнечной энергии,
электрические сети кораблей).
Включение
холодильника и выбор
температуры
ÂÂêêëëþþ÷÷ååííèèåå õõîîëëîîääèèëëüüííèèêêàà
Выведите переключатель 22 температуры
из положения “0” (рис. E).
Холодильник начинает работать.
Если дверца морозильной камеры не
открывается, подождите 2-3 минуты,
пока выровняется давление в камере.
ÂÂûûááîîðð òòååììïïååððààòòóóððûû
Температуру в холодильной и
морозильной камер можно установить
пользуясь переключателем температуры.
Цифры большего порядка обеспечивают в
обеих камерах более низкую температуру.
Когда переключатель установлен на “0”,
тогда охлаждение выключено. Поворот
переключателя на “1” или выше
обеспечивает включение температуры.
Мы рекомендуем устанавливать
переключатель в положение “2” или “3”.
Для замораживания свежих продуктов
поставьте переключатель в положение
“3” (см. “Замораживание продуктов”).
Если температура в помещении падает
ниже +18°С, нажмите кнопку глубокой
заморозки. Это обеспечит поддержание
температуры, необходимой для хранения
продуктов длительное время.
Выключение
холодильника
ÂÂûûêêëëþþ÷÷ååííèèåå õõîîëëîîääèèëëüüííèèêêàà
Поставьте переключатель температуры в
положение “0” (рис. E). При этом
положении переключателя холодильник
не работает.
Если Вы не пользуетесь холодильником
длительное время, то нужно вытащить
вилку из розетки, разморозить и очистить
холодильник. Дверцы оставьте
открытыми.
RU.qxd 21/10/05 18:24 Page 93
Page 92

ru
Размещение продуктов
Полки для складывания продуктов в
холодильной камере можно ставить по
своему усмотрению на любой высоте.
Чтобы поменять расстояние между
полками, нужно вынуть их и вставить в
нужное место (рис. R).
Полки, расположенные на дверце
холодильной камеры, можно вынимать
для очистки (рис. Y).
При укладывании продуктов в
холодильник необходимо иметь в виду
следующее:
• остужайте теплые продукты и напитки
перед помещением их в холодильник;
• хорошо упаковывайте продукты или
хорошо закрывайте посуду, где они
хранятся.
• не допускайте соприкосновения масла
или жира с внутренними стенками
холодильника или уплотнителем
дверцы;
• не храните в холодильнике взрывчатые
вещества;
• алкогольные напитки храните в
хорошо закупоренных бутылках, в
вертикальном положении;
• имейте в виду, самые холодные
области в холодильнике находятся у
задней стенки и на нижней полке.
ÐÐààññïïîîëëîîææååííèèåå ïïððîîääóóêêòòîîââ ââ
õõîîëëîîääèèëëüüííèèêêåå
В морозильной камере
(À)
можно
замораживать свежие продукты и хранить
их длительное время, à также
приготовить лед.
В холодильной камере
(Â)
:
на решетках
(3)
(сверху вниз) можно
разместить выпечку, готовые блюда,
молочные продукты;
в емкости для мяса
(4)
: мясо, колбасные
изделия;
на стеклянной полке
(5)
: мясо, колбасные
изделия;
в емкости для овощей
(7)
: овощи,
фрукты, салат;
на полке
(9)
: маленькие банки и бутылки;
на большой полке
(10)
: большие
бутылки.
ÎÎááððààòòèèòòåå ââííèèììààííèèåå ííàà ççîîííûû
õõîîëëîîääàà ââ õõîîëëîîääèèëëüüííîîìì
îîòòääååëëååííèèèè..
В связи с тем, что воздух циркулирует
внутри холодильного отделения, в нем
образуются различные по температуре
зоны холода:
Температурная зона для деликатных
продуктов зависит от модели и находится
внизу, между боковой стрелкой и
стеклянной нижней полкой
(Рис !1/1 им 2) или также может
находиться между двумя стрелками
(Рис. !2/1 è 2).
Идеально подходит для хранения мяса,
рыбы, колбасных изделий, различных
салатов, и т.д.
RU.qxd 21/10/05 18:24 Page 94
Page 93

ru
Замораживание и
хранение продуктов
ÏÏððààââèèëëàà îîááððààùùååííèèÿÿ ññ
ïïððîîääóóêêòòààììèè,, ïïîîääââååððããààââùùèèììèèññÿÿ
ííèèççêêîîòòååììïïååððààòòóóððííîîéé îîááððààááîîòòêêåå
• При покупке следите за тем, чтобы
упаковка была целой.
• Обязательно соблюдайте указанный
срок хранения.
• При покупке обращайте внимание на
то, чтобы температура, которую
показывает термометр внутри
холодильного прилавка, была -18°С
или ниже.
• Продукты, подвергшиеся
низкотемпературной обработке следует
покупать в последнюю очередь и,
тщательно завернув в газету или
положив в переносной холодильник,
быстро отвезти их домой и уложить в
морозильную камеру.
Если Вы сами замораживаете продукты,
используйте для этого только свежие
высококачественные продукты.
Упаковка продуктов
Продукты необходимо герметично
запаковывать, чтобы они не потеряли
свой вкус и не увяли.
Для упаковки подходят:
Пластиковая пленка, полиэтиленовые
пакеты, алюминиевая фольга и
специальные контейнеры для
замораживания.
Для упаковки не подходят:
Упаковочная бумага, пергамент, целлофан
и вскрытая магазинная упаковка.
Вложите продукты в упаковку,
выпустите из нее воздух и плотно
закройте.
Для закрывания упаковки подходят:
Резиновые кольца, пластмассовые
зажимы, морозоустойчивые клеящие
ленты (скотч) и т.п. Полиэтиленовые
пакеты можно запаивать с помощью
специального бытового прибора.
Перед закладкой продуктов в
морозильную камеру, пометьте пакеты,
указав èõ содержимое è äàòó закладки.
ÌÌîîùùííîîññòòüü ççààììîîððààææèèââààííèèÿÿ
Данные относительно макс.
производителъности замоpаживания в
соответствии с требованиями,
прмвенными â Действуeющей
нормативной Документации, Вы найдете
в фирменной табличке.
ОкУменМаксимальная мощность
замораживания свежих продуктов за 24
часа (помещенных íà замораживающие
решетки), указывается в таблнце
характеристик (в кг/24ч.), см. Рисунок
!0
.
Положите продукты, которые Вы хотите
заморозить, на дно морозильной камеры.
Следите за тем, чтобы уже
замороженные и свежие продукты не
соприкасались друг с другом.
ÂÂêêëëþþ÷÷ååííèèåå ççààììîîððààææèèââààííèèÿÿ èè
ââûûááîîðð òòååììïïååððààòòóóððûû
Поставьте переключатель температуры в
положение “3”, если Вы хотите
заморозить свежие продукты. При этом
положении переключателя Вы можете
заморозить до 2,5 кг продуктов. Для
замораживания большего количества
продуктов необходимо дополнительно
нажать кнопку глубокой заморозки 22
(рис. E). При этом загорается красный
индикатор. Для полной заморозки
продуктов необходимо 24 часа. После
этого режим глубокой заморозки нужно
отключить.
RU.qxd 21/10/05 18:24 Page 95
Page 94

ru
ÊÊààëëååííääààððüü ççààììîîððààææèèââààííèèÿÿ
Для того чтобы сохранить качество
замороженных продуктов, важно
соблюдать допустимый срок хранения,
который зависит от вида замороженных
продуктов. Перед замораживанием
отметьте дату изготовления продукта и
дату закладки в морозильную камеру.
ÐÐààççììîîððààææèèââààííèèåå
ççààììîîððîîææååííííûûõõ ïïððîîääóóêêòòîîââ
В зависимости от вида продуктов и их
последующей обработки,
размораживание можно осуществлять
различными способами:
- при комнатной температуре,
- в холодильной камере,
- в электрической духовке,
- в микроволновой печи.
Размороженные и размораживаемые
продукты могут быть снова заморожены,
если мясо и рыба не более 1 дня, а
другие продукты - не более 3 дней
находились при температуре выше + 3ºС.
Во всех других случаях, если вкус, запах
и внешний вид продукта не изменилисъ,
его можно сварить или пожарить и снова
заморозить. При этом срок последующего
хранения продукта сокращается.
ÏÏððèèããîîòòîîââëëååííèèåå ëëüüääàà
Наполните ванночку для льда на 3/4
водой и поставьте в морозильную камеру.
Для того чтобы Вам было легче
извлекать готовые кубики льда из
ванночки, можно ее слегка перегнуть.
Размораживание
холодильника
ÐÐààççììîîððààææèèââààííèèåå õõîîëëîîääèèëëüüííîîéé
êêààììååððûû
Холодильник размораживается
автоматически. Вода собирается в
сточный желоб 7 (рис. I), откуда
подается в холодильную машину и там
испаряется. Проверьте, чтобы сточный
желоб и сточное отверстие 19 (рис. I)
всегда находились в чистоте.
ÐÐààççììîîððààææèèââààííèèåå ììîîððîîççèèëëüüííîîéé
êêààììååððûû
Морозильная камера размораживается не
автоматически, так как замороженные
продукты не должны подтаивать. Слой
инея или льда ухудшает подачу холода в
морозильную камеру, что в свою очередь
увеличивает расход электроэнергии.
ÑÑííÿÿòòèèåå ññëëîîÿÿ èèííååÿÿ
Чтобы удалить слой образовавшегося
инея, нужно использовать специальный
скребок. Ни в коем случае нельзя
пользоваться острыми металлическими
предметами, чтобы не повредить
поверхность морозильной камеры.
ÎÎòòòòààèèââààííèèåå ññëëîîÿÿ ëëüüääàà
Если в морозильной камере образовался
слой льда, то размораживать ее нужно
следующим образом:
• включите режим глубокой заморозки
на 4 часа, нажав кнопку 22 (рис. E);
• выньте замороженные продукты,
заверните их в газету и положите в
прохладное место;
RU.qxd 21/10/05 18:24 Page 96
Page 95

ru
• переключатель температуры поставьте
в положение “0” или вытащите вилку
из розетки. Следите за тем, чтобы вода
не попала внутрь переключателя
температуры;
• оставьте дверцу открытой;
• удалите воду полотенцем или губкой;
• насухо протрите морозильную камеру,
включите холодильник и положите
замороженные продукты.
ÏÏîîääððóó÷÷ííûûåå ññððååääññòòââàà
При использовании электровентиляторов
или фенов, равномерно распределяйте
поток горячего воздуха по всей
поверхности камеры. Ни в коем случае не
размещайте электроприборы внутри
морозильной камеры.
Будьте осторожны при использовании
специальных аэрозолей, которые могут
образовывать взрывоопасные газы,
содержать вещества, повреждающие
пластмассовые детали или вредные для
здоровья.
Чистка холодильника
Перед тем как начать чистить и мыть
холодильник, не забудьте отключить его
от сети. Для мытья всего холодильника,
кроме уплотнителя дверцы, годится
теплая вода с небольшим добавлением
моющих средств. Непригодны любые
растворители, а также чистящие
средства, содержащие песок или
кислоты.
Уплотнитель дверцы 18 (рис. Q)
протирать только чистой водой и затем
насухо вытирать. Следите за тем, чтобы
вода не попала внутрь переключателя
температуры.
Сточный желоб и сточное отверстие
нужно очищать чаще, чем остальные
части холодильника, чтобы ничто не
мешало воде при оттаивании стекать по
ним. Сточное отверстие очищайте
палочкой. Следите за тем, чтобы вода,
которой моют холодильник, не попадала
туда, где испаряется вода.
Советы по экономии
электроэнергии
• Устанавливайте холодильник в
прохладном, хорошо проветриваемом
помещении, вдали от прямых
солнечных лучей и источников тепла.
• Не закрывайте вентиляционные
отверстия.
• Теплые блюда перед размещением в
холодильнике предварительно
остужайте вне морозильника.
• Хорошо заморозьте продукты, прежде
чем размораживать морозильную
камеру.
• Для загрузки и выгрузки продуктов
держите дверцы открытыми
минимально возможное время. Чем
меньше Вы будете держать дверцы
открытыми, тем меньше льда будет
образовываться на морозильной
решетке.
• Не оставляйте дверцы холодильника
открытыми длительное время.
RU.qxd 21/10/05 18:24 Page 97
Page 96

ru
Как самостоятельно
устранить мелкие
неполадки/Сервисная
служба
Далеко не при каждой неполадке
необходимо вызывать специалиста
Сервисной службы. Очень часто äåëî
заключается в какой-лëèáî мелочи.
Поэтому, прежде чем обращаться в
Сервисную службу, проверьте, нельзя ли
устранить эту неисправность своими
силами на основании приведенных ниже
указаний.
ÏÏððèè ííååîîááûû÷÷ííîîìì øøóóììåå::
Или холодильник стоит неровно и/или
непрочно, или в холодильный агрегат
попал посторонний предмет так, что
деталь на задней стенке холодильника не
может свободно вибрировать. Осторожно
удалите этот предмет.
ÅÅññëëèè ííåå ããîîððèèòò îîññââååùùååííèèåå
õõîîëëîîääèèëëüüííîîéé êêààììååððûû::
• Неисправна лампа накаливания. Выньте
вилку сетевого шнура из розетки,
снимите крышку (рис. O), замените
лампу (макс. 15 Вт, 220 В, цоколь
Е 14).
• Заклинился выключатель освещения 1
(рис. T). Проверьте, может ли он
двигаться. Если нет, то вызовите
специалиста Сервисной службы.
• Переключатель температуры находится
в положении “0”.
ÂÂ õõîîëëîîääèèëëüüííîîéé êêààììååððåå
òòååììïïååððààòòóóððàà ííèèææåå îîááûû÷÷ííîîéé::
• Переключатель температуры стоит не в
той позиции.
• В морозильную камеру положили
слишком много свежих продуктов, не
включив кнопку режима глубокой
заморозки.
ÂÂ õõîîëëîîääèèëëüüííèèêêåå òòååììïïååððààòòóóððàà
ââûûøøåå îîááûû÷÷ííîîéé::
• Слишком часто открываются дверцы.
• В морозильной камере слишком много
свежих продуктов.
• Очень большой слой инея в
морозильной камере.
• Закрыты вентиляция и вытяжка.
• Между стеной и холодильником попал
посторонний предмет.
ÑÑîîââññååìì ííååòò îîõõëëààææääååííèèÿÿ::
• Вилка плохо укреплена в розетке.
• Выключилось предохранительное
устройство.
• Переключатель температуры стоит в
положении “0”.
Если Вам не удалось устранить
неисправность на основании приведенных
здесь указаний, обращайтесь в
Сервисную службу.
Чтобы избежать потерь холода, не
открывайте дверцы без необходимости.
Не производите самостоятельно
дальнейшие работы, прежде всего, с
электрической частью агрегата.
ÑÑååðð ââèèññííààÿÿ ññëëóóææááàà
При обращении в Сервисную службу
сообщайте, пожалуйста, серийный
(рис. !0/23) и заводской (рис. !0/24)
номер Вашего агрегата.
Эти данные Вы найдете в черной рамке на
типовой табличке, расположенной слева
снизу в морозильном отделении, рядом с
боксом для овощей.
RU.qxd 21/10/05 18:24 Page 98
Page 97

Уважаемые господа, сообщаем Вам, что наша продукция сертифицирована на соответствие российским
требованиям безопасности согласно Закону РФ «О защите прав потребителей». Информацию по
сертификации наших приборов, а также данные о номере сертификата и сроке его действия Вы можете
получить в фирме ООО «БСХ Бытовая техника» по телефону (095) 737-2939.
Телефон диспетчерской службы по ремонту бытовых приборов «Бош» (095) 737-2961
Телефон диспетчерской службы по ремонту бытовых приборов «Сименс» (095) 737-2962
Телефон диспетчерской службы по ремонту бытовых приборов «Гаггенау» (095) 737-2965
Технические консультации по телефону: (095) 737-2975
Прием заявок на ремонт и рекламаций: (095) 737-2982 (ôàêñ)
Гарантия изготовителя
Фирма-изготовитель предоставляет на приобретенный Вами прибор, к которому при покупке был выдан
Гарантийный талон, гарантию в соответствии с действующим законодательством РФ о защите прав
потребителей сроком
12 месяцев.
Внимание! Важная информация для потребителей
• Данный прибор предназначен для использования
исключительно для личных, семейных, домашних и
иных нужд, не связанных с осуществлением
предпринимательской деятельности. Использование
прибора в целях, отличных от вышеуказанных,
является нарушением правил надлежащей
эксплуатации прибора.
• Изготовитель не несет ответственность за недостатки в
приборе, если сервисной службой будет доказано, что
они возникли после передачи прибора потребителю
вследствие нарушения им правил пользования,
транспортировки, хранения, действий третьих лиц,
непреодолимой силы (пожара, природной катастрофы
и т.п.), попадания бытовых насекомых и грызунов,
воздействия иных посторонних факторов, а также
вследствие существенных нарушений технических
требований, оговоренных в инструкции по
эксплуатации, в том числе нестабильности параметров
электросети, установленных ГОСТ 13109-87.
• Для подтверждения даты покупки прибора при
гарантийном ремонте или предъявлении иных
предусмотренных законом требований, убедительно
просим Вас сохранять сопроводительные документы
(чек, квитанцию, правильно и четко заполненный
гарантийный талон с указанием серийного номера
прибора, даты продажи, четко различимой печати
продавца, иные документы, подтверждающие дату и
место покупки). С целью облегчения дальнейшего
сервисного обслуживания Вашего прибора,
обращайтесь к мастерам сервиса с просьбой о
занесении сведений обо всех произведенных ремонтных
работах в соответствующий раздел Гарантийного
талона.
• Рекомендуем доверять подключение (установку)
приборов, требующих специального подключения
(установки), только организациям
(предпринимателям), занимающимся по роду своей
деятельности осуществлением таких работ.
Специалисты, осуществляющие подключение
(установку), делают отметку о подключении
(установке) в соответствующем разделе Гарантийного
талона. Просим сохранять квитанции и иные
документы о подключении (установке) Вашего
прибора в течение срока его эксплуатации.
• Соблюдение рекомендаций и указаний, содержащихся
в инструкции по эксплуатации (правилах
пользования), поможет избежать проблем в
эксплуатации прибора и его обслуживании.
• Неисправные узлы приборов в гарантийный период
бесплатно ремонтируются или заменяются новыми.
Решение вопроса о целесообразности их замены или
ремонта остается за службами сервиса.
• В период и после истечения гарантийного срока наша
Служба сервиса, а также мастерские наших партнеров
всегда готовы предложить Вам свои услуги. Список
адресов уполномоченных изготовителем пунктов
авторизованного сервисного обслуживания
прилагается.
• С информацией о сроке службы на бытовые приборы Вы
можете ознакомиться в товаросопроводительной
документации, в магазине при покупке прибора, либо в
сервисных центрах.
RU.qxd 21/10/05 18:24 Page 99
Page 98

Page 99

Page 100

 Loading...