

SIEMENS
Making cooking as much fun as eating
Please read this instruction manual. This will ensure that you make use of all the technical benefits the cooker has to offer.
You will be given important safety information. You will then be introduced to the individual components of your new cooker and we will show you how to adjust it step by step. It is guite simple.
The tables list the settings and shelf heights for numerous well-known dishes. All these dishes are tested in our cooking studio.
In the unlikely event of a fault, look here for information on how to rectify minor faults yourself.
A detailed table of contents will help you to find your way around quickly.
Enjoy your meal!

Instruction manual
9000 052 076
S041184
| Important information | 6 |
|---|---|
| Before installation | 6 |
| Safety information | 6 |
| Reasons for damage | 7 |
| Your new cooker | 8 |
| The control panel | 8 |
| Function selector | 9 |
| Rotary knob | 9 |
| Hotplate control | 10 |
| Control buttons and display panel | 10 |
| Push-in control knobs | 11 |
| Light ring | 11 |
| Types of heating | 11 |
| Oven carriage and shelving accessories | 14 |
| Cooling fan | 16 |
| Before using for the first time | 17 |
| Heating up the oven | 17 |
| Pre-cleaning the accessories | 17 |
| Setting the hob | 18 |
| Setting the oven | 18 |
| Setting procedure | 19 |
| If the oven is to switch off automatically | 20 |
| If the oven is to switch on and off automatically | 21 |
| Residual heat indicator | 22 |
| Rapid heating | 23 |
|---|---|
| Setting procedure | 23 |
| Automatic roasting | 24 |
| Ovenware | 24 |
| Preparing food | 25 |
| Programs | 26 |
| How long will the meal take to cook? | 27 |
| Setting procedure | 28 |
| The oven will switch on and off automatically | 29 |
| Tips for automatic roasting | 30 |
| Sabbath setting | 31 |
| Setting procedure | 31 |
| Time | 32 |
| Setting procedure | 32 |
| Timer | 33 |
| Setting procedure | 33 |
| Basic settings | 34 |
| Changing the basic settings | 35 |
| Childproof lock | 36 |
| Automatic time limiter | 36 |
| Automatic self-cleaning | 37 |
|---|---|
| Setting procedure | 38 |
| Self-cleaning should switch on and off automatically | 39 |
| When the oven has cooled | 40 |
| Care and cleaning | 40 |
| Oven exterior | 40 |
| Oven | 41 |
| Cleaning the glass panels | 42 |
| Seal | 45 |
| Hob | 45 |
| Accessories | 45 |
| Steam filter | 46 |
| Troubleshooting | 47 |
| Replacing the oven light | 48 |
| Replacing the oven light | 48 |
| After-sales service | 50 |
| Packaging and old appliances | 50 |
| Tables and tips | 51 |
|---|---|
| Cakes and pastries | 51 |
| Baking tips | 54 |
| Meat, poultry, fish | 56 |
| Tips for roasting and grilling | 59 |
| Bakes, gratins, toast | 59 |
| Frozen foods | 60 |
| Defrosting | 60 |
| Drying | 61 |
| Preserving | 62 |
| Energy saving tips | 63 |
| Acrylamide in food | 64 |
| What can you do? | 65 |
| Test dishes | 66 |
Important information
| Read this instruction manual carefully. Only then will you be able to operate your cooker safely and correctly. | |
| Please keep the instruction and installation manual in a safe place. Please pass on the instruction manual to the new owner if you sell the appliance. | |
| Before installation | |
| Transport damage | Check the appliance after unpacking it. Do not connect the appliance if it has been damaged in transport. |
| Electrical connection | The cooker may only be connected by an approved specialist. Losses resulting from damage caused by incorrect connection will invalidate warranty claims. |
| Safety information |
This appliance is intended for domestic use only.
Only use the cooker for food preparation. |
| Hot oven |
Open the oven door carefully. Hot steam may escape.
Never touch the internal surfaces of the oven or the heating elements. There is a risk of burning. Children must be kept at a safe distance from the appliance. |
| Never store combustible items in the oven. Risk of fire | |
| Never clamp leads of electrical appliances in the hot oven door. The insulation on the leads could melt. There is a risk of short-circuiting. | |
| Repairs |
Incorrectly done repairs are dangerous. There is a risk
of electrocution. Repairs may only be carried out by after-sales service technicians who have been fully trained by BSH. |
| If there is a fault, switch off the oven fuse at the fuse box. Call the after-sales service. |
Automatic self-cleaning

Loose food residue, grease and meat juices may ignite during self-cleaning. Risk of fire. Before every self-cleaning operation, remove any coarse dirt from the oven.
Never hang flammable items, such as tea towels, on the door handle. Risk of fire.
The oven exterior will be very hot to the touch during the self-cleaning operation. Keep children at a safe distance.
Never clean metal sheets and dishes which have been coated with a non-stick coating using the oven's automatic self-cleaning function (pyrolysis operation). High temperatures can cause poisonous gases to be formed from the non-stick coating - risk of serious damage to health.
Reasons for damage
Baking sheet or aluminium Do not place baking sheets on the oven floor. Do not foil on the oven floor line the oven floor with aluminium foil. This causes heat to accumulate. Baking and roasting times will no longer be correct and the enamel will be damaged. Water in the oven Never pour water directly into a hot oven. This could damage the enamel. Fruit juice When baking very moist fruit cakes, do not put too much on the baking sheet. Fruit juice dripping from the baking sheet leaves stains that cannot be removed It is recommended that you use the deeper universal pan. Cooling with the oven Only leave the oven to cool with the door closed. Even carriage open if you only leave the oven carriage open slightly, the fronts of adjacent units may become damaged over time
| Very dirty oven seal |
If the oven seal is very dirty, the oven carriage will no
longer close properly when the oven is in use. The fronts of adjacent units could be damaged. Keep the oven seal clean. |
|---|---|
| Using the oven carriage as a seat | Do not stand or sit on the open oven carriage. |
Your new cooker
Here you will learn more about your new oven. The control panel and its switches and indicators are explained here. The heating modes and the accessories included with your oven will be explained here.
The control panel
Details vary according to the appliance model.

Function selector

Use the function selector to select the type of heating for the oven. A default value appears in the display for each type of heating.
| Settings | |
|---|---|
| Conventional heat | |
| ٩ | Conventional baking* |
| 3D hot air | |
| 8 | Intensive fan-assisted cooking / pizza setting |
| Bottom heating | |
| Hot air grilling | |
| ~ | Radiant grill - large area |
| Automatic self-cleaning | |
| Ρ | Easy roasting |
*Type of heating with energy efficiency class determined in accordance with EN50304.
The oven light switches on when you select a function.
Rotary knob
The default values and set values can be altered using the rotary knob.

| Ranges | |
|---|---|
| 20 - 300 | Temperature in °C |
| The maximum temperature for the 3D hot air () and intensive hot air / pizza setting () setting = 275 °C | |
| 1 - 3 |
for grill settings, large areas
Turn back to |
| 1 - 3 | for grill settings, small areas |
| 1 - 3 | Cleaning levels |
| 1 min - 23.59 h | Duration |
| 5 sec - 12.00 h | Timer period |
| P 01 - P 24 | Programs |
| P 25 | Sabbath program |
Hotplate control

Adjust the heat setting of the hotplates using the 4 hotplate controls.
Settings
| Heat setting 1 | lowest setting |
|---|---|
| Heat setting 9 | highest setting |
|
Memory function (if your hob is equipped
with memory) If your hob does not have a memory function, the setting is equivalent to heat setting 9) |
Each heat setting has an intermediate step. This is marked by a dot.
Control buttons and display panel

| Clock button 🕒 | Use this button to set the time of day, the cooking time I→I and the completion time →I. |
|---|---|
| Key button • • | Use this button to switch the childproof lock on and off. |
| Timer button 4 | Use this button to set the timer. |
| Info button i | Use this button to call up information. |
| Oven light button Å | Use this button to switch the oven light on and off. |
| Rapid heating button »ss | Use this button to heat up the oven quickly. |

The values set can be seen in the display panel. The rise in temperature or the residual heat in the oven is shown in the preheating indicator below the temperature display.
10
Push-in control knobs
The control knobs can be pushed in. Simply press the control knob to release or lock it.
You can turn the control knobs to the left or to the right.
Light ring
Hotplate control
The ring on the switch lights up when you switch on the hotplate.
Types of heating
Different types of oven heating are available. You can therefore select the best method for cooking any dish.

Top and bottom heating
This ensures the even distribution of heat onto the cake or roast from the top and bottom of the oven. This type of heating is best for cake mixtures in tins or for bakes. Top and bottom heating is also suitable for cooking lean roasts of beef, veal and game.
To keep food warm III: You can keep food warm in the 65-100 °C temperature range. Do not keep food warm for longer than two hours.

Conventional Baking
is the most energy-efficient type of heating. This type of heating also ensures even heat distribution to the food from the top and bottom of the oven. The moisture which is extracted during the baking is retained as steam in the oven. The food does not dry out.
Yeast-risen food such as bread, bread rolls or plaited buns turn out especially well when cooked using this type of heating. This type of heating is also best for cooking choux pastry goods such as cream puffs.

3D hot air
A fan in the rear panel distributes the heat from the ring heating element evenly inside the oven. Using 3D hot air, it is possible to bake cakes and pizza on two shelves. You can cook biscuits and puff pastry on three levels at the same time. The required oven temperatures are lower than those for top and bottom heating. Additional baking trays may be obtained from specialist shops.
3D hot air is ideal for drying food.
Defrosting I. You can defrost food in the 20-60 °C temperature range.

Intensive hot air / pizza setting
This type of heating uses bottom heating and the ring heating element.
This type of heating is particularly suitable for deep-frozen foods. It is ideal for cooking pizzas, chips or strudels, without requiring preheating.

Bottom heat
You can reheat or brown meals using bottom heating. It is also the most suitable type of heating for preserving food.

Hot air grilling
This type of heating involves the grill element and the fan switching on and off alternately. During the pause in heating, the fan circulates the heat generated by the grill around the food. This ensures that pieces of meat are crisped and brown on all sides.

Radiant grill - large area
The entire area under the grill element becomes hot. This is ideal if you wish to cook several steaks, sausages, fish or slices of toast.
For radiant grilling, small areas : Only the centre of the grill element becomes hot. This type of heating is ideal for cooking small quantities. This saves energy. Place the pieces to be grilled in the centre of the wire grill. Turn the rotary knob until the symbol changes to the symbol, and set the grill setting.
Notes
Heating is interrupted if you open the oven door while the oven is in operation.
To ensure that the heat is well distributed, the fan switches on for a short time during preheating for types of heating with top and bottom heating.
Oven carriage and shelving accessories

The shelf can be inserted at 5 different heights. The shelf must be inserted into the hooks on the left-hand and right-hand sides of the oven.
Accessories
Accessories may be purchased at a later date from the after-sales service or from specialist shops. Please specify the HZ number.

HZ 344000 wire rack
for ovenware, cake tins, roasts, grilling and frozen meals.

Universal pan HZ 342070
for moist cakes, pastries, frozen food and large roasts. It can also be used to catch dripping fat when you are grilling directly on the wire rack.

Enamel baking tray HZ 341070
for cakes and biscuits.
Optional accessory
Optional accessories may be purchased from the after-sales service or from specialist shops.

Grill pan HZ 325070
Can be used for grilling instead of the wire grill or as a spray guard to protect the oven against dirt. Only use the grill pan in the universal pan.
To grill using the grill pan: use the same shelf height as for the wire grill.
Using the grill pan as a spray guard: insert the universal pan with the grill pan under the wire grill.

HZ 324000 wire rack
for grilling. Always place the wire grill in the universal pan. Fat and meat juices are collected.

Profi extra-deep pan HZ 343070
for cooking large quantities of food.

Lid for the Profi extra-deep pan HZ 333001
Converts the Profi extra-deep pan into the Profi roasting dish.

Glass roasting dish HZ 915000
for braised dishes and bakes that are cooked in the oven. It is especially suitable for the automatic roasting function.

Metal roasting dish HZ26000
It is intended for use in the extended cooking zone of the glass ceramic hob. The dish is suitable for the sensor cooking system as well as for the automatic roasting function.
The roasting dish is enamel on the outside and has a non-stick coating on the inside.

Pizza tray HZ 317000
Ideal for pizza, frozen foods and large round cakes, for example. You can use the pizza tray instead of the universal pan. Place the tray on the wire grill. Observe the information provided in the tables.

Baking tin HZ 26001
You can bake especially moist cakes using the leak-proof baking tin. The extra wide rim prevents leakage and your cooker stays clean. The baking tin has a non-stick coating on the inside.
Cooling fan
The oven is fitted with a cooling fan. It switches itself on and off as necessary. The warm air escapes above the door.
Before using for the first time
| This section will tell you everything you need to do before using the cooker for the first time. | |||
|---|---|---|---|
| Heat the oven and clean the accessories. Read the safety instructions in the "Important information" section. | |||
| Firstly, check to see if the Symbol and three zeros are flashing in the display. | |||
| If the symbol and three | Set the time. | ||
| zeros are flashing |
|
||
| 2. Set the time using the rotary knob. | |||
| The time selected is adopted after a few seconds. The cooker is now ready for use. | |||
| Heating up the over | |||
| neating up the oven | Heat the empty oven with the door closed to remove the new oven smell. | ||
| Method |
|
||
|
|||
| Switch off the function selector after 60 minutes. | |||
Pre-cleaning the accessories
Please wash the accessories thoroughly with soapy water and a cleaning cloth before using them.
Setting the hob
Your hob has its own instruction manual. In it you will find important safety advice and information about setting and caring for your hob.
Setting the oven
| You have various options for setting the oven. | |
|---|---|
| Switching off the oven manually | When your meal is ready, switch off the oven yourself. |
| The oven switches off automatically | You can leave the kitchen for a long period. |
| The oven switches on and off automatically | You can put your meal in the oven in the morning, for example, and set the oven so that your meal is ready at midday. |
| Tables and tips | The correct settings for many dishes can be found in the Tables and tips section. |
Setting procedure
1. Select the desired type of heating using the function selector.
The default value for this type of heating appears in the temperature display.
2. Use the rotary knob to set the temperature or grill setting.
Switching off
Changing the setting
Preheating indicator

Example: Top/bottom heating, 190 °C

Switch off the function selector when the meal is ready.
You may change the temperature or grill setting at any time.
The preheating indicator provides a visual display of the oven temperature increase. It is best to insert the dish in the oven when all segments are lit. The preheating indicator does not appear if you are grilling.
You can call up the approximate preheating temperature with the Info i button.
The thermal inertia of the oven means that a temperature may be displayed during the heating up phase which differs from the actual oven temperature.
If the oven is to switch off automatically
Press the ⊕ clock button. The cooking time symbol I→I will flash.
Make settings as described in steps 1 and 2. Set the cooking time (duration) for your meal.
Example: Cooking time of 45 minutes

4. Set the cooking time using the rotary knob.
The oven switches on after a few seconds. The I->I symbol lights up in the display.
The cooking time has elapsed
Changing the setting
Cancelling the setting
Calling up the settings
A signal sounds. The oven switches off. Switch off the function selector.
Press the clock button. Use the rotary knob to change the cooking time.
Switch off the function selector.
To call up the end time ->I or time (): Press the () clock button until the relevant symbol flashes. The value called up will then appear for a few seconds.
If the oven is to switch on and off automatically
Perform the settings as described in steps 1 to 4.
Press the ⊕ clock button until the →I end symbol flashes.
In the display you will see the time when the meal will be ready.
6. Use the rotary knob to set a later end time.
The setting is adopted after a few seconds. The display will show the end time until the oven switches on.
The cooking time has elapsed
Note
Please remember that easily spoiled foods must not be allowed to remain in the oven for too long.
Example: Imagine - it's 10:45 a.m. The meal will take 45 minutes to cook and must be ready at 12:45 pm.


A signal sounds. The oven switches off. Switch off the function selector.
You can change the setting while the symbol is flashing. The setting has been adopted if the symbol lights up permanently. You may change the waiting time that elapses before the setting is adopted. See the Basic settings section for more details.
Residual heat indicator
When you switch off the oven, the residual heat in the oven is indicated in the preheating indicator. When all segments are lit, the temperature in the oven is approximately 300 °C.
The preheating indicator goes out when the temperature has fallen to approximately 60 °C.
Using the residual heat
You can keep food warm in the oven using the residual heat.
For meals with long cooking times, you may switch off the oven 5 to 10 minutes earlier. The residual heat will finish cooking the meal, thereby saving energy.
Rapid heating
This allows you to heat up the oven particularly quickly.
Suitable types of heating
- = Top/bottom heating
- = Conventional Baking
- 🕲 = 3D hot air
- Intensive hot air
- I = Hot air grilling
Setting procedure
First set the oven.
Then press the rapid heating button »... The »... symbol lights up in the display. The oven will heat up. The segments of the preheating indicator will light up.
The rapid heating process is complete
Cancelling the rapid heating function
Notes
You will hear a short signal. The »s symbol will go out. Put your dish in the oven.
Press the rapid heating button. The symbol will go out. The rapid heating process is cancelled.
The rapid heating function is interrupted if you change the type of heating.
The rapid heating function will not work if the temperature set is below 100 °C.
If the temperature in the oven is only slightly below the temperature set, the rapid heating function is not necessary. It will not switch on.
During the rapid heating phase, you can call up the current preheating temperature with the "Info i" button.
Automatic roasting
|
Using automatic roasting, you will be able to produce
delicious braised meals, juicy roasts and tasty stews without the need for turning or basting the meat which, in turn, keeps your oven clean. |
|
|---|---|
| Ovenware | |
| The automatic roasting function is only suitable for roasting in a covered dish. Only use a roasting dish with a suitable lid. | |
| Suitable dishes |
Suitable dishes are heat-resistant (up to 300 °C), glass
or glass ceramic dishes. Add more fluid when roasting in enamalled steel, cast—iron or pressed aluminium dishes. The food will brown more. Please observe the instructions of the dish manufacturers. |
| High–grade steel dishes are only suitable in some cases. The food will not brown as much and the meat will not cook as well. | |
| Unsuitable dishes | Dishes made of shiny aluminium, unglazed clay or dishes with plastic handles are not suitable. |
| Dish size | The meat should cover around two thirds of the base of the dish. This ensures that the meat juices turn out well. |
| There should be at least 3 cm between the meat and the lid. The meat may expand while roasting. |
Preparing food
Select a suitable dish.
Weigh the fresh or deep-frozen meat, the fish or the vegetables if it is a vegetarian dish. You need this weight to adjust cooking times etc.
Close the dish with the lid. Place it on the wire grill at shelf position 2.
Add fluid to the empty dish if indicated in the roasting table. The base of the dish must be covered.
Season meat, place it in the dish and close with the lid.
Clean the fish and add lemon juice and salt to taste.
Steamed fish: Add the fluid, e.g. wine or lemon juice, to a depth of 1/2 cm.
Baked fish: Toss the fish in flour and coat with melted butter.
Note: Fish cooks best when placed in the "swimming position" in the dish.
Stew
Meat
Fish
You can combine different kinds of meat and fresh vegetables.
Cut the fish into bite-size pieces. Chicken pieces can be used without cutting them up.
Add double the amount of vegetables to meat. Example: Use between 0.5 kg and 1 kg fresh vegetables for 0.5kg meat.

Programs
| Fresh meals | Use for |
Program
number |
Weight
range |
Add liquid |
|---|---|---|---|---|
| Roast beef joint | Spare ribs, shoulder, sides, braised marinated beef | 01 | 0.5-3.0 kg | Yes |
| Roast beef | Roast beef, spare rib | 02 | 0.5-2.5 kg | No |
| Roast beef, rare | Roast beef, spare rib | 03 | 0.5-2.5 kg | No |
| Roast pork | Neck, collar, sides, thick flank, fillet | 04 | 0.5-3.0 kg | Yes |
| Roast pork with crackling | Shoulder with rind, belly | 05 | 0.5-2.0 kg | No |
| Roast veal | Shoulder, shank, thick flank, topside, stuffed breast of veal | 06 | 0.5-2.5 kg | Yes |
| Leg of lamb | Boned | 07 | 0.5-2.5 kg | Yes |
| Poultry |
Chicken, duck, goose,
baby turkey |
08 | 0.5-2.5 kg | No |
| Drumsticks |
Chicken, turkey, duck, goose
drumsticks |
09 | 0.3-1.5 kg | No |
| Turkey breast | Turkey breast, fillet | 10 | 0.5-2.5 kg | Yes |
| Mutton, venison | Shoulder, neck, breast | 11 | 0.5-2.5 kg | Yes |
| Pork loin, venison, small game | Leg of venison, leg of hare | 12 | 0.5-3.0 kg | Yes |
| Meat loaf | Beef/pork meatloaf | 13 | 0.3-3.0 kg | No |
| Stews | Roulade, meat and vegetable stew, Szegedin goulash | 14 | 0.3-3.0 kg | Yes |
| Fish, steamed | Trout, pike-perch, carp, whole cod | 15 | 0.3-1.5 kg | Yes |
| Fish, roasted | Trout, pike-perch, carp, whole cod | 16 | 0.5-1.5 kg | No |
-
|
Frozen
meals* |
Use for |
Program
number |
Weight
range |
Add liquid |
|---|---|---|---|---|
| Roast beef joint | Spare ribs, shoulder, sides | 17 | 0.5-2.0 kg | Yes |
| Roast beef | Roast beef, spare rib | 18 | 0.5-2.0 kg | No |
| Roast pork | Neck, collar, sides, thick flank, fillet | 19 | 0.5-2.0 kg | Yes |
| Roast veal | Shoulder, shank, thick flank, topside, stuffed breast of veal | 20 | 0.5-2.0 kg | Yes |
| Leg of lamb | Boned | 21 | 0.5-2.0 kg | Yes |
| Drumsticks |
Chicken, turkey, duck, goose
drumsticks |
22 | 0.3-1.5 kg | No |
| Mutton, venison | Shoulder, neck, breast | 23 | 0.5-2.0 kg | Yes |
| Venison, small game | Leg of venison, leg of hare | 24 | 0.5-2.0 kg | Yes |
* N.B. If preparing frozen meat, the end time cannot be set to a later time. The meat would thaw out before the program starts.
How long will the meal take to cook?
So that you know how long the meal will take to cook, make the settings as described in steps 1 to 4. The cooking time will appear in the display. To interrupt the program: Switch off the function selector.
Setting procedure
- 1. Select the appropriate program from the roasting table.
- 2. Turn the function selector until P appears in the temperature display.
Example: Well-cooked roast beef, 1.2 kg

3. Use the rotary knob to set the program number you require.
When the program has been adopted, the default value for the particular weight appears.
4. Turn the rotary knob to enter the weight.
The oven switches on after a few seconds. The time counts down in the display.
The cooking time has elapsed
A signal sounds. The oven switches off. Switch off the function selector
Cancelling the program
Switch off the function selector.


The oven will switch on and off automatically
Only use fresh meat or fresh fish.
Do not leave the food to stand in the oven for too long. Meat and fish will spoil easily when not in the refrigerator.
Example: Program 02, the meal will be ready at 12:15 pm.
Perform the settings as described in steps 1 to 4
- Press the ⊕ clock button repeatedly until the →I end symbol flashes. In the display you will see the time when the meal will be ready.
- 6. Use the rotary knob to set a later end time.
The setting is adopted after a few seconds. The end time is shown in the display. The ->I end symbol lights up. The oven switches on at the appropriate time.
The cooking time has elapsed
Note


A signal sounds. The oven switches off. Switch off the function selector.
The set time counts down in the display.
To call up the remaining cooking time →I, end time →I or time ⊕: Press the ⊕ clock button repeatedly until the relevant symbol appears.
To call up the weight: Press the i info button.
Tips for automatic roasting
| The weight of meat or poultry is over the specified weight range | The weight range is deliberately limited. It is rare to find casserole dishes of sufficient size for cooking large pieces of meat. Cook large pieces of meat using top/bottom heating a or hot air grilling a. |
|---|---|
| The meat is good, but the juices are too dark | Use a smaller dish and more liquid. |
| The meat is good, but the juices are too clear and watery | Use a larger dish and less liquid. |
| The top of the roast is too dry | Use a casserole dish with a firmly fitting lid. Very lean meat stays more juicy if it is covered with bacon rashers. |
| While the meat is roasting, it smells as though it is burning even though the meat looks good | The roasting dish lid is not closed properly. Or the meat has risen and raised the lid. Always use a suitable lid. Ensure that there is a minimum distance of 3 cm between the meat and the lid. |
| You want to cook frozen meat |
Season the frozen meat in exactly the same way as fresh meat.
N.B. The end time cannot be set to a later time if cooking meat from frozen. The meat would defrost before the program starts. |
|
You want to roast several chicken
drumsticks or other poultry drumsticks at the same time |
The drumsticks must be of approximately the same size. Enter the weight of the heaviest drumstick. Example: Two turkey drumsticks weighing 1.4 and 1.5 kg. Enter 1.5 kg. |
| You want to poach or bake several fish at the same time | The fish must be approximately the same size. Enter the total weight. Example: Two trout weighing 0.6 and 0.5 kg. Enter 1.1 kg. |
| You want to cook stuffed poultry | This method of cooking is not suitable for stuffed poultry. This is best cooked uncovered on the wire grill. Look up poultry in the table. |
| The meat in the stew is not sufficiently browned | Next time place the pieces of meat at the edge of the dish. Place the vegetables in the middle. |
| The vegetables in the stew are too hard |
When cooking a stew, enter the weight of the meat. This ensures
that the vegetables are crunchy. If you want the vegetables to be softer, enter the combined weight of the vegetables and meat. |
| You want to cook vegetarian stew | Only use firm vegetables, such as carrots, green beans, white cabbage, celery and potatoes. The smaller you cut the vegetables, the softer they will be. Cover the vegetables with liquid to prevent them from browning excessively. |
| You wish to use your stainless steel roasting dish | The stainless steel dish is only suitable to a certain degree. The shiny surface reflects much of the heat radiation. The meal will not brown as much and the meat will be less well done. If you use the stainless steel roasting dish: Remove the lid once the program has ended. Grill the meat at grill setting 3 T for a further 8 to 10 minutes. |
|---|---|
Sabbath setting
With the Sabbath setting, you can use top/bottom heating to keep the oven at a temperature of 85 °C for 73 hours.
During this time, you can keep meals warm without needing to switch the oven on or off.
Setting procedure
|
|
|---|---|
|
2.
Use the rotary knob to select the P25 program.
If P lights up, the setting has been adopted. The duration counts down in the display. The oven switches off automatically after 73 hours. |
|
| The program has ended |
A signal sounds. The
I->I
duration symbol flashes.
Switch off the function selector to display the time again. |
| Cancelling the program | Switch off the function selector. |
| Notes |
The buttons are locked once the program has started.
It is not possible to call up or modify settings. |
| The oven light is lit during the entire program. |
Time
When the oven is first connected, or following a power cut, the symbol and three zeros flash in the display. Set the time.
The function selector must be switched off.
Setting procedure
1. Press the Clock button. 12.00 appears in the display and the Symbol flashes.
2. Set the time using the rotary knob.
The time selected is adopted after a few seconds. The 🕒 symbol will go out.
Changing the time e.g. from summer to winter time
Hiding the time
Example: 13:00


Press the Clock button and use the rotary knob to change the time.
You can hide the time. To do this, you must change the basic setting. See the Basic settings section.
Timer
You can use the timer as a kitchen timer. It operates independently of the oven.
The timer has a special signal.
You can also set the timer if the childproof lock is active.
Setting procedure
1. Press the $\Delta$ timer button. The $\Delta$ symbol will flash.
Example: 20 minutes

2. Set the alarm time using the rotary knob.
The timer starts after a few seconds. The A symbol lights up in the display. The time counts down visibly.
The time has elapsed
Changing the timer period
Cancelling the setting

A signal sounds. Press the 4 timer button. The timer display will go out.
Press the 4 timer button. Change the time using the rotary knob.
Press the $\Delta$ timer button 3x.
The timer and cooking time count down simultaneously
The symbols light up. The timer period counts down visibly in the display.
To call up remaining cooking time →I, end time →I or time ⊕: Press the ⊕ clock button until the appropriate symbol flashes.
The value called up will then appear in the display for a few seconds.
Basic settings
Your oven has several basic settings. You may change the basic settings for the time, the signal duration and the reset time for a setting.
| Basic setting | Function | Change to |
|---|---|---|
|
Time ()
I =Time in the foreground |
Time display |
Time
D = Time hidden* |
|
Signal duration ☆
I = approx. 10 seconds |
Signal after cooking
time or timer period has elapsed. |
Signal duration
2 = approx. 1 min. 3 = approx. 4 mins. |
|
Reset time I→I
2 = medium |
Waiting time
between the adjustment increments before the setting is adopted. |
Reset time
↓ = short ∃ = long |
* Exception: The time is shown when the residual heat is displayed.
34
Changing the basic settings
There must be no program set.
Example: Hiding the time
- Press the Colock button and the c-m button simultaneously until a t appears in the display. This is the basic setting for the time in the foreground.
- 2. Use the rotary knob to change the basic setting.


3. Confirm with the 🕒 clock button.
A t will appear in the display for the basic setting for the signal duration.

Change the basic setting as described in step 2 and confirm with the O clock button. You can now change the reset time. To finish press the O clock button.
If you do not wish to change a basic setting, press the Clock button. The next basic setting will appear.
Correcting settings
all the basic settings
You do not wish to change
You may change your settings again at any time.
Childproof lock
| The oven has a childproof lock to prevent children switching it on accidentally. | |
|---|---|
| Locking the oven |
The function selector must be switched off.
Press the o-m key button until the o-m symbol appears in the display. This will take approximately 4 seconds. |
| Unlocking | Press the o-m key button until the o-m symbol goes out. |
| Notes | You can set the timer and the clock even when the oven is locked. |
Automatic time limiter
|
If you have forgotten to switch off the oven, the
automatic time limiter will be activated. Oven operation will be interrupted. The time when this happens depends on the selected temperature or grill setting. |
|
|---|---|
| A 5 appears in the clock display when the oven is no longer heating up. | |
|
The heating function is interrupted until you switch off the function selector. The
5
will go out.
You can now reset the oven. |
|
| Cancelling the automatic time limiter |
If you enter a cooking time, the oven will then switch off automatically.
The time limiter is cancelled |
Automatic self-cleaning
The oven is heated to approximately 500 °C. Any food residues from roasting, grilling and baking are burnt to ash.
You may choose from three cleaning levels.
| Level | Degree of cleaning | Duration |
|---|---|---|
| 1 | Low | approx. 11/4 hours |
| 2 | Medium | approx. 1½ hours |
| 3 | Intensive | approximately 2 hours |
For safety reasons, the oven locks automatically. You can only open the oven door again when
What you should know

the locking symbol in the display goes out. The exterior of the oven will become very hot. Make sure that nothing is placed against the front panel. Keep children at a safe distance.
If you open the oven again after automatic self-cleaning begins, the locking latch may be visible at the top of the oven. This is normal. The latch disappears automatically when you close the door again. Please do not attempt to push in the latch by hand.
You cannot switch the oven light on during automatic self-cleaning. The preheating indicator does not appear.
Remove unsuitable accessories and all ovenware from the oven.

Risk of fire. Loose food residue, grease and meat juices are flammable.
Wipe the oven and the accessories that are to be cleaned at the same time with a damp cloth.
Clean the oven door and along the edges of the oven around the seal. Do not scour the seal.
Before automatic self-cleaning
Cleaning accessories at the same time
The universal pan or the enamel baking tray can be placed in the oven at level 2 and cleaned at the same time. The wire grill is not suitable for self-cleaning.

Never clean metal sheets and dishes which have been coated with a non-stick coating using the oven's automatic self-cleaning function (pyrolysis operation). High temperatures can cause poisonous gases to be formed from the non-stick coating - risk of serious damage to health.
Setting procedure
1. Set the function selector to ......
Example: Cleaning level 3

2. Use the rotary knob to set the desired cleaning level.
Self-cleaning starts after a few seconds.
A signal sounds. The ->I symbol flashes.
The ⊕ symbol lights up
The cleaning time has
elapsed
Calling up the cooking time and end time
The oven is hot and locked for safety reasons. The oven door will only open when the ⊕ symbol goes out. Only then should you switch off the function selector.
To call up the remaining cooking time I or end time I ress the O clock button until the relevant symbol flashes
38
Self-cleaning should switch on and off automatically
This enables you to make use of the cheaper off-peak electricity rates, for example.
Make settings as described in steps 1 and 2
3. Press the () clock button repeatedly until the →I end symbol flashes.
The display shows when automatic self-cleaning will be finished.
4. Use the rotary knob to set a later end time.
The self-cleaning function switches on and off at the appropriate times. The clock reappears once self-cleaning has started.
The cleaning time has elapsed
Cancelling the setting
Notes
Example: You want automatic self-cleaning to finish at 23:00.

A signal sounds. The →I symbol flashes. Switch off the function selector.
Switch off the function selector.
The cleaning level can no longer be changed once the cleaning operation has been started.
When the oven has cooled
Note
Wipe away any remaining ash from inside the oven using a moist cloth.
Under normal use, it is usually sufficient to clean the oven every two to three months. You only require about 2.5 - 4.7 kilowatt hours for each self-cleaning process.
The special heat-resistant enamel and the shiny parts in the oven may become dull or discoloured over time. This is normal and does not affect the function. Do not use coarse scouring pads or strong cleaning agents to remove such discolorations.
Care and cleaning
Do not use high-pressure cleaners or steam jets.
| Oven exterior | |
| Wipe the oven with water and a little washing-up liquid. Dry it with a soft cloth. | |
| Caustic or abrasive substances are not suitable. If any such substances come into contact with the frontage, wipe it off immediately with water. | |
| Note | Slight differences in the colours on the appliance front are caused by the use of different materials, such as glass, plastic and metal. |
| Shadows on the door panel which resemble smears are reflections from the oven light. | |
| Appliances with stainless steel fronts |
Always remove any flecks of limescale, grease,
cornflour and egg white immediately. Corrosion can form under such flecks. |
| Use stainless steel care products. Follow the manufacturer's instructions. Try out the product on a small area first, before using on the whole surface. | |
|---|---|
| Appliances with aluminium fronts | Use a mild window-cleaning detergent. Wipe the area with a soft window cloth or a fluff-free micro-fibre cloth, using a horizontal action without applying pressure. |
| Aggressive cleaning products, scratchy sponges and rough cleaning cloths are not suitable. | |
| Oven | |
|
Never use coarse scouring pads or cleaning sponges.
Oven cleaner may only be used on the enamelled surfaces of the oven. |
|
|
For ease of cleaning
The oven carriage can be removed. |
|
| Removing the oven carriage | Pull the oven carriage out to the stop, raise it slightly, then pull it out and store it carefully. |
| Cleaning the enamelled | Use hot soapy water or a vinegar solution. |
| surfaces of the oven | |
|
It is best to use oven cleaner if the oven is very dirty.
Only use oven cleaner in a cold oven. |
|
|
It is best to use oven cleaner if the oven is very dirty.
Only use oven cleaner in a cold oven. Note: Enamel is baked on at very high temperatures. This can cause some slight colour variation. This is normal and does not affect the function. Do not use coarse scouring pads or strong cleaning agents to remove such discolorations. |
|
|
It is best to use oven cleaner if the oven is very dirty.
Only use oven cleaner in a cold oven. Note: Enamel is baked on at very high temperatures. This can cause some slight colour variation. This is normal and does not affect the function. Do not use coarse scouring pads or strong cleaning agents to remove such discolorations. The edges of thin trays cannot be completely enamelled. As a result, these edges can be rough. Anti-corrosion protection is guaranteed. |
Cleaning the glass panels
The glass panels on the oven carriage can be removed to assist in cleaning.
If you remove the inner glass, make sure that you reassemble the panels in the same order. Use the numbers on the panels as a guide.
- 1. Slide out the oven carriage.
- 2. Unscrew the top cover on the oven carriage. To do so, unscrew the left and right-hand screws. (fig A)
- B
- 3. Remove the clip with the magnet. (fig B)

4. Unscrew the two screws on the left and right. (fig C)
Removal

Hold the glass panels on the left and right-hand sides and pull them upwards. (fig D) With the handle facing downward, lay them on a cloth.
The inner glass panel with the hanging hooks remains in the oven carriage.

- 6. Push the front right and left retaining springs outwards, one after another. If the clips are hard to push to the side, use a spoon to help. (fig E) Take out the upper panel.
- 7. Remove the small clips from the bottom glass panel. (fig E)
- 8. Remove the bottom glass panel as described in point 6.
Clean the glass panel with glass cleaner and a soft cloth.
Installation

Make sure that the "Right above" text is upside down at the bottom left of both panels.
- 1. Insert the lower glass panel at an angle towards the rear. (fig A)
- 2. Push the right and left retaining springs outwards so that the panel lies on them.

44

- 8. Reattach the clip with the magnet. (fig F)
- 9. Reinsert the panels into the mounting on the oven carriage.
- 10. Fit and screw on the cover. If the cover cannot be screwed on, check that the panel is seated correctly in the mounting.
- 11. Close the oven carriage again.
The oven must not be used again until the panels have been correctly installed.
Seal
Clean the seal on the oven with washing-up liquid. Never use caustic or abrasive detergents.
Hob
You will find information on how to care for your hob in the hob instruction manual.
Accessories
Immediately after use, soak the accessories in washing-up liquid. Food residues can then be easily removed with a brush or sponge.
The universal pan or the enamel baking tray can be cleaned at the same time as the oven in the automatic self-cleaning operation.
Steam filter
The oven cover features a steam filter. This filters out grease particles in the extracted air, thereby reducing odours.
The filter must be cleaned occasionally.
Method


- 1. Using an Allen (6 mm), turn the filter head anticlockwise and remove. Figure A.
- 2. Remove both filter elements.
The filter head and the thin, single-layer filter element can be cleaned with washing-up liquid or washed in the cutlery basket of the dishwasher. You must not wash the thicker filter element. The coating could be damaged.
- 3. Place the single-layer filter element and then the double-layer filter element back in the filter head.
- 4. Insert the filter head and, using the Allen key, tighten it by turning it clockwise.The filter head must be inserted as shown in Figure B. Only then can it be re-fitted securely.
Troubleshooting
Should a malfunction occur, it is often only due to a minor fault. Please read the following instructions before calling the after-sales service:
| Problem | Possible cause | Comments/remedy |
|---|---|---|
| The oven does not work. | Blown fuse | Look in the fuse box and check that the fuse is in working order. |
| The clock display flashes. | Power cut | Reset the time. |
|
The oven door cannot be opened.
The function selector is in the position and three zeros are flashing in the display. |
Power cut |
Switch off the function selector. Set the time of day and restart self-cleaning.
If you no longer wish to repeat automatic self-cleaning, you must still wait for the oven temperature to fall below 300 °C. |
| The oven does not heat up. | The oven door is not properly closed. | Close the oven door fully. |
| A "5" appears in the clock display. | The automatic time limiter was activated. | Switch off the function selector. |
|
The "Er 1" or "Er 4" error
message appears in the clock display. |
The temperature sensor has failed. | Contact the after-sales service. |
| The "Er 2" error message appears in the clock display. | Incorrect mains connection | Remove the fuses from the fuse box and connect the cooker properly. |
|
The "Er 6" error message
appears in the clock display. You have set self-cleaning. |
The lock on the oven door is defective. |
Remove the fuse from the function
selector and call the after-sales service. All other oven functions can be used. |
|
The oven door cannot be opened.
The "Er 7" error message appears in the clock display. |
The oven door release mechanism is faulty. | Contact the after-sales service. |
| The "Er 11" error message appears in the clock display. |
A button has been
pressed for too long or a button has jammed. |
Press all buttons separately. If the error message remains, please contact the after-sales service. |
Repairs may only be carried out by fully trained after-sales service technicians.
Improper repairs may constitute serious hazards to the user.
Replacing the oven light
Method

If the oven light fails, it must be replaced. 10 watt heat-resistant halogen bulbs can be obtained from the after-sales service or from specialist shops. Hold the halogen bulb with a dry cloth. This will increase the service life of the bulb.
- 1. Switch off the oven fuse in the fuse box.
- 2. Place a tea towel in the cold oven to prevent damage.
- 3. Remove the glass cover. To do this, press the metal tab to the side with your thumb. Figure A.

- 4. Pull out the bulb do not turn it and insert the new bulb. Figure B. Take care to position the pins correctly. Press the bulb in firmly.
- 5. Fit the glass cover back on. To do this, insert it on one side and press firmly on the other side. The glass cover will now click into place.
- 6. Remove the tea towel and switch the fuse back on.
Replacing the oven light
If the oven light fails, it must be replaced. Heat-resistant 10 watt halogen bulbs are available from your local specialist. Hold the halogen bulb with a dry cloth. This will increase the life of the bulb. Only use these bulbs.
Method

- 1. Switch off the fuse in the fuse box.
- 2. Place a tea towel in the cold oven to prevent damage.
- 3. Remove the glass cover. To do this, open the glass cover from underneath by hand. Fig. A. If the glass cover is difficult to remove, use a spoon to help you.

4. Remove the bulb - do not turn it - and fit the new bulb. Fig B. Take care to position the pins correctly. Push the new bulb in firmly.

- Put the glass cover back on. Make sure that the curvature of the glass is on the right. Insert the glass at the top and press it in firmly at the bottom. Fig C. The glass cover will now click into place.
- 6. Remove the tea towel and switch on the fuse again.
Replacing the glass cover
The glass cover on the oven light must be replaced if it is damaged. Replacement glass covers may be obtained from the after-sales service. To this end, please specify the E number and FD number of your appliance.
After-sales service
|
Our after-sales service is there for you if your oven
needs repairing. You will find the address and telephone number of your nearest after-sales servic centre in the phone book. The after-sales service centres listed will also be happy to advise you of a service point in your area. |
е | ||
|---|---|---|---|
| E number and FD number |
Please quote the E number (product number) and the
FD number (production number) of your appliance when contacting the after-sales service. The rating plate containing these numbers is found on the right, on the side of the oven carriage. You can make a note of these numbers in the space below to save time in the event of your appliance malfunctioning. |
||
| E no. FD no. | |||
| After-sales service 📾 | |||
Packaging and old appliances
Your new appliance was protected by suitable packaging while it was on its way to you. All materials used for this purpose are environmentally friendly and can be recycled. Please make a contribution to protecting the environment by disposing of the packaging appropriately.
Old appliances are not worthless rubbish. Environmentally-conscious recycling can reclaim valuable raw materials.
Before disposing of your old appliance, please make sure that it is unusable, or label it with a sticker stating "Caution, scrap".
Up-to-date information on how to dispose of your old appliance and the packaging from the new one can be obtained from your retailer or local authority.
Tables and tips
This table contains a selection of dishes and the optimum settings at which to cook them. You can find out which type of heating and temperature is best for your dish, which accessories to use, and at which oven level the dish should be inserted. You will find a variety of tips about ovenware and preparation, and a small troubleshooting section in case anything should go wrong.
Cakes and pastries
Baking on one level
Baking tins
If you are baking cakes on one level, you should use top/bottom heating . This will give the best results for your cakes.
It is best to use dark baking tins. You should use 3D hot air when using thin baking tins, or glass containers. This means, however, that the baking time is increased and the cake does not brown so evenly.
Always place the cake tin on the wire grill.
If you are cooking using three tins at the same time, position these as illustrated.

Tables
The values in the table apply to dishes placed in a cold oven. This saves energy. Shorten the baking times indicated by 5 to 10 minutes if you have preheated the oven.
The tables show which type of heating is best for different cakes and bakes.
The temperature and cooking time you select depends on the quantity and type of pastry. This is why "ranges" are given in the tables.
You should try to use a lower temperature setting to start with, since this allows more even browning. If necessary, use a higher temperature setting the next time.
Note: Condensation may form on the inner pane in the oven door as a result of the high moisture content created when cooking using in conventional baking. Steam escapes when you open the oven door.
More information can be found in the "Baking tips" section which follows the tables.
| Cakes in tins | Tin on the wire grill | Level | Type of heating |
Tempera-
ture in °C |
Baking time in minutes |
|---|---|---|---|---|---|
| Sponge cake, simple |
Round/Vienna ring/
rectangular tin |
2 | 160-180 | 50-60 | |
| 3 cake tins* | 1+3 | 8 | 150-170 | 70-100 | |
|
Sponge cake, delicate
(e.g. pound cake) |
Round/Vienna ring/
rectangular tin |
2 | 150-170 | 60-70 | |
| 3 cake tins* | 1+3 | 130-150 | 70-100 | ||
| Short pastry base with edge | Springform cake tin | 1 | 170-190 | 25-35 | |
| Cake base made from sponge mixture | Fruit cake base | 2 | 160-180 | 20-30 | |
| Sponge cake | Springform cake tin | 2 | • | 160-180 | 30-40 |
| Fruit cake or cheesecake, short crust pastry** | Non-stick springform cake tin | 1 | 170-190 | 70-90 | |
| Fruit cake, fine sponge mixture |
Springform cake tin/
bowl mould |
2 | 160-180 | 50-60 | |
|
Savoury bakes**
(e.g. quiche/onion tart) |
Springform cake tin | 1 | 180-200 | 50-60 |
* Please position the tins correctly. Additional wire grills may be obtained as optional accessories from specialist shops.
** Allow cakes to cool in the oven for approximately 20 minutes.
| Cakes on the tray | Level |
Type of
heating |
Temperature
in ℃ |
Baking
time in minutes |
|
|---|---|---|---|---|---|
| Sponge or yeast pastry with dry topping |
Universal pan
Baking tray + universal pan** |
2
2+4 |
• |
170-190
150-170 |
20-30
35-45 |
|
Sponge or yeast pastry
with fruit topping* |
Universal pan
Baking tray + universal pan** |
3
2+4 |
|
170-190
150-170 |
40-50
50-60 |
| Swiss roll (preheat) | Universal pan | 2 | € | 170-190 | 15-20 |
| Plaited loaf made with 500 g flour | Universal pan | 2 | • | 170-190 | 30-40 |
| Stollen made with 500 g flour | Universal pan | 3 | 160-180 | 60-70 | |
| Stollen made with 1 kg flour | Universal pan | 3 | 150-170 | 90-100 | |
| Strudel, sweet | Universal pan | 2 | 190-210 | 55-65 | |
| Pizza |
Universal pan
Baking tray + universal pan** |
2
2+4 |
220-240
180-200 |
25-35
40-50 |
* Use the deeper universal pan for very moist fruit cakes.
** Always place the universal pan above the tray when you are cooking on two levels at once.
| Bread and rolls | Level | Type of heating |
Temperature
in °C |
Cooking time in minutes | |
|---|---|---|---|---|---|
|
Bread made from 1.2 kg
flour* (preheat) |
Universal pan | 2 | • |
300
200 |
8
35-45 |
|
Sour dough bread made
from 1.2 kg flour* (preheat) |
Universal pan | 2 | • |
300
200 |
8
40-50 |
| Bread rolls (e.g. rye rolls) | Universal pan | 3 | • | 200-220 | 20-30 |
| * Never pour water directly | / into a hot oven. |
| Small baked products | Level |
Type of
heating |
Temperature
in °C |
Baking
time in minutes |
|
|---|---|---|---|---|---|
| Biscuits |
Baking tray
Baking tray + universal pan** 2 baking trays* + universal pan*** |
3
2+4 2+3+5 |
6 |
150-170
130-150 130-150 |
10-20
25-35 30-40 |
| Meringue | tray | 3 | 80-100 |
100-15
0 |
|
| Cream puffs | tray | 2 | ⊡ | 210-230 | 30-40 |
| Macaroons |
Baking tray
Baking tray + universal pan** 2 baking trays* + universal pan*** |
2
2+4 2+3+5 |
6 |
110-130
100-120 100-120 |
30-40
35-45 40-50 |
| Puff pastry |
Baking tray
Baking tray + universal pan** 2 baking trays* + universal pan*** |
3
2+4 2+3+5 |
6 |
190-210
180-200 180-200 |
20-30
25-35 35-45 |
* Additional baking trays may be obtained as optional accessories from specialist shops.
** Always place the universal pan above the tray when you are cooking on two levels at once.
*** Insert the universal pan at the bottom of the oven. This can be removed before cooking.
Baking tips
| You wish to cook to your own recipe. | Refer to the instructions in the tables for similar types of food. | ||||
|---|---|---|---|---|---|
| How to check that a sponge cake is cooked properly. |
Approximately 10 minutes before the end of the baking time
given in the recipe, pierce the tallest point of the cake with a cocktail stick. The cake is done if the cocktail stick comes out clean. |
||||
| The cake collapses. | Next time, use less liquid or decrease the oven temperature by | ||||
| The cake has risen in the centre but is lower at the edges. |
Do not grease the sides of the springform cake tin. As soon as
the cake is done, carefully loosen the cake around the edges using a knife. |
|---|---|
| The cake is too dark at the top. | Insert it at a lower level in the oven, select a lower temperature and cook the cake a little while longer. |
| The cake is too dry. | Use a toothpick to make small holes in the finished cake. Then drizzle fruit juice or alcohol over the top. Next time you should decrease the temperature by around 10 degrees and reduce the baking times. |
|
The bread or cake
(e.g. cheesecake) looks fine, but is soggy on the inside (soft, with watery areas). |
Next time you should add a little less liquid and cook for a little
longer at a lower temperature. Cakes with fruit topping: Precook the base first of all. Sprinkle with almonds or breadcrumbs and then place the topping over this. Please observe the recipe and the baking times. |
| The pastry is unevenly browned. |
Select a slightly lower temperature to ensure that the pastry is
baked more evenly. Delicate pastry should be baked on one level using top/bottom heating . Baking paper that protrudes over the food can affect the air circulation. For this reason, always cut the baking paper to fit the baking tray. |
| The fruit cake is too light at the bottom. The fruit juice flows over. | Use the deeper universal pan next time. |
|
You were baking on several
levels. The food on the top baking tray is darker than that on the bottom baking tray. |
Always use 3D hot air when baking on several levels. Baking trays that are placed in the oven at the same time will not necessarily be ready at the same time. |
| Condensation is formed when baking cakes containing fresh fruit. |
Baking may result in the formation of water vapour. It escapes
above the door handle. The steam may settle and form water droplets on the control panel or on the fronts of adjacent units. This is a normal physical process. |
Meat, poultry, fish
| Ovenware | You may use any heat-resistant dishes. The universal pan is also suitable for larger roasts. |
|---|---|
| Always place the dishes in the centre of the wire grill. | |
|
Hot glass dishes should be placed on a dry kitchen
towel after being removed from the oven. The glass could crack if placed on a cold or wet surface. |
|
| Advice on roasting | The roasting result depends on the type and quality of meat. |
|
Add 2 to 3 soup spoons of liquid to lean meat, and
8 to 10 soup spoons of liquid to pot roasts, depending on the size. |
|
| Meat should be turned half way through the cooking time. | |
|
When the roast is ready, switch off the oven and leave
the roast to stand for 10 minutes with the oven door closed. This allows the meat juices to distribute more favourably. |
|
| Advice on grilling | Always close the oven door when grilling. |
|
If possible, use pieces of meat which are of the same
thickness. They should be at least 2 to 3 cm thick. Such pieces will be browned evenly and stay juicy and soft in the middle. Only salt the steaks after they have been grilled. |
|
|
Place the pieces of meat directly onto the wire grill. If
you are grilling just one piece of meat, it will turn out best if you place it in the centre of the wire grill. You should also insert the universal pan at level 1. The meat juices are collected here and the oven is kept clean. |
|
| Turn the pieces of meat after two thirds of the cooking time indicated. | |
|
The grill element automatically switches itself off and
back on again. This is normal. The number of times this happens depends on the grill setting you have selected. |
Meat
The table applies to insertion into a cold oven. The time specifications are provided as guidelines only and depend on the type and quality of the meat.
| Meat | Weight | Ovenware | Level |
Type of
heating |
Tempera-
ture in °C, grill |
Cooking
time in minutes |
|---|---|---|---|---|---|---|
|
Beef pot roast
(e.g. ribs) |
1 kg
1.5 kg 2 kg |
Covered |
2
2 2 |
200-220
190-210 180-200 |
80
100 120 |
|
| Sirloin of beef |
1 kg
1.5 kg 2 kg |
Uncovered |
2
2 2 |
210-230
200-220 190-210 |
70
80 90 |
|
| Sirloin, medium-rare* | 1 kg | Uncovered | 1 | Ĩ. | 230-240 | 60 |
|
Steaks, well done
Steaks, medium rare |
Wire grill***
Wire grill*** |
5
5 |
~~~
~~~ |
Setting 3
Setting 3 |
20
15 |
|
| Pork without rind (e.g. neck) |
1 kg
1.5 kg 2 kg |
Uncovered |
1
1 1 |
)
|
190-210
180-200 170-190 |
110
150 170 |
|
Pork with rind**
(e. g. shoulder, leg) |
1 kg
1.5 kg 2 kg |
Uncovered |
1
1 1 |
) |
190-210
180-200 170-190 |
130
160 190 |
| Smoked pork on the bone | 1 kg | Covered | 2 | 210-230 | 70 | |
| Meat loaf | 750 g | Uncovered | 1 | Ĩ | 180-200 | 70 |
| Sausage |
approx.
750 g |
Wire grill*** | 4 | ~~~ | Setting 3 | 15 |
| Roast veal |
1 kg
2 kg |
Uncovered |
2
2 |
190-210
170-190 |
100
120 |
|
| Leg of lamb without bone | 1.5 kg | Uncovered | 1 | Ĩ | 160-180 | 130 |
* Turn roast beef after half the cooking time. After cooking, wrap the sirloin in aluminium foil and leave in the oven to stand for 10 minutes.
** Make cuts in the pork rind and place the pork in the dish if the pork is to be turned, first place the pork with the rind side down.
*** Insert the universal pan at level 1.
| Poultry | The table applies to dishes placed in a cold oven. |
|---|---|
| The weights indicated in the table refer to oven-ready poultry (without stuffing). | |
| If you are grilling directly on the wire rack, you should |
also insert the universal pan at level 1.
Pierce the skin of duck or goose under the wings to enable the fat to run off.
Turn whole poultry after two thirds of the grilling time.
Poultry will turn out particularly crispy and brown if you baste it towards the end of the roasting time with butter, salted water or orange juice.
| Poultry | Weight | Ovenware | Level |
Type of
heating |
Temperature
in °C |
Cooking
time in minutes |
|---|---|---|---|---|---|---|
| Chicken halves, 1 to 4 | 400 g each | Wire rack | 2 | Ĩ | 220-240 | 40-50 |
| Chicken pieces | 250 g each | Wire rack | 2 | Ĩ | 220-240 | 30-40 |
| Whole chickens, 1 to 4 | 1 kg each | Wire rack | 2 | Ĩ | 220-240 | 50-80 |
| Duck | 1.7 kg | Wire rack | 2 | X | 180-200 | 90-100 |
| Goose | 3 kg | Wire rack | 2 | Ĩ | 170-190 |
110-13
0 |
| Young turkey | 3 kg | Wire rack | 2 | Ĩ | 190-210 | 80-100 |
| 2 turkey drumsticks | 800 g each | Wire rack | 2 | X | 200-220 | 90-110 |
Fish
The table applies to dishes placed in a cold oven.
| Fish | Weight | Ovenware | Level |
Type of
heating |
Temperature
in °C, grill setting |
Duration,
minutes |
|---|---|---|---|---|---|---|
| Fish, grilled |
300 g each
1 kg 1.5 kg |
Wire rack* |
3
2 2 |
]
] ] ] ] ] ] |
2
190-210 180-200 |
20-25
45-50 50-60 |
| Sliced fish (e.g. fish steaks) | 300 g each | Wire rack* | 4 | ~~ | 2 | 20-25 |
| * Insert the universal pan | at level 1. |
Tips for roasting and grilling
| The table does not contain specifications for the weight of the roast. | Select the next lowest weight from the instructions and extend the time. |
|---|---|
| How can you tell when the roast is ready. |
Use a meat thermometer (available from specialist stores) or
implement a "spoon test". Press a spoon onto the roast. If it feels firm, it is ready. If it can be pressed in, it needs to be cooked for a little longer. |
| The roast is too dark and the crackling is partly burnt. | Check the insertion level and temperature. |
| The roast looks good, but the sauce is burnt. | Next time, use a smaller roasting dish and add more liquid. |
| The roast looks good, but the sauce is too light and watery. | Next time, use a larger roasting dish and add less liquid. |
| Steam rises from the roast when the stock is added. |
Most escapes through the steam outlet, some may condense on
the cool control panel front or the surrounding cabinets where it will drip off. This will be dependent on the physical conditions. |
Bakes, gratins, toast
The table applies to dishes placed in a cold oven.
| Meal | Ovenware | Level |
Type of
heating |
Temperature
in °C, grill |
Cooking
time in minutes |
|
|---|---|---|---|---|---|---|
| Sweet bakes | t haka) | Casserole dish | 2 | 170-190 | 40-50 | |
| (e.y. quark and nu | l Dakej | |||||
| Savoury bakes mad | le from cooked | Casserole, | 2 | 210-230 | 30-40 | |
| ingredients (e.g. pasta bake) | universal pan | 2 | 210-230 | 20-30 | ||
| Savourv bakes mad | le from raw | Casserole dish or | 2 | Ĩ | 160-180 | 50-60 |
| ingredients* (e.g. p | otato gratin) | universal pan | 2 | 160-180 | 50-60 | |
| Toast | 4 pieces | Wire rack | 4 | Ĩ | Setting 3 | 6-7 |
| 12 pieces | Wire rack | 4 | ~~~ | Setting 3 | 4-5 | |
| Toast with topping | 4 pieces | Wire rack** | 4 | ~ | Setting 3 | 7-10 |
| 12 pieces | Wire rack** | 4 | ~~ | Setting 3 | 5-8 | |
* The bake must be no higher than 2 cm.
** Always insert the universal pan at level 1.
Frozen foods
Please observe the instructions on the packaging.
The values in the table apply to dishes placed in a cold oven.
| Meal | Use for | Level | Type of heating |
Temperature
in ℃ |
Cooking time in minutes |
|---|---|---|---|---|---|
| Pizza* |
Pizza with a thin base
Pizza with a thick base Pizza baguette Mini pizza |
2
2 2 3 |
8 |
200-220
180-200 180-200 190-210 |
15-25
20-30 20-30 10-20 |
| Potato products* |
Chips
Duchess potatoes Fried potatoes Filled potato skins |
2
2 2 2 |
8
8 8 |
200-220
200-220 200-220 200-220 |
20-30
20-30 20-30 15-25 |
| Baked goods* |
Rolls
Pretzels |
3
3 |
8 |
190-210
200-220 |
10-20
10-20 |
| Fried foods* |
Fish fingers
Chicken nuggets Vegetable burgers |
2
2 2 |
8
8 |
200-220
200-220 200-220 |
5-15
10-20 15-25 |
| Strudel* | Apple strudel | 3 | 190-210 | 30-40 |
* Line the universal pan with greaseproof paper. Please ensure that the greaseproof paper is suitable for use at these temperatures.
Defrosting
Remove the food from its packaging and place it in a suitable dish on the wire grill.
Please observe the instructions on the packaging.
The defrosting times depend on the type and amount of food.
Setting procedure
1. Set the function selector to B 3D hot air.
2. Set the temperature using the rotary knob. The 3D hot air symbol is replaced by the
| Meal | Accessories | Level |
Type of
heating |
Temperature
in °C |
|---|---|---|---|---|
|
Delicate frozen foods
e.g. cream gateaux, cream cakes, cakes with chocolate or icing, fruit etc. |
Wire rack | 2 | * | 20 °C |
|
Other frozen foods*
Chicken, sausage and meat, bread, bread rolls and other pastries |
Wire rack | 2 | * | 50 °C |
* Cover frozen food with microwave foil. Place poultry onto the plate with the breast side down.
In the 30 to 60 °C range, the oven light remains switched off. This gives best control.
Drying
Only use perfectly fresh fruit and vegetables, and wash them thoroughly.
Allow the food to drain well and dry it yourself.
Line the universal pan and wire rack with baking paper or greaseproof paper.
| Meal | Level | Type of heating |
Temperature in
°C |
Cooking time in hours |
|---|---|---|---|---|
| 600 g apple rings | 2 + 4 | Ø | 80 | Approx. 5 |
| 800 g sliced pears | 2 + 4 | 8 | 80 | Approx. 8 |
| 1.5 kg prunes or plums | 2 + 4 | 8 | 80 | Approx. 8 - 10 |
| 200 g fresh herbs, washed | 2 + 4 | 8 | 80 | Approx. 1½ |
Note
Very moist fruit or vegetables should be turned several times. Once dried, remove the food from the paper immediately.
Preserving
| Preparation |
The jars and rubber sealing rings must be clean and
intact. Use jars of the same size if possible. The instructions in the table refer to round 1-litre jars. Caution Do not use larger or taller jars. The lid could crack. |
||
|---|---|---|---|
| Only use perfectly fresh fruit and vegetables. Wash them thoroughly. | |||
|
Pour the fruit or vegetables into the jars. Wipe clean
the tops of the jars again if necessary. They must be clean. Place a wet rubber sealing ring and lid on each jar and lock the jars using clamps. |
|||
| Do not place more than six jars in the oven. | |||
|
The times specified in the tables are guidelines only.
They can be influenced by the room temperature, the number of jars and the amount and temperature of the jar contents. Before you change settings or switch off the appliance, make sure that the contents of the jars are actually bubbling. |
|||
| Setting procedure | 1. Place the universal pan on level 2. Place the jars inside the pan so that they do not come into contact with each other. | ||
| 2. Pour ½ litre of hot water (approx. 80 °C) into the universal pan. | |||
| 3. Close the oven door. | |||
| 4. Switch the function selector to . | |||
| 5. Set the rotary knob to 170 to 180 °C. | |||
| Preserving fruit |
As soon as the contents of the jars begins to simmer,
that is when small bubbles appear at short intervals - after about 40 to 50 minutes - turn off the function selector. |
||
| The jars should be removed from the oven after being reheated for 25 to 35 minutes. If the food is left to cool in the oven for longer, bacteria might form, causing the preserved fruit to spoil prematurely. | |||
| Fruit in 1-litre jars | After bubbling | Reheating |
|---|---|---|
| Apples, red/blackcurrants, strawberries | turn off | approx. 25 minutes |
| Cherries, apricots, peaches, gooseberries | turn off | approx. 30 minutes |
| Apple purée, pears, plums | turn off | approx. 35 minutes |
Preserving vegetablesAs soon as the contents of the jars begins to simmer,<br/>set the rotary knob back to approximately 120 to<br/>140 °C. The table shows when you can switch off the<br/>oven Allow the vegetables to stand in the oven for a<br/>further 30 to 35 minutes.
| Vegetables with cold stock in 1-litre jars |
After bubbling
120 - 140 °C |
Reheating |
|---|---|---|
| Cucumbers | _ | approx. 35 minutes |
| Beetroot | approx. 35 minutes | approx. 30 minutes |
| Brussel sprouts | approx. 45 minutes | approx. 30 minutes |
| Beans, kohlrabi, red cabbage | approx. 60 minutes | approx. 30 minutes |
| Peas | approx. 70 minutes | approx. 30 minutes |
Remove the jars
Never place the hot jars on a cold or wet surface as this could cause the glass to crack.
Energy saving tips
Only preheat the oven if it specifies in the recipe or in the table in the instruction manual that you should do so.
Use non-stick, black painted or enamelled tins. They absorb the heat especially well.
If you have several cakes to bake it is best to bake them one after the other. The oven is still warm. This shortens the baking time for the second cake. You can also put two baking tins in one after the other.
For long cooking times, the oven can be switched off 10 minutes before the end of the cooking time and the remaining heat can be used to finish the cooking.
Acrylamide in food
| Experts are currently discussing how dangerous acrylamide in food can be. We have compiled this information sheet for you on the basis of current research. | ||
|---|---|---|
| Where does acrylamide come from? |
Acrylamide in food does not come from external
contamination. It is formed in the food itself during preparation - provided that the food contains carbohydrate and protein. Exactly how this happens has not yet been completely explained. However, it appears that the acrylamide content is strongly influenced by: |
|
|
high temperatures
a low water content in food intensive browning of the food. |
||
| What sort of foods are affected? | Acrylamide forms mostly in grain and potato products that are prepared at high temperatures, e.g.: | |
|
crisps, chips,
toast, rolls, bread, baked goods made from shortcrust pastry (speciality biscuits and cakes). |
||
| What can you do? |
You can avoid high levels of acrylamide when baking,
frying and grilling. The following recommendations were published by AID 1 and BMVEL 2 to help you minimise acrylamide levels: |
| In general | Keep cooking times as short as possible. |
| "Brown rather than burn" - cook food only until it is golden brown. | |
| The larger and thicker the food is, the less acrylamide it contains. | |
| Baking | Set the temperature to a maximum of 200 °C when using the top/bottom heating setting, and to a maximum of 180 °C for the 3D hot air setting. |
|
Cookies: Set the temperature to a maximum of 190 °C
when using the top/bottom heating setting, and to a maximum of 170 °C for the 3D hot air setting. The presence of egg or egg yolk in a recipe reduces the formation of acrylamide. |
|
| Spread oven chips evenly over the baking sheet in one layer where possible. To prevent the food from drying out quickly, place at least 400 g on each baking sheet. | |
|
1
AID "Acrylamide" information leaflet, published by AID (German
Evaluation and Information Service for Nutrition, Agriculture and Forestry) and BMVEL (German Federal Ministry for Consumer Protection, Food and Agriculture), as at 12/02, Internet: http://www.aid.de. |
|
|
2
BMVEL press release 365, as at 4.12.2002,
Internet:http://www.verbraucherministerium.de |
Test dishes
In accordance with DIN 44547 and EN 60350
| _ | |||||
|---|---|---|---|---|---|
| Meal | Accessories and notes | Level |
Type of
heating |
Tempera-
ture in °C |
Baking
time in minutes |
| Viennese whirls |
Baking tray
Baking tray + universal pan** 2 baking trays* + universal pan*** |
3
2+4 2+3+5 |
• |
160-180
140-160 140-160 |
20-30
30-40 40-50 |
| Small cakes x 20 | Baking tray | 3 | 170-190 | 20-30 | |
| Small cakes, 20 per baking tray (preheat) |
Baking tray + universal pan**
2 baking trays* + universal pan*** |
2+4
2+3+5 |
8 |
140-160
140-160 |
25-35
30-40 |
| Swiss roll | Springform cake tin | 2 | • | 160-180 | 30-40 |
| Yeast cakes on a baking tray |
Universal pan
Baking tray + universal pan** |
3
2+4 |
|
170-190
150-170 |
40-50
50-60 |
| German apple pie | 2 wire racks* + 2 tinplate springform cake tins Ø 20 cm**** | 1+3 | 190-210 | 70-80 | |
|
Universal pan + 2 tinplate
springform cake tins Ø 20 cm**** |
1 | 200-220 | 70-80 |
Baking
The values in the table apply to dishes placed in a cold oven.
* Baking trays and wire racks may be obtained as optional accessories from specialist shops.
** Always place the universal pan above the tray when you are cooking on two levels at once.
*** Always insert the universal pan at the bottom of the oven. This can be removed before cooking.
**** Place the cakes diagonally on the accessories.
Grilling
The values in the table apply to dishes placed in a cold oven.
| Meal | Accessories | Level |
Type of
heating |
Grill setting |
Cooking time
in minutes |
|---|---|---|---|---|---|
|
Toast
(preheat for 10 mins.) |
Wire rack | 5 | ~~~ | 3 | 1-2 |
| Beefburgers, x 12* | Wire rack | 4 | 3 | 25-30 | |
| * Turn after 2 / 2 of the | time has elapsed. Ir | sert the unive | ersal pan at | level 1. |
|
|
|
|
|
|
|
|
|
|
|
|
|
|
|
|


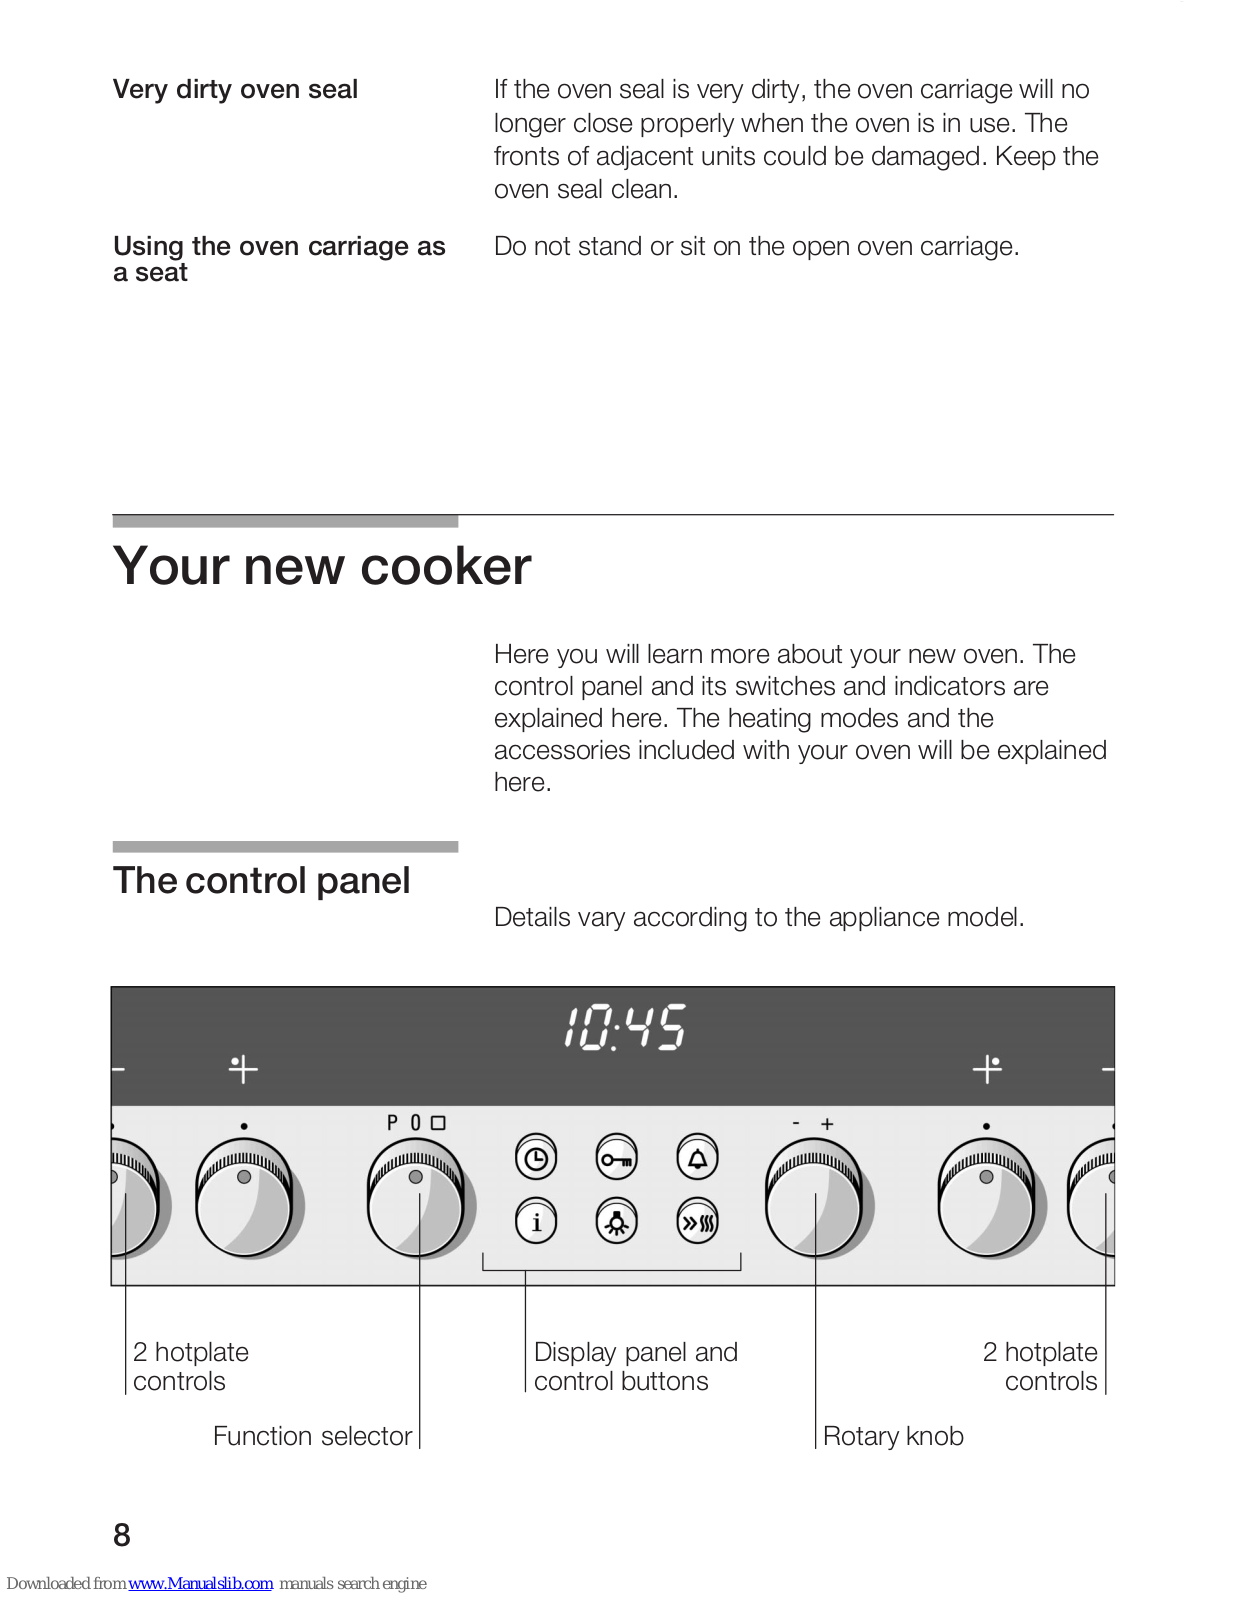
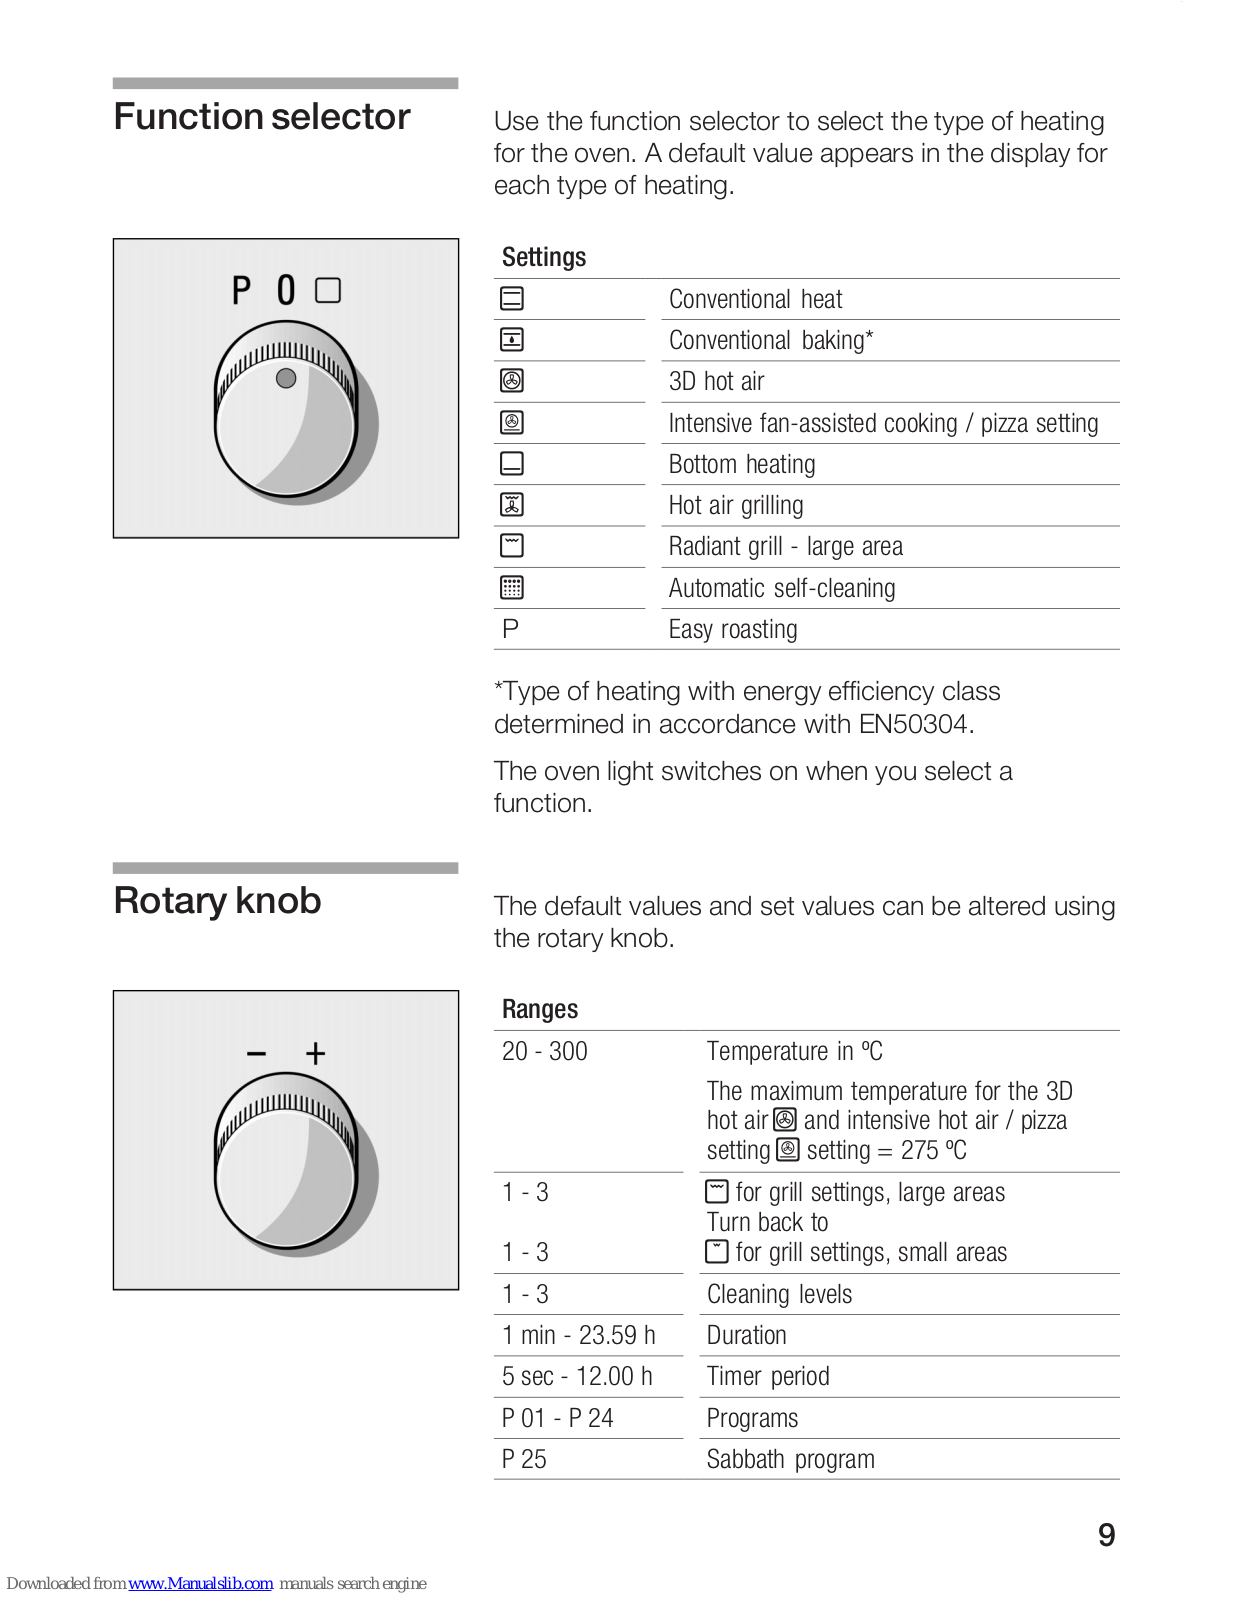
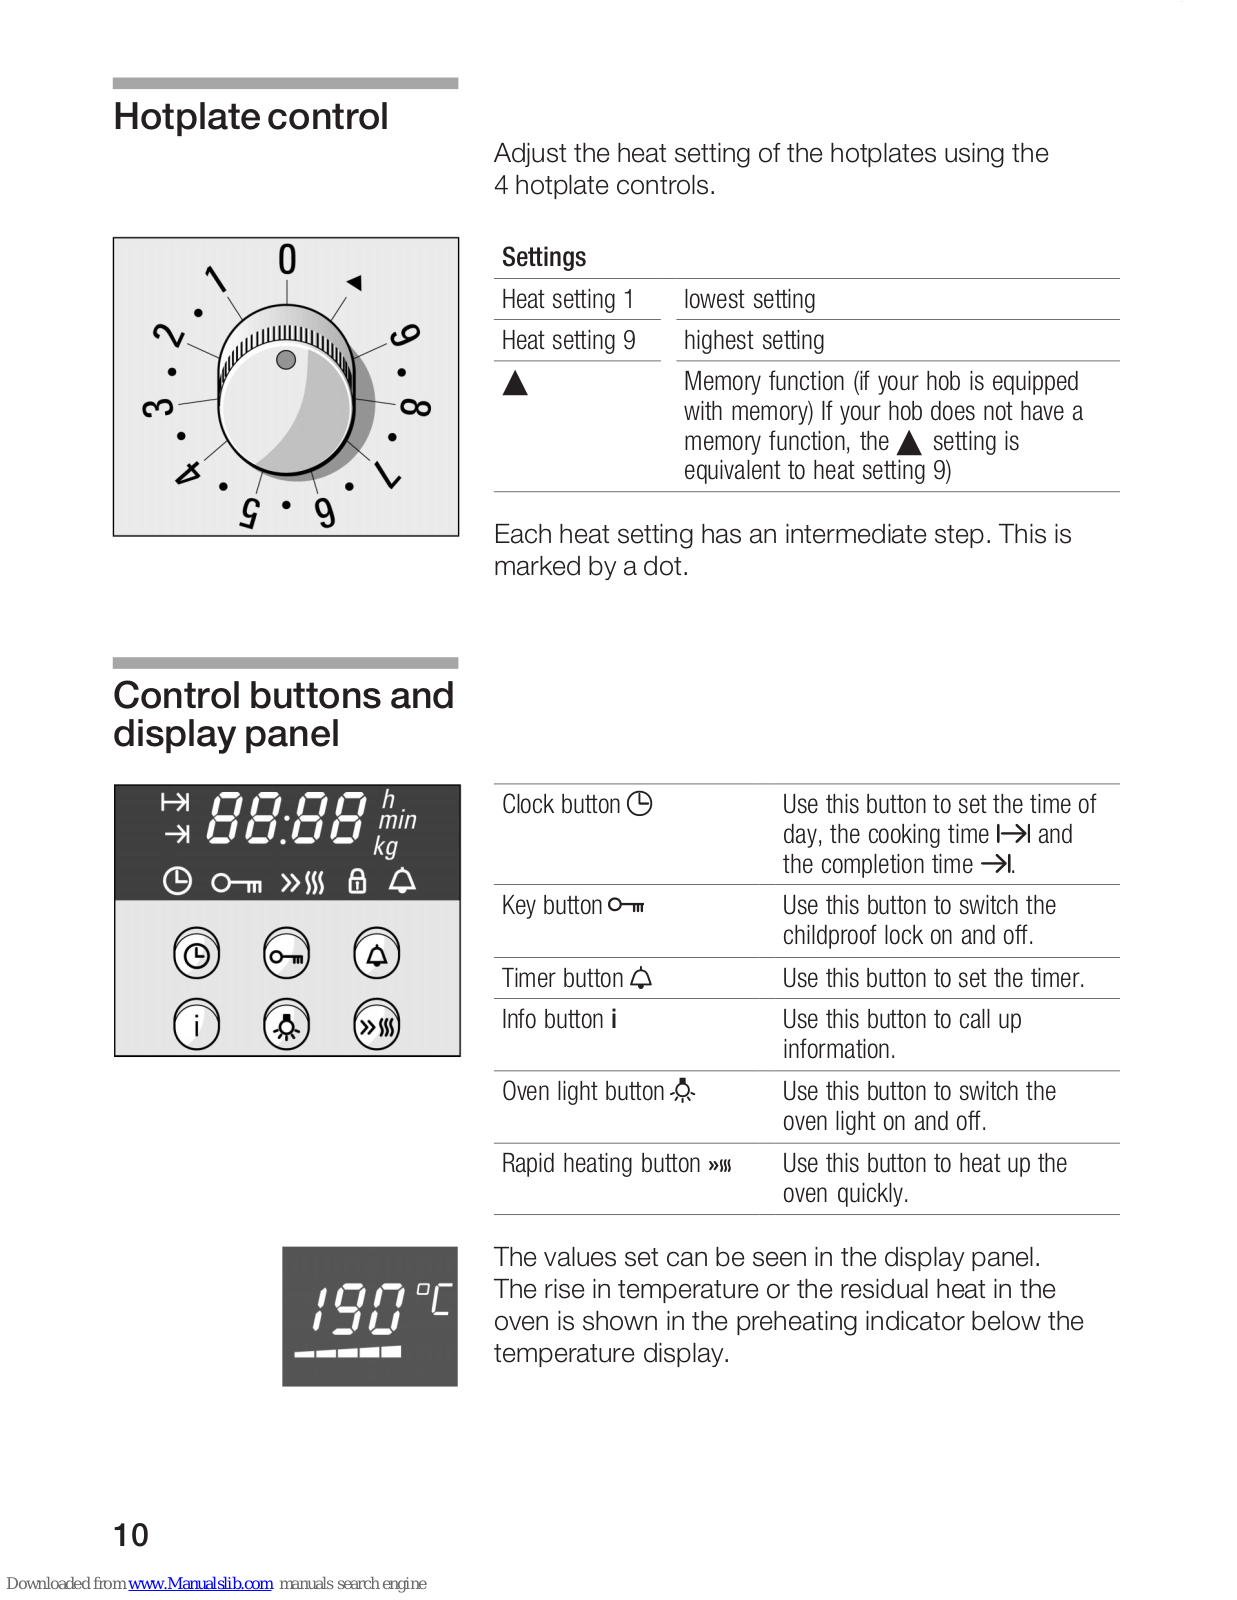
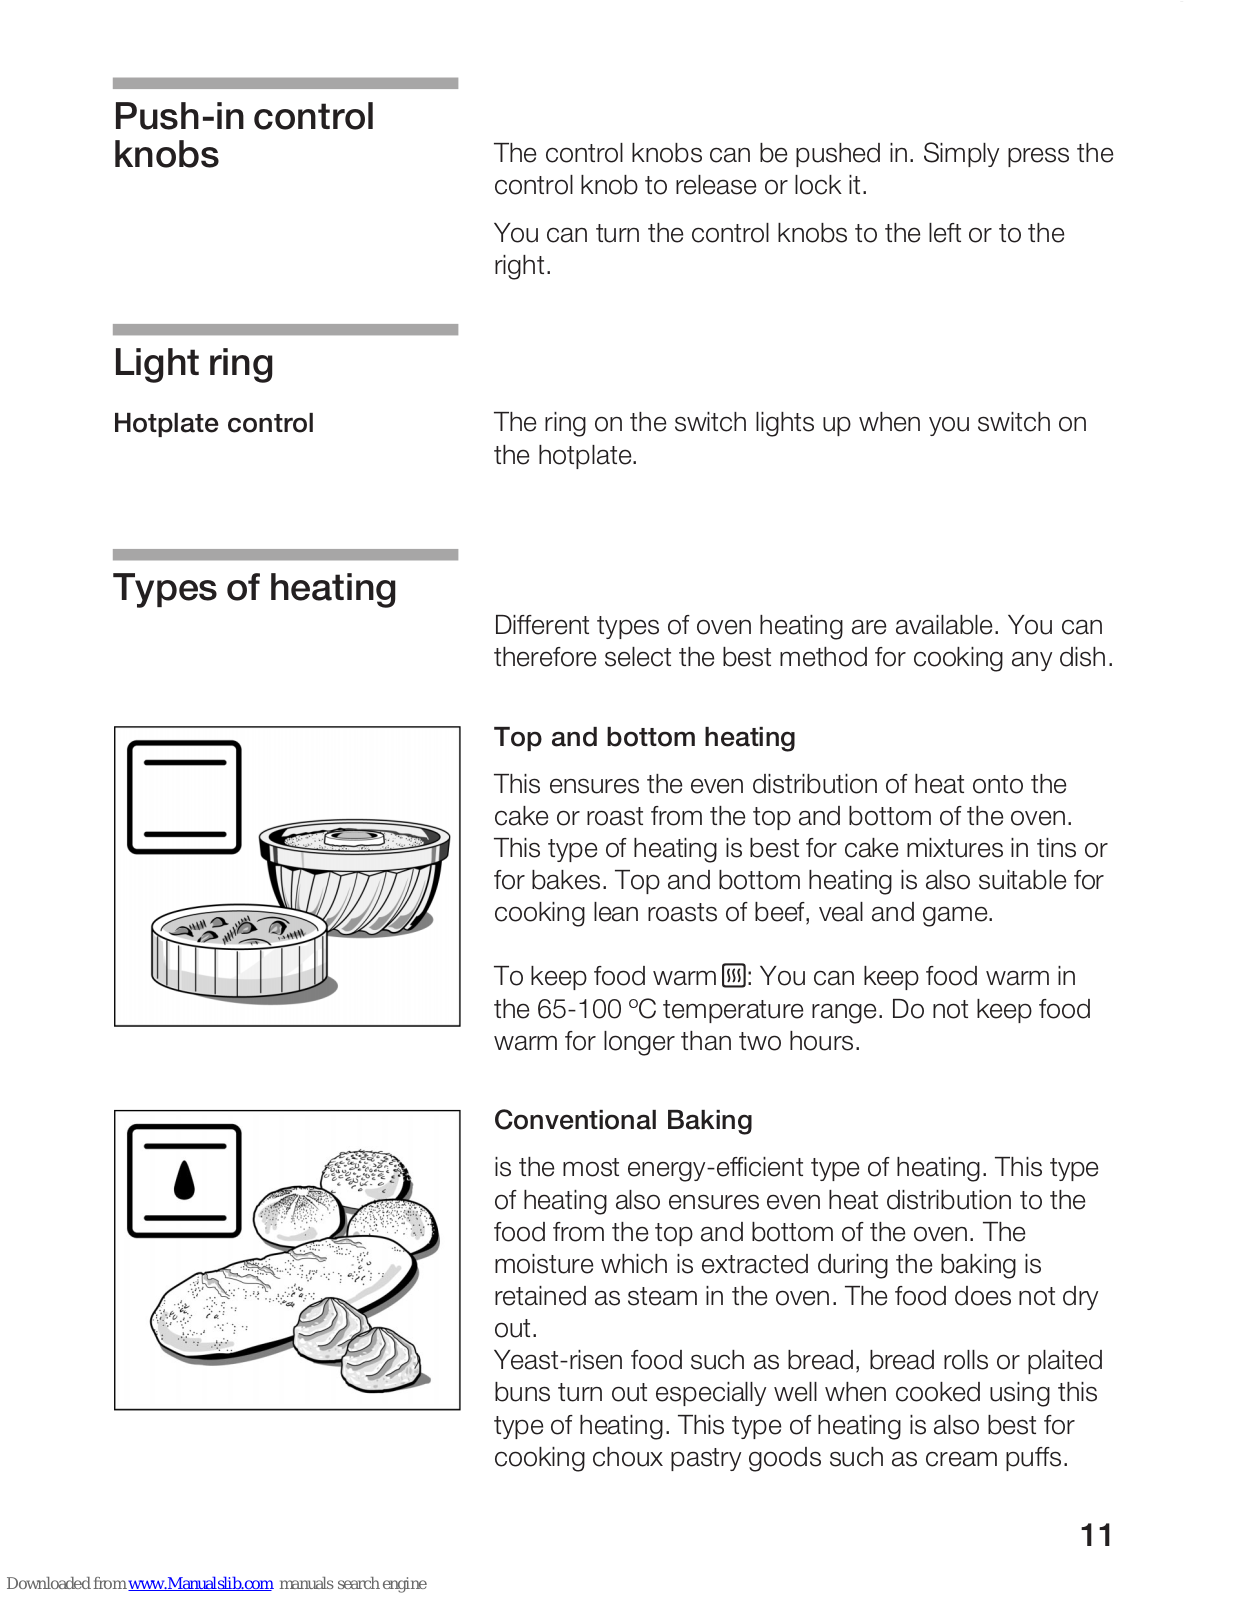
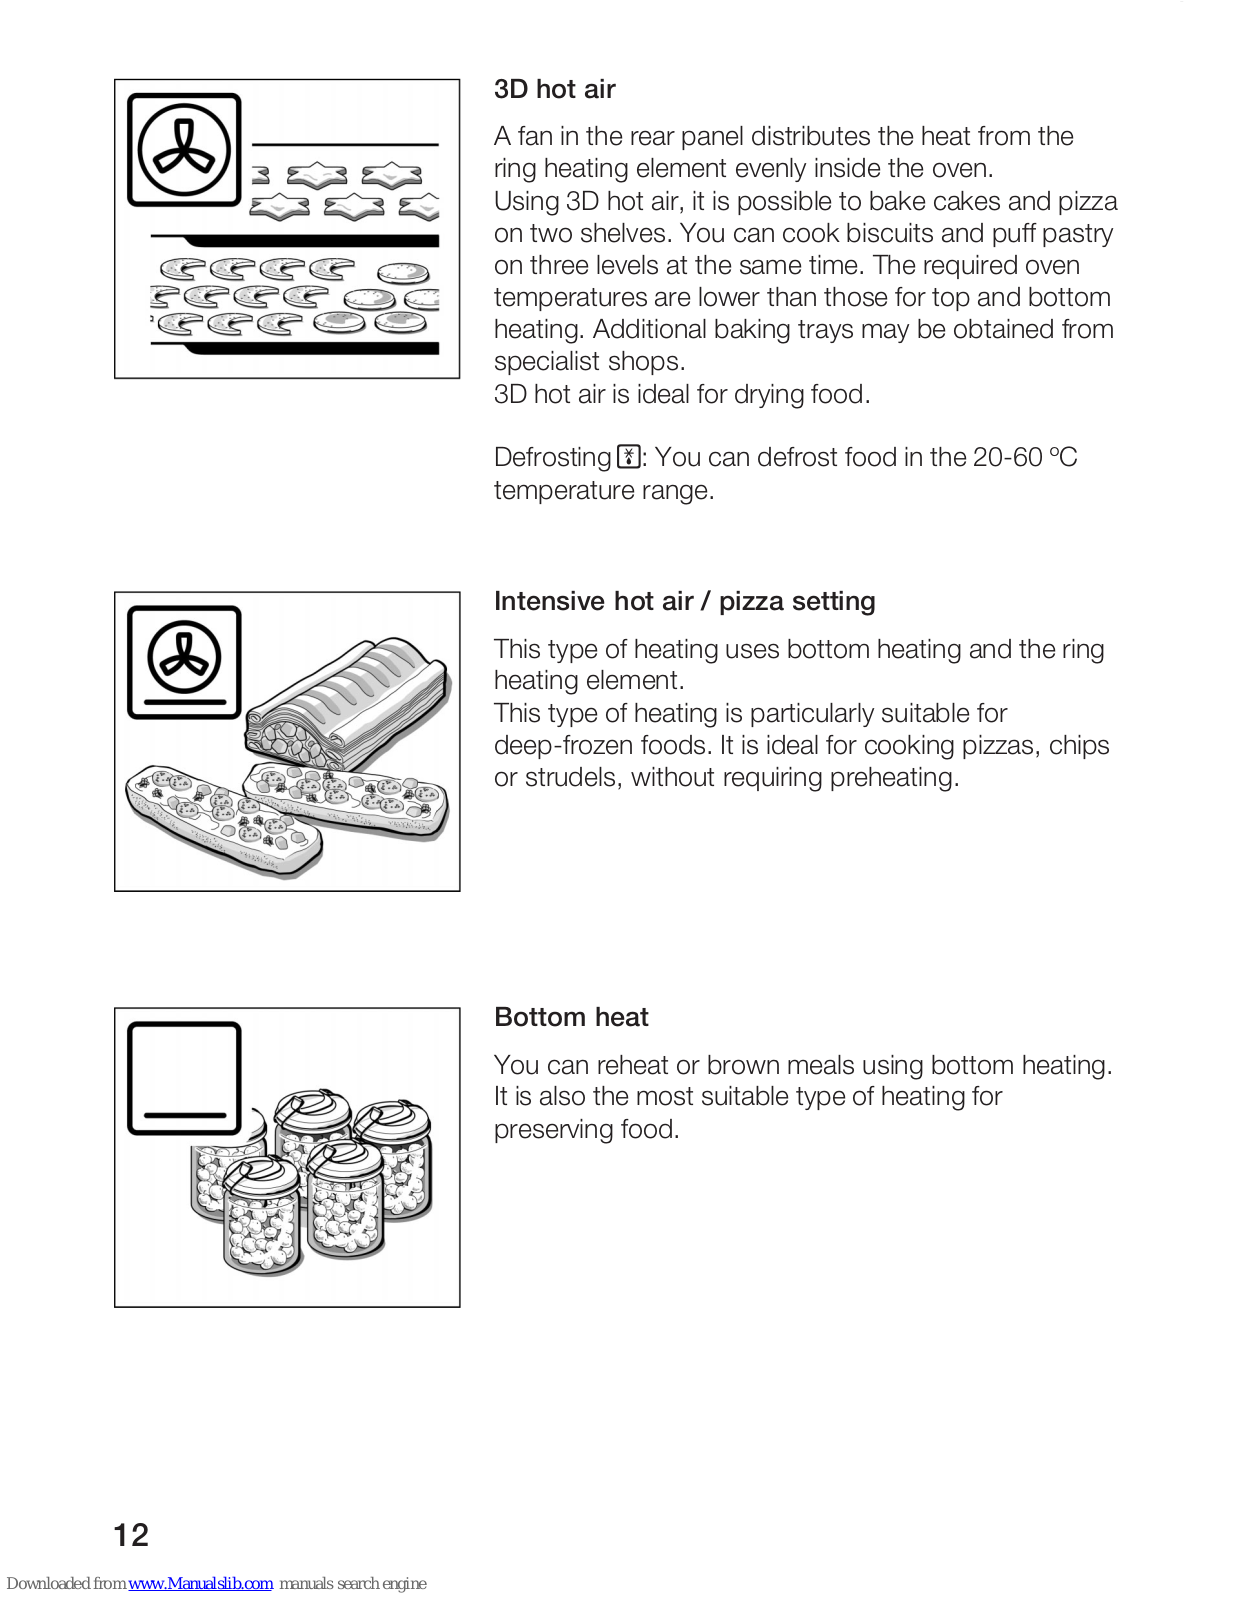
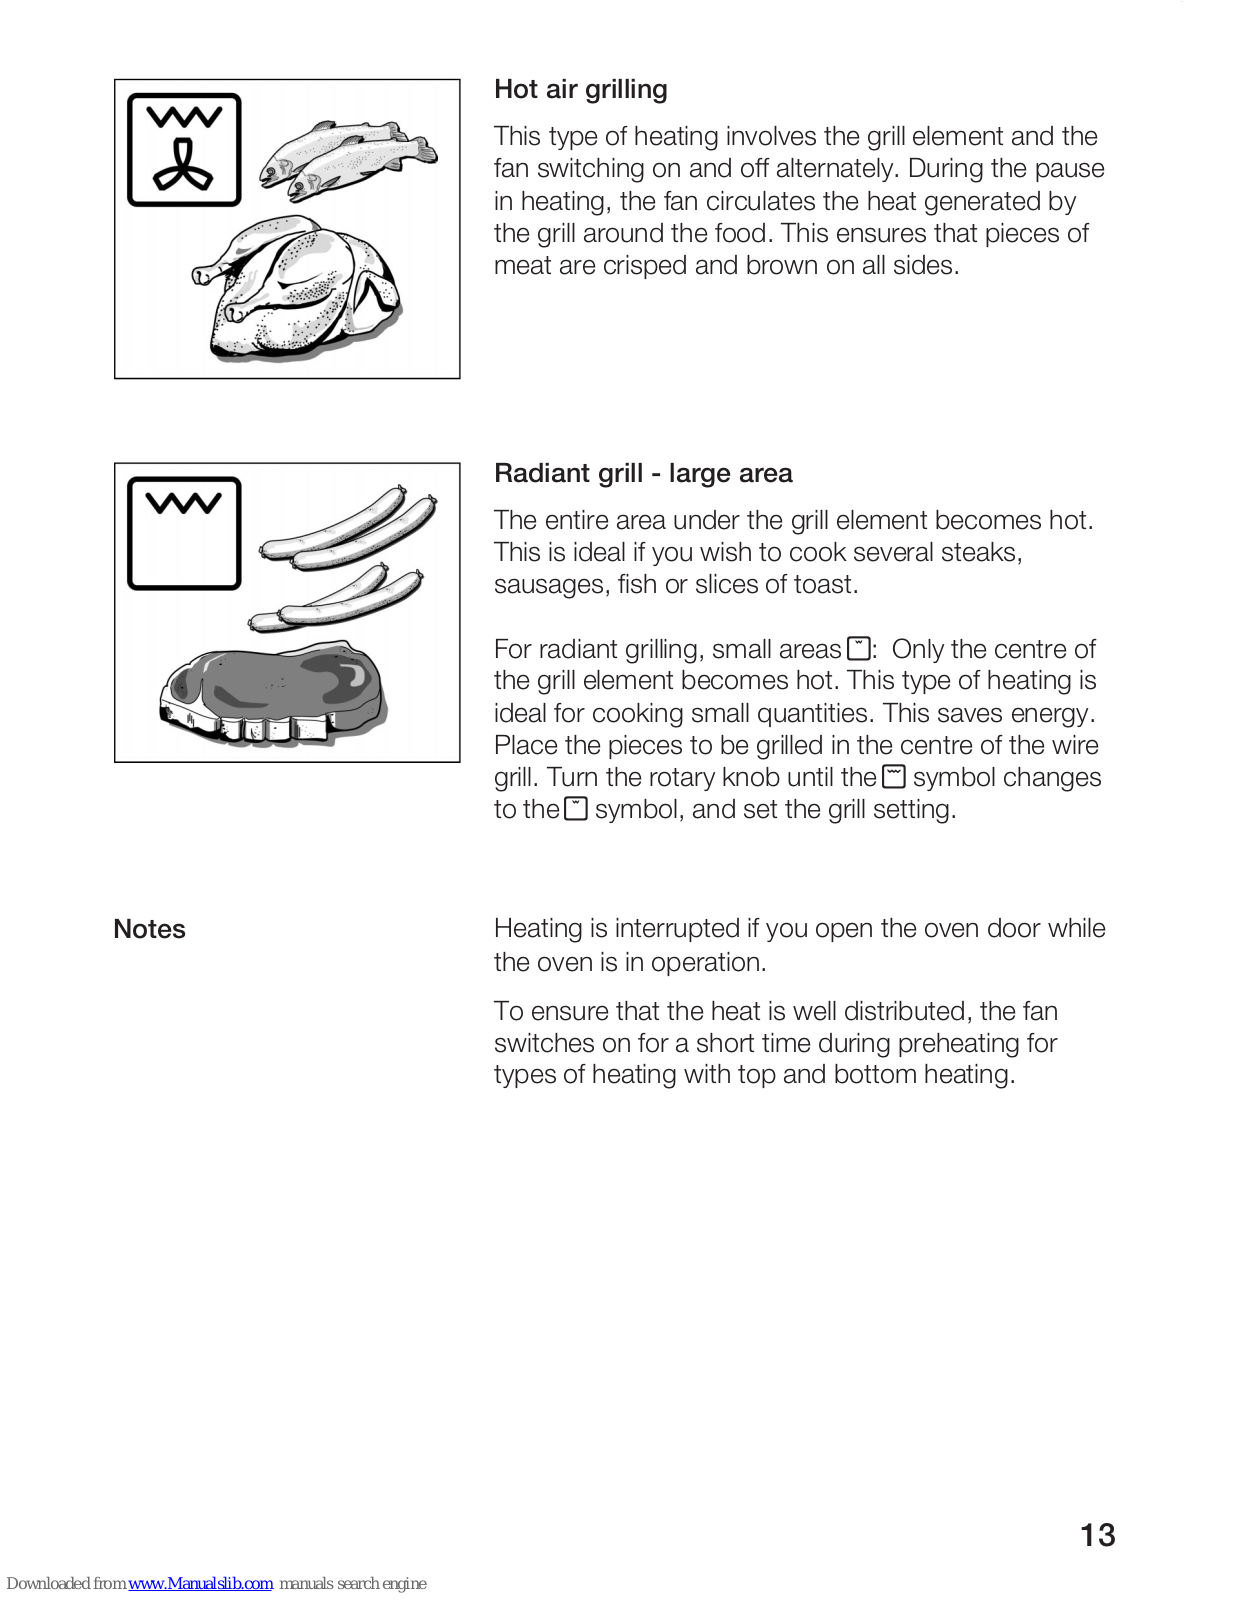
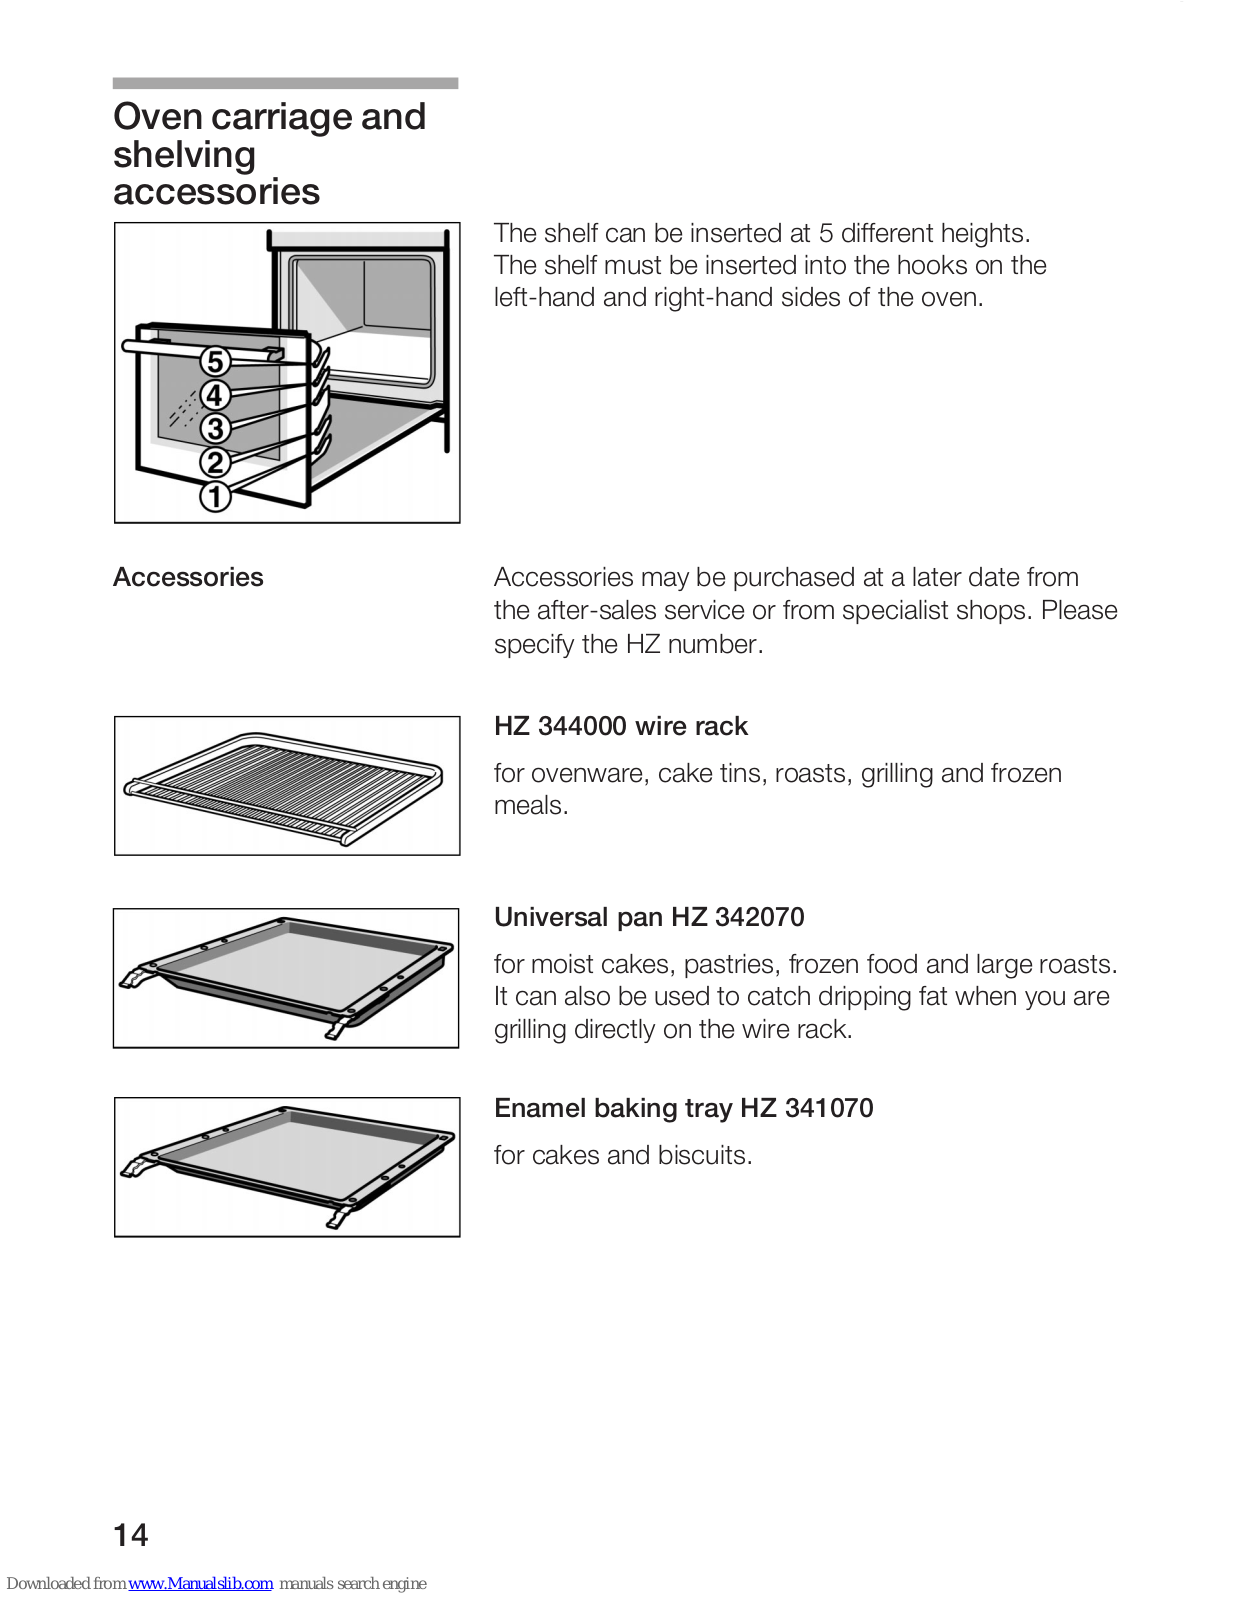
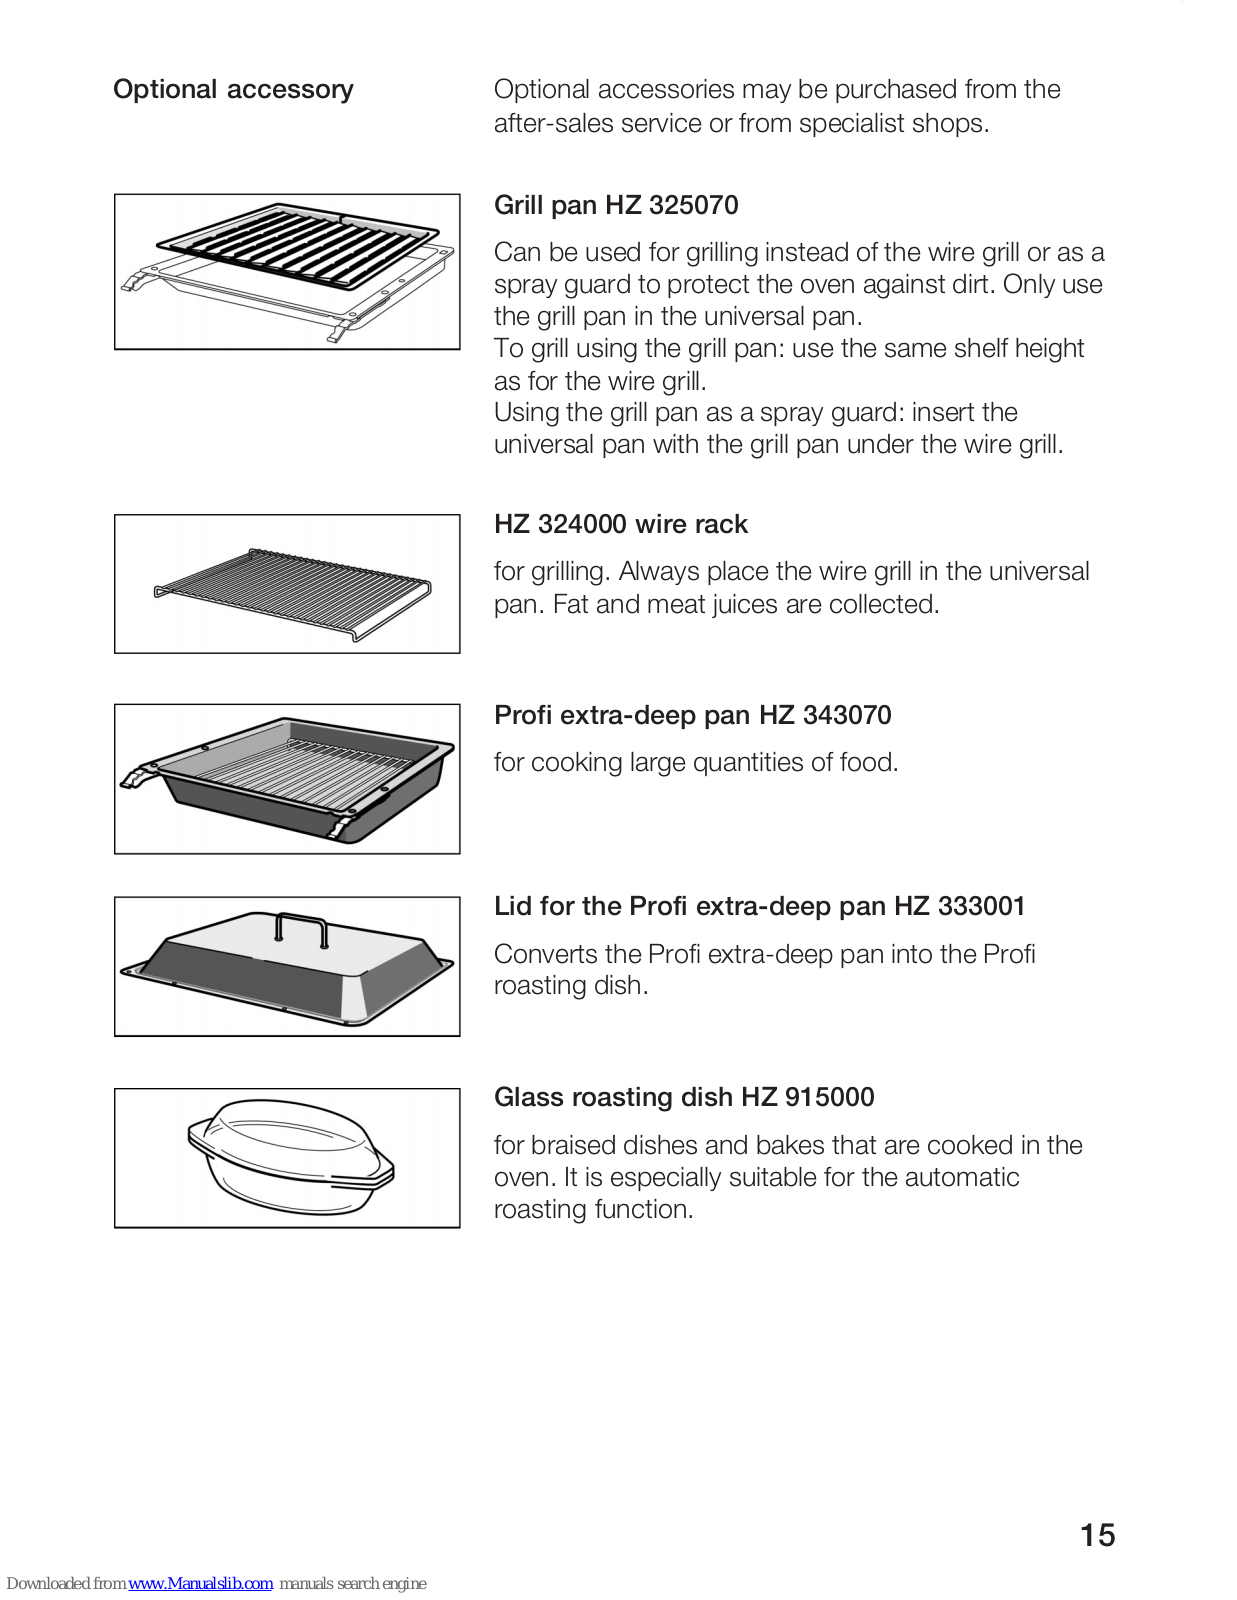

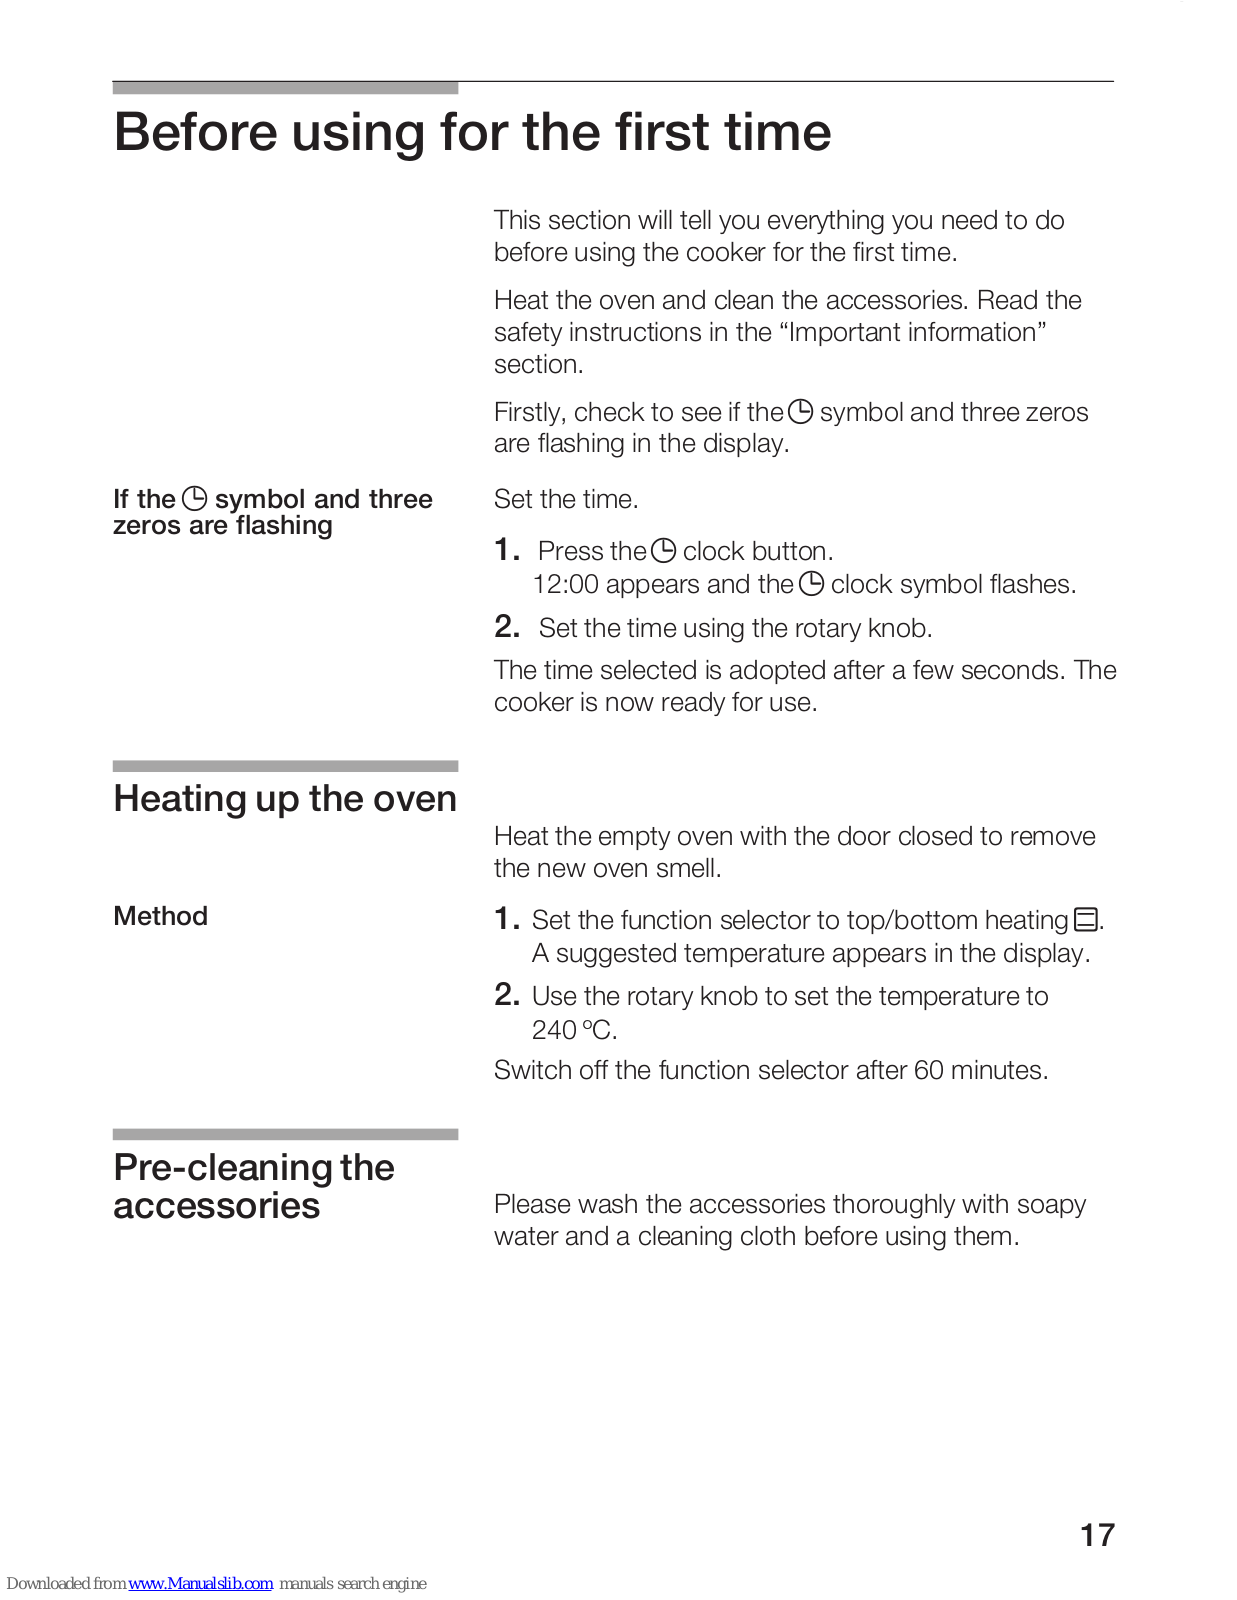
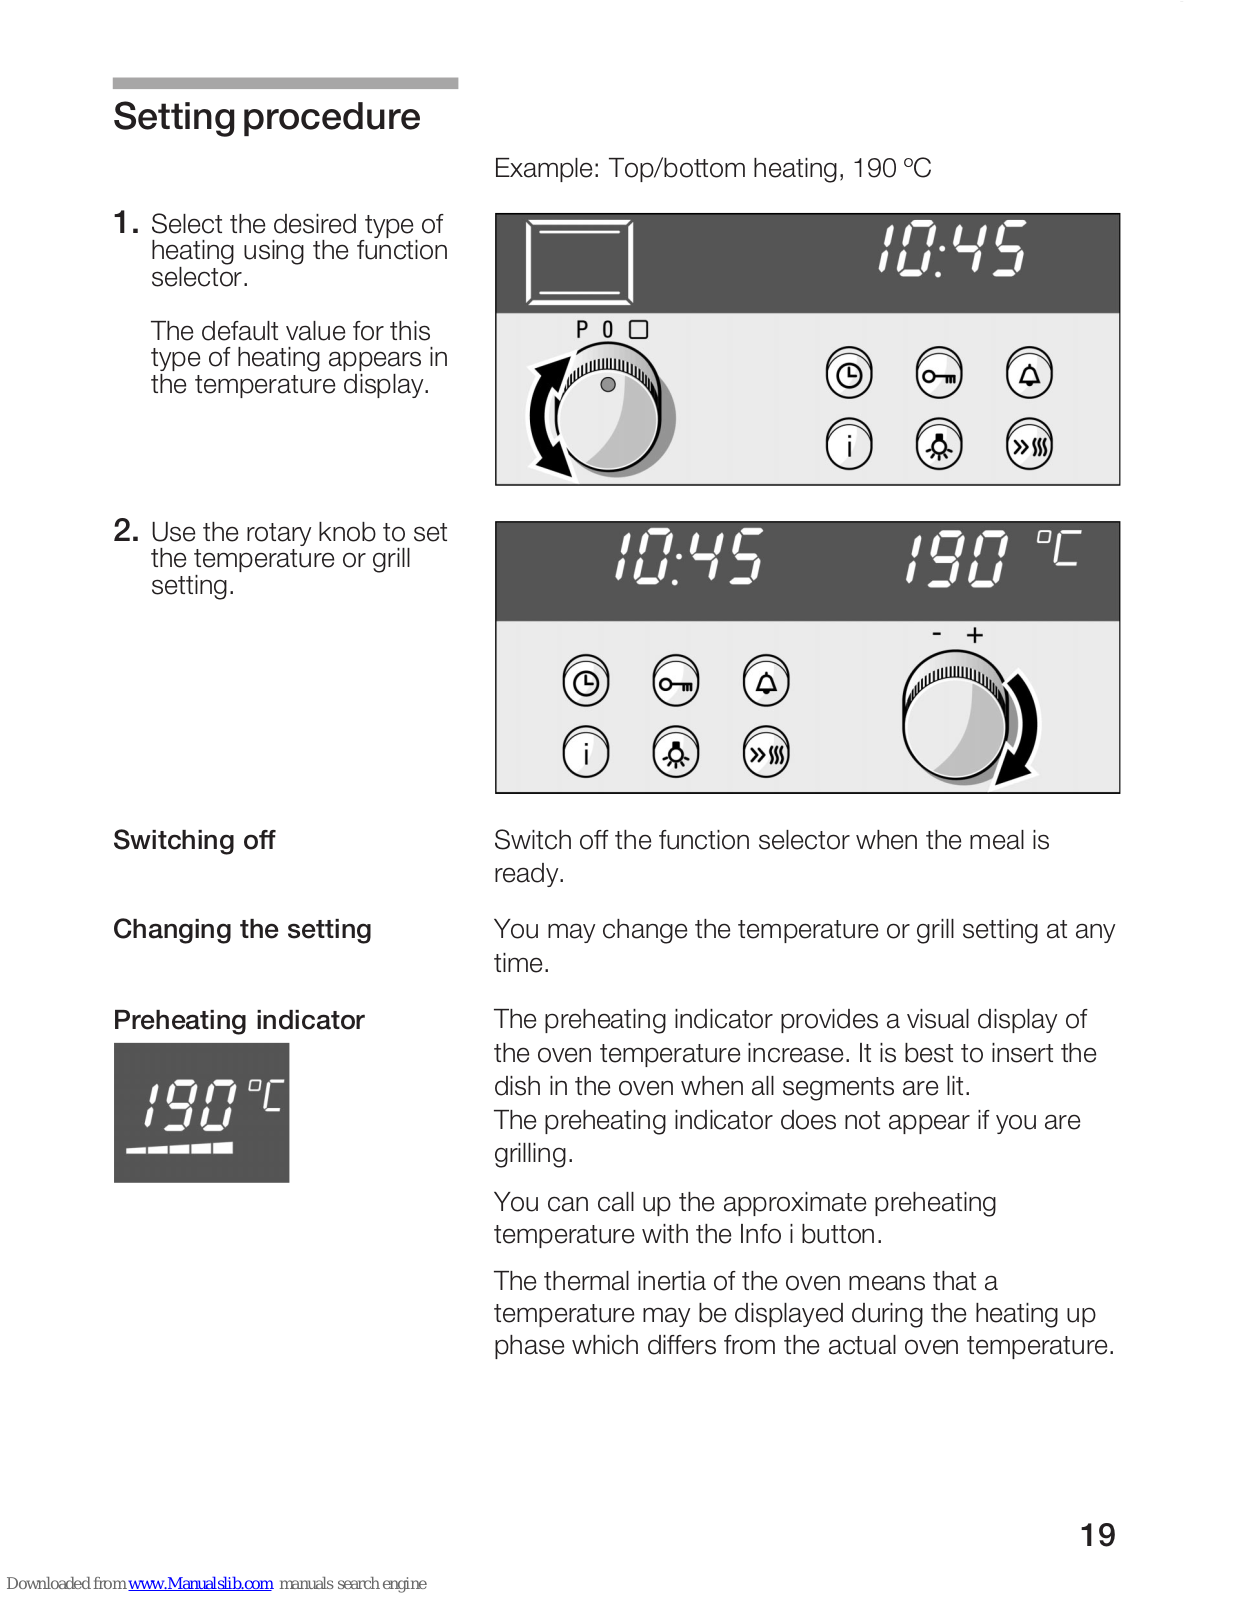
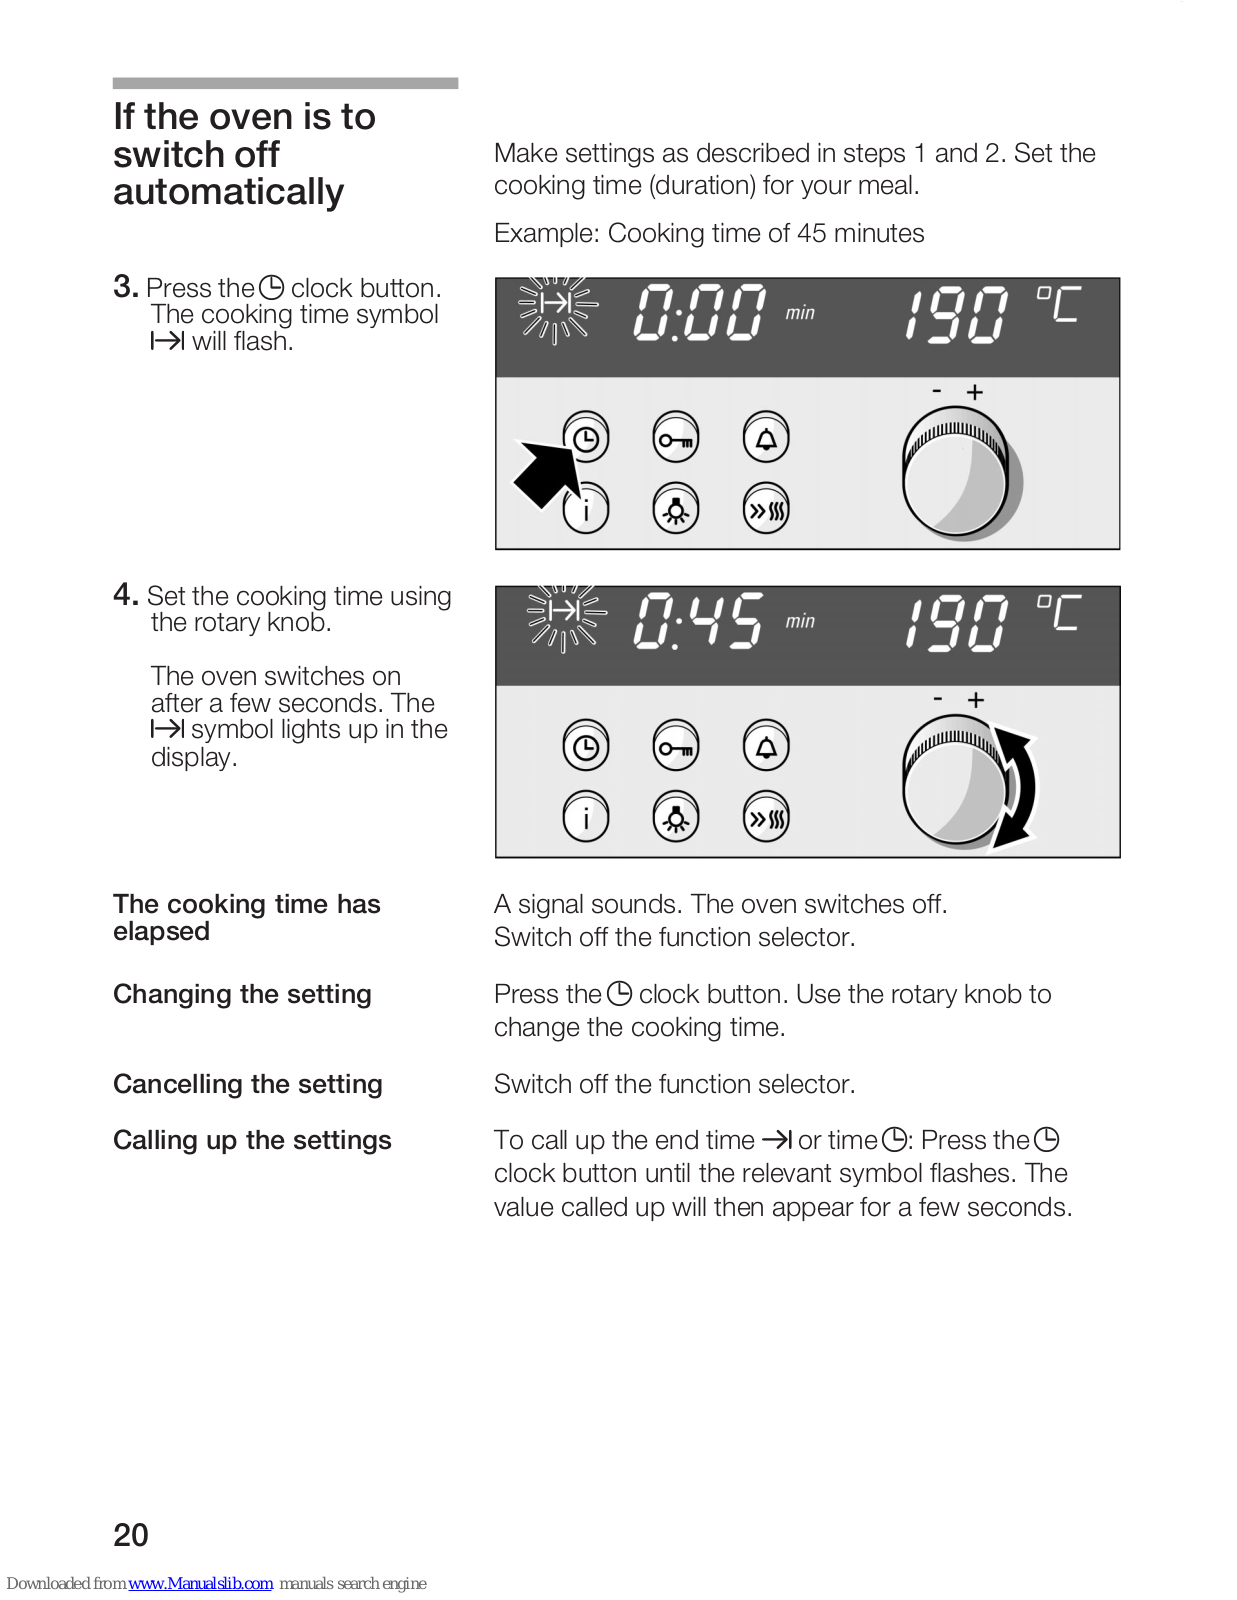
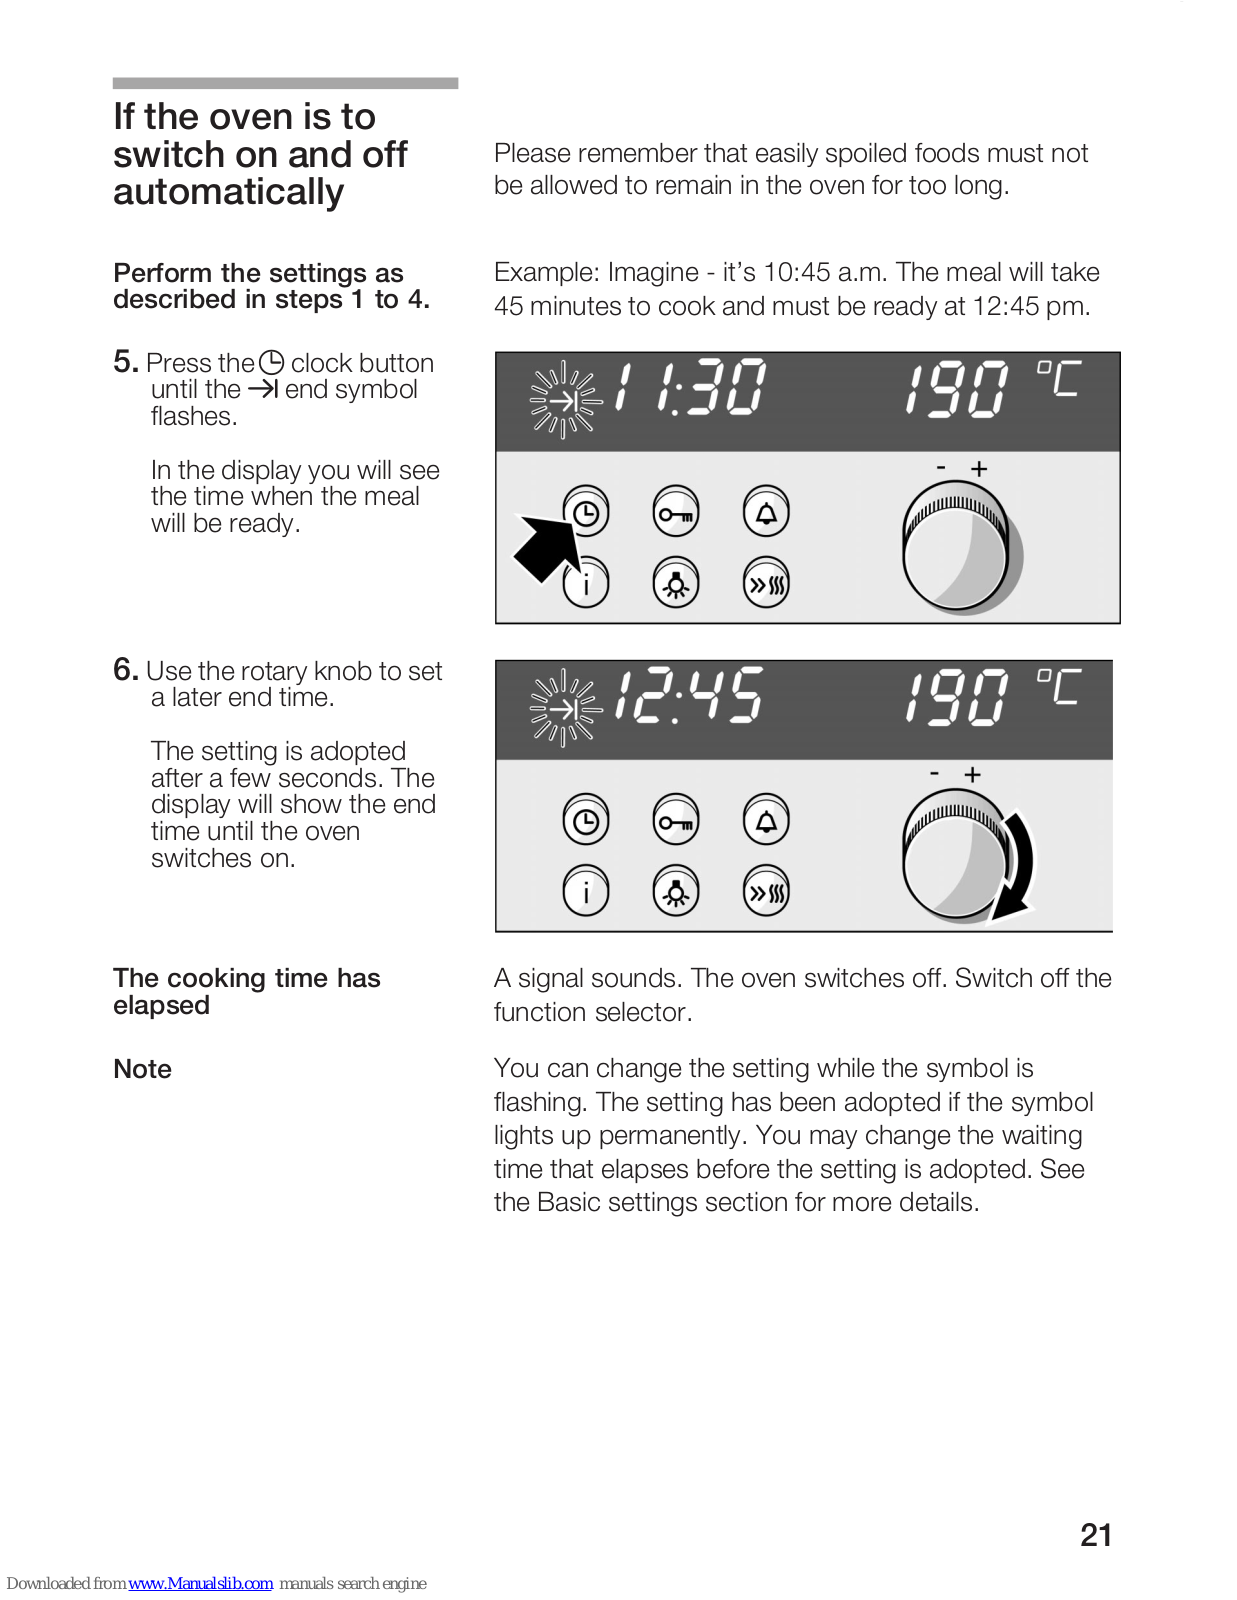


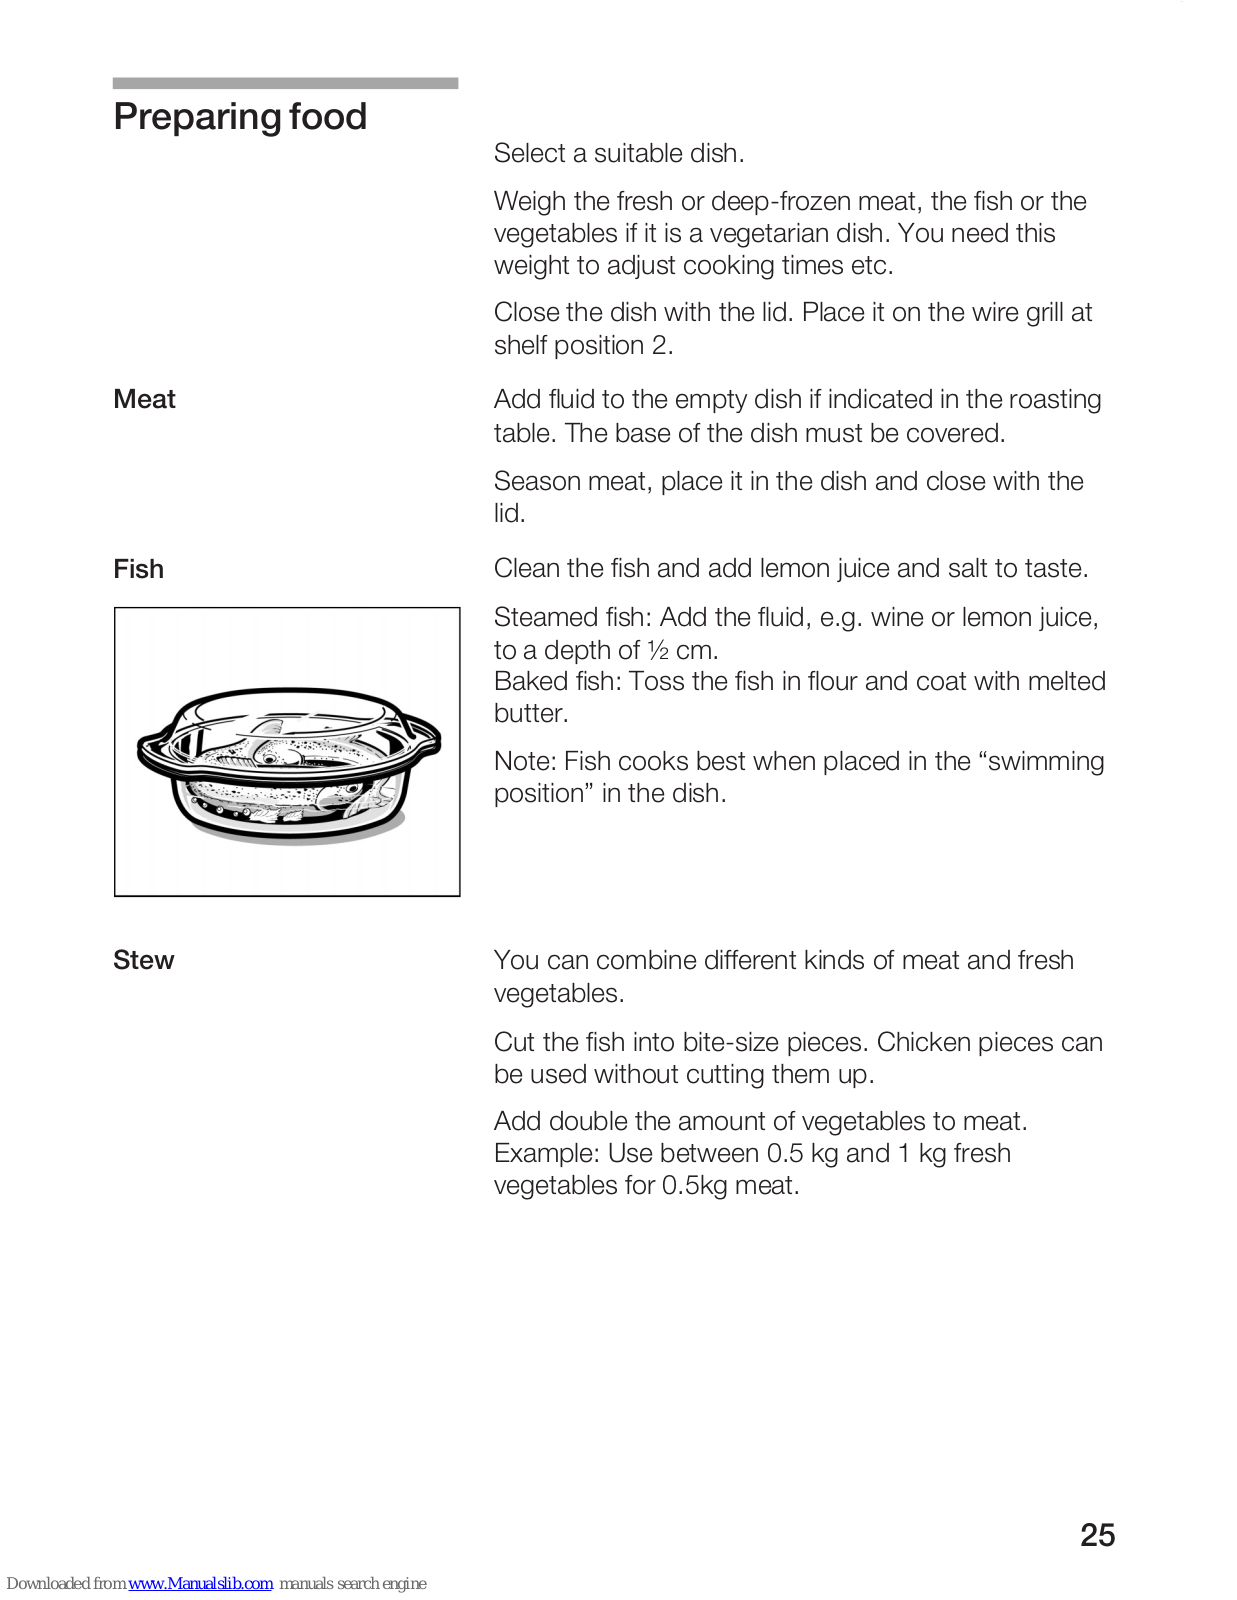


 Loading...