

Page 1

GETTING STARTED WITH
FLASH
®
LITE™ 1. x
Page 2

© 2007 Adobe Systems Incorporated. All rights reserved.
Getting Started with Flash® Lite™ 1.x
If this guide is distributed with software that includes an end user agreement, this guide, as well as the software described in it, is
furnished under license and may be used or copied only in accordance with the terms of such license. Except as permitted by any
such license, no part of this guide may be reproduced, stored in a retrieval system, or transmitted, in any form or by any means,
electronic, mechanical, recording, or otherwise, without the prior written permission of Adobe Systems Incorporated. Please note
that the content in this guide is protected under copyright law even if it is not distributed with software that includes an end user
license agreement.
The content of this guide is furnished for informational use only, is subject to change without notice, and should not be
construed as a commitment by Adobe Systems Incorporated. Adobe Systems Incorporated assumes no responsibility or liability
for any errors or inaccuracies that may appear in the informational content contained in this guide.
Please remember that existing artwork or images that you may want to include in your project may be protected under copyright
law. The unauthorized incorporation of such material into your new work could be a violation of the rights of the copyright
owner. Please be sure to obtain any permission required from the copyright owner.
Any references to company names in sample templates are for demonstration purposes only and are not intended to refer to any
actual organization.
Adobe, the Adobe logo, Flash Lite, and Flash are either registered trademarks or trademarks of Adobe Systems Incorporated in
the United States and/or other countries.
Third-Party Information
This guide contains links to third-party websites that are not under the control of Adobe Systems Incorporated, and Adobe
Systems Incorporated is not responsible for the content on any linked site. If you access a third-party website mentioned in this
guide, then you do so at your own risk. Adobe Systems Incorporated provides these links only as a convenience, and the inclusion
of the link does not imply that Adobe Systems Incorporated endorses or accepts any responsibility for the content on those thirdparty sites.
Sorenson™ Spark™ video compression and decompression technology licensed from
Sorenson Media, Inc.
Fraunhofer-IIS/Thomson Multimedia: MPEG Layer-3 audio compression technology licensed by
Fraunhofer IIS and Thomson Multimedia (http://www.iis.fhg.de/amm/).
Independent JPEG Group: This software is based in part on the work of the Independent JPEG Group.
Nellymoser, Inc.: Speech compression and decompression technology licensed by Nellymoser, Inc. (http:www.nelly-moser.com).
Opera ® browser Copyright © 1995-2002 Opera Software ASA and its suppliers. All rights reserved.
Macromedia Flash 8 video is powered by On2 TrueMotion video technology. © 1992-2005 On2 Technologies, Inc. All Rights
Reserved. http://www.on2.com.
Visual SourceSafe is a registered trademark or trademark of Microsoft Corporation in the United States and/or other countries.
Updated Information/Additional Third Party Code Information available at http://www.adobe.com/go/thirdparty/.
Adobe Systems Incorporated, 345 Park Avenue, San Jose, California 95110, USA.
Notice to U.S. Government End Users. The Software and Documentation are “Commercial Items,” as that term is defined at 48
C.F.R. §2.101, consisting of “Commercial Computer Software” and “Commercial Computer Software Documentation,” as such
terms are used in 48 C.F.R. §12.212 or 48 C.F.R. §227.7202, as applicable. Consistent with 48 C.F.R. §12.212 or 48 C.F.R.
§§227.7202-1 through 227.7202-4, as applicable, the Commercial Computer Software and Commercial Computer Software
Documentation are being licensed to U.S. Government end users (a) only as Commercial Items and (b) with only those rights as
are granted to all other end users pursuant to the terms and conditions herein. Unpublished-rights reserved under the copyright
Page 3

laws of the United States. Adobe Systems Incorporated, 345 Park Avenue, San Jose, CA 95110-2704, USA. For U.S.
Government End Users, Adobe agrees to comply with all applicable equal opportunity laws including, if appropriate, the
provisions of Executive Order 11246, as amended, Section 402 of the Vietnam Era Veterans Readjustment Assistance Act of
1974 (38 USC 4212), and Section 503 of the Rehabilitation Act of 1973, as amended, and the regulations at 41 CFR Parts 60-1
through 60-60, 60-250, and 60-741. The affirmative action clause and regulations contained in the preceding sentence shall be
incorporated by reference.
Page 4

Page 5

Contents
Introduction . . . . . . . . . . . . . . . . . . . . . . . . . . . . . . . . . . . . . . . . . . . . . 7
What’s new in Flash Lite authoring . . . . . . . . . . . . . . . . . . . . . . . . . . . . . . . 7
Guide to instructional media. . . . . . . . . . . . . . . . . . . . . . . . . . . . . . . . . . . . . . 8
Additional resources . . . . . . . . . . . . . . . . . . . . . . . . . . . . . . . . . . . . . . . . . . . . 9
Typographical conventions . . . . . . . . . . . . . . . . . . . . . . . . . . . . . . . . . . . . . . 9
Chapter 1: Flash Lite Overview . . . . . . . . . . . . . . . . . . . . . . . . . . . . .11
About Flash Lite technology . . . . . . . . . . . . . . . . . . . . . . . . . . . . . . . . . . . . .11
Flash Lite 1.x availability . . . . . . . . . . . . . . . . . . . . . . . . . . . . . . . . . . . . . . . . 12
About Flash Lite content types . . . . . . . . . . . . . . . . . . . . . . . . . . . . . . . . . . 13
Workflow for authoring Flash Lite applications . . . . . . . . . . . . . . . . . . . . 14
Flash Lite authoring features . . . . . . . . . . . . . . . . . . . . . . . . . . . . . . . . . . . . 15
Using Flash Lite document templates . . . . . . . . . . . . . . . . . . . . . . . . . . . . 16
Hello World Flash Lite application . . . . . . . . . . . . . . . . . . . . . . . . . . . . . . . 18
About the stand-alone Flash Lite player . . . . . . . . . . . . . . . . . . . . . . . . . 20
Chapter 2: Creating a Flash Lite Application. . . . . . . . . . . . . . . . . 21
Café application overview. . . . . . . . . . . . . . . . . . . . . . . . . . . . . . . . . . . . . . . 21
Viewing the completed application . . . . . . . . . . . . . . . . . . . . . . . . . . . . . 22
Creating the application . . . . . . . . . . . . . . . . . . . . . . . . . . . . . . . . . . . . . . . 23
5
Page 6

6
Page 7

Introduction
This manual provides an introduction to Macromedia® Flash® Lite™ 1.x
from Adobe and describes how to test your content using the Adobe®
Device Central CS3 emulator, which is part of Adobe® Flash® CS3
Professional. The primary difference between using Flash Lite in Flash CS3
and in previous versions of Flash is that the Flash Lite emulator is now part
of Device Central. See the Device Central documentation for more
information.
What’s new in Flash Lite authoring
Flash includes the following new features to help developers create Flash
Lite applications:
Adobe® Device Central emulator Adobe Device Central includes an
emulator that lets you preview your content as it will function on an actual
device. The emulator can configure itself to mimic the features available on
any supported device. The emulator also provides debugging information
that alerts you to potential problems and incompatibilities on the target
device.
Device Settings Adobe Device Central lets you select your test devices
and Flash Lite content type. When you test your content in the Device
Central emulator, you can choose the test device you want the emulator to
mimic.
Device document templates Adobe Flash CS3 Professional includes
document templates to let you quickly start creating content for specific
devices and content types.
7
Page 8

Guide to instructional media
The Flash Lite documentation package includes the following media to
help you learn how to create Flash Lite applications:
■ Getting Started with Flash Lite 1.x provides an overview of Flash Lite 1.x
technology and developing Flash Lite content for mobile devices. It
also includes a step-by-step tutorial for creating a Flash Lite 1.x
application.
■ Developing Flash Lite 1.x Applications is a comprehensive guide to
creating Flash Lite content, and includes instructions for testing your
applications in Adobe Device Central.
■ Flash Lite 1.x ActionScript Language Reference describes all the
ActionScript language features available to Flash Lite developers, and
provides example code.
■ Learning Flash Lite 1.x ActionScript complements the language
reference and provides additional code examples and an introduction to
writing Flash 4 ActionScript, upon which Flash Lite 1.x ActionScript
is based.
■ The Flash Lite sample applications at www.adobe.com/go/
learn_flt_samples_and_tutorials demonstrate key concepts and best
practices discussed or mentioned in the written documentation.
8Introduction
Page 9

Additional resources
For the latest information on developing Flash Lite applications, plus
advice from expert users, advanced topics, examples, tips, and other
updates, see the Mobile and Devices Developer Center at www.adobe.com/
go/developer_flashlite.
For TechNotes, documentation updates, and links to additional resources
in the Flash Lite developer community, see the Adobe Flash Lite Support
Center at www.adobe.com/go/support_flashlite.
Typographical conventions
The following typographical conventions are used in this book:
■ Italic font indicates a value that should be replaced (for example, in a
folder path).
■ Code font indicates ActionScript code.
■ Code font italic indicates an ActionScript parameter.
■ Bold font indicates a verbatim entry.
■ Double quotation marks ("") in code examples indicate delimited
strings. However, programmers can also use single quotation marks.
Typographical conventions 9
Page 10

10 Introduction
Page 11

CHAPTER 1
Flash Lite Overview
This chapter contains the following topics:
About Flash Lite technology . . . . . . . . . . . . . . . . . . . . . . . . . . . . . . . . . 11
Flash Lite 1.x availability . . . . . . . . . . . . . . . . . . . . . . . . . . . . . . . . . . . . 12
About Flash Lite content types . . . . . . . . . . . . . . . . . . . . . . . . . . . . . . 13
Workflow for authoring Flash Lite applications. . . . . . . . . . . . . . . . 14
Flash Lite authoring features. . . . . . . . . . . . . . . . . . . . . . . . . . . . . . . . 15
Using Flash Lite document templates. . . . . . . . . . . . . . . . . . . . . . . . 16
Hello World Flash Lite application . . . . . . . . . . . . . . . . . . . . . . . . . . . 18
About the stand-alone Flash Lite player . . . . . . . . . . . . . . . . . . . . . . 20
About Flash Lite technology
Macromedia Flash Lite from Adobe is a version of Adobe Flash Player
designed for mobile devices. It balances Flash features and capabilities with
the processing power and configurations of today’s mass market mobile
devices. There are currently two versions of Flash Lite 1: Flash Lite 1.0 and
Flash Lite 1.1, collectively known as Flash Lite 1.x. Flash Lite 1.x consists
of the following features:
The core rendering engine The rendering engine handles all vector and
bitmap rendering.
ActionScript interpreter Flash Lite supports the version of the
ActionScript language used in Macromedia® Flash® Player 4 from Adobe,
including many mobile-specific commands, such as getting time and date
information from the device. This hybrid of Flash Player 4 ActionScript
and commands with properties specific to Flash Lite is collectively called
Flash Lite 1.x ActionScript.
For more information about Flash Lite 1.x ActionScript, see Flash Lite 1.x
ActionScript Language Reference and Learning Flash Lite 1.x ActionScript.
1
11
Page 12

Text and fonts Flash Lite supports static, dynamic, and input text fields.
You can use fonts that are available on the device or embed font data in
your published SWF file. For more information about using text and fonts
in Flash Lite, see Chapter 2, “Working with Text and Fonts” in Developing
Flash Lite 1.x Applications.
Sound Flash Lite 1.0 and Flash Lite 1.1 both support device audio
formats (such as MIDI or MFi). Flash Lite 1.1 also supports standard Flash
audio. For more information about working with sound in Flash Lite, see
Chapter 3, “Working with Sound” in Developing Flash Lite 1.x
Applications.
Network connectivity Flash Lite 1.1 supports the ability to load external
data and SWF files, as well as commands and properties for getting
connectivity and HTTP request status information.
Device and platform integration Flash Lite provides access to several
system features and commands, such as the ability to initiate phone calls
and short message service (SMS) messages, get platform capability
information, and get user input using the device’s standard input
dialog box.
Flash Lite 1.x availability
Flash Lite 1.0 and Flash Lite 1.1 are supported on a variety of mobile
devices that are available in a number of different geographic regions and
markets. Some of these devices are available globally, while others are
available only in specific geographic regions or from specific mobile
operators. Some devices come with Flash Lite pre-installed from the device
manufacturer or mobile operator, while on others it can be installed
after purchase.
For the most current list of devices that support Flash Lite, see the
Supported Devices page located at www.adobe.com/go/
mobile_supported_devices/.
12 Flash Lite Overview
Page 13

Globally available devices that support Flash Lite include the Symbian
Series 60-based devices from Nokia, Sendo, and Seimens, and the Symbian
UIQ-based devices from Sony-Ericcson. As of this writing, all globally
available devices support only the stand-alone Flash Lite player. The standalone player installs as a “top-level” application that a user can start from
the device’s application menu (just like a text messaging application or a
mobile web browser, for example). For more information about the standalone Flash Lite player, see “About the stand-alone Flash Lite player”
on page 20.
As of this writing, the Flash Lite stand-alone player is not pre-installed on
any globally available devices. You can purchase the stand-alone player for
development purposes from the Adobe online store at www.adobe.com/go/
store.
Regionally available devices that support Flash Lite comprise a larger
group of devices than are available globally. As of this writing, these devices
are available primarily in Japan and come with Flash Lite pre-installed. On
these devices, Flash Lite enables several different types of content, such as
Flash screen savers or animated ring tones. For more information about
Flash Lite content types, see “About Flash Lite content types” on page 13.
About Flash Lite content types
Before you start developing a Flash Lite application, you need to know
the following:
■ The device or devices on which the content will be running, or target
devices. The Flash Lite player is installed on a variety of devices. For a
full list of devices with Flash Lite installed, see the Supported Devices
page on the Adobe website at www.adobe.com/go/
mobile_supported_devices.
■ The Flash Lite content types supported by the target devices. Each
Flash Lite installation supports one or more application modes, or
content types. For example, some devices use Flash Lite to enable Flashbased screen savers or animated ring tones. Others use Flash Lite to
render Flash content that is embedded in mobile web pages. Not all
content types support all Flash Lite features.
About Flash Lite content types 13
Page 14

Each Flash Lite content type, paired with a specific device, defines a
specific set of Flash Lite features that are available to your application. For
example, a Flash application that's running as a screen saver is not typically
allowed to make network connections or download data.
The Flash Lite testing features in Flash let you test against multiple devices
and different Flash Lite content types. This lets you determine if your
application uses features that aren't available for the type of content that
you are developing. For more information about selecting target devices
and content types, see Chapter 5, “Testing Flash Lite Content” in
Developing Flash Lite 1.x Applications.
Workflow for authoring Flash Lite applications
The process for creating Flash Lite content is an iterative one that involves
the following steps:
Identify your target device(s) and Flash Lite content type Different
devices have different screen sizes, support different audio formats, and
have different screen color depths, among other factors. These factors may
influence your application’s design or implementation.
In addition, different devices support different Flash Lite content types,
such as screen savers, stand-alone applications, or animated ring tones. The
content type for which you are developing also determines the features that
are available to your application. For more information about Flash Lite
content types, see “About Flash Lite content types” on page 13.
Create and test your application in Flash Adobe Flash CS3
Professionalincludes an emulator available on Adobe Device Central CS3,
which lets you test your application without having to transfer it to a
device. You use the emulator to refine your application design and fix any
problems before you test it on a mobile device.
Test the application on your target device or devices This step is
important because the emulator doesn’t emulate all aspects of the target
device. For instance, a color gradient that appears smooth in the emulator
may appear banded when viewed on the actual device. After testing your
application on a device, you may find that you need to refine the
application’s design in the Flash authoring tool.
14 Flash Lite Overview
Page 15
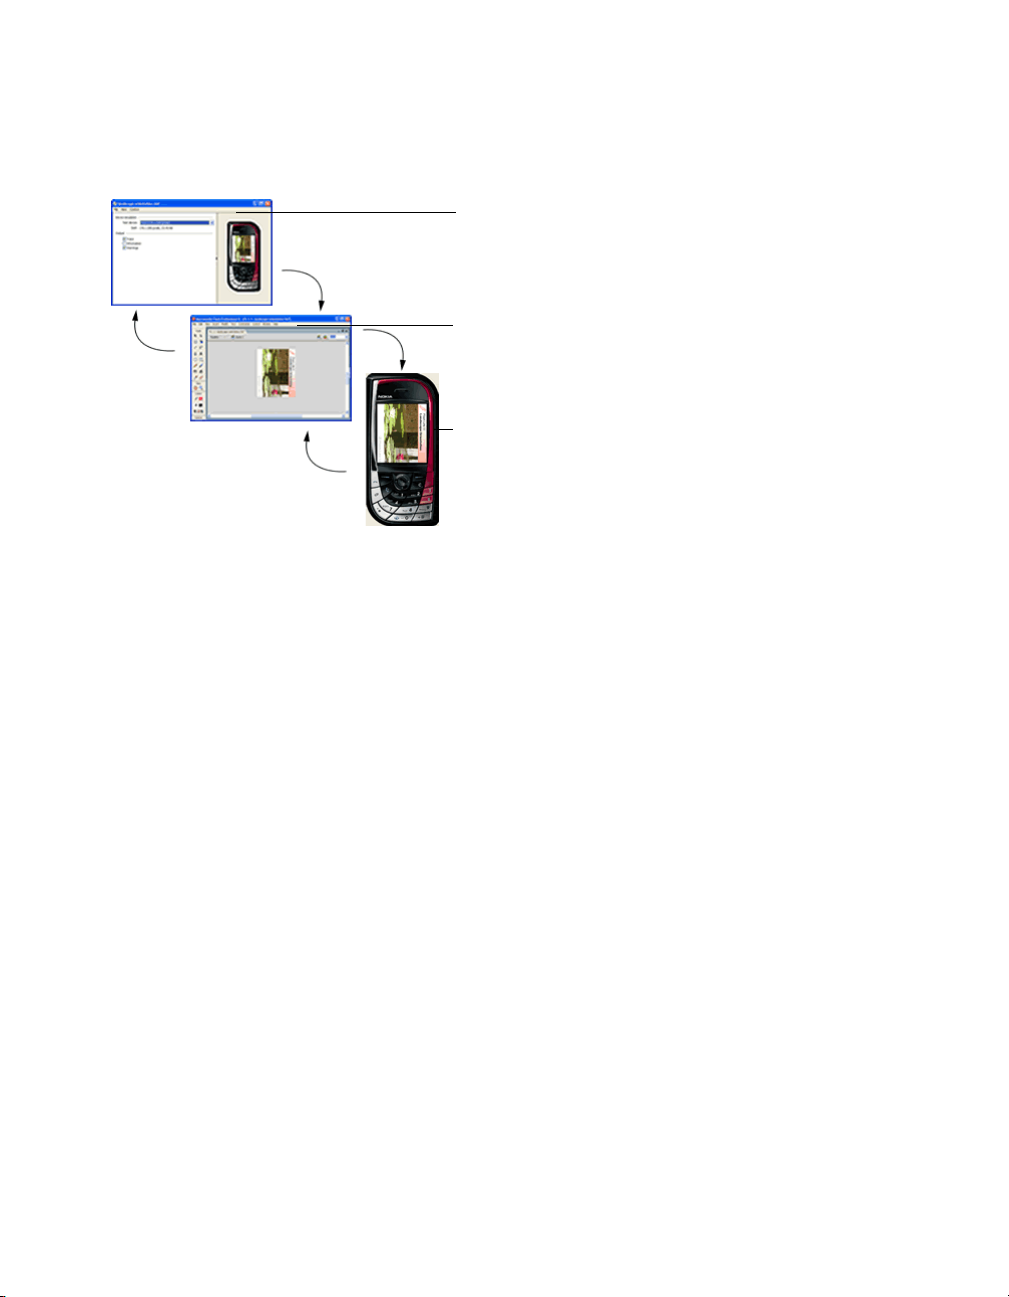
The following figure illustrates the iterative development and testing
Editing the FLA file in Adobe
Flash CS3
Testing in the Adobe Device
Central emulator
Testing on a device
process described above.
Flash Lite authoring features
This section discusses the features in Flash designed specifically for Flash
Lite developers. With the exception of the device templates feature, the
following features are only available when your document’s Version setting
on the Flash tab of the Publish Setting dialog box is set to either Flash Lite
1.0 or Flash Lite 1.1. For information on how to specify your document’s
SWF version, see “Setting publish options for the Flash SWF file format”
in Using Flash.
Adobe Device Central lets you test your content as it will run and appear
on an actual device. It also lets you select a different test device, view
information about your application, and set emulator debug output
options. Different devices support different media types (for example,
different types of device sound formats) as well as different Flash Lite
content types, such as stand-alone player, screensaver, or browser. When
you preview your application, the emulator mimics the features available to
the selected test device running as the selected content type.
For more information about Flash Lite content types, see “Ab out Fl ash L ite
content types” on page 13.
Flash Lite authoring features 15
Page 16
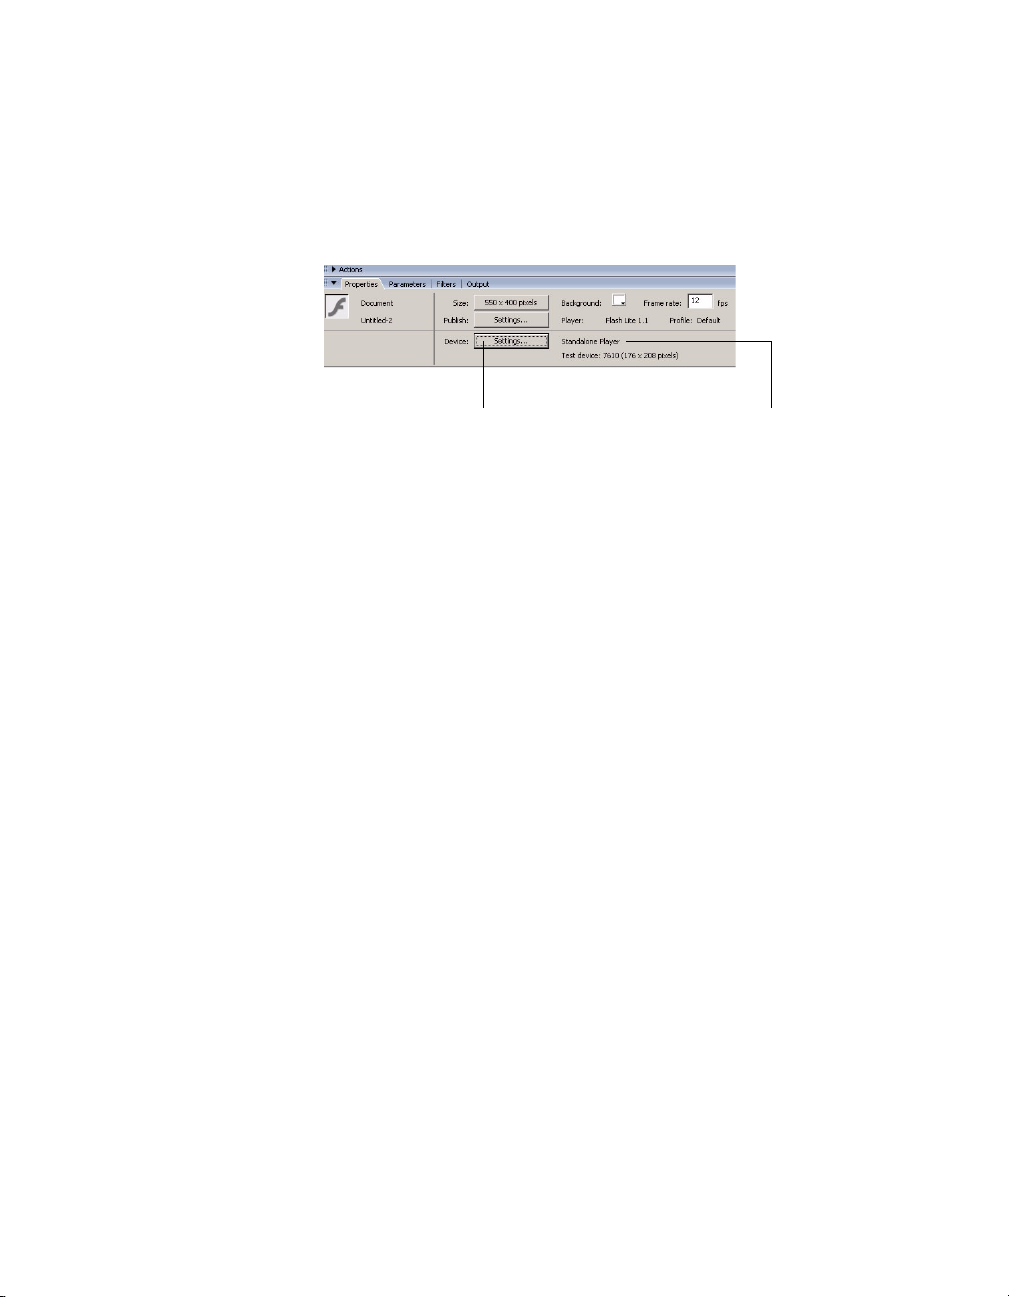
The Property inspector contains a section that provides information
Device Settings button Current content type and test device
about your current device settings, as well as a button that lets you open
the Device Settings dialog box. This button is active only when your
document’s Version setting on the Flash tab of the Publish Setting dialog
box is set to Flash Lite 1.0 or Flash Lite 1.1.
Document templates provide a starting point for you to create different
types of Flash Lite content for different categories of devices. For more
information, see “Using Flash Lite document templates” on page 16.
Using Flash Lite document templates
Flash includes several templates that provide starting points for creating
Flash Lite content for various devices and content types. When you create a
new document from one of the Flash Lite templates, your document is
preconfigured with the proper Stage size, publish settings, and device
settings for the device type that you specify. In some cases, you may need to
adjust the Stage size from the default dimensions for your target device.
The first step in most of the examples and sample applications in this
documentation is to create a new document from one of the Flash Lite
document templates.
16 Flash Lite Overview
Page 17
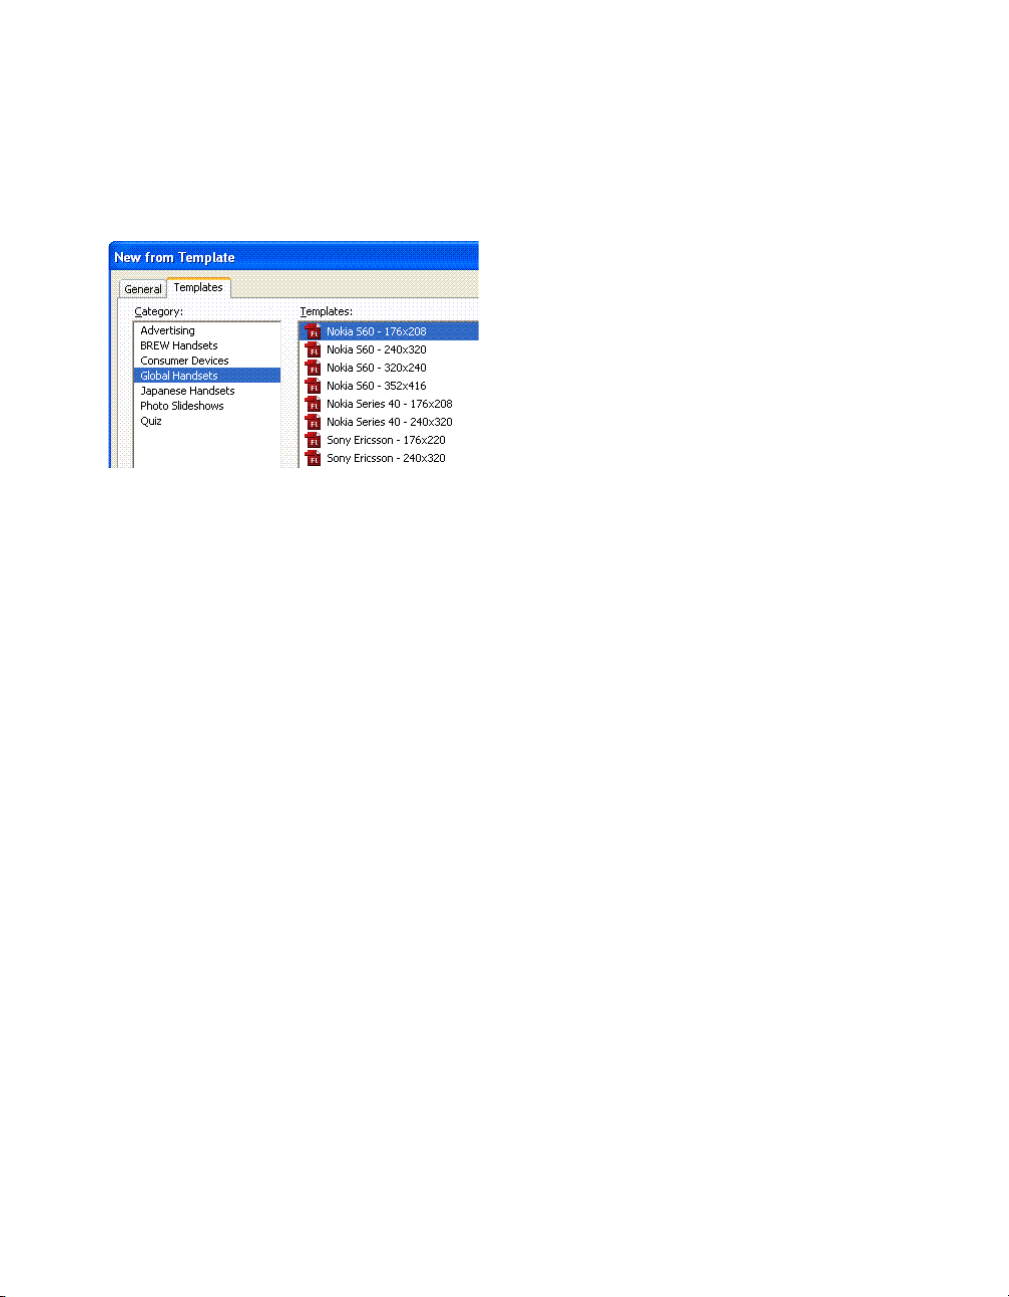
As the following figure shows, Flash Lite document templates are organized
into several groups, including Global Handsets and Japanese Handsets.
The name of each template in each group includes the target device name
and screen size.
The Global Handsets category contains templates for creating full-screen
applications for the stand-alone Flash Lite 1.1 player on Series 60 and UIQ
platforms. The Japanese Handsets category contains templates for creating
content for devices available in the Japanese market. For more information
about Flash Lite availability in global and regional markets, see “Flash Lite
1.x availability” on page 12.
To create a new document from a Flash Lite template:
1. In Flash, select File > New.
2. Select the Templates tab in the New Document dialog box.
3. Select a category from the list of categories:
■ Select Global Phones if you’re developing a Flash Lite application
for a phone available globally.
■ Select Japanese Phones if you’re developing an application for a
phone only available in the Japanese market.
4. Select a template from the list of templates.
5. Click OK to close the New Document dialog box.
Using Flash Lite document templates 17
Page 18

Hello World Flash Lite application
In this section, you create a simple Flash Lite application and test it in the
Adobe Device Central emulator. The purpose of this tutorial is to acquaint
you with the mobile authoring and testing features in Adobe Flash CS3
Professional as well as the general workflow for creating Flash Lite content.
For a more complete sample application, see Chapter 2, “Creating a Flash
Lite Application,” on page 21.
First, you need to decide which devices and Flash Lite content type you are
targeting. For the purposes of this tutorial, we’ll assume that you’re
developing content for the Flash Lite 1.1 stand-alone player on the Series
60 devices from Nokia. All of the supported Nokia Series 60 devices have
the same available Stage size (176 x 208 pixels), so in theory, the same
application (SWF file) will run on all of those devices.
To begin development, you first need to configure your Flash document’s
publish settings, document settings, and device settings for the target
device and content type. You can do this manually using a new blank
document, or you can use a Flash Lite template (see “Using Flash Lite
document templates” on page 16) to create a new document that’s
preconfigured with the proper settings for your target device and content
type. The following procedure explains how to create a simple Hello World
application.
18 Flash Lite Overview
To configure and create a simple Flash Lite application:
1. Start Flash.
2. On the main Flash screen, select Create New > Flash Mobile
Document. Flash opens Adobe Device Central and displays the New
Document tab.
3. In Device Central, select FlashLite 1.1 in the Player Version box,
ActionScript 2.0 in the ActionScript Version box, and Standalone
Player in the Content Type box.
4. Click Custom Size for All Selected Devices at the bottom of the screen.
This allows you to create content for the stand-alone Flash Lite player.
5. Click Create. You are returned to Flash, which creates a new document
with preset publish settings and (when you specify a device) the correct
size for the device you selected.
Page 19

6. In the Tools panel, select the Text tool and drag to create a text box on
the Stage.
Ty pe Hello, world! (or other text) in the text box.
7. Select Control > Test Movie to export your application to Adobe Device
Central and view your application in the Adobe Device Central
emulator.
Note: During testing in Device Central, you can change the device
and content type to see your application on a different platform. To
do this, double-click a device in the Available Devices panel and
select a new content type from Content Type. When you return to
Flash, Flash remembers the settings you last used in the emulator.
To return to Flash, select File > Return to Flash.Select Control > Test
8.
Movie to view your application in the Adobe Device Central emulator.
Hello World Flash Lite application 19
Page 20

About the stand-alone Flash Lite player
The stand-alone Flash Lite 1.1 player is an application that allows you to
open and view SWF files that reside on your device’s memory card, that
you browse to in your device’s mobile web browser, or that you receive in
your device’s messaging in-box over Bluetooth® wireless technology or an
infrared connection.
As of this writing, the stand-alone player is available globally for the
following platforms and devices:
Series 60 platform:
■ Nokia 3600, 3620, 3650, 3660, 6260, 6600, 6620, 6630, 6670, 6680,
6681, 7610, N-Gage, N-Gage QD
■ Sendo X
■ Siemens SX1
UIQ platform:
■ Sony Ericsson P900, P910
If you’re a developer, you can purchase the stand-alone Flash Lite 1.1 player
for these supported devices from the Adobe online store at
www.adobe.com/go/store. For a list of commonly asked questions about
purchasing the stand-alone player, see the Flash Lite 1.1 FAQ at
www.adobe.com/go/bb660cc2/. For help installing the player, see
TechNote 4632f5aa at www.adobe.com/go/4632f5aa.
20 Flash Lite Overview
Page 21
CHAPTER 2
Creating a Flash Lite Application
In this section, you’ll develop an Adobe Flash Lite application that
promotes a fictional restaurant called Café Townsend. Users can view a list
of specials at the restaurant and call the restaurant to make reservations.
This chapter contains the following topics:
Café application overview . . . . . . . . . . . . . . . . . . . . . . . . . . . . . . . . . . 21
Viewing the completed application . . . . . . . . . . . . . . . . . . . . . . . . . . 22
Creating the application . . . . . . . . . . . . . . . . . . . . . . . . . . . . . . . . . . . . 23
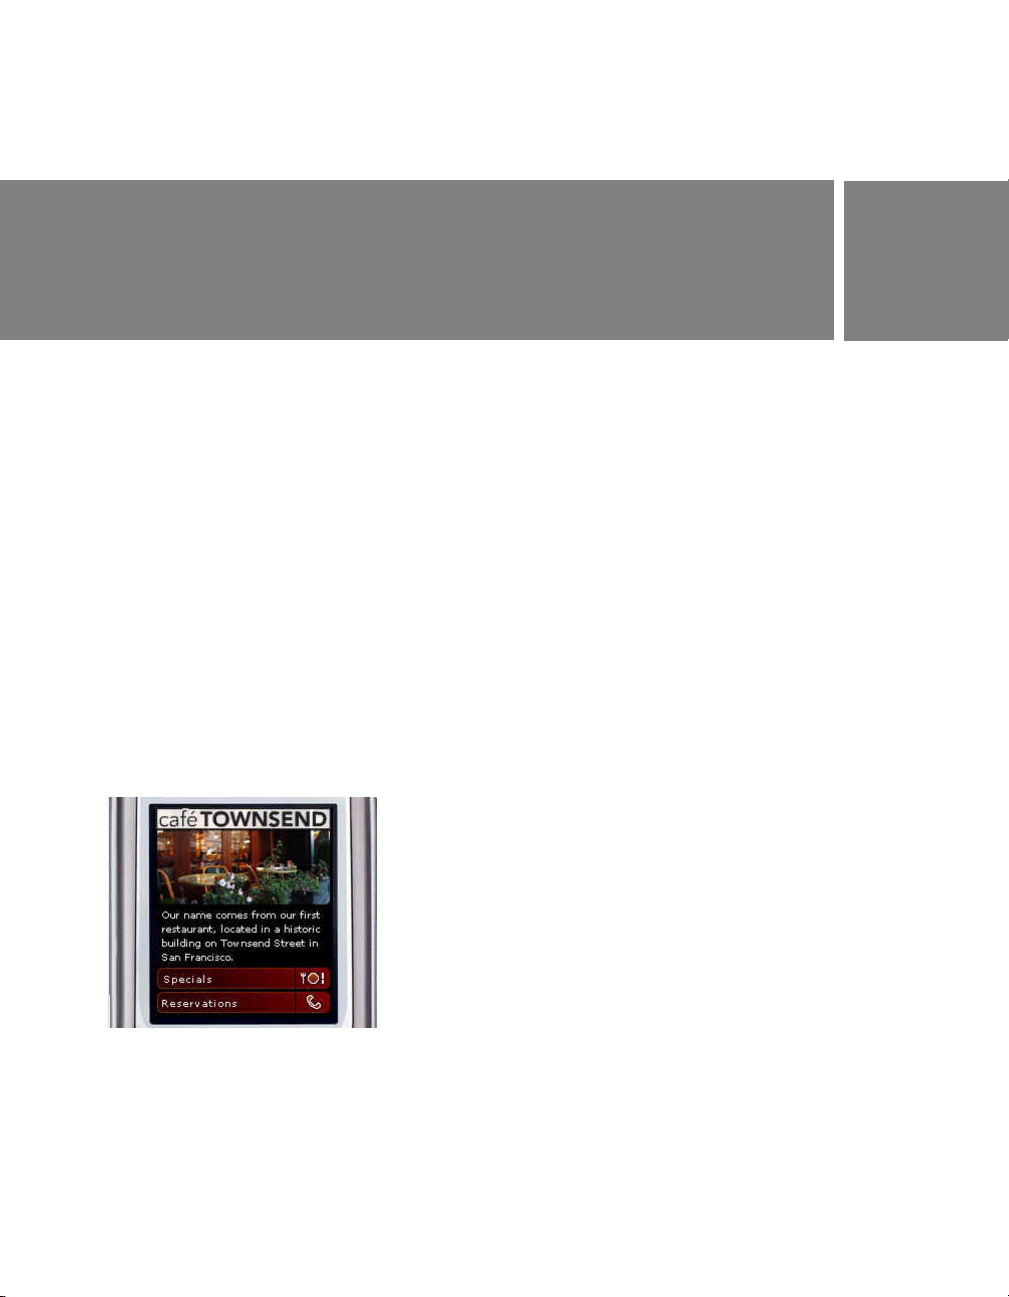
Café application overview
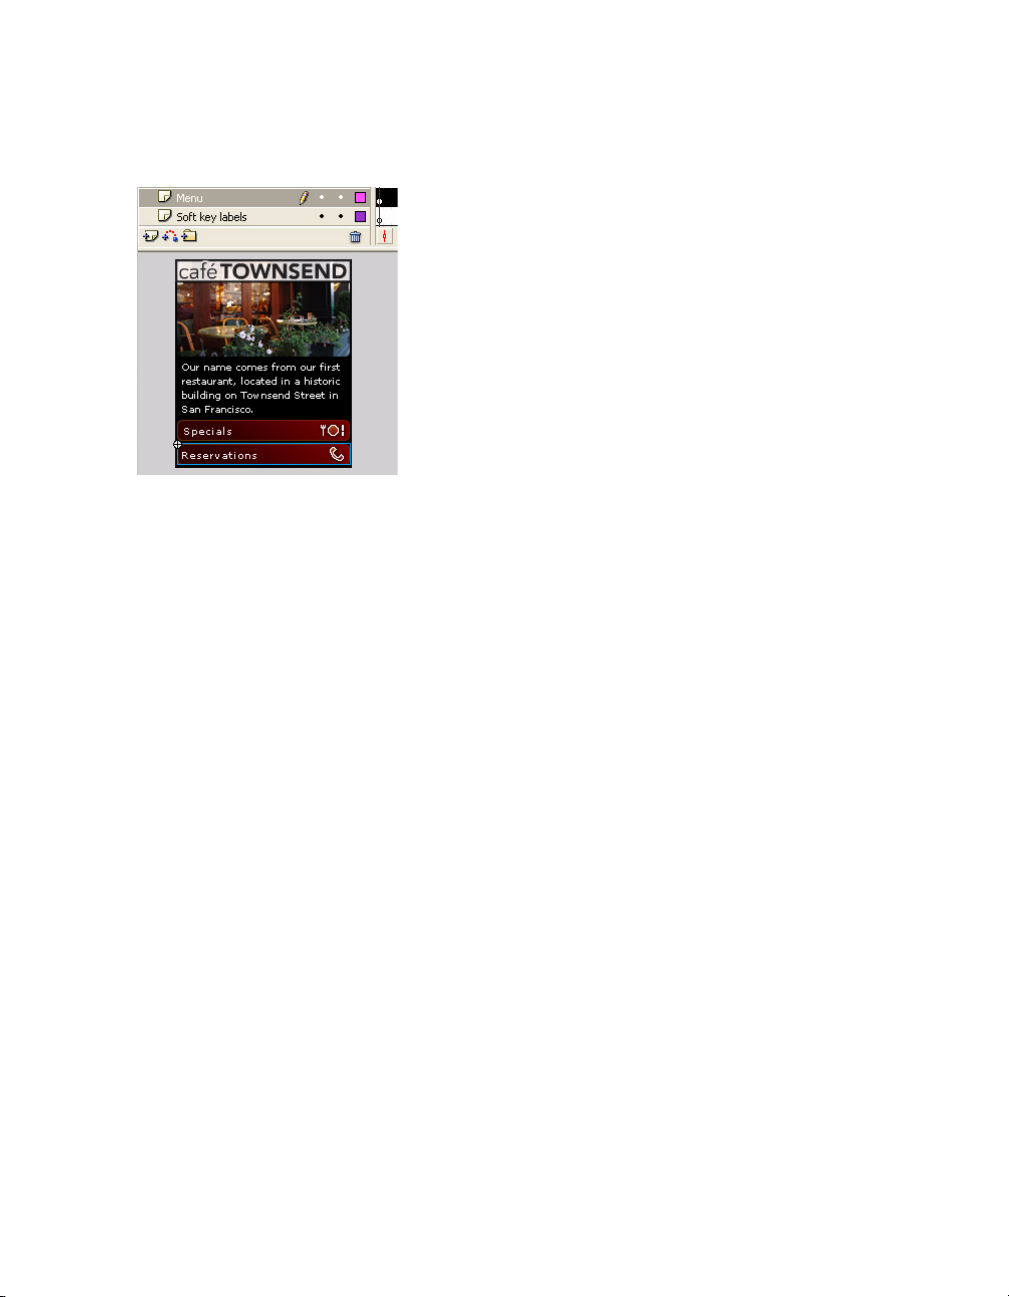
The café application’s initial screen contains some introductory text about
the restaurant and a menu listing two options: Specials and Reservations.
The user selects a menu item by pressing the Up and Down arrows on their
device to set the focus, and then pressing the Select key to confirm
the selection.
2
The café application’s main screen
21
Page 22
If the user selects the Specials menu option, a screen for navigating a list of
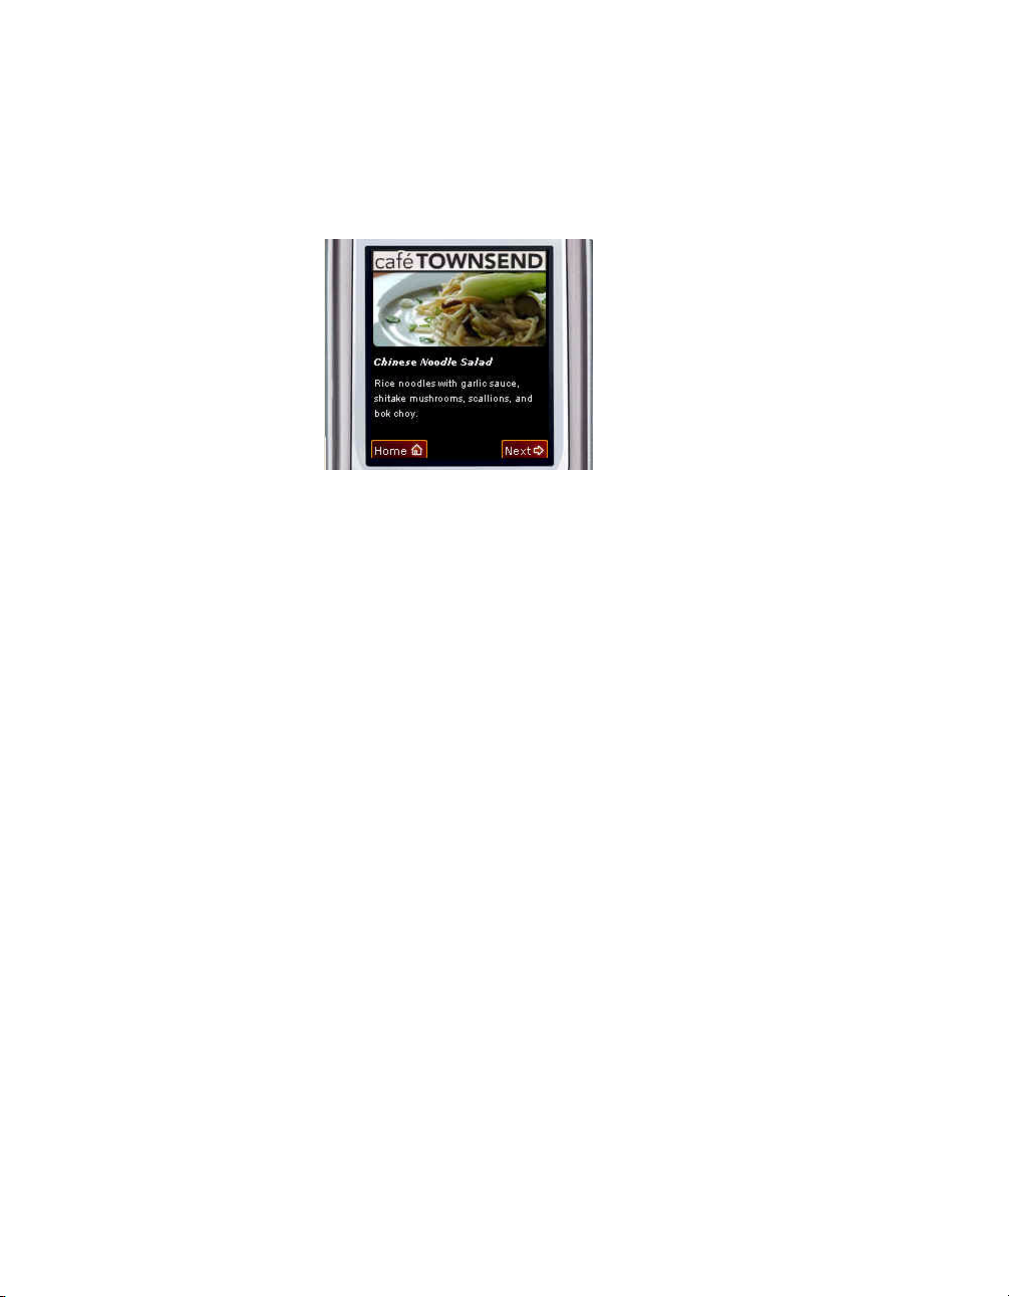
today’s specials appears. To browse images and descriptions of the specials,
the user presses the device’s Right soft key (labeled Next). To return to the
main application, the user presses the Left soft key (labeled Home).
The cafe application’s specials screen
If the user selects the Reservations option on the main screen, the
application initiates a phone call to the restaurant. Before Flash Lite dials
the requested number, it always asks the user to confirm that they would
like to make the call.
Viewing the completed
22 Creating a Flash Lite Application
application
A completed version of the café application is installed with Flash. You can
view the completed application in Device Central, or if you have the standalone version of Flash Lite 1.1 installed on a mobile device, you can
transfer the SWF file to your device to view it there.
To view the completed application in Adobe Device Central:
1. In Flash, open the file named cafe_tutorial_complete.fla located at
www.adobe.com/go/learn_flt_samples_and_tutorials. On the Samples
and Tutorials page, locate, download and decompress the .zip file for
your Flash Lite version, and then navigate to the Tutorial Assets folder
to access the file.
2. Choose Control > Test Movie to start the application in the emulator.
Page 23

3. To interact with the application, do the following:
■ On the main screen, click the Down Arrow key on the emulator’s
keypad to select the Specials menu item. Then click the Select key
on the emulator to view the specials screen.
■ On the specials screen, click the Right soft key (Next) on the
emulator to view the image and description for each special. Click
the Left soft key (Home) to return to the main screen.
■ Back on the main screen, select the Reservations menu item to start
a phone call to the restaurant.
Creating the application
This section contains step-by-step procedures that show you how to
recreate the cafe application. The tutorial is divided into three parts:
■ Selecting your test devices and content types. In this section, you’ll
configure your Flash document’s publish settings, document settings,
and device settings.
■ Creating the menu for the application’s main screen. From this screen,
the user can select from a simple menu to view images and descriptions
of the day’s specials, or to call the restaurant to make a reservation.
■ Creating the specials screen. On this screen, users can press the device’s
Left soft key to navigate between images and descriptions for each
lunch special at the cafe, or press the Right soft key to return to the
main screen.
This section contains the following topics:
Selecting your test devices and content type . . . . . . . . . . . . . . . . . . . . . . . . .24
Creating the menu for the main screen. . . . . . . . . . . . . . . . . . . . . . . . . . . . . . . 24
Creating the specials screen. . . . . . . . . . . . . . . . . . . . . . . . . . . . . . . . . . . . . . . . 27
Creating the application 23
Page 24

Selecting your test devices and content type
You use Device Central to select the devices and content type that you are
targeting. When you test your application in the Adobe Device Central
emulator, the emulator configures itself to match the configuration of the
player on the target device as well as the content type.
You specify these settings when you first create your Flash mobile
document. For details on creating a new document from scratch, see
“Hello World Flash Lite application” on page 9.
Creating the menu for the main screen
In this section, you’ll create the menu for the application’s main screen.
The menu consists of two options: Specials and Reservations. The Specials
option takes the user to a screen to view images and descriptions of specials
at the cafe. The Reservations option initiates a phone call to the cafe so that
the user can make reservations.
The menu consists of two standard Flash buttons that define up, over, and
down states. The user gives focus to one of the buttons by pressing the Up
or Down Arrow keys on their device. When a button has focus it displays
its over state. The button that has focus generates a button
when the user presses the Select key on the device. This default tab
navigation provides an easy way to create a simple user interface for a Flash
Lite application. For more information about using tab navigation, see
“Using tab navigation in Flash Lite” in Developing Flash Lite 1.x
Applications.
press event
24 Creating a Flash Lite Application
To create the main screen’s menu:
1. In Flash, open the file you saved in the previous section (see “Selecting
your test devices and content type” on page 24).
2. In the Timeline window (Window > Timeline), select Frame 1 on the
menu layer.
3. To create the menu, open the Library panel (Window > Library), and
drag an instance of the button symbol called Specials to the Stage.
Position the button beneath the text field (already in place) that
introduces the restaurant.
Page 25
4. Drag an instance of the button symbol named Reservations to the Stage
and position it below the Specials button, as the following image shows:
5. Select the Specials button, and open the Actions panel
(Window > Actions).
6. Add the following code to the Actions panel:
on(press) {
gotoAndStop("specials");
}
This event handler code sends the playhead to the frame labeled
specials when the user selects this button. You’ll create the content
for that frame in the next section (see “Creating the specials screen”
on page 27).
7. On the Stage, select the Reservations button and open the Actions
panel again.
8. In the Actions panel, enter the following code:
on(press) {
getURL("tel:1-415-555-1212");
}
When the user selects the Reservations menu item, Flash Lite initiates a
phone call to the specified number. Flash Lite always prompts the user
to allow or deny a request from a SWF file to dial a number. For more
information, see “Initiating a phone call” in Learning Flash Lite 1.x
ActionScript.
9. In the Timeline, select Frame 1 on the Actions layer.
Creating the application 25
Page 26

10. Open the Actions panel and enter the following code:
stop();
_focusRect = false;
fscommand2("resetsoftkeys");
fscommand2("setquality", "high");
fscommand2("fullscreen", "true");
This code does the following:
■ Stops the playhead at this frame.
■ Disables the yellow focus rectangle that Flash Lite draws by default
around the button or input text field with the current focus (see
“Abo u t th e focu s re c tang le” in Developing Flash Lite 1.x
Applications.
■ Resets the soft keys to their default state. (Later in the tutorial,
you’ll add code that registers the soft keys for your application
to use.)
■ Sets the player’s rendering quality to high. By default, Flash Lite
renders graphical content at medium quality.
■ Forces the player to display the application full screen.
11. To test your work so far, select Control > Test Movie.
12. In the emulator, click the Up or Down Arrow keys on the keypad with
your mouse (or press the Up or Down Arrow keys on your computer’s
keyboard) to give focus to the Specials button.
When the Specials button item gets focus, you will see the button’s
over state.
13. Click the Select key on the emulator’s keypad (or press the Enter key on
your keyboard) to select the menu item.
At this point, the specials screen contains no features. In the next
section, you’ll add interactivity and animation to create the specials
screen (see “Creating the specials screen” on page 27).
26 Creating a Flash Lite Application
Page 27

Creating the specials screen
In this section, you’ll create the user interface elements that let the user
browse images and descriptions of each special. The specials screen consists
of the following parts:
■ An animation that transitions between images of each special.
■ Dynamic text fields that display the name and description for
each special.
■ User interface elements that let the user navigate between specials and
return to the main application screen.
This section of the tutorial is divided into two parts. In the first part, you’ll
create the animation that transitions between images of each special. In the
second part, you’ll add user interface elements and ActionScript to let the
user navigate between the images and to display each special’s name and
description.
This section contains the following topics:
Creating the image animation . . . . . . . . . . . . . . . . . . . . . . . . . . . . . . . 27
Adding navigation and text to the specials screen . . . . . . . . . . . . . 31
Creating the image animation
In this section you’ll create the tweened animation that transitions between
images of each special. When you’ve completed this section, the animation
will play through without stopping. Later in the tutorial, you’ll add
navigation and ActionScript that lets the user control the animation with
the device’s Right soft key.
Creating the application 27
Page 28

To create the animation you’ll use a prebuilt movie clip that contains
Masking layer object
Masked movie clip of images
Tween direction
Duplicated image
images of all the specials arranged in a vertical column. You’ll use a masking
layer to make only one of the images visible. Then you’ll create a series of
tweens that move the movie clip upward, so that a different image is
visible. The last image in the movie clip is a duplicate of the first one, so
that the animation sequence can return to its initial state after the user has
viewed the final image. The following image illustrates these concepts:
In the last section of the tutorial, you’ll add ActionScript and user interface
elements that let the user control the animation sequence.
28 Creating a Flash Lite Application
Page 29

To create the image animation:
1. Open the file you saved in the previous section (see “Creating the menu
for the main screen” on page 24).
2. In the Timeline, select the keyframe on Frame 10 on the layer
named Images.
3. Open the Library panel, and drag the symbol named Specials Images
movie clip to the Stage.
The rest of this tutorial refers to this movie clip simply as the images
movie clip.
4. With the new movie clip instance selected, set the movie clip’s x and y
coordinates both to 0 in the Property inspector.
This aligns the top-left corner of the images movie clip with the topleft corner of the Stage.
5. On the Images layer, insert keyframes on Frames 20, 30, 40, and 50, as
the following image shows:
6. In the Timeline, select the keyframe on Frame 20.
7. On the Stage, select the images movie clip, and set its y coordinate to
-100 in the Property inspector.
This moves the movie clip upward on the Stage 100 pixels.
8. Select the keyframe on Frame 30 in the Timeline, select the images
movie clip, and set its y coordinate to -200 in the Property inspector.
9. Select the keyframe on Frame 40, select the images movie clip, and set
its y coordinate to -300 in the Property inspector.
10. Select the keyframe on Frame 50, select the images movie clip, and set
its y coordinate to -400 in the Property inspector.
11. Select the keyframe on Frame 10, and select Motion from the Tween
pop-up menu in the Property inspector.
This tweens the images movie clip’s position between the keyframes on
Frames 10 and 20.
12. To create transitions between the other images, repeat step 11 for the
keyframes located on Frames 20, 30, and 40.
Creating the application 29
Page 30

13. To create the mask layer, select the Images layer in the Timeline, and
Masking rectangle
Mask layer
Masked layer
Masked region
on the Stage
then select Insert > Timeline > New Layer (or click the Insert Layer
button in the Timeline).
14. Insert a keyframe on Frame 10 of the new mask layer.
15. Using the Rectangle tool in the Tools panel, create a rectangle over the
first (top-most) image in the images movie clip.
It doesn’t matter what fill color you use for the rectangle, but it must be
completely opaque.
16. To make sure the rectangle covers the entire image area, double-click the
rectangle to select it, and then use the Property inspector to set its x and
y coordinates both to 0, its width to 176, and its height to 100.
17. Right-click (Windows) or Control-click (Macintosh) the Image Mask
layer in the Timeline, and select Mask from the context menu.
The layer is converted to a mask layer, indicated by a mask layer icon.
The layer immediately below it is linked to the mask layer, and its
contents show through the filled area on the mask. For more
information about working with mask layers in Flash, see “Using mask
layers” in Using Flash.
30 Creating a Flash Lite Application
Page 31

18. Save your changes (File > Save).
Text field to display name of special
At this point, if you were to test the application in the emulator, the
animation you created would play through to the end and then stop. In the
next section (see “Adding navigation and text to the specials screen”
on page 31), you’ll add ActionScript that stops the animation at each
keyframe, as well as user interface elements that let the user navigate
between images.
Adding navigation and text to the specials screen
In this section, you’ll add interactivity to the specials screen that lets the
user control the transition between each animation. You’ll also add
dynamic text fields that display the name and description of each image.
To add text to display the names and descriptions of
the specials:
1. In Flash, open the file you completed in the previous section (see
“Creating the menu for the main screen” on page 24).
2. In the Timeline, select Frame 10 on the Text layer.
3. In the Tools panel, select the Text tool and create a text field below the
first masked specials image.
This text field will display the name of the special whose image is
currently being displayed.
Creating the application 31
Page 32

4. With the text field selected on the Stage, make the following changes in
Text field to display description of special
the Property inspector:
■ Select Dynamic Text from the Text Type pop-up menu.
■ Select Verdana from the Font pop-up menu.
■ Select the Italics text style option.
■ Set the font size to 10.
■ Select Bitmap (no anti-alias) from the Font Rendering Method
pop-up menu.
■ Ty pe title in the Var text box. This is the variable name assigned to
the dynamic text field.
5. Create another text field below the first one to display a short
description of the specials being viewed by the user.
6. Using the Selection tool, resize the text field so that it’s about three times
as tall as the other text field.
32 Creating a Flash Lite Application
7. With the text field selected on the Stage, make the following changes in
the Property inspector:
■ Select Dynamic Text from the Text Type pop-up menu.
■ Select Multiline from the Line Type pop-up menu.
■ Select Verdana from the Font pop-up menu.
■ Set the font size to 10.
■ Select Bitmap (no anti-alias) from the Font Rendering Method
pop-up menu.
■ Ty pe description in the Var text box.
8. In the Timeline, select the keyframe on Frame 10 on the Actions layer.
Page 33

9. Open the Actions panel and add the following code:
title = "Summer salad";
description = "Butter lettuce with apples, blood orange
segments, gorgonzola, and raspberry vinaigrette.";
fscommand2("SetSoftKeys", "Home", "Next");
stop();
This code displays the name and description of the special that the user
is currently viewing, and stops the playhead. The
SetSoftKeys
command registers the device’s soft keys that will let the user return to
the home screen, as well as navigate between specials.
10. On the Actions layer, select the keyframe on Frame 20 and enter the
following code in the Actions panel:
title = "Chinese Noodle Salad";
description = "Rice noodles with garlic sauce, shitake
mushrooms, scallions, and bok choy.";
stop();
On the Actions layer, select the keyframe on Frame 30 and enter the
11.
following code in the Actions panel:
title = "Seared Salmon";
description = "Filet of wild salmon with caramelized
onions, new potatoes, and caper and tomato salsa.";
stop();
On the Actions layer, select the keyframe on Frame 40 and enter the
12.
following code in the Actions panel:
title = "New York Cheesecake";
description = "Creamy traditional cheesecake served with
chocolate sauce and strawberries.";
stop();
On the Actions layer, select the keyframe on Frame 50 and enter the
13.
following code in the Actions panel:
gotoAndStop("specials");
This code returns the playhead to the beginning of the animation
sequence. The first and last images in the animation sequence are the
same, which creates the illusion of a continuous animation.
14. Save your changes.
Next you’ll add navigation to the specials screen that lets the user navigate
between images and descriptions of each special.
Creating the application 33
Page 34
To add navigation to the specials screen:
1. Open the file you completed in the previous section.
2. In the Library panel (Window > Library), locate the symbol named
Home and drag it to the lower-left corner of the Stage.
3. In the Property inspector, set the Home graphic’s x coordinate to 0 and
its y coordinate to 188.
4. Drag the symbol named Next from the Library to the lower-right corner
of the Stage.
5. In the Property inspector, set the graphic’s x coordinate to 120 and its y
coordinate to 188.
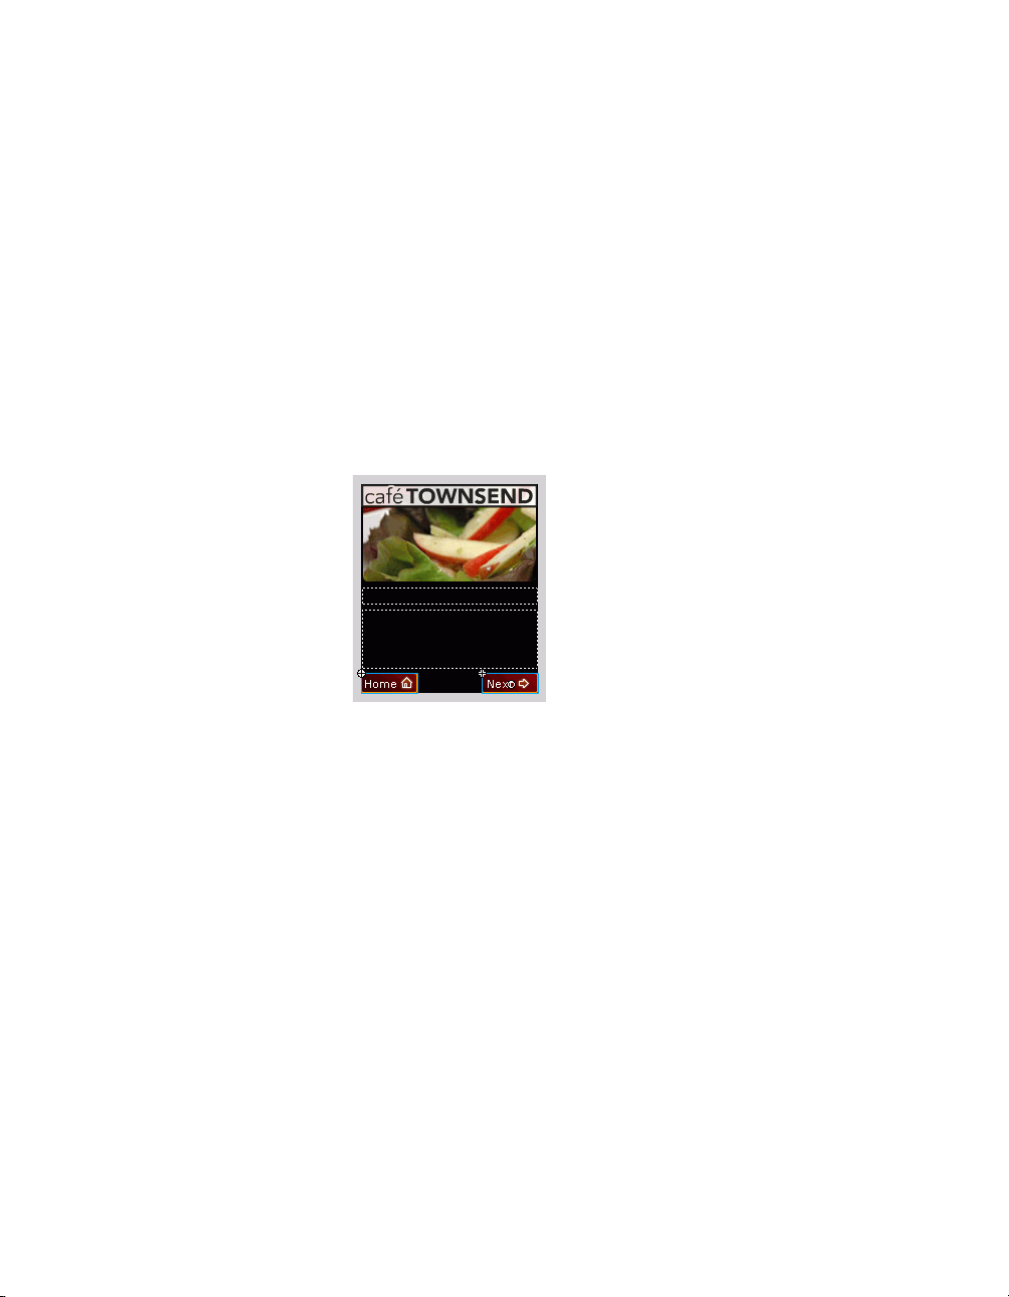
The Stage in your application should look something like the following
screen shot:
34 Creating a Flash Lite Application
6. In the Timeline, select the keyframe on Frame 10 on the layer named
Key Catcher.
Page 35
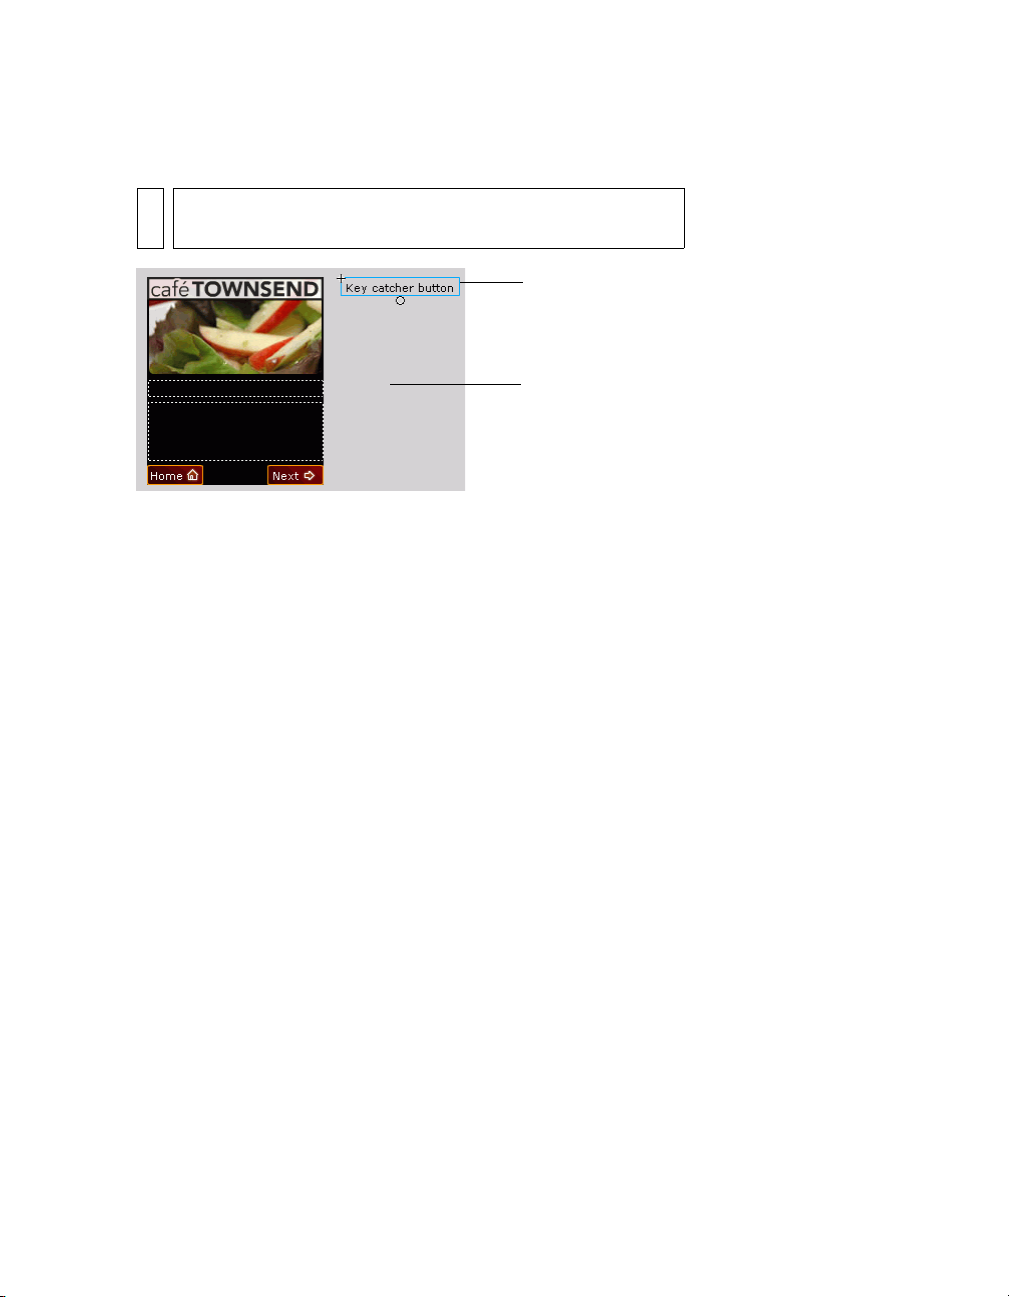
7. From the Library, drag the Key Catcher button symbol and place it in
Work area
Key catcher button
the work area off the Stage.
NOTE
To view the work area, in Flash choose View > Work Area.
The purpose of this button is to “catch” ActionScript keypress events
initiated by the user, and then take the appropriate action. For more
information about using key catcher buttons, see “Creating a key
catcher button” in Developing Flash Lite 1.x Applications.
8. Select the key catcher button, and in the Actions panel, enter the
following code:
// Handle right soft key event ("Next" button):
on(keyPress "<PageDown>") {
play();
}
// Handle left soft key event ("Home" button):
on(keyPress "<PageUp>") {
gotoAndStop("main");
}
The first on(keyPress) handler advances the image animation to the
next image in the sequence; the second one sends the playhead to the
main application screen.
9. Choose Control > Test Movie to test the final application in
the emulator.
Creating the application 35
Page 36

36 Creating a Flash Lite Application
Page 37

Index
A
Adobe Device Central emulator 15
availability of Flash Lite 12
available Stage size 18
C
Cafe Townsend application
about 21
creating navigation 31
creating the main menu 24
creating the specials animation 27
creating the specials screen 27
content types 13
creating navigation
creating a key catcher button 31
using buttons 24
using the soft keys 31
D
document templates
about 16
global phones 16
Japanese phones 16
using 16
dynamic text fields 31
F
Flash Lite
authoring features in Flash 15
authoring overview 14
availability 12
content types 13
stand-alone player 12
technology overview 11
Flash Lite authoring features
device settings 15
emulator 15
Flash Lite content types 13
H
Hello World application 18
M
mask layers, using 27
P
Property inspector, Device Settings button 16
S
soft keys, using 31
T
target devices 13
test devices 13
text fields
dynamic 31
setting properties 31
tweened animation 27
W
workflow for authoring content 14
37
Page 38

38
 Loading...