

Page 1

Digital Imaging System for AXIOM Iconos R200
Operator Manual
FLUOROSPOT Compact
FLUOROSPOT Compact
Operator Manual
Digital Imaging System for AXIOM Iconos R200
www.siemens.com/me dical
Siemens AG
Wittelsbacherplatz 2
D-80333 Muenchen
Germany
© Siemens AG
All rights reserved
Order No.: AX41-060.621.23.01.02
12.2007
Original Language: English
Contact Information
Siemens AG, Medical Solutions
Angiography, Fluoroscopic and Radiographic Systems
Siemensstrasse 1
D-91301 Forchheim
Germany
Telephone: +49 9191 18-0
www.siemens.com/medical
Page 2

FLUOROSPOT Compact Imaging System
FLUOROSPOT Compact
Operator Manual
Imaging System for AXIOM Iconos R200
Software VE22 or higher
www.siemens.com/medical
Page 3

Usability
BEFORE USING THIS SYSTEM
This system should be used only by employees adequately trained in the use of this equipment.
Before using this system, the operator should be thoroughly acquainted with the instructions for use and safety
recommendations provided in this manual.
Failure to follow the instructions for use and safety recommendations provided in this manual can cause serious
injury to the patient, to the operator or to other persons.
Please observe the system’s Safety Operator Manual.
Important information is given there.
Siemens AG
Wittelsbacherplatz 2
D-80333 Muenchen
Germany
© Siemens AG
All rights reserved
Order No.: AX41-060.621.23.01.02
12.2007
Original Language: English
Contact Information
Siemens AG, Medical Solutions
Angiography, Fluoroscopic and Radiographic Systems
Siemensstrasse 1
D-91301 Forchheim
Germany
Telephone: +49 9191 18-0
www.siemens.com /medical
Page 4

FLUOROSPOT Compact Imaging System
Table of Contents
Part: FLUOROSPOT Compact Imaging System ..................... 9
Chapter: Safety ................................................................................................................9
Additional notes on safety .................................................................................................................9
Chapter: Overview / Operating Elements and Displays ....................................................13
Introduction ....................................................................................................................................13
Overview .........................................................................................................................................14
Basic system ...............................................................................................................................14
Imaging system configuration .....................................................................................................14
Operating elements and displays .....................................................................................................15
Places of operation .....................................................................................................................15
The console ................................................................................................................................16
Keyboard ....................................................................................................................................16
Mouse ........................................................................................................................................17
Infrared remote control ..............................................................................................................18
The application program ..................................................................................................................20
Languages ..................................................................................................................................20
Imaging system user interface ....................................................................................................20
Basic modes / task cards ..............................................................................................................22
System and resource information ................................................................................................22
Text information in images .........................................................................................................23
Image numbering and image types .............................................................................................24
Function overview and key assignment ............................................................................................26
General functions .......................................................................................................................26
Patient mode (study lists) ...........................................................................................................26
General functions ..................................................................................................................26
Patient subtask card ..............................................................................................................28
Settings subtask card ............................................................................................................28
Examination mode ....................................................................................................................29
General functions ..................................................................................................................29
Settings subtask card ............................................................................................................30
Review controls .....................................................................................................................30
Control subtask card .............................................................................................................31
Postprocessing mode ................................................................................................................32
General functions ..................................................................................................................32
Process. subtask card ............................................................................................................32
Graphics subtask card ...........................................................................................................33
DSA subtask card ...................................................................................................................34
IQ subtask card ......................................................................................................................34
Cursor keys ............................................................................................................................35
Documentation mode ...............................................................................................................35
General functions ..................................................................................................................35
Series/image selection ...........................................................................................................36
Film subtask card ..................................................................................................................37
Send subtask card .................................................................................................................37
Select subtask card ................................................................................................................38
FLUOROSPOT Compact AX41-060.621.23.01.02 3 / 236
Page 5

FLUOROSPOT Compact Imaging System
Table of Contents
Status of the buttons in the function area ................................................................................... 38
Tool tips ..................................................................................................................................... 39
Text lists .................................................................................................................................... 39
Selection fields ........................................................................................................................... 40
Scroll bars .................................................................................................................................. 40
Mouse pointers .......................................................................................................................... 40
Chapter: Operation ........................................................................................................ 43
Switching on/off ............................................................................................................................. 43
Switching on and starting the system ......................................................................................... 43
Logging in .................................................................................................................................. 43
Screen saver ............................................................................................................................... 45
Logging off ................................................................................................................................ 46
Changing the password .............................................................................................................. 46
Switching off the system ............................................................................................................ 47
Patient (Study) Administration ........................................................................................................ 48
DICOM terms ............................................................................................................................. 48
Study lists .................................................................................................................................. 49
Description of the study lists .................................................................................................. 49
Accessing the study lists ........................................................................................................ 50
Printing the study list on a paper printer ................................................................................ 51
Updating the work list ........................................................................................................... 51
Data in the study lists ............................................................................................................ 53
Displaying the work list data ..................................................................................................54
Displaying images .................................................................................................................55
Changing the sorting sequence ............................................................................................. 55
Changing the column width ..................................................................................................56
Applying a database filter ...................................................................................................... 57
Scrolling the study list ........................................................................................................... 58
Selecting a study (patient) ..................................................................................................... 58
Manual registration .................................................................................................................... 59
Emergency registration .........................................................................................................59
Entering patient data ............................................................................................................. 60
Modifying patient data .......................................................................................................... 63
Creating another study for a patient already registered ..........................................................65
Closing a study ........................................................................................................................... 66
Updating the study status ........................................................................................................... 68
Deleting studies ......................................................................................................................... 69
Protecting studies from deletion ................................................................................................. 71
Canceling delete protection ........................................................................................................ 71
Study statistics ........................................................................................................................... 71
Fluoroscopy / Acquisition ................................................................................................................. 74
General notes ............................................................................................................................ 74
Storage and disk space ............................................................................................................... 75
Preparing fluoroscopy/acquisition ............................................................................................... 76
The integrated generator control console ...................................................................................78
Selecting the workstation and the organ program ....................................................................... 80
Fluoroscopy ............................................................................................................................... 82
4 / 236 AX41-060.621.23.01.02 Operator Manual
Page 6

FLUOROSPOT Compact Imaging System
Table of Contents
Performing fluoroscopy ..........................................................................................................82
Changing the fluoro mode .....................................................................................................82
Marking a LIH or an image from a fluoro loop .........................................................................83
Storing a LIH or fluoro loop image ..........................................................................................83
Fluoro timer ..........................................................................................................................84
Collimating without radiation - CAREPROFILE ..............................................................................84
Positioning without radiation - CAREPOSITION (with CAREPROFILE) .............................................85
Fluoro loop .................................................................................................................................86
ROADMAP ..................................................................................................................................87
Single acquisitions or series ........................................................................................................89
Selecting the organ program ..................................................................................................90
Preselecting R/L label .............................................................................................................90
Changing the acquisition frame rate .......................................................................................91
Performing acquisition ...........................................................................................................91
PERI/Phlebo Stepping ..................................................................................................................92
Fluoroscopy/roadmap and organ programs ......................................................................................93
Setting parameters for fluoroscopy/roadmap ...............................................................................93
Parameters for fluoroscopy ....................................................................................................94
Additional parameters for ROADMAP ......................................................................................95
Setting parameters in organ programs ........................................................................................96
Examples for organ program settings .....................................................................................97
Parameters for organ programs ............................................................................................100
Additional parameters for PERI .............................................................................................103
Context of automatic marking and automatic sending ...............................................................103
Closing the parameter window .................................................................................................104
Image display ................................................................................................................................105
Displaying images / representatives of series .............................................................................105
Paging representatives of series / single images .........................................................................105
Paging images of a series ..........................................................................................................106
Series replay .............................................................................................................................107
Replay of PERI Stepping (sub-)series ..........................................................................................108
Storing and retrieving reference images (without reference image monitor) ..............................108
Displaying the reference image catalog ................................................................................108
Reference image monitor ..........................................................................................................110
Possible applications of the reference image monitor ...........................................................110
Storing and retrieving reference images with reference image monitor ................................111
Copying a screen to the reference image monitor .................................................................112
Image display in Documentation mode with reference image monitor ..................................112
Paper printing of images ...........................................................................................................113
Marking or unmarking images ..................................................................................................113
Postprocessing ..............................................................................................................................114
Graphics on fluoro images ........................................................................................................115
Undoing changes (Home and Undo/Redo) .................................................................................115
Storing changes ........................................................................................................................115
Processing images ....................................................................................................................116
Using the magnifying glass function ....................................................................................116
Setting the window values ...................................................................................................117
FLUOROSPOT Compact AX41-060.621.23.01.02 5 / 236
Page 7

FLUOROSPOT Compact Imaging System
Table of Contents
Using filters - edge enhancement and harmonization/DDO ................................................... 118
Displaying an electronic shutter ........................................................................................... 119
Zooming an image .............................................................................................................. 119
Panning an image ............................................................................................................... 120
Inverting gray scales ............................................................................................................ 120
Flipping an image ................................................................................................................ 121
Image annotation ..................................................................................................................... 122
Placing text in the image .....................................................................................................122
Adding comment lines ........................................................................................................ 123
Adding R/L labels ...................................................................................................................... 124
Placing graphic elements .......................................................................................................... 125
Adding circles to the image ................................................................................................. 125
Adding arrows to the image ................................................................................................125
Calibration and measuring distances .................................................................................... 125
Measuring angles ................................................................................................................ 128
Measuring stenosis .............................................................................................................. 129
Changing graphic elements subsequently ............................................................................ 131
DSA postprocessing .................................................................................................................. 133
Introduction ........................................................................................................................ 133
Changing the mask ............................................................................................................. 134
Switching between subtracted and unsubtracted display ..................................................... 135
Generating the image with maximum contrast medium filling
(Max/Min Opac.) ................................................................................................................. 136
Making the image and mask coincide exactly (Pixelshift) ......................................................137
Fading in anatomical background (Landmark) ..................................................................... 137
Improving the noise impression (Averaging) ........................................................................ 138
Checking image quality(IQ) ...................................................................................................... 139
Performing IQ on test images .............................................................................................. 139
Performing IQ on patient images ......................................................................................... 140
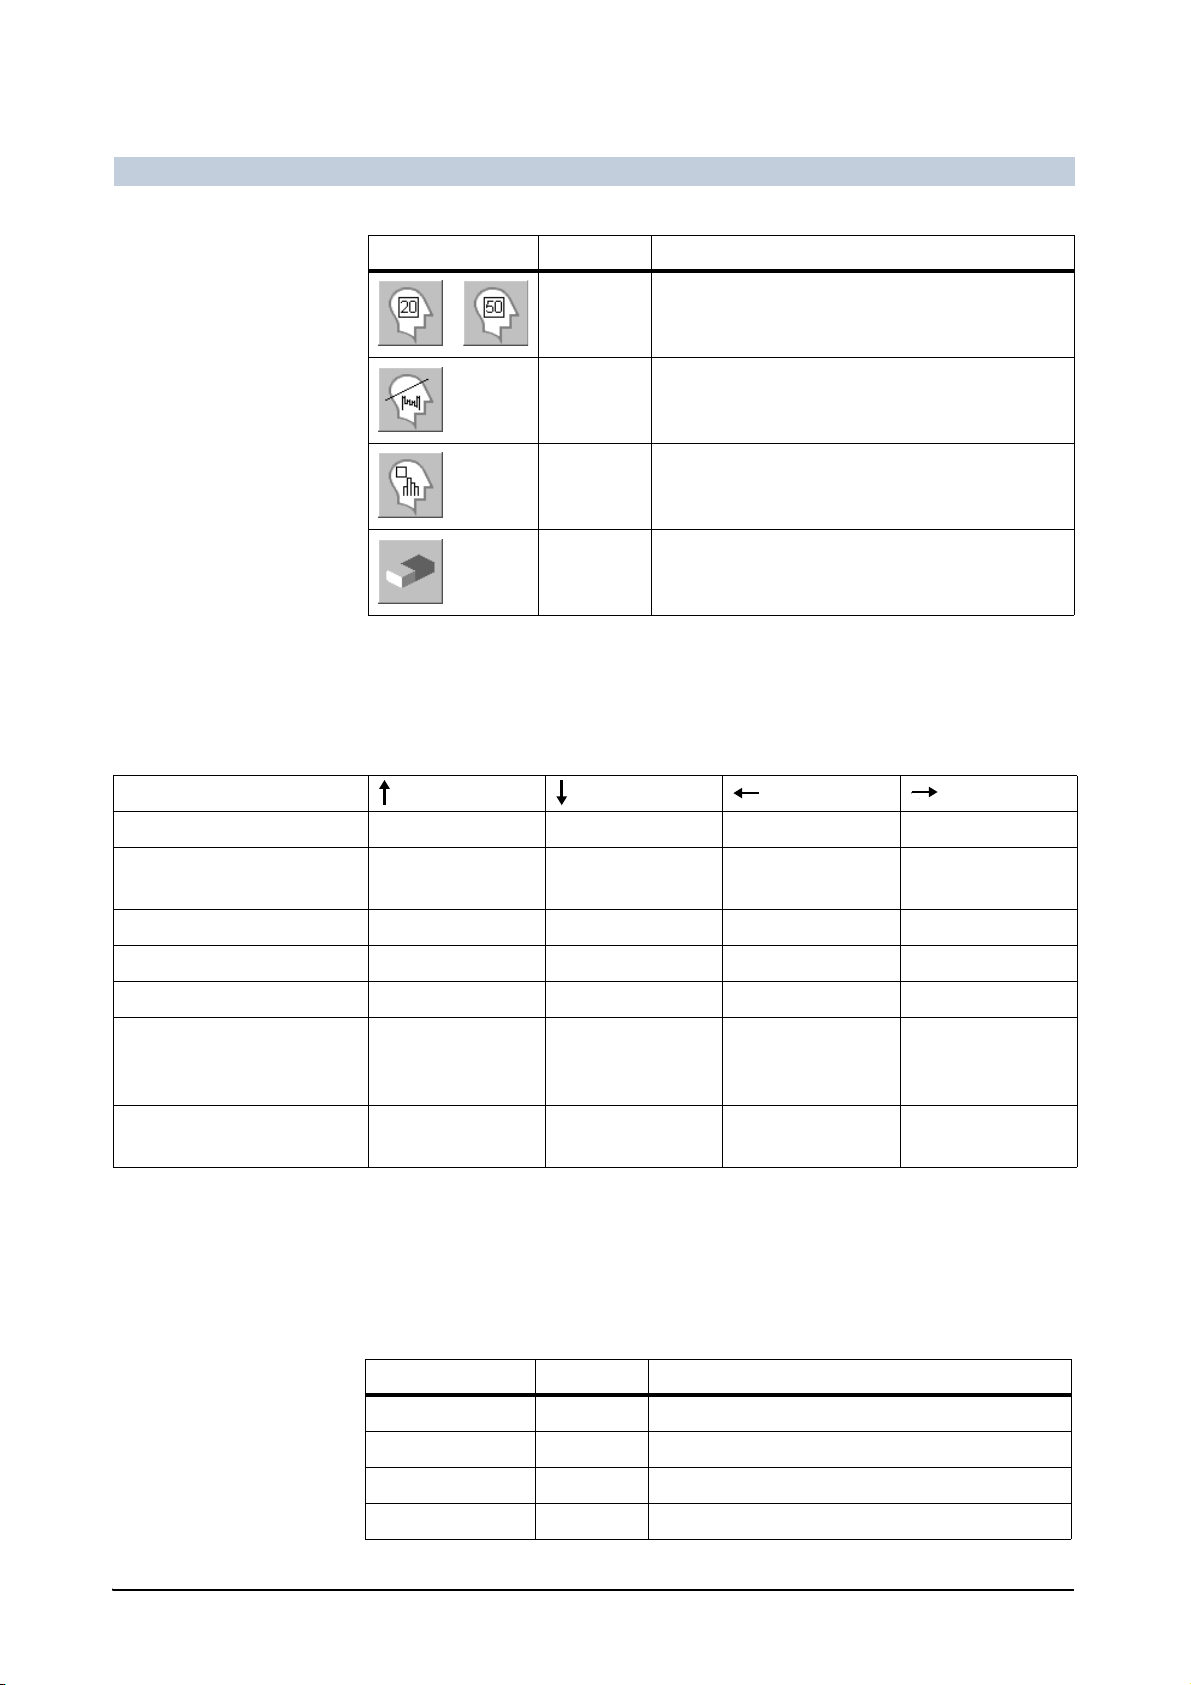
Measuring pixel values - ROI 20 / ROI 50 .............................................................................. 141
Measuring pixel values - Line profile .................................................................................... 142
Measuring pixel values - Histogram ..................................................................................... 142
Deactivating IQ ................................................................................................................... 144
Image documentation ................................................................................................................... 144
Overview of the series/images of a study/series ......................................................................... 144
Displaying the overview of a study ....................................................................................... 144
Displaying the overview of a series ...................................................................................... 147
Displaying an image/series in full size .................................................................................. 148
Back to overview page ......................................................................................................... 149
Summary of display modes .................................................................................................. 150
Paging in study or series overview ............................................................................................ 150
Paging representatives of series / single images ................................................................... 150
Paging images of a series .................................................................................................... 152
Selecting images for processing ........................................................................................... 152
Documentation functions ......................................................................................................... 153
Marking images or series .......................................................................................................... 153
Putting images together to form a twinview layout ................................................................... 154
Subtracting single images (DSA basic) ...................................................................................... 156
6 / 236 AX41-060.621.23.01.02 Operator Manual
Page 8

FLUOROSPOT Compact Imaging System
Table of Contents
Applying processing parameters from one image to other images .............................................158
Transferring/Archiving images to DICOM ...................................................................................159
General information on DICOM Send ....................................................................................159
Transfer formats ..................................................................................................................160
Transfer problems ................................................................................................................161
Transferring images (DICOM Send) ......................................................................................162
Transferring images for hardcopy/filming (DICOM Print) ............................................................163
Performing hardcopy ...........................................................................................................164
Film preview (virtual film sheet) ................................................................................................165
Paging film sheets ...............................................................................................................167
Repositioning images on a film sheet ...................................................................................167
Moving an image from one film sheet to another .................................................................168
Postprocessing images on the virtual film sheet ....................................................................169
Managing image transfers / Status display .................................................................................170
Managing print jobs / Status of paper printer .............................................................................172
Displaying the study report .......................................................................................................173
Creating/editing a medical report ..............................................................................................175
Creating/editing a medical report .........................................................................................176
Finishing the medical report ................................................................................................178
Deleting images or series ..........................................................................................................179
Storing on and reading from CD-R .............................................................................................181
Notes on handling CDs .........................................................................................................181
CD drive ..............................................................................................................................181
Inserting and removing CDs .................................................................................................182
Displaying the study list of a CD ...........................................................................................183
Transferring data from a CD to the system ............................................................................185
Storing on CD-R ...................................................................................................................186
Restoring archived image data ..................................................................................................190
Archiving information ..........................................................................................................190
Applying a database filter .....................................................................................................191
Retrieving images from an archive or a CD-R .........................................................................192
Query for patient data ..........................................................................................................193
Changing user settings ..................................................................................................................195
Site information ........................................................................................................................196
DICOM properties .....................................................................................................................197
Examination properties .............................................................................................................200
Image display properties ...........................................................................................................201
Service functions ...........................................................................................................................202
Exporting images for service .....................................................................................................202
Service login .............................................................................................................................203
Chapter: Administration (HIPAA) ..................................................................................205
Introduction to HIPAA ....................................................................................................................205
Logging in as administrator ...........................................................................................................206
Setting up the network connection ................................................................................................207
Users and groups management .....................................................................................................209
FLUOROSPOT Compact groups and users ..................................................................................209
Setting up (local) groups and users ...........................................................................................212
FLUOROSPOT Compact AX41-060.621.23.01.02 7 / 236
Page 9

FLUOROSPOT Compact Imaging System
Table of Contents
Setting up FLC groups and users on a domain controller ........................................................... 219
Backing up users and groups .................................................................................................... 220
Restoring users and groups ...................................................................................................... 221
Audit trail ...................................................................................................................................... 222
Viewing the audit trail .............................................................................................................. 223
Backing up the audit trail files ................................................................................................... 224
Chapter: Technical Description ....................................................................................227
Technical data ............................................................................................................................... 227
Imaging system ........................................................................................................................ 227
Computer system ..................................................................................................................... 228
Monitor system ........................................................................................................................ 228
Archiving and documentation .................................................................................................. 228
Dimensions and weights .......................................................................................................... 229
Electrical data .......................................................................................................................... 229
Ambient conditions .................................................................................................................. 229
8 / 236 AX41-060.621.23.01.02 Operator Manual
Page 10

Part FLUOROSPOT Compact Imaging System
Chapter Safety
Additional notes on safety
For general notes on safety see the Safety part of the system Operator Manual.
Please observe the safety notes in the following chapters.
Note
Do not use the spacer on the rear side of the computer housing as a handle or use
for carrying.
Image failures If no image appears on the monitor or if image quality has deteriorated noticeably,
this can be due to a defect in the system. To check this:
Shut down the system and turn it on again.
– The system performs a self-test when turned on.
Pay attention to error messages during restart.
If the fault remains:
Shut down the system and call Siemens Service.
Caution
If image display quality deteriorated due to a defect.
Risk of error in diagnosis caused by poor image quality
Shut down the system and call Siemens Service.
Image archiving The FLUOROSPOT Compact offers image archiving via network or CD-R.
Transferring/Archiving images to DICOM on page 159
Caution
The hard disk of the imaging system is not suitable for image archiving.
Risk of data loss due to system failure (e.g. defective hard disk)
Always archive patient and image data on suitable archive media.
Third-party software Only software authorized by Siemens for use with this product may be used.
Caution
Use of non-approved or manipulated software or hardware components
Risk of malfunctions posing a hazard to patients and equipment
Only use software or hardware components approved by Siemens.
Modifications shall be performed only with our expressed written approval.
FLUOROSPOT Compact AX41-060.621.23.01.02 9 / 236
Page 11

FLUOROSPOT Compact Imaging System
Safety
Computer viruses The FLUOROSPOT Compact imaging system must be operated within a ’secured
network’, i.e. the network to which the imaging system is connected must be protected from computer viruses, worms, etc.
Caution
Computer virus infections, computer worms etc.
Risk that the system is not operational anymore
Risk of data loss
Always operate the imaging system within a secured network.
Virus scanner To protect the FLUOROSPOT Compact imaging system from common computer vi-
ruses, a virus scanner is installed.
If a virus is found, a window pops up.
Note
In this case it is mandatory to call the Siemens Service!
Don’t try to act by yourself!
Options This operator manual describes all system features of all system variants.
Note
The complete system is described with all options and components that have been
released. Possible options have not been specially marked.
Particular options or components may not be available for specific systems.
The quotation text of your order is the sole reference for the functional scope of
your system.
If your system does not have a specific feature, please contact your local sales
representative.
10 / 236 AX41-060.621.23.01.02 Operator Manual
Page 12

FLUOROSPOT Compact Imaging System
Safety
Value statements All technical data are typical values unless specific tolerances are stated.
Values shown in pictures of the software user interface have no clinical meaning.
Please only set the values preset in the organ programs provided or the values
recommended by experienced application specialists.
Illustrations All illustrations of equipment and of the program user interface shown in this Op-
erator Manual are examples only. The functions actually available depend on the
type of system, the installed options, and the current configuration.
Other differences in detail may occur in your system due to constant development
and improvement of the system.
Reproduction of images can cause loss of detail. Pictures in this Operator Manual
do not therefore provide any indication of image quality.
Names All names of patients shown in figures are purely fictional. Any similarities with ex-
isting persons are entirely coincidental.
Warnings and hints In some cases, the imaging system has to inform you about certain facts. Then, an
information window is displayed.
There are different types:
Question!
The system asks you to decide something.
Information!
The system informs you about a certain fact.
Warning!
The system warns you about possible consequences.
Ignoring the warning may lead to severe consequences.
Operation hint
You tried to perform an action which is not possible in the current state of the
system.
FLUOROSPOT Compact AX41-060.621.23.01.02 11 / 236
Page 13

FLUOROSPOT Compact Imaging System
Safety
12 / 236 AX41-060.621.23.01.02 Operator Manual
Page 14

Part FLUOROSPOT Compact Imaging System
Chapter Overview / Operating Elements and Displays
Introduction
The FLUOROSPOT Compact (FLC) you have purchased is a digital imaging system
which opens up new dimensions in digital fluororadiography.
The basic system of the FLUOROSPOT Compact is based on a PC with the
Windows XP® operating system.
With only a basic knowledge of the operation of PCs and Windows® you can quickly learn how to operate the imaging system.
Capabilities The imaging system provides simple use and numerous functions for radiological
diagnostics, such as:
Study administration
Organ program management
Integrated generator control console
Image acquisition and display
1
–DFR
Image postprocessing
– Annotation functions
–Graphic functions
–DSA functions
– Functions for checking the image quality
Documentation (film preview, filming, paper printing, medical report and
DICOM send)
Archiving via network or on CD-R
Acquisition system This version of the FLUOROSPOT Compact is suitable for image acquisition and re-
porting with the following acquisition systems:
AXIOM Iconos R200
Application The FLUOROSPOT Compact imaging system can be used for many types of radio-
logical examinations.
Please also refer to the operator manual of the system.
With the FLUOROSPOT Compact imaging system, digital radiographic images can
be acquired, processed, displayed and managed.
images or series from the image intensifier and the CCD camera
1
DFR = Digital Fluoro Radiography
FLUOROSPOT Compact AX41-060.621.23.01.02 13 / 236
Page 15

FLUOROSPOT Compact Imaging System
Overview / Operating Elements and Displays
Overview
Basic system
The FLUOROSPOT Compact digital imaging system consists of the following components:
Computer and camera electronics
Image monitors (TFT LCDs) in the examination room and in the control room
CD drive
Keyboard and mouse
At the camera system:
CCD camera
Using the appropriate inherent software you control the imaging system and perform image analysis.
Imaging system configuration
The FLUOROSPOT Compact imaging system provides the following features:
Patient registration DICOM Worklist (HIS/RIS) for receiving patient data from a clinical network,
MPPS (included in DICOM Worklist)
Barcode reader for entering patient data
Examination Fluoro loop
DSA and ROADMAP
PERI Stepping
Reference image monitors (TFT LCDs) in the examination room and/or in the
control room
Additional disk capacity for storing a larger number of images
CAREPROFILE
CAREPOSITION
CAREVISION
SUPERVISION
Postprocessing Harmonization (DDO), also online
Stenosis quantification
14 / 236 AX41-060.621.23.01.02 Operator Manual
Page 16

FLUOROSPOT Compact Imaging System
Overview / Operating Elements and Displays
Documentation CD-R recording for archiving your images in various formats
Interface for storing fluoroscopy images and acquisitions onto a video recorder
DICOM Send for transferring images into a clinical network
DICOM Print for transferring images to a hardcopy camera via a clinical net-
work
DICOM Query/Retrieve for retrieving images from a clinical network
Paper printer
Transfer operations are carried out in the background.
HIPAA The HIPAA (Health Insurance Portability and Accountability Act) feature provides
mechanisms to secure the FLUOROSPOT Compact imaging system, patient data
and images from misuse by unauthorized persons.
Operating elements and displays
Places of operation
The imaging system functions can be operated from the control room as well as
from the examination room:
Via keyboard and mouse on the console from the control room
Via infrared remote control from the examination or control room
Infrared remote control on page 18
FLUOROSPOT Compact AX41-060.621.23.01.02 15 / 236
Page 17

FLUOROSPOT Compact Imaging System
Overview / Operating Elements and Displays
The console
FLC console
(1)
(2)
(4)
(3)
(1) Image monitor (LCD)
(2) Keyboard and mouse
(3) Computer with camera electronics
(4) CD-R drive
Keyboard
The imaging system is equipped with a standard PC keyboard.
(1) Function keys
(2) Alphanumeric keys
(3) Cursor control keys
Function overview and key assignment on page 26
(4) Numeric/syngo® keypad
16 / 236 AX41-060.621.23.01.02 Operator Manual
Page 18

FLUOROSPOT Compact Imaging System
Overview / Operating Elements and Displays
Note
If a syngo® keyboard is installed, the symbols on the keys do not apply.
The numeric/syngo® keypad is without function except the Enter key.
The Enter key has the Return key function.
Mouse
A mouse with two buttons and one wheel is connected to the PC.
(1) With the left mouse button, you execute most actions.
(2) With the right mouse button, you can mark images, for example.
1
(3) By rotating the wheel, you can scroll in the study lists and in the image direc-
tories.
Terms In this operator manual, various terms are used in connection with the mouse:
Click: Move the mouse in such a way that the mouse pointer on the screen is
pointing to the object in question. Now press the mouse button
1
and release
it again.
Double-click: Like clicking, but you press the mouse button twice in quick suc-
cession.
1
Drag (and drop): Like clicking, but you keep the mouse button pressed while
moving the mouse.
1
1
Where click appears in the text, we always mean the left mouse button
unless the right mouse button is mentioned explicitly.
FLUOROSPOT Compact AX41-060.621.23.01.02 17 / 236
Page 19

FLUOROSPOT Compact Imaging System
Overview / Operating Elements and Displays
Infrared remote control
With the infrared remote control, you can control certain functions of the imaging
system remotely in the examination room:
Note
The function of the keys on the infrared remote control depends on the system.
Some keys may not work on your system. Some keys may have been labelled differently. Depending on configuration the following functions are possible:
IR key Short description
Org - / Org +
Careposition CAREPOSITION on/off
Paging Show previous image (of a series)
*
Switch to previous/next organ program
Selection of remote organ programs 1 to 7
†
Select previous mask in remask function
Paging Show next image (of a series)
†
Select next mask in remask function
Mon. Split Toggle study / series overview, fullscreen display (discards
LIH or not stored fluoro loop; no function with fluoro loop
replay)
Mark Image Mark /unmark an image
‡
Mon 1 2 Copy image to reference image monitor
Store Image Store a LIH or a fluoro image of a fluoro loop
Sub. / Native Alternate between subtracted and native image display
Remask Select function to change mask image
‡
**
**
Roadmap Select/deselect ROADMAP
R Preselect label R on the left side of the image
L Preselect label L on the right side of the image
Store ref. Store the current image as a reference image
Recall ref. Recall the current reference image
Replay Loop Replay series: start/stop loop
††
‡‡
††
Store Fluoro Store the current fluoro loop
F/s Change frame rate before and during series acquisition
18 / 236 AX41-060.621.23.01.02 Operator Manual
Page 20

FLUOROSPOT Compact Imaging System
Overview / Operating Elements and Displays
IR key Short description
Fluoro - /
Fluoro +
Switches to next lower/higher fluoro mode
On systems with SUPERVISION:
Switch between standard fluoroscopy and supervision
On systems with CAREVISION (pulsed fluoroscopy):
Change the pulse frequency for fluoroscopy (including
selection of standard fluoroscopy)
*
not with SIRESKOP CX, ICONOS R200
†
no function with LIH or with fluoro loop replay
‡
also during fluoroscopy
**
only with stored DSA series
††
no function with LIH, or non stored image, or with fluoro loop replay
‡‡
no function with single LIHs or images
Note
During acquisition only the key F/s is enabled.
During fluoroscopy only the keys Fluoro -/+, Mark Image and Store Image are enabled.
Note
If you press a button on the infrared remote control, which function is not applicable in the current operating state of the imaging system, then the symbol
shown is displayed on the upper right-hand corner of the screen. The function will
not be executed.
FLUOROSPOT Compact AX41-060.621.23.01.02 19 / 236
Page 21

FLUOROSPOT Compact Imaging System
Overview / Operating Elements and Displays
The application program
Languages
The FLUOROSPOT Compact system can be configured by the Siemens Customer
Service in one of the following languages (user interface and keyboard layout):
English
German
French
Spanish
Russian
Swedish keyboard (for use with the English user interface)
Portuguese (with Spanish keyboard)
Italian
Chinese
The user interface for HIPAA administration is available in English only.
Imaging system user interface
On the image monitor all acquired images are displayed. You can perform all functions required for examination, data entry, image acquisition, postprocessing and
documentation.
20 / 236 AX41-060.621.23.01.02 Operator Manual
Page 22

FLUOROSPOT Compact Imaging System
Overview / Operating Elements and Displays
(1) Display area for images and lists
(2) Control area
(3) Tabs of the task cards for mode selection
(4) Patient information
(5) System information
(6) Resource information
(7) Display control
(8) Subtask cards for function selection
(9) Indication of radiation parameters
FLUOROSPOT Compact AX41-060.621.23.01.02 21 / 236
Page 23

FLUOROSPOT Compact Imaging System
Overview / Operating Elements and Displays
Basic modes / task cards
To simplify operation, the application program has four modes. Each mode is
available on a task card.
Patient mode: study lists, input of patient data and archiving; basic settings
Examination mode: fluoroscopy and acquisition, settings for organ and fluoro
programs
Postprocessing mode: image postprocessing
Documentation mode: hardcopy and DICOM send
To select a mode:
Click on the corresponding task card tab with the mouse.
System and resource information
On the top right-hand side, the following system information is displayed
(example):
(1) Marked images of current study
(2) Images in current study
(3) Images in current series
(4) Free space in study / on disk
(5) Acquisition mode and frame rates for acquisition and fluoroscopy
(6) Selected organ program, fluoro mode and I.I. symbol with zoom stage
22 / 236 AX41-060.621.23.01.02 Operator Manual
Page 24

FLUOROSPOT Compact Imaging System
Overview / Operating Elements and Displays
Bottom right On the bottom right-hand side, the following system information is displayed
(example):
Prior to fluoroscopy/
acquisition
During fluoroscopy After fluoroscopy After acquisition
(1) Fluoroscopy progress bar
– During fluoroscopy: current to maximum fluoroscopy scene length
– After fluoroscopy: current position in fluoroscopy scene
(2) Prefiltration and dose data
1
(3) Fluoroscopy and acquisition data
(4) Reset fluoroscopy time
Note
A flashing value indicates that the actual value is different from the setting in the
organ program.
Text information in images
In the four corners of an image (in Examination or Postprocessing mode) and on
the film sheet the following information is displayed:
1
not in Patient mode
FLUOROSPOT Compact AX41-060.621.23.01.02 23 / 236
Page 25

FLUOROSPOT Compact Imaging System
Overview / Operating Elements and Displays
Left Right
Top Patient name (last, first name)
Patient ID
Patient’s date of birth
Ward
Request ID
Accession No.
†
Mark symbol
: solid white circle or
none
Bottom Image content data:
R/L label or mirror/flip indication
Acquisition data:
kV
mAs
Dose value
I.I. format
Image number Ö page 24
Institution name Ö page 196
Product name: FLUOROSPOT
Referring physician
*
Date of acquisition
Time of acquisition
R/L label
†
Image type
Ö page 24
Image settings:
Tomo height or Peri subseries
F: Filter (edge enhancement)
H: Harmonization
‡
LM: landmark (anatomic back-
ground)
‡
C: Contrast
*
only on film sheet (configurable)
†
not on film sheet
‡
depending on image type (native or subtracted)
Note
You can switch off and on image text by pressing the spacebar.
Image numbering and image types
In the following table you can see the different image types and how they will be
numbered:
B: Brightness
‡
WW:
window width
(only with automatic contrast)
X:/Y:
‡
pixelshift values
24 / 236 AX41-060.621.23.01.02 Operator Manual
Page 26

FLUOROSPOT Compact Imaging System
Overview / Operating Elements and Displays
Image
number
(left)
# none single image 13
# single image of a tomography
# none image of a fluoro loop (not stored)
S# SER series or DSA series S5
S# PERI Peristepping or Phlebostepping series S5
S#_# SER image of a series (not subtracted)
SL#_# SER image of a stored fluoro loop
S#_#-# DSA image of a DSA series (subtracted)
Image
type
(right)
Short description Example
for image number
single image no. 13
series no. 5
S5_12
series number _ image number
series number _ image number
series number _ image number mask number
series no. 5, image no. 12
SL6_13
stored fluoro loop no. 6, image no. 13
S5_12-4
series no. 5, image no. 12
current mask is image no. 4
none OPAC max./min. opacification image
(not stored)
PO_S# none stored max./min. opacification image
PO (for peak opacification)
series number
none SUM averaged image (not stored) -
SU_S# none stored averaged image
SU (for sum) series number
none LIH LIH image or fluoro loop (not stored) -
LIH# none stored LIH image LIH3
SL# none stored fluoro loop SL4
SL#_# none image out of a stored fluoro loop SL4_22
none REF# reference image REF6
-
PO_S5
peak opacification image of
series no. 5
SU_S6
averaged image of series no. 6
3rd stored LIH image
4th stored fluoro loop
4th stored fluoro loop, image no. 22
6th reference image
SM_# none Store Monitor image
or image read from CD
FLUOROSPOT Compact AX41-060.621.23.01.02 25 / 236
SM_3
3rd Store Monitor image
Page 27

FLUOROSPOT Compact Imaging System
Overview / Operating Elements and Displays
Image
number
(left)
TW_# none stored twinview image TW_2
SUB_# none stored subtraction image SUB_1
Image
type
(right)
Short description Example
for image number
2nd twinview image
1st subtraction image
Function overview and key assignment
On the following pages, a short overview is given of the basic functions of the
FLUOROSPOT Compact imaging system.
The function keys (F1 to F12 and other keys on the keyboard) are assigned certain
functions. Depending on the mode of the imaging system, different functions are
assigned to the keys.
General functions
Icon Key Short description
*
Enter
Esc Cancel selected function
left mouse click and Shift Select several objects in sequence
left mouse click and Ctrl Select several objects
*
Enter always operates the default action. If none is set Enter has no function.
Depending on the selected function the default action may be set to OK or Cancel.
OK; accept selected function
Patient mode (study lists)
General functions
Icon Key Short description
- F1 Call up the operator manual
- Ctrl + F1 Call up the operator manual of the system
*
*
- F5 No function
26 / 236 AX41-060.621.23.01.02 Operator Manual
Page 28

FLUOROSPOT Compact Imaging System
Overview / Operating Elements and Displays
Icon Key Short description
Examination F6 Switch to Examination mode
Postprocessing F7 Switch to Postprocessing mode
Documentation F8 Switch to Documentation mode
- F10 No function
F12 Emergency registration
+
- Read study from CD /
Write study to CD-R
- Left click: Copy screen contents to reference
image monitor
Right click: Clear reference image monitor
- Retrieve study from archive
(only with Archiving Information list)
- Query and retrieve study from archive
(only with Archiving Information list)
mouse wheel / Scroll columns of study list
- Select previous study
- Select next study
- Home Select first entry of study list
- End Select last entry of study list
Ctrl A Select all study list entries
- Ctrl R Reset width and order of all study list columns
- Prt Sc Print study list data of selected study or
study list of all entries on paper
- Pause Show status of paper printer
*
in Patient mode only. The operator manual must have been installed by Siemens Service.
*
FLUOROSPOT Compact AX41-060.621.23.01.02 27 / 236
Page 29

FLUOROSPOT Compact Imaging System
Overview / Operating Elements and Displays
Patient subtask card
Icon Key Short description
F2 Call up the input form to create a new study
with a new patient
F3 Add a study to selected patient
F4 Modify patient data
- Delete selected study/studies
F9 Protect / unprotect study
- Apply filter to study list
- Get worklist / Update HIS/RIS
- F11 Update HIS/RIS
- Update storage commitment status
- Close MPPS study
Settings subtask card
Icon Key Short description
- Change general settings
- Enter/leave service mode
- Enable/disable access for remote diagnosis (on
service login dialog)
28 / 236 AX41-060.621.23.01.02 Operator Manual
Page 30

FLUOROSPOT Compact Imaging System
Overview / Operating Elements and Displays
Icon Key Short description
Show status dialog
- Display test images and switch to
Postprocessing mode
-Enable IQ (image quality) subtask card and
switch to Postprocessing mode using a selected study
- Create a study statistics
Ctrl F2 Logout
*
- Call up audit trail dialog*† for saving the audit
trail to a CD-R or saving/restoring users and
groups to/from a CD-R
- User and groups administration
*
HIPAA
†
only available when logged-in as administrator
Examination mode
General functions
Icon Key Short description
- F1 No function
*†
Patient F5 Switch to Patient mode
- F6 No function
Postprocessing F7 Switch to Postprocessing mode
Documentation F8 Switch to Documentation mode
- Fluoroscopy parameters
-Acquisition parameters
- Reset fluoroscopy signal
FLUOROSPOT Compact AX41-060.621.23.01.02 29 / 236
Page 31

FLUOROSPOT Compact Imaging System
Overview / Operating Elements and Displays
Icon Key Short description
- Prt Sc Print image on paper
Settings subtask card
Icon Key Short description
- Copy screen contents to reference image
monitor
Alt + L Open the integrated generator control console
F11 Edit acquisition program
F12 Edit fluoro program
Review controls
Icon Key Short description
- Show previous series (of a study)
- Show next series (of a study)
Return Toggle study / series overview,
fullscreen display
- Home Show first image (of a series)
- End Show last image (of a series)
Page Up
mouse
wheel
Page
Down
mouse
wheel
30 / 236 AX41-060.621.23.01.02 Operator Manual
Show previous image (of a series)
Select previous mask in remask function
Show next image (of a series)
Select next mask in remask function
Page 32

FLUOROSPOT Compact Imaging System
Overview / Operating Elements and Displays
Icon Key Short description
F2 Replay series: start/stop loop
right mouse click F3 Mark /unmark an image
F4 Store a new or modified image
- Store the current fluoro loop
F9 Store the current image as a reference image
F10 Recall the current reference image
Control subtask card
Icon Short description
Alternate between subtracted and native image display
Enable change mask
Selects/deselect ROADMAP
Preselect label R on the left side of the image
Preselect label L on the right side of the image
Store the current fluoro image
Change frame rate before or during series acquisition
FLUOROSPOT Compact AX41-060.621.23.01.02 31 / 236
Page 33

FLUOROSPOT Compact Imaging System
Overview / Operating Elements and Displays
Icon Short description
Postprocessing mode
Review controls on page 30
General functions
Icon Key Short description
Switch to next lower fluoro mode
Switch to next higher fluoro mode
- F1 No function
Patient F5 Switch to Patient mode
Examination F6 Switch to Examination mode
- F7 No function
Documentation F8 Switch to Documentation mode
F11 Restore original state of an image to the state
after acquisition
F12 Restore the state of an image to the state
before calling up the current function
- Select graphical object(s)
Del Remove selected graphical object(s)
- Prt Sc Print image on paper
Process. subtask card
Icon Key Short description
- Zoom/Unzoom image by a factor of two
- Pan: move image
32 / 236 AX41-060.621.23.01.02 Operator Manual
Page 34

FLUOROSPOT Compact Imaging System
Overview / Operating Elements and Displays
Icon Key Short description
- Invert/Reinvert grey scales of an image
- Shutter: Set or change the electronic shutter
- Flip vertically/horizontally
- Window: Adjust contrast and brightness
- Filter: Adjust edge enhancement and
harmonization
Graphics subtask card
Icon Key Short description
- Draw circle(s)
- Draw arrow(s)
- Set/remove R/L laterality label
- Draw/calculate stenosis
- Draw distance(s), Calibration /
Reset calibration
-Draw angle(s)
- Text: Enter image text and image comment
FLUOROSPOT Compact AX41-060.621.23.01.02 33 / 236
Page 35

FLUOROSPOT Compact Imaging System
Overview / Operating Elements and Displays
DSA subtask card
Note
The DSA subtask card is only available if a DSA or Roadmap scene is displayed.
Icon Key Short description
-Enable change mask
- Averaging of fill/mask images
- Calculate peak opacification image
IQ subtask card
- Toggle between subtracted and native image
display
- Pixelshift: Shift mask in fractions of pixels
- Landmark: Change proportion of subtracted
image (anatomical background)
- Window: Adjust contrast and brightness
- Filter: Adjust edge enhancement
- Text: Enter image text and image comment
Note
The IQ subtask card is only displayed if the IQ mode is enabled and/or test images
are displayed (see the Settings subtask card in Patient mode).
34 / 236 AX41-060.621.23.01.02 Operator Manual
Page 36
FLUOROSPOT Compact Imaging System
Overview / Operating Elements and Displays
Icon Key Short description
- Draw ROI 20/50
- Draw line profile
- Draw histogram of a ROI
Del Remove selected graphical object(s)
Cursor keys
The four arrow keys on the keyboard have the same effect as moving the mouse
depending on the function which is currently active.
Key
Function with Window brightness + brightness - contrast - contrast +
Function with Filter harmonization + harmonization - edge
enhancement -
Function with Shutter open vertically close vertically open horizontally close horizontally
Function with Pan move up move down move left move right
Function with Pixelshift increase y decrease y decrease x increase x
Function with Landmark --decrease
anatomical
background
Function with Stenosis move stenosis
cursor distal
move stenosis
cursor proximal
move reference
cursor proximal
edge
enhancement +
increase
anatomical
background
move reference
cursor distal
Documentation mode
General functions
Icon Key Short description
- F1 No function
Patient F5 Switch to Patient mode
Examination F6 Switch to Examination mode
Postprocessing F7 Switch to Postprocessing mode
FLUOROSPOT Compact AX41-060.621.23.01.02 35 / 236
Page 37

FLUOROSPOT Compact Imaging System
Overview / Operating Elements and Displays
Icon Key Short description
- F8 No function
F11 Display study report
- Create/edit medical report
-Return to FLUOROSPOT Compact
- Print medical report on paper
- Copy screen contents to reference monitor
- Prt Sc Print displayed images on paper
Series/image selection
Icon Key Short description
Return Toggle study / series overview,
fullscreen display
- Switch to study overview, if necessary, and select previous series (of the study)
- Switch to study overview, if necessary, and select next series (of the study)
- Switch to series overview, if necessary, and select previous image (of the selected series)
- Switch to series overview, if necessary, and select next image (of the selected series)
- Select image/series to the left
- Select image/series to the right
- Select the image/series above
- Select the image/series below
36 / 236 AX41-060.621.23.01.02 Operator Manual
Page 38
FLUOROSPOT Compact Imaging System
Overview / Operating Elements and Displays
Icon Key Short description
- Home Select first image/series
- End Select last image/series
- Page Up Show previous page
- Page
Show next page
Down
See also Review controls on page 30
Film subtask card
Icon Key Short description
F2 Film marked image(s)
F4 Preview marked images
- Show film status
- Create composed images on film sheet
(depending on film layout)
Send subtask card
Icon Key Short description
F3 Send marked image(s)
- Show send status
*
When the system is in the Documentation mode, a first press of the F3 key activates the Send subtask card and a second press of the F3 key activates image sending, if images are marked.
If no images are marked, the second F3 press is without any effect.
*
FLUOROSPOT Compact AX41-060.621.23.01.02 37 / 236
Page 39

FLUOROSPOT Compact Imaging System
Overview / Operating Elements and Displays
Select subtask card
Icon Key Short description
F9 Mark all images for filming/sending
F10 Unmark all images for filming/sending
- Mark/unmark single image for filming/sending
- Create twin image horizontal/vertical
- Create a subtraction image
- Delete image(s)
- Apply window/filter/harmonization values to
other images
- Apply shutter/zoom/pan parameters to other
images
- F12 Export image(s) to service folder
Status of the buttons in the function area
You control the program by clicking buttons. Depending on what you were doing
previously, the button will be in a certain state:
selectable The button is shown unpressed with gray background and clear graphics or text.
– You can select its function.
active The button appears pressed with white background and clear graphics or text.
– Its function is active.
38 / 236 AX41-060.621.23.01.02 Operator Manual
Page 40

FLUOROSPOT Compact Imaging System
Overview / Operating Elements and Displays
dimmed The button appears unpressed with gray background and grayed out graphics or
text.
– Its function is not available in the current state of the imaging system or it is
an option and not licensed.
Tool tips
If you have the mouse pointer on a button, information about this button is
displayed. (This is not the case if the button is dimmed.)
Note
You can switch the tool tips on or off.
Site information on page 196
Text lists
In several cases when entering text you can use pre-entered texts. These texts are
then organized in selection lists.
Using an entry
Click on the arrow button.
– The list drops down.
Click on the required entry.
– The list folds up.
– The selected entry is now in the box.
Adding entries
You can add new entries to a list at any time:
Enter the required text and highlight it with the mouse.
Press the Ins key.
– The new entry is added after the selected entry of the list.
Alternatively you can add it at any position in the list:
Click on the arrow button.
– The list drops down.
Move the mouse cursor to the entry after which you want to add the
new entry.
– The entry is highlighted.
Enter the required text and highlight it with the mouse.
Press the Ins key.
– The new entry is added.
FLUOROSPOT Compact AX41-060.621.23.01.02 39 / 236
Page 41

FLUOROSPOT Compact Imaging System
Overview / Operating Elements and Displays
Removing entries
You can also remove entries:
Click on the text to be deleted.
Press the Del key.
Selection fields
For some parameters, there are two different types of buttons for changing the
parameter in the field displayed:
Click on the arrow button.
– The parameter within the box changes to its next possible value.
– After the last possible value, the first possible value appears again.
Click on the arrow up or arrow down button.
– The parameter within the box is increased or decreased.
Scroll bars
When a list has a lot of entries (e.g. the study list with many study/patient entries)
it might be too long to be displayed completely.
In this case the list is displayed with a scroll bar on the bottom and on the righthand side if necessary. To use a scroll bar:
Click on the arrows left or right.
Or
Click and drag the bar.
Or
Click into the empty space.
Or
Use the wheel on the mouse.
Mouse pointers
In the following table you will get an overview, which shapes/functions the mouse
pointer (cursor) can take:
Mode Cursor Function Icon Short description
all Standard - Standard cursor in the study list, for example, or
for selecting functions.
Busy - The imaging system is busy. - Please wait.
40 / 236 AX41-060.621.23.01.02 Operator Manual
Page 42

FLUOROSPOT Compact Imaging System
Overview / Operating Elements and Displays
Mode Cursor Function Icon Short description
Patient Column
width
CD busy - The computer is busy because a CD has been in-
Postprocessing
Magnifying
glass
Window Adjust window values with left mouse button
Filter Adjust edge enhancement and harmonization
Pan image Pan image with left mouse button pressed.
Image text Input image text after having pressed left mouse
- Change column width in the study list.
serted. - Please wait.
- Magnify a part of the image by a factor of two by
pressing the left mouse button.
pressed.
with left mouse button pressed.
button.
Documentation
Correct
contour
Select object Select image texts or graphic elements with left
Move object - Move a selected object with left mouse button
Twinview Mark images for Twinview image with mouse-
Delete Mark image(s) for deleting with mouse-click.
Export - Mark image(s) for exporting with mouse-click.
Correct the stenosis border after automatic
contour detection
mouse button pressed.
pressed.
click.
FLUOROSPOT Compact AX41-060.621.23.01.02 41 / 236
Page 43

FLUOROSPOT Compact Imaging System
Overview / Operating Elements and Displays
42 / 236 AX41-060.621.23.01.02 Operator Manual
Page 44

Part FLUOROSPOT Compact Imaging System
Chapter Operation
Switching on/off
The FLUOROSPOT Compact imaging system is switched on and off together with
the acquisition system.
Switching on and starting the system
Press the “ON” button on the console.
The system is powered up.
Wait until the application program is displayed on the monitor.
– The system automatically runs a self-test when it is switched on.
– The operating system of the computer is started.
– The application program is started.
– If HIPAA is licensed, the login window is displayed.
– If HIPAA is not licensed, the Preregistered Patients list is displayed.
The system is now ready to use.
Caution
If a message is displayed indicating a fault during the self-test after power-on
Risk of radiation without a stored image
Risk of poor image quality
Shut down the system and turn it on again.
If the fault remains:
Shut down the system and call Siemens Service.
Note
If the power has failed, switch off the entire system and then switch it on again.
The last image might be lost.
If a fault is indicated when the system starts up again, call Siemens Service.
Logging in
1
HIPAA provides user management assigning each user different rights. This prevents the system, patient data and images from misuse by unauthorized persons.
1
only available, if HIPAA is licensed
FLUOROSPOT Compact AX41-060.621.23.01.02 43 / 236
Page 45

FLUOROSPOT Compact Imaging System
Operation
Note
Depending on the rights given to a user by the administrator, not all patients can
be seen and some functions of the imaging system may not be available.
If HIPAA is licensed, you must log-in using your login name and password.
Your system administrator must create user accounts and assign groups and privileges to them.
For more information concerning user management, please refer to the
Administration (HIPAA) on page 205.
Performing an emergency login
If you forgot your password or you don’t have an account for this system and must
perform an emergency examination, you can perform an emergency login.
Click on Emergency in the login window.
– The task cards appear.
Note
When logged-in as the emergency user, it is only possible to perform fluoroscopy
and acquisition. Only emergency patients can be seen.
No other functions can be performed and no other patients can be seen.
Note
Patients acquired in emergency mode are assigned by the system to no group,
i.e. everybody can see them.
An emergency patient can be assigned to a group via the Data Entry Dialog.
Modifying patient data on page 63
Performing a login
Enter your login name and your password.
44 / 236 AX41-060.621.23.01.02 Operator Manual
Page 46

FLUOROSPOT Compact Imaging System
Select your domain, if required on your site.
Click on Login.
– The task cards appear.
Operation
Note
The login name of the user currently logged-in is displayed bottom right.
Screen saver
If no entries are made in the FLUOROSPOT Compact for a configured time, a
screen saver is activated.
Deactivation of screen saver
The screen saver is automatically deactivated as soon as one of the following action is performed (not if the Patient task card is on top):
unit movement on acquisition system (except table movement)
collimator action
radiation release
infrared remote control action
or on the FLUOROSPOT Compact imaging system:
1
mouse click
or keyboard action
1
not mouse movement
FLUOROSPOT Compact AX41-060.621.23.01.02 45 / 236
Page 47

FLUOROSPOT Compact Imaging System
Operation
Press the space bar, for example.
– If HIPAA is not licensed, the imaging system is ready to use again.
– If HIPAA is licensed, the login window is displayed.
Performing a login on page 44
Setting the screen saver time delay
Site information on page 196
Logging off
If another user takes over or when you want to leave the room you should log off
for safety reasons.
1
Note
If HIPAA has not been activated, logoff is done automatically when the system is
shut down.
Switching off the system on page 47
Click on this icon on the Settings subtask card.
Or
Press the Ctrl F2 keys on the keyboard.
– The login window is displayed.
Changing the password
For the first login, the system administrator creates a login account with login
name and password for you.
Administration (HIPAA) on page 205
2
If you want to change your login password, you must be logged-in.
Log in, if you are not logged-in.
Click on this icon on the Settings subtask card.
– The login window is displayed again.
Click on Change Password.
– The password change dialog is displayed.
1
only available, if HIPAA is licensed
2
only available, if HIPAA is licensed
46 / 236 AX41-060.621.23.01.02 Operator Manual
Page 48

FLUOROSPOT Compact Imaging System
Enter your old password.
Note
The password must have a length of six characters minimum.
Operation
Use only letters and figures.
Enter your new password.
Re-enter your new password.
Click on OK.
Note
The emergency user has an empty password.
It is not possible to change that.
Switching off the system
Note
Do not press the keys Ctrl+Alt+Del.
Pressing this key combination is on your own risk.
If you do so, problems may occur.
Terminate the current examination or review.
Note
Changes that you have made to the images are automatically stored when you go
to the next image or to another study.
FLUOROSPOT Compact AX41-060.621.23.01.02 47 / 236
Page 49
FLUOROSPOT Compact Imaging System
Operation
Shutdown
Press the “OFF” button on the console.
– Active background operations are completed and terminated. This may take
some time.
– The application program is terminated.
– The operating system of the computer shuts down (dark monitor).
– The entire system including all connected devices is switched off.
Only, when the monitor is dark, you can switch off using the main switch.
Caution
Switching off the system using the main switch before the operating system of the
computer has been shut down.
Irreversible damage to the system hard disk may occur
Wait until the imaging system has been shut down (dark monitor).
Switch off the main switch of the x-ray unit (or room), if necessary.
Patient (Study) Administration
DICOM terms
In the DICOM standard, and increasingly also in radiological practice, certain terms
are used to describe the assignment of images to examinations of a patient.
Image 1 Image 2 Series 1
Study 1
Image 1 Image 2
Study 2
Image 3
Image 1
Study 1
Patient 1 Patient 2
Example of an assignment of images to patients
Patient All examination results, i.e. studies, are uniquely assigned to a patient. Unique as-
signment is usually achieved with the patient’s personal data, i.e. last name, first
name, date of birth, sex and patient identification number.
Study A radiological examination is a study. A study can consist of one or more images
and/or more than one series.
48 / 236 AX41-060.621.23.01.02 Operator Manual
Page 50

FLUOROSPOT Compact Imaging System
Operation
Procedure step Some radiological information systems (RIS) can divide a study into several
procedure steps.
Series A series consists of several images recorded. For example, an several images ac-
quired in a series are used to display a dynamic process.
Image An Image can be an X-ray acquisition or fluoroscopic image (LIH = last image
hold).
Note
The FLUOROSPOT Compact digital imaging system “knows” the terms study, procedure step (if supported by the RIS), series and image.
The assignment of a study (or procedure step) to the patient is made in study lists
using the personal data of the patient.
Study lists
All patient data with the personal data of a patient, the acquisitions and other examination and image data is stored in studies on the hard disk of the imaging sys-
tem. You can access these data via study lists in Patient mode:
1. You will enter the personal data of the patient and create a new study in the
Preregistered Patients list (work list). Alternatively, patient data (a study or a
procedure step) may come in via HIS/RIS (hospital/radiological information system).
2. All acquisitions (images, series) are stored under the selected study entry in the
Examined Patients list.
3. When an examination is finished you will archive the study data via network,
CD-R or hardcopy. You may then delete the image data to regain space for new
patients. Data of deleted patients is stored in the Archiving Information list.
4. If a patient has to be examined once more, but previous patient data has been
deleted, you can look for the old data in the Archiving Information list. Depending on archive type (network archive or CD-R), you can select the required
studies in the Query list or CD list and then restore it to the Examined Pa-
tients list.
Note
All patient data is stored in compliance with the DICOM 3.0 standard.
Description of the study lists
The study lists consist of the following parts:
FLUOROSPOT Compact AX41-060.621.23.01.02 49 / 236
Page 51
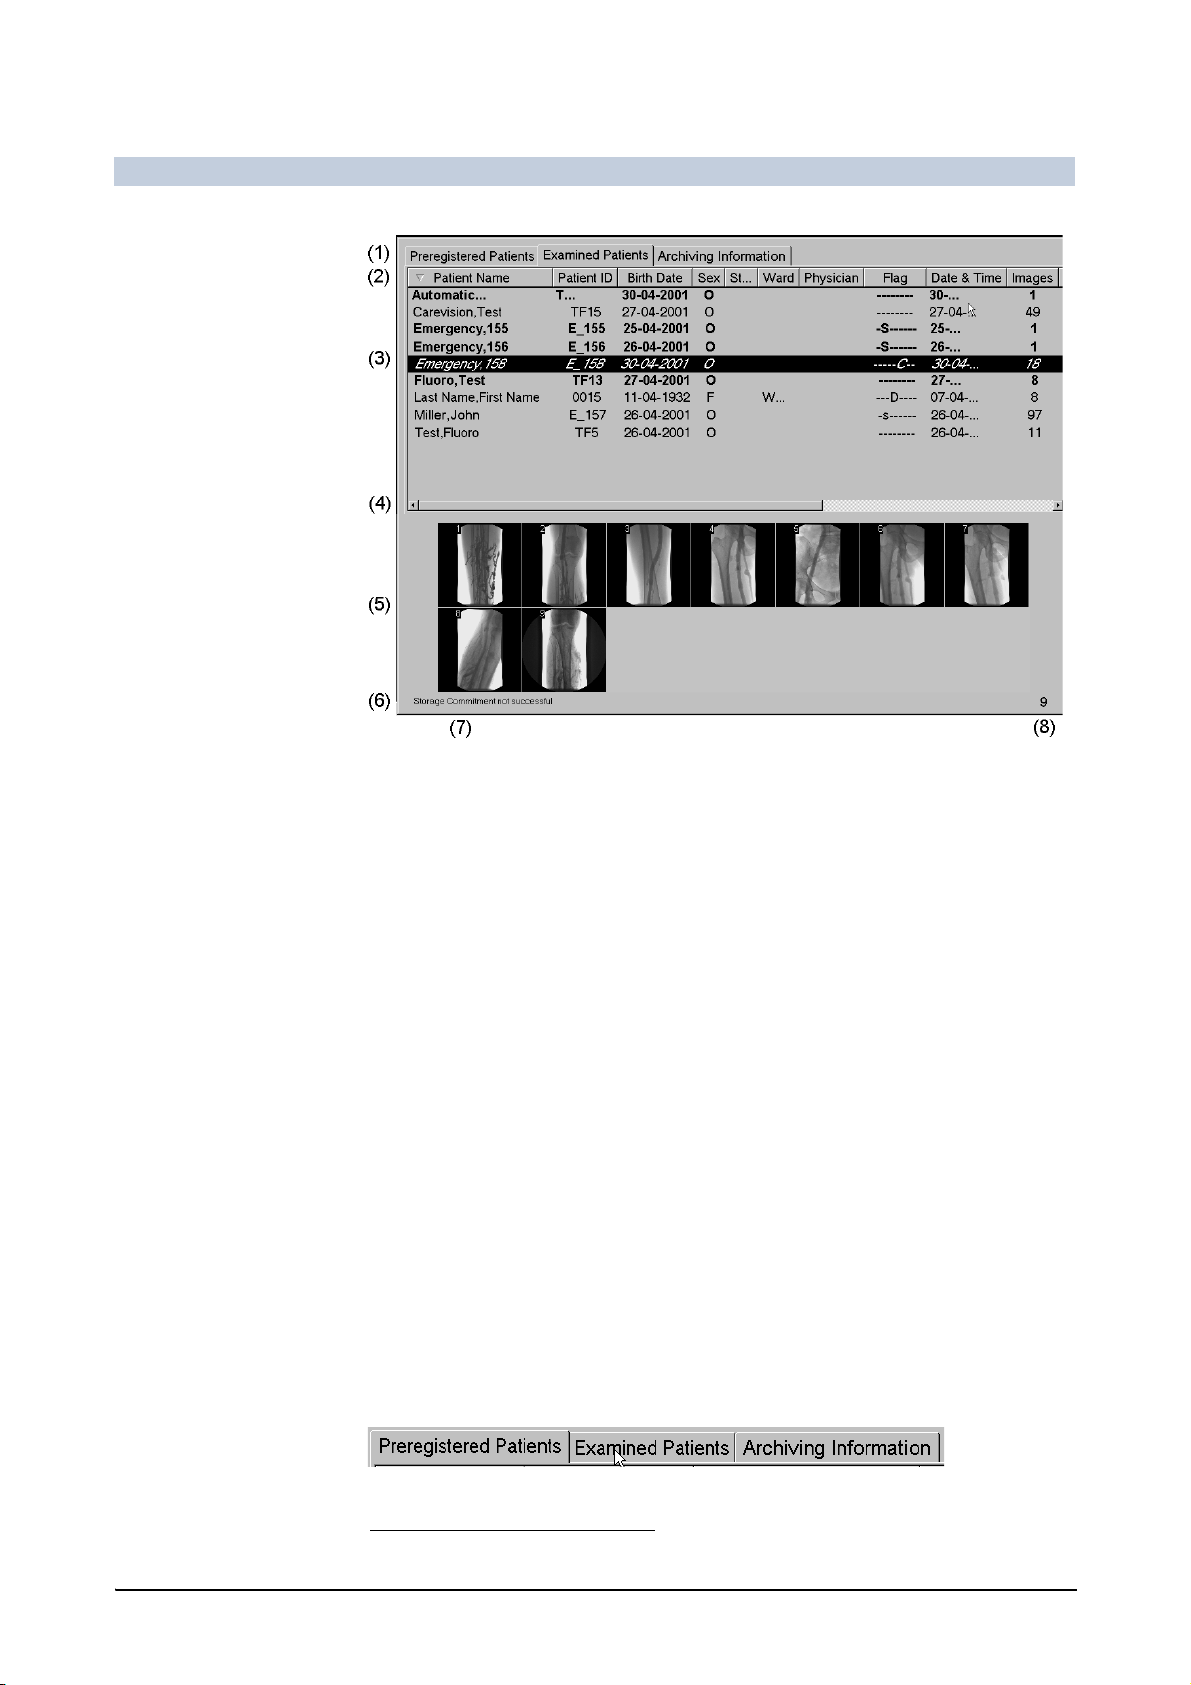
FLUOROSPOT Compact Imaging System
Operation
(1) Tabs of study lists
(2) Headings line
(3) Study entries
(4) Scroll bar
(5) Image preview
1
(6) Status line
(7) Status message
(8) Number of studies being displayed
Display of study entries
“Normal” study entries are displayed in normal letters.
MPPS study entries in progress are displayed in bold letters.
MPPS study entries that were discontinued are displayed in italic letters.
Finishing a patient entry - MPPS Close on page 67
Accessing the study lists
The study lists are always displayed on the Patient task card.
Click on the Patient tab, if necessary.
Click on the tab of the required study list.
1
Only if the study contains images or series.
50 / 236 AX41-060.621.23.01.02 Operator Manual
Page 52

FLUOROSPOT Compact Imaging System
Operation
See also:
– Archiving information on page 190
– Query for patient data on page 193
– Displaying the study list of a CD on page 183
Printing the study list on a paper printer
Press the Prt Sc key.
– If none or one study is selected the complete study list is sent to the config-
ured paper printer.
– If more than one study is selected a list of the selected entries are sent to
the configured paper printer.
Updating the work list
If your system is connected to an HIS/RIS patients coming in are displayed in the
Preregistered Patients list.
The Preregistered Patients list is updated periodically at an interval which is configurable.
DICOM properties on page 197
However you can update it manually:
Click on this icon on the Patient subtask card.
– An input form appears.
If the patient is already waiting you can enter his name or you can ask the HIS/RIS
for special entries only.
Entering data
Enter any known data, if required.
FLUOROSPOT Compact AX41-060.621.23.01.02 51 / 236
Page 53
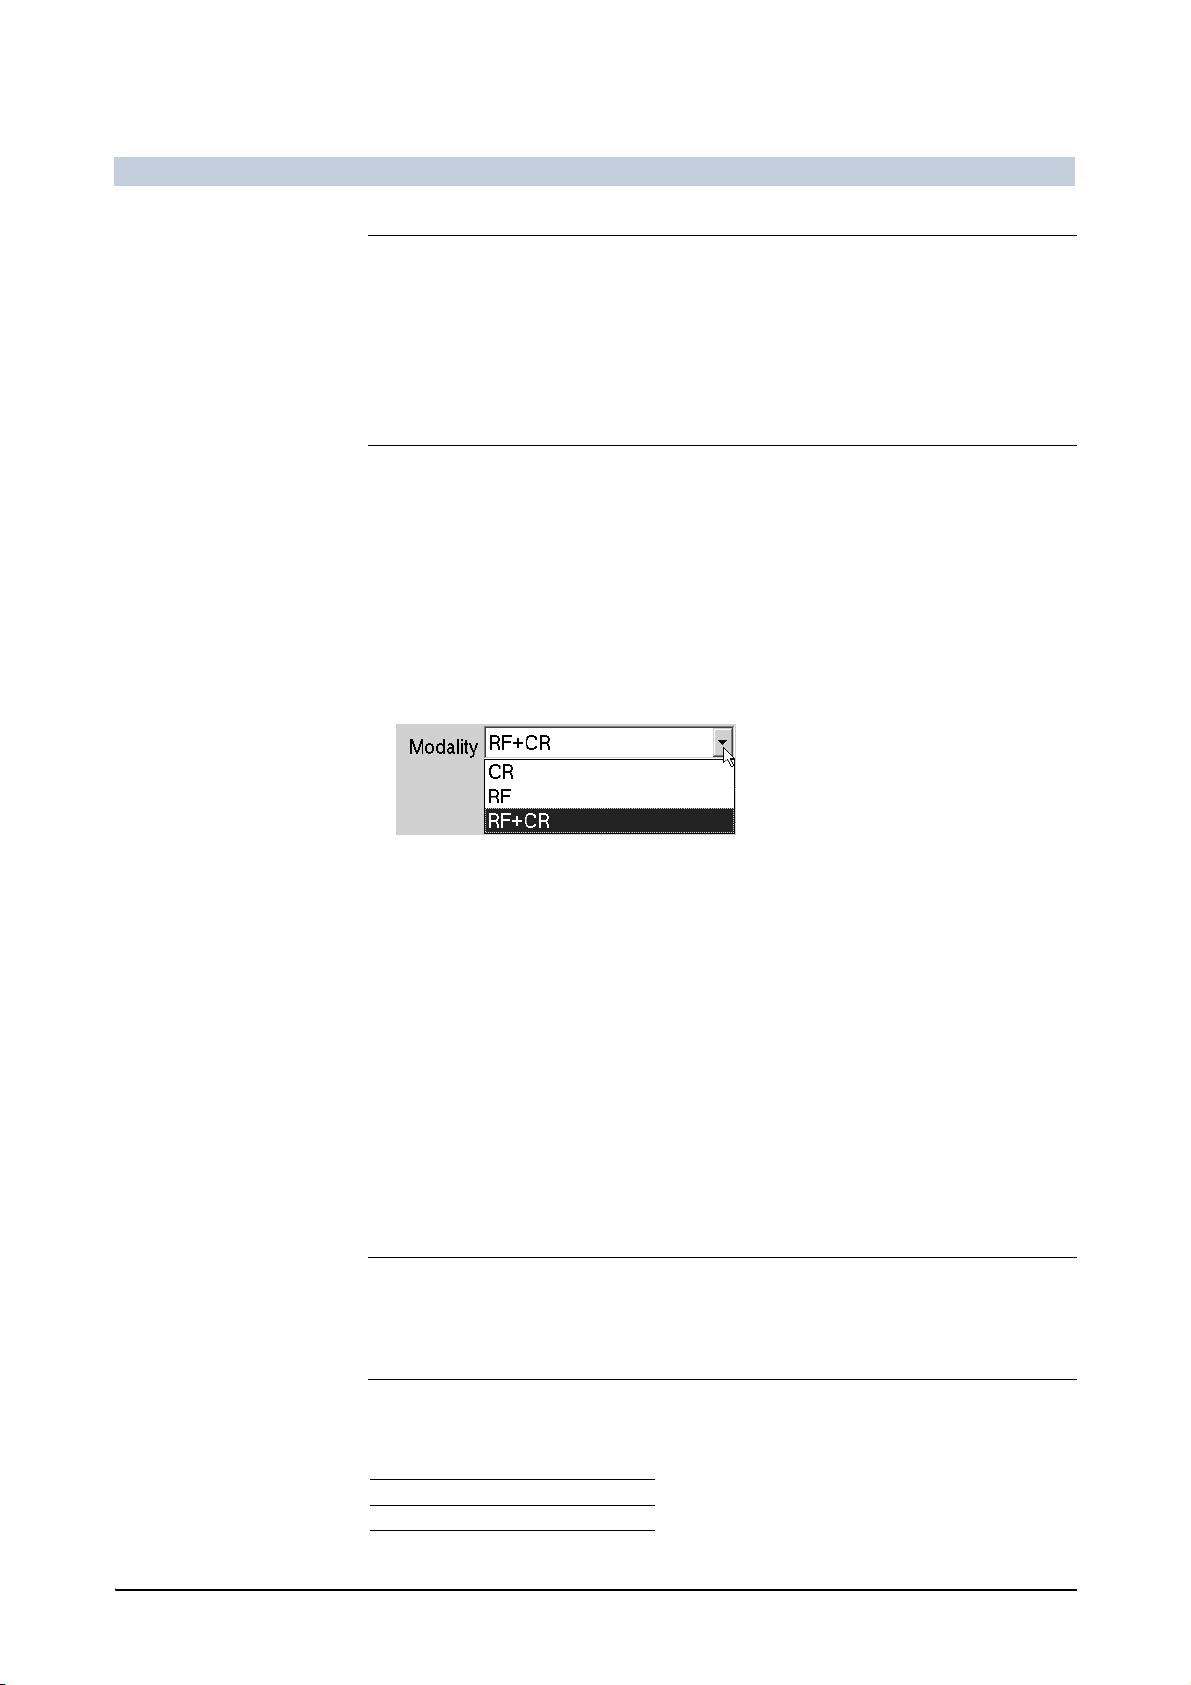
FLUOROSPOT Compact Imaging System
Operation
Note
You can use the following wildcards:
An asterisk * indicates one or more arbitrary characters
A question mark ? indicates one arbitrary character
If nothing is being entered, the unfiltered work list will be displayed.
Setting the time range
Normally, only patients of today’s planning are displayed.
Click the Not only today’s worklist check box to display all the patients with-
out restriction of the planned day.
Selecting the modality
Select the required modality/modalities:
1
– CR: Only patients of the CR
– RF: Only patients of the RF
modality will be considered.
2
modality will be considered.
– RF+CR: Patients of both modalities will be considered.
– XA: Only patients of the XA
3
modality will be considered.
– All: Patients of all modalities will be considered.
Updating the worklist
Click on Get Worklist.
– The current worklist entries are removed and replaced by the received
worklist.
– For existing studies, the mandatory entries are checked and modified auto-
matically, if the patient ID is identical and the worklist contains updated values.
– If data is inconsistent, an error message is displayed.
Note
The maximum number of received study entries can be configured (1 ... 999) by
Siemens Customer Service.
1
CR = Computer Radiography
2
RF = Radiography, Fluorography
3
XA = X-ray, Angio
52 / 236 AX41-060.621.23.01.02 Operator Manual
Page 54

FLUOROSPOT Compact Imaging System
Data in the study lists
In all study lists, the following study data is displayed:
Header Description
Patient Name Last name and first name of the patient
Patient ID Identification number of the patient
Birth Date Date of birth of the patient
Sex Sex of the patient:
M = male
F = female
O = other (e.g. phantom)
? = unknown
Study Description Organ name
Ward Name of the ward / clinic / practice
Physician Name of performing physician
Operation
Flag Status of the study:
* = work list study
P = printed (on film)
S = sent to a network node with DICOM send
A = archived to the network archive
R = retrieved from network archive
D = archived on or retrieved from CD-R
C = closed, confirmed by RIS
c = closed, not confirmed by RIS
# = protected from unintentional deletion
and combinations of any of these
Capital letters: all images of the study were pro-
cessed completely
Small letters: not all images of the study were
processed
Date & Time Date and time of acquisition of the first image
Images Number of images stored in the study
– A number in brackets indicates the number of
marked images.
– A plus sign “+” indicates the presence of a
medical report.
*
Accession No. Identification number of the examination
Request ID Identification number of the examination request
CD Label Label of the CD-R on which the study has been
archived
Archive Node Identification of the archive
Comment Study comment
FLUOROSPOT Compact AX41-060.621.23.01.02 53 / 236
Page 55

FLUOROSPOT Compact Imaging System
Operation
Header Description
Group Group the operator belongs to (HIPAA)
User User name of operator (HIPAA)
*
only set when stored in Packed or a DICOM format, not set when stored in TIF or AVI format
Work list data Additional data is displayed in the Preregistered Patients list (work list).
Displaying the work list data
The study lists contain several entries which cannot be displayed at once. If you
want to see them all together:
Click on a study entry with the right mouse button.
– The work list data is displayed.
Work list data (example)
Selecting another study entry
Click on the required study entry with the right mouse button.
Or
54 / 236 AX41-060.621.23.01.02 Operator Manual
Page 56

FLUOROSPOT Compact Imaging System
Operation
Press the or key on the keyboard to display the data of the previous/next
study entry.
Displaying additional information
For some entries (Additional Patient History, Patient Comment and Medical
Report) there may not be enough space to display the contents completely.
Click the required (underlined) entry.
– An additional window appears displaying the contents.
Printing the work list data on a paper printer
Click on Print.
– The work list data is sent to the configured paper printer.
Closing the window
Click on Close.
Or
Click on another study entry with the left mouse button.
Displaying images
Images shown in the preview area of the Examined Patients list can be displayed
without switching to Postprocessing or Documentation mode.
Click on an image icon with the right mouse button and hold.
– The image is displayed as long as the mouse button is depressed.
Or
Click on an image icon with the left mouse button.
– The image is displayed on the reference image monitor.
Changing the sorting sequence
After switching on, the entries in the study list are sorted by date and time.
The sort order is indicated by a triangle.
Changing the sorting sequence of study entries
Click in the header of a column you require.
– The study list is then sorted alphanumerically by this column.
FLUOROSPOT Compact AX41-060.621.23.01.02 55 / 236
Page 57
FLUOROSPOT Compact Imaging System
Operation
Example: Sorting by patient name (descending order)
Click in the header of the same column again.
– The sorting sequence is reversed.
Example: Sorting by patient names (ascending order)
Changing the sorting sequence of columns
It is also possible to rearrange the columns.
Click in the column header, drag and drop it at the required position.
– The columns are shifted according to the new position.
Restoring the original positions of columns
You can restore the default sorting sequence of the columns.
Press the keys Ctrl + R.
– The original positions (and widths) of all columns are restored.
Changing the column width
If an entry, e.g. a patient name, exceeds a certain length, it might not be displayed
completely (this is shown by three periods: ... ).
To change the width of a column
Move the mouse pointer onto the line in the header separating the columns.
– The mouse pointer changes shape.
Click and drag the column to the width you want.
Example: Dragging the name column to make it wider
56 / 236 AX41-060.621.23.01.02 Operator Manual
Page 58

FLUOROSPOT Compact Imaging System
Operation
Restoring the original widths
If you have made one or more columns so narrow that they disappear, for example, you can resize them to the original widths.
Press the keys Ctrl + R.
– The original widths (and positions) of all columns are restored.
Adjusting to optimal width
You can set the column width to the width of the longest entry:
Double-click on the column line.
– The optimal width of this column is adjusted.
Applying a database filter
It is possible to display specific studies only, using a database filter.
Note
If HIPAA is licensed, only studies available to the user are displayed.
Click on this icon on the Patient subtask card.
– A window with the available flags is displayed.
Activate the required check boxes.
– + : display study entries if the selected flag is set
– - : do not display study entries if the selected flag is set
Flag Description (study status)
*
P
S
A
R
D
C
Work list patient (HIS/RIS)
Printed (on film)
Sent to the network with DICOM send
Archived to network archive
Retrieved from network archive
Archived on or retrieved from CD-R
Closed (MPPS)
#
See also Data in the study lists on page 53
Applying the filter
Click on this icon.
– Studies with flags “+” are displayed.
– Studies with flags “-” are not displayed.
– This icon is displayed instead of the previous icon.
FLUOROSPOT Compact AX41-060.621.23.01.02 57 / 236
Protected from unintentional deletion
Page 59

FLUOROSPOT Compact Imaging System
Operation
Note
In the bottom right corner of the study list the number of displayed / total number
of studies is indicated.
Discarding any filter
Click on this icon.
– All studies are displayed.
– This icon is displayed instead of the previous icon.
Canceling changes
Click on this icon.
– Study list display remains unchanged.
Scrolling the study list
Scrolling general
Scroll bars on page 40
Scrolling alphabetically
Click on any study entry so that the study list has the input focus.
Press the initial letter of the entry you are searching for on the keyboard.
– The study list is moved so that the patients with the initial letter you entered
become visible.
Selecting a study (patient)
If you want to use the data of a previously registered patient for an examination,
for postprocessing or documentation:
Click on the correct line in a study list.
– The line appears inverted.
58 / 236 AX41-060.621.23.01.02 Operator Manual
Page 60

FLUOROSPOT Compact Imaging System
Operation
Note
For each study, one entry is assigned to in the study lists.
For each patient, there may exist one or more study entries.
Click on the Examination, Postprocessing or Documentation tab.
– The system switches to Examination/Postprocessing/Documentation
mode.
Or
Double-click on the correct line of the study.
– The system switches to Examination/Postprocessing mode.
You can now apply fluoroscopy or create new acquisitions for this study or postprocess images that already exist.
Manual registration
If yo ur system is not connected to a n HIS/RIS or i n an emergen cy, you must register
the patient to be examined.
Note
Registration is necessary, since acquisition is not possible without it.
In case of an emergency, you can perform a “fast registration” and enter the personal data of the patient later.
See also Performing an emergency login on page 44
Emergency registration
If you do not have time to enter the personal data of the patient in an emergency
or if you do not know the data, you can skip this entry and proceed with the acquisition immediately.
If you are not logged-in, click on Emergency in the login window.
Click on this icon on the Patient subtask card.
– The input form appears.
Entering patient data on page 60
Click on Emergency.
– A new “Emergency study” is created in the study list in which the missing
required parameters are entered automatically.
A “default patient” is registered with the following data:
Last name:
First name: sequential number
Date of birth: present date entry
Sex: Other
Patient ID: E_sequential number
FLUOROSPOT Compact AX41-060.621.23.01.02 59 / 236
Page 61

FLUOROSPOT Compact Imaging System
Operation
Note
Later on you can enter the missing personal data of the patient.
Modifying patient data on page 63
Entering patient data
For patients that are to be registered manually (not for HIS/RIS patients), you can
enter the data as follows:
Click on this icon on the Patient subtask card.
–The Data Entry Dialog appears.
Enter all the relevant data.
Note
Required entries are displayed in bold letters.
PATIENT fields Last Name
First Name
1
Entry required
60 / 236 AX41-060.621.23.01.02 Operator Manual
1
: Last name of the patient
1
: First name of the patient
Page 62

FLUOROSPOT Compact Imaging System
Operation
(Last Name and First Name together may have up to 64 characters.)
Middle Name: Middle name of the patient
Title: Title of the patient
Suffix: Suffix name of the patient
Note
You can switch off Middle Name, Title and Suffix using the Display Full Name
setting if you don’t require them.
Site information on page 196
1
Patient ID
(up to 16 alphanumeric characters)
It is possible to generate the Patient ID automatically when registering a new pa-
tient in the Date Entry Dialog.
: Identification number of the patient
Click on the # button next to the Patient ID entry field.
– A new patient ID is generated based on the current date and time.
1
Birth Date
: Date of birth of the patient (day - month - year)
Note
The system does not accept a date of birth in the future.
If the date entered has a two-digit number for the year and would be in the
future, then the system inserts “19” in front of the entry for the year.
If the date entered has a two-digit number for the year and would be in the
past, then the system inserts “20” in front of the entry for the year.
Examples: today’s date is 03.09.2003 (DD.MM.YYYY)
– An entry of “11.3.64” results in ”11.03.1964“
– An entry of “1.10.03” results in ”01.10.1903“
– An entry of “1.1.00” results in ”01.01.2000“
In order to avoid errors, beginning with the year 2000 the year should be
entered as a four-digit number.
Note
You must enter Last Name, First Name, Patient ID and Birth Date.
It is possible but unlikely that two patients might have the same name and have
been born on the same day. In this case, the identification number of the patient
must be different!
Make sure that each patient ID is absolutely unique!
Sex: Sex of the patient (male/female/others)
FLUOROSPOT Compact AX41-060.621.23.01.02 61 / 236
Page 63

FLUOROSPOT Compact Imaging System
Operation
Note
If you do not enter the sex of the patient “unknown” is used instead.
In the study list a blank “ “ is then displayed in the Sex column.
STUDY fields Accession No.: Identification number of the examination
(up to 16 alphanumeric characters)
Request ID: Identification number of the examination request
(up to 16 alphanumeric characters)
Note
Each study is identified by a media unique identification number (the Study
Instance UID).
Study Descr.: Organ to be examined
(up to 64 alphanumeric characters)
Study ID: Identification number of the study
(up to 16 alphanumeric characters)
Study comment: Comment for the study
(more than 256 alphanumeric characters).
Note
You can either enter text or select items from a list in some input fields.
You can also add and remove list entries.
Text lists on page 39
INSTITUTION fields Physician 1: First performing physician
(up to 64 alphanumeric characters)
Physician 2: Second performing physician
(up to 64 alphanumeric characters)
Operator 1: First assistant
(up to 64 alphanumeric characters)
Operator 2: Second assistant
(up to 64 alphanumeric characters)
Referring Phys.: Referring physician
(up to 64 alphanumeric characters)
Ward: Name of ward, hospital or practice, for example
(up to 64 alphanumeric characters)
GROUPS field Group: FLUOROSPOT Compact user group the patient is assigned to
(only available, if HIPAA is licensed)
If your user account belongs to several groups, you can select the group,
the patient shall belong to.
62 / 236 AX41-060.621.23.01.02 Operator Manual
Page 64

FLUOROSPOT Compact Imaging System
Note
Only groups your user account belongs to are displayed.
Select the required group in the Group list.
Registering the patient
When you have entered all the data
Operation
Click on OK.
– A new study is created in the study list with the data you have entered.
Note
If you have made a typing error you can change the data.
Modifying patient data on page 63
Examining the patient immediately
Click on Examination.
– The data is passed to the Examination task card.
Discarding the data entered
Click on Cancel.
Modifying patient data
You can correct or add to the personal data of a patient already registered in the
study list (e.g. after emergency registration).
Click on the corresponding entry in the study list.
FLUOROSPOT Compact AX41-060.621.23.01.02 63 / 236
Page 65
FLUOROSPOT Compact Imaging System
Operation
Caution
Selecting the wrong study entry
Risk of mixing or switching patient data
Before starting fluoroscopy or acquisition, make sure that the patient’s name
on the monitor agrees with the name of the patient to be examined.
Click on this icon on the Patient subtask card.
–The Data Entry Dialog appears.
Correct or complete the personal data of the patient.
Entering patient data on page 60
Note
If you ch ange one, more tha n one, or all of the first five items of data, these entries
are changed in all the existing studies of this patient!
For patients delivered by HIS/RIS you can only modify some entries.
Changing the group
If your user account belongs to several groups, you can change the group,
the patient belongs to.
Note
Only groups, your user account belongs to, are displayed.
If you are belonging to several groups, the first group in the list is assigned per default. When you changed the setting, this state remains for all patients until you
log off or the imaging system is restarted.
Select the required group in the Group list.
Accepting changes
When you have entered/modified all the required data
Click on OK.
– The changed data is assigned to the existing study or studies.
64 / 236 AX41-060.621.23.01.02 Operator Manual
Page 66
FLUOROSPOT Compact Imaging System
Operation
Canceling changes
If you want to reject the data entered
Click on Cancel.
– The entries are restored to their original values.
Creating another study for a patient already registered
If a new study is created for the same patient (e.g. follow-up examination)
you do not need to enter the personal data again.
Click on the corresponding entry in the study list.
Caution
Selecting the wrong study entry
Risk of mixing or switching patient data
Before starting fluoroscopy or acquisition, make sure that the patient’s name
on the monitor agrees with the name of the patient to be examined.
Click on this icon on the Patient subtask card.
–The Data Entry Dialog appears.
FLUOROSPOT Compact AX41-060.621.23.01.02 65 / 236
Page 67

FLUOROSPOT Compact Imaging System
Operation
Enter any additional data you require.
Entering patient data on page 60
Creating the study
Click on OK.
– A new study is created for the patient already registered with identical per-
sonal data.
Examining the patient immediately
Click on Examination.
– The data is passed to the Examination task card.
Closing a study
Closing a study manually
When an examination is finished you can close the study.
Note
Closed studies cannot be reopened for acquisition.
Click on the corresponding entry in the study list.
Click on this icon on the Patient subtask card.
– If MPPS is not used: a confirmation window appears.
– If MPPS is used: the MPPS Dialog appears.
Note
You can configure that the patient close dialog pops up automatically when reentering the Patient mode with an open study.
Check the Auto MPPS Dialog setting in the User Settings.
DICOM properties on page 197
Closing a patient entry if MPPS is not used
If the examination is finished:
Click on the OK icon.
– No more fluoroscopy or acquisitions are possible on this study.
If you want to continue the examination:
Click on the Cancel icon.
– The study remains open.
66 / 236 AX41-060.621.23.01.02 Operator Manual
Page 68
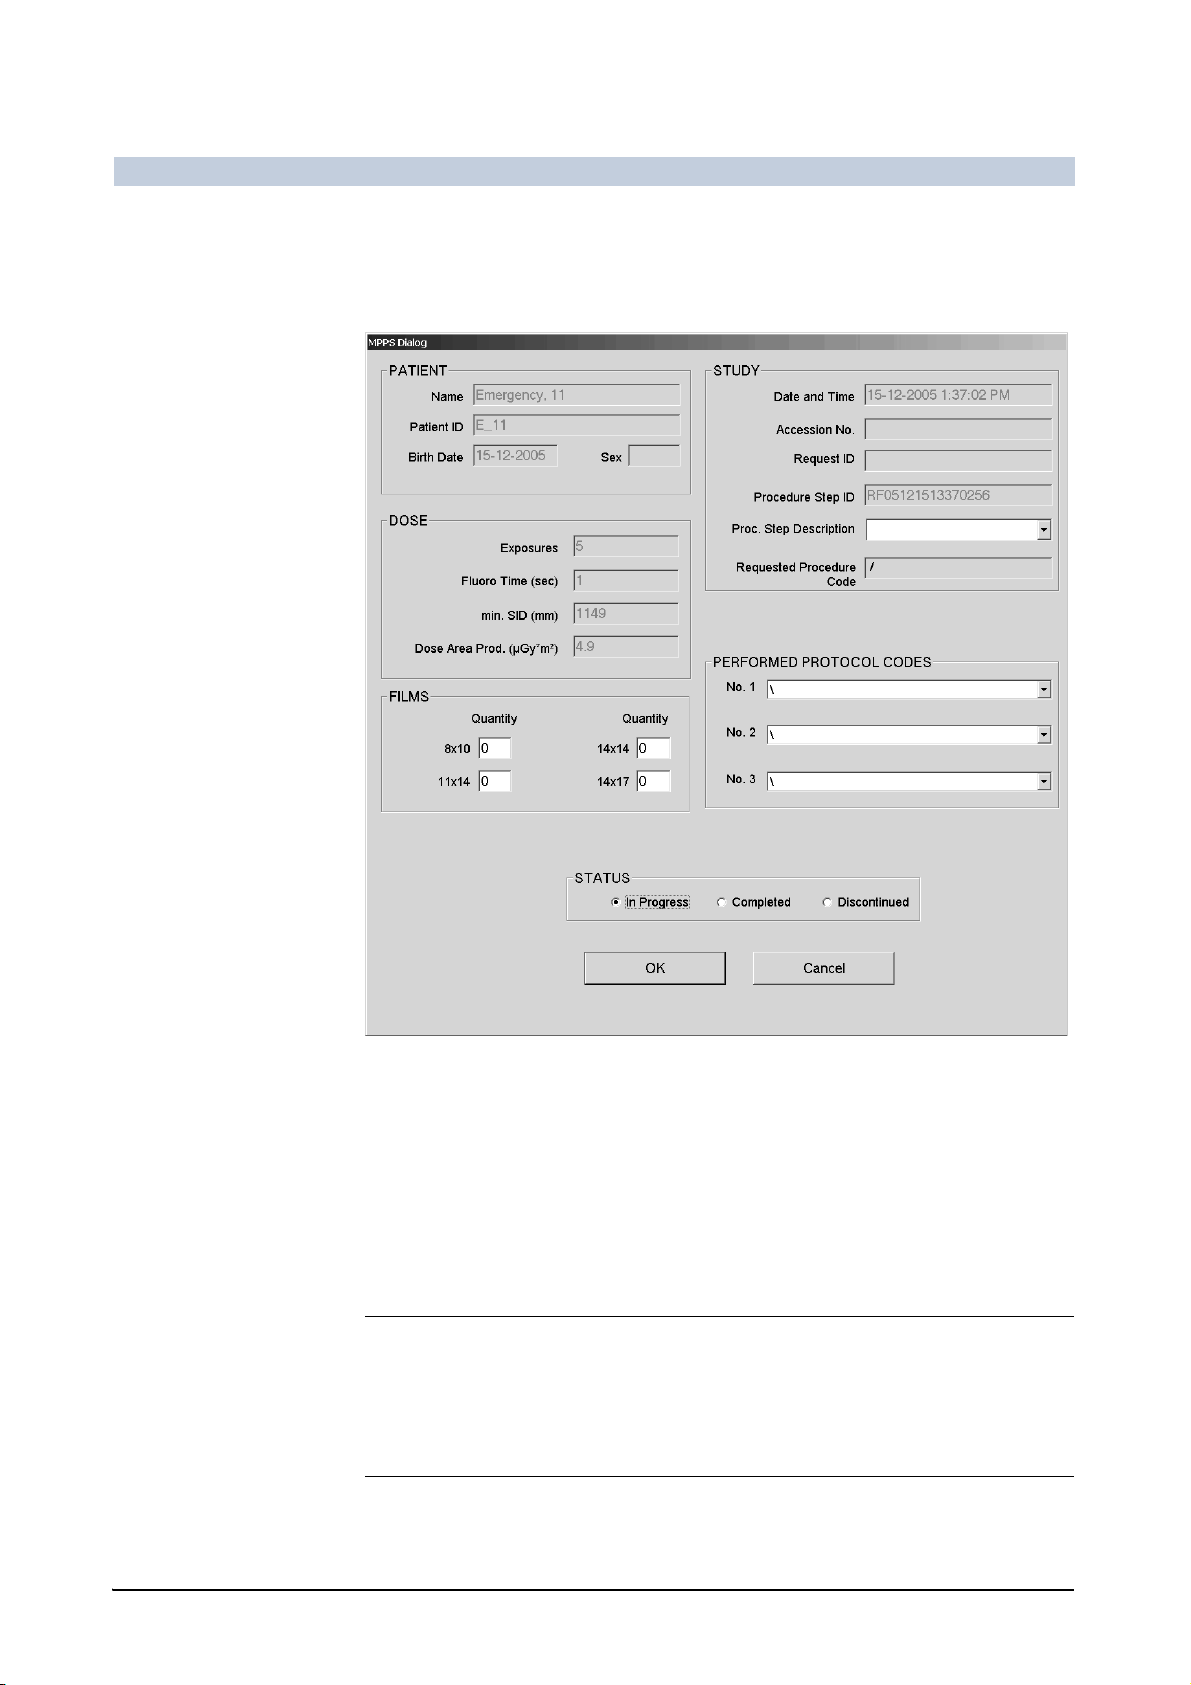
FLUOROSPOT Compact Imaging System
Operation
Finishing a patient entry - MPPS Close
If your institution uses MPPS (Modality Performed Procedure Step), an examination of a patient has to be confirmed when completed or discontinued.
PATIENT Patient data is displayed.
DOSE Dose data is displayed.
See also Displaying the study report on page 173
FILMS Enter the used film quantities, if necessary.
STUDY Study data is displayed.
Select or enter the performed Procedure Step information.
Text lists on page 39
Note
Initially the Procedure Step is predefined with the (Requested) Procedure De-
scription of work list data.
Work list data on page 54
Other study data is displayed only.
FLUOROSPOT Compact AX41-060.621.23.01.02 67 / 236
Page 69

FLUOROSPOT Compact Imaging System
Operation
PERFORMED
PROTOCOL CODES
STATUS In Progress: The examination is still in progress.
Edit Protocol Code on page 199
Select the performed protocol code information.Performed protocol codes
(Radiation has been released.)
Completed: The examination has been finished.
Discontinued: The examination has been stopped, e.g. in case the patient is in
a critical state and so his examination cannot be completed.
Note
A study marked as Completed or Discontinued cannot be continued.
Click the required radio button.
Note
In the Examined Patients list the studies will be displayed differently:
Study entries being In Progress are displayed in bold letters.
Study entries being Discontinued are displayed in italics letters.
Confirming entries
When you have entered all the required data:
Click on OK.
– The data is sent to the MPPS server.
Canceling an entry
If you want to reject the data entered:
Click on Cancel.
– Any modified data is discarded.
Updating the study status
Select the required study entry in the Examined Patients list.
68 / 236 AX41-060.621.23.01.02 Operator Manual
Page 70

FLUOROSPOT Compact Imaging System
Operation
Click on this icon on the Patient subtask card.
– A check is performed in the background.
– A message is displayed in the status line.
Deleting studies
You can delete studies in the Preregistered Patients list or studies in the Examined Patients list which are unprotected and archived.
You can also delete items in the Archiving Information list.
Note
The Preregistered Patients list is cleared automatically before an update is performed manually or by the RIS.
Note
Retrieved studies are considered to be archived.
Caution
Deleting studies which are being archived
Risk that images are lost
It is not possible to restore any unarchived image data which has been deleted.
Ensure that the data arrived correctly on the archive media before deleting.
The image data must be readable.
Caution
Deleting studies which are being sent to a hardcopy camera
Risk that images are lost on the hardcopy line
It is not possible to restore any unarchived image data which has been deleted.
Have a look on the hardcopy before deleting studies.
The image must have been printed well.
Click on this icon on the Patient subtask card.
– A dialog box appears.
Selecting the study/studies to be deleted
One study Click on the study to be deleted in the study list.
– The entry is displayed inverted.
Two or more studies Click on the first study to be deleted.
– The entry is displayed inverted.
FLUOROSPOT Compact AX41-060.621.23.01.02 69 / 236
Page 71

FLUOROSPOT Compact Imaging System
Operation
Press the Ctrl key and click on the other studies you want to delete in the study
list.
– The entries clicked are displayed inverted.
A series of contiguous
studies
All studies Press the keys Ctrl + A.
Click on the first study you want to delete.
– The entry is displayed inverted.
Press the Shift key and click on the last study you want to delete in the study
list.
– This and all the entries in between are displayed inverted.
– All study entries are displayed inverted.
Deleting the selected items
If you want to delete the study/studies
Click on the OK icon.
– The studies are deleted.
If you are not sure
Click on the Cancel icon.
– The delete operation is canceled.
If there are studies with unarchived images among those selected, a further dialog
box is displayed.
Note
If an archive has been configured then the A-flag is used as criteria.
If not, the S-flag is used.
Data in the study lists on page 53
If you want to delete this/these unarchived study/studies:
Click on the OK icon.
– All the selected studies are deleted irrevocably.
If you do not want to delete unarchived studies
Click on the Cancel icon.
– Studies already archived are deleted.
– Unarchived studies are retained.
Note
It is easy to restore archived image data by using the Archiving Information list.
Archiving information on page 190
70 / 236 AX41-060.621.23.01.02 Operator Manual
Page 72

FLUOROSPOT Compact Imaging System
Operation
Protecting studies from deletion
You can protect studies from unintentional deletion by marking them with a
delete protection mark.
Click on the study to be protected in the study list.
– The entry appears inverted.
Click on this icon on the Patient subtask card.
–The symbol “#” appears in the flag column of the study list:
1
The study and all the images of the study
are protected from deletion.
Canceling delete protection
You can release a protected study for deletion again.
Click on the protected study in the study list.
– The entry is displayed inverted.
Click on this icon.
– The symbol “#” disappears from the flag column of the study list:
The study is released for deletion.
Study statistics
For statistics purposes, you can create a list of studies fulfilling certain criteria, you
define.
Click on this icon on the Settings subtask card.
– The input form appears.
1
also in Documentation mode
FLUOROSPOT Compact AX41-060.621.23.01.02 71 / 236
Page 73
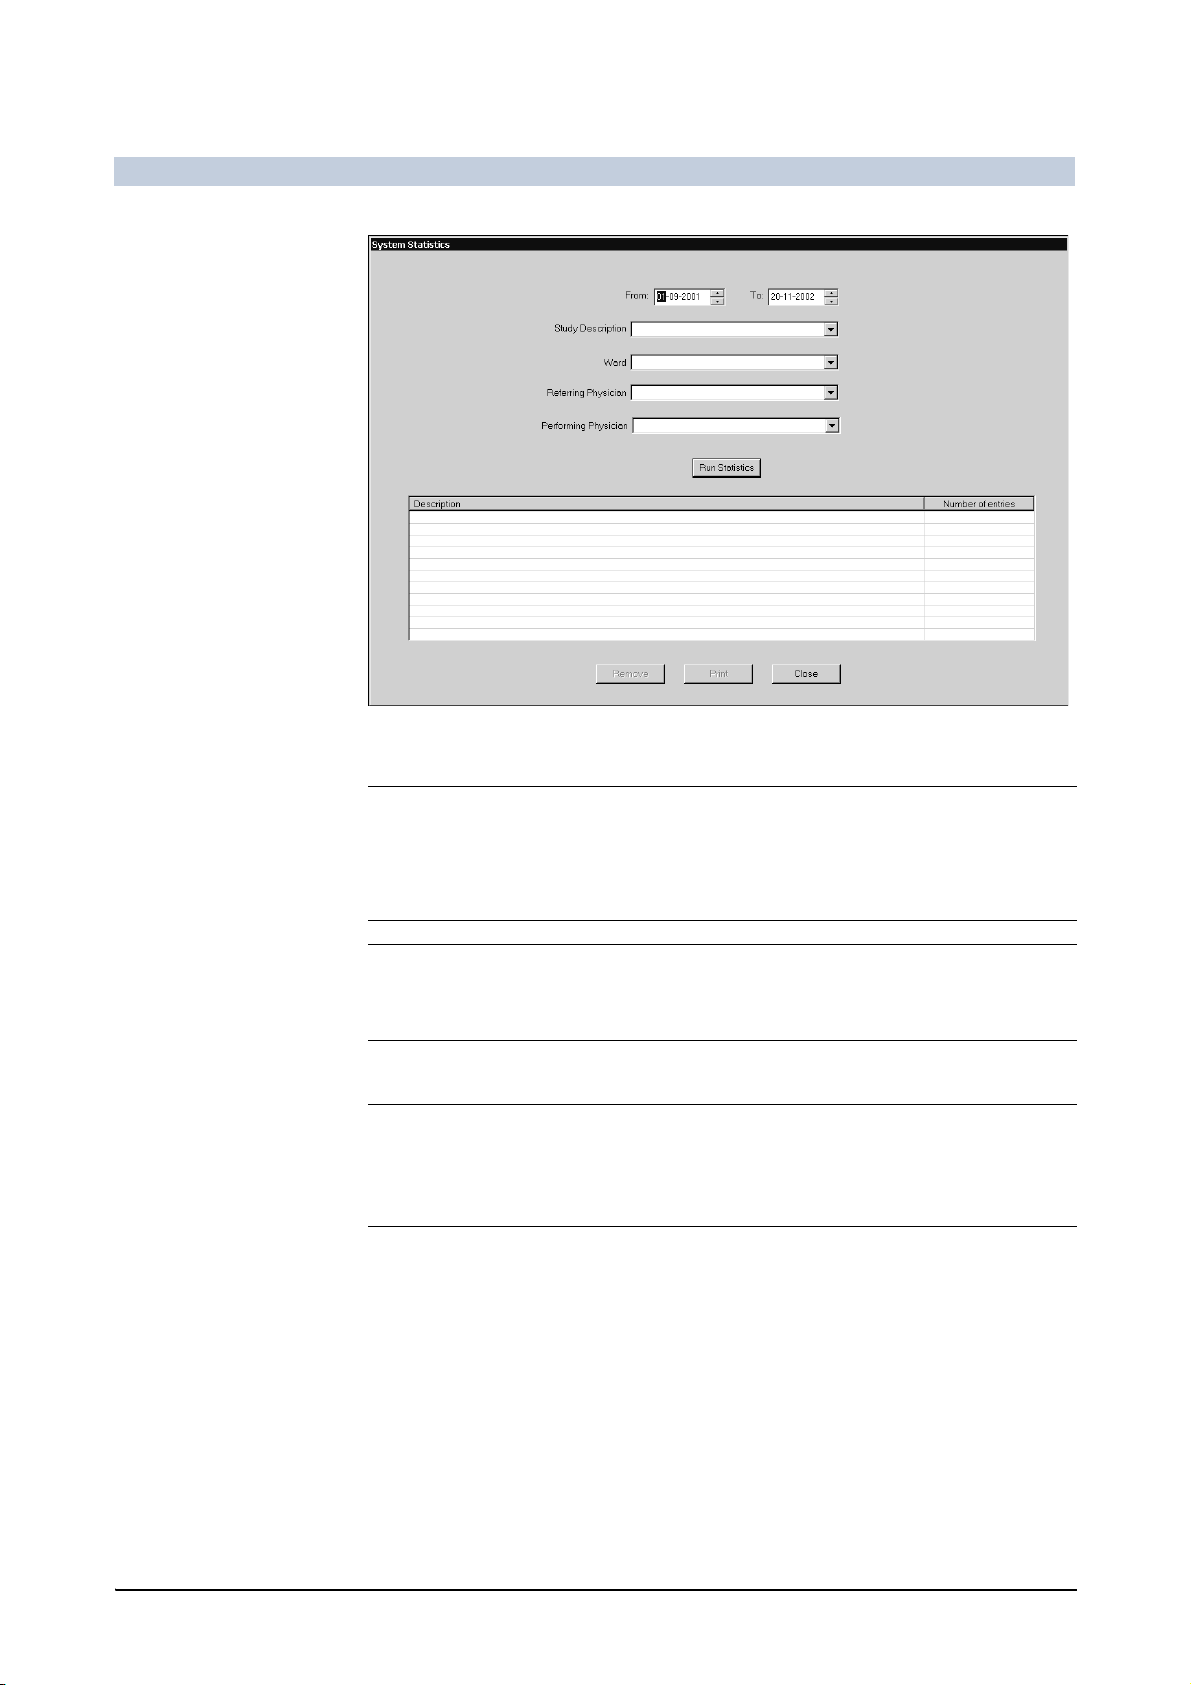
FLUOROSPOT Compact Imaging System
Operation
Entering criteria
Note
You need only enter the criteria you require.
If you enter nothing in a field, all studies of this type will be found.
Note
Only studies available to the user currently logged in will be found.
From - To You can specify a time range, the examinations were performed, if required.
Note
The From date is included, the To date is excluded, i.e. to include it, enter one day
in addition.
Click the required day, month or year.
Click on the arrow buttons.
Or
Enter the required date.
Study Description You can specify the examination type, if required.
Enter a study description or select it from the list.
Ward You can specify the ward where the examinations were performed, if required.
Enter a ward or select it from the list.
72 / 236 AX41-060.621.23.01.02 Operator Manual
Page 74

FLUOROSPOT Compact Imaging System
Operation
Referring Physician You can specify the referring physician, the examinations were caused by, if re-
quired.
Enter a referring physician or select it from the list.
Performing Physician You can specify the physician who performed the examinations, if required.
Enter a performing physician or select it from the list.
Creating the statistics list
Click on Run Statistics.
– Studies matching all the criteria you entered are listed.
Printing the statistics on a paper printer
Click on Print.
– The statistics list is sent to the configured paper printer.
Deleting a statistics
Click the statistics item to delete.
Click on Remove.
Closing the window
Click on Close.
FLUOROSPOT Compact AX41-060.621.23.01.02 73 / 236
Page 75

FLUOROSPOT Compact Imaging System
Operation
Fluoroscopy / Acquisition
General notes
Generator controls The selection of fluoroscopy or acquisition programs is done in general on the in-
tegrated generator control console.
See the operator manual for the generator.
1
With the Org + / Org - keys
mote organ programs 1 to 7.
Radiation release You can release fluoroscopy or acquisition in Examination, Postprocessing or
Documentation mode.
Note
on the infrared remote control you can select the re-
Fluoroscopy or acquisition is not possible in Patient mode!
From Postprocessing or Documentation mode the system switches to Examina-
tion mode automatically.
Caution
System not ready
If the imaging system is not ready, you cannot perform acquisitions or
fluoroscopy.
Pay attention to error messages before releasing an acquisition.
Caution
An acquisition or fluoroscopy has been released and no image appears on the
monitor of the apparently ready imaging system.
Risk of radiation without an image
Do not release any further acquisitions or further fluoroscopy.
Shut down the system and call Siemens Service.
Note
If the image quality has deteriorated noticeably during the acquisition, this can be
due to a defect in the system. To check this:
Shut down the system and turn it on again.
– The system performs a self-test when turned on.
Pay attention to error messages during restart.
1
not with SIRESKOP CX, ICONOS R200
74 / 236 AX41-060.621.23.01.02 Operator Manual
Page 76

FLUOROSPOT Compact Imaging System
Operation
Caution
Footswitch defective or software error
Risk of unwanted radiation exposure
In this case, switch off the system using the on-site emergency SHUTDOWN
button.
Background transfers Image transfers in the background are interrupted during fluoroscopy or acquisi-
tion.
Organ programs You can easily define default settings for fluoroscopy and organ programs on the
FLUOROSPOT Compact imaging system.
Setting parameters in organ programs on page 96
Setting parameters for fluoroscopy/roadmap on page 93
Storage and disk space
Image storage Images taken in Examination mode are stored automatically.
The patient entry is moved to the Examined Patients list when switching back to
Patient mode:
If no X-ray acquisition has been performed except fluoroscopy, the last LIH and
dose data are automatically stored.
If no digital X-ray acquisition and no fluoroscopy have been performed be-
cause one or more cassette acquisitions were taken, a dummy cassette image
and dose data are stored.
The patient entry remains in the Preregistered Patients list:
If no digital X-ray acquisition and no fluoroscopy have been performed
and if no cassette acquisitions were taken.
Note
If a DSA series is acquired and stopped before the mask is set, then the series is
stored as a native series.
Please note, that a stopped DSA series (which is stored native) may look slightly
different from a ’normal’ native series.
Note
It is possible to store a maximum of 2,000 images per study.
Optionally up to 30,000 images can be stored on the hard disk (single images, images from series and images from fluoro loops).
Disk space If the hard disk of the system only has space for 50 or fewer images, a warning
symbol is displayed.
FLUOROSPOT Compact AX41-060.621.23.01.02 75 / 236
Page 77

FLUOROSPOT Compact Imaging System
Operation
There are two indications of shortage for the free storage capacity for image and
examination data:
A static warning triangle is displayed if insufficient storage capacity is available
for the number of images expected according to the organ program series default. However, acquisitions are possible until "0" images is displayed.
A flashing warning triangle is displayed, if the selected organ program allows
more images than disk space is available. The "0" images display refers in this
case to the current study. However, it is possible to start a new study to acquire
further images.
If the part of the hard disk reserved for image data is actually completely occupied,
(archived) studies must be deleted to release memory for further acquisitions.
Caution
When disk space exhausted, acquisitions are no longer possible, including cassette acquisitions!
Risk of radiation without a stored image
You can only perform acquisitions if the system has enough storage capacity for
at least one image.
The number of images which can still be stored in the system is displayed top
right.
Check the available storage capacity before performing acquisitions or
fluoroscopy.
Note
However, fluoroscopy continues to be possible.
Freeing disk space
If there is not enough storage capacity for your intended examination you can:
Archive studies on CD-R. Ö page 186
Archive studies to Hardcopy. Ö page 163
Delete the studies you no longer require. Ö page 69
Preparing fluoroscopy/acquisition
Before you begin with fluoroscopy or acquisition you have to set the imaging system to Examination, Postprocessing or Documentation mode.
Note
Without study selection no acquisition is possible!
76 / 236 AX41-060.621.23.01.02 Operator Manual
Page 78

FLUOROSPOT Compact Imaging System
Operation
Note
Examination is only possible for studies which are not retrieved from network or
CD and which are not being closed.
Note
Patient information of work list studies cannot be changed by the FLUOROSPOT
Compact imaging system.
(It can only be changed in the HIS/RIS system.)
Register the patient or select the correct entry from the study list.
Caution
Selecting the wrong study entry
Risk of mixing or switching patient data
Before starting fluoroscopy or acquisition, make sure that the patient’s name
on the monitor agrees with the name of the patient to be examined.
Close the study when the examination is finished.
Click on the Examination tab.
– The system switches to acquisition mode.
– The name of the actual patient is displayed when the study contains no
images.
Note
Acquisition is not possible in Patient mode! From Postprocessing or Documen-
tation mode the system switches to Examination mode automatically.
FLUOROSPOT Compact AX41-060.621.23.01.02 77 / 236
Page 79

FLUOROSPOT Compact Imaging System
Operation
Note
If the selected study is empty, the screen is displayed black with patient information.
If a study has been selected for which images have already been stored, the last
image of the study is displayed.
Note
The most important acquisition and fluoroscopy parameters are displayed on the
right above and below the Control subtask card.
The integrated generator control console
The generator control console is integrated and can be accessed via the
FLUOROSPOT Compact imaging system.
Integrated generator console AXIOM Iconos R200
Opening the integrated generator control console
It can be configured by Siemens Service that the integrated generator console is
opened automatically when entering the Examination mode.
78 / 236 AX41-060.621.23.01.02 Operator Manual
Page 80
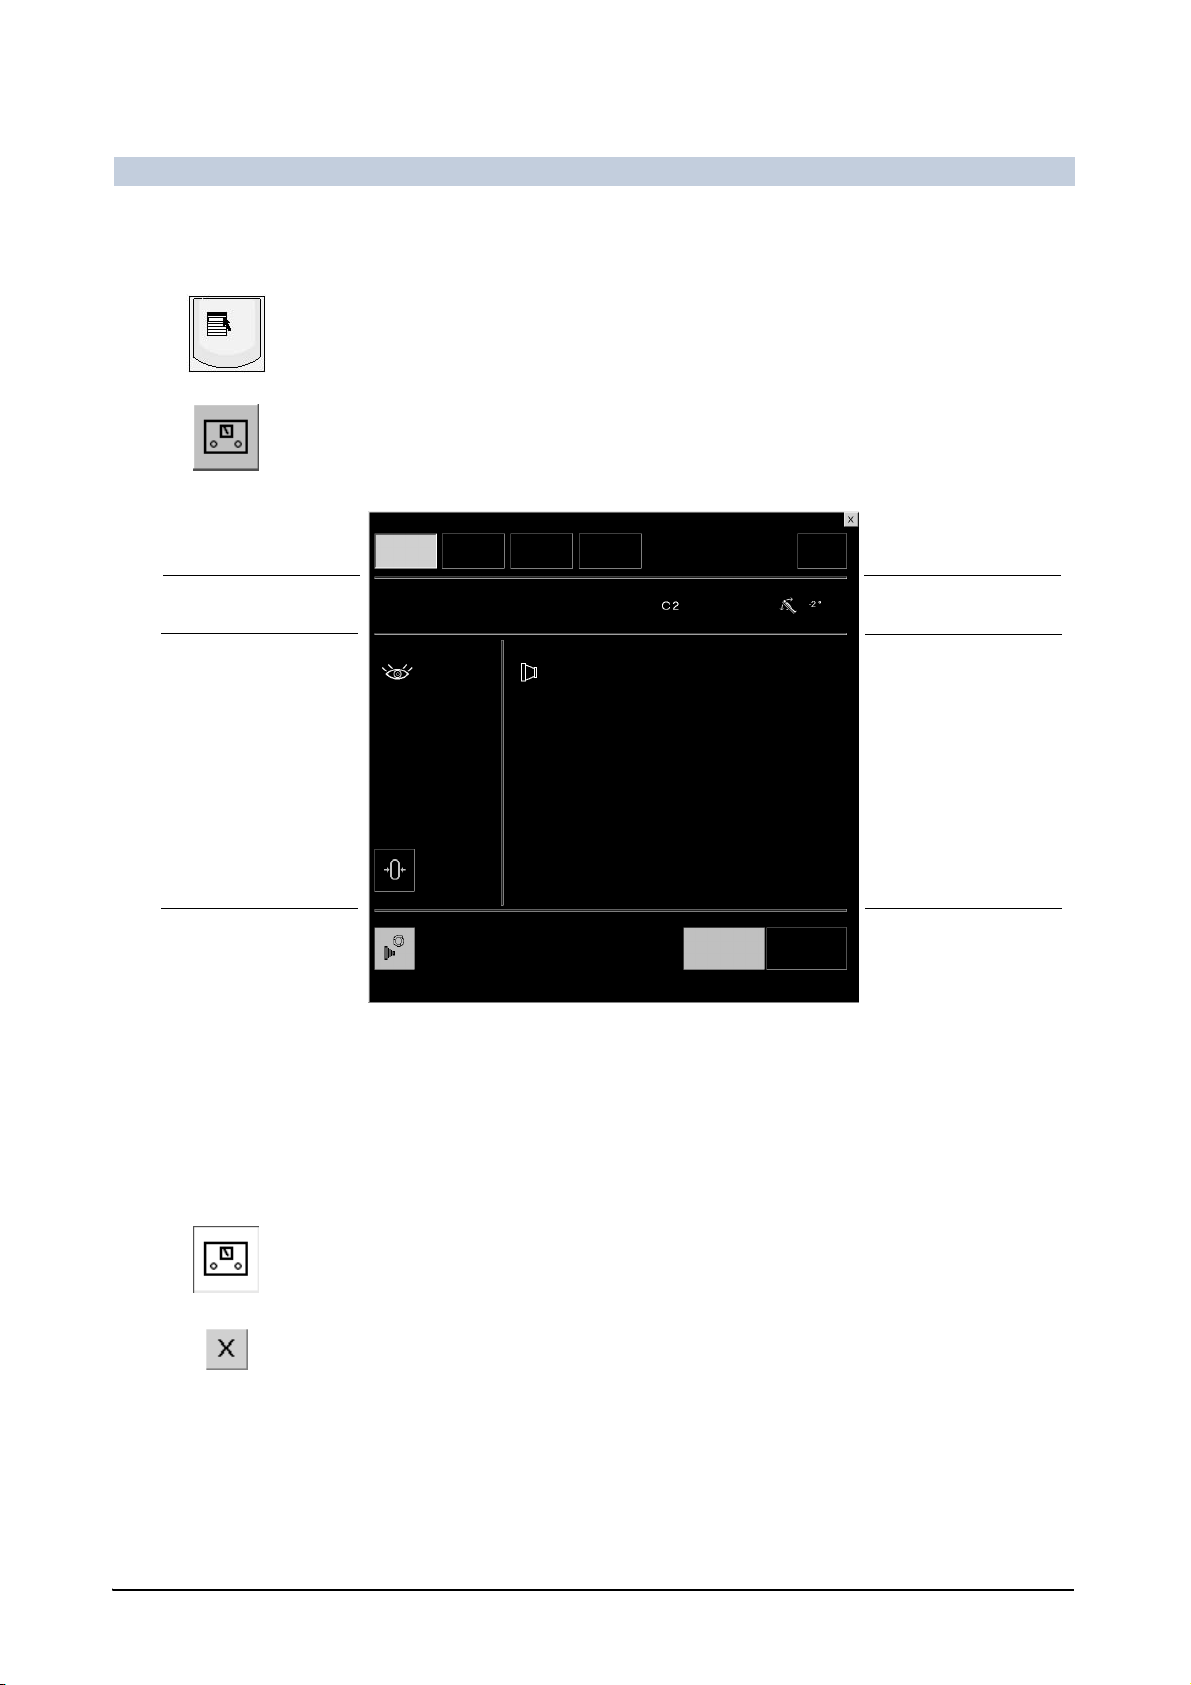
Selection of workstation
Messages
FLUOROSPOT Compact Imaging System
Operation
You can also open it manually in Patient, Examination and Postprocessing
mode:
Press the menu key (or Alt + L keys) on the keyboard.
Or
In Examination mode, click the Settings subtask card, if necessary.
Click on this icon.
The integrated generator control console is displayed.
Close button
Info button for load data of
X-ray tube
Display of fluoroscopy parameters
Reset fluoroscopy time
Indicates selection of 0 point
technique
Display and setting of acquisition parameters
Organ program name and
Program buttons
For more information, please refer to operator manual for the generator.
Closing the integrated generator control console
The integrated generator console is automatically closed when radiation is released.
You can close it manually at any time:
Click on this icon.
Or
Click on this icon (top right).
– The integrated generator control console is closed.
– The last image is displayed again.
FLUOROSPOT Compact AX41-060.621.23.01.02 79 / 236
Page 81

FLUOROSPOT Compact Imaging System
Operation
Selecting the workstation and the organ program
You can select the workstation and the organ program directly on the Settings
subtask card in Examination mode without accessing the integrated generator
control console.
In Examination mode, click the Settings subtask card, if necessary.
Selecting the workstation
Select the required workstation in the first drop-down list.
Or
Select the workstation on the integrated generator control console.
Selecting the organ program
Select the required organ program in the second drop-down list.
Or
Select the required organ program on the integrated generator control con-
sole.
80 / 236 AX41-060.621.23.01.02 Operator Manual
Page 82
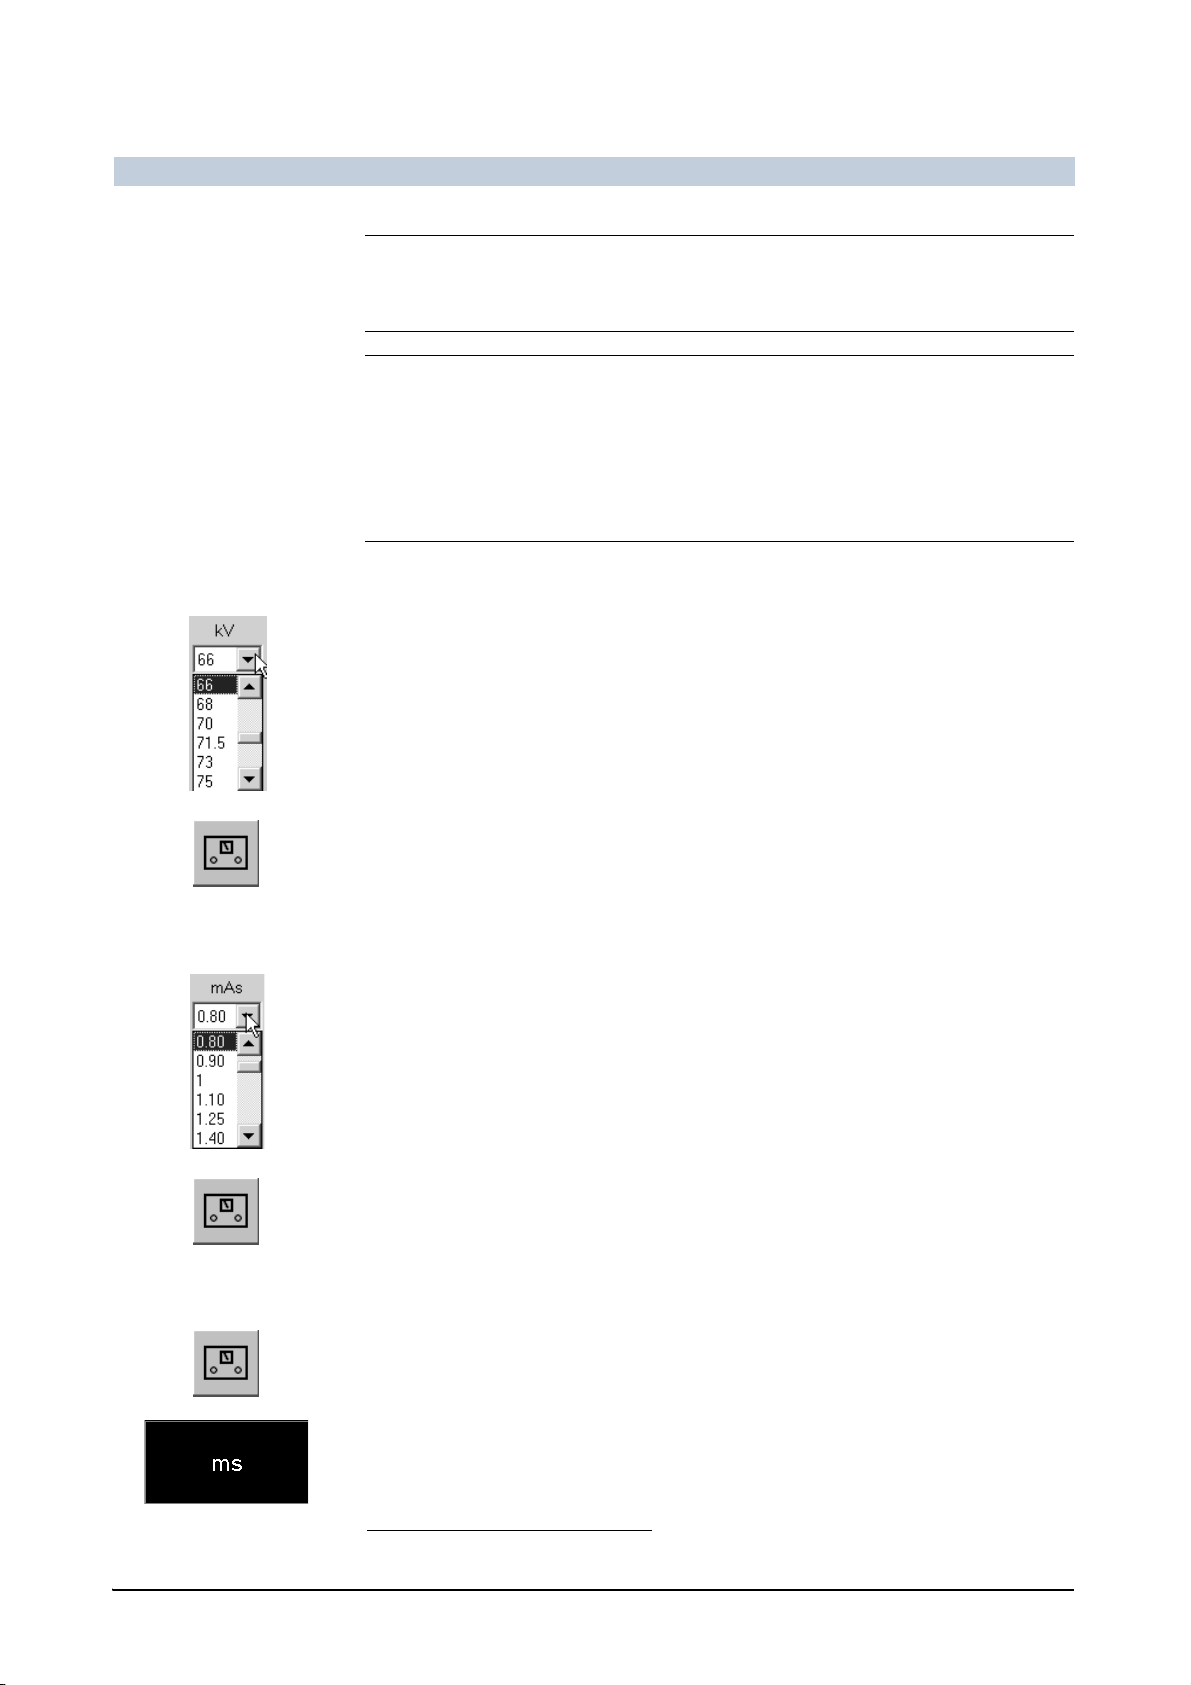
FLUOROSPOT Compact Imaging System
Operation
Note
The available organ programs depend on the selected workstation.
Note
The name of the active organ program is displayed on the upper right-hand corner
below the name of the patient.
If you have selected a different workstation, the name of the workstation is displayed.
Selecting the tube voltage (•/••/••• techniques)
1
Select the required tube voltage in the kV drop-down list.
Or
Select the kV on the integrated generator control console.
Selecting the mAs (••/••• techniques)
1
Select the required dose in the mAs drop-down list.
Or
Select the mAs on the integrated generator control console.
Selecting the ms (••• technique)
1
Open the integrated generator control console.
Click the ms button.
–The ms drop-down list is displayed.
1
only with cassette
FLUOROSPOT Compact AX41-060.621.23.01.02 81 / 236
Page 83
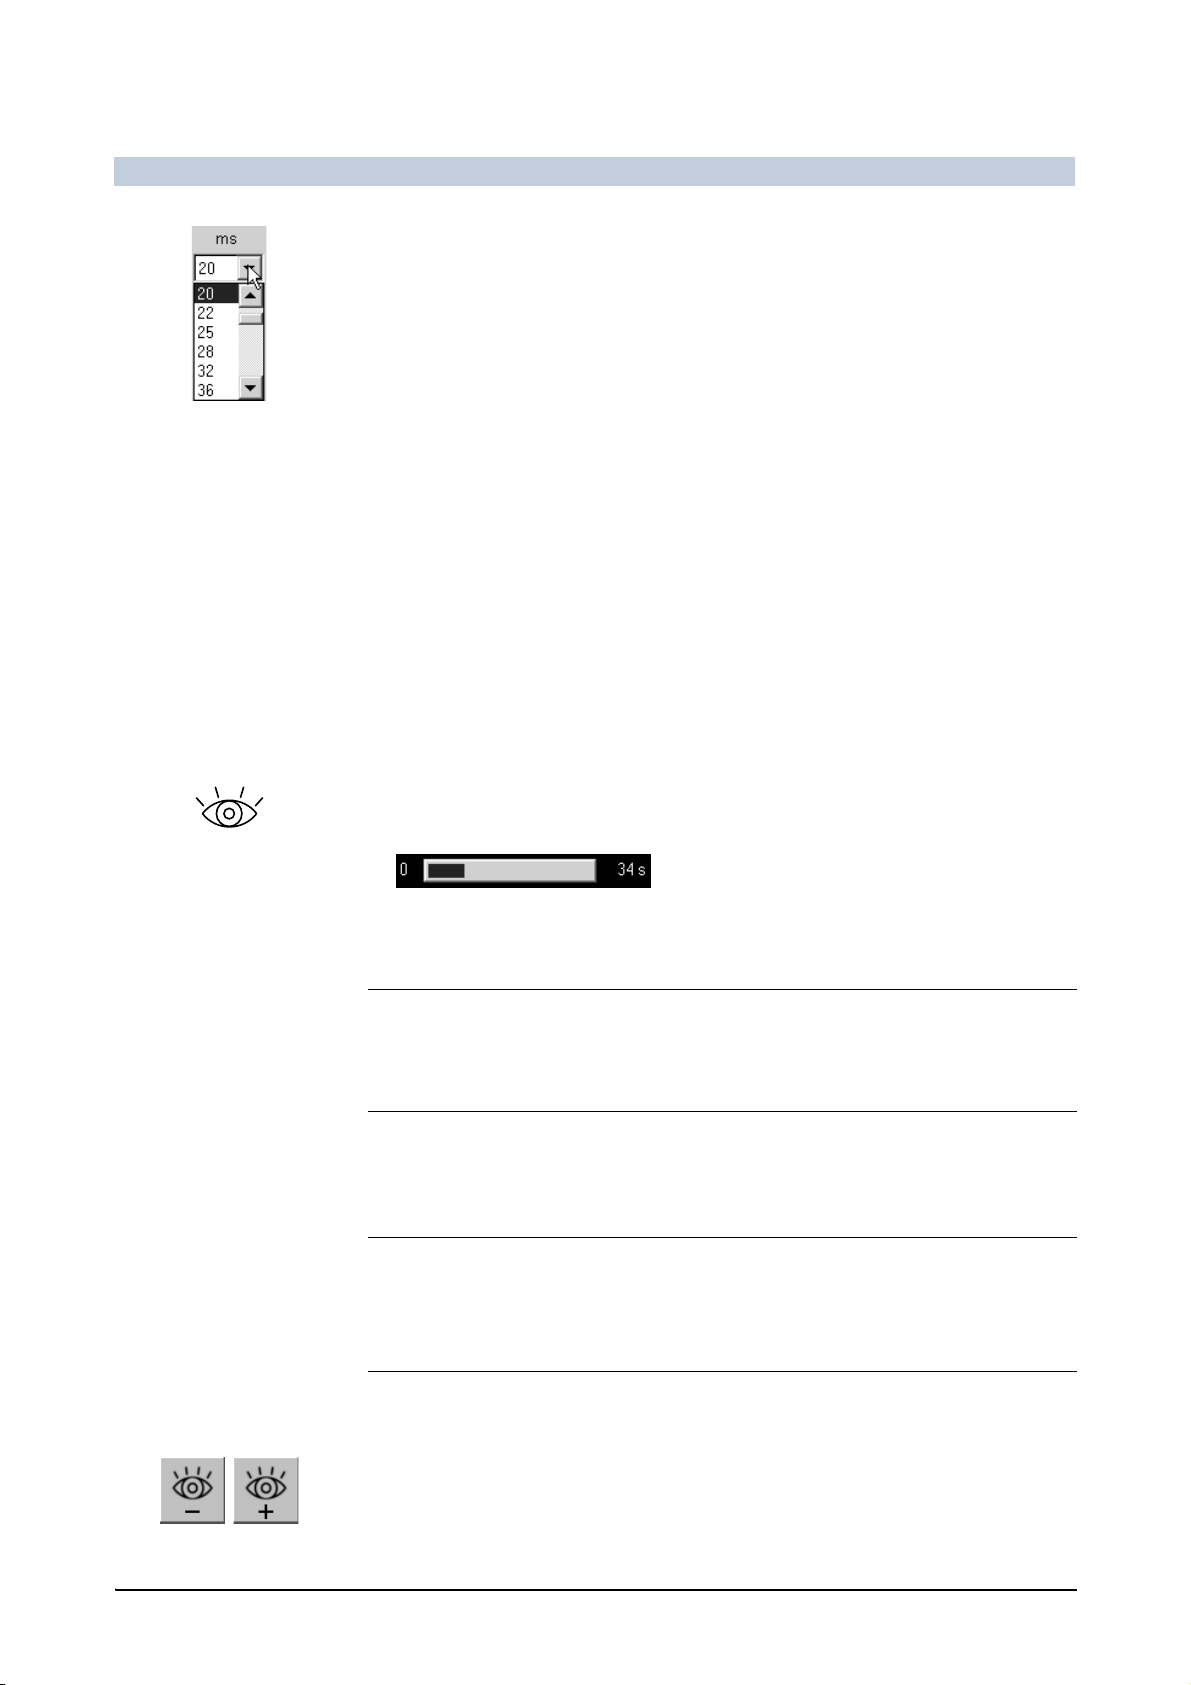
FLUOROSPOT Compact Imaging System
Operation
Select the required time in the ms drop-down list.
For more information, please refer to the operator manual for the generator.
Fluoroscopy
When fluoroscopy is started, the images are displayed in the image area in full
screen mode.
LIH If you stop fluoroscopy, the last fluoroscopy image remains displayed on the mon-
itor (LIH = last image hold) until a new fluoroscopy or acquisition (pre-contact) is
started or another image is recalled.
R/L label Preselecting R/L label on page 90
Performing fluoroscopy
Press the fluoroscopy switch.
– The current fluoroscopy image appears on the monitor.
– On the right-hand side, a bar graph indicates the current length of the fluo-
roscopy scene.
– The fluoroscopic parameters are also displayed.
Note
If you press and release the fluoro button too rapidly the message Err 312/243
DVP not ready for fluoro is displayed for a short time. This is normal.
Changing the fluoro mode
It is possible to change the fluoro mode during fluoroscopy:
Note
Fluoro + / Fluoro - is not possible during radiation with ROADMAP.
Changing the fluoro mode in this case resets ROADMAP to phase 1.
IR control Press the Fluoro - / Fluoro + button on the infrared remote control.
Console Click on the Fluoro -/+ icons.
The next lower/higher fluoro mode is selected.
82 / 236 AX41-060.621.23.01.02 Operator Manual
Page 84

FLUOROSPOT Compact Imaging System
Marking a LIH or an image from a fluoro loop
You can mark the last fluoro image (LIH) or any displayed fluoro image out of the
current fluoro loop, even during fluoroscopy.
See also Marking or unmarking images on page 113
Console Click in the image area with the right mouse button.
– The image is marked on the top left with a white circle.
Note
If Mark Image is set in the fluoro program, the LIH is marked automatically.
Setting parameters for fluoroscopy/roadmap on page 93
If an Autosend Target is selected in the user settings, any marked image is sent
to the set destination automatically.
Changing user settings on page 195
Displaying the next marked image
Operation
Press the Tab key on the keyboard.
– The next marked image is displayed.
Displaying the previous marked image
Press the Shift + Tab keys on the keyboard.
– The previous marked image is displayed.
Storing a LIH or fluoro loop image
You can store the last fluoro image (LIH) or any displayed fluoro image out of the
current fluoro loop, even during fluoroscopy.
Display the image you want to store.
Paging images of a series on page 106
IR control Press the Store Image button on the infrared remote control.
Console Click on this icon.
– The image is stored as the last image of the study.
– If mark image is set in the fluoroscopy program, the stored image is marked.
– If mark image and autosend is set, the stored image is transferred to the
autosend destination.
Note
If no image has been acquired when switching to Patient mode and no other image has been stored in the current active study, then the displayed LIH is stored
automatically.
FLUOROSPOT Compact AX41-060.621.23.01.02 83 / 236
Page 85

FLUOROSPOT Compact Imaging System
Operation
Fluoro timer
The fluoro time is indicated on the integrated generator console, in the exam protocol and on the film sheet, if any.
Note
The fluoro timer can be configured to the legal requirements:
Euro mode: minutes and seconds
Legally required in the EU
Example: 5:20 min i.e. 5 minutes, 20 seconds
CFR mode: minutes and tenth of minutes
Legally required in the US
Example: 5.1 min i.e. 5 minutes, 1 tenth minute
Reset of the fluoroscopy signal
If the elapsed fluoroscopy time exceeds the preset value, e.g. max. 5 minutes, a
warning signal will sound.
When a new patient is registered, the fluoroscopy time is automatically reset to zero.
The elapsed fluoroscopy time of an examination is automatically recorded in the
study report as soon as the patient is completed.
Resetting the warning signal
You can reset the fluoroscopy timer at any time.
Console Click on this icon.
– The acoustic signal is switched off.
– The fluoroscopy time is reset.
Collimating without radiation - CAREPROFILE
With the CAREPROFILE function, the position of the collimator and the semi-transparent filters are displayed graphically in the last image. In this way you can
change the collimation without additional fluoroscopy.
1
Displaying the CAREPROFILE graphics
The indication comes on during any change of the collimator or filter leave position and any change in the I.I. zoom.
Operate the fluoroscopy switch, if necessary.
– The current fluoroscopy image appears on the monitor.
Operate the collimator or filter joystick.
1
Can be configured from 1 to 5 minutes by SIEMENS Uptime Service.
84 / 236 AX41-060.621.23.01.02 Operator Manual
Page 86

FLUOROSPOT Compact Imaging System
Operation
Operate a collimator button.
See the operator manual of the system.
– The collimator position and size or/and the filter leave position is indicated
in the LIH image.
– After a configurable time, the display disappears.
– When triggering fluoroscopy, any existing display is also removed.
– With the next fluoroscopy or acquisition, an electronic shutter automatically
covers the collimator blades (set to black).
Examples of CARE graphics, from left to right: rectangular diaphragm, finger filter, iris diaphragm
Note
The duration of the display and the position of the automatic shutter can be configured.
Examination properties on page 200
Positioning without radiation - CAREPOSITION (with CAREPROFILE)
With CAREPOSITION, any move of table or stand is indicated in the last acquired
image or LIH.
After selection, the CAREPOSITION function is active and stays active. The status
of CAREPOSITION is displayed on the monitor by a “CP” indicator.
You can reposition the patient without applying radiation.
The following movements are indicated.
table longitudinal
table transversal
central beam longitudinal
FLUOROSPOT Compact AX41-060.621.23.01.02 85 / 236
Page 87

FLUOROSPOT Compact Imaging System
Operation
Activating CAREPOSITION
Press the Care position button on the infrared remote control.
– The CAREPOSITION graphics is displayed: the actual central-line as a cross
and the graphical frame of the image area (iris blade or rectangle from collimator).
– The CAREPOSITION graphics is updated whenever the position of the system
is changed: table longitudinal, table transverse or x-ray system longitudinal.
The CAREPOSITION graphics is removed after a configurable period of time.
Whenever CAREPOSITION is active, CP is indicated top right.
Deactivating CAREPOSITION
Press the Care position button on the infrared remote control again.
Fluoro loop
Fluoro loop replay
If you have acquired a fluoro loop you can display it as a “movie”.
Series replay on page 107
Note
You can configure fluoro loops to be started automatically. Ö page 195
Note
The acquired fluoro loop is kept in a ring buffer which can keep a maximum of:
256 images in 1kx1k matrix size (up to 15 f/s) or
512 images in 1kx0.5k matrix size (up to 30 f/s)
256 images in 1kx1k matrix size (up to 12.5 f/s) or
512 images in 1kx0.5k matrix size (up to 25 f/s).
(depends on CCD camera installed)
The maximum scene length can be calculated as follows:
No. of images / Frame rate
Storing the fluoro loop
Display the image you want to be the beginning of the stored scene.
Paging images of a series on page 106
– On the right-hand side, a bar graph indicates the current length of the fluo-
roscopy scene to be stored (beginning from the last image).
86 / 236 AX41-060.621.23.01.02 Operator Manual
Page 88

FLUOROSPOT Compact Imaging System
Note
If fluoroscopy is triggered while system is busy storing a fluoro loop, the system
will not store the complete loop. The system will store only images it has time to
store, before fluoro is triggered again.
This behavior is intended since priority 'to be ready for fluoro' is higher than the
storage of a fluoro loop. Both cannot be done at the same time in order to have
best performance in the imaging system.
Note
In ROADMAP phase 2, store fluoro loop is not possible, only a LIH can be stored.
In ROADMAP phase 3, store fluoro loop is possible.
IR control Press the Store Fluoro button on the infrared remote control.
Operation
Console Click on this icon.
– If the LIH is displayed the complete loop is stored and then becomes the last
series of the study.
– If another image is displayed a fluoro loop series beginning from the current
displayed image to the LIH is stored.
Note
All graphic functions are blocked on stored fluoro loops, including ROADMAP.
Stored fluoro loops are also considered as series.
ROADMAP
ROADMAP is a fluoroscopic operating mode with subtracted display.
A mask image is created during fluoroscopy that is used for subtraction for the
subsequent fluoroscopy action.
ROADMAP simplifies the positioning of catheters and guide wires by special
display of the vessels. Because images are subtracted in this examination, the patient must not move.
The examination is performed in 3 phases:
Phase 1 After you have selected a fluoroscopy program with ROADMAP, a fluoroscopy
image is created at the end of phase 1 for use as the mask for subsequent fluoroscopy images.
Phase 2 Switch over to subtracted display is automatic. Contrast medium is now inject-
ed to display the vessels.
Phase 3 The vessel image is used as the mask for subsequent subtracted fluoroscopy.
FLUOROSPOT Compact AX41-060.621.23.01.02 87 / 236
Page 89

FLUOROSPOT Compact Imaging System
Operation
Note
In phase 2, it is possible to store a LIH image but it is not possible to store a fluoro
loop.
In phase 3, it is possible to store a LIH and also a fluoro loop. (A stored fluoro loop
becomes a DSA series.)
Starting ROADMAP
First phase (native) You may switch on the ROADMAP when there is sufficient contrast media:
IR control Press the Roadmap button on the infrared remote control.
Console Click on this icon.
Second phase (contrast
medium injection)
Third phase
(subtraction)
Press the fluoroscopy switch and hold it pressed.
– First you will see a native (normal) fluoroscopic image on the monitor.
– After 2 seconds the mask image is set.
– The second phase begins.
Hold the fluoroscopy switch pressed.
Inject contrast medium.
– A subtraction image appears at the monitor.
– The vessels filled with contrast medium are now displayed in the fluoro-
scopic image.
– If the peak opacification function is selected in the ROADMAP program, the
images are displayed with peak opacification.
Let go of the fluoroscopy switch when the examination area is sufficiently filled
with contrast medium.
– The last (subtracted) image continues to be displayed after you let go of the
fluoroscopy switch (LIH).
– The last image of the second phase is set as the mask for the following
fluoroscopy actions.
– The second phase ends when fluoroscopy is switched off.
Fluoroscopy can be interrupted as often as desired. The system remains in phase 3
and displays new subtracted images with the ROADMAP technique every time the
fluoroscopy switch is pressed.
Press and release the fluoroscopy switch as often you want.
– You will see fluoroscopic images from which the last filled image from
phase 2 is subtracted.
– The last image continues to be displayed after you let go of the fluoroscopy
switch (LIH).
Note
The peak opacification function is not possible in phase 3.
88 / 236 AX41-060.621.23.01.02 Operator Manual
Page 90

FLUOROSPOT Compact Imaging System
Switching off ROADMAP
You may switch off the ROADMAP program at any time:
IR control Press the Roadmap button on the infrared remote control.
Console Click on this icon.
New ROADMAP
If you would like to start a new examination in phase 1 using ROADMAP:
IR control Press the Roadmap button again after its deselection.
Console Click on this icon again.
Operation
Note
Patient movement may impair the ROADMAP subtraction image of the second and
third phase. If this happens, deselect ROADMAP and begin a new examination.
Single acquisitions or series
Harmonization If harmonization is set in the acquisition program, harmonization is performed on-
line.
immediately, for single images
after the last image, for series
Auto Shutter During acquisition, the shutter position is calculated from the acquired image and
overlaid to the next acquired images of the series.
The current position of the collimator blades is used as start position.
For single images, the shutter is overlaid immediately after acquisition.
Note
The autoshutter position can be adjusted closer to the center of the display area
by a configurable default (range: 0 ... 200 pixel).
Examination properties on page 200
Series acquisition For a series, the acquired images appear one after the other on the monitor.
The representative image of the series remains displayed on the monitor after the
end of the series.
FLUOROSPOT Compact AX41-060.621.23.01.02 89 / 236
Page 91

FLUOROSPOT Compact Imaging System
Operation
Acquisition frame rates You can override the acquisition frame rate before and during an acquisition.
Before an acquisition, you can select the frame rate.
After the lowest frame rate the highest frame rate is selected.
– The selected frame rate stays until another organ program is selected.
During an acquisition, you can switch from the first to the second or third
frame rate defined in the organ program.
– The selected frame rate stays only for the current series.
– For the next series, the latest selected frame rate is also used.
– If you want to start a new series with the frame rate defined in the organ
program, select another organ program and then reselect your organ program.
Selecting the organ program
Select the required organ program on the integrated generator control con-
sole.
See the operator manual for the generator.
Selecting the workstation and the organ program on page 80
Preselecting R/L label
You can define a default orientation label position for the next acquisition.
Note
The preset label is valid only for the next acquisition.
If a label is preset in fluoroscopy, it is valid for all following fluoroscopy actions.
This is intended because fluoroscopy is normally the preparation for acquisition. If
used in fluoroscopy, you must disable the label manually.
If a label is preset to one image of a series or fluoro loop, it applies to all the images
of this series or fluoro loop.
Warning
Incorrectly placed R/L labels
Risk of incorrect diagnosis, e.g. surgical intervention on the wrong side
The examining physician is responsible for correct R/L labelling.
Make sure that the R/L labels are placed correctly.
If necessary, use lead letters during fluoroscopy/acquisition.
90 / 236 AX41-060.621.23.01.02 Operator Manual
Page 92

FLUOROSPOT Compact Imaging System
Warning
Image reversal being selected at the system
R or L labels will not be disabled automatically.
Risk of incorrect diagnosis due to wrong image orientation
Pay attention to correct laterality display when selecting Image reversal.
Select/deselect R or L, label, if necessary.
Preselecting the R label
IR control Press the R button on the infrared remote control.
Console Click on this icon.
The R label will be displayed on the left side of the next acquired image.
Operation
Preselecting the L label
IR control Press the L button on the infrared remote control.
Console Click on this icon.
The L label will be displayed on the right side of the next acquired image.
Changing the acquisition frame rate
IR control Press the F/s button on the infrared remote control.
Console Click on this icon.
The acquisition rate is decreased by one step.
For possible acquisition frame rates please refer to Imaging system on page 227
Performing acquisition
You create single or series acquisitions in the same way.
Press the acquisition push-button or the pedal on the footswitch.
The images are automatically stored on the hard disk.
Note
If the hard disk of the system only has space for 50 or fewer images, a warning
symbol is displayed.
Delete studies which have already been archived and/or are no longer required.
Deleting studies on page 69.
FLUOROSPOT Compact AX41-060.621.23.01.02 91 / 236
Page 93

FLUOROSPOT Compact Imaging System
Operation
Note
If Mark Image is set in the organ program, the acquired images or series are
marked automatically.
Setting parameters in organ programs on page 96
If an Autosend Target is selected in the user settings, any marked image is sent
to the set destination automatically.
Changing user settings on page 195
Note
If no image has been acquired when switching to Patient mode and no other image has been stored in the current active study, then the displayed LIH is stored
automatically.
Review You can view the acquisitions or series immediately.
Image display on page 105
Postprocessing You can process the acquisitions or series immediately or create further acquisi-
tions/series.
Click on the Postprocessing tab for accessing the postprocessing functions.
Postprocessing on page 114
Transfer Transferring/Archiving images to DICOM on page 159
Filming Transferring images for hardcopy/filming (DICOM Print) on page 163
PERI/Phlebo Stepping
A PERI Stepping acquisition consists of several sub-series combined to one PERIseries.
Note
Phlebostepping is the PERI stepping function using an other start position and the
contrary stepping direction.
Performing PERI Stepping
Select the required PERI Stepping program at the system/generator control con-
sole.
See the operator manual for the system/generator.
92 / 236 AX41-060.621.23.01.02 Operator Manual
Page 94

FLUOROSPOT Compact Imaging System
Operation
Press the acquisition switch.
– The monitor displays the acquisition rate for the starting position, and the
note PERI.
– The system moves only in fixed steps.
– At each step the position of the measuring field (dominant) is displayed dur-
ing x-ray preparation.
– At each step a sub-series is acquired.
– The acquired images appear one after the other on the monitor.
Note
The frame rate cannot be changed manually during a PERI sequence manually,
each step has a predefined frame rate from the organ program.
For further information for PERI Stepping please refer to the operator manual for
the system.
Replay The images are displayed according to the sub-series acquisition of the stepping.
Note
Except for replay of sub-series, the PERI series is treated as one single series.
Series replay on page 107
Postprocessing The following processing functions are applied to a single sub-series:
Window
Zoom
Pan
Shutter
All other operations are always applied to all sub-series.
Fluoroscopy/roadmap and organ programs
Setting parameters for fluoroscopy/roadmap
As for organ programs, you can also define certain parameters for fluoroscopy and
roadmap on the imaging system.
Select the required fluoroscopy mode at the system control console of the ac-
quisition system.
Click on this icon on the Settings subtask card in Examination mode.
– The menu for defining fluoroscopy parameters is displayed.
FLUOROSPOT Compact AX41-060.621.23.01.02 93 / 236
Page 95

FLUOROSPOT Compact Imaging System
Operation
Example for fluoroscopy program
Define the parameters.
Parameters for fluoroscopy
Note
Please observe: Depending on your system and the installed options not all
parameters are displayed.
Program Name Fluoroscopy program name / Name of the fluoroscopy curve (display only)
Fluoro Mode Fluoroscopy mode (display only)
Parameters for organ programs on page 100.
Note
For CAREVISION, a copper filter of 0.2 mm minimum will be selected automatically.
Mark Image Automatic marking of stored fluoro image Yes/No
(not possible for fluoro loop)
Context of automatic marking and automatic sending on page 103
Dose Rate Level Dose rate level set (display only)
Window Width Basic setting of the window width (image contrast) for fluoroscopy
Possible values: 1 ... 1023
94 / 236 AX41-060.621.23.01.02 Operator Manual
Page 96

FLUOROSPOT Compact Imaging System
Operation
Window Center Basic setting of the window center (image brightness) for fluoroscopy
Possible values: 0 ... 768
Edge Filter (F) Basic setting for edge enhancement for fluoroscopy
Possible values: 0 ... 100%
Kernel Size Size of edge enhancement filter kernel
Possible values: 3 ... 49 odd only
Noise Reduction % Degree of integration in % for noise reduction (moving weighted averaging)
Possible values: 0 ... 100%
Fluoro Filter Auto Automatic use of a filter Yes/No
Filter Type Thickness of the copper filter in mm
Possible values: depending on acquisition system
Harmonis. (H)
1
Basic setting for harmonization (reduction of brightness differences).
Possible values: 0 ... 100%, Default setting: 0%
Harmonis. Kernel
1
Size of harmonization kernel
– Kernel larger: larger extended brightness differences are reduced
– Kernel smaller: smaller extended brightness differences are reduced
Possible values: 47 ... 255 odd only, Default setting: 127
Additional parameters for ROADMAP
The following parameters are displayed only when a ROADMAP program
is selected.
Click on this icon.
Or
Press the Roadmap button on the infrared remote control.
1
not with ROADMAP
FLUOROSPOT Compact AX41-060.621.23.01.02 95 / 236
Page 97
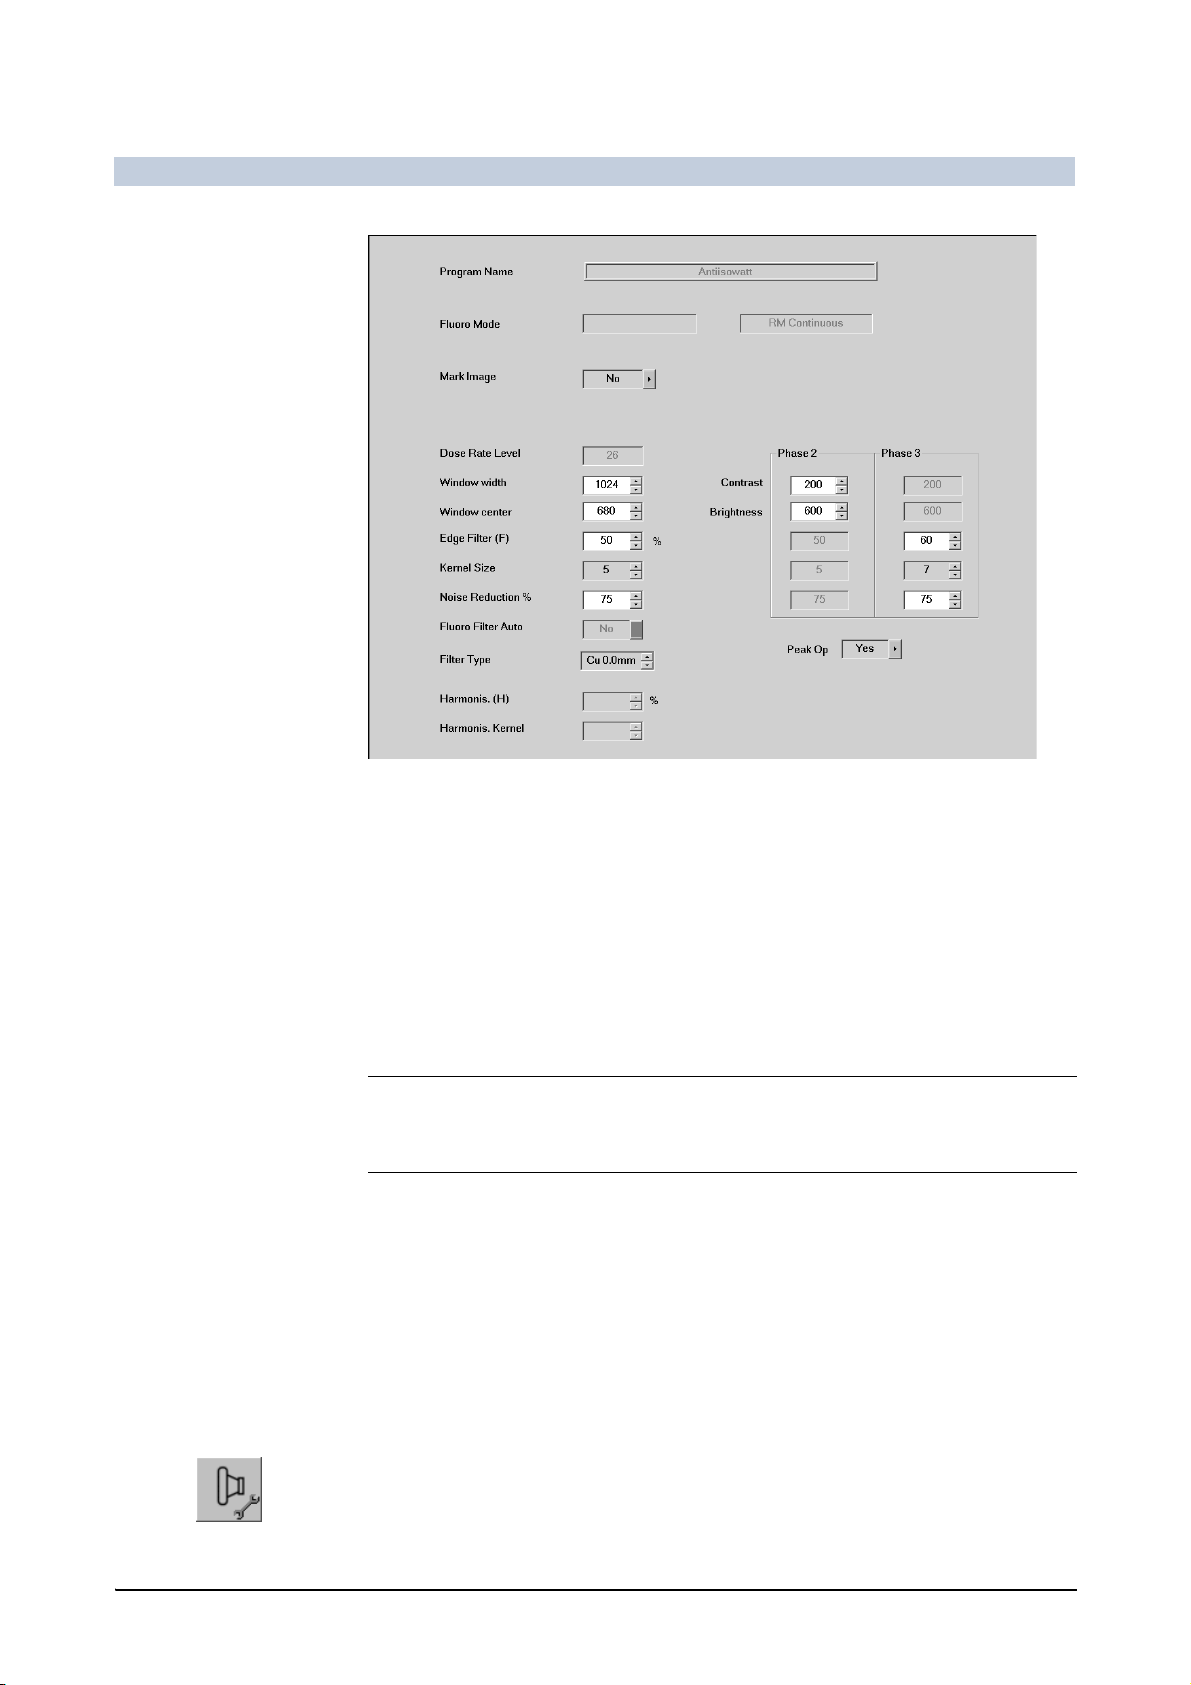
FLUOROSPOT Compact Imaging System
Operation
Example for ROADMAP program
Phase 2 Parameters for ROADMAP phase 2
Phase 3 Parameters for ROADMAP phase 3
Contrast Basic setting of the image contrast for roadmap
Possible values: 1 ... 1023
Brightness Basic setting of the image brightness for roadmap
Possible values: 0 ... 1023
Peak Opac. Automatic use of peak opacification Yes/No
Note
Dimmed entries have the same values as those in the previous phase.
Setting parameters in organ programs
Your system was supplied from the factory with a number of predefined organ
programs. You can adapt them to your requirements.
Select the required organ program on the integrated generator control con-
sole.
See the operator manual for the generator.
Selecting the workstation and the organ program on page 80
Click on this icon on the Settings subtask card in Examination mode.
– The menu for editing organ programs is displayed.
– The name of the organ program will appear in the uppermost line.
96 / 236 AX41-060.621.23.01.02 Operator Manual
Page 98

Single shot
FLUOROSPOT Compact Imaging System
Operation
Change the name of the organ program, if required.
Define the parameters.
Examples for organ program settings
Example for acquisition program (single shot)
Parameters for organ programs on page 100
FLUOROSPOT Compact AX41-060.621.23.01.02 97 / 236
Page 99

FLUOROSPOT Compact Imaging System
Operation
Tomography
Series
Example for acquisition program (tomography)
Example for acquisition program (non-subtracted series)
98 / 236 AX41-060.621.23.01.02 Operator Manual
Page 100

DSA series
FLUOROSPOT Compact Imaging System
Operation
PERI series
Example for acquisition program (subtracted series)
Example for acquisition program (peristepping)
Additional parameters for PERI on page 103
FLUOROSPOT Compact AX41-060.621.23.01.02 99 / 236
 Loading...