

Page 1

Issued by
BenQ Mobile GmbH & Co. OHG
Haidenauplatz 1
D-81667 Munich
© BenQ Mobile GmbH & Co. OHG 2005
All rights reserved. Subject to availability.
Rights of modification reserved.
Manufactured by BenQ Mobile GmbH & Co. OHG
under trademark license of Siemens AG
www.BenQ-Siemens.com/ef81
EF81
Page 2

Table of Contents 1
Safety precautions ..................... 2
Phone overview ......................... 5
Display symbols ....................... 10
Getting started ......................... 11
Switching phone on/off,
entering PIN ............................. 14
General instructions ................ 15
Security .................................... 20
Text entry ................................. 21
Calling ...................................... 24
Contacts ................................... 29
Call records .............................. 34
Camera ..................................... 34
Create message ....................... 36
Inbox ........................................ 37
Message lists ............................ 40
Message settings ..................... 40
Voice mail ................................. 42
Internet .................................... 42
Games ....................................... 44
Settings .................................... 44
Organiser .................................. 52
Extras ........................................ 53
Media player ............................. 55
My stuff .................................... 56
Mobile Phone Manager ............58
Customer Care .......................... 59
Care and maintenance ............. 61
Product data ............................. 62
SAR ........................................... 63
Guarantee certificate (UK) ....... 64
Guarantee certificate (IRL) .......65
License Agreement ................... 66
Index ......................................... 69
This is a summarised version of the User Guide. The c omplete version
can be found on the Internet at this address:
www.BenQ-Siemens.com/ef81
Page 3
Safety precautions2
Safety precautions
Information for parents
Please read the operating instructions and safety precautions carefully before use.
Explain the content to your children and the hazards associated with using the phone.
Remember to comply with legal
requirements and local restrictions when using the phone.
For example, in aeroplanes,
petrol stations, hospitals or
while driving.
Mobile phones can interfere
with the functioning of medical
devices such as hearing aids or
pacemakers. Keep at least
20 cm/9 inch between phone
and pacemaker. Whilst using
the mobile phone hold it to the
ear which is furthest away from
the pacemaker. For more information consult your doctor.
Tones, music and handsfree
talking are reproduced through
the loudspeaker. Do not hold
the phone to your ear when it
rings or when you have
switched on the handsfree
function. Otherwise you risk serious permanent damage to
your hearing.
Only use original batteries
(100% mercury-free) and
- charging devices. Otherwise
you risk serious damage to
health and property. The
battery could explode, for
instance.
Small parts such as the SIM
card, dust cap, lens ring or lens
cap as well as the Micro SD
Card can be dismantled and
swallowed by small children.
The phone must therefore be
stored out of the reach of small
children.
Permanent hearing loss may
occur if you use ear- or headphones at high volume.You
can adapt over time to a higher
volume, which may sound normal but can be damaging to
your hearing. Set your volume
to a safe level. If you experience ringing in your ears, reduce the volume or discontinue
use of your system.
The mains voltage specified on
the power supply unit (V) must
not be exceeded. Otherwise
the charging device may be
destroyed.
The power supply must be
plugged into an easily accessible AC mains power socket
when charging the battery. The
only way to turn off the charging device after charging the
battery is to unplug it.
Page 4
3Safety precautions
You may only open the phone
to replace the battery (100 %
mercury-free), SIM and Micro
SD Card. You must not open
the battery under any
circumstances. All other
changes to this device are
strictly prohibited and will invalidate the guarantee.
All electrical and electronic
products should be disposed of
separately from the municipal
waste stream via designated
collection facilities appointed
by the government or the local
authorities.
This crossed-out bin symbol on
the product means the product
is covered by the European Directive 2002/96/EC.
The correct disposal and separate collection of your old appliance will help prevent potential
negative consequences for the
environment and human
health. It is a precondition for
re-use and recycling of used
electrical and electronic
equipment.
For more detailed information
about disposal of your old appliance, please contact your local council, waste disposal
service or the shop where you
purchased the product.
The phone may cause interference in the vicinity of TV sets,
radios and PCs.
Do not place the phone near to
electromagnetic data carriers
such as credit cards and floppy
disks. Information stored on
them could be lost.
Use only original accessories.
This will avoid potential risks to
health or property and ensure
compliance with all relevant
regulations.
Improper use will invalidate the guarantee!
These safety instructions also apply to
original accessories.
As mobile devices offer a range of functions, they can be used in positions other
than the head, such as on the body. In this
case, separation distance of 1.0 cm is
required.
Page 5

Safety precautions4
Bluetooth
Your phone has a Bluetooth interface. This
makes it possible to establish a wireless
connection of your phone with a headset
of a car kit, or with other Bluetooth-enabled
devices.
In order to establish a secure link between
the devices and to prevent a third party from
having access to your phone, you should observe the following points:
• The initial connection between two devices, what is called "pairing", should take
place in familiar surroundings.
• Both devices must be able to identify
themselves one time by using a password/PIN. To ensure sufficient security,
you should choose a 16-digit number combination for a password that would be difficult to guess (if a PIN has not been
assigned).
• An automatic connection acceptance
("connection without confirmation") should
only be used in exceptional cases.
• In general, only trustworthy devices should
be linked in order to minimize security
risks.
• You should restrict the "visibility" of your
phone if possible. This will make it much
more difficult for unknown devices to establish a connection with your phone. To
do this, deactivate visibility in the Bluetooth menu.
• The name of your phone is transmitted in a
Bluetooth connection. The factory default
is the "Bluetooth ID". The first time Bluetooth is activated, or later in the Bluetooth
menu, you can change this name.
• If Bluetooth is not needed, this function
should be deactivated.
®
Before using Bluetooth accessories, or a
mobile phone inside a vehicle, check the vehicle user guide for any limitations on the use
of these products.
Page 6
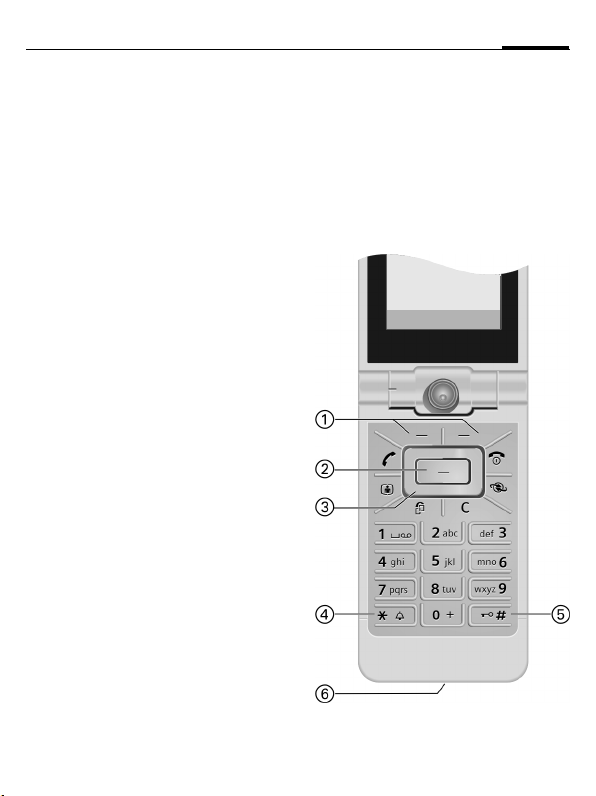
Phone overview
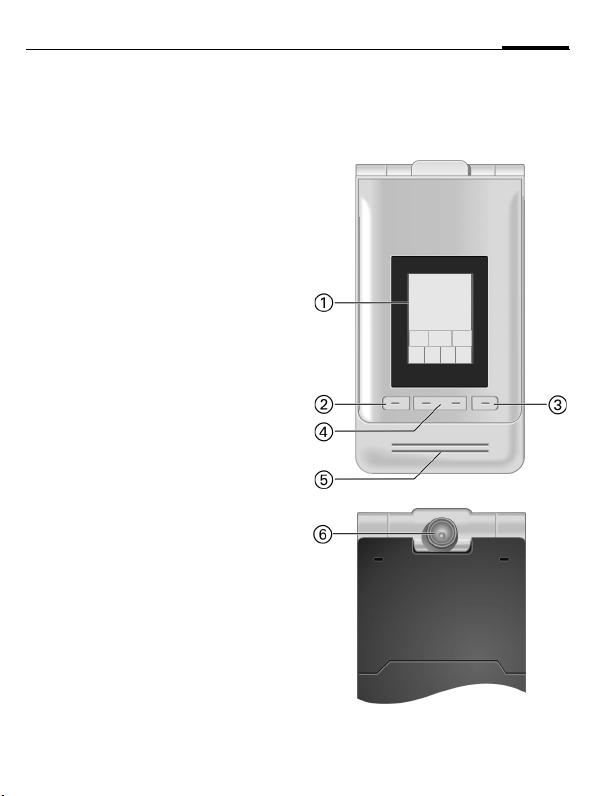
Clamshell closed
Outer display
1
2 -4 Outer softkeys
The current functions of these keys are
shown in the bottom line of the outer display as symbols.
Use functions while clamshell is closed.
The outer softkeys have no function if
the clamshell is open.
In standby mode:
2 ‚ Start the selected application.
3 Ä Press and hold: Lock/unlock
4 Œ/ˆ Scroll to select available
2 Ý Accept call in handsfree mode
3 µ Reject call.
4 ½ Switch off ringtone for this call.
2 ¡/¢ Switch on/off microphone
3 µ End call.
4 -/ + Control volume.
5
6
outer softkeys.
application ;/</: (page 8).
Incoming call:
(not for video call).
During a call:
(mute).
Loudspeaker
Camera lens
Z
Operator
12:04
;<:
‚ Œ ˆ Ä
5Phone overview
W
Page 7
Phone overview6
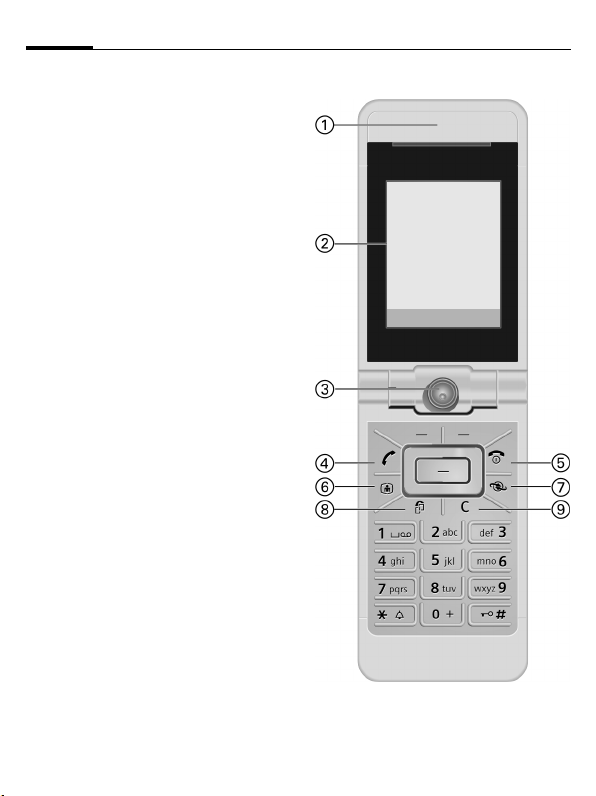
Clamshell open
Earpiece
1
Main display
2
3
Camera lens
Call key
4
A
Dial the number/name displayed/ highlighted, take calls.Open the call log lists
in standby mode.
On/Off/End key
B
5
• Switched off:
Press and hold to switch on.
• In standby mode:
Press and hold to switch off.
Press briefly to open the switch off
menu (page 14).
• During a conversation or in an applica-
tion: Press briefly to finish.
• In menus: Press and hold to go back to
standby mode.
Video call key
6
j
Press to open the video mode.
Internet key
k
7
Open the browser if not predefined.
Task key
8
i
Press briefly: Open task switcher.
Press and hold: Open the main menu.
Clear key
9
l
Text input: Clear characters one by one
in text input mode. Press and hold to delete text quickly.
Lists/Input fields: Delete highlighted
item(s).
Z
01.12.2005 10:10
Service provider
ContactsƒMusic
W
Page 8
7Phone overview
Softkeys
1
The current functions of these keys are
shown in the bottom line of the main
display as §Text§/symbol.
C Navi key
2
• Press the navi key to select an
option/list item or to start an
application/function.
• In standby mode, press to open the
main menu.
Navi ring
3
In standby mode:
Press briefly: Open the user
G
profiles.
Press and hold: Start voice
dialling.
H
Open the Contacts.
E
Open the Inbox.
D
Start the Media player.
In lists, messages and menus:
I
Scroll up and down.
During audio playback:
I
Control volume.
Switch to previous/next track.
F
Ringtone
*
4
• Press and hold in standby mode:
Switch all audible signals on/off (except alarm). Vibration is activated
automatically.
• Press and hold while an incoming call
is signalled: Switch off ringtone for this
call only.
Key lock
#
5
In standby mode: Press and hold to
switch key lock on/off. Only emergency
numbers can be dialled.
While dialling: Enter wildcard "?".
Connection socket
6
For charger, headset etc.
ContactsƒMusic
Page 9
Phone overview8
Opening/closing the clamshell
Clamshell closed
• In standby mode you can start one of the
following applications:
Start the camera in picture mode
;
(page 34).
Start the camera in video mode.
<
Open the music tab of the Media
:
Player (page 55) and start audio
playback.
• Camera active: You can take pictures/
record videos.
• Media player active: You can select tracks
and control playback.
• Task switching: You can control only one
application at the same time.
• Incoming call: You can accept the call in
handsfree mode using the outer softkeys
(not for video calls).
• Voice dialling: If a headset is plugged into
the phone you can activate voice dialling
by pressing the activation key on the
headset.
Opening the clamshell
If you open the clamshell a logo is displayed
on the outer display. The outer softkeys are
deactivated.
Opening the clamshell has different effects
depending on the current situation:
• In standby mode: The key lock is released
automatically. The opening melody is
played if activated. Press any key to end
playback.
• Incoming call: You accept the call.
You can change this setting to manually
accept the call after the clamshell is
opened (page 49).
• Open applications remain open.
• Open requests and notifications, e.g. in
dialogs, are accepted.
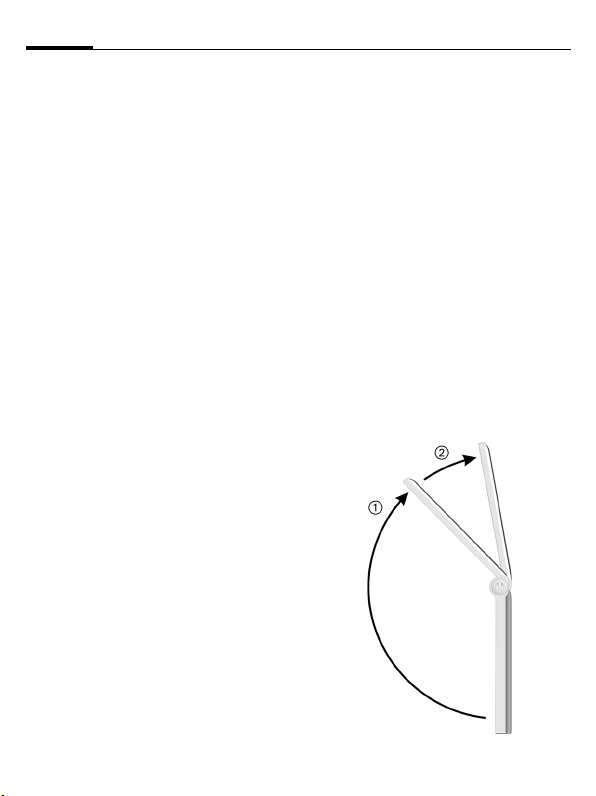
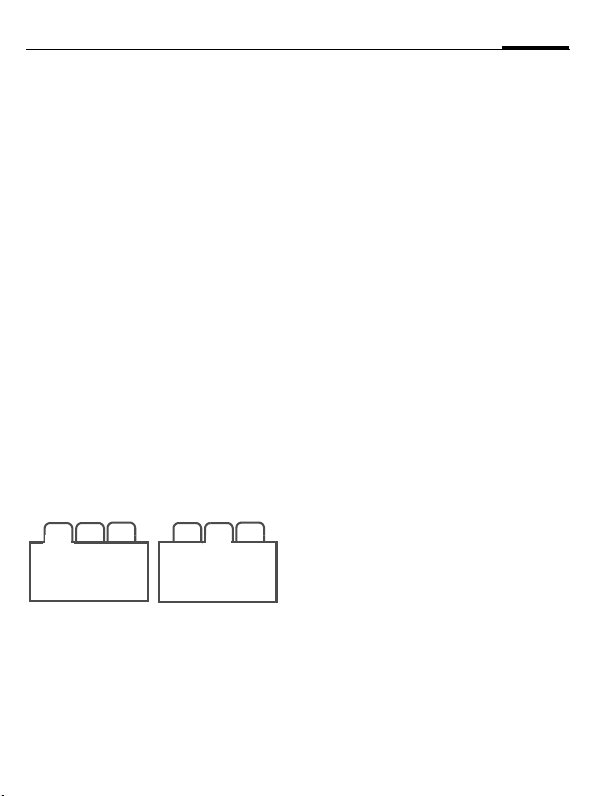
Clamshell positions
When opening the clamshell you can engage it in two different positions:
Position
1:
This is the ideal position for video calls or for
self-timing in camera mode. Placed on a
desk you can comfortably have a conversation with the person shown in the display or
take a photo in self-timing mode.
Position
2:
This is the normal position when holding the
phone to your ear.
Page 10

Closing the clamshell
Closing the clamshell has different effects
depending on the current situation:
• In standby mode: The closing melody is
played if activated. Press any outer
softkey to end playback.
• During calls: All active/held calls are
ended.
If you talk in handsfree mode (page 26), a
request is displayed on the outer display
whether or not you want to continue the
active call.
• Camera active: If the camera is in the foreground, the camera remains open in the
selected mode.
• Media Player active: If the music tab is selected or during audio playback, the application remains open, even if used in the
background.
• Data connections: Ongoing data transfer
(e.g. sending/receiving SMS/MMS or retrieving e-mail, data download, synchronisation) and open Bluetooth
connections are not affected by closing the
clamshell.
• All other active applications are closed.
Unsaved data is saved automatically.
• Open requests and notifications, e.g. in
dialogs, are rejected.
®
or server
9Phone overview
Page 11
Display symbols10
Display symbols
Menu (only outer display)
;
Camera in picture mode
<
Camera in video mode
Media player(audio playback)
:
Main menu (only main display)
L
Contacts
Call records
P
O
Internet
Camera
R
M
Messages
Q
Organiser
Games
§
Media player
¦
Video telephony
¥
S
Extras
My stuff (file management)
N
Settings
T
Display symbols (selection)
Z
Y
Ç
¿
Signal strength
Charging
All calls are diverted
Ringtone off
¹
Alarm set
Ä
Keypad locked
Bluetooth activated
¨
Bluetooth visible for others
©
Events (selection)
SMS memory full
ã
}
Missed calls
Phone memory full
å
Message symbols (selection)
Unread
p
Read
q
MMS received
w
MMS read
x
À
Voice mail received
Camera symbols (outer display)
Open brightness settings
Ë
Open zoom settings
Ø
Page 12
Getting started
Your phone's displays are covered
with a protective film. Remove this
film slowly before using the phone.
In rare cases, static discharge may
cause discolouration at the edges of
the display. However, this will disappear within approx. 10 minutes.
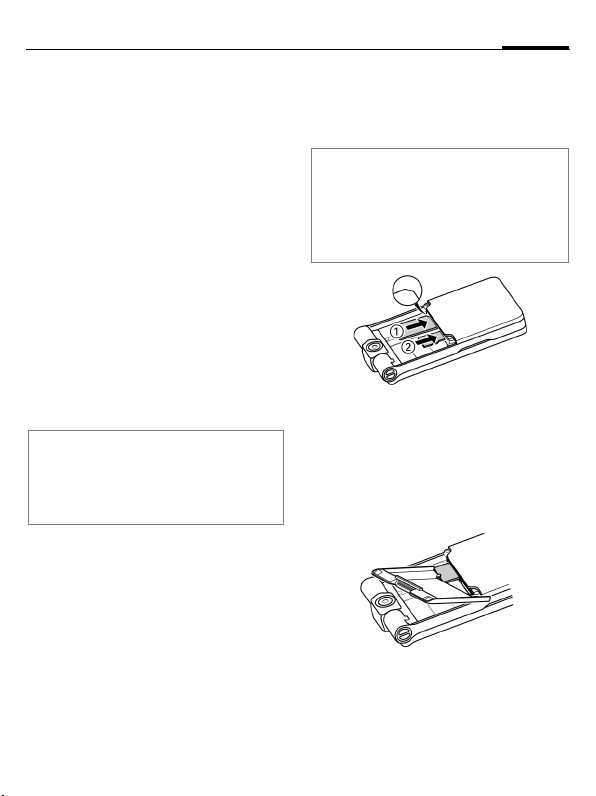
Inserting the SIMcard/ Micro SD card
The service provider supplies you with
a SIM card on which all the important
data for your line is stored. If the SIM
card has been delivered in credit-card
size, snap the smaller segment out
and remove any rough edges.
Attention
Insert the SIM card before inserting the
Micro SD Card.When the Micro SD Card is
wrongly inserted into the SIM card slot, it
cannot be removed!
The Micro SD Card gives your phone
a very large memory capacity. This
allows you to save picture/video files
and sound recordings, for example.
However, you can also use this Micro
SD Card like a floppy disk to save any
other files.
You can access the list of folders and
files in the My stuff menu (page 56).
If you assign a file from the Micro SD
Card to a function in the phone such
as a ringtone, the file is copied to the
phone memory.
New Micro SD Card
• Create a backup copy of the data on the
old Micro SD Card on a PC.
• Format the new Micro SD Card.
• Copy the data from the PC onto the new
Micro SD Card.
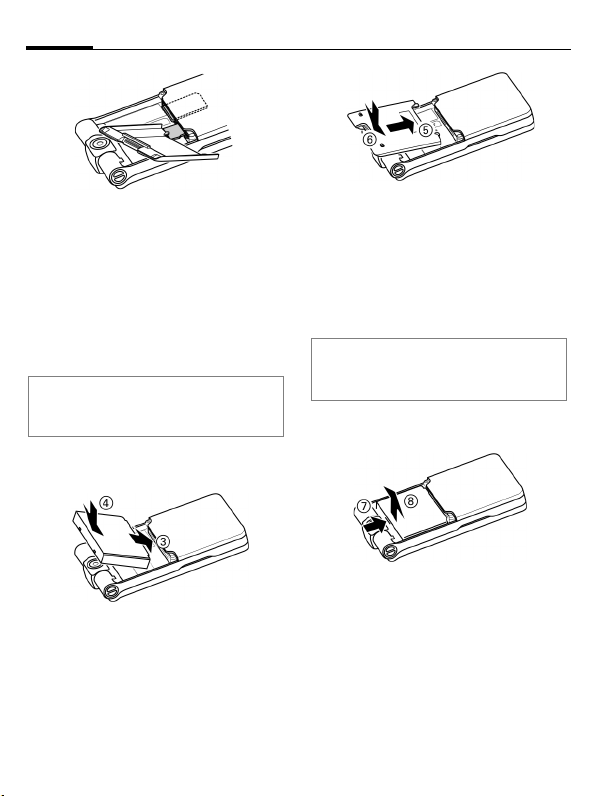
Place the SIM card in front of the slot
with the contact surface facing down-
wards
1. Ensure that the chamfered
corner is in the correct position.
Place the Micro SD Card in front of
2.
the slot
Use the battery cover as illustrated to
press the SIM card slightly into the
slot.
11Getting started
Page 13
Getting started12
Use the battery cover as illustrated to
press the Micro SD Card slightly into
the slot.
To remove one of the cards use the
corner of the battery cover to release
or push in the SIM card and the Micro
SD Card. Otherwise you risk damaging the SIM card release mechanism.
The card is ejected.
Please observe the manufacturer's operating instructions that come with the Micro
SD Card.
Inserting the battery
Insert the battery into the phone 3,
then press it downwards
engages.
4 until it
To close the cover place the cover in
position, so that the check marks get
caught in the cut-outs
press it downwards, until it clicks into place
6.
5. Then
Removing the battery
Attention
Please switch off your phone before
removing the battery!
To open the cover, push the cover
open and lift it up.
To remove the battery, press against
the battery in the direction indicated
7 and lift the battery up 8 and out.
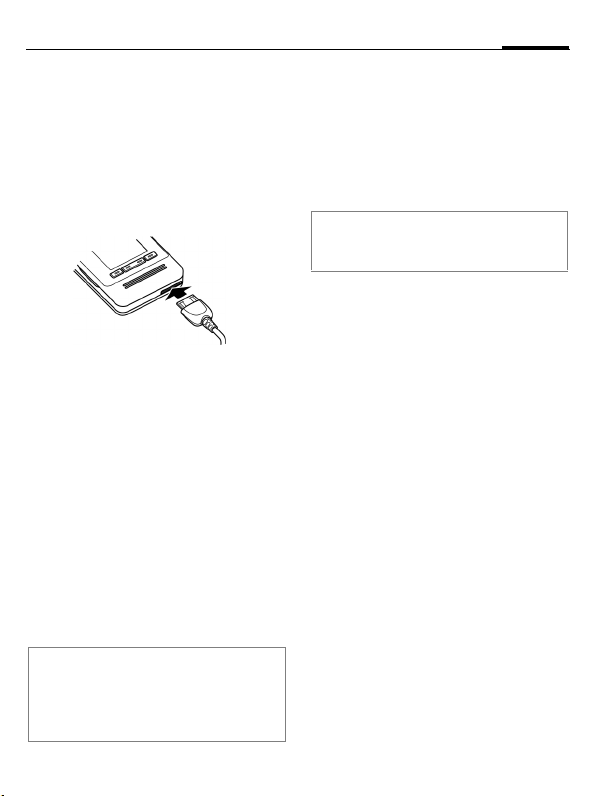
Charging the battery
The battery is not fully charged
when delivered. Plug the charger
cable into the bottom of the phone.
Page 14
13Getting started
Plug the power supply unit into a
mains power socket and charge for
at least two hours.
Only use the plug-in power supply
included in delivery!
As an alternative, the battery can
be charged via the USB port
(Accessories, page 52).
Y
Display during charging.
Charging time
An empty battery is fully charged after about 2 hours. Charging is only
possible within a temperature range
of +5 °C to 45 °C. If the temperature
rises/falls 5 °C above/below this, the
charge symbol flashes a warning.
The mains voltage specified on the
power supply unit must not be
exceeded.
Do not remove the battery unnecessarily,
and where possible, do not end the
charging process prematurely.
• The power supply unit heats up when
used for long periods. This is normal and
not dangerous.
• If the battery is removed for longer than
30 seconds, the clock must be reset.
Operating time and temperature
The operating time depends upon
the respective conditions of use. Extreme temperatures considerably reduce the phone’s standby time.
Avoid placing the phone in the sun
or on a heater.
The phone may heat up during data transfer or when using UMTS. This is normal
and not dangerous.
Call time:
UMTS: up to 210 minutes
GSM: up to 270 minutes
Standby time:
UMTS: up to 250 hours
GSM: up to 300 hours
Charge icon not visible
If the battery has been discharged
fully, the charge icon is not immediately visible when the power supply
is plugged in. It will appear after up
to two hours. In this case the battery
is fully charged after 3 to 4 hours.
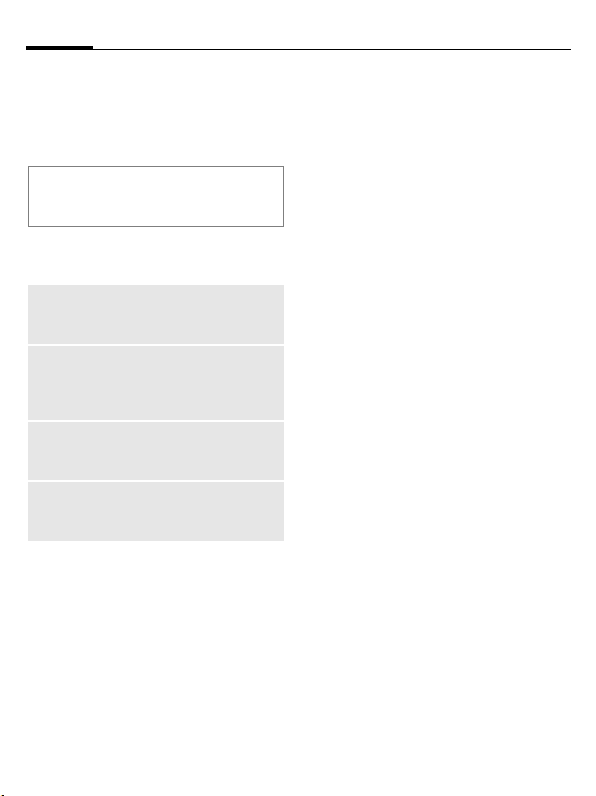
Display while in service
Charge level display during operation (empty–full):
Battery low warning
When the battery is almost empty
you are warned twice: with 10 and
with 1 minutes of power remaining.
Powering off
If the battery is completely empty,
the phone switches off.
VWX
Page 15

Switching phone on/off, entering PIN14
Switching phone on/off, entering PIN
Switching phone on
Open the clamshell.
B
Enter PIN or confirm request
(page 21).
The phone switches on automatically when:
• you charge the phone via USB or
• an alert or calendar event appears.
§Yes§ Press to activate.
Or
§Offline§ Press to start in offline
If you close the clamshell before entering
the PIN, the phone is switched off again.
Entering PIN
The SIM card can be protected with a
4 to 8-digit PIN.
J
§OK§ Confirm. Logging on to
Press and hold On/Off/End
key to switch phone on.
mode (see below).
Enter PIN using number
keys. Asterisks appear to
ensure nobody can read
your PIN on the display.
Correct with
the network will take a
few seconds.
l.
You can change the PIN (page 20).
To clear SIM card barrings, see
page 21.
Switching phone off
B
Or
B
Switch off
Offline mode
Press and hold On/Off/End
key.
Press briefly and select one
of the following options.
Switch phone off. Phone
switches on automatically if
alarm or calendar event
occurs.
Phone is not switched off, but
has no connectivity.
Offline mode
In offline mode you can operate
many phone functions, but you are
not connected to any network (you
are not available for incoming calls
and you cannot initiate a call).
Switching between offline and online mode:
Open the clamshell.
B
C
Press briefly and select
Offline mode/Online mode.
Confirm request.
Page 16

15General instructions
Emergency number (SOS)
Only to be used in real emergencies!
Open the clamshell to use the
keypad.
By pressing the softkey §SOS§ you can
make an emergency call on any network without a SIM card and without
entering a PIN (not available in all
countries).
If the clamshell is open and key lock is active (page 7), only emergency numbers
can be dialled.
Switching on your phone
for the first time
When you switch on the phone for
the first time or after the battery has
been removed, you are prompted to
set the time/date.
C
Time zones
F
I
§Options§ Open menu and select Set
Select if you want to enter
time/date.
Select desired setting and
change time zone in
world map.
Select a city in the selected time zone.
time zone to save.
Time/Date
Set the clock and date so that it displays the correct time. You will not
have to make this setting again.
J
C
Further options and settings on
page 50.
First enter date
(day/month/year), then
time (24 hours).
Press to update time and
date.
General instructions
Standby mode
The phone is in standby mode and is
ready for use when the name of the
service provider appears on the
display.
Clamshell closed
µ Press to end call/function.
Clamshell open
B
Press and hold the On/Off/
End key to return to
standby mode from any
situation.
Page 17

General instructions16
Signal strength
Z Strong signal strength.
[
A weak signal reduces the
call quality and may lead
to loss of the connection.
Change your location.
Connectivity
Your phone supports different methods for transmitting data in the mobile network:
• The fastest method is UMTS (Uni-
versal Mobile Telecommunications
System). If you use UMTS, you can
make video calls in high quality.
You can be connected to the Internet permanently. Only the current
transmission time is charged by
the network operator. Some service providers do not yet support
this service.
•GPRS (General Packet Radio Serv-
ice) is another method for transmitting data in the mobile
network. With GPRS you can be
connected to the Internet permanently, as well, if the network has
sufficient capacity. Only the current transmission time is charged
by the network operator.
•GSM (Global System for Mobile
Communications) is a fully digital
standard for mobile networks
mainly used for voice calls and
text messages (SMS).
Depending on the surrounding network and your provider, the different
methods are used automatically. Depending on your provider you may
set which method to use (page 52).
Digital Rights Mgmt. (DRM)
Remember that your telephone has
digital rights management. The use of
downloaded pictures, sounds or applications can be restricted by the suppliers, e.g. copy protection, use for a limited period of time only, number of
times they can be used etc.
User guide
Symbols
The following symbols are used to
explain operation:
J
B
A
§Options§
C
Enter numbers or letters.
On/Off/End key
Call key
Displays a softkey
function.
Press the navigation key,
to call up the menu for
example.
Page 18
17General instructions
D F E
H I G
=
Display navigation function. Press navigation key
in the direction indicated.
Function dependent on
service provider, may require special registration.
Main menu
The main menu is displayed
graphically with symbols.
C
Call up from standby
mode.
F/I
Select application
symbols.
C
Tabs
Tabs allow fast access to information
and applications.
1
2
Start application.
3
2
31
Navigation key
The symbol in the centre of the lower line of the display shows the current function when the navigation
key is pressed down vertically.
Outer softkeys
The symbols in the lower line of
the outer display show the current
function of each key.
Menu control
The steps needed to reach a function
are shown in a condensed form in the
user guide, e. g. to set ringtones
C ¢ T ¢ Ringtones
This comprises the following steps:
C
Open main menu.
F/I
Select T to open Settings
menu.
C
I
C
Confirm selection.
Select Ringtones function.
Confirm selection.
Page 19

General instructions18
Standard functions
Options menu
The list contains functions that are
offered in several options menus.
§Options§ Open menu.
<New entry>
Save
Change
View
Details
Details
Delete/
Delete all
Exit
Edit
Text input
meth.
Text edit
menu
Sort by
Set as
Rename
Create new entry.
Store entry.
Open options list. Select
option and confirm.
Display entry.
Display properties of
selected entry.
Display additional
information about the file.
Delete entry/delete all
entries after confirmation.
Exit application.
Open entry to edit/open
input field to edit.
Open input method menu
(page 22).
Open text edit menu
(page 22).
Select sort criteria.
e.g. set picture as wallpaper, melody as ringtone.
Rename selected entry.
Send
Create
message
Reply/
Reply to all
Capacity/
Memory
status
Select transmission type
(MMS, SMS, e-mail,
Bluetooth).
Select transmission type
and create message.
The sender becomes the
recipient, "Re." is placed in
front of the subject matter.
Display memory status for
respective application,
phone, SIM card or the
Micro SD Card. If memory
is insufficient start the
Memory assistant.
Fast list search
Pressing number keys while you are
in alphabetically ordered lists opens
a fast search window.
J
Enter text to jump quickly
to the entry that corresponds most closely with
the entered text.
Memory assistant
The memory assistant is launched
automatically if memory is low.
A notification is displayed on either
display depending on whether or not
the clamshell is open.
If the clamshell is closed, you can
start the memory assistent by opening the clamshell.
Page 20

19General instructions
Start via main menu:
(Only if the clamshell is open)
¢T ¢ Phone
C
¢ File system
¢ Memory assistant
All saved folders and files in the
phone memory and on the Micro SD
Card are listed (page 11).
F
Select tab (phone
memory/Micro SD Card).
List of folders/files is
displayed.
I Select folder/file.
§Options§
Mark mode
In some applications (e.g. Contacts/
My Stuff) one or more entries in a list
can be highlighted to carry out a
function jointly.
§Options§
I
C
Mark options
Depending on the actual situation,
different functions will be offered.
§Options§ Open menu.
Open menu and select
function (standard
functions page 18).
Open menu and select
Mark
.
Select entry/entries.
Mark/unmark entry.
Mark/
Unmark
Mark all
Unmark all
Delete
marked
Send
marked
Retrieve
marked
Mark/unmark selected
entry.
Mark all entries.
Unmark all marked entries.
Delete all marked entries.
Send marked messages
(e.g. e-mails from draft
folder).
Retrieve marked e-mails (if
only header is retrieved).
Task switching
You can switch from the current application to the main menu, standby
mode or to any open application.
i
You can directly switch to the Main
Menu, Home or to any open
application:
Menu/Home/<application>
If you are holding a call, select
Current call to return to the call.
Press to list all currently
open applications.
Select and confirm
with
C.
Page 21
Security20
Security
The phone and SIM card are protected against misuse by several security
codes.
Keep these confidential numbers in
a safe place where you can access
them again if required.
PIN codes
PIN
PIN2
PUK
PUK2
Phone
code
C
PIN control
The PIN is usually requested each
time the phone is switched on.
You can deactivate this feature but
you risk unauthorised use of the
phone. Some service providers do
not permit deactivating the control.
Protects your SIM card
(personal identification
number).
This is needed to set the
charge detail display and to
access additional functions on
special SIM cards.
Key code. Used to unlock
SIM cards after the wrong PIN
has been entered repeatedly.
Protects your phone. Must be
entered at the first security
setting.
¢T ¢ Security
¢ PIN codes ¢ Select function.
On/Off Activate/deactivate PIN
J
C
control.
Enter PIN code.
Confirm.
Change PIN
You can change the PIN to any
4 to 8-digit number you find easier
to remember.
J
J
J
C
Enter current PIN code
and confirm with
Enter new PIN code and
confirm with
Re-enter new PIN code and
confirm with
Confirm.
C.
C.
C.
Change PIN2
(Display only if PIN2 is available).
Proceed as with Change PIN.
Change phonecode
You define the phone code
(4 to 8-digits) when you call up a
phone-code protected function for
the first time. It is then valid for all
phone-code protected functions.
To change phone code proceed as
with Change PIN.
Following the third unsuccessful attempt, access to the phone code and
the functions that use it is denied.
Contact the Service Centre (page 59).
Page 22

21Text entry
Clearing SIM card barring
If the PIN is entered incorrectly three
times, the SIM card is barred.
J
J
J
C
If the PUK (MASTER PIN) has been lost,
please contact your service provider.
Enter new PIN code and
confirm with
Enter new PIN code again
and confirm with
Enter PUK code
(MASTER PIN) provided by
your service provider with
the SIM card in accordance with the instructions
and confirm with
Confirm.
C.
C.
C.
Preventing accidental
activation
Even if PIN use is deactivated
(page 14), confirmation is required
to switch on the phone.
This prevents accidental activation
of the phone, e.g. when you are
carrying it in a bag or when you are
travelling in an aircraft.
B
§OK§ Press. The phone
§Cancel§ Press or take no action.
Press and hold.
switches on.
The phone does not
switch on.
Connecting to PCs
You can connect your phone to a
Windows® PC using Bluetooth or a
data cable. The Windows® PC program MPM (Mobile Phone Manager,
page 58) enables you to backup data
on your Windows® PC and to synchronise the contacts with Outlook®
and Lotus Notes™. You can download the Mobile Phone Manager
from the Internet at:
www.BenQ-Siemens.com/ef81
The data cable is included in delivery.
You find the MPM program on the
CD ROM also included in delivery.
Text entry
Text entry without T9
Press number key repeatedly until
the required letter appears. After a
brief interval the cursor will advance.
Example:
2
l
F
Press once briefly to write
the letter a, twice to write
b etc. Press and hold to
write the number.
Press briefly to delete the
letter left of the cursor or
marked text. Press and
hold to delete text quickly.
Move the cursor
(forwards/back).
Page 23

Text entry22
#
*
0
1
Press briefly: Swap between: abc, Abc, ABC,
T9 abc, T9 Abc, T9 ABC, 123.
Press and hold: Input
method menu is
displayed.
Press briefly: Special
characters are shown.
Press and hold: Open edit
menu.
Press once/repeatedly:
. , ? ! ’ " 0 + - ( ) @ / : _
Press and hold: inserts 0.
Press to insert space.
Press twice to insert line
feed.
Special characters
*
1
) ¿¡ _; . , ?!
+- "’ : */ ( )
¤¥$£€@\ &#
[]{}%~<=>
| ^` § Γ ∆ Θ Λ Ξ
Π Σ Φ Ψ Ω
1
) Line feed
I
C
Press briefly.
F
/
Navigate to characters.
Confirm.
Text edit menu
*
Selecting input language
Select the language in which you
want to compose your message.
§Options§ Open edit menu and se-
If you select Automatic, the Input
language is based on the Display
language.
Marking text
You can highlight text in order to
copy and paste it to a different place.
*
Press and hold:
Insert symbol, Spell word,
Mark text, Copy/Paste, Input
language
lect Input language. Then
select language and
confirm.
Press and hold. The edit
menu is displayed:
Mark text, Copy, Paste.
Text entry withT9
"T9" deduces the correct word from
the individual key entries.
Activating, deactivating T9
#
Select desired input mode.
§Select§ Activate/deactivate T9.
Press and hold.
Page 24

23Text entry
Writing with T9
Finish a word without looking at the
display.
Simply press the keys once where the
relevant letter is located.
1 A blank ends a word.
Do not use special characters such as
Ä. Use standard characters instead,
e.g. A; T9 will do the rest for you.
T9® Text Input is licensed under one or more of
the following: U.S. Pat. Nos. 5,187,480,
5,818,437, 5,945,928, 5,953,541, 6,011,554,
6,286,064, 6,307,548, 6,307,549, 6,636,162 and
6,646,573;
Australian Pat. Nos. 727539, 746674, and
747901;
Canadian Pat. Nos. 1,331,057, 2,302,595 and
2,227,904;
Japan Pat. No. 3532780, 3492981;
United Kingdom Pat. No. 2238414B;
Hong Kong Standard Pat. No. HK1010924;
Republic of Singapore Pat. No. 51383, 66959,
and 71979;
European Pat. Nos. 0 842 463 (96927260.8),
1 010 057 (98903671.0), 1 018 069
(98950708.2);
Republic of Korea Pat. Nos. KR201211B1 and
KR226206B1.
People's Republic of China Pat. Application Nos.
98802801.8, 98809472.X and 96196739.0;
Mexico Pat. No. 208141;
Russian Federation Pat. No. 2206118;
and additional patents are pending worldwide.
T9 word suggestions
If several options are found in the
dictionary for a key sequence
(a word), the most probable is displayed first. The word must be
shown §highlighted§. Then press
§<< T9 <<§ The displayed word is re-
placed with a different
word. If this word is also
incorrect, press again
§<< T9 <<§ Repeat until the correct
word is displayed.
To add a word to the dictionary:
§Spell§ Select.
The last suggestion is deleted and
the word may now be entered without T9 support. Press §OK§ to add it
automatically to the dictionary.
Correcting a word
F
§<< T9 <<§ Scroll through the T9
Move left or right,
word by word, until
the required word is
§highlighted§.
word suggestions again.
l Deletes the character
to the left of cursor and
displays a new possible
word!
Page 25

Calling24
Within a "T9-word", individual letters may
not be edited without first removing the T9
status. In most cases it is better to rewrite
the complete word.
0
Input method
#
Special characters
*
Set a full stop. A Word is
concluded if it is followed
by space. Within a word,
full stop represents an
apostrophe or hyphen:
e.g. §provider.s§ = provider’s.
Press briefly: Switch between: abc, Abc, T9 abc,
T9 Abc, 123. Status shown in
top line of display.
Press and hold: All input
variants are displayed.
Press briefly: Select special
characters (page 22).
Press and hold: Open edit
menu (page 22).
Text templates
C
¢M ¢ Template
Text templates are short excerpts of
texts that you can insert in your
messages (SMS, MMS).
Calling
With your phone you can make conventional (voice) calls as well as video calls. However, it is not possible
to make a voice call and a video call
at the same time.
If the clamshell is closed:
• You can accept calls in handsfree
mode.
• You can continue voice calls in
handsfree mode.
• You cannot initiate calls.
• You cannot accept or continue
video calls.
Video calls
(Only if the clamshell is open)
To initiate a video call (in standby
mode):
¢¥
C
Or
j
The phone switches to video call
mode and you can enter a number
(see Dialling with number keys).
You can also decide to make a video
call after you have already entered a
number or selected a number from a
call list.
Press the video call key.
Page 26

25Calling
Dialling with number
keys
(Only if the clamshell is open)
J
A
Or
j
The displayed number is dialled.
Enter the number (always
with prefix/international
dialling code).
Press the Call key.
Press the video call key to
make a video call.
Ending a call
Clamshell closed
µ Press to end call.
Clamshell open
B
Press this key even if the person on
the other end of the line has hung up
first.
You can also end a call by closing the
clamshell.
Press the End key briefly.
Setting the volume
(Only possible during a call)
Clamshell closed
+/ - Regulate the volume.
Clamshell open
I
Regulate the volume.
Redialling previous
numbers
(Only if the clamshell is open)
A Press the Call key.
The list of previously dialled
numbers is displayed:
I
A
Or
j
Select the number.
Press the Call key again.
Press the video call key to
make a video call.
Accepting a call
Clamshell closed
Ý Not for video calls: Press
Depending on your settings
(page 49) you can accept a call by
simply opening the clamshell.
Clamshell open
A Press.
Or
j Press to accept a video
Video call
(Only if the clamshell is open)
If the incoming call is a video call and
Show my image is deactivated (de-
fault, page 49) Do you want to show
your video image? is displayed. You
have the following options:
to accept the call in
handsfree mode.
call.
Page 27

Calling26
§Yes§ Your video is shown to
§No§ The video mute picture is
the caller.
shown to the caller (Select
image, page 49).
Rejecting a call
Clamshell closed
µ Press.
Clamshell open
B
You can also reject the call by closing
the clamshell.
Warning!
Please make sure you have accepted the
call before holding the phone to your ear.
This will avoid damage to your hearing from
loud ringtones.
Press briefly.
Handsfree talking
Clamshell closed
If you accept a call with the clamshell
closed, handsfree talking is activated
automatically.
Handsfree talking is deactivated automatically, if you open the clamshell during a call.
Clamshell open
§Options§ Open menu, select Hands
free and confirm
with
C.
If you close the clamshell while in handsfree mode, a request is displayed on the
outer display whether or not you want to
continue the call. If you do not answer
the request the call is ended automatically
after a short time.
A video call is ended whithout request if
you close the clamshell also when in
handsfree mode.
Warning!
Always switch off "handsfree talking"
before holding the phone to your ear!
Otherwise, you will damage your hearing!
Swapping between
2calls b
(not during video calls)
Establish a second connection
(Only if the clamshell is open)
J
Swapping calls
When the new connection is established you can swap between calls:
Clamshell closed
‡ Press.
Clamshell open
§Options§ Open menu and select
Or
A Press.
Dial the new number and
A
press
is put on hold.
Swap.
. The current call
Page 28

27Calling
Incoming calls during a call
You will hear a special tone during
the call (page 48). You have the
following options:
Accepting the waiting call in addition
to the first
Ý Accept the waiting call.
Depending on your settings
(page 49) you can also accept
the waiting call by opening the
clamshell.
A
‡
.
If the clamshell is closed, press
to swap between the calls.
Or (if the clamshell is open)
§Swap§ /
To swap betweeen the two
calls when two connections are
established, always press
Rejecting the waiting call
Accept the waiting call.
A
The current call is put on
hold.
µ Press.
Or (if the clamshell is open)
§Reject§ Press.
Accepting the waiting call, ending the
current call
(Only if the clamshell is open)
B
C
End the current call.
Accept the new call.
Ending calls
Clamshell closed
Press. You return to the
µ
Clamshell open
B
Or
§Options§ Open menu and select
After the Return to held call? display,
you have the following options:
§Yes§ Accept the held call.
§No§ End the held call.
held call.
Press the End key briefly.
Drop.
Conference b
(Not during video calls)
Call up to 5 parties one by one and
link them together in a multiparty
call.
You cannot establish a conference when
the clamshell is closed.
When closing the clamshell you can continue an ongoing conference if you are in
handsfree mode (page 31).
Once a call has already been
established:
§Options§ Open menu and select
J
Hold call. The current call
is put on hold.
Dial a new number. When
the new connection is
established ...
Page 29

Calling28
§Options§ … open menu and select
Conference. The held call is
joined.
Ending a conference
Ending all calls
µ Press.
Or (if the clamshell is open)
B
Or close the clamshell.
All calls in the multiparty conversa-
tion are ended.
Ending one call
(Only if the clamshell is open)
See Ending calls, page 27.
Private call
(Only if the clamshell is open)
You can remove a party from a conference and make a private call to
that party while the conference is
put on hold.
§Options§ Open menu and select
You can swap between the private
call and the conference:
§Options§ Open menu and select
When your private call is finished,
you have the following options:
B
Press.
Private. Then select the
entry for the private call.
Swap.
End the private call and
return to the conference.
Or
§Options§ Open menu and select
Conference. The private
call is joined to the
conference again.
Call options
The following functions are only
available during a call:
§Options§ Open menu.
Hands free
Upgrade to
vid/Switch to
voice
Transf
access'ry/
Transfer
phone
Add to
Contacts
Mute call/
Mute sound
Call via the loudspeaker.
Change the current voice
call to a video call or vice
versa. The current call is
ended and a new connection with the same
partner is established.
Switch the sound of the
current call to the headset and back to the
phone.
Select To a new contact/
To exist. contact. Select
number type to store the
number in the contacts.
Confirm save command
with C.
The person on the other
end of the line cannot
hear you (muting). Also:
Press and hold*.
Clamshell closed: Press
¢/¡.
In video calls your video
is still shown on the other
end of the line.
Page 30

29Contacts
Not during video calls:
Hold call
Swap
Conference
Drop
Private
DTMF
Only during video calls:
Mute video
Pause inc./
Pause outg.
Full/split
screen
Frame rate
White balance
Flicker
adjustment
Hold current call.
Swap between calls.
(see page 27)
End a call in a
conference.
Make private call in a
conference.
Enter tone sequences
(numbers) for remote inquiries to an answering
machine.
The incoming video is
muted and the video
mute picture is sent
(Select image, page 49)
Pause the incoming video (of the other party) or
outgoing video (yours).
The menu entry changes
to Resume inc./
Resume outg.
Select the video presentation on your display.
Adjust how many frames
per second the camera
will capture.
Adjust the sensitivity to
light.
Adjust the sensitivity to
indoor lightening flicker
rate.
Send picture/
Send video
Select a picture/video
from My stuff and show it
to the person on the other
end of the line.
Tone sequences (DTMF)
(Only if the clamshell is open)
You can enter control codes (numbers) for remote access to an automatic answering machine while an-
other connection exists. These inputs
are transmitted directly as
DTMFcodes (control codes).
Contacts
You can store contacts with a variety
of phone and fax numbers as well as
additional address details.
The contacts may contain the
following types of entries:
• Contacts saved on the phone (see
below).
• SIM contacts saved on the SIM
card (page 32).
• Distribution lists: short-cuts for
communication with more than
one person.
• Groups: contact categories
(e.g. shared ringtone).
Page 31

Contacts30
¢L
C
Or
H
For fast access, contacts are organised on 4 tabs (All contacts, Groups,
SIM contacts, Filter).
Open Contacts.
Dialling a contact
A Call selected contact.
Or
j
Or
G
Contact selected
Call the default/video enabled
number. If no default number is
stored, select which number to call.
SIM contact selected
Call the number. If several numbers
are stored, select which number to
call.
Several numbers selected
If several contacts or a distribution
list is selected, the call key
the video call key
Make (video) call.
Press and hold to activate
voice dialling.
A, and
j have no effect.
All contacts
Each contact may consist of
4 numbers and e-mail addresses,
2 URLs, fax numbers and postal
addresses. You can set one value
as default for each type.
New entry
<New entry>
I
The possible input fields are organised on 4 tabs.
The following tabs are displayed:
General
info
Private
Business
Personal
Within the tabs:
I
J
At least one name must be entered.
The name of each contact must be
unique. Always enter the number
with prefix.
Assign media files
In some input fields (ringtone, video,
picture) you can assign audio/video
ringtones and pictures.
Select.
Select the number type.
First and last name, important
numbers (private, business,
mobile phone).
E-mail address, fax number,
address and notes.
Office information and
address.
Ringtone, picture, group,
birthday and display name.
Select input fields.
Fill in input fields.
Page 32

31Contacts
I
Save contact
§Options§ Open menu and select
Select media field (e.g.
picture) and confirm
with
C.
Save. Confirm request
with
C.
Contact options
§Options§ Open menu.
Set as default
Create e-mail
Switch tab...
Add birthday/
Remove
birthday
Set date
Number field selected:
Insert 2-s pause
Insert wildcard
Record voice
tag
Play voice tag
Delete voice tag
Further options on page 32.
Set selected field as
default for that type.
Send e-mail to selected
contact(s).
Select contact tab for
more input fields.
Add/delete birthday.
Open calendar to currently entered date.
Insert pause ("P").
Insert wildcard ("?").
Start recording voice
tag (page 33).
Start playback.
Delete voice tag.
Groups
The following groups have already
been created and can be renamed
but not deleted: Family, Friend, Office,
VIP.
New group
You can add personal groups.
<New group>
§Done§ Press to confirm.
Add member
I
§Options§ Open menu and select
I
§Add§ Confirm selection.
Edit group
§Options§ Open menu and select
You can rename the group and attach an audio ringtone and a picture
(page 30).
Select and enter the name
of a new group.
Select a group. The
number of entries is displayed in the second line
when highlighted.
Add new member. A list of
all contacts that are not
already in the group is
displayed.
Select new members and
confirm with
Edit.
C.
Page 33

Contacts32
SIM contacts
Contacts saved on SIM card are managed on this tab. SIM contacts contain less information than contacts
saved on the phone.
New entry
<New entry>
I
J
SIM/Protected SIM
F
§Options§
C
Select to create a new
entry.
Navigate to input fields.
Fill in input fields (name
and up to 3 numbers).
Select storage location.
Select available number.
Open menu and select
Save and confirm request
C.
with
Confirm save command.
SIM options
§Options§ Open menu and select
Convert SIM contact to regular
contact.
Add more fields.
Filter
Select a filter criterion. A list is displayed with contacts that contain
the chosen feature.
Option menu
Depending on the actual situation,
different functions will be offered.
These functions can be applied to
the entry currently selected as well
as to multiple selected entries.
§Options§ Open menu.
Distribution lists
New distr.
list
Add to distr.
list
Add new
member
Remove
from list
Groups
New group
Add to
group
Business card
Create biz
card
Set as biz
card
Undo biz
card
Enter name.
Add contact to a new or
existing distribution list.
Select contacts and add
them to the distribution list.
Remove selected contact(s) from distribution list.
Enter name.
Add contact(s) to new or
existing group.
Create a business card.
Selected contact is set as
business card.
Convert selected business
card to a regular contact.
Page 34

33Contacts
Media field selected
e.g. Play
ringtone
e.g.
Replace
ringtone
e.g.
Remove
ringtone
General options
Synchronise
Open web
site
Special
numbers
=
Send
contact
Set as vid.
allow'd/
Undo
vid.allow'd
Save
options
Save
location
Duplicate
Find
For standard functions see page 18.
Start playback. Same for
video and picture.
Select new ringtone. Same
for video and picture.
Delete current ringtone
from contacts. Same for
video and picture.
Initiate synchronization.
Load URL.
Your provider may supply
you with special numbers.
Send contact as vCard.
Only one number of the
contact can be set as
video allowed. Note that
this option is not available
for SIM contacts.
• copy/move to SIM: Only
SIM information is saved.
• copy/move to phone.
Select SIM/Phone as
default save location.
Open new contact with
duplicate information.
Start search.
Voice-activated dialling
You can dial numbers from the contacts by speaking the name. SIM contacts, distribution lists and groups
cannot have a voice tag.
You can store about 100 voice tags.
You can associate one voice tag to
each number of a contact.
Recording a voice tag
Record the voice tag in a quiet
environment. The voice tag may
be 3 sec. long.
F
I
I
§Options§
§Start§ Start recording.
A short signal is sounded. Speak the
name. Repeat the name after
playback.
Voice-activated dialling
Clamshell closed
If a headset is plugged into the
phone: Press the activation key
on the headset to activate voice
dialling.
Clamshell open
G Press and hold.
Speak the name after the signal
tone.
Open the Contacts tab.
Select a contact.
Select number input field.
Open menu and select
Record voice tag.
Page 35

Call records34
Call records
P
¢
C
The different call information is
listed on 5 tabs:
All calls, Dialled calls, Missed calls,
Received calls and Duration/charges.
F
Each list displays the 100 most
recent calls.
Call log lists
Your phone stores dialled, missed
and received calls for convenient
redialling.
Audio and video calls are stored.
Dial number
F
I
C
A/
Missed calls b
The numbers of calls that you have
received but not answered are
stored for callback purposes.
Navigate to tabs.
Select call log list
(e.g. Missed calls).
Select entry.
/
j
Dial number (if available),
make video call.
Duration/charges
Display the charges and duration
during a call. Set the currency and
rate for charge display. Depending
on your SIM card you can also set an
account limit.
For the selected call type the following information is displayed: the
date/time and the duration and
charges. For all incoming and all outgoing calls the number of recorded
calls is displayed, too.
Camera
You can start and control the camera
also when the clamshell is closed.
Û
Ø
Ë
;
If you use the camera when the
clamshell is closed, you should turn
the phone about 90 degrees to the
left in order to view menus. The pictures/videos are displayed and saved
in landscape mode. Otherwise, the
pictures/videos are displayed in right
Page 36

35Camera
angle when opened with the Media
player or sent in a message.
Start the camera
Clamshell closed
;/< Select to start the camera
in picture/video mode.
Clamshell open
¢R
C
Picture mode/Video mode
The current (preview) image is
displayed.
You can also start the camera using
the media player or MMS editor.
When video recording is started from
MMS the maximum length will be the time
allocated for messaging (10 seconds).
Select mode and confirm
C.
with
Taking pictures/videos
Settings prior to taking
pictures/recording videos
Clamshell closed
Ë
Ø
Press to open brightness
setting. Press Ì/ Í to set
brightness.
Press to open zoom
mode. Press
select zoom level.
Ù/ Ú to
Clamshell open
F
I
Decrease/increase brightness. Brightness can be
set in 7 levels (-3 to +3).
Zoom in/out in 7 levels.
Taking pictures
Start the camera in picture mode.
Clamshell closed
Take picture.
;
Clamshell open
C
Take picture.
Recording videos
Start the camera in video mode.
Clamshell closed
Š
‰/ˆ
‹
Clamshell open
C
§Pause§/ §Resume§
§Stop§ End recording.
A video record/playback is paused if you
open/close the clamshell.
Start recording.
Pause/resume recording.
End recording.
Start recording. You can
record up to 5 minutes.
Control recording.
Page 37

Create message36
Reviewing pictures/videos
Save pictures/videos
‚ Confirm save notification.
Or (if the clamshell is open)
C
The picture/video is saved with a
name, the date and the time in the
Media player folder (page 55).
Start video playback
Confirm save notification.
The picture is displayed.
ˆ Start playback.
ˆ/‰
+/ -
Playback/pause depending on current state.
Control volume durnig
playback.
‹ Stop playback.
Or (if the clamshell is open)
§Options§ Open menu and
Return to view finder
select Play.
‚ Open view finder.
Or (if the clamshell is open)
C
Delete pictures/videos
Open view finder to take
another picture/record
another video.
Ü Delete picture/video and
open view finder.
Or (if the clamshell is open)
§Discard§ Delete picture/video and
open view finder.
Create message
You can create SMS and MMS
messages and e-mails.
¢M ¢ Create message
C
¢ Select message type.
SMS/MMS
About SMS
You can transmit and receive long
messages (up to 760 characters) on
your phone. They are automatically
devided into concatenated SMS
messages (note higher charges).
About MMS
The Multimedia Message Service
(MMS) enables you to send texts,
pictures/ videos and sounds in a
combined message to another mobile phone or to an e-mail address.
Ask your service provider whether
this service is available. You may
need to register for this service
separately.
Writing/sending an SMS
¢M ¢ Create message
C
¢ SMS
J
§Options§ Open menu and select
Enter text/add items.
Add recipient.
Page 38

37Inbox
A Send message.
C
If the SMS could not be sent
successfully, press §Retry§.
Writing/sending an MMS
C ¢
J
Confirm.
M
¢ MMS
¢ Create message
Add items and/or
enter text (depending on
your provider up to
1024 characters).
A Send message.
C
If the MMS could not be sent
successfully, press §Retry§.
SMS/MMS options
In the options menu you can add/
remove recipients, pictures, templates, contacts or create new items.
You can save messages as a draft.
For MMS you can add items and a
subject.
Confirm.
Your phone has an e-mail program
(client). You can use it to create and
receive e-mails. To create new
e-mails you have to configure at
least one e-mail account (page 42).
C ¢
M
¢ Create message
¢ E-mail
J
§Options§ Open menu and select
A
Enter text/add items.
Add recipient.
Send message. The sending progress is displayed.
Inbox
The inbox contains all MMS, SMS,
CB, e-mail and WAP push messages
received on the phone.
¢M ¢ Inbox
C
Inbox structure
For fast access, the inbox is organised on three tabs: MMS/SMS/CB,
e-mail and WAP push messages.
Make a call: Select SMS, MMS or e-mail
and press A/ j.
Page 39

Inbox38
Receiving messages
When new messages are received,
a notification is displayed on either
display. You cannot open/read a
message if the clamshell is closed.
SMS
If a new SMS is received, a notification is displayed. New messages are
saved in the Inbox automatically.
MMS
An MMS is received in two steps: first
the MMS notification, then the MMS.
If a new MMS is available for downloading, the MMS notification is
displayed.
CB
Some service providers offer information services (Cell Broadcast
Service). If the function is activated
(page 42), CB messages are
received automatically.
E-mail
E-mails are not received automatically. Before an e-mail can be read,
it must be retrieved from the server
(page 39).
WAP push
WAP push messages are provided by
special service centres. Depending
on the current setting WAP push
messages are received/rejected
automatically.
If you receive the message that a
software update is available, you
can start a Device Manager session
(page 50).
SMS, MMS, CB
I
Numbers, e-mail addresses, vCards
and other saveable objects are highlighted automatically.
I Set volume.
* Switch sound on/off.
Only MMS:
I
F
C
While in the inbox you have the
following options: View, Downld
message, Reply/Reply to all, Forward,
Mark as unread, Add to Contacts.
While reading a message you have
the following options: Send, Send
MMS, Open link, Play again, e.g. Save
sound (Save downloaded file), Call
number, Save appoint.. Standard func-
tions on page 18.
Downloading ringtones and logos
You can receive links for downloading content with an SMS. Highlight
this link and, by pressing the Call
key
ber that ringtones/logos may be protected (DRM, page 16).
Select message and
confirm with
Navigate within a slide.
Switch to next/previous slide.
Play media file.
C.
A, start the download. Remem-
Page 40

39Inbox
E-mail
Before an e-mail can be read, it must
be retrieved from the server.
POP3 account
The inbox on the phone contains all
e-mails that are in the inbox on the
POP3 server.
IMAP4 account
The inbox lists e-mails as well as subscribed folders (e.g. mailbox). You
can subscribe to various folders on
the IMAP4 server. E-mails are retrieved only from the subscribed
folders.
If you delete e-mails on the phone,
they are deleted on the server
automatically.
E-mail options
While in the inbox you have the following options: View, Retrieve e-mail,
Retrieve all accts, Account settings,
Reply/Reply to all, Forward, Add to
Contacts. For POP3 accounts: Delete
on server. For IMAP4 accounts:
Subscr. to folders, Move to folder,
Unsubscribe and sort display order.
While reading a message you have
the following options: Voice call, Go
to URL, View/Download, Delete on
phone, Go to URL.
WAP push
Service Indication (SI), audio/ video/
image/text and service loading are
displayed.
Service loading message
Depending on your setting, you are
connected to the browser and the
service is loaded automatically.
DM request
If the pushed operation causes initial
configuration of the handset and
provisioning of application settings,
the device manager is started
(page 50).
Add to Contacts
You can add contacts received via
SMS, MMS or e-mail. You can add
the contact details of the sender,
contact details included in the message and vCards.
Save sender/contact details
Contact details included in a message are displayed in the §highlighted§
text.
§Options§ Open menu and select
Add to Contacts.
You can either add the information
to an existing contact or create a
new contact.
Save vCard
§Options§ Open menu and select
Save contact.
Page 41

Message lists40
Message lists
Messages are displayed the same as
in the inbox (page 37).
Drafts
¢M ¢ Drafts
C
The list is organised on two tabs:
SMS/MMS and e-mail.
You can save a message as a draft
while creating it. Messages are saved
as drafts automatically if transmission fails and if you close the clamshell or start another application
while creating a message (e.g. you
accept an incoming call).
E-mails are not synchronised with
the server.
Sent messages
¢M ¢ Sent messages
C
The list contains all sent messages
and is organised on two tabs:
SMS/MMS and e-mail.
Message settings
You can configure SMS, MMS,
e-mails, cell broadcast (CB) and voice
mail.
SMS settings
¢M ¢ Message settings
C
¢ SMS ¢ Select function.
SMS profiles
The SMS parameters are configured
in up to 5 different profiles.
Auto header
The Header template is automatically inserted at the start of the SMS.
Auto signature
The Signature template is automatically inserted at the end of the SMS.
Save sent items
All sent SMS messages are saved automatically in the Sent folder
(page 40).
Auto delete SMS
The oldest SMS message in the Inbox
will be deleted upon arrival of a new
SMS message.
Emoticons
Emoticons are automatically
displayed as little pictures.
Text size
You can set the displayed size of the
text in the SMS Viewer.
Page 42

41Message settings
MMS settings
¢M ¢ Message settings
C
¢ MMS ¢ Select function.
MMS profiles
The MMS parameters are configured
in up to 5 different profiles. You will
receive the necessary data from your
service provider or via the "Setting
Configurator" at
www.BenQMobile.com/customercare
Home retrieval/Roaming retrieval
You can configure when the MMS
messages are to be downloaded
from the message server for Home
and Roaming retrieval.
Req. read report
If the function is activated, a report is
sent back when the recipient reads
MMS message for the first time.
Req. deliv report
If the function is activated, a report is
sent back when the recipient has
downloaded the MMS message.
Delivery time
Select how long MMS should be held
on the server before sending it to
recipient.
Validity period
If an MMS message could not be delivered during this period, it is deleted from the server automatically.
Hide number
If the function is activated, your
number is withheld from recipient.
Anon. messages
If set to Reject, anonymous MMS
messages are rejected
automatically.
Allow read report
If the function is activated, requested read reports are enabled.
Allow deliv report
If the function is activated, requested delivery reports are enabled.
Creation mode
You can restrict the content that can
be added to an MMS.
Auto signature
See SMS settings page 40.
Save sent items
See SMS settings page 40.
Allow adverts
If the function is deactivated, MMSbased advertisements are automatically rejected.
Max msg size
The size restriction affects downloaded and created MMS messages.
b
Page 43

Voice mail42
E-mail settings
¢M ¢ Message settings
C
¢ E-mail ¢ Select function.
Before using this service you must
set the server access and your e-mail
parameters. You will receive the necessary data from the service provider
or via the "Setting Configurator" at
www.BenQMobile.com/customercare
The e-mail parameters are configured in up to 5 different accounts.
CB settings
¢M ¢ Message settings
C
¢ Cell broadcast
¢ Select function
Activate/deactivate the CB service
and display the local cell information
in standby mode. Configure up to
10 types of broadcast messages you
want to receive.
Voice mail b
Most service providers supply you
with a mailbox in which a caller can
leave a voice mail for you if
• your phone is switched off or not
ready to receive,
• you do not want to answer,
• you are making a phone call (and
if Call waiting page 48 is not
activated).
If the voice mail service is not part of
your service provider's standard
package, you will need to register for
it, and possibly set the voice mail
manually. The following sequence
may vary from service provider to
service provider.
Settings
¢M ¢ Voicemail
C
If the number is not yet entered:
§Yes§ Confirm request to open
Or open editor via main menu:
C
Voicemail no.:
J
Notification
You can activate and deactivate display of a message notifying of new
voice mail entries.
input field.
¢M ¢ Message settings
¢ Voicemail
Enter number and
confirm with
C.
Internet
¢O ¢ Select function.
C
Get the latest information from the
Internet that is specifically adapted
to the display options of your phone.
The browser is activated with the
preset option as soon as you call up
the function. Settings may be speci-
Page 44

43Internet
fied/pre-assigned by the service
provider.
Ending a connection
B
Navigation in the browser
C
I
F
Entering special characters
Press to end the connection and close the
browser.
• Select a link.
• Settings, status on/off.
§Back§
Press to go back a page.
• One input field/link
forward/back.
• Scroll one line.
Tab through active content
(left on page).
*/0
Select special characters.
Enter URL
J
§Options§ Open menu and select Go.
Start the browser and display the entered Internet site.
Enter URL.
Bookmarks list
Display the list of bookmarks stored
in the phone.
I
Select the bookmark and
confirm with
up URL.
Cto call
History
Display the list of most recently visited Internet sites.
I
C
For standard functions see page 18.
Select the history entry.
Call up the URL.
Browser settings
Set the multimedia behaviour, look
and feel, security issues and WAP
push for the browser to suit your
requirements. You can configure
and select up to 5 browser profiles.
Download
Downloads are offered on the Internet. Once downloaded, these are
available to you via the phone. You
cannot download more than one
content at the same time.
Closing the clamshell does not affect
ongoing downloads.
There are three categories of
downloads:
•Web browsing.
• Open Mobile Alliance (OMA):
Download of the media content
that has associated digital rights.
• Download of Java applications:
Java applications are decrypted
and processed by the Java Application Manager (JAM).
Page 45

Games44
You can use the browser to download applications (e.g. ringtones, games, pictures, animations) from the Internet.
BenQ Mobile excludes all warranty and liability
claims in respect of or in connection with any applications subsequently installed by the customer
and any software not included in the original delivery package. This also applies to functions enabled subsequently at the customer's instigation.
The purchaser bears sole risk for the loss of, damage to, and any defects arising in, this device or
the applications and for any direct damage or consequential damage of whatever nature resulting
from the use of this application. For technical reasons, such applications and subsequent enabling
of certain functions are lost in the event of the device being replaced/re-supplied and may be lost if
it is repaired. In such cases, the buyer is required
to download or enable the application again.
Please ensure that your phone has Digital Rights
Management (DRM) so that downloaded applications are protected from unauthorised reproduction. These applications are then exclusively
intended for your phone and cannot be transferred from this even to create a backup.
BenQ Mobile offers no warranty or guarantee nor
does it accept any liability for the customer's ability to download or enable applications again or to
do so free of charge. We recommend that you carry out a backup from time to time of the applications on your Windows
Phone Manager"
(www.BenQ-Siemens.com/ef81).
Your Internet browser is under license of:
®
PC using the "Mobile
Games
¢§
C
Games are offered on the Internet.
You can download games to the
phone. Once downloaded, these are
available to you via the phone.
Some games are already pre-installed on your phone. You will
find these listed here:
www.BenQ-Siemens.com/ef81
Settings
Profiles
¢T ¢ Profiles
C
Several settings can be stored in a
phone profile, for example to adapt
the phone to the surrounding level
of noise.
• Bluetooth Car Kits do not support profiles, e.g. General, Silent, Meeting, Outdoor, Car kit, Headset.
• If you change settings when not in the
profile menu, changes are not saved in
the current selected profile.
I
C
Edit a default profile or create a new
personal profile:
I
Select a default profile or
a personal profile.
Activate profile.
Select profile.
Page 46

45Settings
§Options§ Open menu and select
The list of available settings is displayed. For details see corresponding menu descriptions.
Headset
Profile is automatically set if an original headset is attached.
Change settings.
Ringtones
¢T ¢ Ringtones
C
Set the tones on the phone to suit
your requirements. The volume setting controls the volume of the ringtone as well as the general volume
level of beeps and tones played by
different applications.
Activate/deactivate the ringtone for
different functions or reduce it to a
short beep.
Themes
¢T ¢ Themes
C
Load a completely new user interface in your phone. With the press
of a key, various functions are
re-organised based on a theme.
Theme files are compressed to save
memory space. After a download
(page 43) or a call from My stuff
(page 57), these are automatically
unzipped when activated.
I
Select theme and confirm
with
C.
If you delete an active theme, some
used elements are reset to default.
Display
¢T ¢ Display
C
Pictures
You can set pictures separately for
the following functions:
• Wallpaper: Background image
used on either standby display.
You can set a Wallpaper for each
display separately.
• Logo: Graphic to be displayed
instead of the provider logo.
Screensaver
Picture displayed on either display
when a time period specified by you
has elapsed. An incoming call pressing any key or opening/closing the
clamshell will end the function unless the safety function is activated.
The setting is valid for both displays.
When the screensaver is manually set,
• the talk/standby time is reduced
dramatically
• the screensaver can cause irreversible
display burn-in effects.
Greeting message
Set message displayed when the
phone is switched on.
Backlight time
Set backlight duration for display.
Page 47

Settings46
Brightness
Set brightness level for the display.
Power save
Set time when the display goes into
power save mode. The setting is
valid for both displays.
Vibration (silent alert)
¢T ¢ Vibration
C
To avoid the disturbance caused by a
ringing phone, you can activate the
silent alert function as an alternative. The silent alert can also be activated in addition to the ringtone.
Connectivity
¢T ¢ Connectivity
C
Bluetooth® (BT)
Bluetooth is a short-range radio connection by means of which a headset
or car kit or such can be connected
without the need for wires.
Each Bluetooth device has its own
specific address and can be given a
self-explanatory name as an option.
Password protection ensures the security of a Bluetooth connection, as
does including the BT partner in a list
of "confidential" devices.
The Bluetooth® word mark and logos are
owned by the Bluetooth SIG, Inc. and any use
of such marks by BenQ Corp. is under license.
Other trademarks and trade names are those
of their respective owners. Bluetooth QDID
(Qualified Design ID): B02421
Bluetooth active
Activate/deactivate Bluetooth.
File location
Select where the files are to be
stored after being transferred via
Bluetooth.
Search
Search for specific categories of devices or for all Bluetooth devices.
Found devices are displayed in a list
(for list options see below).
Known devices
View the list of known devices
(list options see below).
Last connected
View the list of last 10 connected
devices, including those that are
currently connected (list options
see below).
Bluetooth name
Display your device information. Enter Device name:. This is the name the
partner sees. If you give no name,
the phone uses the non-changeable
device address.
Page 48

47Settings
Bluetooth visibility
The device address or the Bluetooth
name of your phone is shown or not
shown to other BT devices when
they request this in order to receive
or send data.
GPRS b
(General Packet Radio Service)
GPRS can be enabled or disabled
depending on your service provider.
Data counter
Display data transfer information.
Connect.profiles b
Depending on your provider up to
25 profiles are preset containing a
collection of settings utilised by
applications.
Internet profiles b
Depending on your provider up to
25 profiles are preset containing a
collection of settings utilised by
applications.
Linger time b
Depending on your provider you can
specify the linger time which will
apply to all applications.
Shortcuts
You can assign one important
number or one important function
to each one of the two softkeys, the
navigation key and number
keys 2 to 9 (speed-dial numbers).
¢T ¢ Shortcuts
C
Select key
Left soft key/Right soft key
Navigation keys
Number keys
Set function
I
Start function/call number
Press and hold key to start application/dial number.
Pre-defined key functions
The following key functions are
predefined and cannot be changed.
H
Select key and confirm
with
C.
Select and confirm
C. Select
with
Up/Down/
Left/Right and confirm
with
C.
Select and confirm
C. Select
with
number key and confirm
with
C.
Select function and
confirm with
Open Contacts (page 29).
C.
Page 49

Settings48
1
The service provider may have already assigned functions to a softkey (e.g access
to "SIM services" or direct call-up of the Internet portal). It may not be possible to
modify this key assignment.
Select the mailbox
number (page 42).
Call setup
¢T ¢ Call setup
C
¢ Select function.
Hide ID b
When you make a call, your number
can be shown on the display of the
called party. The settings you make
here apply to voice and video calls.
Call waiting b
If you are registered for this service,
activate/deactivate call waiting.
Diverts
You can specify the conditions
under which the call types should
be diverted to your mailbox or
other numbers.
Divert video calls/voice calls
Voice calls/Video calls
I
Select a call type and
confirm with
Select option and confirm
with
C.
C.
§Options§ Open menu and
J
Divert other call types
All calls/Data/Fax/Messages
§Options§ Open menu and select
J
All calls
All calls are diverted.
Ç
Unanswered
A call is diverted in the following situations: Not reachable, No reply, Busy
(see below).
Not reachable
A call is diverted if the phone is
switched off or is out of range.
No reply
A call is only diverted after a delay
that is determined by the network.
Busy
A call is diverted if another call is in
progress. If you activated Call waiting
(page 48), you will hear the call
waiting tone during a call (page 27).
select Set.
Enter a number/select
contact for divert.
Select a call type and
confirm with
Set.
Enter a number/select
contact for divert.
Symbol displayed in
standby mode.
C.
b
b
b
b
b
Page 50

49Settings
Fax b
Fax calls are diverted to a number
with a fax connection.
Data/Messages
Data calls are diverted to a number
with a PC connection.
b
Any key answer
Incoming calls can be accepted by
pressing any key (except for
B).
Open clamshell
If Auto accept is activated, incoming
calls are accepted by opening the
clamshell.
Video calls
Specify the additional settings for
video calls.
Show my image
Your video is always transmitted to
the caller during a video call.
Otherwise you can choose whether
or not to sent the video when you
receive a incoming video call.
Select image
If you do not want to transmit your
video image to the caller (Show my
image is deactivated), you can select
a video mute picture that is shown
instead.
You cannot send protected files during a
video call (DRM, page 16).
Phone
¢T ¢ Phone
C
¢ Select function.
Language
Set current language.
• Display language: Show the currently set display language.
• Input language: Select a language
for text entry. Languages with T9
support are marked with the
T9 symbol.
The phone can be reset to the language of your home service provider
with the following input (in standby
mode):
T9 mode
Set T9 (intelligent text entry) or the
multi-tap as default text entry method for most of the text entry items.
Key tones
Set the tone that is played when
pressing keys. Possible settings are
Tone, Silent.
Info tones
Set the service and alarm tones.
# 0 0 0 0 # A.
*
Page 51

Settings50
File system
Format card
Format the Micro SD Card and delete
all saved data. Formatting can last
longer than one minute.
Memory assistant
Start the memory assistant
(page 18).
Phone identity
The phone identity number (IMEI) is
displayed. This information may be
useful for customer service.
Device check
After the last information page,
a self-test as well as the individual
test are offered. If you select Self test,
all individual tests are carried out.
To display the software version for your
phone in standby mode:
select the Configuration tab.
# 0 6 #, and
*
Device manager (DM)
Start DM session. With the device
manager, configuration files are
transmitted from your provider. Sessions can be inititated as automatic
software updates each time the
phone is switched on.
Master reset
Reset the phone to default values
(factory setting). This does not affect
the SIM card or the network settings.
Alternatively enter in standby mode:
# 9 9 9 9 # A. Enter phone code
*
(page 20) and confirm with
C.
Clock
¢T ¢ Clock
C
The clock must be set correctly once
at start-up (page 15).
Setting the time and date
Time/Date Select and confirm
J
The time and date you entered are
only used if the Auto time (see below)
is deactivate. Otherwise the network
time is used and displayed.
Time zone
The world clock shows the current
system time above the map.
The time zone can be changed:
F
I
C
C.
with
Enter the time
(hours/minutes) or date
(day/month/year) and
confirm with
Select desired setting and
change the time zone in
the world map.
Select a city in the
selected time zone.
Display set time zone.
C.
Page 52

51Settings
If you changed the time zone:
• Alarm clock is changed to the current
time zone.
• Calendar events are not affected by time
zone changes.
Time format
Set the display format for time used
in various applications.
Date format
Set the display format for date.
Show clock
Set the time and date display in
standby mode.
Auto time
If you activate this setting, the time
zone is switched automatically to
local time by network.
b
Security
¢T ¢ Security
C
¢ Select function.
Auto key lock
If activated, the keypad is locked
automatically if no key has been
pressed for one minute in standby
mode. However, you can still be
called and you can still make an
emergency call.
The keypad can also be directly locked and
unlocked in standby mode. In each case:
# Press and hold.
Only protect. SIM
(PIN2 or phone code-protected)
Dialling options are restricted to
the SIM protected numbers in the
contacts.
PIN codes
Description on page 20: PIN control,
Change PIN, Change PIN2, Change
phonecode.
This SIM only
(PIN2 or phone-code protected)
The phone can be connected to a
SIM card when the phone code is
entered.
Barrings
Barring restricts the use of your SIM
card (not supported by all service
providers).
• All outgoing: All outgoing calls
except emergency numbers
are barred.
• Outg. internat.: Only national calls
can be made.
• Outg. int. x home: International calls
are not permitted. However you
can make calls to your home
country when abroad.
• All incoming: Phone is barred for
incoming calls.
• When roaming: You do not receive
calls when you are outside your
home network.
b
b
b
Page 53

Organiser52
Content downl'd ?
Enable or disable a content
download notification (page 16).
Network
C
¢T ¢ Network
¢ Select function.
Network info
Retrieve information about the network operator currently set.
Choose network
Start network search. This is useful
if you are not in your home network
or want to register in a different
network.
Auto network
The phone searches automatically
and selects the next network on the
preferred network list.
Preferred network
Display a list of preferred networks.
Customise the list by changing
entries to the desired networks.
Mode selection
Select transmission/transfer mode
GSM only/ UMTS only or Automatic.
Make sure that your service provider
supports the selected mode.
Fast search
Network reconnection is speeded
up.
b
Accessories
C
¢T ¢ Accessories
¢ Select function.
Headset
If an original headset is used, the
Headset profile is automatically acti-
vated when the headset is plugged
in.
Charge via USB
The phone is charged via USB when
connected to a computer via USB
cable.
Organiser
¢Q ¢ Select function.
C
Calendar
You can enter events in the calendar.
Time and date must be set for the
calendar to work correctly.
The calendar offers a daily, weekly
and monthly view. When you switch
the view, the current hour/day/week
is marked.
§Options§ Open menu and select
Enter start date and time and end
date and time. Alarm/repeat can be
set for each event. When the set date
and time of the event are reached
there is an audio and a visual alarm.
New event/Edit event.
Page 54

53Extras
An alarm sounds even when the phone is
switched off.
Dictat. machine
To start/playback recording see
sound recorder (page 54).
Time zones
The time zone can be selected in the
world map or city list (page 50).
Remote sync
Synchronise data filed on a remote
server with the data on your phone.
Before you start the synchronisation,
check Active profile, Sync mode and
Apps to synchronise. You can config-
ure up to 5 profiles with a different
provider, URL, port and database.
Extras
¢S ¢ Select function.
C
My menu
Create your own menu with frequently used functions, phone numbers from the contact list or applications. A list of 10 entries is preset.
You can change it as you wish.
SIM toolkit (optional) b
Your service provider may offer
special applications such as mobile
banking, share prices, etc. via the
SIM card.
U
For further information, please contact your service provider.
Symbol for SIM services.
Alarm clock
The alarm clock can be set for each
day of the week separately. The
alarm will ring at the set time, even
when the ringtone or the phone is
switched off. Press any key to end
alarm.
I
§Options§ Open menu and select Set
J
§Options§ Open menu and select
Apply every day
§Options§ Open menu and select
Select day of the week.
alarm.
Set time (hh:mm).
Save.
Apply every day.
Page 55

Extras54
Calculator
The input line and two calculation
lines are located in the top display
half.
J
Enter digit(s).
F/I
Navigate to functions.
C
J
C
Unit converter
You can convert various amounts
into other units.
F
H
J
H
F
You can use both input fields
alternately.
C
Select function.
Enter digit(s).
Use function. The result is
calculated and displayed
Select the source unit/
currency.
Switch to the input field.
Enter the quantity to be
converted.
Switch to the selection
field.
Select the target amount.
The result is displayed.
Opens the calculator with
the current converted
value.
Currency
Enter a basic currency into which the
conversions are to be made.
Sound recorder
Record new
If the Micro SD Card is inserted
(page 11), select save location:
Phone memory/Card
C
§Done§ End recording.
For playback see media player
(page 55).
Select.
Select default save
location and confirm
with
C.
Record/pause alternately.
Stopwatch
Use the stopwatch to measure time
or to save intermediate times.
C Start/Stop/Restart.
§Lap§ Switch to lap mode. In lap
After a stop:
§Reset§ Reset time to zero.
mode: Save lap time.
Page 56

55Media player
Media player
You can use the audio playback with
the Media player also if the clamshell
is closed.
Start the Media player
Clamshell closed
:
You access directly the Music tab.
Clamshell open
When you are viewing a picture/video or listening to a melody, the application starts the media player automatically.
Starting via the main menu:
C
The media player functions are accessible via 4 tabs: Music, Pictures,
Videos and Bookmarks.
F
The media player contains files
stored in the phone memory as
well as files stored on the Micro SD
Card.
Select to open the music
tab of the Media player.
¦
¢
Select tab.
Music
The music tab includes MP3 and AAC
files.
Playback with Clamshell closed
(Only if the Media player is in the
foreground)
¶/ ·
ˆ/ ‰
During playback:
Select track/playlist and
confirm with
Playback/pause depending on current state.
ˆ/‚.
+/ - Control volume.
If playback is paused:
£/ ¤
(not within live stream)
Skip to previous/next
track or rewind/forward
within track.
‹ End playback and return
to music tab.
Playback with Clamshell open
I
The media player offers the following functions for music playback:
C
F
I
Select track/playlist and
confirm with
Playback/Pause depending on current state.
Press briefly: Skip to
previous/next track.
Press and hold: Rewind/
fast forward within the
current track.
Set the volume.
C.
Page 57

My stuff56
Pictures
All files are listed with thumbnail,
file name and size.
I
The following functions can be
applied to a displayed picture:
Select file and confirm
with
C.
C Switch to full screen
mode.
I
Zoom picture
§Options§ Open menu and select
Videos
The media player offers the following functions for video playback:
C
F
I
Bookmarks
Play music/video directly from bookmark. The Bookmarks tab shows a
listing of all streaming content links
on the phone and the Micro SD Card.
Skip to previous/next
picture in the directory.
zoom mode Zoom in/Zoom
out/Fit to screen.
Playback/Pause depending on current state.
(only local playback, not
video streaming)
Press briefly: Rewind/Fast
forward if supported.
Press and hold: Go to
next/previous key frame.
Set the volume.
My stuff
To organise your files, you can use
th e f il e s yst em li ke a P C fi le ma na ger.
There are some folders in My stuff for
various data types for this purpose.
Remember that pictures and sounds
may be protected (DRM, page 16).
You can open My stuff either from
other applications, e.g. media player, messages or via main menu:
¢N
C
If the Micro SD Card is inserted
(page 11), folders/files are organised
on a separate tab. Files are managed
the same way as files saved on the
phone.
F
I
Depending on your selection, file
and respective application are
opened, or download is started.
Select tab (phone memory/Micro SD Card). List of
folders/files is displayed.
Select folder/file or link
and confirm with
C.
Page 58

Index structure
Folder Content/Options Formats
Sounds
Pictures
Videos
Themes
Games
Appl.
Misc.
Melodies,
records
Pictures bmp, jpg,
Videos 3gp
Load theme *
Launch JAM and
display list of
downloaded applications.
Files of other media types, e.g.
text modules.
(e.g.)
mp3, aac+
m3u, mid
amr, wav
jpeg png, gif
jar, jad
*
html, wml
57My stuff
Page 59

Mobile Phone Manager58
Mobile Phone Manager
MPM (Mobile Phone Manager) enables you to use extended phone
functions from your PC. The phone
and PC communicate via Bluetooth
or a data cable. MPM offers you a
multitude of functions:
You can manage your address and
contact data and synchronise it with
other phones.
MPM allows easy management of
your music and sound files, play lists,
ringtones and videos. With a mouse
click you can transfer the contents of
a whole music CD to your phone as
space saving AAC or MP3 files in top
quality.
With the Mobile Modem Assistant
you can use your phone as a modem
at home and abroad with ease. You
can gather your WAP favourites and
move them to your phone
conveniently.
Of course your phone’s data and settings can also be backed up on your
PC. With Phone Explorer you can
access your phone’s files as if it
was just another folder on your PC.
If you like, the software will do your
routine work for you like synchronising your contacts, downloading your
newly taken photos, or updating
your music files.
MPM and a detailed manual and online help can be found on the CD included with this phone. You can
download future versions of this
software from the Internet at:
www.BenQ-Siemens.com/ef81
Page 60

Customer Care
We offer fast, individual advice! You have
several options:
Our online support on the Internet:
www.BenQMobile.com/customercare
We can be reached any time, any place.
You are given 24 hour support on all aspects of our products. Here you will find an
interactive fault-finding system, a compilation of the most frequently asked questions
and answers, plus user guides and current
software updates to download.
When calling customer service, please
have ready your receipt and the phone
identity number (IMEI, to display press
#06#), the software version (to display,
*
press
#06#, and select the Configuration
*
tab) and if available, your Service customer number.
You can also get personal advice about our
range of products on our Premium Hotline:
United Kingdom ............................ 0906 9597500
(0.75 £ per minute)
Qualified employees are waiting to offer you
expert information about our products and
installation.
In some countries repair and replace services are impossible where the products are
not sold through our authorised dealers.
If repair work is necessary, please contact
one of our service centres:
Abu Dhabi .........................................0 26 42 38 00
Argentina .....................................0 81 02 22 66 24
Australia..........................................13 00 66 53 66
Austria.............................................05 17 07 50 04
Bahrain .................................................... 40 42 34
Bangladesh.......................................0 17 52 74 47
Belgium.............................................0 78 15 22 21
Bolivia ...............................................0 21 21 41 14
Bosnia Herzegovina..........................0 33 27 66 49
Brunei ................................................. 02 43 08 01
Bulgaria............................................... 02 73 94 88
Cambodia ........................................... 12 80 05 00
Canada ........................................1 88 87 77 02 11
Chile..................................................8 00 53 06 62
China ..............................................40 08 88 56 56
Colombia....................................01 80 07 00 66 24
Croatia ..............................................0 16 10 53 81
Czech Republic.................................2 33 03 27 27
Denmark ............................................. 35 25 65 29
Dubai ................................................0 43 96 64 33
Ecuador ..........................................18 00 10 10 00
Egypt.................................................0 23 33 41 11
Estonia................................................ 56 64 54 00
Finland ............................................09 22 94 37 00
France.............................................01 56 38 42 00
Germany ......................................0 18 05 33 32 26
Greece ............................................80 11 11 11 16
Hong Kong.......................................... 28 61 11 18
Hungary ..........................................06 14 71 24 44
Iceland .................................................. 5 20 30 00
India.............................22 24 98 70 00 Extn: 70 40
Indonesia .....................................0 21 46 82 60 81
Ireland.............................................18 50 77 72 77
Italy .................................................02 45 27 90 36
Ivory Coast.......................................... 05 02 02 59
Jordan...............................................0 64 39 86 42
Kenya.................................................... 2 72 37 17
Kuwait ................................................... 2 45 41 78
Latvia .................................................... 7 50 11 18
Lebanon.............................................. 01 44 30 43
Libya ...............................................02 13 50 28 82
Lithuania ...........................................8 70 07 07 00
Luxembourg....................................40 66 61 56 40
Macedonia ........................................0 23 13 18 48
Malaysia....................................+ 6 03 77 12 43 04
Malta .......................................+ 35 32 14 94 06 32
Mauritius ............................................... 2 11 62 13
Mexico .......................................01 80 07 11 00 03
Morocco .............................................. 22 66 92 09
Netherlands .................................0 90 03 33 31 00
New Zealand...................................08 00 27 43 63
59Customer Care
Page 61

Customer Care60
Nigeria ..............................................0 14 50 05 00
Norway.................................................22 57 77 46
Oman....................................................... 79 10 12
Pakistan..........................................02 15 66 22 00
Paraguay ..........................................8 00 10 20 04
Peru ..................................................0 80 05 24 00
Philippines ........................................0 27 57 11 18
Poland.............................................08 01 30 00 30
Portugal ............................................8 08 20 15 21
Qatar....................................................04 32 20 10
Romania .........................................02 12 09 99 66
Russia..........................................8 80 02 00 10 10
Saudi Arabia .....................................0 22 26 00 43
Serbia .............................................01 13 07 00 80
Singapore ............................................62 27 11 18
Slovak Republic ..............................02 59 68 22 66
Slovenia............................................0 14 74 63 36
South Africa ....................................08 60 10 11 57
Spain.................................................9 02 11 50 61
Sweden...........................................08 57 92 90 49
Switzerland .....................................08 48 21 20 00
Taiwan ............................................02 23 96 10 06
Thailand............................................0 27 22 11 18
Tunisia .................................................71 86 19 02
Turkey..........................................0 21 64 59 98 98
Ukraine ........................................8 80 05 01 00 00
United Arab Emirates........................0 43 66 03 86
United Kingdom ...........................0 87 05 33 44 11
Uruguay ..........................................00 04 05 46 62
USA .............................................1 88 87 77 02 11
Venezuela....................................0 80 01 00 56 66
Vietnam...........................................84 89 20 24 64
Zimbabwe ............................................04 36 94 24
Page 62

Care and maintenance
Your phone has been designed and manufactured to the highest of standards and
should be treated with great care. The suggestions below will help you to enjoy your
phone for many years.
• Protect your phone from moisture and humidity. Precipitation, humidity and liquids
contain minerals that will corrode electronic circuits. Nevertheless, should your
phone become wet, disconnect it immediately from the power supply to avoid electric shock. Do not place your phone (even
to dry it) on/in a source of heat such as a
microwave oven, oven or radiator. The
phone may become overheated and possibly explode.
• Do not use or store the phone in dusty,
dirty areas. Its moving parts may be damaged and the casing may become deformed and discoloured.
• Do not store your phone in hot environments (e.g. vehicle instrument panel in the
summer). High temperatures can shorten
the life of electronic devices, damage batteries and warp or melt certain plastics.
• Do not store your phone in cold environments. When the phone warms up again
(to its normal ambient temperature), moisture can form inside the phone, which may
damage electronic circuit boards.
• Do not drop, knock or shake your phone.
Rough handling can damage internal circuit boards!
• Do not use harsh chemicals, cleaning solvents, or strong detergents to clean the
phone!
The suggestions given above apply equally
to your phone, battery, charger and all accessories. If any of these parts is not working
properly, obtain fast and reliable help at our
service centres.
Battery quality statement
The capacity of your mobile phone battery
will reduce each time it is charged/emptied.
Storage at too high or low temperatures will
also result in a graduly capacity loss. As a result the operating time of your mobile phone
may be considerably reduced, even after a
full recharge of the battery.
Regardless of this, the battery has been designed and manufactured so that it can be recharged and used for six months after the
purchase of your mobile phone. After six
months, if the battery is clearly suffering from
loss of performance, we recommend that your
replace it. Please buy only original batteries.
Display quality declaration
For technological reasons, a few small dots
with different colours may appear in the display in exceptional cases.
Just remember that the appearance of
brighter or darker dots generally does not
mean that a fault has occurred.
61Care and maintenance
Page 63

Product data62
Product data
Declaration of conformity
BenQ Mobile hereby declares that the phone
described in this user guide is in compliance
with the essential requirements and other
relevant provisions of European Directive
1999/5/EC (R&TTE). The relevant declaration of conformity (DoC) has been signed.
Please call the company hotline if you
require a copy of the original:
www.BenQMobile.com/conformity
Technical data
UMTS class: 3 (0,25 watt)
Frequency range: 1 920 - 2 170 MHz
GSM class: 4 (2 watt)
Frequency range: 880 - 930 MHz
GSM class: 1 (1 watt)
Frequency range: 1 710 - 1 880 MHz
GSM class: 1 (1 watt)
Frequency range: 1 850 - 1 990 MHz
Weight phone:
Weight charger:
Weight headset:
Weight USB cable:
Size: 94 x 51 x 15.9 mm
Li-Ion battery: 950 mAh
SIM card: 3.0/1.8 V
(Band I)
110 g
55 g
20 g
70 g
(80 ccm)
Phone ID
You will need the following details if you
lose your phone or SIM card:
the number of the SIM card (on the card):
..............................................................
15 digit serial number of the phone
(under the battery):
..............................................................
the customer service number of the service
provider:
..............................................................
Lost phone
If you lose your phone or SIM card, contact
your service provider immediately to
prevent misuse.
Operating time
The operating time depends upon the respective conditions of use: Extreme temperatures considerably reduce the phone’s
standby time. Avoid placing the phone in the
sun or on a heater.
Call time
• UMTS: up to 210 minutes
• GSM: up to 270 minutes
Standby time
• UMTS: up to 250 hours
• GSM: up to 300 hours
Action taken Time
Calling 1 30 - 90 minutes
Light * 1 50 minutes
Network search 1 15 minutes
* Key input, games, organiser etc.
(min)
Reduction of
standby time by
Page 64

SAR
63SAR
European Union (RTTE) and international (ICNIRP)
INFORMATION ON RF EXPOSURE /
SPECIFIC ABSORPTION RATE (SAR)
THIS MODEL MEETS INTERNATIONAL
GUIDELINES FOR EXPOSURE TO RADIO
WAVES
Your mobile device is a radio transmitter and
receiver. It is designed not to exceed the limits for exposure to radio waves recommended by international guidelines. These
guidelines were developed by the independent scientific organization ICNIRP and include safety margins designed to assure the
protection of all persons, regardless of age
and health.
The guidelines use a unit of measurement
known as the Specific Absorption Rate, or
SAR. The SAR limit for mobile devices is
2 W/kg and was adopted into the European
Standard EN 50360 and into other national
standards. The CE mark demonstrates that
the EU requirements are met.
The highest SAR value for this device when
tested at the ear was 0.37 W/kg
devices offer a range of functions, they can
be used in positions other than the head,
such as on the body. In this case, a separation distance of 1.0 cm is required.
As SAR is measured utilizing the device's
highest transmitting power, the actual SAR
of this device while operating is typically below that indicated above. This is due to automatic changes to the power level of the
1
. As mobile
device to ensure it only uses the minimum
level required to reach the network.
The World Health Organization has stated
that present scientific information does not
indicate the need for any special precautions
for the use of mobile devices. They note that
if you nevertheless want to reduce your exposure then you can do so by limiting the
length of calls or using a 'hands-free' device
to keep the mobile phone away from the
head and body.
Additional Information can be found on the
websites of the World Health Organization
(www.who.int/emf) or BenQ Mobile
(www.BenQMobile.com).
1 The tests are carried out in accordance with
international guidelines for testing.
Page 65

Guarantee certificate (UK)64
Guarantee certificate (UK)
Without prejudice to any claim the user (customer) may have in relation to the dealer or retailer, the customer shall be granted a
manufacturer's Guarantee under the conditions
set out below:
• In the case of new devices and their components exhibiting defects resulting from manufacturing and/or material faults within
24 months of purchase, BenQ Mobile shall,
at its own option and free of charge, either replace the device with another device reflecting the current state of the art, or repair the
said device. In respect of parts subject to
wear and tear (including but not limited to,
batteries, keypads, casings, small parts
on casings, protective coverings where included in the scope of delivery), this warranty
shall be valid for six months from the date of
purchase.
• This Guarantee shall be invalid if the device
defect is attributable to improper treatment
and/or failure to comply with information contained in the user manuals.
• This Guarantee shall not apply to or extend to
services performed by the authorised dealer
or the customer themselves (e.g. installation,
configuration, software downloads). User
manuals and any software supplied on a separate data medium shall be excluded from the
Guarantee.
• The purchase receipt, together with the date
of purchase, shall be required as evidence for
invoking the Guarantee. Claims under the
Guarantee must be submitted within two
months of the Guarantee default becoming
evident.
• Ownership of devices or components replaced by and returned to BenQ Mobile shall
vest in BenQ Mobile.
• This Guarantee shall apply to new devices
purchased in the European Union. For Products sold in the United Kingdom the Guarantee is issued by BenQ Mobile UK Ltd.,
Carmelite 50, Victoria, Embankment, London, EC4Y 0DX, U.K.
• Any other claims resulting out of or in connection with the device shall be excluded from
this Guarantee. Nothing in this Guarantee
shall attempt to limit or exclude a Customers
Statutory Rights, nor the manufacturer's liability for death or personal injury resulting
from its negligence.
• The duration of the Guarantee shall not be
extended by services rendered under the
terms of the Guarantee.
• Insofar as no Guarantee default exists,
BenQ Mobile reserves the right to charge the
customer for replacement or repair.
• The above provisions does not imply a
change in the burden of proof to the detriment
of the customer.
To invoke this Guarantee, please contact our
online support on the Internet
www.BenQMobile.com/customercare
or the telephone service. The relevant number
is to be found in the accompanying user guide.
Page 66

Guarantee certificate (IRL)
Without prejudice to any claim the user (customer) may have in relation to the dealer or
retailer, the customer shall be granted a manufacturer’s Guarantee under the conditions set
out below:
• In the case of new devices and their components exhibiting defects resulting from manufacturing and/or material faults within 24
months of purchase, BenQ Mobile shall, at its
own option and free of charge, either replace
the device with another device reflecting the
current state of the art, or repair the said device. In respect of parts subject to wear and
tear (including but not limited to, batteries,
keypads, casings, small parts on casings,
protective coverings where included in the
scope of delivery), this warranty shall be valid
for six months from the date of purchase.
• This Guarantee shall be invalid if the device
defect is attributable to improper care or use
and/or failure to comply with information contained in the user manuals.
• In particular claims under the Guarantee cannot be made if:
• The device is opened (this is classed as
third party intervention)
• Repairs or other work done by persons not
authorised by BenQ Mobile.
• Components on the printed circuit board
are manipulated
• The software is manipulated
• Defects or damage caused by dropping,
breaking, lightning or ingress of moisture.
This also applies if defects or damage was
caused by mechanical, chemical, radio interference or thermal factors (e.g.: microwave, sauna etc.)
• Devices fitted with accessories not author-
ised by BenQ Mobile
• This Guarantee shall not apply to or extend to
services performed by the authorised dealer
or the customer themselves (e.g. installation,
configuration, software downloads). User
manuals and any software supplied on a separate data medium shall be excluded from the
Guarantee.
• The purchase receipt, together with the date
of purchase, shall be required as evidence for
invoking the Guarantee. Claims under the
Guarantee must be submitted within two
months of the Guarantee default becoming
evident.
• Ownership of devices or components replaced by and returned to BenQ Mobile shall
vest in BenQ Mobile.
• This Guarantee shall apply to new devices
purchased in the European Union. For Products sold in the Republic of Ireland the Guarantee is issued by BenQ Mobile UK, Branch
Ireland, 1st Floor, Riverview House,
21–23 City Quay, Dublin – The Republic
of Ireland.
• Any other claims resulting out of or in connection with the device shall be excluded from
this Guarantee. Nothing in this Guarantee
shall attempt to limit or exclude a Customers
Statutory Rights, nor the manufacturer’s liability for death or personal injury resulting
from its negligence.
• The duration of the Guarantee shall not be
extended by services rendered under the
terms of the Guarantee.
• Insofar as no Guarantee default exists,
BenQ Mobile reserves the right to charge the
customer for replacement or repair.
• The above provisions does not imply a
change in the burden of proof to the detriment
of the customer.
To invoke this Guarantee, please contact our
online support on the Internet
www.BenQMobile.com/customercare
or the telephone service. The relevant number
is to be found in the accompanying user guide.
65Guarantee certificate (IRL)
Page 67

License Agreement66
License Agreement
This License Agreement ("Agreement") is between You and BenQ Mobile GmbH & Co.
OHG, Germany ("BenQ"). The Agreement authorizes You to use the Licensed Software,
specified in Clause 1 below, which may be included in your phone, stored on a CD-ROM,
sent to You by electronic mail or over the air,
downloaded from BenQ Web pages or servers
or from other sources under the terms and conditions set forth below.
Read this Agreement carefully before using
your phone. By using your phone or installing,
copying, and/or using the Licensed Software,
You acknowledge that You have read and understood the Agreement and agree to be bound
by all of the terms and conditions stated below.
You further agree that if BenQ or any licensor of
BenQ ("Licensor") is required to engage in any
proceeding, legal or otherwise, to enforce their
rights under this Agreement, BenQ and/or its Licensor shall be entitled to recover from You, in
addition to any other sums due, reasonable attorney's fees, costs and disbursements. If You
do not agree to all of the terms and conditions of
this Agreement, do not install or use the
Licensed Software. This Agreement governs
any Updates, releases, revisions, or enhancements to the Licensed Software.
1. LICENSED SOFTWARE. As used in this
Agreement, the term "Licensed Software"
means collectively: all the software in Your
phone, all of the contents of the disk(s), CDROM(s), electronic mail and its file attachments, or other media with which this Agreement is provided and includes any related
BenQ or third party software and upgrades,
modified versions, updates, additions and copies of the Licensed Software, if any, distributed
over the air, downloaded from BenQ Web pages or servers or from other sources.
2. COPYRIGHT. The Licensed Software and
all related rights, without limitation including
proprietary rights therein, are owned by BenQ,
its Licensors or affiliates and are protected by
international treaty provisions and all applicable
national laws. This Agreement does not convey
to You nor allow You to acquire any title or ownership interest in the Licensed Software or
rights therein. The structure, organization, data
and code of the Licensed Software are the valuable trade secrets and confidential information
of BenQ, its Licensors or affiliates. You must reproduce and include the copyright notices with
any permitted copies You make of the Licensed
Software.
3. LICENSE AND USE. BenQ grants to You
a non-exclusive, non-transferable end user
right to install the Licensed Software or use the
Licensed Software installed on the phone. The
Licensed Software is licensed with the phone
as a single integrated product and may be used
with the phone only as set forth in these licensing terms.
4. LIMITATIONS ON LICENSE. You may not
copy, distribute, or make derivative works of the
Licensed Software except as follows:
(a) You may make one copy of the Licensed
Software, excluding the documentation, as an
archival backup copy of the original. Any other
copies You make of the Licensed Software are
in violation of this Agreement.
(b) You may not use, modify, or transfer the
right to use the Licensed Software other than
together with the accompanying hardware or
copy the Licensed Software except as expressly provided in this Agreement.
(c) You may not sublicense, rent or lease the
Licensed Software.
(d) You may not reverse engineer, decompile,
modify, or disassemble those Licensed Software programs except and only to the extent
that such activity is expressly permitted by applicable law notwithstanding this limitation.
Page 68

67License Agreement
Parts of the Licensed Software may be supplied
by third parties and may be subject to separate
license terms. Such terms are set out within the
documentation.
5. MISUSE OF THE LICENSED SOFTWARE OR DATA GENERATED BY THE LICENSED SOFTWARE IS STRICTLY
PROHIBITED BY BENQ, MAY VIOLATE GERMAN, U.S. AND OTHER LAWS AND MAY
SUBJECT YOU TO SUBSTANTIAL LIABILITY.
You are solely responsible for any misuse of the
Licensed Software under this Agreement and
for any liability or damage related in any way to
your use of the Licensed Software in violation of
this Agreement. You are also responsible for
using the Licensed Software in accordance with
the limitations of this Agreement.
6. TERMINATION. This Agreement is effective from the first date You install, copy or otherwise use the Licensed Software. You may
terminate this license at any time by deleting or
destroying the Licensed Software, all back up
copies and all related materials provided to You
by BenQ. Your license rights terminate automatically and immediately without notice if You
fail to comply with any provision of this Agreement. The rights and obligations under sections
2, 5, 6, 7, 9, 12 and 13 of this Agreement shall
survive the termination of this Agreement.
7. YOU ACKNOWLEDGE THE LICENSED
SOFTWARE IS PROVIDED "AS IS" AND NEITHER BENQ NOR ANY OF ITS LICENSORS
MAKE ANY REPRESENTATIONS OR WARRANTIES, EXPRESS OR IMPLIED, INCLUDING BUT NOT LIMITED TO THE
WARRANTIES OF MERCHANTABILITY OR
FITNESS FOR A PARTICULAR PURPOSE
OR THAT THE LICENSED SOFTWARE WILL
NOT INFRINGE ANY THIRD PARTY PATENTS, COPYRIGHTS, TRADEMARKS OR
OTHER RIGHTS. THERE IS NO WARRANTY
BY BENQ OR ITS LICENSORS OR BY ANY
OTHER PARTY THAT THE FUNCTIONS
CONTAINED IN THE LICENSED SOFTWARE
WILL MEET YOUR REQUIREMENTS OR
THAT THE OPERATION OF THE LICENSED
SOFTWARE WILL BE UNINTERRUPTED OR
ERROR-FREE AND BENQ AND ITS LICENSORS HEREBY DISCLAIM ANY AND ALL LIABILITY ON ACCOUNT THEREOF. NO ORAL
OR WRITTEN INFORMATION OR ADVICE
GIVEN BY A BENQ REPRESENTATIVE
SHALL CREATE A WARRANTY OR IN ANY
WAY AFFECT THIS DISCLAIMER. YOU ASSUME ALL RESPONSIBILITY TO ACHIEVE
YOUR INTENDED RESULTS AND FOR THE
INSTALLATION, USE, AND RESULTS OBTAINED FROM IT.
8. NO OTHER OBLIGATIONS. This Agree-
ment creates no obligations on the part of BenQ
other than as specifically set forth herein.
9. LIMITATION OF LIABILITY. IN NO
EVENT SHALL BENQ, ITS EMPLOYEES, LICENSORS, AFFILIATES OR AGENTS BE LIABLE FOR ANY DIRECT DAMAGES, LOST
PROFITS, DATA OR BUSINESS, OR COSTS
OF PROCUREMENT OF SUBSTITUTE
GOODS OR SERVICES, PROPERTY DAMAGE, INTERRUPTION OF BUSINESS OR
FOR ANY SPECIAL, INDIRECT, INCIDENTAL,
EXEMPLARY, ECONOMIC, PUNITIVE OR
CONSEQUENTIAL DAMAGES, HOWEVER
CAUSED, AND WHETHER ARISING UNDER
CONTRACT, TORT, NEGLIGENCE, OR OTHER THEORY OF LIABILITY, OR ARISING OUT
OF THE USE OF OR INABILITY TO USE THE
LICENSED SOFTWARE, EVEN IF BENQ IS
ADVISED OF THE POSSIBILITY OF SUCH
DAMAGES. THE LIMITATION OF LIABILITY
SHALL NOT APPLY IF AND TO THE EXTENT
BENQ´s LIABILITY IS MANDATORY UNDER
THE APPLICABLE LAW E.G. ACCORDING
TO PRODUCT LIABILITY LAW OR IN THE
EVENT OF INTENTIONAL MISCONDUCT,
PERSONAL INJURY OR DEATH.
10. TECHNICAL SUPPORT. BenQ and its Li-
censors have no obligation to furnish You with
technical support unless separately agreed in
writing between You and BenQ or the applicable Licensor.
Page 69

License Agreement68
BenQ and where applicable its Licensors in the
Licensed Software shall be free to use any
feedback received from You resulting from your
access to and use of the Licensed Software for
any purpose including (without limitation) the
manufacture, marketing and maintenance or
support of products and services.
11. EXPORT CONTROL. The Licensed Software may include technical data and cryptographic software and is subject to German,
European Union and U.S. export controls and
may be subject to import or export controls in
other countries. You agree to strictly comply
with all applicable import and export laws and
regulations. Specifically, You agree, to the extent required by U.S. Export Administration
Regulations, that You shall not disclose or otherwise export or re-export the Licensed Software or any part thereof delivered under this
Agreement to (a) Cuba, Iran, Iraq, Libya, North
Korea, Sudan, Syria or any other country (including a national or resident of such country) to
which the U.S. has restricted or prohibited the
export of goods or services.
12. APPLICABLE LAW AND FORUM. The
laws of Germany govern this Agreement. No
choice of law rules of any jurisdiction will apply.
The courts in Munich shall settle any disputes
arising out of or relating to this Agreement provided you are a merchant.
13. MISCELLANEOUS. This Agreement represents the entire agreement between You and
BenQ relating to the Licensed Software and (i)
supersedes all prior or contemporaneous oral
or written communications, proposals, and representations with respect to its subject matter;
and (ii) prevails over any conflicting or additional terms of any acknowledgement or similar
communication between the parties during the
term of this License. Notwithstanding the foregoing, some products of BenQ may require You
to agree to additional terms through an on-line
"click-wrap" license, and such terms shall supplement this Agreement. If any provision of this
Agreement is held invalid, all other provisions
shall remain valid unless such validity would
frustrate the purpose of this Agreement, and
this Agreement shall be enforced to the full extent allowable under applicable law. No modification to this Agreement is binding, unless in
writing and signed by a duly authorized representative of each party. This Agreement shall
be binding on and shall inure to the benefit of
the heirs, successors, and assigns of the parties hereto. The failure of either party to enforce
any right resulting from the breach of any provision of this Agreement by the other party will not
be deemed a waiver of any right related to a
subsequent breach of such provision or any
other right hereunder. Notwithstanding anything to the contrary in this Agreement, BenQ
and/or its licensors may enforce its rights, including but not limited to copyright, trademark
or trade names, in accordance with the rules of
law in each country.
Page 70

Index
A
Accessories.........................................52
Alarm clock.........................................53
Answering service (external)............... 42
Any key answer...................................49
Auto key lock...................................... 51
Auto time ...........................................51
B
Band selection ....................................52
Barrings..............................................51
Battery
Charge ...........................................12
Insert........................................11
Operating time .........................13
Remove..........................................12
Bluetooth® .........................................46
Bookmark
Media player...................................56
WAP ...............................................43
Brightness ..........................................46
Browser ..............................................42
C
Calculator...........................................54
Calendar............................................. 52
Alarm ............................................. 52
Call
Accept/end .....................................25
Charges..........................................34
Conference.....................................27
Divert .............................................48
End ................................................25
Hold ...............................................26
Mute ..............................................28
Options ..........................................28
Reject.............................................26
Swap (change) ...............................26
Video .............................................24
Waiting ..........................................27
Call log lists ........................................34
Call waiting on/off ..............................48
Calling................................................24
Camera...............................................34
Settings..........................................35
Take picture/video ..........................35
Care and maintenance........................61
, 12
, 62
Case sensitivity (T9)............................ 22
Cell broadcast (CB)
Receive .......................................... 38
Settings ......................................... 42
Charges.............................................. 34
Charging time .................................... 13
Clamshell
Auto accept.................................... 49
open/close ....................................... 8
Clock.................................................. 50
Conference ........................................ 27
Connection profiles ............................ 47
Connectivity....................................... 46
Contacts............................................. 29
Distribution list............................... 32
Groups........................................... 31
New entry...................................... 30
New SIM entry ............................... 32
Content download prompt ................. 52
Control code (DTMF) .......................... 29
Create messages ................................ 36
Currency converter............................. 54
Customer Care.................................... 59
D
Data counter ...................................... 47
Date format........................................ 51
Declaration of conformity................... 62
Device manager ................................. 50
Dialling code ...................................... 25
Dialling with number keys .................. 25
Dictating machine .............................. 53
Digital Rights Management................. 16
Display ............................................... 45
Brightness...................................... 46
Greeting message .......................... 45
Language....................................... 49
Logo .............................................. 45
Power save..................................... 46
Screensaver ................................... 45
Symbols......................................... 10
Wallpaper....................................... 45
Distribution list................................... 32
Divert calls ......................................... 48
Download .......................................... 43
DTMF tones (tone sequences)............. 29
Duration/charges................................ 34
69Index
Page 71

Index70
E
E-mail
Create ............................................37
Retrieve..........................................39
Settings..........................................42
Emergency number ............................15
Extras .................................................53
F
Fast access..........................................48
Fast list search ....................................18
Fax/data .............................................47
File system..........................................50
G
Games................................................44
GPRS...................................................47
Greeting message...............................45
Guarantee certificate ..........................64
H
Handset volume..................................25
Handsfree talking................................26
Headset settings .................................52
Hide ID on/off ..................................... 48
Hold call .......................................26
Hotline ............................................... 59
, 29
I
IMEI number.......................................50
Inbox..................................................37
Info tones...........................................49
Input language .............................22
Internet ..............................................42
Profiles...........................................47
, 49
K
Key lock................................................7
Automatically .................................51
Clamshell closed...............................5
Key tones............................................49
L
Language ...........................................49
Linger time ......................................... 47
Logo...................................................45
Lost of phone, SIM card.......................62
M
Mailbox.............................................. 42
Main menu......................................... 17
Maintenance of phone ....................... 61
Mark mode......................................... 19
Master reset ....................................... 50
Media player ...................................... 55
Bookmark ...................................... 56
Music............................................. 55
Pictures.......................................... 56
Video ............................................. 56
Memory assistant ............................... 18
Memory card...................................... 11
Message
E-mail ............................................ 37
MMS .............................................. 36
SMS ............................................... 36
Micro SD Card..................................... 11
Microphone on/off.............................. 28
Missed calls (log list)........................... 34
MMS
Create............................................ 36
Receive .......................................... 38
Settings ......................................... 41
Mobile Phone Manager....................... 58
Music ................................................. 55
Muting (microphone) ......................... 28
My Stuff ............................................. 56
N
Navigation key ................................... 17
Network............................................. 52
Auto network................................. 52
Band selection................................ 52
Choose .......................................... 52
Fast search..................................... 52
Info................................................ 52
Preferred network .......................... 52
O
Offline mode...................................... 14
Only protected SIM............................. 51
Operating time................................... 13
Battery........................................... 62
Organiser ........................................... 52
Overview phone................................... 5
Page 72

71Index
P
PC connection.....................................21
Phone
Operating time ...............................62
Overview..........................................5
Settings..........................................44
Technical data ................................62
Phone code.........................................20
Phone identity number (IMEI) .............50
Picture
Media player...................................56
Take ...............................................35
PIN
Change...........................................20
Control...........................................20
Enter ..............................................14
Phone code ....................................20
PIN2 ...................................................20
Power save .........................................46
Preventing accidental activation.......... 21
Product data .......................................62
Profiles ...............................................44
PUK, PUK2 ..........................................20
R
Redial .................................................25
Remote sync .......................................53
Ringtones ...........................................45
S
Safety precautions ................................ 2
Screensaver ........................................45
Security
Codes.............................................20
Settings..........................................51
Settings ..............................................44
Accessories.....................................52
Call setup .......................................48
Clock..............................................50
Connectivity ................................... 46
Display ........................................... 45
Network .........................................52
Phone.............................................49
Profiles...........................................44
Ringtones.......................................45
Security..........................................51
Shortcuts........................................ 47
Themes .......................................... 45
Vibration ........................................46
Short cuts........................................... 47
Short message (SMS).......................... 36
Show clock......................................... 51
Signal strength................................... 16
Silent alert.......................................... 46
SIM card
Clear barring .................................. 21
Insert ............................................. 11
Toolkit ........................................... 53
SMS
Create............................................ 36
Receive .......................................... 38
Settings ......................................... 40
SOS.................................................... 15
Sound recorder................................... 54
Special characters............................... 22
Standard functions............................. 18
Standby mode.................................... 15
Standby time................................ 13
Stopwatch.......................................... 54
Swap calls .......................................... 26
Switch on/off phone........................... 14
Symbols ............................................. 10
, 62
T
T9
On/off............................................ 49
Text entry ...................................... 22
Tabs................................................... 17
Talk time (battery).............................. 62
Task switching.................................... 19
Key .................................................. 6
Technical data.................................... 62
Templates .......................................... 24
Text entry
Edit Menu ...................................... 22
Input language............................... 22
With T9.......................................... 22
Without T9..................................... 21
Text module....................................... 24
Themes .............................................. 45
This SIM only...................................... 51
Time format ....................................... 51
Time zone .................................... 15
Time/Date .................................... 15
, 50
, 50
U
User guide symbols ............................ 16
Page 73

Index72
A31008-H2640-A1-3-7619
V
Vibration ............................................46
Video
Media player...................................56
Record............................................35
Video call
Accept............................................ 25
End ................................................25
Key...................................................6
Options ..........................................28
Settings..........................................49
Voice dialling ......................................33
Activate..........................................33
Record voice tag .............................33
Voice message (mailbox) .................... 42
Volume
Handset volume .............................25
W
Wallpaper (display)............................. 45
WAP ................................................... 42
WAP push........................................... 38
Wildcard............................................. 31
 Loading...