

Page 1
s
mobile
Issued by
Information and Communication mobile
Haidenauplatz 1
D-81667 Munich
© Siemens AG 2004
All rights reserved. Subject to availability.
Rights of modification reserved.
Siemens Aktiengesellschaft
www.siemens-mobile.com/cx70emoty
s
mobile
Designed for life
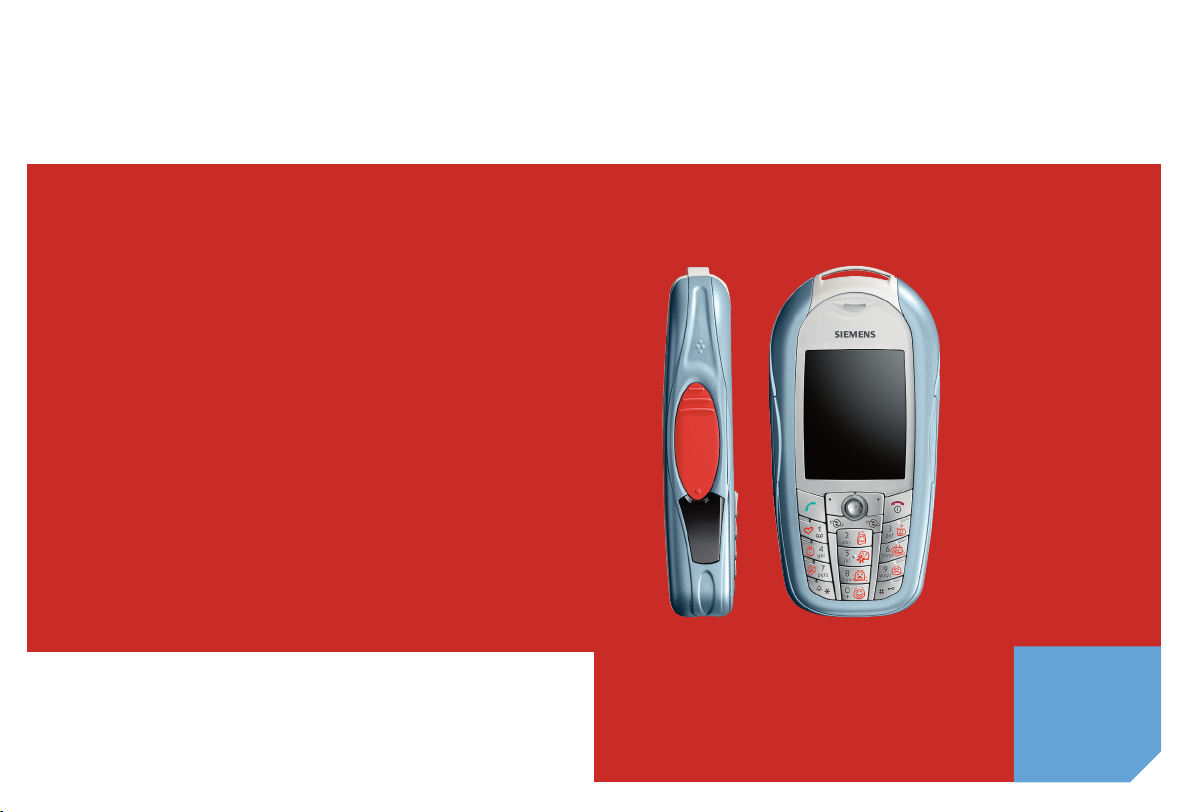
CX70
Emoty
Page 2
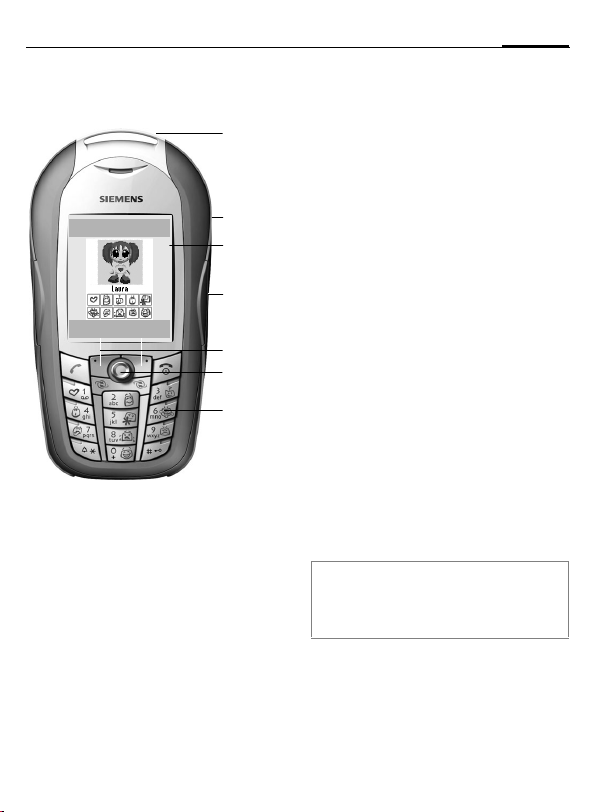
Overview (en)
Emoty
Info ì Options
1
2
3
4
5
6
7
Emoty device. The Emoty device is fit-
1
ted like a CLIPIt™ cover, p. 7.
Studs for opening the Emoty cover,
2
p. 8.
Emoty start screen. This appears
3
when the Emoty application has
started, p. 10.
Emoty sensors. You can control the
4
intensity and expression of the animated figure with the three built-in
sensors. The stroking and pressing
sensors are on the sides. The shaking
sensor is built into in the CLIPIt™
cover, p. 10.
Display buttons
5
Joystick. You can use the joystick I to
6
select a figure (p. 10).
Emotion keys 0 - 9.
7
Use these buttons to select the emotions that you would like to send
(p. 12). The emotion keys only
become active after you have started
the Emoty application.
This user handbook uses the same symbols and menu guidance as those shown
in the user handbook of your mobile telephone.
3Overview (en)
Page 3

4 Table of Contents
Table of Contents
Overview (en) ............................ 3
Table of Contents ....................... 4
Introduction ............................... 5
Welcome ................................. 5
Safety precautions ................... 5
Getting started ........................... 7
Installing Emoty on your
telephone ................................ 7
Disassembling your
telephone ............................ 7
Install Emoty ........................ 7
Uninstalling the Emoty ......... 8
Software installation ................ 9
Download ............................ 9
Upload from a PC ................. 9
Using Emoty ............................. 10
Start Emoty ............................ 10
Ending Emoty ........................ 10
Creating emotions ................. 10
Select a figure with
the joystick ......................... 10
Assigning an emotion ......... 11
Changing the emotion ........ 11
The fun button ................... 12
Sending emotions by MMS .....12
Sending emotions ............... 13
Send display ....................... 13
Adding text ......................... 14
Saving text ......................... 14
Resetting the emotion ........ 15
Changing the resolution
of the animation ................. 15
Setup ........................................ 16
Downloading new figures ....... 16
Downloading new emotions ... 16
Deleting a figure/emotion ....... 16
Adjusting and testing sensor
settings .................................. 17
Dynamic Light .................... 17
Appendix .................................. 18
Self help for problems ............ 18
Customer Care ....................... 18
Care and maintenance ............ 19
Battery quality declaration ...... 19
Display quality declaration ...... 19
Technical data .................... 20
Operating times .................. 20
Guarantee certificate (UK) ......20
Guarantee certificate (IRL) ......21
SAR – European Union (RTTE) .22
SAR – International (ICNIRP) ... 23
Page 4
Introduction
5Introduction
Welcome
Your Emoty lets you express your
emotions in a completely new way
and send them immediately by MMS
to your friends and acquaintances.
• Choose one of three figures,
p. 10.
• Choose one of 10 different emotions, p. 11.
• Show your feelings to the figure
by pressing, stroking or shaking
your telephone, p. 11.
• Add a text and send the emotion
immediately by MMS, p. 12.
• Download new figures from the
Internet, p. 16.
Safety precautions
Information for parents
Please read the operating instructions and
safety precautions carefully before use.
Explain the content to your children and the
hazards associated with using the phone.
Remember to comply with
legal requirements and local
restrictions when using the
phone. For example in aeroplanes, petrol stations, hospitals or while driving.
Mobile phones can interfere
with the functioning of medical
devices such as hearing aids
or pacemakers. Keep at least
20 cm/ 9 inches between
phone and pacemaker. When
using the mobile phone hold it
to the ear which is further away
from the pacemaker. For more
information consult your
doctor.
Message tones are reproduced through the loudspeaker. Do not hold the
telephone to your ear when it
rings. Otherwise you risk serious permanent damage to
your hearing.
Page 5
Introduction6
Only use original Siemens batteries (100% mercury-free)
and charging devices. Otherwise you risk serious damage
to health and property: the battery could explode, for
instance.
You may only open the phone
to replace the battery, faceplate, keypad or SIM card. You
must not open the battery
under any circumstances. Any
other changes to this device
are strictly prohibited and will
invalidate the operating
licence.
Important
Dispose of used batteries and
phones according to the legal
regulations.
Mobile phones can interfere
with the operation of nearby
TVs, radios or PCs.
Use only Siemens original
accessories. This will avoid
potential risks to health or
property and ensure compliance with all relevant
regulations.
Improper use will invalidate the guarantee!
These safety instructions also apply to Siemens original accessories.
Page 6
Getting started
7Getting started
Installing Emoty on your
telephone
If you have a CX70 Emoty, you only
need to insert the SIM card and fit
the Emoty cover before you can "get
going" (p. 10)!
If you have a separate CX70 Emoty
cover, you need to install the Emoty
application and Emoty animations
on your telephone as well, p. 9.
Before fitting the Emoty cover, switch
your telephone off!
Disassembling your telephone
• If necessary, disassemble your telephone according to the instructions in the user handbook of your
telephone.
• Remove the old keypad.
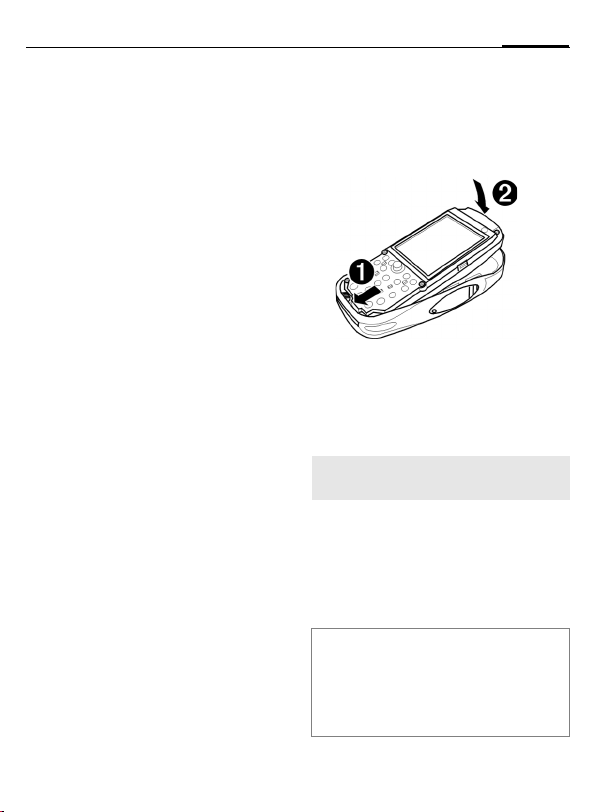
Install Emoty
Insert the telephone in the lower shell
Hold the telephone with the display
1
facing upwards.
Insert the lower edge of the telephone
at an angle into the lower shell of the
Emoty cover.
Make sure that the telephone is inserted
under the contact pin of the Emoty!
Carefully press on the upper shell of
2
the telephone until it clicks into place
in the lower shell.
Place the new keypad on the telephone. Make sure that it is seated correctly.
Emoty keyboard
The new keyboard lets you select Emotions
by pressing the symbols (p. 11). If the
Emoty application is switched off, the keyboard functions like your normal telephone
keyboard.
Page 7
Getting started8
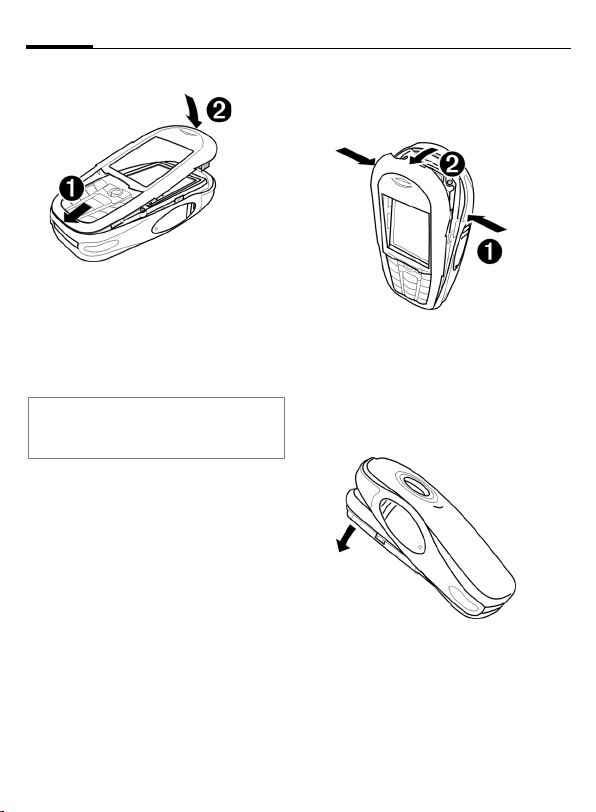
Fitting the upper shell
Insert the stud on the bottom of the
1
upper shell into the corresponding
recess of the Emoty lower shell.
Carefully press on the upper shell until
2
it clicks into place.
Note
Please check that all sides of the upper
shell have clicked correctly into place.
Uninstalling the Emoty
Remove the upper shell of the
Emoty cover
Press on the side studs (p. 3) until the
1
upper shell springs open.
Pull the upper shell forwards at an
2
angle and remove it.
Removing the telephone
Tilt the lower shell forwards and take
out the telephone. You can carefully
tap the lower shell against your hand
so that the telephone comes out
gently.
Page 8

9Getting started
Software installation
If you upgrade one of the telephones
of the CX70 series to Emoty, you
must first install the Emoty application with the animations on your
telephone.
Requirement: Your telephone must
have an Emoty hardware interface.
Please ask your dealer for details.
Download
C
¢O¢Applications
I Select Emoty.
C
Or
C
§Options§ Open menu.
Go to... Select and enter
C
Upload from a PC
You can load the software from a PC
to the telephone.
The software necessary for this is
available on the enclosed CD. You
can install it on the telephone from
your PC.
Further information about the installation is available on the Internet
under www.siemens.com/
cx70emoty.
Start the browser.
¢O¢Internet
wap.siemensmobile.com/emoty.
Start the download.
Requirements
• The telephone is switched on.
• You have connected your telephone to your PC via the data
cable or via the IrDA interface.
Installation
• Insert the CD in the CD drive of
your PC.
• Start the Mobile Phone Manager
(Requirement: The program is
installed).
• Copy the Emoty folder and all its
contents from the CD onto the
telephone.
Further information is available on
the CD or on the Internet under
www.siemens.com/
cx70emoty.
You must then disconnect the telephone from your PC.
Now you can start the Emoty application on the telephone. Requirement: You have already fitted the
Emoty cover (p. 7)
Note
If you have any questions or problems
about the software installation, please contact our customer service, p. 18.
Page 9

Using Emoty10
Using Emoty
The user handbook uses the same
symbols and menu guidance as
those shown in the user handbook
of your mobile telephone.
Start Emoty
If you have fitted the Emoty cover on
your telephone, there are two ways
of starting Emoty.
Either:
§Emoty§ Press this display button.
If this display button is not yet
assigned to the Emoty application,
you must change the assignment
first. For details of how to do this,
read the user handbook of your telephone.
Or:
Start the Emoty application via the
Surf & Fun menu of your telephone.
C¢O¢Applications
¢Emoty
Emoty is started.
Note
The Emoty application must be installed
(p. 9).
Ending Emoty
§Options§ Open menu.
Exit Select this function.
§Yes§ Emoty is ended.
§No§ Process is stopped.
Creating emotions
Select a figure with the joystick
After you have started Emoty, the
start display appears. A figure is
already selected. If you like it, you
can assign it your emotions (p. 11).
If you want to select another figure:
I Select a figure.
Emoty
Info
í
Options
Under each figure, the emotions
which can be selected are highlighted.
You can, however, also download
new figures and/or emotions (p. 16).
Page 10

11Using Emoty
Note
The last figure you selected is automatically
loaded when the Emoty application is
restarted.
Assigning an emotion
You can now assign an emotion to
the selected figure. You can choose
between the following emotions:
Icon/button Emotion
1
2
3
4
5
6
7
8
9
0
Love
Happy
Curious
Surprise
Apology
Naughty
Boredom
Sad
Anger
Fun
Press one of the buttons
to assign this emotion to your figure.
After selecting an emotion the
selected figure displays this emotion
and can only be changed by you.
0 to 9
Changing the emotion
Your Emoty cover has three sensors
which can be used to change the
emotion of your figure:
• Pressing. Press on the left or right
sensor (p. 3).
• Stroking. Stroke the left or right
sensor (p. 3).
• Shaking the telephone.
Note
You can adjust the sensitivity of the sensors, p. 17.
Effects of positive emotions
If you have selected one of the positive emotions
means:
• Stroking a sensor strengthens the
emotion
• Pressing a sensor weakens the
emotion
1 to 5, this
Page 11

Using Emoty12
Effects of negative emotions
If you have selected one of the negative emotions
pressing causes exactly the opposite
effect, i.e.
• Stroking a sensor weakens the
emotion
• Pressing a sensor strengthens the
emotion
As soon as you operate the sensor,
you see the figure react.
Strength of the reaction
The sensors react at three levels: The
stronger you stroke or press a sensor, the more intensive the figure
displays the emotion.
In both cases if you shake your telephone, the expression of your figure
changes, while the intensity of its
emotion remains the same.
Resetting the emotion
Press the
ure to the original animation. If the
figure is already in the initial state, it
is reset to the start display.
6 to 9, stroking or
B button to reset your fig-
The fun button
The fun button 0 is an exception.
It is not used to express a specific
emotion, but rather to send birthday
greetings or invitations to your
friends for example.
Shaking several times lets you
choose different templates.
Just like the positive emotions, stroking strengthens and pressing weakens the chosen template.
Sending emotions by
MMS
You can send the emotion you created by MMS to the MMS-capable
telephone of your friends or
acquaintances and add a text.
Requirement
Your service provider offers the MMS service. You may have to register specially to
use this service.
Page 12

13Using Emoty
Sending emotions
First assign an emotion and change
it as you want. Then:
§Options§ Open menu.
Send Select this function.
The send display appears.
I
J
Select the input fields you
want.
Fill out input fields.
Send display
To:
Subject:
Text:
Sound:
Enter the telephone
number of your friend or acquaintance.
Press
K to select an en-
try from the address book
or the telephone book.
Enter a subject reference.
The added text appears
here (p. 14). Press §Edit§ to
change the existing text or
to write a new text.
Press §Change§ to select
whether sound should be
send with the text or not.
The size of the MMS appears in the
last line Size:. A lower resolution results in a smaller MMS.
Preview
§Options§ Open menu.
Preview Select this function.
A preview of the MMS appears.
Briefly press the
to the menu.
Sending to a number of recipients
§Options§ Open menu.
Cc: Select this function.
/
I
J
§OK§ Press the display button
B button to return
Select the address line
and enter the telephone
number. You can also
choose an entry from the
address book or from the
telephone book.
to return to Send.
Page 13

Using Emoty14
Sending
Send
To:
+4917512345678
Subject:
Hi!
Text:
Hello. How are you?
Sound:
]
§Options§ Open menu.
Send Select this function. The
telephone prepares to
send the message.
Yes§ Press the display button in
order to confirm sending.
The MMS is sent.
Options
Adding text
You can also enter a text starting
from the send display. Or:
§Options§ Open menu.
Edit text Select this function.
The text editor opens.
J
Enter text.
You can now enter up to 500 characters of text. The T9 text help is set by
default. To find out more about "T9",
please read the user handbook of
your telephone.
You can also switch off the T9
support:
#
Press the Hash key repeatedly until T9 is switched
off.
Saving text
When you have completed the text,
you can save it.
§Options§ Open menu.
Save Select this function.
Page 14

15Using Emoty
Resetting the emotion
There are two ways to reset the current emotion to its initial state.
Either:
B Briefly press.
The emotion is reset to its initial
state. If the emotion has already
been reset, you return to the start
display. If you have written a text, it
is not lost.
Or:
§Options§ Open menu.
Reset Select this function. Con-
firm with §Yes§.
You return to the start display.
Changing the resolution of the
animation
You can change the resolution of the
animation. This setting can be used
to adjust the size of the MMS.
§Options§ Open menu.
Resolution MMS
Select this function.
I Jump to the required res-
olution High/Low.
§Select§ Select resolution.
§OK§ Press.
The new resolution is selected.
Page 15

Setup16
Setup
You can adapt Emoty to meet your
own personal requirements, as well
as download or delete new figures.
The menu is found under §Options§ of
the start display.
Downloading new figures
You can download new figures and
emotions to your telephone.
§Options§ Open menu.
Character Selection
Download More...
If you cannot establish an Internet
connection, please check your
browser settings or ask your provider
for the correct settings.
I
The figure is downloaded with the
Fun emotion. If the Emoty application becomes active again, the new
figure is available for use. But the figure has not yet been selected
(p. 10).
Select this function.
Select and press §Down-
load§.
Jump to the figure you
want and select it.
<Figure> Emotions
I
If you cannot establish an Internet
connection, please check your
browser settings or ask your provider
for the correct settings.
Select this function.
Jump to an emotion that
is not yet available
(marked by an empty box
Õ), select it and press
§Change§. Confirm with
§Yes§.
The emotion is downloaded.
Deleting a figure/emotion
You can delete figures or the individual emotions of a figure, e.g. to save
memory space.
Downloading new
emotions
You can also download other emotions for a figure.
§Options§ Open menu.
Page 16

Deleting figures
§Options§ Open menu.
Character Selection
I
Deleting individual emotions
§Options§ Open menu.
<Figure> Emotions
I
Note
You can download emotions of a figure that
were previously deleted or are not yet
installed. To do this, you must press
§Download§ (p. 16).
Select this function.
Jump to the figure and
press §Delete§ to delete the
figure. Confirm with §Yes§.
Select this function.
Jump to an existing emo-
tion, select it and press
§Change§. Confirm with
§Yes§.
The emotion is deleted.
Adjusting and testing
sensor settings
You can adjust the sensitivity with
which the sensors react to your
pressing, stroking or shaking. You
can also test your settings.
Sensitivity Test
Stroke
Press
Shake
ì OK
§Options§ Open menu.
Sensitivity Select this function.
Setting the sensitivity
I
§Select§ Select the resolution.
B Briefly press this button.
The Sensitivity is set.
Testing the sensitivity
§Test§ Press the display button.
Now you can test the selected sensitivity of the sensors.
Dynamic Light
Dynamic Light is not supported by
the CX70 Emoty.
Set the sensitivity you
require.
17Setup
Page 17

Appendix18
Appendix
Self help for problems
No Emoty function available
1. The Emoty application cannot be activated:
• The Emoty application is not
installed: Install the Emoty application (p. 9). If necessary, check that
the Emoty cover is correctly fitted
(p. 7) and switch the telephone off
and then on again.
2. The Emoty start menu is not displayed.
Possible error: Emoty animation is not
installed. At least one Emoty animation must be installed.
• Install an Emoty animation (p. 16).
3. The required figure/emotion is not
available.
• Download required figure/emotion
(p. 16).
4. The sensors do not react.
• Check that the Emoty cover is cor-
rectly fitted (p. 7). Then switch the
telephone off and on again.
• Test sensor settings (p. 17).
You do not see a display
1. The telephone is switched off.
• Switch on the telephone.
2. The battery is empty.
• Charge the battery.
Note
If there are any problems, further information on self-help is given in the user handbook of your mobile telephone.
Customer Care
We offer fast, individual advice! You have
several options:
Our online support on the Internet:
www.siemens.com/
mobilephonescustomercare
We can be reached any time, any place.
You are given 24 hour support on all
aspects of our products. Here you will find
an interactive faultfinding system, a compilation of the most frequently asked questions and answers, plus user guides and
current software updates to download.
The most frequently asked questions and
answers are given in the appendix of this
user handbook (p. 18).
You can also get personal advice about our
range of products on our Premium Hotline:
United Kingdom ................... 0906 9597500
(£0.75 per minute)
Page 18

19Appendix
Qualified Siemens employees are waiting
to offer you expert information about our
products and installation.
In some countries repair and replace services are impossible where the products are
not sold through our authorised dealers.
If repair work is necessary, please contact
one of our service centres (p. 149).
Care and maintenance
Your phone has been designed and crafted
with great care and attention and should also
be treated with care. The suggestions below
will help you to enjoy your phone for many
years.
• Protect your phone from moisture and
humidity! Precipitation, humidity and liquids contain minerals that will corrode
electronic circuits. Should your phone
nonetheless become wet, disconnect it
immediately from any power supply and/or
remove the battery, and leave the open
phone to dry at room temperature!
• Do not use or store the phone in dusty,
dirty areas. Its moving parts may become
damaged.
• Do not store your phone in hot areas. High
temperatures can shorten the life of electronic devices, damage batteries and warp
or melt certain plastics.
• Do not store your phone in cold areas.
When the phone warms up again (to its
normal ambient temperature), moisture
can form inside the phone, which may
damage electronic components.
• Do not drop, knock or shake your phone.
Rough handling can damage components
inside the device!
• Do not use harsh chemicals, cleaning solvents, or strong detergents to clean the
phone!
The suggestions given above apply equally
to your phone, battery, charger and all
accessories. If any of these parts are not
working properly, take them to your nearest
qualified service outlet. The personnel there
will assist you and, if necessary, repair the
device.
Battery quality
declaration
The capacity of your mobile phone battery
will reduce each time it is charged/discharged. Storage at too high or low temperatures will also result in a gradual capacity
loss. As a result the operating time of your
mobile phone may be considerably reduced,
even after a full recharge of the battery.
Regardless of this, the battery has been
designed and manufactured so that it can be
recharged and used for six months after the
purchase of your mobile phone. After six
months, if the battery is clearly suffering from
loss of performance, we recommend that
you replace it. Please buy only Siemens
original batteries.
Display quality
declaration
For technological reasons, some small dots
in other colours may appear in the display in
rare cases.
Please remember that if some dots appear
brighter or darker in the display, this generally does not mean that a fault has occurred.
Page 19

Appendix20
Declaration of conformity
Siemens Information and Communication
mobile hereby declares that the phone
described in this user guide is in compliance
with the essential requirements and other
relevant provisions of European Directive
1999/5/EC (R&TTE). The declaration of conformity (DoC) concerned has been signed.
Please call the company hotline if you
require a copy of the original or visit:
www.siemens.com/mobiledocs
Technical data
Dimensions
Weight of Emoty
(incl. telephone)
Size: 115 x 56 x 24 mm
Operating temp.: –10 °C… 55 °C
116 g
(L x W x H)
Operating times
When the Emoty function is switched on, the
power consumption is increased compared
to the values specified in the user handbook
of your telephone. The operating time of the
battery is thereby reduced.
Guarantee certificate
(UK)
Without prejudice to any claim the user (customer) may have in relation to the dealer or
retailer, the customer shall be granted a
manufacturer's Guarantee under the conditions set out below:
• In the case of new devices and their components exhibiting defects resulting from
manufacturing and/or material faults within
24 months of purchase, Siemens shall, at
its own option and free of charge, either
replace the device with another device
reflecting the current state of the art, or
repair the said device. For wearing parts
(e.g., batteries, keypads, housings, small
parts on housings, protective coverings
where included in the scope of delivery),
this durability guarantee shall be valid for
six months from the date of purchase.
• This Guarantee shall be invalid if the
device defect is attributable to improper
treatment and/or failure to comply with
information contained in the user manuals.
• This Guarantee shall not apply to or
extend to services performed by the
authorised dealer or the customer themselves (e.g. installation, configuration,
software downloads). User manuals and
any software supplied on a separate data
medium shall be excluded from the Guarantee.
• The purchase receipt, together with the
date of purchase, shall be required as evidence for invoking the Guarantee. Claims
under the Guarantee must be submitted
within two months of the Guarantee
default becoming evident.
• Ownership of devices or components
replaced by and returned to Siemens shall
vest in Siemens.
• This Guarantee shall apply to new devices
purchased in the European Union.
For Products sold in the United Kingdom
the Guarantee is issued by Siemens plc,
Siemens House, Oldbury, Bracknell,
Berkshire, RG12 8FZ.
• Any other claims resulting out of or in connection with the device shall be excluded
from this Guarantee. Nothing in this Guarantee shall attempt to limit or exclude a
Page 20

21Appendix
Customers Statutory Rights, nor the manufacturer's liability for death or personal
injury resulting from its negligence.
• The duration of the Guarantee shall not be
extended by services rendered under the
terms of the Guarantee.
• Insofar as no Guarantee default exists,
Siemens reserves the right to charge the
customer for replacement or repair.
• The above provisions does not imply a
change in the burden of proof to the detriment of the customer.
To invoke this Guarantee, please contact the
Siemens telephone service. The relevant
number is to be found in the accompanying
user guide.
Guarantee certificate
(IRL)
Without prejudice to any claim the user (customer) may have in relation to the dealer or
retailer, the customer shall be granted a
manufacturer’s Guarantee under the conditions set out below:
• In the case of new devices and their components exhibiting defects resulting from
manufacturing and/or material faults within
24 months of purchase, Siemens shall, at
its own option and free of charge, either
replace the device with another device
reflecting the current state of the art, or
repair the said device. In respect of parts
subject to wear and tear (including but not
limited to, batteries, keypads, casing), this
warranty shall be valid for six months from
the date of purchase.
• This Guarantee shall be invalid if the
device defect is attributable to improper
care or use and/or failure to comply with
information contained in the user manuals.
In particular claims under the Guarantee
cannot be made if:
• The device is opened (this is classed as
third party intervention)
• Repairs or other work done by persons not
authorised by Siemens.
• Components on the printed circuit board
are manipulated
• The software is manipulated
• Defects or damage caused by dropping,
breaking, lightning or ingress of moisture.
This also applies if defects or damage was
caused by mechanical, chemical, radio
interference or thermal factors (e.g.:
microwave, sauna etc.)
• Devices fitted with accessories not authorised by Siemens
• This Guarantee shall not apply to or
extend to services performed by the
authorised dealer or the customer themselves (e.g. installation, configuration,
software downloads). User manuals and
any software supplied on a separate data
medium shall be excluded from the Guarantee.
• The purchase receipt, together with the
date of purchase, shall be required as evidence for invoking the Guarantee. Claims
under the Guarantee must be submitted
within two months of the Guarantee
default becoming evident.
• Ownership of devices or components
replaced by and returned to Siemens shall
vest in Siemens.
• This Guarantee shall apply to new devices
purchased in the European Union. For
Products sold in the Republic of Ireland the
Guarantee is issued by Siemens Ireland
Limited, Ballymoss Road, Sandyford
Industrial Estate, Dublin 18 – The Republic
of Ireland.
Page 21

Appendix22
• Any other claims resulting out of or in connection with the device shall be excluded
from this Guarantee. Nothing in this Guarantee shall attempt to limit or exclude a
Customers Statutory Rights, nor the manufacturer’s liability for death or personal
injury resulting from its negligence.
• The duration of the Guarantee shall not be
extended by services rendered under the
terms of the Guarantee.
• Insofar as no Guarantee default exists,
Siemens reserves the right to charge the
customer for replacement or repair.
• The above provisions does not imply a
change in the burden of proof to the detriment of the customer.
To invoke this Guarantee, please contact the
Siemens helpdesk on 1850 777 277. This
number is also to be found in the accompanying user guide.
SAR – European Union
(RTTE)
INFORMATION ON RF
EXPOSURE/SPECIFIC ABSORPTION
RATE (SAR)
THIS MOBILE PHONE MEETS THE LIMITS
SET BY THE EU (1999/519/EC) FOR PROTECTION OF THE HEALTH OF THE PUBLIC FROM THE EFFECTS OF EXPOSURE
TO ELECTROMAGNETIC FIELDS
These limits are part of comprehensive recommendations for the protection of the public. The recommendations were developed
and confirmed by independent scientific
organisations through periodic and thorough
evaluation of scientific studies
include a substantial safety margin designed
to assure the safety of all persons, regardless of age and health.
1
. The limits
Before a radio equipment may be placed on
the market, compliance with the European
laws and the respective technical limit
requirements must be demonstrated. Only
then the CE mark may be affixed
for mobile phones recommended by the
Council of the European Union employs a
unit of measurement known as the Specific
Absorption Rate, or SAR. This SAR limit is
3
2.0 W/kg
. This corresponds with the
requirements of the International Commission for Non-Ionizing Radiation Protection
ICNIRP and was adopted into the European
Norm for Mobile Radio Equipment EN
50360. The SAR of mobile phones is determined in accordance with the European
Norm EN 50361. This involves measuring
the maximum value in all frequency bands of
the mobile phone with the phone transmitting at its highest power level. The actual
SAR level of the phone during normal operation may be well below the maximum value.
This is because the phone is designed to
operate at multiple power levels so as to use
only the power required to reach the network. In general, the closer you are to a base
station, the lower the power output.
1 The World Health Organization (WHO,
CH-1211 Geneva 27, Switzerland) states
that present scientific information does
not indicate the need for any special precautions for use of mobile phones. Further information: www.who.int/peh-emf,
www.mmfai.org,
www.siemens.com/mobilephones
2 The CE mark confirms that the product is
in compliance with the legal requirements
of the European Union as a prerequisite
for the placing on the market and the free
movement of goods within the European
internal market.
3 averaged over 10 g body tissue
2
. The limit
Page 22

The highest SAR value for this phone model
when tested for compliance against the
standard was 0.89 W/kg
You can also find the SAR value for this
device on the Internet at this address
www.siemens.com/mobilephones
While there may be differences between the
SAR levels of various phones and at various
positions, all Siemens products meet the
legal requirements.
4
.
SAR – International
(ICNIRP)
INFORMATION ON RF
EXPOSURE/SPECIFIC ABSORPTION
RATE (SAR)
THIS MOBILE PHONE MEETS THE LIMITS
FOR PROTECTION OF THE HEALTH OF
THE PUBLIC FROM THE EFFECTS OF
EXPOSURE TO ELECTROMAGNETIC
FIELDS
Your mobile phone is a radio transmitter and
receiver. It is designed and manufactured
not to exceed the limits for exposure to radio
frequency (RF) energy recommended by
international guidelines from the
International Commission on Non-Ionizing
Radiation Protection (ICNIRP). These limits
are part of comprehensive guidelines for the
protection of the public and establish permitted levels of RF energy for the population.
The guidelines were confirmed by independent scientific organisations through periodic
and thorough evaluation of scientific
4 SAR values may vary depending on na-
tional requirements and frequency bands.
SAR information for different regions can
be found at www.siemens.com/mobile-
phones
5
studies
. The limits include a substantial
safety margin designed to assure the safety
of all persons, regardless of age and health.
The exposure limit for mobile phones
employs a unit of measurement known as
the Specific Absorption Rate, or SAR. The
SAR limit stated in the international guidelines is 2.0 W/kg
ducted in all frequency bands using standard
operating positions with the phone transmitting at its highest power level. The actual
SAR level of the phone during operation can
be well below the maximum value. This is
because the phone is designed to operate at
multiple power levels so as to use only the
power required to reach the network. In general, the closer you are to a base station, the
lower the power output.
The highest SAR value for this model phone
when tested for use at the ear is 0.89 W/kg
SAR information can also be found
at www.siemens.com/mobilephones
While there may be differences between the
SAR levels of various phones and at various
positions, they all meet the international
guidelines for safe RF exposure.
5 The World Health Organization (WHO,
CH-1211 Geneva 27, Switzerland) states
that present scientific information does
not indicate the need for any special precautions for use of mobile phones. Further information: www.who.int/peh-emf,
www.mmfai.org,
www.siemens.com/mobilephones
6 averaged over 10g of tissue.
7 SAR values may vary depending on na-
tional requirements and frequency bands.
information for different regions can be
found at
www.siemens.com/mobilephones
6
. Tests for SAR are con-
23Appendix
7
.
Page 23

149Customer Care
Customer Care
Simple, straightforward support for
technical and operational queries is
available from our online support
service on the Internet:
www.siemens.com/
mobilephonescustomercare
Abu Dhabi .........................................0 26 42 38 00
Argentina .....................................0 80 08 88 98 78
Australia..........................................13 00 66 53 66
Austria.............................................05 17 07 50 04
Bahrain .................................................... 40 42 34
Bangladesh.......................................0 17 52 74 47
Belgium.............................................0 78 15 22 21
Bolivia ...............................................0 21 21 41 14
Bosnia Herzegovina..........................0 33 27 66 49
Brazil............................................0 80 07 07 12 48
Brunei ..................................................02 43 08 01
Bulgaria................................................02 73 94 88
Cambodia ............................................12 80 05 00
Canada ........................................1 88 87 77 02 11
China ...........................................0 21 38 98 47 77
Croatia ..............................................0 16 10 53 81
Czech Republic.................................2 33 03 27 27
Denmark ..............................................35 25 86 00
Dubai ................................................0 43 96 64 33
Egypt.................................................0 23 33 41 11
Estonia...................................................6 30 47 97
Finland............................................09 22 94 37 00
France.............................................01 56 38 42 00
Germany *....................................0 18 05 33 32 26
Greece............................................80 11 11 11 16
Hong Kong...........................................28 61 11 18
Hungary ..........................................06 14 71 24 44
Iceland ...................................................5 11 30 00
India .............................22 24 98 70 00 Extn: 70 40
Indonesia .....................................0 21 46 82 60 81
Ireland.............................................18 50 77 72 77
Italy .................................................02 24 36 44 00
Ivory Coast...........................................05 02 02 59
Jordan...............................................0 64 39 86 42
* 0,12 Euro/min.
Kenya.................................................... 2 72 37 17
Kuwait ................................................... 2 45 41 78
Latvia .................................................... 7 50 11 18
Lebanon.............................................. 01 44 30 43
Libya ...............................................02 13 50 28 82
Lithuania ...........................................8 52 74 20 10
Luxembourg........................................ 43 84 33 99
Macedonia .......................................... 02 13 14 84
Malaysia....................................+ 6 03 77 12 43 04
Malta .......................................+ 35 32 14 94 06 32
Mauritius ............................................... 2 11 62 13
Mexico .......................................01 80 07 11 00 03
Morocco .............................................. 22 66 92 09
Netherlands .................................0 90 03 33 31 00
New Zealand...................................08 00 57 43 63
Nigeria ..............................................0 14 50 05 00
Norway................................................ 22 70 84 00
Oman ....................................................... 79 10 12
Pakistan ..........................................02 15 66 22 00
Paraguay ..........................................8 00 10 20 04
Philippines ........................................0 27 57 11 18
Poland.............................................08 01 30 00 30
Portugal ............................................8 08 20 15 21
Qatar................................................... 04 32 20 10
Romania .........................................02 12 04 60 00
Russia..........................................8 80 02 00 10 10
Saudi Arabia .....................................0 22 26 00 43
Serbia .............................................01 13 07 00 80
Singapore ........................................... 62 27 11 18
Slovak Republic ..............................02 59 68 22 66
Slovenia ............................................0 14 74 63 36
South Africa ....................................08 60 10 11 57
Spain.................................................9 02 11 50 61
Sweden.............................................0 87 50 99 11
Switzerland .....................................08 48 21 20 00
Taiwan ............................................02 23 96 10 06
Thailand ............................................0 27 22 11 18
Tunisia ................................................ 71 86 19 02
Turkey..........................................0 21 65 79 71 00
Ukraine ........................................8 80 05 01 00 00
United Arab Emirates........................0 43 66 03 86
United Kingdom ...........................0 87 05 33 44 11
USA .............................................1 88 87 77 02 11
Vietnam...........................................84 89 20 24 64
Zimbabwe ........................................... 04 36 94 24
 Loading...