

Page 1

s
mobile
Issued by
Information and Communication mobile
Haidenauplatz 1
D-81667 Munich
© Siemens AG 2004
All rights reserved. Subject to availability.
Rights of modification reserved.
Siemens Aktiengesellschaft
www.siemens-mobile.com
s
mobile
Designed for life
C65
CV65
CT65
Page 2

!" 1
C65 ct-e2, A31008-H7800-M7-1-RC19
89:;<= ................................ 2
$>?@ ....................................... 4
ABCDE ................................... 6
+,F*GH ................................ 8
I>JK>LMN PIN O ........... 11
PQ+,RB .............................. 12
SGTU ..................................... 14
89VW ..................................... 15
XYMN ..................................... 17
Z[\ ......................................... 19
]V^_` ................................. 21
ab" ......................................... 22
[\` ......................................... 24
a\c" ..................................... 26
de> ......................................... 27
bfgh ..................................... 29
ibVW ..................................... 30
jkl'b ................................. 32
mnopJqrst ................... 36
u5vw ..................................... 37
VW ............................................ 40
xyz ......................................... 49
{t|h ..................................... 50
}~TU ..................................... 52
3*•€• ................................. 54
‚ƒst ..................................... 55
$>„… .....................................57
†‡ˆ‰ .....................................58
SAR - Š‹ ŒICNIRP• ..............59
!"? .........................................60
Ž• ............................................66
#$%&'()*+,$%- ./)01234*567
www.siemens-mobile.com/c65
Page 3
89:;<=2
C65 ct-e2, A31008-H7800-M7-1-RC19
89:;<=
•‘’“
!"#$%&'()*+,-./0123456
789:;<=>?@AB;CDE/"#AFG;HIJK6
!"#AFG%LMNO
PQRSTU/VWRX
YZ6 [\!]F^_`a
bC_cdCefgG6
hijklmnopcq
rs;tmu\vwxe y
Sz{x6 AF|ySz{
x}~M•€•‚ƒ 20 „
…;†‡6 "#hijk
Gu%ˆjk‰Š‹Œ•Ž
•‡ySz{x6 HI•
‘u%9:;c’“”6
SIM•–l—˜™;6 <y
23š ›œ(<;•žl
mn—Ÿ ¡¢6
%£"#¤¥j¦§¨x
^©-ª;j« ¬V-6 ®
¯lmn°±²j³´6
µ¶¬· 42 ¸-_¹ L º
»¼¬· 44 ¸- |½•w
¾ºk;¼¿nÀ¥Á¼
xÂÃÄ™6 ÅÆVAF
Ç™µ¶GeV:ÈÉi
½•ºktmGu%£ˆA
FÊ!‹Œ•¬· 19¸-6
®¯u:;wËÌlmÍ
ÎÏÐ_ÑÒÓ;ÔÕ6
Ö×ØÙ:ÚÛ#ÜÝÞ
ßàjá¬100% âãä/²jx6 ®¯Ìlmn
е:;жз/ийклП
Р;ФХ6 ì\?ujáÌ
lmnÇ’íî6
%£"#прстКуф
хцчИЙi;шщъы
ь [Class 1 LED éý ¬þ
ÿ IEC 60825-1 …!- ]6
%£"fAF6 :Úm#
h$%já ¬100% âã
ä-e SIM •6 !&'‘
()*âO"fjá6 Ï
+,³@hijku&',
³ˆ"hijk-,©.
}!/0Ç123ë456
Page 4
”•–—7
C65 ct-e2, A31008-H7800-M7-1-RC19
âV;"#ˆn"€J45š ›œ0
1-.KL#MÜÝÞ;ßàDž6
67;já/hijk.
8RXTU9E:;6
hijk<Ê´!j=F_
>¼F/ð?j@AŠl
mnêëBC;op6
%ЪЫ#ЬЭЮЯаDž6
›ˆlE½æçeèél
mFΰG;HKuŽ l I
€PQ©ÌHIRT6
389:;<=
Page 5
$>?@4
C65 ct-e2, A31008-H7800-M7-1-RC19
$>?@
1
a\z
A
NOP.QR™P.;jkST
QUV_Wwõj6 !XFYZ
)lP.$[ºN™;jk6
2
I>JK>J˜™z-
B
• fF\ š›Æ]lfF6
• ºk^~e!ïð¨#_ZC\
šPœÆ]l`a6
• !bcC\ šPœÆ] = de
$ïfbc6 š›Æ] = de
XFYZ
•
!XFYZ)\š›Æ]lIF6
3
•žz
9)ghi]lÉiïð
C
¨#_Zetm6
Ÿ >¡¢œ7
C
fÉjbc6
fÉ"#k;rUl6
G
fÉjkmQºnc6
H
E
fÉ£¤¥6
D
ÉiHFtm6
Ÿ¦§Lop¨!"©7
I
^)o)6
D
pe$ïfbc6
E
qtmrst]6
a\ª7
I
rU¼¿6
E
ºkÛ56
X
Z
¬-®¯
2004.09.15 10:15
í
°±jkl
1
3
4
«z
›œt]b$;tmnE
Q
u.;(ZP.!P.vw)
üïh ¬[\ p-6
›œxù;ySˆlP.!âr
5
z{)gh|]©} h;tm
¬%~•· 7 ¸-6
!"
5
4
2
XY
Page 6
C65 ct-e2, A31008-H7800-M7-1-RC19
1
©²³´
<4M€u%£•3‚ƒjá„
E^;AFF…6 >ný†ˆn
ÅƇˆ‰6
2
µn¶
3
AB·
4
¸¹´º» ŒIrDA•
5
¼NN½56
6
MNz
7
¾–
*
• !XFYZ)š›Æ]\
lÉiQIŠ©ÌÂ.¼
¬‹µŒù-6
• W•õjGš›Æ]\
ÚIŠ›ºõj;µ¶6
8
z·¿
#
!XFYZ)š›Æ]\
ÉiQ>f]Ž•6
9
À´ÁÂ
•W²jx_‹F_‘ñ’“6
5$>?@
1
2
3
4
5
6
7
Z
¬-®¯
2004.09.15 10:15
í
°±jkl
X
!"
8
9
:
¹Ã³´*ÁÂ
e>ÄÅ
ÄÆ ¬=AFF/‡U-
Page 7

ABCDE6
x
y
C65 ct-e2, A31008-H7800-M7-1-RC19
ABCDE
ABCDE ŒÇÈ•
Z
>n”•
Y
²j–
W
já;j¿u[\ 50 %
L
jkm
P
ºkNc
O
^—˜™ /
š›œk•ž—b
Q
ŸLv;
M
n ¡;
R
¢HF
S
A`tm
N
Ö;£¤¥
T
rU
Ç
©Ìõj¦n—§¨
¿
µ¶ÈIŠ
¾
ÚÇ™©µ¶ ¬ª¼-
¼
ÚÌ«¬!jkmC;õ
jkOõ;jk-nÇ™
µ¶6
¹
‹µÈrU
Ä
]ŽÈ•®
Å
#i¨¯tmÈÉi
T9Abc
"# T9 °V±•R
£
ÈÉi²l#
¢
ȳB
¤
´G–µ
±
WAP ‡ú
²
WAP È•ú
³
À¥ GPRS ¶· WAP
´
WAP 4—¸
¯
шщъИЙi
®
øùú¹±
<¤ ŒÇÈ•
ã
©nNº»È¼
ä
½¾»¿nNº»È¼
å
AFNº»È¼
Æ
À•^—¸
Â
ÀWõj
Ê
Nº»¡;
opDE ŒÇÈ•
p
À*˜
q
È*˜
r
ÁÂ
s
ȹÃ
t
½¾»¿nÀ¹Ã
w
>•½¾»¿n
½¾»¿nÈ*˜
Äs DRM CD;½¾»¿
n ¬· 12 ¸-
À
żÆÇÈ>•
Page 8

e>DE
C65 ct-e2, A31008-H7800-M7-1-RC19
Ù
Ú
Û
•žzDE
È•
3ÉÊË
ÌÍÎ
×
‘ñ’È•W
î
HF
ñ
ό
ð
OjkQWwõj
í
bc
ï
ÐÊ
ì
IU
7ABCDE
Page 9
+,F*GH8
C65 ct-e2, A31008-H7800-M7-1-RC19
+,F*GH
SIM
ÁN
:;©Ì•ú£¤¦n«¬! SIM
•^6
«ЦЧШФЩ
u788
1
u–ÚÛ;Ü
9ݙބ
6
2
ˆ SIM •´
••ß–
u Wğ
3
ќ6
4
5
ÉJ[Ê
1
2
3
3
àAFáâÒ
•já
789)«
6
5
4
6
ÒÓ•b
!fÉAF}$u%&IF6
@AFéêë 3 ìí; SIM •6
\:; SIM •–îZ;u%ï“:
;š›œk6
Ë[ÊÌ[
Ì[ÍÎ
já™àGŽÀÑ1²j6 %ˆ²
jx•WúÒ•AFÓÔu78ˆ
u
j¦§¨xÒ•j¦ÒÕu%²j
‚ƒ 2 ÏЪ6
Y
²j^~P.;u.6
ˆÞ„«9
áâ;ãä
å•äæ
6
çè6
Page 10

9+,F*GH
C65 ct-e2, A31008-H7800-M7-1-RC19
Ì[ªÔ
ïðjË67;já! 2 <G}8
ñlÑ1²¼6 ÚÌVòóûMô
õ +5 •‚ 45 •}~uÜlöh²
j6Vó•ÃMQ÷MÆó•øù
5 •Gu²ju.n‘úE.û»6
%£"#¤¥j¦§¨x^©-ª
;j«6
ÕÖªÔ
+,G~ü©•ý=+,;zþ‡
U\ AF<ÿ!!"Ãe"÷;ó
•)uXFG~nó#Щ6 %E
½ˆAFåWÿ$!%ñ)eÊ!
&'x^6
ºkG~\ ü( 300 …)
XFG~\ ü( 250 ð<G
ЧШЩЪМ[?B
\*jáÈÑ1Êju!²jf+
Gân™,&'²ju.6Æu.
ˆ!-ð<G}C.™,6 Ñ16
7jË;já! 3 ‚ 4 <G}8ñ
lÑ1²¼jË6
ÛÜU+,}Ý*[Þßà¶á
ÕÖâÔ*Ì[?B
!+,^~P.;²j¿ ¬¼/-\
V W X
jájË0#7GuAFnÇ™ª
¶û»6 já;j¿M•1¥â~
µ;²jQÊj}8-n2IP.6
ÅÆuŸã䕪0åæÙ[Êu
rG%3lmг•зийкМ[ 6
ÒÓ•b
²jx!üG~"#}8n3'6
›–24,5u6ÌJKÓ6
<já—˜™¤¥ 30 7)u8M•
Ð9rUG)6
Page 11
+,F*GH10
C65 ct-e2, A31008-H7800-M7-1-RC19
CLIPIt
ëì
:l"# CLIPIt™ ù: ¬Dž-þ
ÿ:;ð?;<3%:;AFùö6
™
¹í
î@$>
¨Œjá„u78˜™já ( =· 8
¸ )6 \€¨Œü>u%ˆ?@Ò•
„^;AuBCÝ«
ï)
ñlf•6
2
%£#?@ÂDAFu›Eˆlm
°±ü>6
urGC§
1
ïð$>
ˆ]ŽF3´•^GÔÙ;ü>
^6 %I€:ȈHÊ•2II´6
\*ü>Ó)Ì<JK\ˆü>-
á;LMå2]ŽF;-áu"]
ŽF2IWN^›œJKu78.
ö•OP
4
6
3
ˆAFÓý´•ü>Ó)
yWÝöuå•Häæçè
8´•jáuÊejá„.I^u
å•Häæçè(=· 8 ¸)6
4
u.<
° 7
5
5
4
Page 12

PIN
C65 ct-e2, A31008-H7800-M7-1-RC19
O
11I>JK>LMN
I>JK>LMN
I>JK>
B
MN
SIM •lQïR 4 ‚ 8 TËVRë
; PIN T€S6
J
C
ÒÓ•b
3$ PIN T ffffffffffff · 15 ¸
>f SIM •• ffffffffff · 16 ¸
ñò[\EO Œ
уTUфхцчшст*щъœ+,б
ñ"!×Ø SIM •e±• PIN T;
‘()u:KlEgt] u
À¥&'ïð—¸NOæVjk
¬â–©ÌWXWY*̧Æt
m-6
š›Æ]6
PIN
O
#ËV]±• PIN T6
;ySn™,uE I€
****
6Ì?màP.v^÷™
:; PIN T6 #
gh|]IT6 U•—¸
.€[7);G~6
]
SOS
SOS
$,6
PIN
O
ûPüI>
VWýâªÔ
%!f+"#AFGZrU<2I
;G~6
C
J
C
ªþ
rU:©:WY;GY6
I
VW
•
ÿ!
·ïcÒ• SIM •Gulˆ SIM •
^;£¤de‚ºnc6 0åéê
ÆÍÎ6 !de¥_–0åÃ$%
[6 %8¢P.v^;-.6
:lB8 .de SIM •;£¤
¬· 25 ¸-6
gÆ]u78Û[ 6
\&rU]^ ¬] / ^ /
_-u78–G~ ¬24 <
GG)u`ã7Ë-6
gï)6 G~|]^È—
$96
à ab– Û [ © € ;G
Y ...
... 78rU6
SIM
*"#
&ë
Page 13

PQ+,RB12
C65 ct-e2, A31008-H7800-M7-1-RC19
PQ+,RB
>¡¢
Vš›œk;Ug™,!P.vGu
AFÈ:M >¡¢©uŽ²'Ý
ª+,6
B
š›Æ]u:ñlà&'
z{–deXFYZ6
£b()
Z
[
”ó;W>nS6
>nh‰ˆni ÷ºký
†Žlmjk• ú–µ6
%,3:;©!I´6
*+,-gh
%N®u:;AFÄsËIlm¡
;_Z6 §¨ŸlYZ)n}uM_
¶¼e¨#_Z;"#u[\op
€S_ÚYïUGq"#_YU"
#cË““6
.!"
jbc–EuMyS;rZP.!
AF^\
C
F
C
.!"Ç=
Ç=
8¨#‘þ‡Uu:l"#)tâ
r;tm\
/YlAB
01d—
àXFYZs™jbc6
Û[¨#_ZyS6
I
Éi¨#_Z6
fÉbc6
:lÛ[-uP. v
V»ó<6
lrUvÈQvw;
P.vxñ¢ª6
Page 14

13PQ+,RB
!"
C65 ct-e2, A31008-H7800-M7-1-RC19
+,$%
!"23
@"#ABy#ïð'4*‰¢õ
?ªs™ïðtm;OPu[\\
<€P.ÀWõj;¿zºkNc\
¢P¢
C
E^?ª`ã)tOP\
C
¢
ÇÈ
!"xyz
©Ìbc¦CrSTu}:!XF
YZ)±•ïðSTñlåWÛ[
ïðtm ¬[\~•9©n-6
C
5
1
1
567Ã%[
fÉjbc6
9^¨ihi]u78ˆ
hi]g9)uE Û [¬R
™P.hi]R™P.567Ã
%[6
IT6 {|NcÈfÉ6
g Æ ] E P . jbc6
78g
lö•bfghu78.g
lö•°±•€u.g
Eö•ibXY6
P
u7 8 ."#
DE
@AB"#)tySõ?ª+,O
P\
J
B
A
<>
C
D F E
I
H
=
±•ËVQV€6
fFQIFQ`a]
ºk]
t]
P.ïðt]tm6
Æhi]l¨i 5 ðÜ
96
[\\g)hi]ls
™bc6
8-.;Ü9ghi]6
G
Ætm•ý=š›œk
–®lêëulm.€
•ù킳B6
Page 15

SGTU14
C65 ct-e2, A31008-H7800-M7-1-RC19
SGTU
Ç=!"
Ðd™,!Û5bc–;tmab6
Ç=
:;
56
<=J
9><=
°±•€
?@ ...
ABJ
AB9>
CD
CDE 9
FG
XYMN
H
¬·17¸-
fÉbc6
fÉ£¤E,„,6
P.£¤6
IT8ÏŒïð£¤Q
©Ì£¤6
9…£¤6
Û[¹Ã;¹±¹L/
¾û6
†ž?3ë>ž?6 >
•;ÆÇCD—§¨•
9;ÆÇ–6
«¬£¤6
ˆ>ž?«¬‚b$;
‡ˆm6
rU‰Š12
¬V€_!/_G~-6
T9 IJ
ÉiQIŠ T9 ±•R6
éX^KL
#iP.º4ëå"#
;°VÛ[6
éXMNH
:lrUw½ 2 u–
°±•R§±•ÆÇ"
#6
”°MN
OP
QR
+,çB
çÛ[;£¤Ð9‹U6
P.Nº»D¿6
P.—R™P.}Œž
;íÓ6
P."#Â.6
8ÙAB¡¢
ˆïðe½ð£¤R™P.uEåH
QH×}hï5tm6
Ç=
Sc ÉiYZ6
Sc
@=Sc
qHR™P.;tm\
9>Sc
9>@=Sc
<=Scþ
fÉbc6
R™P.ïð798ÙA
B;£¤6
˜ƒ—R™P.}£¤;
8ÙABz{6
R ™ P .©Ì;
£¤6
˜ƒ©ÌÈR™ P
.}£¤;R™P
.z{6
©ÌÛ[;£¤ˆ
—ÏŒ6
Page 16

89VW
C65 ct-e2, A31008-H7800-M7-1-RC19
@F/ SIM •lÀ¥Ëð01•T
õoè—Ž#6
0täUVWSO£XŸPÏ89
*"YZ[\Ÿœü]•ªæ,-
SOVW
PIN O
PIN2 O
PUK O
PUK2 O
$>SO
€S:; SIM •¬ð?
”‚T-6
!rUk•£¤P.E
/"#í– SIM •}x
ùtmG•"#Æ•T6
>•T6 l!Ðd±•
—˜; PIN T }8#õ
>f SIM ••6
€S :;AF6 M•±
•, ç :AF;·ïð
01rU6
C
PIN
!•ïcfFGº4nÂ.:±•
PIN T6 :l˜ƒÆtmu•›En
…`q‘?Ž#AF;JK6Ìœ
š›œknâD’:˜ƒ•T|Z6
ÇÈ
J
C
&ë
C
&ë
:lˆ PIN T3$ç&'ïR:v
D“NO; 4 ‚ 8 TST6
J
C
J
J
PIN O
¢
Û[tm
¢
O„T
gï)6
±• PIN T6
IT±•6
gï)6
IT6
PIN
O
±•° PIN T6
gï)6
C
±•° PIN T6
_
C
Ð9±•° PIN T6
_
89VW
¢T¢
1589VW
Page 17

89VW16
C65 ct-e2, A31008-H7800-M7-1-RC19
89VW
¢T¢
C
&ë
¬ÚÌVAFÄsïð PIN2 TG-
nP.Ætm-6 g¢&ë PIN O;
HrOPöh6
¢
Û[tm
¢
PIN2
PIN O
O
&ë$>SO
¬3$AF•T-
:l!·ïcs™QAF•T€S
;tm ¬[\^Ã_Eu· 46 ¸GU™/±•AF•T ¬4 ‚ 8
T-6 Æ•TW)õˆlL#M©Ì
ÎAF•T€S;tm6
!šc±•—˜•TGu:ˆ4R
.±•AF•TK4R"#QÆ•
T€S;tm6 Ç’Æ‘þGu%
kjÜÝÞ¹L–y¬·55 ¸-6
SIM
@I
\*ï•šc±•—˜; PIN Tu
SIM •n—•Š6 %þÿ-.±•
:;š›œk• SIM •Â§›:;
PUK T ¬MASTER PIN-6 <:œ
• PUK T ¬MASTER PIN-u % ‡
ˆ:;š›œk6
É¿
`a;¹bc$>
ñ"ÈIŠ PIN T|Z¬·15
¸-u!fFGž.™IT6
›loè:3ùÉiAFu[\V
:ˆAFŸ! `Ce–V:¡¢
]FG6
B
C
æd
š›Æ]6
gï)6 AFZnfF6
gÆ]ue â £&'i,6
AFˆânfF6
Page 18

17XYMN
C65 ct-e2, A31008-H7800-M7-1-RC19
XYMN
T9
ã,
ÐdgËV]uå•™,:©€;V
¤çè6 [Þ\
2
]
F
#
*
0
1
MNXY
šPül±•V€ aug-
cl±•b ““6 š›l
±•ËV6
šPœÆ]lÏŒ¥1$
ü;V€uš›¯lÏŒ
{ðV6
¨i¥1¬9$Q98-6
šPœ7!
T9
abc
123
%6
š›7 P.©Ì±•YZ6
šPœ7 P.í–V¤6
š›7 fɱ•bc6
šPüJ”ÿš\
. , ? ! ’ " 0 + - ( ) @ / : _
š›7 •™ 06
•™/r6 šhü = §h6
T9
_
_en_
abc_Abc_
T9
_
Abc
ABC
fg}~¦
ijYk
*
+- " ’ : * / ( )
¤¥
[]{}%~<=>
|^ §
ΠΣ ΦΨΩ
I
ÇÈ
_
gï)6
¿¡_;.,?!
$£€@\ &#
Γ∆ΘΛΞ
µh
_
¨‚V¤6
F
gï)6
MN!"
š›\
*
+,
¨T9©lౕ;ârg]ݵ™2
I;°V6
#
XY‰¢¬ÚYM©n-_
XYMNH_ScXY_
ÿ!
T9
XYMNH
ÉiQIŠ T96
ÇÈMNXY*mp
Ç=
T9 IJ Û[6
&ë
fÉ°Vbc6
Û [ XYMNH u7 8
Û[ MNmp6
Éi T96
Page 19
XYMN18
C65 ct-e2, A31008-H7800-M7-1-RC19
éX^KL
#iP.º4ëå"#;°VÛ[6
éXMNH
:lrUw½ 2 u–°±•R§±•
ÆÇ"#6
T9 ª¼
T9 2¼
T9 «»|¬
T9 ¿»|¬
ÇÈ
IT6
+,T9MNXY
ÛlmŸMN/ÏYªã•6nA
BC-
:Ú.€…‚ ! -ðV € ;HIg
]^šPüñl6
/
ïð/re9s¨i;i
E
1
%£"#Ä›!;í–V¤u:Ú .
±•12;V¤u[\ AuWÖ T9
ˆç:±•2I;°V6
T9
<!V®–JåïðV̽ðÛ[u
w4#;Vn&—P.™õ6
^
^
ˆïðV9…‚V®\
eY
,8n`aÆV6
XY²o
gï)6 <ÆVK–â2
I;u.gïc
ÐdÆOPå•™,2I
;°Vçè6
â"# T9 Û[/±•°
V6 78Û[ 6
CD
pqPÏXY
"# T9 ~•;°V\
F
^
]
ÒÓ•b
#
*
T9
l’l\³W´mS\
5,953,541 _5,187,480_5,945,928
6,011,554
W´mS
HK0940329¶
´mS
FI_ FR_ IT_ NL_ PT_ ES_ SE_ GB
q‘WX;xù´m¾%ÌX¿º6
9¯e9s °ï¨i‚•
ðVuå•©.}°V—
çè6
AB
.co) T9 °VØÙ6
ÏŒ¥1¯â;V€urª
P.ïð9;lm°V6
šPœ7¦%E)z{\
abc_Abc
T9
Abc_ T9ABC_123
en_fg6
š›7 P.©Ì±•YZ6
š›
¬· 17 ¸-6
®
°V±•RȱOE)ï5e½5²
¶`‰ó´mS
2238414B¶
9`»´mS
0 842 463¬96927260.8-DE/DK
T9
_
abc_
fɱ•bc
7
5,818,437
1,331,057¶
¸¹1º´mS
51383¶
_
µ
¼½
¶!
XYs#
¢M¢
C
XYs#l«¬!AFCuE`•:
;ÆǬ©n_½¾»¿n-C D –6
XYs#
_
·
_
Page 20
Z[\
v
çBm
C65 ct-e2, A31008-H7800-M7-1-RC19
J
A
˜™a\
B
VWnP
I
”_tF*EO
A
s™ÐNSTÁ\
A
I
A
vc”_
±•ST ¬M•`^NS
TQWÀNST )6
]
išlaŒw8ïTu
š›¯laŒ1ÔST6
NOjkST6
šPœ`a]6
9^Q9)gÆ ]Ez{
¼¿6
šhœ6 ÐNluPüN
¥;jkST6
šPœ6
ÂÛïðjkSTu78
çN™{ST ...
... gÆ]6
:;AFn#iE°Ã`
c”_
ü ;~Ä G~• Å Ð N
10 c6
A[
A[
}$Æ ú;STl W º
Gu:;AFnǙǵ6
WÖgºk]ñlN™{
ST6
”_çw
!15 …)8nÌïðª¼
ÂÈ:ÐNP.v^;j
kST6
Ã$%[
A
gï)6
xÃ%[
šPœ6
B
ÒÓ•b
çE½°Õ‹ŒwËu%&Wwõ
ju78.ˆhijk‰Š‹Œ6
Ð
yz${
*
Š‹_EO
0
Š|"þ
ˆjkST«¬!ºn
cQjkmC6
À¥Á¼xÄÊ ¬½•
w¾ºk-6
%LM&IŠ¨½•w¾
ºk©u78.ˆAF‰
Š:;‹Œš›ˆlE
½:;wËΰš
š›Æ]lIŠk¾6
š›Æ]å•™,ïð
¨+©6
Û[WX6
19Z[\
b
Page 21

Z[\20
&
ˆ
C65 ct-e2, A31008-H7800-M7-1-RC19
a\Ç=
Ç=
Ÿha[\tÔ}ì
²~û•a[\
Ç=
„o €Æb$; ºku7 8N
Ç=
}ì !ºk}~¦%6
Ÿa\âÔÃEPa%[
:ˆnw•ïð¨õj¼©uÆG:l\
• Ã$€ é*[\Z•„o!F*
}ì
• xÀ é*%[
xÃ
• Ã$€ é*[\Z•˜™!F*
B
C
ÚÌ!ºkâÔ-n"#
;tm6
fÉbc6
Ç9;jkST6
fÉbc6
a\-
Ww“X–;jkuŽ€
Æb$;ºk6
ÉWõjueÀ¥
§¨‚żÊË6
a\
`aºk6
Ww9;õj6
b
%[†‡
˜™a\
B
[\‚o
:l°ïNj› 5 Uµnk6 ïðj
kWº}8\
Ç=
J
Ç=
˜™‚o
B
„nj… Œ
±••ý•`¯cF;¼Ï¬ST-6
Ç=
g`a]6
Ì̀Ɩ;ºk6
`a©Ìºk6
b
fÉbcŽÛ[„o6 b
$;ºkÈ—€Æ)õ6
, !uN Çïð9 ;j
k ST6 ›ºjkW º
}8 ...
... fÉbcŽÛ[[\‚
o6 ÎÅNjuå•Wº
©Ìµnkçè6
g`a]GulïD`a
½?ºk–;ƒØºk6
DTMF
fÉbcŽÛ[ ?@
DTMF ¼Ï6
•
Page 22

]V^_`
C65 ct-e2, A31008-H7800-M7-1-RC19
L
¢
C
Û[tm
¢
AB•€
P.v^ˆP.Ðr‡ˆm¬ºnc
ejkm-;£¤§:Û[6
/
þÿ·ïðV€Û[ÑU
I
J
°±•€
9…£¤6
ab" ¬Òl~•· 22 ¸-
[\` ¬Òl~•· 24 ¸-
]V^_`
:lrUïðíU;‡ˆm, ç:
Ó<"#;‡ˆm6
!X F YZ)l#hi]fÉ:Û
[;12‡ˆm6
H
ab"
!ºnc–u:lJå•ï|£¤N
có¿;£nuŽl"#xù;tm
¬[\uM_’]“-6
/¬e-o)6
fÉjkmeºnc
[\`
jkmIM SIM •^6•ï|£¤Ú
m±•ïðjkST6 SIM •^;j
kmlBÔ§¨‚•ïÔAF6
N‰
ØÕ:#Ö;UMuEZˆUM¹Ã
‚•ïÔ GSM AF6 <:ÀØÕ¥
&'UMu@AFˆÂ.:±•UM
£¤6
H
gï)6
CD
ÒÓ•b
UM|ºnc£¤;CD•yØW
À12 ¬vCard-6
Ð
!-×I~¨iE]•:
;£¤6
àºncQjkm–d
eST6
Šï
%~•· 23 ¸6
21]V^_`
Page 23

ab"22
C65 ct-e2, A31008-H7800-M7-1-RC19
ab"
ºncl«¬w½ 1000 |£¤u•
ï| £¤l `ã-ujk|¹Ù S
TuE/xù;•(WÚ£¤6 ›œ
£¤µAFNº»C;jkm£¤
–…f¡;;6
°±•€
<ºncÈ—rUç12;‡ˆm\
H
C
I
J
ijMN‹7
Šï : -U‚ïðÛR; £¤
"# : §:±•Ñ{WÚ;…r
“ý : Éi 8u: l ±•™’
?‰ : -Uï#u M‚Æ£¤6
fɺnc ¬!X F Y
Z)-6
P.±•×6
Û[©.;±•×6
!×I±•£¤6
:‚ƒM•±•ïðÑ
U6 ±•jkSTG%N
O`^$T6
¬· 23 ¸-6
×I\ Œ• :_ Ž•þE :_
•‘ :_ Š|’"þ :
]^ 6
H”çB : AFn!:±
•;’]$ïÜÂÈ:6
V:W•{jkST;õ
juP.v^ˆ™,›#
uM6
./‹+ / •'‹+
CD
ÒÓ•b
Î
P.©.;±•×6
«¬£¤6
´G¦%‚jkm6
Page 24

23ab"
C65 ct-e2, A31008-H7800-M7-1-RC19
ABJ–—•€
H
J
C
ABÇ=
Ç=
fɺnc ¬!X F Y
Z)-6
Û[©.;£¤6
/
I
P.6
P.©Û±•×;tm6
&ë•€
H
J
I
J
fɺnc ¬!X F Y
Z)-6
Û [ ï | £¤u7 8 g
/
I
6
:;
Û[±•×u78g 6
3$£¤u78g 6
:;
CD
_ZPf•€
H
J
A
\*ºnc£¤–̽RSTuˆn
P.§:Û[6
fɺnc ¬!X F Y
Z)-6
/
þÿ·ïðV€Û[ÑU
I
/¬e-o)6
N™{ST6
ab"Ç=
8¨#‘þ‡Uu:l"#)târ
;tm\
Ç=
™‡E ...
ÿ!E
SIM É
šN
¬åM12tmu%~•· 14 ¸-
fÉbc6
ˆV$;£¤eR ™
P.;£¤de‚ï
ðÛR6
ˆÑ U / STde‚
SIM •¬jkm-6
ØÕÀ¥øùú¬·45
¸- e©n¬· 30¸-
W>ºnc£¤;t
m6
Šï
@AFCÈÐr 9 ðÛRul}:$
ÌÝ;WY…:;ºnc£¤6 :l
Ð9‹U 7 ðÛR6
H
< Šï > Û[ ¬£¤Ë¿ntª!
I
RW˜ï¾–
%~•· 42 ¸6
fɺnc ¬!X F Y
Z)-6
ÛRUg}8-6
Û[ÛR6
Page 25

[\`24
C65 ct-e2, A31008-H7800-M7-1-RC19
[\`
jkm¬SIM •-C;£¤µºnc
;£¤–…f¡;;6
°±•€
<ÈÛ[jkm,ç12‡ˆm\
H
H
C
I
EO
±•jkSTG%NO`^NST6
<À±•jkSTu£¤ˆ4R «
¬6
NY :
±•UV/QeÑõ6
Šï :
ÐrÞ\7VWŠï
— ßØëïR ;Ѐ jkST
¬VIP-6
fÉjkm ¬!X F Y
Z)-6
Û[ < °±•€ >6
P.±•×6
!-ð±•×}~¨i/
±•£¤6
+›"œ :
ÐrÞ\SIM •
í–; SIM •lˆjkST€¬!
ïð΀SYàC¬SIM •€SY-
¬.€ PIN2 T-6
c":E :
n—#i…D›•ï|£¤6 :l#
Nc~SõNOjkST6
CD
ÒÓ•b
Î
Š|"þ
gï)E«¬9;£¤6
´G¦%‚ºnc6
WÀNST· 19 ¸
_EŒ–—Pf•€•
H
J
A
fÉjkm6
þÿ·ïðV€Û[ÑU
/
I
/Qeo)6
STñ—N™6
Page 26

25[\`
C65 ct-e2, A31008-H7800-M7-1-RC19
&ë•€
I
:;
J
J
CD
àjkm–Û[ï|£¤6
gï)6
Û[©.;±•×6
/
I
,M€;„,6
gï)6
[\`Ç=
E) tml®"#u•=V$zþ
‡U6
Ç=
ÿ!E 9
9>ÿ!E
9
<=
šN
¬åM12tmu%~•· 14 ¸-6
fÉbc6
ˆ©ÌR™P.;£
¤de‚ºnc6
ˆ©Ì£¤de‚º
nc6
ÏŒ{ðjkm6 Æ
tmQ PIN T€S6
Ø Õ À¥øùú
¬· 45 ¸-e ©n
¬· 30 ¸- W>jk
m£¤;tm6
<
ij^_`
H
<
:lE!jkmC±•¨@F©ST
¬[\¹Ù-E«¬›|£n6
<VIP
P.«¬! VIP R;jkST6
<SIM
«¬! SIM •jkm C;£¤Kl
!qH GSM AF^"#6
<SIM
jkSTl—«¬‚í– SIM •^
;ïð΀SYà6 €„,G.€±
• PIN2 T6
fÉjkmŽÛ[ < ij
^_` >6
#>EO
[\EO
[\`EO
„TþEO
>
>
>
>
>
b
Page 27

a\c"26
C65 ct-e2, A31008-H7800-M7-1-RC19
a\c"
jkST«¬!›álÜZ:ÐN6
¢
C
I
C
I
A
•ïðºkNcCl«¬ 10 ðjk
ST\
567Ã%[
:ÈW••À ¨ ¯;jk}jkS
Tl—Nc)õuE§:]8ej6
Â
56%[c"
ˆt™©ÌÈW•;õj6
56_Ùc"
l˜#:wŠN¥;[ºjkST6
A
¦=c"
©ÌºkNc;CDn—aŒ6
P
Û[Nc6
fɺkNc6
Û[jkST6
NOjkST6
b
ÀWõj6
!XFYZ)l0âö•6
\ª/\•
:lrU!ºk^~ P .kG/ã
•£¤6
¢P¢
C
Û[
Fü\ª_ƒØ_Ù[\_ƒØ%[_
žŸ§+_ •VW
”V
•VW
C
¡¢
~ä:;åæbI6
v£•¤
±•åæ/•bI/G~;•ç6
•õ¥
í–; SIM •l} :eš›œkU
™YZAFN ™jk}$;ã•Y
xQ^Y6
vcAB
#iP.©ÌkG/k•£¤6
\ª / \•
ÐrÛ[;rU6
fÉbc6
Page 28

de>
C65 ct-e2, A31008-H7800-M7-1-RC19
:lÕñ ö諬!CØHF–;
¢MQéMuŽl
• ˆ¢MV,Þêéë_1ì_
fQIFiíeîv€S_Z6
• E½¾»¿n¹Ã¢M6
bc
¢
C
’
D
íü^nP.V$ ¬Ð·-;éë6
:l!·ïh÷•)t£n¬à¯‚
s-\
Ù
Ú
Û
×
!Ð · éë;s^ ï ˆP.!ÆÛ
U;>ð•)ñlòô½ƒó¢M6
ÆËbn8âr;òôjô¬©.;
«¬/~-‡Ì"ó;õö6 зé
ë)Ün P .ÌI:Û[ }>ð•
;£n6
R
!XFYZ)ÉiHF6
È•
3ÉÊË
ÌÍÎ
•W;‘ñ’
"n
C
C
Æ¢M«¬GˆAÌïðUg_]^
/G~6 \€±•Ugu%~•Û5
bc ¬· 28 ¸-–;VW6
ò¢$;rUÞ\
F
I
¦§@¨)
â÷зéë;>ð•\'uéë;
ý†–lErU;u[\\
I :
é :
©ª?« :
ý=:Û[; ËI3ɇUu>ð•l
mn•}i÷6
ò¢6
P . ) ï ó ¢ M ; Ð ·
éë6
rUÈ•6
rU3ÉÊË6
27de>
Page 29

de>28
C65 ct-e2, A31008-H7800-M7-1-RC19
¬1- Œ®¤•
<lÉ#‘ñ’uP.v^n™,ï
ðyS6 ‘ñ’!•W‚AFŽÈÉ
iHFGn€•!Ȳjs#;z
{6 ›lЩXFG~6
×
ÌIrUu%~•Û5bc6
‘ñ ’2!s#z{Gu
ÆySn‘ú6
e>Ç=
E) tml®"#u•=V$zþ
‡U6
Ç=
VW
?‰
+,¬1-
vcWª¶
²³´
¬åM12tmu%~•· 14 ¸-
ÒÓ•b
Ê
fÉbc6
• cé;Ug
• éë>ð•
P. v ^n™, :©
òô;w8ïó¢M6
Û[\
vcVW_ z¯_ K°_
d=¸±ð›
!øùóú 15 7}8
Znò)¢M6 åMw
8 5 7)u:n ! •ï
7w•ïcÂ.¼6
Û[\
vcÇÈ_ µ©_ ƒ¹
«¬/~âû6 %ÉiN
º»¡;_ZEÏŒíU
;£¤ ¬· 44 ¸-6
Page 30

bfgh
C65 ct-e2, A31008-H7800-M7-1-RC19
29bfgh
£¤¥
Æß –Z>ž üCã©ÌW>•;
ÆÇ6 ›œ£¤n1NïðýÁq!
//z{;yS ¬· 6 ¸-6
\€s™Æß–Z>žüu[\<È
W>ïð9;©n\
p
V:fÉïð£¤GuKlfÉHI
;¨#_Z6 !ïðÐr;GY}8
¬-uÈ*˜/fÉ;ÆÇ£¤
ÚnP.!{ ÆÇHI;>žab
C6
!>žüCu:ˆl÷•E);op
¶·\
ib_ jkl'b
¬-bf\
ÌIjkl'b_7à ¸¹_7 Ã
”•c<_567Ã% [_stº
»bf_mn¼½;n 6
•€¾¤\
¾–_ ?‰_ ý¿•€_c</N‰6
gyS)Ü;t]6
Ç=
op¦§
©Ìib/jkl'bÆÇl…‚
P.!þðab–6
£¤¥
M
¢
C
W>}ÆÇ;ab6
C
«¬}ÁÂ;ab6
C
ñÀëtÙ}ÆÇ;ab
C
¢
W>}ÆÇ;ab6
Ç=
¢
Û[ÆÇ!/6
¢
ÀÁ
M
¢
¢
Û[ÆÇ!/6
¢
7?@
M
¢
¢
Û[ÆÇ!/6
¢
Â?@
M
¢
¢
Û[ÆÇ!/6
s™tmbcE+,›œ
ÆÇ6
Page 31

ibVW30
C65 ct-e2, A31008-H7800-M7-1-RC19
ibVW
:lm#@AF¹Ã/W>ÿ4 ü;
ÆÇ ¬w½l( 760 ðV¤-6 ›u
ÆÇ–#i`ؽ! ¨ï"©;©n
‡ØÕ;¬%23uqã•vÃ-6 Æ
ùu:#lˆuM/¶¼Ò•©n–6
:ÃJ?@
¢M¢
C
¢
J
A
/
Ï
J
C
ijTU
?‰Ä–n
¹ÃA`°Ve ÀA` °V;uM
/¼z6 %N®u›œuM|¼zl
m–΀S;¬ ËIlm¡;u · 12
¸-6
°±•€
ibXY
±•°V ¬Ò l ~•·
17 ¸-6 ~•°V
;tm6
f+¹Ã;OP6
à jkmQº ncÛ [
ïðSTue ±•ïð9
ST6
©nn&—¹•¹L–y
E¹Ã™$6
Ç=
°V±•×fÉ}8\
Ç=
I
I
C
I
<Û[©²cÅ / ©²–n\
C
<Û[3*cÅÆ_3*?‰Æ_3*
–nÆ\
C
C
fÉbc6
Û[?‰Ä–n 6
bcC`ã\
©²cÅ_©²–n_3
*cÅÆ_3*?‰Æ_
3*–nÆ
Û[ab6
IT6 P.v^P.©Û
ab;·ï|£¤6
o)‚:©€;£¤6
:Û[;£¤n—`•©
n–6
:Û[;£¤nP.Q
ÄÊ™õ6
:Û[;£¤n—`•©
n–6
ib!"
¢M¢
C
P. v ^nP.«¬!AFC;©
nab6
ib!"
Page 32

31ibVW
C65 ct-e2, A31008-H7800-M7-1-RC19
Šïib
:lˆ©nE¨„»©ÜZ¹Ã›ï
ð>ž?ÛRC;©Ìë%6
Ç=
?@ Û[6
Šï
I
C
C
fÉbc6
ÛRabn™, ! P .
v^6
Û[ÛR6
fÉÛRŽ&ÌP.©ÌQ
b|£¤6
01“”n —IT}8
f+¹Ã ©n6
Çæ
p
£¤¥ÈfÉ6 Hl}:0⶷V
$>•;©n6
C
I
ã
P.v^nº':ÈW•
ïð9©n6
<€*˜(ï©nu%g
hi]6
°ho){ð©n6
<ÆyS‘úuÁ.
SIM •Nº»È¼6
ÏŒe«¬©n6
AB
:lÕñe)V$fÉ;©n6 9`
•; °VCDn—´MW•; °V
CD^Ü6
C
åWe);tm6
VW
ibÈN
¢M¢
C
¢
:l±•ïðw½ 16 ðV€; ¨*
U©6 Æ*Uˆn—#iA`‚•ï
ð©nu E/€3$ï!,¬
©nG¯Œù6
ibVWÆ
¢M¢
C
¢
:w½lrU 5 ð©nl6 ©n;¹
±íÓ–Q›œ©nlU™;6
bcibÆ
I
C
VWibÆ
I
bfVW
ibVW¢ibÈN
AB
bfVW
ibVW¢ibVWÆ
Û[©nl6
Éi6
Û[©nluŽm#
fÉE}h3$6
:;
Page 33

jkl'b32
C65 ct-e2, A31008-H7800-M7-1-RC19
jkl'b
jkl'bstl}:ˆ°V_uMQ
éM/¶¼A!ïð+ ØÓ;ÆÇ
C¹Ã‚•ïðhijk6
þÿ:;AFrU‡Uu:ˆnW>
•Ñ{;½¾»¿neÚ>•ïð
`ã † ž?£¤/n D¿;º'
n 6 ¥8u:l#AiÜZn•,
À;½¾»¿n6
:Ã
½¾»¿n`ãWÚ 1Û|CD-
ÔÙ6 Hlm`ã•Å˸6 •ï¸
l`ã°V_ï#uM/ïð¶¼6
%N®u›œuM|¶¼lm–΀
S;¬ËIlm¡;u · 12 ¸-6
:ÃSG*jkl'b
¢M¢
C
¢
\&u%Û[ïð€`‚½¾»¿n
·ï¸;Œž\
< ?‰ > Û[6
C
°±•€
jkl'b
P.uMtm\ ~N?‰_
de>
< –n > Û[6
C
< XY > Û[6
C
P.¶¼tm\ ~N–n_
"n
P.°V;tm ¬Òl~
•· 17 ¸-6
Ç=
Ç=
law
?@
]2
?‰ ...
–n ...
XY ...
jkl'
bÉ
bf©O
fÉbc6
¹Ã½¾»¿n6
!P . v ^ÄÊ{ð
½¾»¿n6
=$ü?ª6
=$ü?ª6
=$ü?ª6
°±jklÉ\ !V$
Ƹ}8Ò•9;ï
¸6
<=jklÉ\ ÏŒV
$;¸ü6
jkl'bʧ\ P.
,Ì;¸ü6
ªÔË/\rU½¾»
¿n;ÄÊ-.\
• ABjkl'bÉ :
M•&Ð&rUç$
cY¢uÜl"#Æ
rU6 ±•ïð¿n
¸ü;G~ü©6
±•¹Ã;~ˬ=)
ï/-6
Page 34

33jkl'b
C65 ct-e2, A31008-H7800-M7-1-RC19
CDÌs
#
)»V
ÏÐ
¬åM12tmu%~•· 14 ¸-
ØÕ½¾»¿n}8u
ˆH«¬çïðø@6
Ò=)°\
àþulm5 ü – Û
[ïu\
°V!uM^Ü_)Ü_
•â ¬¯âesâ-6
Û[)tÔÙ;67\
• XYÏÐ
• XY©ª
• ?‰©ª
'bs#
¢M¢
C
½¾»¿n;ø @–¬GÀ
AWÚ;½¾»¿n6 ‘×lV,9
;½¾»¿n¹ÃueV,ïð9½
¾»¿n}ïÔÙ"#6 01l«¬
10 ðø@6
:l~•ïð9; ½¾»¿ne"
#}$>•;ïð½¾»¿nõØ
Õø@6
Ç=
jkl'bs#
fÉbcŽÛ[CDÌs
#6
?@
:ÈØÕ9;½¾»¿n;¸ü6 {
½¾»¿nn2.!P.v^6
A
.Í : ±•ïqÌI½¾»¿n
£¤Î :
/Ð
A
C
ëj : §xù;WÚ×6
fÉWÚ£¤6
jkl:;¶
ç
.Í :
Greetings from Munich
£¤Î :
+1234567654321
/Ð :
85 KB
]
;©36
±•ïðe$½jkST6
: P. ½¾»¿n; l 4
ó<6
f+¹Ã;OP6
½¾»¿nn!IT8¹
Ù$6
ì
|
Ç=
Page 35

jkl'b34
C65 ct-e2, A31008-H7800-M7-1-RC19
?@Ç=
Ç=
?@
rÓ
:;
~N£¤Î
~N}¤
jkl'b
ʧ
CDÌs#
¬åM12t mu% ~•· 14 ¸-6
fÉbc6
¹Ã½¾»¿n6
!P . v^ÄÊ{ð
½¾»¿n6
§ŒžÛ[ E 3$
Œž6
`•«¬!V$‡ˆ
mC;>ž?6
9…Až\
• Æ«
• N‰
• ”•c<
P. ½¾»¿n;¸
üuE§ 8=/¬e-
„,6
ØÕ½¾»¿n}8u
ˆH«¬çïðø@6
ã
/
P.v^nº':W•ï
p
w
ð9;½¾»¿nQº'
n
6
<
ç•W>ÝÑ;Ñ{½¾»¿nu
M•fÉ{¿n6
ã
f+W>6þÿrU
35
¸-‡Uu½¾»¿nQ
©nn—§¨•ß–Z;
>žabC¬£¤¥-6
f+¹±6
¬·
ÂÇæ
:ÈÑ{W>ïð½¾»¿n6
C
j€;ÄÊtm\
E
D
I
C
½¾»¿nÄÑ}8uP.v^n™
,{¿n;•(£¤6
.Í : ÌI½¾»¿n;©36
ҤΠ: ÌI†ž?;£n6
/Ð
ëj : xù;±•×6
f+ÄÊ6
•)ï¸6
gï)ldeV$¸ü;
fýug-)lde^ï
¸;fý6
rU¼¿6
`a6
/
B
: ½¾»¿n;l4ó<u
E KB Á.6
Page 36

35jkl'b
C65 ct-e2, A31008-H7800-M7-1-RC19
VW
¢M¢
C
¢
¢
jkl'bVWÆ
:lrU 6 ð½¾»¿nl6 ›œr
UlClU™¿n¹±;íÓ6 º4u
›œrUÞ–Ð&n•;6 <Ì.€u
%9:;š›œkï“HI•‘6
I
C
VWÇ=
Ç=
bc_”°MN_&ëVWÔ
,ƒVW
:lDØ :;. 9õrU½¾»¿
n;¹ÃÜZ\
ùÕÖ× :
]VIJ
üG :
ØÛâõ
bfVW
jkl'b
ÇÈTU
:
Û[½¾»¿nl6
fÉrUlE,„,6
fÉbc6
ç© ¹Ã; ½¾»¿
n€9¹ÃIT6
rU:&;Š\
PQØú_ Ù_ Ú
Û[ ¹L– y <=¹
ý¾»¿n;G~
^Y\
$cY¢_ 1 Ъ_
3 Ъ_ 6 Ъ_12 Ð
ª_ 1 ³_ 1 Üâ_
l/Ô *
* š›œklD’;w
Ã^Y6
¦n‰r
ÓÝ) :
Ž¤æA
Y¢ :
RB/Ð :
=
²~¡¢ :
ïð½¾»¿n¸ü;
2.G~¬12€9-6
W>Ñ{;½¾»¿
neÚW>º'n 6
vcÇÈ
ÕñW>Ñ{;½¾
»¿n6
õIƒ5æA
!f>— C Õ ñW>
Ñ{;½¾»¿n6
$cY¢
Ú>•º'n 6
rU½¾»¿n;w
óD¿/HI+,6
žŸ
Þõ3
ß×
Page 37

mnopJqrst36
Ž¤¼½
C65 ct-e2, A31008-H7800-M7-1-RC19
mnopJqrst
mnop
¢M¢
C
¢
\*:ÌżÊËuõjkl!)t
‘þ)Æ)ïðżÆÇ›:\
• <:;AFÈIFeÀ2s<€
Wwjku
• <:â?¨¯u
• ek<:2!ºk–6
:lmM••h ³ BƹLŽAi
rU6
bfVW
mn¼½
VW
:;š›œkˆÂ§:-RjkST\
CDmn¼½EO
NOÆSTl>w:;żÆÇ6
¢M¢
C
¢
±•Å¼ÊË;jkSTu78#
IT6
àW
CD%[†‡EO
ºkn—§¨‚ÆjkST6
¢T¢
C
¢
¢
±•jkSTuŽ# 9—¸³
BÆST6
bfVW
mn¼½
a\VW
%[†‡
[\7àƇ¢VW
b
àW
$æop
þÿš›œk‡Uu9żÆÇnE
)tÜZº'\
À
’
p
’
:nW•ïð§#iº';õj6
NO:;ÊËSTuŽÄÊÆÇ6
1
yS`ª¼6
1Q©nº'6
š›Æ] ¬<ÌM€ u
:Ú•±•ïcżÊË
ST-6 8:;š›œk
‡Uu:l# /
IT6
b
àW
qrst
¢M¢
C
¢
Ìœš›œkn§£n¹L¬£n
Ï@_5©qr-6 <ÈÉiW>A
Än u:;…•¦§ˆÂ§:ÌI
:©Éi}Ï@;AÄn 6
bfVW
qrst
Page 38

u5vw
C65 ct-e2, A31008-H7800-M7-1-RC19
là—À —¸B ˜ w 9 ; £nu›
–í ‚ DØ@AF;P.Û5‡r
ã;6Æùu:l)nCD/¨#_
Z‚:;AF6:lm.€•ù9š
›œk¾%—À—¸•ú¹L6
5‹5á
¢O¢
C
V:s™¶·xtmGu¶·xˆE
Ðr;Û5Éi ¬ÌI12¶VWu
%~•· 38 ¸¶š›œklmÈ4
&rUQ-UïœrUÞ-6
12¶!"
Ç=
âÉ
ãä
E
”°åN
5‹5á
fÉbc6
s™V$rUl;\
¸¬·38 ¸-6
P.«¬!AFC;
EF¶«¬EF6
U•ïð URL ;—¸6
Ð9n•V$;—¸6
AB5#
c"
éêÀ´
Æ«
VW
˜™12¶
P.V$n•; — ¸
} URLuE ZÀ¥©n
QjÞGž¹Ã6
P.^ïcêH ; —
b6
–µµ—À—¸; •
ú6
«¬V$—¸^;Œ
že«¬{ð—¸uP
.«¬;—¸6
¶·xrU¬·38¸-6
`a¶·x6
˜™À´
B
š›Æ]E`a•úŽI
Š¶·x6
Ÿ12¶©‡cÕÖ
• Û[ïð•`6
C
• rUuÉiQIŠz{6
B
• gPœ\pe^ï¸6
• ¨i‚^ïðQ)ïð±
I
•×Q•`6
• o)‚)ïh6
37u5vw
Page 39

u5vw38
C65 ct-e2, A31008-H7800-M7-1-RC19
12¶©*ABDE
²
±
•ú
—¸
´
³
MNijYk7
Û[Ѐ;í–V¤6
/
*
0
12¶VW
¢O¢
C
Ç=
VW Û[6
12¶
æçVW
abèW
é*
89VW
©O
5‹5á
fÉbc6
rUf+Û5u+,u
M_¼z/¹ÃÛ56
P.v^nP.rUl
;ab§:ÉiQrU
¬=)°-6
rULU~Ë_ÝÄn
/–èG~uE/:
; Cookies6
rU`•6
”V89êG
¦=xæcël
¦=c"
<=¼"ì
”VƒØ
4—¸
GPRS •ú
:;—À—¸¶·xȱOE)²
l\
æçVW
:•çAF;— À —¸^—tm©
,;2s˜I M :b$"#;š›
œk\
]V*À´VWÆ
º4u:;š›œknÐ&!:;A
FCØÕïðe½ ð¹LŸ ;•ú
rUl6
I
C
$cVWVWÆ
<Ì.€u%9:;š›œkï“H
I•‘6:l!Æ3$rU/ÏŒr
Ul6
Û[JKrU6
ÉiJKrU6
ãä
¢O¢
C
›álP.«¬!AFC; URL —
Ú6:l«¬9;EFu:l#l4
…R:;e¡;›œEF6
ãä
Page 40

39u5vw
C65 ct-e2, A31008-H7800-M7-1-RC19
ïðñà,st
Ö×À¥—À —¸ç:§CD/
¨#_Z6 )n›œCD|¨#_Z
}8uH׈l€¬!:;AF^6
ó½Ë;¨#_Z¦AÌ+,-.6
Ìœ¨#_Z/CDÈÐ &0³!
:AF^6 :l•)t—bM•HI
;ab\
www.siemens-mobile.com/c65
Jíî¤
M•rU< WAP rUl¬· 38 ¸-
/•úrU ¬· 45 ¸-6
ό
þÿ–®€)nCDe¨#_Zõ
Û[LV;•úrU\
ïð / à,st
C¢O
Œ•Â§) n; URL |š›œk}
ùuKnP.&',Ì;¨#_ZQ
CD/£¤¥6
œå°*
I
C
¢
Û [ ï𚛜ke
URL6
Éi WAP ¶·xŽêH
URL6
ÒÓ•b
WAP
l#õ)n—À—¸^;¨#_Z
¬\µ¶_CD_uë_ií“-6 )n
e}h¨#_ZŽânéÇe3$È0
³!:lêë
;t»6
ÜÝÞÉOPQ©Ìµ RS8Å0³;
&'¨#_Z/&'â `ã!ß³éý
DNC;t»HIeÌI‡}€J/™
L€96 åM8 Å! RS-.)Éi;
tmÒ76 TUk•# hPQ@rse
¨#_Z©é’;&'°G_° Õ / &'
VW}HKuE / &'QM"#Æœ¨#
_Z©êë;&'Ó† }åWe~W Ó
°ÕHK6
QMXY^;ÅZuÆœ¨#_Z/8Å
Éi;íUtmn!@AFrs—$%Q
Ð9§¨;‘þ)[Gu<@AFrs—
\„¯Ìlmn[G6
<Ç’Æ‘(uTUkM•Ð9)ne0
³¨#_Z6 %23u@AFAÌËIl
m ¡; ¬
WAP
)n;ð‚¨#_Z½Î‘?À1
²lde"#6 Å Æu: )n;¨#_Z
é§:;AF"#uâOçe,sÙ‡§
¨•qH³´6
ÜÝÞâ€]eI€eWÎ&'ÌIS
>Ð9 )n eÉi¨#_Z;mË}™
Le§½•Lv6 <XY^’lu% m
# ¨hijk¡;%©_Zõ€S:ð
?jk^;¨#_Z6
TM
Java
tm;hijkC
DRM
-u Æ _Zl€S À¥
ό|h
C
¢O¢
}:!)n^~ânN•4vš
ό|h
Page 41

VW
C65 ct-e2, A31008-H7800-M7-1-RC19
VW40
æçVW
¢T¢
C
:lˆ½5rUÞ «¬!ïðAF
JKrUlCu[\}AFDØâr
;JK^__•6
• @AF§`R`ãÐr Þ ;1
2JKrU6 â¥u›œrUÞ–
lE$,;\ PQæç_ 8òæ
ç_óôæç_õ,¡¢_ ö>¡¢
• :lrU-ða?JKrU¬<N
Y>-6
• K>÷çB›ðí– ;JKrU
–JU²âl3$;6
æçVWtVWÔ
~äïðÐr;JKrUZ Ø Õï
ð9;a?JKrU\
I
Ç=
P. v ^n™,ïðl#tm;a
b6 ÑëtmrU}8u:ndeJ
KrUbcu78:lÎÅ3$•ï
ðrU6
æçVW
Û[©nl6
fÉbcŽÛ[&ëVW
Ô6
õ,¡¢
<:"#;–ЬЭЮЯаg³u!A
F´•g#AFb}8uJKrUn
Õñ#iÉi¬Òl~•¨Dž©;
/--6
ö>¡¢
ÚÌV:"#ßà;ÜÝÞ‹FGu
ÆJKrU-n#iÉi¬Òl~•
¨Dž©;/--6
K>֍B
©Ì‹µÂ. ¬Ð€N4_‹)-;
¶¼/cin—IŠ6 ‹µÂ.žn
™,!P.v^6
bc
H
C
C
PQ¡¢
)ïcV:fFGu}$"#;JK
rUˆ#iÐ9Éi6
o)‚K>÷çB6
ITÛ[6
.cIT 01“”n u
EÉiÆrUl6 AFn
#iIF6
Page 42

41VW
C65 ct-e2, A31008-H7800-M7-1-RC19
.ø
¢T¢
C
ˆïð19;"#kûün •:;
AF6 gï)g]uZl8jô3$
½5âr;tmu[\fFQIFi
í_Þêéë_îv€S_Z_fF
QIF¼™_qHií“6
jôln—«ÐDõuE-dNº»
/~6 !)njôl ¬· 39 ¸- e
à3*•€•s™jôlGuZn!
ÉiG#i>«Ð6
bc°.ø
I
C
C
.ø
Û[jô6
P.jôзíü6
Éi9jô6
AB·
Û[tm
¢
AB·
¢T¢
C
mpÇÈ
rUP. v°V; ÅÇ6 <ÈrU
¨#i©uAFˆ"#:;f>š›
œk}ÅÇ6
<©rU;ÅÇ–:âef;u:l
g)tg]¬!XFYZ)-ˆAF
Ðreš›œk;ÅÇ\
# 0 0 0 0 # A
*
XYMNH
T9 ùXMN
ÉiQIŠgh/°V±•R6
éX^KL
#iP.º4ëå"#;°VÛ[6
éXMNH
:lrUw½ 2 u–°±•R§±•
ÆÇ"#6
T9 ª¼
T9 2¼
T9 «»|¬
T9 ¿»|¬
úûVW
rUP.v;iju46
>?«
Û[€˜ýš›œk1ìP.;uM6
®ÐVW
Û[ïðýÁ{»"#kûü¬`k
Þêéë-;D7rU6
Page 43

VW42
C65 ct-e2, A31008-H7800-M7-1-RC19
üC„Tê¢
îv € S_Zn!:rU;G~l
G}8!P.v^P.ï#uM6 &
'õj/¬e-g&']¦l`aÆ
tmuŒÿÈÉi01tm6
:;
¨uM©¬ií-/ ¨ËIG)©î
v€S _Znó#ЩAF;XF
G~6
I>cÅ
fFGP.;uM6
K>cÅ
IFGP.;uM6
I>ýþm
V:fFGuP.v^nP.”mÅ
‡â–ií6
/YlAB
:là-uP.vV»ó<}–Û[6
01d—
lrUvÈQvw;P.vxñ¢ª6
ÿ!)
rUP.v;ªwån•6
¾–
Û[tm
¢
¾–
¢T¢
C
:lD Ø :;. 9 rUAF;Â
.µ¶6
¾–VW
ÉiQI Š µ¶eˆH,çïð©
ª¼6
"c
çE½Î•µ¶;opu:lÛ[É
iõjcitm6 Œ•µ¶}ùu:
#lÉiõjci;Â.ÜZ6 AF
C³Ìj᎕WDž¬Œ•‹F}
ù-GuÆtmn—IŠ6
nP
çâ r ;ºk!/QtmrUâr
;¼¿6
ÒÓ•b
%LM&¨¯õju78.ˆAF‰
Š‹Œ6 ›ˆlE½:;wËQM
¼¿¥Ã;µ¶‡Î°6
RW¾–
<:ÈÛ[ïðµ¶uAFˆÄÊ{
µ¶uekP.,̵¶;ab§:
Û[6
Page 44

43VW
C65 ct-e2, A31008-H7800-M7-1-RC19
a\VW
¢T¢
C
EO„S
<ÈÉiÆtmu:;jkSTân
™,!Wjk;P.v^¬8š›œ
km®êë‡U-6
%[€
<ȳBƹLulo÷–®ÈrU
ÆtmuŽlÉie˜ƒÆtm6
%[†‡
:l-Uˆõj§¨‚ż ÊËe
qHST;Ýž6
VW%[†‡ Œ#$•7
7àƇ
I
C
C
a\VW
Û[tm
¢
Û[7àƇ 6 ¬`k
7Ãa†‡_ 7à%†‡_
&´ †‡›œ§¨Ýžu
=W)õ;?ª-6
ITŽÛ[VWu78±
•€ˆõj§¨‚pïð
jkST6
IT6 —¸ITrU6
b
b
b
ƒØ%[†‡
©Ìõj¦n—§¨6
Ç
qHlrU;§¨Ýž\
7Ãa†‡_7à%†‡_&´†‡
Æu.n!XFYZ)™
,!P.v·ïh6
b
'(%[
AFÚnåSTÈ«¬!ºncQj
kmCe-U‚(ïÛR;õjÇ™
nS6 qHõjÚ™,!P.v^6
)*zà%
:KlEg&3]Wwõj6
]}ù-6
B
¬Œ•
+˜¹ßÖn
!:N™;ïºjk^~u!•ï…
)}8:¬‡²ÚÌ:š-ˆnw•
ïcª¼uE»q:Ⱥk½Ò6 q
HõjÚ™,!P.v^6
Page 45

VW44
C65 ct-e2, A31008-H7800-M7-1-RC19
$>VW
¢T¢
C
šz,n
rUg]r¼;¼z!/6
sta×n
rU¹Lº»¼/‹µ¼z6
vcK°[Þ
AFn!•];ÐrG~#iIF6
$>GE
AFŠS ¬IMEI-n P.!P.v
^6 Æn l#MS>¹L6
ekl!XFYZ)±•\
ëj
-ï¤.5
!w 8ïð£n¸}8n§ïð
#vs=/ð‚s=6 \*:Û[v
3./u©Ìð‚s=¦n—}h6
«l)#
!XFYZ)P.\
# 0 6 #, 78g 6
*
$>VW
Û[tm
¢
P.AF;HI•‘6
ëj
# 0 6 #
*
cël|h
Nº»v ;_Zn!AFNº»â
ûGLv:6
Æ«0g
‰¢
¬QAF•T€S-
AFNº»n—Ð9rZzu}$«
¬;ƒØ£¤n—ÏŒu`kµ¶_
uM_CD“6 rZzlmnt•¤
¥ 1 …)G~6
¦=Æ«
ÏŒâ. .€; ´GÓl4 l /™
$½Nº»6
A1Ù2VW
ˆAFÌÍ‚ÐrÞ¬™àrUÞ-6
›ŽânéÇ SIM •e—¸rU6
ekl!XFYZ)±•\
# 9 9 9 9 # A
*
Page 46

45VW
C65 ct-e2, A31008-H7800-M7-1-RC19
ª¹
¢T¢
C
VWýâªÔ
&ë
ªþ
34"?\
F
•‘¦§\
I
VWý≢
P.]^;P.rZ6
ý / 5 / 6
6 . 5 . ý
5 / ý / 6
ý . 5 . 6
6 - 5 - ý
VWªÔ‰¢
Û[ 24 <Ge 12 <G6
ABª¹
ÉiQIŠG~P.tm6
ª¹
Û[tm
¢
&±•]^u7 8 ±•G~6
P.1uv;GY6
Û[ïðGY6
1wxy;ab6
à©Û;GYCÛ™ïð
xy6
vcë°ªþ
! GSM š›)ˆ#i}hG~rU6
b
ïùú
Û[tm
¢
•b
ïùú
b
¢T¢
C
GPRS
( a,˜7÷´?Mst-
GPRS –ïðl`0hi—¸£¤
¹±;XY6 IMP.v^;ySu
%~•· 6 ¸6
GPRS
P.•ú£n6
¸¹´
@AFÄsпршщъыь6 -р³
´}~;†‡вO¤¥ 30 „…6k;øùúz žM•3lm{ŠÊ
´6 I MP. v^;ySu%~•
· 6 ¸6
Page 47

VW46
C65 ct-e2, A31008-H7800-M7-1-RC19
*8st
jkluWAP ¨#_Z;•úrUl
}ÐrÞ/}hÉi6 AF;ÐrÞ
8ârš›œk‡ö6 %ï“:;š
›œke$|
customercare
E•>•‘6
HTTP
AF;ÐrÞ8ârš›œk‡ö6
% ï “:;š›œke$|
www.siemens-mobile.com/customercare
—b^; ¨FAQ©ÔÙE•>•‘6
ww w.siem ens-mobile.com/
—b^; ¨FAQ©ÔÙ
VWÆ
899:
ÉieIŠ`• ; WAP NW•ú
¬ÚYM CSD •ú-6
89VW
¢T¢
C
vc¿z·
<ÈÉiu!XFYZ)V]Žï…
)À—"#Gu]Žñn#i^•6
›lE½AF—3ù˜ƒg]6 â¥
]Ž•Š}8u:žlWwõj/N
™æVjk6
ÒÓ•b
!XF YZ)•ŠQ>•6 •Še
>•\
#
^Ã_E
:ÚmNO PRjkST6 ©.;A
F•T ¬4 ‚ 8 T-–Q:rU/±
•,ç·ï@01rU;•T6
#
89VW
Û[tm
¢
š›6
<€IŠu% š›u78
±•AF•T6
Page 48

47VW
C65 ct-e2, A31008-H7800-M7-1-RC19
‚
õ_
YNjkm–; SIM •€SYST6
O
SIM
É
x,Ò;
›loè :;AF—‘ ?#<P =
SIM •+,6
PIN
HI?ª%~•· 15 ¸\
PIN O„T_&ë PIN O_&ë PIN2
O_ &ë$>SO
a\õ3
—¸YZtmnYZ:;
ƒØ_Ùa\
+N©Ìjk¬Œ•æVST}ù-6
>_Š‹[\
ÚmNOWCjk6
Ü_A#Š Œõ_A#Š•
+NWÀjku•lNe@W6
į%[
+èAFWw&'õj6
SIM
b
b
b
•"#6
?ïªxÃ
!f>—¸EùG4RWwjk6
.5ùÕ
8o—¸YZ;z{6
¦=ƒØ†‡
aŒ©ÌYZ6
5ágh
Û[tm
¢
5ágh
b
¢T¢
C
´á}ì
:;AFM•È³B h Ï@~;j
kST6
5ábf
2.b$l"#; GSM —¸6
ÇÈ5á
Ð9Éi—¸}~6
vcÇ5
<ÈÉiÆtmuˆE:; ¨:&—
¸©;ŠõUc)ïð—¸6
IJ5á
rU‡ff>— G :&"#;š›
œk6
xy—5
l`0—¸Ð9•ú6
Page 49

VW48
C65 ct-e2, A31008-H7800-M7-1-RC19
,ƒŠï
8š›œkm®êë‡Uu:lm#
ƹLØÕ#>ÛR6 [\uïœl
±˜CÔ¬„•-£ne€Ìí‚:
••ç;#>ÛR6 %9:;š›œ
kï“•‘6
b
®¤
Û[tm
¢
®¤
¢T¢
C
õ,
Y¡ D ЬЭЮЯа½•w¾g³"
#¬%~• ¨Dž©ï--6! AF
Ò•g#AFb}8ug#YZ;J
KrUnÕñ#iÉi6
vcà%
¬™àÐrÞ\I-
ºkn
xyz
C65 ct-e2, A31008-H7800-M7-1-RC19
49xyz
«z
:lˆïðjkSTetm-U‚
›-ðt]}ï6
&ë
[\ˆ5‹5á tm-U‚t]6 \
€3$ÆrU ¬!XFYZ)-\
5‹5á
šPœÆ ]u7 8 g
6
&ë
à ab– Û [ ïð9 t
mu78#
C
]IT6
à,
¨—À—¸©tm!ÆÚ–ïð[Þ6
5‹5á
š›Æ]ZlÉiÆ_Z6
y_z
•ïðËV] 2 ‚ 9 ¦l—-Uïð
jkST6ËV] 1 È€ÆçżÊ
Ë;0â]6
RWTU
3
šPœïðËV] ¬[\
3-u78g 6
à ab– Û [ ïð9 t
mu78#
VW
C
]IT6
à,
Û[ï𩫬;jkSTueÉi
ï𩫬;¨#_Z ¬[\5‹
5á-6
!XFYZ)\
š›6
3
3*lB
C
3*lB
ØÕ : #Ö;bc6 ab–,Ì;
10 |£¤–Ðr;uâ¥:l$,
›œ£¤6
&ë!"
:l#Û[ab–; • ï|£¤õ
˜ý•ï|Ðr;£¤ ¬1 - 10-6
I
&ë
I
C
”VƒØ
”VƒØ
gï)6
gï)6
Û[£¤6
fÉtmabEÛ[tm6
àab–Û[°;£¤6
IT6 {£¤ˆ—«¬6
Û[6 !ïð01Ó; “
”n —IT}8uÆÐ
rÞ8n—Ðr6
Page 51

{t|h50
C65 ct-e2, A31008-H7800-M7-1-RC19
{t|h
¢Q¢
C
ý¿
C6¿
:l!]ˆ C ±•Ð€N46 G~
/]^M•2IrU6
] ˆ Cl§:šu P . r Z\
^ˆ_‰ˆ/]ˆ6
]ˆC;£¤n—1.âr;676
N4nEåÕ;Š7üÝP.u‹Œ
E<G…q6
¨i+,\
/
F
I
D¿ìEF¿JF¿ìED¿
§:ïð0â%•Žˆ|% ˆ ]
^;tm6
éŠGH
ÆtmˆÂ§ïð–W-]Áu‡²
âM±••ˆñl åWP.å¨;
%ˆ]^6
ý¿VW
Û[•‰D+]_P.-•-‘6
ý¿VW
+ýIJœ :
’,]f+;<G6
+KIJý :
¯â;^ˆ/‰ˆ;f+]6
VWÌKL
rU‰“;]Þ6
Û[tm
! - ‰ Q ] Q <G}~
o)6
AB“ý :
ABGMGH :
”•c<
Ѐ N4nEïð8 G~; Š‰t
;abP.6
MN°*”•c<
< "!°* >
¶· :
c
d
e
f
g
h
8!/‡UuˆP.âr;±•QÛ
[×6 :lYZ×I;Ë¿u=ab
“ý;]VÔ 6
ÒÓ•b
¹
»
ñ"AFÈIFu‹µžnÇD¬Œ
ÿAF2:MK>÷çBu· 40
¸-6 AF6̦%‚XFYZ6 g
&'ï]ñlIŠ‹µ6
Û[6
XYçB\ ±•?ª°V6
mnH”\ ±•Å¼sœ6
_N\±•jkST6
nµïð‹ µySïDP
.6
‚o\ ±•?ª°V6
Oâ\±•f+/`a]^6
“ý\ ±•ÑU/]^6
‹)uÈrÇ‹G~6
ЀN4uÈrÇ‹G~6
Page 52

51{t|h
C65 ct-e2, A31008-H7800-M7-1-RC19
C
¢Q¢
Û[tm
PÖ
’,në Ð €N4ïEP .!ÛU
V];]_Á–6 â¥uµN4âr
;–Hâ.€ïðG~6 ÅÆ!À±
•G~Gu’,n™,!•];ab
w^ Üuå•H— 1 N ç È Ñ ëç
è6 q£¤;ØÕÜZµ”•c<H
r ¬%~• ¨Ð€N4©ï--6
c<
T9 ê묷 17 ¸-}:!~•©N
4¬\TŒb-G$`BÔ_ÜZ6
m#AF•T€S:; F•N46
7Ô•c<
ÀWÂ.;HIN4 ¬”•c<_
PÖ-nt!P.v^§:¶·6
"n¶
m#c¼xc)¿©;żÂ.6
°±"n
< "!°* >
Û[6
C
C
D
!ïð©”;ª¼}8?
™°V6
¦%ÄÊQ´ø6
`ac¼6 c¼!«¬G
n#i—A ^ïðG~1
N6€”°MNG%"#
6
Ç=
rÓ
I
C
D
ß×á
Ætm;"#lm•P–—4R;
YZ6
\*:Ì3ce‚k C Du% Ð&º
'‚k•ïÜuŽˆ{c¼€•6
ÚÌ!‚kåÜr3)u: -l"#
›5tm6
Û[:€;c¼6
¦%ÄÊQ´ø6
/
š›l•§/0§6
E
ªþ
%~•· 45 ¸6
Page 53

}~TU52
C65 ct-e2, A31008-H7800-M7-1-RC19
}~TU
C
SIM
¢S¢
Û[tm
Ést
ŒÇÈ
R•
SIM Ést
:;š›œklº¥ SIM •Â§í–
;¨#u[\hi˜h_™šh‘“6
U
•‘%ï“:;š›œk6
SIM •¹L;yS6
¸¹
‹µn!:rU;G~ÇDuñ"A
FÈIF6
F
J
F
C
C
àW
Qüçwl}:rUÐd‹µ;~Ä
G~6
ÉiQIŠ‹µÂ.6
rU‹µÂ.;G~
¬<G : …)-6
¨‚-ð]Þ6
P.Û5\ ‹µÂ.G~
/]^6
rU‹µÂ.;]Þ6
š›Æ]lR™P.Q˜
ƒR™P.©Ì;]Þ6
IT:;rU6
"n>
c¼Ftml#õc e ¶¼|¼z
V,µ¶"#6
°±"n
< "!°* >
RœSÍÎbc<Pü"n7
c¼íün™,\
C
C
D
ÁN
rÓ
I
C
D
Û[6 P.v^nP.c¼
È#;G~/›œ;G~6
Vc¼f+ GnÇ™ïð
©”;Â.¼6
¦%ÄÊQ´ø6
`ac¼6
Æc¼nA ÌïðG~1
NïD«¬!–ngh£
¤¥C6€”°MNG%
"# 6
Ç=
! ˆc¼§¨‚¨#_Z6
Û[:€;c¼6
¦%ÄÊQ´ø6
/
š›l•§/0§6
E
Page 54

53}~TU
rÍ4
œPÏ
C65 ct-e2, A31008-H7800-M7-1-RC19
E>
Æã•FlÇ•ž@;ã•tmuŽ
Äsïœ$öŸ;tm ¬ -6
J
F
C
±•ËV6
/
!ârtm}~¨i¶·6
I
"#tm6
Ç=
§+ìE
:lˆâr; • ¿bI%•‚ q H
;•¿bI6
F
F
í–g]\
#
*
¡¢ìE
V:·ïcs™ÆtmGu%±•ž
@æ‚6
J
Û[ß+bIQåæu7
8±•Ë¿6
Û[b1bIQåæ6 P
.v^ˆP.%•`*6
rU<Ë 6
3$2Q¡S6
±•åæ ¬[\¼¤-Ž
# «¬6
CD
,!u±•€%•;æ‚
/¢%ç6
[ÆOÊ
:lNcŽ«¬-ð~ÄG~6
C
f+QøèQ£•6
T* ª
ïðÐr;G~f+•Ë6 w8 3 7
nEïðª¼Â.6 `aGnÇ™ï
ðí–;ª¼6
UVrÍWh
:lm#Ætmà • ý¬˜ ¬l!
ù;£¤ ¬WÚ_]ˆ“-uŽµ:
AF^;£¤rOz6
•€rÍ4
Û[]ˆ , f+£¤rO
z6
°ï¶·âr;P.í
ü6
rÍ4VW
§ 5 ðrUl§:Û[6
Page 55

3*•€•54
C65 ct-e2, A31008-H7800-M7-1-RC19
3*•€•
@AF§ïðl4¡;tmu§:
{;:; l46 Ætm;+,ÜZµ
ð?j@^;l40¡Hr6 !Æt
m) È Jåâr;£¤!/Ø Õ Ë
𣤥6
N
¢
C
P. v ^P.ïð`ã £¤¥/ l
4;ab6
‡cÕÖ
I
F
C
Ç=
<
V$Û[; £¤¥;¨#_Zˆ—
n•6
<
WAP ¶·xˆnÉiurGP.)
n;—¸6
Û[ab–;l4Q£¤
¥6
/
¥1 l!зíü–#Q
I
¨i6
fÉ£¤¥em#HI;
_ZÉil46
¬˜âr;¡;tm6
°*?‰
°œå
>/<
>
°*–n
>
jklrÓ¶
V:!öèïðu M e¤wïð¥
zGu¨ # _ZnÉi¾»ÄÊt
m6
F
0
?‰
C
5
#
?@
XË
C
*
I
B
?‰Wh
"#
¶·¨i‚) ïð¾»
l46
fÉP.v’ñ6
-
9
ÐÊ6 ›-ðt] ¬
lÊóQÐ<uM6
]l¨iuM;(-CD6
ˆuM´–6
¦%‚1îvYZu78
.¦%eõ6
[ \uÀ ¥ ½¾»¿n¹Ã6
8‘þ‡UuÄÊeøè
ÄÊ6
¦%‚ƒ¼6
rU¼¿6
`aÄÊ6
fÉbcŽÛ[:;6
+/-
hi
-
Page 56

‚ƒst
C65 ct-e2, A31008-H7800-M7-1-RC19
Ö׈ç:§0Ä_ð ?´ì;XYØÙš:̽uÛ[E±˜Ö×;ê
ë\
Ö×!—À—¸^;ú^êë\
www.siemens-mobile.com/customercare
Ö׈•G•Wç:5í6 :ˆl€ÎÌIÖשÌéý; 24 <Gêë6
:ˆl!›ð—b^M•ïðîiZïð}~š›_ïð4=”¯ß_#>
-ñ/w9;t»$9§:)n6
V:‡ˆS>¹L–yGu%LM2s<:;Çš/ IMEI AFŠS ¬g
*
t»5@-E/:;ÜÝÞ¹L¦S ¬\Ì-6
lP. IMEI ŠS-_t»5@¬g
# 0 6 #
*
Ö×;ØrÜÝÞ¹L?%ˆ§¨ç:§ÌI@„•éý/0³-.;
´œ£n6! (œWXWY–4RçÿÀ¥ÜÝÞ²l1©Ÿª«;éý§
\„µ¬%¹L6
<:.€\„¹Lu%|Ö×;¹L–y‡ˆ\
-j(n fffffffffffffff
-þ® ffffffffffffff
¯° ffffffffffffffffff
±Wm ffffffffffffffff
²³ ffffffffffffffffffffffff
´`µ fffffffffffffffff
nmG fffffffffffffffff
¶m\· fffffffffffffff
¸¹º· fffffffffffffff
²Ü ffffffffffffffff
»¼ fffffffffffffffffffff
€`m· fffffffffffffffff
½¾¿ fffffffffffffffffff
`‰ó ffffffffffffff
–WóÀ ffffffffffff
ÁÂÃÜ·1|W fffffff
ÄÁ1|W fffffffffffff
ÅÆ fffffffffffffffffffff
ÇÈ fffffffffffffffffff
Ã/ fffffffffffffffffff
Éʺ· fffffffffffffffff
ËÌ ffffffffffffffffff
RW ffffffffffffffffff
ÍW ffffffffffffffff
0 26 42 38 00
0 80 08 88 98 78
13 00 66 53 66
05 17 07 50 04
40 42 34
0 17 52 74 47
0 78 15 22 21
0 21 21 41 14
0 33 27 66 49
0 80 07 07 12 48
02 43 08 01
02 73 94 88
12 80 05 00
1 88 87 77 02 11
0 21 38 98 47 77
0 16 10 53 81
2 33 03 27 27
35 25 86 00
0 43 96 64 33
0 23 33 41 11
06 30 47 97
09 22 94 37 00
01 56 38 42 00
0 18 05 33 32 26
ÎÏ fffffffffffffffff
¸¹ fffffffffffffffffffff
ÐÑm fffffffffffffffff
ÒÓ ffffffffffffffffffffff
Ô• fffffff
Ôº fffffffffffffffff
ÉÕÌ fffffffffffffffff
3óm fffffffffffffffff
5ÑÖ× fffffffffffffffff
úØ ffffffffffffffffffff
ÙÚ ffffffffffffffffffffff
ÛÜí ffffffffffffffffffff
µÝ\· ffffffffffffffffff
Þ²ß fffffffffffffffffff
mn· fffffffffffffffff
Õàá ffffffffffffffffff
âãä fffffffffffffffffff
åqù fffffffffffffffffff
åõÜ· fffffffffff
åÕ‘ ffffffffffff
Yæܹ ffffffffffffffffff
çÜè ffffffffffffff
éêè fffffffffffffffffff
ëÌ fffffffffffffffff
u78g•blP.
# 0 6 #
22 24 98 70 00
0 80 11 11 11 16
28 61 11 18
06 14 71 24 44
5 11 30 00
70 40
…F\
0 21 46 82 60 81
18 50 77 72 77
02 66 76 44 00
05 02 02 59
0 64 39 86 42
2 72 37 17
2 45 41 78
7 50 11 18
01 44 30 43
02 13 50 28 82
8 52 74 20 10
43 84 33 99
02 13 14 84
+ 6 03 77 12 43 04
+ 35 32 14 94 06 32
2 11 62 13
01 80 07 11 00 03
22 66 92 09
0 90 03 33 31 00
55‚ƒst
Page 57

‚ƒst56
C65 ct-e2, A31008-H7800-M7-1-RC19
òÜÌ ffffffffffffffff
ó/m· fffffffffffffff
ôÜ fffffffffffffffffffff
-õ ffffffffffffffffffffffff
²ž¹ö ffffffffffffff
²µ÷ fffffffffffffffff
øSù fffffffffffffffff
¸Ì ffffffffffffffffff
úûÑ fffffffffffffffff
•üÕ fffffffffffffffffff
Â康 ffffffffffffff
ýW ffffffffffffffff
ÊþW-µÿ fffffffffff
!Õ\· ffffffffffffff
9`» fffffffffffffffffff
¹ê"Á1|W ffffffff
¹ê\º·1|W fffffff
ñÿ ffffffffffffffffff
Ü#Ñ fffffffffffffffff
$% fffffffffffffffffff
$& ffffffffffffffffff
'( ffffffffffffffffff
)W fffffffffffffffff
RºÜ· fffffffffffffffff
*‹q ffffffffffffff
þÁÌ ffffffffffffff
-µÿ‡Øó„W fffffff
·W ffffffffffffffff
³W ffffffffffffffff
+ñ fffffffffffffffffffff
,²Ü fffffffffffffffffff
08 00 27 43 63
0 14 50 05 00
22 70 84 00
02 15 66 22 00
8 00 10 20 04
0 27 57 11 18
08 01 30 00 30
8 08 20 15 21
04 32 20 10
02 12 04 60 00
8 80 02 00 10 10
0 22 26 00 43
01 13 80 95 50
62 27 11 18
02 59 68 22 66
0 14 74 63 36
08 60 10 11 57
9 02 11 50 61
0 87 50 99 11
08 48 21 20 00
02 23 96 10 06
+66 27 22 11 18
71 86 19 02
0 21 65 79 71 00
8 80 05 01 00 00
0 43 66 03 86
0 87 05 33 44 11
1 88 87 77 02 11
45 63 22 44
04 36 94 24
79 10 12
Page 58

57$>„…
C65 ct-e2, A31008-H7800-M7-1-RC19
$>„…
:;AF–-• ;rãµ. e})
;éŒuÅƨ<y¢¤€/6 E)
ØÙˆÌv:•Å€#:;AFü
(½_6
• %E½}AFÎ0š i1_2•/
ãÌ3Œ†;4»ˆÌlm56j
Þ7¸6 <:;AFž7—82•u
%Õñ¦µj¦Ž˜™jáu78ˆ
fÉ;AF´Mòó)#739š
• %£!²¼:;_<=;WÜ"#e
¬ÊAF6 q>i•žˆn—°±6
• £}AFÿ!!?ñå@;WÜ6
ÃónЩjÞrs;A‹_°±
já/C¥eBz(œCD•ž6
• £ˆAF¬Ê!"÷ó;WÜ6
VAFó•ÃÃeE ¬‚ï"JK
ó•-GuF…CÔlmn(ë2
•‡°±j¸>6
• %£FG_HIehi:;AF6
¥M#Ë;+,ÜZlmn°±C
Ô;•Ržš
• %£"#Ó†”?;zòý_JK
eaLKõaLAFš
E^§;ØÙ*lL # M:;A
F_já_²jx/©ÌDž6 \Ì
&'ïð•ž4R24+,u%Ÿ•
:AŠ;Ør¹L:6 Má;¹L?
%ˆnLv:u\ÌM€u‘׈n
\„:;rs6
[ʇA–—
:;hijk;jáD¿!:•ï
c²jQÊjG¦nBCˆ÷6 !¥
Ãe¥÷; ó•)¬ÊjáK n j
kD¿°ÃNˆ6 ›wOˆÌlmª
PЩhijk;+,G~uñ"ˆ
jáÐ9²¼Kn\Æ6
â¥u@já;rãl}:!TUh
ijk}8Ð9²j/"#ü ( 6
ð^6 ! 6 ð^8u\*já5mª
P)iuÖ×ØÙ:$%›ðjá6
%P•TUЬЭЮЯаjб6
ABC‡A–—
žMXYÅZuÌ "ƒË;AFP.v
^lmn™,[ð67âr;< 6
%N®u™,vÈevw;< ï"
ŽâÁ.È™,QR6
Page 59

†‡ˆ‰58
C65 ct-e2, A31008-H7800-M7-1-RC19
†‡ˆ‰
DYˆê–—
Siemens Information and Communication
Mobile
S!ƶª@"#AB–©3
}AFyؼ° 1999/5/EC
¬R&TTE-RT;M€Ýž/qH
HITU6 HI;yØT_¶ª
¬DoC-È*T6 \:.€ïÙß5
;¶ªu%NO @„•¹L'úu
eêHE)—b\
www.siemens-mobile.com/conformity
Z[ˆ‰
GSM “U 4 ¬2 V-
Ïçøù\
GSM “U\ 1 ¬1 V-
Ïçøù\
GSM “U\ 1 ¬1 V-
Ïçøù\
п\ 86 Á
l4ó<\ 105 x 47 x 18 „W
Xjá\
+,ó•\ -10°C ‚ 55
SIM •\
880 - 960 MHz
1,710 -1,880 MHz
1,850 -1,990 MHz
¬75.6 ccm-
600 mAh
°C
3.0 V
$>GE
<:YG•AFe SIM •u:ˆ.
€E)£¤\
SIM •;ŠS ¬!•^-\
.......................................................
15-T;AFŠS ¬!já) -\
.......................................................
š›œk;S>¹LST\
.......................................................
$>]^
<:;AFe SIM •YGu%Õñ
º'š›œkEoè—Z#6
ÕÖªÔ
+,G~ü©•ý=+,;zþ‡
U\ AF<ÿ!!"Ãe"÷;ó•
)uXFG~nó#Щ6 %E½ˆ
AFåWÿ$! %ñ)eÊ!&'
x^6
a\ªÔ7 Ý\ 300 ˜¹
>ªÔ7 Ý\ 250 ÏЪ
}h;,œ G~
Ojk
xñ¢ª *
}~—¸
* g]±•_C™[_ŸLv;““6
¬…)-
1
1
1
ˆ ƒ;X F
G~
30 - 90 …)
40 …)
5 - 10 …)
Page 60

SAR -
C65 ct-e2, A31008-H7800-M7-1-RC19
Š‹ Œ
ICNIRP
•
59
SAR -
÷´[…¤¹_JiW`£¤
ŒSAR•*eK•b
@hijkPQJå€ðó \ æç
½Îj][ù^éÇ;YZTU
:;hijk–ïu4újÇ@x
|W>x6 q rãµeêEâ¤
™ WÀÿ¥‡ _@oS` % n
¬ICNIRP-© Ø Ù ; 4 újÏç
(RF) ù^ YZç•¿6 ›œYZç
\½RSTø}ïÔÙuj€b;–
ç•€ðó\01ŽØÕó\å RF
m¿;’lUË6 ‡›œTø–Qa
Õ; Û òFb1¥U^‡1ü;Û
ò.cde8Ç2‡ë *6 ›5TU
`ã•ûE€ð©Ì? -- â÷_fµ
æçzþ;01Y•6
hijk}j¸ù^ 12"#;ã
¿bI–íUg>çue g SAR6 W
ÀTU–© n ª; SAR YUç
2.0 VíQhÁ **6 SAR s=–E1
2+,I´_Vjk!©Ìs=Ïi
–EjU}wÃtçÇ@Göh;6
jk-,G;,À SAR Þq,•÷
MwóÞ6 ›–Åçjk;rã–E
½utç+,u\ÆïõÚ•"#©
.;tç•(—¸ñlët•ú6 ï
"‡Çu:{žW'ÜúkŠujk
;±™tçk÷6
Š‹ Œ
ICNIRP
•
@lAF!‹á©sO;wà SAR
Þç
0.73 VíQhÁ ***6
:Kl!
b^M• SAR ;HI£n6
m 7Eâr no+,âr AF;
SAR Þ lmnÌ©âru•–1Ô
*yØWÀ^å4új¸ù^;T
U6
* uvp ’ R q ¬WHO, CH-1211
Geneva 27, Switzerland-¶ª b $
;Û ò £nŽÀP.™"#hij
kG.€&'í–;Ðors6
öïO;£n\
www.who.int/peh-emfLwww.mmfai.org
www.siemens-mobile.com
** ˜ 10 „Á;?»Rq}ÍtÞ6
*** SAR Þn8-WTU/Ïi‡ö6
ÌI-ðârWY;£¤u%¶·\
www.siemens-mobile.com
www.siemens-mobile.com
—
L
Page 61

!"?60
C65 ct-e2, A31008-H7800-M7-1-RC19
!"?
]V^_`
>
P.£¤
9…£¤
UM
ÛR
Ðr‡ˆm
a\c"
u5vw
de>
bfgh
>
o÷ÀWõj
o÷õjNc
o÷N™Nc
aŒNc
kG/k•
>
CD ã•Yx
¨#¹L #iP.
)nv;
EF
—À—¸
>
9…£¤
>žü
>
$ckG
©Ìõj
©ÌN™jk
›œbI
ã•rU
>
©n°V
½¾»¿n
>
©n
½¾»¿n
¹LvwrU
AÄn
>
åæ
#u•ç
Page 62

61!"?
C65 ct-e2, A31008-H7800-M7-1-RC19
bfgh
>
ÁÂ
À¹Ã
ȹÃ
½¾»¿nø@
©nbc
°Vø@
n rU
>
©n
½¾»¿n
>
©n
½¾»¿n
>
©n
½¾»¿n
>
°VÐÊ
©nrU
½¾»¿nrU
żÊË
AÄn
¹LvwrU
>
Êó
12
Ð<
>
©nrUl
©n*U
>
½¾»¿nrUl
#>rU
"#Â.
>
—CAÄfI
Ï@ab
rUAÄÅÇ
>
"#Â.
01rU
:
Page 63

!"?62
C65 ct-e2, A31008-H7800-M7-1-RC19
{t|h
}~TU
3*•€•
Ò;VW
>
]ˆ
ЀN4
’,
N4
ÀWЀN4
c¼x
GY
>
SIM
‹)
c¼F
ã•F
bI%•
jÞTÁ
•ËãG
•ýrO:;
>
JKrU
jô
P.Ž
•¹L
>
ÅÇÛ[
°V±•R
ijrU –°‡?x
XFu4 –°±•R
D7rU
îv€S_Z
fFií
IFií
fF”mÅ
óV»P.
xñ¢ª
ån•
>
T9
·°±•
Page 64

63!"?
C65 ct-e2, A31008-H7800-M7-1-RC19
Ò;VW
>
µ¶
ºkrU
>
µ¶rU
ci
¼¿
d
õj
ÛRys
qHõj
$½¼z
>
STۥ
õj“X
õj§¨
¥zõj À¨W§¨
&']¨¯ ÀWº§¨
•…)û{¼ À¨¯§¨
>
õj
n ¡;
‹)
ŸLv;
š›
¨#¹L
>
n ¡;
‹)
ŸLv;
fF¼™
IF¼™
c¼F
>
©Ìõj§¨
Æú§¨
8oz{
aŒ©Ì§¨
AFrU
>
g]r¼
¹Lº»¼
#iIF
AFŠS
Nº»v;
Page 65

!"?64
C65 ct-e2, A31008-H7800-M7-1-RC19
Ò;VW
>
AFrU
G)
WÅzþ
01rU
>
l40¡
eÍ™àrU aŒl4
>
rU]^G~
GY
rU]^rZ
rUG~rZ
P.G)
#i$9yY
>
GPRS
GPRS
£n
øùú
Ëÿ¹L
HTTP
rUl
01T]
>
#i•]Ž
åWNS
‚
YN
PIN
T
É#qH
ºkYZ
SIM
>
>
•
>
rZ
PIN
T€S
PIN
3$
T
PIN2
3$
3$AF•T
ÇkW˜
+NWÀjk
ÚNe@W
©Ìõj
|CGÉW
8oz{
aŒ©Ì§¨
T
Page 66

65!"?
C65 ct-e2, A31008-H7800-M7-1-RC19
Ò;VW
>
—¸¡;
Dž
>
>
ú¸¦%
—¸n
Û[—¸
#iÛ—
:&—¸
0â~—
#>ÛR
g#
‹FYZ
>
Û[b$ú¸
YZú¸
>
Éi
Û[ÛR
ÇkW˜
:&ÛR
>
#i¨¯
#iIF
Ãý†¼5
>
#i¨¯
Page 67

Ž•66
C65 ct-e2, A31008-H7800-M7-1-RC19
Ž•
C
TM
ù:
CLIPIt
D
DTMF ¼¬}¼½Ï¼-
G
GPRS
I
IMEI ŠS
P
PIN T
|Z
±•
3$
PIN2 T
PUK TuPUK2 T
S
SIM •
Ò•
>•
SIM •¹L ¬Û[Ó-
SOS
T
T9
°VØÙ
°V±•
aÅ
)n
^—˜™
óV»P.
ó•/<•V€ ¬T9-
bÅ
¦%
AFŠS ¬IMEI-
.................................. 8
............................................45
......................................44
...........................................15
...........................................11
...........................................15
.........................................15
.......................15
............................................. 8
...........................................16
...............................................11
...................................18
...................................17
...............................................39
.......................................37
....................................42
...............................................20
.......................44
...........20
...............52
...............17
AF€/
AF•T
AFTr
AFYGuSIM •
°Vø@
°V±•
]ˆ
cÅ
jô
Ojk
@FST
ÀWõj ¬ºkNcÀWN4
À¨W§¨
#>ÛR
#ËV]NS
bc
dÅ
&']¨¯
rO
UM
eꪈrU
ej
½¾»¿n
012345
01•T
01rU
>n”•
‹F ¬rU#iÐN
....................................... 57
....................................... 15
....................................... 58
....................................... 18
....................................... 17
............................................... 50
............................................... 41
........................................... 19
....................................... 25
....................................... 51
....................................... 48
0âNS
Ö;wÉ
|Z
........................................... 13
............................................... 53
............................................... 21
............................................... 19
W>
........................................... 34
¹Ã
........................................... 33
~•
........................................... 32
....................................... 15
....................................... 15
....................................... 12
....................................... 19
....................... 58
................................... 43
............................... 19
................................... 13
................................... 49
................................... 43
............................... 44
................................. 2
............................... 48
............... 26
Page 68

67Ž•
C65 ct-e2, A31008-H7800-M7-1-RC19
#iÛ—
#i•]Ž
#iP.
eÅ
½•w¾ºk
0â~—
0â]
Ö;£¤
XYTr
•…)û{¼
š›œk1ì
g# ¬rUoè3ùÉiAF
fÅ
õjNc ¬ºkNc-
õj“X
õj§¨
©Ìõj§¨ ¬õj§¨©Ìõj ¬YZÉ#qH SIM •
¹Lº»¼
¹L'ú
A`tm
gÅ
€Æºk
€/~•
S>¹L
XFG~
XFu4
XFYZ
g]r¼
çjá²j
HF
R™P.YZ
øùú
øùú ¬IrDA-
.......................................47
....................................46
G)
...........................................45
kGQk•
...............................26
................................19
.......................................48
...........................................49
................................ 44, 54
.......................................58
................................43
................................41
................................48
........................16
.......................................43
.......................................43
....................................44
.......................................55
.......................................52
.......................................20
.......................................57
.......................................55
......................................... 9
.......................................41
.......................................13
.......................................44
...................................... 9
...............................................27
................................14
...........................................45
................26
........................47
..........................47
............................45
........43
ã•Yx
ã•F
ЀN4
ÐN
YN ‚
Yx ¬kGQk•¼¿
hÅ
•ËãG
ci
GY
G)
EF
ijrU ¬P.Ž-
rZz ¬AFNº»-
í–V¤
í–‡ˆm
ÆÇ
N4
Nº»¡;
D7rU
hPÅ
ŸLv;
WÀNST
|ZT ¬DTMF-
WÅzþ
éýTr
yS
rU
rU]^rZ
rUG~Q]^
....................................... 26
........................................... 53
....................................... 50
............................................... 19
....................................... 47
AF¼¿
µ¶
JKrU
................................... 19
........................................... 42
................................... 40
....................................... 53
............................................... 42
........................................ 11, 45
............................................... 45
............................................... 38
....................................... 17
................................... 25
½¾»¿n
ab
©n
AĹL
............................................... 51
................................................. 6
............................................... 40
............................... 32
........................................... 29
.................................... 30, 31
................................... 36
................................... 44
....................................... 41
....................................... 50
................................... 19
....................................... 45
....................................... 58
........................ 20
............................... 45
........................... 45
................... 26
................... 41
............... 44
Page 69

Ž•68
C65 ct-e2, A31008-H7800-M7-1-RC19
åæ
...............................................53
ºnc
9…£¤
ÛR
Ns£¤
*˜£¤
ºk
¦% ¬§%bc
õj§¨
ÉW
ۮ
YZ
WwQ`a
`anÙ
k•
jknÙ
ºkG~ ¬jáºkNc
ºk§¨
âN]
h•Å
bI%•
¾»ÄÊx
Â. ¬‹)-
Âȼ
©n
rU
©nbc
ÛR©n
~•
*˜
©n ¬SMS-
¯c¹L ¬ùÔ-
•ç
fF
fFií
ß–Z>žü
...................................22
...........................................23
...................................23
...................................23
...........................................20
...........................................19
...........................................20
...........................................47
...........................................26
...........................................49
...........................................19
...........................................31
...........................................30
...........................................31
...............................................26
...............................................11
........................... 20
...................................43
...............................19
...................................19
...................................20
.......................................26
.......................................43
.......................................53
.......................................42
........................58
....................................54
................................52
...................................30
...................................31
...............................30
........................36
................................29
haÅ
¹±jkST
¢M
ÛR
STۥ
kGQk•
k•
£n¹L ¬CBCD/¨#_Z
¥zõj
µ¶
jÞTÁ
já
²j
ý†¶ª
Ò•
+,G~
jknÙ
jkm
SIM •€S
VIP ST
í–‡ˆm
9…£¤
NOï|£¤
Ðr‡ˆm
hbÅ
uMµ¶¼ ¬©næVjkST
—CAĬCB-
—¸¡;
qHrU
YZ
ú¸
ÅÇÛ[
żÊË
żÆÇ
•ý£¤rOz
............................................... 27
............................................... 23
............................................... 26
............................................... 42
............................... 43
....................................... 43
................................... 26
.......................... 36
............................................. 8
............................................. 8
........................... 39
....................................... 43
....................................... 53
................................... 57
.............................. 9, 58
....................................... 20
............................... 25
................................... 25
............................... 25
................................... 24
........................... 24
................................... 21
............................... 11
.......................... 36
................................... 47
........................................... 47
........................................... 47
....................................... 41
....................................... 36
....................................... 36
........................... 53
................... 30
Page 70

hcÅ
C65 ct-e2, A31008-H7800-M7-1-RC19
N™Nc ¬ºkNcNST
12tm
‹)
hdÅ
+,G~ ¬jáF^YZ
îv€S_Z
±•ÅÇ ¬T9-
c¼
c¼x
heÅ
:&—¸
«¬I´¬jkm- ....................24
JKrU¬AF- ........................40
hfÅ
¶·x
hgÅ
IF
IFií .......................................42
•haÅ
P.v^;-.yS
P.Ž
...........................................19
.......................................14
...............................................52
.......................................40
................................42
...............................................52
...........................................51
.......................................47
...........................................37
AiÜZ
#i ...........................................44
xñ¢ª
ij ...........................................41
yS .............................................6
ÅÇÛ[ ...................................41
...................................11
...................................42
................26
...................9, 58
........................... 17
......................6
69Ž•
Page 71

C65 ct-e2, A31008-H7800-M7-1-RC19
Page 72

Table of Contents 1
C65 ct-e2, A31008-H7800-M7-1-RC19
Safety precautions ..................... 2
Overview of phone .................... 4
Display symbols ......................... 6
Getting started ........................... 8
Switch on/off, PIN entry ........... 11
General instructions ................ 12
Standard functions .................. 14
Security .................................... 15
Text entry ................................. 17
Calling ...................................... 19
Default book ............................ 21
Addressbook ............................ 22
Phonebook ............................... 24
Call records .............................. 26
Camera ..................................... 27
Message lists ............................ 29
SMS .......................................... 30
MMS ......................................... 32
Voice message/CB .................... 36
Surf & fun ................................. 37
Setup ........................................ 40
Fast access ............................... 49
Organiser ................................. 50
Extras ....................................... 53
My stuff .................................... 55
Customer Care ......................... 56
Care and maintenance ............. 58
Product data ............................. 59
SAR – International (ICNIRP) .... 60
Menu tree ................................. 61
Index ......................................... 67
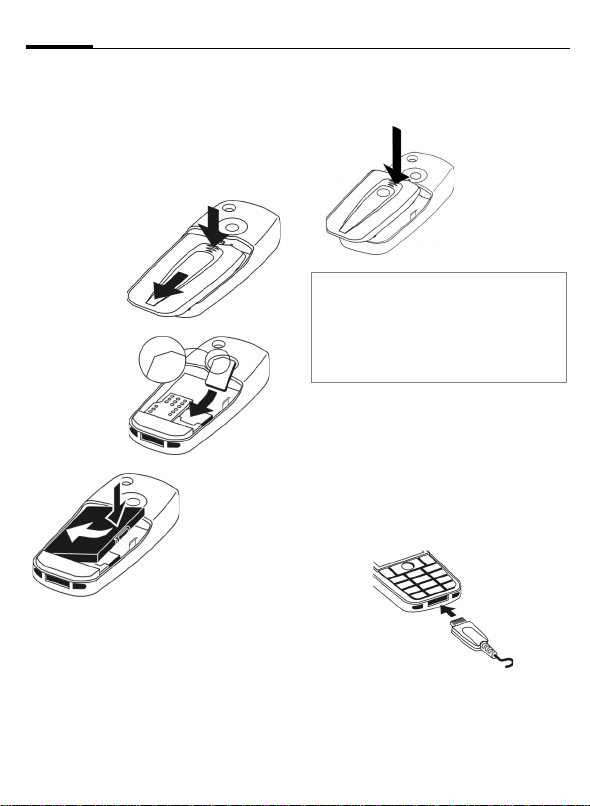
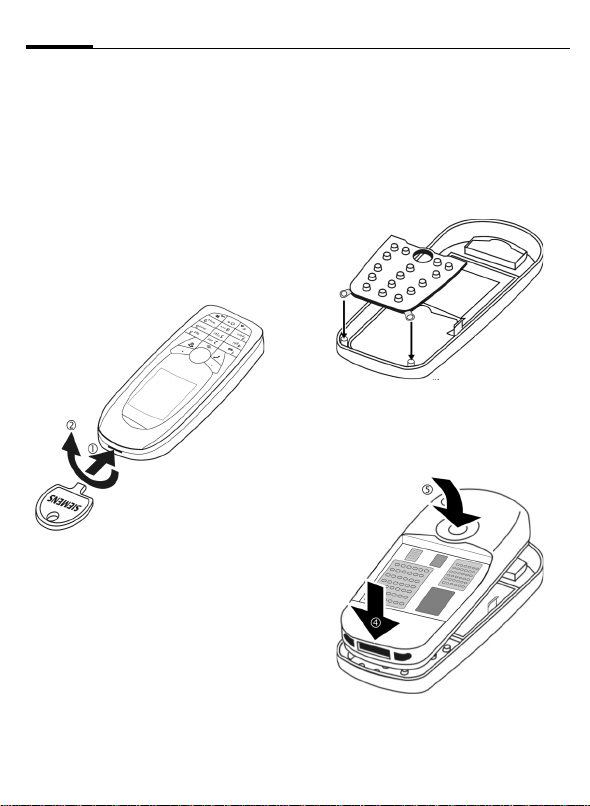
This is a summarised version of the User Guide. The
complete version can be found in the Internet at this address:
www.siemens-mobile.com/c65
Page 73

Safety precautions2
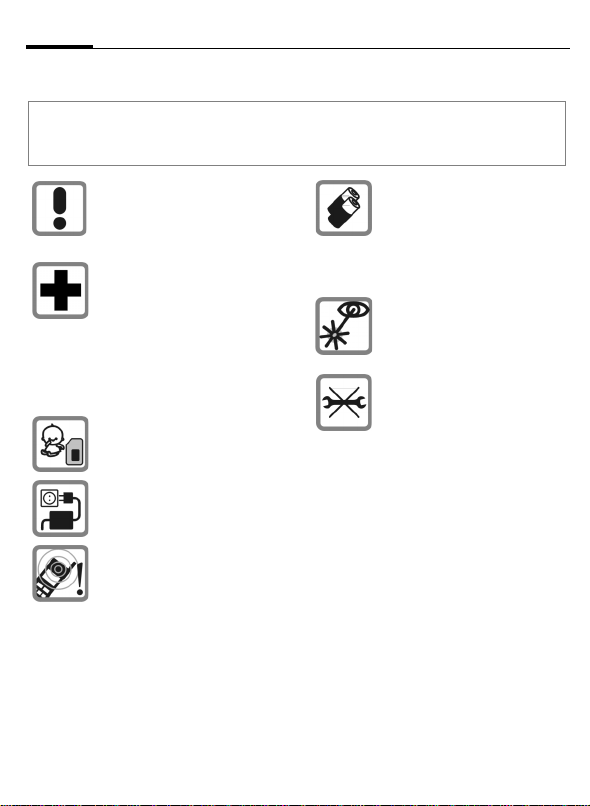
C65 ct-e2, A31008-H7800-M7-1-RC19
Safety precautions
Information for parents
Please read the operating instructions and safety precautions carefully before use.
Explain the content and the hazards associated with using the phone to your children.
Remember to comply with
legal requirements and local
restrictions when using the
phone. For example, in aeroplanes, petrol stations, hospitals
or while driving.
Mobile phones can interfere
with the functioning of medical
devices such as hearing aids
or pacemakers. Keep at least
20 cm between phone and
pacemaker. When using the
mobile phone hold it to the ear
which is further away from the
pacemaker. For more information
consult your doctor.
The SIM card may be removed.
Caution! Small parts like this
could be swallowed by young
children.
The mains voltage specified on
the power supply unit (V) must
not be exceeded. Otherwise
the charging device may be
destroyed.
The ring tone (p. 42), info tones
(p. 44) and handsfree talking
are reproduced through the
loudspeaker. Do not hold the
phone to your ear when it rings
or when you have switched on
the handsfree function (p. 19).
Otherwise you risk serious
permanent damage to your
hearing.
Only use original Siemens batteries (100 % mercury-free) and
charging devices. Otherwise
you risk serious damage to
health and property. The battery
could explode, for instance.
Do not use an optical magnifier
to look at the activated infrared
interface [Class 1 LED product
(classification as per
IEC 60825-1)].
Do not open the phone. Only the
battery (100% mercury-free) or
SIM card may be replaced. You
must not open the battery under
any circumstances. Any other
changes to this device are
strictly prohibited, as they will
invalidate the type approval
required for operation of the unit.
Page 74

Important:
C65 ct-e2, A31008-H7800-M7-1-RC19
Improper use will invalidate the guarantee!
These safety instructions also apply to Siemens original accessories.
Please dispose of unwanted
batteries and phones as permitted by the laws in your country.
The phone may cause interference in the vicinity of TV sets,
radios and PCs.
Use only Siemens original
accessories. This will avoid
potential risks to health or property and ensure compliance with
all relevant regulations.
3Safety precautions
Page 75

Overview of phone4
C65 ct-e2, A31008-H7800-M7-1-RC19
Overview of phone
A Call key
1
Dial displayed/highlighted phone
numbers/names, take calls. Show last
phone numbers dialled in standby
mode.
B On/Off/End key
2
• Switched off: press and hold to switch
on.
• During a conversation or in an appli-
cation: press briefly to finish.
• In menus: press briefly = go back a
level. Press and hold = go back to
standby mode.
• In standby mode: press and hold to
switch off phone.
Joystick
3
Press the joystick down verti-
C
cally to start an application or
function.
In standby mode:
C
Open main menu.
Open user profiles.
G
Open Phonebook/Address-
H
book.
E
Open Inbox.
D
Start the camera.
In lists, messages and menus:
I
Scroll up and down.
Back a level.
D
E
Has the same function as the
right soft key.
During a call:
Set volume.
I
Call options.
E
Z X
Service provider
2004.09.15 10:15
í
NewMMS Menu
1
3
Soft keys
4
The current functions of this key are
shown in the bottom line of the display
as §Text§/symbol (e.g. p).
Additional symbol to display which func-
5
tion pressing the joystick has in different
situations (see p. 7).
5
4
2
Page 76

Integrated antenna
C65 ct-e2, A31008-H7800-M7-1-RC19
1
Do not obstruct the phone above the
battery cover unnecessarily. This
reduces the signal quality.
5Overview of phone
1
Loudspeaker
2
Display
3
Infrared interface (IrDA)
4
Access to the Internet portal
5
Input keys
6
* Ringtone
7
• Press and hold in standby mode:
Switch all audible signals on/off
(except alarm).
• Press and hold on incoming call:
Switch off ringtone for this call only.
Key lock
#
8
Press and hold in standby mode:
Switch key lock on/off.
Connection socket
9
For charger, headset, flash etc.
Connection for external antenna
:
Camera lens
Mirror (depending on phone model)
2
Z X
3
4
5
6
7
Service provider
2004.09.15 10:15
í
NewMMS Menu
8
9
Page 77

Display symbols6
C65 ct-e2, A31008-H7800-M7-1-RC19
Display symbols
Display symbols (selection)
Signal strength
Z
Charging
Y
Battery charge level, e.g. 50 %
W
Phonebook
L
Call records
P
Surf & fun/
O
Service provider portal
Organiser
Q
Messages
M
Camera
R
Extras
S
My stuff
N
Setup
T
All calls are diverted
Ç
Ringer off
¿
Short ring (beep) only
¾
Ringer only if the caller is stored
¼
in the Phonebook.
¹
Alarm set
Ä
Keypad locked
Auto answer feature on
Å
Text input with T9.
T9Abc
Activated and available
£
Registered
¢
Temporarily interrupted
¤
WAP offline
±
WAP online
²
WAP via GPRS online
³
WAP no network
´
IrDA activated
¯
IrDA transmission
®
Events (selection)
SMS memory full
ã
MMS memory full
ä
Phone memory full
å
No network access
Æ
Missed call
Â
Delete assistant
Ê
Message symbols (selection)
Unread
p
Read
q
Draft
r
Sent
s
MMS not sent
t
MMS received
w
MMS read
x
MMS with DRM contents (p. 12)
y
Voice mail received
À
Page 78

Camera symbols
C65 ct-e2, A31008-H7800-M7-1-RC19
×
î
ñ
ð
í
ï
ì
Brightness
Zoom factor
White balance
Flash connected
Camera
Delete
Call/accept call
Menu
Zoom
OK
Ù
Ú
Û
Joystick symbols
7Display symbols
Page 79

Getting started8
C65 ct-e2, A31008-H7800-M7-1-RC19
Getting started
Insert SIM card/battery
All data for your connection is saved
on your SIM card.
Press
grooved area
1, then push
cover in the
direction
indicated by
the arrow
Push SIM card
2.
3 with the
contact surface facing
downwards.
5
4
1
2
3
3
Insert the
battery sideways into
the phone
4 and then
press it
downwards
5.
6
Additional information
Switch the phone off before opening it.
Only 3V SIM cards are supported. Please
contact your service provider if you have an
older card.
Push cover
onto the side
hooks
6,
until it clicks
into position.
Charge battery
Charging procedure
The battery is not fully charged
when delivered. Plug charger cable
into the bottom of the phone, plug
power supply unit into a mains
power socket and charge for at least
two hours.
Y
Display during charging.
Page 80

9Getting started
C65 ct-e2, A31008-H7800-M7-1-RC19
Charging time
An empty battery is fully charged
after about 2 hours. Charging is only
possible within a temperature range
of +5 °C to 45 °C. If the temperature
rises/falls 5 °C above/below this, the
charge symbol flashes a warning.
The mains voltage specified on the
power supply unit must not be
exceeded.
Operating times
The operating time depends upon
the respective conditions of use.
Extreme temperatures considerably
reduce the phone’s standby time.
Avoid placing the phone in the sun
or on a heater.
Talktime: Up to 300 minutes
Standby time: Up to 250 hours
Charge icon not visible
If the battery has been discharged
fully, the charge icon is not immediately visible when the power supply
is plugged in. It will appear after up
to two hours. In this case the battery
is fully charged after 3 to 4 hours.
Only use the plug-in power supply unit
supplied!
Display while in service
Charge level display during operation (empty-full):
V W X
A beep sounds when the battery is
nearly empty. The charge level of the
battery is only displayed correctly
after an uninterrupted charging/discharging cycle. You should therefore
not remove the battery unnecessarily
and where possible not finish the
charging process prematurely.
Additional information
The power supply unit heats up when used
for long periods. This is normal and not
dangerous.
If the battery is removed for longer than
30 seconds, the clock must be reset.
Page 81

Getting started10
C65 ct-e2, A31008-H7800-M7-1-RC19
Changing CLIPIt™
covers
You can use CLIPIt™ covers (accessories) to personalise the appearance
of your phone as you wish.
Dismantle the phone
Take off the battery cover and
remove the battery (see p. 8). To
remove the faceplate, insert the key
into the opening provided, apply
slight pressure
same time
Do not use the key to lift the phone
as this could damage the faceplate.
1 and turn it at the
to open the lock.
2
Assemble the phone
Insert the keypad mat 3 into the
upper faceplate. Ensure that it is sitting accurately in place.
If there are small pins at the bottom
of the faceplate: position the tabs on
both sides of the keypad mat precisely on these pins. before carrying
out step
4
.
3
Insert the bottom end of the phone
into the faceplate
carefully until it clicks into position
4 and push it in
5. Then insert the battery, position
the cover and close it so that it clicks
into place (see p. 8).
Page 82

Switch on/off, PIN entry
C65 ct-e2, A31008-H7800-M7-1-RC19
11Switch on/off, PIN entry
Switching phone on/off
B
Press key and hold.
Entering the PIN
The SIM card can be protected with a
4to 8-digit PIN.
J
C
Additional information
Change PIN.......................................p. 15
Clear SIM card barring ......................p. 16
Enter the PIN using the
number keys. The characters
ensure nobody can read
your PIN on the display.
Correct with
Confirm by pressing the
joystick. Logging on to
the network will take a
few seconds.
****
appear to
].
Emergency number
(SOS)
Only to be used in real emergencies!
By pressing the soft key §SOS§ you can
make an emergency call on any network without a SIM card and without
entering a PIN (not available in all
countries).
Switching on your phone
for the first time
Time/date
Set the clock correctly on a one-off
basis when getting started.
C Press this key, then select
§Change§.
J
First enter the date
(day/month/year), then
the time (24 hours,
including seconds).
C Press. The time and date
are updated.
Time zones
Set the time zone for your area.
I
§Set§ ... and set it.
Copy SIM addresses
The first time the SIM card is
inserted, the entries on it can be copied to the Addressbook. Please do not
interrupt this procedure. During this
time do not accept incoming calls. Fol-
low the instructions in the display.
You can also copy data from the SIM
card at a later time (p. 25).
Select the city in the
desired time zone from
the list ...
Page 83

General instructions12
C65 ct-e2, A31008-H7800-M7-1-RC19
General instructions
Standby mode
The phone is in standby mode and is
ready for use when the name of the
service provider appears on the display.
B
By pressing and holding,
you can return to standby
mode from any situation.
Signal strength
Z
[
Strong receiving signal.
A weak signal reduces the
call quality and may lead
to loss of the connection.
Change your location.
Digital Rights Mgmt.
(DRM)
Remember that your telephone has
Digital Rights Management. The use
of downloaded pictures, sounds or
applications can be restricted by the
suppliers, e.g., copy protection, use
for a limited period of time only,
number of times it can be used etc.
Main menu
The main menu is displayed graphically with symbols:
C
F
C
Main menu options
§Options§
Different functions are available
depending on the context:
Big letters
Illumination
Call up from standby
mode.
ISelect the application
symbols.
Start an application.
Open menu.
Select between two font
sizes.
Set display illumination to
brighter/darker.
Page 84

13General instructions
C65 ct-e2, A31008-H7800-M7-1-RC19
User guide
Menu controls
The steps needed to reach a function
are shown in a condensed form in this
user guide, e. g., to display record of
missed calls in condensed form:
C ¢
This comprises the following steps:
P
¢Calls missed
C Open main menu.
¢ Select (highlight)
moving the joystick
upwards, then press vertically down on the joystick
before using the joystick
to highlight Calls missed.
§Select§ Confirm. The record is
opened.
Menu speed dialling
All menus are numbered so that a
function (such as writing a new SMS)
can be selected directly from
standby mode by entering a
number:
C
5
1
1
Press to display the main
menu. Then press
for Messages, then
for Create new, then
for SMS text.
P
by
Symbols
The following symbols are used to
explain operation:
J
B
A
<>
§Menu§
C
D F E
I
H
=
Enter numbers/letters.
On/Off/End key
Call key
Soft keys
Displays a soft-key
function.
The joystick can be moved
in 5 directions.
Press the joystick vertically,
e.g., to call up the menu.
Press the joystick in the
direction indicated.
G
Function dependent on
service provider; special
registration may be
required.
Page 85

Standard functions14
C65 ct-e2, A31008-H7800-M7-1-RC19
Standard functions
Option menus
List of functions repeatedly appearing in options menus.
§Options§ Open menu.
Edit
View
Delete/
Delete all
New entry
Send...
Reply/
Reply to all
Save
Save to 9
Sort
Text input
(p. 17)
Open the entry to edit.
Display entry.
Delete entry / delete all
entries after confirmation.
Create new entry.
Select transmission service
and medium for sending.
The sender becomes the
recipient. The received text
is transferred into the new
message.
Store entry.
Save recipients in the current address directory.
Set sort criteria
(according to alphabetical
order, type, time).
T9 preferred
Activate/deactivate T9
input.
Associated
Automatically display
choices of characters typically used in pairs.
Chinese input
You may set maximum 2
Chinese in put methods to
be used for entering messages.
Rename
Capacity
Attributes
Help
Rename selected entry.
Display memory capacity.
Display properties of the
highlighted object.
Display help text.
Highlighting mode
Highlight one or more entries in
order to perform a function on
it/them.
§Options§
Mark Activate mode.
§Mark§ Highlight a non-highlighted
§Unmark§ Remove the highlighting
Additional highlighting functions:
Mark all
Unmark all
Delete marked
Open menu.
entry.
from a highlighted entry.
Highlight all entries.
Delete highlighting on
all highlighted entries.
All selected entries are
deleted.
Page 86

Security
C65 ct-e2, A31008-H7800-M7-1-RC19
The phone and SIM card are protected against misuse by several
security codes.
Keep these security codes in a safe
place where you can access them again
if required.
Codes
PIN
PIN2
PUK
PUK2
Phone
code
Protects your SIM card
(personal identification
number).
This is needed to set the charge
detail display and to access
additional functions on special
SIM cards.
Key code. Used to unlock SIM
cards after the wrong PIN has
been entered repeatedly.
Protects your phone. Must be
entered at the first security setting.
C ¢T¢Security
¢PIN codes
¢Select function.
PIN control
The PIN is usually requested each
time the phone is switched on. You
can deactivate this feature but you
risk unauthorised use of the phone
together with your SIM card. Some
service providers do not permit deactivating the control.
§Select§ Press.
J Enter PIN.
C Confirm input.
§Change§ Press.
C Confirm.
Change PIN
You can change the PIN to any 4 to 8digit number you find easier to
remember.
J Enter current PIN.
C Press.
C Enter new PIN.
J
,
C Repeat new PIN.
J
,
15Security
Page 87

Security16
C65 ct-e2, A31008-H7800-M7-1-RC19
C ¢T¢Security
¢PIN codes
¢Select function
Change PIN2
(Display only if PIN2 is available).
Proceed as with Change PIN.
Chg.phonecode
(Change phone code)
You define the phone code (4 to
8 digits) when you call up a phonecode protected function for the first
time (e.g. Direct call, p. 46). It is then
valid for all phone-code protected
functions.
Following the third unsuccessful
attempt, access to the phone code
and the functions that use it is
denied. If this occurs, contact the
Siemens Service (p. 56).
Clear SIM card barring
If the PIN is entered incorrectly three
times, the SIM card is barred. Enter
the PUK (MASTER PIN) provided by
your service provider with the SIM
card in accordance with the instructions. If the PUK (MASTER PIN) has
been lost, please contact your service provider.
Preventing accidental
activation
Even if PIN control is deactivated
(p. 15) confirmation is required to
switch on the phone.
This prevents accidental activation
of the phone, e.g. when you are carrying it in a bag or when you are travelling in an aircraft.
Press and hold.
B
C Press. The phone switches
on.
§Cancel§ Press this key or take no
action. The phone does
not switch on.
Page 88

17Text entry
C65 ct-e2, A31008-H7800-M7-1-RC19
Text entry
Text entry without T9
Press number key repeatedly until
the required letter appears. Example:
2
] Press briefly to delete the
F
#
*
0
1
Press once briefly to write
the letter a, twice to write
b etc. Press and hold to
write the number.
letter before the cursor;
press and hold to erase the
whole word.
Move the cursor
(forwards/back).
Press briefly: Swap
between abc, Abc,
T9
Abc, T9ABC, 123, Pinyin,
Bihua.
Press and hold: All input-
variants are displayed.
Press briefly: Special
characters are shown.
Press and hold: Open input
menu.
Press once/repeatedly:
. , ? ! ’ " 0 + - ( ) @ / : _
Press and hold: Writes 0.
Writes blank. Press twice =
line break.
T9
abc,
Special characters
*
+- " ’ : * / ( )
¤¥
[ ] { } %~<=>
|^ §
ΠΣ ΦΨΩ
I
§Select§ Press.
Press briefly.
¿¡_;.,?!
$£€@\ &#
Γ∆ΘΛΞ
Line break
,
Navigate to characters.
F
Text entry menu
Press and hold:
*
Text format (SMS only),
Input language, Mark, Copy
Text input with T9
"T9" deduces the correct word from
the various key inputs.
#
Select input language
§Options§ Open text menu.
T9 preferred Select.
§Change§ Activate T9.
Associated
Automatically display choices of
characters typically used in pairs.
Activate/deactivate T9.
Select Text input, then
select Input language.
Page 89

Text entry18
C65 ct-e2, A31008-H7800-M7-1-RC19
Chinese input
You may set maximum 2 Chinese
input methods to be used for
entering messages.
T9 Bopomofo
T9 Pinyin
T9 Stroke-T
T9 Stroke-S
§Select§ Confirm.
Write with T9
It is best if you finish a word without looking at the display.
You simply press the keys where the
relevant letter is located once.
/ EA blank space or moving
1
Do not input special characters such
as Ä. Use standard characters only
e. g. A. T9 will do the rest.
to the right ends the
word.
T9 word suggestions
If several options are found in the
dictionary for a word, the most probable is displayed first.
^ Press. If this word is also
incorrect, press
^ Keep pressing until the
correct word is displayed.
Add a new word to the dictionary:
§Spell§ Select and enter word
without T9. Then §Save§.
Correct a word
Words written with T9:
F
^
Move left or right, word
by word, until the
required word is
§highlighted§.
Scroll through the T9
word suggestions again.
] Deletes the last character
in a word and displays a
new possible word.
Additional information
#
*
T9® Text Input is licensed under one or more of
the following: U.S. Pat. Nos. 5,818,437,
5,953,541, 5,187,480, 5,945 928 and 6,011,554;
Canadian Pat. No. 1,331,057; United Kingdom
Pat. No. 2238414B; Hong Kong Standard Pat. No.
HK0940329; Republic of Singapore Pat. No.
51383; Euro.Pat. No. 0 842 463 (96927260.8)
DE/DK, FI, FR, IT, NL, PT, ES, SE, GB; and additional patents are pending worldwide.
Press briefly: Switch
between: abc, Abc,
T9
Abc,T9ABC, 123, Pinyin,
Bihua.
Press and hold: All input
modes are displayed.
Press and hold: Opens input
menu (p. 17).
T9
abc,
Text modules
C ¢M¢Text modules
Text modules can be stored in the
phone for adding to your messages
(SMS, MMS).
Page 90

19Calling
C65 ct-e2, A31008-H7800-M7-1-RC19
Calling
J
A
End call
B
Set volume
I
Redial previous numbers
A
Call up the redial list:
A
I
A
Auto. redial
§Auto dial§ The phone number is
Enter the number (always
with dialling code / international dialling code).
] A short press clears the
last digit, a long press
clears the entire phone
number.
Dial phone number.
Press the End key briefly.
Press upwards / downwards to regulate the volume.
Press twice. The phone
number last called is redialled.
Press once.
Pick out a phone number,
then to dial press the …
... key.
dialled up to 10 times at
increasing time intervals.
Call back b
§Call back§ Your phone rings when
the busy number is free.
Press the Call key to dial
the number.
Reminder
§Prompt§ A beep reminds you to
redial the displayed
phone number after
15 minutes.
Accept call
A
Press.
Reject call
Press briefly.
B
Additional information
Accept the call before bringing the phone to
your ear in order to avoid ear damage
caused by the ringtones.
Ð Store phone number in the
§Handsfr.§ Playback using loudspeaker
*
International dialling codes
0
§Country§ Select country.
Addressbook/Phonebook.
(handsfree talking).
Always switch off "handsfree
talking" before holding the
phone to your ear. This will
avoid damage to your
hearing.
Press and hold to switch
microphone off.
Press and hold until a "+" is
displayed.
Page 91

Calling20
C65 ct-e2, A31008-H7800-M7-1-RC19
Call options
§Options§ Functions which are only
available during the call
are offered.
Swap between two callsb
Establish a second connection
§Options§ Open menu
Hold Hold current call, then
§Options§ Open menu.
Swap Swap between calls.
Incoming calls during a call
You will hear the "call waiting" tone
and you can now:
• Accept the waiting call in addition to
§Swap§ Accept the call and put
• Reject the waiting call
§Reject§ Reject the call, or divert it
• Accept the waiting call and end the
B
C
dial the new phone
number.
the first.
the current call on hold.
to the mailbox via §Divert§.
current call
End call
Accept new call.
End call(s)
B
§Yes§
§No§ End all calls.
Press the End key.
Resume held call.
Conference b
You call up to 5 conference participants one after the other. Once you
have established a connection:
§Options§ Open menu and select
J
§Options§ ... open menu and select
End
B
Hold. The current call is
put on hold.
Now dial a new number.
When the new connection is established ...
Conference. Repeat until
all participants are connected.
All calls in the multiparty
conversation are ended
when the End key is
pressed.
Tone sequences (DTMF)
Enter tone sequences (digits) for
remote inquiries to an answering
machine.
§Options§ Open menu and select
Send DTMF.
Page 92

Default book
C65 ct-e2, A31008-H7800-M7-1-RC19
¢L
C
¢Select function.
Show entries
The entries in the default book
(Addressbook or Phonebook) are
shown.
Select a name with the
/
I
J
New entry
Create new entry.
Addressbook (see also p. 22)
Phonebook (see also p. 24)
Default book
You can set which directory you prefer to use.
The selected default book is opened
in standby mode with the joystick.
H
Addressbook
A lot of data can be recorded in the
Addressbook for each entry, and
additional functions (e.g., pictures,
birthdays) can be used.
first letter and/or scroll.
Open Phonebook or
Addressbook
Phonebook
The Phonebook is located on the SIM
card. Only one phone number can be
entered per entry. The Phonebook
on the SIM card can easily be transferred into a different phone.
Business card
Create your own business card to
send to a different GSM-phone. If no
business card has been created yet,
you will be asked for your input.
H
§Save Press.
Additional information
The contents of the business card and the
Addressbook entries correspond to international standards (vCard).
Ï Copy numbers from Address-
Move from field to field to
enter your details.
book/Phonebook.
Groups
See p. 23.
21Default book
Page 93

Addressbook22
C65 ct-e2, A31008-H7800-M7-1-RC19
Addressbook
The Addressbook can store up to
1000 entries, each with a variety of
phone numbers and additional
address details. These entries are
managed separately from those in
the Phonebook in the phone
memory.
New entry
The Addressbook is set as standard:
H
C
I
J
Special input fields:
Group: Allocation to a group
Address: Extension to enter the
Open Addressbook (in
standby mode).
Display input fields.
Select required input
fields.
Fill in input fields.
At least one name must
be entered. Always enter
phone number with
prefix.
(p. 23).
complete address: Street:,
Post code:, City:, Country:
Birthday: Af te r a ct ivation, you can
Picture: Assign a picture to the
All fields/Reduced fields
§Save§ Save the entry.
Additional information
Î
enter the date of birth.
Reminder: The tele-
phone reminds you one
day before the birthday
at the time entered.
entry. It is displayed if
you are called by a corresponding phone
number.
Displays the required
input fields.
Temporary switch to
Phonebook.
Page 94

23Addressbook
C65 ct-e2, A31008-H7800-M7-1-RC19
Display/find entry
H
J
Open Addressbook (in
standby mode).
/ ISelect required entry.
C Display.
Display options
§Options§ Displays functions for the
Change entry
H
J / I
I
J
Call entry
H
J
A
If there are several numbers in the
Addressbook entry, these are
offered for selection.
selected input field.
Open Addressbook (in
standby mode).
Select entry and press
§Edit§.
Select input field and, if
applicable, press §Edit§.
Make changes, then
§Save§.
Open Addressbook (in
standby mode).
/ ISelect a name with the
first letter and/or scroll.
The number is dialled.
Addressbook options
Different functions are available,
depending on the context:
§Options§ Open menu.
Move to ...
Copy to SIM
Import
(For standard functions, see p. 14)
Copy current entry or highlighted entries to a group.
Copies name and number
to the SIM card (Phonebook).
Set up readiness to receive
for an Addressbook entry
via IrDA (p. 45) or SMS
(p. 30).
Groups
Nine groups are specified in your
phone to enable you to arrange your
Addressbook entries clearly. You can
rename seven groups.
H
<Groups> Select (the number of
I
Ringtone for group
See p. 42.
Open Addressbook (in
standby mode).
entries is listed behind the
group name).
Select group.
Page 95

Phonebook24
C65 ct-e2, A31008-H7800-M7-1-RC19
Phonebook
Entries in the Phonebook (on the SIM
card) are managed separately from
the Addressbook.
New entry
If the Phonebook has been selected
as standard:
H
H
C
I
Phone number:
Always enter phone number with
dialling code. An entry is not saved
without a phone number.
Name:
Enter first and/or last names.
Group:
Default No group
Important phone numbers are combined together in a group (VIP).
Open Phonebook
(in standby mode).
Select <New entry>.
Display input fields.
Navigate between and fill
in the input fields.
Location:
Default SIM
Special SIM cards can save phone
numbers in a protected area
(Protected SIM) (PIN2 required).
Record number:
Is automatically assigned to every
entry. The phone number can be
dialled with your entry number.
§Save§ Press to store the new
Additional information
Î
§Country§ International dialling code ...
p. 19
entry.
Temporary switch to Addressbook.
Call (search for an entry)
H
J
A
Open Phonebook.
Select a name with the
/
I
first letter and/or scroll.
Phone number is dialled.
Page 96

25Phonebook
C65 ct-e2, A31008-H7800-M7-1-RC19
Change entry
I
§Edit§ Press.
J
J
§Save§ Press.
Select entry in Phonebook.
Select desired input field.
/
I
Make changes.
Phonebook options
The following functions are available, depending on the current situation.
§Options§
Copy into 9
Copy all to 9
Delete
Import
(For standard functions see p. 14)
Open menu.
Copy all highlighted
entries to the
Addressbook.
Copy all entries to the
Addressbook.
Delete entire Phonebook. PIN-protected.
Set up readiness to
receive for a Phonebook entry via IrDA
(p. 45) or SMS (p. 30).
<Special books>
H
<Own numbers>
Enter "own" phone numbers in
Phonebook (e.g., fax) for information.
<VIP numbers>
Display the phone numbers saved in
the VIP group.
<SIM phonebook>
Entries stored in the Phonebook on
the SIM card can also be used on
other GSM phones.
<Protected SIM> b
On special SIM cards, phone numbers can be stored in a protected
location. PIN2 is required for editing.
Open Phonebook, enter
show entries and select
<Special books>.
Page 97

Call records26
C65 ct-e2, A31008-H7800-M7-1-RC19
Call records
Phone numbers are saved to make it
easier to redial them.
C ¢
I
C
I
A Dial phone number.
10 phone numbers can be stored in
each call record:
Calls missed
The phone numbers of calls that you
have received but not answered are
stored for call back purposes.
Â
Calls received
Accepted calls are listed.
Calls dialled
Access to the last numbers dialled by
you.
A
Delete records
The records are deleted.
P
Select record.
Open record.
Select phone number.
Missed call.
Fast access in standby
mode.
b
Durat/charges
You can display the charges and
duration during a call.
C ¢
Select
Last call, All outg. calls, All incom. calls,
Remain units, Charge sett.
§Reset§ Reset the selected setting.
Charge sett.
C
Currency
Edit your currency.
Personal rate
Enter the currency as well as the
charge per unit and time.
Account limit
Special SIM cards allow you or the
service provider to define a credit
limit or a period after which the
phone is barred for outgoing calls.
Auto display
Call duration and charges are
displayed automatically.
¢Durat/charges
P
Open menu.
Page 98

Camera
C65 ct-e2, A31008-H7800-M7-1-RC19
You can view photos/videos
recorded on the integrated camera
immediately and
• use the photo as a background
image, logo, a switch on/off
animation or a screensaver.
• send the photo via MMS.
Switch on
C ¢
Or
R
D Start camera in standby
mode.
The current (preview) image is displayed. You will see the following in
the first line from left to right:
Ù Brightness
Ú Zoom factor
Û White balance
× Flash connected
The number of photos that can still
be taken in the selected resolution is
displayed in the top right-hand corner of the preview image. This
number varies considerably from
motif to motif (storage space
required). Information about the
selected resolution is located under
the preview image.
Record
C Takes a photo.
C
The photo is saved with a name, the
date and the time. To enter the
name, see Setup in the options menu
(p. 28).
Settings prior to taking a photo:
F
I
Image resolution
It is possible to set the quality of the
image regardless of the preview
image resolution, e.g.
Premium:
Medium:
Wallpaper:
The resolution may decrease
depending on the selected digital
zoom.
Displays the preview
image of the next photo.
Sets the brightness.
Sets the zoom factor.
27Camera
Page 99

Camera28
C65 ct-e2, A31008-H7800-M7-1-RC19
Flash (Accessories)
If the flash is active, this is shown by
a symbol in the display. The flash is
charged constantly while it is connected to the phone and the camera
is activated. This reduces the standby time.
×
For settings, see options menu.
This symbol appears
when the flash is being
loaded.
Camera options
The following functions are available, depending on the current situation.
§Options§ Open menu.
Settings
Pictures
Use flash
Self timer
White balance
(For standard functions see p. 14)
Additional information
Ê
• Name for recordings
• Image resolution
Displays list of photos.
Choose between:
Automatic, Always, Off,
Red eye red.
The photo is taken approx.
15 seconds after triggering.
For the last 5 seconds, you
will hear a signal tone each
second.
Choose between:
Automatic, Indoor,
Outdoor
There is insufficient storage
space available. Start the
delete assistant to delete specific data (p. 44).
Page 100

Message lists
C65 ct-e2, A31008-H7800-M7-1-RC19
29Message lists
Inbox
The central inbox folder contains all
messages which have been
received. The entries are marked
with a symbol to indicate their type
and status (p. 6).
To call up the central inbox folder,
e.g. if a new SMS has been received:
p
When you open an entry, the relevant application also starts. After a
set time (§Options§), entries which
have already been read and opened
are only displayed in the messagerelated incoming lists.
You will find the following message
types in the inbox folder:
SMS, MMS
System messages:
Message about MMS, Missed alarm,
Missed appts., Calls missed, WAP push,
Voice message
Data items:
Ringtones, Pictures, calendar entries,
Notes and Business card.
Press the soft key beneath
the symbol.
Message lists
All SMS and MMS are each displayed
in four lists.
C ¢M
¢
List of received messages.
C ¢M
¢
List of saved drafts.
C ¢M
¢
List of messages not yet successfully
sent.
C ¢M
¢
List of sent messages.
§Options§ Call up the function menu
Inbox
¢
Select message type.
Draft
¢
Select message type.
Unsent
¢
Select message type.
Sent
¢
Select message type.
to process the messages.
 Loading...