

Page 1
Life sounds brilliant.
www.siemens.com/hearing
Ace micon
User Guide
Page 2

2 Content
Content
Welcome 4
Your hearing instruments 5
Getting to know your hearing instruments 5
Components and names 6
Controls 7
Settings 9
Battery size and ear pieces 10
Service information 11
Batteries 12
Replacing non-rechargeable batteries 12
Daily use 14
Turning on and off 14
Inserting 16
Removing 18
Adjusting the volume 19
On the phone 20
Telephone program 20
Page 3

3Content
Maintenance and care 21
Cleaning 21
Drying 22
Storage 22
Exchanging ear pieces 22
Troubleshooting 24
Important information 25
Intended use 25
Explanation of symbols 25
Transport and storage conditions 25
Disposal information 26
Conformance information 26
Important safety information 27
Personal safety 27
Product safety 28
Tinnitus noiser 30
Country-specic information 33
Page 4
Welcome4
You have chosen a Siemens hearing instrument, a reliable
partner to accompany you through everyday life. Like
everything new, it will take you a little while to become
familiar with it.
This document, along with support from your Hearing
Care Professional, will help you. You will quickly come to
appreciate the advantages and greater quality of life your
hearing instrument offers.
CAUTION
Read this user guide thoroughly and completely
and follow the safety information in this document
to avoid damage or injury.
To benet most from your hearing instrument, wear it
daily and all day long. Especially after longer periods of
living with hearing loss, a dedicated hearing training is
recommended - with a Hearing Care Professional or at
home.
Welcome
Page 5
Your hearing instruments 5
Getting to know your hearing instruments
It is recommended to familiarize yourself with your new
hearing instruments. With the instruments in your hand
try using the controls and note their location on the
instrument. This will make it easier for you to feel and
press the controls while wearing the hearing instruments.
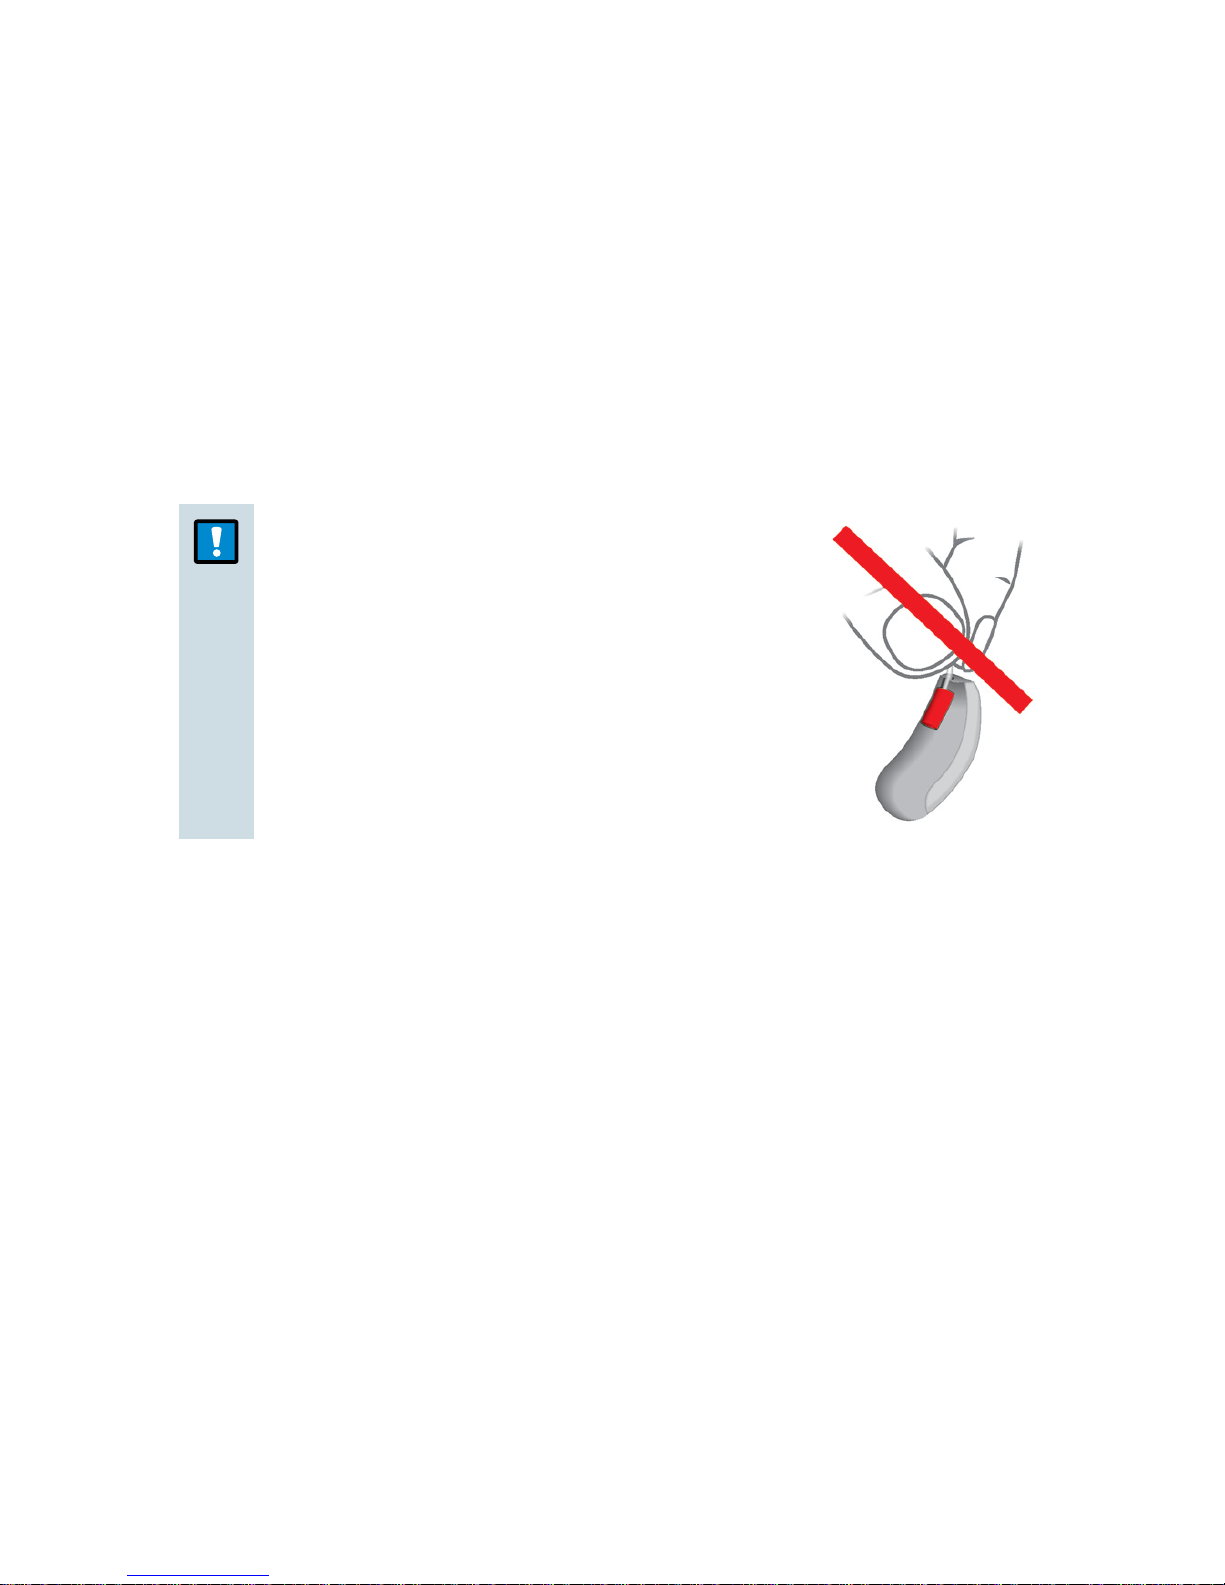
NOTICE
uDo not pull the receiver
connection as this could
damage your hearing
instruments.
Your hearing instruments
Page 6
Your hearing instruments6
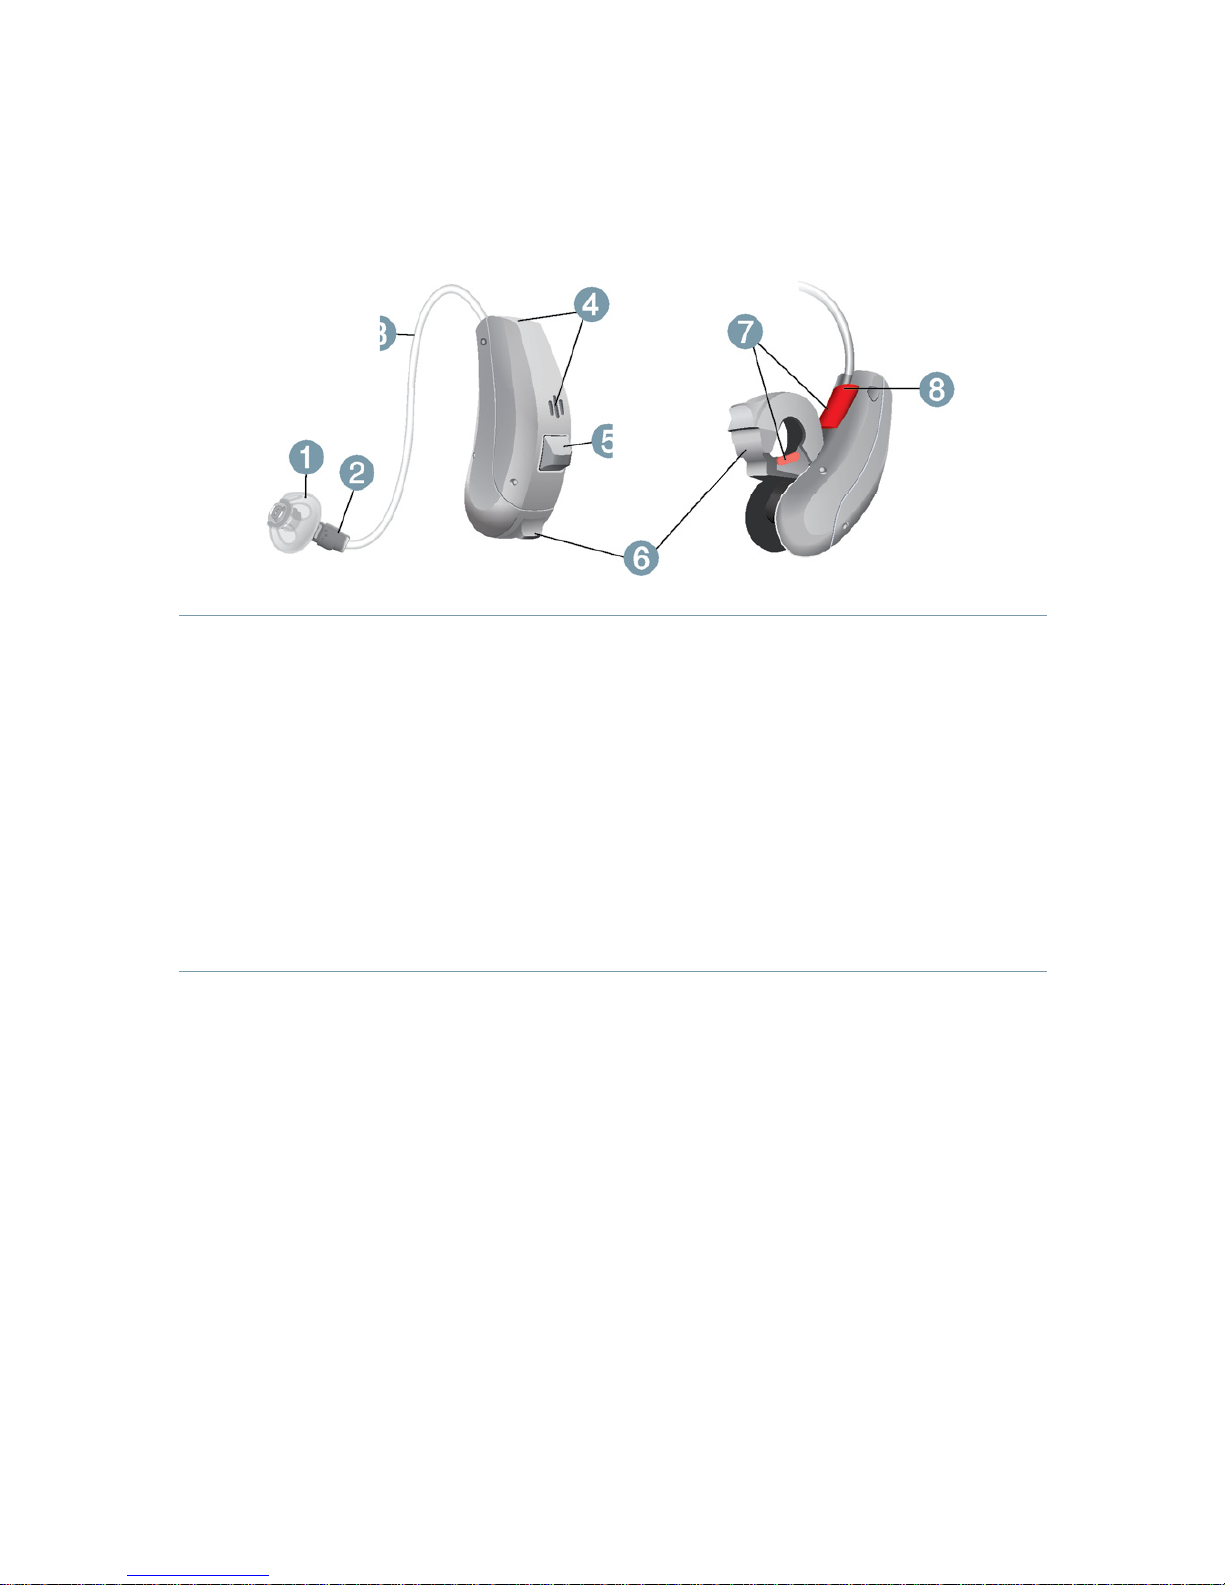
Components and names
➊ Ear piece
➋ Receiver
➌ Receiver cable
➍ Microphone openings
➎ Push button (optional)
➏ Battery compartment
➐ Side indicator
(red = right ear,
blue = left ear)
➑ Receiver connection
Page 7
Your hearing instruments 7
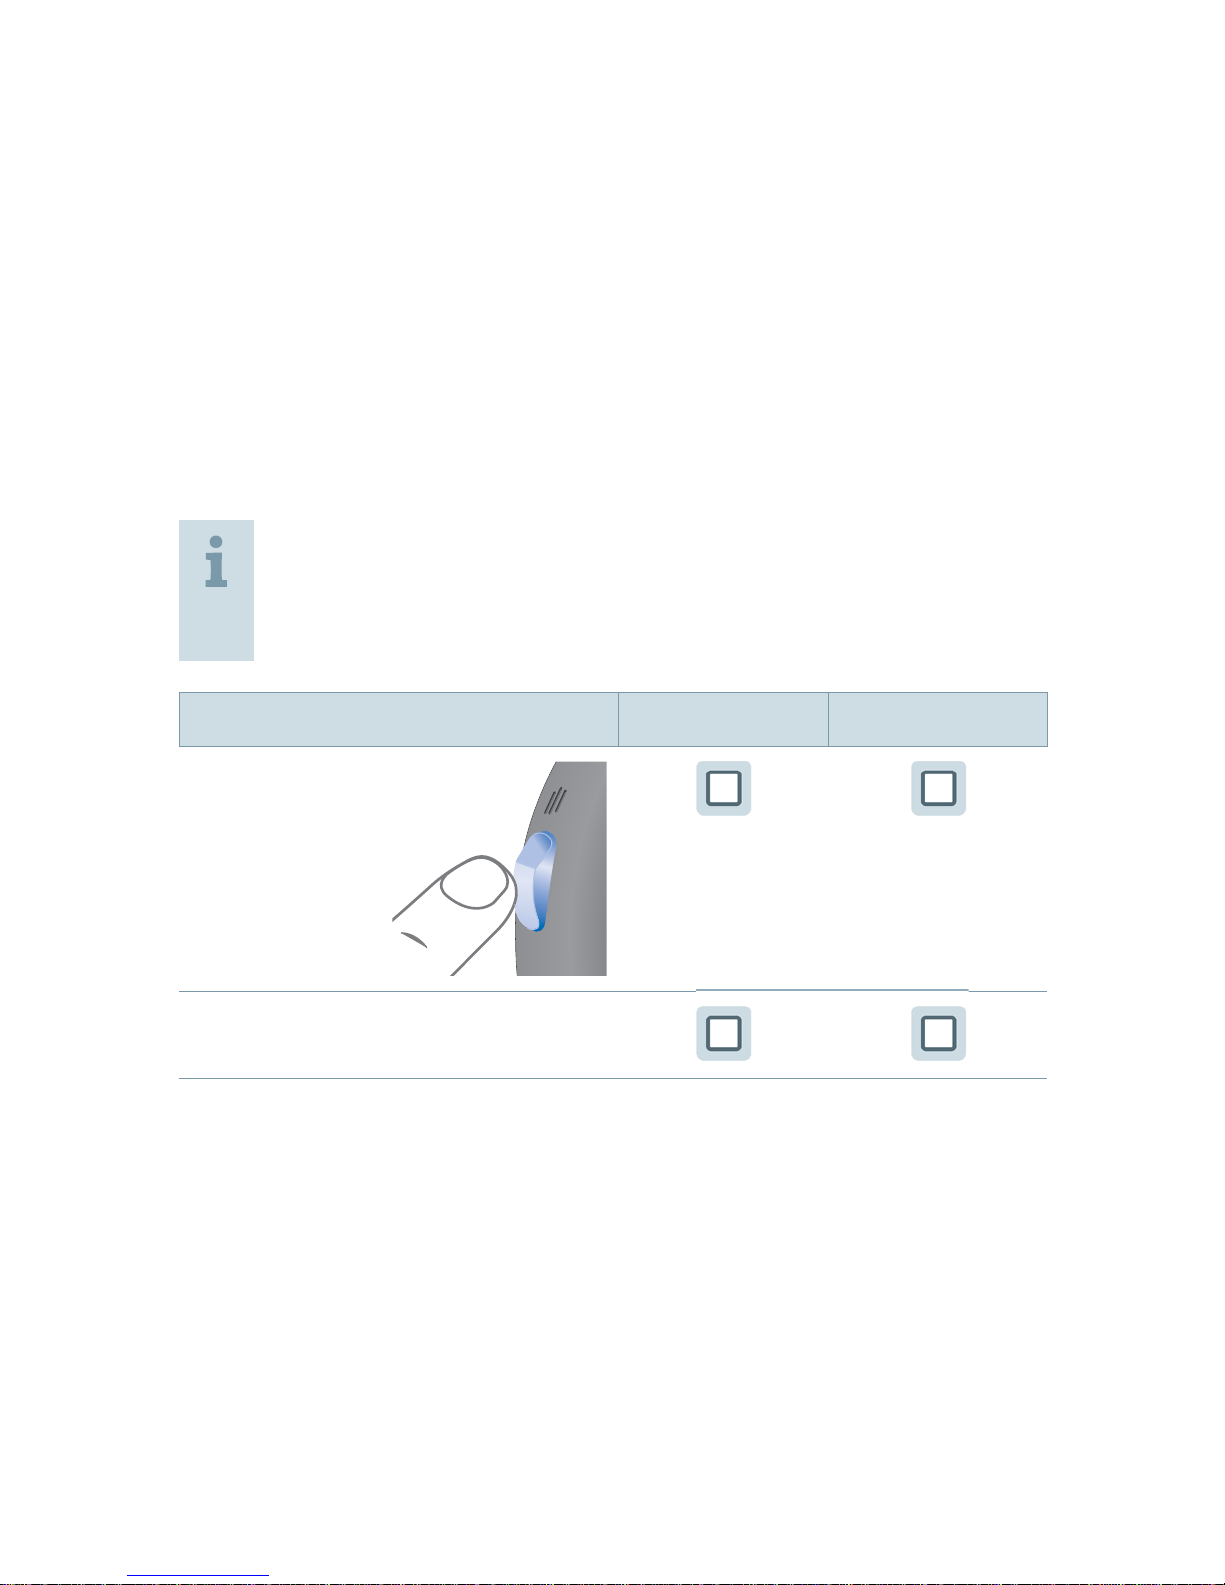
Controls
With the controls you can, for example, switch hearing
programs. Your hearing instruments either have a
push button or no control.
The Hearing Care Professional has assigned your desired
functions to the push button.
Ask your Hearing Care Professional to mark your
controls and their functions on the following
pages.
Control Left Right
Push button
No control
Page 8
Your hearing instruments8
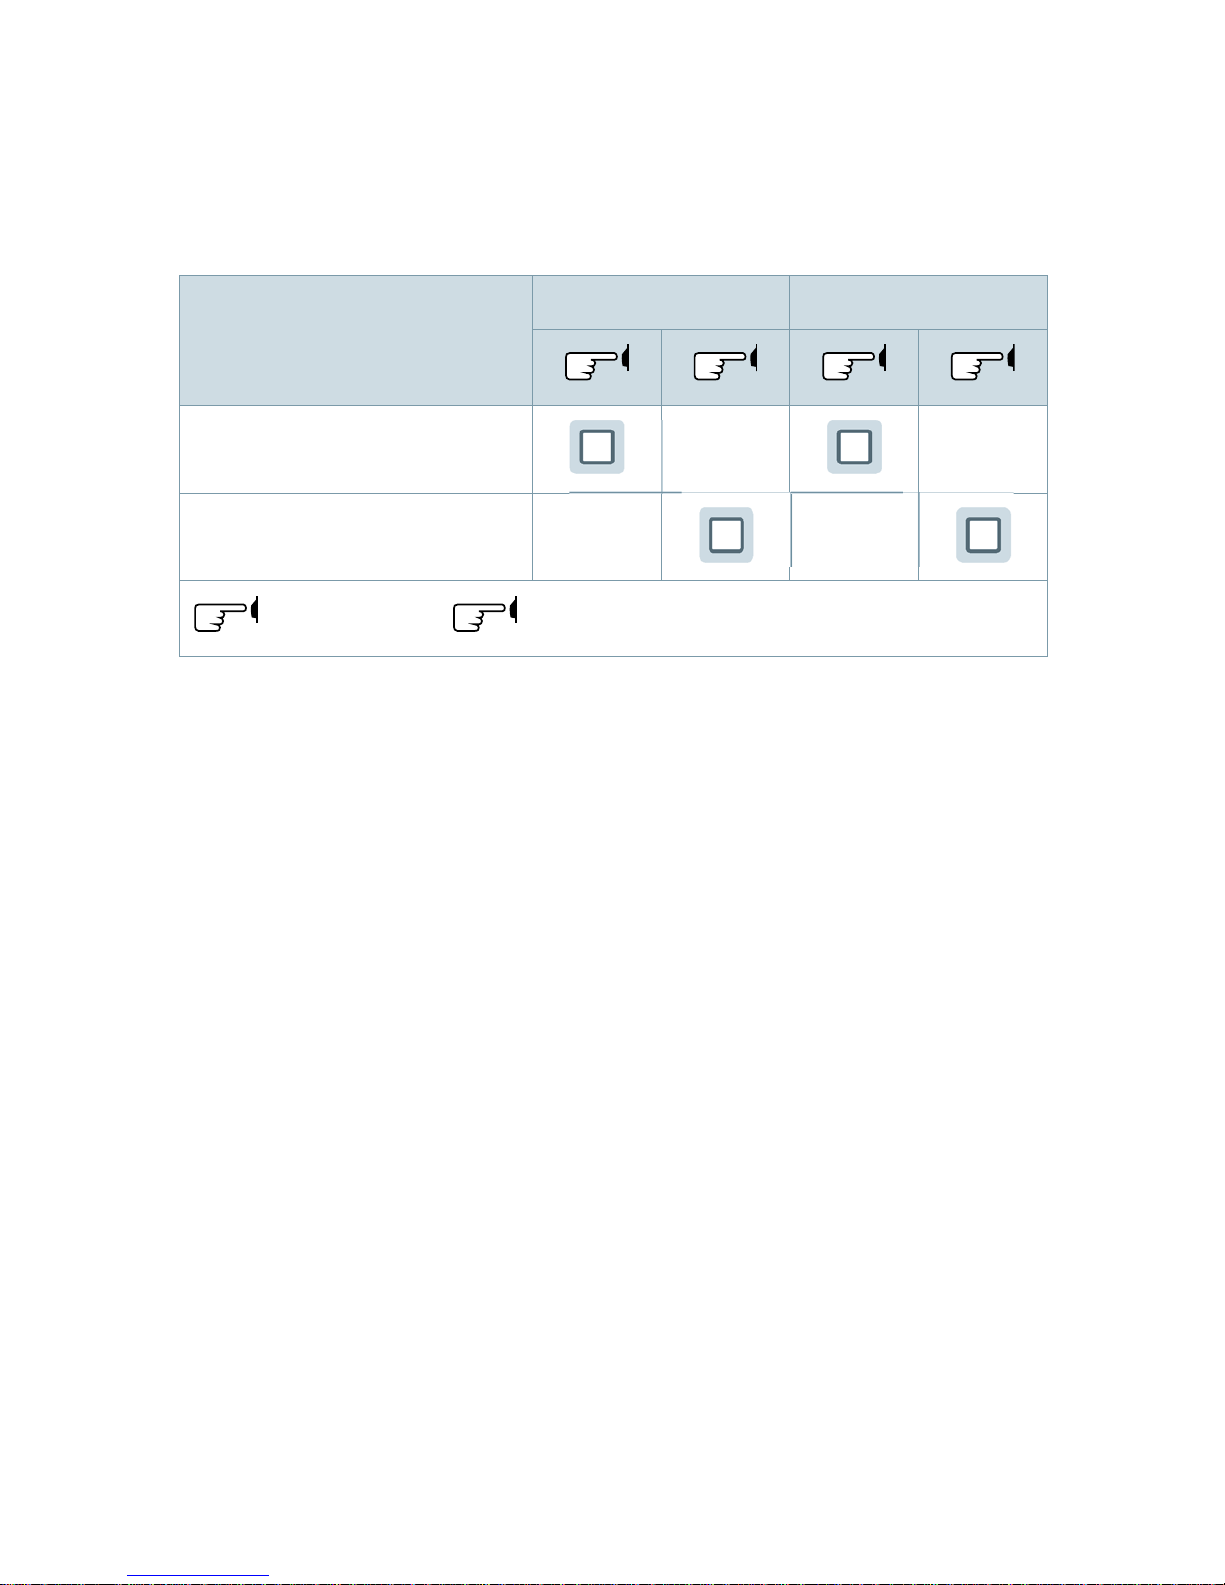
Push button
Function Left Right
Program change
Standby/turn on
press briey,
press 2 seconds
Page 9

Your hearing instruments 9
Settings
Ask your Hearing Care Professional to mark your
individual settings on the following pages.
Hearing programs
1
2
3
4
5
6
Read more in section "Changing the hearing program".
Features
Power-on delay enables whistle-free insertion of
hearing instruments.
Read more in section "Turning on and off".
Page 10
Your hearing instruments10
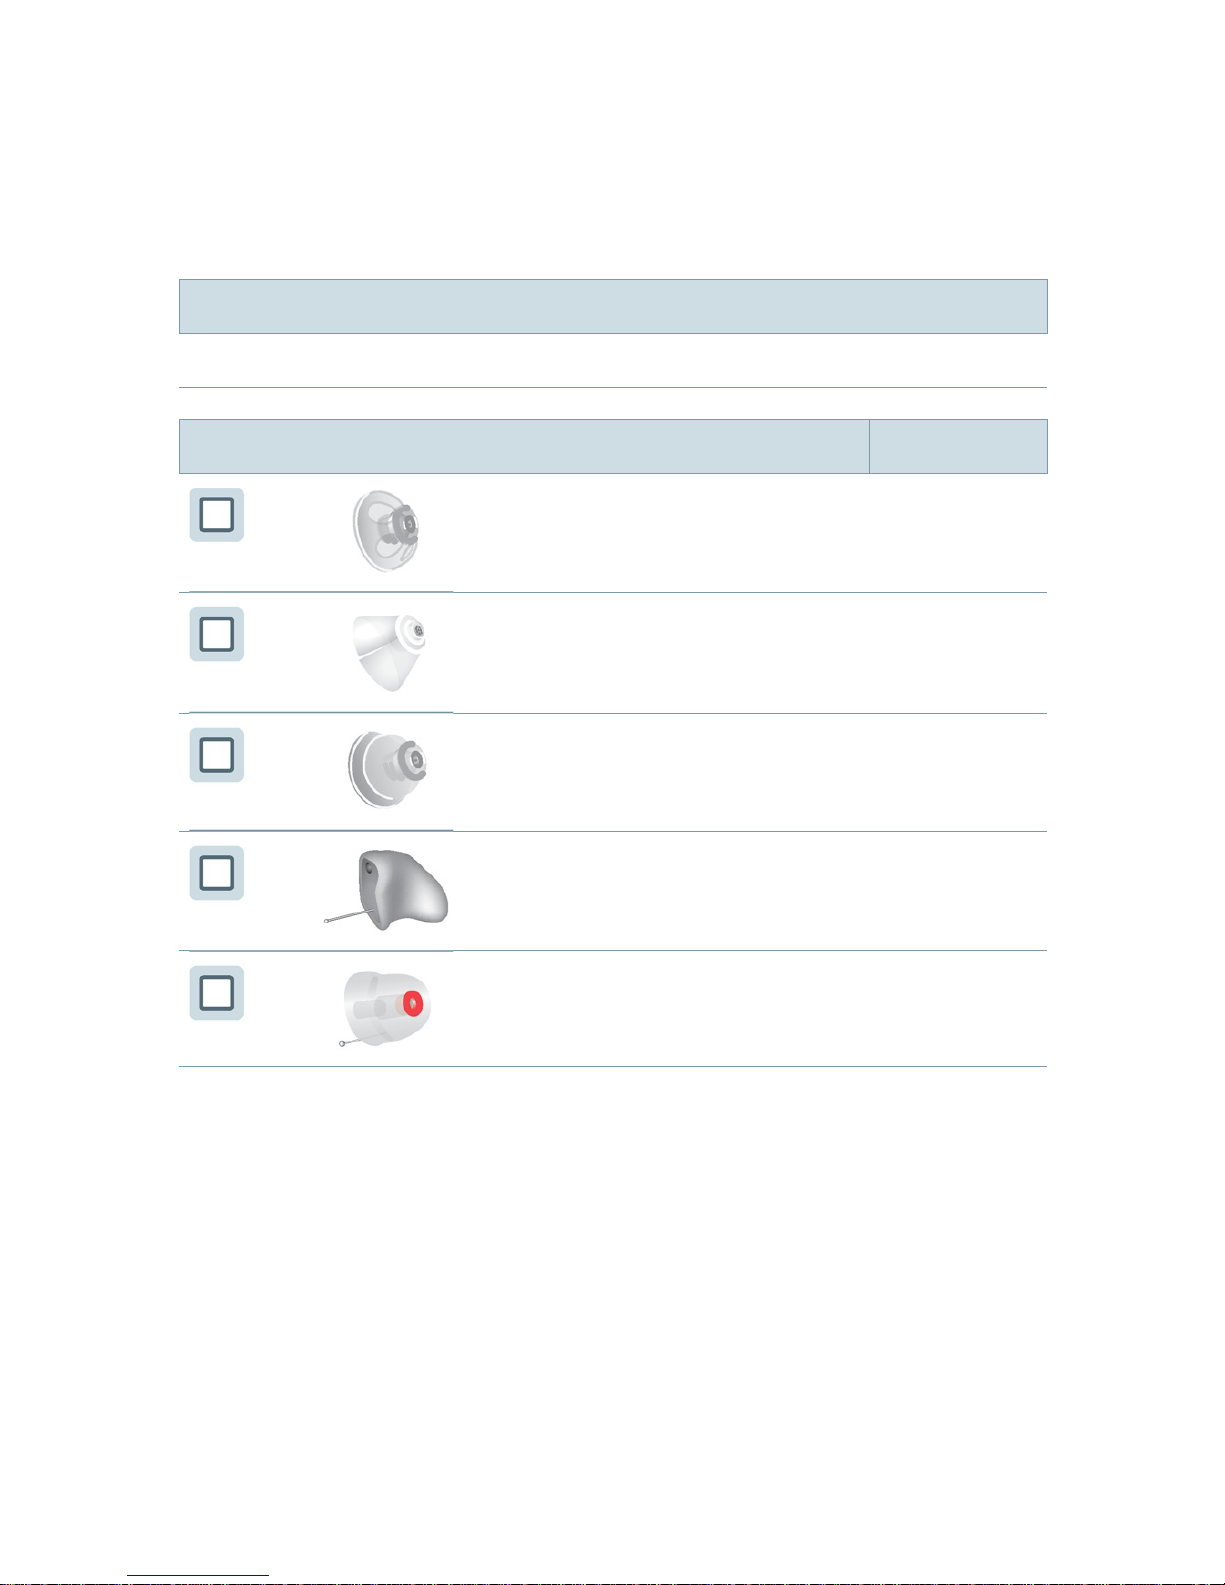
Battery size and ear pieces
Batteries
Non-rechargeable (size 10)
Exchangeable ear pieces Size
Click Dome single
(open or closed)
Click Dome semi-open
Click Dome double
Custom shell
Click Mold
Page 11

Your hearing instruments 11
Service information
Serial numbers
Left:
Right:
Service dates
1:
2:
3:
4:
5:
6:
Your Hearing Care Professional
Date of purchase:
Page 12

Batteries12
When the battery is low the sound becomes weaker or
you will hear an alert signal. It depends on the battery
type how long you have until you have to replace the
battery.
Replacing non-rechargeable batteries
Remove empty batteries immediately and dispose of
according to local regulations.
Remember to have your replacement batteries
with you at all times.
Removing:
uOpen the battery compartment.
The battery falls out when the
compartment is completely open.
uIf the battery does not fall out, lightly
tap the instrument or use the magnet
stick. The magnet stick is available as
an accessory.
Batteries
Page 13

Batteries 13
Inserting:
uRemove the protective lm from the new
battery.
uInsert the battery with the "+" symbol
facing up (refer to the picture).
uCarefully close the battery compartment. If you feel
resistance, the battery is not inserted correctly.
Do not attempt to close the battery compartment by
force. It can be damaged.
Page 14

Daily use14
Turning on and off
You have several options to turn your hearing instruments
on or off.
Via battery compartment:
uTurning on: Close the battery compartment.
The default volume and hearing program are set.
uTurning off: Open the battery compartment.
Via push button:
uTurning on or off: Press the push button for 2 seconds.
Refer to section "Controls" for your personal settings.
After turning on, the previously used volume and
hearing program are set.
■ When wearing the hearing instruments, an
optional signal can indicate when an instrument
is turned on or off.
■ Remove the batteries if the hearing instruments
are not used for several days.
Daily use
Page 15

Daily use 15
When the power-on delay is activated, the hearing
instruments turn on after a delay of several seconds.
During this time you can insert the hearing instruments
without experiencing unpleasant whistling.
The "power-on delay" can be activated by your Hearing
Care Professional.
Page 16

Daily use16
Inserting
Your hearing instruments have been ne-tuned for your
right and left ear. Colored markers indicate
the side:
■ red marker = right ear
■ blue marker = left ear
To insert the hearing instrument:
uHold the receiver cable at the bend.
uCarefully push the ear piece in
the ear canal
➊
.
uTwist it slightly until it sits well.
Open and close your mouth to
avoid accumulation of air in the
ear canal.
uLift the hearing instrument and
slide it over the top of your
ear
➋
.
CAUTION
Risk of injury!
uInsert the ear piece carefully and not too deeply
into the ear.
Page 17

Daily use 17
■ Insert the right hearing instrument with the
right hand and the left hearing instrument with
the left hand.
■ If you have problems inserting the ear piece,
use the other hand to gently pull your earlobe
downwards. This opens the ear canal and eases
insertion of the ear piece.
The optional concha lock helps to securely retain the
ear piece in your ear. To position the concha lock:
uBend the concha lock and position
it carefully into the bowl of your ear
(refer to the picture).
Page 18

Daily use18
Removing
uLift the hearing instrument
and slide it over the top of
your ear
➊
.
uIf your hearing instrument is
equipped with a custom shell
or a Click Mold, remove it by
pulling the small removal cord
toward the back of your head.
uFor all other ear pieces: Grip the receiver in the
ear canal with two ngers and pull it carefully out
➋
.
CAUTION
Risk of injury!
uIn very rare cases the ear piece could remain
in your ear when removing the hearing
instrument. If this happens, have the ear piece
removed by a medical professional.
Clean and dry your hearing instruments after usage.
Read more in section "Maintenance and care".
Page 19

Daily use 19
Adjusting the volume
Your hearing instruments automatically adjust the volume
to the listening situation.
Changing the hearing program
Hearing programs change the characteristics of the sound
coming through the hearing instrument. They help you
to select the optimal setup for every listening situation.
An optional signal can indicate the change of the hearing
program.
uTo change the hearing program, press the push button
briey.
Refer to section "Controls" and to section "Settings" for
your personal settings of the push button and for a list
of your hearing programs.
Page 20

On the phone20
When you are on the phone, hold the
telephone receiver slightly above your
ear. The hearing instrument and
telephone receiver have to be aligned.
Turn the receiver slightly so that the ear
is not completely covered.
Telephone program
You may prefer a certain volume when using the phone.
Ask your Hearing Care Professional to congure a
telephone program.
uSwitch to the telephone program whenever you are
on the phone.
Whether a telephone program is congured for your
hearing instrument is listed in section "Settings".
On the phone
Page 21

Maintenance and care 21
Siemens hearing instruments are so robust that they will
function reliably for years. It is, however, important that
you take care of your instruments and observe a few basic
rules, which will soon become habit.
Cleaning
For hygiene reasons and to maintain functionality, clean
your hearing instruments daily.
NOTICE
uDo not put your hearing instruments
in water.
uClean your hearing instruments with a soft, dry tissue.
uWhen using a Click Dome, clean it
by squeezing the tip of the dome.
uAsk your Hearing Care Professional for recommended
cleaning products, special care sets and further
information on how to keep your hearing instruments
in good condition.
uFor a more thorough professional cleaning, take your
instruments to your Hearing Care Professional.
Maintenance and care
Page 22

Maintenance and care22
Drying
uDry your hearing instruments overnight.
uAsk your Hearing Care Professional for recommended
drying products.
Storage
uDuring longer periods of non-use, store your hearing
instruments with open battery compartment (and
batteries removed) in a drying system in order to
prevent the penetration of moisture.
Exchanging ear pieces
You may want to exchange the ear pieces from time to
time. The procedure for exchanging ear pieces depends
on the type of ear piece. In section "Settings", your
Hearing Care Professional has marked your type of
ear piece.
Page 23

Maintenance and care 23
Exchanging Click Domes
If you have problems removing the old Click Dome, use
the packaging of the Click Domes or the removal tool:
The removal tool is available as an accessory.
To exchange Click Domes:
uFollow the instructions on the packing of the
Click Domes or the instructions delivered with the
removal tool.
uTake particular care that
the new Click Dome clicks
noticeably in place.
Exchanging Click Molds or custom shells
uAsk your Hearing Care Professional.
Page 24

Troubleshooting24
Problem and possible solutions
Sound is weak.
■ Replace the empty battery.
■ Clean or exchange the ear piece.
Hearing instrument emits whistling sounds.
■ Reinsert the ear piece until it ts securely.
■ Clean or exchange the ear piece.
Sound is distorted.
■ Replace the empty battery.
■ Clean or exchange the ear piece.
Hearing instrument emits signal tones.
■ Replace the empty battery.
Hearing instrument does not work.
■ Turn the hearing instrument on.
■ Gently close the battery compartment completely.
■ Replace the empty battery.
■ Make sure the battery is inserted correctly.
■ Power-on delay is active. Wait several seconds and
check again.
Consult your Hearing Care Professional if you encounter
further problems.
Troubleshooting
Page 25

Important information 25
Intended use
Hearing instruments are intended to improve the hearing
of hearing impaired persons. Diagnosis and prescription
of a hearing instrument must be performed by hearing
health specialists, e.g. acousticians, audiologists or
ENT doctors.
Use the hearing instruments and accessories only
as described in this user guide.
Explanation of symbols
Points out a situation that could lead to serious,
moderate, or minor injuries.
Indicates possible property damage.
Advice and tips on how to handle your device better.
Transport and storage conditions
During extended periods of transport and storage, please
observe the following conditions:
Storage Transport
Temperature 10 to 40 °C -20 to 60 °C
Relative humidity 10 to 80 % 5 to 90 %
Air pressure 700 to 1050 hPa 200 to 1200 hPa
For other parts, such as batteries, other conditions may
apply.
Important information
Page 26

Important information26
Disposal information
Within the European Union, the marked equipment
is covered by "Directive 2002/96/EC of the
European Parliament and of the Council of
27 January 2003 on waste electrical and
electronic equipment."
Amended by "Directive 2003/108/EC" (WEEE).
NOTICE
uRecycle hearing instruments, accessories and
packaging according to national regulations.
NOTICE
uTo avoid environmental pollution, do not throw
batteries into household trash.
uRecycle or dispose of batteries according to
national regulations or return them to your
Hearing Care Professional.
Conformance information
With the CE marking Siemens conrms compliance
with the European Directive 93/42/EEC concerning
medical devices.
Page 27

Important safety information 27
Personal safety
CAUTION
Risk of injury!
uAlways wear the receiver cable with an ear
piece.
uMake sure that the ear piece is completely
attached.
WARNING
Risk of impairing the residual hearing of the user.
uUse only hearing instruments that have been
tted especially for your needs.
WARNING
Risk of injury!
uDo not use obviously damaged devices and
return them to point of sale.
WARNING
Risk of explosion!
uDo not use your hearing instruments in
explosive atmospheres (e. g. in mining areas).
Important safety information
Page 28

Important safety information28
WARNING
Choking hazard!
Your hearing instruments contain small parts
which can be swallowed.
uKeep hearing instruments, batteries and
accessories out of reach of children and
mentally disabled persons.
uIf parts have been swallowed consult a
physician or hospital immediately.
Siemens offers special hearing instruments for the
tting of infants and small children.
uAsk your Hearing Care Professional for further
information.
Product safety
NOTICE
Leaking batteries damage the hearing instruments.
uTurn the hearing instruments off when not in
use to preserve the battery.
uRemove batteries when the instruments are not
in use for a prolonged period of time.
Page 29

Important safety information 29
NOTICE
uProtect your hearing instruments from extreme
heat. Do not expose them to direct sunlight.
NOTICE
uDo not dry your hearing instruments in the
microwave oven.
NOTICE
Different types of strong radiation, e. g. during
X-ray or MRI head examinations, may damage
hearing instruments.
uDo not wear the hearing instruments during
these or similar procedures.
Weaker radiation, e. g. from radio equipment or
airport security, does not damage the hearing
instruments.
NOTICE
uProtect your hearing instruments from high
humidity. Do not wear them in the shower or
when you apply make-up, perfume, aftershave,
hairspray or suntan lotion.
Page 30

Important safety information30
Tinnitus noiser
Your hearing instrument may be equipped with a tinnitus
noiser. The use of the tinnitus noiser should be only on
the advice and in consultation with your Hearing Care
Professional.
WARNING
Risk of further impairment to the user’s hearing
health.
There are some potential concerns associated
with the use of any sound generating tinnitus
therapy device. Discontinue use and seek medical
evaluation if any of the following conditions occur:
uchronic skin irritation on, near, or around the
site of device placement.
uunusual side effects (e.g. dizziness, nausea,
headaches, heart palpitations).
uperceived decrease in auditory function
(e.g. decreased loudness, speech not as clear).
WARNING
Risk of further impairment to the user’s hearing
health.
The volume of the tinnitus noiser can be set to
a level which could lead to permanent hearing
damage when used for a prolonged period of time.
uThe tinnitus noiser should never be used at
uncomfortable levels.
Page 31

Important safety information 31
For Hearing Care Professionals:
The target population is primarily the adult population
over 21 years of age. The patient may have some control
of the level or volume of the signal and the patient should
discuss this adjustment as well as his or her comfort
level and sound of the signal with their Hearing Care
Professional.
WARNING
Risk of further impairment to the user’s hearing
health.
The volume of the tinnitus noiser can be set to
a level which could lead to permanent hearing
damage when used for a prolonged period of time.
uShould the tinnitus noiser be set to such a level
in the hearing instrument, advise the user of
the maximum amount of time per day he or she
should use the tinnitus noiser.
For example, occupational safety guidelines
restrict continuous noise exposure of
80 dBA SPL to 8 hours per day.
uThe tinnitus noiser should never be used at
uncomfortable levels.
Page 32

Important safety information32
WARNING
Risk of further impairment to the user’s hearing
health.
A Hearing Care Professional should advise a
prospective tinnitus noiser user to consult
promptly with a licensed physician (preferably an
ear specialist) before using the tinnitus noiser if
the Hearing Care Professional determines through
inquiry, actual observation, or review or any other
available information concerning the prospective
user that the prospective user has any of the
following conditions:
uVisible congenital or traumatic deformity of the
ear.
uHistory of active drainage from the ear within
the previous 90 days.
uHistory of sudden or rapidly progressive hearing
loss within the previous 90 days.
uAcute or chronic dizziness.
uUnilateral hearing loss of sudden or recent
onset within the previous 90 days.
Page 33

Country-specic information 33
Country-specific information
Page 34

34
Page 35

Page 36

www.siemens.com /hearing
Siemens Audiologische Technik GmbH
Gebbertstrasse 125
91058 Erlangen
Germany
Phone +49 9131 308 0
Document No. A91SAT-01966-99T03-7600 EN
Order/Item No. 106 762 84 | Master Rev04, 10.2013 · TA
Printed in Germany | © Siemens AG, 11.2013
 Loading...