

Page 1

Dear Customer,
We thank and congratulate you on your choice.
This practical, modern and functional appliance has been built with
top quality materials. These materials have been subjected to
thorough quality control in the manufacturing process, and
meticulously tested in order for this appliance to meet your every
need, achieving perfect cooking.
Therefore, we ask you to read and follow these simple instructions
in order to guarantee unbeatable results from the first use. This
manual contains important information, not only for use of the
appliance, but safety and maintenance as well.
During transport, our products are protected by efficient packaging
materials. However, we have reduced our packaging to the bare
essentials. The materials are all completely recyclable. Just like us,
you can help protect the environment. To do so, we recommend
you dispose of these materials in the recycling facility nearest you.
Waste oil should not be poured down the sink drain, as this has a
negative impact on the environment. Place it in a closed container
and dispose of it at a collection point. If this is not possible, dispose
of it with standard domestic waste (as it will be taken to a controlled
landfill, and though this is not the best solution, at least water
pollution will be avoided). Present and future generations will
appreciate it.
Before you get rid of an old appliance, make sure you render it
inoperable. Next, deliver it to a recyclable material collection facility.
Your local government can provide you with the necessary information
on the nearest collection facility.
1
Page 2

FOR YOUR SAFETY 3
Important information for installation and usage 4
Important instructions 5
For your safety 5
Before set-up 7
For appliance usage 7
This is what your new cooktop looks like
Gas burners 9
Cooking tips 10
Appropriate cooking utensils 10
Cooktop usage warnings
Steel: cleaning and care 12
Home troubleshooting 13
Installation instructions 14
Installing the cooktop on the kitchen unit:
Fitting measurements 14
Electrical connection 16
Change of gas type: from natural gas to propane 17
Convert the pressure regulator: from 6” W.C. to 10” W.C. 18
Warranty conditions 19
8
11
2
Page 3
For your safety
WARNING: If the information in this manual
is not followed exactly, a fire or explosion
may result causing property damage,
personal injury or death.
Do not store or use gasoline or other
flammable vapors and liquids in the
vicinity of this or any other appliance.
WHAT TO DO IF YOU SMELL GAS
Do not try to light any appliance.
Do not touch any electrical
switch.
Do not use any phone in your
building.
Immediately call your gas supplier
from a neighbor's phone. Follow
the gas supplier's instructions.
If you cannot reach your gas
supplier, call the fire department.
Installation and service must be performed
by a qualified installer, service agency or
the gas supplier.
PLEASE READ THE INSTRUCTIONS BEFORE CONTINUING
IMPORTANT: Keep these instructions for the local electrical inspector to use.
INSTALLER: Leave these instructions next to the unit for the owner.
OWNER: Keep these instructions for future use.
3
Page 4
Important information for
installation
1 - For safety reasons, do not allow the flames
to extend beyond the edge of the cooking
appliance.
2 - Remember that the appliance heats up
when in use. Remember to use common
sense. The absence of a flame does not
mean that the appliance parts are no longer
hot.
3 - For safety reasons, this appliance should
not be used for room heating purposes.
4 - Make sure the power supply is
disconnected before dismantling the
appliance.
5 - Do not store
such as gasoline,
inflammable liquids near the appliance.
6 - Do not block the combustion or ventilation
air flow.
7 - Maintain a minimum distance of 762 mm
(30") between the gas cooktop and cabinets
installed in the upper part.
8 - The gas pressure regulator supplied with
the appliance must be installed in the gas
piping line.
The appliance and its individual shutoff val-
9 -
ve must be disconnected from the gas supply
piping system during any pressure testing
of the system at test pressures in excess of
3.5 kPa (1/2 psig). The appliance must be
isolated from the gas supply piping system
by closing its individual manual shutoff valve
during any pressure testing of the gas supply
piping system at test pressures equal to or
less than 3.5 kPa (1/2 psig).
10 - Important: When using an especially
large pan, leave a minimum space of 50 mm
(2") to prevent damage to countertops of
wooden, plastic or other non-heat resistant
materials. Never leave hot oil or grease
unattended.
11 - Make the caution about leaving oil or
grease unattended.
combustible materials,
other vapors and
and usage
12 -To avoid compromising the electrical
safety of the appliance, use of high-pressure
steam jet cleaning apparatus is forbidden.
The name plate is affixed to the
underside of the appliance.
This appliance may not be used in mobile
housing, recreational vehicles or
motorhomes.
This appliance has been tested in
accordance with ANSI/CSA Z21.1 Standard
for household Cooking Appliances (USA)
and CAN 1.1-M81 (Canada)
For US installations only:
This installation must comply with local
codes, or if none exists, the National Fuel
Gas Code, ANSI Z 223.1/NFPA 54, current
edition.
If an external electrical source is used, the
appliance must be electrically grounded in
compliance with local codes, or if none
exists, the National Electrical Code
ANSI/NFPA 70, current edition.
For Massachusetts installations:
1. Installation must be performed by a
qualified or licensed contractor, plumber or
gas fitter qualified or licensed by the state,
province or region where this appliance is
being installed.
2. Shut-off valve must be a "T" handle gas
cock.
3. Flexible gas connector must not be
longer than 36 inches.
For Canada installations only:
The installation must comply with CAN 1B149.1 and .2- Installation Codes for Gas
Burning Appliances and or local codes.
When installed, the appliance must be
electrically grounded in compliance with local
legislation, or if none exists, in compliance
with CSA Standard C22.1-Canadian Electrical
Code, Part I (current).
4
Page 5

Important instructions
For your safety
Carefully read this Operation and Maintenance
Manual before using your new cooktop.
As its user, you are responsible for the proper
maintenance and use of this appliance in your
home.
WARNING: These precautions will reduce the risk
of burns, electrocution,
fire and personal injury.
Proceed with maximum
care when using this
cooktop, as this
appliance generates
intense heat and can
increase the risk of
accidents.
When using cooking appliances, the following
basic safety precautions must be observed:
• Ensure proper installation and service.
Follow the installation instructions provided with
this product. Only a qualified technician can perform
the installation and grounding of the cooktop.
Do not use the appliance if damaged.
• Have the installer show you where the gas
shut-off valve is located, to know how and where
to shut off the gas mains to the cooktop.
• Do not repair or replace any part of the
appliance unless it is specifically recommended
in this manual. All remaining service must be
performed by a qualified technician.
• It is prohibited to leave children alone or
without adult supervision in an area where
appliances are in use. It is prohibited for anyone
to sit or stand on any part of the appliance.
When children become old enough to operate
the appliance, it is the legal responsibility of the
parents or legal guardians to ensure that they
are instructed in safe practices by qualified
persons.
• Do not place objects that may attract
children's interest on or behind the cooktop.
If children climb up the appliance to retrieve
such objects, they could be seriously injured.
• Do not use aluminium foil to line any part of
the stove.
• Do not use any part of the cooktop to
store objects. Inflammable materials can ignite
and plastic objects can melt or catch fire.
• Extinguish flames with a properly fitted lid,
baking sheet or other metal tray. Next, attempt to
shut off the gas burner. Use caution and avoid
burns. If flames are not extinguished immediately,
evacuate the premises and notify the fire
department.
• When connecting electrical appliances near
the cooktop, make sure that the cables do
not touch any cooking surface that remains hot.
• If the cooktop is near a window, ensure
that the curtains can not be blown or moved over
or near the burners of the cooktop, as this
could trigger a fire.
• DO NOT USE WATER TO EXTINGUISH
GREASE FIRES. Have a fire extinguisher in a
visible location near the cooking area.
Use a fire extinguisher only if;
- You know you have a Class ABC extinguisher
and you already know how to use it.
- The fire is small and contained in the area
where it stated.
- The fire department is being called.
- You can fight the fire with your back to an exit.
• Never allow clothing, baking mitts or other
inflammable materials to come into contact
with a burner or the grate of this appliance,
or to remain close to these objects,
until they have cooled. The fabric can ignite and
cause personal injury.
• Use only dry oven mitts. Wet or damp oven
mitts can cause steam burns when applied to hot
surfaces. Do not use towels or other voluminous
linen products as oven mitts. Do not allow oven
mitts to touch the hot grates of the burners.
• For your personal safety, wear the proper
clothing. Do not wear loose garments, or any
with drooping sleeves while using this appliance.
Some synthetic fabrics may easily catch fire and
should not be worn while cooking.
that personal clothing catches fire, drop and roll
immediately to smother the flames.
In the event
5
Page 6

• This appliance has been designed for the
cooking of food. For safety reasons, never
use the cooktop to heat a room.
• When using the cooktop: DO NOT TOUCH
THE BURNER GRATES OR THE IMMEDIATE
SURROUNDING AREA. They heat up enough
to cause burns.
• Never pick up a burning pot, as this could
cause burns.
• Clean the cooktop with care. Avoid steam
burn risks: do not use a sponge or damp cloth
to clean the cooktop while hot. Some cleaning
products produce harmful vapors if applied to a
hot surface. Follow the instructions provided by
the cleaning product manufacturer.
• Never leave the cooktop unattended.
Spillovers will cause smoke and grease spills that
can ignite.
• Do not heat food containers without
opening them. An accumulation of pressure can
trigger the explosion of the container.
• While cooking, adjust the burner control so
that the hot flame only touches the bottom
of the pot or pan. Do not allow the flame to
extend beyond it.
• Use caution so that the currents triggered by
the forced ventilation openings or fans do not blow
the inflammable material toward the flames, or
push them so that they extend beyond the edges
of the pot or pan.
• Always use cooking utensils with flat
bottoms big enough to cover the burner. If
smaller utensils are used, part of the flame can
remain exposed and set clothing on fire.
• To reduce the risk of burns, ignition of
inflammable materials and unintentional spills,
point the handles of the utensils inward, so
that they do not hang over adjacent working areas,
cooking areas or the edge of the cooktop.
• When stirring or turning food, hold the
handle of the pot or pan firmly, to prevent it from
moving.
• GREASE IS INFLAMMABLE. Let hot grease
cool before handling it. Prevent the formation of
grease build-up. Clean the cooktop following
every use.
• In order for the burners to ignite and operate
properly, keep the burner ports clean.
The burner ports must be cleaned follow ing a
a spill or when the burner does not ignite, even
if the electrical lighters click.
Consult the care and maintenance section.
• Ensure that all the cooktop control
knobs are set to off and that the cooktop is
cool before using any aerosol cleaning product
on or around the cooktop. In the presence of
heat, the chemical products that produce the
spraying action can ignite or trigger corrosion of
the metal pieces.
•
- Only authorized technicians can carry out
the necessary service. Technicians must
disconnect the electrical power supply before
carrying out maintenance operations on this unit.
• Install a smoke detector in or around the
kitchen.
• The warranty for this appliance does not
cover damages caused by non-adherence to
these instructions or by any non-authorized
modifications.
•
California, Proposition 65, Danger: The burning
of gas cooking fuel generates some by-products,
which are on the list of substances which are
known by the State of California to cause cancer or
reproductive harm. California law requires businesses to warn customers of potential exposure
to such substances.
substances, always operate this unit according
to the instructions contained in this booklet and
provide good ventilation to the room when
cooking with gas.
• During maintenance procedures, remove
power and the plug from the outlet and shut
off the gas supply.
In order to guarantee the electrical safety of the
appliance, only authorized technicians can perform
the necessary repairs.
The right to make technical modifications is
reserved.
To minimize exposure to these
6
Page 7
Before the first
start-up
Remove the packaging from the appliance
and dispose of it as per local laws. Remember
that there are other accessories in addition to
packaging materials. Keep packaging materials
and plastic bags out of the reach of children.
Check the condition of the appliance before
installing it, to ensure that it has suffered no
damage during transport.
Only authorized technical personnel must
install and connect the appliance before
its first start-up in compliance with the
regulations of the gas supplier companies and
local.
Turn the control dials to before connecting
the appliance to the current supply.
The appliance's serial number is indicated on
the control slip annexed to this manual. For
warranty purposes, keep this note together
with the usage and assembly instructions.
Carefully read the assembly and usage
instructions before starting up the appliance.
Thoroughly clean the appliance and
accessories when using them for the first time.
This will eliminate any "new" scents and any
remaining dirtiness (see cleaning and care
chapter).
For appliance usage
The use of this gas burning appliance produces
a formation of heat and humidity in the area
of use. Make sure that the area has proper
ventilation conditions.
Keep the ventilation channels open.
Prolonged use of the appliance with several
or all cooking units may require additional
ventilation, such as opening a window or a
door or more intensive extraction of air with
an extraction hood.
To guarantee good combustion, the
room in which the appliance is installed
must have a minimum volume of
3
(35 m ) and must possess a door that
opens outdoors or a window that can
opened.
The use of spit-roasters, pans or grilling
stones simultaneously by more than one
burner is prohibited, as the accumulation of
heat could damage the appliance.
If large pots are used, a minimum separation
of approximately 50 mm (2") should be kept
between the pot and peripheral inflammable
materials. A minimum separation of some
50 mm (2") should be kept between the
control dial or control panel and the pot or
pan. The cooking pot must not touch
the control panel.
If pots or pans are removed temporarily,
set the stovetop to the minimum setting.
This will reduce the risk of suffering burns
while working near open flames; in addition
to saving gas, thus favoring the environment.
If there is a fault in the current supply, do
not use the appliance.
If the appliance does not work properly,
contact the technical service.
1240 cft
BURNER
Large triple-flame burner (Center)
Rapid burner (Left front)
Semi-rapid
Auxiliary 5” 6”
(Right front)
(Right rear)
(Left front)
Ø MINIMUM PAN SIZE Ø MAXIMUM PAN SIZE
9”
9” 10”
6” 8”
7
Page 8
This is what your new Cooktop
looks like
Burner
Grates
7,000 Btu/hr
Grease splash tray
Burner
5,500 Btu/hr
Large triple-flame
burner
for up to
15,300 Btu/hr
Burner
7,000 Btu/hr
Control knobs
Burner
10,000 Btu/hr
8
Page 9
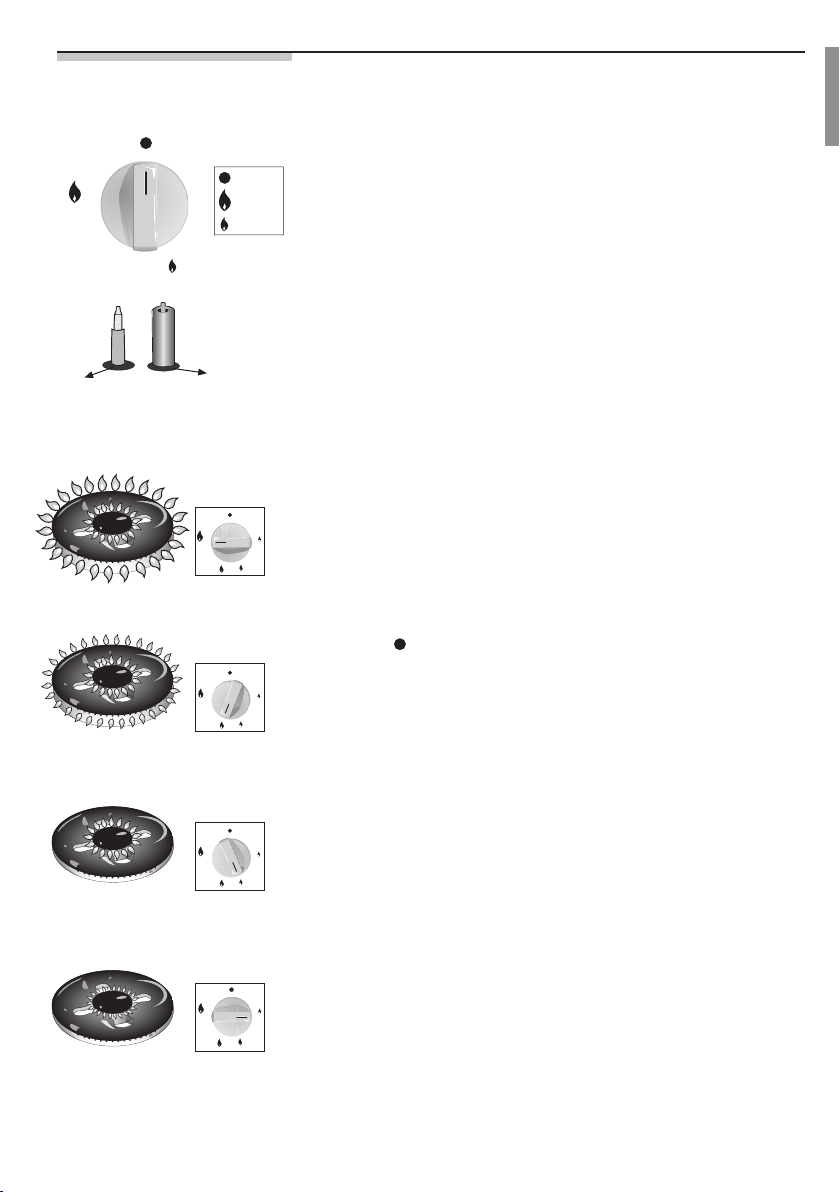
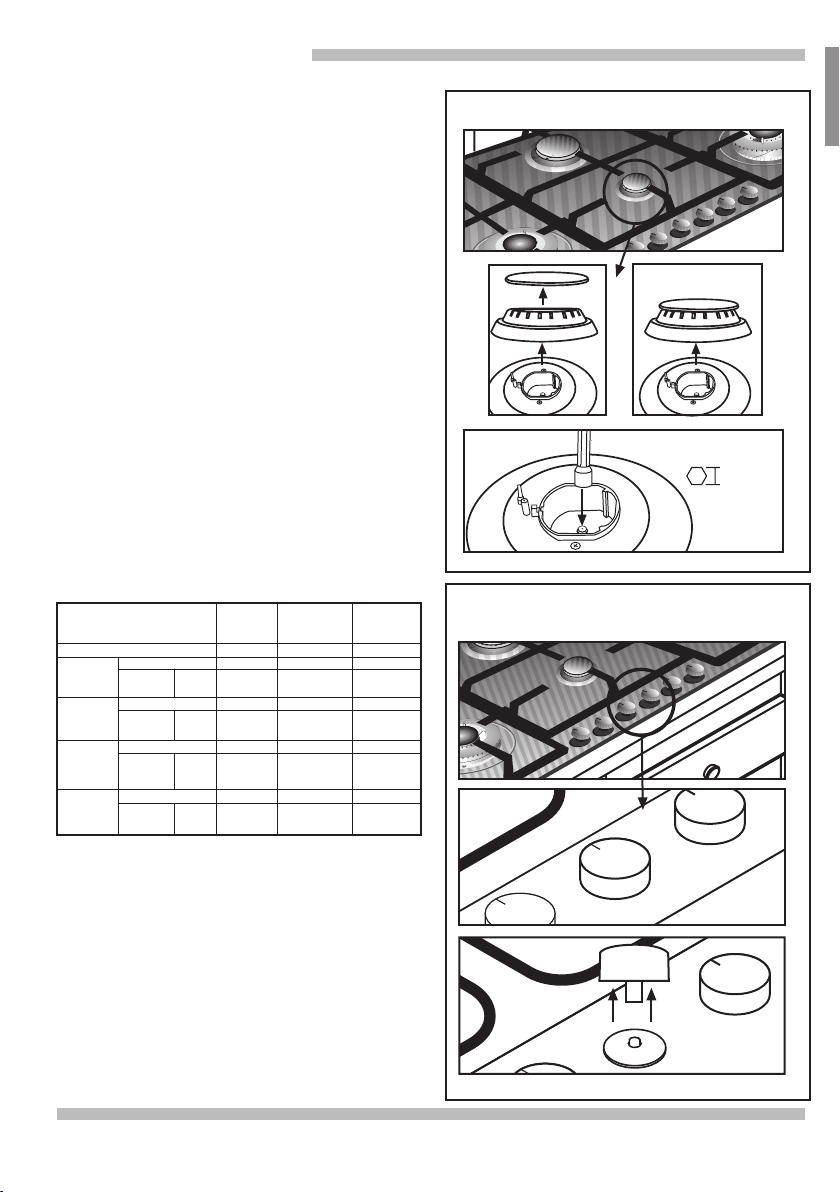
The gas burners
Figure1
Figure 2
Thermocouple
Figure 3
Both rings (inner and outer)
burn at full power.
The outer ring burns at
minimum power, the inner ring
burns at full power.
The inner ring burns
at full power, the outer ring
is turned off.
The inner ring burns
at minimum power, the outer
ring is turned off.
Ignitor
Off
:
: Hi
: Low
There are indications to show which burner each control knob
operates. Fig. 1.
To light a burner, press the chosen control knob and turn it
toward the left, holding it in the maximum setting for a few
seconds until the burner is lit, then release it, and adjust to the
desired setting. If it does not light, repeat the procedure.
CAUTION - All igniters spark w hen any single burner is
turned ON. Do not touch any of the burners w hen the
cooktop is in use.
If the ignitor are dirty, this makes the burner harder
to light. Therefore, keep them as clean as possible. This
cleaning should be performed with a small brush, considering
that the ignitor can not withstand any sharp blows.
If your cooktop is not fitted with this automatic lighting
feature, use a lighter or a match to light the burner.
Your cooktop may be equipped with safety thermocouples
to prevent gas flow if the burners are accidentally extinguished.
Figure 2.
To turn on and activate this innovative system, proceed in
the same way, but keeping the control knob pressed down
until ignition takes place, the flame appears and does not
extinguish.
If ignition does not take place, repeat the procedure, keeping
the control knob pressed down 1-5 seconds.
To turn it off, turn the control knob to the right to the correct
position . When carrying out this procedure, the ignition
system may activate again. This is completely normal.
Your modern, functional cooktop has progressive gas valves
that make it possible to adjust to the necessary setting
between the maximum and minimum flames.
Triple flame burners and large triple flame burners are very
practical and convenient for cooking with "paella" pans, Chinese
Woks (all sorts of Asian dishes), etc.
If your cooktop is equipped with a large triple flame burner,
it will have a valve facilitating independent control of the
interior and exterior flame. This revolutionary system makes it
possible to select from a wide array of power settings.
Working description Fig. 3.
The direct impact of the flame on the enamel may cause an
orange-coloured flame in the Large, triple-flame burner.
The use of the appliance produces heat and humidity in the
site where it is installed. Ensure that the kitchen has good
ventilation. Keep ventilation channels open or install a
mechanical ventilation system (extraction hood).
Prolonged use of the appliance with several or all cooking units
may require additional ventilation, such as opening a window
(without causing air currents) or increasing the power of
mechanical ventilation if it exists.
9
Page 10
Cooking
recommendations
Very high High Medium Low
Large
triple-flame
burner
Rapid
Semi-rapid
Auxiliary
Boiling, cooking, roasting,
browning, "paellas" and
Asian dishes (Wok).
Steaks,
omelettes and fried dishes.
Steamed potatoes, fresh
vegetables and pasta.
Cooking: casseroles, rice
pudding and caramel.
Reheating and keeping food warm:
ready and pre-cooked meals.
Defrosting.
“bechamel”
Rice,
(sauce)
and stew.
Reheating and keeping food warm:
pre-cooked meals, preparing delicate
casseroles.
Defrosting and
slow cooking:
legumes, fruits
and frozen
products.
Appropriate cooking utensils
Match Pan Diameter to Flame Size
- The flame should be the same size the
bottom of the pan or smaller. Do not use
small pans with high flame settings as the
flames can lick up the sides of the pan.
Steaming: fish
and vegetables.
Melting: butter,
chocolate and
gelatin.
Use Balanced Pans
- Pans must sit level on the cooktop grate
without rocking.
- Center pan over burner.
Use a lid That Fits Properly
- A well-fitting lid shorten the cooking time.
10
Page 11
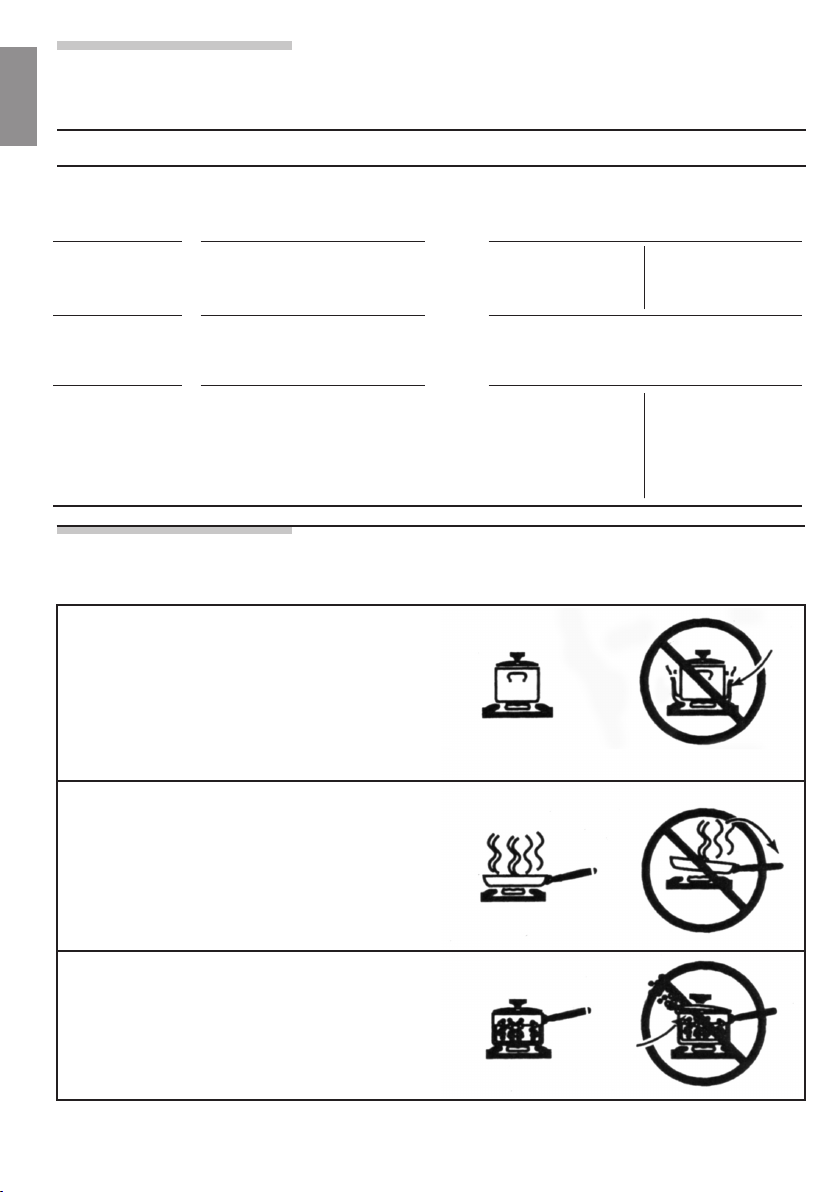
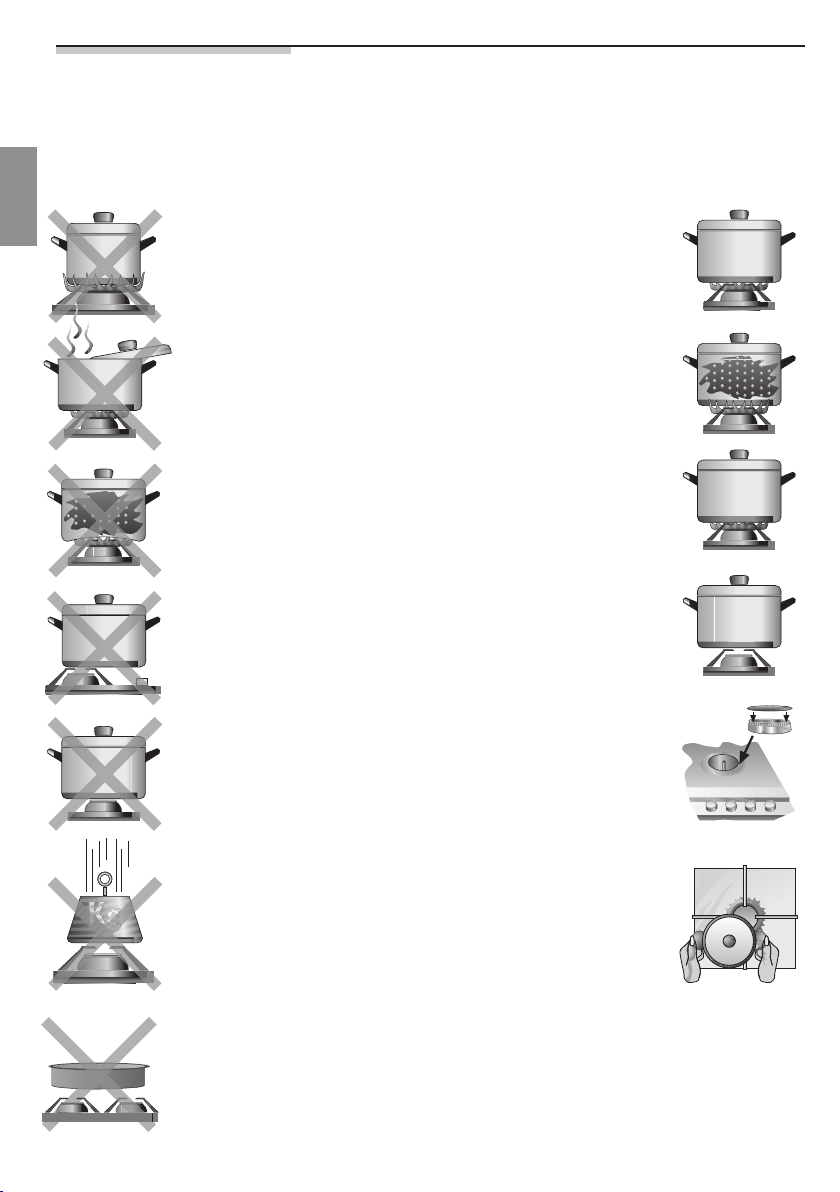
Cooking warnings
NO YES
Do not use small pots on
large burners. The flame
should not touch the sides of
the pot.
Always use appropriate
pots for each burner.
This will prevent excessive
consumption of gas and
staining of the pots.
Do not cook without a lid, or
if the lid moves, as this causes
a partial energy loss.
Do not use pots with
irregular bottoms as they
lengthen cooking time and
increase energy consumption.
Do not place the pot
off-center over the burner, as
tipping could result.
Do not use large-diameter
pots on the burners near
the control knobs, which, once
centered over the burner,
could touch the knobs or be
close enough to them that the
temperature of that area increases, possibly causing
damage.
Never place pots
directly on top of the burners.
Do not use excessive weights
or strike the cooktop with
heavy objects.
Always use the lid.
Use only pots, pans and
casseroles with flat, thick
bottoms.
Center the pot over
the burner.
Place the pot over
the grate.
Make sure that the grates
and burner covers
are in the correct
positions before using the
appliance.
Never use two burners or
heat sources to heat a single
pot.
Avoid using roasting grilles,
earthen pots, etc. for
extended periods at
maximum power.
Handle pots carefully when
they are on the cooktop.
11
Page 12
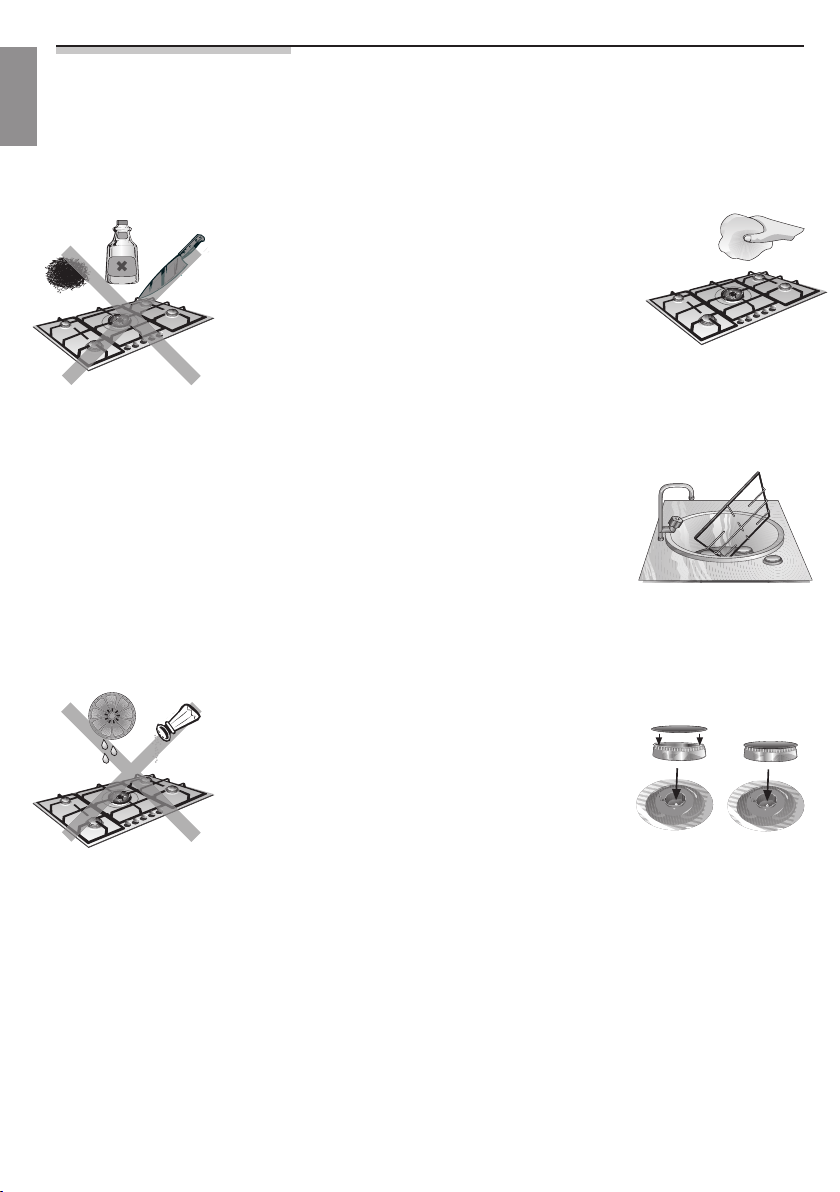
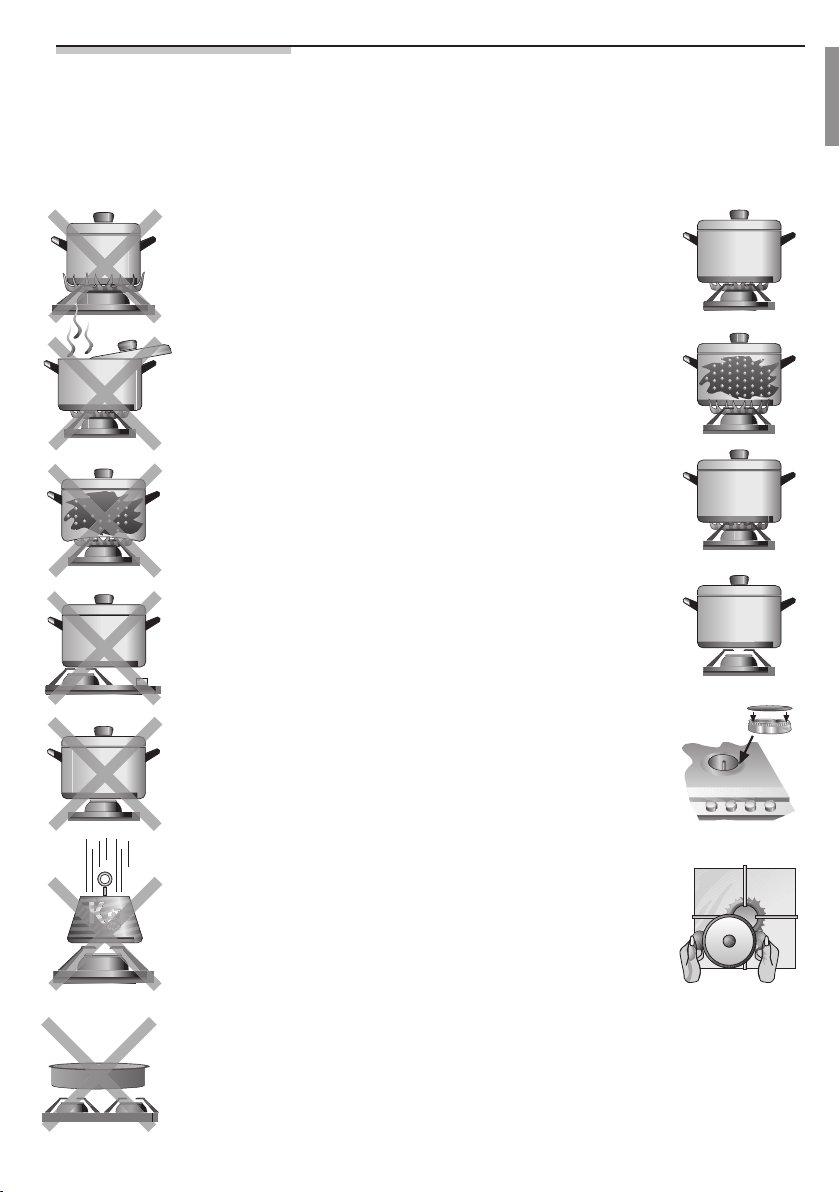
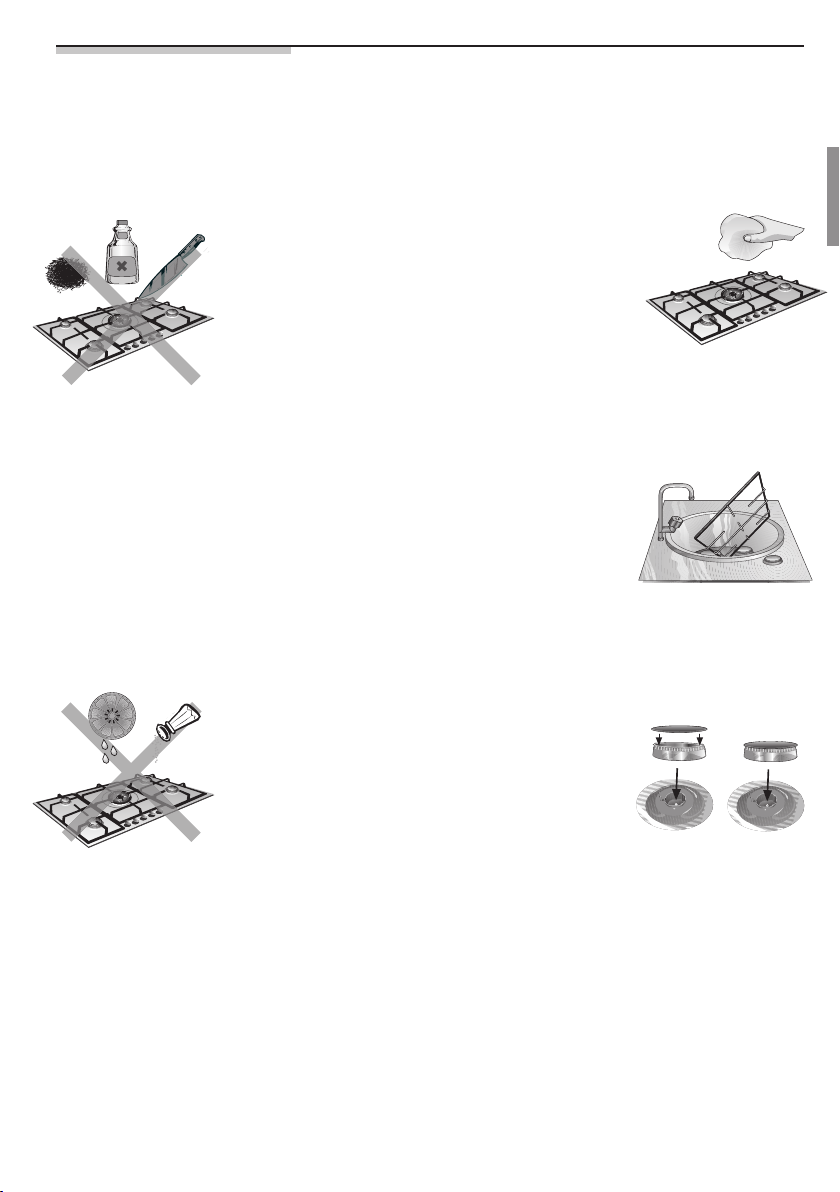
Steel usage rules:
cleaning and care
NO YES
DO NOT use abrasive
products, sharp objects,
steel wool, knives, etc. to
remove hardened
remains of food on the
cooktop, pan
supports, burners or
electrical cooktops.
If your cooktop has a
glass panel, DO NOT
use a knife, scraper or any
similar device to clean
the joint where it meets
the metal.
DO NOT use steam
cleaning machines on the
cooktop, as they
could damage it.
DO NOT leave acidic
liquids (lemon juice,
vinegar, etc.) on the
cooktop.
Once the appliance has
cooled, clean it with a
sponge, soap and
water.
Remove all spilt liquids
immediately. This will
save unnecessary efforts.
To keep the burners and
pan supports clean, they
must be regularly
cleaned, submerging
them in soapy water and
scrubbing them with a
non-metallic brush so that
the holes and slots are
perfectly clear to provide
proper flame. Always dry
the burner covers and the
grates if they have
become wet.
After cleaning and drying
the burners, ensure that
the lids are properly
placed atop the burner
flame diffuser.
If the appliance has
Monoblock burners, ensure that they are perfectly dry before their next
use.
Due to the high temperatures that the ring lid of your triple flame burner, and stainless steel
areas such as the grease splash tray and the outer perimeter of the burners, etc. must withstand,
they will become discoloured over time. This is NORMAL. Clean them after every use using
products appropriate for stainless steel.
After washing the grates, dry them completely before cooking with them again. The
presence of water droplets or wet areas at the beginning of cooking can cause possible points
of enamel deterioration.
If the grates of your cooktop have rubber pads, use precaution when cleaning them,
as they could come off, leaving the grate unprotected and leading to scratching of the
cooktop.
Stainless steel cleaning products should not be used in the area surrounding the control knobs.
The (printed) symbols may be wiped off.
12
Page 13
Home troubleshooting
You do not always need to call the technical assistance
service. In many cases, you can solve problems on your own.
The following table contains useful advice.
Important:
Only authorized personnel from our Technical Service can perform
the necessary tasks relative to the gas and electrical systems.
What's wrong? Cause Probable Solution
The general electrical
system is malfunctioning
The electric ignitor does
not work
-Defective fuse.
-The automatic circuit breaker has
tripped or a fuse has blown.
-There is food or cleaning
product residue between the
ignitor and the burner.
-The burners are wet.
- Check the fuse in the
general fuse box, and replace
it if faulty.
- Check the general incoming
cabinet for a tripped automatic
circuit breaker or blown fuse.
- The space between the
ignitor and the burner must be
cleaned carefully.
-Dry the burner covers carefully.
The flames on the
burners are not uniform
The gas flow does not
appear to be normal or
no gas comes out
There is a smell of gas
in the kitchen area
The safeties of the
various burners do not
work
-The burner caps are not set
correctly.
-The different parts of the burner
have been set incorrectly.
- The grooves on the burners'
gas outlets are dirty.
-The burners may not be totally
dry.
-The gas mains are turned off
through a mid-pipe valve.
- If the gas comes from a gas
bottle, it may be empty.
-A gas valve has been left on.
-There may be a leak from the
coupling to the gas bottle.
- The control knob has not been
held down long enough.
-The grooves on the burners' gas
outlets are dirty.
- Ensure that the covers have
been correctly set.
- Correctly set the various parts.
- Clean the grooves on the
burners' gas outlets.
- Proceed with thorough drying
(take special care with
monoblock burners).
- Open possible mid-pipe
valves.
-Replace the gas bottle with a
full one.
-Check to see if any gas valve
is on.
- Ensure that the coupling has
been made correctly.
- Once the burner is lit, keep
the control knob pressed for a
few more seconds.
- Clean the grooves on the
burners' gas outlets.
13
Page 14
Installation instructions
IMPORTANT INFORMATION
Thoroughly follow the general safety instructions
as well as the important information.
Before using the appliance, an authorized
technician must install and connect it. Additionally,
this technician must ensure that the power supply
and gas connections work properly.
The technician performing the installation is
responsible for the perfect operation of the
appliance in its place of installation.
The technician must show the user how to
disconnect the electricity and gas when necessary.
PRECAUTION: Before
connecting the appliance,
ensure that the local
connection conditions as
well as the gas type and
pressure and the current
supply voltage match
the appliance's settings.
It is necessary for all tasks related with installation,
adjustment and adaptation to LP gas to
be performed by authorized personnel, and that
the codes in force, as well as the requisites of
the gas companies, be respected.
Thus, it is necessary for the combustion gases to
be vented outside.
Check the dimensions of the cooktop as well
as the dimensions of the hole to be cut in the
kitchen unit.
The panels located above the work surface, next
to the cooktop, must be made of noninflammable material. The stratified coatings and
the adhesive that fixes them must be heat-resistant
to prevent possible deterioration.
Electrical cables must not come into contact with
heat zones.
The power cable must be fastened to the kitchen
unit to keep it from touching the hot parts of the
oven or cooktop.
It is mandatory for appliances with any electrical
component to be grounded.
The installation of this appliance must be performed
in accordance with the codes in force and only in
a well-ventilated site.
Read these instructions before installing or using
the appliance.
Handle the appliance with care during the entire
installation process. Avoid any blows to the
appliance.
In the event that these recommendations are not
observed, the installation technician will be
responsible for any damage caused, and the
manufacturer will be exempt from all responsability.
Installing the cooktop
on the kitchen unit:
Fitting measurements
Before you begin, turn off the gas and
electricity supply to the appliance.
Before connecting up the appliance to the
installation, first check that it has been adjusted
for the type of gas that is to be supplied. Our
cooktops are delivered from factory fit to work
with the gas type indicated on the name plate.
It is obligatory for the place where the appliance
is to be installed to have standard ventilation.
14
1 - Minimum distances (mm). Cut a gap of the
required size in the work surface. Fig. 1 a-b
Follow the installation instructions for hoods.
2 - The wood fibres that have been used to make
the cabinets tend to swell quickly
when they come into contact with moisture.
Therefore, we recommend to coat the cut
surfaces, to protect them from steam or
condensed water that could be deposited
under the kitchen unit work surface.
Page 15
IMPORTANT INFORMATION
Requirements for the cabinet
Figure 1a
E
D
A
The appliance is delivered from factory with the
clips and gasket (underside edge of cooktop)
in place. They should not be removed under any
circumstances. The seal ensures that the entire
work surface will be watertight, and prevents water
seepage.
If an oven is not to be installed below the cooktop,
it is recommended to install a separator
C
F
B
blocking access to the underside of the cooktop.
To install the cooktop over an oven, check the
dimensions given in the installation manual.
3 - Simultaneously press the edges so that the
cooktop rests on its entire perimeter. Fig. 2 a.
Figure 2a
A- Minimum 6” (152 mm)
B- Minimum 6” (152 mm)
C- Minimum 30” (762 mm)
D- Minimum 2” (51 mm)
E- Minimum 36” (915 mm)
F- Minimum 18” (458 mm)
Maximum depth of cabinets installed above
cooktop: 13" (330 mm.)
Appliance installation
1
min. 7
”
/
4
13
/
min. 2
”
16
1
/
19
”
4
1
/
33
”
2
min. 6”
Figure 1b
1
/
33
”
2
3
1
”
/
4
1
/
1
”
16
1
1
/
”
16
1
/
19
”
4
Place the cooktop in the middle of the opening
where it is to be inserted into the kitchen unit.
Turn the 6 fastening clips Fig. 2 b. and screw them
tightly into the kitchen unit. Never remove them.
Figure 2b
All operations relative to installation, adjustment
and adaptation to another gas type must be carried
out by authorized personnel from our Technical
Service, and the codes in force, as well as the
requisites of the gas companies must be complied
with.
4 - Before connecting the appliance, ensure that
the local connection conditions, as well as the gas
type and pressure match the settings of the
appliance.
Ensure that the gas supply is cut off through the
manual shut-off valve before connecting the
appliance.
The gas connection must be in a place that permits
access to the manual shut-off valve and that, if
necessary, is visible upon opening the kitchen
cabinet door.
15
Page 16
Connect the regulator Figure 3 (2) to the manifold
Figure 3 (1) as shown by the arrow on the regulator,
applying teflon to the threads.
Connect the pressure regulator to the gas grid
using a flexible gas line fitting between the shutoff valve and the pressure regulator. Figure 3.
Figure 3
1
2
Ensure that a bag containing component 2 is
supplied with the appliance. If this component
is missing, call our Technical Service. Use the
parts we supply to complete the gas
connection.
Tighten the appliance regulador to 15 to 22 ft-lbs of
torque. Never tighten to more than 26 ft-lbs of torque. Always use an approved pipe joint compound
resistant to the action of LP gas.
Connection using a metal pipe. In this case, contact
between this tube and the moving parts of the
kitchen unit (for example, a drawer) and its passage
through areas that could be blocked, must be
avoided.
The manufacturer accepts no responsibility for
leaks or connections carried out by the installation
technician.
Leak testing of the appliance shall be conducted
according to manufacturer s instructions.
,
Electrical connection
Before connecting the power cable to the wall
outlet, make sure the gas shut-off valve and all
the control knobs of the burners are set to "off".
IMPORTANT INFORMATION
The voltage and total power must be checked on
the specifications plate. This appliance must be
grounded.
Always ensure that all connections have been
made in accordance with code requirements.
Thoroughly follow the requisites of the local
electric power company.
The electrical connection (CA 110-127 V) is
established by a connection cable with a grounding
contact plug connected to a grounded outlet to
which there must be access after installation of
the gas cooktop.
All gas connections must be tested for leaks using
an appropriate liquid solution. Never use a flame
to test for gas leaks.
WARNING: this
appliance is equipped with
a three prong grounding
plug for your protection
against shock hazard
and should be plugged
directly into a properly
grounded receptacle.
Do not cut or remove the
grounding prong from
this plug.
The current supply connection cable must be at
least of the JT 3x18 AWG/UL/CSA variety, or
should be heat-resistant (at least 105
The mains connecting cable must only be
purchased through and connected by an
authorised specialist.
Do not tamper with the inside of the appliance.
If this is necessary, call our technical assistance
service.
ºC / 221 ºF).
16
Page 17
IMPORTANT INFORMATION
Gas type changing:
From natural gas to propane
It is necessary that all operations related with
installation, adjustment or adaptation LP
gas be performed by authorized personnel
of our Technical Service, and that the regulations
in force, as well as the requisites of the gas
companies, be followed.
IMPORTANT: Before you begin, turn off the gas
and electricity supply to the appliance.
Before connecting up the appliance to the
installation, first check that it has been adjusted
for the type of gas that is to be supplied. Our
cooktops are delivered from factory prepared
to operate with the gas type indicated on the
specifications plate.
The propane gas tank must be equipped with its
own high pressure regulator in addition to the
pressure regulator supplied with this unit.
Supply Pressure
Natural Gas - 7
Propane Gas - 11" wc (27.4 mbar) minimum.
The maximum supply pressure to this applianc
shall not exceed 14" water column (34.9 mbar).
This cooktop can be adapted to work
with LP gas. To do so, the following
procedures must be completed:
A)
Change of cooktop burner tips. (See table1)
The burner must be used with the
gases indicated on the
specifications plate.
Gas pressure for use
Burner
Rapid
Burner
semirapid
Burner
Auxiliary
Large
Burner
Triple-flame
Burner tip marker
Consumption
(Hs)
Burner tip marker
Consumption
(Hs)
Burner tip marker
Consumption
(Hs)
Burner tip marker
Consumption
(Hs)
(17.5 mbar) minimum.
"
wc
T ABLE 1
Burner data
GAS
TYPE
BTU/hr
Rated
BTU/hr
Rated
BTU/hr
Rated
Rated
BTU/hr
NATURAL PROPANE
6” 10”
133 95
10.000 10.000
110 77
7.000 7.000
98
5.500 5.500
106/81 72/55
15.300 15.300
69
e
.
Figure 4
7 mm.
Figure 5
1 - Remove the grates, covers and the main
body of the burner.
2 - Change the burner tips using a 7 mm socket
wrench and make sure that they are tightened all
the way in order to ensure that they are correctly
sealed. Figure 4.
The adjustment of primary air must not be performed
on these burners.
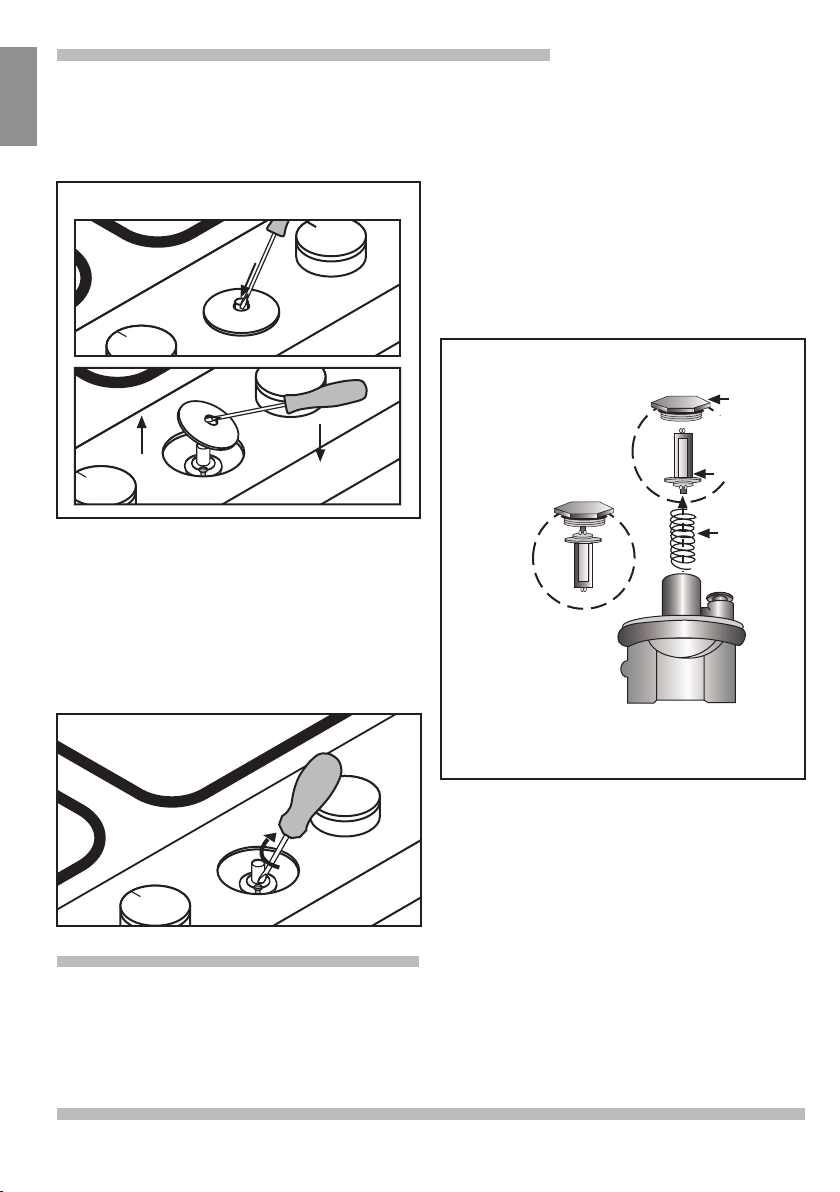
B) Reduced consumption adjustment of the cooktop
burner taps.
1 - Set the taps to the minimum setting.
2 - Remove the control knobs from the taps.
Figure 5.
3 - Remove the anti-spillage disc seals.
17
Page 18
IMPORTANT INFORMATION
• Your cooktop is equipped with exterior plastic
disc seals. Remove them with a screwdriver,
levering through their central opening. Figure 6.
Figure 6
• When you have removed the disc seals from the
orifice the control shaft emerges from, you will find
an interior seal made of flexible rubber; you only
need to press this with the tip of a screwdriver to
clear the path to the tap adjusting screw. Never
remove the inner disc seals.
4 - Adjust the by-pass screw.
Fully tighten the by-pass screw. Figure 7.
pressing it firmly into place so that the letters "LP",
instead of "NAT" can be clearly read on the button.
Replace the lid and button set on the upper part
of the regulator, properly sealing it. Make sure that
the spring is in place. Do not over-tighten.
NOTE: The arrow on the rear part of the regulator
should point in the direction of the gas flow on the
cooktop. Figure 8.
Pin
Pin position
for propane
NAT
Hex
Cap
Hex Lid
Pin
LP
Spring
Figure 8
Hex
Lid
for natural
NAT
Setting
of the pin
gas
NAT
Fig. 7
Conversion of the 6” W.C. pres-
sure regulator to 10” W.C.
Remove the hexagonal lid from the upper part of
the regulator with an adjustable wrench.
Remove the plastic button on the lid and turn it,
18
PRESSURE REGULATOR
DIAGRAM
After performing the gas transformation, always
ensure that the flame of the burners is correct, so
that when changing from the maximum to the
minimum setting it does not go out, or cause
backflashing.
5 - It is important to ensure the proper placement
of all seals in order to prevent any short circuits
in case of spillage on the cooktop.
6 - Replace the control knobs on the taps.
Never remove the tap shaft. In case of fault, change
the whole tap.
C) Place the tag indicating the gas type to which
the appliance has been transformed over the
existing natural gas tag.
Page 19

IMPORTANT INFORMATION
If you call the Technical Service Department,
please be sure to indicate:
E - NR FD
This information appears on the appliance
name plate, situated on the lower part of
the cooktop.
WARRANTY
COOkTOP WARRANTY
WHAT IS COVERED
Full One Year Warranty
For one year from the date of installation or date of
occupancy for a new, previously unoccupied
dwelling, any part which fails in normal home
use will be repaired or replaced free of charge.
Save your dated receipt or other evidence of
the installation/occupancy date. Bosch will pay
for all repair labor and replacement parts found
to be defective due to materials and workman-
ship. Service must be provided by a Factory
Authorized Service Agency during normal
working hours. For Service Agency
nearest you, please phone 800-944-2904.
WHAT IS NOT COVERED
1 - Service by an unauthorized agency. Damage
or repairs due to service by an unauthorized
agency or the use of unauthorized parts.
2 - Service visits to:
• Teach you how to use the appliance.
• Correct the installation. You are responsible
for providing electrical wiring and/or gas
installation and other connecting facilities.
• Reset circuit breakers or replace home fuses.
3 - Damages caused from accident, alteration,
misuse, abuse, improper installation or installation
not in accordance that with local electrical codes
or plumbing codes, or improper storage of the
appliance.
4 - Repairs due to other than normal home use.
5 - Any service visits and labor costs during the
limited warranty.
6 - Travel fees and associated charges incurred
when the product is installed in a location with
limited or restricted access (i.e., airplane flights,
ferry charges, isolated geographic regions).
WARRANTY APPLICATIONS
This warranty applies to appliances used in
residential application; It does not cover their
use in commercial situations.
This warranty is for products purchased and
retained in the 50 states of the U.S.A., the District
of Columbia and Canada. The warranty applies
even if you should move during the warranty period.
Should the appliance be sold by the original purchaser during the warranty period, the new owner
continues to be protected until the expiration date
of the original purchasers warranty period.
BOSCH DOES NOT ASSUME ANY RESPONSIBILITY FOR INCIDENTAL OR
CONSEQUENTIAL DAMAGES.
Some states do not allow exclusion or limitation
of incidental or consequential damages, so the
above limitation or exclusion may not apply to you.
This warranty gives you with specific legal rights
and you may also have other rights which may
vary from state to state or province to province.
SERVICE DATA
For handy reference, the serial tag information has
been affixed to the back cover. For location of the
serial tag on the product. Keep your invoice for
warranty validation.
FOR REPAIRS OR AUTHORIZED SERVICE.
We want you to be satisfied. If you are not satisfied
with the service received, please call 800-9442904 or write us at:
BSH Home Appliances Corp.
Customer Support
5551 McFadden Ave.,
Huntington Beach, CA 92649
Any communication must include the model number, serial number and date of original purchase/installation. (See back cover).
19
Page 20

Cher/chère Client/e :
Nous vous remercions et félicitons de votre choix.
Cet appareil pratique, moderne et fonctionnel a été fabriqué avec
des matériaux de toute première qualité. Ces matériaux ont été
soumis à un contrôle de qualité très strict tout au long du processus
de fabrication et ils ont été méticuleusement testés afin que ce
produit respecte toutes vos exigences dans l'objectif d'obtenir une
cuisson parfaite.
Nous vous prions donc de lire et de respecter ces instructions
très simples pour pouvoir garantir des résultats sans égal dès sa
première utilisation. Ce manuel contient des informations
importantes, non seulement sur l'utilisation de l'appareil mais aussi
sur sa sécurité et maintenance.
Pendant leur transport, nos produits sont conditionnés dans un
emballage protecteur efficace. En ce qui concerne cet emballage,
nous nous limitons à ce qui est absolument indispensable, tout
l'emballage étant recyclable. Vous pouvez contribuer à la conservation
de l'environnement, comme nous le faisons nous-mêmes. Nous
vous recommandons donc de le déposer dans le conteneur le plus
proche de votre domicile disposé à cet effet.
L'huile utilisée ne doit pas être jetée dans l'évier vu que cela pourrait
avoir de graves répercussions sur l'environnement. Déposez-la
dans un récipient fermé et apportez-la à un point de collecte ou, à
défaut, déposez-la dans la poubelle (elle finira dans une décharge
contrôlée, ce qui n’est pas la meilleure solution mais évite la pollution
de l’eau). C’est pour le bénéfice de vos enfants et de vous-même.
Avant de vous défaire d'un appareil usagé, mettez-le hors d'état.
Remettez-le ensuite à un centre de collecte de matières recyclables.
Votre administration locale vous fournira les informations nécessaires
sur le centre de collecte le plus proche de chez vous.
20
Page 21

POUR VOTRE SECURITE 22
Informations importantes pour l'installation et utilisation 23
Indications importantes 24
Pour la sécurité 24
Avant la première mise en service 25
Pour son utilisation 25
Présentation de votre nouvelle table de cuisson 26
Brûleurs à gaz 27
Conseils pour cuisiner 28
Ustensiles de cuisine appropriés 28
Avertissements d'utilisation quant à la préparation 29
Normes d'utilisation pour la plaque en acier :
Nettoyage et conservation 30
Situations anormales 31
Instructions d'installation 32
Installation de la table de cuisson dans le meuble :
Mesures de l'encastrement 33
Connexion électrique 35
Changement du type de gaz : de gaz de ville à propane 36
Transformer le régulateur de pression : de 6” W.C à 10” W.C. 37
Conditions de Garantie 38
21
Page 22

Pour votre sécurité
AVERTISSEMENT : un incendie ou une explosion
provoquant des dégâts matériels, des blessures sur
les personnes, voire un décès, peuvent découler du
non respect strict des informations contenues dans
le présent manuel.
Ne pas stocker ni utilisez d'essence ni d'autres vapeurs
ou liquides inflammables à proximité de cet appareil
ou de tout autre appareil électrique.
QUE FAIRE SI VOUS DÉTECTEZ UNE ODEUR DE GAZ?
Ne cherchez pas à allumer quelque appareil
électrique que ce soit.
Ne touchez aucune commande électrique,
n utilisez aucun télephone dans le bâtiment.
'
Appelez immédiatement votre fournisseur de
gaz depuis le téléphone de votre voisin.
Suivez les consignes que vous donnera votre
fournisseur de gaz.
Si vous ne pouvez joindre votre fournisseur
de gaz, appelez les service des pompiers.
'
L installation et la mise en service doivent être
réalisées par un installateur qualifié, une agence
spécialisée dans le SAV ou bien par votre
fournisseur de gaz.
VEUILLEZ LIRE LES INSTRUCTIONS AVANT DE CONTINUER
IMPORTANT : Conservez ces instructions pour les fournir à l'inspecteur électricien local.
INSTALLATEUR : Joignez ces instructions à l'unité pour remettre l'ensemble au propriétaire.
PROPRIÉTAIRE : Conservez ces instructions pour de futures consultations.
22
Page 23

Informations importantes pour
l'installation et l'utilisation
1 - Ne permettez pas que des flammes
dépassent le bord de l'ustensile de cuisine.
Cette instruction est fondée sur des
considérations de sécurité.
2 - N'oubliez pas que l'appareil chauffe lorsqu'il
est en fonctionnement. Le sens commun est
important. L'extinction des flammes ne signifie
par que les pièces ne sont plus chaudes.
3 - Pour des raisons de sécurité, cet appareil
ne doit pas être destiné à chauffer une piéce.
4 - Assurez-vous de déconnecter l'alimentation
électrique avant de démonter l'appareil.
5 - Maintenez la zone de l'appareil propre et
libre de matières combustibles, par exemple
essence, autres vapeurs et liquides
inflammables.
6 - N'obstruez pas le flux d'air de combustion
et de ventilation.
7 - Il faut conserver une distance minimum de
762 mm (30”) entre la table de cuisson à gaz
et les armoires placées sur la partie supérieure.
8 - Le régulateur de pression de gaz fourni avec
l'appareil doit être installé sur la ligne des tuyaux
de gaz.
9 - L'appareil et sa soupape d'arrêt individuelle
doivent être déconnectés du circuit
d'alimentation en gaz pendant la réalisation
d un test de mise en pression du système à
'
des pressions d 'essai excédant
3,5 kPa (1/2 psig).
L'appareil doit être isolé du circuit
d'alimentation en gaz par fermeture de son
robinet d'arrêt manuel individuel pendant la
réalisation d'un test de pression du circuit
d alimentation de gaz à des pressions d essai
'
èquivalentes ou inférieures à 3,5 kPa(1/2 psig)
10 - Important : quand un récipient très grand
est utilisé, laissez un espace minimum de 50
mm (2”) pour éviter d'endommager la surface
du plan de travail de la table de cuisson en
bois, plastique ou dans d'autres matériaux ne
résistant pas à la chaleur. Surveillez en
permanence l'huile ou la graisse chaude.
11 - Veiller à ne pas laisser de l huile ou de la
graisse sans surveillance.
'
'
12 - Pour éviter de mettre en danger la
sécurité électrique de l'appareil, il est interdit
d'utiliser des appareils de nettoyage à jet vapeur
de haute pression.
La plaque signalétique se trouve sur la partie
inférieure de l'appareil.
Cet appareil ne peut être utilisé dans des
armoires mobiles, des véhicules de loisirs
ou des mobil-home.
Cet appareil a été testé conformément aux
normes ANSI/CSA Z 21.1 concernant les
appareils de cuisson électroménager (USA)
et CAN1.1-M81 (Canada)
Uniquement si l'installation est effectuée
aux USA :
Cette installation doit respecter les lois locales
ou, à défaut, le National Fuel Gas Code (Loi
nationale sur le gaz combustible), ANSI Z
223.1/NFPA 54, édition actuelle.
Si vous utilisez une source électrique externe,
l'appareil doit être mis à la terre conformément
aux lois locales ou, à défaut, au National
Electrical Code (Loi électrique nationale)
ANSI/NFPA 70, édition actuelle.
Installations pour Massachusetts
'
1. L installation doit être effectuée par un technicien ou un entrepreneur un plombier qualifié ou avec licence par l état ou la province
ou la région où l appareil est installé.
2. La soupape d arrêt doit être un robinet de
gaz à poignée en T.
3. Un connecteur de gaz flexible ne doit pas
dépasser 36 po.
Uniquement si l'installation est effectuée au
Canada :
L'installation doit respecter le CAN 1-B149.1 et
.2- Lois sur l'installation d'appareils à combustion
à gaz et/ou les Lois locales.
Cet appareil, quand il est installé, doit être mis
à la terre conformément aux lois locales ou, à
défaut, au CSA Standard C22.1-Loi Electrique
du Canada, Partie I actuelle.
'
'
'
23
Page 24

Indications importantes de sécurité
• Ne placez pas d'objets éveillant l'intérêt des
Lisez attentivement toutes les instructions de ce
Manuel de fonctionnement et de maintenance
avant d'utiliser votre nouvelle table de cuisson.
En tant qu'utilisateur, vous êtes responsable de la
maintenance ainsi que de l'utilisation correcte de cet
appareil chez vous.
AVERTISSEMENT : Ces
précautions réduiront les
risques de brûlures,
d'électrocution, d'incendie
et de blessures
personnelles. Faites très
attention quand vous
utilisez cette table de
cuisson vu que cet
appareil libère une chaleur
intense et peut augmenter
le risque d'accidents.
Quand des appareils de cuisine sont utilisés, il
faut suivre les précautions de base suivantes sur
la sécurité :
• Assurez-vous que l'installation et la mise en
service sont correctes. Suivez les instructions
d'installation fournies avec ce produit. Seul un
technicien qualifié peut réaliser l'installation et la mise
à la terre de la table de cuisson. N'utilisez pas l'appareil
s'il est endommagé.
• Demandez à l'installateur de vous montrer
l'endroit où se trouve le robinet d'arrêt du gaz,
pour savoir comment et où il faut couper l'arrivée de
gaz à la table de cuisson.
• Ne réparez ni remplacez aucune partie de
l'appareil à moins que ce manuel le recommande
spécifiquement. Tous les autres services doivent être
réalisés par un technicien qualifié.
• Il est interdit de laisser des enfants seuls ou
sans surveillance dans une zone où des appareils
sont utilisés. Ne permettez à personne de s'asseoir
Pour la sécurité
ou de rester debout sur une partie de l'appareil.
• Dès que des enfants sont en âge d utiliser
l' appareil
, il est de la responsabilité des parents ou
des représentants légaux d assurer qu ils sont
instruits des pratiques de sécurité par des
personnes qualifiées.
' '
24
'
enfants sur la table de cuisson ou derrière celleci. Si les enfants montent sur l'appareil pour prendre
ces objets, ils peuvent souffrir de graves blessures.
• N'utilisez pas de papier aluminium pour garnir
une partie du four.
• N'utilisez aucune partie de la table de cuisson
pour ranger des objets. Les matières inflammables
peuvent prendre feu et les objets en plastique peuvent
fondre ou prendre feu également.
• Eteignez les flammes à l'aide d'un couvercle aux
dimensions correctes, d'un lèchefrites ou d'un autre
plateau en métal puis essayez d'éteindre le brûleur
à gaz. Faites très attention et évitez de vous brûler.
Si les flammes ne sont pas éteintes immédiatement,
évacuez le lieu et appelez les pompiers.
• En connectant les appareils électriques près
de la table de cuisson, assurez-vous que les câbles
ne touchent aucune surface de cuisson chaude.
• Si la table de cuisson se trouve près d'une
fenêtre, assurez-vous que les rideaux ne peuvent
pas voler sur ou près des brûleurs de la table de
cuisson et provoquer un incendie.
• N'UTILISEZ PAS D'EAU POUR ÉTEINDRE DES
INCENDIES PROVOQUÉS PAR DE LA GRAISSE.
Ayez un extincteur dans un endroit visible là proximité
de la zone de cuisson.
Utiliser un extincteur seulement si:
- Vous savez que vous avez un extincteur Class
ABC et que vous savez déjà l utiliser.
- Le feu est petit et confiné dans la zone oú il a
commencé.
- Les pompiers ont été appelés.
- Vous pouvez combattre le feu dos à une sortie.
• Faites attention à ce que les vêtements, les
gants e cuisine ou d'autres matières inflammables
entrent en contact avec un brûleur ou une grille
de cet appareil ou qu'ils soient à proximité de
ceux-ci, tant qu'ils n'ont pas refroidi. Le tissu peut
prendre feu et provoquer des blessures personnelles.
• N'utilisez que des gants de cuisine secs.
gants de cuisine mouillés ou humides sur les surfaces
chaudes peuvent provoquer des brûlures de vapeur
N'utilisez pas de serviettes ni d'autres produits textiles
volumineux comme des gants de cuisine. Faites
attention à ce que les gants de cuisine ne touchent
pas les grilles chaudes des brûleurs.
• Par sécurité personnelle, portez des vêtements
appropriés. Vous ne devez pas porter de vêtements
flottants ni de manches qui dépassent quand vous
utilisez cet appareil. Certains textiles synthétiques
peuvent prendre feu facilement et ne doivent donc
pas être portés pour cuisiner.
Au cas oúú vos vêtements prendaient feu, mettezvous à terre et roulez-vous au sol immédiatment
pour étouffer les flammes.
'
Les
.
Page 25

• Cet appareil a été conçu pour la cuisson
d'aliments. Pour des raisons de sécurité, n'utilisez
jamais la table de cuisson pour chauffer une pièce
vu que l'appareil pourrait s'endommager.
• Quand vous utilisez la table de cuisson : NE
TOUCHEZ PAS LES GRILLES DES BRULEURS OU
LES ZONES ENVIRONNANTES. Elles sont
suffisamment chaudes pour provoquer des brûlures.
• Ne laissez jamais la table de cuisson sans
surveillance. Les débordements produiront de la
fumée et des déversements de graisse qui peuvent
prendre feu.
• Ne chauffez pas de conteneurs d'aliments
sans les ouvrir. Une accumulation de pression peut
provoquer l'explosion du conteneur.
• Quand vous cuisinez, réglez le contrôle du
brûleur de sorte que la flamme chaude ne touche
que la partie inférieure du récipient et faites
attention à ce qu'elle ne dépasse pas les bords.
• Faites attention à ce que les courants d'air
provoqués par les ouvertures de ventilation forcée
ou de ventilateurs ne soufflent pas la matière
inflammable vers les flammes ou poussent les
flammes de sorte à ce qu'elles dépassent des bords
du récipient.
• Utilisez toujours des ustensiles ayant la partie
inférieure plate et dont le fond est suffisamment
grand pour couvrir le brûleur. Si vous utilisez des
ustensiles ayant des dimensions inférieures, une
partie de la flamme peut être à découvert et incendier
les vêtements.
• Pour minimiser le risque de brûlures, d'ignition
des matières inflammables et de déversements non
voulus, placez les manches des ustensiles vers
l'intérieur, de sorte qu'ils ne dépassent pas des
zones de travail adjacentes, des zones de cuisson
ou du bord de la table de cuisson.
• Prenez le manche du récipient pour éviter que
l'ustensile se déplace en remuant ou en retournant
les aliments.
• LA GRAISSE EST INFLAMMABLE. Laissez
refroidir la graisse chaude avant d'essayer de la
manipuler. Evitez d'accumuler des dépôts de graisse.
Nettoyez la table de cuisson après chaque utilisation.
• Pour que les brûleurs s'allument et fonctionnent
correctement, maintenez propres les sorties. Il faut
nettoyer ces sorties quand il s'est produit un
déversement ou quand le brûleur ne s'allume pas,
même si les allumeurs électroniques font click.
Consultez la section sur l'entretien et la maintenance.
• Ne soulevez jamais une casserole en feu car
vous pourriez vous brûler.
• Nettoyez la table de cuisson avec précaution.
Evitez les risques de brûlures provoqués par la
vapeur ; n'utilisez pas d'éponge ni de chiffon mouillé
pour nettoyer la table de cuisson tant qu'elle est
chaude. Certains produits de nettoyage produisent
des vapeurs nocives s'ils sont appliqués sur une
surface chaude. Suivez les instructions fournies par
le fabricant du produit de nettoyage.
• Assurez-vous d'avoir éteint tous les contrôles
de la table de cuisson et qu'elle est froide avant
d'utiliser un produit de nettoyage en aérosol sur la
plaque de cuisson ou autour de celle-ci. Les produits
chimiques produisant l'action de pulvérisation, en
présence de chaleur, peuvent prendre feu ou
provoquer une corrosion des pièces métalliques.
•
Seuls des techniciens agréés peuvent effectuer
les services nécessaires. Les techniciens doivent
déconnecter l'alimentation électrique avant de réaliser
les services de maintenance de cette unité.
• Installez un détecteur de fumées dans la cuisine
ou à proximité.
• La garantie de cet appareil ne couvre pas les
dommages survenus suite au non respect de ces
instructions. Modifications techniques réservées.
• Avertissement concernant la California
Proposition 65: la combustion de gaz de cuisson
génère certains sous-produits qui figurent sur la
liste des substances considérées par l'Etat de
Californie comme susceptibles de provoquer des
cancers ou des lésions des organes reproducteurs.
La loi californienne impose aux entreprises d avertir
les clients du risque potentiel lié à l exposition à ces
substances. Pour minimiser cette exposition,
utilisez toujours l appareil conformément aux
instructions figurant dans ce manuel et assurez une
bonne ventilation de la pièce lorsque vous faites la
cuisine au gaz.
• Pendant la réalisation de processus de
maintenance, l'appareil doit être éloigné du réseau
de courant électrique. Retirez à cet effet la fiche du
réseau ou actionnez la protection correspondante.
Fermez l'alimentation de gaz.
Pour pouvoir garantir la sécurité électrique de
l'appareil, seuls des techniciens agréés pourront
réaliser les réparations correspondantes.
Droit de réaliser des modifications techniques réservé.
'
'
'
25
Page 26

Avant la première
mise en service
Retirez l'emballage de l'appareil et éliminez-le
conformément aux réglementations locales.
N'oubliez pas qu'il existe d'autres accessoires
en plus de l'emballage. Maintenez les éléments
de l'emballage et les revêtements en plastique
hors de portée des enfants.
Vérifiez l'état de l'appareil avant de l'installer
pour vous assurer qu'il ne s'est produit aucun
dommage pendant son transport.
Seul un personnel agréé pourra installer l'appareil
et le connecter avant la première mise en service
conformément aux réglementations en vigueur
des entreprises fournissant le gaz et à la
réglementation locale sur les travaux civils.
Tournez les manettes de commande sur avant
de connecter l'appareil au réseau électrique.
Le numéro de série de l'appareil se trouve sur
la note de contrôle jointe au présent manuel.
Pour des raisons de garantie, conservez cette
note avec les instructions d'utilisation et de
montage.
Lisez attentivement les instructions de montage
et d'utilisation avant de mettre en marche votre
appareil.
Nettoyez consciencieusement l'appareil et les
accessoires quand vous les utilisez pour la
première fois. Vous éliminerez ainsi les possibles
odeurs à neuf et les restes de poussière
(consultez le chapitre sur le nettoyage et
l'entretien)
pièce où il est placé. Assurez-vous que la pièce
incorpore les conditions de ventilation appropriées.
Maintenez ouverts les canaux de ventilation.
L'utilisation prolongée de l'appareil avec
plusieurs groupes ou avec tous les groupes de
cuisson peut demander une ventilation
supplémentaire, comme l'ouverture d'une
fenêtre ou d'une porte ou une extraction d'air
plus intense à l'aide d'une hotte aspirante.
Pour garantir une bonne combustion, la
pièce où se trouve l'appareil doit avoir un
volume minimal de 1240 cft (35 m3) et
posséder une porte donnant sur
ou une fenêtre pouvant s ouvrir.
Il est interdit d'utiliser simultanément des
rôtissoires, des poêles ou des pierres pour gril
chaudes sur plusieurs brûleurs vu que
l'accumulation de chaleur pourrait endommager
l'appareil.
Si des casseroles ayant de grandes dimensions
sont utilisées, il faudra maintenir une séparation
minimum d'environ 50 mm (2”) entre la
casserole et les matériaux inflammables
périphériques. Entre la manette de commande
ou le bandeau de commande et la casserole
ou la poêle, il faudra maintenir une séparation
minimum d'environ 50 mm (2”). Le récipient de
cuisson ne devra pas toucher le bandeau de
commande.
Si les casseroles ou les poêles sont retirées
momentanément, placez la table de cuisson
sur la graduation minimum. Ainsi sera réduit le
risque de brûlures en travaillant à côté de
flammes ouvertes ; de plus, la consommation
de gaz sera économisée ce qui favorisera
l'environnement.
'
l'extérieur
Pour son utilisation
L'utilisation d'un appareil de cuisson à gaz produit
la formation de chaleur et d'humidité dans la
S'il se produit un défaut d'alimentation, l'appareil
ne devra pas être utilisé.
Si l'appareil ne fonctionne pas correctement,
contactez le service technique.
BRULEUR Ø MINIMUM RECIPIENT Ø MAXIMUM RECIPIENT
Grand brûleur à triple flamme 9”
Rapide 9” 10”
Semi-rapide 6” 8”
Auxiliaire 5” 6”
26
Page 27

Présentation de votre nouvelle table
de cuisson
Brûleurs
7000 Btu/h
Grilles
Lèchefrite
Brûleurs
5500 Btu/h
Grand brûleur
à triple flamme
jusqu'à
15 300 Btu/h
Brûleurs
7000 Btu/h
Bandeau de
commande
Brûleurs
10 000 Btu/h
27
Page 28

Brûleurs à gaz
Fig.1
:
: Haut
: Bas
Fig.2
Thermocouple
Fig.3
Les deux couronnes (extérieure et intérieure)
brûlent à la puissance maximum.
La couronne extérieure brûle avec
une puissance minimale ;
la couronne intérieure, avec
une puissance maximale.
La couronne intérieure brûle
avec une puissance
maximale. la couronne
extérieure est éteinte.
La couronne intérieure brûle avec
une puissance minimale. la
couronne extérieure est éteinte.
Bougie
Chaque commande de mise en marche indique le brûleur qu’elle
contrôle. Fig. 1.
êArr t
Pour allumer un brûleur, appuyez sur la commande du brûleur
choisi et tournez-la vers la gauche, en la maintenant au maximum
quelques secondes jusqu’à ce que le brûleur s’allume, puis
relâchez-la, et réglez-la sur la position souhaitée. Répétez
Si les bougies sont sales, l'allumage sera défectueux, maintenez
votre plaque de cuisson toujours très propre. Ce nettoyage doit
être réalisé avec une petite brosse, en faisant attention à ce que
la bougie ne subisse pas d’impact violent.
Si votre plaque de cuisson ne possède aucun type d'allumage
automatique, approchez un type de flamme (briquet, allumettes,
etc.) du brûleur.
Votre table de cuisson peut disposer de thermocouples de
sécurité qui empêchent la sortie de gaz en cas d’extinction
accidentelle des brûleurs. fig. 2.
Pour allumer et activer ce système innovateur, procédez de la
même manière, mais en appuyant sur le bouton de commande
jusqu’à ce que se produise l’allumage, qu'apparaisse la flamme,
et qu’elle ne s’éteigne pas.
Si l’allumage ne se produit pas, répétez l’opération en maintenant
enfoncée la commande entre 1 et 5 secondes.
Pour éteindre, tournez la commande vers la droite jusqu’à la
position correcte . En réalisant cette opération, le système
d'allumage peut fonctionner à nouveau. Ceci est tout à fait normal.
Votre table de cuisson moderne et fonctionnelle dispose de robinets
progressifs qui permettent de trouver le réglage nécessaire entre
la flamme maximum et minimum.
Les brûleurs à triple flamme et le grand brûleur à triple flamme
sont très pratiques et commodes pour cuisiner avec des poêles
à paella, des Wok chinois (tous types de plats asiatiques) etc.
Si votre table de cuisson est dotée d’un grand brûleur à triple
flamme, elle disposera d'un robinet lui permettant de contrôler les
flammes intérieure et extérieure de façon indépendante. Ce
système révolutionnaire vous permet de sélectionner un vaste
éventail de puissances. Description de fonctionnement Fig. 3.
L'action directe de la flamme sur l é mail peut produire une flamme
de couleur orangee sur le Grand brû leur à triple flamme
L'utilisation de l'appareil à gaz produit de la chaleur et de l'humidité
dans la pièce où il est installé. Vous devez vous assurer que la
cuisine possède une bonne ventilation, que les orifices de ventilation
naturelle sont ouverts ou installer un dispositif de ventilation
mécanique (hotte aspirante).
L’utilisation continue de votre appareil peut requérir une ventilation
supplémentaire, par exemple d’ouvrir une fenêtre (sans provoquer
de forts courants d’air) ou d'augmenter la puissance de la ventilation
mécanique si elle existe.
l'opération s'il ne s'allume pas.
ATTENTION: Tous les allumeurs font une ètincelle lorsqu un
'
seul brûleur est mis en circuit. NE pas toucher aux brûleurs
losque la surface est utilisèe.
'
28
Page 29

Conseils
pour cuisiner
Très fort Fort Moyen Lent
Grand
brûleur à
triple flamme
Rapide
Semi-rapide
Auxiliaire
Bouillir, cuire, rôtir, dorer,
paellas et cuisine asiatique
(Wok).
Escalope, steak, omelette et
fritures.
Pommes de terre vapeur,
légumes frais et pâtes.
Cuire : ragoûts, riz au lait et
caramel.
Réchauffer et maintenir au chaud :
plats préparés et cuisinés.
Décongélation.
Riz, béchamel et
potages.
Réchauffer et maintenir au chaud :
plats cuisinés et ragoûts délicats.
Décongeler et
cuire à feu doux :
légumes secs,
fruits et produits
congelés.
Cuisson à la
vapeur : poissons
et légumes.
Faire fondre :
beurre, chocolat
et gélatine.
Ustensiles de cuisine appropriés
Faire Correspondre lae Diamètre á la Forme de la Flamme.
- La flamme doit être même grandeur que le fond
de la casserole ou plus petite. Ne pas utiliser de
petites casseroles si les réglages de la flamme sont
en position élevée, car la flamme peut lécher les
côtés de la casseroles.
Utilisez des Casseroles Équilibrées
- Les casseroles doivent être de niveau sur la
grille sans vaciller.
- Centrez la casserole sur le brûleur.
Utilisez un Couvercle qui s Ajuste Correctement
- Un couvercle bien ajusté réduit le temps de
cuisson.
’
29
Page 30
Avertissements d'utilisation en ce qui
concerne la cuisson
NON
N’utilisez pas de petits récipients
sur les grands brûleurs. La
flamme ne doit pas toucher les
côtés du récipient.
Ne cuisinez pas sans couvercle
ou si ce dernier se déplace car
une partie de l'énergie est perdue.
N'utilisez pas de récipients ayant
des fonds irréguliers car ils
rallongent le temps de cuisson et
augmentent la consommation
d'énergie.
Ne placez pas le récipient
décentré sur le brûleur car il
pourrait se renverser.
N’utilisez pas de récipients de
grand diamètre sur les brûleurs
proches des boutons. Une fois
centrés sur le brûleur, ces
récipients peuvent les toucher ou
s’en approcher tellement que la
température s’élève dans cette
zone et pourrait provoquer des
dommages.
Ne placez pas les récipients
directement sur le brûleur
OUI
Utilisez toujours des récipients
appropriés à chaque brûleur, vous
éviterez ainsi de consommer
excessivement du gaz et de
tacher les récipients.
Mettez toujours le couvercle.
Utilisez seulement des récipients,
des poêles et des casseroles
avec un fond plat et épais.
Placez le récipient bien centré
sur le brûleur.
Placez le récipient sur la grille.
Assurez-vous que les grilles et
les couvercles des brûleurs
sont bien placés avant de les
utiliser.
30
Ne posez pas de poids excessifs,
ne cognez pas la table de cuisson
avec des objets lourds.
N’utilisez pas deux brûleurs ou
sources de chaleur pour un seul
récipient.
Evitez d'utiliser des grills de
rôtissage, casseroles en terre,
etc., de manière prolongée à
puissance maximum.
Manipulez soigneusement les
récipients sur la table de cuisson.
Page 31
Normes d'utilisation pour la plaque
en acier : Nettoyage et conservation
NON OUI
N’utilisez JAMAIS de
produits abrasifs, d’objets
tranchants, de lavettes en
acier, de couteaux etc., pour
enlever des restes de repas
durcis sur la plaque de
cuisson, sur les grilles, sur
les brûleurs ou sur les
plaques électriques.
Si votre plaque de cuisson
possède un panneau en
verre, n’utilisez pas de couteau, de racleur ou d'objet
similaire pour nettoyer
l’union avec le métal.
N’utilisez PAS de machines
nettoyantes à vapeur sur la
table de cuisson car ils
pourraient l’endommager.
Ne laissez PAS de liquides
acides (jus de citron,
vinaigre, etc.) sur la table de
cuisson.
Quand l’appareil a refroidi,
utilisez une éponge, de
l’eau et du savon.
Retirez immédiatement tout
le liquide ayant débordé,
vous économiserez ainsi des
efforts inutiles.
Pour maintenir les brûleurs
et les grilles propres, ils
doivent régulièrement être
nettoyés en les
submergeant dans de l’eau
savonneuse et en les frottant
avec une brosse non
métallique pour nettoyer
parfaitement les orifices et
les rainures et obtenir une
flamme correcte. Séchez les
couvercles des brûleurs et
les grilles s’ils ont été
mouillés.
Après le nettoyage et le
séchage des brûleurs, veillez
à ce que les couvercles
soient bien placés sur le
diffuseur de la flamme du
brûleur.
Si votre appareil dispose de
brûleurs d’une seule pièce
(Monoblock), veillez à ce
qu’ils soient parfaitement
secs avant leur prochaine
utilisation.
A cause des hautes température que doivent supporter le couvercle de l'anneau du brûleur à
triple flamme et les zones en acier inoxydables comme les lèchefrites, le contour des brûleurs,
etc., avec le temps ils perdent leur couleur ce qui est un processus NORMAL. Nettoyez-les
après chaque utilisation en utilisant un produit approprié pour l'acier inoxydable.
Après avoir lavé les grilles, séchez-les complètement avant de cuisiner à nouveau avec elles.
La présence de gouttes d’eau ou de zones humides au début de la cuisson peut provoquer
d’éventuels points de détérioration de l’émail.
Si les grilles de votre table de cuisson disposent de chevilles en caoutchouc, faites attention
en les nettoyant car elles pourraient se détacher et laisser la grille sans protection et rayer la
table de cuisson.
Il ne faut pas utiliser les produits de nettoyage pour acier inoxydable dans la zone environnant
les commandes. Les indications (sérigraphie) pourraient être effacées.
31
Page 32

Situations anormales
Il n'est pas toujours nécessaire d'appeler le service après-vente.
Très souvent, vous pouvez les résoudre vous-mêmes. Le tableau
suivant contient quelques conseils.
Remarque importante :
Seul un personnel agréé par notre service après-vente peut réaliser
les travaux nécessaires sur le système de gaz et celui électrique.
Que se passe-t-il... Cause probable Solution
...si le fonctionnement
électrique général est
endommagé ?
...si l’allumage électrique ne
fonctionne pas ?
...si la flamme des brûleurs
n’est pas uniforme ?
...si le flux de gaz ne paraît
pas normal ou qu’aucun gaz
ne sort ?
-Fusible défectueux.
-L’automatique ou un différentiel a
pu être déclenché.
-Il peut y avoir des résidus d’aliments
ou de nettoyant entre les bougies et
les brûleurs.
-Les brûleurs sont mouillés.
-Les couvercles du brûleur sont mal
placés.
-Les différentes parties du brûleur
ont été mal posées.
-Les rainures de sortie de gaz des
brûleurs sont sales.
-Le brûleur n’est peut-être pas
parfaitement sec.
- Le passage du gaz est fermé à
cause des robinets intermédiaires.
-Si le gaz provient d’une bouteille,
celle-ci peut être vide.
- Contrôler le fusible dans le
boîtier général des fusibles et le
changer s’il est endommagé.
- Vérifier sur le boîtier général
d'entrée si l'automatique, ou un
différentiel, ne s'est pas déclenché.
- L’espace entre la bougie et le
brûleur doit être soigneusement
nettoyé.
-Séchez soigneusement les
couvercles du brûleur.
- Vérifiez que les couvercles ont été
correctement placés.
- Placez les différentes pièces de
la manière appropriée.
- Nettoyez les rainures de la sortie
de gaz des brûleurs
-Séchez très soigneusement (faites
particulièrement attention aux
brûleurs d’une seule pièce).
-Ouvrez les éventuels robinets
intermédiaires.
-Remplacez la bouteille par une
autre remplie.
...s'il y a une odeur à gaz
dans la cuisine ?
...si les sécurités des
différents brûleurs ne
fonctionnent pas ?
32
- Un robinet est ouvert.
-Possible fuite au raccord de la
bouteille.
- La commande n'a pas été enfoncée
le temps nécessaire.
-Les rainures de sortie de gaz des
brûleurs sont sales.
- Vérifiez ce fait.
- Vérifiez que le raccord est correct.
- Une fois le brûleur allumé, appuyez
sur le bouton pendant quelques
secondes supplémentaires.
- Nettoyez les rainures de la sortie
du gaz des brûleurs.
Page 33
Instructions d'installation
INFORMATION IMPORTANTE
Suivez strictement les indications générales de
sécurité ainsi que les informations importantes.
Avant d'utiliser l'appareil, un technicien agréé doit
l'installer et le connecter. De plus, ce technicien doit
s'assurer que les connexions d'alimentation
d'électricité et de gaz fonctionnent correctement.
Le technicien réalisant l'installation est responsable
du fonctionnement parfait de l'appareil dans la pièce
où il est installé.
Il doit montrer à l'utilisateur la manière de couper
l'électricité et le gaz si cela est nécessaire.
PRECAUTION : Avant de
connecter l'appareil, vérifiez
si les conditions de
connexion locales, ainsi que
le type de gaz, la pression
de gaz et la tension du
réseau électrique coïncident
avec les réglages de
l'appareil.
A cet effet, il est nécessaire que les gaz de la
combustion soient évacués vers l'extérieur.
Révisez les dimensions de la table de cuisson ainsi
que les dimensions de l'ouverture à réaliser sur le
meuble.
Les panneaux se trouvant sur la surface de travail,
à proximité de la table de cuisson électrique, doivent
être faits dans un matériau non inflammable. Autant
les revêtements stratifiés que la colle qui les fixe
doivent être résistants à la chaleur pour éviter ainsi
de possibles détériorations.
Les câbles électriques ne doivent pas se trouver au
contact des zones de chaleur.
Le câble d'alimentation doit être fixé au meuble pour
qu'il ne touche pas des parties chaudes de la cuisinière
ou de la table de cuisson.
Les appareils ayant un composant électrique doivent
être obligatoirement connectés à la terre.
L'installation de cet appareil doit être réalisée
conformément aux réglementations en vigueur et
uniquement à un endroit bien ventilé.
Lisez les instructions avant de procéder à son
installation et à son utilisation.
Pendant tout le processus d'installation, manipulez
l'appareil avec précaution. Ne cognez pas l'appareil.
Si les dispositions sur ce sujet ne sont pas respectees,
les responsabilites seront de l’installateur, le fabricant
etant entierement degage de celles-ci.
Toutes les opérations concernant l'installation, le
réglage et l'adaptation à un de gaz propane doivent
être réalisées par un personnel agréé de et respecter
les réglementations en vigueur et les dispositions
des compagnies de gaz.
Avant de réaliser une action, il faut couper
l'alimentation de gaz et celle électrique de
Avant de connecter l'appareil à l'installation, il faut
vérifier qu'il est adapté au type de gaz qui l'alimentera.
Nos tables de cuisson électriques sont préparées en
usine pour fonctionner avec le type de gaz indiqué
sur la plaque signalétique.
Il est indispensable que le lieu où est installé l'appareil
dispose de la ventilation réglementaire.
l'appareil.
Installation de la table
de cuisson électrique dans
le meuble :
Mesures de l'encastrement
1 - Écarts minimum (mm). Effectuez une découpe
des dimensions nécessaires sur la table de travail.
Fig. 1 a-b.
Respectez les instructions d’installation des hottes.
2 - Les fibres en bois utilisées pour la confection des
plans de travail, en entrant au contact de l'humidité,
gonflent assez rapidement. C'est pourquoi il est
convenable de vernir les surfaces de découpe, afin
de les protéger de la vapeur ou de
qui pourrait se déposer sous la table de travail du
meuble de cuisine.
'
l eau condensée
33
Page 34

INFORMATION IMPORTANTE
Conditions exigées pour l'armoire
Fig. 1a
E
C
D
A
Les agrafes et le joint d'étanchéité (bord inférieur de
la table de cuisson) sont placés d'usine. Ils ne doivent
être jamais retirés. Le joint garantit l'imperméabilisation
de toute la surface de travail et évite les infiltrations.
Si la cuisinière n'est pas montée sous la table de
cuisson, il est recommandé de placer un séparateur
empêchant l'accès à la partie inférieure de la table
de cuisson.
F
B
Pour l’installation sur un four, vérifiez les dimensions
selon votre manuel d’assemblage.
3 - Pressez en même temps les extrémités de sorte
que la table de cuisson s'appuie sur tout son périmètre.
Fig. 2 a
Fig. 2a
A- Minimum 6” (152 mm)
B- Minimum 6” (152 mm)
C- Minimum 30” (762 mm)
D- Minimum 2” (51 mm)
E- Minimum 36” (915 mm)
F- Minimum 18” (458 mm)
Maximum de profondeur pour les armoires se trouvant
au-dessus de la plaque de cuisson: 13 (330 mm.)
"
Installation de l'appareil
1
min. 7
”
/
4
13
/
min. 2
”
16
1
/
19
”
4
1
/
33
”
2
min. 6”
Fig. 1b
1
/
33
”
2
3
1
”
/
4
1
/
1
”
16
1
1
/
”
16
1
/
19
”
4
Centrez la table de cuisson dans sa cavité aveugle
d'encastrement dans le meuble.
Tournez les 6 agrafes de fixation Fig. 2 b. puis vissezles à fond sur le meuble. Ne les retirez jamais.
Fig. 2b
Toutes les opérations concernant l'installation, le
réglage et l'adaptation à un autre type de gaz doivent
être réalisées par un personnel agréé de notre Service
Technique et respecter les réglementations en vigueur
et les dispositions des compagnies de gaz.
4 - Avant de connecter l'appareil, vérifiez que les
conditions locales de connexion, ainsi que le type et
la pression de gaz, coïncident avec les réglages de
l'appareil.
Assurez-vous que l'alimentation de gaz est coupée
au moyen du robinet d'arrêt avant de connecter
l'appareil Fig. 3.
La connexion du gaz doit se trouver à un endroit
permettant d'accéder au robinet d'arrêt manuel et, si
nécessaire, visible après avoir ouvert la porte du
meuble.
34
Page 35

Connectez le régulateur Fig. 3 (2) au collecteur Fig.
3 (1) de la manière indiquée par la flèche marquée
sur le régulateur, en apposant du Téflon autour du
filet.
Connectez le régulateur de pression au réseau de
gaz en utilisant un connecteur flexible de la ligne de
gaz entre la soupape de fermeture et le régulateur
de pression. Fig. 3
Fig. 3
INFORMATION IMPORTANTE
Il faut vérifier sur la plaque signalétique : le voltage
et la puissance totale. L'appareil devra être raccordé
à la terre.
Il faut vous assurer que le raccordement a été effectué
conformément aux dispositions légales du pays.
Respectez toutes les dispositions de l'entreprise
locale fournissant l'électricité.
La connexion électrique (CA 110-127 V) est établie
au moyen d'un câble de connexion avec une prise
de contact de mise à la terre connectée à une prise
avec mise à la terre qui doit être également accessible
après l'installation de la table de cuisson à gaz.
1
2
Vérifiez qu'une poche contenant l'accessoire 2
est fournie avec l'appareil. Si cette pièce n'est
pas fournie, appelez notre Service Technique.
Pour réaliser la connexion de gaz, utilisez les
pièces que nous vous fournissons.
Serrer le détendeur à un couple de 20 à 30 N.m
(15 à 22 pi-lb). Ne jamais serrer à plus de 35 N.m
(26 pi-lb). Toujours utiliser une pâte à filetage
résistant à l action du gaz GPL sur les raccords.
La connexion à un tube flexible métallique. Dans ce
cas, il faut éviter que ce tuyau touche des parties
mobiles de l'unité d'encastrement (par exemple un
tiroir) et le passage à travers des espaces pouvant
s'obstruer.
Le fabricant décline toute responsabilité en cas de
fuite, ainsi que des connexions effectuées par
l’installateur.
La vérification de fuites de l appareil doit être
faite selon les instructions du fabricant.
’
'
L etanchété de toutes les connexions gaz doit
être testée en utilisant une solution liquide appropriée.
Ne jamais utiliser une flamme pour tester l étanchéité.
'
Attention: cet appareil
est
équipé d'une fiche
à trois
de terre,
protection
contre les
électrique,
brancher
une prise
mise à la
couper ou
broches dont une
afin d assurer
'
la
des personnes
risques de choc
il faut donc la
directement dans
correctement
terre: Ne pas
enlever la broche
de terre de cette fiche.
Le câble de connexion au réseau électrique doit
correspondre, au moins, au type JT 3x18
AWG/UL/CSA ou être résistant à la chaleur (105º C
minimum).
Connexion électrique
Avant de connecter le câble d'alimentation électrique
à la prise de courant sur le mur, assurez-vous que
la soupape de fermeture du gaz et tous les contrôles
des brûleurs sont sur la position de déconnexion.
Le câble de connexion au réseau électrique doit
être acheté et connecté par un technicien agréé.
Ne manipulez pas l'intérieur de l'appareil. Le cas
échéant, appelez notre service après-vente.
35
Page 36

INFORMATION IMPORTANTE
Changement du type de gaz :
De gaz de ville à propane
Toutes opérations relatives à l installation,
’
l aunstement et l adaptation au gaz liquide sont à
’
effectuer par du personnel agréé par notre service
aprés-vente. De plus , il est nécessaire de respecter
la réglementation en vigueur, ainsi que les
s pécifications des distributeurs gaz.
IMPORTANT: Avant toute action, coupez l’alimentation
de gaz et électrique de l’appareil.
Avant de connecter l'appareil à l'installation, il faut
vérifier qu'il s'adapte au type de gaz qui l'alimentera.
Nos tables de cuisson électriques sont préparées en
usine pour fonctionner avec le type de gaz indiqué
sur la plaque signalétique.
La bouteille gaz liquide doit être équipée avec son
propre régulateur de haute pression en plus du régulateur de pression fourni avec cet appareil. La pression d alimentation maximale ne doit pas dépasser
14.0 pouces de colonne d eau (34.9 mbar). Cette
table de cuisson peut être convertie en gaz liquide.
Pression d alimentation
Gaz naturel - colonne d
Gaz propane - colonne d eau de 11 po (27,4 mbar) minimum.
eau
'
'
À cet effet, il faut réaliser les opérat ons sui antes :
A) Changement des injecteurs des brûleurs de la
table de cuisson. (Consultez le tableau 1).
TABLEAU 1
Caractéristiques des brûleurs
Le brûleur doit être utilisé avec les
gaz indiqués sur la plaque
signalétique.
Pression d’utilisation
Bruleur
Rapide
Bruleur
SemiRapide
Bruleur
Auxiliaire
Grand
Bruleur
triple flamme
Marqueur d'injecteur
Consommation
Nominale
(Hs)
Marqueur d'injecteur
Consommation
Nominale
(Hs)
Marqueur d'injecteur
Consommation
Nominale
(Hs)
Marqueur d'injecteur
Consommation
Nominale
(Hs)
’
de 7 po (17,5 mbar) minimum.
TYPE
DE GAZ
BTU/hr
BTU/hr
BTU/hr
BTU/hr
i
v
DE VILLE PROPANE
6” 10”
133 95
10000 10000
110 77
7000 7000
98
5500 5500
106/81 72/55
15300 15300
69
Fig. 4
7 mm.
Fig. 5
1 - Retirez les grilles, les clapets et le corps de brûleur.
2 - Changez les injecteurs en utilisant une clé fermée
de 7mm et assurez-vous de les serrer à fond pour
garantir l'étanchéité. Fig. 4 .
Il ne faut réaliser aucun réglage de l'air primaire de
ces brûleurs.
B) Réglage de la consommation réduite des robinets
des brûleurs de la table de cuisson.
1 - Placez les robinets sur la position minimum.
2 - Retirez les commandes des robinets. Fig. 5.
3 - Démontez les anneaux anti-renversement de
liquides.
36
Page 37
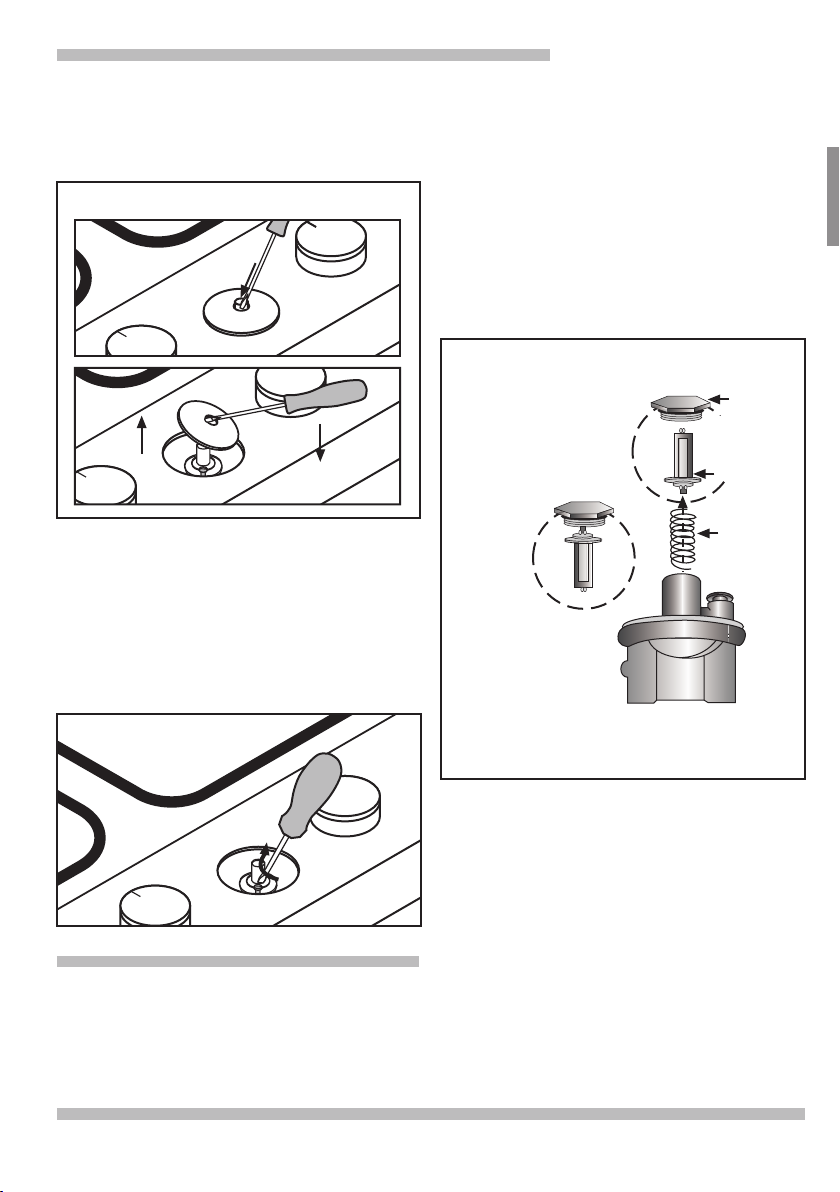
INFORMATION IMPORTANTE
• Votre plaque de cuisson a des anneaux extérieurs
en plastique, démontez-les avec un tournevis, en
faisant levier à travers leur orifice central. Fig. 6 .
Fig. 6
• Quand l’orifice du pas de commandes est libéré
des anneaux, vous trouverez un anneau intérieur en
caoutchouc flexible ; il suffira d’appuyer avec la pointe
du tournevis pour libérer le pas vers la vis de réglage
du robinet. Ne démontez jamais l'anneau intérieur.
4 - Réglage de la vis by-pass.
Les vis By-pass doivent être serrées à fond. Fig. 7.
tournez-le en l'enfonçant fermement pour pouvoir
voir clairement les lettres “LP” sur le bouton, au lieu
de “NAT”.
Remplacez l'ensemble couvercle et bouton de la
partie supérieure du régulateur, en le scellant bien.
Assurez-vous que le ressort est à sa place. Ne serrez
pas trop fort.
NOTE : La flèche sur la partie arrière du régulateur
doit être tournée vers le flux de gaz sur la table de
cuisson. Fig. 8.
Fig. 8
Couvercle
Hex
Position
de la broche
pour Gaz
NAT
Position de la broche
de ville
NAT
Pin
pour Propane
Couvercle Hex
NAT
Hex
Cap
Broche
LP
Ressort
Fig. 7
Transformer le régulateur de
pression : de 6” W.C à 10” W.C.
Retirez le couvercle hexagonal de la partie supérieure
du régulateur à l'aide d'une clé réglable.
Retirez le bouton en plastique du couvercle puis
VUE DU RÉGULATEUR
DE PRESSION
Dans tous les cas, vérifiez qu’après avoir effectué la
transformation de gaz, la flamme des brûleurs est
correcte, de sorte qu’en passant de la position
maximale à la minimale il n’y ait pas d’extinction ni
de recul de la flamme.
5 - Il est important que tous les anneaux soient placés
pour pouvoir assurer l'étanchéité électrique, contre
les versements de liquides de la table de cuisson.
6 - Replacez les commandes sur les robinets.
Ne démontez jamais l'axe du robinet. En cas
d'incidence, changez complètement le robinet.
C) Placez l’étiquette qui indique le gaz auquel a été
adapté l’appareil sur l'étiquette de Gaz de Ville déjà
existante.
37
Page 38

INFORMATION IMPORTANTE
Si vous devez appeler notre Service Technique,
veuillez indiquer :
E - NR FD
Ces données se trouvent sur la plaque signalétique
située dans la partie inférieure de votre table de
cuisson.
GARANTIE
DES PLAQUES DE CUISSON
CE QUI EST COUVERT
Garantie complète d'un an
Pendant un an à partir de la date d'installation ou
la date d'occupation pour une nouvelle résidence
jamais occupée, toute pièce défectueuse, dans des
conditions d utilisation normale, sera réparée ou
remplacée, sans frais. Conserver les factures ou
les preuves de la date d installation ou de
possesion.
Bosch poyera pour toutes les réparations, la
main-d'oeuvre et le remplacement des pièces à
cause de défaut de matériau ou de fabrication. Le
service doit être assuré par un centre de service
autorisé durant les heures d ouverture normales.
Pour connaître le centre de service le plus prés,
téléphoner au ( 800) 944-2904.
CE QUI N EST PAS COUVERT
1 - Le service par une agence non autorisées. Les
dommages ou les réparations à cause d'un service
effectué par une agence non autorisée ou
'
l utilisation de piéces non approuvées.
2 - La visite de service pour:
• Enseigner le fonctionnement de l'appareil.
• Corriger l'installation. Le propriétaire est responsable de fournir le câblage électrique et/ou les
dispositifs de connexion.
• Remise en circuit du disjoncteur ou remplacement
'
d un fusible.
3 - Dommages résultants d un accident, d une
modification, d un mauvais fonctionnement, d abus,
d une installation inadéquate ou d une installation
'
non conforme aux codes électriques ou aux codes
de plomberie ou d un entreposage inapproprié.
4 - Réparations autres qu une utilisation domestique
5 - Toute frais de service ou de main-d'oeuvre
durant la garantie limitée.
6 - Les frais de déplacement et frais associés
encourus lorsque le produit est installé dans un
endroit dont l accès est limité ou restreint (c est-àdire, par avion, frais de traversier, régions isolées
géographiquement).
'
'
'
'
' '
' '
'
'
'
'
'
APPLICATION DE LA GARANTIE
Cette garantie s applique à une utilisation domestique
normale, ceci ne couvre pas l utilisation de type
commercial.
Cette garantie couvre les produits achetés et gardés
dans les 50 états des États-Unis, du district de
Colombia et au Canada. Cette garantie s applique
même s il y a un déménagement pendant la période
de garantie. Si l appareil est vendu par l acheteur
'
d origine pendant la période de garantie, le nouveau
propriétaire sera protégé jusqu à l expiration de la
date d'achat du premier acheteur.
BOSCH N ASSUMEAUCUNE
'
'
'
'
'
'''
'
RESPONSABILITÉ POUR LES DOMMAGES
ACCIDENTELS ET ACCESSOIRES.
Certains états ne permettent pas l'exclusion ou les
limitations des dommages accessoires ou directs,
par conséquent, les limitations et exclusions
ci-dessus peuvent ne pas s appliquer. Cette
garantie donne des droits spécifiques et il peut y
avoir d'autres qui varient
en province.
'
d'etat en état et de province
INFORMATIONS DE DONNÉES
'
A des fins de références, l information de la plaque
signalétique est affichée à la dernière page. Pour
'
l emplacement de la plaque signalétique sur le
produit. Conserver la facture pour la validation
de la garantie.
'
POUR DES REPARATIONS OU SERVICE
AGREE
Notre objectif est votre satisfaction. Si vous n'êtes
pas satisfait du service reçu, veuillez appeler le 800944-2904 ou écrivez-nous à :
BSH Home Appliances Corp.
Customer Support
5551 McFadden Ave.,
Huntington Beach, CA 92649
Sur toutes les communications vous devez inclure
le numéro du modèle, le numéro de série et la date
d'achat/installation d'origine. (Consultez la quatrième
page de garde).
38
Page 39

Estimado cliente:
Le damos las gracias y le felicitamos por su elección.
Este práctico aparato, moderno y funcional se ha fabricado con
materiales de primera calidad. Dichos materiales se han sometido
a un estricto control de calidad durante todo el proceso de fabricación
y se han ensayado meticulosamente para que este aparato cumpla
con todas sus exigencias con el fin de conseguir una perfecta
cocción.
Por consiguiente, le rogamos que lea y respete estas sencillas
instrucciones para poder garantizar unos resultados inmejorables
desde su primera utilización. Este manual contiene información
importante, no sólo para el uso del aparato, sino también para su
seguridad y mantenimiento.
Durante su transporte, nuestros productos cuentan con un embalaje
de protección eficaz. Respecto al mismo nos limitamos a lo
absolutamente imprescindible, todo el embalaje es perfectamente
reciclable. Usted, al igual que nosotros, puede contribuir en la
conservación del entorno. Por lo tanto, le recomendamos que
lo deposite en el contenedor o sitio más cercano a su domicilio
dispuesto para este fin.
El aceite desechado no se debe botar por el fregadero ya que
tendría elevadas repercusiones en el medio ambiente. Deposítelo
en un recipiente cerrado y entréguelo en un punto de recogida o,
en su defecto, deposítelo en la basura (acabará en un vertedero
controlado, no siendo la mejor solución, pero de esta manera
evitamos la contaminación de las aguas). Tanto usted como sus
hijos lo agradecerán.
Antes de deshacerse de un aparato desechado, inutilícelo.
A continuación, entréguelo a un centro de recogida de materias
reciclables.
En su administración local, le facilitarán la información necesaria
acerca del centro de recogida más cercano.
39
Page 40

PARA SU SEGURIDAD 41
Información importante para la instalación y uso 42
Instrucciones importantes 43
Indicaciones de seguridad 43
Antes de la primera puesta en servicio 45
Indicaciones de uso 45
Así se presenta su nueva estufa 46
Quemadores de gas 47
Consejos de cocción 48
Utensilios de cocina apropiados 48
Advertencias de uso respecto a la cocción 49
Normas de uso para el acero: limpieza y conservación 50
Situaciones anómalas 51
Instrucciones de instalación 52
Instalación de la estufa en el mueble:
medidas de empotramiento 52
Conexión eléctrica 54
Cambio de tipo de gas: de gas natural a propano 55
Conversión del regulador de presión: de 6” W.C. a 10” W.C. 56
40
Condiciones de garantía 57
Page 41

Para su seguridad
ADVERTENCIA: Si no se sigue exactamente
la información de este manual, puede producirse
un incendio o explosión, causando daños
materiales, personales o incluso la muerte.
No almacene ni utilice gasolina ni otros vapores o
líquidos inflamables en la proximidad de éste o
de cualquier otro aparato.
QUÉ HACER SI SE NOTA OLOR A GAS:
No intente encender ningún aparato.
No toque ningún interruptor eléctrico,
no utilice ningún teléfono de su
edificio.
Llame inmediatamente a su
compañía de gas desde un teléfono
próximo. Siga las instrucciones
de la Cía. de gas.
Si no puede ponerse en contacto
con su Cía. del gas, llame a
los bomberos.
La instalación y el servicio deben ser realizadas
por un instalador cualificado, una empresa de
servicio o la Cía. del gas.
POR FAVOR LEA LAS INSTRUCCIONES ANTES DE CONTINUAR
IMPORTANTE: Guarde estas instrucciones para el uso del inspector electricista local.
INSTALADOR: Deje estas instrucciones junto con la unidad para el propietario.
PROPIETARIO: Guarde estas instrucciones para el futuro.
41
Page 42

Información importante para
la instalación y uso
1- No permita que las llamas se extiendan más
allá del borde del utensilio de cocina. Esta
instrucción se basa en consideraciones de
seguridad.
2- No olvide que el aparato se calienta cuando
se utiliza. El sentido común es importante. La
extinción de las llamas no significa que las
piezas no puedan estar todavía calientes.
3- Este aparato no se debe usar para fines de
calefacción. Esta instrucción se basa en
consideraciones de seguridad.
4- Asegúrese de desconectar la alimentación
eléctrica antes de desmontar el aparato.
5- Mantenga el área del aparato limpia y libre
de materiales combustibles, tales como
gasolina, otros vapores y líquidos inflamables.
6- No obstruya el flujo de aire de combustión
y de ventilación.
7- Se debe mantener una distancia mínima de
762 mm (30”) entre la estufa de gas y los
gabinetes colocados en la parte superior
8- El regulador de presión de gas suministrado
con el aparato debe instalarse en línea con la
tubería de gas.
9- El aparato y la válvula de cierre individual
deben desconectarse del sistema de tuberías
de suministro de gas cuando se realice una
prueba de presión del sistema con presiones
de prueba que superen 3,5 kPa (1/2 psig). El
aparato debe aislarse del sistema de tuberías
de suministro de gas cerrando la válvula de
cierre manual individual cuando se realice una
prueba de presión del sistema de tuberías de
suministro de gas con presiones de prueba
iguales o inferiores a 3,5 kPa (1/2 psig)
10- Importante: Cuando utilice un recipiente
muy grande, deje un espacio mínimo de
50 mm (2”) para evitar que se dañe la superficie
de la cubierta de la cocina de madera, plástico
u otros materiales no resistentes al calor. No
deje nunca aceite o grasa caliente desatendidos.
11-
No deje grasa o aceites desatendidos.
.
12- Para evitar poner en peligro la seguridad
eléctrica del aparato, está prohibido utilizar
aparatos de limpieza por chorro de vapor a alta
presión.
La placa de características se encuentra en la
parte inferior del aparato.
Este aparato no puede utilizarse en
gabinetes móviles, vehículos recreativos o
caravanas.
Este aparato ha sido ensayado conforme a la
norma ANSI/CSA Z21.1 para aparatos
electrodomésticos de cocción (EEUU) y
CAN.1-M81 (Canada)
Solamente si la instalación se va a efectuar
en EE.UU.:
Esta instalación debe cumplir con las leyes
locales o, en su ausencia, con el National Fuel
Gas Code (Ley nacional de gas combustible),
ANSI Z 223.1/NFPA 54, edición actual.
Si se utiliza una fuente eléctrica externa, el
aparato tiene que conectarse a tierra
eléctricamente de conformidad con las leyes
locales, o en su ausencia, de conformidad con
el National Electrical Code (Ley eléctrica
nacional) ANSI/NFPA 70, edición actual.
Para Instalaciones en Masachussetts:
1. La instalació n debe ser realizada por un
contratista cualificado o autorizado, fontanero
o instalador de gas cualificado o autorizado
por el estado, provincia o regió n donde este
aparato sea instalado.
2. La vá lvula de cierre debe ser una llave de
gas en " T" .
3. El conector flexible de gas no debe ser má s
largo de 92 cm.
Solamente si la instalación se va a efectuar
en Canadá:
La instalación debe cumplir con las leyes
CAN 1-B149.1 y .2- Leyes de instalación de
aparatos de combustión a gas y/o leyes locales.
Este aparato, cuando esté instalado, debe
ponerse a tierra eléctricamente de conformidad
con las leyes locales o, en su ausencia, de
conformidad con la norma CSA Standard C22.1Ley Eléctrica de Canadá, Parte I actual.
42
Page 43

Instrucciones importantes
Indicaciones de seguridad
Lea atentamente todas las instrucciones de este
Manual de funcionamiento y mantenimiento antes
de usar su nueva estufa. Como usuario, Ud. es
responsable del mantenimiento así como del uso
correcto de este aparato en su hogar.
ADVERTENCIA: Estas
precauciones reducirán
el riesgo de quemaduras,
electrocución, incendio y
lesiones personales. Actúe
con la máxima precaución
cuando utilice esta estufa,
ya que este aparato proporciona un calor intenso
y puede aumentar el riesgo
de accidentes.
Cuando se utilicen aparatos de cocina, deben
seguirse las siguientes precauciones básicas de
seguridad:
• Garantice una instalación y servicio correctos.
Siga las instrucciones de instalación proporcionadas
junto con este producto. Sólo un técnico cualificado
debe llevar a cabo la instalación y conexión a tierra
de la estufa. No utilice el aparato si está dañado.
• Haga que el instalador le muestre el lugar en
el que se encuentra situada la llave de paso del
suministro de gas, para saber cómo y dónde se
debe cortar el paso de gas a la estufa.
• No repare ni sustituya ninguna parte del
aparato a menos que se recomiende específicamente
en este manual. Todo el servicio restante tiene que
ser realizado por un técnico cualificado.
• Se prohíbe que los niños permanezcan solos
o sin la supervisión de un adulto en un área en
la que se están usando aparatos. No se debe
permitir nunca que nadie se siente o permanezca de
pie sobre ninguna parte del aparato.
• Cuando los niños se hacen mayores para utilizar
este aparato, es responsabilidad legal de los padres
o tutores legales asegurar que los niños son
enseñados en las
personas cualificadas.
buenas prácticas por
• No coloque objetos de interés para los niños
sobre la estufa o detrás de ella. Si los niños suben
sobre el aparato para coger dichos objetos, pueden
sufrir lesiones graves.
• No utilice papel de aluminio para forrar alguna
parte de la estufa.
• No use nunca ninguna parte de la estufa para
almacenar objetos. Los materiales inflamables
pueden incendiarse y los objetos de plástico fundirse
o encenderse.
• Apague las llamas con una tapa ajustada, bandeja
de horno u otra bandeja de metal y, a continuación,
trate de apagar el quemador de gas. Tenga cuidado
y evite las quemaduras. Cuando las llamas no se
extingan inmediatamente, evacúe el lugar y llame
a los bomberos.
• Al conectar los aparatos eléctricos cerca de la
estufa, asegúrese de los cables no toquen ninguna
superficie de cocción que permanezca caliente.
• Si la estufa está cerca de una ventana,
asegúrese de que las cortinas no puedan agitarse
sobre o cerca de los quemadores de la estufa ya que
se podría provocar un incendio.
• NO UTILICE AGUA PARA APAGAR INCENDIOS
DE GRASA. Tenga un extintor en un lugar visible
cerca del area de cocina. Utilice un extintor sólo si:
- usted sabe que tiene un extintor de Clase ABC y
ya conoce cómo manejarlo.
- el fuego es pequeño y localizado en el area
donde empezó.
- se ha avisado a los bomberos.
- usted puede luchar contra el fuego de espaldas
a una salida.
• No permita nunca que la ropa, las guantes de
cocina u otros materiales inflamables entren en
contacto con un quemador o rejilla de dicho
aparato o permanezcan cerca de dichos objetos,
hasta que se hayan enfriado. El tejido puede
incendiarse y provocar lesiones personales.
• Use sólo guantes secos. Los guantes de cocina
mojados o húmedos sobre las superficies calientes
pueden causar quemaduras de vapor. No use toallas
ni otros productos textiles voluminosos como por
ejemplo guantes. No permita que los guantes de
cocina toquen las rejillas calientes de los quemadores.
• Por seguridad personal, lleve la ropa adecuada.
Mientras utilice este aparato no debe llevar prendas
holgadas ni mangas que cuelguen. Algunos tejidos
sintéticos pueden inflamarse fácilmente y no deben
llevarse mientras se cocina. En caso de que alguna
prenda se inflame, dejar caer y enrollar
inmediatamente para suavizar las llamas.
43
Page 44

• Este aparato se ha diseñado para la cocción
de alimentos. Por motivos de seguridad, no use
nunca la estufa para calentar una habitación.
.
• Cuando use la estufa: NO TOQUE LAS REJILLAS
DE LOS QUEMADORES O LAS ZONAS DEL
ENTORNO INMEDIATO. Se calientan lo suficiente
para causar quemaduras.
• No deje nunca la estufa desatendida. Los
desbordamientos producirán humo y vertidos de
grasa que pueden inflamarse.
• No caliente contenedores de alimentos sin
abrir. Una acumulación de presión puede provocar
la explosión del contenedor.
• Mientras está cocinando, ajuste el control del
quemador de forma que la llama caliente toque
solamente la parte inferior del recipiente y no
deje que salga fuera del mismo.
• Actúe con precaución para que las corrientes
provocadas por las aberturas de ventilación forzada
o ventiladores no soplen el material inflamable hacia
las llamas o las empujen de forma que se extiendan
más allá de los bordes del recipiente.
• Utilice siempre utensilios que tengan la parte
inferior plana así como lo suficientemente grande
para que cubra el quemador. Si se usan utensilios
de tamaño menor, una parte de la llama puede quedar
expuesta y hacer que la ropa se incendie.
• Para minimizar el riesgo de quemaduras, ignición
de los materiales inflamables y vertidos no
intencionados, coloque los mangos de los
utensilios hacia dentro, de forma que no
sobresalgan de las zonas de trabajo adyacentes,
áreas de cocción o del borde de la estufa.
• Sujete el mango del recipiente para evitar que
el utensilio se mueva al agitar o dar la vuelta a los
alimentos.
• LA GRASA ES INFLAMABLE. Deje que se enfríe
la grasa caliente antes de intentar manipularla. Evite
que se acumulen depósitos de grasa. Limpie la estufa
después de cada uso.
• Para que los quemadores se enciendan y
funcionen correctamente, mantenga las salidas
limpias. Es necesario limpiar dichas salidas cuando
se haya producido un derrame o cuando el quemador
no se encienda, aunque los encendedores
electrónicos hagan clic. Consulte la sección de
limpieza y conservación.
• Nunca levante una olla en llamas ya que corre
el riesgo de sufrir quemaduras.
• Limpie la estufa con precaución. Evite los
riesgos de quemaduras provocados por el vapor; no
use ni una esponja ni un paño mojado para limpiar
la cubierta de la estufa mientras permanece caliente.
Algunos productos de limpieza producen vapores
nocivos si se aplican sobre una superficie caliente.
Siga las instrucciones proporcionadas por el fabricante
del producto de limpieza.
• Asegúrese de que se hayan apagado todos
los controles de la estufa y que la cubierta esté
fría antes de usar cualquier tipo de producto de
limpieza en aerosol en la estufa o alrededor de ésta.
Los productos químicos que producen la acción de
pulverización, en presencia de calor pueden
inflamarse o provocar corrosión en las piezas
metálicas. Solamente los técnicos autorizados pueden
•
Solamente los técnicos autorizados pueden
efectuar los servicios necesarios. Los técnicos deben
desconectar la alimentación eléctrica antes de llevar
a cabo los servicios de mantenimiento de esta unidad.
• Instale un detector de humos en la cocina o en
sus inmediaciones.
• La garantía de este aparato no cubre los daños
causados por el incumplimiento de estas
instrucciones o modificaciones no autorizadas.
• California, Proposición 65, Peligro: La combustión
del gas combustible para cocinar genera algunos
subproductos que figuran en la lista de
sustancias catalogadas en el Estado de California
como cancerígenas o que causan trastornos
reproductores. La ley de California exige que
las empresas adviertan a los consumidores de la
exposición potencial a dichas sustancias. Para minimizar la exposición a las mismas, utilice siempre este
aparato de acuerdo con las instrucciones que
contiene este folleto y procure una buena
ventilación en la habitación mientras cocine con gas.
• Durante la realización de procesos de
mantenimiento, el aparato deberá alejarse de la red
de corriente. Extraiga para ello la llave de la red o
accione la protección correspondiente. Cierre el
suministro de alimentación de gas.
Para que se pueda garantizar la seguridad eléctrica
del aparato, sólo los técnicos autorizados podrán
llevar a cabo las reparaciones correspondientes.
Reservado el derecho a realizar modificaciones
técnicas.
44
Page 45

Antes de la primera
puesta en servicio
Retire el embalaje del aparato y evácuelo
conforme a las normativas locales. Tenga en
cuenta que existen otros accesorios además del
embalaje. Mantenga los elementos del embalaje
y las bolsas de plástico fuera del alcance de los
niños.
Compruebe el estado del aparato antes de
instalarlo, para asegurarse de que no se haya
ocasionado ningún daño durante su transporte.
Sólo el personal técnico autorizado deberá
instalar el aparato y conectarlo antes de la
primera puesta en servicio de conformidad con
las normativas en vigor de las empresas
suministradoras de gas y la normativa local de
obra civil.
Gire los botones a 0 antes de conectar el aparato
a la red eléctrica.
El número de serie del aparato lo encontrará en
la nota de control anexada al presente manual.
Por razones de garantía guarde esta nota junto
con la instrucciones de uso y de montaje.
Lea detenidamente las instrucciones de montaje
y de uso antes de la puesta en servicio de su
aparato.
Limpie el aparato y los accesorios a fondo cuando
los utilice por primera vez. Así eliminará los
posibles olores a nuevo y los restos de suciedad
(véase la sección de limpieza y conservación).
en el recinto de colocación. Asegúrese de que
el recinto cuenta con las condiciones de ventilación apropiadas.
Mantenga abiertos los canales de ventilación.
La utilización prolongada del aparato con varios
o todos los grupos de cocción puede requerir
una ventilación adicional, tales como la apertura
de una ventana o una puerta o bien una
extracción de aire más intensa mediante una
campana extractora.
Para garantizar una buena combustión, el
lugar de emplazamiento del aparato deberá
disponer de un volumen de espacio mínimo
conduzca directamente al exterior o una
ventana que pueda abrirse.
Se prohíbe el uso de asadores, sartenes o
piedras para grill calentados simultáneamente
por varios quemadores ya que la acumulación
de calor podría dañar el aparato.
Si se utilizan ollas de un tamaño grande, se
debe mantener una separación mínima de
aproximadamente 50 mm (2”) entre la olla y
los materiales inflamables periféricos. Entre el
botón o bien cuadro de botones y la olla o
sartén se deberá mantener una separación
mínima de unos 50 mm (2”). El recipiente de
cocción no deberá tocar el cuadro de botones.
Si se retiran las ollas o sartenes durante un
instante, coloque la estufa a la graduación
mínima. De este modo, se reducirá el riesgo
de sufrir quemaduras al trabajar junto a llamas
abiertas; además ahorrará el consumo de gas
favoreciendo al medio ambiente.
3
5 m ) y una puerta que de 1240 cft ( 3
Indicaciones de uso
La utilización de un aparato de cocción de gas
produce una formación de calor y de humedad
En caso de producirse un fallo de corriente no
se deberá usar el aparato.
Si el aparato no funciona correctamente,
póngase en contacto con el servicio técnico.
QUEMADOR Ø MÍNIMO RECIPIENTE Ø MÁXIMO RECIPIENTE
Gran quemador triple llama 9”
Rápido 9” 10”
Semirápido 6” 8”
Auxiliar 5” 6”
45
Page 46

Así se presenta su nueva estufa
Quemador
Parrillas
7.000 Btu/hr
Grasera
Quemador
5.500 Btu/hr
Gran quemador
de triple llama
de hasta
15.300 Btu/hr
Quemador
7.000 Btu/hr
Botones
Quemador
10.000 Btu/hr
46
Page 47

Quemadores de gas
Fig.1
Fig.2
Termopar
Fig.3
Ambas coronas (exterior e interior)
arden con máxima potencia.
La corona exterior arde con
mínima potencia; la corona interior
arde con máxima potencia.
La corona interior arde con
máxima potencia; la corona
exterior está apagada
La corona interior arde con
mínima potencia; la corona
exterior está apagada
Bujía
:Apagado
:Alto
: Bajo
Cada botón de accionamiento tiene señalado el quemador
que controla. Fig. 1.
Para encender un quemador, presione el botón del quemador
elegido y gírelo hacia la izquierda, manteniéndolo en el máximo
unos segundos hasta que el quemador se encienda y suéltelo,
regulando después la posición deseada. Si no se enciende
repita la operación.
CUIDADO - Todas las bují as producen chispa cuando se enciende un solo quemador. No toque ningú n quemador cuan-
do la estufa está funcionando.
Si las bujías están sucias el encendido será defectuoso,
mantenga la máxima limpieza. Se debe realizar dicha limpieza
con un cepillo pequeño, teniendo en cuenta que la bujía no
puede sufrir impactos violentos.
Si su estufa no posee ningún tipo de encendido automático,
acerque algún tipo de llama (mechero, cerillas, etc.) al quemador.
Su estufa puede disponer de termopares de seguridad que
impiden la salida de gas en caso del apagado accidental de
los quemadores. Fig. 2.
Para encender y activar este sistema innovador, proceda del
mismo modo, pero manteniendo el botón presionado hasta
que se produzca el encendido, aparezca la llama y ésta no se
extinga.
Si no se produce el encendido repita la operación, esta vez
manteniendo el botón presionado de 1 a 5 segundos.
Para apagar, gire el botón hacia la derecha hasta la posición
correcta . Al realizar esta operación el sistema de encendido
puede funcionar de nuevo. Esto es totalmente normal.
Su estufa moderna y funcional dispone de unos grifos
progresivos que le permiten encontrar entre la llama máxima
y la mínima la regulación necesaria.
Los quemadores de triple llama y gran quemador de triple
llama resultan muy prácticos y cómodos para cocinar con
paelleras, Wok chino (toda clase de platos asiáticos) etc.
Si su estufa está equipada con un gran quemador de triple
llama dispondrá de un grifo que le permite controlar la llama
interior y exterior de forma independiente. Este sistema
revolucionario le permite seleccionar entre un amplio abanico
de potencias. Descripción de funcionamiento Fig. 3.
La incidencia directa de la llama en el esmalte puede producir
una llama amarilla en el Gran quemador de triple llama.
El uso del aparato de gas produce calor y humedad en el local
donde está instalado. Debe asegurarse de que la cocina cuente
con una buena ventilación, se deben mantener abiertos los
orificios de ventilación natural o instalar un dispositivo de
ventilación mecánica (campana extractora).
El uso continuado del aparato puede requerir una ventilación
adicional, por ejemplo, abrir una ventana (sin provocar
corrientes) o incrementar la potencia de la ventilación mecánica
si existe.
47
Page 48

Consejos de
cocción
Muy fuerte Fuerte Medio Lento
Gran
quemador de
triple llama
Rápido
Semirápido
Auxiliar
Hervir, cocer, asar, dorar:
paellas, comidas asiáticas
(Wok).
Carne apanada, bistec, tortilla
y frituras.
Papas al vapor, verduras
frescas, potajes y pastas.
Cocer: guisos, arroz con
leche y caramelo.
Recalentar y mantener calientes:
platos preparados y platos cocinados.
Descongelar.
Arroz, bechamel y
ragout.
Recalentar y mantener: platos
cocinados y hacer guisos delicados.
Descongelar y
cocer despacio:
legumbres, frutas
y productos
congelados.
Cocción al vapor:
pescados y
verduras.
Hacer/fundir:
mantequilla,
chocolate y
gelatina.
Utensilios de cocina apropiados
Empareje el Diámetro de la Olla a la Llama
- La llama debe tener el mismo tamaño que
el fondo de la olla o más pequeño. No utilice
ollas pequeñas con llamas altas ya que las
llamas pueden devorar los lados de la olla.
Use Ollas Balanceadas
- Las ollas deben estar totalmente senadas
sobre la parrilla de la estufa sin mecer.
- Centre la olla sobre el quemador.
Utilice una Tapa que Cierre Bien
- Una tapa que cierra bien acorta el tiempo
de cocinar.
48
Page 49

Advertencias de uso respecto a
la cocción
NO SÍ
No utilice recipientes
pequeños en quemadores
grandes. La llama no debe
tocar los laterales del
recipiente.
No cocine sin tapa o si ésta
se desplaza debido a que se
desperdicia parte de la
energía.
No utilice recipientes con
fondos irregulares porque
alargan el tiempo de cocción
y aumentan el consumo de
energía.
No coloque el recipiente
desplazado sobre el
quemador ya que se podría
volcar.
No utlilice recipientes de gran
diámetro en los quemadores
cercanos a los botones, que
una vez centrados en el quemador pueden llegar a tocarlos o acercarse tanto que la
temperatura en esa zona aumente y pueda llegar a ocasionar daños.
No coloque los recipientes
directamente sobre el
quemador.
No utilice pesos excesivos ni
golpee la estufa con objetos
pesados.
Utilice siempre recipientes
apropiados para cada
quemador, así evitará un
consumo excesivo de gas y
que se manchen los
recipientes.
Coloque siempre la tapa.
Utilice sólo ollas, sartenes y
cazuelas con fondo plano y
grueso.
Coloque el recipiente bien
centrado sobre el quemador.
Coloque el recipiente sobre
la parrilla.
Asegúrese de que las parrillas y tapas de los quema-
dores estén bien colocados
antes de su uso.
No utilice dos quemadores o
fuentes de calor para un solo
recipiente.
Evite la utilización de planchas
de asado, cazuelas de barro,
etc., prolongadamente a
máxima potencia.
Maneje los recipientes con
cuidado sobre la estufa.
49
Page 50

Normas de uso para el acero:
limpieza y conservación
NO SÍ
NO use nunca productos
abrasivos, objetos
cortantes, estropajos de
acero, cuchillos etc., para
quitar restos de comida
endurecidos en la estufa,
las parrillas, los
quemadores así como
en las estufas eléctricas.
Si su estufa posee un
panel de cristal, no utilice
un cuchillo, rasqueta
o similar para limpiar
la unión con el metal.
NO utilice máquinas
de limpieza a vapor en
la estufa ya que podrían
dañarla.
NO deje líquidos ácidos
(zumos de limón, vinagre,
etc.) sobre la estufa.
Debido a las altas temperaturas que debe soportar la tapa del aro de su quemador de triple
llama y las zonas de acero inoxidable tales como graseras, contorno quemadores, etc., con
el paso del tiempo se llegan a decolorar lo que constituye un proceso NORMAL. Límpielas
después de cada uso y utilice un producto apropiado para acero inoxidable.
Después de lavar las parrillas séquelas completamente antes de volver a cocinar con ellas.
La presencia de gotas de agua o zonas húmedas al comienzo de la cocción puede ocasionar
posibles puntos de deterioro del esmalte.
Si las parrillas de su estufa disponen de unos tacos de goma, tenga cuidado cuando los limpie
debido a que podrían soltarse quedando la parrilla desprotejida y rayar la estufa.
No se deben utilizar los productos de limpieza para acero inoxidable en la zona circundante
a los botones. Las indicaciones (serigrafía) se pueden borrar.
Una vez el aparato esté
frío, utilice una esponja,
agua y jabón.
Quite todo el líquido
derramado inmediatamente, de este modo se
ahorrará esfuerzos innecesarios.
Para mantener limpios
los quemadores y las
parrillas se deben limpiar
periódicamente
sumergiéndolos en agua
jabonosa y frotándolos
con un cepillo no metálico
para que los agujeros y
las ranuras queden
perfectamente libres para
proporcionar una llama
correcta. Seque las tapas
de los quemadores y
parrillas siempre que se
hayan mojado.
Después de limpiar y
secar los quemadores,
asegúrese de que las
tapas estén bien
colocadas sobre el
difusor de llama del
quemador.
En caso de que su aparato disponga de quemadores de una sola pieza
(Monoblock), cerciorese
de que estén perfectamente secos, antes de
su próxima utilización.
50
Page 51

Situaciones anómalas
No siempre hay que llamar al servicio de asistencia técnica.
En muchos casos, Ud. mismo puede solucionarlo. La siguiente
tabla contiene algunos consejos.
Nota importante:
Sólo el personal autorizado de nuestro Servicio Técnico puede
llevar a cabo los trabajos necesarios en el sistema de gas y
eléctrico.
¿Qué ocurre... Causa probable Solución
...si el funcionamiento
eléctrico general está
averiado?
...si el encendido
eléctrico no funciona?
...si la llama de los
quemadores no es
uniforme?
...si el flujo de gas
no parece normal o
no sale gas?
...si hay olor a gas en
el recinto de la cocina?
...si no funcionan las
seguridades de los
diferentes quemadores?
- El fusible está defectuoso.
- Puede que el automático o
un diferencial se ha disparado.
- Pueden existir residuos de
alimentos o de limpieza entre
las bujías y los quemadores.
- Los quemadores están
mojados.
- Las tapas del quemador están
mal colocadas.
- Las diferentes partes del
quemador se han colocado
incorrectamente.
- Las ranuras de salida de gas
de los quemadores están sucias.
- Puede que el quemador no se
encuentre perfectamente seco.
- El paso de gas puede estar
cerrado debido a llaves
intermedias.
- Si el gas proviene de un cilindro
de gas éste puede encontrarse
vacío.
- Algún grifo está abierto.
- Posible fuga en el acoplamiento
del cilindro de gas.
- No se ha presionado el botón
durante el tiempo necesario.
- Están sucias las ranuras
de la salida del gas de los
quemadores.
- Controle el fusible en la
caja general de fusibles y
cámbielo si está averiado.
- Verifique en la caja general
de entrada si se ha disparado
el automático o un diferencial.
- El espacio entre la bujía y
el quemador se debe limpiar
cuidadosamente.
- Seque cuidadosamente
las tapas del quemador.
- Verifique que las tapas se han
colocado correctamente.
- Coloque de la manera
apropiada las diferentes piezas.
- Limpie las ranuras de salida
de gas de los quemadores.
- Proceda al secado de una
forma más exaustiva (ponga
especial cuidado en los quemadores de una sola pieza).
- Abra las posibles llaves
intermedias.
- Cambie el cilindro de gas por
uno lleno.
- Proceda a revisarlo.
- Cerciorese que el acoplamiento está correcto.
- Una vez encendido el
quemador, mantenga el botón
presionado durante unos
segundos más.
- Limpie las ranuras de la salida
del gas de los quemadores.
51
Page 52

Instrucciones de instalación
INFORMACIÓN IMPORTANTE
Siga estrictamente las indicaciones generales de
seguridad así como la información importante.
Antes de utilizar el aparato, un técnico autorizado lo
debe instalar y conectar. Asimismo, dicho técnico se
debe asegurar de que la conexión de suministro de
electricidad y de gas funcionan correctamente.
El técnico que realice la instalación es responsable
del funcionamiento perfecto del aparato en su lugar
de instalación.
Debe enseñar al usuario cómo desconectar la
electricidad y el gas cuando sea necesario.
PRECAUCIÓN: Antes
de conectar el aparato,
verifique si las condiciones
de conexión locales así
como el tipo de gas, la
presión de gas y la tensión
de red eléctrica coinciden
con los ajustes del aparato.
Es necesario que todas las operaciones relativas a
la instalación, regulación y adaptación a gas LP
sean realizadas por personal autorizado y que se
respeten las
normativas vigentes así como las
las compañías de gas.
prescripciones de
Es necesario por ello que los gases de la combustión
sean evacuados al exterior.
Revise las dimensiones de la estufa así como las
dimensiones de la abertura a realizar en el mueble.
Los paneles que están sobre la superficie de trabajo,
en la proximidad inmediata de la estufa, deben ser
de un material no inflamable. Tanto los revestimientos
estratificados como la cola que los fija deben ser
resistentes al calor para evitar así posibles deterioros.
Los cables eléctricos no deben estar en contacto con
zonas de calor.
El cable de alimentación se debe fijar al mueble para
evitar que toque con partes calientes del horno o de
la estufa.
Los aparatos con algún componente eléctrico se
deben conectar obligatoriamente a tierra.
La instalación de este aparato se debe llevar a cabo
de conformidad con los reglamentos en vigor y
únicamente en un lugar bien ventilado.
Lea las instrucciones antes de proceder a su
instalación y uso.
Durante todo el proceso de instalación manipule el
aparato con cuidado. No golpee el aparato.
En caso de no cumplirse las disposiciones al respecto,
las responsabilidades serán del instalador, quedando
el fabricante exento de ellas.
Instalación de la estufa
en el mueble:
medidas de empotramiento
IMPORTANTE: Antes de cualquier
actuación, se debe cortar la alimentación de gas y
eléctrica del aparato.
Antes de conectar el aparato a la instalación hay que
verificar que esté preparado para el tipo de gas que
se le va a suministrar. Nuestras estufas salen de
fábrica preparadas para funcionar con el tipo de gas
que se indica en la placa de características.
Es indispensable que el lugar en el que se instale el
aparato disponga de la ventilación reglamentaria.
52
1 - Distancias mínimas (mm). Efectúe un corte de
las dimensiones necesarias en la mesa de trabajo.
Fig. 1 a-b.
Respete las instrucciones de instalación de las
campanas.
2 - Las fibras de madera utilizadas para la confección
de los muebles de la cubierta, al entrar en contacto
con la humedad se inflan con relativa rapidez. Por
ello, es conveniente barnizar con una cola especial
las superficies de corte, para protegerlas del vapor
o del agua condensada que podría depositarse debajo
de la mesa de trabajo del mueble de cocina.
Page 53

INFORMACIÓN IMPORTANTE
Requisitos para el gabinete
Fig. 1a
E
D
A
Las grapas y la junta de estanquidad (borde inferior
de la estufa) salen puestas de fábrica. No se deben
quitar bajo ningún concepto. La junta garantiza la
impermeabilización de toda la superficie de trabajo
y evita cualquier filtración.
En caso de no montar el horno bajo de la estufa, se
recomienda colocar un separador que imposibilite el
C
F
acceso a la parte inferior de la estufa.
Para la instalación sobre un horno compruebe las
dimensiones según su manual de montaje.
B
3 - Presione simultáneamente sobre los extremos
de forma que la estufa se apoye en todo su perímetro.
Fig. 2 a.
Fig. 2a
A- Mínimo 6” (152 mm)
B- Mínimo 6” (152 mm)
C- Mínimo 30” (762 mm)
D- Mínimo 2” (51 mm)
E- Mínimo 36” (915 mm)
F- Mínimo 18” (458 mm)
Profundidad máxima de los gabinetes instalados en la
parte superior de la superficie para cocinar: 13" (330 mm.)
Instalación del aparato
1
/
min. 7
”
4
13
/
min. 2
”
16
1
/
19
”
4
1
33
”
/
2
min. 6”
Fig. 1b
1
/
33
”
2
3
/
1
”
4
1
/
1
”
16
1
1
/
”
16
1
/
19
”
4
Centre la estufa en su hueco ciego de empotramiento
en el mueble.
Gire las 6 grapas de amarre Fig. 2 b. y atorníllelas
fuertemente al mueble. No las quite nunca.
Fig. 2b
Es necesario que todas las operaciones relativas a
la instalación, regulación y adaptación a otro tipo de
gas sean realizadas por personal autorizado de
nuestro Servicio Técnico y que se respeten las
normativas vigentes y prescripciones de las
compañías de gas.
4 - Antes de conectar el aparato, verifique que las
condiciones locales de conexión, así como el tipo y
la presión de gas coincidan con los ajustes del
aparato.
Asegúrese de que el suministro de gas esté cortado
por medio de la llave de paso manual antes de
conectar el aparato.
La conexión de gas debe estar en un lugar que
permita acceder a la llave de paso manual y que, si
procede, esté visible después de abrir la puerta del
mueble.
53
Page 54

Conecte el regulador Fig. 3 (2) al colector Fig. 3 (1)
como indica la flecha marcada en el regulador,
poniendo teflón alrededor de la rosca.
Conecte a la red de gas el regulador de presión
usando un conector flexible de la línea de gas entre
la válvula de cierre y el regulador de presión. Fig. 3.
Fig. 3
1
2
Verifique que junto al aparato se le suministra
una bolsa con el componente 2. Si falta dicha
pieza llame a nuestro Servicio Técnico. Para
realizar la conexión de gas, utilice las piezas que
le suministramos.
Apriete el regulador a una torsión de 15 a 22 pieslibras. Nunca apriete a una torsión mayor de 26
pies-libras. Siempre use un compuesto de uniones
de tubería aprobado que sea resistente a la acción
del gas LP.
La conexión con un tubo flexible metálico. En este
caso hay que evitar el contacto de este tubo con
partes móviles de la unidad de empotramiento (por
ejemplo un cajón) y el paso a través de espacios que
se pudieran obstruir.
Se deben realizar las pruebas de fugas del aparato
de acuerdo a las instrucciones del fabricante.
El fabricante declina cualquier responsabilidad de
fuga, así como de las conexiones realizadas por
el instalador.
Conexión eléctrica
Antes de conectar el cable de alimentación eléctrica
al tomacorriente en la pared, asegúrese de que la
válvula de cierre del gas y todos los controles de los
quemadores estén en posición de apagado.
INFORMACIÓN IMPORTANTE
Se debe verificar en la placa de características: el
voltaje y la potencia total. El aparato deberá estar
conectado a tierra.
Debe cerciorarse de que la conexión ha sido
efectuada de acuerdo con las prescripciones legales
del país. Respete íntegramente las disposiciones de
la empresa local de suministro de electricidad.
La conexión eléctrica (AC 110-127 V) se establece
por medio de un cable de conexión con un enchufe
de contacto de puesta a tierra conectado a un
tomacorriente con puesta a tierra que debe ser
también accesible después de la instalación de
la placa de gas.
Todas las conexiones de gas deben ser comprobadas con una solución líquida apropiada para asegurar que no haya fugas.
ADVERTENCIA: Este
aparato está equipado con
un enchufe de tres clavijas
con puesta a tierra para su
protección contra electrocución y debe enchufarse
directamente en un toma
correctamente puesta a
tierra. No corte ni extraiga
la clavija de puesta a
tierra de este enchufe.
El cable de conexión a la red eléctrica debe
corresponder, por lo menos al tipo JT 3x18
AWG/UL/CSA o debe ser resistente al calor (como
mínimo 105ºC).
El cable de conexión a la red eléctrica debe ser
comprado y conectado exclusivamente por un
técnico autorizado.
No manipule el interior del aparato. En caso de ser
necesario, llame a nuestro servicio de asistencia
técnica.
54
Page 55

INFORMACIÓN IMPORTANTE
Cambio del tipo de gas:
de gas natural a propano
Es necesario que todas las operaciones relativas a
la instalación, regulación y adaptación a gas LP
sean realizadas por personal autorizado de
nuestro Servicio Técnico y que se respeten las
normativas vigentes y prescripciones de las
compañías de gas.
IMPORTANTE: Antes de cualquier actuación, cortar
la alimentación de gas y eléctrica del aparato.
Antes de conectar el aparato a la instalación hay que
comprobar que está preparado para el tipo de gas
que se le va a suministrar. Nuestras estufas salen
de fábrica preparadas para funcionar con el tipo de
gas que se indica en la placa de características.
El tanque de propano debe estar equipado con su
propio regulador de alta presión además del
regulador suministrado con este aparato.
Presión de Suministro
Gas Natural - 6 c minimo (17,5 mbar).
Gas de Propano - 11" w c minimo (27,4 mbar).
La presión de suministro máxima para este aparato
Esta estufa puede adaptarse para que funcione con
.
gas LP
Para ello se deben realizar las siguientes
,
" w
,
(
c
wno puede exceder 14,0 pulgadas
34,9 mbar)
operaciones:
A)
Cambio de inyectores de los quemadores de la
estufa. (Véase tabla 1).
TABLA 1
Características de los quemadores
El quemador se debe utilizar con
los gases que se indican en la
placa de características.
Presión de utilización
Quemador
rápido
Quemador
semirápido
Quemador
auxiliar
Gran
quemador
triple llama
Marcador de inyector
Consumo
(Hs)
Marcador de inyector
Consumo
(Hs)
Marcador de inyector
Consumo
(Hs)
Marcador de inyector
Consumo
(Hs)
1 - Retire las parrillas, tapas y cuerpo de quemador.
2 - Cambie los inyectores usando una llave de tubo
de 7 mm y asegúrese de apretarlos a fondo para
garantizar la estanquidad. Fig. 4.
En estos quemadores no se debe realizar el reglaje
del aire primario.
B) Reglaje del consumo reducido de los grifos de los
quemadores de la estufa.
1 - Coloque los grifos en la posición de mínimo.
2 - Retire los botones de los grifos. Fig. 5.
3 - Desmonte los retenes antivertidos de líquidos.
Nominal
Nominal
Nominal
Nominal
TIPO
DE
GAS
BTU/hr
BTU/hr
BTU/hr
BTU/hr
NATURAL PROPANO
6” 10”
133 95
10.000 10.000
110 77
7.000 7.000
98
5.500 5.500
106/81 72/55
15.300 15.300
69
Fig. 4
7 mm.
Fig. 5
55
Page 56

INFORMACIÓN IMPORTANTE
• Su estufa tiene unos retenes exteriores de plástico,
desmóntelos con un destornillador, haciendo palanca
a través del orificio central de los mismos. Fig. 6.
Fig. 6
• Cuando tenga el orificio de paso de botones libre
de los retenes, se encontrará con un retén interior
de goma flexible; bastará con que se presione con
la punta del destornillador para que se libere el paso
hacia el tornillo de regulación del grifo. Jamás
desmonte el retén interior.
4 - Regulación del tornillo by-pass.
Los tornillos by-pass, se deben apretar a fondo.
Fig. 7.
Fig. 7
presionándolo firmemente en su lugar para que se
puedan ver claramente las letras “LP” en el botón,
en lugar de “NAT”.
Reemplace el conjunto de la tapa y botón en la parte
superior del regulador, sellándolo bien. Asegúrese
de que el resorte esté en su lugar. No apriete
demasiado.
NOTA: La flecha en la parte trasera del regulador
debe apuntar a la dirección del flujo de gas en la
estufa. Fig. 8.
NAT
Pin
Posición del pin
para Propano
NAT
Hex
Cap
Tapa Hex
Pin
LP
Resorte
Fig. 8
Tapa
Hex
NAT
Posición
del pin
para Gas
Natural
VISTA DEL REGULADOR
DE PRESIÓN
En todos los casos verifique que, después de haber
realizado la transformación de gas, la llama de los
quemadores sea la correcta, de tal forma que al
pasar de la posición máxima a la mínima no se
apague ni se cree retroceso de llama.
5 - Es importante que estén colocados todos los
retenes para poder asegurar la estanquidad eléctrica,
Conversión del regulador de
presión: de 6” W.C. a 10” W.C.
Quite la tapa hexagonal de la parte superior del
regulador con una llave ajustable.
Saque el dispositivo de plástico en la tapa y voltéelo
contra los vertidos de líquidos de la estufa.
6 - Vuelva a colocar los botones en los grifos.
Nunca desmonte el eje del grifo. En caso de avería,
cambie el grifo completo.
C) Coloque la etiqueta que indica el gas al que ha
sido transformado el aparato, sobre la etiqueta de
Gas Natural ya existente.
56
Page 57

INFORMACIÓN IMPORTANTE
En caso de llamar a nuestro Servicio Técnico, sírvase
indicar:
E - NR FD
Estas indicaciones figuran en la placa de
características de su aparato, situada en la parte
inferior de su estufa.
GARANTÍA
GARANTÍA PARA LA ESTUFA BOSCH
COBERTURA
Garantía para Un Año
Por un año a partir de la fecha de instalación o
la fecha de ocupación de una vivienda nueva,
previamente desocupada, vamos a reparar o
reemplazar sin costo alguno, cualquier parte que
deje de funcionar con el uso casero normal. Guarde
su recibo fechado u otra muestra de la fecha de
instalación/ocupación. Bosch pagará por
toda la mano de obra y refacciones de partes
defectuosas debido a fallos del material o mano
de obra. Una Agencia de Servicios Autorizada por la
Fábrica debe realizar el servicio durante un horario
laboral normal. Para información sobre una
agencia autorizada de servicios cerca de usted,
llame al 800-944-2904.
FUERA DE COBERTURA
1 - Servicio por una agencia no autorizada, Daños o
reparaciones debido al servicio de una agencia no
autorizada o el uso de partes no autorizadas.
2 - Visitas de servicio para:
• Enseñarle cómo usar el aparato.
• Corregir la instalación. Usted es responsable de
proporcionar el cableado eléctrico y/o la instalación
de gas, etc.
• Poner los cortacircuitos o reemplazar los fusibles.
3 - Daños causados por accidente, alteración, mal
uso, abuso, instalación no apropiada o instalación
que no cumple con los códigos locales eléctricos o
de fontanería o el almacenamiento no apropiado del
aparato.
4 - Reparaciones debido a un uso casero anormal.
5 - Cualquier visita de servicio y costo de mano de
obra durante la garantía limitada.
6 - Gastos viáticos y otros gastos generados cuando
el producto está instalado en un lugar con acceso
limitado o restringido, (ej. vuelos aéreos, viajes con
transbordado y regiones geográficas aisladas).
APLICACIONES DE LA GARANTÍA
Esta garantía tiene validez con aparatos utilizados
en aplicaciones residenciales. No cubre su uso en
situaciones comerciales.
Esta garantía sirve para productos comprados en los
50 estados de los EE.UU., el Distrito de Columbia y
Canadá. La garantía aplica aún si usted se muda
durante el período de garantía.
En caso de que el comprador original venda el aparato
durante el período de garantía, el nuevo propietario
sigue estando protegido hasta la fecha de vencimiento
del período de garantía del comprador original.
BOSCH NO SE HACE RESPONSABLE
DE NINGÚN DAÑO INCIDENTAL O
CONSECUENCIAL
Algunos estados no permiten la exclusión o limitación
de daños incidentales o consecuenciales, de forma
que la limitación o exclusión mencionada arriba tal
vez no aplica para usted. Esta garantía le brinda
derechos legales específicos y puede que usted
tenga otros derechos que pueden variar de estado
a estado o de provincia a provincia.
INFORMACIÓN DE SERVICIO
Como referencia útil, se incluyó la información del
número de serie en la contraportada. Para localizar
el número de serie en el producto. Guarde su factura
para la validación de la garantía.
PARA REPARACIONES O SERVICIO
AUTORIZADO
Queremos que usted quede satisfecho. Si usted no
queda satisfecho con el servicio recibido, por favor
llame al 800-944-2904 o escríbanos a:
BSH Home Appliances Corp.
Customer Support
5551 McFadden Ave.,
Huntington Beach, CA 92649
En cualquier tipo de comunicación se debe incluir el
número de modelo, número de serie y fecha de
compra/instalación original. (Veáse la contraportada).
57
 Loading...