

Page 1
Description
DigiFloor is an electronic thermostat for the regulation of
floor heating. Mounting is done via a connection box. The
thermostat is controlled wirelessly by the DigiHeat control
unit. Time base for switching of load is 20 minutes.
DigiFloor must be installed by an authorized electrician.
If the floor sensor is not connected, the thermostat will use
an internal air sensor for the regulati on of room temperature
(5-30°C). When the floor sensor is connecte d switching
times are operational accor ding to floor temperature. When
the floor sensor is used the set point temperature should be
considered a s a guide figure o nly. Start off with a setpoint
temperature of 20°C and adjust setpoint temperature until
floor temperature is at your comfort level. NOTE! It takes
hours for the floor temperature to stabilize.
It is possible to use both the internal air sensor and floor
sensor. The internal air sen sor will regulate room
temperature, while the floor sensor will limit the floor
temperature to a maximum of 27°C. See paragraph sensor
alternatives for details.
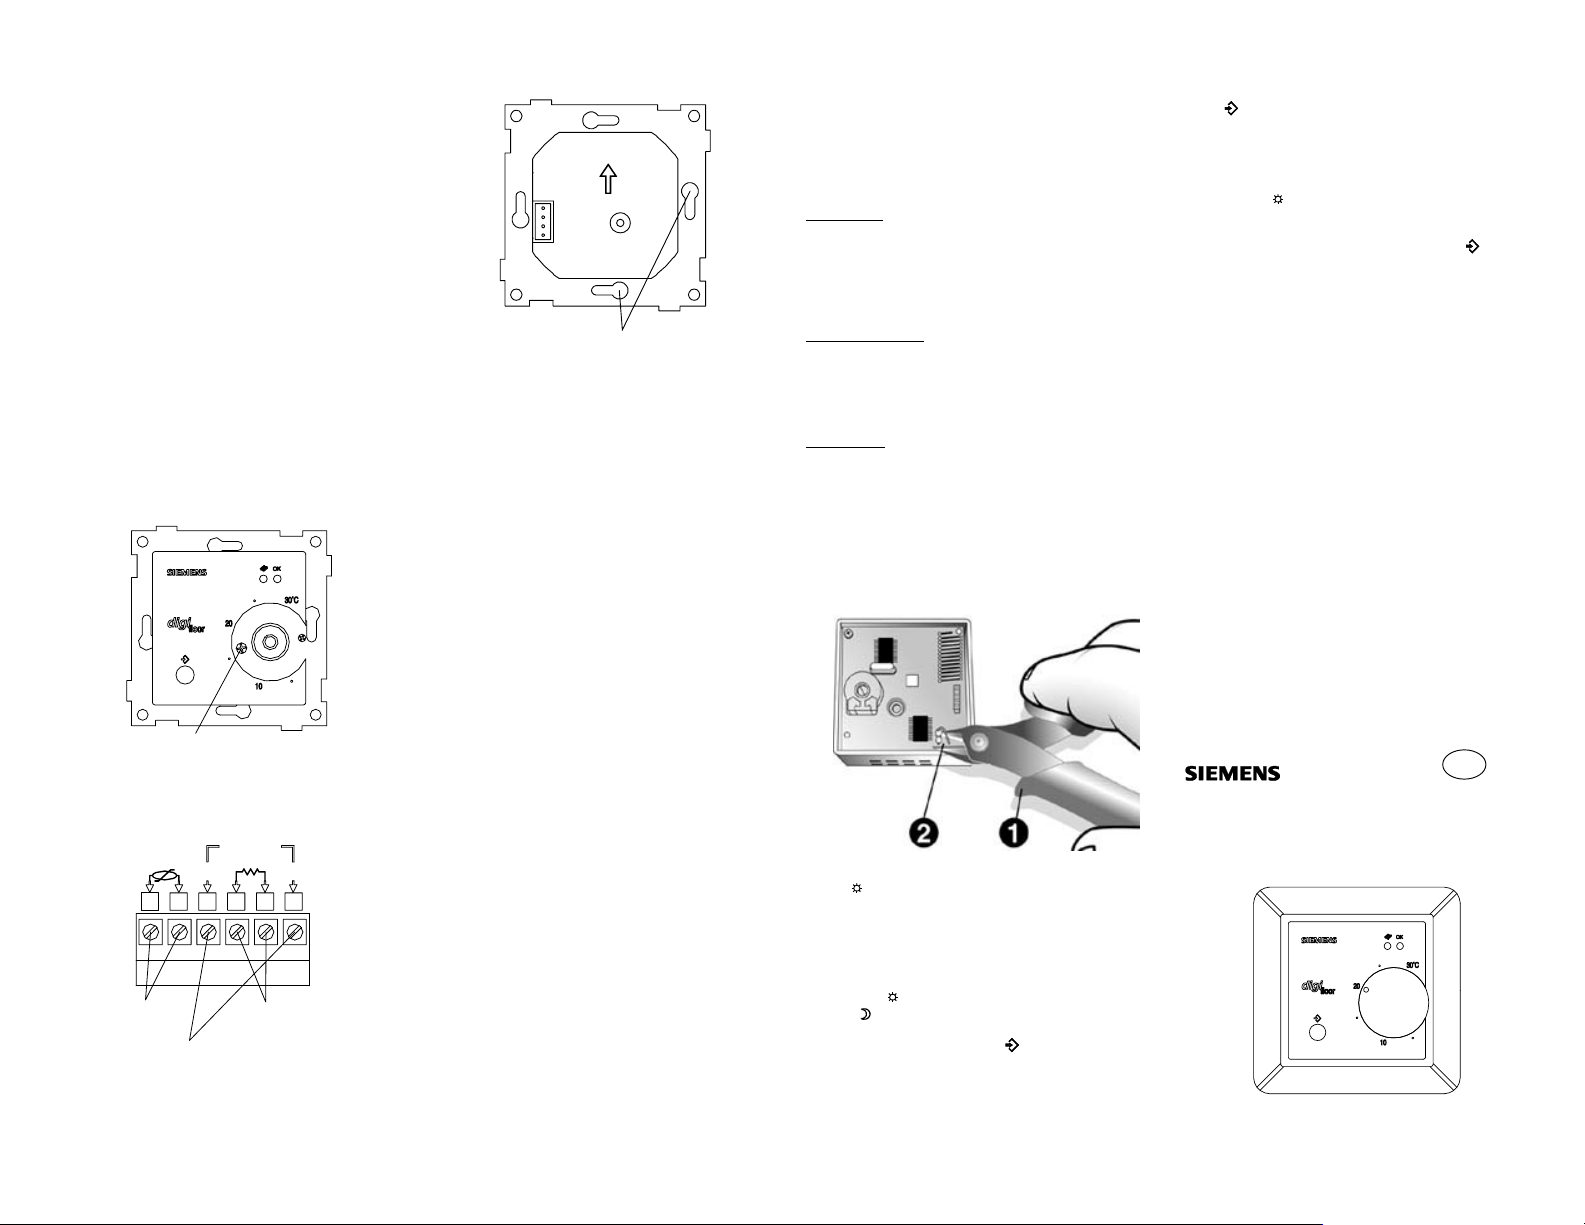
Installation of DigiFloor
Remove the contr ol knob by pulling it towards you. (fig.1).
Remove the bigger of the two screws below t he control
knob (fig. 2).
The front cover and the frame can now be removed. Turn
the thermostat and complete the necessary c onnections
(fig. 3).
Floor
sensor
Screw
Fig. 2
Fig. 1
230V~4VA
16A
N
31 2
Heat element
Max 16A
L
54
6
Mains
The thermostat is then mounted inside the connection box.
230V +/- 10%
Refit the frame and the front cover. Ensure that the arrow
marked ”TOP” is pointing upwards as shown in fig. 4.
Fasten the screw and put the control knob back in position.
Note! DigiFloor is not equipped with a 2-pole switch, and a
separate switch must be mounted if required by the
particular installation.
Note! DigiFloor is not equipped w ith an earth terminal. Any
earth terminals from heat cable/mains must be connected
by separate earth connector.
Configuration of DigiFloor
(see also user instruction for DigiHeat)
First time configuration:
When installed for the first time the thermostat’s green OKlamp will blink. This ‘blinking’ indicates the thermo stat is not
being programmed to receive information from the DigiHeat
control unit. Put DigiHeat in configuration mode (see
DigiHeat user instructions). Press the pus h-button marked
on the thermostat. The OK-lamp will be lit and indicate that
the thermostat is ready to re ceive informat ion from DigiHeat.
Reconfiguration:
Hold the push-button on the thermostat down for about 10
seconds until the OK-lamp starts to blink. Press the pushbutton once. T he OK-lamp wil l light after a few seconds
indicating the thermostat is once again configured. The
thermostat is now controlled by DigiHeat.
Normal operation
During normal operation the thermostat is controlled by
DigiHeat. If the radio communication for some reason
should fail, the thermostat will start regulation, according to
its own temperature setting, after 1 hour. The green OKlamp will start to blink. When the radio communication is reestablished the DigiHeat control unit will automatically take
over.
Installing the floor sensor
The floor sensor is put inside an installation tube embedded
in the concrete floor. The tube should be sealed and placed
as high in the concrete layer as possible. Only the enclosed
floor sensor must be used.
Placing of the thermostat with internal room sensor
The thermostat should be plac ed on the wall 80 – 150 cm
from the floor, where air can pass without obstruction.
Direct sunlight should be avoided. The thermostat is not
approved for outdoor use.
Fig. 4
TOP
Screwhole
LED indicators
Red ON: Heat ele m ent ON.
Red OFF: Heat element OFF.
Green ON: Thermostat is configured.
Green blinking: Unit not configured or radio signal is
missing.
Sensor alternatives
Floor sensor:
- Constant floor temperature, typicall y in rooms
where you wal k barefooted.
- Floor sensor is automatically used when
connected.
- Note that a temperature setting of 5-30°C on
DigiHeat is equivalent to a floor temperature
setting of 5-40°C.
Internal sensor (air):
- Temperature setti ng on Di gi Heat i ndi cat es
required room temperature (5-30°C ).
- The floor temperature will depend on the room
temperature.
- Internal sensor should be used if floor sensor is
not possible.
Two sensors:
- The wire (2) as shown in fig.5 must be cut for the
thermostat to use both internal air sensor and floor
sensor. Use cutting pliers (1).
- Internal air sensor (or sensor in DigiHeat) is used
to regulate room temperature according to s etpoint
temperature.
- Maximum floor temperature is limited to 27°C.
Typically for parquet or other temperature
sensitive floor types.
Local temperature control when DigiHeat is in comfort
mode (
)
In some situations it might be preferable to let the user
adjust the temperature on each heater, without having to do
adjustments on DigiHeat. T he thermostat has a built-in
feature whi ch will allow t his. Normally each heater is
controlled 100% by DigiHeat, and local control of
temperature i s not possible. Note that only comfort
temperature (
setback (
DigiHeat as normal.
To activate this function, hold the button down while the
mains voltage is connected (fuse or switch). Then let go of
the button when either the red or green light is blinking.
When the red light is blinking it indicate s that no local
control of comfort temperature is possible. When the gr een
light is blinking local control of comfort temperature is
Fig.5
) can be contr olled on each heater, while
) and frost protection (OUT) is controlled by
possible. To toggle betwee n these two modes, push the
button once. The choice of mode must be done during
10 seconds after activation.
The local control of comfor t temperature is well suited f or
offices, kindergarten s, and rental hou sing, where it is
preferred to let each user control the temperature during
comfort hours (
the comfort temperature displayed on DigiHeat will not have
any meaning.
During norm al operation on e push on the button allow
for 3 hours ca ncellati on of setback or fr o st protecti on
temperature (for example during overti me hours).This
function is only possible for version v.1.03 (see product
label).
Room thermostat
The thermostat is prepared to receive measured
temperature from DigiHeat. In such case the measured
temperature from DigiHeat will be used to control the room
temperature, and the inter nal sensor i s no longer in use.
See
sensor alternatives. For DigiHeat 1 this will mean the
internal sensor in DigiHeat will control room temperature.
For DigiHeat 6+ the internal sensor can be activated for
zone A by setting P1=1 (see instruction DigiHeat 6+). Note
that DigiHeat must be placed in the temperature zone. Thi s
function is only possible for version v.1.03 (see product
label).
Technical s pecification s
Operating voltage 230V +/- 10%
Maximum load 16A (resistive)
Isolation Class II
Protection IP30
Frequency 433,42 MHz
Temperature Internal sensor 5-30°C
Floor sensor 5-40°C
Temp. limit: Two sensors 27°C floor
OFF-switch No
Sensor type: NTC 100k
Measure (l
Building depth 32mm
El. number 54 683 88
). Note that when this function is activated
x w x h): 70 x 70 x 55mm
Ω / 25°C
GB
DigiHeat room thermostat 16A
2NC9 840
580.042b GB 181004
 Loading...