


KD21

User Manual
OMNINAS KD20

English
i
TABLE OF CONTENTS
Product Overview
Features 1-1
Package Contents ............................................................. 1-1
System Requirements ........................................................ 1-2
Product Views 1-4
Front View ....................................................................... 1-4
Rear View ........................................................................ 1-5
LED Denitions ................................................................. 1-6
Getting Started
Hardware Installation 2-1
First Instance ................................................................... 2-1
Connecting the OMNINAS 2-6
Connecting the Ethernet Port .............................................. 2-6
Connect to a Switch or Router .......................................... 2-6
Connect Directly to a PC or Laptop ................................... 2-7
Connecting to Power .......................................................... 2-8
Powering On ..................................................................... 2-9
Connecting Your OMNINAS ............................................... 2-10
Finder Utility ................................................................ 2-11
System Initialization ..................................................... 2-12

English
ii
Connecting by Web Browser .......................................... 2-18
Mapping Network Drives .................................................. 2-21
Map All ....................................................................... 2-21
Map Individual Drive ..................................................... 2-22
Deleting Network Drives ................................................ 2-23
Web Interface
Overview 3-1
Home Menu...................................................................... 3-1
Settings Menu .................................................................. 3-3
Storage Menu ................................................................... 3-4
Share Menu ..................................................................... 3-5
USB Menu ........................................................................ 3-6
Backup Menu.................................................................... 3-7
BT Download Menu ............................................................ 3-8
Share Box Menu ............................................................... 3-9
Media Server Menu ......................................................... 3-10
Launching the Interface ................................................... 3-10
Logging In 3-11
User Management 3-12
Viewing User List ............................................................ 3-12
Adding Users .................................................................. 3-12
Editing Users .................................................................. 3-14

English
iii
Deleting Users ................................................................ 3-14
Storage Management 3-15
RAID Manager ................................................................ 3-15
RAID Types .................................................................... 3-16
Creating a RAID Mode ................................................... 3-16
Disk Manager Menu ......................................................... 3-18
Checking Disks ............................................................ 3-18
Disk Mangement ............................................................. 3-19
Replacing a Hot-swap Drive ........................................... 3-19
Replacing a Drive ......................................................... 3-22
Formatting Disks ............................................................. 3-23
Auto Mirroring ................................................................ 3-24
Share Management 3-25
Adding Folders ................................................................ 3-25
Viewing Folder Lists ......................................................... 3-27
Editing Folders ............................................................. 3-27
Deleting Folders ........................................................... 3-28
USB Management 3-29
Printer Setting ................................................................ 3-29
Auto Copy ...................................................................... 3-30
System Log 3-31
Clearing Logs ................................................................. 3-31

English
iv
System Backup 3-32
Setting Up Backup Schedules ........................................... 3-33
Editing Backup Schedules................................................. 3-34
Deleting Backup Schedules ............................................... 3-34
Viewing Backup Logs ....................................................... 3-35
System Conguration 3-35
Conguring Network Settings ........................................... 3-35
DHCP settings .............................................................. 3-36
Static settings (manual) ................................................ 3-36
Setting Date and Time ..................................................... 3-37
Rebooting and Powering Off.............................................. 3-38
Reboot the system ....................................................... 3-38
Power Off .................................................................... 3-39
Reset to Factory Default ................................................... 3-39
Web Interface Reset ..................................................... 3-39
Hardware Reset ........................................................... 3-40
Updating Firmware .......................................................... 3-40
Application Services 3-42
iTunes Server ................................................................. 3-42
BT Download .................................................................. 3-43
Setting Up BT Downloads .............................................. 3-43
Conguring Preferences ................................................ 3-45

English
v
Share Box ...................................................................... 3-48
Setting Up Share Box ................................................... 3-48
Accessing Share Box ..................................................... 3-50
Setting Up Media Server .................................................. 3-52
OMNINAS for Android
Installing the Application 4-1
Overview 4-1
Connecting an OMNINAS 4-3
Adding a WAN Device ........................................................ 4-3
Adding a LAN Device ......................................................... 4-5
Main Menus 4-7
Document Files 4-8
Movie Files 4-9
Photo Files 4-10
Posting to Facebook ........................................................ 4-11
Video Files 4-13
Music Files 4-14
Torrents 4-15
OMNINAS for iOS
Main Menus 5-1
Connecting to Your OMNINAS 5-2

English
vi
Adding a Remote Device .................................................... 5-2
Adding a Local Device ........................................................ 5-3
Conguration 5-5
Opening Document Files 5-6
Viewing Movie Files 5-7
Viewing Photo Files 5-8
Posting to Facebook .......................................................... 5-8
Troubleshooting
Troubleshooting 6-1
Environmental Control 6-4
System Temperature ......................................................... 6-4
System Fan Settings .......................................................... 6-4

English
vii
Copyright
©2013 by Shuttle
®
Inc. All Rights Reserved.
No part of this publication may be reproduced, transcribed, stored in a retrieval system, trans-
lated into any language, or transmitted in any form or by any means such as electronic, mechani-
cal, magnetic, optical, chemical, photocopy, manual, or otherwise, without prior written permis-
sion from Shuttle
®
Inc.
Other brands and product names used herein are for identication purposes only and may be
trademarks of their respective owners.
Disclaimer
Shuttle
®
Inc. shall not be liable for any incidental or consequential damages resulting from the
performance or use of this product.
Shuttle
®
Inc. makes no representation or warranty regarding the contents of this manual.
Information in this manual had been carefully checked for accuracy; however, no guarantee is
given as to the correctness of the contents. For continuing product improvement, Shuttle
®
Inc. re-
serves the right to revise the manual or make changes to the specications of this product at any
time without notice and obligation to any person or entity regarding such change. The information
contained in this manual is provided for general use by customers.
• FCC-B Radio Frequency Interference Statement
This device complies with Part 15 of the FCC Rules. Operation is subject to the following
two conditions: (1) this device may not cause harmful interference, and (2) this device must
accept any interference received, including interference that may cause undesired opera-
tion. Any changes or modications not expressly approved by the party responsible for
compliance could void the authority to operate equipment.
This equipment has been tested and found to comply with the limits for a Class B digital device,
pursuant to Part 15 of the FCC Rules. These limits are designed to provide reasonable protection
against harmful interference in a residential installation. This equipment generates, uses and can
radiate radio frequency energy and, if not installed and used in accordance with the instructions,
may cause harmful interference to radio communications. However, there is no guarantee that
interference will not occur in a particular installation.
CAUTION:
Any changes or modications not expressly approved by the guarantee of this device could
void the user’s authority to operate the equipment.
English
viii
CE compliance
This device is classed as a technical information equipment (ITE) in class B and is intended for
use in living room and ofce. The CE and WEEE marks approve the conformity by the EU-guide-
lines:
• EMC- guideline 2004/108/EC ,Directive on Electromagnetic Compatibility
• LVD - guideline 2006/95/EC ,Directive on Low Voltage
• ErP - guideline 2009/125/EC ,Directive on ecoconception of Energy related Products
• RoHS- guideline 2002/95/EC ,Directive on Restriction of Hazardous Substances
• WEEE - guideline 2002/96/EC, Directive on The Waste Electrical and Electronic Equipment
Safety Instructions
The following safety precautions will increase the life of the Computer.
Follow all Precautions and instructions.
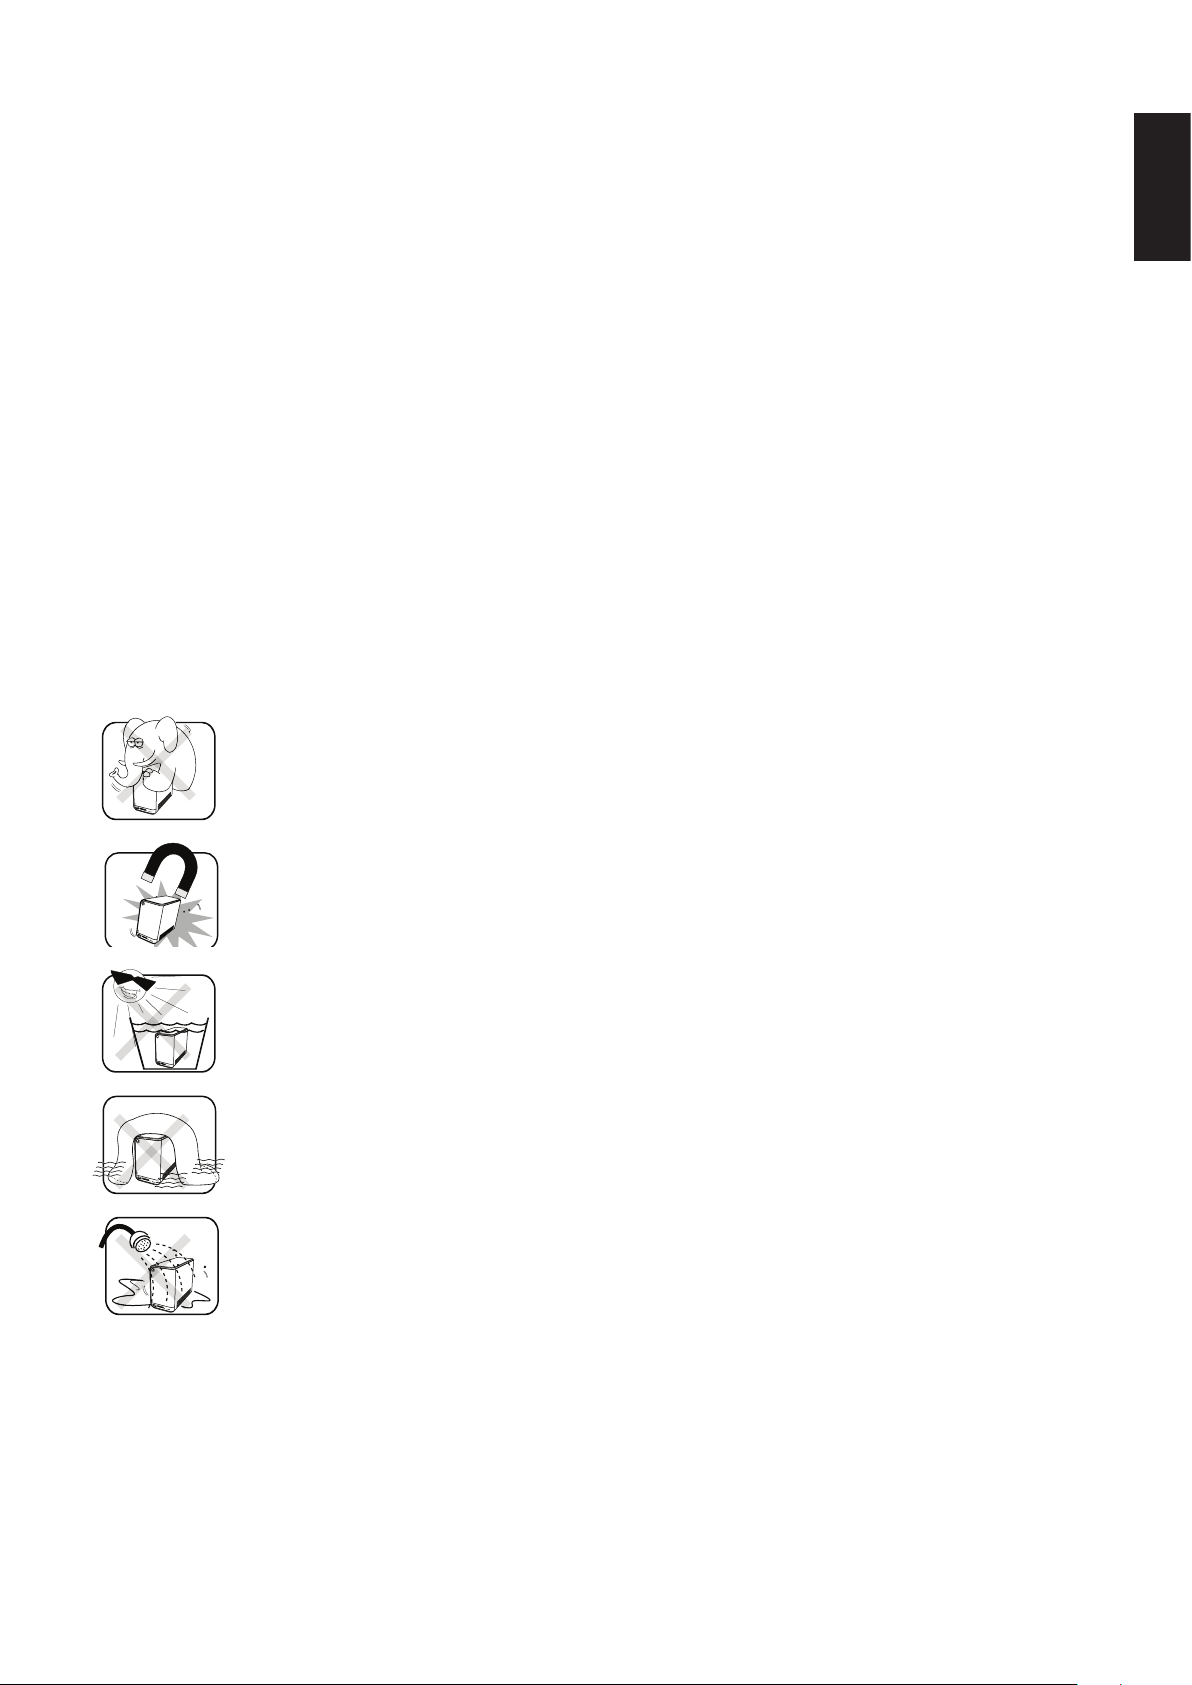
Do not place this device underneath heavy loads or in an unstable position.
Do not use or expose this device around magnetic elds as magnetic interference may affect
the performance of the device.
Do not expose this device to high levels of direct sunlight, high-humidity or wet conditions.
Do not block the air vents to this device or impede the airow in any way.
Do NOT expose to or use near liquid, rain, or moisture.
Do NOT use the modem during electrical storms.
The unit can be operated at an ambient temperature of max. 40°C (104°F). Do not subject it to
temperatures below 0°C (32°F) or above 40°C (104°F).
The ambient operating humidity for this device is 10% (minimum) to 90% (maximum).

Chapter 1
Product Overview

English
1-1
Features Product overview
Features
• Embedded Linux
• Supports Microsoft
®
Windows
®
and Mac OS
• Largest single HDD capacity supported > 4TB
• USB 3.0 (front panel) (ash drive, external HDD, hub, printer, digital camera, etc.)
• SD card reader
• RAID 0, 1, JBOD, single HDD supported
• Power Consumption (Standby/Operational) 9W/15.5W
• Aluminum chassis for improved heat dissipation
• Supports USB Wi-Fi module (optional)
• Supports media server for video streaming
• Easy HDD installation and one button HDD hot swap
• Supports scheduled BT Downloading without PC
• Built-in ultra quiet fan
• Elegant ID design with 2.5 mm aluminum for better heat dissipation
Package Contents
21
OMNINAS Power Cord AC Adapter CD-ROM
QSG
LAN Cable Screw pack Quick Start Guide

English
1-2
Features Product overview
System Requirements
PC Users:
• Pentium
®
III 500Mhz processor or higher
• Microsoft
®
Windows
®
XP Home / Professional / Professional x64 SP3 or later
• Microsoft
®
Internet Explorer
®
7.0, Firefox
®
3.x, Google Chrome or Apple Safari 3.0 or higher
• Must meet minimum RAM requirements for your operating system
• CD or DVD drive
• Available 10/100/1000 Mbps network Ethernet port
DHCP-congured network (recommended)
Network hub, switch, or router (recommended)
• 3.5” SATA Hard Drive(s)
Mac Users:
• Mac OS X 10.4 or higher
• Apple Safari 3.0 or higher
• Must meet minimum RAM requirements for your operating system
• CD or DVD drive
• Available 10/100/1000 Mbps network Ethernet port
DHCP-congured network (recommended)
Network hub, switch, or router (recommended)
• 3.5” SATA Hard Drive(s)
Linux Users:
• Linux kernel 2.6.x or later
• Available 10/100/1000 Mbps network Ethernet port
DHCP-congured network (recommended)
Network hub, switch, or router (recommended)
Smart Phone Users:
• Mobile Device: iPhone, iPad, Android phone, Android tablet
• Mobile OS: iOS 4.2 and above, Android 2.3 and above

English
1-3
Features Product overview
Personal Cloud and Remote Access Requirements:
• Internet connection
• Universal Plug and Play (UPnP™) compatible router or administrative rights to port forward
• Recommended minimum sustained connection speeds for a good Personal Cloud experi-
ence
• Download: 2.5 Mbit/s (recommended)
• Upload: 500 Kbit/s (recommended)
English
1-4
Product views Product overview
Product Views
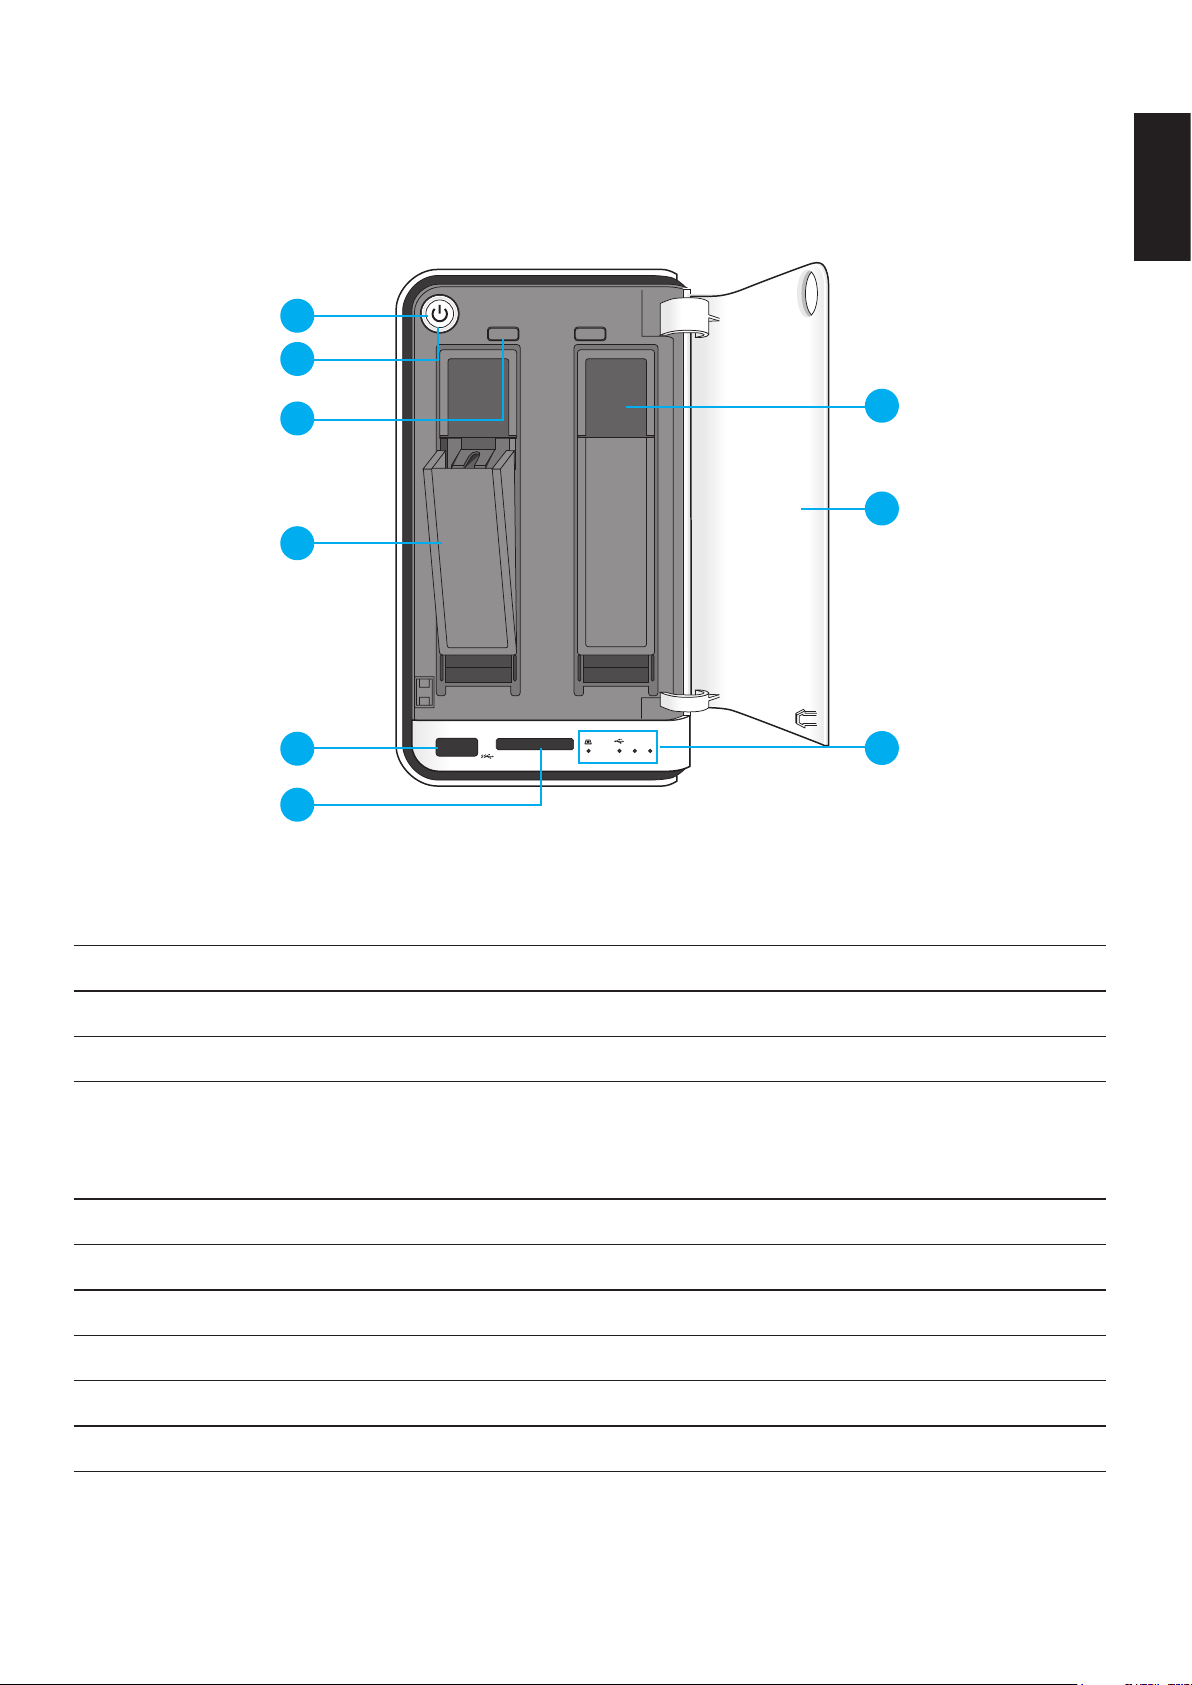
Front View
21
2 1
4
5
6
7
8
9
1
2
3
OMNINAS Front View
Front View Identication
Item DescrIptIon
1 Power Button
2 Status LED, see LED Denitions
3
HDD removal buttons (2 = HDD2, 1 = HDD1)
Note:
For RAID 1 conguration only.
4 HDD tray release
5 USB 3.0, auto copy supported only through this port
6 SD card reader, auto copy supported only through this port
7 HDD bay (HDD1 is on the right and HDD2 is on the left)
8 Bay cover
9 LED indicators, see LED Denitions
English
1-5
Product views Product overview
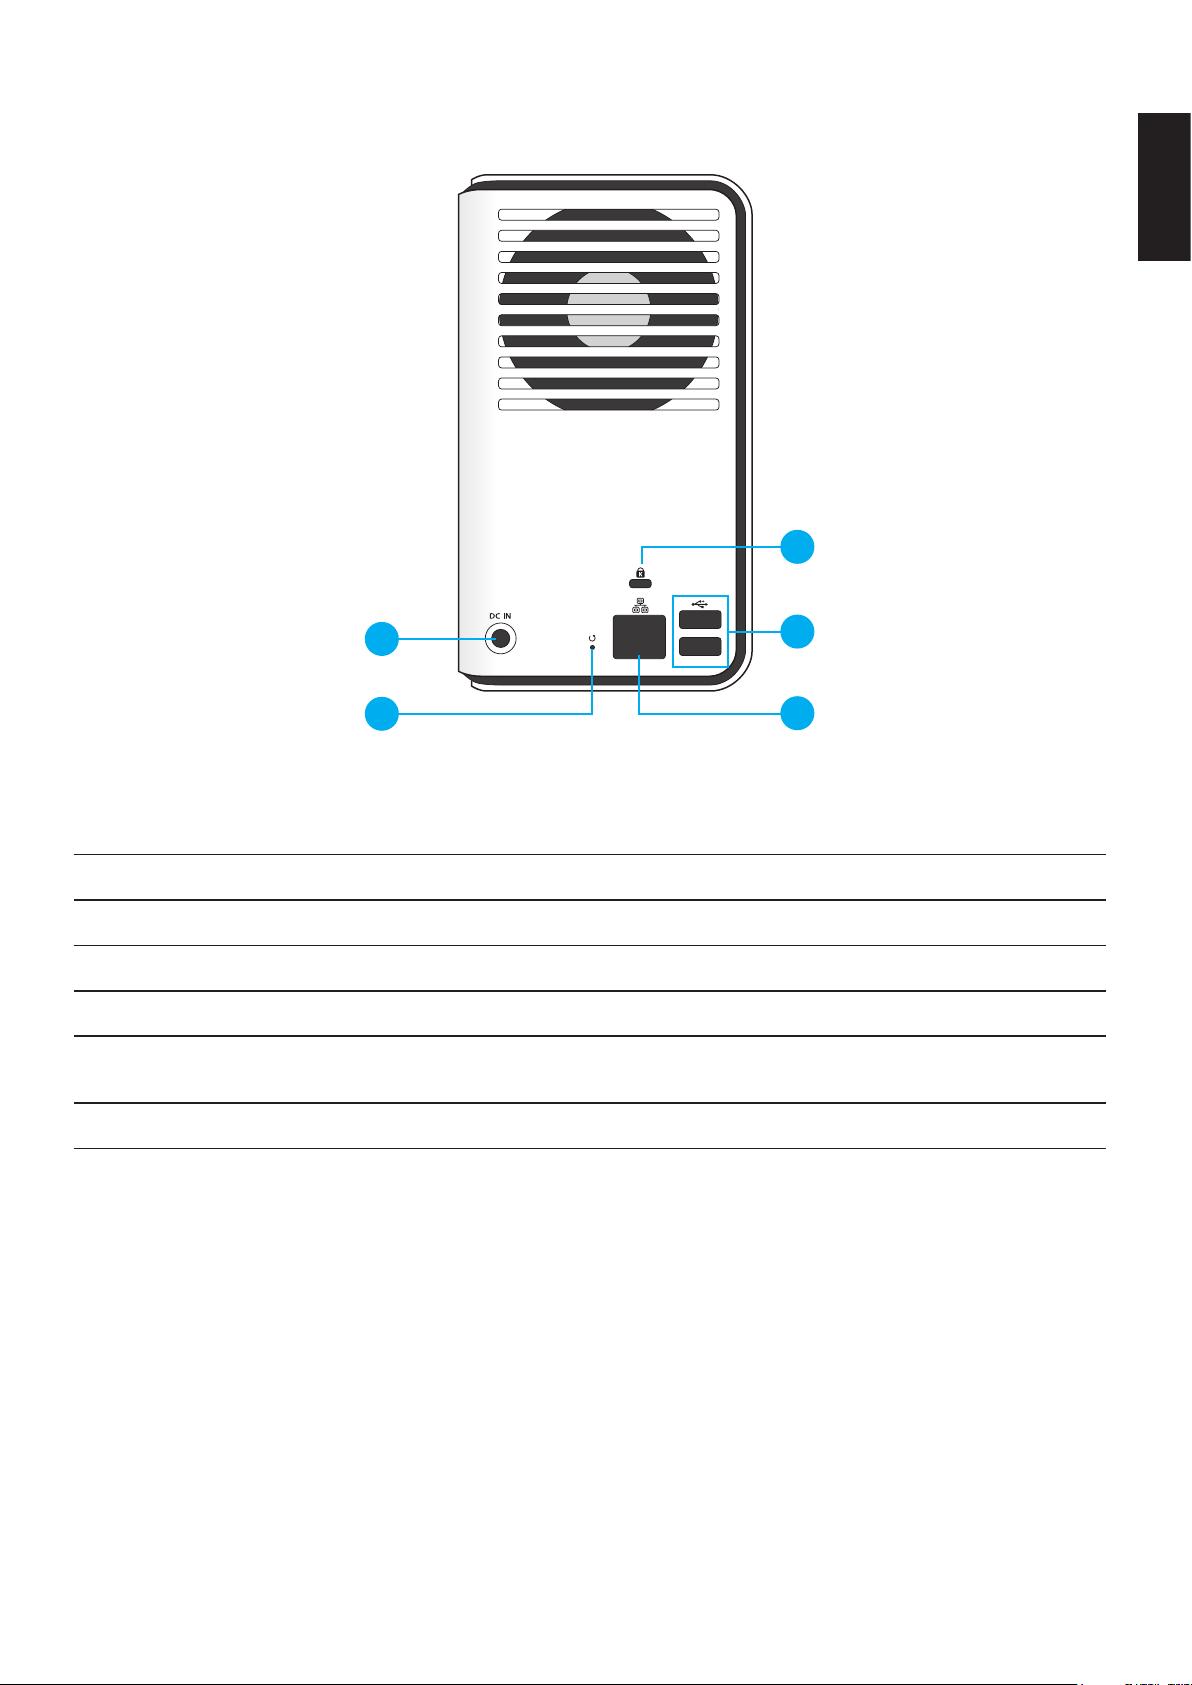
Rear View
1
2
3
4
5
OMNINAS Rear View
Rear View Identication
Item DescrIptIon
1 DC IN, power jack
2 Reset button
3 K-Lock security slot
4
USB 2.0 x 2
(port 2 is in the upper position port 3 is in the lower position)
5 LAN Port
English
1-6
Product views Product overview
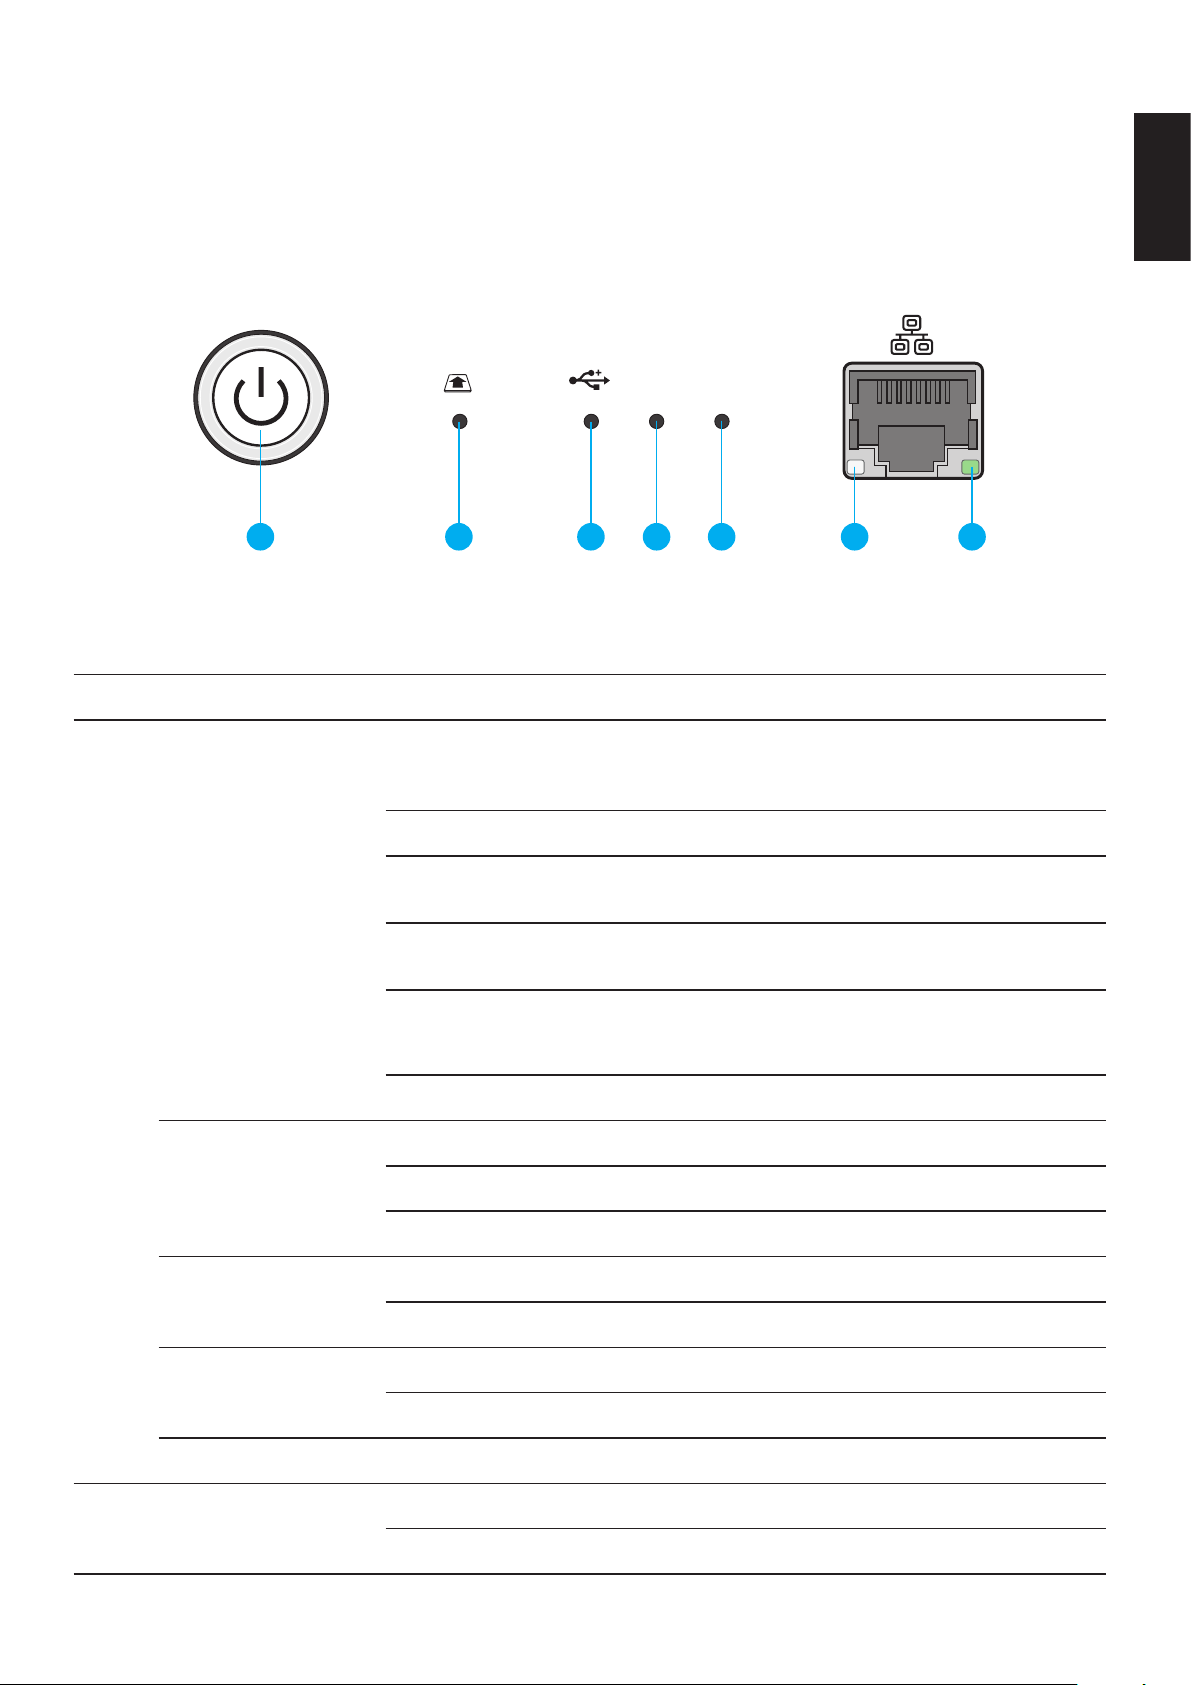
LED Denitions
The OMNINAS comes with six LED indicators (ve in front and one in back). See the following
table for behavior and location descriptions.
21
1 2 3 4 5 6 7
(Rear)
LED Indicators on Front Panel
LED Denitions
Item name color/conDItIon DescrIptIon
1
Status LED
Blue / Blinking / Audible Beep
System in booting sequence
System in shut down sequence, audible
beep x 1
Blue / Solid on / Audible Beep System boots successfully, powered on
Red / Blinking / Audible Beep
System fails to boot
Audible beep x 3
Red / Blinking / Audible Beep
System fails to acquire IP address
Audible beep x 3
Blue / Pulsing
System in power savings mode. Power
saving time setting is adjustable in Set-
tings | General menu.
Off
Web UI LED status
Blue / Blinking Web UI in booting sequence
Blue / Solid on / Audible Beep Web UI is available
Red / Blinking / Audible Beep Web UI failure, audible beep x 3
Backup status LED
Blue / Solid on / Audible Beep Backup successful, audible beep x 3
Red / Blinking / Audible Beep Backup failure, audible beep x 3
Auto copy status LED
Blue / Solid on / Audible Beep Copy successful, audible beep x 3
Red / Blinking / Audible Beep Copy failure, audible beep x 3
Reset status Blue / Blinking / Audible Beep Reset in progress, audible beep x 1
2 SD card status
Blue / Blinking / Solid on Active, auto copy access
Off

English
1-7
Product views Product overview
Item name color/conDItIon DescrIptIon
3 USB status
Blue / Solid on Plugged in / printer connection
Blue / Blinking / Solid on Active, auto copy access
Off
4 HDD 2 status
Blue / Solid on HDD access
Blue / Blinking / Audible Beep RAID1 selected, audible beep x 1
Red / Solid Failure
Red / Blinking HDD2 rebuilding
Off Not detected
5 HDD1 status
Blue / Solid on HDD access
Blue / Blinking / Audible Beep RAID1 selected, audible beep x 1
Red / Solid Failure
Red / Blinking HDD1 rebuilding
Off Not detected
on rear sIDe
6 LAN/Speed LED
Green / Solid on Link speed is 100 Mbits/sec.
Amber / Solid on Link speed is 1000 Mbits/sec.
Off Off or link speed is 10 Mbits/sec.
7
LAN/Link (Activity)
LED
Green / Solid on LAN link
Green / Blinking LAN access
Off Disconnected

Chapter 2
Getting Started

English
2-1
Hardware installation GettinG started
Hardware Installation
This section includes information to help you install the hard drives in the OMNINAS before you
can begin using your storage device.
First Instance
The following guidelines provide information for rst time installation of your OMNINAS. Before
you can get started on the conguration and setup, you will need to install hard drives on your
device.
IMPORTANT:
To prevent data loss or damage to the system, power down your device before removing a
HDD.
1. If your system is not powered down, press the Power button for three (3) seconds until an
audible beep sounds and the LED starts to blink.
2. On the bay cover, press in the indicator to open the cover. The cover pops open.
3. Extend the cover to allow access to the HDD trays.
21
2 1
Opening the HDD Bay Door

English
2-2
Hardware installation GettinG started
4. Pull the tray release to unlock the hard disk tray. The HDD slides out if undocked.
Tray release
HDD1 Tray Released
5. Grasp the tray and slide it out.
Bottom side of tray
Removing the HDD1 Tray
6. Place the tray on a clean surface.
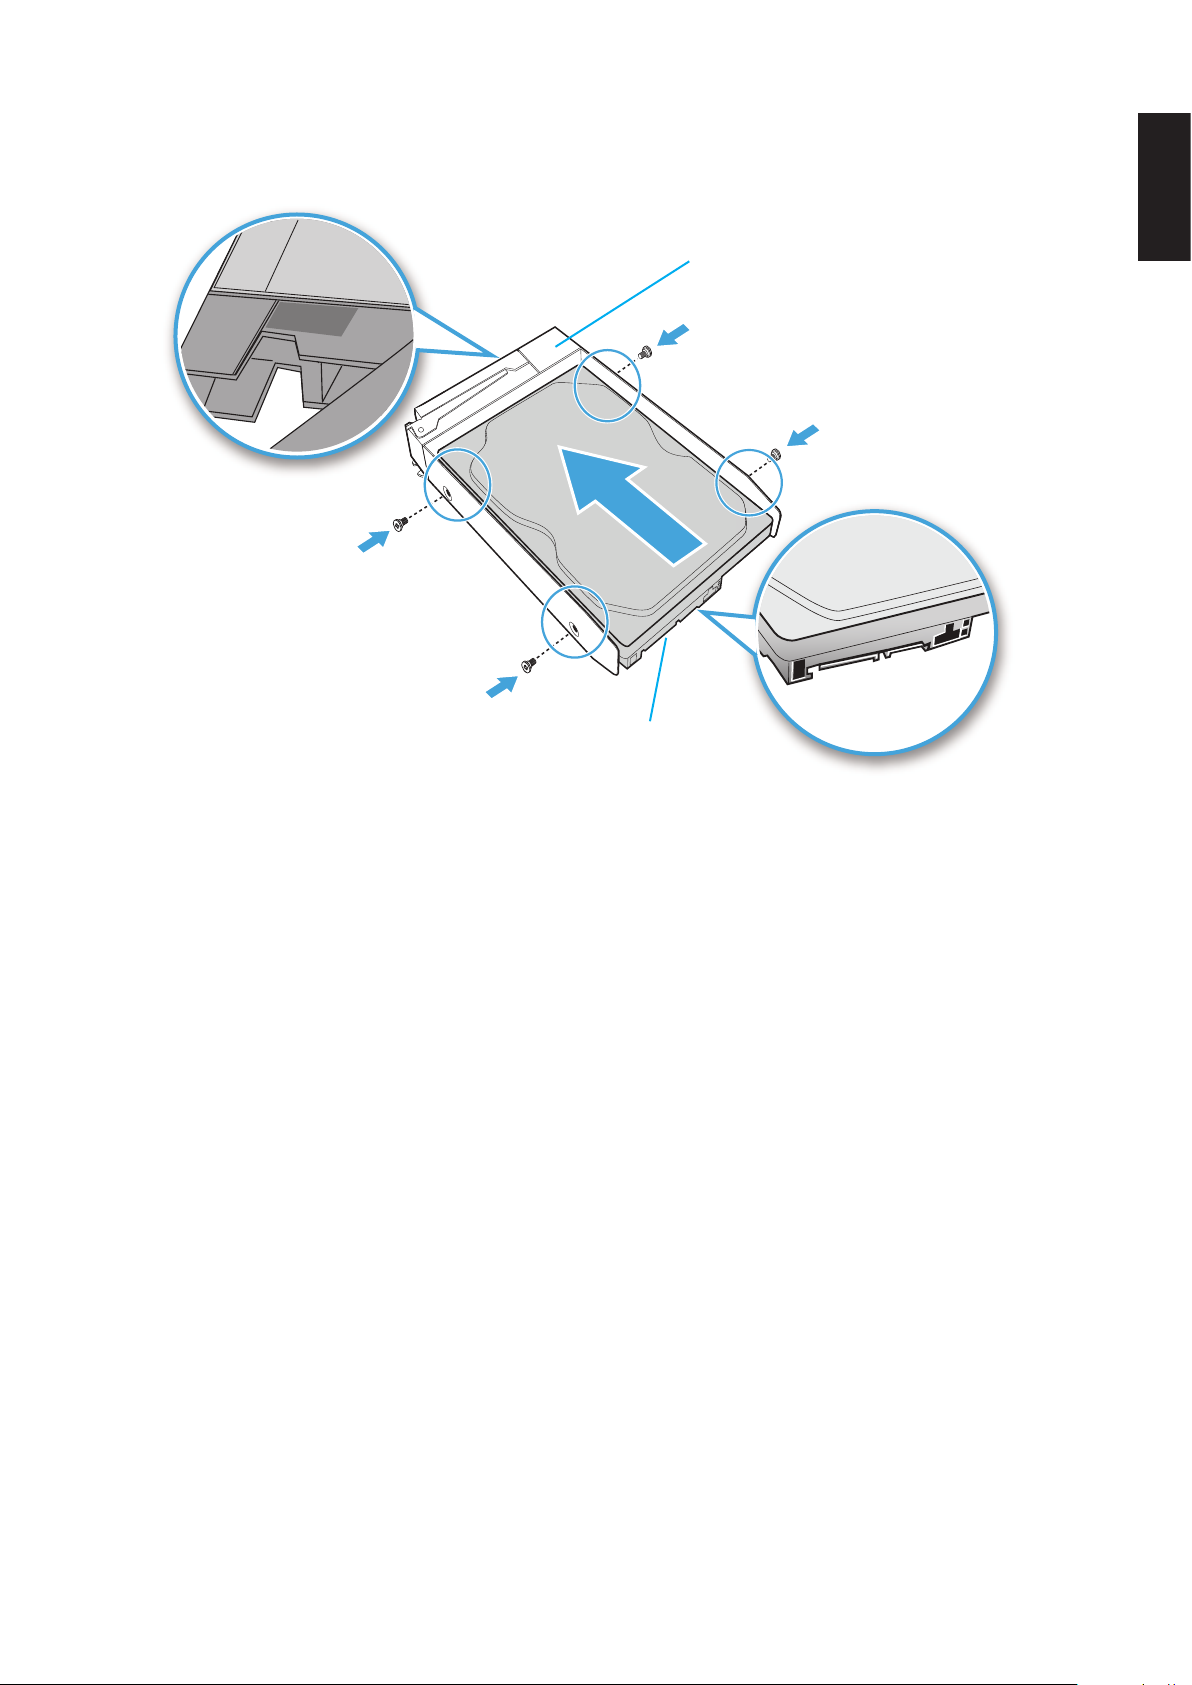
7. Position the HDD as indicated in the following illustration.
Make sure the new HDD is facing up and the connectors are positioned outward.
English
2-3
Hardware installation GettinG started
8. Insert the new HDD into the tray.
9. Secure with the provided screws.
HDD1
Front side
HDD connectors
Securing the HDD Screws
10. Turn the HDD assembly over making sure the This side up label is facing up, see follow-
ing gure.
English
2-4
Hardware installation GettinG started
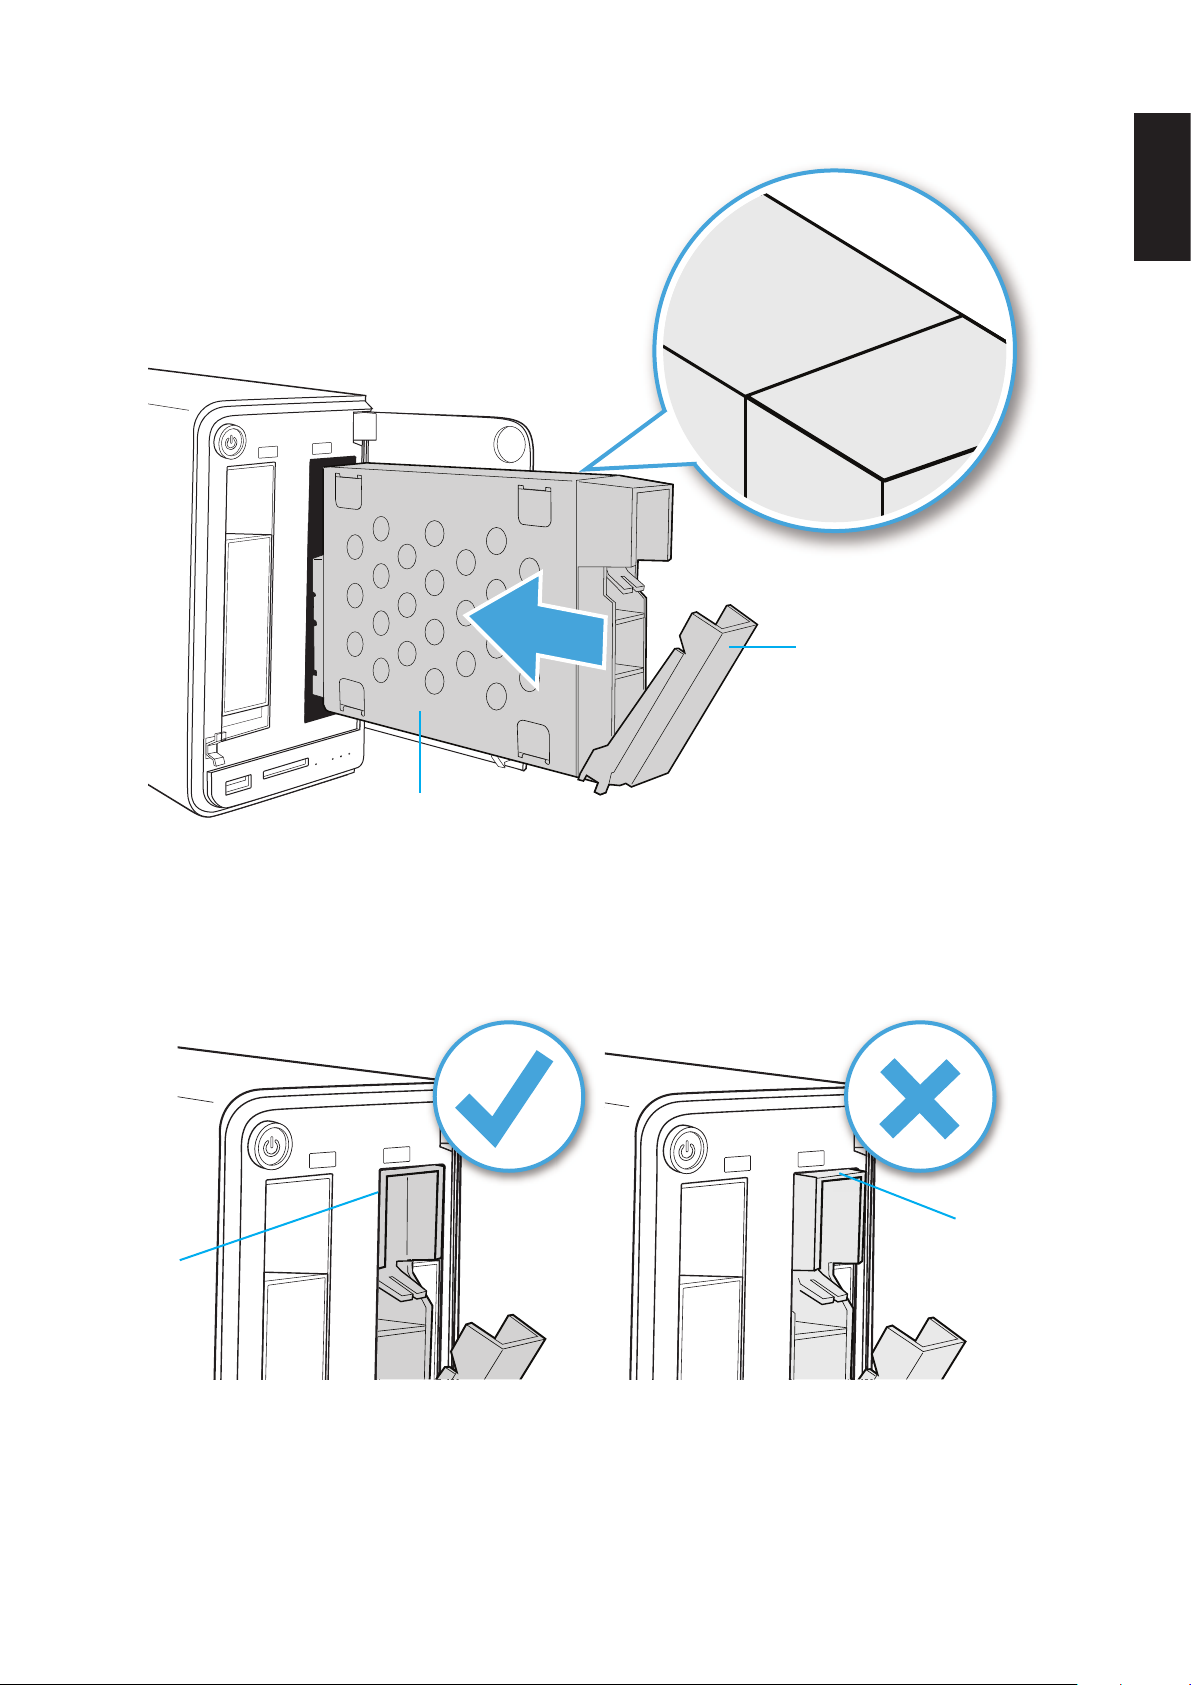
11. Slide the HDD assembly into place until it is ush in the bay.
This side up
Tray release
Bottom side of tray
Installing the HDD Tray Assembly
WARNING:
HDD tray must be ush with the bay, see following illustration.
Correct
position
Incorrect
position
HDD Installation Position
English
2-5
Hardware installation GettinG started
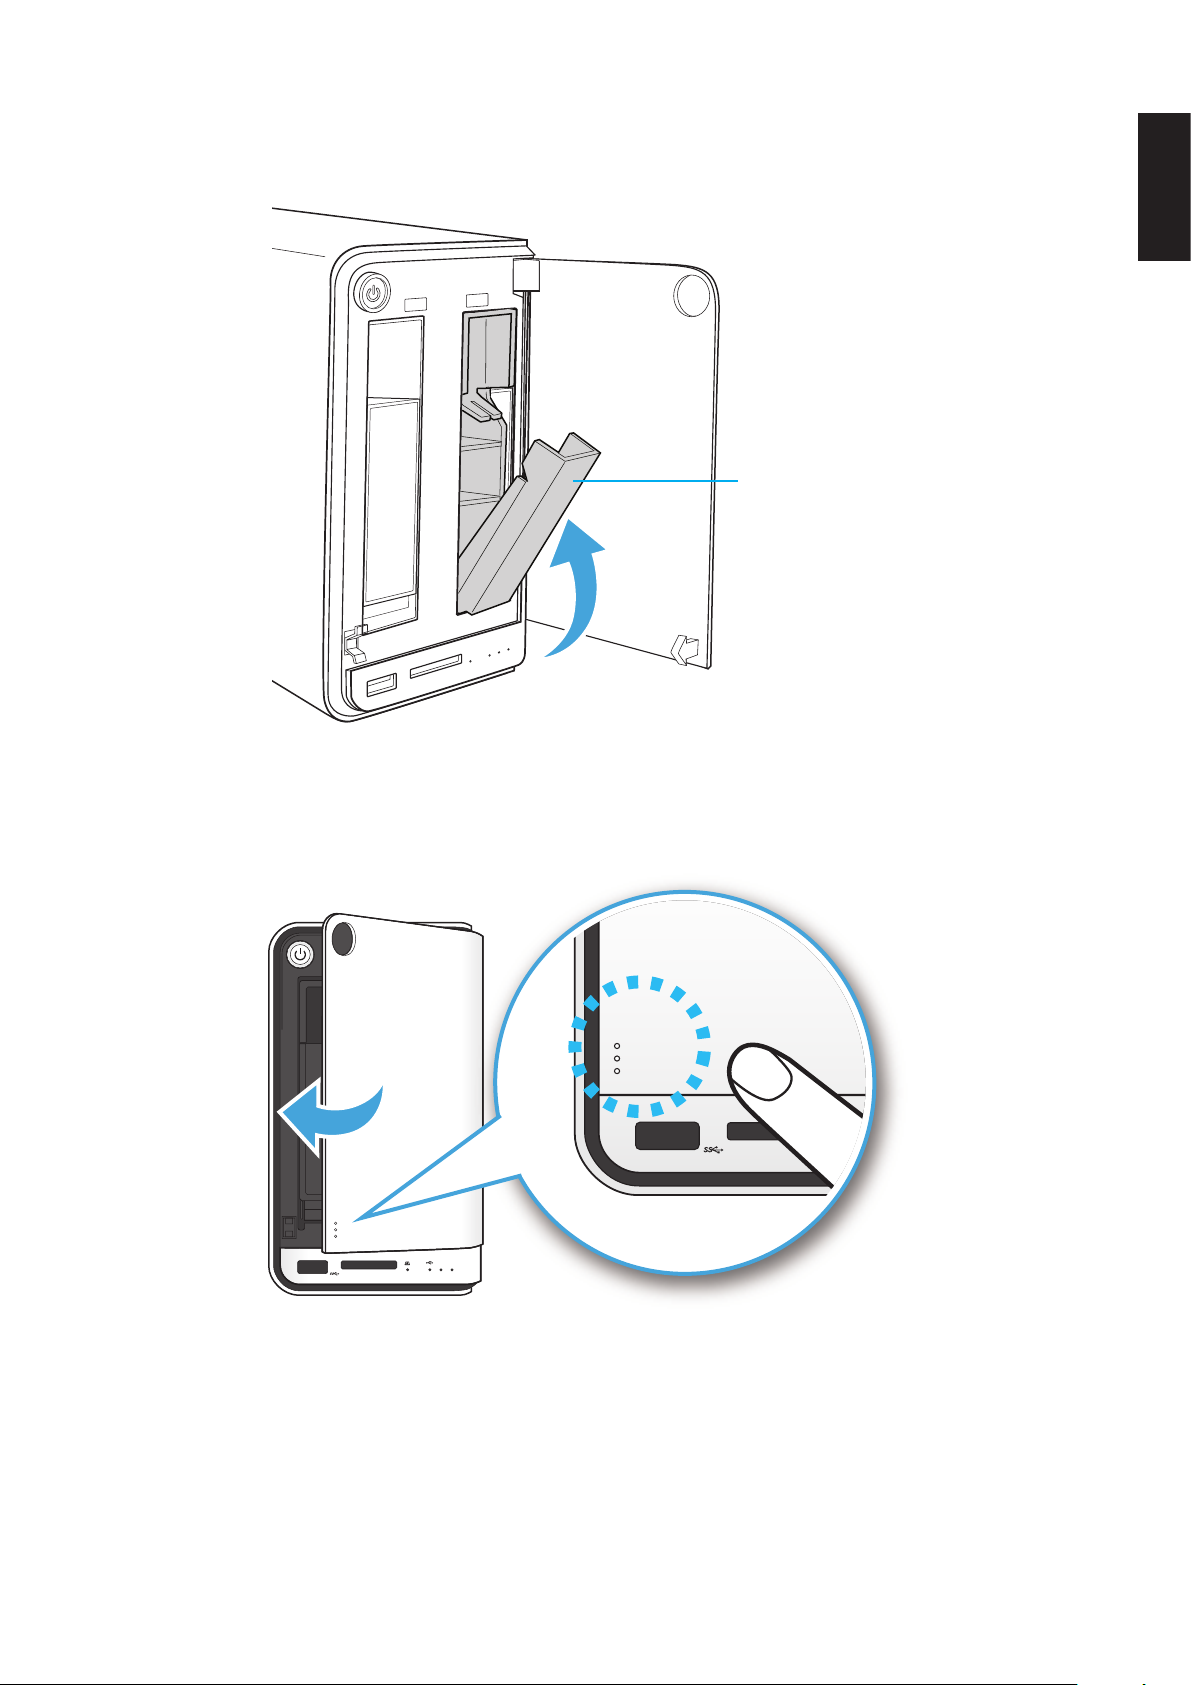
12. Raise the tray release to lock the HDD assembly. An audible click sounds when the tray is
locked.
Tray release
Locking the HDD Assembly
13. Close the bay cover.
21
2 1
Closing the HDD Bay Cover
14. To install a second hard disk drive, repeat the previous instructions.
Your system is now ready to connect your local network. See Connecting the Ethernet Port.
English
2-6
connectinG tHe oMninas GettinG started
Connecting the OMNINAS
Connecting the Ethernet Port
The OMNINAS must be congured and setup before use. Two connection methods are support-
ed:
• Switch/router to OMNINAS
• Direct PC/laptop to OMNINAS
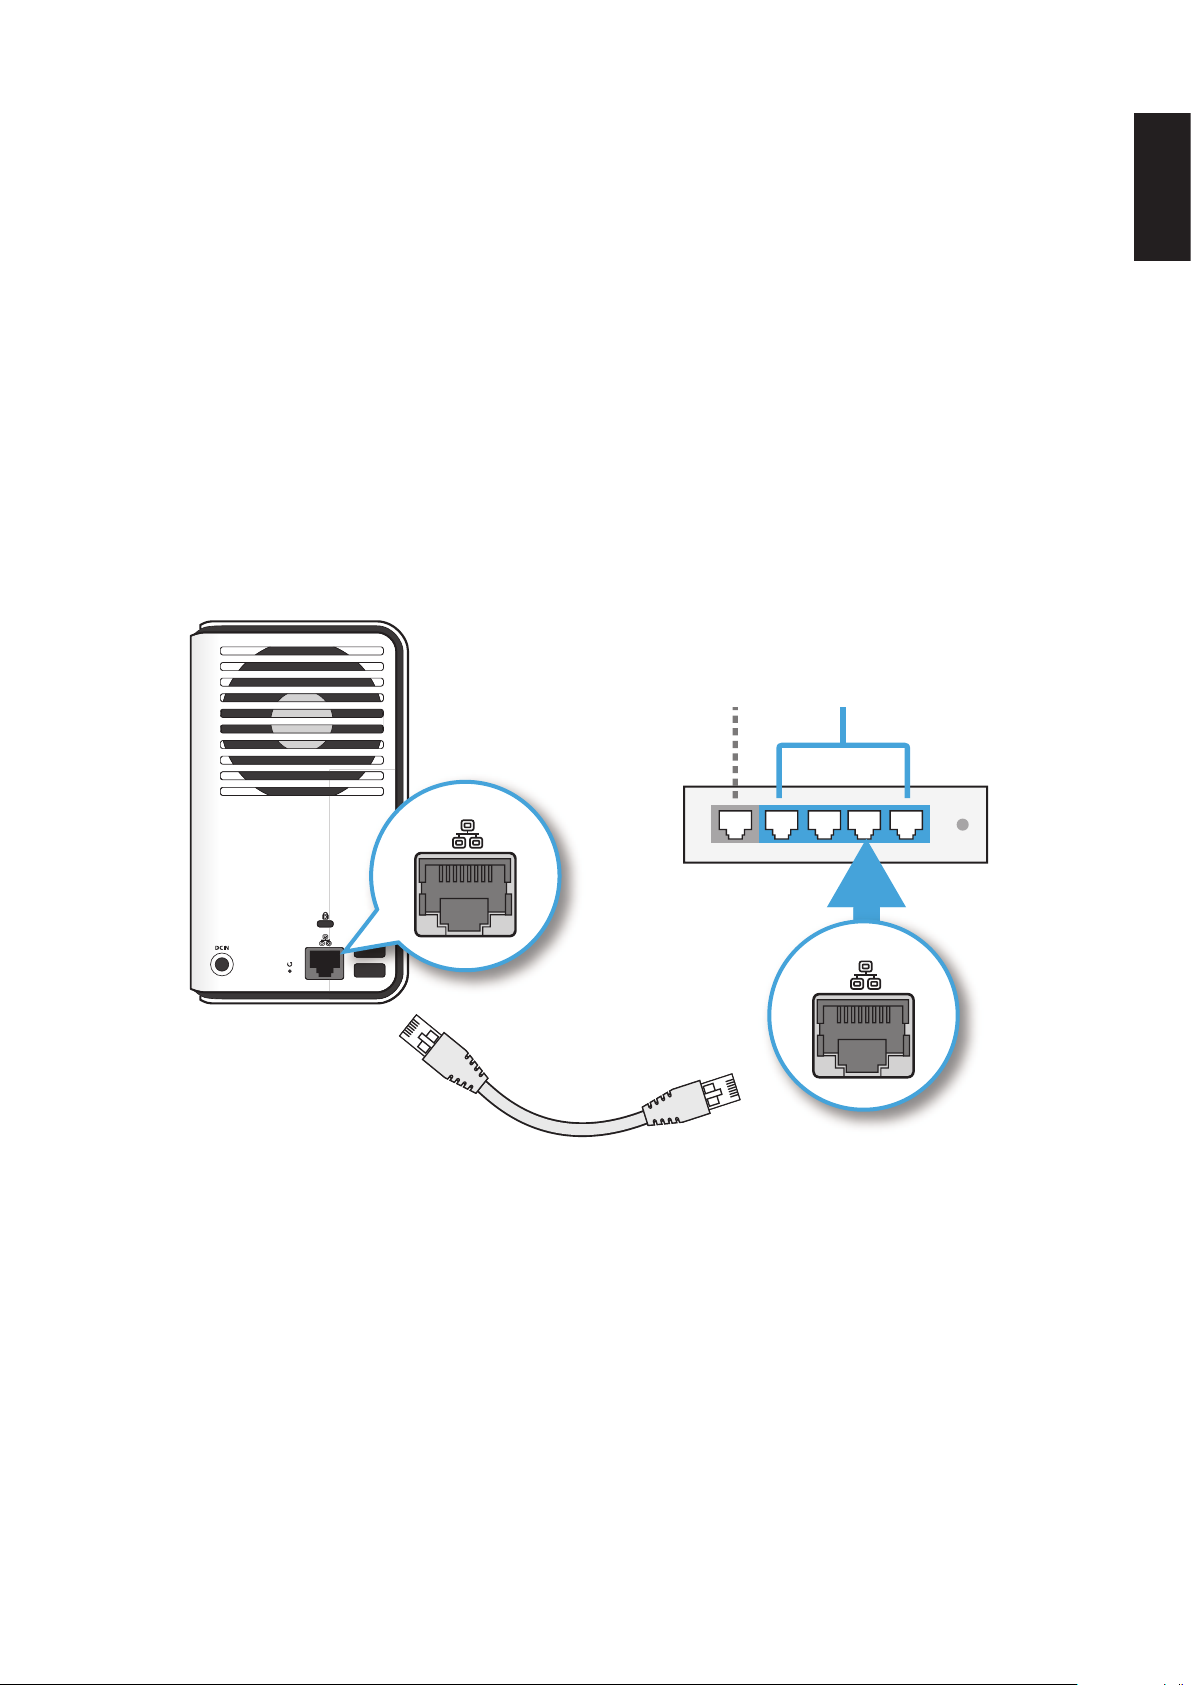
Connect to a Switch or Router
1. Connect one end of the provided LAN cable to the LAN port on the OMNINAS.
2. Connect the other end to a LAN port on the DHCP enabled router, see following gure.
LANWAN
LAN
LAN
Connecting to a Router
Your OMNINAS is now ready for powering on. See Connecting to Power.

English
2-7
connectinG tHe oMninas GettinG started
Connect Directly to a PC or Laptop
1. Set your PC/Laptop’s IP settings to match the network subnet group of the OMNINAS.
Example:
OMNINAS default IP settings: 169.254.100.200
Congure your PC to these settings: 169.254.XX.X (Whereas XX represents a number
from 1 to 254, and X represents a number from 1 to 254 other than 200).
2. Connect one end of the LAN cable to the OMNINAS.
3. Connect the other end to your PC, see following gure.
LAN
PC
Laptop
LAN
Connecting to a PC/Laptop
English
2-8
connectinG tHe oMninas GettinG started
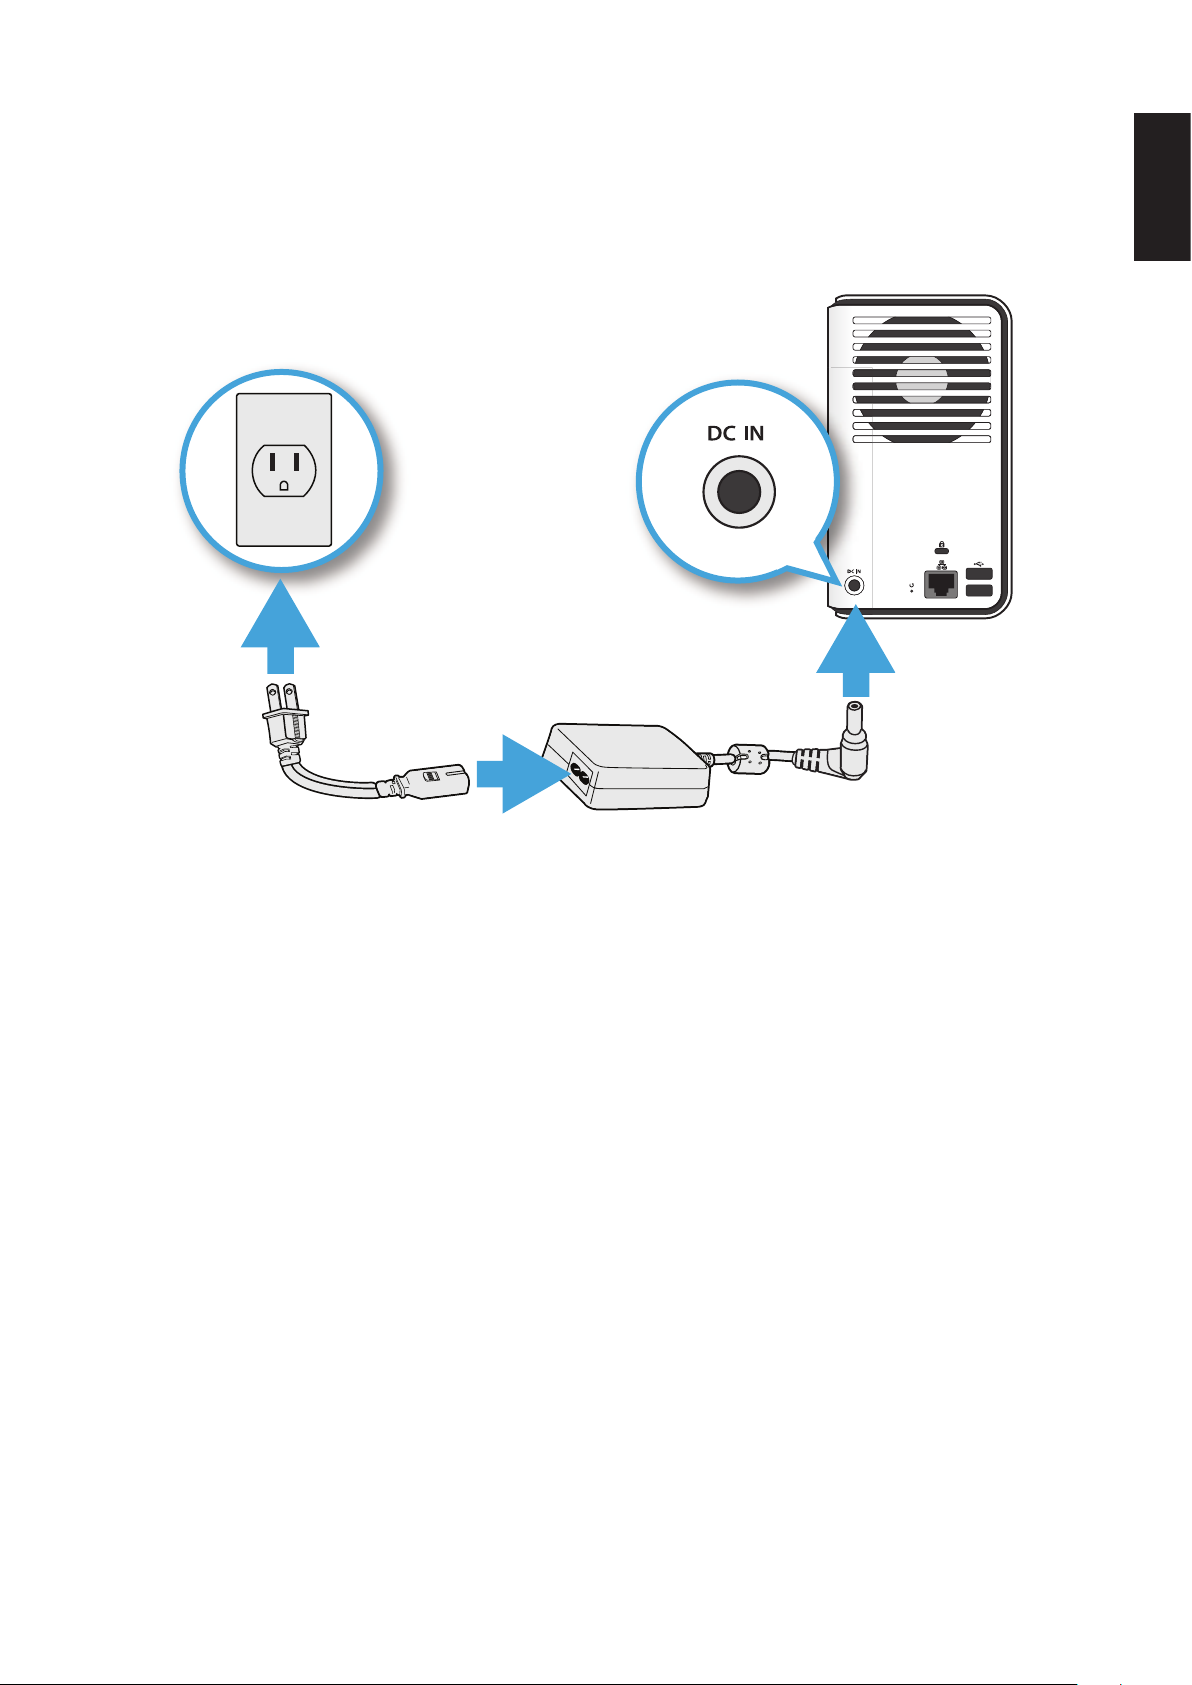
Connecting to Power
1. Connect the power jack to the back of the OMNINAS (DC IN).
2. Connect one end of the power cable to the supplied power adapter, and the other end to a
wall outlet. See the following gure.
Connecting the Power Adapter
Note:
The Power Adapter diagram depicts a typical wall socket. Your region may use a different
socket type.
Your OMNINAS is ready to be powered on. See Powering On.
CAUTION:
Do not use inferior extension cords as this may result in damage to your OMNINAS. The
OMNINAS comes with its own AC adapter. Do not use a different adapter to power the
OMNINAS and other electrical devices.
Note:
The power adapter may become warm to hot when in use. Be sure not to cover the adapter
and keep it away from your body.
English
2-9
connectinG tHe oMninas GettinG started
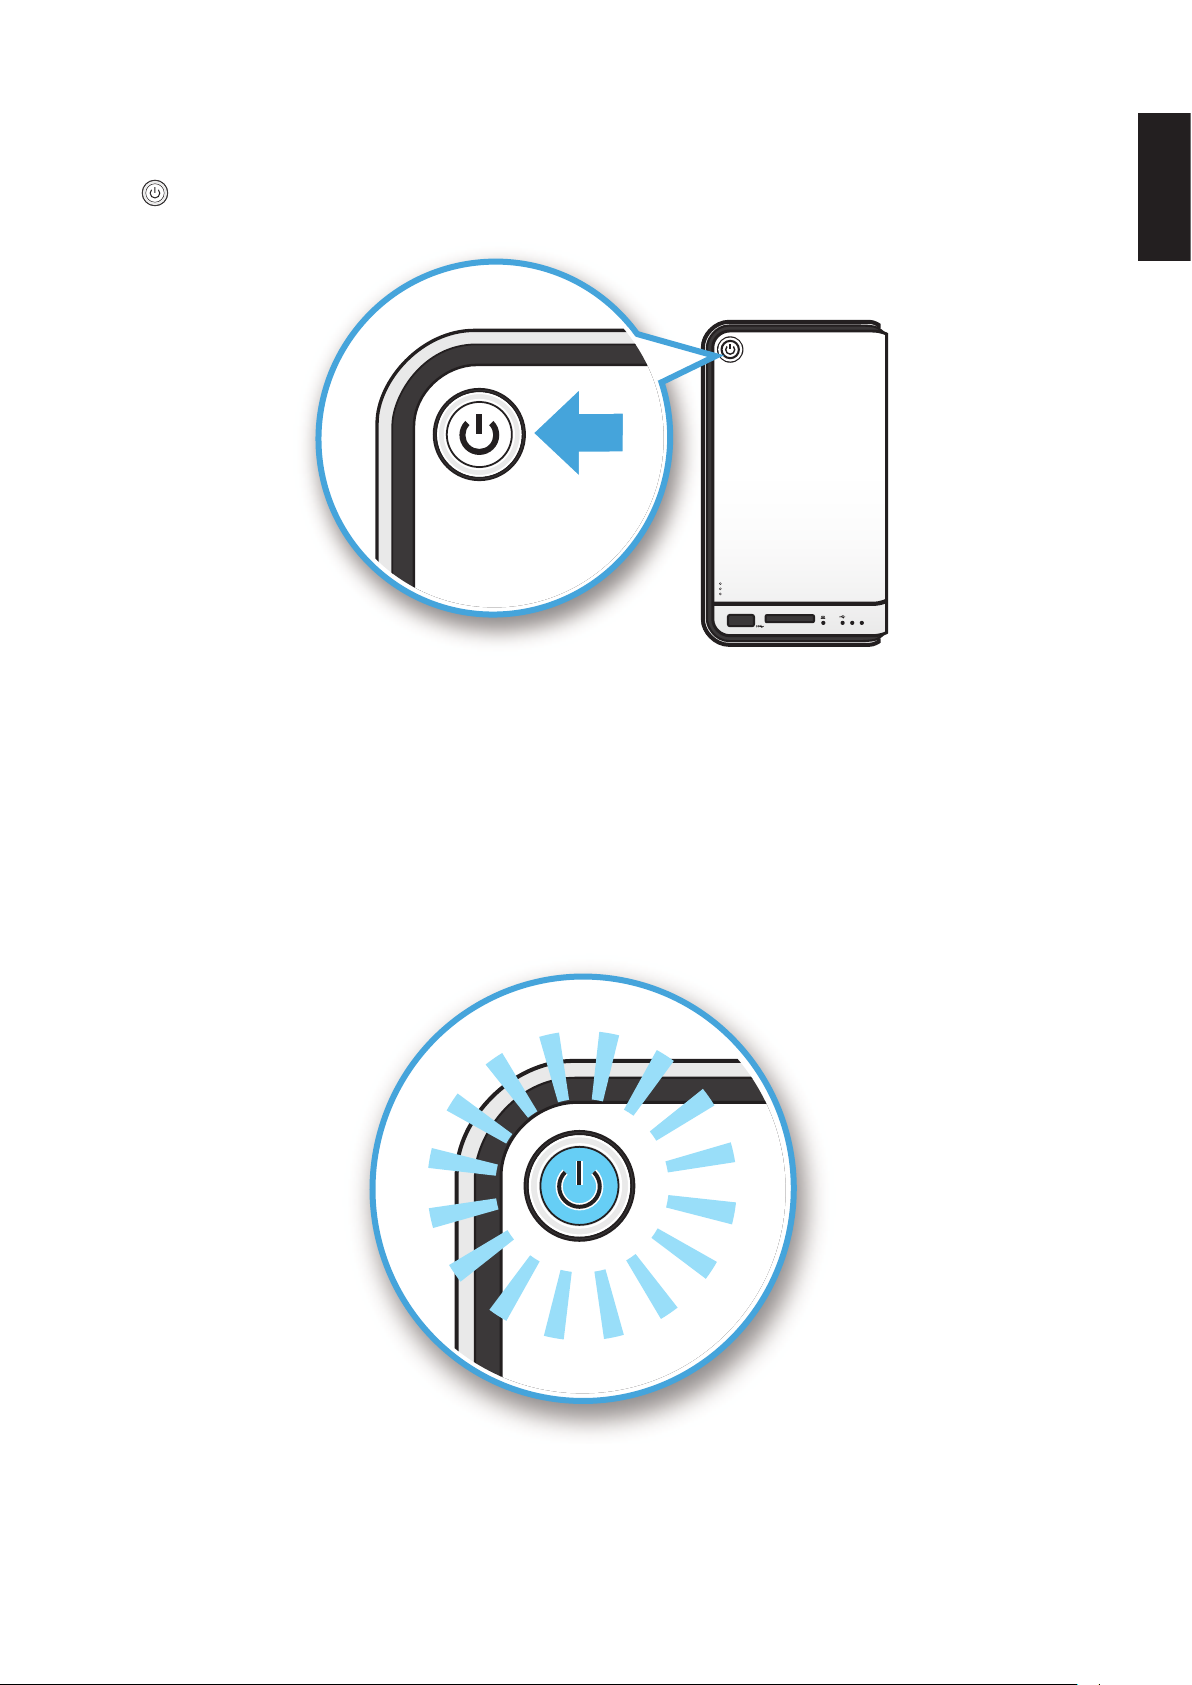
Powering On
Press to power on. The status LED starts to blink. This process may take 1 to 2 minutes.
21
Pressing Power Button
A blinking LED species that the system is in the powering-on state. A solid LED species that
the OMNINAS has obtained an IP address from the router (DHCP connection). See LED Deni-
tions for further information.
In the event of a Red Blinking LED state, the system has failed to obtain an IP address from the
router. The system settings reverts to the default xed IP address (169.254.100.200).
Status LED Display During Boot

English
2-10
connectinG tHe oMninas GettinG started
The HDD LEDs for any installed HDDs also light. See LED Denitions for further information.
21
21
HDD LEDs
Note:
In the event of failure or improperly installed HDDs, the HDD LEDs blink red. Additionally,
the Finder utility displays a power off message, see the following.
Finder Utility Displaying HDD Failure
The OMNINAS is now ready for setup and conguration. Connect the system to your network by
using the Finder Utility.
Connecting Your OMNINAS
After setting up the hardware and connecting the ethernet port, you will need to congure and
initialize the type of mode to use. To get you started quickly and easily, the OMNINAS Finder util-
ity (Windows and Mac users only) is provided so you can quickly connect your OMNINAS. Linux
users proceed to Connecting by Web Browser.
Once a device is detected, information from your OMNINAS, such as: Domain name, IPv4 ad-
dress, Mac address and rmware version is displayed on the main page.
The Finder Utility is available on the provided CD or for download from the following location:
http://global.shuttle.com/download/download
Note:
Linux users connect to the OMNINAS interface through the web browser and not the Finder
utility. Proceed to Connecting by Web Browser..

English
2-11
connectinG tHe oMninas GettinG started
Finder Utility
OMNINAS Finder Utility
Finder Utility Dened
moDe DescrIptIon
Search Click to manually detect devices connected within the same network subgroup.
Connect
Click to access the login screen of the selected device. The web interface of the
device displays through your default browser.
Map Network Drives
Click to create a network shortcut to the selected folder. Once connected, you can
access the shortcut from your computer or Windows Explorer.
Delete Network Drives Click to delete the selected network shortcut (mapped folder).
About Click to view OMNINAS Finder Utility information, display purposes only.
Help Click to open a browser window displaying the OMNINAS help menu.
Exit Click to exit the OMNINAS Finder Utility.
OMNINAS Finder utility is used to detect devices on the local network (same subnet) or to
directly access your device through a web browser (See Connecting by Web Browser).
English
2-12
connectinG tHe oMninas GettinG started
System Initialization
Linux users go to Connecting by Browser to continue the setup process.
Windows and Mac users follow the information provided in the following section to continue the
setup process.
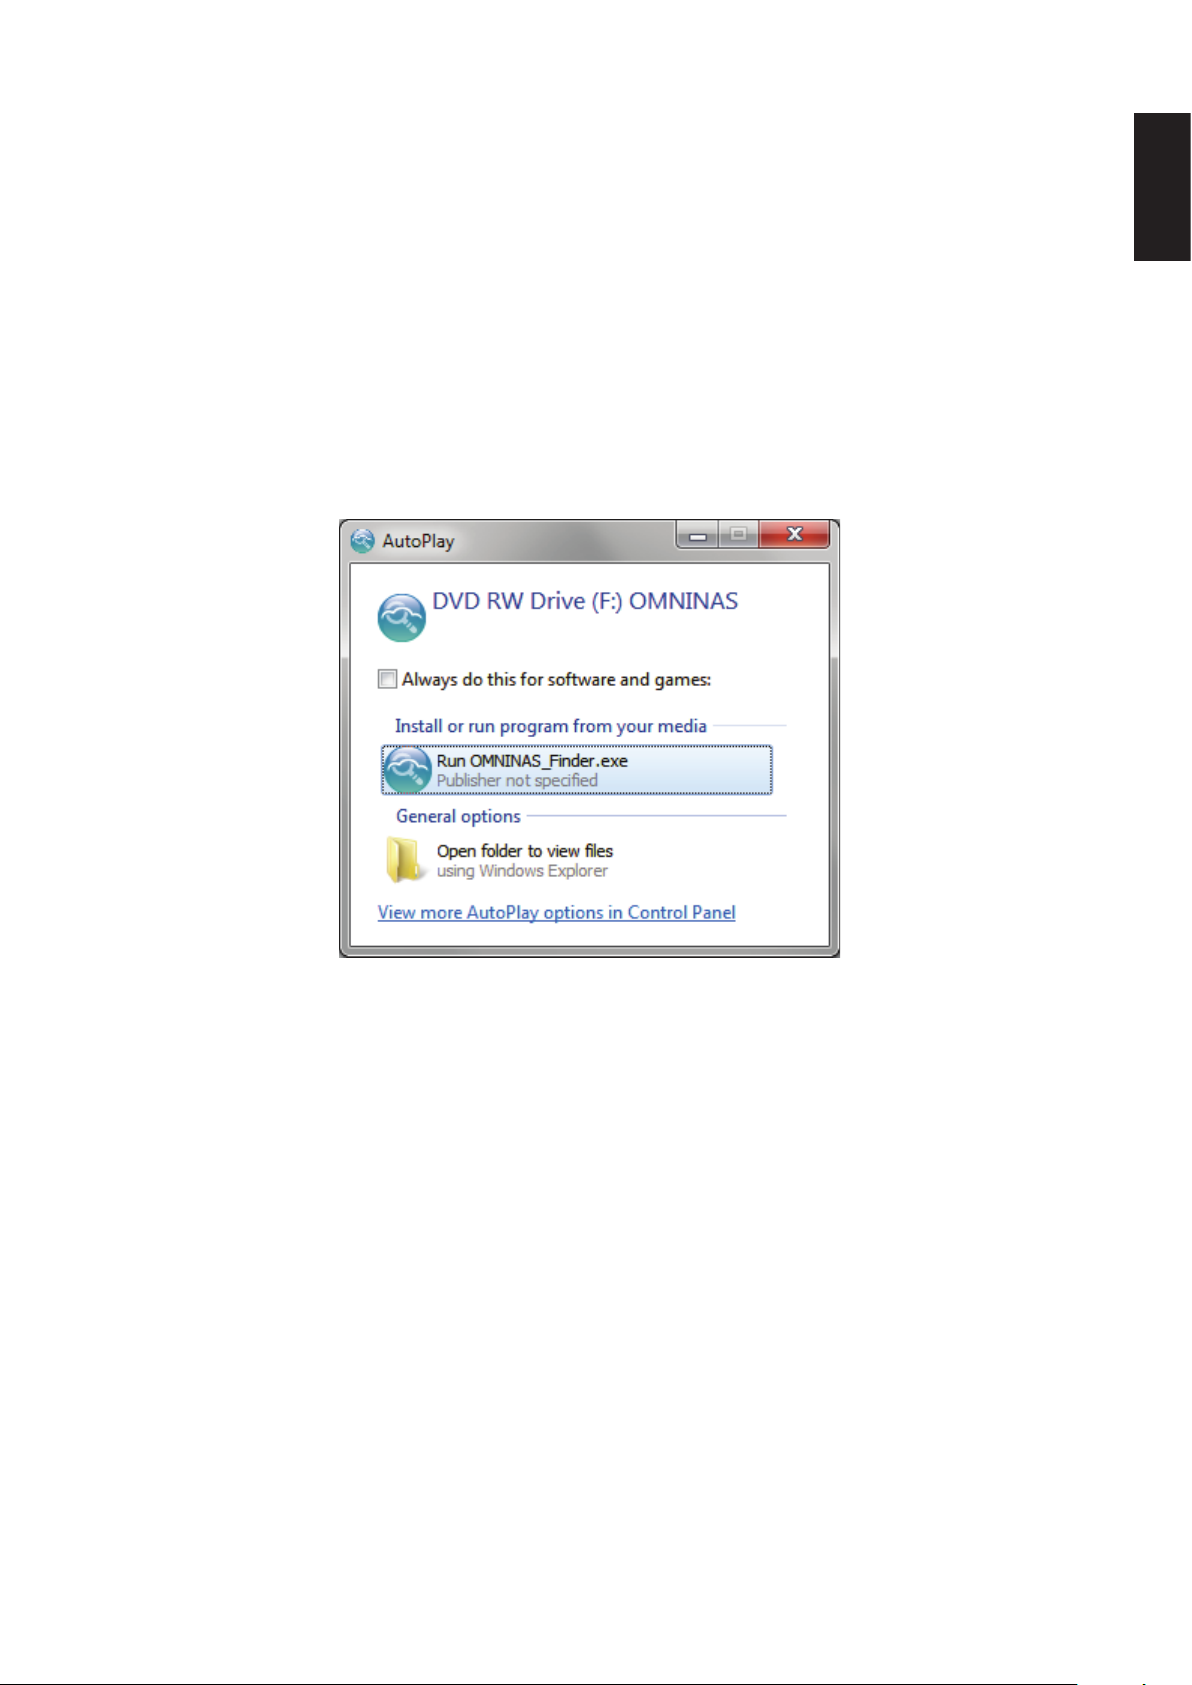
1. Insert OMNINAS CD-ROM into your CD drive.
Note:
Windows 7 users may get an AutoPlay prompt as follows. Select
Run OMNINAS Finder.exe to continue the process.
Windows 7 AutoPlay Prompt
Note:
If the selected language in the Setting Language does not match your computer system’s
settings, the OMNINAS Finder Utility reverts to English by default.
 Loading...