

Page 1
1 2 3 4
RMCE-BT2
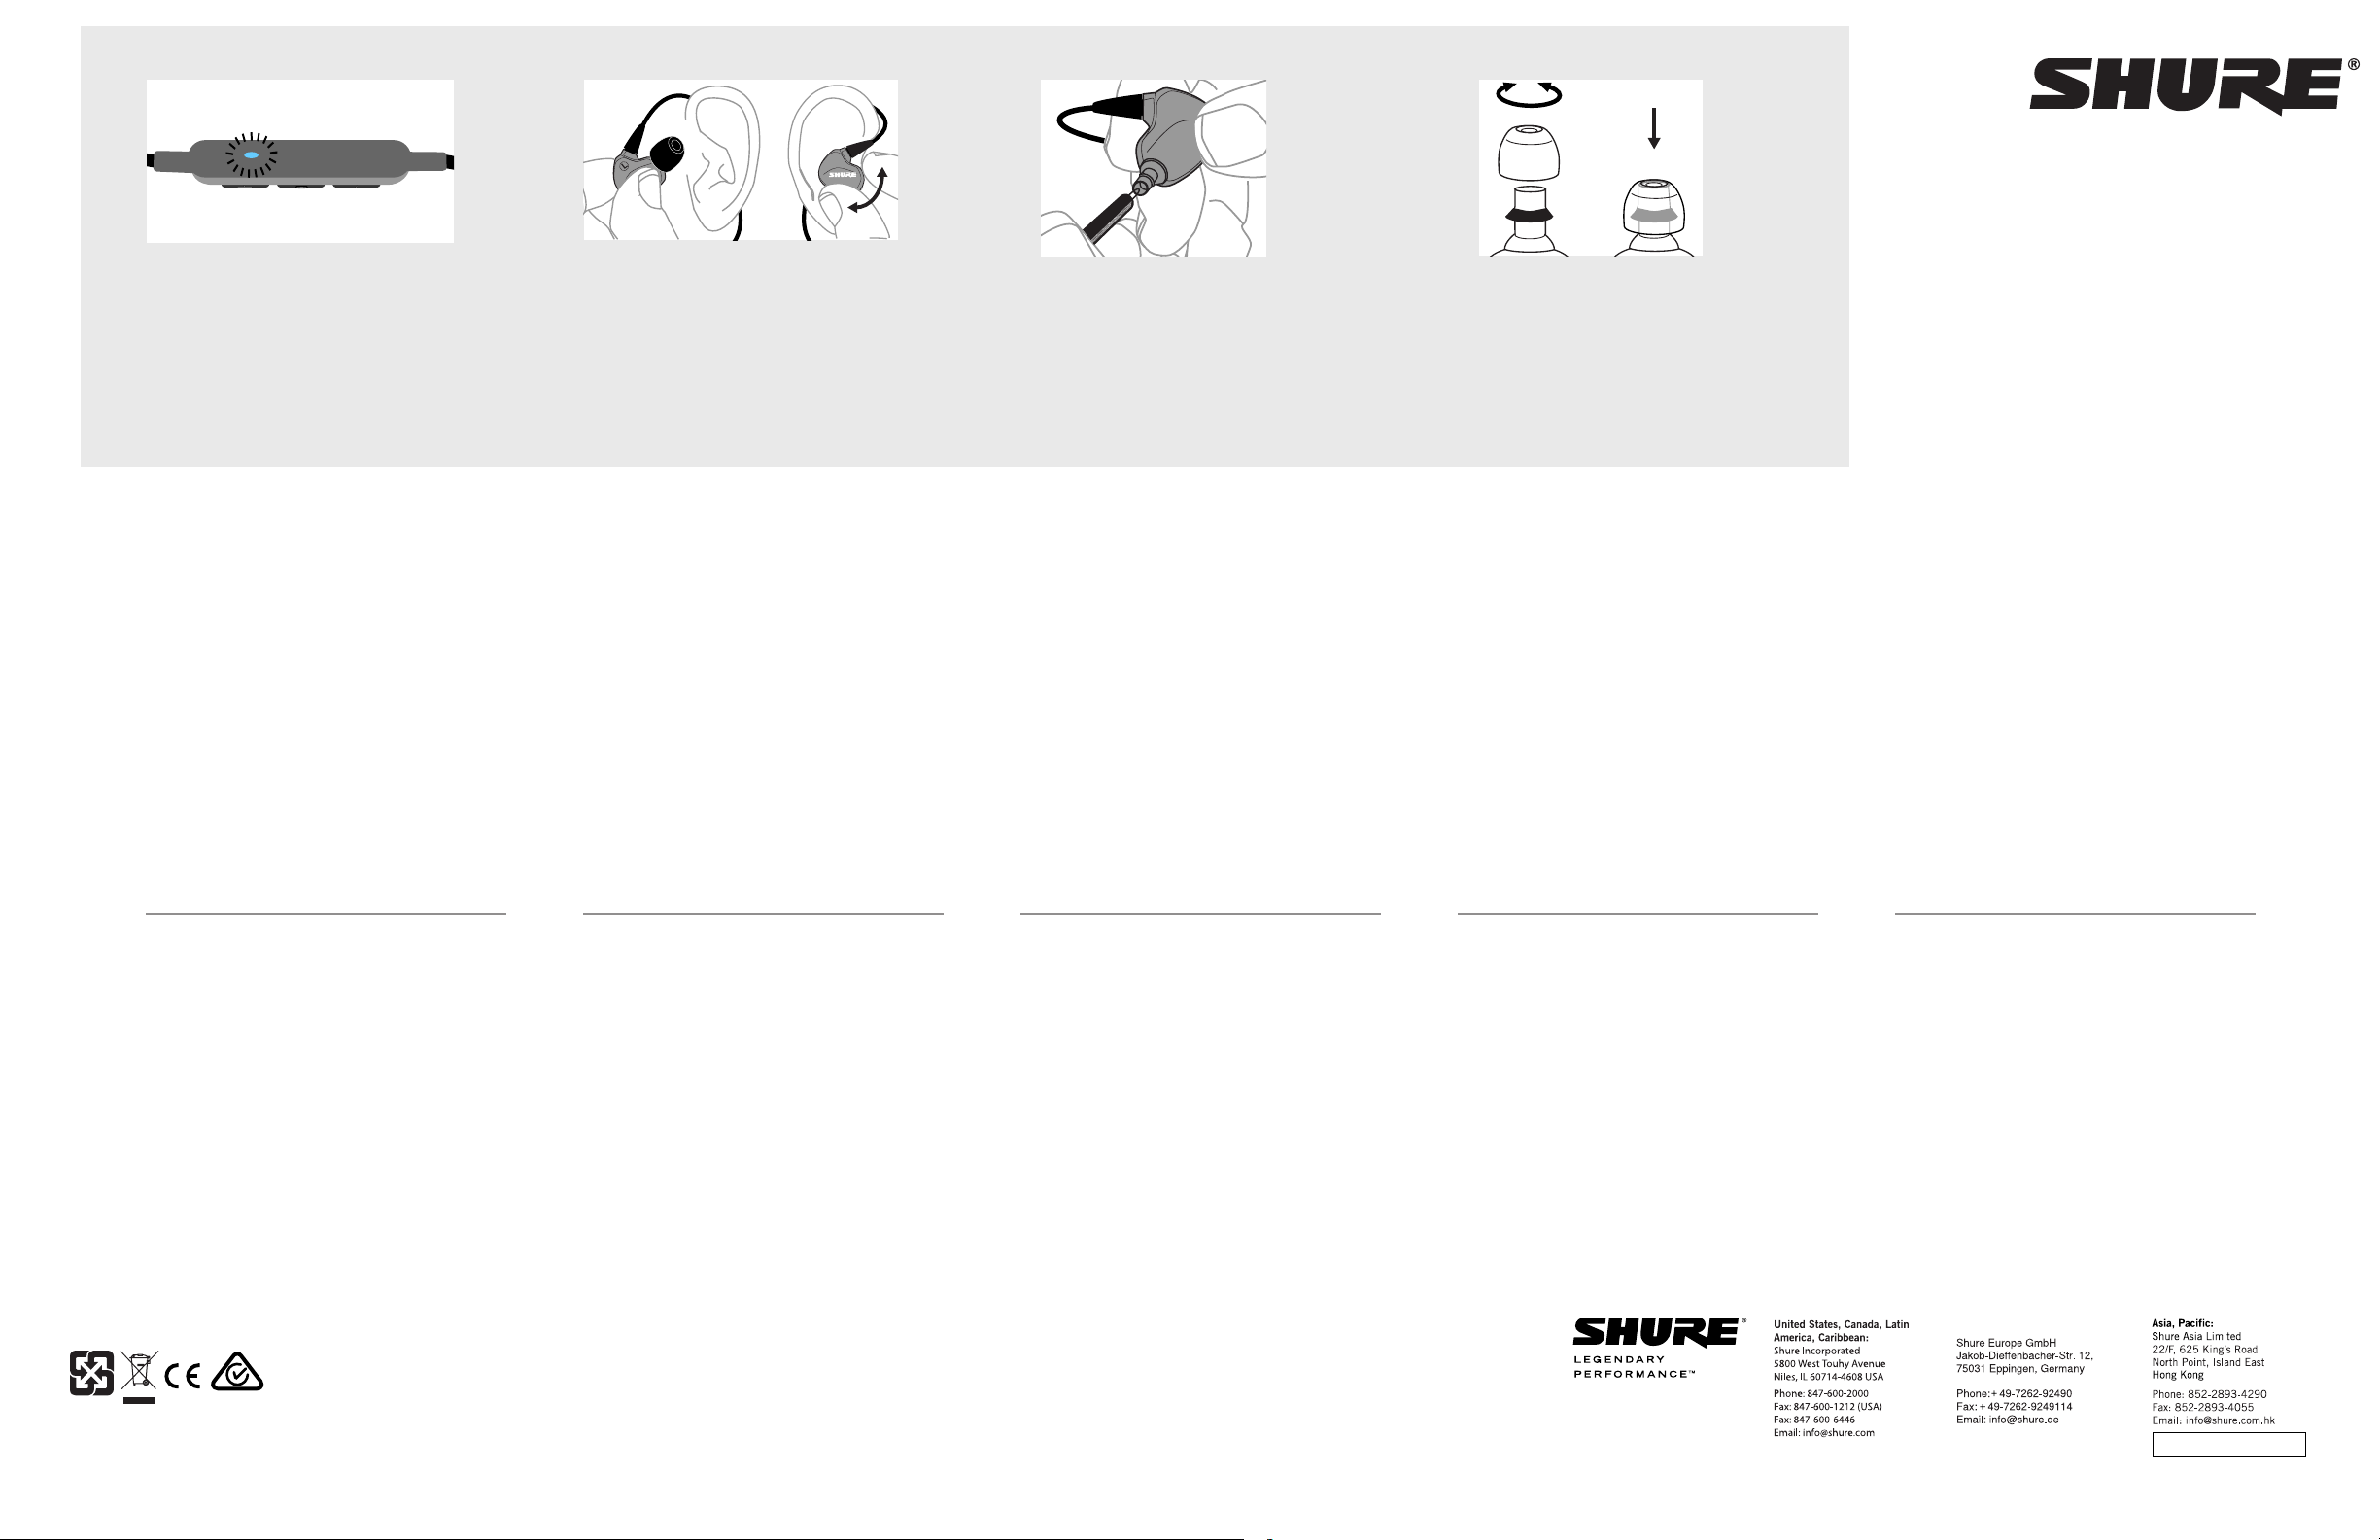
Bluetooth Pairing
1. Turn off the earphones. Press and hold
the center button on the earphone remote
until the LED flashes blue and red.
2. From your audio source, select "Shure BT2."
3. When successfully paired, the LED turns blue. Now
your device will recognize the paired earphones.
For any pairing issues, start the process again.
For additional pairing methods, please visit http://www.shure.
com/earphones.
Écouteurs
Appariement Bluetooth
1. Éteindre les écouteurs. Appuyer sans relâcher sur le
bouton central de la télécommande des écouteurs jusqu’à
ce que la LED clignote en bleu et en rouge.
2. Sélectionner « Shure BT1 » pour la source audio.
3. La LED devient bleue une fois l’appariement réussi.
Pour plus d’informations sur l’appariement, voir www.shure.com/earphones.
Il n’y a pas de son de qualité sans confort
2
• Sélectionner l’insert le mieux adapté (comme pour des bouchons d’oreille).
• Placer le câble derrière l’oreille pour former un joint étanche.
Pour qu’ils continuent de diffuser un son de qualité...
3
• Les nettoyer régulièrement pour éliminer les débris et les dépôts.
• Contacter le service Réparations & Pièces détachées de Shure pour remplacer
un produit endommagé.
Remarque : Certains modèles d’écouteurs Shure sont équipés d’un câble amovible
à connecteur MMCX pour un remplacement plus facile. Détacher simplement les
écouteurs et les renvoyer au service Réparations & Pièces détachées de Shure.
Changement des inserts
4
• Tourner et tirer délicatement pour retirer l’insert.
• Installer un insert neuf pour recouvrir complètement la butée et l’embout.
Aller sur le site www.shure.com/earphones pour commander des pièces de
rechange ou pour consulter des informations de nettoyage et d’entretien
importantes.
®
The best sound starts with a good fit
• Select the sleeve that provides a snug fit (like earplugs).
• Secure the cable behind the ear to maintain a tight seal.
To keep them sounding their best...
• Clean regularly to remove debris and deposits.
• Contact Shure Service and Repair to replace damaged
product. Simply detach and return the broken earpiece for
easy replacement.
Changing Sleeves
• Gently twist and pull to remove sleeve.
• Install the new sleeve so it completely covers the barb
and nozzle.
Visit http://www.shure.com/earphones for replacement parts
and important instructions on cleaning and maintenance.
Visit www.shure.com/earphones for replacement parts and important instructions on cleaning and maintenance.
Auriculares Fones Auriculares イヤホン 耳机
Sincronización Bluetooth
1. Apague los auriculares. Mantenga oprimido el botón del centro en la unidad
remota de los auriculares hasta que el LED destelle en color azul y rojo.
2. Desde su fuente de audio, seleccione “Shure BT1”.
3. El LED se vuelve azul cuando se sincroniza correctamente.
Para obtener opciones adicionales de sincronización visite www.shure.com/
earphones.
El mejor sonido comienza con un buen ajuste
2
• Seleccione la funda que proporciona un calce ceñido (como tapones para
oídos).
• Asegure el cable detrás de la oreja para mantener un sello hermético.
Para mantenerlos sonando lo mejor posible...
• Limpie regularmente para eliminar los residuos y los depósitos.
• Comuníquese con Servicio y Reparación de Shure para reemplazar el
producto dañado.
Nota: algunos modelos de auriculares de Shure cuentan con un cable desmontable
con conexión MMCX para el reemplazo fácil. Simplemente desenganche y
devuélvalo a Servicio y reparación de Shure.
Cambio de las fundas
• Gire suavemente la funda y tire de ella para quitarla.
• Coloque una nueva funda para que cubra completamente la punta.
Visite www.shure.com/earphones para obtener información sobre el reemplazo de
partes e instrucciones importantes de limpieza y mantenimiento.
®
Pareamento Bluetooth
1. Desligue os fones auriculares. Pressione e mantenha pressionado o botão
central no remoto do fone auricular até que o LED pisque em azul e vermelho.
2. A partir de sua fonte de áudio, selecione "Shure BT1".
3. O LED torna-se azul quando o pareamento é bem-sucedido.
Para mais opções de pareamento, visite o site www.shure.com/earphones.
O melhor som começa com um bom encaixe
2
• Selecione o adaptador intra-auricular que forneça um encaixe firme (como
protetores auriculares).
• Prenda o cabo atrás da orelha para manter uma boa vedação.
Para continuar ouvindo o melhor...
33
• Limpe regularmente para remover detritos e depósitos.
• Entre em contato com o Centro de Serviço e Reparo da Shure para substituir
produtos danificados.
Observação: Certos modelos de fones auriculares da Shure apresentam um cabo
destacável com conexão MMCX para uma reposição mais fácil. Apenas destaque-o
e devolva-o para o Centro de Serviço e Reparo da Shure.
Troca dos Adaptadores Intra-Auriculares
44
• Gire suavemente e puxe para remover o adaptador.
• Instale o novo adaptador intra-auricular de forma que ele cubra completamente
a protuberância e o bocal.
Visite o site www.shure.com/earphones para peças de reposição e instruções
importantes quanto à limpeza e manutenção.
®
Bluetooth®ペアリング
1. イヤホンの電源をオフにします。LEDが青と赤で点滅するま
で、イヤホンリモートの中央のボタンを押し続けします。
2. 音源の機器で、「Shure BT1」を選択します。
3. ペアリングに成功するとLEDが青の点灯となります。
その他のペアリングオプションについては、www.shure.com/earphonesをご覧
ください。
良い音を得るにはフィットが重要です
2
• タイトなサイズのイヤパッドを選びます(耳栓のように)。
• ケーブルを耳の後ろに回して耳がふさがれた状態を保てるようにします。
最高の音質を保つには...
• 汚れがたまらないよう定期的こ掃除してください。
• 製品が損傷した場合は、Shureサービスセンターに修理・交換を依頼してく
ださい。
注:多くのShureイヤホンのモデルは、簡単に交換できるMMCXコネクター付きの
取り 外し可能ケーブルを採用しています。取り外してShureサービスセンターに修
理・交換を依頼できます。
イヤパッドの交換
4
• イヤパッドはそっとねじりながら外します。
• 抜け止め部とノズルが完全に隠れるように、新しいイヤパッドを装着します。
交換部品およびクリーニングとメンテナンスに関する重要な情報については、
www.shure.com/earphonesをご覧ください。
蓝牙®配对
11111
1. 关闭耳机。按住耳机遥控器上的中间按钮,直至LED闪动蓝色和红色。
2. 从音频源中选择 “Shure BT1”。
3. 成功配对时,LED 变为蓝色。
有关其他配对选项,请访问 www.shure.com/earphones。
好的声音音始于合适佩戴
2
• 选择可以舒适佩戴的耳塞套。
• 将线缆固定在耳朵后方以维持密封。
日常保养以维持好的音质
33
• 定期清洁,去除碎屑和沉积物。
• 联系 Shure 服务和维修部以更换损坏的产品。
注意:某些型号的 Shure 耳机采用带 MMCX 连接的可拆卸线缆,以便进行更换。只
需拆下并返回给舒尔服务和维修部。
更换耳塞套
4
• 轻轻旋转并拉动以取下耳塞套。
• 套上全新的耳塞套,直至将防脱环和导管完全罩住。
如需了解更换部件以及有关清洁和维护的重要说明,请访问 www.shure.com/
earphones。
Bluetooth® Earphones
Bluetooth®-Kopplung
1. Die Ohrhörer ausschalten. Die mittlere Taste an der OhrhörerFernsteuerung gedrückt halten, bis die LED blau und rot blinkt.
2. Von der Audioquelle „Shure BT1“ auswählen.
3. Die LED wechselt auf blau, wenn die Kopplung erfolgreich war.
Weitere Kopplungsoptionen lassen sich im Internet unter www.shure.com/
earphones finden.
Der beste Sound beginnt mit einem guten Sitz
2
• Das Ohrpassstück auswählen, das einen passgenauen, festen Sitz bietet (wie
Ohrstöpsel).
• Das Kabel hinter dem Ohr fixieren, um einen dichten Verschluss beizubehalten.
Damit sie ihre beste Klangqualität bewahren...
3
• Regelmäßig reinigen, um Schmutz und Ablagerungen zu entfernen.
• Mit dem Shure-Reparaturservice Kontakt aufnehmen, um ein beschädigtes
Produkt auszutauschen.
Hinweis: Bestimmte Modelle von Shure-Ohrhörern verfügen für den einfachen
Austausch über ein abnehmbares Kabel mit MMCX-Anschluss. Einfach abnehmen
und an den Shure-Reparaturservice einsenden.
Auswechseln der Ohrpassstücke
4
• Ohrpassstück zum Entfernen behutsam drehen und abziehen.
• Das neue Ohrpassstück anbringen, sodass das Schallröhrchen völlig bedeckt
ist.
Zu Ersatzteilen und wichtigen Reinigungs- und Pflegeanweisungen www.shure.
com/earphones besuchen.
© 2018 Shure Incorporated
27A39259 (Rev. 1)
Printed in China
Ohrhörer Auricolari Наушники 이어폰 Earphone
Associazione Bluetooth
1. Spegnete gli auricolari. Tenete premuto il pulsante centrale sul telecomando
degli auricolari finché il LED non lampeggia di luce blu e rossa.
2. Dalla sorgente audio, selezionate “Shure BT1”.
3. Il LED diventa blu quando l’associazione avviene correttamente.
Per le ulteriori opzioni di associazione, visitate il sito www.shure.com/earphones.
Il suono è migliore con un’aderenza ottimale
2
• Scegliete l’inserto che consenta la massima aderenza (come i tappi per le
orecchie).
• Fissate il cavo dietro l’orecchio per una corretta tenuta acustica.
3
Per garantire una resa sonora ottimale...
• Pulire regolarmente per rimuovere detriti e depositi.
• Per sostituire un prodotto danneggiato, contattate il servizio di assistenza
Shure.
Nota: alcuni modelli di auricolari Shure presentano un cavo scollegabile con
connettore MMCX per facilitarne la sostituzione. È sufficiente scollegare e restituire
gli auricolari al servizio assistenza Shure.
Cambio degli inserti
4
• Ruotate ed estraete delicatamente l’inserto per rimuoverlo.
• Installate il nuovo inserto in modo che ricopra completamente il corpo e l’ugello.
Visitate il sito www.shure.com/earphones per i ricambi e per ottenere istruzioni
importanti riguardanti la pulizia e la manutenzione.
®
Подключение Bluetooth
1. Выключите наушники. Нажмите и удерживайте центральную
кнопку на пульте дистанционного управления наушников,
пока светодиод не начнет мигать красным и синим.
2. На источнике аудиосигнала выберите устройство «Shure BT1».
3. После успешного подключения светодиод загорится синим.
Для получения информации о дополнительных возможностях подключения
перейдите на веб-страницу www.shure.com/earphones.
Наилучший звук начинается с хорошей посадки
2
• Выберите насадку, которая обеспечивает плотную посадку (как беруши).
• Закрепите кабель за ухом, чтобы обеспечить плотное прилегание.
Чтобы поддерживать наилучшее качество звука...
• Выполняйте регулярную очистку от частиц грязи и отложений.
• Для замены поврежденного изделия обратитесь в подразделения
обслуживания и ремонта компании Shure.
Примечание. Некоторые модели наушников Shure оснащены съемным
кабелем с разъемом MMCX для быстрой замены. Просто отсоедините его и
верните в подразделение обслуживания и ремонта компании Shure.
Смена насадки
4
• Слегка поверните и потяните насадку, чтобы снять ее.
• Установите новую насадку таким образом, чтобы она полностью закрыла
шип и наконечник.
Чтобы узнать о сменных деталях или получить важную информацию по очистке
и обслуживанию, перейдите на веб-страницу www.shure.com/earphones.
®
Bluetooth® 페어링
1. 이어폰을 끕니다. LED가 파란색과 빨간색으로 깜박일 때까지
이어폰 리모콘 의 가운데 버튼을 길게 누릅니다.
2. 오디오 소스에서 “Shure BT1”을 선택합니다.
3. 페어링이 완료되면 LED가 파란색으로 바뀝니다.
추가 페어링 옵션은 www.shure.com/earphones 에서 확인하십시오.
최고의 음질은 제대로 된 착용에서 시작됩니다.
2
• 이어플러그와 같이 꼭 맞는 슬리브를 선택합니다.
• 귀 뒤로 케이블을 고정하여 밀폐 상태를 유지합니다.
최상의 음질을 유지하려면...
• 정기적으로 청소하여 이물질 및 퇴적물을 제거하십시오.
• Shure 서비스 및 수리센터에 손상된 제품의 교체를 문의하십시오.
주: Shure 이어폰의 일부 모델은 교체하기 쉽도록 MMCX 연결의 분리형 케이블을
사용합니다. 간단히 분리하여 Shure 서비스 및 수리센터에 반환하십시오.
슬리브 교체
4
• 슬리브를 살짝 돌린 후 당겨서 제거합니다.
• 바브와 노즐이 완전히 덮이도. 새로운 슬리브를 장착합니다.
교체 부품과 청소 및 유지보수에 대한 주요사항은 www.shure.com/earphones 에서
확인하십시오.
Pemasangan Bluetooth
11111
1. Mematikan earphone. tekan dan tahan tombol tengah pada kontrol
jauh earphone sampai LED berkedip biru dan merah.
2. Dari sumber audio Anda, pilih “Shure BT1”
3. LED berubah biru saat berhasil dipasangkan.
Untuk opsi pemasangan tambahan, silakan buka www.shure.com/earphones.
Suara terbaik dimulai dari sesuatu yang pas
2
• Pilih sleeve yang memberikan kenyamanan dan pas (seperti earplug).
• Amankan kabel di belakang telinga untuk menjaga lubang tertutup sempurna.
Agar suara earphone tetap prima...
333
• Bersihkan secara teratur untuk membuang kotoran dan endapan debu.
• Hubungi Servis dan Perbaikan Shure untuk mengganti produk yang rusak.
Catatan: Model earphone Shure tertentu disertai kabel yang dapat dilepas
dengan sambungan MMCX untuk penggantian yang mudah. Cukup lepaskan dan
kembalikan ke Servis dan Perbaikan Shure.
Penggantian Sleeve
4
• Pelintir dan tarik secara perlahan untuk melepas sleeve.
• Pasang sleeve baru sehingga sleeve sepenuhnya melindungi kait dan pipa
pancar.
Buka www.shure.com/earphones untuk penggantian bagian dan petunjuk penting
mengenai pembersihan dan perawatan.
Europe, Middle East, Africa:
®
I.16.GSI31.00501.0211
Page 2
이어폰 충전
빨간색 LED는 배터리 부족을 나타냅니다.
Using the Remote
경고: 충전하기 전에 제품이 10~45°C 범위의 실온에
있음을 확인하십시오.
주: 현지 규정 준수 사항(예: UL, CSA, VDE, CCC,
INMETRO)을 충족하는 기관 에서 승인 한 전원
공급장치에서만 이 제품을 사용하십시오.
Power on Press and hold
Power off Press and hold, 5
Bluetooth pair Press and hold, 7
Play/Pause Click once
Answer/End a call Click once
Decline a call Press and hold, 3
Activate voice assistant Phone on, press and
Factory Reset From "Off" mode, press
Volume Up/Down Click + or -
Next track Press and hold +, 3
Previous track Press and hold -, 3
Check battery status Press and hold + and -
Your phone may not be compatible with some
functions. Visit http://www.shure.com/earphones for
more information.
Charging the Earphones
Red LED indicates low battery.
1. Connect the earphones to a charging
device using the supplied USB cable.
2. The LED is red while charging.
3. When fully charged, the LED turns off.
Warning: Before charging, make sure the product is at
room temperature, between 10 to 45°C (50 to 113°F).
Note: Use this product only with an agency
approved power supply which meets local regulatory
requirements (e.g., UL, CSA, VDE, CCC, INMETRO).
seconds
seconds
seconds
hold, 3 seconds
and hold, 15 seconds.
Hold past pairing mode
until earphones turn
off again.
seconds
seconds
together, 3 seconds
리모컨 사용
전원 켜기 길게 누르세요
전원 끄기 5초 동안 길게 누르세요
블루투스 연결 7초 동안 길게 누르세요
음악 재생/일시 정지 짧게 누르세요
전화 받기/끊기 짧게 누르세요
통화 거부 3초 동안 길게 누르세요
휴대폰 음성 안내 켜기 휴대폰으 켜있을때 3초
공장 초기화 전원이 꺼져있을때 15
볼륨 올림/내림 + 혹은 – 를 짧게
다음 곡 재생 + 버튼을 3초 동안 길게
이전 곡 재생 - 버튼을 3초 동안 길게
배터리 상태 3초 동안 + 와 – 를
사용 중인 전화기가 몇 가지 기능과 호환되지 않을
수 있습니다. 자세한 내용은 http://www.shure.com/
earphones에서 확인하십시오.
1. 제공된 케이블을 사용하여 이어폰을
충전 장치에 연결하십시오.
2. 충전 중 LED는 빨간색입니다.
3. 이어폰의 충전이 완료되면,
LED가 꺼집니다.
동안 길게 누르세요
초 동안 길게 누르세요.
블루투스 연결 모드를
지나고 이어폰이
꺼질때까지 계속
누르세요
누르세요
누르세요
누르세요
동시에 길게 누게
누르세요
Specifications
Antenna Information:
• Type = Chip
• Gain = +1.6 dBi
Bluetooth 5:
• Operating frequency = 2402MHz-2480MHz
• Modulation scheme = FHSS
• RF power = +7.45dBm (E.I.R.P.)(for EU)
Safety Information
Visit http://www.shure.com/earphones for the latest
regulatory and compliance information.
WARNING
• Follow instructions from manufacturer.
• Product battery may explode or release toxic
materials. Risk of fire or burns. Do not open,
crush, modify, disassemble, heat above 140°F
(60°C), or incinerate.
• Attention should be drawn to the environmental
aspects of battery disposal.
• Product shall not be exposed to excessive heat
such as sunshine, fire, or the like.
• Do NOT make unauthorized alterations to this
product.
WARNING: This product contains a chemical known
to the State of California to cause cancer and birth
defects or other reproductive harm.
Note: Battery replacement to be performed only by
Shure authorized service personnel.
CAUTION: Follow applicable laws regarding mobile
phone and headphone use while driving.
This product contains magnetic material. Consult your
physician on whether this might affect your implantable
medical device.
High sound pressure
Hearing damage risk
To prevent possible hearing damage, do not listen at
high volume levels for long periods.
Information to the user
This equipment has been tested and found to comply
with the limits for a Class B digital device, pursuant to
Part 15 of the FCC Rules. These limits are designed
to provide reasonable protection against harmful
interference in a residential installation. This equipment
generates uses and can radiate radio frequency energy
and, if not installed and used in accordance with the
instructions, may cause harmful interference to radio
communications. However, there is no guarantee that
interference will not occur in a particular installation.
If this equipment does cause harmful interference to
radio or television reception, which can be determined
by turning the equipment off and on, the user is
encouraged to try to correct the interference by one or
more of the following measures:
• Reorient or relocate the receiving antenna.
• Increase the separation between the equipment
and the receiver.
• Connect the equipment to an outlet on a circuit
different from that to which the receiver is
connected.
• Consult the dealer or an experienced radio/TV
technician for help.
IEC 60417-6044 (2011-01)
Supported Codecs:
• aptX™
• aptX HD
• aptX low latency
• SBC
• AAC
This device complies with Part 15 of the FCC Rules.
Operation is subject to the following two conditions: (1)
this device may not cause harmful interference, and
(2) this device must accept any interference received,
including interference that may cause undesired
operation.
This equipment complies with IC RSS-102 radiation
exposure limits set forth for an uncontrolled
environment.
Cet équipement est conforme aux limites d'exposition
aux radiations IC CNR-102 établies pour un
environnement non contrôlé.
Changes or modifications not expressly approved by
the party responsible for compliance could void the
user's authority to operate the equipment.
This Class B digital apparatus complies with Canadian
ICES-003. Cet appareil numérique de la classe B est
conforme à la norme NMB-003 du Canada.
This device complies with Industry Canada licenceexempt RSS standard(s). Operation of this device is
subject to the following two conditions: (1) this device
may not cause interference, and (2) this device must
accept any interference, including interference that
may cause undesired operation of the device. Le
présent appareil est conforme aux CNR d'Industrie
Canada applicables aux appareils radio exempts
de licence. L'exploitation est autorisée aux deux
conditions suivantes : (1) l'appareil ne doit pas produire
de brouillage, et (2) l'utilisateur de l'appareil doit
accepter tout brouillage radioélectrique subi, même
si le brouillage est susceptible d'en compromettre le
fonctionnement.
Note: Testing is based on the use of supplied and
recommended cable types. The use of other than
shielded (screened) cable types may degrade EMC
performance.
Este equipo ha sido diseñado para operar con las
antenas que enseguida se enlistan y para una
ganancia máxima de antena de [+1.6] dBi. El uso con
este equipo de antenas no incluidas en esta lista o que
tengan una ganancia mayor que [+1.6] dBi quedan
prohibidas. La impedancia requerida de la antena es
de [50] ohms.
La operación de este equipo está sujeta a las
siguientes dos condiciones: (1) es posible que este
equipo o dispositivo no cause interferencia perjudicial
y (2) este equipo o dispositivo debe aceptar cualquier
interferencia, incluyendo la que pueda causar su
operación no deseada.
• 电池(电池包或组合电池)不得暴露在诸如日照、
火烤或类似过热环境中。
• 根据当地法规处理废弃电池。
1. 經審驗合格之射頻電信終端設備,非經許
可,公司、商號或使用者均不得擅自變更頻
率、加大功率或變更原設計之特性及功能。
2. 射頻電信終端設備之使用不得影響飛航安全及
干擾合法通信;經發現有干擾現象時,應立即停
用,並改善至無干擾時方得繼續使用。所謂合
法通信,係指依電信法規定作業之無線電信。
3. 輸入、製造射頻電信終端設備之公司、商號或
其使用者違反本辦法規定,擅自使用或變更無線
電頻率、電功率者,除依電信法規定處罰外,國
家通訊傳播委員會並得撤銷其審驗合格證明。
4. 減少電磁波影響,請妥適使用
根據NCC低功率電波輻射性電機管理辦法 規定:
1. 第十二條 經型式認證合格之低功率射頻電機,
非經許可,公司、商號或使用者均不得擅自變更
頻率、加大功率或變更原設計之特性及功能。
2. 第十四條 低功率射頻電機之使用不得影響
飛航安全及干擾合法通信;經發現有干擾
現象時,應立即停用,並改善至無干擾
時方得繼續使用。 前項合法通信,指依
電信法規定作業之無線電通信。 低功率
射頻電機須忍受合法通信或工業、科學
及醫療用電波輻射性電機設備之干擾。
運用に際しての注意
この機器の使用周波数帯では、電子レンジ等の産業・
科学・医療用機器のほか工場の製造ライン等で使用さ
れている移動体識別用の構内無線局(免許を要する無
線局)及び特定小電力無線局(免許を要しない無線
局)並びにアマチュア無線局(免許を要する無線局)
が運用されています。
1. この機器を使用する前に、近くで移動体
識別用の構内無線局及び特定小電力無線
局並びにアマ チュア無線局が運用さ
れていないことを確認して下さい。
2. 万一、この機器から移動体識別用の構内無
線局に対して有害な電波干渉の事例が発生
した場合には、 速やかに使用周波数を変
更するか又は電波の発射を停止した上、下
記連絡先にご連絡頂き、混 信回避のた
めの処置等(例えば、パーティションの
設置など)についてご相談して下さい。
3. その他、この機器から移動体識別用の特定小
電力無線局あるいはアマチュア無線局に対し
て有害な電波干渉の事例が発生した場合な
ど何かお困りのことが起きたときは、保証
書に記載の販売代 理店または購入店へお
問い合わせください。代理店および販売店
情報は Shure 日本語ウェブサイト http://
www.shure.co.jp でもご覧いただけます。
現品表示記号について
現品表示記号は、以下のことを表しています。 こ
の無線機器は 2.4GHz 帯の電波を使用し、変調方式
は「FH-SS」方式、想定与干渉距離は 10m です。
2,400MHz~2,483.5MHz の全帯域を使用し、移動体識
別装置の帯域を回避することはできません。
Japanese Radio Law and Japanese
Telecommunications Business Law Compliance. This
device is granted pursuant to the Japanese Radio
Law (電波法) and the Japanese Telecommunications
Business Law (電気通信事業法). This device should
not be modified (otherwise the granted designation
number will become invalid).
Este equipamento opera em caráter secundário, isto
é, não tem direito a proteção contra interferência
prejudicial, mesmo de estações do mesmo tipo, e não
pode causar interferência a sistemas operando em
carater primario.
Este produto está homologado pela ANATEL, de
acordo com os procedimentos regulamentados pela
Resolução 242/2000, e atende aos requisitos técnicos
aplicados. Para maiores informações, consulte o site
da ANATEL - http://www.anatel.gov.br
The Bluetooth word mark and logos are registered
trademarks owned by the Bluetooth SIG, Inc. and any
use of such marks by Shure Incorporated is under
license. Other trademarks and trade names are those
of their respective owners.
Environmentally friendly disposal
Old electrical appliances must not be disposed of
together with the residual waste, but have to be
disposed of separately. The disposal at the communal
collecting point via private persons is for free. The
owner of old appliances is responsible to bring the
appliances to these collecting points or to similar
collection points. With this little personal effort, you
contribute to recycle valuable raw materials and the
treatment of toxic substances.
Paraguay Distributor: Microsystems S.R.L., Senador
Long 664 c/Dr. Lilio, Asunción, Paraguay
Certifications
This product meets the Essential Requirements of all
relevant European directives and is eligible for CE
marking.
Hereby, Shure Incorporated declares that the radio
equipment is in compliance with Directive 2014/53/
EU. The full text of the EU declaration of conformity is
available at the following internet address: http://www.
shure.com/europe/compliance
designation number will become invalid).
Este equipamento opera em caráter secundário, isto
é, não tem direito a proteção contra interferência
prejudicial, mesmo de estações do mesmo tipo, e não
pode causar interferência a sistemas operando em
Authorized European representative:
Shure Europe GmbH
Headquarters Europe, Middle East
& Africa
Department: EMEA Approval
Jakob-Dieffenbacher-Str. 12
75031 Eppingen, Germany
Phone: +49-7262-92 49 0
Fax: +49-7262-92 49 11 4
Email: EMEAsupport@shure.de
 Loading...