

Page 1
WIRELESS SYSTEM
ULX-D
USER GUIDE
©2014 Shure Incorporated
27A 27230 (Rev. 1)
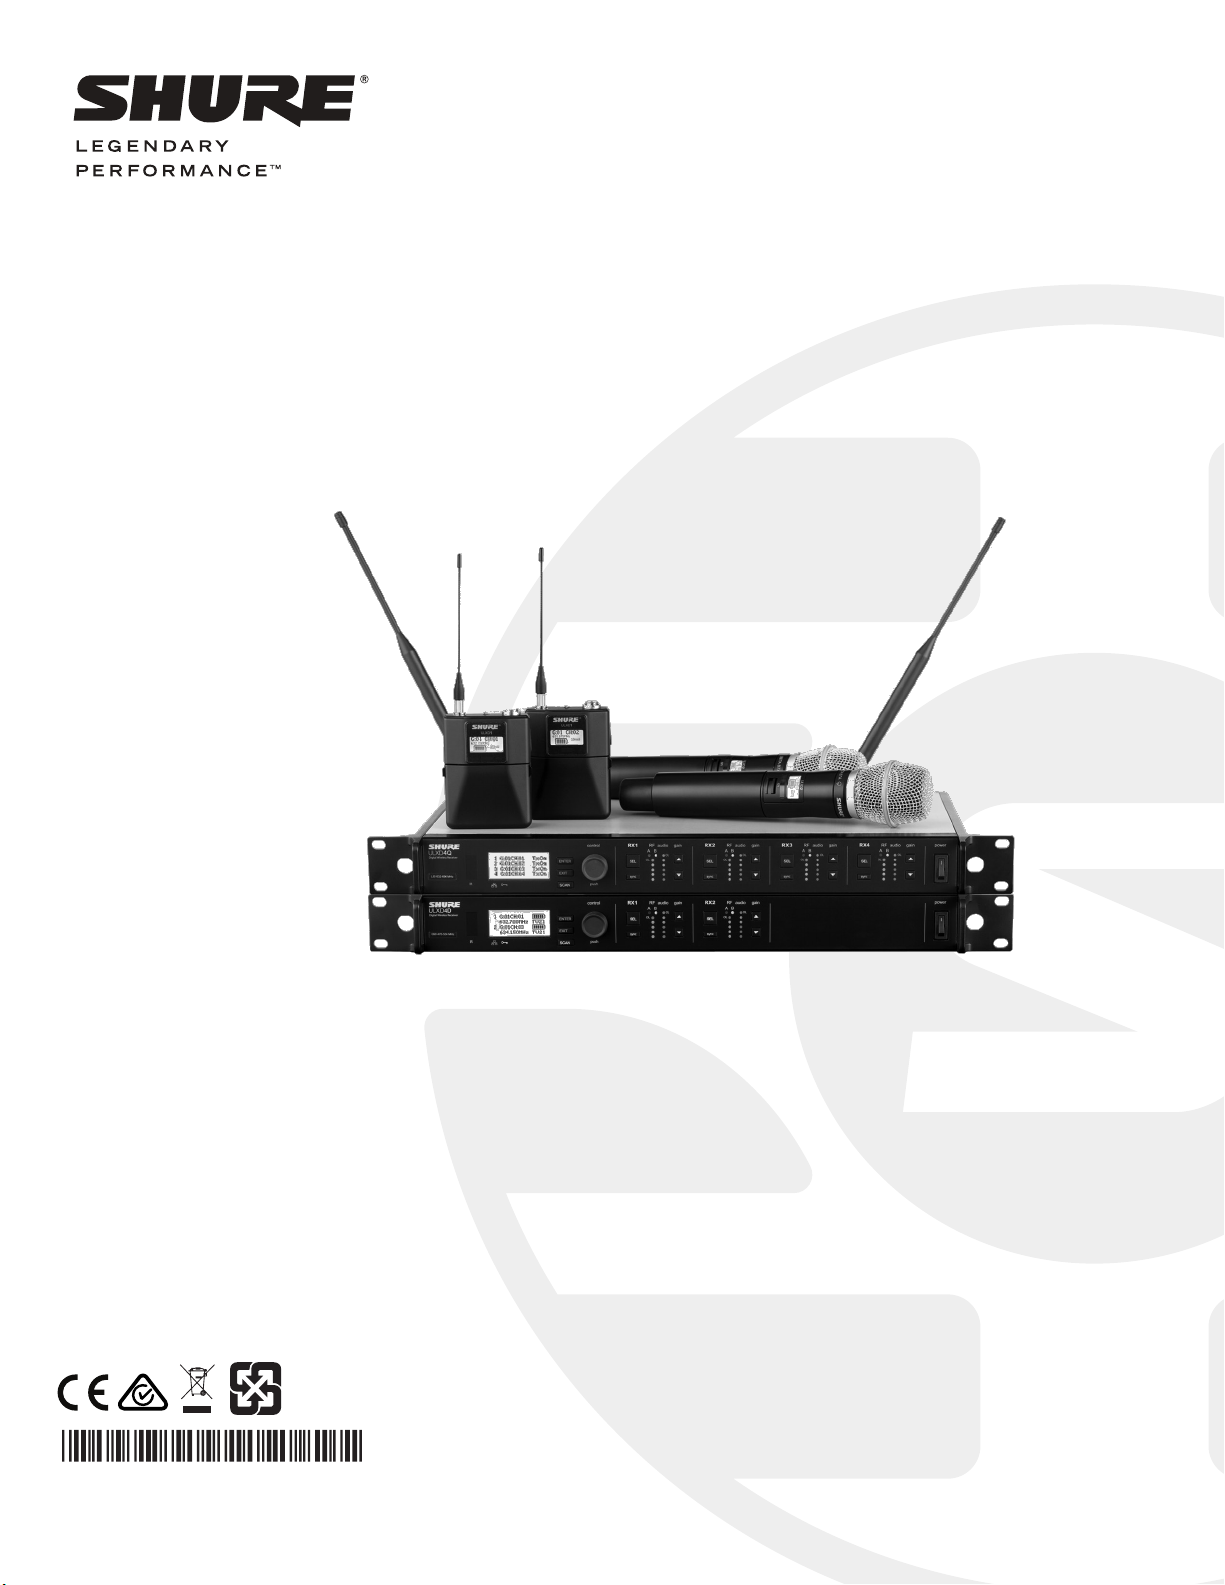
ULX-D Digital Wireless Microphone System
ULX-D Digital Wireless-systemen
Système de microphone sans fil numérique ULX-D
Digitales drahtloses Mikrofonsystem ULX-D
Sistema de micrófonos inalámbricos digitales ULX-D
Sistema radiomicrofonico digitale ULX-D
Sistema de Microfone Sem Fio Digital ULX-D
ULX-D Digital Wireless-systemen
Цифровая беспроводная микрофонная система ULX-D
ULX-D 디지털 무선 마이크 시스템
ULX-D 数字式无线话筒系统
ULX-D 數位式無線話筒系統
ULX-Dデジタルワイヤレスマイクロホンシステム
Sistem Mikrofon Nirkabel Digital ULX-D
Page 2

Page 3
ULXD-G51
470 - 534 MHz, max. 20 mW
ULXD-H51
534 - 598 MHz, max. 20 mW
ULXD-K51
606 - 670 MHz, max. 20 mW
ULXD-P51
710 - 782 MHz, max. 20 mW
ULXD-R51
800 - 810 MHz, max. 20 mW
Country Code
Code de Pays
Codice di paese
Código de país
A, B, BG, CH, CY, CZ, D, EST 470 - 534 MHz *
F, GB, GR, H, I, IS, L, LT 470 - 534 MHz *
NL, P, PL, S, SK, SLO 470 - 534 MHz *
DK, FIN, M, N *
HR, E, IRL, LV, RO, TR *
All other countries *
A, B, BG, CH, CY, CZ, D, EST 534 - 598 MHz *
F, GB, GR, H, I, IS, L, LT 534 - 598 MHz *
NL, P, PL, S, SK, SLO 534 - 598 MHz *
DK, FIN, M, N *
HR, E, IRL, LV, RO, TR *
All other countries *
A, B, BG, CH, CY, CZ, D, EST 606 - 670 MHz *
F, GB, GR, H, I, IS, L, LT 606 - 670 MHz *
NL, P, PL, S, SK, SLO 606 - 670 MHz *
RO 646-647;654-655;662-663 MHz*
DK, E, FIN, HR, IRL, LV, M, N, TR *
All other countries *
A, B, BG, CH, CY, CZ, D, EST, F, GB, 710 - 782 MHz *
GR, H, I, IS, L, LT, NL, P, PL, S, SK, SLO 710 - 782 MHz *
RO
DK, E, FIN, HR, IRL, LV, M, N, TR *
All other countries *
N 800 - 810 MHz*
A, B, BG, CH, CY, CZ, D, DK, E, EST *
F, FIN, GB, GR, H, HR, I, IRL, IS, L, LT *
LV, M, N, NL, P, PL, S, SK, SLO, TR *
All other countries *
Länder-Kürzel
Frequency Range
Gamme de frequences
Gamme di frequenza
Gama de frequencias
Frequenzbereich
718-719; 726-727; 734-743;
750-751; 758-759 MHz*
NOTE: This Radio equipment is intended for use in musical professional entertain-
*
ment and similar applications. This Radio apparatus may be capable of operating
on some frequencies not authorized in your region. Please contact your national
authority to obtain information on authorized frequencies and RF power levels for
wireless microphone products.
REMARQUE : Ce matériel radio est prévu pour une utilisation en spectacles musi-
*
caux professionnels et applications similaires. Il est possible que cet appareil radio
soit capable de fonctionner sur certaines fréquences non autorisées localement.
Se mettre en rapport avec les autorités compétentes pour obtenir les informations
sur les fréquences et niveaux de puissance HF autorisés pour les systèmes de
microphones sans fil.
HINWEIS: Diese Funkausrüstung ist zum Gebrauch bei professionellen
*
Musikveranstaltungen und ähnlichen Anwendungen vorgesehen. Dieses Gerät
kann möglicherweise auf einigen Funkfrequenzen arbeiten, die in Ihrem Gebiet
nicht zugelassen sind. Wenden Sie sich bitte an die zuständige Behörde, um
Informationen über zugelassene Frequenzen und erlaubte Sendeleistungen für
drahtlose Mikrofonprodukte zu erhalten.
NOTA: Este equipo de radio está destinado para uso en presentaciones musicales
*
profesionales y usos similares. Este aparato de radio puede ser capaz de funcionar
en algunas frecuencias no autorizadas en su región. Por favor comuníquese con
las autoridades nacionales para información sobre las frecuencias autorizadas y
los niveles de potencia de radiofrecuencia para micrófonos inalámbricos.
NOTA: questo apparecchio radio è concepito per l'intrattenimento musicale a
*
livello professionale ed applicazioni simili. Questo apparecchio radio può essere in
grado di funzionare a frequenze non autorizzate nel Paese in cui si trova l'utente.
Rivolgetevi alle autorità competenti per ottenere le informazioni relative alle frequenze ed ai livelli di potenza RF autorizzati nella vostra regione per i prodotti
radiomicrofonici.
OPMERKING: Deze radioapparatuur is bedoeld voor gebruik bij professionele
*
muzikale amusementsproducties en soortgelijke toepassingen. Dit radioapparaat
kan mogelijk werken op bepaalde frequenties die niet zijn toegestaan in uw regio.
Raadpleeg de autoriteiten in uw land voor informatie over goedgekeurde frequenties en RF-vermogensniveaus voor draadloze microfoons.
IMPORTANT SAFETY INSTRUCTIONS
1. READ these instructions.
2. KEEP these instructions.
3. HEED all warnings.
4. FOLLOW all instructions.
5. DO NOT use this apparatus near water.
6. CLEAN ONLY with dry cloth.
7. DO NOT block any ventilation openings. Allow sufficient distances for adequate ventilation and install in accordance with the manufacturer’s instructions.
8. DO NOT install near any heat sources such as open flames, radiators, heat registers,
stoves, or other apparatus (including amplifiers) that produce heat. Do not place any open
flame sources on the product.
9. DO NOT defeat the safety purpose of the polarized or groundingtype plug. A polarized
plug has two blades with one wider than the other. A grounding type plug has two blades
and a third grounding prong. The wider blade or the third prong are provided for your
safety. If the provided plug does not fit into your outlet, consult an electrician for replacement of the obsolete outlet.
10. PROTECT the power cord from being walked on or pinched, particularly at plugs, convenience receptacles, and the point where they exit from the apparatus.
11. ONLY USE attachments/accessories specified by the manufacturer.
12. USE only with a cart, stand, tripod, bracket, or table specified by the manufacturer, or sold with the apparatus. When a cart is used, use caution when
moving the cart/apparatus combination to avoid injury from tip-over.
13. UNPLUG this apparatus during lightning storms or when unused for long
periods of time.
CONSIGNES DE SÉCURITÉ IMPORTANTES
1. LIRE ces consignes.
2. CONSERVER ces consignes.
3. OBSERVER tous les avertissements.
4. SUIVRE toutes les consignes.
5. NE PAS utiliser cet appareil à proximité de l'eau.
6. NETTOYER UNIQUEMENT avec un chiffon sec.
7. NE PAS obstruer les ouvertures de ventilation. Laisser des distances suffisantes pour
permettre une ventilation adéquate et effectuer l'installation en respectant les instructions
du fabricant.
8. NE PAS installer à proximité d'une source de chaleur telle qu'une flamme nue, un
radiateur, une bouche de chaleur, un poêle ou d'autres appareils (dont les amplificateurs)
produisant de la chaleur. Ne placer aucune source à flamme nue sur le produit.
9. NE PAS détériorer la sécurité de la fiche polarisée ou de la fiche de terre. Une fiche
polarisée comporte deux lames dont l'une est plus large que l'autre. Une fiche de terre
comporte deux lames et une troisième broche de mise à la terre. La lame la plus large ou
la troisième broche assure la sécurité de l'utilisateur. Si la fiche fournie ne s'adapte pas à
la prise électrique, demander à un électricien de remplacer la prise hors normes.
10. PROTÉGER le cordon d'alimentation afin que personne ne marche dessus et que rien ne
le pince, en particulier au niveau des fiches, des prises de courant et du point de sortie
de l'appareil.
11. UTILISER UNIQUEMENT les accessoires spécifiés par le fabricant.
12. UTILISER uniquement avec un chariot, un pied, un trépied, un support ou
une table spécifié par le fabricant ou vendu avec l'appareil. Si un chariot
est utilisé, déplacer l'ensemble chariot-appareil avec précaution afin de ne
pas le renverser, ce qui pourrait entraîner des blessures.
14. REFER all servicing to qualified service personnel. Servicing is required when the apparatus has been damaged in any way, such as power supply cord or plug is damaged,
liquid has been spilled or objects have fallen into the apparatus, the apparatus has been
exposed to rain or moisture, does not operate normally, or has been dropped.
15. DO NOT expose the apparatus to dripping and splashing. DO NOT put objects filled with
liquids, such as vases, on the apparatus.
16. The MAINS plug or an appliance coupler shall remain readily operable.
17. The airborne noise of the Apparatus does not exceed 70dB (A).
18. Apparatus with CLASS I construction shall be connected to a MAINS socket outlet with a
protective earthing connection.
19. To reduce the risk of fire or electric shock, do not expose this apparatus to rain or
moisture.
20. Do not attempt to modify this product. Doing so could result in personal injury and/or
product failure.
21. Operate this product within its specified operating temperature range.
This symbol indicates that dangerous voltage constituting a risk of
electric shock is present within this unit.
This symbol indicates that there are important operating and maintenance instructions in the literature accompanying this unit.
WARNING: This product contains a chemical known to the State of California to cause cancer and birth
defects or other reproductive harm.
13. DÉBRANCHER l'appareil pendant les orages ou quand il ne sera pas utilisé pendant
longtemps.
14. CONFIER toute réparation à du personnel qualifié. Des réparations sont nécessaires
si l'appareil est endommagé d'une façon quelconque, par exemple : cordon ou prise
d'alimentation endommagé, liquide renversé ou objet tombé à l'intérieur de l'appareil,
exposition de l'appareil à la pluie ou à l'humidité, appareil qui ne marche pas normalement ou que l'on a fait tomber.
15. NE PAS exposer cet appareil aux égouttures et aux éclaboussements. NE PAS poser
des objets contenant de l'eau, comme des vases, sur l'appareil.
16. La prise SECTEUR ou un coupleur d’appareil électrique doit rester facilement utilisable.
17. Le bruit aérien de l'appareil ne dépasse pas 70 dB (A).
18. L'appareil de construction de CLASSE I doit être raccordé à une prise SECTEUR dotée
d'une protection par mise à la terre.
19. Pour réduire les risques d'incendie ou de choc électrique, ne pas exposer cet appareil à
la pluie ou à l'humidité.
20. Ne pas essayer de modifier ce produit. Cela risque de causer des blessures et/ou la
défaillance du produit.
21. Utiliser ce produit dans sa plage de températures de fonctionnement spécifiée.
Ce symbole indique la présence d'une tension dangereuse dans
l'appareil constituant un risque de choc électrique.
Ce symbole indique que la documentation fournie avec l'appareil contient des instructions d'utilisation et d'entretien importantes.
3
Page 4
WICHTIGE SICHERHEITSHINWEISE
1. Diese Hinweise LESEN.
2. Diese Hinweise AUFBEWAHREN.
3. Alle Warnungen BEACHTEN.
4. Alle Hinweise BEFOLGEN.
5. Dieses Gerät NICHT in Wassernähe VERWENDEN.
6. NUR mit einem sauberen Tuch REINIGEN.
7. KEINE Lüftungsöffnungen verdecken. Hinreichende Abstände für ausreichende Belüftung
vorsehen und gemäß den Anweisungen des Herstellers installieren.
8. NICHT in der Nähe von Wärmequellen wie zum Beispiel offenen Flammen, Heizkörpern,
Wärmespeichern, Öfen oder anderen Hitze erzeugenden Geräten (einschließlich
Verstärkern) installieren. Keine Quellen von offenen Flammen auf dem Produkt platzieren.
9. Die Schutzfunktion des Schukosteckers NICHT umgehen. Ein Schukostecker verfügt
über zwei Steckerzinken sowie Schutzleiter. Bei dieser Steckerausführung dienen die
Schutzleiter Ihrer Sicherheit. Wenn der mitgelieferte Stecker nicht in die Steckdose passt,
einen Elektriker mit dem Austauschen der veralteten Steckdose beauftragen.
10. VERHINDERN, dass das Netzkabel gequetscht oder darauf getreten wird, insbesondere
im Bereich der Stecker, Netzsteckdosen und an der Austrittsstelle vom Gerät.
11. NUR das vom Hersteller angegebene Zubehör und entsprechende Zusatzgeräte
verwenden.
12. NUR in Verbindung mit einem vom Hersteller angegebenen oder mit dem Gerät
verkauften Transportwagen, Stand, Stativ, Träger oder Tisch verwenden. Wenn ein
Transportwagen verwendet wird, beim Verschieben der Transportwagen/Geräte-Einheit
vorsichtig vorgehen, um Verletzungen durch Umkippen zu verhüten.
13. Bei Gewitter oder wenn das Gerät lange Zeit nicht benutzt wird, das Netzkabel
HERAUSZIEHEN.
14. ALLE Reparatur- und Wartungsarbeiten von qualifiziertem Kundendienstpersonal
durchführen lassen. Kundendienst ist erforderlich, wenn das Gerät auf irgendwelche
Weise beschädigt wurde, z. B. wenn das Netzkabel oder der Netzstecker beschädigt
wurden, wenn Flüssigkeiten in das Gerät verschüttet wurden oder Fremdkörper
hineinfielen, wenn das Gerät Regen oder Feuchtigkeit ausgesetzt war, nicht normal
funktioniert oder fallen gelassen wurde.
15. Dieses Gerät vor Tropf- und Spritzwasser SCHÜTZEN. KEINE mit Wasser gefüllten
Gegenstände wie zum Beispiel Vasen auf das Gerät STELLEN.
16. Der Netzstecker oder eine Gerätesteckverbindung muss leicht zu betätigen sein.
17. Der Luftschall des Geräts überschreitet 70 dB (A) nicht.
18. Das Gerät mit Bauweise der KLASSE I muss mit einem Schukostecker mit Schutzleiter in
eine Netzsteckdose mit Schutzleiter eingesteckt werden.
19. Dieses Gerät darf nicht Regen oder Feuchtigkeit ausgesetzt werden, um das Risiko von
Bränden oder Stromschlägen zu verringern.
20. Nicht versuchen, dieses Produkt zu modifizieren. Ansonsten könnte es zu Verletzungen
und/oder zum Produktausfall kommen.
21. Dieses Produkt muss innerhalb des vorgeschriebenen Temperaturbereichs betrieben
werden.
Dieses Symbol zeigt an, dass gefährliche Spannungswerte, die ein
Stromschlagrisiko darstellen, innerhalb dieses Geräts auftreten.
Dieses Symbol zeigt an, dass das diesem Gerät beiliegende Handbuch
wichtige Betriebs- und Wartungsanweisungen enthält.
INSTRUCCIONES IMPORTANTES DE SEGURIDAD
1. LEA estas instrucciones.
2. CONSERVE estas instrucciones.
3. PRESTE ATENCION a todas las advertencias.
4. SIGA todas las instrucciones.
5. NO utilice este aparato cerca del agua.
6. LIMPIE UNICAMENTE con un trapo seco.
7. NO obstruya ninguna de las aberturas de ventilación. Deje espacio suficiente para
proporcionar ventilación adecuada e instale los equipos según las instrucciones del
fabricante.
8. NO instale el aparato cerca de fuentes de calor tales como llamas descubiertas, radiadores, registros de calefacción, estufas u otros aparatos (incluyendo amplificadores) que
produzcan calor. No coloque artículos con llamas descubiertas en el producto.
9. NO anule la función de seguridad del enchufe polarizado o con clavija de puesta a tierra.
Un enchufe polarizado tiene dos patas, una más ancha que la otra. Un enchufe con puesta a tierra tiene dos patas y una tercera clavija con puesta a tierra. La pata más ancha
o la tercera clavija se proporciona para su seguridad. Si el tomacorriente no es del tipo
apropiado para el enchufe, consulte a un electricista para que sustituya el tomacorriente
de estilo anticuado.
10. PROTEJA el cable eléctrico para evitar que personas lo pisen o estrujen, particularmente
en sus enchufes, en los tomacorrientes y en el punto en el cual sale del aparato.
11. UTILICE únicamente los accesorios especificados por el fabricante.
12. UTILICE únicamente con un carro, pedestal, trípode, escuadra o mesa del
tipo especificado por el fabricante o vendido con el aparato. Si se usa un
carro, el mismo debe moverse con sumo cuidado para evitar que se vuelque
con el aparato.
ISTRUZIONI IMPORTANTI PER LA SICUREZZA
1. LEGGETE queste istruzioni.
2. CONSERVATELE.
3. OSSERVATE tutte le avvertenze.
4. SEGUITE tutte le istruzioni.
5. NON usate questo apparecchio vicino all'acqua.
6. PULITE l'apparecchio SOLO con un panno asciutto.
7. NON ostruite alcuna apertura per l'aria di raffreddamento. Consentite distanze sufficienti
per un'adeguata ventilazione e installate l'apparecchio seguendo le istruzioni del costruttore.
8. NON installate l'apparecchio accanto a fonti di calore, quali fiamme libere, radiatori, aperture per l'efflusso di aria calda, forni o altri apparecchi (amplificatori inclusi) che generano
calore. Non esponete il prodotto a fonti di calore non controllate.
9. NON modificate la spina polarizzata o con spinotto di protezione per non alterarne
la funzione di sicurezza. Una spina polarizzata è dotata di due lame, una più ampia
dell'altra. Una spina con spinotto è dotata di due lame e di un terzo polo di messa a terra.
La lama più ampia ed il terzo polo hanno lo scopo di tutelare la vostra incolumità. Se la
spina in dotazione non si adatta alla presa di corrente, rivolgetevi ad un elettricista per far
eseguire le modifiche necessarie.
10. EVITATE di calpestare il cavo di alimentazione o di comprimerlo, specie in corrispondenza di spine, prese di corrente e punto di uscita dall'apparecchio.
11. USATE ESCLUSIVAMENTE i dispositivi di collegamento e gli accessori
specificati dal costruttore.
12. USATE l'apparecchio solo con carrelli, sostegni, treppiedi, staffe o tavoli
specificati dal produttore o venduti unitamente all'apparecchio stesso. Se usate un carrello, fate attenzione quando lo spostate con l'apparecchio collocato
su di esso, per evitare infortuni causati da un eventuale ribaltamento del carrello stesso.
13. DESENCHUFE el aparato durante las tormentas eléctricas, o si no va a ser utilizado por
un lapso prolongado.
14. TODA reparación debe ser llevada a cabo por técnicos calificados. El aparato requiere
reparación si ha sufrido cualquier tipo de daño, incluyendo los daños al cordón o enchufe
eléctrico, si se derrama líquido sobre el aparato o si caen objetos en su interior, si ha sido
expuesto a la lluvia o la humedad, si no funciona de modo normal, o si se ha caído.
15. NO exponga este aparato a chorros o salpicaduras de líquidos. NO coloque objetos
llenos con líquido, tales como floreros, sobre el aparato.
16. El enchufe de alimentación o un acoplador para otros aparatos deberá permanecer en
buenas condiciones de funcionamiento.
17. El nivel de ruido transmitido por el aire del aparato no excede de 70 dB(A).
18. Los aparatos de fabricación CLASE I deberán conectarse a un tomacorriente de ALIMENTACION con clavija de puesta a tierra protectora.
19. Para reducir el riesgo de causar un incendio o sacudidas eléctricas, no exponga este
aparato a la lluvia ni a humedad.
20. No intente modificar este producto. Hacerlo podría causar lesiones personales y/o la falla
del producto.
21. Utilice este producto únicamente dentro de la gama de temperaturas de funcionamiento
especificadas.
Este símbolo indica que la unidad contiene niveles de voltaje peligrosos
que representan un riesgo de choques eléctricos.
Este símbolo indica que la literatura que acompaña a esta unidad contiene instrucciones importantes de funcionamiento y mantenimiento.
13. Durante i temporali o in caso di inutilizzo prolungato dell'apparecchio, SCOLLEGATELO
dalla presa di corrente.
14. Per qualsiasi intervento, RIVOLGETEVI a personale di assistenza qualificato. È necessario intervenire sull'apparecchio ogniqualvolta è stato danneggiato, in qualsiasi modo;
ad esempio la spina o il cavo di alimentazione sono danneggiati, si è versato liquido
sull'apparecchio o sono caduti oggetti su di esso, l'apparecchio è stato esposto alla pioggia o all'umidità, non funziona normalmente o è caduto.
15. NON esponete l'apparecchio a sgocciolamenti o spruzzi. NON appoggiate
sull'apparecchio oggetti pieni di liquidi, ad esempio vasi da fiori.
16. La spina ELETTRICA o l'accoppiatore per elettrodomestici deve restare prontamente
utilizzabile.
17. Il rumore aereo dell'apparecchio non supera i 70 dB (A).
18. L'apparecchio appartenente alla CLASSE I deve essere collegato ad una presa elettrica
dotata di messa a terra di protezione.
19. Per ridurre il rischio di incendio o folgorazione, non esponete questo apparecchio alla
pioggia o all'umidità.
20. Non tentate di modificare il prodotto. Tale operazione può causare infortuni e/o il guasto
del prodotto stesso.
21. Utilizzate questo prodotto entro la gamma di temperatura operativa specificata.
Questo simbolo indica la presenza di alta tensione all'interno
dell'apparecchio, che comporta il rischio di folgorazione.
Questo simbolo indica la presenza di istruzioni importanti per l'uso e la
manutenzione nella documentazione in dotazione all'apparecchio.
4
Page 5
IMPORTANTES INSTRUÇÕES DE SEGURANÇA
1. LEIA estas instruções.
2. GUARDE estas instruções.
3. PRESTE ATENÇÃO a todas as instruções.
4. SIGA todas as instruções.
5. NÃO use este aparelho perto de água.
6. LIMPE SOMENTE com um pano seco.
7. NÃO bloqueie nenhuma das aberturas de ventilação. Deixe distâncias suficientes para
ventilação adequada e instale de acordo com as instruções do fabricante.
8. NÃO instale próximo de nenhuma fonte de calor, tais como fogo aceso, radiadores,
bocais de aquecimento, fornos ou outros aparelhos que produzam calor (inclusive amplificadores). Não coloque fontes de chamas sobre o produto.
9. NÃO inutilize as características de segurança do conector polarizado ou com pino de
aterramento. Um conector polarizado possui duas lâminas com uma mais larga do que a
outra. Um conector com pino de aterramento possui duas lâminas e um terceiro pino de
aterramento. É fornecida uma lâmina mais larga ou o terceiro pino para a sua segurança.
Se por acaso o conector não se encaixar na tomada, chame um eletricista para substituir
a tomada obsoleta.
10. PROTEJA o cabo de alimentação, evitando que seja pisado ou que enrosque, especialmente nos conectores, nas tomadas elétricas de emprego geral e no ponto onde elas
saem do aparelho.
11. USE SOMENTE acessórios/apetrechos especificados pelo fabricante.
12. USE somente com um carrinho, pedestal, tripé, suporte ou mesa especificados pelo fabricante ou vendidos com o aparelho. Quando utilizar um
carrinho, tenha cuidado ao movimentar o conjunto aparelho/carrinho para
evitar danos com a queda do mesmo.
13. DESLIGUE este aparelho da tomada elétrica durante tempestades com relâmpagos ou
quando não seja utilizado por longo período.
14. DEIXE toda a manutenção sob a responsabilidade de uma equipe de manutenção
qualificada. É necessário realizar a manutenção quando por algum motivo o aparelho
tiver sido danificado de alguma forma, como por exemplo por dano do cabo de alimentação elétrica ou do seu conector, por derramamento de líquido ou queda de objetos no
aparelho, se o aparelho tiver sido exposto à chuva ou à umidade, não esteja operando
normalmente ou tenha sofrido queda.
15. NÃO exponha o aparelho a respingos ou goteiras. NÃO coloque objetos cheios de
líquidos, tais como vasos, sobre o aparelho.
16. O plugue MAINS (rede elétrica) ou um acoplador de aparelho deve estar sempre pronto
para operação.
17. O ruído aéreo do Aparelho não ultrapassa 70 dB (A).
18. O aparelho com construção CLASSE I deve estar conectado à tomada da rede elétrica
com ligação à terra.
19. Para reduzir o risco de incêndio ou choque elétrico, não exponha este aparelho à chuva
ou umidade.
20. Não tente alterar este produto. Isso poderá resultar em lesão pessoal e/ou falha do
produto.
21. Opere este produto dentro da faixa de temperatura de operação especificada.
Este símbolo indica que existe nesta unidade tensão perigosa que
apresenta risco de choque elétrico.
Este símbolo indica que existem instruções operação e manutenção
importantes na literatura que acompanha esta unidade.
BELANGRIJKE VEILIGHEIDSINSTRUCTIES
1. LEES deze instructies.
2. BEWAAR deze instructies.
3. NEEM alle waarschuwingen in acht.
4. VOLG alle instructies op.
5. GEBRUIK dit apparaat NIET in de buurt van water.
6. REINIG UITSLUITEND met een droge doek.
7. DICHT GEEN ventilatieopeningen AF. Zorg dat er voldoende afstand wordt gehouden
voor adequate ventilatie. Installeer het product volgens de instructies van de fabrikant.
8. Plaats het apparaat NIET in de buurt van warmtebronnen, zoals vuur, radiatoren,
warmteroosters, kachels of andere apparaten (waaronder versterkers) die warmte
genereren. Plaats geen vuurbronnen in de buurt van het product.
9. Zorg ervoor dat de beveiliging van de gepolariseerde stekker of randaardestekker
INTACT blijft. Een gepolariseerde stekker heeft twee pennen waarbij er één breder is
dan de andere. Een randaardestekker heeft twee pennen en een extra aardaansluiting.
De breedste pen en de aardaansluiting zijn bedoeld om uw veiligheid te garanderen. Als
de meegeleverde stekker niet in de contactdoos past, vraag een elektricien dan om de
verouderde contactdoos te vervangen.
10. BESCHERM het netsnoer tegen erop lopen of afknelling, vooral in de buurt van stekkers
en uitgangen en op de plaats waar deze het apparaat verlaten.
11. GEBRUIK UITSLUITEND door de fabrikant gespecificeerde hulpstukken/accessoires.
12. GEBRUIK het apparaat UITSLUITEND in combinatie met een door de
fabrikant gespecificeerde wagen, standaard, driepoot, beugel of tafel of
met een meegeleverde ondersteuning. Wees bij gebruik van een wagen
voorzichtig tijdens verplaatsingen van de wagen/apparaat-combinatie om
letsel door omkantelen te voorkomen.
ВАЖНЫЕ ИНСТРУКЦИИ ПО ТЕХНИКЕ БЕЗОПАСНОСТИ
1. ПРОЧИТАЙТЕ эти инструкции.
2. СОХРАНИТЕ эти инструкции.
3. ОБРАЩАЙТЕ ВНИМАНИЕ на все предупреждения.
4. СЛЕДУЙТЕ всем инструкциям.
5. НЕ пользуйтесь этим прибором вблизи воды.
6. ЧИСТИТЕ ТОЛЬКО сухой тканью.
7. НЕ закрывайте никакие вентиляционные отверстия. Оставляйте расстояния, нужные
для достаточной вентиляции, и выполняйте установку в соответствии с инструкциями
изготовителя.
8. НЕ устанавливайте вблизи каких бы то ни было источников тепла — открытого
пламени, радиаторов, обогревателей, печей или других приборов (включая усилители),
выделяющих тепло. Не помещайте на изделие источники открытого пламени.
9. НЕ пренебрегайте защитными свойствами поляризованной или заземляющей вилки.
Поляризованная вилка имеет два ножевых контакта, из которых один шире другого.
Заземляющая вилка имеет два ножевых контакта и третий, заземляющий, штырь.
Более широкий контакт или третий штырь предусматриваются для безопасности. Если
вилка прибора не подходит к вашей розетке, обратитесь к электрику для замены
розетки устаревшей конструкции.
10. ЗАЩИТИТЕ силовой шнур, чтобы на него не наступали и чтобы он не был пережат,
особенно в местах подсоединения к вилкам, розеткам и в месте выхода из прибора.
11. ИСПОЛЬЗУЙТЕ ТОЛЬКО те принадлежности и приспособления, которые
предусмотрены изготовителем.
12. ИСПОЛЬЗУЙТЕ только с тележкой, стендом, штативом, кронштейном или
столом, которые предусмотрены изготовителем или наглухо прикреплены к
прибору. При использовании тележки будьте осторожны, когда передвигаете
тележку вместе с прибором — переворачивание может привести к травме.
13. HAAL de stekker van dit apparaat uit de contactdoos tijdens onweer/bliksem of wanneer
het lange tijd niet wordt gebruikt.
14. Laat onderhoud altijd UITVOEREN door bevoegd servicepersoneel. Onderhoud moet
worden uitgevoerd wanneer het apparaat op enigerlei wijze is beschadigd, bijvoorbeeld
beschadiging van netsnoer of stekker, vloeistof of voorwerpen in het apparaat zijn
terechtgekomen, het apparaat is blootgesteld aan regen of vocht, niet naar behoren werkt
of is gevallen.
15. STEL het apparaat NIET bloot aan druppelend en rondspattend vocht. PLAATS GEEN
voorwerpen gevuld met vloeistof, bijvoorbeeld een vaas, op het apparaat.
16. De NETSTEKKER of een koppelstuk van het apparaat moet klaar voor gebruik zijn.
17. Het door het apparaat verspreide geluid mag niet meer zijn dan 70 dB(A).
18. Apparaten van een KLASSE I-constructie moeten worden aangesloten op een
WANDCONTACTDOOS met beschermende aardaansluiting.
19. Stel dit apparaat niet bloot aan regen of vocht om het risico op brand of elektrische
schokken te verminderen.
20. Probeer dit product niet te wijzigen. Anders kan lichamelijk letsel optreden en/of het
product defect raken.
21. Gebruik dit product binnen de gespecificeerde bedrijfstemperaturen.
Dit symbool geeft aan dat in deze eenheid een gevaarlijk spanning aanwezig is met het risico op een elektrische schok.
Dit symbool geeft aan dat in de documentatie bij deze eenheid belangrijke bedienings- en onderhoudsinstructies zijn opgenomen.
13. ОТСОЕДИНЯЙТЕ прибор ОТ СЕТИ во время грозы или если он не используется
длительное время.
14. ПОРУЧИТЕ все обслуживание квалифицированному техническому персоналу.
Обслуживание требуется при каком-либо повреждении прибора, например, при
повреждении шнура питания или вилки, если на прибор была пролита жидкость или
на него упал какой-либо предмет, если прибор подвергся воздействию дождя или
сырости, не функционирует нормально или если он падал.
15. НЕ допускайте попадания на прибор капель или брызг. НЕ ставьте на прибор сосуды
с жидкостью, например, вазы.
16. Вилка электропитания или штепсель прибора должны быть легко доступны.
17. Уровень воздушного шума этого аппарата не превышает 70 дБ (A).
18. Аппараты конструкции КЛАССА I необходимо подсоединять к СЕТЕВОЙ розетке с
защитным соединением для заземления.
19. Чтобы уменьшить риск возгорания или поражения электрическим током, не
допускайте попадания на этот аппарат дождя или влаги.
20. Не пытайтесь вносить изменения в это изделие. Это может привести к травме и (или)
выходу изделия из строя.
21. Эксплуатируйте это изделие в указанном диапазоне рабочих температур.
Этот знак показывает, что внутри прибора имеется опасное
напряжение, создающее риск электрического удара.
Этот знак показывает, что в сопроводительной документации
к прибору есть важные указания по его эксплуатации и
обслуживанию.
5
Page 6

중요 안전 지침
1. 이 지침을 정독해 주십시오.
2. 이 지침을 잘 보관해 주십시오.
3. 모든 경고에 유의하십시오.
4. 모든 지침을 준수하십시오.
5. 이 기기를 물 가까이에 두고 사용하지 마십시오.
6. 마른 수건으로만 닦으십시오.
7. 통풍구를 막지 마십시오. 적합한 환기를 위해 충분히 거리를 두고 제조업체의 안내
서에 따라 설치하십시오.
8. 개방된 화염, 난방기, 방열 조절기, 스토브, 기타 열을 발산하는 기기 (앰프포함) 등
의 열원 근처에 설치하지 마십시오. 제품 위에 개방된 화염원을 올려 놓지 마십시오.
9. 안전을 위해 유극 또는 접지 타입의 플러그를 반드시 사용하십시오. 유극 유형의 플
러그는 넓은 핀과 좁은 핀, 두 개의 핀으로 구성되어 있습니다. 접지형 플러그에는
두 개의 핀과 하나의 접지 단자가 있습니다. 넓은 핀이나 접지 단자는 사용자의 안전
을 위한 것입니다. 제공된 플러그가 콘센트에 맞지 않으면 전기 기사에게 문의하여
콘센트를 교체하십시오.
10. 전원 코드는 밟히지 않도록 주의하고 특히 전원 플러그 사이, 접속 소켓 및 기기에서
나오는 부분에 전원 코드가 끼이지 않도록 보호하십시오.
11. 제조업체가 지정한 부속품/액세서리만 사용하십시오.
12. 제조업체에서 지정하거나 기기와 함께 판매되는 카트, 스탠드, 받침대, 브
라켓 또는 테이블에서만 사용하십시오. 카트를 사용하는 경우, 이동 시 카
트와 기기가 넘어져 부상을 입지 않도록 주의하십시오.
13. 낙뢰시 또는 장기간 사용하지 않을 때는 기기의 전원을 빼놓으십시오.
6
14. 모든 서비스는 자격을 갖춘 서비스 전문가에게 의뢰하십시오. 전원 코드나 플러그
가 손상된 경우, 기기 안으로 액체가 들어가거나 물건을 떨어뜨린 경우, 기기가 비나
물에 젖은 경우, 기기가 정상적으로 작동하지 않는 경우 또는 기기를 떨어뜨린 경우
와 같이 기기가 손상되었을 때는 서비스를 받아야 합니다.
15. 기기에 물을 떨어뜨리거나 뿌리지 마십시오. 화병과 같이 물이 담긴 물체를 기기 위
에 올려놓지 마십시오.
16. MAINS 플러그나 기기용 커플러는 작동가능한 상태로 남아 있어야 합니다.
17. 기기의 공기매개 잡음은 70dB을 초과하지 않아야 합니다.
18. CLASS I 구조의 기기는 MAINS 소켓 콘센트에 보호 접지 연결 방식으로 연결되어
야 합니다.
19. 화재나 감전 위험을 줄이려면 이 기기를 빗물 또는 습기에 노출시키지 마십시오.
20. 이 제품을 고치려고 시도하지 마십시오. 그렇게 하면 사람이 다치거나 제품이 고장
을 일으킬 수 있습니다.
21. 이 제품은 명시된 작동 온도 범위내에서 사용하십시오.
이 기호는 기기에 전기 쇼크 위험을 유발하는 위험한 전압이
흐른다는 것을 의미합니다.
이 기호는 이 기기와 함께 제공된 문서에 중요한 작동 및 유지
보수 지침의 내용이 들어 있다는 것을 의미합니다.
Page 7

重要安全事项!
1. 必须阅读这些注意事项。
2. 必须保留这些注意事项。
3. 必须注意所有警告内容。
4. 必须遵循所有注意事项。
5. 不要在靠近水的地方使用本设备。
6. 只能用干布擦拭设备。
7. 不要堵塞任何通风口。留出足够的距离,确保充分通风,并安装在符合制造
商要求的位置。
8. 不要将本设备安装在任何热源(如明火、散热器、调温器、火炉或包括功率
放大器在可的其它可能产生热量的装置附近。不要将任何明火火源放置在产
品上。
9. 不要破坏带极性或接地类型插头的安全功能。极性插头带有两个插片,其中一
个比另一个宽。接地类型插头带有两个插片和第三个接地插脚。较宽的插片或
第三个插脚是为安全目的设置的。如果提供的插头无法插入您的插座,请向电
工咨询如何更换合适的插座。
10. 保护电源线防止被脚踩踏或被夹紧,尤其是在插头、方便插座和机身电源线
的引出处。
11. 只能使用制造商指定的连接部件/附件。
12. 只能使用制造商指定的或随设备售出的手推车、支座、三角架、托
架或支撑台。如果使用手推车,在移动装有设备的手推车时应注意
安全,避免设备翻落。
13. 在雷电天气或长时间不使用情况下,应拔下设备插头。
14. 所有维修均应由合格的维修人员执行。如果设备因下列情况损坏,应进行维
修:电源线或插头损坏、液体泼溅到设备上或异物进入设备,设备暴露在雨水
或潮湿环境中而无法正常工作,或摔落到地上。
15. 不要将本设备暴露在可能滴水和溅水的地方。不要将装有液体的容器(如花瓶
等)放在本设备顶部。
16. 电源插头或电器转接头应保持在随时可用的状态。
17. 本装置的空气噪声不超过 70dB (A)。
18. 应将符合 I 类标准的设备连接到带有接地保护装置的主电源插座。
19. 为降低起火或电击危险,不要将本设备暴露在雨中或潮湿环境下。
20. 不要尝试改装本产品。否则可能会导致人身伤害和/或产品故障。
21. 应在技术规格指定的温度范围内操作此产品。
这个符号表示本设备中存在可能导致触电的危险电压。
这个符号表示本设备附带的说明书中具有重要的操作和维护
说明。
重要安全事項!
1. 必須閱讀這些注意事項。
2. 必須保留這些注意事項。
3. 必須注意所有警告內容。
4. 必須遵循所有注意事項。
5. 不要在靠近水的地方使用本設備。
6. 只能用幹布擦拭設備。
7. 不要堵塞任何通風口。留出足夠的距離,確保充分通風,並安裝在符合製造
商要求的位置。
8. 不要將本設備安裝在任何熱源(如明火、散熱器、調溫器、火爐或包括功率
放大器在可的其它可能產生熱量的裝置附近。不要將任何明火火源放置在產
品上。
9. 不要破壞帶極性或接地類型插頭的安全功能。極性插頭帶有兩個插片,其中一
個比另一個寬。接地類型插頭帶有兩個插片和第三個接地插腳。較寬的插片或
第三個插腳是為安全目的設定的。如果提供的插頭無法插入您的插座,請向電
工咨詢如何更換合適的插座。
10. 保護電源線防止被腳踩踏或被夾緊,尤其是在插頭、方便插座和機身電源線
的引出處。
11. 只能使用製造商指定的連接部件/附件。
12. 只能使用製造商指定的或隨設備售出的手推車、支座、三角架、托
架或支撐台。如果使用手推車,在移動裝有設備的手推車時應注意
安全,避免設備翻落。
PETUNJUK PENTING KESELAMATAN
1. BACA petunjuk ini.
2. SIMPAN petunjuk ini.
3. PATUHI semua peringatan.
4. IKUTI semua petunjuk.
5. JANGAN gunakan perangkat ini dekat dengan air.
6. CUKUP DIBERSIHKAN dengan kain lap kering.
7. JANGAN halangi semua bukaan ventilasi. Biarkan jarak yang cukup dengan lubang
udara yang cukup dan pasang sesuai petunjuk pabrik.
8. JANGAN pasang dekat dengan sumber panas seperti radiator, kisi-kisi tungku pemanas,
kompor, atau perangkat lain (termasuk amplifier) yang menghasilkan panas. Jangan
taruh sumber api terbuka pada produk ini.
9. JANGAN gagalkan tujuan keamanan steker terpolarisasi atau jenis pembumian. Steker
terpolarisasi memiliki dua bilah di mana bilah yang satu lebih lebar dari yang lain. Steker
jenis pembumian memiliki dua bilah dan tonjolan pembumian ketiga. Bilah yang lebih
lebar atau tonjolan ketiga disediakan untuk keselamatan Anda. Jika steker yang disediakan tidak cocok dengan stopkontak Anda, hubungi petugas listrik untuk penggantian
stopkontak yang sudah lama itu.
10. LINDUNGI kabel listrik agar aman dari injakan atau jepitan, terutama pada steker, stopkontak terbuka, dan titik yang menonjol dari perangkat itu.
11. HANYA GUNAKAN kelengkapan/aksesoris yang ditetapkan pabrik.
12. GUNAKAN hanya dengan kereta dorong, penyangga, tripod, braket atau
meja yang ditetapkan oleh pabrikan, atau yang dijual bersama perangkat
tersebut. Bila menggunakan kereta dorong, gunakan secara hati-hati ketika
memindahkan secara bersama-sama kereta dorong/perangkat tersebut untuk
menghindari cedera karena perangkat terguling.
13. 在雷電天氣或長時間不使用時,應拔下設備的插頭。
14. 所有維修均應由合格的維修人員執行。在設備因以下情況被損壞時,應進行維
修:電源線或插頭損壞、液體潑濺到設備上或異物進入設備,設備暴露在雨水
或潮濕環境中而無法正常工作,或摔落到地上。
15. 不要將本設備暴露在可能滴水和濺水的地方。不要將裝有液體的容器(如花瓶
等)放在本設備頂部。
16. 電源插頭或電器轉接頭應保持在隨時可用的狀態。
17. 本裝置的空氣噪聲不超過 70dB (A)。
18. 應將符合 I 類標準的設備連接到帶有接地保護裝置的主電源插座。
19. 為降低起火或電擊危險,不要將本設備暴露在雨中或潮濕環境下。
20. 不要嘗試改裝本產品。否則可能會導致人身傷害和/或產品故障。
21. 應在技術規格指定的溫度範圍內操作此產品。
這個符號表示本設備中存在可能導致觸電的危險電壓。
此符號表示本部件附帶的說明書中具有重要的操作和安全說
明。
13. CABUT perangkat ini selama petir atau bila tidak digunakan untuk waktu yang lama.
14. SERAHKAN semua servis ke petugas ahli. Servis diperlukan apabila perangkat tersebut
sudah rusak dalam cara apapun, seperti kabel catu daya atau steker rusak, cairan tertumpah atau ada benda yang jatuh ke dalam perangkat, perangkat sudah terpapar hujan
atau lembab, tidak bekerja normal, atau perangkat pernah jatuh.
15. JANGAN paparkan perangkat dengan tetesan dan percikan. JANGAN letakkan benda
yang penuh dengan cairan, seperti pot bunga di atas perangkat tersebut.
16. Steker INDUK atau tusuk kontak harus tetap siap digunakan.
17. Kebisingan Perangkat ini yang bersumber dari udara tidak melebihi 70dB (A).
18. Perangkat dengan konstruksi KELAS I harus dihubungkan ke stopkontak soket INDUK
dengan sambungan pembumian untuk pengaman.
19. Untuk mengurangi resiko kebakaran atau sengatan listrik, jangan paparkan perangkat ini
dengan hujan atau lembab.
20. Jangan coba-coba memodifikasi produk ini. Melakukannya dapat menyebabkan cedera
diri dan/atau kerusakan produk.
21. Jalankan produk ini di dalam jarak suhu kerja yang ditetapkan.
Simbol ini menunjukkan bahwa voltase yang berbahaya menimbulkan
resiko atau sengatan yang ada di dalam unit ini.
Lambang ini menunjukkan bahwa terdapat petunjuk kerja dan pemeliharaan penting pada bacaan yang melengkapi unit ini.
7
Page 8

on
n
o
2DXLU
on
ULXD1
ULXD1
on
ULXD2
EXIT
SCAN
EXIT
SCAN
EXIT
SCAN
!
!
!
!
!
!
!
!
!
!
!
!
!
!
!
!
!
!
!
!
!
!
!
!
!
!
!
!
Quickstart Instructions
Instructions de mise en oeuvre rapide
Kurzanleitung
1 2
Instrucciones de arranque rápido
Istruzioni di avviamento rapido
Instruções para Início Rápido
Краткое руководство
ク イッ ク ス タ ート 操 作 ガ イド
빠른 시작 설명서
快速入門說明
Petunjuk Memulai Cepat
b
gainaudio
control
RF
A B
OL
OL
ENTER
EXIT
SCAN
push
1-G: 01CH:03 TxOn
2-G: 01CH:06 TxOn
3-G: 01CH:08 TxOn
4-G: 01CH:12 TxOn
a
gainaudio
control
RF
A B
OL
OL
ENTER
EXIT
SCAN
push
GROUP SCAN
sync
a
45°
150 mA
line
line
mic
mic
line
mic
A
line
mic
sync
power
b
line
line
mic
mic
line
line
mic
mic
Select RX TO SCAN
1 Receiver
2 Receiver
3 Receiver
SCAN COMPLETE
GROUP: 01
OPEN FREQ: 70
RX CHAN FOUND: 4
c
CHANNEL SCAN
line
line
mic
mic
line
line
mic
mic
CROUP SCAN
Deploy Completed
4 of 4
Channels Set
SYNC TX NOW
3
4
RX1
sync
a
a
b
95A15842
c
ULXD2
on
AA SB900
65A15224
b
control
RF
RX1 RX2 RX3 RX4
A B
ULXD4Q
Digital Wireless Receiver
gainaudio
RF
A B
OL
OL
2
D
X
L
U
n
o
<15 cm (6 in.)
ENTER
EXIT
SCAN
OL
OL
push
gainaudio
gainaudio
gainaudio
RF
RF
A B
A B
OL
OL
OL
OL
gainaudio
RF
power
A B
OL
OL
8
Page 9

ULXD Dual and Quad 900 MHz
Full Manual Online
This is the quick-reference version of the user guide.
For information on the following topics, visit www.shure.com to download the comprehensive manual:
• High Density mode
• Frequency Diversity
• Audio Summing
• Encryption
• Dante digital audio
• Multiple systems setup
• RF and hardware presets
• Networking details
• Warning Messages
• AMX and Crestron connections
• Firmware updates
• Troubleshooting
• Product specifications and wiring
diagrams
• Compatible frequencies chart
LICENSING INFORMATION
Licensing: A ministerial license to operate this equipment may be required in certain areas. Consult your national authority for possible requirements. Changes or
modifications not expressly approved by Shure Incorporated could void your authority to operate the equipment. Licensing of Shure wireless microphone equipment is the user’s responsibility, and licensability depends on the user’s classification and application, and on the selected frequency. Shure strongly urges the
user to contact the appropriate telecommunications authority concerning proper licensing, and before choosing and ordering frequencies.
Information to the user
This equipment has been tested and found to comply with the limits for a
Class B digital device, pursuant to Part 15 of the FCC Rules. These limits are
designed to provide reasonable protection against harmful interference in a
residential installation. This equipment generates uses and can radiate radio
frequency energy and, if not installed and used in accordance with the instructions, may cause harmful interference to radio communications. However,
there is no guarantee that interference will not occur in a particular installation.
If this equipment does cause harmful interference to radio or television reception, which can be determined by turning the equipment off and on, the user
is encouraged to try to correct the interference by one or more of the following
measures:
• Reorient or relocate the receiving antenna.
• Increase the separation between the equipment and the receiver.
• Connect the equipment to an outlet on a circuit different from that to which
the receiver is connected.
• Consult the dealer or an experienced radio/TV technician for help.
This device complies with Industry Canada licence-exempt RSS standard(s).
Operation of this device is subject to the following two conditions: (1) this device may not cause interference, and (2) this device must accept any interference, including interference that may cause undesired operation of the device.
Le présent appareil est conforme aux CNR d'Industrie Canada applicables
aux appareils radio exempts de licence. L'exploitation est autorisée aux deux
conditions suivantes : (1) l'appareil ne doit pas produire de brouillage, et (2)
l'utilisateur de l'appareil doit accepter tout brouillage radioélectrique subi,
même si le brouillage est susceptible d'en compromettre le fonctionnement.
WARNING: Danger of explosion if battery incorrectly replaced. Operate only
with Shure compatible batteries.
Note: Use only with the included power supply or a Shure-approved
equivalent.
WARNING
• Battery packs may explode or release toxic materials. Risk of fire or burns.
Do not open, crush, modify, disassemble, heat above 140°F (60°C), or
incinerate.
• Follow instructions from manufacturer
• Only use Shure charger to recharge Shure rechargeable batteries
• WARNING: Danger of explosion if battery incorrectly replaced. Replace only
with same or equivalent type.
• Never put batteries in mouth. If swallowed, contact your physician or local
poison control center
• Do not short circuit; may cause burns or catch fire
• Do not charge or use battery packs other than Shure rechargeable batteries
• Dispose of battery packs properly. Check with local vendor for proper
disposal of used battery packs.
• Batteries (battery pack or batteries installed) shall not be exposed to
excessive heat such as sunshine, fire or the like
9
Page 10

1 2
1 2 3 4
General Description
Shure ULX-D™ Digital Wireless offers uncompromising audio quality and
RF performance, with intelligent, encryption-enabled hardware, flexible receiver options, and advanced rechargeability options for professional sound
reinforcement.
A breakthrough in wireless audio quality, Shure digital processing enables
ULX-D to deliver the purest reproduction of source material ever available in a
wireless system, with a wide selection of trusted Shure microphones to choose
from. Extended 20 Hz – 20 KHz frequency range and totally flat response
captures every detail with clarity, presence, and incredibly accurate low end
and transient response. At greater than 120 dB, ULX-D delivers wide dynamic
range for excellent signal-to-noise performance. For added convenience, proprietary Shure Gain Ranging optimizes the system’s dynamic range for any
input source, eliminating the need for transmitter gain adjustments.
In RF performance, ULX-D sets the bar for spectral efficiency and signal
For scalability and modular flexibility, ULX-D receivers come in dual and quad
channel versions providing rack-ready conveniences such as RF cascade, internal power supply, audio output channel summing, and DANTE™ digital networking, which delivers multi-channel audio over Ethernet. All receivers offer
High-Density mode for closer-range applications where high channel counts
are needed, greatly increasing the amount of simultaneous channels possible
over one frequency band.
Advanced Lithium-ion rechargeability provides extended transmitter battery life
over alkaline batteries, battery life metering in hours and minutes accurate to
within 15 minutes, and detailed tracking of battery health status.
Combined with the suite of features and benefits ULX-D™ Digital Wireless
Systems offer, the ULXD4D and ULXD4Q receivers are truly generations
ahead of any other digital receivers in their class, and bring a new level of per-
formance to professional sound reinforcement.
stability. The intermodulation performance of ULX-D is an incredible advancement in wireless performance, enabling a dramatic increase in the number of
simultaneous active transmitters on one TV channel. Rock-solid RF signal with
no audio artifacts extends over the entire 100-meter line-of-sight range, even
using standard dipole antennas. For applications where secure transmission
is required, ULX-D offers Advanced Encryption Standard (AES) 256-bit encrypted signal for unbreachable privacy.
Dual and Quad Receiver Models
The ULXD4 receiver is available in dual channel and quad channel models. Both models share the same feature set and functionality, but differ in the number of
channels available and the number of audio outputs.
The descriptions and procedures in this guide are applicable to either the dual or the quad receiver.
ULXD4D Dual Receiver
Supports 2 channels of wireless audio.
control
RF
RX1 RX2
ULXD4D
Digital Wireless Receiver
ENTER
EXIT
IR
SCAN
B
A B
OL
push
ULXD4Q Quad Receiver
Supports 4 channels of wireless audio.
gainaudio
OL
gainaudio
RF
A B
OL
OL
PrimarySecondary
line
mic
output 1output 2
line
mic
power
A
ULXD4Q
Digital Wireless Receiver
IR
B
control
ENTER
EXIT
SCAN
push
line
mic
gainaudio
RF
RX1 RX2 RX3 RX4
A B
OL
OL
line
mic
gainaudio
RF
A B
OL
OL
PrimarySecondary
line
mic
gainaudio
RF
A B
OL
OL
output 1output 2output 3output 4
line
mic
gainaudio
RF
power
A B
OL
OL
A
10
Page 11

Receiver
ULXD4Q
Digital Wireless Receiver
1
IR
3
2
4
ENTER
EXIT
SCAN
6
control
push
7
5
8
RX1 RX2 RX3 RX4
SEL
sync
9
Front Panel
① Infrared (IR) Sync Window
Sends IR signal to the transmitter for sync.
② Network Icon
Illuminates when the receiver is connected with other Shure devices on the
network. IP Address must be valid to enable networked control.
③ Encryption Icon
Illuminates when AES-256 encryption is activated.
④ LCD Panel
Displays settings and parameters.
⑤ Scan Button
Press to find the best channel or group.
⑥ Menu Navigation Buttons
Use to navigate and select parameter menus.
⑦ Control Wheel
• Push to select a channel or menu item
• Turn to scroll through menu items or to edit a parameter value
⑧ Channel Select Button
Press to select a channel.
⑨ Sync Button
Press the
aligned to transfer settings from the receiver to the transmitter.
⑩ RF Diversity LEDs
Indicate antenna status:
• Blue = normal RF signal between the receiver and transmitter
• Red = interference detected
• Off = No RF connection between the receiver and transmitter
Note: the receiver will not output audio unless one blue LED is illuminated.
sync button while the receiver and transmitter IR windows are
12
10
gainaudio
RF
A B
OL
OL
11
SEL SEL
sync sync sync
13
gainaudio
RF
A B
OL
OL
gainaudio
RF
A B
OL
OL
SEL
gainaudio
RF
A B
OL
power
OL
14
⑪ RF Signal Strength LEDs
Indicate the RF signal strength from the transmitter:
• Amber = Normal (-90 to -70 dBm)
• Red = Overload (greater than -25 dBm)
⑫ Audio LEDs
Indicate average and peak audio levels:
LED Audio Signal Level Description
Red (6) -0.1 dBFS Overload/ limiter
Yellow (5) -6 dBFS
Yellow (4) -12 dBFS
Normal peaks
Green (3) -20 dBFS
Signal PresentGreen (2) -30 dBFS
Green (1) -40 dBFS
Note: In Frequency Diversity mode, simultaneous blinking of the red and
yellow audio LEDs indicates that diversity audio has been routed to this
channel.
⑬ Gain Buttons
Press the ▲▼
gain buttons on the front of the receiver to incrementally ad-
just gain from -18 to +42 dB.
⑭ Power Switch
Powers the unit on or off.
B
3
1
2
Back Panel
① AC Power Input
IEC Connector, 100 - 240 V AC.
② RF Antenna Diversity Input Jack (2)
For antenna A and antenna B.
③ RF Cascade Jack (2)
Passes the RF signal from Antenna
A and Antenna B to one additional
receiver.
④ Mic/Line Switch (one per channel)
Applies a 30 dB pad in
mic position.
line
mic
line
mic
5
4 5 4
⑤ Balanced XLR Audio Output (one per
channel)
Connect to a mic or line level input.
⑥ Network Status LED (Green)
One per network port.
• Off = no link
• On = network link
• Flashing = network link active
⑦ Ethernet/Dante Network Secondary Port
Connect to an Ethernet network to enable
remote device control via WWB6 software.
Also carries Dante digital audio and control
signals for audio distribution, monitoring,
and recording - see Dante Network topic.
PrimarySecondary
line
mic
7 864
9
5
output 1output 2output 3output 4
line
mic
5
4
A
3
2
⑧ Network Speed LED (Amber)
One per network port.
• Off = 10/100 Mbps
• On = 1 Gbps
⑨ Ethernet/Dante Network Primary Port
Connect to an Ethernet network to enable remote device control via WWB6 software. Also carries Dante
digital audio and control signals for audio distribution,
monitoring, and recording - see Dante Network topic.
11
Page 12

Receiver Home Screen
The home screen displays the following
information for each receiver channel:
• Group and Channel
• Transmitter Status:
battery icon/remaining battery life
Press the SEL button to access a channel menu screen.
NoTx or TxOn,
1 G:01 CH:01 TxOn
2 G:01 CH:02 TxOn
3 G:01 CH:03 TxOn
4 G:01 CH:04 TxOn
Transmitters
① Power LED
• Green = unit is powered on
• Red = low battery or battery error (see Troubleshooting)
• Amber = power switch is disabled
② On/Off Switch
Powers the unit on or off.
③ SMA Connector
Connection point for RF antenna.
④ LCD Display:
View menu screens and settings. Press any control button to activate the
backlight.
⑤ Infrared (IR) Port
Align with the receiver IR port during an IR Sync for automated transmitter
programming.
⑥ Menu Navigation Buttons
Use to navigate through parameter menus and change values.
Receiver Output Level
The following table describes the typical total system gain from the audio input
to the receiver outputs:
Receiver Output Gain
Output Jack System Gain (gain control = 0dB)
XLR (line setting) +24 dB
XLR (mic setting) -6 dB*
*This setting matches a typical wired SM58 audio signal level.
ULXD2
ULXD1
on
exit
enter Enters menu screens and confirms parameter changes
▼▲
⑦ Battery Compartment
⑧ AA Battery Adapter
⑨ Bodypack Antenna
Acts as a 'back' button to return to previous menus or parameters without confirming a value change
Use to scroll through menu screens and to change parameter values
Requires Shure SB900 rechargeable battery or 2 AA batteries.
• Handheld: rotate and store in the battery compartment to use a Shure
SB900 battery
• Bodypack: remove to accommodate a Shure SB900 battery
For RF signal transmission.
Locking Controls and Settings
Use the LOCK feature to prevent accidental or unauthorized changes to the hardware.
Receiver
Menu path: DEVICE UTILITIES > LOCK
Use the control wheel to select and lock any of the following receiver functions.
•
MENU: All menu paths are inaccessible
• GAIN: Gain adjustment is locked
• POWER: Power switch is disabled
• SCN/SYC: Cannot perform a Scan and Sync
Tip: To unlock, press the EXIT button, turn the control wheel to select
UNLOCKED, and then press ENTER to save.
⑩ Integrated Antenna
For RF signal transmission.
⑪ Microphone Cartridge
See Optional Accessories for a list of compatible cartridges.
⑫ TA4M Input Jack
Connects to a 4-Pin Mini Connector (TA4F) microphone or instrument
cable.
Transmitter
Menu path: UTILITY > LOCK
Use the transmitter controls to select and lock any of the following transmitter
functions.
•
MENU LOCK: All menu paths are inaccessible.
• POWER LOCK: Power switch is disabled
Quick-Lock Option: To turn on the transmitter with its power and menu navi-
gation buttons locked, press and hold the ▲ button during power-on until the
locked message is displayed.
Tip: To unlock the MENU LOCK, press the ENTER button 4 times to pass
through the following screens: UTILITY > LOCK > MENU UNLOCK
To unlock the POWER LOCK, set the power switch to the off position, then
press and hold the ▲ button while resetting the power switch to the on position.
12
Page 13

Menu Screens
Receiver Channel
① Receiver Information
Use
DEVICE UTILITIES > HOME INFO to change the home screen display.
② Gain Setting
−18 to +42 dB, or Mute.
③ Mic. Offset Indicator
Indicates offset gain is added to the transmitter.
④ Transmitter Settings
The following information cycles when a transmitter is tuned to the receiver's frequency:
• Transmitter Type
• Input Pad (Bodypack only)
• RF Power Level
• Transmitter Lock Status
• Transmitter Mute Status
⑤ Battery Runtime Indicator
Shure SB900 battery: runtime is displayed in minutes remaining.
AA batteries: runtime is displayed with a 5-bar indicator.
Transmitter
1
2
x
3 4 5 6
① Transmitter Information
Scroll ▲▼ at the home screen to change the display
② Power Lock Indicator
Indicates power switch is disabled
③ Transmitter Audio Muted Indicator
Displayed when the transmitter audio is set to off using the
feature.
9
8
7
MUTE MODE
⑥ TV Channel
Displays the TV channel that contains the tuned frequency.
⑦ High Density Mode Icon
Displayed when High Density mode is enabled.
Transmitter Status
The following text or icons report transmitter status to the receiver screen:
Display Icon Transmitter Status
Bodypack input is attenuated 12 dB
Offset gain is added to the transmitter
Lo 1 mW RF power level
Nm 10 mW RF power level
Hi 20 mW RF power level
M Menu is locked
P Power is locked
TxMuted
-No Tx-
④ Battery Runtime Indicator
• Shure SB900 battery: runtime is displayed in hours:minutes remaining
• AA Batteries: runtime is displayed with a 5-bar indicator
⑤ Menu Lock Indicator
Indicates menu navigation buttons are disabled
⑥ Mic. Offset
Displays microphone offset gain value
⑦ RF Power
Displays RF power setting
⑧ Bodypack Input Pad
The input signal is attenuated 12 dB
⑨ Encryption Icon
Indicates encryption is enabled on the receiver and has been transferred to
the transmitter from a sync
Displayed when the transmitter audio is set to off using
the MUTE MODE feature
No RF connection between a receiver and transmitter
or transmitter OFF
Audio Signal Encryption
When encryption is enabled, the receiver generates a unique encryption key which is shared with a the transmitter during an IR sync. Transmitters and receivers
that share an encryption key form a protected audio path, preventing unauthorized access from other receivers.
Encrypting a Single Transmitter to a Single Receiver
1. From the receiver menu: DEVICE UTILITIES > ENCRYPTION > ON (Auto)
2. Press ENTER.
3. Perform an IR Sync to share the encryption key with the selected
transmitter.
Encrypting Multiple Transmitters to a Single Receiver
Multiple transmitters can share the same encryption key, allowing them access
to a single receiver. Use this method if you have multiple instruments or wish
to use a combination of handheld and bodypack transmitters.
1. From the receiver menu:
KEEP KEYS.
2. Press ENTER.
3. Perform an IR Sync to share the encryption key with the first transmitter.
4. Turn off the transmitter and perform an IR Sync to share the key additional
transmitters.
Caution! Make sure only one transmitter is turned on during an IR sync or a
performance to avoid causing cross interference between transmitters.
DEVICE UTILITIES > ENCRYPTION > ON (Manual) >
Regenerating Encryption Keys
Periodically regenerating the encryption key maintains security for transmitters
and receivers that are paired for extended periods.
1. From the receiver menu:
REGENERATE KEYS.
2. Press ENTER.
3. Perform an IR Sync to share the encryption key with the first transmitter.
4. Turn off the transmitter and perform an IR Sync to share the key additional
transmitters.
Caution! Make sure only one transmitter is turned on during an IR sync or a
performance to avoid causing cross interference between transmitters.
DEVICE UTILITIES > ENCRYPTION > ON (Manual) >
Removing Encryption
1. From the receiver menu: DEVICE UTILITIES ENCRYPTION OFF
2. Press ENTER.
3. IR Sync the transmitter and receiver to clear the encryption key.
Note: If multiple transmitters are encrypted to a single receiver, each transmitter must be IR synced to clear the encryption key.
13
Page 14

ULXD Specifications
Working Range
100 m (330 ft)
Note: Actual range depends on RF signal absorption, reflection and interference.
Audio Frequency Response
ULXD1 20 – 20 kHz (±1 dB)
ULXD2 Note: Dependent on microphone type
Audio Dynamic Range
System Gain @ +10
>120 dB, A-weighted, typical
System Audio Polarity
Positive pressure on microphone diaphragm produces positive
voltage on pin 2 (with respect to pin 3 of XLR output) and the tip
of the 6.35 mm (1/4-inch) output.
Operating Temperature Range
-18°C (0°F) to 50°C (122°F)
Note: Battery characteristics may limit this range.
Housing
ULXD4D/ULXD4Q ULXD1 ULXD2
Steel; Extruded aluminum Cast aluminum Machined aluminum
ULXD4 Power Requirements
ULXD4D 100 to 240 V AC, 50-60 Hz, 0.26 A max.
ULXD4Q 100 to 240 V AC, 50-60 Hz, 0.32 Amax.
Battery Type
Shure SB900 Rechargeable Li-Ion or LR6 AA batteries 1.5 V
Battery Runtime
@ 10 mW
Shure SB900 alkaline
>11 hours 11 hours
Band
Frequency
Range ( MHz)
Power ( mW)
(Lo/Nm/Hi)
G50 470 to 534 1/10/20
G51 470 to 534 1/10/20
G52 479 to 534 1/10
H50 534 to 598 1/10/20
H51 534 to 598 1/10/20
H52 534 to 565 1/10
J50 572 to 636 1/10/20
K51 606 to 670 1/10
L50 632 to 696 1/10/20
L51 632 to 696 1/10/20
P51 710 to 782 1/10/20
R51 800 to 810 1/10/20
JB (Tx only) 806 to 810 1/10
AB (Rx and Tx)
770 to 810 'A' Band (770-805): 1/10/20
'B' Band (806-809): 1/10
Q51 794 to 806 1/10/20
X50 925 to 932 1/10
X51 925 to 937.5 10
902 to 928 (All
X52
America's except
0.25/10/20
Brazil)
X53
X54
902 to 907.500,
915 to 928 (Brazil)
915 to 928
(Australia)
0.25/10/20
0.25/10/20
Certifications
ULXD1, ULXD2, ULXD4D, ULXD4Q
This product meets the Essential Requirements of all relevant European directives and is eligible for CE marking.
ULXD1, ULXD2
Certified under FCC Part 74.
Certified by IC in Canada under RSS-123 and RSS-102.
IC: 616A-ULXD1 G50, 616A-ULXD1 H50, 616A-ULXD1 J50, 616A-ULXD1
L50; 616A-ULXD2 G50, 616A-ULXD2 H50, 616A-ULXD2 J50, 616A-ULXD2
L50.
FCC: DD4ULXD1G50, DD4ULXD1H50, DD4ULXD1J50, DD4ULXD1L50;
DD4ULXD2G50, DD4ULXD2H50, DD4ULXD2J50, DD4ULXD2L50.
Certified under FCC Part 15.
Certified by IC in Canada under RSS-102 and RSS-210.
IC: 616A-ULXD1X52, 616A-ULXD2X52
FCC: DD4ULXD1X52, DD4ULXD2X52
ULXD4D, ULXD4Q
Approved under the Declaration of Conformity (DoC) provision of FCC Part 15.
Certified by IC in Canada under RSS-210.
IC: 616A-ULXD4D G50, 616A-ULXD4D J50, 616A-ULXD4D L50;
616A-ULXD4Q G50, 616A-ULXD4Q J50, 616A-ULXD4Q L50.
Conforms to electrical safety requirements based on IEC 60065.
The CE Declaration of Conformity can be obtained from: www.shure.com/
europe/compliance
Authorized European representative:
Shure Europe GmbH
Headquarters Europe, Middle East & Africa
Department: EMEA Approval
Jakob-Dieffenbacher-Str. 12
75031 Eppingen, Germany
Phone: 49-7262-92 49 0
Fax: 49-7262-92 49 11 4
Email: EMEAsupport@shure.de
Australia Warning for Wireless
This device operates under an ACMA class licence and must comply with
all the conditions of that licence including operating frequencies. Before 31
December 2014, this device will comply if it is operated in the 520-820 MHz
frequency band. WARNING: After 31 December 2014, in order to comply, this
device must not be operated in the 694-820 MHz band.
14
Page 15

Page 16

 Loading...