

Shure ULXD14D-G50-II, ULXD14D-H50-II, ULXD14D/85-G50-II, ULXD14D/85-H50-II, ULXD14D/93-G50-II User's Guide
...Page 1
IMPORTANT SAFETY INSTRUCTIONS
1. READ these instructions.
2. KEEP these instructions.
3. HEED all warnings.
4. FOLLOW all instructions.
5. DO NOT use this apparatus near water.
6. CLEAN ONLY with dry cloth.
7. DO NOT block any ventilation openings. Allow sufficient distances for
adequate ventilation and install in accordance with the manufacturer’s
instructions.
8. DO NOT install near any heat sources such as open flames, radiators,
heat registers, stoves, or other apparatus (including amplifiers) that produce heat. Do not place any open flame sources on the product.
9. DO NOT defeat the safety purpose of the polarized or grounding type
plug. A polarized plug has two blades with one wider than the other. A
grounding type plug has two blades and a third grounding prong. The
wider blade or the third prong are provided for your safety. If the provided
plug does not fit into your outlet, consult an electrician for replacement
of the obsolete outlet.
10. PROTECT the power cord from being walked on or pinched, particularly
at plugs, convenience receptacles, and the point where they exit from
the apparatus.
11. ONLY USE attachments/accessories specified by the manufacturer.
12. USE only with a cart, stand, tripod, bracket, or table specified by the
manufacturer, or sold with the apparatus. When a cart is used, use caution
when moving the cart/apparatus combination to avoid injury from tip-over.
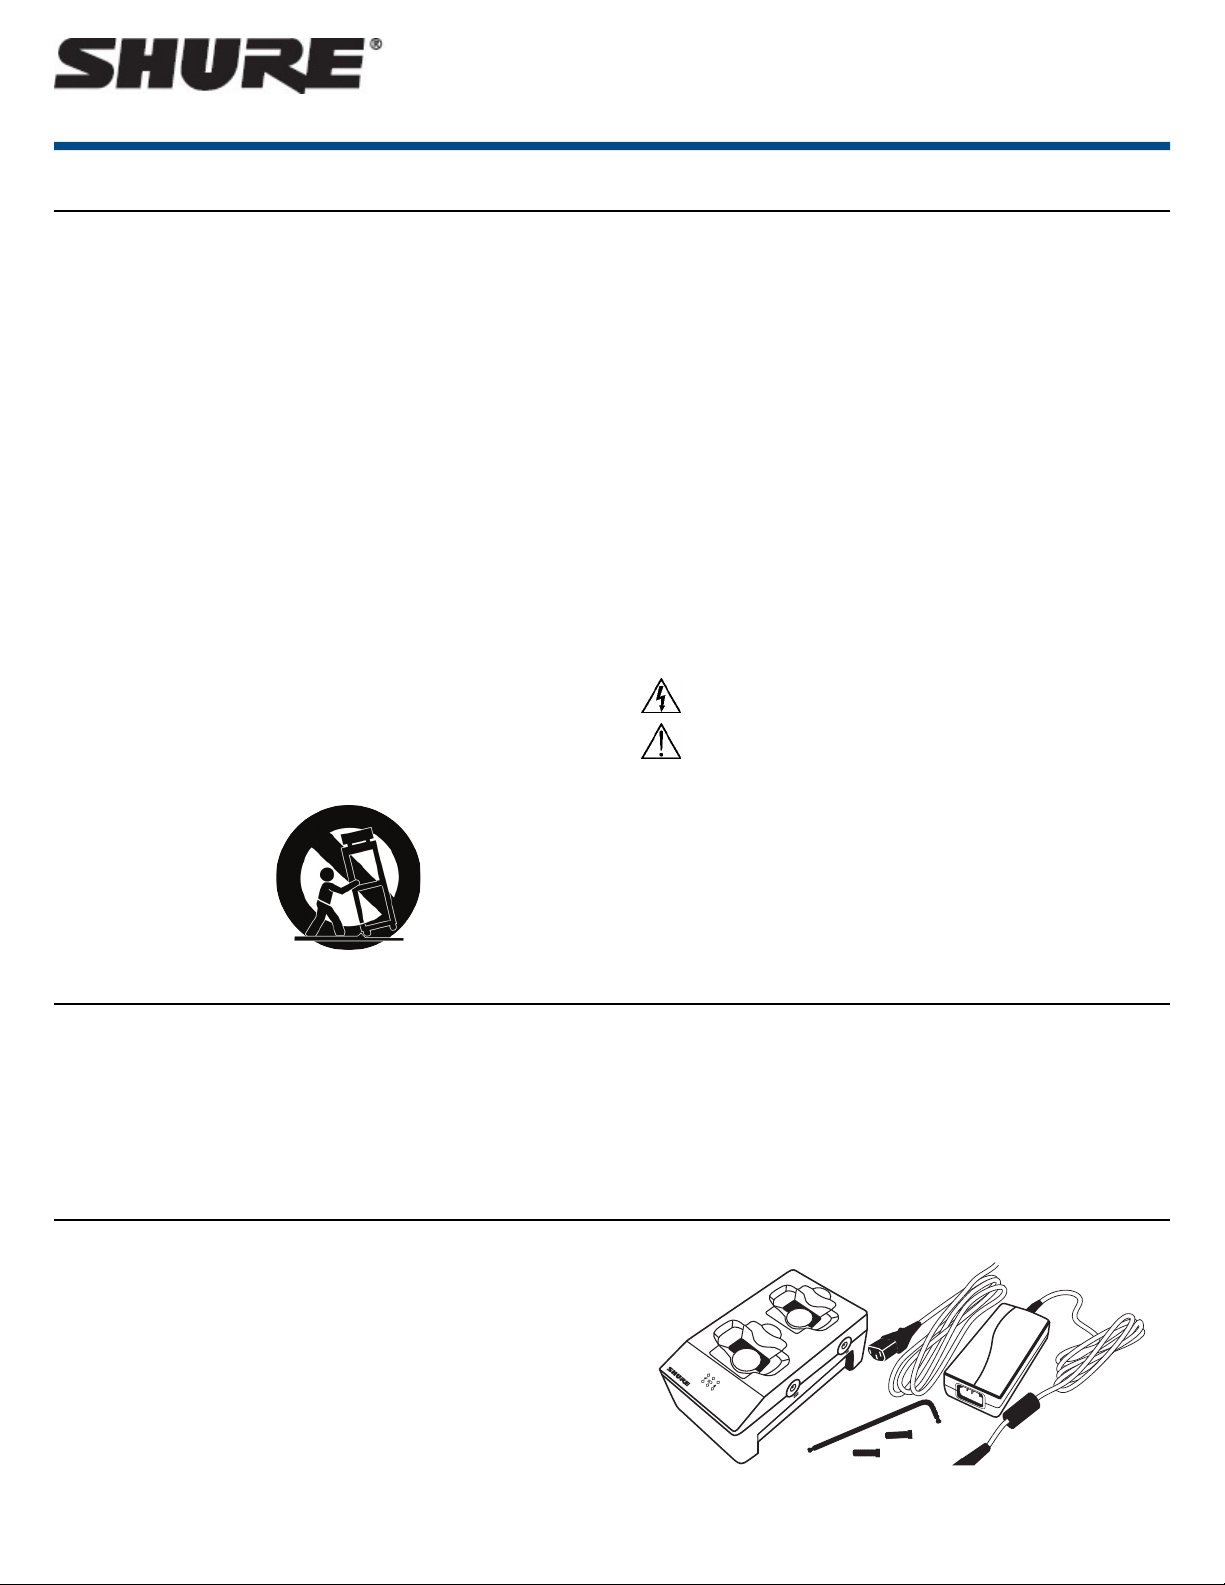
SBC200
Battery Charger
13. UNPLUG this apparatus during lightning storms or when unused for long
periods of time.
14. REFER all servicing to qualified service personnel. Servicing is required
when the apparatus has been damaged in any way, such as power
supply cord or plug is damaged, liquid has been spilled or objects have
fallen into the apparatus, the apparatus has been exposed to rain or
moisture, does not operate normally, or has been dropped.
15. DO NOT expose the apparatus to dripping and splashing. DO NOT put
objects filled with liquids, such as vases, on the apparatus.
16. The MAINS plug or an appliance coupler shall remain readily operable.
17. The airborne noise of the Apparatus does not exceed 70dB (A).
18. Apparatus with CLASS I construction shall be connected to a MAINS
socket outlet with a protective earthing connection.
19. To reduce the risk of fire or electric shock, do not expose this apparatus
to rain or moisture.
20. Do not attempt to modify this product. Doing so could result in personal
injury and/or product failure.
21. Operate this product within its specified operating temperature range.
This symbol indicates that dangerous voltage constituting a risk of
electric shock is present within this unit.
This symbol indicates that there are important operating and
maintenance instructions in the literature accompanying this unit.
Caution: Do not transport chargers with batteries inserted.
Warning:Do not charge batteries in enclosed spaces without proper ventila-
tion.
SBC200 Charger
The SBC200 two-bay charger holds two SBC900 batteries, transmitters, or
bodypacks. It may be used in any appropriate location with adequate space
and ventilation.
Features
• Charge up to two SB900 batteries, body packs or transmitters
Included Components
• SBC200 Charger
• PS60 Power Supply (not included with SBC200 model variation)
• Screws for attaching additional units (8)
• Allen Wrench (hex key)
• Connect up to four units using one PS60 Power supply
• LED icons for battery status
• Works with compatible hand held and bodypack units such as the P9RA,
P10R, ULXD1, and ULXD2
SB900 batteries not included.
1/4©2017 Shure Incorporated
Page 2
Note:
• This equipment is intended to be used in professional audio applications.
• EMC conformance is based on the use of supplied and recommended
cable types. The use of other cable types may degrade EMC performance.
• Use this battery charger only with the Shure charging modules and battery
packs for which it is designed. Use with other than the specified modules
and battery packs may increase the risk of fire or explosion.
• Changes or modifications not expressly approved by Shure Incorporated
could void your authority to operate this equipment.
WARNING
• Battery packs may explode or release toxic materials. Risk of fire or
burns. Do not open, crush, modify, disassemble, heat above 140°F
(60°C), or incinerate.
• Follow instructions from manufacturer
Shure IncorporatedSBC200 Battery Charger
• Only use Shure charger to recharge Shure rechargeable batteries
• WARNING: Danger of explosion if battery incorrectly replaced. Replace
only with same or equivalent type.
• Never put batteries in mouth. If swallowed, contact your physician or local
poison control center
• Do not short circuit; may cause burns or catch fire
• Do not charge or use battery packs other than Shure rechargeable batteries
• Dispose of battery packs properly. Check with local vendor for proper
disposal of used battery packs.
• Batteries (battery pack or batteries installed) shall not be exposed to
excessive heat such as sunshine, fire or the like
WARNING:Danger of explosion if incorrect battery replaced. Operate only
with AA batteries.
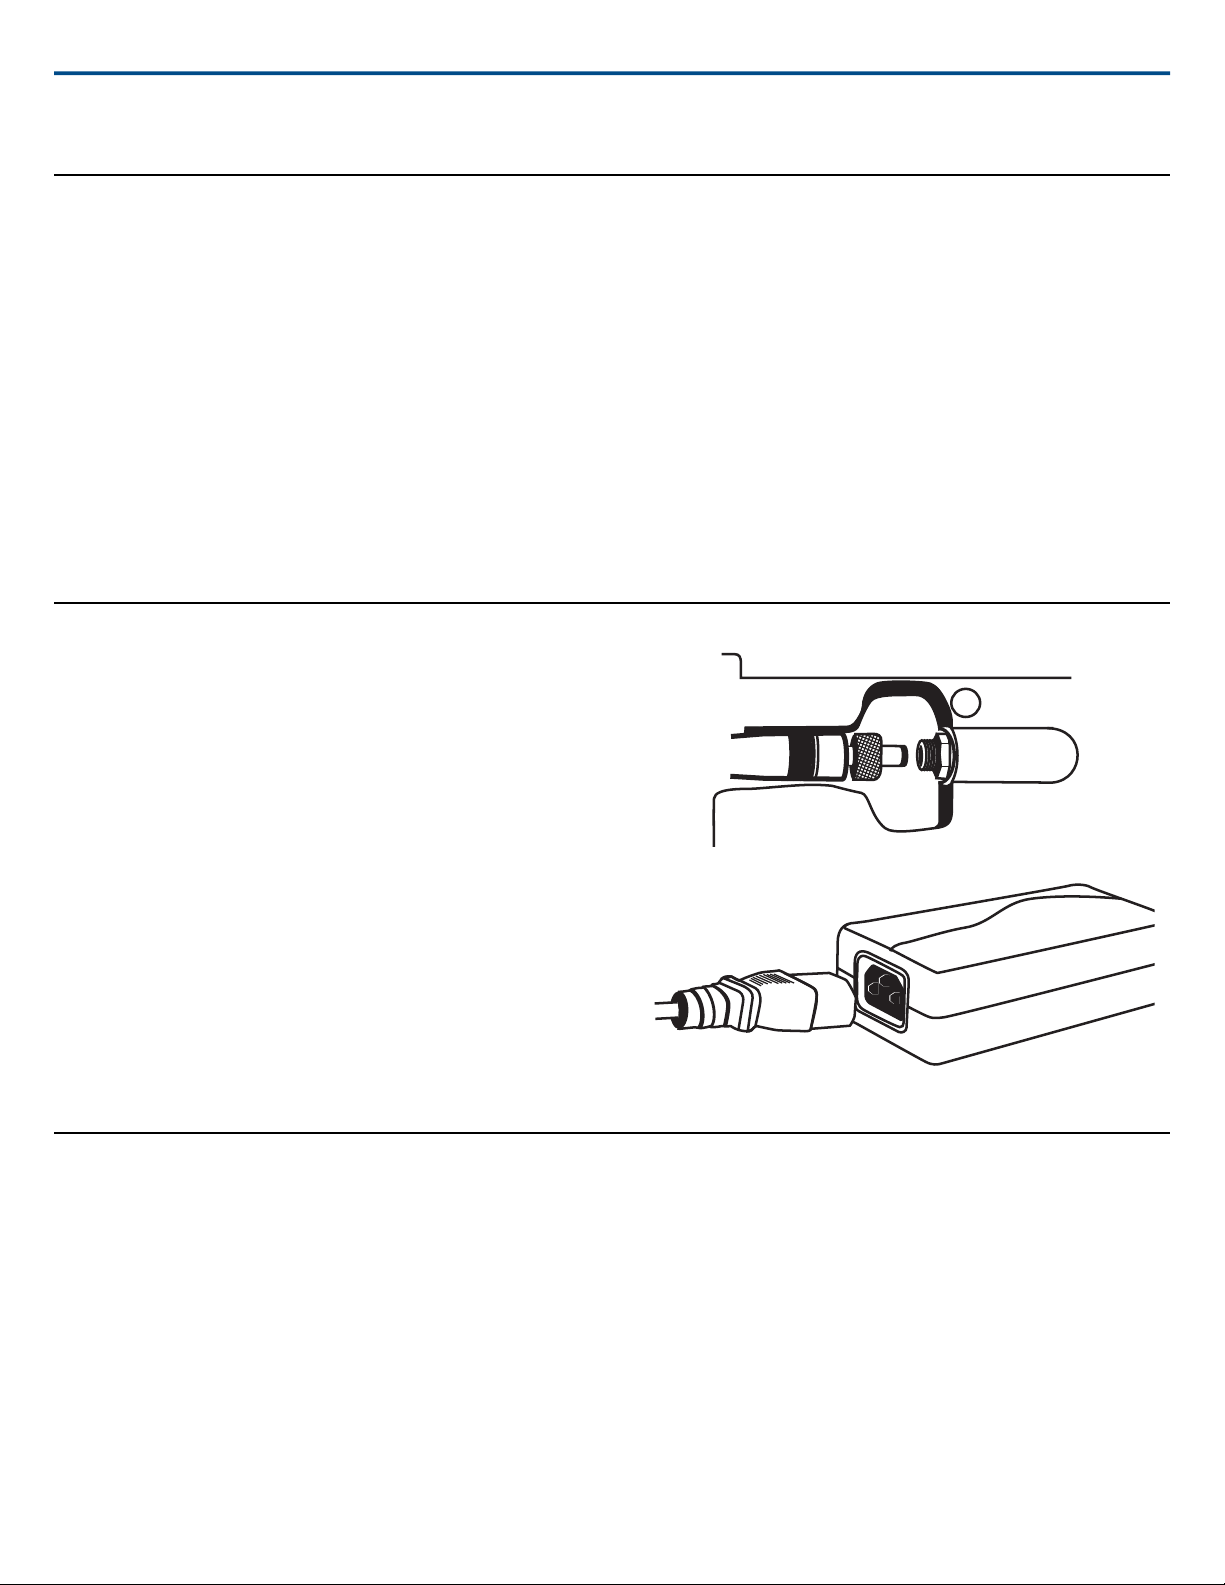
Power
1. Connect DC power cable to input jack on bottom of charger. Finger
tighten lock nut for a secure connection.
2. Route the cable along the desired channel and press into place to secure.
3. Connect power cable to AC Adapter.
WARNING:
• Do not use pliers or any other tools to tighten lock nut. DC power cable
must be attached before charger unit is installed.
• Do not plug in power supply unit until DC connection and charger are in
place.
• After securing the charger, plug the power cable into a properly grounded
outlet.
The SBC200 has no power switch. When plugged in, the charger is ready.
The LEDs illuminate after batteries are inserted.
Adding a Charger
To save space and reduce clutter, up to 4 chargers can share 1 power supply.
1. Unplug charger from the power source.
2. Insert set screws into the power pass-through connector.
3. Align units and tighten screws using the supplied allen wrench.
Important: Do not overtighten.
4. Repeat above steps to add additional chargers.
5. Connect DC power cable to any input jack on the bottom of the charger.
Note: One PS60 will supply power to up to four chargers.
2017/11/062/4
Page 3

ഢӜᆀǺݵ䴫ಘǴࠠဦȐࠠԄȑǺSBC200
ൂϡ烤nit
Ҕނ፦ϷځϯᏢ಄ဦ
ႉLead
(Pb)
Mercury
(Hg)
ᙿCadmium
(Cd)
Ϥሽሐ
Hexavalent
chromium
(Cr
+6
)
ӭྜྷᖄ
Polybrominated
biphenyls
(PBB)
ӭྜྷΒ⾸
Polybrominated
diphenyl ethers
(PBDE)
㏛䐟ᶯ
Ʉ Ʉ Ʉ Ʉ Ʉ Ʉ
㏛䐟ᶯк
䴫䱫
ɡ Ʉ Ʉ Ʉ Ʉ Ʉ
㏛䐟ᶯк
ަԆ䴫ᆀ
ݳಘԦ
Ʉ Ʉ Ʉ Ʉ Ʉ Ʉ
᧕䀨⡷
Ʉ Ʉ Ʉ Ʉ Ʉ Ʉ
ກ㟐ཆ⇬
Ʉ Ʉ Ʉ Ʉ Ʉ Ʉ
ഢԵ1.Ⱥຬр0.1 wt %ȻϷȺຬр0.01 wt %Ȼ߯ࡰҔނ፦ϐԭϩК֖ໆຬрԭϩК֖ໆ୷ྗǶ
ഢԵ2.Ⱥ˕Ȼ߯ࡰ၀Ҕނ፦ϐԭϩК֖ໆ҂ຬрԭϩК֖ໆ୷ྗǶ
ഢԵ3.ȺɡȻ߯ࡰ၀Ҕނ፦ࣁ௨ନҞǶ
Equipment name
Type designation (Type)
Restricted substances and its chemical symbols
Note 1烉“Exceeding 0.1 wt %” and “exceeding 0.01 wt %” indicate that the percentage content of the restricted substance exceeds the
reference percentage value of presence condition.
Note 2烉“ż” indicates that the percentage content of the restricted substance does not exceed the percentage of reference value of presence.
Note 3烉The “í” indicates that the restricted substance corresponds to the exemption.
Shure IncorporatedSBC200 Battery Charger
Charging
To charge, place batteries into the charging bays with slotted sides down.
The LEDs illuminate to indicate battery status.
StateColorLEDDescription
Ready for
Use
* Battery might be too hot or too cold to take a charge.
Note: Store batteries in the charger or in a proper container. To protect ter-
minals from shorting, DO NOT place batteries in a box or pocket with metal
objects such as nails, screws, or keys.
Charged (99-100%)Green
Charging (90-99%)Green and Red
Charging (0- 90%)RedCharging
Battery cannot be charged*YellowWarning
3/42017/11/06
Page 4

Shure IncorporatedSBC200 Battery Charger
Specifications
Charge Current
0.75 A
Charge Time
50% = 1 hour; 100% = 3 hours
External Power Supply
PS60
Certifications
Meets essential requirements of the following European Directives:
• WEEE Directive 2002/96/EC, as amended by 2008/34/EC
• RoHS Directive 2011/65/EU
Note: Please follow your regional recycling scheme for batteries and
electronic waste
The CE Declaration of Conformity can be obtained from Shure Incorporated
or any of its European representatives. For contact information please visit
www.shure.com
The CE Declaration of Conformity can be obtained from:
www.shure.com/europe/compliance
Authorized European representative:
Shure Europe GmbH
Headquarters Europe, Middle East & Africa
Department: EMEA Approval
Jakob-Dieffenbacher-Str. 12
75031 Eppingen, Germany
Phone: +49-7262-92 49 0
Fax: +49-7262-92 49 11 4
Email: info@shure.de
Power Requirements
15 V DC, 3.33 A max.
Dimensions
66 x 99 x 165 mm (2.6 x 3.9 x 6.5 in.), H x W x D
Weight
284 g (10 oz.)
Shure Incorporated 5800 West Touhy Avenue Niles, IL 60714-4608 USA Phone: +1-847-600-2000 Email: info@shure.com
4/4
 Loading...