

Page 1
iOS MID-SIDE STEREO
CONDENSER MICROPHONE
MV88
USER GUIDE
Le Guide de l’Utilisateur
Bedienungsanleitung
Guia del Usuario
Guida dell’Utente
Manual do Usuário
Руководство пользователя
Gebruikershandleiding
取扱説明書
사용자 안내서
用户指南
消費者指南
Panduan Pengguna
© 2015 Shure Incorporated
27A24500 (Rev. 1)
Printed in U.S.A.
Page 2

Page 3

iOS Mid-Side Stereo Condenser Microphone
MV88
The Shure MV88 is a professional quality condenser microphone which plugs directly into an Apple iOS device using a Lightning® connector. Two microphone capsules are arranged in a Mid-Side configuration to provide an adjustable stereo image, suitable for capturing a variety of sources, including
music and speech. The ShurePlus® MOTIV app allows users to customize the sound with digital signal processing (DSP) preset mode selection, gain
adjustment, and stereo width control.
Features
A Mid-Side Stereo Microphone
The classic mid-side stereo microphone technique uses two coincident capsules: one cardioid pointed directly at the source, and one bidirectional aimed
toward the sides. This configuration allows the user to adjust the stereo width and provides excellent mono compatibility.
Plug-and-Play Operation
The MV88 is compatible with any iOS device equipped with a Lightning connector. The free ShurePlus MOTIV app provides flexible controls to adapt the
sound to nearly any environment.
Compact and Durable
The MV88 features lightweight, all-metal construction and is small enough to carry anywhere. Like all Shure products, the MV88 has undergone rigorous
quality testing to ensure reliability in the field.
Flexible Control Through the ShurePlus MOTIV app
The ShurePlus MOTIV app controls microphone settings such as gain, stereo width, and preset modes and can function as a recording app.
Quick Setup
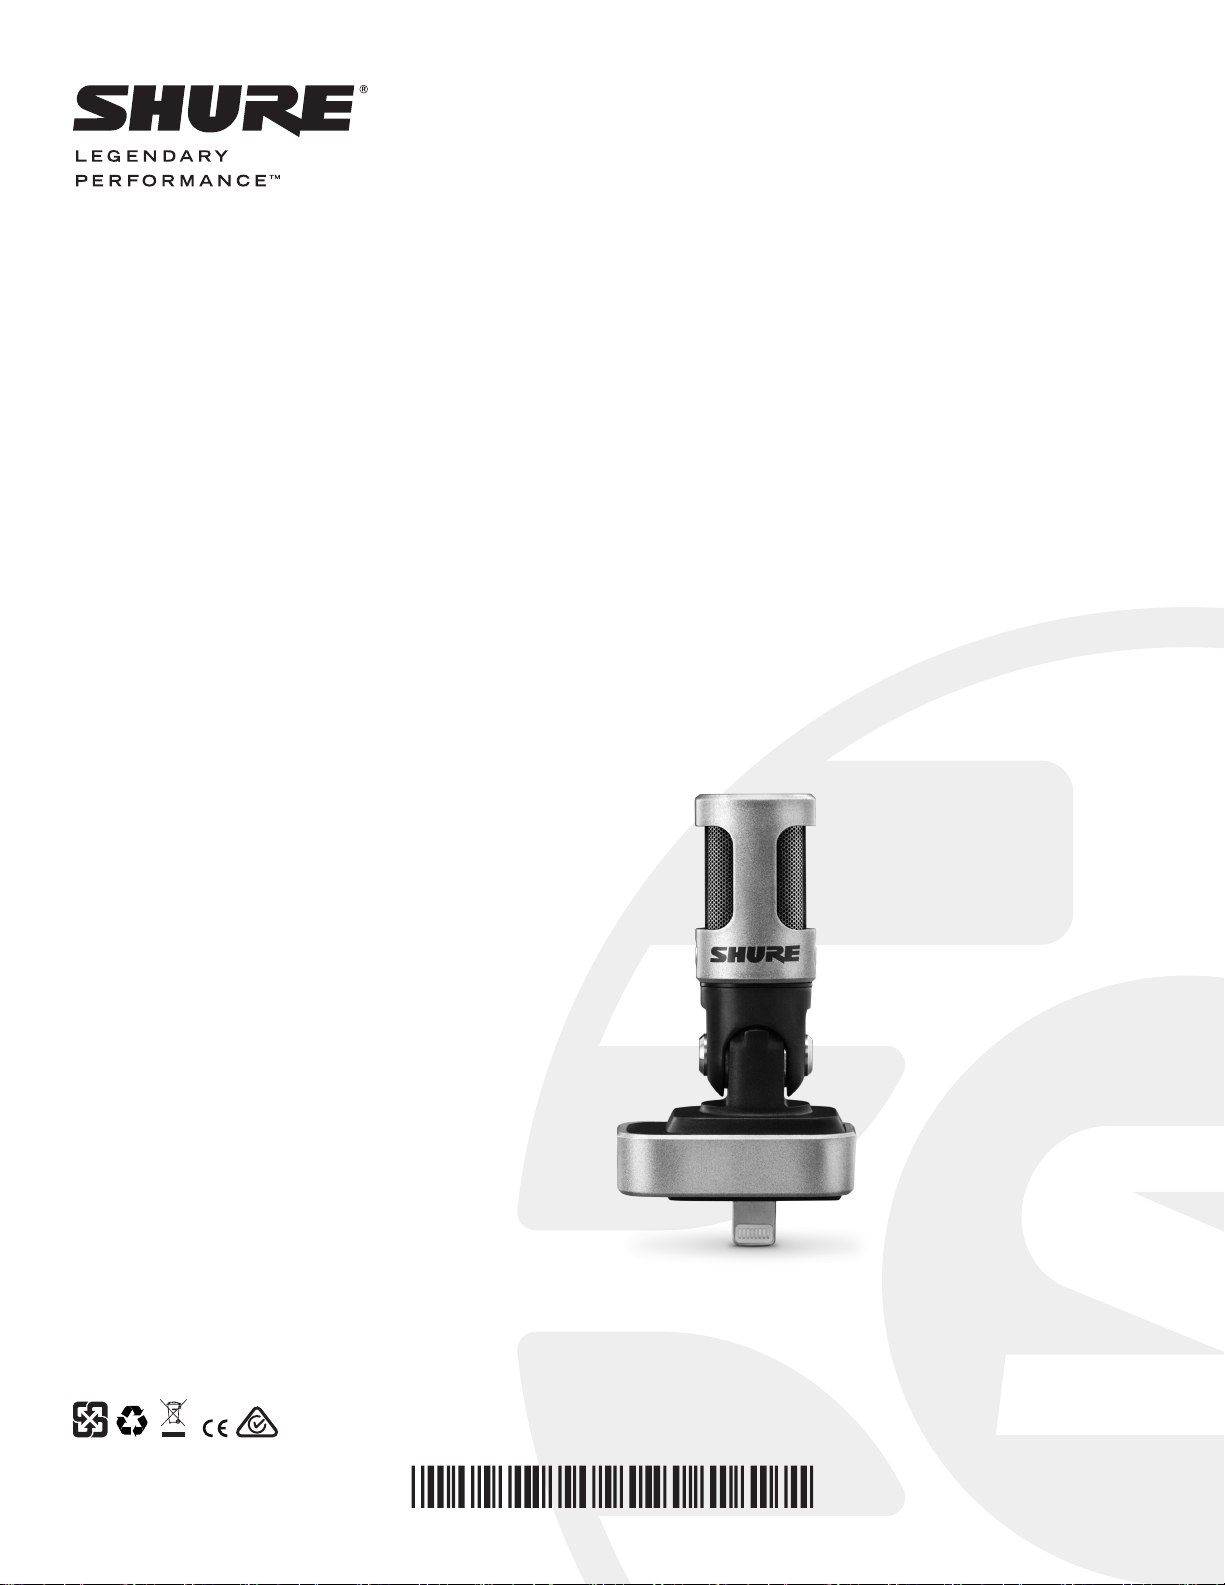
The MV88 is compatible with mobile devices that have a Lightning connector.
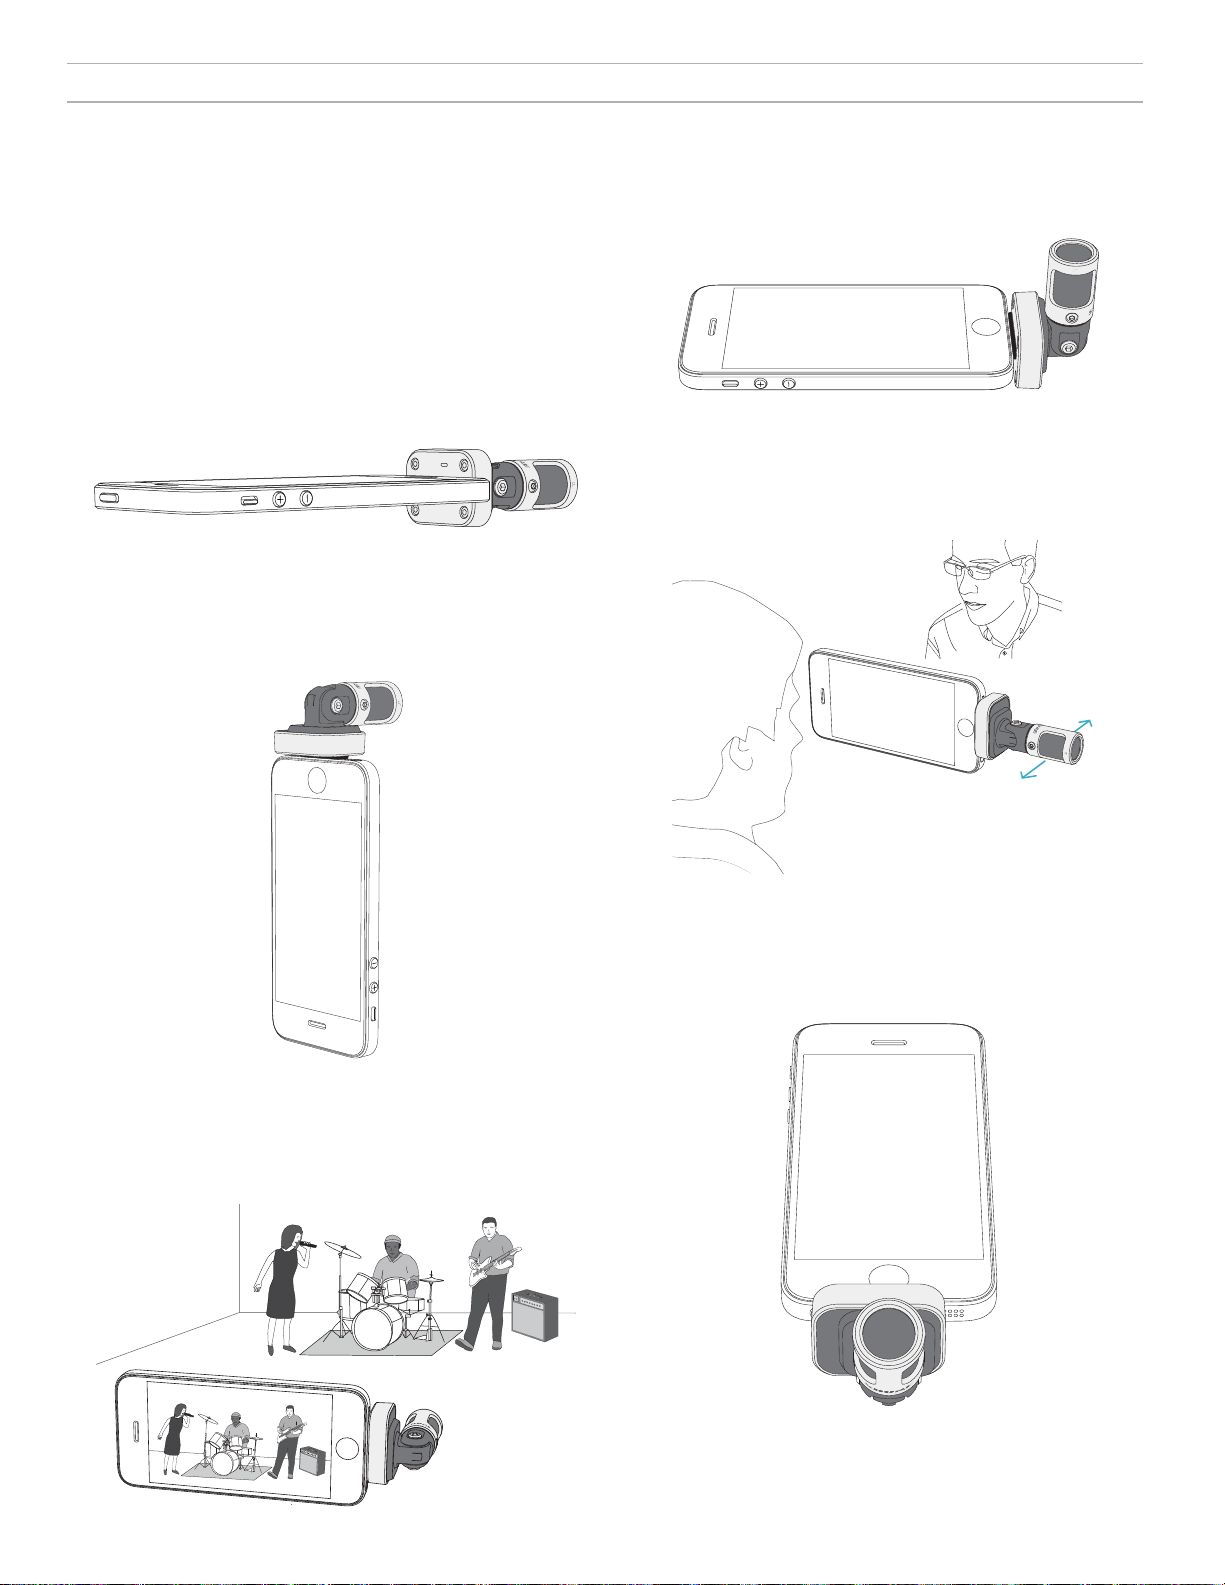
1. Plug the microphone into the Lightning connector on the iOS device.
The LED on the MV88 base illuminates when an audio application or the ShurePlus MOTIV recording app is open and selects the MV88.
Note: The reversible Lightning connector allows the MV88 to be installed in either orientation.
2. Install and open the ShurePlus MOTIV app.
ShurePlus MOTIV controls the microphone and provides instant recording.
3. Check audio and adjust settings with the ShurePlus MOTIV app within the MV88 settings.
Select a preset mode or manually adjust microphone gain and stereo width to optimize audio recordings. See the "Advanced Audio Settings" topic for
more information on the additional audio settings like compression, equalization, and more.
4. Set your device to Airplane Mode and Do Not Disturb before recording.
This allows you to record audio with no interruptions from phone calls or app notifications.
5. Use the integrated ShurePlus MOTIV or third party recording app to begin recording.
The microphone retains all settings from the ShurePlus MOTIV app. Adjustments can be made while recording, but to avoid audible artifacts, test settings prior to recording.
3
Page 4

The MV88 Microphone Design
Center (Cardioid)
Left
Right
The MV88 features two capsules: one capsule has a cardioid pattern, which picks up sound directly in front of the microphone. The other is bidirectional,
and captures sound from the left and right sides.
Microphone Cartridge
Adjusting the Microphone
For accurate stereo recordings in any position, the front of the microphone must be pointed towards the sound source, with the sides facing the appropriate orientation. Use the L and R indicators on the microphone barrel to ensure correct placement.
Note: The Left-Right Channel Swap feature allows you to switch orientation on the microphone if the swap is necessary.
4
Adjusting Microphone Position
The microphone pivots and the barrel can be rotated 90 degrees to achieve desired positioning.
Page 5
Aiming the Microphone
This section suggests microphone placement for typical use cases. Keep
in mind that there are many effective ways to record a given source.
Experiment with microphone placement and settings to find what works
best.
Tip: To ensure correct stereo orientation of the microphone at a glance,
check to see if the Shure name is clearly visible on the top of the microphone. If the name is not visible, turn the barrel 90°.
Audio Recording
The phone or tablet can be used in any position. Aim the front of the
microphone towards the source, with the left and right sides facing the
appropriate direction.
Portrait (Vertical)
Aim the front of the microphone towards the source. The microphone can
be mounted in either orientation of the MV88 with the Lightning connector,
so ensure that the left and right sides are facing the appropriate direction.
Audio Interview (Tabletop)
Set the recording device on a flat surface with one side of the microphone
pointed towards the subject and the other pointed towards the interviewer.
Select the MONO BIDIRECTIONAL preset in the ShurePlus MOTIV app.
Video Interview
To capture the voices of both the subject (on-camera) and the interviewer
(off-camera), select the MONO BIDIRECTIONAL preset in the ShurePlus
MOTIV app. Position the microphone with the left and right sides facing
each person.
Landscape (Horizontal)
Aim the front of the microphone towards the source. The microphone
can be connected in either orientation with the Lightning connector, so
ensure that the left and right sides of the MV88 are facing the appropriate
direction.
Self-Recording (Voice)
Set the device on a flat surface and angle the microphone towards your
mouth. Select the MONO CARDIOID preset in the ShurePlus MOTIV app to
reduce ambient noise.
5
Page 6
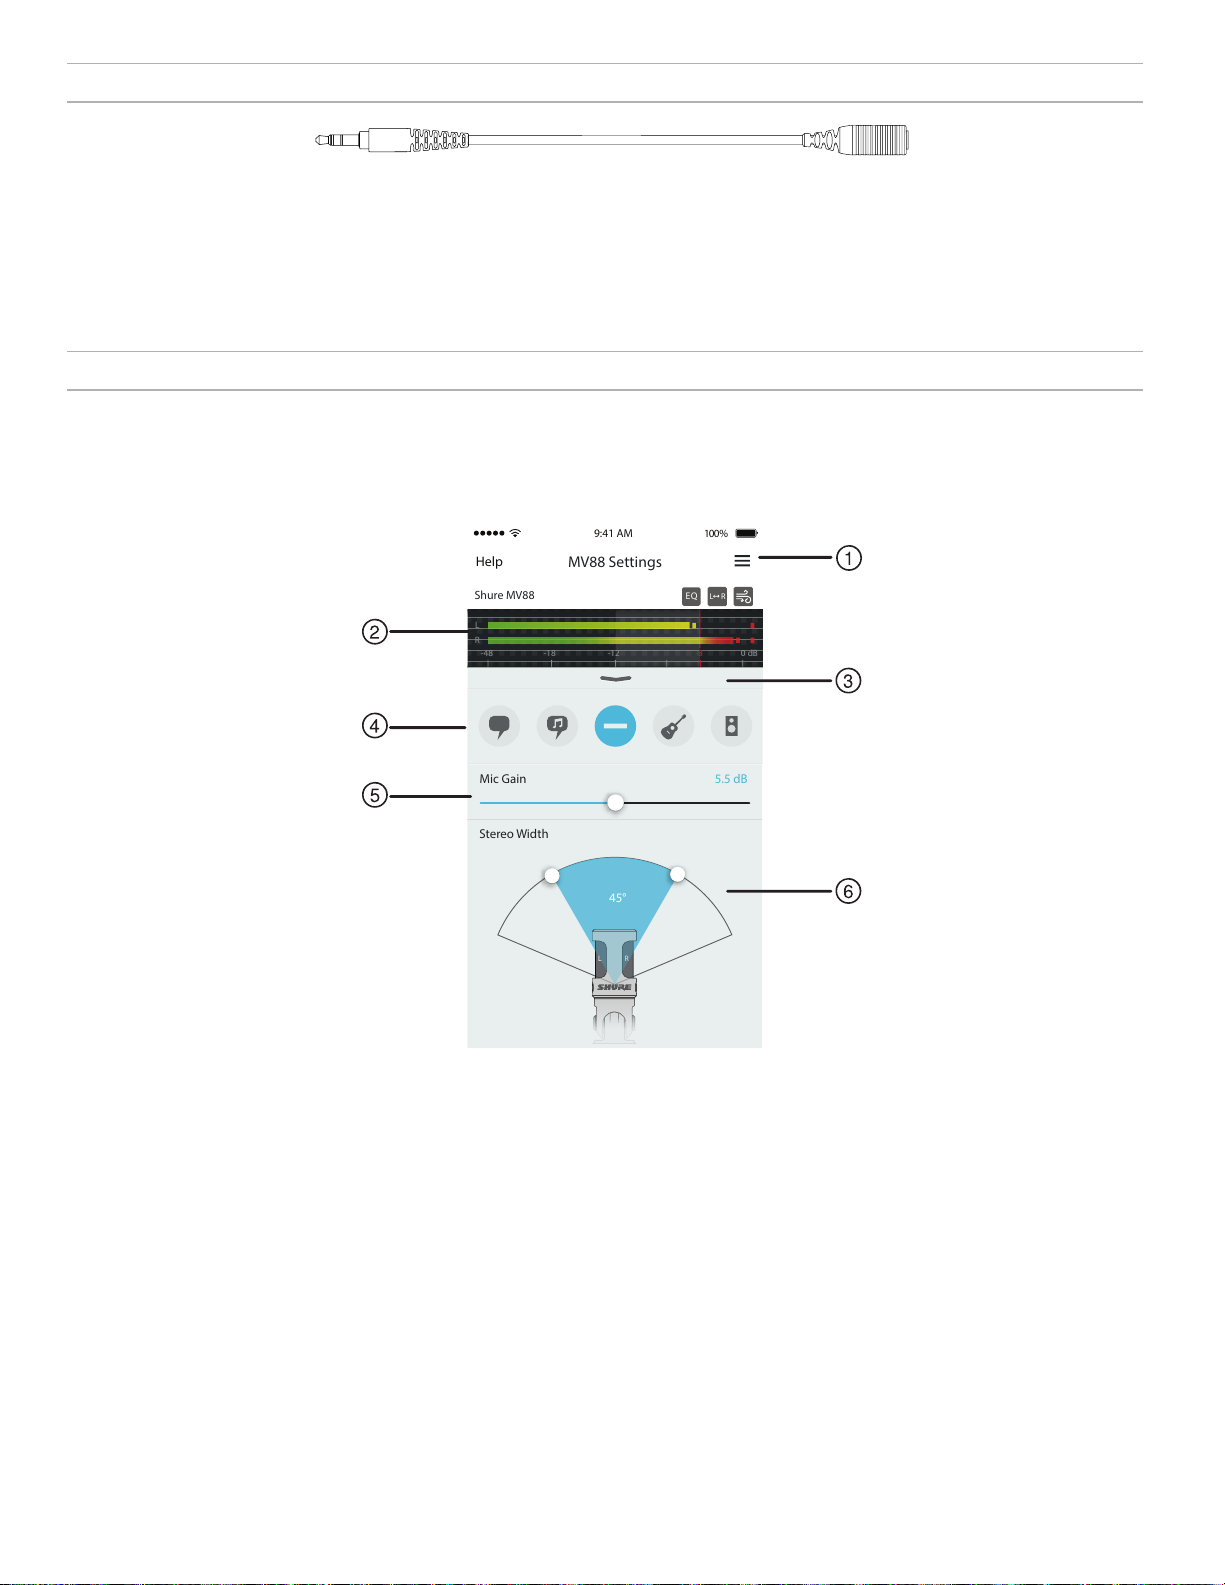
100%9:41 AM
L
R
-48 -18 -12 -3 0 dB
RL
Shure MV88
EQ
MV88 Settings
Help
Mic Gain 5.5 dB
L R
Stereo Width
45°
L R
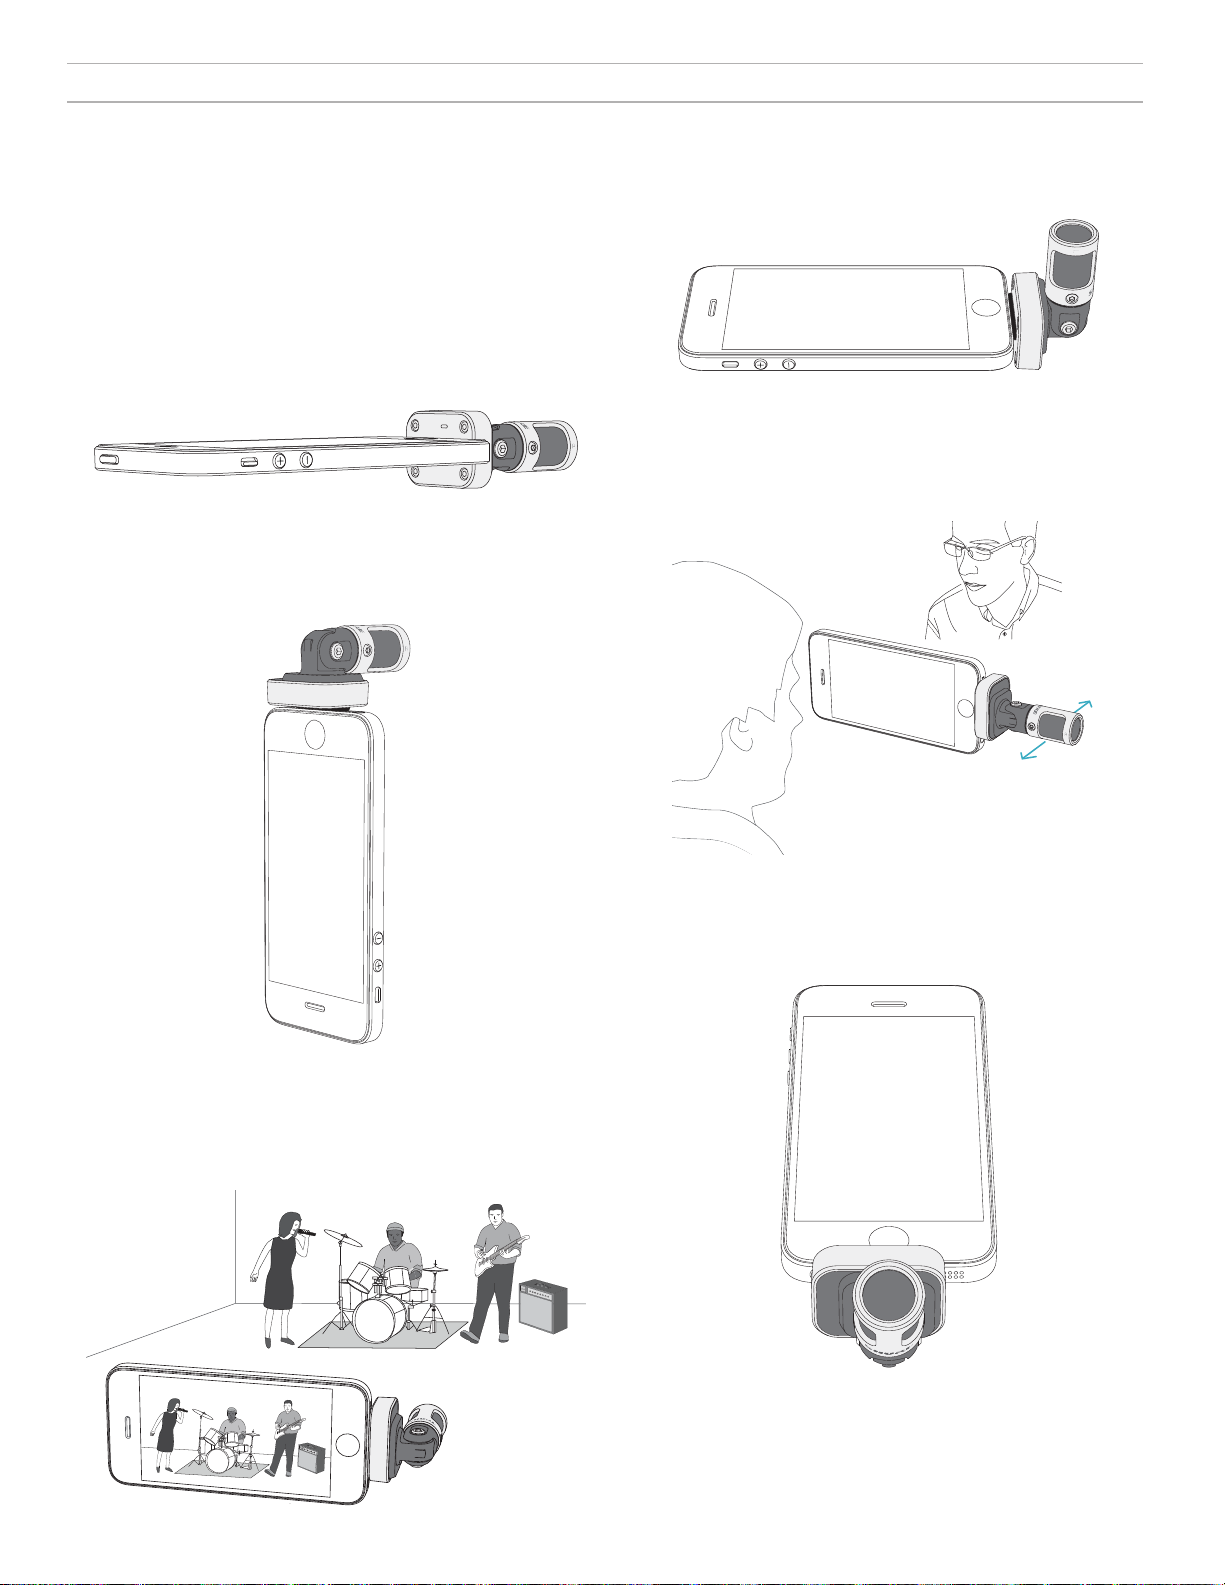
Using with Headphones
Headphone Monitor Adapting Cable
Use the included headphone monitor adapting cable for the following reasons:
• You require a slimmer connection to the headphone input on your recording device. The cable accommodates headphones with larger connectors.
• You want to disable the inline microphone on your earphones. The cable ensures that the recorded sound comes solely from the MV88 and not the
inline microphone of your earphones.
The ShurePlus MOTIV App
The ShurePlus MOTIV app controls microphone settings to optimize performance for specific uses.
Tip: Set the device to Airplane Mode and Do Not Disturb to prevent interruptions to the recording caused by phone calls, text messages, or alerts.
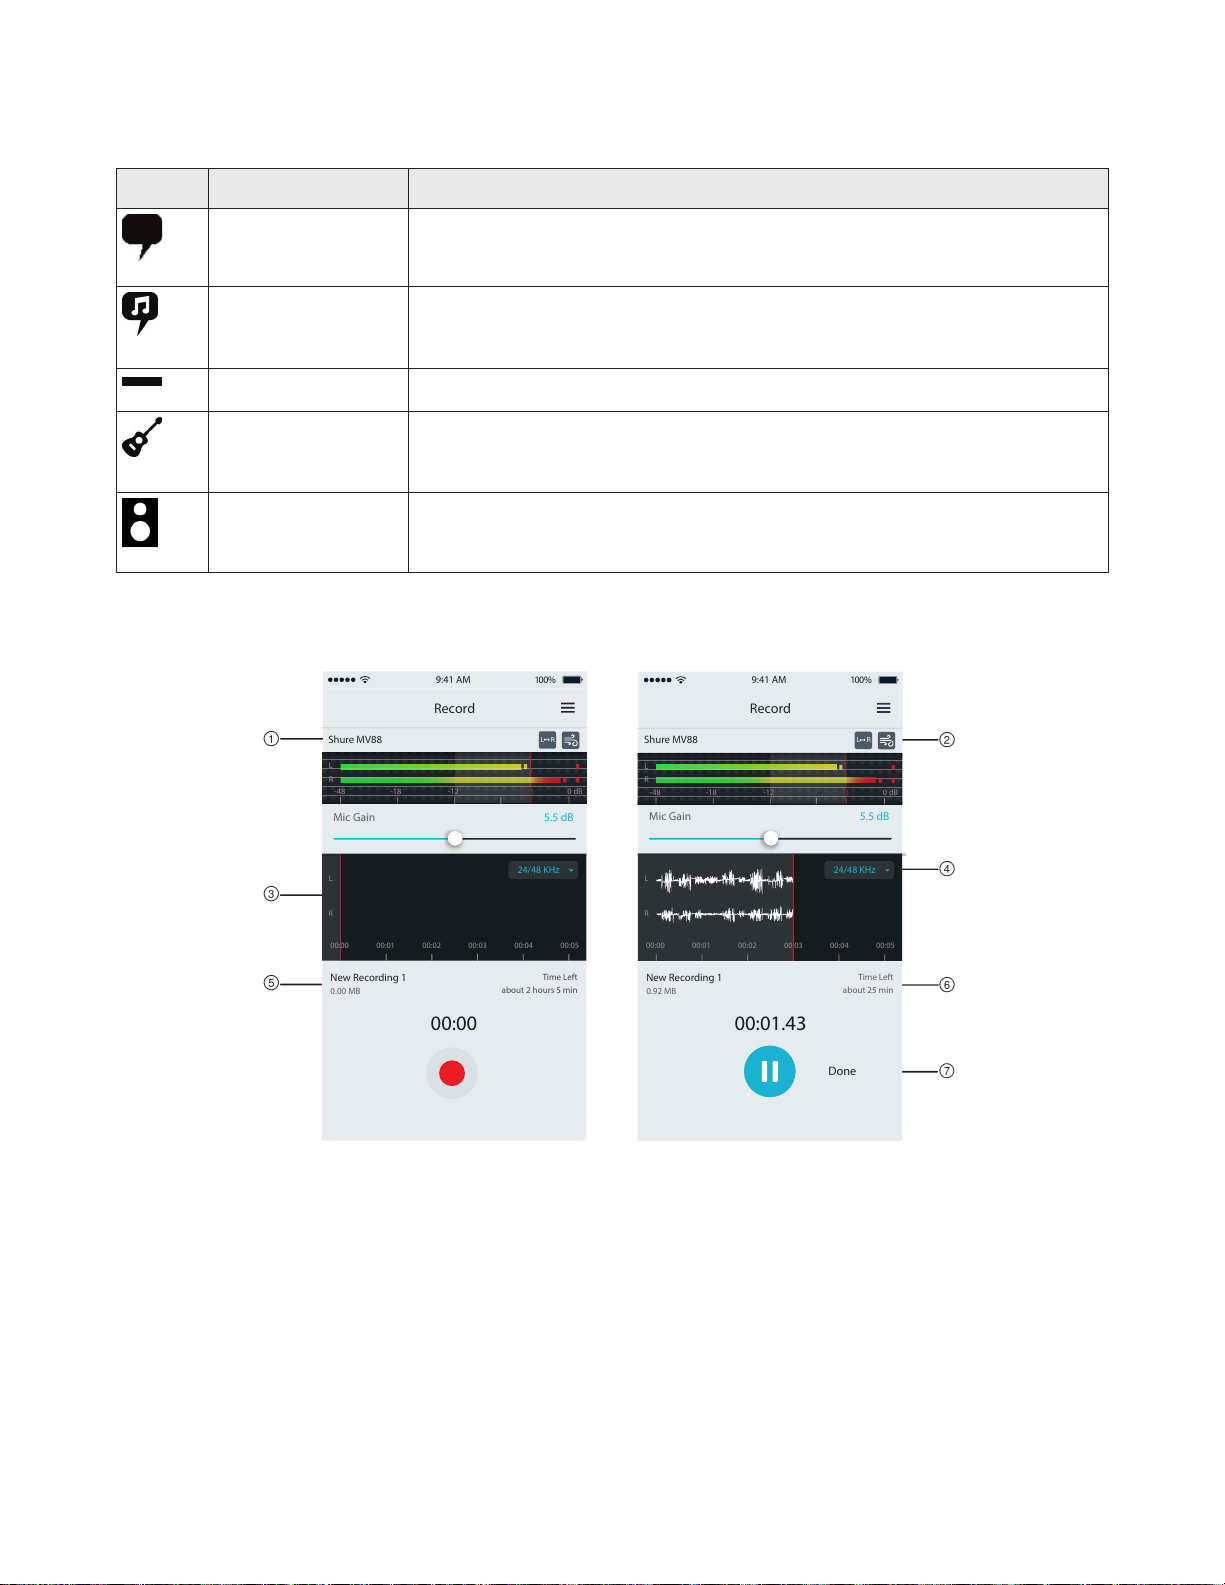
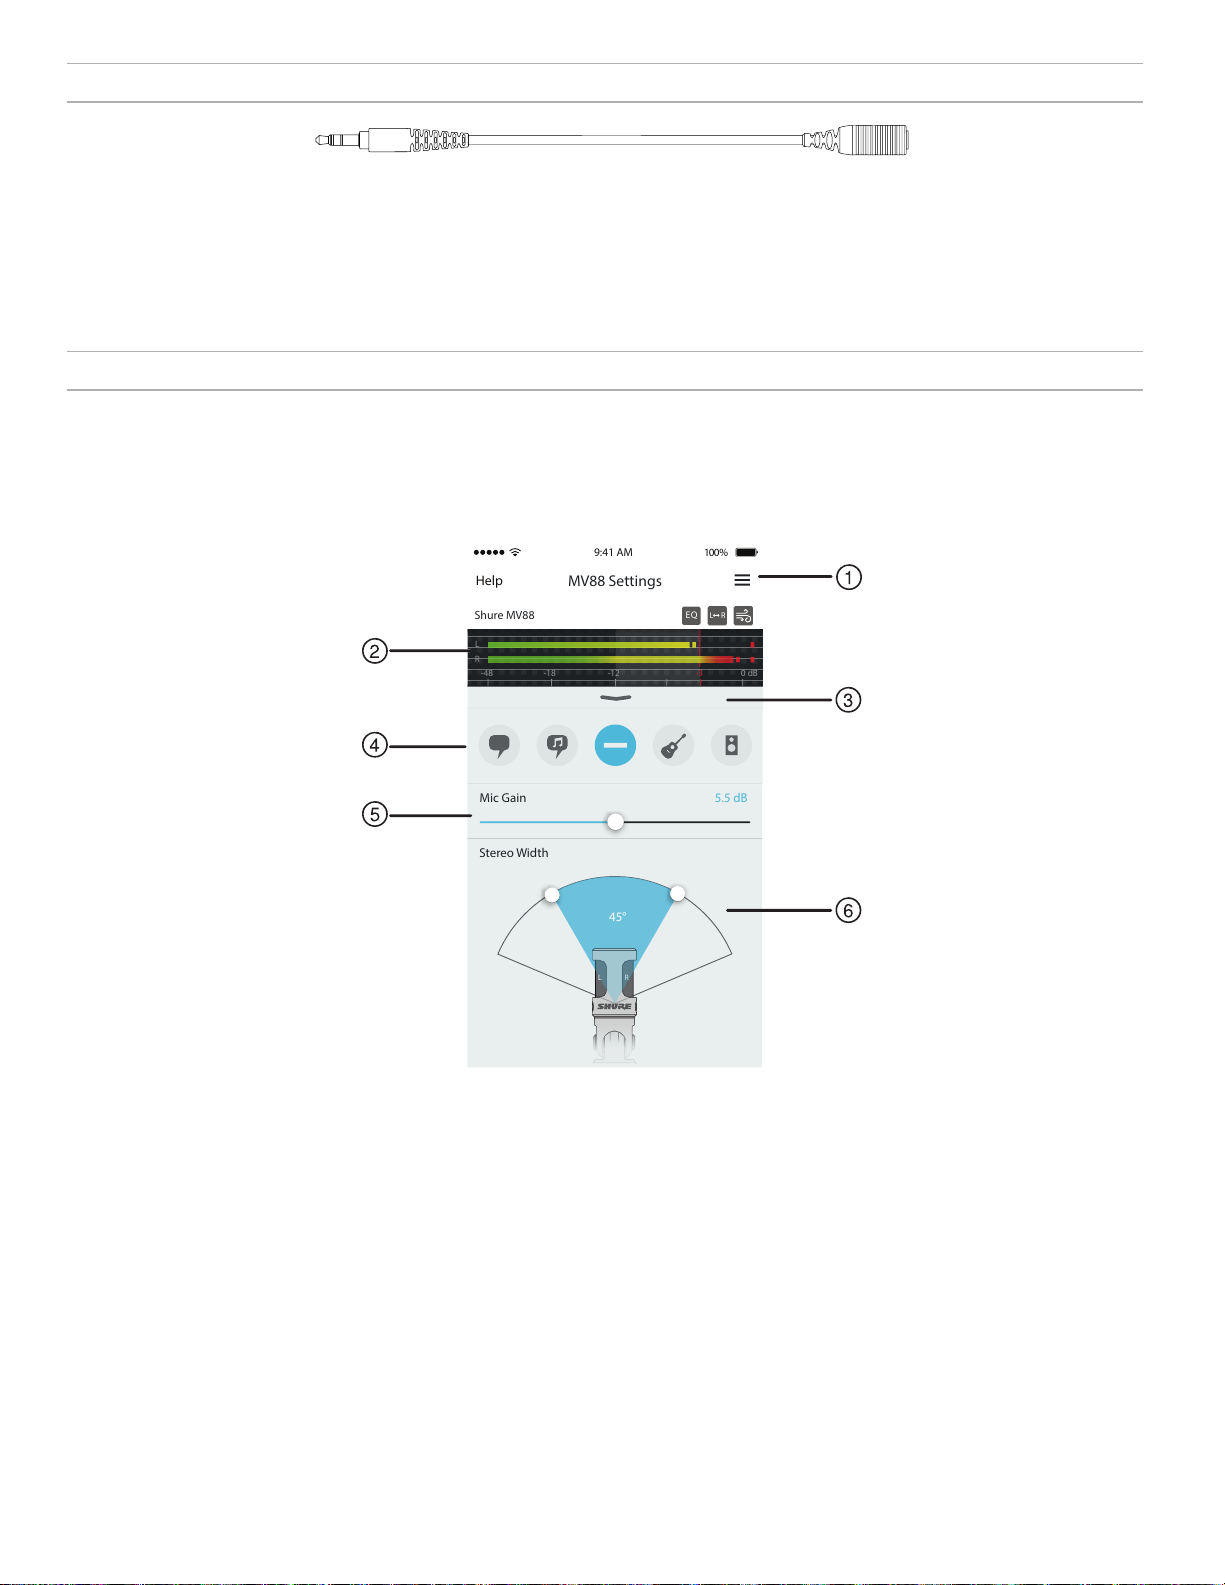
Adjusting the Microphone
① Menu
Select the menu to access the record window, saved recordings,
MV88 settings, and preferences windows.
② Input Meter
Displays the strength of the input signal. The loudest peaks should
reach within the target range (indicated by the shaded region).
③ Advanced Features
Use the pull-down bar to reveal the advanced audio features including
cartridge selection, wind reduction, left-right swap, and equalizer,
limiter, and compressor controls.
④ Preset Modes
Select your mode to set stereo width, equalization, and compression
for specific applications. Refer to the "Preset Modes" topic for more
details.
6
Microphone Settings
⑤ Microphone Gain
Adjust to match the volume of the sound source. Monitor the meter
when making adjustments to ensure levels are in the target range
(indicated by the shaded region of the input meter).
⑥ Stereo Width
Adjusts the width of the stereo microphone pickup area.
Tip: Consider the location of the microphone and the size of the sound source
when adjusting the width. For example, a large orchestra or ensemble recording
will benefit from a wide stereo image to achieve increased separation between
instruments. Other applications, such as speech, benefit from a narrow width for
improved clarity and rejection of ambient (room) sound.
Page 7

Preset Modes
L
R
00:00 00:01 00:02 00:03 00:04 00:05
24/48 KHz
100%9:41 AM
Record
Mic Gain
5.5 dB
New Recording 1
0.00 MB
Time Left
about 2 hours 5 min
00:00
Shure MV88
RL
L
R
-48 -18 -12 -3 0 dB
100%9:41 AM
Record
Mic Gain
5.5 dB
L
R
00:00 00:01 00:02 00:03 00:04 00:05
New Recording 1
0.92 MB
Time Left
about 25 min
00:01.43
Done
Recordings
Shure MV88
RL
24/48 KHz
L
R
-48 -18 -12 -3 0 dB
Five selectable modes optimize settings for gain, stereo width, equalization, and compression to match your recording needs. Set the microphone level
and scroll through the modes to find which sounds best. Then adjust level if needed.
Mode Application Characteristics
Ideal for capturing speech A narrow stereo width to reject background noise, an equalization setting to emphasize clarity
and fullness, and gentle compression to keep levels consistent.
Speech
Use to capture solo or
Medium stereo width with subtle equalization to add richness and clarity for a natural sound.
group vocal performances
Singing
Flat
Acoustic
Suited for any application A completely unprocessed signal (no equalization or compression settings used). Adds flexibility
when processing the audio after recording.
Suited for acoustic instruments and quiet music
A medium stereo width and transparent compression to smooth out volume spikes and bring out
quiet passages. The equalizer setting emphasizes detail and an overall natural sound.
applications
Use to record bands and
louder sources
A wide stereo width to increase separation between sources with equalization to further improve
definition by reducing frequencies that can make the instrumentation sound crowded.
Band
Record Settings
① Device Status
Displays the microphone name to indicate that the ShurePlus MOTIV
app recognizes the connected microphone.
② Advanced Features Display
Displays the icons for the advanced features currently engaged.
③ Record Display
Displays the waveform of the sound while recording.
④ Sample Rate and Bit Depth Selection
Pull-down and select a sampling rate and bit depth.
Record Settings
⑤ Record Details
The left side displays properties of the recorded file, like file name and
file size. The right side displays the remaining record time.
⑥ Record/Pause Button
A large button to engage record and pause.
Note: The maximum file size for a recording is 2GB which will result in
approximately 2 hours of record time. This limitation was put in place to
maximize app performance. Recording at a lower sample rate will allow for
longer, uninterrupted recording time.
7
Page 8
Advanced Audio Settings
To reveal the advanced audio settings menu, use the pull-down bar located below the input meter on the ShurePlus MOTIV iPhone app. Use the
Advanced button to reveal the advanced audio settings when using the iPad version.
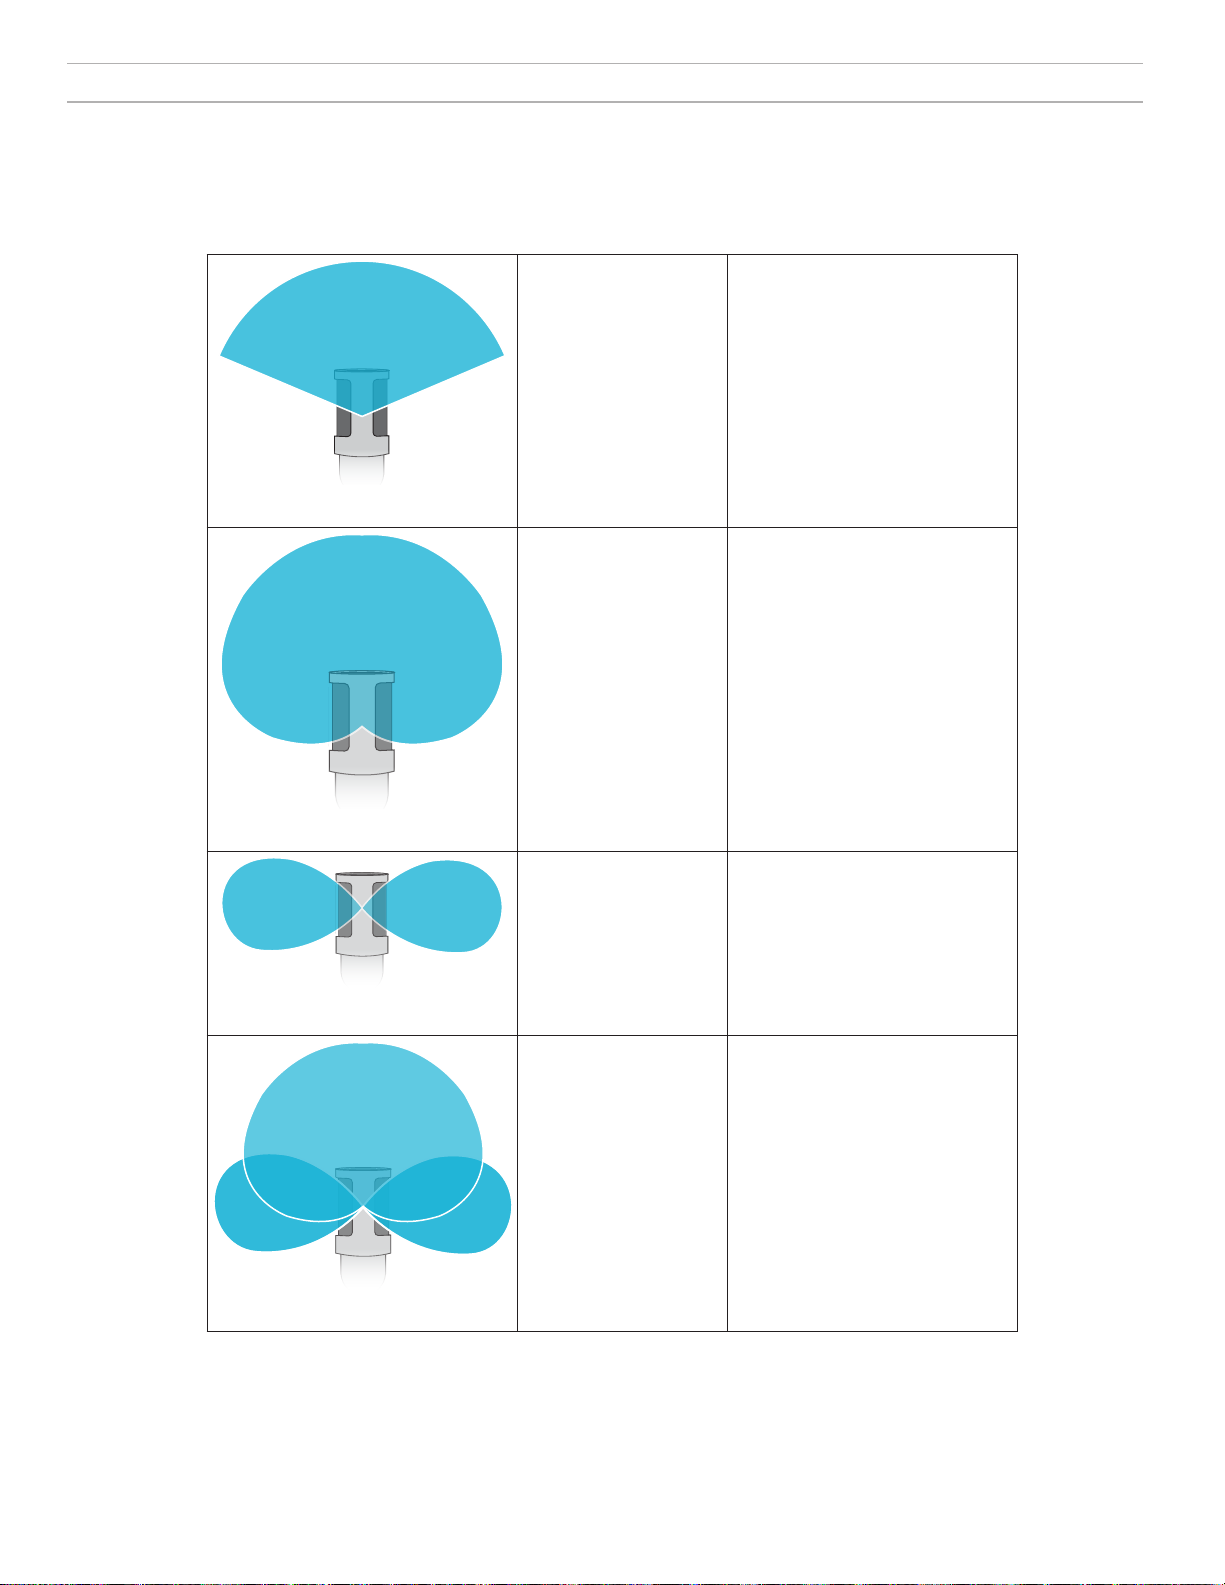
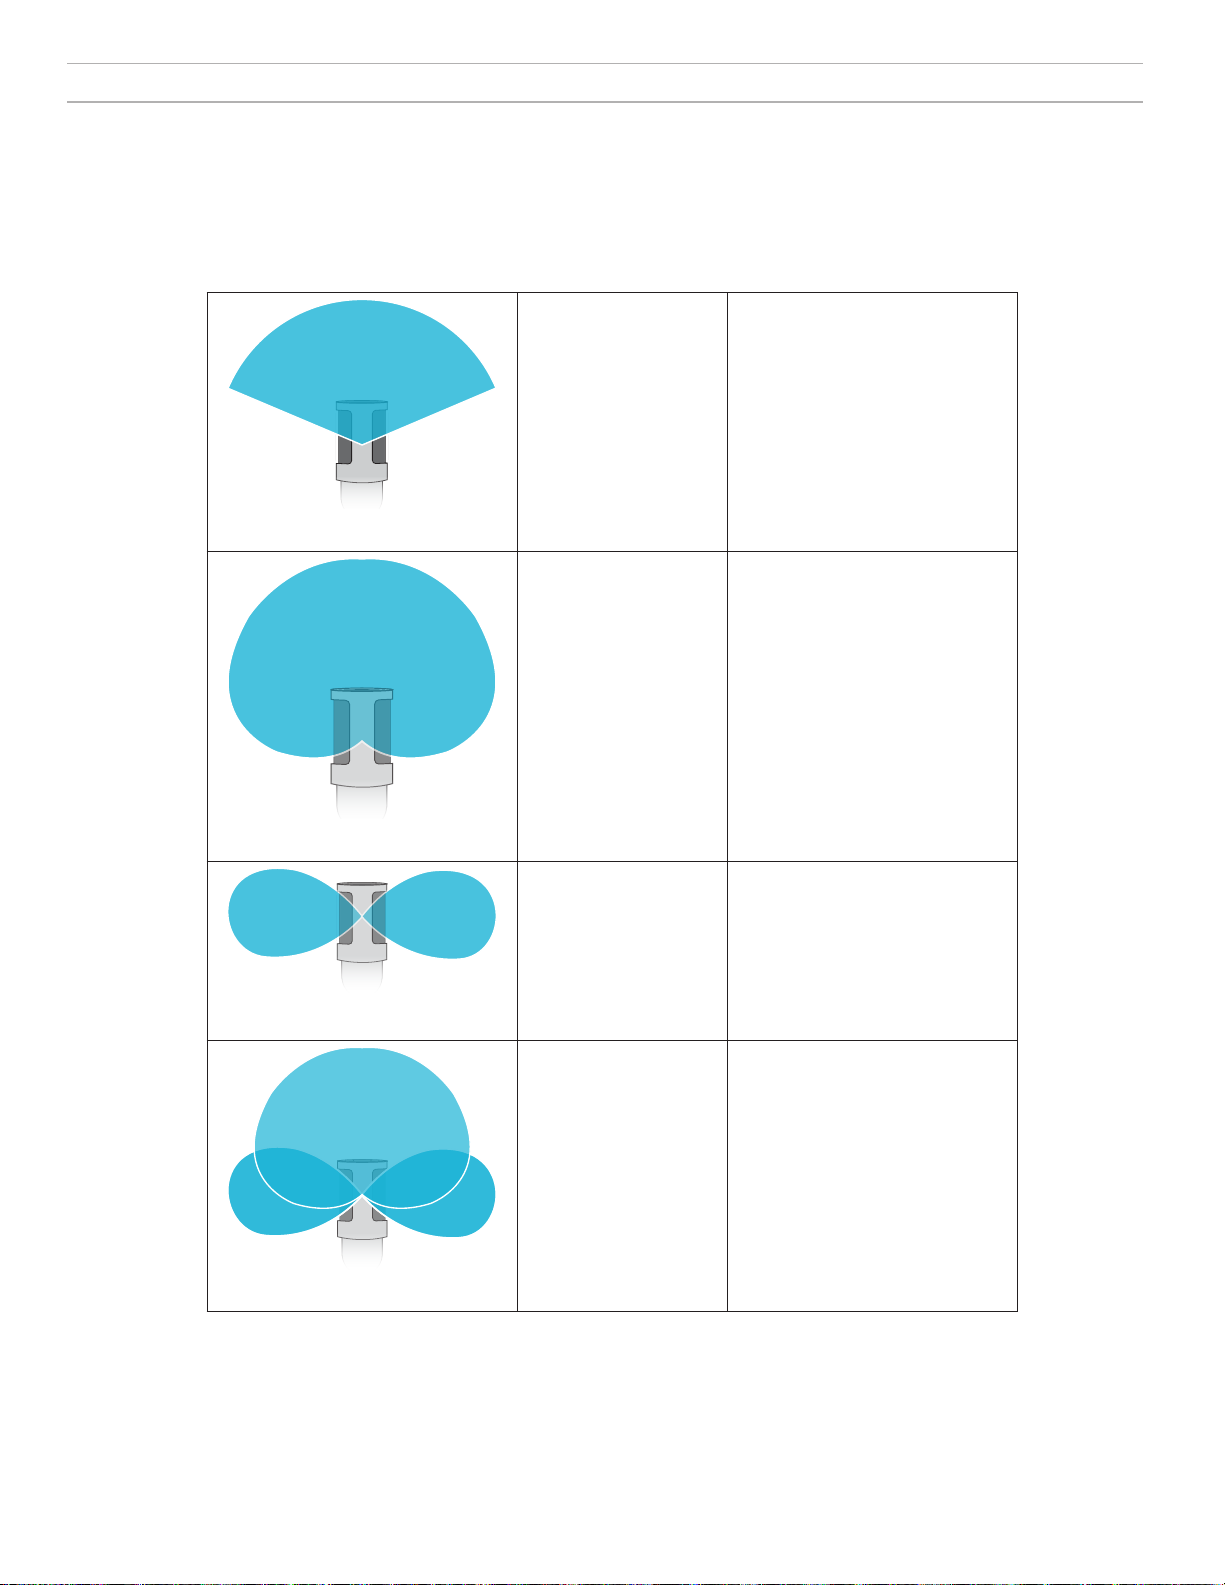
Polar Pattern Selection (Stereo and Mono Settings)
The following settings control microphone capsule activity. When operating in a mono mode, stereo width is not adjustable.
Stereo Front = On
Mono Cardioid Front = On
Sides = On
Sides = Off
Mono Bidirectional Front = Off
Raw Mid-Side See full description for information on
Sides = On
output and processing.
Raw Mid-Side Output
For increased post-processing flexibility, use the Raw Mid-Side setting. This delivers a 2-channel signal with a stereo image that can be adjusted even
after the tracks have been recorded:
Left: Cardioid (front)
Right: Bidirectional (sides)
The Raw Mid-Side setting is intended only for use with audio recording applications that have a mid-side stereo matrix decoder to interpret the recorded
tracks as a stereo image.
8
Page 9

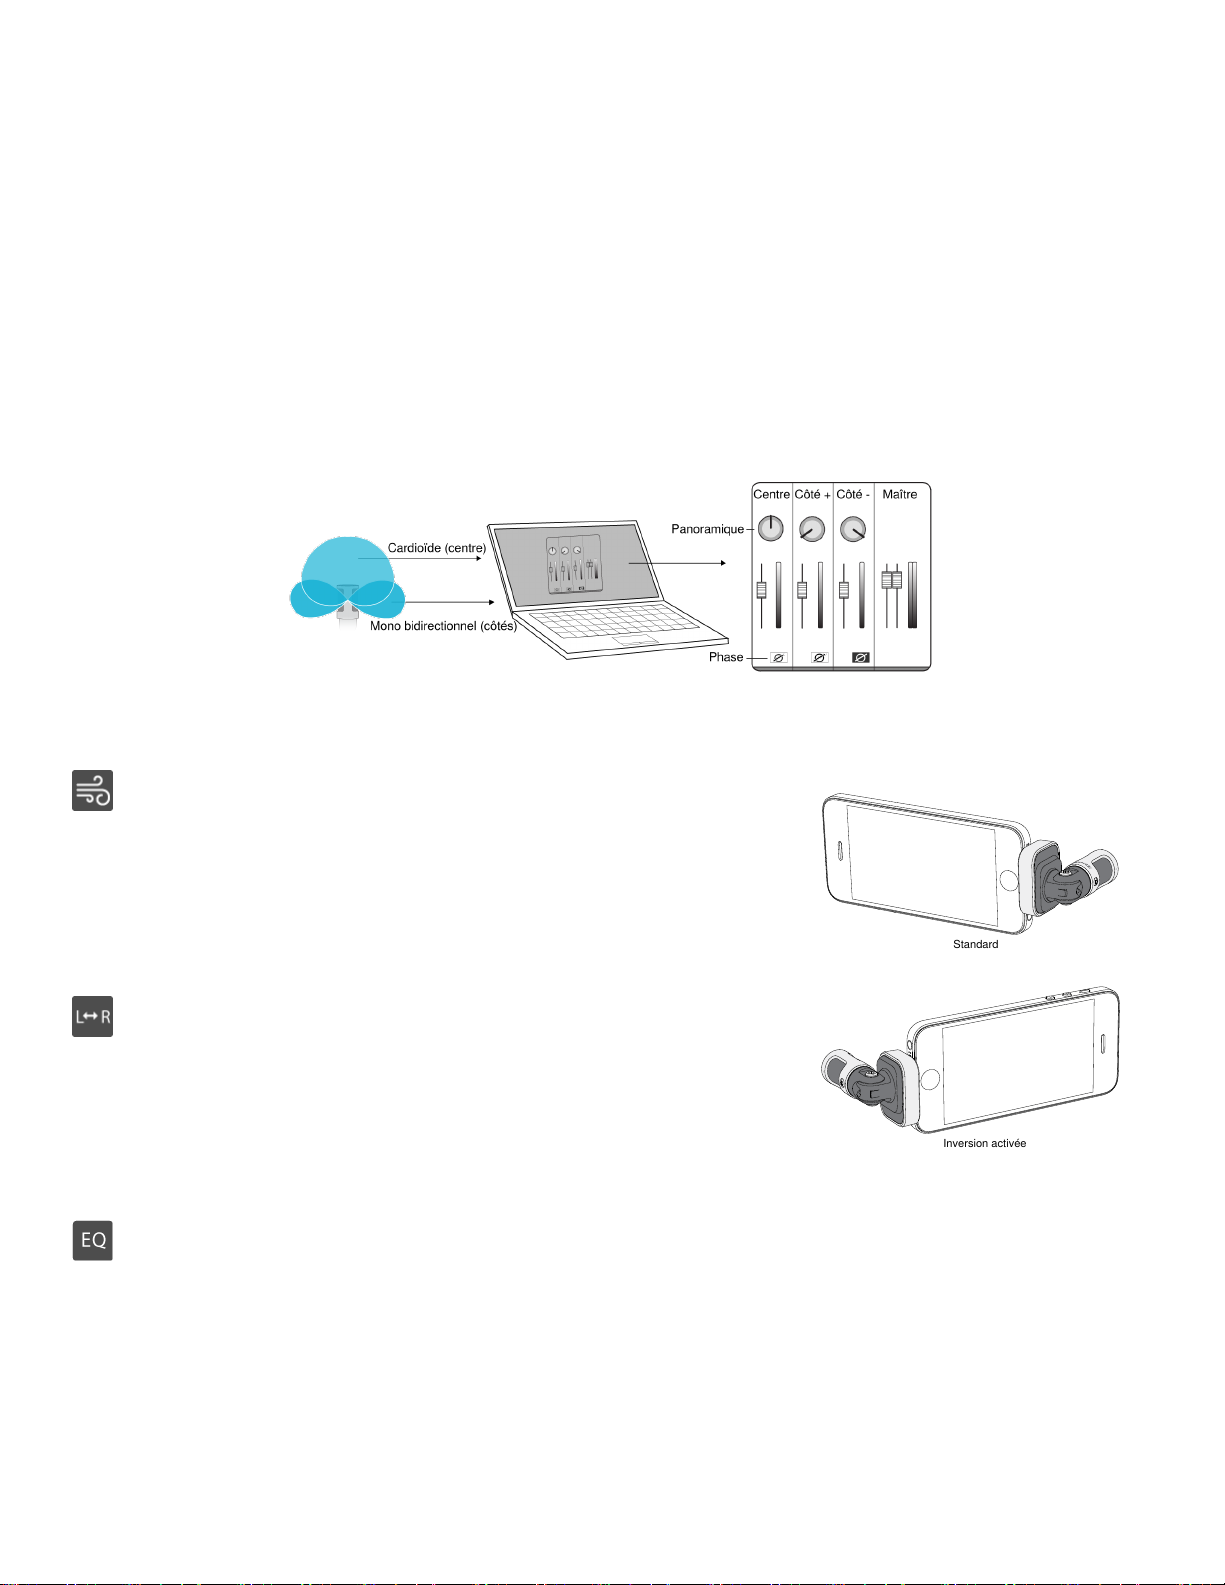
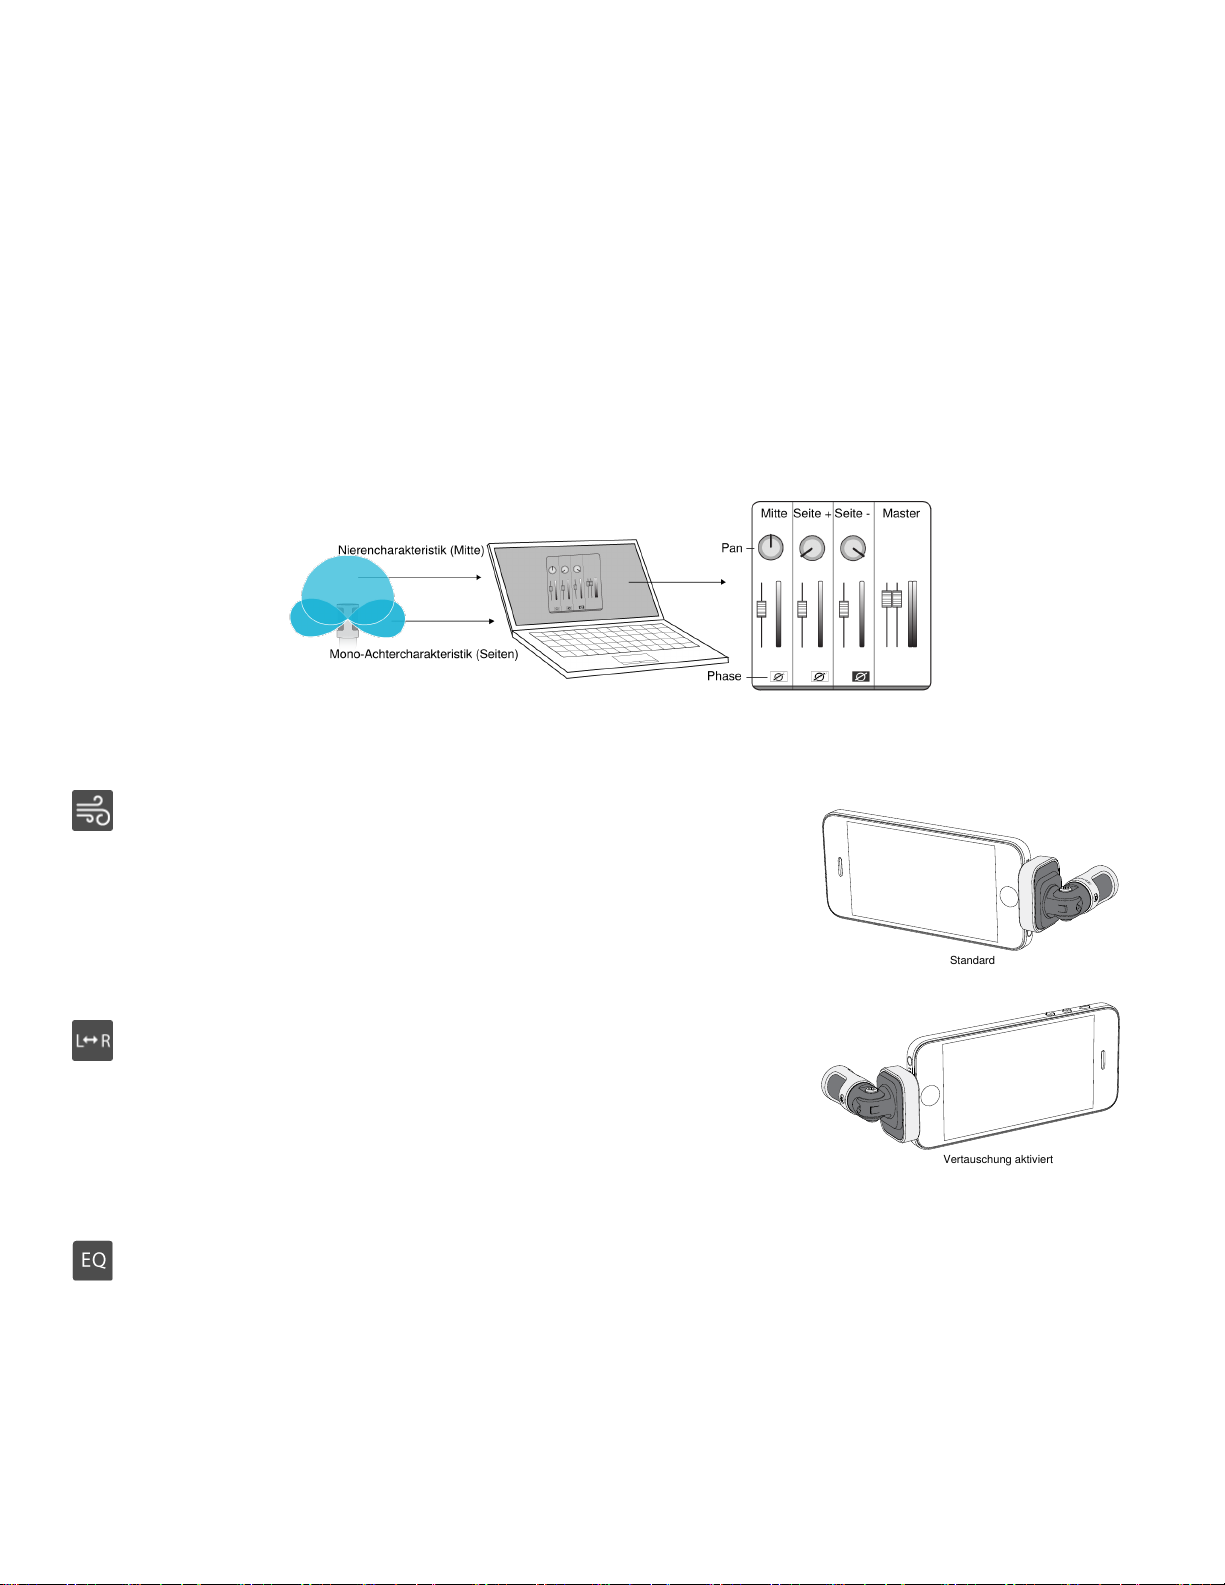
Manual Decoding and Stereo Width Adjustment
Standard
Swap enabled
If your digital audio workstation software (DAW) has no mid-side decoder, use these steps to create an accurate stereo image:
1. Extract the left and right audio signals from the 2-channel Raw Mid-Side file as individual mono tracks.
2. Create 3 blank audio tracks:
First track Use the audio signal (front/cardioid) from the left channel only as a mono track,
Second track Use the audio signal (side/bidirectional) from the right channel only as a mono
Third track Copy the side/bidirectional signal from the second track. Pan this track all the way
3. Group the side tracks together at the same volume level so they can be adjusted simultaneously. Increasing the volume of the side tracks increases the stereo width, while decreasing their volume narrows the width.
Advanced tip: Using compression with a fast attack setting on the side tracks keeps transients (the first part of a sound, such as when a drum stick
strikes a cymbal) toward the center of the stereo image and allows them to expand within the stereo field as the sound decays.
panned to the center.
track, panned all the way to the left.
to the right and reverse the phase.
Manual Decoding of Raw Mid-Side Audio
Wind Noise Reduction
This engages a low-frequency cutoff filter that reduces rumble caused by environmental noise. Use
the included foam windscreen in combination with wind reduction to counteract rumble and plosives
(bursts of air hitting the microphone).
To further reduce wind noise, use the optional Rycote™ Windjammer, which fits over the included
foam windscreen.
Left-Right Channel Swap
When recording in stereo, this feature flips the left and right audio channels to correctly match the
stereo image to the video. This may be necessary for certain phone/tablet positions where the microphone is reversed.
Tip: look at the L and R indicators on the microphone barrel to determine if the swap is necessary.
In this example, left/right swap should be
enabled when the phone is rotated:
Equalizer, Limiter, and Compressor
The advanced features window allows you to fine tune your equalizer, limiter, and compressor settings. Scroll through the preset modes to hear the DSP
changes, and adjust to dial in your sound.
Note: Equalization within presets will not be displayed. Only additional user-selectable equalization is displayed in the advanced features settings
window.
9
Page 10
Troubleshooting
Issue Solution
LED light is not visible The LED is located at the base of the MV88. Because the Lightning connector allows you to
Audio sounds bad Check in the top left corner of the application that the MV88 is fully plugged in and recognized.
Audio quality changes when
a headset is plugged in
Audio is distorted Use the audio meter to ensure that volume peaks are within the target range. If level is reaching
Left/right stereo channels do
not match video
There are beeps and unwanted sounds on the
recording
MV88 is plugged in, but the
volume meter does not register a signal.
insert the microphone in either orientation it is possible that the phone is obscuring the LED.
Remove the microphone, flip and re-insert to check microphone status.
The audio may be from the built-in microphone.
Headsets with microphones override the MV88 as the audio device. Use the included headphone
monitor adapting cable to disable interference from other microphones.
the red peak indicator of the input meter, turn the gain down.
Depending on the orientation of the iOS device, it may be necessary to engage the Left-Right
swap. If the audio has already been recorded, switching the left and right channels can be easily
done in most DAW and audio editing software.
Enable Airplane Mode and Do Not Disturb in your device settings to prevent interference from
other apps.
Edit the privacy setting for the iOS device under SETTINGS > PRIVACY > MICROPHONE to give the
ShurePlus MOTIV app permission to use the microphone.
Sampling Rate and Bit Depth
Sample Rate and Bit Depth settings are found in a drop down menu in
the audio or sound control panel of your computer. You can adjust these
variables to fit your needs. Select a lower sample rate for podcast recording, when it is important to have a smaller file for easy download. Select a
higher sample rate for music and more dynamic recordings.
Tip: Record at a higher sample rate and bounce down to an M4A for a file
with the highest sound quality at a manageable size.
Tip for PC users: Make sure that the sample rate and bit depth microphone settings, found in the sound control panel of the computer, match
with the sample rate and bit depth selected in your software.
System Requirements and Compatibility
iOS • iOS 8.0 and higher
iPhone • iPhone 5
• iPhone 5c
• iPhone 5s
• iPhone 6
• iPhone 6 Plus
iPod Touch • 5th gen
iPad • iPad 4th gen
• iPad Air
• iPad Air 2
iPad Mini • iPad Mini 1st gen
• iPad Mini 2nd gen
• iPad Mini 3rd gen
Specifications
MFi Certified
Yes
DSP Modes (Presets)
Speech/Singing/Acoustic/Loud/Flat
Transducer Type
Cardioid (10 mm)/Bidirectional Condenser Cartridge (10 mm)
Polar Pattern
Adjustable Width Stereo/Mono Bidirectional/Mono Cardioid/Mid-Side
Stereo Principle
Mid-Side
Bit Depth
16-bit/24-bit
Sampling Rate
44.1/48 kHz
Frequency Response
20 Hz to 20,000 Hz
Adjustable Gain Range
0 to +36 dB
Sensitivity
-37 dBFS/Pa at 1 kHz [1] [2]
Maximum SPL
120 dB SPL [2]
Limiter
Yes
Compressor
Yes
Equalizer
5-band
Power Requirements
Powered through Lightning connector
Housing
all metal construction
Net Weight
40.5 g (1.43oz.)
Dimensions
67 x 25 x 35 mm H x W x D
[1] 1 Pa=94 dB SPL
[2]At Minimum Gain, Flat Mode
10
Page 11
Accessories
Furnished Accessories
MV88 Foam Windscreen AMV88-WS
MV88 Carrying Case AMV88-CC
Replacement Parts
MV88 Foam Windscreen AMV88-WS
MV88 Carrying Case AMV88-CC
Headphone Monitor Adapting Cable 95A13511
Optional Accessories
Rycote Windjammer for MV88 AMV88-FUR
Certifications
Information to the user
This equipment has been tested and found to comply with the limits for a Class B digital device, pursuant to Part 15 of the FCC Rules. These limits are
designed to provide reasonable protection against harmful interference in a residential installation. This equipment generates uses and can radiate radio
frequency energy and, if not installed and used in accordance with the instructions, may cause harmful interference to radio communications. However,
there is no guarantee that interference will not occur in a particular installation. If this equipment does cause harmful interference to radio or television
reception, which can be determined by turning the equipment off and on, the user is encouraged to try to correct the interference by one or more of the
following measures:
• Reorient or relocate the receiving antenna.
• Increase the separation between the equipment and the receiver.
• Connect the equipment to an outlet on a circuit different from that to which the receiver is connected.
• Consult the dealer or an experienced radio/TV technician for help.
Industry Canada ICES-003 Compliance Label: CAN ICES-3 (B)/NMB-3(B)
Note: Testing is based on the use of supplied and recommended cable types. The use of other than shielded (screened) cable types may degrade EMC
performance.
This product meets the Essential Requirements of all relevant European directives and is eligible for CE marking.
The CE Declaration of Conformity can be obtained from: www.shure.com/europe/compliance
Authorized European representative:
Shure Europe GmbH
Headquarters Europe, Middle East & Africa
Department: EMEA Approval
Jakob-Dieffenbacher-Str. 12
75031 Eppingen, Germany
Phone: 49-7262-92 49 0
Fax: 49-7262-92 49 11 4
Email: info@shure.de
"Made for iPod," "Made for iPhone," and "Made for iPad" mean that an electronic accessory has been designed to connect specifically to iPod, iPhone,
or iPad, respectively, and has been certified by the developer to meet Apple performance standards. Apple is not responsible for the operation of this
device or its compliance with safety and regulatory standards. Please note that the use of this accessory with iPod, iPhone, or iPad may affect wireless
performance.
iPad, iPhone, iPod, iPod classic, iPod nano, iPod touch, and Retina are trademarks of Apple Inc., registered in the U.S. and other countries. iPad Air and
iPad mini are trademarks of Apple Inc. The trademark "iPhone" is used with a license from Aiphone K.K.
Mac® and Lightning® are registered trademarks of Apple Inc.
11
Page 12

Microphone électrostatique M/S stéréo pour iOS
MV88
Le Shure MV88 est un microphone électrostatique de qualité professionnelle qui se branche directement sur un appareil iOS d’Apple doté d’un port
Lightning®. Deux capsules de microphone sont disposées dans une configuration M/S (centrale/latérale) pour fournir une image stéréo réglable, adaptée
à la capture de diverses sources, dont la musique et la voix parlée. L’application ShurePlus® MOTIV permet aux utilisateurs de personnaliser leur son
avec une sélection de modes DSP préréglés, de régler le gain du microphone et de faire varier la largeur stéréo.
Caractéristiques
Microphone M/S stéréo
La technique classique des microphones M/S stéréo utilise deux capsules coïncidentes : une cardioïde qui fait directement face à la source, et une
bidirectionnelle orientée vers les côtés. Cette configuration permet à l’utilisateur de régler la largeur stéréo et assure une excellente compatibilité
monophonique.
Prêt à l’emploi
Le MV88 est compatible avec n’importe quel appareil iOS équipé d’un port Lightning. L’application ShurePlus MOTIV gratuite fournit des réglages flexibles pour adapter le son à presque tout environnement.
Compact et robuste
Le MV88, de fabrication légère entièrement métallique, est suffisamment petit pour être transporté partout. Comme tous les produits Shure, le MV88 a
été soumis à des tests de qualité rigoureux pour en garantir la fiabilité sur le terrain.
Contrôle flexible à l’aide de l’application ShurePlus MOTIV
L’application ShurePlus MOTIV contrôle les paramètres du microphone tels que le gain, la largeur stéréo et les modes préréglés, et peut aussi être utilisée comme application d’enregistrement.
Mise en service rapide
Le MV88 est compatible avec les appareils mobiles munis d’un port Lightning.
1. Branchez le microphone au port Lightning de l’appareil iOS.
La LED située à la base du MV88 s’allume lorsqu’une application audio ou l’application d’enregistrement ShurePlus MOTIV est ouverte et que le
MV88 est sélectionné.
Remarque : le port Lightning réversible permet d’installer le MV88 dans les deux sens.
2. Installez et ouvrez l’application ShurePlus MOTIV.
ShurePlus MOTIV contrôle le microphone et permet d’enregistrer immédiatement.
3. Vérifiez le son et réglez les paramètres à l’aide de l’application ShurePlus MOTIV dans les paramètres du MV88.
Sélectionnez un mode préréglé ou réglez manuellement le gain et la largeur stéréo du microphone pour optimiser les enregistrements audio. Se
reporter à la rubrique « Paramètres audio avancés » pour plus d’informations sur les autres paramètres audio, tels que la compression, l’égalisation,
entre autres.
4. Placez l’appareil en mode Avion et Ne pas déranger avant d’enregistrer.
Cela permet de réaliser des enregistrements audio sans interruptions dues à des appels téléphoniques ou à des notifications d’applications.
5. Utilisez l’application ShurePlus MOTIV intégrée ou une application d’enregistrement tierce pour commencer l’enregistrement.
Le microphone mémorise tous les paramètres de l’application ShurePlus MOTIV. Des réglages peuvent être effectués en cours d’enregistrement,
mais pour éviter les bruits de fond audibles, testez les paramètres avant l’enregistrement.
12
Page 13
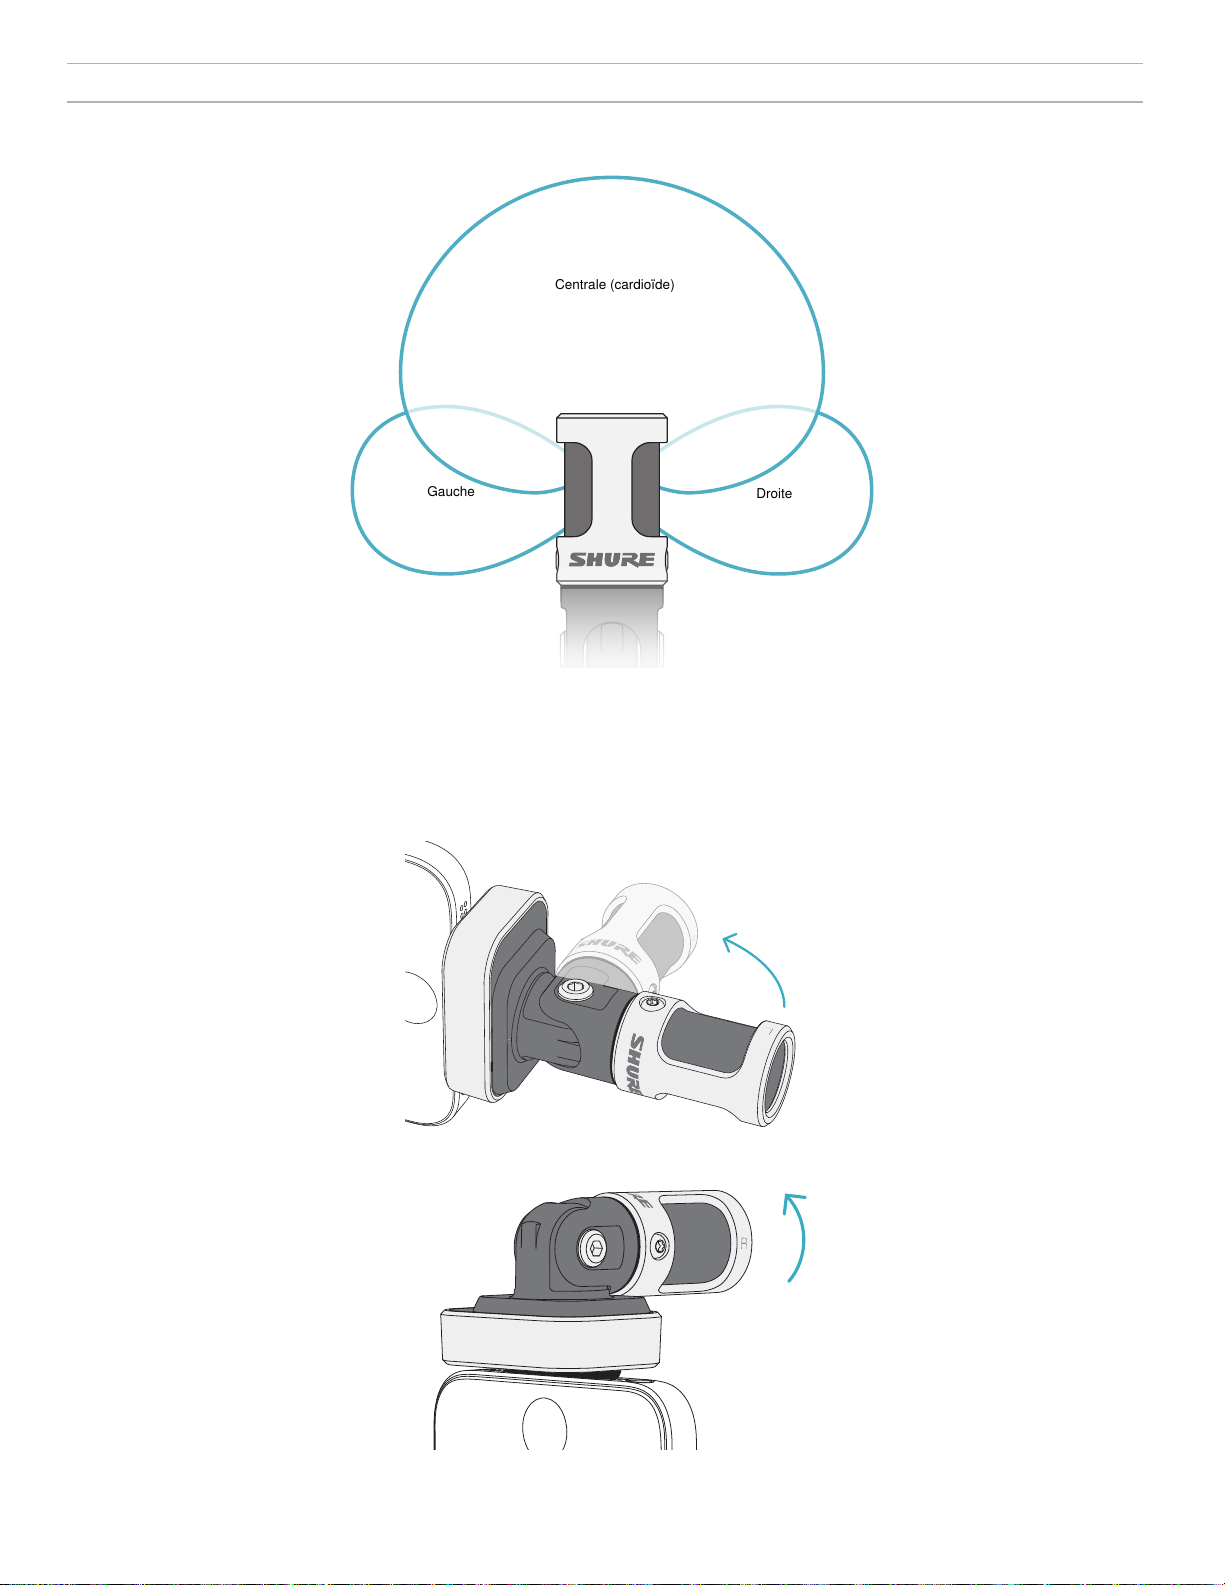
Conception du microphone MV88
Centrale (cardioïde)
Gauche
Droite
Le MV88 intègre deux capsules : une des capsules possède une directivité cardioïde qui capte le son directement devant le microphone. L’autre est bidirectionnelle et capte le son provenant des côtés gauche et droit.
Capsule du microphone
Réglage du microphone
Pour des enregistrements stéréo précis dans n’importe quelle position, orienter l’avant du microphone vers la source sonore, en tournant les côtés dans
la direction appropriée. Utiliser les repères L et R inscrits sur le corps du microphone pour s’assurer qu’il est correctement placé.
Remarque : la fonction d’inversion des canaux gauche/droit permet de modifier l’orientation du microphone si cette inversion est nécessaire.
Réglage de la position du microphone
Le microphone pivote et son corps peut être tourné de 90° pour le placer dans la position souhaitée.
13
Page 14
Orientation du microphone
Le placement du microphone suggéré dans cette section s’applique à
des conditions d’utilisation typiques. Ne pas oublier qu’il existe de nombreuses manières d’enregistrer une source donnée. Faire des essais avec
différents placements et réglages du micro pour trouver ce qui convient le
mieux.
Conseil : pour s’assurer d’un coup d’œil que l’orientation stéréo du microphone est correcte, vérifier que le nom Shure est clairement visible sur
le dessus du microphone. Si le nom n’est pas visible, tourner le corps de
90°.
Enregistrement audio
Le téléphone ou la tablette peuvent être utilisés dans n’importe quelle position. Orienter l’avant du microphone vers la source, les côtés gauche et
droit étant dans la direction appropriée.
Portrait (vertical)
Orienter l’avant du microphone vers la source. Le microphone MV88 pouvant être installé dans les deux sens avec le port Lightning, s’assurer que
les côtés gauche et droit sont dans la direction appropriée.
Interview audio (table)
Poser l’appareil d’enregistrement sur une surface plane en orientant un
côté du microphone vers la personne interrogée et l’autre vers l’intervieweur. Sélectionner le préréglage MONO BIDIRECTIONAL dans l’application ShurePlus MOTIV.
Interview vidéo
Pour capter les voix du sujet (devant la caméra) et de l’intervieweur (derrière la caméra), sélectionner le préréglage MONO BIDIRECTIONAL dans
l’application ShurePlus MOTIV. Positionner le microphone en orientant les
côtés gauche et droit vers chaque personne.
Paysage (horizontal)
Orienter l’avant du microphone vers la source. Le microphone pouvant
être installé dans les deux sens avec le port Lightning, s’assurer que les
côtés gauche et droit du MV88 sont dans la direction appropriée.
Auto-enregistrement (vocal)
Placer l’appareil sur une surface plane et incliner le microphone vers sa
bouche. Sélectionner le préréglage MONO CARDIOID dans l’application
ShurePlus MOTIV pour réduire le bruit ambiant.
14
Page 15

100%9:41 AM
L
R
-48 -18 -12 -3 0 dB
RL
Shure MV88
EQ
MV88 Settings
Help
Mic Gain 5.5 dB
L R
Stereo Width
45°
L R
Utilisation avec un casque
Câble adaptateur de contrôle au casque
Utiliser le câble adaptateur de contrôle au casque fourni pour les raisons suivantes :
• Si l’entrée casque de l’appareil d’enregistrement requiert une connexion plus fine, le câble s’adapte aux casques dotés d’un connecteur de plus grand
diamètre.
• Si l’on souhaite désactiver le microphone intégré au casque, le câble garantit que le son enregistré provient uniquement du MV88 et pas du microphone intégré au casque.
Application ShurePlus MOTIV
L’application ShurePlus MOTIV contrôle les paramètres du microphone pour optimiser les performances à des fins spécifiques.
Conseil : régler l’appareil sur le mode Avion et sur Ne pas déranger pour éviter toute interruption de l’enregistrement causée par des appels téléphoniques, des messages textuels ou des notifications.
Réglage du microphone
① Menu
Sélectionner le menu pour accéder à la fenêtre d’enregistrement, aux
enregistrements sauvegardés, aux réglages du MV88 et aux fenêtres
de préférences.
Paramètres du microphone
② Vumètre d’entrée
Affiche le niveau du signal d’entrée. Les crêtes les plus fortes ne
doivent pas dépasser la plage cible (indiquée par la zone ombrée).
③ Fonctions avancées
Utiliser la barre déroulante pour afficher les fonctions audio avancées
: choix de la capsule, réduction du bruit de vent, inversion des
canaux gauche/droit et commandes d’égaliseur, de limiteur et de
compresseur.
④ Modes préréglés
Sélectionner le mode pour définir la largeur stéréo, l’égalisation et
la compression pour des applications spécifiques. Se reporter à la
rubrique « Modes préréglés » pour plus de détails.
⑤ Gain du microphone
À régler pour l’adapter au volume de la source sonore. Observer le
vu-mètre en effectuant ces réglages pour s’assurer que les niveaux
se situent dans la plage cible (indiquée par la zone ombrée sur le
vumètre d’entrée).
⑥ Largeur stéréo
Règle la largeur de la zone de captation stéréo du microphone.
Conseil : tenir compte de l’emplacement du microphone et de la taille de la
source sonore lors du réglage de la largeur. Par exemple, une image stéréo large
est préférable pour l’enregistrement d’un grand orchestre ou d’un ensemble pour
une meilleure séparation entre les instruments. Une largeur étroite est mieux
adaptée à d’autres applications, comme la voix parlée, pour améliorer la clarté et
la réjection du bruit ambiant.
15
Page 16
Modes préréglés
L
R
00:00 00:01 00:02 00:03 00:04 00:05
24/48 KHz
100%9:41 AM
Record
Mic Gain
5.5 dB
New Recording 1
0.00 MB
Time Left
about 2 hours 5 min
00:00
Shure MV88
RL
L
R
-48 -18 -12 -3 0 dB
100%9:41 AM
Record
Mic Gain
5.5 dB
L
R
00:00 00:01 00:02 00:03 00:04 00:05
New Recording 1
0.92 MB
Time Left
about 25 min
00:01.43
Done
Recordings
Shure MV88
RL
24/48 KHz
L
R
-48 -18 -12 -3 0 dB
Cinq modes sélectionnables optimisent les paramètres de gain, de largeur stéréo, d’égalisation et de compression pour répondre aux besoins de
l’enregistrement. Régler le niveau du microphone et faire défiler les modes pour choisir le réglage offrant le meilleur son. Puis ajuster le niveau si
nécessaire.
Mode Application Caractéristiques
Idéal pour capter la voix
parlée
Largeur stéréo étroite pour rejeter le bruit ambiant, paramètre d’égalisation pour plus de clarté et
d’amplitude et légère compression pour maintenir des niveaux cohérents.
Discours
À utiliser pour la reprise
Largeur stéréo moyenne avec légère égalisation ajoutant ampleur et clarté pour un son naturel.
d’un chanteur soliste
Chant
Uniforme
Acoustique
ou d’un ensemble de
chanteurs
Adapté à toute application Pas de traitement du signal (aucun paramètre d’égalisation ou de compression n’est utilisé).
Offre une plus grande souplesse pour le traitement de l’audio après l’enregistrement.
Idéal pour les instruments
acoustiques et les formations musicales à faible
Largeur stéréo moyenne et compression transparente pour atténuer les variations brusques
de volume et faire ressortir les passages plus calmes. Le paramètre d’égalisation rehausse les
détails et procure un son global naturel.
niveau sonore
À utiliser pour enregistrer
des groupes et d’autres
sources puissantes
Largeur stéréo étendue pour une meilleure séparation des sources avec égalisation et pour
améliorer davantage encore la définition en réduisant les fréquences trop dominantes des
instruments.
Groupe
Paramètres d’enregistrement
① État du dispositif
Affiche le nom du microphone pour indiquer que l’application
ShurePlus MOTIV reconnaît le microphone branché.
Paramètres d’enregistrement
② Affichage des fonctions avancées
Affiche les icônes des fonctions avancées actuellement activées.
③ Affichage de l’enregistrement
Affiche la forme d’onde du son pendant l’enregistrement.
④ Sélection de la fréquence d’échantillonnage et de la résolution
Afficher la liste déroulante et sélectionner une fréquence
d’échantillonnage et une résolution.
16
⑤ Détails de l’enregistrement
Le côté gauche affiche les propriétés du fichier enregistré, telles
que le nom et la taille du fichier. Le côté droit affiche le temps
d’enregistrement restant.
⑥ Bouton Enregistrer/Pause
Grand bouton pour lancer et suspendre l’enregistrement.
Remarque : La taille maximale des fichiers d’enregistrement est de 2 Go,
ce qui correspond à 2 heures d’enregistrement environ. Cette limitation
a été mise en place afin d’optimiser les performances de l’application.
L’enregistrement à une fréquence d’échantillonnage plus basse permet
d’augmenter la durée d’enregistrement sans interruption.
Page 17

Paramètres audio avancés
Pour afficher le menu des paramètres audio avancés, utilisez la barre déroulante située sous le vu-mètre d’entrée de l’application iPhone ShurePlus
MOTIV. Utilisez le bouton Avancé pour afficher les paramètres audio avancés en cas d’utilisation de la version iPad.
Choix de la directivité (réglages stéréo et mono)
Les paramètres suivants contrôlent l’activité des capsules du microphone. En mode mono, la largeur stéréo ne peut pas être réglée.
Stéréo Avant = activé
Mono Cardioïde Avant = activé
Côtés = activés
Côtés = désactivés
Mono Bidirectionnel Avant = désactivé
Côtés = activés
Raw Mid-Side Voir la description complète pour
des informations sur la sortie et son
traitement.
Sortie brute Raw Mid-Side
Pour un post-traitement plus flexible, utiliser le paramètre Raw Mid-Side. Il fournit un signal à 2 canaux avec une image stéréo qui peut être réglée
même une fois les pistes enregistrées :
Gauche : cardioïde (avant)
Droite : bidirectionnel (côté)
Le paramètre Raw Mid-Side est conçu uniquement pour être utilisé avec des applications d’enregistrement audio intégrant une matrice M/S stéréo permettant d’interpréter les pistes enregistrées comme une image stéréo.
17
Page 18
Décodage manuel et réglage de la largeur stéréo
Standard
Inversion activée
Si le logiciel de poste de travail audio numérique (DAW) n’intègre pas de décodeur M/S, procéder comme suit pour créer une image stéréo précise :
1. Extraire les signaux audio gauche et droit du fichier Raw Mid-Side à 2 canaux sous la forme de pistes mono individuelles.
2. Créer trois pistes audio vierges :
Première piste Utiliser le signal audio (avant/cardioïde) du canal gauche uniquement sous la
Deuxième piste Utiliser le signal audio (latéral/bidirectionnel) du canal droit uniquement sous la
Troisième piste Copier le signal latéral/bidirectionnel de la deuxième piste. Régler le panoramique
3. Regrouper les pistes latérales ensemble au même volume de façon à pouvoir les régler simultanément. Augmenter le volume sur les pistes latérales augmente la largeur stéréo, alors que réduire leur volume réduit la largeur.
Conseil de pro : l’utilisation de la compression avec un paramètre d’attaque rapide sur les pistes latérales maintient les transitoires (première partie
d’un son, comme quand une baguette de batterie frappe une cymbale) vers le centre de l’image stéréo et leur permet de s’étendre dans le champ stéréo
à mesure que le son s’affaiblit.
forme d’une piste mono avec le panoramique réglé au centre.
forme d’une piste mono avec le panoramique réglé complètement à gauche.
de cette piste complètement à droite et inverser la phase.
Décodage manuel et son brut Raw Mid-Side
Réduction du bruit de vent
Cela active un filtre coupe-bas qui réduit les bruits basses fréquences provenant de l’environnement.
Utiliser la bonnette en mousse incluse avec la fonction de réduction du bruit de vent pour réduire les
bruits de fond et les plosives (déplacements d’air brutaux qui frappent le microphone).
Pour réduire encore plus le bruit du vent, utiliser la bonnette anti-vent fourrure Rycote™ disponible
en option, qui s’installe par-dessus la bonnette anti-vent en mousse incluse.
Inversion des canaux gauche/droit
En mode d’enregistrement stéréo, cette fonction intervertit les canaux audio gauche et droit de façon
à bien faire correspondre l’image stéréo et la vidéo. Cela peut s’avérer nécessaire pour certaines positions du téléphone ou de la tablette pour lesquelles le microphone est inversé.
Conseil : observer les repères L et R inscrits sur le corps du microphone pour déterminer si l’inver-
sion est nécessaire.
Dans cet exemple, l’inversion des canaux
gauche/droit doit être activée lorsque le télé-
phone est pivoté :
Égaliseur, limiteur et compresseur
Les fonctions avancées permettent d’affiner les paramètres d’égaliseur, de limiteur et de compresseur. Faire défiler les modes préréglés pour écouter
les changements de traitement DSP et les ajuster pour obtenir le son voulu.
Remarque : l’égalisation des préréglages n’est pas affichée. Seule l’égalisation sélectionnable par l’utilisateur est affichée dans la fenêtre de
paramètres des fonctions avancées.
18
Page 19
Dépannage
Problème Solution
La lumière de la LED n’est
pas visible
Son de mauvaise qualité Vérifier dans le coin supérieur gauche de l’application que le MV88 est correctement branché et
La qualité du son change lorsqu’un casque est branché
Le son est distordu Utiliser le vumètre audio pour s’assurer que les crêtes de volume sont comprises dans la plage
Décalage entre les canaux
stéréo gauche/droit et la
vidéo
Le MV88 est branché, mais
le vumètre de volume n’affiche pas de signal.
La LED se trouve à la base du MV88. Le microphone pouvant être inséré dans les deux sens
dans le port Lightning, il est possible que le téléphone masque la LED. Retirer le microphone, le
retourner et le réinsérer pour vérifier son état.
reconnu. Le son peut provenir du microphone intégré.
Les casques à microphone intégré désactivent le MV88 en tant que périphérique audio. Utiliser
le câble adaptateur de contrôle au casque fourni pour supprimer les interférences provenant
d’autres microphones.
cible. Si le niveau atteint le témoin de crête rouge du vumètre d’entrée, réduire le gain.
Selon l’orientation de l’appareil iOS, il peut être nécessaire d’activer l’inversion des canaux
gauche/droit. Si l’audio a déjà été enregistré, les canaux gauche et droit peuvent être facilement
intervertis dans la plupart des logiciels DAW et de traitement du son.
Modifier le paramètre de confidentialité de l’appareil iOS sous SETTINGS > PRIVACY >
MICROPHONE pour autoriser l’application ShurePlus MOTIV à utiliser le microphone.
Fréquence d’échantillonnage et
résolution
Les paramètres de fréquence d’échantillonnage et de résolution se
trouvent dans un menu déroulant du Panneau de configuration Audio
ou Son de l’ordinateur. Ces variables peuvent être réglées selon les
besoins. Sélectionner une fréquence d’échantillonnage plus basse pour
le podcasting, lorsqu’il est important d’avoir un petit fichier pour en faciliter le téléchargement. Sélectionner une fréquence d’échantillonnage
plus élevée pour les enregistrements de musique et obtenir plus de
dynamique.
Conseil : pour obtenir un fichier avec une qualité sonore optimale et d’une
taille gérable, enregistrer à une fréquence d’échantillonnage plus élevée
et comprimer le fichier au format mp3.
Conseil pour les utilisateurs de PC : s’assurer que les paramètres de
fréquence d’échantillonnage et de résolution du microphone, qui se trouvent dans le Panneau de configuration Son de l’ordinateur, correspondent
à la fréquence d’échantillonnage et à la résolution sélectionnées dans le
logiciel.
Configuration système requise et
compatibilité
iOS • iOS 8.0 et supérieur
iPhone • iPhone 5
• iPhone 5c
• iPhone 5s
• iPhone 6
• iPhone 6 Plus
iPod Touch • iPad
5ème génération • iPad 4ème génération
• iPad Air
• iPad Air 2
iPad Mini • iPad Mini 1ère génération
• iPad Mini 2ème génération
• iPad Mini 3ème génération
Caractéristiques
Homologué par MFi
Oui
Modes de ressources de traitement numérique (préréglés)
Voix parlée/Chant/Acoustique/Puissant/Uniforme
Type de transducteur
Cardioïde (10 mms)/Capsule électrostatique bidirectionnelle (10 mms)
Courbe de directivité
Stéréo à largeur réglable/Mono Bidirectional/Mono Cardioid/Mid-Side
Principe stéréo
Mid-Side
Profondeur de bits
16 bits/24 bits
Fréquence d'échantillonnage
44,1/48 kHz
Réponse en fréquence
20 Hz à 20,000 Hz
Gamme de gain réglable
0 à +36 dB
Sensibilité
-37 dBFS/Pa à 1 kHz [1] [2]
SPL maximum
120 dB SPL [2]
Écrêteur
Oui
Compresseur
Oui
Égaliseur
5 bandes
Alimentation
Alimenté via le port Lightning
Boîtier
Construction entièrement métallique
Poids net
40,5 g (1,43oz.)
Dimensions
67 x 25 x 35 mms H x L x P
[1] 1 Pa=94 dB SPL
[2]Au gain minimum, mode uniforme
19
Page 20

Accessoires
Accessoires fournis
Bonnette anti-vent en mousse pour MV88 AMV88-WS
Pochette pour MV88 AMV88-CC
Pièces de rechange
Bonnette anti-vent en mousse pour MV88 AMV88-WS
Pochette pour MV88 AMV88-CC
Câble d’adaptation de contrôle du casque 95A13511
Accessoires en option
Bonnette anti-vent fourrure Rycote pour MV88 AMV88-FUR
Homologations
Information à l'utilisateur
Cet équipement a été testé et déclaré conforme aux limites pour les appareils numériques de classe B, selon la section 15 des règlements de la FCC.
Ces limites sont destinées à assurer une protection raisonnable contre les interférences nuisibles dans une installation résidentielle. Cet équipement
produit, utilise et peut émettre de l'énergie radio électrique et, s'il n'est pas installé et utilisé conformément aux présentes instructions, peut causer des
interférences nuisibles aux communications radio. Il n'existe toutefois aucune garantie que de telles interférences ne se produiront pas dans une installation particulière. Si cet équipement produit des interférences nuisibles à la réception d'émissions de radio ou de télévision, ce qui peut être établi en
mettant l'appareil sous, puis hors tension, il est recommandé à l'utilisateur d'essayer de corriger le problème en prenant l'une ou plusieurs des mesures
suivantes :
• Réorienter ou déplacer l'antenne réceptrice.
• Augmenter la distance séparant l'équipement du récepteur.
• Brancher l'équipement sur un circuit électrique différent de celui du récepteur.
• Consulter le distributeur ou un technicien radio et télévision.
Étiquette de conformité à la norme ICES-003 d’Industrie Canada : CAN ICES-3 (B) / NMB-3 (B)
Remarque : Le contrôle est fondé sur l'utilisation des types de câble fournis et recommandés. L’utilisation de types de câble autres que blindés peut
dégrader les performances CEM.
Ce produit est conforme aux exigences essentielles de toutes les directives européennes applicables et est autorisé à porter la marque CE.
La déclaration de conformité CE peut être obtenue auprès de : www.shure.com/europe/compliance
Représentant agréé européen :
Shure Europe GmbH
Siège Europe, Moyen-Orient et Afrique
Service : Homologation EMA
Jakob-Dieffenbacher-Str. 12
75031 Eppingen, Allemagne
Téléphone : 49-7262-92 49 0
Télécopie : 49-7262-92 49 11 4
Courriel : info@shure.de
« Made for iPod », « Made for iPhone » et « Made for iPad » signifient qu’un accessoire électronique a été conçu pour être branché spécifiquement
à un iPod, iPhone ou iPad, respectivement, et a été certifié par le développeur comme conforme aux normes de performances Apple. Apple n’est pas
responsable du fonctionnement de cet appareil ou de sa conformité aux normes de sécurité et réglementaires. Noter que l’utilisation de cet accessoire
avec un iPod, iPhone ou iPad peut affecter les performances sans fil.
iPad, iPhone, iPod, iPod classic, iPod nano, iPod touch et Retina sont des marques d’Apple Inc., déposées aux États-Unis et dans d’autres pays. iPad
Air et iPad mini sont des marques d’Apple Inc. La marque « iPhone » est utilisée sous licence d’Aiphone K.K.
Mac® et Lightning® sont des marques déposées de Apple Inc.
20
Page 21

iOS-Stereokondensatormikrofon für MS-Stereofonie
MV88
Das Shure MV88 ist ein Kondensatormikrofon in Profiqualität, das unter Verwendung eines Lightning®-Anschlusses direkt in ein Apple iOS-Gerät
eingesteckt wird. Zwei Mikrofonkapseln sind in einer Konfiguration für MS-Stereofonie angeordnet, um ein verstellbares Stereobild zu erzeugen, das zur
Aufnahme einer Vielzahl von Schallquellen, einschließlich Musik und Stimmen, geeignet ist. Mit der ShurePlus® MOTIV-App können die Benutzer den
Ton durch Auswahl von Preset-Modi für digitale Signalverarbeitung, Gain-Einstellungen und Stereobreitenregelung anpassen.
Technische Eigenschaften
Stereomikrofon für MS-Stereofonie
Die klassische MS-Stereofonie-Mikrofontechnik verwendet zwei Kapseln: eine Nierenkapsel, die direkt auf die Schallquelle gerichtet ist, und eine Kapsel
mit Achtercharakteristik, die zu den Seiten gerichtet ist. Mit dieser Konfiguration kann der Benutzer die Stereobreite einstellen; außerdem wird ausgezeichnete Mono-Kompatibilität erzielt.
Plug-and-Play-Betrieb
Das MV88 ist mit allen iOS-Geräten, die einen Lightning-Anschluss aufweisen, kompatibel. Die kostenlose ShurePlus MOTIV-App bietet flexible Regler
zur Anpassung des Tons an praktisch alle Umgebungen.
Kompakt und haltbar
Das MV88 weist eine leichte Ganzmetallkonstruktion auf und kann dank seiner Größe überall hin mitgenommen werden. Wie alle Shure-Produkte wurde
das MV88 strengsten Qualitätsprüfungen unterzogen, um die Zuverlässigkeit während des Einsatzes zu gewährleisten.
Flexible Steuerung mittels ShurePlus MOTIV-App
Die ShurePlus MOTIV-App regelt Mikrofoneinstellungen wie Gain, Stereobreite und Preset-Modi und kann als Aufnahme-App fungieren.
Schnelles Einrichten
Das MV88 ist mit mobilen Geräten, die einen Lightning-Anschluss aufweisen, kompatibel.
1. Das Mikrofon in den Lightning-Anschluss am iOS-Gerät einstecken.
Die LED am Sockel des MV88 leuchtet auf, wenn eine Audio-Anwendung oder die ShurePlus MOTIV-Aufnahme-App offen ist und das MV88 als
Aufnahmegerät ausgewählt ist.
Hinweis: Dank des umkehrbaren Lightning-Anschlusses kann das MV88 in beliebiger Ausrichtung eingesteckt werden.
2. Die ShurePlus MOTIV-App installieren und öffnen.
Mittels der ShurePlus MOTIV App werden die Mikrofoneinstellungen vorgenommen und auch Aufnahmen ermöglicht.
3. Den Audiopegel beachten und mit der ShurePlus MOTIV-App die MV88-Einstellungen ändern.
Einen Preset-Modus auswählen oder den Mikrofon-Gain und die Stereobreite manuell einstellen, um die Audioqualität zu optimieren. Siehe Abschnitt
„Erweiterte Audioeinstellungen“, um weitere Informationen über zusätzliche Audioeinstellungen wie Komprimierung, Entzerrung usw. zu erhalten.
4. Schalten Sie Ihr Gerät vor der Aufnahme in den Flugzeugmodus und auf „Nicht stören“.
Dadurch können Sie die Aufnahme vornehmen, ohne durch Telefonanrufe und Benachrichtigungen gestört zu werden.
5. Die integrierte ShurePlus MOTIV-Aufnahme-App oder die Aufnahme-App eines an-
deren Herstellers verwenden, um eine Audioaufnahme vorzunehmen.
Das Mikrofon speichert intern alle Einstellungen, die mit der ShurePlus MOTIV-App vorgenommen wurden. Änderungen der Einstellungen können
zwar während der Aufnahme durchgeführt werden; um Nebengeräusche zu vermeiden, sollten die Einstellungen jedoch vor der Aufnahme geprüft
werden.
21
Page 22
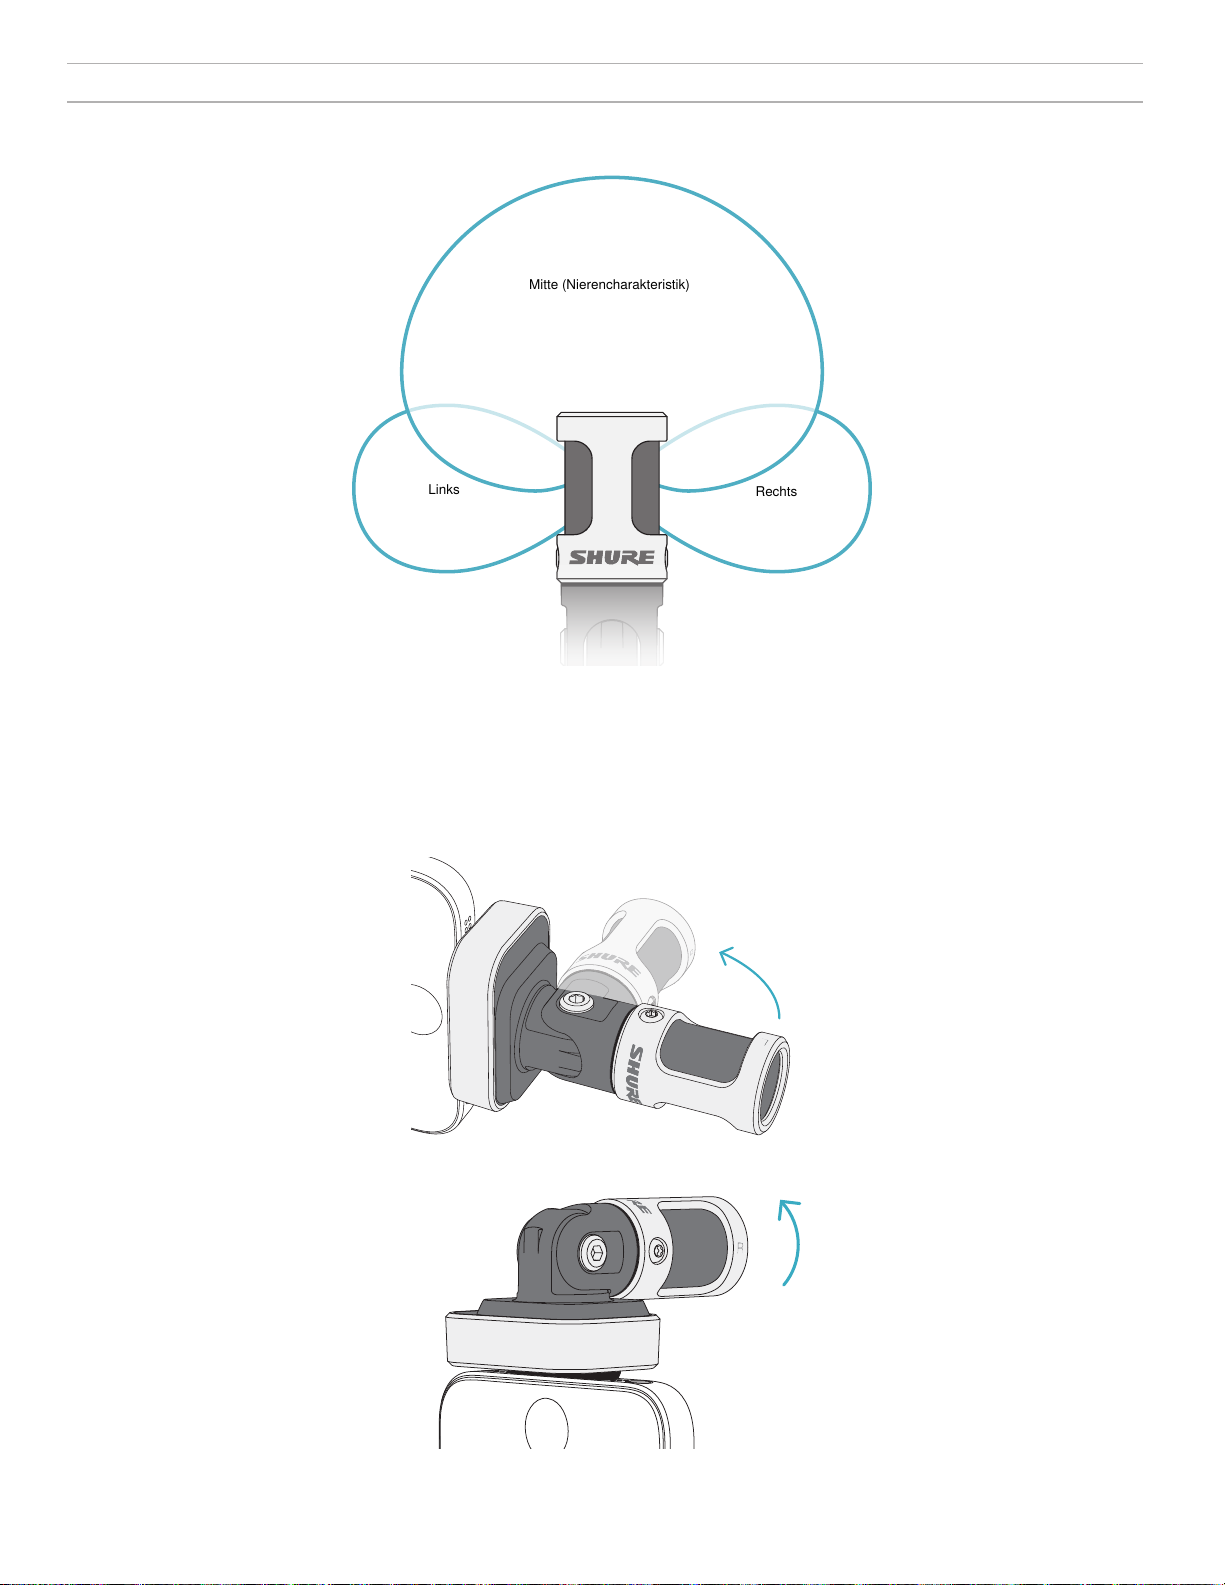
MV88-Mikrofonkonstruktion
Mitte (Nierencharakteristik)
Links
Rechts
Das MV88 verfügt über zwei Kapseln: eine Kapsel weist Nierencharakteristik auf und dient zur Aufnahme von Ton unmittelbar vor dem Mikrofon. Die
andere Kapsel weist Achtercharakteristik auf und dient zur Aufnahme von Ton auf der linken und rechten Seite.
Mikrofonkapsel
Einstellung des Mikrofons
Um genaue Stereoaufnahmen in beliebigen Positionen zu erzielen, muss die Vorderseite des Mikrofons auf die Klangquelle gerichtet werden und die
Seiten müssen richtig ausgerichtet sein. Die Anzeigen L und R am Mikrofongehäuse verwenden, um die richtige Aufstellung zu gewährleisten.
Hinweis: Mit der Funktion zum Vertauschen des linken und rechten Kanals kann die Ausrichtung am Mikrofon umgeschaltet werden, wenn dies notwendig ist.
Das Mikrofon lässt sich schwenken und das Gehäuse kann um 90° gedreht werden, um die gewünschte Platzierung zu erzielen.
22
Einstellen der Mikrofonstellung
Page 23
Ausrichten des Mikrofons
Dieser Abschnitt enthält Empfehlungen zur Mikrofonaufstellung für
typische Einsatzsituationen. Dabei ist zu beachten, dass es viele effektive Möglichkeiten zum Aufnehmen einer bestimmten Klangquelle gibt.
Experimentieren Sie mit der Mikrofonaufstellung und den Einstellungen,
um herauszufinden, was am besten funktioniert.
Tipp: Um die richtige Stereoausrichtung des Mikrofons zu gewährleisten,
nachprüfen, ob der Shure-Name an der Oberseite des Mikrofons deutlich
sichtbar ist. Wenn der Name nicht sichtbar ist, das Gehäuse um 90°
drehen.
Tonaufzeichnung
Das Telefon oder Tablet kann in beliebigen Positionen verwendet werden.
Die Vorderseite des Mikrofons auf die Schallquelle richten, wobei die linke
und rechte Seite in die richtige Richtung weisen.
Portrait (senkrecht)
Die Vorderseite des Mikrofons auf die Schallquelle richten. Das Mikrofon
kann in beliebiger Ausrichtung des MV88 zum Lightning-Anschluss
eingesteckt werden, weshalb sichergestellt werden muss, dass die linke
und rechte Seite in die richtige Richtung weisen.
Audio-Interview (Tischplatte)
Das Aufnahmegerät auf eine flache Oberfläche stellen, wobei eine
Seite des Mikrofons auf die befragte Person und die andere Seite auf
den Fragensteller gerichtet ist. Das Preset MONO BIDIRECTIONAL in der
ShurePlus MOTIV-App auswählen.
Video-Interview
Zur Aufnahme der Stimmen der befragten Person (vor laufender Kamera)
und des Fragenstellers (Off-Sprecher) das Preset MONO BIDIRECTIONAL in
der ShurePlus MOTIV-App auswählen. Das Mikrofon so aufstellen, dass
die linke und rechte Seite zu jeder Person weist.
Landscape (waagerecht)
Die Vorderseite des Mikrofons auf die Schallquelle richten. Das Mikrofon
kann in beliebiger Ausrichtung zum Lightning-Anschluss angeschlossen
werden, weshalb sichergestellt werden muss, dass die linke und rechte
Seite des MV88 in die richtige Richtung weisen.
Selbstaufnahme (Stimme)
Das Gerät auf eine flache Oberfläche stellen und das Mikrofon so anwinkeln, dass es auf ihren Mund gerichtet ist. Das Preset MONO CARDIOID in
der ShurePlus MOTIV-App auswählen, um die Umgebungsgeräusche zu
reduzieren.
23
Page 24
100%9:41 AM
L
R
-48 -18 -12 -3 0 dB
RL
Shure MV88
EQ
MV88 Settings
Help
Mic Gain 5.5 dB
L R
Stereo Width
45°
L R
Verwendung mit Kopfhörern
Kopfhörermonitor-Anpassungskabel
Aus folgenden Gründen das im Lieferumfang enthaltene Kopfhörermonitor-Anpassungskabel verwenden:
• Sie benötigen eine dünnere Verbindung zum Kopfhörereingang an Ihrem Aufnahmegerät. Das Kabel ermöglicht die Verwendung von Kopfhörern mit
größeren Anschlüssen.
• Sie möchten das Inline-Mikrofon an Ihren Ohrhörern deaktivieren. Das Kabel gewährleistet, dass der aufgenommene Ton ausschließlich vom MV88
und nicht vom Inline-Mikrofon Ihrer Ohrhörer stammt.
ShurePlus MOTIV-App
Die ShurePlus MOTIV-App regelt die Mikrofoneinstellungen, um die Leistung für bestimmte Verwendungszwecke zu optimieren.
Tipp: Gerät einstellen auf Flugzeugmodus und Nicht stören um Unterbrechungen bei der Aufnahme durch Telefonanrufe, SMS oder Warnungen zu
verhindern.
Einstellung des Mikrofons
① Menü
Das Menü auswählen, um das Aufnahmefenster, die gespeicherten
Aufnahmen, die MV88-Einstellungen und die Voreinstellungen-Fenster
aufzurufen.
Mikrofoneinstellungen
② Eingangspegelanzeige
Zeigt die Stärke des Eingangssignals an. Die lautesten Spitzen sollten
den Zielbereich erreichen (wird durch schattierten Bereich angezeigt).
③ Erweiterte Funktionen
Die Pulldown-Leiste verwenden, um die erweiterten Audiofunktionen,
einschließlich Kapselauswahl, Windreduzierung, Links/Rechts-Tausch
sowie Regler für Equalizer, Limiter und Kompressor, anzuzeigen.
④ Preset-Modi
Den Modus auswählen, um die Stereobreite, Entzerrung und
Kompression für bestimmte Verwendungszwecke einzustellen.
Weitere Informationen sind im Abschnitt „Preset-Modi“ zu finden.
24
⑤ Mikrofon-Gain
Einstellen, um die Lautstärke der Tonquelle anzupassen. Die
Anzeige bei der Durchführung von Einstellungen beobachten, um
sicherzustellen, dass sich die Pegel im Zielbereich befinden (wird
durch schattierten Bereich der Eingangspegelanzeige angezeigt).
⑥ Stereobreite
Dient zur Einstellung der Breite des
Stereomikrofon-Aufnahmebereichs.
Tipp: Bei der Einstellung der Breite die Stelle des Mikrofons und die Größe
der Klangquelle berücksichtigen. Die Aufnahme eines großen Orchesters oder
Ensembles profitiert bspw. von einem breiten Stereobild, um eine bessere
Trennung der Instrumente zu erzielen. Andere Verwendungszwecke, z.
B. Sprache, profitieren von einer schmalen Breite für bessere Klarheit und
Unterdrückung von Umgebungsgeräuschen.
Page 25

Preset-Modi
L
R
00:00 00:01 00:02 00:03 00:04 00:05
24/48 KHz
100%9:41 AM
Record
Mic Gain
5.5 dB
New Recording 1
0.00 MB
Time Left
about 2 hours 5 min
00:00
Shure MV88
RL
L
R
-48 -18 -12 -3 0 dB
100%9:41 AM
Record
Mic Gain
5.5 dB
L
R
00:00 00:01 00:02 00:03 00:04 00:05
New Recording 1
0.92 MB
Time Left
about 25 min
00:01.43
Done
Recordings
Shure MV88
RL
24/48 KHz
L
R
-48 -18 -12 -3 0 dB
Fünf auswählbare Modi optimieren die Einstellungen für Gain, Stereobreite, Entzerrung und Komprimierung, um Ihren Aufnahmebedürfnissen zu
entsprechen. Den Mikrofonpegel einstellen und durch die Modi navigieren, um herauszufinden, welche Einstellung am besten klingt. Dann bei Bedarf
den Pegel einstellen.
Modus Verwendungszweck Merkmale
Sprache
Gesang
Flat
Akustik
Ideal zur Aufnahme von
Sprache
Dient zur Abnahme von
Solo- oder GruppenGesangspräsentationen
Für jegliche Anwendung
geeignet
Eignet sich für akustische
Instrumente und leise
Musikanwendungen
Zur Aufnahme von Bands
und lauteren Quellen
verwenden
Eine schmale Stereobreite zur Unterdrückung von Umgebungsgeräuschen, eine
Entzerrungseinstellung zum Hervorheben von Klarheit und Fülle und leichte Komprimierung, um
Pegel kohärent zu halten.
Mittlere Stereobreite mit leichter Entzerrung, um Fülle und Klarheit für einen natürlichen Ton
hinzuzufügen.
Völlig unverarbeitetes Signal (keine Entzerrungs- oder Komprimierungseinstellungen angewandt). Bietet Flexibilität beim Verarbeiten des Audiosignals nach der Aufnahme.
Eine mittlere Stereobreite und transparente Komprimierung zum Glätten von Lautstärkespitzen
und zum Hervorheben leiserer Passagen. Die Equalizer-Werte betonen Details und bietet einen
insgesamt natürlichen Klang.
Eine breite Stereobreite zur besseren Trennung der Quellen mit Entzerrung zur zusätzlichen
Verbesserung der Definition durch Verringerung von Frequenzen, die den Instrumententon überfüllt klingen lassen.
Band
Aufnahmeeinstellungen
① Gerätestatus
Zeigt den Namen des aktiven Mikrofons an.
② Anzeige erweiterter Funktionen
Zeigt die Symbole für die derzeit aktivierten erweiterten Funktionen an.
③ Aufnahme-Anzeige
Zeigt die Wellenform des Schallsignals während der Aufnahme an.
④ Auswahl der Abtastrate und Bittiefe
Herunterziehen und die gewünschte Abtastrate und Bittiefe
auswählen.
Aufnahmeeinstellungen
⑤ Aufnahme-Details
Auf der linken Seite werden die Eigenschaften der aufgenommenen
Datei, wie z. B. Dateiname und Dateigröße angezeigt. Die
verbleibende Aufnahmedauer wird auf der rechten Seite angezeigt.
⑥ Aufnahme/Pause-Schaltfläche
Eine große Schaltfläche zum Aktivieren und Pausieren der Aufnahme.
Hinweis: Die maximale Dateigröße für eine Aufnahme beträgt 2 GB, was
einer Aufnahmezeit von etwa 2 Stunden entspricht. Diese Einschränkung
dient zur Leistungsoptimierung der App. Niedrigere Abtastraten ermöglichen längere, unterbrechungsfreie Aufnahmezeiten.
25
Page 26
Erweiterte Audioeinstellungen
Die Pulldown-Leiste unter der Eingangspegelanzeige der ShurePlus MOTIV-iPhone-App verwenden, um das Menü mit den erweiterten
Audioeinstellungen anzuzeigen. Bei Verwendung der iPad-Version die Schaltfläche „Erweitert“ drücken, um die erweiterten Audioeinstellungen
anzuzeigen.
Auswahl der Richtcharakteristik (Stereo- und Monoeinstellungen)
Die folgenden Einstellungen steuern die Aktivität der Mikrofonkapseln. Beim Betrieb in einem Mono-Modus kann die Stereobreite nicht eingestellt
werden.
Stereo Mitte = Ein
Mono-Nierencharakteristik Mitte = Ein
Mono-Achtercharakteristik Mitte = Aus
Seiten = Ein
Seiten = Aus
Seiten = Ein
Mitte/Seite Siehe vollständige Beschreibung
für Informationen zu Ausgang und
Verarbeitung.
Raw Mid-Side Output
Für höhere Flexibilität nach der Verarbeitung die Einstellung Raw Mid-Side verwenden. Dies liefert ein 2-Kanal-Signal mit einem Stereobild, das auch
nach der Aufnahme der Spuren eingestellt werden kann:
Links: Nierencharakteristik (vorne)
Rechts: Achtercharakteristik (Seiten)
Die Einstellung Raw Mid-Side ist nur zur Verwendung mit Audioaufnahmezwecken bestimmt, die über einen MS-Stereofonie-Matrixdecoder verfügen,
um die aufgenommenen Spuren als Stereobild zu interpretieren.
26
Page 27
Manuelles Dekodieren und Stereobreiteneinstellung
Standard
Vertauschung aktiviert
Wenn die Software der digitalen Audio-Arbeitsstation keinen MS-Stereofonie-Decoder aufweist, die folgenden Schritte verwenden, um ein genaueres
Stereobild zu erstellen:
1. Die linken und rechten Audiosignale aus der 2-Kanal-Datei Raw Mid-Side als einzelne Mono-Spuren extrahieren.
2. 3 leere Audio-Spuren erstellen:
Erste Spur Das Audiosignal (vorne/Nierencharakteristik) nur des linken Kanals als Mono-
Zweite Spur Das Audiosignal (Seite/Achtercharakteristik) nur des rechten Kanals als Mono-
Dritte Spur Das Seiten/Achtercharakteristik-Signal der zweiten Spur kopieren. Diese Spur
3. Die Seiten-Spuren mit dem gleichen Lautstärkepegel zusammen gruppieren, damit sie gleichzeitig eingestellt werden können. Durch Erhöhen
der Lautstärke der Seiten-Spuren wird die Stereobreite vergrößert; durch Verringern der Lautstärke wird die Stereobreite verkleinert.
Tipp für Fortgeschrittene: Durch Verwendung von Kompression mit einer schnellen Toneinsatzeinstellung an den Seiten-Spuren werden
Einschwingungen (der erste Teil eines Tons, wenn bspw. ein Trommelstock auf ein Becken schlägt) in der Mitte des Stereobilds gehalten und können
sich im Stereofeld ausdehnen, während der Ton abklingt.
Spur verwenden und zur Mitte verschieben.
Spur verwenden und ganz nach links verschieben.
ganz nach rechts verschieben und die Phase umkehren.
Manuelles Decodieren von Raw Mid-Side-Audio
Windgeräuschreduzierung
Dadurch wird ein steilflankiger Hochpassfilter aktiviert, der durch Umweltgeräusche verursachtes
Rumpeln reduziert. Den im Lieferumfang enthaltenen Schaumstoff-Windschutz zusammen mit der
Windreduzierung verwenden, um Rumpel- und „Popp“-Geräuschen (auf das Mikrofon treffende
Luftstöße) entgegen zu wirken.
Zur zusätzlichen Verringerung von Windgeräuschen den optionalen Rycote™ Windjammer verwenden, der über den im Lieferumfang enthaltenen Schaumstoff-Windschutz passt.
Vertauschen des linken/rechten Kanals
Bei der Aufnahme in Stereo vertauscht diese Funktion den linken und rechten Audiokanal, damit das
Stereobild mit dem Video übereinstimmt. Dies kann bei bestimmten Telefon/Tablett-Stellungen notwendig sein, bei denen das Mikrofon umgekehrt ist.
Tipp: Die Anzeigen L und R am Mikrofongehäuse betrachten, um zu bestimmen, ob die
Vertauschung notwendig ist.
In diesem Beispiel sollte die Vertauschung des
linken und rechten Kanals aktiviert werden, wenn
das Telefon gedreht wird:
Equalizer, Limiter und Kompressor
Im Fenster mit den erweiterten Funktionen können die Equalizer-, Limiter- und Kompressor-Einstellungen fein abgestimmt werden. Durch die PresetModi navigieren, um die DSP-Änderungen zu hören, und den Modus auswählen, der Ihnen am besten gefällt.
Hinweis: Die Entzerrung in den Presets wird nicht angezeigt. Nur die zusätzliche vom Benutzer ausgewählte Entzerrung wird im Einstellungsfenster für
die erweiterten Funktionen angezeigt.
27
Page 28
Störungssuche
Problem Abhilfe
LED nicht sichtbar Die LED befindet sich am Sockel des MV88. Da das Mikrofon aufgrund des Lightning-
Schlechte Audioqualität In der oberen linken Ecke der Anwendung nachprüfen, ob das MV88 vollständig eingesteckt ist
Audio-Qualität ändert sich,
wenn ein Headset eingesteckt wird
Audiosignal ist verzerrt Die Audio-Pegelanzeige verwenden, um sicherzustellen, dass sich die Lautstärkespitzen im
Die linken/rechten
Stereokanäle stimmen nicht
mit dem Video überein
MV88 ist eingesteckt aber
Lautstärkepegelanzeige zeigt
kein Signal an.
Anschlusses in beliebiger Ausrichtung eingesteckt werden kann, ist es möglich, dass das
Telefon die LED verdeckt. Das Mikrofon entfernen, umdrehen und wieder einstecken, um den
Mikrofonstatus zu prüfen.
und erkannt wird. Das Audio stammt möglicherweise vom integrierten Mikrofon.
Headsets mit Mikrofonen übersteuern das MV88 als Audiogerät. Das im Lieferumfang enthal-
tene Kopfhörermonitor-Anpassungskabel verwenden, um Störungen durch andere Mikrofone zu
beseitigen.
Zielbereich befinden. Wenn der Pegel die rote Spitzenwertanzeige der Eingangspegelanzeige
erreicht, die Verstärkung verringern.
Je nach Ausrichtung des iOS-Geräts kann es notwendig sein, die Vertauschung des linken und
rechten Kanals zu aktivieren. Wenn das Audio bereits aufgenommen wurde, lassen sich der linke
und rechte Kanal in den meisten digitalen Audio-Arbeitsstationen und Softwareanwendungen zur
Audiobearbeitung mühelos vertauschen.
Die Privatsphäre-Einstellungen für das iOS-Gerät unter SETTINGS > PRIVACY > MICROPHONE ändern, damit die ShurePlus MOTIV-App die Berechtigung zur Verwendung des Mikrofons erhält.
Abtastrate und Bittiefe
Die Einstellungen für Abtastrate und Bittiefe befinden sich in einem
Dropdownmenü in der Audio- bzw. Sound-Systemsteuerung Ihres
Computers. Sie können diese Variablen bedarfsgemäß einstellen. Wählen
Sie eine niedrigere Abtastrate, um eine geringe Dateigröße zu erzielen. Um eine bessere Klangqualität zu erzielen, wählen Sie eine höhere
Abtastrate aus.
Tipp: Um eine hohe Audioqualität bei geringer Dateigröße zu erzielen,
empfehlen wir die Aufnahme mit hoher Abtastrate und Bittiefe und spätere
Konvertierung in das mp3 Format.
Tipp für PC-Benutzer: Die Einstellungen von Abtastrate und Bittiefe
müssen sowohl in der Systemsteuerung sowie in der verwendeten
Aufnahmesoftware übereinstimmen, da sonst Störungen in der Aufnahme
möglich sind.
Systemanforderungen und Kompatibilität
iOS • iOS 8.0 und neuere Versionen
iPhone • iPhone 5
• iPhone 5c
• iPhone 5s
• iPhone 6
• iPhone 6 Plus
iPod Touch • 5. Gen.
iPad • iPad, 4. Gen.
• iPad Air
• iPad Air 2
iPad Mini • iPad Mini, 1. Gen.
• iPad Mini, 2. Gen.
• iPad Mini, 3. Gen.
Technische Daten
MFi-zertifiziert
Ja
DSP-Modi (Presets)
Sprache/Gesang/Akustisch/Laut/Flat
Wandlertyp
Niere (10 mm)/Achtercharakteristik-Kondensatorkapsel (10 mm)
Richtcharakteristik
Einstellbare Stereobreite/Mono Bidirectional/Mono Cardioid/Mitte-Seite
Stereoprinzip
Mitte-Seite
Bittiefe
16 Bit/24 Bit
Abtastrate
44,1/48 kHz
Frequenzgang
20 Hz bis 20,000 Hz
Einstellbarer Verstärkungsbereich
0 bis +36 dB
Empfindlichkeit
-37 dBFS/Pa bei 1 kHz [1] [2]
Maximaler Schalldruckpegel
120 dB Schalldruckpegel [2]
Limiter
Ja
Kompressor
Ja
Equalizer
Mit 5 Bändern
Versorgungsspannungen
Mittels Lightning-Anschluss gespeist
Gehäuse
Ganzmetallkonstruktion
Nettogewicht
40,5 g (1,43g)
Gesamtabmessungen
67 x 25 x 35 mm H x B x T
[1] 1 Pa=94 dB Schalldruckpegel
[2]Bei Mindest-Gain, Flat-Modus
28
Page 29
Zubehör
Mitgeliefertes Zubehör
MV88-Filter aus Schaumstoff AMV88-WS
MV88-Tragetasche AMV88-CC
Ersatzteile
MV88-Filter aus Schaumstoff AMV88-WS
MV88-Tragetasche AMV88-CC
Kopfhörermonitor-Anpassungskabel 95A13511
Optionales Zubehör
Rycote Windjammer für MV88 AMV88-FUR
Zulassungen
Informationen für den Benutzer
Dieses Gerät wurde geprüft und entspricht den Grenzwerten für ein digitales Gerät der Klasse B gemäß Teil 15 der Richtlinien der USFernmeldebehörde (FCC). Diese Grenzwerte sollen einen angemessenen Schutz gegen störende Interferenzen in Wohngebieten bieten. Dieses Gerät
erzeugt und arbeitet mit HF-Energie und kann diese ausstrahlen; wenn es nicht gemäß den Anweisungen installiert und verwendet wird, kann es störende Interferenzen mit dem Funkverkehr verursachen. Allerdings wird nicht gewährleistet, dass es bei einer bestimmten Installation keine Interferenzen
geben wird. Wenn dieses Gerät störende Interferenzen beim Radio- und Fernsehempfang verursacht (was durch Aus- und Anschalten des Geräts festgestellt werden kann), wird dem Benutzer nahe gelegt, die Interferenz durch eines oder mehrere der folgenden Verfahren zu beheben:
• Die Empfangsantenne anders ausrichten oder anderswo platzieren.
• Den Abstand zwischen dem Gerät und dem Empfänger vergrößern.
• Das Gerät an eine Steckdose eines Netzkreises anschließen, der nicht mit dem des Empfängers identisch ist.
• Den Händler oder einen erfahrenen Radio- und Fernsehtechniker zu Rate ziehen.
Konformitätskennzeichnung Industry Canada ICES-003: CAN ICES-3 (B)/NMB-3(B)
Hinweis: Die Prüfung beruht auf der Verwendung der mitgelieferten und empfohlenen Kabeltypen. Bei Verwendung von nicht abgeschirmten
Kabeltypen kann die elektromagnetische Verträglichkeit beeinträchtigt werden.
Dieses Produkt entspricht den Grundanforderungen aller relevanten Richtlinien der Europäischen Union und ist zur CE-Kennzeichnung berechtigt.
Die CE-Übereinstimmungserklärung ist erhältlich bei: www.shure.com/europe/compliance
Bevollmächtigter Vertreter in Europa:
Shure Europe GmbH
Zentrale für Europa, Nahost und Afrika
Abteilung: EMEA-Approval
Jakob-Dieffenbacher-Str. 12
75031 Eppingen, Deutschland
Telefon: +49 7262 9249-0
Telefax: +49 7262 9249-114
E-Mail: info@shure.de
„Made for iPod“, „Made for iPhone“ und „Made for iPad“ bedeutet, dass ein elektronisches Zubehör speziell für die Verwendung mit dem iPod, iPhone
oder iPad entwickelt wurde und vom Entwickler hinsichtlich der Erfüllung der Apple-Leistungsstandards zertifiziert wurde. Apple ist in keiner Weise für
den Betrieb dieses Geräts oder seine Übereinstimmung mit Sicherheits- und Rechtsstandards verantwortlich. Bitte beachten Sie, dass die Verwendung
dieses Zubehörs mit einem iPod, iPhone oder iPad die drahtlose Leistung beeinträchtigen kann.
iPad, iPhone, iPod, iPod classic, iPod nano, iPod touch und Retina sind Marken von Apple Inc., die in den USA und anderen Ländern eingetragen sind.
iPad Air und iPad mini sind Marken von Apple Inc. Die Marke „iPhone“ wird mit einer Lizenz von Aiphone K.K. verwendet.
Mac® und Lightning® sind eingetragene Marken von Apple Inc.
29
Page 30

Micrófono de condensador estereofónico medio-lateral (Mid-Side) para iOS
MV88
El Shure MV88 es un micrófono de condensador de calidad profesional que se conecta directamente a un dispositivo iOS de Apple mediante un conector Lightning®. Las dos cápsulas del micrófono están dispuestas en una configuración de tipo medio-lateral (Mid-Side) para proporcionar una imagen
estereofónica ajustable, capaz de captar diversas fuentes sonoras, como música y voz. La aplicación ShurePlus® MOTIV permite que los usuarios
personalicen el sonido mediante la selección del modo preajustado de procesamiento de señales digitales (DSP), el ajuste de ganancia y el control de
amplitud estereofónica.
Características
Micrófono estereofónico medio-lateral (Mid-Side)
La clásica técnica de micrófono estereofónico medio-lateral emplea dos cápsulas coincidentes: una cardioide orientada directamente hacia la fuente
sonora, y una bidireccional orientada hacia los lados. Esta configuración le ofrece al usuario la posibilidad de ajustar la amplitud estereofónica y brinda
excelente compatibilidad monofónica.
Funcionamiento inmediato
El MV88 es compatible con cualquier dispositivo iOS provisto de un conector Lightning. La aplicación gratuita ShurePlus MOTIV ofrece controles flexibles para adaptar el sonido a prácticamente cualquier entorno.
Compacto y duradero
El MV88 posee una estructura liviana, totalmente metálica, y su tamaño reducido facilita el traslado a todos lados. Como todos los productos Shure, el
MV88 ha sido sometido a rigurosas pruebas de calidad que garantizan un funcionamiento confiable.
Control flexible a través de la aplicación ShurePlus MOTIV
La aplicación ShurePlus MOTIV permite controlar los parámetros del micrófono, como ganancia, amplitud estereofónica y modos preajustados, y puede
funcionar como aplicación de grabación.
Configuración rápida
El MV88 es compatible con dispositivos móviles que tienen un conector Lightning.
1. Enchufe el micrófono al conector Lightning del dispositivo iOS.
El LED de la base del MV88 se iluminará cuando se abra una aplicación de audio o la aplicación de grabación ShurePlus MOTIV y se seleccione el
MV88.
Nota: El conector reversible Lightning permite instalar el MV88 en cualquier dirección.
2. Instale y abra la aplicación ShurePlus MOTIV.
ShurePlus MOTIV permite controlar el micrófono y tiene capacidad de grabación instantánea.
3. Revise el audio y ajuste los parámetros con la aplicación ShurePlus MOTIV, en la configuración del MV88.
Seleccione un modo preajustado o ajuste la ganancia del micrófono y la amplitud estereofónica manualmente para optimizar las grabaciones de audio. Consulte el tema «Configuración de audio avanzada» para obtener más información sobre otros parámetros de audio, como la compresión y la
ecualización, entre otros.
4. Configure su dispositivo en Modo avión y No molestar antes de grabar.
Esto le permite grabar audio sin las interrupciones que producen las llamadas telefónicas o las notificaciones de las aplicaciones.
5. Utilice la aplicación de grabación integrada ShurePlus MOTIV o una aplicación de terceros para comenzar a grabar.
El micrófono conserva todos los parámetros de la aplicación ShurePlus MOTIV. Aunque es posible realizar ajustes durante la grabación, se
recomienda probar la configuración antes de grabar, para evitar efectos audibles indeseados.
30
Page 31

Diseño del micrófono MV88
Centro (cardioide)
Izquierda
Derecha
El MV88 incluye dos cápsulas: una de ellas cuenta con un patrón cardioide que capta el sonido directamente delante del micrófono. La otra es bidireccional y capta el sonido procedente de los lados derecho e izquierdo.
Cápsula de micrófono
Ajuste del micrófono
Para realizar grabaciones estereofónicas precisas en cualquier posición, la parte anterior del micrófono se debe orientar hacia la fuente sonora, de
manera que los lados queden colocados en la dirección adecuada. Use los indicadores L (izquierda) y R (derecha) del tubo del micrófono para asegurarse de que quede ubicado correctamente.
Nota: La función de intercambio de los canales izquierdo y derecho permite modificar la orientación en el micrófono cuando es necesario realizar esa
operación.
Ajuste de la posición del micrófono
El micrófono gira y el tubo puede rotarse 90 grados para lograr la posición deseada.
31
Page 32

Orientación del micrófono
En esta sección se ofrecen sugerencias sobre la colocación de micrófonos para usos típicos. Recuerde que existen muchas maneras eficaces
de grabar una fuente particular. Experimente con la colocación y ajustes
de los micrófonos para obtener los mejores resultados.
Sugerencia: Para comprobar de un vistazo si la orientación estereofónica
del micrófono es la correcta, controle que el nombre Shure se vea claramente en la parte superior del micrófono. Si el nombre no está visible, gire
el tubo 90°.
Grabación de audio
El teléfono o la tableta pueden utilizarse en cualquier posición. Oriente la
parte anterior del micrófono hacia la fuente sonora, de modo que los lados
izquierdo y derecho queden ubicados en la dirección correcta.
Orientación vertical
Oriente la parte anterior del micrófono hacia la fuente sonora. El micrófono MV88 puede montarse en cualquier dirección con el conector
Lightning; por lo tanto, asegúrese de que los lados izquierdo y derecho
estén orientados correctamente.
Entrevista de audio (micrófono sobre la mesa)
Coloque la grabadora sobre una superficie plana, con un lado del micrófono en dirección al entrevistado y el otro en dirección al entrevistador.
Seleccione el ajuste predeterminado MONO BIDIRECTIONAL en la aplicación ShurePlus MOTIV.
Entrevista en video
Para captar las voces del entrevistado (que está frente a la cámara) y del
entrevistador (que está fuera de cámara), seleccione el ajuste predeterminado MONO BIDIRECTIONAL en la aplicación ShurePlus MOTIV. Ubique el
micrófono con los lados izquierdo y derecho en dirección a cada persona.
Orientación horizontal (apaisada)
Oriente la parte anterior del micrófono hacia la fuente sonora. El micrófono puede instalarse en cualquier dirección con el conector Lightning; por
lo tanto, asegúrese de que los lados izquierdo y derecho del MV88 estén
orientados correctamente.
Autograbación (de voz)
Coloque la grabadora sobre una superficie plana y oriente el micrófono en
dirección a la boca. Seleccione el ajuste predeterminado MONO CARDIOID
en la aplicación ShurePlus MOTIV para reducir el ruido ambiente.
32
Page 33

100%9:41 AM
L
R
-48 -18 -12 -3 0 dB
RL
Shure MV88
EQ
MV88 Settings
Help
Mic Gain 5.5 dB
L R
Stereo Width
45°
L R
Uso con auriculares
Cable adaptador para monitoreo con auriculares
El cable adaptador incluido para el monitoreo con auriculares le resultará útil en los siguientes casos:
• Cuando la entrada de los auriculares en la grabadora sea más estrecha. Cuando utilice auriculares con conectores más grandes.
• Cuando desee inhabilitar el micrófono integrado en los auriculares. El cable le garantizará que el sonido grabado proviene exclusivamente del MV88,
y no del micrófono integrado en los auriculares.
Aplicación ShurePlus MOTIV
La aplicación ShurePlus MOTIV permite controlar los parámetros del micrófono para optimizar el rendimiento en usos específicos.
Sugerencia: Ajuste el dispositivo en Modo avión y No molestar para evitar interrupciones durante la grabación por llamadas telefónicas, mensajes de
texto o alertas.
Ajuste del micrófono
① Menú
Seleccione el menú para acceder a la ventana de grabación, las
grabaciones guardadas, los parámetros del MV88 y las ventanas de
preferencias.
Parámetros del micrófono
② Medidor de entrada
Muestra la intensidad de la señal de entrada. Los picos más altos
deben permanecer en el intervalo deseado (indicado por la zona
sombreada).
③ Funciones avanzadas
Utilice la barra desplegable para visualizar las funciones de audio
avanzadas, entre las que se encuentran: selección de cápsula,
reducción del ruido del viento, intercambio de los canales izquierdo y
derecho, y controles de ecualizador, limitador y compresor.
④ Modos preajustados
Seleccione un modo para configurar la amplitud estereofónica, la
ecualización y la compresión en función de aplicaciones específicas.
Consulte el tema "Modos preajustados" para obtener más información.
⑤ Ganancia del micrófono
Ajuste este parámetro para equipararlo con el volumen de la fuente
sonora. Monitoree el medidor al realizar ajustes para asegurarse de
que los niveles se encuentren en el intervalo deseado (indicado por la
zona sombreada del medidor de entrada).
⑥ Amplitud estereofónica
Permite ajustar la amplitud del área de captura de sonido del
micrófono estereofónico.
Sugerencia: Tenga en cuenta la ubicación del micrófono y el tamaño de la fuente
sonora al ajustar la amplitud. Por ejemplo, una imagen estereofónica amplia resultará más útil para grabar una gran orquesta o conjunto musical, porque permitirá
obtener una mayor separación entre los instrumentos. En otras aplicaciones,
como la de voz, el uso de una amplitud más reducida resulta más conveniente
para obtener mayor claridad y supresión del ruido ambiente (del entorno).
33
Page 34

Modos preajustados
L
R
00:00 00:01 00:02 00:03 00:04 00:05
24/48 KHz
100%9:41 AM
Record
Mic Gain
5.5 dB
New Recording 1
0.00 MB
Time Left
about 2 hours 5 min
00:00
Shure MV88
RL
L
R
-48 -18 -12 -3 0 dB
100%9:41 AM
Record
Mic Gain
5.5 dB
L
R
00:00 00:01 00:02 00:03 00:04 00:05
New Recording 1
0.92 MB
Time Left
about 25 min
00:01.43
Done
Recordings
Shure MV88
RL
24/48 KHz
L
R
-48 -18 -12 -3 0 dB
Cinco modos seleccionables optimizan los parámetros de ganancia, amplitud estereofónica, ecualización y compresión en función de los requisitos
de una grabación. Establezca el nivel del micrófono y avance por los modos hasta hallar el que produzca el mejor sonido. Luego ajuste el nivel según
corresponda.
Modo Uso Características
Ideal para captar voz Amplitud estereofónica reducida para suprimir el ruido de fondo, parámetros de ecualización
para resaltar la claridad y riqueza tonal, y compresión leve para mantener niveles uniformes.
Conferencias
Canto
Uniforme
Se usa para captar presentaciones cantadas
individuales o en grupos
Adecuado para cualquier
situación
Amplitud estereofónica media con ecualización sutil para aportar riqueza tonal y claridad, a fin
de obtener un sonido natural.
Produce una señal completamente carente de procesamiento (no se le aplica ecualización ni
compresión). Añade flexibilidad para situaciones en las cuales se procesará el audio después de
haberlo grabado.
Acústico
Adecuado para instrumentos acústicos y música suave
Utilice este modo para
grabar bandas y fuentes
sonoras más intensas.
Amplitud estereofónica media y compresión transparente para eliminar los picos transitorios de
volumen y resaltar pasajes tenues. La configuración del ecualizador permite realzar los detalles
y producir, en conjunto, un sonido natural.
Mayor amplitud estereofónica para aumentar la separación entre las fuentes sonoras, con ecualización para mejorar aún más la definición mediante la reducción de las frecuencias que impiden
distinguir claramente el sonido de cada instrumento.
Banda
Parámetros de grabación
① Estado del dispositivo
Muestra el nombre del micrófono para indicar que la aplicación
ShurePlus MOTIV ha reconocido el micrófono conectado.
② Pantalla de funciones avanzadas
Muestra los iconos de las funciones avanzadas que están activadas.
③ Pantalla de grabación
Muestra la forma de onda sonora durante la grabación.
④ Selección de frecuencia de muestreo y profundidad de bits
Despliegue el menú y seleccione una frecuencia de muestreo y una
profundidad de bits.
34
Parámetros de grabación
⑤ Detalles de grabación
El lado izquierdo muestra las propiedades del archivo grabado, como
el nombre y el tamaño del archivo. El lado derecho muestra el tiempo
de grabación restante.
⑥ Botón de grabación/pausa
Es un botón grande que activa la función de grabación o pausa.
Nota: El tamaño máximo de archivo para una grabación es de 2 GB, lo
que equivale aproximadamente a 2 horas de grabación. Esta limitación
existe para optimizar al máximo el rendimiento de la aplicación. La
grabación a una frecuencia de muestreo más baja proporciona más tiempo de grabación no interrumpida.
Page 35

Configuración de audio avanzada
Para visualizar el menú de opciones avanzadas para la configuración del audio, use la barra desplegable que está ubicada debajo del medidor de entrada en la aplicación ShurePlus MOTIV para iPhone. Utilice el botón Avanzada para visualizar los ajustes de audio cuando utilice la versión para iPad.
Selección de patrón polar (parámetros estereofónicos y monofónicos)
Los siguientes parámetros controlan la actividad de la cápsula del micrófono. Cuando esté activado el modo monofónico, no se podrá ajustar la amplitud estereofónica.
Estereofónico Frontal = Encendido
Monofónico de cardioide Frontal = Encendido
Laterales = Encendidos
Laterales = Apagados
Monofónico bidireccional Frontal = Apagado
Raw Mid-Side Consulte la descripción completa para
Laterales = Encendidos
obtener información sobre la salida y
el procesamiento.
Salida Raw Mid-Side
Para obtener mayor flexibilidad de posprocesamiento, utilice el parámetro Raw Mid-Side. Esta configuración emite una señal de 2 canales con una imagen estereofónica que se puede ajustar, incluso después de haber grabado las pistas:
Izquierda: Cardioide (frontal)
Derecha: Bidireccional (laterales)
El parámetro Raw Mid-Side solo debería utilizarse con aplicaciones de grabación de audio que empleen un decodificador de matriz estereofónica medio-lateral (Mid-Side) para interpretar las pistas grabadas como imágenes estereofónicas.
35
Page 36

Decodificación manual y ajuste de amplitud estereofónica
Estándar
Intercambio activado
Si el software de su equipo de audio digital (DAW) no posee un decodificador de tipo Mid-Side, siga estos pasos para crear una imagen estereofónica
precisa:
1. Extraiga las señales de audio izquierda y derecha del archivo Raw Mid-Side de 2 canales como pistas monofónicas individuales.
2. Cree 3 pistas de audio en blanco:
Primera pista Utilice la señal de audio (frontal/cardioide) del canal izquierdo únicamente como
Segunda pista Utilice la señal de audio (lateral/bidireccional) del canal derecho únicamente
Tercera pista Copie la señal lateral/bidireccional de la segunda pista. Desplace esta pista com-
3. Asigne el mismo volumen a todas las pistas de las señales laterales para poder ajustarlas simultáneamente. Si sube el volumen de las pistas de señales laterales, se incrementará la amplitud estereofónica; si baja el volumen, se reducirá la amplitud.
Sugerencia avanzada: El uso de la compresión con un parámetro de ataque rápido en las pistas de señales laterales mantiene los picos transitorios
(la primera parte de un sonido; por ejemplo, cuando una baqueta golpea un platillo) hacia el centro de la imagen estereofónica, y les permite expandirse
dentro del campo estereofónico a medida que disminuye la intensidad del sonido.
Decodificación manual del audio Raw Mid-Side (medio-lateral, sin procesar)
pista monofónica, desplazada hacia el centro.
como pista monofónica, desplazada completamente hacia la izquierda.
pletamente hacia la derecha e invierta la fase.
Reducción del ruido del viento
Esta función activa un filtro de corte por baja frecuencia que reduce la reverberación producida por
el ruido ambiente. Use el paraviento de espuma incluido, junto con la función de reducción del ruido
del viento, para contrarrestar la reverberación y los sonidos oclusivos (pequeñas explosiones de aire
que golpean el micrófono).
Para reducir aún más el ruido del viento, utilice el paraviento tipo Windjammer Rycote™ opcional,
que puede colocarse sobre el paraviento de espuma incluido.
Intercambio de los canales izquierdo y derecho
Durante una grabación en modo estereofónico, esta función permite intercambiar los canales de audio izquierdo y derecho para que la imagen estereofónica coincida perfectamente con el video. Este
podría ser un procedimiento necesario en determinadas posiciones del teléfono o la tableta, en las
que el micrófono está invertido.
Sugerencia: Observe los indicadores L (izquierda) y R (derecha) en el tubo del micrófono para de-
terminar si es necesario intercambiar los canales.
En este ejemplo, el intercambio de los canales
izquierdo y derecho debería activarse al girar el
teléfono:
Ecualizador, limitador y compresor
La ventana de funciones avanzadas permite ajustar con precisión los parámetros del ecualizador, limitador y compresor. Desplácese por los modos
preajustados para escuchar los cambios en el procesamiento de señales digitales (DSP), y realice los ajustes necesarios para obtener el sonido
deseado.
Nota: Los ajustes predeterminados no incluyen el parámetro de ecualización. El usuario solo podrá seleccionar otras opciones de ecualización en la
ventana de configuración de funciones avanzas.
36
Page 37

Localización de averías
Problema Solución
La luz LED no está visible. El LED está ubicado en la base del MV88. Dado que el conector Lightning le permite insertar el
La señal de audio es mala. Observe la esquina superior izquierda de la aplicación para comprobar que el MV88 esté bien
La calidad del audio cambia
cuando se conecta un micrófono de diadema.
La señal de audio se
distorsiona.
Los canales estereofónicos
izquierdo/derecho no coinciden con el video.
El MV88 está enchufado,
pero el vúmetro no registra
ninguna señal.
micrófono en cualquier dirección, es posible que el teléfono esté ocultando el LED. Retire el micrófono, voltéelo y vuelva a insertarlo para controlar su estado.
enchufado y haya sido reconocido. El audio puede provenir del micrófono incorporado.
Los micrófonos de diadema anulan el MV88 como dispositivo de audio. Utilice el cable adapta-
dor incluido para monitoreo en auriculares a fin de evitar interferencias de otros micrófonos.
Utilice el medidor de audio para comprobar que los picos de volumen se encuentren en el intervalo deseado. Si el nivel alcanza el indicador de pico rojo del medidor de entrada, disminuya la
ganancia.
Según la orientación del dispositivo iOS, posiblemente sea necesario activar el intercambio de
los canales izquierdo y derecho. Si el audio ya está grabado, se podrá realizar fácilmente el intercambio de los canales izquierdo y derecho en la mayoría de los programas de software de los
DAW y de edición de audio.
Edite la configuración de privacidad del dispositivo iOS en SETTINGS > PRIVACY > MICROPHONE
para que la aplicación ShurePlus MOTIV pueda acceder al uso del micrófono.
Frecuencia de muestreo y profundidad
de bits
Los parámetros de frecuencia de muestreo y profundidad de bits se hallan
en un menú desplegable en el panel de control de audio o de sonido de
su computadora. Estas variables pueden ajustarse según sus necesidades. Seleccione una frecuencia más baja para grabaciones de podcast,
cuando es importante tener un archivo pequeño para facilitar descargarlo.
Seleccione una frecuencia de muestreo más alta para captar música y
otras grabaciones dinámicas.
Sugerencia: Utilice una frecuencia de muestreo más alta al grabar y
luego genere una mezcla en M4A para obtener un archivo con la mejor
calidad sonora y un tamaño manejable.
Sugerencias para usuarios de PC: Asegúrese de que los parámetros
de frecuencia de muestreo y profundidad de bits del micrófono, que se
encuentran en el panel de control de sonido de la computadora, coincidan
con la frecuencia de muestreo y la profundidad de bits seleccionadas en
el software.
Requisitos del sistema y compatibilidad
iOS • iOS 8.0 y posteriores
iPhone • iPhone 5
• iPhone 5c
• iPhone 5s
• iPhone 6
• iPhone 6 Plus
iPod Touch • 5a gen
iPad • iPad 4a gen
• iPad Air
• iPad Air 2
iPad Mini • iPad Mini 1a gen
• iPad Mini 2a gen
• iPad Mini 3a gen
Especificaciones
Certificado por MFi
Sí
Modos DSP (preajustados)
Voz/Canto/Acústico/Intenso/Uniforme
Tipo de transductor
Cardioide (10 mm)/Cápsula de condensador bidireccional (10 mm)
Patrón polar
Amplitud estereofónica ajustable/Monofónico bidireccional/Monofónico de cardioide/Mid-Side
Principio estéreo
Mid-Side
Profundidad de bits
16 bits/24 bits
Frecuencia de muestreo
44,1/48 kHz
Respuesta de frecuencia
20 Hz a 20,000 Hz
Gama de ajuste de ganancia
0 a +36 dB
Sensibilidad
-37 dBFS/Pa a 1 kHz [1] [2]
Nivel de presión acústica (SPL) máx.
120 dB SPL [2]
Limitador
Sí
Compresor
Sí
Ecualizador.
5 bandas
Requisitos de alimentación
Alimentado por conector Lightning
Caja
Fabricación totalmente metálica
Peso neto
40,5 g (1,43oz)
Dimensiones
67 x 25 x 35 mm Al x an x pr
[1] 1 Pa=94 dB SPL
[2]Con ganancia mínima y modo uniforme
37
Page 38

Accesorios
Accesorios suministrados
Paravientos de espuma para MV88 AMV88-WS
Estuche para transporte de MV88 AMV88-CC
Piezas de repuesto
Paravientos de espuma para MV88 AMV88-WS
Estuche para transporte de MV88 AMV88-CC
Cable adaptador para monitoreo con auriculares 95A13511
Accesorios opcionales
Windjammer de Rycote para MV88 AMV88-FUR
Certificaciones
Información para el usuario
Este equipo ha sido probado y hallado en cumplimiento con los límites establecidos para un dispositivo digital categoría B, según la Parte 15 de las
normas de la FCC. Estos límites han sido diseñados para proporcionar una protección razonable contra las interferencias perjudiciales en instalaciones
residenciales. Este equipo genera, utiliza y puede irradiar energía de radiofrecuencia y, si no se instala y utiliza de acuerdo con las instrucciones, puede
causar interferencias perjudiciales a las comunicaciones de radio. Sin embargo, no se garantiza que no ocurrirán interferencias en una instalación
particular. Si este equipo causara interferencias perjudiciales a la recepción de radio o televisión, que se puede determinar apagando y encendiendo el
equipo, se recomienda tratar de corregir la interferencia realizando una de las siguientes acciones:
• Cambie la orientación o la ubicación de la antena receptora.
• Aumente la distancia entre el equipo y el receptor.
• Conecte el equipo a un tomacorriente de un circuito diferente al que está conectado el receptor.
• Consulte al concesionario o a un técnico de radio/TV con experiencia para recibir ayuda.
Etiqueta de cumplimiento con ICES-003 de Industry Canada: CAN ICES-3 (B)/NMB-3(B)
Nota: Las pruebas se basan en el uso de los tipos de cables suministrados y recomendados. El uso de tipos de cable distintos de los blindados (con
malla) puede degradar el rendimiento EMC.
Este producto cumple los requisitos esenciales de las directrices europeas pertinentes y califica para llevar el distintivo CE.
La declaración de homologación de CE se puede obtener en: www.shure.com/europe/compliance
Representante europeo autorizado:
Shure Europe GmbH
Casa matriz en Europa, Medio Oriente y Africa
Departamento: Aprobación para región de EMEA
Jakob-Dieffenbacher-Str. 12
75031 Eppingen, Alemania
Teléfono: 49-7262-92 49 0
Fax: 49-7262-92 49 11 4
Email: info@shure.de
Los términos "Made for iPod", "Made for iPhone" y "Made for iPad" indican que un accesorio electrónico ha sido diseñado para conectarse con iPod,
iPhone o iPad, respectivamente, y que cumple con las normas de rendimiento de Apple, según consta en la certificación del desarrollador. Apple no es
responsable del funcionamiento de este dispositivo ni de su conformidad con las normas de seguridad y reguladoras. Tenga en cuenta que el uso de
este accesorio con iPod, iPhone o iPad podría afectar el desempeño inalámbrico.
iPad, iPhone, iPod, iPod classic, iPod nano, iPod touch y Retina son marcas comerciales de Apple Inc. registradas en EE. UU. y en otros países. iPad
Air y iPad mini son marcas comerciales de Apple Inc. La marca comercial "iPhone" se utiliza bajo una licencia de Aiphone K.K.
Mac® y Lightning® son marcas comerciales registradas de Apple Inc.
38
Page 39

Microfono stereo a condensatore Mid-Side per iOS
MV88
L'unità Shure MV88 è un microfono a condensatore di qualità professionale che si inserisce direttamente in un dispositivo Apple iOS utilizzando un
connettore Lightning®. Due capsule microfoniche sono disposte in configurazione Mid-Side per fornire un'immagine stereo regolabile, adatta a captare
un'ampia varietà di sorgenti, inclusi musica e parlato. L'app ShurePlus® MOTIV consente agli utenti di personalizzare il suono attraverso la selezione di
modalità preimpostate di elaborazione dei segnali digitali (DSP), la regolazione del guadagno e il controllo dell'ampiezza stereo.
Caratteristiche
Un microfono stereo Mid-Side
La tecnica microfonica stereo mid-side tradizionale utilizza due capsule coincidenti: una cardioide rivolta direttamente verso la sorgente e l'altra bidirezionale, orientata verso i lati. Questa configurazione consente all'utente di regolare l'ampiezza stereo e garantisce un'ottima compatibilità monofonica.
Funzionamento plug-and-play
L'MV88 è compatibile con qualsiasi dispositivo iOS dotato di connettore Lightning. L'app ShurePlus MOTIV gratuita offre controlli flessibili per adattare il
suono praticamente a qualsiasi ambiente.
Compatto e di lunga durata
L'MV88 presenta una struttura leggera, interamente metallica, ed è sufficientemente compatto da poter essere trasportato ovunque. Come tutti i prodotti
Shure, l'MV88 è stato sottoposto a rigorosi test di qualità per assicurarne l'affidabilità sul campo.
Flessibilità di controllo grazie all'app ShurePlus MOTIV
L'app ShurePlus MOTIV controlla impostazioni del microfono quali guadagno, ampiezza stereo e modalità preimpostate e può fungere da app di
registrazione.
Installazione rapida
L’MV88 è compatibile con i dispositivi mobili dotati di connettore Lightning.
1. Inserite il microfono nel connettore Lightning sul dispositivo iOS.
Il LED sulla base dell’MV88 si accende quando un’applicazione audio o l’app di registrazione ShurePlus MOTIV è aperta e seleziona l’MV88.
Nota: il connettore Lightning reversibile consente di installare l’MV88 in qualsiasi orientamento.
2. Installate e aprite l’app ShurePlus MOTIV.
ShurePlus MOTIV controlla il microfono e fornisce la registrazione istantanea.
3. Controllate l’audio e regolate le impostazioni con l’app ShurePlus MOTIV affinché rientrino nelle impostazioni dell’MV88.
Selezionate una modalità preimpostata o regolate manualmente guadagno del microfono e ampiezza stereo per ottimizzare le registrazioni audio.
Per maggiori informazioni su altre impostazioni audio come compressione, equalizzazione e altre ancora, consultate l’argomento “Impostazioni audio
avanzate”.
4. Impostate il vostro dispositivo su Modalità aereo e Non disturbare prima di registrare.
Questo permette la registrazione audio senza interruzioni a causa di chiamate in entrata o delle notifiche delle applicazioni.
5. Utilizzate l’app ShurePlus MOTIV integrata o un’app di registrazione di terzi per iniziare la registrazione.
Il microfono mantiene tutte le impostazioni dell’app ShurePlus MOTIV. Durante la registrazione è possibile eseguire regolazioni, tuttavia, per evitare
artefatti udibili, testate le impostazioni prima della registrazione.
39
Page 40

Costruzione del microfono MV88
Centro (cardioide)
Sinistra
Destra
L'MV88 presenta due capsule: una con diagramma a cardioide, che riprende il suono direttamente davanti al microfono. L'altra è bidirezionale e capta il
suono dai lati sinistro e destro.
Capsula microfonica
Regolazione del microfono
Per registrazioni stereo precise in qualsiasi posizione, orientate la parte anteriore del microfono verso la sorgente sonora, con i lati rivolti verso la direzione appropriata. Utilizzate gli indicatori L e R sull'asta del microfono per assicurare il corretto posizionamento.
Nota: la funzione di scambio dei canali sinistro/destro consente di invertire l'orientamento del microfono se è necessario lo scambio.
40
Regolazione della posizione del microfono
Il microfono è montato su un supporto snodabile e la capsula può essere ruotata di 90 gradi per ottenere il posizionamento desiderato.
Page 41

Orientamento del microfono
Questa sezione suggerisce le collocazioni del microfono per casi di utilizzo
tipici. Tenete presente che esistono molti modi efficaci per registrare una
data sorgente. Fate delle prove per individuare la collocazione del microfono e le impostazioni migliori.
Suggerimento: per assicurare immediatamente l'orientamento stereo corretto del microfono, controllate se il nome Shure è chiaramente visibile sulla sommità del microfono. Se il nome non è visibile, ruotate l'asta di 90°.
Registrazione audio
Il telefono o il tablet può essere utilizzato in qualsiasi posizione. Orientate
la parte anteriore del microfono verso la sorgente, con i lati sinistro e destro rivolti nella direzione appropriata.
Ritratto (verticale)
Orientate la parte anteriore del microfono verso la sorgente. Il microfono
può essere montato in entrambi gli orientamenti dell'MV88 con il connettore Lightning, pertanto verificate che i lati sinistro e destro siano rivolti
verso la direzione appropriata.
Intervista audio (da tavolo)
Collocate il dispositivo di registrazione su una superficie piana con un
lato del microfono rivolto verso il soggetto e l'altro verso l'intervistatore.
Selezionate la preimpostazione MONO BIDIRECTIONAL nell'app ShurePlus
MOTIV.
Intervista video
Per captare le voci sia del soggetto (dentro l'inquadratura) sia dell'intervistatore (fuori dall'inquadratura), selezionate la preimpostazione
MONO BIDIRECTIONAL nell'app ShurePlus MOTIV. Posizionate il microfono
con i lati sinistro e destro rivolti verso ogni persona.
Paesaggio (orizzontale)
Orientate la parte anteriore del microfono verso la sorgente. Il microfono
può essere fissato in entrambi gli orientamenti con il connettore Lightning,
pertanto verificate che i lati sinistro e destro dell'MV88 siano rivolti verso la
direzione appropriata.
Autoregistrazione (voce)
Collocate il dispositivo su una superficie piana e angolate il microfono
verso la bocca. Selezionate la preimpostazione MONO CARDIOID nell'app
ShurePlus MOTIV per ridurre il rumore ambientale.
41
Page 42

100%9:41 AM
L
R
-48 -18 -12 -3 0 dB
RL
Shure MV88
EQ
MV88 Settings
Help
Mic Gain 5.5 dB
L R
Stereo Width
45°
L R
Utilizzo delle cuffie
Cavo adattatore del controllo in cuffia
Utilizzate il cavo adattatore del controllo in cuffia, fornito in dotazione, per i seguenti motivi:
• È necessario un collegamento più sottile con l'ingresso cuffia sul dispositivo di registrazione. Il cavo è compatibile con cuffie dotate di connettori più
grandi.
• Desiderate disattivare il microfono in linea sugli auricolari. Il cavo assicura che il suono registrato provenga unicamente dall'MV88 e non dal microfono
in linea degli auricolari.
L'app ShurePlus MOTIV
L'app ShurePlus MOTIV controlla le impostazioni del microfono per ottimizzare le prestazioni in condizioni di utilizzo specifiche.
Suggerimento: impostate il dispositivo su modalità Aereo e Non disturbare per evitare interruzioni alla registrazione causate da telefonate, messaggi di
testo o avvisi.
Regolazione del microfono
① Menu
Selezionate il menu per accedere alla finestra di registrazione, alle
registrazioni salvate, alle impostazioni dell'MV88 e alle finestre delle
preferenze.
Impostazioni del microfono
② Misuratore di ingresso
Visualizza la potenza del segnale di ingresso. I picchi a volume
più alto devono rientrare nella gamma prevista (indicata dall'area
ombreggiata).
③ Funzioni avanzate
Utilizzate la barra di scorrimento per visualizzare le funzioni audio
avanzate tra cui selezione cartucce, riduzione del rumore del vento,
scambio canale sinistro-destro e i controlli equalizzatore, limitatore e
compressore.
42
④ Modalità preimpostate
Selezionate la modalità per impostare ampiezza stereo,
equalizzazione e compressione per applicazioni specifiche. Per
ulteriori dettagli, consultate l'argomento "Modalità preimpostate".
⑤ Guadagno del microfono
Regolate in funzione del volume della sorgente sonora. Controllate
il misuratore durante le regolazioni per verificare che i livelli rientrino
nella gamma prevista (indicata dall'area ombreggiata del misuratore di
ingresso).
⑥ Ampiezza stereo
Consente di regolare l'ampiezza dell'area di ripresa.
Suggerimento: durante la regolazione, considerate la posizione del microfono
e le dimensioni della sorgente sonora. Ad esempio, per la registrazione di un'orchestra o un ensemble di grandi dimensioni, è consigliabile un'ampia immagine
stereo per ottenere una separazione più precisa dei vari strumenti. Altre applicazioni, come il parlato, richiedono un'ampiezza più limitata per migliorare la nitidezza
e assicurare la reiezione del suono (rumore) ambientale.
Page 43

Modalità preimpostate
L
R
00:00 00:01 00:02 00:03 00:04 00:05
24/48 KHz
100%9:41 AM
Record
Mic Gain
5.5 dB
New Recording 1
0.00 MB
Time Left
about 2 hours 5 min
00:00
Shure MV88
RL
L
R
-48 -18 -12 -3 0 dB
100%9:41 AM
Record
Mic Gain
5.5 dB
L
R
00:00 00:01 00:02 00:03 00:04 00:05
New Recording 1
0.92 MB
Time Left
about 25 min
00:01.43
Done
Recordings
Shure MV88
RL
24/48 KHz
L
R
-48 -18 -12 -3 0 dB
Cinque modalità selezionabili ottimizzano le impostazioni di guadagno, ampiezza stereo, equalizzazione e compressione per soddisfare le vostre esigenze di registrazione. Impostate il livello del microfono e scorrete le modalità per trovare l'impostazione con il suono migliore. Quindi, regolate il livello
se necessario.
Modalità Applicazione Caratteristiche
Ideale per captare il
parlato
L'ampiezza stereo limitata assicura la reiezione del rumore di fondo, l'equalizzazione enfatizza
nitidezza e ampiezza e la tenue compressione mantiene uniformi i livelli.
Parlato
Canto
Piatta
Da utilizzare per captare
esecuzioni vocali di solisti
o gruppi
Adatta a qualsiasi
applicazione
L'ampiezza stereo di livello medio con una lieve equalizzazione aggiunge ricchezza e nitidezza e
produce un suono naturale.
Un segnale totalmente privo di elaborazione (non viene utilizzata alcuna impostazione di
equalizzazione o compressione). Aggiunge flessibilità durante l'elaborazione dell'audio dopo la
registrazione.
Acustica
Adatta per applicazioni
con strumenti acustici e
musica a basso volume
Da utilizzare per registrare
gruppi musicali e sorgenti
a volumi più alti
L'ampiezza stereo di livello medio e la compressione limpida uniforma i picchi di volume e porta
in primo piano i passaggi con volume più basso. L'impostazione dell'equalizzatore enfatizza i dettagli e produce un suono complessivo naturale.
L'estesa ampiezza stereo aumenta la separazione tra le sorgenti e l'equalizzazione migliora ulteriormente la definizione riducendo le frequenze che possono rendere "affollato" il suono della
strumentazione.
Banda
Impostazioni di registrazione
① Stato del dispositivo
Visualizza il nome del microfono per indicare che l’app ShurePlus
MOTIV ha riconosciuto il microfono collegato.
Impostazioni di registrazione
② Visualizzazione delle funzioni avanzate
Visualizza le icone delle funzioni avanzate attualmente attivate.
③ Visualizzazione della registrazione
Visualizza la forma d’onda del suono durante la registrazione.
④ Selezione frequenza di campionamento e profondità di bit
Consente di visualizzare l’elenco a discesa e di selezionare una
frequenza di campionamento e una profondità di bit.
⑤ Dettagli di registrazione
Il lato sinistro visualizza le proprietà del file registrato, come nome e
dimensioni del file. Il lato destro visualizza il tempo di registrazione
restante.
⑥ Pulsante di registrazione/messa in pausa
Un ampio pulsante per avviare e mettere in pausa la registrazione.
Nota: La dimensione massima del file è di 2 GB a registrazione (circa
2 ore di registrazione). Questo limite è stato applicato per ottimizzare le
prestazioni dell’app. La registrazione a una frequenza di campionamento
più bassa permette un tempo di registrazione continuata più lungo.
43
Page 44

Impostazioni audio avanzate
Per visualizzare il menu delle impostazioni audio avanzate, utilizzate la barra a discesa situata sotto il misuratore di ingresso nell’app ShurePlus MOTIV
per iPhone. Utilizzate il pulsante Avanzate per visualizzare il menu delle impostazioni audio avanzate quando usate la versione per iPad.
Selezione del diagramma polare (impostazioni stereo e mono)
Le impostazioni indicate di seguito controllano l’attività delle capsule microfoniche. In modalità di funzionamento mono, l’ampiezza stereo non è
regolabile.
Stereofonia Parte anteriore = attivata
Cardioide mono Parte anteriore = attivata
Lati = attivati
Lati = disattivati
Bidirezionale mono Parte anteriore = disattivata
Modalità Mid-Side non
elaborata
Lati = attivati
Consultate la descrizione completa per informazioni sull’uscita e
sull’elaborazione.
Uscita Mid-Side non elaborata
Per migliorare la flessibilità post-elaborazione, utilizzate l'impostazione Raw Mid-Side. Fornisce un segnale a 2 canali con un'immagine stereo che può
essere regolata anche dopo la registrazione dei brani:
Sinistra: cardioide (parte anteriore)
Destra: bidirezionale (lati)
L'impostazione Raw Mid-Side è destinata a essere utilizzata solo con applicazioni di registrazione audio, dotate di decoder a matrice stereo mid-side per
l'interpretazione dei brani registrati come immagine stereo.
44
Page 45

Decodifica e regolazione ampiezza stereo manuale
Standard
Scambio attivato
Se il software della workstation audio digitale (DAW) in uso non dispone di decoder mid-side, seguite questi passaggi per creare un'immagine stereo
precisa:
1. Estraete i segnali audio sinistro e destro dal file Raw Mid-Side a 2 canali, come singoli brani mono.
2. Create 3 brani audio vuoti:
Primo brano Utilizzate il segnale audio (parte anteriore/cardioide) estratto solo dal canale
Secondo brano Utilizzate il segnale audio (laterale/bidirezionale) estratto solo dal canale destro
Terzo brano Copiate il segnale laterale/bidirezionale dal secondo brano. Spostate questo bra-
3. Raggruppate i brani laterali sullo stesso livello del volume, in modo da poterli regolare contemporaneamente. Aumentando
il volume dei brani laterali, aumenta l'ampiezza stereo, mentre diminuendo il volume, l'ampiezza si restringe.
Suggerimento avanzato: l'utilizzo della compressione con un'impostazione di attacco rapido sui canali laterali mantiene i transienti (ovvero la prima
parte di un suono, come quando una bacchetta della batteria percuote un piatto) verso il centro dell'immagine stereo, consentendo agli stessi di espandersi all'interno del campo stereo mentre il suono decade.
sinistro come brano mono, spostato verso il centro.
come brano mono, spostato completamente verso sinistra.
no completamente verso destra e invertite la fase.
Decodifica manuale dell'audio mid-side non elaborato
Riduzione del rumore del vento
Questa funzione attiva un filtro con frequenza di taglio alle basse frequenze che riduce il rumore ambientale di fondo. Utilizzate l'antivento in schiuma poliuretanica, fornito in dotazione, in combinazione
con la riduzione del rumore del vento per rimediare ai rumori di fondo e a quelli provocati dalla pronuncia di consonanti esplosive (intense emissioni d'aria che colpiscono il microfono).
Per ridurre ulteriormente il rumore del vento, utilizzate il windjammer Rycote™ opzionale, che si colloca sopra l'antivento fornito in dotazione.
Scambio dei canali sinistro-destro
Durante la registrazione in modalità stereo, questa funzione scambia i canali audio sinistro e destro
per far corrispondere esattamente l'immagine stereo al video. Questa operazione può essere necessaria per alcuni telefoni/tablet in cui la posizione del microfono è invertita.
Suggerimento: esaminate gli indicatori L e R sull'asta del microfono per stabilire se lo scambio è
necessario.
In questo esempio, lo scambio sinistro/destro
deve essere attivato quando si ruota il telefono:
Equalizzatore, limitatore e compressore
La finestra delle funzioni avanzate consente di ottimizzare le impostazioni di equalizzatore, limitatore e compressore. Scorrete le modalità preimpostate
per sentire le variazioni del DSP e regolate il suono.
Nota: l'equalizzazione che rientra nelle preimpostazioni non viene visualizzata. Nella finestra delle impostazioni delle funzioni avanzate viene visualizzata solo l'equalizzazione aggiuntiva selezionabile dall'utente.
45
Page 46

Soluzione dei problemi
Problema Soluzione
La luce del LED non è
visibile
L'audio suona male Controllate nell'angolo in alto a sinistra dell'applicazione che l'MV88 sia completamente inserito e
La qualità dell'audio varia
quando viene inserita una
cuffia
L'audio è distorto Utilizzate il misuratore audio per assicurarvi che i picchi del volume rientrino nella gamma pre-
I canali stereo sinistro/destro
non corrispondono al video
L'MV88 è inserito, ma il
misuratore del volume non
registra alcun segnale.
Il LED si trova sulla base dell'MV88. Poiché il connettore Lightning consente di inserire il microfono in uno dei due orientamenti, è possibile il telefono stia oscurando il LED. Rimuovete il microfono, ruotatelo e reinseritelo per controllare lo stato del microfono.
sia stato riconosciuto L'audio potrebbe provenire dal microfono incorporato.
Le cuffie con microfoni escludono l'MV88 come dispositivo audio. Utilizzate il cavo adattatore del
controllo in cuffia per disattivare le interferenze dovute ad altri microfoni.
vista. Se il livello raggiunge l'indicatore di picco rosso del misuratore di ingresso, abbassate il
guadagno.
A seconda dell'orientamento del dispositivo iOS, potrebbe essere necessario attivare lo scambio
sinistro-destro. Se l'audio è già stato registrato, lo scambio dei canali sinistro e destro può essere
realizzato facilmente nella maggior parte dei software di editing audio e DAW.
Modificate l'impostazione della privacy del dispositivo iOS in SETTINGS > PRIVACY > MICROPHONE
per concedere all'app ShurePlus MOTIV l'autorizzazione a utilizzare il microfono.
Frequenza di campionamento e
profondità di bit
Le impostazioni di frequenza di campionamento e di attenuazione bit
sono disponibili in un menu a discesa nel pannello di controllo dell'audio o del suono sul computer in uso. Potete regolare queste variabili in
modo da soddisfare le vostre esigenze. Selezionate una frequenza di
campionamento più bassa per registrazioni podcast, nelle quali è importante disporre di file di dimensioni ridotte per facilitarne lo scaricamento.
Selezionate una frequenza di campionamento più alta per la musica e per
ottenere registrazioni con maggiore dinamica.
Suggerimento: registrate a una frequenza di campionamento più alta e
riducete al formato mp3 per ottenere un file di dimensioni gestibili con una
qualità sonora più elevata.
Suggerimento per gli utenti del PC: assicuratevi che le impostazioni del
microfono relative a frequenza di campionamento e numero di bit, indicate
nel pannello di controllo del suono del computer, corrispondano ai rispettivi valori selezionati nel software in uso.
Requisiti di sistema e compatibilità
iOS • iOS 8.0 e versioni successive
iPhone • iPhone 5
• iPhone 5c
• iPhone 5s
• iPhone 6
• iPhone 6 Plus
iPod Touch • di quinta generazione
iPad • iPad quarta generazione
• iPad Air
• iPad Air 2
iPad Mini • iPad Mini prima generazione
• iPad Mini seconda generazione
• iPad Mini terza generazione
Specifiche tecniche
Con certificazione MFi
Sì
Modalità DSP (preimpostate)
Parlato/Canto/Acustica/Alto volume/Piatta
Tipo di trasduttore
Cardioide (10 mm)/Capsula a condensatore bidirezionale (10 mm)
Diagramma polare
Stereo ad ampiezza regolabile/Bidirezionale mono/Cardioide mono/Mid-Side
Principio stereo
Mid-Side
Attenuazione bit
16-bit/24-bit
Frequenza di campionamento
44,1/48 kHz
Risposta in frequenza
20 Hz - 20,000 Hz
Intervallo guadagno regolabile
0 - +36 dB
Sensibilità
-37 dBFS/Pa ad 1 kHz [1] [2]
Livello di pressione sonora (SPL) massimo
120 dB di SPL [2]
Limitatore
Sì
Compressore
Sì
Equalizzatore
A 5 bande
Alimentazione
Alimentato tramite connettore Lightning
Alloggiamento
Costruzione interamente in metallo
Peso netto
40,5 g (1,43once)
Dimensioni
67 x 25 x 35 mm A x L x P
[1] 1 Pa=94 dB di SPL
[2]Con guadagno minimo, modalità piatta
46
Page 47

Accessori
Accessori in dotazione
Antivento in schiuma poliuretanica per MV88 AMV88-WS
Custodia da trasporto per MV88 AMV88-CC
Parti di ricambio
Antivento in schiuma poliuretanica per MV88 AMV88-WS
Custodia da trasporto per MV88 AMV88-CC
Cavo adattatore del controllo in cuffia 95A13511
Accessori opzionali
Windjammer Rycote per MV88 AMV88-FUR
Omologazioni
Avviso per gli utenti
in base alle prove su di esso eseguite, si è determinata la conformità ai limiti relativi ai dispositivi digitali di Classe B, secondo la Parte 15 delle norme
FCC. Tali limiti sono stati concepiti per fornire una protezione adeguata da interferenze pericolose in ambiente domestico. Questo apparecchio genera,
utilizza e può irradiare energia a radiofrequenza e, se non installato ed utilizzato secondo le istruzioni, può causare interferenze dannose per le comunicazioni radio. Tuttavia, non esiste alcuna garanzia che, in una specifica installazione, non si verificheranno interferenze. Se questo apparecchio causasse interferenze dannose per la ricezione dei segnali radio o televisivi, determinabili spegnendolo e riaccendendolo, si consiglia di tentare di rimediare
all'interferenza tramite uno o più dei seguenti metodi:
• Modificate l'orientamento dell'antenna ricevente o spostatela.
• aumentate la distanza tra l'apparecchio ed il ricevitore;
• collegate l'apparecchio ad una presa inserita in un circuito diverso da quello a cui è collegato il ricevitore;
• Per qualsiasi problema rivolgetevi al rivenditore o ad un tecnico radio/TV qualificato.
Etichetta di conformità alla norma ICES-003 della IC in Canada: CAN ICES-3 (B)/NMB-3(B)
Nota: La verifica della conformità presuppone che vengano impiegati i cavi in dotazione e raccomandati. Utilizzando cavi non schermati si possono
compromettere le prestazioni relative alla compatibilità elettromagnetica.
Questo prodotto è conforme ai requisiti essenziali specificati nelle direttive pertinenti dell'Unione europea ed è contrassegnabile con la marcatura CE.
La Dichiarazione di conformità CE è reperibile sul sito: www.shure.com/europe/compliance
Rappresentante europeo autorizzato:
Shure Europe GmbH
Sede per Europa, Medio Oriente e Africa
Ufficio: EMEA Approval
Jakob-Dieffenbacher-Str. 12
75031 Eppingen, Germania
N. di telefono: 49-7262-92 49 0
Fax: 49-7262-92 49 11 4
E-mail: info@shure.de
Le diciture "Made for iPod", "Made for iPhone" e "Made for iPad" indicano che un accessorio elettronico è stato progettato in modo da collegarsi espressamente all'iPod, all'iPhone o all'iPad, rispettivamente e che è stato certificato dallo sviluppatore conforme alle norme sulle prestazioni Apple. Apple non
è responsabile del funzionamento di questo dispositivo né della sua conformità alle prescrizioni di sicurezza e alle normative. Tenete presente che l'utilizzo di questo accessorio con un dispositivo iPod, iPhone o iPad potrebbe incidere sulle prestazioni in modalità wireless.
iPad, iPhone, iPod, iPod classic, iPod nano, iPod touch e Retina sono marchi commerciali di Apple Inc., registrati negli Stati Uniti e in altri paesi. iPad Air
e iPad mini sono marchi commerciali di Apple Inc. Il marchio "iPhone" è utilizzato su licenza di Aiphone K.K.
Mac® e Lightning® sono marchi registrati di Apple Inc.
47
Page 48

Microfone de Condensador Estéreo de Captação Lateral (Mid-Side) para
iOS
MV88
O Shure MV88 é um microfone de condensador de qualidade profissional que é conectado diretamente ao dispositivo Apple iOS usando um conector
Lightning®. As duas cápsulas de microfone são arranjadas em uma configuração de captação lateral (Mid-Side) para proporcionar uma imagem estéreo
ajustável, adequada para capturar grande variedade de fontes, inclusive música e fala. O aplicativo ShurePlus® MOTIV permite aos usuários personalizar o som com um modo predefinido de processamento digital de sinal (DSP), ajuste do ganho e controle da largura do estéreo.
Recursos
Um Microfone Estéreo de Captação Lateral (Mid-Side)
A técnica clássica do microfone estéreo de captação lateral (mid-side) utiliza duas cápsulas coincidentes: uma cardioide apontada diretamente para a
fonte e uma bidirecional apontada para os lados. Essa configuração permite que o usuário ajuste a largura do estéreo e proporciona excelente compatibilidade de mono.
Operação Plug and Play
O MV88 é compatível com qualquer dispositivo iOS equipado com um conector Lightning. O aplicativo gratuito ShurePlus MOTIV proporciona controles
flexíveis para adaptar o som a virtualmente qualquer ambiente.
Compacto e Durável
O MV88, de construção totalmente metálica, é leve e pequeno o bastante para ser levado a qualquer lugar. Da mesma forma que todos os produtos
Shure, o MV88 passa por rigorosos testes de qualidade para garantir a confiabilidade no campo.
Controle Flexível Através do Aplicativo ShurePlus MOTIV
O aplicativo ShurePlus MOTIV controla configurações do microfone tais como ganho, largura do estéreo e modos predefinidos e pode operar como um
aplicativo de gravação.
Configuração Rápida
O MV88 é compatível com os dispositivos móveis que possuem um conector Lightning.
1. Conecte o microfone ao conector Lightning do dispositivo iOS.
O LED na base do MV88 acende quando um aplicativo de áudio ou o aplicativo de gravação ShurePlus MOTIV é aberto e seleciona o MV88.
Observação: O conector Lightning reversível permite que o MV88 seja instalado em qualquer orientação.
2. Instale e abra o aplicativo ShurePlus MOTIV.
O ShurePlus MOTIV controla o microfone e permite gravação instantânea.
3. Verifique o áudio e ajuste as configurações com o aplicativo ShurePlus MOTIV dentro das configurações do MV88.
Selecione um modo predefinido ou ajuste manualmente o ganho do microfone e a largura do estéreo para otimizar as gravações de áudio. Consulte
o tópico "Configurações de Áudio Avançadas" para obter mais informações sobre configurações de áudio adicionais como compressão, equalização
e mais.
4. Coloque seu dispositivo no Modo Avião e em Não Incomode antes de gravar.
Isso permite gravar áudio sem interrupções causadas por ligações telefônicas ou notificações de aplicativos.
5. Use o aplicativo ShurePlus MOTIV integrado ou um aplicativo de gravação de terceiros para começar a gravar.
O microfone mantém todas as configurações do aplicativo ShurePlus MOTIV. É possível fazer ajustes durante a gravação, mas para evitar erros
audíveis, teste as configurações antes de gravar.
48
Page 49

O Projeto do Microfone MV88
Central (Cardioide)
Esquerda
Direita
O MV88 contém duas cápsulas: uma cápsula possui padrão cardioide, que capta o som diretamente na frente do microfone. A outra é bidirecional e
captura o som dos lados esquerdo e direito.
Cápsula do microfone
Ajuste do Microfone
Para obter gravações estéreo precisas em qualquer posição, a parte dianteira do microfone deve ser apontada para a fonte sonora com os lados voltados para a orientação adequada. Use os indicadores L e R no barril do microfone para assegurar o posicionamento correto.
Observação: O recurso Inversão de Canal Esquerdo-Direito permite comutar a orientação no microfone se a inversão for necessária.
Ajuste da Posição do Microfone
O microfone gira, e o barril pode ser girado 90° para obter o posicionamento desejado.
49
Page 50

Direcionamento do Microfone
Esta seção sugere posições do microfone para casos de uso típicos.
Lembre-se de que há várias maneiras eficazes de gravar determinada
fonte. Teste o posicionamento e configurações do microfone para descobrir a melhor opção.
Dica: Para assegurar a orientação de estéreo correta do microfone com
uma olhada, verifique se o nome Shure está claramente visível na parte
superior do microfone. Se o nome não estiver visível, gire o barril 90°.
Gravação de Áudio
O fone ou tablet pode ser usado em qualquer posição. Aponte a parte dianteira do microfone para a fonte com os lados esquerdo e direito virados
para o sentido apropriado.
Retrato (Vertical)
Aponte a parte dianteira do microfone para a fonte. O microfone pode
ser montado em qualquer orientação do MV88 com o conector Lightning,
portanto certifique-se que os lados esquerdo e direito estão virados para o
sentido correto.
Áudio de Entrevista (Sobre uma Mesa)
Ponha o dispositivo de gravação sobre uma superfície plana com um lado
do microfone apontado para o sujeito e o outro apontado para o entrevistador. Selecione MONO BIDIRECTIONAL predefinido no aplicativo ShurePlus
MOTIV.
Vídeo de Entrevista
Para capturar as vozes de ambos, o sujeito (na câmera) e do entrevistador (fora da câmera), selecione o MONO BIDIRECTIONAL predefinido no
aplicativo ShurePlus MOTIV. Posicione o microfone com os lados esquerdo e direito virados para cada pessoa.
Paisagem (Horizontal)
Aponte a parte dianteira do microfone para a fonte. O microfone pode ser
conectado em qualquer orientação com conector Lightning, portanto certifique-se que os lados esquerdo e direito do MV88 estejam virados para o
sentido correto.
Auto-gravação (Voz)
Ponha o dispositivo sobre uma superfície plana e incline o microfone
para a sua boca. Selecione o MONO CARDIOID predefinido no aplicativo
ShurePlus MOTIV para reduzir o ruído ambiente.
50
Page 51

100%9:41 AM
L
R
-48 -18 -12 -3 0 dB
RL
Shure MV88
EQ
MV88 Settings
Help
Mic Gain 5.5 dB
L R
Stereo Width
45°
L R
Uso com Fones de Ouvido
Cabo Adaptador do Monitor do Fone de Ouvido
Use o cabo adaptador do monitor do fone de ouvido pelos seguintes motivos:
• Você precisa de uma conexão mais prática para a entrada de fone de ouvido no seu aparelho de gravação. O cabo acomoda fones de ouvido com
conectores maiores.
• Você deseja desativar o microfone em linha em seus fones de ouvido. O cabo assegura que o som gravado provém somente do MV88 e não do microfone em linha dos seus fones de ouvido.
O Aplicativo ShurePlus MOTIV
O aplicativo ShurePlus MOTIV controla as configurações do microfone para otimizar o desempenho em usos específicos.
Dica: Configure o dispositivo para Modo Avião e Não Incomode para evitar interrupções na gravação causadas por chamadas telefônicas, mensagens
de texto ou alertas.
Ajuste do Microfone
① Menu
Selecione o menu para acessar a janela de gravação, as gravações
salvas, as configurações do MV88 e as janelas de preferências
② Medidor de Entrada
Configurações do Microfone
Exibe a intensidade do sinal de entrada. Os picos mais altos devem
atingir a faixa alvo (indicada por uma região sombreada).
③ Recursos Avançados
Use a barra suspensa para exibir os recursos de áudio avançados
incluindo seleção da cápsula, redução do vento, inversão esquerdadireita e controles do equalizador, limitador e compressor.
④ Modos Predefinidos
Selecione seu modo para definir largura do estéreo, equalização e
compressão para aplicações específicas. Consulte o tópico "Modos
Predefinidos" para obter mais detalhes.
⑤ Ganho do Microfone
Ajuste para corresponder ao volume da fonte sonora. Monitore o
medidor ao fazer ajustes para assegurar que os níveis estejam na
faixa-alvo (indicada pela região sombreada no medidor de entrada).
⑥ Largura do Estéreo
Ajusta a largura da área de captação do microfone estéreo.
Dica: Considere a localização do microfone e o tamanho da fonte sonora ao ajustar a largura. Por exemplo, uma gravação de orquestra grande ou de grupos será
beneficiada por uma imagem de estéreo larga para obter maior separação entre
os instrumentos. Outras aplicações, como voz, serão beneficiadas por largura
estreita para obter maior clareza e rejeição do som ambiente (sala).
51
Page 52

Modos Predefinidos
L
R
00:00 00:01 00:02 00:03 00:04 00:05
24/48 KHz
100%9:41 AM
Record
Mic Gain
5.5 dB
New Recording 1
0.00 MB
Time Left
about 2 hours 5 min
00:00
Shure MV88
RL
L
R
-48 -18 -12 -3 0 dB
100%9:41 AM
Record
Mic Gain
5.5 dB
L
R
00:00 00:01 00:02 00:03 00:04 00:05
New Recording 1
0.92 MB
Time Left
about 25 min
00:01.43
Done
Recordings
Shure MV88
RL
24/48 KHz
L
R
-48 -18 -12 -3 0 dB
Cinco modos selecionáveis otimizam as configurações do ganho, largura do estéreo, equalização e compressão para atender às suas necessidades
de gravação. Ajuste o nível do microfone e navegue pelos modos para encontrar qual deles proporciona o melhor som. Em seguida, ajuste o nível se
necessário.
Modo Aplicação Características
Ideal para a captura de
voz
Uma largura de estéreo estreita para rejeitar o ruído de fundo, uma configuração de equalização
para enfatizar nitidez e volume, e compressão suave para manter os níveis consistentes.
Discursos
Canto
Flat
Acústico
Use para capturar apresentações vocais solo ou
de grupos
Adequado para qualquer
aplicação
Ideal para instrumentos
acústicos e aplicações
com música calma
Use ao gravar uma banda
e fontes altas
Largura de estéreo média com equalização sutil para enriquecer e aumentar a nitidez de um
som natural.
Um sinal não processado (nenhuma configuração de equalização ou compressão usada).
Aumenta a flexibilidade ao processar o áudio após a gravação.
Uma largura de estéreo média e compressão transparente para suavizar os picos de volume e
proporcionar passagens calmas. A configuração de equalizador destaca detalhes e proporciona
um som natural no todo.
Uma largura de estéreo ampla para aumentar a separação entre as fontes com equalização para
melhorar ainda mais a definição reduzindo as frequências que podem fazer a instrumentação
parecer congestionada.
Banda
Configurações de Gravação
① Status do Dispositivo
Exibe o nome do microfone para indicar que o aplicativo ShurePlus
MOTIV reconhece o microfone conectado.
Configurações de Gravação
② Mostrador de Recursos Avançados
Exibe os ícones dos recursos avançados atualmente ativos.
③ Mostrador de Gravação
Exibe a forma de onda do som durante a gravação.
④ Taxa de Amostragem e Intensidade de Bits
Puxe para baixo e selecione uma taxa de amostragem e intensidade
de bits
52
⑤ Detalhes da Gravação
O lado esquerdo exibe as propriedades do arquivo gravado, como o
nome e tamanho do arquivo. O lado direito exibe o tempo de gravação
restante.
⑥ Botão Gravar/Pausar
Um botão grande para ativar a gravação ou pausar.
Observação: O tamanho máximo de arquivo para uma gravação é de 2
GB, que resulta em aproximadamente 2 horas de gravação. Este limite
foi estabelecido para maximizar o desempenho do aplicativo. Gravar com
uma taxa de amostragem menor permite um tempo de gravação maior e
ininterrupto.
Page 53

Configurações de Áudio Avançadas
Para exibir o menu de configurações de áudio avançadas, use a barra suspensa localizada abaixo do medidor de entrada na tela do aplicativo
ShurePlus MOTIV para iPhone. Use o botão Avançado para exibir as configurações avançadas de áudio ao usar a versão para iPad.
Seleção de Padrão Polar (Configurações para Estéreo e Mono)
As seguintes configurações controlam a atividade da cápsula do microfone. Ao operar em um modo mono, a largura do estéreo não é ajustável.
Estéreo Dianteira = Ligado
Mono Cardioide Dianteira = Ligado
Lados = Ligados
Lados = Desligados
Mono Bidirecional Dianteira = Desligado
Mid-Side bruta Consulte a descrição completa para
Lados = Ligados
obter informações sobre a saída e o
processamento.
Saída da Captura Lateral (Mid-Side) Bruta
Para aumentar a flexibilidade após o processamento use a configuração Raw Mid-Side. Essa configuração libera um sinal de 2 canais com uma imagem estéreo que pode ser ajustada mesmo após a gravação das faixas:
Esquerda: Cardioide (dianteira)
Direita: Bidirecional (lados)
A configuração Raw Mid-Side destina-se somente ao uso com aplicativos de gravação de áudio que tenham decodificador de matriz estéreo de captura
lateral (mid-side) para interpretar as faixas gravadas como imagem estéreo.
53
Page 54

Decodificação Manual e Ajuste da Largura do Estéreo
Padrão
Inversão ativada
Se o software da estação de trabalho de áudio digital (DAW) não tiver decodificador de captura lateral (mid-side), utilize estas etapas para criar uma
imagem estéreo precisa:
1. Extraia os sinais de áudio esquerdo e direito do arquivo Raw Mid-Side de 2 canais como faixas mono individuais.
2. Crie 3 faixas de áudio em branco:
Primeira faixa Use o sinal de áudio (dianteiro/cardioide) do canal esquerdo somente como
Segunda faixa Use o sinal de áudio (lado/bidirecional) do canal direito somente como uma
Terceira faixa Copie o sinal do lado/bidirecional da segunda faixa. Gire totalmente essa faixa
3. Agrupe as faixas dos lados com o mesmo nível de volume para que possam ser ajustadas simultaneamente. Aumentar
o volume das faixas dos lados aumenta a largura do estéreo e diminuir seus volumes estreita a largura.
Dica avançada: Usando compressão com uma configuração de ataque rápido em um lado mantém os transientes (a primeira parte de um som, como o
observado quando a baqueta de bateria bate em um prato) na direção do centro da imagem estéreo e permite que se expandam no campo do estéreo
à medida que o som diminui.
uma faixa mono, girada para o centro.
faixa mono, girada totalmente para a esquerda.
para a direita e inverta a fase.
Decodificação Manual e Áudio de Captura Lateral (Mid-Side) Bruto
Redução do Ruído de Vento
Isso ativa um filtro passa-baixas que reduz o ronco causado pelo ruído ambiente. Use a windscreen
de espuma incluída em combinação com a redução de vento para compensar o ronco e sons oclusivos (estouros do ar que atingem o microfone).
Para reduzir ainda mais o ruído do vento, use o Windjammer Rycote™ opcional, que adapta-se sobre a windscreen de espuma incluída.
Inversão de canais esquerdo-direito
Ao gravar em estéreo, este recurso vira os canais de áudio esquerdo e direito para corresponder
corretamente a imagem estéreo ao vídeo. Isso pode ser necessário em certas posições do telefone/
tablet em que o microfone está invertido.
Dica: observe os indicadores L e R no barril do microfone para determinar se a inversão é
necessária.
Neste exemplo, a inversão esquerda/direita deve
ser ativada quando o telefone for girado:
Equalizador, Limitador e Compressor
A janela de configurações avançadas permite fazer ajuste fino das configurações do equalizador, limitador e compressor. Navegue nos modos predefinidos para ouvir as mudanças no DSP e ajuste o botão giratório em seu som.
Observação: A equalização nas predefinições não será exibida. Somente a equalização adicional que pode ser selecionada pelo usuário é exibida na
janela de configurações de recursos avançados.
54
Page 55

Solução de Problemas
Problema Solução
A luz do LED não está visível O LED está localizado na base do MV88. Como o conector Lightning permite que o microfone
O som do áudio é ruim Verifique no canto superior esquerdo do aplicativo se o MV88 foi totalmente conectado e se foi
A qualidade do áudio muda
quando um fone de cabeça é
conectado
O áudio está distorcido Use o medidor de áudio para garantir que os picos de volume estejam dentro da faixa-alvo. Se o
Os canais estéreo esquerdo/
direito não correspondem ao
vídeo
O MV88 está conectado,
mas o medidor de volume
não registra um sinal.
seja inserido com qualquer orientação, pode ser que o microfone esteja obstruindo o LED.
Remova o microfone, vire e insira novamente para verificar o status do microfone.
reconhecido. O áudio pode ser proveniente do microfone integrado.
Fones de cabeça com microfone substituem o MV88 como o dispositivo de áudio. Use o cabo
adaptador do monitor do fone de ouvido incluído para desativar a interferência de outros
microfones.
nível estiver atingindo um indicador de pico vermelho no medidor da entrada, diminua o ganho.
Dependendo da orientação do dispositivo iOS, pode ser necessário ativar a Inversão esquer-
da-direita. Se o áudio já tiver sido gravado, a inversão dos canais esquerdo e direito pode ser
feita com facilidade através do software da maioria das DAWs e de edição de áudio.
Edite a configuração de privacidade do dispositivo iOS em SETTINGS > PRIVACY > MICROPHONE
para dar ao aplicativo ShurePlus MOTIV permissão para usar o microfone.
Taxa de Amostragem e Intensidade de
Bits
As configurações Taxa de Amostragem e Intensidade de Bits são encontradas em um menu suspenso no painel de controle de áudio ou som do
seu computador. Essas variáveis podem ser ajustadas de acordo com as
suas necessidades. Selecione uma taxa de amostragem menor para a
gravação de podcasts, quando é importante ter um arquivo menor, para
facilitar os downloads. Selecione uma taxa de amostragem maior para
música e gravações mais dinâmicas.
Dica: Grave em uma taxa de amostragem maior e selecione M4A para
obter um arquivo com a melhor qualidade de som em um tamanho de fácil
manipulação.
Dica para os usuários de PC: Certifique-se que as configurações da
taxa de amostragem e profundidade de bits do microfone, encontradas
no painel de controle do som no computador, correspondam à taxa de
amostragem e profundidade de bits selecionadas em seu software.
Requisitos de Sistema e Compatibilidade
iOS • iOS 8.0 e superior
iPhone • iPhone 5
• iPhone 5c
• iPhone 5s
• iPhone 6
• iPhone 6 Plus
iPod Touch • 5ª geração
iPad • iPad 4ª geração
• iPad Air
• iPad Air 2
iPad Mini • iPad Mini 1ª geração
• iPad Mini 2ª geração
• iPad Mini 3ª geração
Especificações
Certificação MFi
Sim
Modos DSP (Predefinições)
Fala/Canto/Acústico/Alto/Plano
Tipo de transdutor
Cardióide (10 mm)/Cápsula do Condensador Bidirecional (10 mm)
Padrão polar
Largura de estéreo ajustável/Mono Bidirecional/Mono Cardioide/Mid-Side
Princípio do Estéreo
Mid-Side
Profundidade de bit
16 bits/24 bits
Taxa de amostragem
44,1/48 kHz
Resposta a Frequências
20 Hz a 20,000 Hz
Intervalo de ganho ajustável
0 a +36 dB
Sensibilidade
-37 dBFS/Pa a 1 kHz [1] [2]
SPL máximo
120 dB SPL [2]
Limitador
Sim
Compressor
Sim
Equalizador
5-bandas
Requisitos de Alimentação Elétrica
Alimentação por meio de conector Lightning
Alojamento
Estrutura Inteiramente em Metal
Peso Líquido
40,5 g (1,43oz.)
Dimensões
67 x 25 x 35 mm A x L x P
[1] 1 Pa=94 dB SPL
[2]Com Ganho Mínimo, Modo Flat
55
Page 56

Acessórios
Acessórios Inclusos
Tela protetora de espuma do MV88 AMV88-WS
Estojo para transporte do MV88 AMV88-CC
Peças de reposição
Tela protetora de espuma do MV88 AMV88-WS
Estojo para transporte do MV88 AMV88-CC
Cabo Adaptador do Monitor do Fone de Ouvido 95A13511
Acessórios Opcionais
Windjammer Rycote para o MV88 AMV88-FUR
Certificações
Informações para o usuário
Este equipamento foi testado e está de acordo com os limites para um dispositivo digital Classe B, segundo a Parte 15 das Normas do FCC. Estes
limites foram projetados para fornecer razoável proteção contra interferência prejudicial em uma instalação residencial. Este equipamento gera, usa e
pode irradiar energia de radiofrequência e, se não for instalado e usado conforme as instruções, pode causar interferência prejudicial às comunicações
de rádio. Entretanto, não há garantias de que não ocorrerão interferências em uma determinada instalação. Se este equipamento causar interferência
prejudicial à recepção de rádio ou televisão, o que pode ser determinado ao desligar e ligar o equipamento, o usuário deve tentar corrigir a interferência
tomando uma das seguintes medidas:
• Reoriente ou mude de lugar a antena receptora.
• Aumente a distância entre o equipamento e o receptor.
• Conecte o equipamento a uma tomada de um circuito diferente do circuito da tomada onde o receptor está conectado.
• Consulte o fabricante do equipamento ou um técnico de rádio/televisão experiente.
Selo de Conformidade ICES-003 da Indústria Canadense CAN ICES-3 (B)/NMB-3(B)
Observação: O teste é baseado no uso dos tipos de cabos recomendados e fornecidos. O uso de outros tipos de cabos que não blindados (telados)
pode degradar o desempenho da compatibilidade eletromagnética.
Atende a todos os requisitos essenciais das Diretivas Europeias relevantes e pode exibir a marca CE.
A Declaração de Conformidade da CE pode ser obtida em: www.shure.com/europe/compliance
Representante Autorizado Europeu:
Shure Europe GmbH
Headquarters Europe, Middle East & Africa
Department: EMEA Approval
Jakob-Dieffenbacher-Str. 12
75031 Eppingen, Alemanha
Telefone: 49-7262-92 49 0
Fax: 49-7262-92 49 11 4
E-mail: info@shure.de
“Made for iPod” (Fabricado para iPod), “Made for iPhone” (Fabricado para iPhone) e “Made for iPad” (Fabricado para iPad) significam que o acessório
eletrônico foi projetado especificamente para ser conectado ao iPod, iPhone ou iPad, respectivamente, e foi certificado pelo desenvolvedor para
atender os padrões de desempenho da Apple. A Apple não é responsável pela operação deste dispositivo ou de que ele cumpra normas de segurança
e regulatórias. Observe que o uso deste acessório com o iPod, iPhone ou iPad pode afetar o desempenho sem fio.
iPad, iPhone, iPod, iPod classic, iPod nano, iPod touch, e Retina são marcas comerciais da Apple Inc., registradas nos EUA e em outros países. iPad
Air e mini-iPad são marcas comerciais da Apple Inc. A marca iPhone é usado com uma licença da Aiphone K.K.
Mac® e Lightning® são marcas registradas da Apple Inc.
56
Page 57

Конденсаторный Mid-Side iOS-стереомикрофон
MV88
Shure MV88 — конденсаторный микрофон профессионального качества, подключаемый непосредственно к устройству Apple iOS через
разъем Lightning®. Две микрофонные капсулы расположены в конфигурации Mid-Side (центральная – боковая), что дает регулируемое
стереоизображение звука и пригодно для приема разнообразных источников, включая музыку и речь. Приложение ShurePlus® MOTIV дает
пользователю возможность модифицировать звук посредством выбора предварительной настройки цифровой обработки звука (DSP),
регулирования усиления и управления шириной стерео.
Основные особенности
Конденсаторный Mid-Side стереомикрофон
В классическом стереомикрофоне, построенном на основе технологии mid-side, используются две совмещенные капсулы: одна кардиоидная,
направляемая прямо на источник, и вторая двунаправленная, обращенная в стороны. Эта конфигурация позволяет регулировать ширину
стерео и обеспечивает прекрасную моносовместимость.
Автоматическое конфигурирование про подключении
MV88 совместим с любым устройством iOS, оборудованным разъемом Lightning. Бесплатное приложение ShurePlus MOTIV обеспечивает
гибкое управление, адаптирующее звук практически к любым внешним условиям.
Компактность и надежность
MV88 выполнен целиком из металла, мало весит и обладает малыми размерами, что позволяет носить его где угодно. Как и все изделия Shure,
MV88 проходит строжайшую проверку качества, что гарантирует его эксплуатационную надежность.
Гибкость управления посредством приложения ShurePlus MOTIV
Приложение ShurePlus MOTIV управляет настройками микрофона — усилением, шириной стерео и режимами предварительной настройки —
и может выполнять звукозапись.
Быстрая настройка
MV88 совместим с мобильными устройствами, оборудованными разъемом Lightning.
1. Подключите микрофон к разъему Lightning устройства iOS.
Когда аудиоприложение или приложение записи ShurePlus MOTIV откроется и выберет MV88, на основании MV88 загорится светодиод.
Примечание. Реверсивный разъем Lightning позволяет подключить MV88 в любой ориентации.
2. Установите и откройте приложение ShurePlus MOTIV.
ShurePlus MOTIV управляет микрофоном и обеспечивает немедленную запись.
3. Проверьте звук и откорректируйте настройки MV88 посредством настроек приложения ShurePlus MOTIV.
Выберите режим предварительной настройки или настройте вручную усиление микрофона и ширину стерео, чтобы оптимизировать
аудиозапись. Подробные сведения о дополнительных аудионастройках, таких как сжатие, частотная коррекция и т.д. см. раздел
«Расширенные аудионастройки».
4. Перед записью установите для устройства параметры Режим самолета и Не беспокоить.
Это позволяет записывать звук без прерывания из-за телефонных звонков или получения уведомлений приложения.
5. Начните запись при помощи встроенного приложения ShurePlus MOTIV или другого приложения для аудиозаписи.
Микрофон сохранит все настройки, выполненные из приложения ShurePlus MOTIV. Настраивать можно и во время записи, но во избежание
слышимых артефактов проверяйте настройки перед записью.
57
Page 58

Конструкция микрофона MV88
Центр (кардиоида)
Левая
Правая
Микрофон MV88 состоит из двух капсул: одна имеет кардиоидную диаграмму направленности и принимает звук непосредственно перед
микрофоном. Вторая — двунаправленная, принимает звук с левой и правой сторон.
Микрофонная головка
Регулировка микрофона
Для получения точной стереозаписи в любом положении передняя сторона микрофона должна быть обращена к источнику звука, а боковые
стороны ориентированы соответствующим образом. Используйте для правильной установки микрофона индикаторы L (Левая) и R (Правая) на
его гильзе.
Примечание. Функция обмена левого и правого каналов позволяет вам переключать ориентацию, если такой обмен необходим.
58
Настройка положения микрофона
Микрофонный стержень и микрофонный цилиндр могут быть повернуты на 90 градусов для установления в желаемую позицию.
Page 59

Направление микрофона
В этом разделе предлагается размещение микрофона для типичных
применений. Существует множество вариантов записи каждого
источника. Поэкспериментируйте с размещением микрофона и
настройками для поиска наилучшего варианта.
Совет. Чтобы быстро добиться нужной ориентации микрофона для
стереозаписи, проверьте, хорошо ли видна надпись Shure сверху
микрофона. Если надпись не видна, поверните гильзу на 90°.
Аудиозапись
Телефон и планшет могут использоваться в любом положении.
Направьте микрофон передней стороной к источнику и
соответственно ориентируйте левую и правую стороны.
Книжная (вертикальная) ориентация
Направьте микрофон передней стороной к источнику звука. По
отношению к разъему Lightning микрофон MV88 может быть
установлен в любой ориентации, поэтому проследите, чтобы левая и
правая стороны смотрели в нужных направлениях.
Аудиоинтервью (настольная установка)
Установите записывающее устройство на плоскую поверхность,
направив одну сторону микрофона к интервьюируемому и
другую — к интервьюеру. Выберите в приложении ShurePlus
MOTIV предварительную настройку MONO BIDIRECTIONAL (Моно
двунаправленная)
Видеоинтервью
Чтобы принимать голоса и интервьюируемого (в камере), и
интервьюера (вне камеры), выберите в приложении ShurePlus
MOTIV предварительную настройку MONO BIDIRECTIONAL (Моно
двунаправленная) Установите микрофон, направив левую и правую
стороны соответственно на обоих участников.
Альбомная (горизонтальная) ориентация
Направьте микрофон передней стороной к источнику звука. По
отношению к разъему Lightning микрофон MV88 может быть
установлен в любой ориентации, поэтому проследите, чтобы левая и
правая стороны смотрели в нужных направлениях.
Самостоятельная запись (голос)
Установите устройство на плоскую поверхность и поверните
микрофон к своему рту. Выберите в приложении ShurePlus MOTIV
предварительную настройку MONO CARDIOID (Моно кардиоида), чтобы
уменьшить внешний шум.
59
Page 60

100%9:41 AM
L
R
-48 -18 -12 -3 0 dB
RL
Shure MV88
EQ
MV88 Settings
Help
Mic Gain 5.5 dB
L R
Stereo Width
45°
L R
Использование с наушниками
Кабель-адаптер мониторных наушников
Используйте входящий в комплект кабель-адаптер мониторных наушников в следующих случаях.
• Вам требуется незаметное подключение ко входу наушников на записывающем устройстве. Вам нужно приспособить наушники с более
крупными разъемами.
• Вы хотите блокировать в своих наушниках линейный микрофон. Кабель гарантирует, что записываемый звук поступает только от MV88, а не
от линейного микрофона ваших наушников.
Приложение ShurePlus MOTIV
Приложение ShurePlus MOTIV управляет настройками микрофона, оптимизируя его работу для конкретного применения.
Совет. Настройте устройство на Airplane Mode (Режим самолета) и Do Not Disturb (Не беспокоить) чтобы не допустить перерывов в записи изза телефонных звонков, текстовых сообщений и предупреждений.
Регулировка микрофона
① Меню
Выберите меню для доступа к окну записи, сохраненным записям,
настройкам MV88 и окнам предпочтений.
② Измеритель входного сигнала
Настройки микрофона
Показывает интенсивность входного сигнала. Пики максимальной
громкости должны умещаться в целевой интервал (затененная
область).
③ Расширенные функции
Используйте раскрывающуюся панель для доступа к
расширенным настройкам аудио — выбору головки, уменьшению
влияния ветра, замене левой – правой сторон и управлению
эквалайзером, ограничителем и компрессором.
60
④ Режимы предварительной настройки
Выберите режим для настройки ширины стерео, частотной
коррекции и сжатия применительно к конкретному приложению.
Подробнее см. раздел «Режимы предварительной настройки»
⑤ Усиление микрофона
Отрегулируйте для согласования с громкостью источника звука
При настройке следите за измерителем, чтобы уровни попадали в
целевой интервал (затененная область измерителя).
⑥ Ширина стерео
Регулирует ширину области приема стереомикрофоном
Совет. При регулировке ширины учитывайте положение микрофона и
размеры источника звука. Например, для записи большого оркестра или
ансамбля целесообразно широкое стереоизображение, так как при нем
достигается лучшее разделение инструментов. В других приложениях,
например, при записи речи, малая ширина повышает четкость и подавление
окружающего (комнатного) шума.
Page 61

Режимы предварительной настройки
L
R
00:00 00:01 00:02 00:03 00:04 00:05
24/48 KHz
100%9:41 AM
Record
Mic Gain
5.5 dB
New Recording 1
0.00 MB
Time Left
about 2 hours 5 min
00:00
Shure MV88
RL
L
R
-48 -18 -12 -3 0 dB
100%9:41 AM
Record
Mic Gain
5.5 dB
L
R
00:00 00:01 00:02 00:03 00:04 00:05
New Recording 1
0.92 MB
Time Left
about 25 min
00:01.43
Done
Recordings
Shure MV88
RL
24/48 KHz
L
R
-48 -18 -12 -3 0 dB
Пять заранее выбираемых режимов оптимизируют настройки усиления, ширины стерео, частотной коррекции и сжатия для согласования
с вашими требованиями к записи. Установите нужный уровень громкости микрофона и прокручивайте режимы, чтобы найти наиболее
подходящую настройку звука. Затем настройте уровень, как потребуется.
Режим Назначение Характеристики
Идеально подходит для
приема речи
Малая ширина стерео подавляет фоновый шум, настройка частотной коррекции усиливает
четкость и полноту, небольшое сжатие сохраняет согласованность уровней.
Речь
Пение
Ровная
Используйте для приема
сольного или группового
вокального исполнения
Подходит для любых
применений.
Средняя ширина стерео с тонкой частотной коррекцией усиливает богатство и четкость
естественного звука.
Сигнал не обрабатывается (настройки частотной коррекции и сжатия не используются).
Добавляет гибкости при обработке звука после записи.
характеристика
Акустические
инструменты
Подходит для
акустических
инструментов и тихого
музыкального исполнения
Используйте для записи
оркестров и источников
повышенной громкости
Средняя ширина стерео и прозрачное сжатие сглаживает пики громкости и выявляет тихие
пассажи. Настройка эквалайзера усиливает детали и общий уровень естественного звука.
Большая ширина стерео увеличивает разделение источников; частотная коррекция также
способствует более четкому определению инструментов, подавляя частоты, которые могут
создавать ощущение смешения источников.
Оркестр
Настройки записи
① Состояние устройства
Выводит имя микрофона, показывая, что приложение ShurePlus
MOTIV распознает подключенный микрофон.
② Дисплей расширенных функций
Выводит значки действующих в данный момент расширенных
функций.
③ Дисплей записи
Показывает форму записываемого в данный момент звукового
сигнала.
④ Выбор частоты дискретизации и битовой глубины
Развертывающееся меню выбора частоты дискретизации и
битовой глубины
Настройки записи
⑤ Детали записи
Слева выводятся свойства записываемого файла, в частности,
имя и размер файла. Справа выводится остающееся для записи
время.
⑥ Кнопка Запись / Пауза
Крупная кнопка для включения записи и паузы.
Примечание. Максимальный размер файла записи составляет 2
ГБ, время записи при этом составит приблизительно 2 часа. Это
ограничение было введено с целью достижения максимальной
эффективности приложения. Запись при пониженной частоте
дискретизации позволит увеличить время непрерывной записи.
61
Page 62

Расширенные аудионастройки
Чтобы открыть меню расширенных аудионастроек, воспользуйтесь раскрывающейся панелью под измерителем входного сигнала в
приложении ShurePlus MOTIV для iPhone. При использовании версии для iPad для открытия меню расширенных аудионастроек нажмите
кнопку Дополнительно.
Выбор полярной диаграммы (настройки стерео и моно)
Следующие настройки управляют работой капсул микрофона. При работе в режиме моно ширина стерео не регулируется.
Стерео Передняя – вкл.
Моно кардиоидная Передняя – вкл.
Боковые – вкл
Боковые – выкл
Моно двунаправленная Передняя – выкл
Исходная Mid-Side Сведения о выходе и обработке см.
Боковые – вкл
полное описание.
Выход исходной настройки Mid-Side
Для увеличения гибкости последующей обработки используйте настройку Raw Mid-Side Это дает 2-канальный сигнал со стереоизображением,
которое можно регулировать даже после записи дорожек.
Левая: Кардиоида (передняя)
Правая: Двунаправленная (боковые)
Настройка Raw Mid-Side предназначена только для тех приложений аудиозаписи, в которых предусмотрен декодер стереоматрицы mid-side
для интерпретации дорожек как стереоизображения.
62
Page 63

Ручное декодирование и регулировка ширины стерео.
Стандартное положение
Обмен разрешен
Если в программном обеспечении вашей цифровой звуковой рабочей станции нет декодера mid-side, для создания точного аудиоизображения
действуйте следующим образом:
1. Извлеките из 2-канального файла Raw Mid-Side левый и правый аудиосигналы как индивидуальные монозаписи.
2. Создайте три пустые звуковые дорожки:
Первая дорожка Используйте аудиосигнал (передняя/кардиоидная) только левого канала в
Вторая дорожка Используйте аудиосигнал (боковые/двунаправленная) только правого
Третья дорожка Скопируйте сигнал боковой/двунаправленной капсулы со второй дорожки.
3. Сгруппируйте боковые дорожки вместе при одном уровне громкости, чтобы можно было регулировать их одновременно.
Увеличение громкости боковых дорожек увеличивает ширину стерео, уменьшение их громкости уменьшает ширину.
Дополнительный совет. Использование компрессора, настроенного на быструю атаку, для боковых дорожек удерживает переходные
составляющие (первая часть звука, например, когда барабанная палочка ударяет по тарелке) у центра стереоизображения и дает им
возможность распространяться в поле стерео по мере затухания звука.
качестве монозаписи, сдвинутой к центру.
канала в качестве монозаписи, сдвинутой до конца влево.
Сдвиньте эту дорожку полностью вправо и реверсируйте фазу
Ручное декодирование исходного аудиосигнала Mid-Side
Подавление шума ветра
Здесь используется низкочастотный отсекающий фильтр, который сокращает гул, вызываемый
внешним шумом. Используйте входящий в комплект пенопластовый ветрозащитный экран в
сочетании с подавлением шума ветра для противодействия гулу и взрывным шумам (порывам
ветра, ударяющим по микрофону).
Для дополнительного уменьшения шума ветра используйте меховую ветрозащиту Rycote™
Windjammer, надеваемую поверх ветрозащитного экрана.
Обмен левого и правого каналов
При записи в режиме стерео эта функция перебрасывает левый и правый видеоканалы
для согласования стерео- и видеоизображений Это может потребоваться при некоторых
положениях телефона или планшета, когда микрофон оказывается перевернутым.
Совет. Смотрите на индикаторы L и R на гильзе микрофона, чтобы определить, требуется ли
обмен.
В этом примере обмен левой и правой
сторон следует разрешить, если телефон
поворачивается:
Эквалайзер, ограничитель и компрессор
Окно расширенных настроек дает возможность точно настраивать эквалайзер, ограничитель и компрессор. Прокручивайте через режимы
предварительной настройки, слушайте изменения выхода DSP и регулируйте для настройки на свой звук.
Примечание. Частотная коррекция в режимах предварительной настройки на экран не выводится. В окне расширенных настроек выводится
только дополнительная частотная коррекция, выбираемая пользователем.
63
Page 64

Поиск и устранение неисправностей
Проблема Решение
Не видно, горит ли
светодиод
Плохой звук Проверьте в левом верхнем углу приложения, что MV88 полностью вставлен и распознан.
Качество звука меняется
при подключении
наушников
Звук искажается Воспользуйтесь аудиометром и проверьте, что пики громкости находятся внутри целевого
Левый и правый
стереоканалы не
соответствуют видео.
MV88 вставлен, но
измеритель громкости не
регистрирует сигнал.
Светодиод установлен на основании MV88. Поскольку разъем Lightning позволяет
вставлять микрофон любой стороной, возможно, что светодиод закрыт микрофоном.
Извлеките микрофон, поверните, вставьте снова и проверьте состояние микрофона.
Возможно, вы слышите звук от встроенного микрофона.
Наушники с микрофоном отменяют выбор MV88 в качестве аудиоустройства. Чтобы
блокировать помехи от других микрофонов, используйте входящий в комплект кабельадаптер мониторных наушников.
интервала. Если доходит до красного индикатора пиков аудиометра, уменьшите усиление.
В зависимости от ориентации устройства iOS может потребоваться замена левой – правой
сторон. Если аудиосигнал уже записан, то переключение левого и правого каналов легко
может быть выполнено в большинстве программ цифровых рабочих аудиостанций (DAW) и
редактирования аудиозаписей.
Отредактируйте настройку конфиденциальности для устройства iOS SETTINGS > PRIVACY >
MICROPHONE , чтобы разрешить приложению ShurePlus MOTIV использовать микрофон.
Частота дискретизации и разрядность
Частота дискретизации и битовая глубина настраиваются через
раскрывающееся меню в аудиосистеме или на панели управления
звуком компьютера. Эти переменные можно изменить требуемым
образом. Выберите пониженную частоту дискретизации для записи
подкастов, если важно уменьшить размер файлов для упрощения их
загрузки. Выберите повышенную частоту дискретизации для музыки и
динамичных записей.
Совет. Записывайте с более высокой частотой дискретизации
и спуститесь на mp3. Это даст файл приемлемого размера с
высочайшим качеством звука.
Совет пользователям ПК. Убедитесь, что настройки частоты
дискретизации и битовой глубины микрофона на панели управления
звуком компьютера соответствуют настройкам этих параметров,
выбранным в вашей программе.
Требования к системе и
совместимости
iOS • iOS 8.0 и выше
iPhone • iPhone 5
• iPhone 5c
• iPhone 5s
• iPhone 6
• iPhone 6 Plus
iPod Touch • 5-го поколения
iPad • iPad 4-го поколения
• iPad Air
• iPad Air 2
iPad Mini • iPad Mini 1-го поколения
• iPad Mini 2-го поколения
• iPad Mini 3-го поколения
Технические характеристики
Сертификат MFi
Да
Режимы DSP (предварительные настройки)
Речь, пение, акустика, громкий звук, бемоль
Тип преобразователя
Кардиоидная (10 мм)/Двунаправленная конденсаторная головка (10 мм)
Диаграмма направленности
Регулируемая ширина стерео/Моно двунаправленная/Моно кардиоидная/Mid-Side
Принцип стерео
Mid-Side
Разрядность
16-битовый/24-битный
Частота дискретизации
44,1/48 кГц
Амплитудно-частотная характеристика
20 Гц до 20,000 Гц
Диапазон настройки усиления
0 до +36 дБ
Чувствительность
-37 dBFS/Pa при 1 кГц [1] [2]
Максимальный уровень звукового давления (УЗД)
120 дБ УЗД [2]
Ограничитель
Да
Компрессор
Да
Эквалайзер
5-полосный
Питание
Питание через разъем Lightning
Корпус
Цельнометаллическая конструкция
Масса нетто
40,5 г (1,43унций)
Размеры
67 x 25 x 35 мм В x Ш x Г
[1] 1 Pa=94 дБ УЗД
[2]При минимальном усилении, без обработки
64
Page 65

Принадлежности
Принадлежности, входящие в комплект
Пенопластовый ветрозащитный экран MV88 AMV88-WS
Футляр для переноски MV88 AMV88-CC
Запасные части
Пенопластовый ветрозащитный экран MV88 AMV88-WS
Футляр для переноски MV88 AMV88-CC
Кабель-адаптер головного монитора 95A13511
Дополнительные принадлежности
Меховая ветрозащита Rycote Windjammer для
MV88
AMV88-FUR
Сертификация
Информация для пользователя
Данное оборудование прошло испытания, и было установлено, что оно соответствует пределам для цифрового устройства класса В согласно
части 15 Правил FCC. Эти пределы определены исходя из обеспечения обоснованного уровня защиты от вредных помех при установке в
жилых зданиях. Это оборудование генерирует, использует и может излучать высокочастотную энергию; если его установка осуществляется
не в соответствии с инструкциями, оно может создавать вредные помехи для радиосвязи. Однако нет гарантии, что при конкретной установке
помехи не возникнут. Если оборудование создает вредные помехи приему радио- или телевизионных передач, в чем можно убедиться,
включая и выключая оборудование, пользователю рекомендуется устранить помехи одной или несколькими из следующих мер:
• Измените ориентацию или переместите приемную антенну.
• Увеличьте расстояние между оборудованием и приемником.
• Подключите оборудование к розетке, находящейся не в той цепи, к которой подсоединен приемник.
• Обратитесь за помощью к дилеру или опытному радио- или телевизионному технику.
Знак соответствия стандарту Industry Canada ICES-003: CAN ICES-3 (B)/NMB-3(B)
Примечание. Тестирование проводилось с использованием входящих в комплект и рекомендуемых типов кабелей. Использование
неэкранированных кабелей может ухудшить характеристики ЭМС.
Это изделие удовлетворяет существенным требованиям всех соответствующих директив ЕС и имеет разрешение на маркировку CE.
Декларацию соответствия CE можно получить по следующему адресу: www.shure.com/europe/compliance
Уполномоченный европейский представитель:
Shure Europe GmbH
Headquarters Europe, Middle East & Africa
Department: EMEA Approval
Jakob-Dieffenbacher-Str. 12
75031 Eppingen, Germany
Телефон: 49-7262-92 49 0
Факс: 49-7262-92 49 11 4
Email: info@shure.de
Надписи «Made for iPod», «Made for iPhone» и «Made for iPad» означают, что электронное устройство специально рассчитано на подключение
к iPod, iPhone или iPad и что соответствие стандартам рабочих характеристик Apple сертифицировано разработчиком. Apple не несет
ответственности за работу этого устройства или его соответствие стандартам безопасности и регулятивным стандартам. Имейте в виду, что
использование этого приспособления с iPod, iPhone или iPad может повлиять на работу беспроводного устройства.
iPad, iPhone, iPod, iPod classic, iPod nano, iPod touch и Retina являются товарными знаками Apple Inc., зарегистрированными в США и других
странах. iPad Air и iPad mini являются товарными знаками Apple Inc. Товарный знак «iPhone» используется по лицензии от Aiphone K.K.
Mac® и Lightning® являются зарегистрированными товарными знаками Apple Inc.
65
Page 66

iOS-Stereokondensatormikrofon für MS-Stereofonie
MV88
Das Shure MV88 ist ein Kondensatormikrofon in Profiqualität, das unter Verwendung eines Lightning®-Anschlusses direkt in ein Apple iOS-Gerät
eingesteckt wird. Zwei Mikrofonkapseln sind in einer Konfiguration für MS-Stereofonie angeordnet, um ein verstellbares Stereobild zu erzeugen, das zur
Aufnahme einer Vielzahl von Schallquellen, einschließlich Musik und Stimmen, geeignet ist. Mit der ShurePlus® MOTIV-App können die Benutzer den
Ton durch Auswahl von Preset-Modi für digitale Signalverarbeitung, Gain-Einstellungen und Stereobreitenregelung anpassen.
Technische Eigenschaften
Stereomikrofon für MS-Stereofonie
Die klassische MS-Stereofonie-Mikrofontechnik verwendet zwei Kapseln: eine Nierenkapsel, die direkt auf die Schallquelle gerichtet ist, und eine Kapsel
mit Achtercharakteristik, die zu den Seiten gerichtet ist. Mit dieser Konfiguration kann der Benutzer die Stereobreite einstellen; außerdem wird ausgezeichnete Mono-Kompatibilität erzielt.
Plug-and-Play-Betrieb
Das MV88 ist mit allen iOS-Geräten, die einen Lightning-Anschluss aufweisen, kompatibel. Die kostenlose ShurePlus MOTIV-App bietet flexible Regler
zur Anpassung des Tons an praktisch alle Umgebungen.
Kompakt und haltbar
Das MV88 weist eine leichte Ganzmetallkonstruktion auf und kann dank seiner Größe überall hin mitgenommen werden. Wie alle Shure-Produkte wurde
das MV88 strengsten Qualitätsprüfungen unterzogen, um die Zuverlässigkeit während des Einsatzes zu gewährleisten.
Flexible Steuerung mittels ShurePlus MOTIV-App
Die ShurePlus MOTIV-App regelt Mikrofoneinstellungen wie Gain, Stereobreite und Preset-Modi und kann als Aufnahme-App fungieren.
Snelle installatie
De MV88 is compatibel met mobiele apparaten die een Lightning-connector hebben.
1. Steek de microfoon in de Lightning-connector op het iOS-apparaat.
De LED op de MV88-voet licht op wanneer een audiotoepassing of de opnametoepassing ShurePlus MOTIV is geopend en de MV88 wordt
geselecteerd.
Opmerking: Met de omkeerbare Lightning-connector kan de MV88 in beide oriëntaties worden geïnstalleerd.
2. Installeer en open de toepassing ShurePlus MOTIV.
ShurePlus MOTIV regelt de microfoon en biedt onmiddellijk opnamefunctionaliteit.
3. Controleer het geluid en regel de instellingen af met de toepassing ShurePlus MOTIV in de MV88-instellingen.
Selecteer een voorinstelmodus of regel handmatig de microfoonversterking en stereobreedte af om de geluidsopname te optimaliseren. Zie het onderwerp 'Geavanceerde audio-instellingen' voor meer informatie over aanvullende audio-instellingen, zoals bijv. compressie en niveauregeling.
4. Stel uw apparaat in op Vliegtuigmodus en Niet storen voordat u gaat opnemen.
Hierdoor kunt u opnemen zonder te worden onderbroken door gespreksoproepen of meldingen van apps.
5. Gebruik de geïntegreerde opnametoepassing ShurePlus MOTIV of die van een andere fabrikant om de opname te beginnen.
De microfoon onthoudt alle instellingen van de toepassing ShurePlus MOTIV. Tijdens de opname kan er worden bijgeregeld, maar om hoorbare artefacten te vermijden, is het beter om de instellingen voorafgaand aan de opname te testen.
66
Page 67

MV88-Mikrofonkonstruktion
Mitte (Nierencharakteristik)
Links
Rechts
Das MV88 verfügt über zwei Kapseln: eine Kapsel weist Nierencharakteristik auf und dient zur Aufnahme von Ton unmittelbar vor dem Mikrofon. Die
andere Kapsel weist Achtercharakteristik auf und dient zur Aufnahme von Ton auf der linken und rechten Seite.
Mikrofonkapsel
Einstellung des Mikrofons
Um genaue Stereoaufnahmen in beliebigen Positionen zu erzielen, muss die Vorderseite des Mikrofons auf die Klangquelle gerichtet werden und die
Seiten müssen richtig ausgerichtet sein. Die Anzeigen L und R am Mikrofongehäuse verwenden, um die richtige Aufstellung zu gewährleisten.
Hinweis: Mit der Funktion zum Vertauschen des linken und rechten Kanals kann die Ausrichtung am Mikrofon umgeschaltet werden, wenn dies notwendig ist.
Das Mikrofon lässt sich schwenken und das Gehäuse kann um 90° gedreht werden, um die gewünschte Platzierung zu erzielen.
Einstellen der Mikrofonstellung
67
Page 68

Ausrichten des Mikrofons
Dieser Abschnitt enthält Empfehlungen zur Mikrofonaufstellung für
typische Einsatzsituationen. Dabei ist zu beachten, dass es viele effektive Möglichkeiten zum Aufnehmen einer bestimmten Klangquelle gibt.
Experimentieren Sie mit der Mikrofonaufstellung und den Einstellungen,
um herauszufinden, was am besten funktioniert.
Tipp: Um die richtige Stereoausrichtung des Mikrofons zu gewährleisten,
nachprüfen, ob der Shure-Name an der Oberseite des Mikrofons deutlich
sichtbar ist. Wenn der Name nicht sichtbar ist, das Gehäuse um 90°
drehen.
Tonaufzeichnung
Das Telefon oder Tablet kann in beliebigen Positionen verwendet werden.
Die Vorderseite des Mikrofons auf die Schallquelle richten, wobei die linke
und rechte Seite in die richtige Richtung weisen.
Portrait (senkrecht)
Die Vorderseite des Mikrofons auf die Schallquelle richten. Das Mikrofon
kann in beliebiger Ausrichtung des MV88 zum Lightning-Anschluss
eingesteckt werden, weshalb sichergestellt werden muss, dass die linke
und rechte Seite in die richtige Richtung weisen.
Audio-Interview (Tischplatte)
Das Aufnahmegerät auf eine flache Oberfläche stellen, wobei eine
Seite des Mikrofons auf die befragte Person und die andere Seite auf
den Fragensteller gerichtet ist. Das Preset MONO BIDIRECTIONAL in der
ShurePlus MOTIV-App auswählen.
Video-Interview
Zur Aufnahme der Stimmen der befragten Person (vor laufender Kamera)
und des Fragenstellers (Off-Sprecher) das Preset MONO BIDIRECTIONAL in
der ShurePlus MOTIV-App auswählen. Das Mikrofon so aufstellen, dass
die linke und rechte Seite zu jeder Person weist.
Landscape (waagerecht)
Die Vorderseite des Mikrofons auf die Schallquelle richten. Das Mikrofon
kann in beliebiger Ausrichtung zum Lightning-Anschluss angeschlossen
werden, weshalb sichergestellt werden muss, dass die linke und rechte
Seite des MV88 in die richtige Richtung weisen.
Selbstaufnahme (Stimme)
Das Gerät auf eine flache Oberfläche stellen und das Mikrofon so anwinkeln, dass es auf ihren Mund gerichtet ist. Das Preset MONO CARDIOID in
der ShurePlus MOTIV-App auswählen, um die Umgebungsgeräusche zu
reduzieren.
68
Page 69

100%9:41 AM
L
R
-48 -18 -12 -3 0 dB
RL
Shure MV88
EQ
MV88 Settings
Help
Mic Gain 5.5 dB
L R
Stereo Width
45°
L R
Verwendung mit Kopfhörern
Kopfhörermonitor-Anpassungskabel
Aus folgenden Gründen das im Lieferumfang enthaltene Kopfhörermonitor-Anpassungskabel verwenden:
• Sie benötigen eine dünnere Verbindung zum Kopfhörereingang an Ihrem Aufnahmegerät. Das Kabel ermöglicht die Verwendung von Kopfhörern mit
größeren Anschlüssen.
• Sie möchten das Inline-Mikrofon an Ihren Ohrhörern deaktivieren. Das Kabel gewährleistet, dass der aufgenommene Ton ausschließlich vom MV88
und nicht vom Inline-Mikrofon Ihrer Ohrhörer stammt.
ShurePlus MOTIV-App
Die ShurePlus MOTIV-App regelt die Mikrofoneinstellungen, um die Leistung für bestimmte Verwendungszwecke zu optimieren.
Tipp: Gerät einstellen auf Flugzeugmodus und Nicht stören um Unterbrechungen bei der Aufnahme durch Telefonanrufe, SMS oder Warnungen zu
verhindern.
Einstellung des Mikrofons
① Menü
Das Menü auswählen, um das Aufnahmefenster, die gespeicherten
Aufnahmen, die MV88-Einstellungen und die Voreinstellungen-Fenster
aufzurufen.
Mikrofoneinstellungen
② Eingangspegelanzeige
Zeigt die Stärke des Eingangssignals an. Die lautesten Spitzen sollten
den Zielbereich erreichen (wird durch schattierten Bereich angezeigt).
③ Erweiterte Funktionen
Die Pulldown-Leiste verwenden, um die erweiterten Audiofunktionen,
einschließlich Kapselauswahl, Windreduzierung, Links/Rechts-Tausch
sowie Regler für Equalizer, Limiter und Kompressor, anzuzeigen.
④ Preset-Modi
Den Modus auswählen, um die Stereobreite, Entzerrung und
Kompression für bestimmte Verwendungszwecke einzustellen.
Weitere Informationen sind im Abschnitt „Preset-Modi“ zu finden.
⑤ Mikrofon-Gain
Einstellen, um die Lautstärke der Tonquelle anzupassen. Die
Anzeige bei der Durchführung von Einstellungen beobachten, um
sicherzustellen, dass sich die Pegel im Zielbereich befinden (wird
durch schattierten Bereich der Eingangspegelanzeige angezeigt).
⑥ Stereobreite
Dient zur Einstellung der Breite des
Stereomikrofon-Aufnahmebereichs.
Tipp: Bei der Einstellung der Breite die Stelle des Mikrofons und die Größe
der Klangquelle berücksichtigen. Die Aufnahme eines großen Orchesters oder
Ensembles profitiert bspw. von einem breiten Stereobild, um eine bessere
Trennung der Instrumente zu erzielen. Andere Verwendungszwecke, z.
B. Sprache, profitieren von einer schmalen Breite für bessere Klarheit und
Unterdrückung von Umgebungsgeräuschen.
69
Page 70

Preset-Modi
L
R
00:00 00:01 00:02 00:03 00:04 00:05
24/48 KHz
100%9:41 AM
Record
Mic Gain
5.5 dB
New Recording 1
0.00 MB
Time Left
about 2 hours 5 min
00:00
Shure MV88
RL
L
R
-48 -18 -12 -3 0 dB
100%9:41 AM
Record
Mic Gain
5.5 dB
L
R
00:00 00:01 00:02 00:03 00:04 00:05
New Recording 1
0.92 MB
Time Left
about 25 min
00:01.43
Done
Recordings
Shure MV88
RL
24/48 KHz
L
R
-48 -18 -12 -3 0 dB
Fünf auswählbare Modi optimieren die Einstellungen für Gain, Stereobreite, Entzerrung und Komprimierung, um Ihren Aufnahmebedürfnissen zu
entsprechen. Den Mikrofonpegel einstellen und durch die Modi navigieren, um herauszufinden, welche Einstellung am besten klingt. Dann bei Bedarf
den Pegel einstellen.
Modus Verwendungszweck Merkmale
Ideal zur Aufnahme von
Sprache
Eine schmale Stereobreite zur Unterdrückung von Umgebungsgeräuschen, eine
Entzerrungseinstellung zum Hervorheben von Klarheit und Fülle und leichte Komprimierung, um
Pegel kohärent zu halten.
Sprache
Gesang
Flat
Akustik
Dient zur Abnahme von
Solo- oder GruppenGesangspräsentationen
Für jegliche Anwendung
geeignet
Eignet sich für akustische
Instrumente und leise
Musikanwendungen
Zur Aufnahme von Bands
und lauteren Quellen
verwenden
Mittlere Stereobreite mit leichter Entzerrung, um Fülle und Klarheit für einen natürlichen Ton
hinzuzufügen.
Völlig unverarbeitetes Signal (keine Entzerrungs- oder Komprimierungseinstellungen angewandt). Bietet Flexibilität beim Verarbeiten des Audiosignals nach der Aufnahme.
Eine mittlere Stereobreite und transparente Komprimierung zum Glätten von Lautstärkespitzen
und zum Hervorheben leiserer Passagen. Die Equalizer-Werte betonen Details und bietet einen
insgesamt natürlichen Klang.
Eine breite Stereobreite zur besseren Trennung der Quellen mit Entzerrung zur zusätzlichen
Verbesserung der Definition durch Verringerung von Frequenzen, die den Instrumententon überfüllt klingen lassen.
Band
Opname-instellingen
① Apparaatstatus
Deze geeft de microfoonnaam weer om aan te geven dat de
toepassing ShurePlus MOTIV de aangesloten microfoon herkent.
② Display voor geavanceerde functies
Dit geeft de pictogrammen voor de geavanceerde functies weer die
momenteel zijn geactiveerd.
③ Opnamedisplay
Dit geeft de golfvorm van het geluid tijdens de opname weer.
④ Selectie van bemonsteringssnelheid en bitdiepte
Klik hierop en selecteer een bemonsteringssnelheid en bitdiepte.
70
Opname-instellingen
⑤ Opnamedetails
De linkerzijde geeft de eigenschappen van het opgenomen bestand,
zoals bestandsnaam en bestandsgrootte. De rechterzijde geeft de
resterende opnametijd weer.
⑥ Opname-/pauzeknop
Een grote knop voor opnemen of pauzeren.
Opmerking: De maximale bestandsgrootte voor een opname is 2 GB,
hetgeen ongeveer overeenkomt met een opnameduur van 2 uur. Deze
beperking is ingesteld om het prestatievermogen van de app te maximaliseren. Bij opnamen op een lagere bemonsteringssnelheid kan langer
zonder onderbrekingen worden opgenomen.
Page 71

Geavanceerde audio-instellingen
Gebruik de vervolgkeuzebalk om het menu voor geavanceerde audio-instellingen weer te geven, dat zich onder de ingangsmeter bevindt in de
ShurePlus MOTIV-app voor de iPhone. Wanneer u de iPad-versie gebruikt, kunt u de geavanceerde audio-instellingen met de knop Geavanceerd
weergeven.
Polairpatroon selecteren (stereo- en mono-instellingen)
De volgende instellingen regelen de activiteit van de microfooncapsule. Bij gebruik van de monomodus is de stereobreedte niet regelbaar.
Stereo Voorzijde = AAN
Mono-cardioïde Voorzijde = AAN
Zijkanten = AAN
Zijkanten = UIT
Mono-bidirectioneel Voorzijde = UIT
Onbewerkt midden-opzij Zie volledige beschrijving voor in-
Zijkanten = AAN
formatie over uitgangssignaal en
bewerking.
Raw Mid-Side Output
Für höhere Flexibilität nach der Verarbeitung die Einstellung Raw Mid-Side verwenden. Dies liefert ein 2-Kanal-Signal mit einem Stereobild, das auch
nach der Aufnahme der Spuren eingestellt werden kann:
Links: Nierencharakteristik (vorne)
Rechts: Achtercharakteristik (Seiten)
Die Einstellung Raw Mid-Side ist nur zur Verwendung mit Audioaufnahmezwecken bestimmt, die über einen MS-Stereofonie-Matrixdecoder verfügen,
um die aufgenommenen Spuren als Stereobild zu interpretieren.
71
Page 72

Manuelles Dekodieren und Stereobreiteneinstellung
Standard
Vertauschung aktiviert
Wenn die Software der digitalen Audio-Arbeitsstation keinen MS-Stereofonie-Decoder aufweist, die folgenden Schritte verwenden, um ein genaueres
Stereobild zu erstellen:
1. Die linken und rechten Audiosignale aus der 2-Kanal-Datei Raw Mid-Side als einzelne Mono-Spuren extrahieren.
2. 3 leere Audio-Spuren erstellen:
Erste Spur Das Audiosignal (vorne/Nierencharakteristik) nur des linken Kanals als Mono-
Zweite Spur Das Audiosignal (Seite/Achtercharakteristik) nur des rechten Kanals als Mono-
Dritte Spur Das Seiten/Achtercharakteristik-Signal der zweiten Spur kopieren. Diese Spur
3. Die Seiten-Spuren mit dem gleichen Lautstärkepegel zusammen gruppieren, damit sie gleichzeitig eingestellt werden können. Durch Erhöhen
der Lautstärke der Seiten-Spuren wird die Stereobreite vergrößert; durch Verringern der Lautstärke wird die Stereobreite verkleinert.
Tipp für Fortgeschrittene: Durch Verwendung von Kompression mit einer schnellen Toneinsatzeinstellung an den Seiten-Spuren werden
Einschwingungen (der erste Teil eines Tons, wenn bspw. ein Trommelstock auf ein Becken schlägt) in der Mitte des Stereobilds gehalten und können
sich im Stereofeld ausdehnen, während der Ton abklingt.
Spur verwenden und zur Mitte verschieben.
Spur verwenden und ganz nach links verschieben.
ganz nach rechts verschieben und die Phase umkehren.
Manuelles Decodieren von Raw Mid-Side-Audio
Windgeräuschreduzierung
Dadurch wird ein steilflankiger Hochpassfilter aktiviert, der durch Umweltgeräusche verursachtes
Rumpeln reduziert. Den im Lieferumfang enthaltenen Schaumstoff-Windschutz zusammen mit der
Windreduzierung verwenden, um Rumpel- und „Popp“-Geräuschen (auf das Mikrofon treffende
Luftstöße) entgegen zu wirken.
Zur zusätzlichen Verringerung von Windgeräuschen den optionalen Rycote™ Windjammer verwenden, der über den im Lieferumfang enthaltenen Schaumstoff-Windschutz passt.
Vertauschen des linken/rechten Kanals
Bei der Aufnahme in Stereo vertauscht diese Funktion den linken und rechten Audiokanal, damit das
Stereobild mit dem Video übereinstimmt. Dies kann bei bestimmten Telefon/Tablett-Stellungen notwendig sein, bei denen das Mikrofon umgekehrt ist.
Tipp: Die Anzeigen L und R am Mikrofongehäuse betrachten, um zu bestimmen, ob die
Vertauschung notwendig ist.
In diesem Beispiel sollte die Vertauschung des
linken und rechten Kanals aktiviert werden, wenn
das Telefon gedreht wird:
Equalizer, Limiter und Kompressor
Im Fenster mit den erweiterten Funktionen können die Equalizer-, Limiter- und Kompressor-Einstellungen fein abgestimmt werden. Durch die PresetModi navigieren, um die DSP-Änderungen zu hören, und den Modus auswählen, der Ihnen am besten gefällt.
Hinweis: Die Entzerrung in den Presets wird nicht angezeigt. Nur die zusätzliche vom Benutzer ausgewählte Entzerrung wird im Einstellungsfenster für
die erweiterten Funktionen angezeigt.
72
Page 73

Störungssuche
Problem Abhilfe
LED nicht sichtbar Die LED befindet sich am Sockel des MV88. Da das Mikrofon aufgrund des Lightning-
Schlechte Audioqualität In der oberen linken Ecke der Anwendung nachprüfen, ob das MV88 vollständig eingesteckt ist
Audio-Qualität ändert sich,
wenn ein Headset eingesteckt wird
Audiosignal ist verzerrt Die Audio-Pegelanzeige verwenden, um sicherzustellen, dass sich die Lautstärkespitzen im
Die linken/rechten
Stereokanäle stimmen nicht
mit dem Video überein
MV88 ist eingesteckt aber
Lautstärkepegelanzeige zeigt
kein Signal an.
Anschlusses in beliebiger Ausrichtung eingesteckt werden kann, ist es möglich, dass das
Telefon die LED verdeckt. Das Mikrofon entfernen, umdrehen und wieder einstecken, um den
Mikrofonstatus zu prüfen.
und erkannt wird. Das Audio stammt möglicherweise vom integrierten Mikrofon.
Headsets mit Mikrofonen übersteuern das MV88 als Audiogerät. Das im Lieferumfang enthal-
tene Kopfhörermonitor-Anpassungskabel verwenden, um Störungen durch andere Mikrofone zu
beseitigen.
Zielbereich befinden. Wenn der Pegel die rote Spitzenwertanzeige der Eingangspegelanzeige
erreicht, die Verstärkung verringern.
Je nach Ausrichtung des iOS-Geräts kann es notwendig sein, die Vertauschung des linken und
rechten Kanals zu aktivieren. Wenn das Audio bereits aufgenommen wurde, lassen sich der linke
und rechte Kanal in den meisten digitalen Audio-Arbeitsstationen und Softwareanwendungen zur
Audiobearbeitung mühelos vertauschen.
Die Privatsphäre-Einstellungen für das iOS-Gerät unter SETTINGS > PRIVACY > MICROPHONE ändern, damit die ShurePlus MOTIV-App die Berechtigung zur Verwendung des Mikrofons erhält.
Abtastrate und Bittiefe
Die Einstellungen für Abtastrate und Bittiefe befinden sich in einem
Dropdownmenü in der Audio- bzw. Sound-Systemsteuerung Ihres
Computers. Sie können diese Variablen bedarfsgemäß einstellen. Wählen
Sie eine niedrigere Abtastrate, um eine geringe Dateigröße zu erzielen. Um eine bessere Klangqualität zu erzielen, wählen Sie eine höhere
Abtastrate aus.
Tipp: Um eine hohe Audioqualität bei geringer Dateigröße zu erzielen,
empfehlen wir die Aufnahme mit hoher Abtastrate und Bittiefe und spätere
Konvertierung in das mp3 Format.
Tipp für PC-Benutzer: Die Einstellungen von Abtastrate und Bittiefe
müssen sowohl in der Systemsteuerung sowie in der verwendeten
Aufnahmesoftware übereinstimmen, da sonst Störungen in der Aufnahme
möglich sind.
Systemanforderungen und Kompatibilität
iOS • iOS 8.0 und neuere Versionen
iPhone • iPhone 5
• iPhone 5c
• iPhone 5s
• iPhone 6
• iPhone 6 Plus
iPod Touch • 5. Gen.
iPad • iPad, 4. Gen.
• iPad Air
• iPad Air 2
iPad Mini • iPad Mini, 1. Gen.
• iPad Mini, 2. Gen.
• iPad Mini, 3. Gen.
Technische Daten
MFi-gecertificeerd
Ja
DSP-modi (voorinstellingen)
Spraak/Zang/Akoestisch/Luid/Vlak
Transducertype
Cardioïde (10 mm)/Bidirectionele condensatorcapsule (10 mm)
Polairpatroon
Aanpasbare breedte stereo/Mono-bidirectioneel/Mono-cardioïde/Midden-opzij
Stereoprincipe
Midden-opzij
Bitdiepte
16-bit/24-bits
Bemonsteringssnelheid
44,1/48 kHz
Frequentiekarakteristiek
20 Hz tot 20,000 Hz
Instelbaar versterkingsbereik
0 tot +36 dB
Gevoeligheid
-37 dBFS/Pa bij 1 kHz [1] [2]
Maximum-SPL
120 dB SPL [2]
Begrenzer
Ja
Compressor
Ja
Niveauregelaar
5-band
Voedingsvereisten
Gevoed via Lightning-connector
Behuizing
Volledig metalen constructie
Nettogewicht
40,5 g (1,43oz.)
Afmetingen
67 x 25 x 35 mm H x B x D
[1] 1 Pa=94 dB SPL
[2]Bij minimale versterkingsfactor, vlakke modus
73
Page 74

Zubehör
Mitgeliefertes Zubehör
Schuimrubber windkap voor MV88 AMV88-WS
Draagkoffer voor MV88 AMV88-CC
Ersatzteile
Schuimrubber windkap voor MV88 AMV88-WS
Draagkoffer voor MV88 AMV88-CC
Overgangskabel hoofdtelefoonmonitor 95A13511
Optionales Zubehör
Rycote Windjammer voor MV88 AMV88-FUR
Zulassungen
Informationen für den Benutzer
Dieses Gerät wurde geprüft und entspricht den Grenzwerten für ein digitales Gerät der Klasse B gemäß Teil 15 der Richtlinien der USFernmeldebehörde (FCC). Diese Grenzwerte sollen einen angemessenen Schutz gegen störende Interferenzen in Wohngebieten bieten. Dieses Gerät
erzeugt und arbeitet mit HF-Energie und kann diese ausstrahlen; wenn es nicht gemäß den Anweisungen installiert und verwendet wird, kann es störende Interferenzen mit dem Funkverkehr verursachen. Allerdings wird nicht gewährleistet, dass es bei einer bestimmten Installation keine Interferenzen
geben wird. Wenn dieses Gerät störende Interferenzen beim Radio- und Fernsehempfang verursacht (was durch Aus- und Anschalten des Geräts festgestellt werden kann), wird dem Benutzer nahe gelegt, die Interferenz durch eines oder mehrere der folgenden Verfahren zu beheben:
• Die Empfangsantenne anders ausrichten oder anderswo platzieren.
• Den Abstand zwischen dem Gerät und dem Empfänger vergrößern.
• Das Gerät an eine Steckdose eines Netzkreises anschließen, der nicht mit dem des Empfängers identisch ist.
• Den Händler oder einen erfahrenen Radio- und Fernsehtechniker zu Rate ziehen.
Konformitätskennzeichnung Industry Canada ICES-003: CAN ICES-3 (B)/NMB-3(B)
Hinweis: Die Prüfung beruht auf der Verwendung der mitgelieferten und empfohlenen Kabeltypen. Bei Verwendung von nicht abgeschirmten
Kabeltypen kann die elektromagnetische Verträglichkeit beeinträchtigt werden.
Dieses Produkt entspricht den Grundanforderungen aller relevanten Richtlinien der Europäischen Union und ist zur CE-Kennzeichnung berechtigt.
Die CE-Übereinstimmungserklärung ist erhältlich bei: www.shure.com/europe/compliance
Bevollmächtigter Vertreter in Europa:
Shure Europe GmbH
Zentrale für Europa, Nahost und Afrika
Abteilung: EMEA-Approval
Jakob-Dieffenbacher-Str. 12
75031 Eppingen, Deutschland
Telefon: +49 7262 9249-0
Telefax: +49 7262 9249-114
E-Mail: info@shure.de
"Made for iPod", "Made for iPhone" en "Made for iPad" betekenen dat een elektronisch accessoire is ontworpen om specifiek te worden aangesloten op
respectievelijk een iPod, iPhone of iPad en door de ontwikkelaar gecertificeerd is om te voldoen aan de prestatienormen van Apple. Apple is niet verantwoordelijk voor de werking van dit apparaat of de naleving ervan met veiligheids- en regelgevingsnormen. Denk eraan dat het gebruik van dit accessoire
met een iPod, iPhone of iPad de draadloze prestaties nadelig kunnen beïnvloeden.
iPad, iPhone, iPod, iPod classic, iPod nano, iPod touch en Retina zijn handelsmerken van Apple Inc., gedeponeerd in de VS en andere landen. iPad Air
en iPad mini zijn handelsmerken van Apple Inc. Het handelsmerk "iPhone" wordt gebruikt met een licentie van Aiphone K.K.
Mac® und Lightning® sind eingetragene Marken von Apple Inc.
74
Page 75

iOSミッドサイドステレオ コンデンサ マイクロホン
MV88
Shure MV88はLightning®コネクターを使用してApple iOS機器に直接接続できるプロ品質のコンデンサ ーマイクロホンです。ミッドサイド構成とした2つのマイクロホ
ンカプセルによりステレオイメージを調整可能としたことで、音楽やスピーチなど多種多様な音源の収音に対応しています。ShurePlus® MOTIVアプリによりユーザー
はデジタル信号処理(DSP)のプリセットモード選択、ゲイン調節、およびステレオ幅調節による音質のカスタマイズが可能です。
特長
ミッド サ イド ス テ レ オ マ イクロ ホ ン
定評のあるミッドサイドステレオマイクロホン方式は2つのカプセルを同時に使用しています。1つはカーディオイドカプセルで音源に直接向けられ、もう1つは双指向
性カプセルで左右に向けられます。この配置により、ユーザーはステレオ幅の調節が可能となり、また優れたモノラル互換性も得られます。
プ ラグ&プ レ イ
MV88はLightningコネクターを備えたあらゆるiOS機器と互換性があります。無料のShurePlus MOTIVアプリの柔軟なコントロールにより、あらゆる環境でも最適に音
を 得 る こ と が で き ま す 。
コンパクトで高い耐久性
MV88は軽量なオールメタル製で、さらにどこにでも携帯できるコンパクトさを備えています。すべてのShure製品と同様に、MV88は現場での信頼性を確保するため
の厳密な品質テストに合格しています。
ShurePlus MOTIVアプリによる柔軟なコントロール
ShurePlus MOTIVアプリでは、ゲイン、ステレオ幅、プリセットモードなどのマイクロホン設定を調節できるほか、録音アプリとしても機能します。
ク イック セット アッ プ
MV88はLightningコネクターを備えた携帯機器と互換性があります。
1. iOS機器のLightningコネクターにマイクロホンを差し込みます。
オーディオアプリケーションまたはShurePlus MOTIV録音アプリが起動しMV88が選択されると、MV88の基部にあるLEDが点灯します。
注:Lightningコネクターは接続に裏表が無いため、MV88はどちらの向きでも取り付けが可能です。
2. ShurePlus MOTIVアプリをインストールして開きます。
ShurePlus MOTIVによりマイクロホンを調整し直ちに録音を開始できます。
3. 音声を確認し、ShurePlus MOTIVアプリのMV88設定で調節を行います。
プリセットモードを選択するか、手動でマイクロホンのゲインとステレオ幅を調節して録音に最適になるようにします。コンプレッサー、イコライザーといったオーディ
オ設定の詳細については、「詳細設定」の項目を参照してください。
4. 録音を行う前に、お使いの機器を「機内モード」と「おやすみモード」に設定します。
これにより、電話着信やアプリの通知によって邪魔されることなく、オーディオを録音できます。
5. ShurePlus MOTIVまたはサードパーティ製録音アプリを使用して録音を開始します。
マイクロホンはShurePlus MOTIVアプリによる全ての設定を保持し続けます。録音中に調節することも可能ですが、不自然に聞こえることを避けるために、録音の
前 に 設 定 を テ ス ト し て く だ さ い 。
75
Page 76

MV88マイクロホンのデザイン
センター(カーディオイド)
左側
右側
MV88は2つのカプセルを備えています。1つはカーディオイドパターンで、マイクロホンの前方向からの音声を直接捉えます。もう1つのカプセルは双指向性で、左側
と右側からの音を捉えます。
マ イク ロ ホ ン カートリッ ジ
マ イクロホン の 調 整
いずれの位置においても、正確なステレオ録音を行うためにはマイクロホンの前面をまっすぐ音源に向け、側面はそれぞれ正しい方向を向くようにしなければなり
ません。マイクロホン円筒部にある L と R の表示により左右の向きが正しいことを確認します。
注:左右チャンネル入替機能を用いると、必要に応じてマイクロホンの左右を入れ替えることができます。
76
マイクロホンの位置調整
マイクロホンは90度の首振りと円筒部の回転が可能なので、好みのポジションを得ることができます。
Page 77

マイクロホンの角度設定
この項では一般的な使用事例でのマイクロホンの設置について説明します。各
音源を録音するための効果的な方法がいろいろあることは覚えておいてくださ
い。いろいろなマイクロホンの設置と設定を試し、最善の結果が得られる方法を
見 つ け て く だ さ い 。
ヒ ント:マイクロホンのステレオ方向が正しいかを素 早く確認するには、マイクロ
ホンの上となる側にShureのロゴが来ているかどうかチェックします。ロゴが見え
ない場合は、円筒部を90°回転させます。
録音
電話機またはタブレットはどのように持ってもかまいません。マイクロホンの前面
を音源に向け、左 右それぞれが 正しい方向に向くようにします。
縦向き(垂直)
マイクロホンの前面を音源に向けます。マイクロホンの左右は、MV88をLightning
コネクターに差し込む 向き次 第 でどちらの向きにもなりますの で、左と右が 正し
い方向に向いていることを確認してください。
音声インタビュー(卓上)
録音機器を平らな場所に置き、マイクロホンの片側をインタビューを受ける人
に向け、もう一方の側をインタビュアーに向けます。ShurePlus MOTIVアプリで
MONO BIDIRECTIONAL プリセットを選 択します。
動 画 イン タビ ュー
イン タビ ュー を 受 け る 人( カメラ に 映 る 人 )の 音 声と 、イン タビ ュ ア ー( カ
メラには映らない人)の声を両方捉えるには、ShurePlus MOTIVアプリで
MONO BIDIRECTIONAL プリセットを選択します。マイクロホンの右側と左側がそ
れぞ れ の 人を向くように 配 置します。
横向き(水平)
マイクロホンの前面を音源に向けます。マイクロホンの左右は、Lightningコネク
ターに差し込む向き次第でどちら向きにもなりますので、MV88の左と右が正しい
方向に向いていることを確認してください。
セルフ録音(声)
機器を平らな場所に置き、マイクロホンをユーザーの口元に向けます。周囲のノ
イズを軽減するには、ShurePlus MOTIVアプリで MONO CARDIOID プリセ ット を 選
択します。
77
Page 78

100%9:41 AM
L
R
-48 -18 -12 -3 0 dB
RL
Shure MV88
EQ
MV88 Settings
Help
Mic Gain 5.5 dB
L R
Stereo Width
45°
L R
ヘ ッド ホ ン の 併 用
ヘ ッド ホ ン モ ニ タ ー 接 続 ケ ー ブ ル
以下の場合には、付属のヘッドホンモニター接続ケーブルを使用してください。
• 録音機器のヘッドホン入力に細いプラグで接続する必要がある場合。このケーブルにより太いコネクター付きのヘッドホンに対応できます。
• イヤホンに搭載されたマイクロホンを無効にしたい場合。このケーブルを使用すると、MV88からの音のみが録音され、イヤホンに搭載されたマイクロホンからの音
は 録 音 さ れ ま せ ん 。
ShurePlus MOTIVアプリ
ShurePlus MOTIVアプリはマイクロホン設定を調整し、個別の用途のためにパフォーマンスを最適化します。
ヒ ン ト:着信電話、テキスト メッセージやアラートによって録音が中断されないようにするには、機器を「 機内モード 」と「 おやすみモード」に 設定します。
マ イクロホン の 調 整
① メニュー
録音画面、保存済みの録音、MV88設定、プリファレンス画面にアクセスする
には、メニューを 選 択します。
② 入力メーター
入力信号の強さを表示します。最大音量ピークが目安の範囲(網掛け部分)
内 に 収 ま っ て い る 必 要 が あ り ま す 。
③ 詳細設定
プルダウンバーを下げると詳細設定が表示され、カートリッジ選択、ウィンド
ノイズ軽減、LRチャンネル入替、イコライザー、リミッター、コンプレッサーのコ
ン ト ロ ー ル が で き ま す 。
78
マ イクロホン 設定
④ プ リセ ット モ ード
モードを選択することで、用途に合ったステレオ幅、イコライザー、コンプレッ
サーが設定されます。詳細については、「プリセットモード」の項目を参照して
く だ さ い 。
⑤ マ イクロ ホ ン の ゲ イン
音源の音量に合わせて調節します。調節を行う際にはメーターを見てレベ
ルが目安の範囲(入力メーターの網掛け部分)内に収まっていることを確認
します。
⑥ ス テレ オ 幅
ステレオマイクロホンの収音範囲の幅を調節します。
ヒ ン ト: 幅を調節する際には、マイクロホンの位置と音源のサイズを考慮します。例えば、
大きなオーケストラやアンサンブルの録音では、各楽器間のセパレーションを高めるため
には広い幅のステレオイメージとすることが有効です。スピーチといった用途では、明瞭
さを高め、周囲(室内)の雑音を入らなくするには幅を狭めることが有効です。
Page 79

プ リセ ット モ ード
L
R
00:00 00:01 00:02 00:03 00:04 00:05
24/48 KHz
100%9:41 AM
Record
Mic Gain
5.5 dB
New Recording 1
0.00 MB
Time Left
about 2 hours 5 min
00:00
Shure MV88
RL
L
R
-48 -18 -12 -3 0 dB
100%9:41 AM
Record
Mic Gain
5.5 dB
L
R
00:00 00:01 00:02 00:03 00:04 00:05
New Recording 1
0.92 MB
Time Left
about 25 min
00:01.43
Done
Recordings
Shure MV88
RL
24/48 KHz
L
R
-48 -18 -12 -3 0 dB
5つのモードにより、録音ニーズに合わせた最適なゲイン、ステレオ幅、イコライザー、コンプレッサー、リミッターが設定されます。マイクロホンのレベルを設定したら、
各モードに切り替えて、音質が最適となるモードを選びます。その後、必要に応じてレベルを調節します。
モ ード 用途 特性
スピー チ の 収 音 に 適し て
います
狭いステレオ幅により背景のノイズを排除、明瞭度と豊かさを高めるイコライジング、さらに軽めのコンプ
レ ッ サ ー に よ り レ ベ ル を 一 定 に 保 ち ま す 。
スピー チ
ソロま た は グ ル ープ で の
中程度のステレオ幅と控えめなイコライジングにより豊かさと明瞭さを高めた自然なサウンドです。
ボー カ ル パフォー マン ス の
歌声
フ ラット
録音用
あらゆる用途に適してい
ます
ア コ ー ス テ ィッ ク 楽 器 や 静 か
な音楽向きです
完全に未処理の信号です(イコライザーやコンプレッサーは使用されません)。録音後に音声を処理する
場合に柔軟性を発揮します。
中程度のステレオ幅と透明度の高いコンプレッサーにより音のスパイクを取り除き、静音部を引き立たせ
ます。ディテールを強調し、全体的に自然なサウンドとしたイコライザー設定です。
アコース
テ ィッ ク
バンドや音の大きい音源の
録音に使用します
広いステレオ幅により音源のセパレーションを高め、さらに楽器の音の混濁を生じさせる可能性のある周
波数をイコライジングにより低減し音の明瞭度を高めます。
バンド
録音設定
① 機器のステータス
ShurePlus MOTIVアプリが接続されたマイクロホンを認識するとマイクロホ
ン 名 が 表 示 さ れ ま す 。
② 詳細設定画面の表示
現在有効になっている機能のアイコンが表示されます。
③ 録音表示
録音中に音の波形を表示します。
④ サンプルレートおよびビット深度の選択
プルダウンしてサンプリングレートとビット深度を選 択します。
録音設定
⑤ 録音の詳細
左 側 に は 、ファイ ル 名やファイ ル サ イズ な ど 、録 音され たファイ ル のプ ロ パ テ
ィが表示されます。右側には録音可能な残り時間が表示されます。
⑥ 録音/一時停止ボタン
録音と一時停止のボタンです。
注:1つの録音の最大ファイルサイズは2 GBで、録音可能時間としては約2時間
となります。アプリのパフォーマンスを最大限にするため、この制限を設けていま
す。サンプルレートを低くして録音すると、より長時間の連続録音が可能です。
79
Page 80

詳細設定
ShurePlus MOTIVアプリの入力メーターの下にあるプルダウンバーにより詳細設定メニューを表示できます。iPadバージョンでは、詳細設定の表示には「詳細」ボタン
を使 用します。
指向特性の選択(ステレオとモノラルの設定)
以下の設定によりマイクロホンカプセルの動作がコントロールされます。モノモードで動作しているときは、ステレオ幅は調節できません。
Stereo(ステレオ) 前=オン
左 右=オン
Mono Cardioid(モノカーディ
オ イド )
Mono Bidirectional(モノ双
指向性)
Raw Mid-Side(Rawミッドサ
イド )
前=オン
左右=オフ
前=オフ
左 右=オン
出力と処理については説明書を参照して
く だ さ い 。
Raw Mid-Side出力
処理後の柔軟性を高めるには、Raw Mid-Side 設定を使用します。この設定では、録音後にステレオイメージが調節可能となる2チャンネル信号が提供されます。
左:カーディオイド(前)
右:双指向性(左右)
Raw Mid-Side 設定は、ミッドサイド ステレオマトリクスデコーダーを備えたオーディオ録 音アプリケーションにより、録音されたトラックがステレオイメージに変換され
る こ と を 意 図 し た も の で す 。
80
Page 81

マニュアル デコーディングとステレ オ 幅 の 調 整
標準
入替が必要
お使いのデジタルオーディオワークステーションソフトウェア(DAW)がミッドサイドデコーダーを備えていない場合は、以下の手順により正確なステレオイメージを得
る こ と が で き ま す 。
1. 2 チ ャン ネ ル の Raw Mid-Side ファイルから左右の音声信号をそれぞれ独立したモノトラックとして取り出します。
2. 空 のオーディオ トラックを3つ作 成します。
1番目のトラック
2番目のトラック
3番目のトラック
3. 左右のトラックを同じ音量レベルでグループにして同時に調節できるようにします。左右のトラッ
クの 音 量 を 上 げ るとステレ オ 幅 が 広 がり、下 げ ると幅 は 狭 くなります 。
高 度 な テ ク ニ ック:アタックの速いコンプレッサーを左右トラックに使用すると、過渡期(ドラムスティックでシンバルを叩いたときの最初の部分の音)がステレオイメ
ージの中央に保たれ、音が減衰するにつれてステレオ音場内に広がります。
左 チ ャン ネ ル の み の音声信号(前/カーディオイド)をモノトラックとして使用し、パンはセ
ン ターにします。
右 チ ャン ネ ル の み の音声信号(左右/双指向性)をモノトラックとして使用し、パンは左振
り切りにします。
2番目のトラックから左右/双指向性の信号をコピーします。このトラックのパンは右振り切
りとし 、位 相 を 逆にします 。
Raw Mid-Sideオーディオのマニュアルデコーディング
ウィンド ノ イズ リダ クション
低周波数カットオフフィルターにより環境ノイズによるゴロゴロという雑音を減少させます。付属のフォームウィ
ンドスクリーンをウィンドノイズリダクションと併用することで、ゴロゴロという雑音と破裂音(マイクロホンに強
く当たる空気音)が抑えられます。
ウィンドノイズをさらに減少させるには、オプションのRycote™ウィンドジャマーを付属のフォームウィンドスクリ
ー ン の 上 か ら 被 せ ま す 。
左右チャンネル入替
ステレオで録音を行う際に、この機能により左右のオーディオチャンネルを入 れ替えてステレオイメージと動
画を正しく一致させることができます。この機能は、電話機/タブレットがマイクロホンの向きが逆になってしま
う位置となる場合に必要となります。
ヒ ン ト:チャンネル入替が必要かどうかはマイクロホンの円筒部にある L と R のインジ ケーター で 確 認 し ま
す。
この例のように、電話機を回転させた場合にLRチャン
ネル入替を行う必要があります。
イコライザー、リミッター、コンプレッサー
詳細設定画面では、イコライザー、リミッター、コンプレッサーの設定を微調整できます。プリセットモードをスクロールしてDSPの変化を聴き、音質を調整します。
注:プリセット内のイコライジングは表示されません。ユーザーが加えたイコライジングのみが、詳細設定画面上に表示されます。
81
Page 82

ト ラブ ル シ ュー テ ィン グ
問題 解決策
LEDランプが見えない LEDはMV88の基部にあります。Lightningコネクターではマイクロホンをどちらの向きにでも接続できるた
音質が悪い Motivアプリ画面の左上をチェックし、MV88が正しく接続され認識されていることを確認します。音声が内
ヘ ッド セ ット を 接 続 す ると 音 質
が変わる
音が歪む オーディオメーターを見て、音量のピークが目安の範囲内になるようにします。レベルが入力メーターの
ステレオチャンネルの左右が
動画と一致しない
MV88は接続されているが、音
量 メー ターに 信 号 が示 さ れ な い
め、電話機の陰になってLEDが見えなくなる場合があります。マイクロホンを外し裏返して接続するとマ
イクロホンの 状 態 が 確 認 できるようになります。
蔵マイクロホンから得られている可能 性があります。
マイクロホン付きのヘッドセットは、オーディオ機器としてMV88より優先されます。他のマイクロホンとの
干渉を避けるには、付属のヘッドホンモニター接続ケーブルを使用します。
赤色の表示に達している場合にはゲインを下げます。
iOS機器の向きによっては、LRチャンネルの入替を行う必要があります。オーディオがすでに録音済みで
ある場合には、DAWやオーディオ編集ソフトウェアにより簡単に左右のチャンネルの入れ替えができま
す。
iOS機器のプライバシーにあるマイクの設定で SETTINGS > PRIVACY > MICROPHONE ShurePlus MOTIV
ア プ リ に 許 可 を 与 え ま す 。
サ ン プ リン グ レ ート お よ び ビ ット 深 度
サン プ ルレートとビット深 度は 、お 使 い のコンピュータの オーディオとサウンドのコ
ントロールパネ ル のメニューで設 定できます。これらの値は、ユーザーのニーズに
合わせて調節が可能です。ポッドキャスト録音で、容易にダウンロードできるよう
ファイルを小さくすることが重要である場合には、サンプルレートを低く設定しま
す。音楽やダイナミックな録音を行う場合は、サンプルレートを高くします。
ヒ ン ト:高いサンプルレートで録音し、m4aファイルにすることで扱いやすいサイ
ズの高音質なファイルが得られます。
P C ユ ー ザ ー 向 け のヒ ン ト:コンピ ュー ター の サウンド コントロー ル パネ ル に あ る マ
イクロホンのサンプルレートとビット深度設定が、お使いのソフトウェアで選択さ
れているサンプルレートとビット深度と一致していることを確認します。
システム要件および互換性
iOS • iOS 8.0以上
iPhone • iPhone 5
• iPhone 5c
• iPhone 5s
• iPhone 6
• iPhone 6 Plus
iPod Touch • 第5世代
iPad • iPad第4世代
• iPad Air
• iPad Air 2
iPad Mini • iPad Mini第1世代
• iPad Mini第2世代
• iPad Mini第3世代
仕様
MFi認証取得済
はい
DSPモード(プリセット)
スピーチ/歌唱/アコースティック/ラウド/フラット
トラン スデ ューサー タ イプ
カーディオイド (10mm)/双方向コンデンサ カートリッジ (10mm)
指向特性
ステレオ幅調節可能/Mono Bidirectional/Mono Cardioid/Mid-Side
Stereo Principle
Mid-Side
ビ ット 深 度
16ビット/24ビット
サ ン プ リン グレ ート
44.1/48kHz
周波数特性
20Hz ~ 20,000Hz
調整可能なゲイン範囲
0 ~ +36dB
感度
-37dBFS/Pa @1 kHz [1] [2]
最大SPL
120dB SPL [2]
リミッ タ
はい
コンプ レッサ
はい
イコラ イザ
5 バ ンド
使用電源
Lightningコネクタ経由で電源供給
外装
総金属製
質量
40.5g (1.43オンス)
寸法
67 x 25 x 35mm 高さ×幅×奥行き
[1] 1 Pa=94 dB SPL
[2]最小ゲイン、フラットモードの場合
82
Page 83

アク セサリー
付 属 の ア クセ サリー
MV88フォーム ウィンドスクリーン AMV88-WS
MV88キャリングケース AMV88-CC
交 換 パーツ
MV88フォーム ウィンドスクリーン AMV88-WS
MV88キャリングケース AMV88-CC
ヘ ッド ホ ン モ ニ タ 適 合 ケ ー ブ ル 95A13511
オ プ ション ア ク セ サリー
MV88用Rycote Windjammer AMV88-FUR
認証
ユーザーへの お知らせ
本機器はテストされFCC規定パート15に則りクラスBデジタル機器に限定的に適合します。この制限は、住宅地域において設置する場合に有害な電波干渉から保護
するためのものです。本機器は電磁波を発生・使用し、放射することがあります。取扱説明書に従って設置、使用しないと無線通信に電波干渉が起こす可能性があ
ります。あるいは設置状況に関わらず障害を引き起こす可能性もあります。本機器によりラジオやテレビの受信に電波干渉が起こるようであれば(これは、機器の電
源を一度切ってから入れるとわかります)、以下の手段を1つまたはいくつかを用いて電波干渉を防いでください。
• 受信アンテナの向きまたは位置を変更する。
• 機器と受信機の設置間隔を広げる。
• 受信機を接続しているコンセントとは別の回路にあるコンセントに機器を接続する。
• 販売店または熟練したラジオ/テレビ技術者に相談する。
産業のカナダICES-003コンプライアンスレベル:CAN ICES-3 (B)/NMB-3(B)
メ モ:テストは、同梱および推奨のケーブル使用に基づきます。シールド(スクリーン)型以外のケーブルを使用した場合はEMC性能が低下します。
本製品は、関連するすべての欧州指令の基本的要件を満たし、CEマークに適合しています。
CE適合宣言書は以下より入手可能です: www.shure.com/europe/compliance
ヨーロッパ認可代理店:
Shure Europe GmbH
ヨーロッパ、中東、アフリカ地域本部:
部門:EMEA承認
Jakob-Dieffenbacher-Str.12
75031 Eppingen, Germany
TEL:49-7262-92 49 0
FAX:49-7262-92 49 11 4
Eメール:info@shure.de
「iPod用に製造」、「iPhone用に製造」、および「iPad用に製造」とは、 電子アクセサリーがiPod、iPhone、またはiPadそれぞれの接続専用にデザインされ、Appleのパフ
ォーマンス基準に合うよう開発者によって認定されたことを表しています。Apple社は、本機器の作動または安全基準および規制基準の順守について責任を負いま
せん。iPod、iPhone、またはiPadでの本アクセサリー製品の使用により無線性能に影響が及ぶ可能性があることにご留意ください。
iPad、iPhone、iPod、iPod classic、iPod nano、iPod touch、およびRetinaはApple Inc.の商標であり、米国および他の国々で登録されています。iPad AirおよびiPad mini
はApple Inc.の商標です。iPhoneの商標は、アイホン株式会社のライセンスに基づき使用されています。
Mac®およびLightning®は、Apple Inc.の登録商標です。
83
Page 84

iOS 미드 사이드 스테레오 콘덴서 마이크
MV88
Shure MV88은 Lightning® 커넥터를 사용하여 Apple iOS 장치에 직접 연결할 수 있는 전문가 품질의 콘덴서 마이크입니다. 두 개의 마이크 캡슐이 미드 사
이드 구성으로 배열되어 있어 조절 가능한 스테레오 이미지를 제공하고 음악 및 연설을 포함한 다양한 집음에 적합합니다. ShurePlus® MOTIV 앱을 사용
하면 디지털 신호 처리(DSP) 사전 설정 모드 선택, 게인 조절, 스테레오 폭 제어로 사운드를 사용자 지정할 수 있습니다.
기능
미드 사이드 스테레오 마이크
기존의 미드 사이드 스테레오 마이크 기법은 2개의 코인시던트 캡슐을 사용했습니다. 하나는 소스를 직접 향하는 단일지향성 캡슐이고 하나는 측면을 향
하는 양방향성 캡슐입니다. 이러한 구성은 스테레오 폭을 조절하고 뛰어난 모노 호환성을 제공합니다.
플러그 앤 플레이 작동
MV88은 Lightning 커넥터가 장착된 iOS 장치와 호환됩니다. 무료로 이용할 수 있는 ShurePlus MOTIV 앱은 거의 모든 환경에서 사운드를 조절할 수 있는
유연한 제어 기능을 제공합니다.
컴팩트한 크기와 내구성
MV88은 경량 올메탈의 소형 구조로서 어디에나 소지할 수 있습니다. 다른 모든 Shure 제품들과 마찬가지로, MV88도 현장에서의 안정성을 확인하는 엄격
한 품질 검사를 거쳤습니다.
ShurePlus MOTIV 앱을 통한 유연한 제어
ShurePlus MOTIV 앱은 게인, 스테레오 폭, 사전 설정 모드와 같은 마이크 설정을 제어하고, 레코딩 앱 기능도 수행합니다.
빠른 설정
MV88은 Lightning 커넥터가 있는 모바일 장치와 호환됩니다.
1. iOS 장치의 Lightning 커넥터에 마이크를 연결하십시오.
오디오 응용 프로그램 또는 ShurePlus MOTIV 녹음 앱이 열리고 MV88이 선택되면 MV88 하단의 LED가 켜집니다.
주: 가역 Lightning 커넥터를 사용하면 양쪽 방향으로 MV88을 설치할 수 있습니다.
2. ShurePlus MOTIV 앱을 설치하고 엽니다.
ShurePlus MOTIV는 마이크를 제어하고 인스턴트 녹음을 제공합니다.
3. 오디오를 점검하고 MV88 설정에서 ShurePlus MOTIV 앱으로 설정을 조정합니다.
오디오 녹음을 최적화하려면 사전 설정 모드를 선택하거나 게인 및 스테레오 폭을 수동 조절합니다. 압축, 이퀄라이제이션 등과 같은 추가 오디오 설정
에 대한 자세한 내용은 "고급 오디오 설정" 항목을 참조하십시오.
4. 녹음 전에 비행기 모드 및 방해 금지 상태로 기기를 설정하십시오.
이렇게 설정하면 음성 통화나 앱 알림의 방해를 받지 않고 오디오를 녹음할 수 있습니다.
5. 녹음을 시작하려면 통합 ShurePlus MOTIV 또는 타사 녹음 앱을 사용합니다.
마이크는 ShurePlus MOTIV 앱의 모든 설정을 유지합니다. 녹음 중에도 조절할 수 있으나 가청 인공물을 방지하기 위해 녹음 전에 설정을 테스트하십시
오.
84
Page 85

MV88 마이크 디자인
중앙(단일방향성)
왼쪽
오른쪽
MV88은 2개의 캡슐로 구성됩니다. 하나는 마이크 전면에서 직접 집음하는 단일방향성 캡슐입니다. 다른 하나는 좌측과 우측에서 집음하는 양방향성 캡슐
입니다.
마이크 카트리지
마이크 조절
어떤 위치에서도 정확한 스테레오 레코딩을 위해 마이크 전면은 음원을 향하고 측면은 적절한 방향을 향하도록 위치시키십시오. 마이크 배럴의 L 및 R i표
시기를 사용하여 정확한 위치로 배치하십시오.
주: 좌측-우측 채널 스왑 기능을 사용하여 스왑이 필요한 경우에 마이크의 위치를 전환할 수 있습니다.
마이크 위치 조절하기
The microphone pivots and the barrel can be rotated 90 degrees to achieve desired positioning.
85
Page 86

마이크 조준
이 단원은 대표적인 사용 사례에 대한 마이크 배치방법을 제시합니다. 주어
진 소스를 레코딩하는 효과적인 방법은 다양하다는 점을 잊지마십시오. 마
이크 배치방법 및 설정을 실험하여 최적의 방법을 찾아보십시오.
팁: 마이크의 정확한 스테레오 방향을 간편하게 조절하려면 Shure 이름이
마이크 맨 위에 뚜렷하게 보이는지 확인하십시오. 이름이 보이지 않으면 배
럴을 90° 회전시키십시오.
오디오 레코딩
어느 위치에서나 휴대전화나 태블릿을 사용할 수 있습니다. 마이크 전면이
음원을 향하도록 조준하고 왼쪽 및 오른쪽 측면을 사용하여 정확하게 배치
하십시오.
세로(수직)
마이크 전면이 음원을 향하도록 조준하십시오. Lightning 커넥터를 사용하
면 마이크를 양방향으로 장착할 수 있으므로, MV88의 좌측과 우측이 적절
한 방향을 향하는지 확인하십시오.
오디오 인터뷰(테이블탑)
마이크의 한쪽 면이 대상을 향하고 다른쪽 면이 인터뷰어를 향하도록
레코딩 장치를 편평한 면에 설치하십시오. ShurePlus MOTIV 앱에서
MONO BIDIRECTIONAL 사전 설정을 선택합니다.
비디오 인터뷰
대상(온카메라)과 인터뷰어(오프 카메라)의 음성을 모두 집음하려면
ShurePlus MOTIV 앱에서 MONO BIDIRECTIONAL 사전 설정을 선택하십시
오. 좌측과 우측이 각각의 사람을 향하도록 마이크를 위치시키십시오.
가로(수평)
마이크 전면이 음원을 향하도록 조준하십시오. Lightning 커넥터를 사용하
면 마이크를 양방향으로 연결할 수 있으므로, MV88의 좌측과 우측이 적절
한 방향을 향하는지 확인하십시오.
셀프 레코딩(음성)
장치를 편평한 면에 설치하고 마이크를 입으로 기울이십시오. 주변 소음을
줄이려면 ShurePlus MOTIV 앱에서MONO CARDIOID 사전 설정을 선택하십
시오.
86
Page 87

100%9:41 AM
L
R
-48 -18 -12 -3 0 dB
RL
Shure MV88
EQ
MV88 Settings
Help
Mic Gain 5.5 dB
L R
Stereo Width
45°
L R
헤드폰과 함께 사용하기
헤드폰 모니터 어댑터 케이블
포함된 헤드폰 모니터 어댑터 케이블을 다음과 같은 목적으로 사용하십시오:
• 레코딩 장치의 헤드폰 입력에 가는 연결이 필요한 경우. 큰 커넥터로 케이블을 통해 헤드폰을 연결하는 경우.
• 이어폰의 인라인 마이크를 비활성화하는 경우. 케이블을 사용하면 이어폰의 인라인 마이크가 아닌 MV88에서만 사운드가 레코딩됩니다.
ShurePlus MOTIV 앱
ShurePlus MOTIV 앱은 마이크 설정을 제어하여 특정 용도에서의 성능을 최적화합니다.
팁: 장치를 비행기 모드 및 방해 금지 로 설정하여 음성 통화, 문자 메시지 또는 알림에 의해 레코딩이 방해되지 않도록 하십시오.
마이크 조절
① 메뉴
레코딩 창, 저장된 레코딩, MV88 설정, 기본 설정 창에 액세스하려면
메뉴를 선택합니다.
② 입력 미터
입력 신호의 강도를 표시합니다. 가장 큰 피크는 목표 범위(음영
영역으로 표시된 범위) 내에 도달해야 합니다.
③ 고급 기능
풀다운 바를 사용하여 카트리지 선택, 바람 소리 감소, 좌측-우측 스왑,
이퀄라이저, 리미터 및 압축 제어기가 포함된 고급 오디오 기능을
표시합니다.
④ 사전 설정 모드
특정 응용에 대한 스테레오 폭, 이퀄라이제이션, 압축을 설정하려면
모드를 선택합니다. 자세한 내용은 "사전 설정 모드"를 참조하십시오.
마이크 설정
⑤ 마이크 게인
음원 볼륨이 일치하도록 조절합니다. 수준이 목표 범위(입력 미터의
음영 영역으로 표시된 범위)에 속하도록 조절할 때 입력 미터를
모니터링합니다.
⑥ 스테레오 폭
스테레오 마이크 집음 영역의 폭을 조절합니다.
팁: 폭을 조절할 때 마이크 위치와 소스 크기를 고려하십시오. 예를 들어, 대규모 오
케스트라나 앙상블 레코딩의 경우 폭이 넓은 스테레오 이미지를 사용하는 것이 각
악기의 분리를 개선하는 데 유용합니다. 연설과 같은 기타 응용의 경우 폭이 좁은
것이 명료도를 개선하고 주변(녹음실) 사운드를 거부하는 데 유용합니다.
87
Page 88

사전 설정 모드
L
R
00:00 00:01 00:02 00:03 00:04 00:05
24/48 KHz
100%9:41 AM
Record
Mic Gain
5.5 dB
New Recording 1
0.00 MB
Time Left
about 2 hours 5 min
00:00
Shure MV88
RL
L
R
-48 -18 -12 -3 0 dB
100%9:41 AM
Record
Mic Gain
5.5 dB
L
R
00:00 00:01 00:02 00:03 00:04 00:05
New Recording 1
0.92 MB
Time Left
about 25 min
00:01.43
Done
Recordings
Shure MV88
RL
24/48 KHz
L
R
-48 -18 -12 -3 0 dB
5개의 선택 가능 모드로 레코딩 요구에 적합하도록 게인, 스테레오 폭, 이퀄라이제이션 및 압축 설정을 최적화합니다. 마이크 수준을 설정하고 스크롤로
사운드에 가장 적합한 모드를 찾습니다. 그런 다음 필요에 따라 수준을 조절합니다.
모드 적용 특성
연설 집음에 최적화 주변 소음을 거부하는 좁은 스테레오 폭, 명료도와 풍부함이 강조되는 이퀄라이제이션 설정, 수준
을 일정하게 유지하는 섬세한 압축을 자랑합니다.
연설
솔로 또는 그룹 보컬 공연의
집음에 사용
이퀄라이제이션이 섬세한 중간 스테레오 폭은 풍부함과 명료도를 더하여 자연스러운 사운드를 재
현합니다.
노래
플랫어느 용도에나 적합 전혀 처리되지 않은 신호(이퀄라이제이션 또는 압축 설정을 사용하지 않음). 레코딩 후 오디오 처
리 시 유연성을 더합니다.
어쿠스틱 악기 및 조용한 음
악에 적합
중간 스테레오 폭과 투명한 압축으로 볼륨 스파이크를 완화하고 방음 통로를 전달합니다. 이퀄라
이제이션은 디테일을 강조하고 전체적으로 자연스러운 사운드를 전달합니다.
어쿠스틱
밴드 및 소리 큰 소스의 레코
딩에 사용
이퀄라이제이션으로 소스간 분리도를 높히는 넓은 스테레오 폭은 악기 사운드를 혼잡하게 만들
수 있는 주파수를 줄임으로써 해상도를 개선합니다.
밴드
녹음 설정
① 장치 상태
마이크 이름이 표시되어 ShurePlus MOTIV 앱이 연결된 마이크를
인식하고 있음을 표시합니다.
② 고급 기능 디스플레이
현재 활성화되어 있는 고급 기능에 대한 아이콘을 표시합니다.
③ 녹음 디스플레이
녹음 중 사운드의 음파를 표시합니다.
④ 샘플링 레이트 및 비트 깊이 선택
풀다운하여 샘플링 레이트 및 비트 깊이를 선택합니다.
88
녹음 설정
⑤ 녹음 세부 정보
파일 이름 및 파일 크기와 같이 녹음된 파일의 속성들이 좌측에
표시됩니다. 남은 녹음 시간이 우측에 표시됩니다.
⑥ 녹음/일시 정지 버튼
큰 버튼을 누르면 녹음과 일시 정지가 활성화됩니다.
주: 최대 녹음 파일 크기는 2GB로, 약 2시간의 녹음 시간에 해당합니다. 이
제한은 앱 성능 극대화를 위한 조치입니다. 더 낮은 샘플링 레이트에서의
녹음은 방해받지 않는 더 긴 녹음 시간을 감안합니다.
Page 89

고급 오디오 설정
고급 오디오 설정 메뉴를 표시하려면 ShurePlus MOTIV iPhone 앱의 입력 미터 아래에 있는 풀다운 바를 사용합니다. iPad 버전을 사용할 때 고급 오디오
설정을 표시하려면 고급 버튼을 사용하십시오.
극성 패턴 선택(스테레오 및 모노 설정)
다음 설정은 마이크 캡슐 활동을 제어합니다. 모노 모드로 작동할 경우 스테레오 폭은 조절되지 않습니다.
스테레오 전면 = 켜짐
모노 단일방향성 전면 = 켜짐
측면 = 켜짐
측면 = 꺼짐
모노 양방향성 전면 = 꺼짐
로우 미드 사이드 출력 및 처리에 관한 정보는 전체 설명
측면 = 켜짐
을 참조하십시오.
로우 미드 사이드 출력
처리 후 유연성을 높이려면 Raw Mid-Side 설정을 사용하십시오. 이 설정은 트랙이 녹음된 후에도 스테레오 이미지를 조절할 수 있는 2채널 신호를 전달합
니다.
왼쪽: 단일방향성(전면)
오른쪽: 양방향성(측면)
Raw Mid-Side 설정은 녹음된 트랙을 스테레오 이미지로 해석할 수 있는 미드 사이드 스테레오 매트릭스 디코더를 지원하는 오디오 레코딩 응용 프로그램
이 있는 경우에만 사용할 수 있습니다.
89
Page 90

수동 디코딩 및 스테레오 폭 조절
표준
스왑 활성화
디지털 오디오 워크스테이션 소프트웨어(DAW)가 미드 사이드 디코더를 지원하지 않는 경우, 정확한 스테레오 이미지를 생성하려면 다음 단계를 사용하
십시오.
1. 2채널 Raw Mid-Side 파일에서 좌측 오디오 신호와 우측 오디오 신호를 개별 모노 트랙으로 추출합니다.
2. 3개의 빈 오디오 트랙을 생성합니다.
첫 번째 트랙 좌측 채널의 오디오 신호(전면/단일방향성)를 중앙으로 전개되는 모노 트랙으로 사
두 번째 트랙 우측 채널의 오디오 신호(측면/양방향성)를 좌측 전체로 전개되는 모노 트랙으로 사
세 번째 트랙 두 번째 트랙의 측면/양방향성 신호를 복사합니다. 이 트랙을 우측 전체로 전개하고
3. 측면 트랙들을 동시에 조절할 수 있도록 동일한 볼륨 수준으로 그룹화합니다. 측면 트랙의 볼
륨을 높이면 스테레오 폭이 넓어지고, 볼륨을 낮추면 폭이 좁아집니다.
고급 팁: 측면 트랙에서 빠른 연주 설정으로 압축하기를 사용하면 과도기(드럼 스틱이 심벌즈를 칠 때와 같이 사운드의 첫 부분)가 스테레오 이미지의 중
심으로 유지되고 스테레오 필드 내에서 사운드 감쇠로 확대됩니다.
용합니다.
용합니다.
단계를 역으로 진행합니다.
로우 미드 사이드 오디오의 수동 디코딩
바람 소리 감소
이 기능은 환경 잡음에 의한 럼블을 감소시키는 저주파수 차단 필터를 활성화시킵니다. 포함된 폼 바
람 막이를 바람 소리 감소와 함께 사용하면 럼블과 폭발음(공기가 마이크를 강타하는 파열음)을 방지
할 수 있습니다.
바람 소리를 더욱 줄이려면 포함된 폼 바람 막이에 조립되는 옵션으로 제공되는 Rycote™
Windjammer를 사용하십시오.
좌측-우측 채널 스왑
스테레오 레코딩 시 이 기능은 좌측 오디오 채널과 우측 오디오 채널을 뒤집어 스테레오 이미지를 비
디오로 정확하게 일치시킵니다. 이 기능은 마이크가 뒤집어지는 휴대전화/태블릿 위치에서 필요할 수
있습니다.
팁: 마이크 배럴의 L 및 R 표시기를 보고 스왑이 필요한지 확인하십시오.
이 예에서, 휴대전화를 회전시키면 좌측/우측 스왑
이 활성화되어야 합니다.
이퀄라이저, 리미터 및 압축기
고급 기능 창을 사용하면 아퀄라이저, 리미터 및 압축기 설정을 미세 조절할 수 있습니다. DSP 변경을 들으려면 사전 설정 모드를 스크롤하여 사운드에서
다이얼을 조절하십시오.
주: 사전 설정 내에서의 이퀄라이제이션은 표시되지 않습니다. 고급 기능 설정 창에는 추가적인 사용자 선택 가능 이퀄라이제이션만 표시됩니다.
90
Page 91

문제 해결
문제점 해결책
LED 조명이 보이지 않음 LED는 MV88 바닥에 있습니다. Lightning 커넥터를 사용하면 마이크를 양방향으로 연결할 수 있으
오디오 사운드 불량 응용 프로그램 맨 왼쪽 구석에서 MV88이 완전히 연결되어있고 인식되는지 확인하십시오. 오디오
헤드셋을 연결하면 오디오 품
질이 변합니다.
오디오 왜곡 오디오 미터를 사용하여 볼륨 피크가 목표 범위에 속하는지 확인하십시오. 수준이 입력 미터의 붉
좌측/우측 스테레오 채널이
비디오와 일치하지 않음
MV88이 꽂혀있으나 볼륨 미
터가 신호를 등록하지 않습
니다.
므로 휴대전화의 LED가 잘 보이지 않을 수 있습니다. 마이크를 분리하고 뒤집어서 다시 연결한 후
마이크 상태를 확인합니다.
는 내장형 마이크에서 전달될 수도 있습니다.
마이크가 내장된 헤드셋은 오디오 장치로서의 MV88에 우선합니다. 다른 마이크로 인한 간섭을 차
단하려면 포함된 헤드폰 모니터 어댑터 케이블을 사용하십시오.
은색 피크 표시기에 도달하면 게인을 낮추십시오.
iOS 장치의 방향에 따라 좌측-우측 스왑을 활성화해야 할 수 있습니다. 오디오가 이미 레코딩된 경
우, 좌측 채널과 우측 채널의 전환은 대부분의 DAW 및 오디오 편집 소프트웨어에서 간단하게 실
행할 수 있습니다.
ShurePlus MOTIV 앱에 마이크 사용 권한이 부여되도록 SETTINGS > PRIVACY > MICROPHONE 개
인 보호 설정을 편집하십시오.
샘플링 레이트 및 비트 깊이
샘플링 레이트 및 비트 깊이 설정은 컴퓨터의 오디오 또는 사운드 제어판의
드롭다운 메뉴에 있습니다. 필요에 따라 이 설정을 조절할 수 있습니다. 간
편하게 다운로드하는 것이 중요한 방송 혹은 레코딩 시에는 낮은 샘플링 레
이트를 선택합니다. 음악 및 보다 동적인 레코딩 시에는 높은 샘플링 레이
트를 선택합니다.
팁: 높은 샘플레이트로 녹음을 하여 MP3 음원을 바운스하면, 그만큼 고품
질의 사운드를 구현할 수 있습니다.
PC 사용자를 위한 팁: 사운드 제어판에서 마이크의 샘플레이트와 비트 레
이트가 사용하고 계시는 소프트웨어의 설정과 동일한지 확인하십시오.
시스템 요구 사항 및 호환성
iOS • iOS 8.0 이상
iPhone • iPhone 5
• iPhone 5c
• iPhone 5s
• iPhone 6
• iPhone 6 Plus
iPod Touch • 5세대
iPad • iPad 4세대
• iPad Air
• iPad Air 2
iPad Mini • iPad Mini 1세대
• iPad Mini 2세대
• iPad Mini 3세대
사양
MFi 인증
예
DSP 모드(사전 설정)
발언/노래/어쿠스틱/큰 소리/플랫
변환기 유형
카디오이드 (10 mm)/양방향성 콘덴서 카트리지 (10 mm)
극성 패턴
가변 폭 스테레오/모노 양방향성/모노 단일방향성/미드 사이드
스테레오 원칙
미드 사이드
비트 깊이
16비트/24 비트
샘플링 레이트
44.1/48 kHz
주파수 응답
20 Hz ~ 20,000 Hz
조정가능한 게인 범위
0 ~ +36 dB
감도
-37 dBFS/Pa 1 kHz에서 [1] [2]
Maximum SPL
120 dB SPL [2]
리미터
예
압축기
예
이퀄라이저
5개 대역
전력 사양
Lightning 커넥터를 통한 전원 공급
외장 케이스
올메탈 구조
순중량
40.5 g (1.43oz.)
크기
67 x 25 x 35 mm 높이 x 폭 x 깊이
[1] 1 Pa=94 dB SPL
[2]최소 게인, 플랫 모드
91
Page 92

액세서리
기본 제공 액세서리
MV88 폼 윈드스크린 AMV88-WS
MV88 운반 케이스 AMV88-CC
교체용 부품
MV88 폼 윈드스크린 AMV88-WS
MV88 운반 케이스 AMV88-CC
헤드폰 모니터 어댑터 케이블 95A13511
액세서리 선택 사양
MV88용 Rycote Windjammer AMV88-FUR
인증
사용자 정보
본 장비는 FCC 규정 Part 15에 따른 Class B 디지털 장치에 대한 제한사항 준수 시험을 거쳤으며 해당 제한사항을 준수하는 것으로 인정되었습니다. 이러
한 제한은 주택에서 설치할 때 유해한 간섭으로부터 적절한 보호를 제공하기 위해 고안되었습니다. 본 장비는 무선 주파수 에너지를 발생시키고, 사용하
며, 방출할 수 있으며, 해당 지침에 따라 설치 및 사용되지 않을 경우, 무선 통신에 유해한 간섭을 일으킬 수 있습니다. 하지만, 그 간섭이 어떤 특별한 설치
에서 발생하지 않을 것이라는 보장은 없습니다. 본 장비를 끄고 켤 때에 라디오나 TV 수신에 유해한 간섭을 발생시키는 것으로 파악되면, 사용자는 다음
조치 중 하나 이상을 수행하여 그 간섭을 교정하시기 바랍니다:
• 수신 안테나의 방향을 바꾸거나 위치를 바꿉니다.
• 장비와 수신기 사이의 거리를 더 멀리합니다.
• 장비를 수신기가 연결되어 있는 것과 다른 회로의 콘센트에 연결합니다.
• 도움이 필요하시면 판매점이나 라디오/TV 기술자에게 문의하십시오.
Industry Canada ICES-003 규정준수 레이블: CAN ICES-3 (B)/NMB-3(B)
주: 시험은 제공되는 권장 유형의 케이블을 사용하는 것을 조건으로 이루어졌습니다. 차폐(스크린) 케이블 이외의 다른 유형의 케이블을 사용하면 EMC 성
능이 저하될 수 있습니다.
이 제품은 관련된 모든 유럽 지침의 필수 요건을 충족하며 CE 마크를 사용할 자격이 있습니다.
CE 적합성 선언은 다음 사이트에서 확인할 수 있습니다: www.shure.com/europe/compliance
공인 유럽 대리점:
Shure Europe GmbH
유럽, 중동, 아프리카 본부
부서: EMEA 승인
Jakob-Dieffenbacher-Str. 12
75031 Eppingen, Germany
전화: 49-7262-92 49 0
팩스: 49-7262-92 49 11 4
이메일: info@shure.de
“Made for iPod,” “Made for iPhone” 및 “Made for iPad”는 각각 iPod, iPhone 또는 iPad에 연결되도록 설계되어 Apple 성능 표준을 충족하는 것으로 개발
자에 의해 인증된 전자 액세서리를 의미합니다. Apple은 이 장치의 작동 또는 안전 및 규제 표준에 대한 부합성을 책임지지 않습니다. iPod, iPhone 또는
iPad와 이 액세서리들을 함께 사용할 경우 무선 성능에 영향이 있을 수 있습니다.
iPad, iPhone, iPod, iPod classic, iPod nano, iPod touch 및 Retina는 미국과 기타 국가에서 Apple Inc.의 등록 상표입니다. iPad Air와 iPad mini는 Apple
Inc.의 상표입니다. 상표 "iPhone"은 Aiphone K.K.로부터 라이센스를 받아 사용되었습니다.
Mac® 및 Lightning®은 Apple Inc.의 등록 상표입니다.
92
Page 93

iOS Mid-Side 立体声电容话筒
MV88
Shure MV88 是一款专业质量的电容话筒,可使用 Lightning® 接头直接插入 Apple iOS 设备。两个话筒拾音头按 Mid-Side 配置排列,提供可调节的立体声
声像,适合捕获各种音源,包括音乐和语音。ShurePlus® MOTIV 应用允许用户通过数字信号处理 (DSP) 预设模式选择、增益调节和立体声宽广度控制来
自定义声音。
特点
Mid-Side 立体声话筒
经典的中侧立体声话筒技术使用两个一致的拾音头:一个心形拾音头直接指向音源,一个双向拾音头对准两侧。此配置便于用户调节立体声宽广度并提供
极佳的单声道兼容性。
即插即用运行
MV88 可与配备 Lightning 接口的任何 iOS 设备兼容。免费的 ShurePlus MOTIV 应用提供灵活的控制,使声音适合几乎任何环境。
紧凑和耐用
MV88 具备轻量、全金属结构特征,非常小巧,可携带到任何地方。与所有 Shure 产品一样,MV88 经受过严格的质量测试,确保实际使用的可靠性。
通过 ShurePlus MOTIV 应用灵活控制
ShurePlus MOTIV 应用可控制增益、立体声宽广度和预设模式等话筒设置,还可当作录音应用。
快速设置
MV88 与具有 Lightning 接口的移动设备兼容。
1. 将话筒插入 iOS 设备上的 Lightning 接口。
当音频应用程序或 ShurePlus MOTIV 录音应用打开且选择 MV88 时,MV88 基座上的 LED 亮起。
注意:可反转的 Lightning 接头允许 MV88 安装在任一方向。
2. 安装并打开 ShurePlus MOTIV 应用。
ShurePlus MOTIV 控制话筒并提供即时录音。
3. 使用 ShurePlus MOTIV 应用检查音频并调节 MV88 设置。
选择预设模式或手动调节话筒增益和立体声宽广度以优化录音。请参见“高级音频设置”主题,了解有关压缩、均衡等附加音频设置的更多信息。
4. 将设备设置为飞行模式和勿扰模式,然后再开始录音。
这样您的录音过程就不会被来电或应用通知中断。
5. 使用集成的 ShurePlus MOTIV 或第三方录音应用开始录音。
话筒会保留在 ShurePlus MOTIV 应用中作出的所有设置。可在录音过程中进行调节,但为了避免音频噪声,请在录音前测试好设置。
93
Page 94

MV88 话筒设计
中央(心形)
左
右
MV88 配备两个拾音头:一个拾音头采用心形形式,拾取话筒正前方的声音。另一个是双向拾音头,捕获来自左侧和右侧的声音。
话筒拾音头
调节话筒
为了在任何位置准确地录制立体声,话筒的前部必须朝向音源,两侧朝向适当的方向。使用话筒拾音头上的 L 和 R 指示符来确保正确放置。
注意:左右通道互换功能允许您在必要时切换话筒上的方向。
调节话筒位置
话筒支点和拾声头可旋转 90 度以转到所需的方向。
94
Page 95

对准话筒
此节为典型使用情况下的话筒摆放提供建议。请记住,有许多有效方式来记
录给定的音源。试验不同的话筒摆放和设置,找到最适合的设置。
提示:为了确保看一眼就能正确确定话筒的立体声定向,请检查话筒顶部的
Shure 名称标志是否清楚可见。如果看不到名称,请将圆筒旋转 90°。
录音
电话或平板电脑可在任意位置使用。将话筒的前部对准音源,左侧和右侧朝
向适当的方向。
竖立(垂直)
将话筒前部对准音源。话筒可通过 Lightning 接头安装在 MV88 的任一方
向,因而确保左侧和右侧朝向适当的方向。
录音采访(桌面)
将录音设备安置在平整表面,话筒的一侧指向受访者,另一侧指向采访者。
在 ShurePlus MOTIV 应用中选择 MONO BIDIRECTIONAL 预设。
电视采访
若要捕获受访者(摄像机中)和采访者(摄像机外)的声音,请选择
ShurePlus MOTIV 应用中的 MONO BIDIRECTIONAL 预设。放置好话筒,使
左侧和右侧分别朝向两个人。
横向(水平)
将话筒前部对准音源。话筒可通过 Lightning 接头连接在任一方向,因而确
保 MV88 的左侧和右侧朝向适当的方向。
自我录音(话音)
将设备放置在平整表面,使话筒弯曲一定角度,对准您的嘴巴。在
ShurePlus MOTIV 应用中选择 MONO CARDIOID 预设以降低环境噪声。
95
Page 96

100%9:41 AM
L
R
-48 -18 -12 -3 0 dB
RL
Shure MV88
EQ
MV88 Settings
Help
Mic Gain 5.5 dB
L R
Stereo Width
45°
L R
配合耳机使用
耳机监听适配线缆
使用随附的耳机监听适配线缆,理由如下:
• 您需要使用更细的线连接到录音设备上的耳机输入孔。该线缆适合带有大接头的耳机。
• 您想要禁用耳机上的内联话筒。该线缆确保录制的声音仅来自 MV88,而不会录制来自耳机内联话筒的声音。
ShurePlus MOTIV 应用
ShurePlus MOTIV 应用控制话筒设置,为特定用途优化性能。
提示:将设备设置为 飞行模式 和 请勿打扰 以防止电话、短信和通知干扰录音。
调节话筒
① 菜单
选择菜单以访问录音窗口、保存的录音、MV88 设置和首选项窗口。
② 输入电平表
显示输入信号的强度。最大音量的峰值应处于目标范围内(由阴影区域
指明)。
③ 高级功能
使用下拉条以显示高级音频功能,包括拾音头选择、风噪降低、左右互
换以及均衡器、限幅器和压缩器控制。
④ 预设模式
选择您的模式以便为特定应用设置立体声宽广度、均衡和压缩。请参
阅“预设模式”主题以了解更多详情。
96
话筒设置
⑤ 话筒增益
调节此设置以匹配音源的音量。在作出调整时监测计量表,以确保电平
处于目标范围内(由输入电平表的阴影区域指明)。
⑥ 立体声宽广度
调节立体声话筒拾音区的广度。
提示:在调节广度时,应考虑话筒的位置和音源的大小。例如,大型管弦乐队或合
奏录音将受益于宽广的立体声声像,从而可增强乐器间的隔离度。讲话等其他应用
将受益于更窄的广度,从而可提高清晰度及消除环境(房间)声音。
Page 97

预设模式
L
R
00:00 00:01 00:02 00:03 00:04 00:05
24/48 KHz
100%9:41 AM
Record
Mic Gain
5.5 dB
New Recording 1
0.00 MB
Time Left
about 2 hours 5 min
00:00
Shure MV88
RL
L
R
-48 -18 -12 -3 0 dB
100%9:41 AM
Record
Mic Gain
5.5 dB
L
R
00:00 00:01 00:02 00:03 00:04 00:05
New Recording 1
0.92 MB
Time Left
about 25 min
00:01.43
Done
Recordings
Shure MV88
RL
24/48 KHz
L
R
-48 -18 -12 -3 0 dB
五种可选择模式,优化增益、立体声宽广度、均衡和压缩设置以符合您的录音需求。设置话筒电平并在模式间切换以找出哪个设置听起来效果最好。然后
在需要时调节电平。
Mode(模式) 应用场合 特性
非常适合拾取演讲的声音 狭窄的立体声宽广度可消除环境噪声,这种均衡设置强调清晰度和丰满度,并且温和压
缩,从而使电平保持一致。
演讲
用于拾取独唱或团体声乐
中等立体声宽广度具有精细的均衡,可为自然声音增加饱满度和清晰度。
表演
歌唱
适合任何应用 完全未经处理的信号(未使用均衡或压缩设置)。在录音后处理音频时增加了灵活性。
降音
适合原声乐器和相对低声
压级音乐应用
具有中等立体声广度和透明压缩,使音量峰值变平滑及提供声压级低的录制。该均衡器设
置强调细节,并呈现自然的声音。
原声
用于录制乐队和更大声的
音源
宽广的立体声宽广度用于增强音源之间的分离,其具有的均衡通过降低频率(该频率使得
乐器声音听起来嘈杂),可进一步提高清晰度。
频带
录音设置
① 设备状态
显示话筒名称,指明 ShurePlus MOTIV 应用已识别连接的话筒。
② 高级功能显示
显示当前可用的高级功能的图标。
③ 录音显示
在录音时显示声音的波形。
④ 采样率和位深度选择
拉下并选择采样率和位深度。
录音设置
⑤ 录音详情
左侧显示录音文件的属性,例如文件名和文件大小。右侧显示剩余录音
时间。
⑥ 录音/暂停按钮
用于开始录音和暂停的大按钮。
注意:录音文件的最大大小为 2GB,即录音时间约 2 小时。此限制的设定
是为了让应用的性能达到最优。以低采样率录音可有更长且连续的录音时
间。
97
Page 98

高级音频设置
如需显示高级音频设置菜单,请使用位于 ShurePlus MOTIV iPhone 版应用的输入电平表下面的下拉条。如果使用 iPad 版应用,点击“高级”按钮即可显示
高级音频设置菜单。
指向性选择(立体声和单声道设置)
以下设置控制话筒拾音头活动。当在单声道模式下运行时,立体声宽广度不可调节。
立体声 前部 = 开
单声道心形 前部 = 开
侧面 = 开
侧面 = 关
单声道 8 字形 前部 = 关
原始 Mid-Side 请参见有关输出和处理的完整说明信
侧面 = 开
息。
原始 Mid-Side 输出
为增强处理后灵活性,请使用 Raw Mid-Side 设置。这样可实现带有立体声声像的 2 通道信号,即使在音轨已录制后也可进行调节:
向左:心形(前部)
向右:双向(侧面)
Raw Mid-Side 设置仅适用于使用中间立体声矩阵解码器将录制的音轨解释为立体声声像的录音应用。
98
Page 99

手动解码和立体声宽广度调整
标准
互换已启用
如果您的数字音频工作站软件 (DAW) 没有 mid-side 解码器,则可按照以下步骤创建精确的立体声声像:
1. 从 2 通道 Raw Mid-Side 文件中提取左和右音频信号,作为单独的单声道音轨。
2. 创建 3 个空白音轨:
第一个音轨 使用仅来自左通道的音频信号(前部/心形)作为单声道音轨,平移到中央。
第二个音轨 使用仅来自右通道的音频信号(侧面/双向)作为单声道音轨,一直平移到左侧。
第三个音轨 复制第二个音轨中的侧面/双向信号。将此音轨一直平移到右侧并反相。
3. 将相同音量水平的侧面音轨组合在一起,以便它们可同时调节。提高侧面音轨的音量会扩宽立体声宽广度,而降低其音量会缩窄广度。
高级技巧:在侧面音轨上使用具有快速瞬态响应设置的压缩,可使瞬变的音色(声音的第一部分,例如当鼓棒击打铙钹时)朝向立体声声像的中央,并让
它们能够随着声音衰减在立体声场内扩展。
原始 Mid-Side 音频的手动解码
风噪降低
此功能通过一个低切滤波器来降低由环境噪声产生的隆隆声。将随附的泡沫防风罩与风噪降低功能结
合使用,抵消隆隆声和爆破音(空气击打话筒而产生的爆发音)。
为进一步降低风噪,请使用可选的 Rycote™ 防风罩,它可装在随附的泡沫防风罩上。
左右通道互换
录制立体声时,此功能可切换左和右音频通道,从而使立体声声像与视频适当地匹配。在话筒处于反
转位置的某些手机/平板布置方案中,可能需要使用此功能。
提示:请查看话筒拾音头上的 L 和 R 指示符,以确定是否需要互换。
在此示例中,当手机旋转时,应启用左/右互换功
均衡器、限幅器和压缩器
在高级功能窗口中,您可微调均衡器、限幅器和压缩器设置。在预设模式间切换,倾听 DSP 变化,然后调节为适合您的声音。
注意:预设内的均衡将不会显示。仅附加的用户可选均衡才会显示在高级功能设置窗口中。
能:
99
Page 100

故障排除
问题 解决方法
没看到 LED 灯 LED 位于 MV88 基座上。因为 Lightning 接口可让您以任一方向插入话筒,可能是手机挡住了
声音难听 查看应用程序的左上角,确定 MV88 是否已完全插入并被识别。音频可能来自内置话筒。
当耳麦插入时音频质量会变化 带有话筒的耳麦会取代 MV88 作为音频设备。使用随附的耳机监听适配线缆来消除其他话筒的干
声音失真 使用音频电平表以确保音量峰值处于目标范围内。如果电平达到输入电平表的红色峰值指示符,则
左/右立体声通道与视频不匹配取决于 iOS 设备的方向,可能需要启用左右互换功能。如果音频已经录制好,则可轻松地在大部
MV88 已插入,但音量电平表
未显示信号。
LED。取下话筒,翻转,然后重新插入,即可查看话筒状态。
扰。
降低增益。
分 DAW 和音频编辑软件中切换左和右通道。
在 iOS 设备的以下菜单中编辑隐私设置 SETTINGS > PRIVACY > MICROPHONE 以便授予 ShurePlus
MOTIV 应用使用话筒的权限。
采样率和位深度
采样率和位深度设置可在计算机上的“音频”或“声音”控制面板中的下拉菜单
中找到。您可调节这些变量以适合您的需求。当需要获得较小的文件以方便
下载时,为播客录音选择较低的采样率。对于音乐和更有活力的录音,选择
较高的采样率。
提示:在较高的采样率录制,然后降低到 M4A,文件会得到最好的音质,
且大小可控。
PC 用户提示:确保在计算机声音控制面板中找到的话筒采样率和位深度设
置与软件中所选的采样率和位深度匹配。
系统要求和兼容性
iOS • iOS 8.0 及更高版本
iPhone • iPhone 5
• iPhone 5c
• iPhone 5s
• iPhone 6
• iPhone 6 Plus
iPod Touch • 第五代
iPad • iPad 第四代
• iPad Air
• iPad Air 2
iPad Mini • iPad Mini 第一代
• iPad Mini 第二代
• iPad Mini 第三代
规格
MFi 认证
是
DSP 模式(预设)
语音/歌唱/原声/大声/平坦
换能器类型
心形指向性 (10 毫米)/双向电容话筒头 (10 毫米)
指向性形状
可调节广度立体声/单声道双向/单声道心形/Mid-Side
立体声原理
Mid-Side
位深度
16 位/24 位
采样率
44.1/48 千赫茲
频率响应
20 赫兹 到 20,000 赫兹
可调增益范围
0 到 +36 dB
灵敏度
-37 dBFS/Pa 1 千赫下 [1] [2]
最大声压级
120 分贝声压级 [2]
限幅器
是
压缩器
是
均衡器
5 波段
电源要求
通过 Lightning 接头供电
外壳
全金属结构
净重
40.5 克 (1.43盎司)
外观尺寸
67 x 25 x 35 毫米 高度 x 宽度 x 深度
[1] 1 Pa=94 分贝声压级
[2]最低增益、平坦模式
100
 Loading...