

SHOWTEC Lite-8 Pro, Lite-4 Pro User Manual
User's Manual User's Manual
No. 24-004-1601 Rev 1.0

Welcome
Thanks for your purchasing this "Lite-8 Pro" lighting control equipment. This
product has the following listed main features:
1
Every effort has been made to design dependability, reliability and comfort into
each unit. New products are being designed constantly to meet the needs of both
entertainment and the lighting industry. We welcome your comments about our
product and services.
It is both a privilege and a pleasure serving you.
8 Ch. dimming console with 8 dimming faders, 8 flash buttons and 1
master-fader.
Ch9~13 output switches, Ch13 output switch + adjusting knob.
18 original preset chases.
Manual/Auto/Audio(sound-to-light) triggering mode.
One/Mix/Sequence chasing mode available.
MIDI signal receivable.
FULL ON and STAND-BY functions are provided, and user can also
define and reset the FULL ON and STAND-BY functions.
External step control & USB light connector.
0.05sec~10min speed control & TAP SYNC function.
Three-character LED display.
Fade to speed & No fade time available.
General Instruction
This is a professional lighting controller with 13 output channels (8 channels
with faders & 5 channel-output switches) and 18 preset programs. Each program
is editable with up to 99 steps. Lighting effect can be triggered in Manul, Auto, or
Audio control mode as your desire. Additionally, this product can receive MIDI
signal to realize MIDI control into lighting effect.
To optimize performance of this product, please read the instructions carefully
to familiarize yourself with the basic operations.
Chases are programmable and recordable with up to 99 steps.
Built-in microphone & External sound input connector provided.
General Instruction
2
This is a professional lighting controller with 13 output channels (8 channels
with faders & 5 channel-output switches) and 18 preset programs. Each program
is editable with up to 99 steps. Lighting effect can be triggered in Manul, Auto, or
Audio control mode as your desire. Additionally, this product can receive MIDI
signal to realize MIDI control into lighting effect.
Specifications and improvements in the design of this product and this
manual are subject to change without any prior notice.
Notice:
To optimize performance of this product, please read the instructions carefully
to familiarize yourself with the basic operations.
Warnings
Cautions
When unpacking, please check the unit is not damaged. Should something
wrong happen to this product, contact the local dealer immediately.
All rights reserved. No part of the manual included with this product may be
reproduced, transmitted, transcribed or translated into any language in any
form, by any means, without authorized permission.
This unit must be earthed.
Do not make any inflammable liquids, water or metal objects enter the unit.
No user serviceable parts inside, do not dismantle the unit by yourself.
This unit is intended for indoor use only.
To reduce the risk of fire or electric shock, do not expose the unit to rain or
moisture.
Repairs must be done by qualified personnel.
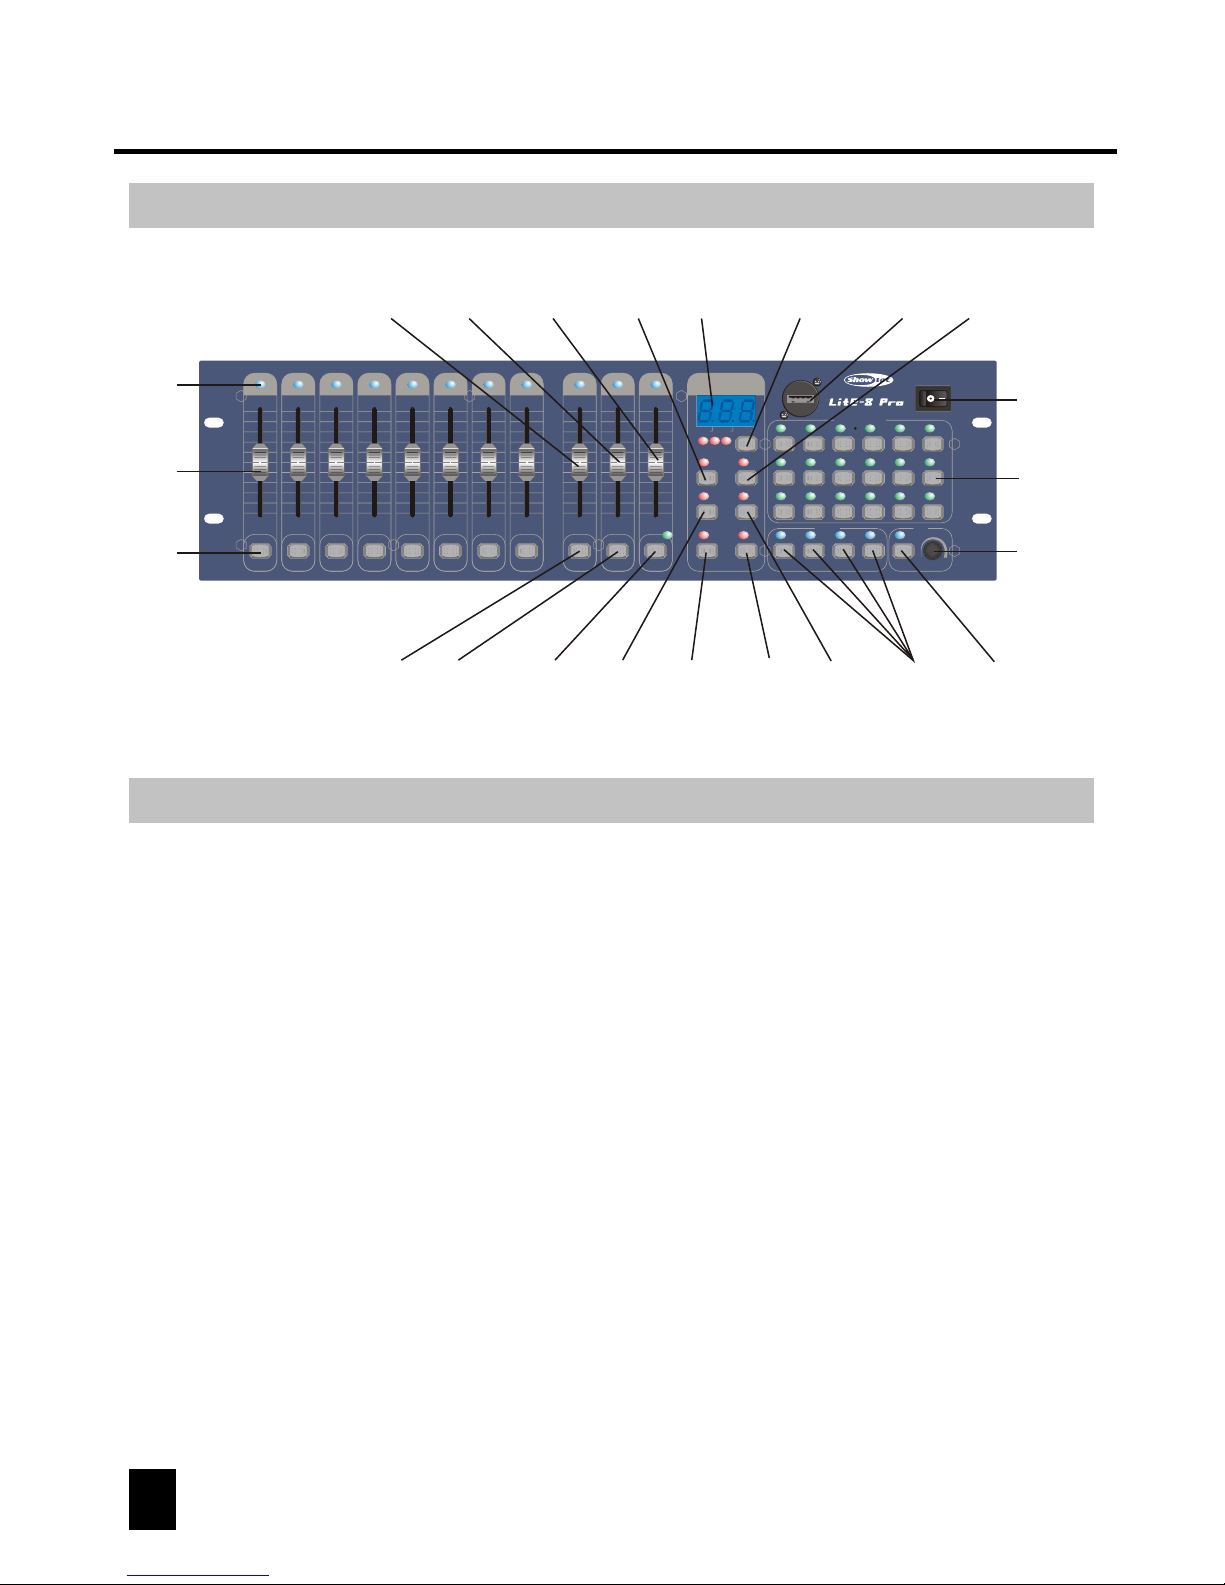
Control and Functions
3
USB socket: to connect an USB light.
Speed fader: to adjust the speed level from 0.05 second to 10 minutes.
Power switch: to turn on/off the main power.
Audio Sense fader: used to adjust the audio sensitivity level as your desire.
Indicating LED(s): all channel faders have LEDs that mimic the output level of each fader.
LEDs also are indicators of related functions when they are activated.
Flash buttons: it is a momentary button that flashes the level of the corresponding fader
to full. Press the flash button once to trigger the flash function.
10
8
6
4
2
0
FLASH
1
10
8
6
4
2
0
FLASH
2
10
8
6
4
2
0
FLASH
3
10
8
6
4
2
0
FLASH
4
10
8
6
4
2
0
FLASH
5
10
8
6
4
2
0
FLASH
6
10
8
6
4
2
0
FLASH
7
10
8
6
4
2
0
FLASH
8
10
8
6
4
2
0
FULL ON
0.05s
10Min
STEP
10
8
6
4
2
0
STAND-BY
AUDIO SENSSPEEDMASTER
POWER
USB LIGHT
SCENES / CHASES
SWITCH
AUX
6
12
18
1
7
13
9
2
8
14
10
3
9
15
11
4
10
16
12
5
11
17
13
ONE MIX
SEQ
REC
AUDIO
FADE TO
SPEED
RUN
MIDI
TAP
SYNC
MIN
SEC
MIDI
Indicating
LED
Channel
fader
Flash
button
Master
fader
Speed
fader
Audio sense
fader
LED
Display
USB
socket
Power
switch
FULL ON
button
STEP
button
STAND-BY
button
REC
button
RUN
button
ONE/MIX/SEQ
select button
AUDIO
button
MIDI
button
Fade to
speed
button
TAP
SYNC
button
Switch 13
(AUX)
9~12
Switches
AUX
knob
Scene/Chase
button (1~12)
FULL ON button: press this button to make the corresponding channel(s) into full dimming
level. Additionally, user can also define and reset the "FULL ON" function as your desire.
Master fader: to totally control the channels' dimming output. The master fader is always
active during your operation.
Channel fader(s): to control the dimming output of each corresponding channel.
Quick Guide
Control and Functions
STEP button: press this button to manually trigger the programmed chase step by step.
Stand-by button: this will allow the operator to instantly stop all channels' output (press
this button again to reactivate the output).
ONE/MIX/SEQ select button: press this button to select ONE, MIX or SEQ running mode
as your desire. (related LED is lit if you chose one mode.)
REC button: holding down this REC button for 3 seconds to enter the editing mode. (it's a
function button, please see the "Operation Guide" for details)
LED-display: to show you relevant information depending on your operation.
RUN button: this function button, please see the "Operation Guide" for details.
AUDIO button: to enable or disable the Audio Sense function.
MIDI button: press and hold down this button for about 5 seconds to enter to set desired
MIDI channel (see the "Operation Guide" for details).
Fade To Speed button: press this button to select "Fade to speed" or "No fade time".
Tap Syc button: to establish a interval chasing rate. (see "Operation Guide" for details)
Scene/Chase buttons (1~18): to select a Scene/Chase.
Switches 9~12: to separately switch on/off the output of Ch5~8.
Switch 13 (AUX): this auxiliary switch is used to switch on/off the output of Ch13.
Adjusting knob: this auxiliary adjusting knob is used to adjust the output of Ch13 (rotate
the knob clockwise to get higher level, rotate it counterclockwise to get lower level).
Rear Panel View
1. MIDI IN: to receive MIDI data.
2. DMX OUT: 3 Pin/5Pin DMX output sockets (female).
3. EXT Sound INPUT: this RCA connector is used to input external audio signal.
5. DC INPUT: to input main power (DC 9V~15V, 500mA Min).
4. DB-9 connector: to connect a external step controller.
Control Panel View
 Loading...