

Page 1

Chimp 100 / 300 v1.03
Highlite International B.V. – Vestastraat 2 – 6468 EX – Kerkrade – the Netherlands
Ordercode: 55000 / 55010
User Guide
ENGLISH
Page 2

1
Infinity Chimp Series
Infinity Chimp Series
Table of contents
1 Warning ..................................................................................................................................................................... 9
Unpacking Instructions .......................................................................................................................................... 9
Your shipment includes: ........................................................................................................................................ 9
Safety Instructions ................................................................................................................................................... 9
Operating Determinations ..................................................................................................................................11
Connection with the mains ................................................................................................................................11
Return Procedure .................................................................................................................................................12
Claims .....................................................................................................................................................................12
2 Description of the device ..................................................................................................................................... 13
Features ..................................................................................................................................................................13
Optional accessories ...........................................................................................................................................13
3 About this Guide .................................................................................................................................................... 14
Text Conventions ..................................................................................................................................................14
4 Console Backpanel ............................................................................................................................................... 14
Chimp 100 Back panel ........................................................................................................................................14
Chimp 300 Back panel ........................................................................................................................................15
5 The Frontpanel ....................................................................................................................................................... 16
Front panel .............................................................................................................................................................16
Playback Faders ...................................................................................................................................................16
Programming Section ..........................................................................................................................................17
Executor Buttons ...................................................................................................................................................17
Special Faders .......................................................................................................................................................18
Touchscreen (Applies to Chimp 300 Console, only)......................................................................................18
6 Basic Concepts ...................................................................................................................................................... 19
Hybrid Console ......................................................................................................................................................19
Fixtures vs. Channels ............................................................................................................................................19
Priority Concept ....................................................................................................................................................19
6.3.1 What is LTP and HTP? ......................................................................................................................................19
6.3.2 Priority Stacks ...................................................................................................................................................20
6.3.3 Programmer Priority ........................................................................................................................................20
6.3.4 Priority Overview .............................................................................................................................................20
6.3.5 Examples ..........................................................................................................................................................20
Tracking ..................................................................................................................................................................22
6.4.1 Basic Idea ........................................................................................................................................................22
6.4.2 Tracking in a Nutshell .....................................................................................................................................22
6.4.3 Examples ..........................................................................................................................................................22
7 The Graphical User Interface ............................................................................................................................... 25
The “Top Toolbar” .................................................................................................................................................25
7.1.1 Main View Buttons ..........................................................................................................................................26
7.1.2 Status Buttons ..................................................................................................................................................26
7.1.3 Setup / Backup / Lock Console and Quicksave Buttons .......................................................................27
The “Content Area” .............................................................................................................................................27
7.2.1 The different Split Widgets ............................................................................................................................28
7.2.2 Pool Split Widgets ...........................................................................................................................................29
7.2.3 Fixture Pool .......................................................................................................................................................30
Page 3

2
Infinity Chimp Series
Infinity Chimp Series
7.2.4 Group Pool.......................................................................................................................................................30
7.2.5 Preset Pool .......................................................................................................................................................31
7.2.6 Cuelist View .....................................................................................................................................................32
7.2.7 (Virtual) Executors ...........................................................................................................................................33
7.2.8 Cuelist Pool ......................................................................................................................................................34
The “Bottom Toolbar” ..........................................................................................................................................35
7.3.1 Playback Fader Labels ..................................................................................................................................35
7.3.2 Encoder Labels ...............................................................................................................................................36
7.3.3 Executor Labels ...............................................................................................................................................37
7.3.4 Toolbars ............................................................................................................................................................38
7.3.5 Commandline .................................................................................................................................................41
7.3.6 Commandline Syntax ....................................................................................................................................41
7.3.7 Fan Options / Selection Buttons ..................................................................................................................42
7.3.8 Special Master Fader Labels ........................................................................................................................43
Dialog Windows ....................................................................................................................................................44
7.4.1 Keypad Dialogs ..............................................................................................................................................45
7.4.2 On-Screen Keyboard .....................................................................................................................................46
8 Operation ............................................................................................................................................................... 47
To Begin Using the Console ................................................................................................................................47
8.1.1 Unpack Console and Accessories ..............................................................................................................47
8.1.2 Connect Console to Any Accessories and Power ..................................................................................47
8.1.3 Boot up the Console ......................................................................................................................................48
9 Working with Shows ............................................................................................................................................... 49
Create a new Show .............................................................................................................................................49
Loading a Show ....................................................................................................................................................49
Saving the Showfile ..............................................................................................................................................50
Enable / Disable the “Autosave” -function .....................................................................................................50
Saving as new Showfile .......................................................................................................................................51
Import Shows from USB ........................................................................................................................................52
Export Shows to USB .............................................................................................................................................53
Deleting Shows from the Consoles built-in Memory ......................................................................................54
10 Show related Settings .......................................................................................................................................... 55
Auto-Fix Faders / Executors on Page Change..............................................................................................56
10.1.1 Enable / Disable Auto Fix ............................................................................................................................56
Set Desklight Brightness .....................................................................................................................................57
Enable Button LED Backlight ............................................................................................................................57
Change Desklock PIN ........................................................................................................................................58
Locking the Console ..........................................................................................................................................58
11 Fixture Setup ......................................................................................................................................................... 59
Add Fixtures to the Show...................................................................................................................................59
Configuring existing Fixtures .............................................................................................................................62
11.2.1 Change User ID .............................................................................................................................................63
11.2.2 Change Fixture Name .................................................................................................................................64
11.2.3 Inverting Pan / Tilt and defining if a Fixture reacts to the Grandmaster Fader ................................66
11.2.4 Change DMX-Patch ....................................................................................................................................68
11.2.5 Change Fixture Type ....................................................................................................................................70
11.2.6 Clone Fixtures ................................................................................................................................................71
11.2.7 Delete Fixtures ...............................................................................................................................................73
Page 4

3
Infinity Chimp Series
Infinity Chimp Series
12 Setting up Default Timings and Speed Master Options ................................................................................... 74
Cue Timing ...........................................................................................................................................................75
Speed Master Settings .......................................................................................................................................76
Fade Master Settings .........................................................................................................................................76
13 Setting up Inputs and Outputs ............................................................................................................................ 77
Setup ArtNET Output ..........................................................................................................................................77
13.1.1 ArtNet Basics..................................................................................................................................................77
13.1.2 Enable DMX Output over Ethernet ...........................................................................................................78
13.1.3 Setup ArtNet ..................................................................................................................................................78
DMX Input ............................................................................................................................................................79
Midi Input .............................................................................................................................................................80
13.3.1 Show Current Midi Input ..............................................................................................................................80
13.3.2 Midi Input Mapping .....................................................................................................................................80
Sound Input .........................................................................................................................................................81
Timecode Input ...................................................................................................................................................83
13.5.1 Timecode Setup ...........................................................................................................................................83
13.5.2 Using Timecode ............................................................................................................................................83
13.5.3 Enabling / Disabling and Resetting the Timecode from the Top Toolbar .........................................83
14 Working with Fixtures ........................................................................................................................................... 84
Selecting Fixtures ................................................................................................................................................84
14.1.1 Selection Order .............................................................................................................................................84
14.1.2 Select Fixtures using the keypad (a.k.a “The Commandline Interface”) ..........................................84
14.1.3 Select and Deselect Fixtures using the “Fixture Pool” –window ..........................................................85
14.1.4 Select Fixtures using a previously recorded Group ...............................................................................85
14.1.5 Select Fixtures using the “Selection” –toolbar ........................................................................................86
14.1.6 De-Selecting all Fixtures...............................................................................................................................86
14.1.7 Fixture Sub-Selection using the Selection Toolbar ..................................................................................86
14.1.8 Stepping through fixtures using Last & Next Fixture ...............................................................................88
14.1.9 Selecting Fixture X out of Y. ........................................................................................................................88
Assigning Names to Fixtures ..............................................................................................................................89
14.2.1 Assign Name using the Fixture Pool ..........................................................................................................89
14.2.2 Assign Name using the Command Line Interface .................................................................................89
14.2.3 Using Fixture Groups .....................................................................................................................................89
14.2.4 Using the Edit Fixture Window ....................................................................................................................90
Edit Fixture Window ............................................................................................................................................91
15 Working with Groups ........................................................................................................................................... 92
About Groups ......................................................................................................................................................92
Recording Fixture Groups .................................................................................................................................92
15.2.1 Storing a Fixture Group Using Group Split Widget ..................................................................................92
15.2.2 Storing a Group Using Command Line Interface ..................................................................................92
Merge Fixtures into Groups ...............................................................................................................................92
15.3.1 Merge Fixture(s) into Group using Group Split Widget..........................................................................92
15.3.2 Merge Fixture(s) into Group using the Commandline Interface .........................................................93
Remove Fixtures from Groups ..........................................................................................................................93
15.4.1 Remove Fixture(s) from a Group using Group Split Widget .................................................................93
15.4.2 Remove Fixture(s) from Group using the Commandline Interface ....................................................94
Replace a Group ...............................................................................................................................................94
15.5.1 Replace Fixture(s) from a Group using Group Split Widget .................................................................94
Page 5

4
Infinity Chimp Series
Infinity Chimp Series
15.5.2 Replace a Group using the Commandline Interface ..........................................................................94
Selecting and Deselecting Groups .................................................................................................................95
15.6.1 Selecting Fixture Groups Using Group Split Widget ...............................................................................95
15.6.2 Selecting Fixture Groups Using Command Line Interface ...................................................................95
Naming a Group ................................................................................................................................................95
15.7.1 Assign Name using the Group Split Widget ............................................................................................95
15.7.2 Assign Name using the Command Line Interface .................................................................................95
15.7.3 Assign Name using the Edit Group Window ...........................................................................................95
Copy a Group .....................................................................................................................................................95
15.8.1 Copy Groups using the Group Split Widget ............................................................................................95
15.8.2 Copy Groups using the Command Line Interface ................................................................................95
Move a Group ....................................................................................................................................................96
15.9.1 Move Groups using the Group Split Widget ...........................................................................................96
15.9.2 Move Groups using the Command Line Interface ................................................................................96
Delete a Group .................................................................................................................................................96
15.10.1 Delete Groups using the Group Split Widget........................................................................................96
15.10.2 Delete Groups using the Command Line Interface ............................................................................96
Create a Group Dimmer Master ...................................................................................................................96
15.11.1 Using the Group Split Widget Window ...................................................................................................96
15.11.2 Using the Command Line Interface .......................................................................................................96
Edit Group Window ..........................................................................................................................................97
16 Working with Fixture Values ............................................................................................................................... 98
What is the programmer? .................................................................................................................................99
16.1.1 Different states of fixture attribute values ................................................................................................99
16.1.2 Emptying the Programmers „Content“ ....................................................................................................99
Programmer Title Bar Buttons ........................................................................................................................ 100
16.2.1 Highlight Function ...................................................................................................................................... 100
16.2.2 Blind Function ............................................................................................................................................. 101
16.2.3 Link Values .................................................................................................................................................. 101
16.2.4 RAW Val. ..................................................................................................................................................... 101
Alter Fixture Parameters ................................................................................................................................. 102
16.3.1 Altering Intensity (Dimmer Values) Using Keypad ............................................................................... 102
16.3.2 Alter Parameters using the Encoders .................................................................................................... 103
16.3.3 Alter Parameters using the ranges / slots defined in the Fixture Library ......................................... 103
16.3.4 Alter Color-Values using the Color-Picker ............................................................................................. 104
16.3.5 Alter Color-Values using Color Faders ................................................................................................... 104
16.3.6 Alter Color-Values using the built-in Swatch Book .............................................................................. 104
16.3.7 Alter Color-Values using the encoders ................................................................................................. 105
16.3.8 Setting All Fixture Attribute Values to the Fixtures default value ...................................................... 105
16.3.9 Using Presets (as a reference) ................................................................................................................ 105
16.3.10 Using Values (instead of referencing) from a Preset ........................................................................ 105
Loading Values from other sources ............................................................................................................. 105
16.4.1 Loading all Values from Current Output............................................................................................... 105
16.4.2 Loading all Values without Effects from Current Output ................................................................... 105
16.4.3 Loading all Effects without Base Values from Current Output ......................................................... 105
16.4.4 Loading Values from a Cuelist ................................................................................................................ 105
Fanning Values (spreading values across different fixtures) ................................................................... 106
16.5.1 Fan any value using the Encoders: ........................................................................................................ 106
Page 6

5
Infinity Chimp Series
Infinity Chimp Series
16.5.2 Fan Intensity Values using the Keypad. ................................................................................................ 106
Adjusting how Fannings are applied using the Fan Mode Toolbar ....................................................... 107
16.6.1 Changing the Fan Direction ................................................................................................................... 107
16.6.2 Fanning with Groupings ........................................................................................................................... 108
Removing Values from the Programmer .................................................................................................... 109
16.7.1 Remove all attributes for a specific fixture from the programmer .................................................. 109
16.7.2 Remove all attribute values for a fixture group from the programmer .......................................... 109
16.7.3 Removing Individual attributes from the programmer ...................................................................... 109
Untouch / Deactivate Individual attributes in the programmer ............................................................ 110
17 Working with Effects ..........................................................................................................................................111
Effect Basics ...................................................................................................................................................... 111
17.1.1 Effect Synchronization .............................................................................................................................. 111
The Effect Attributes ........................................................................................................................................ 112
17.2.1 “Type” Effect Attribute ............................................................................................................................. 112
17.2.2 “Fixtures” Effect Attribute ......................................................................................................................... 113
17.2.3 “Size” Effect Attribute ............................................................................................................................... 114
17.2.4 “Speed” Effect Attribute .......................................................................................................................... 115
17.2.5 “Offset” Effect Attribute ........................................................................................................................... 116
17.2.6 “Duty Cycle” Effect Attribute .................................................................................................................. 117
17.2.7 “Grouping” Effect Attribute .................................................................................................................... 118
17.2.8 “Buddying” Effect Attribute ..................................................................................................................... 119
17.2.9 “Wings” Effect Attribute ........................................................................................................................... 120
17.2.10 “Direction” Effect Attribute ................................................................................................................... 121
The Effects Programmer ................................................................................................................................. 122
17.3.1 Adding an Effect ....................................................................................................................................... 123
17.3.2 Deleting an Effect ..................................................................................................................................... 125
17.3.3 Modifying an Effect................................................................................................................................... 125
17.3.4 Stopping an Effect .................................................................................................................................... 126
18 Working with Presets ..........................................................................................................................................127
The Preset Split Widget ................................................................................................................................... 128
Recording Presets ............................................................................................................................................ 128
18.2.1 Record a Preset using the Preset Split Widget ..................................................................................... 129
Selecting Presets .............................................................................................................................................. 129
18.3.1 Selecting Presets as a Reference ........................................................................................................... 129
18.3.2 Recalling a Preset as a ‘Hard Value’ .................................................................................................... 129
18.3.3 Selecting a Preset ‘Live’ without a fixture selection ........................................................................... 130
18.3.4 Deselecting (“Knocking Out”) a preset ................................................................................................ 130
Naming a Preset .............................................................................................................................................. 130
Removing Contents from a Preset ............................................................................................................... 131
Replacing a Preset .......................................................................................................................................... 131
Merging contents into a Preset (Or: Updating a Preset) ......................................................................... 132
Copy a Preset................................................................................................................................................... 132
Move a Preset .................................................................................................................................................. 132
Delete a Preset .............................................................................................................................................. 132
Edit Preset Window ........................................................................................................................................ 133
18.11.1 Set Preset Name ...................................................................................................................................... 133
18.11.2 Merge to Prog(grammer) ...................................................................................................................... 133
18.11.3 Load to Prog(rammer) ........................................................................................................................... 133
Page 7

6
Infinity Chimp Series
Infinity Chimp Series
19 Working with Cuelists ........................................................................................................................................134
What is a Cuelist ............................................................................................................................................... 134
Storing Cues in a Cuelist ................................................................................................................................. 134
19.2.1 Storing a Cuelist to a Master or Executor Button ................................................................................. 134
19.2.2 Storing a Cuelists using Cuelist Split Widget ......................................................................................... 134
19.2.3 Storing a Cue using Command Line Interface .................................................................................... 134
19.2.4 Storing a second Cue to a Cuelist ......................................................................................................... 134
Additonal Options while recording a Cue ................................................................................................. 135
19.3.1 Store a Cue including timing .................................................................................................................. 135
Modifying the Cuelist itself ............................................................................................................................. 136
19.4.1 Naming a Cuelist ....................................................................................................................................... 136
19.4.2 Copy a Cuelist ........................................................................................................................................... 136
19.4.3 Move a Cuelist ........................................................................................................................................... 136
19.4.4 Delete a Cuelist ......................................................................................................................................... 136
Updating Cues in a Cuelist ............................................................................................................................ 137
19.5.1 Adding additional / changing existing content of a Cue („Merge“ Data into the Cue) .......... 137
19.5.2 Removing content from a Cue .............................................................................................................. 137
19.5.3 Replacing a Cue ....................................................................................................................................... 138
19.5.4 Inserting a Cue into a Cuelist .................................................................................................................. 138
19.5.5 Copying a Cue .......................................................................................................................................... 139
19.5.6 Moving a Cue ............................................................................................................................................ 139
19.5.7 Deleting a Cue .......................................................................................................................................... 139
Loading a Cue to the Programmer ............................................................................................................. 140
Assigning Cuelists to Masters ......................................................................................................................... 140
19.7.1 Assigning a Cuelist to a Master / Executor Using Cuelist Split Widget ............................................ 140
19.7.2 Assigning a Cuelist to a Master / Executor Using Command Line Interface ................................. 140
The Cuelist View (Cue Sheet) Window ........................................................................................................ 140
19.8.1 Opening the Cuelist View Window ........................................................................................................ 140
19.8.2 Cuelist View Window – Title Bar Buttons ................................................................................................ 141
19.8.3 Background Colors and their meanings ............................................................................................... 141
Changing Cue Names, Timings and other Settings .................................................................................. 142
19.9.1 The different Trigger types that are available per Cue ..................................................................... 143
Edit Cuelist Window....................................................................................................................................... 144
19.10.1 Saving Options as Default ..................................................................................................................... 144
19.10.2 Loading Options from Default .............................................................................................................. 145
Altering Cuelist Options ................................................................................................................................ 145
19.11.1 Setting the Cuelist Playback Mode ..................................................................................................... 145
19.11.2 Settings shared between Cuelists and Chases ................................................................................. 145
19.11.3 Settings for Cuelists only ......................................................................................................................... 147
19.11.4 Settings for Chasers only ........................................................................................................................ 147
Playing back Cuelists .................................................................................................................................... 148
Selecting Cuelists ........................................................................................................................................... 148
Switching Off Cuelists.................................................................................................................................... 148
19.14.1 The Off Key ............................................................................................................................................... 148
19.14.2 The Off Toolbar ........................................................................................................................................ 148
19.14.3 The Off Window ....................................................................................................................................... 149
20 Working with Masters and Executors ..............................................................................................................150
Basics.................................................................................................................................................................. 150
Page 8

7
Infinity Chimp Series
Infinity Chimp Series
20.1.1 Difference between Masters and Master Faders ............................................................................... 150
Linking Objects to a Master ........................................................................................................................... 150
20.2.1 Linking a Global Master ........................................................................................................................... 150
20.2.2 Linking Groups (Creating a Group Dimmer Master) .......................................................................... 150
20.2.3 Linking Cuelists ........................................................................................................................................... 151
Moving a Master .............................................................................................................................................. 151
Deleting a Master ............................................................................................................................................ 151
Configuring Fader and Button functions .................................................................................................... 152
20.5.1 Common Settings ...................................................................................................................................... 152
20.5.2 Button and Fader functions ..................................................................................................................... 153
21 Working with Fader and Executor Pages ........................................................................................................156
About Pages ..................................................................................................................................................... 156
Changing Fader Pages .................................................................................................................................. 156
Template Page ................................................................................................................................................ 156
Editing Fader-Pages ........................................................................................................................................ 157
21.4.1 Adding Pages ............................................................................................................................................ 157
21.4.2 Moving Pages ............................................................................................................................................ 157
21.4.3 Deleting Pages .......................................................................................................................................... 157
21.4.4 Naming one or more Pages .................................................................................................................... 157
22 Configure system-wide settings.......................................................................................................................158
Change the USB-Keyboard Locale .............................................................................................................. 159
Set Date and Time ........................................................................................................................................... 160
Network Settings .............................................................................................................................................. 160
22.3.1 Changing the IP Address ......................................................................................................................... 161
22.3.2 The current Ethernet Status ...................................................................................................................... 161
Configure (optional) WDMX Transmitter ..................................................................................................... 162
23 Edit the Fixture Library .......................................................................................................................................163
The Fixture Library Concept ........................................................................................................................... 163
23.1.1 System Library............................................................................................................................................. 163
23.1.2 User Library .................................................................................................................................................. 163
23.1.3 Show Library ............................................................................................................................................... 163
The Library Editor .............................................................................................................................................. 164
23.2.1 Channel Setup Mode ............................................................................................................................... 164
23.2.2 Select Parameter Menu ........................................................................................................................... 165
23.2.3 Edit Ranges Menu ..................................................................................................................................... 166
23.2.4 General Setup Mode ................................................................................................................................ 167
Edit existing Fixture Libraries ........................................................................................................................... 167
Add a new Fixture to the Library .................................................................................................................. 168
23.4.1 Start a Fixture from scratch ...................................................................................................................... 168
23.4.2 Start a Fixture using an existing Fixture Type as a template .............................................................. 169
Transfer Fixtures between libraries ................................................................................................................ 170
Delete a Fixture Type ...................................................................................................................................... 170
24 Maintenance......................................................................................................................................................171
USB folder structure ......................................................................................................................................... 171
Update Software ............................................................................................................................................. 172
24.2.1 Update USB ................................................................................................................................................. 172
24.2.2 Update Online ........................................................................................................................................... 173
24.2.3 Calibrate Touchscreen(s) ........................................................................................................................ 174
Page 9

8
Infinity Chimp Series
Infinity Chimp Series
25 Hotkeys ...............................................................................................................................................................175
General ............................................................................................................................................................. 175
Programmer ...................................................................................................................................................... 175
Library Editor ..................................................................................................................................................... 175
External Keyboard ........................................................................................................................................... 175
Page 10

9
Infinity Chimp Series
Infinity Chimp Series
1 Warning
Unpacking Instructions
Immediately upon receiving this product, carefully unpack the carton and check the contents to ensure
that all parts are present and have been received in good condition. Notify the dealer immediately and
retain packing material for inspection if any parts appear damaged from shipping or the carton itself
shows signs of mishandling. Save the carton and all packing materials. In the event that a fixture must be
returned to the factory, it is important that the fixture be returned in the original factory box and packing.
Your shipment includes:
Infinity Chimp Controller
IEC to Schuko power cable 1,5
m
This Quick Start Guide
Safety Instructions
Every person involved with the installation, operation and maintenance of this device has to:
be qualified
follow the instructions of this manual
Before the initial start-up, please make sure that there is no damage caused by transportation.
Should there be any, consult your dealer and do not use the device.
To maintain perfect condition and to ensure a safe operation, it is absolutely necessary for the user to
follow the safety instructions and warning notes written in this manual.
Please consider that damages caused by manual modifications to the device are not subject to
warranty.
This device contains no user-serviceable parts. Refer servicing to qualified technicians only.
Page 11

10
Infinity Chimp Series
Infinity Chimp Series
IMPORTANT:
The manufacturer will not accept liability for any resulting damages caused by the non-observance of
this manual or any unauthorized modification to the device.
● Never let the power cord come into contact with other cables! Handle the power cord and all
connections with the mains with particular caution!
● Never remove warning or informative labels from the unit.
● Never use anything to cover the ground contact.
● Never lift the fixture holding it by the projector-head, as the mechanics may be damaged. Always
hold the fixture by the transport handles.
● Never place any material over the lens.
● Never look directly into the light source.
● Never leave any cables lying around.
● Never loosen the screws of the rotating gobo otherwise you risk opening of the ball bearing.
● Do not insert objects into air vents.
● Do not connect this device to a dimmerpack.
● Do not switch the device on and off in short intervals, as this will reduce the device’s life.
● Do not touch the device’s housing bare-handed during its operation (housing becomes hot). Allow
the fixture to cool for at least 5 minutes before handling.
● Do not shake the device. Avoid brute force when installing or operating the device.
● Only use the device indoors, avoid contact with water or other liquids.
● Only operate the fixture after having checked if the housing is firmly closed and all screws are tightly
fastened.
● Only operate the device after having familiarized with its functions.
● Avoid flames and do not put close to flammable liquids or gases.
● Always keep the case closed while operating.
● Always allow a free air space of at least 50 cm around the unit for ventilation.
● Always disconnect power from the mains, when device is not used or before cleaning! Only handle
the power cord holding it by the plug. Never pull out the plug by tugging the power cord.
● Make sure that the device is not exposed to extreme heat, moisture or dust.
● Make sure that the available voltage is not higher than stated on the rear panel.
● Make sure that the power cord is never crimped or damaged. Check the device and the power
cord from time to time.
● If the lens is obviously damaged, it has to be replaced.
● If device was dropped or struck, disconnect mains power supply immediately. Have a qualified
engineer inspect for safety before operating.
● If the device has been exposed to drastic temperature fluctuation (e.g. after transportation), do not
switch it on immediately. The arising condensation water might damage your device. Leave the
device switched off until it has reached room temperature.
● If your Infinity device fails to work properly, discontinue the use immediately. Pack the unit securely
(preferably in the original packing material), and return it to your Infinity dealer for service.
● For adult use only. Moving head must be installed beyond the reach of children. Never leave the unit
running unattended.
● Never attempt to bypass the thermostatic switch or fuses.
● For replacement use fuses of same type and rating only.
● The user is responsible for correct positioning and operating of the iB-16R. The manufacturer will not
accept liability for damages caused by the misuse or incorrect installation of this device.
● This device falls under protection class I. Therefore it is essential to connect the yellow/green
conductor to earth.
● Repairs, servicing and electric connection must be carried out by a qualified technician.
● WARRANTY: Till one year after date of purchase.
Page 12

11
Infinity Chimp Series
Infinity Chimp Series
Operating Determinations
This device is not designed for permanent operation. Consistent operation breaks will ensure that the
device will serve you for a long time without defects.
The maximum ambient temperature ta = 40°C must never be exceeded.
The relative humidity must not exceed 50 % with an ambient temperature of 40° C.
If this device is operated in any other way than the one described in this manual, the product may
suffer damages and the warranty becomes void.
Any other operation may lead to dangers like short-circuit, burns, electric shock, crash etc.
You endanger your own safety and the safety of others!
Connection with the mains
Connect the device to the mains with the power-plug.
Always check if the right color cable is connected to the right place.
International
EU Cable
UK Cable
US Cable
Pin
L
BROWN
RED
YELLOW/COPPER
PHASE
N
BLUE
BLACK
SILVER
NEUTRAL
YELLOW/GREEN
GREEN
GREEN
PROTECTIVE
GROUND
Make sure that the device is always properly connected to the earth!
Improper installation can cause serious injuries and/or damage of property!
Page 13

12
Infinity Chimp Series
Infinity Chimp Series
Return Procedure
Returned merchandise must be sent prepaid and in the original packing, call tags will not be issued.
Package must be clearly labelled with a Return Authorization Number (RMA number). Products returned
without an RMA number will be refused. Highlite will not accept the returned goods or any responsibility.
Call Highlite 0031-455667723 or mail aftersales@highlite.nl and request an RMA prior to shipping the fixture.
Be prepared to provide the model number, serial number and a brief description of the cause for the
return. Be sure to properly pack fixture, any shipping damage resulting from inadequate packaging is the
customer’s responsibility. Highlite reserves the right to use its own discretion to repair or replace
product(s). As a suggestion, proper UPS packing or double-boxing is always a safe method to use.
Note: If you are given an RMA number, please include the following information on a piece of paper
inside the box:
01) Your name
02) Your address
03) Your phone number
04) A brief description of the symptoms
Claims
The client has the obligation to check the delivered goods immediately upon delivery for any shortcomings and/or visible defects, or perform this check after our announcement that the goods are at their
disposal. Damage incurred in shipping is the responsibility of the shipper; therefore the damage must be
reported to the carrier upon receipt of merchandise.
It is the customer's responsibility to notify and submit claims with the shipper in the event that a fixture is
damaged due to shipping. Transportation damage has to be reported to us within one day after receipt
of the delivery.
Any return shipment has to be made post-paid at all times. Return shipments must be accompanied with
a letter defining the reason for return shipment. Non-prepaid return shipments will be refused, unless
otherwise agreed in writing.
Complaints against us must be made known in writing or by fax within 10 working days after receipt of the
invoice. After this period complaints will not be handled anymore.
Complaints will only then be considered if the client has so far complied with all parts of the agreement,
regardless of the agreement of which the obligation is resulting.
Page 14

13
Infinity Chimp Series
Infinity Chimp Series
2 Description of the device
Features
The Chimp is a hybrid programmer based tracking console.
Hybrid means it may be used to either control conventional or moving light fixtures in the same easy-touse way.
Being a programmer based Console, you always have the chance to override the Chimps output
manually, as the programmer always has precedence. To “empty” the programmers contents, you need
to hit the clear button three times, or press it for a longer period of time.
“Tracking” as opposed to non-tracking defines that values are tracked over from one cue in a cuelist to
another (i.e. a fixture has been brought to a level of 50% in cue #1, and it will remain at this level
proceeding through the cuelist until you change it to a different level). This is the default setting, however
you still have the option to set cuelists to a “Non-Tracking” mode on a per cuelist basis.
Chimp 100
Chimp 300
On-board Screen
-
22” Full Color Touchscreen
External Monitor
2x HDMI
1x HDMI
Faders
10 + 4
Playback Pages
40
60
Encoders
4
DMX Channels
1024
2048
DMX Universes
2
4
Artnet
2
4
Fixtures
100
300
Channels per Fixture
120
Memories
5000
10000
CueLists
200
400
MIDI In / Through / Out
Yes
SMPTE/Time Code
-
Yes (Using Audio In XLR)
DMX input
Yes (By switching direction)
Audio Input
Yes
Yes
Desklight Connectors
2
2
Input Voltage
100-240V, 60/50Hz
100-240V, 60/50Hz
Power Consumption
75W
125W
Fuse
Internal Fuse
Internal Fuse
Housing
Metal & Flame retardant plastic
Dimensions
400 x 575 x 160mm
647 x 575 x 279mm
Weight
9kg
18kg
Optional accessories
Chimp 100
Chimp 300
Dustcover Ordercode
55001
55011
Flight case Ordercode
D7250
D7251
Page 15

14
Infinity Chimp Series
Infinity Chimp Series
3 About this Guide
Text Conventions
The following styles are used throughout this guide:
Style
Meaning
[Button]
Front panel (faceplate) hard buttons or keys. Example: Press [Button] to operate
or select.
Button
LCD display menu softkeys. These are buttons that appear on the LCD display
touchscreen. Example: Press Button to operate or select.
4 Console Backpanel
Chimp 100 Back panel
Please make sure to connect your main Monitor to HDMI Port 1, as this will be the primary screen you are
interfacing with. If you are using one Touchscreen and one regular screen without touch facilities,
connect the touchscreen monitor to this port. Make sure both displays support 1920 by 1080 pixel
resolution.
Connect both monitors prior to booting the console.
Fig. 1 Chimp 100 Back panel
1
Desklight Connector
6
Power Connector
2
Ethernet Port
7
Audio Input
3
USB 2.0 Ports
8
Midi Out / Thru / In
4
HDMI Ports 1 & 2
9
DMX Ports
5
Desklight Connector
Page 16

15
Infinity Chimp Series
Infinity Chimp Series
Chimp 300 Back panel
Please make sure the external screen you are about to connect to the console, supports 1920 by 1080
pixels of resolution. Connect it before booting the console.
Fig. 2: Chimp 300 Back panel
1
Desklight Connector
6
Power Connector
2
Ethernet Port
7
Audio Input
3
USB 2.0 Port
8
Midi Out / Thru / In
4
HDMI Port (External Screen)
9
DMX Ports
5
Desklight Connector
Page 17

16
Infinity Chimp Series
Infinity Chimp Series
5 The Frontpanel
Front panel
The front panel contains all the necessary buttons and faders for operation. The Front panel looks exactly
the same across both products. Here is a quick overview:
Fig. 3: Chimp 100 Front panel
Playback Faders
The Chimps front panel consists of multiple playback fader controls, each consisting of a fader and flash,
go, pause/back buttons. These may contain Cuelists, Groups or Special Masters, like Speedmasters. These
are pageable and the button functions are assignable. The buttons below the faders are labelled 1 to 10.
Fig. 4: Playback Faders
Page 18

17
Infinity Chimp Series
Infinity Chimp Series
Programming Section
This part of the Chimps front panel contains all keys needed for programming. Take a few moments to
familiarize yourself with the buttons found here. It may seem like a lot to learn, but don't worry. You’ll be
training your muscle memory over time. Also, all controls for value entry may be found here.
Fig. 5: Programming Section
Executor Buttons
You will find ten buttons labelled e1 to e10 next to the faders, below the programming section. These
may contain Cuelists or Groups. The Executors are independently pageable from the Playback Faders.
These buttons have assignable functions as well.
Fig. 6: Executor Buttons
Page 19

18
Infinity Chimp Series
Infinity Chimp Series
Special Faders
The far right side of the Chimps front panel contains four special master fader controls, each consisting of
a fader and button. These may contain Groups or Special Masters, like Speedmasters. The buttons below
the faders are labelled s1 to s4.
Fig. 7: Special Faders
Touchscreen (Applies to Chimp 300 Console, only)
The 22“ Touchscreen of the Chimp 300 Console is one of the key elements used for user interaction with
the Chimp. It features an easy and intuitive to use graphical user interface.
The Chimp 100 Console does not have a built-in screen and needs to be connected to an external
screen with full-HD resolution (1920 by 1080) as the user interface is optimized for that resolution. The
Screen may be a touch screen as well.
Page 20

19
Infinity Chimp Series
Infinity Chimp Series
6 Basic Concepts
Hybrid Console
The Highlite Chimp is a hybrid console. This means, that it is not limited to control of a specific fixture type
only. It equally treats Dimmer Channels and Movinglights.
Fixtures vs. Channels
The Chimp does not distinguish between channels or fixtures. It only knows about “Fixtures”. This is to allow
more flexibility.
As an example: You may easily replace any fixture with a different model of fixture or even replicate
fixtures while maintaining the values programmed previously.
To make fixture replacement and replication working, a conventional dimmer channel is also a “Fixture”
and is patched using a library file that contains one attribute only: A Dimmer.
This also applies to numbering. Chimp uses “Fixture Numbers” for numbering, not “Channel Numbers”.
Priority Concept
6.3.1 What is LTP and HTP?
In this part of the manual you will get a basic understanding about the priority concept used in the
console. Depending on which consoles you have used in the past, these concepts may sound more or
less familiar.
HTP (Highest takes precedence)
Generally, desks that are not designed to handle moving lights (like a simple 2 Preset Desk) work on a
Highest Takes Precedence (HTP) basis.
This means that if a fixture‘s intensity is being controlled by two different parts of the console, such as a
Preset 1 and Preset 2 at the same time, the intensity will be at the higher of the two levels.
For example, if Fixture 1 is at 50% on the first Preset bank, and at 100% on the second Preset bank, the
level output is 100%. If the value set on Preset bank 2 is reduced to 40%, the Output level will be at 50%,
since the value set by the first Preset bank is now the highest value, hence output.
Unlike other consoles, we have laid out the way the console decides which parameter of a moving light
fixture should be treated as a dimmable channel quite smartly - we let you decide when creating a
library. The intensity faders will also control everything that is set as dimmable in the library, and only those
channels will be compared HTP.
LTP (latest takes precedence)
Highest takes precedence generally works well for non-moving light fixtures, but moving lights introduce a
problem. Parameters other than intensity do not have ‘higher’ or ‘lower’ values: A colour of red is not
higher or lower than green, and Gobo 1 is not higher or lower than Gobo 2.
When working with moving lights, a better way to decide precedence, called Latest Takes Precedence
(LTP) is needed.
With this system, the fixture values will always be at the value they have most recently been set to. Taking
our example made previously, setting the value of the fixture on the second Preset bank to 40% would
result in an output level of 40%, since the level change has been the latest action and hence, takes
precedence.
Page 21

20
Infinity Chimp Series
Infinity Chimp Series
6.3.2 Priority Stacks
The consoles maintains so called „Priority Stacks“ which are used to figure out which values have been
last set by which playback to calculate output values accordingly. There is a “Low Priority” stack, as well
as a “High Priority” stack. Think of it as two different stacks of paperwork, where the piece of paper on
top of the stack is the most recent one. Cuelists set to high priority will always take precedence over nonhigh priority cuelists.
6.3.3 Programmer Priority
The general programming layer, called the “Programmer” always takes precedence over playbacks,
unless it is in “Blind”-Programming mode. This may seem a bit strange at first glance, but in fact is very
useful since the programmer enables the user to gain additional control over the consoles output at any
time.
6.3.4 Priority Overview
The console has a quite easy to understand priority concept:
Priority
Level
Highest
7
[Highlight] Button
6 Grand Master
5 Group Submasters
4 Programmer
3 Playbacks at High Priority
2 Playbacks at Low Priority
Lowest
1
Default Values
Multiple Playbacks
The console allows multiple different cuelists to be run at the same time. You can have several cuelists
active at the same time, each on its own playback.
6.3.5 Examples
Starting multiple Cuelists
Let’s say you start multiple cuelists one after another controlling the same fixture:
Cuelist (In start order)
Dimmer
Color
Gobo
#1: Intensity
80%
#2: Intensity and Color
50%
Red
#3: Gobo
Gobo 1
#4: Gobo and Color
Blue
Gobo 2
The next table will show you what the results would be:
Dimmer
Color
Gobo
80%
Blue
Gobo 2
Starting multiple Cuelists with different priorities
Let’s take our previous example and add different priorities to the mix:
Cuelist (In start order)
Priority
Dimmer
Color
Gobo
#1: Intensity
80%
#2: Intensity and Color
High
50%
Red
#3: Gobo
High
Gobo 1
#4: Gobo and Color
Blue
Gobo 2
Page 22

21
Infinity Chimp Series
Infinity Chimp Series
The next table will show you what the results would be:
Dimmer
Color
Gobo
80%
Red
Gobo 1
As you can see, the „High Priority“ option is only affecting LTP channels.
Stopping Cuelists with different priorities
Let’s take our previous example again and switch off one of the cuelists after starting them all:
Cuelist (In start order)
Priority
Dimmer
Color
Gobo
#1: Intensity
80%
#2: Intensity and Color
High
50%
Red
#3: Gobo
High
Gobo 1
#4: Gobo and Color
Blue
Gobo 2
Will genereate the following output:
Dimmer
Color
Gobo
80%
Red
Gobo 1
After stopping Cuelist #2, the following values are output:
Dimmer
Color
Gobo
80%
Blue
Gobo 1
Page 23

22
Infinity Chimp Series
Infinity Chimp Series
Tracking
6.4.1 Basic Idea
When a sequence of cues is programmed, the lighting console can store the information in one of two
ways: either it records the settings for all attributes of all the fixtures used in the cuelist, or it is only
recording the values that have changed. The latter is called tracking and was invented because
consoles in the early years had too little memory to store all the information it would have needed to
store for the first example given. However, tracking is not outdated. It has its advantages over the “NonTracking” approach.
The Chimp console allows you to playback cuelists both in tracking or Non-Tracking modes.
6.4.2 Tracking in a Nutshell
Imagine you come home late at night and it is already dark outside:
You open up your apartment’s main door (Cue 1) and you switch on the light in the corridor (Cue 2).
You close the door (Cue 3), and go straight into the living room after opening its door (Cue 4), where you
switch on the light as well (Cue 5).
The light in the corridor is still on, and the living room door still open since you did not change the states of
these.
Here is a closer look at what happened and at what would be stored in the cues if we think of this chain
of events as a cuelist:
Cue
Entrance Door
Corridor Light
Living Room Door
Living Room Light
#1: Entrance
Open
#2: Light in corridor
On
#3: Close main door
Closed
#4: Living room door
Open
#5: Living room light
On
With tracking enabled, the final state at the end of this sequence is:
Closed
On
Open
On
6.4.3 Examples
General Example
The following example shows the intensities of four fixtures in three cues on a Non-Tracking console:
Fixture 1
Fixture 2
Fixture 3
Fixture 4
Cue 1
80%
80%
50%
50%
Cue 2
80%
50%
100%
50%
Cue 3
100%
50%
100%
50%
Cue 4
0%
50%
100%
50%
With a tracking console, however, the recorded information would be:
Fixture 1
Fixture 2
Fixture 3
Fixture 4
Cue 1
80%
80%
50%
50%
Cue 2
50%
100%
Cue 3
100%
Cue 4
0%
Page 24

23
Infinity Chimp Series
Infinity Chimp Series
If the intensity has not been changed or touched, then no value is recorded for that attribute. During
playback, if Tracking is enabled, attributes remain at their last assigned level, i.e.: Fixture 4 remains at 50%
intensity while cue 2 is played back, because no change was recorded into cue 2.
Tracking through Changes
One advantage of tracking is that changes can be ‘tracked through’ a series of cues. In the example
given above, if you changed the intensity of Fixture 1 in cue 1 to 60%, this value would track through into
cue 2, since Cue 2 has no information for Fixture 2 recorded. The value will still change to 100% in cue 3,
because a value is recorded.
Tracking can be very useful when you want to make the same change to a series of cues: for example,
you might have a series of cues that include a fixture that lights a part of the set in the same way
throughout. If you later want to change the intensity of that light, you may change it in the first cue the
light appears, and the change will track trough to all the cues until the next change for this attribute of
this fixture.
While tracking can help speed up the modification of cues, you may not always want changes to track
through. For example, in a theatre show, you probably would not want changes to track through from
one scene to the next, and in a music concert, you would not want changes to track through from one
song to the next. To prevent changes tracking through, you may record a so-called “blocking cue”. A
blocking cue contains values for all attributes that have values in the cuelist, regardless of whether the
values have tracked through from previous cues. In the example given below, cue 4, would act as a
blocking cue:
Fixture 1
Fixture 2
Fixture 3
Fixture 4
Cue 1
80%
80%
50%
50%
Cue 2
50%
100%
Cue 3
100%
Cue 4 “Blocking Cue”
100%
50%
100%
50%
Cue 4 acts as an end-stop, preventing any future changes to cues 1-3 from tracking through to
subsequent cues after cue 4.
Maintaining Tracking
Sometimes you may need to playback cues out of order – For example in a rehearsal situation where it
might be necessary to jump between different scenes or even acts. The Chimp Console is taking care of
maintaining the tracking state and will always calculate all values as if the cuelist was played back in
order.
Page 25

24
Infinity Chimp Series
Infinity Chimp Series
Track Through End
Sometimes it is desirable to track values from the last cue in the cuelist to the first cue. A real live example
for this is a looping cuelist that creates a color chase, that when you run it first should set the fixtures
intensity to 100% cue by cue. After the loop, they should stay on and just alternate colors between red
and blue.
Fixture 1
Fixture 2
Fixture 3
Fixture 4
Cue 1
100%
Blue
Red
Blue
Red
Cue 2
Red
100%
Blue
Red
Blue
Cue 3
Blue
Red
100%
Blue
Red
Cue 4
Red
Blue
Red
100%
Blue
Without Track Through End the intensity of a fixture is brought to 100% in each cue, and these values track
through for the duration of the loop. However, as soon as the cuelists loops to cue 1, the console
calculates tracking as if you just started this cuelist – hence only the first fixture would have its intensity set
to 100%.
To stop this from happening, you need to enable “Track Thru End” – this will tell the console to track
everything from the last cue into the first as if it would be one large cuelist with a never-ending number of
cues.
Page 26

25
Infinity Chimp Series
Infinity Chimp Series
7 The Graphical User Interface
The console utilizes an easy to use and intuitive graphical user interface (GUI). The following sections
explain the basics of finding your way around the GUI, in the internal as well as the external display.
The Screen Layout of the Chimp Consoles is divided into three different parts: The Top Toolbar, the
Content Area and the Bottom Toolbar.
The Top Toolbar provides access to the different configuration and programming / playback views.
Fig. 8: The Graphical User Interface
The “Top Toolbar”
The Top Toolbar is divided into three parts. The left part shows the views that are used for programming
and during playback. The center part shows status information like the current date and time, current
Timecode and the active fader and executor pages.
The right part shows buttons to enter the Setup and Backup screens, and buttons to lock the console and
to save the show.
Fig. 9: The Top Toolbar
Page 27

26
Infinity Chimp Series
Infinity Chimp Series
7.1.1 Main View Buttons
The Main View buttons provided in the top toolbar switches the Content Areas contents between various
predefined views. Please note the programming interface (the programmer) is only available in
“Programming”.
Fig. 10: Main View Buttons
7.1.2 Status Buttons
The time and date label provides quick information about the current date and time.
The Fader Page and Executor Page Buttons are used to display the current Fader or Executor Page, or to
open the Page Directory for quickly changing between pages, or to move, delete and naming them.
The Timecode buttons provide quick access to most needed timecode functions, such as resetting the
Timecode back to the start value or enabling and disabling the timecode. The label on the right side
shows the current timecode value.
Fig. 11: Status Buttons
Page 28

27
Infinity Chimp Series
Infinity Chimp Series
7.1.3 Setup / Backup / Lock Console and Quicksave Buttons
The Setup and Backup buttons show the corresponding menus to patch fixtures, setup preferences or to
back up your show to an USB key.
To lock the user interface of the console to unauthorized personnel, click on the Lock Console button.
The default pin for the desk lock is “0000”.
The Quicksave button will save your showfile on the internal disk.
Fig. 12: Setup – Backup – Lock Console – Quicksave Buttons
The “Content Area”
The Content Area is used to display context sensitive windows and widgets, based on the selection made
from the top toolbar. It also displays dialogs which may be opened using the hard buttons on the front
panel of the console.
Fig. 13: The Content Area
Page 29

28
Infinity Chimp Series
Infinity Chimp Series
7.2.1 The different Split Widgets
Let’s call any of the split items in the Content Area a “Split Widget”.
Each of the Split Widgets behaves in the same way. They do have a Menu bar on the left (or right,
dependant on the position of the widget).
Fig. 14: Split Widgets
The Menu on the left (or right) is used to switch the type of that particular Split Widget to a different type.
Different Types are, for example: Fixtures, Groups, Presets, a Cuelist View Widget, Virtual Executors and
Cuelists. In some cases you may notice a Button that says x/y, for example 1/2. Pressing that button will
open the second level of the menu. If that button is missing – there is no second level for that menu.
Fig. 15: Side Menu
Page 30

29
Infinity Chimp Series
Infinity Chimp Series
The Title Bar of a Split Widget may also contain some buttons that toggle between contents of the
widget, or are used to trigger specific functions in the console.
Fig. 16: Split Widget Title Bar
7.2.2 Pool Split Widgets
The so-called “Pools” are used throughout the console to provide a quick and easy way to interact with
Fixtures, Groups, Presets and Cuelists.
If a single object within a Pool is referred to, we will often refer to it as a “Item”.
Pool items may be used in combination with keys found on the face-plate of the console like [Record]
or [Delete] or to quickly select or deselect the appropriate object by clicking (or touching) it.
This section is meant to give you an overview of the various items and their differences.
The Title Bar of a Pool View usually provides buttons for quick access to useful functions, dependent on
the type of the Pool.
Pool-Items in general have 3 States: Empty, Not Selected and Selected. The empty state is indicated by a
darker background color.
An existing Pool Item is indicated by a lighter background color, with the ID of the Item in the top left
corner. If a Pool Item is selected, the background of the Item will turn green.
Fig. 17: States of Pool Items
Page 31

30
Infinity Chimp Series
Infinity Chimp Series
7.2.3 Fixture Pool
There are two big differences regarding the fixture pool that differentiates it from the other pools:
It only shows Fixtures that have been added to the Show, instead of showing empty Items – and – it
provides an overview of the fixture values that are being output.
Fig. 18: Fixture Pool
Selected fixtures will show a green background color, like all other Pool Items do. A line at the bottom of
the Item is displayed in red color if the appropriate fixture has values set in the programmer.
When a fixture is in Highlight mode, the background color of the fixture item will be yellow.
7.2.4 Group Pool
The Group Pool is used to show and select fixture Groups.
Groups store the selection order and selected fixtures.
Fig. 19: Group Pool
Page 32

31
Infinity Chimp Series
Infinity Chimp Series
7.2.5 Preset Pool
Preset Pools, as opposed to Groups and Cuelists, are divided into Sub Pools, which filter Preset contents
by attribute Group (For example: All, Intensity, Position, Color, Beam).
When a Preset is stored into the Color Preset Pool, only the Color information will be recorded into this
Preset.
Preset Pool items show how many fixtures within the programmer are applied to this Preset.
Fig. 20: Preset Pool
Preset Items will also show some extended information once fixtures are selected:
Fig. 21: Preset Pool Item Status Indication
The green or yellow bar in the bottom area of the item indicates if this item may be applied to all of the
fixtures selected (green bar) or only to a part of them (yellow bar).
If a preset is selected for a part of the current selection only, but could be applied to all selected fixtures,
the presets background color will be yellow.
Presets that are displayed with a darker background color may not be applied to the current selection
set at all. However, it might be this preset is already selected for other fixtures in the programmer, which
are not actively selected at the moment. If this is the case, the preset will show the count of fixtures it is
applied to in the upper right corner.
Page 33

32
Infinity Chimp Series
Infinity Chimp Series
7.2.6 Cuelist View
The Cuelist View is used to alter names and timings of cues, and to provide overview about the current,
next and previous cues.
Fig. 22: Cuelist View
To alter the name or timings of a cue, select the appropriate cells and press the [Set] key on the
console front panel.
The background color of the active cue’s row indicates the cuelist state:
Background Color
State
The cuelist is running
The cuelist is in a paused state
The cuelist has been switched off and is outfading
The cuelist is in learn Timing / Timecode mode or Manual X-Fade.
The cuelist is not running.
Page 34

33
Infinity Chimp Series
Infinity Chimp Series
7.2.7 (Virtual) Executors
Virtual Executors provide another method to playback cuelists or quickly select groups during a live show.
They behave exactly the same way as the physical Executor buttons, with the only difference being that
they are shown on the screen.
The Virtual Executor Split Widget is providing you with four (4) different pages that may be used to quickly
call cuelists on screen.
Similar to the Fader / Executor Items they provide status information by using the background color of the
button and status indicator of the current cue.
Fig. 23: Virtual Executors
The background color of the button indicates following cuelist states:
Background Color
State
The cuelist is running
The cuelist is in a paused state
The cuelist has been switched off and is outfading
The background color of the status indicator indicates the different cuelist states:
Background Color
State
The cuelist is running
The cuelist is in a paused state
The cuelist has been switched off and is outfading
The cuelist is in learn Timing / Timecode mode or Manual X-Fade.
The cuelist is not running.
Page 35

34
Infinity Chimp Series
Infinity Chimp Series
7.2.8 Cuelist Pool
Cuelist Pool Items have a status indicator that shows the current Cue (or, if the Cuelist is not running, the
Cue that would be started) and status of the Cuelist.
Fig. 24: Cuelist Pool
Cuelist Items of Cuelists that are played back are displayed using a green background color.
The color of the status indicator indicates the different cuelist states:
Background Color
State
The cuelist is running
The cuelist is in a paused state
The cuelist has been switched off and is outfading
The cuelist is in learn Timing / Timecode mode or Manual X-Fade.
The cuelist is not running.
Page 36

35
Infinity Chimp Series
Infinity Chimp Series
The “Bottom Toolbar”
The Bottom toolbar is used to show fader labels on the left side, encoder labels as well as executor labels
on the center part, and the align settings, sub-selection and master faders on the right side.
Fig. 25: Bottom Toolbar
7.3.1 Playback Fader Labels
Fader labels give you a quick overview of fader assignments, current cuelist states and much more. The
look of the fader labels varies a little depending on the fader contents.
Fig. 26: Playback Fader Labels
The type of the fader is indicated by the description in the upper right corner:
Abbreviation
Item Type
CL3
Cuelist 3
GR1
Group 1
SM1
Speed Master 1
FM1
Fade Master 1
GM
Grand Master
Page 37

36
Infinity Chimp Series
Infinity Chimp Series
Furthermore, the Fader Item shows the name of the object, and the value of the fader.
Cuelists also show more detailed information about their state, like the previous, current and next cue.
The background color of the label indicates following cuelist states:
Background Color
State
The cuelist is running
The cuelist is in a paused state
The cuelist has been switched off and is outfading
The background color of the status indicator indicates the different cuelist states:
Background Color
State
The cuelist is running
The cuelist is in a paused state
The cuelist has been switched off and is outfading
The cuelist is in learn Timing / Timecode mode or Manual X-Fade.
The cuelist is not running.
Furthermore, clicking into the fader Item will open the “Edit Fader” Menu for that Master which allows to
configure Fader and button settings.
7.3.2 Encoder Labels
The “Encoder Labels” show encoder function and values.
Clicking on the labels or pushing the encoder either shows the “select slots / keypad” dialog or toggles
between a set of commonly used values. In the programmer screen, labels will not show values. Instead,
the programmer window is used to display values.
Fig. 27: Encoder Labels
Page 38

37
Infinity Chimp Series
Infinity Chimp Series
7.3.3 Executor Labels
Executor labels give you a quick overview of executor assignments, current cuelist states and much
more. The look of the executor labels varies a little depending on the executors contents.
Fig. 28: Executor Labels
The type of the executor is indicated by the description in the upper right corner:
Abbreviation
Item Type
CL3
Cuelist 3
GR1
Group 1
Furthermore, the Executor Item shows the name of the object.
Cuelists also show more detailed information about their state, like the previous, current and next cue.
The background color of the executor label indicates following cuelist states:
Background Color
State
The cuelist is running
The cuelist is in a paused state
The cuelist has been switched off and is outfading
The background color of the status indicator indicates the different cuelist states:
Background Color
State
The cuelist is running
The cuelist is in a paused state
The cuelist has been switched off and is outfading
The cuelist is in learn Timing / Timecode mode or Manual X-Fade.
The cuelist is not running.
Furthermore, clicking into the executor Item will open the “Edit Executor” Menu which allows to configure
button behaviour.
Page 39

38
Infinity Chimp Series
Infinity Chimp Series
7.3.4 Toolbars
Toolbars are context sensitive aids and provide quick access to multiple different functions. They are
shown in the same position as the Executor Labels, when applicable.
Fig. 29: Selection Toolbar
Here is a quick overview over the available toolbars.
“Selection” Toolbar
The “Fixture Selection” Toolbar provides quick access to fixture sub selection.
Fig. 30: Selection Toolbar
For more Information on the Select Toolbar, please see section “14.1.5 Select Fixtures using the
“Selection” –toolbar” on page 86.
“Fan” Toolbar
The “Fan” –Toolbar is used to alter settings that are used in conjunction with the Fan function of the
console. The Fan function is invoked by pressing the [Fan] key and may be used to spread fixture
attribute values.
Fig. 31: Fan Toolbar
Grouping “n”: This will define the count of fixtures per Group for the fanning.
Align Left: Fanning will start from the left side of the fixture selection, meaning that the 1st fixture in the
selection set will not move.
Align Center: Fanning will start from the center of the fixture selection, meaning that the centered fixture
in the selection set will not move; or if there are two fixtures in the center, will move least.
Align Right: Fanning will start from the right side of the fixture selection, meaning that the last fixture in the
selection set will not move.
Reset: Will reset the Fanning Options back to default (no Grouping, Align Center).
Page 40

39
Infinity Chimp Series
Infinity Chimp Series
“Record” Toolbar
The “Record” –Toolbar provides you with modifiers when recording an object. It is shown after pressing
the [Rec] key.
Fig. 32. Record Toolbar
Insert: Only valid for Cuelists. Will insert a Cue in front of an already existing Cue.
Replace: Will replace a given object with the programmer values.
Remove: Will remove the programmer values from the given object.
Merge: Will merge the programmer values into the given object, combining the object and the
programmer values.
All for Selected: Will record all parameters of the selected fixtures, no matter if they are touched or not.
Everything: Will record every parameter for every fixture on the console.
Name It!: Will open up an On-Screen keyboard for quick naming after recording the object.
Page 41

40
Infinity Chimp Series
Infinity Chimp Series
“Delete” Toolbar
The “Delete” –Toolbar, like the “Record” –Toolbar shows several options useful for deleting objects. The
toolbar is shown after pressing the [Delete] key.
Fig. 33: Delete Toolbar
Delete Object: Only deletes the selected Object
Delete All: Deletes the selected Object and all directly connected Objects. Example: When Delete All is
selected while deleting a Fader Assignment, the assigned Object will be deleted as well.
Delete Cues: Is used to delete Cues from a Cuelist
Remove Content: Will remove all touched Values (if applied to a Preset or Cue) from the Preset or Cue, or
selected Fixtures (if applied to a Group) from the Group.
“Off” Toolbar
The “Off” –Toolbar is shown after pressing the [Off] key. It can be used to quickly “Off” all running
Cuelists, to reset all Sub (Fixture & Group Masters)- or assigned Grandmasters back to 100%.
The console will ask for confirmation when any of the “Reset” or “Release” buttons is pressed. However
you may omit the Confirmation Screen by holding the [Infinity] button pressed while clicking on any
of these buttons.
Fig. 34: Off Toolbar
Off Window will open the “Off”-Window” which provides you with a more detailed view of Cuelist states
and a quick way off switching off playbacks across all playback pages.
Reset Group Fader will reset all Group Master back faders to 100%.
Reset Cuelist Fader will reset all Cuelist Faders back faders to 100%.
Off All Playbacks wills switch off all running Playbacks (Faders and (Virtual) Executors.
Release Everything will off all Cuelists and reset all Fixture & Groupmasters as well as the Grandmaster to
100%.
Page 42

41
Infinity Chimp Series
Infinity Chimp Series
7.3.5 Commandline
Whenever you enter commands on the consoles front panel they are written into the Command Line
Interface.
Fig. 35: Commandline
It will also check if the command entered is a valid command. If the command is invalid (or incomplete),
the CLI will show a warning sign.
Fig. 36: Invalid CMD
Fig. 37: Valid CMD
7.3.6 Commandline Syntax
In general, the Commandline Syntax needs to be entered in “Action – Source – Target” form. When no
Action is specified, the source Item will be selected.
Action
Source
Target
[Rec]
[Cuelist] [5]
[Cuelist] [5]
[Copy]
[Cuelist] [5]
[Cuelist] [8]
[Move]
[Cuelist] [5]
[Cuelist] [8]
[Link]
[Cuelist] [2]
[Go] or [Pause / Back]
Commands interacting with a visual object (such as a Pool Item or a Faders Pause/Back Button) will be
executed automatically once they are syntactically correct. However, commands that do not interact
with visual elements need to be executed by pressing the [Enter] –Key.
Page 43

42
Infinity Chimp Series
Infinity Chimp Series
7.3.7 Fan Options / Selection Buttons
Clicking on the Fan Options button will open the Align Toolbar which is used to alter the way the FanFunction works.
Clicking on the Selection button will open the Selection toolbar that contains several shortcuts for fixture
sub selection (like Odd / Even, Half / Half, etc).
Fig. 38: Fan Options / Selection Button
Page 44
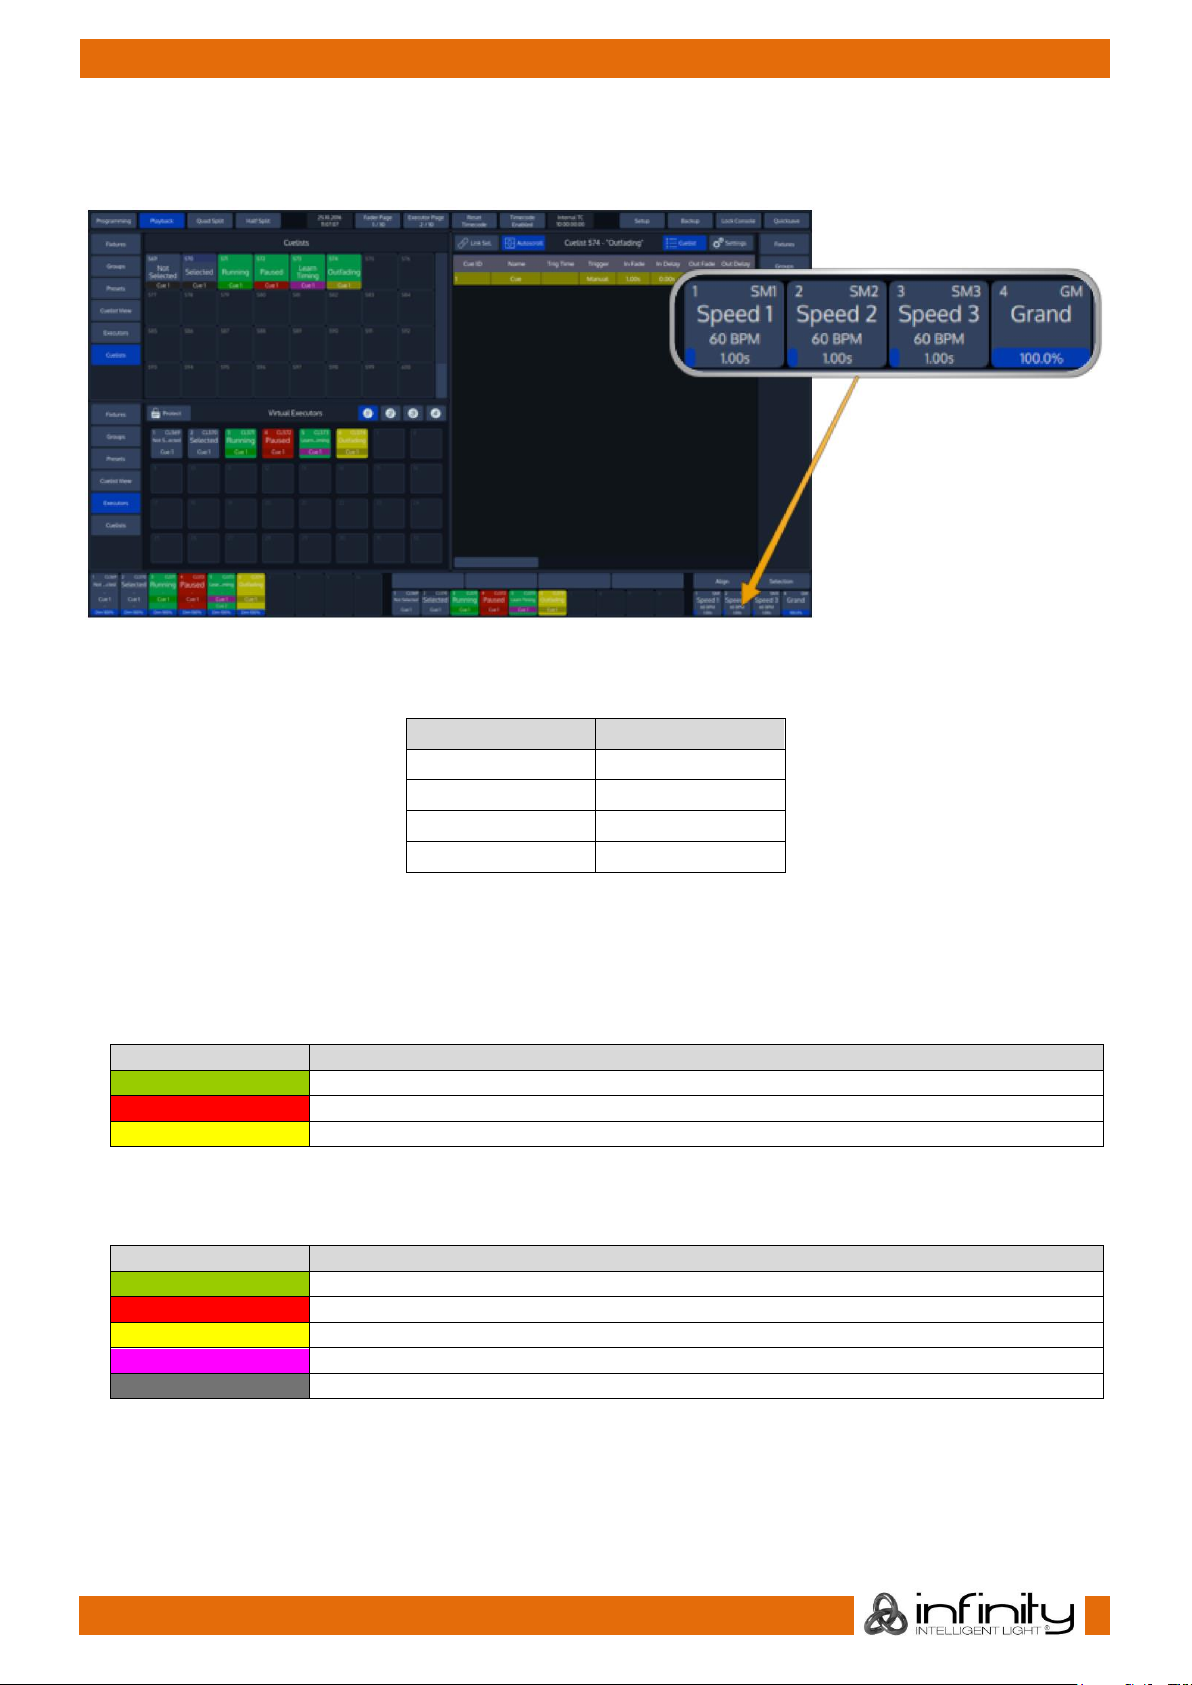
43
Infinity Chimp Series
Infinity Chimp Series
7.3.8 Special Master Fader Labels
Executor labels give you a quick overview of executor assignments, current cuelist states and much
more. The look of the executor labels varies a little depending on the executors contents.
Fig. 39: Special Master Faders
The type of the executor is indicated by the description in the upper right corner:
Abbreviation
Item Type
GR1
Group 1
SM1
Speed Master 1
FM1
Fade Master 1
GM
Grand Master
Furthermore, the Executor Item shows the name of the object.
Cuelists also show more detailed information about their state, like the previous, current and next cue.
The background color of the executor label indicates following cuelist states:
Background Color
State
The cuelist is running
The cuelist is in a paused state
The cuelist has been switched off and is outfading
The background color of the status indicator indicates the different cuelist states:
Background Color
State
The cuelist is running
The cuelist is in a paused state
The cuelist has been switched off and is outfading
The cuelist is in learn Timing / Timecode mode or Manual X-Fade.
The cuelist is not running.
Furthermore, clicking into the executor Item will open the “Edit Executor” Menu which allows to configure
button behaviour.
Page 45
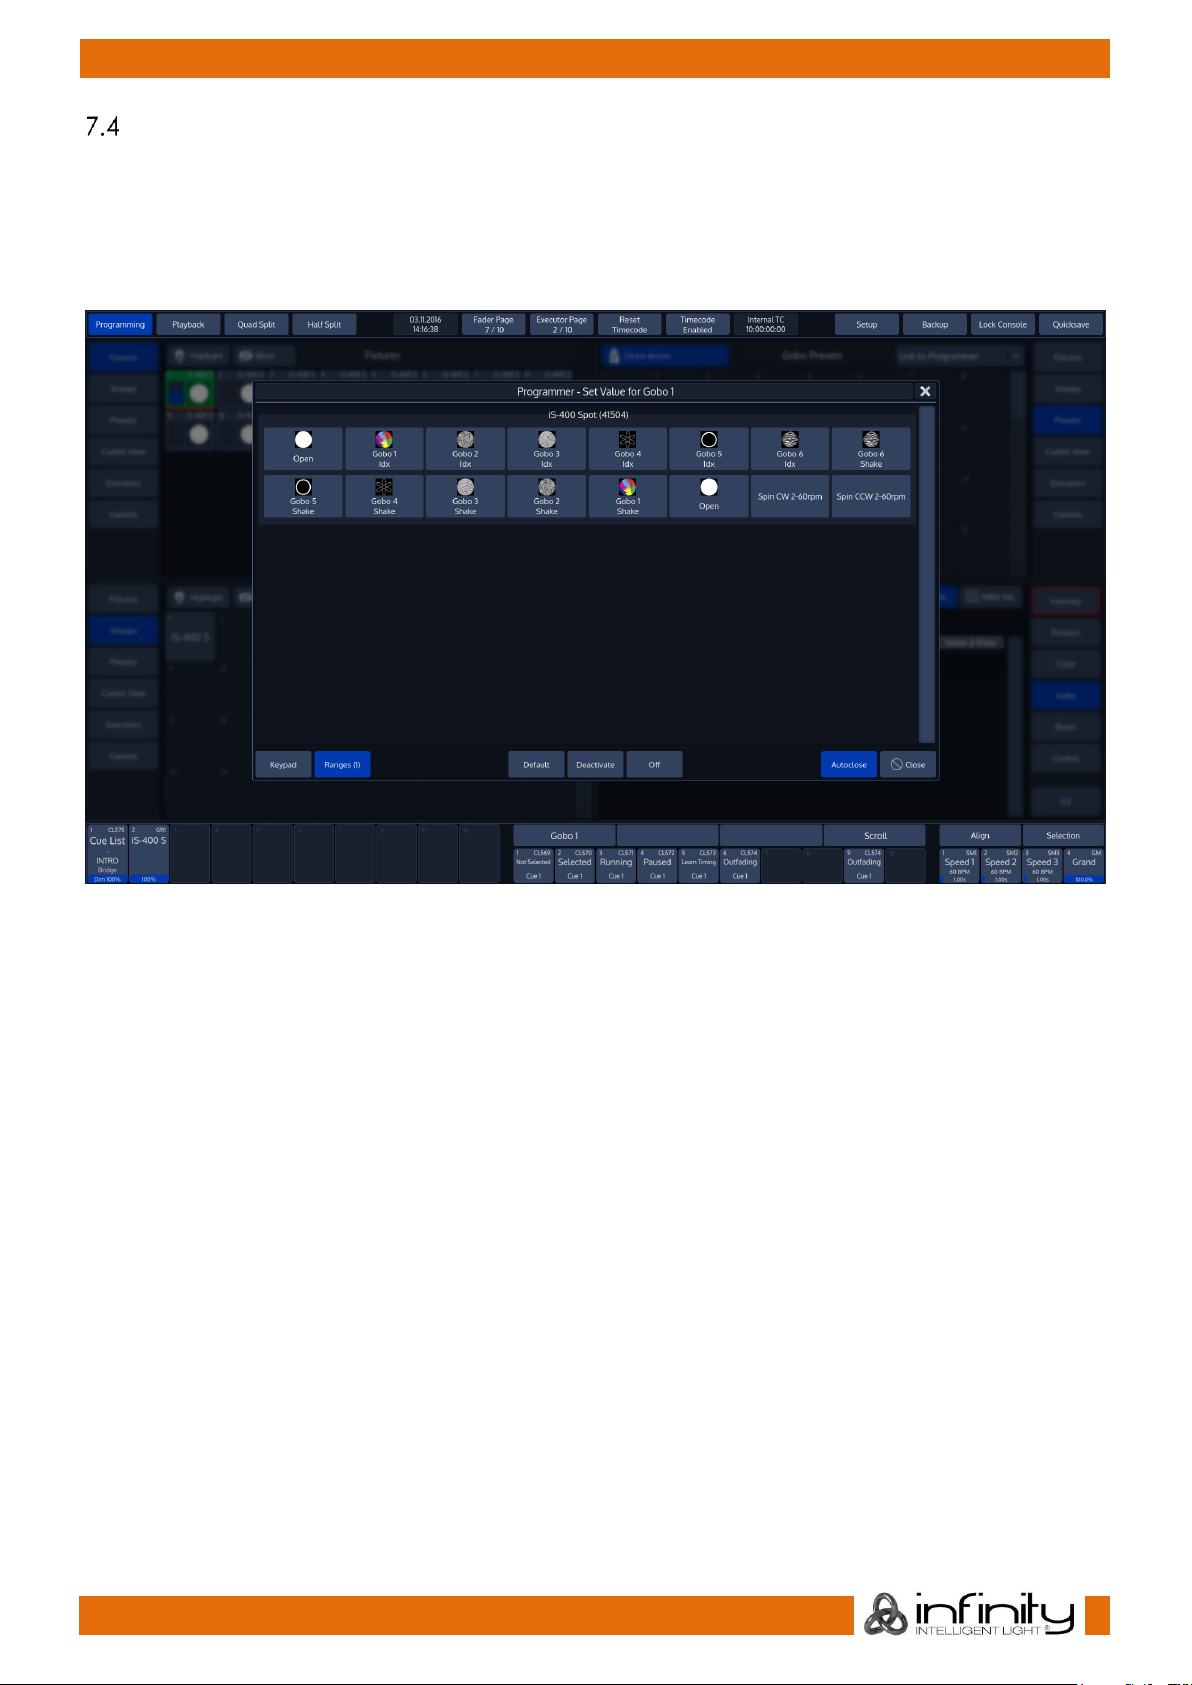
44
Infinity Chimp Series
Infinity Chimp Series
Dialog Windows
Dialog Windows are used throughout the console to pull your focus towards a specific task. Dialog
windows block the remaining GUI, so they need to be closed or accepted first.
Dialog Windows may either be closed by clicking the X button in the top right corner, or by using the
appropriate buttons found in the bottom row of the dialog.
Fig. 40: Dialog Windows
Page 46

45
Infinity Chimp Series
Infinity Chimp Series
7.4.1 Keypad Dialogs
Whenever a Keypad Dialog is shown, the keypad on the faceplate of the console may be used to set
values.
The Keypad may be used to directly enter values or to increment / decrement values using the [+], or
[-] Key. [Enter] closes the dialog.
Fig. 41: Keypad Dialogs
Page 47

46
Infinity Chimp Series
Infinity Chimp Series
7.4.2 On-Screen Keyboard
You may enter values and names using an external USB Keyboard connected to the console whenever
the On-Screen Keyboard is shown.
For added convenience, starting to type when the keyboard is shown will erase the old text without the
need to press backspace first.
Fig. 42: Keyboard Dialog
Page 48

47
Infinity Chimp Series
Infinity Chimp Series
8 Operation
To Begin Using the Console
8.1.1 Unpack Console and Accessories
Before you can use the console, unpack it and its accessories from the shipping carton.
Note: Before connecting any accessories to the Chimp Lighting Control Console, the console must be
located on a sturdy and flat surface in a dry, dust free environment.
8.1.2 Connect Console to Any Accessories and Power
Connect all optional accessories such as USB keyboard, mouse, touchscreen, etc. to the console.
Connect DMX cables to the console’s DMX output ports.
If you are using ArtNet for data output, also connect the network cable to the consoles network port.
Use the supplied AC power cable to connect the console to a grounded, AC power source. The console
operates on an AC voltage of 100 to 240VAC.
Press the power button on the right hand side of the console, above the special faders to boot up the
console.
Fig. 43: Power Button
During the boot process a boot menu will be shown. This boot screen provides several maintenance
utilities; however, it will continue to automatically boot the Console OS without user intervention.
The Chimp Lighting Control Console will perform a system check during boot up.
Page 49
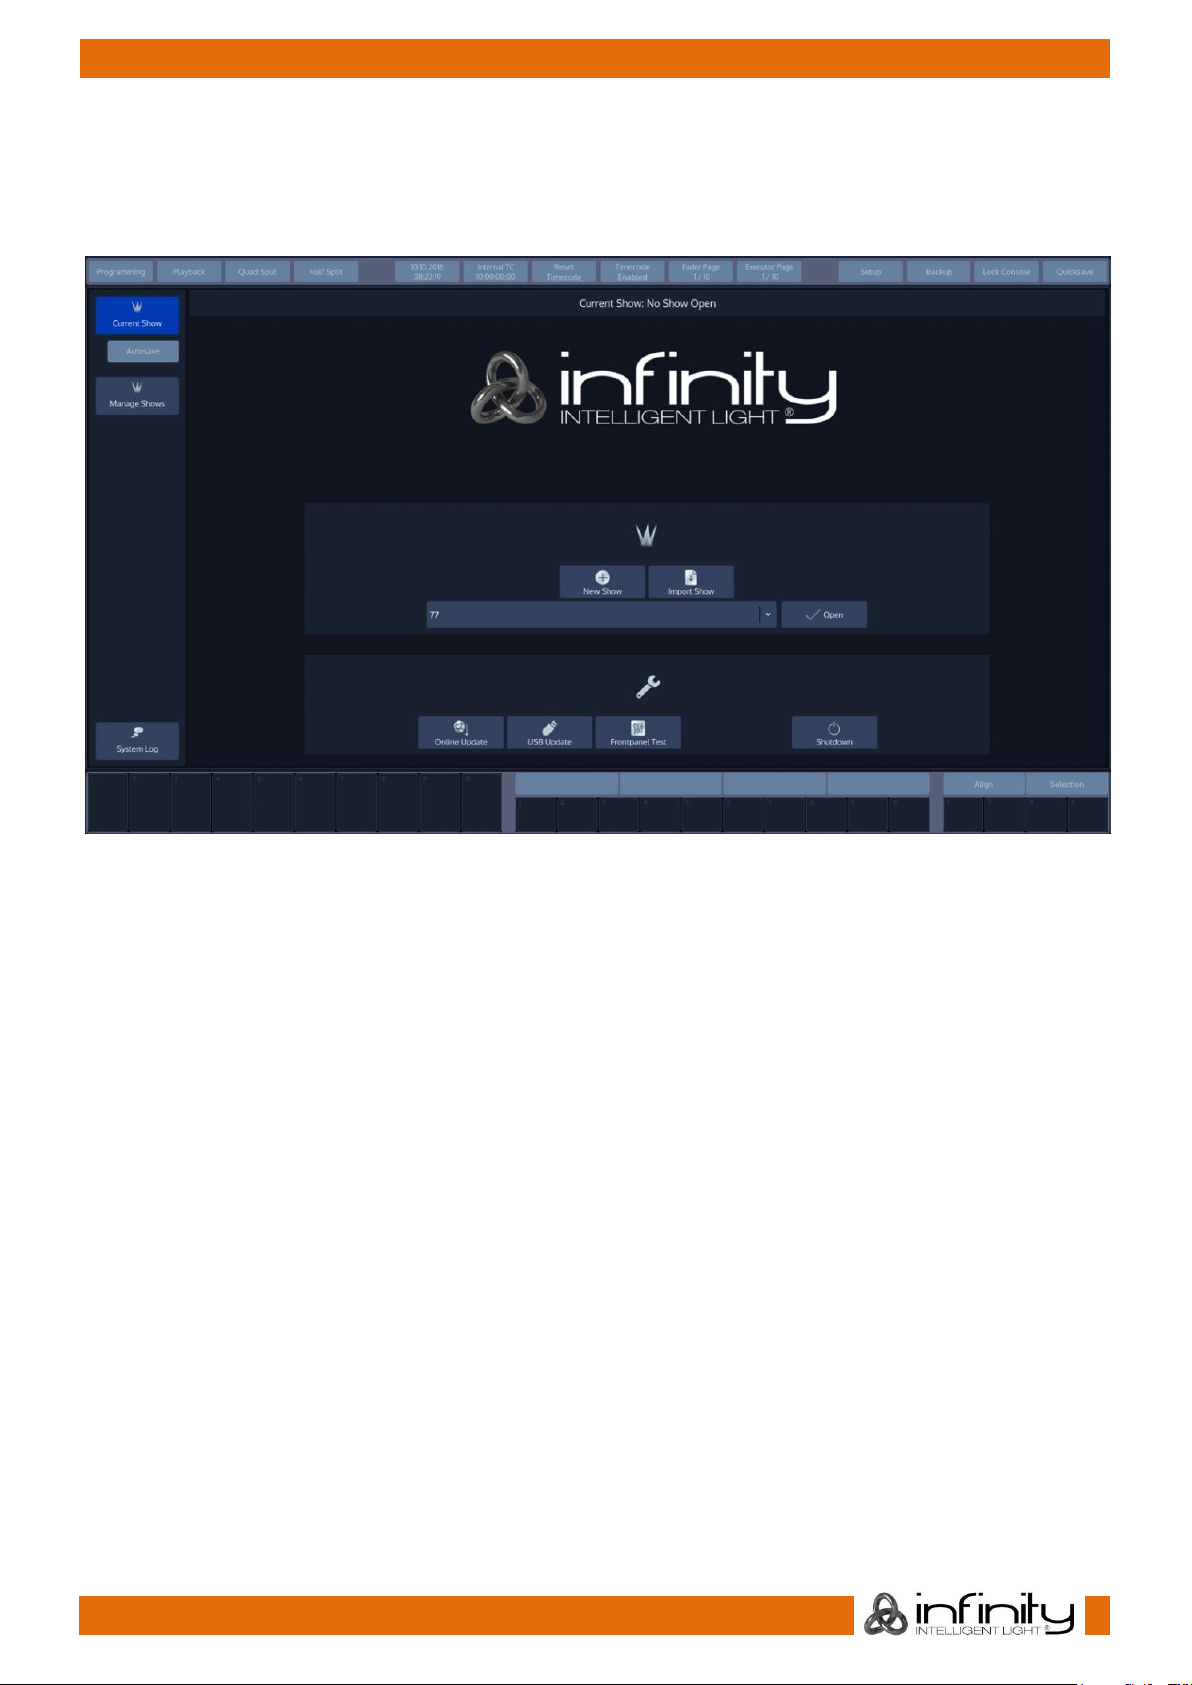
48
Infinity Chimp Series
Infinity Chimp Series
8.1.3 Boot up the Console
Once the system is ready to use, the Welcome screen will appear.
Once the Welcome Screen is shown, you may either start a new show file, or load an existing one.
Fig. 44: Welcome Screen
Page 50

49
Infinity Chimp Series
Infinity Chimp Series
9 Working with Shows
Showfiles contain all your show related settings like fixture schedule and patching, input settings, groups,
presets, cues, master assignments, etc. Multiple shows may reside on the console and the amount of
shows is only limited by hard disk memory. However, we advise to regularly backup old shows to a USB
key and delete them off the consoles memory.
Create a new Show
Within the touchscreen display, hit the New Show button.
This will open up a keyboard dialog to enter the name of the show to be created. You may also enter the
Name using an attached USB-Keyboard anytime the keyboard dialog is shown. As soon as you hit the
enter button a new show with the name you just entered will be created.
Fig. 45: Welcome Screen - New Show
Loading a Show
Within the touchscreen display, simply select the show you would like to open up from the drop-down
menu. After you selected the desired show to load, hit the Open button.
Fig. 46: Welcome Screen - Loading a Show
Page 51

50
Infinity Chimp Series
Infinity Chimp Series
Saving the Showfile
We recommend to save your show every once in a while. You may do this from within a show by hitting
the Show Quicksave button on the Top-Toolbar.
Fig. 47: Show Quicksave Button
Enable / Disable the “Autosave” -function
For added convenience, you may enable the „Autosave“ function which will make sure your showfile is
periodically saved to disk automatically.
To setup the autosave function, head over the Backup Menu by pressing the Backup Button on the Top
Toolbar.
Switch to the Autosave menu by pressing the button in the Side Menu.
Enable or disable Autosave and set the interval in the Show Autosave groupbox.
Fig. 48: Show Autosave
Page 52

51
Infinity Chimp Series
Infinity Chimp Series
Saving as new Showfile
We recommend to periodically save your show file as a new file.
The „Save Show as“ button will create a copy of the showfile you are working on at the moment (with a
given name) and will automatically continue with the new showfile, preventing further changes to the
previous show file.
To save as a new Showfile, head over the Backup Menu by pressing the Backup Button on the Top
Toolbar.
Make sure Current Show is selected in the side menu.
Click on Save Show As. An on-screen keyboard will be shown. Enter the new Showfile name and press
Enter to complete the process.
Fig. 49: Save Show as
Page 53

52
Infinity Chimp Series
Infinity Chimp Series
Import Shows from USB
Plug the USB Key into one of the Chimps USB Ports and head over to the Backup Menu.
Select Manage Shows from the Side Menu.
When the Manage Shows screen is shown, click on Import Show.
Fig. 50: Manage Shows
Chimp will open a wizard guiding you through the process.
You cannot import a showfile with the same name as the one that is opened. If this is the case, the
Import Show wizard will ask you to close the showfile prior to import and provide a button to do so.
Page 54

53
Infinity Chimp Series
Infinity Chimp Series
Export Shows to USB
Plug the USB Key into one of the Chimps USB Ports and head over to the Backup Menu. Select Manage
Shows from the Side Menu.
From within the Manage Shows screen, select all shows to be exported from the list. Click on Export Shows
when done.
Fig. 51: Export Shows
Page 55

54
Infinity Chimp Series
Infinity Chimp Series
Deleting Shows from the Consoles built-in Memory
From the top toolbar hit the Backup button.
Head over to the Manage Shows Screen.
You will now be presented with a list of shows. Select the show(s) you would like to delete and hit the
Delete Show(s) button found in the title bar.
Fig. 52: Delete Shows
You cannot delete a showfile that is opened
Page 56

55
Infinity Chimp Series
Infinity Chimp Series
10 Show related Settings
The Chimp Lighting Console keeps different options that are related to the Showfile reduced to a
minimum.
However, this section will cover the different customization options.
All Showfile related settings (Including Fixture Schedule and Patch) are defined in the Setup Screens Show
Settings hierarchy.
Fig. 53: Show Settings
The Setup Menu is not available when no Showfile has been started.
Page 57

56
Infinity Chimp Series
Infinity Chimp Series
Auto-Fix Faders / Executors on Page Change
Autofix is a convenience function that is used to carry over running playbacks to the new fader or
executor page. This particular playback will be “on top” of other playbacks and hiding the playback in
the same spot on that page until it is switched off.
It is best explained with a little example:
Imagine you have a cuelist running on Fader Page 1. With Auto Fix enabled, when you switch to Page 2
this playback will be carried over to the new page and will continue to be “fixed” to that particular spot
until you switch it off.
With Auto Fix disabled, the playback will be kept running in the background.
10.1.1 Enable / Disable Auto Fix
To enable or disable Auto Fix, head over to the Show Settings screen and check or uncheck the
appropriate checkboxes within the Auto Fix Settings groupbox.
Fig. 54: Show Settings - AutoFix
Page 58

57
Infinity Chimp Series
Infinity Chimp Series
Set Desklight Brightness
To set the desklight brightness, head over to the Show Settings screen and use the Plus and Minus buttons
of the Desklight text field accordingly.
Fig. 55: Show Settings - UI Brightness
Enable Button LED Backlight
To enable or disable the Backlighting of Keys found on the faceplate, head over to the Show Settings
screen and Enable or Disable the Backlight.
Fig. 56: Show Settings - Enable Button Backlight
Page 59

58
Infinity Chimp Series
Infinity Chimp Series
Change Desklock PIN
To change the PIN Code requested to unlock the console, head over to the Show Settings screen and fill
in the current PIN code (If you already changed it).
Enter the new PIN in the New PIN and Repeat New PIN text fields. And click on Change PIN.
The Pin Code my be any Numeric Number.
Fig. 57: Show Settings - Desklock Pin
The default PIN Code is “0000” – four times zero.
Locking the Console
To lock / unlock the console, simply select the Lock Console button from the top Menu Bars right hand
side.
Page 60

59
Infinity Chimp Series
Infinity Chimp Series
11 Fixture Setup
Add Fixtures to the Show
In order to add and patch fixtures, please press the Setup Button on the Chimps top-menu bar. A menu
will be opened on the touchscreen display, presenting you several options. Choose Patch. From within
the Patch Window, select Add Fixtures.
Fig. 58: Patch Screen – Add Fixtures
A menu allowing you to pick the manufacturer and fixture type from the Show Library (this is the Fixture
Library that contains all Fixtures in the Show File) will be opened. Since we haven’t added any fixture
types to the show yet, this Library is empty.
Click on Add Type from Factory Library to proceed. Should you wish to import a user defined or imported
fixture, select Add Type from User Library.
Fig. 59: Add Library to Show
Page 61

60
Infinity Chimp Series
Infinity Chimp Series
A new dialog screen will be shown.
For training purposes, we are going to pick “Infinity” as the manufacturer. Now select iS-400 Spot in
Advanced Mode from the list. You may also use the full text search provided.
Hit the Ok button as soon as you are done.
Fig. 60: Select Fixture from Library
You may now enter the fixture count, and more importantly, set a user number which will be the
“identifier” that is used to select these fixtures using the numberblock.
We are going to add 12 fixtures, with user numbers starting at 1.
Again, when you have done so, click on Next.
Fig. 61: Enter Fixture Count
Page 62

61
Infinity Chimp Series
Infinity Chimp Series
The next screen is used to patch our fixtures to the DMX-Universes.
We will select Auto Patch for now – in general there are three different options available which are
explained below.
To finish the process of adding fixtures to your show, press Finish.
Fig. 62: Patch Fixtures While Adding
No Patch
The fixtures will be added but not patched.
Manual Patch
The fixtures will be patched to the address and universe specified by the user. Select Manual Patch on
the left hand side of the screen. Then, select the Universe to which the Fixtures shall be patched from the
dropdown menu. Then either enter the Address using the Keypad shown on the right hand side of the
screen or the Keypad on the consoles front panel.
You may also select an address visually by hitting the Select Address button. This will open up a new
screen enabling you to select the address visually.
This screen will also indicate free addresses by a green color, as well as used addresses by a red color. If
you click onto one channel, the console will show you how many addresses the fixture(s) you are about
to patch will use, and if they fit.
Auto Patch
The fixtures will be patched at the next free address of the selected universe automatically. Should the
selected universe not have sufficient unused DMX channels left, Auto Patch will automatically add the
remainders that do not fit onto the next DMX Universe.
However, Auto Patch will always patch all of the selected fixtures in one big block. This means that should
there not be sufficient space to patch all fixtures in between other fixtures, no fixture will be patched.
Page 63

62
Infinity Chimp Series
Infinity Chimp Series
Configuring existing Fixtures
Should you desire to modify the User Number, Fixture Name, Options, Patch or Type for fixtures that have
already been added to the show, press the Setup Button on the Chimps top-menu bar.
Choose Patch from the left-hand side menu. The Patch Screen, listing all your fixtures, will be shown.
Fig. 63: Patch Screen
All options in the Patch screen will be applied to the selected fixtures only. Fixtures may either be selected
by using the standard methods of fixture selection (see
Selecting Fixtures) or by selecting the rows of fixtures within the Patch screen.
Page 64
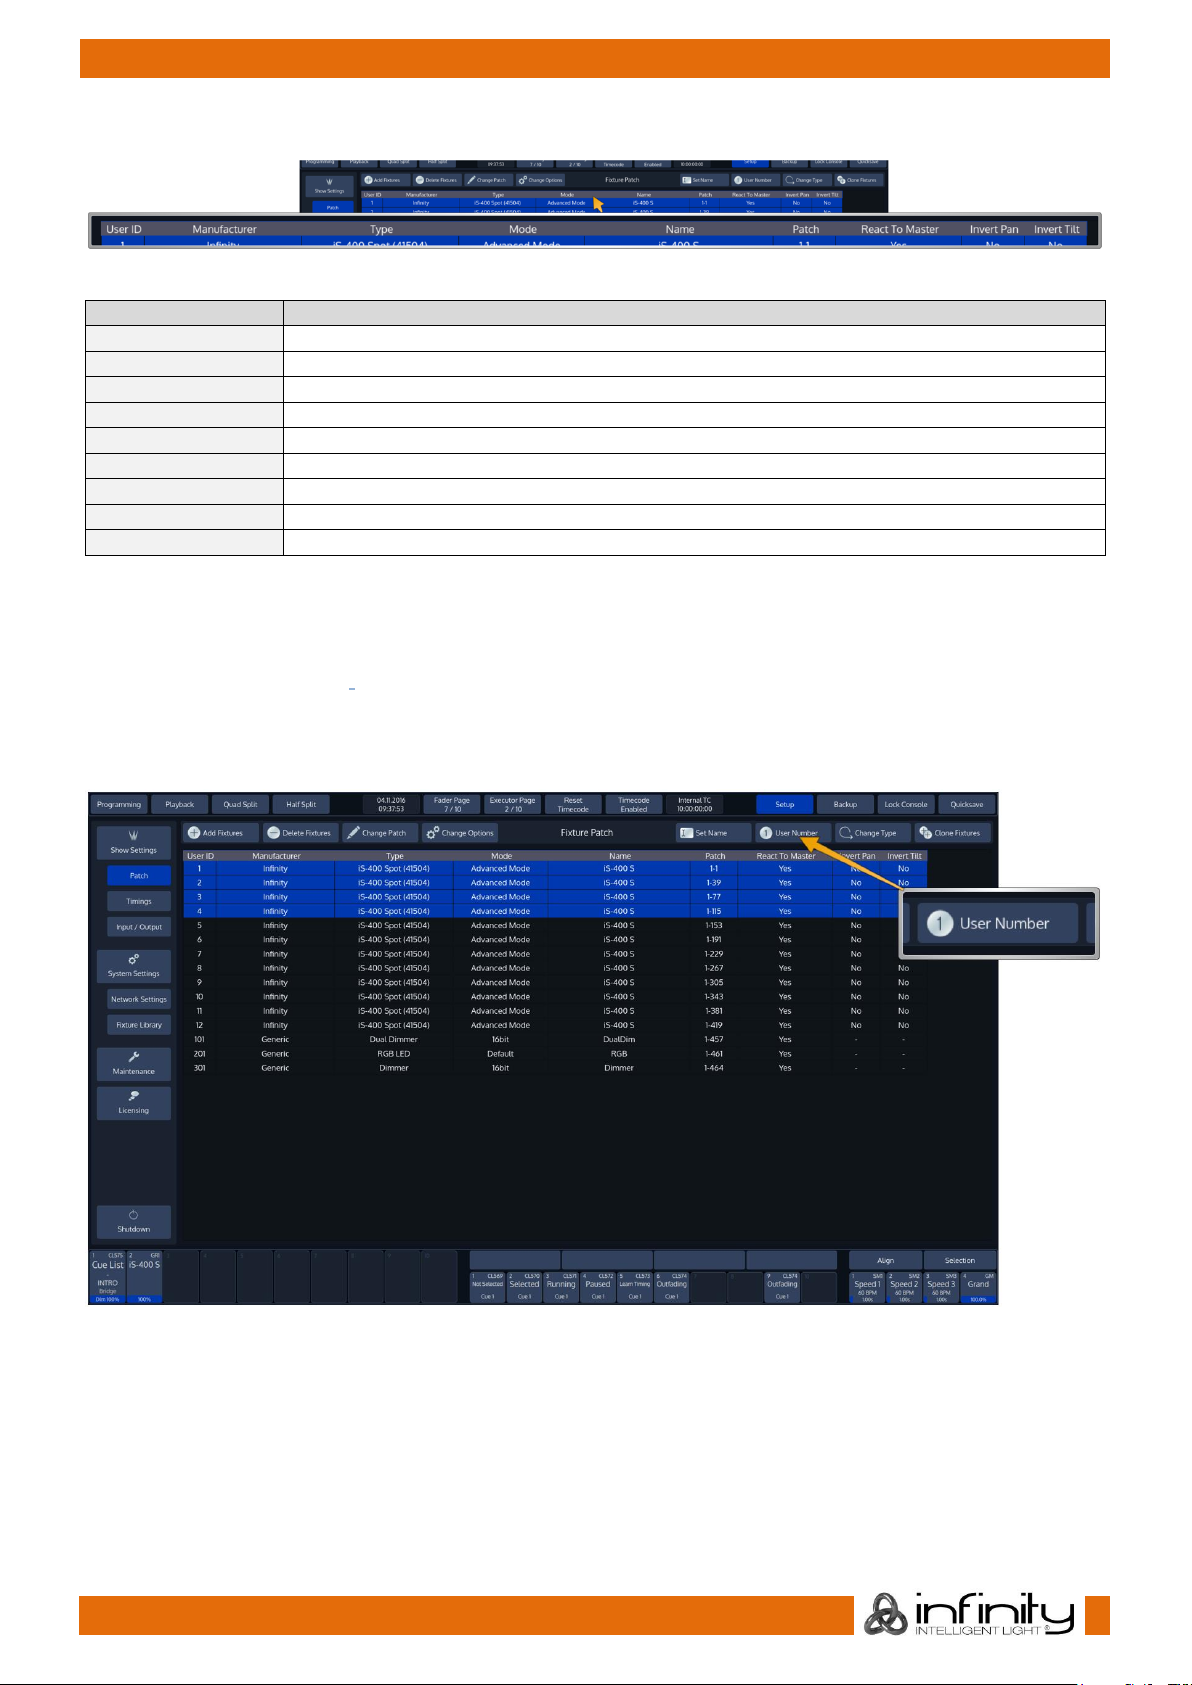
63
Infinity Chimp Series
Infinity Chimp Series
The header of the Patch screen table shows the following information:
Fig. 64: Patch Table - Header
Caption
Description
User ID
This column shows the User ID of the fixture
Manufacturer
This is the Manufacturer of the Fixture Type
Type
This column displays the Fixture Type
Mode
DMX Mode of the Fixture
Name
User given Name of the Fixture within the showfile
Patch
Indicates the fixtures DMX Address (Universe – Channel)
React To Master
Indicates if the Fixture will react to the Grandmaster Fader
Invert Pan
Shows if Pan is inverted
Invert Tilt
Shows if Tilt inverted
11.2.1 Change User ID
The User ID is a unique ID that is used to select a single or multiple fixtures using the keypad found on the
console’s faceplate. In order to change the User ID, open the Patch Screen as described in section
Configuring existing Fixtures.
Select the fixtures you would like to change and hit the User Number button from within the Patch
Screens title bar.
Fig. 65: Change User ID
Page 65

64
Infinity Chimp Series
Infinity Chimp Series
An on-screen Keypad asking you to enter new User IDs will be opened.
Click on OK when done.
Fig. 66: Change User Number Dialog
11.2.2 Change Fixture Name
To change the Fixture Name for one or multiple fixtures at once, open the Patch window as described in
section Configuring existing Fixtures.
Select the fixtures in question and hit the Set Name button from the Patch Screens title bar.
Fig. 67: Set Fixture Name Button
Page 66

65
Infinity Chimp Series
Infinity Chimp Series
An on-screen keyboard will be shown.
Fig. 68: Set Fixture Name On Screen Keyboard
Notice the Auto Number button next to the Fixture Name Text field
If Auto Number is active, Chimp will automatically append numbers to the Fixture Name based on the
selection order.
Click Enter when done.
Page 67

66
Infinity Chimp Series
Infinity Chimp Series
11.2.3 Inverting Pan / Tilt and defining if a Fixture reacts to the Grandmaster Fader
Sometimes it may be necessary to invert the direction of a fixture’s Pan or Tilt attribute or define if a
fixtures Dimmer should react to the Grandmaster.
To do this for multiple fixtures at once, first select the fixtures you would like to change the Pan and Tilt
Invert for and click on Change Options within the Patch Screen. The Change Fixture Options dialog will
be opened.
Fig. 69: Change Fixture Options Button
Page 68

67
Infinity Chimp Series
Infinity Chimp Series
The Change Fixture Options dialog consists of multiple dropdown menus, where the default setting of
each menu is “keep”. This ensures that only modified values are applied to the fixtures. Select if a fixture’s
Pan or Tilt should be inverted or not, and if the selected Fixtures should react to the Chimps grandmaster
fader. Select the appropriate options from the drop down menus and click on Change to finish.
Note: Sometimes it is desirable, to not have a Fixture react to the GrandMaster. Good examples
would be Worklights, Bar-lighting and much more, depending on the use-case of the console.
Fig. 70: Fixture Options Dialog
Page 69

68
Infinity Chimp Series
Infinity Chimp Series
11.2.4 Change DMX-Patch
To change the DMX-Patch for a single or multiple fixtures at once, select the fixtures you would like to
patch and click on Change Patch within the Patch Screen.
The Patch Fixtures dialog will be opened.
Fig. 71: Change Patch Button
Note: Programming is not dependent on the patch. This means you may easily program an
unpatched fixture, and you may re- or even unpatch fixtures at any time without losing any of the
fixtures programming.
Page 70

69
Infinity Chimp Series
Infinity Chimp Series
Within the Patch Fixtures Dialog you can choose several options.
Fig. 72: Change Patch Dialog
Unpatch
Unpatch will remove any patch information from the fixtures. However, the fixtures and all of their
programming will be kept within she showfile.
Manual Patch
The fixtures will be patched to the address and universe specified by the user. Select Manual Patch on
the left hand side of the screen. Then, select the Universe to which the Fixtures shall be patched from the
dropdown menu. Then either enter the Address using the Keypad shown on the right hand side of the
screen or the Keypad on the consoles front panel.
You may also select an address visually by hitting the Select Address button. This will open up a new
screen enabling you to select the address visually.
This screen will also indicate free addresses by a green color, as well as used addresses by a red color. If
you click onto one channel, the console will show you how many addresses the fixture(s) you are about
to patch will use, and if they fit.
Auto Patch
The fixtures will be patched at the next free address of the selected universe automatically. Should the
selected universe not have sufficient unused DMX channels left, Auto Patch will automatically add the
remainders that do not fit onto the next DMX Universe.
However, Auto Patch will always patch all of the selected fixtures in one big block. This means that should
there not be sufficient space to patch all fixtures in between other fixtures, no fixture will be patched.
Page 71

70
Infinity Chimp Series
Infinity Chimp Series
11.2.5 Change Fixture Type
To change the Type of a single or multiple fixtures at once, select the fixtures you would like to change
the type of and click on Change Type within the Patch Screen.
Fig. 73: Change Fixture Type Button
A dialog window will be opened, asking you to select the new fixture type from the Show Library.
If the desired fixture type is not yet in the Show Library, click on the appropriate Add Library button. The
procedure is very similar to adding a new fixture type to the show.
Fig. 74: Select New Fixture Type Dialog
After selecting the fixture from the show library, click on Next.
Page 72

71
Infinity Chimp Series
Infinity Chimp Series
The console will now ask for confirmation on the fixture replacement, displaying a brief summary of the
changes to be made. Click Ok to proceed.
Chimp will now work its magic, and will transfer existing programming over to the new fixture type. After
this process is completed you will be notified of the changes made.
Click on OK to proceed to the Patch window to patch the fixtures.
11.2.6 Clone Fixtures
Sometimes you might wish to add more fixtures to a show and carry over existing programming of
specific fixtures to the new fixtures.
To do this, open up the Setup Menu and select the Patch widget.
Now select the fixtures you would like to clone the information from. You may either select the fixtures
from the list, or by using the keypad. You may also select Fixture Groups on the external screen. Selection
order, as usual is also taken into account.
Click on Clone Fixtures. A wizard that assists you in the cloning process will be shown.
Fig. 75: Clone Fixtures Button
Page 73
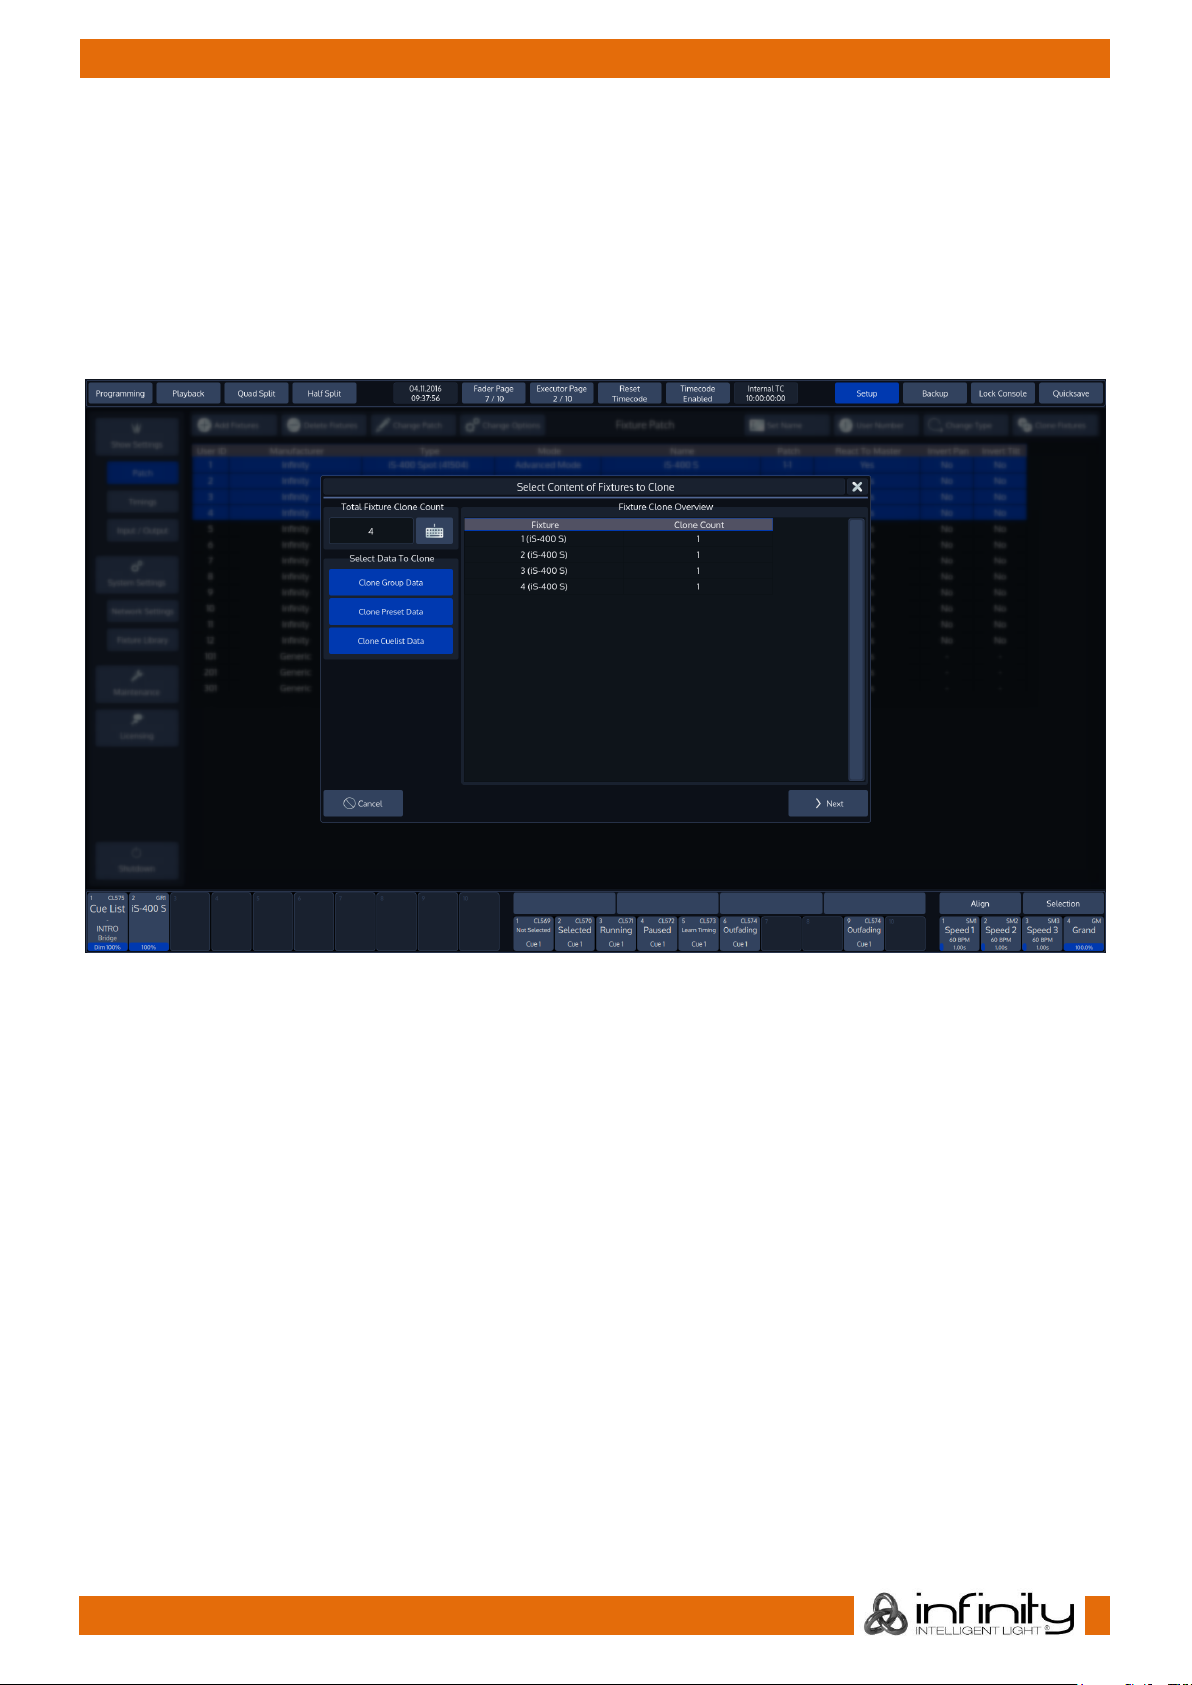
72
Infinity Chimp Series
Infinity Chimp Series
The console will now ask for the number of fixtures to be added and for the types of programming to be
cloned.
Keep in mind that cloning Cuelists only makes sense if you clone Presets as well, since cuelists that are
programmed using presets may exhibit unpredictable behavior, otherwise.
Additionally, you will be shown which fixture’s programming will be taken over to which of the new
fixtures.
Click on Next when done. The console will ask for confirmation. Click on Ok.
Fig. 76: Select Cloning Contents
The results of the Clone process will be shown.
The new fixtures are still unpatched and do not have user numbers assigned to them.
Fixtures without User Numbers are shown at the End of the Fixture list.
Click on Patch Window to proceed to the Patch window to assign a Patch and User Numbers.
Page 74

73
Infinity Chimp Series
Infinity Chimp Series
11.2.7 Delete Fixtures
Should you wish to delete fixtures and all of their programming from the showfile, head over to the Setup
Menu.
Select the Patch widget and select the fixtures you would like to delete using the keypad or fixture
groups.
Click on Delete Fixtures.
Fig. 77: Delete Fixtures Button
Page 75

74
Infinity Chimp Series
Infinity Chimp Series
12 Setting up Default Timings and Speed Master Options
Default timings and Speed Master settings are configured from within the Setup screen. Open the Setup
screen by clicking on the Setup Button on the top toolbar and select Timings from the left hand side
menu.
Fig. 78: Setup Menu – Timing Page
Page 76

75
Infinity Chimp Series
Infinity Chimp Series
Cue Timing
The Cue Default Timings may be altered on the left hand side of the screen. These timings will be used for
all new Cues that are recorded afterwards.
Fig. 79: Default Cue Timing
The Cue Default Timings will be stored as part of the Showfile. Cue Default Timings may be overridden by
temporary Timings which can be set using the [Time] button prior to recording a Cue.
These temporary Programmer Timings will be reset whenever the Programmer is cleared or when the Cue
Timings for the Show are being edited.
Selecting a Cell and hitting the [Set] Button or double-clicking a Cell will open a Keypad dialog to
configure each timing.
The Default Snap Value can be edited using the Keyboard Button in the top right corner.
Page 77

76
Infinity Chimp Series
Infinity Chimp Series
Speed Master Settings
The Speed Master Settings may be altered on the right hand side, top part of the screen.
Fig. 80: Speed Master Settings
Each Speed Master may be configured to either count in seconds or BPM. For each setting a Minimum
and a Maximum value can be set.
These Minimum and Maximum values will be used by Cuelists / Chasers that have been linked to the
according Speed Master as their Min and Max values.
Settings and Timings can be changed by selecting a Cell and hitting the [Set] button or by doubleclicking a Cell.
Fade Master Settings
The Fade Master Settings may be altered on the right hand side, top part of the screen.
Fig. 81: Fade Master Settings
Each Fade Master may be configured to either be an absolute or relative Fade Master. For each setting
a Minimum and a Maximum value can be set.
These Minimum and Maximum values will be used by Cuelists / Chasers that have been linked to the
according Fade Master as their Min and Max values.
Settings and Timings can be changed by selecting a Cell and hitting the [Set] button or by doubleclicking a Cell.
Page 78

77
Infinity Chimp Series
Infinity Chimp Series
13 Setting up Inputs and Outputs
Setup ArtNET Output
13.1.1 ArtNet Basics
What is ArtNet
ArtNet is a protocol for transmitting the lighting control protocol DMX512 over Ethernet. It uses UDP for
data transmission. The protocol was developed by Artistic Licence Engineering (UK) Ltd and is open for
implementation without charge. It is typically implemented in ArtNet to DMX converters, often called
„nodes“, and being driven from a lighting desk or similar software operating as a transmitter.
ArtNet compatible products are made available by dozens of companies, however not all ArtNet to DMX
converter units are built complying with the ArtNet specification.
IP Addresses
According to the specification units outputting and accepting ArtNet should be in a class A-Subnet
(Subnet Mask 255.0.0.0) and using IP-Addresses in the range 2.xxx.xxx.xxx or 10.xxx.xxx.xxx.
However, you may change the IP Address to your liking. The console will continue to output ArtNet, even
if the IP is dramatically different from what the ArtNet specification dictates.
Different ways of numbering universes
The ArtNet Standard is very comprehensive, but unfortunately it leaves one thing open: The way different
ArtNet Nodes represent their Universes. Here is what we‘ve seen so far:
Description
Example (Universe
12)
Universe Representation
Decimal zero based values, separated by Subnet and
Universe
0, 11
Subnet 0 - 15, Universe 015
Decimal one based values, separated by Subnet and
Universe
0, 12
Subnet 1 - 16, Universe 016
Hexadecimal values, separated by Subnet and Universe
0, B
Subnet 0 - F, Universe 0-F
Decimal zero based values, not separated
11
0 - 255
Decimal one based values, not separated
12
1 - 256
Hexadecimal values, not separated
0B
00 – FF
– or –
0x00 - 0xFF
Chimp represents the data in the following way:
A (0xBC)
Whereas A represents the Universe in a Decimal, zero based notation. B represents the ArtNET Subnet, C
the Universe in Hexadecimal.
Page 79
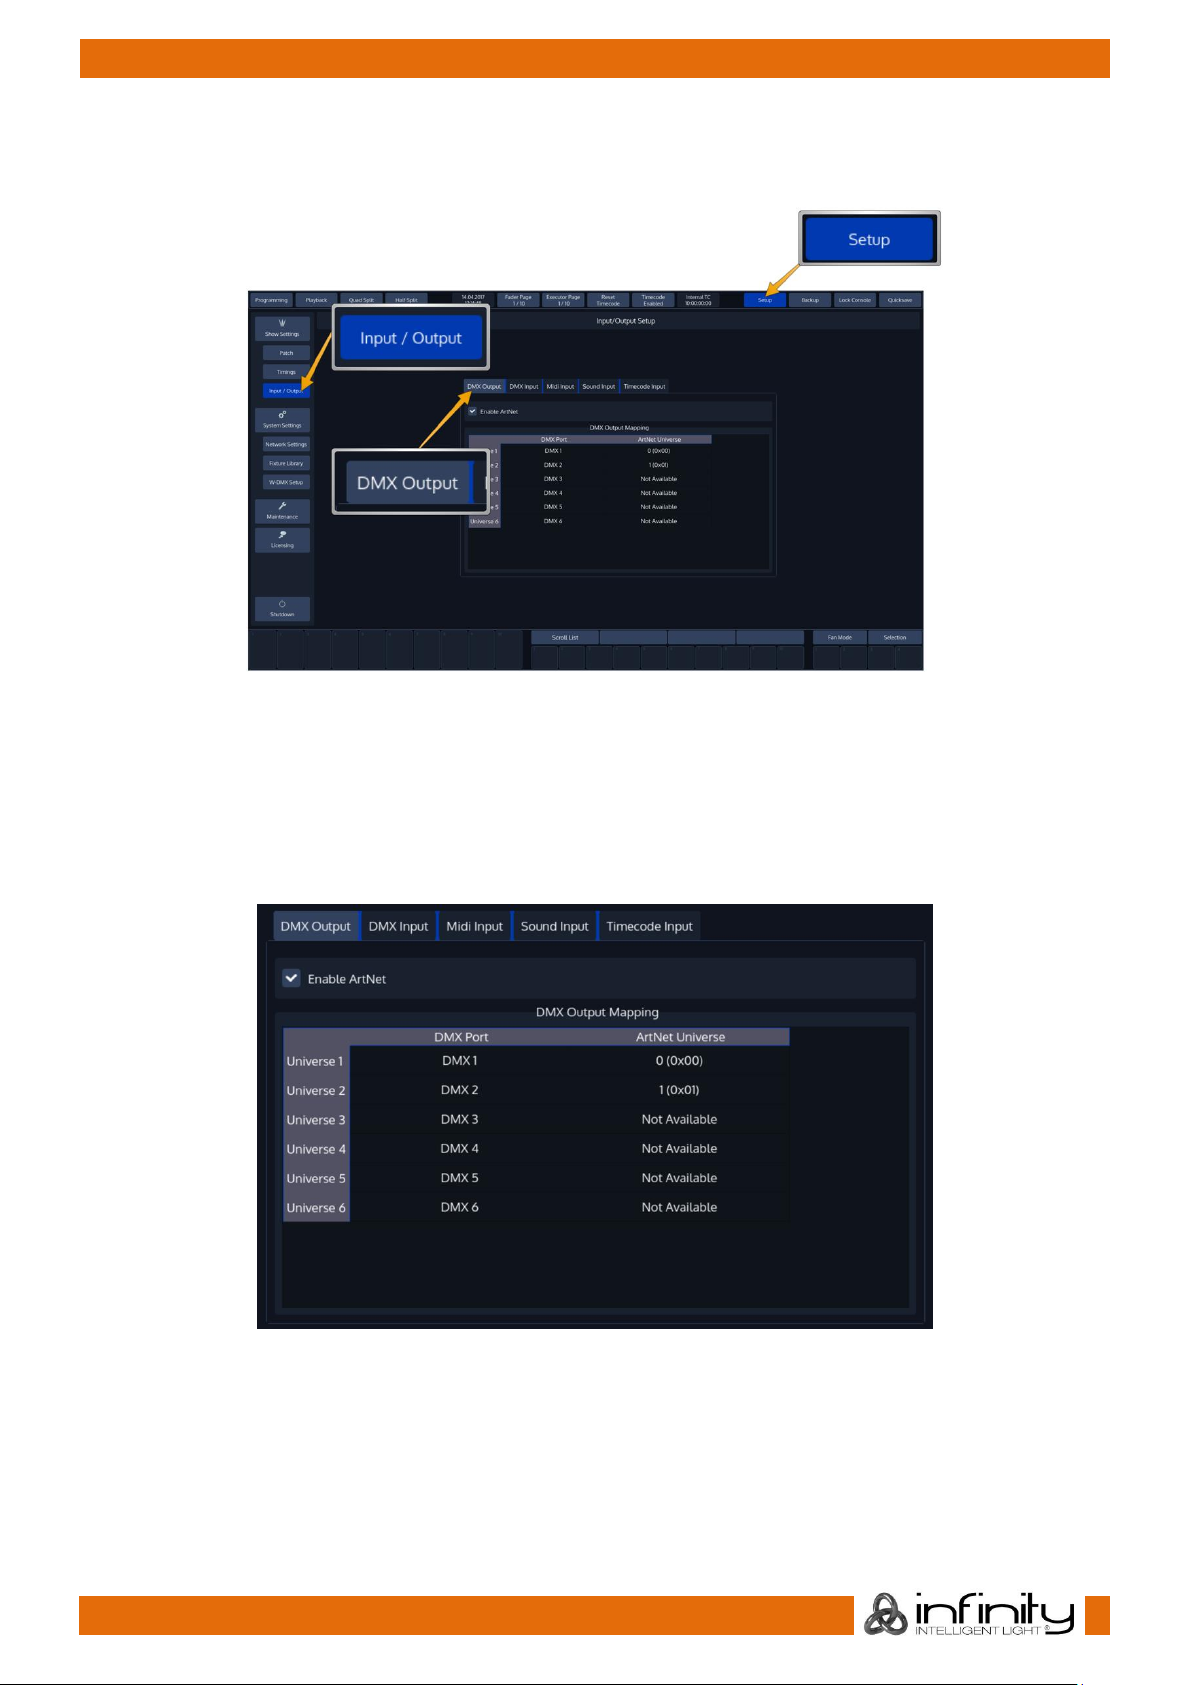
78
Infinity Chimp Series
Infinity Chimp Series
13.1.2 Enable DMX Output over Ethernet
To set up DMX Output over Ethernet, open the Setup Screen, head over to the Input Output Page and
select DMX Output from the Tabs shown in the center of the screen.
Fig. 82: Setup Input / Output
All DMX Output settings are stored inside the Showfile.
13.1.3 Setup ArtNet
To enable ArtNet Output, tick the Enable ArtNet Checkbox. To further configure each Universe, select it
from the List and press the [Set] key. A new screen allowing to enable or disable the ArtNet Output, as
well as to configure the ArtNet Universe for this Universe will be shown.
Fig. 83: DMX Output Mapping
Please note that depending on your console type, certain Universes might not be available for output.
Page 80

79
Infinity Chimp Series
Infinity Chimp Series
DMX Input
To set up DMX Input, open the Setup Screen, head over to the Input Output Page and select DMX Input
from the Tabs shown in the center of the screen.
Fig. 84: DMX Input Settings
When using the DMX Input, the last available DMX Universe on the Console will be switched in direction
and may be used as an Input.
With the DMX Input enabled, you may choose a Universe the incoming DMX Data should be merged to.
Data is merged Highest Takes Precedence.
Furthermore, you may choose to have the console hold the last received DMX Values on loss of the DMX
Signal, or to reset the input to all zero values.
Page 81

80
Infinity Chimp Series
Infinity Chimp Series
Midi Input
To set up MIDI Input, open the Setup Screen, head over to the Input Output Page and select MIDI Input
from the Tabs shown in the center of the screen.
Enable the MIDI Input by ticking the Enable Midi Input Checkbox.
Fig. 85: Midi Input Settings
13.3.1 Show Current Midi Input
To enable MIDI Monitoring, tick the Show Current Midi Input Checkbox. The Console will now show
received MIDI Signals.
13.3.2 Midi Input Mapping
The Midi Input is mapped the following:
Midi Note On/Off 0-59: Executor Page 1-6 with 10 Executors each
Midi Note On/Off 60-91: Virtual Executor 1-32
Midi Note On/Off 100-102: Master Speed Tapsync 1-3
Midi Note On/Off 103-105: Master Fade Tapsync 1-3
Page 82

81
Infinity Chimp Series
Infinity Chimp Series
Sound Input
To set up Sound Input, open the Setup Screen, head over to the Input Output Page and select Sound
Input from the Tabs shown in the center of the screen.
The Chimp provides 6 independently configurable Sound triggers.
Each trigger may have a frequency range set, a high and a low threshold.
Fig. 86: Sound Input Settings
To setup one of the triggers, press the Edit Button found in the groupbox for each trigger. This will open the
Edit Sound Trigger screen which shows a Graphical Analyzer of the incoming Audio signal.
Fig. 87: Edit Sound Trigger
To be able to use this trigger, you need to enable it by checking the Enable button.
Additionally, you may set a Name for this trigger to be able to recognize it later on by clicking on Edit
Name.
Page 83

82
Infinity Chimp Series
Infinity Chimp Series
The Skip Counter lets this trigger skip beats. You could, for example configure it in a way it will only trigger
after every second or fourth beat.
Furthermore, the encoders are used to specify the frequency range of the trigger, as well as sound level
thresholds:
Min. Frequency: This is the lower bound of the frequency range this trigger will listen to.
Max. Frequency: This is the upper bound of the frequency range this trigger is active for.
Low Threshold: This is the value the combined sound level needs to fall under after the trigger
triggered before it will trigger again of the frequency range that is selected.
High Threshold: This is the value the combined sound level needs to reach in order to have the
trigger react to audio.
Page 84

83
Infinity Chimp Series
Infinity Chimp Series
Timecode Input
To set up Timecode Input, open the Setup Screen, head over to the Input Output Page and select
Timecode Input from the Tabs shown in the center of the screen.
Fig. 88: Timecode Input
13.5.1 Timecode Setup
Internal Timecode
Should you wish to use the internal Timecode, set the Timecode Source to Internal Generator. You may
now define the Framerate and the Start and Stop Time of the internal timecode. The stop time is used to
either stop the timecode as soon as it reaches set time or to loop (if enabled) the timecode. Looping the
timecode will cause the timecode to jump back to the start time.
Generated Timecode will be Output using the MIDI Out connector.
To start the timecode generator, click on Enable Timecode. To disable it, click the button again.
External Timecode Source
To use an external Source to trigger the Chimp Console, connect the Timecode source to the console either using the SMPTE (Linear Timecode) connector on the back, or by connecting to the MIDI In for MIDI
Timecode. After that, navigate to the Timecode Input Configuration window and select the appropriate
source from the Timecode Source dropdown.
Please note that the console will auto-detect the framerate of the incoming signal, hence no further
configuration is needed. Any received Timecode will be output through the MIDI Out connector. That
means the console converts SMPTE Timecode to MIDI Timecode.
The console will always listen to timecode, however Cues are only triggered if the Timecode is enabled.
To enable the Timecode, make sure the Enable Timecode button within the Timecode Input
Configuration menu is highlighted.
13.5.2 Using Timecode
The defined Timecode Source may trigger Cues in Cuelists when their Cue trigger is set to Timecode.
13.5.3 Enabling / Disabling and Resetting the Timecode from the Top Toolbar
The top toolbar has several buttons that may be used to Enable or Disable the timecode input, to reset
the internal generator and to show the status of the incoming timecode signal.
Fig. 89: Timecode Buttons in Top Menu Bar
Page 85

84
Infinity Chimp Series
Infinity Chimp Series
14 Working with Fixtures
Selecting Fixtures
Before you can start altering any values or programming, you need to select the fixtures you would like to
work with. There are four different ways to select your fixtures.
14.1.1 Selection Order
The order in which you select fixtures determines how sub-selection and fanning are applied to them. For
example, applying a fanned value or an odd sub-selection to them after selecting fixtures 1 thru 5 will
appear different than if you selected fixtures 1 + 3 + 2 + 5 + 4.
The selection order matters during programming and is recorded as part of groups, but is not recorded in
presets or cues.
14.1.2 Select Fixtures using the keypad (a.k.a “The Commandline Interface”)
To select fixtures on the keypad, simply do so by typing their user IDs.
You may use the [Thru], [+] and [-] keys to further extend your selection.
A few examples:
[1] [Thru] [Enter] will select all fixtures following fixture 1 until a different fixture type starts, or a gap
in the numbering scheme is detected.
[1] [+] [2] [Enter] will select fixtures 1 and 2
[1] [Thru] [10] [Enter] will select all fixtures from fixture 1 to 10
[1] [Thru] [10] [–] [3] [Enter] will select all fixtures from fixture 1 to 10 except 3
Repeatedly pressing [Last] or [Next] steps backwards or forwards through the current selection, with
the order determined by the Selection Order.
[Infinity] [+] [Last / Next] will bring you back to your original selection.
The keypad does also have special functions for extended fixture sub-selection, which can be applied on
your current selection.
Page 86

85
Infinity Chimp Series
Infinity Chimp Series
14.1.3 Select and Deselect Fixtures using the “Fixture Pool” –window
Open a fixture split widget by clicking on the Fixtures button in any of the split widget side menus.
You may now select or deselect fixtures by simply clicking on them.
Fig. 90: Fixture Pool
14.1.4 Select Fixtures using a previously recorded Group
Open a fixture split widget by clicking on the Fixtures button in any of the split widget s ide menus.
Fig. 91: Group Pool
Now you can simply select and deselect fixture groups by clicking on them. You may also select a Group
from using the Commandline Interface: [Group] [1] [Enter].
See “Working with Groups” for more information about working with Group Pools.
Page 87

86
Infinity Chimp Series
Infinity Chimp Series
14.1.5 Select Fixtures using the “Selection” –toolbar
From within the bottom toolbar, click on the button that reads Selection.
Fig. 92: Selection Button
The Selection toolbar will now be shown.
If you have fixtures selected, it may be used to further alter the current fixture selection (See “Fixture SubSelection” for details).
If you do not have fixtures selected, Its selection options will be applied to all fixtures.
14.1.6 De-Selecting all Fixtures
To de-select fixtures, simply press the [0] –key on the keypad followed by [Enter].
You may also clear fixture selection by pressing the Clear button on the Fixture Selection Toolbar:
14.1.7 Fixture Sub-Selection using the Selection Toolbar
Fixture Sub-Selection provides additional Fixture Selection features based on your current Fixture selection
set.
This means that all Sub-Selection functions are applied to your current Fixture selection.
If you do not have fixtures selected, the Fixture Sub-Selection will be applied to all fixtures instead. If you
select any of the Sub-Selection functions, the console will remember the full selection that you made
using the keypad, and will apply all sub select functions to this “Sub-Selection” memory.
Most Sub-Selection functions are easily accessed by using the Selection Toolbar. To open the Selection
Toolbar, click on the button that reads Selection from within the bottom toolbar.
Clicking on Selection again will close the Selection-Toolbar.
However, some sub selection functions are accessed directly by keys on the console or the keypad.
Page 88

87
Infinity Chimp Series
Infinity Chimp Series
Fig. 93: Selection Toolbar
Invert Selection
Clicking on Invert Selection, will invert the current selection.
Invert extends to either the previous selection set, or, if no fixtures have been selected before using any of
the subselect features, extends to all fixtures contained in the showfile.
Example:
1. Select Fixtures 1 thru 10
2. Press the Random button on the selection toolbar. The console will now select random fixtures out
of the “memorized” fixture selection:
3. To invert this sub-selection, press the Invert button.
All Fixtures
If no “Sub Selection” has previously been made, this will select all fixtures contained in the showfile.
If you previously selected some fixtures and altered that selection using any of the available sub selection
modes (like Even Odd, Half, etc) this will bring you back to your complete selection set.
Example:
1. Select Fixture 1 thru 10. This selection is now “memorized” until you clear the selection.
2. Press the Even Odd button on the selection toolbar. The console will now select all even fixtures
out of the selection you have previously made.
3. Press the All button on the selection toolbar. The console will now select all fixtures of your
“memorized” fixture selection:
Even / Odd
If no selection has previously been made, Even / Odd will, on the first press of the button, select all even
numbered fixtures contained in the showfile.
The second press on the Even Odd button will select the odd numbered fixtures.
If you previously made a selection using any of the selection methods, Even Odd will be applied to the
selected fixtures instead. The first press on the button selects all even, the second selects all odd fixtures.
Example:
1. Select Fixture 501 thru 510.
2. Press the Even Odd button on the selection toolbar.
3. To select all odd fixtures of the overall selection set (1 thru 10), press the Even Odd button again.
Page 89

88
Infinity Chimp Series
Infinity Chimp Series
Half
If no selection has previously been made, Half will, on the first press of the button, select the first half of
the selected fixtures contained in the showfile.
The second press on the Half button will select the other half of all fixtures contained in the showfile.
If you previously made a selection using any of the selection methods, Half will be applied to the
selected fixtures instead. The first press on the button selects the first, the second selects the second half
of the fixtures.
Example:
1. Select Fixture 1 thru 10.
2. Press the Half button on the selection. The console will now select the first half of fixtures out of the
selection you have previously made.
3. To select the second half of the overall selection set (the “memorized” fixture selection), press the
Half button again.
Random
If no Selection has previously been made, Random will make a random selection out of all fixtures
contained in the showfile. If you previously made a selection using any of the selection methods, Random
will be applied to the selected fixtures instead.
Each press of the random button will generate a new random selection.
Example:
1. Select Fixture 1 thru 10. This selection is now “memorized” until you clear the selection.
2. Press the Random button on the selection toolbar. The console will now select random fixtures out
of the “memorized” fixture selection.
3. To randomly select different fixtures out of the “memorized” fixture selection, press the Random
button again.
Clear Fixture Selection
The Clear button will deselect all selected fixtures and clear the “Sub Selection” memory.
14.1.8 Stepping through fixtures using Last & Next Fixture
Sometimes it is desirable to step through the fixtures one by one at a time, especially when used in
combination with the “Highlight” function to be able to quickly and easily focus a large number of lights
in series.
This may be accomplished by using the [Last] or [Next] keys.
Each press on one of the keys will sub-select a single fixture from within the current selection.
Repeatedly pressing [Last] or [Next] steps backwards or forwards through the current selection, with
the order determined by the Selection Order.
[Infinity] [+] [Last / Next] will bring you back to your original selection.
14.1.9 Selecting Fixture X out of Y.
The console offers a built-in module sub-selection function which will select every Xth fixture out of Y.
The syntax is quite easy: We use [/] for the “out of” part of the command.
In the following example, we are going to select every first fixture out of three:
1. Select fixtures 1 to 12
Page 90

89
Infinity Chimp Series
Infinity Chimp Series
2. Type [1] [/] [3] [Enter] on the keypad.
3. To select every second fixture out of three, type [2] [/] [3] [Enter]
4. To select every third fixture out of three, type [3] [/] [3] [Enter]
Please note you may also combine the modulo function with more advanced functions:
1. Select fixtures 1 to 12:
2. Type [1] [+] [2] [/] [3] [Enter] on the keypad translates into “Select each first and
second fixture out of three”.
Or:
1. Select fixtures 1 to 12
2. Typing [1] [thru] [3] [+] [5] [/] [5] [Enter] on the keypad translates into “Select
each first through third and fifth fixture out of five fixtures”.
Assigning Names to Fixtures
You may decide between different ways should you wish to rename your fixtures to make them more
identifiable within the Fixture Pool, programmer and fixture configuration dialogs:
14.2.1 Assign Name using the Fixture Pool
Open a Fixture Split Widget.
Now, press the [Name] key. The command line will read Name. Now select the fixture you wish to
rename from within the Fixture Split Widget.
14.2.2 Assign Name using the Command Line Interface
You may use the Commandline approach by typing [Name] followed by the fixture selection, in
example: [Fixture] [1] [Thru] [12] [Enter].
The “Enter Fixture Name” On-Screen Keyboard will be shown.
14.2.3 Using Fixture Groups
Another approach would be to use a Group to bulk rename all fixtures in the Group. To do so, open a
Group Split Widget.
Press the [Edit] key.
Now, select the group that contains the fixtures to be renamed by clicking on it. This will open the Edit
Group Screen.
Now click on Smart Name.
An on-screen keyboard which will rename both, the group and all fixtures in the group will be shown. For
more information see “
Page 91

90
Infinity Chimp Series
Infinity Chimp Series
Edit Group Window”.
14.2.4 Using the Edit Fixture Window
You may also use the “Edit Fixture” –Window to rename a fixture.
Page 92

91
Infinity Chimp Series
Infinity Chimp Series
Edit Fixture Window
The “Edit Fixture” –Window may be used as a quick way to read a fixtures DMX Universe / Address, Fixture
type and set options like inverting Pan / Tilt, changing the User Number or Fixture Name.
Fig. 94: Edit Fixture Window
To open the Edit Fixture Window, type [Edit] followed by the User ID of the fixture you would like to edit,
eg. [1]. Finish the command by pressing [Enter].
Alternatively, you may use the Fixture Split Widget to select the fixture:
Open a Fixture Split Widget. Press the [Edit] key and select the Fixture you would like to edit from within
the shown Fixture Split Widget.
Edit Name
Clicking on the Edit Name button will open up an on-screen keyboard allowing you to rename this
particular Fixture.
Clear User Number
Clicking on the Clear User Number button will remove a fixture’s User Number. Please note that after you
did this, the only way to select this fixture is to use the Fixture Split Widget.
Set User Number
The Set User Number button will open up a dialog window asking you to enter a new User Number for this
particular Fixture.
Invert Pan
The Invert Pan checkbox will either invert or normalize the direction of Pan movement for this particular
Fixture.
Invert Tilt
The Invert Tilt checkbox will either invert or normalize the direction of Tilt movement for this particular
Fixture.
React to Master
The React to Master checkbox defines if this fixture reacts to the Grandmaster fader.
Page 93

92
Infinity Chimp Series
Infinity Chimp Series
15 Working with Groups
About Groups
Groups are meant as a programming aid and are a quick way to access specific groups of fixtures.
They store information about fixture selection and selection order.
Recording Fixture Groups
To record your first group, start out by selecting fixtures 1 through 12 by using the Keypad (refer to "
Selecting Fixtures" for more information).
15.2.1 Storing a Fixture Group Using Group Split Widget
Once fixtures are selected to be a Group, open a Group Split Widget by clicking on the Groups button in
one of the side menus.
Hit the [Rec] key. Select any empty slot (an empty box with a number in the corner) to store a new
fixture Group.
Fig. 95: Group Pool
15.2.2 Storing a Group Using Command Line Interface
As soon as you selected the fixtures you wish to group together, press the [Rec] keypad button followed
by the [Group] keypad button.
Now, type the number of the memory space to store the group using the keypad (for example) [1]
followed by [Enter]:
[Rec] [Group] [1] [Enter]
Merge Fixtures into Groups
Sometimes you may need to add some fixtures to a group that already exists. To do so, first select the
fixtures you would like to add to an existing group.
15.3.1 Merge Fixture(s) into Group using Group Split Widget
Open a Group Split Widget by clicking on the Groups button in one of the side menus.
Hit the [Rec] key on the consoles front panel.
Now, select Merge from within the Record-Toolbar.
Page 94

93
Infinity Chimp Series
Infinity Chimp Series
Fig. 96: Record Toolbar - Merge
Select the Group you would like to merge the selected fixtures into.
If you did not select an option from the Record-Toolbar, a dialog window, asking you what to do, will
open up. Click on Merge.
15.3.2 Merge Fixture(s) into Group using the Commandline Interface
Press the [Rec] key, followed by the [Group] key.
Select the Merge Option in the Record-Toolbar.
Now type the number of the group you would like to add the Fixtures to on the console’s keypad, in
example, [1] followed by [Enter]:
[Rec] [Group] [1] [Enter]
If you did not select an option from the Record-Toolbar, a dialog window, asking you what to do, will be
shown. Click on Merge.
Remove Fixtures from Groups
To remove fixtures from a group, at first select the fixtures you would like to remove.
15.4.1 Remove Fixture(s) from a Group using Group Split Widget
Open a Group Split Widget by clicking on the Groups button in one of the side menus.
Hit the [Rec] key on the consoles front panel.
Now, select Remove from within the Record-Toolbar.
Fig. 97: Record Toolbar - Remove
Select the Group you would like to remove the selected fixtures from.
If you did not select an option from the Record-Toolbar, a dialog window, asking you what to do, will
open up. Click on Remove.
Page 95

94
Infinity Chimp Series
Infinity Chimp Series
15.4.2 Remove Fixture(s) from Group using the Commandline Interface
Press the [Rec] key, followed by the [Group] key.
Select the Remove Option in the Record-Toolbar.
Now type the number of the group you would like to remove the Fixtures from on the console’s keypad,
in example, [1] followed by [Enter]:
[Rec] [Group] [1] [Enter]
If you did not select an option from the Record-Toolbar, a dialog window, asking you what to do, will be
shown. Click on Remove.
Replace a Group
Before you may replace (overwrite) an entire group, you first need to select the fixtures you would like to
store in the new group.
15.5.1 Replace Fixture(s) from a Group using Group Split Widget
Open a Group Split Widget by clicking on the Groups button in one of the side menus.
Hit the [Rec] key on the consoles front panel.
Now, select Replace from within the Record-Toolbar.
Fig. 98: Record Toolbar - Replace
Select the Group you would like to replace with the selected fixtures.
If you did not select an option from the Record-Toolbar, a dialog window, asking you what to do, will
open up. Click on Replace.
15.5.2 Replace a Group using the Commandline Interface
Press the [Rec] key, followed by the [Group] key.
Select the Replace Option in the Record-Toolbar.
Now type the number of the group you would like to replace with the selected fixtures on the console’s
keypad. In example, [1] followed by [Enter]:
[Rec] [Group] [1] [Enter]
If you did not select an option from the Record-Toolbar, a dialog window, asking you what to do, will be
shown. Click on Replace.
Page 96

95
Infinity Chimp Series
Infinity Chimp Series
Selecting and Deselecting Groups
15.6.1 Selecting Fixture Groups Using Group Split Widget
Open a Group Pool Split widget by selecting Groups from a split widgets side menu. Now you can simply
select and deselect fixture groups by clicking on them.
15.6.2 Selecting Fixture Groups Using Command Line Interface
Press the [Group] key. Now just type the number of the group you would like to select via the console’s
keypad such as [1] followed by [Enter]. Please note that you may also use the [+], [-] and [Thru]
keys to further extend your selection:
[Group] [1] [+] [12] will select group 1 and 12.
[Group] [1] [Thru] [4] [-] [2] will select group 1 through 4 but will not select group 2.
Naming a Group
15.7.1 Assign Name using the Group Split Widget
Select Groups from a split widgets side menu. The Group Pool will be shown. Press the [Name] key. The
commandline will now read Name. Now select the group you wish to rename from within the Group Split
Widget.
15.7.2 Assign Name using the Command Line Interface
You may use the Commandline approach by typing [Name]. Then press the [Group] key, followed by
the Group ID, in this case [1]. Hit [Enter] to complete the command. Please note you may also
rename multiple Groups at once by using the [Thru], [+] and [-] modifier keys.
The “Enter Group Name” On-Screen Keyboard will be shown.
15.7.3 Assign Name using the Edit Group Window
You may also assign a Name to the group and its contained fixtures using the “Edit Group” Window.
Copy a Group
15.8.1 Copy Groups using the Group Split Widget
Select Groups from a split widgets side menu. The Group Pool will be shown. Press the [Copy] key. Now
select the Group you would like to copy, followed by the destination Pool Item.
15.8.2 Copy Groups using the Command Line Interface
You may copy groups using the Command line approach by using the [Copy] key.
After pressing the [Copy] key, hit the [Group] key, followed by the source Group ID, in this case [1].
Now enter the destination Group ID, ie [5]. Hit [Enter] to complete the command.
Page 97

96
Infinity Chimp Series
Infinity Chimp Series
Move a Group
15.9.1 Move Groups using the Group Split Widget
Select Groups from a split widgets side menu. The Group Split Widget will be shown.
Press the [Move] key. Now select the Group you would like to move, followed by the destination Pool
Item.
15.9.2 Move Groups using the Command Line Interface
You may move groups using the Command line approach by pressing the [Move] key.
Then hit the [Group] key, followed by the source Group ID, in this case [1]. Now enter the destination
Group ID, i.e. [5]. Hit [Enter] to complete the command.
Delete a Group
15.10.1 Delete Groups using the Group Split Widget
Select Groups from a split widgets side menu. The Group Split Widget will be shown.
Press the [Delete] key. The delete toolbar will be shown. Make sure Delete Object is selected on the
delete Toolbar. Now select the Group you would like to delete.
Note: If you keep pressing the [Delete] key while selecting items to be deleted, the console will not ask
for confirmation. This is a way to quickly delete multiple Items.
15.10.2 Delete Groups using the Command Line Interface
You may delete groups using the Command line approach by pressing the [Delete] key, followed by
the [Group] key and the ID(s) of the Group you would like to delete, ie. [31]. Please note you may
delete multiple groups by extending the selection using the [+], [-] and [Thru] keys. Hit [Enter] to
complete the command.
Create a Group Dimmer Master
Group Dimmer Masters allow you to limit the intensity of a specific fixture group. If the Group Master is at
full, then the fixtures that this group contains will be at the level determined by the playbacks,
Programmer, and so on. When the master’s level is reduced, the contained fixtures intensity will be
reduced in proportion to the master. For example, if you have the fixture at 80% intensity in a cue that is
being output, and the master of the group is at 50%, a fixture intensity value of 40% will be output.
Multiple Group Dimmer Masters are compared HTP, so the highest master will take precedence.
There are two ways to assign a Group Dimmer Master:
15.11.1 Using the Group Split Widget Window
Select Groups from a split widgets side menu. The Group Pool will be shown.
Hit the [Link] key. Now select the Group from within the Split Widget followed by the [Go], or
[Pause/Back] key of the fader that should act as the Dimmer Master.
15.11.2 Using the Command Line Interface
Press the [Link] key, followed by the Group key and the appropriate ID of the group, in example:
[Group] [1].
Now select the [Go], or [Pause/Back] key of the fader that should act as the Dimmer Master.
Page 98

97
Infinity Chimp Series
Infinity Chimp Series
Edit Group Window
The “Edit Group” –Window may be used as a quick way to rename a group and all of the contained
fixtures.
To open the Edit Group Window, select Groups from a split widgets side menu. Press the [Edit] –key.
Select the Group you would like to edit.
To open the Edit Group Window using the Command Line Interface, type [Edit] [Group], followed by
the ID of the group you would like to edit, eg. [31]. Finish the command by pressing [Enter].
Fig. 99: Edit Group Window
Set Group Name
Clicking on the Set Group Name button will open up an on-screen keyboard allowing you to rename this
particular Group.
Smart Name
Clicking on the Smart Name button will open up an on-screen keyboard asking for a new group name.
Smart Name will also rename contained fixtures using the same name that you enter for the group.
Page 99

98
Infinity Chimp Series
Infinity Chimp Series
16 Working with Fixture Values
Altering fixture parameter values is only possible from within the Programming Window.
The programmer is shown in the bottom right part of the screen. It behaves very similar to the group split
widgets – it has buttons in the title bar and features a side menu for parameter selection.
The Chimp groups fixture parameters, by dividing them into separate groups like Intensity, Position, Color,
Gobo, Beam, Shaper (Blades or Knifes in Profile Lights), Control, Macro and Special.
You’ll see one more group called Effects, which is used to open the Shape Generator / FX Engine.
Fig. 100: The Programmer
Page 100

99
Infinity Chimp Series
Infinity Chimp Series
What is the programmer?
The “Programmer” is the place where all of the programming happens.
As soon as you modify a fixtures attribute value by using any of the value input methods described
below, it will show up in the programmer.
The programmer always takes precedence over cuelists, this way you may always at any point in a show
modify the look on stage – by using the programmer.
16.1.1 Different states of fixture attribute values
This image shows how the programmer looks like if you have
fixtures selected, but no values assigned to them. They are still
outputting values set by cuelists or their default values set in the
library.
This image shows how the programmer looks like if you have
fixtures selected, with values assigned in the programmer. The
programmer takes precedence over cuelist output for the
attributes with values in the programmer. However, these values
would not be recorded.
This screenshot shows how the programmer looks like if you
modified (touched) values of an attribute in the programmer.
The programmer takes precedence over cuelist output for all
attributes with values in the programmer. As soon as values are
“touched” (indicated by red background color of the
corresponding cell) they can be recorded.
The side menu of the programmer indicates which attribute groups have active (touched) values by
using a red border color. Attribute groups with inactive colors will show an orange border color instead.
16.1.2 Emptying the Programmers „Content“
In order for all playbacks to re-gain control over the fixture attributes contained in the programmer, the
programmer needs to be cleared out. This happens in three steps with each press of the [Clear] key.
The first press of the [Clear] key will un-touch all values, however they are still in the programmer
overriding the playback. The second press of the [Clear] button will remove all values from the
programmer and playback values will be output again. The third and last press will unselect all fixtures
that were selected.
In short, three times [Clear] will clear the programmer:
[Clear] [Clear] [Clear]
If you accidentally cleared the programmer contents, [Infinity] + [Clear] will undo the last clear
command.
 Loading...