

Page 1
OPERATINGINSTRUCTIONS
V-756
DVD PLAYER
Page 2
CAUTION : TO REDUCE THE RISK OF
ELECTRIC SHOCK, DO NOT
REMOVE COVER (OR BACK).
NO USER-SERVICEABLE PARTS
INSIDE. REFER SERVICING TO
QUALIFIED SERVICE PERSONNEL.
2
Introduction
Congratulations on Your Purchase!
Your new DVD Player is designed to deliver maximum
enjoyment and years of trouble free service.
Please take a few moments to read this manual thoroughly. It
will explain the features and operation of your unit and help
ensure a trouble free installation.
Please unpack your unit carefully. We recommend that you
save the carton and packing material. They will be helpful if you
ever need to move your unit and may be required if you ever
need to return it for service. Your unit is designed to be placed
in a horizontal position and it is important to allow at least two
inches of space behind your unit for adequate ventilation and
cabling convenience.
To avoid damage, never place the unit near radiators, in front of
heating vents, in direct sunlight, in excessively humid, dusty
locations or near sources of strong magnetic fields. Connect
your complementary components as illustrated in the following
section.
CAUTION
RISK OF ELECTRIC SHOCK
DO NOT OPEN
This symbol is intended to alert the user to the
presence of uninsulated "dangerous voltage" within
the product's enclosure that may be of sufficient
magnitude to constitute a risk of electric shock to
persons.
This symbol is intended to alert the user to the
presence of important operating and maintenance
(servicing) instructions in the literature
accompanying the appliance.
To prevent fire or shock hazard, do not expose this unit to rain
or moisture.
FOR U.S.A.
FCC INFORMATION
This equipment has been tested and found to comply with
the limits for a Class B digital device, pursuant to Part 15 of
the FCC Rules. These limits are designed to provide
reasonable protection against harmful interference in a
residential installation. This equipment generates, uses
and can radiate radio frequency energy and, if not installed
and used in accordance with the instructions, may cause
harmful interference to radio communications. However,
there is no guarantee that interference will not occur in a
particular installation. If this equipment does cause harmful
interference to radio or television reception, which can be
determined by turning the equipment off and on, the user is
encouraged to try to correct the interference by one or
more of the following measures:
Reorient or relocate the receiving antenna.
Increase the separation between the equipment and
receiver.
Connect the equipment into an outlet on a circuit
different from that to which the receiver is connected.
Consult the dealer or an experienced radio/TV technician
for help.
CAUTION: Any changes or modifications in construction of
this device which are not expressly approved by
the party responsible for compliance could void
the user's authority to operate the equipment.
■Moisture condensation
Moisture may form on the lens in the following
conditions.
Immediately after a heater has been turned on.
In a steamy or very humid room.
When this unit is moved from a cold place to a warm
one.
If moisture forms inside this unit, it may not operate
properly.
In this case, turn on the power and wait about one hour
for the moisture to evaporate.
■If there is noise interference on the TV while a broadcast
is being received.
Depending on the reception condition of the TV,
interference may appear on the TV screen while you are
watching a TV broadcast and this unit is left on. This is
not a malfunction of this unit or the TV. To watch a TV
broadcast, turn off this unit.
■Do not transport this unit with a disc left in it.
CAUTION
Invisible laser radiation when the unit is open. Do not
stare into beam
WARNING
PRECAUTIONS
UNPACKING AND INSTALLATION
ENGLISH
CAUTION : USE OF ANY CONTROLS, ADJUSTMENTS, OR
PORCEDURES OTHER THAN THOSE SPECIFIED HEREIN
MAY RESULT IN HAZARDOUS RADIATION EXPOSURE.
CLASS 1
LASER PRODUCT
Page 3
Units shipped to countries other than the above
countries are equipped with an AC voltage selector
switch on the rear panel. Refer to the following
paragraph for the proper setting of this switch.
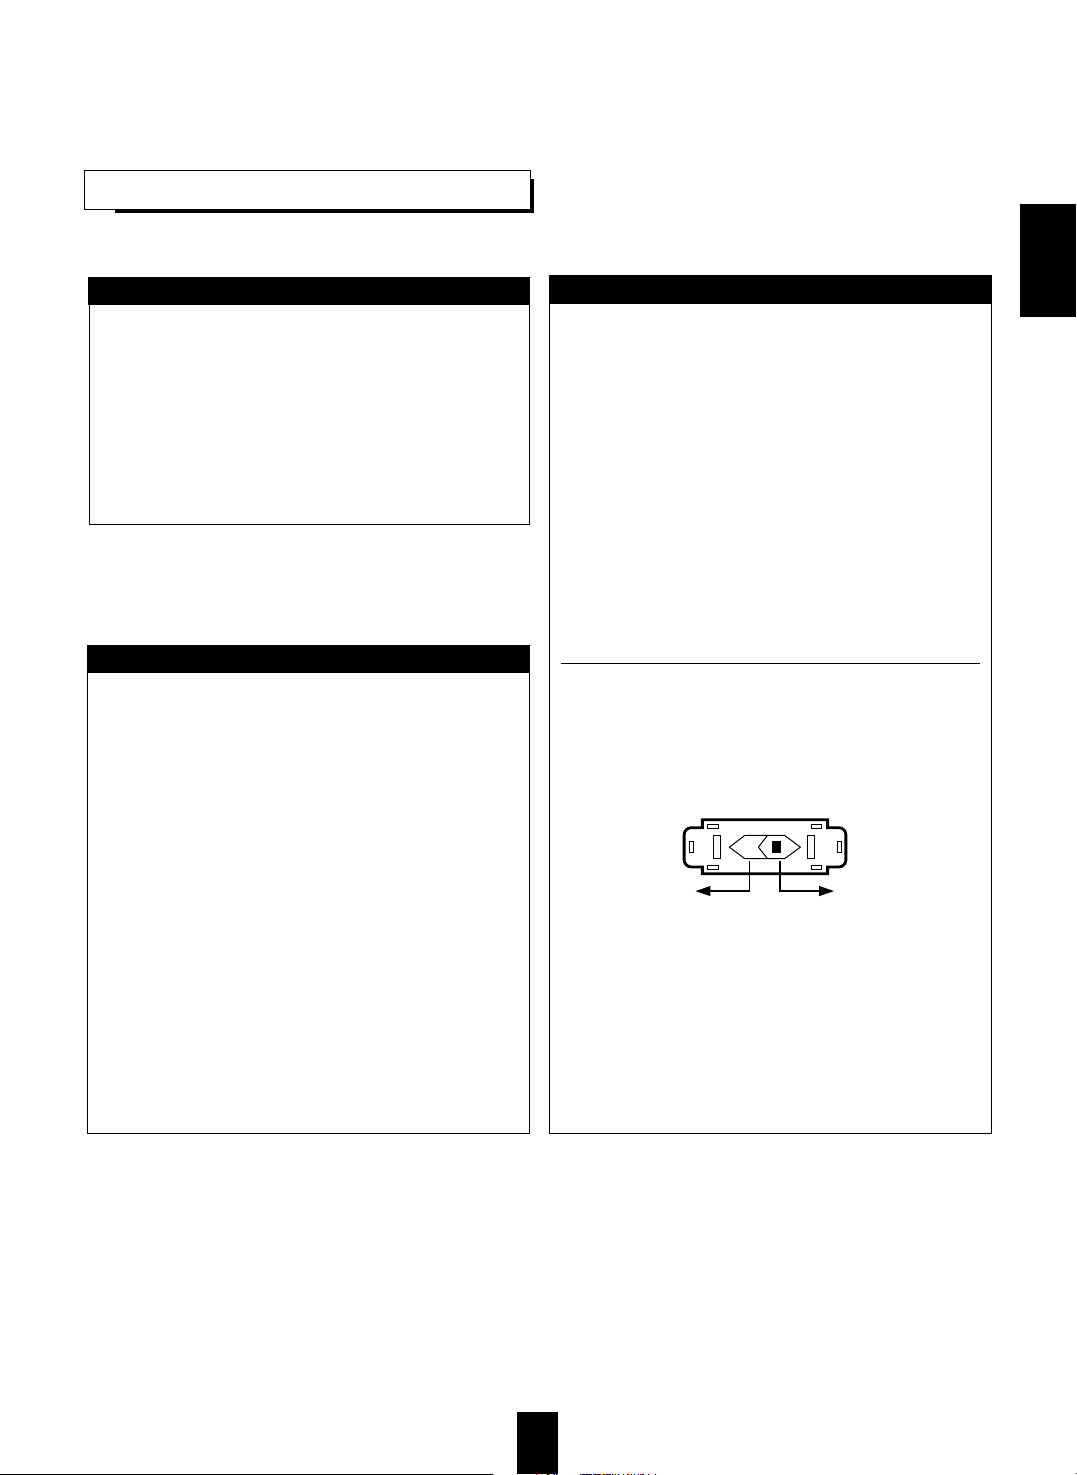
AC VOLTAGE SELECTION
This unit operates on 115 / 230 V AC. The AC
voltage selector switch on the rear panel is set to the
voltage that prevails in the area to which the unit is
shipped. Before connecting the power cord to your
AC outlet, make sure that the setting position of this
switch matches your line voltage. If not, it must be
set to your voltage in accordance with the following
direction.
AC voltage selector switch
Move switch lever to match your line voltage with a
small screwdriver or other pointed tool.
FOR U.S.A. AND CANADA ..............................................120 V
Units shipped to the U.S.A. and Canada are
designed for operation on 120 V AC only.
Observe all safety precautions with use of a
polarized AC plug.
However, some products may be supplied with a
nonpolarized plug.
CAUTION : To prevent electric shock, match wide
blade of plug to wide slot, insert fully.
FOR YOUR SAFETY
FOR CHINA, EUROPE AND AUSTRALIA ........... 220V/230 V/240V
Units shipped to China are designed for operation
on 220 V AC only.
Units shipped to Australia are designed for operation
on 240 V AC only.
To ensure safe operation, the three-pin plug
supplied must be inserted only into a standard threepin power point which is effectively earthed through
the normal household wiring. Extension cords used
with the equipment must be three-core and be
correctly wired to provide connection to earth.
Improper extension cords are a major cause of
fatalities. The fact that the equipment operates
satisfactorily does not imply that the power point is
earthed and that the installation is completely safe.
For your safety, if in any doubt about the effective
earthing of the power point, consult a qualified
electrician.
PAN-EUROPEAN UNIFIED VOLTAGE
All units are suitable for use on supplies 230-240 V
AC.
FOR YOUR SAFETY
FOR OTHER COUNTRIES .......................................... 115 V/230 V
FOR YOUR SAFETY
AC 220 V AC 110 V
/120 V
3
ENGLISH
READ THIS BEFORE OPERATING YOUR UNIT
AC 230VAC 115V
Page 4

4
CONTENTS
Introduction
UNPACKING AND INSTALLATION 2
READ THIS BEFORE OPERATING YOUR UNIT 3
System Connections
CONNECTING TO A/V AMPLIFIER OR RECEIVER 5
CONNECTING TO TV WITH AUDIO AND VIDEO INPUTS 7
CONNECTING TO ADDITIONAL COMPONENT WITH VIDEO AND DIGITAL OUTS 7
CONNECTING SYSTEM CONTROL 8
CONNECTING TO TV AND VCR WITH SCART CONNECTORS (Regional Option) 9
Front Panel & Remote Controls 10
REMOTE CONTROL OPERATION RANGE 12
LOADING BATTERIES 12
Preliminary Knowledge About Discs
PLAYABLE DISC TYPES 13
NOTES ON DVD VIDEOS 13
NOTES ON COPYRIGHT 13
SYMBOL AND MESSAGE ABOUT INVALID OPERATION 14
CARE AND HANDLING OF DISCS 14
Operartions
BASIC PLAYBACK 15
GENERAL INFORMATION ABOUT ON-SCREEN SYMBOLS 18
PLAYING THE DESIRED SECTION OF DISC (TITLE/CHAPTER/TRACK/TIME SEARCH) 19
PLAYING A SPECIFIC ITEM [DVD Video only] 20
REPEAT PLAYBACK 21
INTROSCAN PLAYBACK [CD only] 22
CHANGING THE TIME DISPLAY DURING PLAYBACK 22
CHANGING THE CAMERA ANGLE [DVD Video only] 23
CHANGING THE AUDIO LANGUAGE [DVD Video only] 23
CHANGING THE SUBTITLE LANGUAGE [DVD Video only] 24
PLAYING A SCENE CLOSE-UP [DVD Video only] 25
LISTENING WITH HEADPHONES 26
Initial Settings 27
SETTING THE SYSTEM 29
SETTING THE LANGUAGE 30
SETTING THE TV SCREEN 31
SETTING THE AUDIO SETUP 32
SETTING THE CUSTOM SETUP 36
SETTING THE RATING LEVEL 39
SETTING THE DISC SETUP 40
Definition Of Terms 44
Troubleshooting Guide 45
Specifications 46
DVD Language Code List 47
ENGLISH
Page 5
System Connections
5
Plase make all connections to this DVD player before plugging in the AC cord.
Since different components may have different names for the same inputs and outputs, carefully read the
operating instructions of any component to be connected to this player.
Please follow all color coding when making the audio and video connections.
The video output of this player can be optimized to fit your TV screen. Please select either 4:3 or 16:9. (refer to
“SETTING THE TV SCREEN” on page 31.)
The Sherwood Newcastle V-756 DVD Player/Decoder is a very versatile unit.
Because it has built-in decoding for DTS, Dolby Digital, Dolby Pro Logic, Dolby Virtual, Circle Surround, MPEG
Multichannel and 6.1 Extended surround it can be used with 5.1 (or 6.1) ready amplifiers and receivers that do
not have their own decoders built-in.
Because it also has coaxial and optical digital outputs, it can also pass the digital data stream to an external
decoder or to amplifier or receiver that has built-in digital decoders.
It can even be used as a high quality multi-channel digital decoder for other source components such as
satellite TV receiver or HDTV tuner.
Follow the enclosed instructions to add the V-756 to your system.
ENGLISH
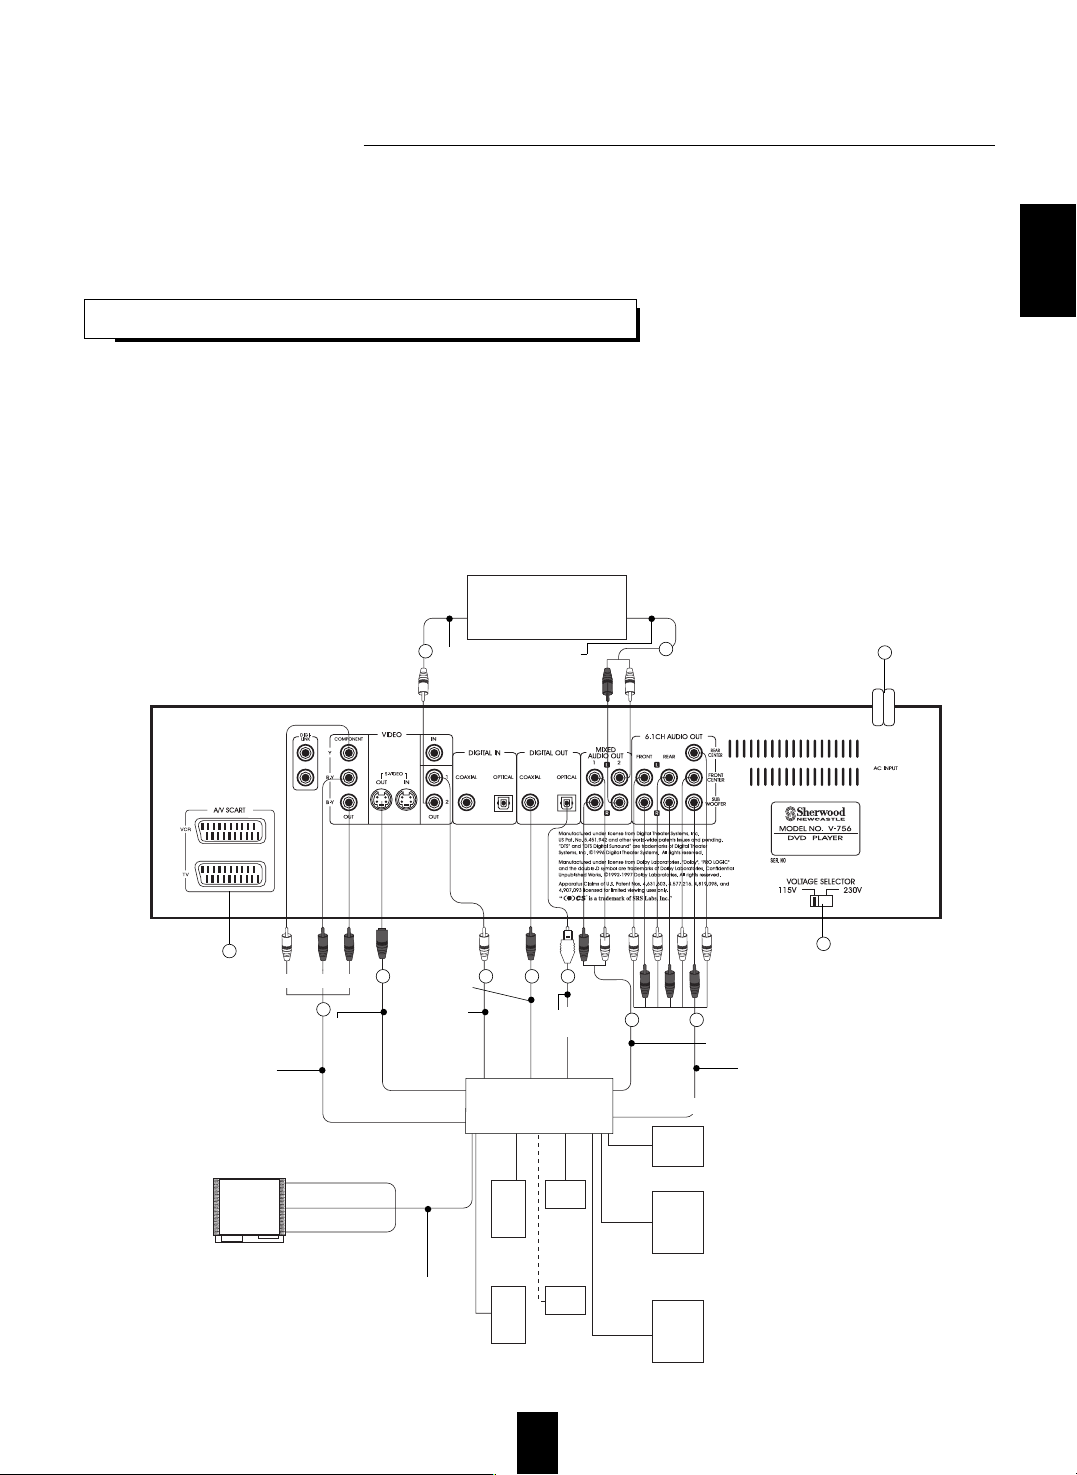
CONNECTING TO AN A/V AMPLIFIER OR RECEIVER
Powered subwoofer
AUDIO IN
6.1(or 6)CH AUDIO IN
Audio cord(supplied)
Main A/V Amplifer
or Receiver
Additional
TV or amplifier
Center
speaker
(front)
Center
speaker
(rear)
Front speaker (right)
Front
speaker
(left)
Video cords
(not supplied)
S-VIDEO IN
(MONITOR) VIDEO OUT
COMPONENT VIDEO IN
S-VIDEO IN
VIDEO IN
COMPONENT VIDEO IN
Monitor TV
VIDEO IN
VIDEO IN
Video cord
(not supplied)
Audio cord
(not supplied)
AUDIO IN
This Unit
Rear speaker
(left)
Rear speaker (right)
Audio cord(not supplied)
Video cord
(supplied)
S-video
cord(not
supplied)
BlueRedGreen
Component video
cord
(not supplied)
75Ω coaxial
digital cord
(not supplied)
COAXIAL
DIGITAL
INPUT
OPTICAL
DIGITAL
INPUT
Optical digital
cord(not supplied)
5
5
6
7
4
1
33
2
2
2
8
Page 6

6
1. Connecting MIXED AUDIO OUTs 1
Connect these jacks to the DVD (, AUX, etc.) IN jacks of your
amplifier or receiver.
Notes :
While playing back a disc containing multi-channel signal
format such as DTS, Dolby Digital and MPEG Multichannel
with this connection, the 5 discrete channels (front L, center,
front R, rear L and rear R) are mixed down to these front
and headphone channels.
If the MIXED AUDIO OUT connection is made, only two
front speakers are required.
2. Connecting VIDEO OUT’s
This DVD Player has 3 kinds of Video Outputs :
Component Video, S-Video and Composite Video.
If your receiver or amplifier has both VIDEO INPUT jacks and
VIDEO (MONITOR) OUTPUT jacks, connect these VIDEO
OUTS to the corresponding VIDEO IN jacks of your amplifier
or receiver and the receiver’ MONITOR OUTPUT jacks to the
corresponding input jacks on your TV. If your amplifier or
receiver does not have the necessary input and output jacks,
connect these jacks directly to the VIDEO IN jacks of the TV.
(Refer to “CONNECTING TO TV WITH AUDIO AND VIDEO
INPUTS” on the next page.)
When making COMPONENT VIDEO connections, connect
“Y” to “Y”, “R-Y” to “R-Y” (or “P
R
”), “B-Y” to “B-Y” (or “PB”)
For your reference, video picture quality is usually rated as
follows :
“COMPONENT” > “S-VIDEO” > “COMPOSITE”
NOTE : Do not connect this unit to your TV through a VCR.
The copy protection function built into DVD software may
interfere with the picture.
3. Connecting DIGITAL OUTs
If your amplifier or receiver has built-in digital decoders or if
you wish to make direct connection to an MD or CD recorder,
connect the COAXIAL and/or OPTICAL DIGITAL OUTPUTS
to the corresponding DIGITAL INPUTS of the associated
device(s).
Notes :
You must select the appropriate digital output mode on this
DVD player before trying to use it with an outboard amplifier
or receiver via the digital connections.
Otherwise, operation with the incorrect digital mode may
result in a loud noise through your speakers that could
damage the speakers and/or our hearing. (For details, refer
to “When selecting the DIGITAL OUTPUT” on page 32.)
Recordings of DVD software made via the digital connection
on an MD or CD recorder may not be made properly.
When making the COAXIAL DIGITAL connections, use 75
Ohm coaxial cable not standard audio patch cords.
Not all of the commercially available optical cables are
suitable for use with audio equipment. If you have any
questions regarding the appropriateness of any cable,
please consult your dealer or a professional service
organization.
Remove the protecive cap before making any OPTICAL
DIGITAL connections. Re-install the cap when you will not
be using the OPTICAL INS or OUTS.
4. Connecting the 6.1 CH AUDIO OUTs
This DVD player has built-in multi-channel digital decoders for
DTS, Dolby Digital, Dolby Pro Logic, MPEG Multichannel and
Circle Surround including the 6.1 Extended Surround versions
of both DTS and Dolby Digital so you can enjoy high-quality
audio and surround sound without the need for an external
decoder.
Connect these jacks to the corresponding 6.1 (or 6) channel
inputs of your amplifier or receiver.
Notes :
If you amplifier or receiver has only 6 channel direct inputs,
do not hook up the REAR CENTER OUTPUT.
In that case, you can run the REAR CENTER OUTPUT to a
separate amplifier or powered speaker. With such a hookup, however, you will have limited ability to control the rear
center speaker level as this DVD player does not have a
master volume control. Center Rear volume trim is limited to
+/- 12 dB compared to the other channels. If you need more
volume adjustment capability, it should come from the
associated amplifier or powered speaker.
When using the 6.1 CH Audio Outs, adjustments for
speaker set-up, bass management, dynamic range control,
and surround sound mode should be made from this DVD
player and not from your amplifier or receiver.
(Refer to “When selecting the Dynamic Range Control”,
when selecting the SURROUND” and “When selecting the
SPEAKER OPTIONS” on pages 33-34.)
5. Connecting to an additional amplifier or TV set
This unit incorporates additional audio and video outputs such
as (composite) VIDEO OUT 2 and MIXED AUDIO OUT 2 for
use with a second TV or amplifier.
To connect these jacks correctly, refer to “Connecting
MIXED AUDIO OUT’s 1” and Connecting VIDEO OUTs”
described above.
6. AC INPUT CORD
When all connections are made, plug this cord into an AC
outlet.
7. VOLTAGE SELECTOR SWITCH (Optional by region)
In some countries, this unit operates on AC 115V or AC 230V.
If your unit has this capability, set the VOLTAGE SELECTOR
switch to match your line voltage before connecting the AC
input cord to an AC outlet.
8. A/V SCART CONNECTORs (Regional Option)
Refer to “CONNECTING TO TV AND VCR WITH SCART
CONNECTORS (Regional Option)” on page 9.
ENGLISH
Page 7
7
ENGLISH
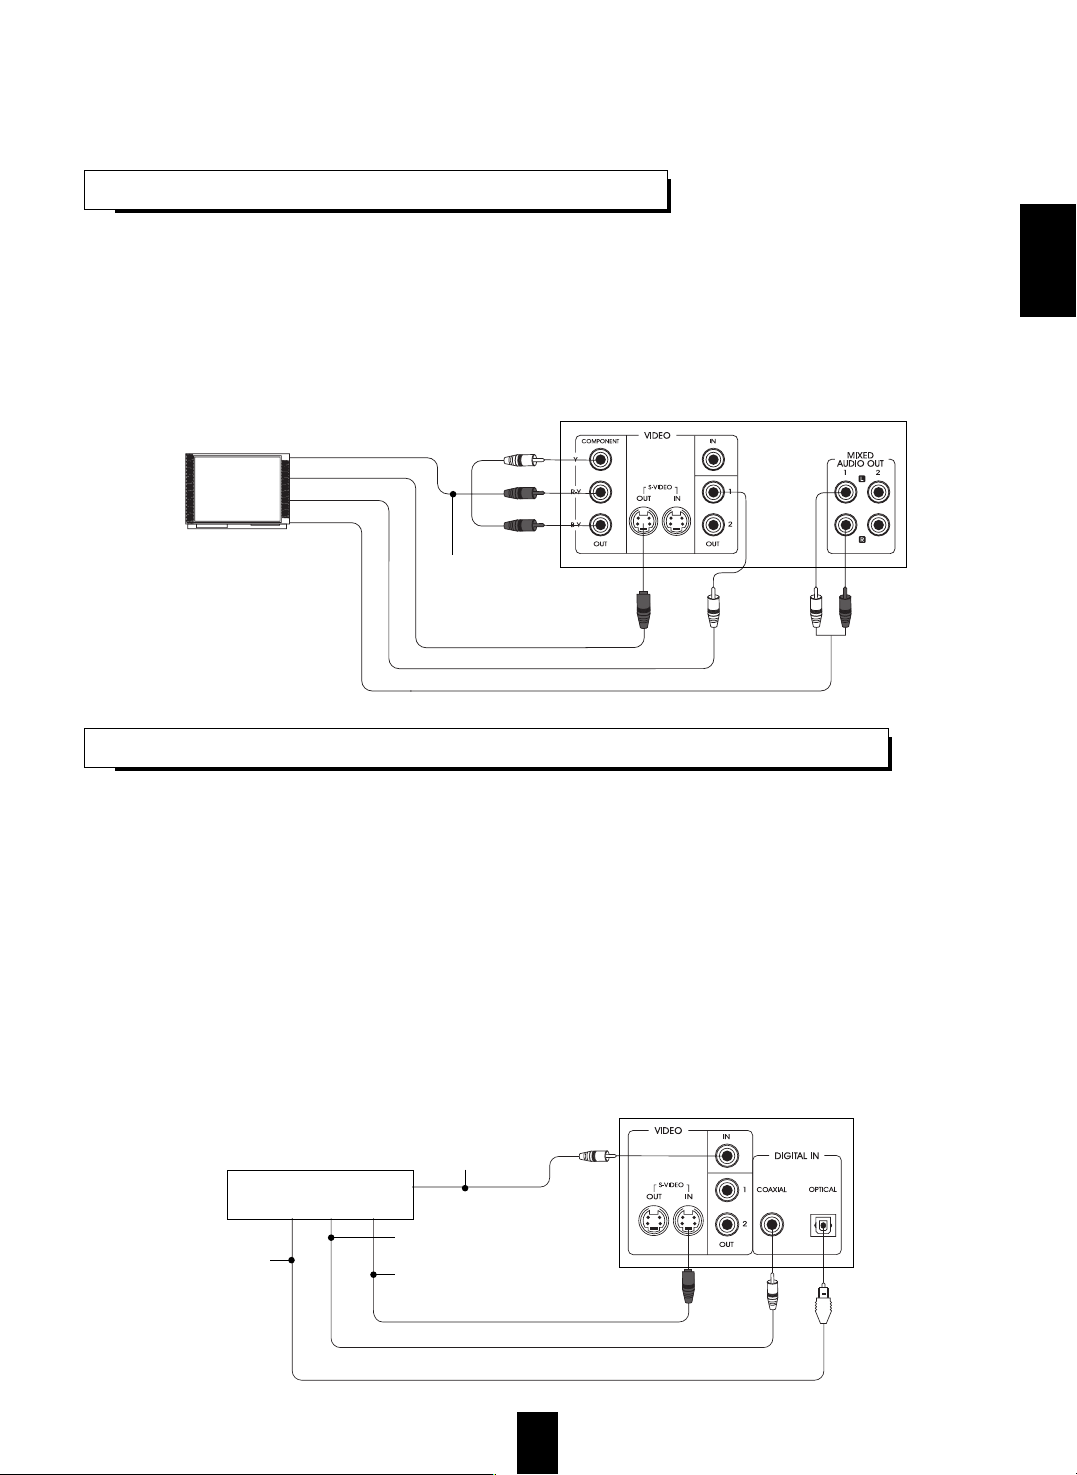
You can enjoy DVD Videos by simply connecting this unit to a TV. To hear improved audio sound quality, connect the MIXED
AUDIO OUTs 1 to your amplifier or receiver.
To connect these jacks correctly, refer to “Connecting MIXED AUDIO OUTs 1” and “Connecting VIDEO OUTs” on the
previous page.
Note :
If your TV has only a monaural audio input instead of stereo, you will need to use an optional audio cord which converts
stereo audio output to monaural.
Do not connect the VIDEO OUTs of the unit to the TV through a VCR. Otherwise the image may be disturbed due to the copy
protection builtinto the DVD software.
CONNECTING TO TV WITH AUDIO AND VIDEO INPUTS
When these VIDEO and DIGITAL INs are connected to the corresponding VIDEO and DIGITAL OUTs of additional DVD
player, etc., you can also enjoy high-quality audio and surround by using the built-in DTS/Dolby Digital/MPEG Multichannel
decoder of this unit. If this is the case, be sure to connect the 6.1 CH AUDIO OUTs (and MIXED AUDIO OUTs ) to your
amplifier or receiver.
When you connect the additional equipment with a digital output, before using, change the SYSTEM setting according to the
type of the DIGITAL OUT jack of the equipment connected. (Refer to “SETTING THE SYSTEM” on page 29.)
The digital audio signal from either the OPTICAL or the COAXIAL DIGITAL IN can be directly transferred to both of the
DIGITAL OUTs of this unit. If this is the case, be sure to connect these DIGITAL OUTs to your amplifier, etc.
A signal from the S-VIDEO IN can be directly transferred to only the S-VIDEO OUT and a signal from the regular VIDEO IN to
only the regular VIDEO OUTs 1 and 2.
Depending on your use, the unit’s settings should be set properly. With DIGITAL OUT connections, the DIGITAL OUTPUT
setting should be made from this unit and with 6.1 CH AUDIO OUT connections, settings for “D·R·C”, “SURROUND” and
“SPEAKER OPTIONS” on the AUDIO SETUP menu should be made.
For correct connection and use, refer to “Connecting DIGITAL OUTs” and “Connecting 6.1 CH AUDIO OUTs” on the previous
page.
The audio component such as CD player, etc. can be also connected to these DIGITAL INs only, not the VIDEO INs.
CONNECTING TO ADDITIONAL COMPONENT WITH VIDEO AND DIGITAL OUTS
COMPONENT VIDEO IN
Monitor TV
Component video cord
(not supplied)
S-video cord (not supplied)
Video cord (Yellow, supplied)
Audio cord (Red&White, supplied)
This Unit
S-VIDEO IN
VIDEO IN
AUDIO IN
Green
Red
Blue
VIDEO OUT
S-VIDEO OUT
This unit
COAXIAL DIGITAL OUT
OPTICAL DIGITAL OUT
Video cord
(not supplied)
Optical digital cord
(not supplied)
S-video cord
(not supplied)
75Ω coaxial digital
cord (not supplied)
DVD player, etc.
Page 8
8
ENGLISH
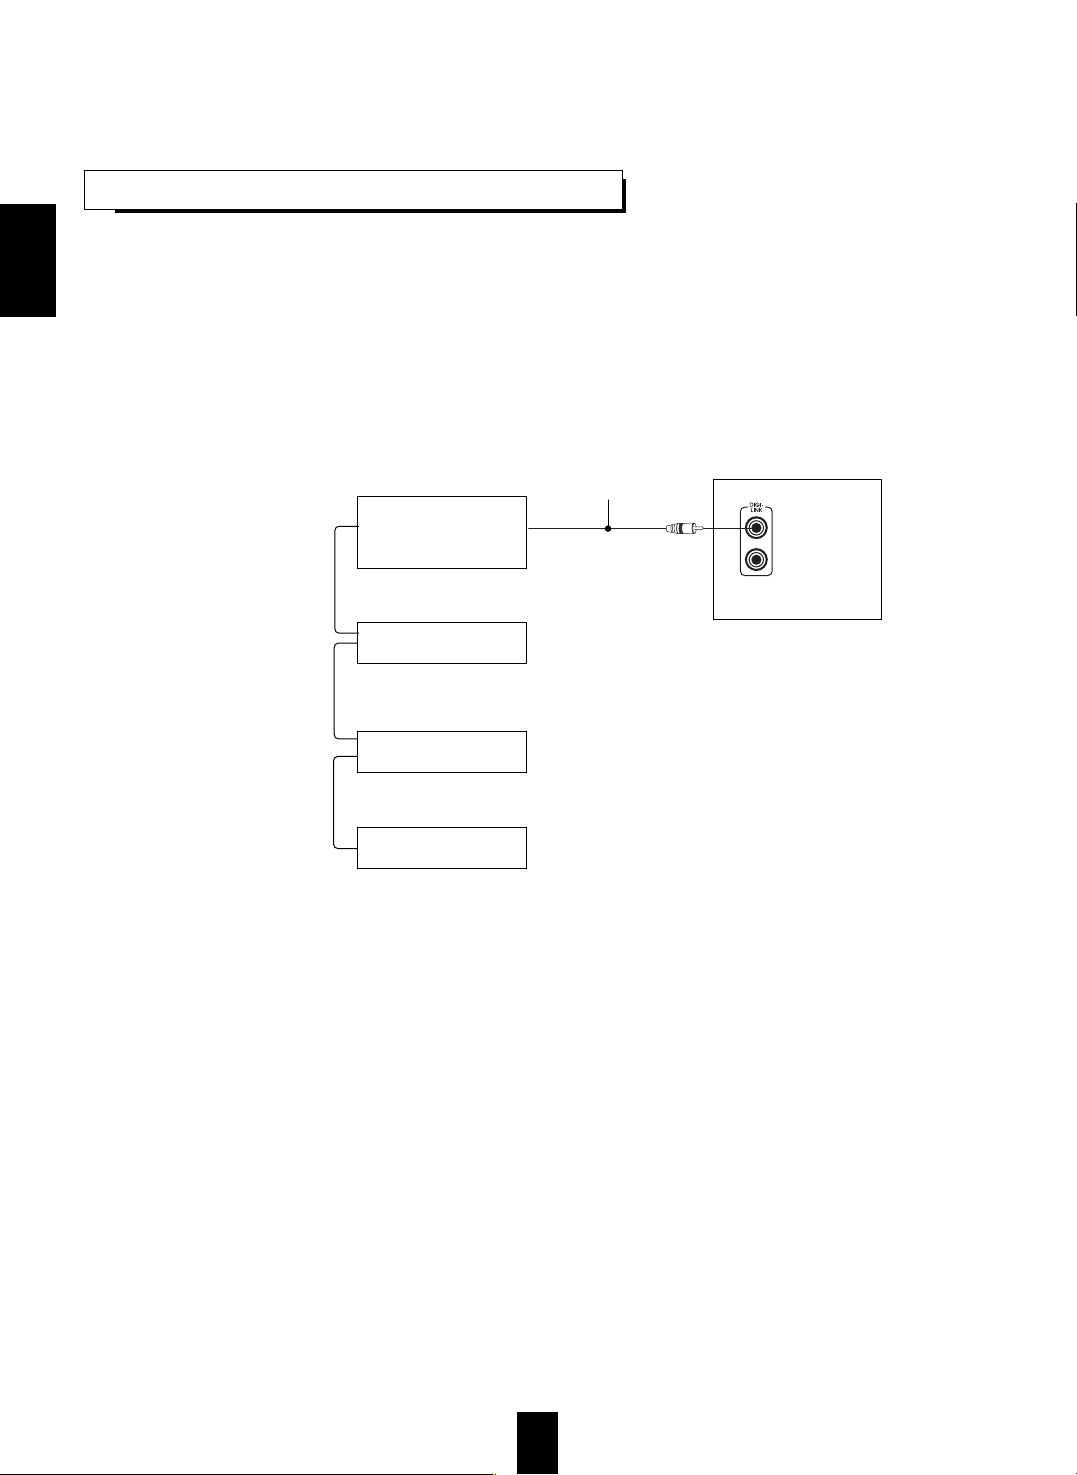
Connect this jack to the DIGI LINK jack of some Sherwood receivers such as RV-5106/R, RD-6106/R, RD-
7106/R, R-756/R, R-956/R, etc. that uses the DIGI LINK III remote control system.
(For details, refer to the operating instructions of that unit.)
When connecting this jack to the DIGI LINK jack of some Sherwood receivers such as RV-5106/R, RD-6106/R,
RD-7106/R, R-756/R, R-956/R, etc., only this unit does not respond to system power control due to the auto
play feature.
CONNECTING SYSTEM CONTROL
Some receivers with
DIGI LINK III remote
control system only
CD player
Sherwood equipment with
DIGI LINK remote control
system
System control cord
(Green, supplied)
This unit
System control
cord
Tape deck
Graphic equalizer
Page 9
9
ENGLISH
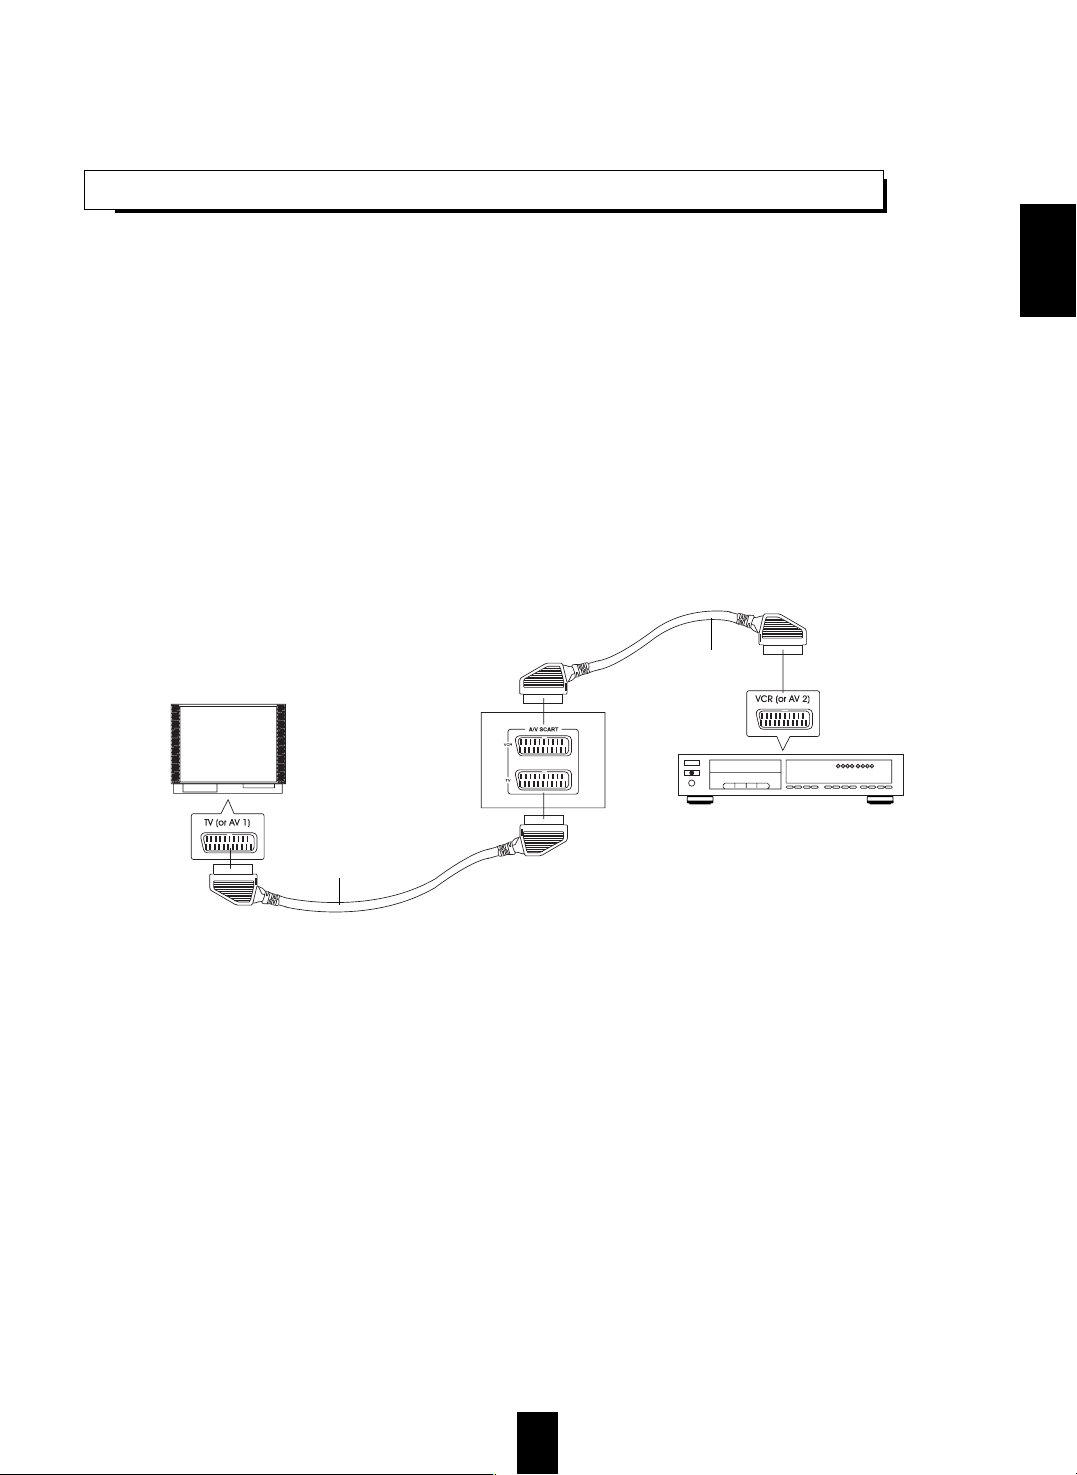
For some countries like Europe, the unit incorporates the TV and VCR SCART connectors.
You can connect the unit to TV and VCR easily using the SCART connections without other cumbersome audio
and video connections.
During operation of the unit, these connectors can deliver either the regular video and RGB signals or the S-
video (Y and C) signals as well as the mixed audio L and R signals.
To obtain the highest picture quality, you can make the COMPONENT VIDEO connections between the unit
and TV.
Depending on the video signal(s) to be used, adjust the COMPONENT VIDEO and SCART OUTPUT settings
to your preference and set your TV and VCR to the corresponding one to match the selected settings of the
unit.
(Refer to “When selecting the COMPONENT VIDEO (Regional Option)” on page 37, “When selecting the
SCART OUTPUT (Regional option)” on page 38 and the operating instructions of the component(s)
connected.)
Note
In this connection, do not connect the unit to the TV through a VCR. Otherwise the image may be disturbed due
to the copy protection function.
CONNECTING TO TV AND VCR WITH SCART CONNECTORS (Regional Option)
In this connection, to view a program source from the VCR on the TV screen or to record a TV broadcast onto
the VCR, be sure to turn the unit off to enter the standby mode.
This unit
Monitor TV
VCR
21-pin SCART
cable (not supplied)
21-pin SCART
cable (not supplied)
Page 10
10
ENGLISH
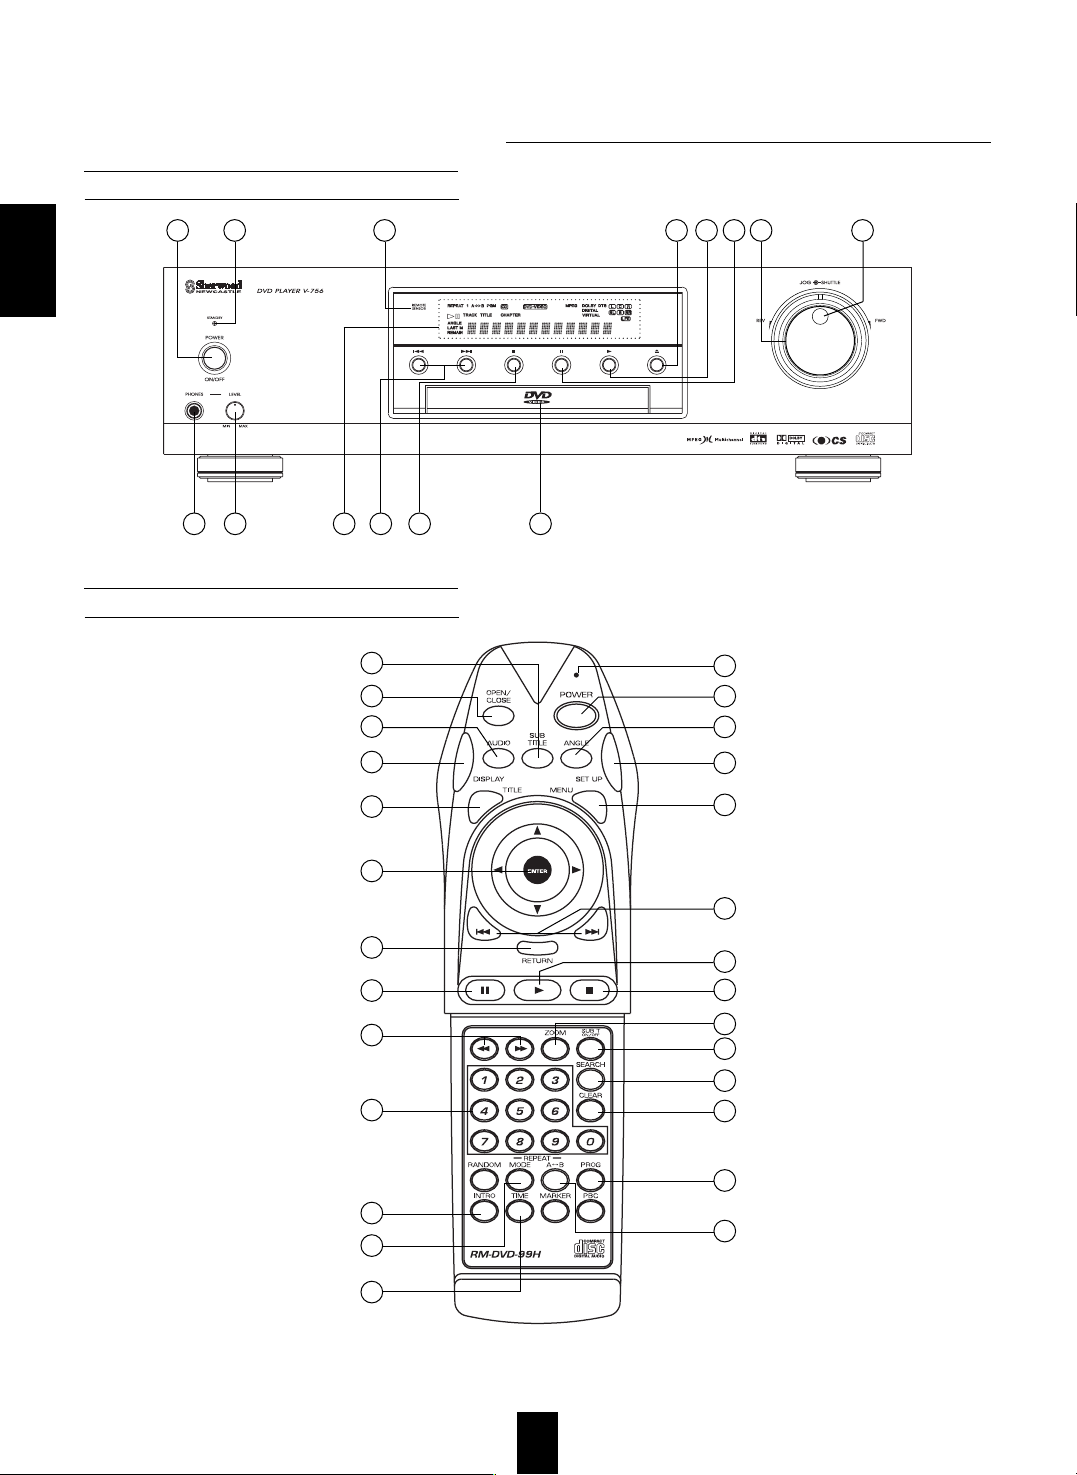
Front Panel & Remote Controls
Front Panel Controls
Remote Controls
1
34 35 36 11 10 6
11
8
10
26
19
27
28
29
32
33
31
30
15
12
9
25
24
17
16
20
7
18
22
23
21
3
4
2 5 7 8 9 13 14
Page 11

22. MENU BUTTON
Press to display the DVD menu on the TV screen.
23. SETUP BUTTON
In the stop mode, press to adjust the initial settings of
the unit on the TV screen .
24. CURSOR ( ) / ENTER BUTTON
Tilt in the desired direction to select an item in the onscreen display or in any displayed menus and press
down to execute or select that item.
25. RETURN BUTTON
Press to return to the previous menu.
26. ZOOM BUTTON
Press to enlarge a part of the scene during playback of
a DVD video .
27. SEARCH BUTTON
Press to perform a title / chapter / time search during
playback of a DVD Video or a track / time search
during playback of a CD.
28. CLEAR BUTTON
Press to delete the current selection on the title,
chapter, track, time, setup menu, etc.
29. PROGRAM BUTTON
Press to program chapters / tracks in the desired
sequence.
30. INTRO BUTTON
Press to play the first 10 seconds of each track on a
CD.
31. REPEAT MODE BUTTON
Press to play a single chapter / title on a DVD Video or
a sigle track / entire disc on a CD repeatedly.
32. REPEAT A↔B BUTTON
Press to play a specific part repeatedly.
33. TIME BUTTON
Press to display the elapsed / remaining time of the title
or chapter on a DVD Video or the elapsed / remaining
time of the track or disc on a CD.
34. HEADPHONE JACK
Insert headphones for private listening.
35. HEADPHONE LEVEL CONTROL KNOB
Rotate to adjust the volume level of the headphones.
36. FLUORESCENT DISPLAY
For details, see the next page.
Note :
On the remote control, the RANDOM, MARKER and
PBC buttons are not available for this unit.
1. POWER SWITCH
Press to turn the power of the unit between the standby
and off modes.
2. STANDBY indicator.
Lights up in the standby mode and goes off in power on
mode.
3. POWER BUTTON
Press to turn the power of the unit from power on to
standby or vice versa.
4. LED LAMP
5. REMOTE SENSOR
6. DISC TRAY
Load the disc to be played on the tray.
7. OPEN/CLOSE ( ) BUTTON
Press to open or close the disc tray.
8. PLAY ( ) BUTTON
Press to start playback.
9. PAUSE ( ) BUTTON
Press to pause playback temporarily.
In the pause mode, press to advance the picture of
DVD Videos frame by frame.
10. STOP ( ) BUTTON
Press to stop playback.
11. FORWARD/BACKWARD ( ) SKIP BUTTONS
Press either button to skip chapters/tracks or locate the
beginning of a chapter/track.
12. FORWARD/BACKWARD ( ) SEARCH
BUTTONS
Press either button to fast forward or reverse a chapter
or track and to play back DVD Videos slowly.
13. SHUTTLE RING
Rotate in either direction to fast forward or reverse a
chapter or track.
14. JOG DIAL
In the sill picture mode, rotate in either direction to
advance or reverse the picture of DVD Video frame by
frame.
15. NUMERIC (0~9) BUTTONS
Press to enter a title, chapter or track number, etc. for
direct input.
16. DISPLAY BUTTON
Press to display the on-screen symbols meaning
information about the disc and the unit on the TV screen.
17. TITLE BUTTON
Press to display the DVD Video title menu on the TV
screen.
18. SUBTITLE BUTTON
Press to select the subtitle language on the TV screen
during DVD Video playback .
19. SUBTITLE ON/OFF BUTTON
Press to switch the subtitle display on or off during DVD
video playback.
20. AUDIO BUTTON
Press to select the audio language or sound during DVD
Video playback.
21. ANGLE BUTTON
Press to select the camera angle during playback of a
DVD Video that contains multiple camera angles.
11
ENGLISH
Page 12
12
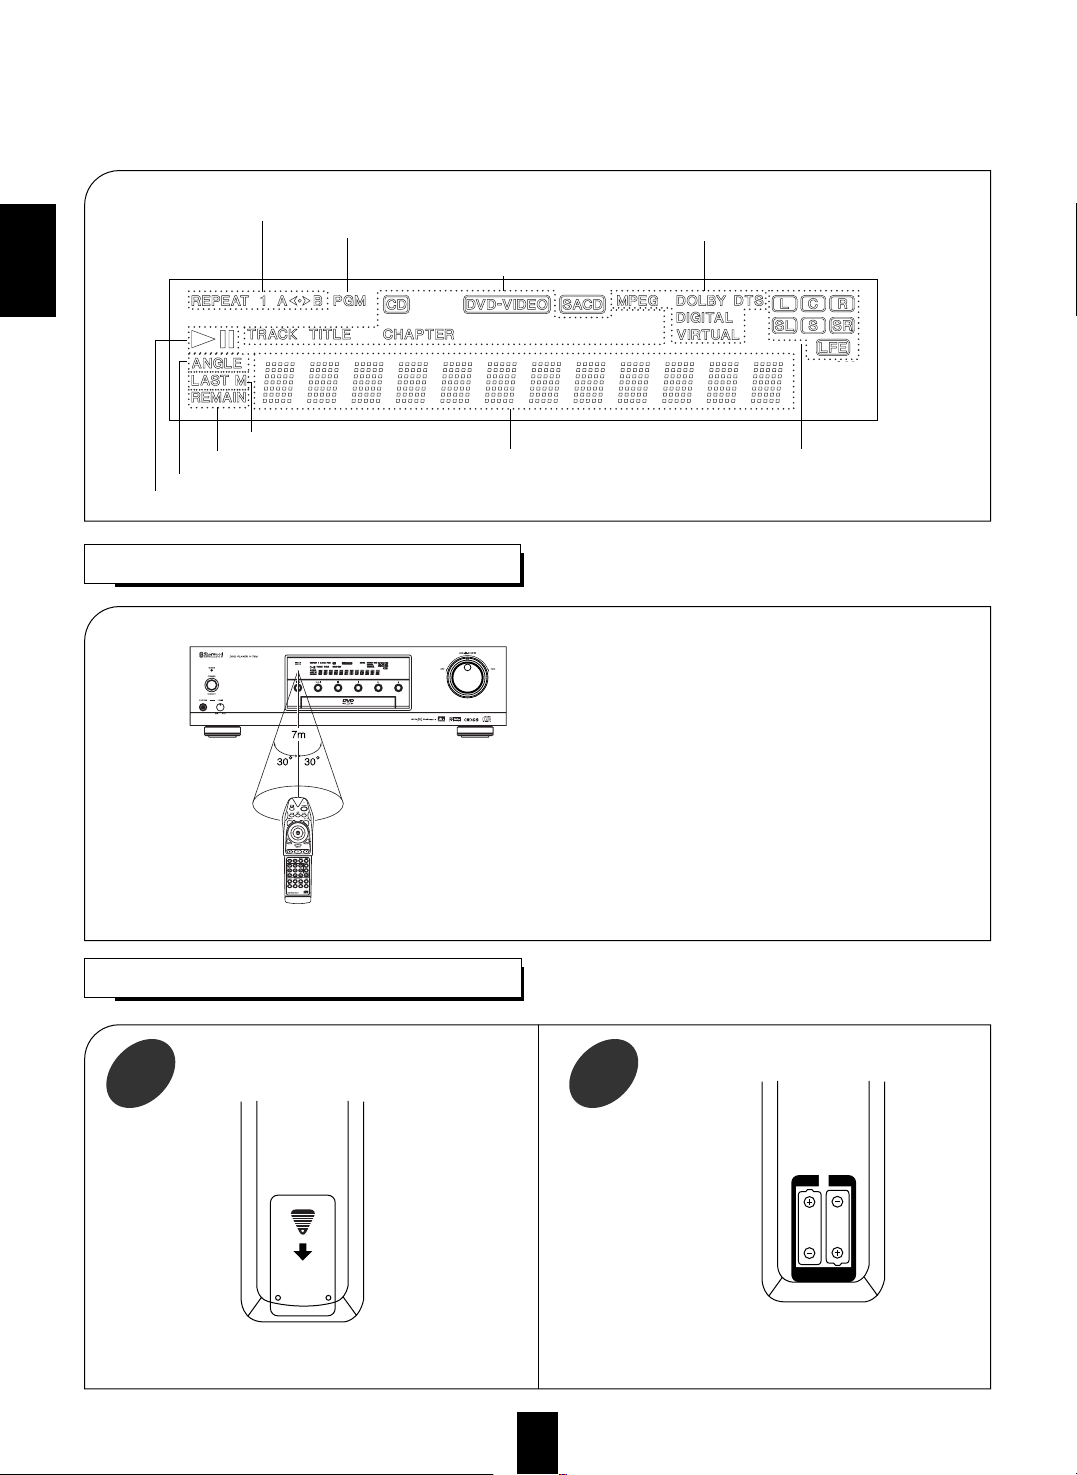
■FLUORESCENT DISPLAY
ENGLISH
Use the remote control unit within a range of about 7
meters (23 feet) and angles of up to 30 degrees
aiming at the remote sensor.
LOADING BATTERIES
REMOTE CONTROL OPERATION RANGE
Remove the batteries when they are not used for a
long time.
Do not use rechargeable batteries(Ni-Cd type).
1
Remove the cover.
2
Load two size “AAA” batteries matching
the polarity.
REPEAT INDICATORS
PROGRAM INDICATOR
SURROUND MODE INDICATORS
SPEAKER INDICATORS
MULTI-INFORMATION DISPLAY
CD/DVD INFORMATION INDICATORS
PLAY/PAUSE INDICATORS
ANGLE INDICATOR
REMAINING TIME INDICATOR
LAST MEMORY INDICATOR
Page 13
13
ENGLISH
■Markings on the DVD Videos
Please check the copyright laws in your country
before attempting to record from DVD Video or CD.
Recording copyrighted material may infringe on
copyright laws.
DVD Video is protected by the copyguard system.
If you connect the unit directly, to your VCR the
copyguard system activates and the picture may not
play back correctly.
This product incorporates copyright protection
technology that is protected by method claims of
certain U.S. patents and other intellectual property
rights owned by Macrovision Corporation and other
right owners. Use of this copyright protection
technology must be authorized by Macrovision
Corporation, and is intended for home and other limited
viewing uses only unless otherwise authorized by
Macrovision Corporation. Reverse engineering or
disassembly is prohibited.
Preliminary Knowledge About Discs
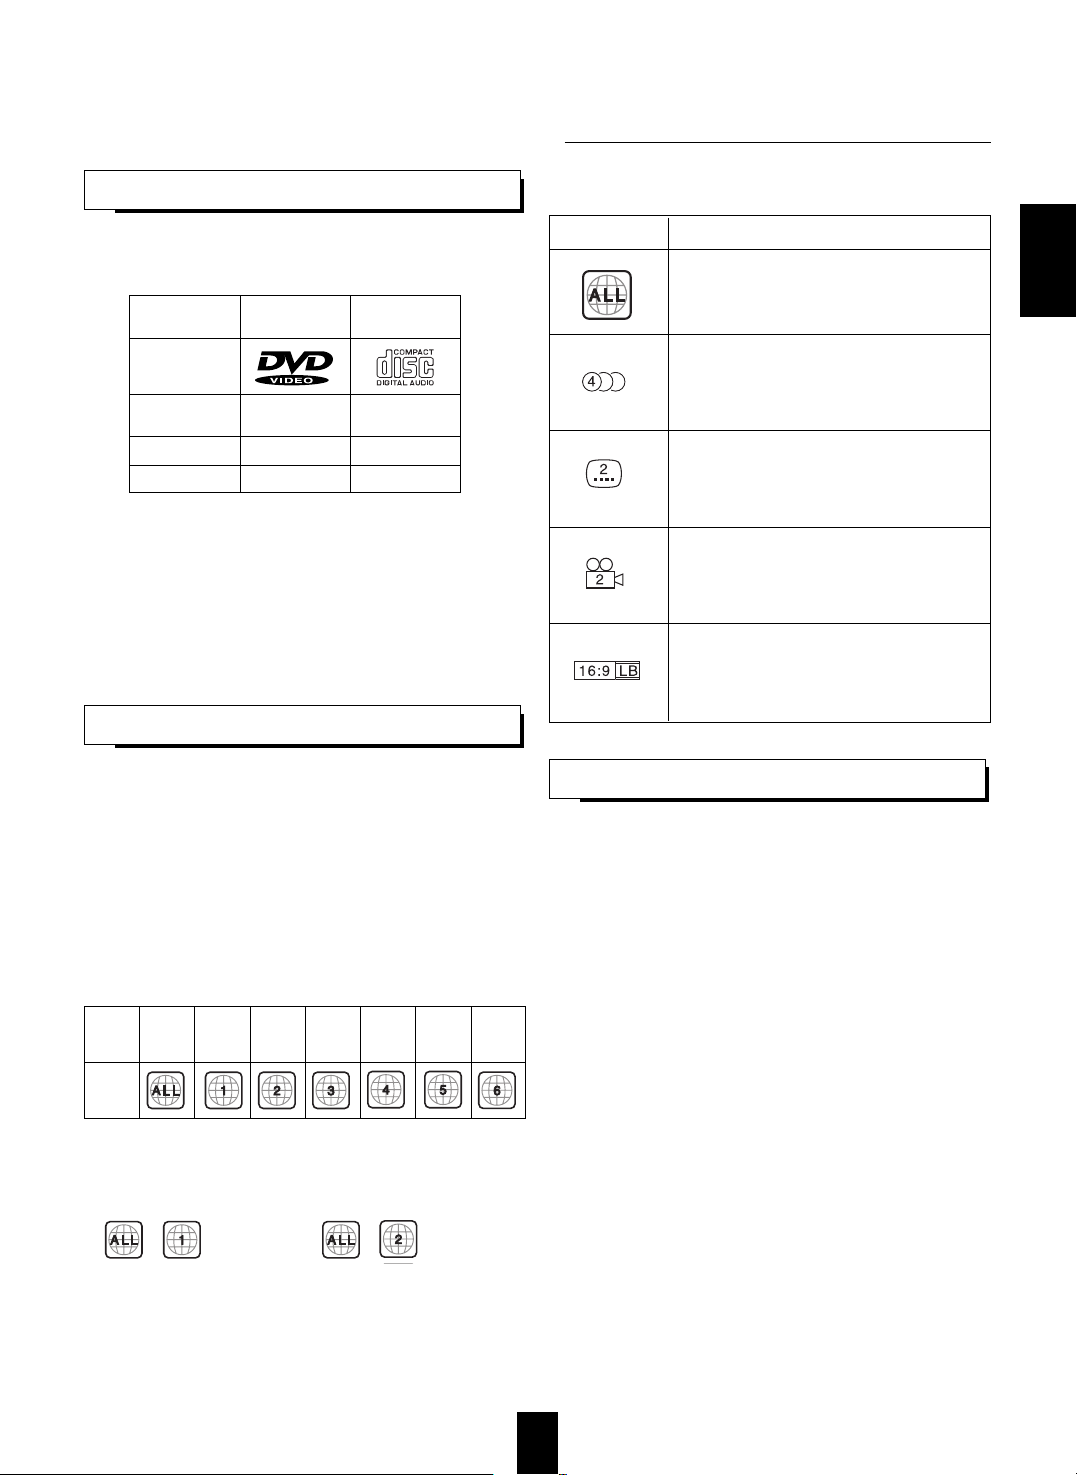
PLAYABLE DISC TYPES
NOTES ON DVD VIDEOS
NOTES ON COPYRIGHT
This unit can play back discs bearing any of the
following marks :
Notes :
When you play back discs other than those listed
above, playing back them may generate noise and
damage speakers.
Depending on the countries, this unit conforms to
either the NTSC color system for U.S.A., Canada, etc.
or the PAL for Europe, Australia, China, etc.
It cannot play back discs with the other color systems.
■Region code
DVD players and DVD Videos have their own Region
Code numbers which are assigned to each country
or area as shown below. DVD players are set to your
Region Code number at the factory. As a result, if
the region code number of this DVD player is
different from that of the DVD Video, playback of the
DVD Video will not be allowed by the DVD player. (In
this case, “WRONG REGION CODE” is displayed on
the TV screen)
Examples of playable DVD Videos :
In U.S.A In Europe
DVD VIDEO CD
Logo mark
Disc size
3″(8 cm) /
5″(12 cm)
3″(8 cm) /
5″(12 cm)
Played sides One or both One side only
Contents Audio + Video Audio
Major
countries
or area
Playable
Region
code
All
regions
North
America
Europe,
Japen,
Middle East
Southeast
Asia
Oceania,
South
America
Russia
China
Mark Description
Indicates the region code where the disc
can be played back.
Number of audio languages recorded with
multiple audio languages. The number in
the mark indicates the number of audio
languages. (Up to 8 languages)
Number of subtitle languages recorded
with the multiple subtitle languages. The
number in the mark indicates the number
of subtitle languages. (Up to 32 languages)
Number of angles recorded from the
multiple camera angles. The number in the
mark indicates the number of angles. (Up
to 9 angles)
Aspect ratio and TV screen type.
“16:9”, “4:3”, etc. stands for aspect ratio,
“LB” for letter box, “PS” for pan-scan,
“WIDE” for wide screen.
Page 14
14
SYMBOL AND MESSAGE ABOUT INVALID
OPERATION
CARE AND HANDLING OF DISCS
ENGLISH
When you press a button, if the unit does not accept
that operation, appears on the TV screen.
Operations are occasionally unacceptable even if
is not displayed.
During operation, if the “WRONG REGION CODE” is
displayed on the TV screen, it means the region
code number of the unit is different from that of the
DVD Video and playback will not be allowed.
During operation, if the “WRONG DISC FORMAT” is
displayed, it means the color system of the unit is
different from that of the DVD Video.
In case a disc is not playable, this message will be
also displayed.
During operation, if “BAD PARENTAL LEVEL” is
displayed, it means the rating level function is
operating.
In this case, select the preferred rating level.
(For details, refer to “SETTING THE RATING
LEVEL” on page 39.)
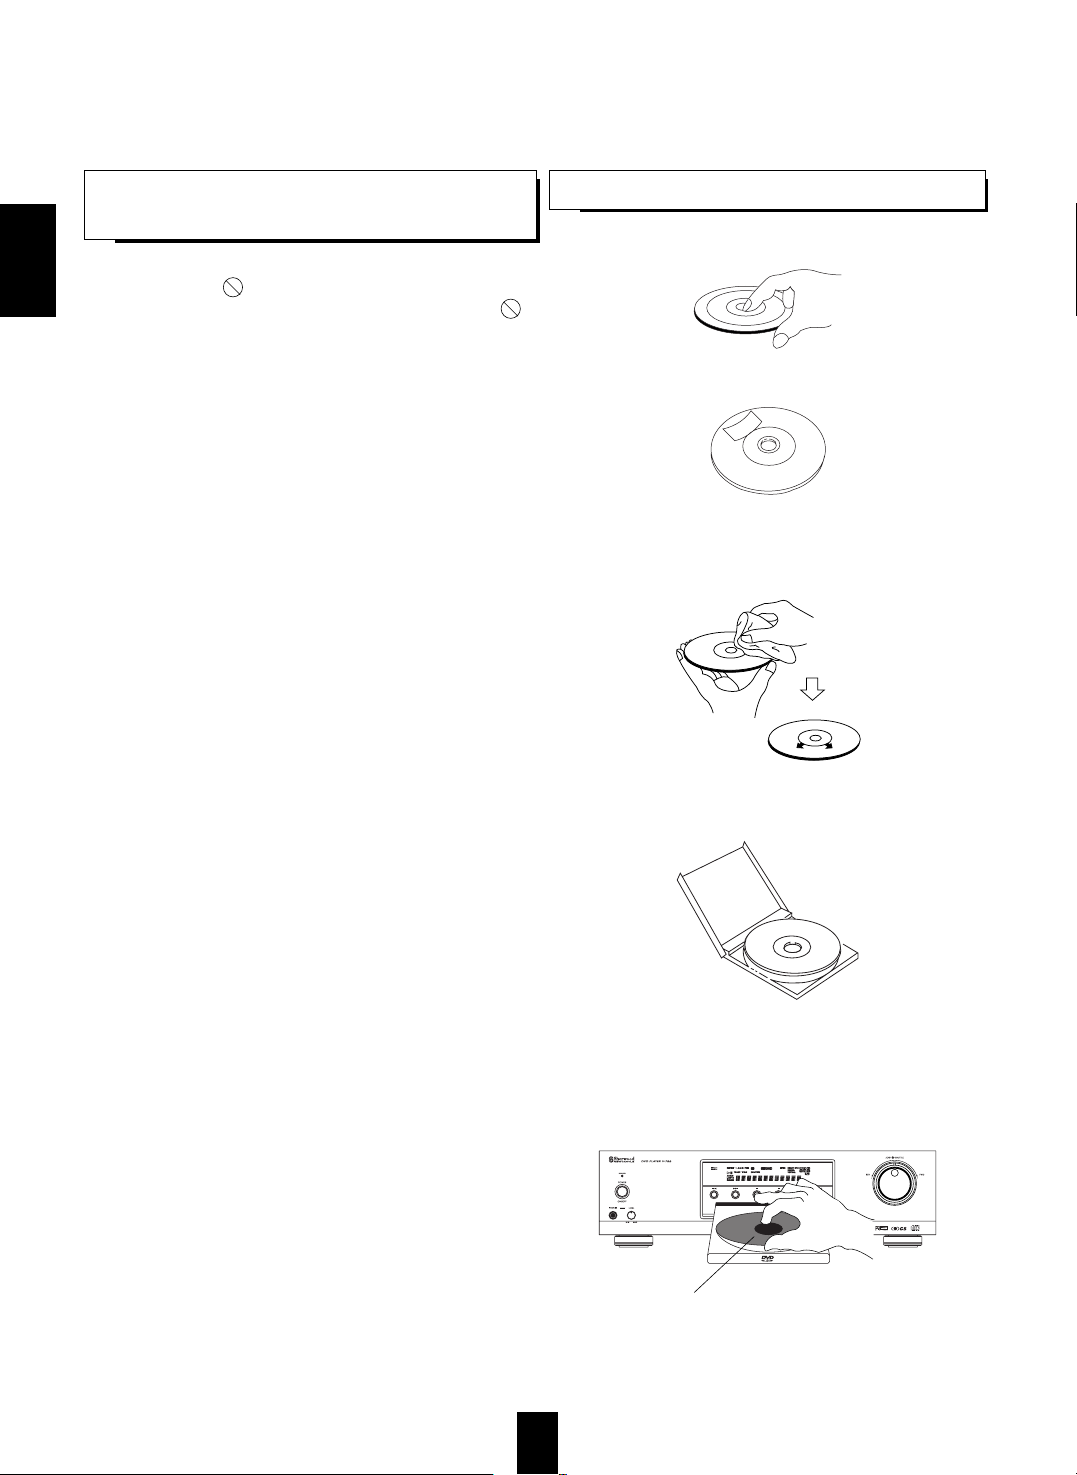
In handling a disc, hold it carefully by the edges.
Do not stick paper or write anything on the printed
surface.
Fingermarks and dust on the recorded surface
should be carefully wiped off with a soft cloth. Wipe
straight from the inside to the outside of the disc.
Always keep the discs in their cases after use to
protect them from dust and scratches.
Notes:
Do not expose discs to direct sunlight, high humidity
or high temperature for a long time.
When loading or unloading a disc in the disc tray,
always place it with the printed side up.
Printed side
Page 15
15
ENGLISH
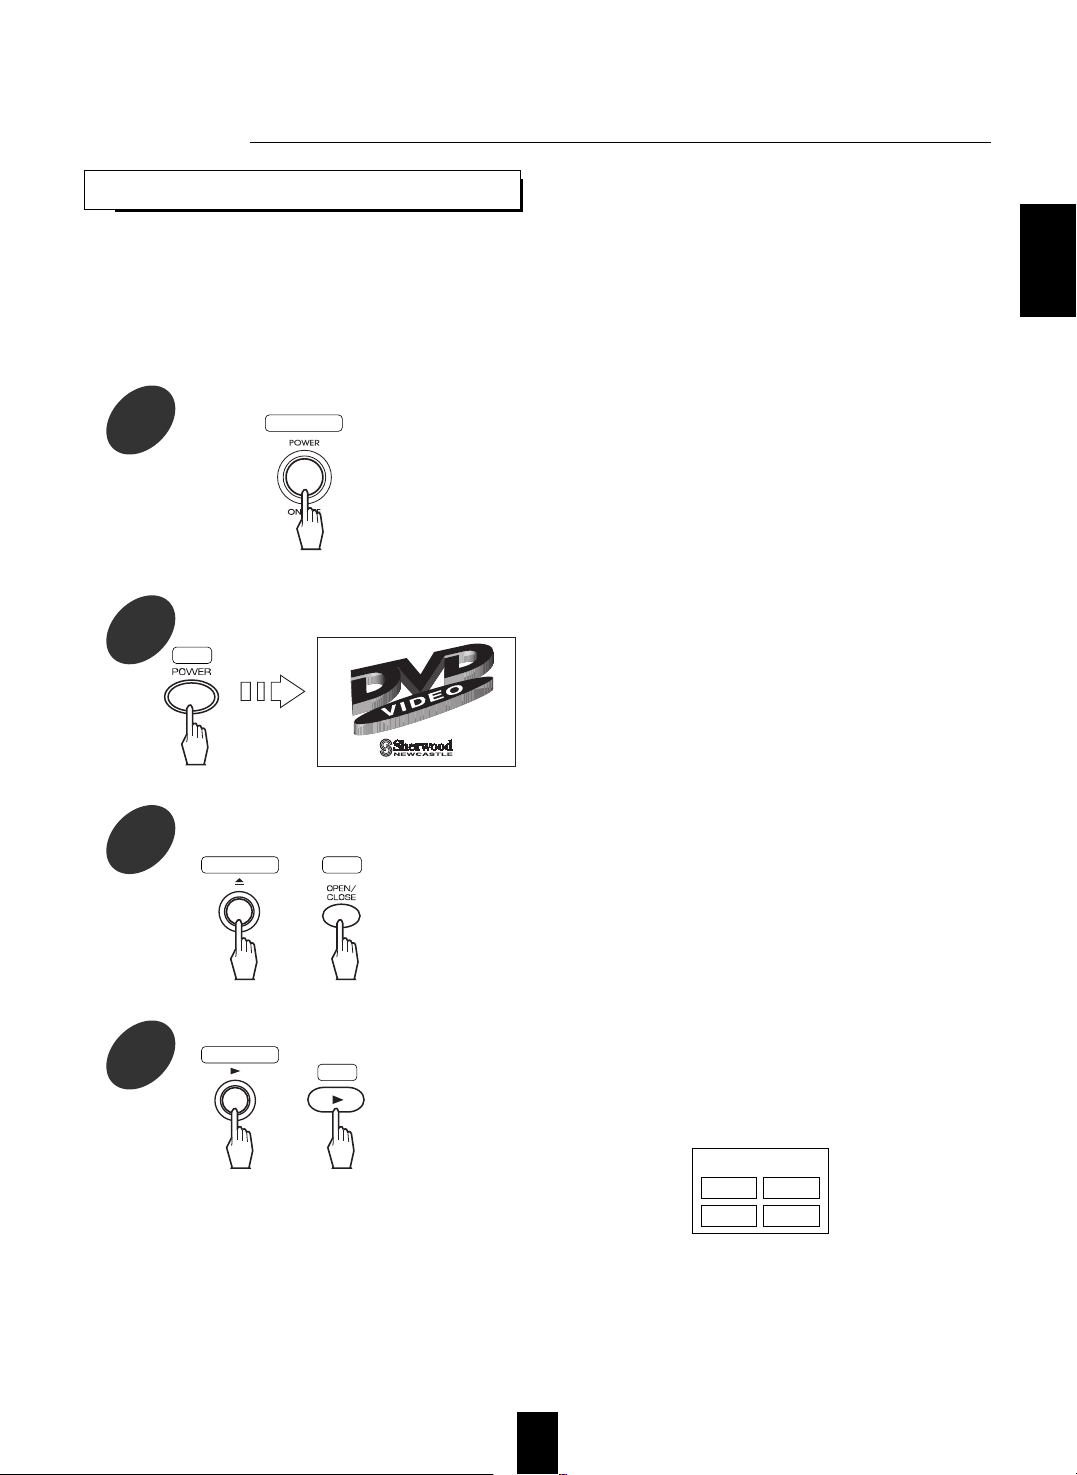
BASIC PLAYBACK
■Preparations
Turn on the TV and select the video input source connected to the unit.
To enjoy the sound of the disc from your audio system, turn on the audio system and select the input source
connected to the unit.
Set the TV screen type correctly to match your TV.
The STANDBY indicator lights up. This means that
the unit is connected to the AC mains and a small
amount of current is retained to support operational
readiness.
To switch the power off, push the POWER switch
again. Power is cut off and the STANDBY indicator
goes off.
Operations
Each time the POWER button on the remote
control is pressed, the unit is turned on to enter the
operating mode or off to enter the standby mode.
In the stanby mode, if the OPEN/CLOSE button is
pressed, the unit can be also turned on (and when
there is a disc in the unit, the disc is automatically
played back).
1
Before operation, enter the standby
mode.
2
In the standby mode, turn the power on.
8 cm (3 inch) discs can be loaded on the inside
circle of the tray, too.
3
Open the disc tray, then load a disc with
the printed side up.
The disc tray closes and playback starts.
When the disc tray is closed by pressing the
OPEN/CLOSE button, playback starts, too.
Example of DVD Video
4
Start playback.
Note :
When you play a DVD Video, the menu display
may appear on the TV screen. In this case, see
“To start playback from the menu” on the next
page.
TITLE MENU
Dogs Cats
Cows Horses
Main unit
Main unit
or
RC
RC
Main unit
or
RC
Page 16
Playback of the selected item starts.
When using the NUMERIC buttons to select an item, it may be necessary, with some discs, to also press the
PLAY (or ENTER) button to start playback of your selection.
When the selected item contains the subitems, repeat the above step until the preferred item is selected.
16
ENGLISH
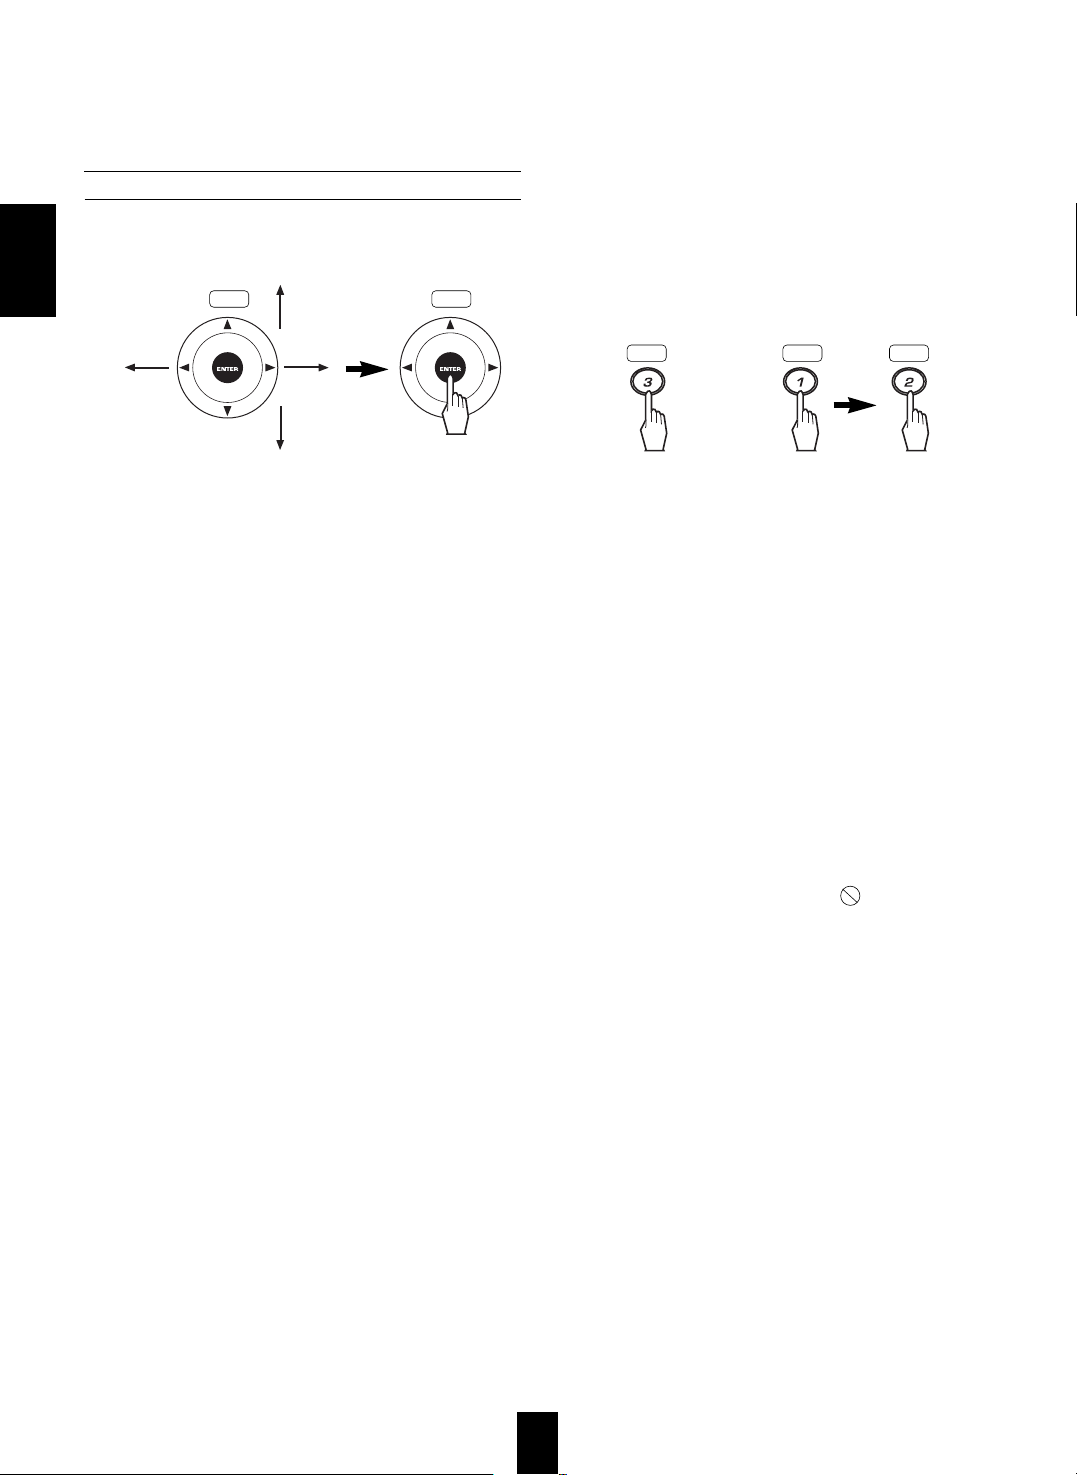
To start playback from the menu
To select the preferred item, tilt the CURSOR/ENTER button in the desired direction and press the
CURSOR/ENTER button (or PLAY button), or press the NUMERIC buttons.
■To stop playback and return to the menu display
In case of DVD Videos,
Press the TITLE, MENU or RETURN button on the remote control.
(Which button is pressed differs depending on the disc used.)
Playback is suspended and the menu display appears.
Notes :
The disc continues to rotate while the menu display appears even after the unit has finished playback of an
item. When no further selections are to be played back, be sure to press the STOP button to clear the menu
display.
A TV screen may be burned in if a static picture is displayed for too long a time.
To prevent this, turn off the TV temporarily when a static picture, such as an on-screen display or menu, will be
displayed for over 10 minutes.
When you press a button, if the corresponding operation is prohibited by the unit or the disc, will appear on
your TV screen.
In case of use of the NUMERIC buttons.
when selecting “12”when selecting “3”
RC RC
RC RC RC
Page 17

17
ENGLISH
To stop playback
To skip ahead or back during playback
To pause playback during playback
To skip ahead To skip back
When playback is stopped, the unit memorizes the
point where the STOP button was pressed
(RESUME function).
Press the PLAY button again, and playback will
resume from this point. When the disc tray is
opened or the STOP button is pressed again, the
RESUME function will be cleared.
During playback of a disc, if either the
OPEN/CLOSE button or the POWER button is
pressed by mistake, etc., playback may also be
resumed from the memorized point on the disc by
pressing the corresponding button, again.
Each time the button is pressed, a chapter (for DVD
Videos) or a track (for CDs) is skipped.
When the button is pressed once midway through a
chapter/track, playback returns to the start of that
chapter/track.
When it is pressed again, a chapter/track is skipped
each time the button is pressed.
DVD Video :
The unit will be in the still picture mode.
CD :
The unit will be in the pause mode.
To return to normal play, press the PLAY button.
Each time the PAUSE button is pressed, the disc is
advanced by one frame.
Each time the JOG dial is rotated in either direction,
the disc is advanced or reversed by one frame.
Note : Only in U.S.A., Canada, etc. where this unit
conforms to the NTSC color system, frame
reverse playback can be available.
In the still picture mode,
Frame advance / reverse playback [DVD Video only]
RC
Main unit
or
RC
Main unit
or
RC
Main unit
or
RC
Main unit Main unit
or
To reverse
RC
Main unit
or
To advance
Page 18

18
ENGLISH
Rapid (/slow) advance / reverse playback during playback
You can play back discs at various speeds.
Note : Only in U.S.A., Canada, etc. where this unit conforms
to the NTSC color system, slow reverse playback can
be available.
Each time the FORWARD SEARCH button is pressed, the
speed increases by up to 5 steps depending on the discs
as follows;
(1/8 x
→1/2 x →) 2 x → 8 x → (16 x →) off
Each time the BACKWARD SEARCH button is pressed,
the speed increases by up to 4 steps depending on the
discs as follows;
(slower speed
→) 2 x → 8 x → (16 x →) off
( ) : DVD Video only.
Each time the SHUTTLE ring is rotated in either direction,
the disc is advanced or reversed at a faster speed.
→
→
RC
To advanceTo reverse
Main unit
To reverse To advance
GENERAL INFORMATION ABOUT ON-SCREEN SYMBOLS
The unit features on-screen symbols showing disc information (title/chapter/track number, elapsed/remaining
time, subtitle/audio language and angle, etc.) and player information (repeat mode, program mode and
operation status, etc.). Some symbols only show the indicated information. Other symbols allow the settings to
be changed.
Press the DISPLAY button during playback or in the stop mode.
Then the on-screen symbols are displayed on the
TV screen.
Each time this button is pressed, the on-screen
symbols are changed depending on the discs as
follows;
DVD Video :
Title Time Operation status
Chapter Angle
Track Repeat mode Operation status
Time Program mode
Repeat mode Operation status
Subtitle language Sound recording system Program mode
Audio language
OFF
Depending on the disc and operation status, the on-
screen symbols may not be displayed, or may be
may be partially or differently displayed on the TV
screen.
CD :
OFF
RC
or
Page 19

19
PLAYING THE DESIRED SECTION OF DISC (TITLE/CHAPTER/TRACK/TIME SEARCH)
The on-screen symbols will be displayed
automatically, even if the on-screen display is
turned off or not already visible.
Each time this button is pressed, the search mode
changes depending on the disc as follows;
→ [(T
--
/3
→ C--
/2) or T--/18] → T
--:--:-- → OFF
( ) : DVD Video only
Some DVD videos do not have chapter numbers
and searching by chapters is impossible.
Title search Track search
Chapter search Time search
1
During playback, press the SEARCH button to select the preferred search mode.
2
Select the section to be played with the NUMERIC buttons.
3
Start playback from the selected section.
Examples)
When entering the title or chapter No. 2 When entering the track No. 11
When searching the point at 8 min. 35 sec.
Each time this button is pressed, the numbers are
cleared one by one.
■When correcting the numbers entered.
1. Press the CLEAR button.
2. Enter the desired number again in the same way.
Notes :
If the title, chapter, track, etc. you have selected is
not contained in the disc, title, etc., appears on
the TV screen, meaning searching for it is not
possible.
On some discs, search and playback will not
operate or may operate in a different manner.
You can playback a disc from the desired point of
the current title or track by specifying the elapsed
time from which to begin.
RC
RC
RC
RC
RC
Main unit
or or
RC
RC
ENGLISH
Page 20
20
PLAYING A SPECIFIC ITEM [DVD Video only]
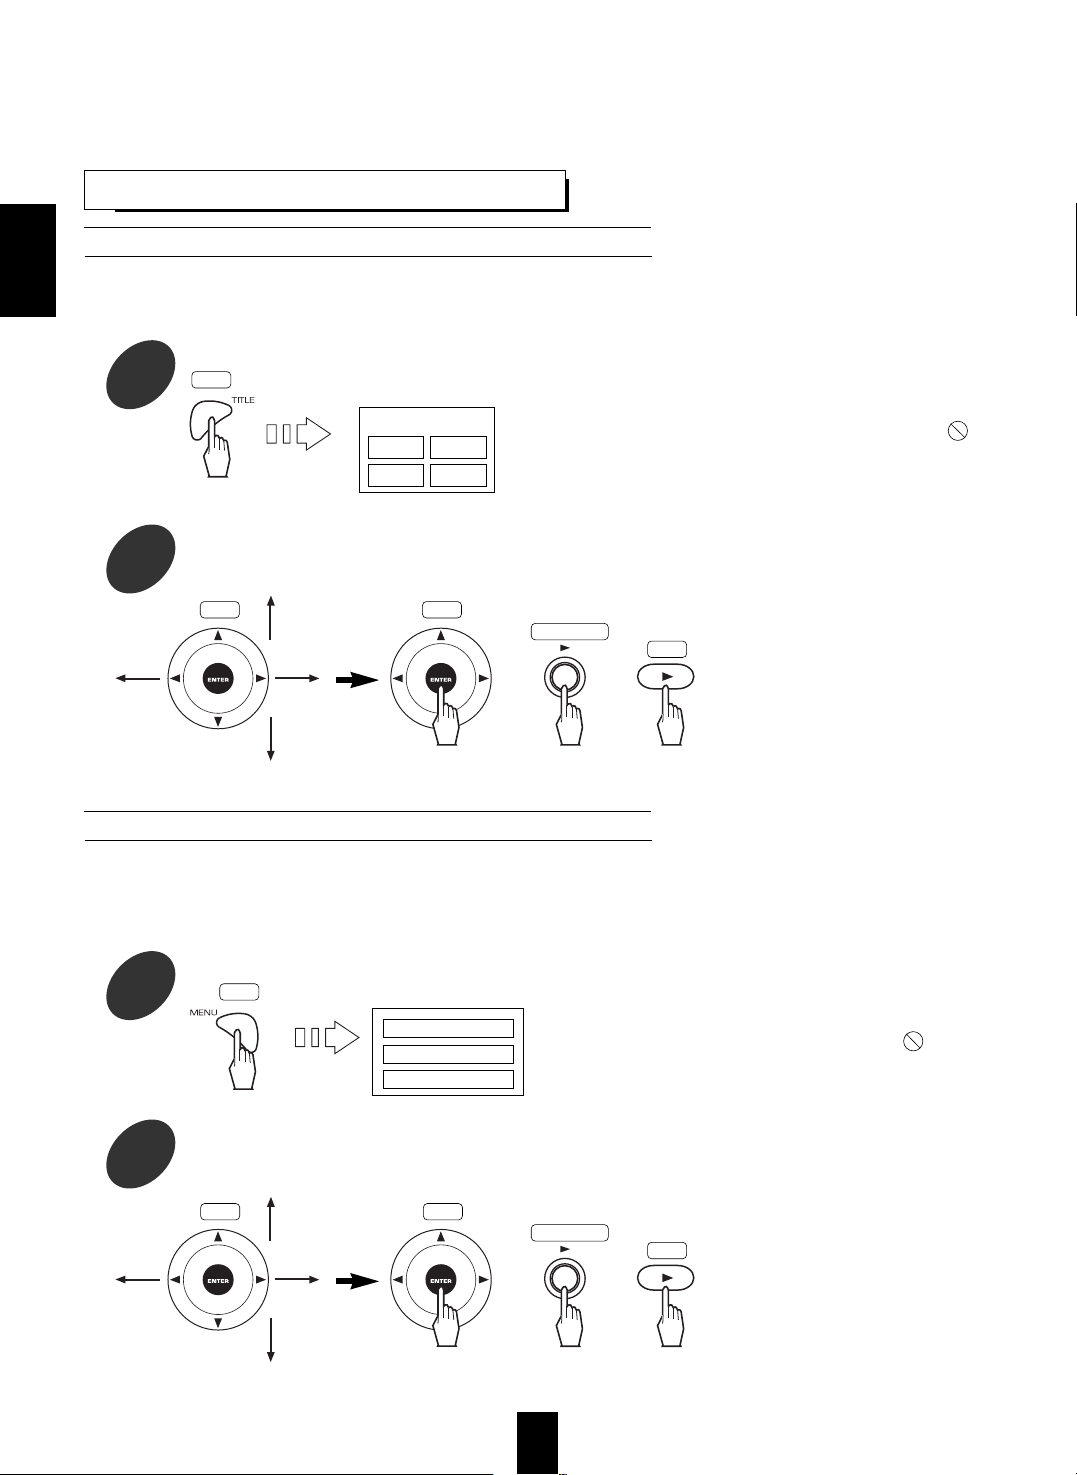
1
During playback, press the TITLE button.
When using a title menu
If some DVD Videos which contain more than one title may have the menu like as a list of the titles, the TITLE
button can be used to select the desired title. (The details of operation differ depending on the disc used.)
Then a list of titles on the disc is displayed on TV
screen.
If the disc does not have a “list of titles” menu,
appears on the TV screen.
2
Tilt the CURSOR/ENTER button in the desired direction to select the desired title,
then press the CURSOR/ENTER or PLAY button.
The unit starts playback of the
selected title.
When the menu continues onto
another screen, repeat this
step until the desired title is
selected.
The unit starts playback of the
selected item.
When the menu continues onto
another screen, repeat this
step until the desired item is
selected.
1
During playback, press the MENU button.
When using a DVD menu
Some DVD Videos have unique menu structures called DVD menus. For example, the discs programmed with
complex contents provide guide menus, and those recorded with various languages provide menus for audio
and subtitle language. Although the DVD menu’s contents and operation differ from disc to disc, the following
explains the basic operation when this feature is used.
Then the DVD menu available on the disc will be
displayed on the TV screen.
If the disc does not have the DVD menu,
appears on the TV screen.
Example
2
Tilt the CURSOR/ENTER button in the desired direction to select the desired item,
then press the CURSOR/ENTER or PLAY button.
Example
TITLE MENU
Dogs Cats
Cows Horses
Main unit
oror
RC
Main unit
oror
RC
RC
RC
RC
RC
1. AUDIO
2. SUBTITLE
3. ANGLE
RCRC
ENGLISH
Page 21
21
Repeating a title, chapter or track
Repeating the desired part
REPEAT PLAYBACK
You can play back a current title, chapter, track or section repeatedly. (Title repeat, enitire disc repeat,
chapter/track repeat, A-B repeat)
Note :
Repeat playback may not work correctly on some DVD Videos.
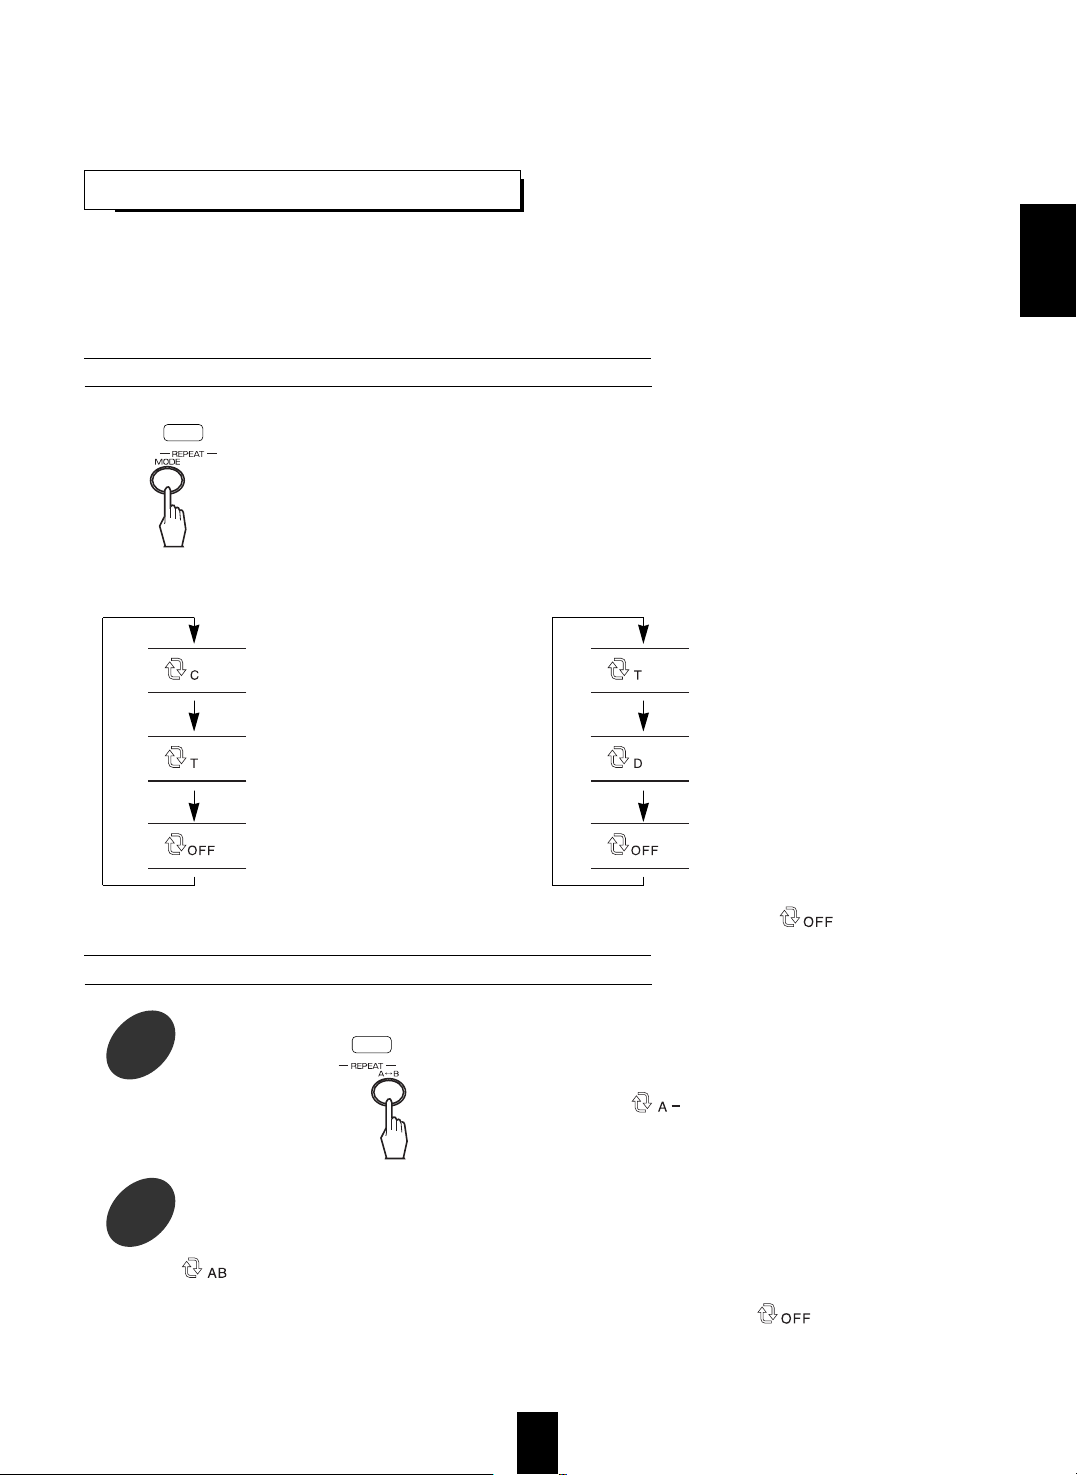
During playback of the desired title, chapter or track, press the REPEAT MODE button.
Each time this button is pressed, the repeat mode changes depending on the disc as follows :
Repeat of the chapter being played.
Repeat of the title being played.
Repeat mode off (normal playback)
Repeat of the track being played.
DVD Video :
CD :
Repeat of the entire disc being played.
Repeat mode off (normal playback)
The on-screen symbols will be displayed
automatically, even if the on-screen display is
turned off or not already visible.
1
During playback at the beginning of the part you want to repeat, press the REPEAT
A↔B button.
2
At the end of the part, press the REPEAT A↔B button again.
Then “ ” is displayed on the TV screen, and the part between points A and B will play back
repeatedly.
To return to normal playback, press the REPEAT A↔B button repeatedly until “ ” is displayed.
Note :
You may not use repeat A↔B playback on any section that include multiple camera angles.
Then “ ” is displayed on the TV screen.
RC
RC
To return to normal playback, press the REPEAT MODE button repeatedly until the “ ” is displayed.
ENGLISH
Page 22

22
INTROSCAN PLAYBACK [CD only]
You can play back the first 10 seconds of each track.
Start introscan playback.
To return to normal playback, press this button again.
Then “ ” is displayed on the TV screen, and the
first 10 seconds of each track on a CD will play
back in sequence repeatedly.
During introscan playback, when the BACKWARD
SKIP ( ) or the FORWARD SKIP ( ) button is
pressed, the “ ” or “ ” is displayed and
introscan playback operates in the corresponding
direction.
RC
CHANGING THE TIME DISPLAY DURING PLAYBACK
Press the TIME button.
DVD Video :
Each time this button is pressed, the time display changes depending on the disc as follows;
Depending on the disc and the status of some operations such as playback of DVD Video by using a title or
DVD menu, etc., the time display may not be displayed.
The on-screen symbols will be displayed
automatically, even if the on-screen display is
turned off or not already visible.
Elapsed time of the title
Remaining time of the title
Elapsed time of the chapter
Remaining time of the chapter
CD :
Elapsed time of the track
Remaining time of the track
Elapsed time of the disc
Remaining time of the disc
RC
ENGLISH
Page 23
23
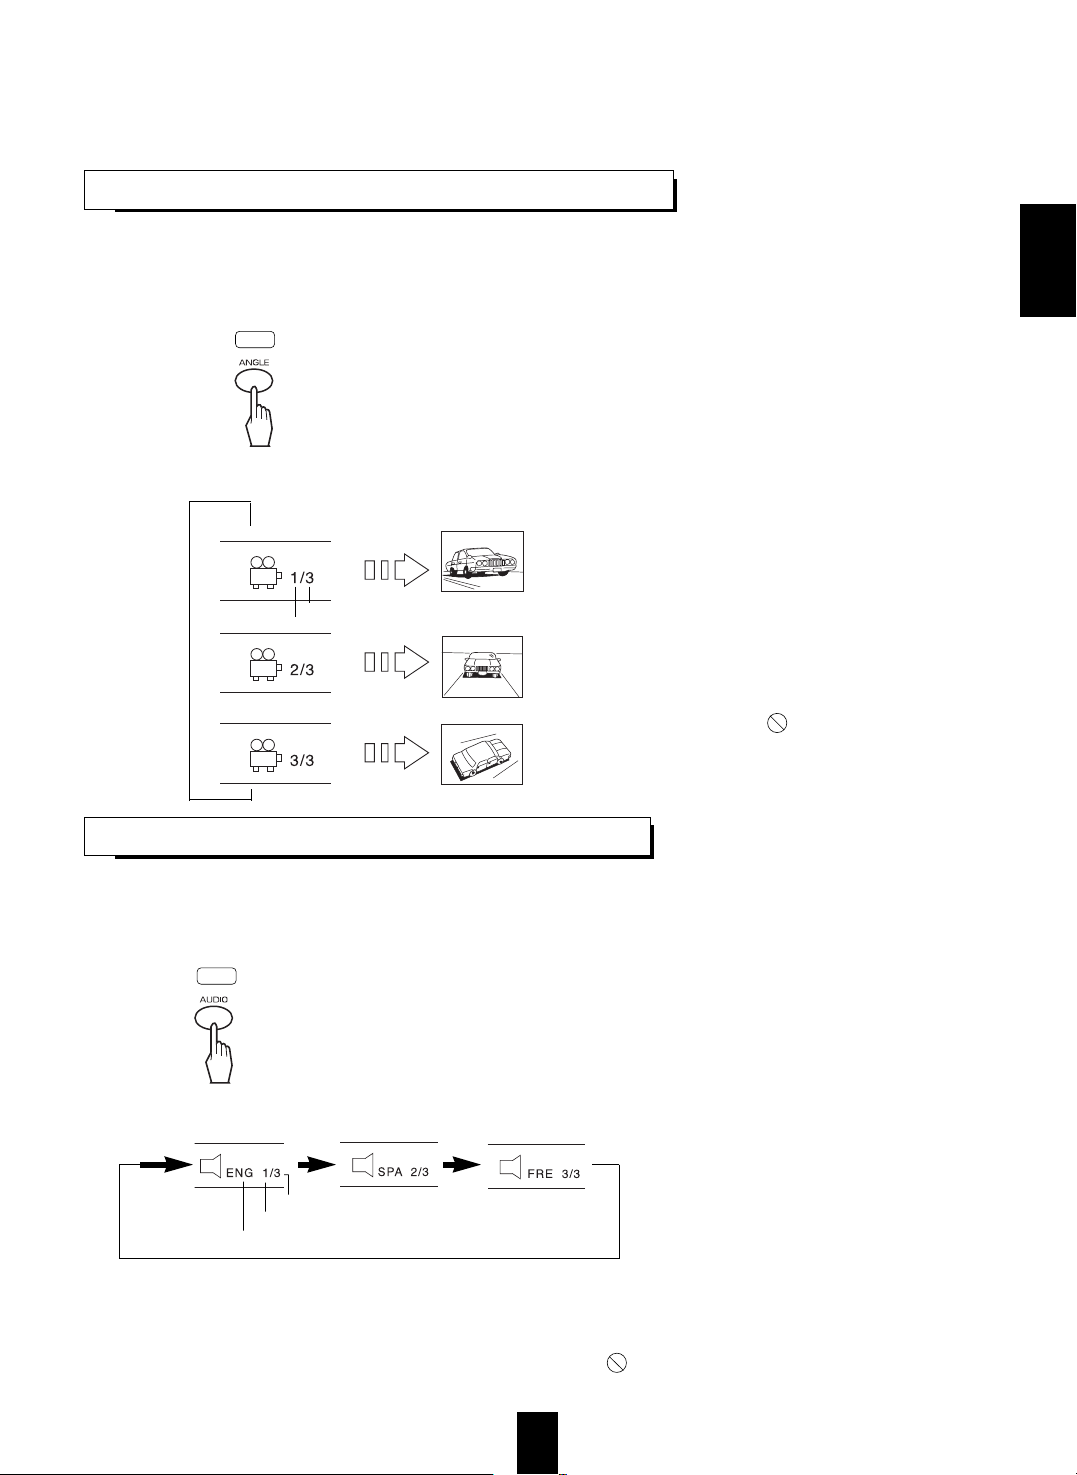
CHANGING THE AUDIO LANGUAGE [DVD Video only]
It is possible to change the audio language to a different language from the one selected at the initial settings.
(For details, refer to “SETTING THE LANGUAGE” on page 30.)
This operation works only with discs on which multiple audio languages are recorded.
Each time this button is pressed, the audio language changes as follows;
Example)
Total number
Selected audio number
Selected audio language
Depending on the disc, the audio language display may not be available, or may be differently displayed on the TV screen.
If the language other than ENG, JAP, GER, SPA, FRE, HIN, HUN, ITA, POR, RUS, CHI is selected, DEF is displayed as the
selected audio language on the TV screen.
Note :
If the disc contains only one audio language and you press this button, appears on the TV screen.
The on-screen symbols will be displayed automatically,
even if the on-screen display is turned off or not already
visible.
During playback, press the AUDIO button.
RC
CHANGING THE CAMERA ANGLE [DVD Video only]
Some DVD Videos contain scenes which have been shot simultaneously from multiple camera angles. For these discs, the
same scene can be viewed from each of these different angles.
The recorded angles differ depending on the disc used.
Each time this button is pressed, the angle changes
as follows :
During playback of the scene recorded from multiple camera angles, press the ANGLE button.
During playback of the scene recorded from multiple
camera angles, “ANGLE” is shown on the unit’s display
and the on-screen symbols reflect the total number of
different views (angles) that are available.
The on-screen symbols will be displayed automatically,
even if the on-screen display is turned off or not already
visible.
Dedending on the disc, up to 9 angle scenes can be
included.
Notes :
This function works only at scenes recorded from multiple
angles.
If the current scene is not recorded from multiple angles
and this button is pressed, appears on the TV screen.
RC
Example)
Total number
Selected angle
ENGLISH
Page 24

24
CHANGING THE SUBTITLE LANGUAGE [DVD Video only]
It is possible to change the subtitle language to a different language from the one selected at the initial settings.
(For details, refer to “SETTING THE LANGUAGE” on page 30.)
This operation works only with discs on which multiple subtitle languages are recorded.
Each time this button is pressed, the subtitle language changes as follows;
Example)
Depending on the disc, the subtitle language display may not be displayed, or may be differently displayed on
the TV screen.
If the language other than ENG, JAP, GER, SPA, FRE, HIN, HUN, ITA, POR, RUS, CHI is selected, then DEF
is displayed as the selected subtitle language on the TV screen.
Note :
When you cannot select the subtitle language because the disc contains only one subtitle language,
appears on the TV screen.
■To clear the subtitle.
While the subtitle is being displayed, press the SUBTITLE ON/OFF button.
Then subtitles disappear from the TV screen.
Press this button to display the subtitles.
Total number
Select subtitle language
The on-screen symbols will be displayed
automatically, even if the on-screen display is
turned off or not already visible.
During playback, press the SUBTITLE button.
RC
RC
ENGLISH
Page 25

25
PLAYING A SCENE CLOSE-UP [DVD Video only]
It is possible to zoom in on a part of the scene. You can select and view any part of the scene according to the
initial settings. (For details, refer to “When selecting the ZOOM SETUP” on page 37.)
Each time this button is pressed, the zoom scale changes as follows :
Vertical position of zoom point
Horizontal position of zoom point
Double size
2
OFF
Quadruple size
4
1
During playback or in the still pause mode, press the ZOOM button.
RC
To return to the previous status, press the ZOOM button repeatedly until the zoom playback is canceled.
2
Tilt the CURSOR/ENTER button in the desired direction to shift the zoom point to the
desired position.
Note :
Depending on the disc and the status of some
operations such as playback of DVD Video by using
a title or DVD menu, etc., zoom playback will not
work.
RC
ENGLISH
Page 26
26
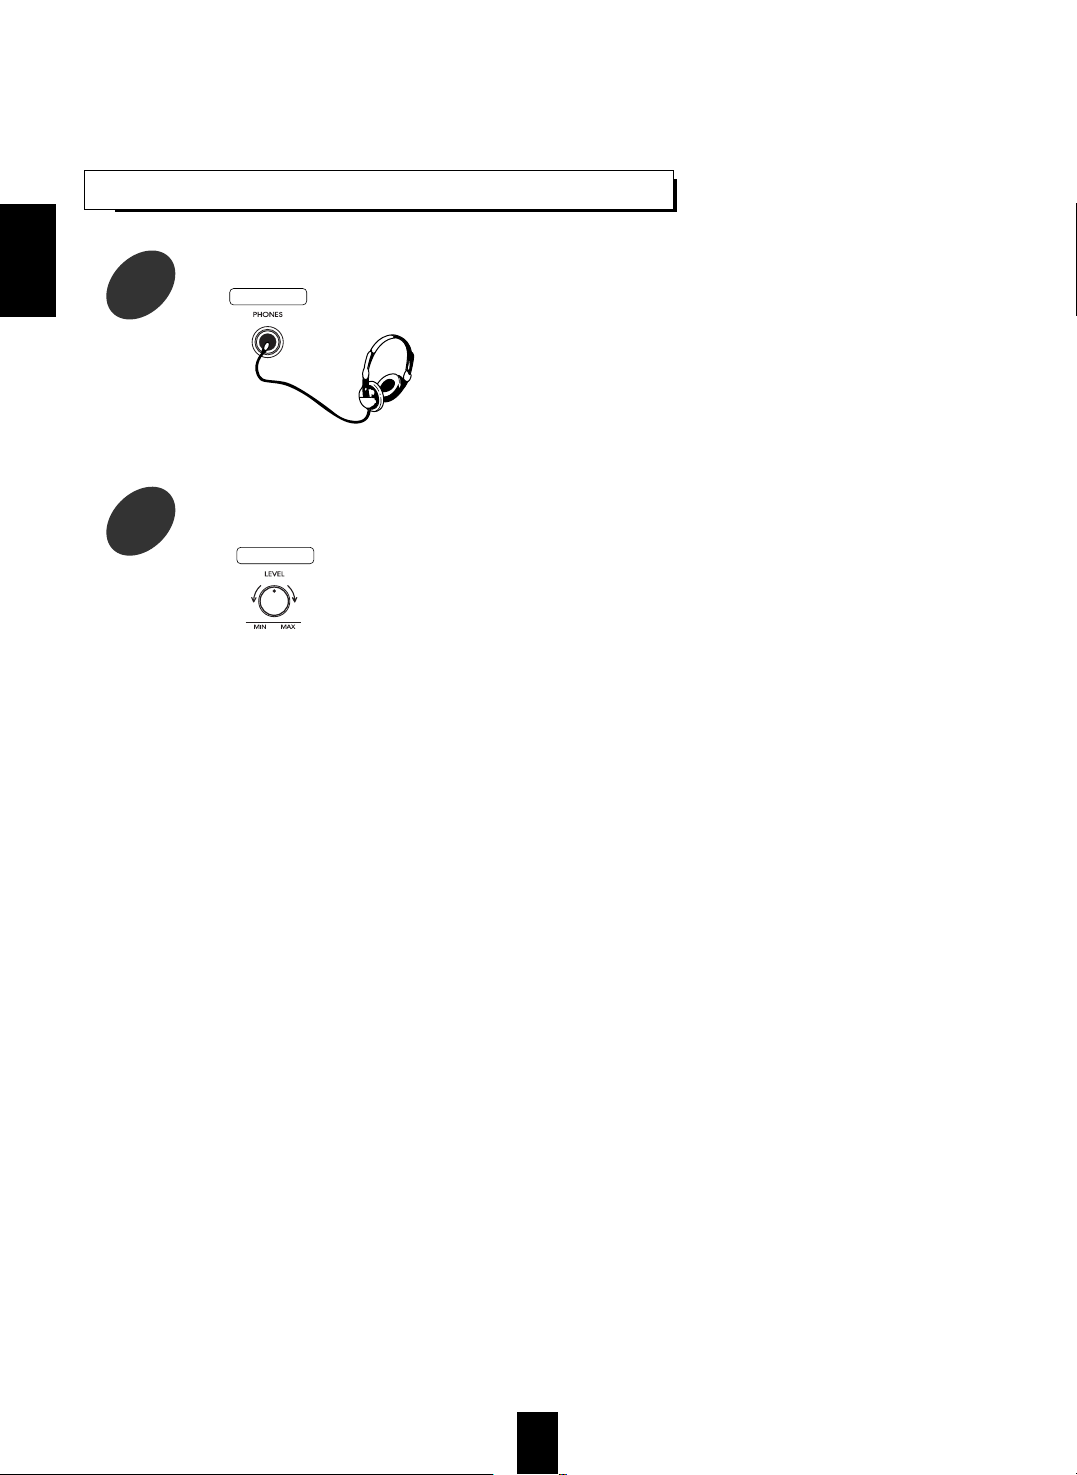
LISTENING WITH HEADPHONES
1
For private listening, connect the headphones.
Headphones with a 1/4 inch (6.3 mm) stereo plug
can be connected.
2
Adjust the volume level of the headphones as desired.
Note :
Listening at extremely high levels may be
harmful to your ears and headphones.
Main unit
Main unit
ENGLISH
Page 27
27
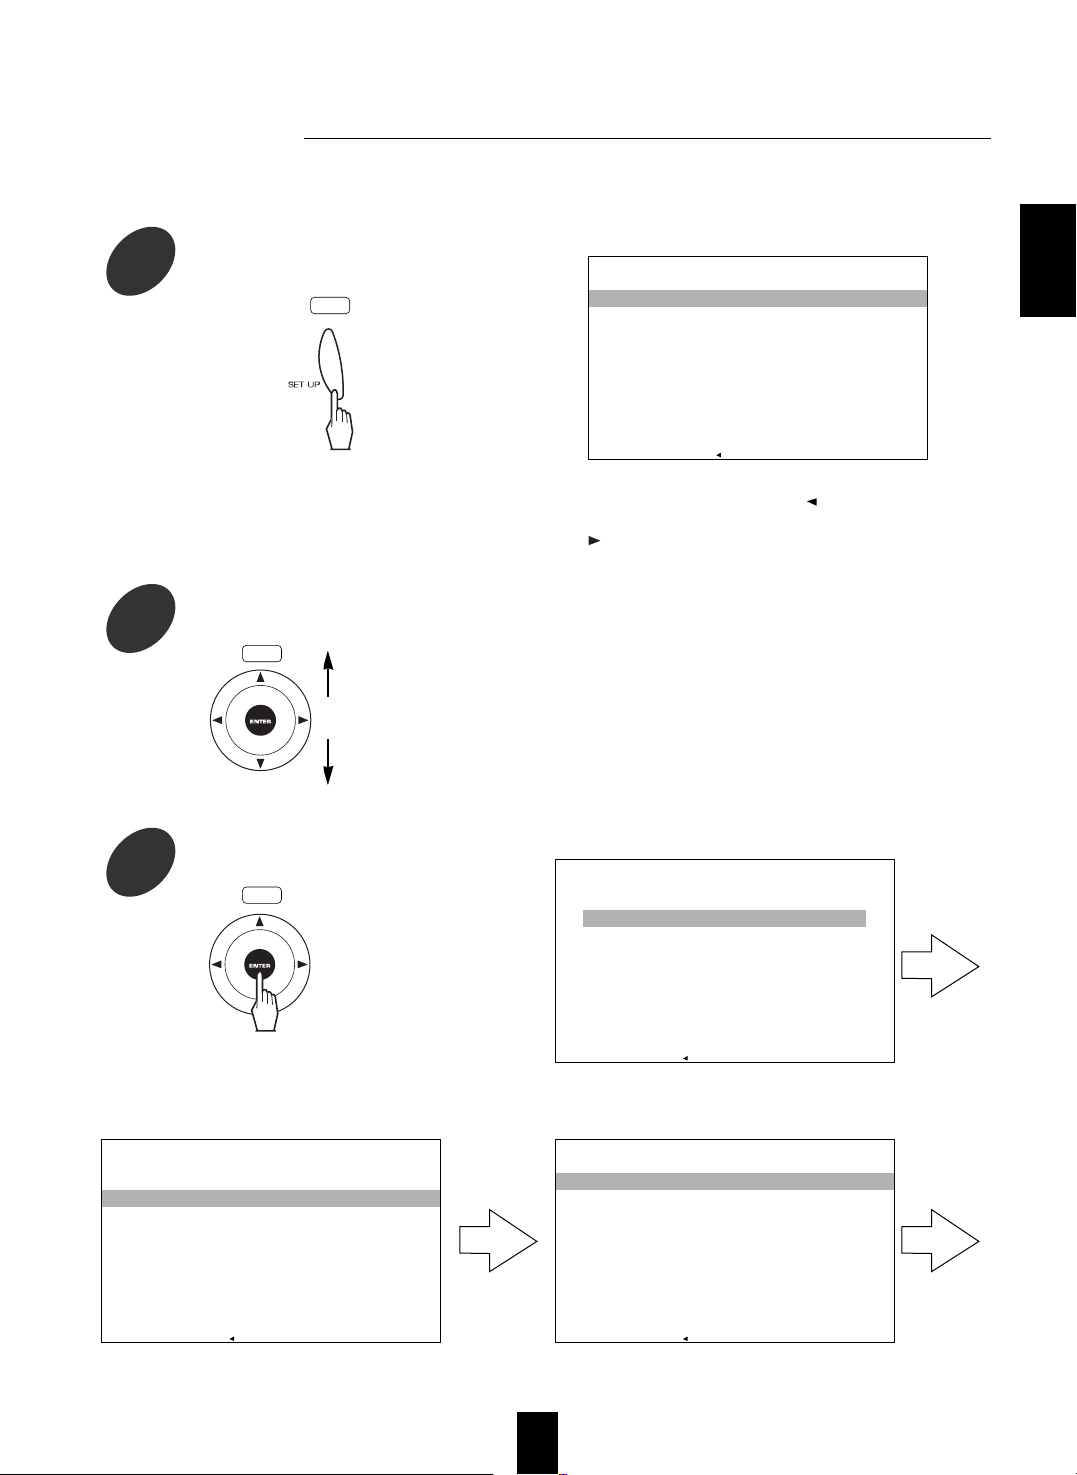
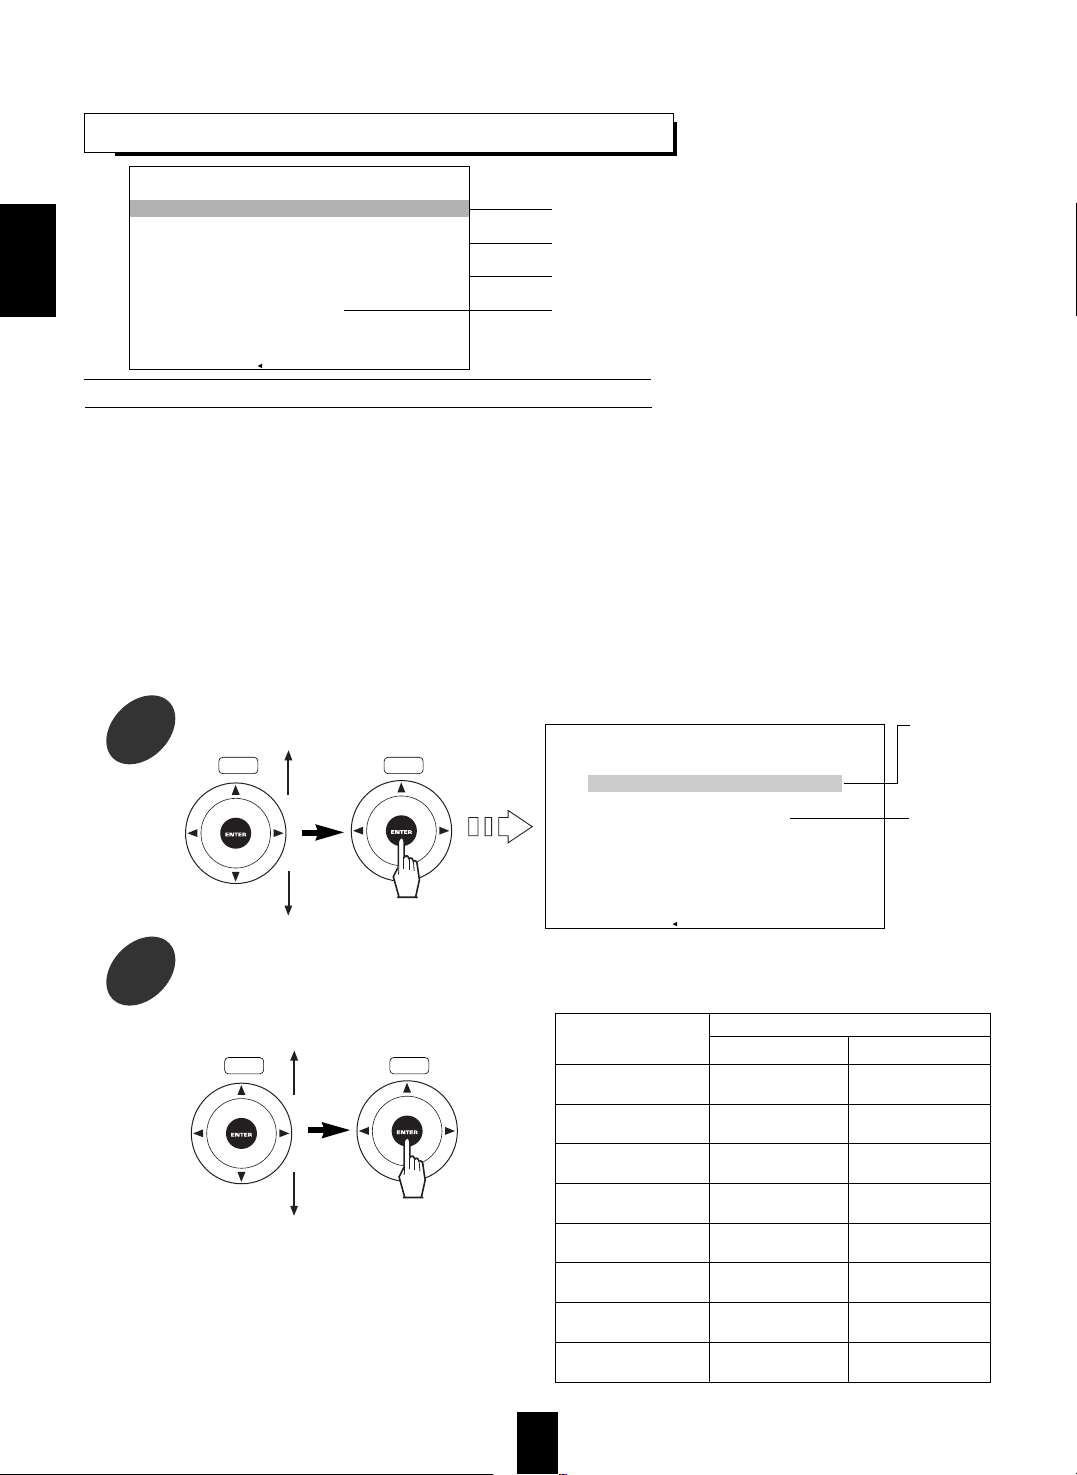
The initial settings made to this unit at the factory are stored in memory and can be modified as desired, later.
The setup menu screen appears on the TV screen.
If you press the SETUP button again while the
SETUP menu is displayed, the menu will disappear.
The necessary details for the selected category will
appear on succeeding screens.
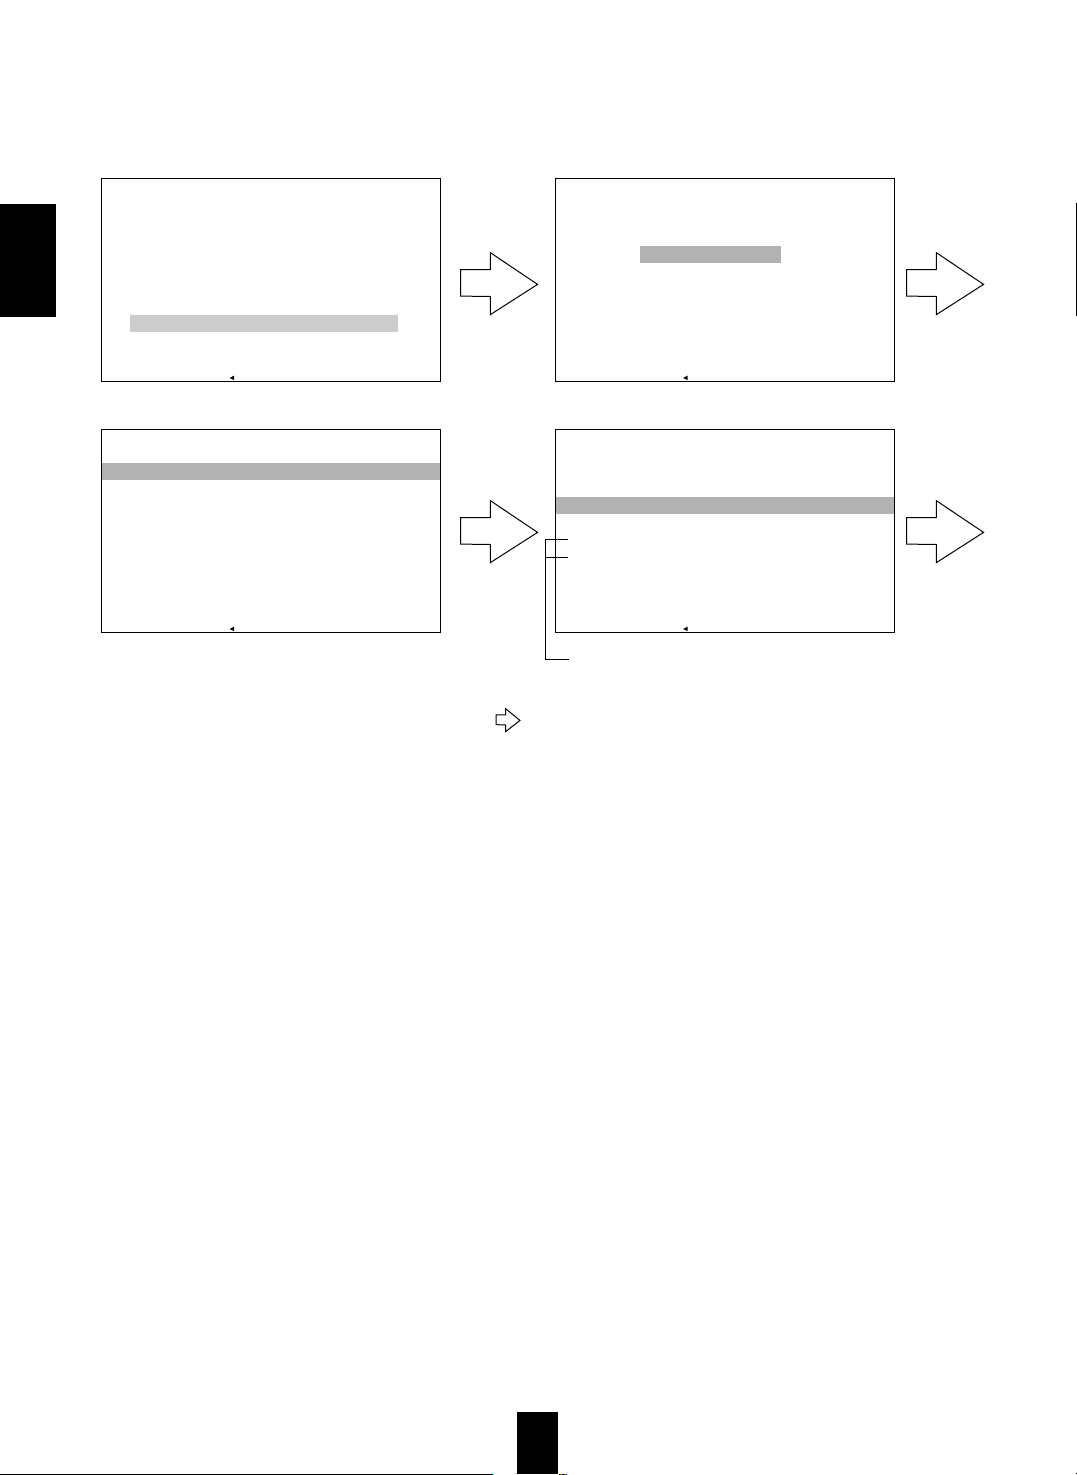
■When selecting DISC SETUP ■When selecting LANGUAGE
■When selecting SYSTEM
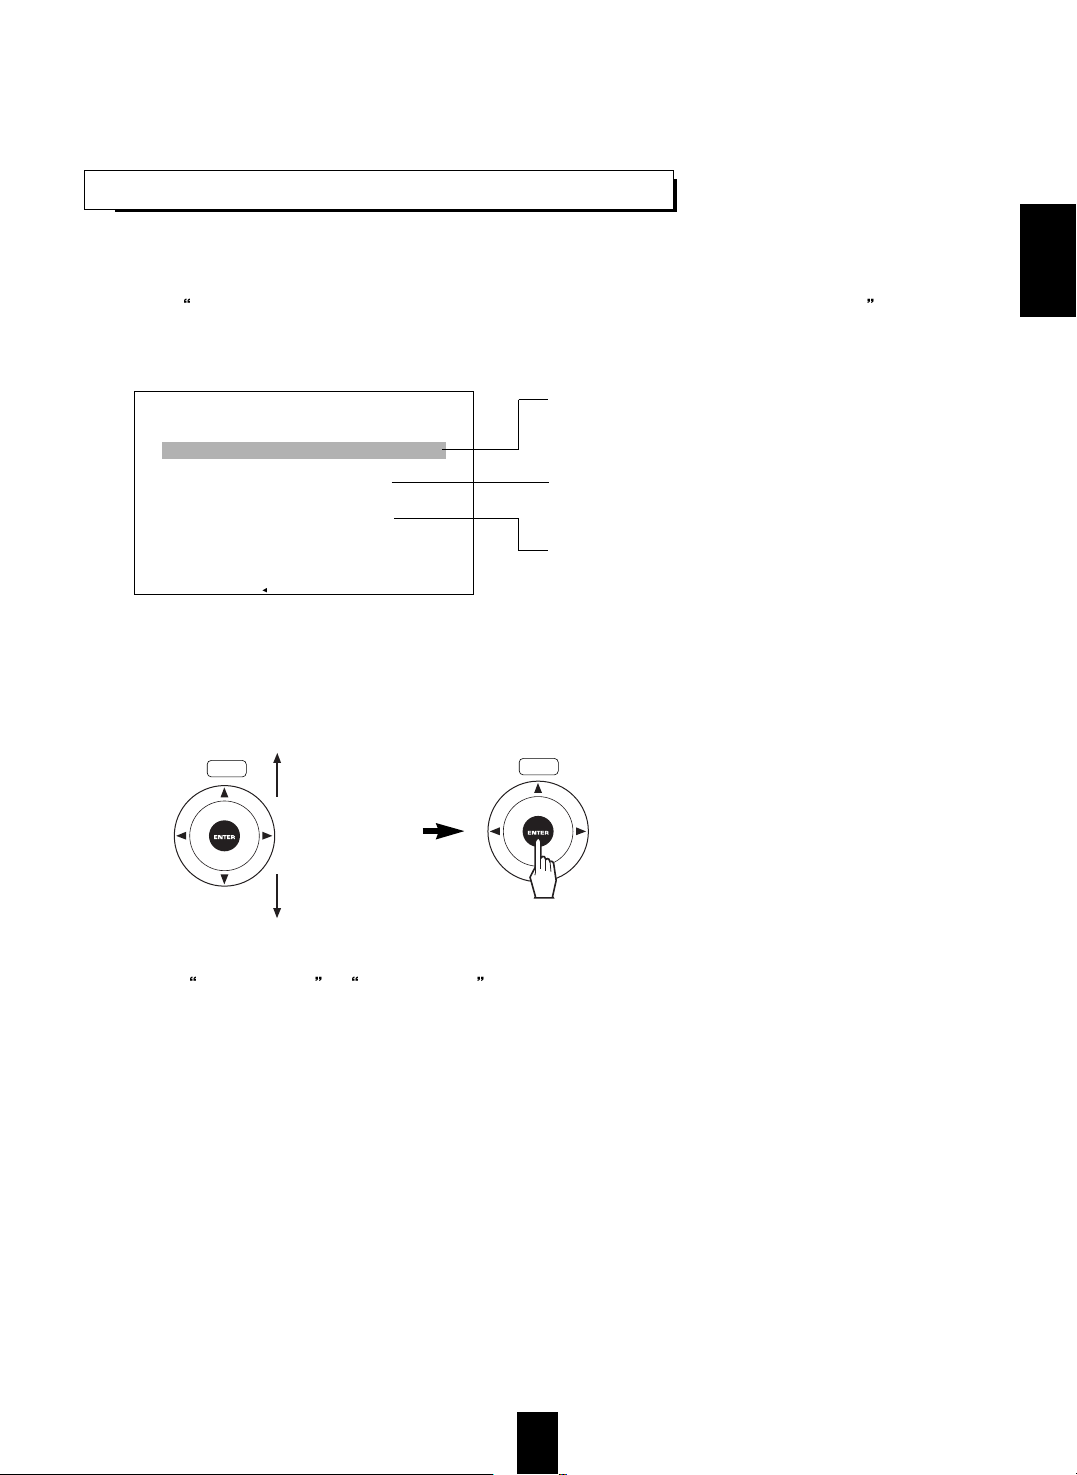
For the upper category or item
For the lower
SETUP menu mode
The selected category or item is highlighted.
Initial Settings
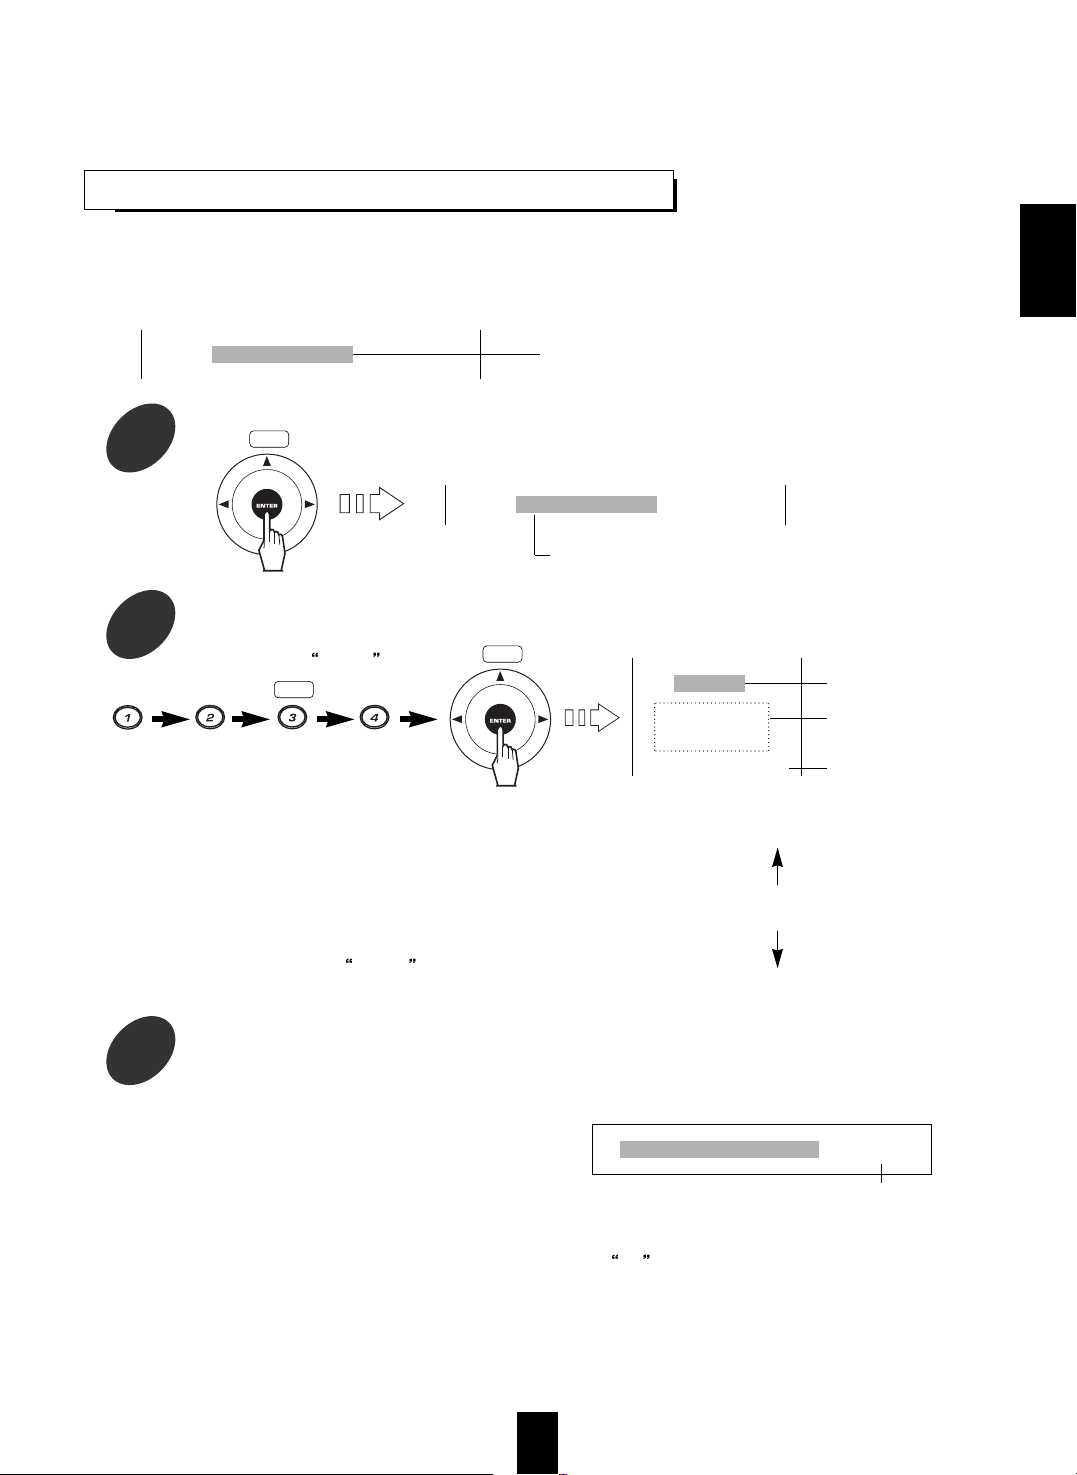
1
While the unit is in the “STOP” mode,
press the SETUP button to enter the
SETUP mode.
2
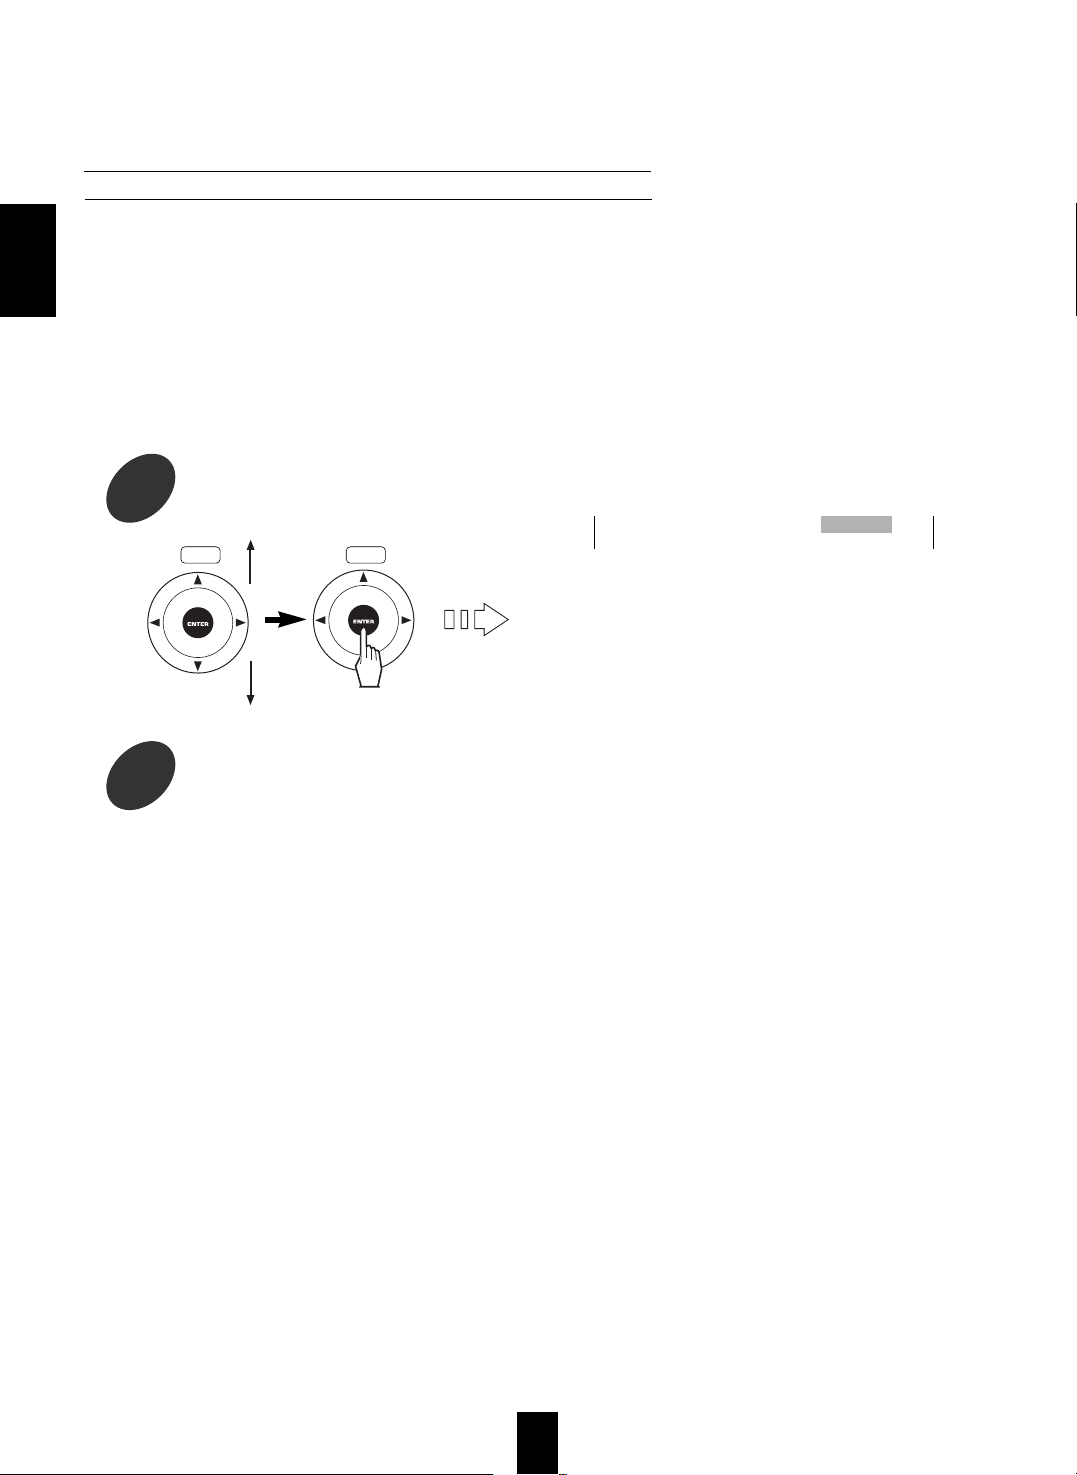
Tilt the CURSOR/ENTER button upward or
downward to select a category.
3
Press the CURSOR/ENTER button to
confirm your selection.
SETUP SELECT : +
SYSTEM DVD PLAY
DISC SETUP
LANGUAGE
TVSCREEN 1 6 : 9
RAT I NG L EVEL OFF
A
U D I O S E T U P
CUSTOM SE TUP
RETURN : SETUP : F I N I SH
LANGUAG S SEELECT:+
AUD I O ENGL I SH
SUBT I TL E PORTUGUESE
M
E N U H I N D I
RETURN : SETUP : F I N I SH
D I SC SE TUP SE LECT : +
PROGRAM MENU NEW
FAVORI TE COND OFF
C
L E A R D I SCI D
RETURN : SETUP : F I N I SH
On the menu screen, “SELECT” stands for the
CURSOR /ENTER button, “ ” for the RETURN,
“FINISH” for the SETUP and “PLAY” for the PLAY
( ).
29
30
40
SYSTEM SELECT : +
DVD P LAY
EXT OPT I
CAL
E X T C O A X I A L
RET URN :
⊃
SETUP : F I NI SH
RC
RC
RC
⊃
⊃⊃
ENGLISH
⊃
Page 28
28
■When selecting TV SCREEN ■When selecting RATING LEVEL
■When selecting AUDIO SETUP ■When selecting CUSTOM SETUP
For the setting details, see the page number in .
Adjust the setting(s) in each category to your
preference.
PARENTAL PWD SELECT : +
PASSWORD
RETURN : SETUP : F I N I SH
TV SCREEN SELECT : +
4:3 PAN-SCAN
4:3 LETTERBOX
16 :9
W
IDE
RETURN : SETUP : F I N I SH
CUST OM SE TUP S EL ECT : +
ZOOM S ETUP
COL OR S CHEME YE L LOW
COMPONEN T V I D OF F
S
C A R T O U T P U T S - V I DEO
R
Regional Option for Europe,etc. only
ETURN: SETUP : F I N ISH
AUD I O SETUP SELECT : +
D·R
··
C STARDARD TV
SURROU ND DOL BY PROLOG I C
SPEAKER OPT IONS
DIGITAL OUTPUT BI TSTRM
RETURN : SETUP : F I N I SH
⊃ ⊃
⊃ ⊃
3931
3632
ENGLISH
Page 29
⊃
29
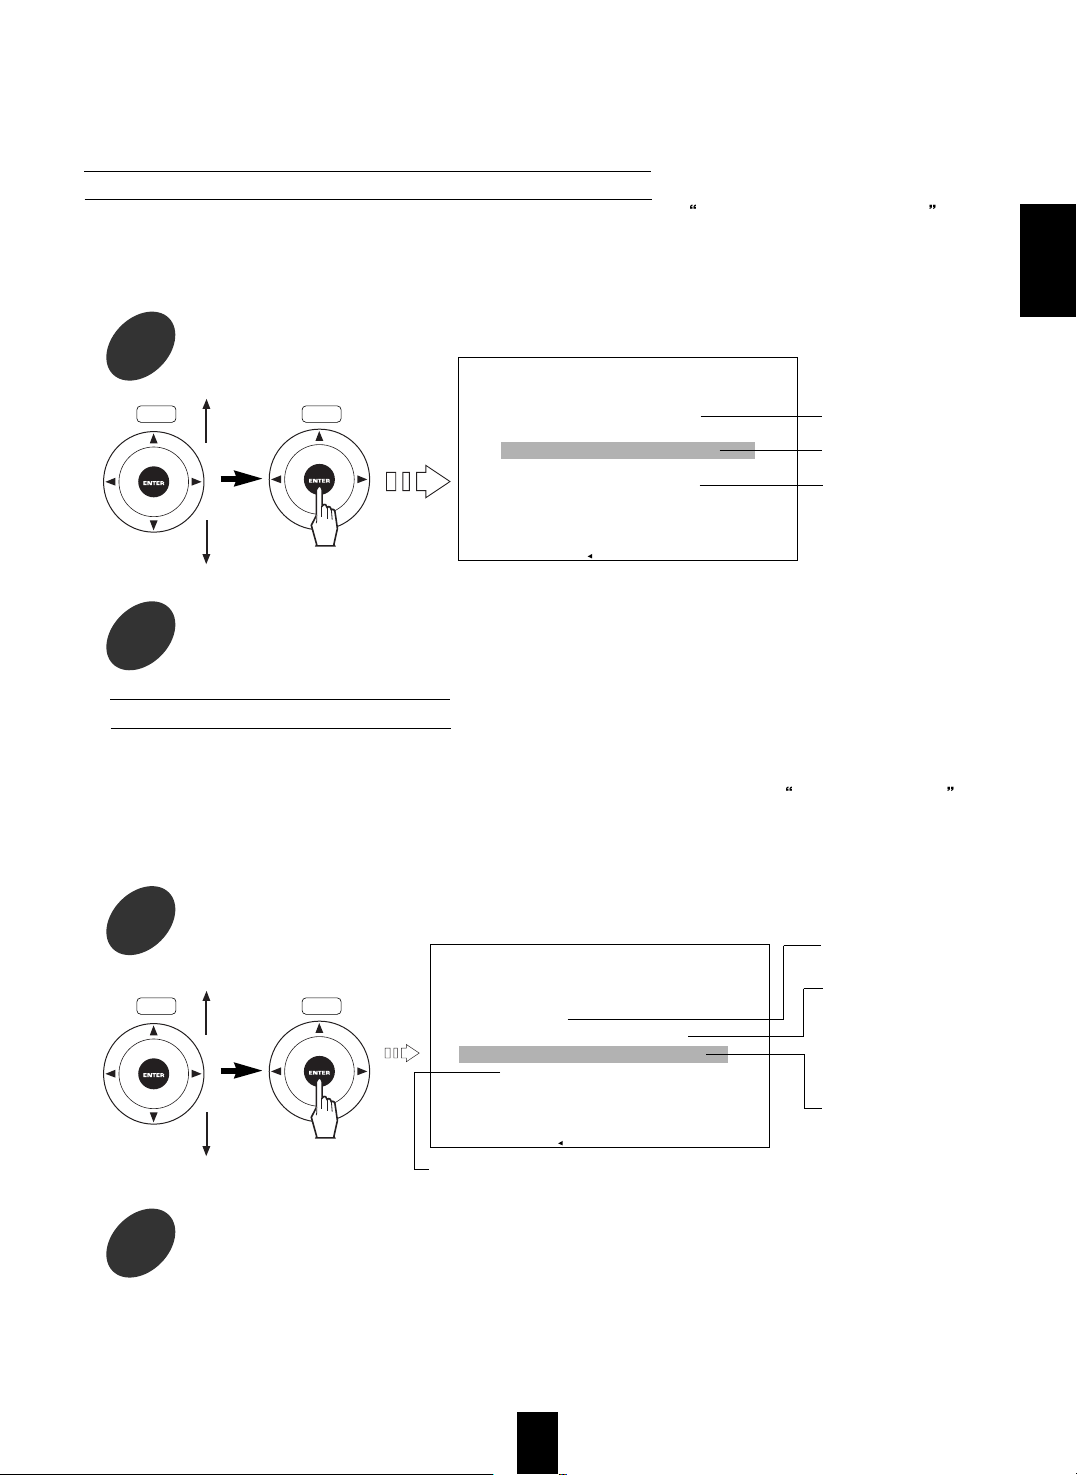
SETTING THE SYSTEM
You can use the unit as DVD player or as a digital surround sound decoder (or both).
For use as a surround sound decoder, be sure to connect the DIGITAL OUTs of the associated source unit to
the DIGITAL INs of this unit.
(Refer to
CONNECTING TO ADDITIONAL COMPONENT WITH VIDEO AND DIGITAL OUTS on page 7.)
Depending on your use, tilt the CURSOR/ENTER button upward or downward to select the item, then
press the CURSOR/ENTER button.
Note :
When the
EXT OPTICAL or EXT COAXIAL is seleted to use this unit as a built-in decoder, only the
AUDIO SETUP on the SETUP menu can be selected and most of the function buttons such as PLAY,
OPEN/CLOSE,etc. for DVD player operation will not work.
To use as a DVD player
To use as a surround sound decoder for the digital audio signal from
the OPTICAL DIGITAL IN of this unit.
To use for the digital audio signal from the COAXIAL DIGITAL IN.
The selected item is highlighted.
For the lower
For the upper
SYSTEM SELECT : +
DVD P LAY
EXT OPT I CAL
E X T C O A X I A L
RET URN : S ETUP : F I N I SH
RC
RC
ENGLISH
Page 30

⊃
⊃
1
Tilt the CURSOR/ENTER button upward or downward to select the item, then press the
CURSOR/ENTER button.
30
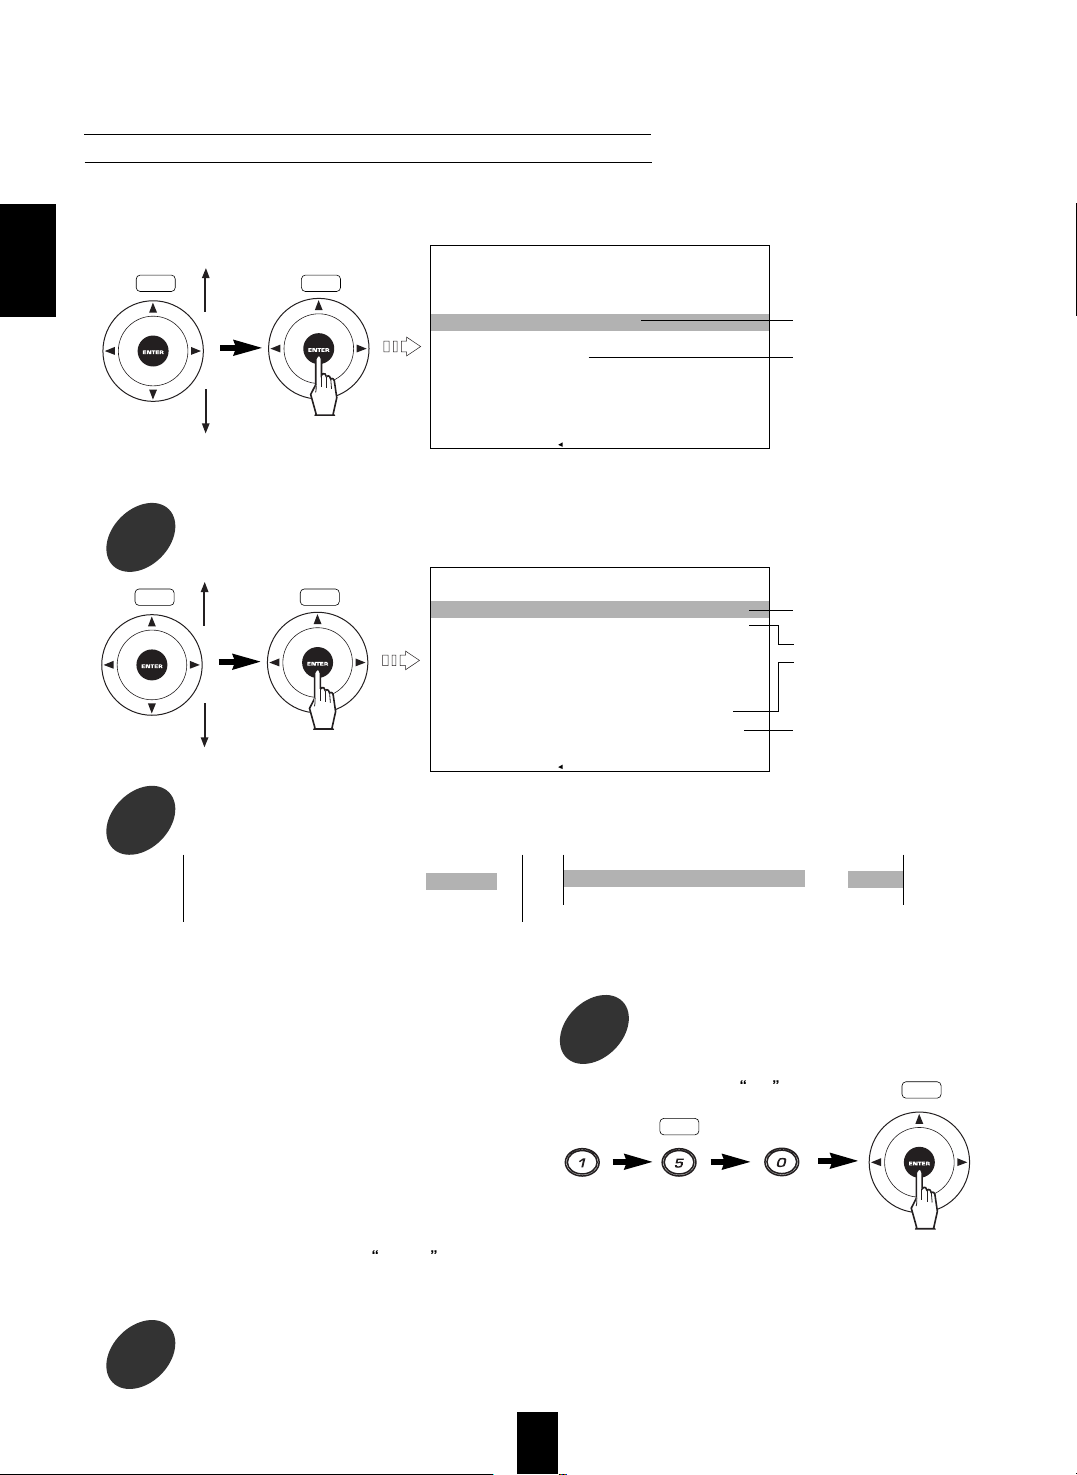
SETTING THE LANGUAGE
Note :
If the selected language is not recorded, the initial language on the disc is played or displayed.
Refer to the
DVD Language Code List
on page 47 to find the 4-digit language
code for the preferred language and
enter it with the NUMERIC buttons, then
press the CURSOR/ENTER button.
■When selecting
OTHERS
OTHERS - - - -
Then the selected item is displayed.
To select a preferred audio language to be played from those
included on the DVD Video.
To select a preferred subtitle language to be displayed from those
included on the DVD Video.
To select a preferred menu language to be displayed from those
included on the DVD Video.
The selected language is highlighted.
When you select the
ORIGINAL on the AUDIO
setting display, the initial language among the
audio languages recorded on the disc is played.
When you select
AUTO on the SUBTITLE
setting display, the same language selected in the
AUDIO setting is automatically selected.
When you want to select a language other than the
displayed languages, select
OTHERS .
Example) When entering
8076 .
Example) When selecting AUDIO
2
Tilt the CURSOR/ENTER button in the desired direction to select the preferred language,
then press the CURSOR/ENTER button.
3
Repeat the above step 1 and 2 to adjust the other language settings to your preference.
LANGU
AUD I O
AGE
SUBT
MENU
ITLE
S
ENGL I SH
PORTUG
HINDI
UESE
SELECT : +
RET URN : S ETUP : F I N I SH
AUD I O
ENGL I SH H
JAPANESE
GERM
FRENC
HINDI
H
AN
SPAN I SH
UNGAR I
IYTAL I AN
OR IG I NAL OTHERS O
AN
IDDISH
PRORT UGUES E
USS I AN
CH I NES E
SELECT : +
RET URN : S ETUP : F I N I SH
For the lower
For the upper
RC
RC
RC
RC
RC
RC
ENGLISH
Page 31

RCRC
⊃
31
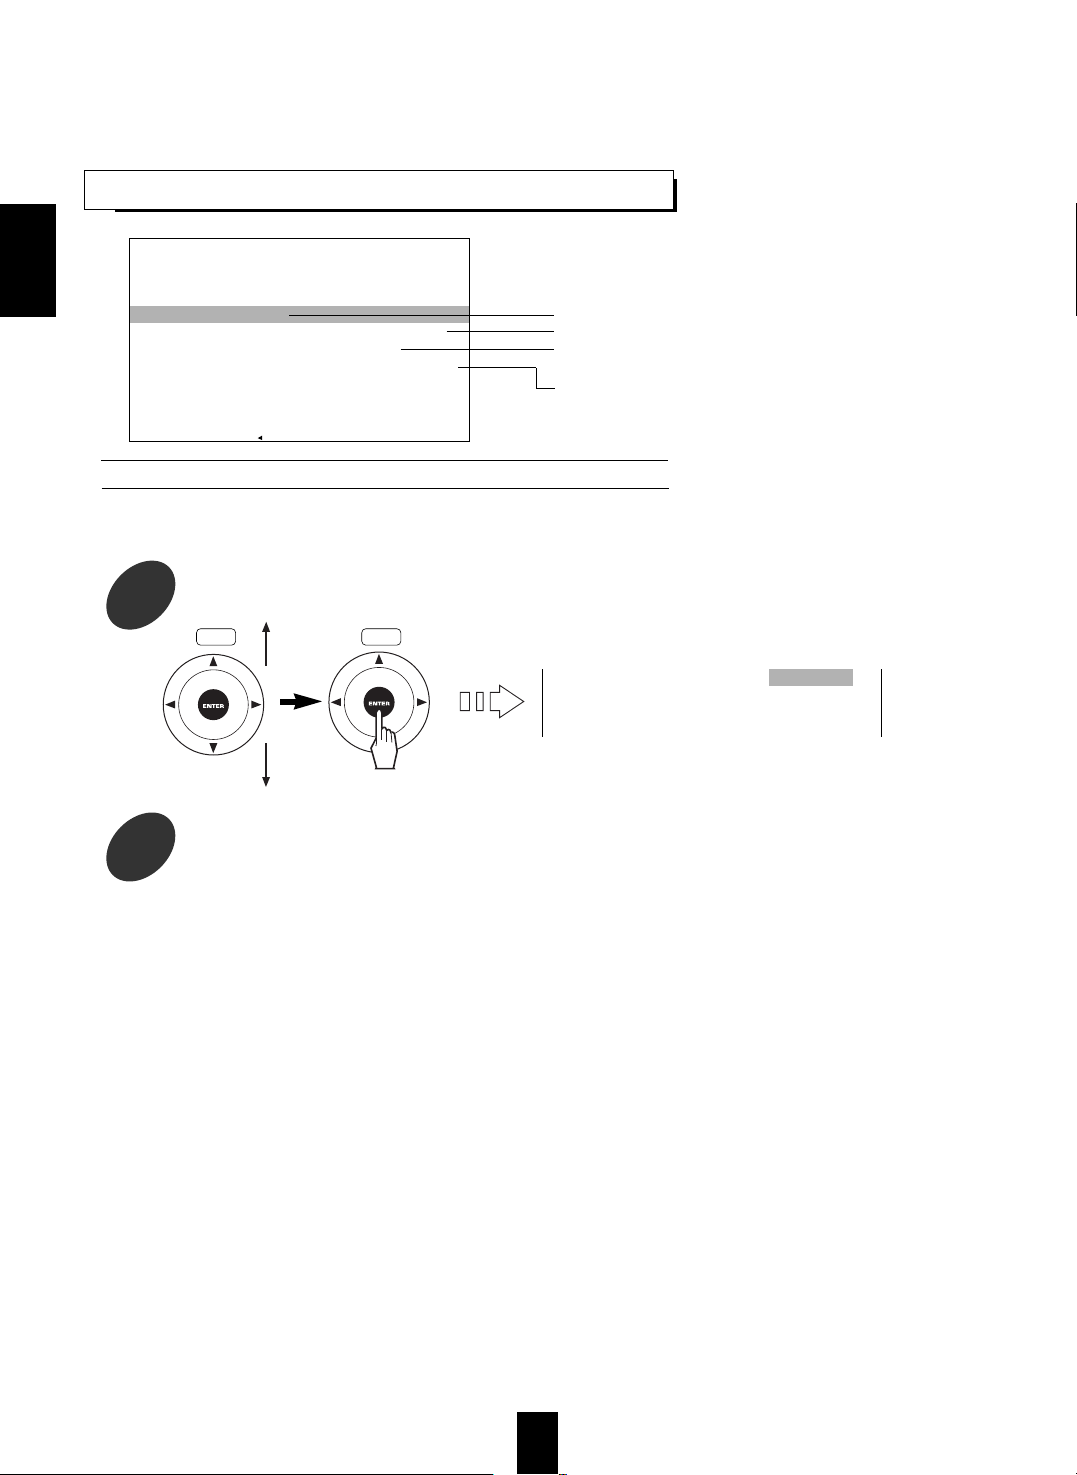
SETTING THE TV SCREEN
Depending on your TV, tilt the CURSOR/ENTER button upward or downward to select a TV screen type, then
press the CURSOR/ENTER button.
The selected type is highlighted.
Letter bax screen with 4:3 aspect ratio.
DVD Video software recorded with the 16:9 aspect ratio is
reproduced in the letter box screen which has black bands on the
top and bottom.
Pan-scan screen with 4:3 aspect ratio
DVD Video software recorded with the 16:9 aspect ratio and the
pan-scan specification is reproduced in the pan-scan screen which
automatically trims the left and right of the image.
The DVD video software recorded without the pan-scan
specification is reproduced in the letter box screen.
Wide screen with 16:9 aspect ratio
DVD Video software recorded with the 16:9 screen is reproduced
by filling the TV screen.
You can select the TV screen type to match your TV during playback of DVD Videos recorded for wide screen
TVs.
When you connect a normal TV with 4:3 aspect ratio to the unit, select either
4:3 LETTERBOX or 4:3 PAN-
SCAN
and when you connect a wide TV with 16:9 aspect ratio, select 16:9 WIDE .
TV SCREEN S ELECT : +
4 : 3 LET TERBOX
4 : 3 P AN- SCAN
1 6 : 9
W
I D E
RET URN : S ETUP : F I N I SH
ENGLISH
Page 32
⊃
32
SETTING THE AUDIO SETUP
To select the bitstream or linear PCM as digital audio signal format
To select a preferred dynamic range control
To select a preferred surround sound
To select a preferred speaker option
For your reference, the following chart shows the
relationship between types of playback discs and
digital audio output signals.
When the DIGITAL OUTs of the unit are connected to the corresponding DIGITAL INs of an amplifier with builtin decoder, etc., this item should be set correctly.
1
Tilt the CURSOR/ENTER button upward or downward to select the DIGITAL OUTPUT, then
press the CURSOR/ENTER button.
2
Tilt the CURSOR/ENTER button upward
or downward to select the correct digital
audio signal format, then press the
CURSOR/ENTER button.
Notes :
When the DIGITAL OUT of this unit is connected to the DIGITAL IN of an amplifier which does not contain a
Dolby Digital, DTS or MPEG Multichannel decoder,etc.(which processes the bitstream signal), you should set
the DIGITAL OUT to LINEAR PCM. If not, loud noise may be heard from the speakers, that could be harmful to
your ears and damage the speakers.
When connecting to the DIGITAL IN of an MD or CD recorder for digital recording, you should set the DIGITAL
OUT to LINEAR PCM. If not, the digital recording will not perform properly.
When the DIGITAL OUT is set to LINEAR PCM, the multi-channel signal format (front L, center, front R, rear L
and R) is mixed down to 2 channels and converted to a linear PCM signal.
The selected format is highighted.
DVD Video with 48 kHz,
16 bit linear PCM
DVD Video with 48 kHz,
20/24 bit linear PCM
DVD Video with 96 kHz,
linear PCM
DVD Video with DTS
DVD Video with Dolby
Digital
DVD Video with MPEG
audio
Audio CD
Audio CD with DTS
DTS bitstream
48 kHz, 16 bit linear
PCM
48 kHz, 20/24 bit linear
PCM
48 kHz, 24 bit linear
PCM
Dolby Digital bitstream
MPEG bitstream
44.1 kHz, 16 bit linear
PCM
DTS bitstream
48 kHz, 16 bit linear
PCM
48 kHz, 20 bit linear
PCM
48 kHz, 24 bit linear
PCM
48 kHz, 20 bit linear
PCM
48 kHz, 16 bit linear
PCM
48 kHz, 16 bit linear
PCM
44.1 kHz, 16 bit linear
PCM
44.1 kHz, 20 bit linear
PCM
Playback discs
Digital audio output
BITSTREAM LINEAR PCM
D
D
S
AUD I O
IGITAL OUTPU
SE
R
C
URROUND DOL
TUP
TBITSTRM
STANDA
BY
SPEAKER OPT I ONS
PROLOGI C
RD TV
SELECT : +
RET URN : S ETUP : F I N I SH
To output
the digital
audio signal
as it was
recorded
To convert
the bitstream
signal to the
linear PCM
signal and to
output it
OUTPUT TYPE
BIT STREAM
L I NEAR PCM
SELECT : +
RETURN : SETUP : F I NI SH
RCRC
When selecting the DIGITAL OUTPUT
RCRC
ENGLISH
⊃
Page 33
⊃
⊃
33
This function can be activated in the Dolby Digital mode only. (Refer to When selecting SURROUND on this
page.)
You can compress the dynamic range of the Dolby Digital sound if you need.
Using this function, you can listen to sound at low volume levels easily.
The built-in decoder of the unit allows you to enjoy surround sound with various program sources;
Dolby Digital, Dolby Pro Logic, Dolby Virtual, DTS, MPEG Multichannel, Circle Surround.
For details on surround sound such as Dolby Digital, Dolby Pro Logic, etc., refer to
Definition Of Terms
on page 44.
Depending on the program source recorded with multichannel audio such as Dolby Digital, Dolby Pro Logic,
DTS and MPEG Multichannel, you can select a surround mode to match your program source.
The selected mode is highlighted.
Dynamic range control off
Low compression
High compression
1
Tilt the CURSOR/ENTER button upward or downward to select Dynamic Range Control, then
press the CURSOR/ENTER button.
2
Tilt the CURSOR button upward or downward to select a
preferred dynamic range, then press the ENTER button.
The selected mode is highlighted.
1
Tilt the CURSOR/ENTER button upward or downward to select SURROUND, then press the
CURSOR/ENTER button.
2
Tilt the CURSOR/ENTER button upward or
downward to select a preferred surround
mode, then press the CURSOR/ENTER
button.
Note :
In some Dolby Digital softwares, this
function may not be available.
Note :
When the selected surround sound does not match
the program source being played back, the
program source is played back as it was recorded.
To enjoy a program
source as it was recorded.
To enjoy Dolby Digital,
Dolby Pro Logic or 2
channel stereo digital
audio (recorded in linear
PCM) program source in
the Dolby Virtual mode.
To enjoy the Dolby Digital
program source in the
Dolby Pro Logic mode.
To enjoy the 2 channel stereo digital audio (recorded in
linear PCM) program source in the Circle Surround mode.
FUL L RANGE
STANDARD T
NIGHT T IME
V
SELECT : +
RETURN : SETUP : F I N I SH
D
RC
LBY VIRTUA
RCL E SURRO
L
SELECT : +
RETURN : SETUP : F I N I SH
SURROUND MODE
AU
DO
LBY PROLOGI C
UND
DO
CI
TO
RCRC
RCRC
When selecting the Dynamic Range Control
Continued
When selecting the SURROUND
ENGLISH
Page 34
⊃
⊃
34
When the 6.1 CH AUDIO OUTS of the unit are connected to the 6.1 (or 6) CH INs of your amplifier or receiver to enjoy
high-quality audio and surround with the built-in decoder, these items should be set correctly.
Tilt the CURSOR/ENTER button upward or downward to select SPEAKER OPTIONS, then press the CURSOR/ENTER
button.
■When selecting the SPEAKER SETUP
Depending on your speaker type, you can select one of
these following speaker types.
LARGE : Large speaker(s) which can fully reproduce the
low frequency range.
SMALL : Small speaker(s) which cannot fully reproduce
the low frequency range.
NONE : No speaker(s) connected. (It can be selected in
the speaker types other than FRONT L/R TYPE.)
PRESENT : A speaker is connected. (It can be selected
in the R-CENTER TYPE only.)
LFE : When reproducing only the separate low frequency
range that be contained in multi-channel sound
systems such as DTS, Dolby Digital, MPEG
Multichannel,etc. (It can be selected in the
SUBWOOFER OUT only.)
MIXED : When mixing the low frequency range of the
speaker(s) which is set to
SMALL with that of
subwoofer and reproducing them. (It can be
selected in the SUBWOOFER OUT only.)
Example) When selecting the FRONT L/R TYPE
To adjust the speaker setting.
To adjust each channel level
equally loud. (See next page.)
2
Tilt the CURSOR/ENTER button upward or downward to select the preferred item, then press the
CURSOR/ENTER button.
3
Tilt the CURSOR button upward or downward to
select the preferred speaker type, then press the
CURSOR/ENTER button.
3
Enter the distance 17 cm with the NUMERIC
button, then press the CURSOR/ENTER button.
1
Tilt the CURSOR/ENTER button upward or downward to select SPEAKER SETUP, then press the
CURSOR/ENTER button.
You can enter up 999 cm as the distance between the
speaker and prime listening position.
One foot equals about 30 cm.
Notes :
When the NONE is selected respectively for the front
center and rear speaker types, the front distance cannot
be entered.
When the NONE is selected for the front center or the rear
speaker type, the corresponding speaker distance cannot
be entered.
Example) When entering
150 cm.
To adjust the speaker size
connected.
To adjust the delay time.
To adjust the speaker setting
depending on whether the
speaker is connected or not.
To reproduce the low
frequency range depending on
the speaker settings.
Example) When selecting the DISTANCE
When selecting the SPEAKER OPTIONS
SELECT : +
RETURN : SETUP : F I N I SH
SPEAKER OPT
SPEAKER SE
TEST NOI SE
TUP
SPEAKER SETUP
FRONT L / R TTY
DISTA
F-CE
REAR
NTER
PE
L/R TYPE
D I STANCE
LA
NYCE O
RGE
R-CENTER TYPE NON
SUB
W
OOF ER OUT M I XE D
E
CM
D I STANCE O CM
OCM
PE SMAL L
SMA LL
SELECT : +
RETURN : SETUP : F I N I SH
---CM
FRONT L / R TYPE L ARGE
SMA LL
D I STANCE
RC
RC
RCRC
RCRC
Continued
ENGLISH
Page 35

⊃
35
No test
noise
Notes :
The delay time(s) is (are) automatically adjusted, based on the distance entered.
When
PRESENT is selected for the rear center speaker type, the rear center signal is extracted from the
rear left and right signals and reproduced during playback of 5.1 CH program sources such as Dolby Digital,
DTS and MPEG Multichannel.
When the front L/R, front center and rear L/R speakers are all set to
LARGE , the subwoofer is automatically
set to
LFE .
When the front L/R speakers are set to
SMALL , the front center and rear L/R speakers are all set to
SMALL (or “NONE”) and the subwoofer is set to MIXED automatically.
When the front center or rear L/R speakers are set to
LARGE , the front L/R speakers cannot be set to
SMALL .
When the rear L/R speakers are set to “NONE”, the rear center speaker is automatically set to “NONE”.
When the front center or rear L/R speakers are set to
NONE , the sound intended for these speaker(s) is
redirected to other speakers.
When the speaker(s) is (are) set to
SMALL , the low frequency range of the speaker(s) is redirected to other
speaker(s) which is (are) set to
LARGE or MIXED .
The test noise will be heard from the speaker of
each channel for 2 seconds.
When the speaker type is adjusted to NONE ,
N/A is displayed at its channel, and the test noise
will skip that channel.
4
Repeat the above steps 2 and 3 to adjust each speaker setting correctly.
1
Tilt the CURSOR/ENTER button upward or downward to select the preferred channel, then tilt the
CURSOR/ENTER button left or right to adjust its level as preferred.
2
Repeat the step 1 until the sound level of each channel is heard to be equally loud.
TEST NOI SE
FRONT L EFT 0 dB
FRONT CENT ER 0 dB
FRONT R IGHT
RIGHT
0dB
REAR +3 dB
CENTEREAR R N / A
LEFTREAR - 3 dB
SUBWOOF ER + 5 d B
SELECT : +
RETURN : SETUP : F I N I SH
RC
RC
Continued
■When selecting the TEST NOISE (TEST TONES)
ENGLISH
Page 36
36
SETTING THE CUSTOM SETUP
1
Tilt the CURSOR/ENTER button upward or downward to select COLOR SCHEME, then press
the CURSOR/ENTER button.
2
Tilt the CURSOR/ENTER button upward or downward to select the preferred color, then press
the CURSOR/ENTER button.
The selected color is highlighted.
When selecting the COLOR SCHEME
When you cannot distinguish the on-screen symbols from the background by color, adjust the color of
the on-screen symbols to your preference.
To adjust the initial zoom settings.
To adjust the color of the on-screen symbols
To use the COMPONENT VIDEO OUTs (Regional Option for
Europe,etc. only).
To use the SCART OUTPUT (Regional Option for Europe,etc. only).
COL OR S CHEME YE L LOW
GRE EN
BLUE
RED
CUST OM SE TUP S EL ECT : +
ZOOM S ETUP
COL OR S CHEME YE L LOW
COMPONENT V I D OFF
S C A R T O U T P U T S - V I DEO
RET URN :
⊃
SETUP : F I NI SH
RCRC
ENGLISH
Page 37

⊃
37
1
Tilt the CURSOR/ENTER button upward or downward to select the ZOOM SETUP, then press
the CURSOR/ENTER button.
2
Tilt the CURSOR/ENTER button upward or downward to select the preferred item, then press the
CURSOR/ENTER button.
3
Tilt the CURSOR/ENTER button upward or downward to select to preferred mode, then press the
CURSOR/ENTER button.
1
Tilt the CURSOR/ENTER button upward or downward to select the COMPONENT VIDEO, then
press the CURSOR/ENTER button.
2
Tilt the CURSOR/ENTER button upward or downward to select the preferred mode, then press
the CURSOR/ENTER button.
When selecting ZOOM SETUP
When selecting the COMPONENT VIDEO (Regional Option)
You can select the initial setting as preferred for zoom playback of DVD Video.
UPPER LEFT : Upper left of the scene.
CENTER : Center of the scene.
LAST POINT : The zoom point shifted last.
For some countries like Europe, the unit incorporates the TV and VCR SCART connectors which can deliver
either the regular video and RGB signals or the S-video (Y and C) signals as well as the mixed audio L and
R signals for easy connection.
When the SCART connections between the unit and video components are made, depending on whether the
COMPONENT VIDEO OUTs of the unit is connected to TV or not, adjust the COMPONENT VIDEO to your
preference.
NORMAL : Shiftable in 6 steps.
ROUGH : Shiftable in 3 steps.
FINE : Shiftable in 12 steps.
ON : When using the video signals from the
COMPONENT VIDEO OUTs
OFF : When not using the video signals from the
COMPONENT VIDEO OUTs for RGB signals from
the TV and VCR SCART connectors of the unit.
Example) When selecting the START POINT Example) When selecting the PAN SCALE
To select the stat point of
the sence.
To select the shift step.
ZOOM S ETUP SE LECT : +
TS ART POI NT UPPER LEFT
AP N S CA LE NORMAL
ER T URN : S ETUP : F I N I SH
START PO I NT UPPER LEFT
CENTER
LAST POI NT
PAN SCALE NORMAL
ROUGH
FINE
COMPONEN T V I D ON
OFF
RCRC
RCRC
Continued
ENGLISH
Page 38
For some countries like Europe, the unit incorporates the TV and VCR SCART connectors which can deliver
either the regular video and RGB signals or the S-video (Y and C) signals as well as the mixed audio L and
R signals for easy connection.
When the SCART connections between the unit and video components are made, depending on whether
you use the regular video signal from the SCART connector or the S-video signals, you can select either the
regular VIDEO or the S-VIDEO.
Note :
Be sure to set your TV and VCR to the corresponding one of the regular video, S-video (Y and C) and RGB
modes to match the SCART OUT setting of the unit. (Refer to the operating instructions of the component(s)
connected.)
38
1
Tilt the CURSOR/ENTER button upward or downward to select the SCART OUTPUT, then press
the CURSOR/ENTER button.
2
Tilt the CURSOR/ENTER button upward or downward to select the preferred mode, then
press the CURSOR/ENTER button.
When selecting the SCART OUTPUT (Regional Option)
VIDEO : When using the regular video signal from
the TV and VCR SCART connectors of the unit.
S-VIDEO : When using the S-video signals only
from the TV and VCR SCART connectors of the
unit. (Only when the COMPONENT VIDEO is
adjusted to OFF, you can use the RGB signals,
too.)
SCART OUT PUT V I DEO
S-VIDEO
RCRC
Continued
ENGLISH
Page 39
39
SETTING THE RATING LEVEL
1
Press the CURSOR/ENTER button to enter a password.
2
Enter a 4-digit with the NUMERIC buttons, then press the CURSOR/ENTER button.
3
Tilt the CURSOR/ENTER button upword or downward to select the preferred item, then press the
CURSOR/ENTER button.
This function restricts playback of DVD Video which contains violent and other scenes according to the level
set by the user. For example, if a movie which includes violent scenes supports the parental lock feature, such
scenes which you do not want to let children view can be cut or replaced with other scenes.
Example)
When entering
1 2 3 4
Password mode
The unit requires you to enter a 4-digit password.
To cancel the rating level
To select the rating level
To change the password
Rating level setting mode
For your reference on the rating levels,
8 : Level 8 : No restriction
7 : Level 7 :
6 : Level 6 :
5 : Level 5 :
4 : Level 4 :
3 : Level 3 :
2 : Level 2 :
1 : Level 1 : Maximum restriction
When the 4-digit password entered is wrong, the
SETUP menu mode is resumed. If this is the
case, repeat the above steps ① and ② after
selecting the RATING LEVEL in the SETUP menu
mode.
Note :
If a password has never been entered yet or you
forget your password, enter
7 8 9 0
■When selecting either the OFF or a rating level.
The item is selected and the SETUP menu mode
is resumed.
■When selecting the CHANGE PWD.
Previous password
1. Press the CURSOR/ENTER button to enter a new
password, then the previous password is changed
into
---- .
2. Enter a new password performing step ② above.
The new passord is memorized and the rating level
setting mode is resumed.
■Notes :
When you set the parental level strictly, some
discs may not play back at all. If this is the case,
set the rating level more laxly or to OFF mode.
DVD Videos may or may not respond to the rating
level setting. Make sure this function works with
your DVD Videos.
NEW PASSWORD 1 2 34
PASSWORD
PASSWORD
OFF
1357
2468
CHANGE PWD
RC
RC
RC
Lax
Strict
ENGLISH
Page 40

⊃
⊃
⊃
40
Up to 20 chapters or tracks can be programmed to be played in any desired sequence.
■Playing back your selections in the preferred sequence.
When a DVD Video is loaded.
When a CD is loaded.
To program chapters/tracks in the desired sequence.
To memorize the favorite condition or select either the FACTORY
DEFAULT or the RELOAD FC function.
To clear the disc title.
Chapter
number
Title number
Programmed
order
Then the program menu screen is displayed.
In the stop mode, if the PROG button on the remote
control is pressed, the program menu mode can be
entered directly, too.
And if the PROG button is pressed again, the stop
mode is entered.
Note :
When a disc is not loaded, the program menu mode
cannot be selected.
When selecting the PROGRAM MENU
SETTING THE DISC SETUP
Track
number
Programmed
order
1
Tilt the CURSOR/ENTER button upward or downward to select the PROGRAM MENU, then
press the CURSOR/ENTER button.
2
Press the CURSOR/ENTER button to enter either the preferred title for DVD Video or the preferred track for CD.
The highlight on the item disappears and the range for selection appears (Example) CHOOSE 1~12 appears.)
3
Enter the preferred number with the NUMERIC buttons, then press the CURSOR/ENTER button to store it.
Example) When entering 11 .
The preferred number can be also entered by
tilting the CURSOR/ENTER button, then press
the CURSOR/ENTER button.
In case of a DVD Video, after entering a title
number, you should enter the preferred chapter
number in the same way.
The number entered is stored.
4
Tilt the CURSOR/ENTER button downward to move to the next order.
When the preferred 10 items are programmed, if you move to NEXT by tilting the CURSOR/ENTER button
and then press the CURSOR/ENTER button to enter the latter program menu mode, the next 10 items can be
programmed.
On the contrary, if you move to PREVIOUS by tilting the CURSOR/ENTER button in the latter program
menu mode and press the CURSOR/ENTER button, the first program menu mode will be entered.
DISC SETUP
PROGRAM MENU NE
W
FAVORI TE COND
CLEAR D I SC ID
OF
F
SELECT : +
RETURN : SETUP : F I N I SH
PROGRAM ME
T I TLE CHAPT T ITLE CH
PREV I OUS NEXT
ENTER :SAVE PL AY
APT
1-2-3-4-5--
-
-
-
-
-
-
-
-
-
-
-
-
-
-
-
NU SE LECT : +
RETURN : SETUP : F I N I SH
6
7
8
9
10
-
-
-
-
-
-
-
-
-
-
-
-
-
-
-
-
-
-
-
-
PROGRAM ME
PREV I OUS NEXT
ENTER : SAVE P LAY
TTRR1ACK
--
NU SE LEC T : +
RETURN : SETUP : F I NI SH
ACK
6
--
2-- 7
--
3-- 8
--
4-- 9
--
5-- 10
--
RC
RC
RCRC
ENGLISH
Page 41
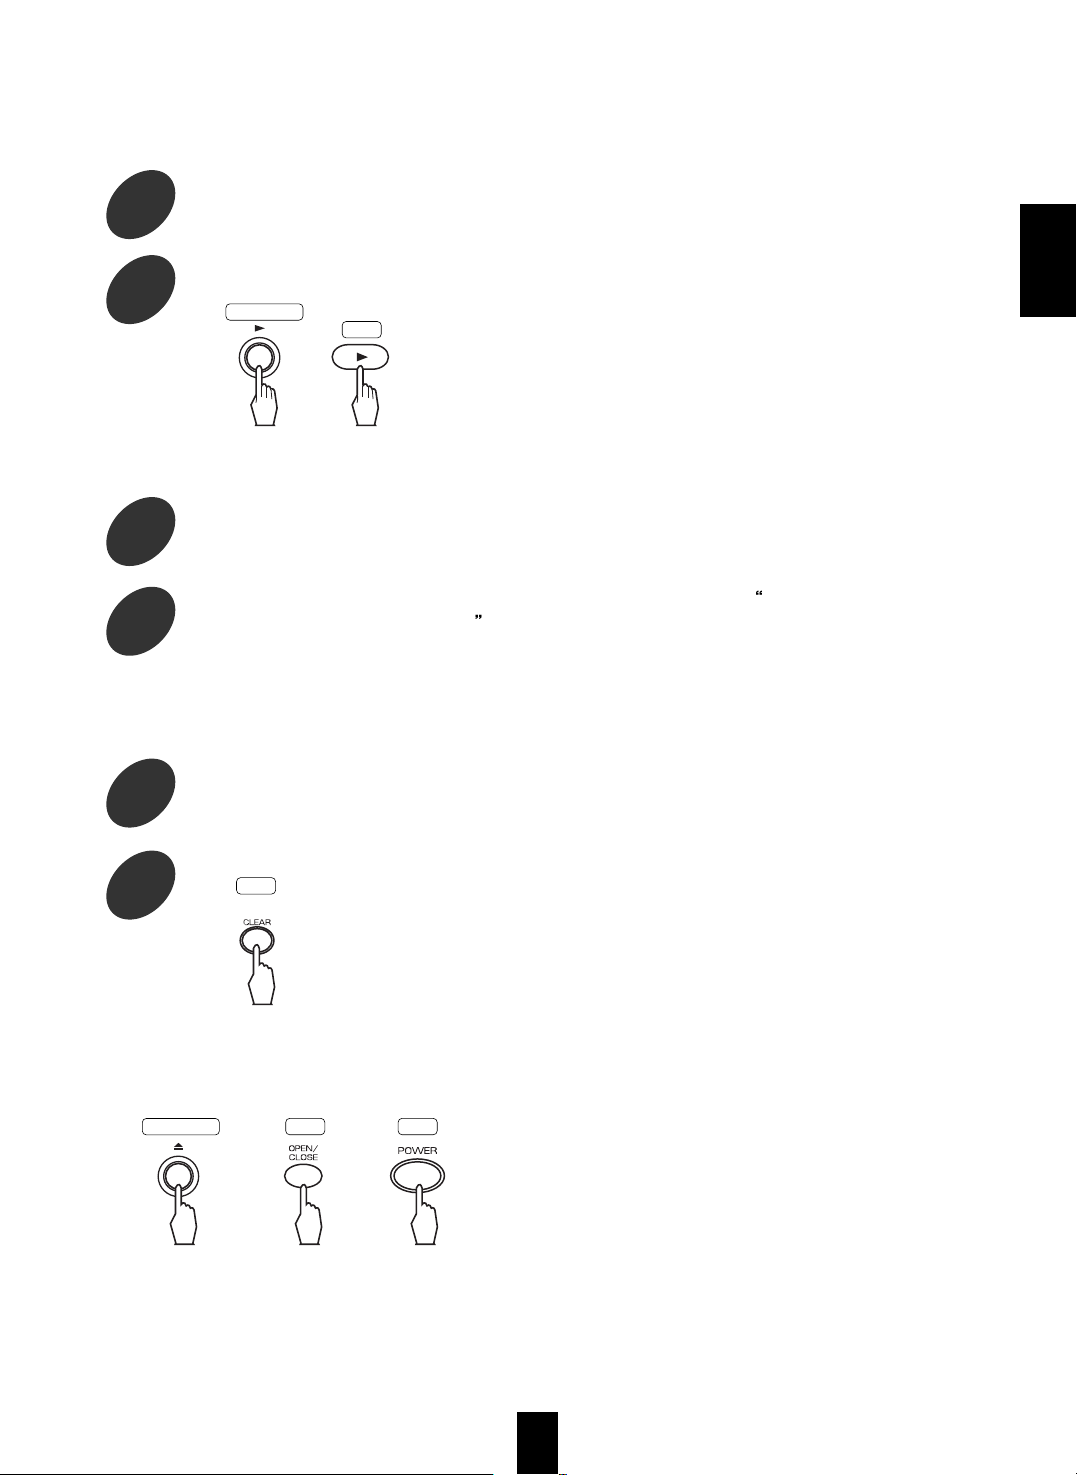
41
If the programmed items are all played back, the
program menu mode is resumed.
■Correcting any wrong programmed item.
5
Repeat the above steps ②~④ until your selections is completed.
6
Start the programmed playback in the desired sequence.
1
In the program menu mode, move to the program number you want by tilting the
CURSOR/ENTER button repeatedly.
2
Replacing the wrong program item, performing the steps ② and ③ in Playing back your
selections in the preferred sequence
procedure on the previous page.
■Clearing the programmed items.
■
To clear a specific item
■
To clear all programmed items.
Open the disc tray or turn the power off to the standby mode.
The item you want is cleared.
Then all the programmed items are cleared.
1
In the program menu mode, move to the program number you want by tilting the
CURSOR/ENTER button repeatedly.
2
Clear the item you want.
Main unit
RC
RC RC
Main unit
or
or or
RC
Continued
ENGLISH
Page 42

42
Each time a DVD Video is loaded, the LANGUAGE, TV SCREEN and PROGRAM MENU settitings should be
adjusted to your favorite condition.
However, once the LANGUAGE, TV SCREEN and PROGRAM MENU settings for a DVD Video are memorized
using the SAVE FC (Favorite Condition), each time a disc is loaded, your chosen settings will be selected
automatically.
■Memorizing the favorite condition for the LANGUAGE, TV SCREEN and PROGRAM MENU on the
current disc.
Each favorite condition for up to 30 DVD Videos can be memorized.
■Correcting a disc title
1. In the EDIT TITLE mode, tilt the CURSOR/ENTER button right or left to move to the character you want.
2. Tilt the CURSOR/ENTER button upward or downward repeatedly to select the preferred character.
On a character, if the CLEAR button on the remote control is pressed, the character is cleared.
3. Repeat the above steps 1 and 2 until the disc title is corrected as to your preference.
→ 0 ↔ 1 ↔ 2 ↔ --------- ↔ A ↔ B -------- ↔ X ↔ Y ↔ Z ←
When selecting the FAVORITE CONDITION
1
After adjusting the LANGUAGE and TV SCREEN settings to your favorite condition, tilt the
CURSOR/ENTER button upward or downward to select the FAVORITE CONDITION, then press
the CURSOR/ENTER button.
2
Tilt the CURSOR/ENTER button upward or downward to select the SAVE FC, then press the
CURSOR/ENTER button.
The EDIT TITLE mode that requires
entering a disc title.
3
Tilt the CURSOR/ENTER button upward or downward to enter the disc title as your preference.
Each time the CURSOR/ENTER button is tilted upward or downward, the characters change as
follows ;
4
Tilt the CURSOR/ENTER button right or left to move to the next digit after a character is entered
on the digit.
5
Repeat the above steps ③ and ④ until the preferred disc title is entered.
Up to 8 characters can be entered.
Note : When the disc title is not entered, the favorite condition cannot be memorized.
6
Press the CURSOR/ENTER button to memorize the LANGUAGE, TV SCREEN and PROGRAM
MENU settings along with the title entered.
Then these are memorized and the FAVORITE COND ON is displayed on the DISC SETUP
menu screen.
After you change the favorite condition for the LANGUAGE, TV SCREEN and PROGRAM
MENU on the same disc, if you perform the above steps ①~⑥, the changed condition is
memorized.
FAVORITE CONDITION menu
EDIT TITLE mode
SAVE FC
FACTORY DEFAU
RELOAD FC
L
TS
ED
--------
IT TITLE
RCRC
Continued
ENGLISH
Page 43
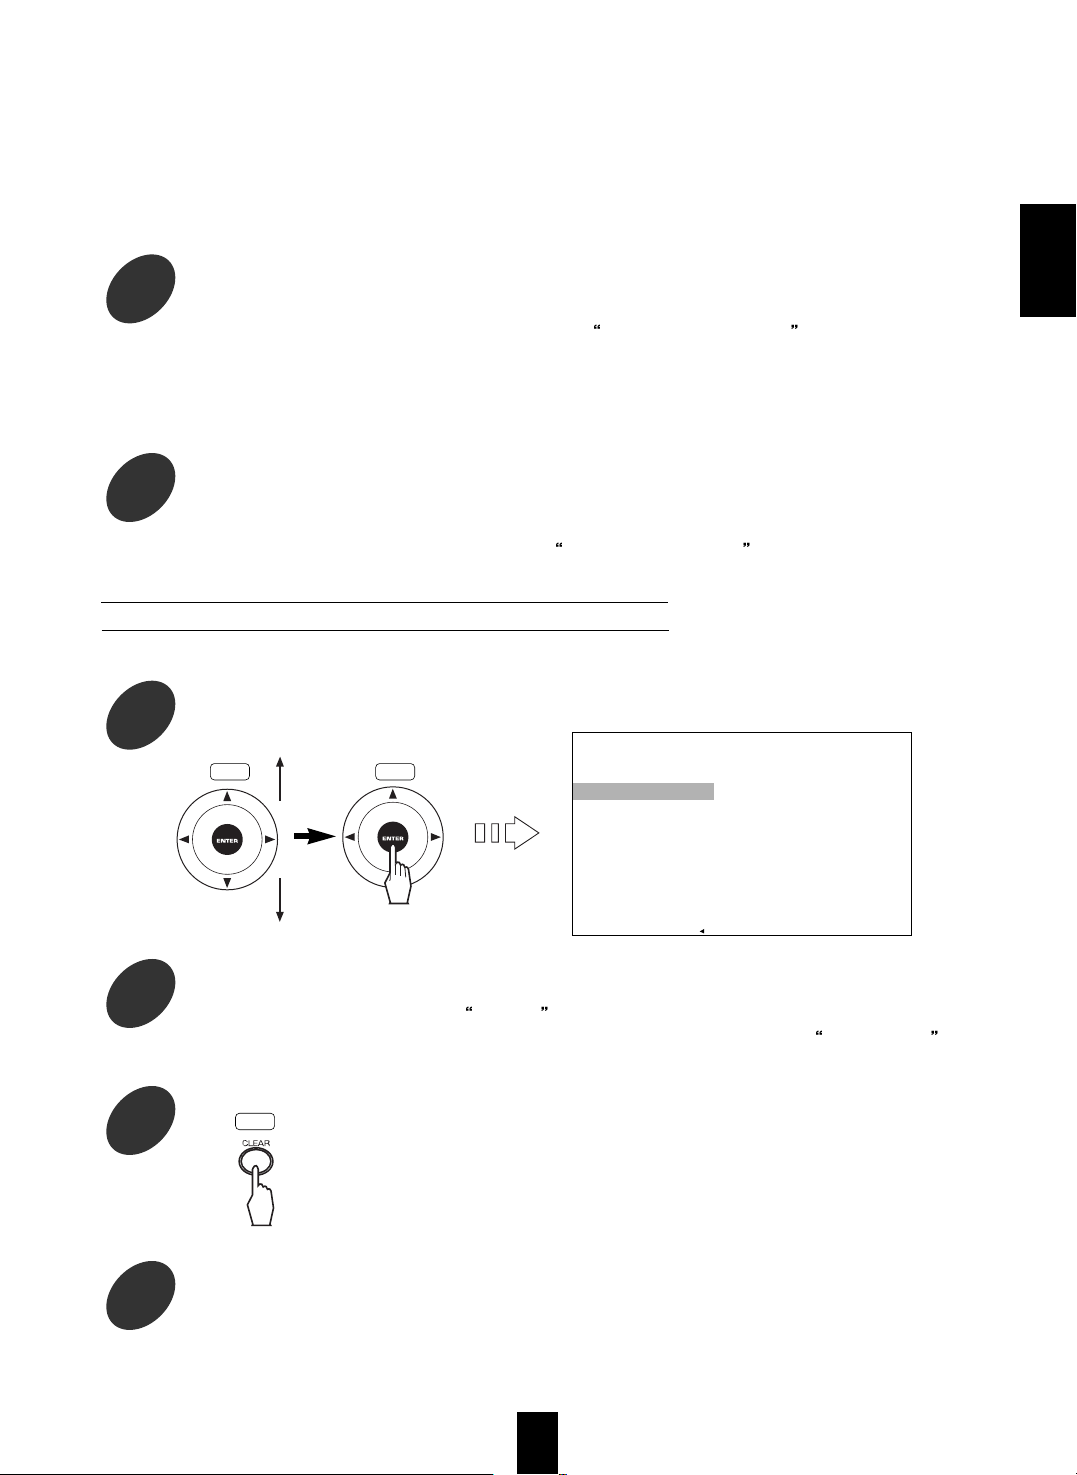
⊃
43
■Playing back a DVD Video in the factory settings for the LANGUAGE, TV SCREEN and PROGRAM
MENU.
You can play back a DVD Video in the factory defaults for the LANGUAGE, TV SCREEN and PROGRAM
MENU without clearing the favorite condition.
■Playing back a DVD Video in the favorite condition again.
In case FACTORY DEFAULTS is selected, if you select the RELOAD FC, the FACTORY DEFAULTS is
canceled and you can play back a DVD Video in the favorite condition again.
2
In the FAVORITE CONDITION menu, tilt the CURSOR/ENTER button upward or downward to
select the FACTORY DEFAULTS, then press the CURSOR/ENTER button.
Then FACTORY DEFAULTS is selected and the FAVORITE COND OFF is displayed on the
DISC SETUP menu screen.
Then the FAVORITE CONDITION is selected and the FAVORITE COND ON is displayed on the DISC
SETUP menu screen.
When a disc title is cleared, the memorized favorite condition is cleared, too.
2
In the FAVORITE CONDITION menu, tilt the CURSOR/ENTER button upward or downward to
select the RELOAD FC, then press the CURSOR/ENTER button.
1
Tilt the CURSOR/ENTER button upward or downward to select the CLEAR DISC ID, then press
the CURSOR/ENTER button.
2
Tilt the CURSOR/ENTER button upward or downward to select the preferred disc title.
To see the next page, move to NEXT by tilting the CURSOR/ENTER button and then
press the CURSOR/ENTER button and to see the previous page, move to
PREVIOUS by
tilting the CURSOR/ENTER button and then press the CURSOR/ENTER button.
3
Clear the selected disc title.
4
Repeat the above steps ①~③ until the disc titles are cleared.
The favorite condition as well as the disc title is
cleared.
When selecting the CLEAR DISC ID
DELETE I D SELECT : +
DISC TI TLE DISC T ITLE
ZORRO BAT
ANT HORSE
RABB I T L I ON
COOW
USE
TZIEGBERR
AM
PAGE 1
PREV I OUS
↑
↓
↓
↓
NEXT
RET URN : S ETUP : F I N I SH
RCRC
RC
Continued
ENGLISH
Page 44
44
DVD Video
This refers to a high-density optical disc on which high-quality
pictures and sound have been recorded by means of digital
signals. Incorporating a new video compression technology
(MPEG II) and high-density recording technology. DVD Video
enables esthetically pleasing full-motion video to be recorded
over long periods of time (for instance, a whole movie can be
recorded).
DVD Video has a structure consisting of two 0.6 mm thin discs
which are adhered to each other. Since the thinner the disc, the
higher the density at which the information can be recorded, a
DVD Video has a greater capacity than a single 1.2 mm thick
disc. Since the two thin discs are adhered to each other, there
is the potential to achieve double-sided play sometime in the
future for even longer duration play.
MPEG (DVD Video)
MPEG stands for Moving Picture Expert Group. It is regarded
as an international standard for digital signal compression and
restoration for media.
Track number (CD)
Track numbers are used to designate the various sections of a
disc.
Title, Title number (DVD Video)
The title is the largest unit of the video/audio recording in DVD
Videos. Usually, the title corresponds to a movie of video
software or an album (or a piece) of music software. Title
numbers are sequential numbers assigned to titles.
Chapter, Chapter number (DVD Video)
Chapters are divisions, which are smaller than the titles, of the
contents recorded on DVD Videos. Every title is composed of
more than one chapter. Chapter numbers are the sequential
numbers assigned to the chapters in a DVD Video.
Aspect ratio (DVD Video)
The aspect ratio is the ratio between the vertical and horizontal
size of the picture displayed on a TV screen. The aspect ratio
of normal TV screen is 4:3 while that of the wide-screen TV and
HDTV screens is 16:9.
Subtitle (DVD Video)
Some DVD Videos contain the recording of more than one
subtitle languages. With these discs, this unit can select one of
the subtitle languages as desired during playback.
Dolby Digital
This is the latest digital surround system developed by Dolby
Laboratories. Discs bearing the includes the
recording of up to 5.1 channels of digital signals, which can
reproduce much better sound quality, spatial expansion and
dynamic range characteristics than the previous Dolby
Surround effect.
Dolby Pro Logic
This is a specially encoded 2 channel surround format
designed to provide theater-like surround sound from Dolby
Pro Logic program sources bearing the .
Dolby Virtual
This employs sophiticated digital processing to create the
illusion of five
phantom speakers. Therefore, this allows you
to experience a realistic multi-channel experience from the
Dolby Digital, Dolby Pro Logic or 2 channel stereo digital audio
(recorded in linear PCM) program source, through just a single
pair of front speakers.
Manufactured under licence from Dolby Laboratories. Dolby ,
Pro Logic , and the double-D symbol are trandemarks of
Dolby Laboratories. Confidential Unpublished Works. 19921997 Dolby Laboratories. All rights reserved.
DTS (Digital Theater Systems)
DTS is a newly-developed surround system which can handle
more amount of data than Dolby Digital, providing better audio
quality. Though the number of audio channels is 5.1 which is
same as Dolby Digital, discs bearing the provides fat
sound and better signal-to-noise ratio, thanks to the lower
audio compression ratio format. It also provides wide dynamic
range and better separation, resulting in magnificent sound.
Manufactured under license from Digital Theather Systems,
Inc. US Pat. No. 5,451,942 and other world-wide patents
issues and pending.
DTS and DTS Digital Surround
are trademarks of Digital Theater Systems, Inc. 1996
Digital Theater Systems, Inc. All rights reserved.
MPEG Multichannel
This is a newly-developed surround system which faithfully
reproduces the ambience and dynamics of movie soundtracks
and music alike. Though the number of audio channels is 5.1
which is same as Dolby Digital, discs bearing the
is much better at locating individual sounds
to the correct and stable position in the sound stage.
Circle Surround
This provides listeners with 5.1 discrete channels of surround
sound from stereo recorded music or surround encoded
movies.
Circle Surround and the symbol are trademarks of
SRS Labs, Inc. in the United States and selected foreign
countries. Circle Surround technology is incorporated under
license from SRS Labs, Inc.
Definition Of Terms
C
C
ENGLISH
Page 45
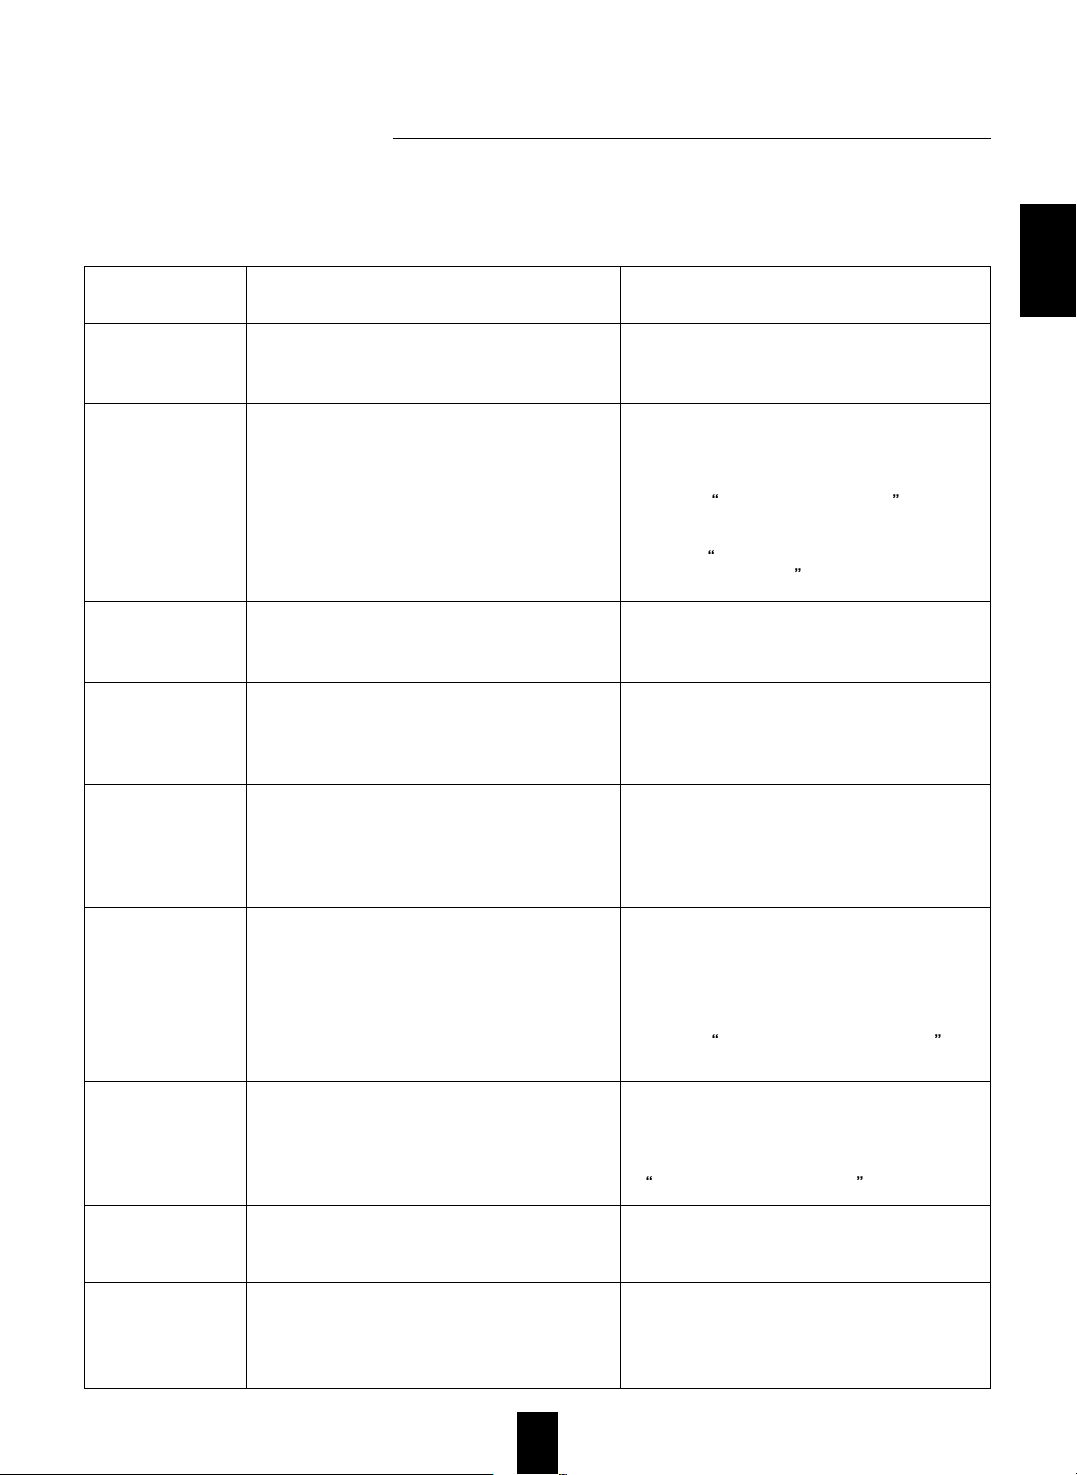
45
If a fault occurs, run through the table below before taking your unit for repair.
If the fault persists, attempt to solve it by switching the unit off and on again. If this fails to resolve the situation,
consult your dealer. Under no circumstances should you repair the unit yourself as this could invalidate the
warranty.
Troubleshooting Guide
PROBLEM POSSIBLE CAUSE REMEDY
No power
No playback
Malfunction
No picture
Noisy or distorted
picture
No sound
No sound from the
speaker(s) other than
the front speakers.
Noisy or distorted
sound
Remote control unit
does not operate.
The AC input cord is disconnected.
Poor connection at AC wall outlet or the outlet
is dead or off.
The disc is loaded upside down.
The disc is not playable.
The disc is dirty.
The system setting is not adjusted correctly.
The symbol or message about invalid operation
is displayed.
The disc is scratched or dirty badly.
The video cords are disconnected.
The incorrect selection of input source on the
TV.
The disc is not playable.
The unit is connected to a VCR directly and the
copyguard function is activated.
The disc is dirty.
It is in rapid advance or reverse playback, or in
frame advance or reverse playback.
The audio cords are disconnected.
The speakers are disconnected to the
amplifier.
The incorrect selection of input source on the
amplifier.
The audio setup is not adjusted correctly.
The speaker(s) is (are) disconnected to the
amplifier.
The audio cord(s) is (are) disconnected.
The SURROUND and SPEAKER OPTIONS
are not adjusted correctly.
The disc is dirty.
Poor connections.
Batteries are not loaded or are exhausted.
The remote sensor is obstructed.
Connect the cord securely.
Check the outlet using a lamp or another
appliance.
Reload the disc with the printed side up.
Use a playable disc.
Clean the disc.
Adjust the system setting correctly.
(Refer to SETTING THE SYSTEM on page
29.)
Adjust the setting correctly.
(Refer to SYMBOL AND MESSAGE ABOUT
INVALID OPERATION on page 14.)
Press the POWER switch to switch the power
off, press the POWER switch again and then
unload the disc.
Connect the cords correctly.
Select the input source correctly.
Use a playable disc.
Connect the unit so that the picture signal is
transferred directly to the TV.
Clean the disc.
Sometimes a small amount of picture distortion
may appear. This is not a malfunction.
Connect the cords correctly.
Connect the speakers correctly.
Select the input source correctly.
Adjust the audio setup correctly.
(Refer to SETTING THE AUDIO SETUP on
page 32.)
Connect the speaker(s) correctly.
Connect the cord(s) correctly.
Adjust the settings correctly. (Refer to
SETTING THE AUDIO SETUP on page 32.)
Clean the disc.
Check the connections and connect all cords
securely.
Replace the batteries.
Remove the obstacle.
ENGLISH
Page 46

46
■TYPE
System DVD Video player system.
Signal read system Semiconductor laser, wavelength 650 nm
■D/A CONVERSION SECTION
D/A conversion 24 bit
Oversampling
Sampling freqnency : 44.1, 48 kHz / 96 kHz 8 fs, 8 fs / 4 fs
■AUDIO SECTION
Frequency response
Sampling frequency : 44.1 kHz 4 Hz ~ 20 kHz
Sampling frequency : 48 kHz 4 Hz ~ 22 kHz
Sampling frequency : 96 kHz 4 Hz ~ 44 kHz
Signal to noise ratio, A wtd.
CD 115 dB
Dynamic range
16 / 20 / 24 bit More than 99 / 108 / 108 dB
Total harmonic ditortion, 1 kHz
CD Less than 0.003 %
Wow and flutler Unmeasurable (less than ±0.002%)
Analog output level
MIXED AUDIO, 10kΩ 2.0 V
6.1 CH AUDIO : FRONT/CENTER/REAR/SUBWOOFER, 10KΩ 2.0 / 2.0 / 2.0 / 1.0 V
Digital output / input level
COAXIAL, 75 Ω 0.5 Vp-p
OPTICAL, 660 nm - 21 ~ - 15 dBm
■VIDEO SECTION
Video compression, DVD Video MPEG 2
Horizontal resolution 500 lines
Signal to noise ratio More than 65 dB
Output/input level, 75 Ω
VIDEO (regular, composite) 1.0 Vp-p
S-VIDEO : Y/C 1.0 / 0.286 Vp-p
COMPONENT : Y / R-Y / B-Y 1.0 / 0.7 / 0.7 Vp-p
R / G / B (For Europe only) 0.7 / 0.7 / 0.7 Vp-p
■GENERAL
Video format
U.S.A. and Canada NTSC
Europe and Australia PAL
China PAL
Power supply
U.S.A. and Canada AC 120 V, 60 Hz
Europe and Australia AC 230 V / AC 240 V, 50 Hz
China AC 220 V, 50 Hz
Other countries AC 115 V / AC 230 V, 50 / 60 Hz
Power consumption 40 W
Dimension (W x H x D) 440 x 126 x 355 mm
(17-3/8 x 4-15/16 x 13-15/16 inches)
Weight (Net) 6.2 kg (13.7 lbs)
Note : Design and specifications are subject to change without notice for improvements.
Specifications
ENGLISH
Page 47

47
6565 Afar
6566 Abkhazian
6570 Afrikaans
6577 Amharic
6582 Arabic
6583 Assamese
6588 Aymara
6590 Azerbaijani
6665 Bashkir
6669 Byelorussian
6671 Bulgarian
6672 Bihari
6678 Bengari ; Bangla
6679 Tibetan
6682 Breton
6765 Catalan
6779 Corsican
6783 Czech
6789 Welsh
6865 Danish
6869 German
6890 Bhutani
6976 Greek
6978 English
6979 Esperanto
6983 Spanish
6984 Estonian
6985 Basque
7065 Persian
7073 Finnish
7074 Fiji
7079 Faroese
7082 French
7089 Frisian
7165 Irish
7168 Scots Gaelic
7176 Galician
7178 Guarani
7185 Gujarati
7265 Hausa
7273 Hindi
7282 Croatian
7285 Hungarian
7289 Armenian
7365 Interlingua
7378 Indonesian
7383 Icelandic
7384 Italian
7387 Hebrew
7465 Japanese
7473 Yiddish
7487 Javanese
7565 Geogian
7575 Kazakh
7576 Greenlandic
7577 Cambodian
7578 Kannada
7579 Korean
7583 Kashmiri
7585 Kurdish
7589 Kirghiz
7665 Latin
7678 Lingala
7679 Laothian
7684 Lithuanian
7686 Latvian ; Lettish
7771 Malagasy
7773 Maori
7775 Macedonian
7776 Malayalam
7778 Mongolian
7779 Moldavian
7782 Marathi
7783 Malay
7784 Maltese
7789 Burmese
7865 Nauru
7869 Nepali
7876 Dutch
7879 Nowegian
7982 Oriya
8065 Punjabi
8076 Polish
8083 Pashto : Pushto
8084 Portuguese
8185 Quechua
8277 Rhaeto-Romance
8279 Romanian
8285 Russian
8365 Sanskrit
8368 Sindhi
8372 Serbo-Croatian
8373 Singhalese
8375 Slovak
8376 Slovenian
8377 Samoan
8378 Shona
8379 Somali
8381 Albanian
8382 Serbian
8385 Sundanese
8386 Swedish
8387 Swahili
8465 Tamil
8469 Telugu
8471 Tajik
8472 Thai
8473 Tigrinya
8475 Turkmen
8476 Tagalog
8479 Tonga
8482 Turkish
8484 Tatar
8487 Twi
8575 Ukrainian
8582 Urdu
8590 Uzbek
8673 Vietnamese
8679 Volapük
8779 Wolof
8872 Xhosa
8979 Yoruba
9072 Chinese
9085 Zulu
DVD Language Code List
Code No. Language Code No. Language Code No. Language
ENGLISH
Page 48

V-756
DVD PLAYER
5707-04724-001-0
OPERATINGINSTRUCTIONS
 Loading...