

Page 1

OPERATING INSTRUCTIONS
INSTRUCCIONES DE FUNCIONAMIENTO
MODE D'EMPLOI
CDC-5506
5 DISC CD CHANGER
CAMBIADOR DE CD PARA 5 DISCOS
CHANGEUR DE 5 CD
CDC-5506 (A)_ENG_11-11-21:CDC-5506(A)_ENG 2011-11-21 오 4:59 페이지 1
Page 2

2
ENGLISH
IMPORTANT SAFETY INSTRUCTIONS
1. Read these instructions.
2. Keep these instructions.
3. Heed all warnings.
4. Follow all instructions.
5. Do not use this apparatus near water.
6. Clean only with dry cloth.
7. Do not block any ventilation openings.
Install in accordance with the manufacturer’s instructions.
8. Do not install near any heat sources such as radiators,
heat registers, stoves, or other apparatus (including
amplifiers) that produce heat.
9. Do not defeat the safety purpose of the polarized or
grounding-type plug. A polarized plug has two blades
with one wider than the other.
A grounding type plug has two blades and a third
grounding prong. The wide blade or the third prong are
provided for your safety. If the provided plug does not fit
into your outlet, consult an electrician for replacement of
the obsolete outlet.
10. Protect the power cord from being walked on or pinched
particularly at plugs, convenience receptacles, and the
point where they exit from the apparatus.
11. Only use attachments/accessories specified by the
manufacturer.
12. Use only with the cart, stand, tripod, bracket, or table
specified by the manufacturer, or sold with the
apparatus.
When a cart is used, use caution when moving the
cart/apparatus combination to avoid injury from tip-over.
13. Unplug this apparatus during lightning storms or when
unused for long periods of time.
14. Refer all servicing to qualified service personnel.
Servicing is required when the apparatus has been
damaged in any way, such as power-supply cord or
plug is damaged, liquid has been spilled or objects have
fallen into the apparatus, the apparatus has been
exposed to rain or moisture, does not operate normally,
or has been dropped.
PORTABLE CART WARNING
CDC-5506 (A)_ENG_11-11-21:CDC-5506(A)_ENG 2011-11-21 오 4:59 페이지 2
Page 3
3
ENGLISH
FOR YOUR SAFETY
CAUTION
Introduction
: TO REDUCE THE RISK OF FIRE OR ELECTRIC SHOCK, DO NOT EXPOSE THIS APPLIANCE TO RAIN OR MOISTURE.
This symbol is intended to alert the user to the presence of
uninsulated "dangerous voltage" within the product's
e
nclosure that may be of sufficient magnitude to constitute
a risk of electric shock to persons.
This symbol is intended to alert the user to the presence of
i
mportant operating and maintenance (servicing)
instructions in the literature accompanying the appliance.
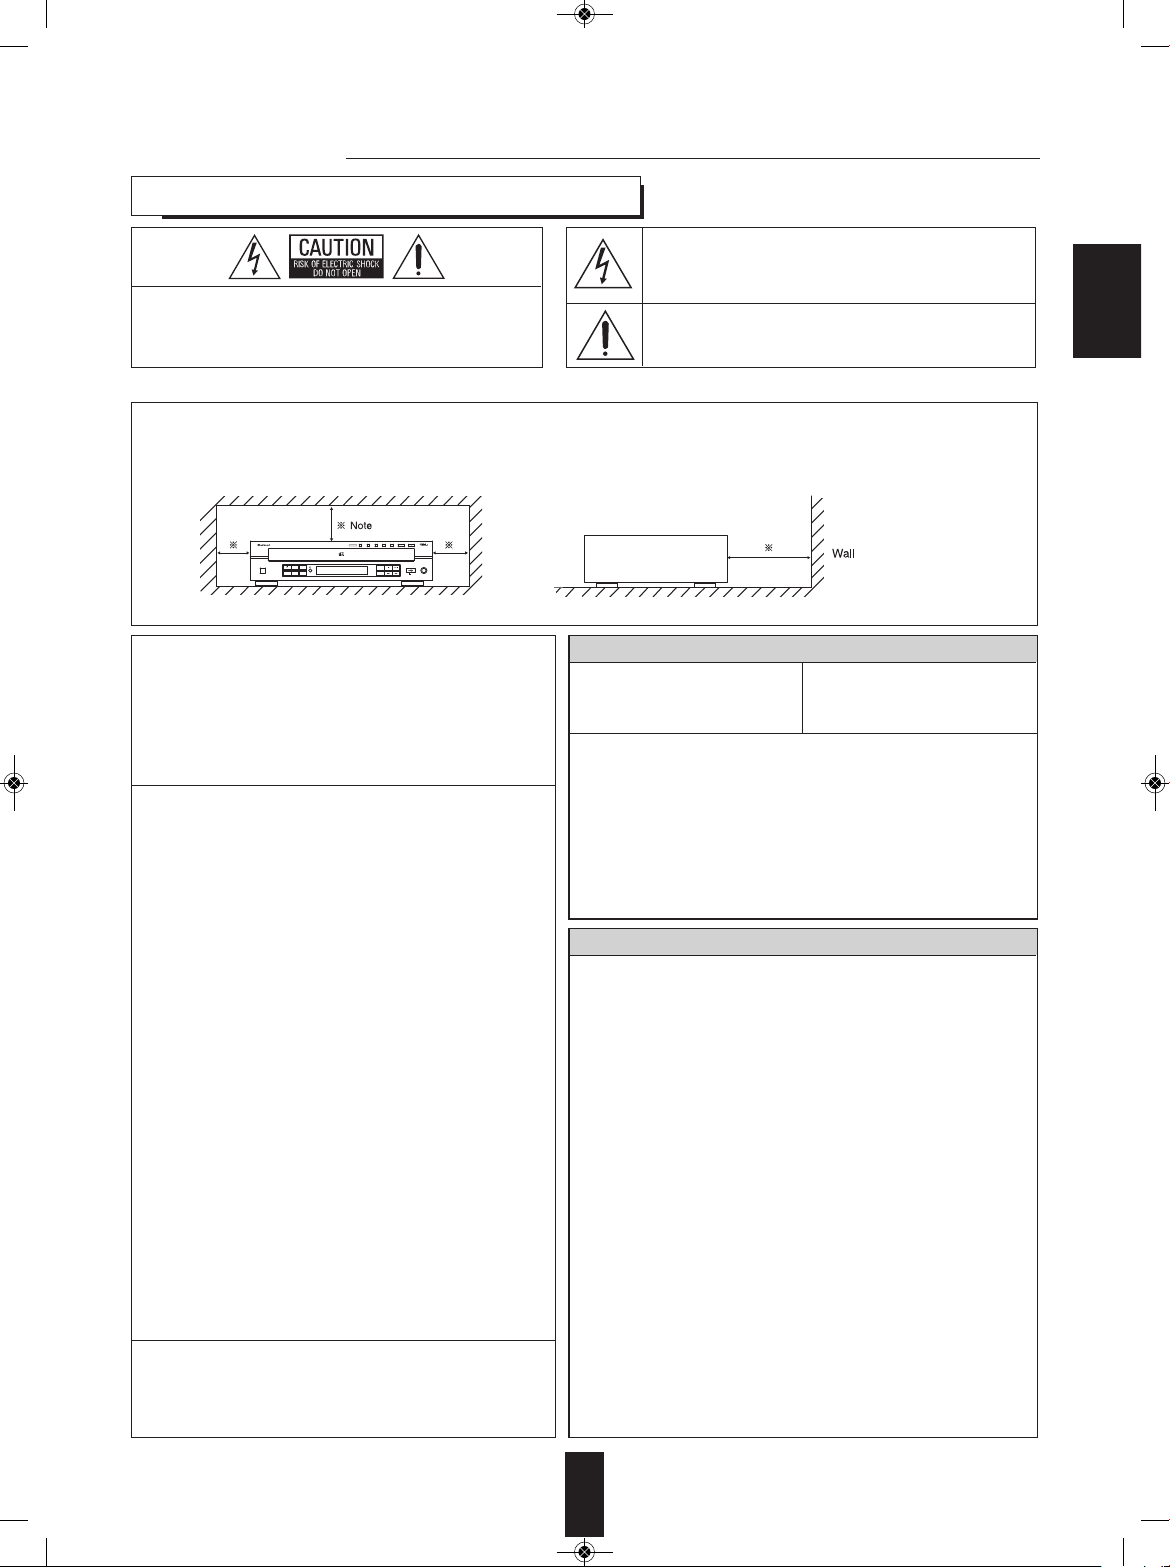
Caution regarding installation
Note : For heat dispersal, do not install this unit in a confined space such as a bookcase or similar enclosure.
Be sure to leave a space around this unit equal to, or greater than, shown below.
Left, right and rear sides : 20 cm, top side : 40 cm.
: TO REDUCE THE RISK OF ELECTRIC SHOCK,
D
O NOT REMOVE COVER (OR BACK).
NO USER-SERVICEABLE PARTS INSIDE.
REFER SERVICING TO QUALIFIED SERVICE
PERSONNEL.
CAUTION
WARNING
Do not block ventilation openings or stack other equipment on the top.
READ THIS BEFORE OPERATING YOUR UNIT
Note to CATV System Installer :
This reminder is provided to call the CATV system
installer’s attention to Article 820-40 of the NEC that
provides guidelines for proper grounding and, in
particular, specifies that the cable ground shall be
connected to the grounding system of the building, as
close to the point of cable entry as practical.
FCC INFORMATION
This equipment has been tested and found to comply
with the limits for a Class B digital device, pursuant to
Part 15 of the FCC Rules. These limits are designed to
provide reasonable protection against harmful
interference in a residential installation. This equipment
generates, uses and can radiate radio frequency
energy and, if not installed and used in accordance
with the instructions, may cause harmful interference to
radio communications. However, there is no guarantee
that interference will not occur in a particular
installation. If this equipment does cause harmful
interference to radio or television reception, which can
be determined by turning the equipment off and on, the
user is encouraged to try to correct the interference by
one or more of the following measures:
• Reorient or relocate the receiving antenna.
• Increase the separation between the equipment and
receiver.
• Connect the equipment into an outlet on a circuit
different from that to which the receiver is connected.
• Consult the dealer or an experienced radio/TV
technician for help.
Caution : Any changes or modifications in construction
of this device which are not expressly
approved by the party responsible for
compliance could void the user’s authority to
operate the equipment.
This Class B digital apparatus complies with Canadian
ICES-003.
Cet appareil numérique de la Classe B est conforme à
la norme NMB-003 du Canada.
Units shipped to the U.S.A and CANADA are designed for
operation on 120 V AC only.
Safety precaution with use of a polarized AC plug.
However, some products may be supplied with a nonpolarized plug.
U.S.A
CANADA
120 V
• Leave a space around the unit for sufficient ventilation.
• Avoid installation in extremely hot or cold locations, or in an area
that is exposed to direct sunlight or heating equipment.
• Keep the unit free from moisture, water, and dust.
• Do not let foreign objects in the unit.
• The ventilation should not be impeded by covering the ventilation
openings with items, such as newspapers, table-cloths, curtains, etc.
• No naked flame sources, such as lighted candles, should be
placed on the unit.
• Please be care the environmental aspects of battery disposal.
• The unit shall not be exposed to dripping or splashing for use.
• No objects filled with liquids, such as vases, shall be placed on
the unit.
• Do not let insecticides, benzene, and thinner come in contact with
the set.
• Never disassemble or modify the unit in any way.
■Notes on the AC power cord and the wall outlet.
• The unit is not disconnected from the AC power source(mains) as
long as it is connected to the wall outlet, even if the unit has been
turned off.
• To completely disconnect this product from the mains, disconnect
the plug from the wall socket outlet.
• When setting up this product, make sure that the AC outlet you
are using is easily accessible.
• Disconnect the plug from the wall outlet when not using the unit
for long periods of time.
: To prevent electric shock, match wide blade of
plug to wide slot, fully insert.
: Pour éviter chocs électriques, introduire la lame la
plus large de la fiche dans la borne correspondante
de la prise et pousser jusqu’ au fond.
CAUTION
ATTENTION
5
DISC CD CHANGER
C
DC-5
506
P
OWER
D
ISC SELECTOR
1
2345
D
ISC SKIP OPEN/CLOSE
P
HONES
U
SB
5
V 500mA
5 DISC AUTOMATIC LOADING SYSTEM
O
N/STANDBY
I
NTRO
D
IMMERCD/USB
T
IME
P
ROGRAM
R
ANDOM
R
EPEAT
CDC-5506 (A)_ENG_11-11-21:CDC-5506(A)_ENG 2011-11-21 오 4:59 페이지 3
Page 4

4
CONTENTS
Introduction
• READ THIS BEFORE OPERATING YOUR UNIT I 2
Rear Panel Connections I 5
Front Panel & Remote Controls I 6
• REMOTE CONTROL OPERATION RANGE I 9
• LOADING BATTERIES I 9
Preliminary Knowledge About Discs & Files
• PLAYABLE DISCS I 10
• USB MEMORY DEVICES I 10
• PLAYABLE AUDIO FILE FORMATS I 10
• CARE AND HANDLING OF DISCS I 10
Operations
• PLAYING TRACKS/FILES I 11
• PLAYING IN RANDOM ORDER I 13
• REPEAT PLAY I 13
• PLAYING THE FIRST 10 SECONDS OF EACH TRACK/FILE I 14
• PLAYING IN DESIRED ORDER I 14
• SELECTING A TIME DISPLAY (Audio CD only) I 16
• ADJUSTING THE BRIGHTNESS OF THE FLUORESCENT DISPLAY I 16
• LISTENING WITH HEADPHONES I 16
Troubleshooting Guide I 17
Specifications I 18
ENGLISH
CDC-5506 (A)_ENG_11-11-21:CDC-5506(A)_ENG 2011-11-21 오 4:59 페이지 4
Page 5
5
P
OWER SOURCE
P
OWER CONSUMPTION
5
DISC CD CHANGER
C
DC-5506
1
20V 60Hz
2
3 W
DESIGNED IN USA
M
ADE IN CHINA
T
his device complies with Part 15 of the FCC rules. Operation is subject to the following two
c
onditions : (1)This device may not cause harmful interference, and (2)This device must
accept any interference received, including interference that may cause undesired operation.
Manufactured : DWE
T
his product complies with DHHS rules 21 CFR Subchapter
J Part 1040.10 at date of manufacture.
DIGITAL
OPT
ANALOG
L
R
DIGI LINK
SN.
A
VIS : RISQUE DE CHOC ELECTRIQUE-NE PAS OUVRIR.
W
ARNING : SHOCK HAZARD-DO NOT OPEN.
4
5
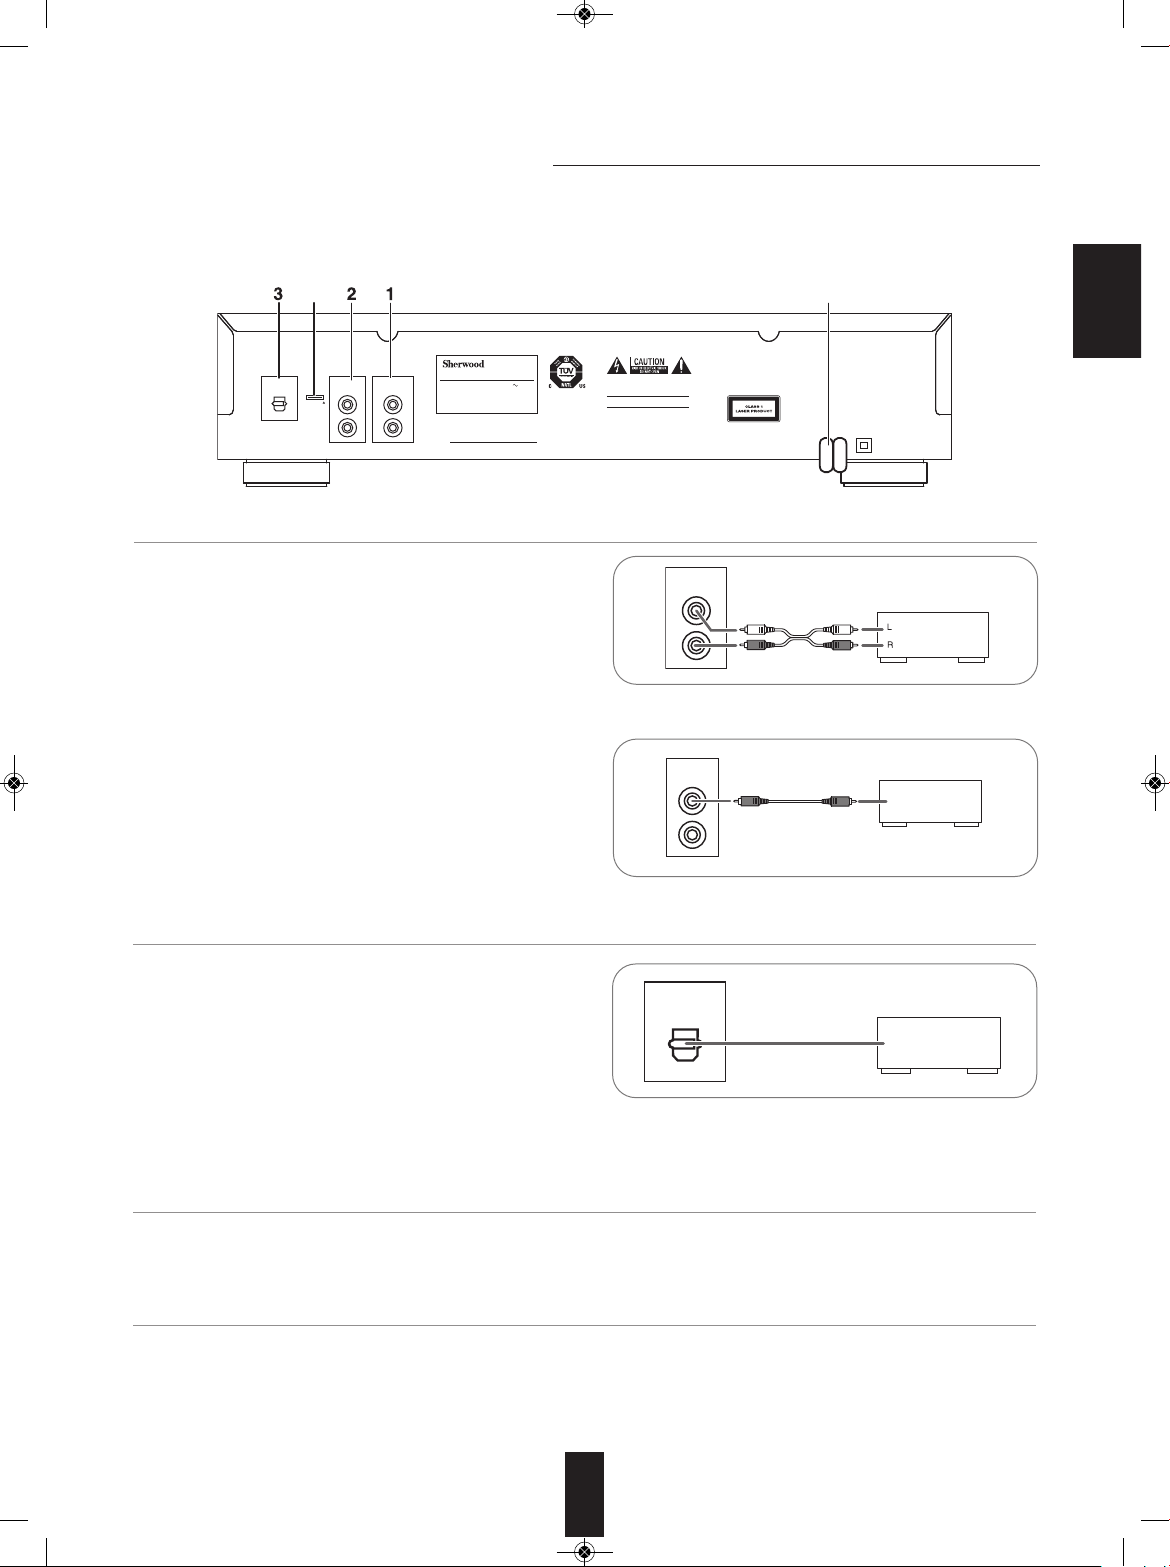
Rear Panel Connections
• Do not plug the AC input cord into the AC outlet when making connections.
• Be sure to connect the white plugs to the L(Left) jacks and the red plugs to the R (Right) jacks when making
connections.
• Refer to the connecting diagram in the operating instructions of your amplifier/receiver
• Connect the ANALOG L and R jacks to the CD IN jacks of
your amplifier/receiver.
1. CONNECTING ANALOG AUDIO OUTS
• Connect this jack to the DIGILINK jack of Sherwood system
amplifier/receiver to control this unit remotely by DIGILINK II
or III system. (For details, refer to the operating instructions of
Sherwood amplifier/receiver.)
■Note :
• The DIGILINK operation may not work on some Sherwood
components.
2. CONNECTING DIGILINK
• Connect this jack to the OPTICAL DIGITAL IN jack of your
amplifier/receiver to enjoy digital sound.
■Notes :
• It is not recommended to record digital audio signals with
digital audio connection between this unit and MD or CD
recorder, etc.. When recording the sounds played on this unit,
record them through the ANALOG AUDIO OUT jacks.
3. CONNECTING OPTICAL DIGITAL OUT
• Plug the cord into a wall AC outlet.
4. AC INPUT CORD
• This terminal may be used in the future to update the operating software, etc.
■Note :
• Programming for upgrade requires specialized programming knowledge and for that reason we recommend that it only be
done by qualified installers.
5. TERMINAL FOR UPGRADE
ANALOG
L
R
Amplifier/receiver
CD IN
Sherwood amplifier/receiver
DIGILINK
D
IGI LINK
DIGITAL
OPT
Amplifier/receiver
OPTICAL IN
• Some of the commercially available optical fiber cords cannot be used for the equipment. If there is an optical fiber cord which
cannot be connected to your equipment, consult your dealer or nearest service organization.
ENGLISH
CDC-5506 (A)_ENG_11-11-21:CDC-5506(A)_ENG 2011-11-21 오 4:59 페이지 5
Page 6

Front Panel & Remote Controls
5 DISC CD CHANGER
C
DC
-
5
506
POWER
D
ISC SELECTOR
12345DISC SKIP OPEN/ CLOSE
PHONES
U
SB
5V 500mA
5
DISC AUTOMATI C LOADING SYST EM
ON/STANDBY
INTRO
D
IMMERCD/USB
T
IME
P
ROGRAM
R
ANDOM
REPEAT
1
20 16 18 19 17 13 14 10 11 12 9 25 8
2
5
32423
7
4
2
13
d
16
15
22
20
e
f
17
21
6
b
a
c
10
18
14
Front panel controls
Remote controls
6
ENGLISH
CDC-5506 (A)_ENG_11-11-21:CDC-5506(A)_ENG 2011-11-21 오 4:59 페이지 6
Page 7

7
16. PROGRAM BUTTON
Press this button to program your favorite tracks/files or
to review the programmed tracks/files.
17. INTROSCAN BUTTON
Press this button to play the first 10 seconds of each
track/file.
18. TIME BUTTON
Press this button to display the different time
information on the Audio CD.
19. DIMMER BUTTON
Press this button to select the brightness of the
fluorescent display as desired.
20. CD/USB SELECTOR BUTTON
Press this button to select the disc or the USB memory
device as playback source.
21. NUMERIC(0~9) BUTTONS
Press the corresponding buttons to select a track/file
for play or programming.
22. FOLDER UP/DOWN (+/-) BUTTONS
Press these buttons to select the desired folder.
23. REMOTE SENSOR
This receives the signals from the remote control unit.
24. FLUORESCENT DISPLAY
For details, see next page.
25. USB CONNECTOR
For details, see next page.
■DIGILINK SYSTEM REMOTE CONTROL
This unit can be remotely conrolled with Sherwood
DIGILINK III amplifier or receiver.
• For avaliable functions, refer to the compatible
unit’s operating instructions.
• To listen to a CD by DIGILINK system, first
make DIGILINK connection between this unit
and the Sherwood compatible amplifier or
receiver.
1. POWER SWITCH
Push this switch to enter the standby mode.
To switch the power off, push this switch again.
2. POWER ON/STANDBY button
In the standby mode, press this button to turn the power
on and to enter the operating mode.
In the operating mode, press this button again to turn
the power off and to enter the standby mode.
3. DISC TRAY
Load a disc on the disc tray.
4. OPEN/CLOSE ( ) BUTTON
Press this button to open or close the disc tray.
5. DISC SELECTOR BUTTONS
Use these buttons to select the disc to be played.
6. DISC BUTTON
When selecting a disc with this button, press this first
and then the desired disc number(1~5) on the numeric
buttons within 2 seconds.
7. DISC SKIP BUTTON
For loading or unloading discs, press this button to
rotate clockwise to the next disc position.
8. HEADPHONE JACK
Stereo headphones can be plugged into this jack for
private listening.
9. PLAY/PAUSE ( ) BUTTON
ⓐPress this button to start play in the stop or pause
mode.
ⓑPress this button to interrupt play temporarily.
10. STOP ( ) button
Press this button to stop play or clear the programmed
tracks/files.
11. BACKWARD SKIP/SEARCH( / ) BUTTON
ⓒPress this button to replay from the beginning of the
current track/file or return to a previous track/file.
ⓓPress and hold down this button to search for a
specific passage in fast backward.
12. FORWARD SKIP/SEARCH( / ) BUTTON
ⓔPress this button to play from the beginning of a
next track/file.
ⓕPress and hold down this button to search for a
specific passage in fast forward.
13. RANDOM PLAY BUTTON
Press this button to play tracks/files in random order.
14. REPEAT (1/F/ALL) BUTTON
Press this button to play a track/file, a folder, or all
tracks/ files repeatedly.
15. REPEAT A↔B BUTTON
Press this button to play a specific passage repeatedly.
ENGLISH
CDC-5506 (A)_ENG_11-11-21:CDC-5506(A)_ENG 2011-11-21 오 4:59 페이지 7
Page 8

8
■FLUORESCENT DISPLAY
1 2 3 4 5
SCENE TRACK
PROG RANDOM REPEAT ALL 1 DISCS
123
456
789
10 11 12
13 14
A< >B INTRO
4 5 6 7 8 9
321
■USB CONNECTOR
• An USB memory device can be connected to th USB connector to listen to MP3 or WMA
files stored on it through this unit.
■ Note :
• After USB playback, remove the USB memory device in the stop mode or in the standby
mode.
1. PROGRAM indicator
2. RANDOM indicator
3. REPEAT display
4. Disc tray number display
• 1~5 : Disc tray Numbers
• : Light(s) up when disc(s) is(are) loaded.
• : Lights up to show the disc being played
currently.
5. PLAY indicator
6. PAUSE indicator
7. Track/file number, playing time,
operating information, etc.
8. INTROSCAN indicator
9. MUSIC CALENDAR display
USB memory device
ENGLISH
CDC-5506 (A)_ENG_11-11-21:CDC-5506(A)_ENG 2011-11-21 오 4:59 페이지 8
Page 9

REMOTE CONTROL OPERATION RANGE
9
LOADING BATTERIES
1. Remove the cover. 2. Load two batteries (“AAA” size, 2 x 1.5V)
matching the polarity.
• Use the remote control unit within a range of about
7 meters (23 feet) and angles of up to 30 degrees
aiming at the remote sensor.
• Remove the batteries when they are not used for a
long time.
• Do not use the rechargeable batteries (Ni-Cd type).
5 DISC CD CHANGER C
DC-5
506
POWER
D
ISC SELECTOR
12345
D
ISC SKIP OPEN/CLOSE
P
HONES
U
SB
5
V 500mA
5
DISC AUTOMATIC LOADING SYSTEM
O
N/STANDBY
INTRO
D
IMMERCD/USB
T
IME
P
ROGRAM
R
ANDOM
R
EPEAT
ENGLISH
CDC-5506 (A)_ENG_11-11-21:CDC-5506(A)_ENG 2011-11-21 오 4:59 페이지 9
Page 10

Preliminary Knowledge About Discs & Files
PLAYABLE DISCS
This unit supports the following discs.
• This unit supports CD-R and CD-RW discs recorded in
Audio CD(CD-DA) format, MP3 or WMA format.
• Only CD-R and CD-RW discs recorded with ISO9660
format can be played back.
• This unit supports multi-session discs. Some multi-session
discs may take a long time to load and some may not be
loaded at all.
■Unplayable discs
• Since this unit cannot support disc types, formats and file
types not listed above, do not play such discs.
• Some CD-R and CD-RW discs cannot be played due to
incomplete disc finalization, recording quality or physical
condition of the disc, characteristics of recording device or
authoring software, etc.
See the operating instructions supplied with your recording
device for more information.
• Some Audio CDs use copy protection that doesn’t
conform to the official CD standard. Since these are
nonstandard discs, this unit cannot play them properly.
• When an Audio CD recorded in DTS-ES or Dolby Digital
EX is played, noise may be heard.
Disc Logo Format or file type
PCM
Audio CD, MP3, WMA
Audio CD, MP3, WMA
■W
MA(Windows Media Audio)
• Sampling frequency : 32, 44.1, 48 kHz
• Bit rate : 32 ~ 320 kbps
• Extension : .wma, .WMA
•
WMA Tag is not available
•
Windows Media and the Windows logo are trademarks or
registered trademarks of Microsoft Corporation in the United States
and/or other countries.
■N
otes :
•
Folders can be up to ten levels deep.
• For some files, it may not be possible to use certain functions
during playback.
•
Files protected by DRM(Digital Rights Management) cannot be
p
layed.
• When the data of file and folder names is larger than the unit’s
memory capacity, some files, etc. cannot be recognized and
p
layed.
USB MEMORY DEVICES
• An USB memory device can be connected to the USB
connector on the front panel to play MP3 or WMA files
stored on it.
• Only USB memory devices conforming to mass storage
class and MTP(Media Transfer Protocol) standards can be
played on this unit.
• Thin unit supports FAT16 or FAT32 file format system for
USB memory divece.
PLAYABLE AUDIO FILE FORMATS
■MP3(MPEG-1 Audio Layer-3)
• Sampling frequency : 32, 44.1, 48 kHz
• Bit rate : 32 ~ 320 kbps
• Extension : .mp3, .MP3
• Fixed bit-rate files are recommended. Variable bit-rate
(VBR) fiels are playable, but playing time may be
displayed incorrectly.
• ID3 Tag is not avaliable.
• MPEG Layer-3 audio coding technology licensed from
Fraunhofer IIS and Thomson.
10
CARE AND HANDLING OF DISCS
5 DISC CD CHANGER CDC
5506
P
OWER
D
ISC SELECTOR
12345
D
ISC SKIP OPEN/CLOSE
PHONES
USB
5V 500mA
5 DISC AUTOMATIC LOADING SYSTEM
ON/STANDBY
INTRO
DIMMERCD/USB
TIME
PROGRAM
R
ANDOM
REPEAT
Printed sideTray
• In handling a disc, hold it carefully
with edges.
• Do not stick paper or write
anything on the printed surface.
• Finger marks and dust on the
recorded surface should be
carefully wiped off with a soft cloth.
Wipe straight from the inside to the
outside of the disc.
• Always keep the discs in their
cases after use to protect them
from dust and scratches.
• Do not use a cracked, deformed, or repaired disc.
These discs are easily broken and may cause serious
personal injury and apparatus malfunction.
■Notes:
• Do not expose discs to direct sunlight, high humidity or
high temperature for a long time.
• When loading or unloading a disc in the disc tray, always
place it with the printed side up.
ENGLISH
CDC-5506 (A)_ENG_11-11-21:CDC-5506(A)_ENG 2011-11-21 오 4:59 페이지 10
Page 11

Operations
PLAYING TRACKS/FILES
11
Before operation
• Push the POWER switch.
• Then this switch is kept depressed, it enters the standby
mode.
• To switch the power off, push this switch again.
• Then the power is cut off.
■Standby mode
• In the standby mode, this unit is not disconnected from
the AC mains and a small amount of current is retained
to support the operation readiness.
■Auto Power Save
• The auto power save is a function that automatically
turns the power off to enter the standby mode. When it
is in the stop mode, in the pause mode, etc. for more
than 30 minutes, the auto power save will function.
• Each time this button is pressed, this unit is turned on to
enter the operating mode or off to enter the standby
mode.
• When the number of files is more than 99 (i.e. a three-digit
number), the third-digit number is displayed on the music
calendar.
• “ ” indicator lights up on the music calendar when the
number of tracks is more than 14.
• For loading discs on other trays each, press the DISC SKIP
button.
• 8 cm (3 inch) discs can be loaded on the inside circle of the
tray, too.
• It may take a long time to read a disc or an USB memory
device that contains many files and folders, etc.
■Note :
• Do not open or close the tray by force.
Doing so may damage it.
1. In the standby mode, turn the power on.
3. Depending on the selected playback source,
load the disc(s) or connect the USB memory
device.
O
N/
S
T
A
N
D
B
Y
• Each time this button is pressed, the playback source
changes as follows :
“CD” ↔ “USB”
■Note :
• Depending on the selected playback source, the DISC
SELECTOR buttons or the FOLDER UP/DOWN(+/-)
buttons, etc. will not function.
2. Select the disc or the USB memory device as a
playback source.
C
D/USB
OPEN / CLOSE
or
or
or
Example : Audio CD
Total tracks
Total files
Total playing time
Total folders
Music calendar
Example : Music files (923 files and 15 folders)
1 2 345
SCENE TRACK
STEP
123
456
789
10 11 12
13 14
1
2345
SCENE
9
+
ENGLISH
CDC-5506 (A)_ENG_11-11-21:CDC-5506(A)_ENG 2011-11-21 오 4:59 페이지 11
Page 12
4
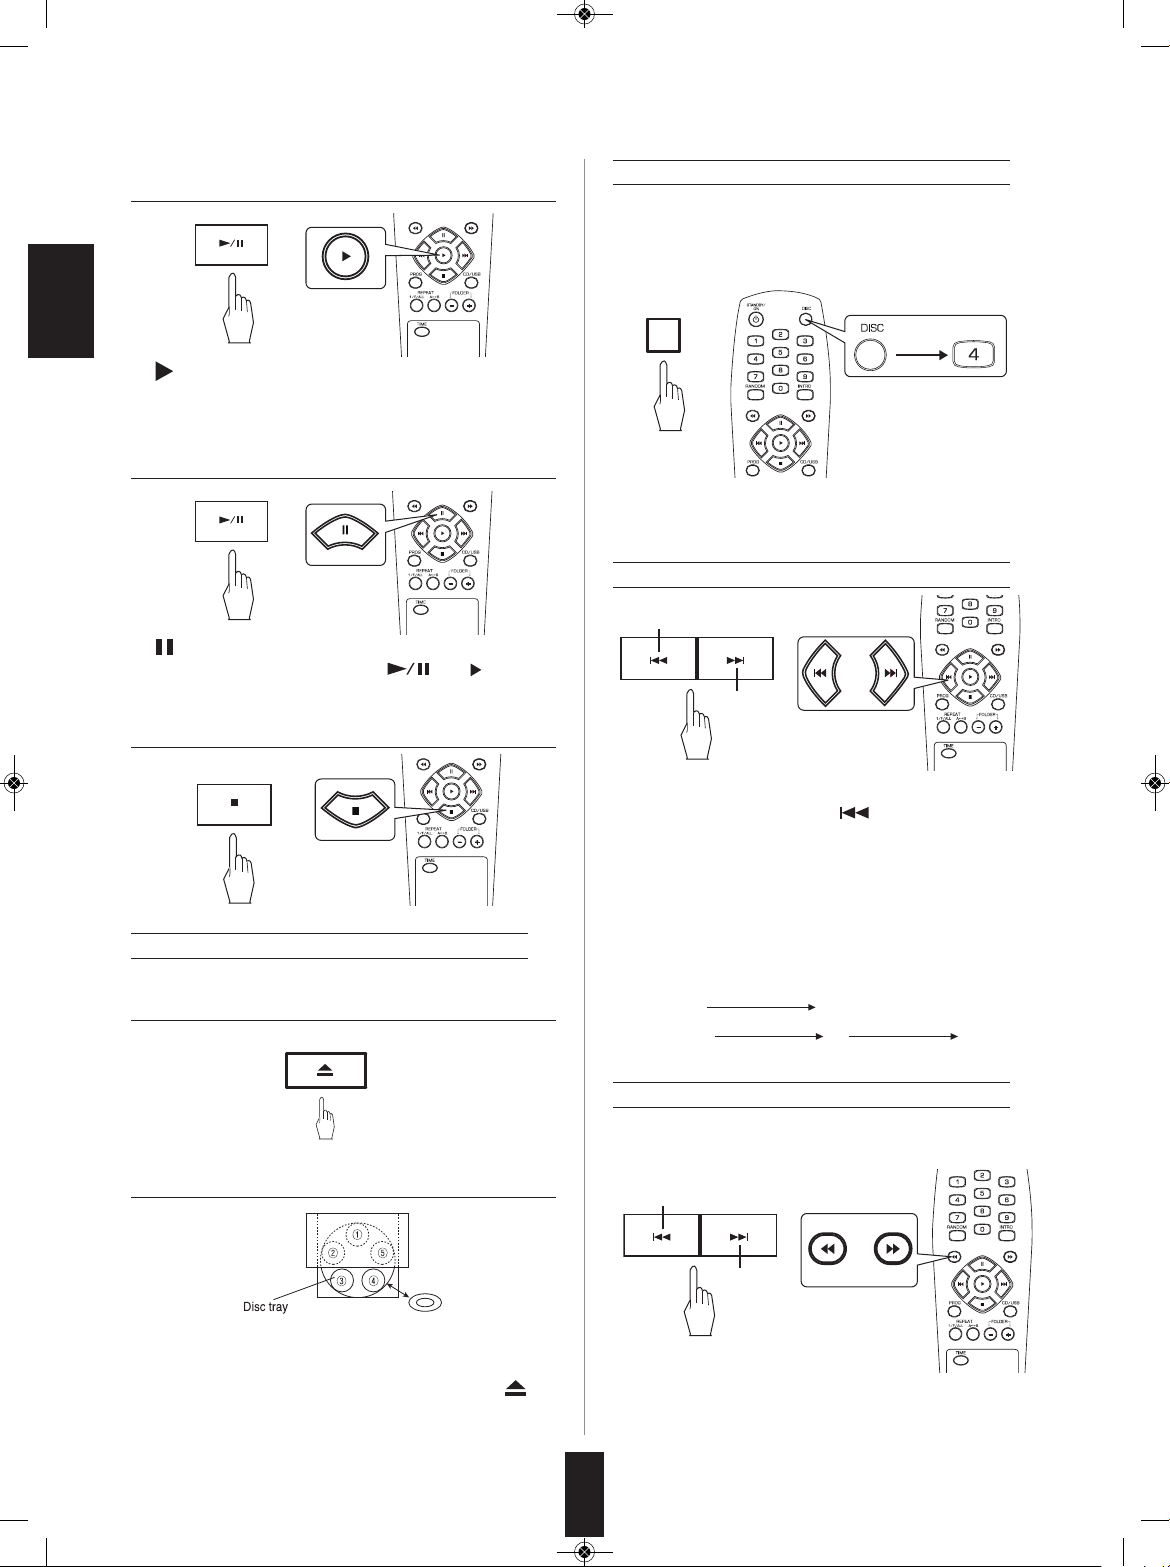
Selecting a track/file during play
Selecting a disc
Changing discs during play
12
4. Start play.
• “ ” indicator lights up.
• The unit plays from the first track/file (on the current disc
to the last on the 5th disc.
5. To interrupt play temporarily.
• “ ” indicator lights up.
• To resume play, press the PLAY(“ ” or “ ”) button.
• During playing the disc ①, the disc ③ and ④ can be
changed.
• After changing the discs, press the OPEN/CLOSE( )
butto to close the disc tray.
• When changing the disc ② or ⑤, press the DISC SKIP
button and rotate the disc tray.
• Press the corresponding button to start play from the
desired disc.
• The first track/file of the selected disc will be played.
Example : When selecting the disc 4
6. To stop play.
• Each time the button is pressed, a track/file is skipped.
• When the BACKWARD SKIP( ) button is pressed
once midway through a track/file, play returns to the
beginning of that. When it is pressed again, a track/file is
skipped.
• When using the NUMERIC buttons on the remote control.
Example :
For “3” :
3
For “15” : 1 5
For “123” : 1 2 3
or
or
within
2 sec.
or
1. Open the disc tray.
OPEN / CLOSE
2. Change the desired discs.
or
or
To skip back
To skip
ahead
within 2 sec.
within 2 sec.
within 2 sec.
To advance or reverse fast during play
• Press and hold down the button until the desired passage
is reached.
To reverse fast
or
To advance
fast
ENGLISH
CDC-5506 (A)_ENG_11-11-21:CDC-5506(A)_ENG 2011-11-21 오 4:59 페이지 12
Page 13
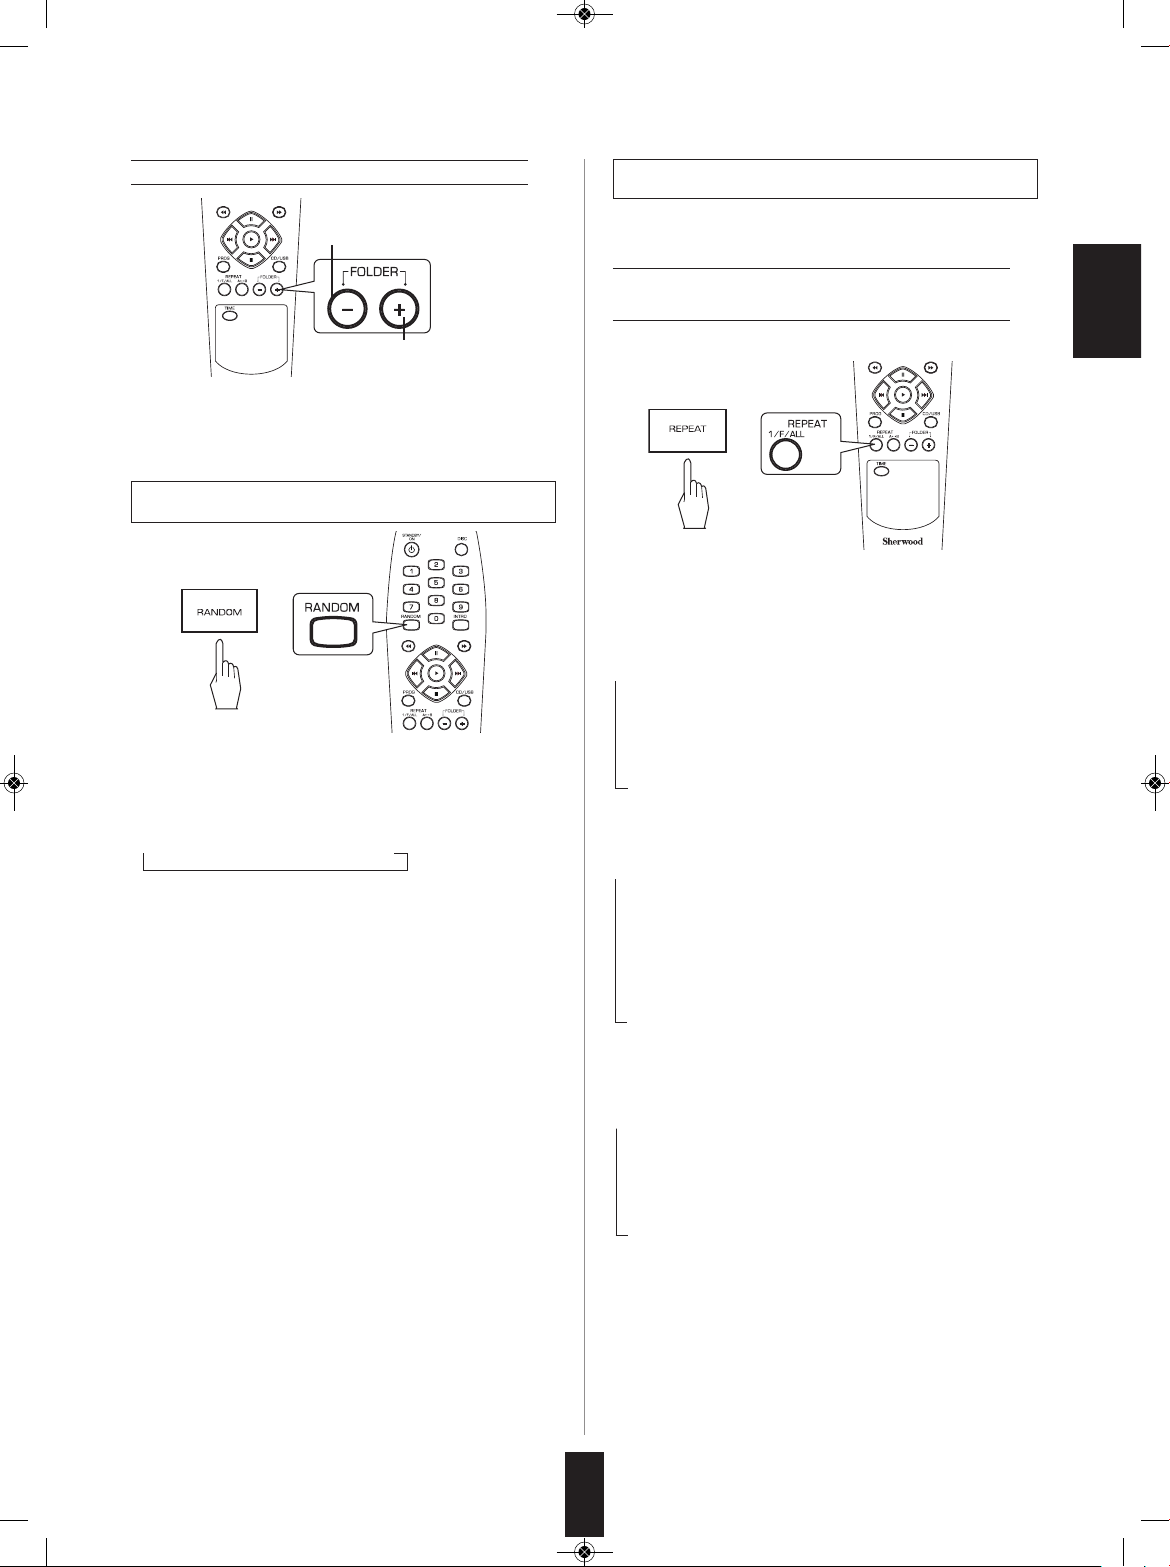
Selecting a folder during play
• Each time the button is pressed, the previous or the next
folder is selected and the first file in that folder is
automatically played.
• “ ” indicator lights up.
• Each time the button is pressed, the random mode
changes as follows :
• In case of CD
→1 DISC → ALL DISC → OFF
• In case of USB
1 DISC ↔ OFF
• The unit automatically selects and plays tracks in random
order.
• Press this button again to cancel the random play.
■Notes :
• The random play skip the track/folder which has 100
tracks/files more.
• When the NUMERIC buttons are pressed during random
play or program play, the random play or the program
play is canceled. (However, the programmed contents
are not cleared. To recall the programmed contents,
press the PROGRAM button in the stop mode.)
PLAYING IN RANDOM ORDER
or
T
o select previous
To select next
RANDOM
13
• Each time this button is pressed, the repeat mode
changes as follows.
■Notes :
• During random play or introscan play, you can select the
all track/file repeat mode only.
• During program play, the folder repeat mode cannot be
selected.
• In case of Audio CD
→
ONE(“REPEAT 1”) : Track repeat
↓
dISC(“REPEAT 1DISC”) : Disc repeat
↓
ALL(“REPEAT ALL DISCS”) : All disc repeat
↓
OFF : Repeat mode off
• In case of USB
→
dISC(“REPEAT 1DISC”) : All file repeat
↓
ONE(“REPEAT 1”) : File repeat
↓
FOL(“REPEAT ”) : Folder repeat
↓
OFF : Repeat mode off
• In case of CD with files
→ONE(“REPEAT 1”) : File repeat
↓
FOL(“REPEAT”) : Folder repeat
↓
dISC(“REPEAT 1 DISC”) : Disc repeat
↓
ALL(“REPEAT ALL DISC”) : All disc repeat
↓
OFF : Repeat mode off
Repeating a track/file, a folder, all
tracks/files
REPEAT PLAY
• You can play a track/file, a folder, all tracks/files or a
specific passage repeatedly.
• During play of the desired track/file or folder,
or
ENGLISH
CDC-5506 (A)_ENG_11-11-21:CDC-5506(A)_ENG 2011-11-21 오 4:59 페이지 13
Page 14

1 2 3 4 5
TRACK
PROG
PROGRAM
• Each time this button is pressed, the intro mode changes
as follows :
• In case of CD
→1 DISC INTRO → ALL DISC INTRO → OFF
• In case of USB
1 DISC ↔ OFF
• The unit plays the first 10 seconds of each track/file.
• Press this button again to cancel the introscan play.
■Notes :
• During program play, introscan play will not work.
• During all disc introscan play, the unit plays only the first
track on each disc for 10 seconds.
• Up to 32 tracks/files can be programmed to be played in
any desired order.
• Then “ ” indicator flickers.
Example :
When selecting and storing track 4 on an Audio CD
Track No.
Programmed order
PLAYING THE FIRST 10 SECONDS OF
EACH TRACK/FILE
PLAYING IN DESIRED ORDER
1. In the stop mode, enter the program mode.
2. Select the desired track/file and store it in the
memory.
PROG
PROGRAM
or
or
• Then “ ” indicator lights up as well and the desired
passage is played repeatedly.
• Press this button again to cancel the repeat A↔B play.
■Notes :
• Repeat A↔B play works only within a track/file.
• During random play or introscan play, repeat A↔B play
will not work.
Repeating a specific passage
• “ ” and “ ” indicators light up.
1. During play at the beginning of the desired
passage, press the REPEAT A↔B button.
2. At the end of the desired passage, press the
REPEAT A↔B button again.
R
EPEAT
A< >
• You can select a track/file with pressing the NUMERIC
buttons.
Example :
For “3” : 3
For “15” : 1 5
For “123” : 1 2 3
• Then the selected track/file is stored automatically without
pressing the PROGRAM button.
within 2 sec.
within 2 sec.
within 2 sec.
14
ENGLISH
CDC-5506 (A)_ENG_11-11-21:CDC-5506(A)_ENG 2011-11-21 오 4:59 페이지 14
Page 15

15
3. Repeat the above step 2 until the desired tracks
/files are programmed.
• Play starts in the programmed order.
or
4. Start program play.
Checking the programmed tracks/files
• Each time the PROGRAM button is pressed in the
program mode, the programmed tracks/files are displayed
in the programmed order.
or
PROGRAM
Clearing the programmed tracks/files
■To clear on by one
• Each time the STOP( ) button is pressed in the
program mode, the programmed tracks/files are cleared
one by one in the opposite order.
■To clear all programmed tracks/files
• Press the STOP( ) button for more than 4 seconds in
the program mode.
• Opening the disc tray or selecting the other playback
source clears all programmed tracks/files, too.
■To clear a specific track/file
• Find the desired track/file and clear it in the program
mode.
or
P
ROGRAM
or
PROGRAM
Rectifying any wrong programmed
track/file
Example :
When track 5, 9 and 7 are programmed and you want to
replace track 9 with track 10 on an Audio CD.
• Then the programmed track(/file) is displayed for several
seconds.
1. Find track(/file) 9 in the program mode.
or
1 2 3 4 5
TRACK
STEP
PROG
ENGLISH
CDC-5506 (A)_ENG_11-11-21:CDC-5506(A)_ENG 2011-11-21 오 4:59 페이지 15
Page 16

P
ROGRAM
16
2. While displaying the track(/file) to be replaced
with new one, select track(/file) 10 and store it in
the memory.
• You can select a track(/file) with pressing the NUMERIC
buttons.
Example : For “10” : 1 0
• When selecting a track with the NUMERIC buttons, the
selected track is stored automatically without the
PROGRAM button.
• When the track/file to be replaced disappears, perform
the above step 1 again.
or
1 2 3 4 5
TRACK
STEP
P
ROG
within 2 sec.
• Each time this button is pressed, the time display
changes as follows.
• During random play, etc., the time display may show “
--:--”.
• During play,
SELECTING A TIME DISPLAY
(Audio CD only)
TIME
1 2 3 4 5
TRACK
INDEX
789
10 11 12
1 2 3 4 5
TRACK
INDEX STEP
789
10 11 12
1 2 3 4 5
789
10 11 12
→
↓
↓
Elapsed time of the current track
Remaining time of the current track
Remaining time of the disc
or
• For private listening, insert the headphones into the
PHONES jack.
■Note :
• Be careful not to set the volume too high when using
headphones.
• Each time this button is pressed, the brightness of the
fluorescent display changes as follows.
→ ON → dimmer → OFF
• In the display OFF mode, pressing any buttons
cancel the display OFF mode to display the operation
status.
LISTENING WITH HEADPHONES
ADJUSTING THE BRIGHTNESS OF THE
FLUORESCENT DISPLAY
D
IMMER
P
HONES
ENGLISH
CDC-5506 (A)_ENG_11-11-21:CDC-5506(A)_ENG 2011-11-21 오 4:59 페이지 16
Page 17

17
Troubleshooting Guide
If a fault occurs, run through the table below before taking your unit for repair.
If the fault persists, attempt to solve it by switching the unit off and on again. If this fails to resolve the situation, consult your
dealer. Under no circumstances should you attempt to repair the unit yourself. This could void the warranty.
PROBLEM POSSIBLE CAUSE REMEDY
No power
No play
No sound
Poor or distorted
sound
Sound skips
Programming is not
performed
It takes a long time to
read a disc or an
USB memory device.
• The AC input cord is disconnected.
• Poor connection at AC wall outlet or the outlet
is dead or off.
• The disc is loaded upside down.
• Dirty disc.
• Defective or deeply scratched disc.
• The CD-R/CD-RW disc is nonstandard.
• Music files in non-compatible format are
recorded.
• Incorrect connections.
• Incorrect operation of the amplifier/receiver.
• The “ ” indicator lights up.
• The unit is connected to the PHONO input
jacks of the amplifier/receiver.
• Poor connections.
• Defective or deeply scratched disc.
• The unit is placed on a surface that is subject
to vibration or physical shock.
• The disc is dirty or badly scratched.
• The programming procedure is not correct.
• The number of the programmed tracks/files is
32.
• It may take a longer time to read a disc or an USB
memory device that contains many files and
folders, etc.
• Connect the cord securely.
• Check the outlet using a lamp or another
appliance.
• Reload the disc with the printed side up.
• Clean the disc.
• Load another disc.
• See “Unplayable discs” on page 10.
• Only music files in MP3 and WMA formats can
be played.
• Make connections correctly.
• Operate the amplifier/receiver correctly.
• Press the “ ” button to cancel the pause
mode.
• Make connections correctly.
• Check the connections and connect all cords
securely.
• Play another disc.
• Place this unit on a stable surface.
• Try again with a scratch-free disc.
• Try again.
• Check the number of the programmed
tracks/files.
• This is not mulfuntion.
ENGLISH
CDC-5506 (A)_ENG_11-11-21:CDC-5506(A)_ENG 2011-11-21 오 4:59 페이지 17
Page 18

18
■ TYPICAL AUDIO PERFORMANCES
• Number of channels I 2
• Frequency response, 20~20,000 Hz I ±0.8 dB
• Signal to noise ratio, A Wtd. I 94 dB
• Dynamic Range I 86 dB
• Total harmonic distortion, 1 kHz I 0.009 %
• Wow and flutter I Quartz crystal precision
• Audio output level I 2 V RMS
• Digital output, optical, wavelength 660 nm I -20 ~ -15 dBm
■ OPTICAL READOUT SYSTEM
• Laser I Semiconductor laser
• Wavelength I 760~800 nm
• Numerical aperture I 0.45
■ SIGNAL FORMAT
• Sampling Frequency I 44.1 kHz
• D/A Conversion I Multibit (Sigma-delta conversion)
• Oversampling I 8 times
■ GENERAL
• Power supply I 120 V ~ 60 Hz
• Power consumption I 23 W
• Dimensions (WxHxD, including protruding parts) I 440x112x397 mm (17-5/16x4-7/16x15-4/6 inches)
• Weight (Net) I 5.6 kg (12.4 lbs)
Note: Design and specifications are subject to change without notice for improvements.
Specifications
ENGLISH
CDC-5506 (A)_ENG_11-11-21:CDC-5506(A)_ENG 2011-11-21 오 4:59 페이지 18
Page 19

19
MEMO
CDC-5506 (A)_ENG_11-11-21:CDC-5506(A)_ENG 2011-11-21 오 4:59 페이지 19
Page 20

5707-00000-588-0S
CDC-5506
5 DISC CD CHANGER
CAMBIADOR DE CD PARA 5 DISCOS
CHANGEUR DE 5 CD
CDC-5506 (A)_ENG_11-11-21:CDC-5506(A)_ENG 2011-11-21 오 4:59 페이지 20
 Loading...